
Immortal Love 4: Black Lotus – The walkthrough of the game begins with the fact that the joyful evening of your wedding was interrupted due to the fact that the bride received a mysterious black lotus and fell ill. Now from this flower she quickly grows old. For the eternal youth of the sender, he must constantly take young lives. You must find the sender and save your bride before it’s too late. If you can’t complete any of the puzzles or don’t know where the items are, you can watch the Immortal Love 4: Black Lotus walkthrough, on our website and complete the journey to save your love.
Immortal Love 4: Black Lotus – Walkthrough
Here you can watch the full walkthrough of the game Immortal Love 4: Black Lotus, namely, all the chapters, including the bonus one, in pictures.
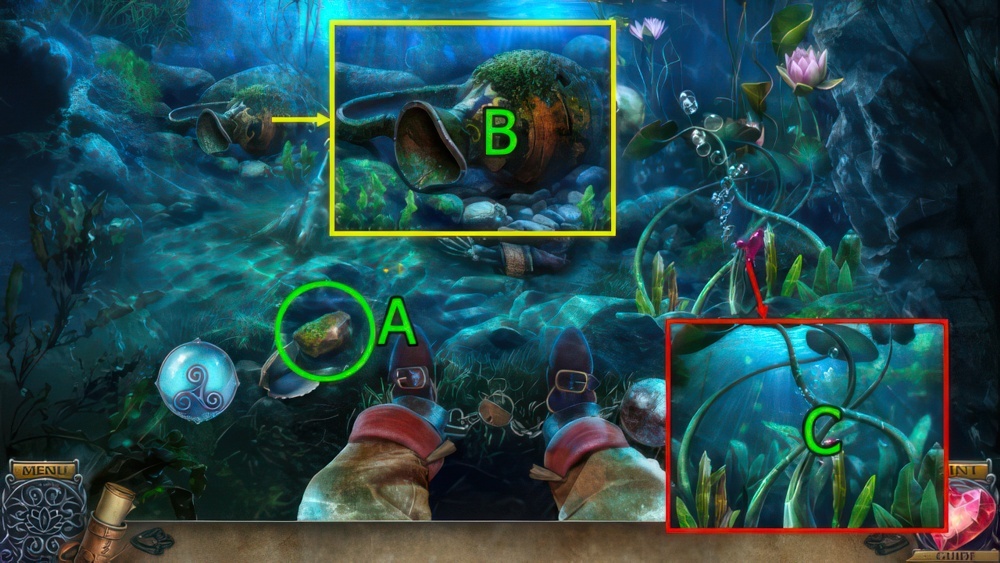
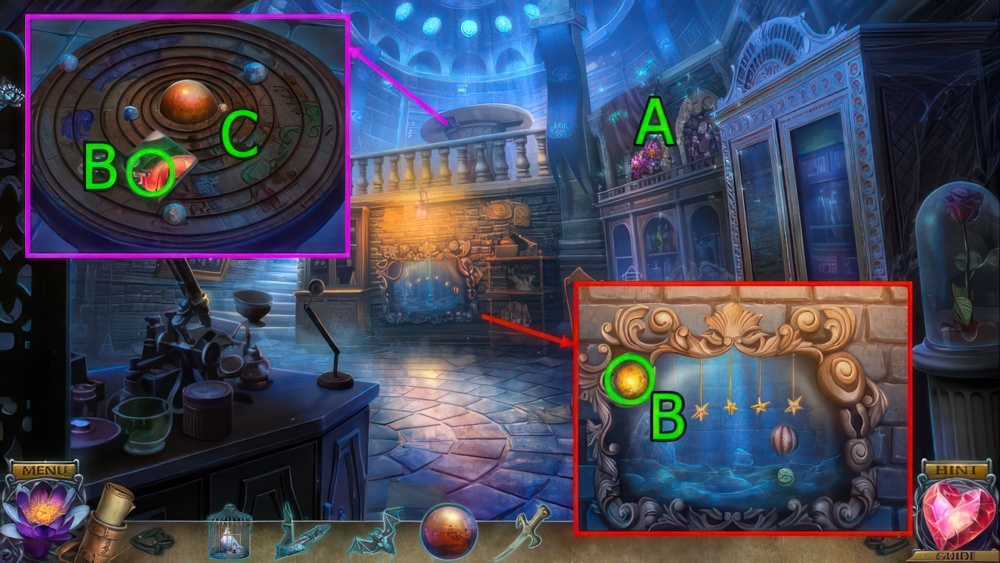
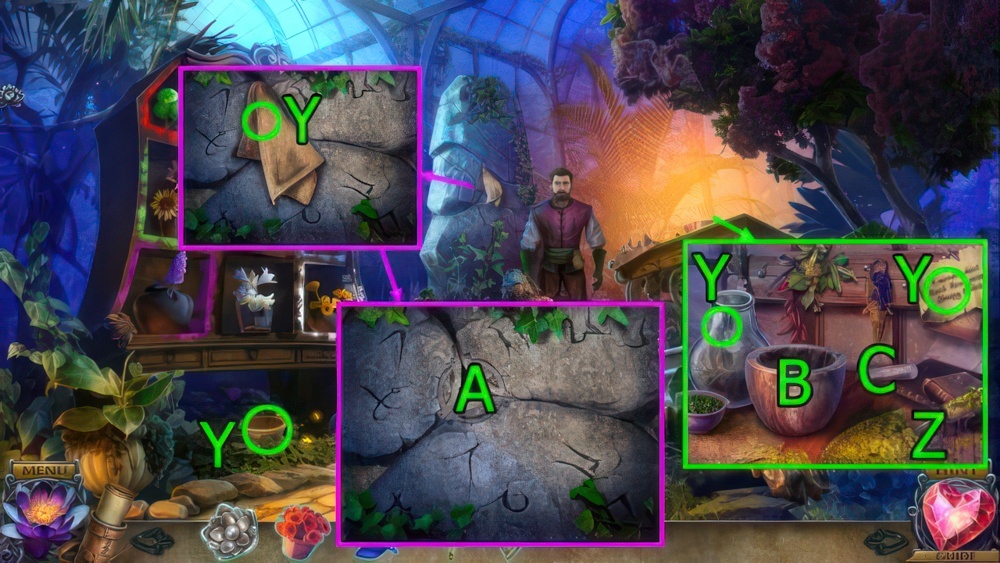
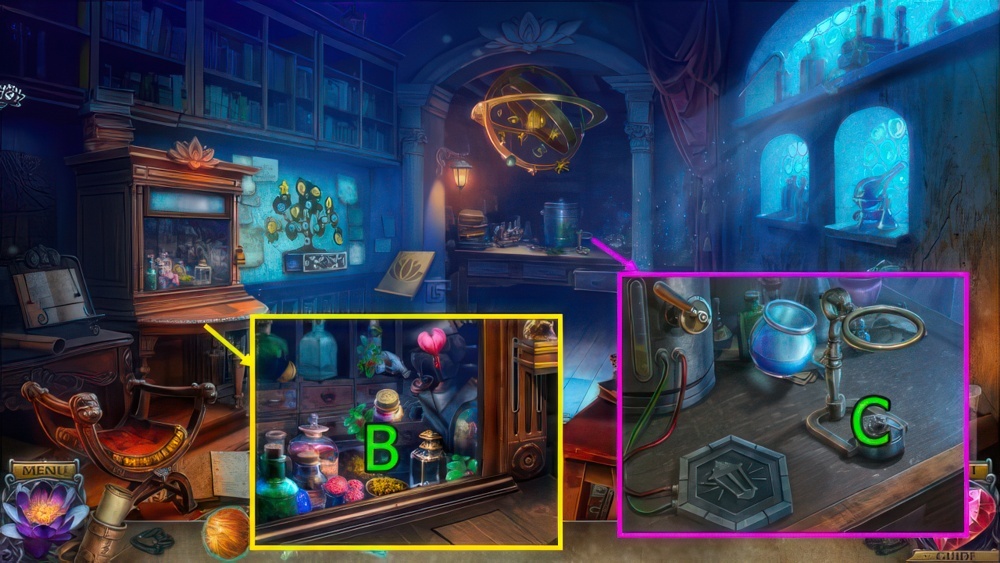
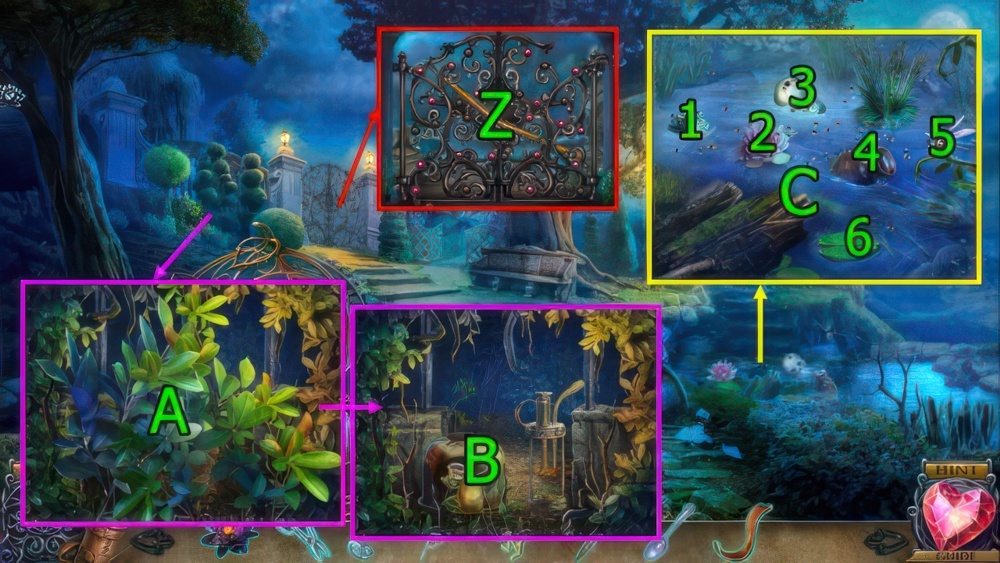
- Take STONE (A).
- Use STONE on (B), get SKULL TILE and CLAY SHARD.
- Use CLAY SHARD on (C), get RUBY FLEUR-DE-LIS.
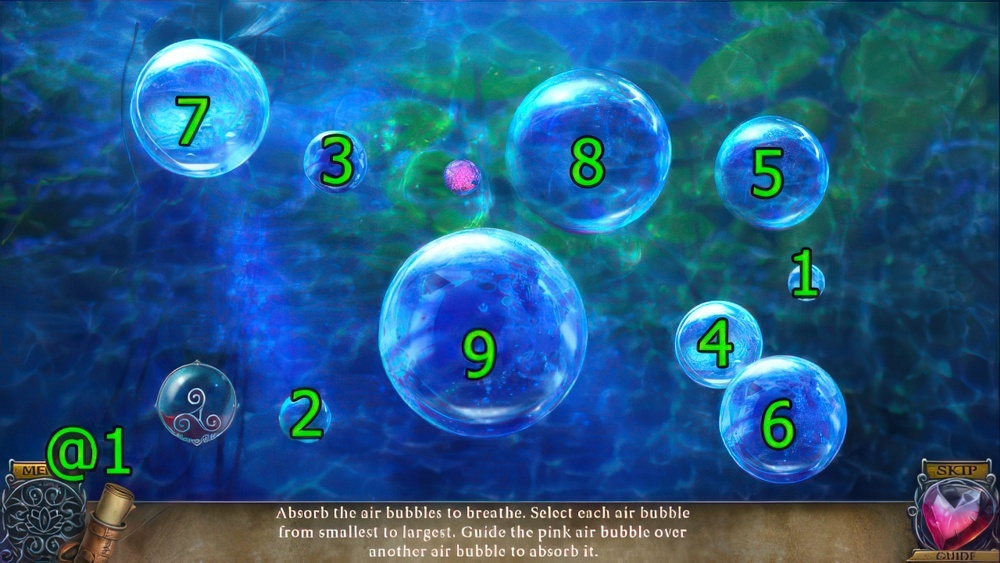
- Absorb the air bubbles to breathe.
- Guide the pink bubble over the air bubbles in order from smallest to largest.
- Solution (@1): Drag (1-2-3-4-5-6-7-8-9).
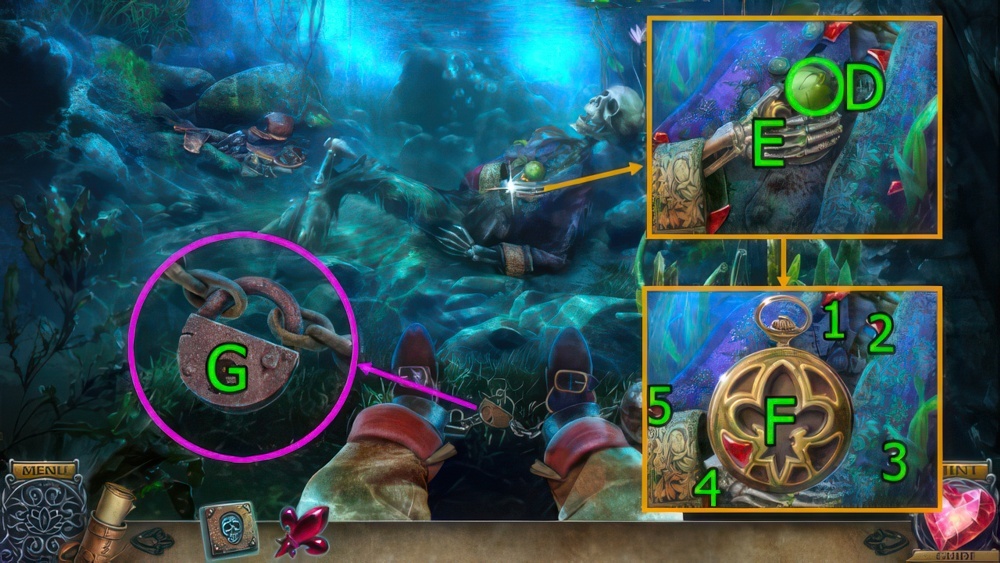
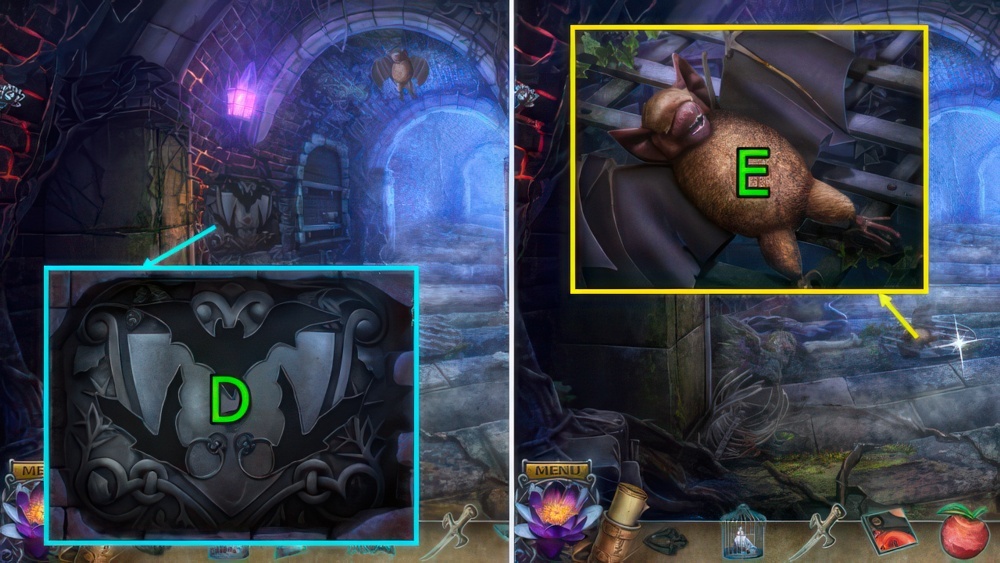
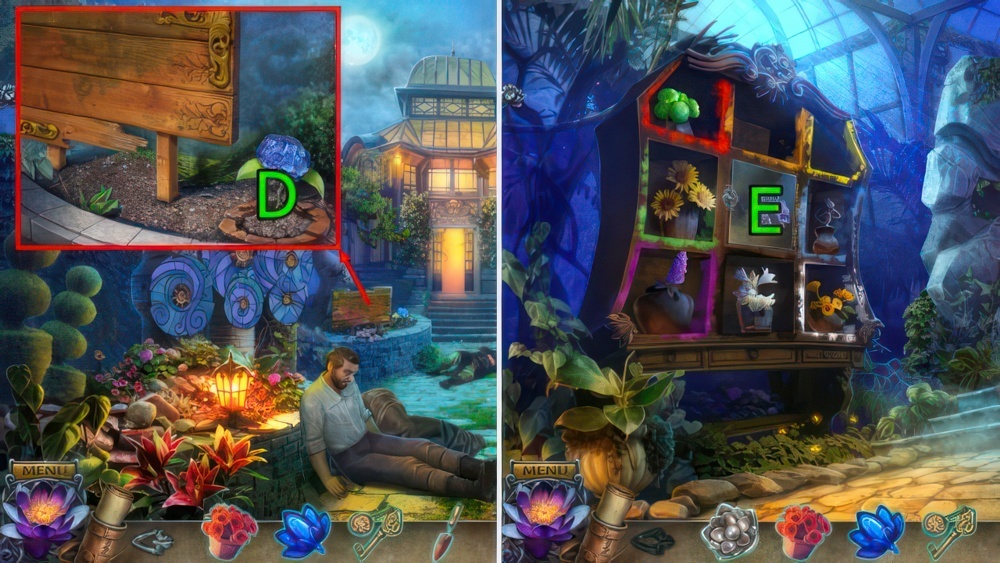
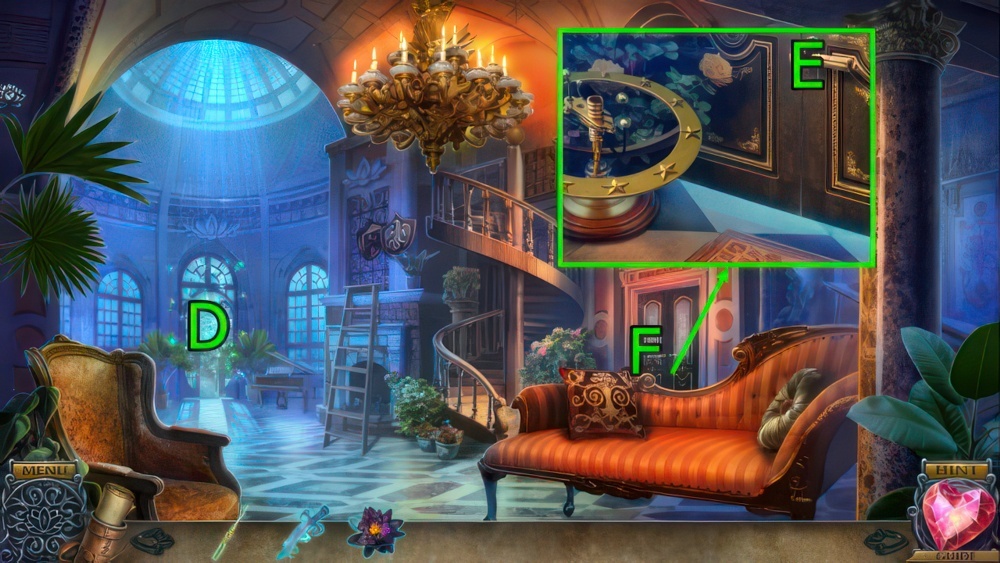
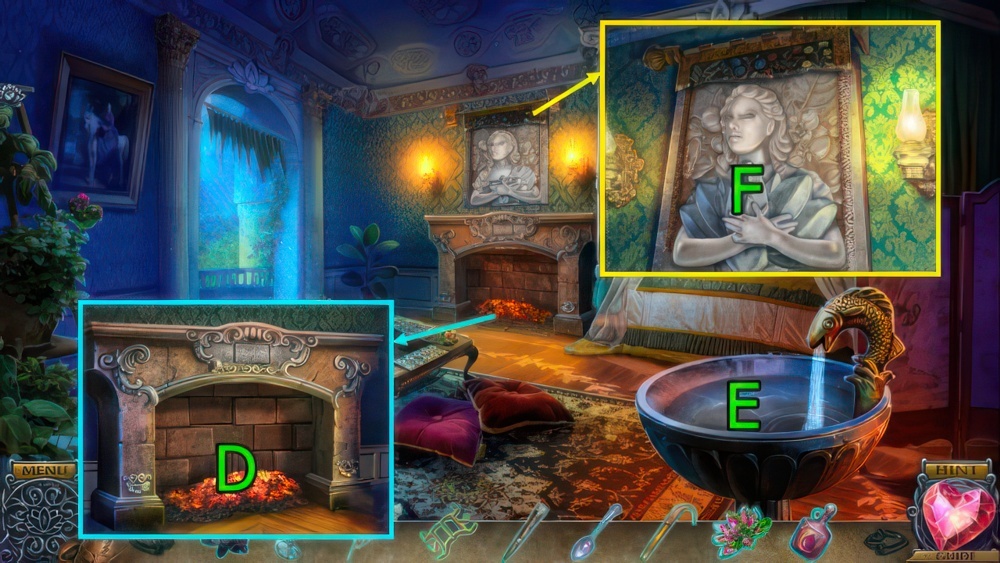
- Get LOTUS BUD (D).
- Press (E).
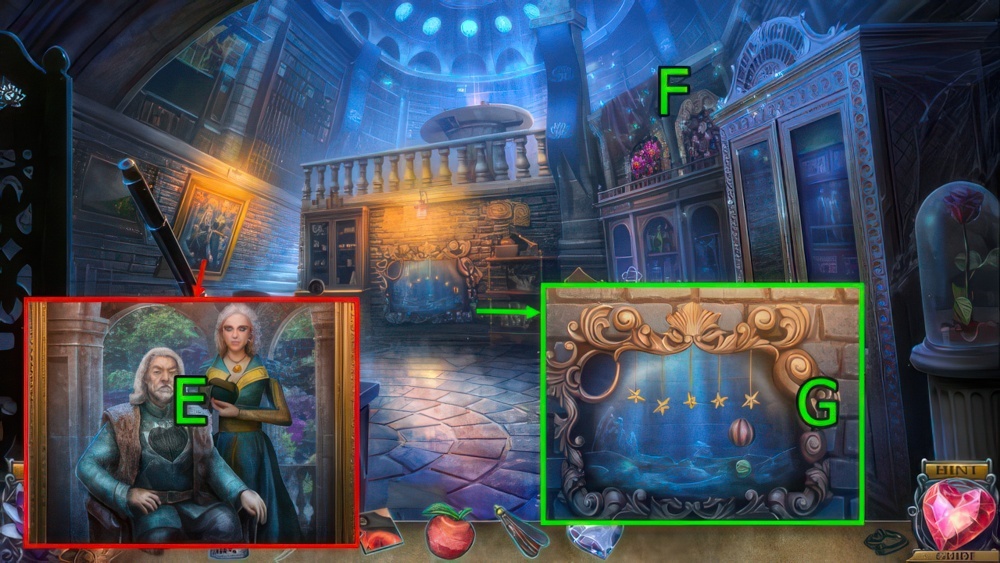
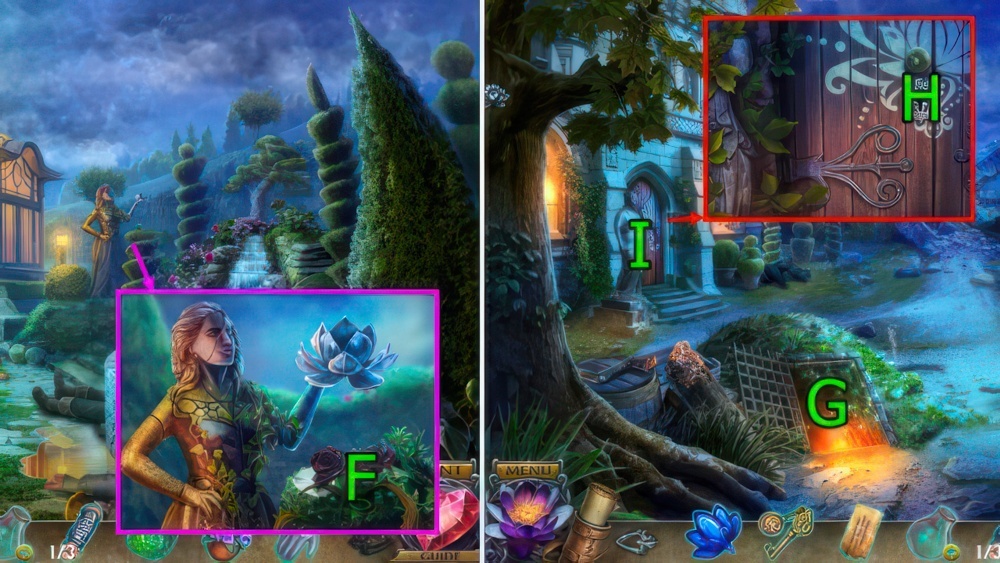
- Use RUBY FLEUR-DE-LIS on (F).
- Press (1-2-3-4-5), get CLOCK HAND.
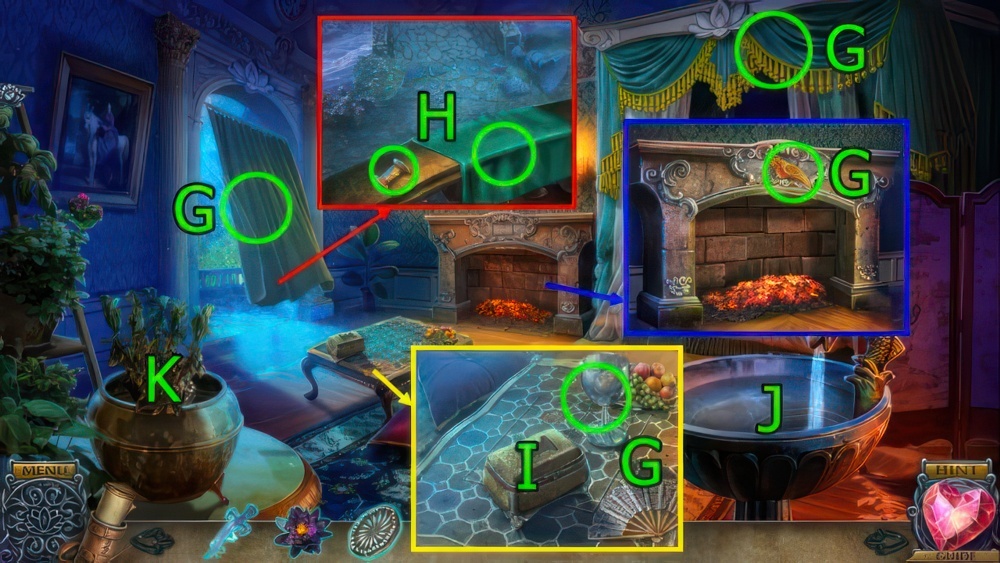
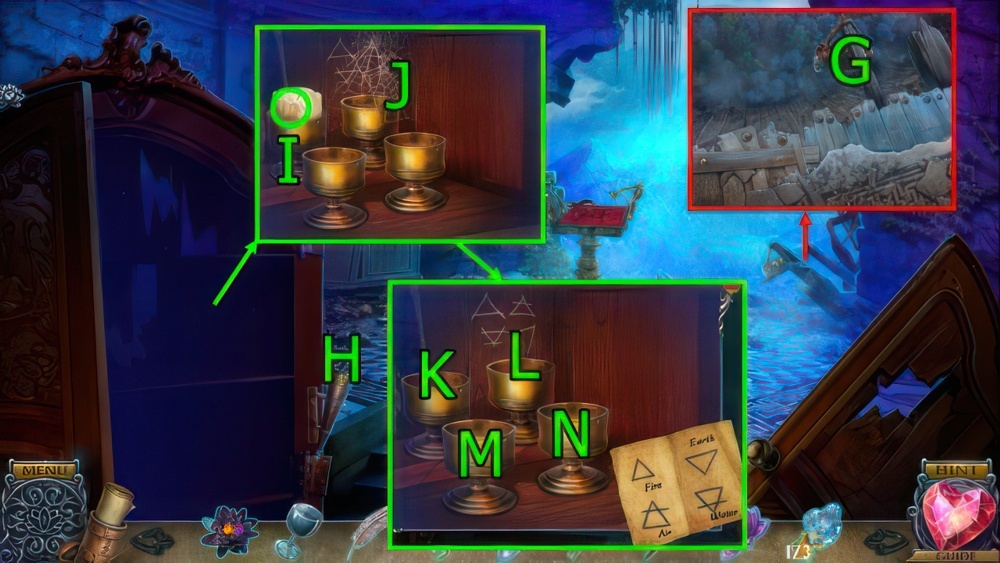
- Use CLOCK HAND on (G).
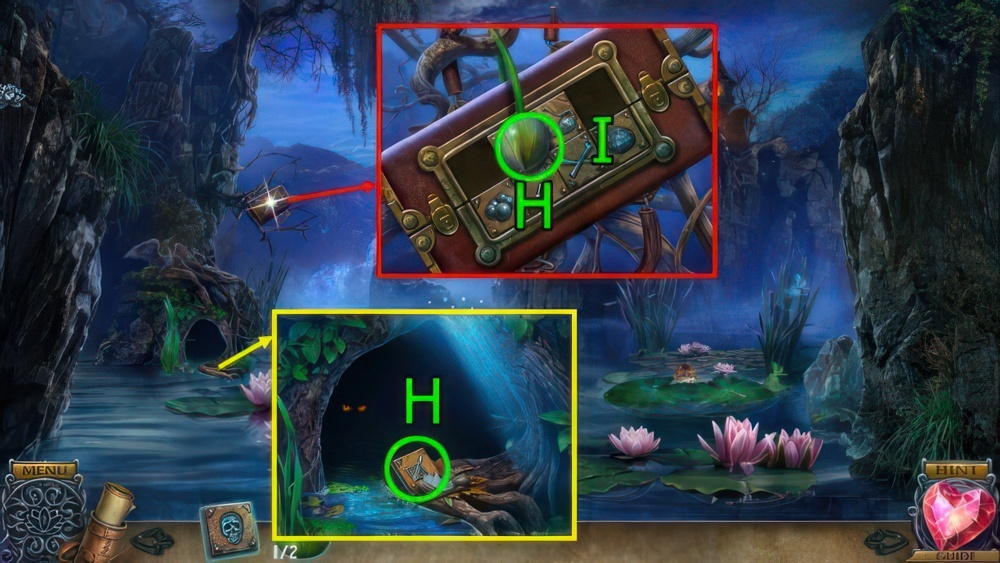
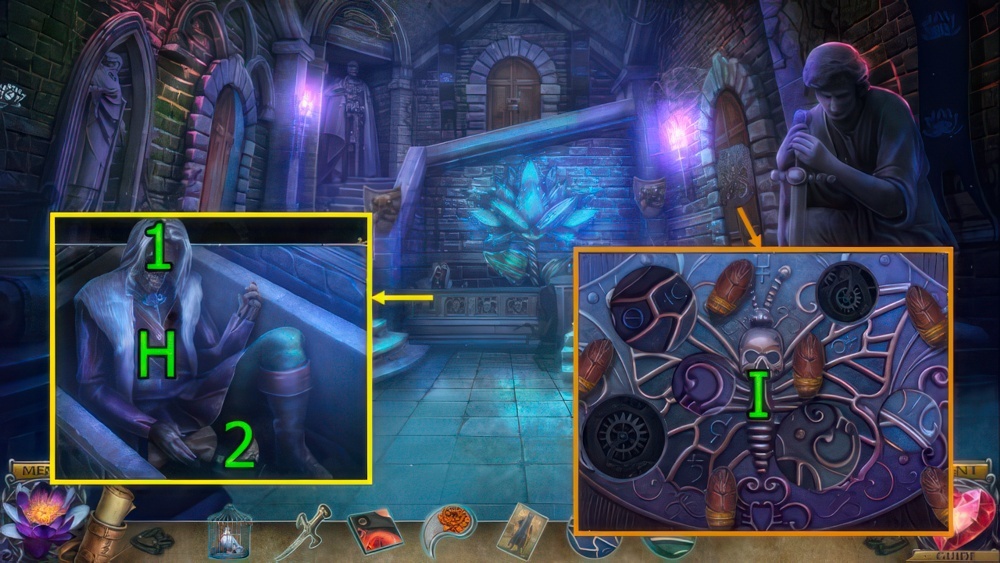
- Get CROSSBOW TILE and LOTUS BUDS (2/2) (H).
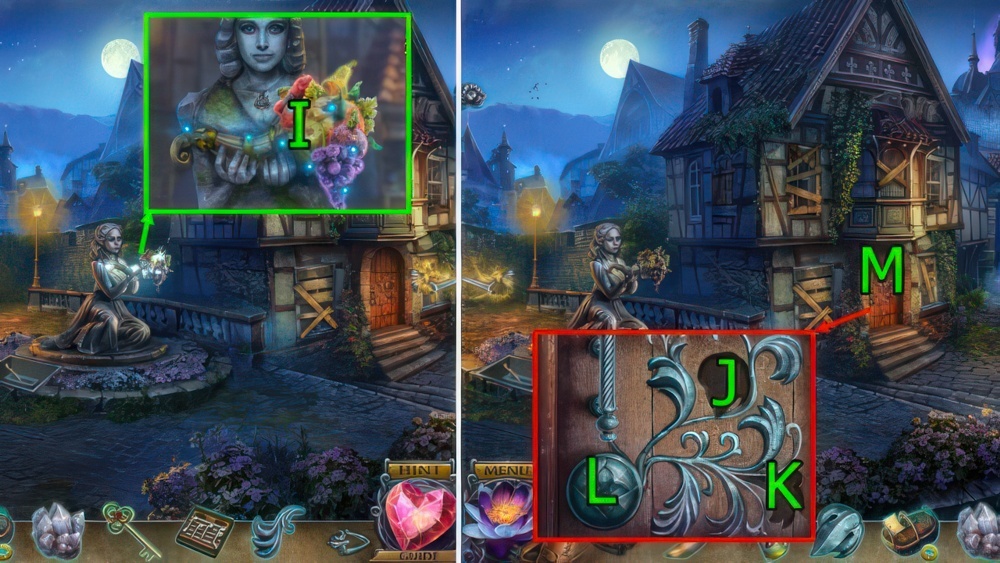
- Use SKULL TILE and CROSSBOW TILE on (I).
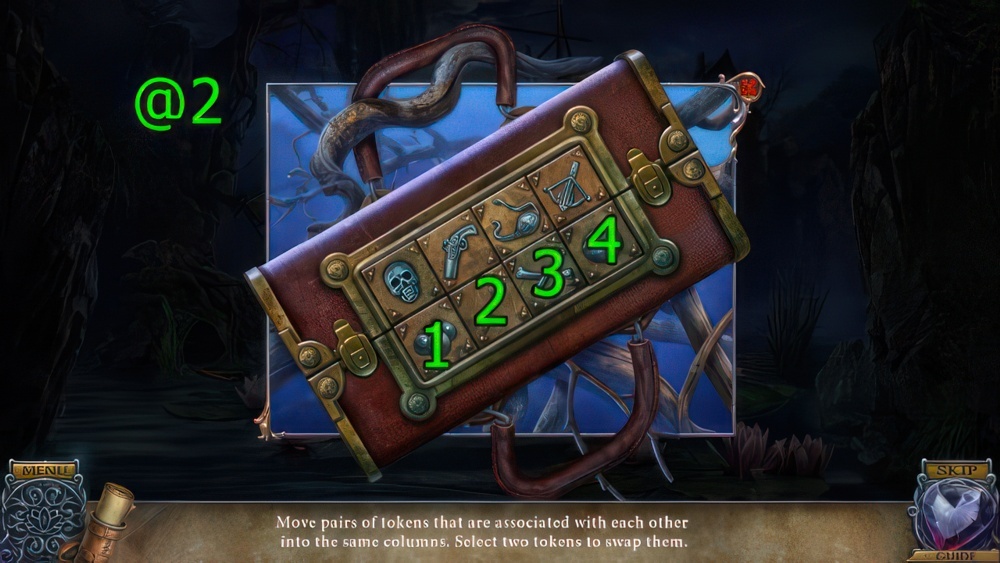
- Move related tiles into the same column.
- Select two tiles to swap them.
- Solution (@2): Press (1-3)-(3-2)-(3-4).
- Get WATER LILY PENDANT and INCOMPLETE CROSSBOW.
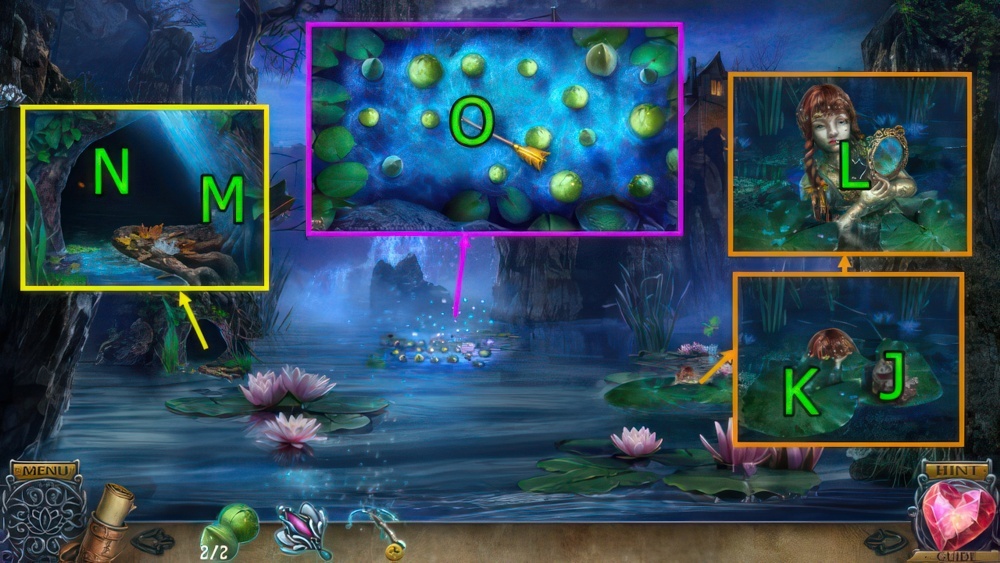
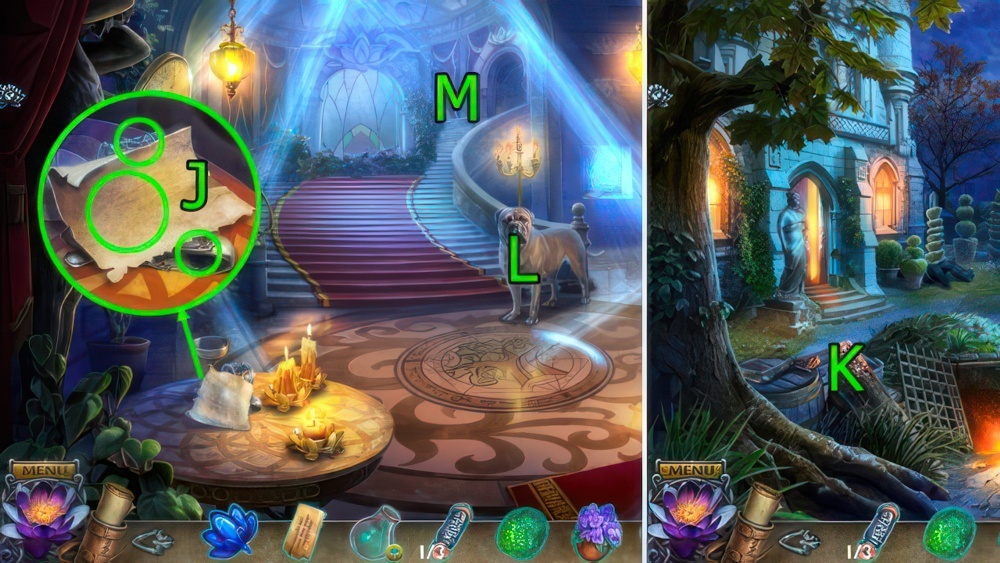
- Press (Jx4), Get LOCK CYLINDER (1/2).
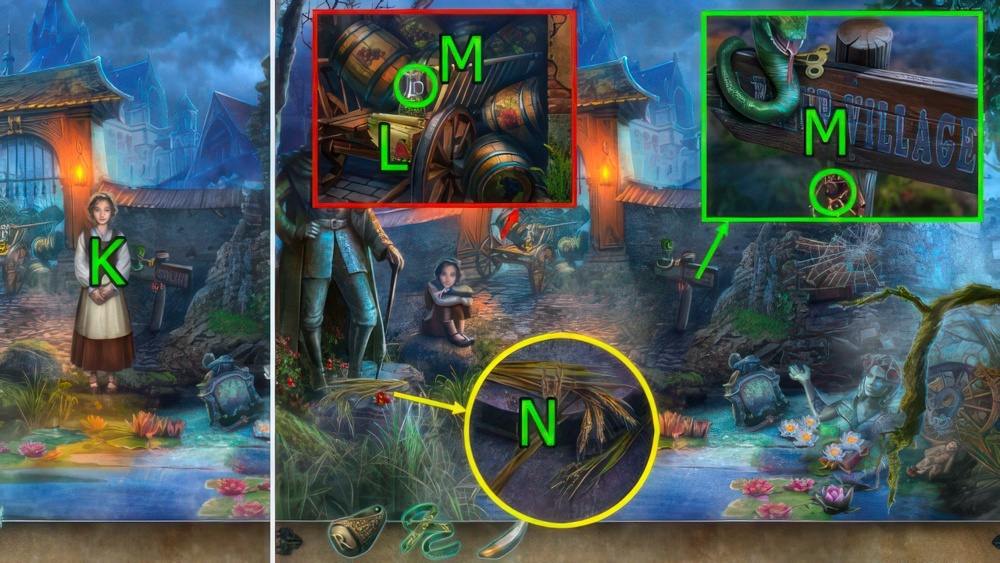
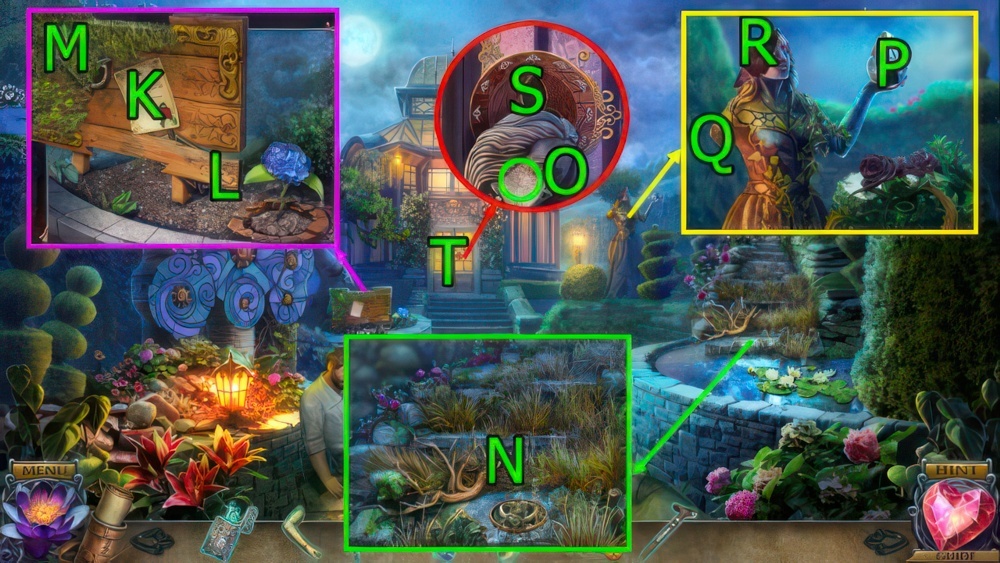
- Press (J) and (K).
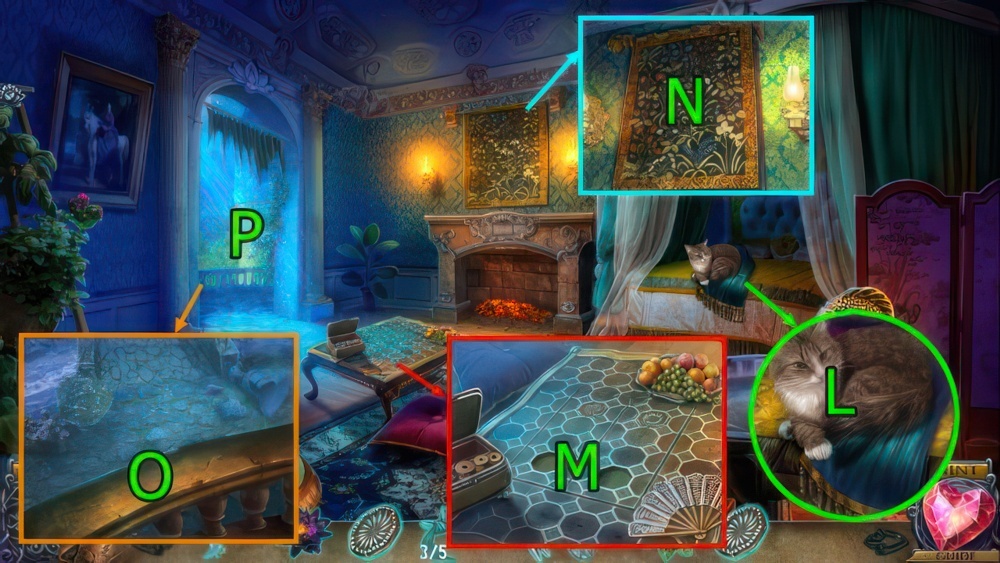
- Use WATER LILY PENDANT on (L), get MIRROR.
- Use MIRROR on (M).
- Press (N), get BOWSTRING.
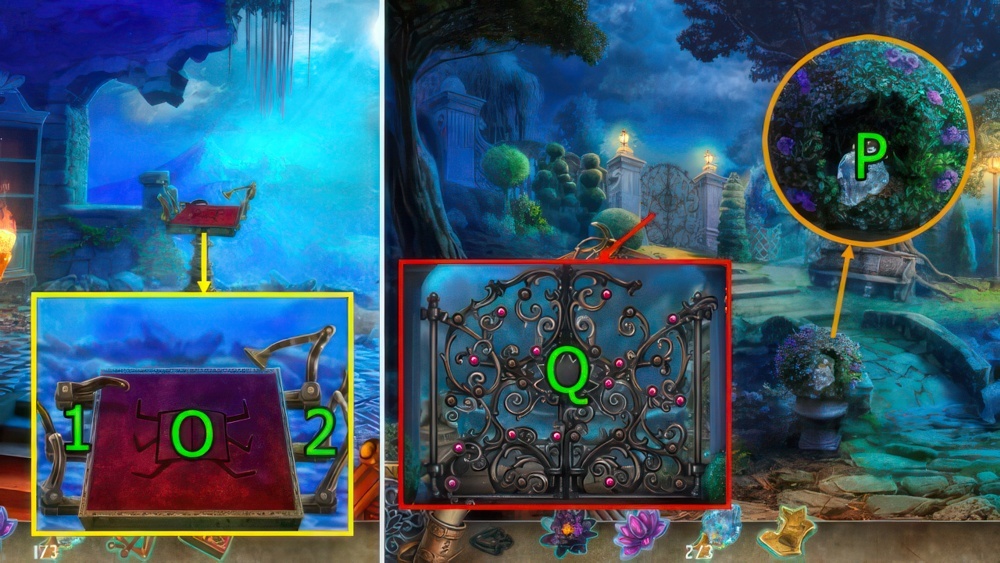
- Press and use LOTUS BUDS (2/2) on (O).
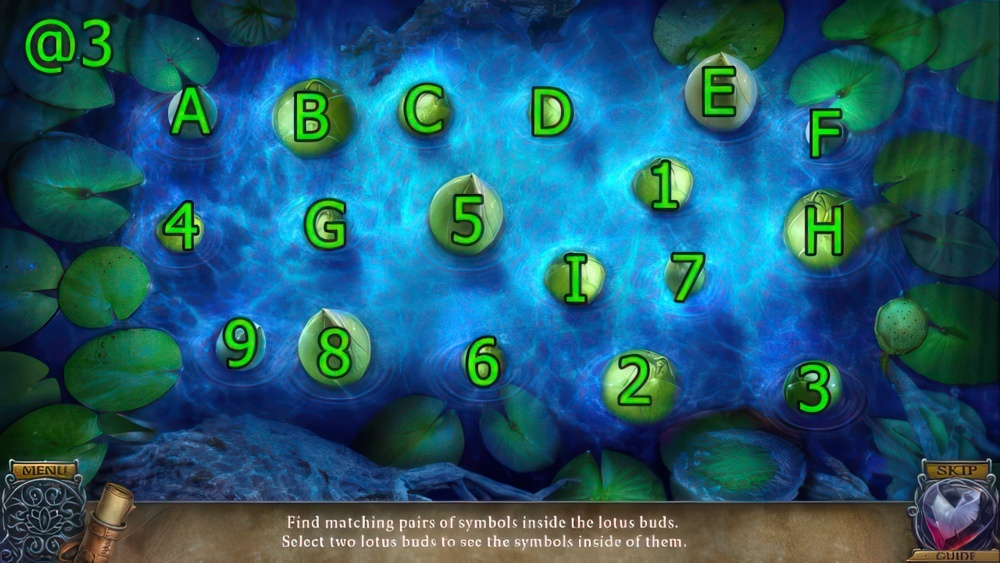
- Find matching pairs of symbols inside the lotus buds.
- Select two lotus buds to see the symbols inside of them.
- Solution (@3): (A-1)-(B-2)-(C-3)-(D-4)-(E-5)-(F-6)-(G-7)-(H-8)-(I-9).
- Get HAIR COMB and CROSSBOW BOLT.

- BOWSTRING and CROSSBOW BOLT on INCOMPLETE CROSSBOW, get CROSSBOW.
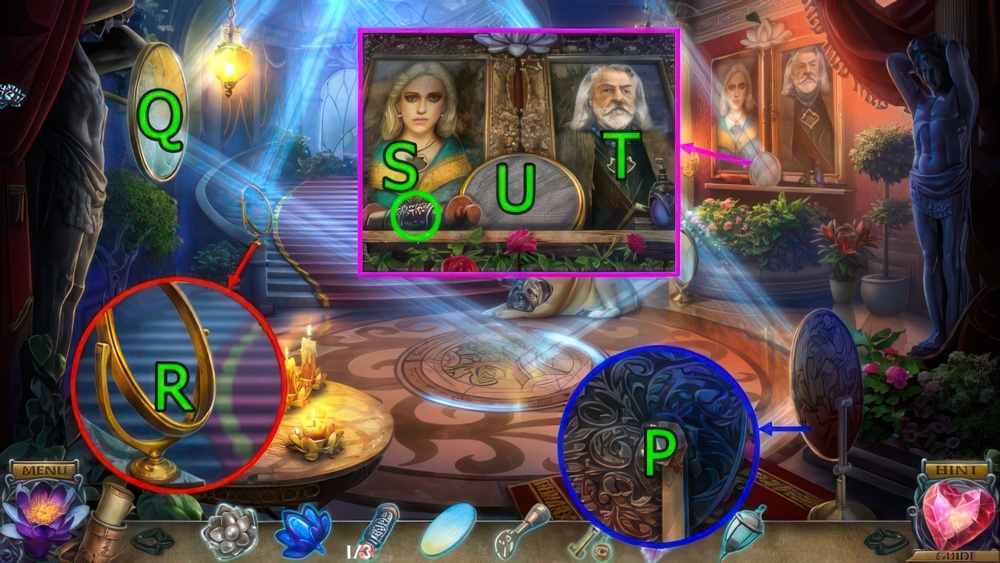
- Use CROSSBOW on (P).
- Press (Q).
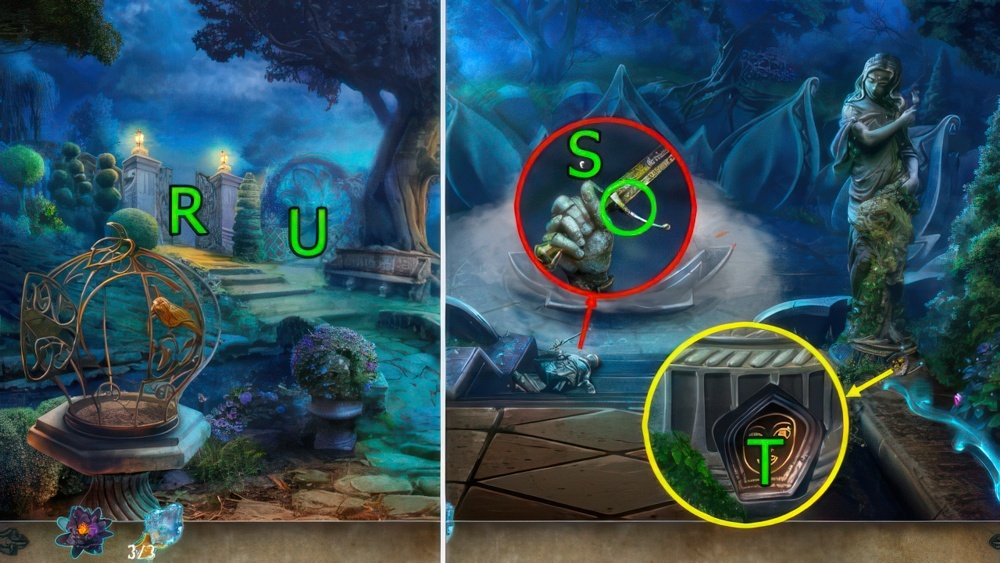
- Go (R).
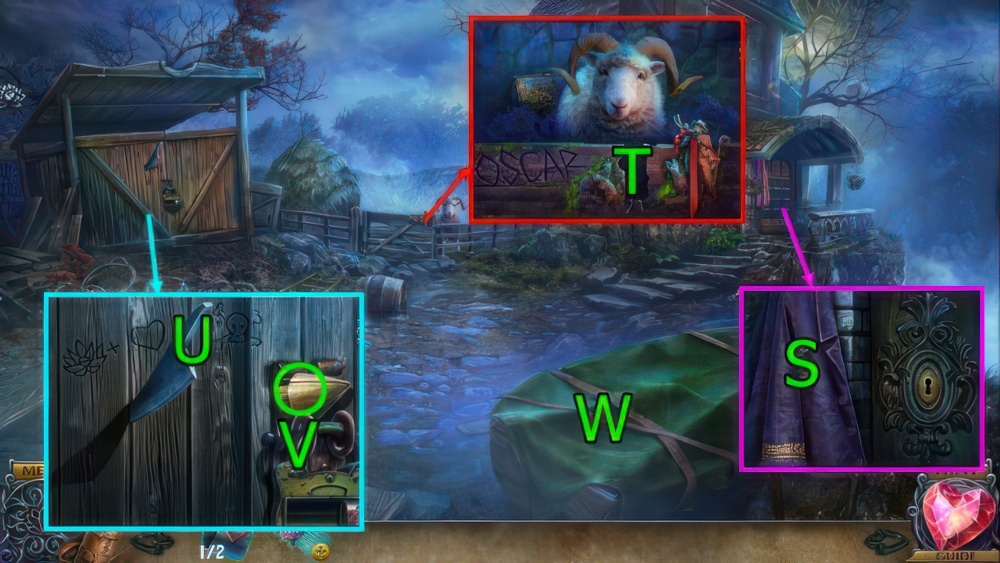
- Press (S), get SHEPHERDESS.
- Use SHEPHERDESS on (T), get LEATHER STRAP.
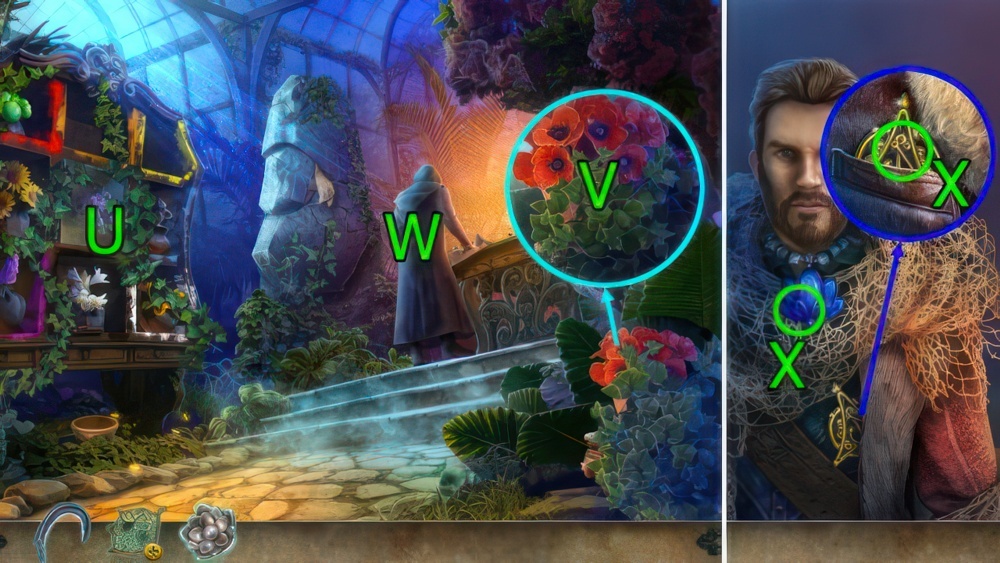
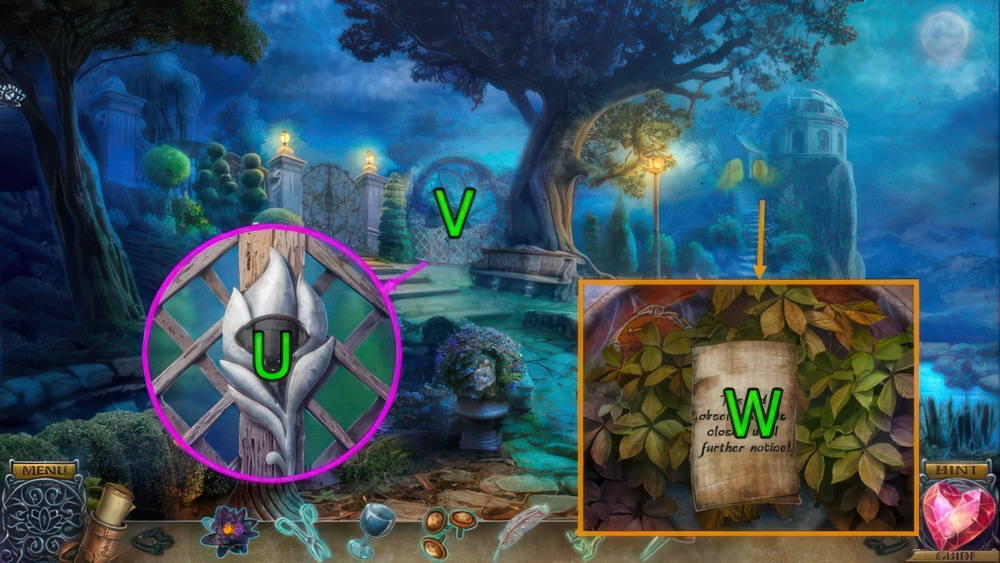
- Use LEATHER STRAP on (U), get SHARP KNIFE.
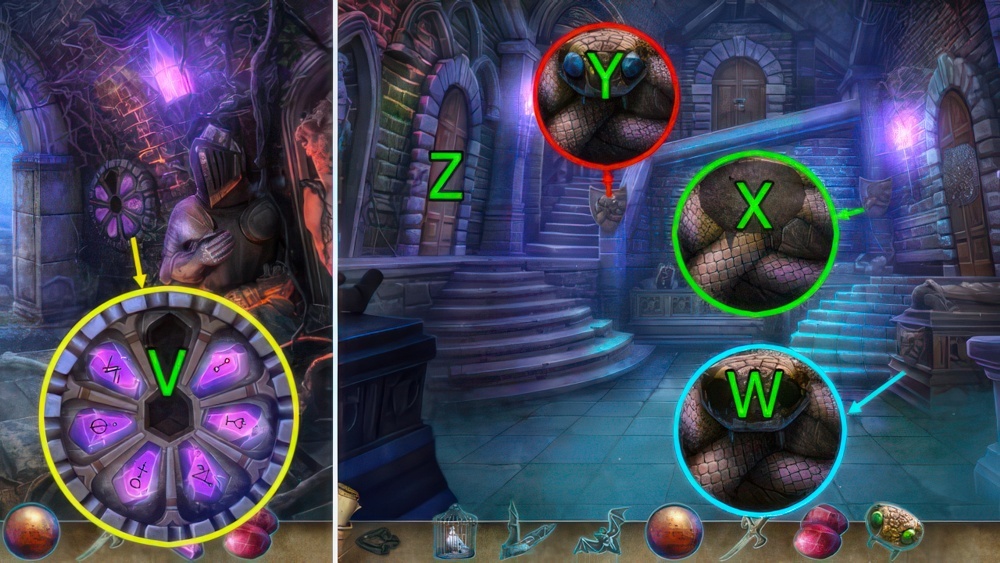
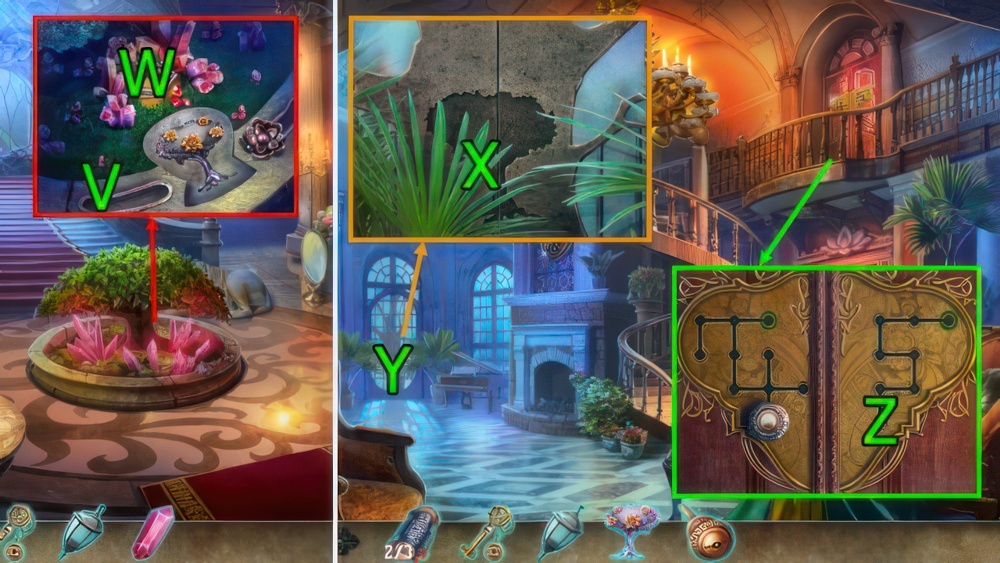
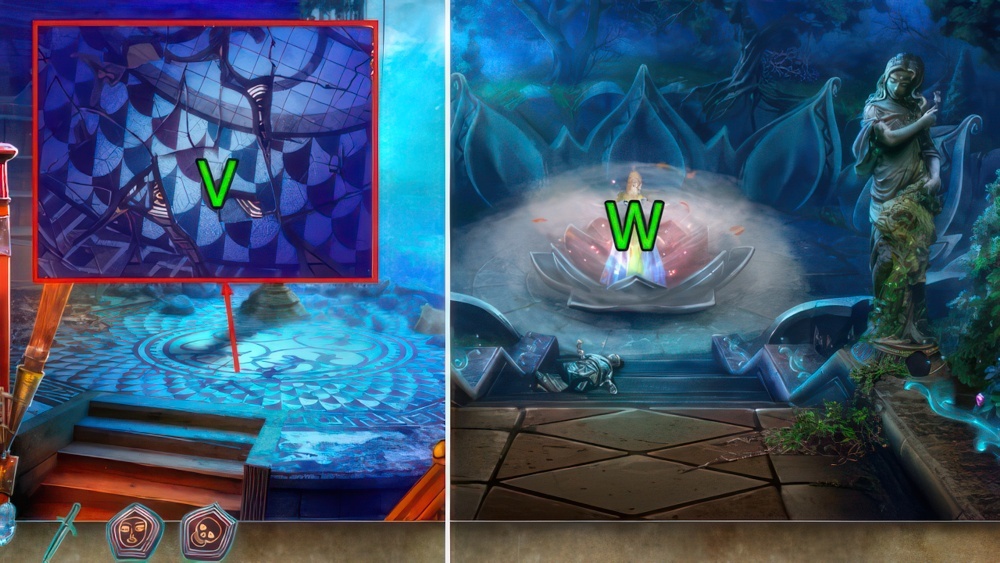
- Get TOY CASTLE TOWER (V).
- Use SHARP KNIFE on (W).
- Solve puzzle (W), get HENRIETTA’S BAG.
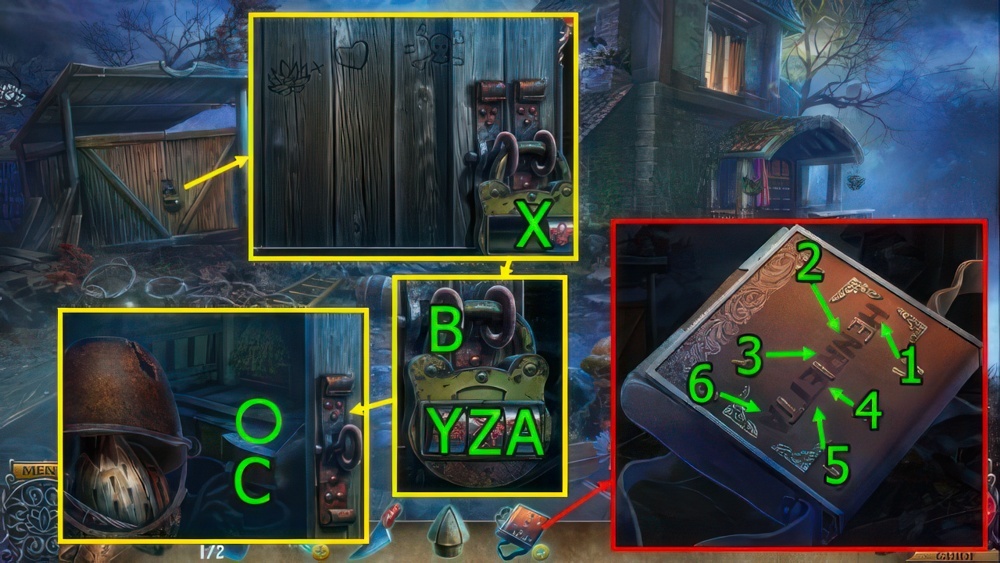
- Use HENRIETTA’S BAG, drag (1-2-3-4-5-6).
- Get Black Lotus Petals, GHOST FIGURINE, and METAL CYLINDERS (2/2).
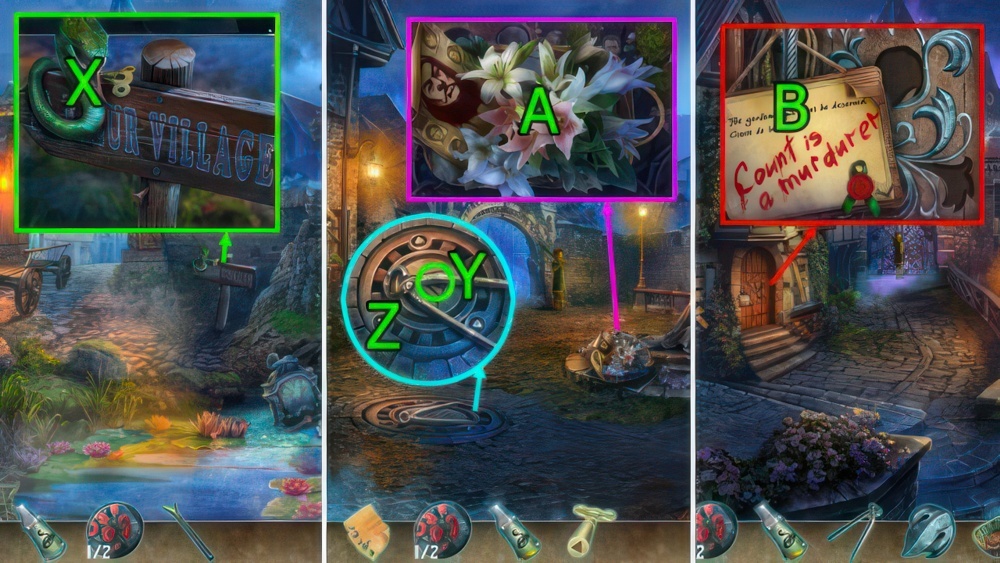
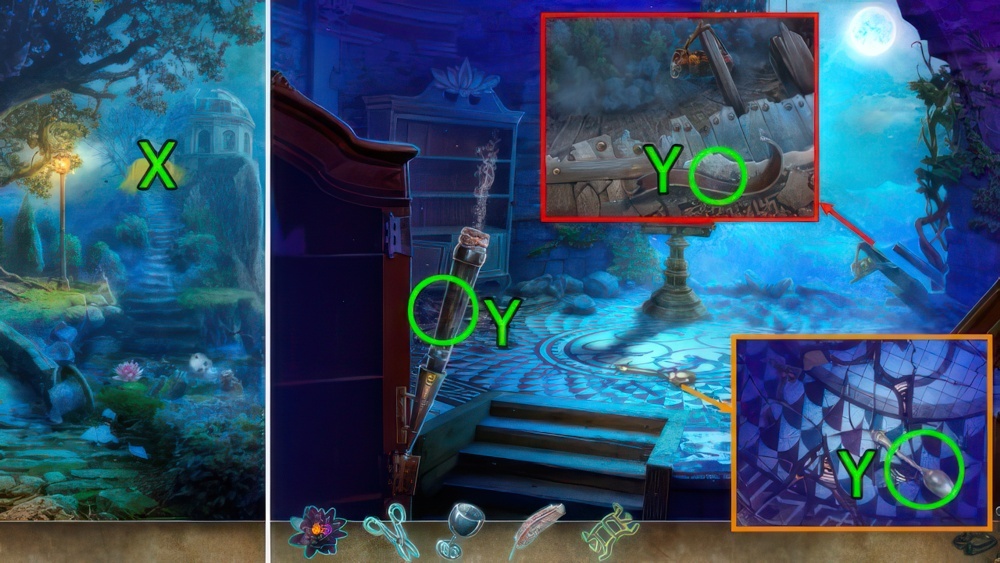
- Use METAL CYLINDERS (2/2) on (X).
- Press (Yx2)-(Zx1)-(Ax5)-(Bx2).
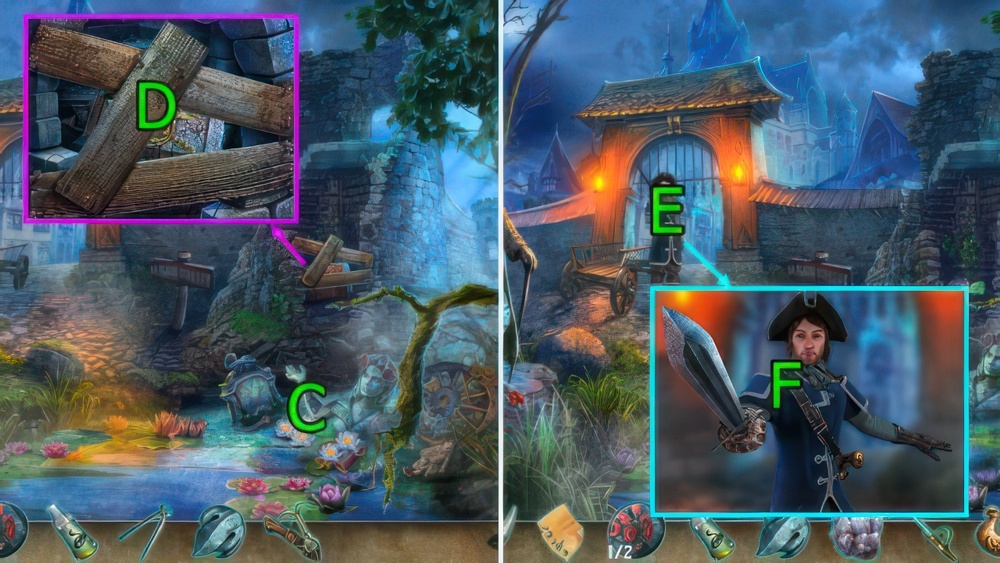
- Get AXE (C).
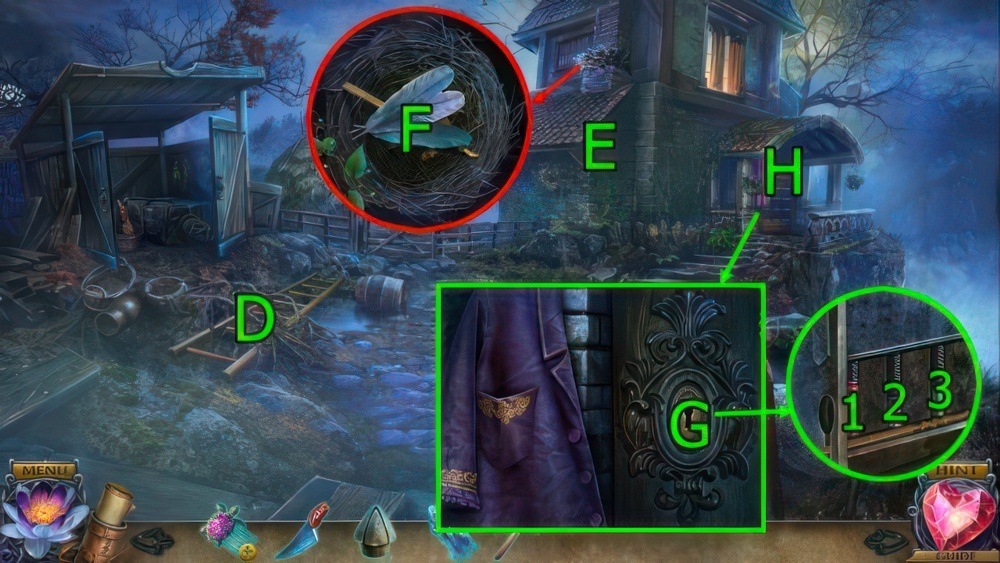
- Use AXE on (D), get LADDER.
- Use LADDER on (E).
- Press (Fx3), get LOCKPICK.
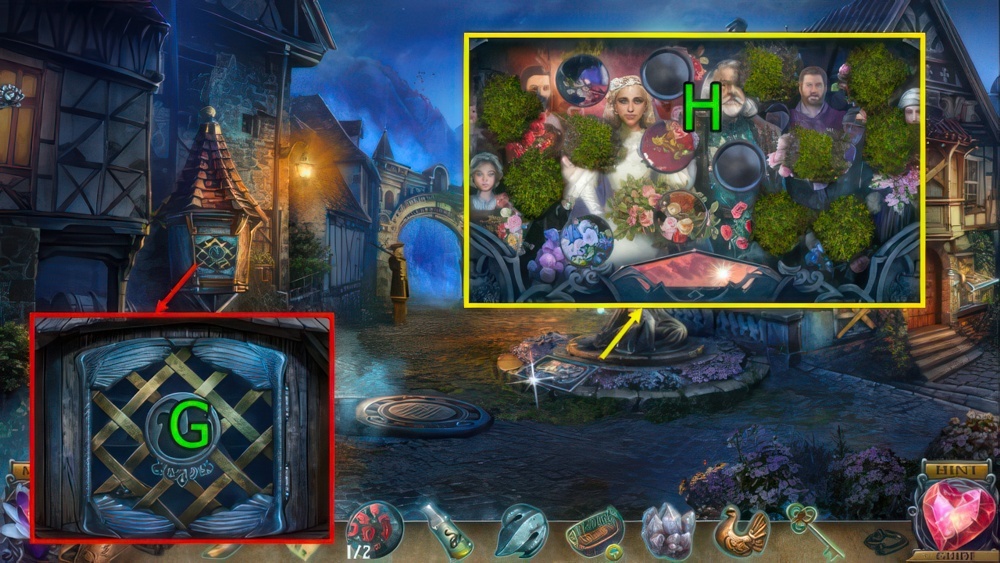
- Use LOCKPICK on (G), press (2)-(3)-(1).
- Go (H).

- Use LADDER on (I).
- Press (Jx2), get STAR ORNAMENT.
- Use SHARP KNIFE on (K), get STAR ORNAMENT.
- Use STAR ORNAMENT and STAR ORNAMENT on (L), get MATCHES.
- Use MATCHES on (M), get COAT OF ARMS.
- Use TOY CASTLE TOWER on (N) and COAT OF ARMS on (O), get MAILBOX KEY.
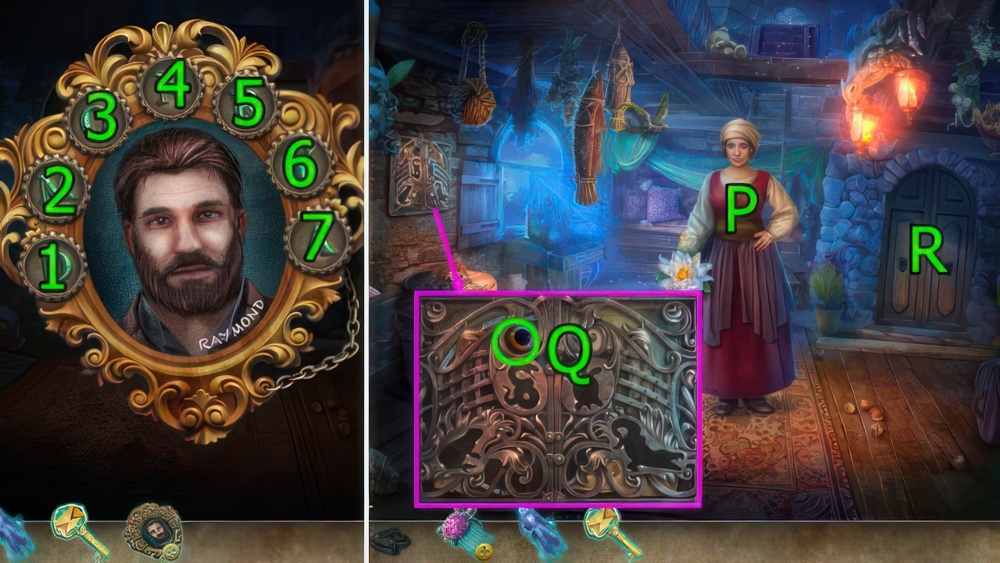
- Press (P), get RAYMOND’S PORTRAIT.
- Use RAYMOND’S PORTRAIT.
- Press (1-5)-(2-7)-(3-6)-(4-7)-(5-6)-(6-7), get RAYMOND’S RING and APPLE INLAY.
- Get EYE (Q).
- Go (R).

- Press and use APPLE INLAY on (S), get APPLES.
- Get CROWBAR and RIBBON (T).
- Press and use MAILBOX KEY on (U), get LETTER H.
- Go Front Yard.
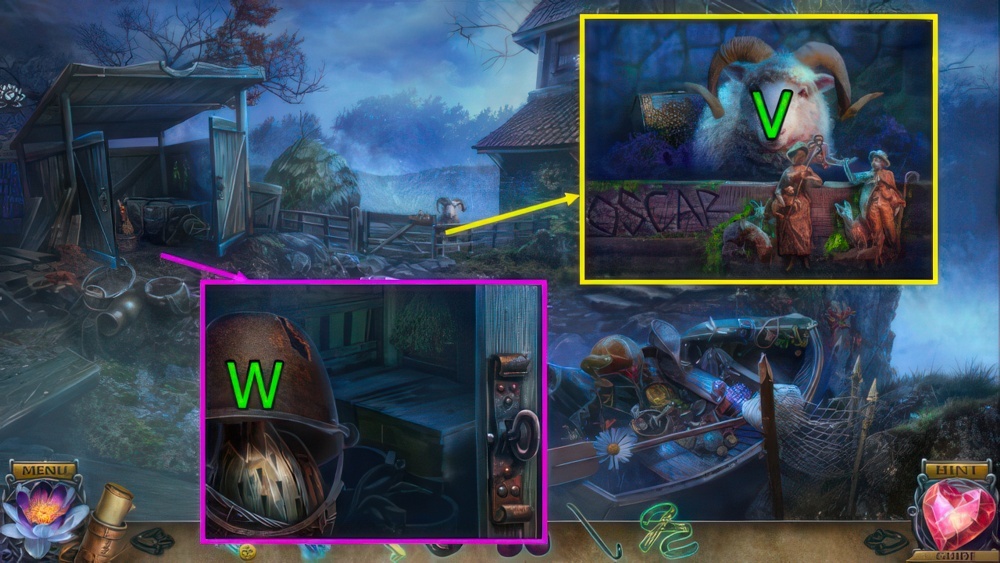
- Use APPLES on (V), get HENRIETTA’S CHEST.
- Press and use EYE on (W), get BOTTLE EMBLEMS (1/3).
- Go Henrietta’s House.

- Use LETTER H on (X), get BOTTLE EMBLEMS (2/3).
- Press and use CROWBAR on (Y).
- Press (Z), get BOTTLE EMBLEMS (3/3).
- BOTTLE EMBLEMS (3/3) on HENRIETTA’S CHEST.
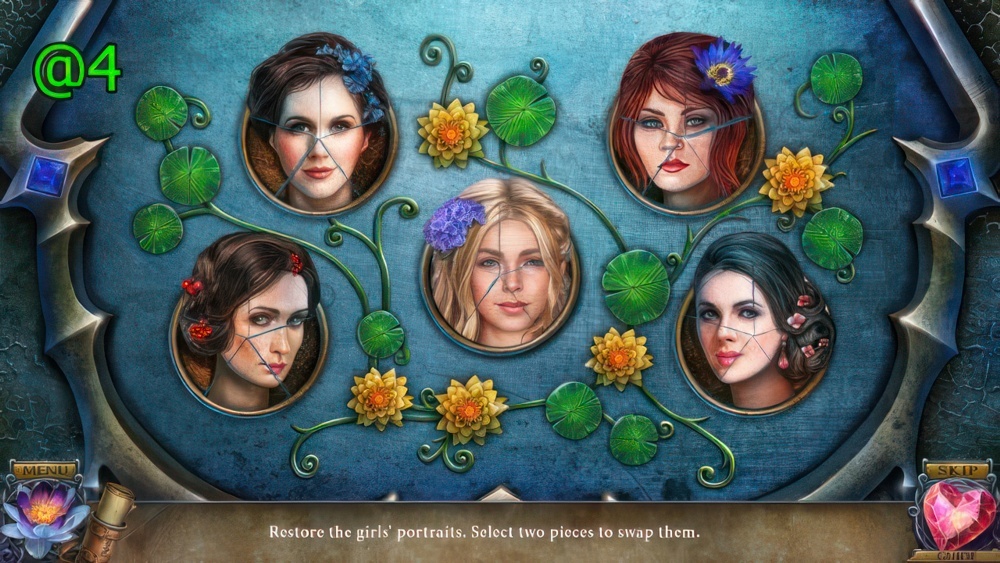
- Restore the portraits.
- Select two pieces to swap them.
- Solution (@4).
- Get SMALL PURPLE GEM, METAL SNAKE, and MIMI’S MEDICINE.
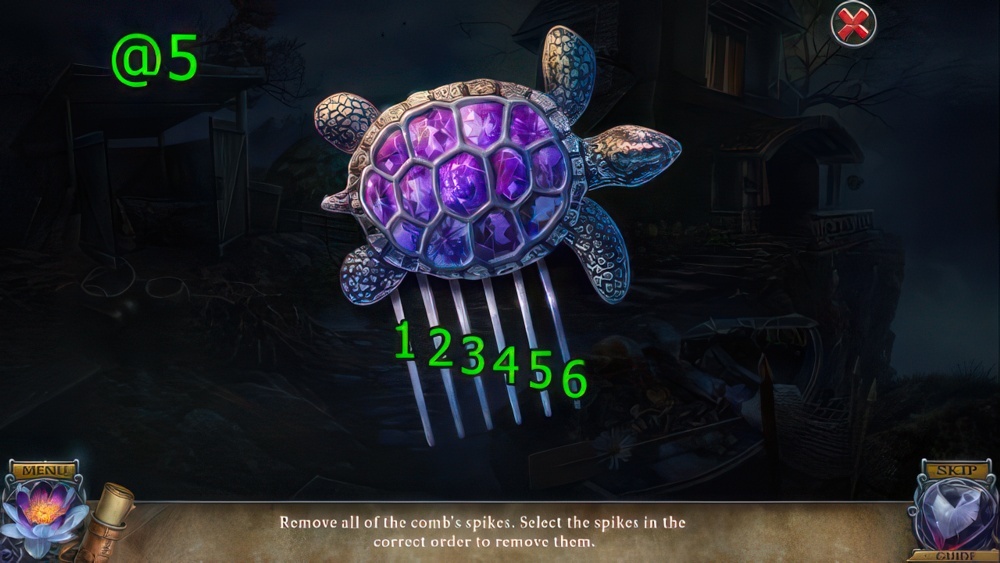
- SMALL PURPLE GEM on HAIR COMB.
- Remove all of the comb’s teeth.
- Select the teeth in the correct order to remove them.
- Solution (@5): Press (5-2-1-6-1-4).
- Get METAL TURTLE.
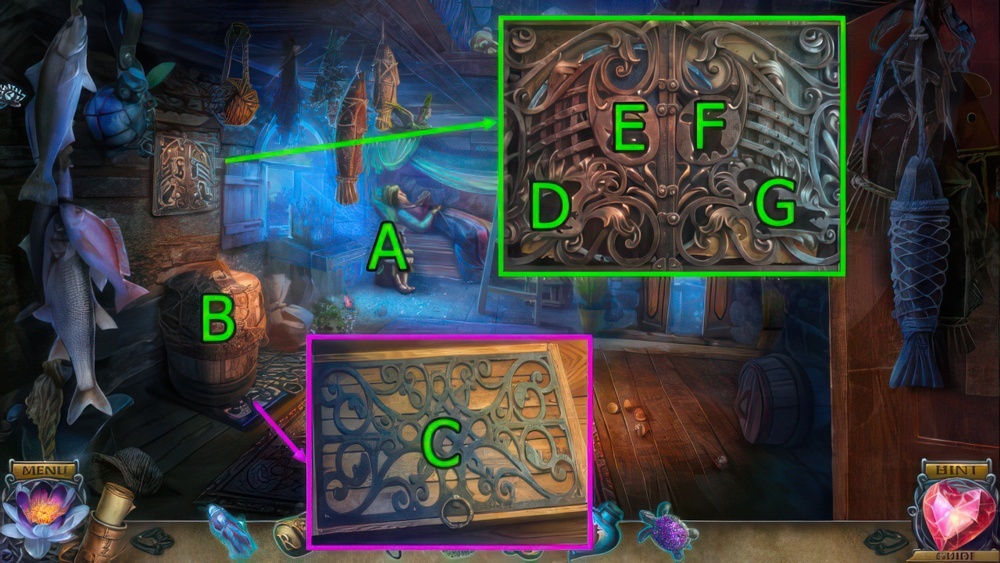
- Use MIMI’S MEDICINE on (A), get COUNT’S MEMOIR.
- GHOST FIGURINE on COUNT’S MEMOIR.
- Solve puzzle.
- Get METAL CROCODILE.
- Use CROWBAR on (B).
- Press (Cx2), get METAL FROG.
- Use METAL FROG on (D).
- Use METAL SNAKE on (E).
- Use METAL TURTLE on (F).
- Use METAL CROCODILE on (G).
- Get SHIELD and MAP OF THE MARSHES.
- Go Porch.

- Press and use MAP OF THE MARSHES on (H).
- Go (I).
- Use SHIELD on (J).
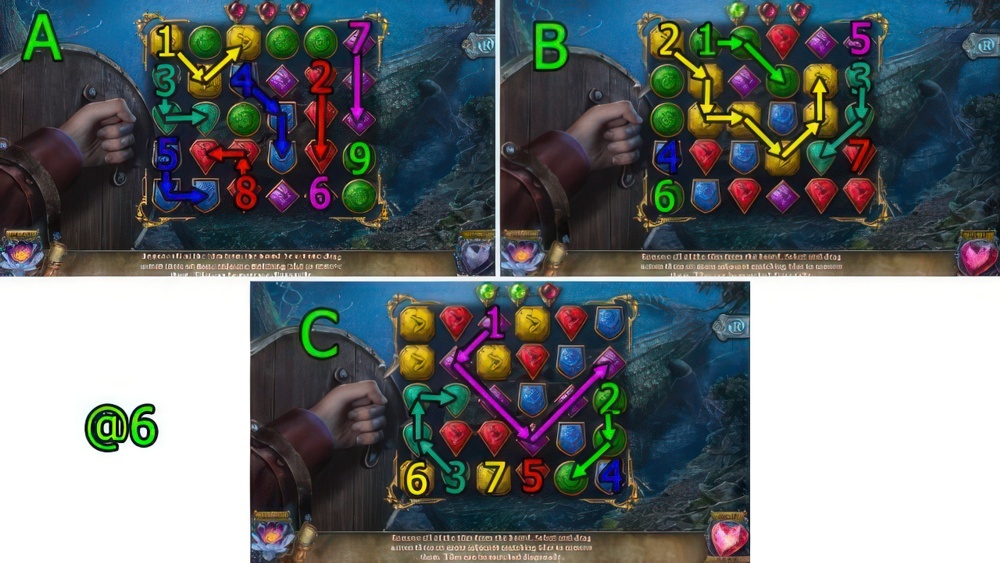
- Remove all of the tiles from the board.
- Press and drag across three or more adjacent matching tiles to remove them.
- Tiles can be matched diagonally.
- Solution (@6): (A)-(1-2-3-4-5-6-7-8-9).
- (B)-(1-2-3-4-5-6-7).
- (C)-(1-2-3-4-5-6-7).
- Get CROCODILE TOOTH.
- Press (K).
- Press (L).
- Get OLIVE OIL and VALVE HANDLE (M).
- Press (Nx2).
- Use RIBBON on (N), get BROOM.
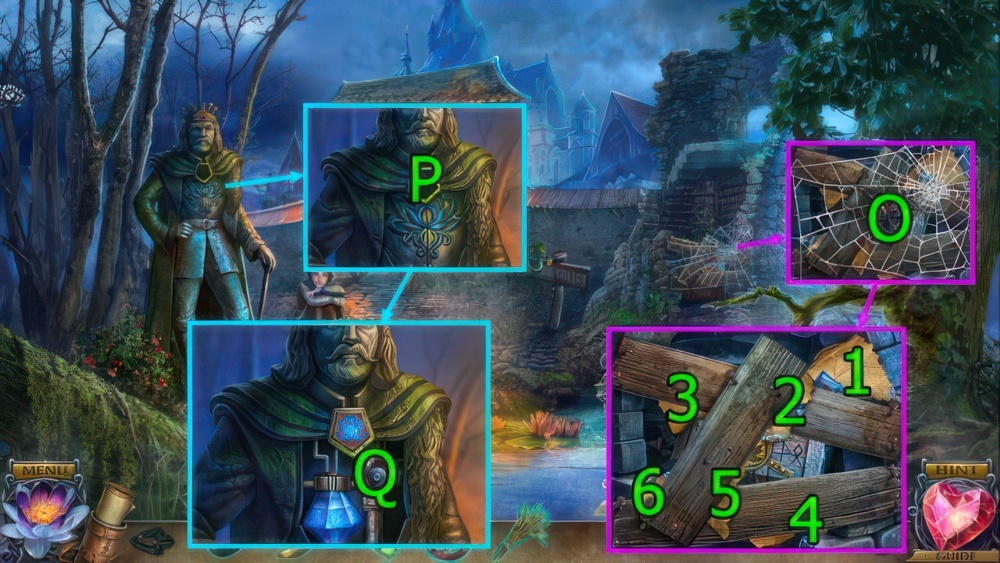
- Use BROOM on (O).
- Press (1-2-3-4-5-6-1×2), get CLOAK CLASP.
- Use CLOAK CLASP on (P).
- Use VALVE HANDLE and OLIVE OIL and press (Q), get FREEZING LIQUID.
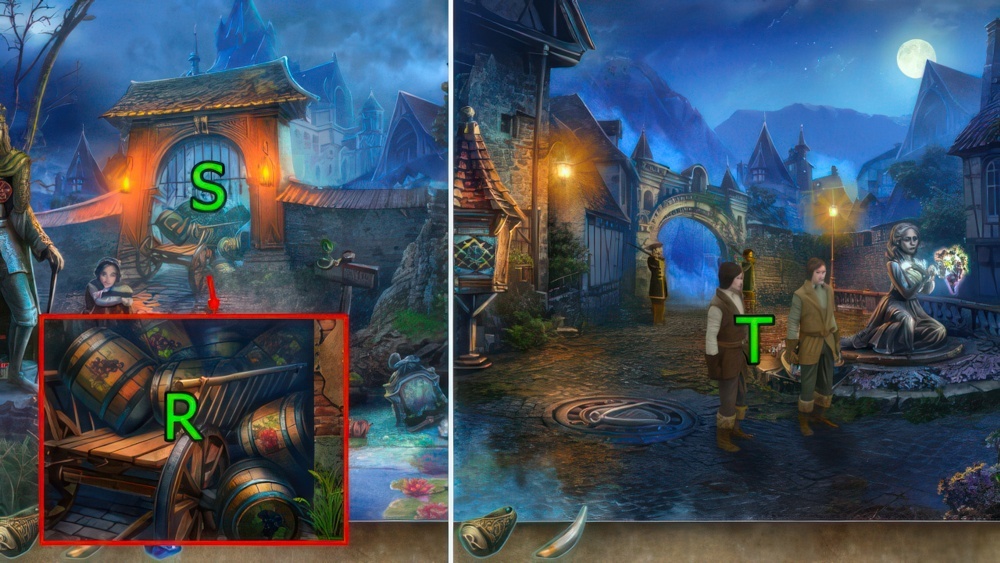
- Use FREEZING LIQUID on and press (R).
- Go (S).
- Press (T).
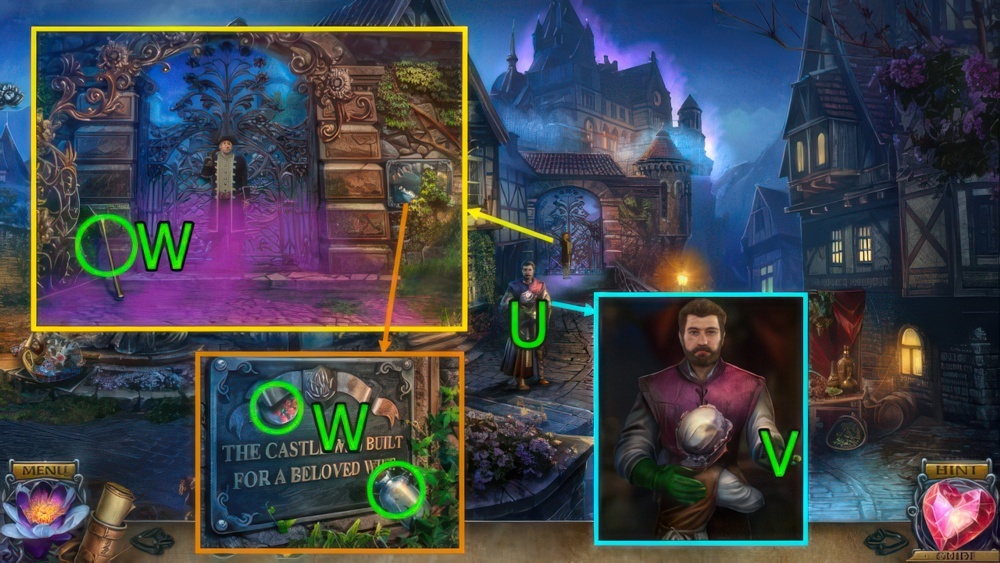
- Press (U).
- Use RAYMOND’S RING on (V), get LIST OF INGREDIENTS.
- Get SMALL BOTTLE, STONE DISC (1/2), and SNAKE HOOK (W).
- Go Village Gate.
- Use SNAKE HOOK and SMALL BOTTLE on (X), get SNAKE VENOM and TRIANGLE KEY.
- Go Village Square.
- Get NAIL PULLER (Y).
- Use TRIANGLE KEY on (Z), get IRON ORNAMENT.
- Press (Ax3), get WICKER BASKET.
- Press (Bx2), get GRAPPLING HOOK.
- Go Village Gate.
- Use GRAPPLING HOOK and solve puzzle (C), get JEWELED LOTUS.
- Use NAIL PULLER and JEWELED LOTUS on (D), get QUARTZ, SWORD, and PIGEON EMBLEM.
- Press (E).
- Use SWORD on (F).

- Press one of the three tokens: Attack, Defend, or Disarm.
- Attack beats Defend, Defend beats Disarm, and Disarm beats Attack.
- Solution (@7): Press (1)-(2)-(3) until you win.
- Get HOUSE KEY.
- Go Village Square.
- Use PIGEON EMBLEM and press (G), get STONE DISCS (2/2) and FLUTE PART.
- Use STONE DISCS (2/2) on (H).
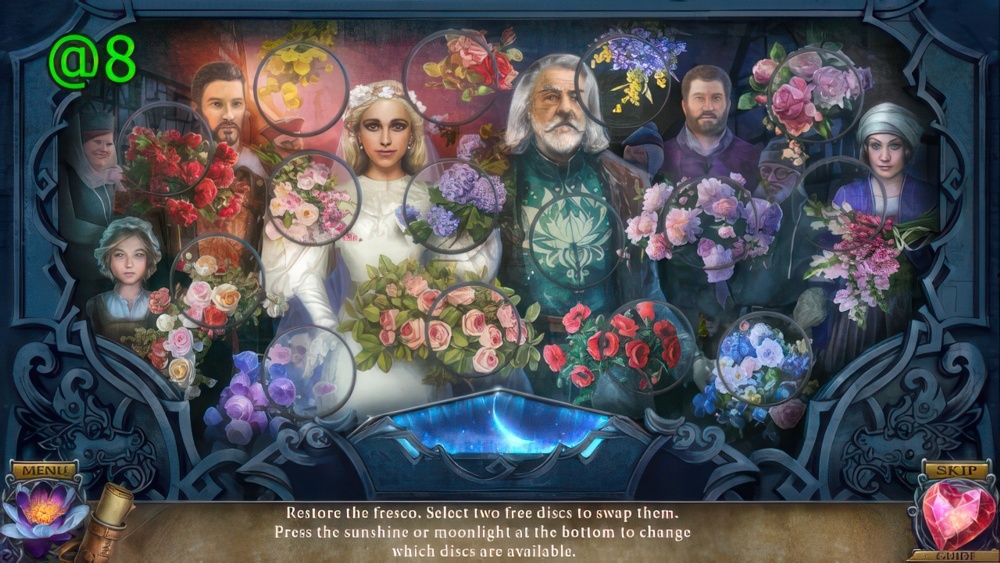
- Restore the fresco.
- Select two free discs to swap them.
- Press the sunshine or moonlight at the bottom to change which discs are available.
- Solution (@8).

- Get IRON ORNAMENT and BELT (H1).
- Press (H2).
- Get FIREFLIES (I).
- Use IRON ORNAMENT on (J) and IRON ORNAMENT on (K).
- Use HOUSE KEY on (L).
- Go (M).

- Get GHOSTLY COUNTESS FIGURINE.
- Press (N), get FLOWER TILE (1/2).
- Get BOOTS, PEASANT CLOTHES, VEST, and GREEN BOOK (O).
- Use GREEN BOOK on (P).
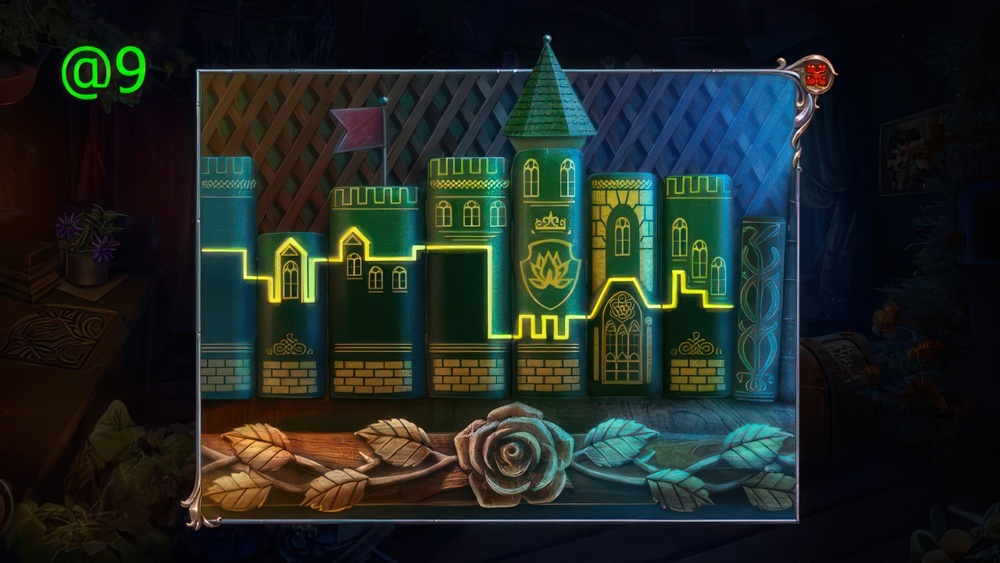
- Arrange the books to form a complete picture.
- Select two books to swap them.
- Solution (@9).
- Get COUNT’S MEMOIR.
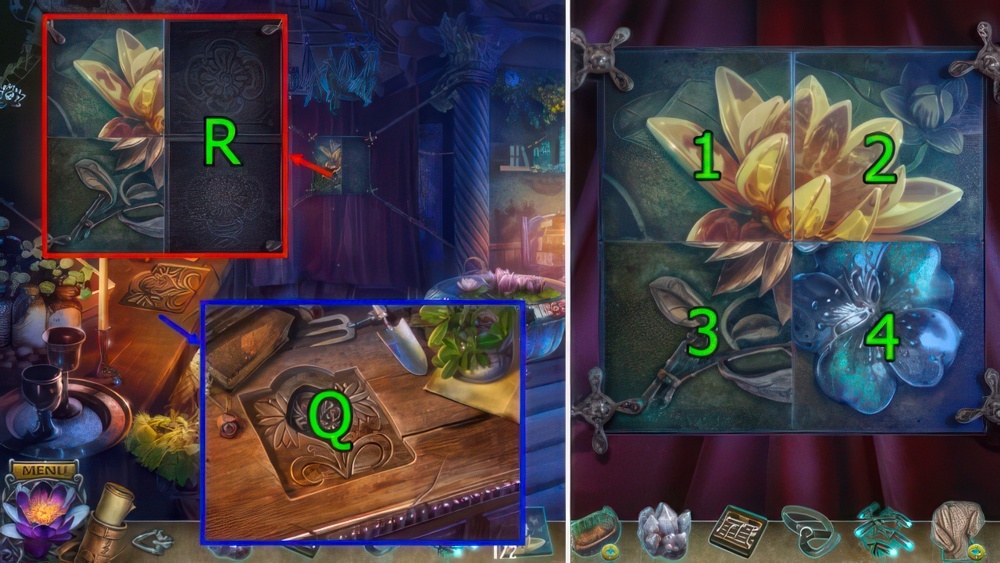
- GHOSTLY COUNTESS FIGURINE on COUNT’S MEMOIR.
- Solve puzzle, get COUNTESS’S EMBLEM.
- Use COUNTESS’S EMBLEM on (Q), get FLOWER TILES (2/2).
- Use FLOWER TILES (2/2) on (R).
- Press (3×3-4×2)-(1-4×2)-(2-4).
- Solve puzzle, get ACID.
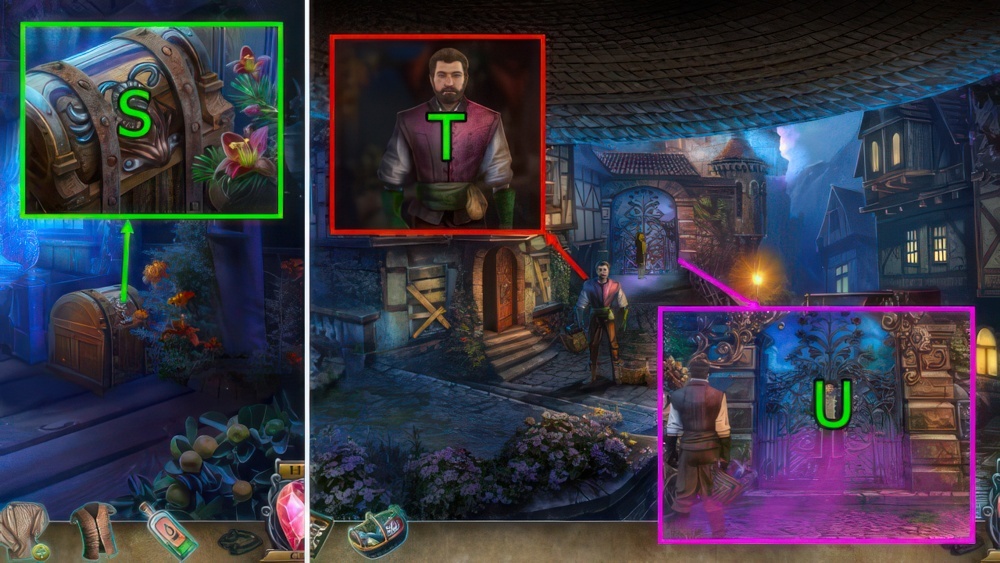
- Use ACID and press (S), get EMERALD, TROUSERS, and HAT.
- LIST OF INGREDIENTS, SNAKE VENOM, CROCODILE TOOTH, QUARTZ, FIREFLIES, and EMERALD on WICKER BASKET, get INGREDIENTS.
- BOOTS, BELT, VEST, TROUSERS, and HAT on PEASANT CLOTHES.
- Go Village Square.
- Press (T).
- Use INGREDIENTS on (U).
- Get YELLOW LOTUS.
- Go Paul’s House.

- Use YELLOW LOTUS on (V).
- Press (1-3-4-2), get CANVAS PIECE.
- Use CANVAS PIECE on (W).

- Restore the picture.
- Press two pieces to swap them.
- Solution (@10), get EVIDENCE, FLUTE PART, GOLD COIN, and CAGE.
- Go Village Square.
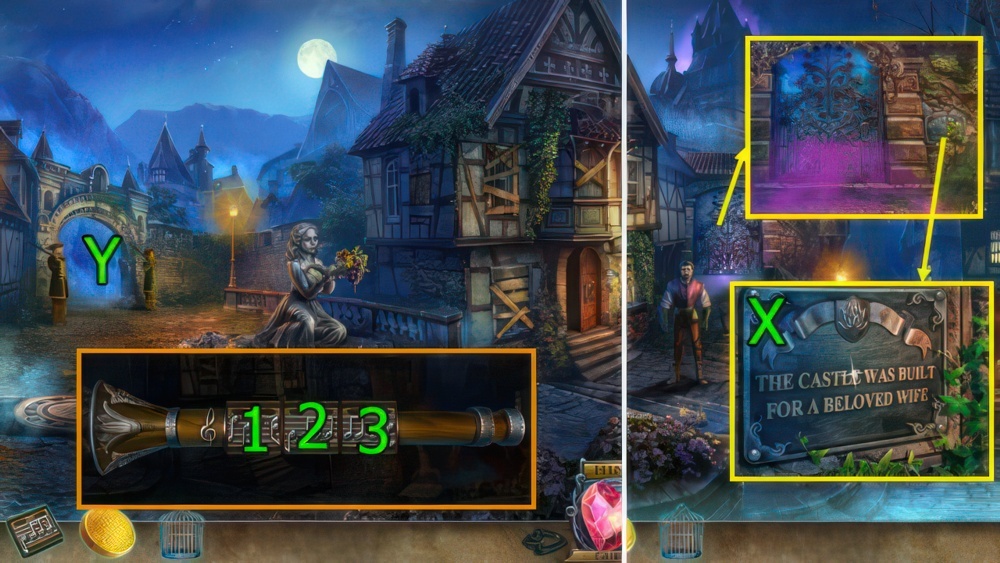
- Use GOLD COIN on (X), get BROKEN FLUTE.
- FLUTE PART and FLUTE PART on BROKEN FLUTE, press (1×2-2×2-3×2), get FLUTE.
- Use FLUTE on and go (Y).
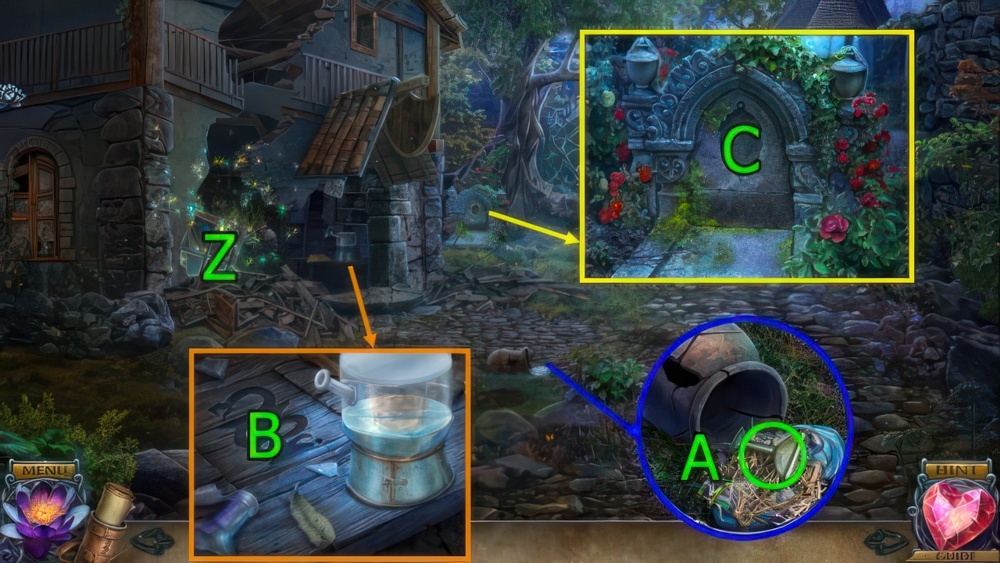
- Solve puzzle (Z), get BRONZE SNAKE.
- Get MEDICINE BOWL EMBLEM (A).
- Use MEDICINE BOWL EMBLEM and BRONZE SNAKE and press (B).
- Get DAUGHTER’S PORTRAIT and EVIDENCE.
- Use DAUGHTER’S PORTRAIT on (C), get EVIDENCE and STRANGE SYMBOL.
- EVIDENCE and EVIDENCE on EVIDENCE, get EVIDENCE.
- Go Village Square.

- Use EVIDENCE on (D), get BIRDSEED.
- Use CAGE and BIRDSEED on (E), get CARRIER PIGEON and LEATHER GLOVE.
- Go Apothecary’s House.
- Solve puzzle (F), get GARDEN PRUNERS.
- Use GARDEN PRUNERS on (Gx3).
- Go (G).
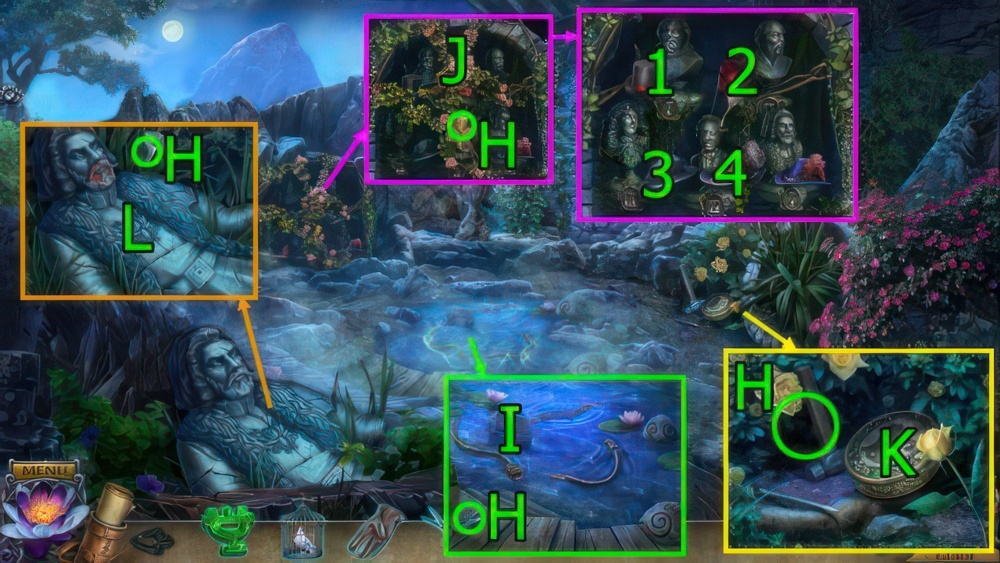
- Get CANDLE, HAMMER AND CHISEL, FUNNEL, and FLINT AND STEEL (H).
- Use LEATHER GLOVE and STRANGE SYMBOL on (I), get SAPPHIRE RECIPE and SAPPHIRE POWDER.
- Use GARDEN PRUNERS on (J), get ROSES and STRANGE TELESCOPE.
- Press (1-4)-(2-1)-(2-3), get CAT EMBLEM.
- Use CAT EMBLEM on (K).
- Get METAL BAT and ENGRAVED TILE (1/2).
- Use HAMMER AND CHISEL on (L), get ENGRAVED TILE (2/2).
- Go Apothecary’s House.

- Use LEATHER GLOVE and HAMMER AND CHISEL on (M), get GLASS LENS.
- Press and use SAPPHIRE RECIPE, FUNNEL, CANDLE, SAPPHIRE POWDER, and FLINT AND STEEL on (N), press (Nx2), get SAPPHIRE.
- Go Castle Wall.
- SAPPHIRE and GLASS LENS on STRANGE TELESCOPE, get STRANGE TELESCOPE.
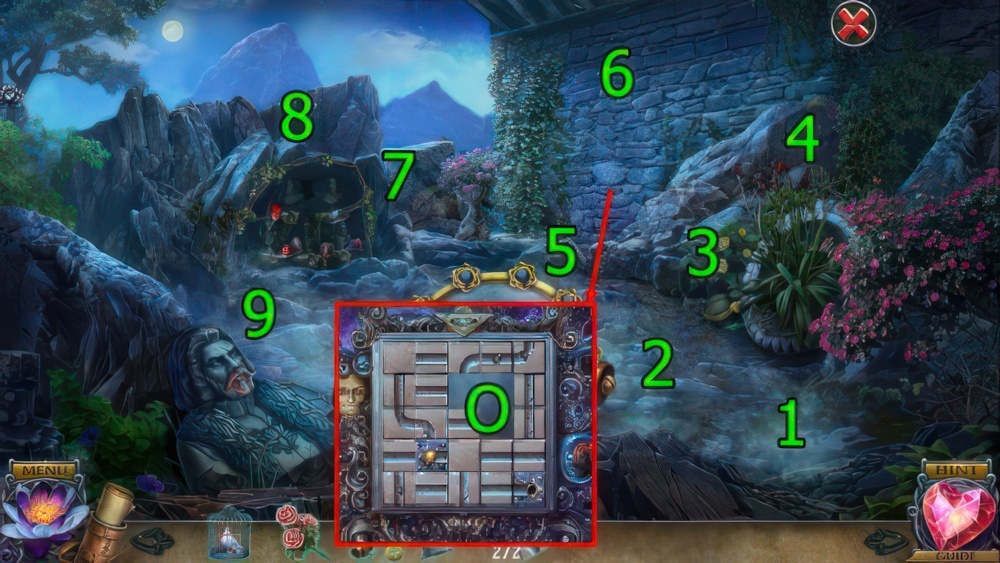
- Press (1-2-3-4-5-6-7-8-9).
- Use ENGRAVED TILE (2/2) on (O).

- Build a path from the ball to the hole to release the chains.
- Press a tile to slide it into an adjacent empty slot.
- Solution (@11).
- Get PHANTOM SNAKE FIGURINE.

- Get RUNE CRYSTAL, EMPTY OILCAN, and PESTLE (P).
- Use PESTLE, ROSES, and EMPTY OILCAN and press (Q), get OIL.
- Use OIL and press (R).
- Get TORCH.
- Use TORCH on (S), get METAL BAT.
- Go (T).

- Get MARS, RUNE CRYSTAL, DAGGER, and COUNT’S MEMOIR (U).
- PHANTOM SNAKE FIGURINE on COUNT’S MEMOIR.
- Solve puzzle, get SNAKE EYES.
- Go Secret Passage.
- Use RUNE CRYSTAL and RUNE CRYSTAL on (V), get SNAKE HEAD.
- Go Crypt.
- Use SNAKE EYES and press (W).
- Use SNAKE HEAD and press (Xx2).
- Press (Yx2).
- Go (Z).
- Solve puzzle (A), get METAL BAT.
- Get VENUS and PAINTED TILE (B).
- Use MARS and VENUS on (C), get GLASS APPLE.
- Go Secret Passage.
- Use METAL BAT, METAL BAT, and METAL BAT on (D), get BELLOWS.
- Use DAGGER on (E), get HEART OF GLASS.
- Go Count’s Study.
- Use GLASS APPLE and HEART OF GLASS on (E), get LOTUS ORNAMENT and COUNT’S PORTRAIT.
- Solve puzzle (F), get METAL DISC.
- Use BELLOWS and press (Gx3), get METAL DISC.
- Go Crypt.
- Use COUNT’S PORTRAIT on (H), press (1-2), get LA FLEUR RING.
- Use METAL DISC and METAL DISC on (I).
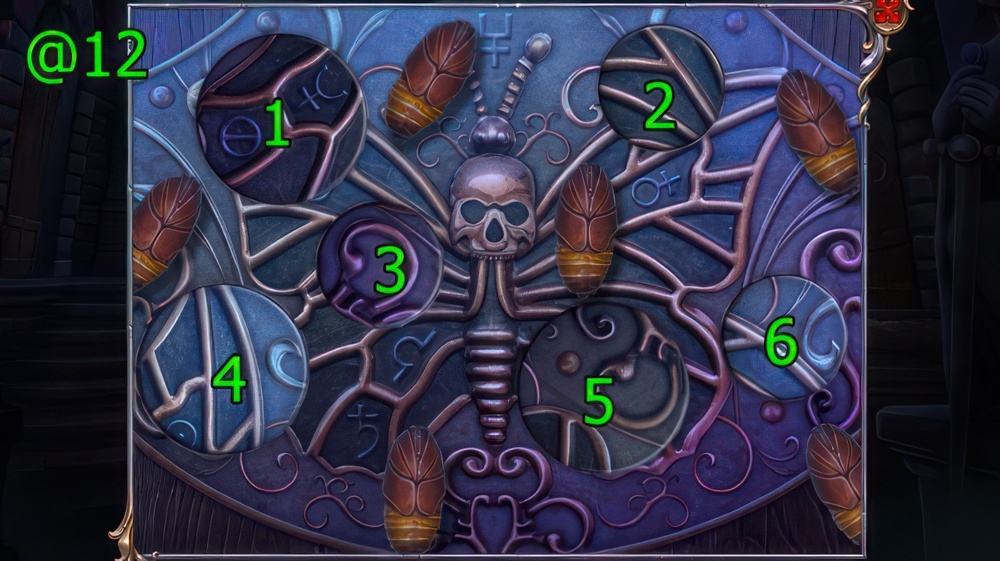
- Restore the image, connecting all the lines.
- Press two tokens to swap them, or press a token twice to rotate it.
- Solution (@12), Press (1-4)-(3-6)-(3-2)-(5-4).
- (1×11)-(2×11)-(3×12)-(4×9)-(5×10)-(6×9).
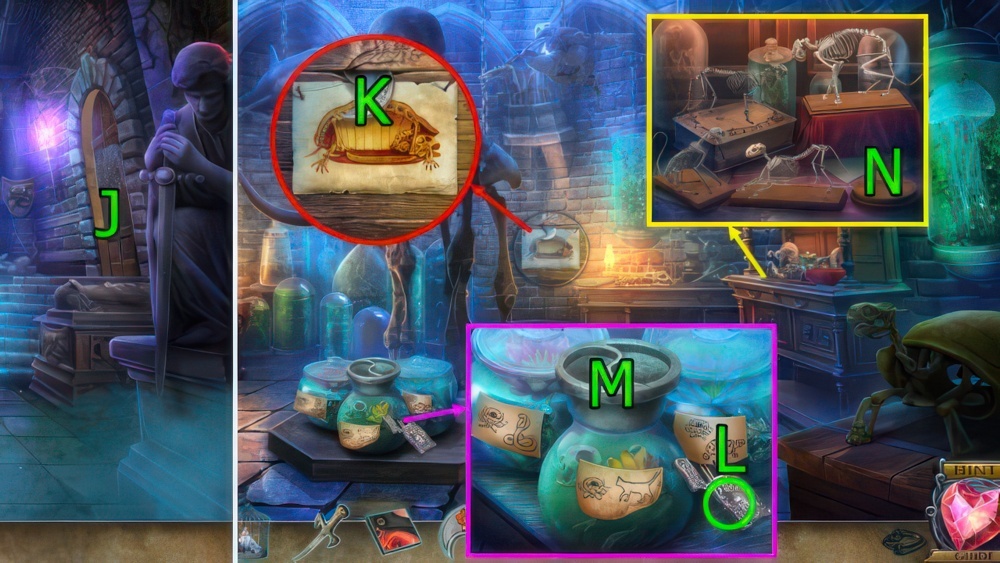
- Go (J).
- Use DAGGER on (K), get CAT ORNAMENT.
- Get MATCHES (L).
- Use LOTUS ORNAMENT and CAT ORNAMENT and press (M), get CAT SKELETON.
- Use CAT SKELETON on (N).
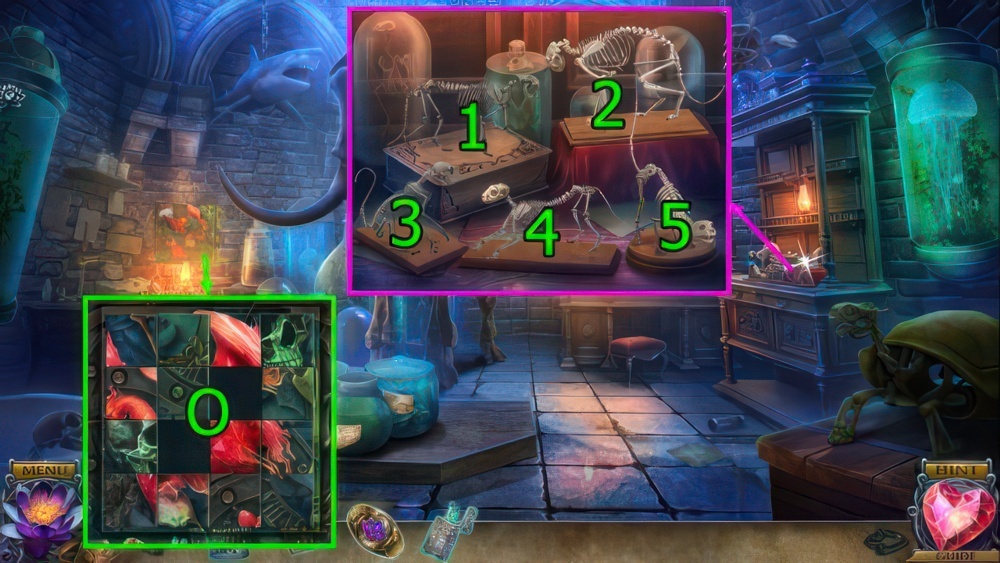
- Press (5-3)-(2-4)-(4-1), get PAINTED TILE.
- Use PAINTED TILE and PAINTED TILE on (O).
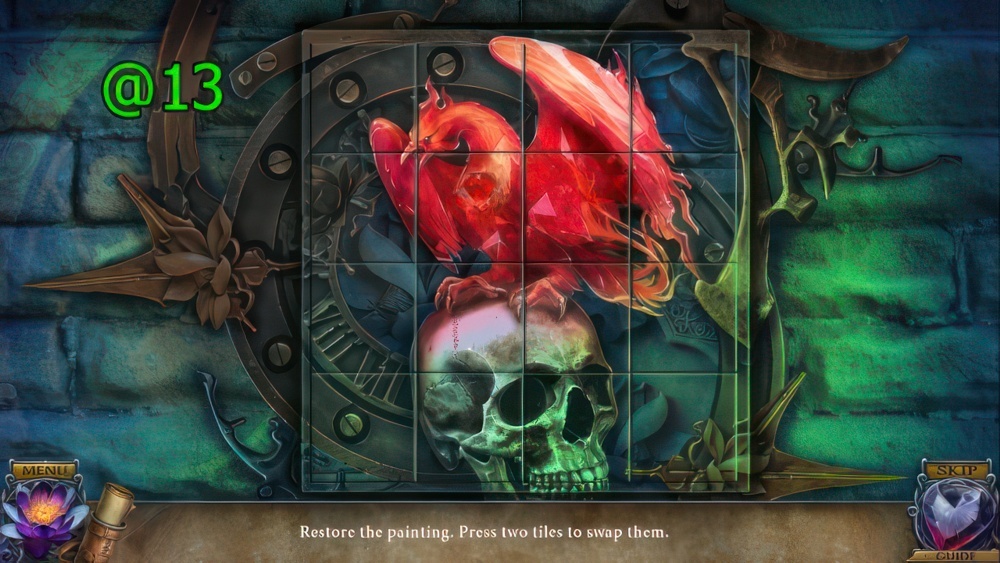
- Restore the painting.
- Press two tiles to swap them.
- Solution (@13).
- Get LOTUS KEY.
- Go Crypt.

- Use LA FLEUR RING, LOTUS KEY, and CARRIER PIGEON on (P).
- Go (Q).

- Get GUARD’S EMBLEM, METAL SCRAP, MARBLE ARM, TONGS, and BLACK POWDER (R).
- Use METAL SCRAP on (S), get SICKLE.
- Use SICKLE on (T), get JAIL KEY.
- Use SICKLE on (U), get WOODEN HANDLE.
- Use JAIL KEY on (V), drag (1-2)-(3-4).
- Solve puzzle (W), get CANNONBALL.
- Use WOODEN HANDLE on (X), get RAMROD.
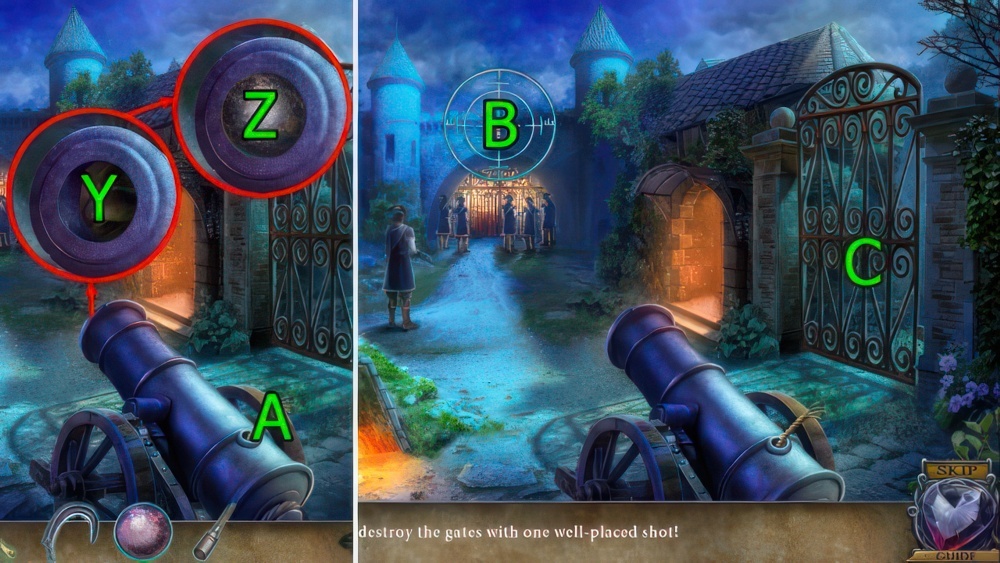
- Use TONGS, BLACK POWDER, and CANNONBALL on (Y), get GHOSTLY SCROLL FIGURINE.
- Use RAMROD on (Z).
- Use MATCHES on (A).
- Press (B).
- Go (C).

- Use TONGS on (D) and press (E), get GUARD’S EMBLEM and BLUE CANVAS (1/4).
- Get BLUE CANVAS (2/4) (F).
- Go Courtyard.
- Use GUARD’S EMBLEM and GUARD’S EMBLEM on (G), get GAS MASK and BRUSH.
- Go Garden.
- Use GAS MASK on (H).
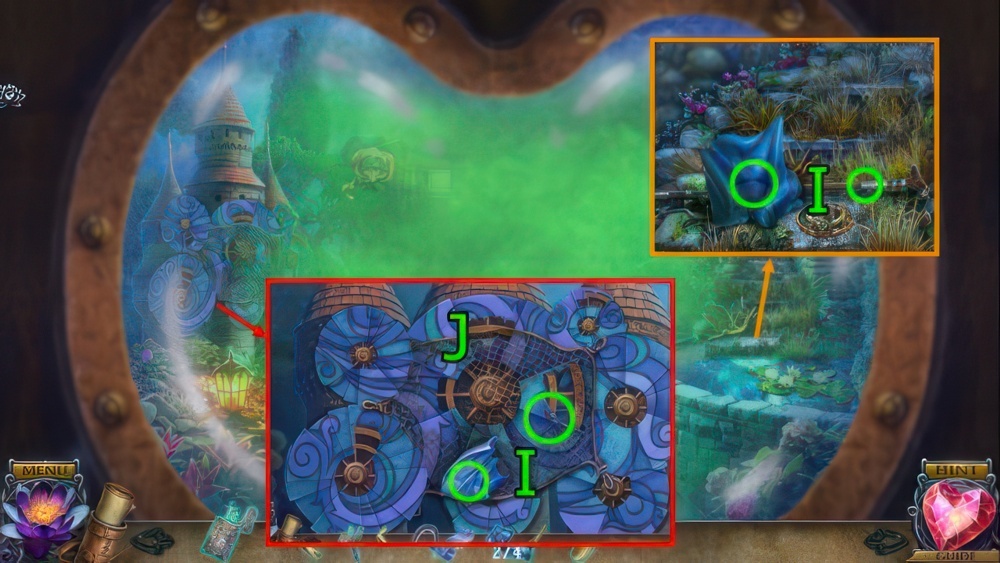
- Get BLUE CANVAS (3/4), COUNT’S CANE, BLUE CANVAS (4/4), and TORN FISHING NET (I).
- Use BLUE CANVAS (4/4) on (J).
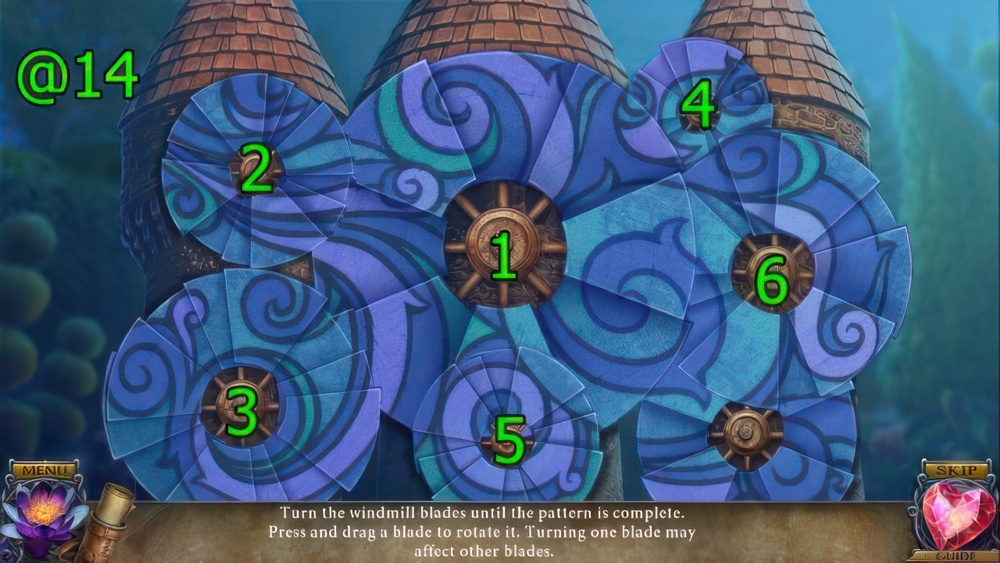
- Turn the windmill blades until the pattern is complete.
- Press and drag a blade to rotate it.
- Turning one blade may affect other blades.
- Solution (@14), Rotate in order to match image, (1-2-3-4-5-6-1).
- Press (Kx2).
- Use COUNT’S CANE on (L), get BRONZE PLATE.
- Use BRUSH on (M), get BRONZE PLATE.
- Use MATCHES, BRONZE PLATE, and BRONZE PLATE on (N), get COUNT’S MEMOIR.
- GHOSTLY SCROLL FIGURINE on COUNT’S MEMOIR.
- Solve puzzle, get SILVER PETALS.
- Get MARBLE FACE (O).
- Use SILVER PETALS on (P), use MARBLE ARM on (Q), use MARBLE FACE on (R), get GREENHOUSE EMBLEM and METAL FLOWER.
- Use GREENHOUSE EMBLEM on (S).
- Go (T).
- Use SICKLE on (U), get VINE (1/2).
- Use SICKLE on (V), get VINES (2/2) and RED FLOWER.
- VINES (2/2) on TORN FISHING NET, get FISHING NET.
- Use FISHING NET on (W).
- Get LOTUS MEDALLION and GOLDEN EMBLEM (X), Get CASTLE KEY.
- Get OLD RAG, FLOWER POT, POTION RECIPE HALF, and EMPTY VIAL (Y).
- Use OLD RAG on (Z), get TROWEL.
- Use GOLDEN EMBLEM and TROWEL on (A), get EMERALD and ANCIENT SCROLL (1/3).
- Use EMERALD on (B), press (C-Bx3), get EMERALD DUST.
- Go Garden.
- Use FLOWER POT and TROWEL on (D), get BLUE FLOWER.
- Go Greenhouse.
- Use RED FLOWER and BLUE FLOWER on (E).

- Solution (@15).
- Get SLEEPY VIOLETS and GARDENING GLOVE.
- Go Garden.
- Use GARDENING GLOVE on (F), get BLACK ROSE PETALS and MIRROR.
- Go Courtyard.
- Solve puzzle (G), get GOLDEN KEY.
- Use CASTLE KEY on (H).
- Go (I).
- Get PAPER WITH MARKINGS, TWEEZERS, and ALCOHOL (J).
- Go Courtyard.
- Use TWEEZERS on (K), get COAL.
- POTION RECIPE HALF, EMERALD DUST, SLEEPY VIOLETS, BLACK ROSE PETALS, PAPER WITH MARKINGS, COAL, and ALCOHOL on EMPTY VIAL, get SLEEPING GAS.
- Go Castle Hall.
- Use SLEEPING GAS on (L).
- Go (M).

- Press (N), get OFFICE KEY.
- Press (O), get FEATHERED FAN.
- Go Castle Hall.
- Press (3-2-1-3-4), get OIL LAMP.
- Use GOLDEN KEY on (P).
- Press (Q).
- Use MIRROR on (R).
- Get ANCIENT SCROLLS (2/3) (S).
- Use LOTUS MEDALLION on (T), get MEMORY CRYSTAL.
- Use FEATHERED FAN on (U).
- Use METAL FLOWER and press (V), get METAL TREE.
- Use MEMORY CRYSTAL on (W), get DOOR KNOB.
- Go Corridor.
- Press and use METAL TREE on (X).
- Solve puzzle (Y), get COUNT’S WATCH.
- Use DOOR KNOB and OFFICE KEY on (Z).
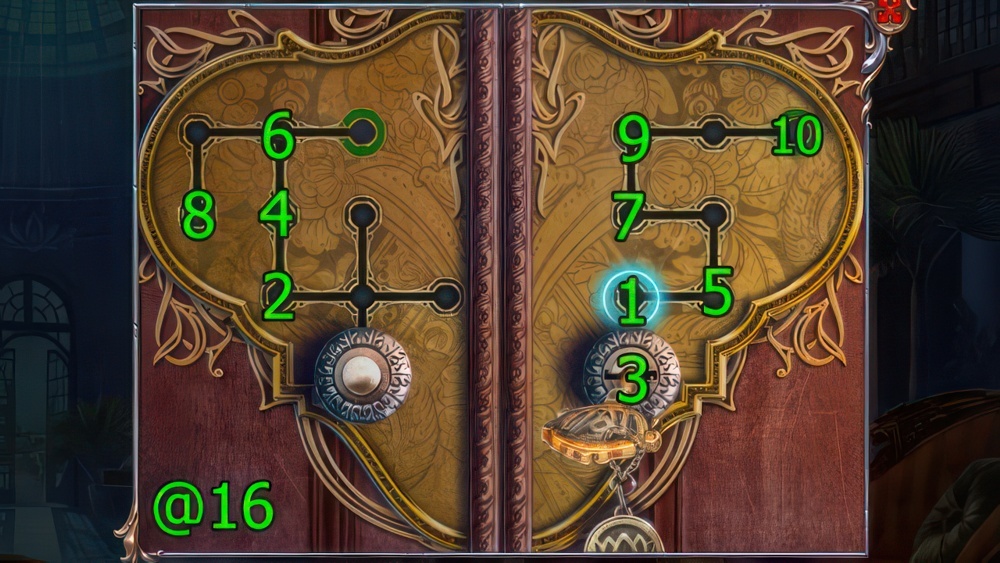
- Move both door knobs to the green areas.
- Press a highlighted slot to move the knobs there, keeping in mind that they move together.
- Solution (@16): press (1-2-3-4-5-6-7-8-9-6-10).
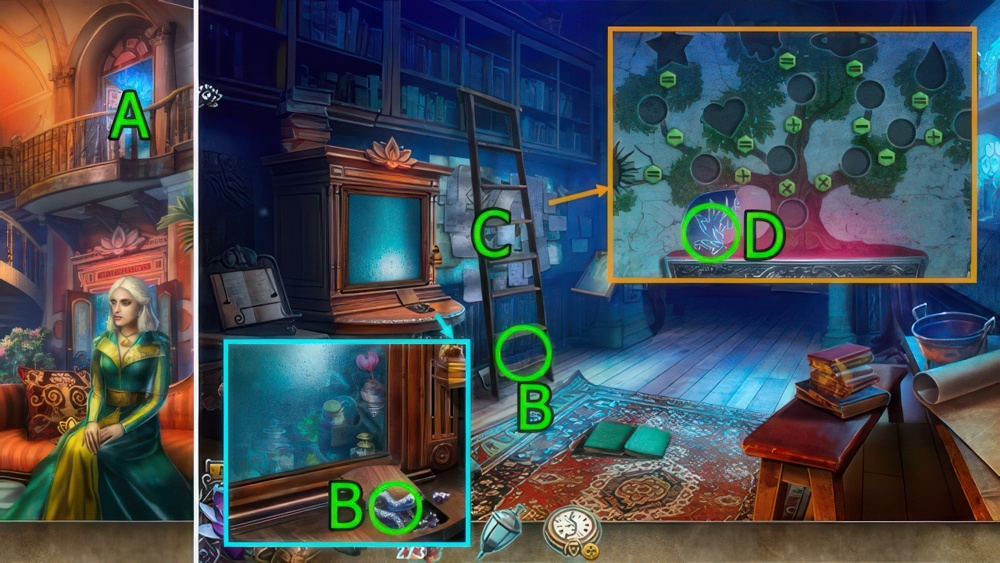
- Go (A).
- Get METAL SERPENT and LADDER (B).
- Press (C).
- Get WATCH FACE PART (D).
- Go Corridor.
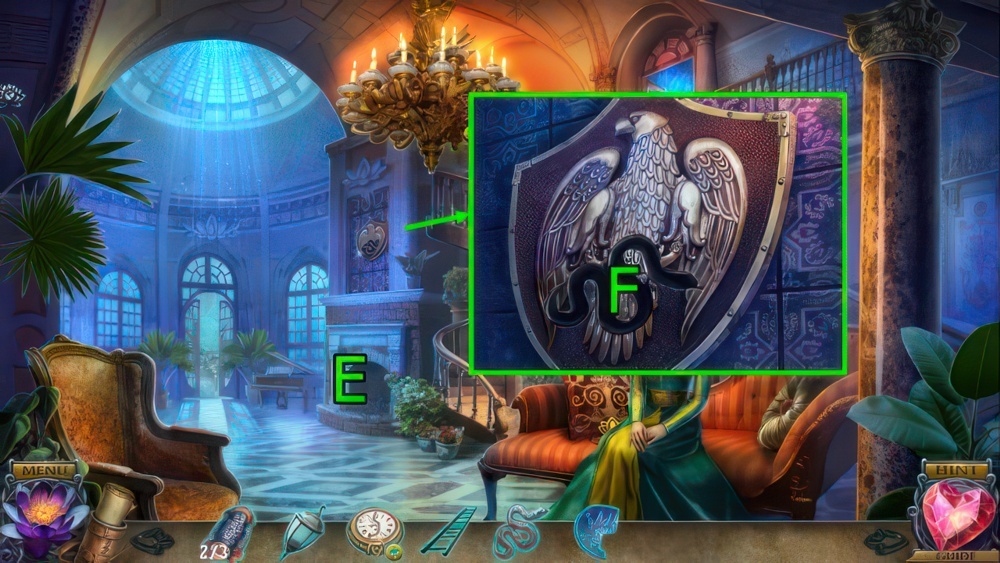
- Use LADDER on (E).
- Use METAL SERPENT on (F), get WATCH FACE PART, TRIANGULAR GEMS, and VALVE LEVER.
- Go Office.
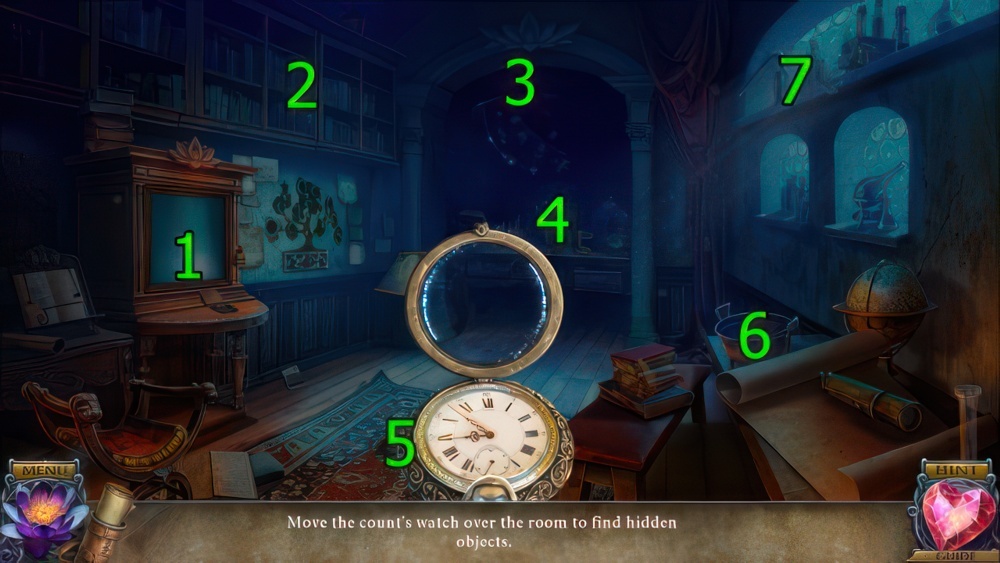
- WATCH FACE PART and WATCH FACE PART on COUNT’S WATCH.
- Move the count’s watch over the room to find hidden objects.
- Press (1-2-3-4-5-6-7), get GOLDEN TOKENS (7/7).

- Use TRIANGULAR GEMS on (G), get GLASS PLATES (1/2).
- Use OIL LAMP on (H).
- Use VALVE LEVER and press (I), get LIT LAMP.
- Use LIT LAMP on (J).
- Get STARS 5/5 and FANCY GEAR (K).
- Use FANCY GEAR on (L).
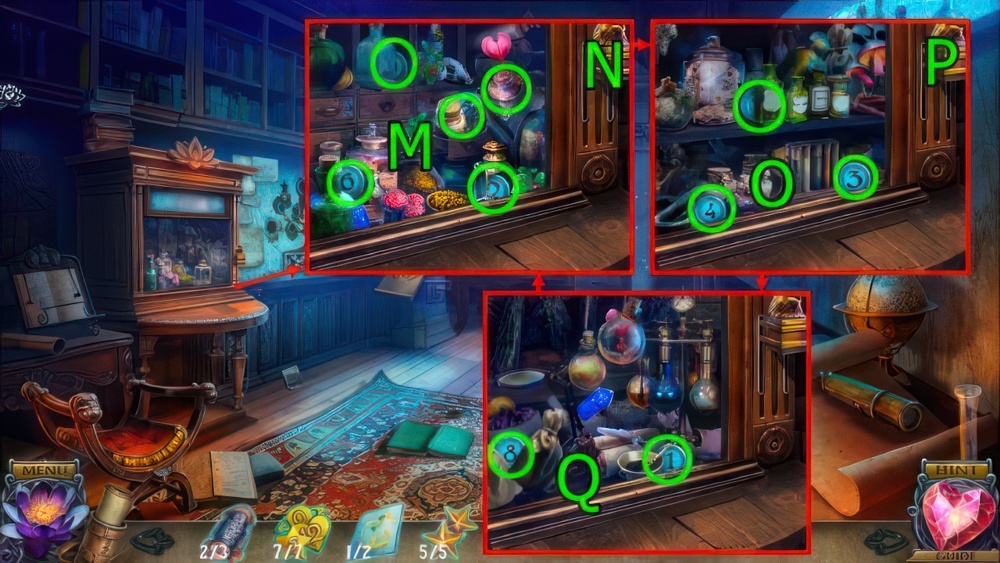
- Get ANCIENT SCROLLS (3/3) and BLUE TOKENS (4/9) (M), press (N).
- Get BLUE TOKENS (7/9) (O), press (P).
- Get BLUE TOKENS (9/9) (Q).
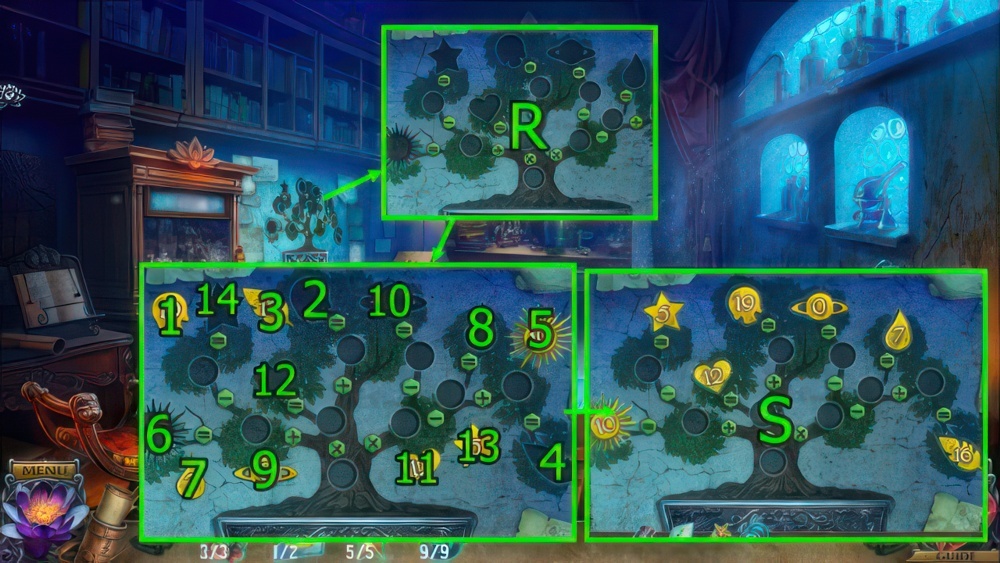
- Use GOLDEN TOKENS (7/7) on (R).
- Press (1-2)-(3-4)-(5-6)-(7-8)-(9-10)-(11-12)-(13-14).
- Use BLUE TOKENS (9/9) on (S).
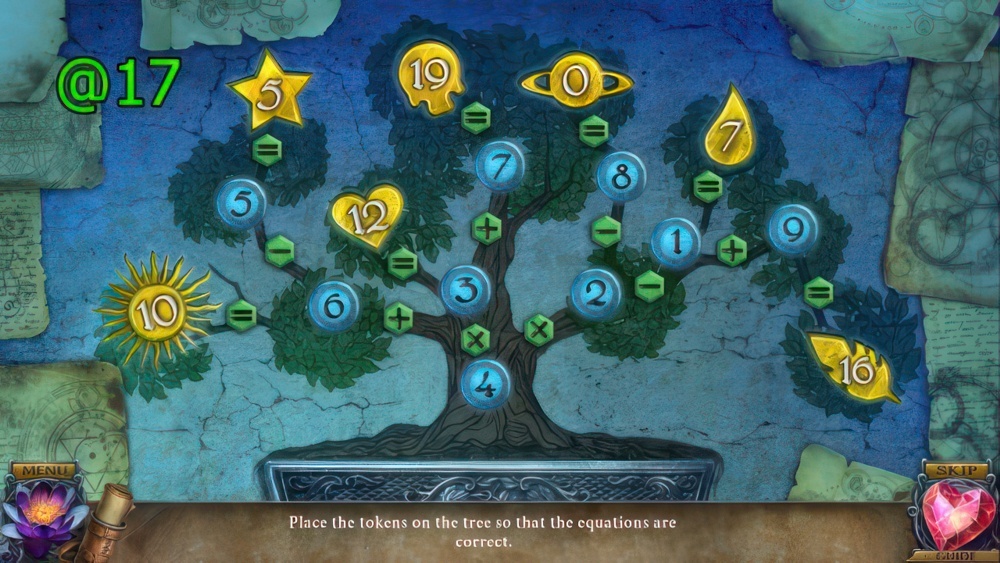
- Place the tokens on the tree so that the equations are correct.
- Solution (@17).
- Get ANTIDOTE.
- Go Corridor.
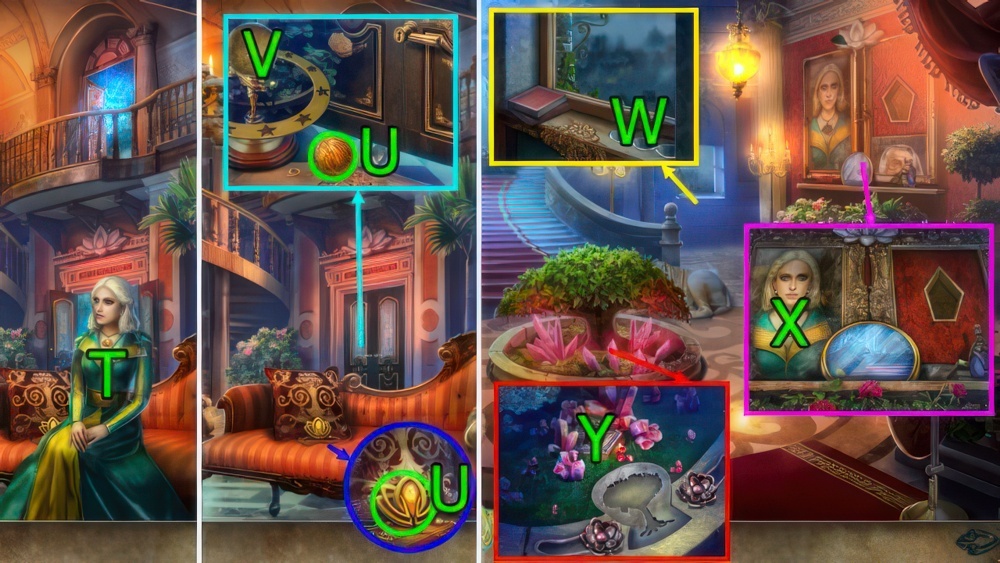
- Use ANTIDOTE on (T).
- Get COUNTESS’S MEDALLION and YARN (U).
- Use STARS 5/5 on (V), get GOLDEN MOON.
- Go CASTLE HALL.
- Use ANCIENT SCROLLS (3/3) on (W), get GLASS PLATE.
- Use COUNTESS’S MEDALLION on (X), get MEMORY CRYSTAL.
- Use MEMORY CRYSTAL on (Y), get NUTS.
- Go Corridor.

- Use NUTS on (Z), get LOCKPICK IN WEBS.
- Go Office.
- Use GOLDEN MOON on (A), get GLASS PLATE (2/2).
- GLASS PLATE (2/2) on GLASS PLATE.
- Press (1×1)-(3×3), get ANTIDOTE RECIPE.
- Use ANTIDOTE RECIPE on (B).
- Solve puzzle, get INGREDIENTS.
- Use YARN and INGREDIENTS and press (C).
- Use LOCKPICK IN WEBS on (C), get LOCKPICK, DEADLY DAGGER FIGURINE, and BLACK LOTUS.
- Go Corridor.
- Solve puzzle (D), get OCTAGONAL EMBLEM.
- Use LOCKPICK on (E).
- Go (F).
- Get CLOTH (1/5), CLOTH (2/5), BRONZE BIRD, and WINEGLASS (G).
- Get CLOTH (3/5) and SPOOL EMBLEM (H).
- Use SPOOL EMBLEM on (I), get SCISSORS.
- Use WINEGLASS on (J), get WATER.
- Use WATER on (K), get CATNIP and OCTAGONAL EMBLEM.
- Use CATNIP on (L), get CLOTH (4/5).
- Use OCTAGONAL EMBLEM and OCTAGONAL EMBLEM on (M), get COUNT’S MEMOIR.
- DEADLY DAGGER FIGURINE on COUNT’S MEMOIR.
- Solve puzzle, get STAR PINS.
- Use SCISSORS on (N), get CLOTH (5/5).
- Use CLOTH (5/5) on (O).
- Go (P).

- Press (Qx5), get GOLDEN BOOK EMBLEM.
- Get FEATHER and AWL (R).
- Press and use AWL on (S), get BRONZE BIRD.
- Use BRONZE BIRD and BRONZE BIRD on (T), get POPPY EMBLEM.
- Use POPPY EMBLEM on (U).
- Solve puzzle (V), get CONSTELLATION.
- Press and use SCISSORS, STAR PINS, and CONSTELLATION on (W).
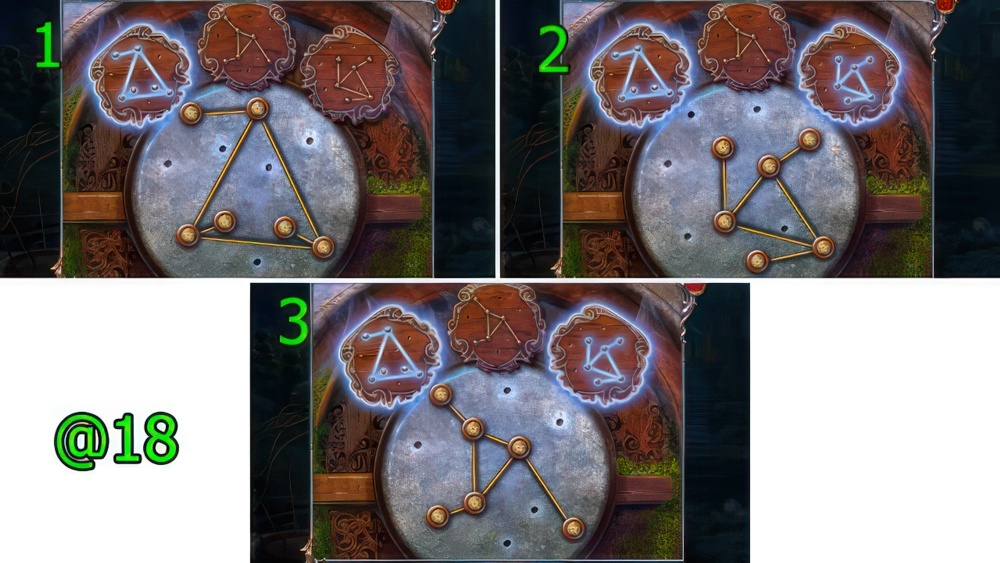
- Recreate the constellations one by one.
- Press a pin to pick it up or put it down.
- Solution (@18).
- Go (X).
- Get TORCH, LEATHER STRAP, and SILVER SPOON (Y).
- Go Bridge.
- Use LEATHER STRAP on (Z), get LONG HOOK.
- Use SCISSORS and LONG HOOK on (A), press (Bx2), get BUG SPRAY.
- Use SILVER SPOON on (B), get DIRT.
- Use BUG SPRAY on (C).
- Press (1-2-3-4-5-6), get DIRTY LOTUS and SCENTED OIL.
- Go Bedroom.
- Use TORCH on (D), get LIT TORCH.
- Use DIRTY LOTUS on (E), get PINK LOTUS EMBLEM.
- Use SCENTED OIL and press (F), get GLASS KEY (1/3).
- Go Old Observatory.
- Use LONG HOOK on (G), get ELEMENTAL NOTE and METAL LEGS.
- Use LIT TORCH on (H).
- Get CANDLE (I).
- Use CANDLE on (H), get LIT CANDLE.
- Press and use ELEMENTAL NOTE on (J).
- Use LIT CANDLE on (K).
- Use FEATHER on (L).
- Use WATER on (M).
- Use DIRT on (N).
- Get RECIPE BOOK.
- Use GOLDEN BOOK EMBLEM on (O), press (1×3-2×3).
- Use METAL LEGS and RECIPE BOOK on (O).
- Press (1×3)-(2×3), get GLASS KEY HANDLE and GLASS KEYS (2/3).
- Go Bridge.
- Use GLASS KEY HANDLE on (P), get GLASS KEYS (3/3).
- Use PINK LOTUS EMBLEM on (Q).
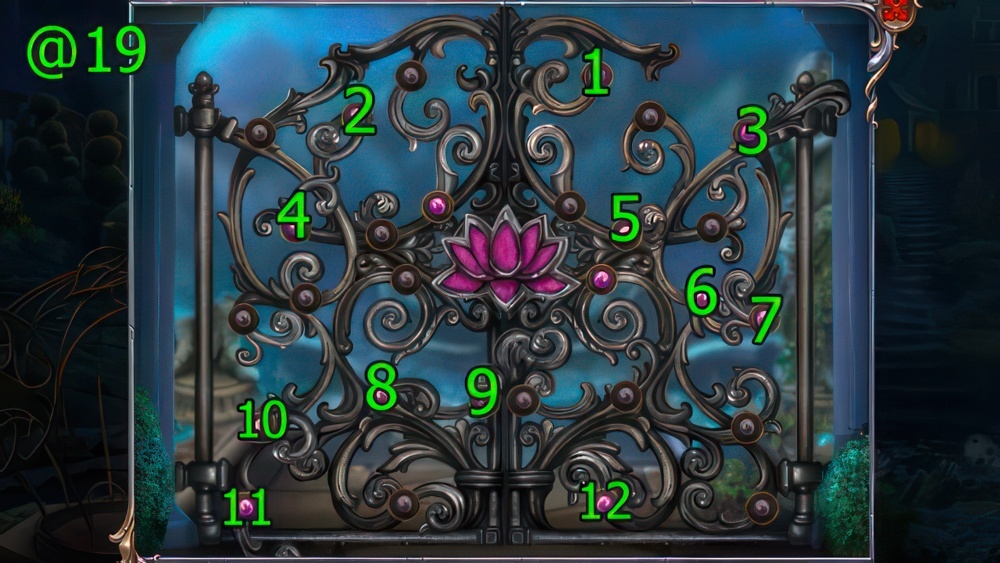
- Arrange the decorative elements so that both sides match.
- Press the pink buttons to move the elements.
- Solution (@19): Press (1×3)-(2×1)-(3×2)-(4×1)-(5×3)-(6×2).
- (7×1)-(8×2)-(9×1)-(10×2)-(11×1)-(12×3).
- Go (R).
- Get OLD SWORD (S).
- Use OLD SWORD on (T), get FACE PLAQUE.
- Go Bridge.
- Solve puzzle (U), get SKULL PLAQUE.
- Go Old Observatory.
- Use OLD SWORD, FACE PLAQUE, and SKULL PLAQUE on (V), get COUNT’S GOLDEN ORB.
- GLASS KEYS (3/3) and BLACK LOTUS on COUNT’S GOLDEN ORB, get WHITE LOTUS.
- Go Lotus Pond.
- Use WHITE LOTUS on (W).

- Move all the lotuses to the empty slots.
- Press an adjacent available tile to move there.
- Solution (@20).
- Walkthrough Bonus Chapter, at the link below.


