Lost Lands 7: Redemption (Bonus Chapter) – Susan meets Maaron, who has another mission for her, this time somewhere on earth where an ancient artifact was found. This artifact of an ancient god that was buried in the Lost Lands while his heart was sent elsewhere to ensure that he would never regain his destructive power. Now Susan must find the heart and make sure it doesn’t fall into the wrong hands or it could be a disaster for all worlds. The journey picks up where you left off as Susan, Jimmy and Maaron return there to find Maaron the Impaler, who was abandoned during the main game.
Bonus Chapter Walkthrough
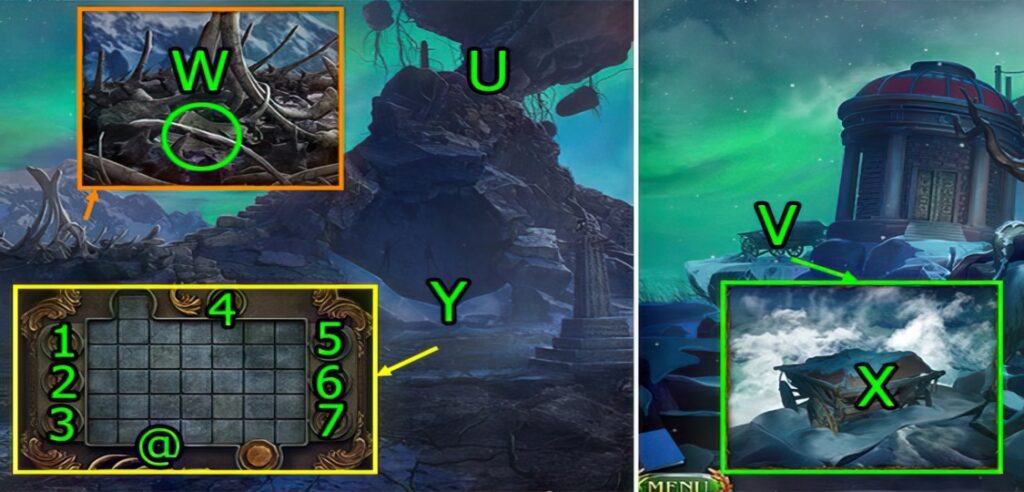
- Go (U).
- Go (V).
- Go Dragon’s Tooth Rock.
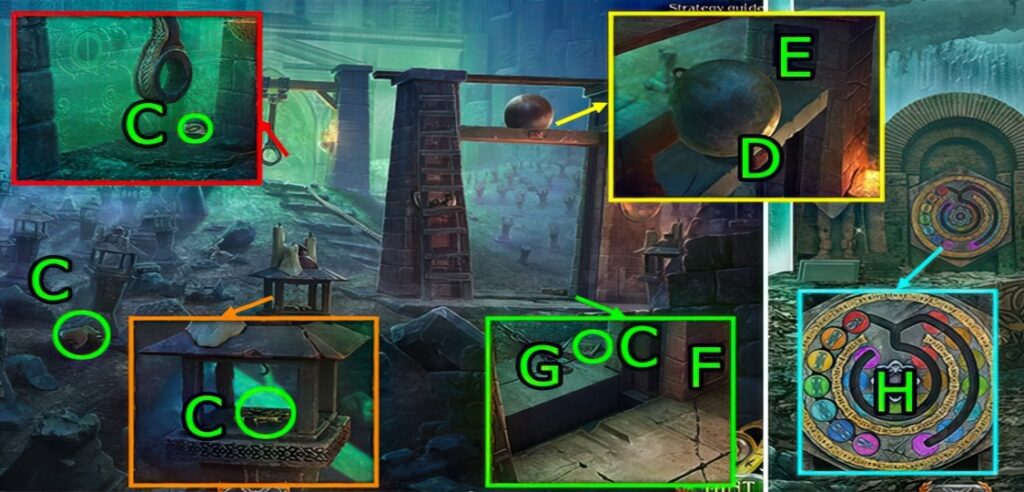
- Get WHALE RIB (W).
- Go Dead Garden.
- Use WHALE RIB on (X).
- Go Dragon’s Tooth Rock.
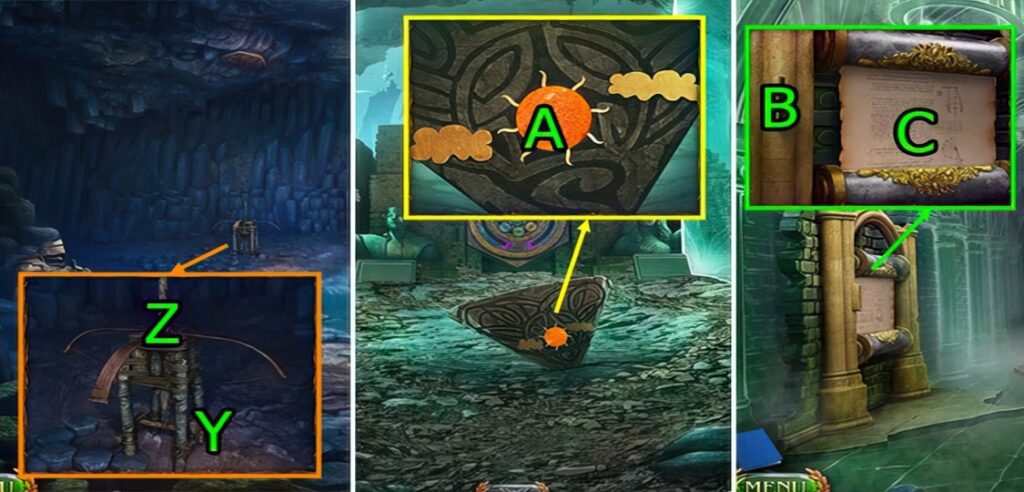
- Solve puzzle (Y).
- Puzzle Solution (@): press (7-6-1-4-2-3-5).

- Get FRAME, STONE PANEL (Z).
- Press (A), get HINT.
- Use HINT on (B), press (Bx1)-(Cx2)-(Dx3).
- Get STONE PANEL and DWARF GAUNTLET (E).
- Use STONE PANEL and STONE PANEL on (F).
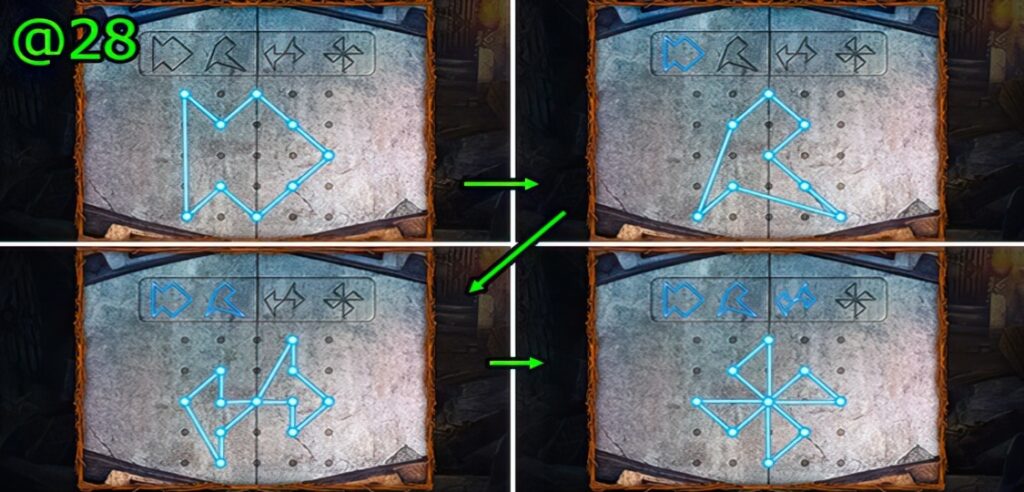
- Solution (@28).
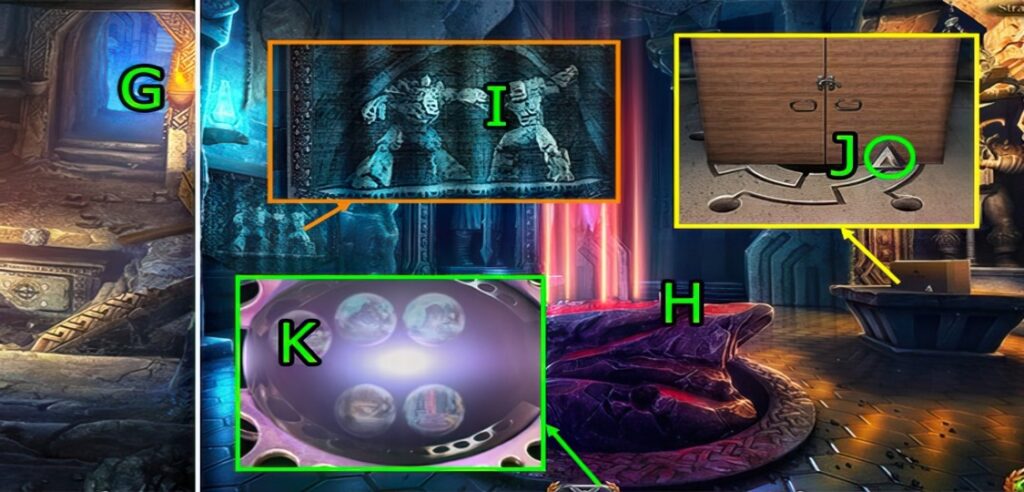
- Go (G).
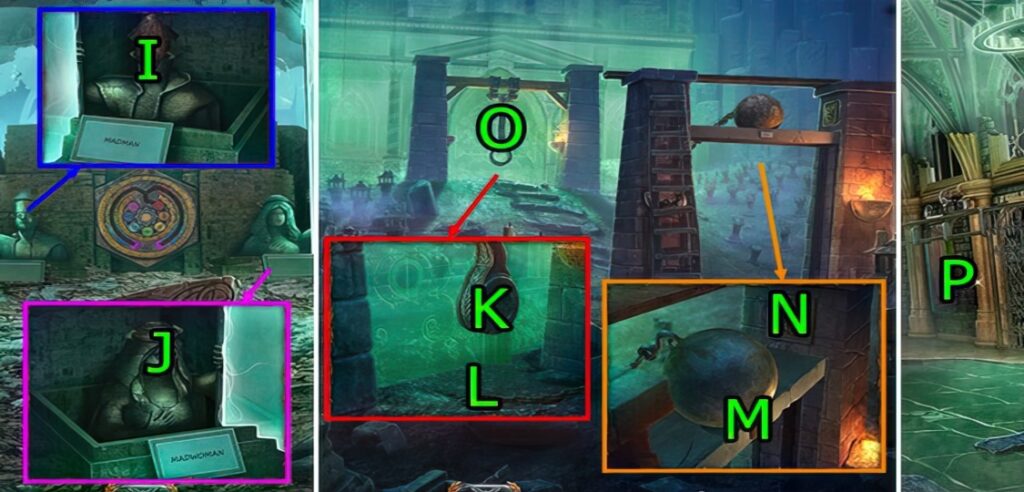
- Press (H).
- Press (Ix2), get SPACE IMPALER.
- Get TRIANGULAR ELEMENT (J).
- Use TRIANGULAR ELEMENT on (H).
- Use SPACE IMPALER, press (K).
- Go Down.
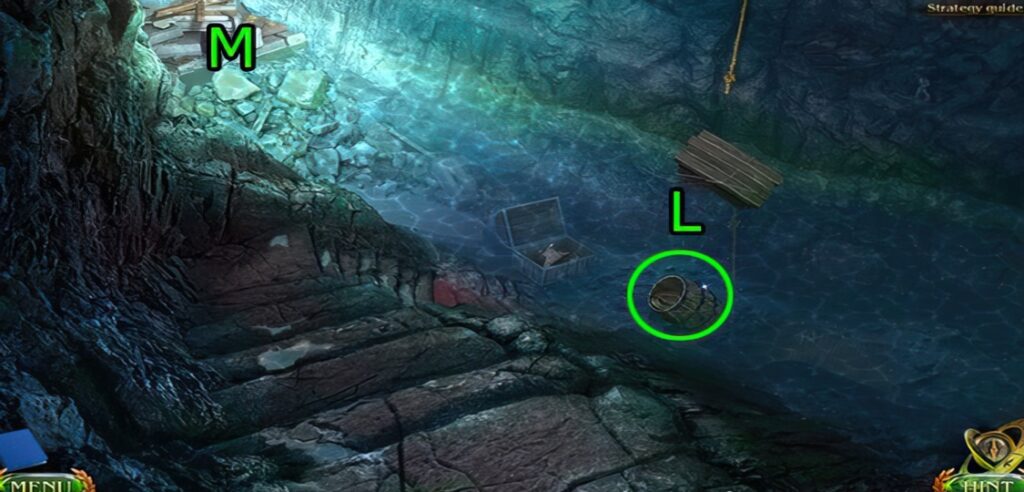
- Get BROKEN BARREL (L).
- Go (M).

- Solution (@30): Press (1-2)-(3-4)-(5-1)-(6-3)-(7-3), (8-9)-(10-11)-(8-10)-(9-12)-(8-9)-(10-13)-(14-15)-(15-16), (17-18)-(19-20)-(21-22)-(19-18)-(23-24), (25-26)-(25-27)-(28-29)-(26-30)-(28-31)-(29-32)-(26-33)-(27-32)-(26-34)-(26-34)-(29-35).

- Continued solution (@30): (36-37)-(38-39)-(40-41)-(42-43)-(42-44)-(42-45)-(46-47)-(48-49), (50-51)-(52-51)-(53-54)-(52-55)-(56-57)-(57-58)-(55-59)-(60-61), (62-63)-(64-65)-(62-66)-(65-67)-(68-69).
- Get RIM, POLE, and THE SPEARHEAD.

- Press (N), get WINESKIN.
- Go Up.
- Use THE SPEARHEAD on (O), get ROPE.
- Use THE SPEARHEAD on (P), get MOSS.
- RIM, MOSS, and THE SPEARHEAD on BROKEN BARREL, get BARREL.
- ROPE on WINESKIN, get FLOATS.
- Use SPACE IMPALER, press (Q).
- Use BARREL, FLOATS, and POLE on (R).
- Go (S).
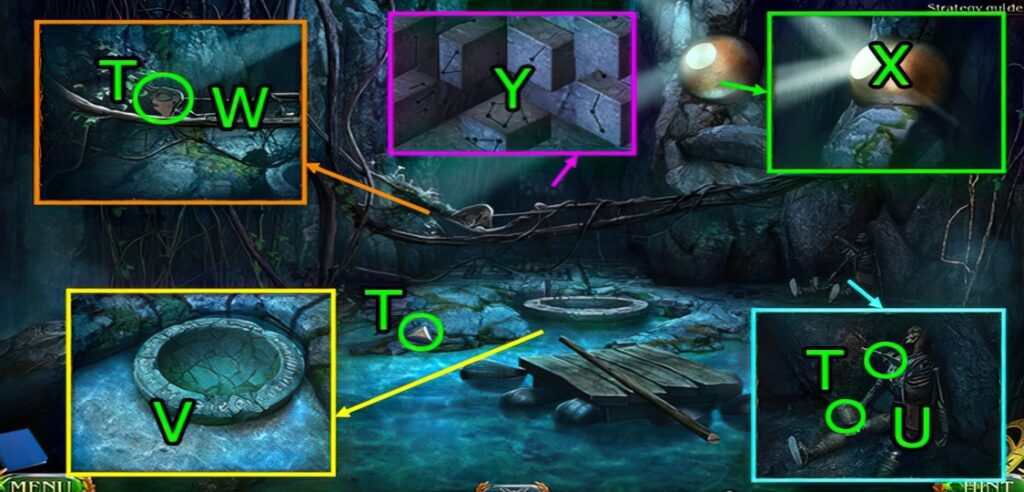
- Get TRIANGULAR ELEMENT, RIGHT EYE, MACHETE, and CUP (T).
- Press (Ux2), get CONSTELLATIONS, press (U).
- Use CUP on (V).
- Use MACHETE on (W).
- Press (X).
- Use CONSTELLATIONS on (Y).
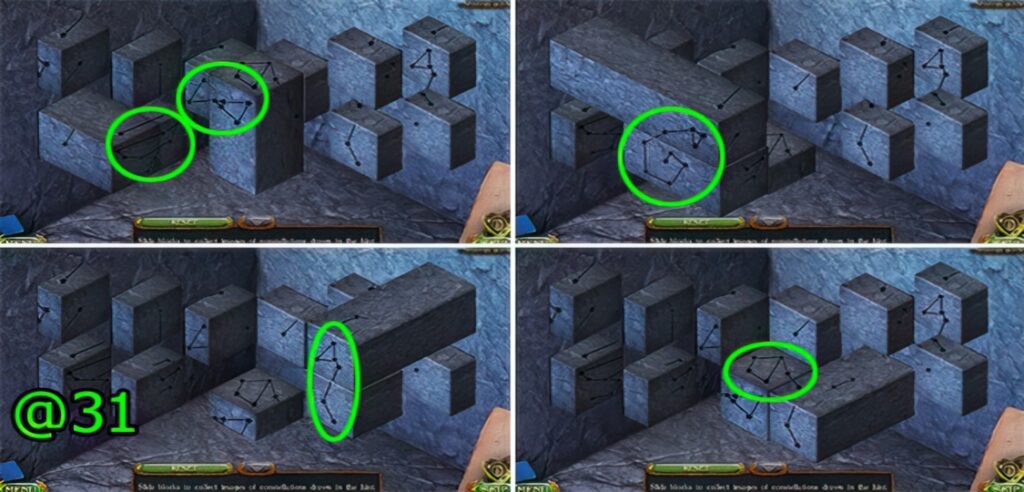
- Solution (@31).

- Continued solution (@31).
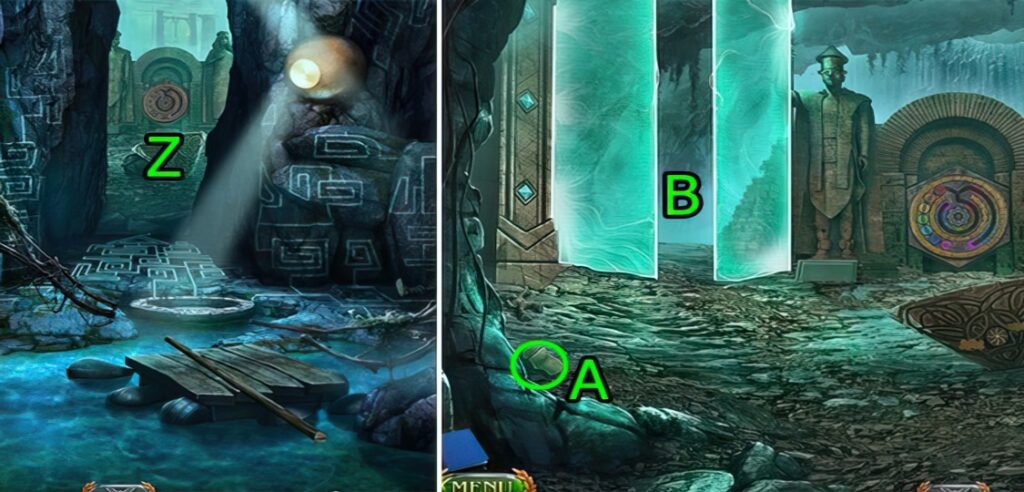
- Go (Z).
- Get LIPS (A).
- Go (B).
- Get EYES, CENTRAL ELEMENT, LEFT EYE, and BUTTON (C).
- Press (D), use BUTTON and press (E).
- Press (F) and (G).
- Press (E).
- Go Down.
- Use CENTRAL ELEMENT on (H).
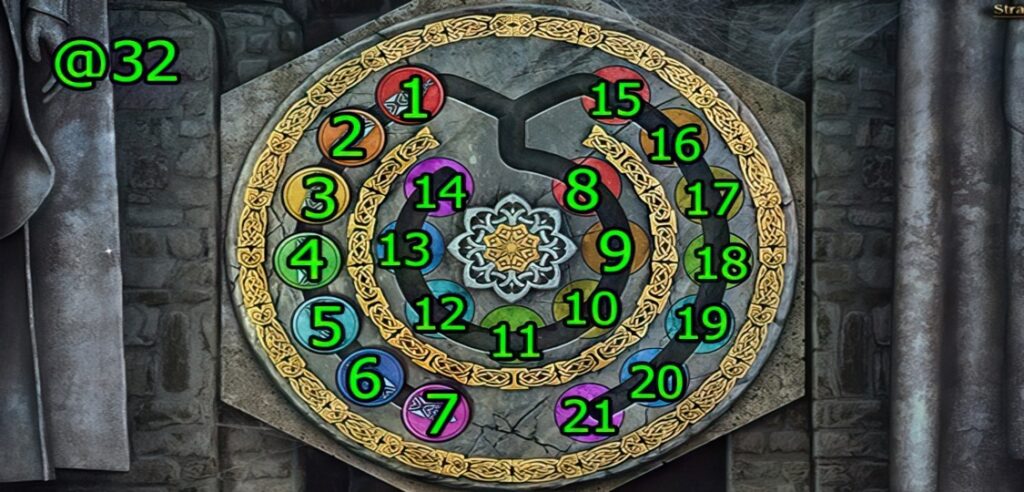
- Solution (@32): Press (1-8-2-16-8-15-3-10-15-8)-(16-2-8-15-2-9-15-8-4-18).
- (8-15-9-2-15-1-10-17-1-8-2)-(16-8-15-5-12-15-1-16-9-1).
- (8-17-3-8-1-9-16-1-8)-(16-2-8-1-18-11-1-8-2-16-8).
- (1-16-9-1-15-9-2-15-8-2)-(16-8-15-3-10-15-1-16-9).

- (@32a) (1-8-6-20-8-1-9-16-1-15-10)-(3-15-8-16-2-8-1-11-18-1).
- (8-2-16-8-15-3-10-15-1-16)-(9-1-8-18-4-8-15-9-2-15).
- (1-10-17-1-8-2-16-8-1-16)-(9-1-8-17-3-8-15-9-2-15).
- (1-12-19-1-15-2-9-15-8-3)-(17-8-15-9-2-15-1-17).
- (10-1-15-2-9-15-8-4-18-8-15).
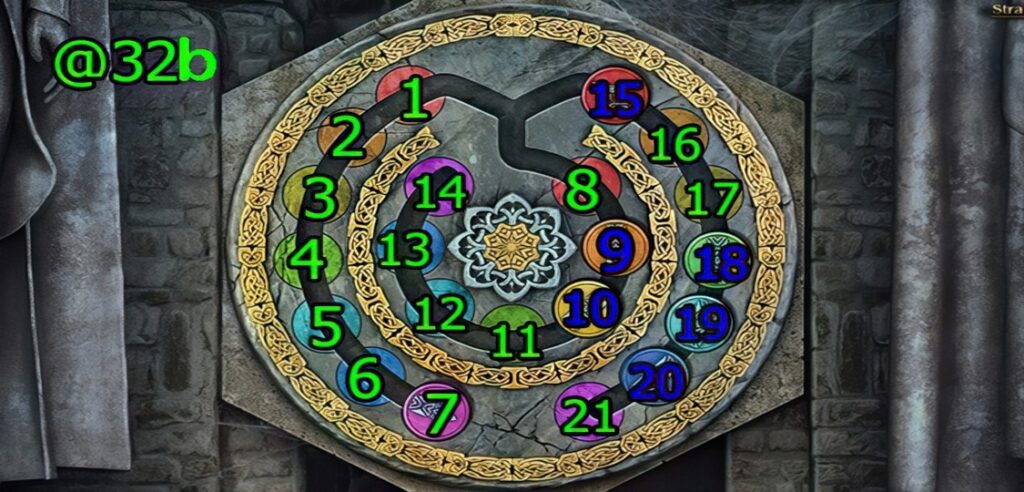
- (@32b) (9-2-15-1-10-17-1-8-2)-(16-8-15-7-14-15-8-16-2-8).
- (1-17-10-1-8-2-16-8-15-10)-(3-15-8-16-2-8-1-18-11-1).
- (8-2-16-8-15-3-10-15-1-16)-(9-1-8-19-5-8-1-9-16-1).
- (15-10-3-15-1-16-9-1-8-3)-(17-8-1-9-16-1-15-11-4-15).
- (1-16-9-1-8-17-3-8-15-9-2).
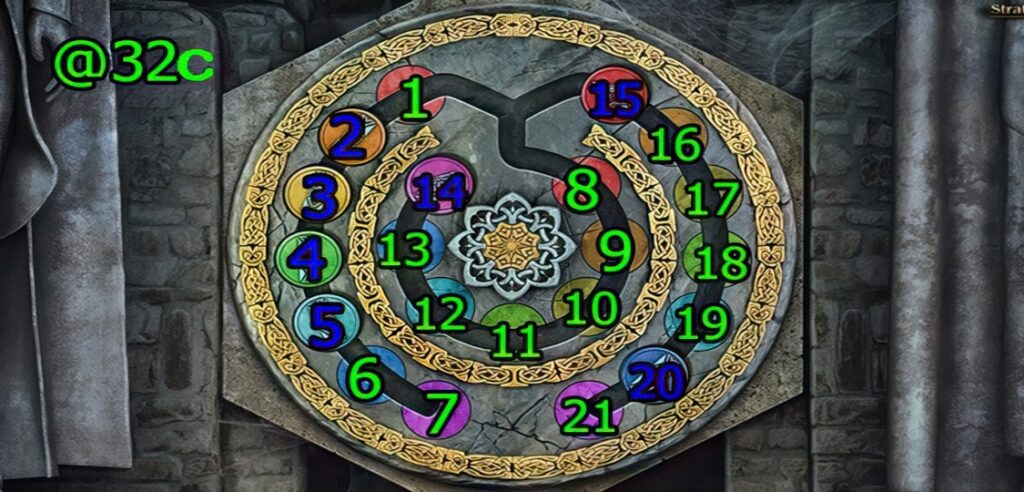
- (@32c) (15-1-20-13-1-8)-(2-16-8-15-3-10-15-1-16-9).
- (1-8-4-18-8-1-9-16-1-8)-(16-2-8-1-10-17-1-8-2-16).
- (8-15-5-12-15-1-16-9-1-8)-(17-3-8-15-9-2-15-1-18-11).
- (1-8-2-16-8-15-3-10-15-1)-(16-9-1-8).
- Use RIGHT EYE and LEFT EYE on (I), get THE CAP OF A MADMAN.
- Use EYES and LIPS on (J), get THE CAP OF A MADWOMAN.
- Go Chapels.
- Use THE CAP OF A MADMAN and THE CAP OF A MADWOMAN on (K).
- Press (L).
- Press (M).
- Press (N).
- Go (O).
- Go (P).
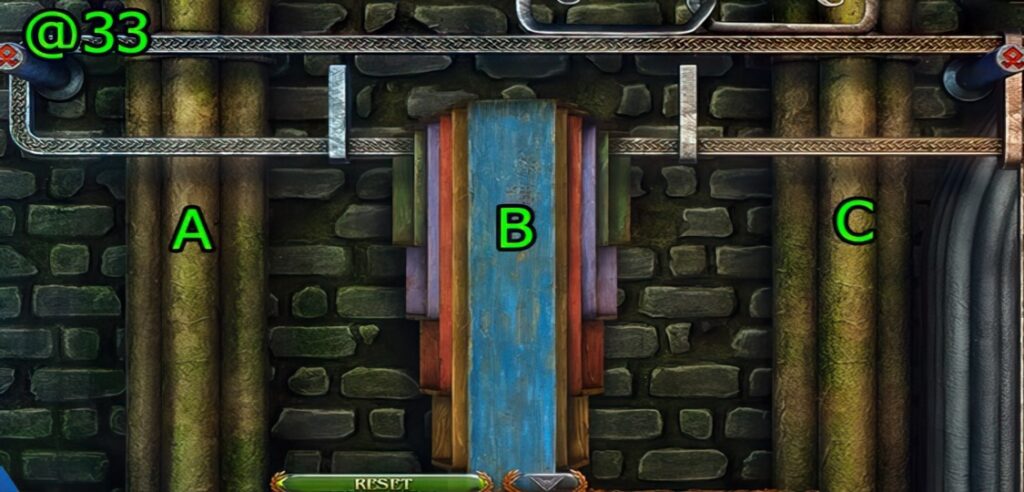
- Solution (@33): Press (B-A-B-C-A-C-B-A-C-A)-(C-B-A-C-B-A-C-A-B-C)-(A-C-A-B-C-A-B-C-A-C)-(A-B-C-A-C-B-A-C-B-A)-(C-A-B-C-A-C-A-B-C-A)-(B-C-A-C-B-A-C-A-C-B)-(A-C-B-A-C-A-C-B-A-C)-(A-B-C-A-B-C-A-C-B-A)-(C-A-C-B-A-C-B-A-C-A)-(C-B-A-C-A-B-C-A-B-C).
- (A-C-A-B-C-A-C-B-A-C)-(B-A-C-A-B-C-A-C-A-B)-(C-A-B-C-A-C-B-A-C-A)-(C-B-A-C-B-A-C-A-C-B)-(A-C-A-B-C-A-B-C-A-C)-(B-A-C-A-C-B-A-C-B-A-C-A).
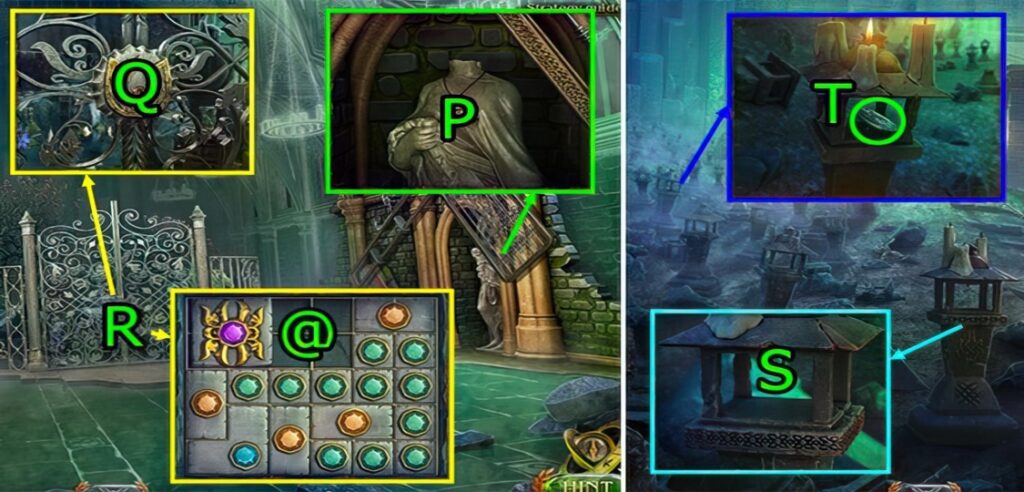
- Press (Px2), get KEY.
- Use KEY on (Q).
- Solve puzzle (R).
- Puzzle solution (@): arrange tiles as shown.
- Get BELL.
- Go Down.
- Use BELL on (S).
- Get MOON (T).
- Go Down.

- Use MOON and press (U).
- Go (V).
- Get CRUMPLED HINT (W).
- Use CRUMPLED HINT and press (Xx9).
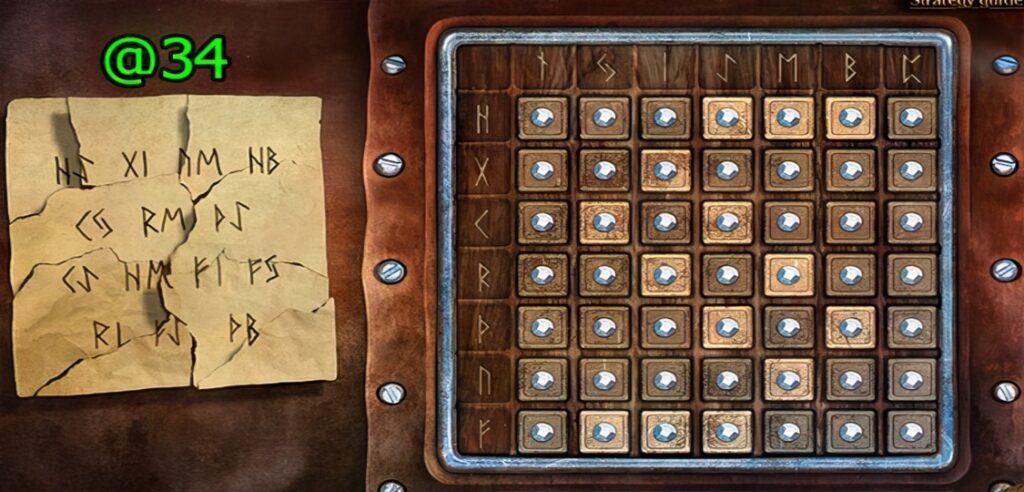
- Solution (@34).
- Get HANDLE.
- Use HANDLE and press (Yx2), get BROKEN SPEAR.
- THE SPEARHEAD and MACHETE on BROKEN SPEAR, get SPEAR.
- Use SPEAR on (Z), press (Yx2), get YELLOW PLATE.
- Go Down.
- Use DWARF GAUNTLET on (A).
- Go Ghost Palace.
- Use YELLOW PLATE on (B) and press (C).
- Go Dead Garden.

- Get URI’S BODY (D).
- Use SPACE IMPALER, press (E), get FRAME.
- Use TRIANGULAR ELEMENT on (F).
- Press (G), get BUTTON.
- Use SPACE IMPALER, press (H).

- Use BUTTON on (I).
- Use MACHETE on (J), get LOCK OF YUDNAR’S HAIR.
- Go Reincarnation Waterfall.
- Use LOCK OF YUDNAR’S HAIR on (K), use URI’S BODY on (L).
- Go Gates of the City of Souls.
- Use FRAME and FRAME on (M).
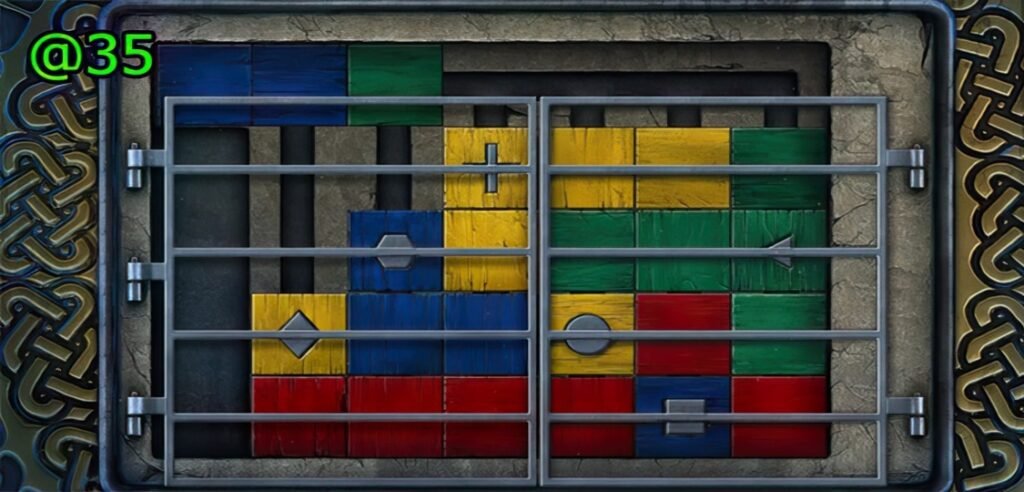
- Solution (@35).

- Go (N).
- Get JARS WITH POWDERS (O).
- Use SPACE IMPALER, press (P).
- Press and use JARS WITH POWDERS on (Q).
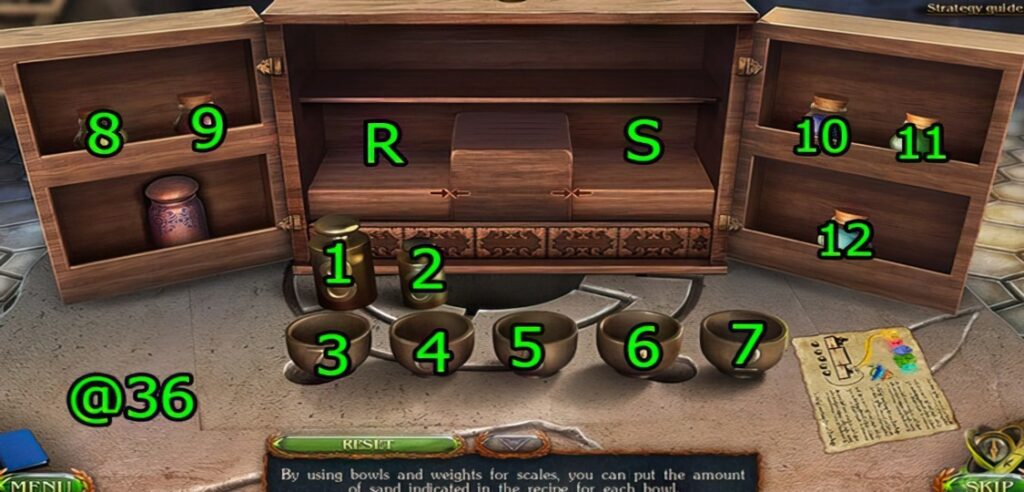
- Solution (@36): Press (1-R)-(2-S)-(5-S)-(10-S), clear, press (2-R)-(7-R)-(5-S)-(8-R), clear, press (5-R)-(7-R)-(3-S)-(12-S), clear, press (3-R)-(2-S)-(6-S)-(9-S), clear, press (4-R)-(6-S)-(7-S)-(11-R).
- Get BLINDING POWDER.
- Go Secret Room.
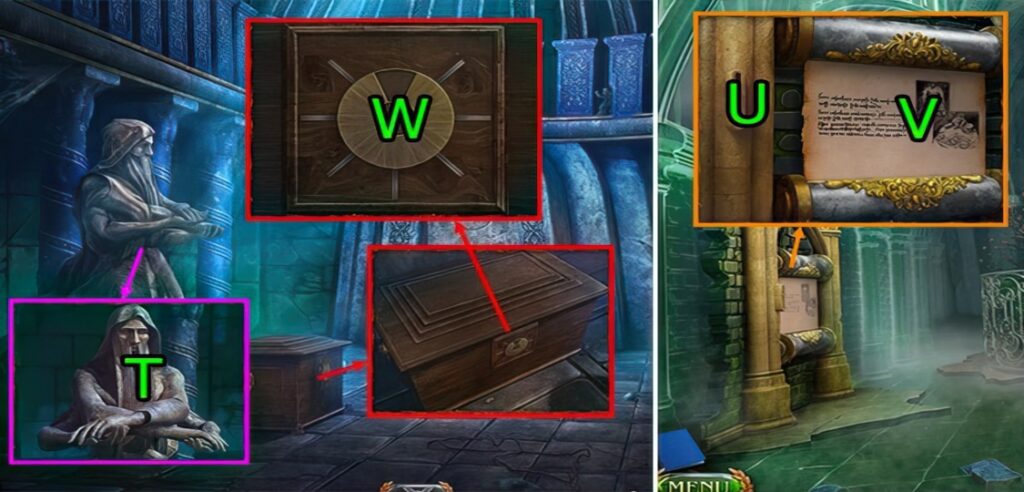
- Use BLINDING POWDER on (T), get RED PLATE and KEY TO THE CHEST.
- Go Ghost Palace.
- Use RED PLATE on (U) and press (V).
- Go Secret Room.
- Use KEY TO THE CHEST on (W).
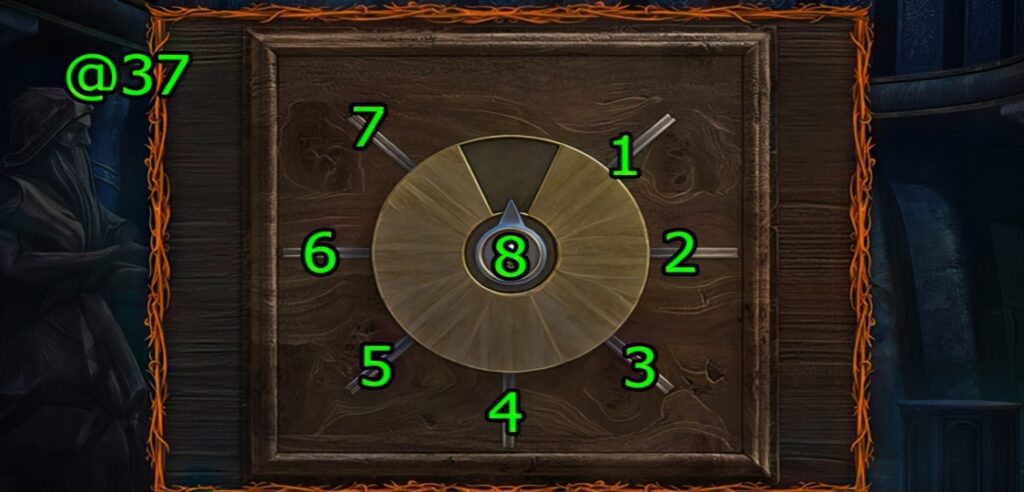
- Solution (@37): Rotate (8)-(3-1-5-4-7-2-6).
- Get BLUE PLATE and TRIANGULAR ELEMENT.
- Go Ghost Palace.
- Use BLUE PLATE on (X) and press (Y).
- Go Buldan’s Temple.
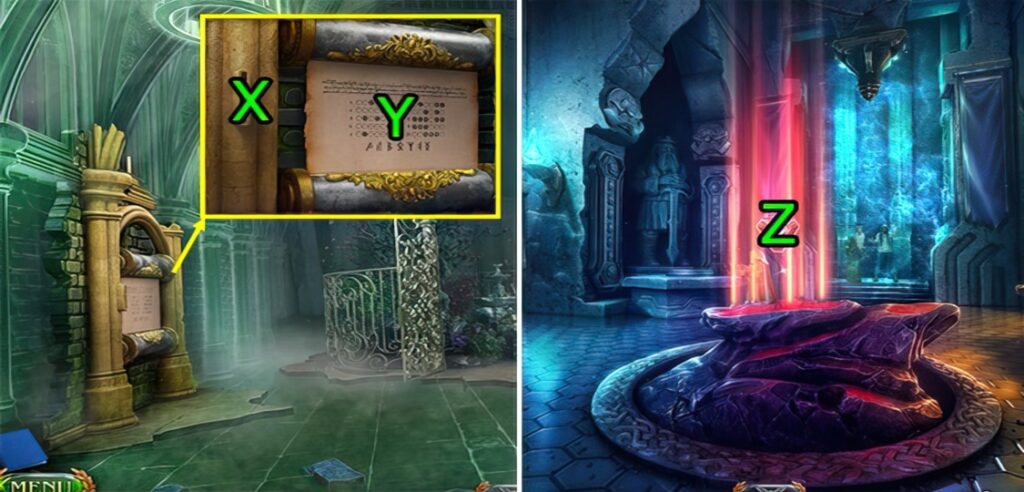
- Use TRIANGULAR ELEMENT on (Z), get THREE-SIDED KEY.
- Go Secret Room.
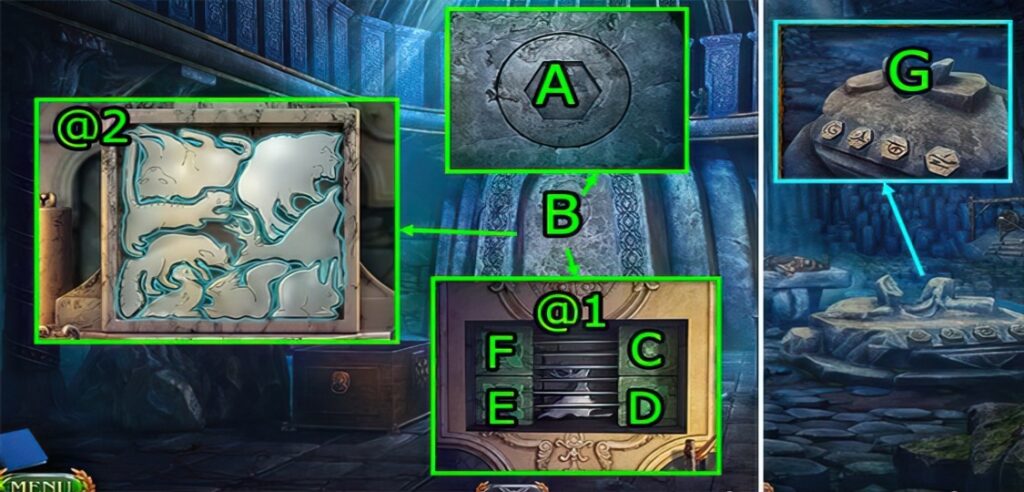
- Use THREE-SIDED KEY on (A).
- Solve puzzle (B).
- Puzzle Solution (@1): press (E-C-F-D).
- Puzzle Solution (@2).
- Get HORN OF THE ELEMENTS.
- Go Reincarnation Waterfall.
- Use HORN OF THE ELEMENTS on (G).

- Solution (@38): Press (3-2-4-1-2-4-1).

- Go (H).
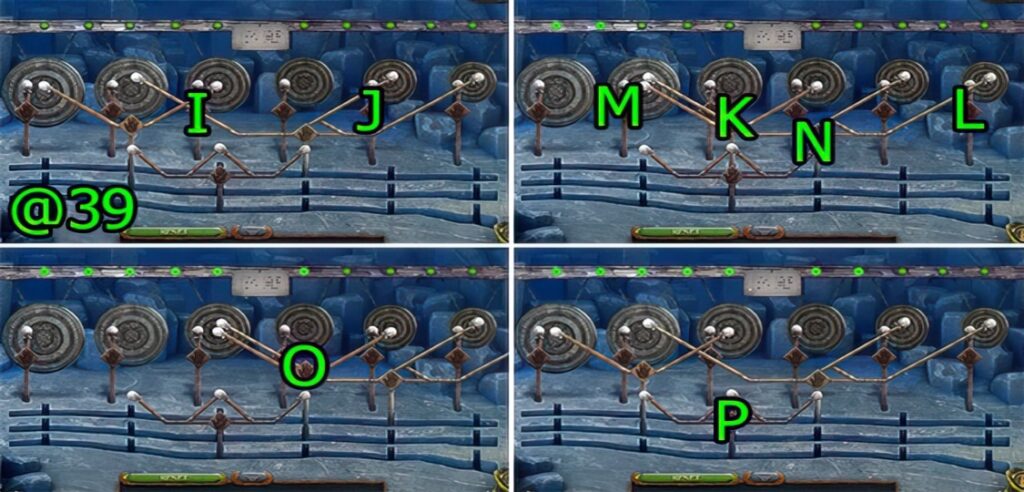
- Solution (@39): Press (I-J-K-L-M)-(N-O-P)
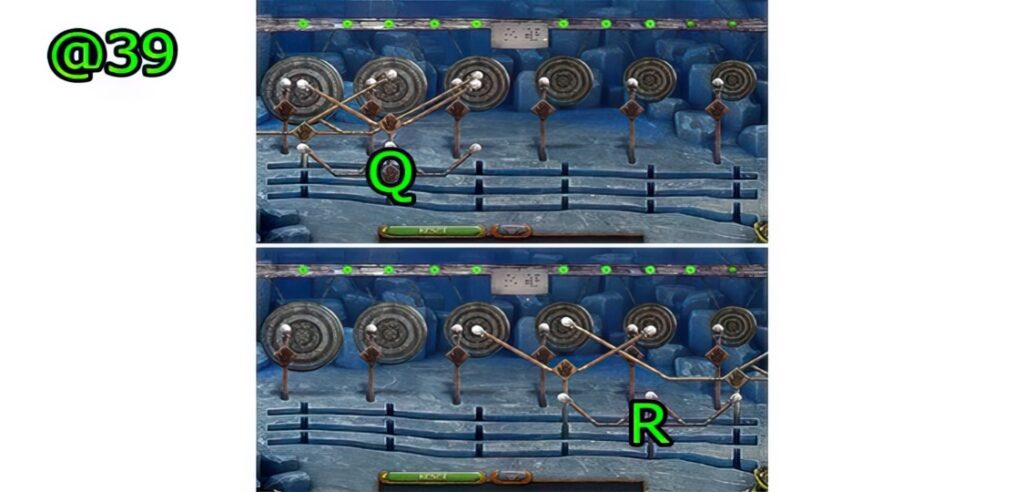
- Continued solution (@39): Press (Q-R).

- Press (S).
Congratulations! You have completed the game Lost Lands 7: Redemption.


That color door game is truly the worst minigame in this entire series. And then they somehow made a worse one right after with the weird wooden bar flag thing. I honestly just deleted the app, the bonus chapter is not worth the headache of these two awful games. Thank you anyway for the walkthrough.