Lost Lands 5: Ice Spell – Adventure game with a fantasy world, go through a fascinating story with the search for items and solving puzzles. The main character Susan is involved in the complex problems of another world. Snow, Ice and deadly wind blowing from the Ice Mountains! This is the Lost Lands that Susan has never seen before, and only her blazing heart could stand against misfortune. The cold has come to the Lost Lands with an icy spell in the middle of summer. People hid inside, trying to warm their homes. All living things are frozen, all the flowers are gone, the crops are dead, and the birds are running for their lives. The old people say, “The spirit of the Ice Mountains has awakened” But no one expects the cause to be dug deep into the ancient history of the Lost Lands when the world was young. Yet an ancient power has been awakened by ordinary people from our world. The Wizard Maaron has summoned the only link between the two worlds, Susan. Dress warmly because it will be cold during the passage. Explore in Lost Lands 5: Ice Spell, more than 40 exciting locations, pass more than 40 different puzzles, and look for items in the most unexpected places.
Lost Lands 5: Ice Spell – Walkthrough
Here you can see the full walkthrough for Lost Lands 5: Ice Spell, including the main story and bonus chapter.
Where am I
I’ve just travelled through a portal – and it wasn’t my idea. I must figure out who’s responsible for this.

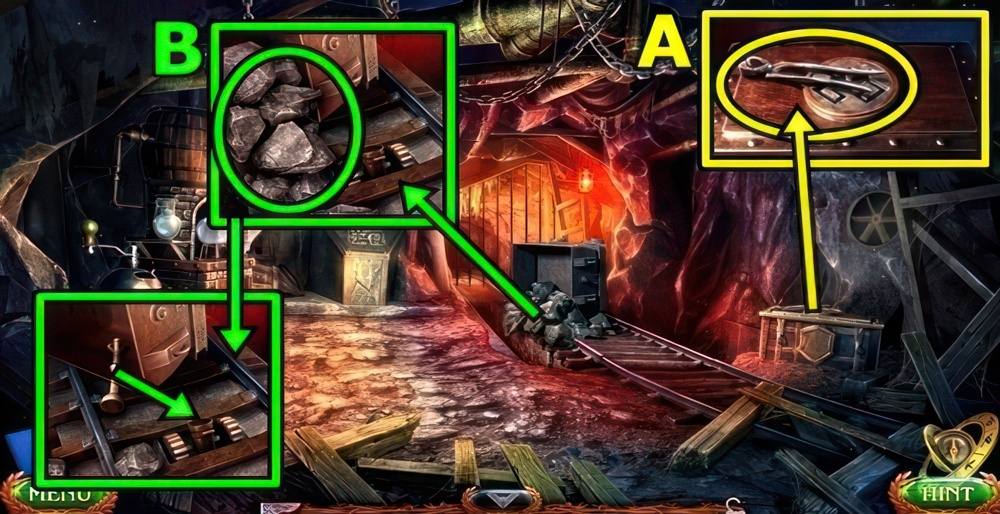
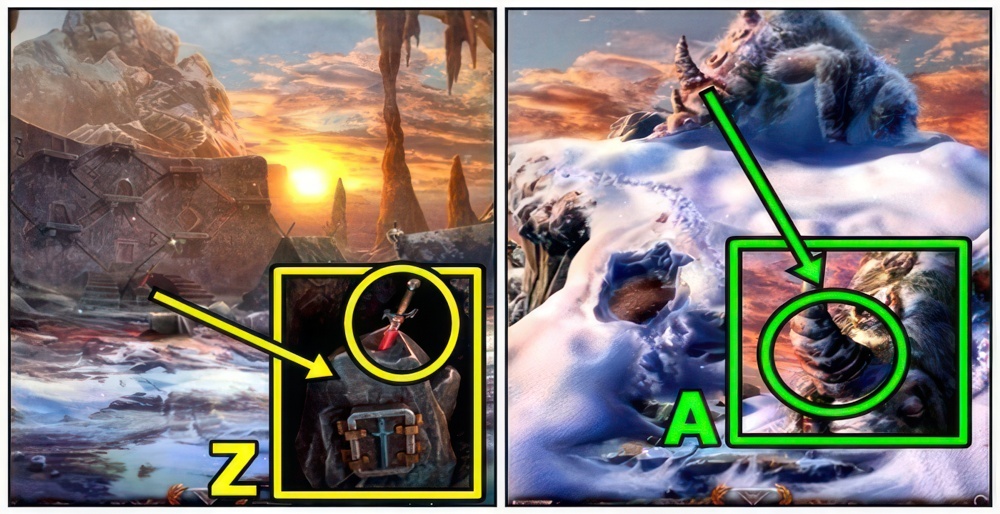
- Take SHARP STONE (A).

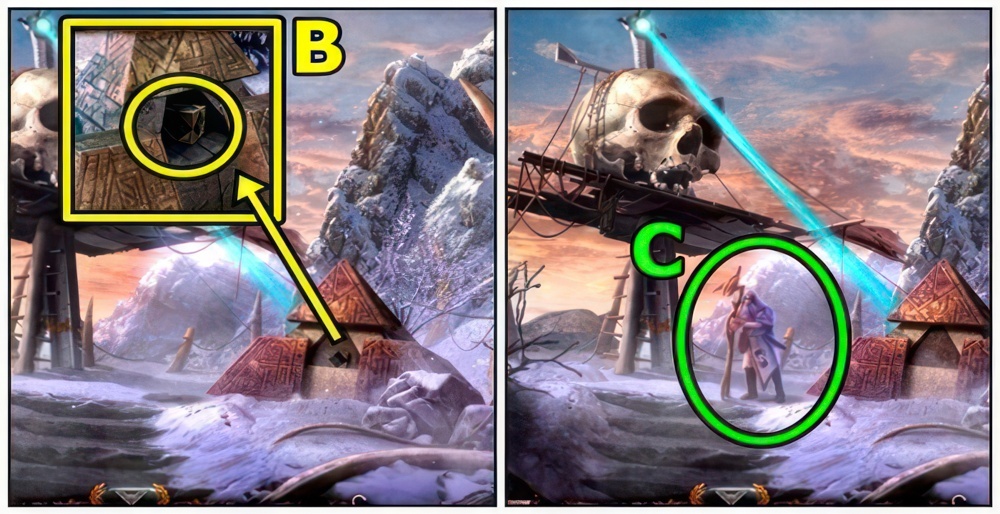
- Use SHARP STONE (B), open bag.
- Read note, take KEY TO MAARON’S HUT, bearskin cape and SHOVEL.
Meeting at the hut
Maaron left me everything I need to reach his hut. I need to get there and meet with him.
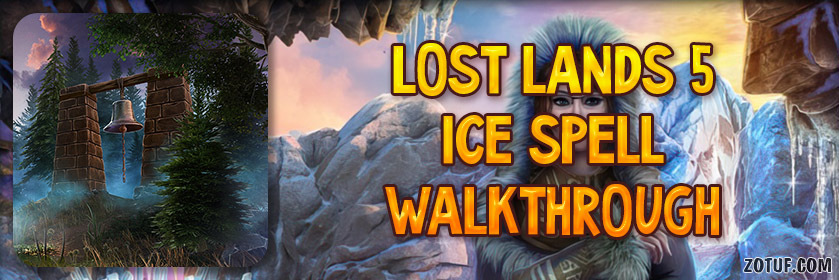
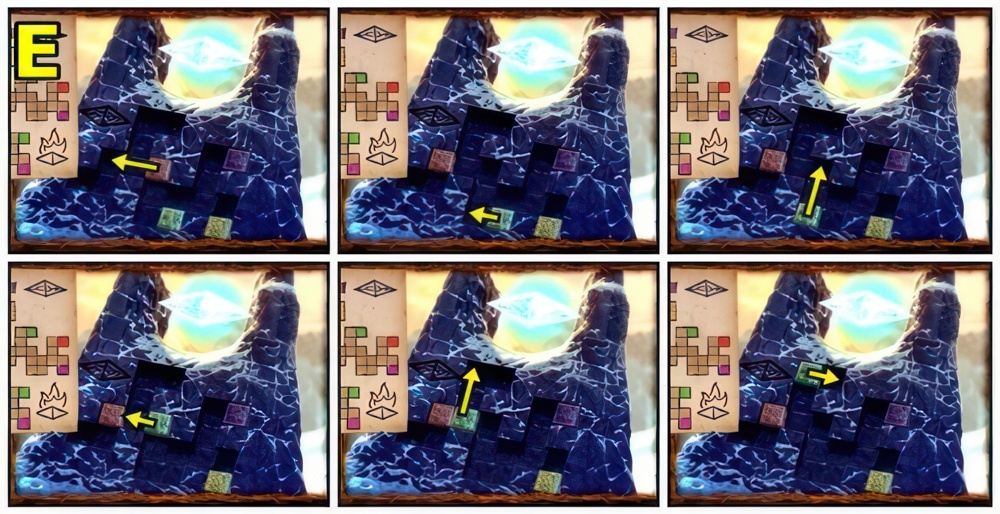
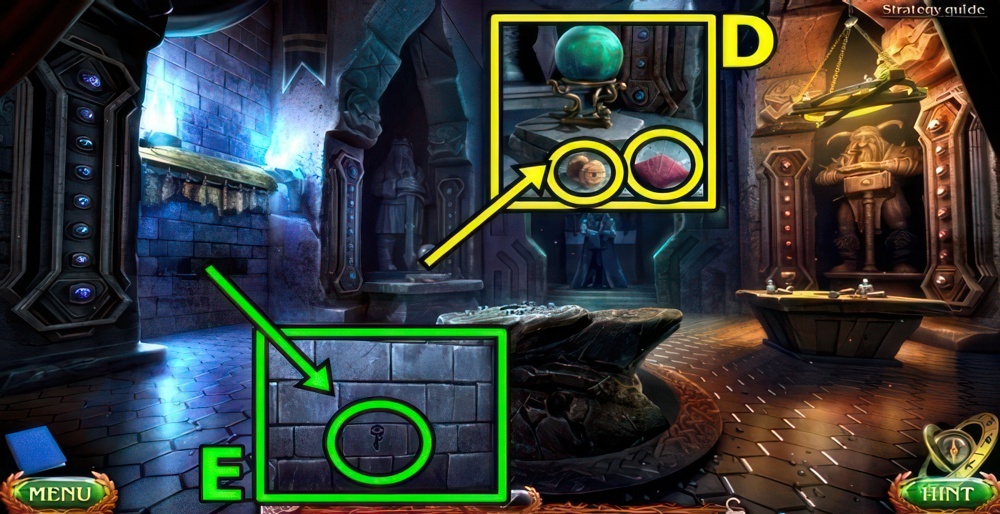
- Use SHOVEL (C).

- Shovel the snow into the pit.
- When you click on an empty cell, adjacent snow heaps move one square away from it.
- If a heap is pressed against the field borders, it can’t be removed, and you will have to restart.
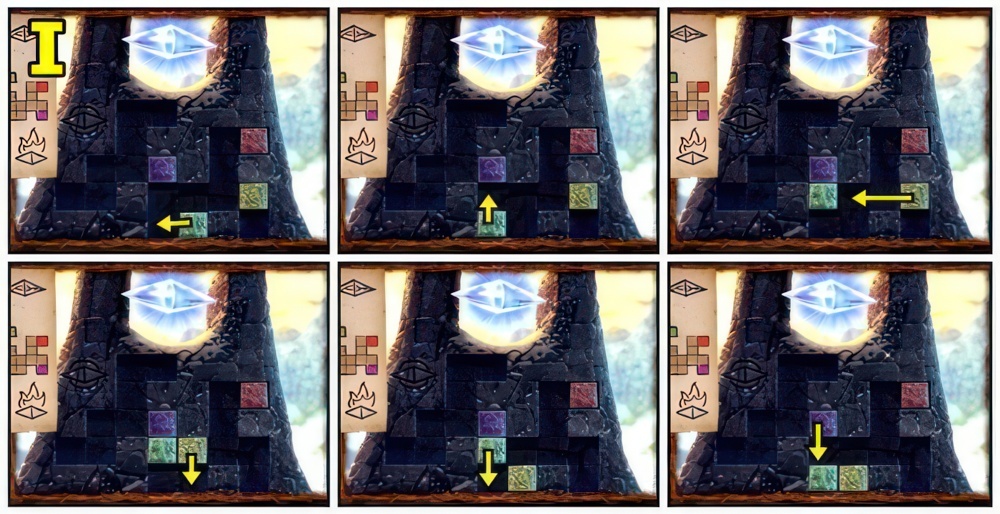
- Walkthrough: (D).

- Walkthrough: (E).
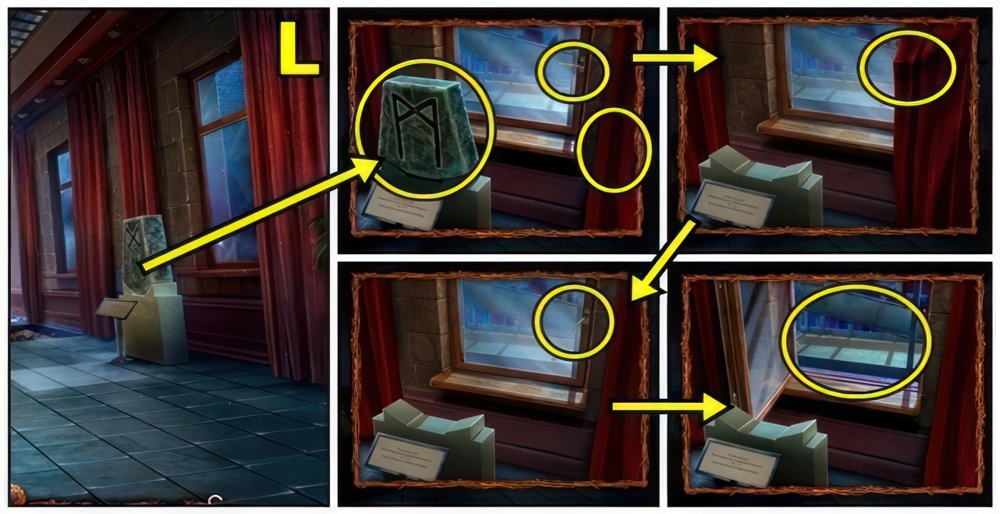
Rune stone
I found a shard of a rune stone on the table in the hut. I need to look for the rest of the shards and restore the stone to use it on a dolmen which will transport me to the Stronghold.
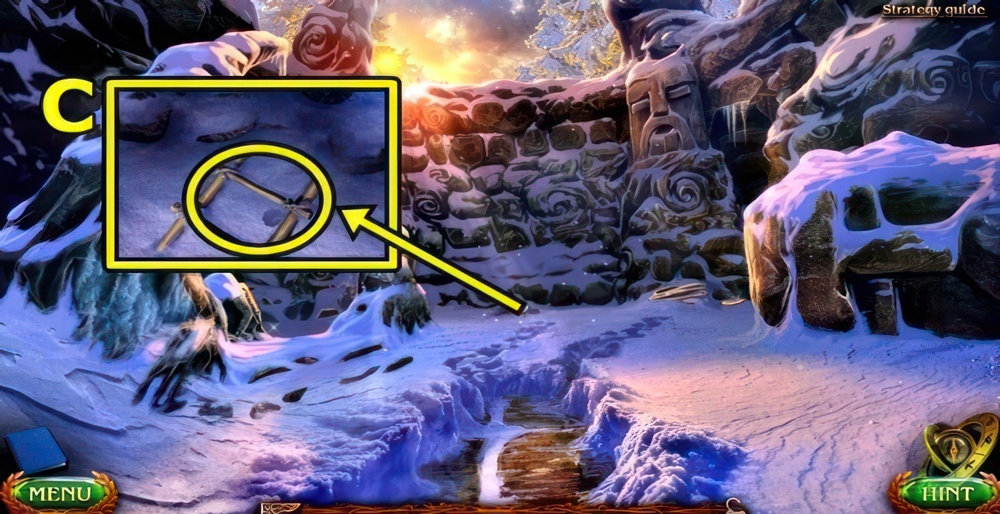
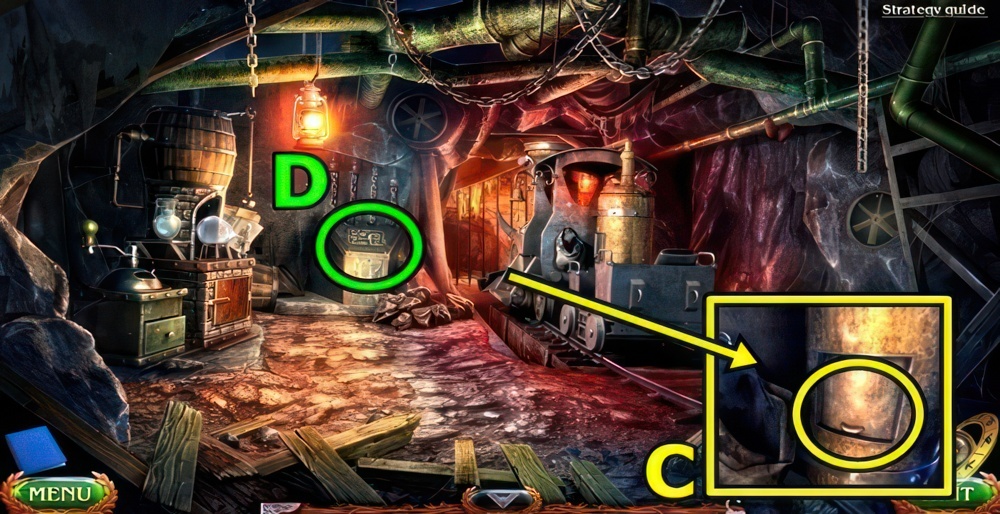
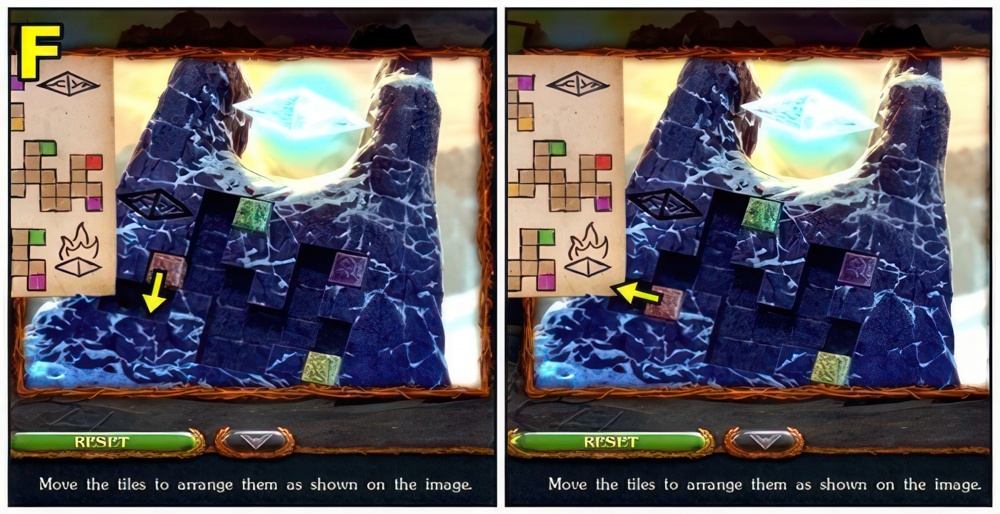
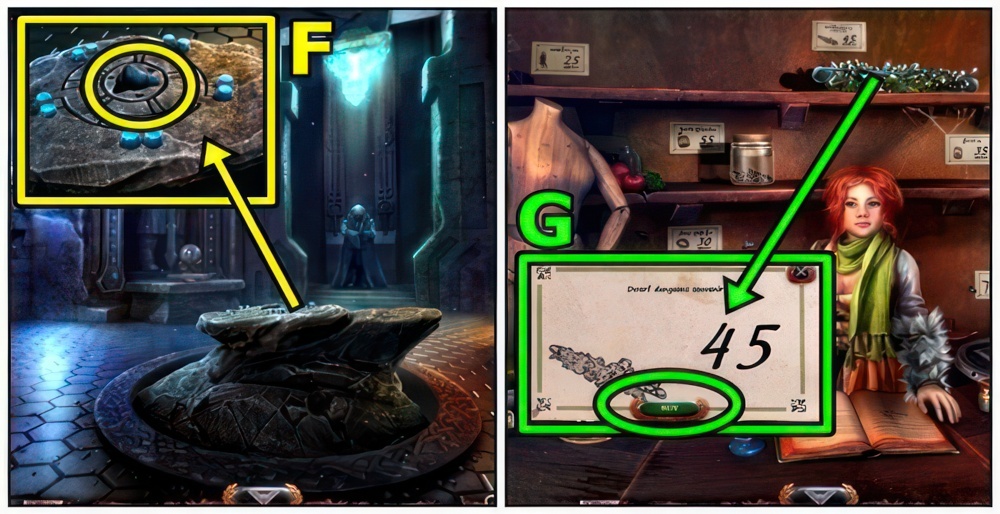
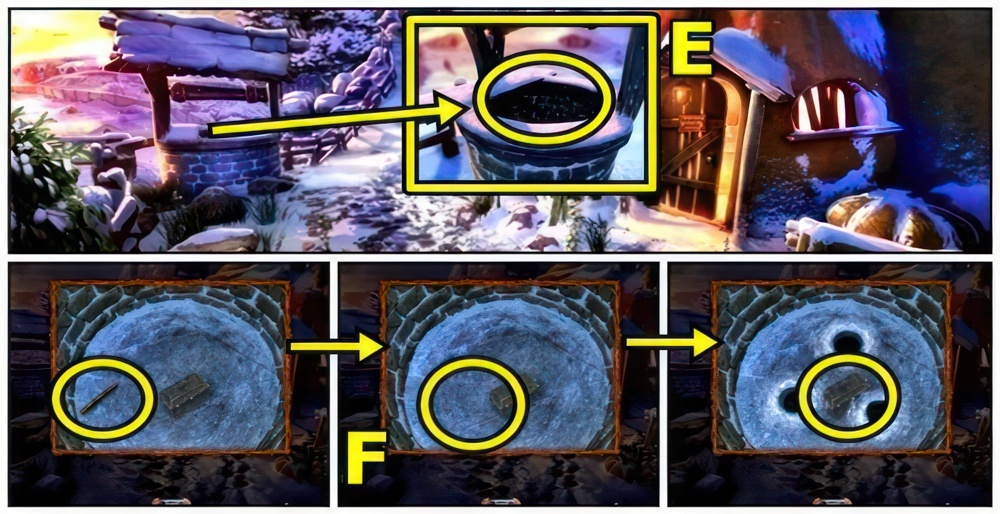
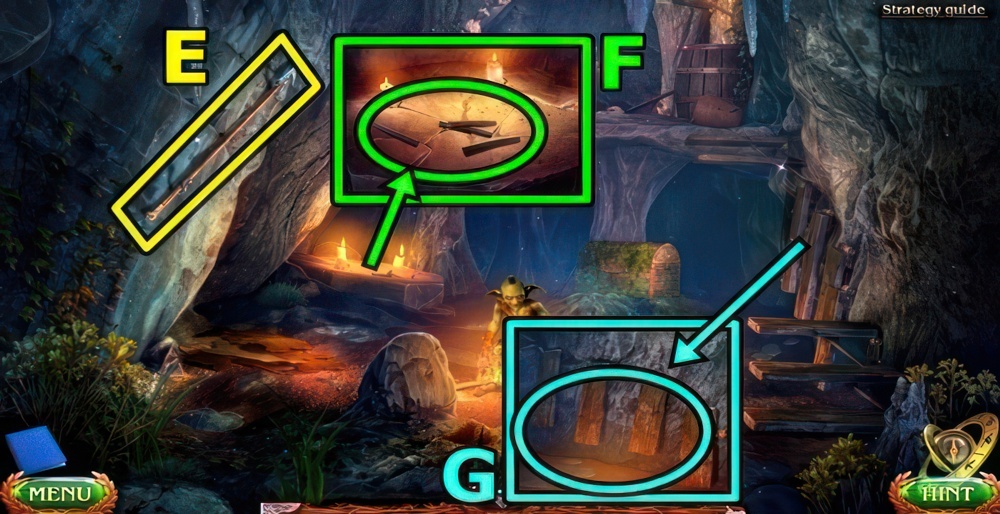
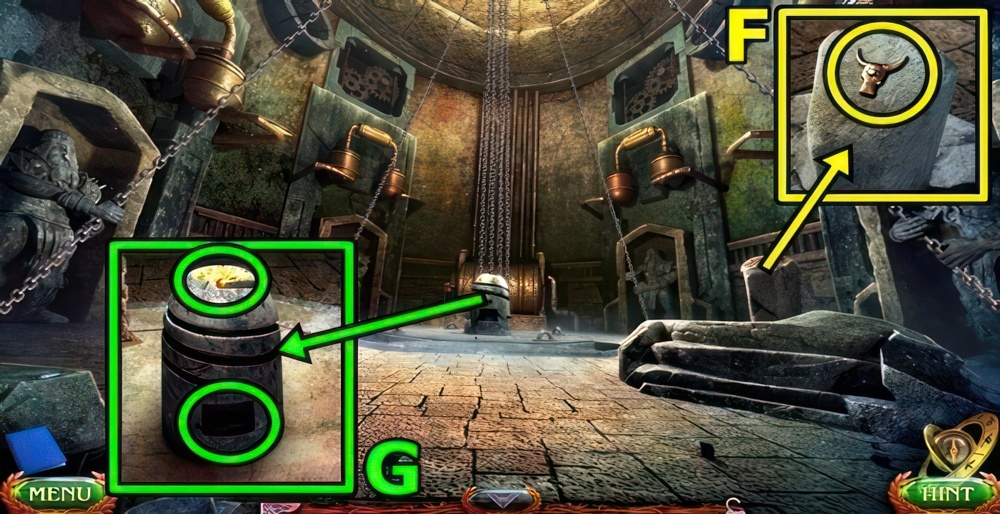
- Raise ladder (F).
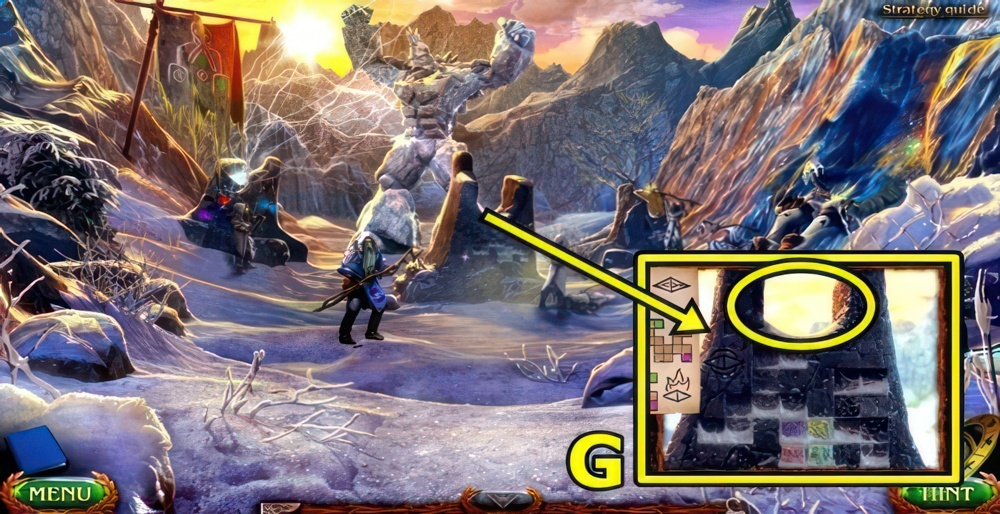
- Climb the ladder (G).

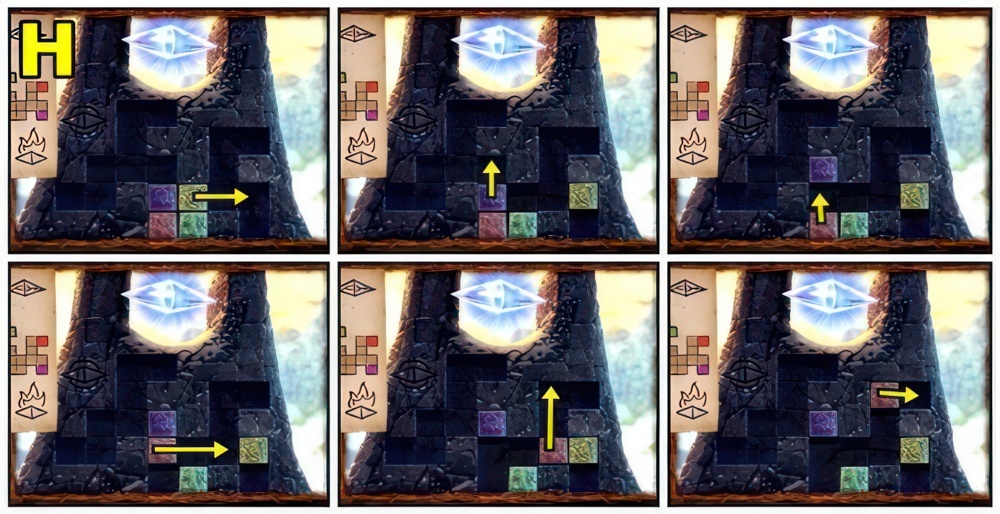
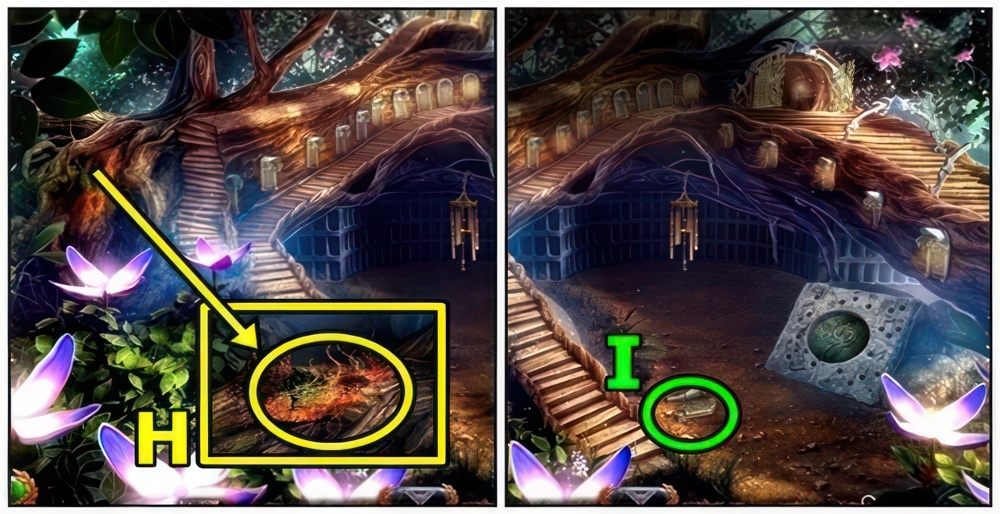
- Take RAG (H).
- Remove snow and sticks, take SNOWSHOES.
- Use SNOWSHOES (I).
- Go forward.

- Pass by the wolves undetected.
- Make your move to the next location when the wolves aren’t looking at the path.
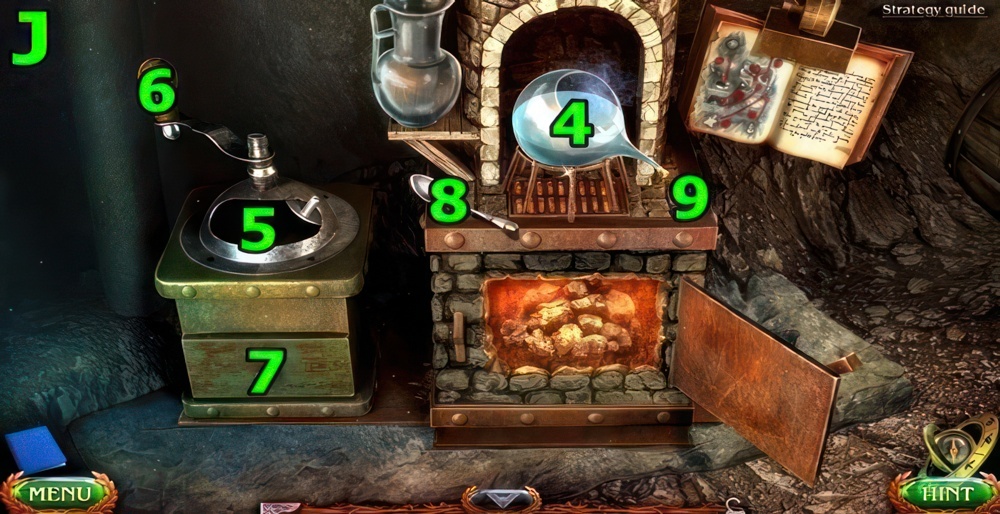
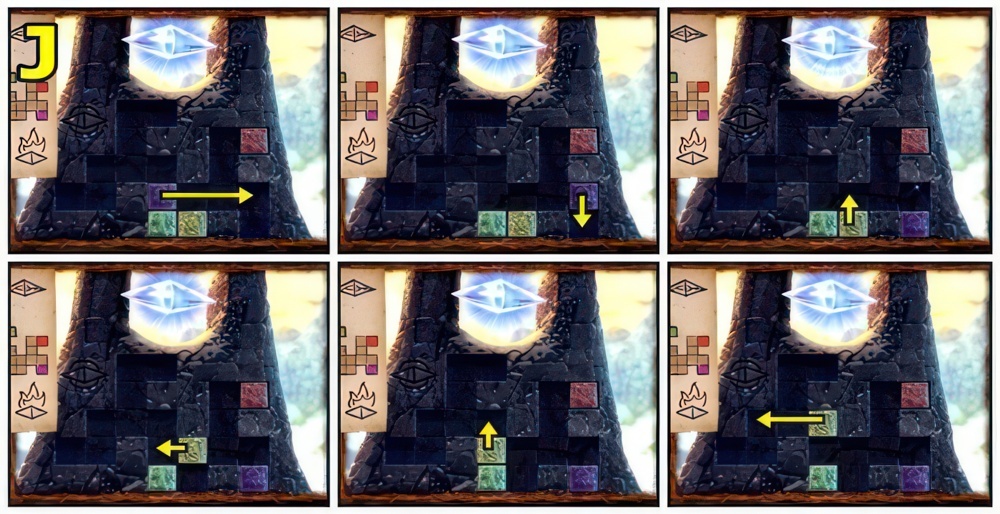
- Walkthrough: (J).
Following Maaron’s trail
Maaron couldn’t wait for me at home and he left for the Frozen Mountains. I’m going after him.
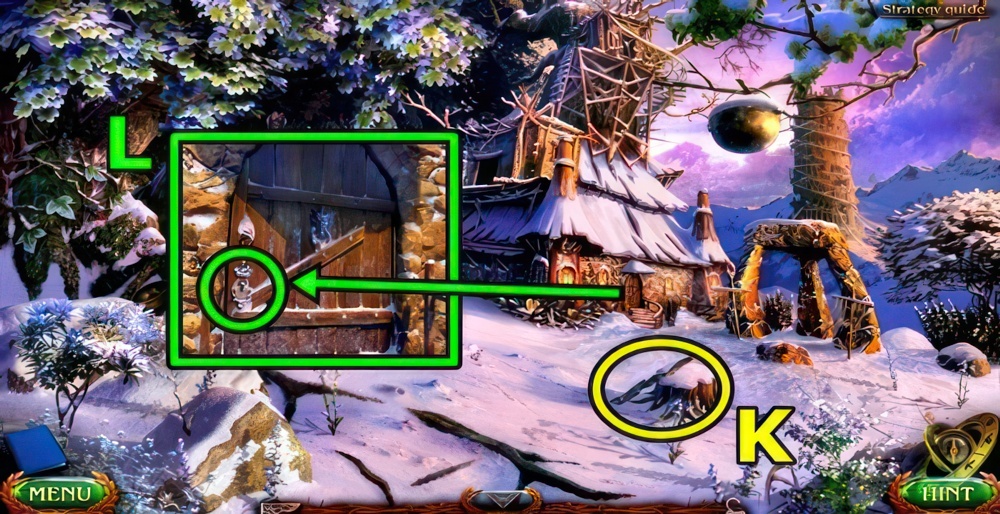
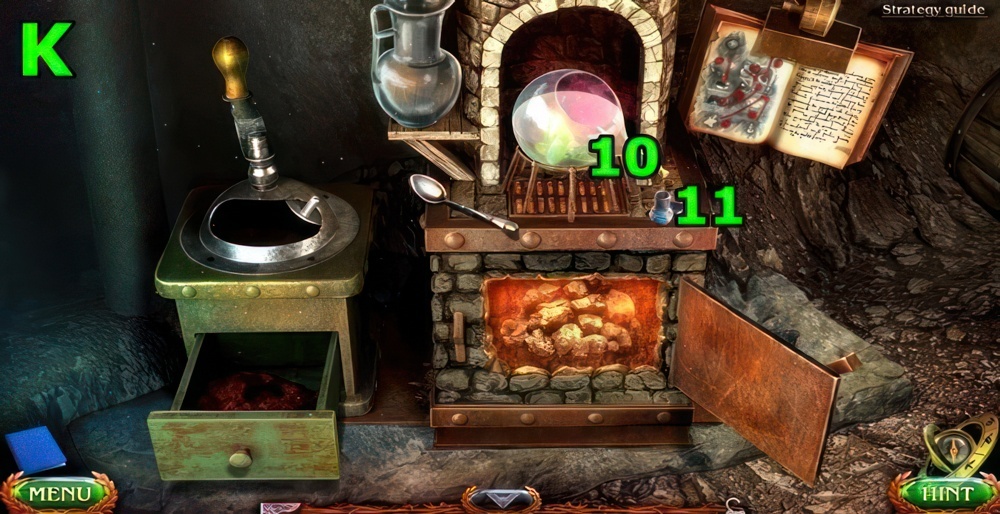
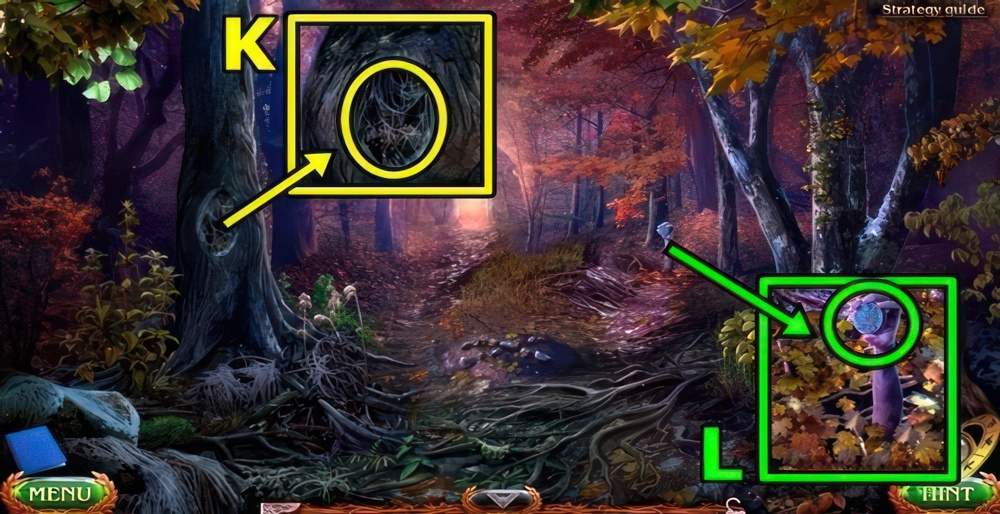
- Take CLUB (K).
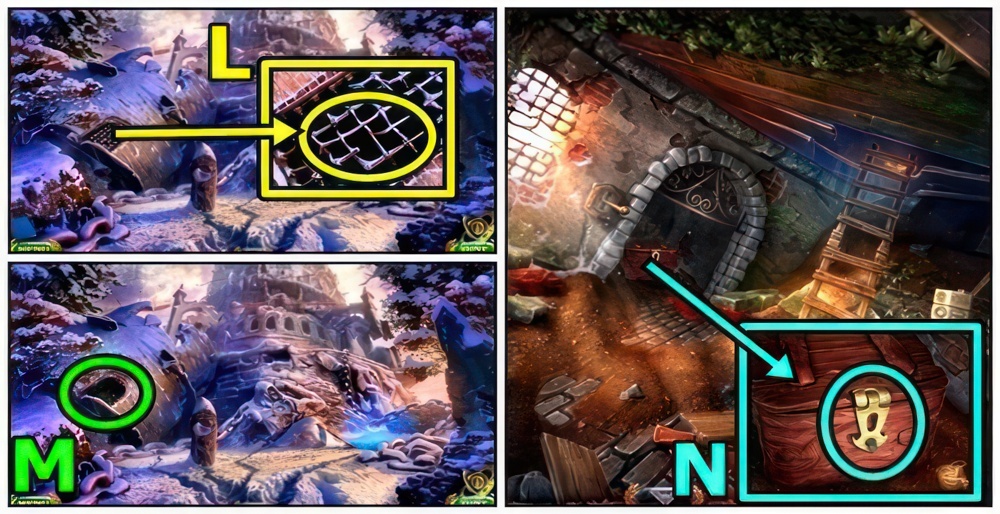
- Insert KEY TO MAARON’S HUT (L).
- Enter.
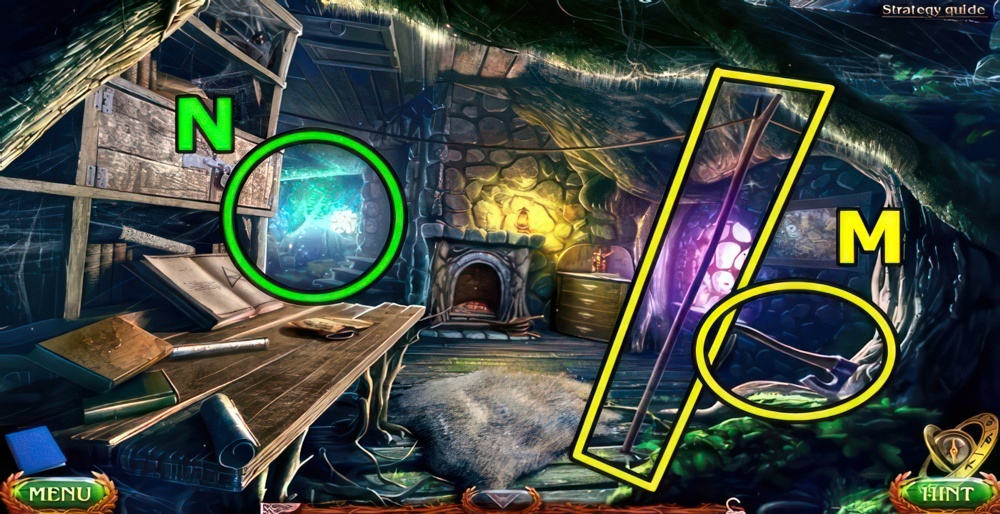
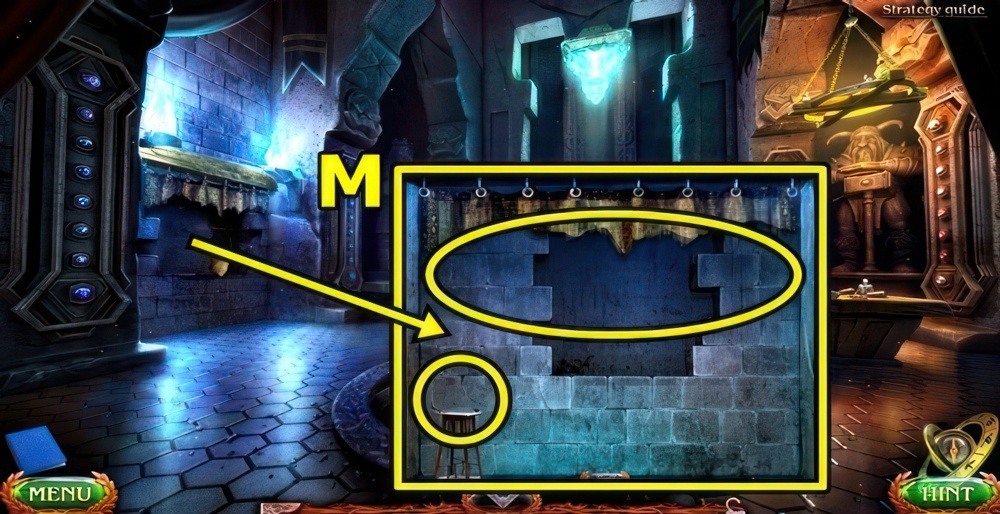
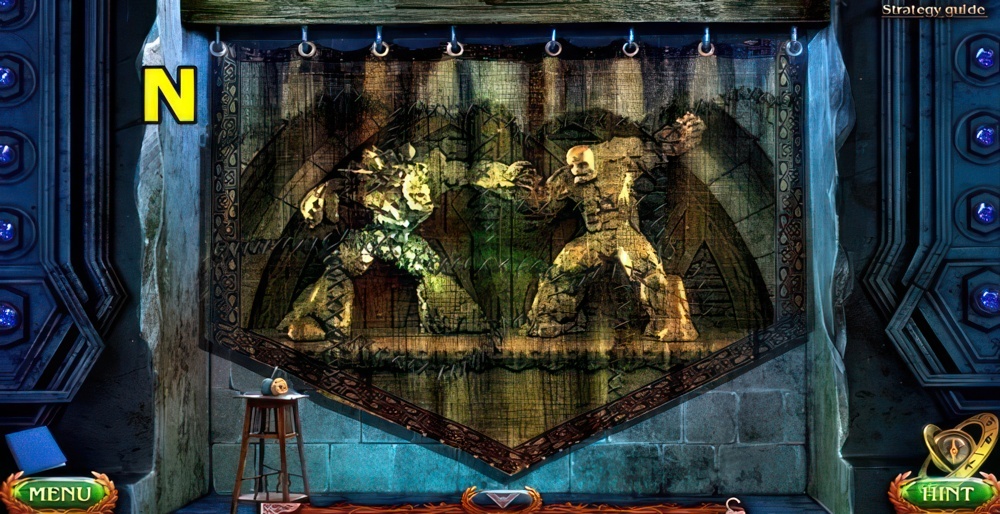
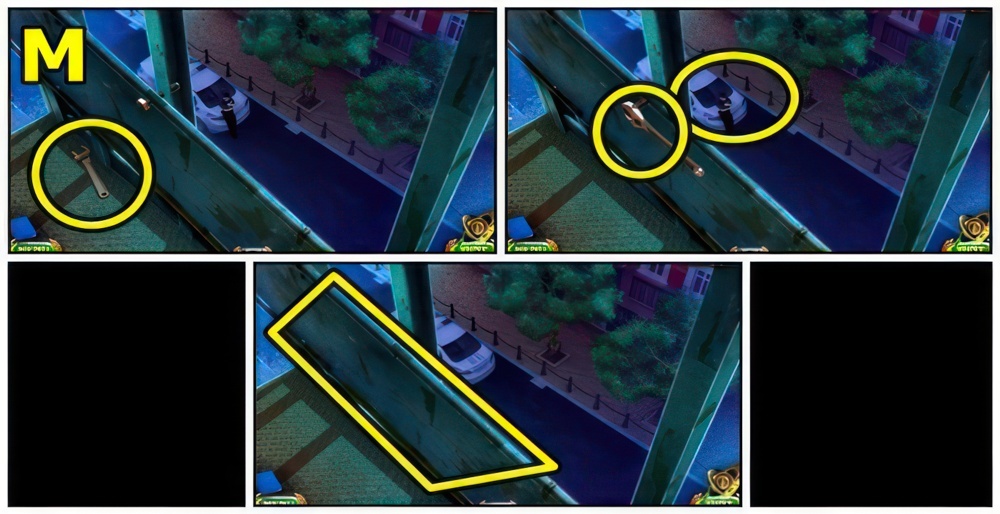
- Take AXE (M) and WOODEN POLE.
- Rotate the pointers to set them on the required symbols.
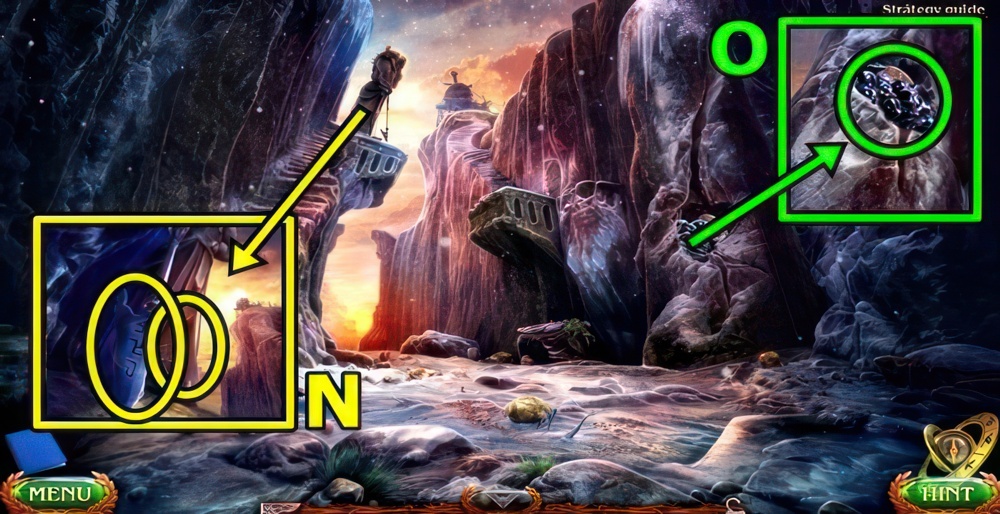
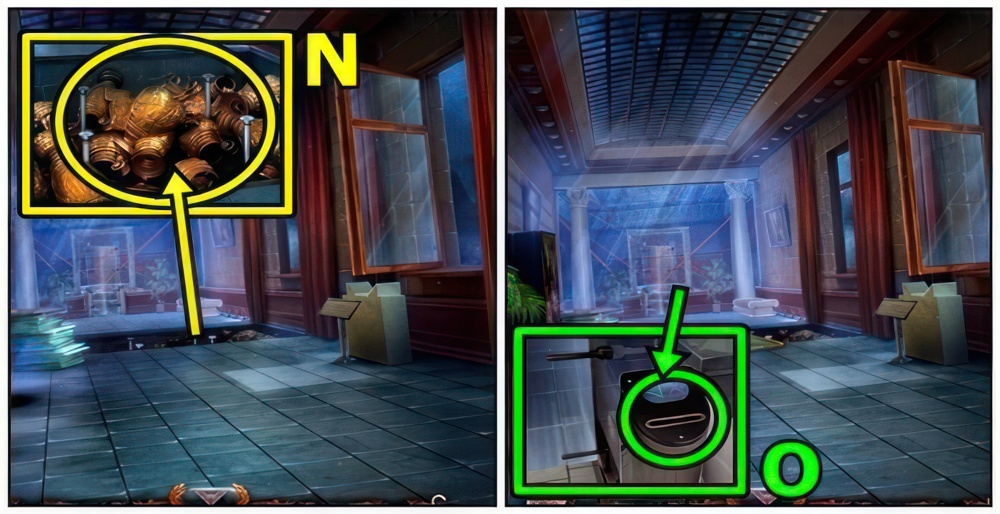
- Play puzzle (N), receive MAGIC WAND.
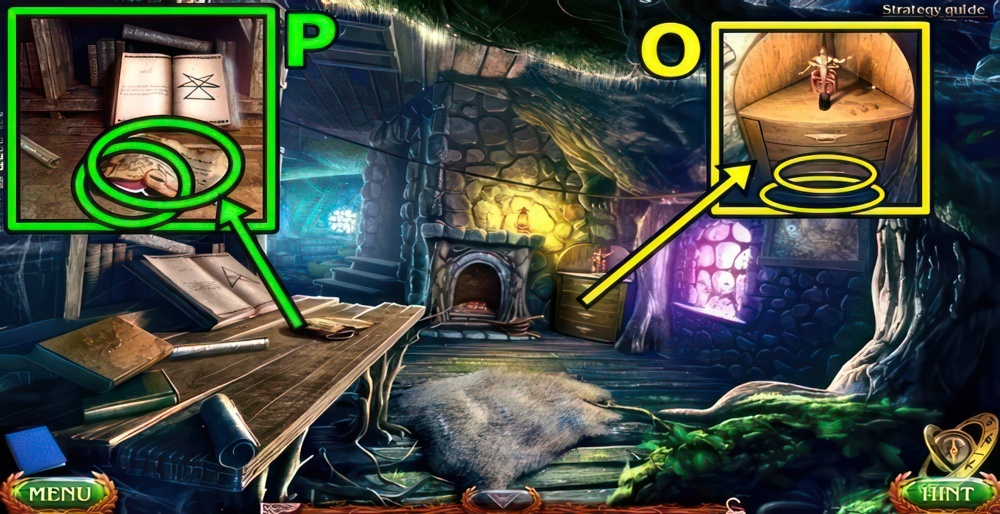
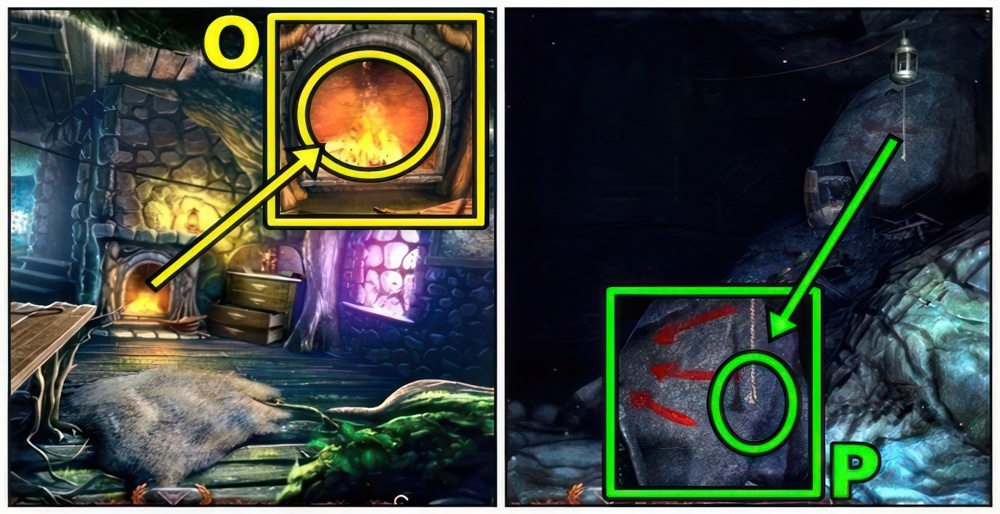
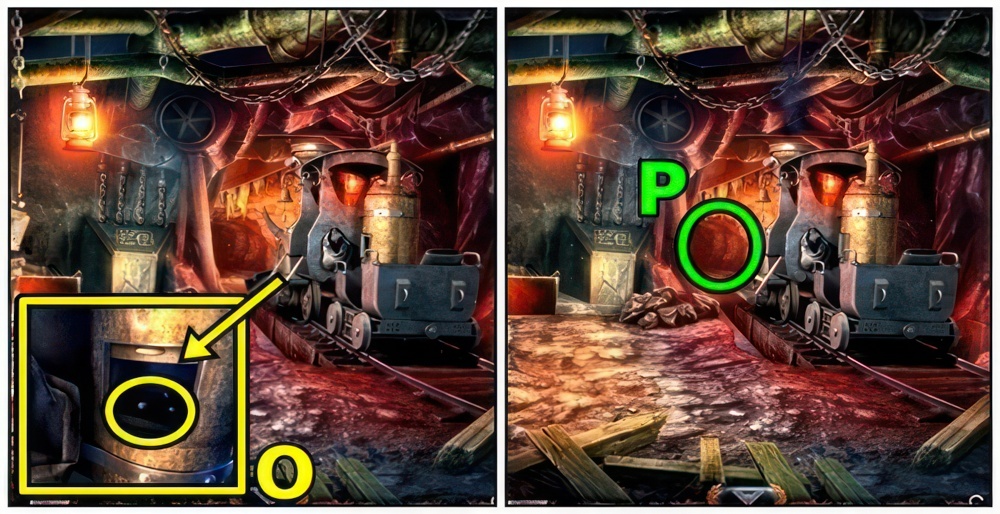
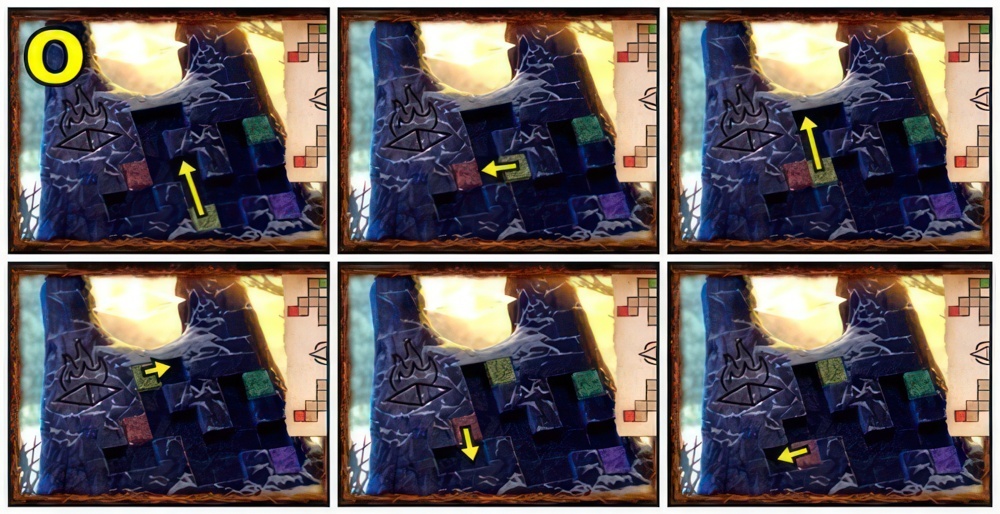
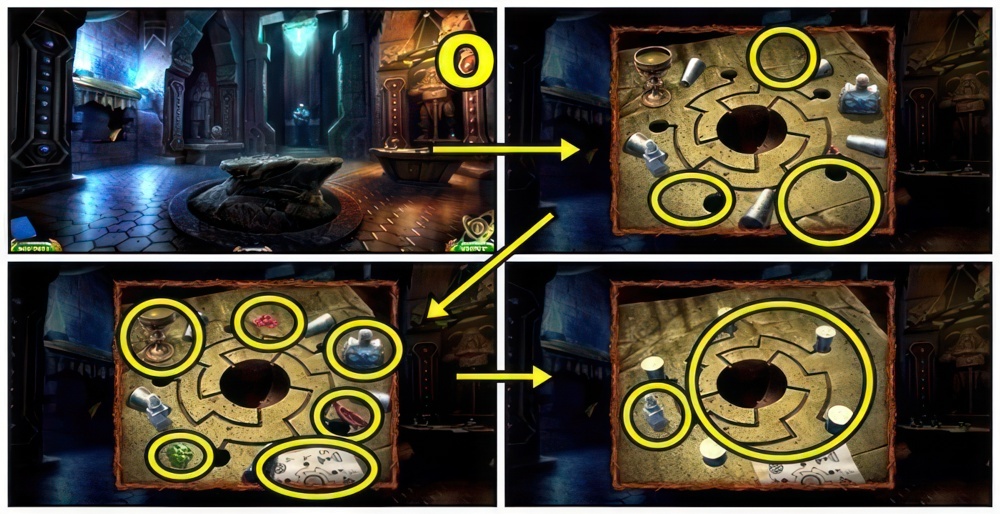
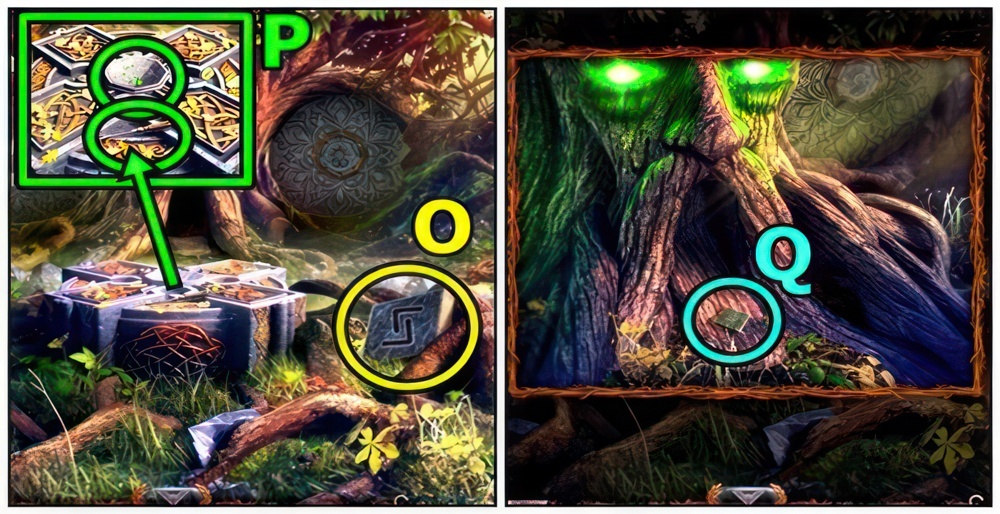
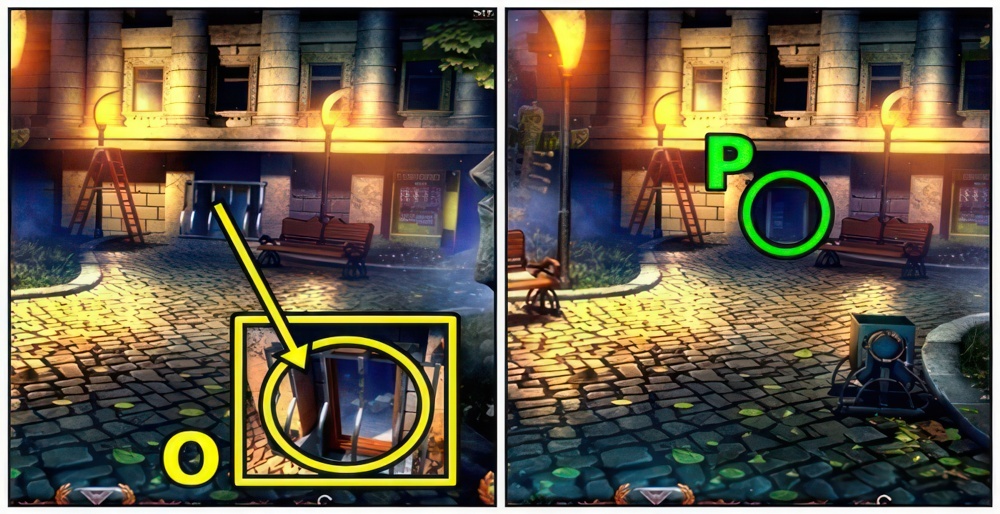
- Open drawers (O), move items, take SACK OF COINS.
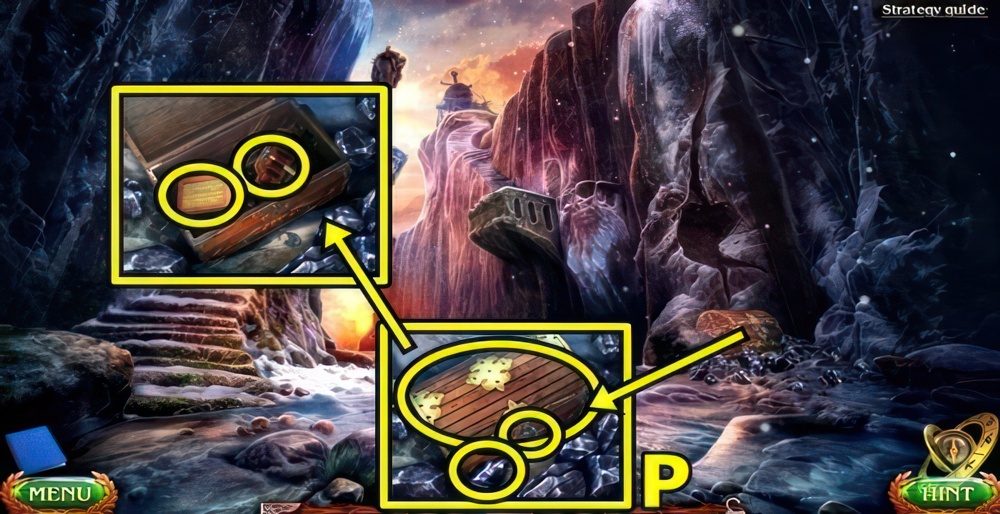
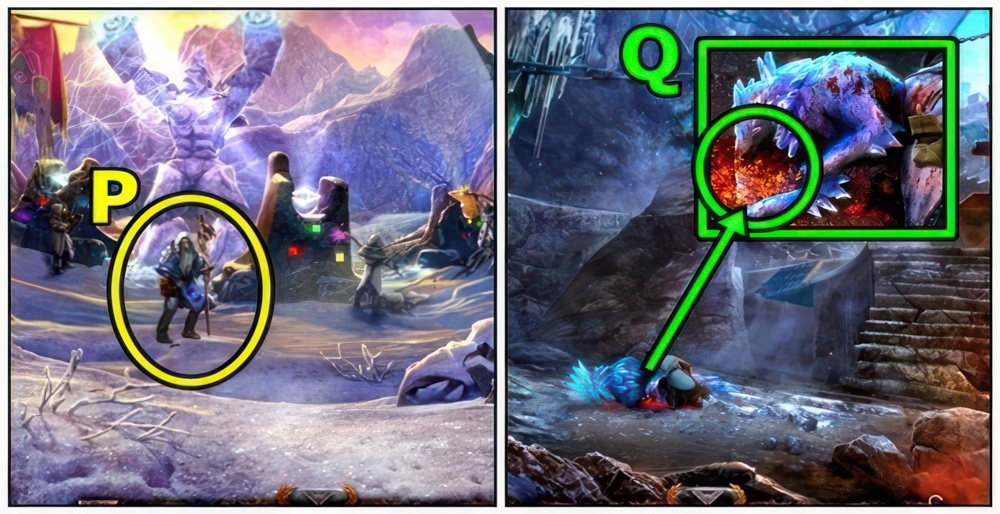
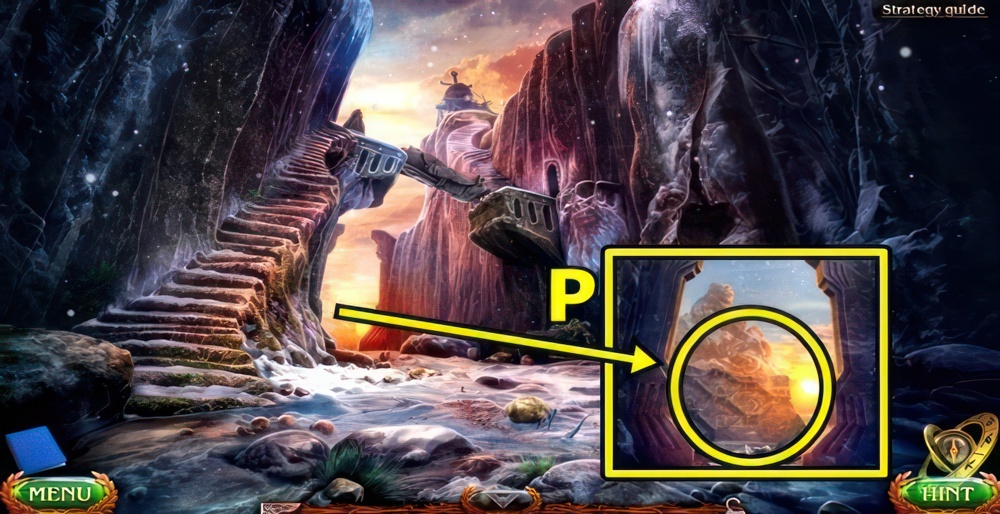
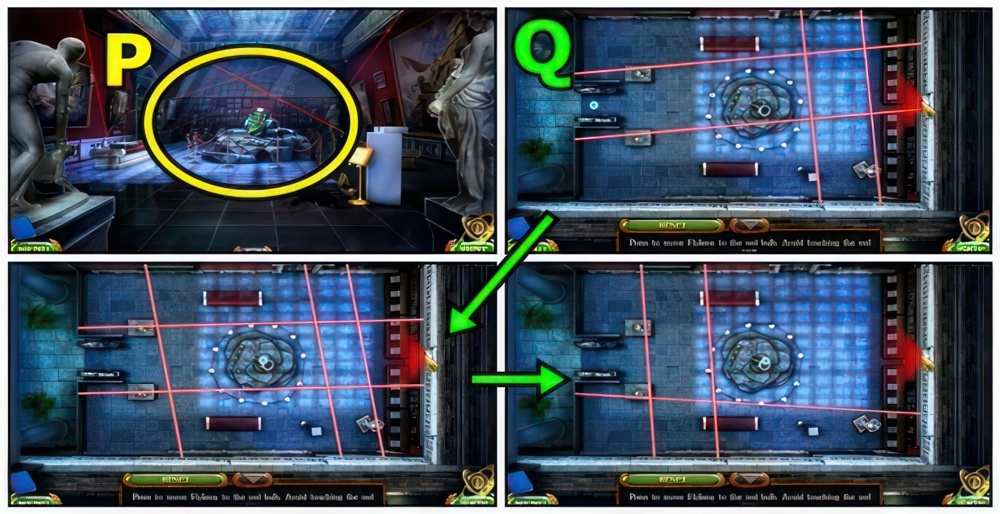
- Read note (P).
- Take MITTEN, receive BOOK OF SPELLS.
- Return to Forest Path.

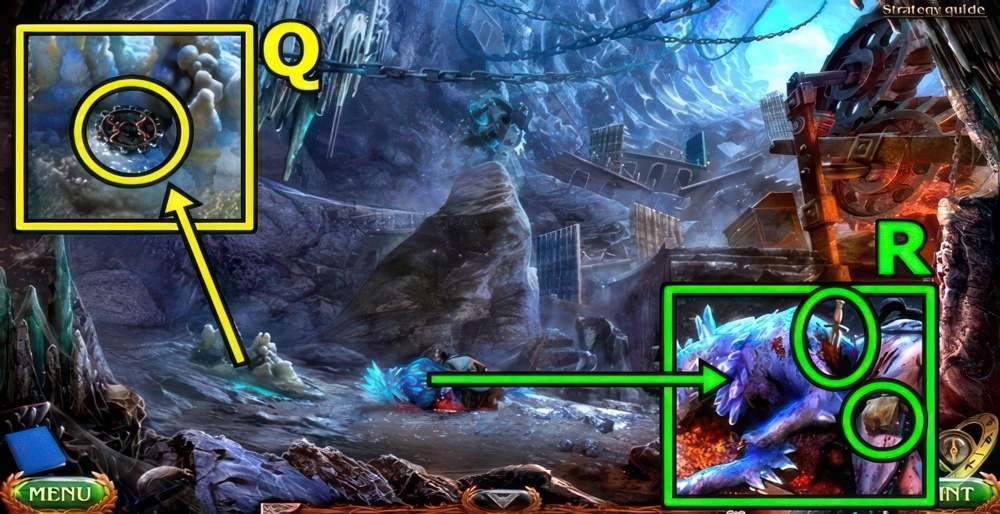
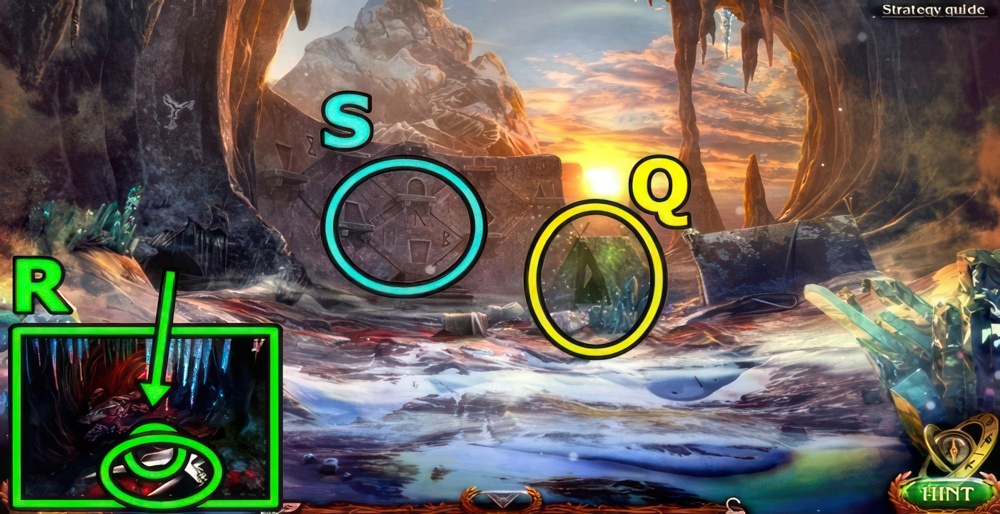
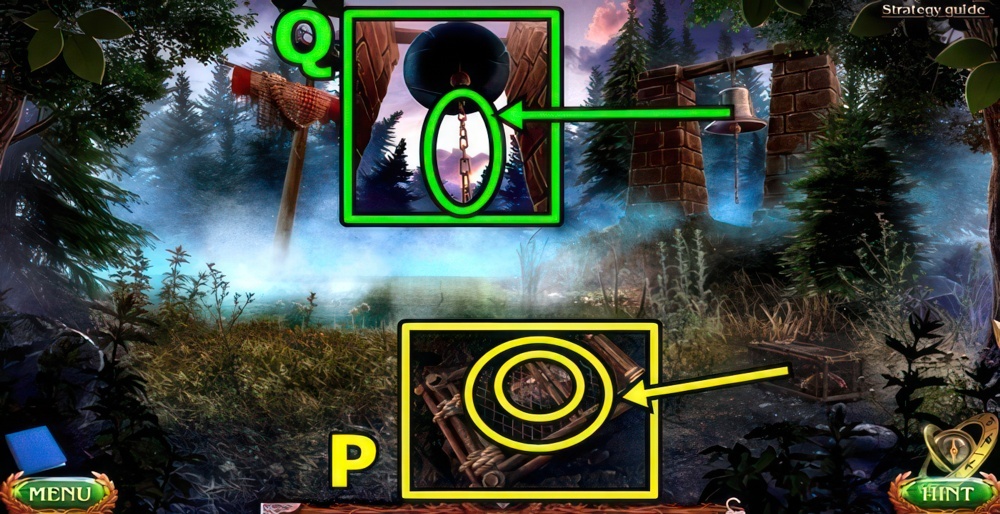
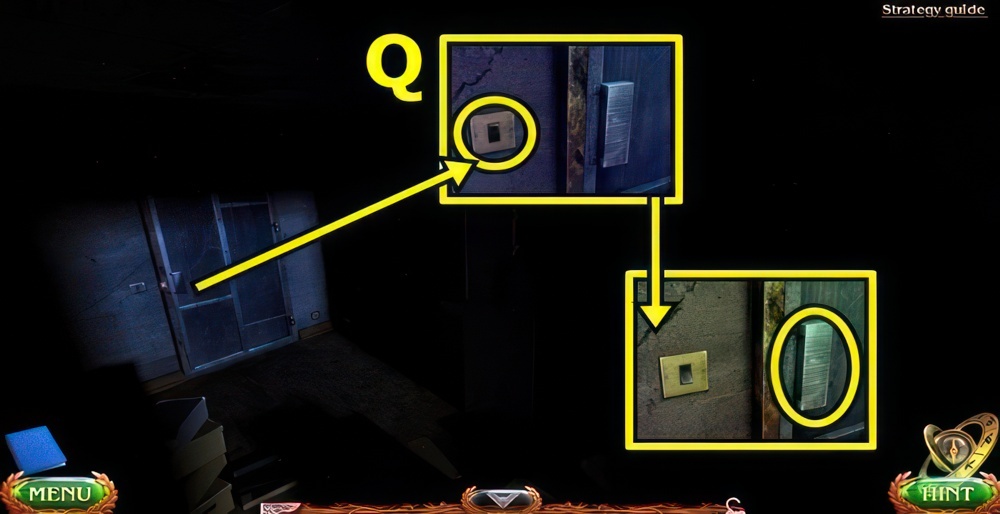
- Remove snow (Q), use AXE, take SPLINTERS.
- Go forward.
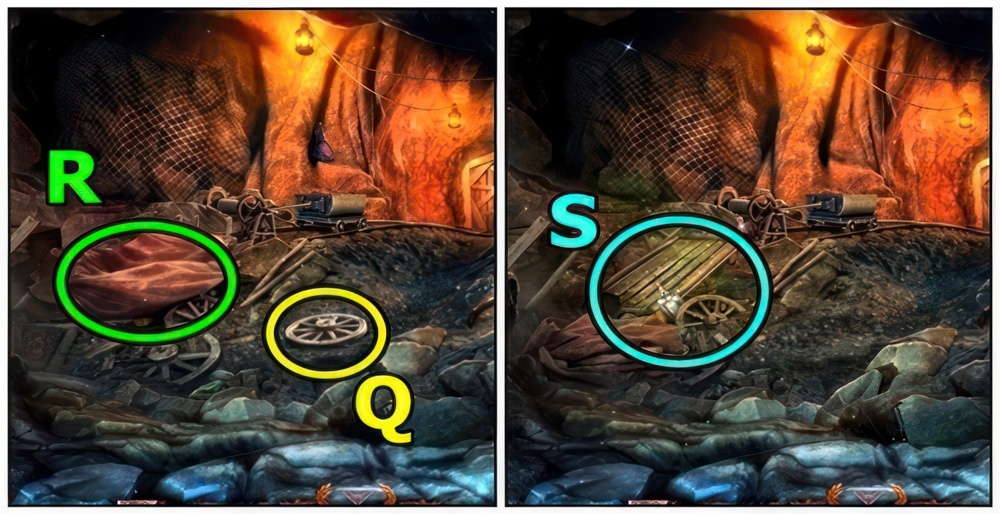
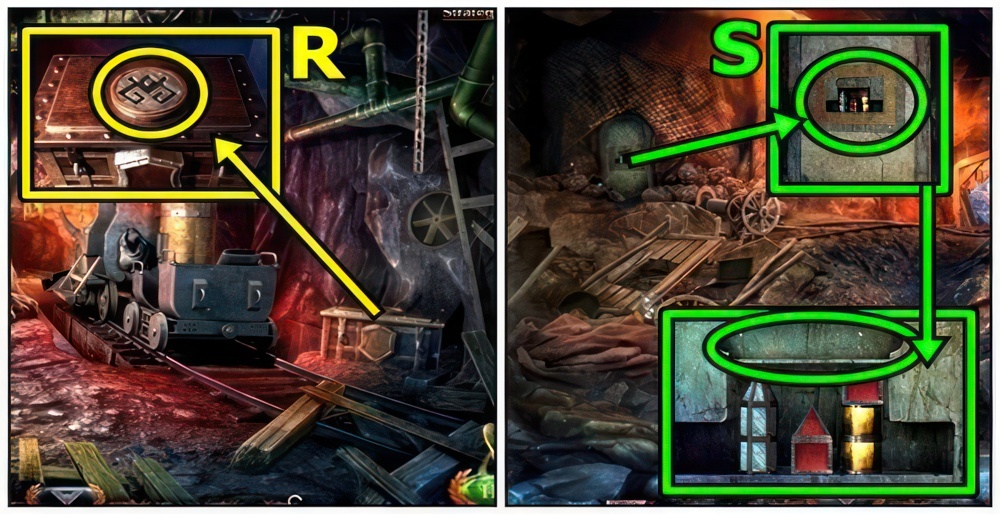
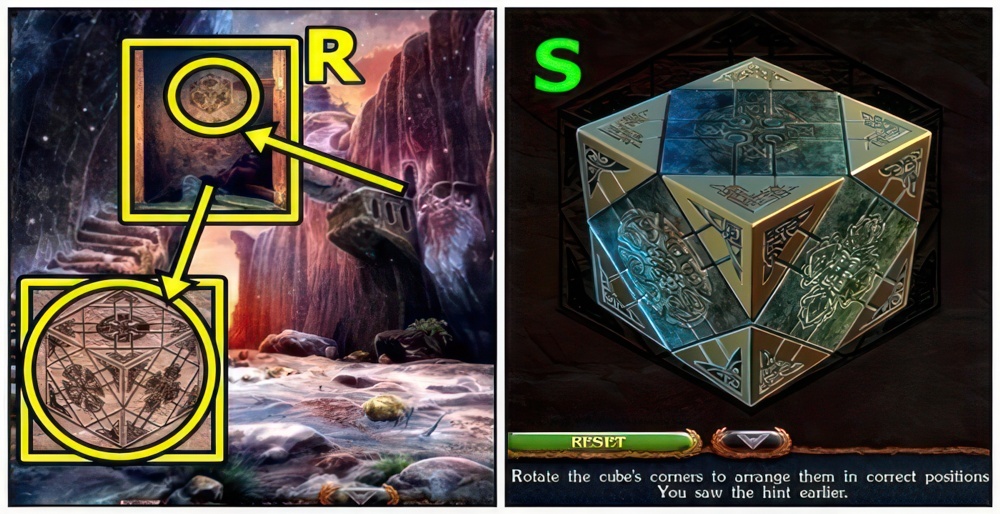
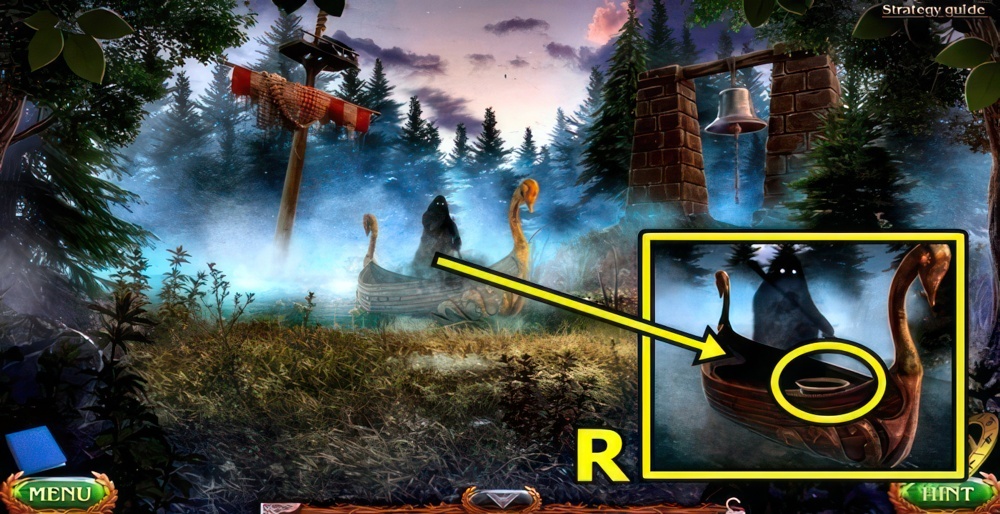
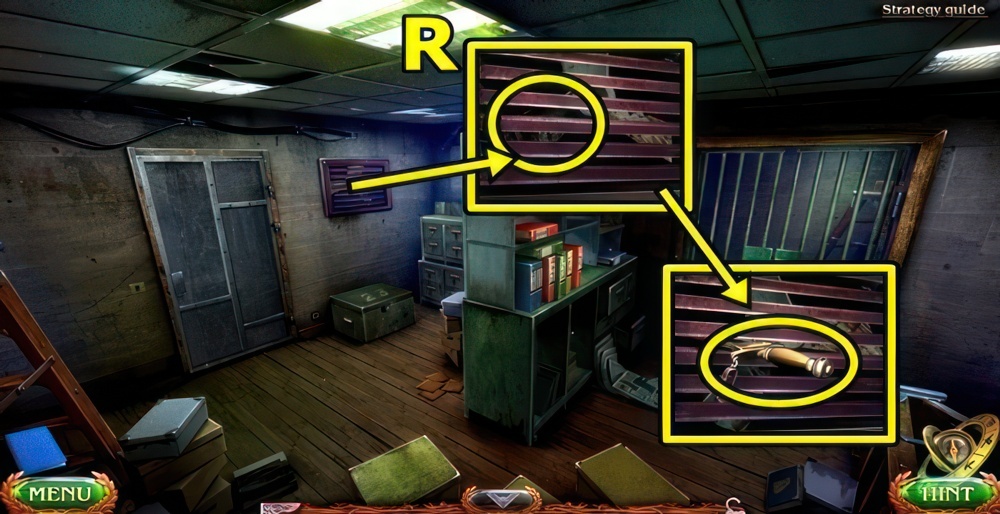
- Use WOODEN POLE (R), receive CAULDRON OF SNOW.
- Enter Maaron’s Hut.
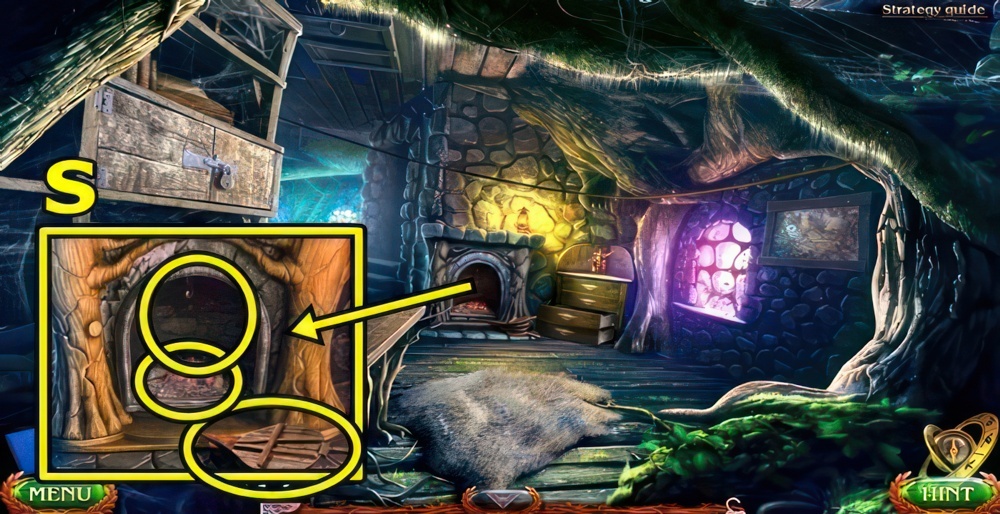
- Place CAULDRON OF SNOW (S), place SPLINTERS, press bellows.
- Use MITTEN, receive CAULDRON OF HOT WATER.
- Return to Forest Path.

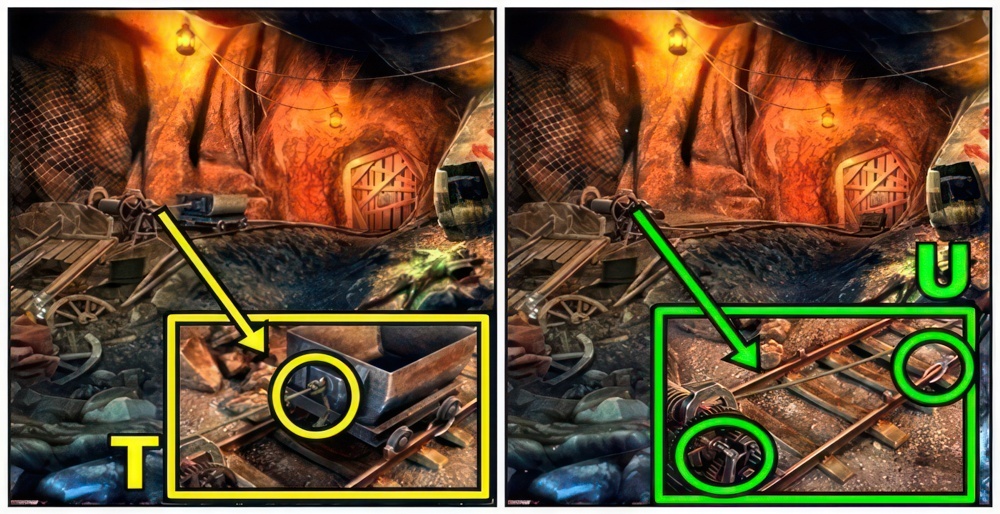
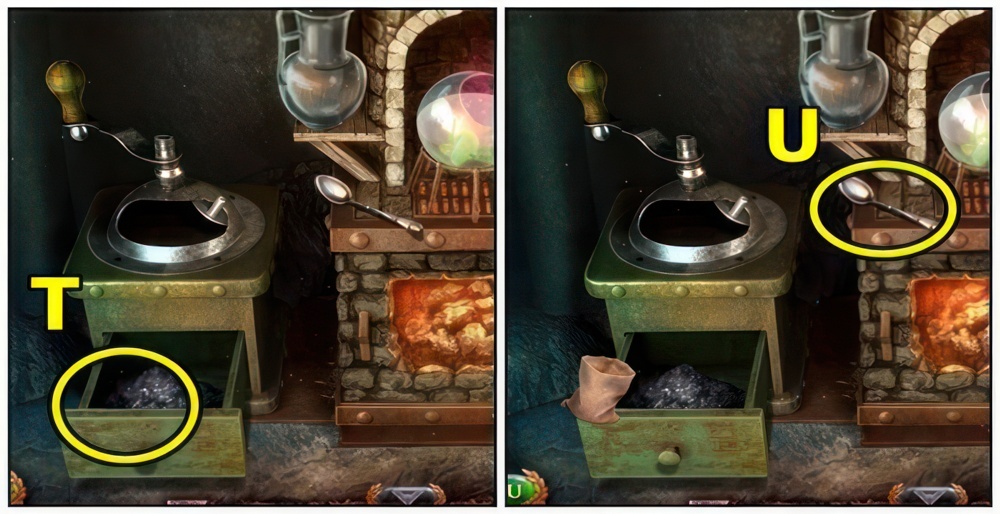
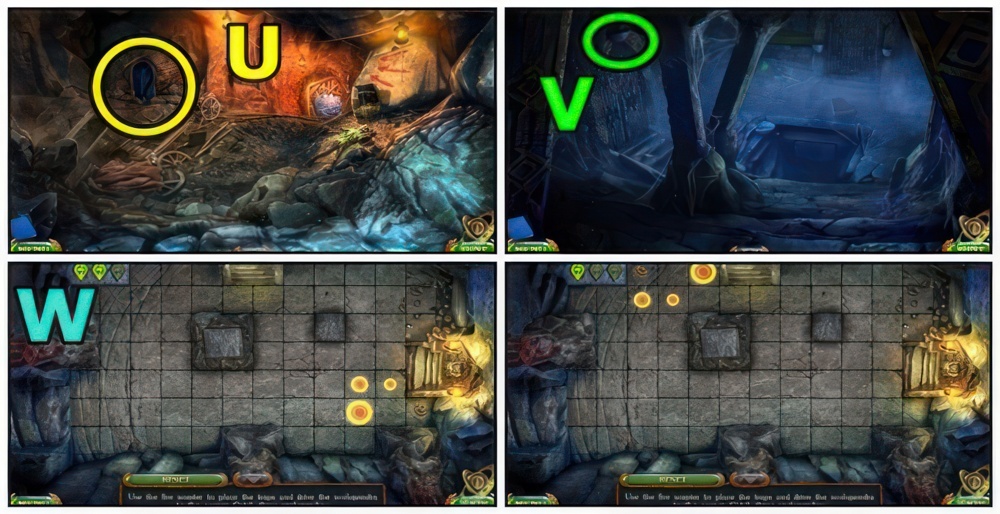
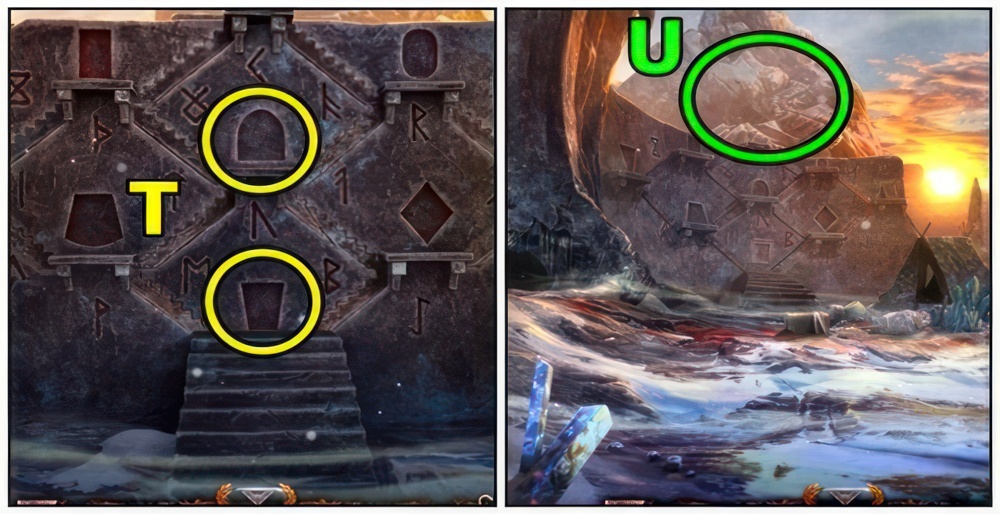
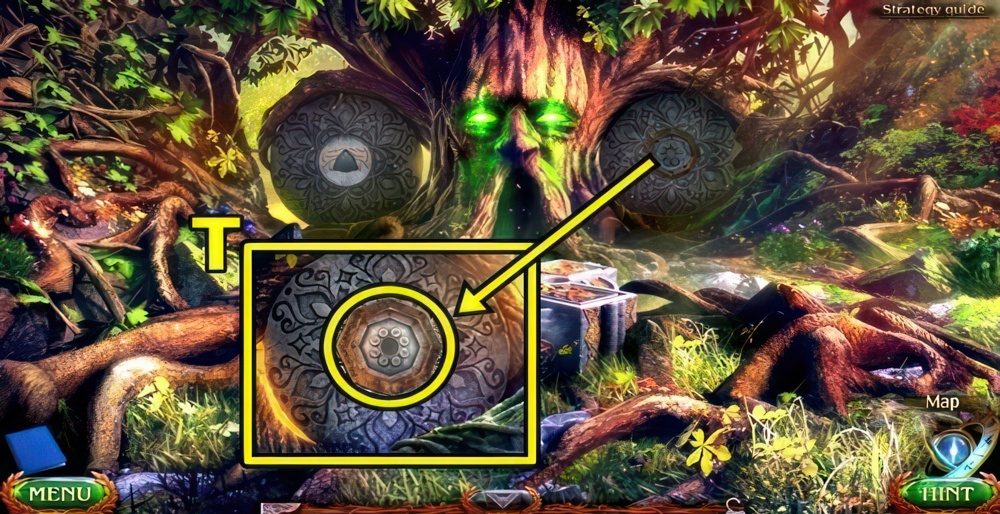
- Pour CAULDRON OF HOT WATER (T), take KEY.
- Go forward.
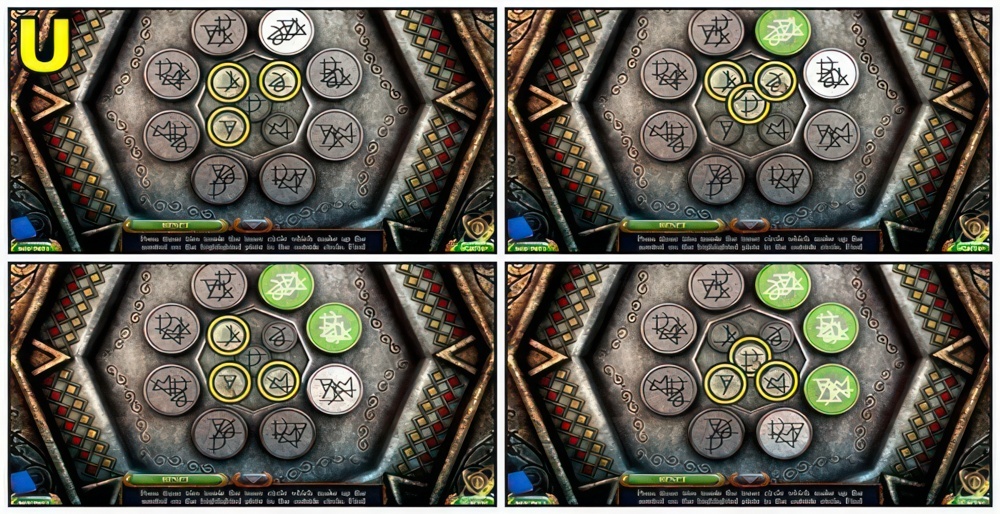
- Insert KEY (U).
- Enter gates.
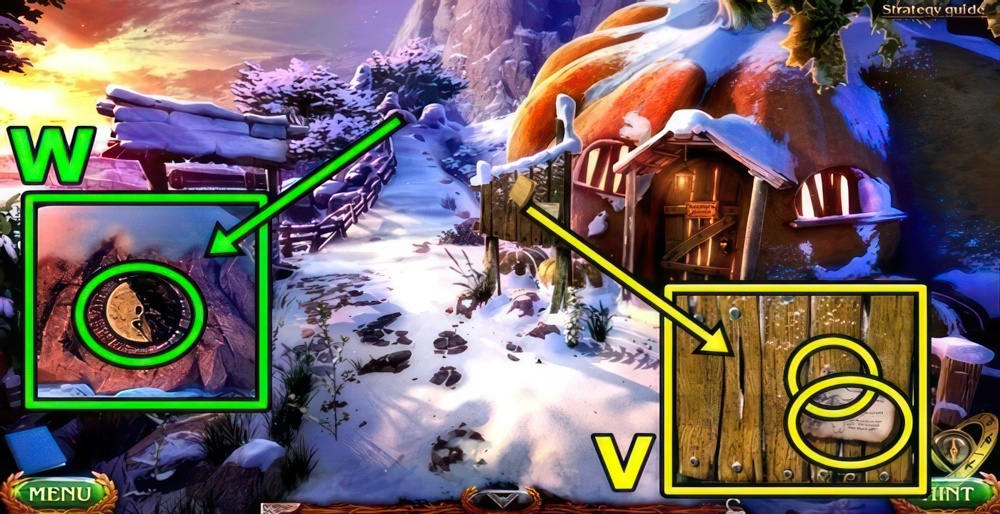
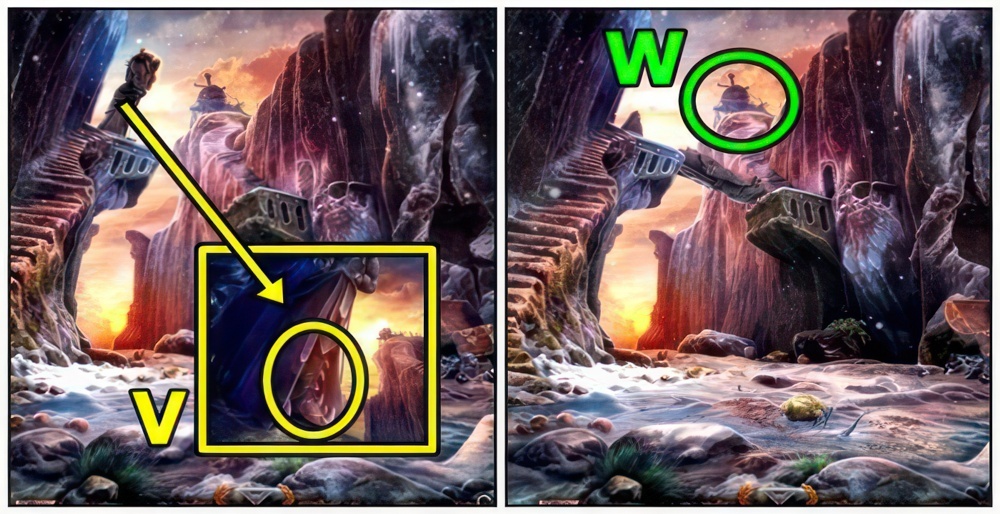
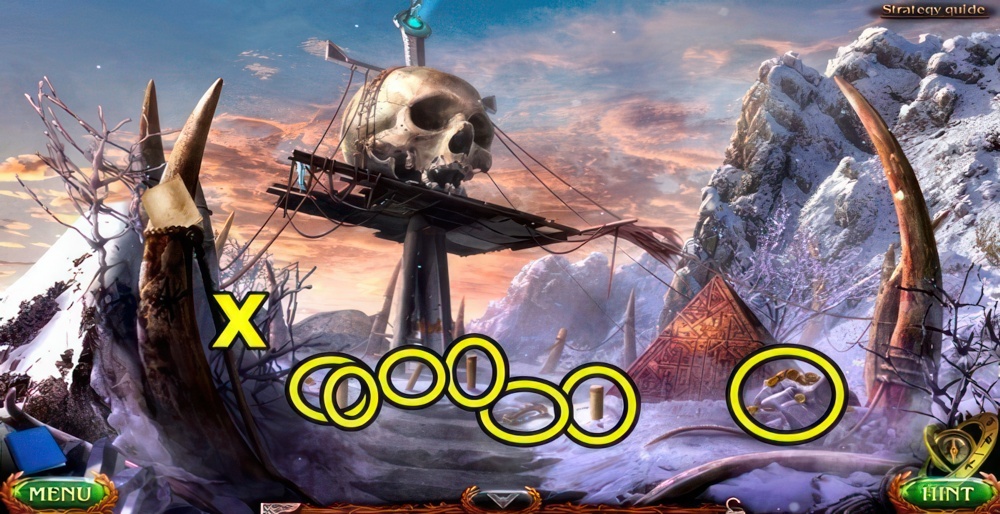
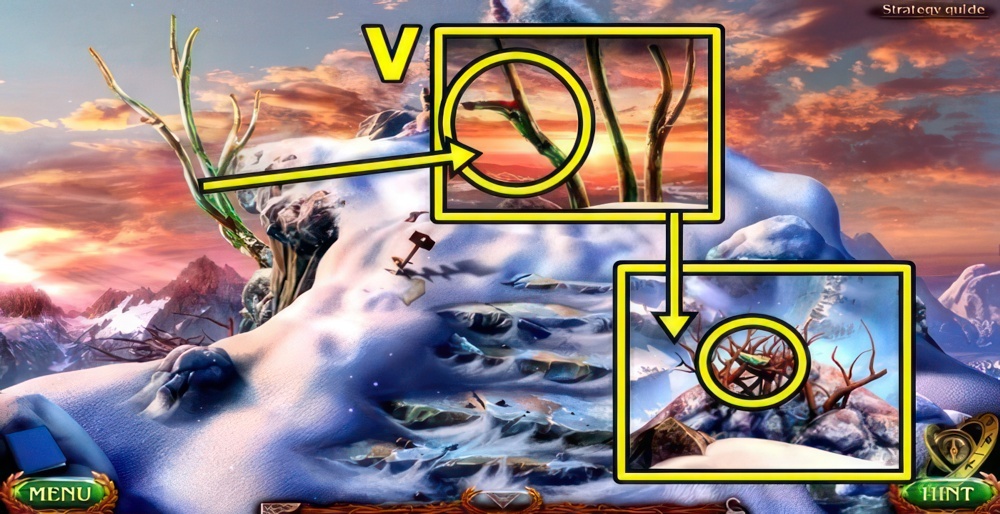
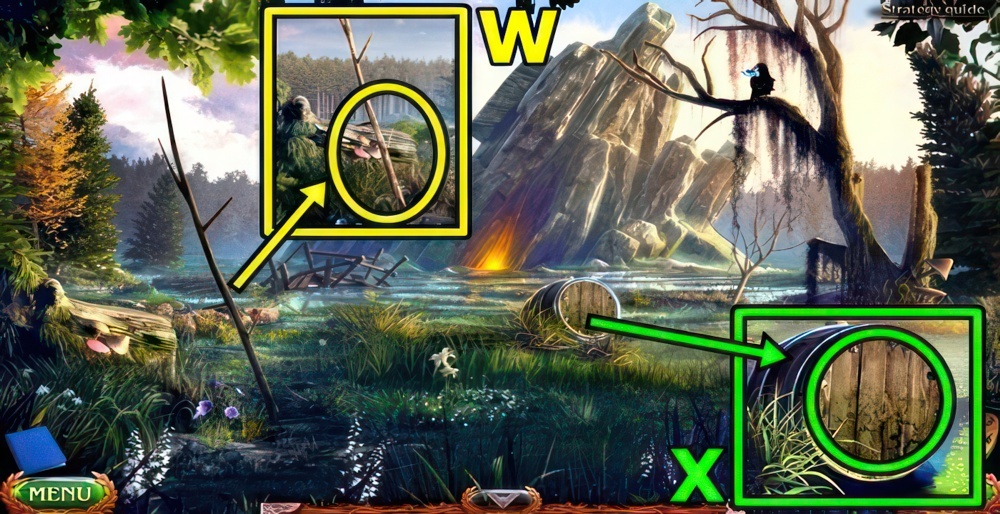
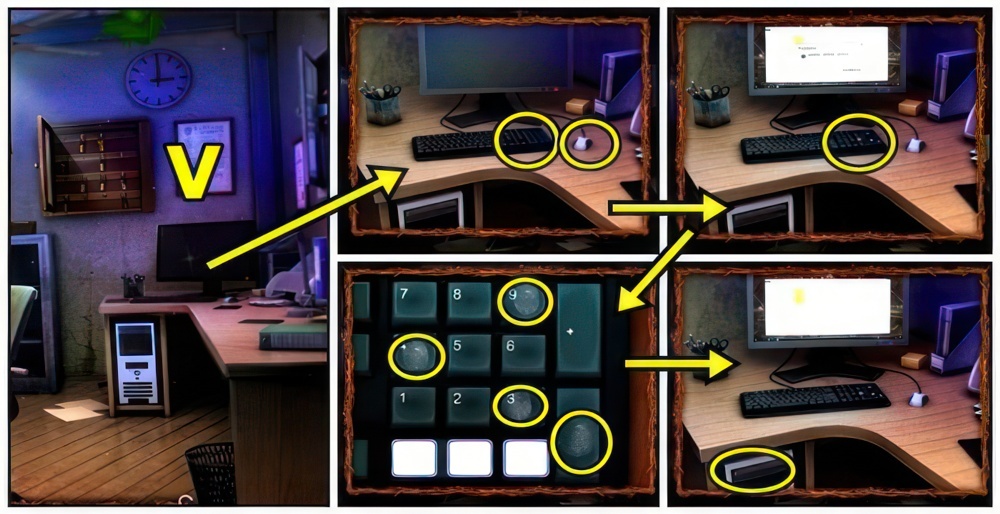
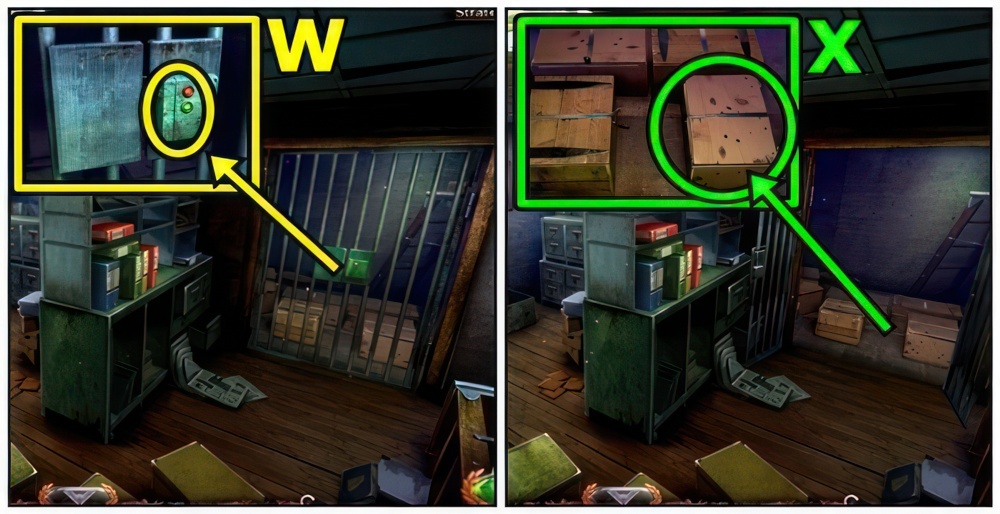
- Read note (V), take AWL.
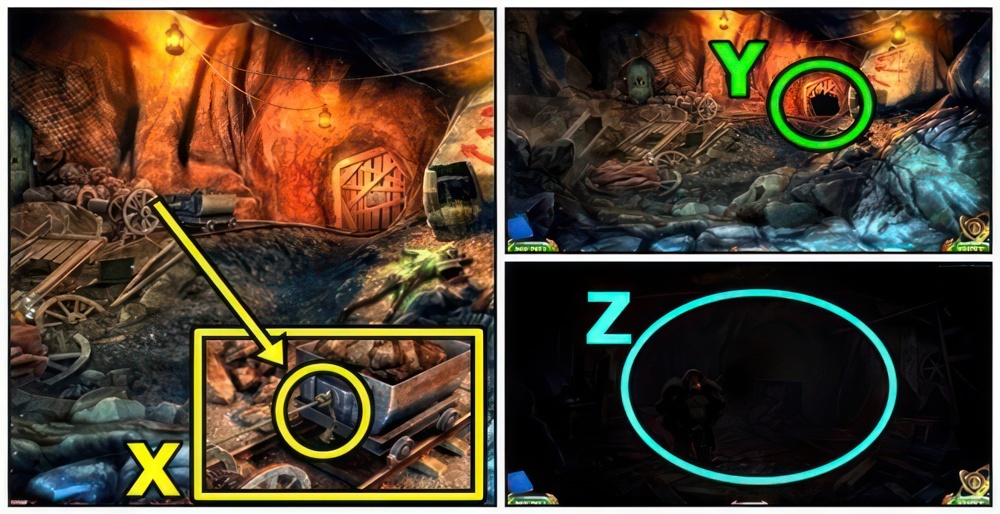
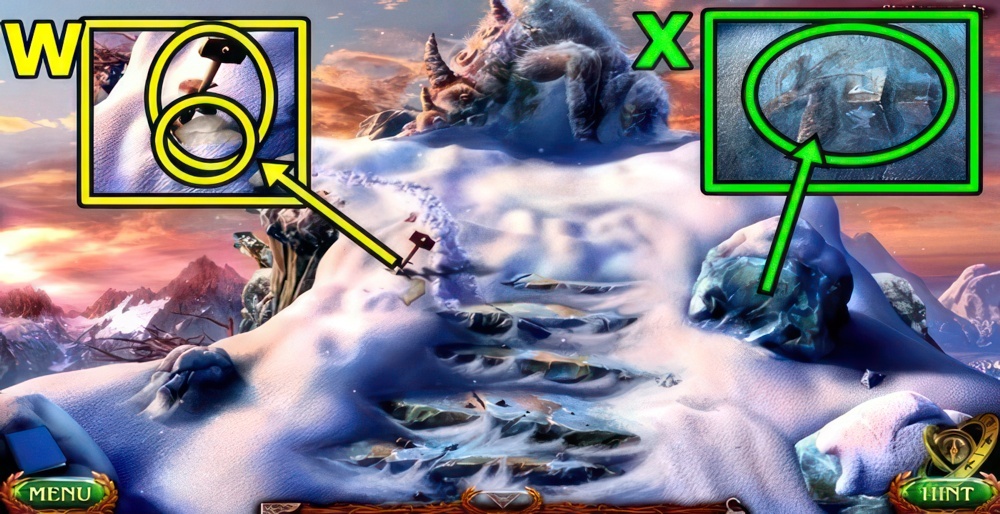
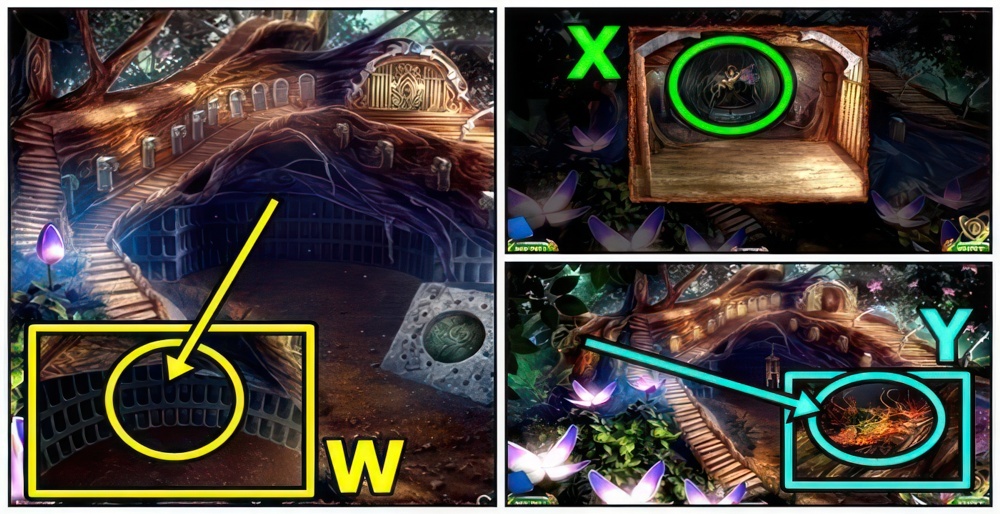
- Take RUNE STONE SHARD (W).
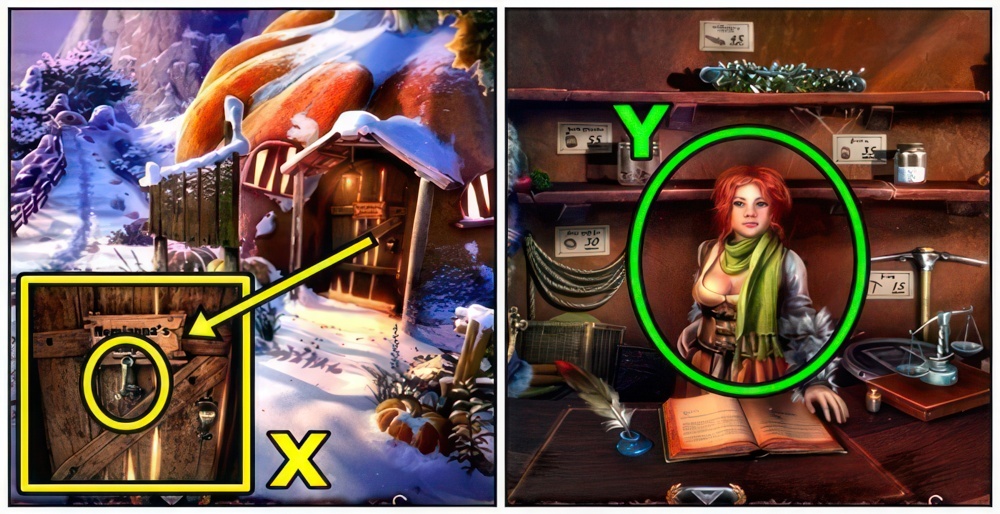
- Knock (X).
- Enter Nomianna’s Pumpkin.
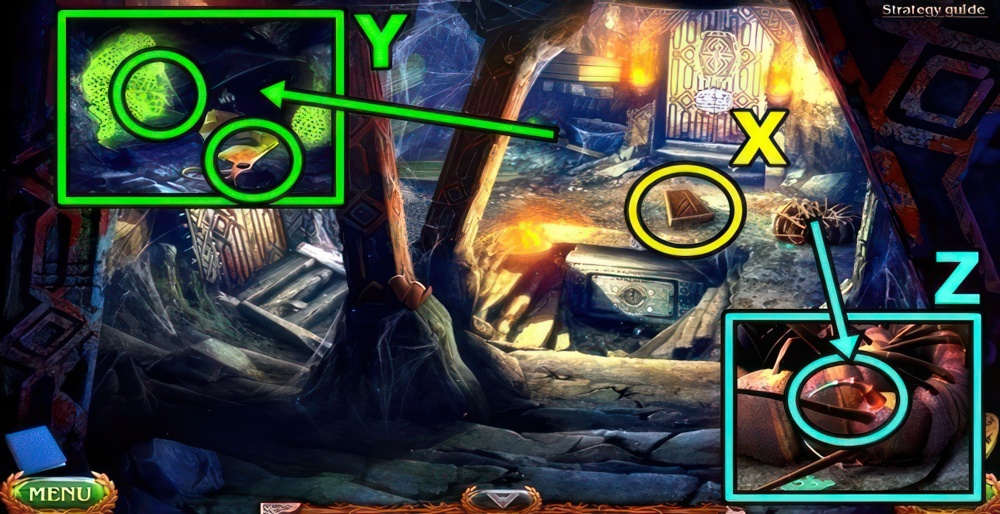
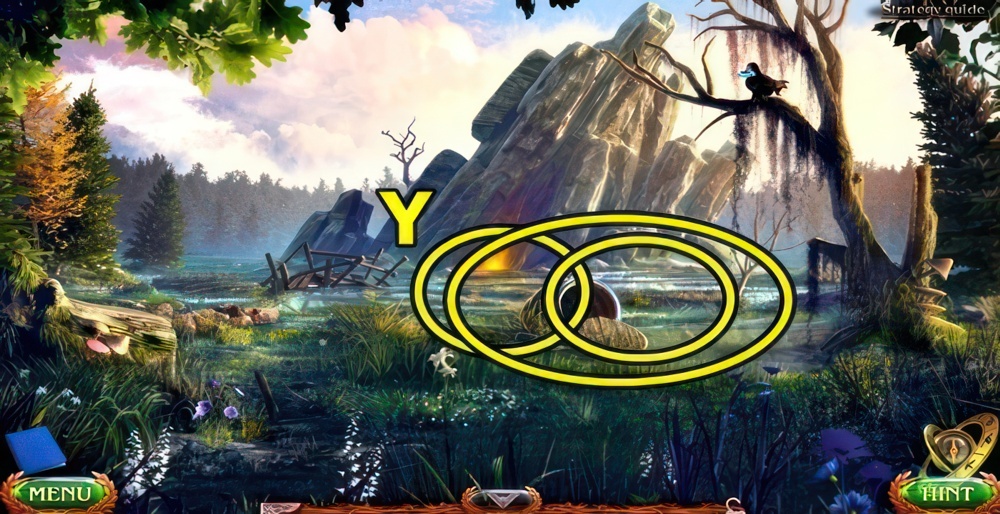
- Talk (Y).
- Receive MAARON’S CRYPTEX.
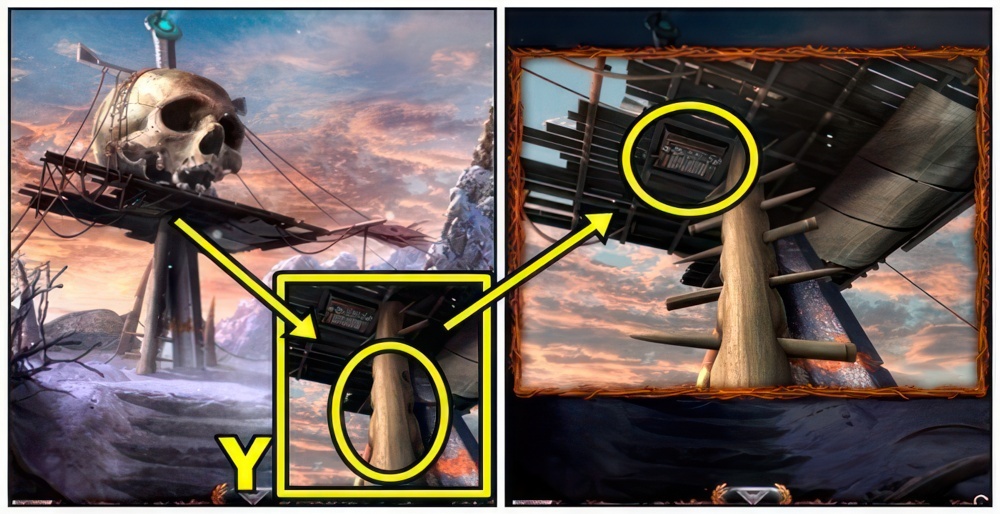
- Return to Maaron’s Hut.
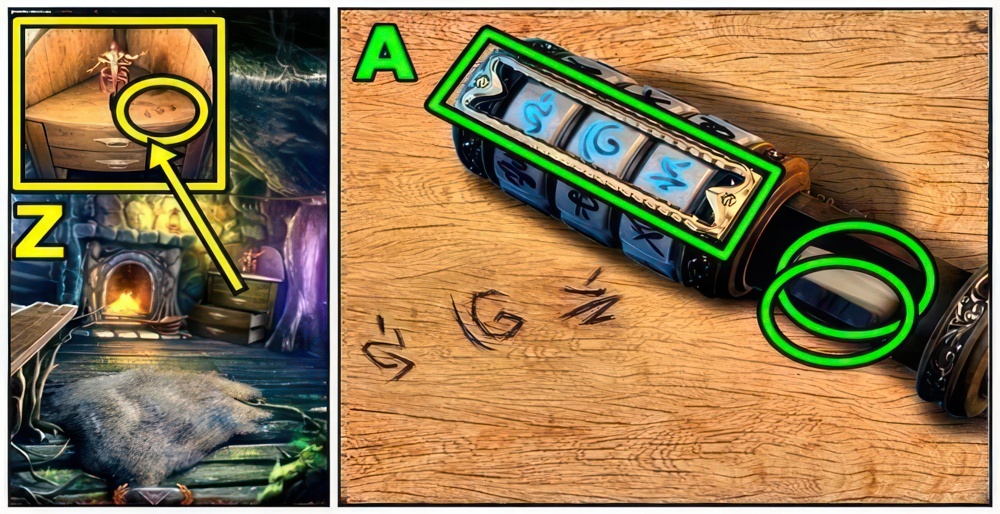
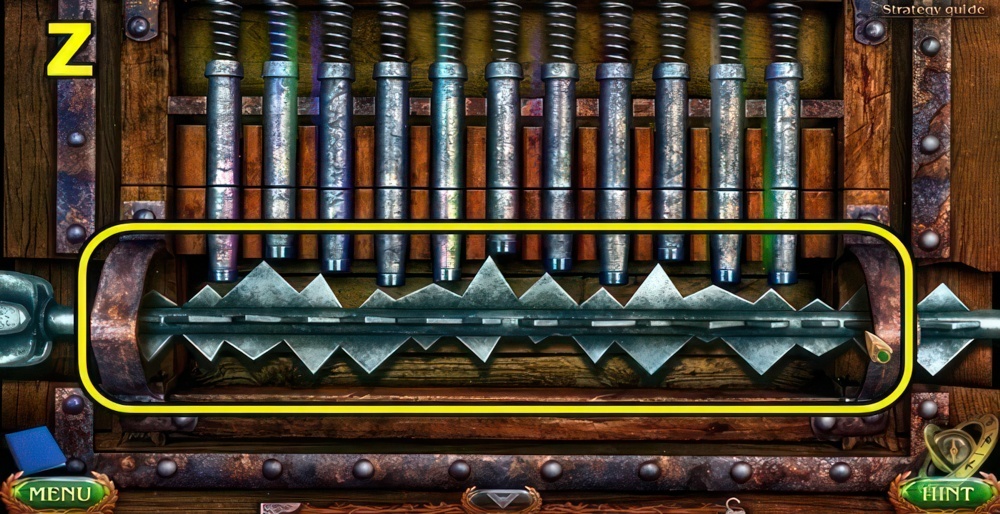
- Add MAARON’S CRYPTEX (Z).
- Use the hint to select the correct symbols.
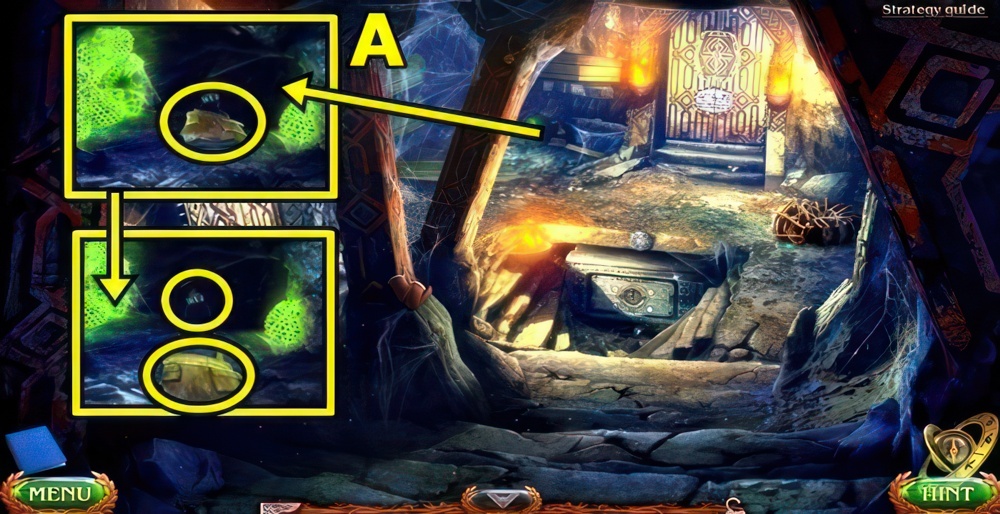
- Walkthrough: (A).
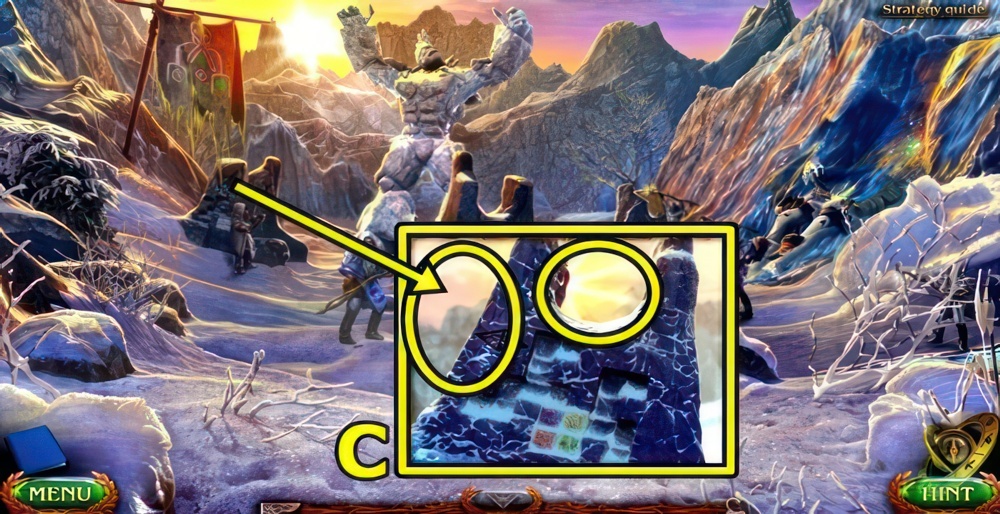
- Take MECHANISM PIECE and STATUE DRAWING.

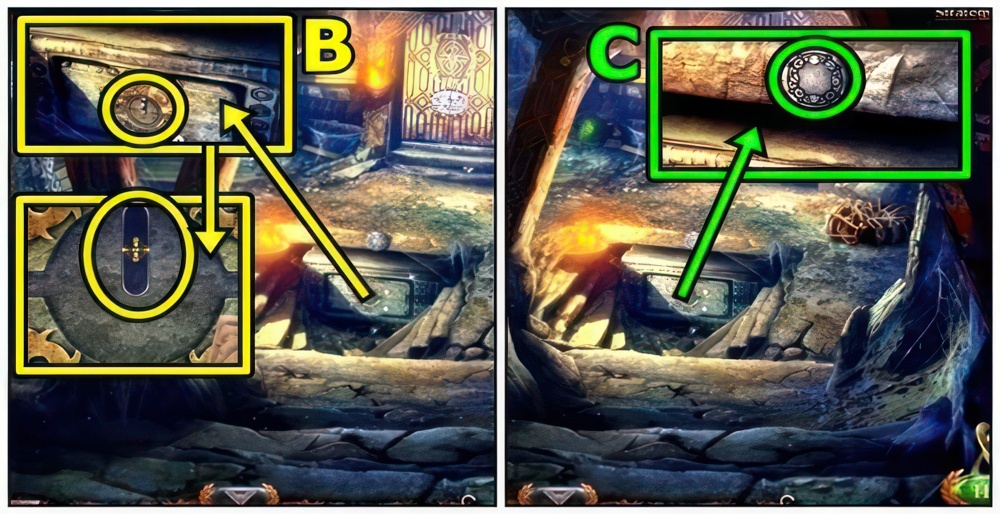
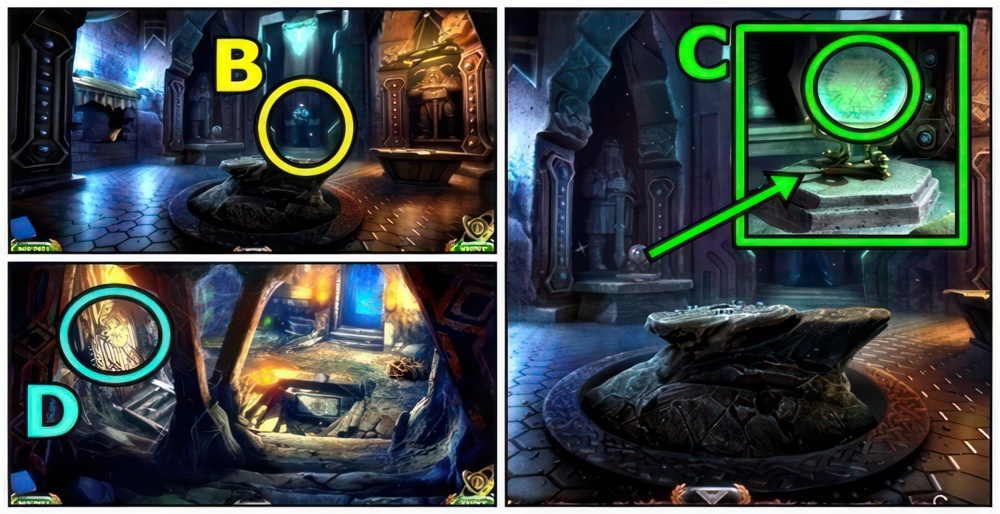
- Place STATUE DRAWING (B).
- Arrange the statue’s arms as shown in the image.
- Walkthrough: (C).
- Move items, take RUNE STONE SHARD.
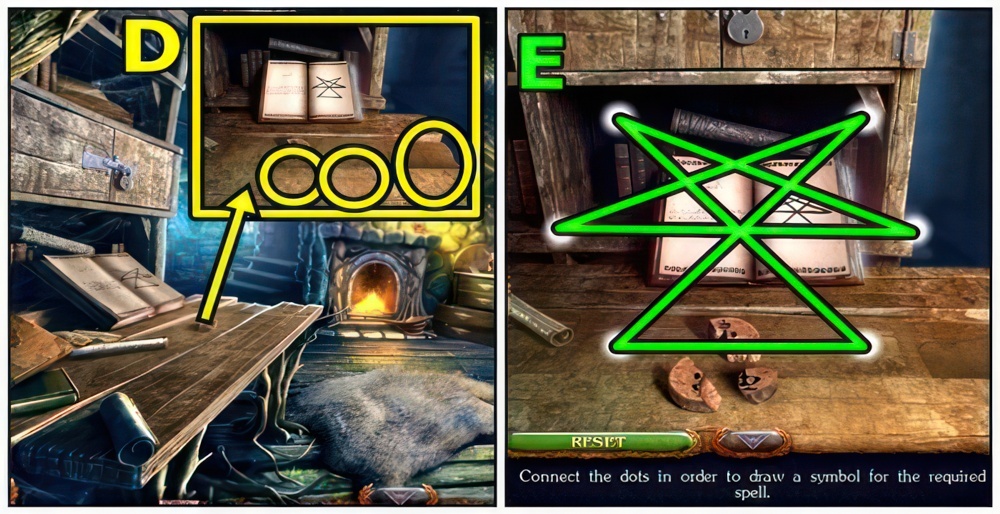
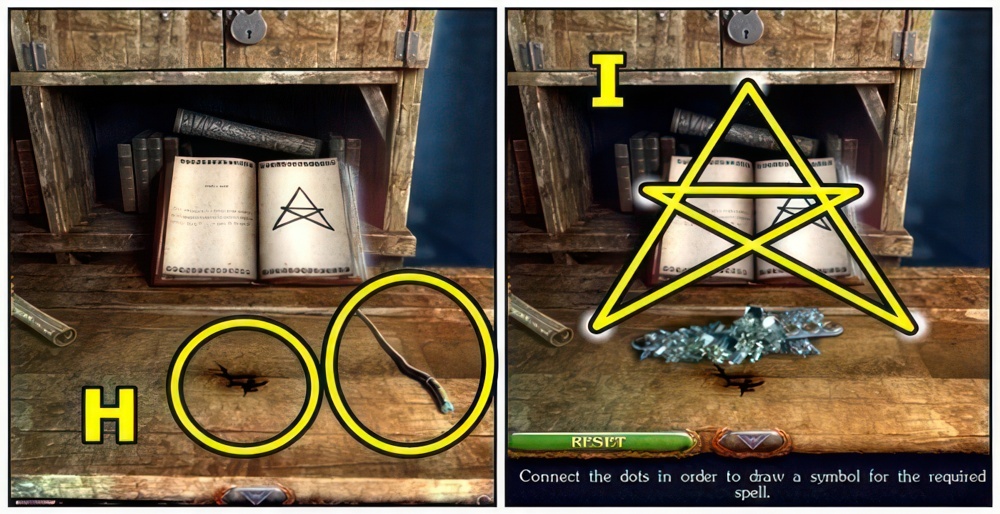
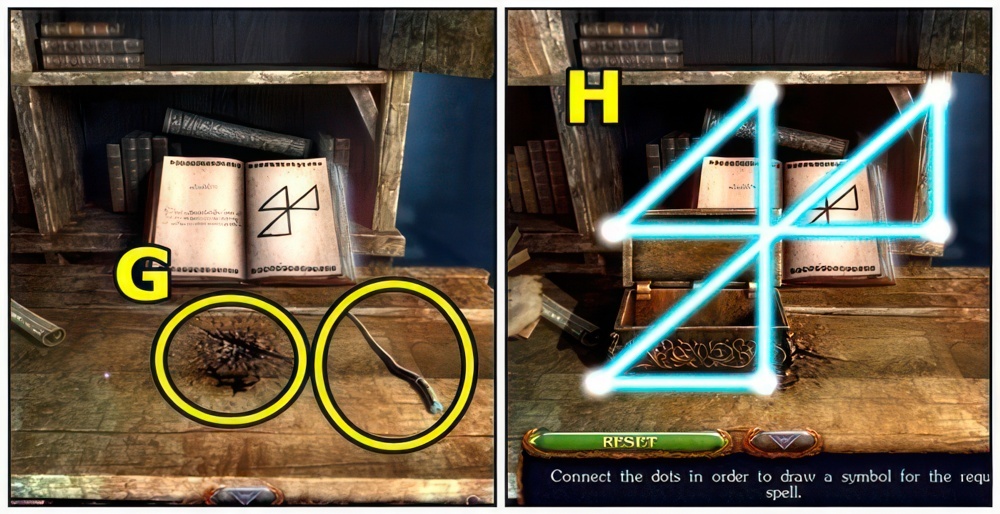
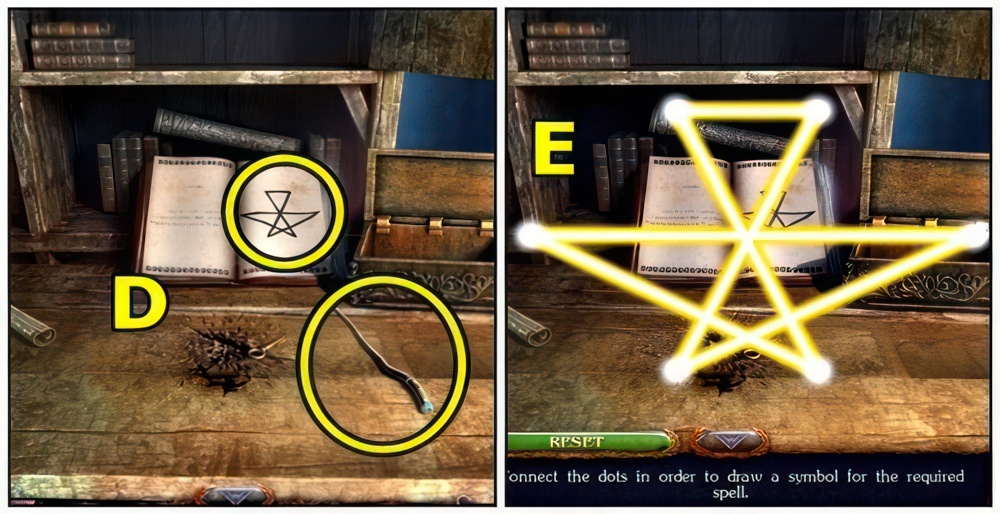
- Add RUNE STONE SHARDS (D) and MAGIC WAND.
- Turn to Mend Spell.
- Connect the dots in order to draw a symbol for the required spell.
- Walkthrough: (E).
- Take RUNE STONE.
- Go to Forest Edge.

- Add RUNE STONE (F).
- Go (G).
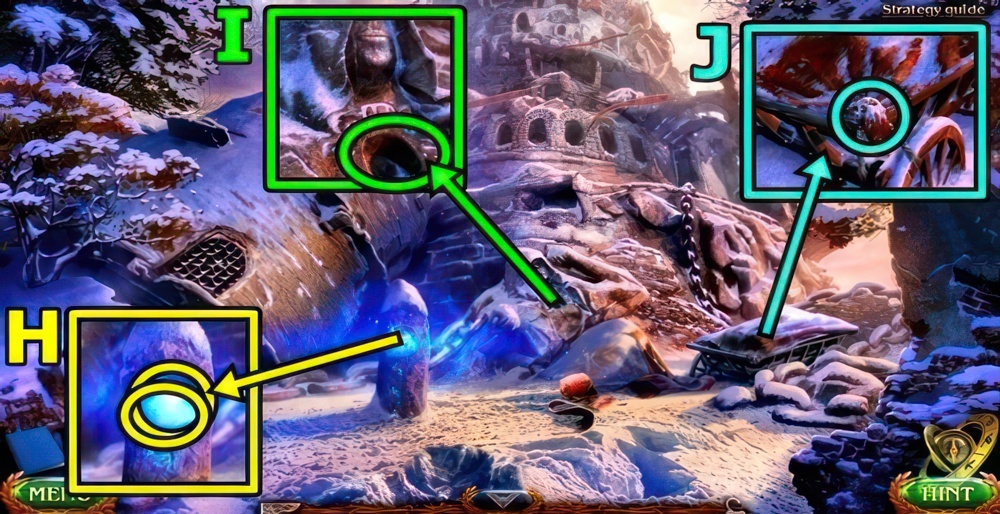
- Remove snow (H), take ENERGY ORB.
- Add ENERGY ORB (I), take FLASK OF ESSENCE.
- Use AWL (J).

- Lower cloth (K).
- Take GLOWING MUSHROOMS (L).
- Open bag, remove, open sack, take KYOLLS.
- Return to Halfling Village, enter Nomianna’s Pumpkin.

- Open SACK OF COINS, take KYOLLS.
- Buy (M), receive PICKAXE.
- Return to Catacombs.
- Remove rings (N), break barrel, use PICKAXE.
- Take TAR.
- Return to Maaron’s Hut.
- RAG on CLUB, receive HALF-FINISHED TORCH.
- Add TAR (O), then HALF-FINISHED TORCH.
- Receive TORCH.
- Return to Catacombs.
- Use TORCH (P).
Underground passage
Maaron suggested I reach the mountains through the underground tunnels. The entrance is at the foot of the Stronghold. I must find the way.
- Take CART WHEEL (Q).
- Remove cloth (R).
- Rotate the dials to input the correct code.
- There’s a hint to the code on the image.
- Play puzzle (S), receive NOMIANNA’S BOX.
- Untie (T).
- Take CUTTING PLIERS (U).
- Add CART WHEEL.
- Press wheel.

- Use CUTTING PLIERS (V).
- Add rocks (W), take CRIMSON STONE.
- Untie (X).
- Go (Y).
- Examine (Z).
- Receive KYOLLS.
Folnur’s machine
We can reach the Frozen Mountains quickly in Folnur’s vehicle.
- Take BLACKSMITH’S TONGS (A).
- Move rocks (B).
- Move lever.
- Lift (C).
- Rotate the dials to input the correct code. There’s a hint to the code on the image.
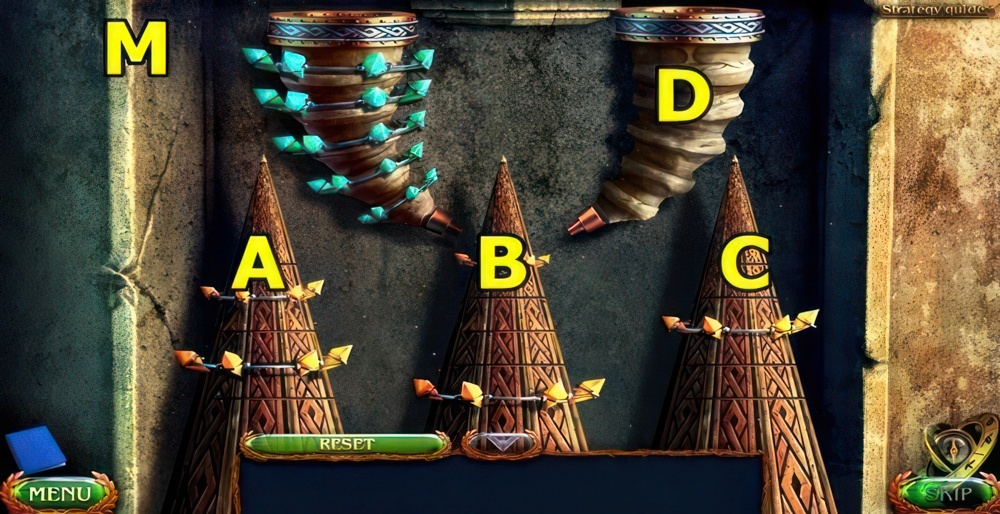
- Play puzzle (D).
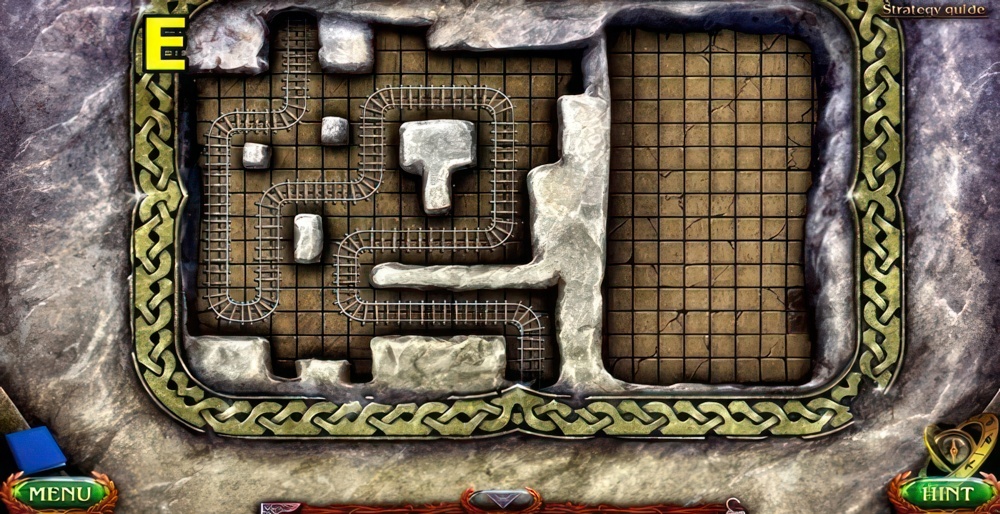
- Use the track pieces to make a railroad that connects the rails coming out from the tunnels.
- Walkthrough: (E).

- Take EMPTY FLASK (F).
- Use EMPTY FLASK (G), receive CAVE TEARS.
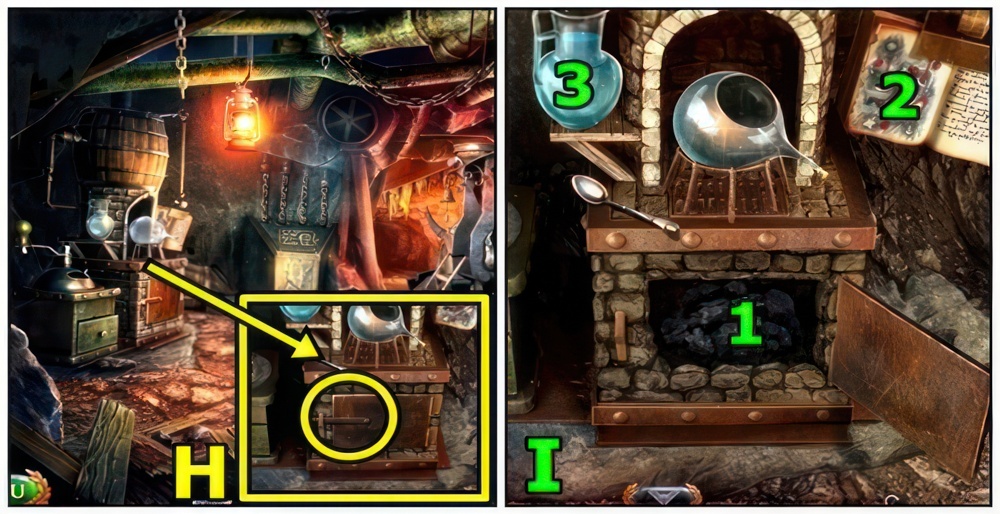
- Remove rope from FLASK OF ESSENCE, read note, receive BASILISK VENOM.
- Open (H).
- 1-Use TORCH (I).
- 2-read.
- 3-pour.
- 4-Add GLOWING MUSHROOMS (J)
- 5-add CRIMSON STONE.
- 6-grind.
- 7-open.
- 8-scoop.
- 9-place CAVE TEARS.
- 10-uncork (K).
- 11-add BASILISK VENOM.
- Take OMNIVOROUS ACID.
- Return to Stronghold Ruins.
- Pour OMNIVOROUS ACID (L).
- Play puzzle (M).
- Open (N), take HEATONITE.
- Return to Folnur’s Dwelling.
- Add HEATONITE (O), use TORCH.
- Go (P).
Suitable equipment
If I want to survive the deadly temperatures in the Frozen Mountains I’ll need proper winter clothes.
- Take MECHANISM PIECE (Q).
- Take DAGGER (R).
- Open, take KYOLLS and MECHANISM PIECE.
- Return to Halfling Village, enter Nomianna’s Pumpkin.
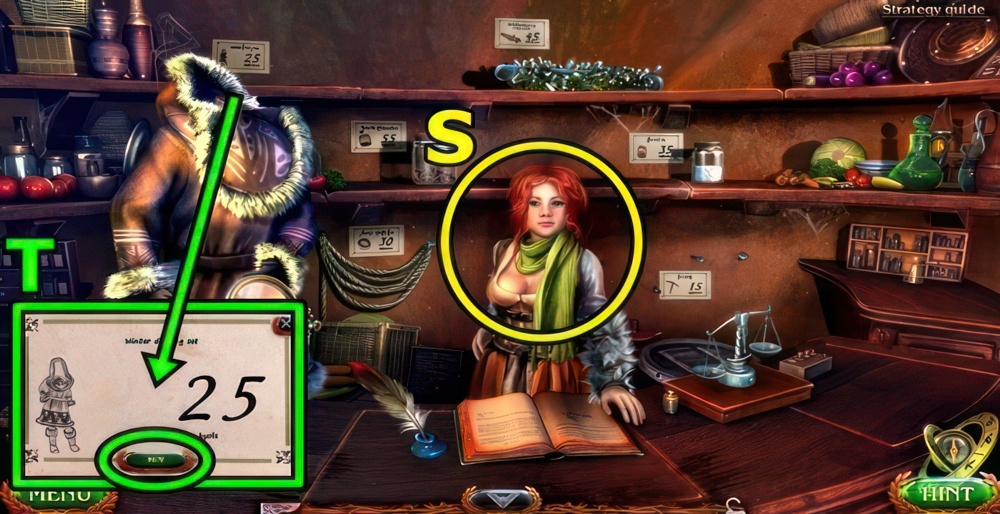
- Offer NOMIANNA’S BOX (S), receive KYOLLS.
- Buy (T), receive winter clothing set.
- Return to Cave End.
Bridges
We need to lower the hanging bridges to be able to get up to the surface in the Frozen Mountains.

- Play puzzle (U).
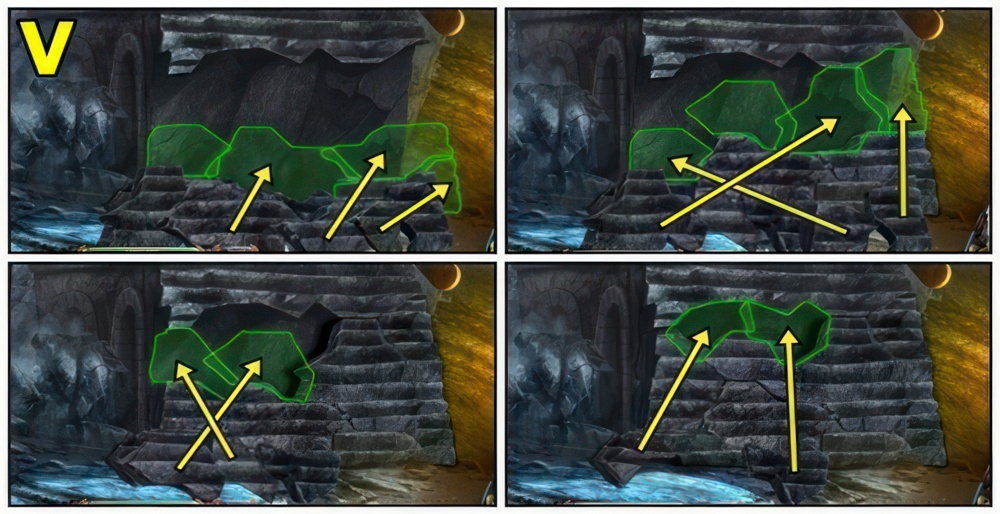
- Restore the broken stairs.
- Walkthrough: (V).
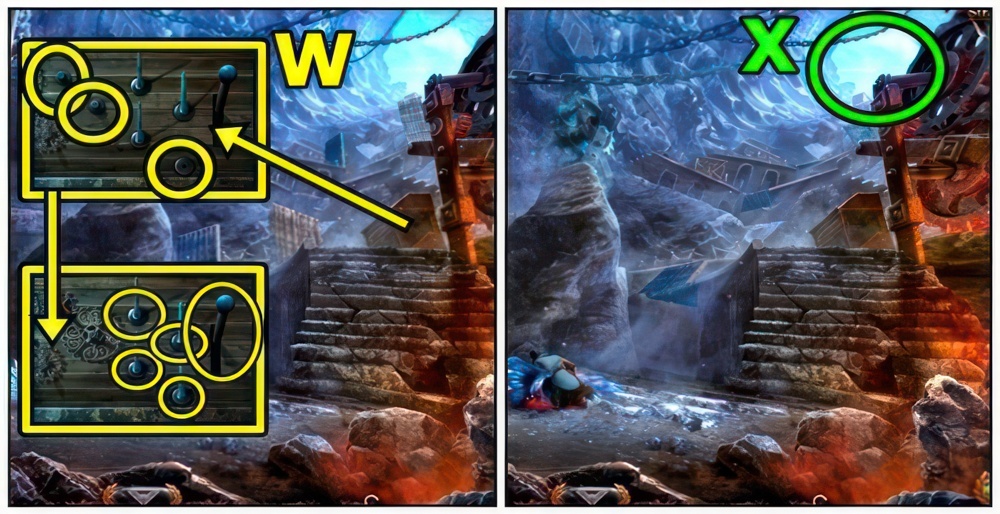
- Add MECHANISM PIECES (W).
- Adjust all handles, pull lever.
- Go (X).
Trap
Druids driven Frosty Tarsas into the trap. I have to get there and discus what seems to be a problem with Maaron.

- Use TORCH (Y).
- Take KEY (Z).
- Insert KEY, take LIGHTNING ELEMENT and FLASK OF RUM.
- Offer FLASK OF RUM, take CHARGED STAFF.

- Use CHARGED STAFF (A).
- Go (B).
- Examine (C).
- Receive FLAMES ELEMENT.

- Examine (D).
- Open (E), take SULFUR.
- Use DAGGER, receive HOOK.
- Go down.

- Remove (F).
- Use BLACKSMITH’S TONGS, receive GIANT’S TOOTH.
- Return to Halfling Village, enter Nomianna’s Pumpkin.

- Offer GIANT’S TOOTH (G), receive KYOLLS.
- Buy (H), receive ROPE.
- Return to Forest Path.

- Press the right buttons. You saw the hint earlier.
- Walkthrough: (I).
- Play puzzle (J).

- Place the blue crystals to light up all the red ones.
- A crystal powers only the adjacent cells.
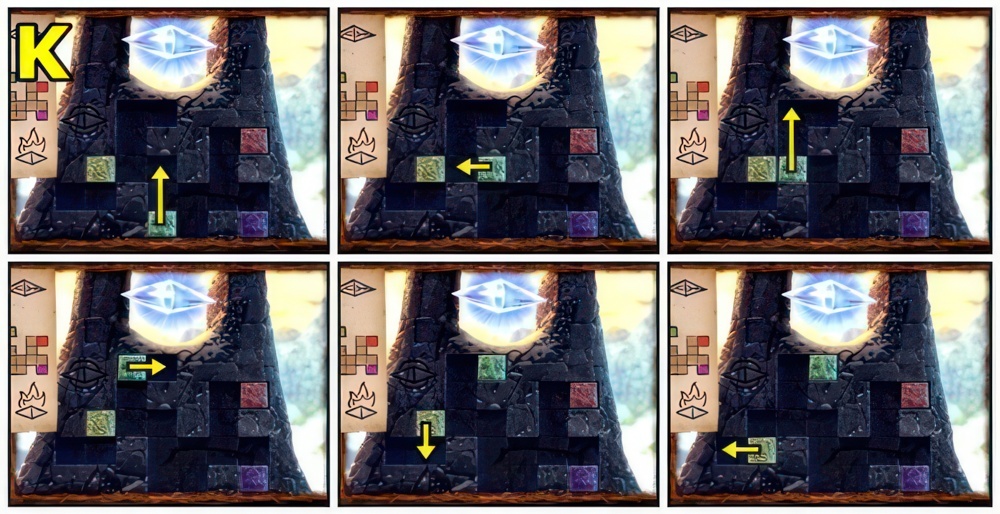
- Walkthrough: (K).
- Take PART.
- Return to Exit to the Mountains.

- HOOK on ROPE, attach, receive HOOK ON ROPE.
- Remove (L).
- Use HOOK ON ROPE.
- Go (M).
- Take HALBERD (N), examine statue.
- Receive CANNONBALL.
- Use HALBERD (O).
- Take COAL (P).
- Touch lock.
- Open, take HAMMER, open, take SMALL SACK and KYOLLS.
- Return to Halfling Village, enter Nomianna’s Pumpkin.

- Buy (Q), receive NITER.
- Receive MITTENS.
- Go to Folnur’s Dwelling.

- Add COAL (R), close, grind.
- Open (S).
- Add SMALL SACK (T).
- Use spoon (U), receive COAL.
- Return to Gorge.
- Remove instructions from CANNONBALL.
- Add SULFUR, remove cap, empty flask, add sulfur to cannonball.
- Add NITER, remove lid, empty jar, add niter to cannonball.
- Add COAL, open and empty sack, add both piles of coal to cannonball.
- Receive BOMB.
- Add BOMB (V), use TORCH.
- Go (W).
- Take FANGS 4/4 (X), BOOK PART and KYOLLS.
- Add FANGS (Y), use HAMMER.
- Play puzzle.
- Move the key left or right, or rotate it, to find the position of the key where all lines on the pins form one straight line.
- Walkthrough (Z): Rotate key twice, adjust.

- Play puzzle (A), receive DOME ELEMENT.
- Return to Exit to the Mountains.
- BOOK PART on PART, receive KEY.
- Go (B), add KEY, take HINT.
- Go left.
Elements
We have to activate the energy of all ritual stones with the help of the special elements in order to entrap the Tarsas.
- Add LIGHTNING ELEMENT (C) and HINT.

- Move the tiles to arrange them as shown on the image.
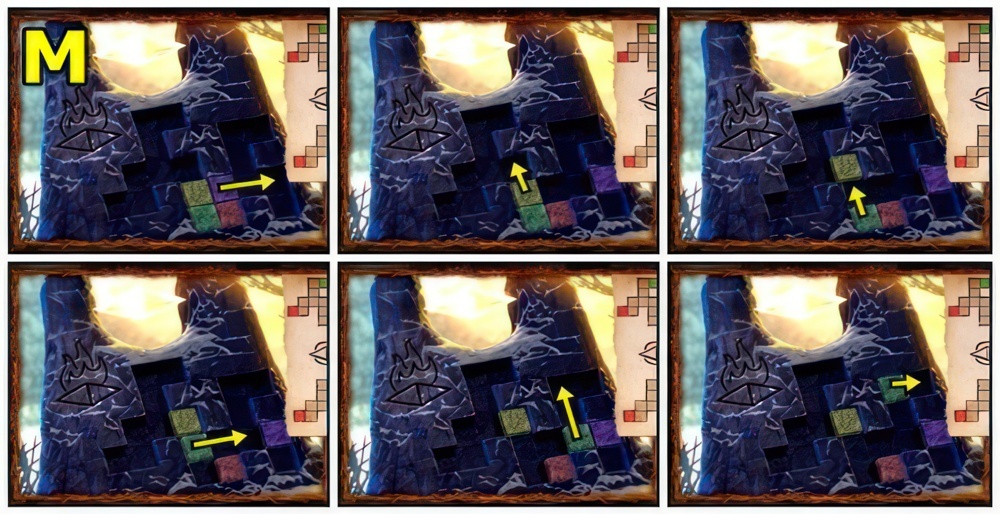
- Walkthrough: (D).
- Walkthrough: (E).
- Walkthrough: (F).
Buldan the Priest
Buldan the Priest, from the Dwarf Dungeons might now how to calm down Tarsas, at least according to the Folnur it is. I have to ask him if that’s so.
- Add DOME ELEMENT (G).
- Move the tiles to arrange them as shown on the image.
- Walkthrough: (H).
- Walkthrough: (I).
- Walkthrough: (J).
- Walkthrough: (K).

- Add FLAMES ELEMENT (L).
- Move the tiles to arrange them as shown on the image.
- Walkthrough: (M).

- Walkthrough: (N).
- Walkthrough: (O).
- Talk (P).
- Receive PIECE OF FOLNUR’S CHEST and FIRE SCEPTER.
- Return to Cave End.
- Use HAMMER (Q), receive FROST WOLF BLOOD.
- Go down.
- Insert PIECE OF FOLNUR’S CHEST (R).
- Take KEY PART, HINT PLATE and KYOLLS.
- Go down.
- Add HINT PLATE (S).
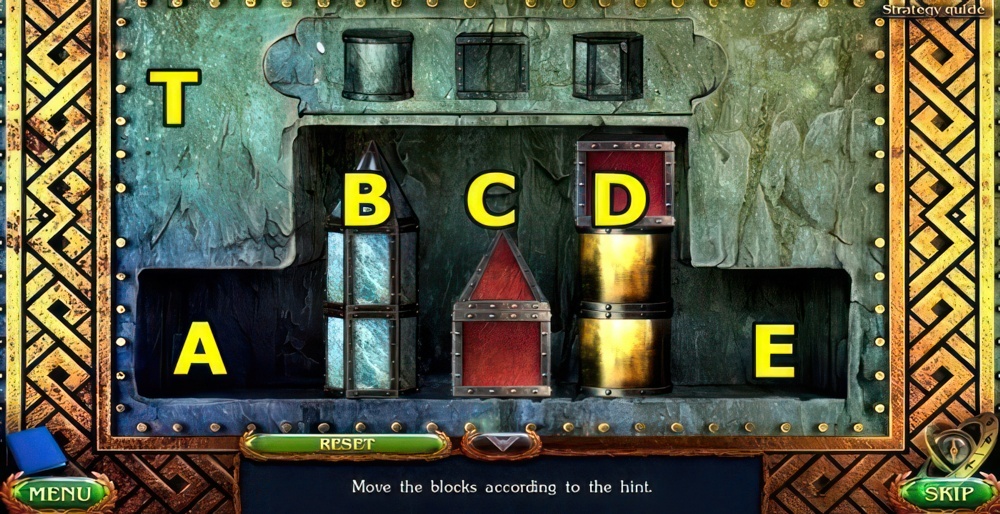
- Move the blocks according to the hint.
- Walkthrough (T): (C-A)-(D-C)-(A-C)-(B-A)-(D-E)-(B-D)-(B-D).
- (E-B)-(D-B)-(D-B)-(D-E)-(B-D)-(B-D)-(A-D)-(E-B).
- Go (U).
- Use FIRE SCEPTER (V).
- Use the fire scepter to place the traps and drive the scolopendra to the corner.
- Catch three scolopendras.
- Walkthrough (W): Puzzle is random, image shows possible solution.
- Take RUNE (X).
- Take HANDSAW (Y).
- Use DAGGER, receive SCOLOPENDRA EGGS.
- Use HANDSAW (Z), receive SCOLOPENDRA STINGER.
- Pull (A).
- Use SCOLOPENDRA STINGER, take BAG.
- Take KEY PART (B).
- Open BAG, take KYOLLS and PATTERN PART.
- Receive EMPTY BAG.
- Insert PATTERN PART (C).
- Go forward.
- Take SPOOL (D) and NEEDLE.
- Press (E), read note, take POWDER OF PROPHECY and KYOLLS.
- Add POWDER OF PROPHECY (F).
- Receive KEY BASE.
- Return to Halfling Village, enter Nomianna’s Pumpkin.
- Buy (G), receive DWARVES’ SOUVENIR.
Grave of the ancients
Buldan suggested to open an ancient grave with the body of his ancestor in order to learn something about Tarsas.
- Open BOOK OF SPELLS.
- Place DWARVES’ SOUVENIR (H), use magic wand.
- Turn to Destruction Spell.
- Connect the dots in order to draw a symbol for the required spell.
- Walkthrough: (I).
- Take KEY PART.
- Return to Temple.

- Add KEY BASE (J) and KEY PARTS.
- Take SARCOPHAGUS PART.
- Go down.
- Examine (K), add SARCOPHAGUS PART.
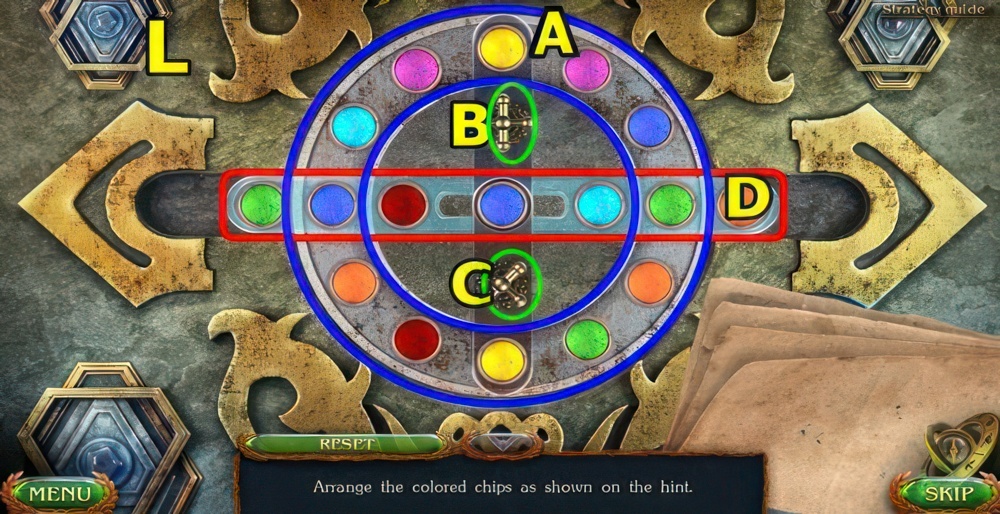
- Rotate (A) either clockwise (CW) or counter-clockwise (CCW).
- Drag (D) either left or right).
- Arrange the colored chips as shown on the hint.
- Walkthrough (L): (D-right×1)-(A-CCW×4)-(D-left×1)-(A-CCW)-(D-left×1)-(C).
- (A-CW×3)-(C)-(A-CCW×3)-(D-right×1)-(B).
- (A-CCW×3)-(B)-(A-CW×2)-(B)-(A-CCW×4)-(B).
- (A-CW×3)-(B)-(A-CCW×3)-(B)-(A-CW×2)-(B).
- (A-CW×2)-(C)-(A-CCW×2)-(C).
- (A-CW×2)-(C)-(A-CCW)-(C)-(A-CW×3)-(C)-(A-CCW).
- Take TAPESTRY FRAGMENT.
- Go forward.
Fireborn
To calm the Frosty Tarsas we need someone equal to his power. So we have to wake up a Fire Tarsas to deal with him.
- SPOOL on MITTENS, then DAGGER, add NEEDLE, receive THREAD AND NEEDLE.
- Add THREAD AND NEEDLE (M) and TAPESTRY FRAGMENT.
- Restore the tapestry.
- Walkthrough: (N).
- Receive COLD BLOOD ELIXIR RECIPE.
- Add COLD BLOOD ELIXIR RECIPE (O), then SCOLOPENDRA EGGS and FROST WOLF BLOOD.
- Add all ingredients, use HAMMER.
- Fill vial, receive COLD BLOOD ELIXIR.
- Return to Gorge.
Big preparations
In order to re-create the Horn of Fire we have to bring Buldan the Horn of Frost as well as new clean horn from the head of the mountain beast.
- Use COLD BLOOD ELIXIR (P).
- Play puzzle (Q), receive RUNE.
- Go (R), take PROJECTOR SEAL 1/2.
- Go (S).
- Add RUNES (T).
- Go down.
- Go (U).
- Use HAMMER (V).
- Use EMPTY BAG, receive CHARCOAL CRYSTAL.
- Remove (W), take DRILL.
- Use FIRE SCEPTER (X), take PROJECTOR SEAL 2/2.
- Return to Giant’s Site.

- Adjust (Y), add PROJECTOR SEALS.
- Examine (Z).

- Rotate the circles and move pieces of the mosaic into the slots so that they continue the image in the central circle.
- Walkthrough: (A).
Goblin and the Fairy of the forest
Go to the Darkwoods and ask help from the goblin and fairy.
- Take PUZZLE CUBE (B).
- Talk (C).
- Receive KEY.

- Open BOOK OF SPELLS.
- Insert KEY (D), take PLANK ON ROPE.
- Return to Halfling Village.
- Add PLANK ON ROPE (E).
- Take STICK.
- STICK on DRILL.
- Use DRILL (F), then HAMMER.
- Take CASKET.
- Open BOOK OF SPELLS.
- Open CASKET, take KYOLLS.
- Receive MAARON’S CASKET.
- Place MAARON’S CHEST (G), open, use magic wand.
- Turn to Revelation Spell.
- Walkthrough: (H).
- Take RUNE STONE.
- Return to Forest Edge.

- Insert RUNE STONE (I).
- Go (J).
- Use DAGGER (K), take CONES.
- Examine (L).

- Take CROSSBOW (M) and KEY PART.
- Go up.
- Use CROSSBOW (N).
- Go up.
- Go forward.
- Take RUNE (O).
- Take NAIL PULLER (P).
- Add CHARCOAL CRYSTAL.
- Take KEY PART (Q).
- Return to Gorge.
- Examine (R).
- KEY PARTS on PUZZLE CUBE.
- Rotate the cube’s corners to arrange them in correct positions.
- You saw the hint earlier.
- Walkthrough: (S).
- Take FRAGMENT.
- Return to Ancient Ontus.
- Press (T).
- Press three tiles inside the inner circle which make up the symbol on the highlighted plate in the outside circle.
- Find matches of three for all the plates in the outside circle.
- Walkthrough: (U).

- Walkthrough: (V).
- Take right path.
- Use DAGGER (W), take POLE.
- Use NAIL PULLER (X), receive NAILS.
- Take RED FLAGS.
- Place POLE (Y) and RED FLAGS.
- Examine.
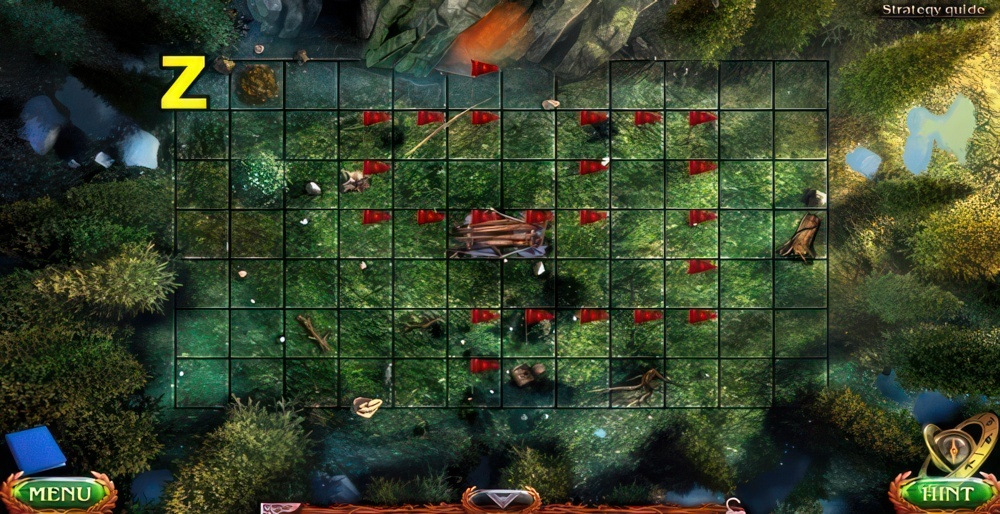
- Prod the swamp with the pole to find a safe route to the cave.
- Walkthrough: (Z).

- Take PLANKS (A) and RUNE.
- Sort PLANKS, add NAILS, use HAMMER, receive TEMPORARY BRIDGE.
- Lay TEMPORARY BRIDGE (B).
- Examine.

- Go (C).
- Examine (D).
- Take PIKE POLE (E).
- Take RODS (F).
- Add RODS (G).

- Position the tiles so that specific symbols are in the openings.
- You saw the hint earlier.
- Play puzzle (H), receive KRICKAR’S BELT.
- Offer KRICKAR’S BELT (I).
- Receive DRAWING.
- Go (J), take GARDEN TROWEL.
- Go down.

- Throw CONES (K).
- Use PIKE POLE (L), receive MEDALLION.
- Return to Forest Thicket.
- Use GARDEN TROWEL (M).
- Lift, take KYOLLS.
- Go forward.

- Add DRAWING (N).
- Restore the image using the hint.
- Walkthrough: (O).
- Take left path.
- Open (P), take NOTE.
- Pull (Q).
- Offer KYOLLS (R).
- Go forward.

- Take DEVICE BASE (S).
- Take TREBLE CLEF (T).
- Add TREBLE CLEF (U), take SET OF PIPES.

- DEVICE BASE and SET OF PIPES to NOTE.
- Hang up only the pipes that are shown on the image.
- Walkthrough: (V).
- Receive WIND CHIME.
Poisonous moss
Flylena asked to heal her tree from the poisonous moss. She’ll help me only when this task is done.
- Add WIND CHIME (W).
- Talk (X).
- Receive TINY FAIRY BOOK.
- Examine (Y).
- Go down.

- Use PIKE POLE (Z).
- Take MEDALLION HANDLE.
- Return to Goblin Cave.
- MEDALLION HANDLE on MEDALLION, receive KEY.
- Remove (A), insert KEY, open.
- Take LEATHER BAG.
- Open LEATHER BAG pockets, take MAGNIFYING GLASS, KYOLLS and TWEEZERS.

- Open BOOK OF SPELLS.
- Place TINY FAIRY BOOK (B), use magic wand.
- Turn to Enlarge Spell.
- Connect the dots in order to draw a symbol for the required spell.
- Walkthrough: (C).
- Open book, read note, remove key.
- Turn spell book to Reduction Spell (D).
- Use magic wand.
- Connect the dots in order to draw a symbol for the required spell.
- Walkthrough: (E).

- Use MAGNIFYING GLASS (F) and TWEEZERS, receive SMALL KEY.
- Return to Halfling Village, enter Nomianna’s Pumpkin.
- Buy (G), receive BUGS.
- Return to Fairy Glade.
- Use BUGS (H).
- Take PORTAL ACTIVATOR (I).
- Receive SLEEPY FLOWER.
- Go down.

- Use SLEEPY FLOWER (J).
- Take CHEST.
- Return to Ancient Portal.
- MAGNIFYING GLASS on CHEST, use SMALL KEY, receive CHEST OF DUST.
- Insert PORTAL ACTIVATOR (K), then CHEST OF DUST.
- Enter portal.
Museum
Get inside of the museum unnoticed and search for the Horn of Frost.

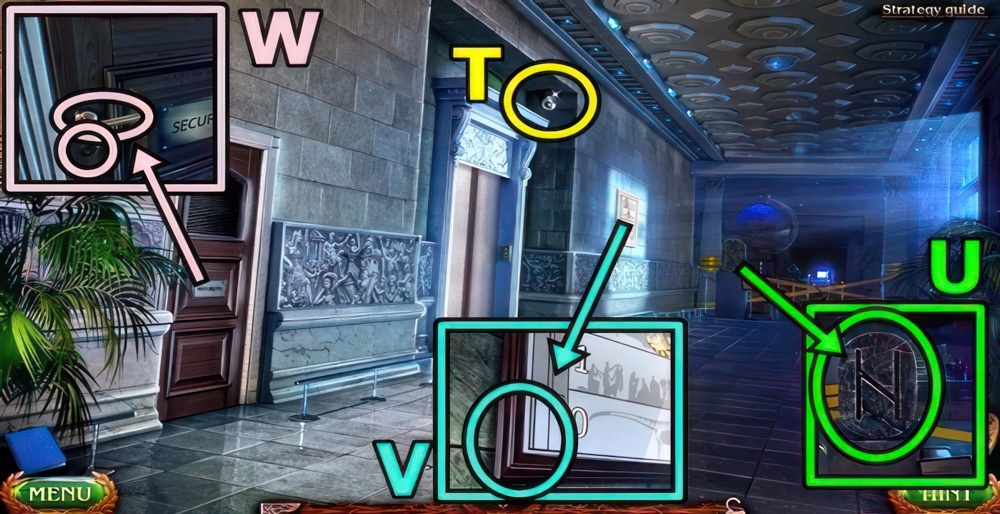
- Read (L), take PAPERCLIP.
- Use PAPERCLIP (M), take LIGHT BULB and CROWBAR.
- Add LIGHT BULB (N).
- Use CROWBAR (O).
- Go (P).
- Press (Q).
- Try to open.
- Insert DAGGER (R).
- Examine.
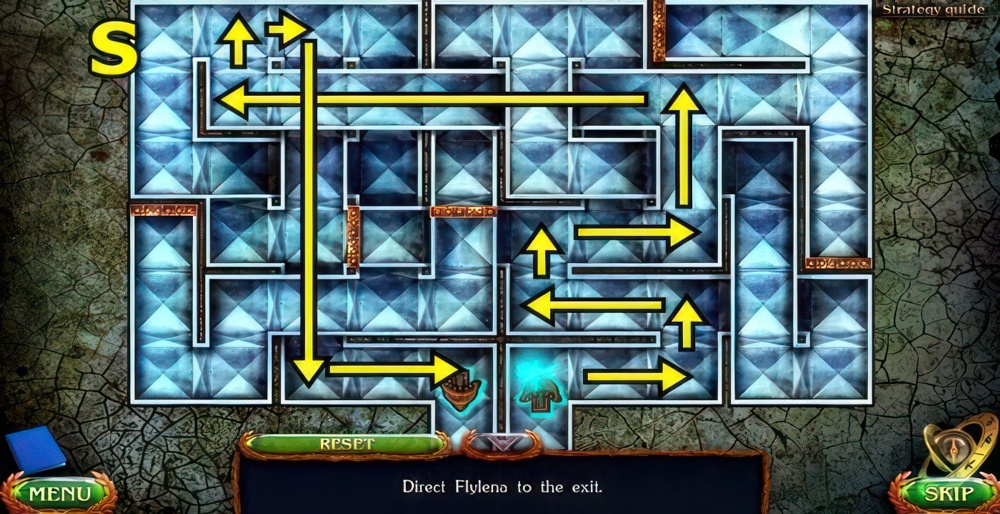
- Direct Flylena to the exit.
- Walkthrough: (S).
- Go left.
- Break (T).
- Take RUNE (U).
- Go (V), take KEY.
- Examine.
- Insert KEY (W), pull handle.
- Enter.
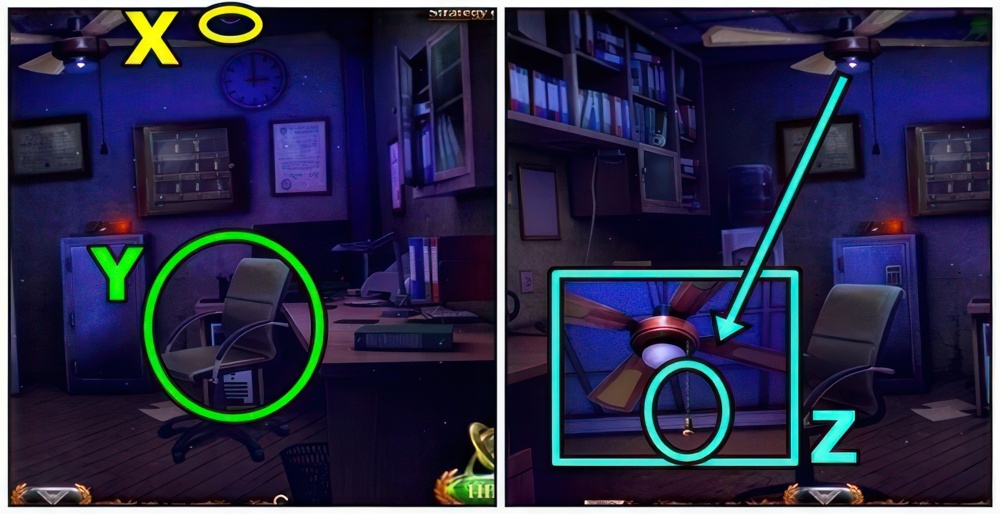
- Break (X).
- Go (Y).
- Pull (Z).
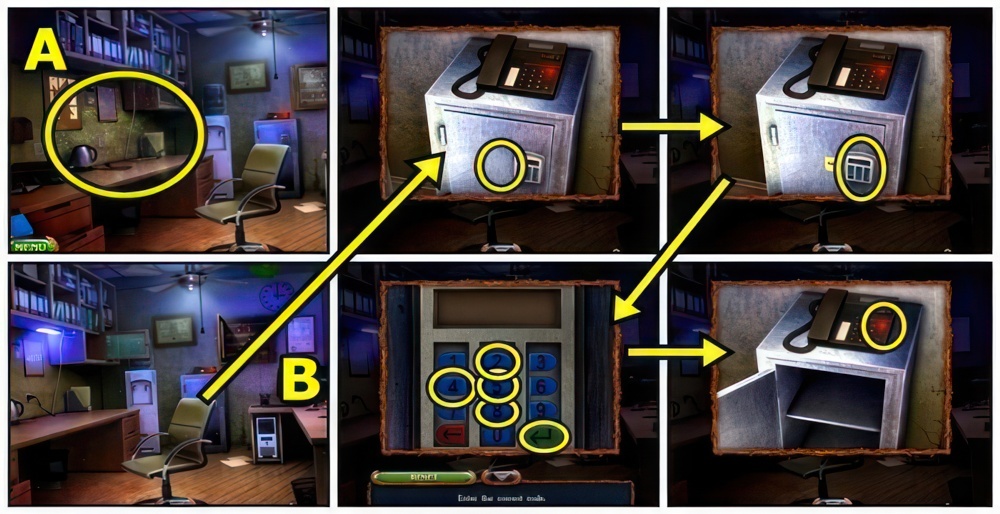
- Move the sheets to restore the image.
- Play puzzle (A), receive NOTE WITH CODE.
- Place NOTE WITH CODE (B).
- Enter 4-8-5-2.
- Take DOLLAR BILL and MINT CANDY.
- Press Play.

- Open (C), take KEY NUMBERED 23.
- Return to Archives.
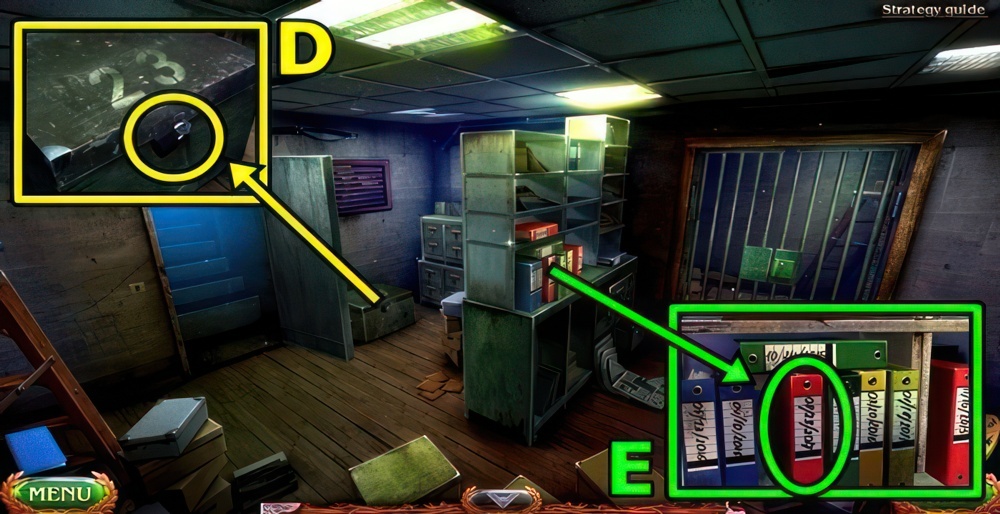
- Insert KEY NUMBERED 23 (D), take FUSES.
- Take FILE (E).
- Go down.

- Tip (F).
- Take TICKET.
- Add FUSES (G).
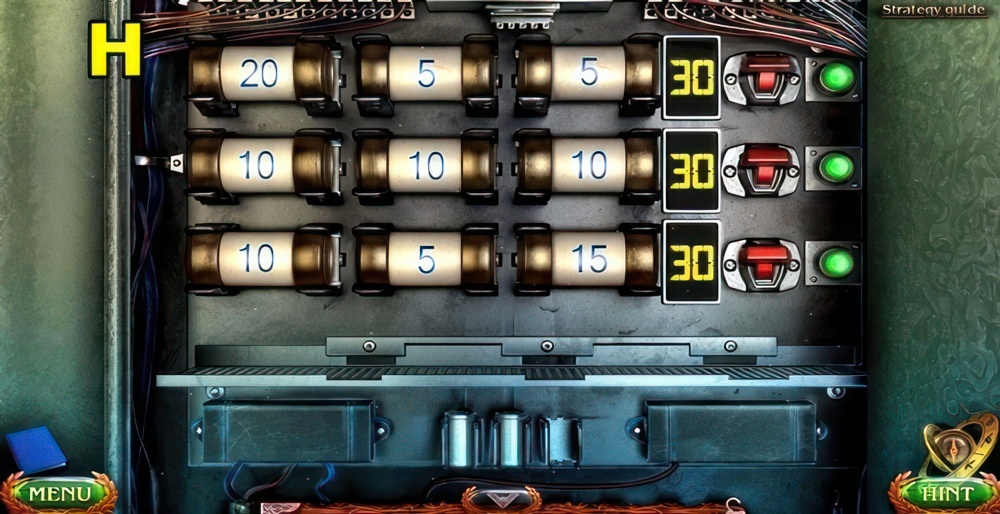
- Place the fuses in such a way that the sum of all numbers is the same in each row.
- Turn on the toggle switches.
- Walkthrough (H): Place fuses, flip switches.
- Return to First Floor.
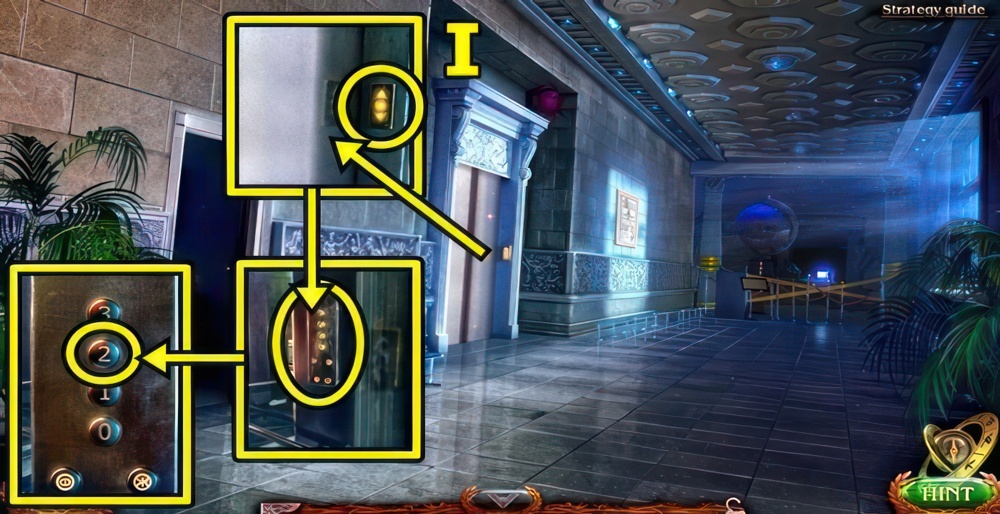
- Press (I), press 2.
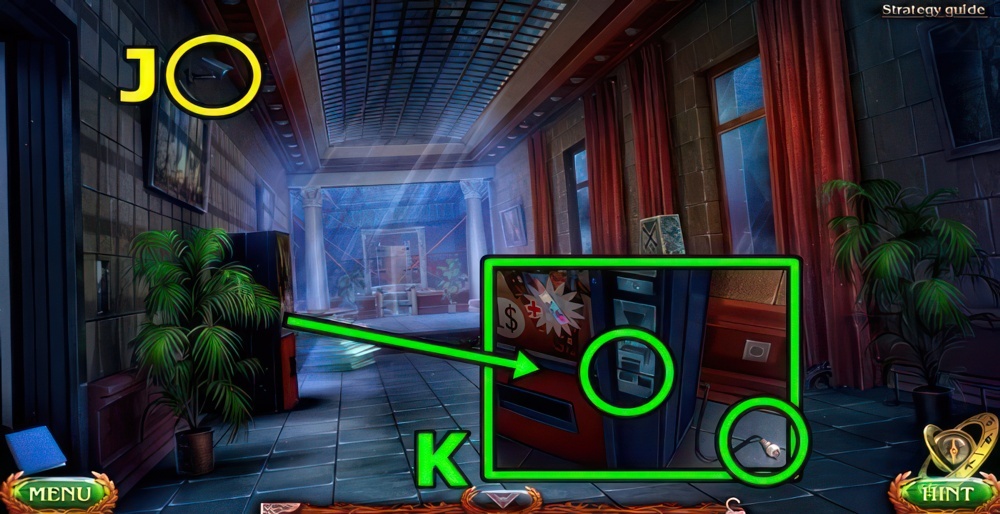
- Break (J).
- Insert (K).
- Insert DOLLAR BILL.
- Take DOLLAR BILL.
- Smooth DOLLAR BILL.
- Insert SMOOTH DOLLAR BILL.
- Take SODA.
- Remove chewing gum from SODA, add and unwrap MINT CANDY.
- Remove cap, unwrap and wad gum, place gum in cap, place mint in cap, replace cap.
- Receive SWEET BOMB.
- Take RUNE (L).
- Try to open.
- Move curtain, use HAMMER.
- Open, climb out.
- Pick up wrench (M).
- Throw SWEET BOMB.
- Use wrench, take BOARD.
Video
The camera should’ve captured the moment the guard disappeared. I have to watch that video and understand what went wrong exactly.
- Place BOARD (N).
- Insert TICKET (O).
- Go forward.
- Examine (P).
- Move Flylena to the red bulb.
- Avoid touching the red rays.
- Walkthrough (Q): This puzzle is random.

- Break (R).
- Take HORN OF FROST (S).
- Take KEY CARD (T).
- Open (U).
- Take FORENSIC SET.
- Return to Security Room.
- Open FILE, read, take CD.
- Press (V).
- Use FORENSIC SET.
- Press 9-4-3-ENTER.
- Open, remove CD, insert CD, close.
- Return to Archives.
- Insert KEY CARD (W).
- Open (X), clear, take RUNE.
- Return to Wall of First Birth.

- Add RUNE (Y), take and add remaining RUNES.
- Take PHANTOM BLADE (Z).
- Go up.
- Use PHANTOM BLADE (A), receive HORN.
- Return to Temple.
Horn of Fire
I have to go to the workshop and create a new Horn of Fire based on the Horn of Frost.
- Talk (B).
- Examine (C).
- Go down.
- Play puzzle (D).
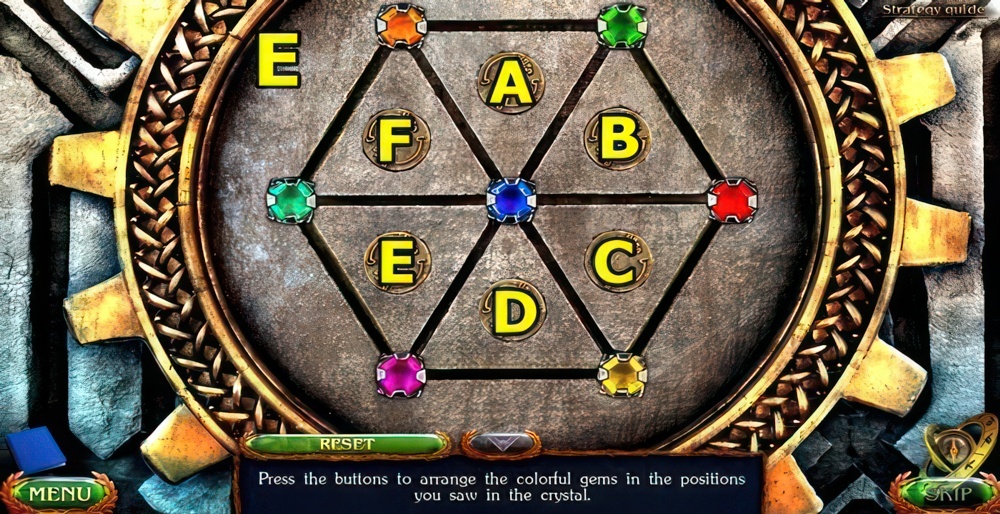
- Press the buttons to arrange the colorful gems in the positions you saw in the crystal ball.
- Walkthrough (E): C-A×2-E×2.
- Enter.
- Take KEY (F).
- Add FIRE SCEPTER (G), then KYOLLS.

- Insert KEY (H).
- Arrange the tiles as shown on the image.
- Play puzzle (I), receive CRYSTALS.
Awakening
I have to place the Horn of Fire on the pedestal at the museum, press and buttons in the correct order and, well, blow it.

- Add CRYSTALS (J).
- Add HORN OF FROST (K) and HORN.
- Assemble horn (L).
- Add crystals to the horn in the correct order.
- Walkthrough (M): (B-C)-(B-D)-(A-B)-(A-D)-(C-A)-(C-D)-(B-D)-(A-D).
- Take HORN OF FIRE.
- Return to Exhibition Hall.
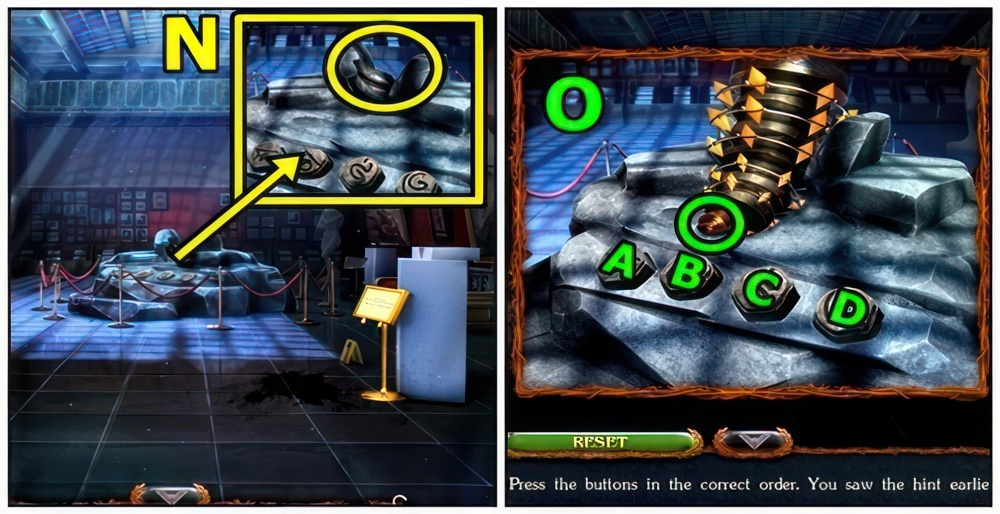
- Insert HORN OF FIRE (N).
- Press the buttons in the correct order. You saw the hint earlier.
- Walkthrough (O): A-D-C-B.
- Press Horn.
- Walkthrough Bonus Chapter, at the link below.


I’m having trouble with the Set of Pipes mini game glitching out. It will not let me place the pipes in the device at all. I’ve lined each one up pixel-perfect, and they slot back to their default position on the other side of the screen rather than staying in the device. Is there a fix for this?