
Unsolved Case 7: Whispers of Elderwick – You find yourself at the center of events unfolding in a quiet English village. It all begins with a piercing scream that shatters the usual evening silence, and it soon becomes clear that the death of your neighbor, Clarissa Morton, was no accident. You play as Mavis Donahue, a sharp-witted retiree with an unusual gift: when she touches objects, she sees echoes of the past and even possible events of the future. It is this gift that gradually draws you deeper into the investigation, where every detail could prove crucial. Together with Detective Marcus Partridge, you begin to piece together what happened. At first, it’s a routine interview with neighbors: some heard a gunshot, others noticed strange silhouettes at night, and some prefer to remain silent. But the further you go, the more suspicion each villager arouses. The pharmacist Agatha Flynn acts secretive and leaves the house at night; the grumpy Albert Crow is hiding something in his greenhouse; and the postman Arthur Pennington turns out to be involved in a strange story involving stolen letters and a stamp collection. Even harmless conversations over tea or book club meetings begin to seem like part of a larger picture, full of unspoken truths and unsettling coincidences. Gradually, the investigation goes beyond a single murder. You discover forged threatening letters, stolen mail, and traces of a mysterious company involved in home foreclosures. What seemed like a tragic accident turns out to be a calculated plan to pressure the villagers. Someone is deliberately sowing fear, pushing people toward desperate decisions, and won’t even stop at murder. Mavis must not only search for clues but also rely on her visions, which sometimes show terrifying scenes and make her doubt every step she takes. During the investigation, you’ll explore cozy homes with the scent of fresh tea, locked greenhouses, empty shops, and moonlit gardens, where danger may lurk around every corner. Conversations with the villagers play a crucial role: some share rumors, others try to hide the truth, and still others find themselves in danger. The tension rises with every new discovery, and it becomes clear that the killer is much closer than it seems. If you can’t solve a puzzle or don’t know where to find items, you can check out the walkthrough for Unsolved Case 7: Whispers of Elderwick, and stop the one who has decided to turn Elderwick into a place of fear.
Unsolved Case 7: Whispers of Elderwick – Walkthrough
Here you can see the complete walkthrough for Unsolved Case 7: Whispers of Elderwick, namely all chapters, including the bonus chapter, in pictures.
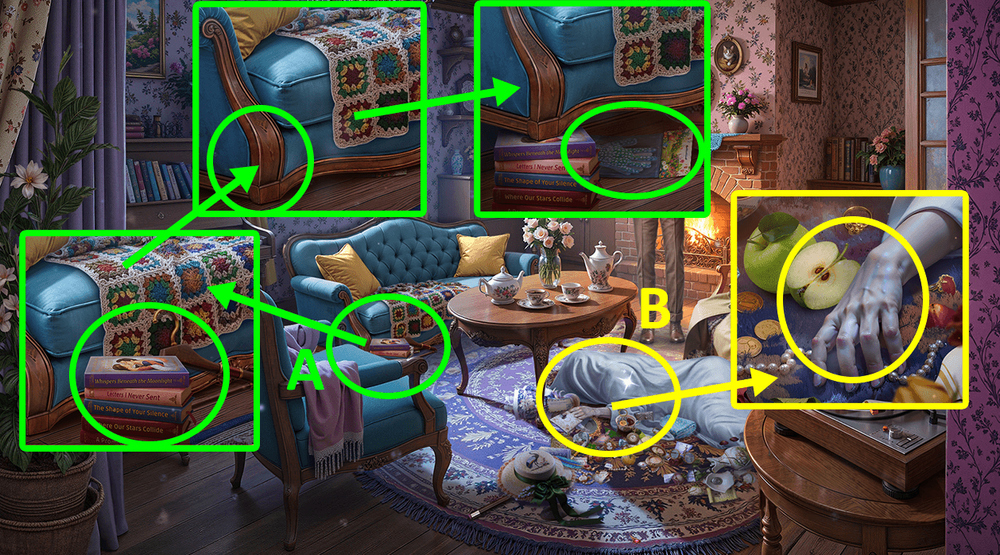
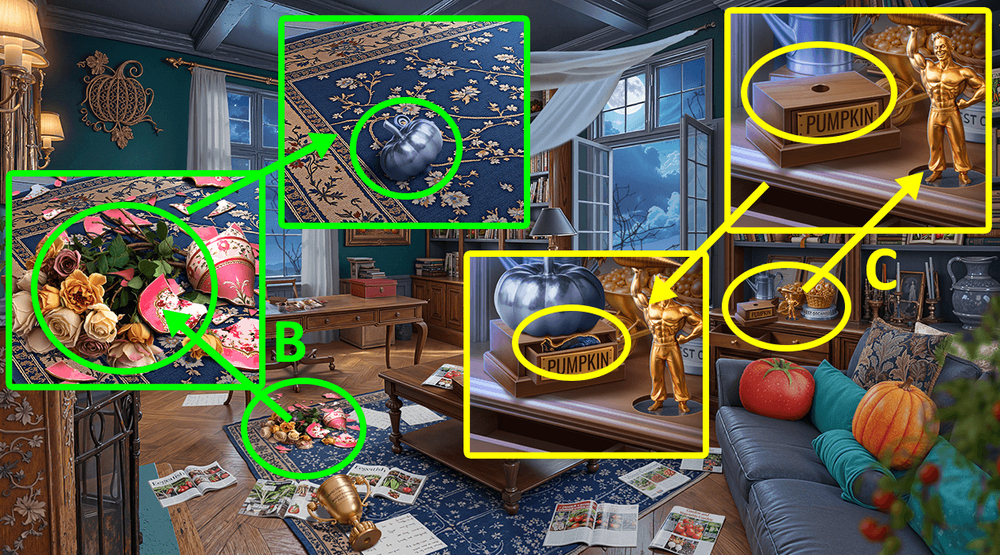
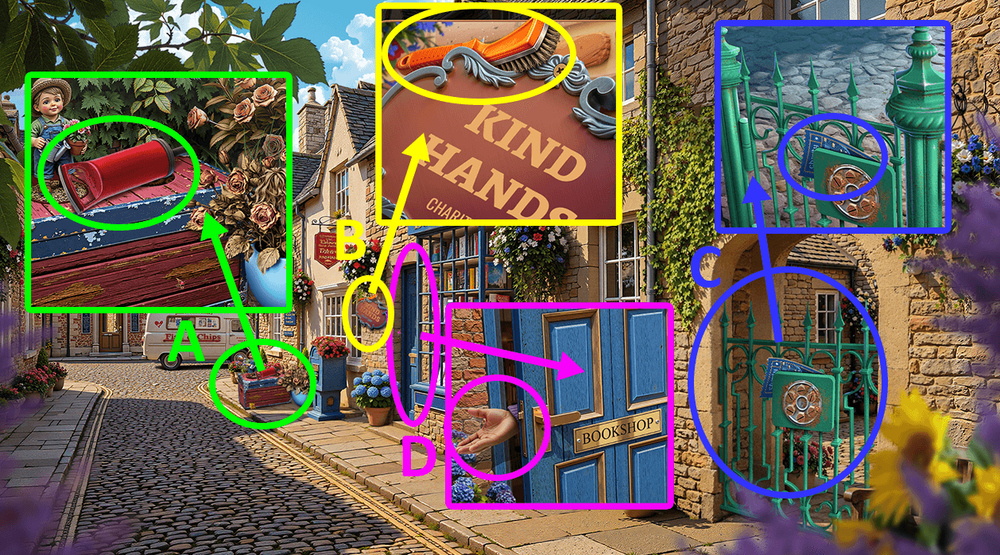
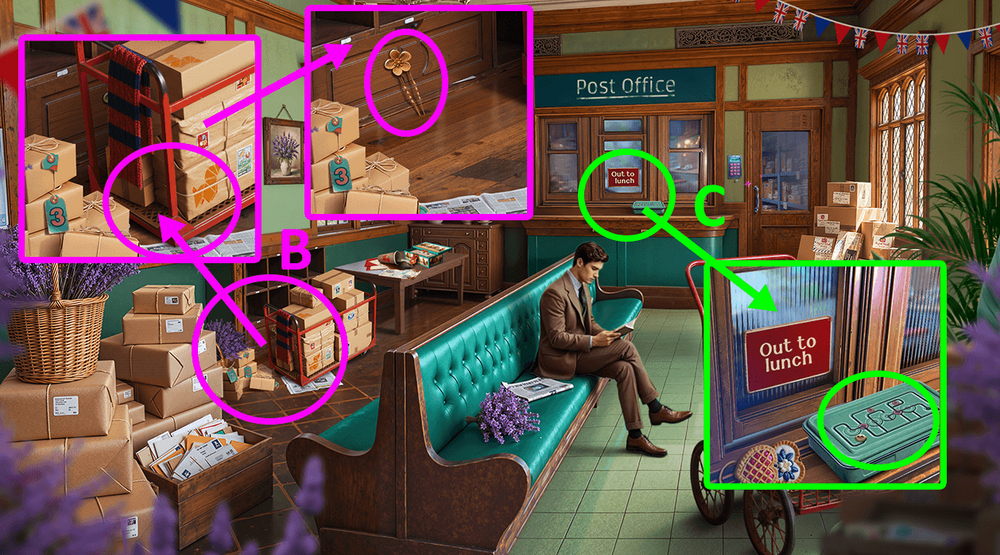
- Take STACK OF ROMANCE NOVELS, HANGERS 1/2 and COARSE SALT, use STACK OF ROMANCE NOVELS on the side of the couch, take RUBBER GARDEN GLOVES (A).
- Use RUBBER GARDEN GLOVES (B).
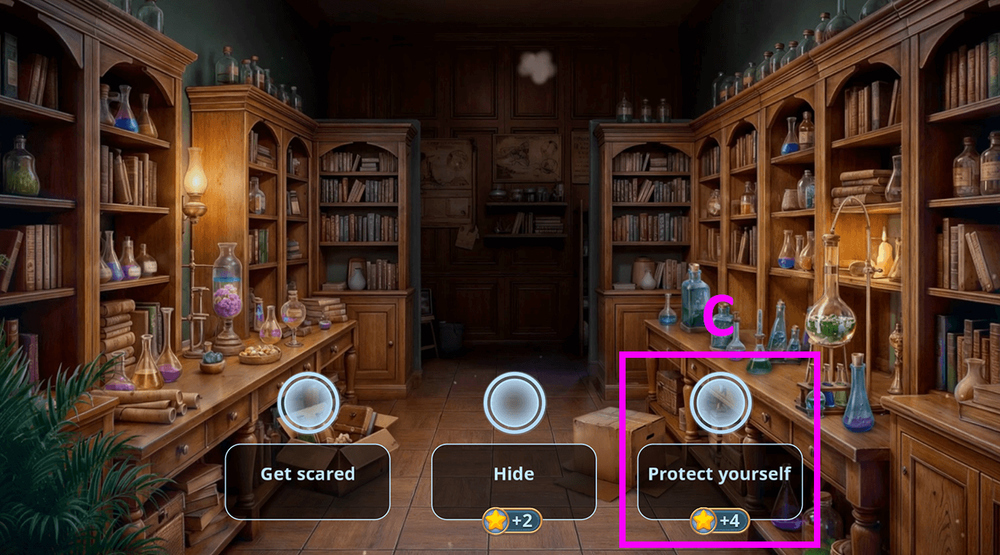
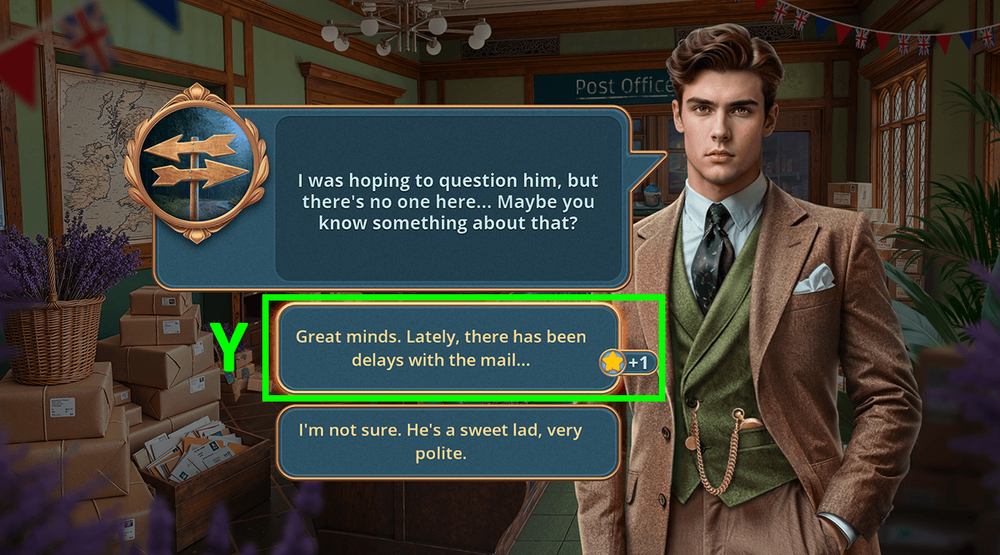
- Play puzzle, earn STRANGE LETTER (C).
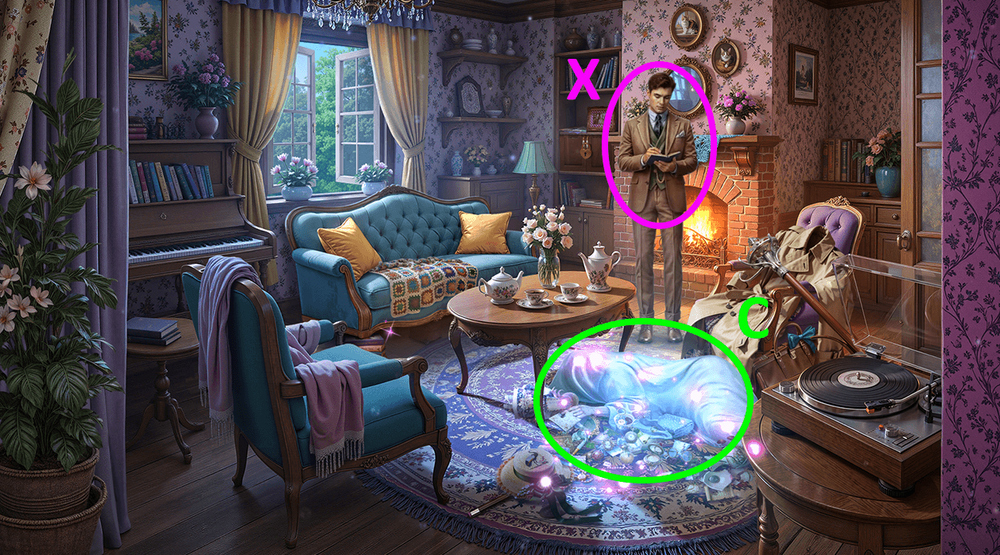
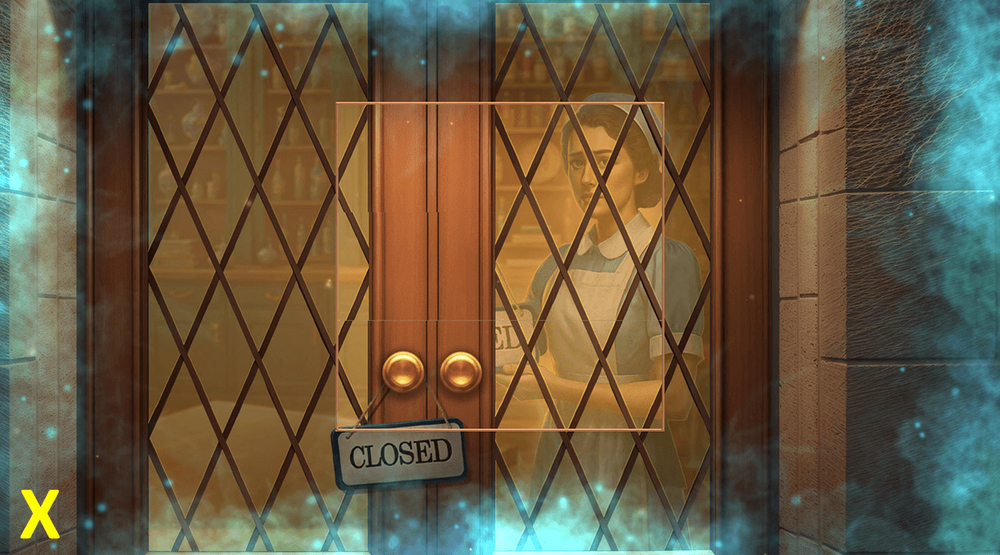
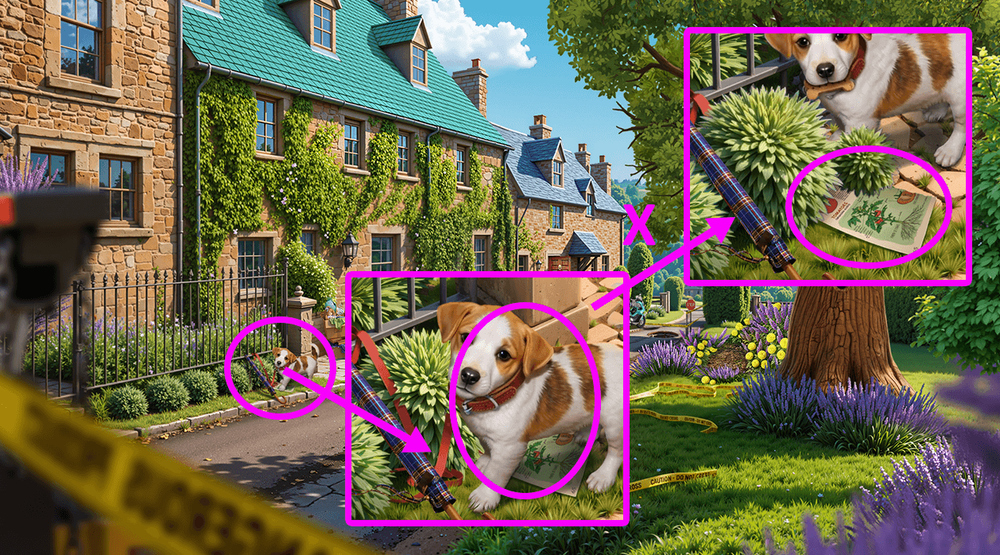
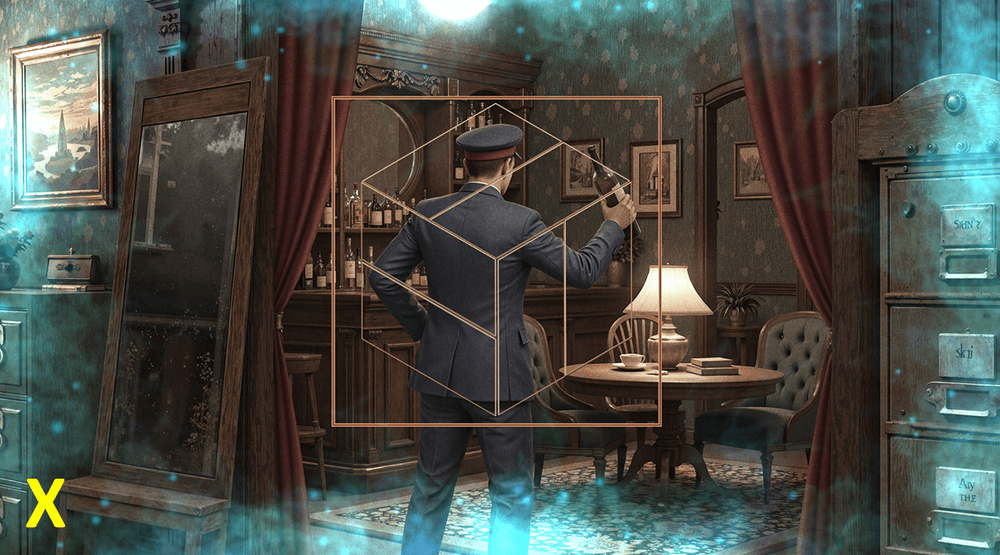
- Give STRANGE LETTER to Marcus, earn BALLERINA FIGURINE (X).

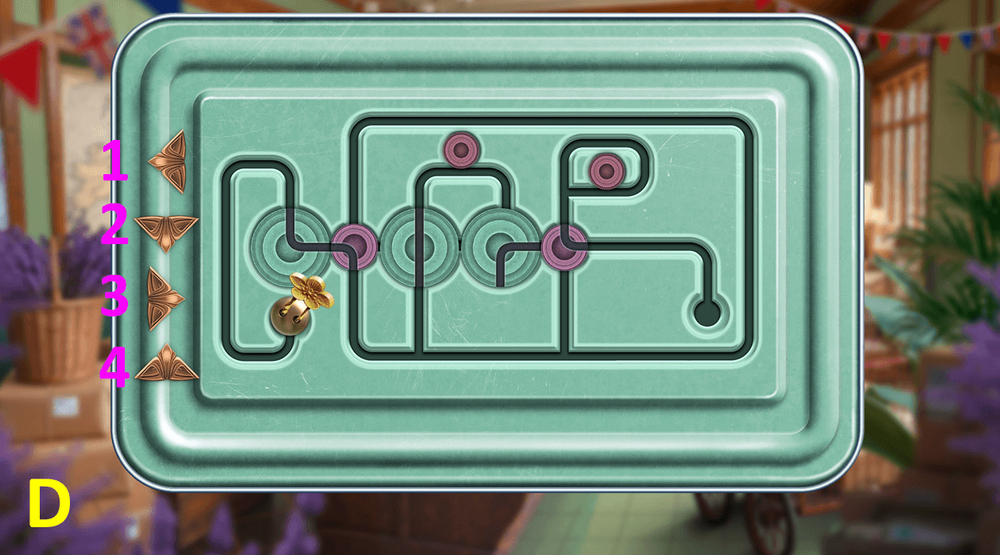
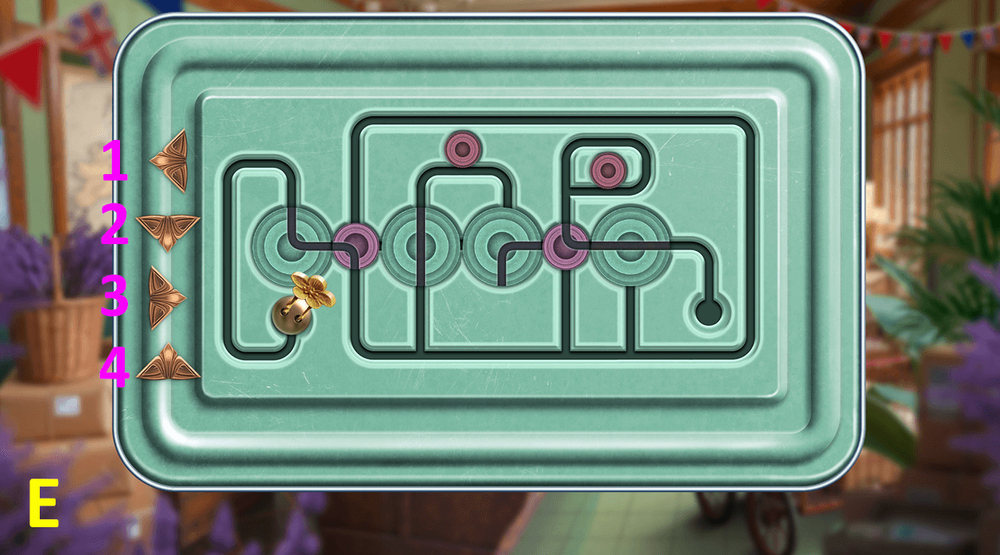
- Click on the box, use BALLERINA FIGURINE, take COINS 1/2, SPONGE and KEY (D).
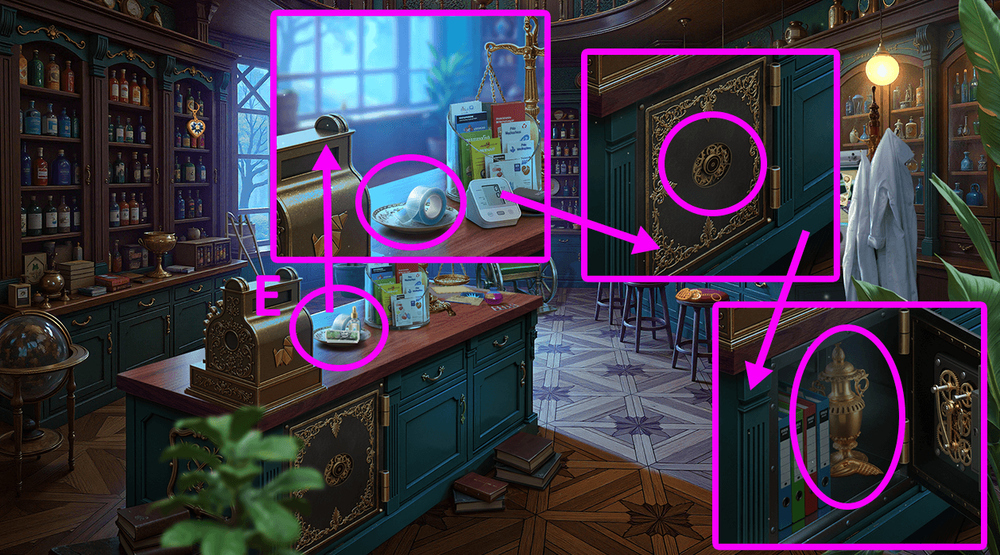
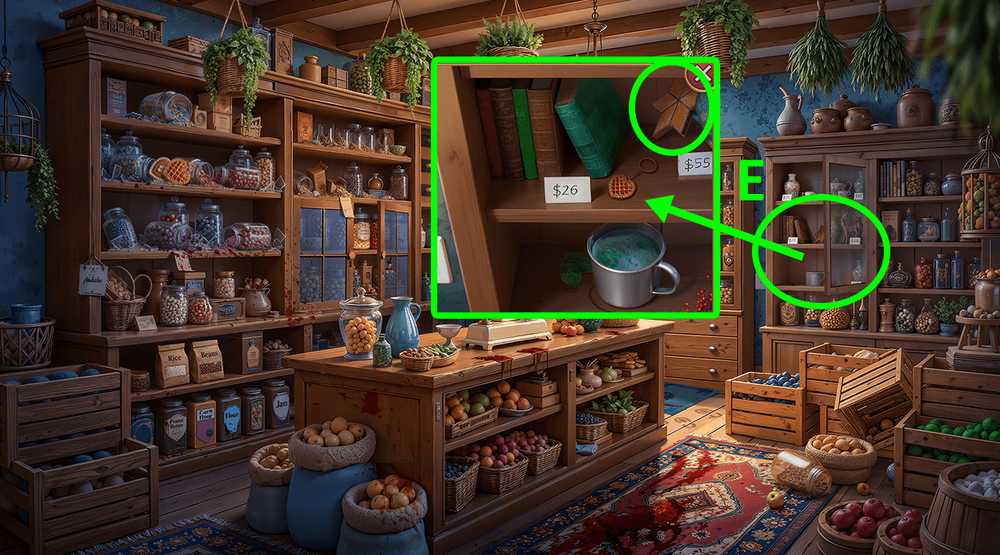
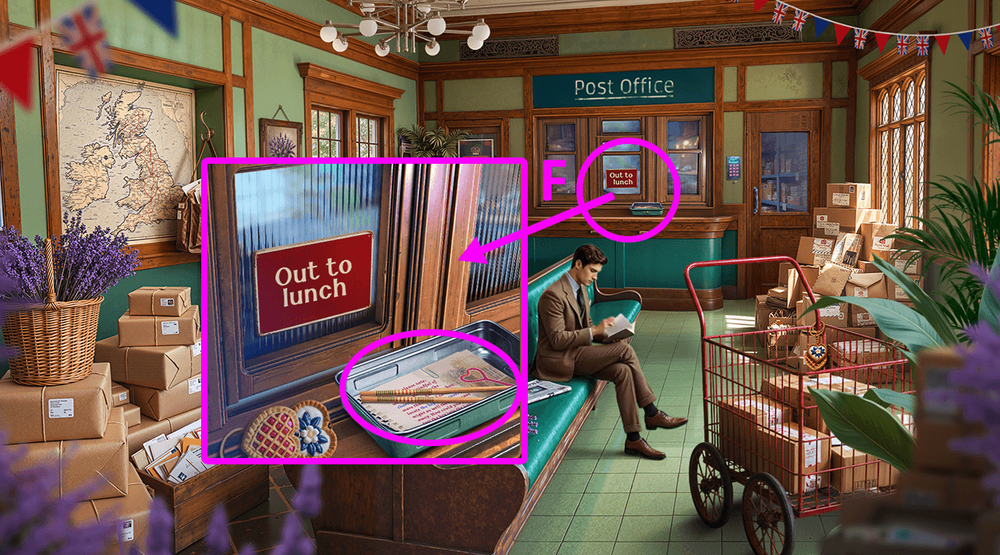
- Use KEY to open the lock, take SPRAYER and HANGERS 2/2 (E).
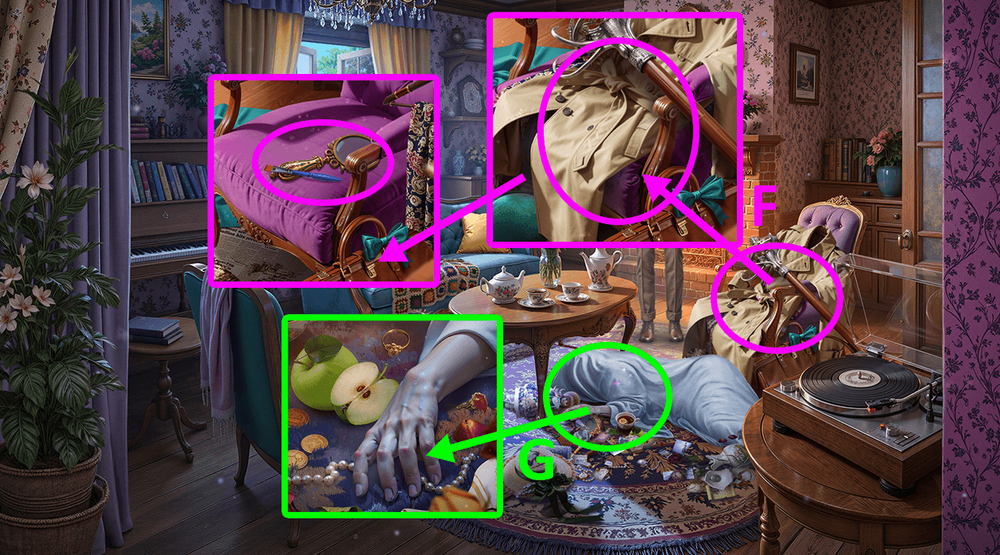
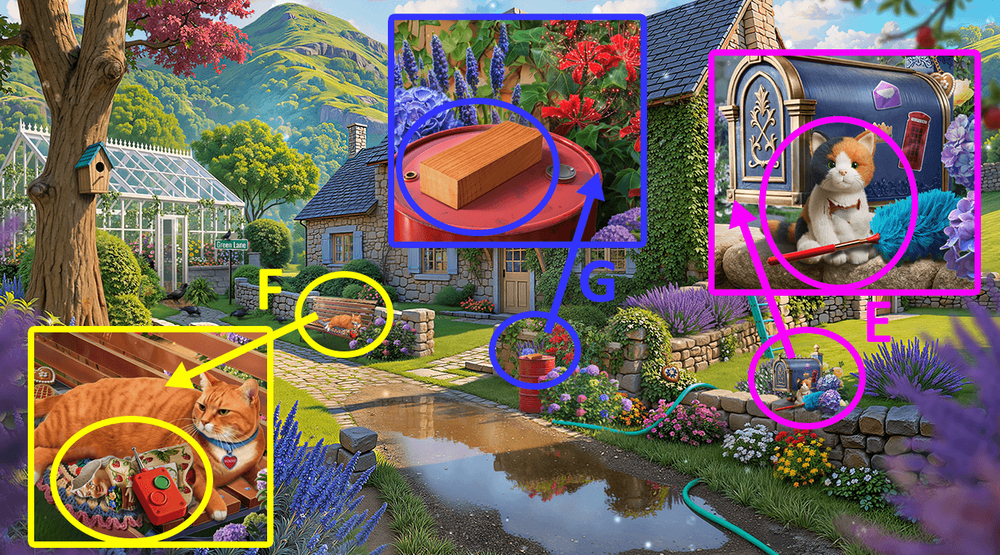
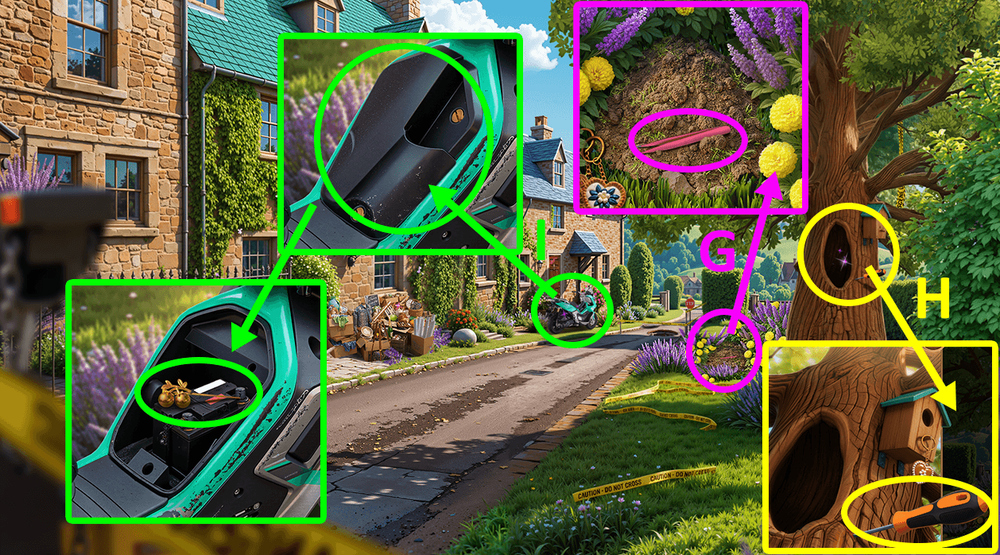
- Use HANGERS 2/2 on the pile of items, take BRUSH and MAGNIFYING GLASS (F).
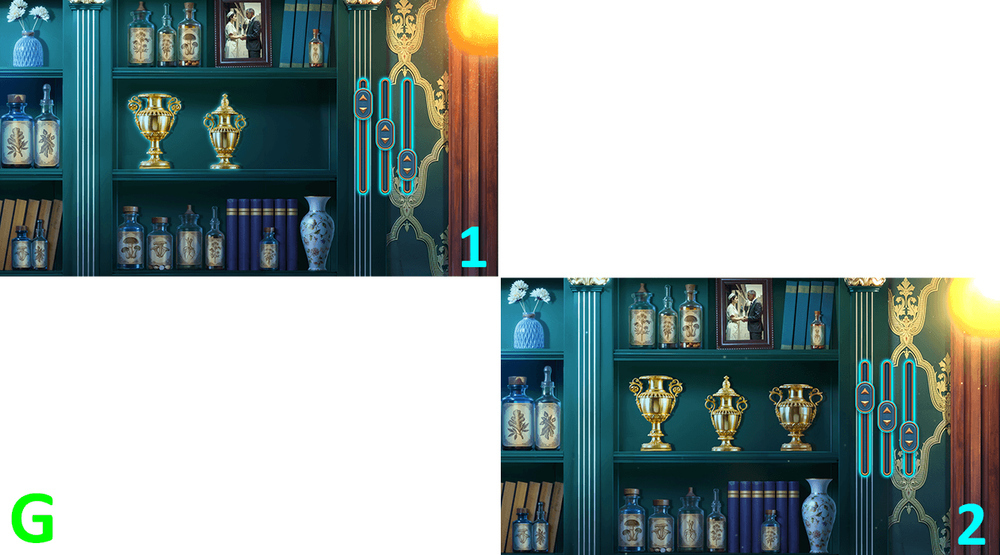
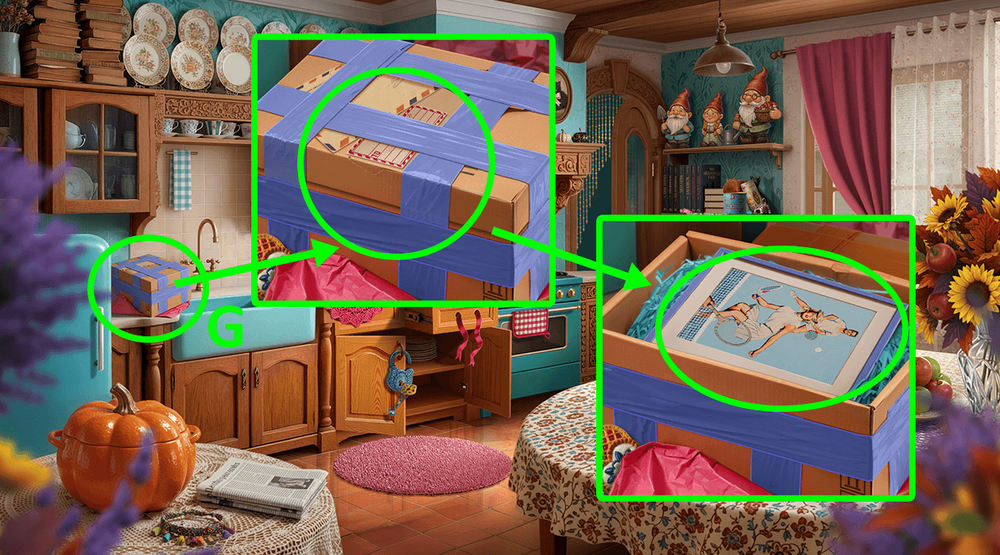
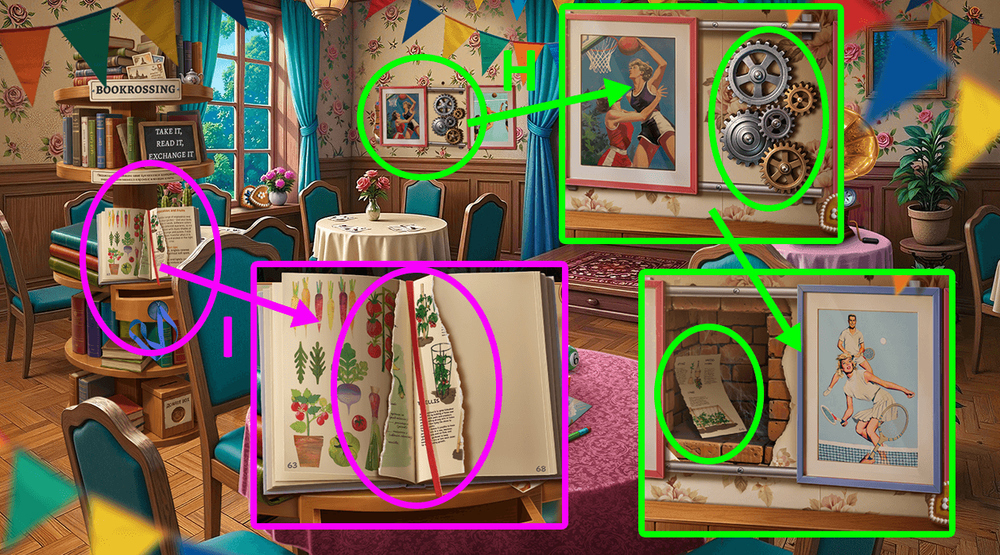
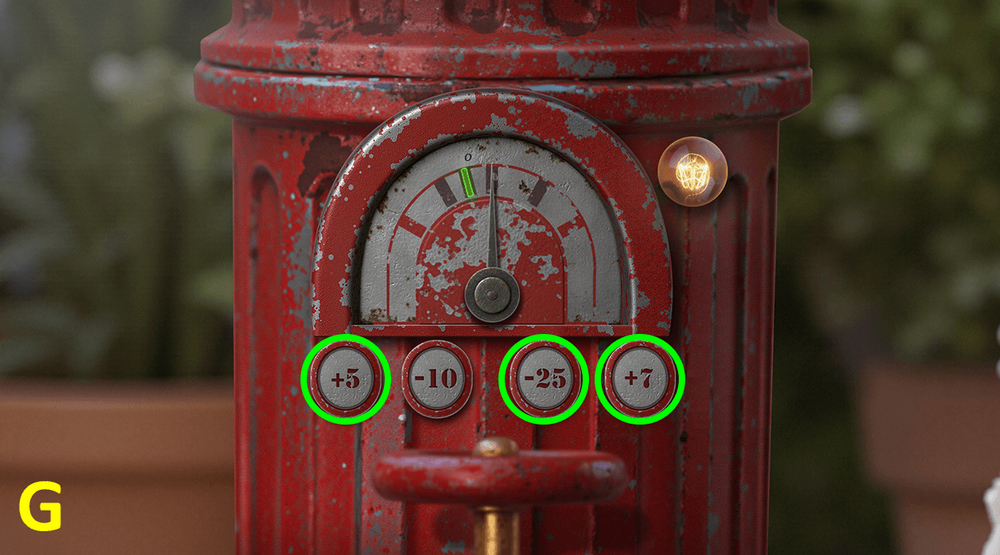
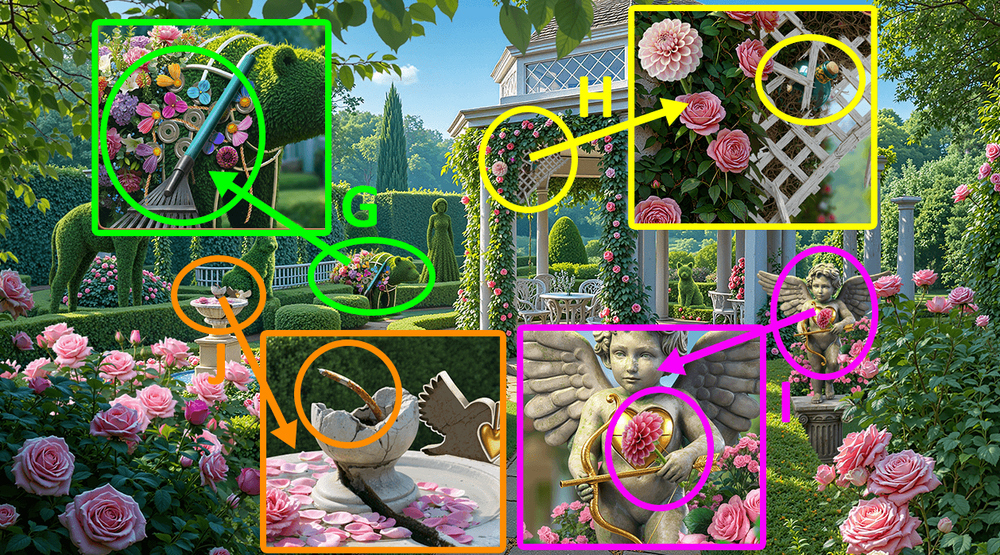
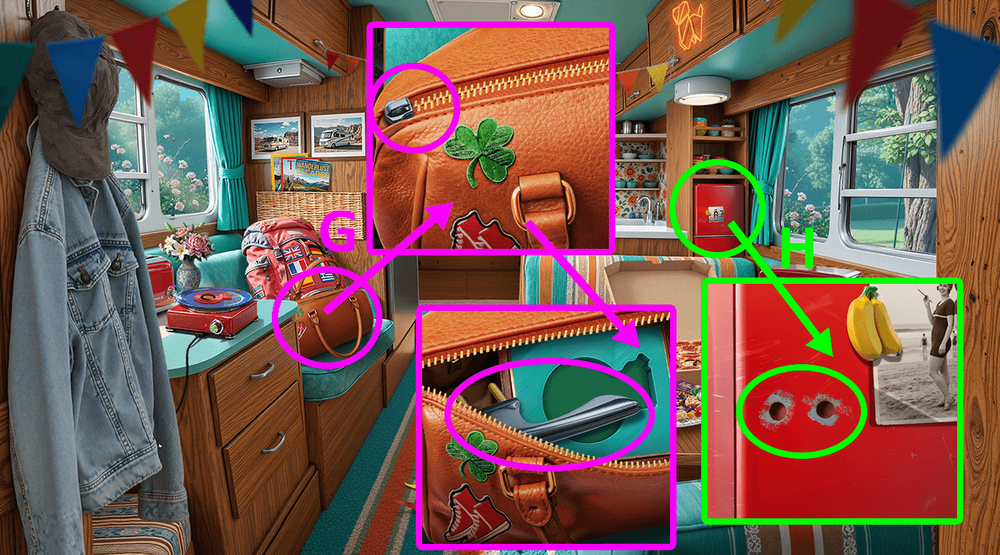
- Use MAGNIFYING GLASS (G).
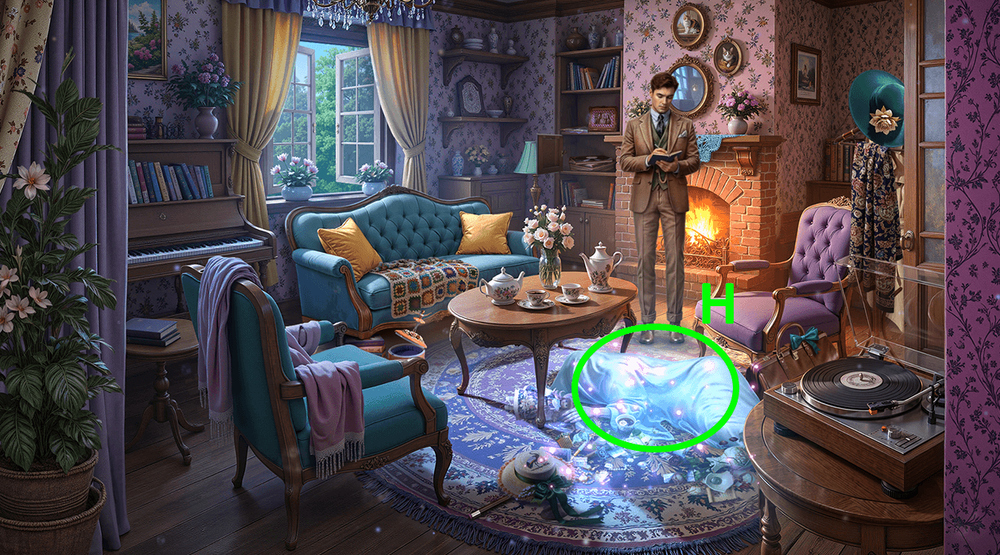
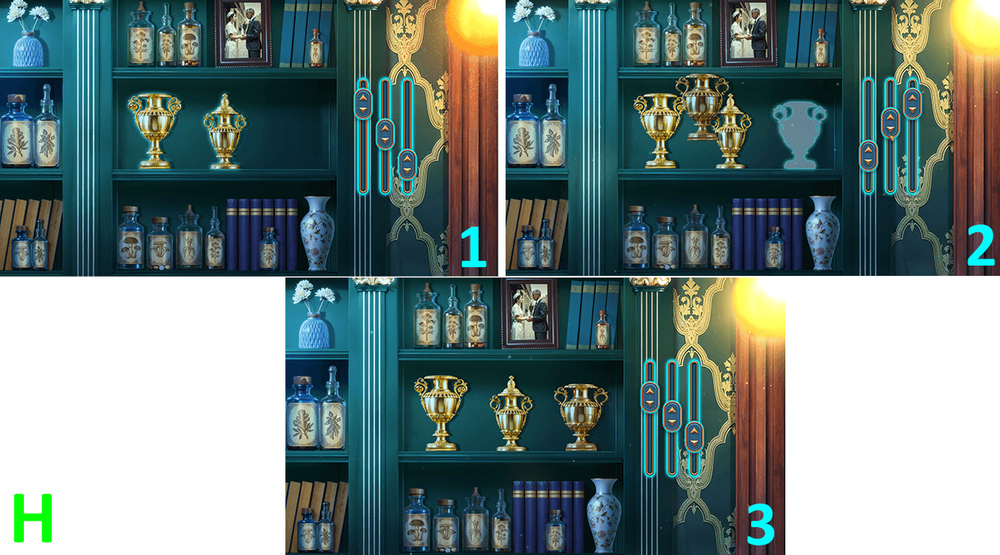
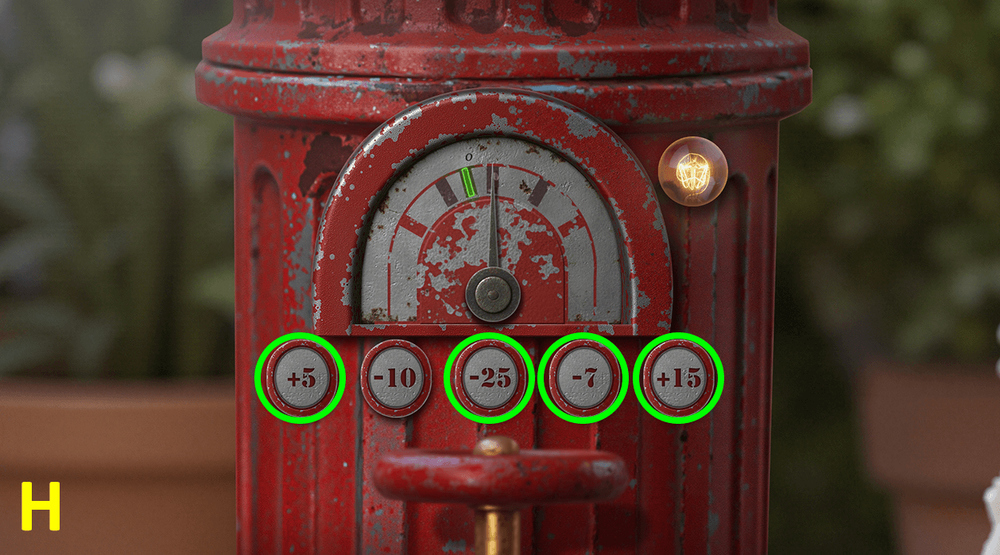
- Play puzzle (H).
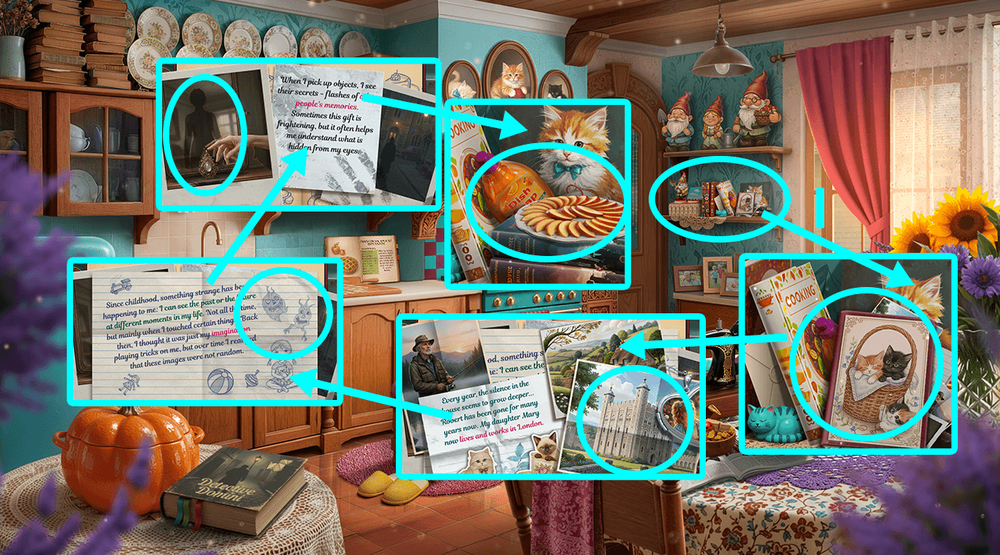
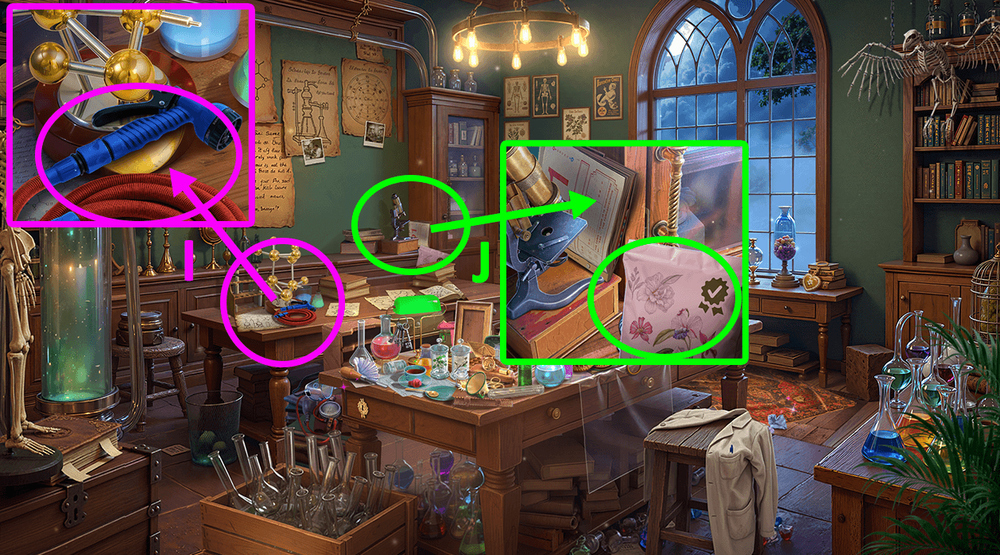
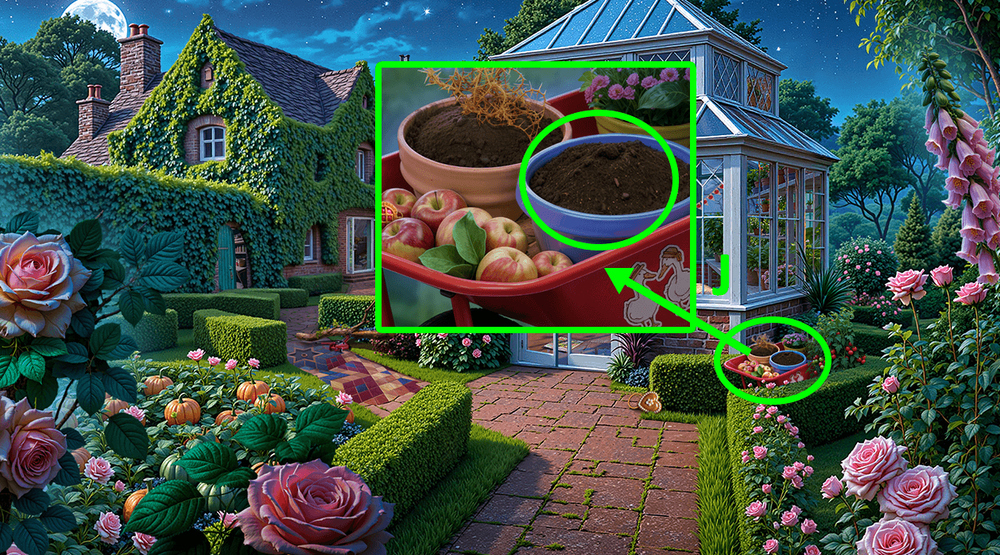
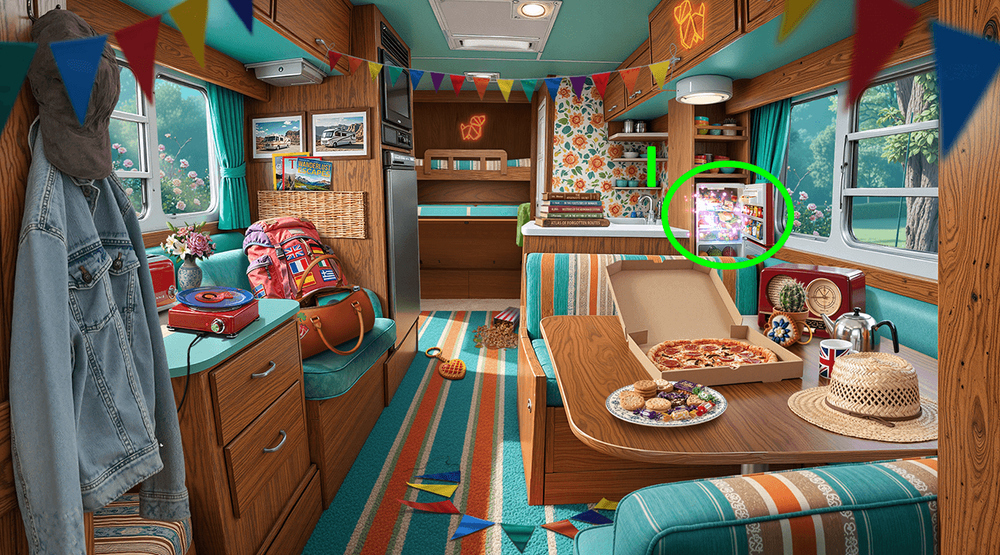
- Open the book, click on the castle, the drawing with strange creatures and the mirror, take APPLES and DISH SOAP (I).

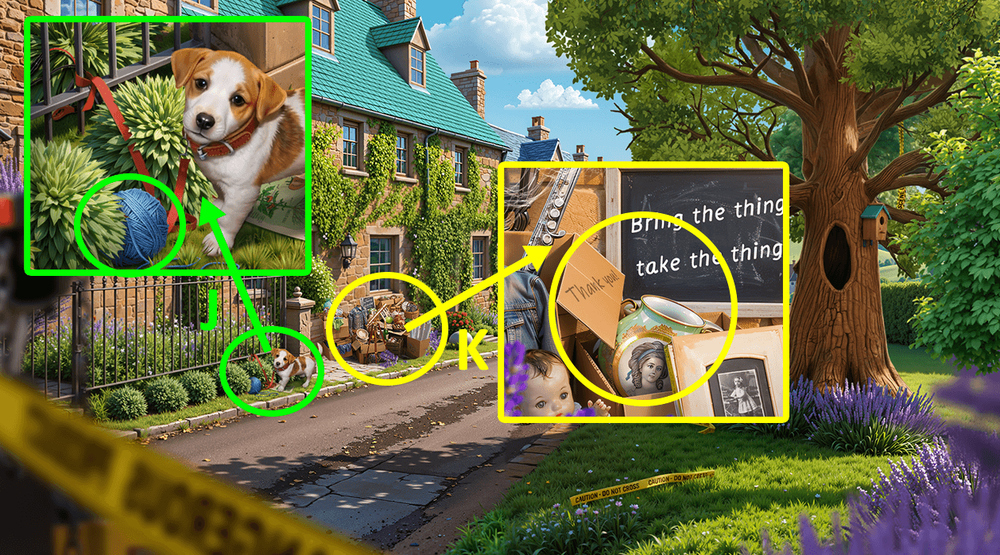
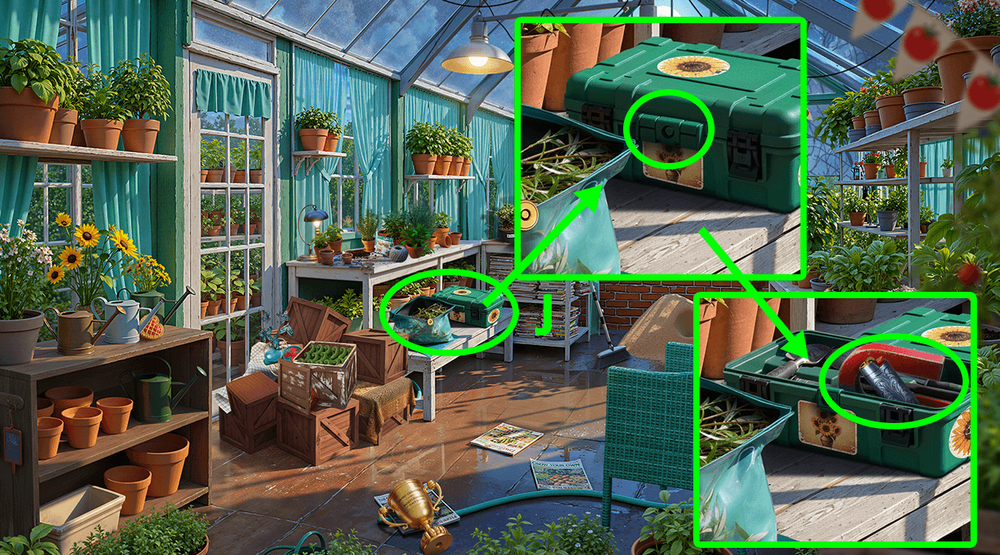
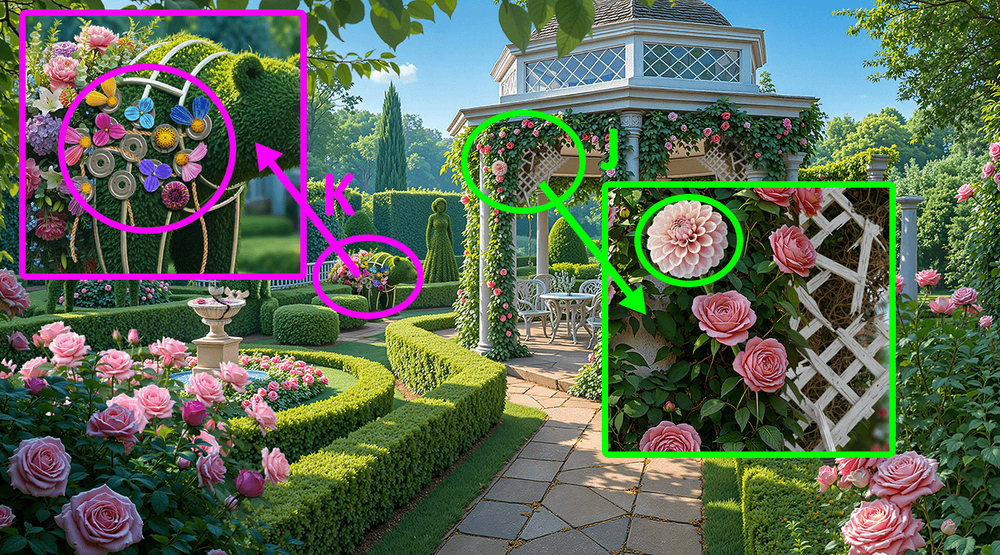
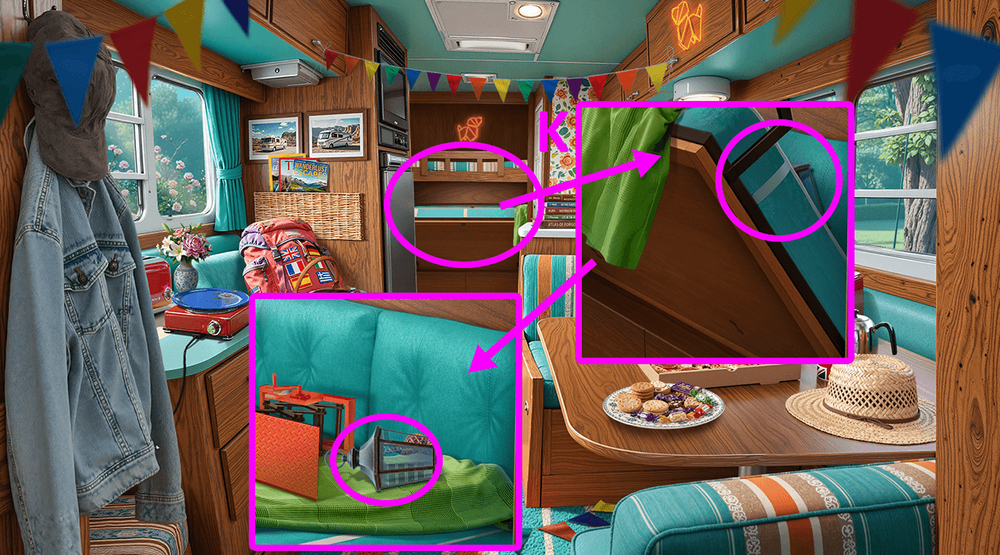
- Use SPONGE and DISH SOAP on the dirty dishes, take MILL LEVER (J).
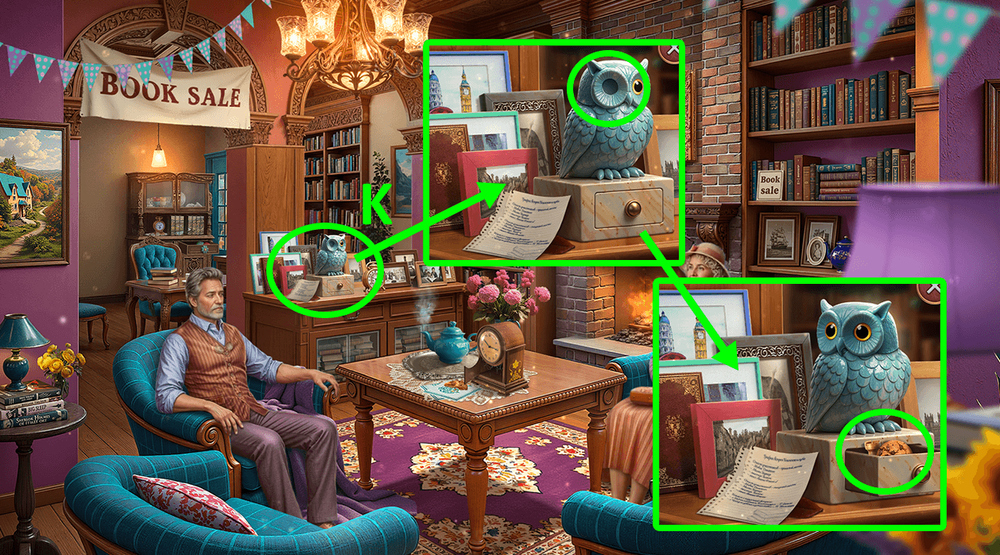
- Take CLOTHESPIN PARTS 1/2 and RAISINS, use MILL LEVER and COARSE SALT on the hand mill, take GROUND SALT (K).
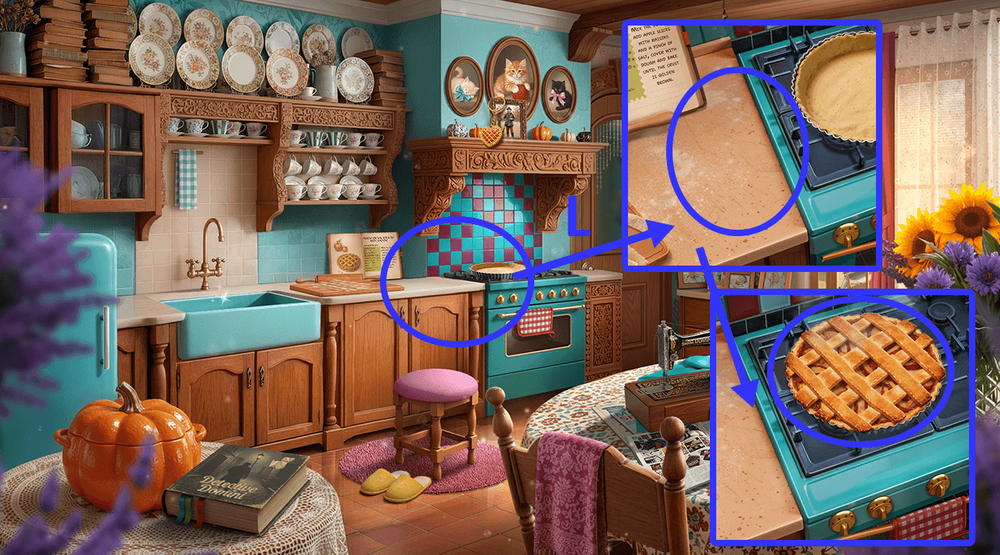
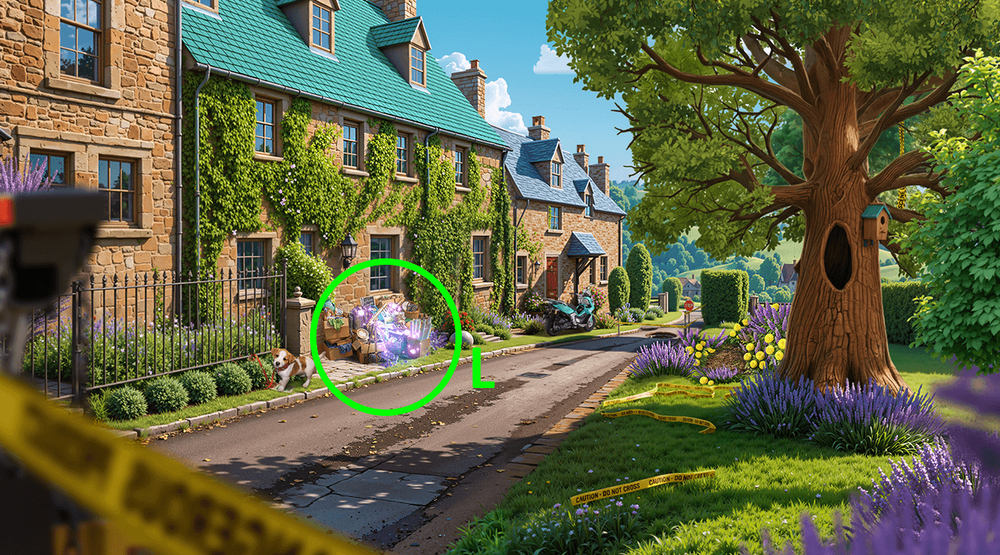
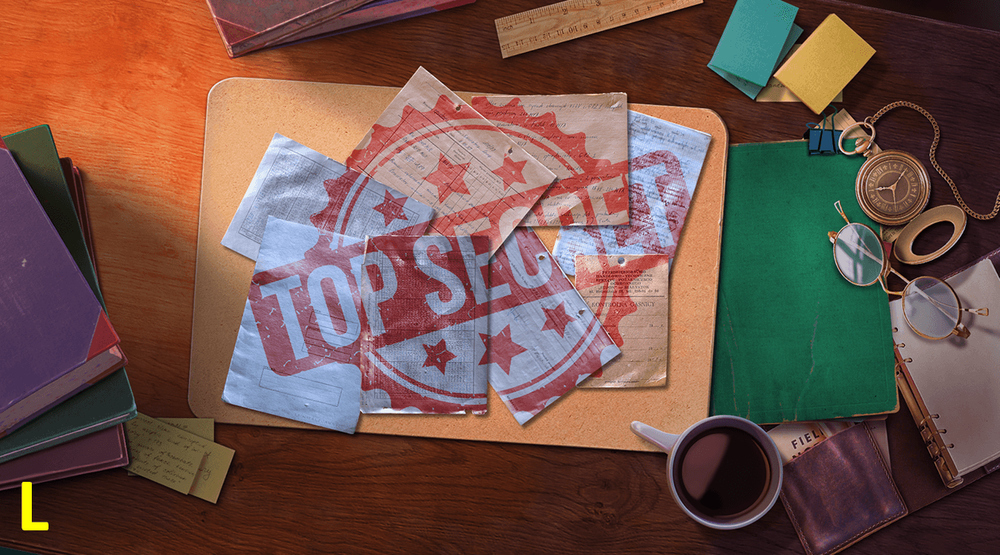
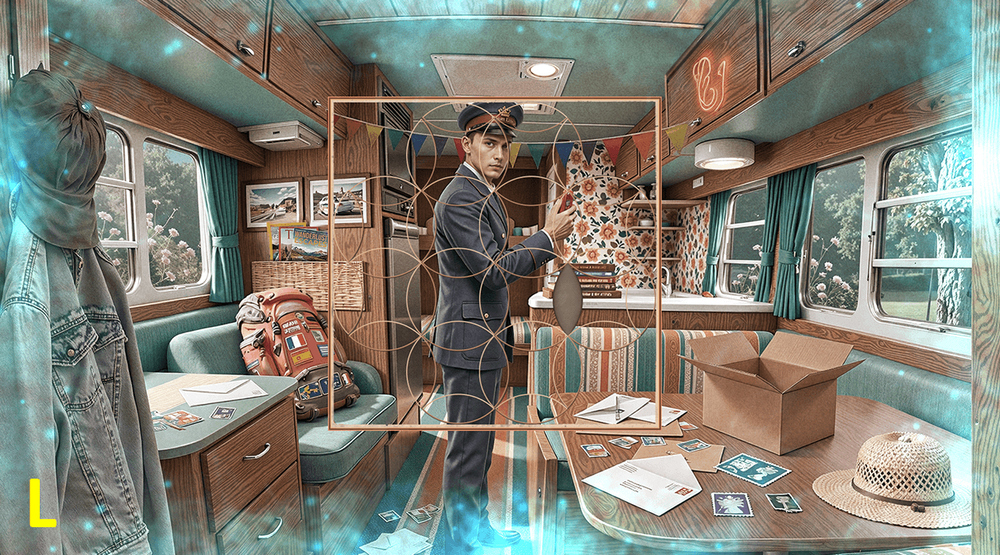
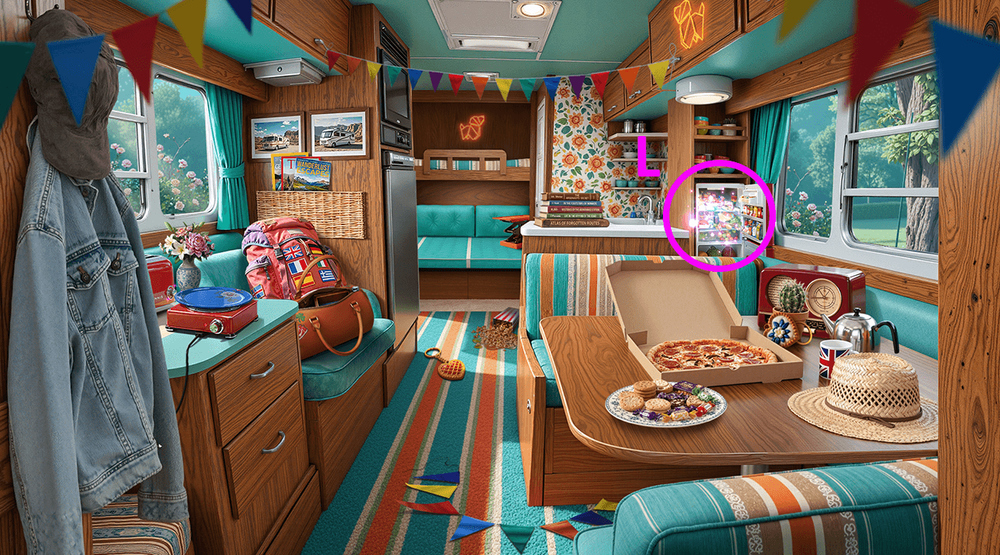
- Use APPLES, RAISINS and GROUND SALT, take PIE (L).
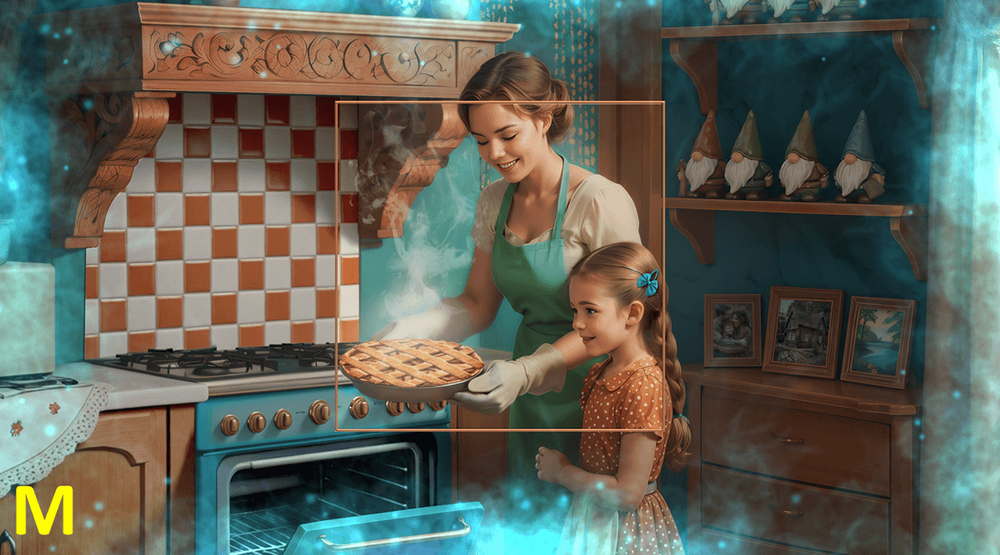
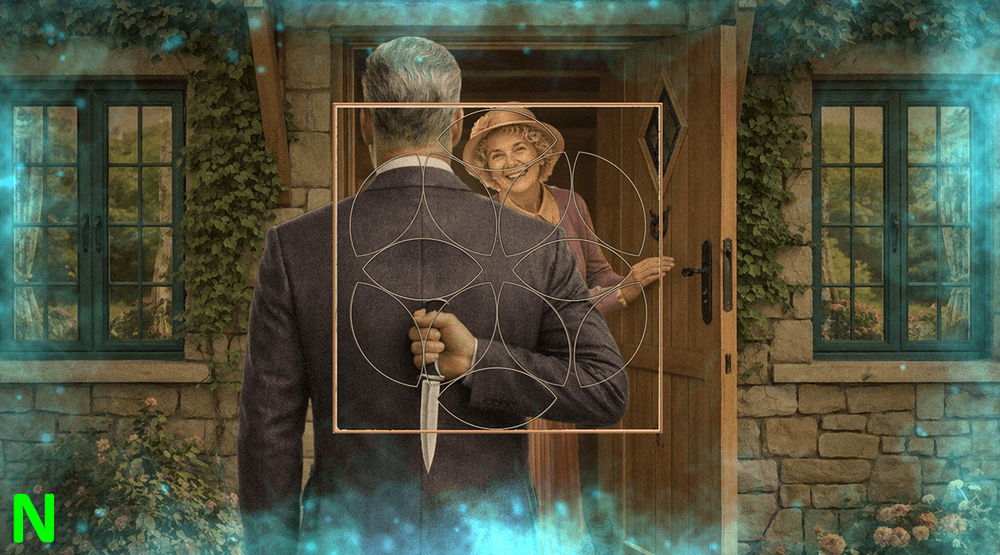
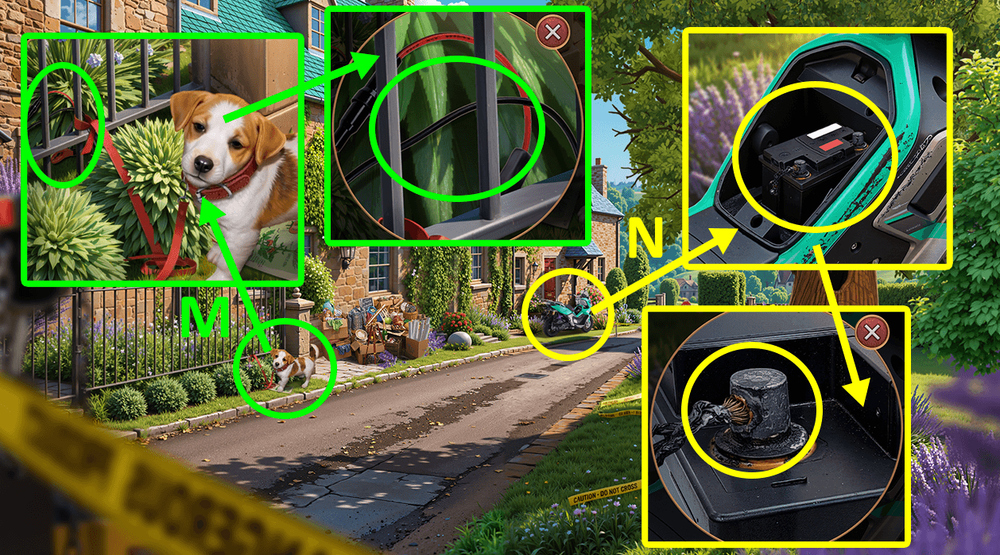
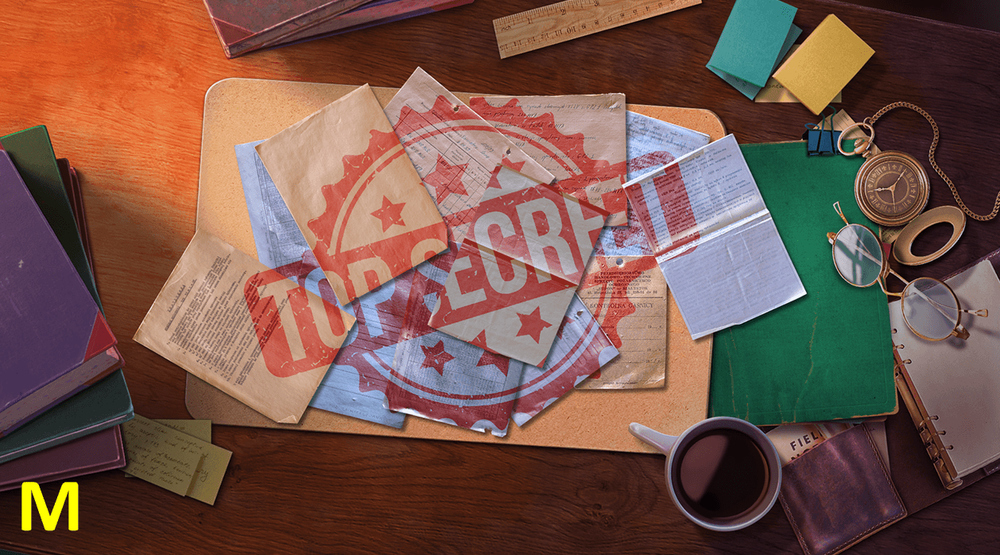
- Solution: Arrange all the puzzle pieces as shown in the image (M).

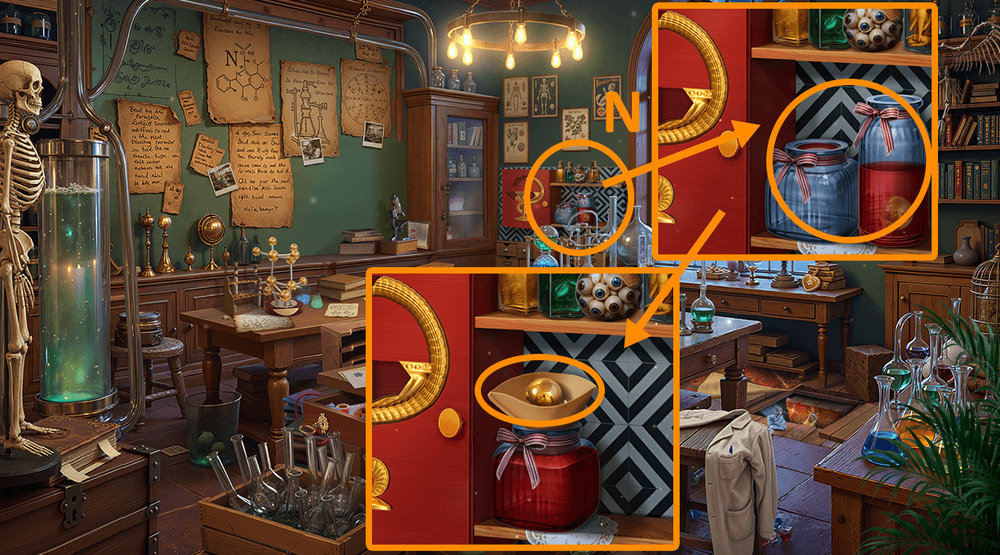
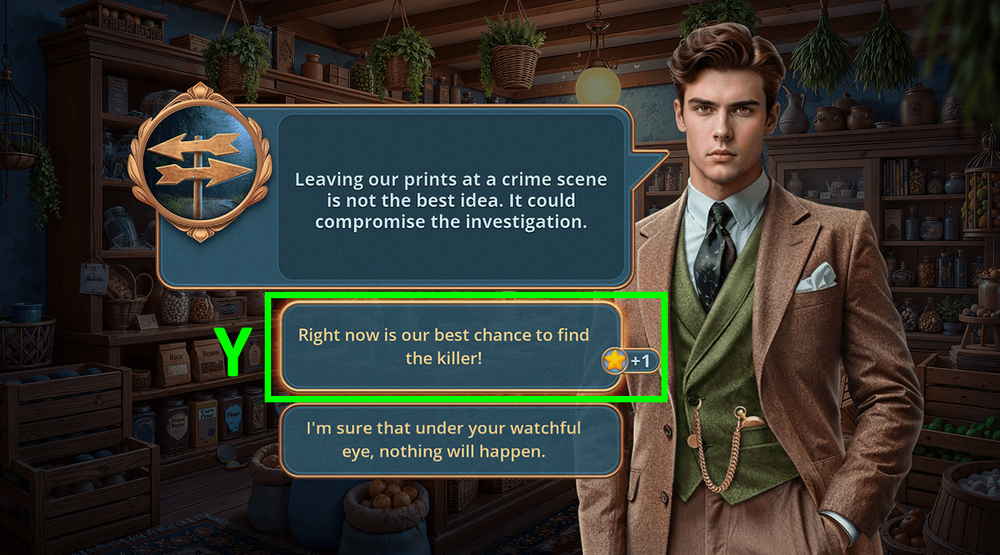
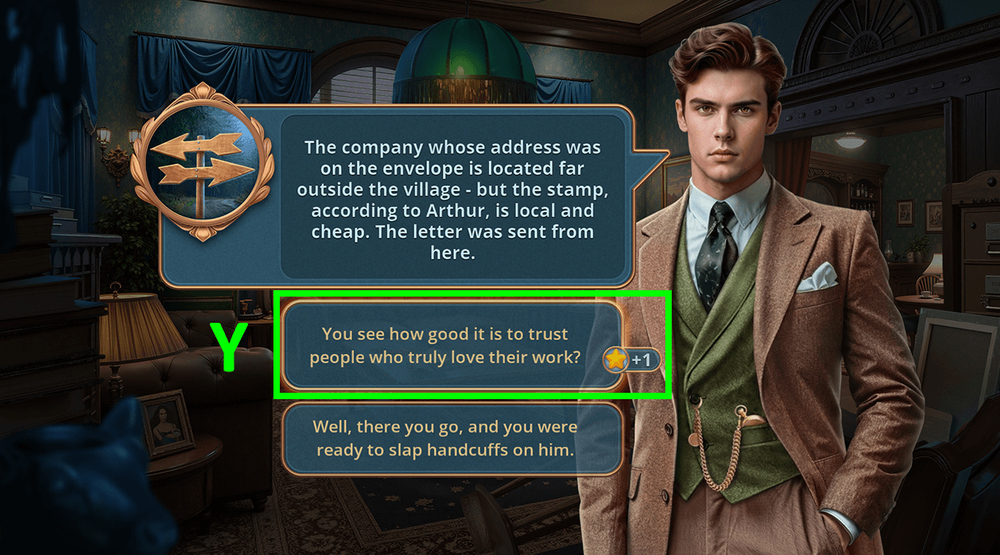
- Select this option (N).
- Go forward.

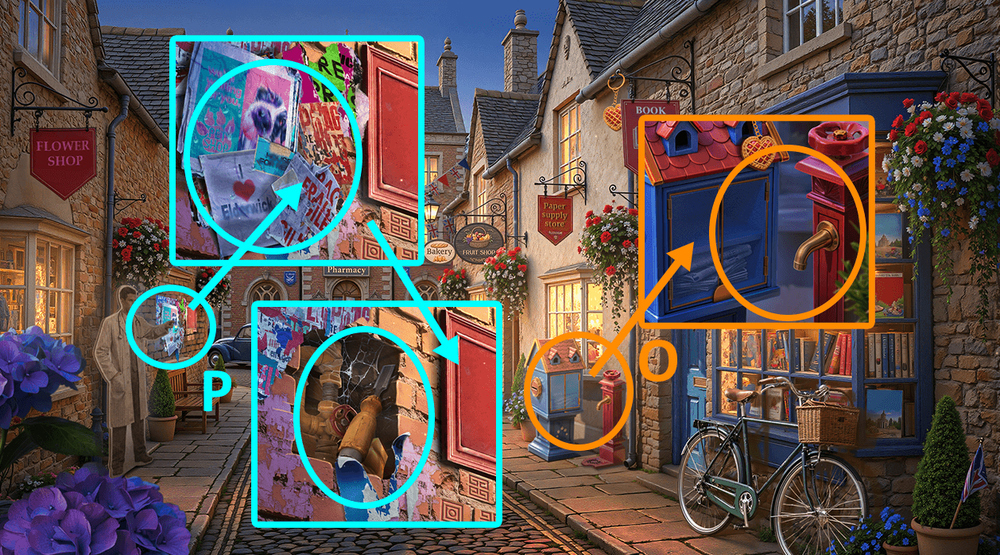
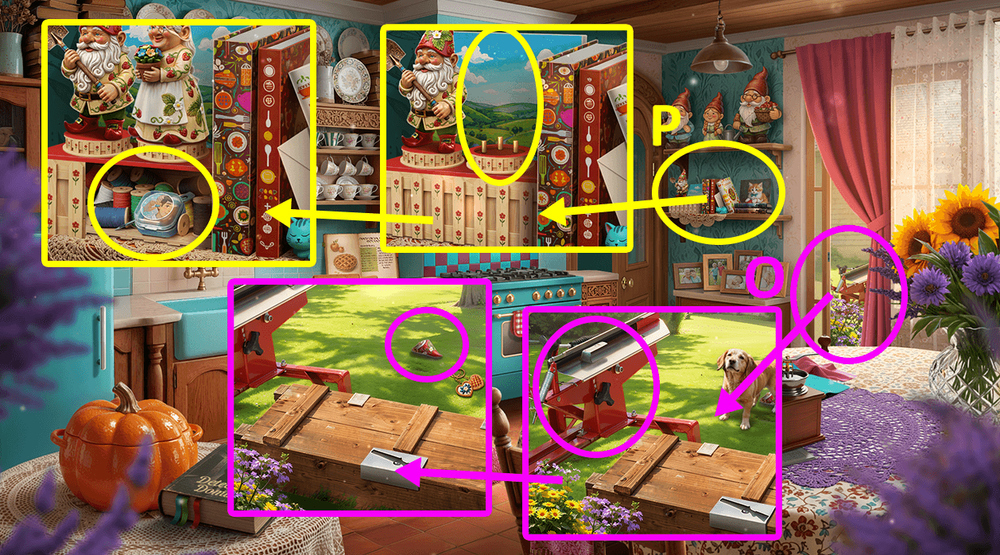
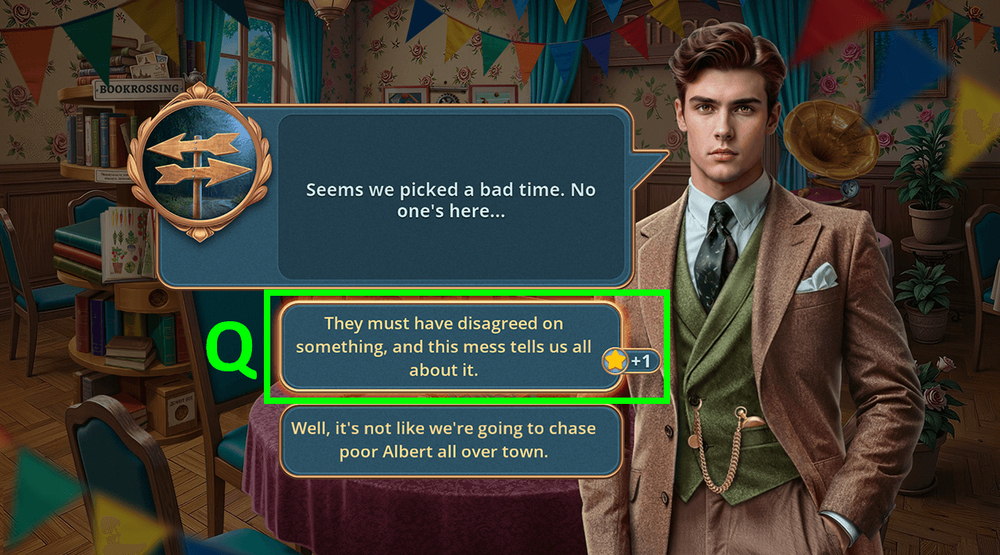
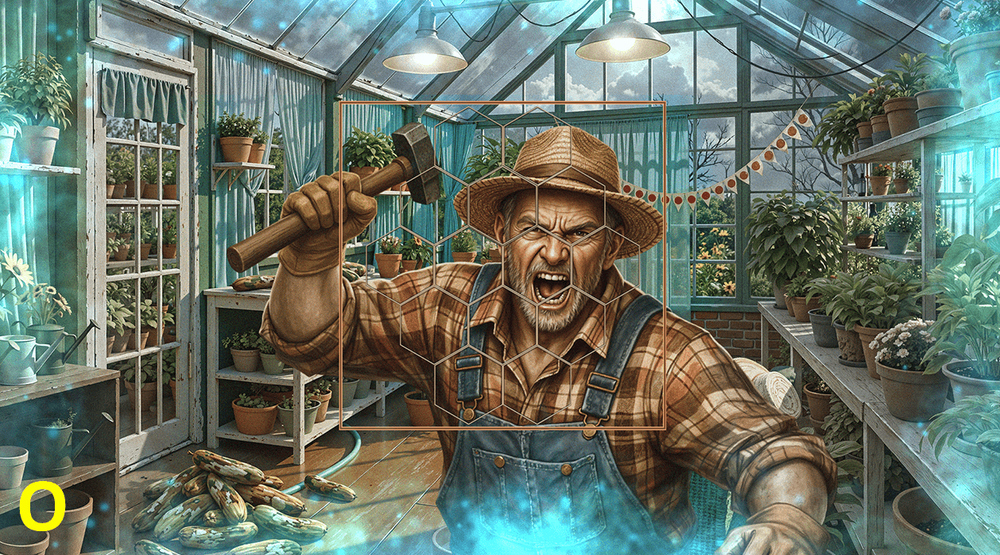
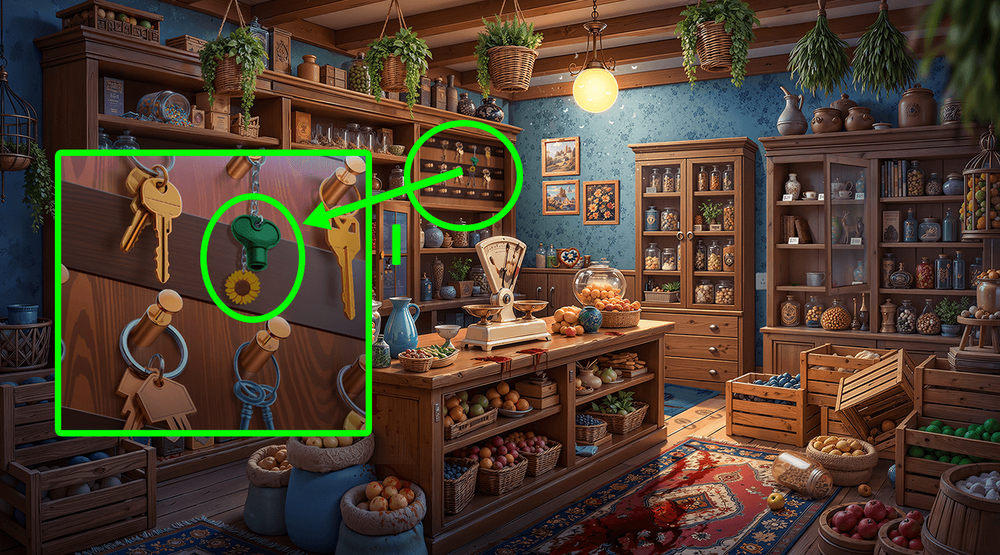
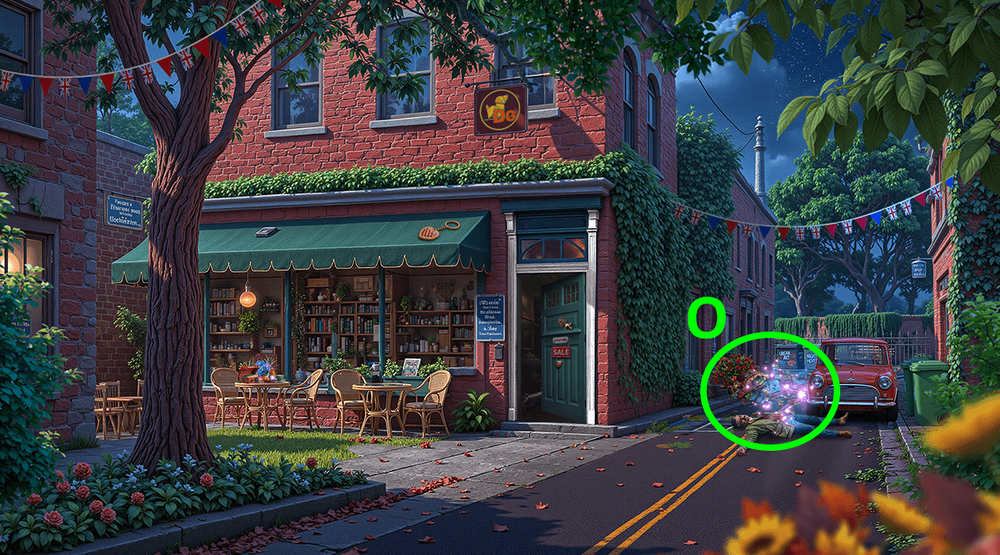
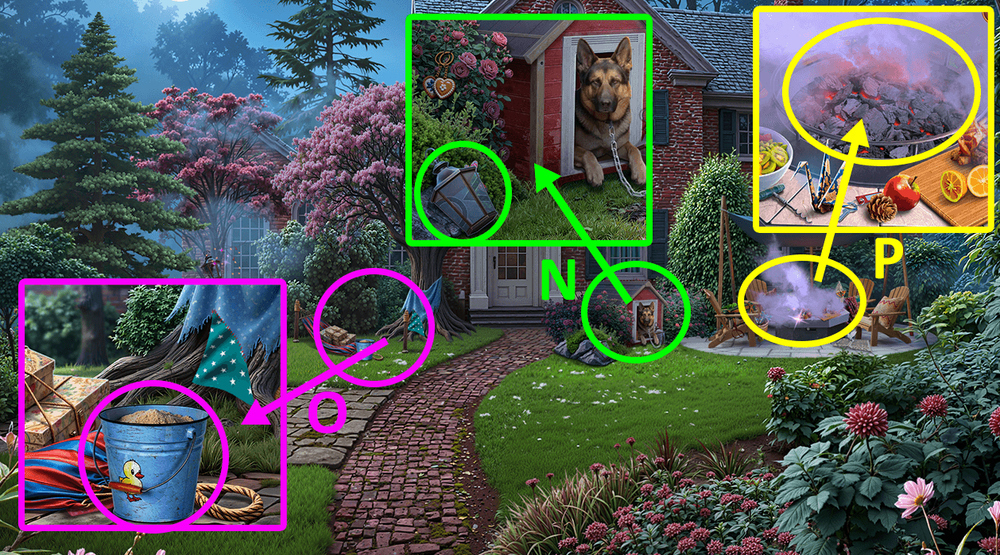
- Give PIE to Mr. Higgins (O).
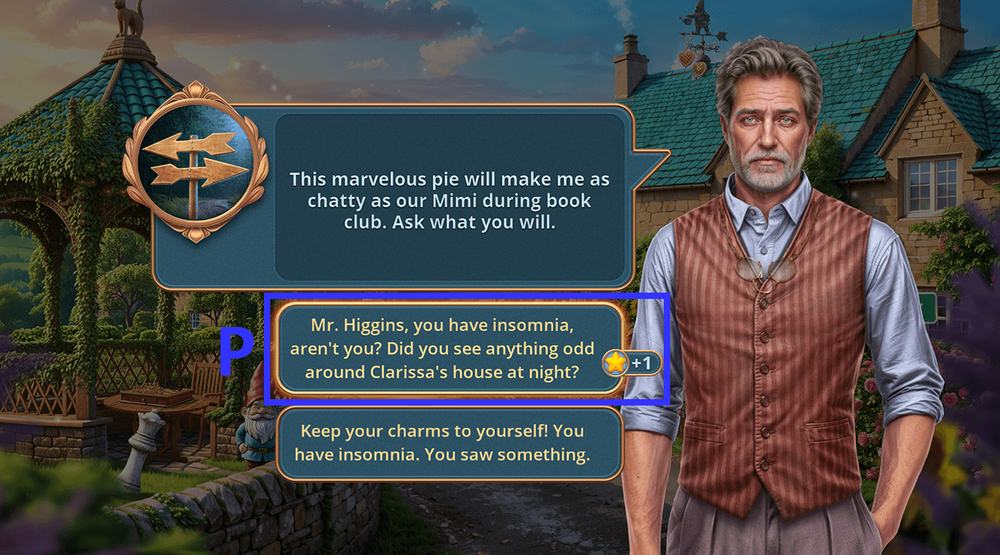
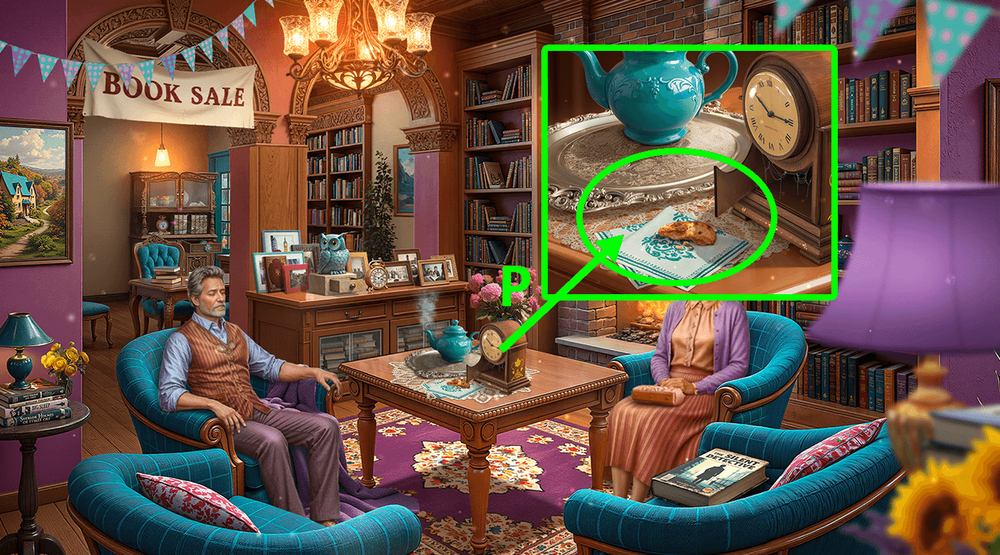
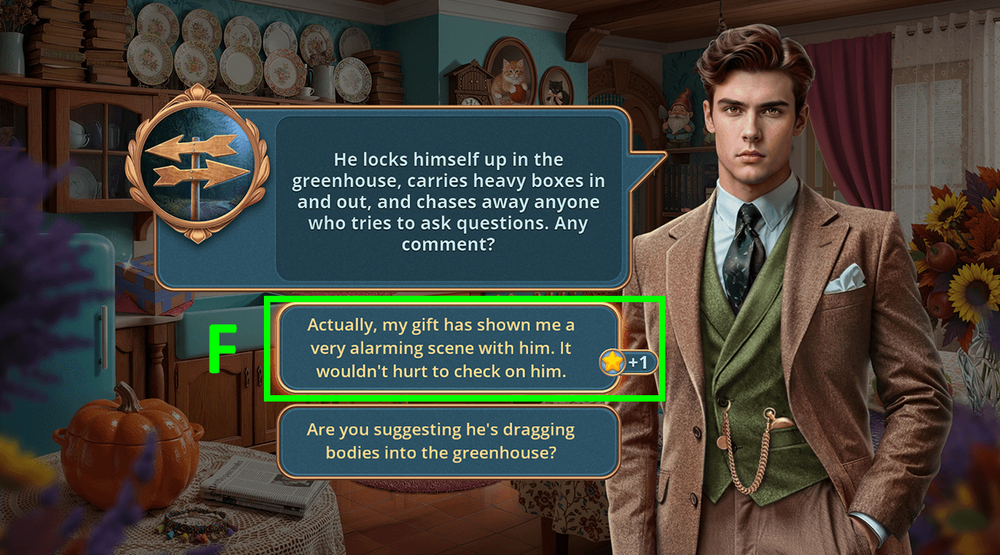
- Select this option, earn INSECTICIDE (P).
- Use SPRAYER on the INSECTICIDE, earn INSECTICIDE SPRAY.
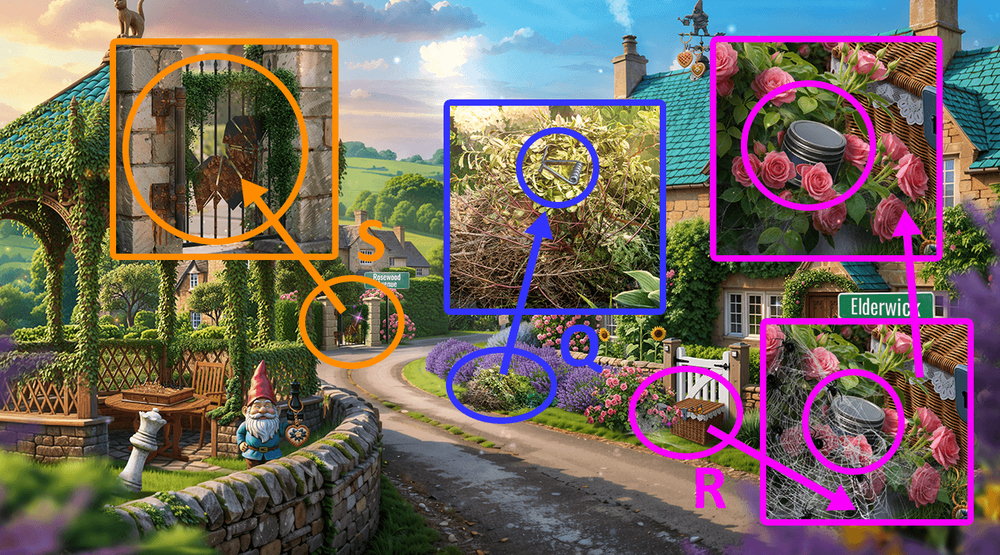
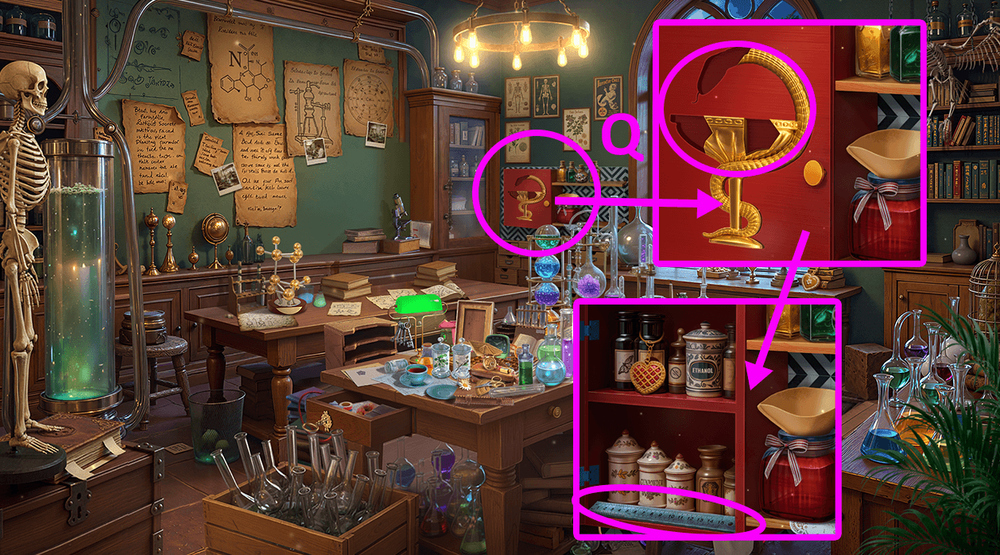
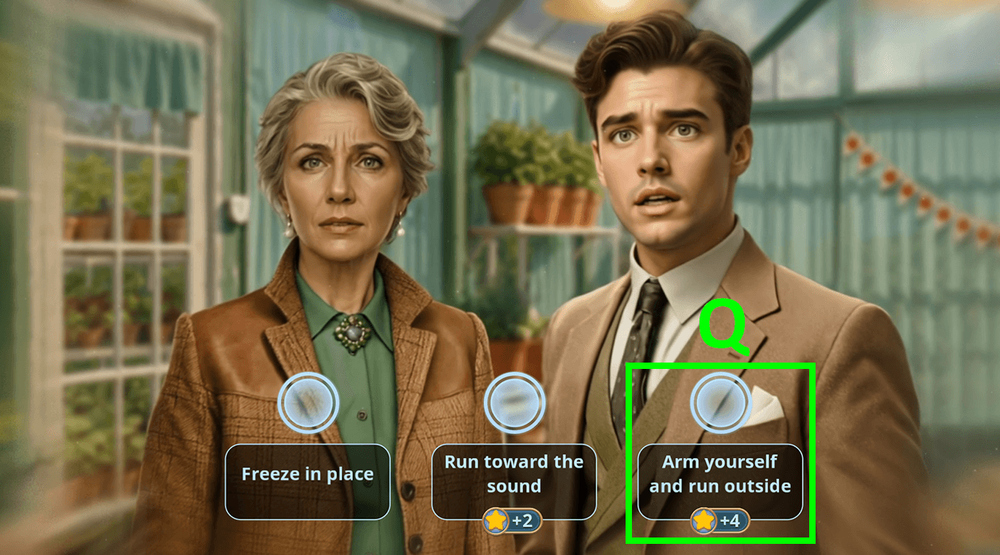
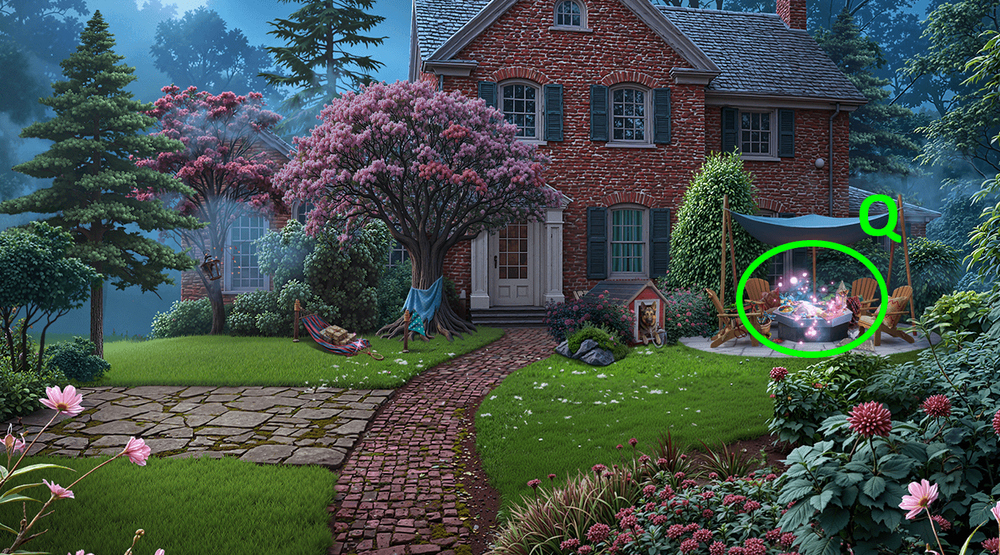
- Take CLOTHESPIN SPRING (Q).
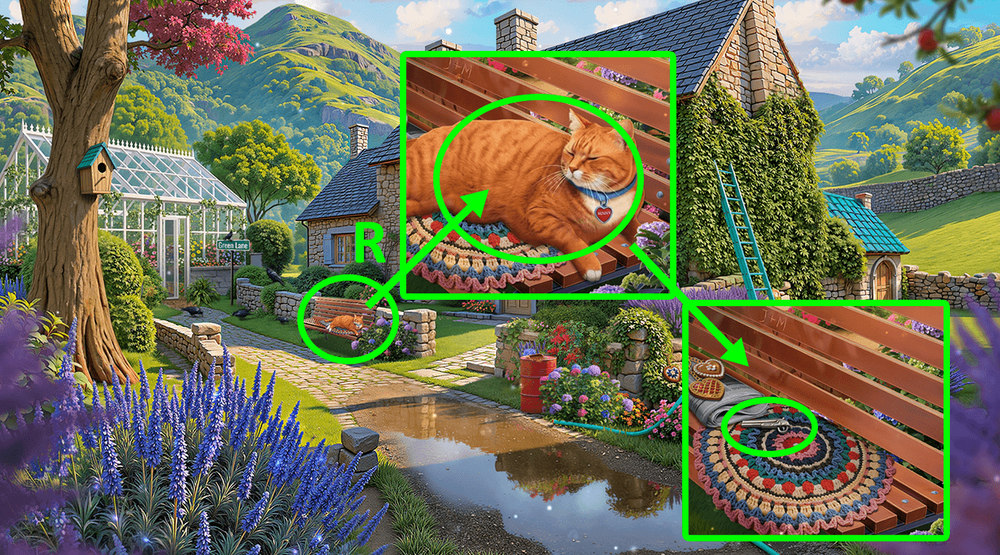
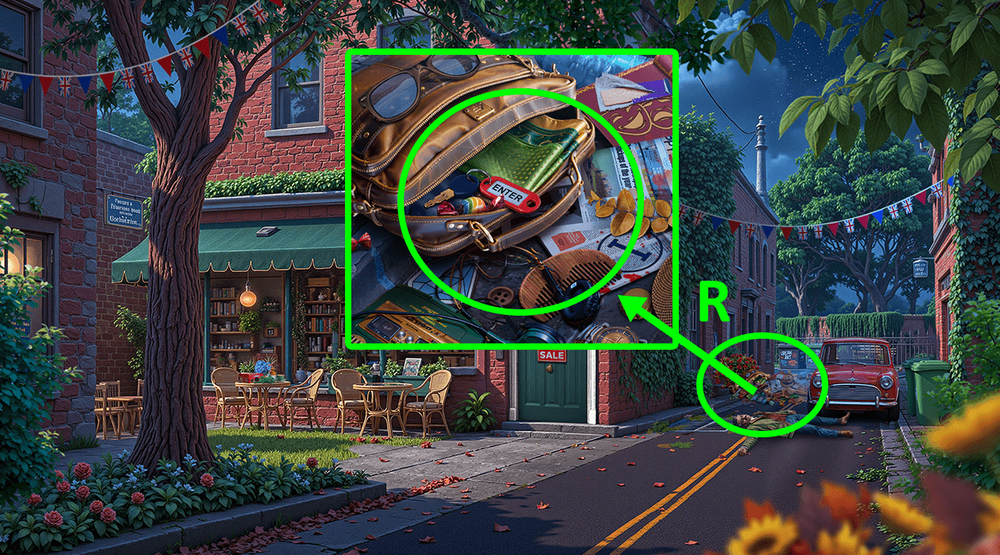
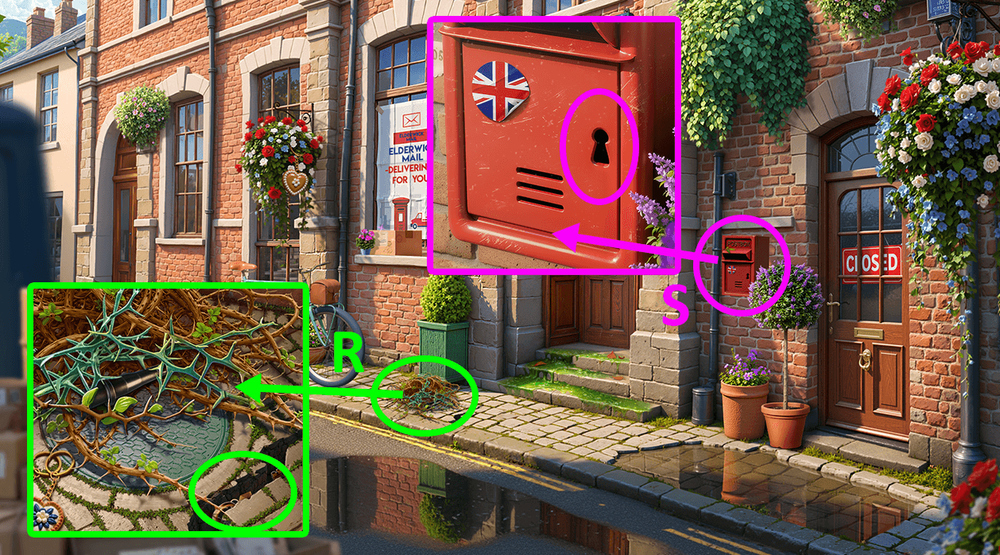
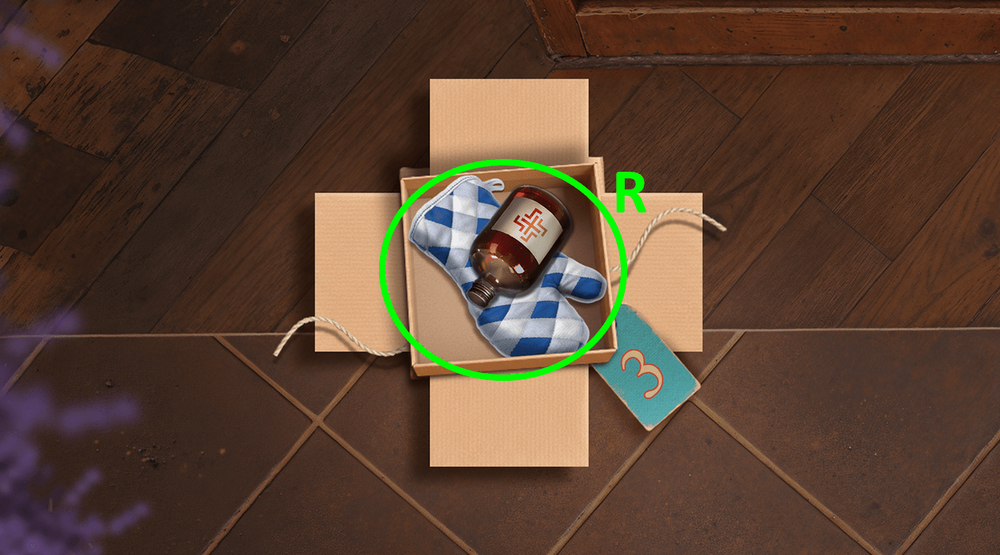
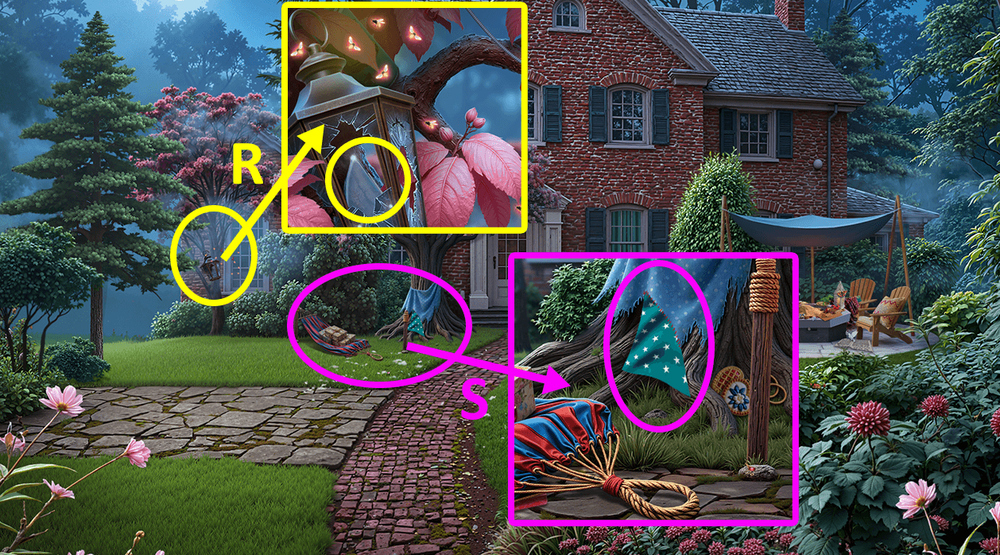
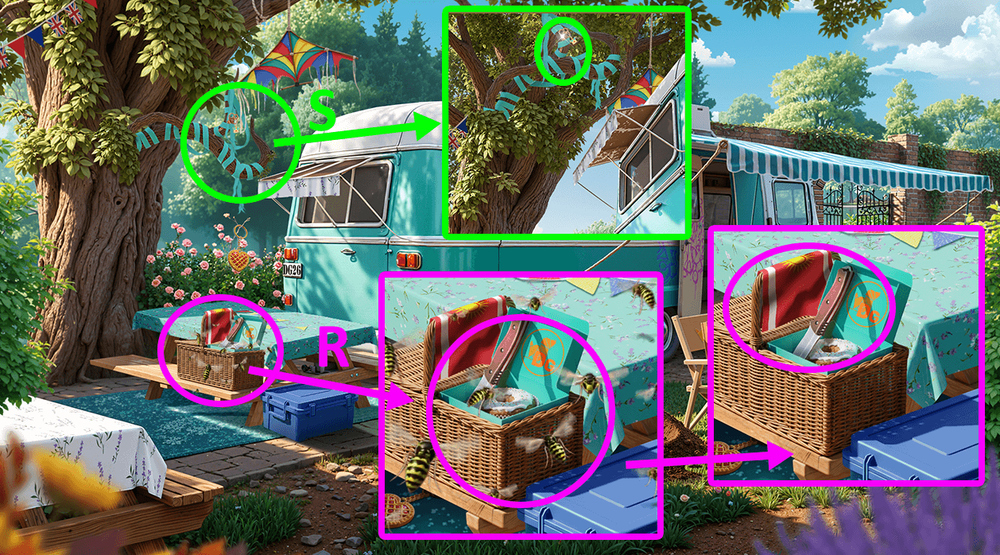
- Use INSECTICIDE SPRAY on the spiders, take SHOE POLISH (R).
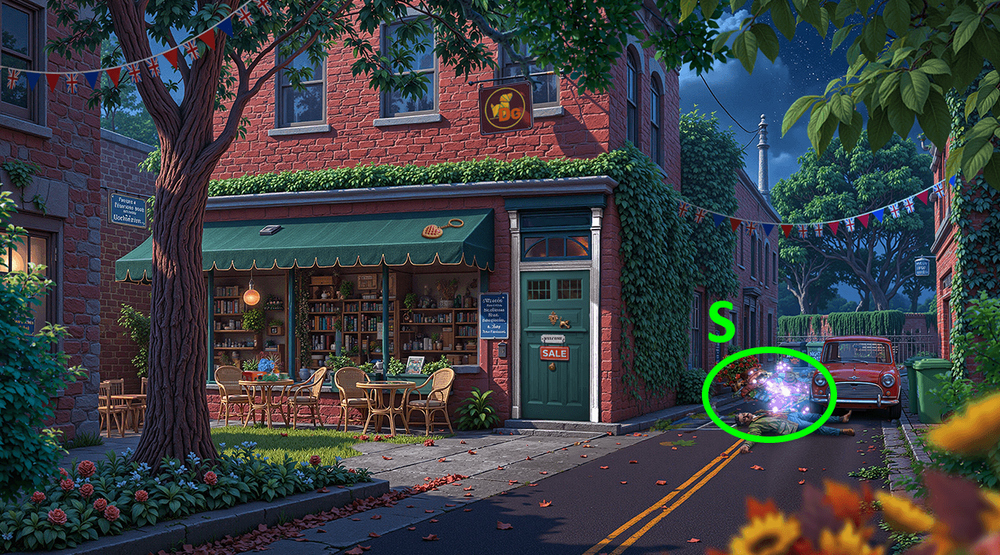
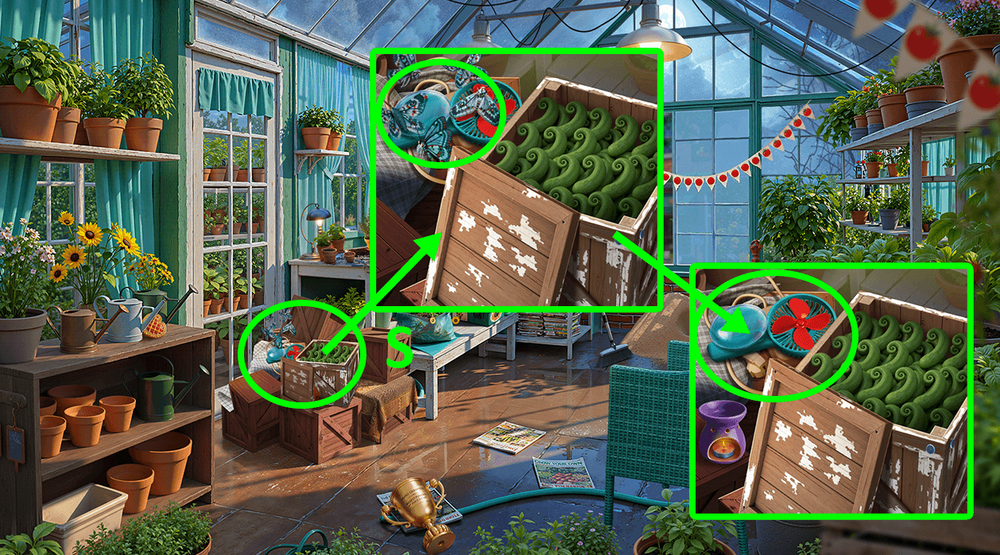
- Use SHOE POLISH on the gates (S).
- Go forward.

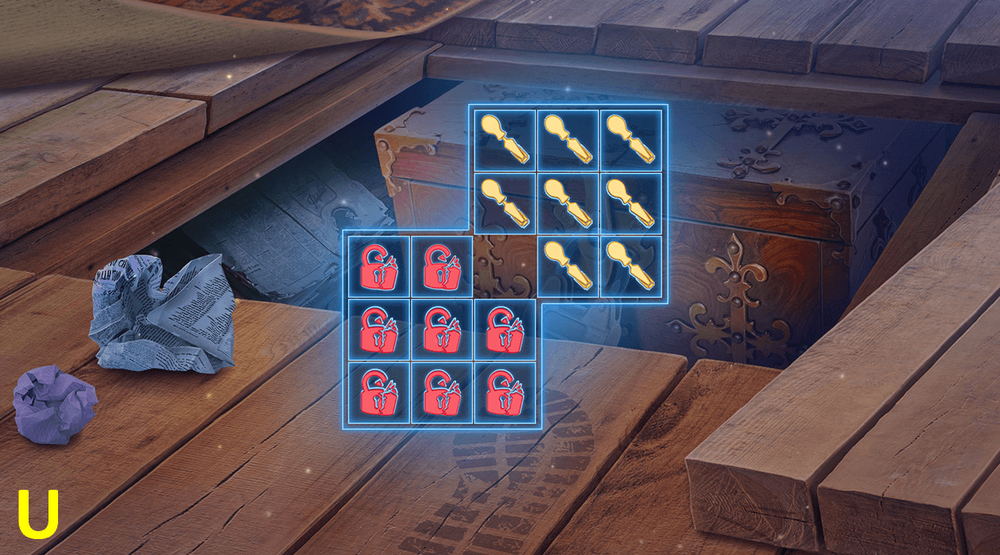
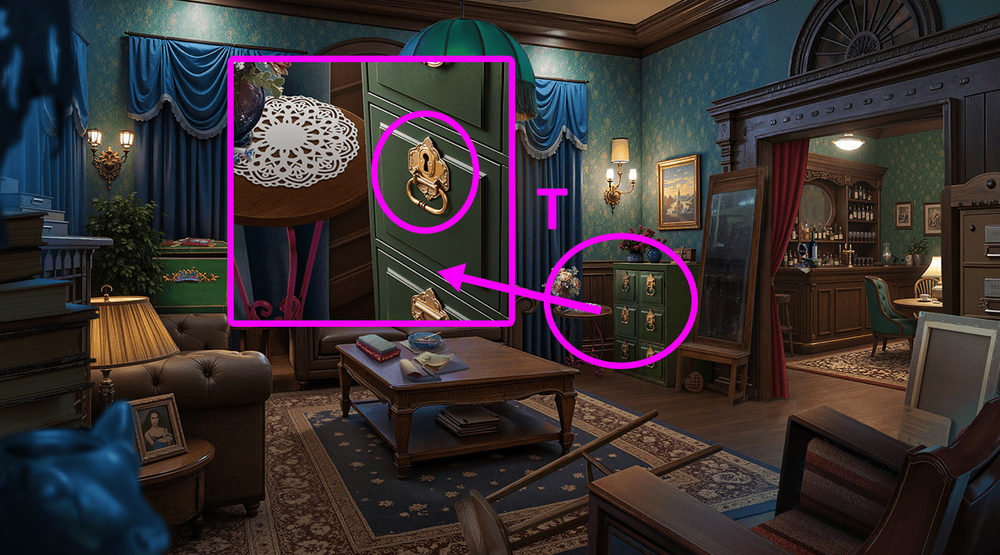
- Solution: Arrange all the puzzle pieces as shown in the image (T).

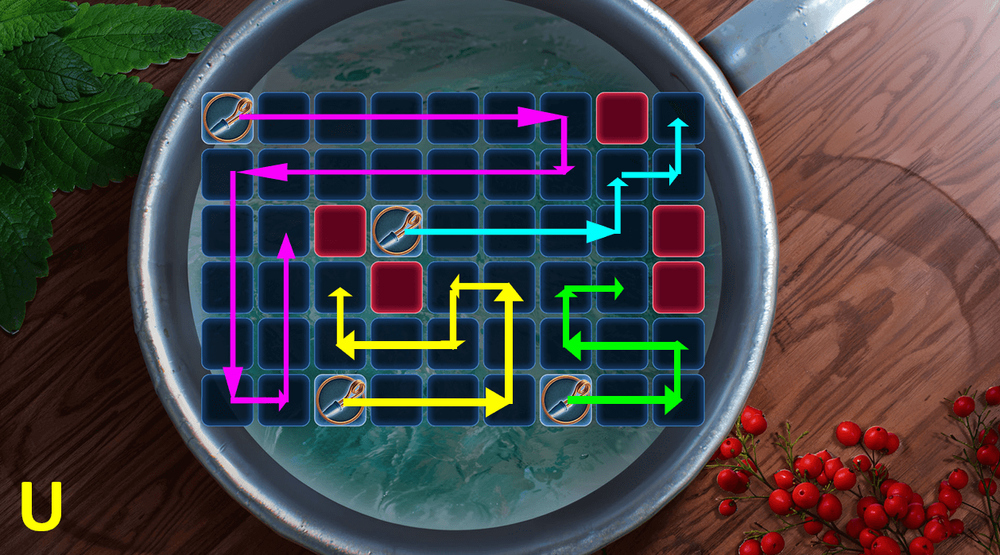
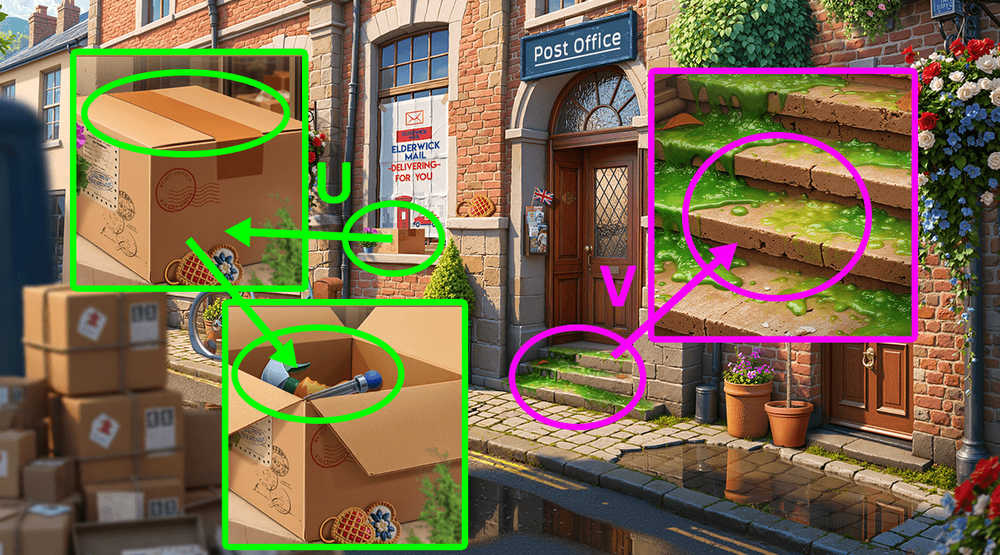
- Select this option (U).
- Go to Mrs.
- Peabody’s Bookshop.

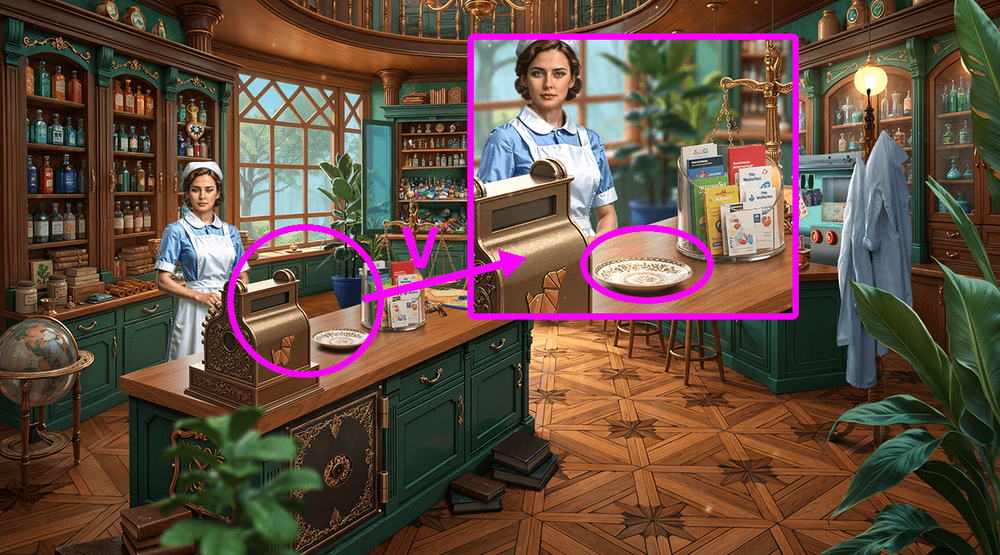
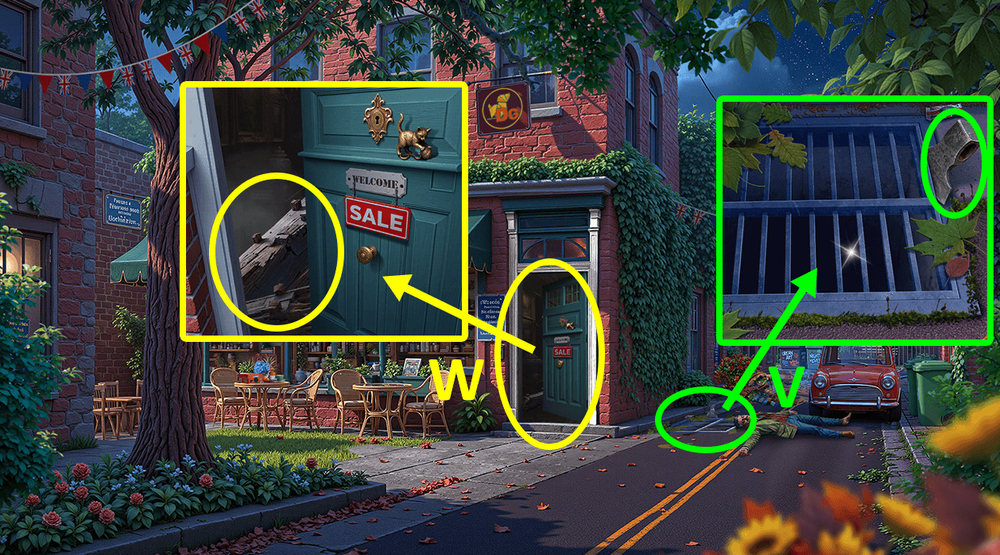
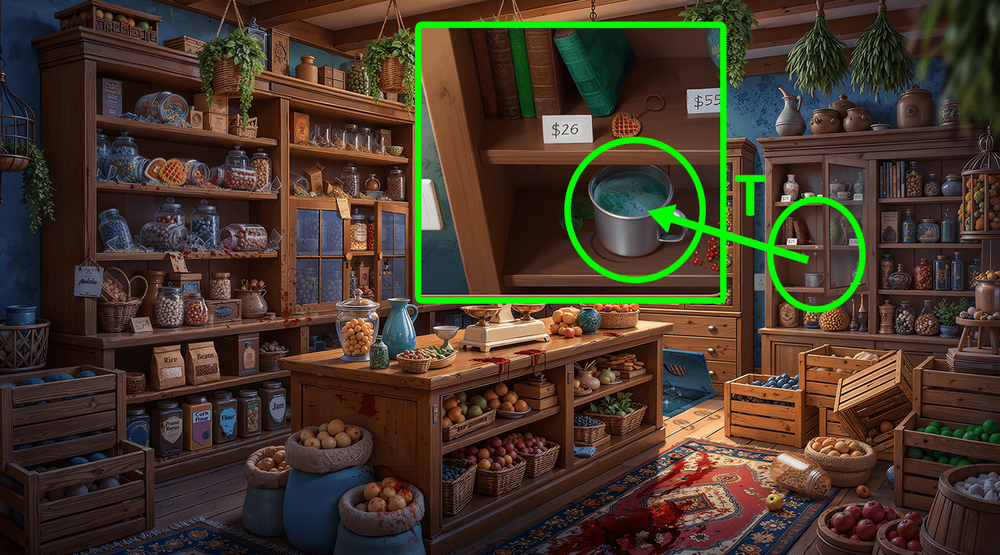
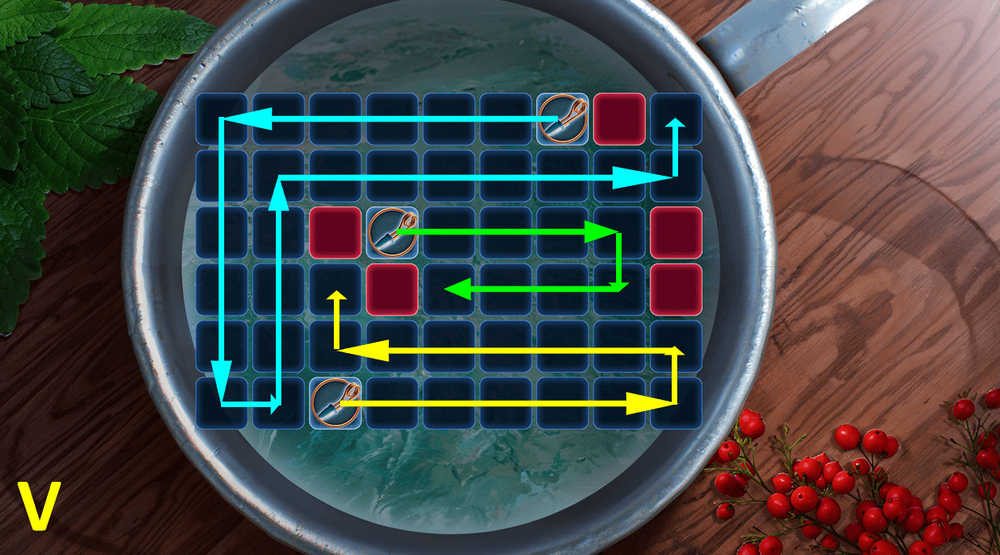
- Read the note, take RED LEAVES (V).
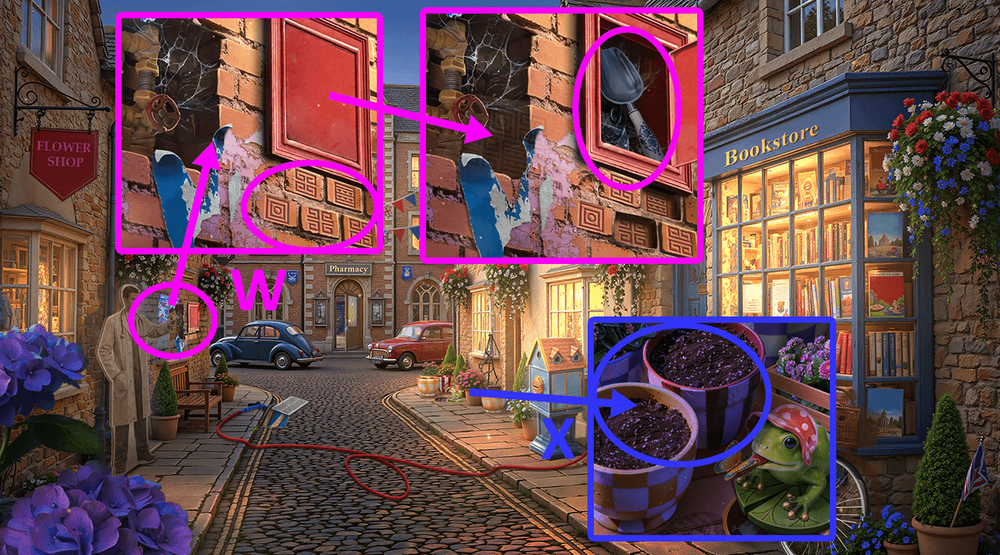
- Take CLOCK FACE (W).
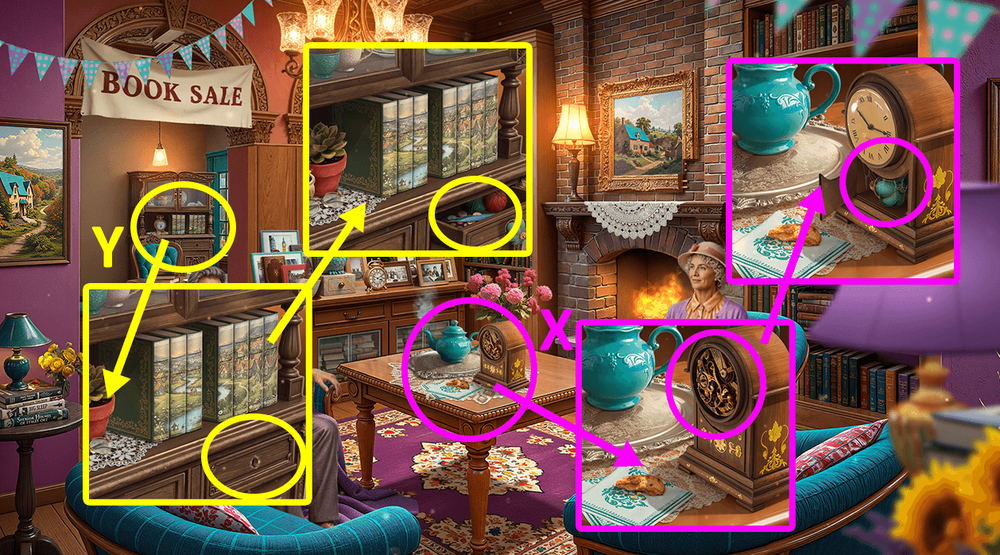
- Use CLOCK FACE on the broken clock, take DRAWER HANDLE (X).
- Use DRAWER HANDLE, take TWEEZERS (Y).
- Go back.

- Take CERAMIC BUTTERFLY (Z).
- Use CERAMIC BUTTERFLY, take COINS 2/2 (A).
- Use COINS 2/2 on the coin receiver, read the newspaper, take PAPER CLIP and BUTTONS 1/2, use TWEEZERS, earn OWL’S EYE (B).
- Go to Pharmacy.
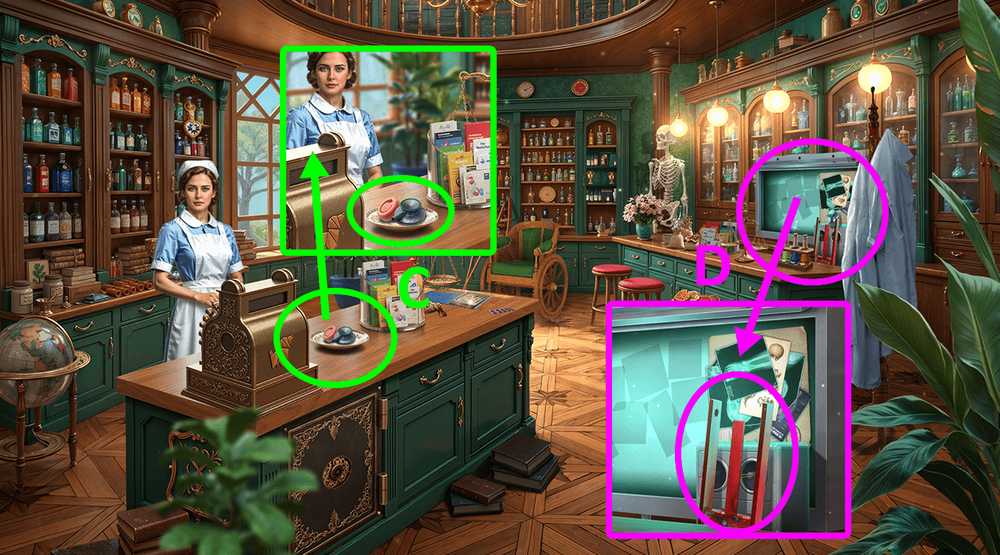
- Take BUTTONS 2/2 and STETHOSCOPE (C).
- Take RATCHET PART, use BUTTONS 2/2 (D).
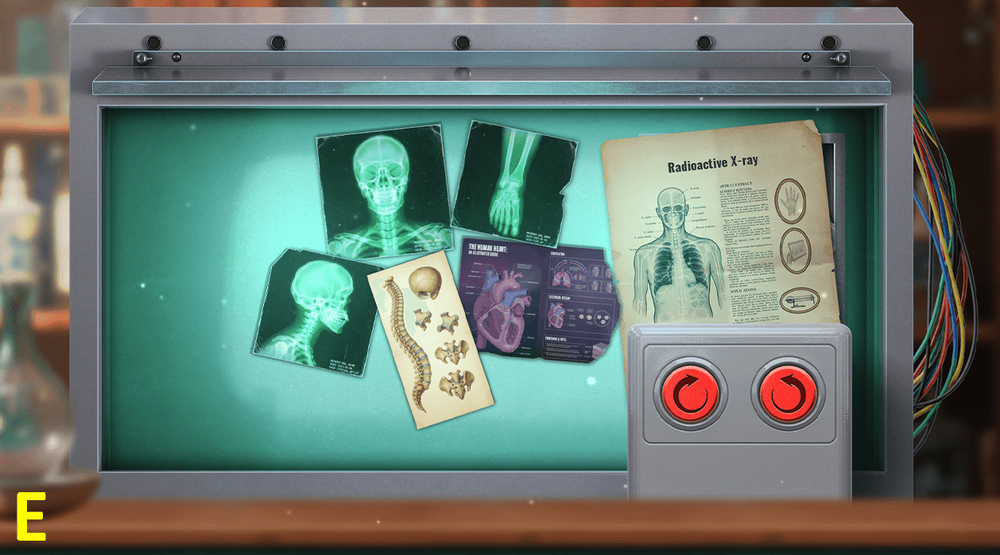
- Easy solution: Arrange all the posters as shown in the image (E).
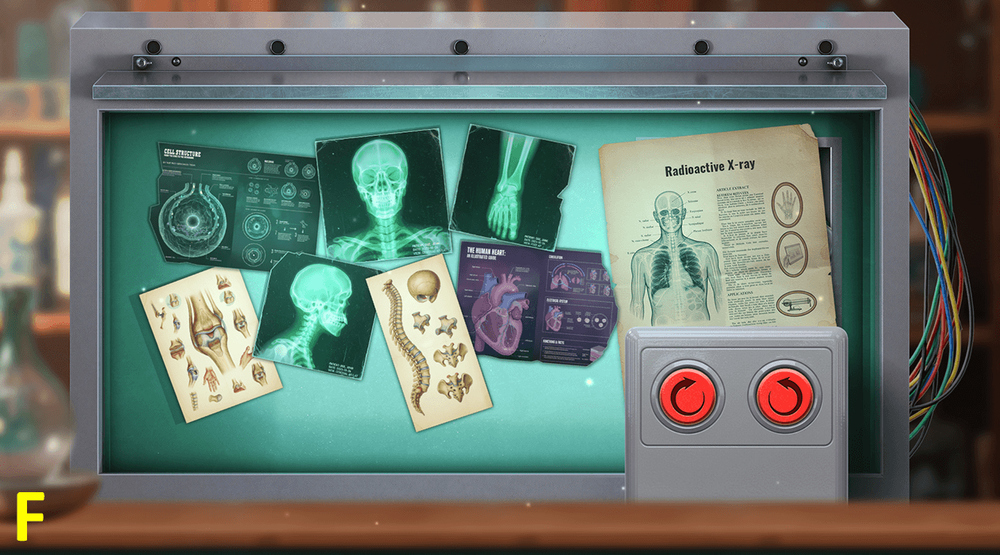
- Hard solution: Arrange all the posters as shown in the image (F).
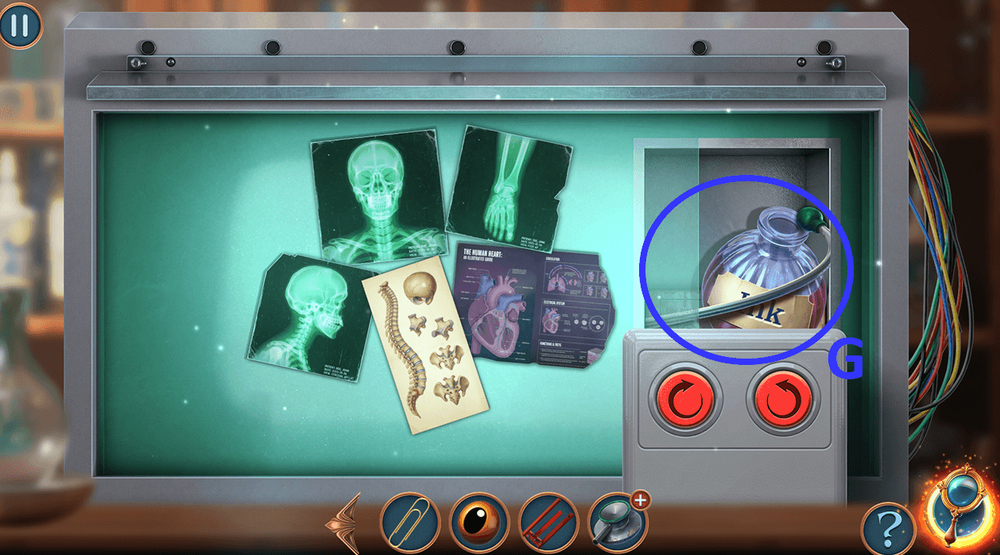
- Take STETHOSCOPE EARPIECES 1/2 and INK DEVELOPER (G).
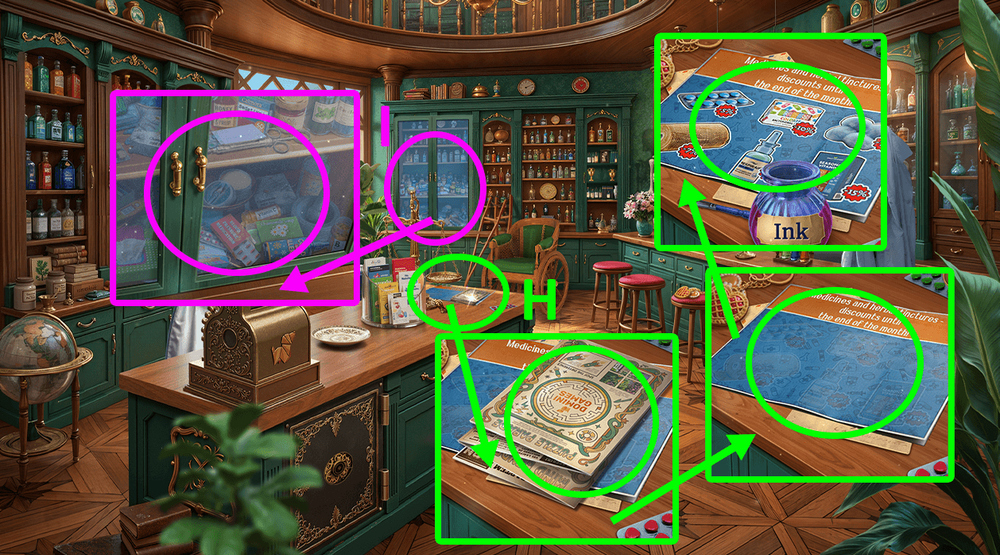
- Take the map, look at the poster, use INK DEVELOPER and BRUSH, take PAMPHLET (H).
- Use PAMPHLET (I).

- Play puzzle, earn LOCK PICKS (J).
- Go to Mrs.
- Peabody’s Bookshop.
- Use OWL’S EYE, take COOKIE and CHESS PIECE (K).
- Go to Elderwick Street.

- Use LOCK PICKS, take SCRAPER (L).

- Use SCRAPER on the moss, take OILER, use CHESS PIECE on the chessboard, take FRAME PART (M).
- Go to Mrs.
- Peabody’s Bookshop.

- Use FRAME PART, take BOOK (N).
- Use BOOK, take FOUR TEACUPS (O).
- Use FOUR TEACUPS, RED LEAVES and COOKIE (P).
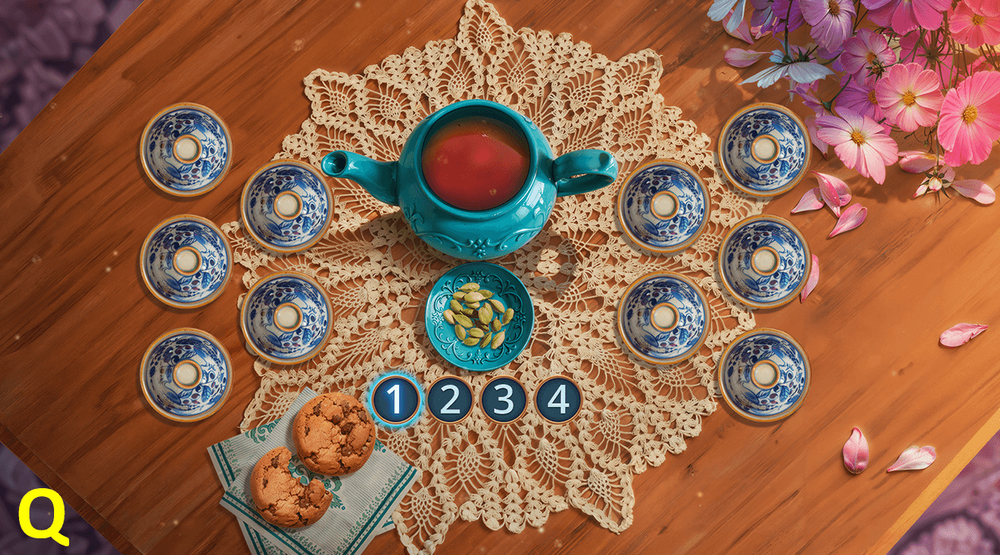
- Solution: Random (Q).
- Go to My Kitchen.
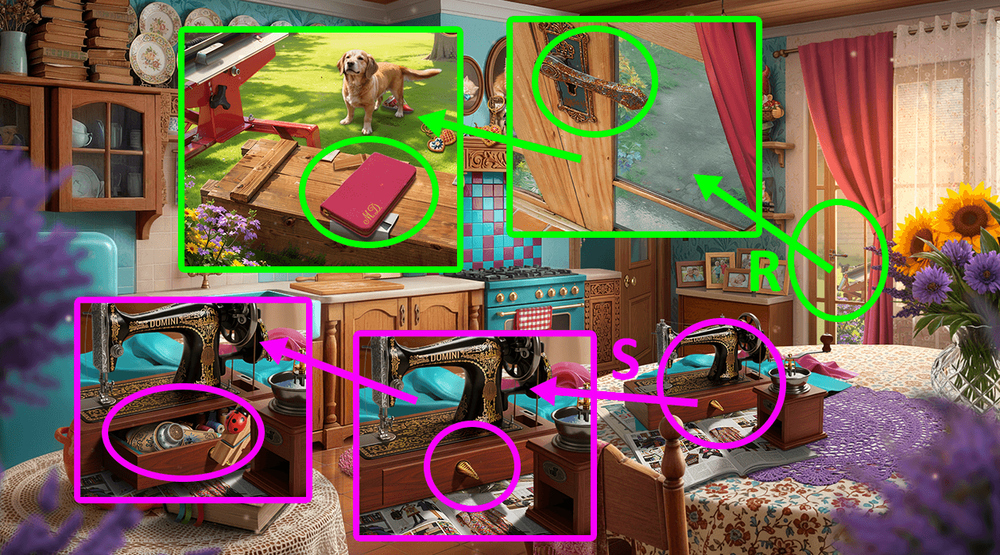
- Use OILER on the door handle, take MY WALLET and CLOTHESPIN PARTS 2/2 (R).
- Use CLOTHESPIN PARTS 2/2 on the CLOTHESPIN SPRING, earn WOODEN CLOTHESPIN.
- Use PAPER CLIP on MY WALLET, earn BANKNOTE.
- Use WOODEN CLOTHESPIN, take SAFE HANDLE and OLD MEDICINE LABEL (S).
- Go to Pharmacy.
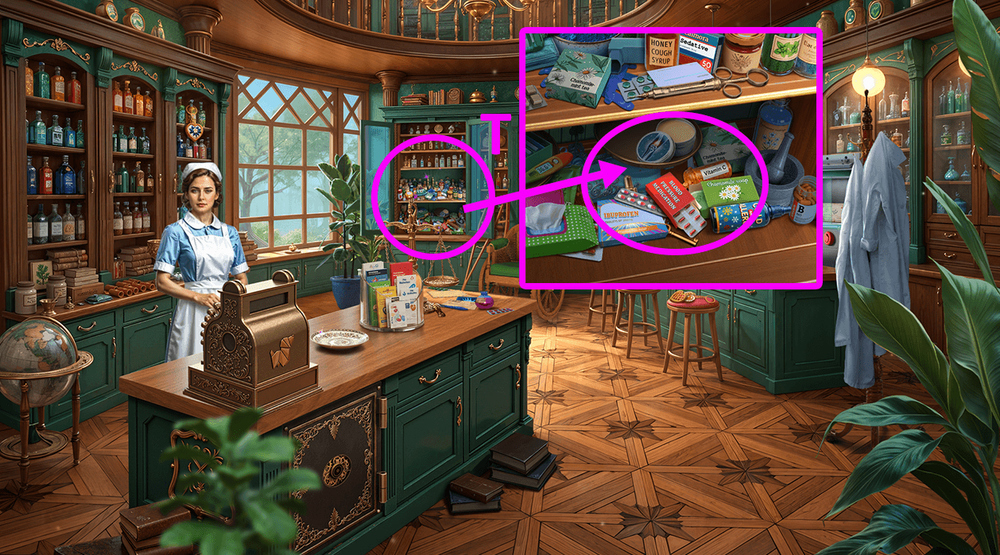
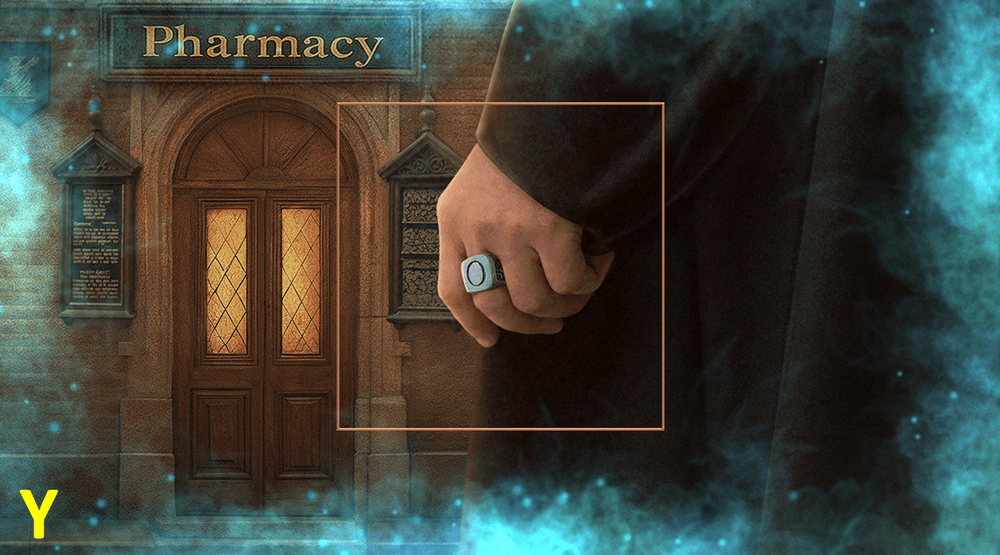
- Use OLD MEDICINE LABEL (T).
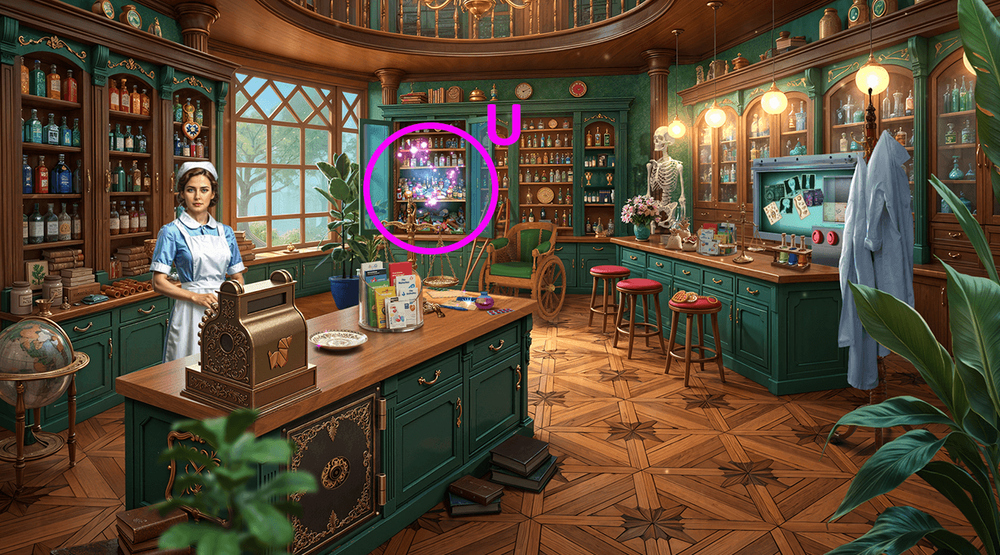
- Play puzzle, earn DROPS (U).
- Use DROPS and BANKNOTE (V).
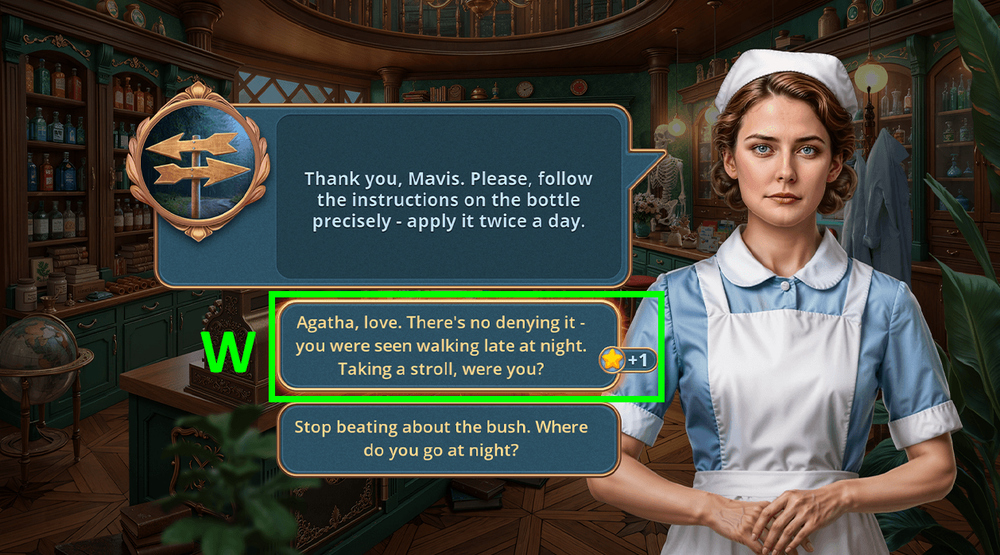
- Select this option (W).
- Solution: Arrange all the puzzle pieces as shown in the image (X).

- Take STETHOSCOPE EARPIECES 2/2 and CANISTER (Y).
- Take TUBE and VALVE (Z).
- Use VALVE and CANISTER, take CANISTER OF WATER (A).

- Use CANISTER OF WATER, take LENS, BROKEN RATCHET, LONG HAIRPIN (B).
- Use LONG HAIRPIN on the keyhole (C).
- Go forward.

- Solution: Arrange all the puzzle pieces as shown in the image (D).
- Take TAPE (E).
- Use STETHOSCOPE EARPIECES, TUBE and TAPE on the STETHOSCOPE, earn STETHOSCOPE.
- Use STETHOSCOPE and SAFE HANDLE on the safe door, take HYGIEIA PARTS 1/3 and AWARD (E).

- Use AWARD (F).
- Easy solution: Adjust the sliders as shown in the image (G).
- Hard solution: Adjust the sliders as shown in the image (H).
- Go forward.
- Take HOSE (I).
- Take FERTILIZER and SEPTUM RING (J).

- Take HYGIEIA PARTS 2/3, click on the carpet, use SEPTUM RING on the hatch, take DESK DRAWER KEY (K).
- Take WOOD CHISEL and LARGE SEASHELL, use DESK DRAWER KEY (L).

- Play puzzle, earn PAPER FILTER (M).
- Use PAPER FILTER, take MOLECULES 1/2 (N).
- Go to Rosewood Avenue.
- Use HOSE (O).
- Use LARGE SEASHELL, take CHISEL and HYGIEIA PARTS 3/3 (P).
- Go to Hidden Lab.
- Use HYGIEIA PARTS 3/3, take METAL MEDICAL RULER (Q).

- Solution: Arrange all the puzzle pieces as shown in the image (R).

- Use METAL MEDICAL RULER, take PAPERWEIGHT (S).
- Use PAPERWEIGHT and CHISEL (T).
- Solution: Arrange all the puzzle pieces as shown in the image (U).

- Take PATTERNED IMPRINT (V).
- Go to Rosewood Avenue.
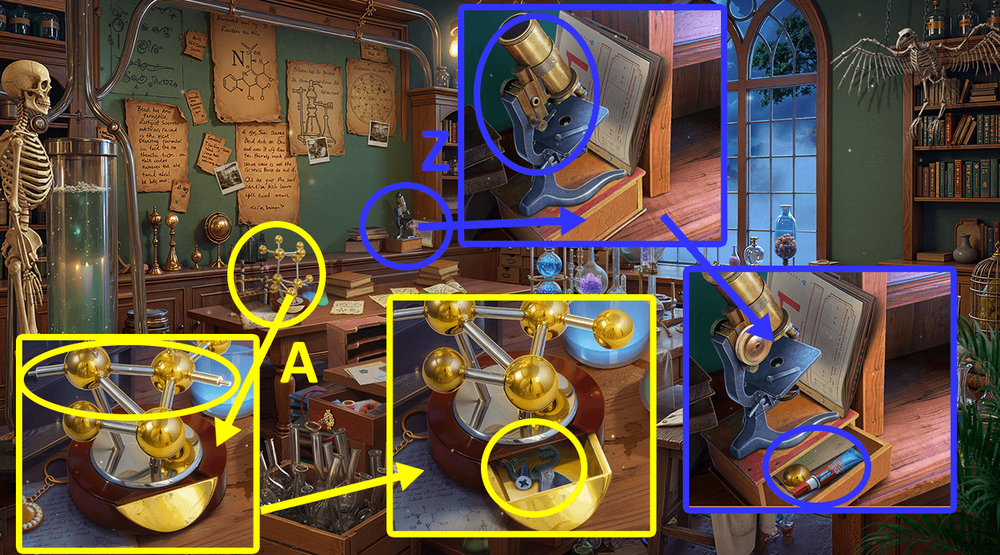
- Use PATTERNED IMPRINT, take TROWEL (W).
- Use TROWEL and FERTILIZER, earn MICROSCOPE ADJUSTMENT KNOB (X).
- Solution: Rotate the puzzle pieces until they are in the position shown in the image (Y).
- Go to Hidden Lab.
- Use LENS and MICROSCOPE ADJUSTMENT KNOB, take GLUE and MOLECULES 2/2 (Z).
- Use MOLECULES 2/2, take SCREW and LARGE GARDEN SHEARS (A).

- Play puzzle (B).
- Select this option (C).

- Read the note, use LARGE GARDEN SHEARS (D).
- Go forward.
- Take DUSTER and TORN TOY (E).
- Take SHOOTING MACHINE REMOTE and BROKEN FIGURINE (F).
- Use WOOD CHISEL (G).
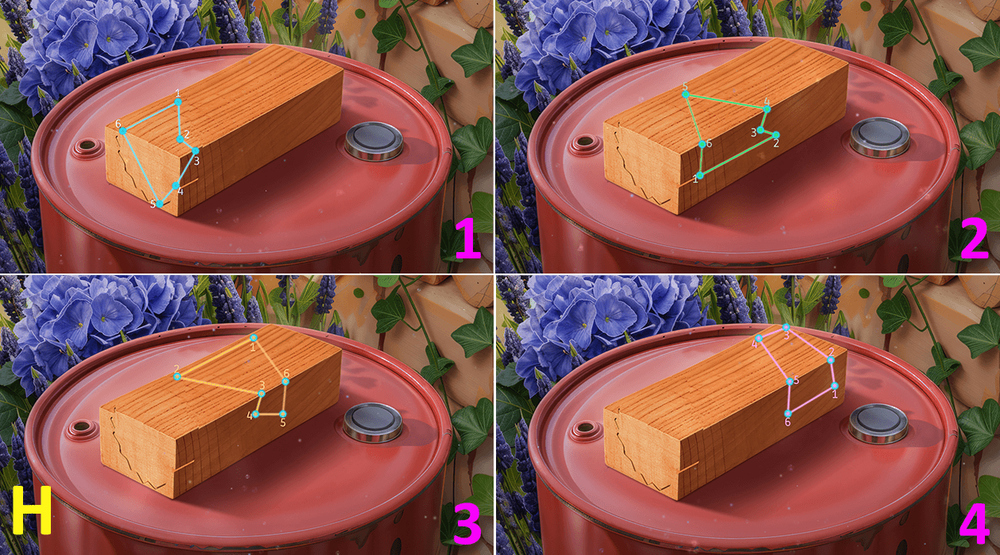
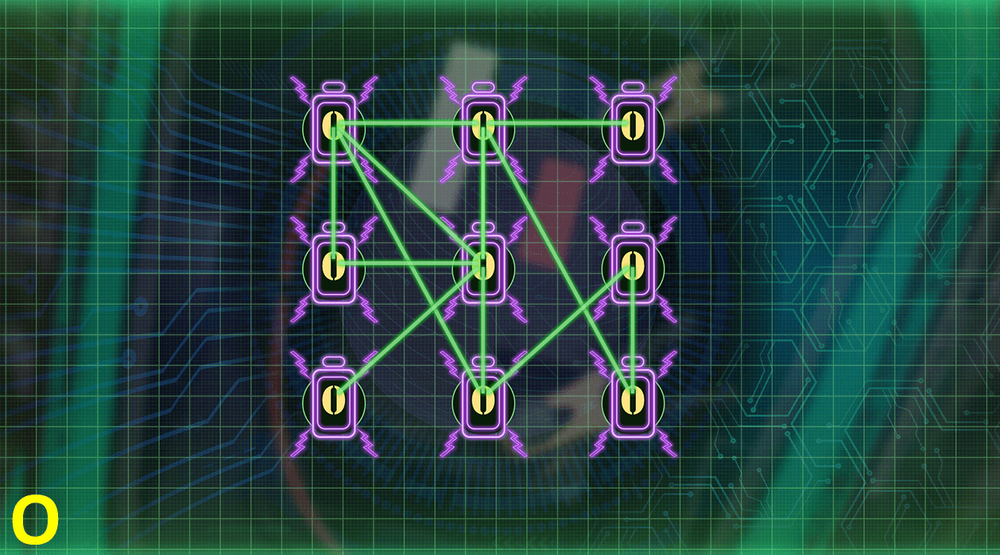
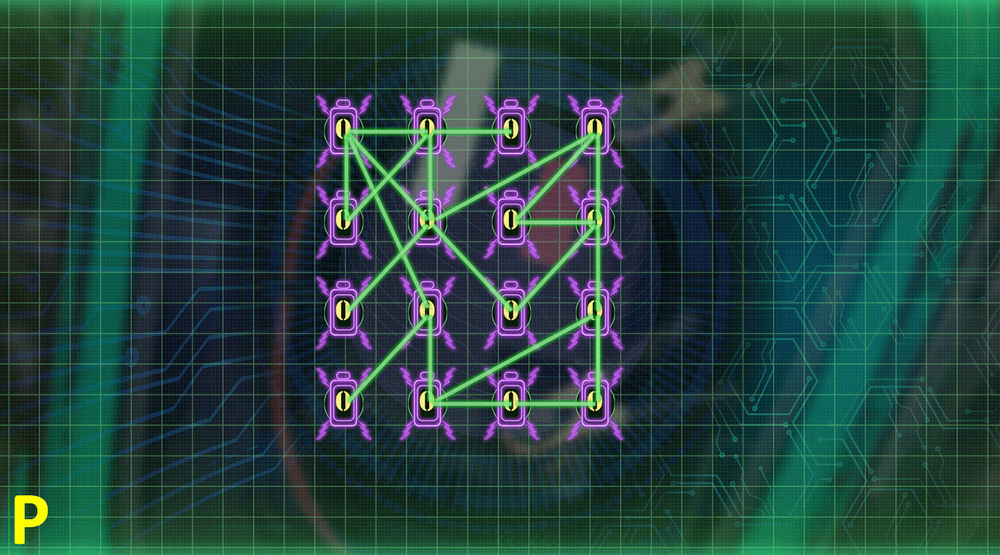
- Connect all the dots by clicking on them in the order shown in the images (H).

- Take WOODEN RATCHET DRUM (I).
- Use WOODEN RATCHET DRUM and RATCHET PART on the BROKEN RATCHET, earn RATCHET.
- Use RATCHET on the flock of crows (J).

- Play puzzle, earn RAKE (K).
- Go back.
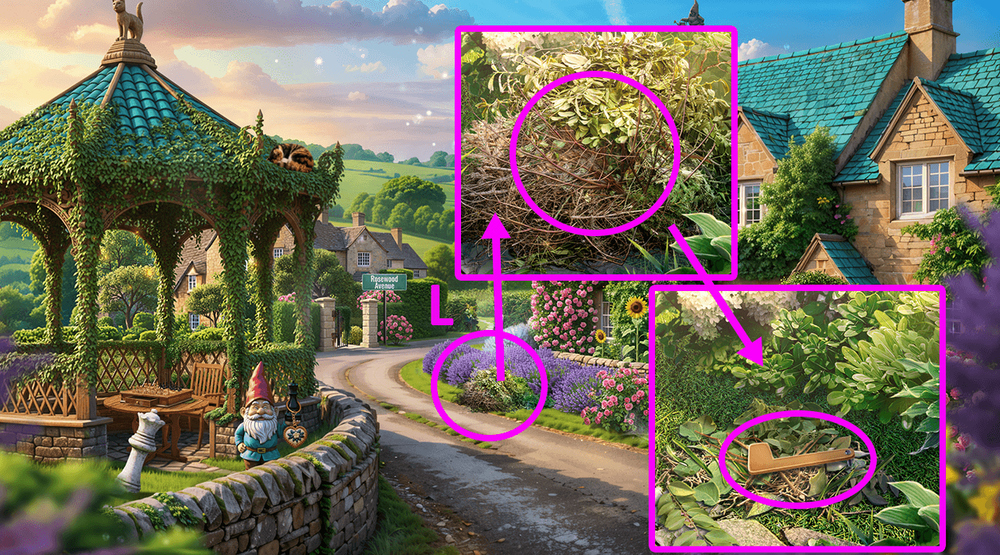
- Use RAKE, take MAILBOX HORN (L).
- Go forward.
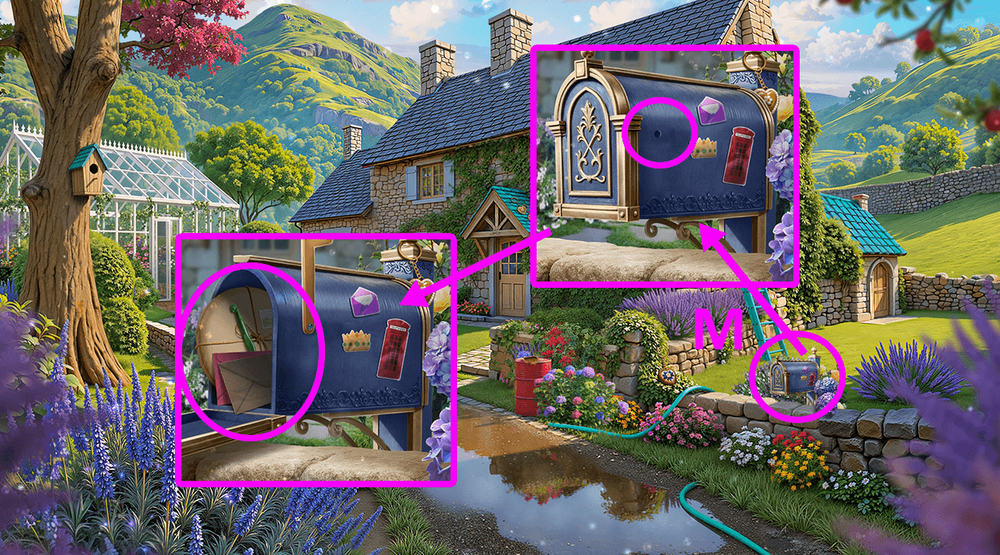
- Use MAILBOX HORN, read the letter, take CROCHET HOOK and SHOOTING TARGET PLATE (M).
- Solution: Rotate the puzzle pieces until they are in the position shown in the image (N).
- Go to My Kitchen.
- Use SHOOTING TARGET PLATE and SHOOTING MACHINE REMOTE, take PIECE OF FIGURINE (O).
- Use PIECE OF FIGURINE and GLUE on the BROKEN FIGURINE, earn GNOME FIGURINE.
- Use GNOME FIGURINE, take EARPLUGS and NEEDLE (P).
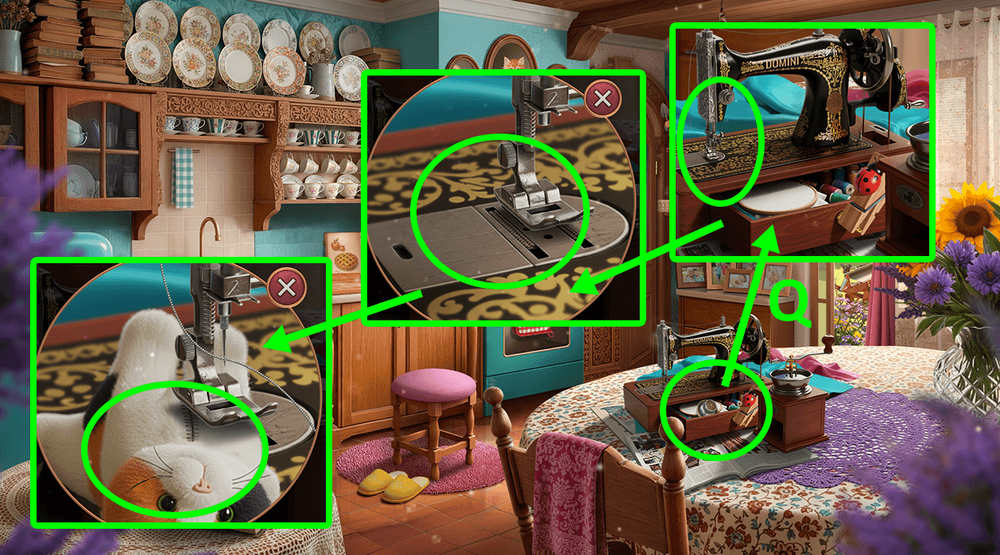
- Use NEEDLE and TORN TOY on the sewing machine, take CAT TOY (Q).
- Go to In Front of Mimi’s House.
- Use CAT TOY, take RIFLE-SHAPED AMULET 1/2 (R).

- Play puzzle, earn PESTICIDE (S).
- Use PESTICIDE, take RIFLE-SHAPED AMULET 2/2 (T).
- Go to My Kitchen.

- Use RIFLE-SHAPED AMULET 2/2, take RIFLE (U).
- Go to In Front of Mimi’s House.

- Use RIFLE (V).
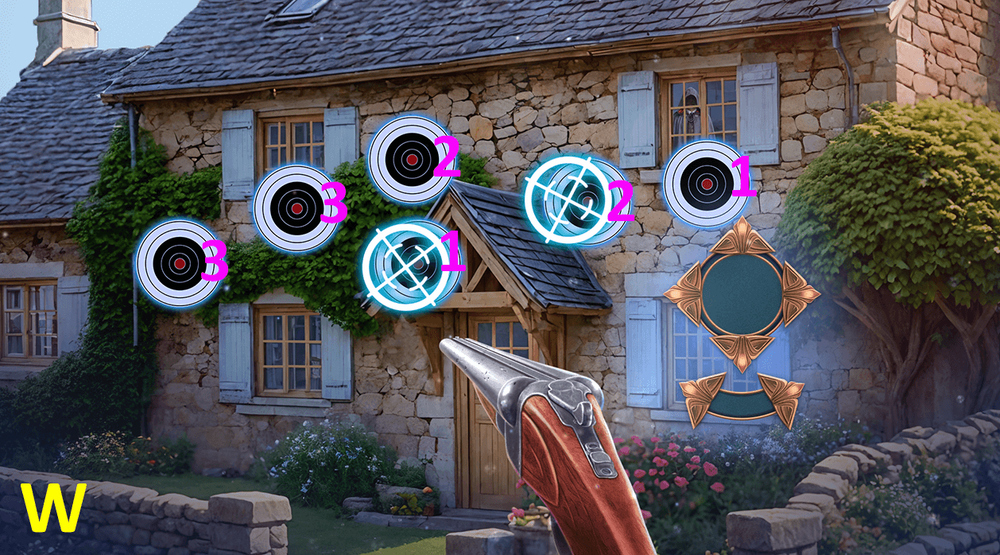
- Easy solution: Remove all pairs of targets from the field.
- The numbers of the pairs are shown in the image (W).

- Hard solution: Remove all pairs of targets from the field.
- The numbers of the pairs are shown in the image (X).
- Take SCARF (A).
- Use DUSTER to remove the shards, take SMALL KEY (B).

- Use SMALL KEY, take PORCELAIN CUP (C).
- Use PORCELAIN CUP (D).

- Solution: Random (E).
- Select this option, earn TASER (F).
- Go forward.
- Take TWEEZERS (G).
- Take SCREWDRIVER (H).
- Use SCREWDRIVER to open the lid, take HAIRPIN (I).
- Take YARN (J).
- Use YARN and CROCHET HOOK on the SCARF, earn HANDMADE SCARF.
- Use HANDMADE SCARF (K).
- Play puzzle, earn UMBRELLA (L).
- Use UMBRELLA, earn WIRE (M).
- Use WIRE and TASER (N).
- Easy solution: Connect the pieces as shown in the picture (O).
- Hard solution: Connect the pieces as shown in the picture (P).
- Go forward.
- Select this option (Q).
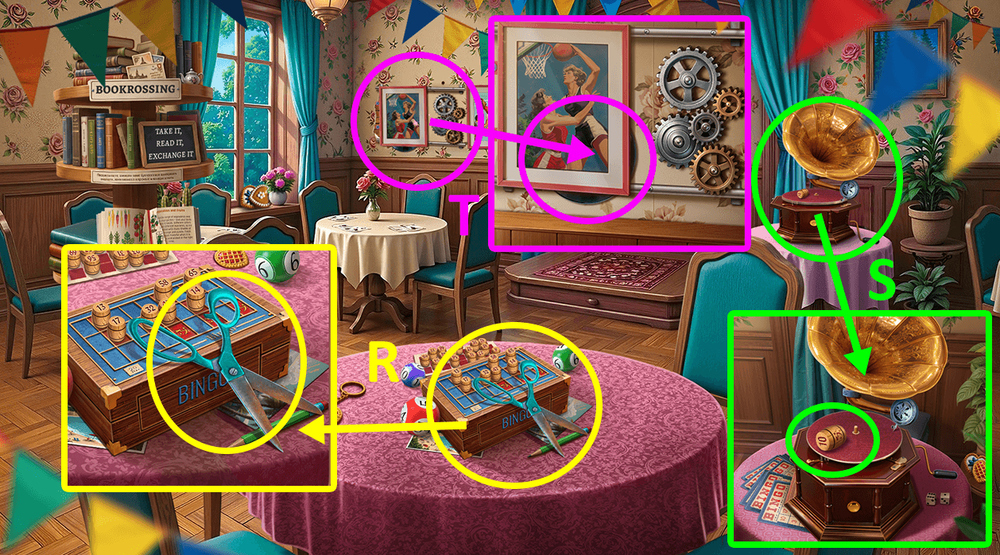
- Take BLUNT SCISSORS (R).
- Take BINGO PIECES 1/3 (S).
- Use EARPLUGS on the TWEEZERS, earn TWEEZERS WITH EARPLUGS.
- Use TWEEZERS WITH EARPLUGS on the painting, earn RECORD (T).

- Use RECORD, take BINGO PIECES 2/3 and RIBBON (U).
- Go to My House.
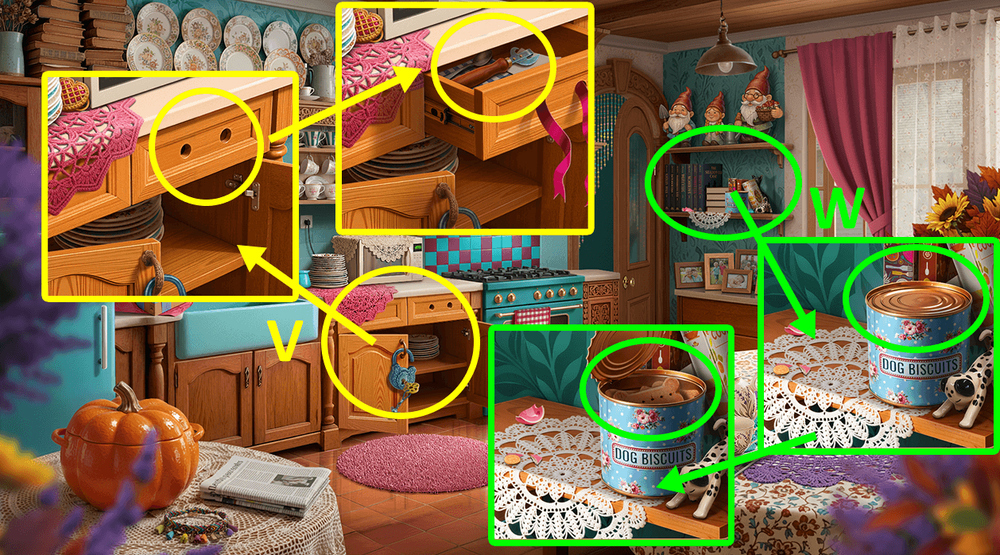
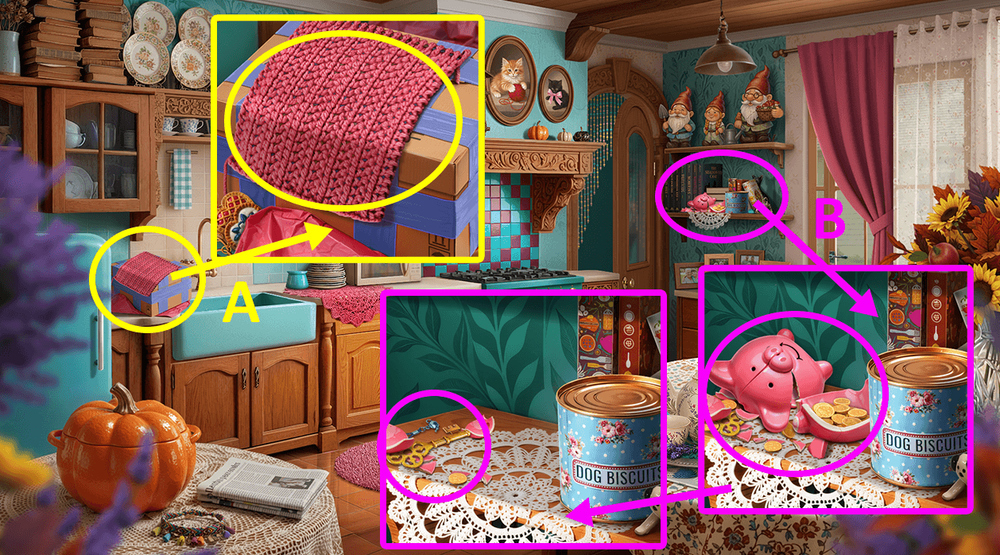
- Use RIBBON, take CAN OPENER (V).
- Use CAN OPENER, take DOG BISCUIT (W).
- Go forward.
- Use DOG BISCUIT, take BOOK PAGES 1/2 (X).
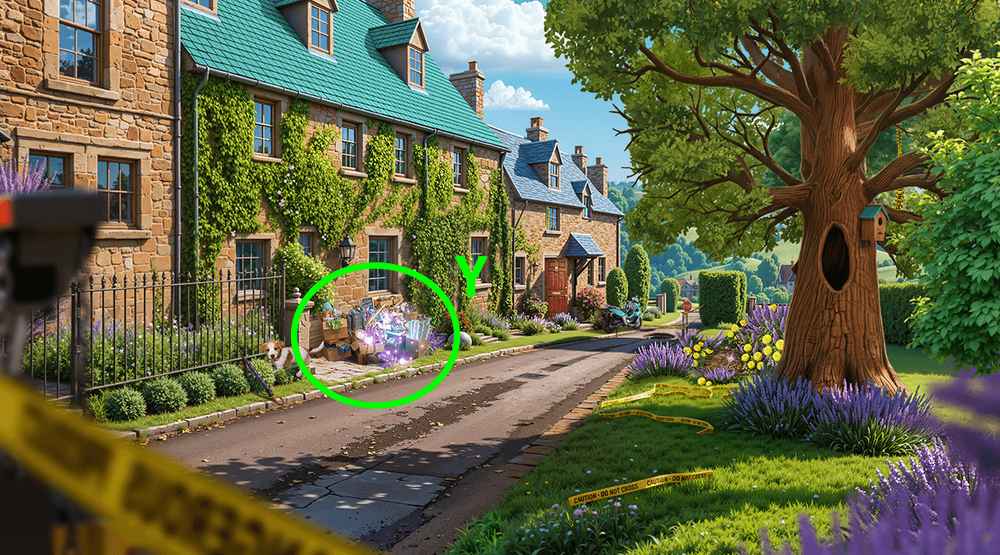
- Play puzzle, earn LUCKY SHOVEL (Y).
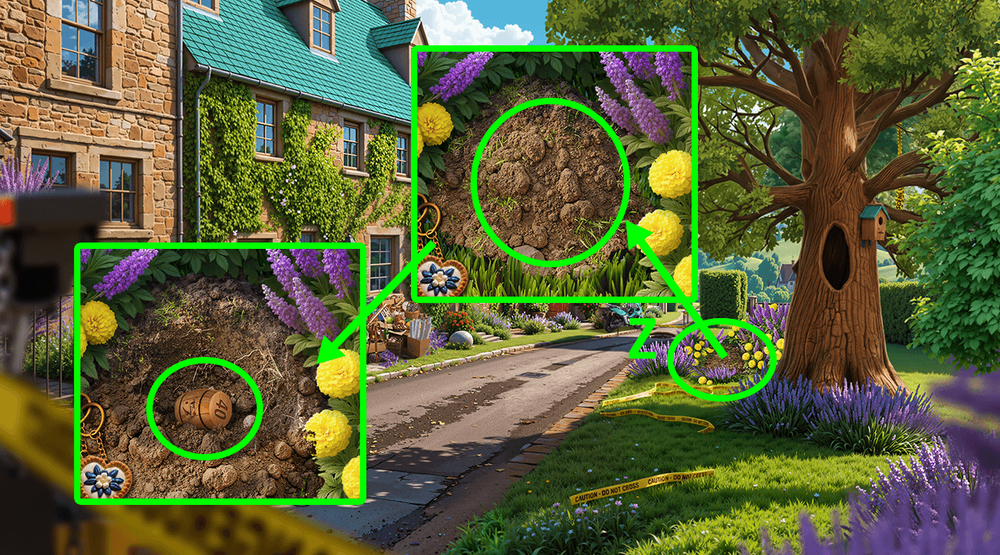
- Use LUCKY SHOVEL, take BINGO PIECES 3/3 (Z).
- Go forward.
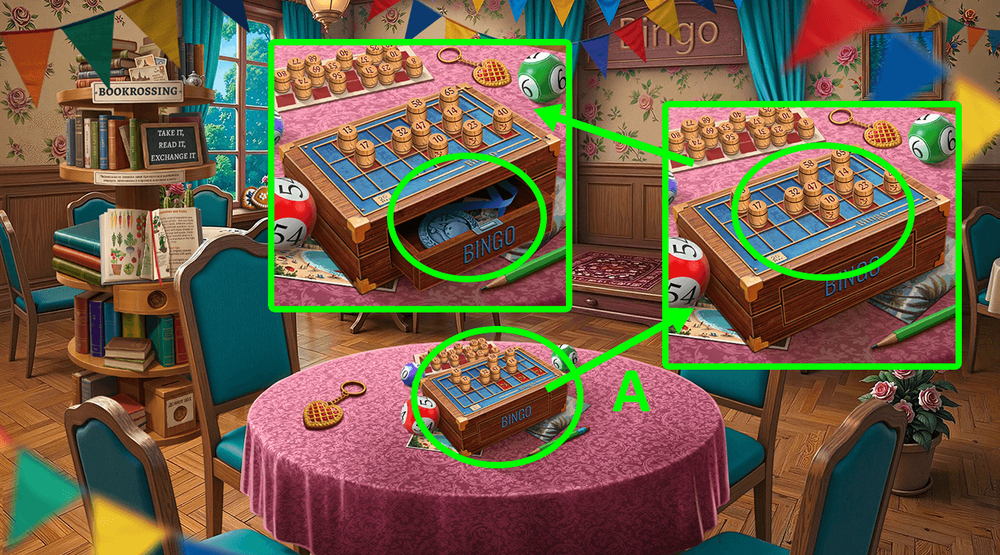
- Use BINGO PIECES 3/3, take SILVER MEDAL (A).

- Solution: Arrange all the puzzle pieces as shown in the image (B).
- Use SILVER MEDAL to open the drawer, read the note, earn SEEDS, take FLASHLIGHT (C).
- Go back.

- Use FLASHLIGHT, take WILLOW VINES and SANDPAPER, earn DEAD FLASHLIGHT (D).
- Use SANDPAPER on the BLUNT SCISSORS.

- Easy solution: Set the switches to the position shown in the image, earn SCISSORS (E).
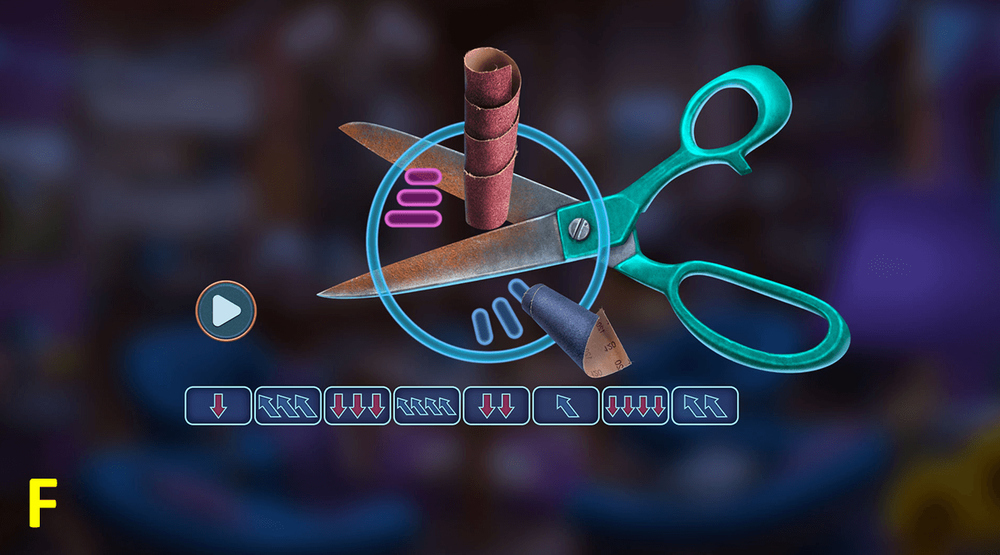
- Hard solution: Set the switches to the position shown in the image, earn SCISSORS (F).
- Go back.
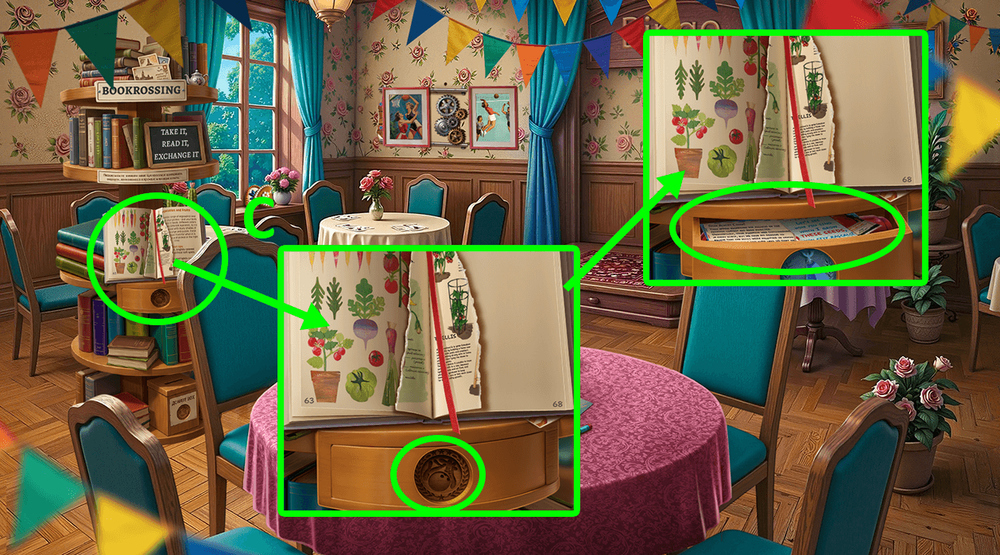
- Use SCISSORS, take POSTER (G).
- Go to Bingo Club.
- Use POSTER, take BOOK PAGES 2/2 (H).
- Use BOOK PAGES 2/2 (I).

- Solution: Arrange all the puzzle pieces as shown in the image (J).

- Select this option (K).
- Go to Mr. Crow’s Office.
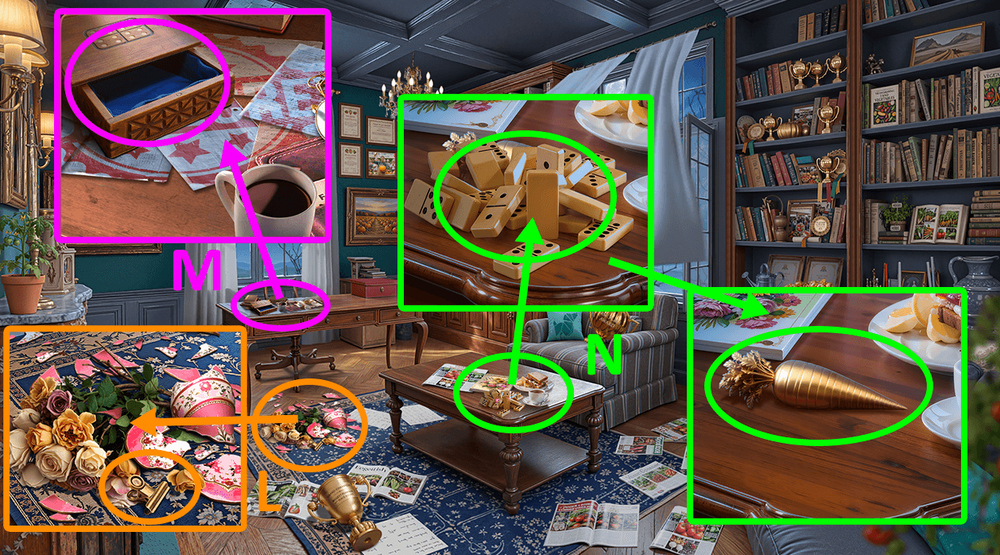
- Take PAPER CLAMPS 1/3 (L).
- Take DOMINO BOX (M).
- Use DOMINO BOX, take STATUETTE PART (N).

- Use STATUETTE PART, take JACK (O).
- Go back.
- Use JACK to lift the fallen tree, take SCOOP AND BRUSH (P).
- Take RUSTY GARDEN FAUCET and PERFUME (Q).

- Use PERFUME to chase away the wasps (R).
- Play puzzle, earn GARDEN SHEARS (S).

- Use GARDEN SHEARS, take HANDKERCHIEF, MAGNIFYING GLASS and GREENHOUSE KEY (T).

- Solution: Arrange all the puzzle pieces as shown in the image (U).

- Use GREENHOUSE KEY (V).
- Go forward.
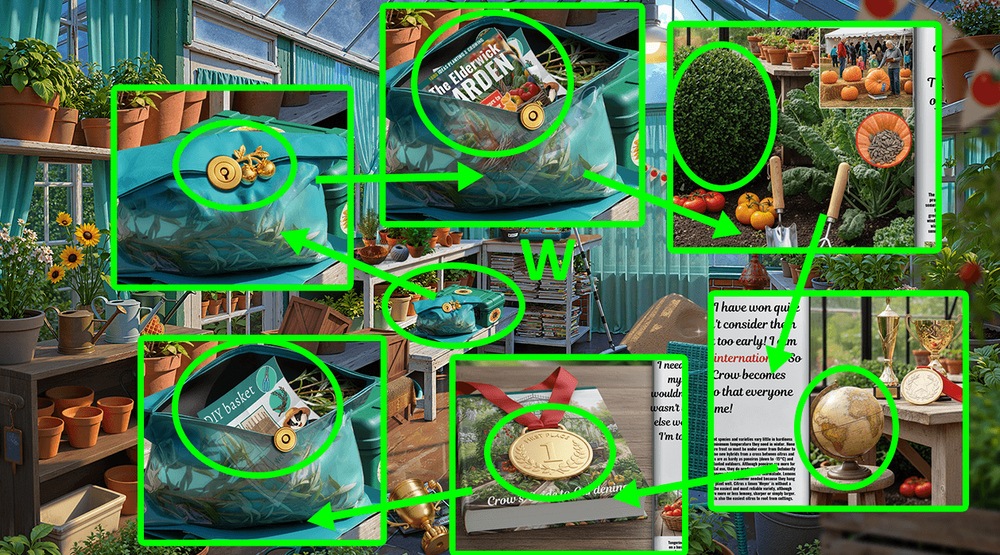
- Use HAIRPIN, open the journal, click on the bush, the globe and the medal, take WEAVING PATTERN (W).

- Use WEAVING PATTERN and WILLOW VINES (X).

- Easy solution: Drag the pliers to the location shown in the image (Y).
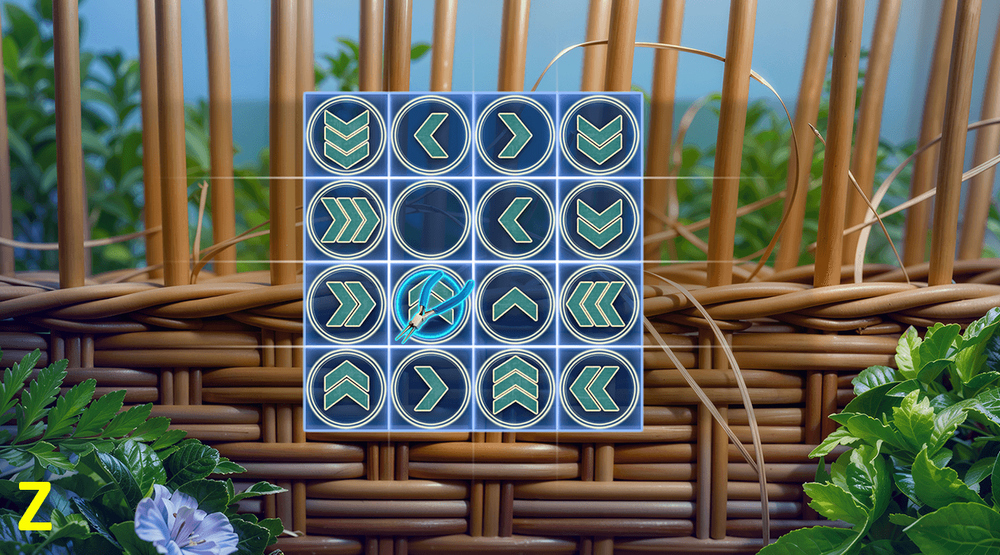
- Hard solution: Drag the pliers to the location shown in the image (Z).

- Take WICKER BASKET (A).
- Go to Mr. Crow’s Office.
- Use SCOOP AND BRUSH on the shards, take TROPHY and PAPER CLAMPS 2/3 (B).
- Use TROPHY on the pedestal, take PIN (C).
- Go to Mr. Crow’s Greenhouse.
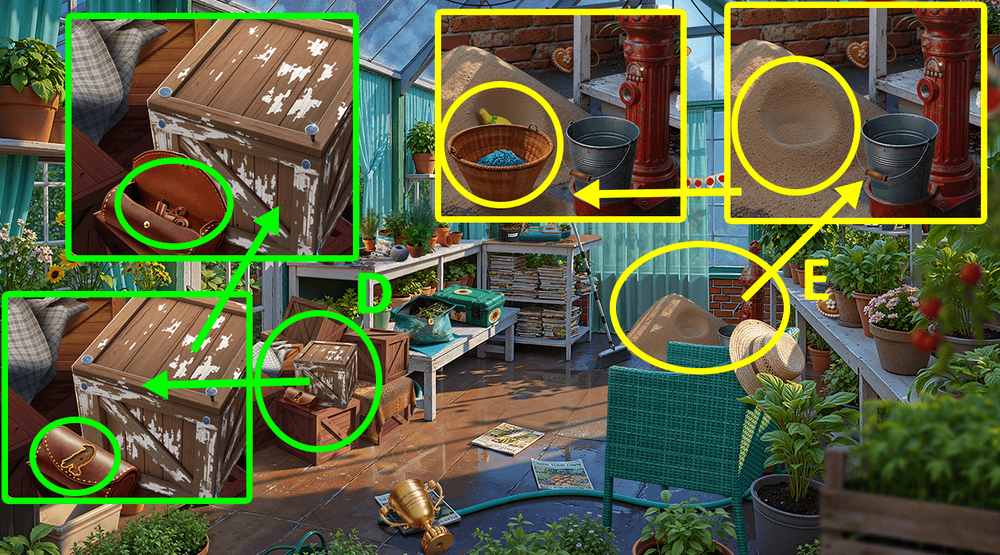
- Use PIN on the closed bag, take PAPER CLAMPS 3/3 (D).
- Use WICKER BASKET on the pile of sand, take HOOK WITH LINE, PHOSPHATE FERTILIZER and LEMON JUICE (E).

- Use HANDKERCHIEF and LEMON JUICE on the RUSTY GARDEN FAUCET, earn GARDEN FAUCET.
- Use GARDEN FAUCET (F).
- Easy solution: Click the buttons shown in the image (G).
- Hard solution: Click the buttons shown in the image (H).

- Take WATER (I).
- Go back.
- Use WATER, SEEDS and PHOSPHATE FERTILIZER, earn BIG TOMATO (J).
- Go to Mr. Crow’s Office.

- Use PAPER CLAMPS 3/3 (K).
- Easy solution: Arrange the pages as shown in the image, read the notes (L).
- Hard solution: Arrange the pages as shown in the image, read the notes (M).
- Go to Mr. Crow’s Greenhouse.
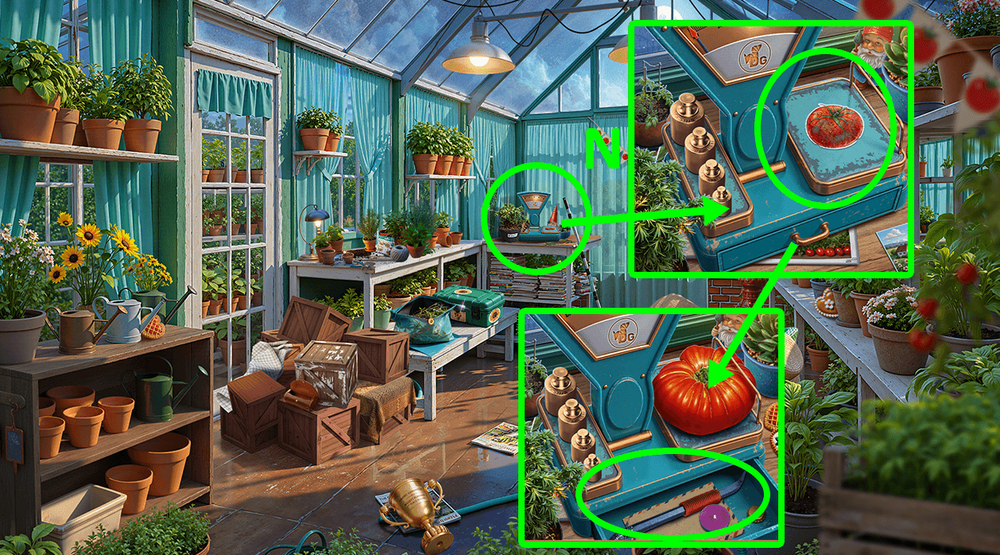
- Use BIG TOMATO, take CANDLE and NAIL PULLER (N).
- Solution: Arrange all the puzzle pieces as shown in the image (O).
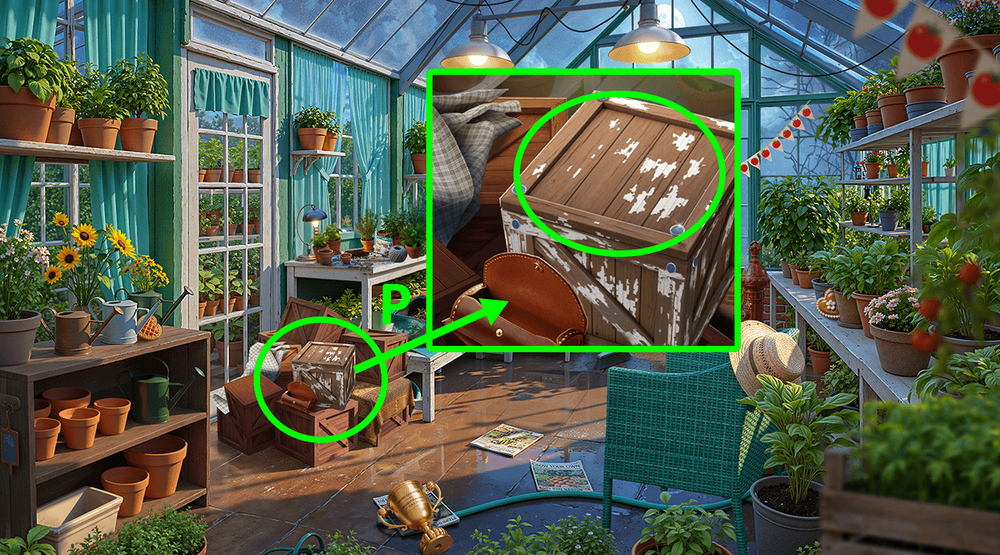
- Use NAIL PULLER to open the crate (P).
- Select this option (Q).
- Use MAGNIFYING GLASS (R).
- Play puzzle, earn KEY (S).

- Use KEY, earn CLOTHESPIN (T).
- Take LONG CORD and HANDLE (U).
- Use HANDLE on the axe head, earn AXE (V).
- Use AXE on the debris (W).

- Solution: Random (X).
- Select this option (Y).
- Take MIRROR (Z).
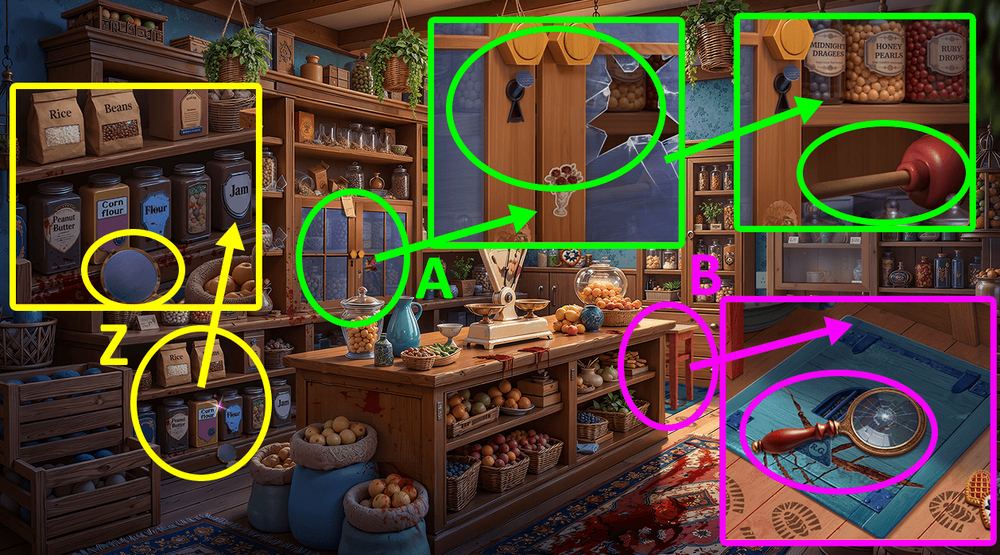
- Use MIRROR and HOOK WITH LINE to open the latch, take PLUNGER (A).
- Click on the stool to move it, take CRACKED MAGNIFYING GLASS (B).

- Use PLUNGER to open the glass window (C).

- Solution: Arrange all the puzzle pieces as shown in the image (D).
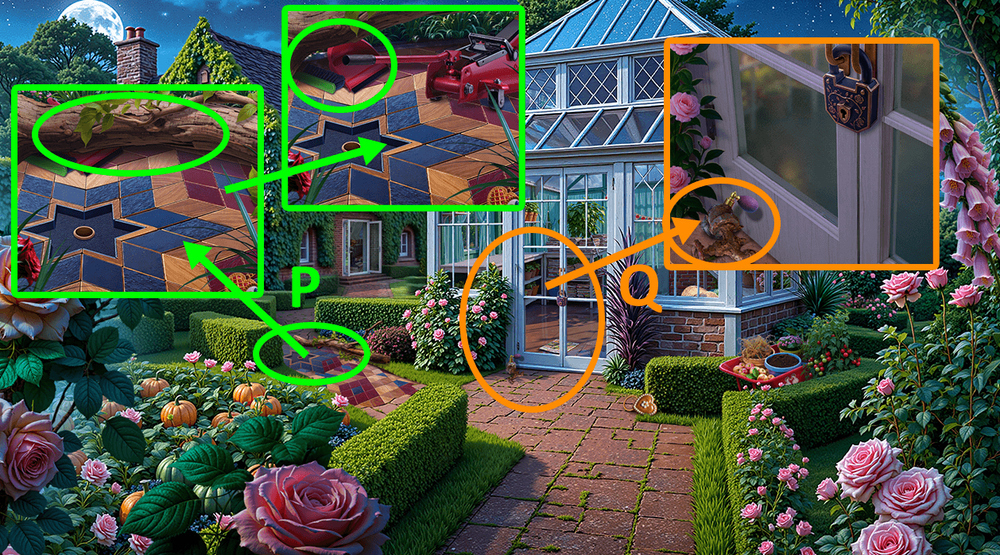
- Take STAR TILE (E).
- Go to Mr. Crow’s Garden.
- Use STAR TILE, take EMPTY AROMA LAMP, read the note, take BATTERIES (F).
- Use BATTERIES on the DEAD FLASHLIGHT, earn WORKING FLASHLIGHT.
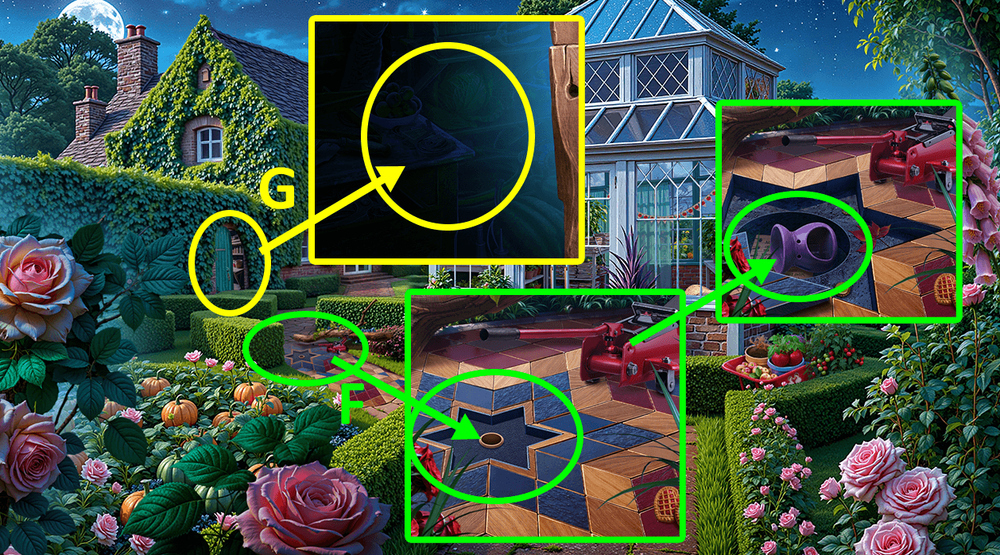
- Use WORKING FLASHLIGHT (G).

- Play puzzle, earn CANE (H).
- Go to Mr. Graham’s House.
- Use CANE, earn KEY (I).
- Go to Mr. Crow’s Greenhouse.
- Use KEY, take LIGHTER and MAGNET (J).
- Use MAGNET on the LONG CORD.
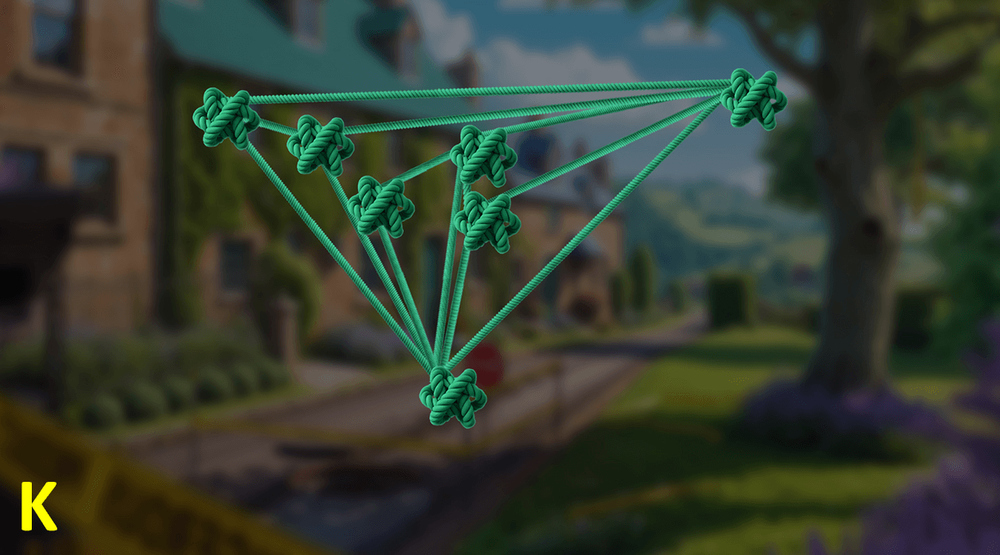
- Easy solution: Arrange all the nodes as shown in the image, earn MAGNET ON CORD (K).

- Hard solution: Arrange all the nodes as shown in the image, earn MAGNET ON CORD (L).
- Go forward.

- Use MAGNET ON CORD, earn ROUND BATTERY (M).
- Use ROUND BATTERY on the box, read the note, take SUPERGLUE (N).
- Play puzzle, earn MR. GRAHAM’S SEAL (O).
- Go forward.

- Use MR. GRAHAM’S SEAL, read the letter, take IMMERSION WATER BOILER, OILER and ENGRAVED CORKSCREW (P).
- Go back.

- Use ENGRAVED CORKSCREW, take ESSENTIAL OIL (Q).

- Solution: Arrange all the puzzle pieces as shown in the image (R).
- Use ESSENTIAL OIL, LIGHTER and CANDLE on the EMPTY AROMA LAMP, earn AROMA LAMP.
- Go back.
- Use AROMA LAMP, take LENS, FAN and CABLE (S).
- Go to Mr. Graham’s House.
- Use IMMERSION WATER BOILER and CABLE (T).
- Easy solution: Move all the pieces across the board as shown in the picture (U).
- Hard solution: Move all the pieces across the board as shown in the picture (V).

- Take HOT WATER (W).
- Use HOT WATER, SUPERGLUE and LENS on the CRACKED MAGNIFYING GLASS, earn MAGNIFYING GLASS (X).

- Solution: Random (Y).
- Take PUMP WITHOUT NOZZLE (A).
- Take BRUSH (B).
- Use CLOTHESPIN, earn COUPON (C).
- Use COUPON (D).

- Play puzzle, earn SCREWDRIVER (E).

- Select this option (F).
- Go to Topiary Competition.
- Take RAKE (G).
- Use RAKE, earn BOTTLE WITH NUTRIENT (H).
- Take FLOWERS 1/3 (I).
- Use BOTTLE WITH NUTRIENT, earn NUTRIENT (J).
- Go back.

- Use NUTRIENT, take FLOWERS 2/3 and BIRD (K).
- Use OILER and SCREWDRIVER on the gate (L).

- Easy solution: Click on the bolts in the order shown in the image (M).

- Hard solution: Click on the bolts in the order shown in the image (N).
- Go forward.
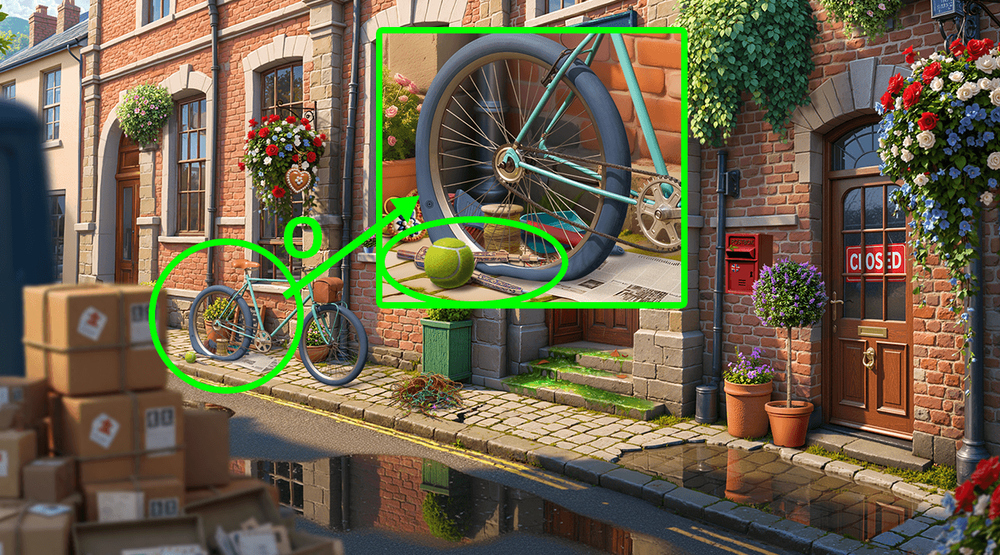
- Take TENNIS BALL and DIVIDERS (O).
- Go to Topiary Competition.
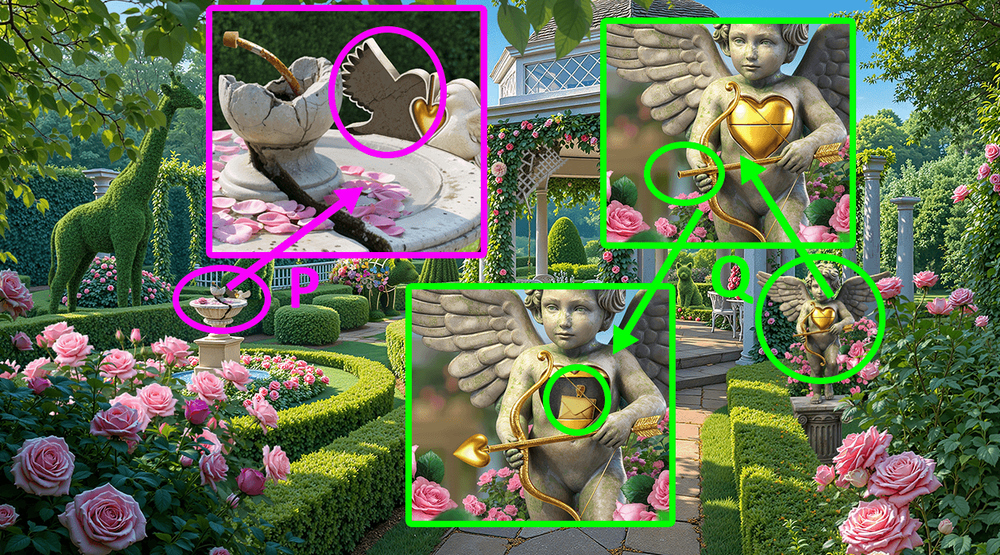
- Use BIRD, take CUPID’S HEART (P).
- Use CUPID’S HEART, take PENDANT (Q).
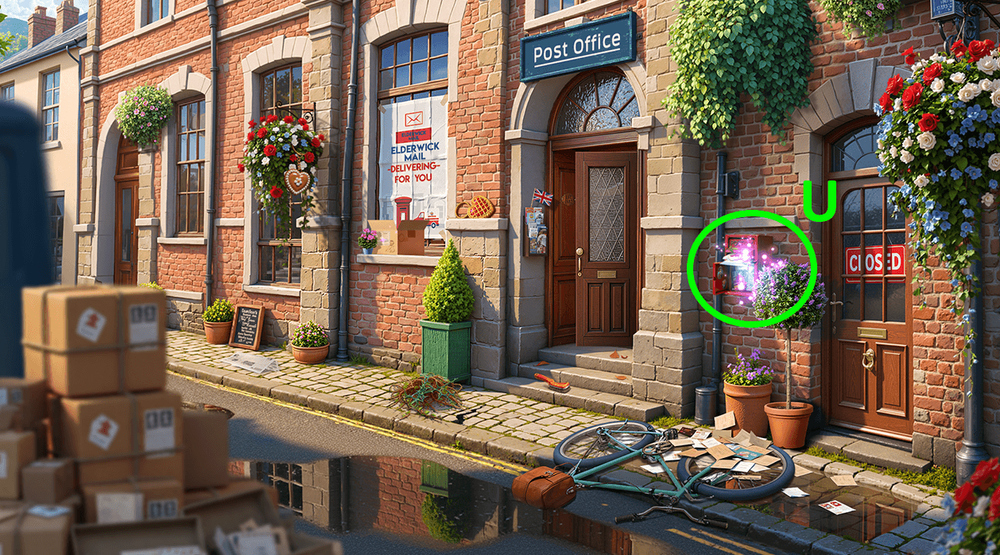
- Go to Near Post Office.
- Use DIVIDERS on the crevice in the tiles, earn KEY (R).
- Use KEY (S).

- Play puzzle, earn PAPER KNIFE (T).
- Use PAPER KNIFE, take PIPETTE and CLEANING SPRAY (U).
- Use CLEANING SPRAY and BRUSH on the slippery stairs (V).
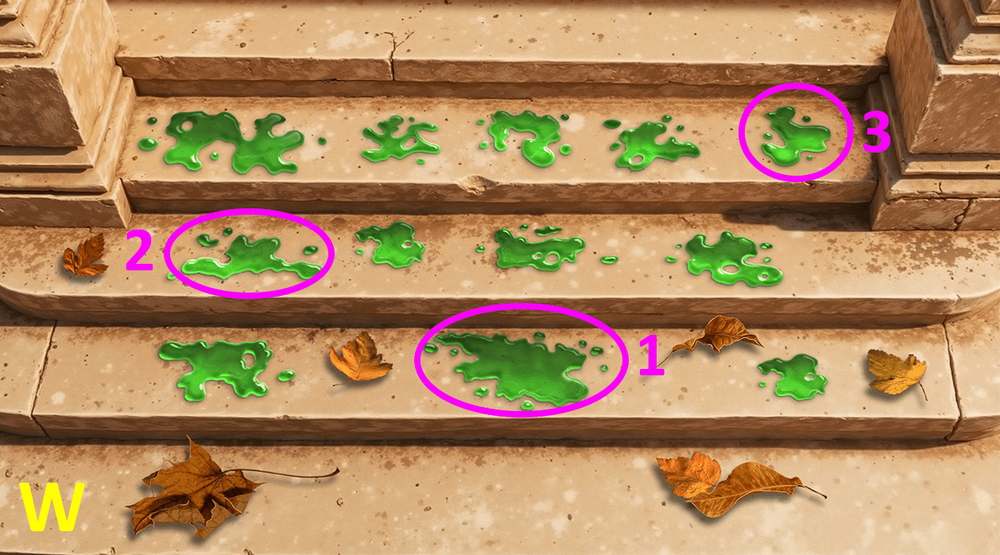
- Easy solution: Click on the stains in the order shown in the image (W).
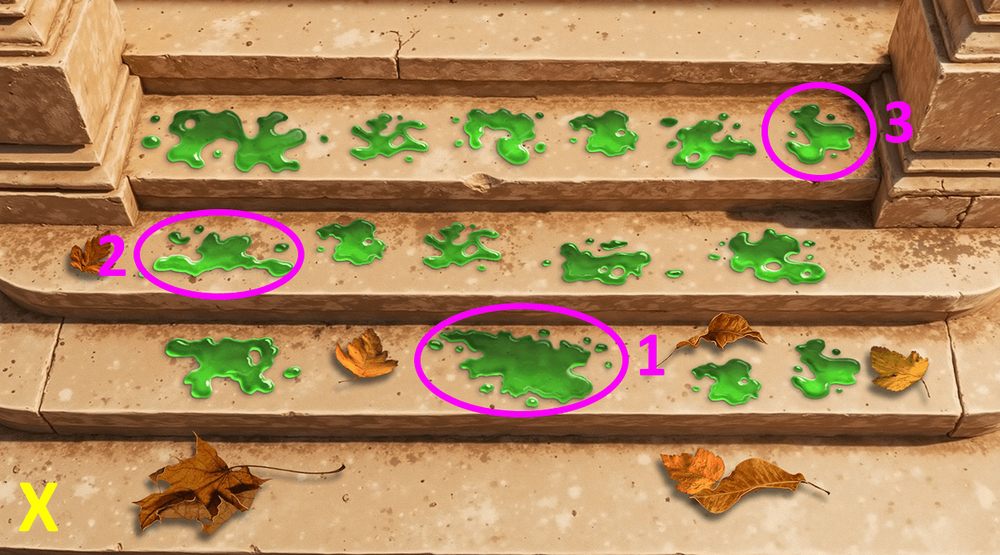
- Hard solution: Click on the stains in the order shown in the image (X).
- Go forward.
- Select this option (Y).

- Take UNFINISHED SOLUTION (Z).
- Use FAN on the fragment, take NUMBER FRAGMENTS 1/3, use PENDANT on the box lock, take SCISSORS (A).
- Use TENNIS BALL on the broken cart, take HAIRPIN (B).
- Use HAIRPIN (C).
- Easy solution: Press the buttons in the following order: 2-1-4-3-2-3-2-3-4-3-2-3-4-4-3-2-1-2-3-2 (D).
- Hard solution: Press the buttons in the following order: 2-1-4-3-2-3-2-3-4-3-2-3-4-4-3-2-1-2-3-3-2 (E).
- Take CHOPSTICKS, read the note (F).
- Go to Rosewood Avenue.

- Play puzzle, earn GIRL FIGURINE (G).
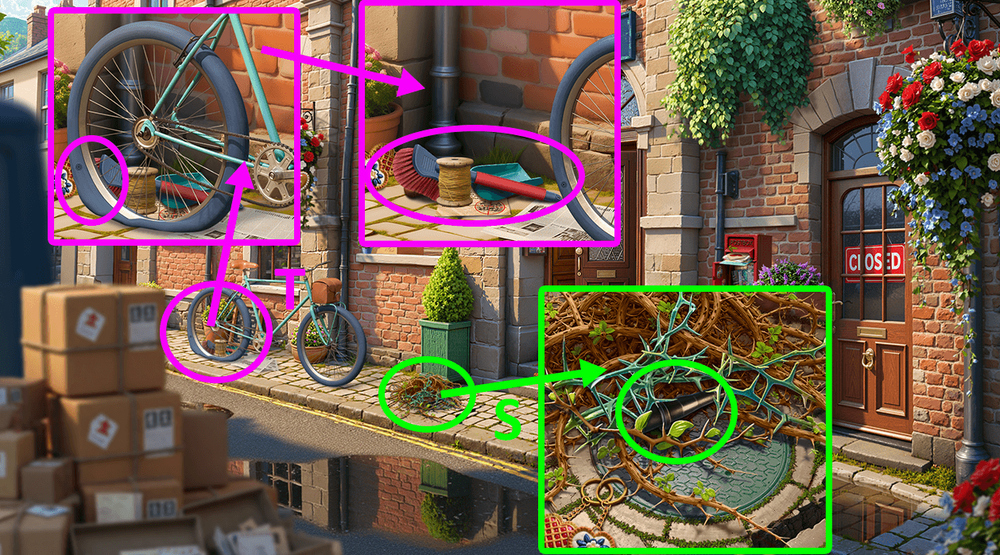
- Use GIRL FIGURINE, take PIPE (H).
- Go to Post Office.
- Use PIPE, take FAKE HOOK and NUMBER FRAGMENTS 2/3 (I).
- Go to Topiary Competition.
- Use SCISSORS, earn FLOWERS 3/3 (J).
- Use FLOWERS 3/3 on the topiary (K).

- Easy solution: Click on the flowers in order from 1 to 11 (L).

- Hard solution: Click on the flowers in order from 1 to 13 (M).
- Go back.

- Use FAKE HOOK, earn NUMBER FRAGMENTS 3/3 (N).
- Go to Post Office.

- Use NUMBER FRAGMENTS 3/3 (O).
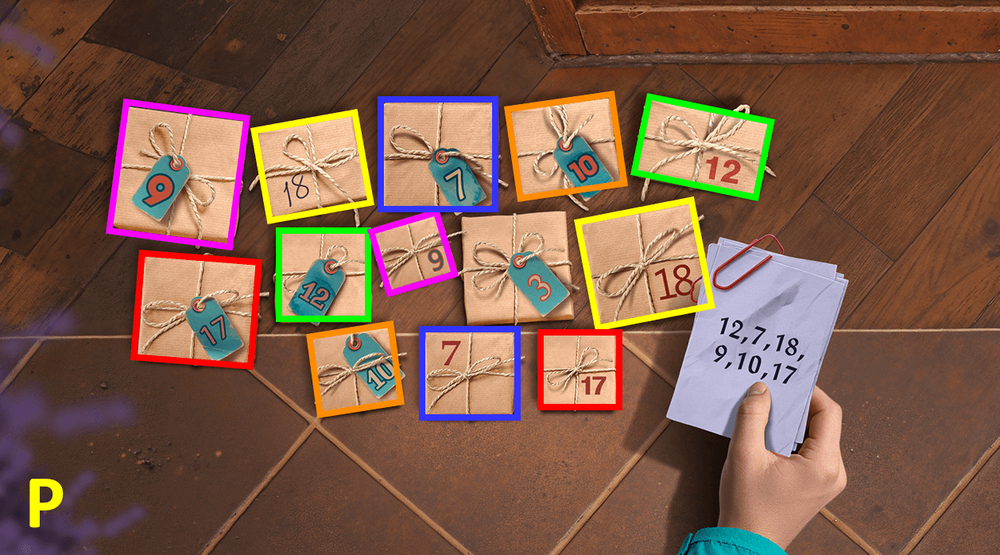
- Easy solution: Click on the pairs of boxes to remove them from the board.
- Each pair is highlighted in a different color in the image (P).
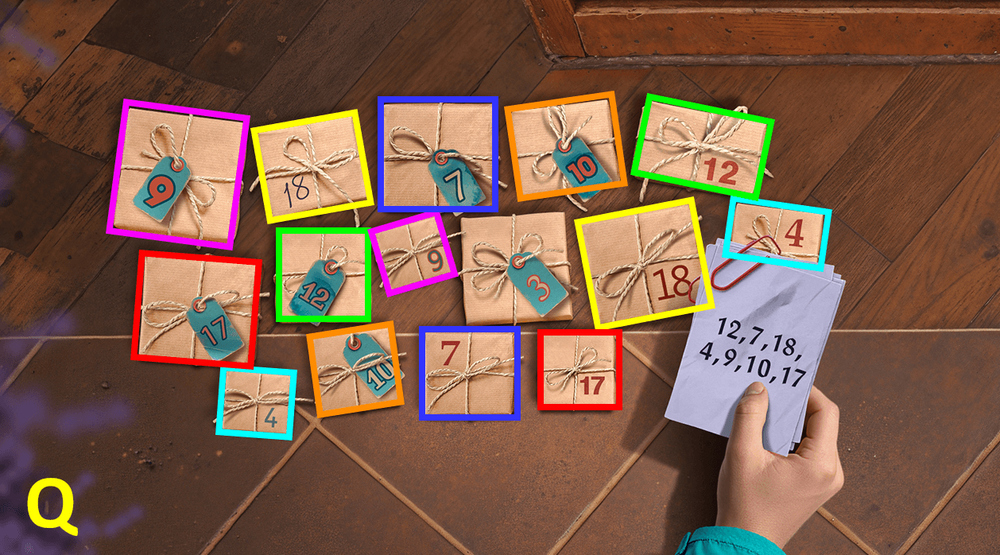
- Hard solution: Click on the pairs of boxes to remove them from the board.
- Each pair is highlighted in a different color in the image (Q).
- Take IODINE and OVEN MITTEN (R).
- Go back.
- Use OVEN MITTEN, take PUMP NOZZLE (S).
- Use PUMP NOZZLE on the PUMP WITHOUT NOZZLE, earn PUMP.
- Use PUMP, take THREADS, BRUSH and SCOOP, read the note (T).
- Play puzzle, earn HALF OF MANUAL (U).
- Use HALF OF MANUAL, IODINE and PIPETTE on UNFINISHED SOLUTION, earn DEVELOPER.
- Go forward.
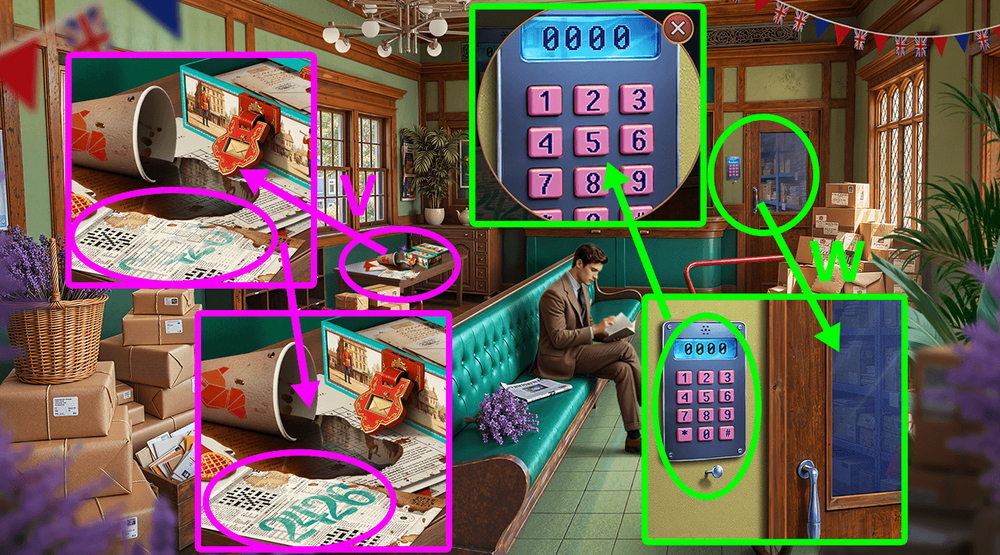
- Use DEVELOPER, take STORAGE ROOM CODE (V).
- Use STORAGE ROOM CODE, enter the password on the terminal: 2426 (W).

- Open the folder, press on the letter, the clock and the kitchen knife, take ARTHUR’S NOTES (X).
- Solution: Arrange all the puzzle pieces as shown in the image (Y).
- Give ARTHUR’S NOTES to Marcus (Z).
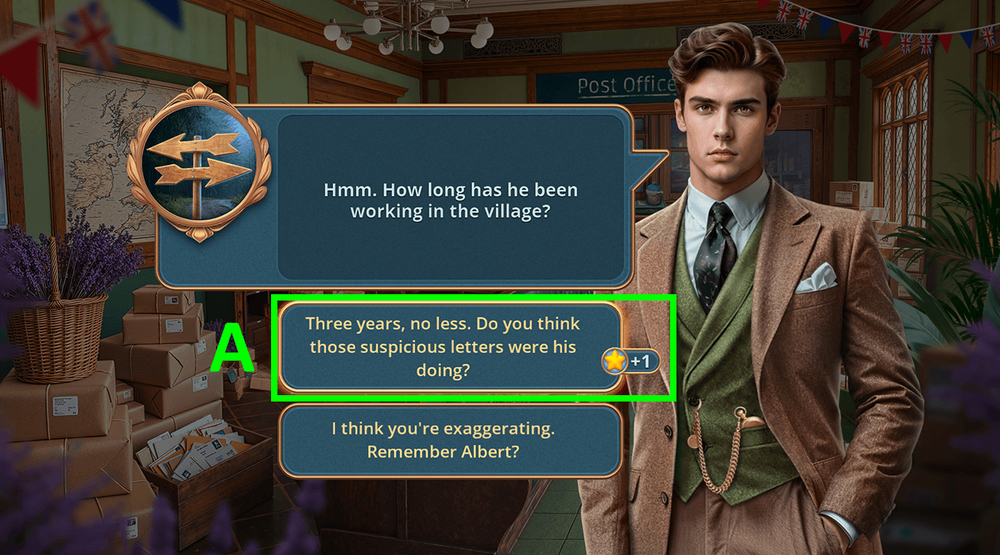
- Select this option (A).

- Take TORN NET (B).
- Take FLAGS 1/4 (C).
- Use SCOOP, take LOCK PICKS (D).
- Use LOCK PICKS (E).

- Solution: Arrange all the puzzle pieces as shown in the image (F).
- Use CHOPSTICKS, take REFRIGERATOR HANDLE (G).
- Use REFRIGERATOR HANDLE (H).
- Play puzzle, earn COLD SODA (I).

- Use COLD SODA to cool down the hot plate, take METAL DISC, take NETS (J).
- Use METAL DISC, press on the album (K).
- Solution: Arrange all the puzzle pieces as shown in the image (L).

- Select this option (M).
- Take LANTERNS 1/3 (N).
- Take BUCKET OF SAND (O).
- Use BUCKET OF SAND (P).
- Play puzzle, earn LEATHER GLOVE (Q).
- Use LEATHER GLOVE, earn GLASS SHARD (R).
- Use GLASS SHARD on the canvas, earn FLAGS 2/4 (S).

- Solution: Arrange all the puzzle pieces as shown in the image (T).
- Go forward.

- Take GLUE (U).
- Use GLUE on the broken plate, take BOWL (V).
- Use BRUSH and BOWL to remove the shards, take SPOON (W).
- Solution: Arrange all the puzzle pieces as shown in the image (X).
- Select this option (Y).
- Go to Trailer.
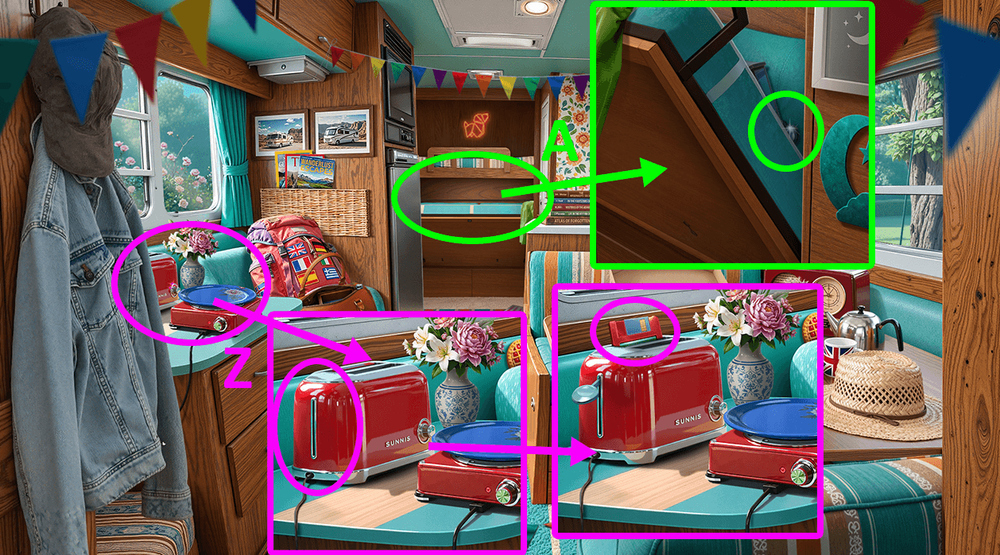
- Use SPOON on the shiny object, earn TOASTER HANDLE (A).
- Use TOASTER HANDLE, take FLOPPY DISK (Z).
- Go back.

- Use FLOPPY DISK, take FLAGS 3/4 and NEEDLE (B).
- Use NEEDLE, NETS and THREADS on the TORN NET, earn SCOOP NET.
- Use SCOOP NET, take STEEL BRACELET (C).
- Go to Near Arthur’s House.
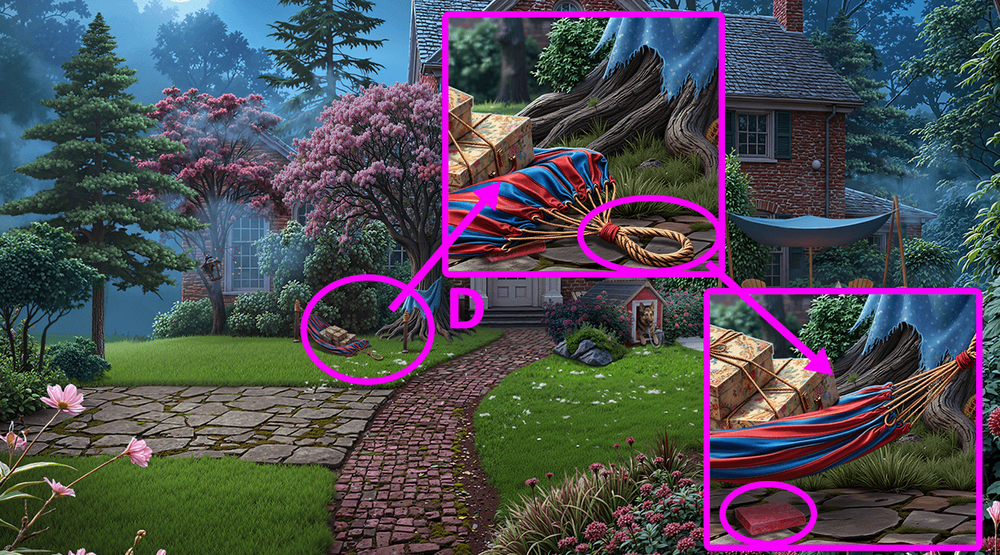
- Use STEEL BRACELET to hang a hammock, take SOAP (D).

- Play puzzle, earn SCRAPER (E).
- Use SCRAPER on the bush, take COMB (F).
- Go forward.

- Use COMB, take JUICER and GRINDSTONE (G).
- Use GRINDSTONE, earn RAZOR (H).

- Use RAZOR, take JACK (I).
- Solution: Arrange all the puzzle pieces as shown in the image (J).
- Go to Trailer.
- Use JACK, take LANTERNS 2/3 (K).
- Play puzzle, earn PATE (L).
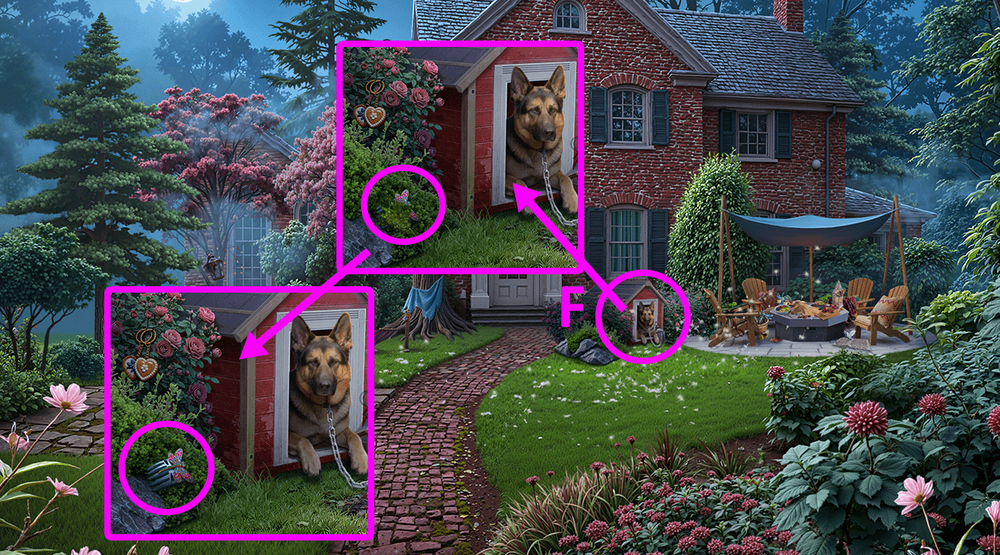
- Go to Near Arthur’s House.
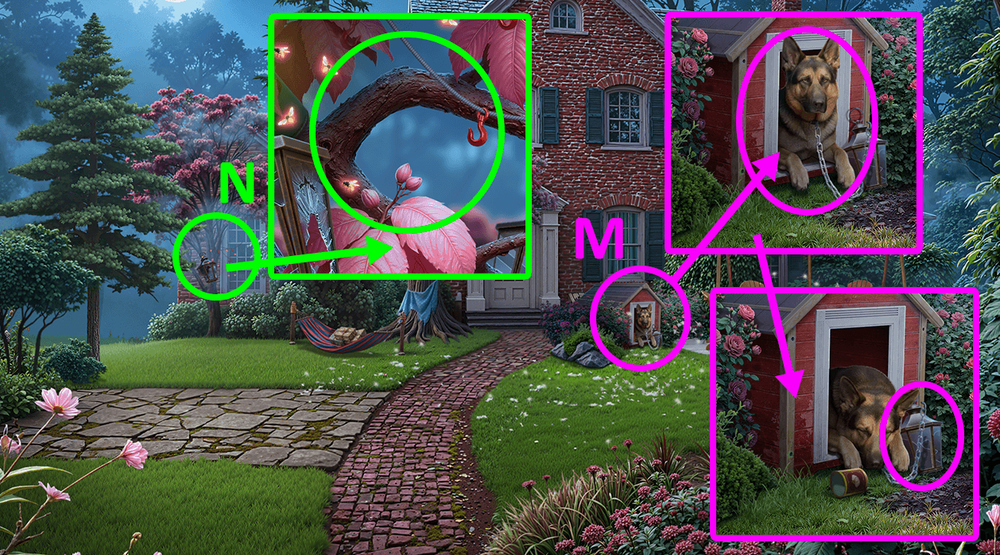
- Give PATE to the dog, take LANTERNS 3/3 (M).
- Use LANTERNS 3/3 (N).
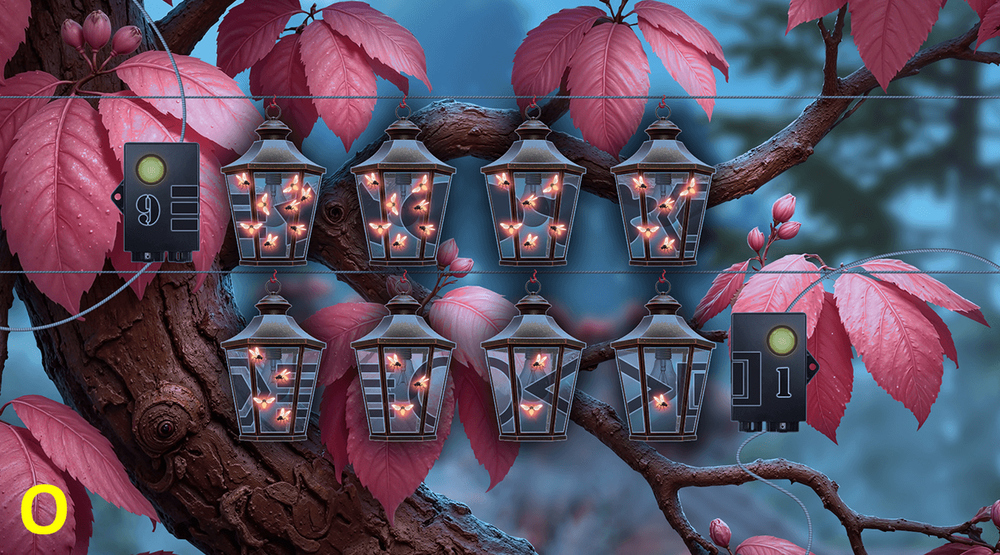
- Easy solution: Arrange the lights as shown in the image (O).
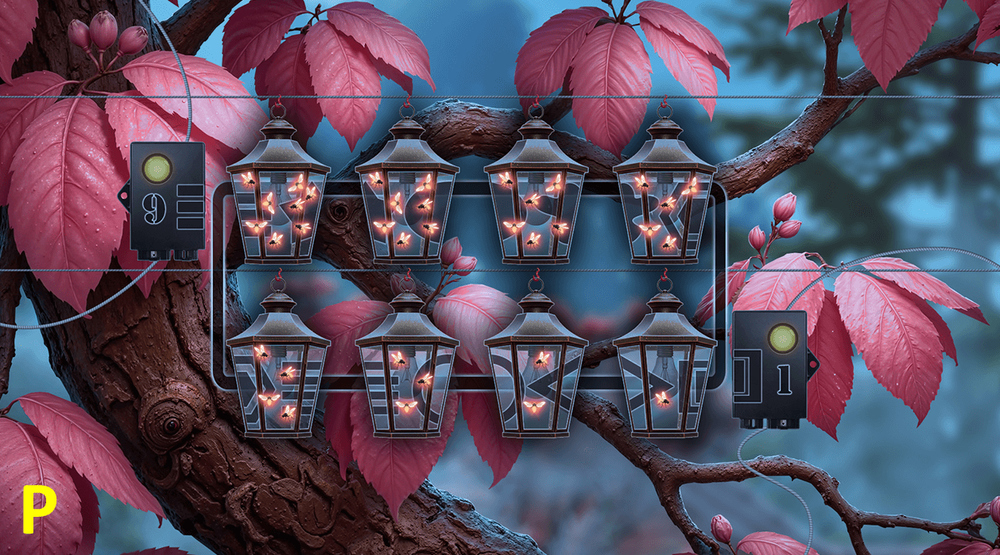
- Hard solution: Arrange the lights as shown in the image (P).

- Take INSECT REPELLENT (Q).
- Go to Near Trailer.
- Use INSECT REPELLENT, take KNIFE and FLAGS 4/4 (R).
- Use FLAGS 4/4, earn ARCHIVE KEY (S).
- Go to Arthur’s House.
- Use ARCHIVE KEY (T).
- Solution: Arrange the lights as shown in the image (U).
- Walkthrough Bonus Chapter, at the link below.


