
Hidden Legacy 2: Whispering Walls – You must uncover the dark secret of the Saxon town of Schwarzgrund and the cursed von Rottenburg family mansion. It all begins with a request from Agnes von Rottenburg, who turns to you for help after inheriting her ancestors’ old house. The young woman is convinced that the mansion is cursed, she hears voices, sees mysterious silhouettes, and the hired builders fled the house in terror after supernatural occurrences. Upon arriving at the estate, you yourself encounter inexplicable events, a devastating fire breaks out in the house, and the ghost of architect Heinrich Braun accuses the Rottenburg family of lies and murders, demanding retribution for past sins. During your investigation, you’ll explore the mansion’s gloomy rooms, hidden passages, the old garden where strange screams are heard at night, and other eerie locations in Schwarzgrund. Together with historian Thomas Kraus, you’ll learn that decades ago, the town was built by the brilliant architect Heinrich Braun, who vanished without a trace immediately after the estate was completed. In the old archives, Thomas finds encrypted documents and evidence of financial fraud by the von Rottenburg family, as well as proof that the entire town may be hiding a carefully concealed crime. As you progress, you’ll need to search for hidden objects, decipher old files, solve puzzles, interrogate suspects, and piece together the events of the past from fragments of evidence. Each new discovery reveals more and more secrets about Heinrich Braun, the missing blueprints, and the sealed rooms of the mansion. But the closer you get to the truth, the more dangerous the supernatural forces become, haunting Agnes and everyone who tries to uncover the secrets of Schwarzgrund. If you can’t solve a puzzle or don’t know where to find items, you can view the walkthrough for Hidden Legacy 2: Whispering Walls on our website and uncover the city’s secret.
Hidden Legacy 2: Whispering Walls – Walkthrough
Here you can see the complete walkthrough for Hidden Legacy 2: Whispering Walls, namely all chapters, including the bonus chapter, in pictures.

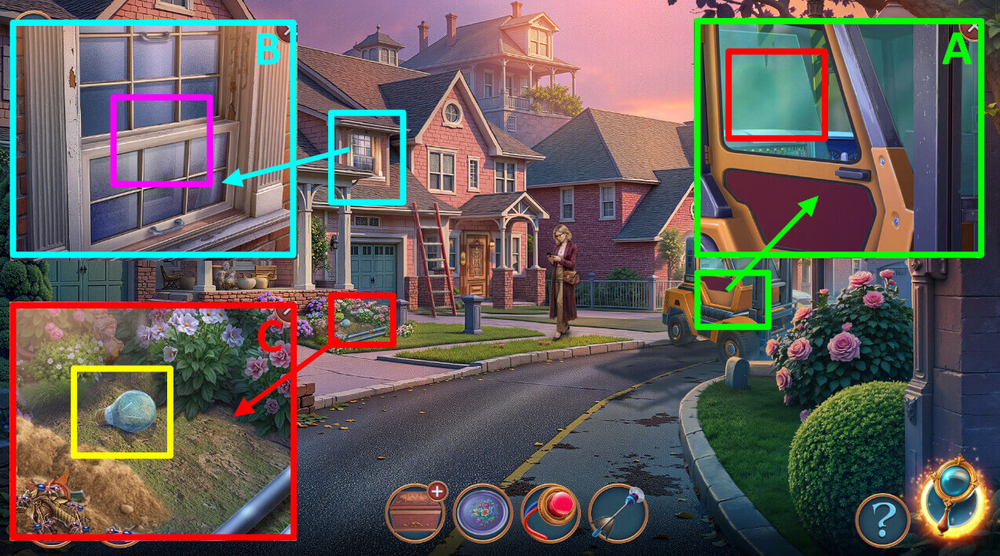
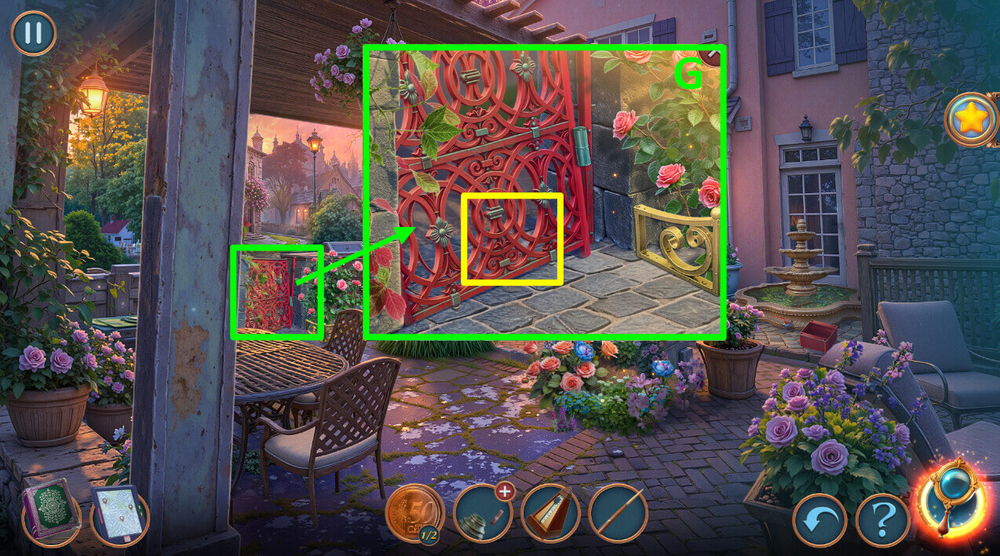
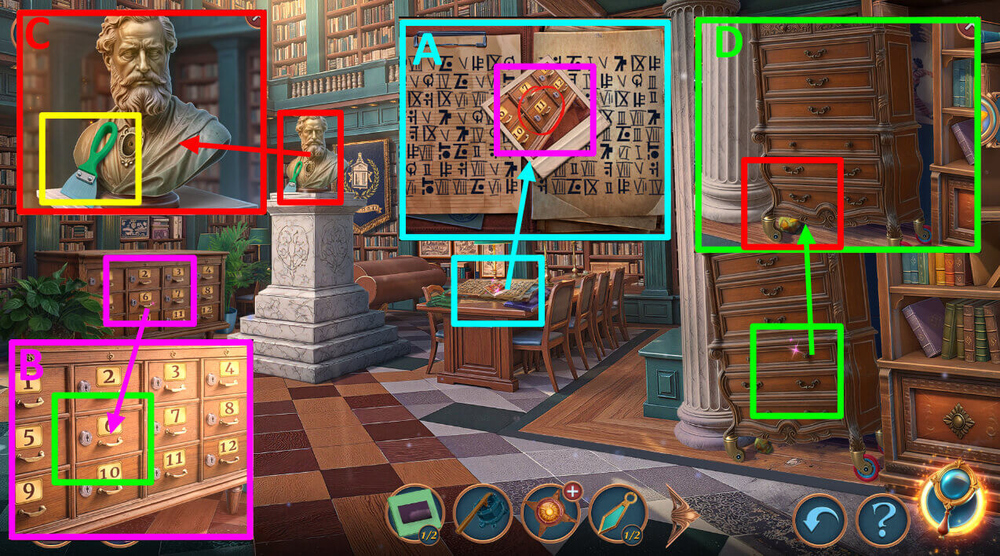
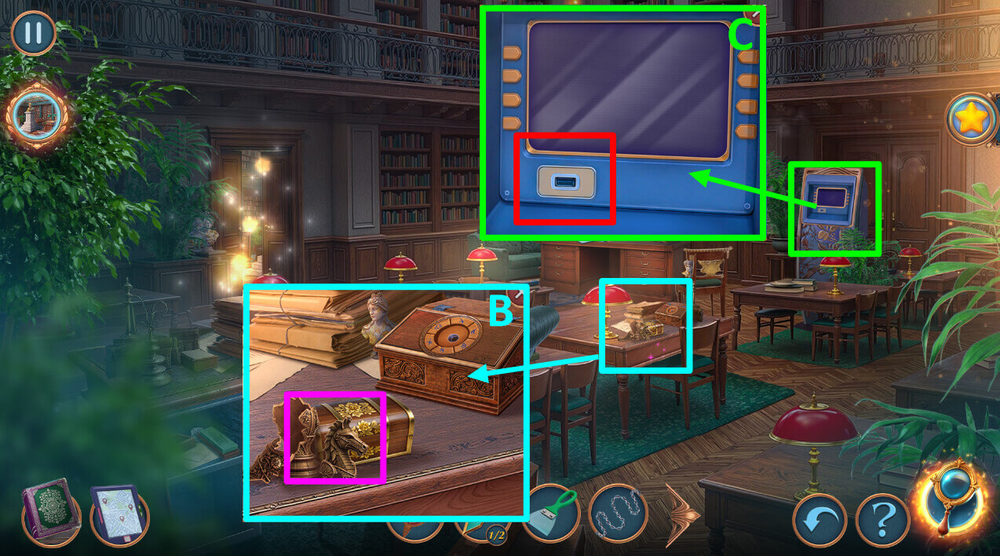
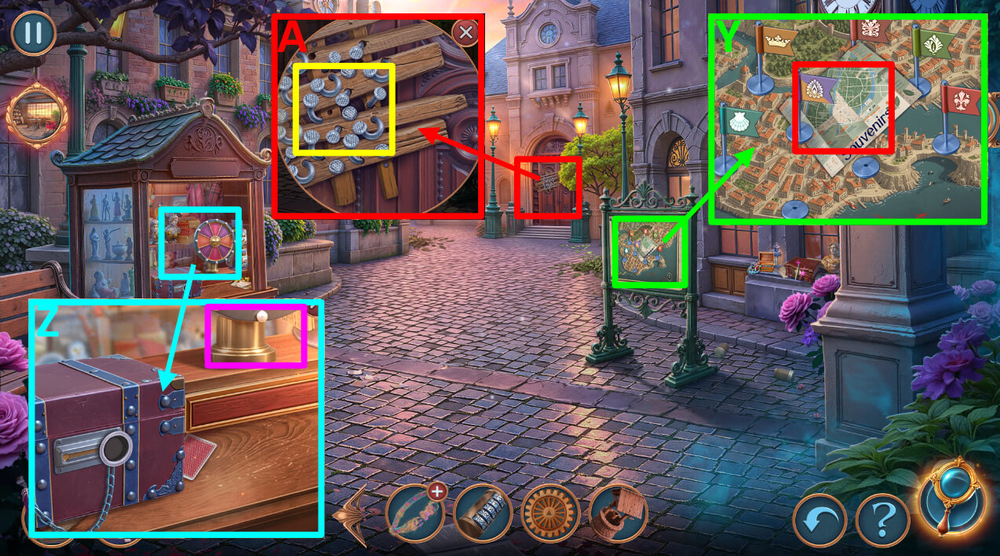
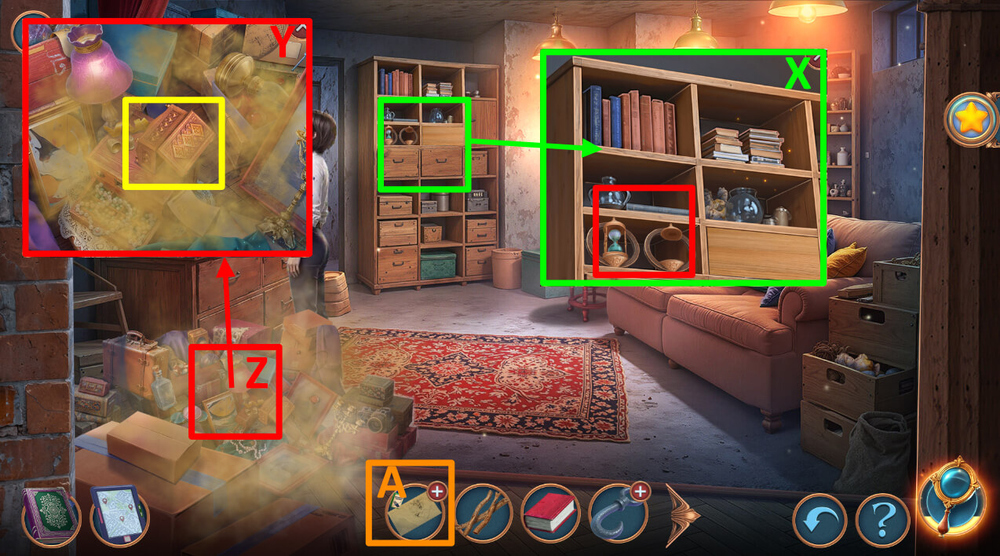
- Take GLASS CUTTER WHEEL and WIRE CUTTERS, use WIRE CUTTERS on the wire, take JACK (A).
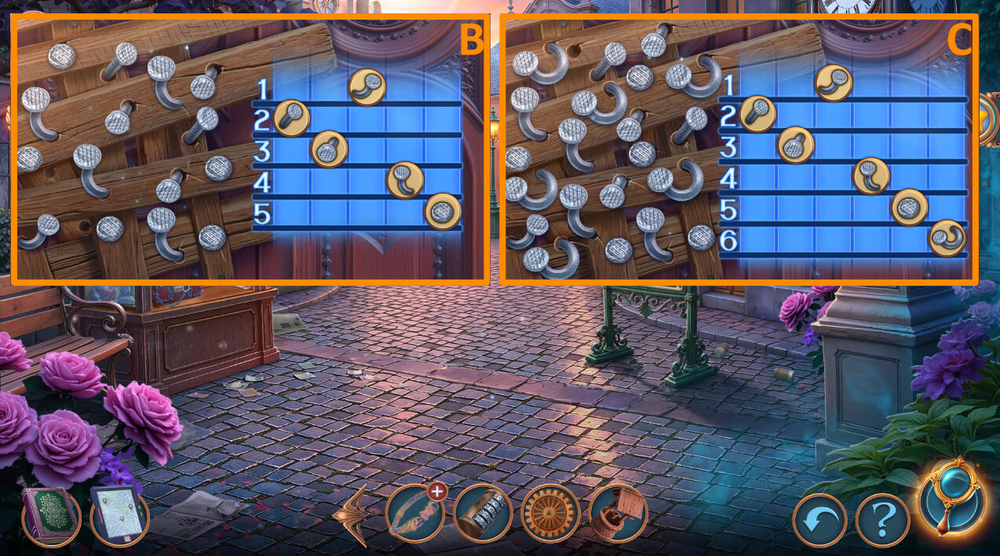
- Use JACK on the garbage, play puzzle (B).
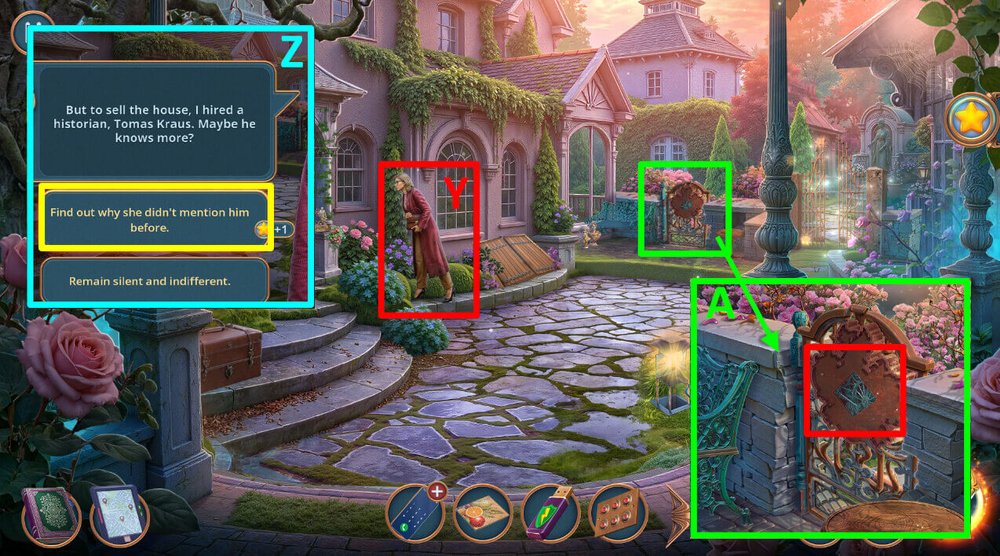
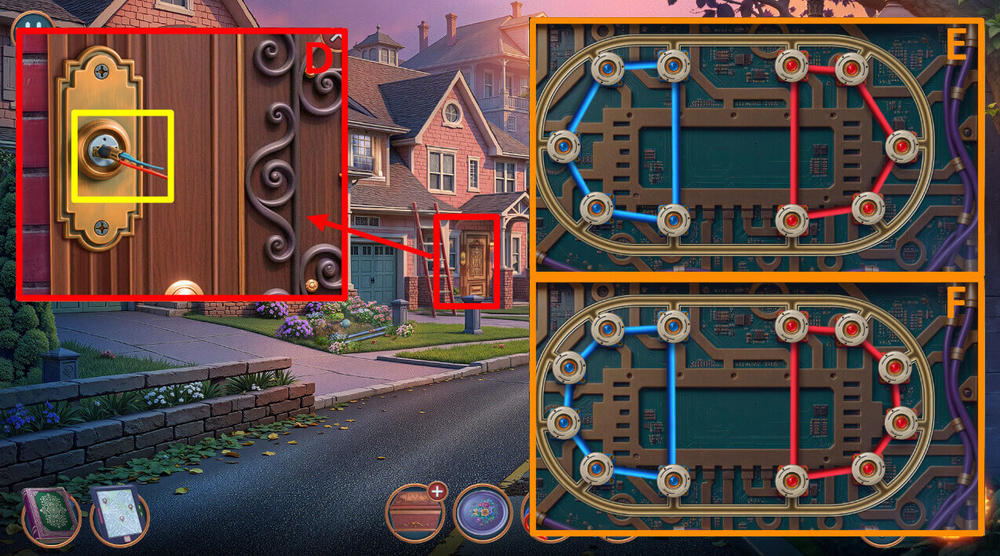
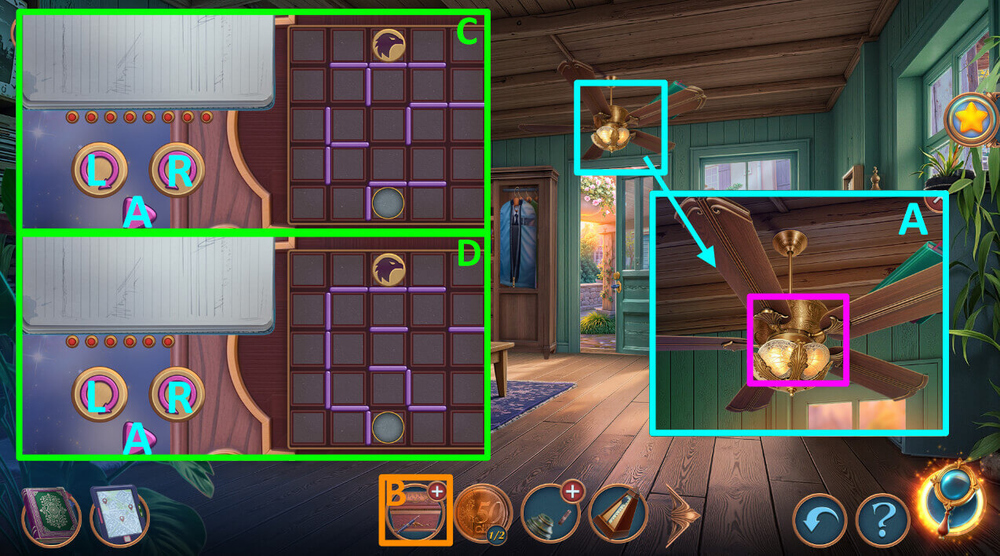
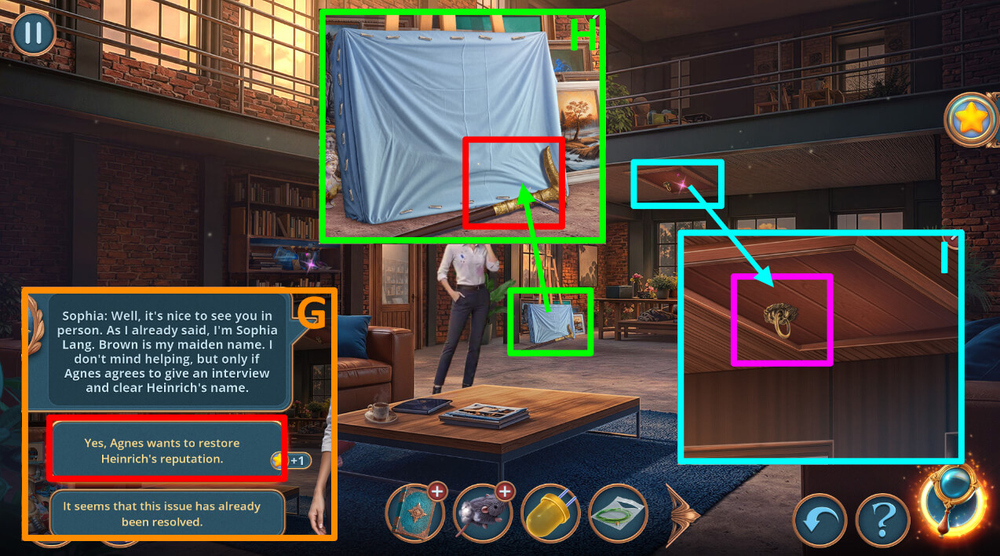
- Select this option, earn HOUSE KEYS (C).
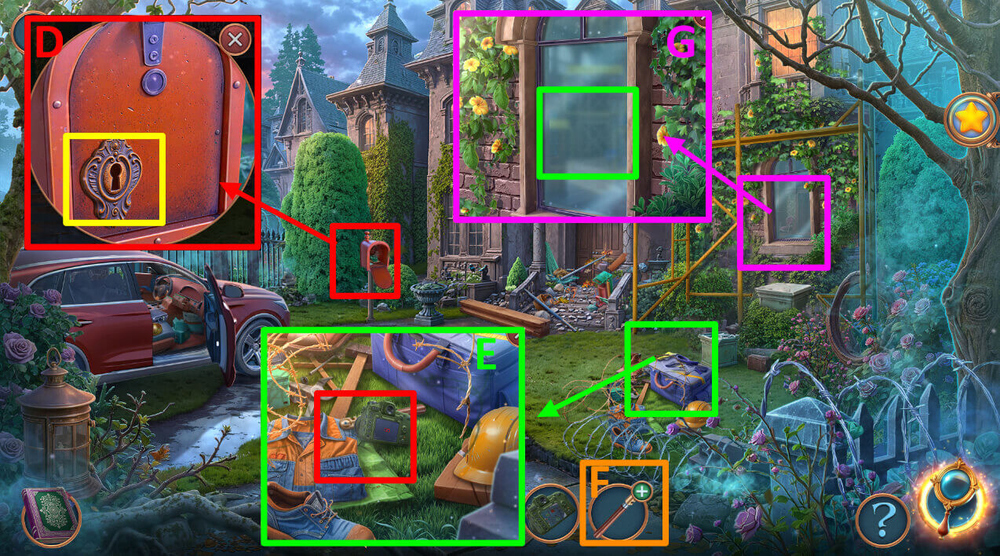
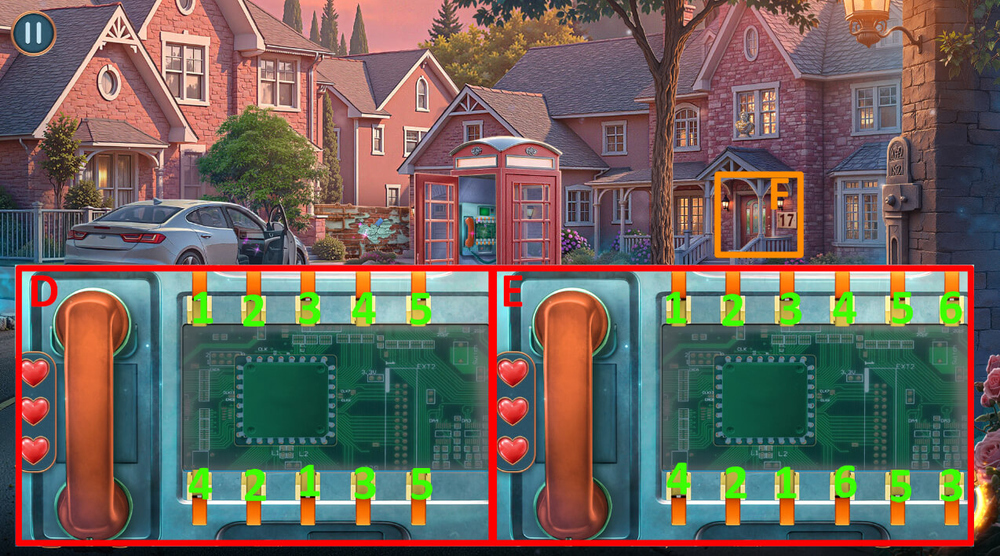
- Use HOUSE KEYS on the lock, earn HOUSE KEY RING, take OLD BOOKS 1/2 and POWER BANK (D).
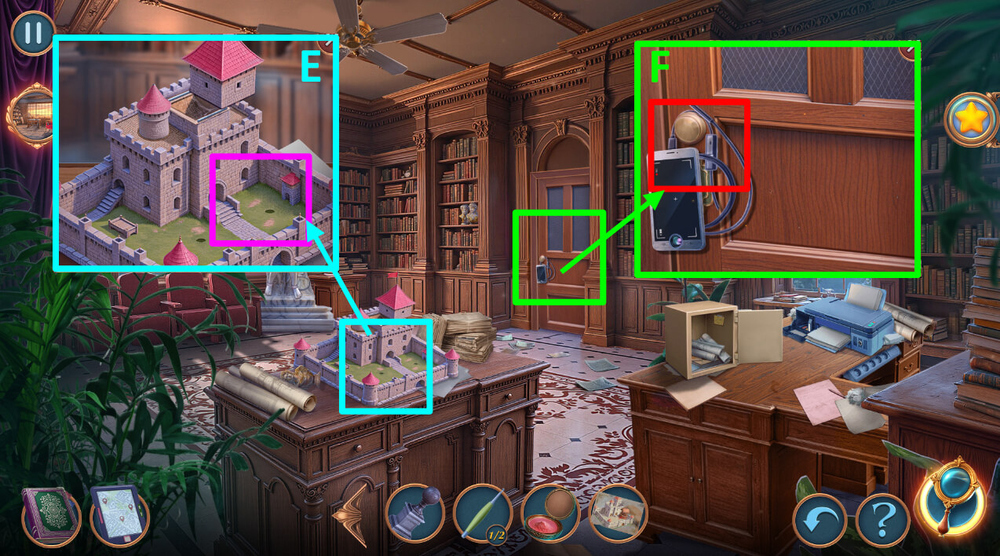
- Use POWER BANK on the camera, earn BUILDER’S CAMERA, take GLASS CUTTER HANDLE (E).
- Use GLASS CUTTER WHEEL on the GLASS CUTTER HANDLE, earn GLASS CUTTER (F).
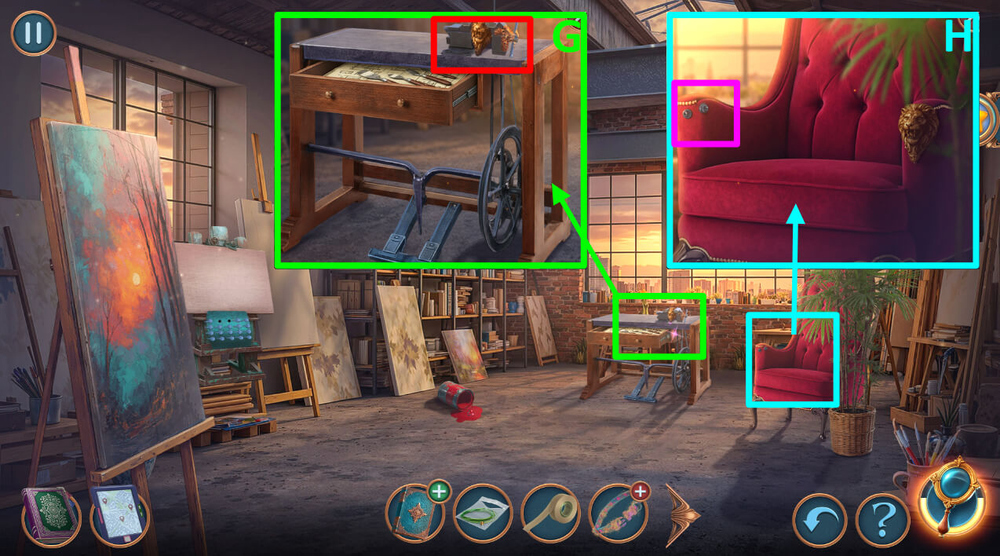
- Use GLASS CUTTER on the window (G).

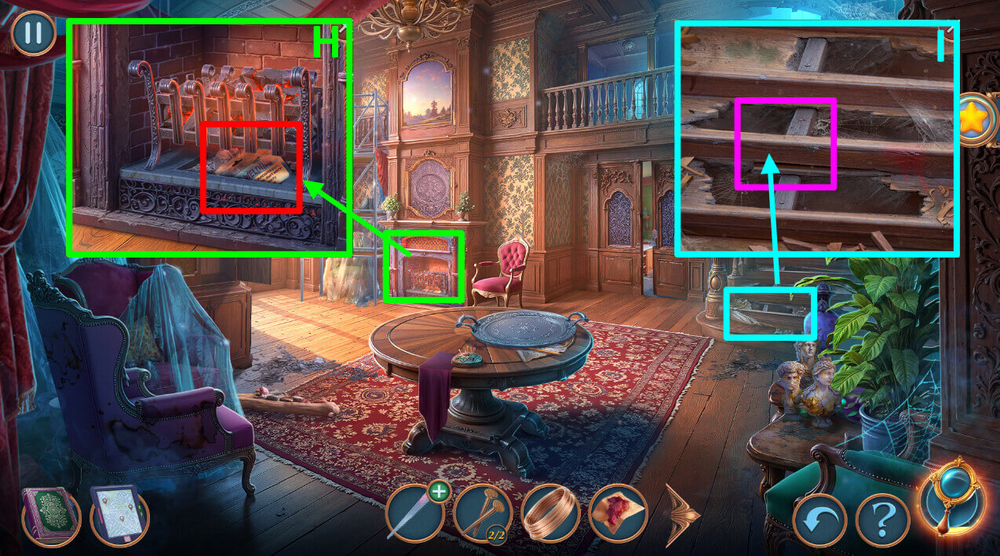
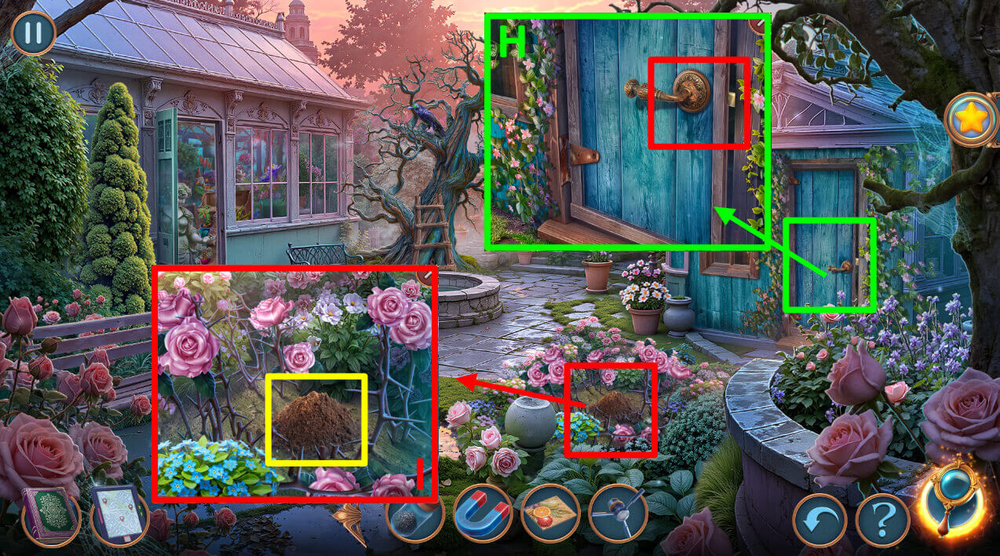
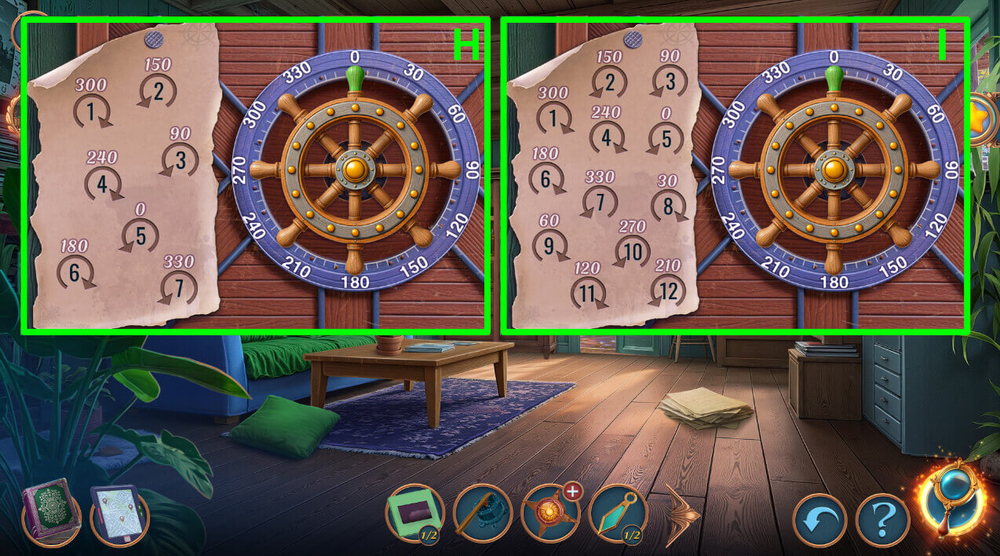
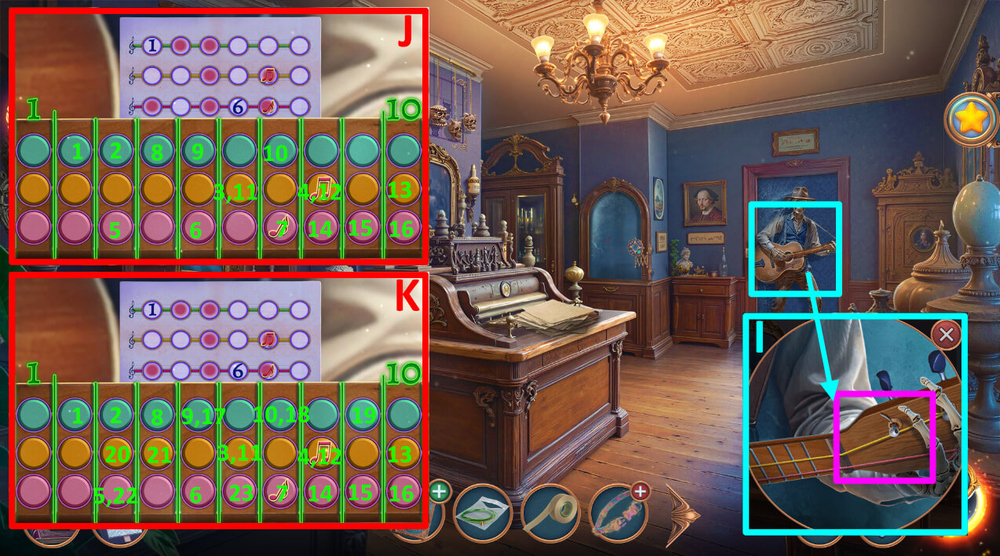
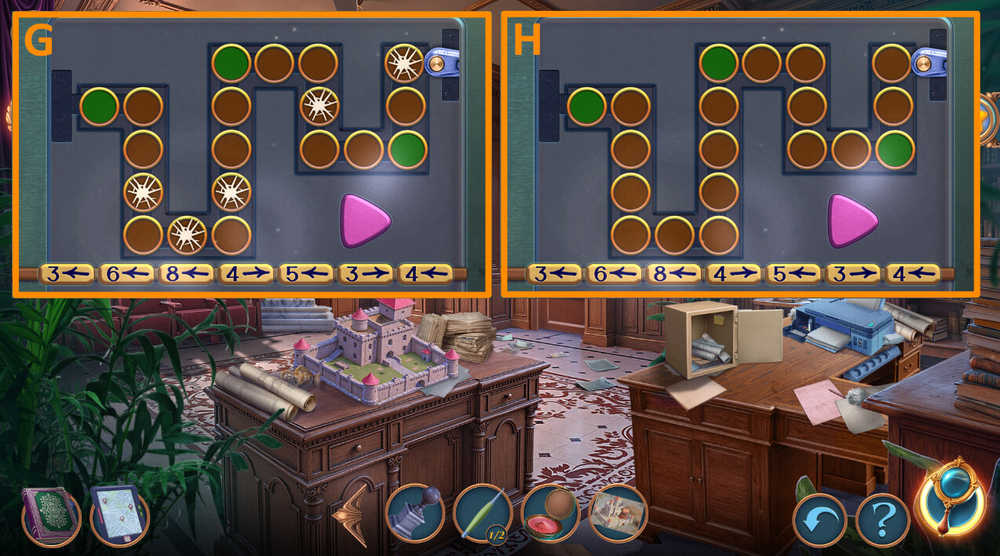
- Easy solution: Click on the circles in the following order: 1×3-2×5 (H).
- Hard solution: Click on the circles in the following order: 1×5-2-3-4×5 (I).
- Go forward.
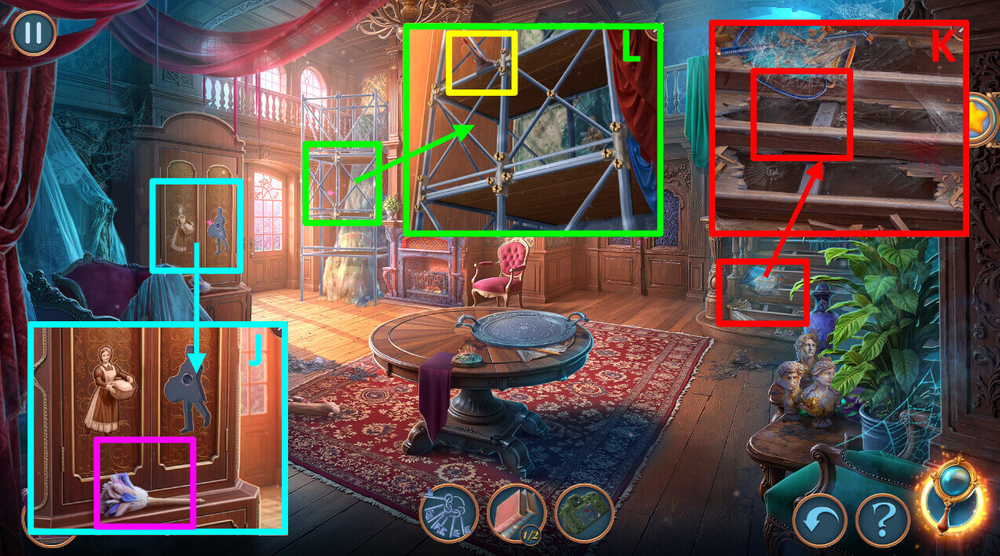
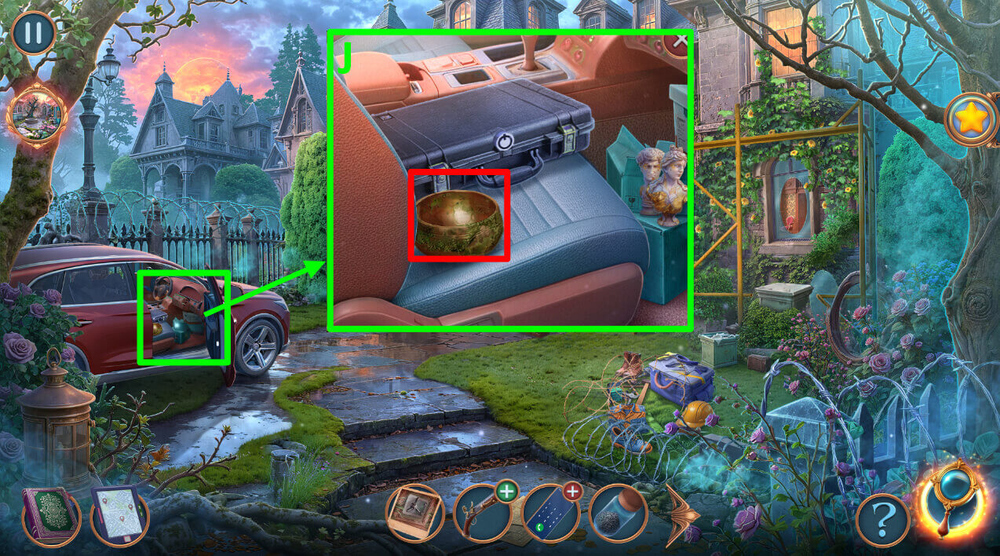
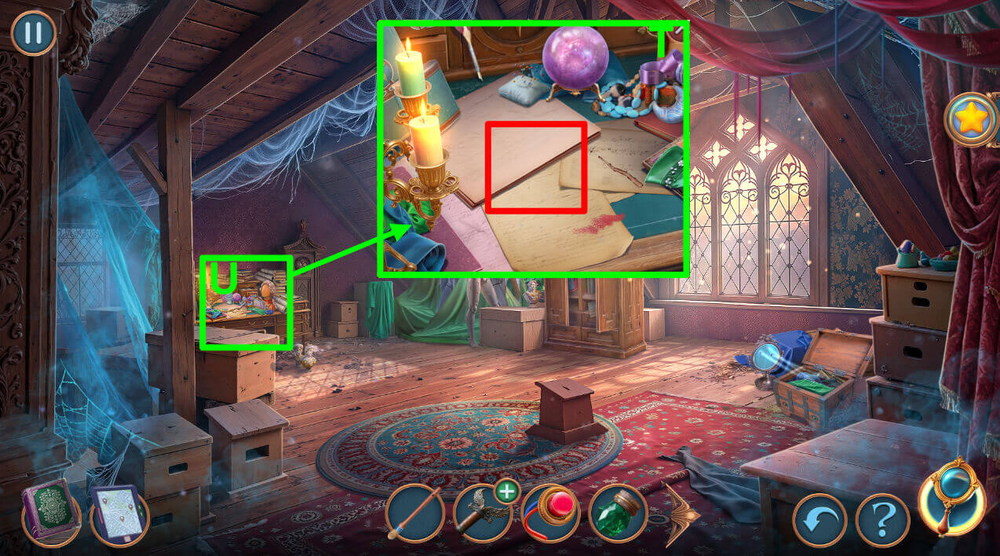
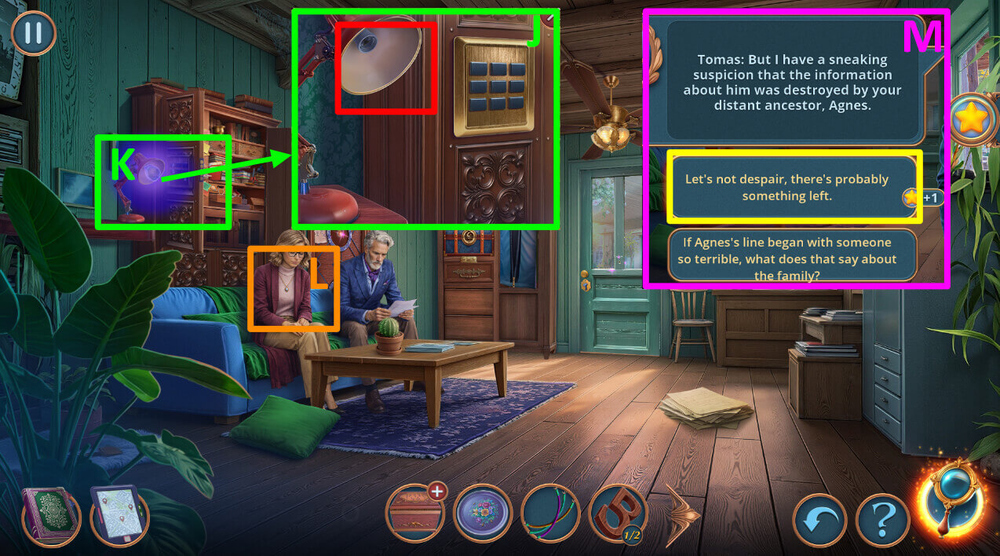
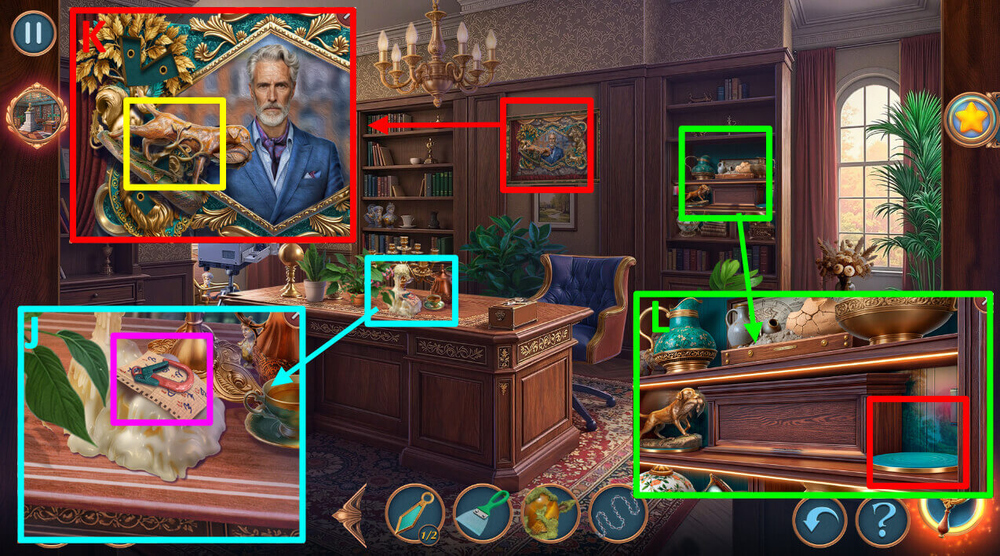
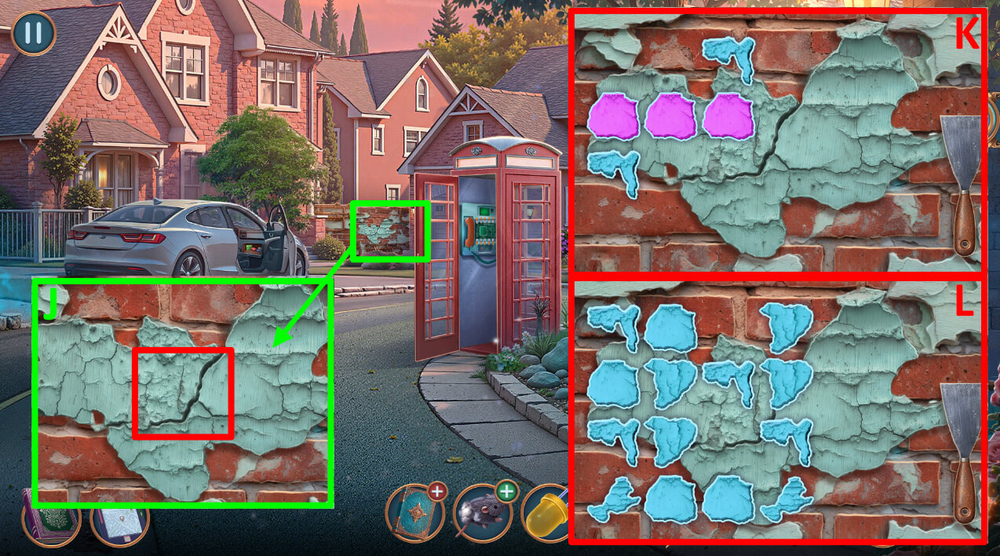
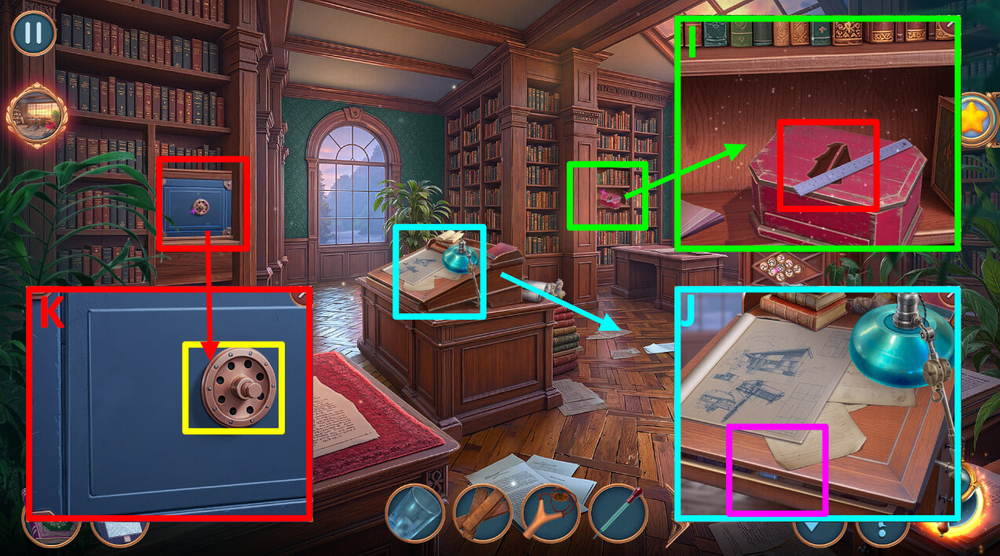
- Take FEATHER DUSTER (J).
- Use FEATHER DUSTER on the spider web, take GARDEN SPRAYER and SLINGSHOT (K).
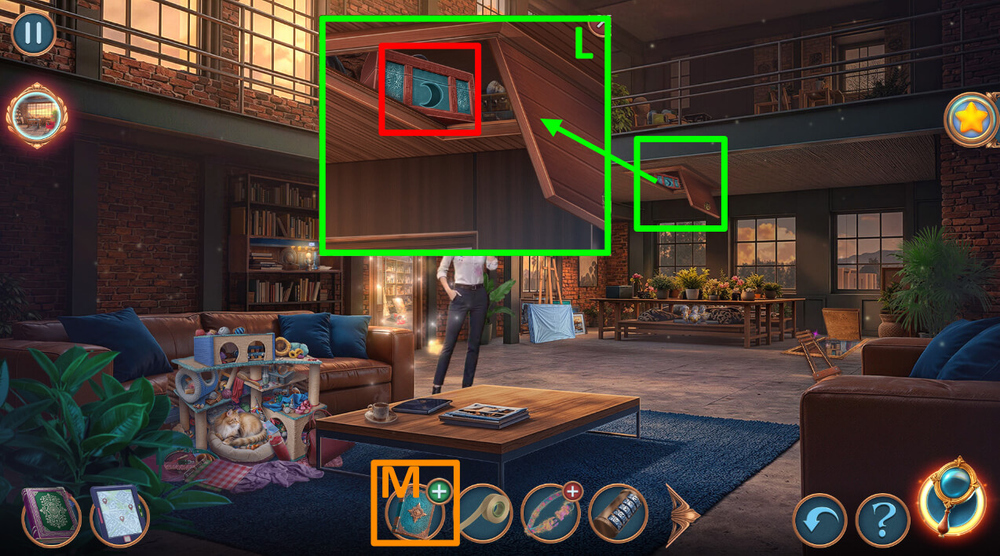
- Use SLINGSHOT on the OIL, earn OIL (L).
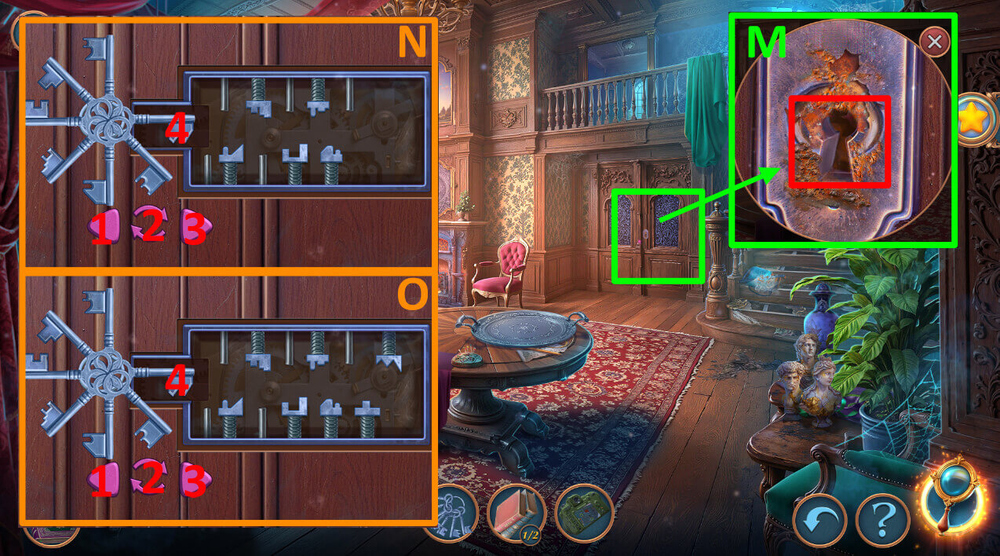
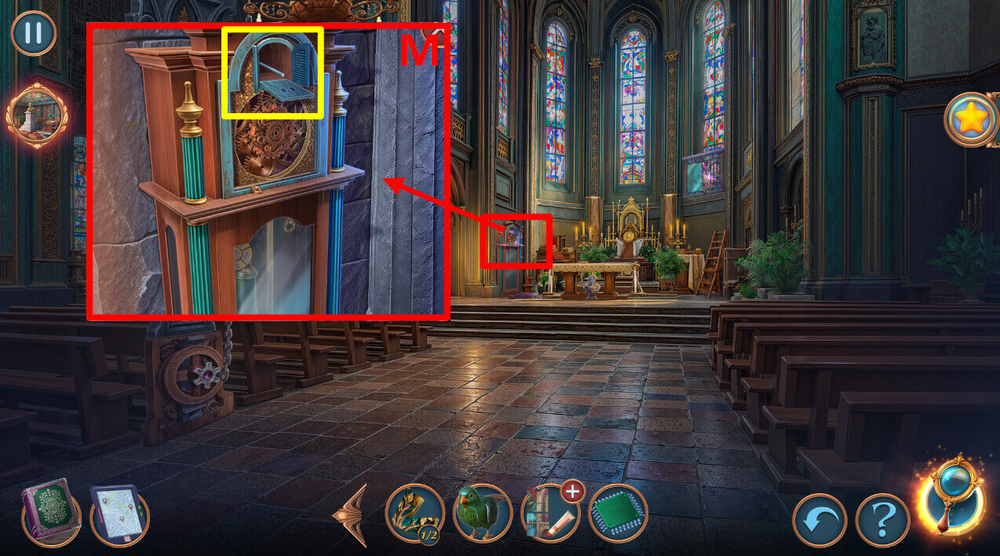
- Use OIL and HOUSE KEY RING on the lock (M).
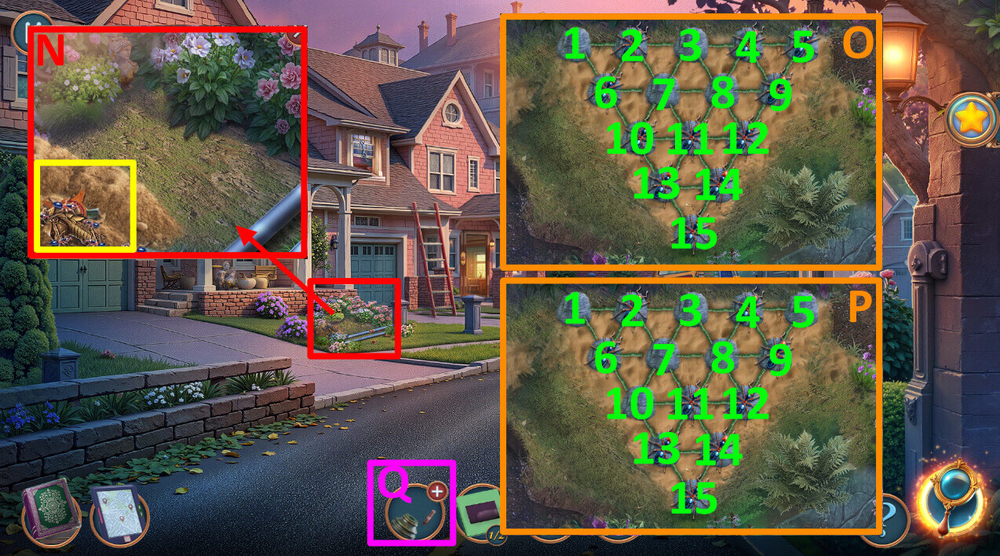
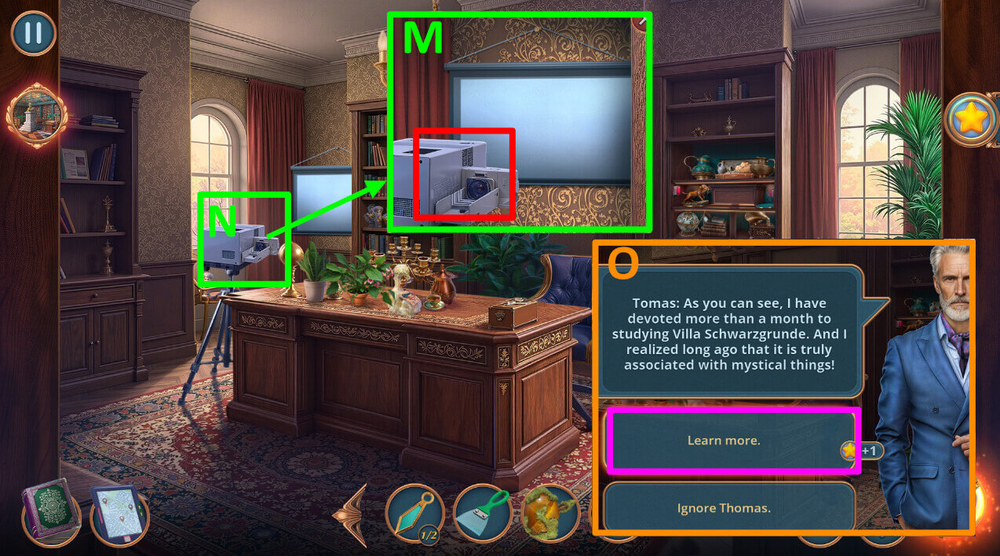
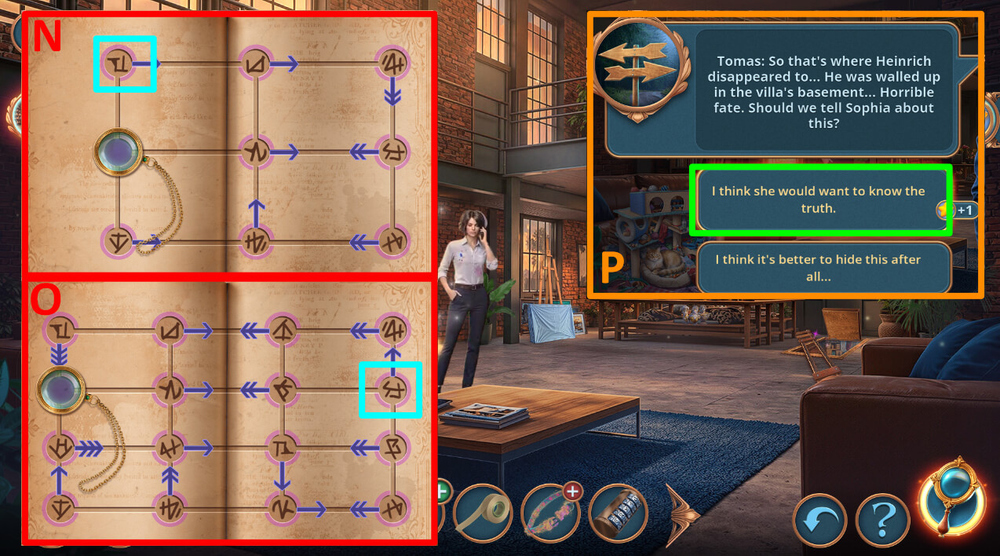
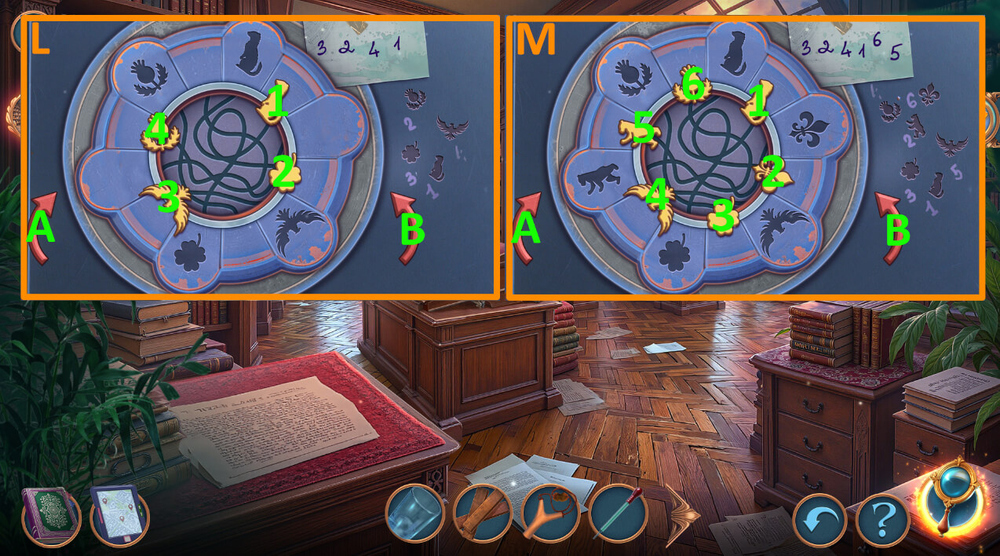
- Easy solution: Click the buttons in the following order: 3×2-4-3-2-4-3×2-2-4-3×3-2-4-3×5-2-4 (N).
- Hard solution: Click the buttons in the following order: 3×2-4-3-2-4-3×2-2-4-3×3-2-4-3×5-2-4-1×2-4-3×3-2-4 (O).
- Go forward.
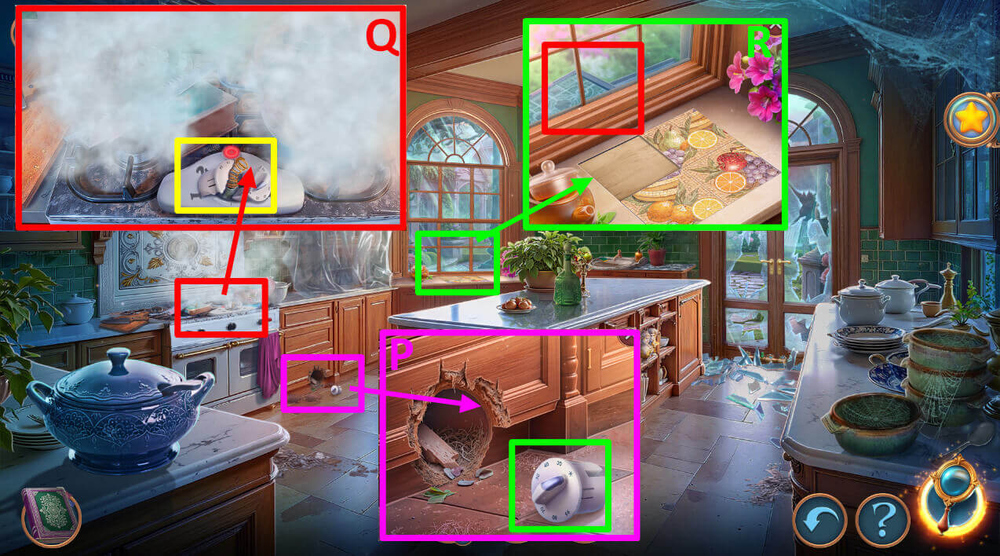
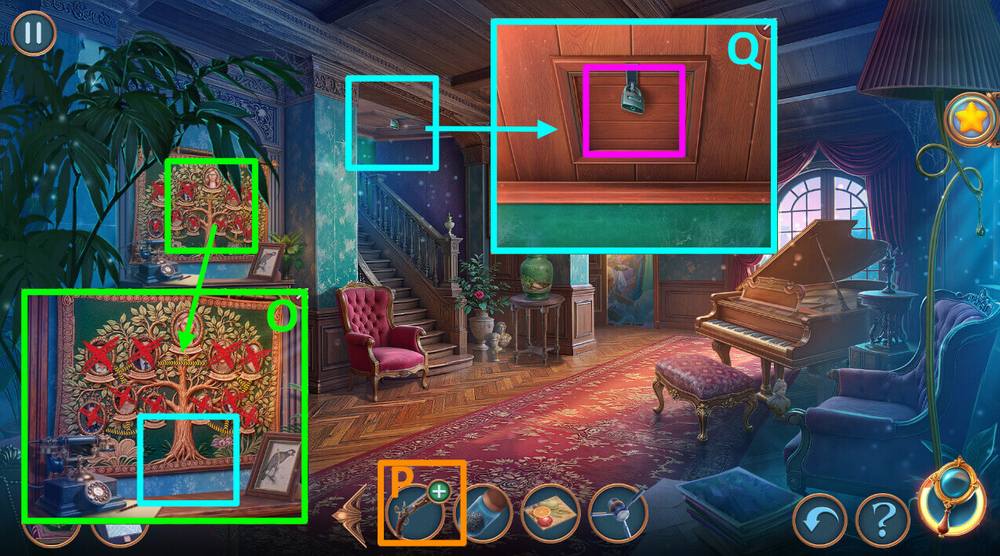
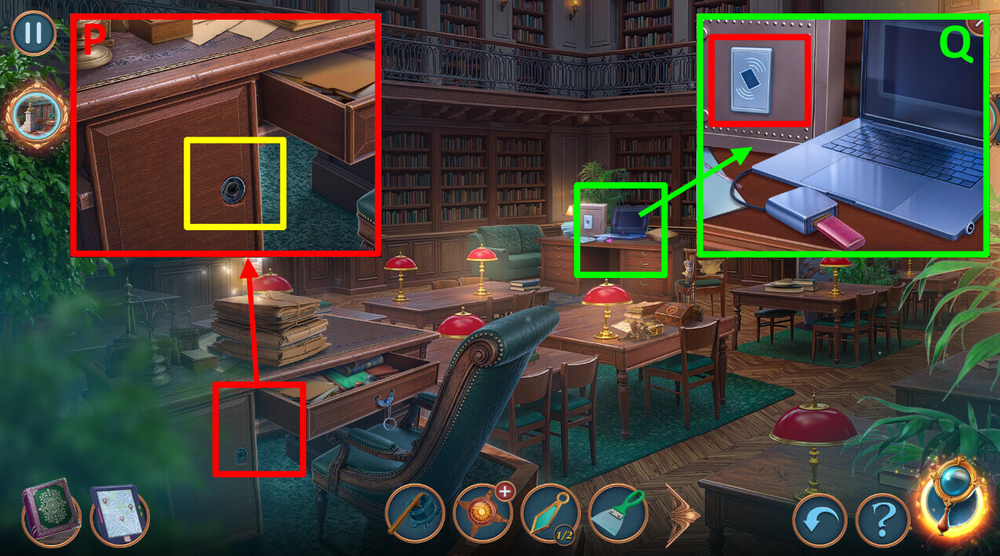
- Take STOVE TOGGLE SWITCH (P).
- Use STOVE TOGGLE SWITCH on the broken button, take SAW BLADE, NAILS 1/2 and OLD BOOKS 2/2 (Q).
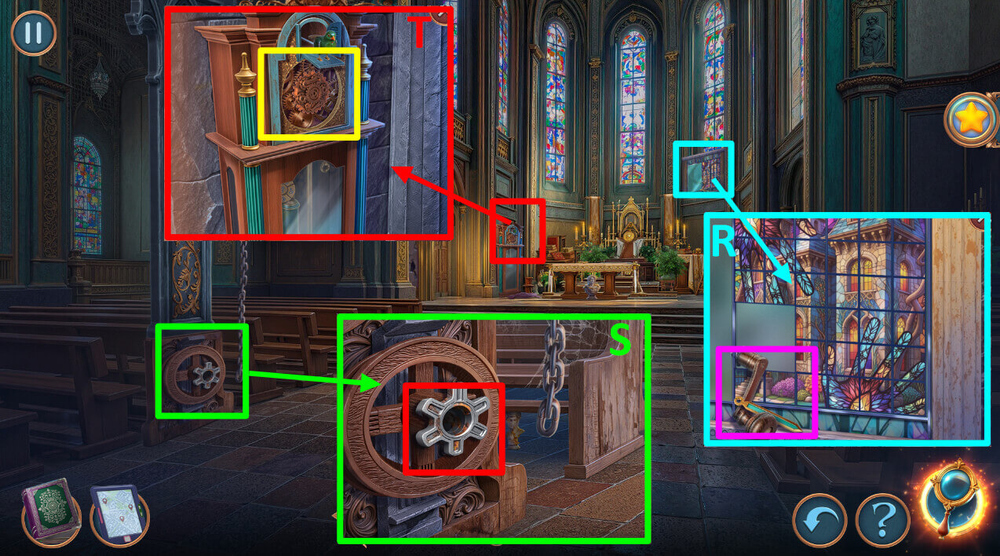
- Use OLD BOOKS 2/2 on the window, take the map book and HERALDIC BROOCH (R).
- Go back.
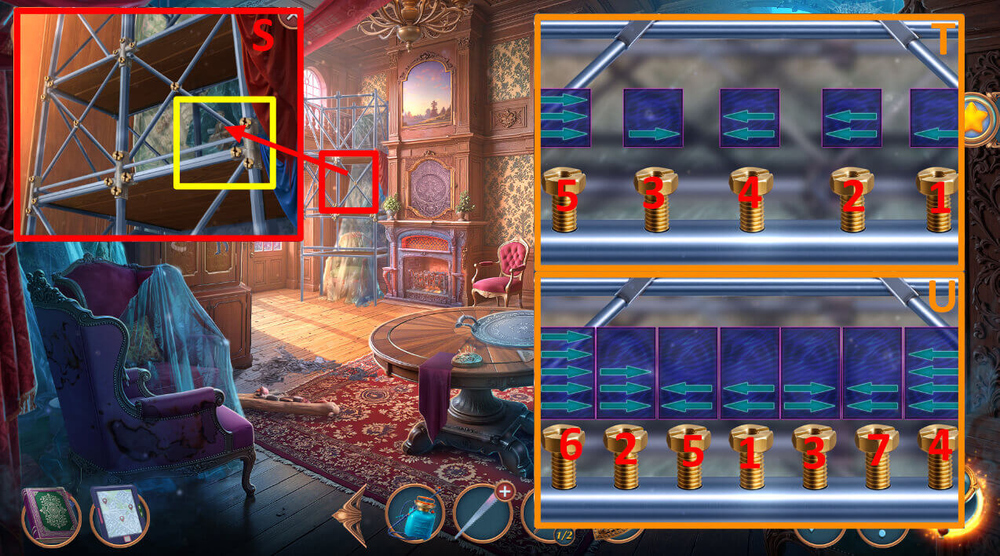
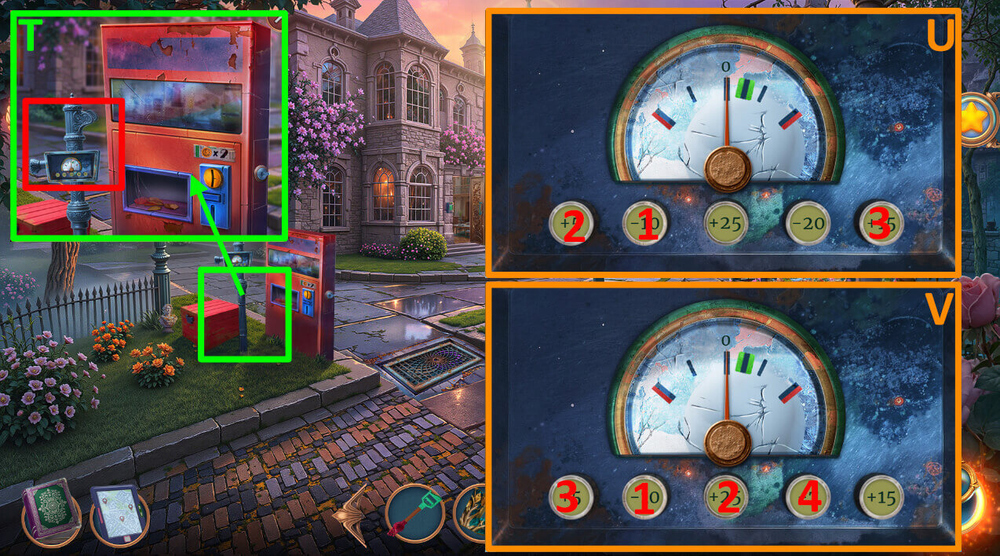
- Use HERALDIC BROOCH on the bolts (S).
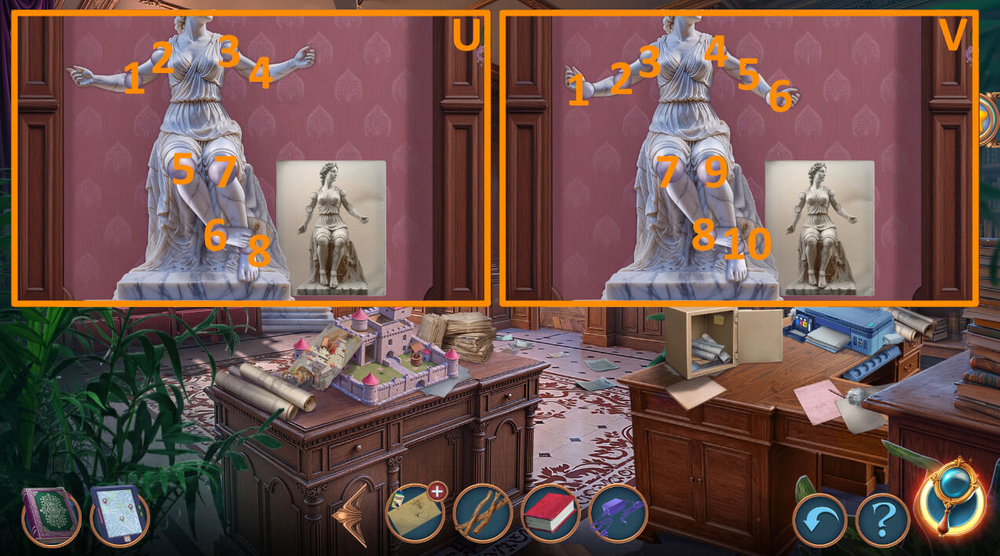
- Easy solution: Tighten the bolts as shown in the picture (T).
- Hard solution: Tighten the bolts as shown in the picture (U).
- Click on the membrane, take BUTLER FIGURINE.

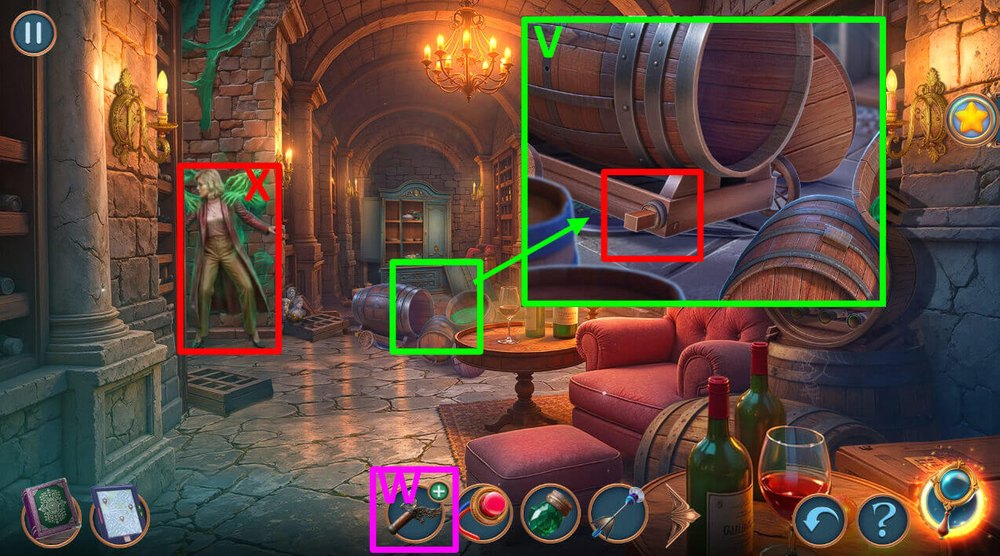
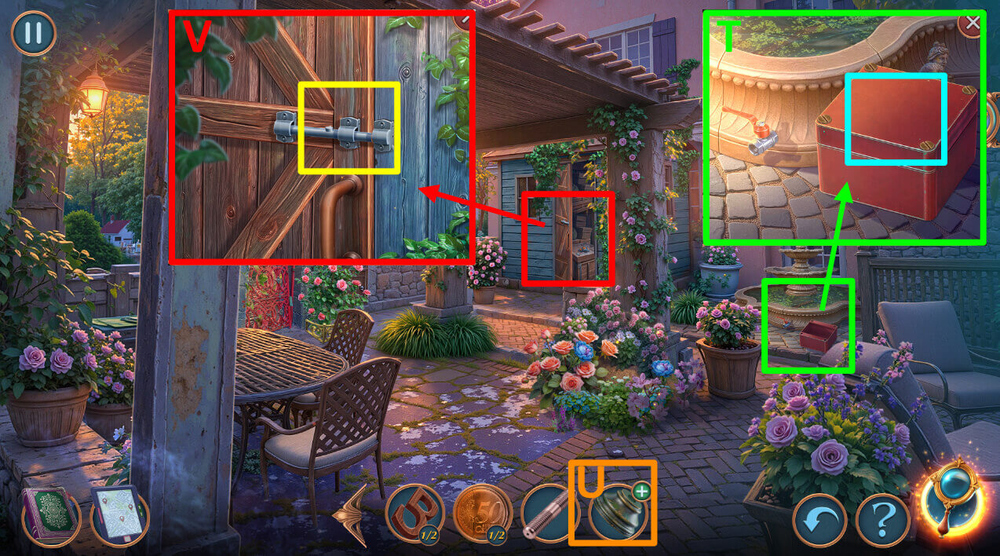
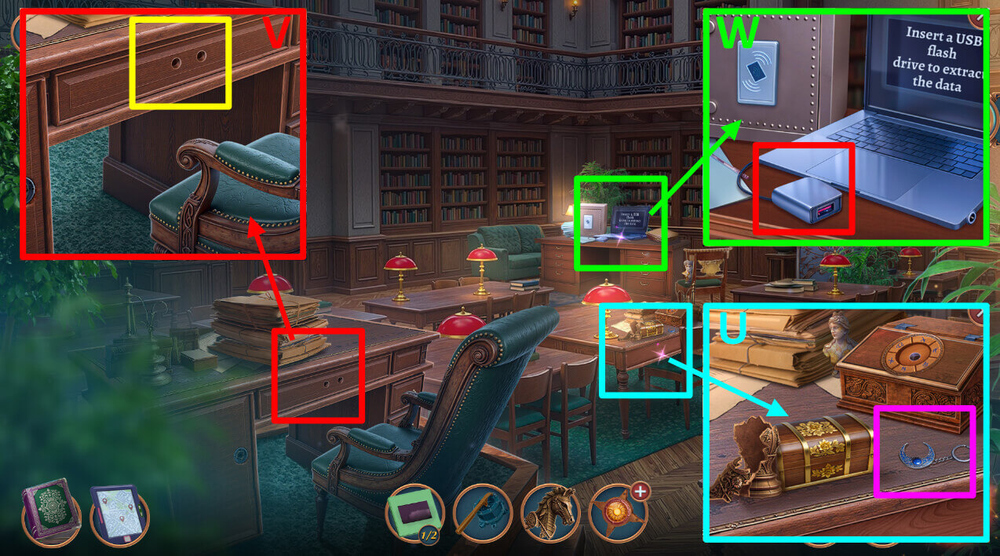
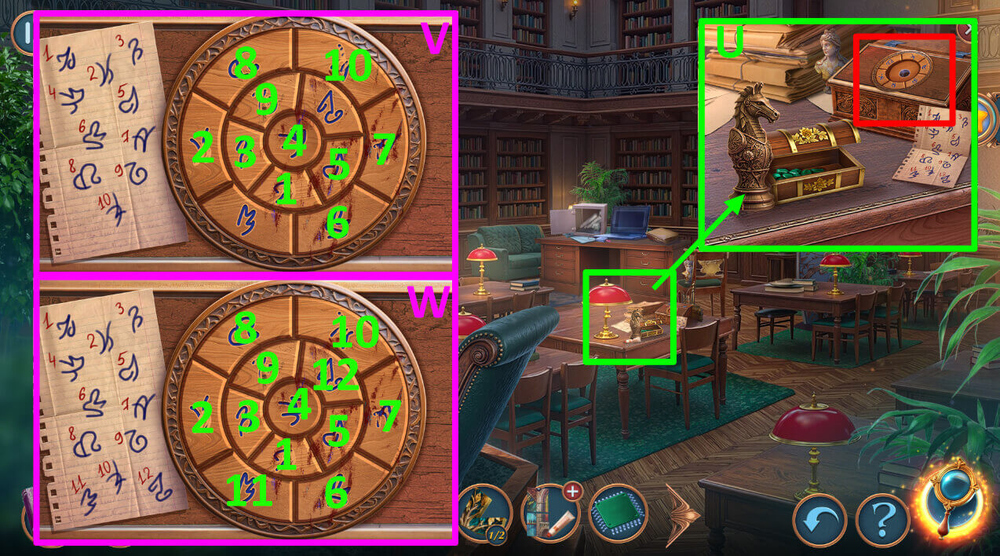
- Select this option (V).
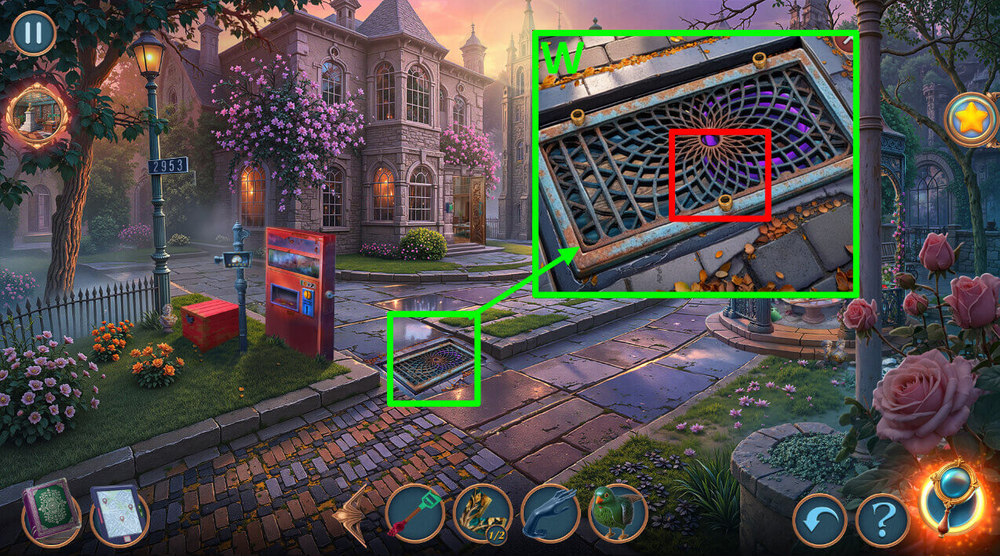
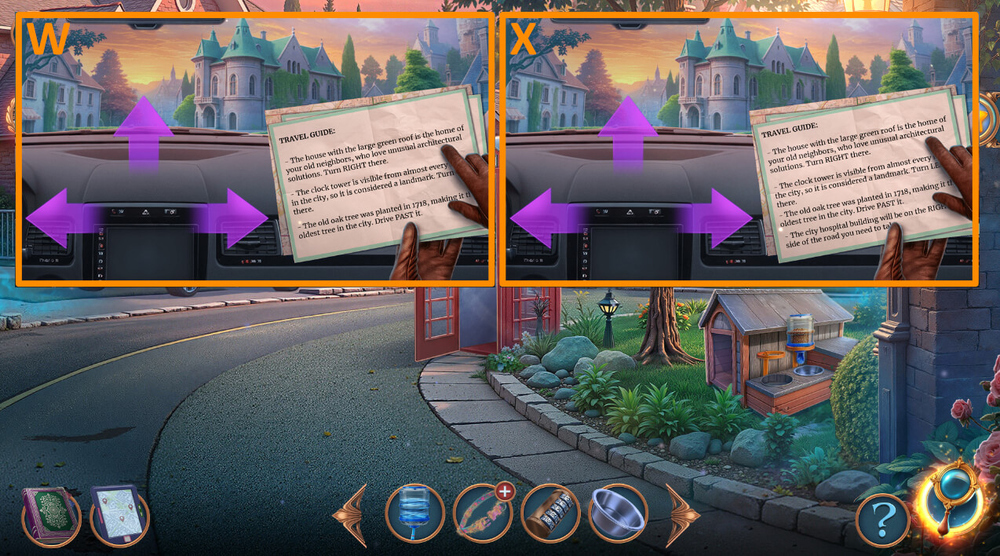
- Use BUTLER FIGURINE on the slot, take NAILS 2/2, SOLAR PANEL and KITCHEN TONGS (W).
- Go forward.
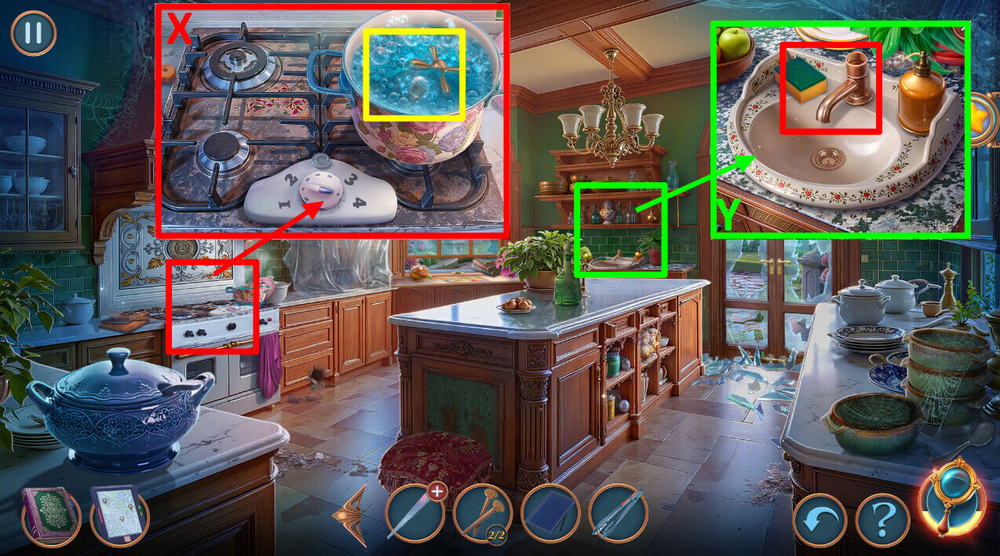
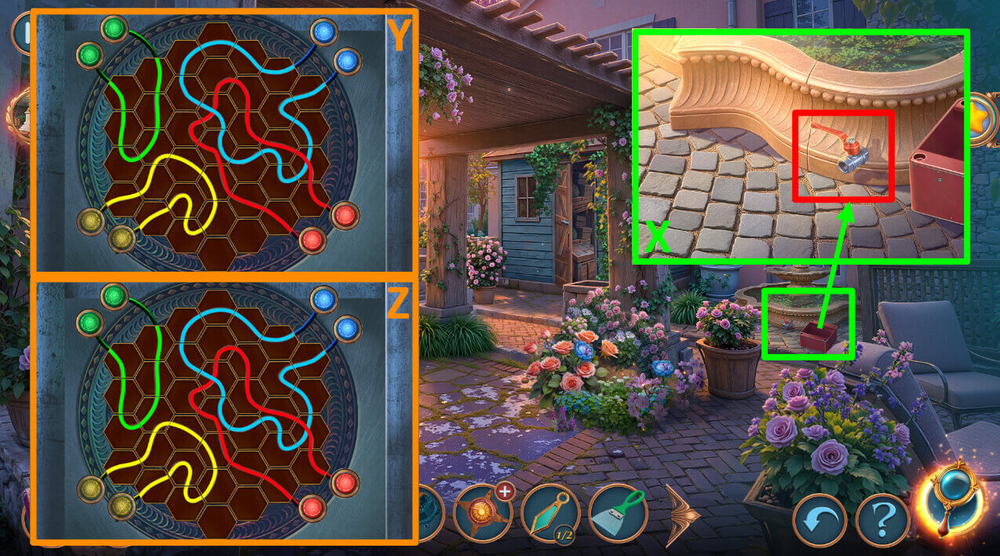
- Use KITCHEN TONGS on the water, earn FAUCET HANDLE (X).
- Use GARDEN SPRAYER and FAUCET HANDLE on the sink, earn GARDEN SPRAYER WITH WATER (Y).
- Go back.

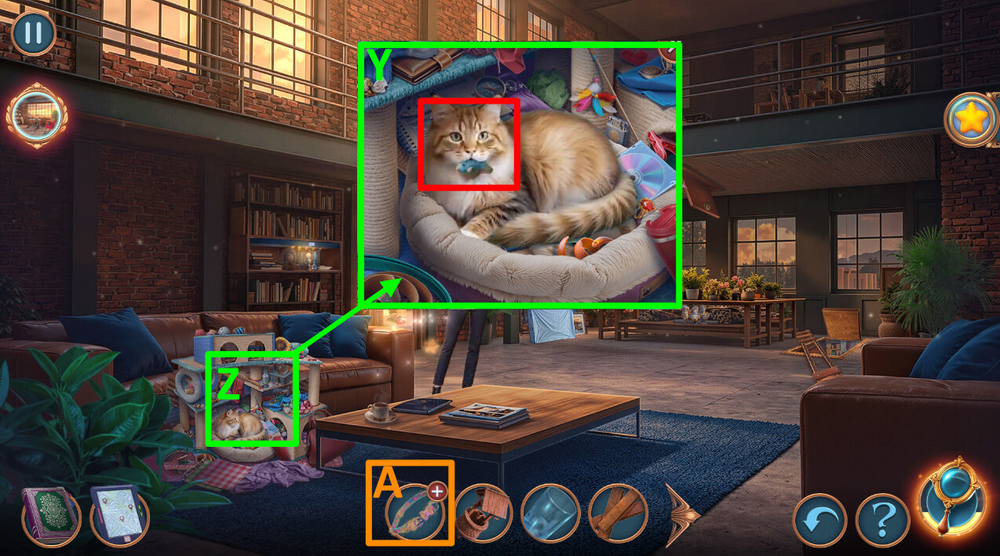
- Use GARDEN SPRAYER WITH WATER on the fire (Z).
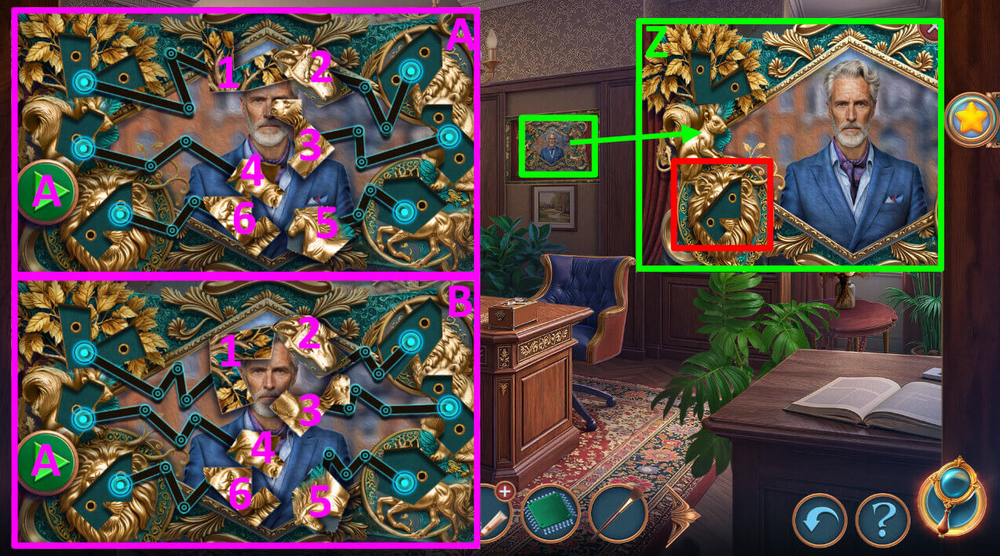
- Easy solution: Click on chip 2, left-up-right, chip 3, left-down-right-up-left-up-left, chip 2, down-right-up-right-down, chip 3, right-down-left-up-left (A).
- Hard solution: Click on chip 3, up-left-down-right-up-left, chip 4, left-down-right, chip 2, left-up-right-down-right-up-right-up, chip 1, right-down-left-up-left (B).
- Talk to Agnes, earn AGNES’S HANDKERCHIEF.
- Go to Mansion Kitchen.
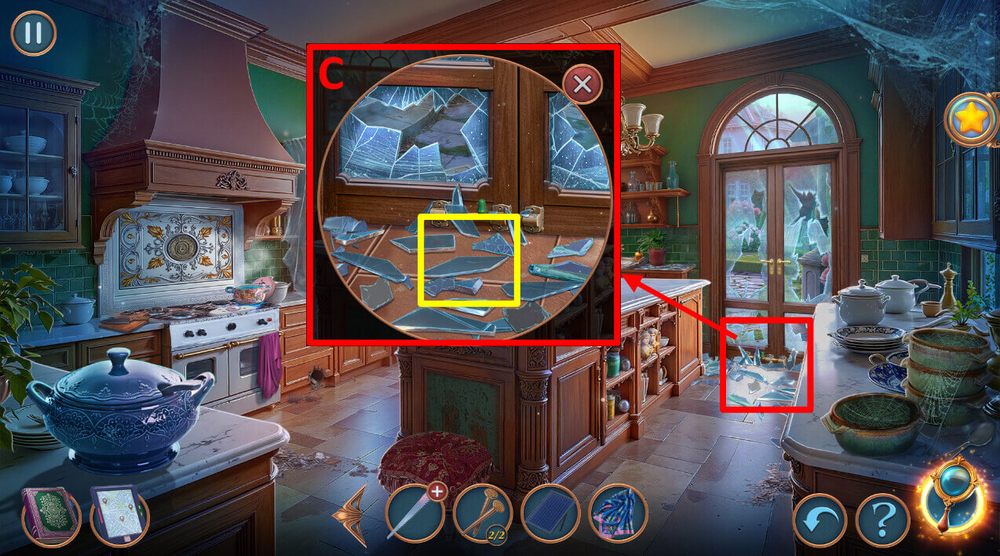
- Use AGNES’S HANDKERCHIEF on the shards (C).
- Go forward.
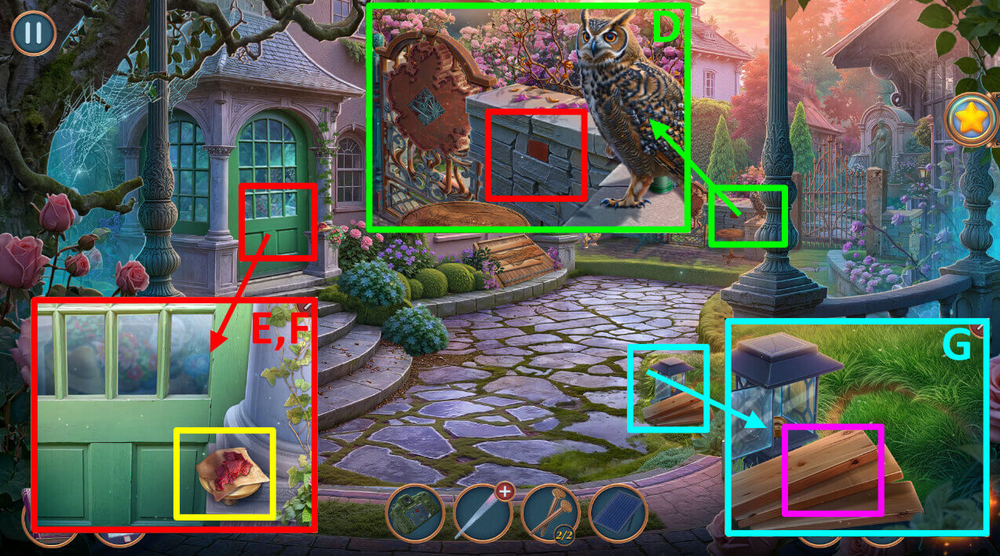
- Use BUILDER’S CAMERA on the fence, take WIRE and BRAUN FIGURINE (D).
- Take JERKY, use BRAUN FIGURINE on the slot (E).
- Play puzzle, earn POKER (F).
- Take PLANKS, use SOLAR PANEL on the lamp (G).
- Go to Mansion Main Hall.
- Use POKER on the items, earn COLD WELDING and OWL FIGURINE (H).
- Use NAILS 2/2, PLANKS and OWL FIGURINE on the stairs (I).
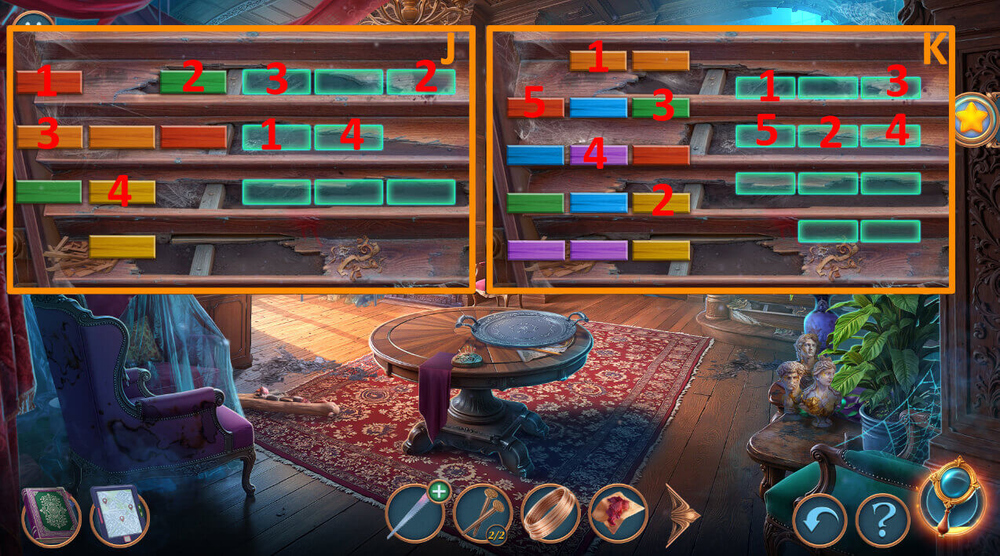
- Easy solution: Arrange the planks as shown in the picture (J).
- Hard solution: Arrange the planks as shown in the picture (K).
- Go to Second Floor Hall.
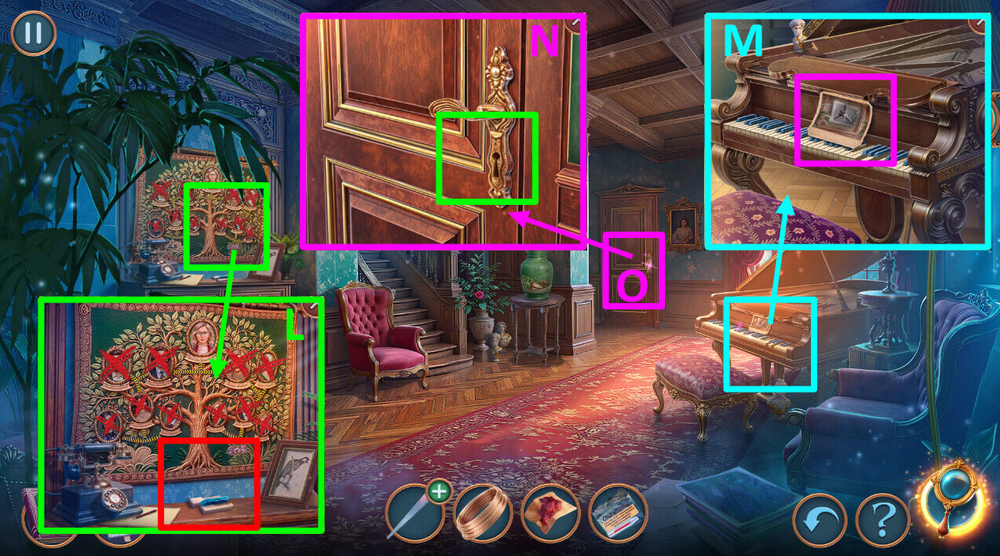
- Take PIANO KEYS (L).
- Take VINTAGE PHOTO, use PIANO KEYS on the piano, take ANTIQUE HAIRPIN (M).
- Use ANTIQUE HAIRPIN on the door (N).
- Play puzzle, earn FALCONER’S GLOVE (O).
- Go to Mansion Terrace.
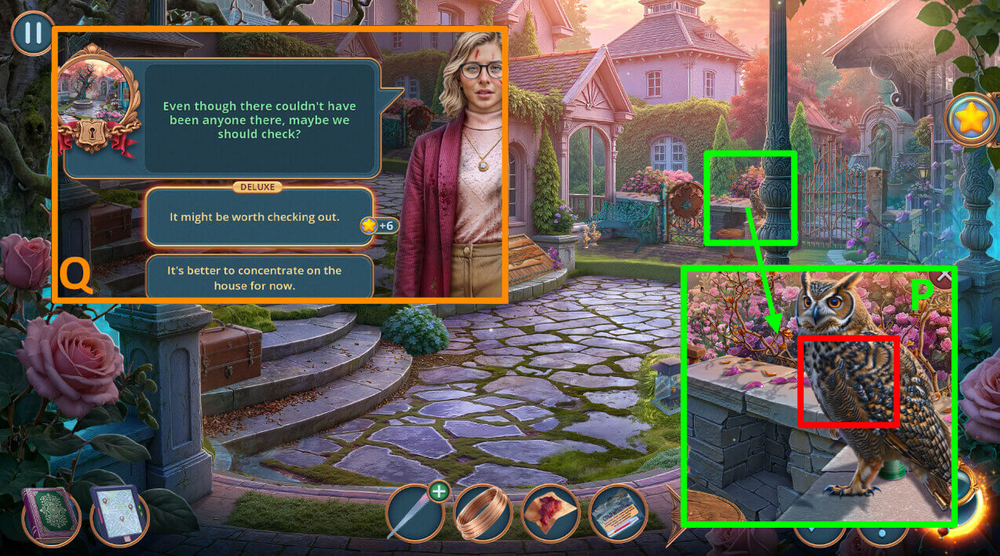
- Use JERKY and FALCONER’S GLOVE on the owl, take INSECTICIDE and ANTIQUE MUSKET (P).
- Select this option (Q).

- Use INSECTICIDE on the bees (R).
- Play puzzle, earn LIGHT BULB (S).
- Use LIGHT BULB on the lamp, take AGNES’S PHONE, ANTIQUE WOODEN HANDLE and GUNPOWDER (T).
- Use WIRE and ANTIQUE WOODEN HANDLE on SAW BLADE, earn IMPROVISED SAW (U).
- Go to Mansion Garden.
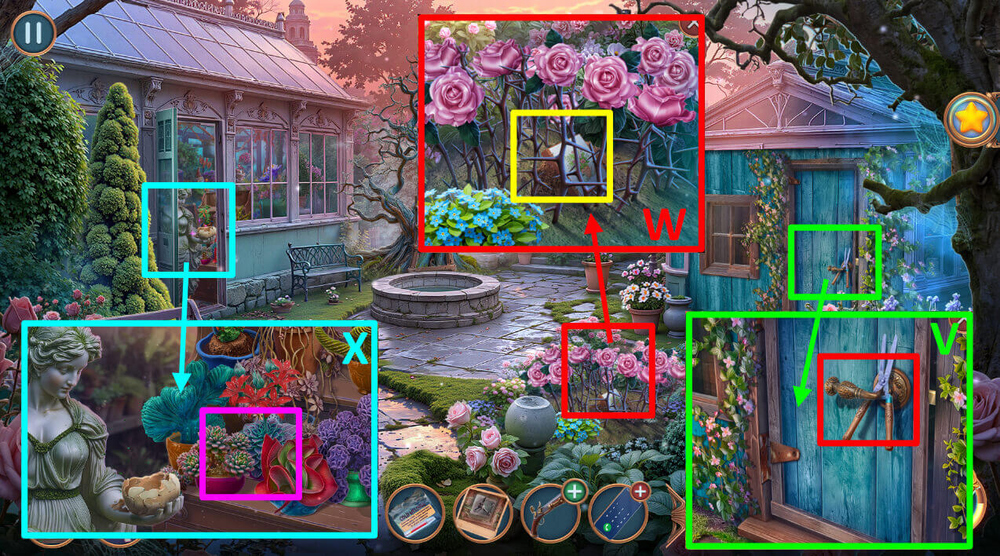
- Take PRUNING SHEARS (V).
- Use PRUNING SHEARS on the flowers, play puzzle, take GARDENER’S JOURNAL (W).
- Click on the broken bowl, use GARDENER’S JOURNAL on the flowers, take COLANDER (X).
- Go back.
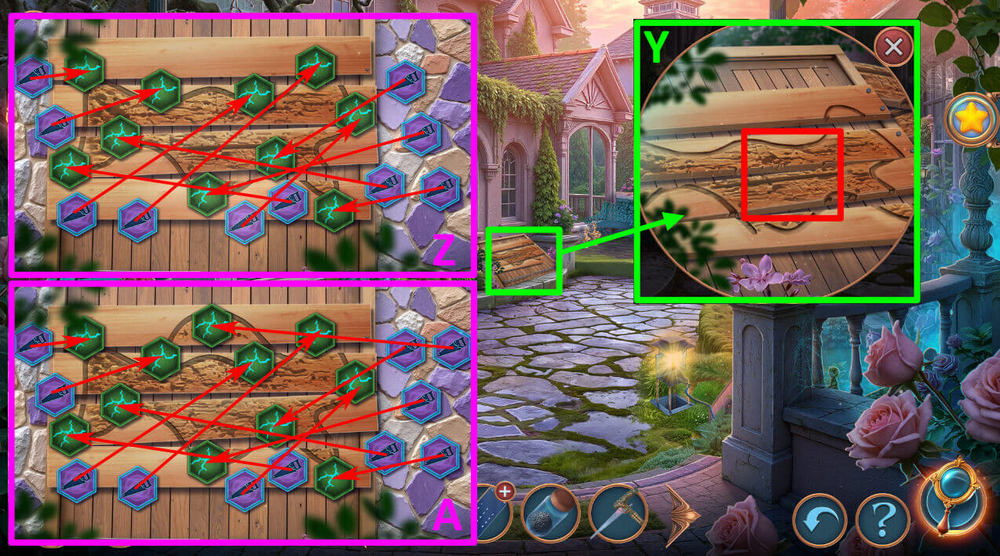
- Use IMPROVISED SAW on the boards (Y).
- Easy solution: Arrange the chips as shown in the picture (Z).
- Hard solution: Arrange the chips as shown in the picture (A).
- Go forward.
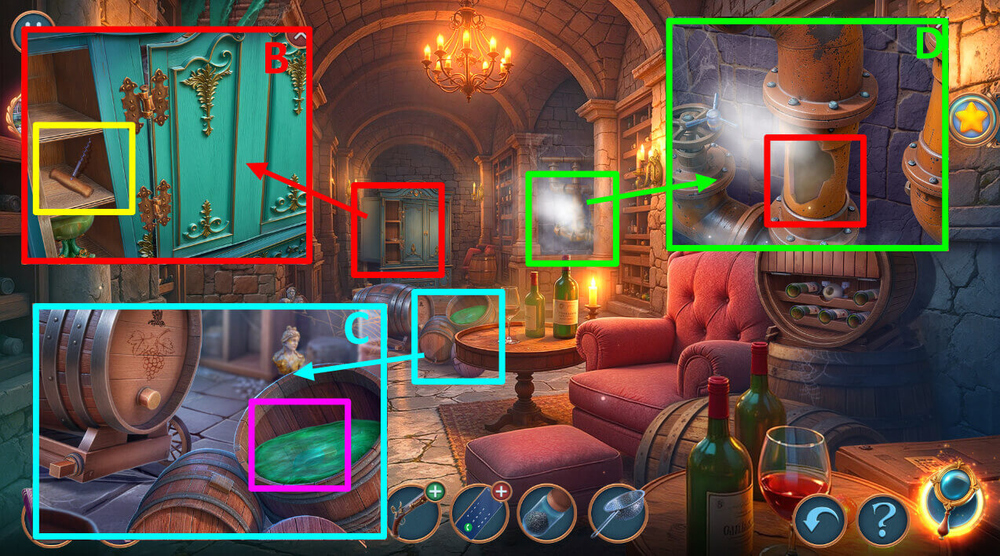
- Take CORKSCREW (B).
- Use COLANDER on the liquid, earn MAGNET, use CORKSCREW on the cork, take MOSAIC FRAGMENT and COPPER PIPE (C).
- Use COLD WELDING and COPPER PIPE on the pipes (D).
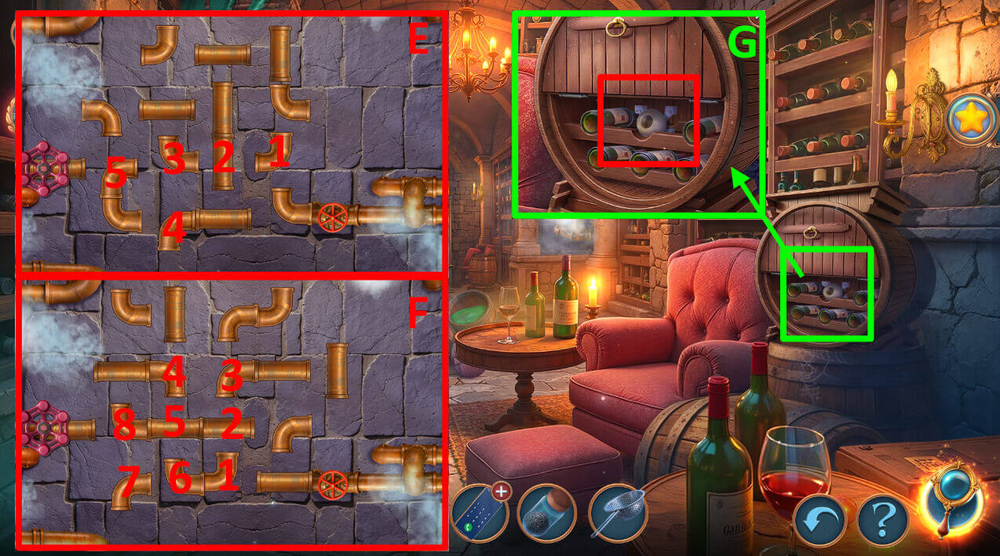
- Easy solution: Click on the pipes in the following order: 1-2-3-4×2-5×3, take VALVE HANDLE (E).
- Hard solution: Click on the pipes in the following order: 1×3-2-3-4×3-5-6-7-8×2, take VALVE HANDLE (F).
- Take MANNEQUIN JOINT (G).
- Go to Mansion Garden.
- Use MAGNET on the door, take CLEANER and GARDENING TROWEL (H).
- Use GARDENING TROWEL on the dirt, take BRUSH (I).
- Go to Mansion Schwarzgrunde.
- Use CLEANER and BRUSH on the bowl, take SINGING BOWL (J).
- Go to Mansion Garden.

- Use SINGING BOWL on the hand, take WHISTLE (K).
- Use WHISTLE on the crow (L).
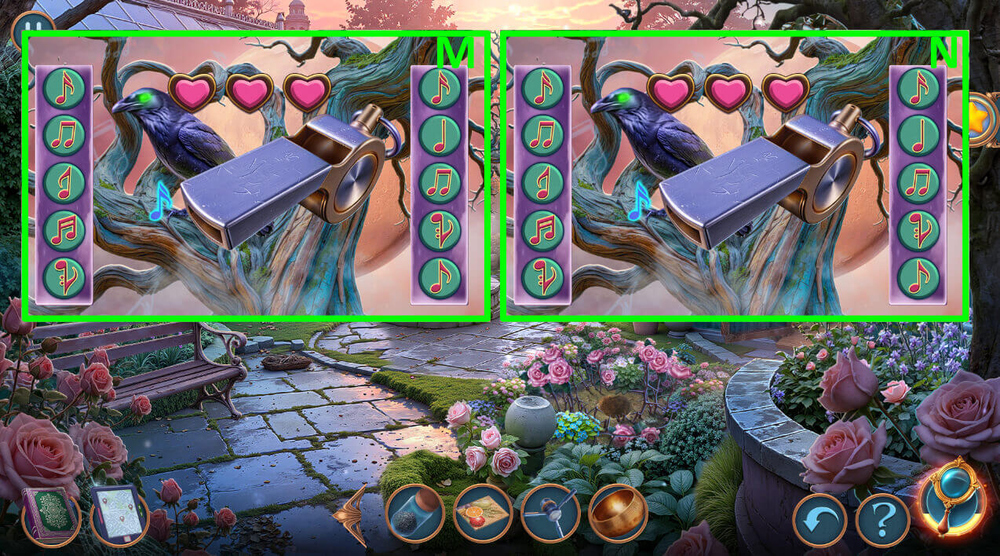
- Easy solution: Follow the instructions in the mini-game description (M).
- Hard solution: Follow the instructions in the mini-game description (N).
- Go to Second Floor Hall.
- Use VINTAGE PHOTO on the curtain, use VALVE HANDLE on the safe, take MATCH, CANDLES 1/2 and BALL (O).
- Use GUNPOWDER and BALL on ANTIQUE MUSKET, earn LOADED MUSKET (P).
- Use LOADED MUSKET on the lock (Q).
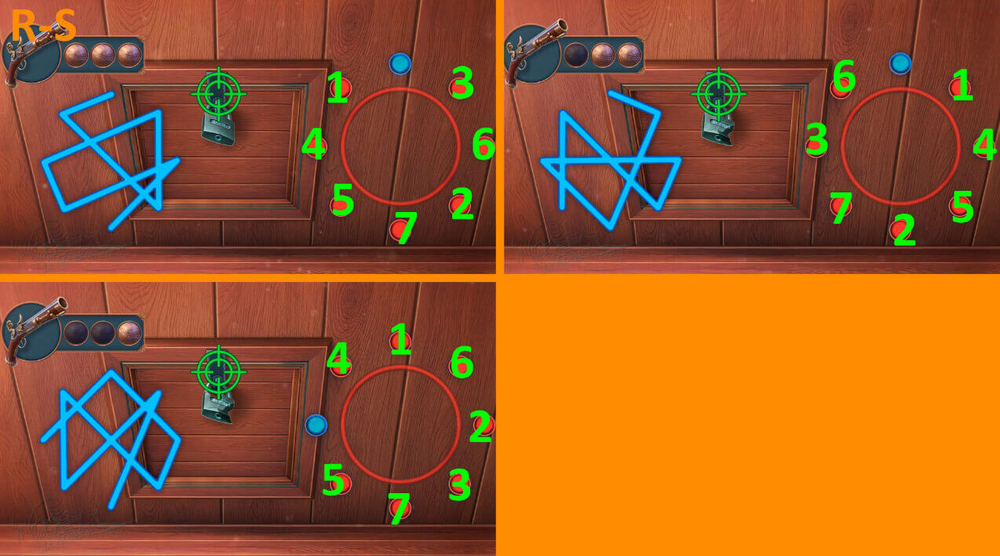
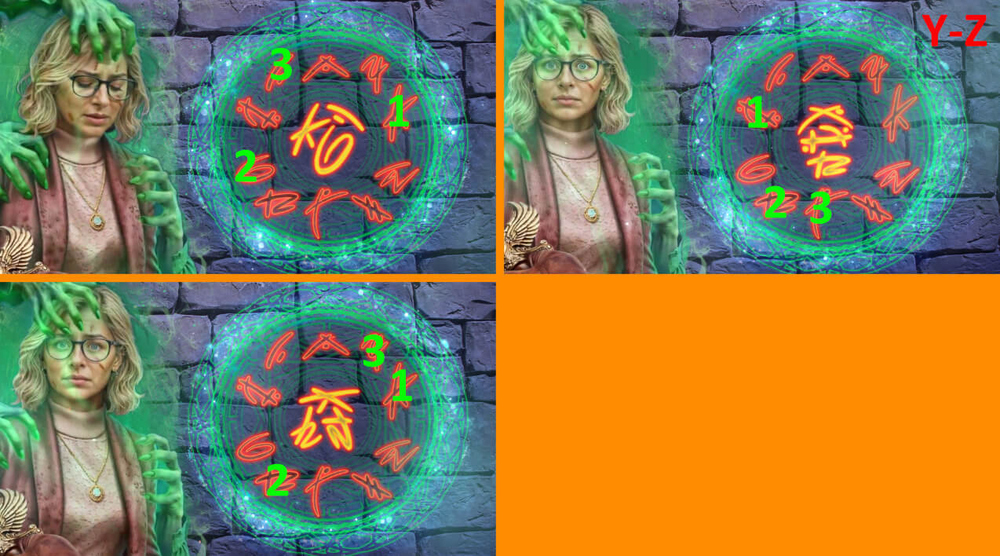
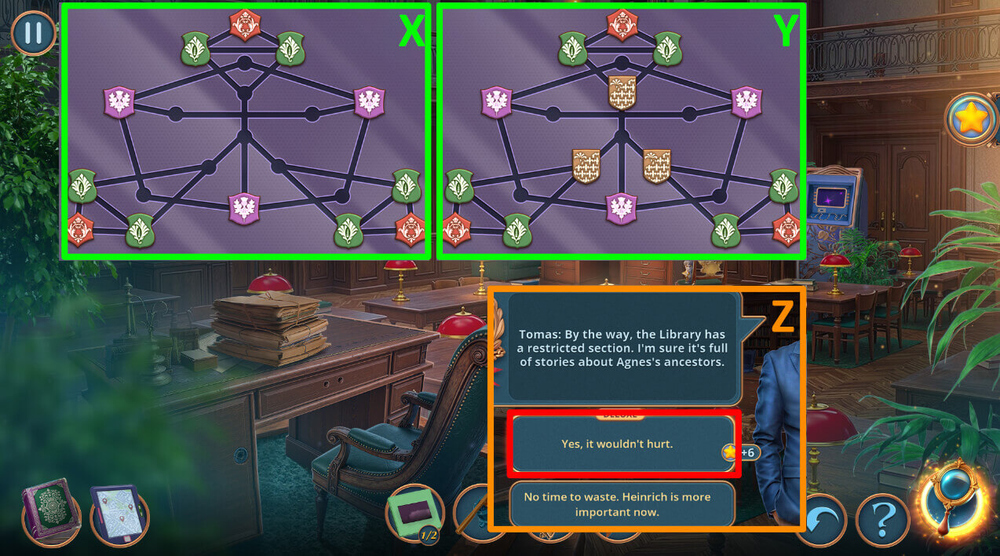
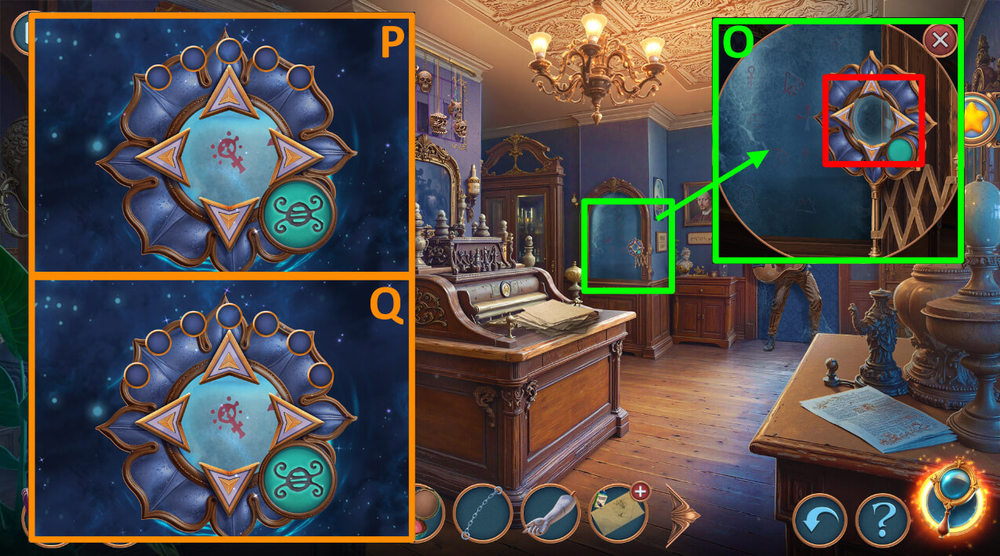
- Easy solution: Click on the symbols in the order shown in the images (R).
- Hard solution: Click on the symbols in the order shown in the images (S).
- Go forward.

- Take ANTIVIRUS FLASH DRIVE and CAKE SPATULA (T).
- Use CAKE SPATULA on the door, take BOX PANEL and MANNEQUIN ARM (U).
- Use MANNEQUIN JOINT and MANNEQUIN ARM on the mannequin, take AWL and CANDLES 2/2 (V).
- Use CANDLES 2/2 and MATCH on the candle holder (W).
- Play puzzle, earn ARCHITECT’S JOURNAL (X).
- Go to Mansion Terrace.
- Use ARCHITECT’S JOURNAL on Agnes (Y).
- Select this option, earn COAT OF ARMS (Z).
- Use COAT OF ARMS on the door, take BRUSH and SMALL KEY (A).
- Go to Mansion Schwarzgrunde.

- Use SMALL KEY on the case, take DEPLETED LAPTOP (B).
- Play puzzle, earn TELEPHONE BOOK (C).
- Use TELEPHONE BOOK on AGNES’S PHONE (D).
- Select this option, earn PHOTO OF MOSAIC (E).
- Go to Mansion Kitchen.

- Use MOSAIC FRAGMENT and PHOTO OF MOSAIC on the mosaic (F).
- Solution: Arrange the mosaic pieces as shown in the picture, take and read the note, take ANTIQUE SWORD HANDLE and WIND-UP MOUSE (G).

- Use WIND-UP MOUSE on the hole (H).
- Easy solution: Follow the instructions in the mini-game description, take GLASS WITH HOLES (I).
- Hard solution: Follow the instructions in the mini-game description, take GLASS WITH HOLES (J).
- Go to Mansion Attic.

- Use BOX PANEL on the lid, use GLASS WITH HOLES on the mirror, take DOOR BELL and WIRELESS INTERNET MODEM (K).
- Use WIRELESS INTERNET MODEM and ANTIVIRUS FLASH DRIVE on the DEPLETED LAPTOP (L).
- Easy solution: Click on the symbols in the order shown in the image, read the note, earn HEINRICH BRAUN’S MUSIC (M).
- Hard solution: Click on the symbols in the order shown in the image, read the note, earn HEINRICH BRAUN’S MUSIC (N).

- Use HEINRICH BRAUN’S MUSIC on the piano, take SWORD POMMEL, STICKY DART and HEINRICH’S PHOTOGRAPH (O).
- Use HEINRICH’S PHOTOGRAPH on the storeroom (P).
- Play puzzle, earn WINE BOTTLE (Q).
- Go to Mansion Cellar.

- Use WINE BOTTLE on the empty slot, take WINEMAKER AWARD (R).
- Use AWL and WINEMAKER AWARD on the door, take ENCRYPTED BOX and INK DEVELOPER (S).
- Go to Mansion Attic.
- Use BRUSH and INK DEVELOPER on the records (T).
- Play puzzle, earn WHEEL (U).
- Go to Mansion Cellar.
- Use WHEEL on the barrel, take SILVER TRAY and BLADE (V).
- Use SWORD POMMEL and BLADE on the ANTIQUE SWORD HANDLE, earn KNIGHT SWORD (W).
- Use KNIGHT SWORD on the ghost hands (X).
- Easy solution: Click on the symbols in the order shown in the image (Y).
- Hard solution: Click on the symbols in the order shown in the image (Z).
- Use STICKY DART on the glass, take SET OF WIRES and HANDCUFFS, use SET OF WIRES on the panel (A).
- Use HANDCUFFS on the window, take LETTERS 1/2 and DUCT TAPE (B).
- Take LIGHT BULB (C).
- Use DUCT TAPE and DOOR BELL on the door (D).
- Easy solution: Arrange the chips as shown in the picture (E).
- Hard solution: Arrange the chips as shown in the picture (F).
- Go forward.

- Select this option (G).
- Take OIL (H).
- Use OIL on the zipper, take COINS 1/2 and PURPLE PAPER (I).
- Use LIGHT BULB and PURPLE PAPER on the lamp (J).
- Play puzzle, earn VALERIAN (K).
- Use VALERIAN on Agnes (L).

- Use SILVER TRAY and PEN on the door, use the key on the door, earn PEN (N).
- Use PEN on the ENCRYPTED BOX (O).
- Go forward.

- Take BOLT and PRUNING SHEARS (P).
- Use PRUNING SHEARS on the flowers (Q).
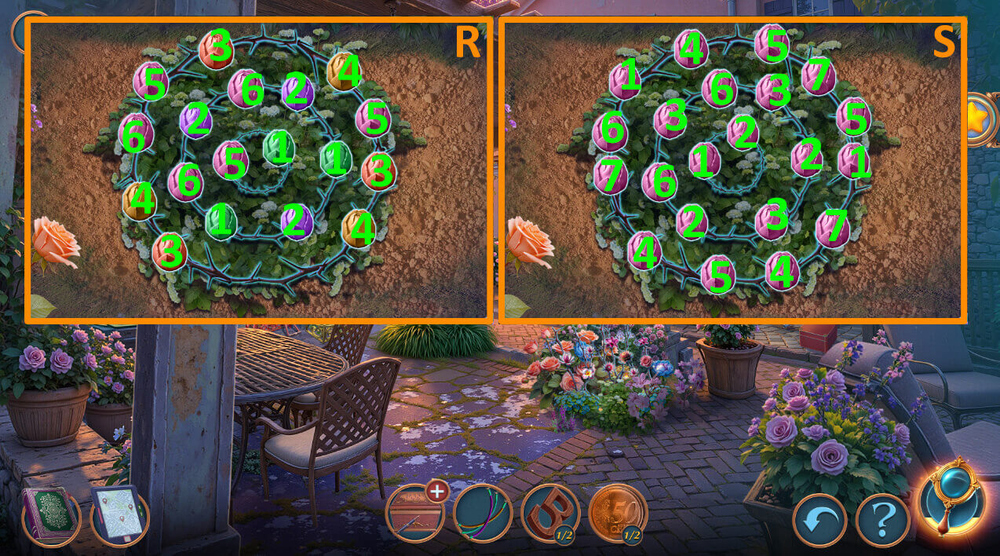
- Easy solution: The pairs of colors are indicated by numbers in the image, take AGNES’S BROOCH (R).
- Hard solution: The pairs of colors are indicated by numbers in the image, take AGNES’S BROOCH (S).
- Use AGNES’S BROOCH on the lid, take CHESS PIECE BASE and MAGNET (T).
- Use BOLT on CHESS PIECE BASE (U).
- Use MAGNET on the door, take CONNECTORS (V).
- Go to City Suburbs.

- Use CONNECTORS on the panel (W).
- Easy solution: Arrange the corners as shown in the image, take METRONOME and LETTERS 2/2 (X).
- Hard solution: Arrange the corners as shown in the image, take METRONOME and LETTERS 2/2 (Y).

- Use LETTERS 2/2 on the slot, take WOODEN POLE and FAN REMOTE (Z).
- Go forward.
- Use FAN REMOTE on the fan, earn TOMAS’S SELF-HELP BOOK (A).
- Use TOMAS’S SELF-HELP BOOK on the ENCRYPTED BOX (B).
- Easy solution: Click the buttons in the following order: L-Rx2-Lx2-R-A, take and read the note (C).
- Hard solution: Click the buttons in the following order: R-Lx3-Rx3-A, take and read the note (D).
- Play puzzle, earn CUE (E).
- Use WOODEN POLE on the hole (F).
- Go forward.
- Use METRONOME and CUE on the door (G).
- Go forward.

- Take and read the note, take SLIDES 1/2 (H).
- Click on the wallet, take COINS 2/2 (I).
- Use COINS 2/2 on the vendor, take NEWSPAPER (J).

- Use NEWSPAPER on the smoke (K).
- Play puzzle, earn CANE (L).
- Use CANE on the items, earn PUMP and SUGAR (M).
- Go to City Suburbs.
- Use SUGAR on the ANTS (N).
- Easy solution: Click on the slots in the following order: 14-7-2-11-13-8-4-11-6-13-15-10-9-14-10-12-14-9-5-12, take FIGURINE HEAD, DAMAGED SUN AMULET and CHESS PIECE PART (O).
- Hard solution: Click on the slots in the following order: 15-10-14-7-12-5-5-3-6-8-2-4-4-11-10-12, take FIGURINE HEAD, DAMAGED SUN AMULET and CHESS PIECE PART (P).
- Use CHESS PIECE PART on CHESS PIECE BASE, earn CHESS PIECE (Q).
- Go to City Park.

- Use CHESS PIECE on the chessboard (R).
- Play puzzle, earn LIBRARY PASS (S).
- Use LIBRARY PASS on the scanner (T).
- Go forward.
- Take CRESCENT MOON CHARM, use FIGURINE HEAD on the figurine (U).
- Use CRESCENT MOON CHARM on the lid, take CLOCK HANDS 1/2 and EMPTY FLASH DRIVE (V).
- Use EMPTY FLASH DRIVE on the notebook (W).
- Easy solution: Arrange the chips as shown in the picture (X).
- Hard solution: Arrange the chips as shown in the picture (Y).
- Select this option, earn WAVE PENDANT (Z).
- Go forward.
- Take PHOTOGRAPH (A).
- Use PHOTOGRAPH on the shelf, take WHEEL (B).
- Take SCRAPER (C).
- Use WHEEL on the stand, take DIRTY AMBER, use SCRAPER on the posters (D).
- Go back.

- Take CHAIN (E).
- Go to Tomas’s House.

- Use WAVE PENDANT on the chest, take STEERING WHEEL (F).
- Use STEERING WHEEL on the hole (G).
- Easy solution: Follow the hint (H).
- Hard solution: Follow the hint (I).
- Go to Tomas’s Study.
- Take CARBINE and PUZZLE HINT (J).
- Take DOG FIGURINE (K).
- Use DOG FIGURINE on the slot, take GRABBER HAND and SLIDES 2/2 (L).
- Use SLIDES 2/2 on the projector (M).
- Play puzzle, take DRAWER HANDLE (N).
- Select this option (O).
- Go to City Library.
- Use DRAWER HANDLE on the drawer, take FRAME FRAGMENTS 1/2 and ACCESS CARD, use DIRTY AMBER on the grindstone, earn AMBER (P).
- Use ACCESS CARD on the safe, take and read the note, take MANNEQUIN HAND (Q).
- Go forward.

- Use AMBER on the statue, take KEYS (R).
- Use KEYS on the shelf, take CUCKOO (S).
- Go to City Park.
- Use MANNEQUIN HAND on the water column (T).
- Easy solution: Click the buttons as shown in the picture, take HEX KEY (U).
- Hard solution: Click the buttons as shown in the picture, take HEX KEY (V).
- Use HEX KEY on the grid, take HOSE (W).
- Go back.
- Use PUMP and HOSE on the tube (X).
- Easy solution: The correct position of the segments is shown in the image, take CROWBAR (Y).
- Hard solution: The correct position of the segments is shown in the image, take CROWBAR (Z).

- Use CROWBAR on the lid, take GLUE (A).
- Go to City Library.
- Use GLUE on the figurine, earn GLUE, take STAINED GLASS PIECES and DATA FLASH DRIVE, use PUZZLE HINT on the cache (B).
- Use DATA FLASH DRIVE on the data board (C).
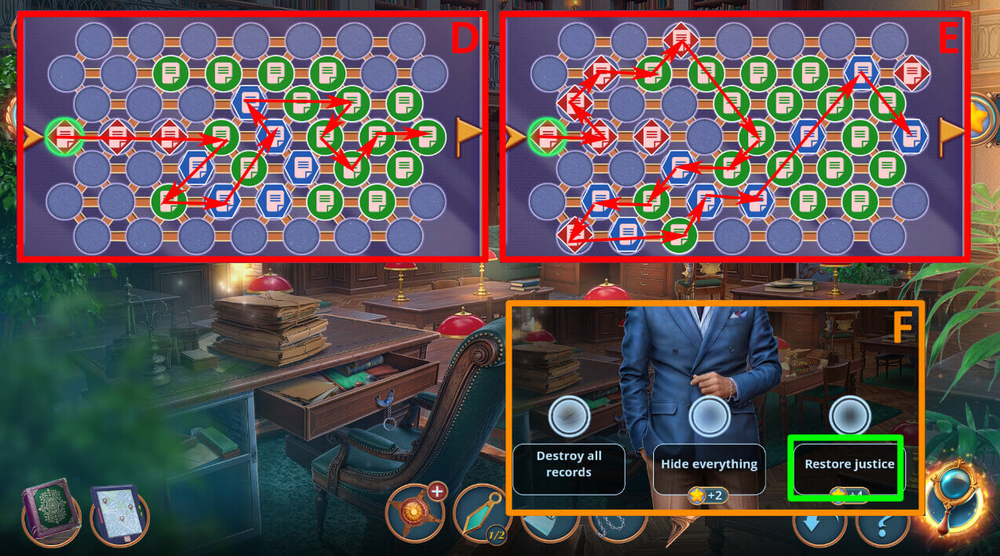
- Easy solution: Follow the path indicated by the arrow in the image, read the note (D).
- Hard solution: Follow the path indicated by the arrow in the image, read the note (E).
- Select this option, earn PAPER CLIP (F).
- Go back.
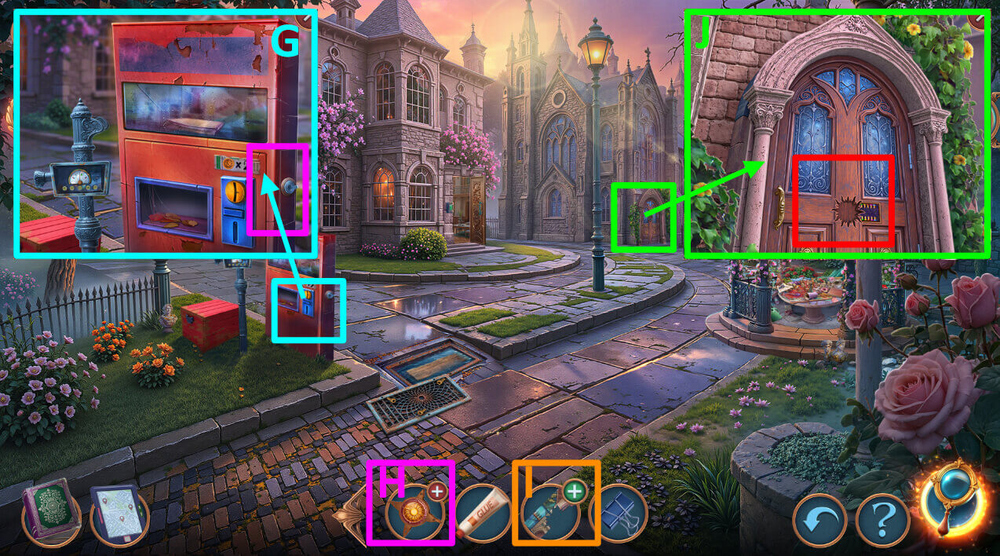
- Use PAPER CLIP on the door, take COLORED GLASS, MICROCHIP and SUN RAYS (G).
- Use SUN RAYS on DAMAGED SUN AMULET, earn SUN AMULET (H).
- Use GLUE and COLORED GLASS on STAINED GLASS PIECES (I).
- Use SUN AMULET on the door (J).
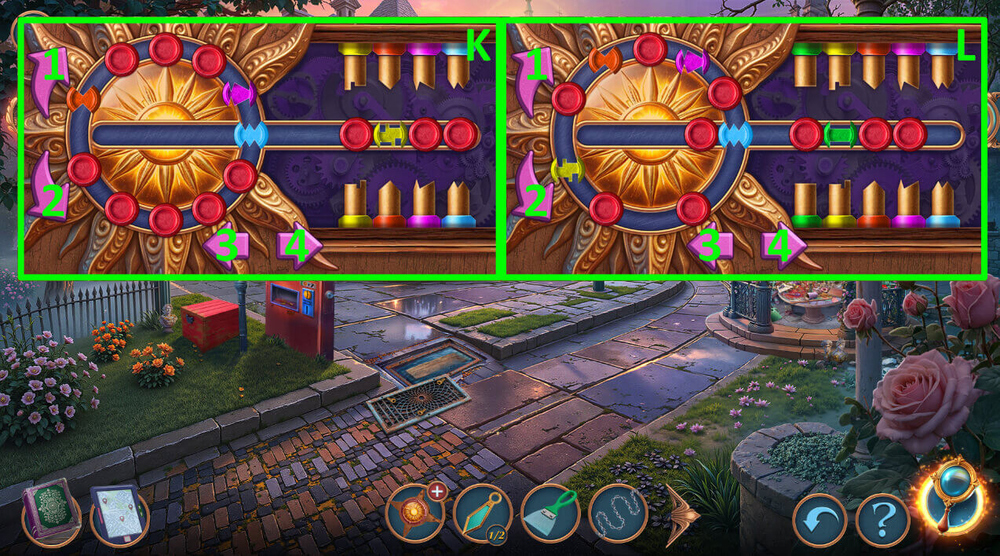
- Easy solution: Click the buttons in the following order: 2-3×2-2-3×2-1×2-4-1-4-1×4-4-1×5-4 (K).
- Hard solution: Click the buttons in the following order: 2-3-2-3×2-1×2-4-1×2-4-1×2-4-1×2-4-1×4-4 (L).
- Go forward.
- Use CUCKOO on the mechanism, take ALKALI (M).
- Go to Library Restricted Section.
- Use ALKALI on the posters, take DECODER (N).
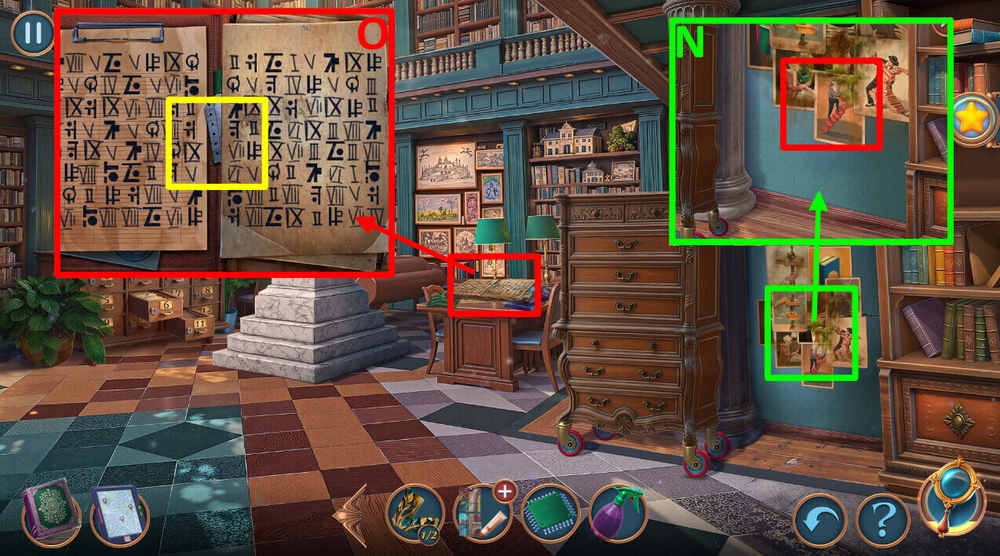
- Use DECODER on the records (O).
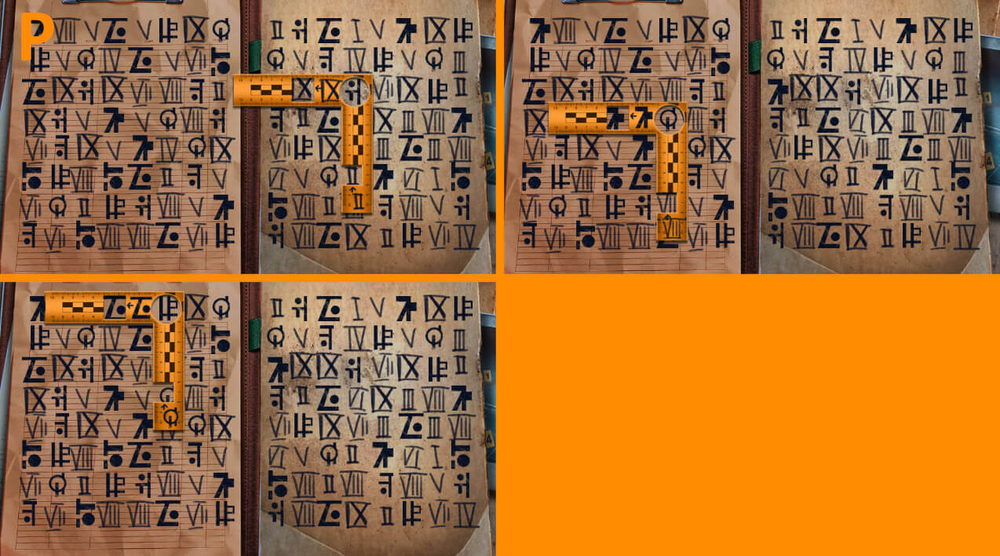
- Easy solution: Position the decoder as shown in the images, read the note (P).
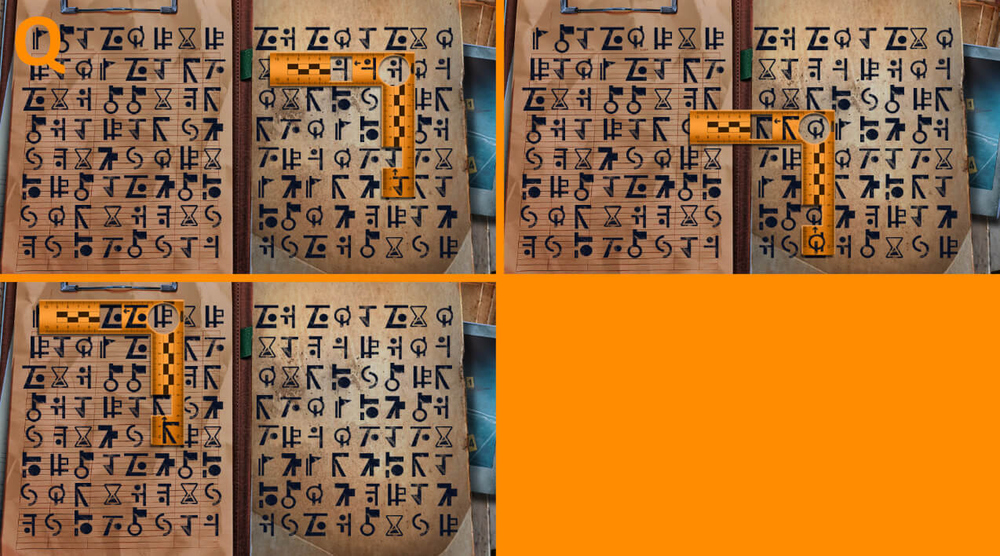
- Hard solution: Position the decoder as shown in the images, read the note (Q).
- Go to Old Chapel.
- Take CLOCK HANDS 2/2 and CHANDELIER LEVER (R).
- Use CHAIN, CHANDELIER LEVER and CARBINE on the mechanism, take BRUSH and CLOCK FACE (S).
- Use CLOCK FACE and CLOCK HANDS 2/2 on the clock, take CODE LOCK PART (T).
- Go to City Library.
- Use CODE LOCK PART on the cache (U).
- Easy solution: Click on the symbols in the order shown in the image, take CANDLE (V).
- Hard solution: Click on the symbols in the order shown in the image, take CANDLE (W).
- Go to Old Chapel.

- Use CANDLE on the candlestick, take MIRROR SHard (X).
- Use MIRROR SHard on the rays, take LED, use GRABBER HAND on the FRAME FRAGMENTS, earn FRAME FRAGMENTS 2/2 (Y).
- Go to Tomas’s Study.
- Use FRAME FRAGMENTS 2/2 on the frame (Z).
- Easy solution: Click the buttons in the following order: 1-2×2-3×3-4×2-5-6×2-A, take LIGHTER (A).
- Hard solution: Click the buttons in the following order: 1×3-2-3×3-4×3-5-6-A, take LIGHTER (B).

- Use LIGHTER on the wax, take TORN TOY and MINI DRILL (C).
- Use MINI DRILL and BRUSH on the clay, take NEW STRING, take and read the note (D).
- Play puzzle, take the note and WEIGHT (E).
- Go to Old Chapel.

- Use WEIGHT on the chain, take COUPON and FRAME (F).
- Use FRAME on the STAINED GLASS PIECES, earn STAINED GLASS (G).
- Use STAINED GLASS on the fresco (H).
- Easy solution: Arrange the pieces as shown in the image, take HEINRICH’S JOURNAL (I).
- Hard solution: Arrange the pieces as shown in the image, take HEINRICH’S JOURNAL (J).

- Take CREDIT CARD (A).
- Use CREDIT CARD on the cache, take SOLDERING IRON (B).
- Use SOLDERING IRON and MICROCHIP on the chip (C).
- Easy solution: The pairs of buttons are shown in the image, earn SOPHIA’S ADDRESS (D).
- Hard solution: The pairs of buttons are shown in the image, earn SOPHIA’S ADDRESS (E).
- Use SOPHIA’S ADDRESS on the house (F).
- Go forward.
- Select this option (G).
- Take NEEDLE and CANE (H).
- Use CANE on the attic, take TAPE and SPATULA (I).
- Go back.
- Use SPATULA on the paint (J).
- Easy solution: Follow the instructions in the mini-game description, take BATTERY (K).
- Hard solution: Follow the instructions in the mini-game description, take BATTERY (L).
- Go forward.

- Take and read the note, take DRINKING WATER, use LED and BATTERY on the slot, take FURRY COLLAR and THREAD (M).
- Use NEEDLE and THREAD on the TORN TOY, earn TOY (N).
- Take CRYPTEX, use TOY on the cat (O).
- Play puzzle, earn BOWL (P).
- Select this option (Q).
- Go forward.

- Take WORKBENCH PEDAL (R).
- Use WORKBENCH PEDAL on workbench, take HANDKERCHIEF (S).
- Use HANDKERCHIEF on the paint, take GEAR (T).
- Go to City Suburbs.
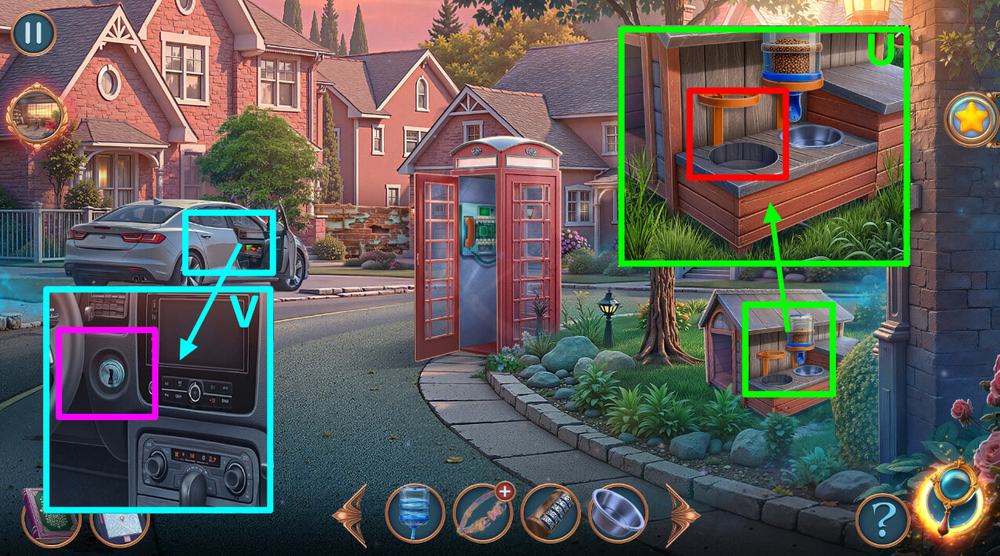
- Use BOWL and DRINKING WATER on the feeder, take WELL MODEL and LOST KEY (U).
- Use LOST KEY on the car (V).
- Easy solution: Click the arrows in the following order: right-left-up-right-up-left (W).
- Hard solution: Click the arrows in the following order: right-left-up-right-right-left-up-left (X).
- Take ADVERTISING BROCHURE (Y).
- Use ADVERTISING BROCHURE and COUPON on the wheel, take GLASS and METAL TRIDENT (Z).
- Use METAL TRIDENT on the nails (A).
- Easy solution: Set the sliders as shown in the figure (B).
- Hard solution: Set the sliders as shown in the figure (C).
- Go forward.

- Take PLANKS (D).
- Take CASH REGISTER BUTTON (E).
- Use GEAR on the slot, take POLISH, use CASH REGISTER BUTTON on the cash register, take SLINGSHOT and MUSIC HINT (F).
- Go to Sophia’s Workshop.
- Use POLISH on the rust on the vise, take LION HEAD (G).
- Use LION HEAD on the slot, take PIPETTE (H).
- Go to Antique Shop.
- Use NEW STRING and MUSIC HINT on the skeleton (I).
- Easy solution: Click the buttons in the order shown in the image, take MOON SIGNET RING (J).
- Hard solution: Click the buttons in the order shown in the image, take MOON SIGNET RING (K).
- Go to Sophia Lang’s House.
- Use MOON SIGNET RING on the box, take FLAGS 1/2 and PENDANT (L).
- Use PENDANT and CRYPTEX on HEINRICH’S JOURNAL (M).
- Easy solution: Place the token on the position shown in the image, take and read the note (N).
- Hard solution: Place the token on the position shown in the image, take and read the note (O).
- Select this option, earn COIN (P).
- Go to Town Square.

- Use COIN on the empty slot, take GRANITE AWARD and GRAPPLING HOOK (Q).
- Take HOOKS 1/2 (R).
- Use GRAPPLING HOOK on the window (S).
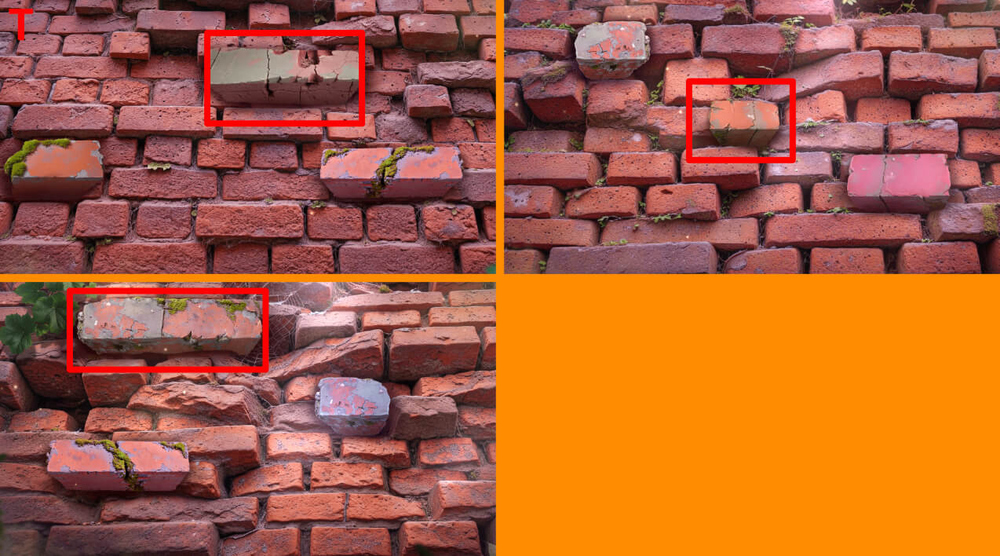
- Easy solution: Click on the stones highlighted in the image, then use the arrows to avoid the falling debris (T).

- Hard solution: Click on the stones highlighted in the image, then use the arrows to avoid the falling debris (U).

- Take TOWER MODEL (V).
- Use TOWER MODEL on the model, take BUSINESS CARD and POWDER (W).
- Use BUSINESS CARD and TAPE on the safe, take TREAT (X).
- Go to Sophia Lang’s House.
- Use TREAT on the cat (Y).
- Play puzzle, earn ROLLER (Z).
- Use ROLLER on the FURRY COLLAR, earn COLLAR (A).
- Go to Antique Shop.
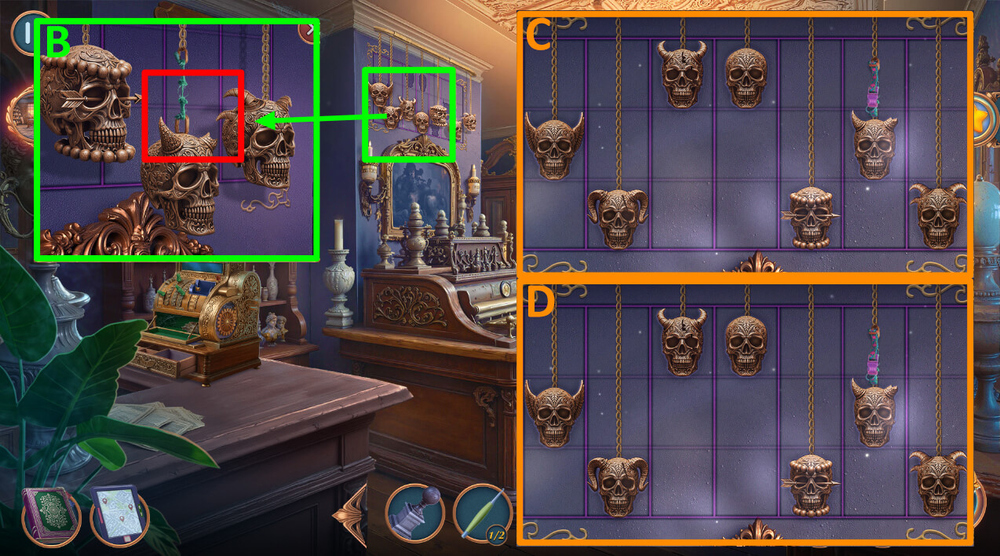
- Use COLLAR on the skulls (B).
- Easy solution: Arrange the skulls as shown in the picture, take OLD CITY MAP (C).
- Hard solution: Arrange the skulls as shown in the picture, take OLD CITY MAP (D).
- Go to Architects’ Building.
- Use OLD CITY MAP and WELL MODEL on the model, take CARTRIDGE and HOOKS 2/2 (E).
- Take ENDOSCOPE WITH CAMERA, use HOOKS 2/2 on the door (F).
- Easy solution: Arrange the chips as shown in the picture, Click the “Play” button (G).
- Hard solution: Arrange the chips as shown in the picture, Click the “Play” button (H).
- Go forward.
- Take DRAWING RULER (I).
- Use DRAWING RULER on the shelf, take SAFE HANDLE (J).
- Use SAFE HANDLE and GLASS on the safe (K).
- Easy solution: Click on the buttons in the following order: 2-A-4-Ax2-3-1, take ANTIQUE DAGGER (L).
- Hard solution: Click on the buttons in the following order: A-3-A-B-A-B-5-A-6-A-B-A-B-1-A-2-Ax2-4, take ANTIQUE DAGGER (M).
- Go to Sophia Lang’s House.
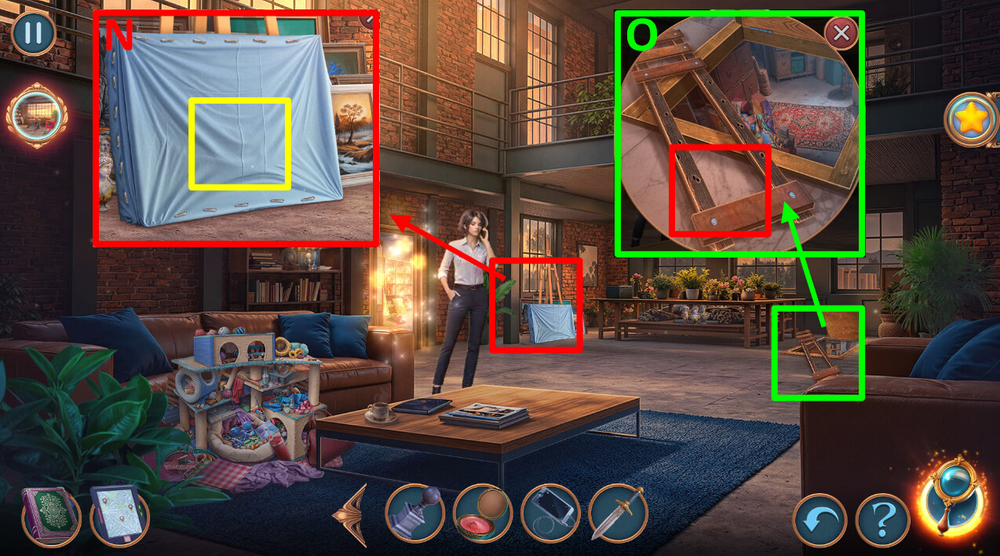
- Use ANTIQUE DAGGER on the curtain, take CHAIN and NAILS (N).
- Use NAILS, PLANKS and GRANITE AWARD on the ladder (O).
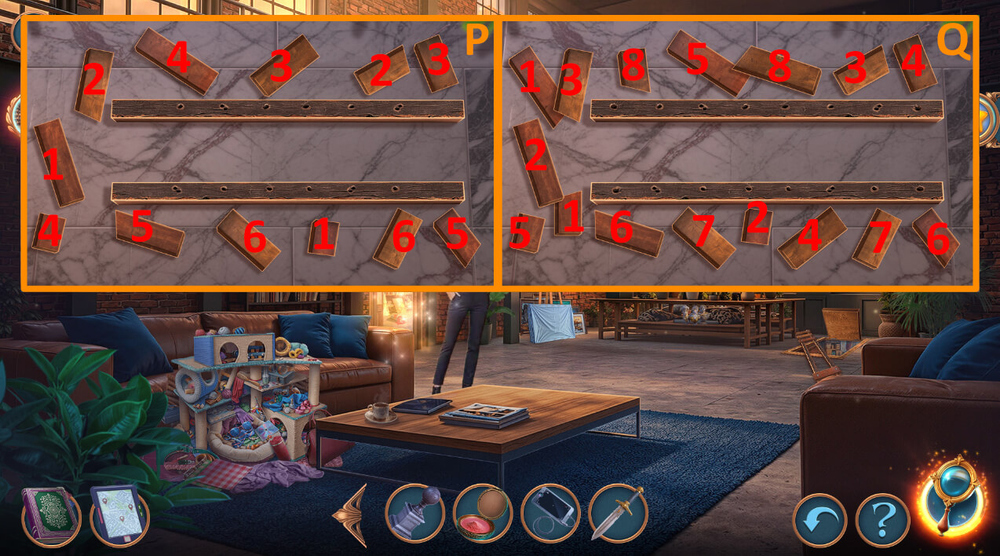
- Easy solution: Arrange the boards from left to right in the order shown on the screen (P).
- Hard solution: Arrange the boards from left to right in the order shown on the screen (Q).

- Take CONTINENT (R).
- Use CONTINENT on the globe, take STEEL BALLS (S).
- Use STEEL BALLS and SLINGSHOT on the board, earn INVENTORY LIST (T).
- Use INVENTORY LIST on the staff (U).
- Play puzzle, earn HOUSE-SHAPED EARRINGS (V).
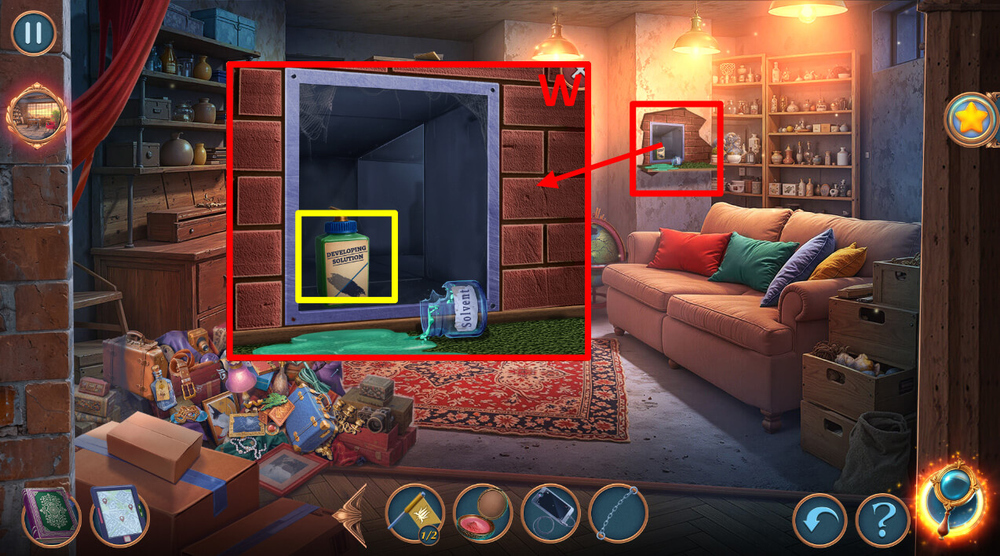
- Take DEVELOPING SOLUTION, use PIPETTE on the liquid, earn SOLVENT (W).
- Go to Sophia’s Workshop.
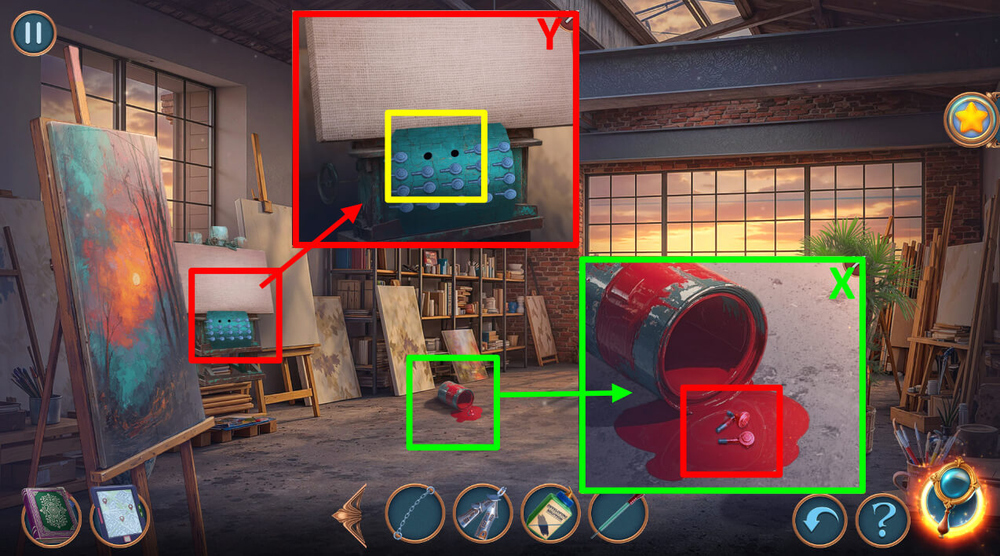
- Use SOLVENT on the paint, take EASEL LEVERS (X).
- Use EASEL LEVERS on the empty slots (Y).

- Easy solution: Click on the levers in the following order: 3-2-5-1-8-4-9-16-12-15-14-11-6-7-10-13, examine the painting (Z).
- Hard solution: Click on the levers in the following order: 2-3-4-5-6-8-10-14-13-16, examine the painting (A).
- Go to Architects’ Archive.
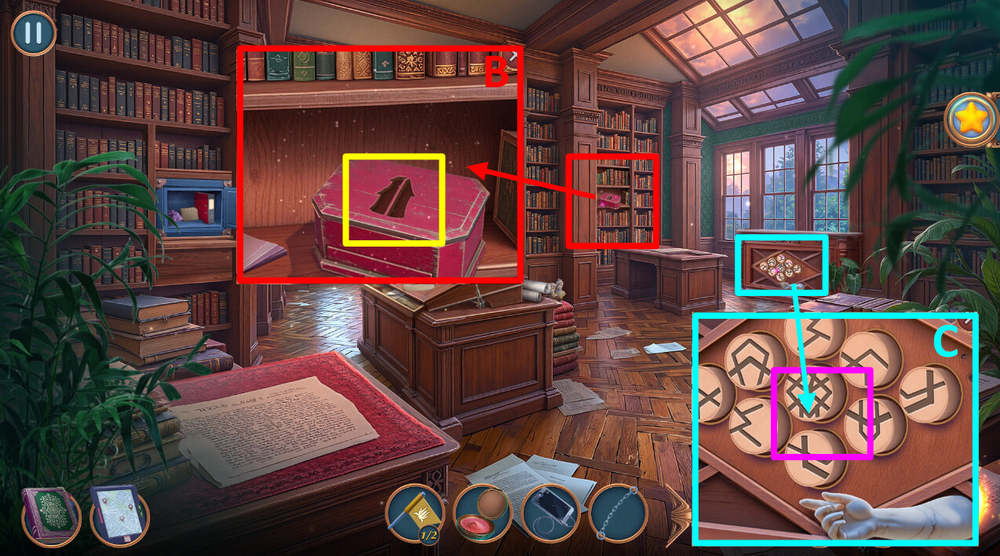
- Use HOUSE-SHAPED EARRINGS on the box, take OLD PAINTING (B).
- Take SCULPTURE PART, use OLD PAINTING on the symbols (C).

- Easy solution: Arrange the symbols as shown in the image, take DIVIDERS (D).
- Hard solution: Arrange the symbols as shown in the image, take DIVIDERS (E).
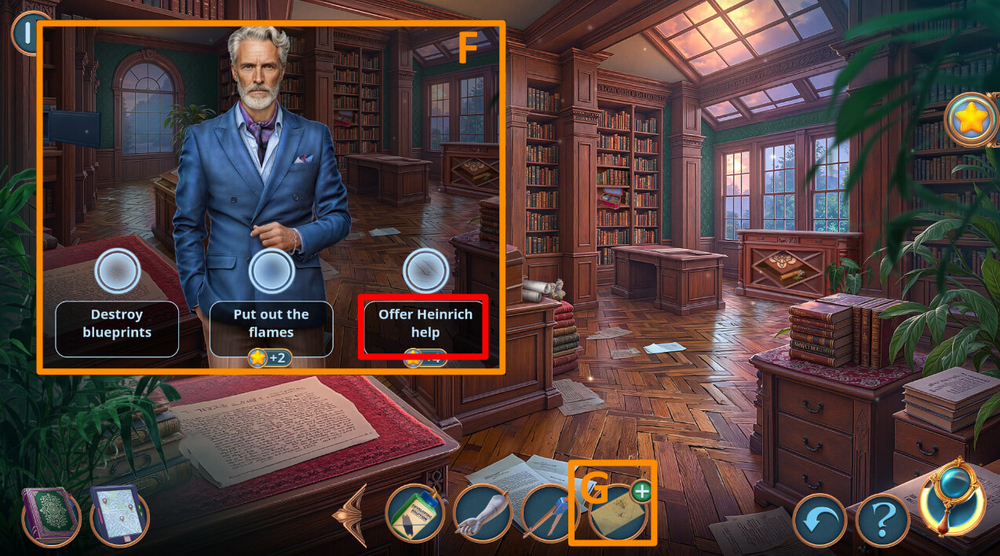
- Select this option, earn ORIGINAL VILLA DRAWINGS (F).
- Use DEVELOPING SOLUTION on the ORIGINAL VILLA DRAWINGS (G).
- Go to Town Square.

- Use DIVIDERS on the lock, take BRANCHES and FLAGS 2/2 (H).
- Use FLAGS 2/2 on the map (I).

- Easy solution: Place the flags as shown in the image, take VENTILATION PLAN (J).
- Hard solution: Place the flags as shown in the image, take VENTILATION PLAN (K).
- Go to Sophia’s Basement.

- Use VENTILATION PLAN and ENDOSCOPE WITH CAMERA on the ventilation, take THICK BOOK and GIFT BOTTLE (L).
- Use GIFT BOTTLE on the bottles, take FEATHER BOA (M).
- Select this option (N).
- Go to Antique Shop.
- Use POWDER and FEATHER BOA on the glass (O).
- Easy solution: Find the symbols shown in the hint, take RECEIPT TAPE (P).
- Hard solution: Find the symbols shown in the hint, take RECEIPT TAPE (Q).

- Use RECEIPT TAPE on the cash register, take CABLE (R).
- Go to Architects’ Building.

- Use CARTRIDGE and CABLE on the printer, take SCULPTURE DRAWING (S).
- Use SCULPTURE DRAWING and SCULPTURE PART on the sculpture (T).
- Easy solution: Click on the parts in the following order: 2×4-1×3-3×2-4×2-5×2-6×3-7×2-8×6, take LIGHT BULB (U).
- Hard solution: Click on the parts in the following order: 3×4-2×4-1×3-4×2-5×4-6×2-7×2-8×3-9×2-10×6, take LIGHT BULB (V).
- Go forward.

- Use LIGHT BULB and CHAIN on the lamp, take HOOK and HOURGLASS (W).
- Go to Sophia’s Basement.
- Use HOURGLASS on the slot, take SYRINGE and MINI VACUUM (X).
- Use MINI VACUUM on the dust (Y).
- Play puzzle, earn HEINRICH’S PAINTING (Z).
- Use HEINRICH’S PAINTING on ORIGINAL VILLA DRAWINGS, take and read the note (A).
- Walkthrough Bonus Chapter, at the link below.


