Lost Lands 7: Redemption – An adventure game about the journey of the girl Susan. After working so hard to maintain order in the Lost Lands, Susan returns home to her homeland. A dangerous relic, the heart of an ancient god, has been discovered on Earth. But even for the difference in time between the two worlds, the girl was not at home much more than she wanted. Her son is offended that his mother disappeared so suddenly. She wants to quickly solve the problem and restore order to the world, but this most likely will not come true. Find secrets and collect manuscripts full of ancient knowledge. Solve the mysteries of the mysterious world in order to defeat the ancient god. Go through unexpected plot twists in fantastic locations and use your wits to solve puzzles. If you are stuck in any place, and do not know how to proceed further, you can see the walkthrough of the game on our website.
Lost Lands 7: Redemption – Walkthrough
Here you can watch the full walkthrough of Lost Lands 7: Redemption, namely the main story and the bonus chapter.
Maaron’s artifact
The Orc went to his lair, where he hid an artifact stolen from Maaron. Maaron said that the artifact looks like a magic orb in a frame. I need to find it and return to the owner.
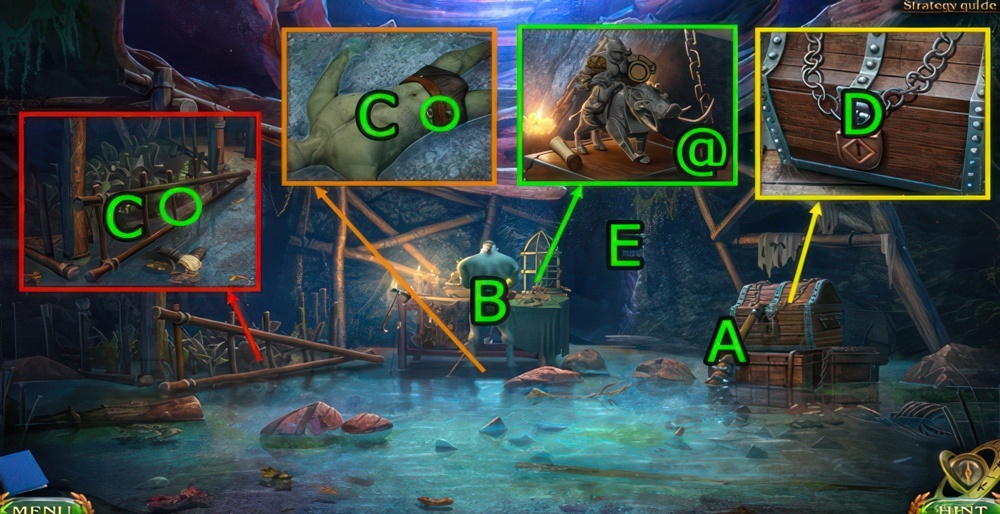
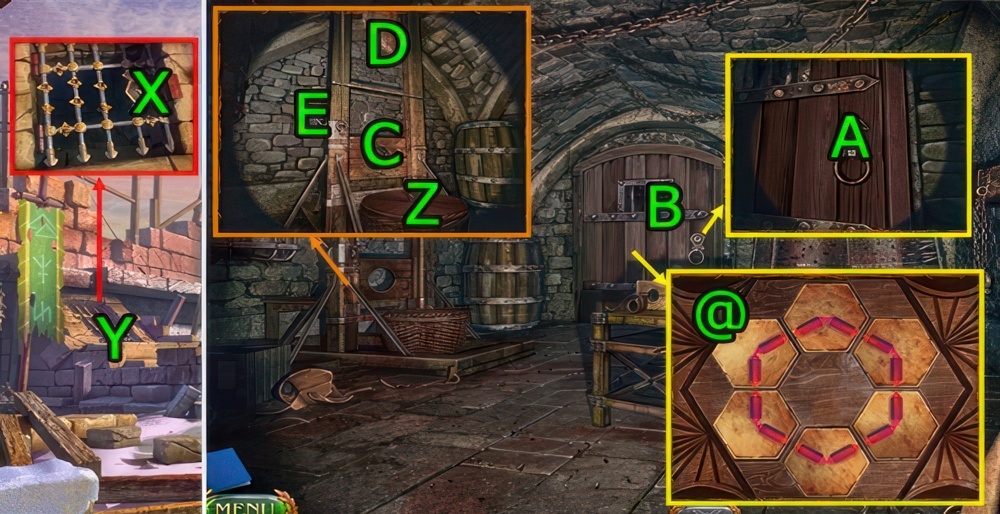
- Drag (A-B).
- Play the puzzle (B).
- By changing the position of the rider, put him in the pose shown in the hint.
- Puzzle walkthrough (@), pose figure as shown.
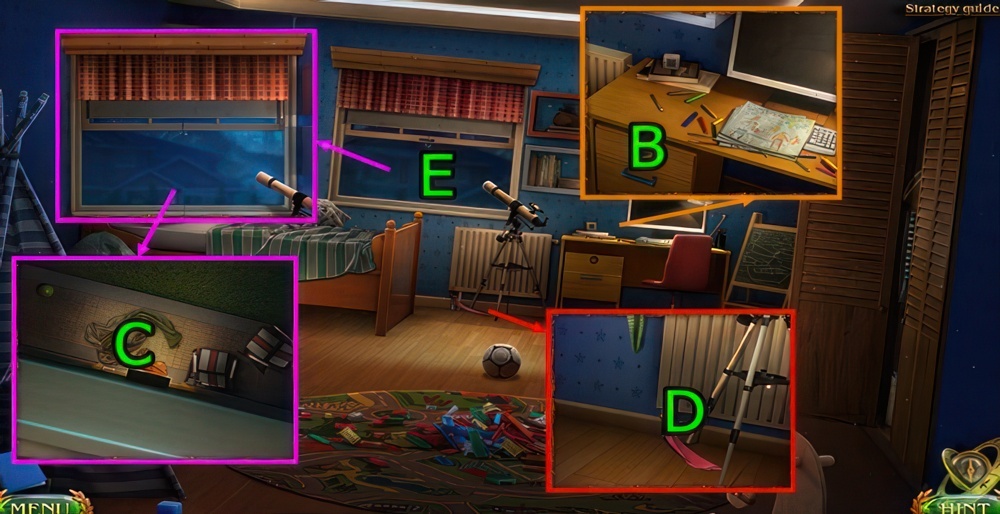
- Get ROPE.
- Get LADDER and KEY (C).
- Use KEY on (D), press (D×2), get SPHERICAL STONE and SCISSORS.
- ROPE and SCISSORS on LADDER, get LADDER.
- Use LADDER on (E).
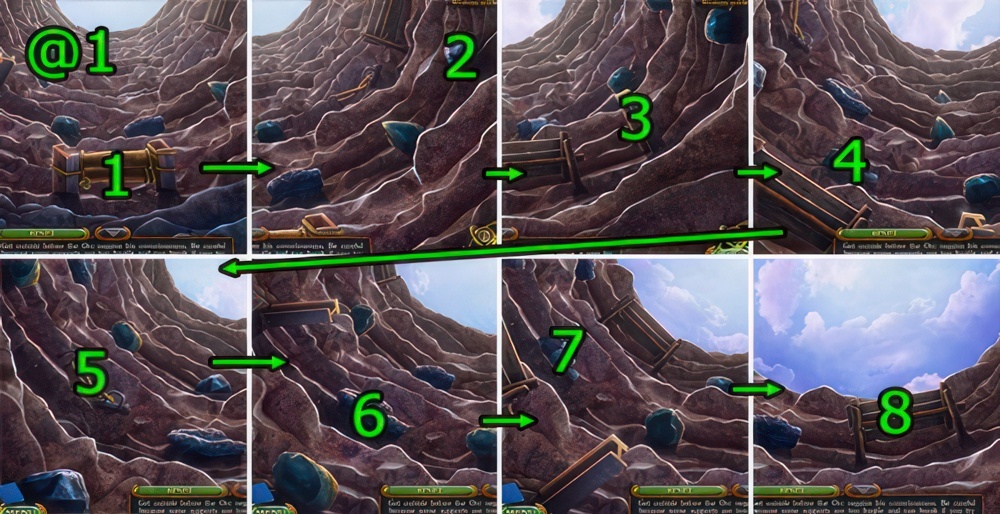
- Get outside before the Orc regains his consciousness.
- Be careful because some supports are fragile and can break if you try to grab them.
- Walkthrough (@1): Press (1-2-3-4-5-6-7-8).
Hilamir the Keeper
We need to find the local keeper somewhere near the shrines. His name is Hilamir.
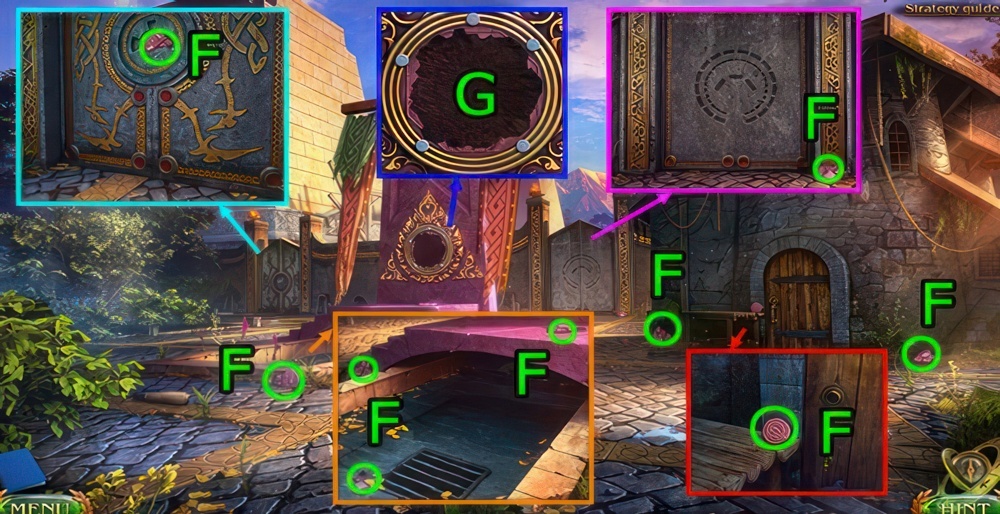
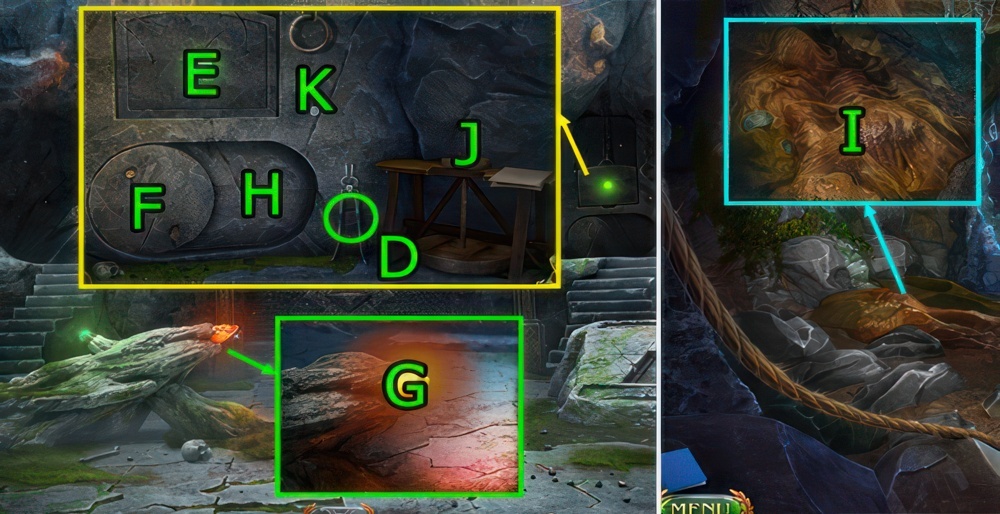
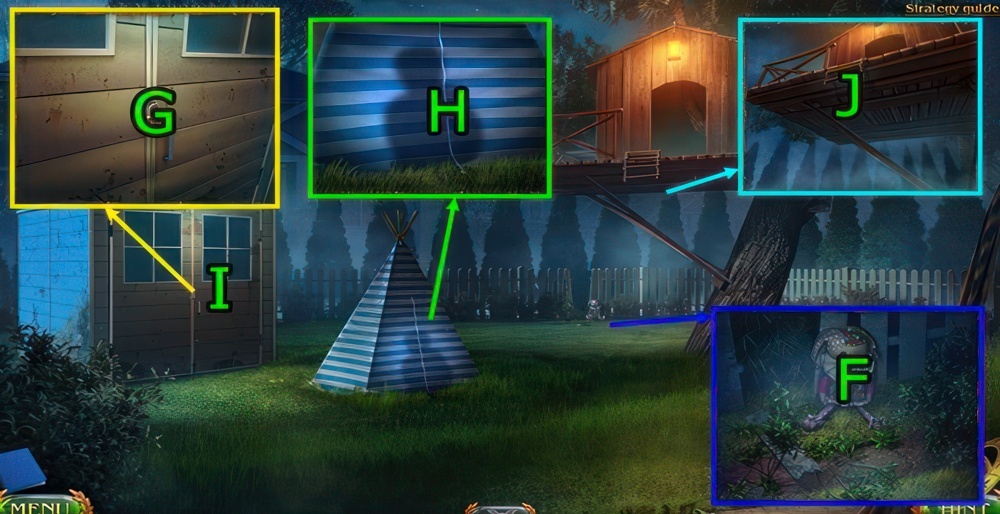
- Get all FRAGMENTS OF THE STELE (8/8), and CENTRAL ELEMENT (F).
- Use FRAGMENTS OF THE STELE (8/8) and CENTRAL ELEMENT and press (G).
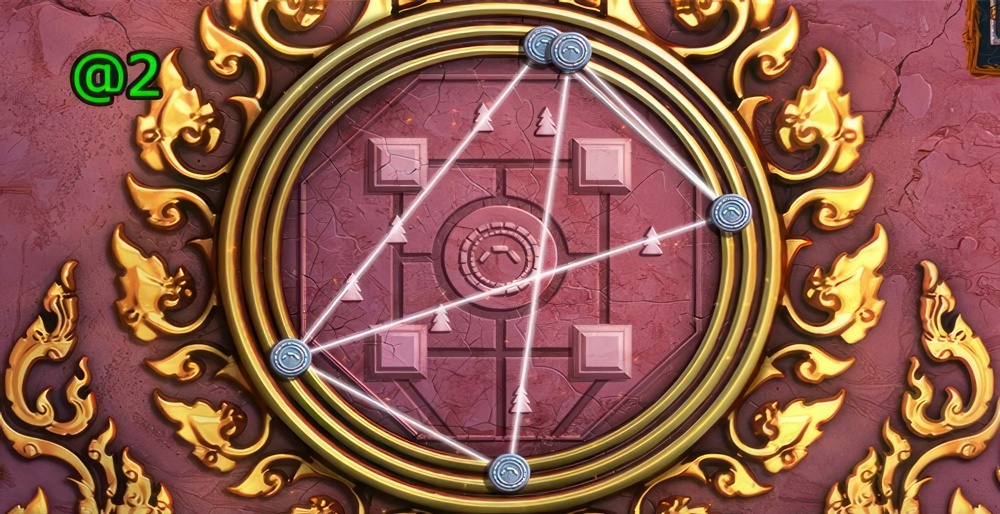
- As you move the chips around the circle, find a position when all the trees are highlighted by rays.
- Walkthrough (@2).
Particles of the void
I need to activate the Gate of the Worlds to collect some particles of the Void. By doing so, I will be able to go to the Earth.
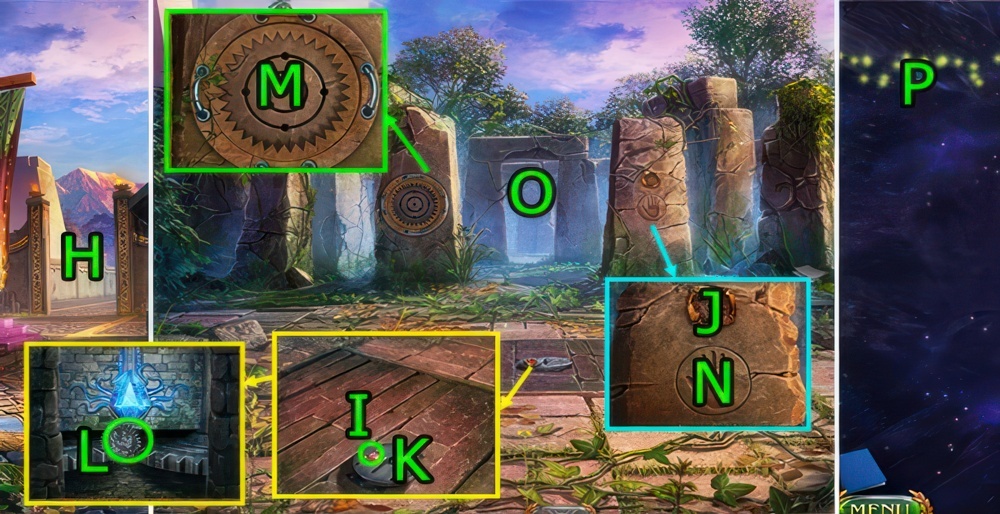
- Go forward (H).
- Get FRAMED CRYSTAL (I).
- Use FRAMED CRYSTAL on (J), get VESSEL FOR PARTICLES and THE KEY FROM THE HATCH.
- Use THE KEY FROM THE HATCH on (K).
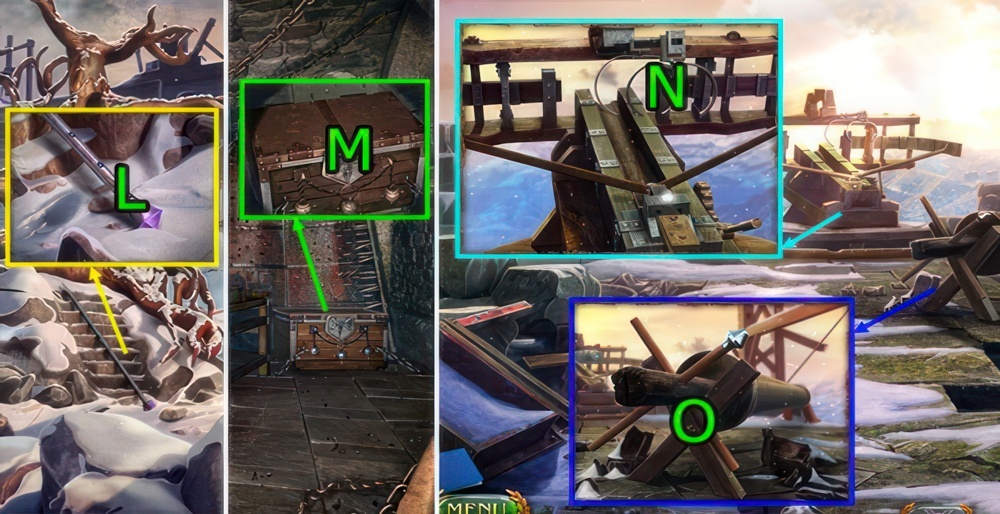
- Get CONTROL ELEMENT (L).
- Use CONTROL ELEMENT and press (M×3).
- Press (N).
- Go forward (O).
- Use VESSEL FOR PARTICLES on (P).
Heart Of Drak Ul
I must find the Heart of Drak Ul and use the particles of the void to bring it back to Maaron.
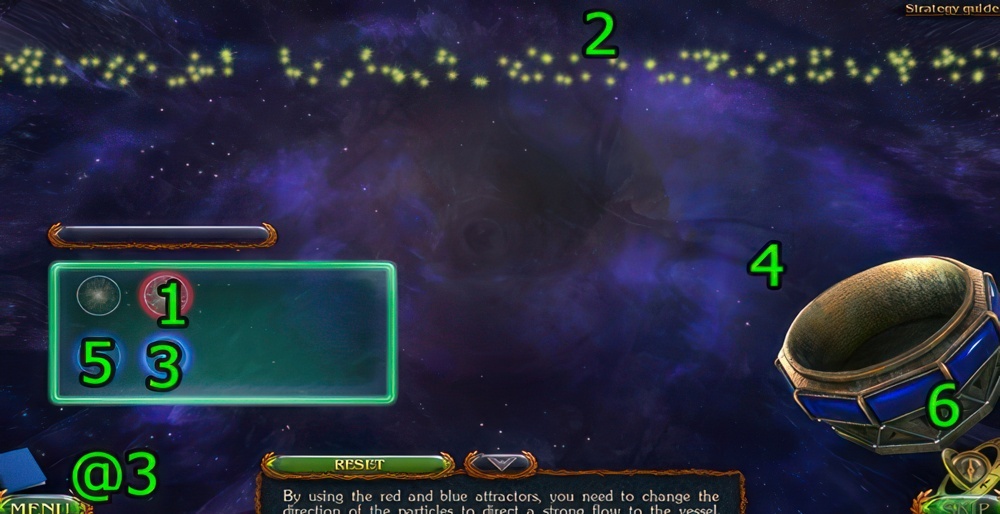
- Using the red and blue attractors, change the direction of the particles to direct a strong flow to the vessel.
- Walkthrough (@3): Drag (1-2)-(3-4)-(5-6).
- Get PARTICLES OF THE VOID.
News
I’m sure that all news agencies of the Earth have to speak about such an important discovery as the heart of Drak Ul. I need to check the latest news.
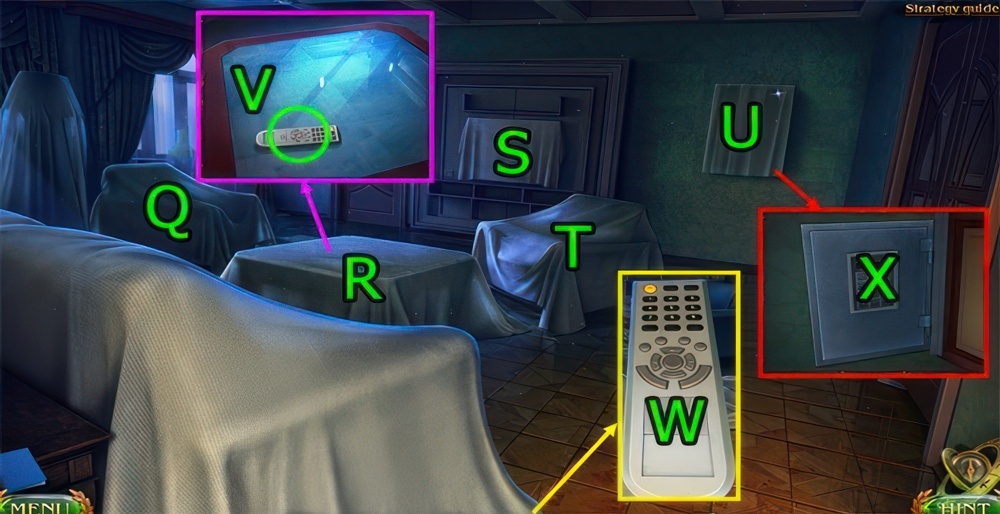
- Press (Q-R-S-T-U).
- Get REMOTE (V).
- Use REMOTE on (U), press (W×2).
- Go (X).
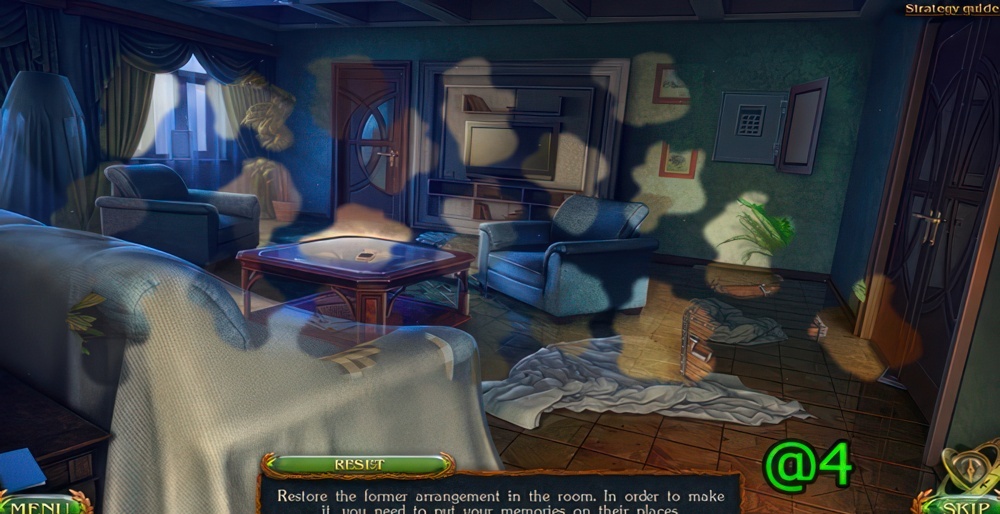
- Restore the room to its former arrangement by putting your memories on their places.
- Walkthrough (@4).
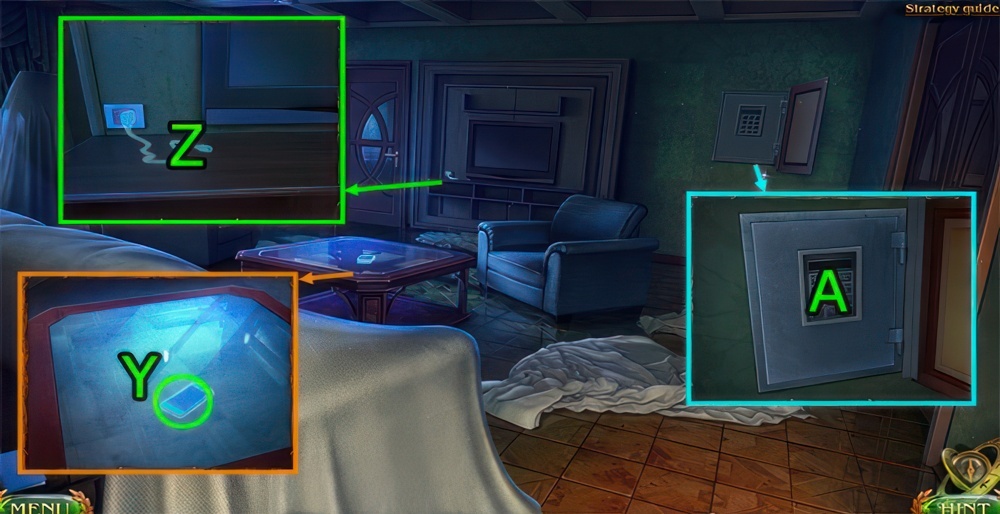
- Get MEMORIES ABOUT THE PHONE (Y).
- Use MEMORIES ABOUT THE PHONE and press (Z×4).
- Press (A).
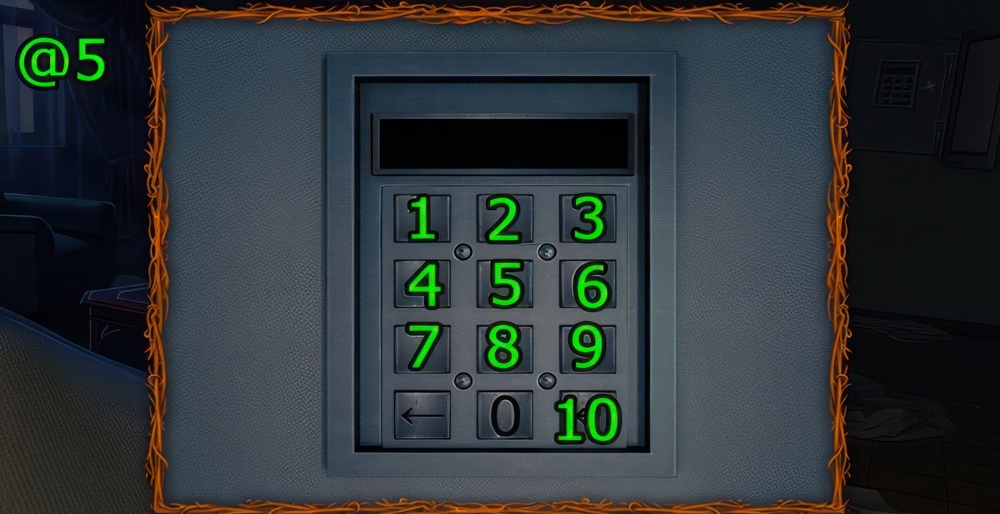
- Enter the code you read in the message.
- Walkthrough (@5): Press (4-8-1-5-1-6-2-3-4-2-10).
- Get MONEY, KNIFE and KEY.
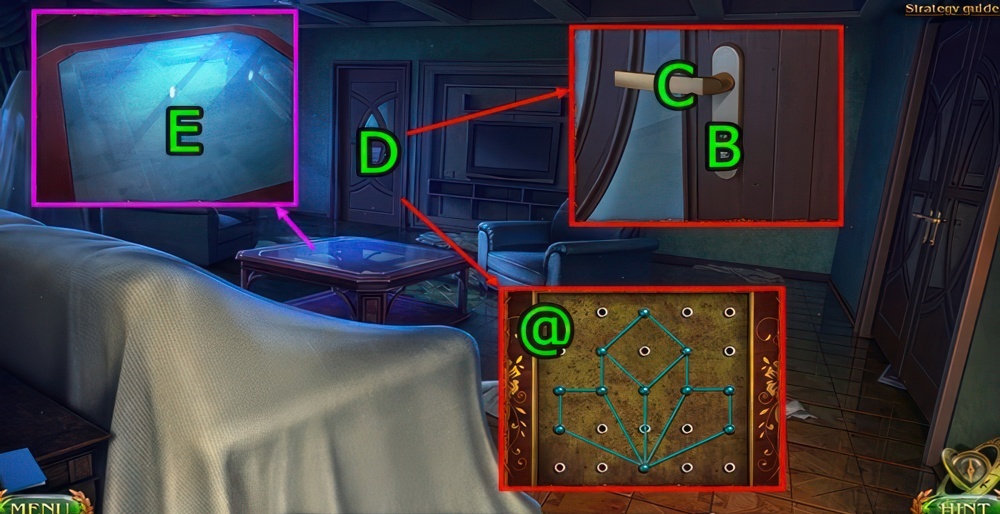
- Use KEY on (B) and press (C).
- Play the puzzle (D).
- Move the points to create the right pattern. You’ve already saw it.
- Puzzle walkthrough (@): arrange orbs as shown.
- Get BAG WITH THE LAPTOP.
- Use BAG WITH THE LAPTOP, get LAPTOP.
- Use LAPTOP and press (E×3).
The scene of the accident
The heart of the Drak is really close. I need to find the exact location and reach it.
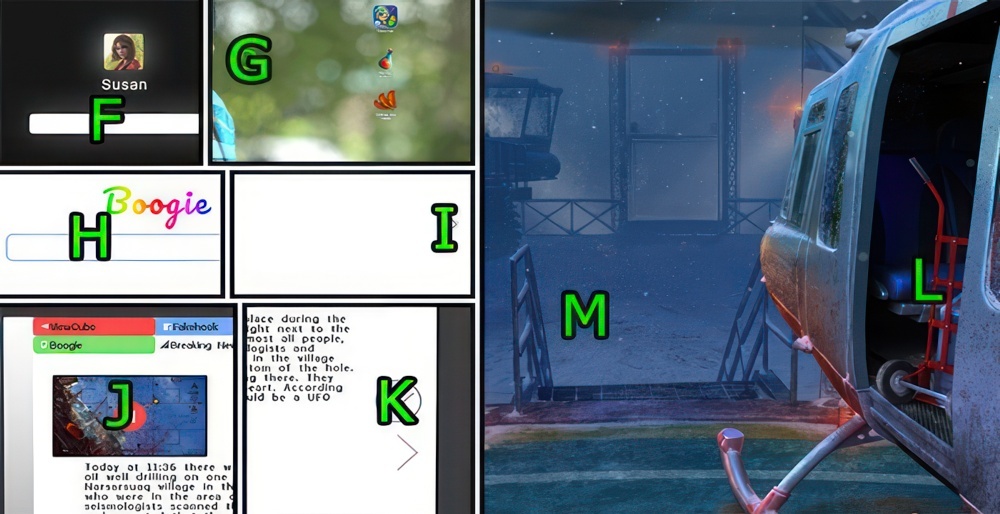
- Press (F-G-H-I×4-J-K).
- Press (L), get BOTTLES WITH WATER.
- Go forward (M).
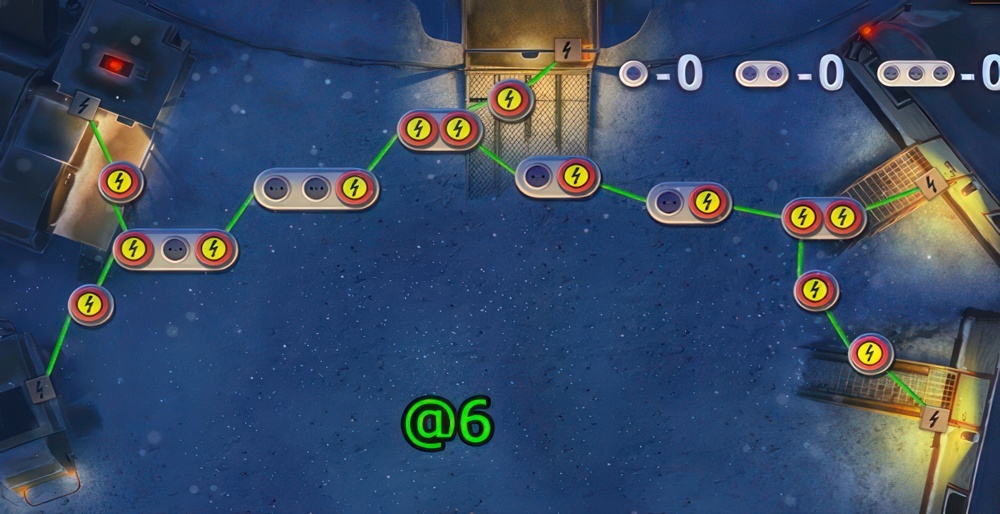
- Using the extension cords, try to conduct lighting from the generator to all trailers.
- Walkthrough (@6).
Plan B
Agent Klausen is a huge obstacle on our way to success. We need to get rid of him somehow.
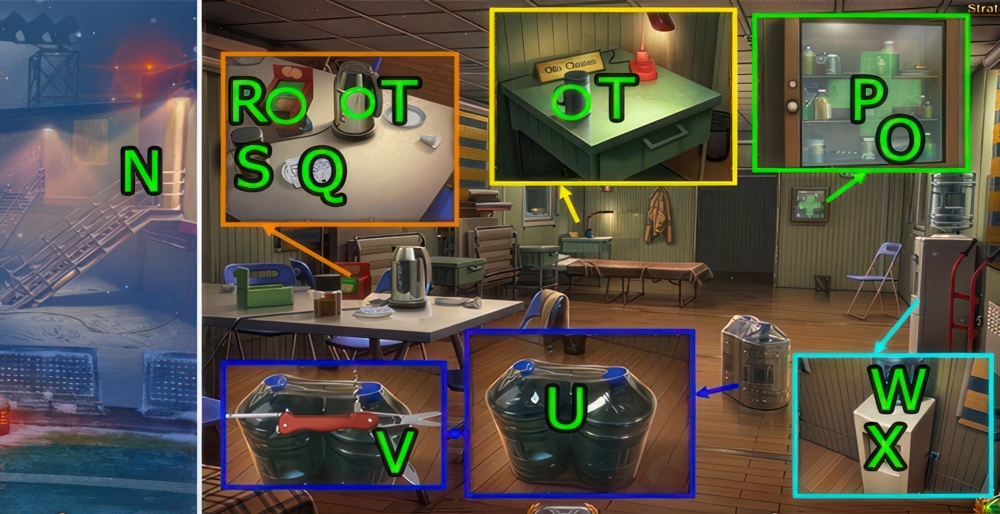
- Go (N).
- Press (O), get BANDAGE.
- Press (P×2), get LAXATIVE.
- Press (Q×2).
- Get COOKIES (R), press (R).
- Press (S).
- Get EMPTY KETTLE and CUP (T).
- Use KNIFE on (U) and press (V), get BOTTLE OF WATER.
- Press and use BOTTLE OF WATER on (W).
- Use EMPTY KETTLE on (X), get KETTLE WITH WATER.
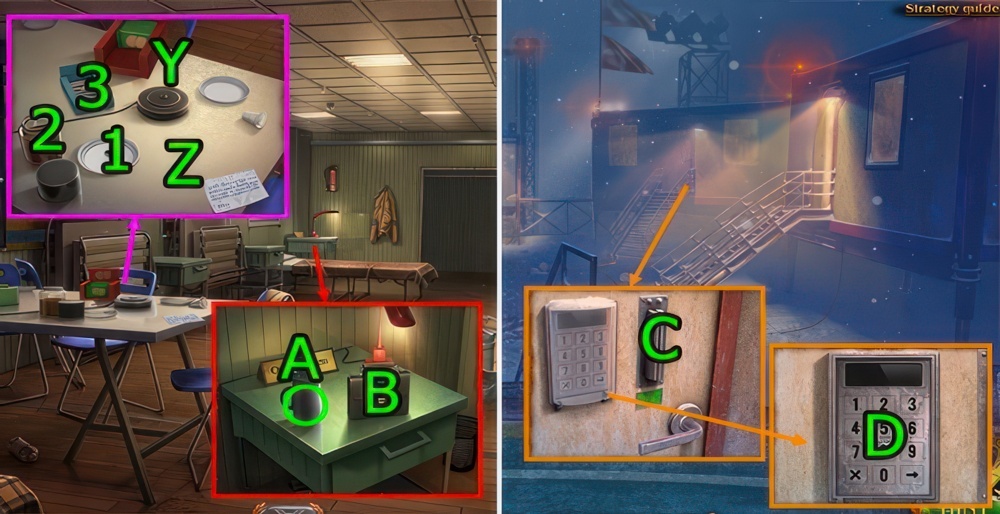
- Use KETTLE WITH WATER and press (Y).
- Use CUP and press (Z).
- Use LAXATIVE on (Z).
- Drag (1-2)-(3-Z)-(Y-Z)-(1-Z), get COFFEE.
- Get COFFEE (A).
- Press (B), get GREEN KEY CARD.
- Go Camp.
- Use GREEN KEY CARD on (C).
- Use COFFEE on (D).
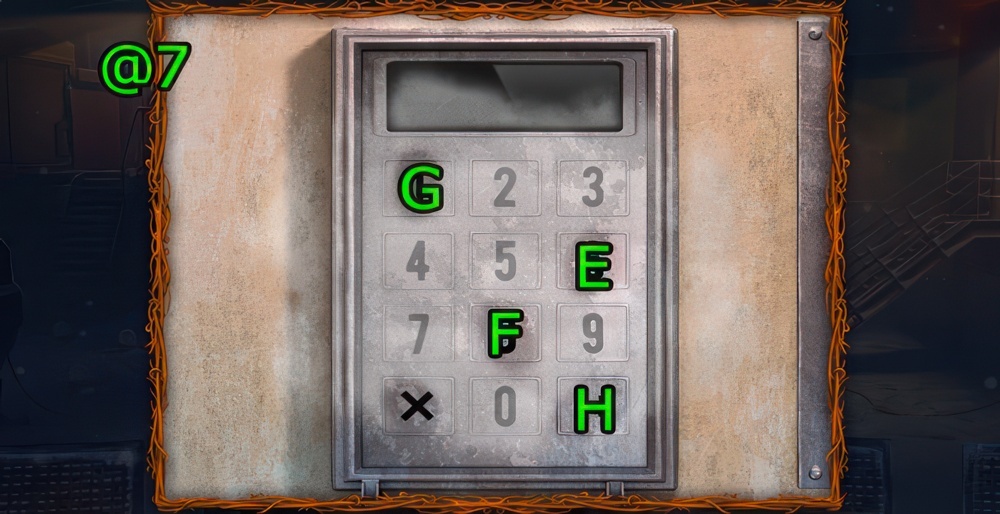
- Pick the right combination.
- Walkthrough (@7): Press (E-F-G-H).
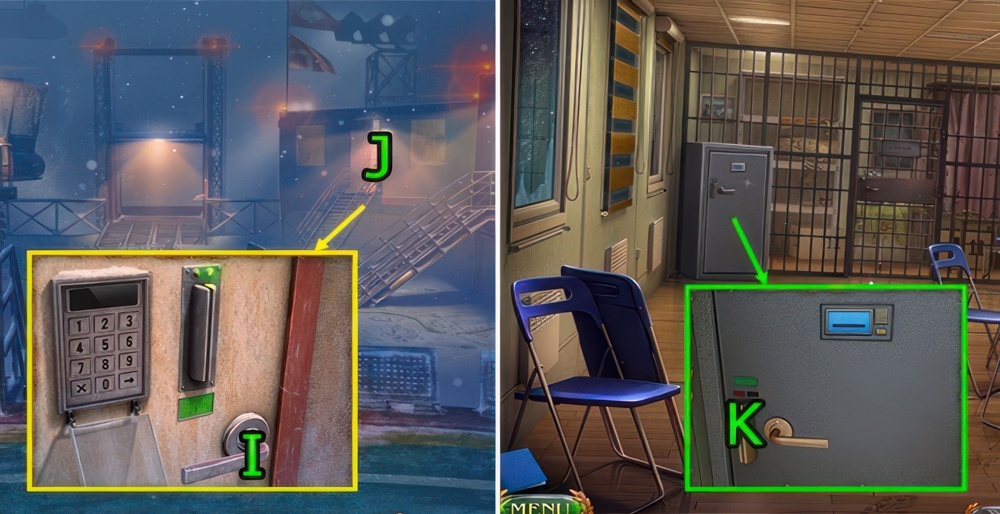
- Press (I).
- Go forward (J).
- Use GREEN KEY CARD on (K).
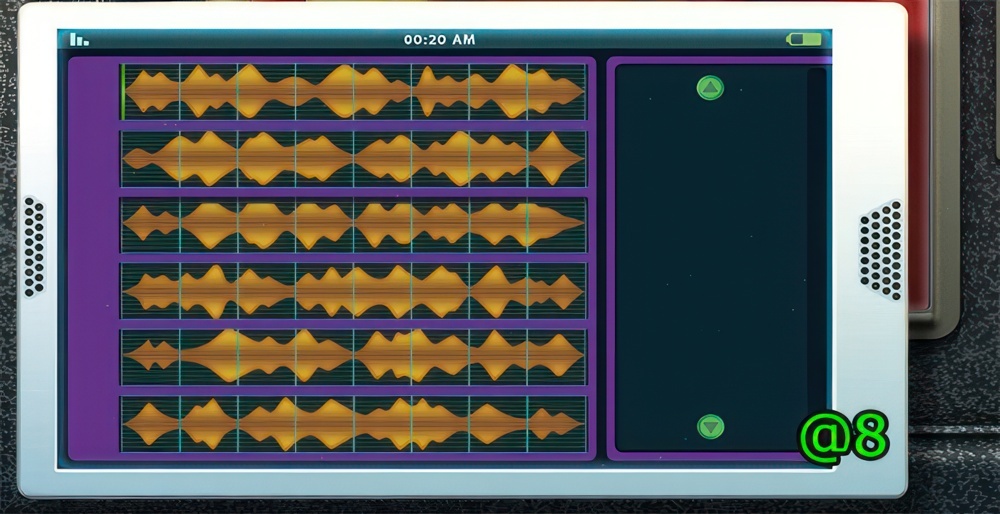
- Move the fragments of the recording to restore the proper sequence and listen to the phrase that will open the lock.
- Walkthrough (@8).
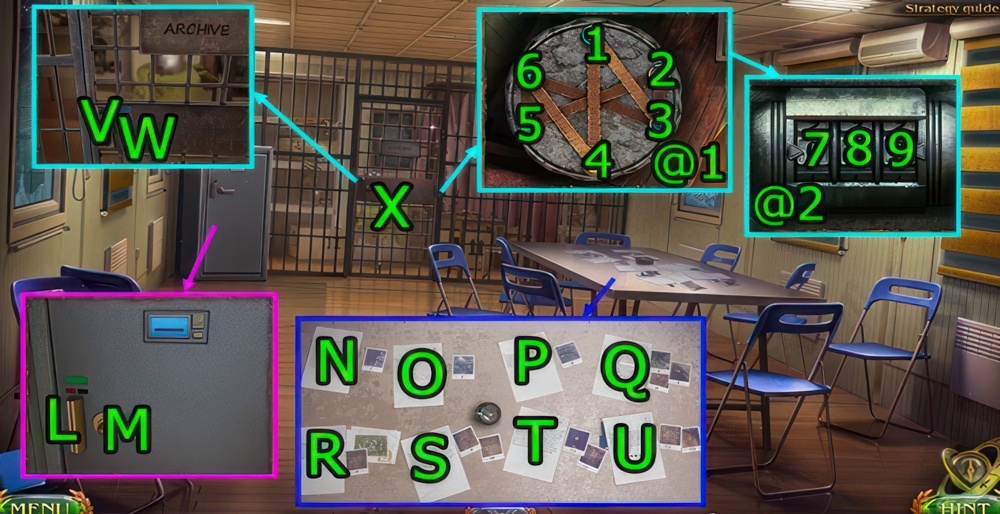
- Use GREEN KEY CARD on (L).
- Press (M), get RUNIC STONE.
- Press (N×2)-(O×2)-(P×2)-(Q×2)-(R×2)-(S×2)-(T×2)-(U×2), get BLUE KEY CARD.
- Use BLUE KEY CARD on (V) and press (W).
- Play the puzzle (X).
- Puzzle walkthrough (@1): press (3-6-4-1-3-6-5-2).
- Puzzle walkthrough (@2): press (7×3)-(8×4)-(9×2).
- Get RUNIC STONE.
- Go Camp.
Through thorns
The passage to the cave with the heart is blocked with the wreckage of the collapsed station. There’s a giant crane with the magnet on the top of the pit. I need to use it and clear the way.
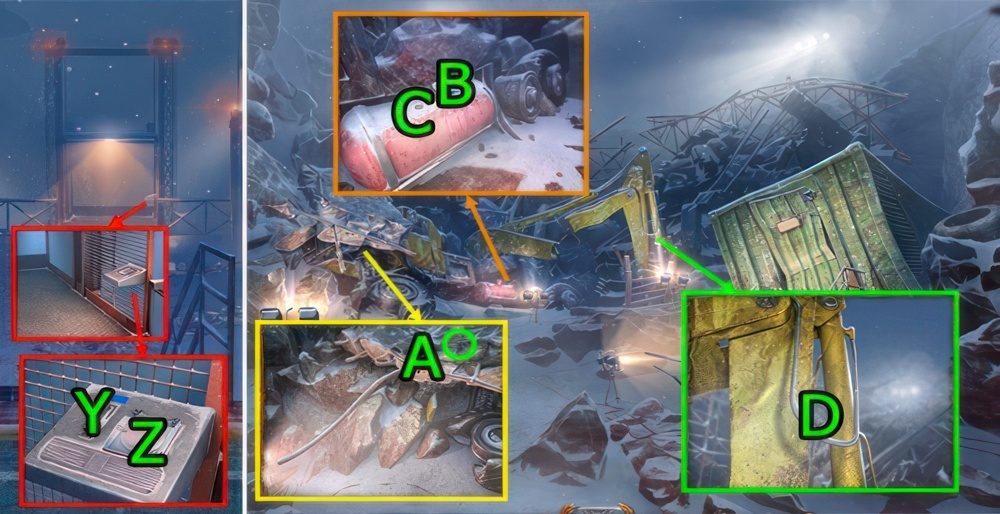
- Use BLUE KEY CARD on (Y) and press (Z).
- Get KEY FROM THE CRANE CABIN (A).
- Press (B) and (C).
- Use KNIFE on (D), get HOSE.
- Use HOSE on (B).
- Go Camp.
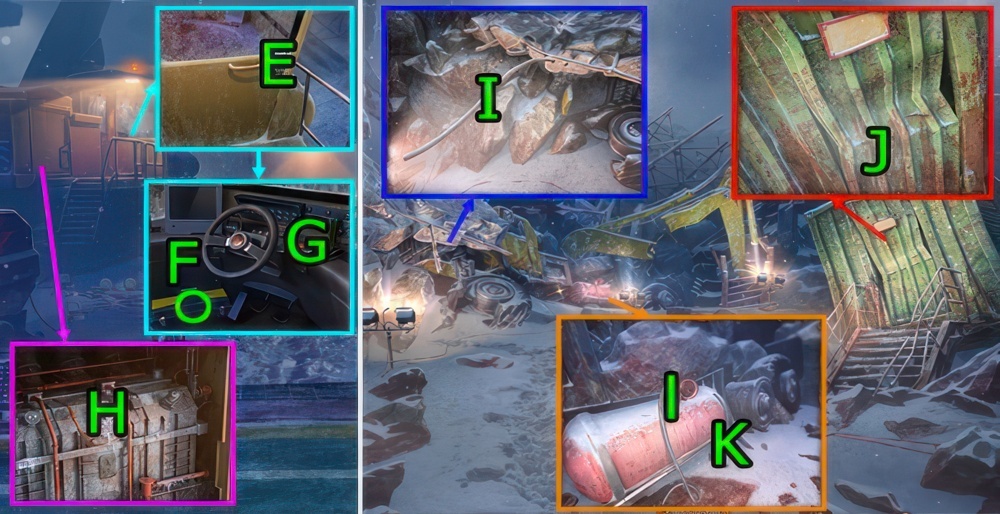
- Use KEY FROM THE CRANE CABIN on (E).
- Get CASE WITH ANGLE GRINDER (F).
- Press (G).
- Use COFFEE and BANDAGE and press (H).
- Use CASE WITH ANGLE GRINDER, get ANGLE GRINDER.
- Go Ruins.
- Use ANGLE GRINDER on (L), get ROD.
- Use ROD on (J), get FLASHLIGHT.
- Press (J×7), get CANISTER.
- Use CANISTER and press (K).
- Press (L), get THE CANISTER WITH FUEL.
- Go Camp.
- Use THE CANISTER WITH FUEL on (H).
- Press (G×2).
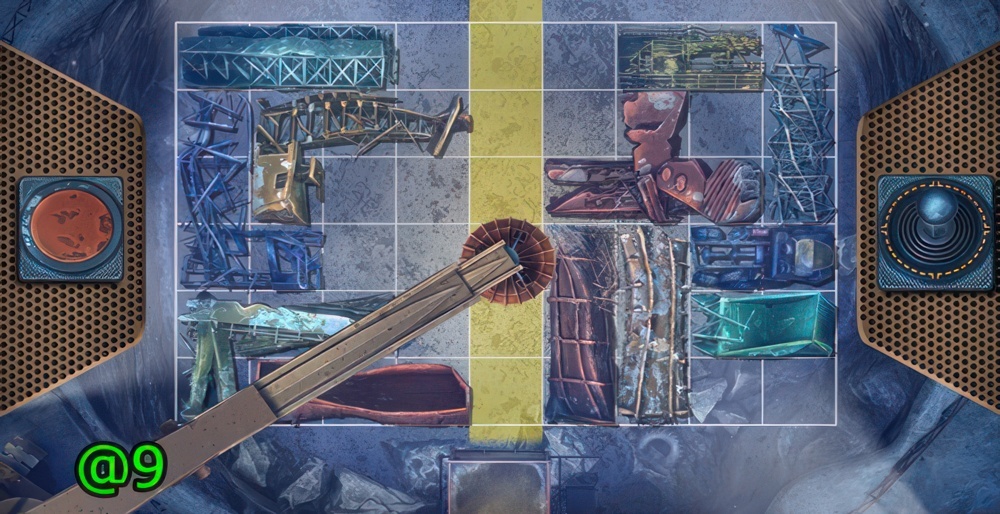
- Control the crane with the lever and button to remove all the trash in the yellow highlighted area.
- Walkthrough (@9).
- Go Ruins.
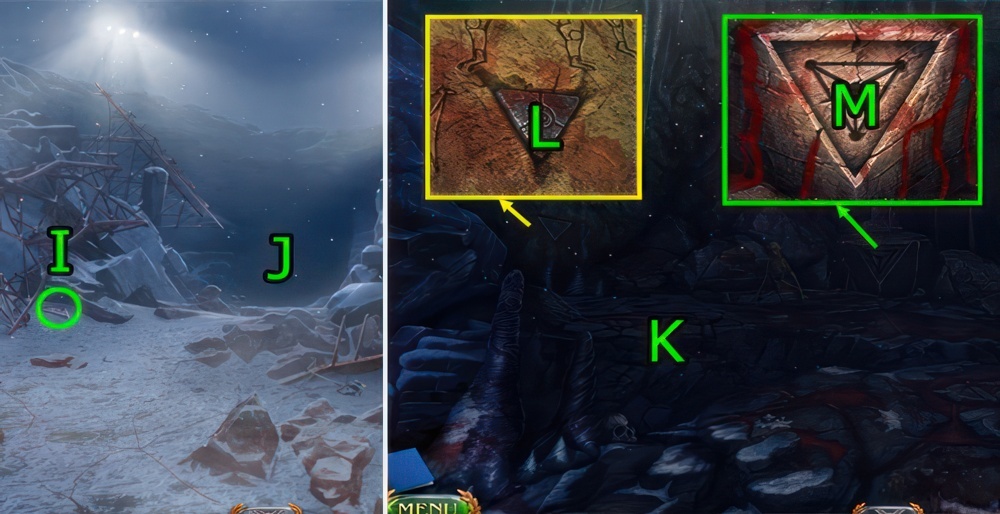
- Get RUNIC STONE (I).
- Go forward (J).
- Use FLASHLIGHT on (K).
- Use KNIFE on (L), get RUNIC STONE.
- Use RUNIC STONE, RUNIC STONE, RUNIC STONE, and RUNIC STONE on (M).
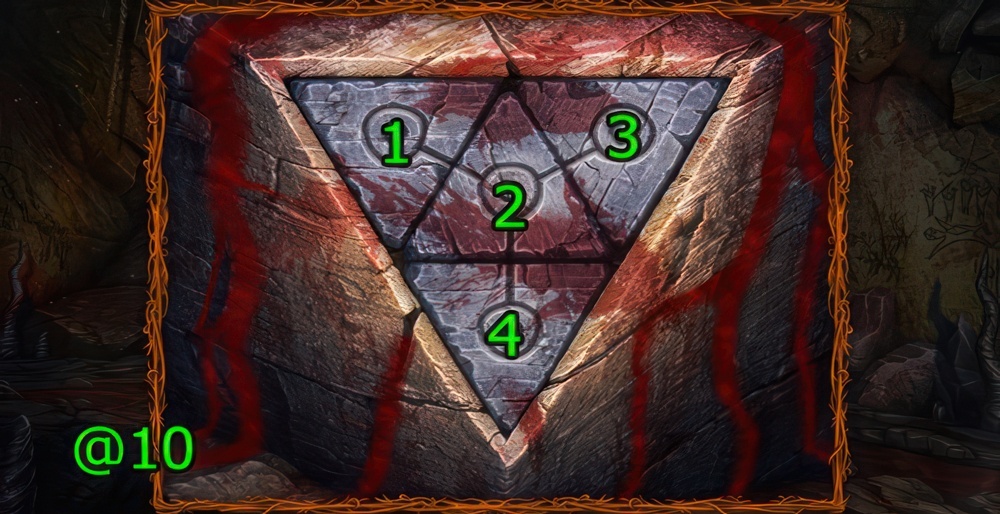
- By pressing the circles in the center of runic stones, you need to activate them in a right sequence. You already know it.
- Walkthrough (@10): Press (3-4-2-3-1-3).
Only to Maaron
Maaron is waiting for me somewhere on the territory of the complex. I need to find him and give him the Ul’s Heart.
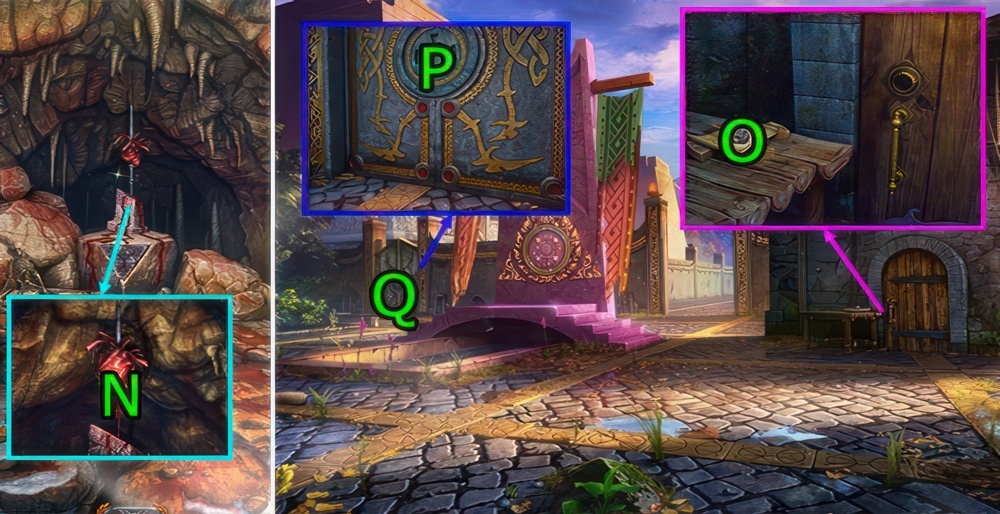
- Use PARTICLES OF THE VOID on (N).
- Go Drak Square.
- Press (O×2), get THE KEY FROM THE STONE GATE.
- Use THE KEY FROM THE STONE GATE on (P).
- Go forward (Q).
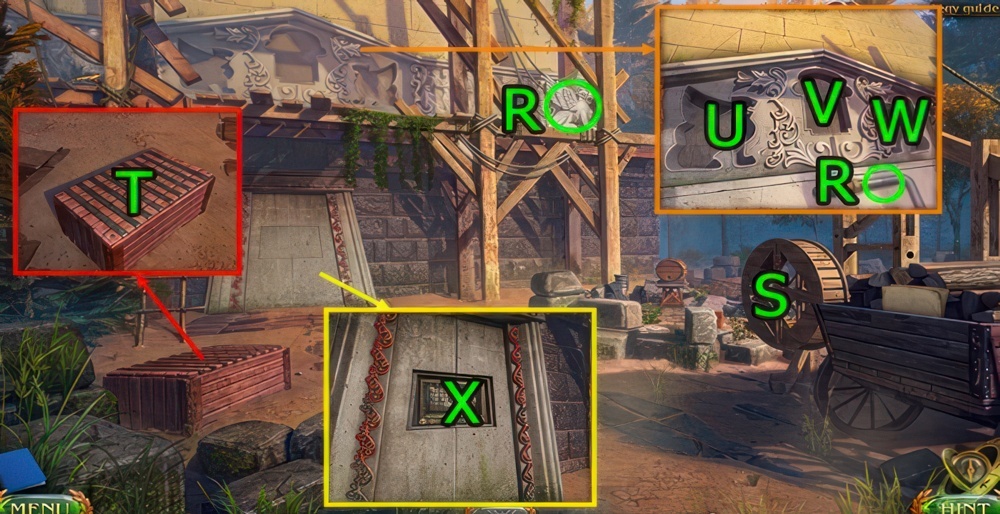
- Get LION BAS-RELIEF and HANDLE (R).
- Use HANDLE and press (S).
- Play the puzzle (S), get FACE BAS-RELIEF.
- Use KNIFE and press (T), get LION BAS-RELIEF.
- Use LION BAS-RELIEF on (U).
- Use FACE BAS-RELIEF on (V).
- Use LION BAS-RELIEF on (W).
- Go (X).
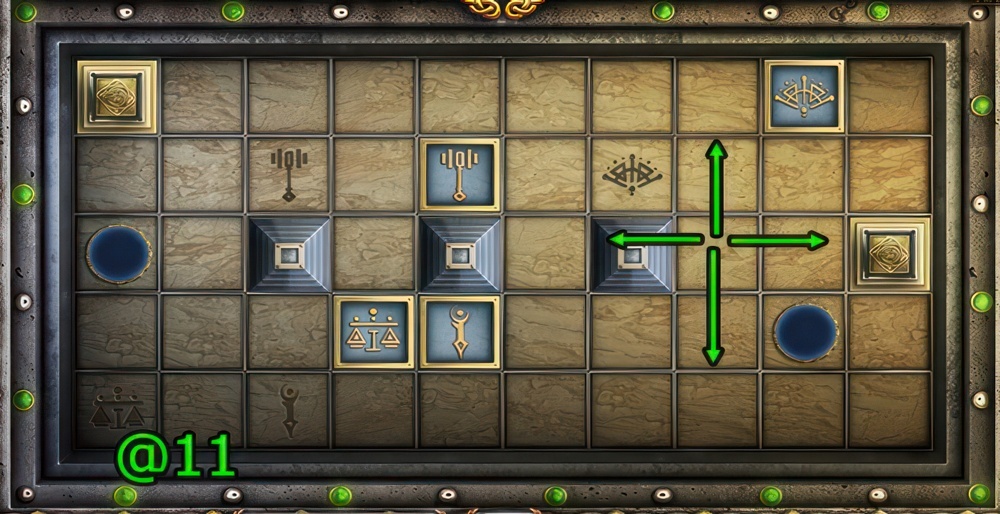
- Place the chips on the cells with matching symbols.
- Move the chips along the board and use the blocking chips (squared) and portals (circular).
- Walkthrough (@11): Drag (DOWN-LEFT-UP×2-LEFT-DOWN×2-RIGHT-DOWN-LEFT-UP-LEFT-DOWN).
New adviser
Maaron was killed, and Drak Ul was released. It seems only Hilamir knows the consequences of these actions. We need to find him.
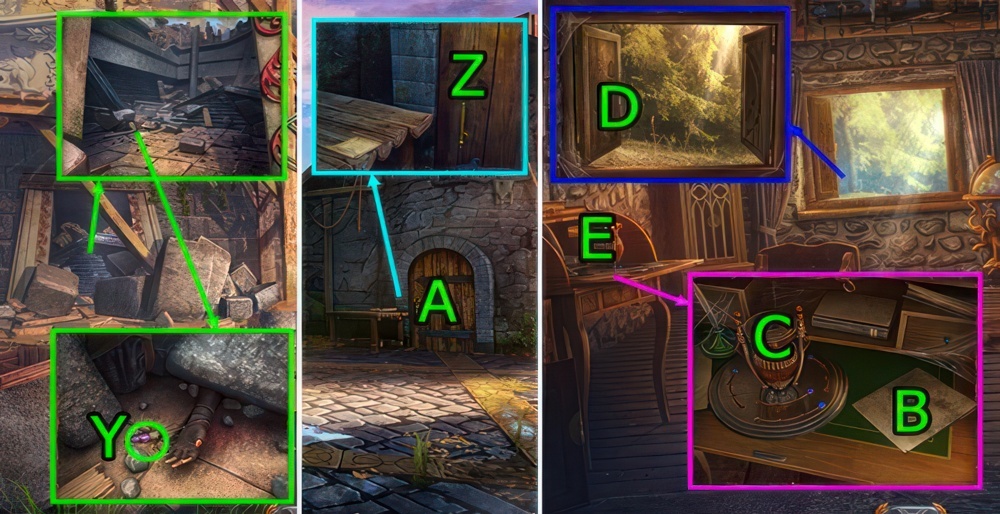
- Get HILAMIR’s PENDANT (Y).
- Go Drak Square.
- Use HILAMIR’s PENDANT (Z).
- Go (A).
- Press (B×3), use HILAMIR’s PENDANT (C).
- Press (D).
- Go (E).
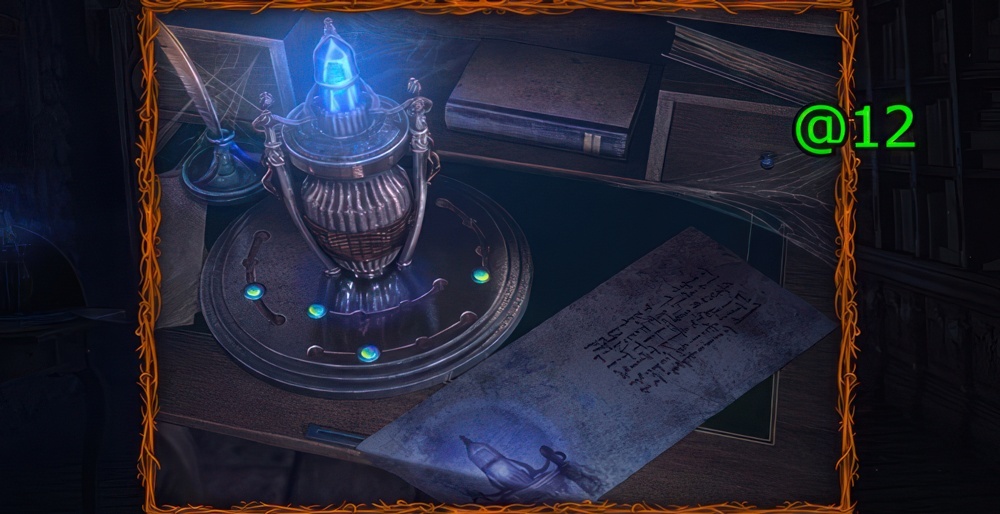
- Set the buttons to the correct positions. You’ve already seen the hint.
- Walkthrough (@12).
Sip of water
Maaron is very exhausted and dehydrated. We need to get him some water.
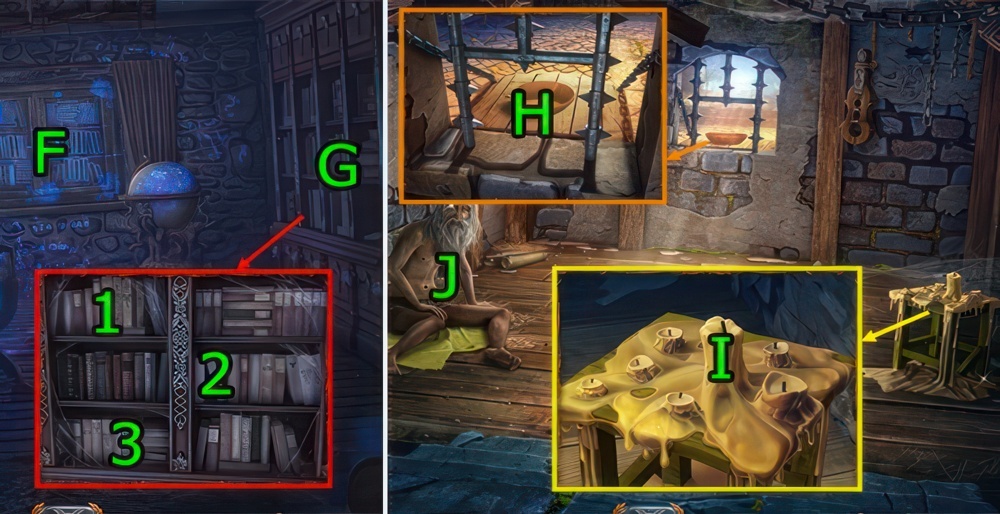
- Go (F).
- Press (1-2-3).
- Go (G).
- Press (H×2).
- Use KNIFE on (I), get CANDLE.
- Use CANDLE on (J), get BURNING CANDLE.
- Use BURNING CANDLE on (H), get BOWL.
- Go Drak Square.
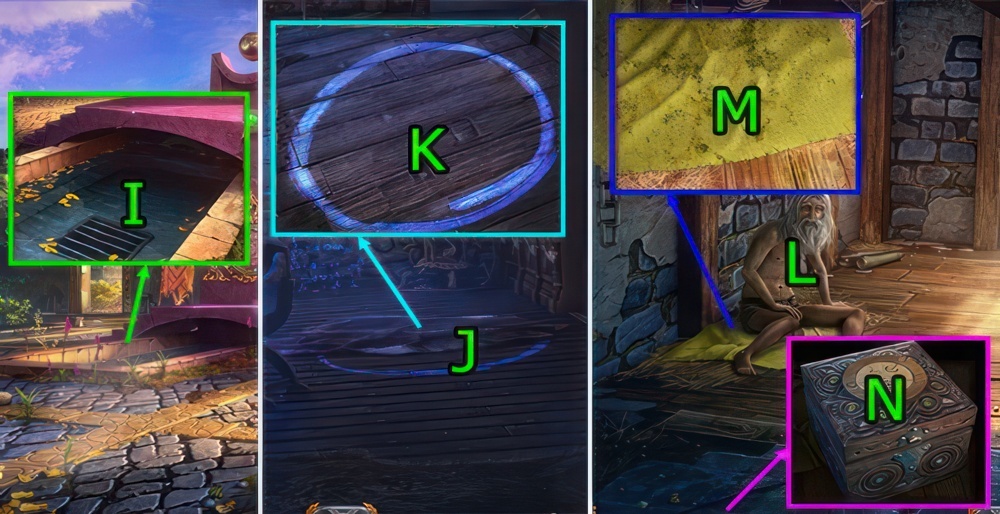
- Use BOWL on (I), get BOWL OF WATER.
- Go Hilamir’s House.
- Press (J).
- Use KNIFE on (K), press (K×2), get HILAMIR’S CASKET and AXE.
- Go Hidden Room.
- Use BOWL OF WATER on (L).
- Press (M×2).
- Use HILAMIR’S CASKET, press (N).
The plan of Hilamir
Hilamir was planning something devious. We need to open his casket and find out what he might have written about that in his diary.
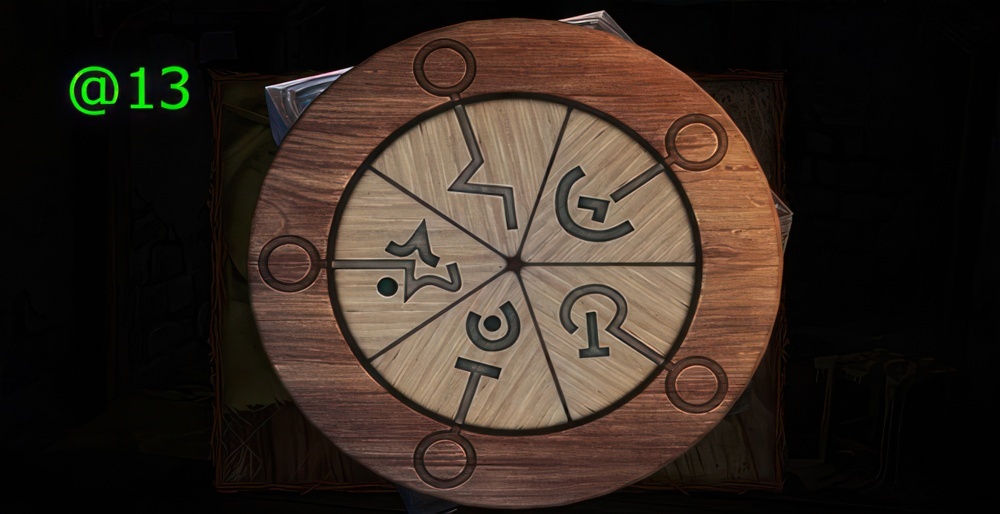
- Place the symbols in their places to open the casket.
- Maaron scribbled the code on the floorboard.
- Walkthrough (@13).
- Get ROUND TILE and DIARY OF HILAMIR.
- Go Hilamir’s House.
Temple of the Universe
We must find the Temple of the Universe, and to discover the revelation so desired by Hilamir.
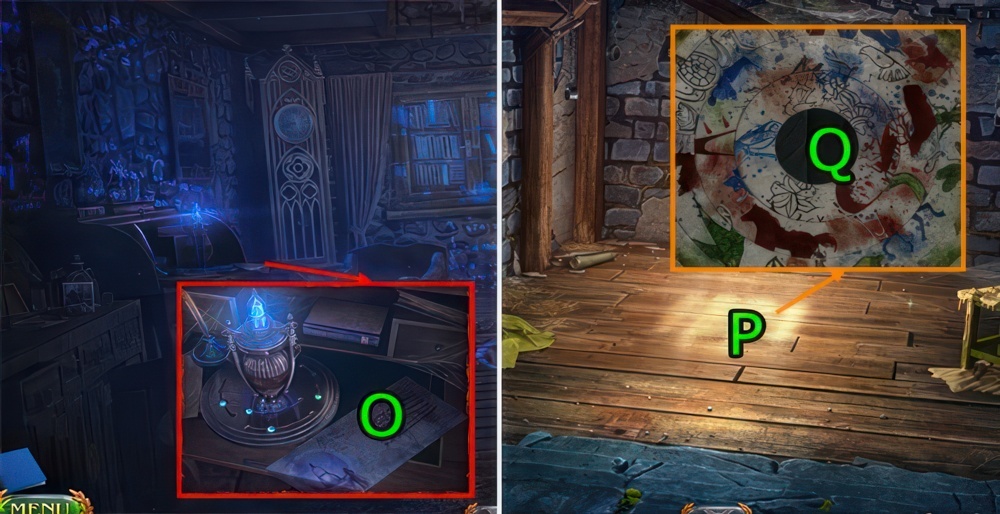
- Use DIARY OF HILAMIR and press (O×2).
- Go Hidden Room.
- Use AXE on (P).
- Use ROUND TILE on (Q).
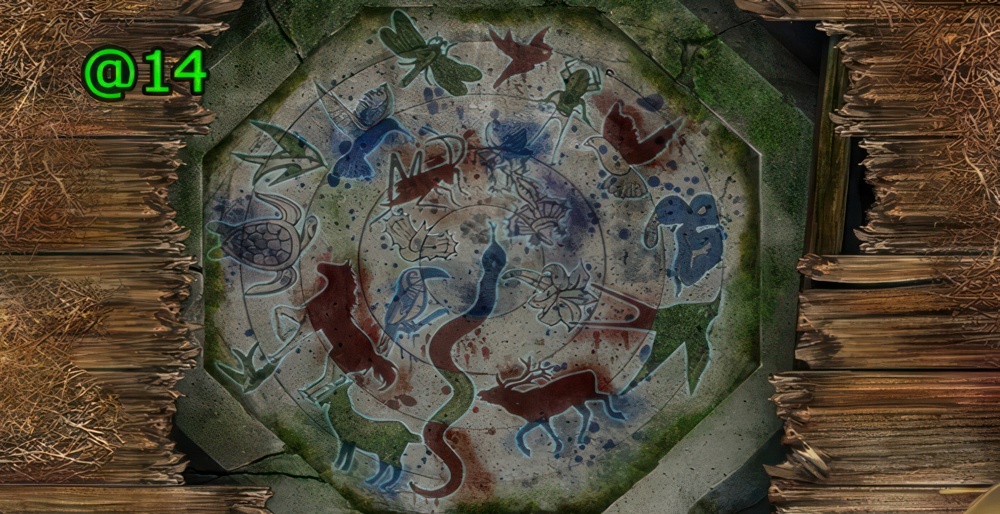
- Rotate the disks to connect parts of the birds, plants, and animal images.
- Walkthrough (@14).
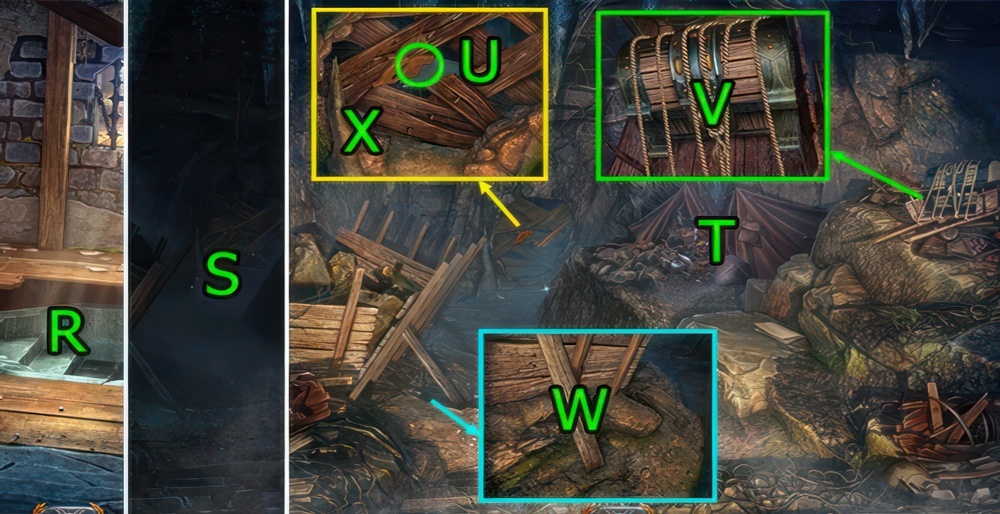
- Go (R).
- Use FLASHLIGHT on (S).
- Play the puzzle (T), get MECHANICAL PALM.
- Get SAW (U).
- Use KNIFE on (V), get ROPE.
- Use SAW on (W), get METEOR STONE.
- Use ROPE and press (X).
The topper of the staff
The topper of the staff was hidden in the chest of the diggers. We need to get it.
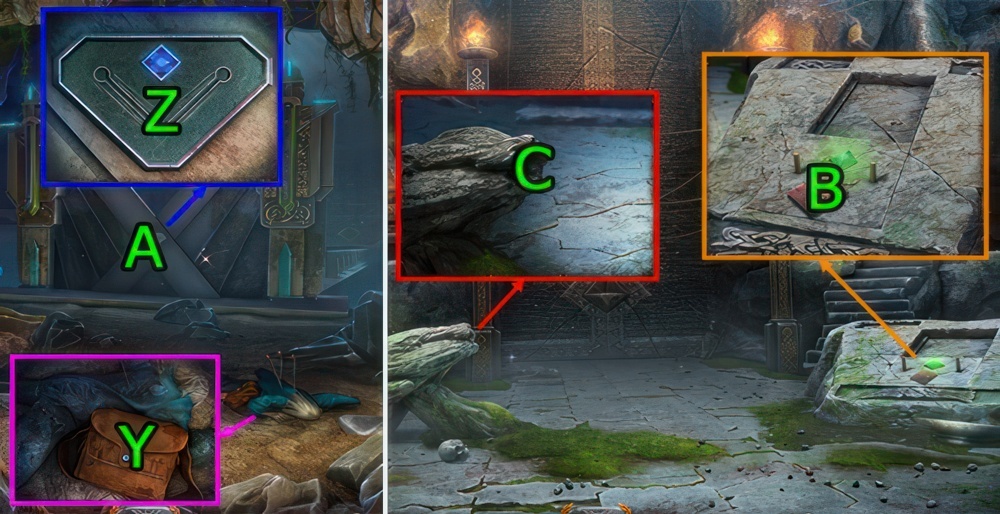
- Press (Y×3), get MECHANICAL PALM.
- Use MECHANICAL PALM and MECHANICAL PALM on (Z).
- Go (A).
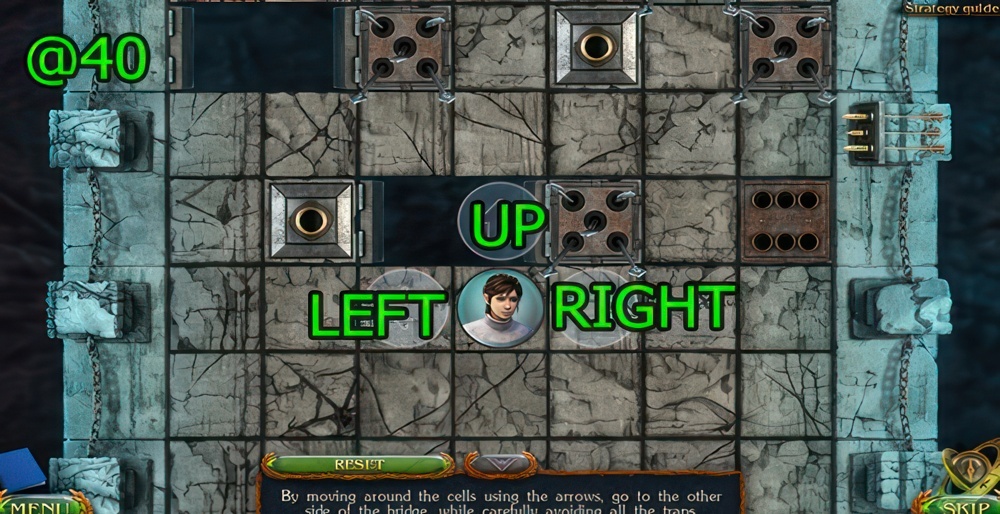
- By moving around the cells using the arrows, go to the other side of the bridge, while carefully avoiding all the traps.
- Walkthrough (@40): Go (UP×3)-(UP×2)-(RIGHT×3-UP×3)-(UP-LEFT×2)-(LEFT×4-UP)-(UP×3).
- (RIGHT-UP)-(UP×3)-(UP×2)-(UP×2)-(RIGHT×3)-(UP×2-LEFT)-(UP×2)-(LEFT-UP×2)-(UP×2).
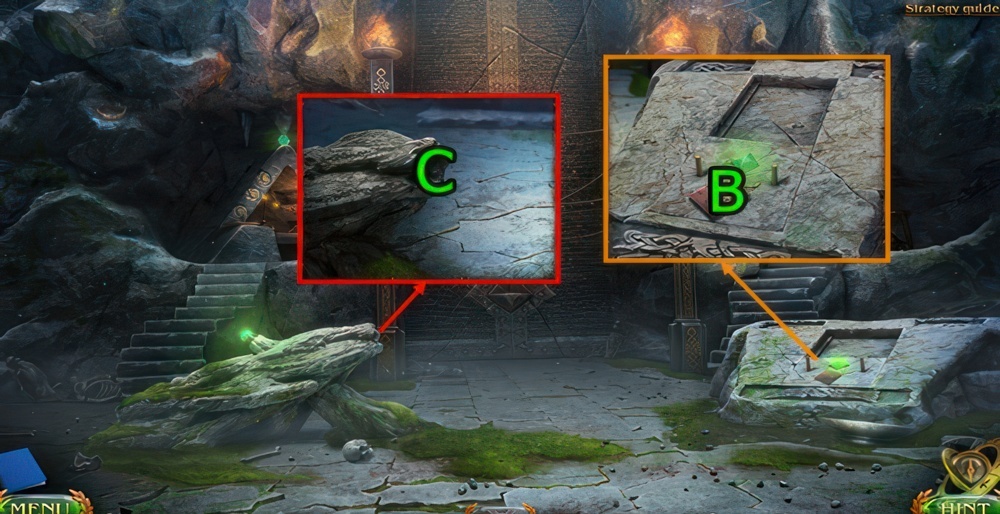
- Press (B×4).
- Use METEOR STONE on (C).
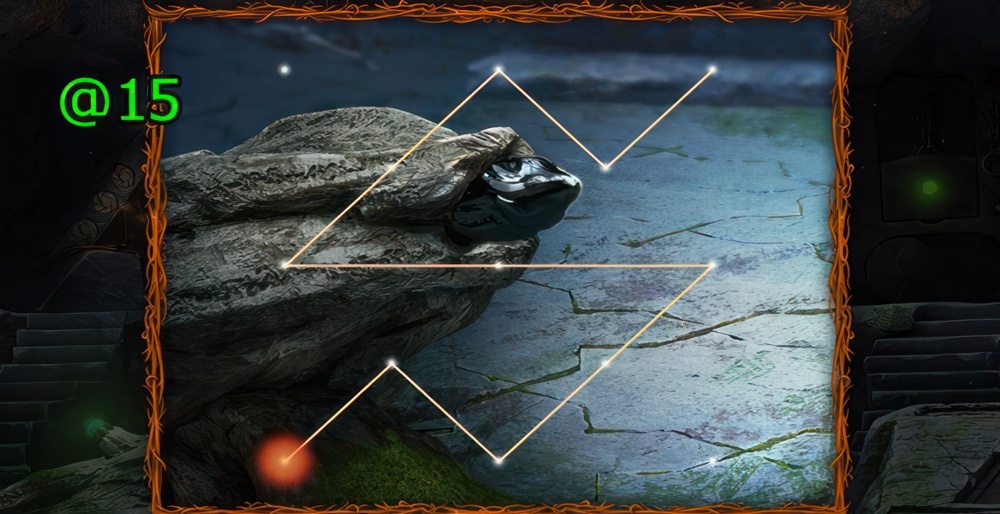
- Using one single continuous line, connect all the points without repetitions into the design in the hint.
- Walkthrough (@15).
Ulakian gorge
The stream of water washed me deep into the gorge. Jim stayed on top. We need to get out of here.
- Get BLACKSMITH TONGS (D).
- Press (E-F), get BLADE.
- Use BLACKSMITH TONGS on (G), get FIRE SHARD.
- Use FIRE SHARD on (F), get BLACKSMITH TONGS.
- Press (H).
- Go Bridge.
- Use BLADE on (I), get NATURAL CLAY.
- Go Temple Door.
- Use NATURAL CLAY on (J), press (J-E)-(K).
- Use BLACKSMITH TONGS on (E), get BAKED BOWL.
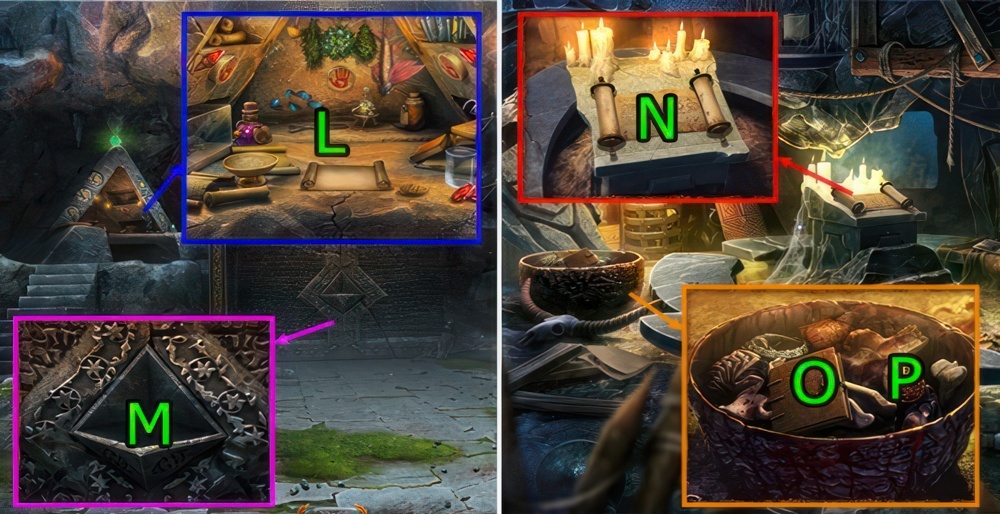
- Use BAKED BOWL on (L), play the puzzle, get POTION OF EQUALITY OF FORCES.
- Use POTION OF EQUALITY OF FORCES on (M).
- Press (N×2), get MOON TILE.
- Press (O×2).
- Press (P).
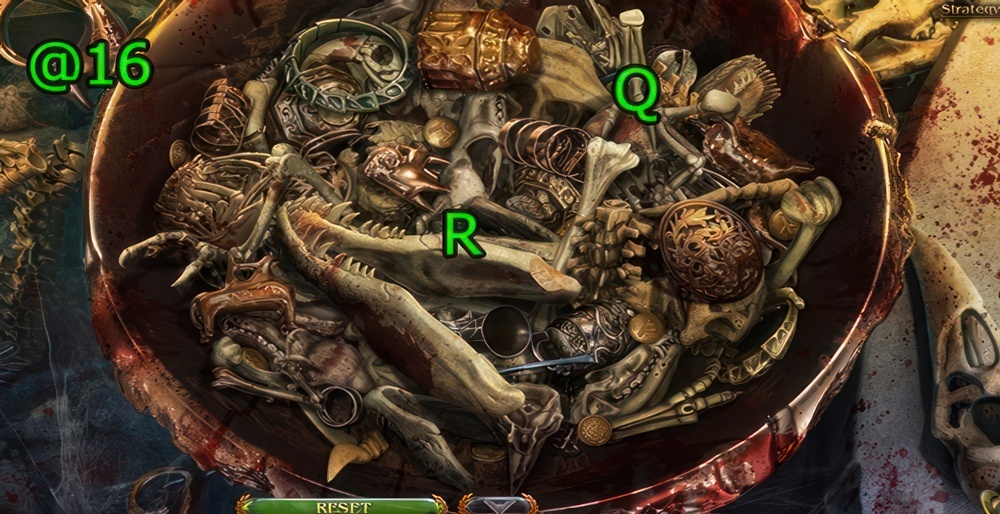
- Find the moon tile by moving the bones in the altar.
- Walkthrough (@16): Drag (Q-R) until tile is uncovered.
- Get MOON TILE.
The spearhead
One of the diggers wrote that, in addition to the topper, he saw the spearhead in the temple. We need to get it and go back to Maaron.
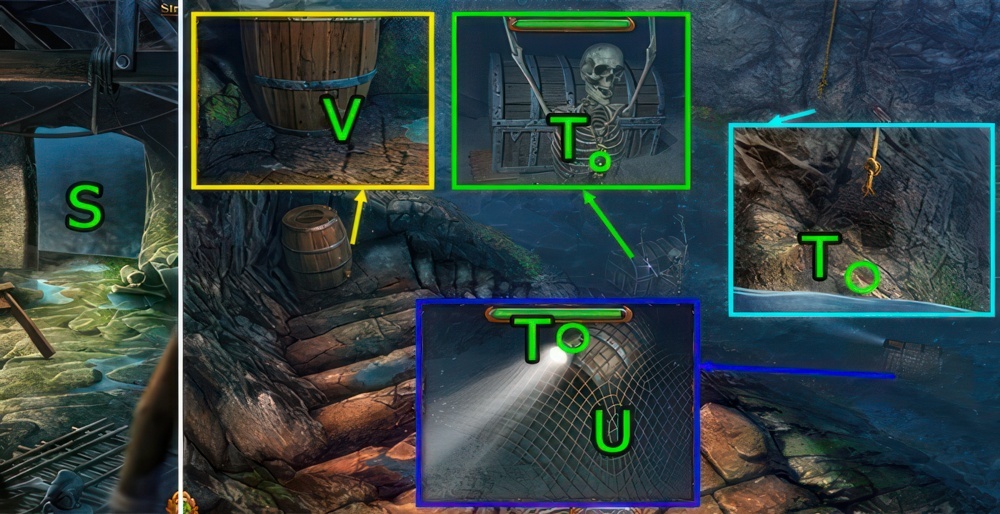
- Go forward (S).
- Get DAMAGED MULTITOOL, KEY, and FLASHLIGHT (T).
- Use DAMAGED MULTITOOL on (U), get GREEN BARREL.
- Use DAMAGED MULTITOOL on (V), get BLUE BARREL.
- Go Hideaway of Ulakian.

- Use DAMAGED MULTITOOL on (W), get TABLE COVER.
- BLUE BARREL and GREEN BARREL on TABLE COVER, get RAFT.
- Go The Bottom of the Gorge.
- Use RAFT on (X).
- Go (X).
- Go (Y).
- Press (Z).
- Play the puzzle (A).
- By opening one adjacent cell at a time, open the entire drawing.
- Puzzle walkthrough (@): Press (1-2-3×3)-(4-1-4-1-4-1)-(2-1-2-1-2)-(3-2-3-2-3-4-3).
- Get MOON TILE.
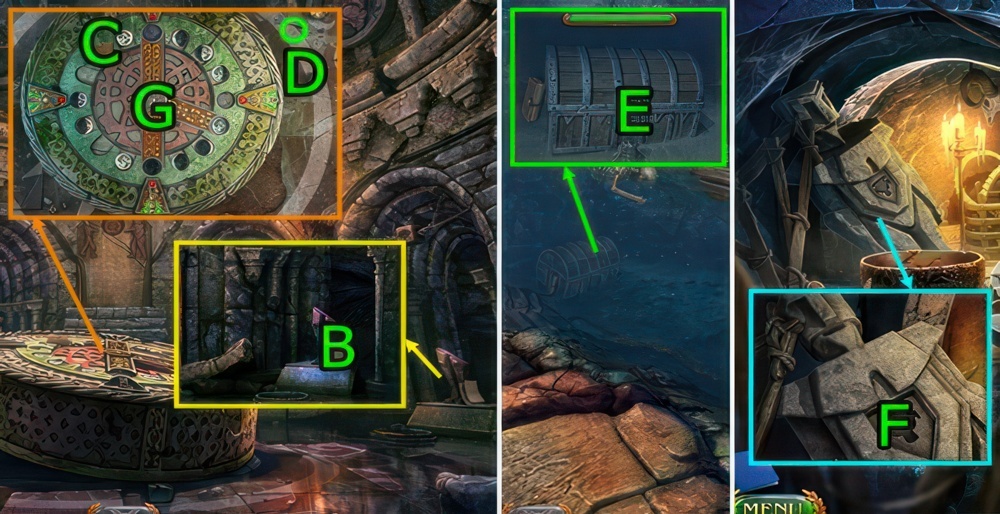
- Press (B×2), get SEAL OF UL.
- Press (C×2).
- Get KEY (D).
- Go The Bottom of the Gorge.
- Use KEY and press (E), get MOON TILE.
- Go Hideaway of Ulakian.
- Use SEAL OF UL on (F), get MOON TILE.
- Go Temple of the Universe.
- Use MOON TILE, MOON TILE, MOON TILE, MOON TILE, and MOON TILE on (G).
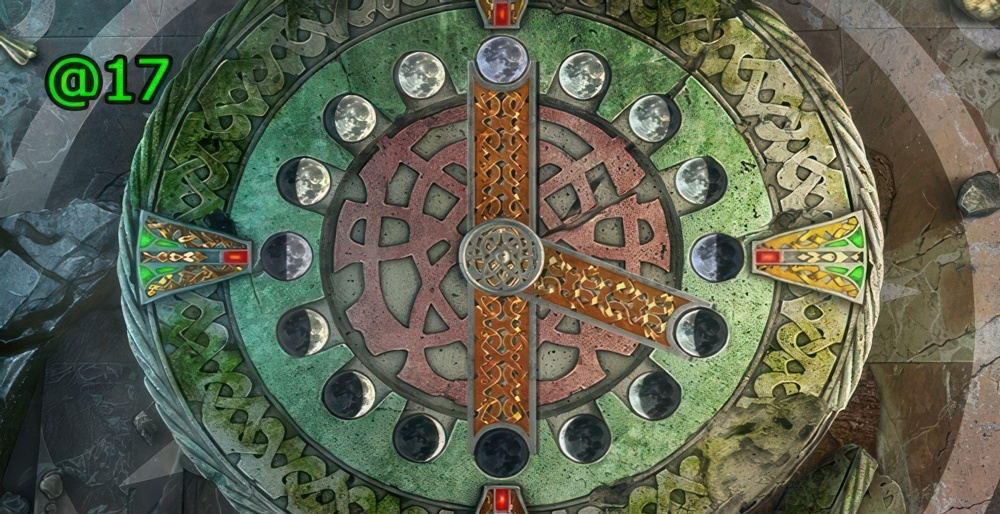
- By switching the moons in places, put them in the correct positions so that the moon decreases, and then grows.
- Walkthrough (@17).
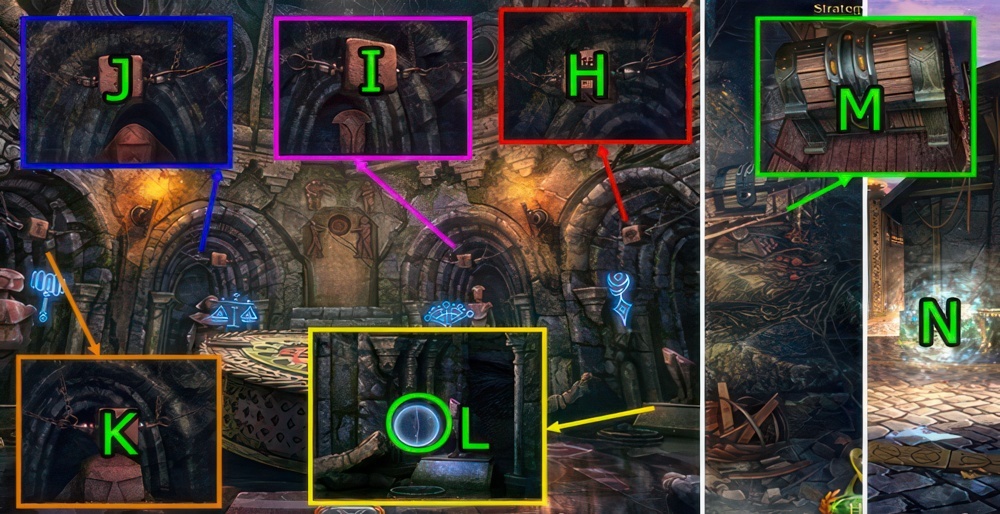
- Press (H×2), press (I×2), press (J), press (K×3).
- Get THE SPEARHEAD (L).
- Go Secret Descent.
- Use KEY and press (M×3) get THE TOPPER.
- Go Drak Square.
- Go forward (N).
Mountain giants
Mountain giants may know something about the pole. We need to go to them and find out what happens.
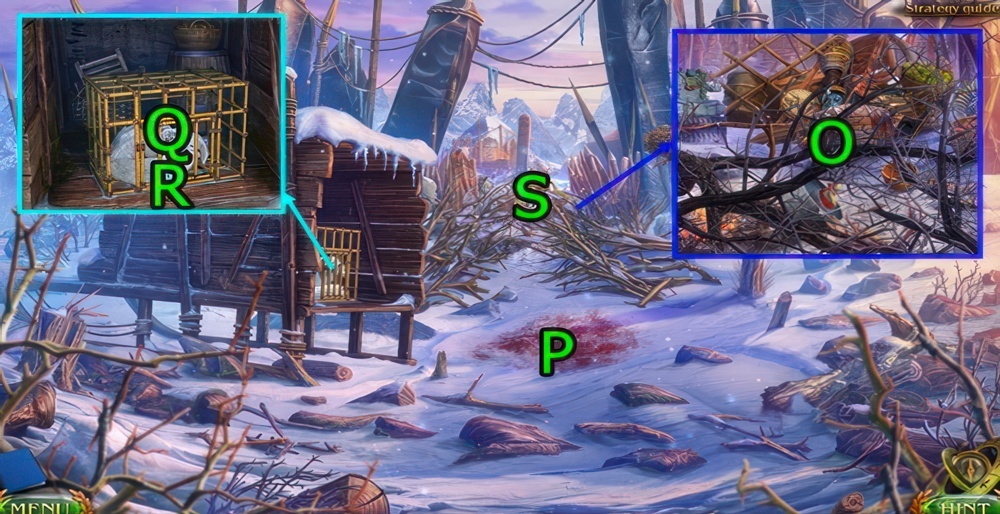
- Press (O), play the puzzle, get PIECE OF CLOTH.
- Go (P).
- Press (Q×3), use COOKIES on (R), get HORN.
- Go (S).
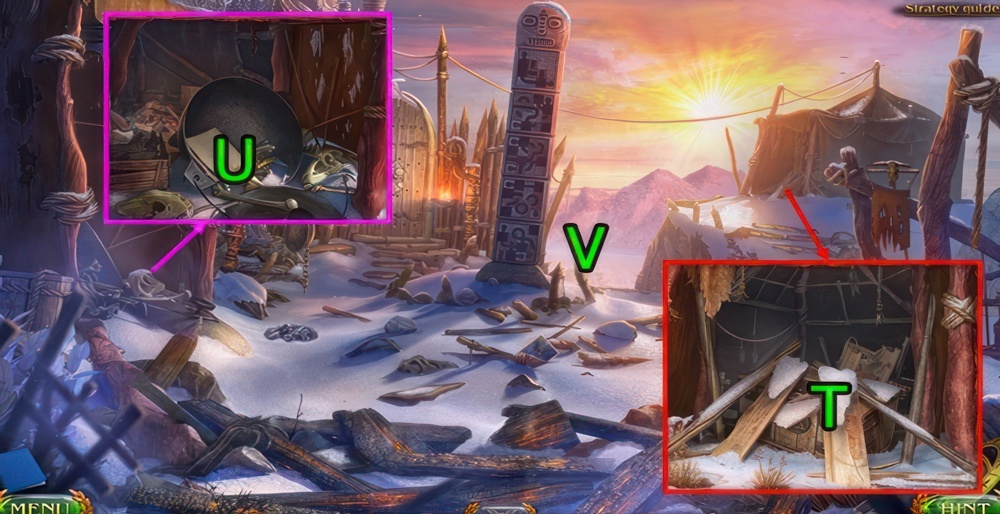
- Press (T).
- Press (U×3), get WOLF SKULL.
- Go forward (V).
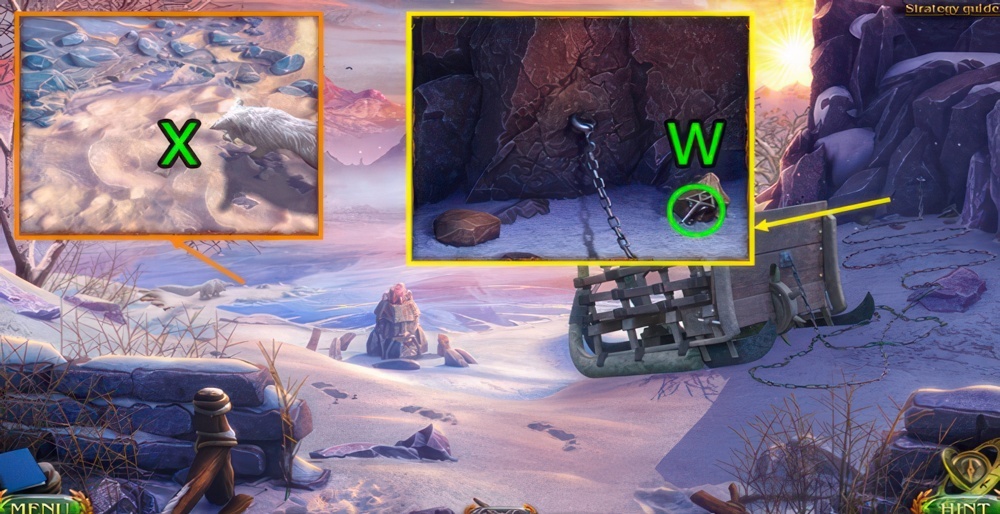
- Get KEY (W).
- Press (X).
- Go Settlement of Giants.
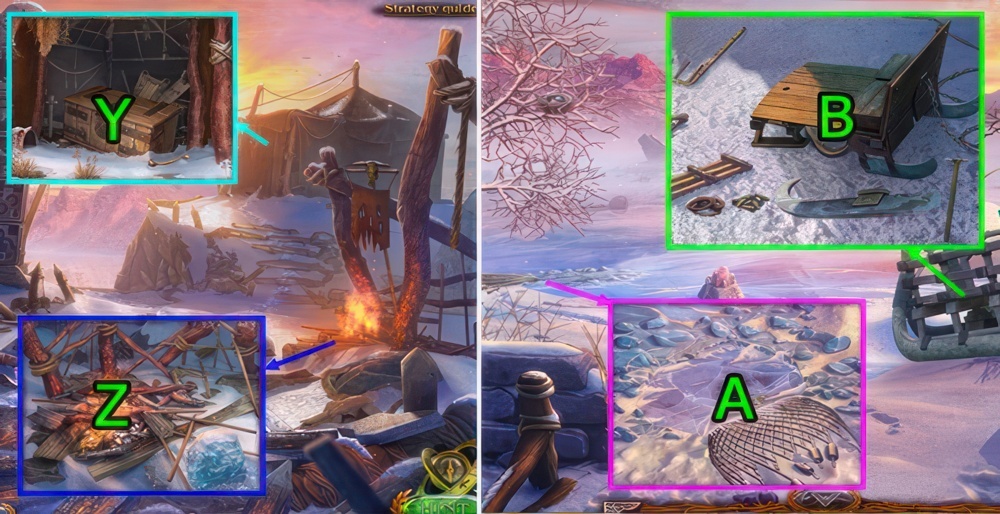
- Use KEY and press (Y×2), get DRAWING OF SLEDGES and SCOOP.
- Use SCOOP on (Z), get THE SCOOP WITH EMBERS.
- Go Mountain Lake.
- Use THE SCOOP WITH EMBERS on (A), get FISH SKULL.
- Use DRAWING OF SLEDGES on (B).
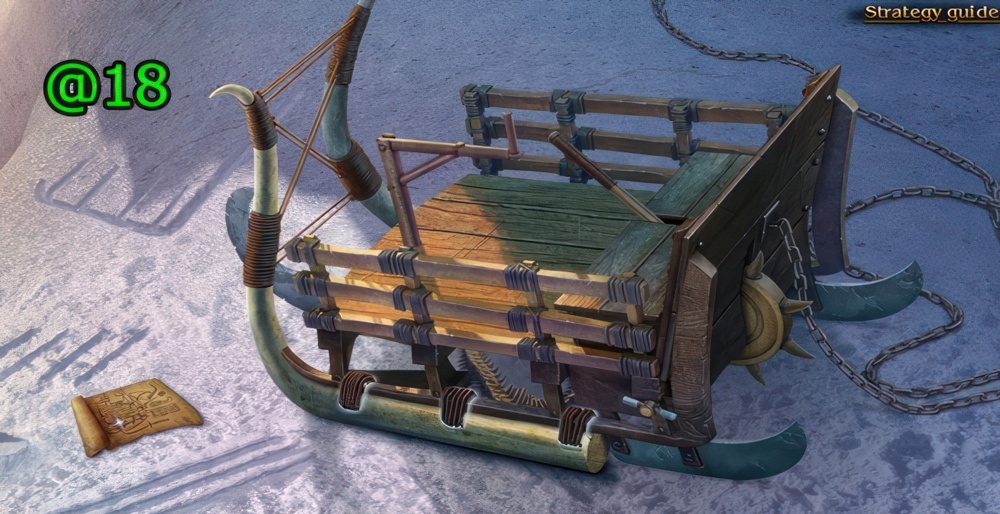
- Assemble the sled using the drawing.
- Walkthrough (@18).
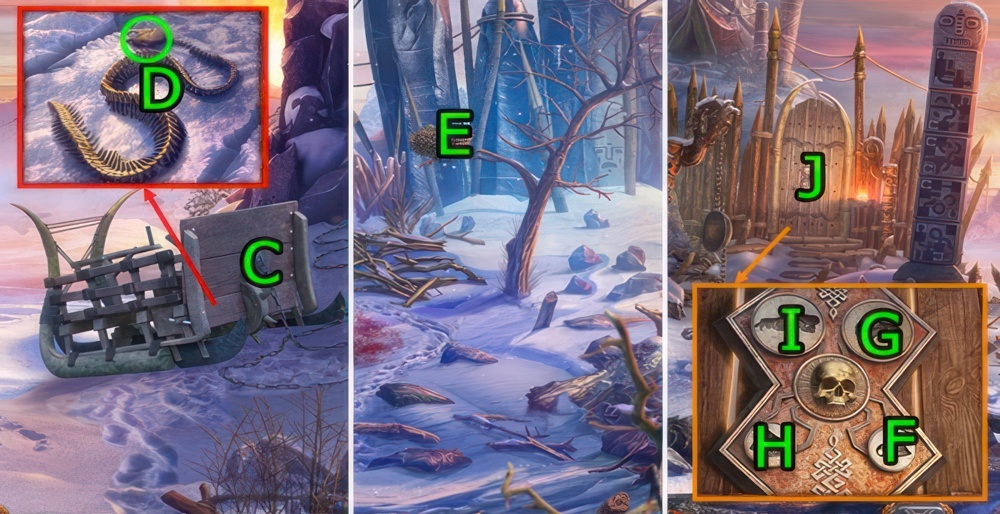
- Press (C).
- Get THE SKULL OF SNAKE (D).
- Go The Trail of the Giant.
- Go (E), get EAGLE SKULL.
- Go Settlement of Giants.
- Use THE SKULL OF SNAKE on (F).
- Use EAGLE SKULL on (G).
- Use FISH SKULL on (H).
- Use WOLF SKULL on (I).
- Go (J).
Hidden island
The shaman said the pole was hidden on a certain “hidden island”. We need to find this island.
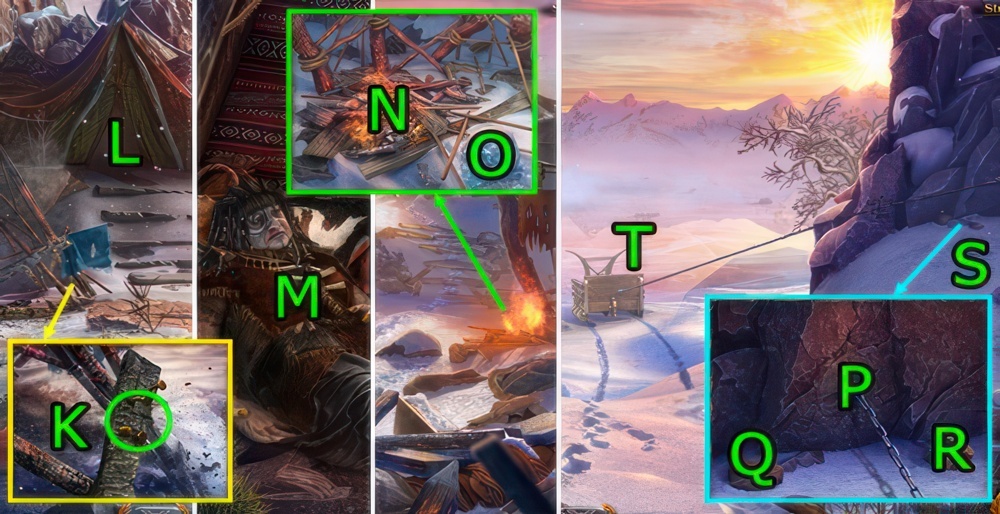
- Get BOARD WITH NAILS (K).
- Go (L).
- Press (M×2).
- Go Settlement of Giants.
- Use BOARD WITH NAILS on (N), drag (O-N), get GIANT’S NAILS.
- Go Mountain Lake.
- Use GIANT’S NAILS on (P), drag (Q-P)-(R-P).
- Press (S).
- Go (T).
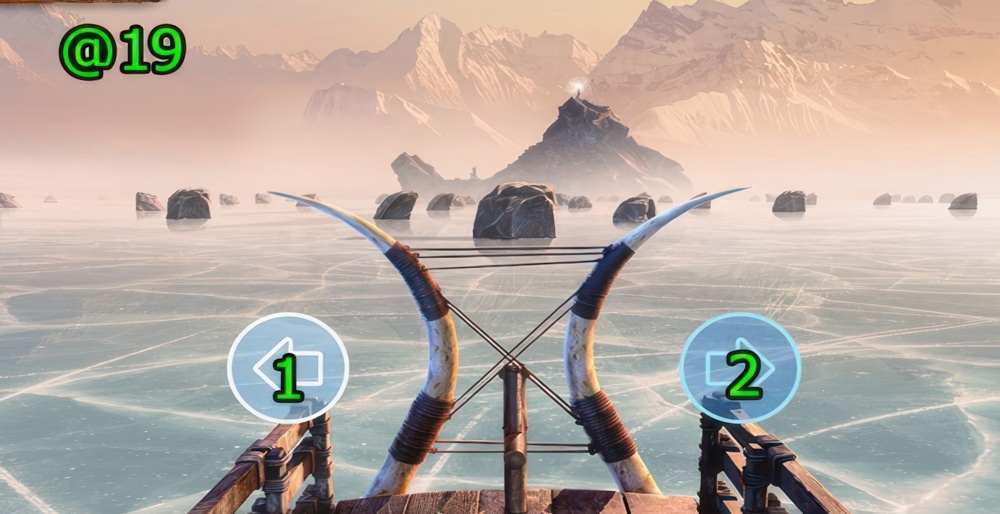
- Get to the island on a sledge by dodging the stones using the left and right arrows.
- Walkthrough (@19): Press (2-1-2-1-2-1-2-1-2-1-2-1-2-1-1).

- Press (U×4), get PIECE OF BARK.
- Go Sacred Hill.
- Go (V).
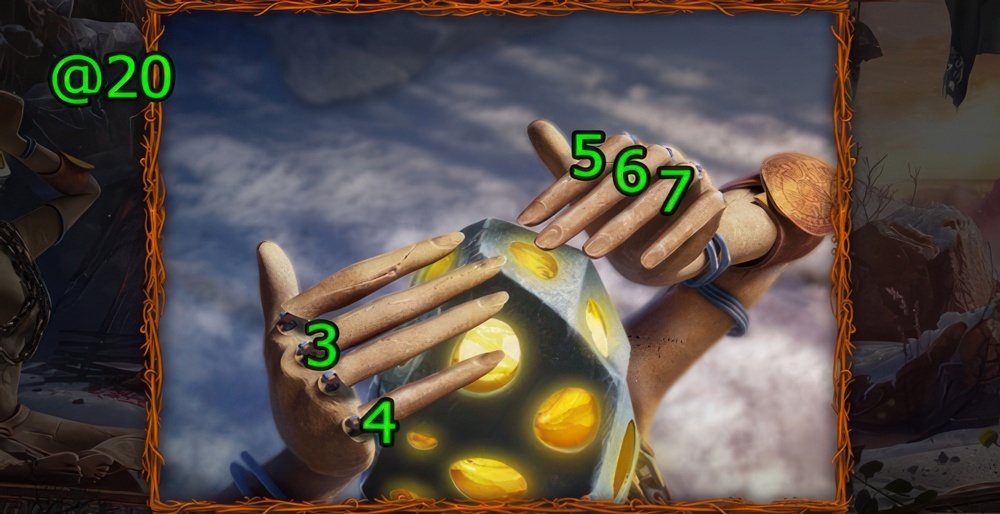
- Put the fingers in the position shown in the hint. You’ve already seen it.
- Walkthrough (@20): Press (3-4-5-6-7).
- Get SHARD OF THE SUN.
- Go Shaman’s Tent.
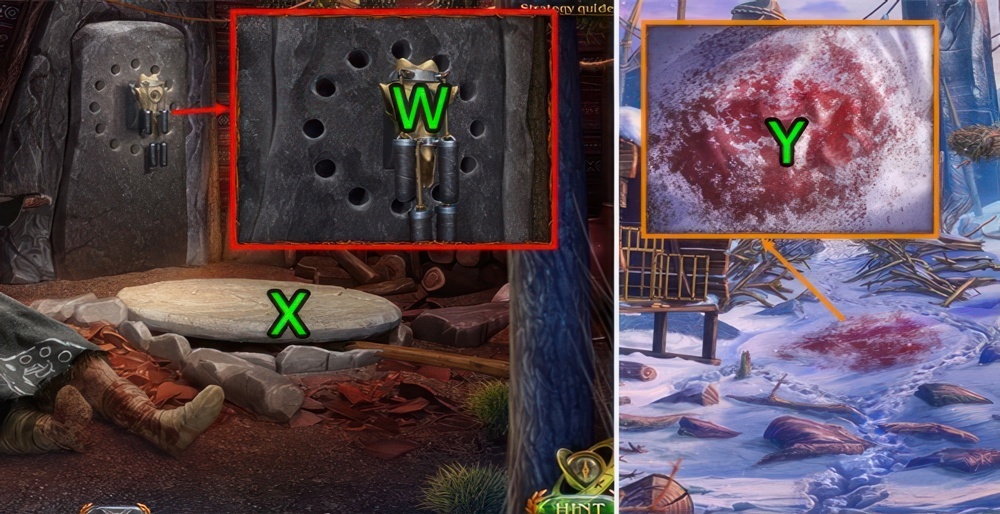
- Use HORN on (W).
- Press (X), get THE BROKEN JAR and LONG STICK.
- Go Sacred Hill.

- Use LONG STICK on (Z), get PIECE OF CLOTH.
- Go Shaman’s Tent.
- Use PIECE OF CLOTH and PIECE OF CLOTH on (A).
- Go forward (B).
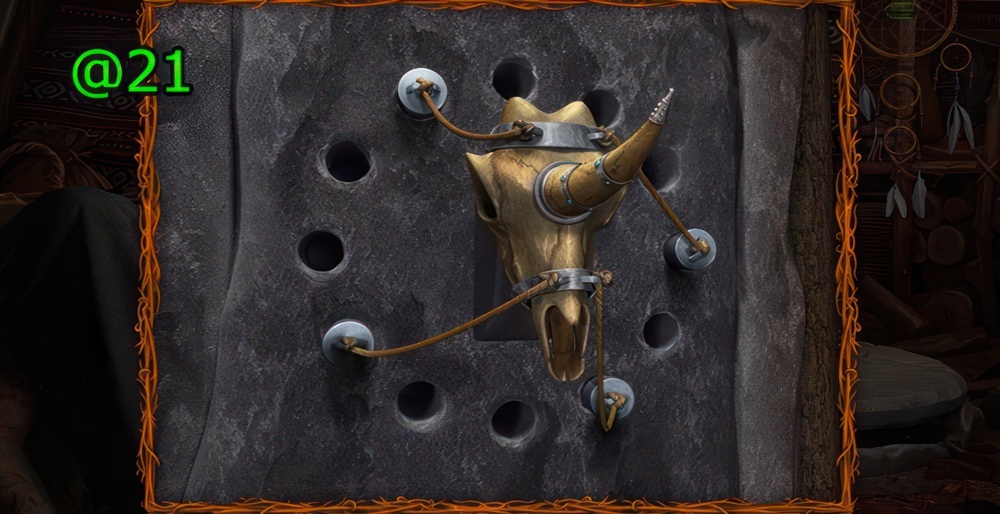
- Insert the weights into the holes as shown in the hint.
- Walkthrough (@21).
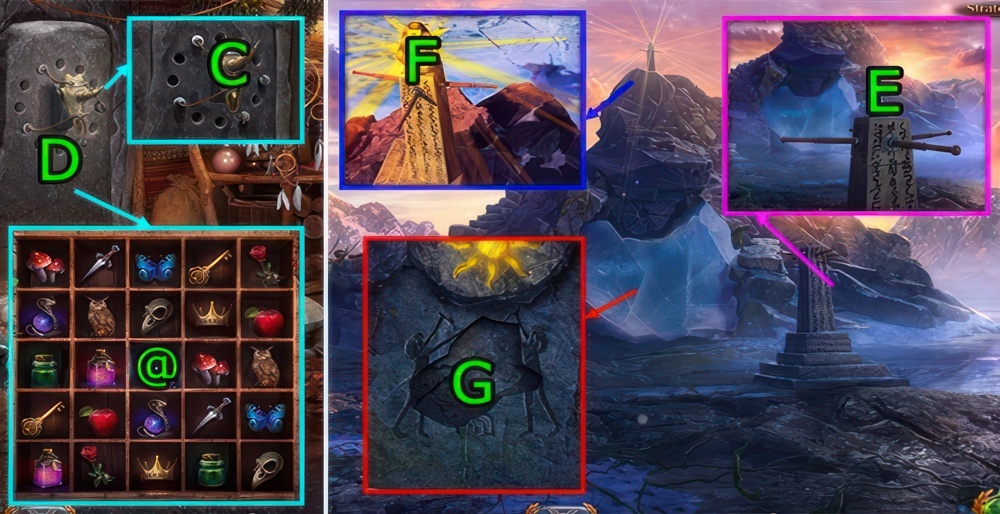
- Press (C).
- Play the puzzle (D).
- Open the cells and remember the shapes behind them.
- Use the same approach to open all pairs of shapes.
- Puzzle walkthrough (@).
- Get TABLET OF KNOWLEDGE.
- Go Dragon’s Tooth Rock.
- Use SHARD OF THE SUN on (E).
- Press (F×2).
- Press (E).
- Use TABLET OF KNOWLEDGE on (G).
- Get PIECE OF BARK.
- Go The Trail of the Giant.

- Use THE BROKEN JAR on (Y), get GIANT’S BLOOD.
- Go Mountain Lake.
- Use GIANT’S BLOOD on (H).
- Go Dragon’s Tooth Rock.
- Go forward (I).
Ul’s pole
I found a tree on a hidden island. All we have to do is to remove the pole from the tree.
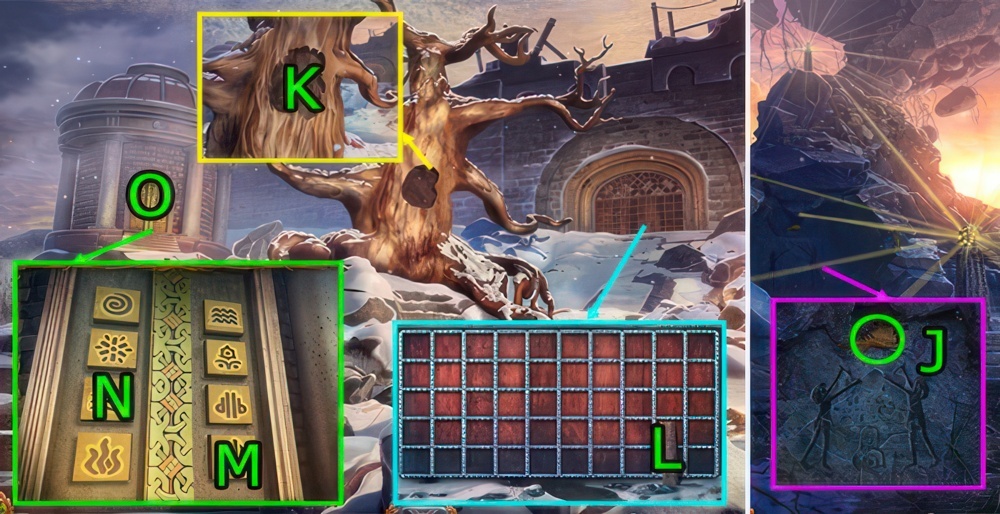
- Go Dragon’s Tooth Rock.
- Get PIECE OF BARK (J).
- Go Tree of Giants.
- Use PIECE OF BARK and PIECE OF BARK on (K).
- Press (L).
- Press (M) and (N).
- Go (O).
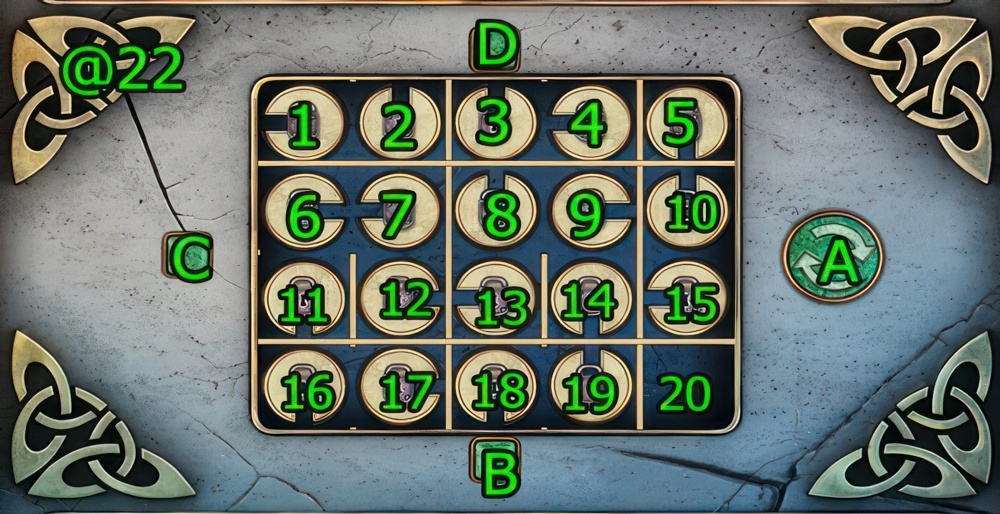
- Free each chip from its lock by sliding it to an empty adjacent space.
- To do this, adjust the walls using the square buttons, and rotate the chips using the large round button on the right.
- Walkthrough (@22): Press (A-C), drag (15-down), press (B), drag (14-right), press (A).
- Drag (19-up)-(14-down), press (C-A), drag (9-down)-(8-right)-(13-up), press (A-C), drag (18-up).
- Press (A×2), drag (17-right), press (A), drag (12-down), press (A×2-C).
- Drag (7-down), press (A), drag (6-right), press (A×2), drag (11-up).
- Press (C), drag (16-up)-(11-down), press (C), drag (6-down), press (C-A).
- Drag (1-down)-(2-left), press (D), drag (3-left), press (A-D), drag (4-left).
- Press (D-A), drag (5-left), press (A×3), drag (10-up).
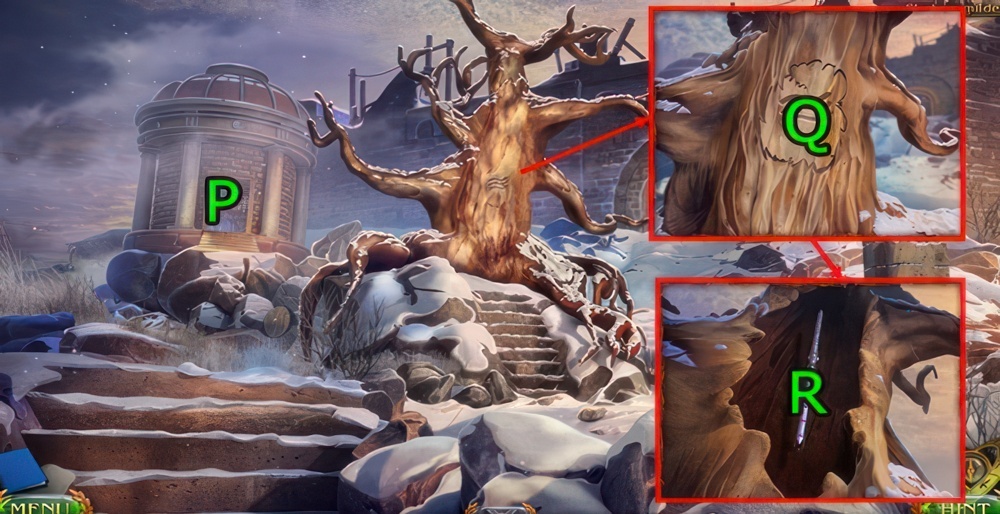
- Play the puzzle (P), get STORM PAINT.
- Use STORM PAINT and STONE KNIFE on (Q).
- Use THE SPEARHEAD and THE TOPPER on (R).
Jim’s demons
My baby’s gone! I must find him!
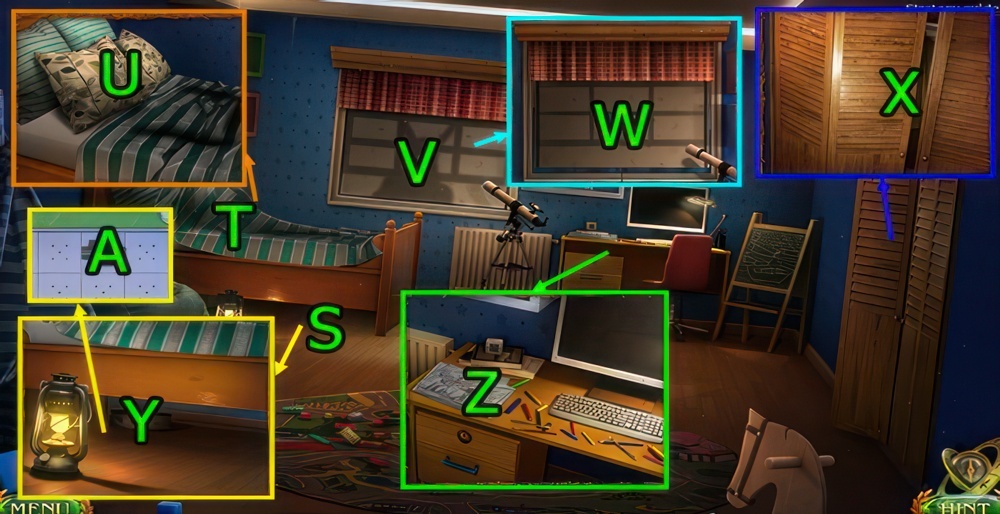
- Go (S).
- Press (T).
- Press (U×2), get GRAB-IT CLAW.
- Press (V).
- Press (W×3).
- Press (X×2), get ICE HOCKEY STICK.
- Use ICE HOCKEY STICK on (Y).
- Press (Z×6), get CAR.
- Use CAR on (A).
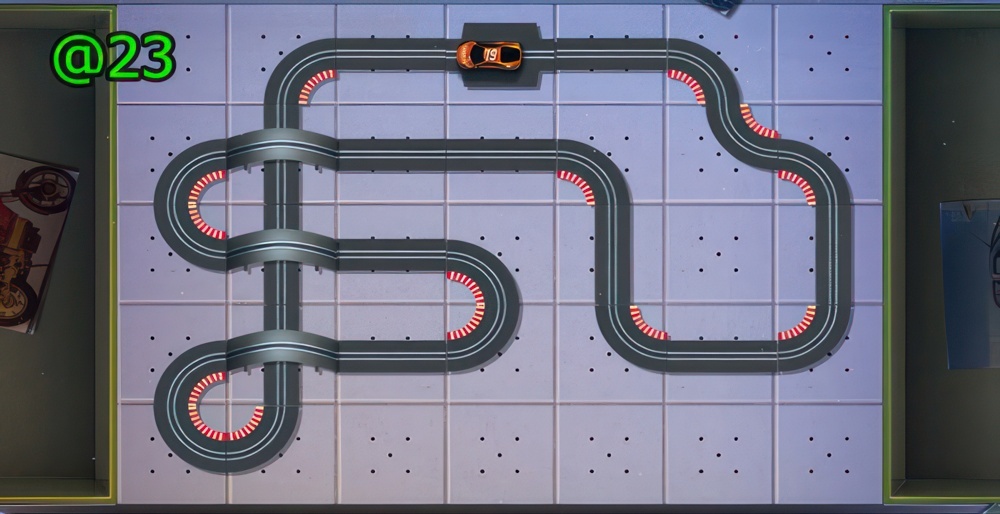
- Using all the details, assemble the road in such a way that the car can travel a continuous path throughout and return to the place.
- Walkthrough (@23).
- Get SMALL KEY.
- Use SMALL KEY and press (B×3), get METAL CONSTRUCTOR.
- METAL CONSTRUCTOR on GRAB-IT CLAW: get GRAB-IT CLAW.
- Use GRAB-IT CLAW on (C).
- Press (D).
- Go (E).
- Press (F×2), get TOY CLOWN and CLAW HAMMER.
- Use CLAW HAMMER and press (G×2).
- Press (H×2), get TOY FLASHLIGHT.
- TOY CLOWN on TOY FLASHLIGHT, get TOY FLASHLIGHT.
- Use TOY FLASHLIGHT on (G).
- Play the puzzle (I), get LADDER.
- Use LADDER on (J).
Ballista
There is an old ballista at the top of the tower in the citadel. We need to get there and study it.
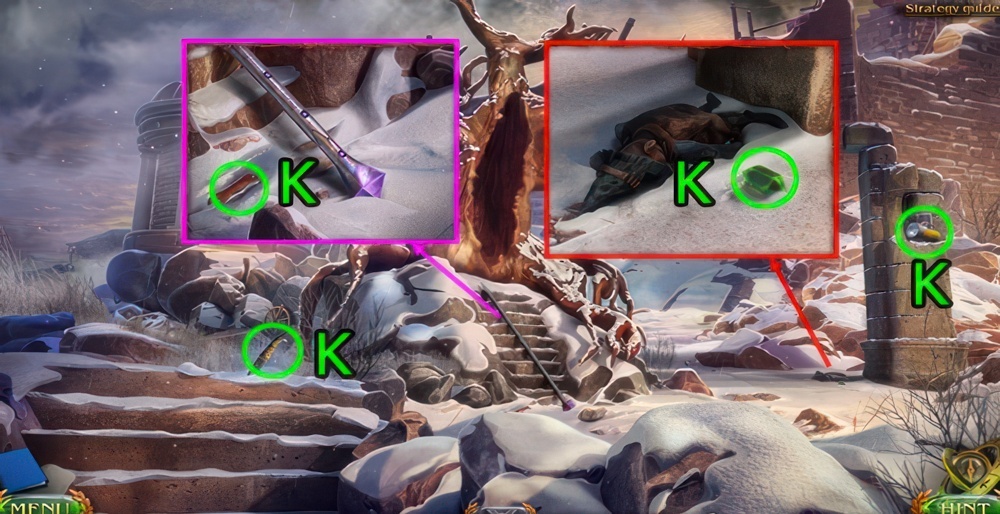
- Get STONE KNIFE, DAMAGED MULTITOOL, FLASHLIGHT, and EMERALD (K).
- Go Shaman’s Tent.
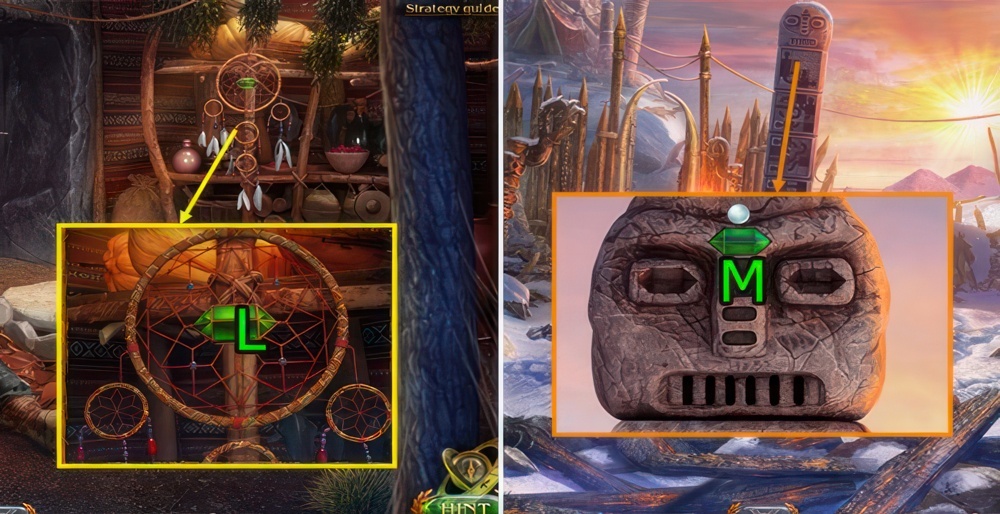
- Use DAMAGED MULTITOOL on (L), get EMERALD.
- Go Settlement of Giants.
- Use EMERALD and EMERALD on (M).
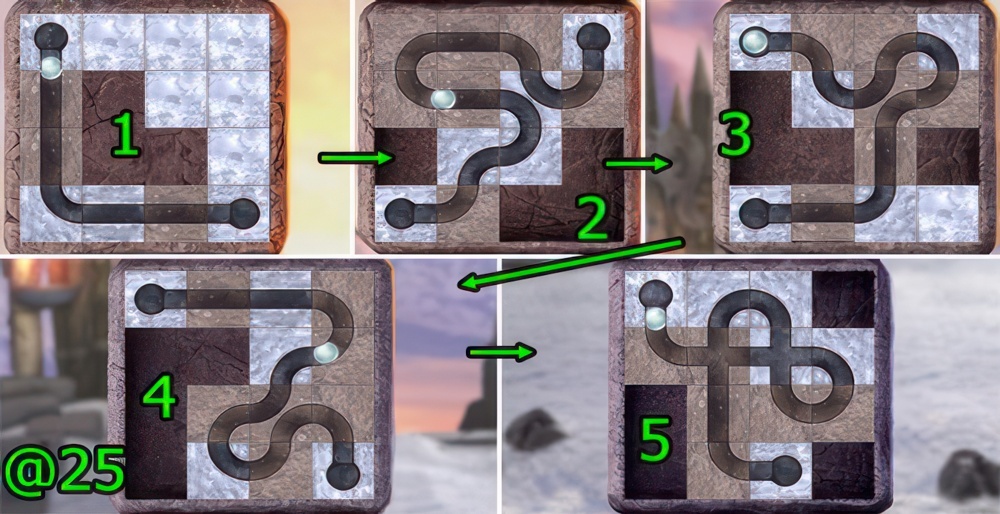
- By moving the chips, create the path for the ball. Bring it to the bottom.
- Walkthrough (@24): Arrange as shown (1-2-3-4-5).
- Get POWER STONE.
- Go Sacred Hill.
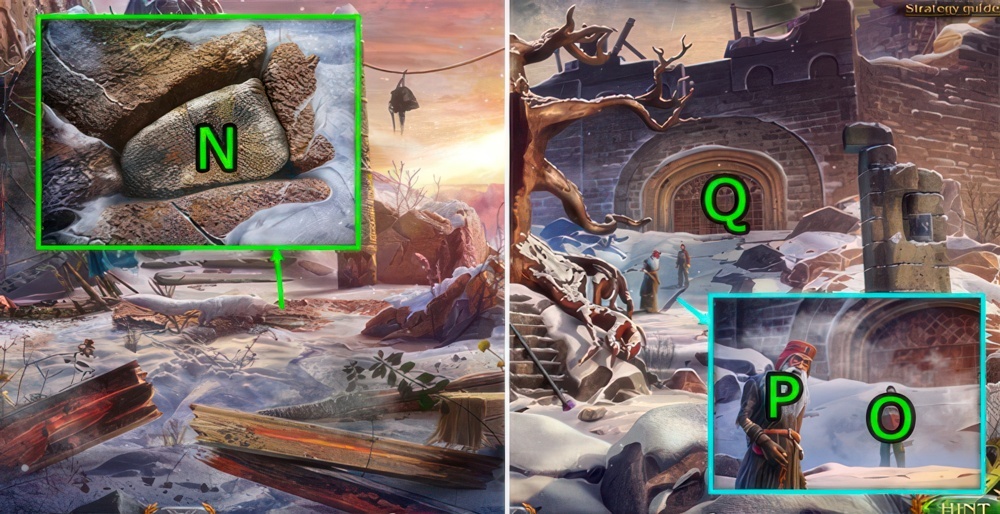
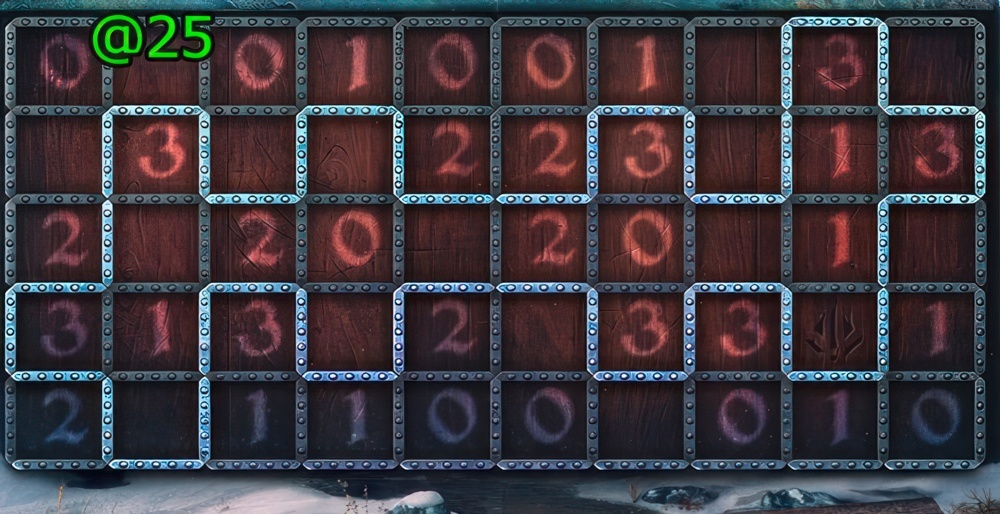
- Use DAMAGED MULTITOOL and press (N×5), get STENCIL.
- Go Tree of Giants.
- Use STENCIL on (O), use FLASHLIGHT on (P).
- Go forward (Q).
- Connect the cell walls with a continuous line.
- The number in the cell indicates the number of sides that should be highlighted around it.
- Walkthrough (@25).
Last motion
Jim came up with a crazy and adventurous idea. To implement it, you need to prepare the ballista for the shot.
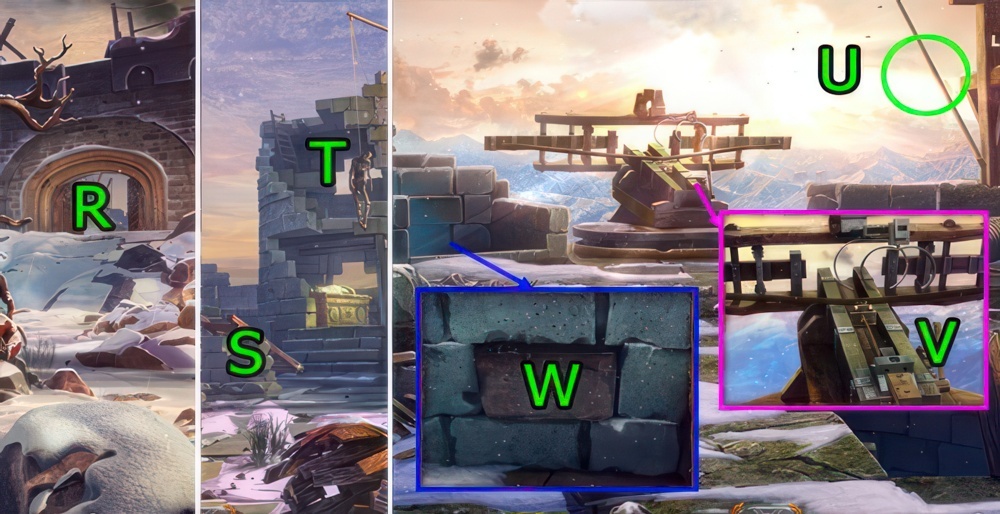
- Go forward (R).
- Press (S).
- Go (T).
- Get FLAGPOLE (U).
- Press (V).
- Press (W), get BUNCH OF KEYS.
- Go Ruins of the Citadel.
- Use BUNCH OF KEYS on (X).
- Go (Y).
- Press (Z×2), get ELEMENT OF THE SARCOPHAGUS.
- Use BUNCH OF KEYS on (A).
- Play the puzzle (B).
- Move the tiles to form a closed chain of crystals.
- Puzzle walkthrough (@), arrange tiles as shown.
- Get TWO-HANDED SAW.
- Use FLAGPOLE on (C).
- Use STONE KNIFE on (D).
- Press (E), get PARTS OF THE FLAGPOLE.
- Go Ruins of the Citadel.
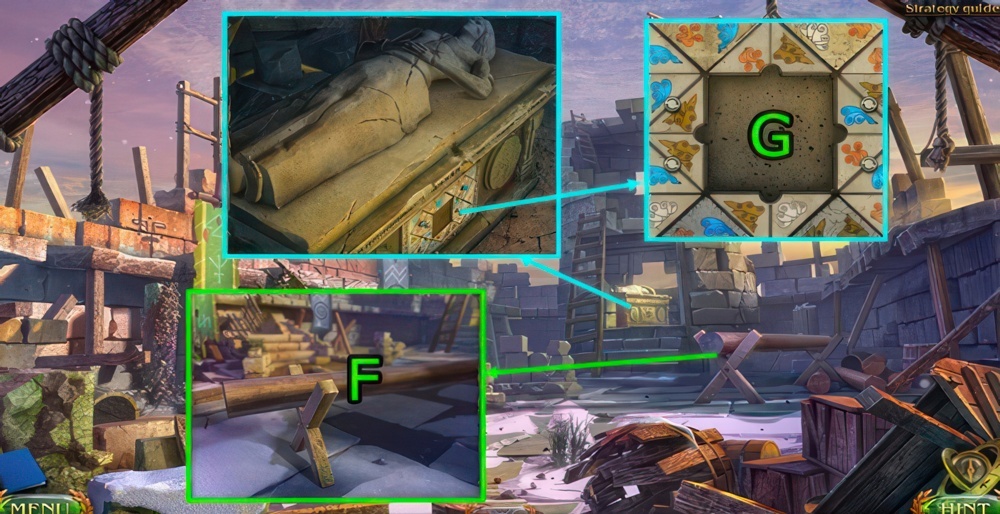
- Use TWO-HANDED SAW on (F), get X-SHAPED STAND.
- Use ELEMENT OF THE SARCOPHAGUS on (G).
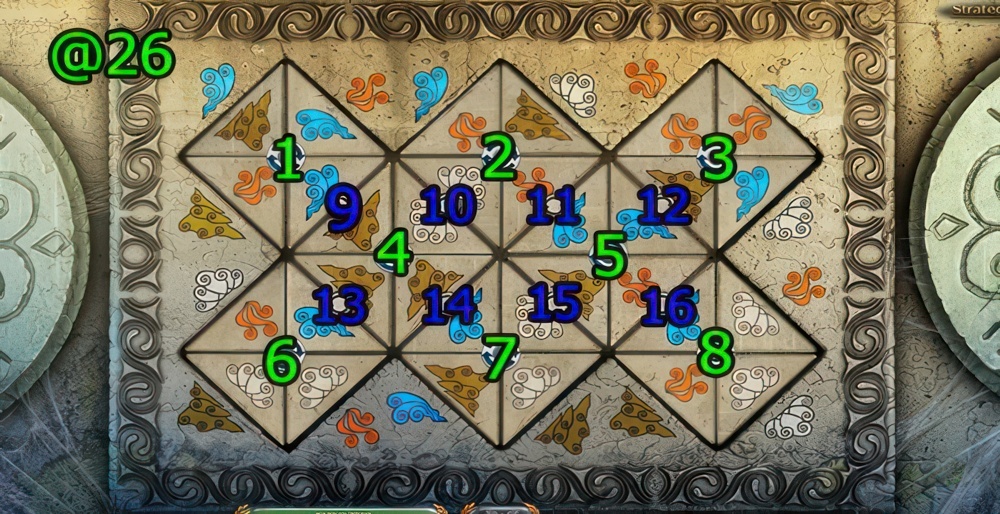
- Rotate the tiles to create pairs from the pictures on them.
- Walkthrough (@26): Press (8×3)-(16)-(8×2)-(5×3)-(16)-(8×3)-(11)-(2×3)-(12)-(3×3).
- (5×3)-(15)-(7×3)-(14)-(4×3)-(13)-(6×2)-(13)-(4×3)-(14)-(10)-(2×3)-(9)-(4×3)-(1×3).
- Get HAMMER.
- Go The Basement of the Citadel.
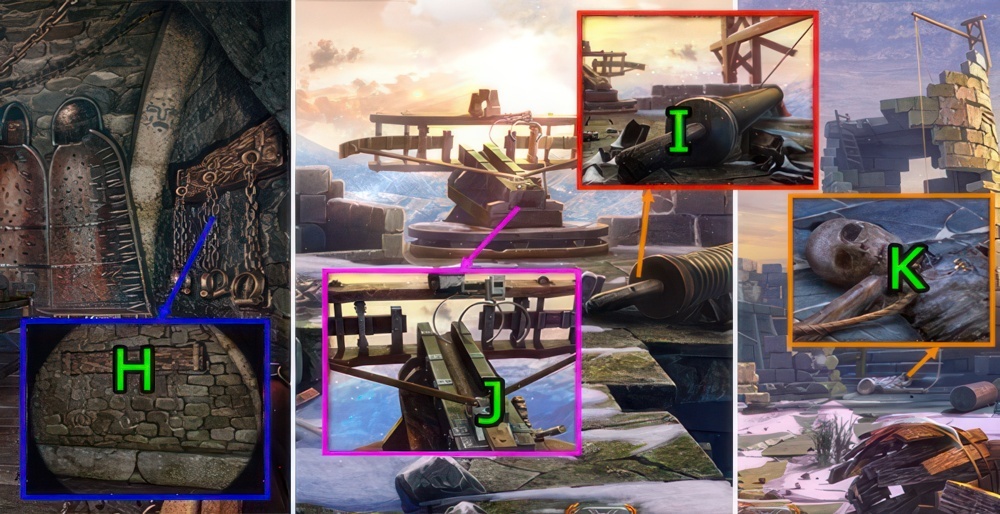
- Use HAMMER on (H), get SHACKLES.
- Go Top of the Tower.
- Use X-SHAPED STAND, PARTS OF THE FLAGPOLE, and HAMMER on (I).
- Use POWER STONE on (J).
- Go Ruins of the Citadel.
- Press (K), get AMULET OF THE GIANT and END OF THE ROPE.
- Go Tree of Giants.
- Use END OF THE ROPE on (L).
- Go The Basement of the Citadel.
- Use AMULET OF THE GIANT and press (M×3), get MONOCULAR.
- Go Top of the Tower.
- Use MONOCULAR on (N).
- Press (O).
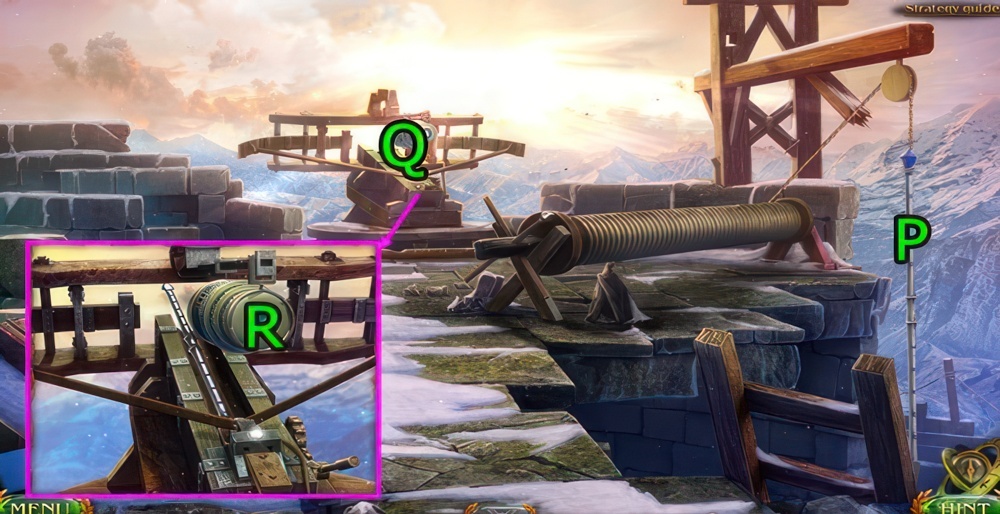
- Drag (P)-(Q).
- Press (R).
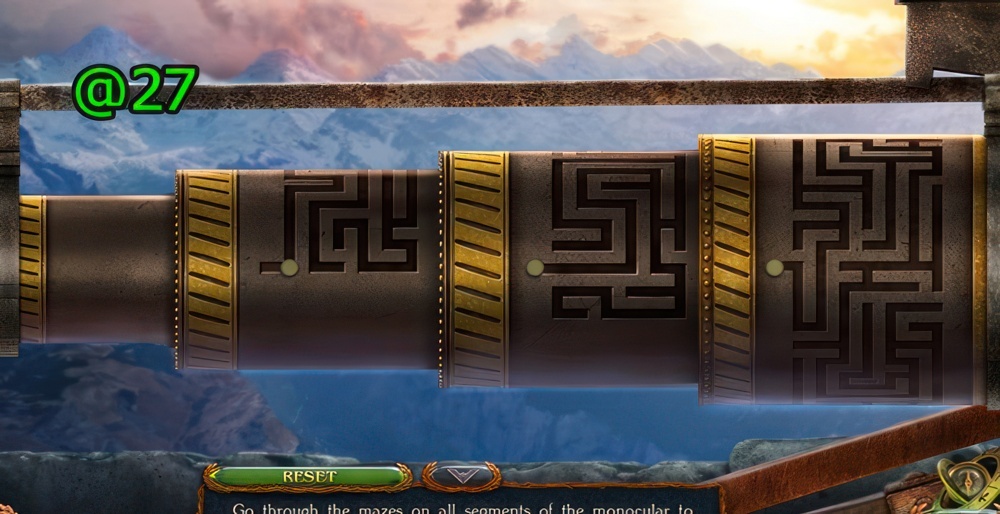
- Go through the mazes on all segments of the monocular to reveal it.
- Walkthrough (@27).
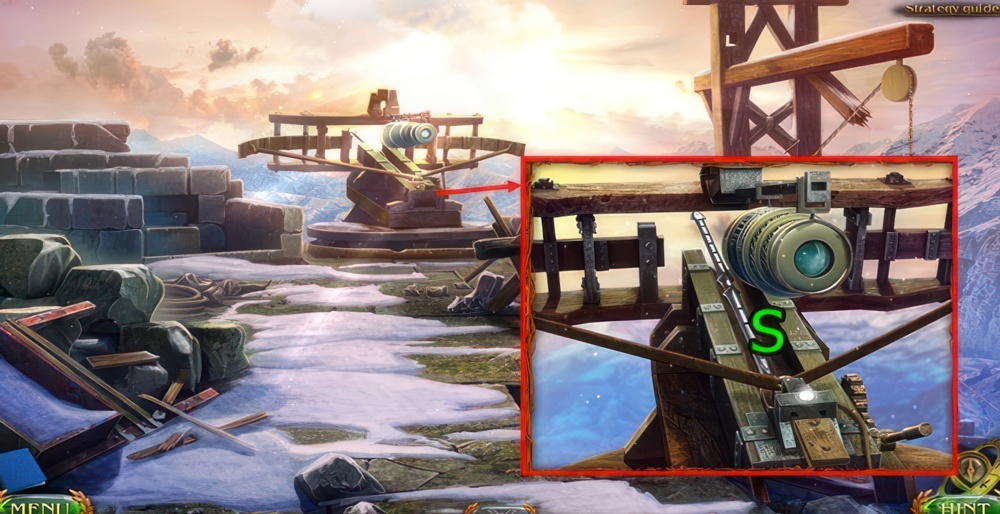
- Press (S).
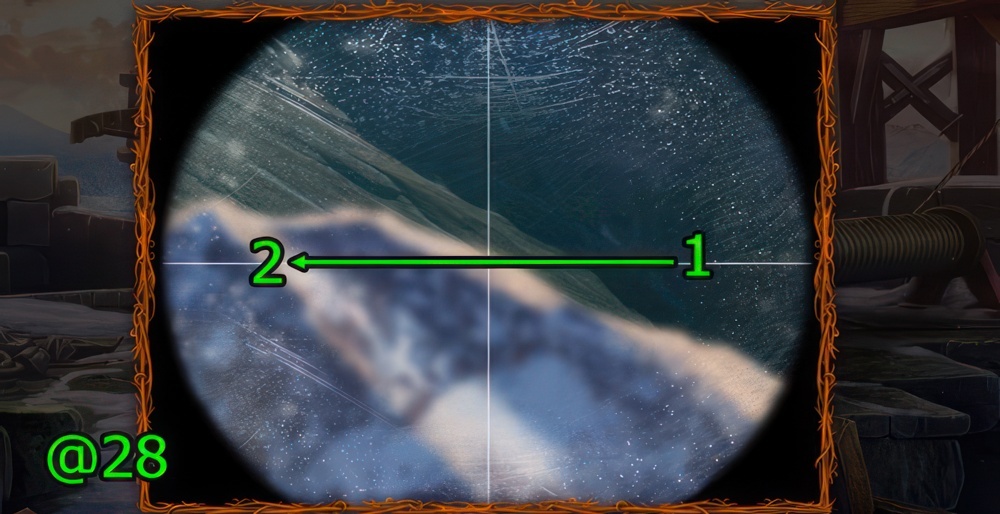
- Aim the ballista at the Gate of the Worlds.
- Walkthrough (@28): Slide (1-2).
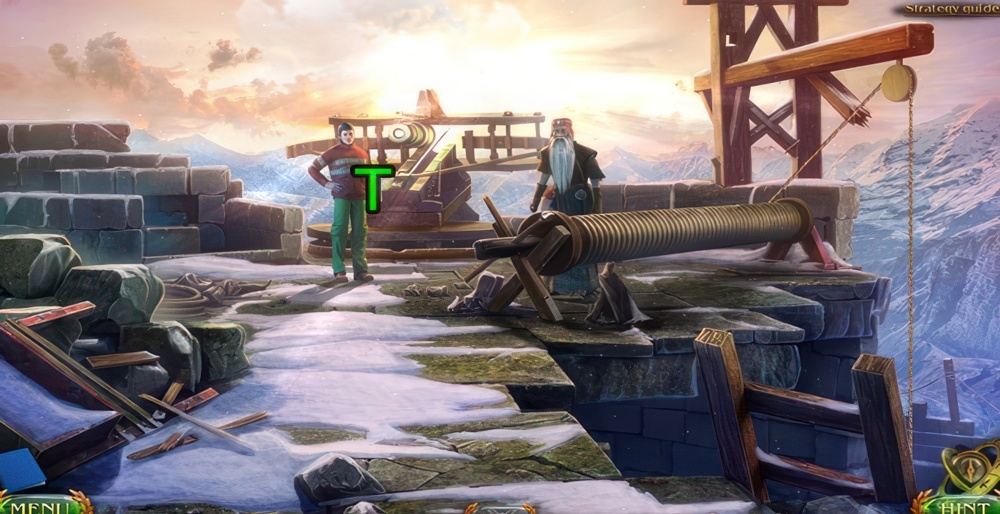
- Use SHACKLES and HAMMER on (T).
- Walkthrough Bonus Chapter, at the link below.


