Bridge to Another World 6: Gulliver Syndrome – The game starts with you talking to a doctor and telling him what’s bothering you. Ever since you found the porcelain figurine you have been having the same strange dream, you are of enormous stature and people around you are all small. Your case is familiar to the doctor, he calls it ‘Gulliver’s syndrome’. After hypnosis you find yourself in an extraordinary realm where you find yourself a giant. To protect Lilliput, the governor orders the navy to destroy the giant. But on that day a terrible storm was brewing at sea, and Gulliver bravely helped the ships safely to shore. Since then, Gulliver has been a national hero and defender of Lilliput. He protected the country from the harsh north winds, built aqueducts, shared his knowledge and taught the Lilliputians new skills. Gulliver’s stories about the world he came from delighted the Lilliputians. If you can not pass any of the puzzles or do not know where the items are, on our site you can watch the walkthrough of Bridge to Another World 6: Gulliver Syndrome, and save this miniature world.
Bridge to Another World 6: Gulliver Syndrome – Walkthrough
Here you can see the full walkthrough of Bridge to Another World 6: Gulliver Syndrome, namely for all chapters, including bonus chapter, in pictures.
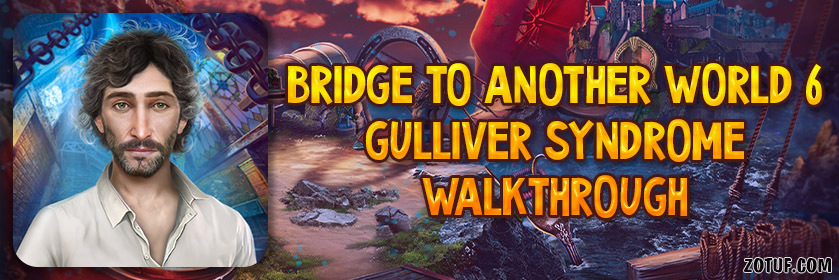
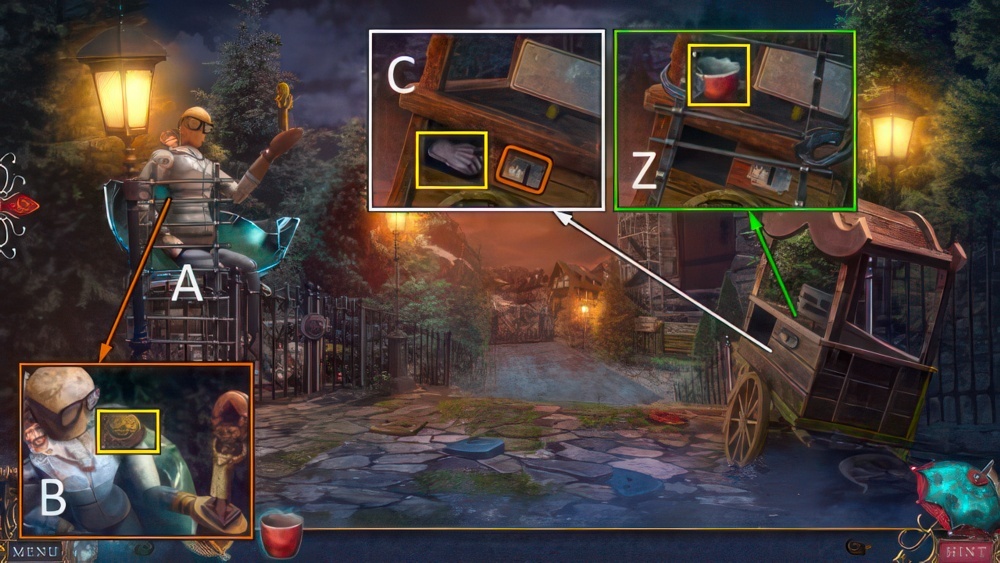
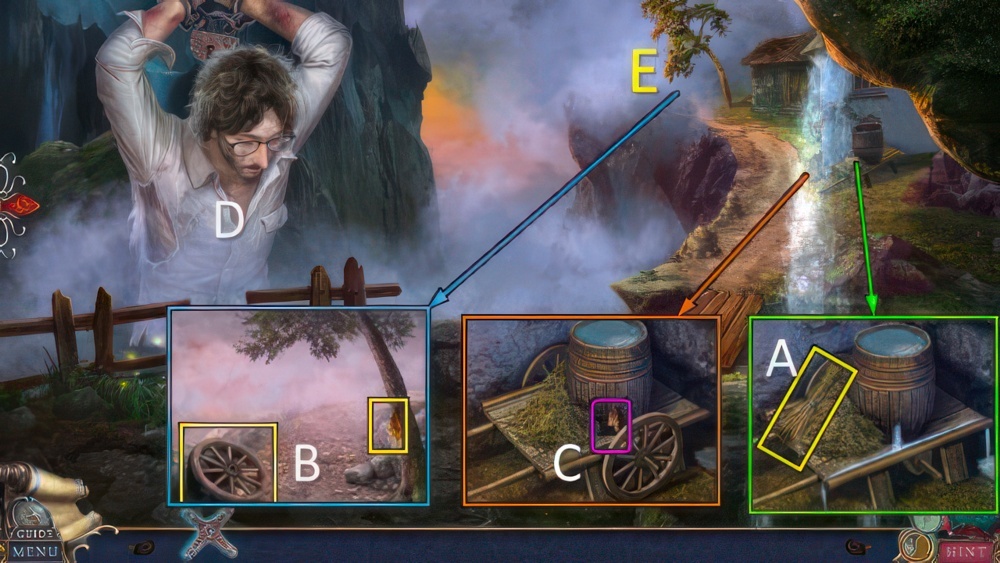
- Check sign, take HANDKERCHIEF and MINIATURE MESSAGE (A).
- Take GLASSES (B).
- HANDLE from GLASSES.
- Use HANDKERCHIEF and MINIATURE MESSAGE.
- Take map.
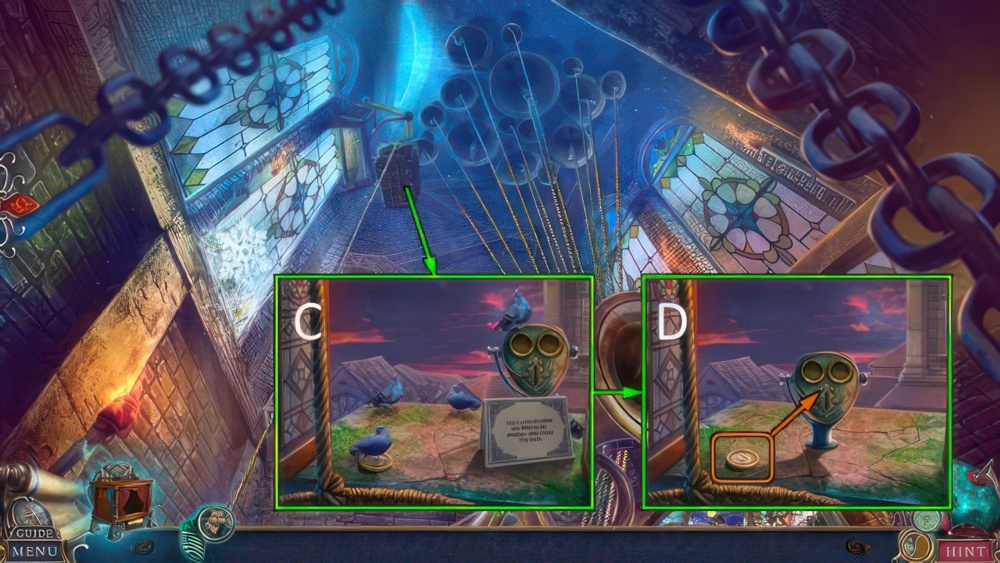
- Place HANDLE, take SHOVEL (C).
- Use SHOVEL (D).
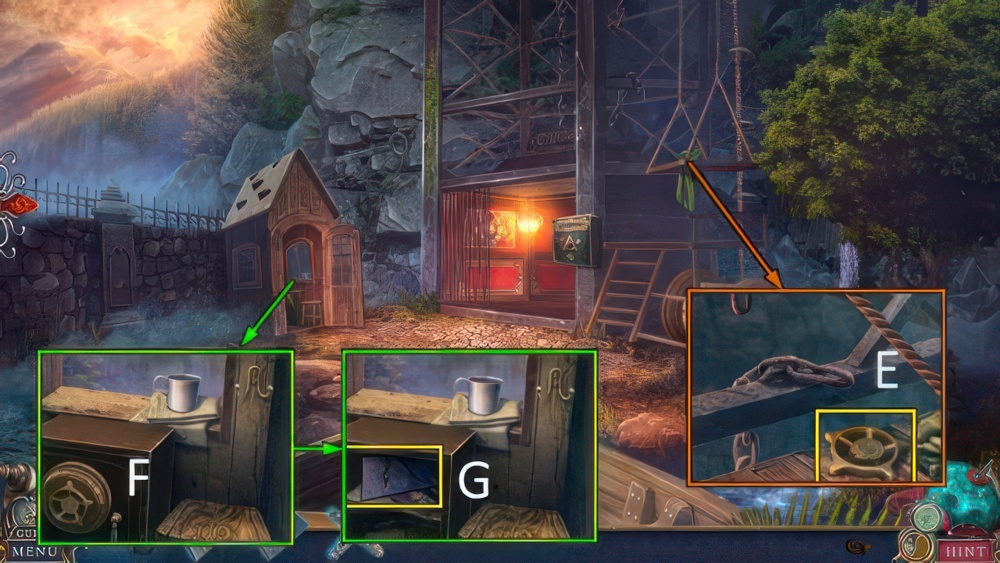
- Go (E).
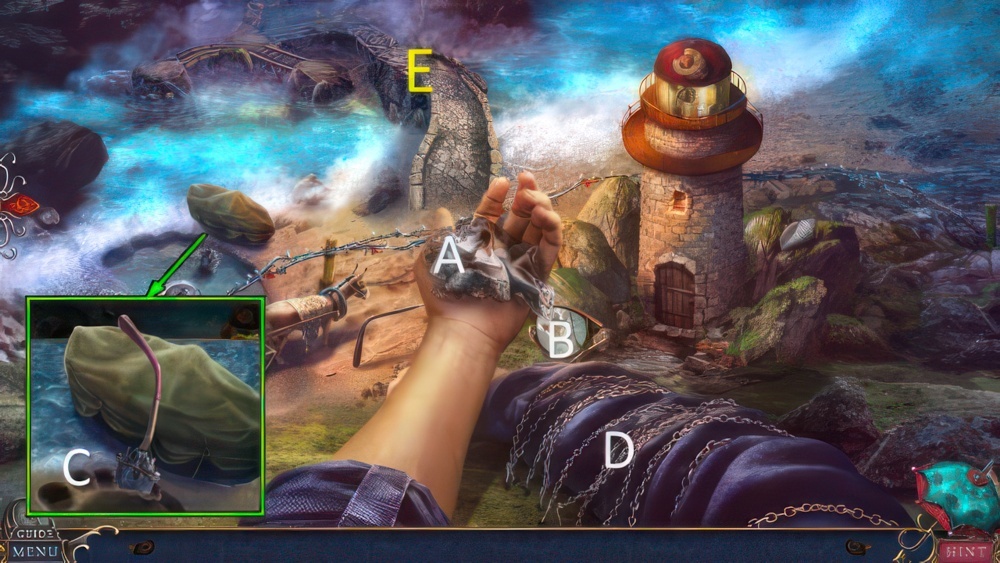
- Prevent the donkey from escaping without it hitting a trap.
- Select a bridge to destroy it.
- Each time you destroy a bridge, the donkey moves.
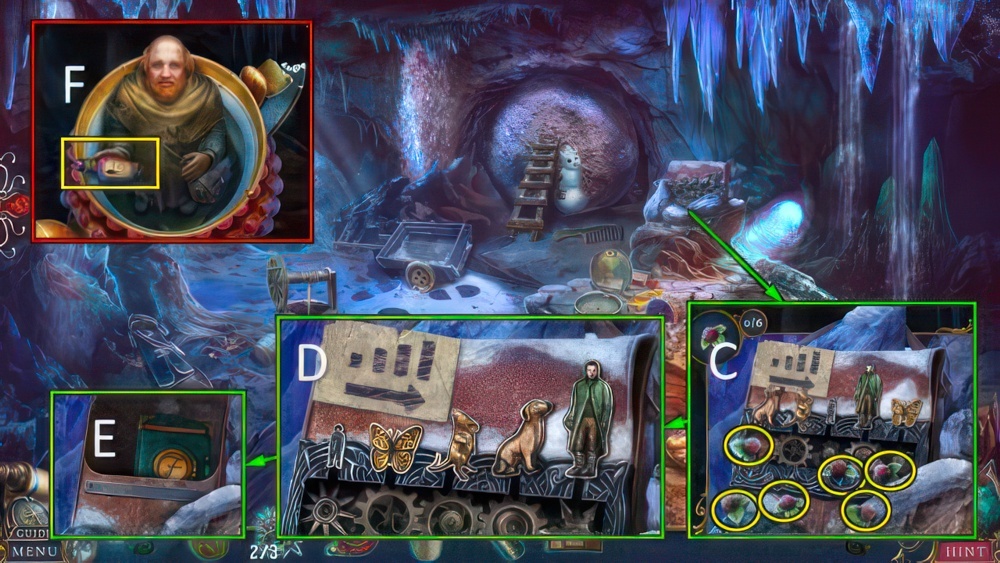
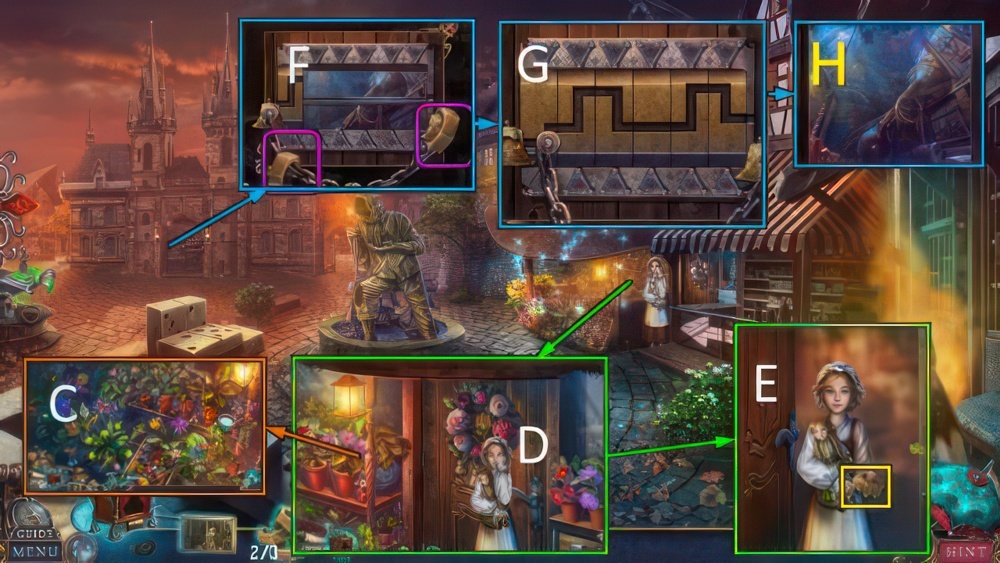
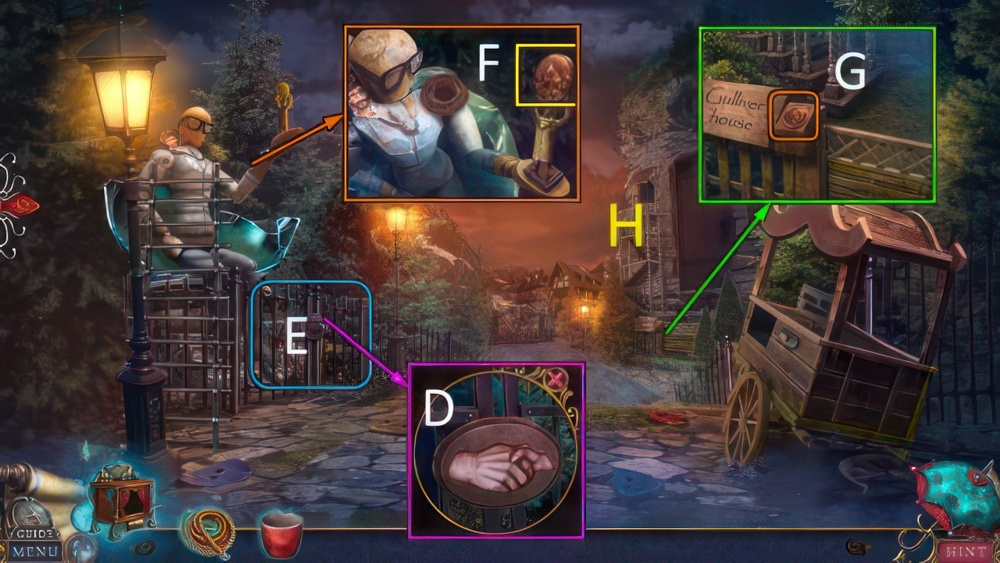
- Touch donkey, take SHIP FIGURINE (F).
- Select 1-7 (G).
- Receive LILIPUTIAN DONKEY.
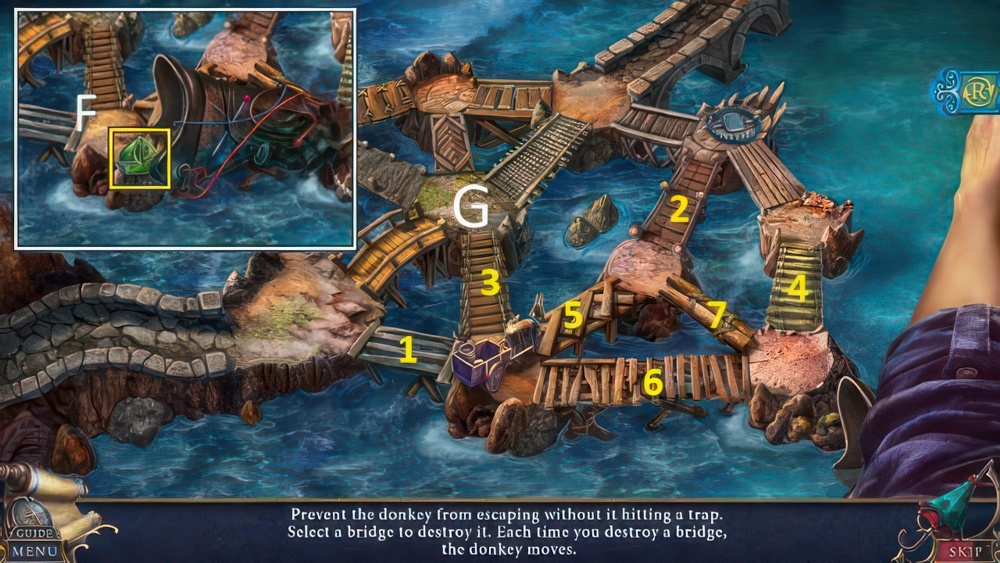
- Scroll left.
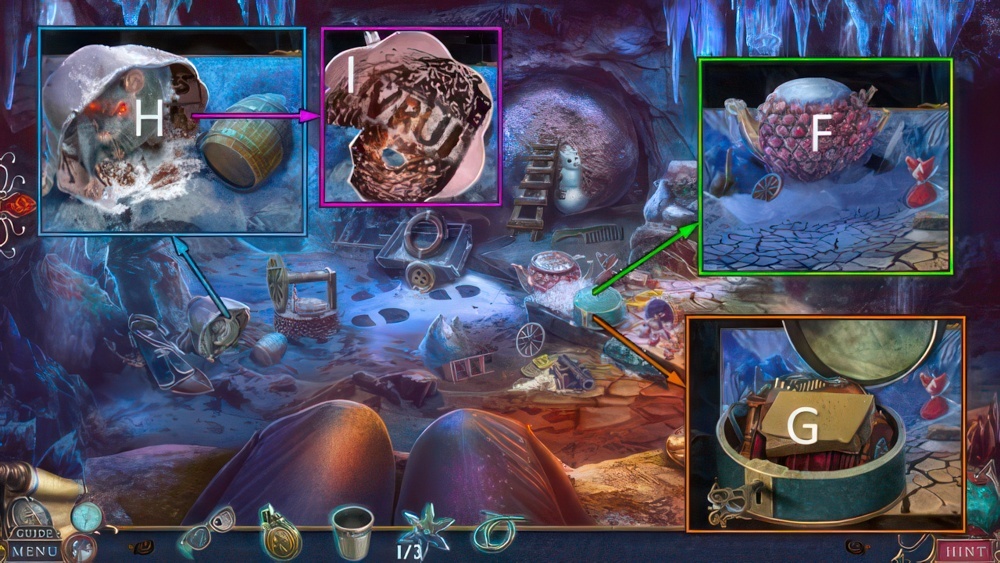
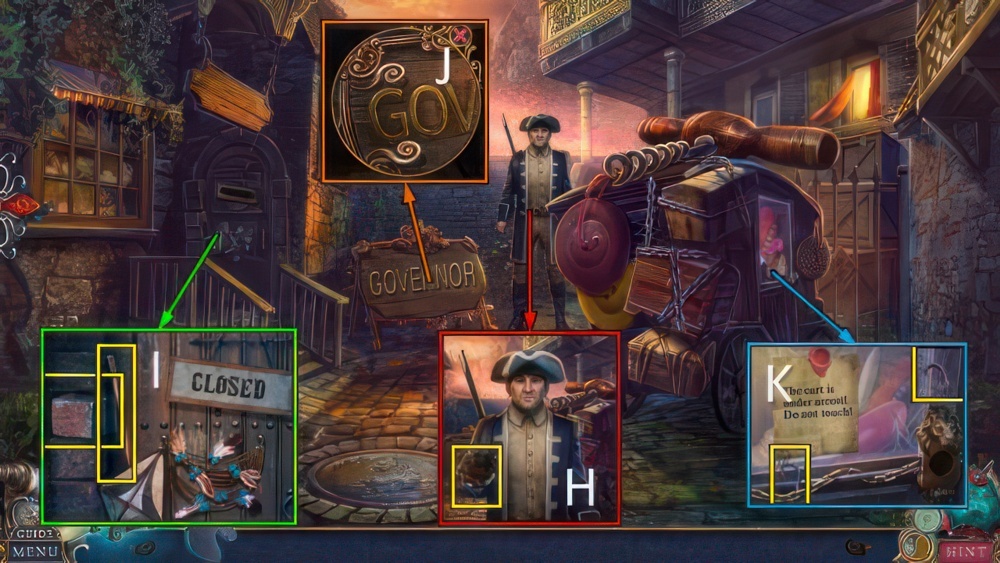
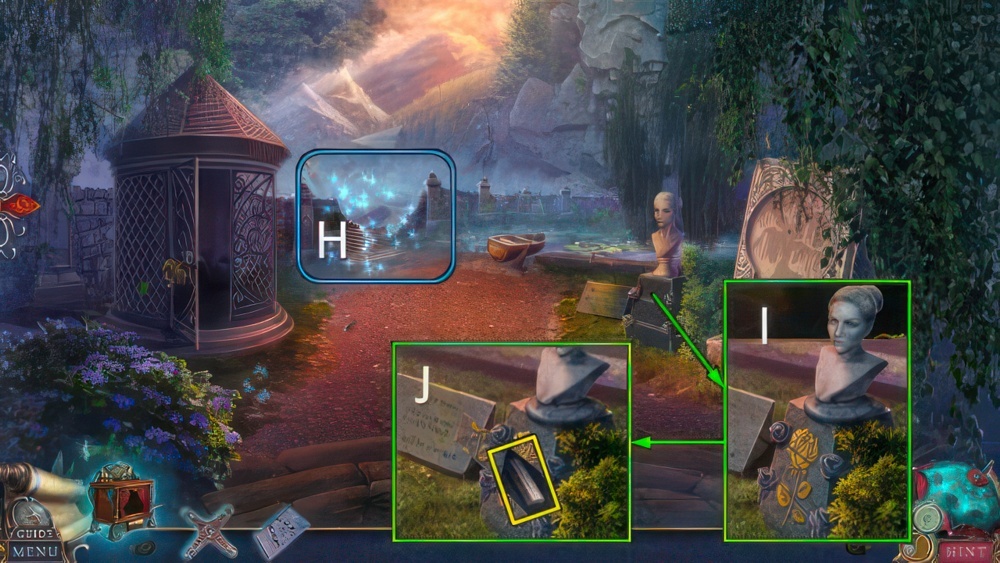
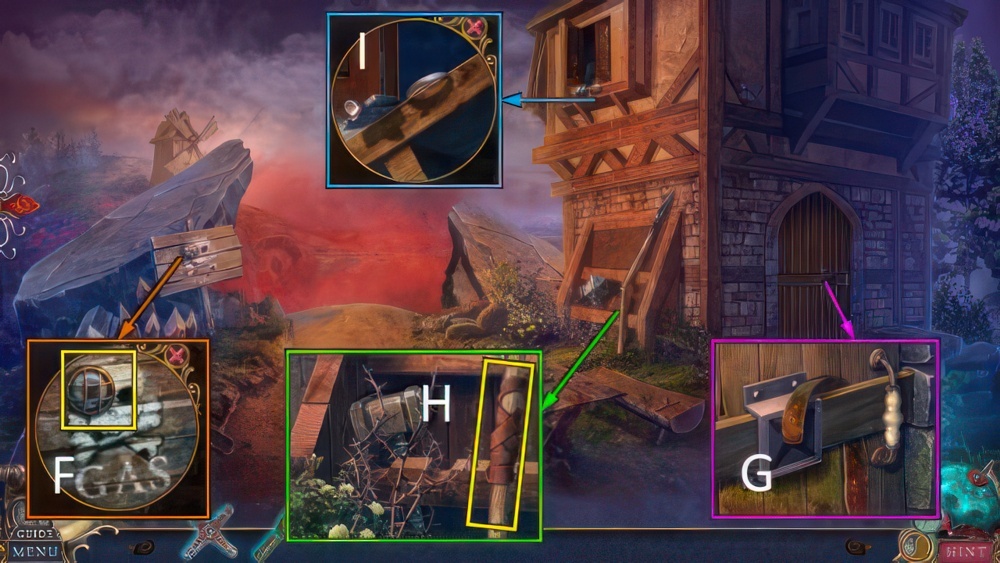
- Take SHOE (H).
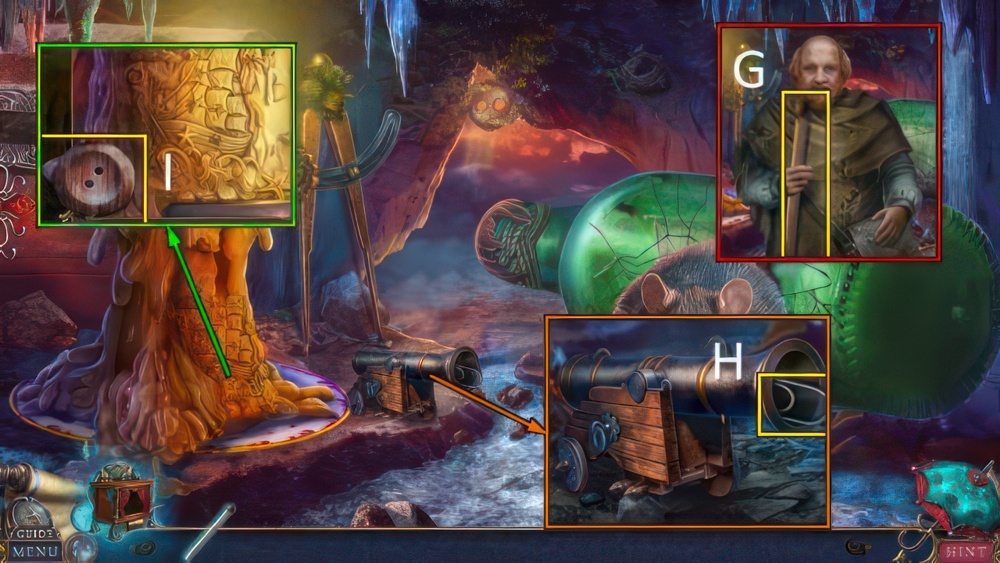
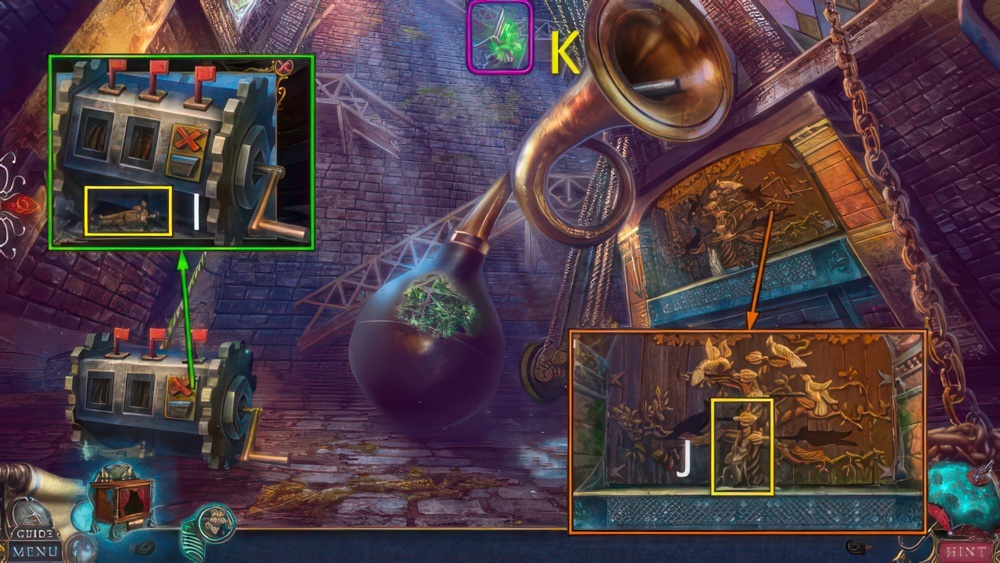
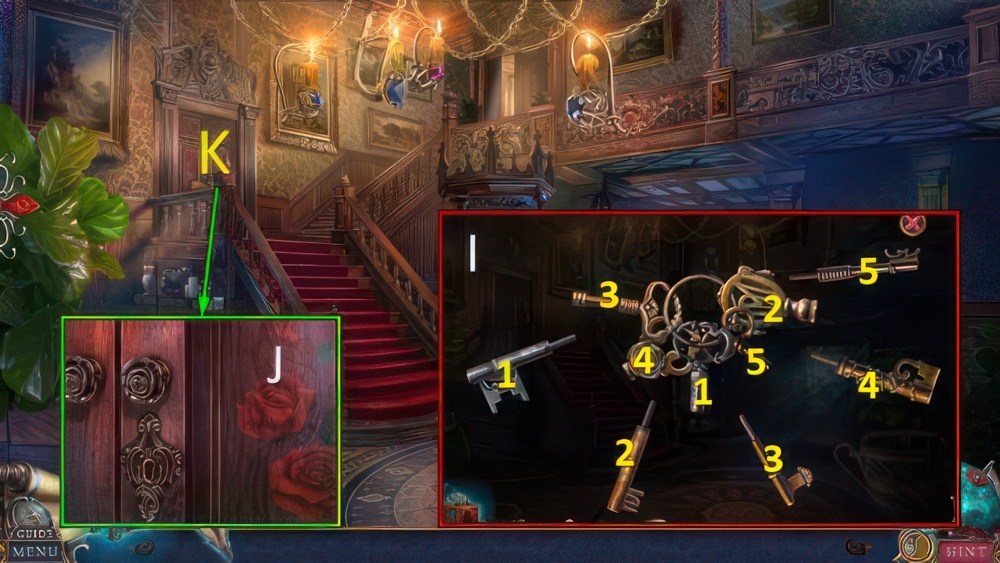
- Touch bird, take FIN KEY (I).
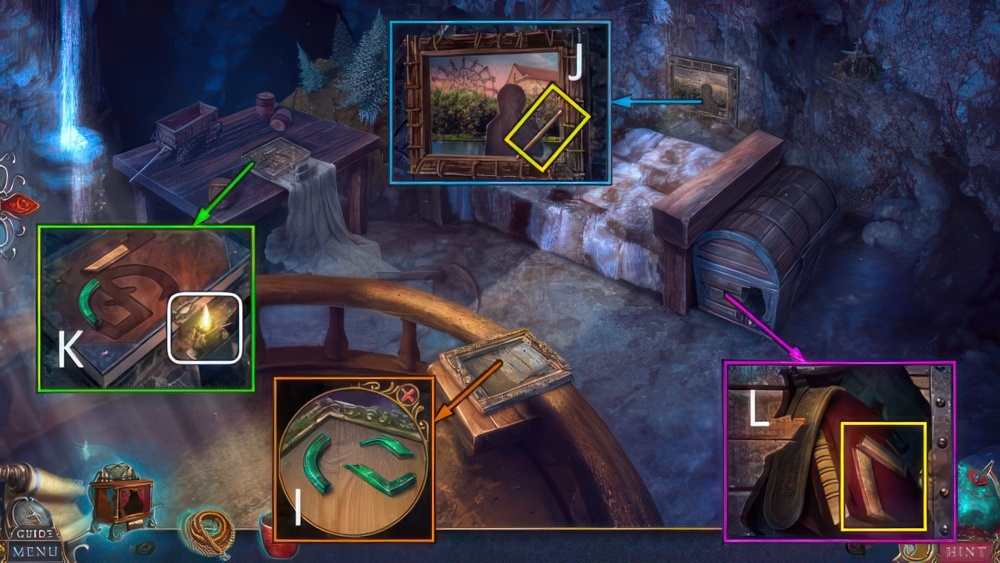
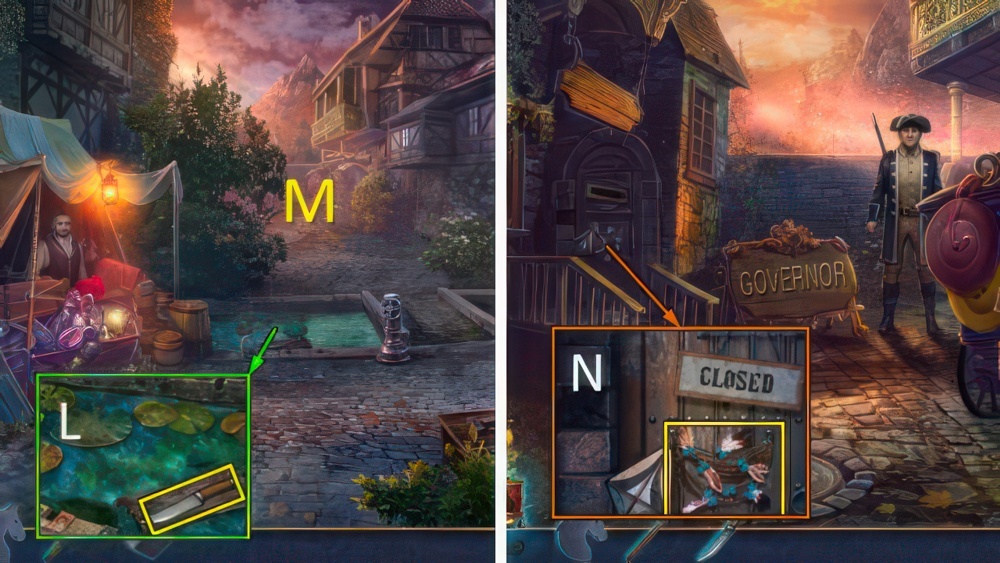
- Go (J).
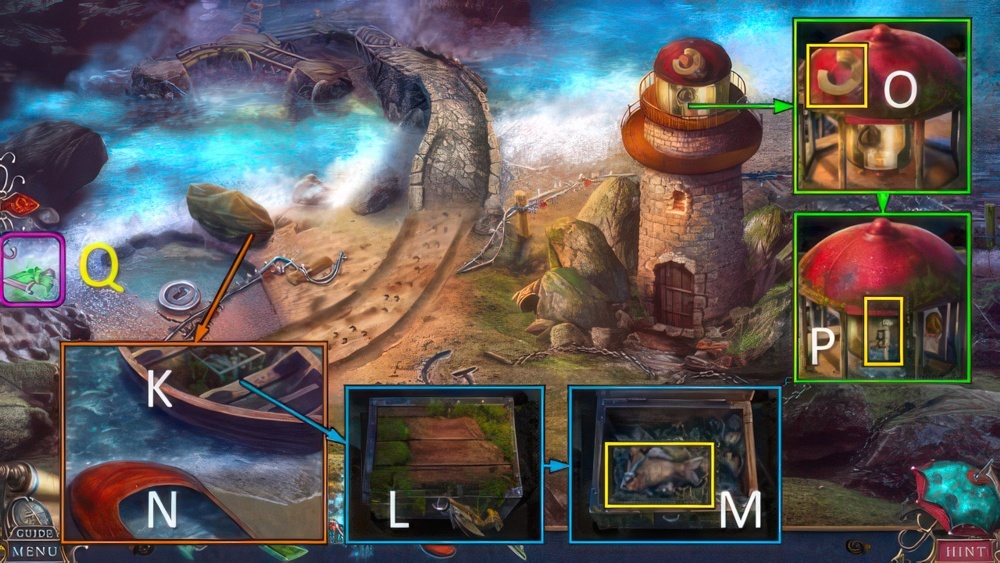
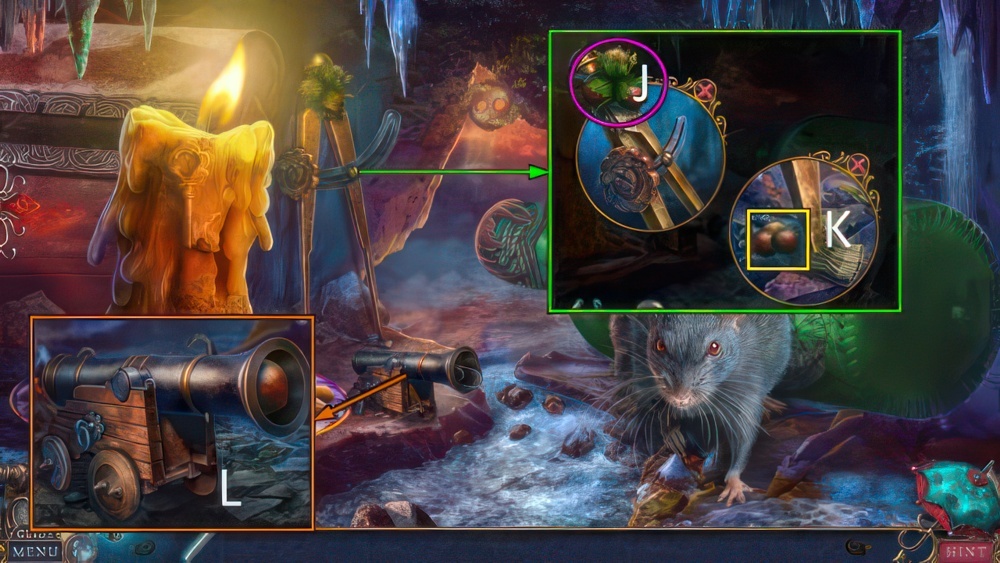
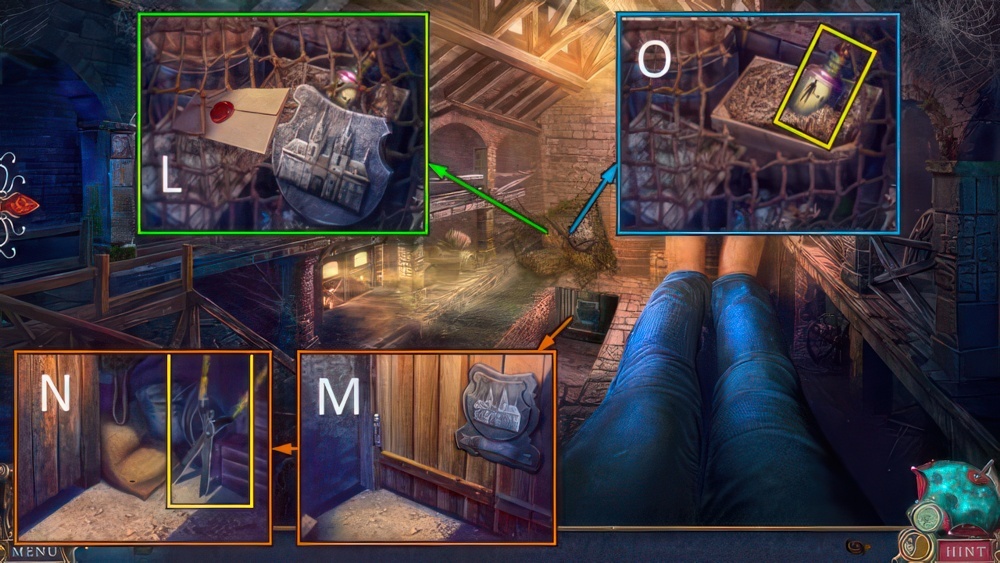
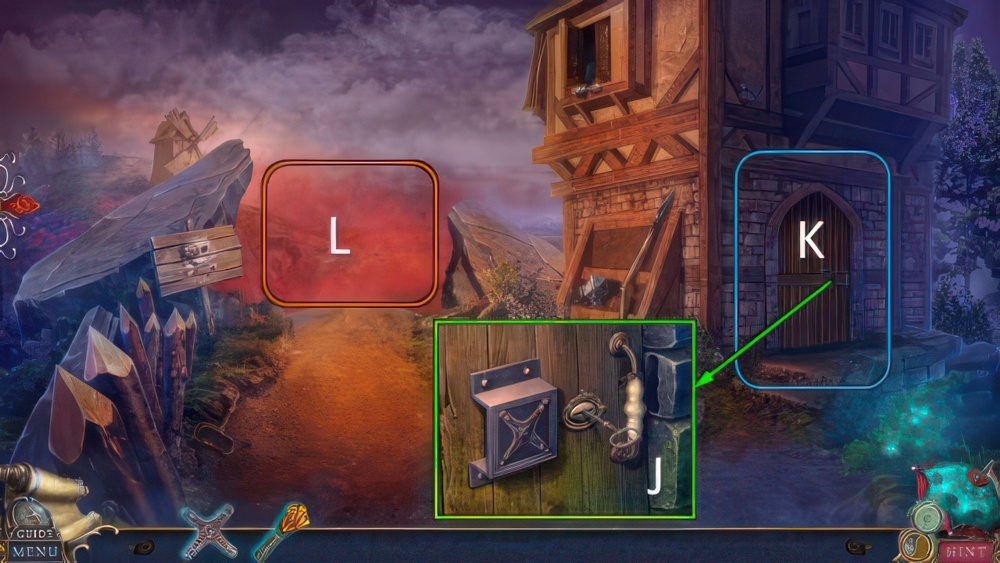
- Remove tarp (K).
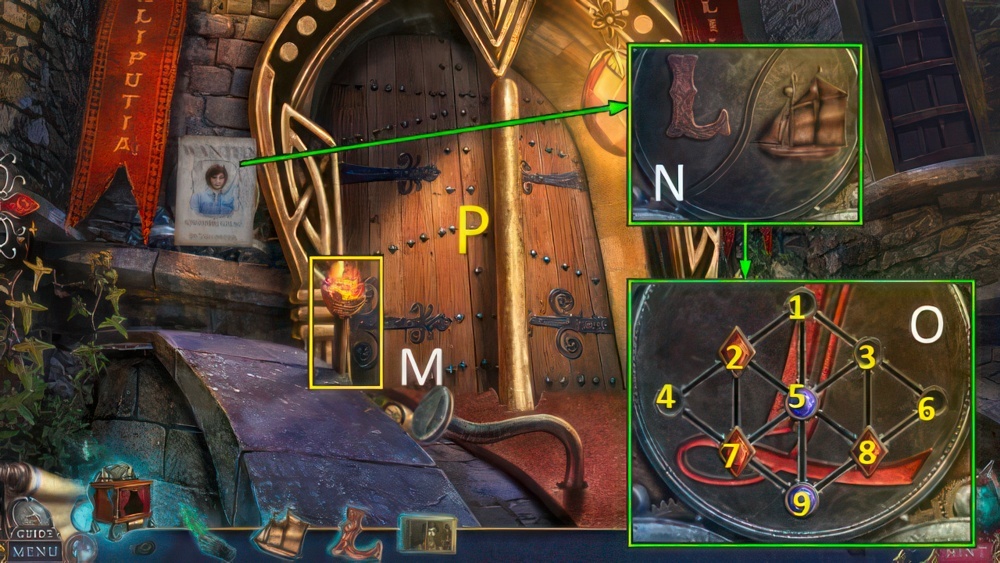
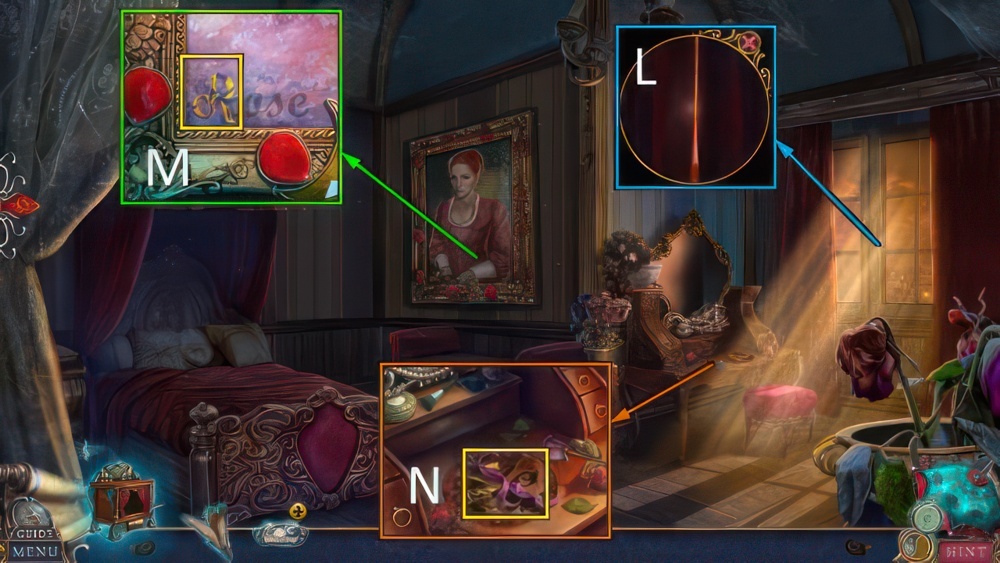
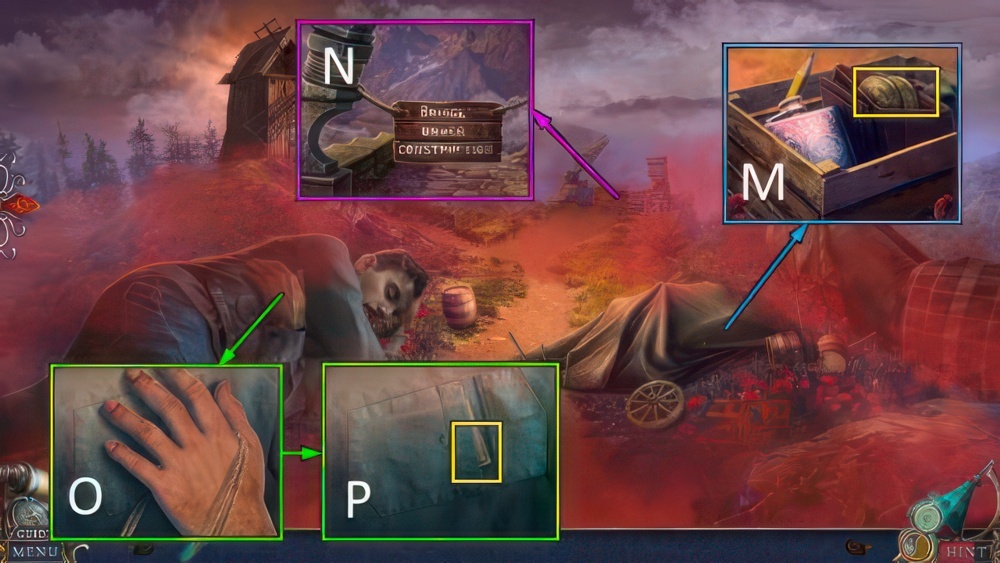
- Use FIN KEY (L), take DRIED FISH (M).
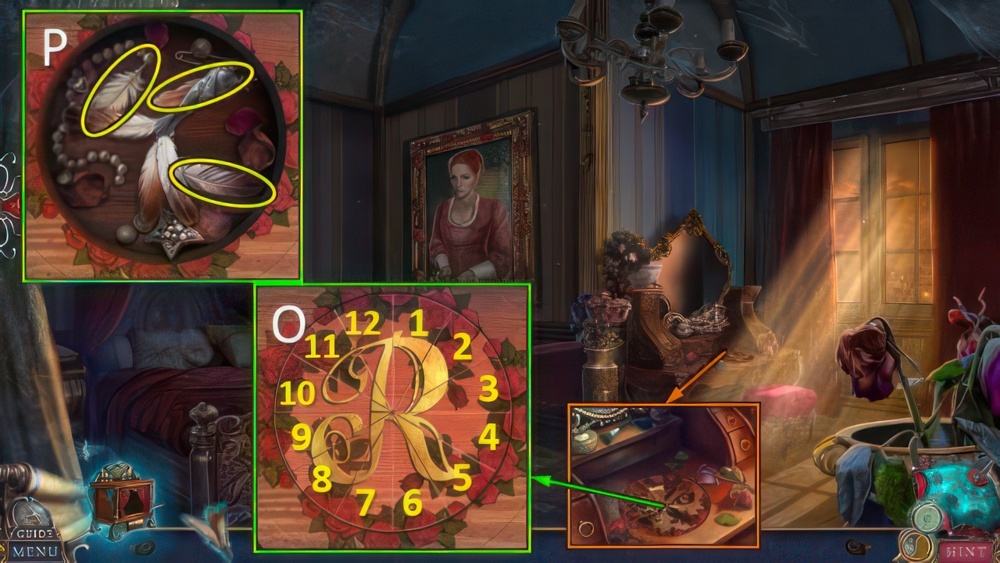
- Take WATER with SHOE (N).
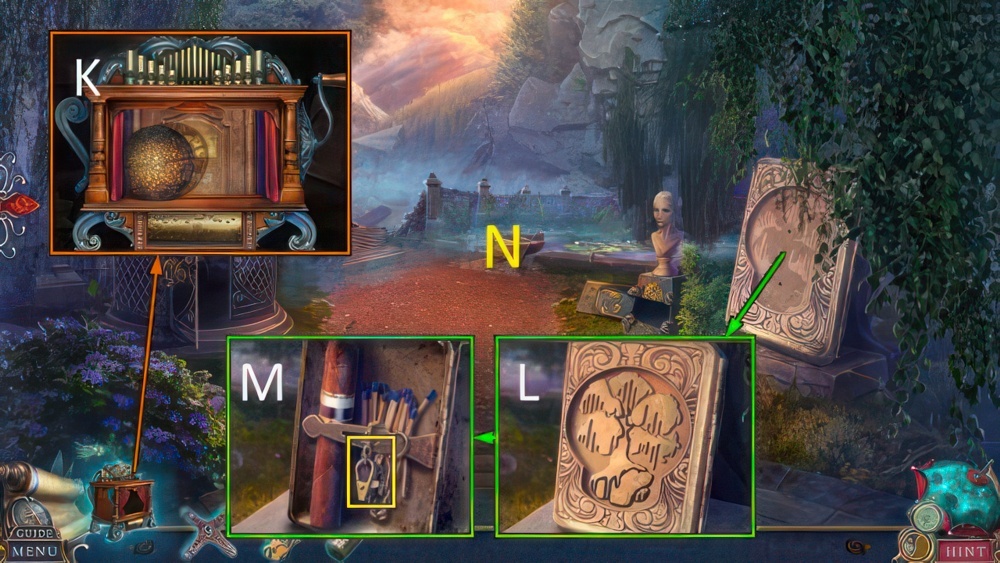
- Access LILIPUTIAN DONKEY for puzzle, receive METAL BUTTON 1/3.
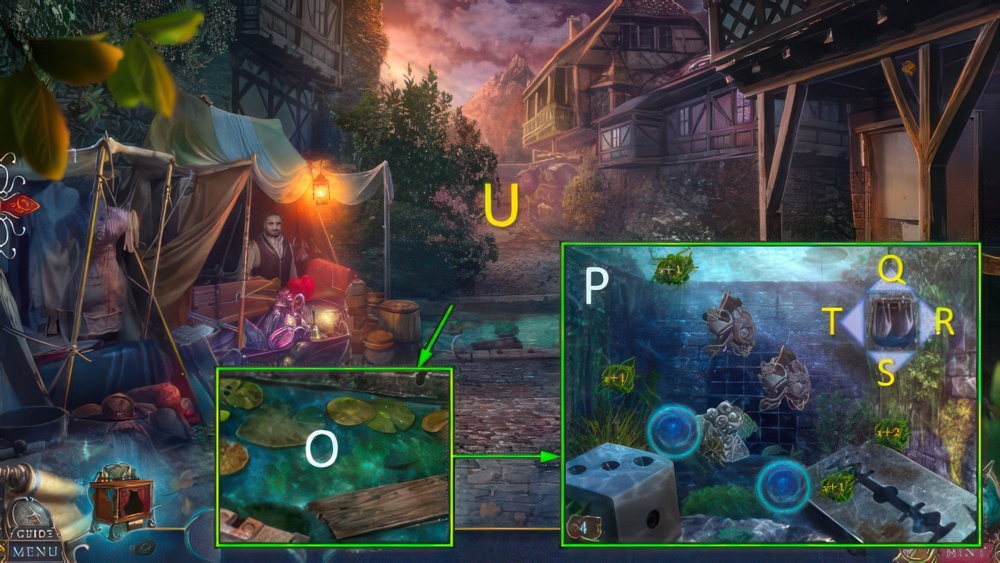
- Take METAL BUTTON 2/3, place SHIP FIGURINE (O).
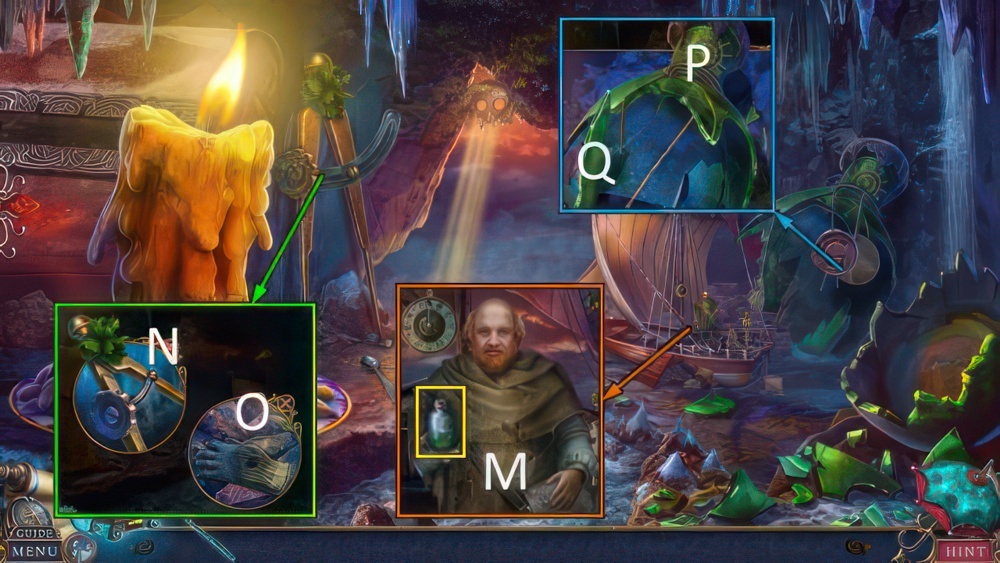
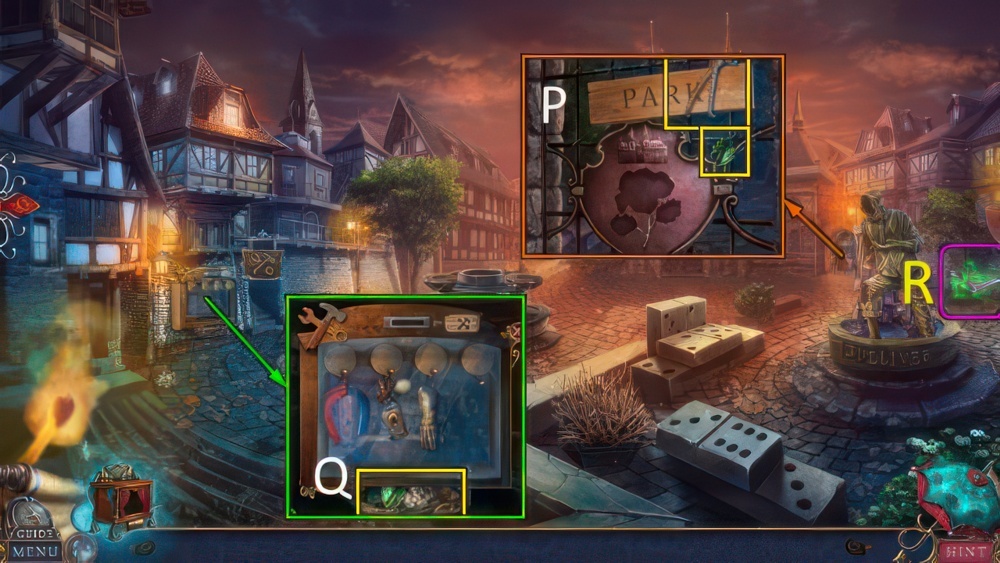
- Use WATER, take OIL (P).
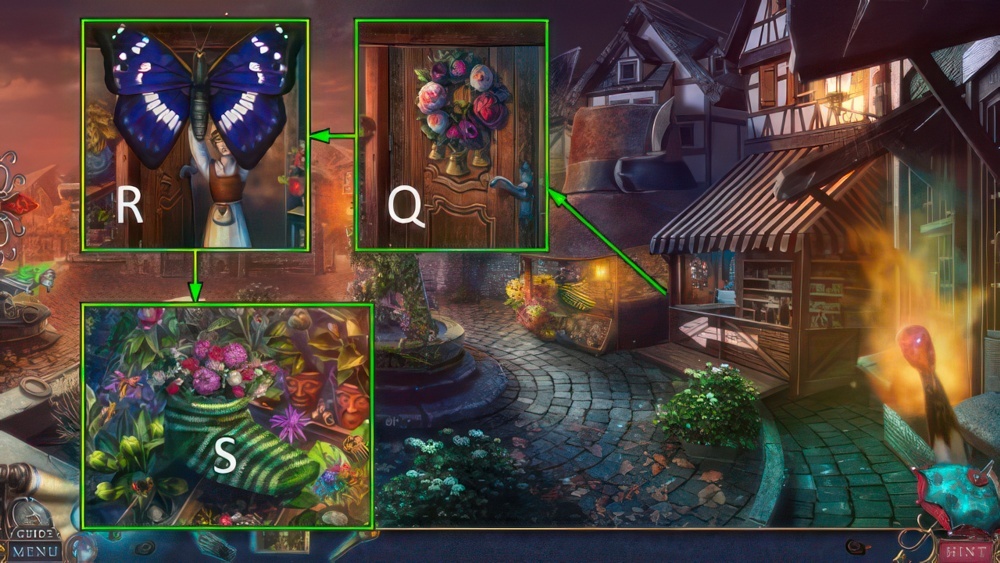
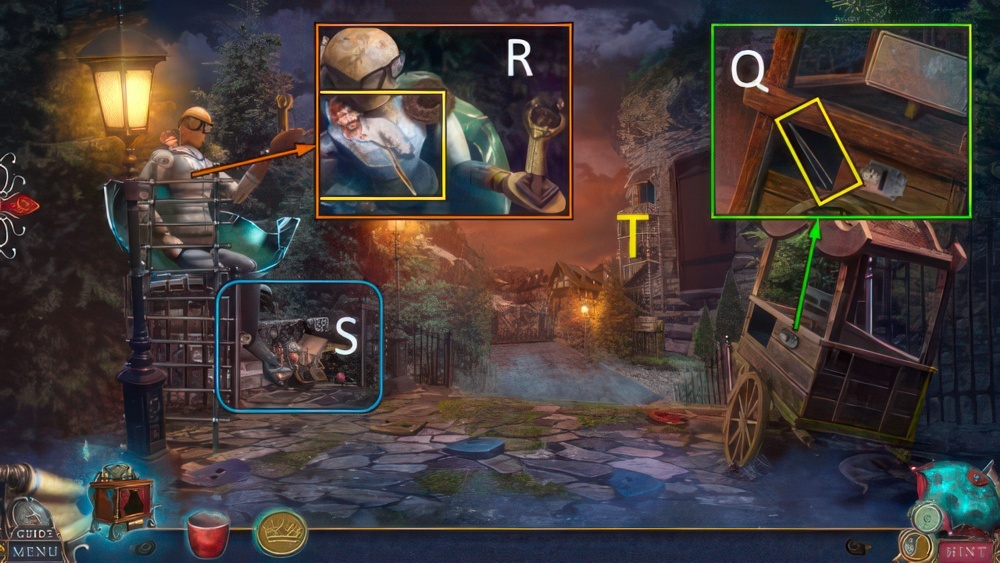
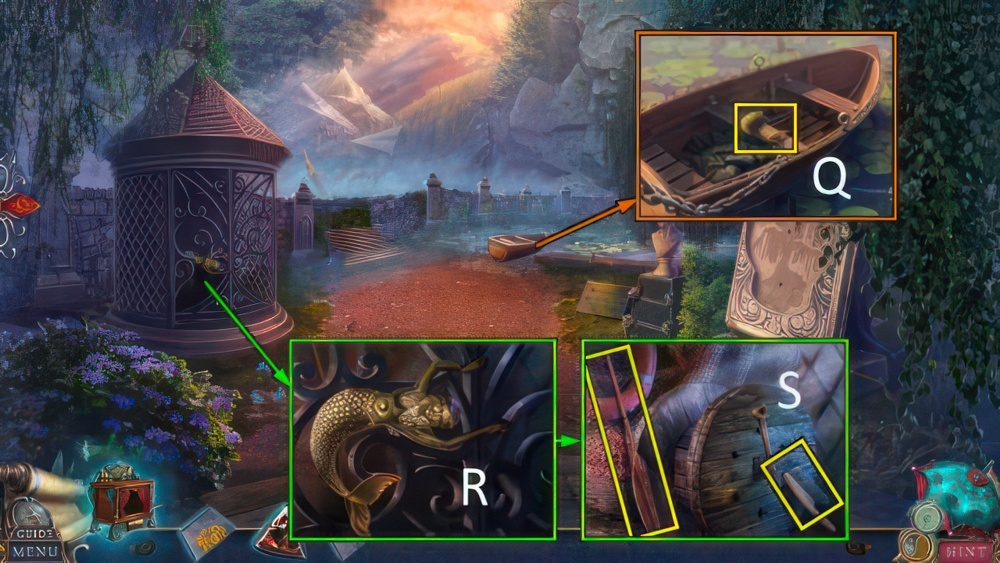
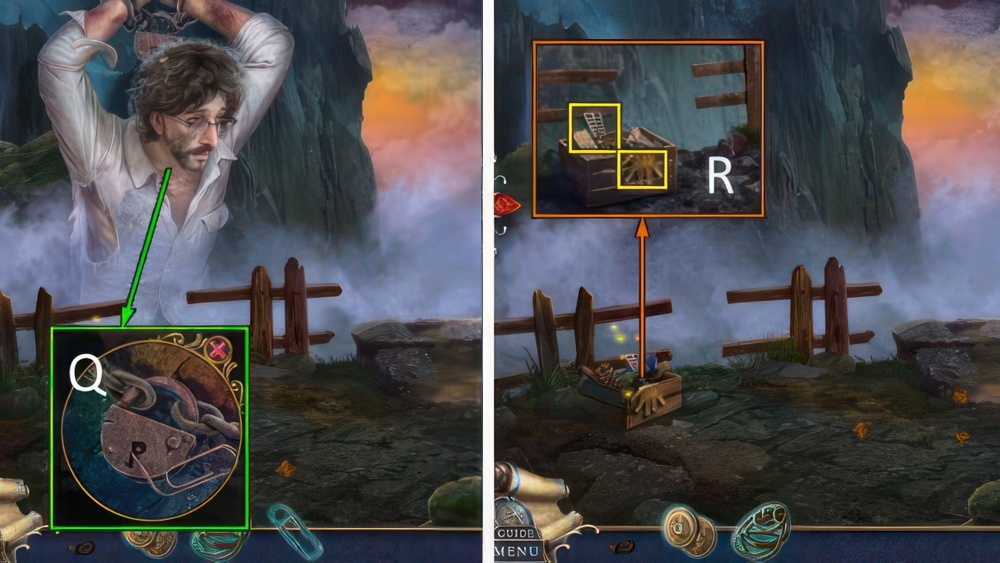
- Go (Q).
- Offer DRIED FISH.
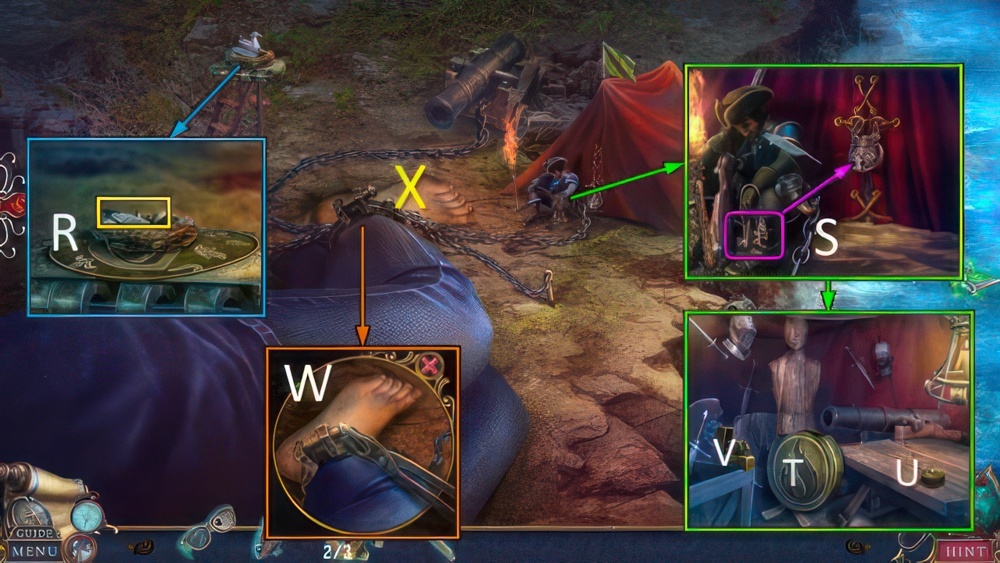
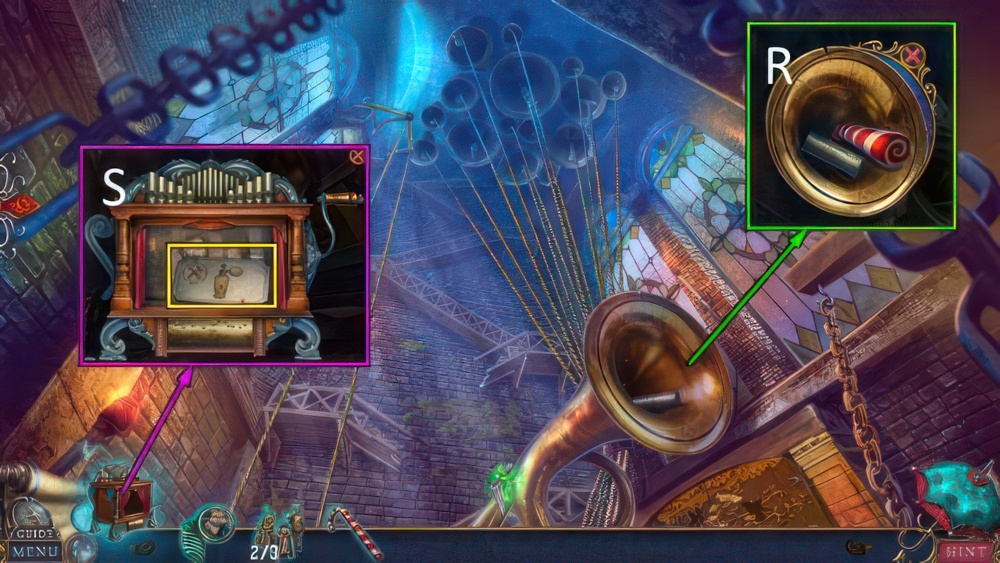
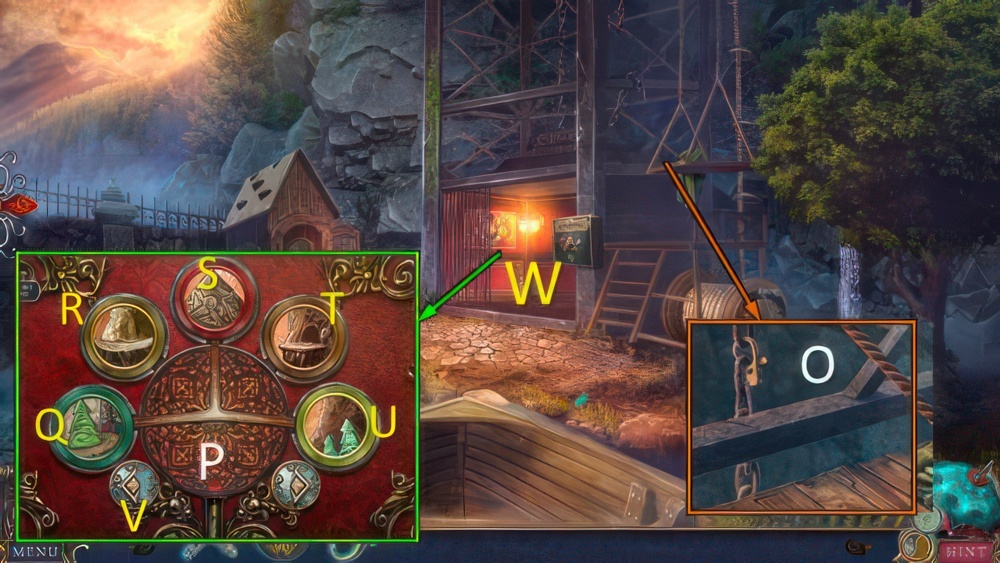
- Take FEATHER and BOX (R).
- Use FEATHER.
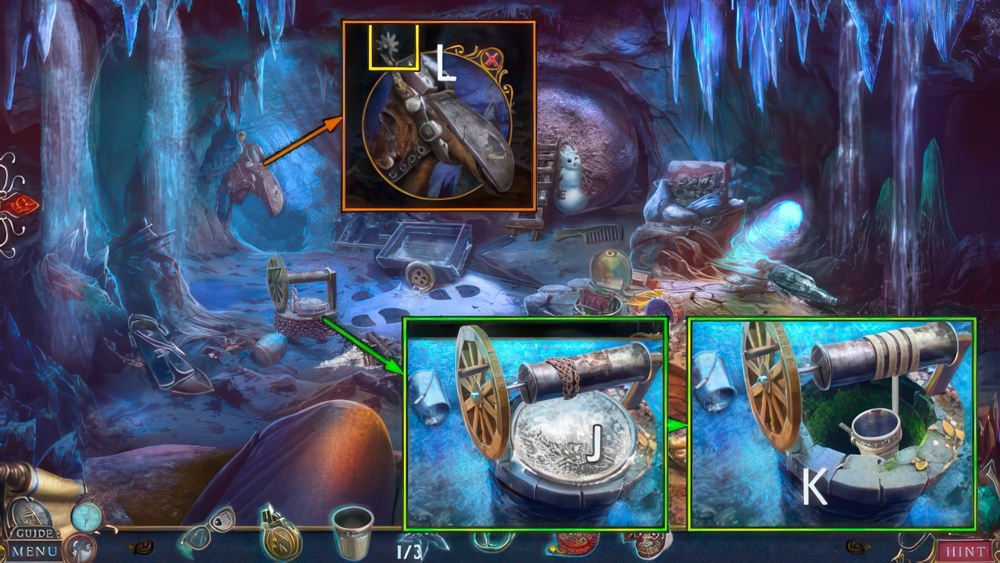
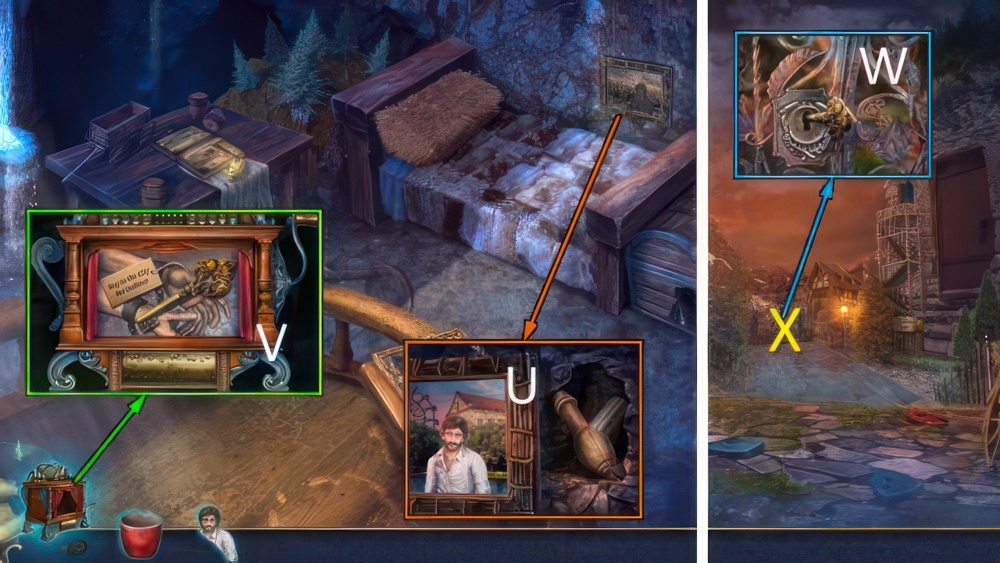
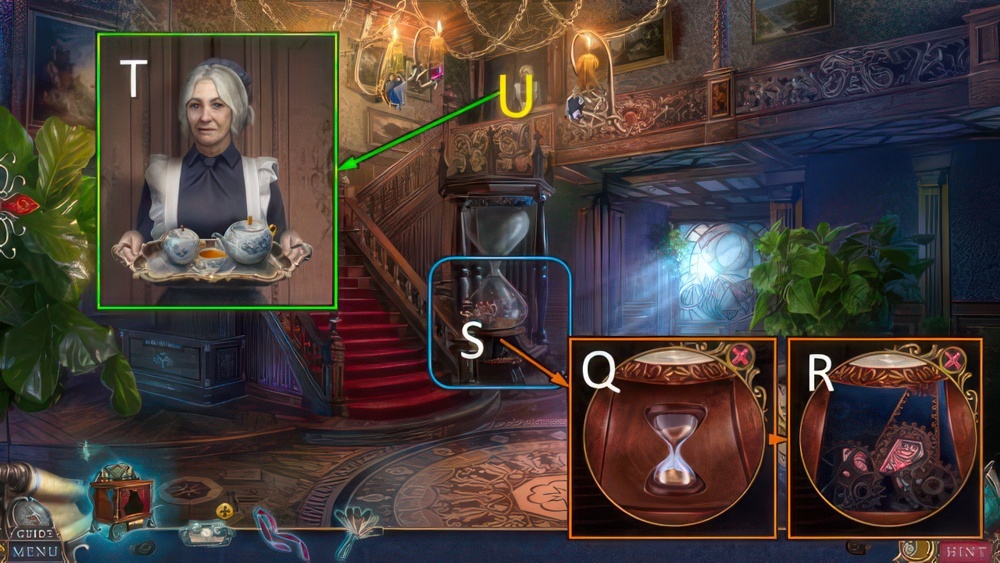
- Use keys (S).
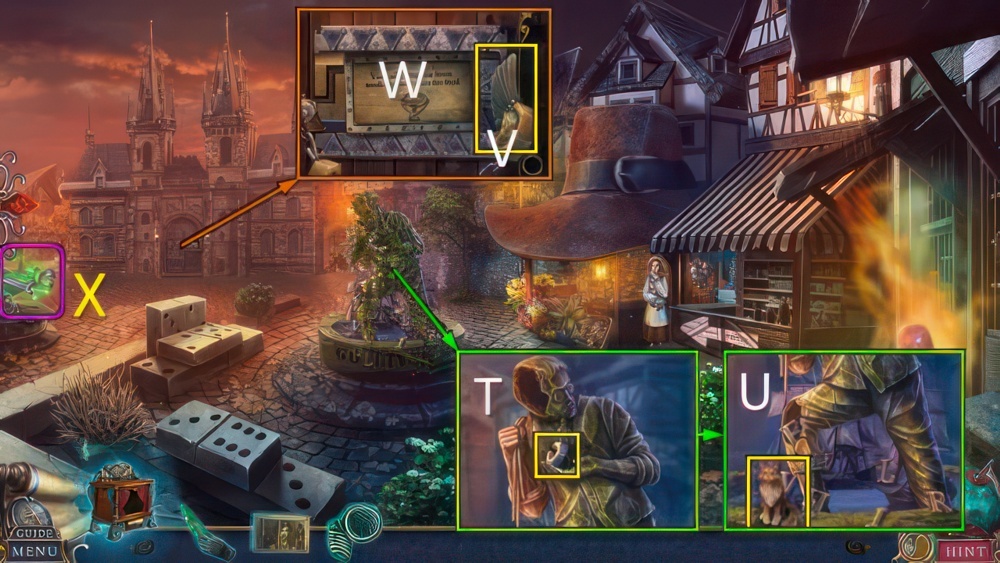
- Move reservoir (T).
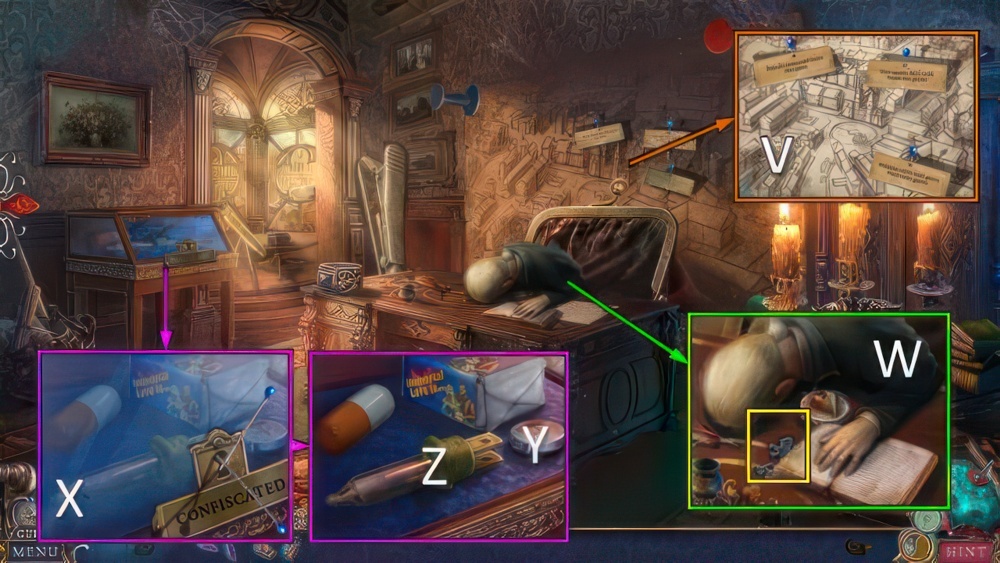
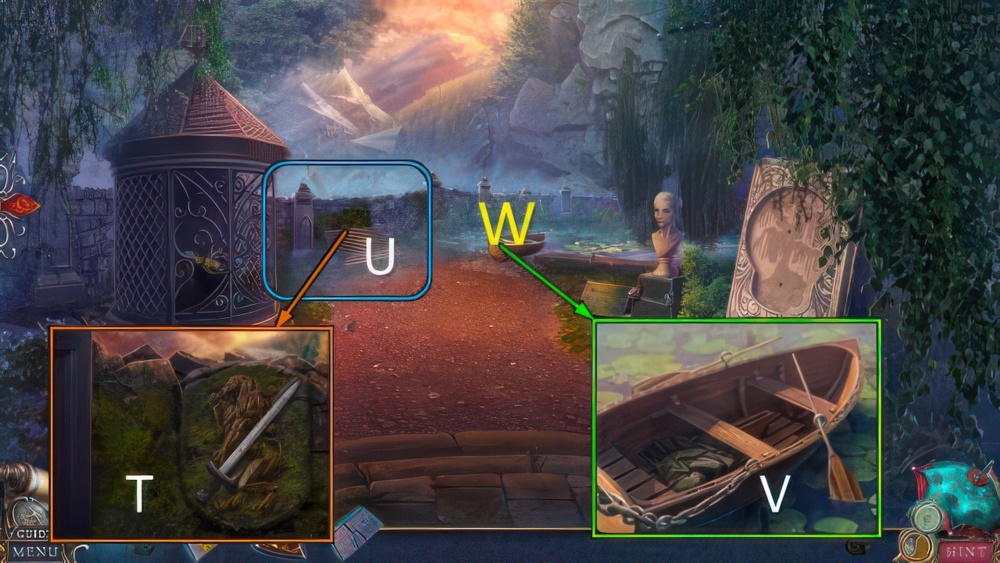
- Drape, note, wheel (U), and top (V), use OIL.
- Take LIGHTER and METAL BUTTONS 3/3.
- METAL BUTTONS on BOX, spell GULLIVER.
- Take THIMBLE and CLIPPERS.
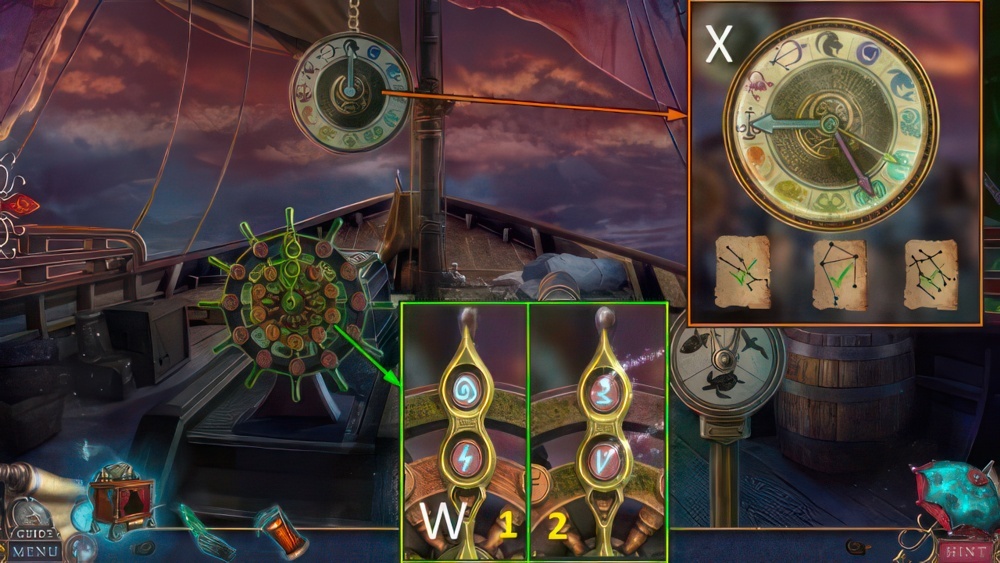
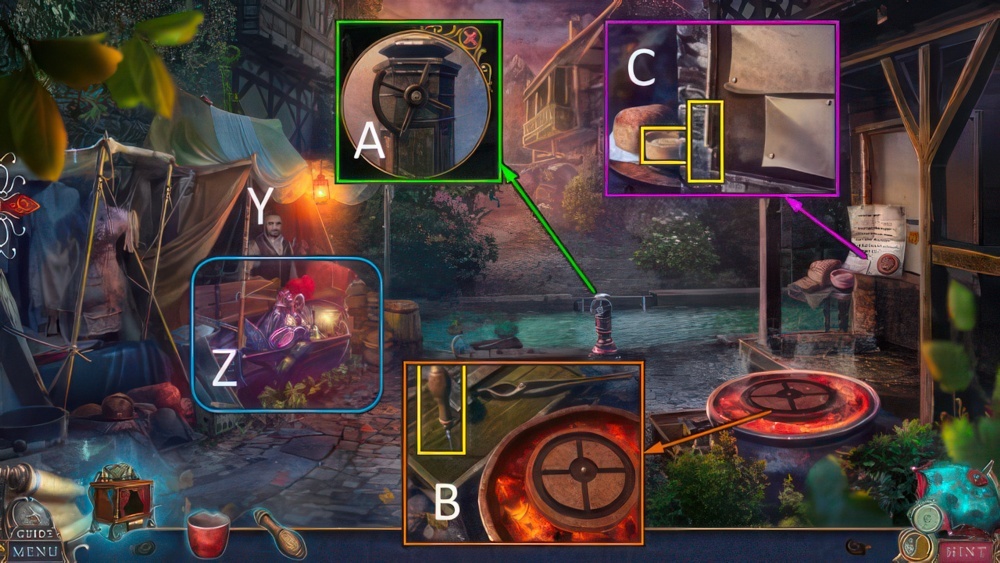
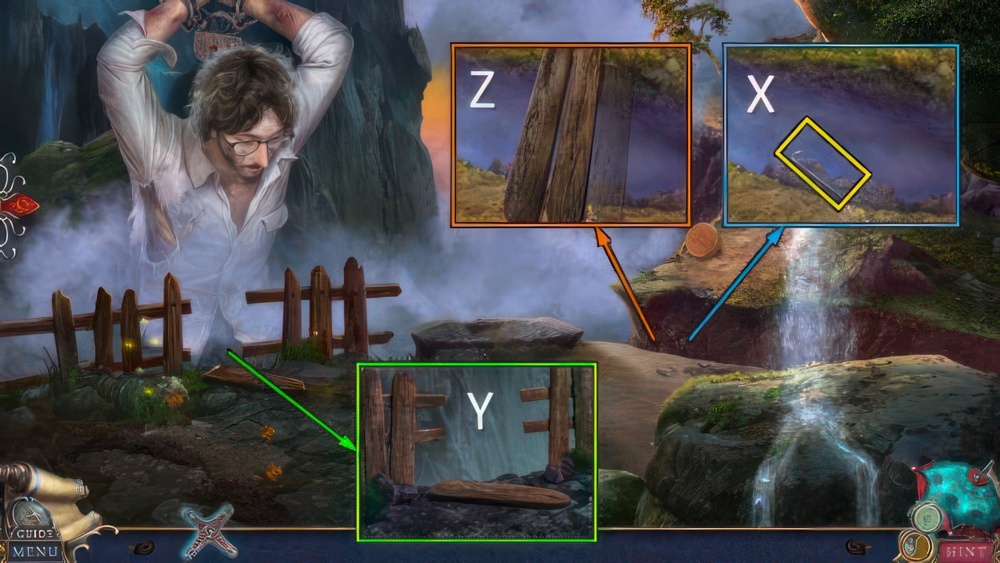
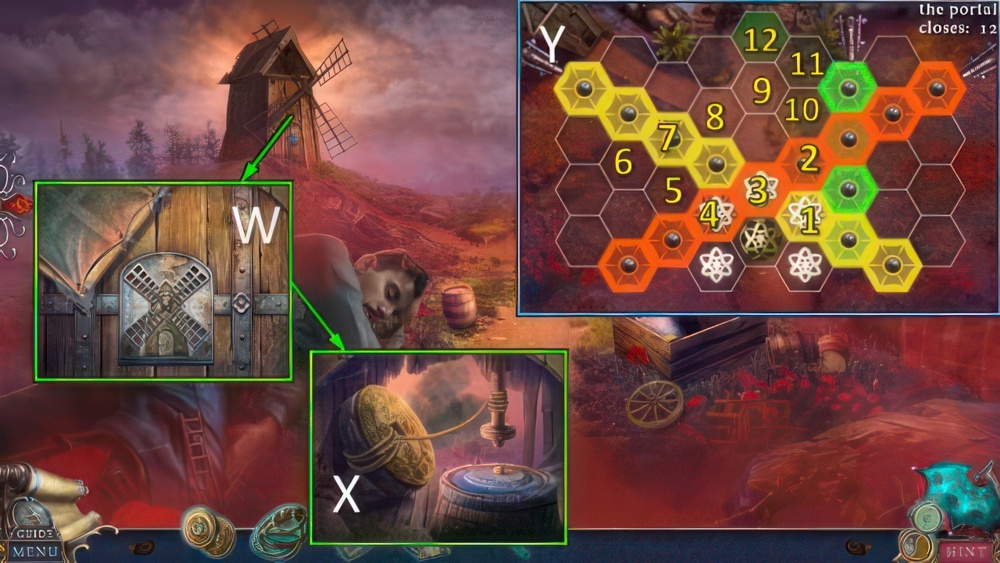
- Use CLIPPERS (W).
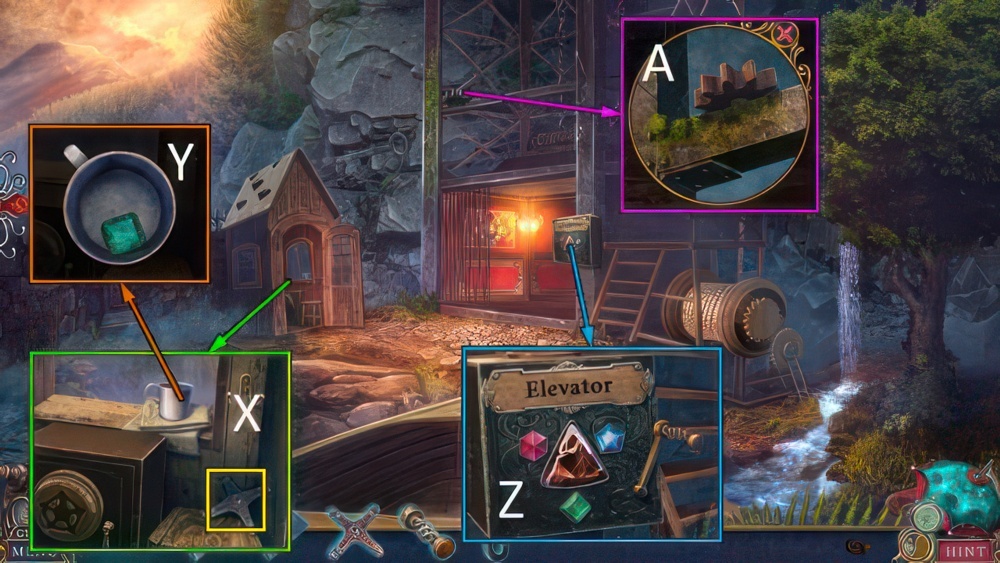
- Move (X).
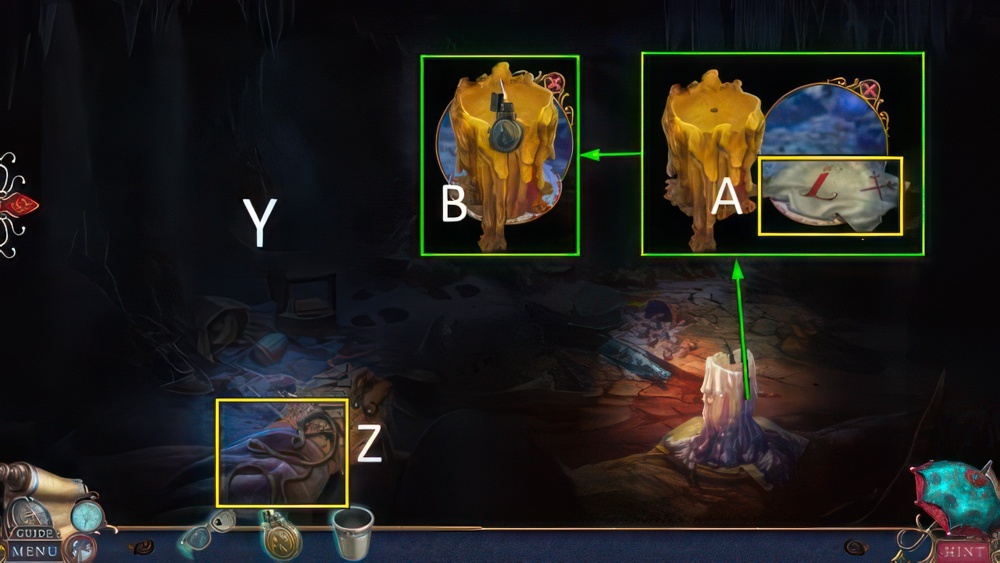
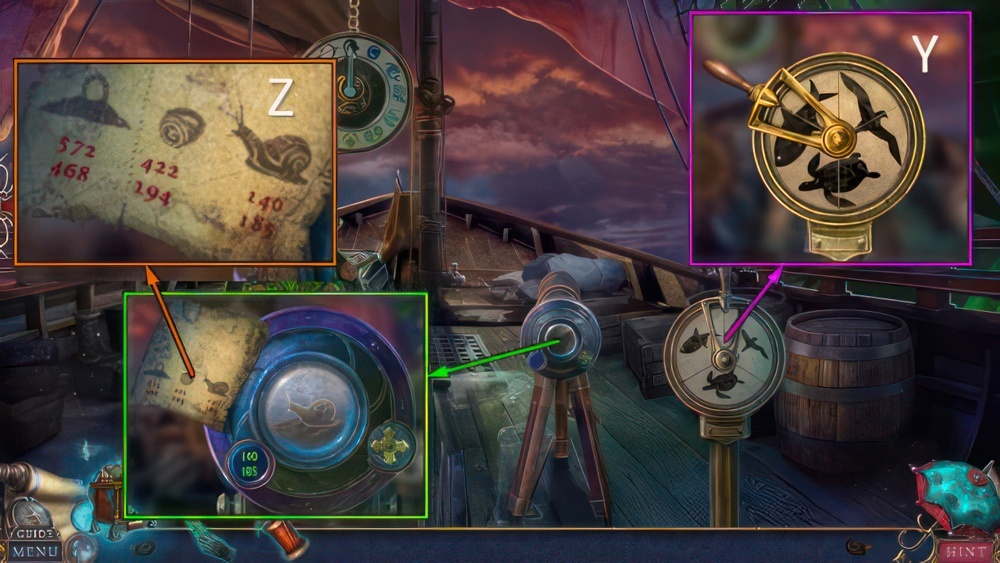
- Use LIGHTER (Y).
- Take WICK (Z).
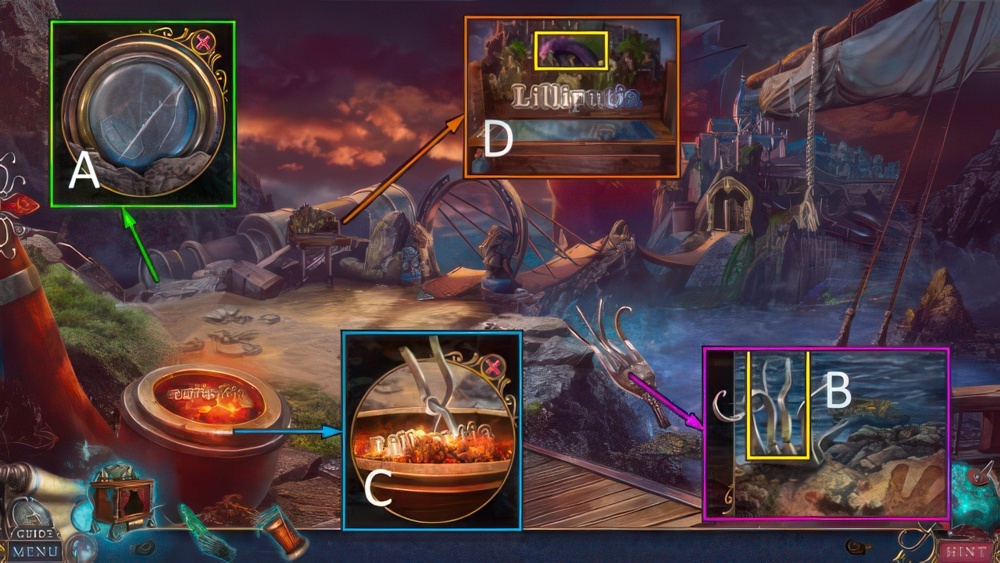
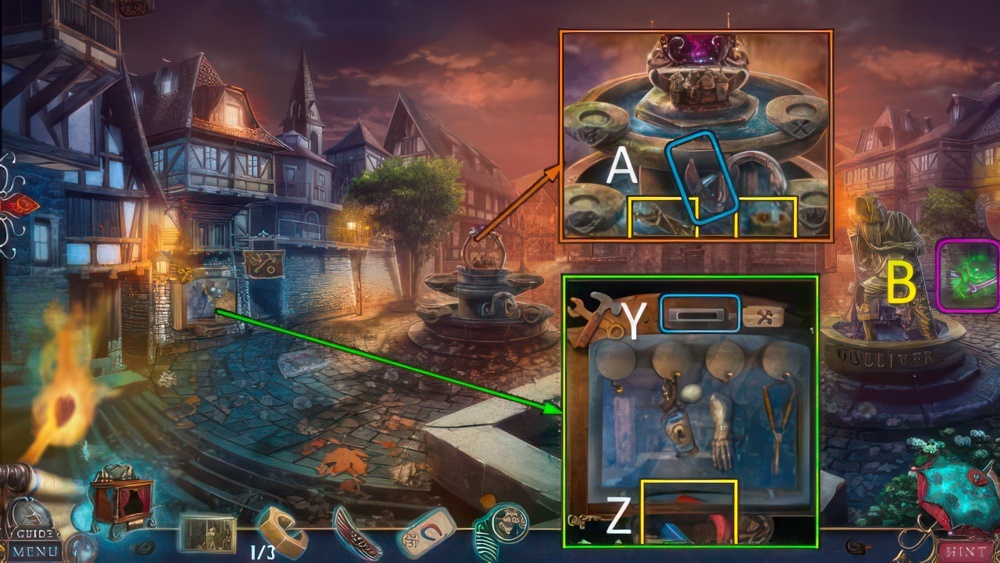
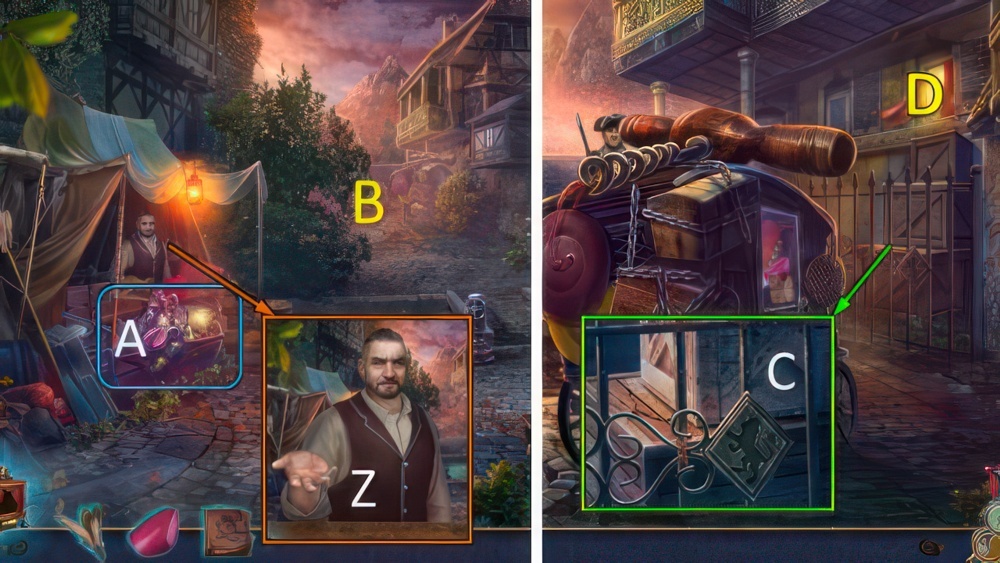
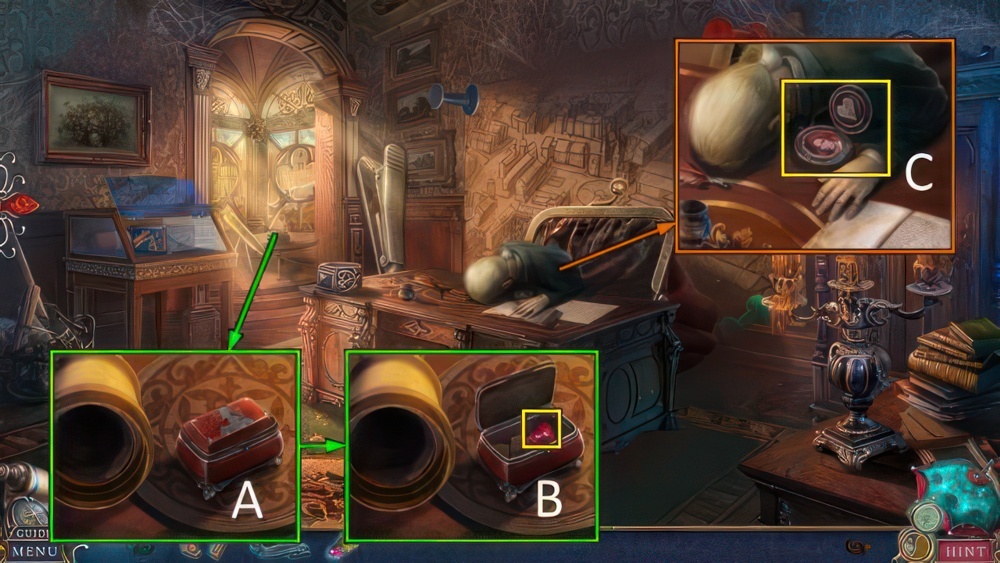
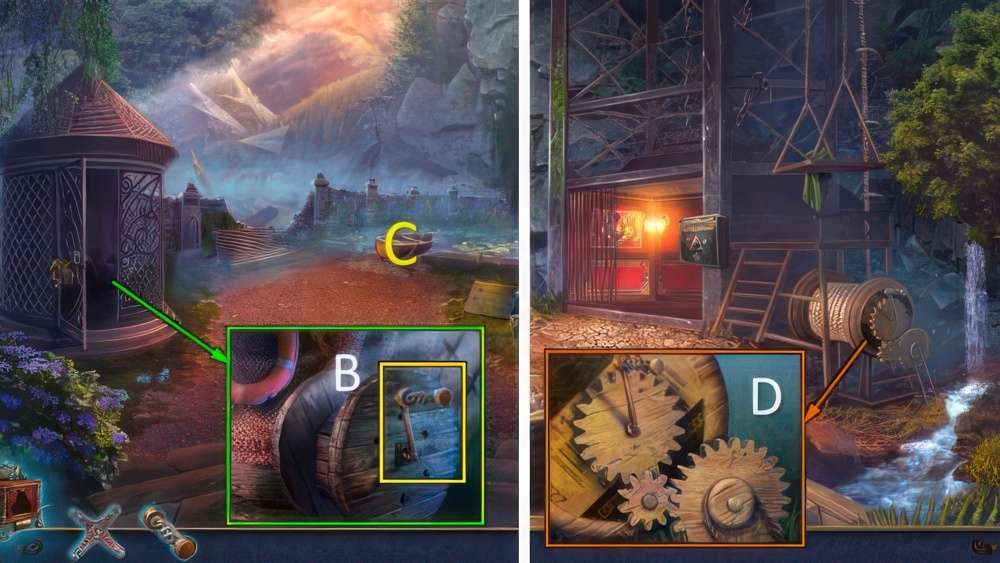
- Take FLAG (A).
- Place WICK and LIGHTER (B).
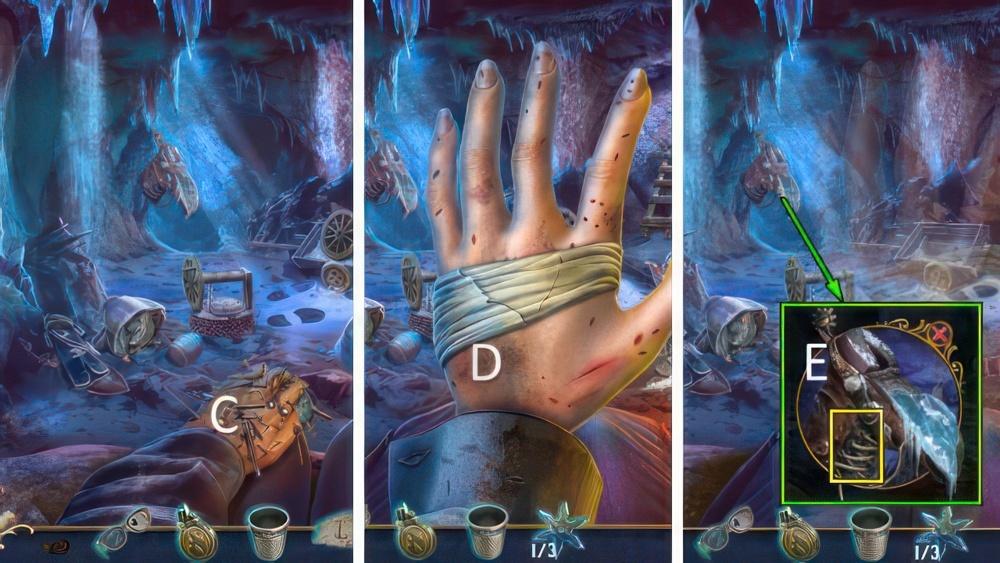
- Use GLASSES (C).
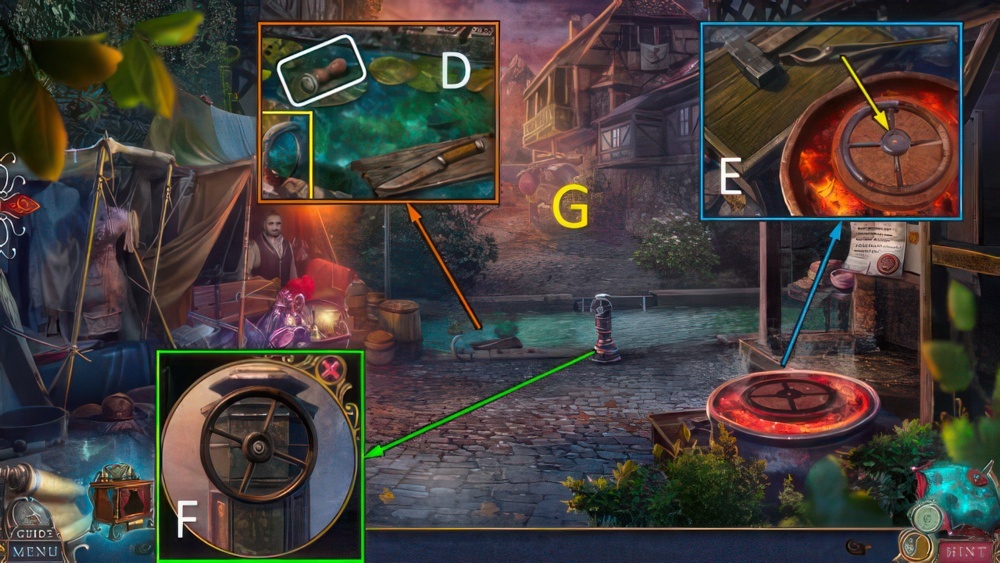
- Play puzzle, receive THROWING STAR 1/3.
- Place FLAG (D).
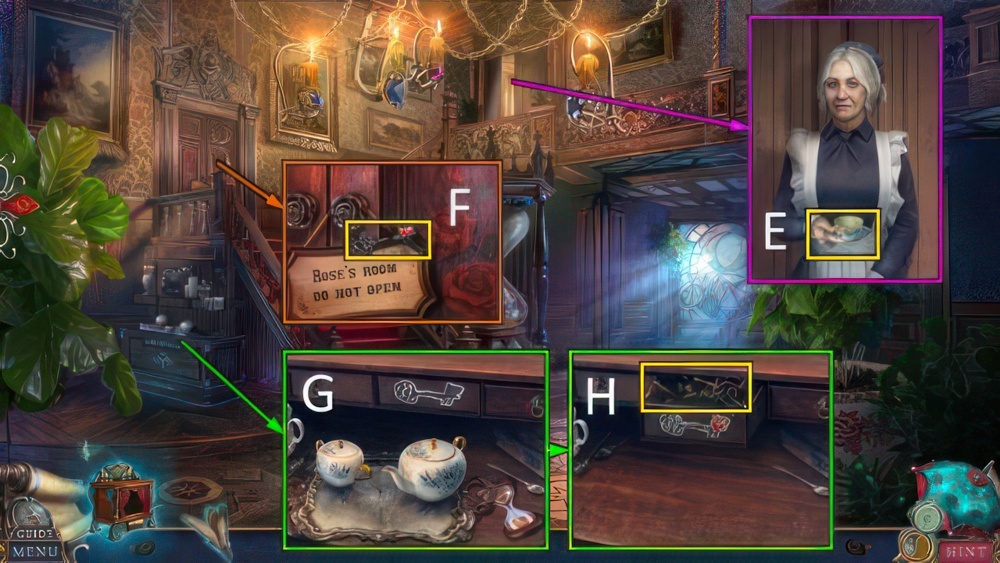
- Take SHOELACE (E).
- Move items, take TEAPOT (F).
- KEY from TEAPOT.
- Use KEY, take CHEESE (G).
- Offer CHEESE (H).
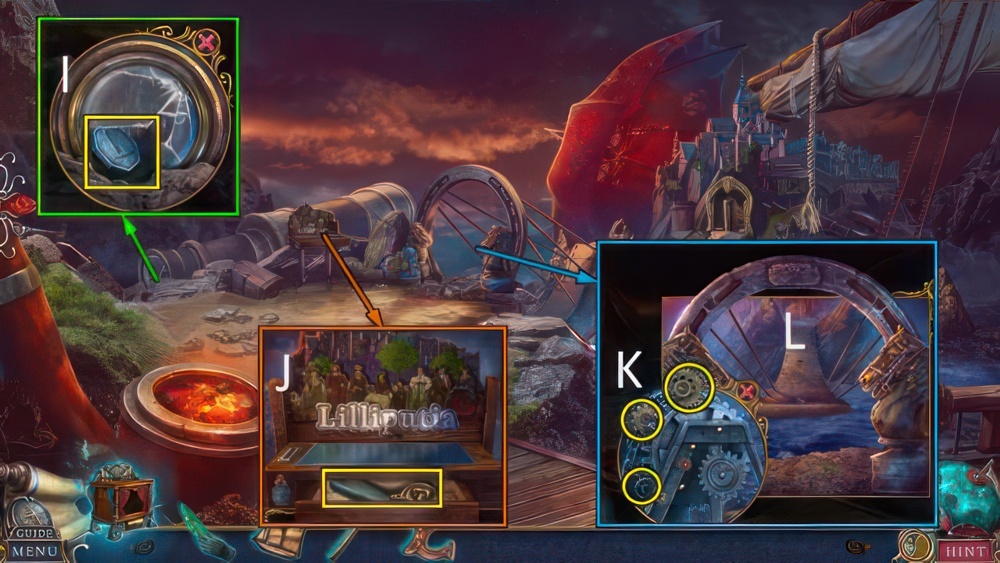
- Use LIGHTER, take CODE (I).
- Take COIN (J).
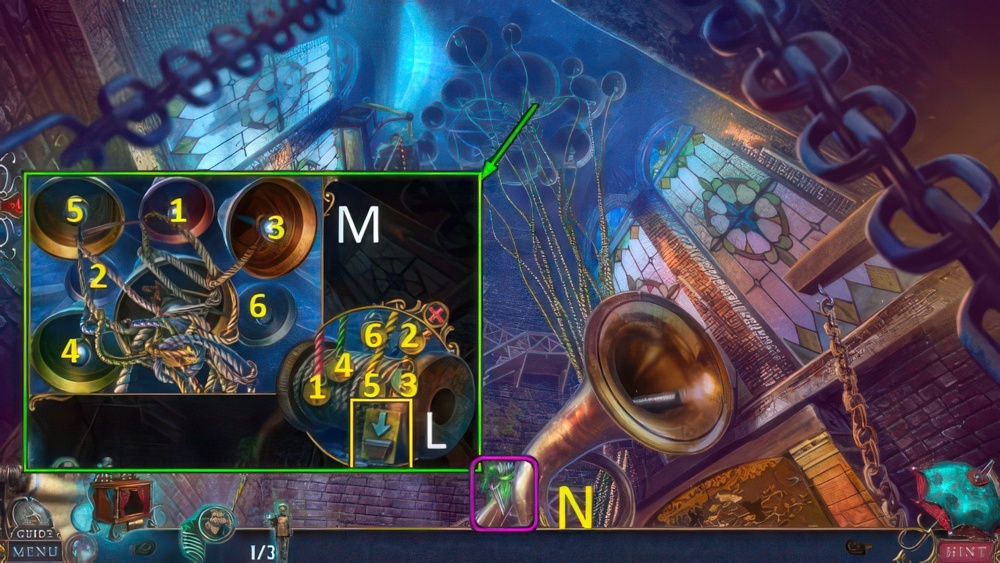
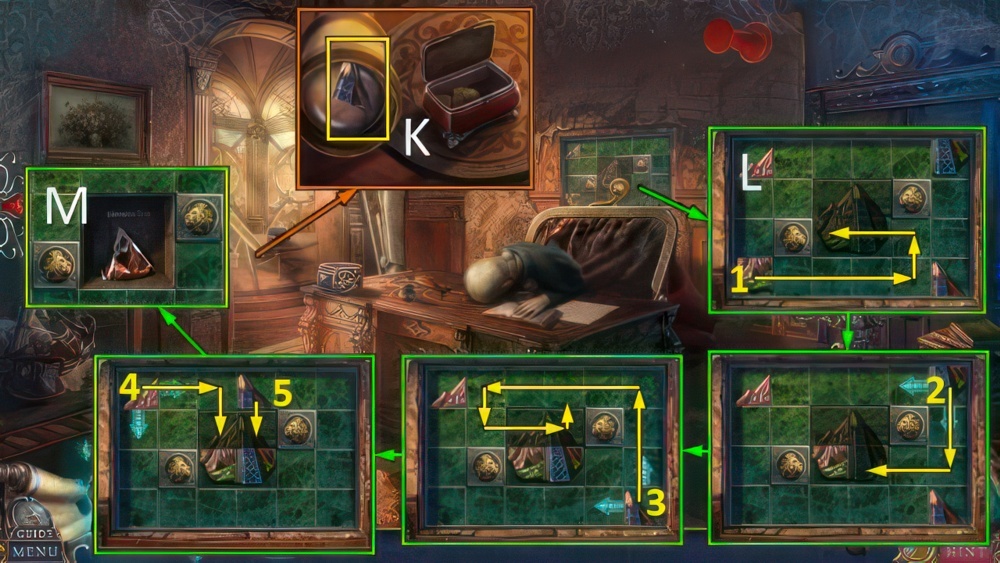
- Place SHOELACE and THIMBLE, turn handle and take WATER (K).
- Use COIN, take IMPROVISED GEARS 2/3 (L).
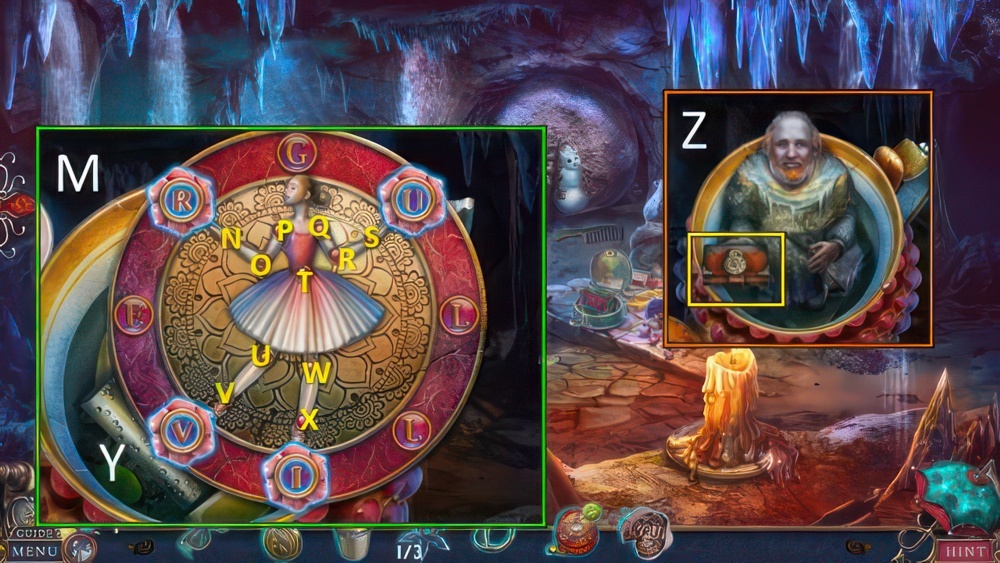
- CODE on TEAPOT (M).
- Move the metal limbs so they land on the correct letters.
- Select the circles the on limbs to move them.
- Correct letters turn blue when landed on.
- Walkthrough: T×3-O×3-N×3-Q-S-U-W-X.
- Take CYLINDER (Y).
- Talk, take WARMING TEA RECIPE (Z).
- GLASSES on WARMING TEA RECIPE, take BARREL ORGAN HANDLE.
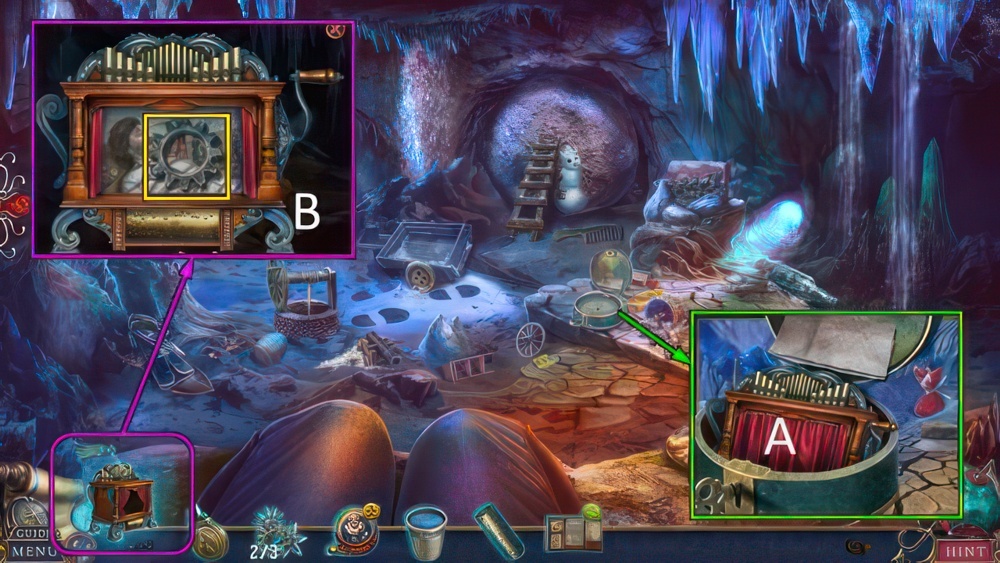
- Place BARREL ORGAN HANDLE, take organ (A).
- Place and play CYLINDER, take IMPROVISED GEARS 3/3 (B).
- Move rocks, find ×6 BERRIES (C).
- Place IMPROVISED GEARS, walkthrough (D).
- Take ×3 DRIED HERBS from book (E).
- WATER, BERRIES and DRIED HERBS on WARMING TEA RECIPE.
- Use LIGHTER.
- Take WARMING TEA.
- WARMING TEA on TEAPOT.
- Talk.
- Take SHRINKING POTION (F).
- Use SHRINKING POTION.
- Talk.
- Take MATCH (G).
- Take PAPER CLIP (H).
- Find items, take BUTTON (I).
- Turn PAPER CLIP into HARPOON.
- Use HARPOON ×3 (J).
- Take HAZELNUTS (K).
- Place BUTTON and HAZELNUTS (L).
- Turn, and use MATCH.
- Talk, take ACID (M).
- Use ACID (N).
- Take GLOVE (O).
- Move items, use HARPOON.
- Take STEERING WHEEL (P).
- Take KNIFE with GLOVE (Q).

- Use spoon and KNIFE (R).
- Take NEEDLE AND THREAD and SPYGLASS (S).
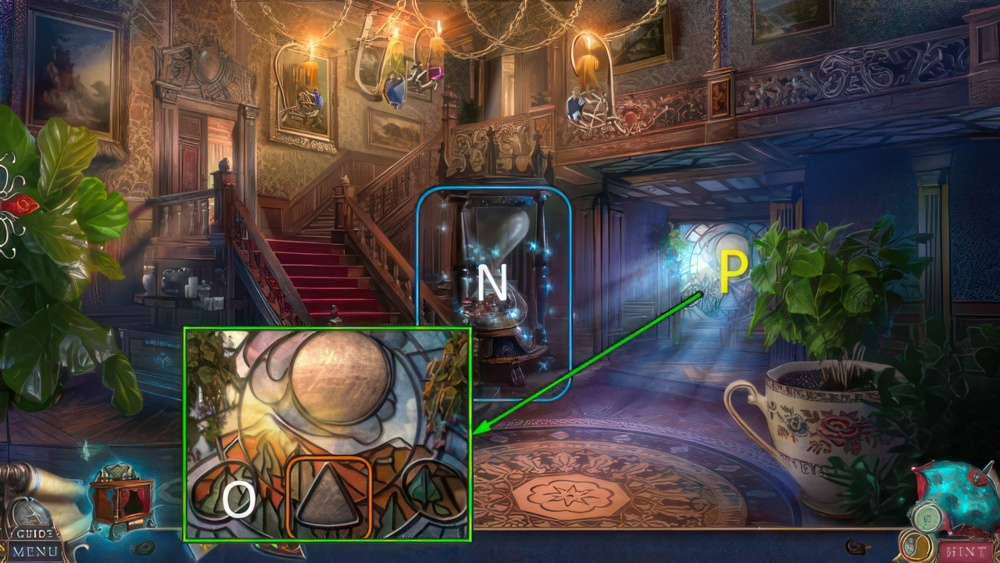
- Place STEERING WHEEL (T) and SPYGLASS (U).
- Take note (V).
- Rotate the wheels so they land on the two symbols that create the pattern on the right when combined.
- Select the wheels to rotate them.
- Walkthrough 1 (W).
- Select each constellation clue, and then select the zodiac sign on the compass that matches it.
- Walkthrough 2 (X).
- Swap the segments to complete three images.
- Select two segments to swap them.
- Note that the top left segment is already placed correctly.
- Walkthrough 3 (Y).
- Locate the three objects shown on the map with the lens and select them.
- Adjust the lens using the arrows.
- Each object will have a coordinate you need.
- Walkthrough 4 (Z).
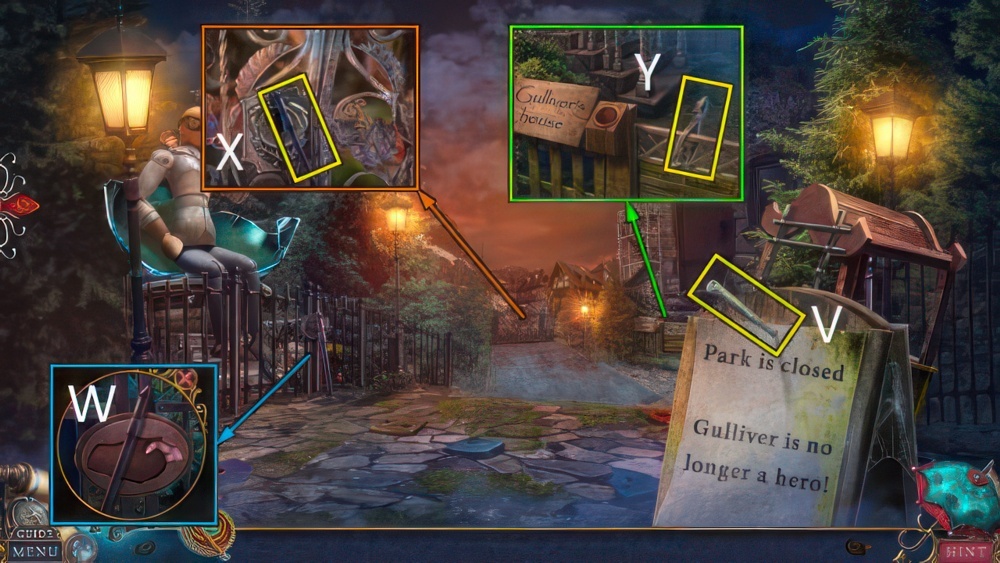
- Inspect (A).
- Take IMPROVISED TONGS (B).
- Take NAMEPLATE with IMPROVISED TONGS (C).
- Replace NAMEPLATE, take ELASTIC (D).

- Place ELASTIC, select rock (E).
- Move net, take METAL SHIP and TORN FISHING NET (F).
- NEEDLE AND THREAD on TORN FISHING NET, take FISHING NET.
- Inspect.
- Use FISHING NET, take HAMMER (G).
- Take METAL LETTER (H).
- Use HAMMER, take NEWSPAPER TOKEN (I).
- Use NEWSPAPER TOKEN, take GULLIVER’S PORTRAIT and MECHANISM HANDLE (J).
- Move gears, use MECHANISM HANDLE (K).
- Go (L).
- Take TORCH (M).
- Place METAL LETTER and METAL SHIP (N).
- Walkthrough (O): (9-4)-(4-1)-(8-2)-(1-4).
- Go (P).
- Inspect (Q).
- Use TORCH (R).
- Take BAG (S).
- Use KNIFE, take LOCK BUTTON 1/3 (T).
- Use BAG, take CAT IN BAG (U).
- Take WING (V), inspect (W).
- Go (X).
- TOOL SHOP TICKET and CAT from CAT IN BAG.
- Use TOOL SHOP TICKET (Y).
- Take MAGNET (Z).
- Use WING, take statuette and LOCK BUTTONS 2/3 (A).
- Go (B).
- Place MAGNET for puzzle (C), receive METAL HANDLE.
- Use METAL HANDLE (D).
- Show GULLIVER’S PORTRAIT, take LOCK BUTTONS 3/3 (E).
- Move buttons and place LOCK BUTTONS (F).
- Create a path for the clasp to move from the left to the right side of the lock.
- Select the arrows to rotate each button and change its image.
- Walkthrough (G).
- Go (H).
- Take STATUETTE 1/3 (I).
- Take STATUETTES 2/3 (J).
- Go (K).
- Take LIFT MECHANISM PLATE (L).
- Match number plates and cells to untangle the ropes.
- Note the colors of ropes and bells.
- Walkthrough (M).
- Receive STATUETTES 3/3.
- Go (N).

- Place LIFT MECHANISM PLATE (O).
- Take CANDY CANE (P).
- Go (Q).
- Take CYLINDER with CANDY CANE (R).
- Play CYLINDER, take TOOL SHOP TICKET (S).
- Go down and scroll left.

- Use TOOL SHOP TICKET, take BUG SPRAY (T).
- Place STATUETTES.
- Swap (1-2) and (1-3), take MONUMENT LETTER (U).
- Move letters (V).
- Place MONUMENT LETTER, take BIRD FIGURINE 1/2 (W).
- Go (X).
- Use BUG SPRAY, take BIRD FIGURINES 2/2 (Y).
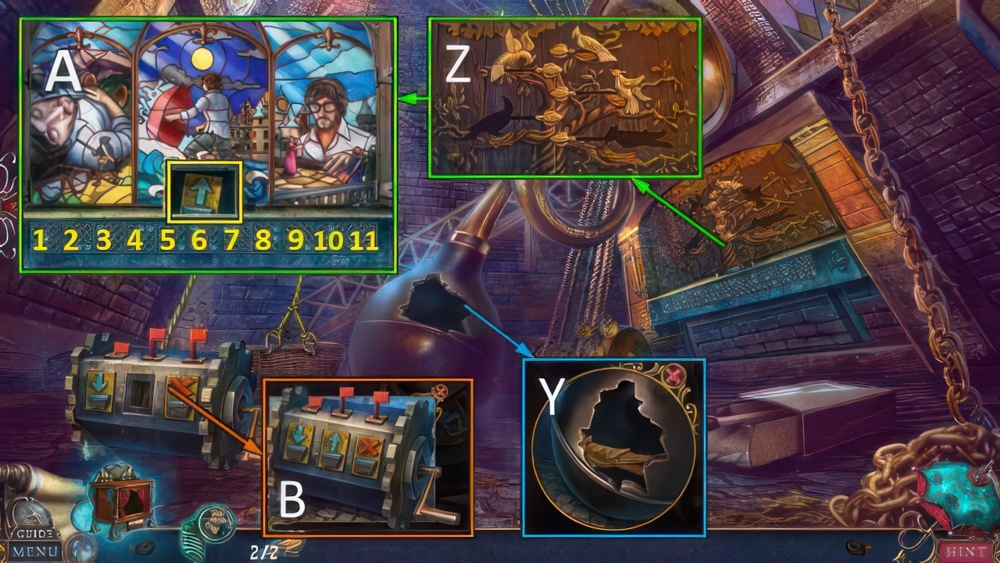
- Place BIRD FIGURINES (Z).
- Reveal all three stained-glass pictures from left to right.
- Select the correct bottom blue buttons to flip over the indicated stained-glass pieces.
- Walkthrough (A): 1-3-8, 2-5-8-10, 3-4-5-7-9-11.
- Take LIFT MECHANISM PLATE.
- Place LIFT MECHANISM PLATE (B).
- Release CAT (C).
- Move coin, view (D).
- Take PITCHFORK and BUCKET (E).
- Take SHOVEL.
- Take WATER with BUCKET (F).
- Use WATER, take CLOTH, PICKAX and HAMMER (G).
- Take RAKE (H).
- Use CLOTH and remove items.
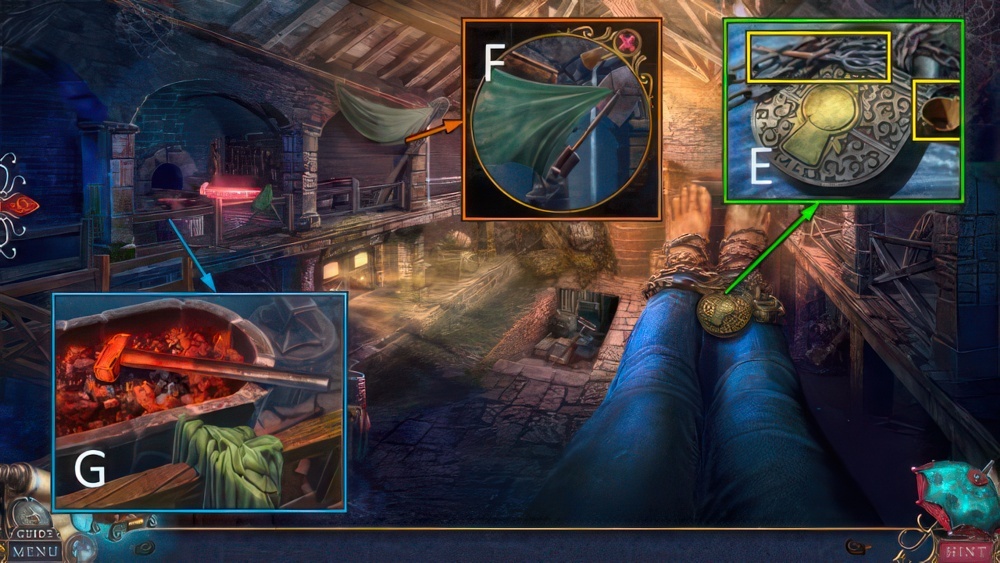
- Take SCYTHE (I).
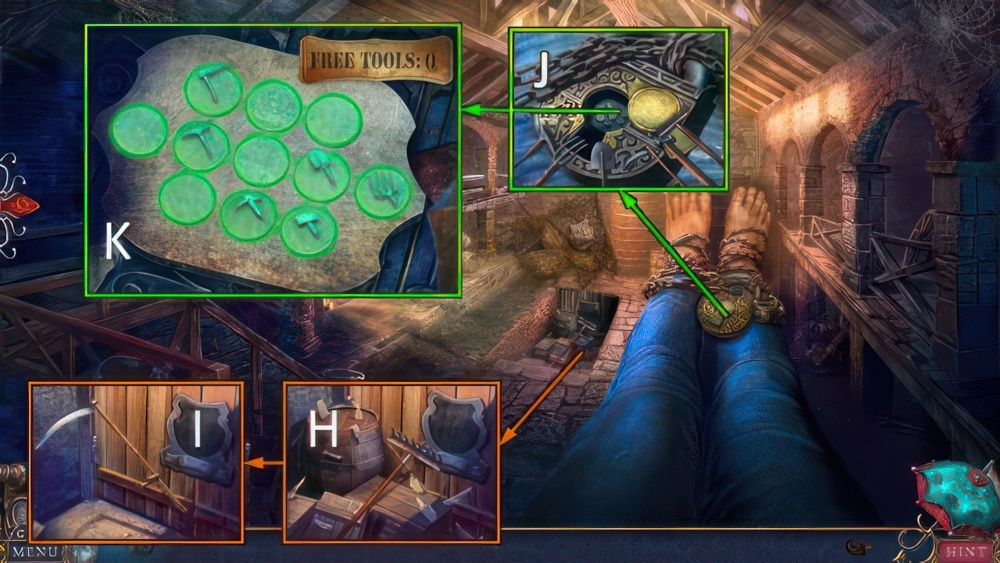
- Open lock, place PITCHFORK, SCYTHE, RAKE, SHOVEL, HAMMER and PICKAX (J).
- Place the tools on the pins to press them down and level with a lock surface.
- Each pin holds one tool and moves all the pins next to it.
- Walkthrough (K).
- Take DOOR EMBLEM and note (L).
- Place DOOR EMBLEM (M).
- Take SHEERS (N).
- Use SHEERS, take SHRINKING POTION (O).
- Drink SHRINKING POTION.
- Take ROPE, TOOL SHOP TICKET and LEAF (P).
- Use TOOL SHOP TICKET, take LEAF (Q).
- Go (R).
- Play puzzle (S), receive FLOWER BADGE.
- Place LEAF ×2 and FLOWER BADGE (T).
- Go (U).
- Take METAL ROD 1/3 (V).
- Take METAL RODS 2/3 (W).
- Take METAL RODS 3/3 (X).
- Take PLIERS (Y).
- Use PLIERS, place METAL RODS.
- Take LADDER and CUP (Z).
- Place LADDER (A).
- Take COIN (B).
- Use COIN, take STATUE EMBLEM (C).
- Place STATUE EMBLEM (D).
- Play puzzle (E), receive HOUSE EMBLEM.
- Place HOUSE EMBLEM, take HOUSE PASS (F).
- Place HOUSE PASS (G).
- Go (H).
- Take note and DIARY EMBLEM (I).
- Take MATCH (J).
- Open lighter, place ROPE.
- Use MATCH.
- Receive LIT MATCH (K).
- Use LIT MATCH.
- Move glove, take DIARY EMBLEM (L).

- Place DIARY EMBLEM ×2.
- Move pieces (M).
- Find the pairs by revealing two pictures at a time.
- Every wrong move swaps the pictures’ places.
- Walkthrough 1 (N).
- Walkthrough 2 (O).
- Take COIN and PICTURE PIECE (P).
- Go down.
- Use COIN, take TWEEZERS (Q).
- Use TWEEZERS (R).
- Play puzzle (S), receive PICTURE PIECE.
- Go (T).
- Place PICTURE PIECE ×2, take WOODEN PEG and CYLINDER (U).
- Play CYLINDER, take KEY TO THE CITY (V).
- Go down.
- Use KEY TO THE CITY (W).
- Go (X).
- Talk (Y).
- Play puzzle (Z), receive WAGON KEY.
- Take BROKEN VALVE (A).
- Place WOODEN PEG.
- Take CHISEL (B).
- Take note.
- Take METAL STRIPS with CHISEL, take OIL with CUP (C).
- Touch seal.
- Use OIL, take METAL RING (D).
- Place BROKEN VALVE, METAL STRIPS and METAL RING, use tongs and take VALVE (E).
- Place and turn VALVE (F).
- Go (G).
- Talk, take POUCH (H).
- Take POLE and WHETSTONE (I).
- Take HOOKS (J).
- Take HOOKS 1-2/2 (K).
- Go down.
- Use WHETSTONE, take KNIFE (L).
- Go (M).
- Take ROPE and FEATHERS with KNIFE (N).
- Go down.
- POUCH, ROPE and HOOKS ×2 on POLE, assemble.
- Take FISHING ROD.
- Use FISHING ROD (O).
- Gather all the seaweed to find which one holds the seal.
- Each collected seaweed adds free moves, so plan your route carefully.
- Walkthrough 1 (P): S×4-T×3-Q×3-R.
- Walkthrough 2 (P): Q-R×2-Q-R-T-R-Q-S-Q-S×3-R.
- Receive SEAL.
- Go (U).

- Offer SEAL, take OFFICER’S PERMIT (V).
- Place OFFICER’S PERMIT and WAGON KEY (W).
- Take and move LIPSTICK (X).
- Take ACCOUNTING BOOK (Y).
- Go down.
- Offer ACCOUNTING BOOK (Z).
- Play puzzle (A), receive FENCE EMBLEM.
- Go (B).
- Place FENCE EMBLEM and LIPSTICK, move fence (C).
- Go (D).
- Take CUP (E).
- Take DRAWER EMBLEM (F).
- Take TEA SET and HOURGLASS EMBLEM (G).
- Place DRAWER EMBLEM, take KEYS (H).
- Match KEYS, take BEDROOM KEY (I).
- Place BEDROOM KEY (J).
- Go (K).
- Open (L).
- Take BROKEN LETTER (M).
- Take SILK RIBBON (N).
- Place BROKEN LETTER (O).
- Restore the picture by swapping the pieces three at a time.
- Select the pieces and then select a place you want to move them to.
- Walkthrough: 5-10-3-7-5-11.
- Take note.
- Place FEATHERS and move feathers, take DUSTER (P).
- Go down.
- Place HOURGLASS EMBLEM, use DUSTER (Q).
- Take GEM SHARDS (R).
- Play puzzle (S), receive SLEEPING DRUG.
- CUP and SLEEPING DRUG on TEA SET.
- Add tea, drugs and sugar.
- Take SLEEPY TEA.
- Offer SLEEPY TEA (T).
- Go (U).
- Take PINS (V).
- Move book, take LION EMBLEM (W).
- Use PINS (X).
- Move battery (Y) and place SILK RIBBON, take LAMP (Z).
- Place LION EMBLEM (A).
- Take note and LOCKET EMBLEM (B).
- Place LOCKET EMBLEM, take ROSE’S PICTURE (C).
- Go down and left.

- Place ROSE’S PICTURE and GEM SHARDS.
- Select all shards (D).
- Use LAMP, move rose and take CYLINDER (E).
- Play CYLINDER, take HEART HALF (F).

- Place HEART HALF, take GLASS SHARDS and STONE PLATE (G).
- Place GLASS SHARDS, take CRESCENT (H).
- Go down.
- Place CRESCENT, take LENS (I).
- Go (J).
- Place LENS, take WALL SAFE LOCK (K).
- Place WALL SAFE LOCK.
- Restore the emblem by placing the element in the middle.
- Elements move in the selected direction until they collide with another element or the edge.
- Walkthrough (L).
- Take ELEVATOR KEY (M).
- Go down.
- Play puzzle (N), receive STONE PLATE.
- Place ELEVATOR KEY (O).
- Go (P).
- Take MERMAID’S TAIL (Q).
- Place MERMAID’S TAIL (R).
- Take METAL BRUSH and OAR (S).
- Use METAL BRUSH, take SWORD (T).
- Play puzzle (U), receive OAR.
- Place OAR ×2, use SWORD (V).
- Go (W).
- Take GUARD’S CROSS (X).
- Take GEM (Y).
- Place GEM and ELEVATOR KEY, take BROKEN HANDLE (Z).
- Receive CHAIN LINKS.
- Take COG with CHAIN LINKS (A).
- Go down.
- Place BROKEN HANDLE, take LEVER (B).
- Go (C).
- Place COG, use LEVER (D).
- Move cloth, take SAFE LEVER (E).
- Place SAFE LEVER (F).
- Take STONE PLATE (G).
- Go down.
- Play puzzle (H), receive TREE EMBLEM.
- Place STONE PLATE ×3, change plates (I).
- Take CYLINDER (J).
- Play CYLINDER, take POWER SOURCE (K).
- Place TREE EMBLEM, move branches (L).
- Take CHAIN LOCK (M).
- Go (N).
- Place CHAIN LOCK (O).
- Place POWER SOURCE (P).
- Swap the elements so they match their colors with the sockets.
- Change the direction of the elements by moving the middle sphere with the bottom arrows.
- Walkthrough: Q-V-T-V-R-V-U-V-S.
- Go (W).
- Take CROWBAR (X).
- Take BOARD 1/4.
- Take BOARDS 2-4/4 with CROWBAR (Y).
- Place BOARDS (Z).
- Take WHISK (A).
- Take WHEEL.
- Take RESIN with WHISK (B).
- Place WHEEL and RESIN, touch cart (C).
- Talk (D).
- Go (E).
- Take GLASS LENS (F).
- Take BELT, place GUARD’S CROSS (G).
- Place BELT, take SPEAR (H).
- Take GUARD’S KEY with SPEAR (I).
- Place GUARD’S KEY (J).
- Play puzzle (K), receive OLD MASK.
- GLASS LENS on OLD MASK.
- Move other lens, use RESIN.
- Take GAS MASK.
- Use GAS MASK (L).
- Use SPEAR, take COINS (M).
- Take ROPE (N).
- Place ROPE and pull (O).
- Use SPEAR, take PAPER CLIP (P).
- Go down twice.
- Use PAPER CLIP (Q).
- Take WINDMILL BLADES and GLOVE (R).
- Go forward.

- Play puzzle (S), receive HANDKERCHIEF.
- Move note.
- Place WINDMILL BLADES, take WINDMILL EMBLEM (T).
- Use GLOVE, take HAMMER (U).
- Go (V).
- Place WINDMILL EMBLEM and HANDKERCHIEF (W).
- Place COINS and ROPE, use HAMMER.
- Touch wheel (X).
- Get to the portal at the top of the mountain field.
- Select a tile to move and avoid cannon shots.
- Their color indicates when the shot will take place.
- Walkthrough (Y).
- Walkthrough Bonus Chapter, at the link below.


