Ms. Holmes 3: The Adventure of the McKirk Ritual – The game’s walkthrough begins when a noble lady named Mallory McKirk comes to Mrs Holmes asking her to investigate strange mystical events that happened in her mansion. Since you have solved the Baskerville case, she needs your help. She claims a ghost is haunting her house. The strangest part of the story is that no one but the Mrs can see or hear the ghost. She first saw the ghost a month ago, and since then she has been seeing it almost every night. Sometimes she leaves glowing footprints in the corridors and the rustling of her dress keeps her awake. She had to put a lock on every door in the house. Her jewellery started to go missing. At first she suspected servants, but then she saw a ghost coming out of her bedroom. Captain George Russell, a detective, a rising star at Scotland Yard, answered her call. He questioned her in detail about the missing jewellery and thoroughly inspected the house and then questioned the servants. Become a detective and learn the secrets of the secret estate. If you can not pass any of the puzzles or do not know where the items are, on our site you can watch the walkthrough of the game Ms. Holmes 3: The Adventure of the McKirk Ritual, and solve the mystery of the appearance of the ghost.
Ms. Holmes 3: The Adventure of the McKirk Ritual – Walkthrough
Here you can see the full walkthrough of Ms. Holmes 3: The Adventure of the McKirk Ritual, including all chapters, including bonus chapter, in pictures.
- Play puzzle, take FOLDER.
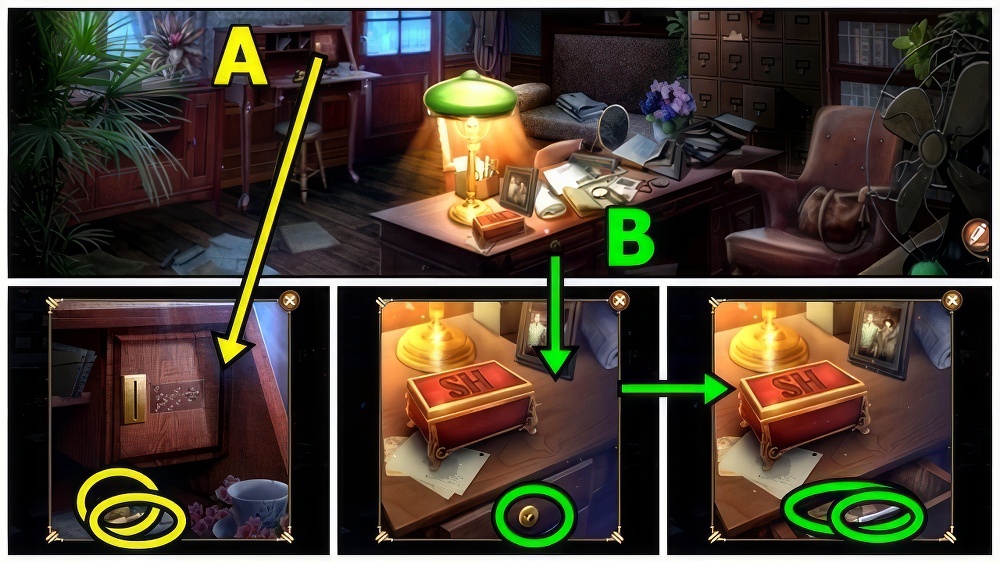
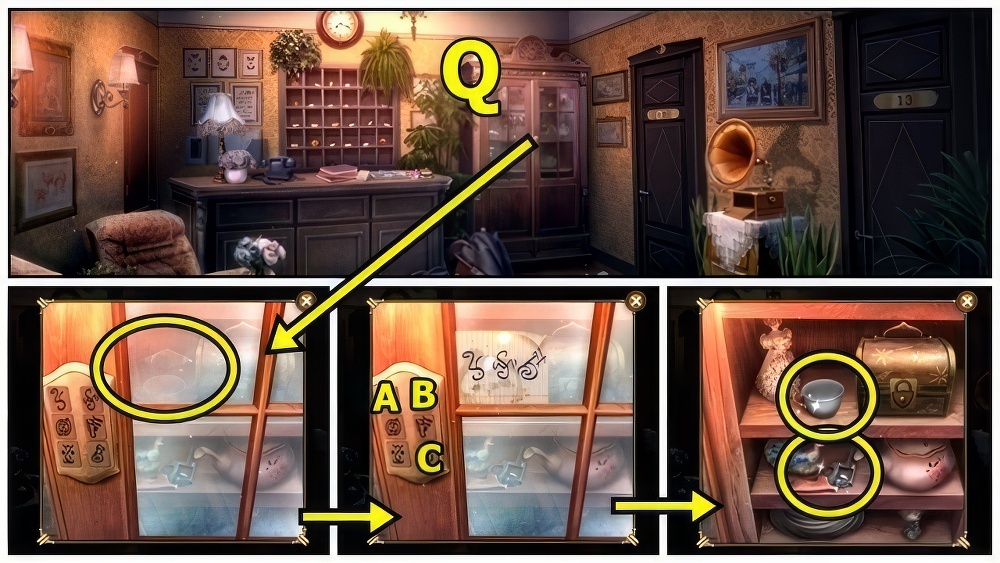
- Take GLASS CUTTER (A) and DECORATIVE HANDLE.
- Add DECORATIVE HANDLE (B), take LETTER OPENER and SMALL CIPHER.
- LETTER OPENER on FOLDER, take MATCHES, read.

- Use MATCHES (C), add SMALL CIPHER, select icons A-B-C.
- Take S MONOGRAM and KEYCARD.
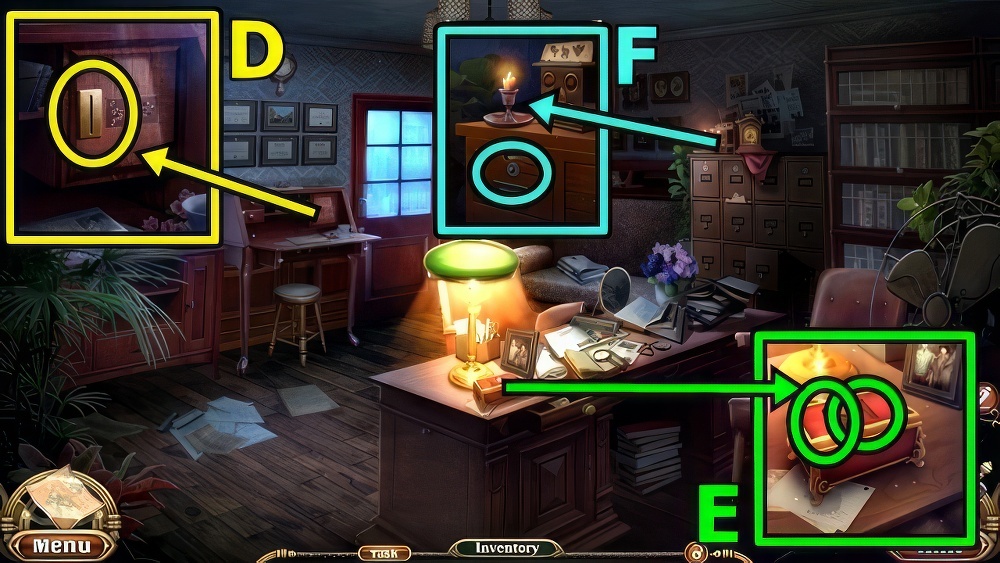
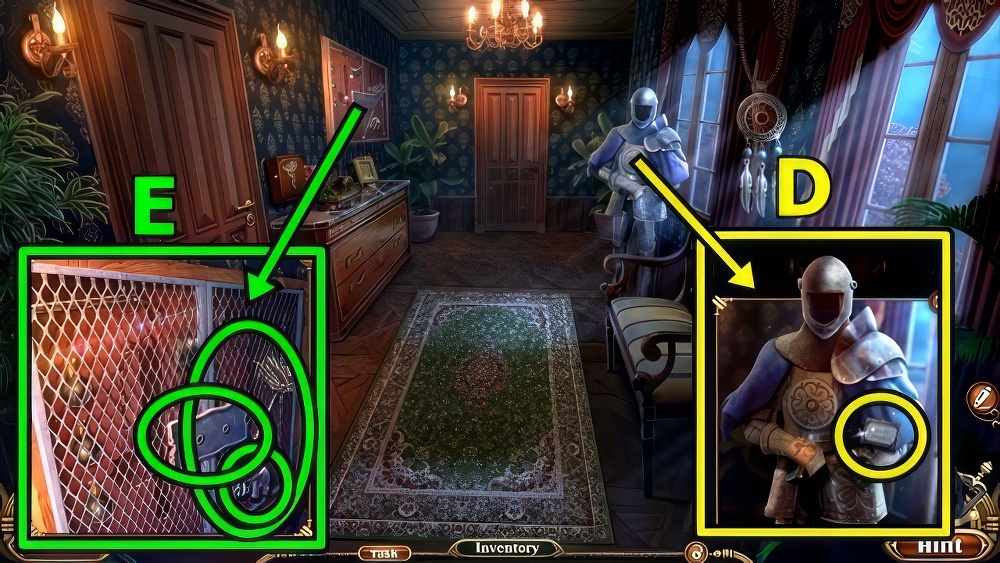
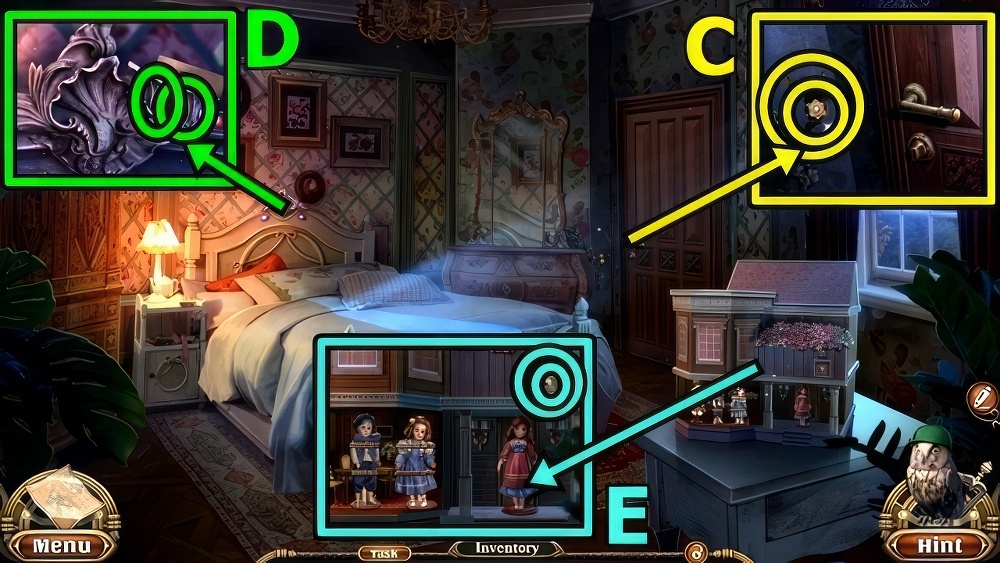
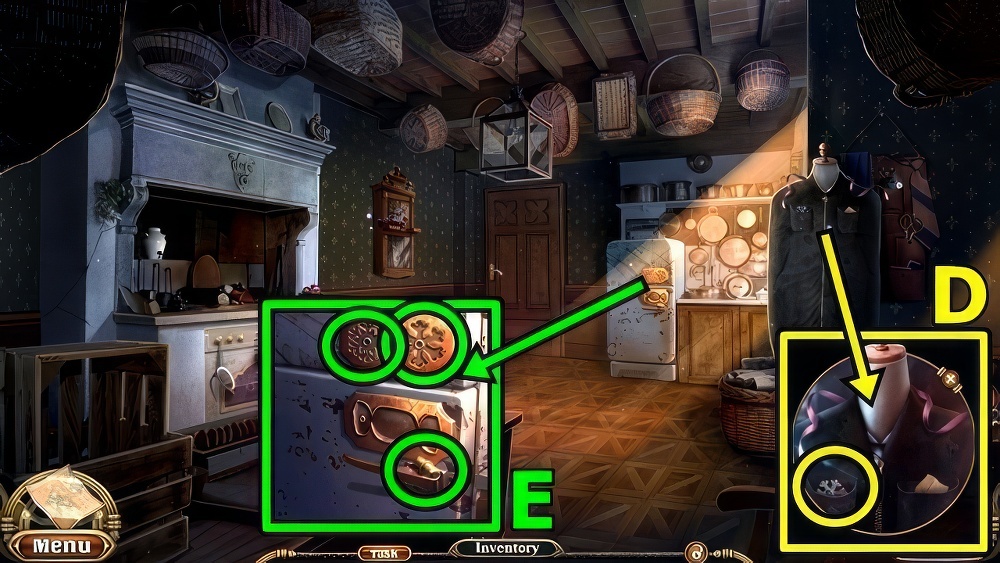
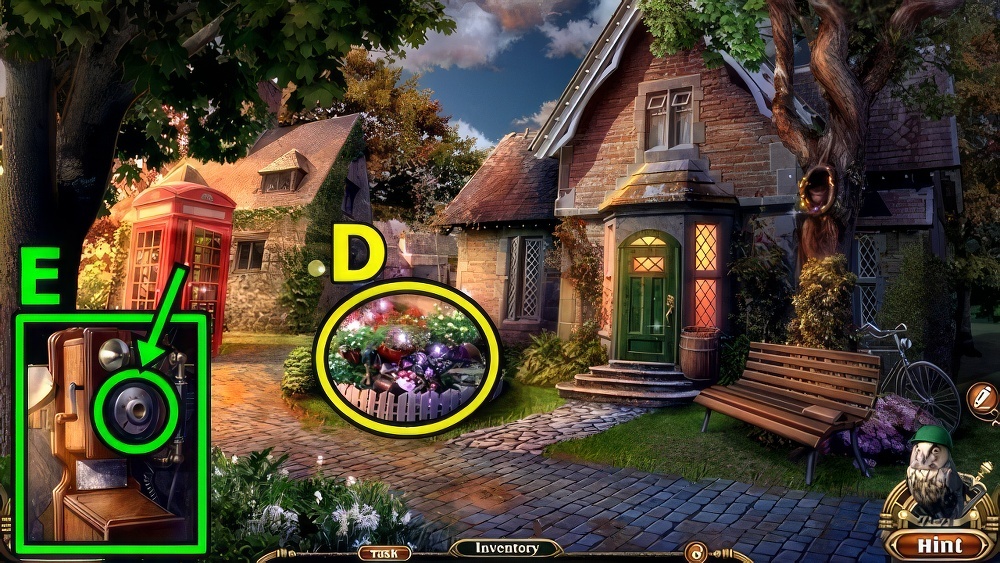
- Insert KEYCARD (D), take H MONOGRAM.
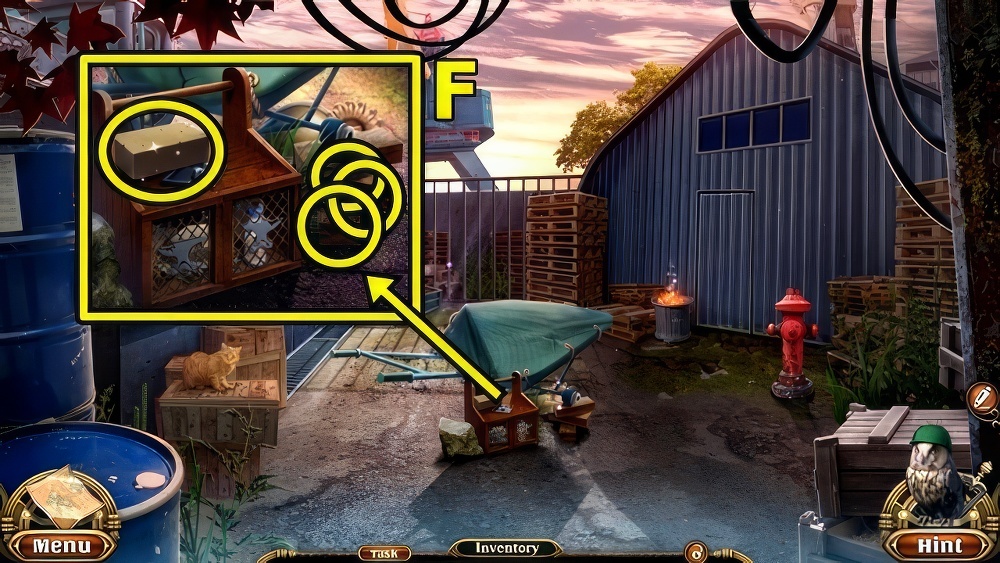
- Insert S MONOGRAM (E) and H MONOGRAM, take HOLMES’ ID and MAGNET.
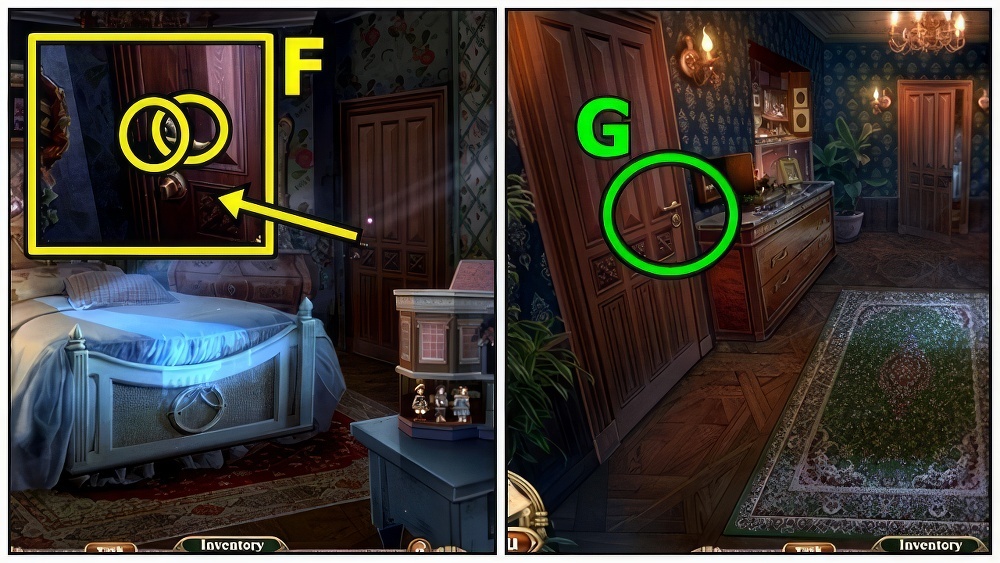
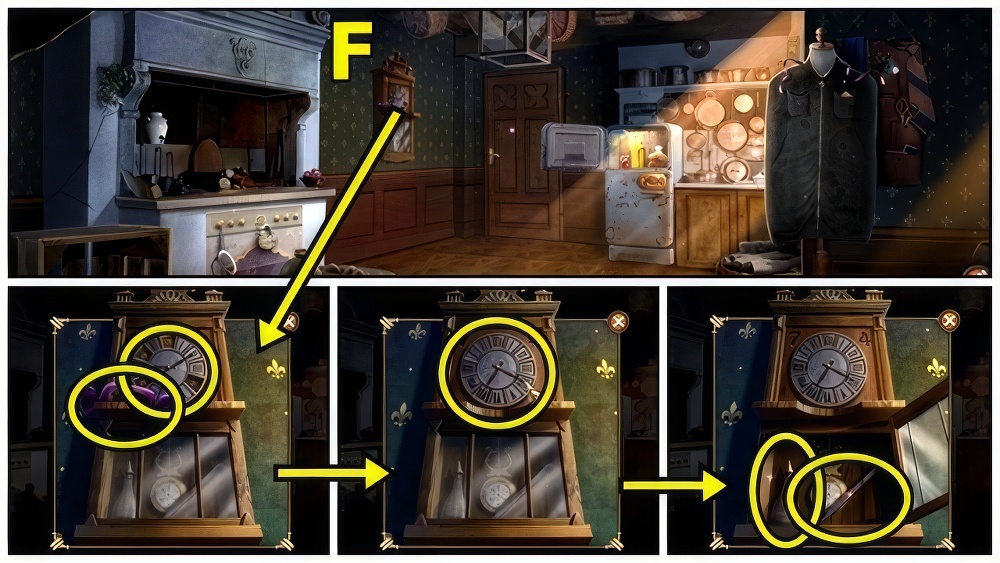
- Use MAGNET (F).
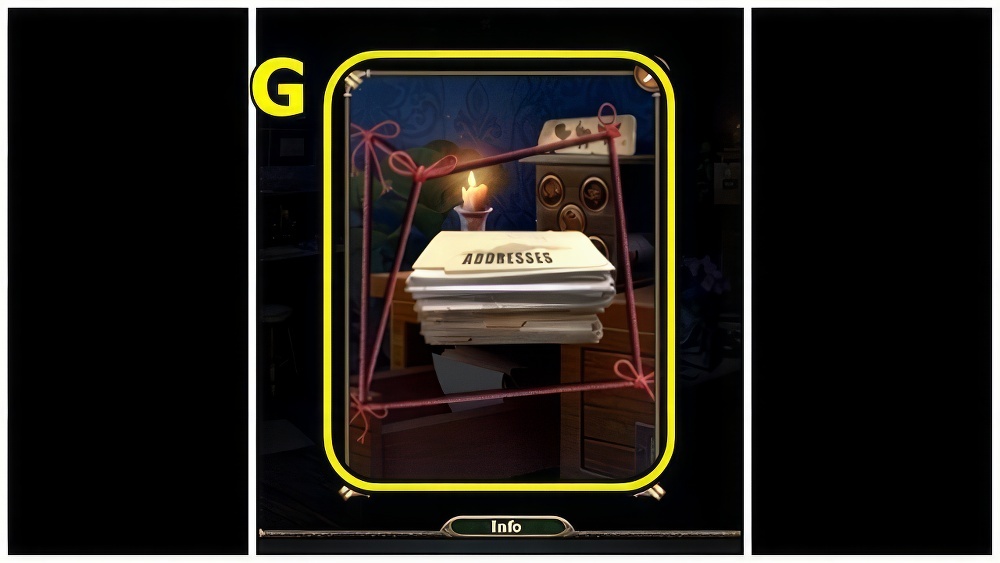
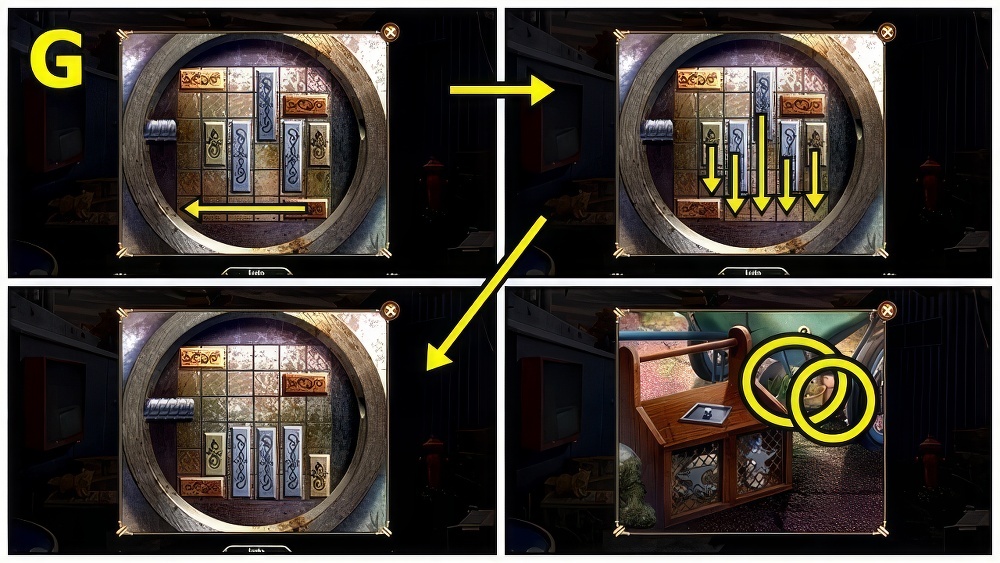
- Untangle the rope so the lines don’t cross over each other or the stack of papers.
- Select and drag the knots to move them.
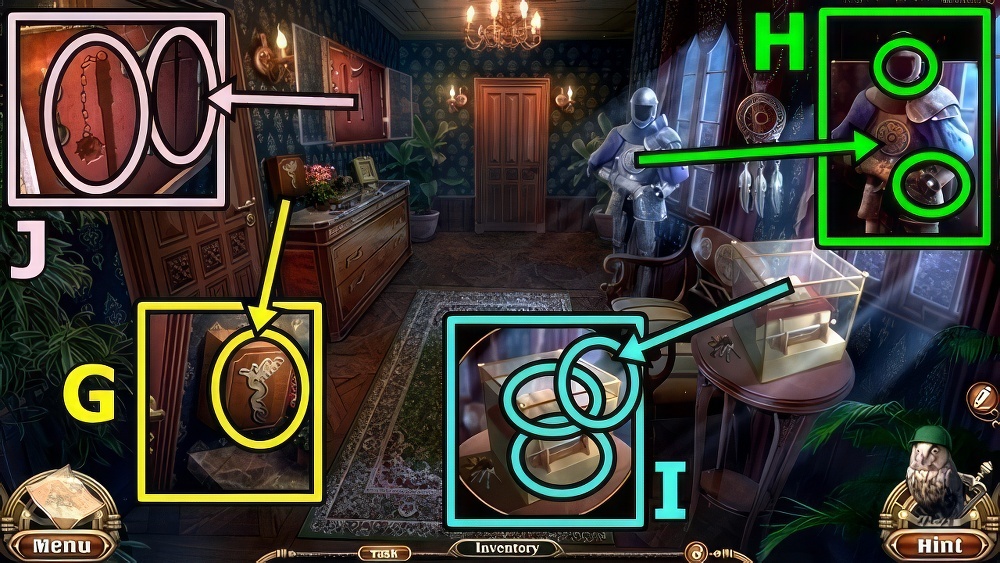
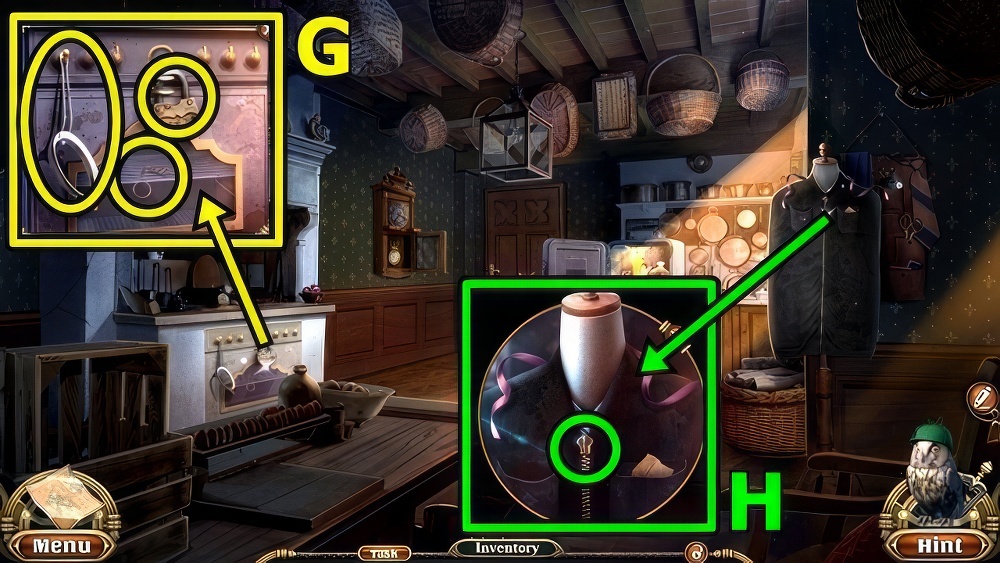
- Walkthrough (G). Examine.

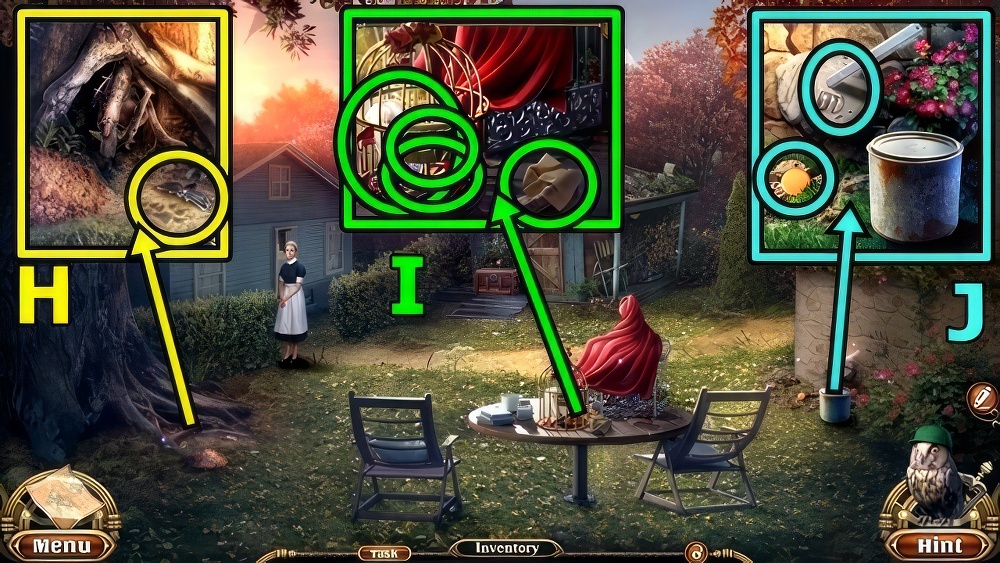
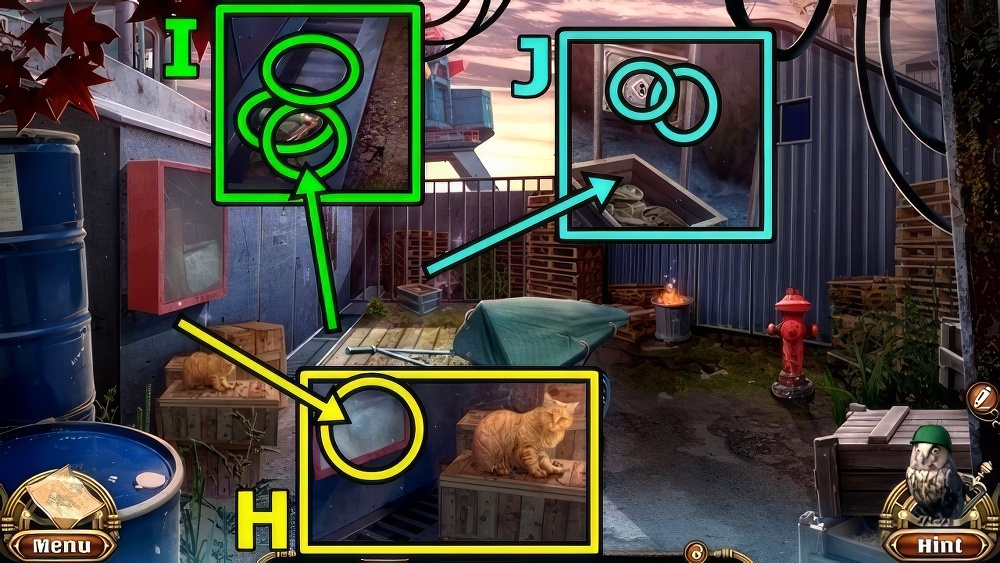
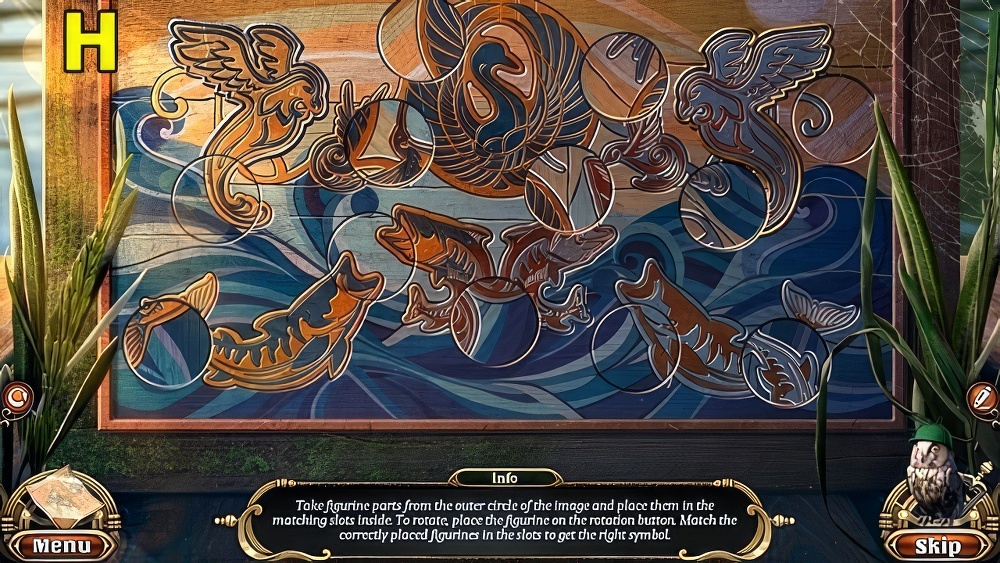
- Use GLASS CUTTER (H), take POST HORN and GLOVES.
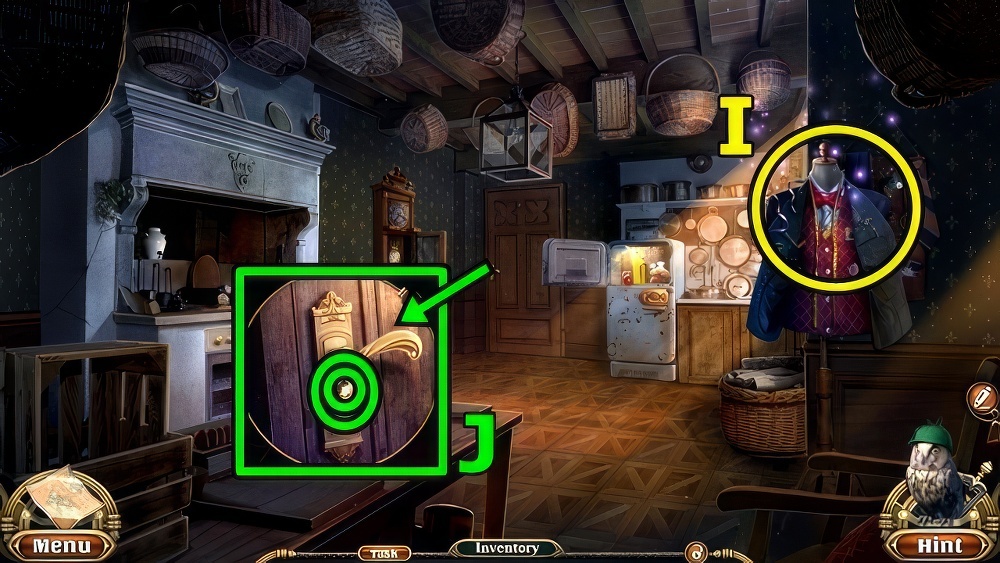
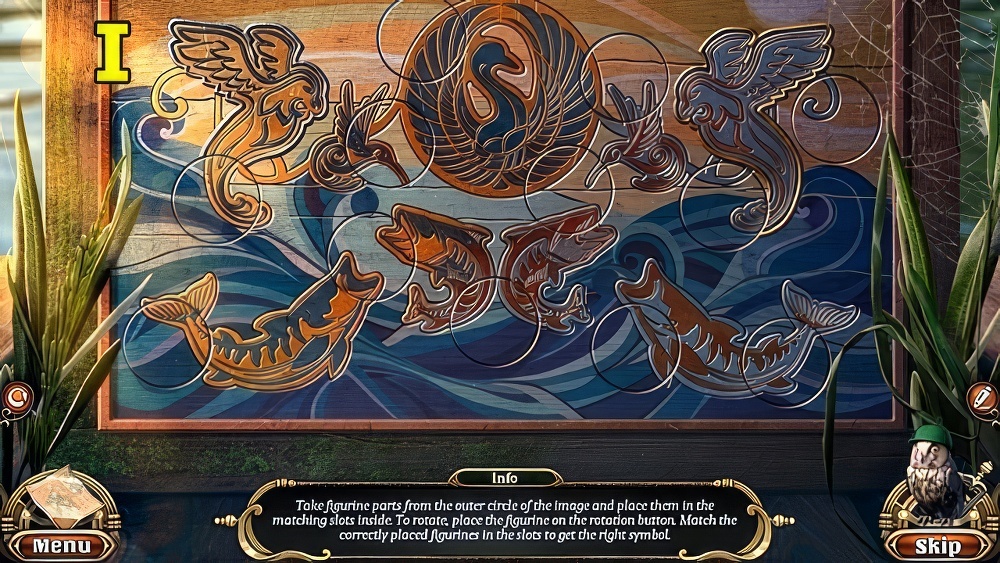
- Take STAR 1/4 (I).
- Use GLOVES, take SICKLE and BROKEN DOORBELL.
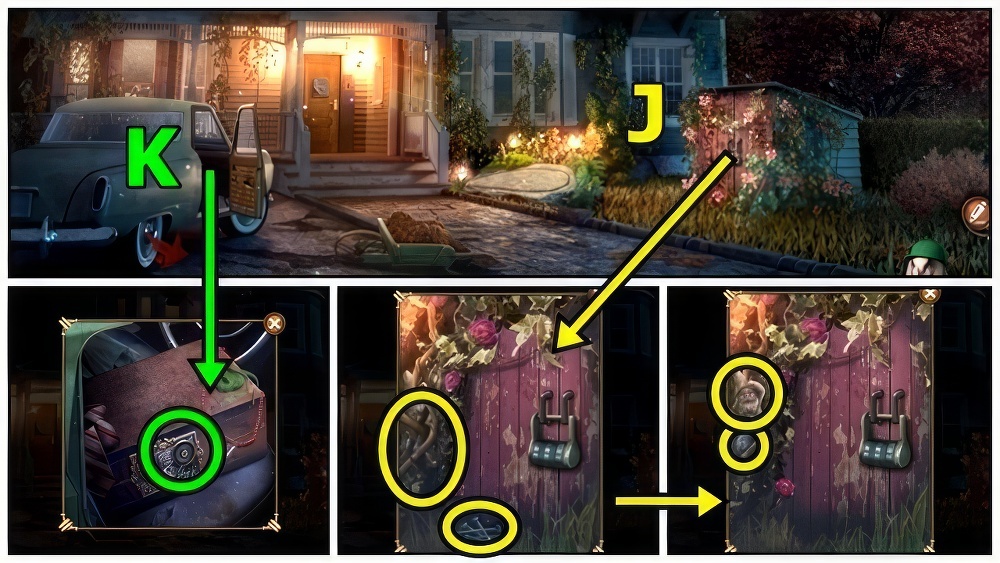
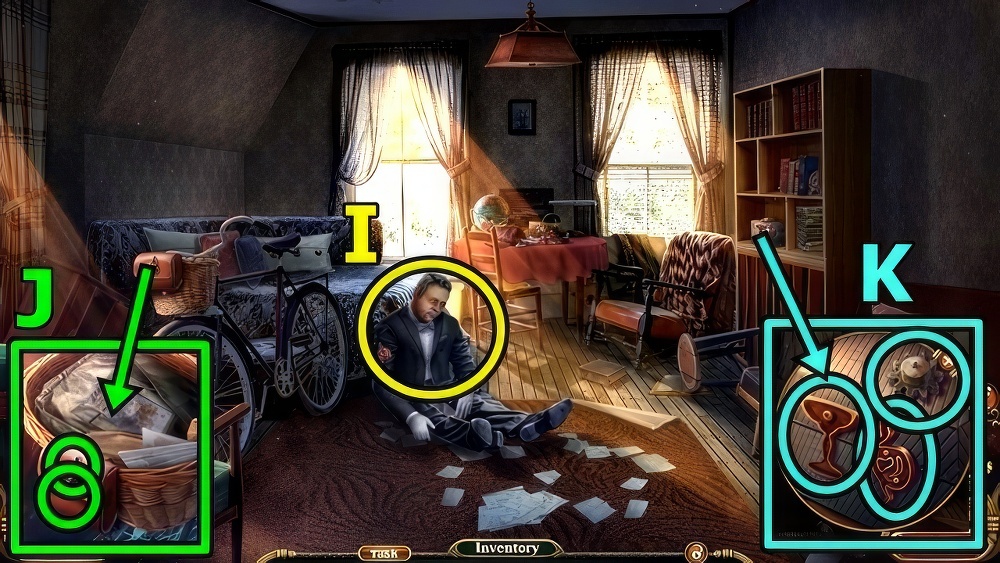
- Take NAILS (J).
- Use SICKLE, take GARDEN GNOME 1/3 and ROUND AMULET.
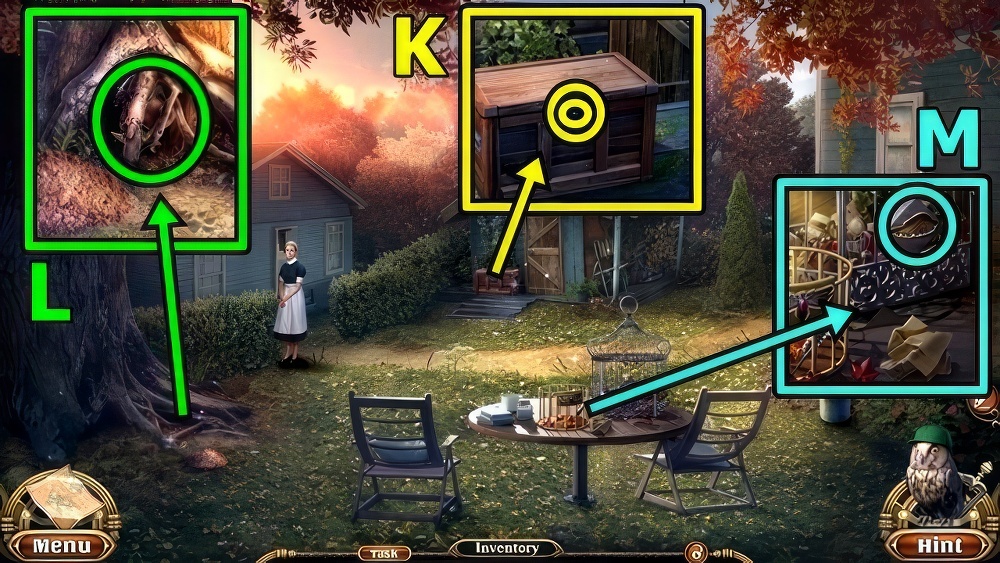
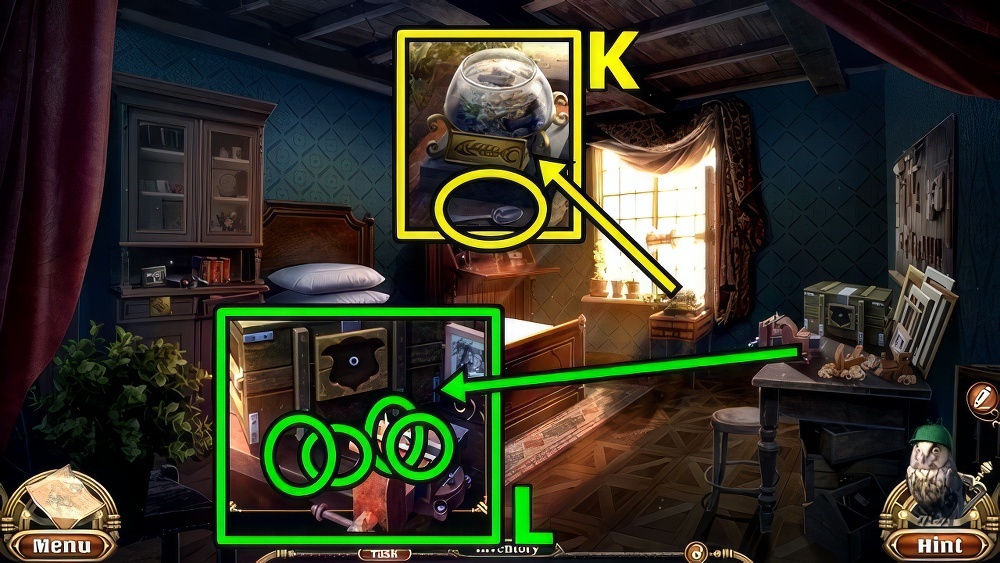
- Add ROUND AMULET (K).
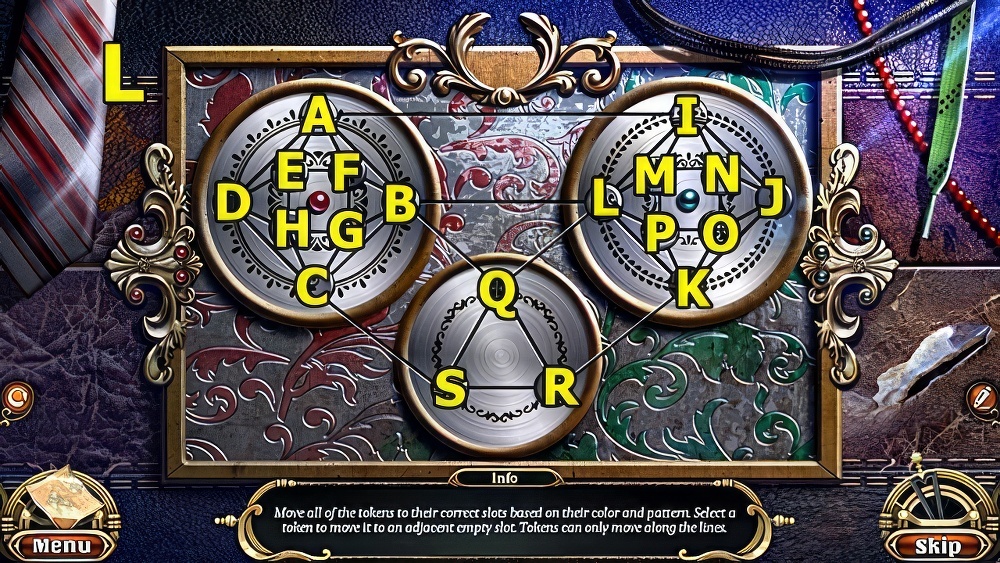
- Move all of the tokens to their correct slots based on their color and pattern.
- Select a token to move it to an adjacent empty slot.
- Tokens can only move along the lines.
- Walkthrough: (L) L-Q-B-C-S-R-Q-B-A-I-L-K-R-Q-B-L-I-N-O-K-L-B-A-I-L.
- K-P-M-I-L-M-P-L-I-A-B-F-E.
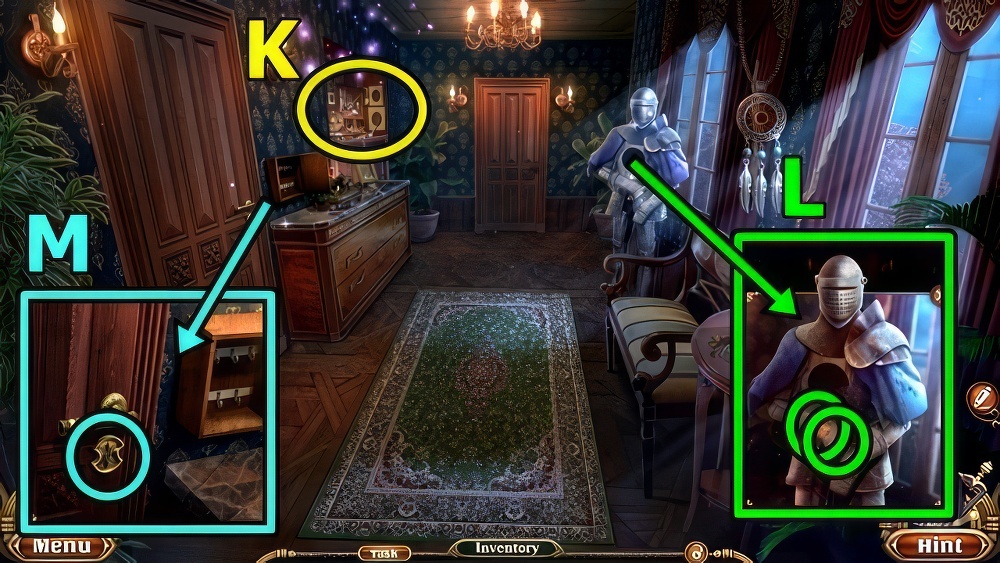
- Take BELL and MESSENGER PIGEON.
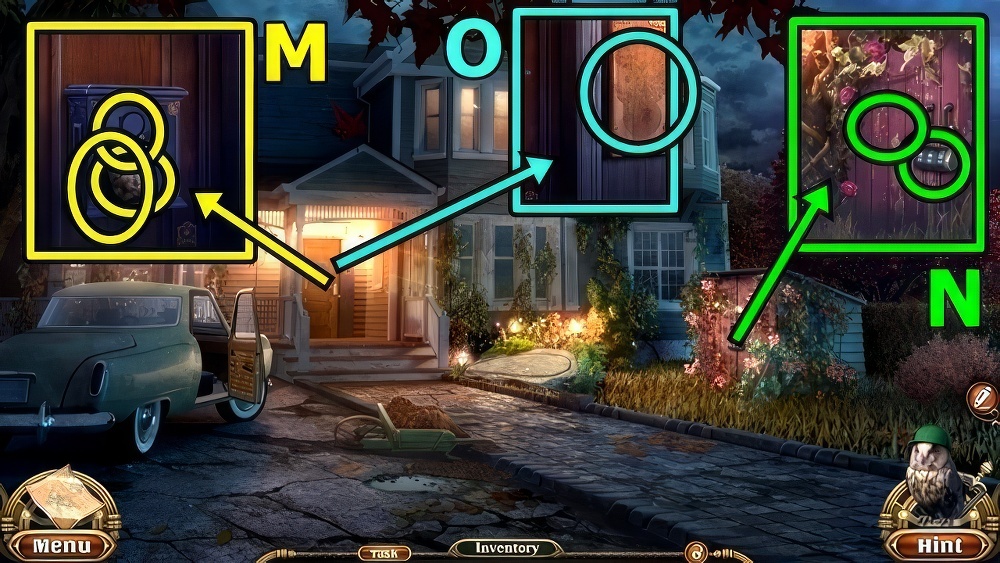
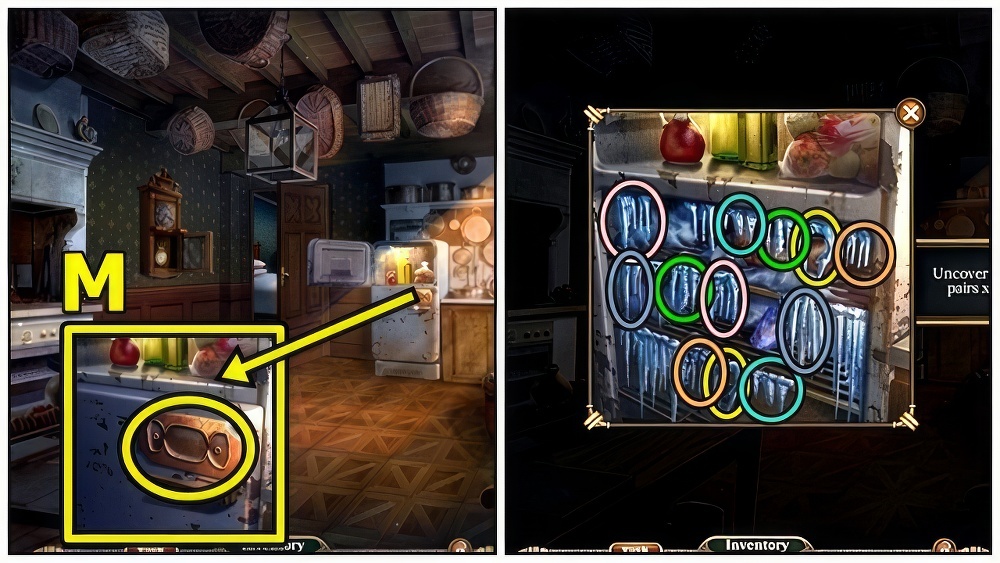
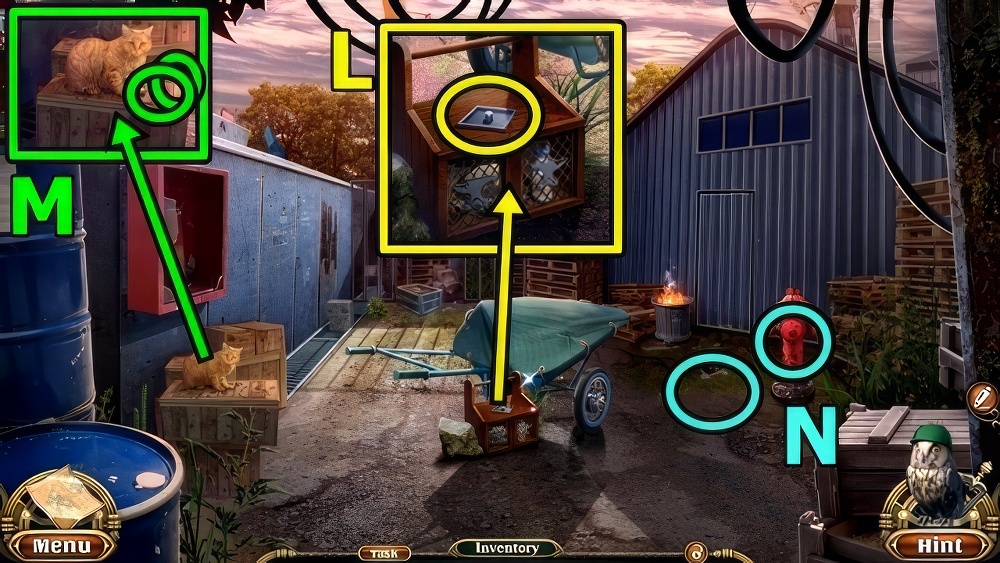
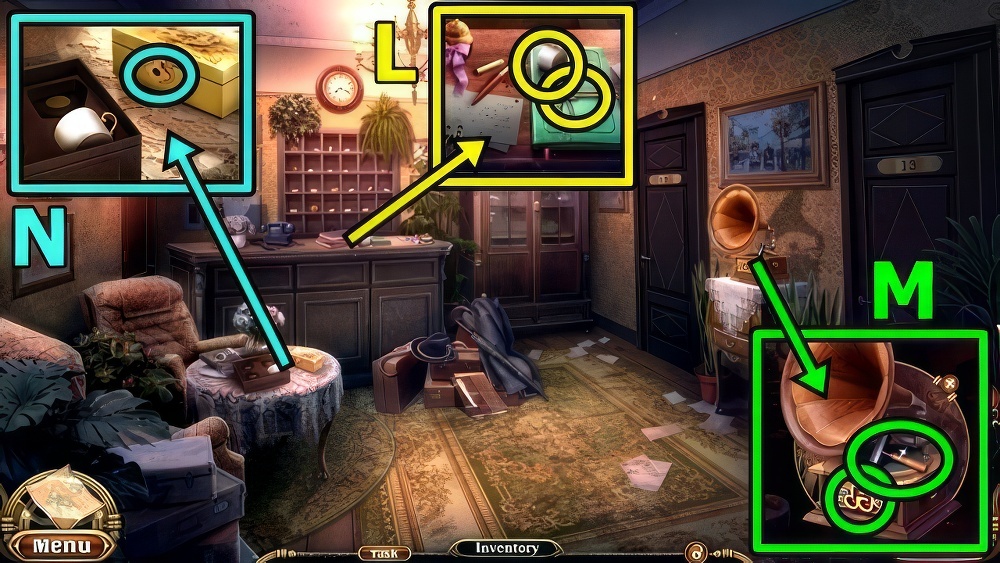
- Take GARDEN GNOME 2/3 (M).
- Add POST HORN and MESSENGER PIGEON, take STAR 2/4 and SHED CODE.
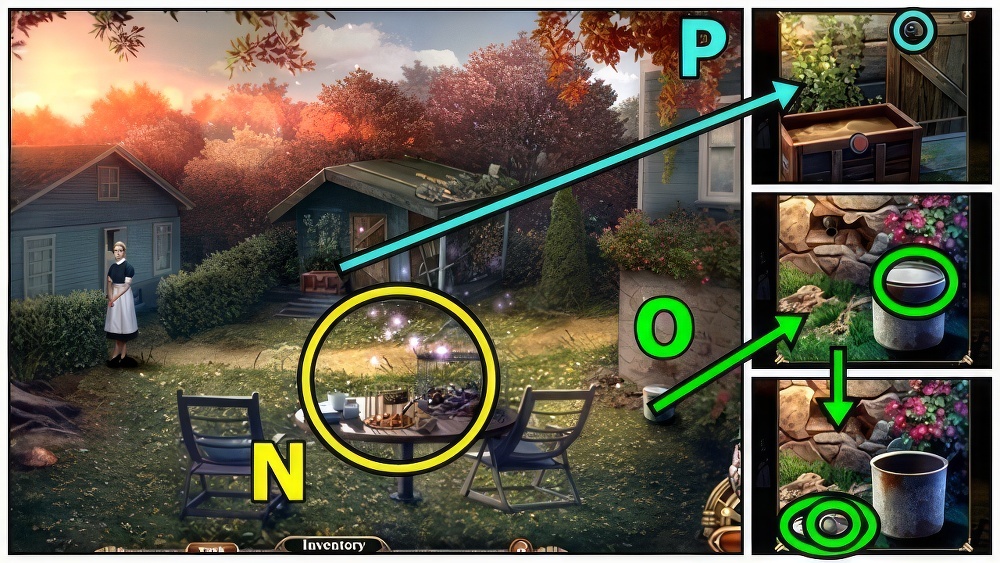
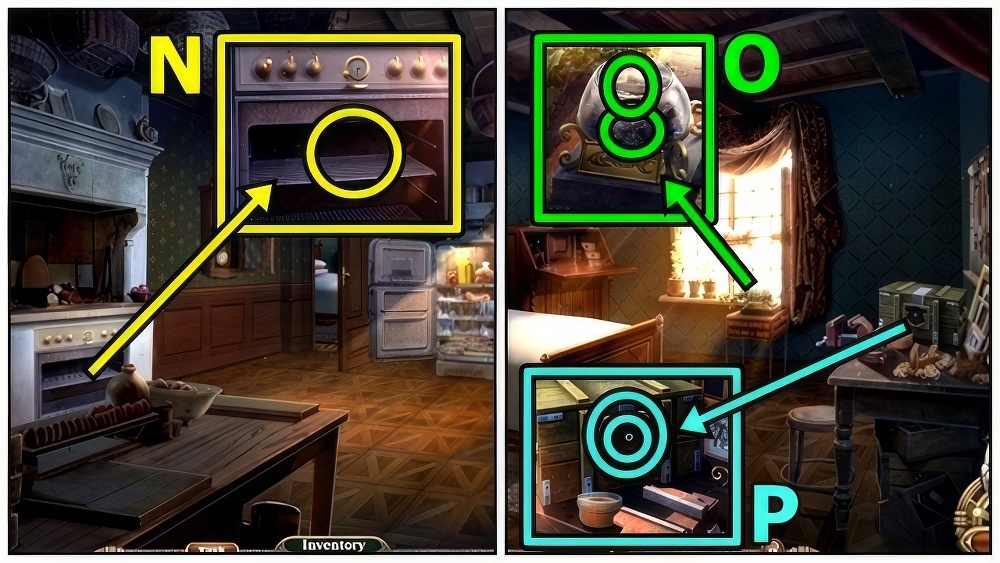
- Add SHED CODE (N), press three times.
- Take ELECTRICAL TAPE and PLANKS.
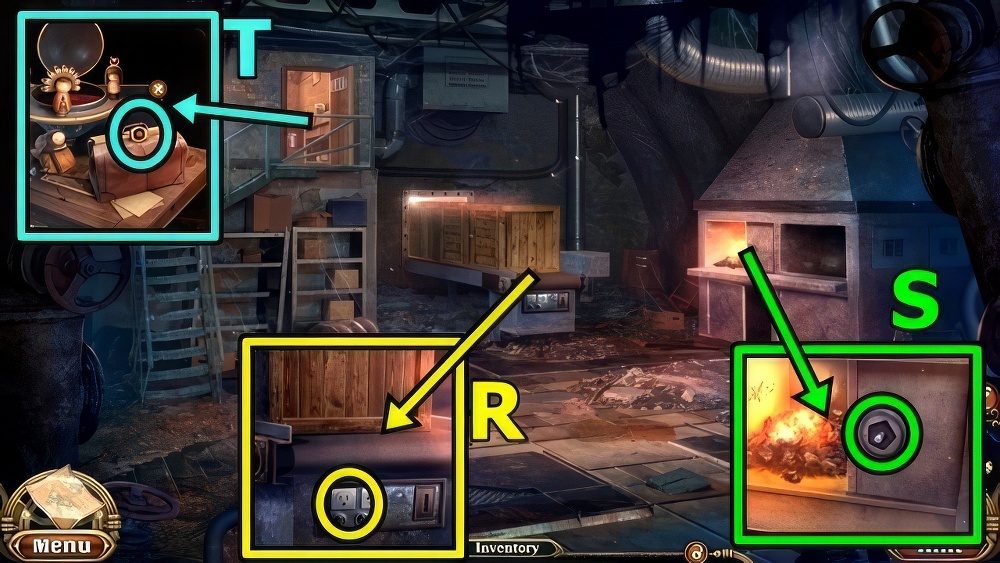
- ELECTRICAL TAPE and BELL on BROKEN DOORBELL, take ELECTRIC DOORBELL.
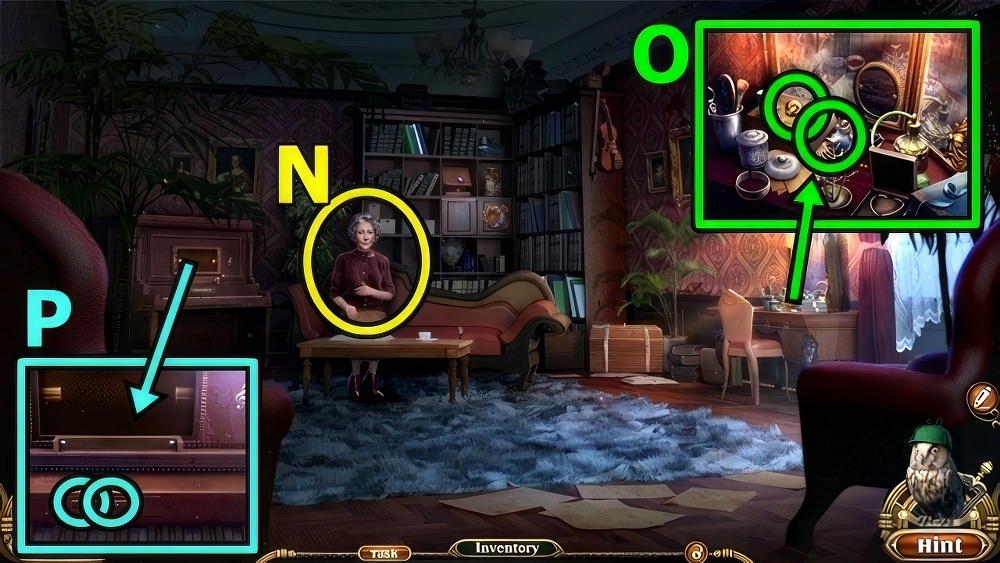
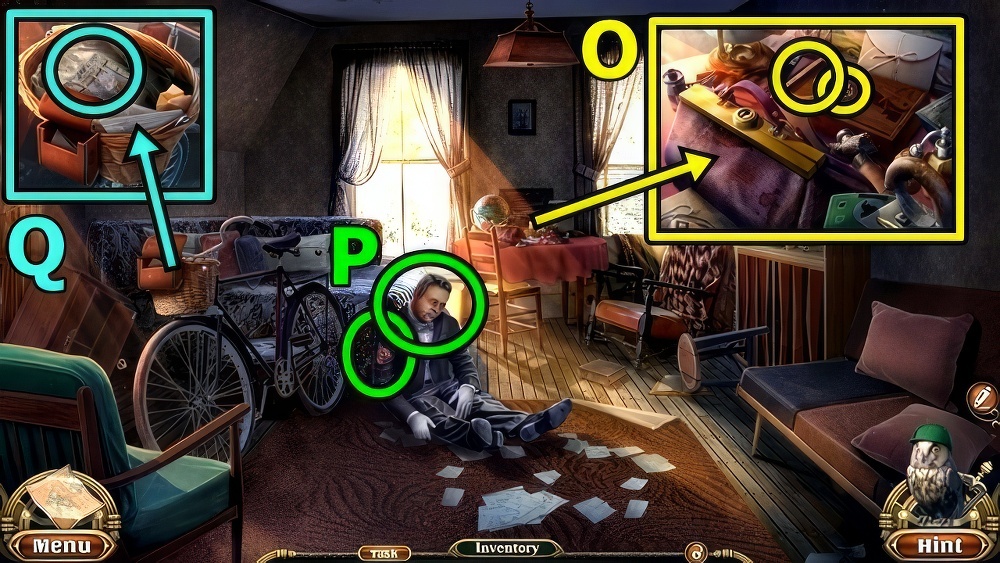
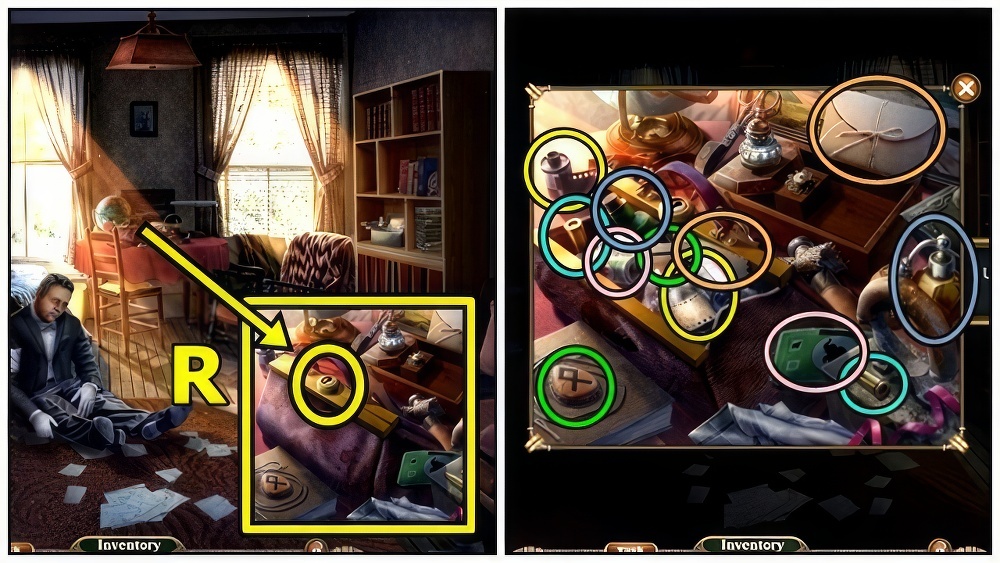
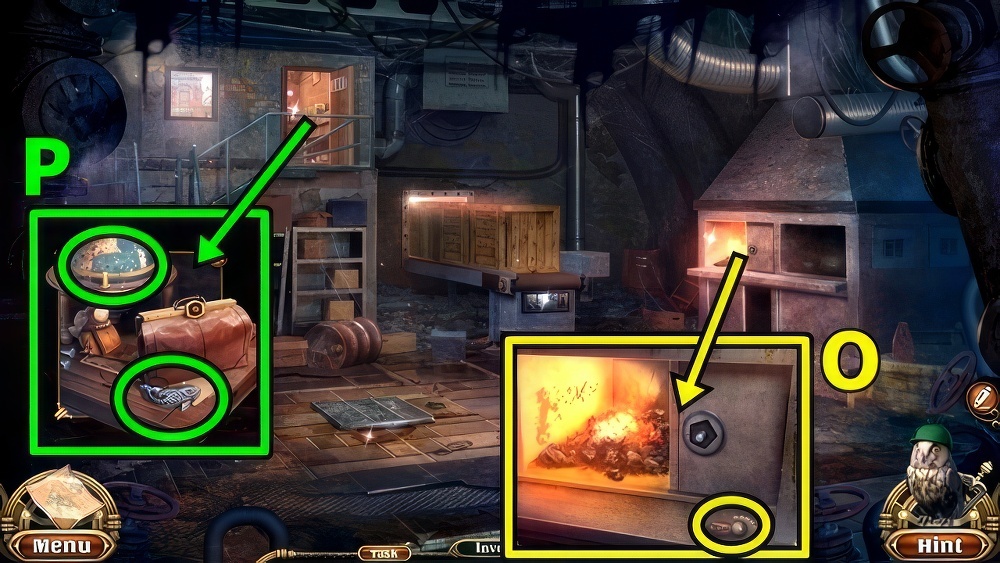
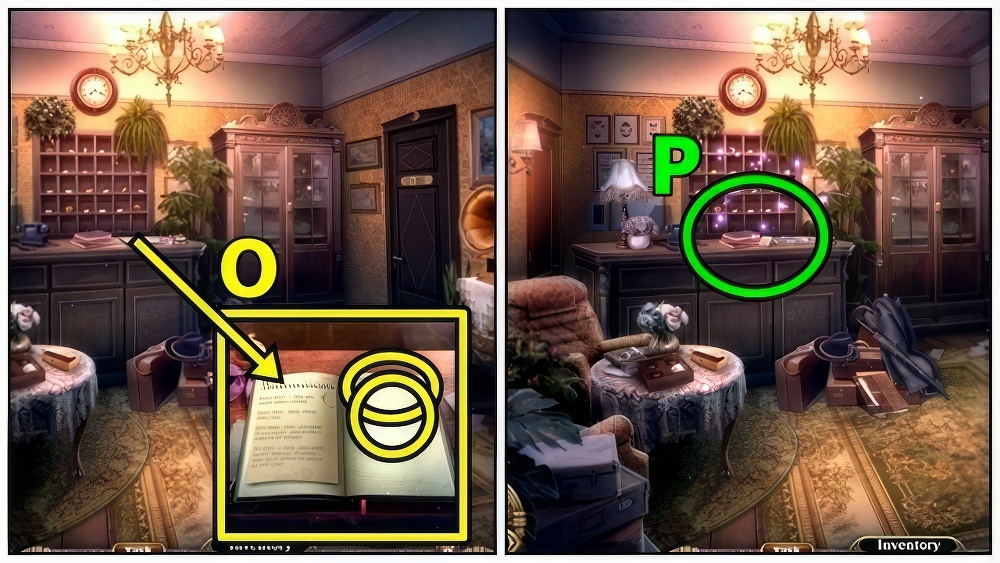
- Add ELECTRIC DOORBELL (O).
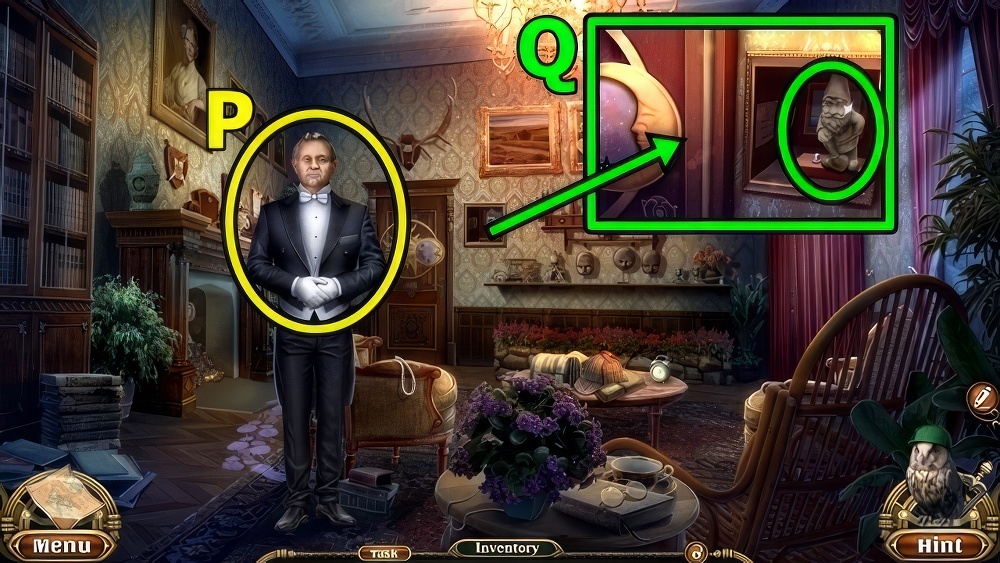
- Offer HOLMES’ ID (P), receive STAR 3/4.
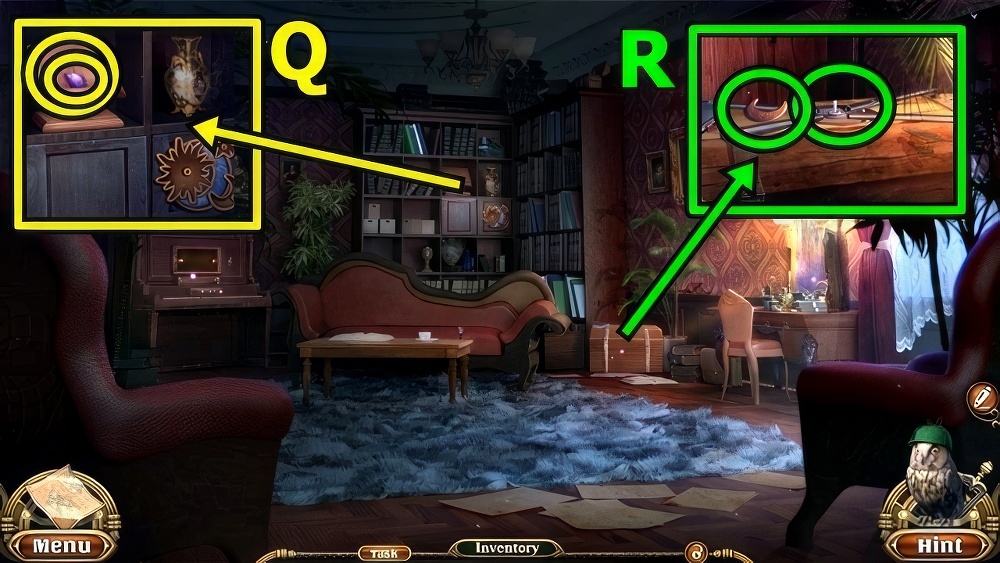
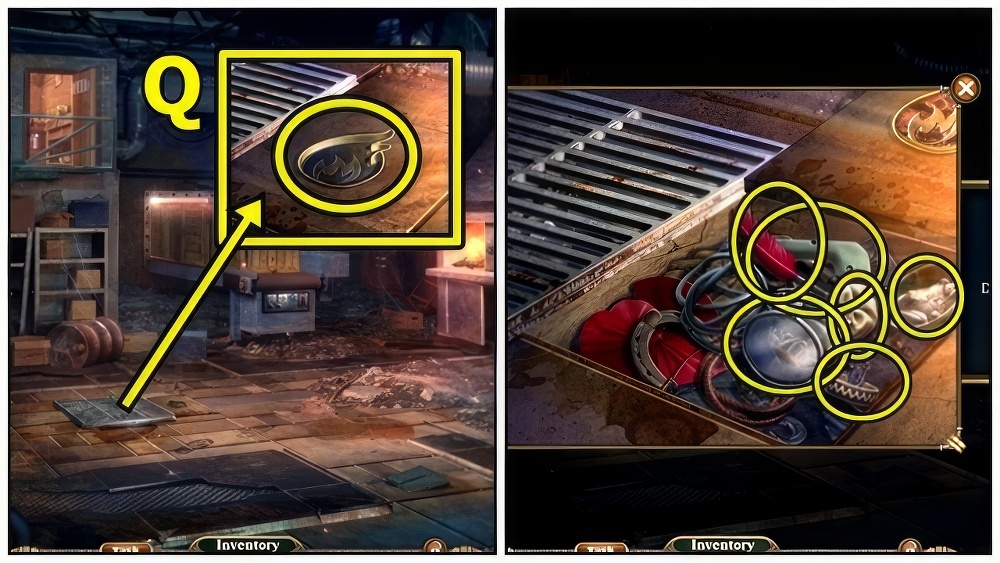
- Take GARDEN GNOME 3/3 (Q).
- Move down.
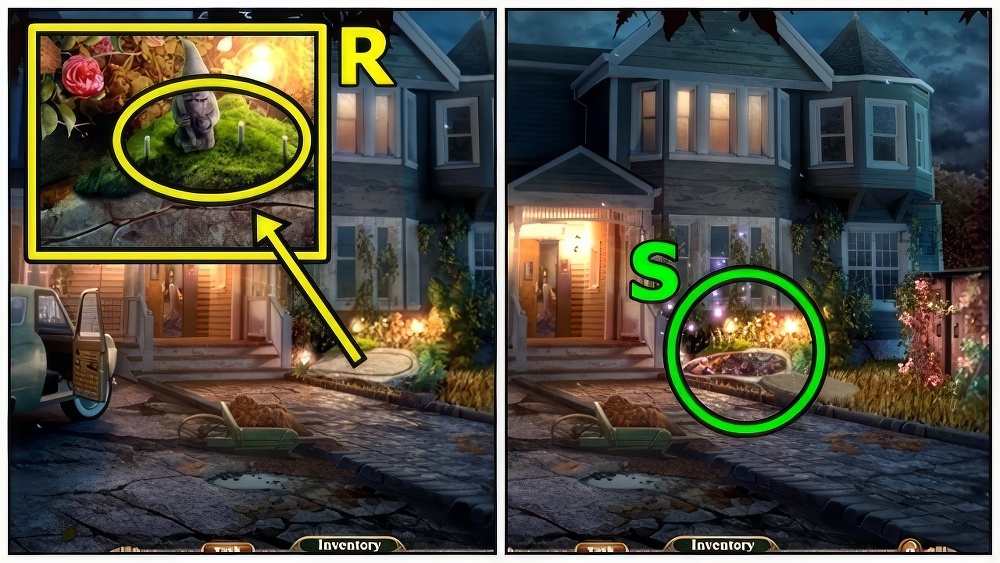
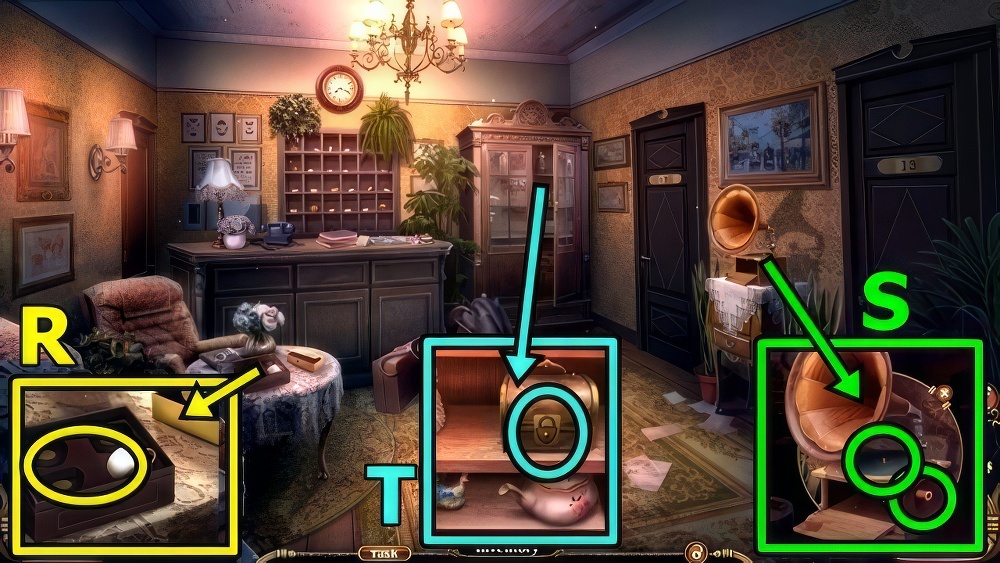
- Add GARDEN GNOME (R).
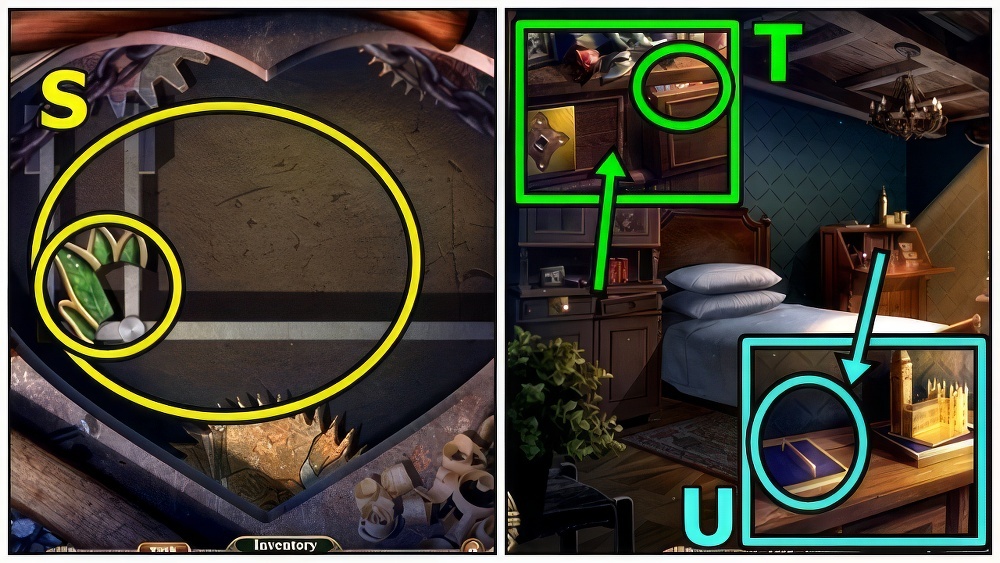
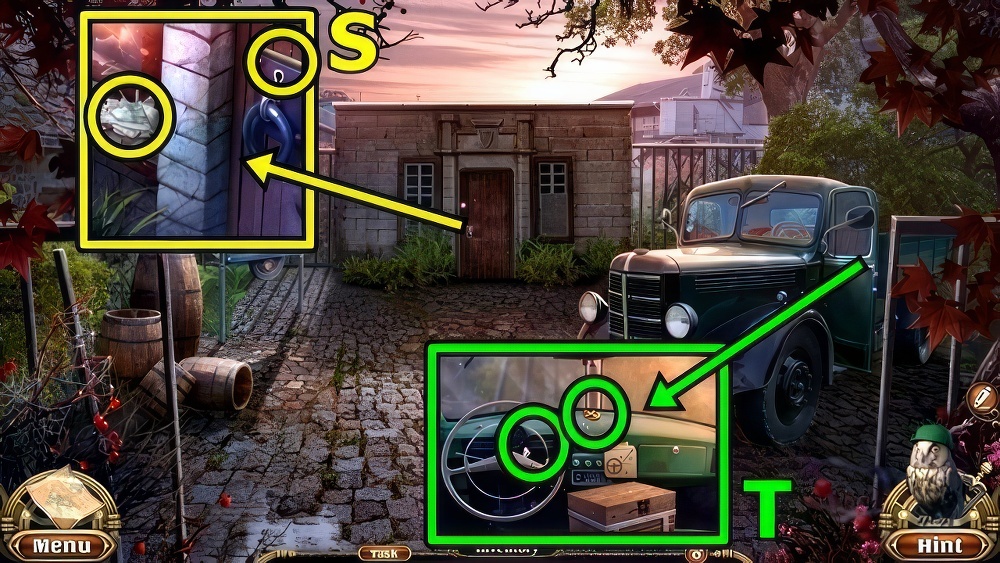
- Play puzzle (S), receive CURTAIN TIEBACK.
- Enter Drawing Room.
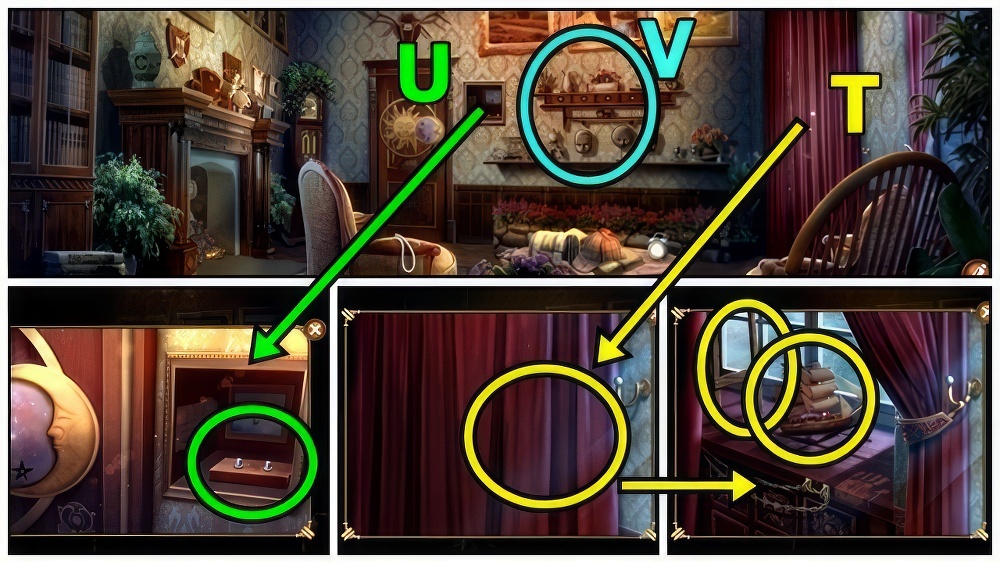
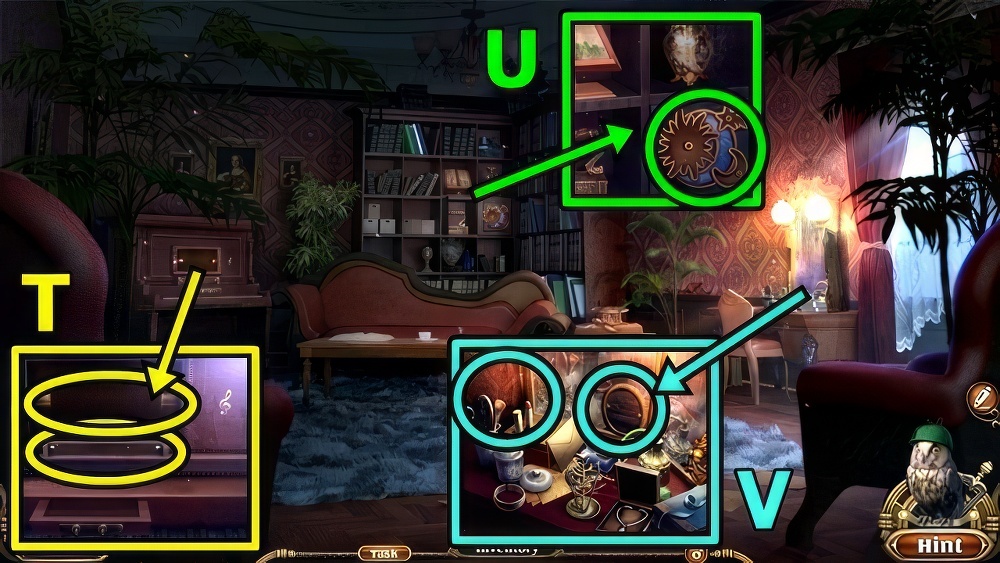
- Add CURTAIN TIEBACK (T), take MODEL SHIP and BROKEN LADDER.
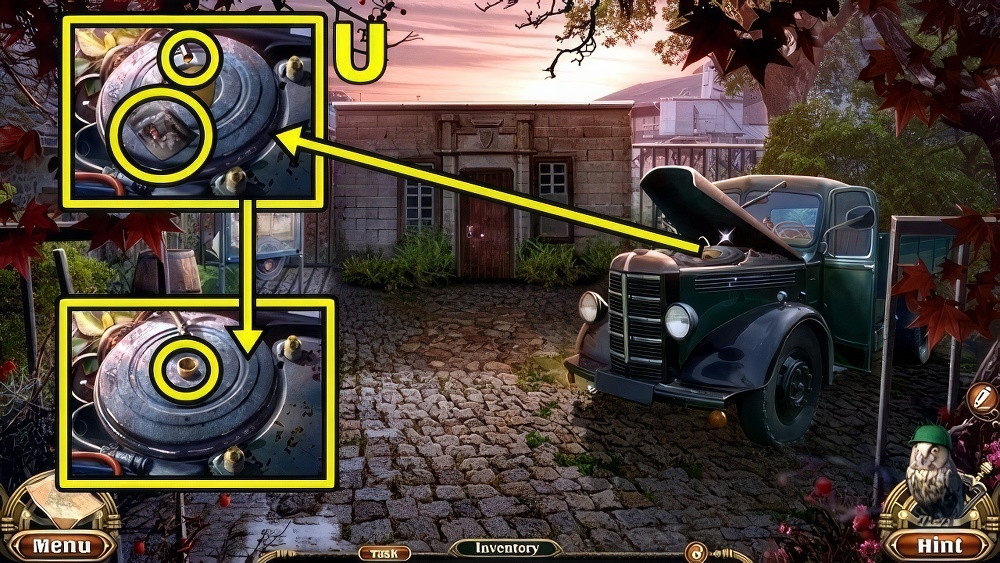
- Add MODEL SHIP (U), take HAMMER and KNIGHT STATUETTE.
- PLANKS, NAILS and HAMMER on BROKEN LADDER, take WOODEN LADDER.
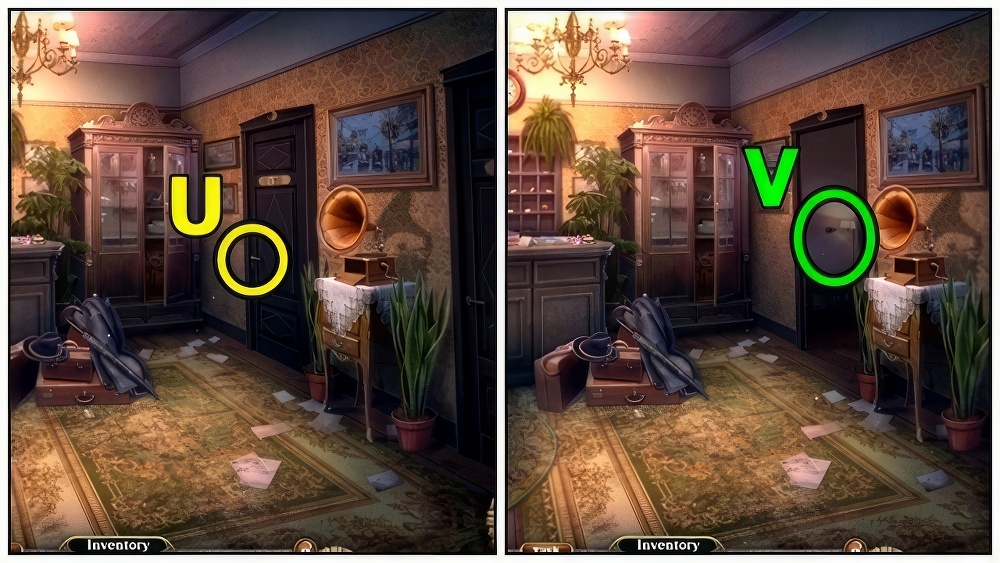
- Add WOODEN LADDER (V).
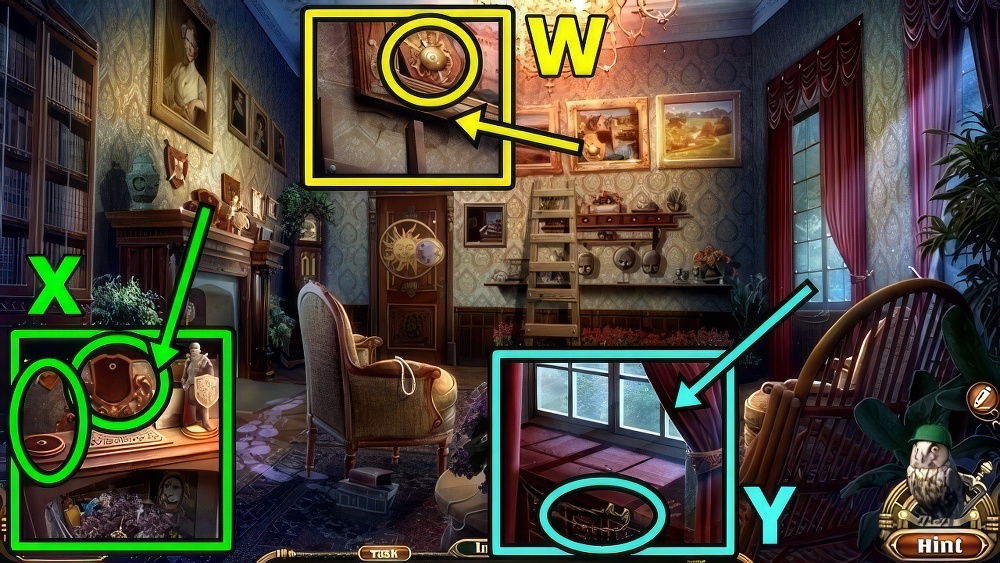
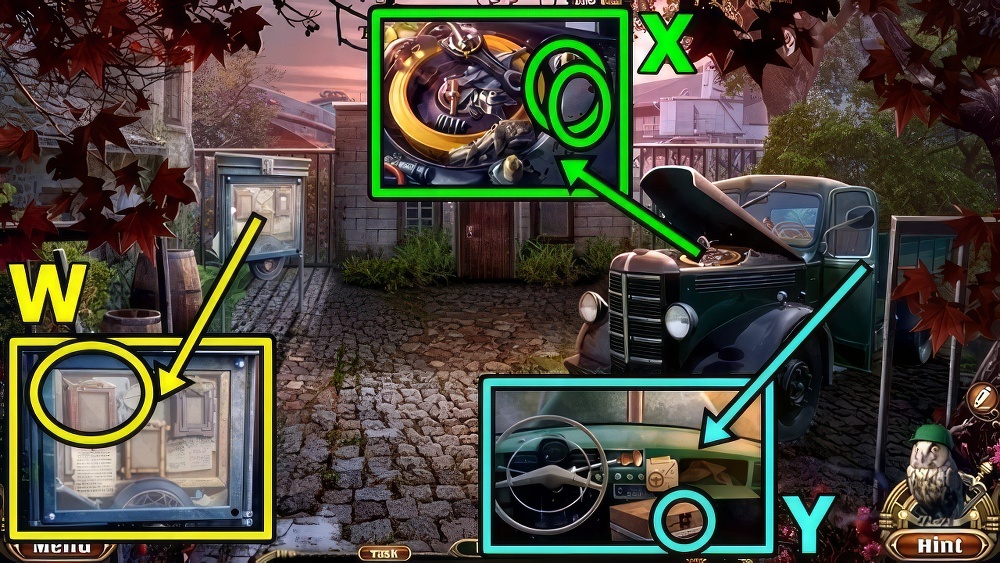
- Take CREST SHIELD (W).
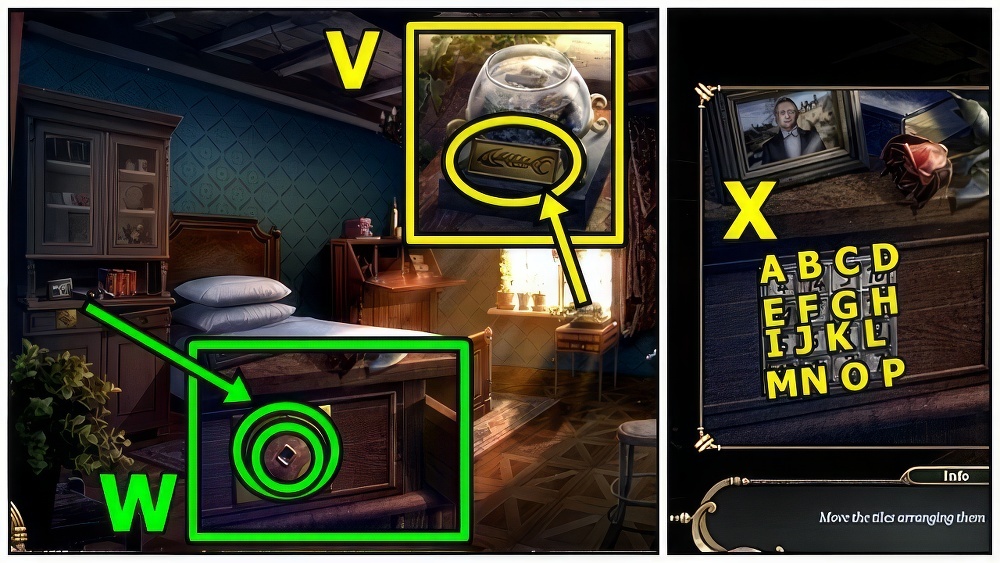
- Add KNIGHT STATUETTE (X) and CREST SHIELD, take GAUNTLET and CUTTERS.
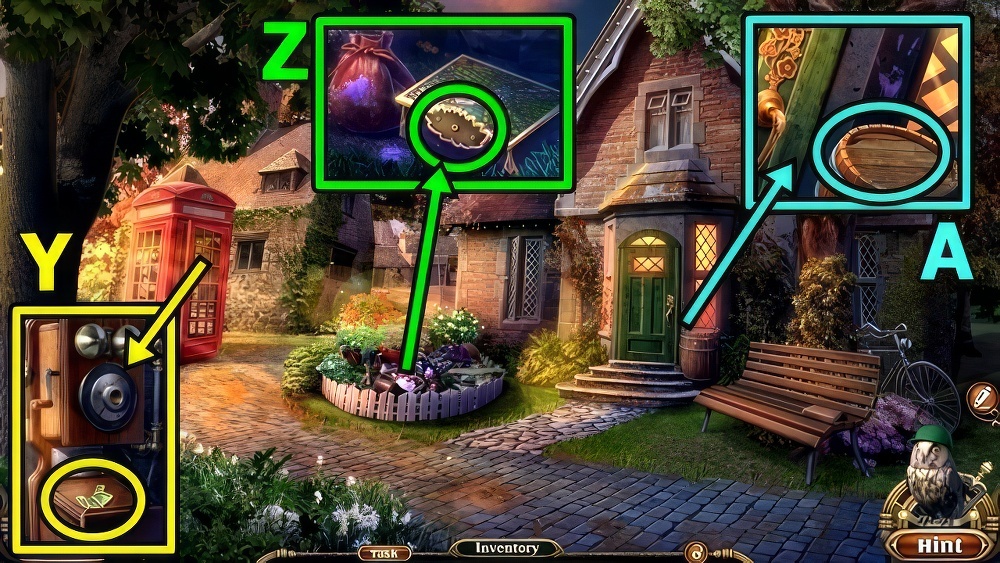
- Use CUTTERS (Y), take TURTLE and SEWING SCISSORS.
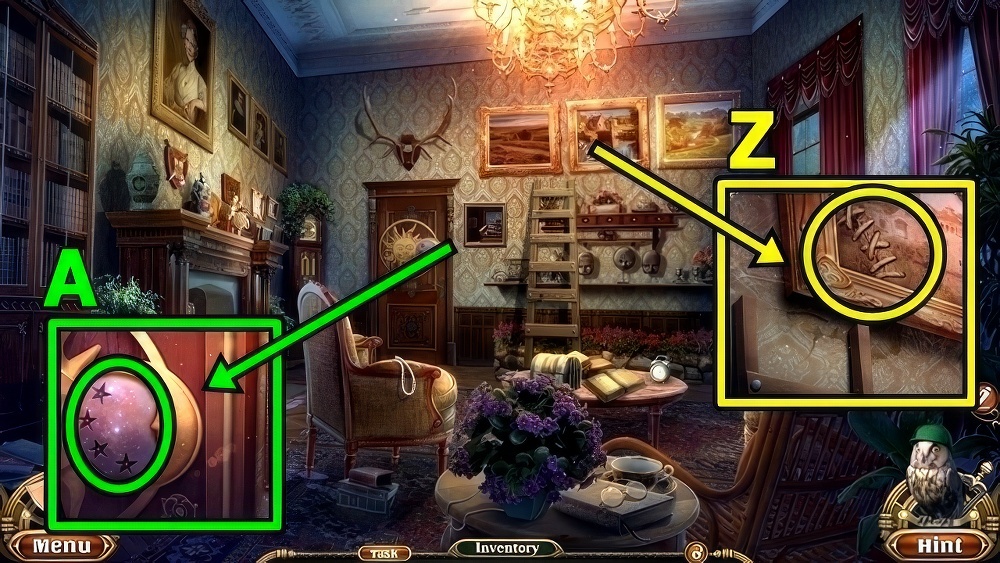
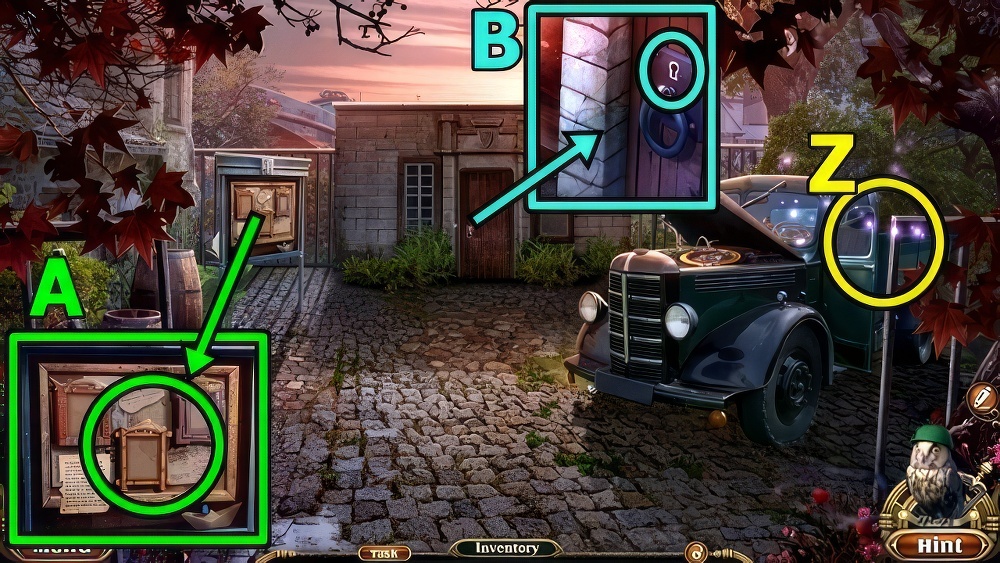
- Use SEWING SCISSORS (Z), take STAR 4/4 and DIAMOND RING.
- Add STAR (A).
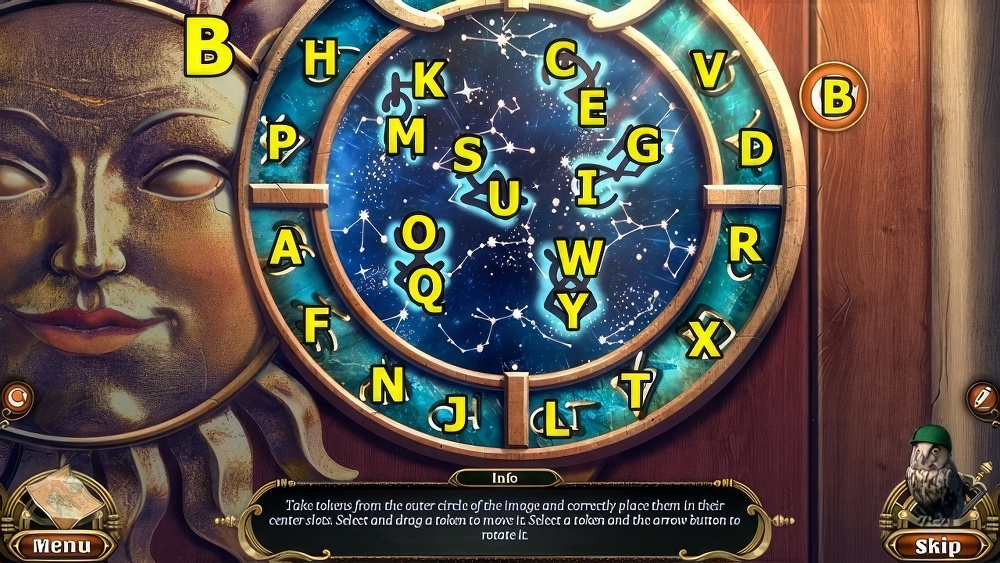
- Take tokens from the outer circle of the image and correctly place them in their center slots.
- Select and drag a token to move it.
- Select a token and the arrow button to rotate it.
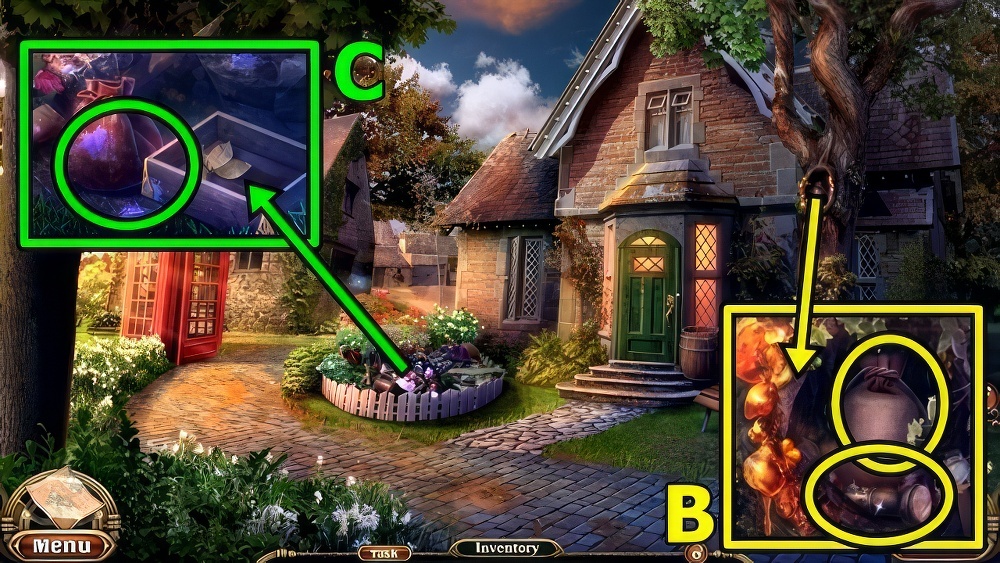
- Walkthrough: (B) A-B×3-C-D-E-F-B×3-G-H-I-J-B×2-K-L-B-M-N-B×2-O-P-B.
- Q-R-B×2-S-T-B-U-V-W-X-B×3-Y.
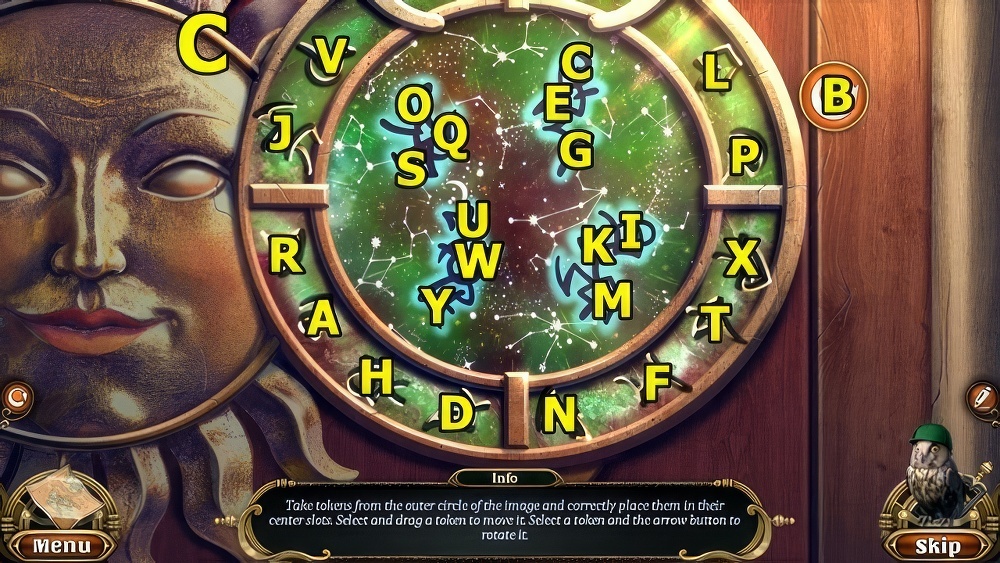
- Walkthrough: (C) A-B×2-C-D-E-F-B-G-H-B×2-I-J-B×3-K-L-M-N-B×3-O-P-B×2-Q.
- R-B-S-T-B-U-V-W-X-B×3-Y.
- Enter Corridor.
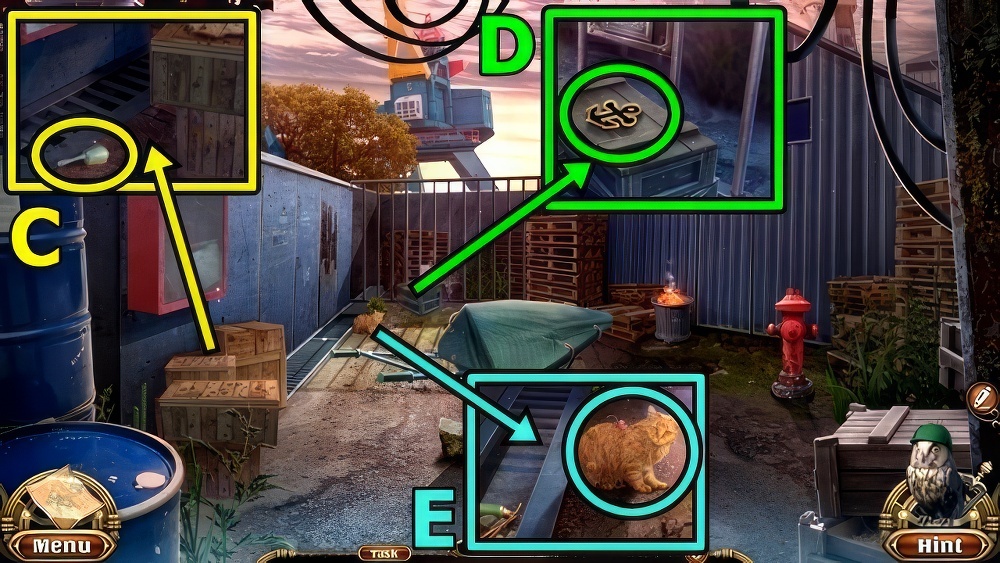
- Take NAMEPLATE (D).
- Take GRAY ELEPHANT (E).
- Add NAMEPLATE, take POKER and FABRIC.
- Move down.
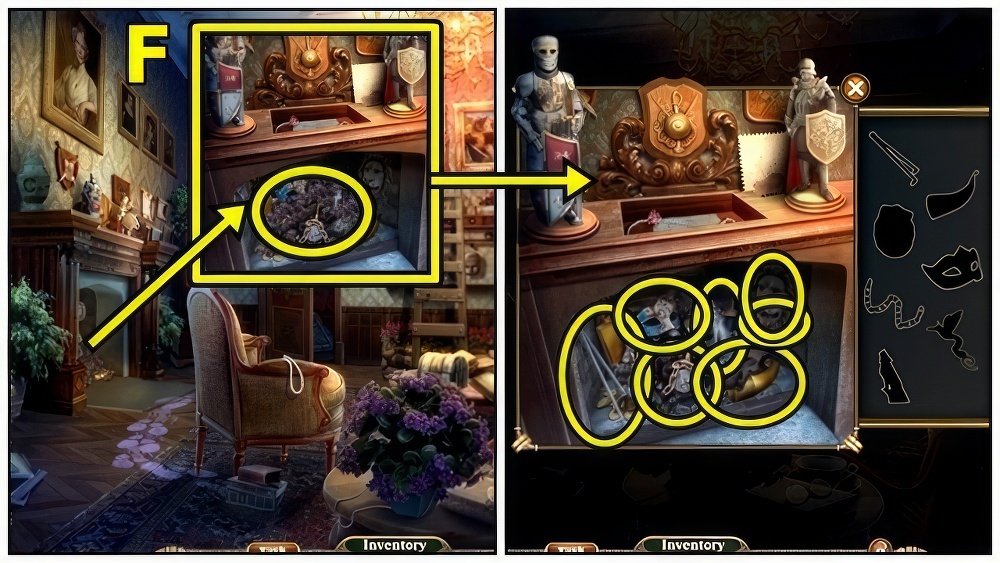
- Use POKER (F), find items, receive BIRD INLAY.
- Enter Corridor.
- Insert BIRD INLAY (G), take VISOR and PIANO PART.
- Add VISOR and GAUNTLET (H), take FLAIL and SCREWDRIVER.
- Use SCREWDRIVER (I), take FOLIO and SWORD.
- Add FLAIL (J) and SWORD.
- Play puzzle (K), receive OILER.
- Add OILER (L) and FABRIC.
- Receive EARTH LAYOUT and CREST KEY.
- Insert CREST KEY (M).
- Enter Mallory’s Room.
- Offer DIAMOND RING (N), receive CELESTIAL BODY 1/3.
- Read (O), take PIANO PART.
- Add PIANO PARTS (P), take DOLL DRESS and WHITE ELEPHANT.
- Take CRYSTAL (Q).
- Add FOLIO, take MUSIC CYLINDER.
- GRAY ELEPHANT, WHITE ELEPHANT then EARTH LAYOUT on TURTLE, take WORLD TOPPER.
- Take CELESTIAL BODY 2/3 (R), add WORLD TOPPER.

- Complete the world map.
- Select two map parts to swap them.
- Walkthrough (S).
- Take PIANO HAMMERS and DECORATIVE MIRROR.
- Add MUSIC CYLINDER (T) and PIANO HAMMERS, take DOLL and CELESTIAL BODY 3/3.
- Add CELESTIAL BODY (U), take ACID VIAL and CARVED MIRROR.
- Add CARVED MIRROR (V) and DECORATIVE MIRROR.
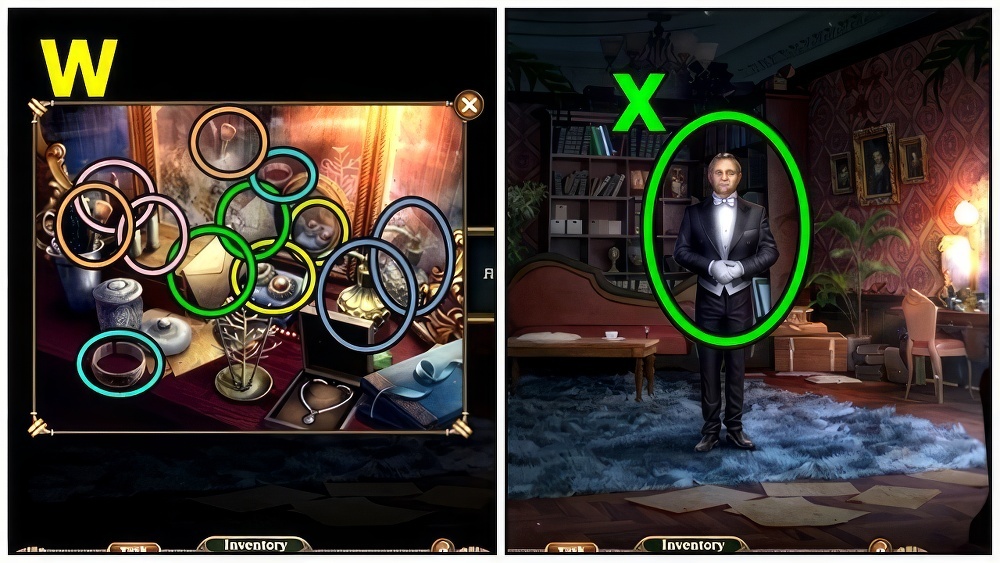
- Find pairs (W), receive LETTER.
- Offer LETTER (X).
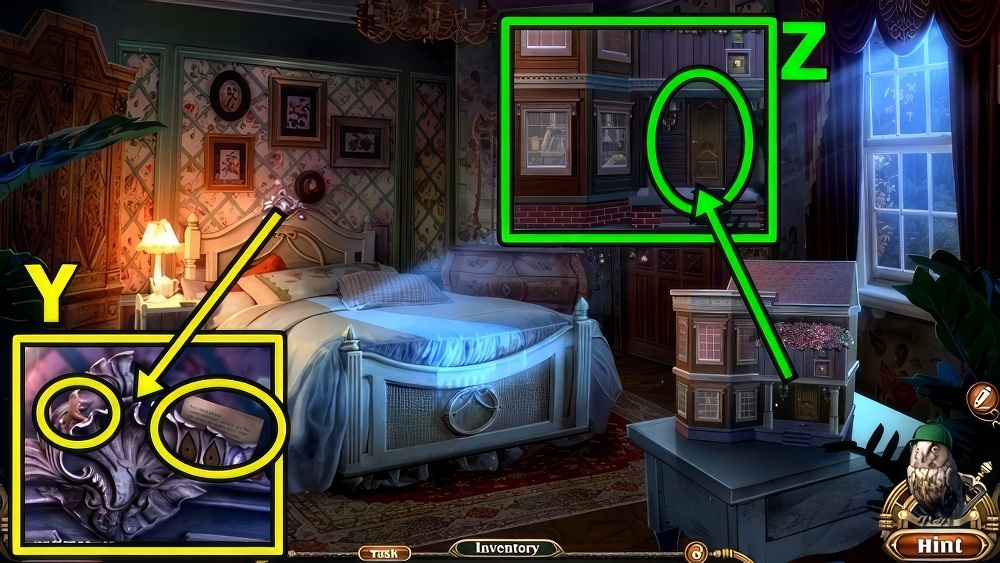
- Read (Y), take WINDING KEY.
- DOLL DRESS and WINDING KEY on DOLL, take WINDUP DOLL.
- Add WINDUP DOLL (Z).
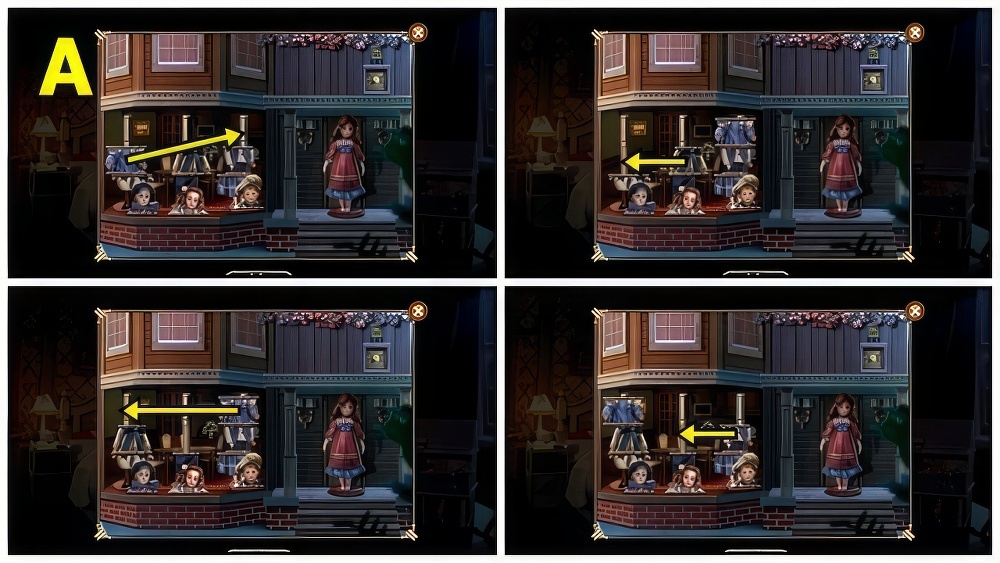
- Move the doll parts between the dowels to assemble them correctly.
- Select and drag a doll part to place it on a dowel.
- Nothing can be placed on top of a doll’s head.
- Walkthrough (A).
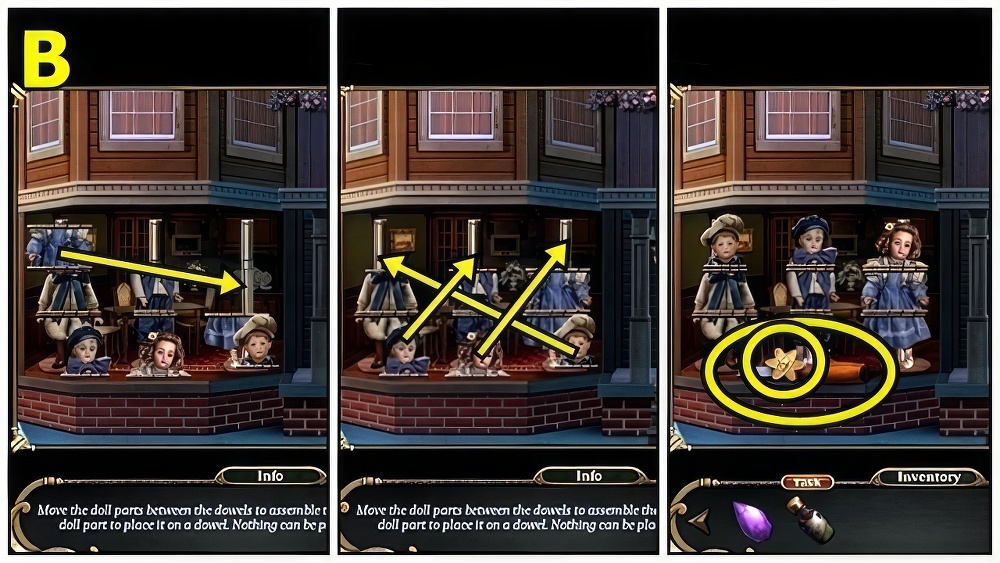
- Walkthrough (B).
- Take ATOM BADGE 1/4 and CHISEL.
- Take ATOM BADGE 2/4 (C).
- Use CHISEL, take CRYSTAL and HOUSE PIECE.
- Add CRYSTALS (D), take PAPER CLIP and GLUE.
- Add GLUE (E) then HOUSE PIECE, take COIN and DROPPER.
- Use ACID VIAL and DROPPER (F).
- Enter Corridor.
- Examine (G).
- Take BIRD AMULET (H).
- Read (I).
- Add BIRD AMULET, take ROCK HAMMER and BULB.
- Take BUTTON (J).
- Use ROCK HAMMER, take HACKSAW BLADE and SPRING MECHANISM.
- Add SPRING MECHANISM (K) and BUTTON.
- Take HACKSAW.
- HACKSAW BLADE and PAPER CLIP on HACKSAW, take SAW.
- Use SAW (L), take ATOM BADGE 3/4, WING AMULET and SPOTLIGHT CASE.
- Add WING AMULET (M), then COIN.
- Play puzzle (N), receive OPENER.
- Use OPENER (O), take CARVED HANDLE and QUICKLIME.
- Add CARVED HANDLE (P).
- Enter Storeroom.
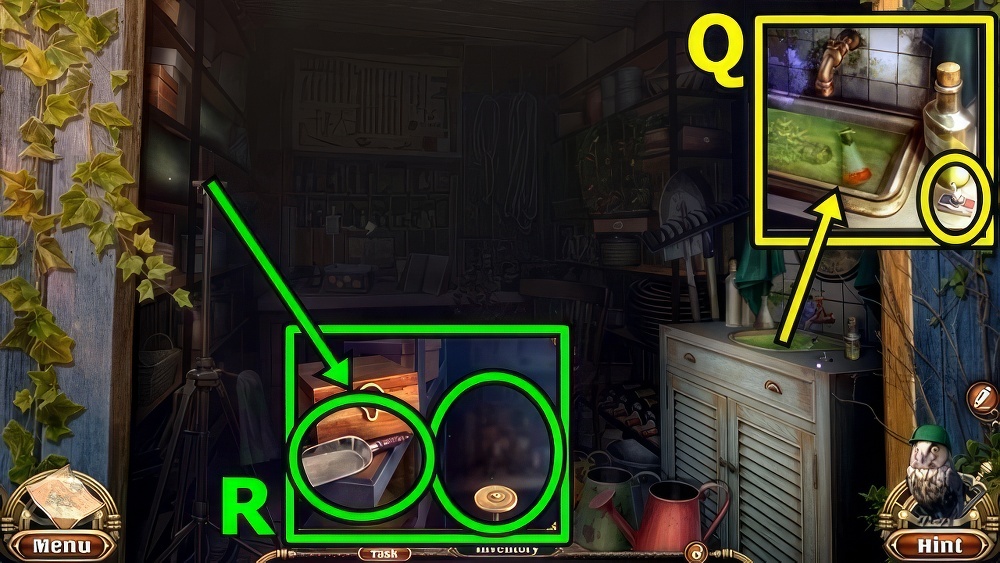
- Take TOGGLE SWITCH (Q).
- BULB and TOGGLE SWITCH on SPOTLIGHT CASE, take WORKING SPOTLIGHT.
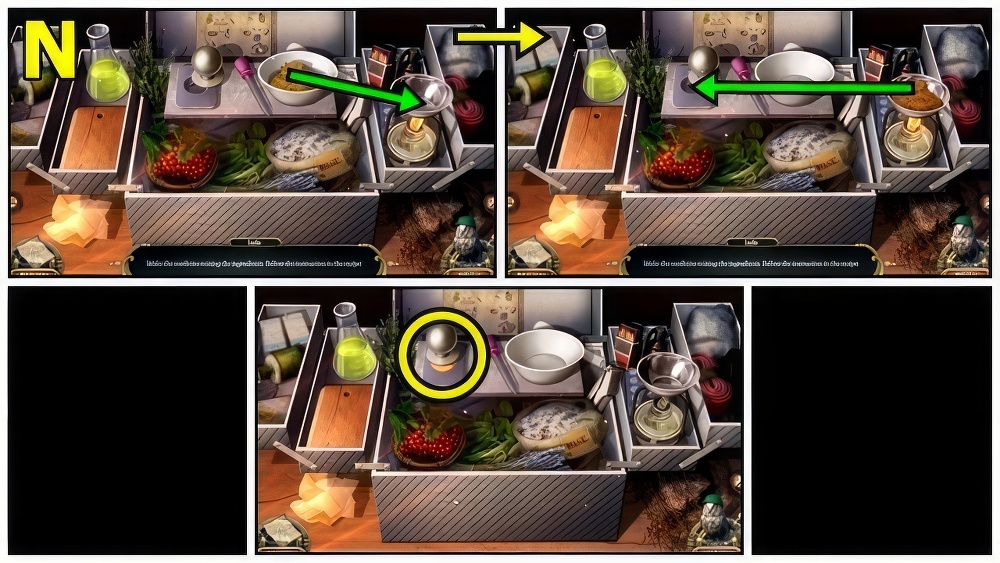
- Take KITCHEN SCOOP (R).
- Add WORKING SPOTLIGHT.
- Move down.
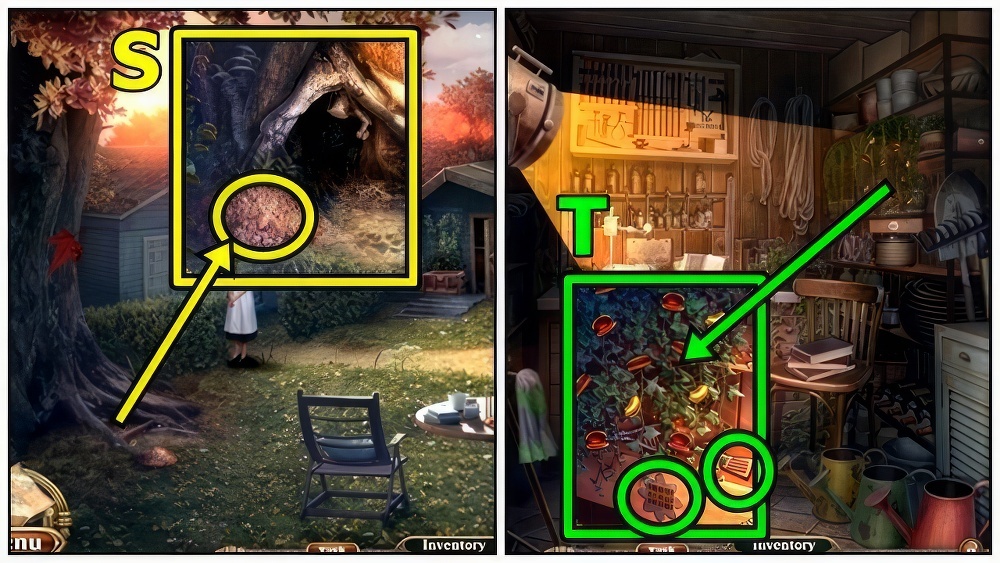
- Use KITCHEN SCOOP (S), take FLOWER KEYS and METALLIC HANGER.
- Enter Storeroom.
- Take CLOCK NUMBERS 1/4 (T).
- Insert FLOWER KEYS.
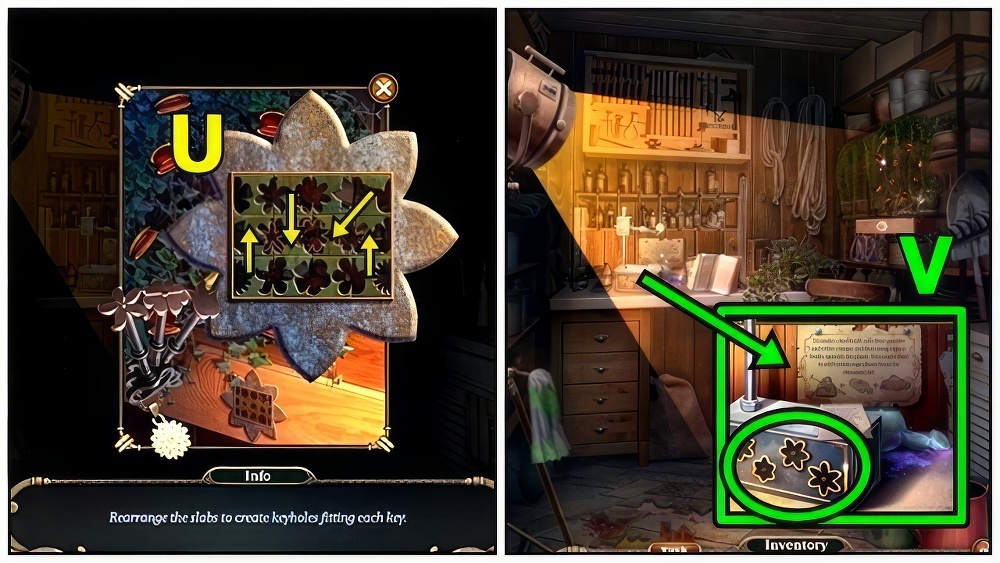
- Rearrange the slabs to create keyholes fitting each key.
- Walkthrough (U).
- Take ATOMIZER and ATOM BADGE 4/4.
- Add ATOM BADGE (V), receive LIGHT BADGE and CLOCK NUMBERS 2/4.
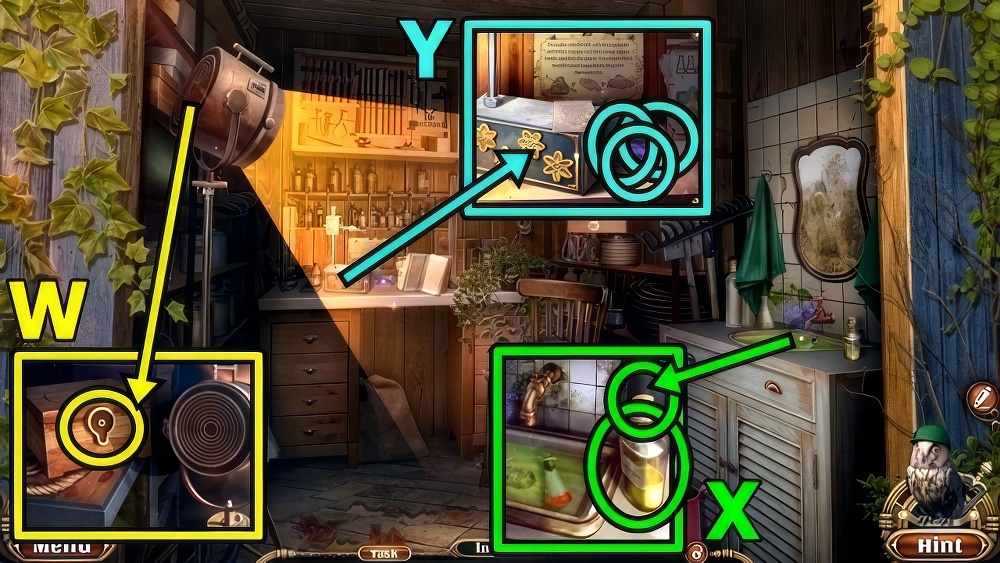
- Insert LIGHT BADGE (W), take CORKSCREW.
- Insert CORKSCREW (X), take WHITE VINEGAR.
- Add ATOMIZER (Y), QUICKLIME and WHITE VINEGAR.
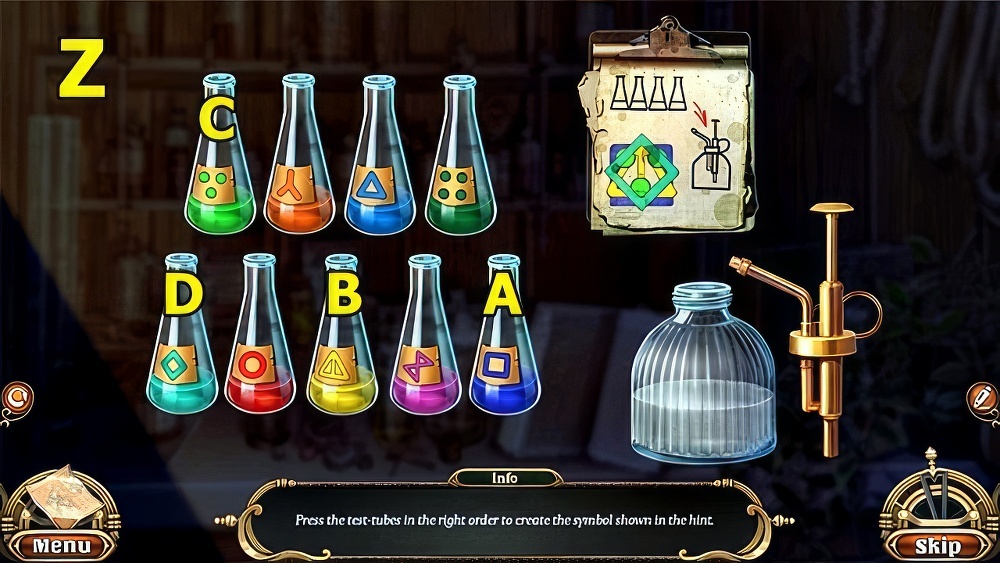
- Select the test-tubes in the right order to create the symbol shown in the hint.
- Walkthrough: (Z) A-B-C-D.
- Take HERBICIDE.
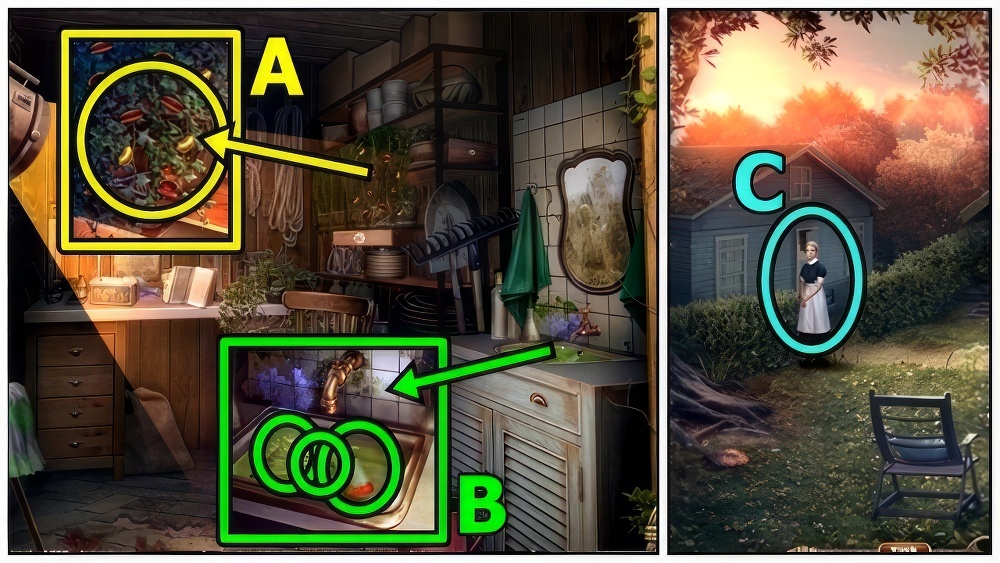
- Use HERBICIDE (A), take CLOCK NUMBERS 3/4 and PLIERS.
- PLIERS on METALLIC HANGER, take WIRE.
- Use WIRE (B), take GLOWING FLASK and SNOWFLAKE.
- Move down.
- Offer GLOWING FLASK (C).
- Enter Servants’ House.
- Take SNOWFLAKE (D).
- Take METALLIC DOWEL 1/4 (E).
- Insert SNOWFLAKES, take CLOCK NUMBERS 4/4 and JAR WITH GREASE.
- Take BROKEN CANDY (F), add CLOCK NUMBERS.
- Adjust dials.
- Take SMALL CROWBAR and EPOXY RESIN.
- Take TORN STRAINER (G).
- Use SMALL CROWBAR, take FOB.
- Add FOB (H).
- Play puzzle (I), receive BUTLER’S KEY.
- Take METALLIC DOWEL 2/4 (J).
- Insert BUTLER’S KEY.
- Enter Walter’s Room.
- Take SPOON (K).
- Add JAR WITH GREASE (L) and SPOON.
- Take METALLIC DOWEL 3/4 and HARDENER.
- Move down.
- EPOXY RESIN and HARDENER on BROKEN CANDY, take CERAMIC CANDY.
- Insert CERAMIC CANDY (M), find pairs, receive FROZEN ITEM.
- Add FROZEN ITEM (N), take KEYHOLE PLATE and NYLON SOCK.
- Enter Walter’s Room.
- NYLON SOCK on TORN STRAINER, take IMPROVISED SCOOP-NET.
- Use IMPROVISED SCOOP-NET (O), take HAMMER BADGE.
- Insert KEYHOLE PLATE (P) and HAMMER BADGE.
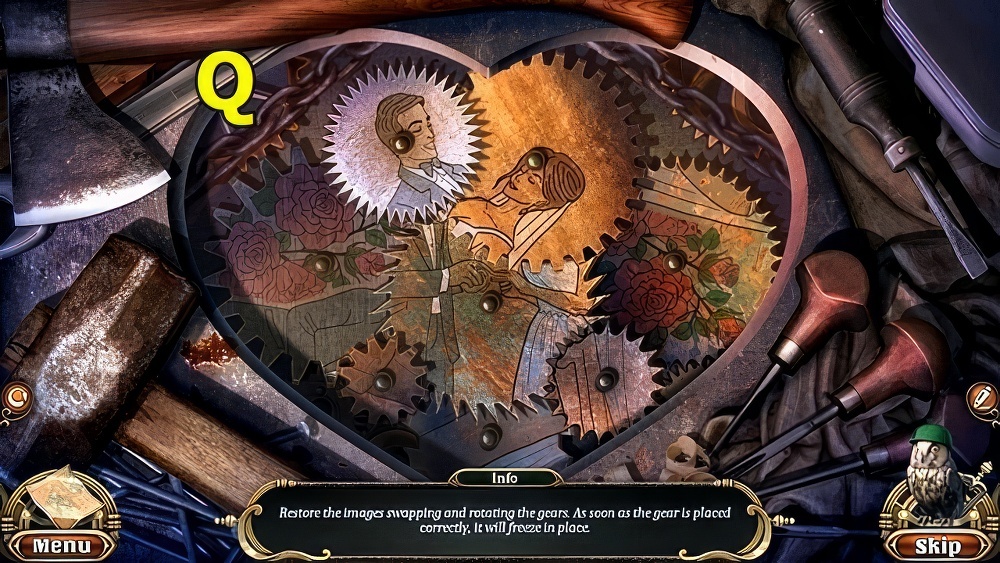
- Restore the images swapping and rotating the gears.
- As soon as the gear is placed correctly, it will freeze in place.
- Walkthrough (Q).

- Walkthrough (R).
- Take COLORED SHARD 1/3 (S) and EXPANDER.
- Use EXPANDER (T), take COLORED SHARD 2/3 and DOUBLE-DECKER BUS.
- Add DOUBLE-DECKER BUS (U), take FISH SKELETON and COPPER RING.
- Insert FISH SKELETON (V), take RED FLOWER and METALLIC DOWEL 4/4.
- Insert COPPER RING (W) and METALLIC DOWEL.
- Move the tiles, arranging them in ascending numerical order.
- Walkthrough: (X) C-B-F-G-K-J-I-E-F-G-K-O-N-J-F-G-K-O-N-J-F-G-K-L-H-D-C-B-A.
- E-F-G-C-B-A-E-F-G-H-D-C-B-A-E-F-G-K-O-P-L-K-J-I-M-N-O-K-L-H-G-F-E-I-M-N.
- O-K-L-H-G-F-E-I-M-N-O-P.
- Take COLORED SHARD 3/3 (Y).
- Insert COLORED SHARD (Z), take BLUE FOIL and METAL WEDGE.
- Use METAL WEDGE (A), take BICYCLE TOKEN and PENKNIFE.
- Take HAND LANTERN (B).
- Use PENKNIFE, take RED CELLOPHANE and BOX WITH WAX.
- Add BLUE FOIL and RED CELLOPHANE to HAND LANTERN, take UV LANTERN.
- Use UV LANTERN (C).
- Play puzzle (D), receive LIGHTER.
- LIGHTER on BOX WITH WAX, take AMMONIA and DIAL.
- Add DIAL (E).

- Take NAMEPLATE (F).
- Use NAMEPLATE (G), take SNAKE SYMBOL and YELLOW FLOWER.
- Add RED FLOWER (H) and YELLOW FLOWER.
- Enter Entry Hall.
- Use AMMONIA (I), receive RIDER TOKEN.
- Add BICYCLE TOKEN (J) and RIDER TOKEN, take INKWELL and BOWL SYMBOL.
- Take LOCK SPROCKET (K).
- Add BOWL SYMBOL and SNAKE SYMBOL.
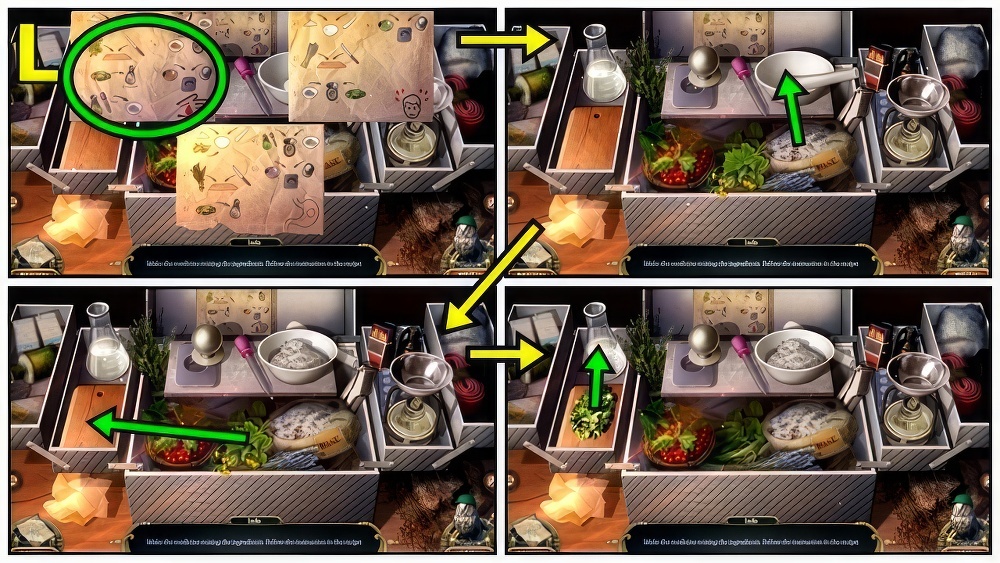
- Make the right medicine by mixing the ingredients.
- Follow the instruction in the recipe.
- Walkthrough (L).
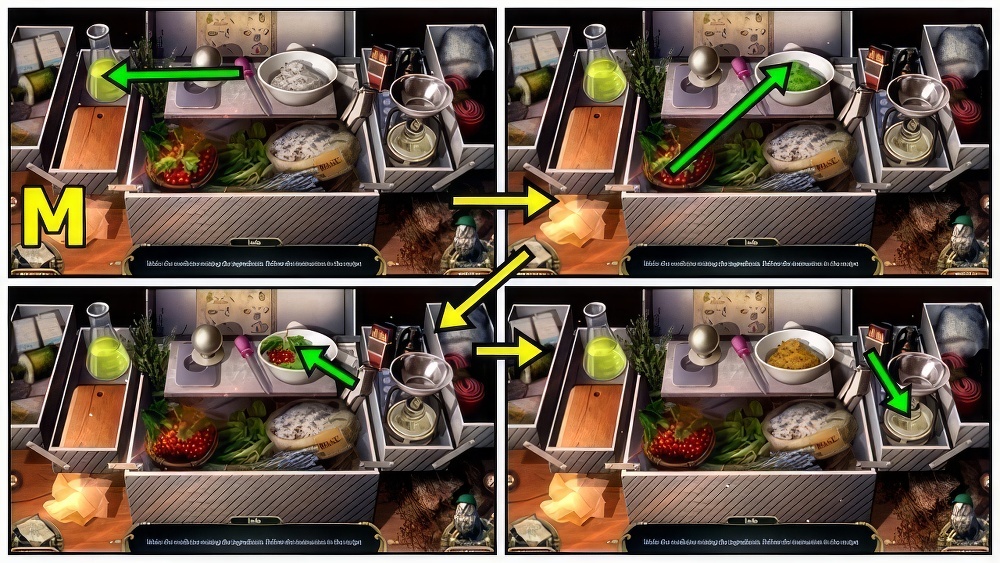
- Walkthrough (M).
- Walkthrough (N).
- Take MEDICINE.
- Add INKWELL (O) and LOCK SPROCKET, take BRUSH and BANDAGE.
- Give MEDICINE (P) and BANDAGE.
- Receive SMALL SCISSORS.
- Use SMALL SCISSORS (Q), take LOCKPICK and HOSE CLAMP.
- Use LOCKPICK (R), find pairs.
- Take PLASTIC BAR (S).
- Use BRUSH, take VALVE and HOOD HANDLE.
- Take ANCHOR BADGE (T).
- Insert HOOD HANDLE, take WRENCH and FISHERMEN’S PHOTO 1/3.
- Take FISHERMEN’S PHOTO 2/3 (U), add HOSE CLAMP.
- Add VALVE.

- Find items (V), receive SANDPAPER.
- SANDPAPER on PLASTIC BAR, take SHARPENED BAR.
- Use SHARPENED BAR (W), receive CART WHEEL.
- Take OPEN WRENCH.
- Use WRENCH (X) and OPEN WRENCH, take CHROME APPLIQUE and CHEST HANDLE.
- Insert CHEST HANDLE (Y).
- Play puzzle (Z), receive FISHERMEN’S PHOTO 3/3.
- Add FISHERMEN’S PHOTO (A).
- Take DISH and KEY TO DOCKS.
- Use KEY TO DOCKS (B).
- Enter Docks.
- Take BRUSH (C).
- Insert ANCHOR BADGE (D), take PEOPLES FIGURINE 1/3 and RETAINING NUT.
- Use BRUSH (E), take FASTENER.
- Take SPONGE (F).
- Add RETAINING NUT, CART WHEEL and FASTENER.
- Walkthrough (G).
- Take PEOPLES FIGURINE 2/3 and HELMET.
- Use HELMET (H), take CONCRETE BLOCK and NOZZLE.
- Add CONCRETE BLOCK (I), take CROCHET HOOKS and POLISH.
- SPONGE, then POLISH on CHROME APPLIQUE, take IMPROVISED MIRROR.
- Use CROCHET HOOKS (J), then IMPROVISED MIRROR.
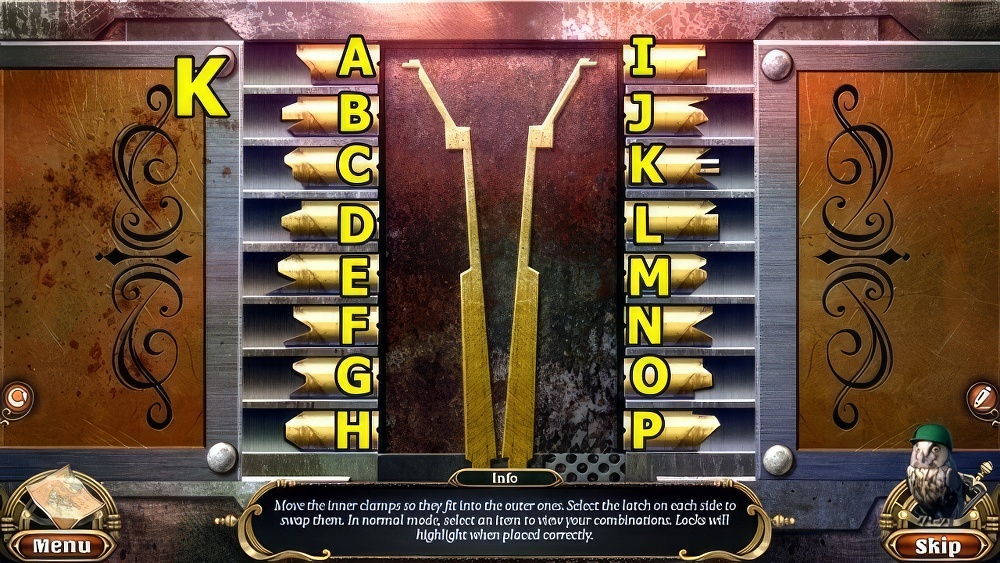
- Move the inner clamps so they fit into the outer ones.
- Select the latch on each side to swap them. In normal mode, select an item to view your combinations.
- Locks will highlight when placed correctly.
- Walkthrough: (K) (A-J)-(B-M)-(C-P)-(D-N)-(F-I)-(H-K)-(E-P)-(F-N)-(G-M)-(E-I)-(F-J)-(G-O)-(H-J)-(G-L)-(G-I).
- Take BLACKSMITH FIGURINE.
- Add BLACKSMITH FIGURINE (L), take CREAM and CASTING MOLD, read.
- Add DISH (M) and CREAM, take JIGSAW and FIRE HOSE.
- Add FIRE HOSE (N), then NOZZLE.
- Enter Old Warehouse.
- Take PEOPLES FIGURINE 3/3 (O).
- Take FISH FIGURINE 1/4 (P).
- Add PEOPLES FIGURINE, take FLAME AMULET and BLADE.
- Insert FLAME AMULET (Q), find items, receive HANDLE.
- BLADE and HANDLE on JIGSAW, take PORTABLE JIGSAW.
- Use PORTABLE JIGSAW (R), take FISH FIGURINE 2/4 and OVEN LEVER.
- Add OVEN LEVER (S), take FISH FIGURINE 3/4 and DUPIN’S SIGNET.
- Insert DUPIN’S SIGNET (T).
- Play puzzle (U), receive LID HOOK.
- Use LID HOOK (V), take LEAD and EDGAR’S NOTEBOOK.
- Add CASTING MOLD (W), LEAD and EDGAR’S NOTEBOOK, receive BOARDING HOUSE ADDRESS.
- Take CONVEYER KEY.
- Insert CONVEYER KEY (X).
- Go to Pier.
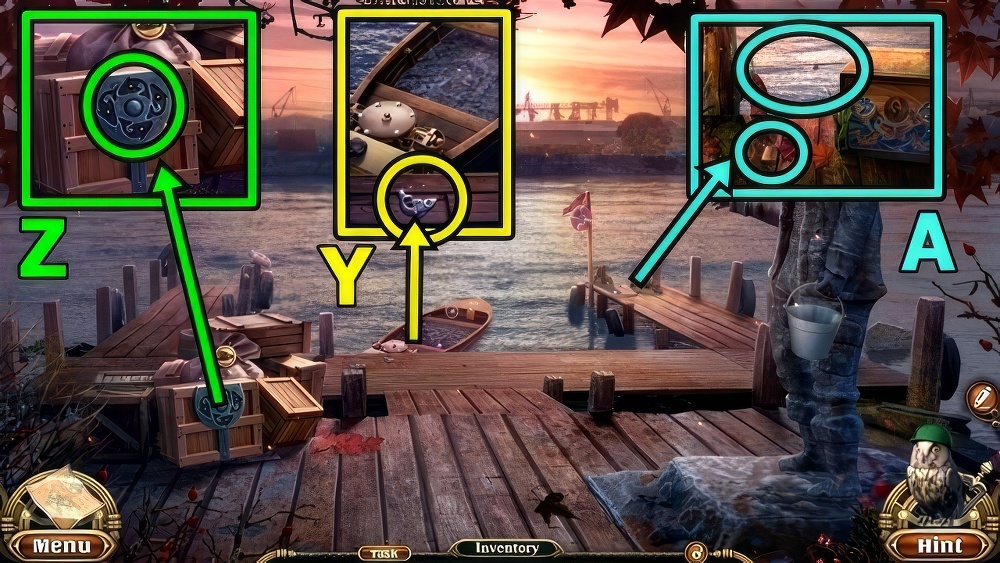
- Take FISH FIGURINE 4/4 (Y).
- Add FISH FIGURINE (Z), take AXE HANDLE and NET.
- Take WEDGE (A).
- Use NET.
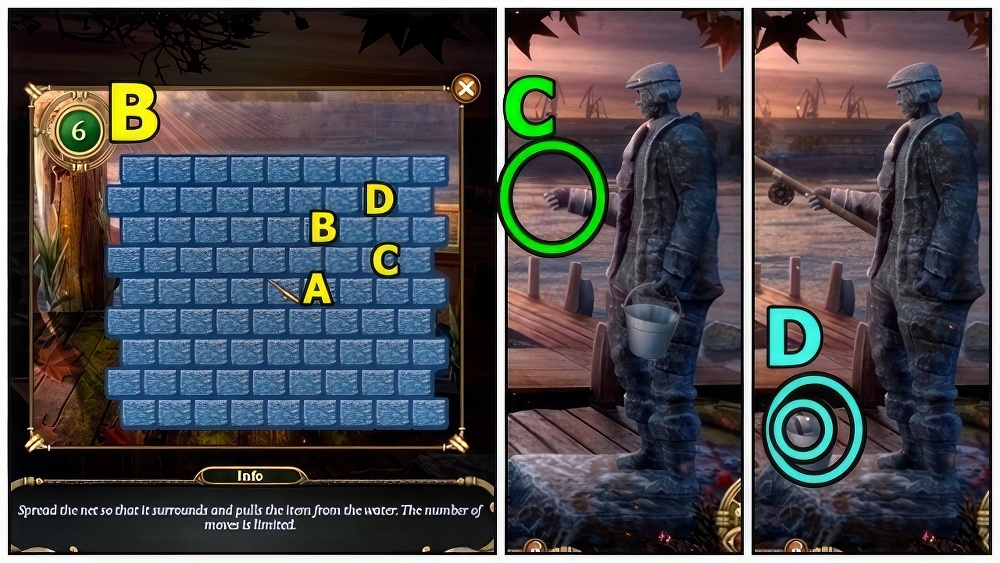
- Walkthrough: (B) A-B-C-D.
- Receive FISHING ROD.
- Add FISHING ROD (C).
- Take AXE BLADE (D) and BUCKET.
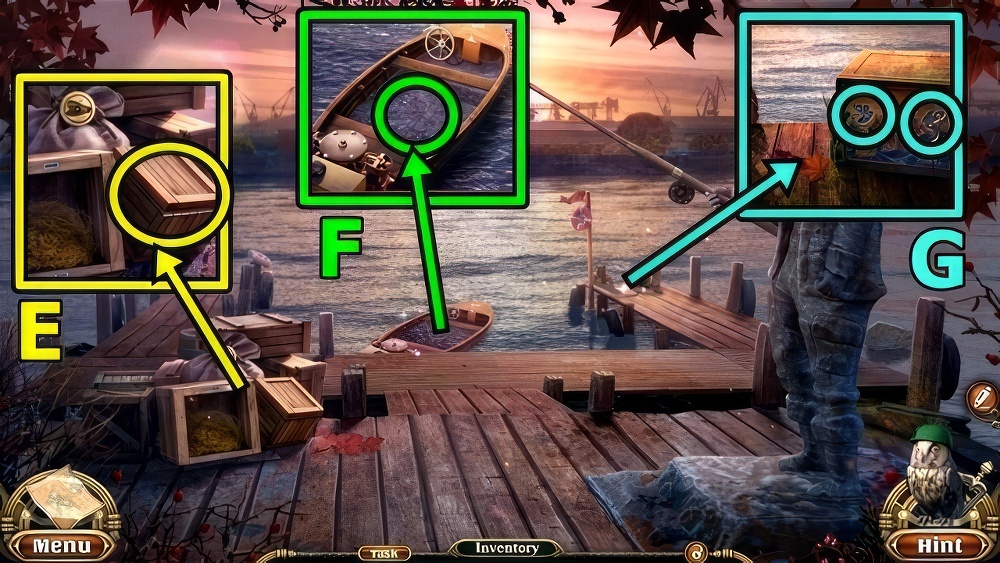
- AXE BLADE and WEDGE on AXE HANDLE, take AXE.
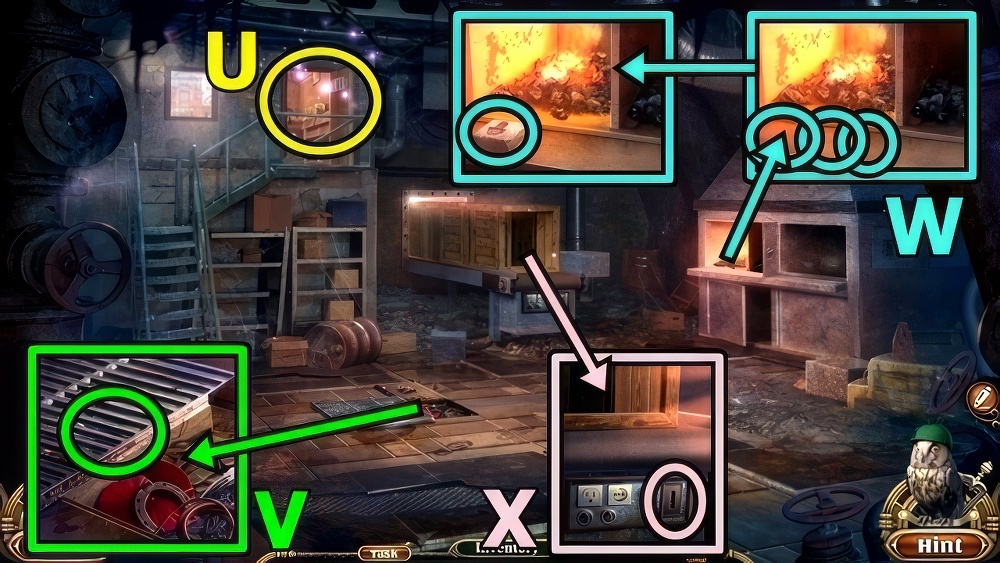
- Use AXE (E), take REPAIR KIT and GOLDEN BIRD IMAGE.
- Use BUCKET (F), take SILVER BIRD IMAGE.
- Add GOLDEN BIRD IMAGE (G) and SILVER BIRD IMAGE.
- Switch the discs until the patterns all match.
- To rotate, place the disc on the rotation button.
- Walkthrough (H).
- Walkthrough (I).
- Take CAP AMULET and GAS.

- Insert CAP AMULET (J), take FISHING KNIFE and HAND STARTER.
- Add REPAIR KIT (K), HAND STARTER and GAS.
- Add BOARDING HOUSE ADDRESS.
- Take CUP 1/3 (L).
- Use FISHING KNIFE, take MUSIC NOTES APPLIQUE.
- Take SOLID ROLLER (M).
- Insert MUSIC NOTES APPLIQUE, take HEX WRENCH and CUP 2/3.
- Insert HEX WRENCH (N), take PHONOGRAPH HANDLE and INDIA INK.
- Add SOLID ROLLER (O), then INDIA INK.
- Play puzzle (P), receive DRAWN CODE.
- Add DRAWN CODE (Q), press symbols A-B-C.
- Take CUP 3/3 and OLD GUN.
- Add CUP (R), take CARTRIDGES and RECORD.
- Add RECORD (S) and PHONOGRAPH HANDLE, take CYLINDER and EMBLEM LOCK.
- Insert EMBLEM LOCK (T), take ROOM KEY and TRIGGER.
- CYLINDER, CARTRIDGES and TRIGGER on OLD GUN, take REVOLVER.
- Use ROOM KEY (U).
- Use REVOLVER (V).
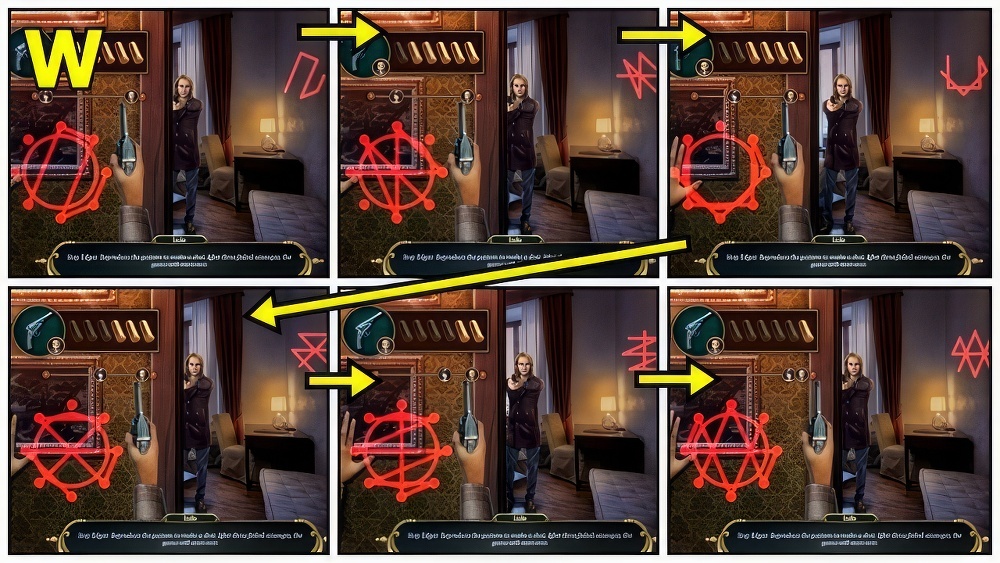
- Stop Edgar.
- Reproduce the pattern to make a shot.
- After three failed attempts, the game will start over.
- Walkthrough (W).
- Walkthrough Bonus Chapter, at the link below.


