
Lucky Season 1: King of Fools (Bonus Chapter) – You’ll be playing Jack, the director tells you the premiere is in a week. If you know how it’s supposed to go, have the script ready by tomorrow. Otherwise they’ll use the one they have. You always knew leprechauns existed. And you’ve seen them in your dreams. And you believed you were destined to meet them one day. The first time you met Will, you were scared at first, but then you helped him save the worlds from the evil leprechaun. When Will returned to his world, you decided to write a play about the leprechaun. In it, you wanted to realize your ideas and tell people how kind and meaningful leprechauns are to our world. Your script and actors could convince people of the reality of the wondrous creatures, and then faith would become a source of magic.
Bonus Chapter Walkthrough

- Talk (A).
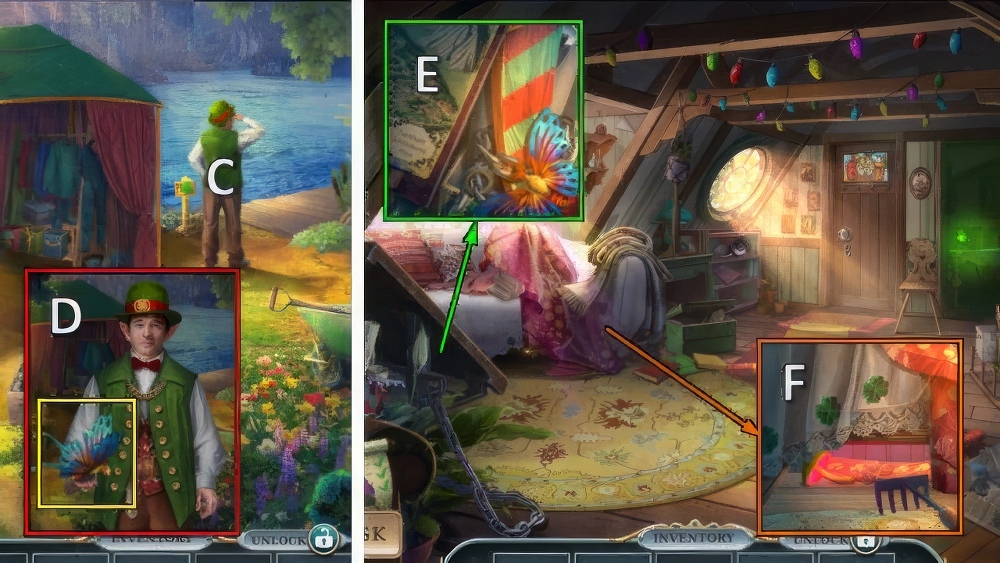
- Select B or C.
- Take NEEDLE (D).
- Take ROTATING HANDLE (E).

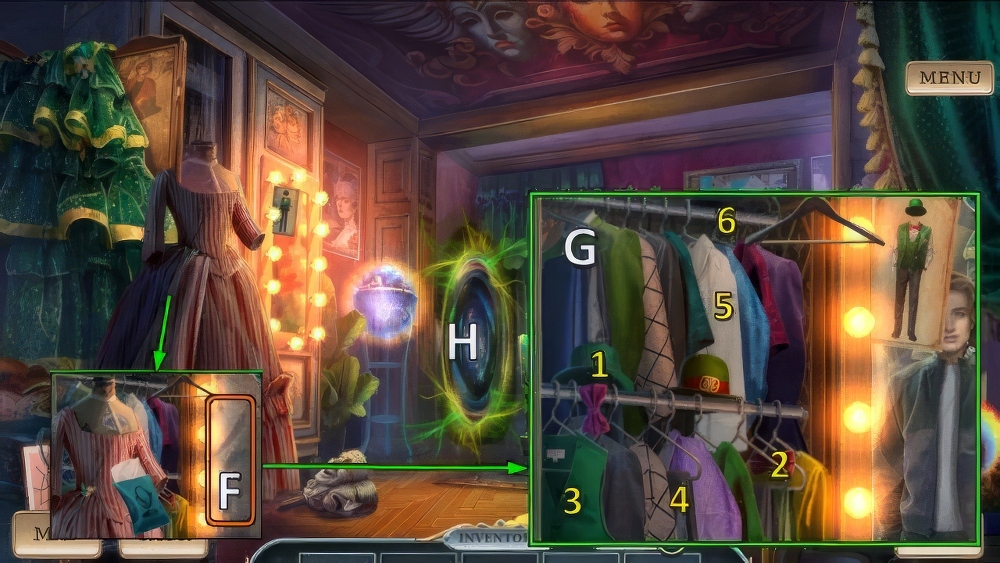
- Place ROTATING HANDLE, take MASK KEY and GEAR (F).
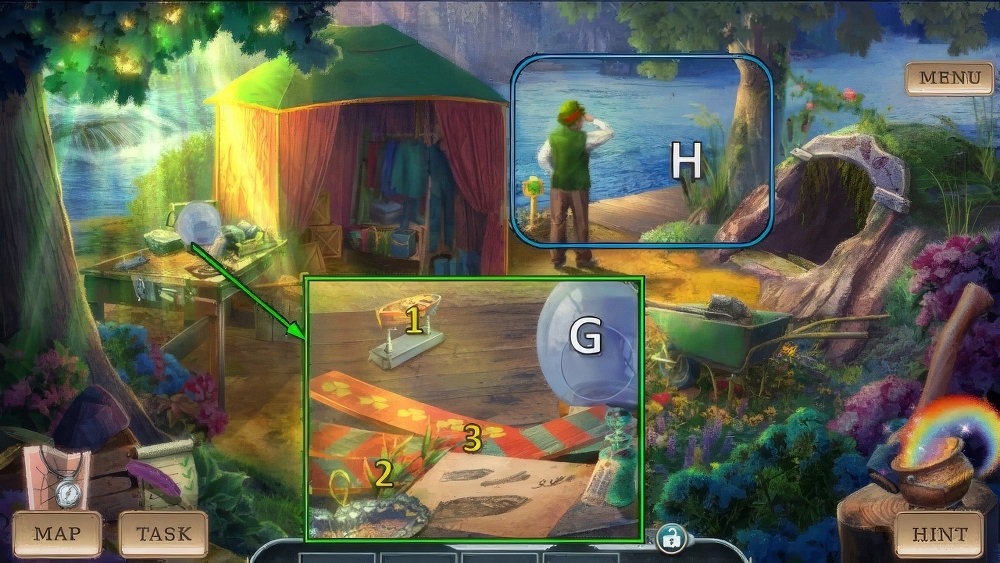
- Use MASK KEY (G).
- Go (H).
- Move note, take LEPRECHAUN HAT (I).
- Take CRAYON (J).
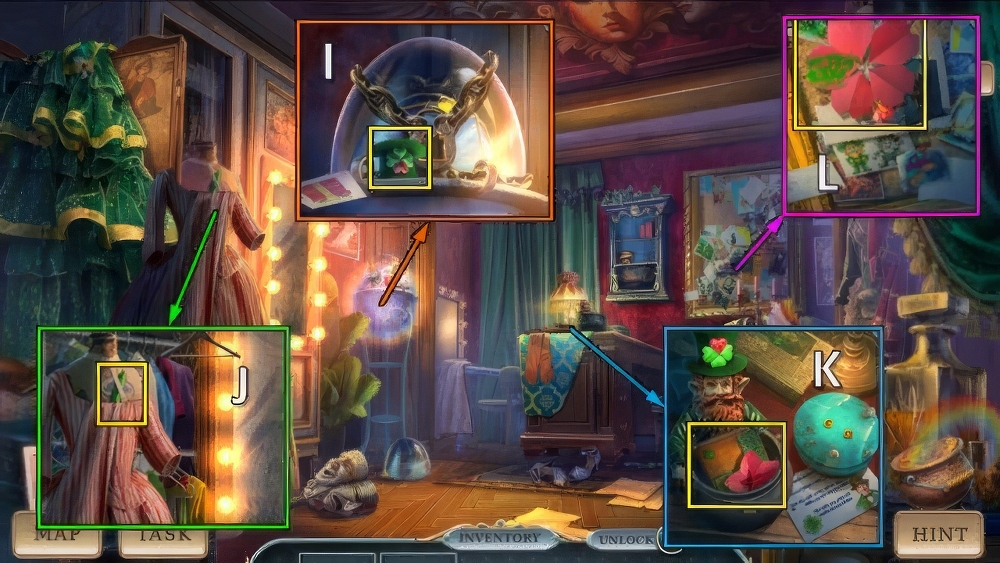
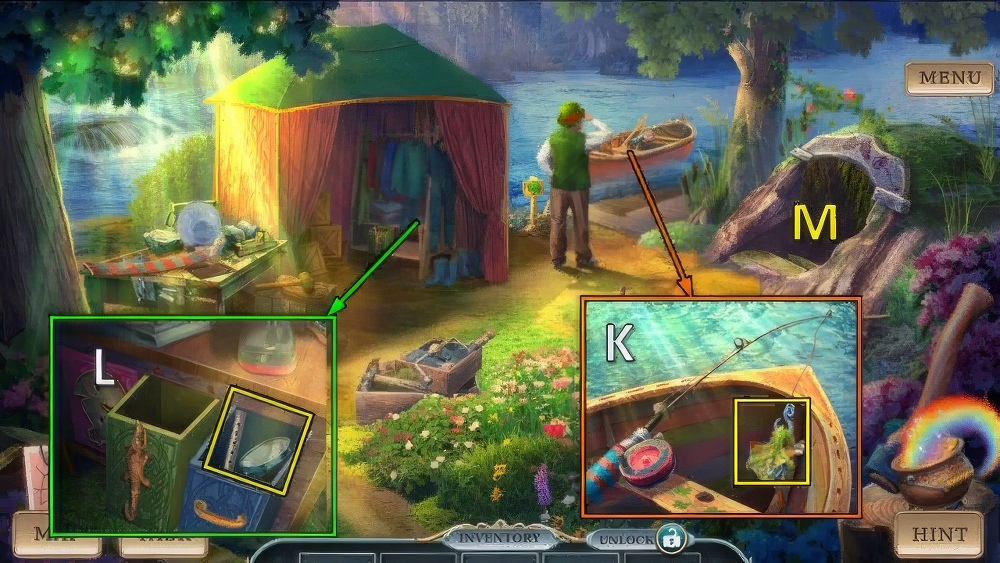
- Place LEPRECHAUN HAT, take PAPER FLOWER and DIARY (K).
- Use PAPER FLOWER and CRAYON, take CODE COMBINATION and FIREFLY 1/3 (L).
- Walk down.

- Place CODE COMBINATION.
- Move note, take STAGE LIGHTS and EMPTY BAG (M).
- Place STAGE LIGHTS and DIARY (N).
- Play puzzle (O), receive DEVICE BATTERY and GREEN BUTTON.
- Go (P).

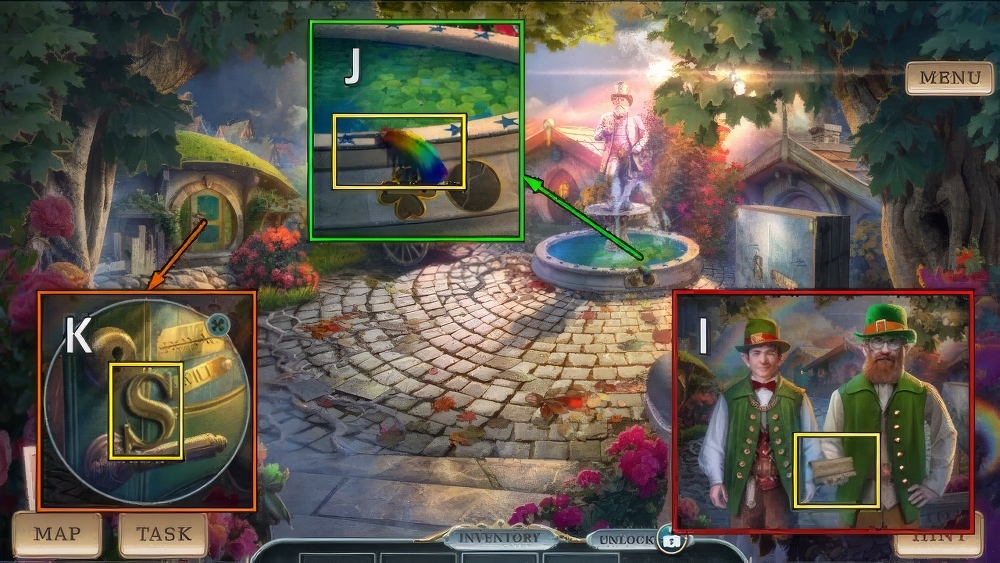
- Use NEEDLE and GREEN BUTTON, take ENERGY RUNE and GIFT TOKEN (Q).
- Place GIFT TOKEN (R), take BRONZE CHAIN and FIREFLY 2/3 (S).
- Walk down.

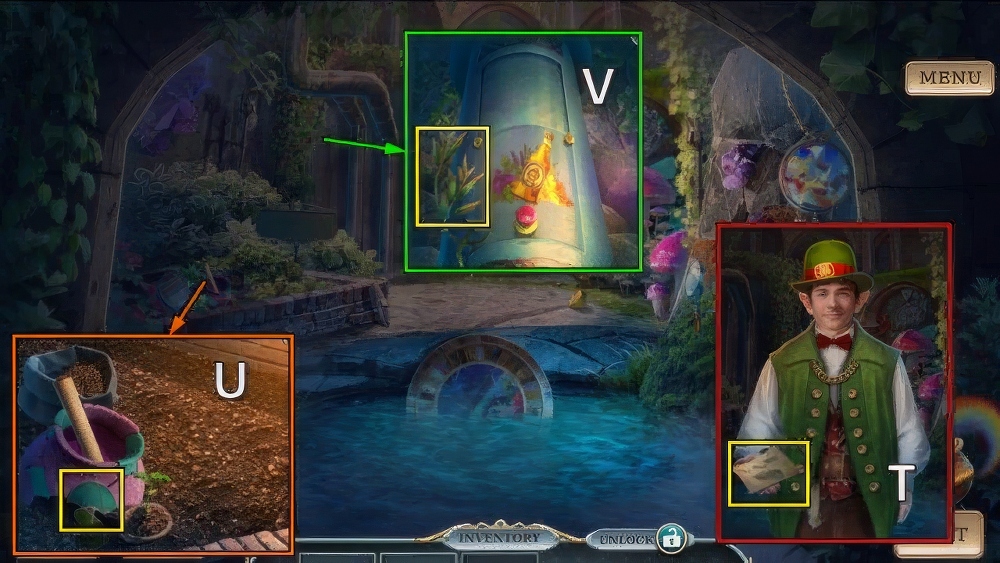
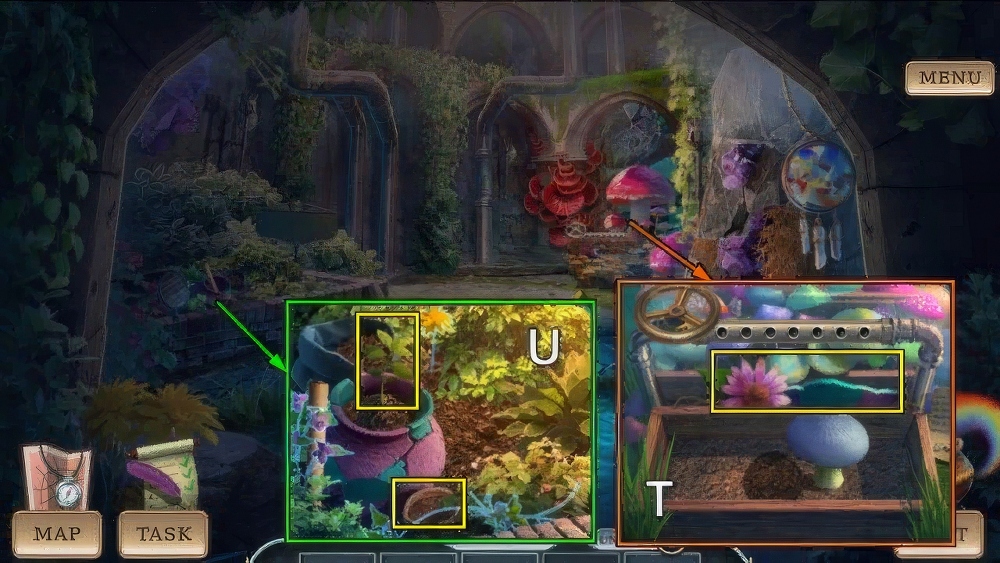
- Place GEAR and BRONZE CHAIN (T), take STAR KEYCHAIN and WET WIPES (U).
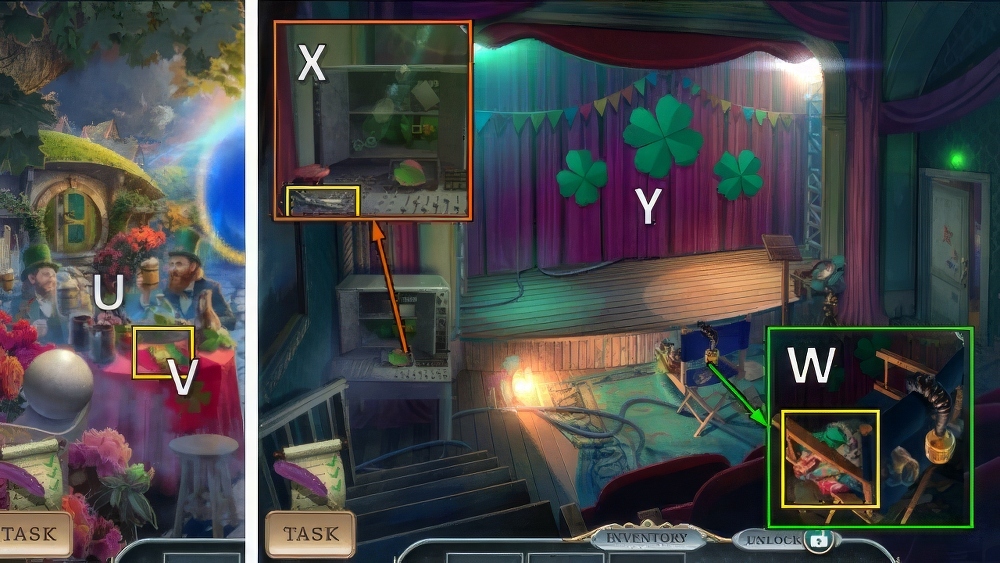
- Use STAR KEYCHAIN (V), take FIREFLY 3/3 (W).
- Go (X).

- ENERGY RUNE and FIREFLY on DEVICE BATTERY, take CHARGED BATTERY.
- Place CHARGED BATTERY (Y).
- Solution (Z-A): (3-17)-(8-10)-(9-11)-(10-18)-(13-19)-(14-15)-(16-19)-(6-19)-B-(21-38)-(22-37)-(25-26)-(26-40)-(27-34)-(31-38)-(34-38)-(37-40).

- Solution (C).
- Receive KELPIE FIGURINE and UNCHARGED CRYSTAL 1/4.
- Place KELPIE FIGURINE (D), take CARD LEPRECHAUN and TOOL SET (E).
- Use WET WIPES and CARD LEPRECHAUN (F), select 1-2-3-4-5 (G).
- Receive GRANDMA’S ADVICE.
- TOOL SET and GRANDMA’S ADVICE on EMPTY BAG, take TRAVELER’S KIT.
- Use TRAVELER’S KIT (H).
- Take DIARY (I).
- Take PEN (J).
- Take MISSING LETTER (K).

- Place MISSING LETTER (L), take LIST OF PLACES and TOGGLE SWITCH (M).
- PEN and LIST OF PLACES on WISH LIST.
- Solution (N).
- Take TOUR PLAN.

- Use TOUR PLAN (O).
- Take WILL’S KEY (P).
- Use WILL’S KEY (Q).
- Go (R).

- Take MOTHER-OF-PEARL TRIANGLE (S).
- Take UNCHARGED CRYSTAL 2/4 (T).
- Place MOTHER-OF-PEARL TRIANGLE, take COLOR LIGHT BULB and UNCHARGED CRYSTAL 3/4 (U).
- Place COLOR LIGHT BULB and TOGGLE SWITCH, take SMALL PICKAXE and UNCHARGED CRYSTAL 4/4 (V).
- Walk down.

- Place UNCHARGED CRYSTAL, take CHARGED CRYSTAL (W).
- Use CHARGED CRYSTAL (X).
- Play puzzle (Y).

- Talk (Z).
- Take TORCH (A).
- Take CROCODILE TAIL (B).
- Place CROCODILE TAIL, take OILY TISSUE and FLOWER WATER (C).

- Use SMALL PICKAXE and FLOWER WATER, take MIRROR 1/3 and SMALL DIAMOND (D).
- Use SMALL DIAMOND, take HOT SPARK and COOKIE (E).
- OILY TISSUE and HOT SPARK on TORCH, take BURNING TORCH.
- Use BURNING TORCH (F).
- Select 1-2-3 (G).
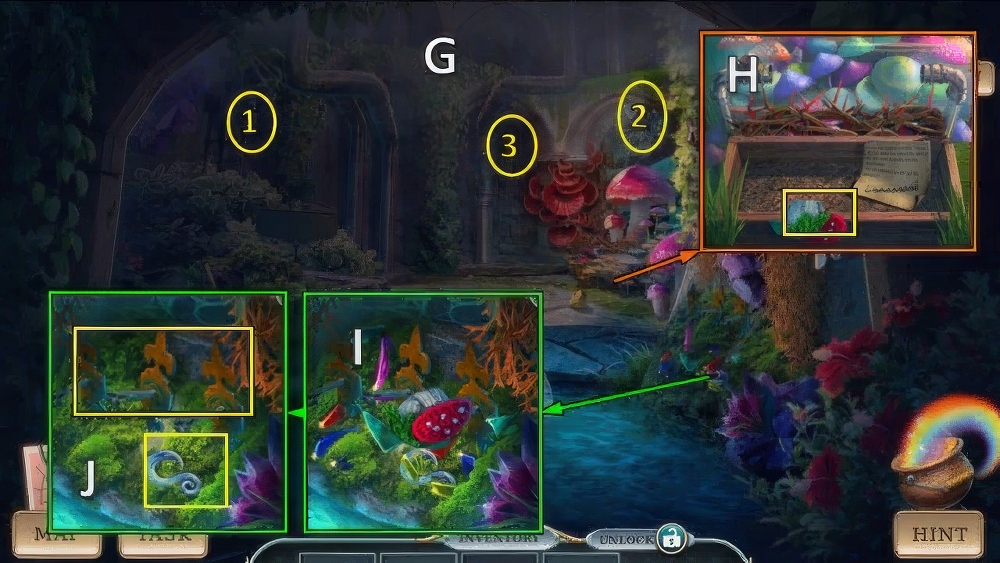
- Take MUSHROOM NAPKIN (H).
- Use MUSHROOM NAPKIN (I), take GLASS HOOK and UNIVERSAL MOUNT (J).
- Walk down.
- Use GLASS HOOK, take STICKY TREE ESSENCE and MIRROR 2/3 (K).
- Use COOKIE and STICKY TREE ESSENCE, take MIRROR 3/3 and PIPE WITH HOLES (L).
- Go (M).

- MIRROR and TRAVELER’S KIT on UNIVERSAL MOUNT, take MIRRORS ON STANDS.
- Place MIRRORS ON STANDS (N).
- Solution: Ox2-P-Qx2-Rx2-S.
- Take BOAT DRAWING (T).
- Take UMBRELLA TOKEN (U).
- Take FASTENING WILLOW SPROUT (V).
- Walk down.

- Use UMBRELLA TOKEN, take BOAT BASE and WILD BUTTERFLY WINGS (W).
- Use WILD BUTTERFLY WINGS, take POLISHED WOODEN PLANK 1/3 and VALVE (X).
- Go (Y).

- Place VALVE and PIPE WITH HOLES, take FAST GROWTH SPORES and SHINING MUSHROOM (Z).
- Place FAST GROWTH SPORES for puzzle, take HERBS FOR ALE (A).
- Use HERBS FOR ALE (B).
- Talk (C).
- Take METAL EATER (D).
- Go to Leprechaun’s House.
- Use METAL EATER, take POLISHED WOODEN PLANK 2/3 and SMALL RAKE (E).
- Use SHINING MUSHROOM and SMALL RAKE, take GOOD LUCK SIGN and POLISHED WOODEN PLANK 3/3 (F).
- Go to At the Cave.
- BOAT BASE, FASTENING WILLOW SPROUT and POLISHED WOODEN PLANKS on BOAT DRAWING, take ITEMS FOR BOAT.
- Place ITEMS FOR BOAT, select 1-2-3 (G).
- Receive NEW BOAT.
- Place NEW BOAT, play puzzle (H).

- Take EMPTY BASKET (I).
- Take SEED OIL (J).
- Use SEED OIL, take BAD LUCK SIGN and SHOVEL (K).
- Walk down twice.

- Place GOOD LUCK SIGN and BAD LUCK SIGN (L), take HAM and DECIPHER (M).
- Place DECIPHER for puzzle (N), receive LOCAL MAP.
- Take MEDICINAL HERBS 1/3 (O).
- Go to Grass Field.

- Use LOCAL MAP, go (P).
- Take BREADFRUIT (Q).
- BREADFRUIT and HAM in EMPTY BASKET, take OFFERING.
- Offer OFFERING (R).
- Take ANTI-WEED (S).
- Go to Cave with Spice.
- Use ANTI-WEED, take MEDICINAL HERBS 2/3 and PIECE OF POT (T).
- Use PIECE OF POT and SHOVEL, take MEDICINAL HERB 3/3 and NUT SHELL (U).
- Go to Grass Field.

- Use NUT SHELL, take SPRING WATER (V).
- Use SPRING WATER, MEDICINAL HERBS and TRAVELLER’S KIT (W).
- Play game (X), receive CURE FOR FOXES.
- Go (Y).

- Use CURE FOR FOXES (Z), select A-B-C.
- Take BARREL KEY and FOOD LIST (D).
- Go to Leprechaun’s House.
- Use BARREL KEY, go (E).

- Take ALPHABETICAL INDEX (F).
- Take SPICE (G).
- Place ALPHABETICAL INDEX (H), take TWINE and STRONG WORM (I).
- Go to Grass Field.

- Use STRONG WORM (J), take LIGHT SIGNAL and RINGING BELL (K).
- Use RINGING BELL and TWINE.
- Find pairs, take THIN BEAK and CUPCAKE 1/2 (L).
- Go to Square.

- Use THIN BEAK, take CUPCAKE 2/2 and CLEANING STAR (M).
- Use CLEANING STAR (N), take WIND ROSE (O).
- Go to Brewery.

- Place WIND ROSE and LIGHT SIGNAL, take PASTRY and CARAMEL YEAST (P).
- Place PASTRY, take LIZARDBIRD CLAW and COLOR LEVER (Q).
- Place COLOR LEVEL, take CRANBERRY SAUCE (R).
- Place TRAVELLER’S KIT, SPICE and CARAMEL YEAST (S).
- Play puzzle (T), receive ORIGINAL ALE.
- Walk down twice.
- ORIGINAL ALE, CRANBERRY SAUCE and CUPCAKES on FOOD LIST, take FESTIVE FOOD.
- Offer FESTIVE FOOD (U).
- Take FINISHED DIARY (V).
- Use LIZARDBIRD CLAW, take COLORFUL TISSUE and RESET BUTTON (W).
- Place RESET BUTTON, take TAILOR SCISSORS (X).
- COLORFUL TISSUE and TAILOR SCISSORS on FINISHED DIARY, take NEW DECORATIONS.
- Use NEW DECORATIONS (Y).

- Solution (Z): select 4-2-5-8-1-7-6-3.
Congratulations! You have completed the game Lucky Season 1: King of Fools.


