
Secrets of Salem 1: Shadow of the Witch (Bonus Chapter) – After the events of the main story, Sebilla and Dakota face a new threat. Someone has left a note on the shop door, written not in ink but in magic: “Get out of town, witches. Otherwise a terrible force will rise and there will be no mercy for you.” After studying the letter, Sebilla realizes that its author wields powerful dark magic unlike anything she’s seen before. Meanwhile, strange things begin to happen in the town, and the locals are terrified. Whether it’s coincidence or not, Dakota and Sebilla must find out what’s behind these events before it’s too late. Their investigation leads them to an ancient artifact, the Amulet of Radiance, known as a harbinger of ultimate evil. Legend has it that a miner, once enchanted by its power, brought the Amulet to the surface. The witches of Salem were able to seal it away, hiding it deep underground, but now that it has reawakened, its influence is growing. The higher it rises, the more powerful it becomes, but at the same time its structure is weakening. The only way to avert disaster is to destroy the Amulet, shattering it into a million pieces. Dakota and Sebilla realize they have no other choice. Time is short, and the fate of Salem once again depends on them. Now they must descend into the mines where the Amulet was found long ago. In the gloomy dungeons, among ancient traps and echoes of forgotten magic, the witches will face their final test.
Bonus Chapter Walkthrough
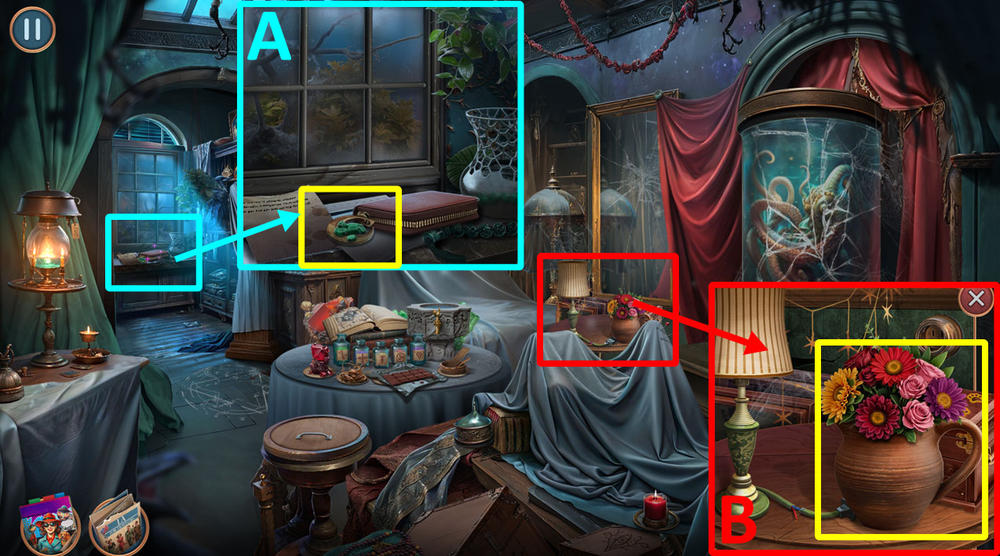
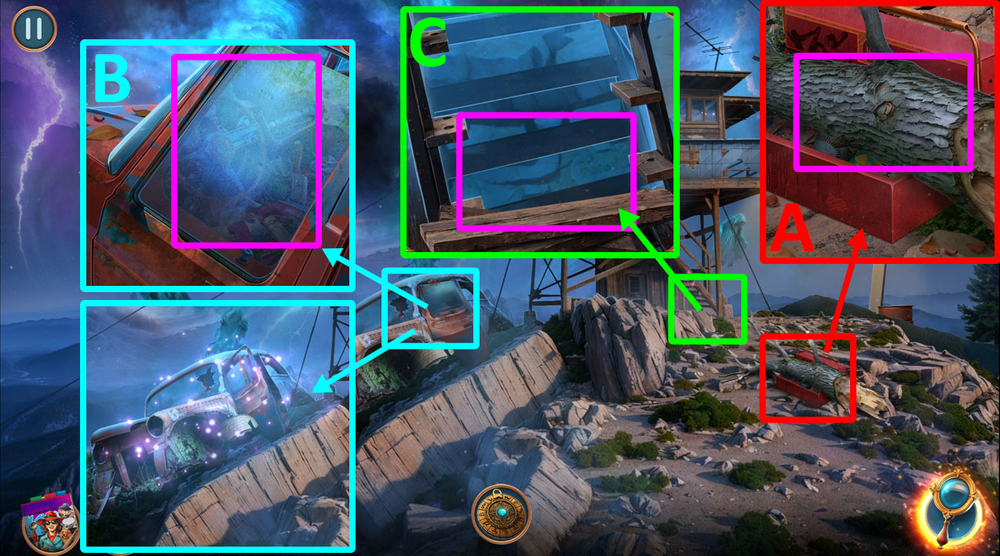
- Take GEMS and MOON AMULET (A).
- Take JUG OF WATER (B).
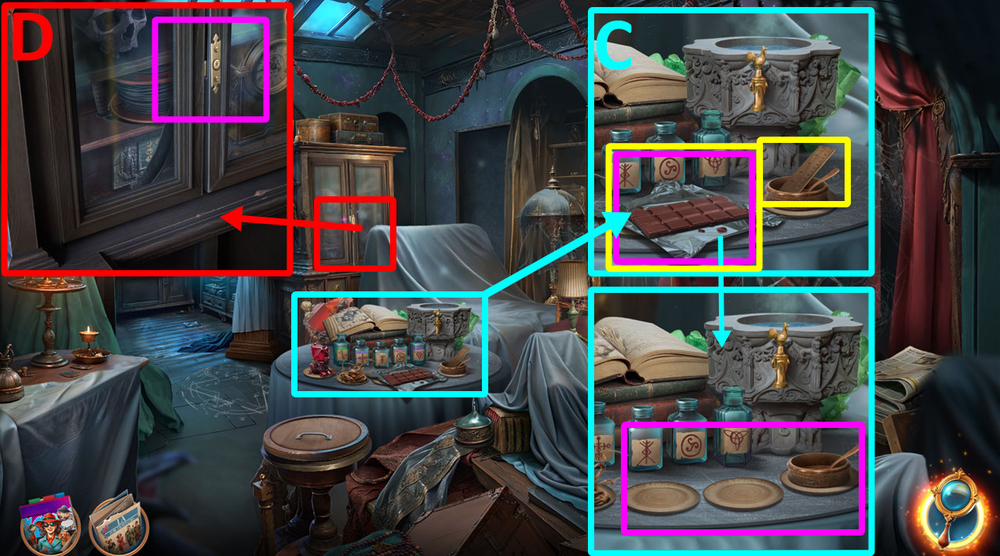
- Take RULER, eat the chocolate, take FOIL, use GEMS and JUG OF WATER on the bottles (C).
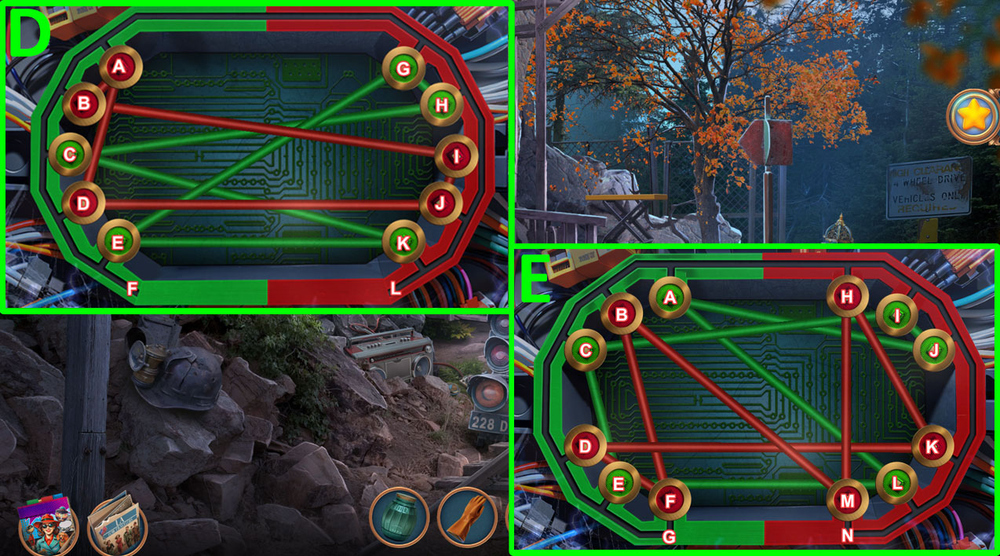
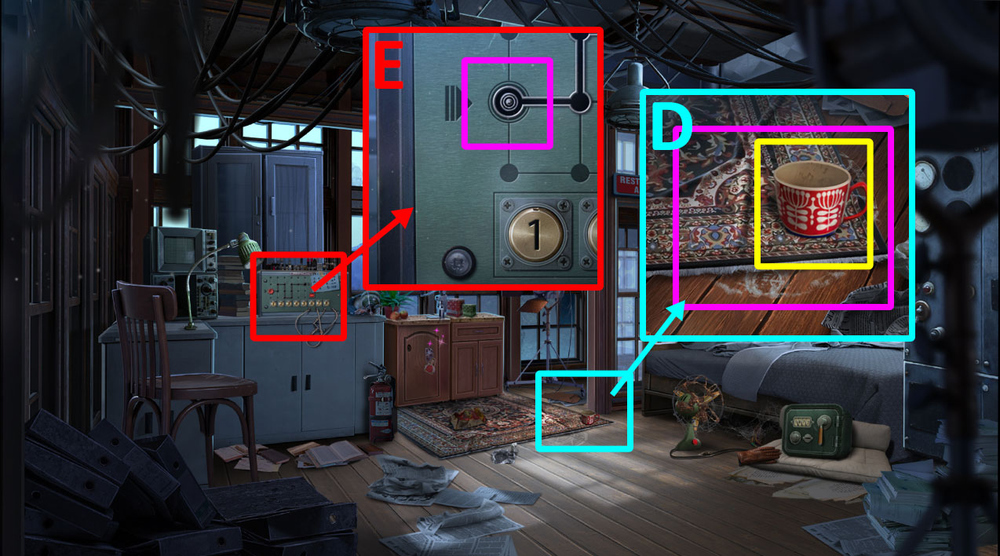
- Use RULER on the cabinet, take BLACK FEATHER and EXTENSION CABLE, use MOON AMULET on the safe (D).
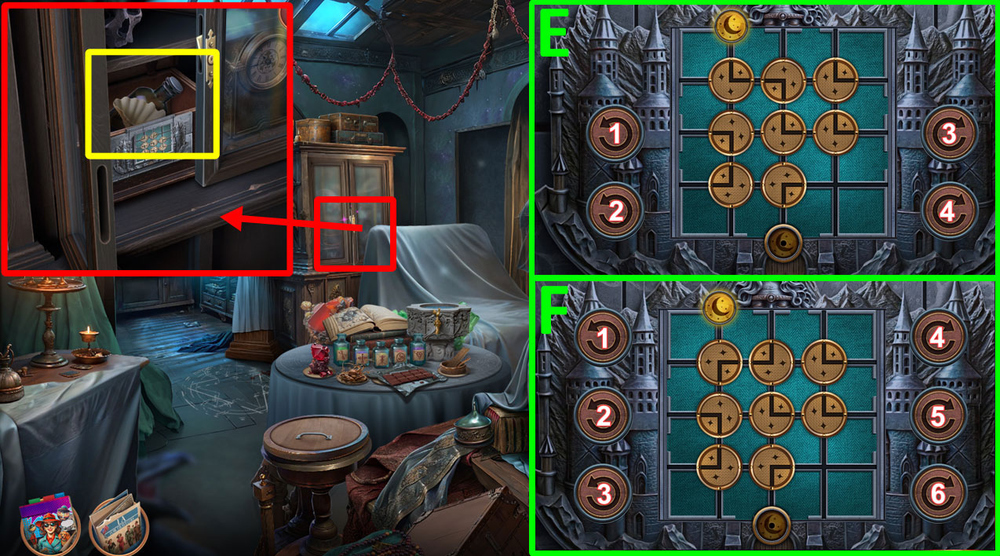
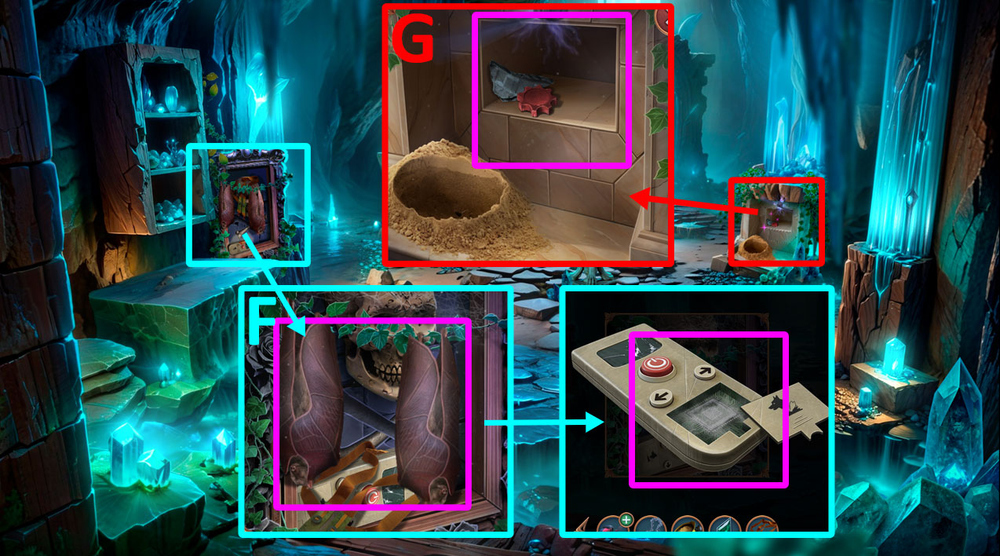
- Easy solution: 1 (1 click), 4 (1 click) (E).
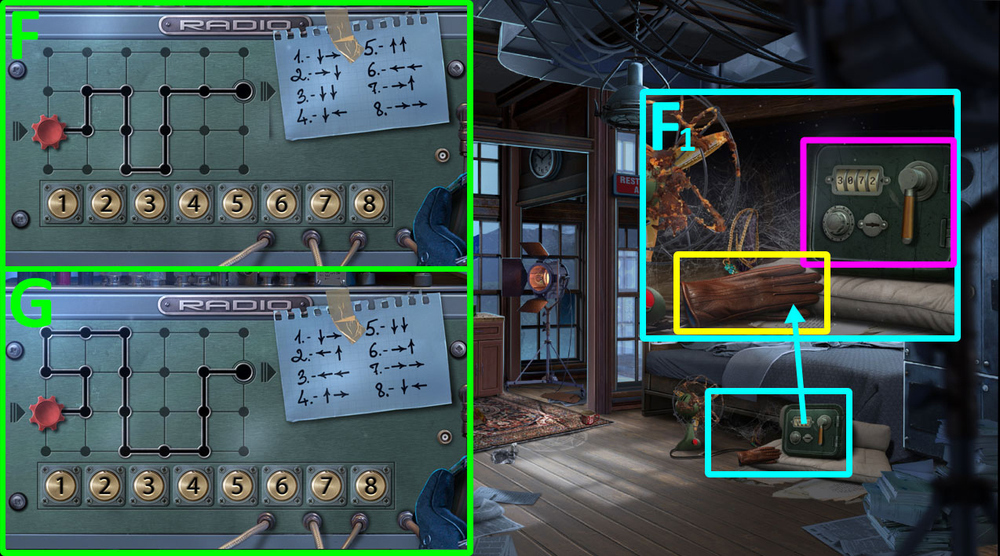
- Hard solution: 1 (1 click), 2 (1 click), 6 (1 click) (F).
- Take SEASHELL and REAGENT.
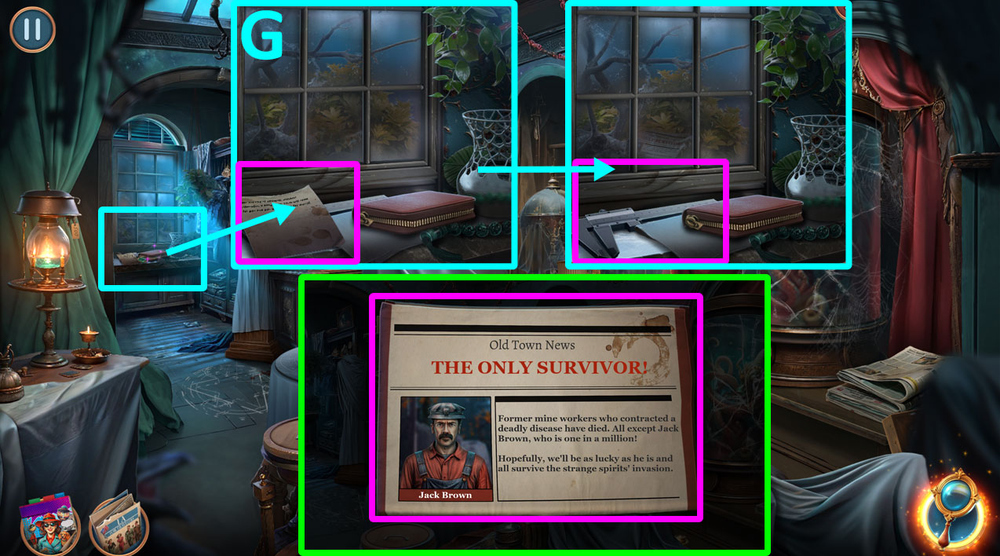
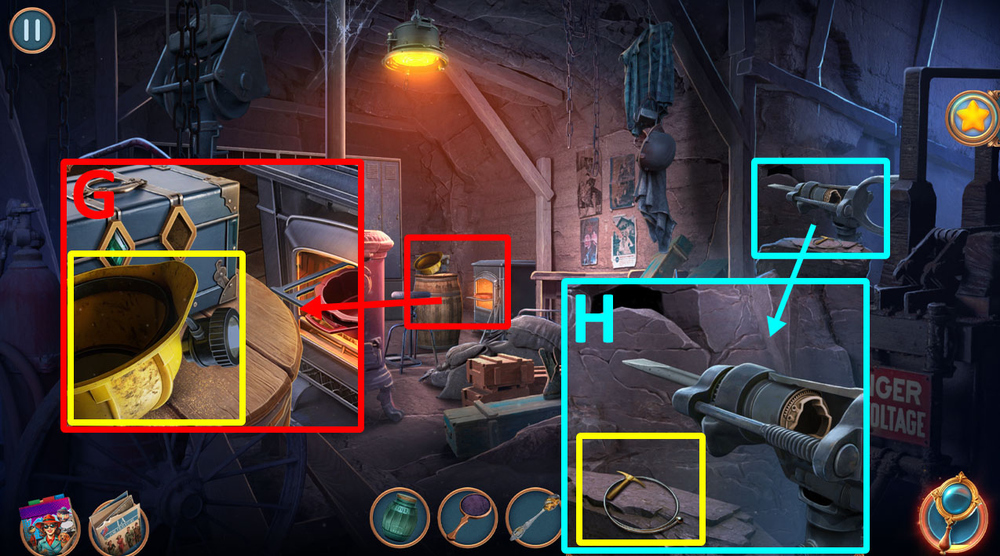
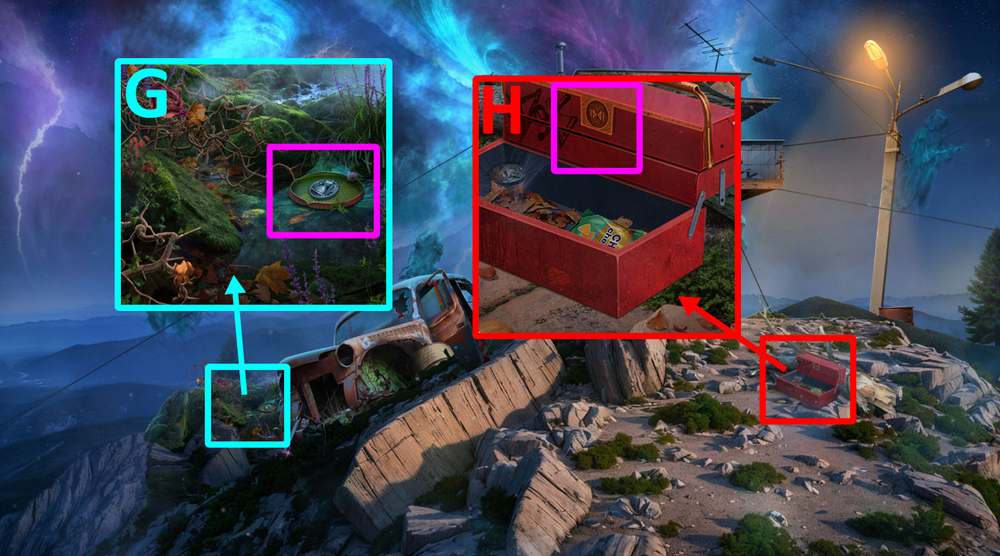
- Read the note, use REAGENT on the page, read the note again, click on the callipers, take NEWSPAPER, examine NEWSPAPER, take CAT PICTURE (G).
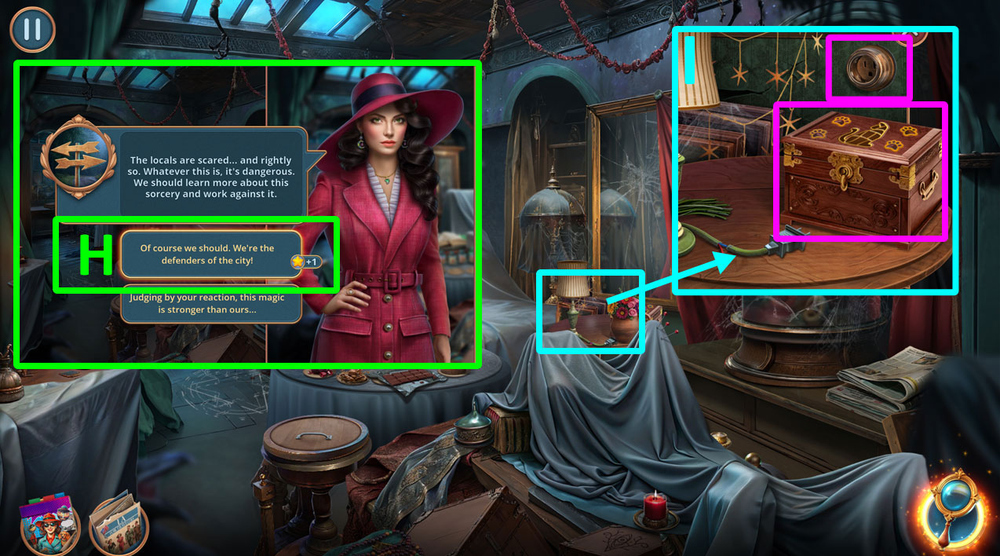
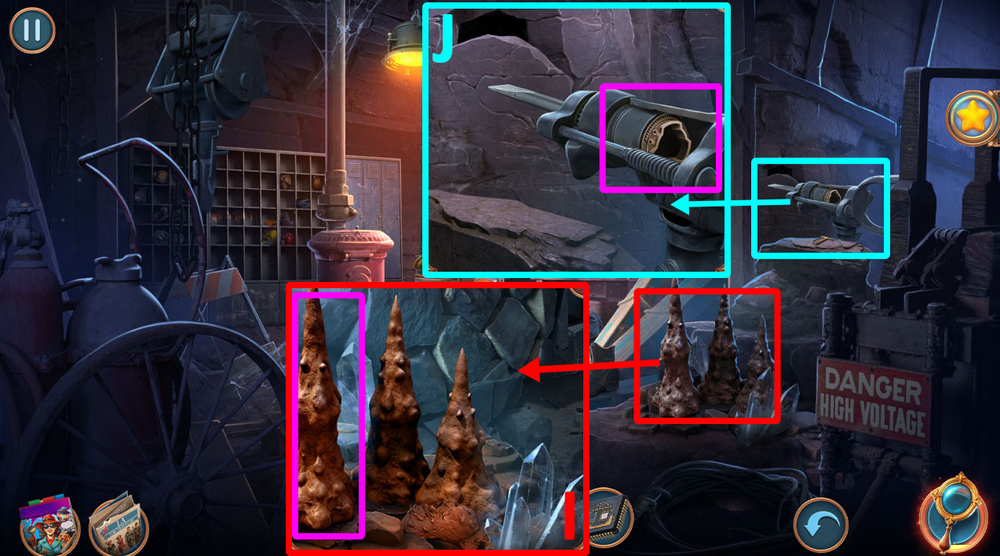
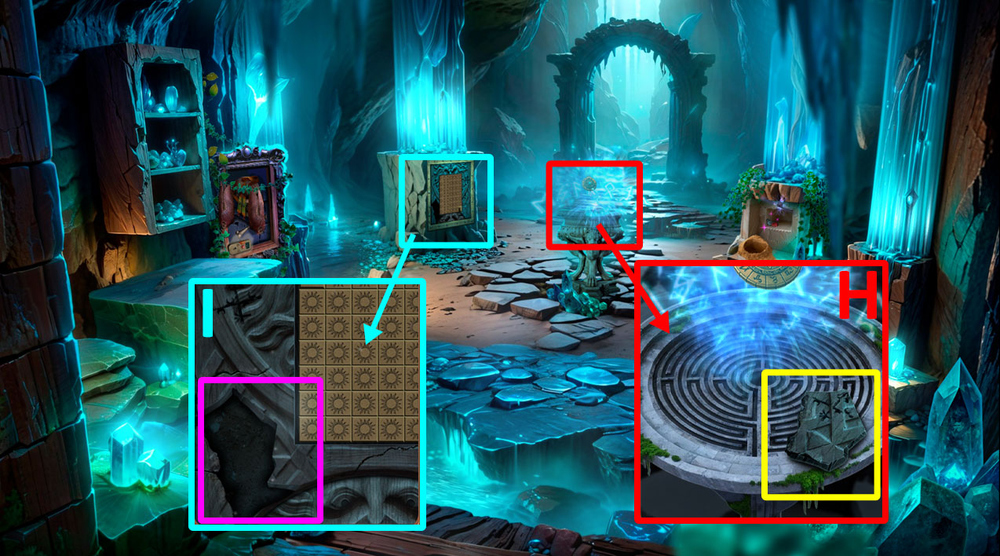
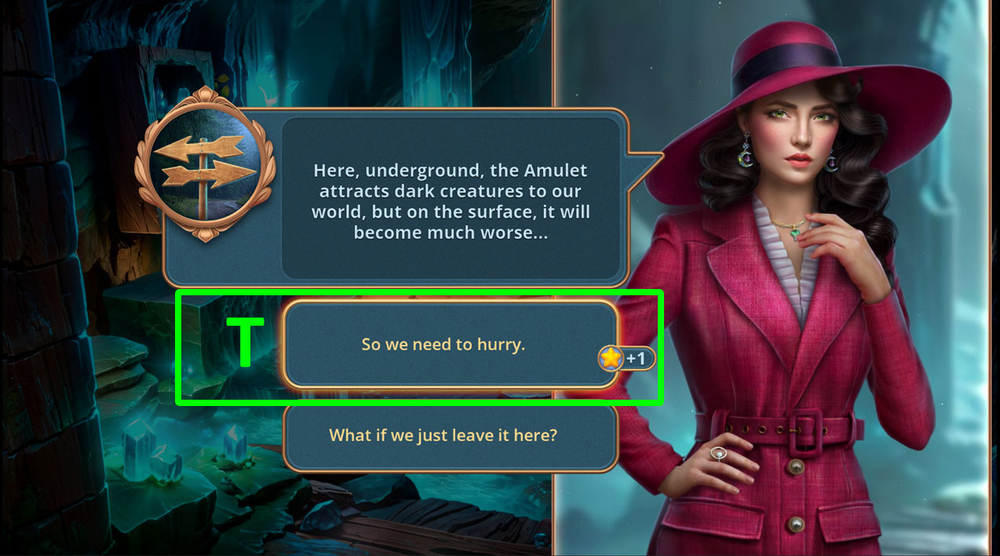
- Select this option (H).
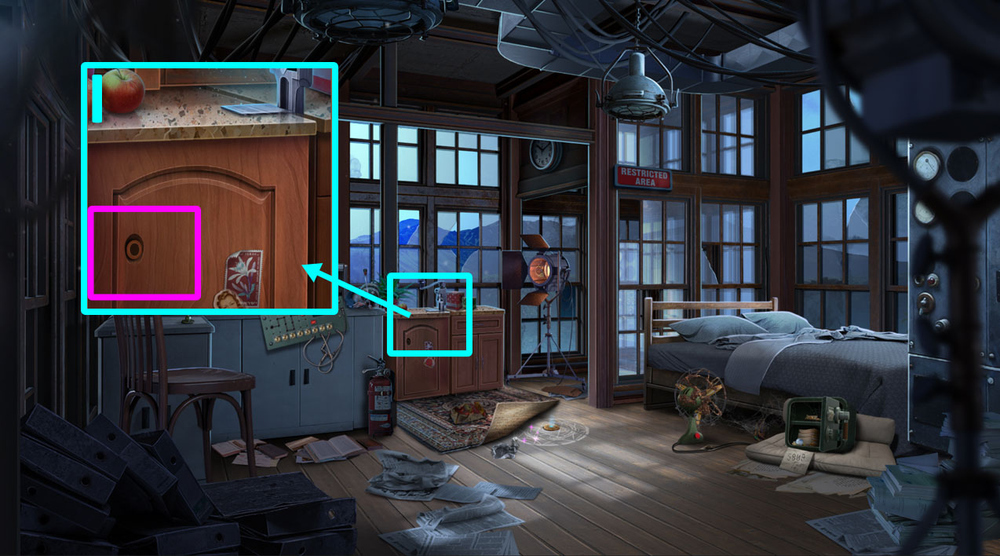
- Use EXTENSION CABLE on the power outlet, use CAT PICTURE on the jewellery box (I).
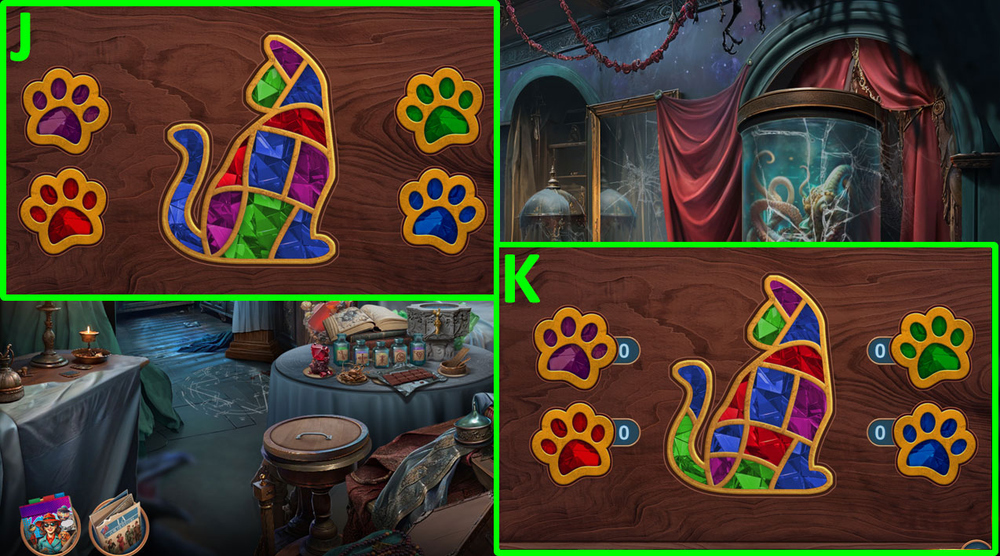
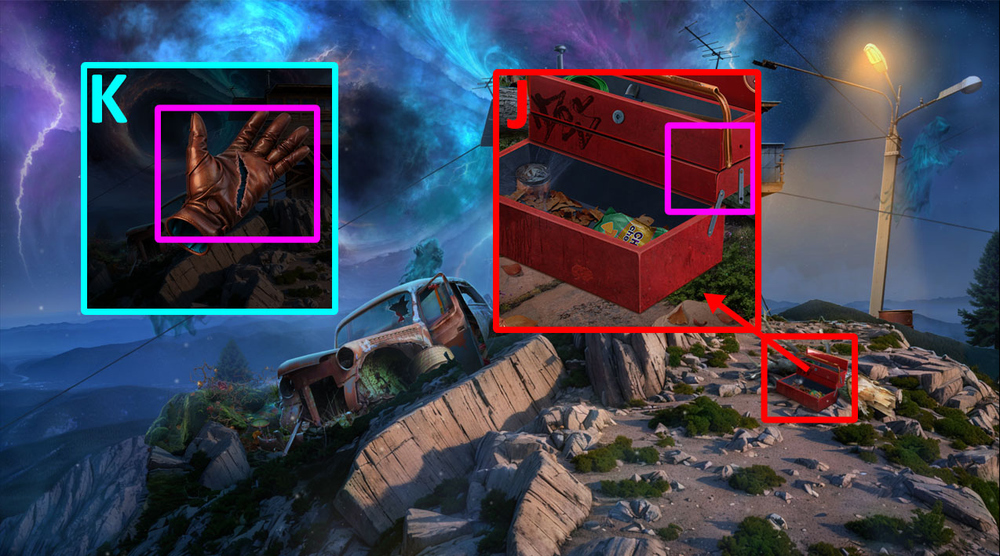
- Easy solution: Color the image in the same way as in the screenshot by tapping on the paws of the desired color and filling in the areas (J).
- Hard solution: Color the image in the same way as in the screenshot by tapping on the paws of the desired color and filling in the areas (K).
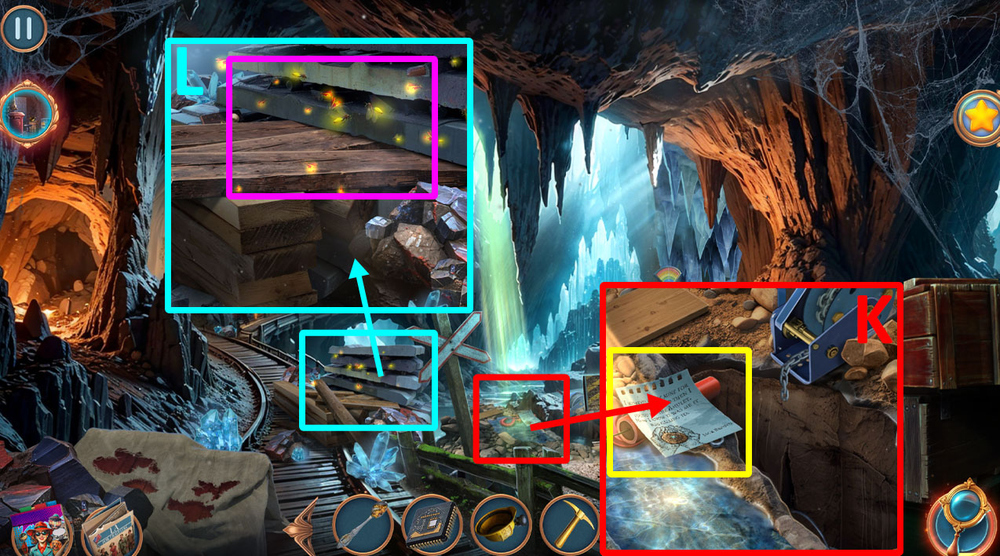
- Take SAPPHIRES 1/2 and BOOK PAGE.
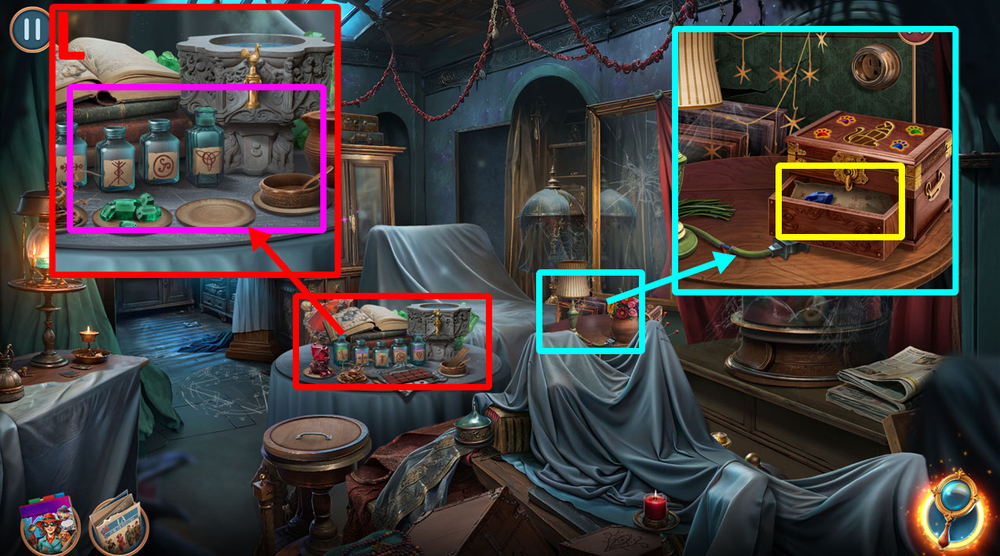
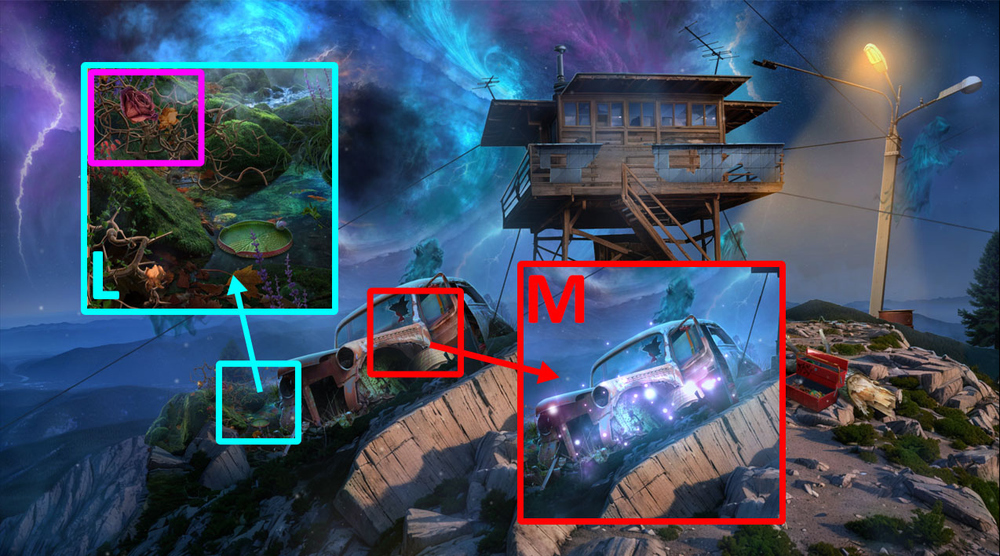
- Use BLACK FEATHER and BOOK PAGE on the bottles (L).
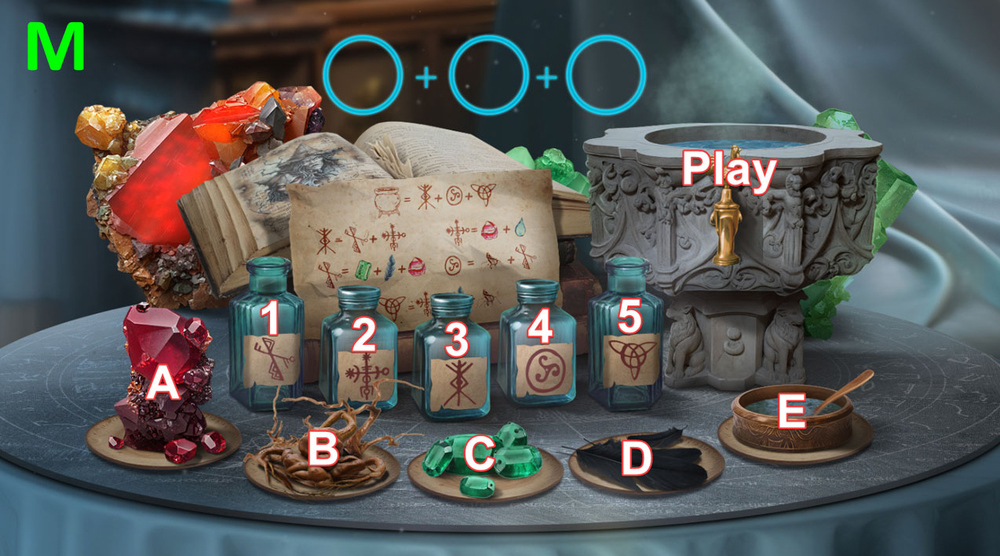
- Solution: C-D-A-Play, A-E-Play, 1-2-Play, B-1-Play, 2-D-B-Play, 3-4-5-Play (M).
- Click on the basin.
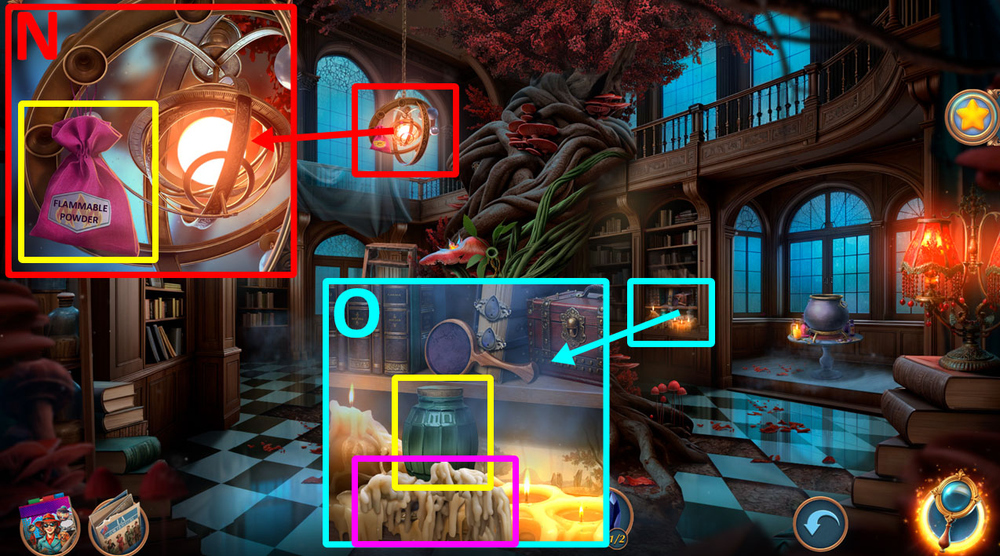
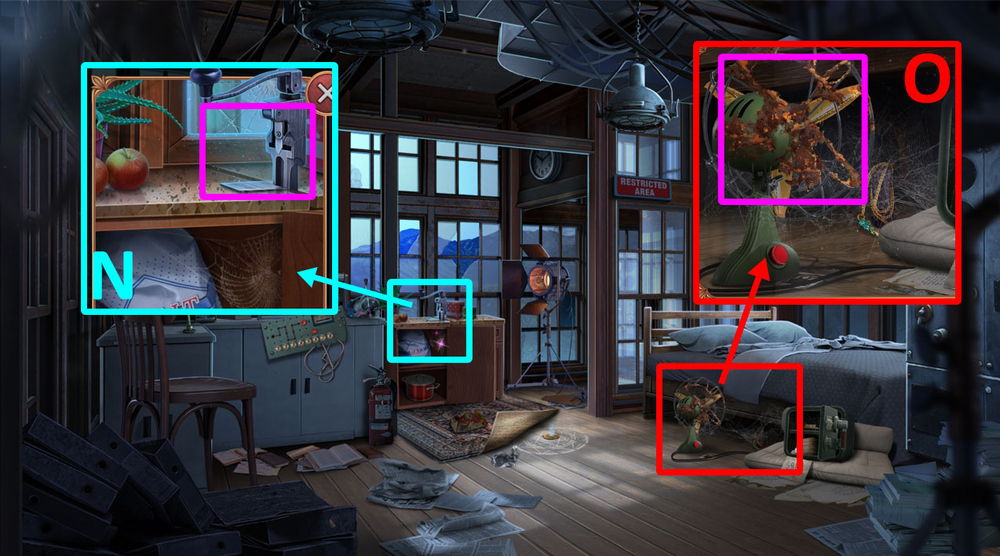
- Take FLAMMABLE POWDER (N).
- Take JAR, use SEASHELL on the wax, take PLANETS 1/2 (O).
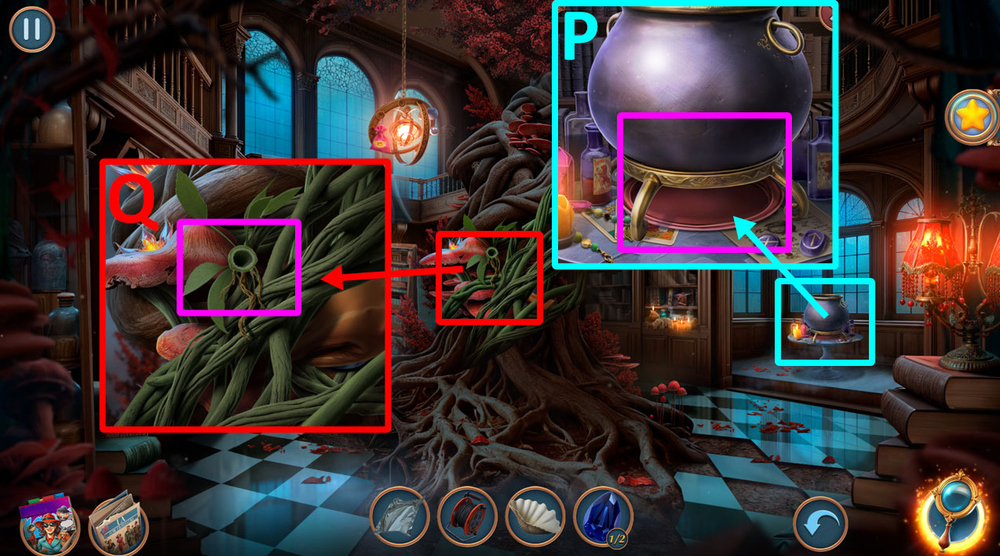
- Use FOIL and FLAMMABLE POWDER on the cauldron, play puzzle, earn BIG FLOWER (P).
- Use BIG FLOWER on the vines, take RUBBER GLOVE, FUNNEL, and DUCT TAPE (Q).
- Go back
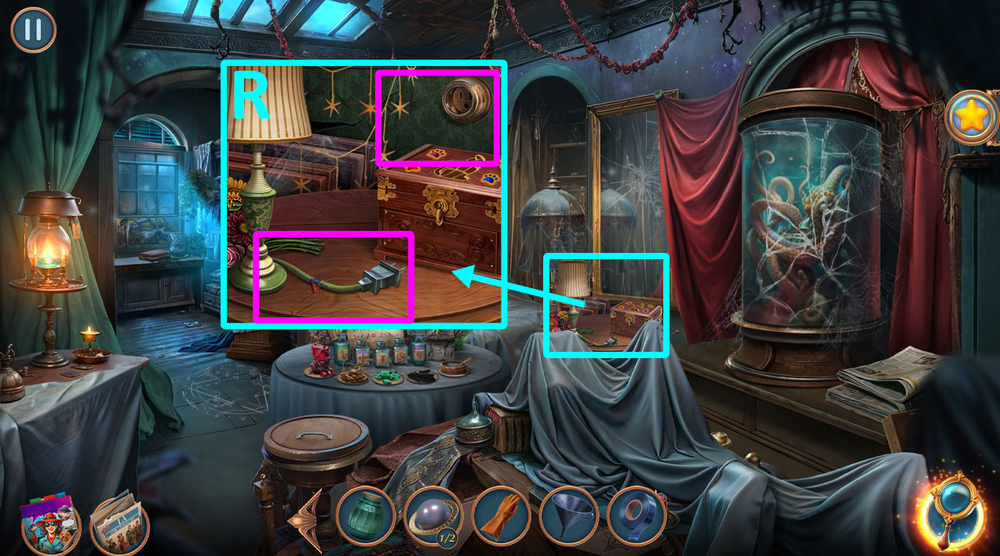
- Use DUCT TAPE on the wire, examine the lamp, take PLANETS 2/2 (R).
- Go to the Coven’s Library.
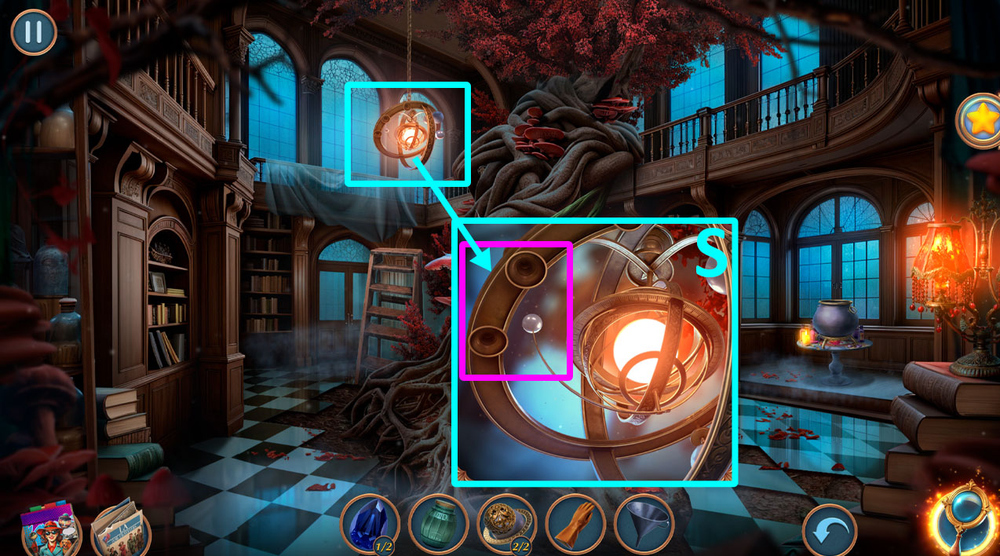
- Use PLANETS on the rim of the decoration (S).
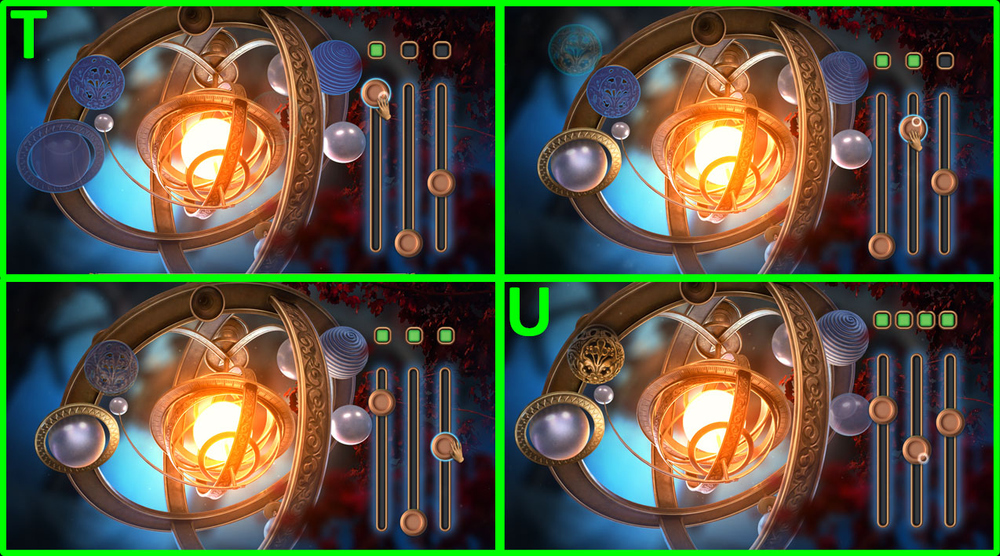
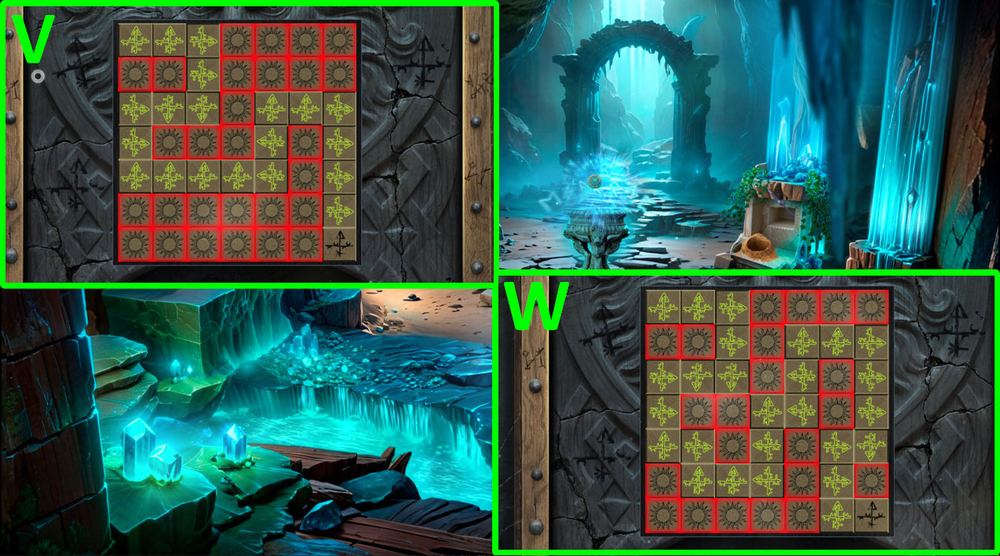
- Easy solution: See the picture for correct positioning (T).
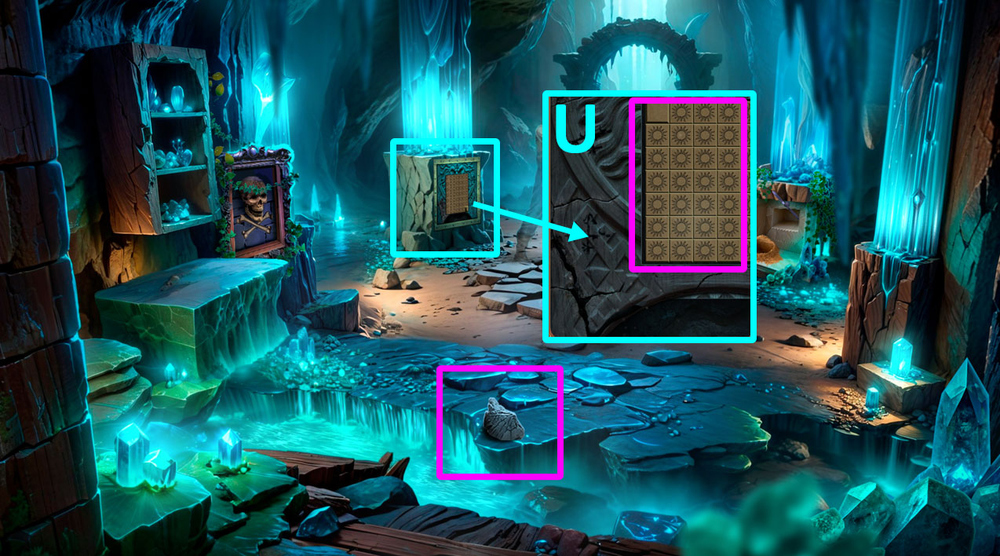
- Hard solution: See the picture for correct positioning (U).
- Take PIN.
- Go back
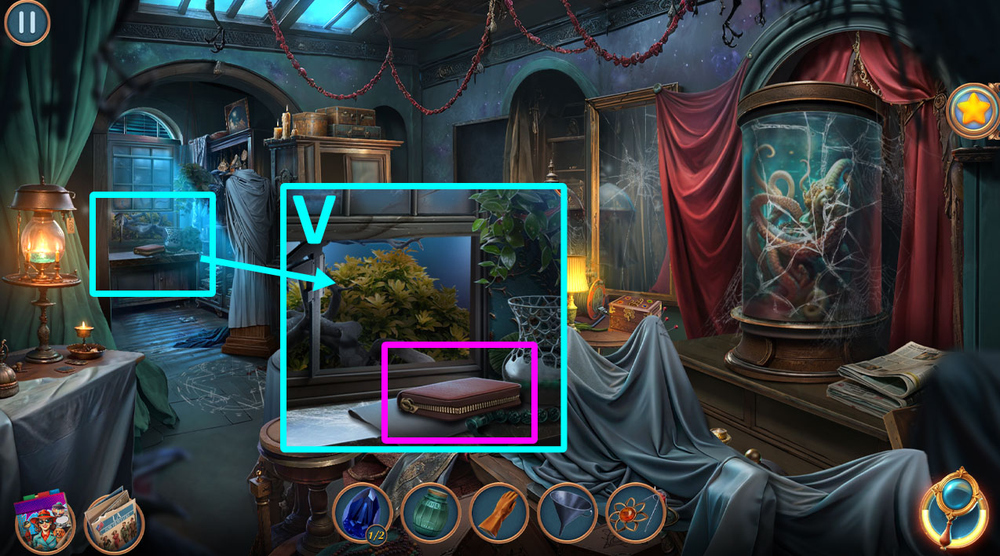
- Use PIN on the purse, take SAPPHIRES 2/2, read the note (V).
- Go to the Coven’s Library.
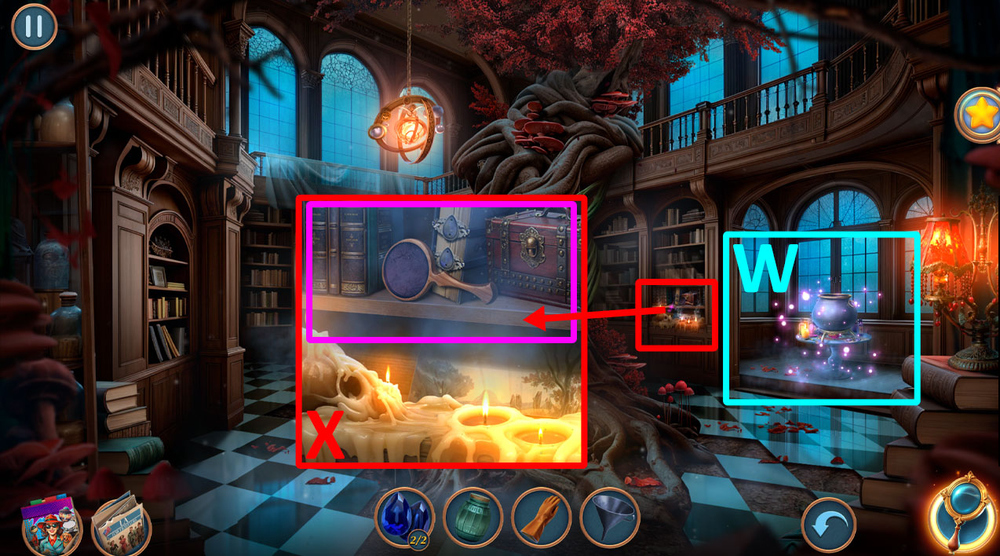
- Play puzzle, earn FAN (W).
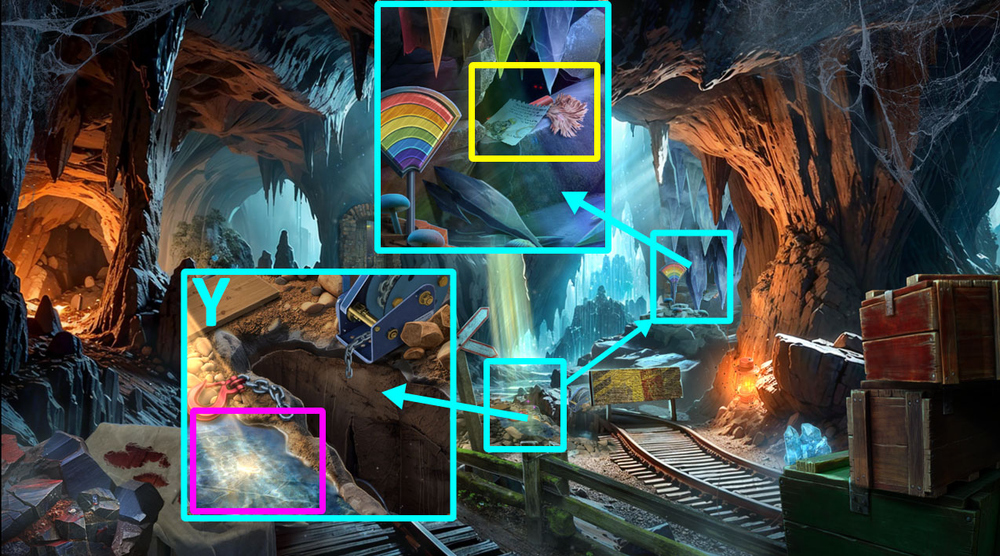
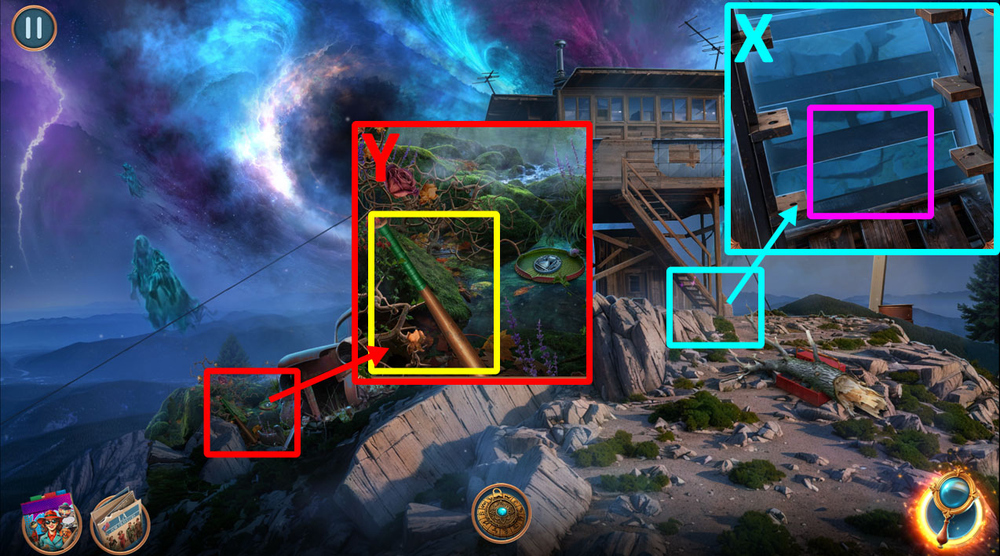
- Use FAN on the smoke, take MIRROR FRAME, use SAPPHIRES on the book, read the book (X).

- Select this option (Y).
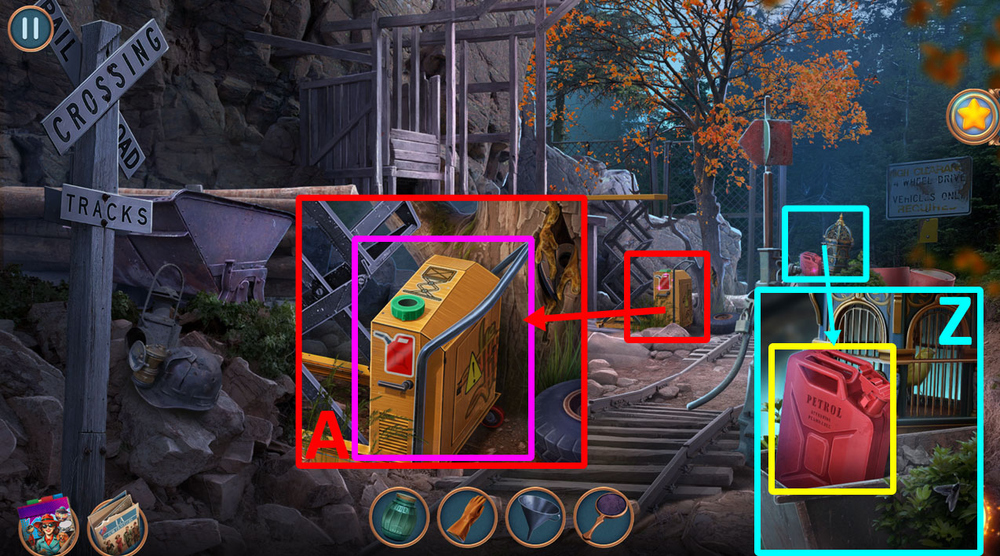
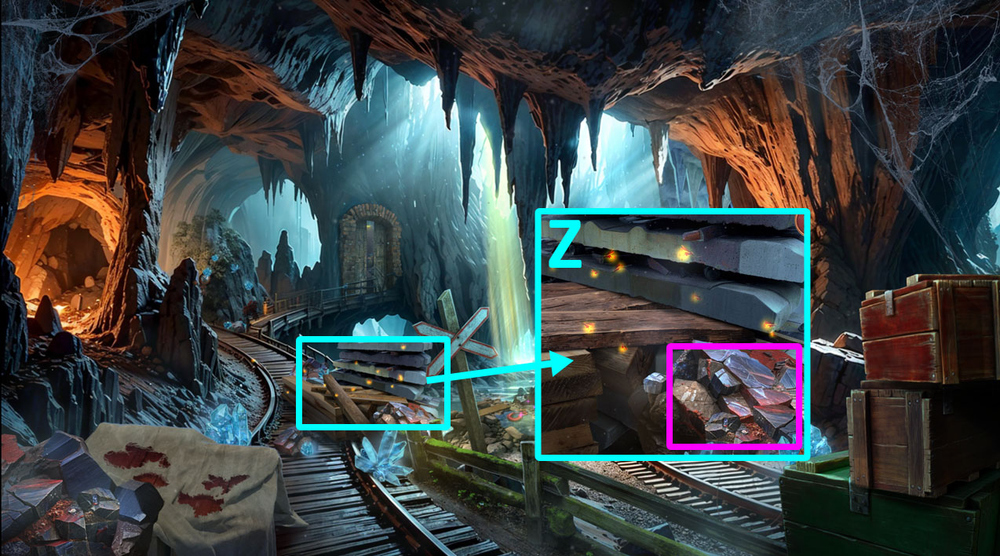
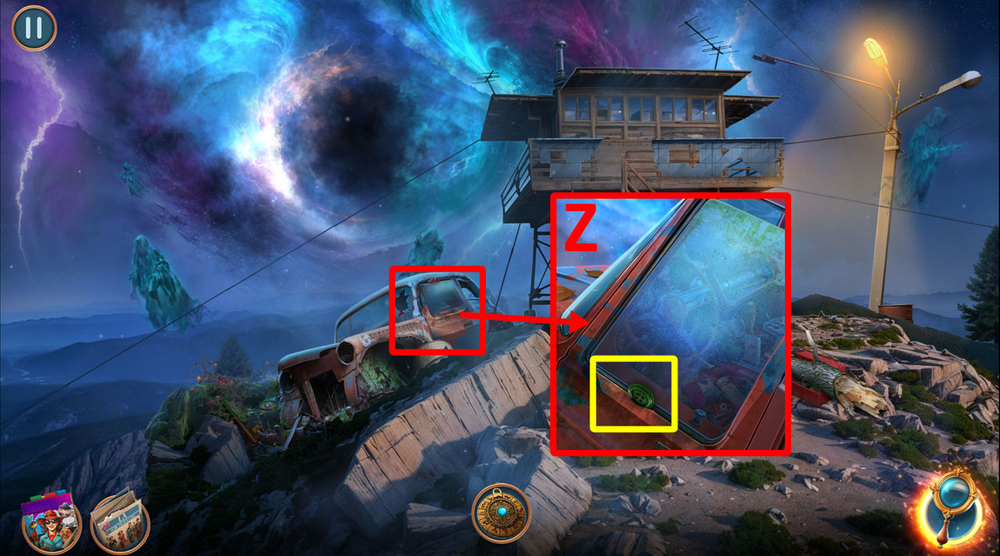
- Take PETROL (Z).
- Use FUNNEL and PETROL on the lift, take the spoon, get SPOONFUL OF RESIN, take BUTTONS 1/2 and CIGAR CLIPPER (A).

- Take BUTTONS 2/2, open the tape compartment, use CIGAR CLIPPER on the wires, get WIRES (B).
- Read the note, use BUTTONS on the panel, take MICROCHIP, use RUBBER GLOVE and WIRES on the panel (C).
- Easy solution: A-L, G-A, L-G, D-L, K-D, L-K, B-L, H-B, L-H (D).
- Hard solution: D-N, F-D, L-F, B-L, J-B, N-J, D-N, C-D, I-C, K-I, N-K (E).
- Go forward.

- Select this option (F).
- Go to the Miners’ Room.
- Take SAFETY HAT (G).
- Take PICKAXE AMULET and STRING (H).
- Use STRING on the stalagmite, get CLAY (I).
- Use CLAY on the drill, get DETAIL MOLD (J).
- Go back.
- Read the note, take DYNAMITE 1/2 and TWEEZERS (K).
- Use JAR on the fireflies, get FIREFLIES (L).
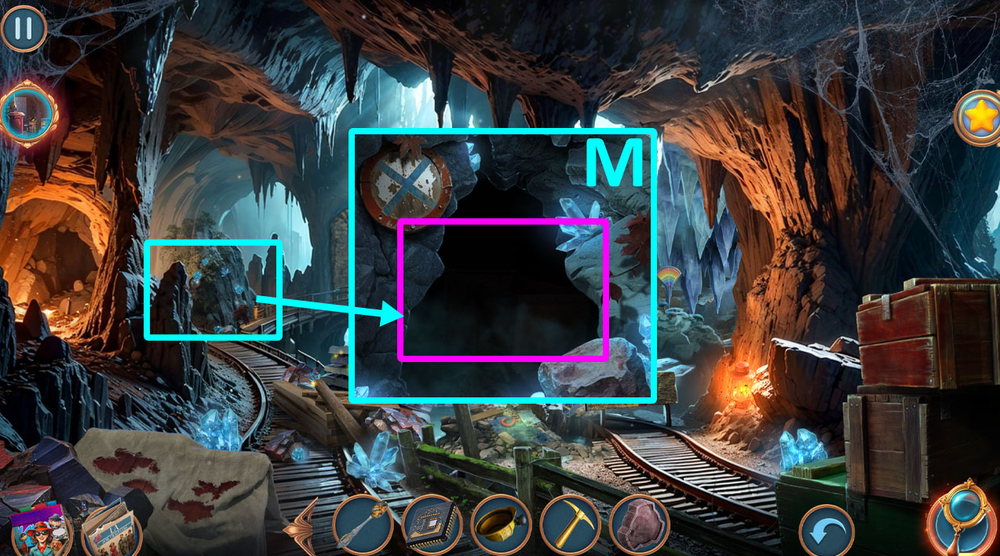
- Use FIREFLIES on the cave (M).

- Easy solution: See the picture for correct positioning (N).
- Hard solution: See the picture for correct positioning (O).

- Select this option (P).
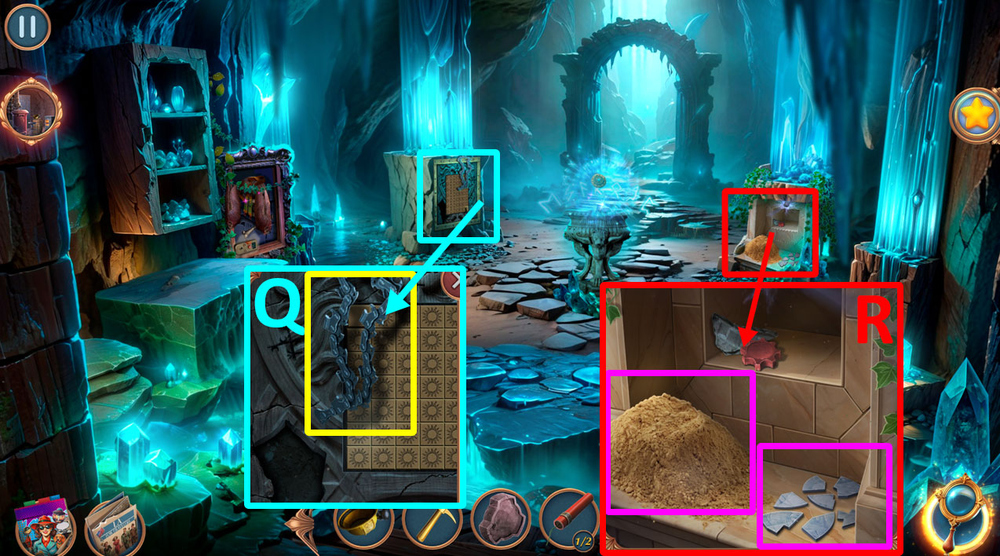
- Take CHAIN (Q).
- Use MIRROR FRAME, SPOONFUL OF RESIN, and TWEEZERS on the shards, use SAFETY HAT on the sand, get SAND, take CRYSTAL (R).
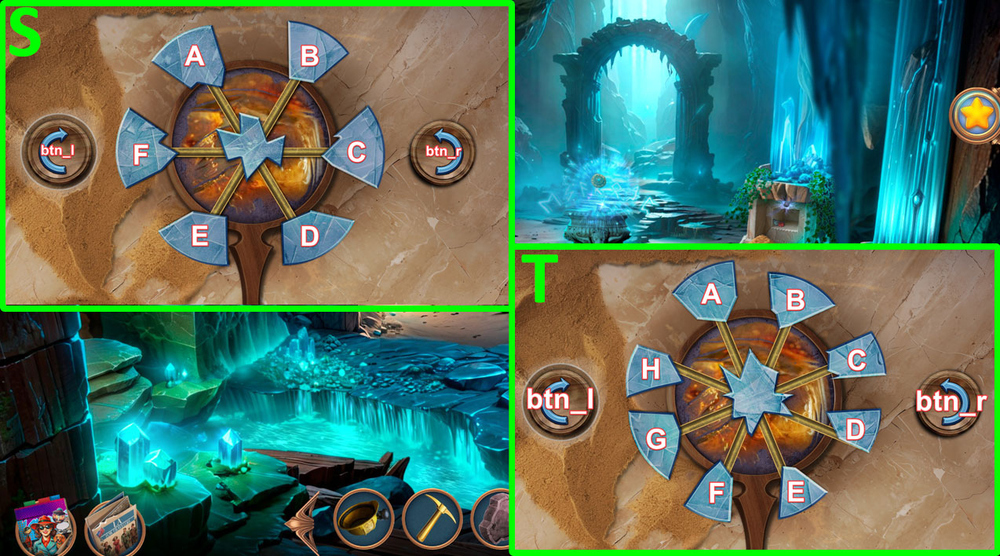
- Easy solution: btn_r (2 click), C, btn_l (1click), A, F, E, btn_l (2 click), D, btn_r (3 click), B (S).
- Hard solution: btn_r (1 click), H, btn_r (2 click), G, btn_r (1 click), D, C, B, A, btn_r (1 click), F, btn_r (2 click), E (T).
- Get CRACKED MIRROR.
- Go to the Miners’ Room.
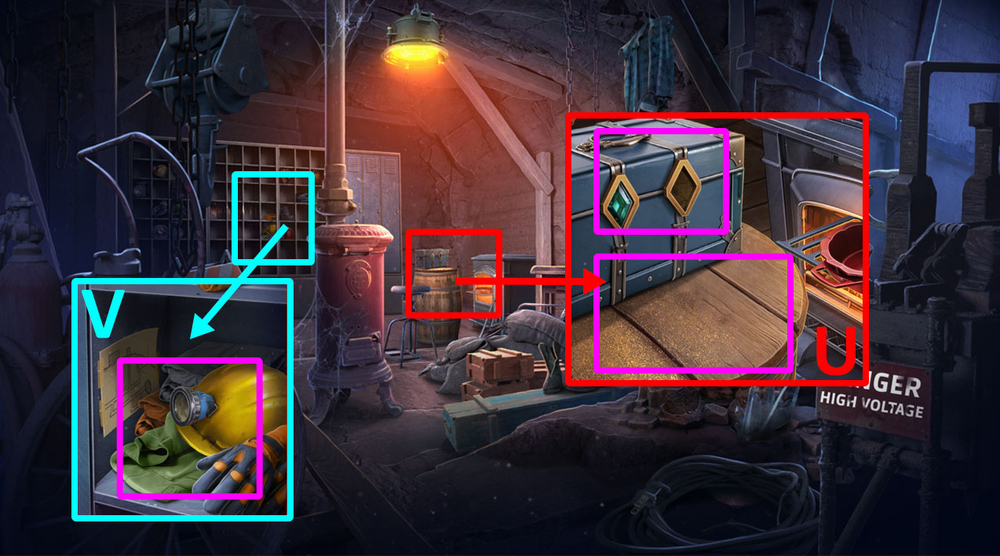
- Use SAND and DETAIL MOLD on the table, use CRYSTAL on the chest, take CLOTHES DESCRIPTION (U).
- Use CLOTHES DESCRIPTION on the shelf (V).

- Easy solution: 1-D, 2-F, 3-C, 4-G, 5-J, 6-B, 7-E, 8-I, 9-A, 10-H (W).
- Hard solution: 1-D, 2-E, 3-G, 4-C, 5-H, 6-L, 7-B, 8-K, 9-F, 10-J, 11-A, 12-I (X).

- Take TOOTHED CHISEL.
- Go back.
- Use CRACKED MIRROR on the ray of light, read the note, take DUSTER and DYNAMITE 2/2 (Y).
- Use TOOTHED CHISEL on the ore, get METAL ORE (Z).
- Go to the Miners’ Room.

- Use METAL ORE on the baking mold, get MECHANISM DETAIL (A).
- Use MECHANISM DETAIL on the drill, click on the item in the crack, use PICKAXE AMULET on the journal, play puzzle (B).
- Go to the Mine Entrance.
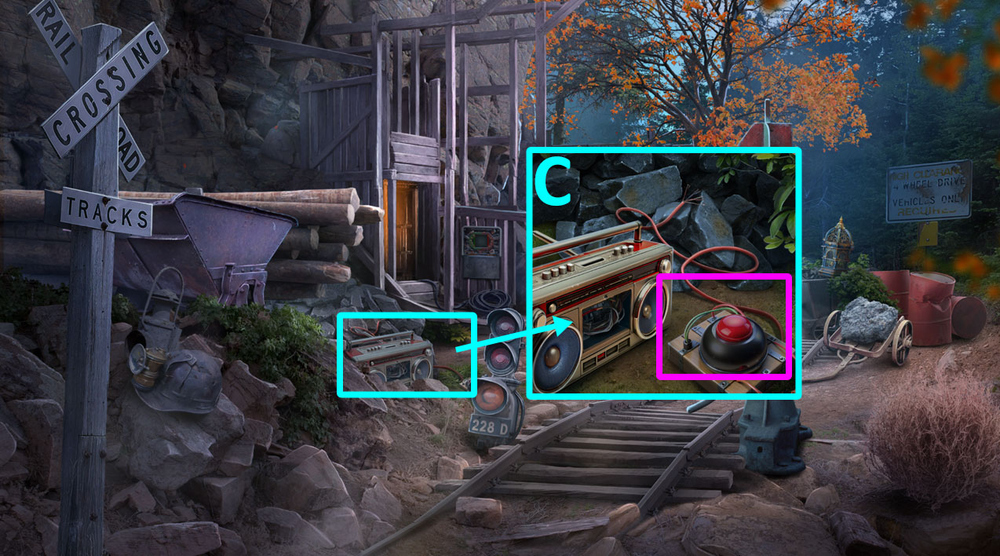
- Use DYNAMITE on the big red button (C).
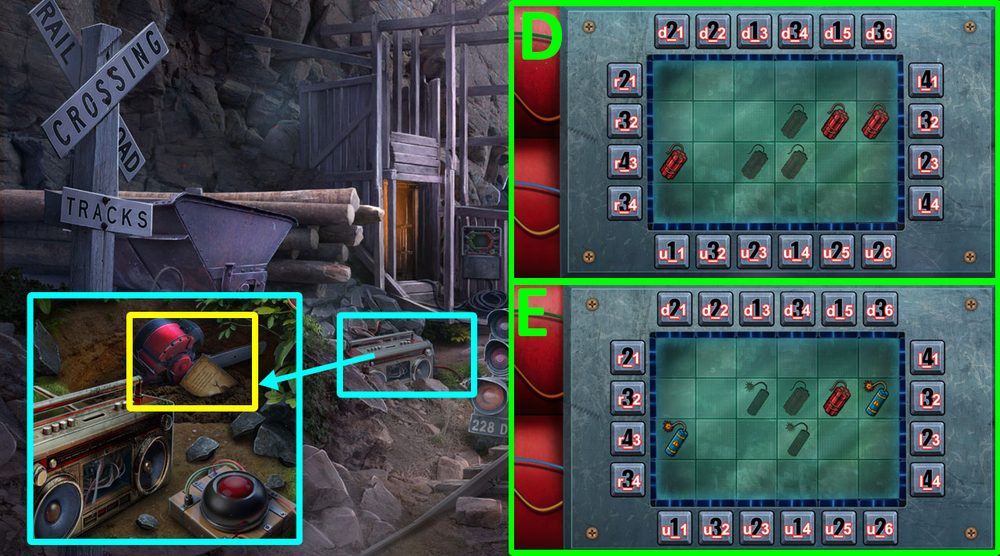
- Easy solution: l_2, d_2, r_2, r_3, l_3 (D).
- Hard solution: r_3, l_2, d_2, r_3, l_3, d_4, r_3, l_3, u_4 (E).
- Read the note, take POWER SAW and HARMONICA.
- Go to the Crypt.
- Use HARMONICA on the bats, take SUSPENDERS, examine the remote control and use MICROCHIP and DUSTER on it, take REMOTE CONTROL (F).
- Use REMOTE CONTROL on the fan, take REGULATOR and BAS-RELIEFS 1/2 (G).
- Take BAS-RELIEFS 2/2 (H).
- Use BAS-RELIEFS on the wall, read the note, take HAIRPIN (I).
- Go to the Mine Entrance.
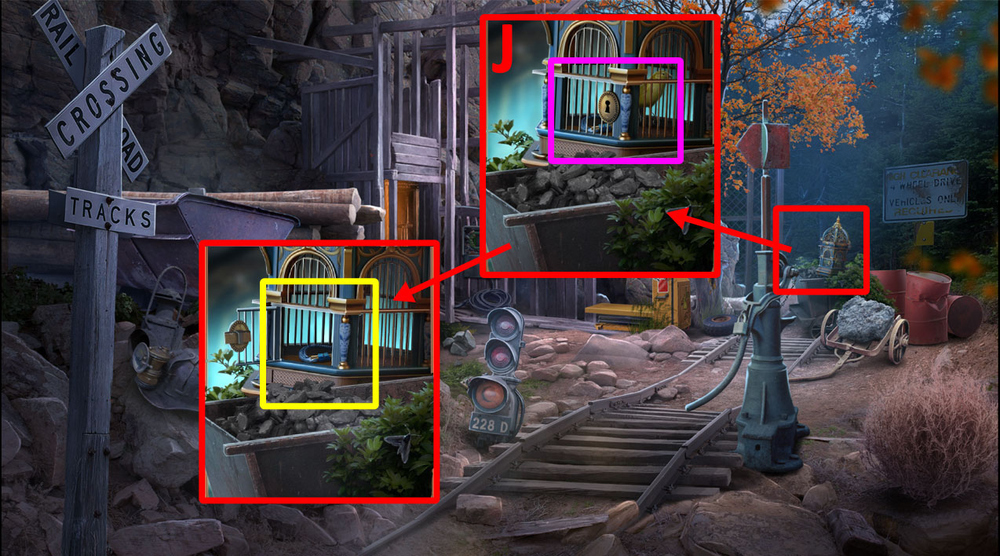
- Use HAIRPIN on the cage (J).
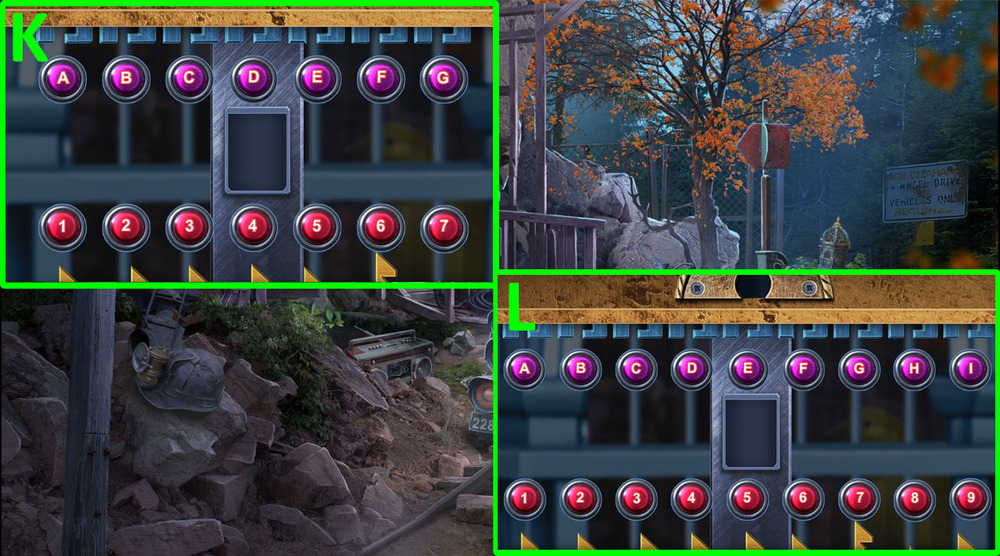
- Easy solution: A-5, B-3, C-1, D-6, E-2, F-7, G-4 (K).
- Hard solution: A-9, B-6, C-4, D-2, E-7, F-3, G-8, H-5, I-1 (L).
- Take CARABINER.
- Go to the Mines.
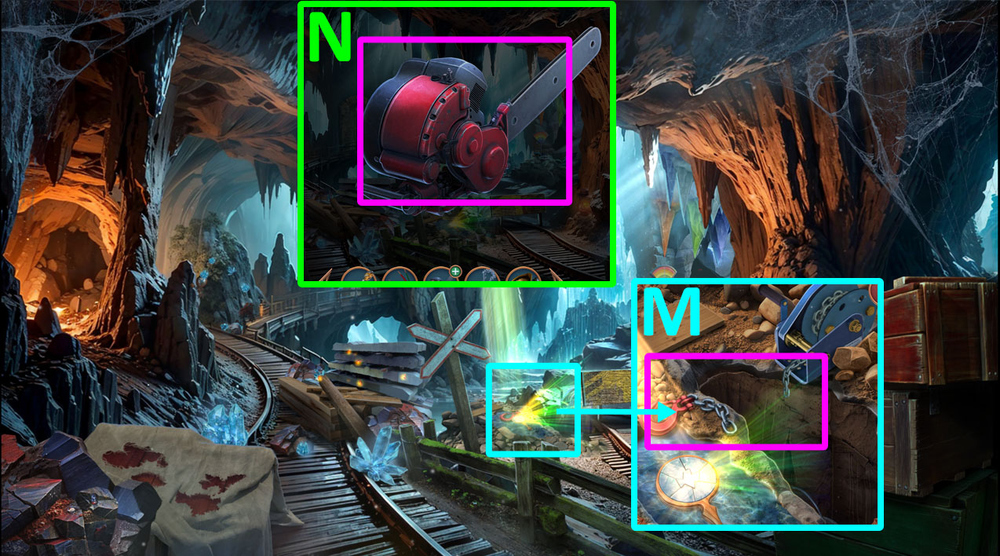
- Use CARABINER on the chain, read the note, take DUMBBEL and HANDLE (M).
- Use CHAIN and HANDLE on POWER SAW, get POWER SAW (N).
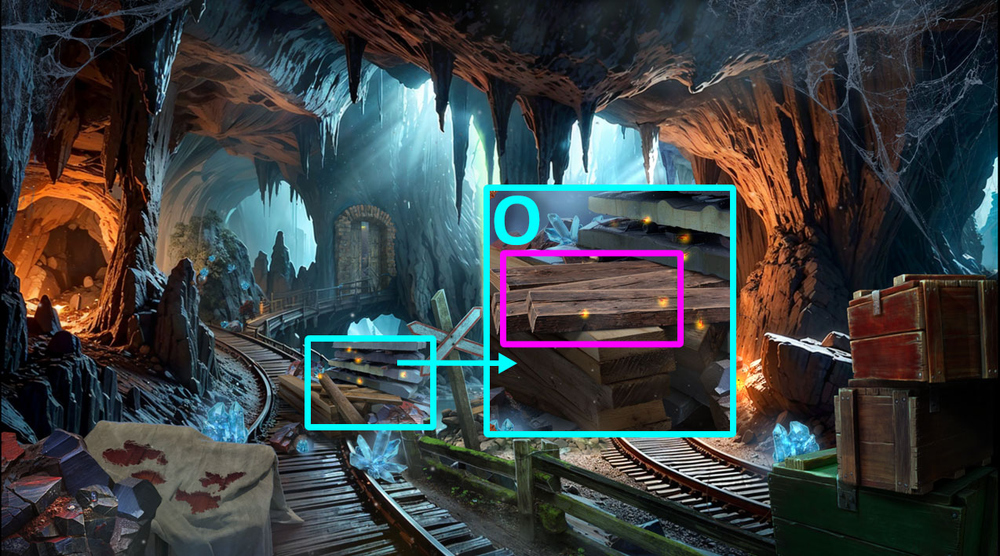
- Use POWER SAW on the boards, get BOARDS, take BONE (O).
- Go to the Crypt.
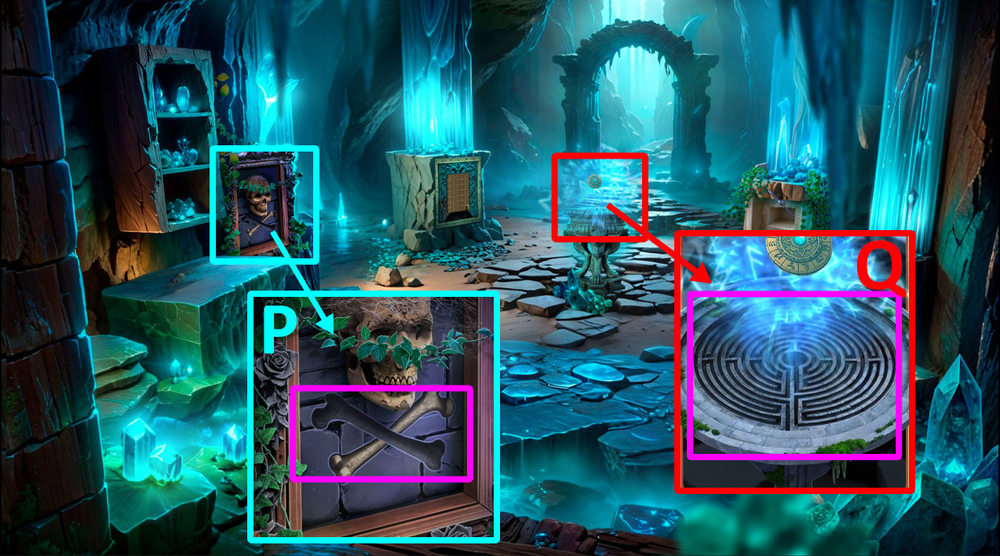
- Use BONE on the skull, take CEREMONIAL DAGGER (P).
- Use CEREMONIAL DAGGER on the amulet (Q).
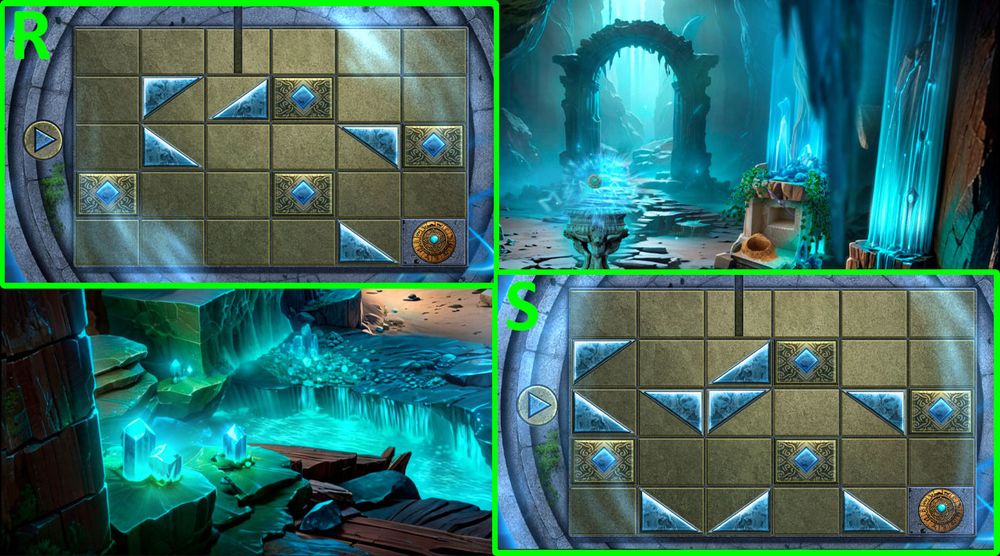
- Easy solution: See the picture for correct positioning (R).
- Hard solution: See the picture for correct positioning (S).
- Take AMULET OF RADIANCE.
- Select this option (T).
- Take the fallen COAL.
- Use COAL on the puzzle (U).
- Easy solution: See the picture for correct positioning (V).
- Hard solution: See the picture for correct positioning (W).
- Use BOARDS on the steps (X).
- Take BAT (Y).
- Take BUTTON (Z).
- Use DUMBBELL and BAT on the log, take BASEBALL, examine the broken hinge, use BUTTON on the loose hinge (A).
- Use BASEBALL and SUSPENDERS on the window, play puzzle, earn GLUE (B).
- Use GLUE on the steps (C).
- Go forward.
- Take MUG, move the carpet, use AMULET OF RADIANCE on the ritual circle (D).
- Use REGULATOR on the radio (E).
- Easy solution: Click in this order (7, 2, 1, 5, 8) (F).
- Hard solution: Click in this order (6, 2, 7, 5, 1, 6, 4) (G).
- Take CANDLE 1/3 and CODE
- Use CODE on the safe, enter 5809, take TORN GLOVE, examine the contents of the safe, get BENT WIRE (F1).
- Go back.
- Use BENT WIRE on the lilly pad, take HOURGLASS AMULET (G).
- Use HOURGLASS AMULET on the top compartment, take CANDLE 2/3 and HANDLE (H).
- Go to the Observation Tower.
- Use HANDLE on the cabinet door, take DRY FLOWERS 1/2 and SCREW (I).
- Go back.
- Examine the broken hinge, use SCREW on the loose hinge, take SEWING KIT (J).
- Use SEWING KIT on TORN GLOVE, get GLOVE (K).
- Use GLOVE on the rose, get DRY FLOWERS 2/2 (L).
- Play puzzle, earn SEALED CAN (M).
- Go to the Observation Tower.
- Use SEALED CAN on the opener, get OPEN CANNED FOOD (N).
- Use OPEN CANNED FOOD on the fan, press the red button, take CLAW PENDANT and CANDLE 3/3 (O).
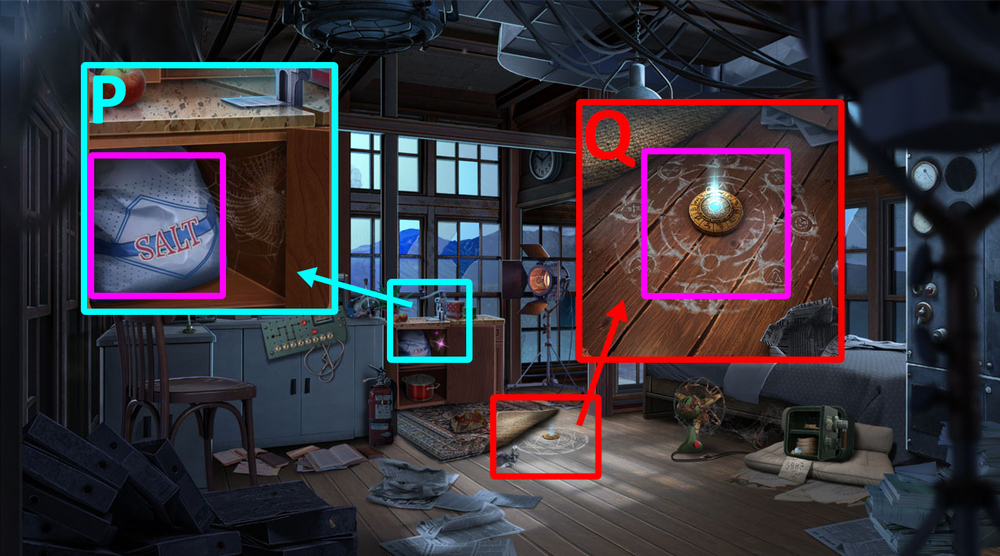
- Use CLAW PENDANT and MUG on the sack of salt, get MUG OF SALT (P).
- Use DRY FLOWERS, CANDLE, and MUG OF SALT on the ritual circle (Q).
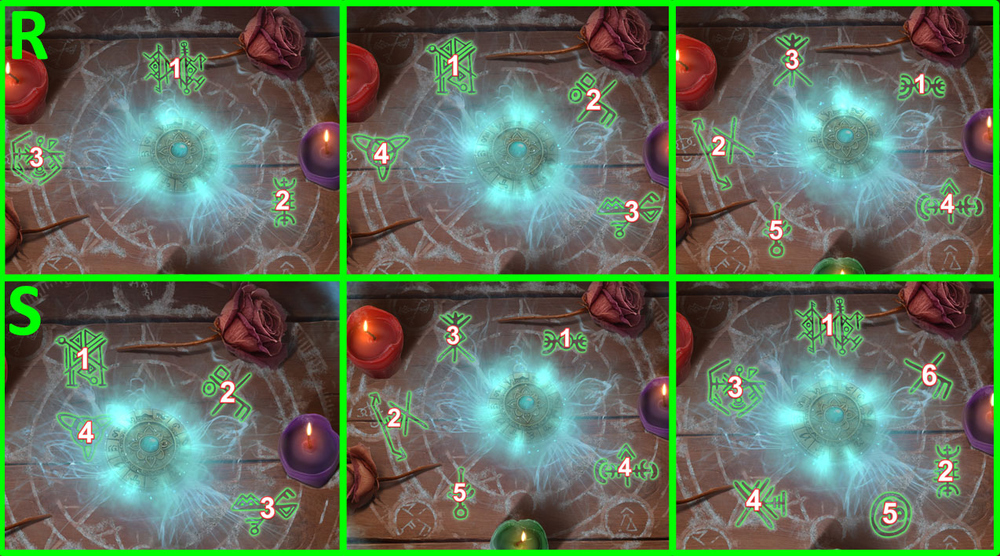
- Easy solution: Click on the symbols in order as shown in the picture (R).
- Hard solution: Click on the symbols in order as shown in the picture (S).
Congratulations! You have completed the game Secrets of Salem 1: Shadow of the Witch.


