A Diary Of Darkness – A puzzle game where you play as a mother who is looking for her son who disappeared several years ago. The strange thing is that the child disappeared on his birthday. He was last seen in an ordinary house. However, there was a murder. It has been blocked for many years. You have to unravel the terrifying reason for everything. If you can’t get through some of the puzzles or don’t know where the items are, you can watch the A Diary Of Darkness walkthrough on our website and learn a lot of strange things.
A Diary Of Darkness – Walkthrough
Here you can watch the full walkthrough of the game A Diary Of Darkness, step by step in pictures.
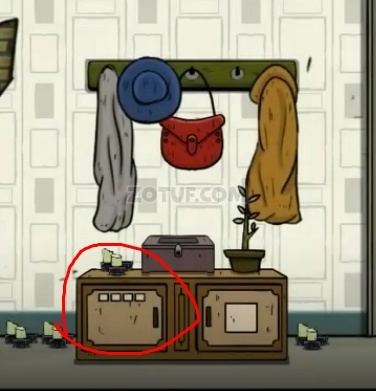
Step 1
Click on the drawer.

Step 2
Complete the puzzle, take the candle 1/5.

Step 3
Take candle 2/5.

Step 4
Take candle 3/5.

Step 5
Take matches.

Step 6
Take candle 4/5.

Step 7
Set the sliders as in the picture, take a candle 5/5.

Step 8
Set up candles and light them with matches.

Step 9
Take a crowbar.

Step 10
Take the key.

Step 11
Open the cabinet with the key, take the mirror shard 1/3.

Step 12
Use the crowbar to get the key out of the bottle.

Step 13
Open the cabinet with the key, take the mirror shard 2/3.

Step 14
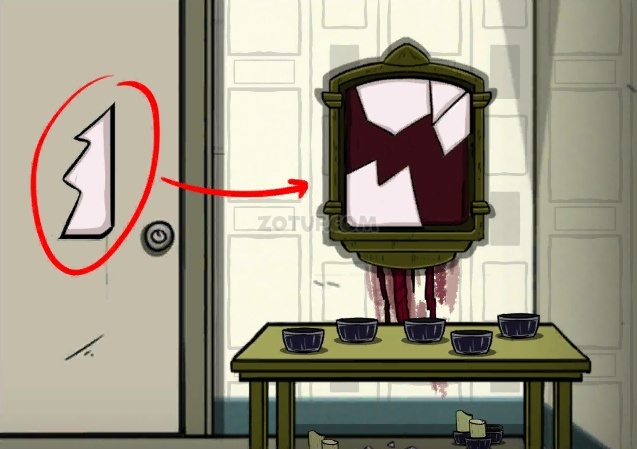
Take mirror shard 3/3.

Step 15
Install all mirror shards.
Step 16
Take the handle 1/4.

Step 17
Take the key.

Step 18
Open drawer and take handle 2/4.

Step 19
Take the handle 3/4.

Step 20
Take a book.

Step 21
Take the handle 4/4.

Step 22
Install all handles.

Step 23
Turn the handles to the position as in the picture.

Step 24
Click several times on the jar and take the heart.

Step 25
Take a piece of a book page.

Step 26
Insert a page snippet into a book.

Step 27
Take a green leaf.

Step 28
Take the flask.

Step 29
Take the second flask.

Step 30
Press a few times and take a piece of your finger.

Step 31
Take a pot.

Step 32
Put the pot on the gas stove.

Step 33
Add the contents of the flask, the green leaf, the heart, and the finger piece to the pots.

Step 34
Turn on the stove.

Step 35
Draw the resulting red liquid into the flask.

Step 36
Pour red liquid over mirror.

Step 37
Remember part of the cipher.

Step 38
Puzzle solution 21.43 FM.

Step 39
Set the wave 21.43 FM on the radio.

Step 40
Remember part of the password, sun symbol.

Step 41
Remember part of the password, two sticks symbol.

Step 42
Remember part of the password, arc symbol with dots.

Step 43
Remember part of the password, symbol two semicircles.

Step 44
Click on the chest of drawers.
Step 45
Enter the password, take a piece of painting 1/4.

Step 46
Take the scissors.

Step 47
Use the scissors on the chair; take the piece of painting 2/4.

Step 48
Remember the order of the code, from small to large sticks.

Step 49
Enter the password, take the curtain.

Step 50
Hang a curtain.

Step 51
Remember the password.

Step 52
Click on the lock.

Step 53
Enter the code, take the key.

Step 54
Open cabinet door, take painting piece 3/4.

Step 55
Take the key.

Step 56
Open the cabinet door with the key, take the electrical tape.

Step 57
Tape the damaged cable.

Step 58
Turn the knobs on the TV, take a piece of picture 4/4.

Step 59
Place all the pieces of the picture.

Step 60
Remember password 5763.

Step 61
Enter password 5763 on the safe, take a piece of a book page.

Step 62
Insert a page snippet into a book.

Step 63
Get a password.

Step 64
Click on the hanging locker.

Step 65
Enter password, take horns 1/2.

Step 66
Take the gear 1/4.

Step 67
Take the gear 2/4.

Step 68
Take the gear 3/4.

Step 69
Take the gear 4/4.

Step 70
Take a screwdriver.

Step 71
Click on the chest of drawers.

Step 72
Enter the password, take the clerical knife.

Step 73
Unscrew the bolts on the clock with a screwdriver.

Step 74
Place the gears.

Step 75
Move the gears to this position.

Step 76
Cut the wallpaper with a utility knife.

Step 77
Remember the time 7:45.

Step 78
Set clock time to 7:45.

Step 79
Take the horns 2/2.

Step 80
Attach the horns, take the golden key.

Step 81
Open the door with the golden key.

Congratulations! You have completed the game A Diary Of Darkness.


