
A Haunting Novel 2: Surfaced Secrets (Bonus Chapter) – Return to the world of ghostly apparitions and play as the Pier Guard, a man who is about to encounter the strangest incident of his entire career. Seventy years ago, a yacht disappeared without a trace, along with actor Jack Blue, a friend of silent film star Robert Patson. Now it has suddenly reappeared in the city harbor, crewless, covered in time, and with a frightening ghostly glow on board. The disappearance, shrouded in rumors and mysteries, resurfaces. When Emma Shirley notices a strange glow on the deck and reports it to writer and paranormal investigator David Blackthorn, a new investigation begins. Your task is to reach the yacht, explore its gloomy decks, and find out what happened on that fateful night. What happened to Jack, why Robert Patson refuses to talk about the past. And who, or what, returned with the yacht decades later.
Bonus Chapter Walkthrough
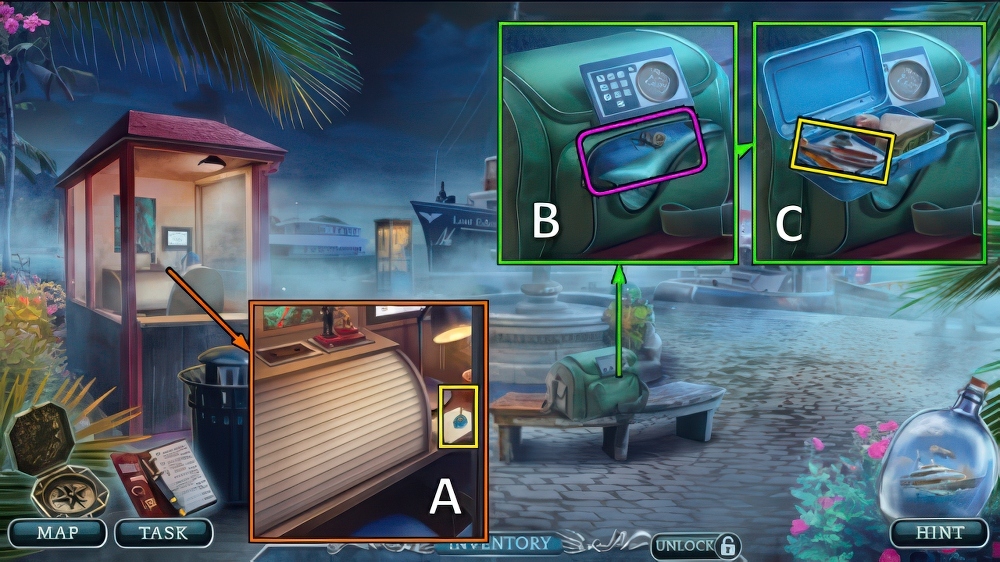
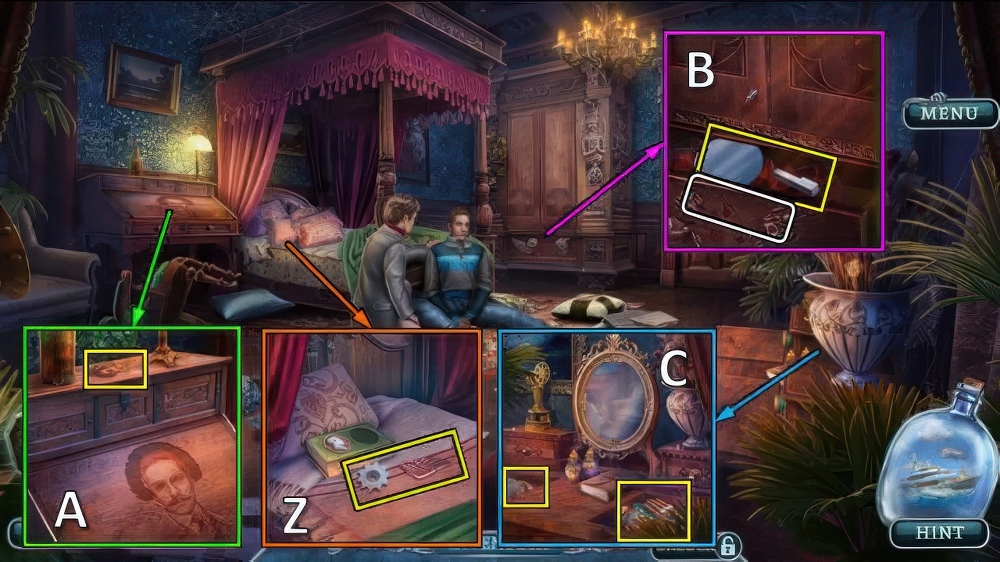
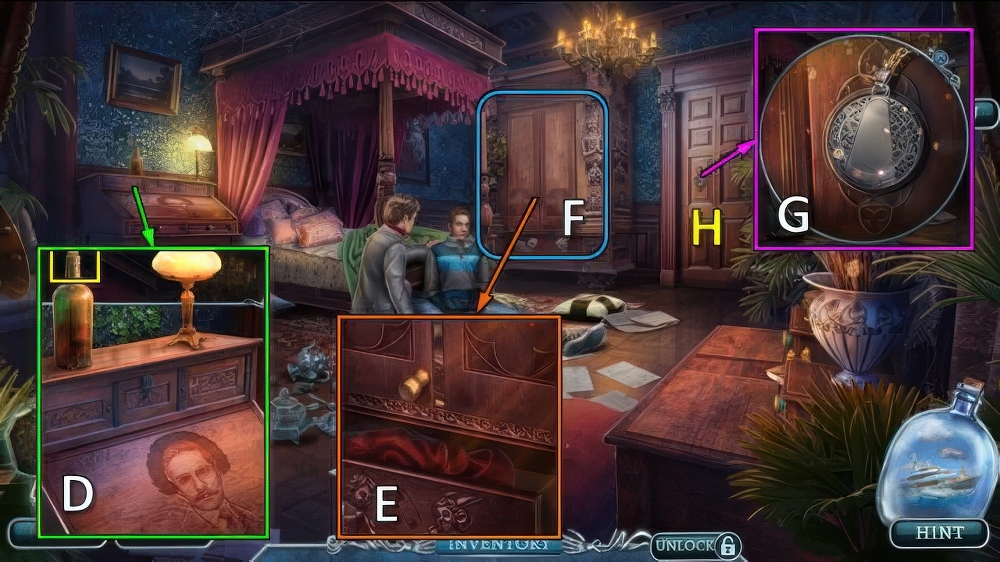
- Open, take LUNCH BOX KEY (A).
- Open, use LUNCH BOX KEY (B).
- Take FOLDING KNIFE and CERAMIC CAP (C).
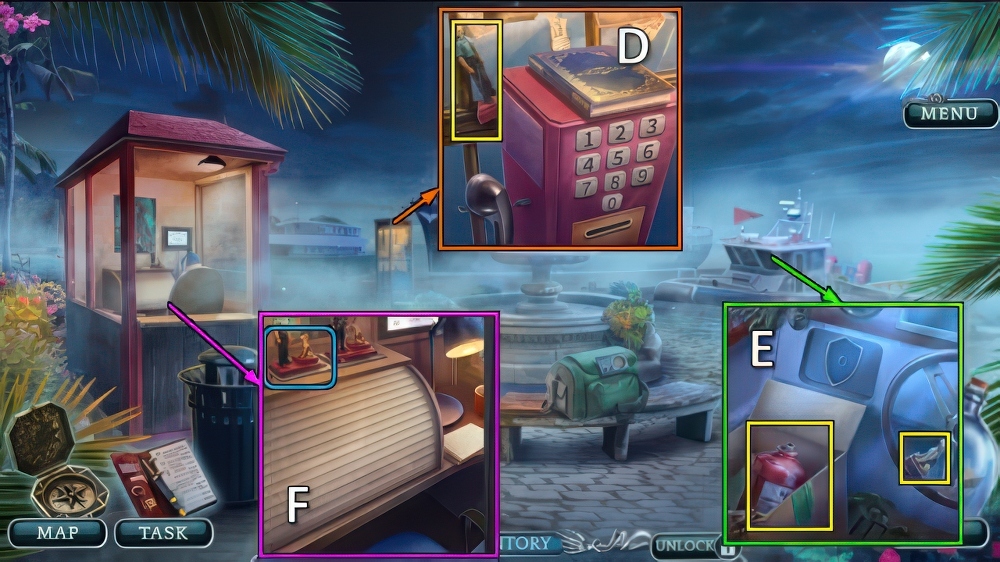
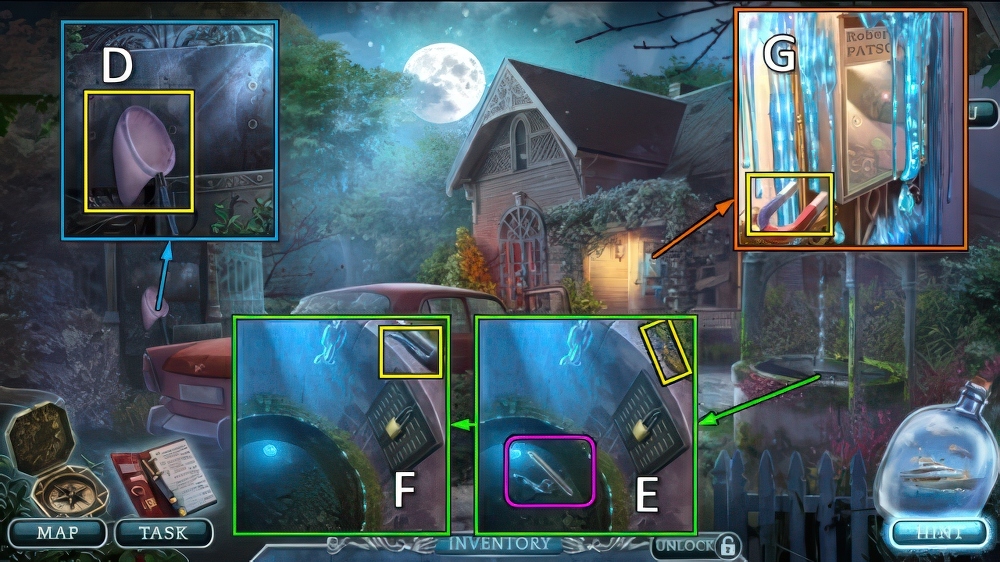
- Take SECURITY GUARD FIGURINE (D).
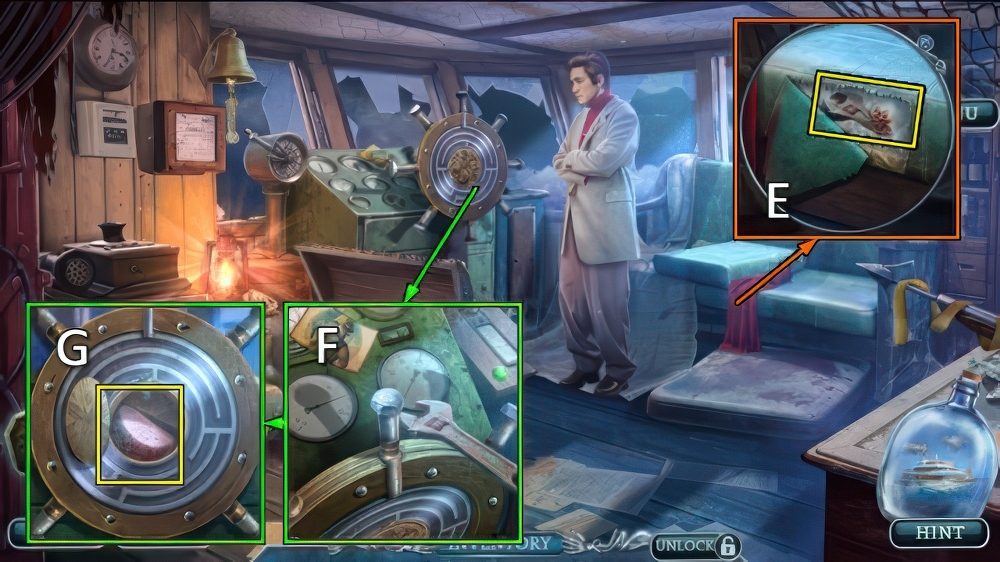
- Use FOLDING KNIFE, take GAS CYLINDER and DOG FIGURINE (E).
- CERAMIC CAP and DOG FIGURINE on SECURITY GUARD FIGURINE, take SECURITY GUARD WITH DOG.
- Place SECURITY GUARD WITH DOG (F).
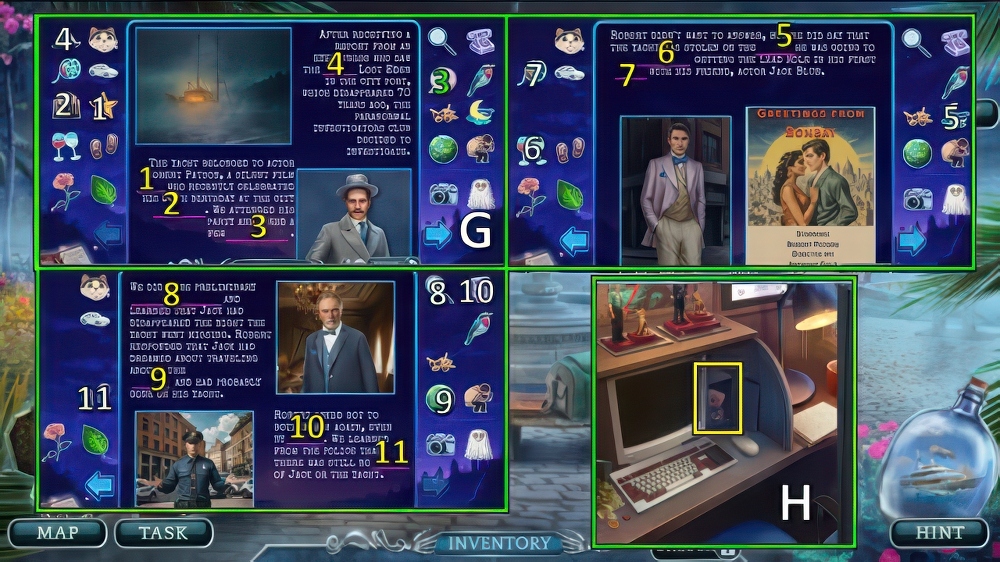
- Solution (G).
- Take AWARD TOKEN and PHONE CARD (H).
- Open, use PHONE CARD.
- Dial 555-78-41.
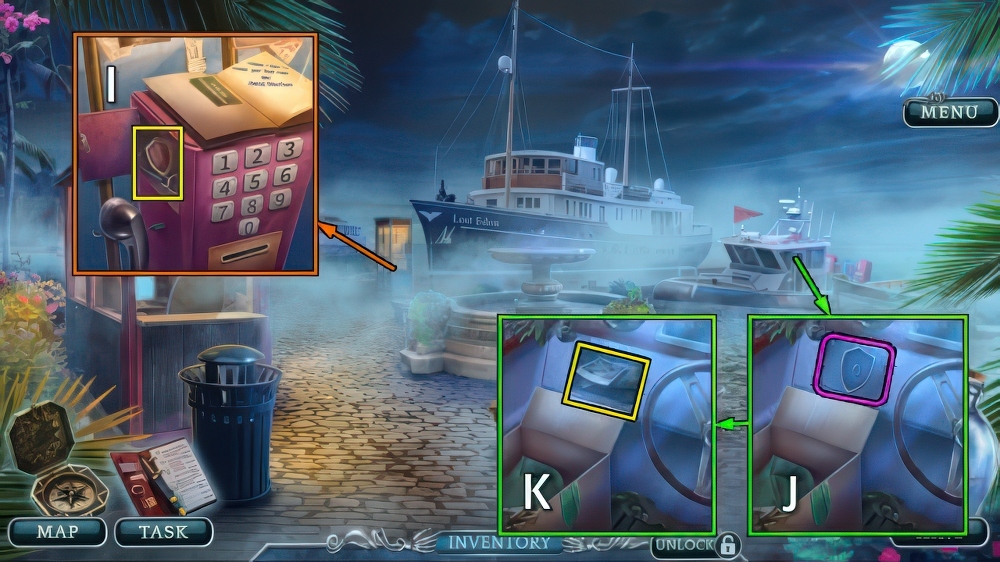
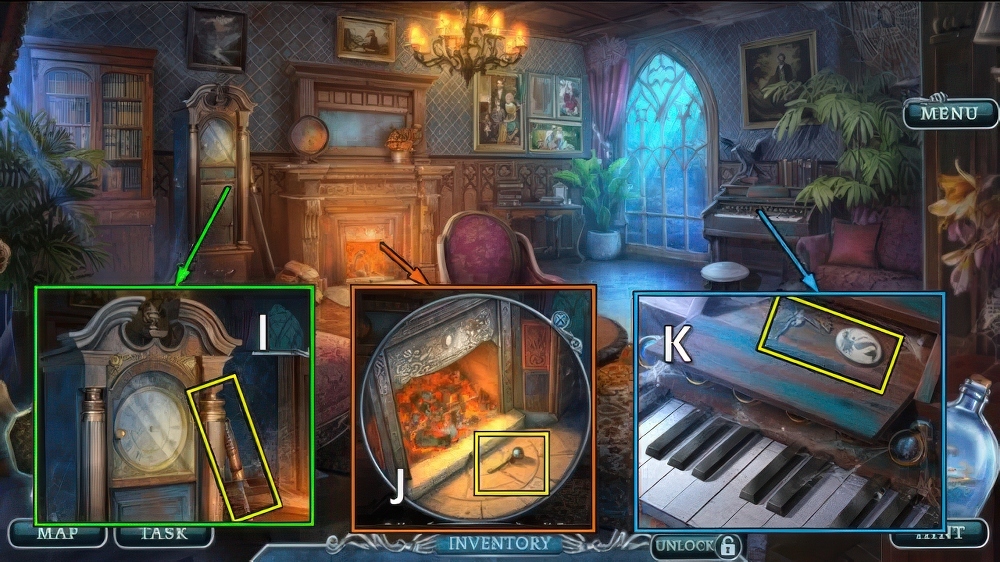
- Take GUARD SYMBOL and MASTER KEY 1/3 (I).
- Place GUARD SYMBOL (J).
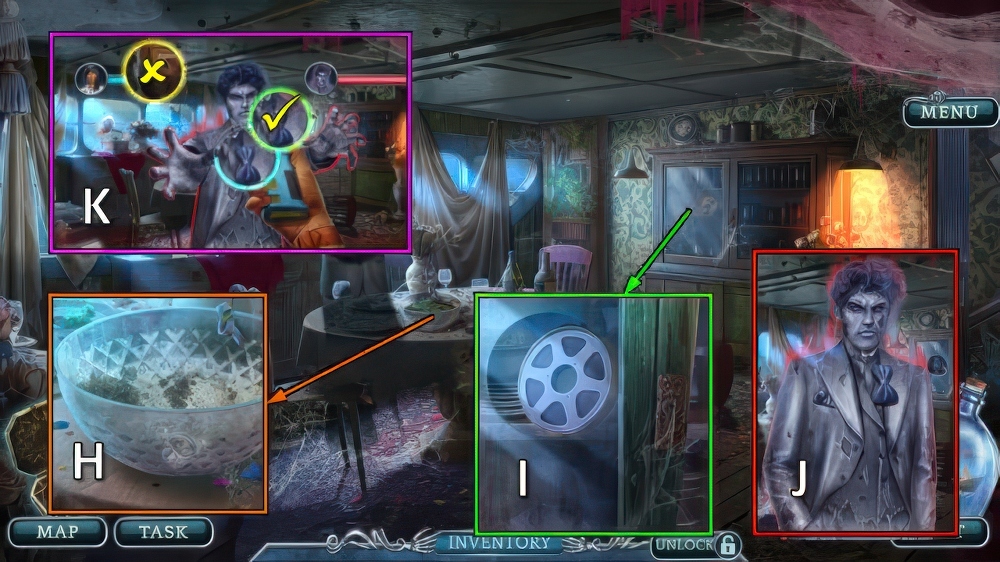
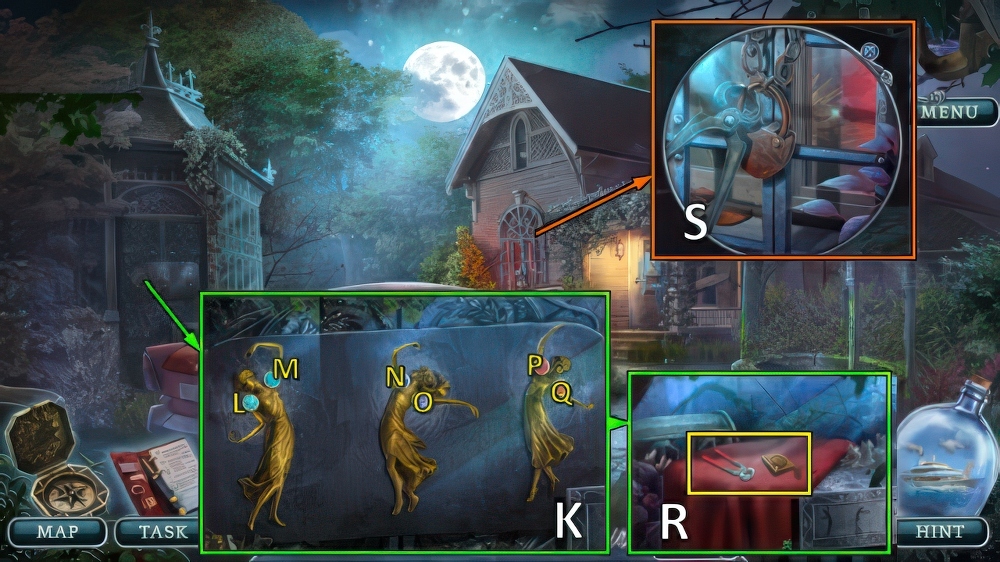
- Take DOG’S PHOTO and BROOM (K).

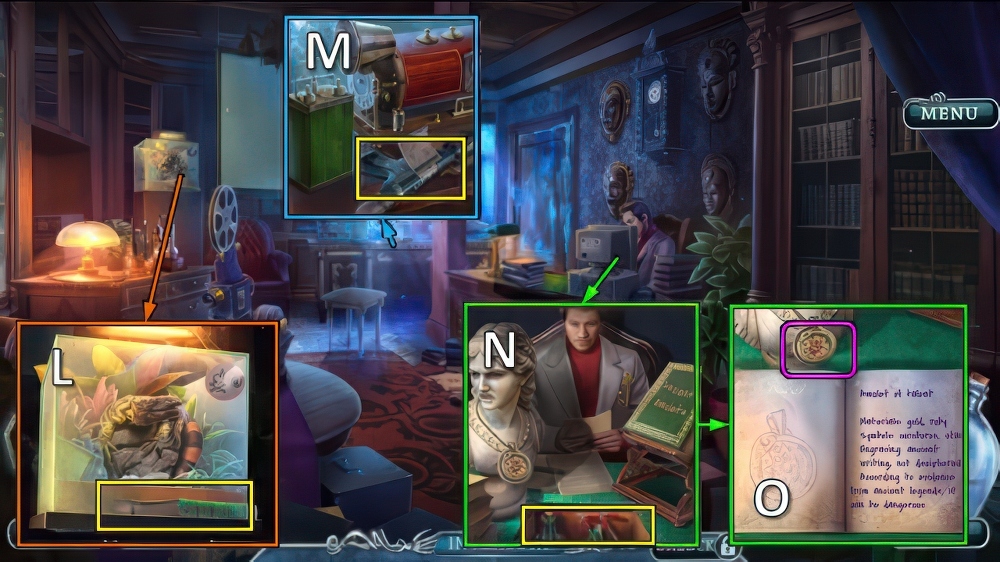
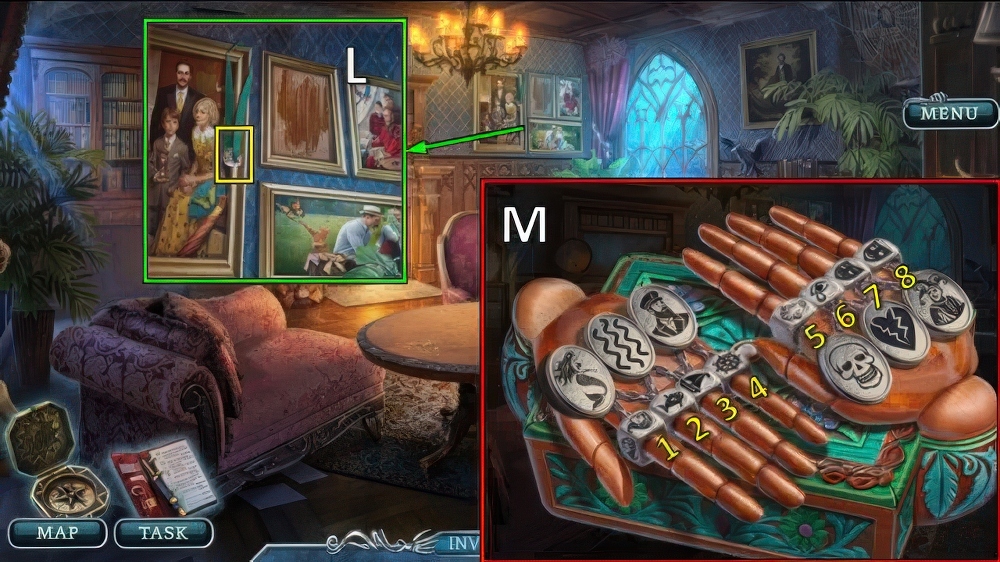
- Place DOG’S PHOTO and AWARD TOKEN (L).
- Take MASTER KEY 2/3 and STUN GUN (M).
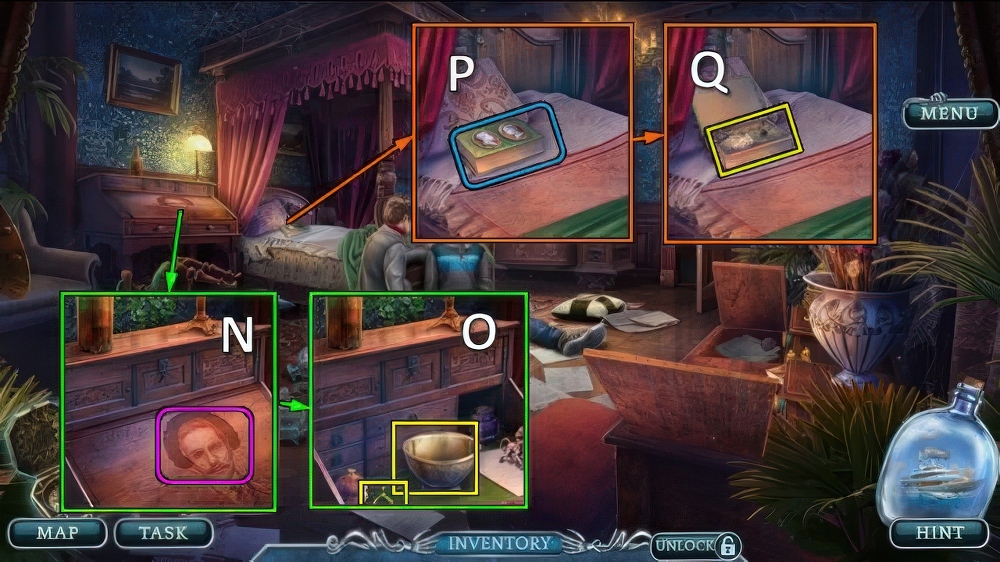
- Go (N).
- Open, use BROOM.
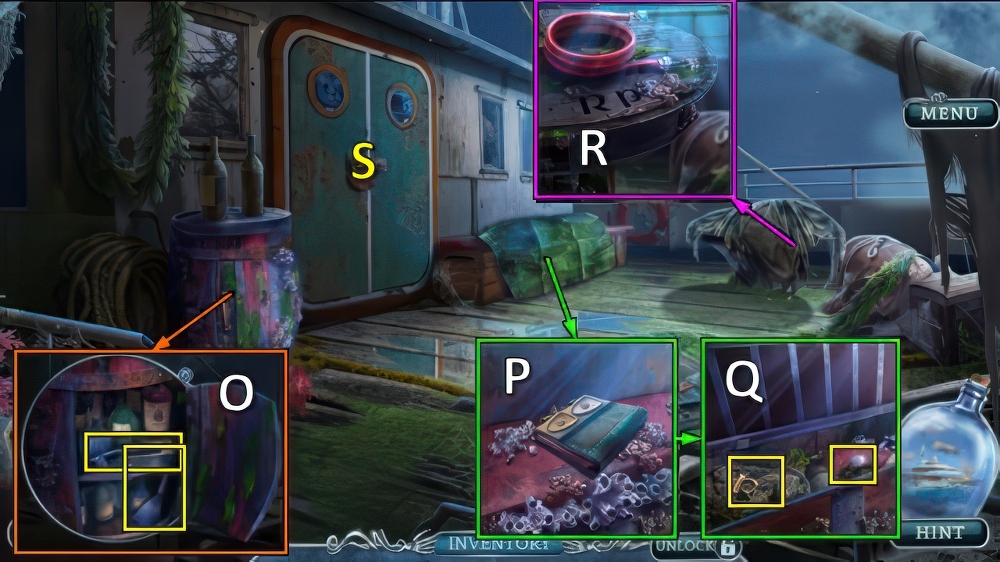
- Take NOZZLE and SPATULA (O).
- Move tarp, take LEATHER FOLDER (P).
- Use SPATULA, take GOLDEN R and LIGHTER (Q).
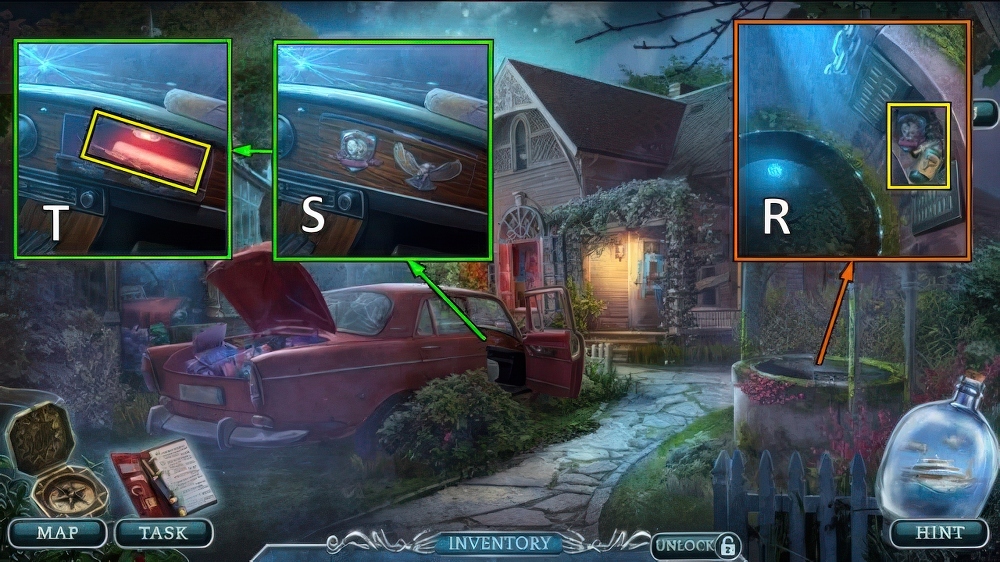
- Move tarp, take CORD (R).
- NOZZLE, CORD and LIGHTER on GAS CYLINDER, take GAS TORCH.
- Use GAS TORCH, go (S).
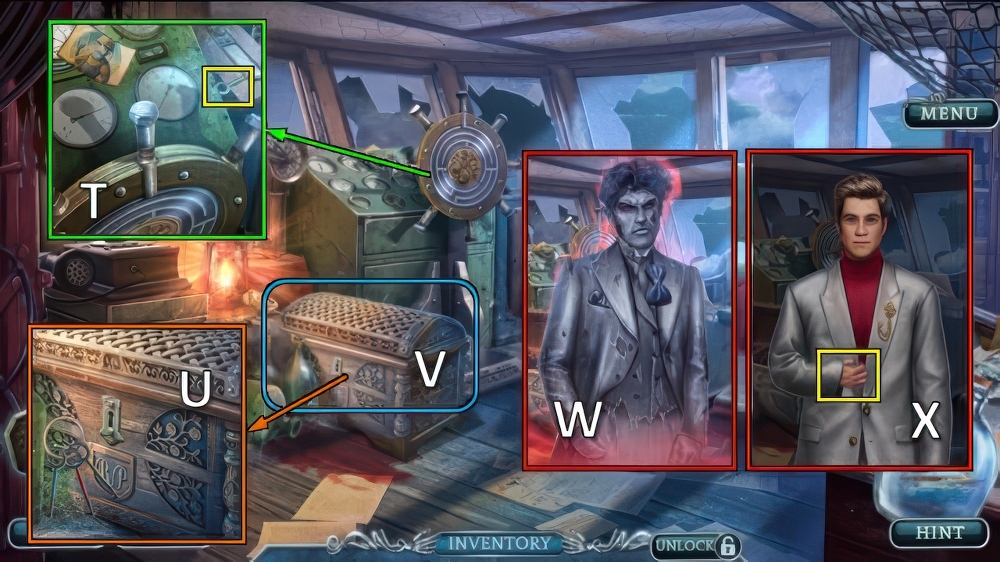
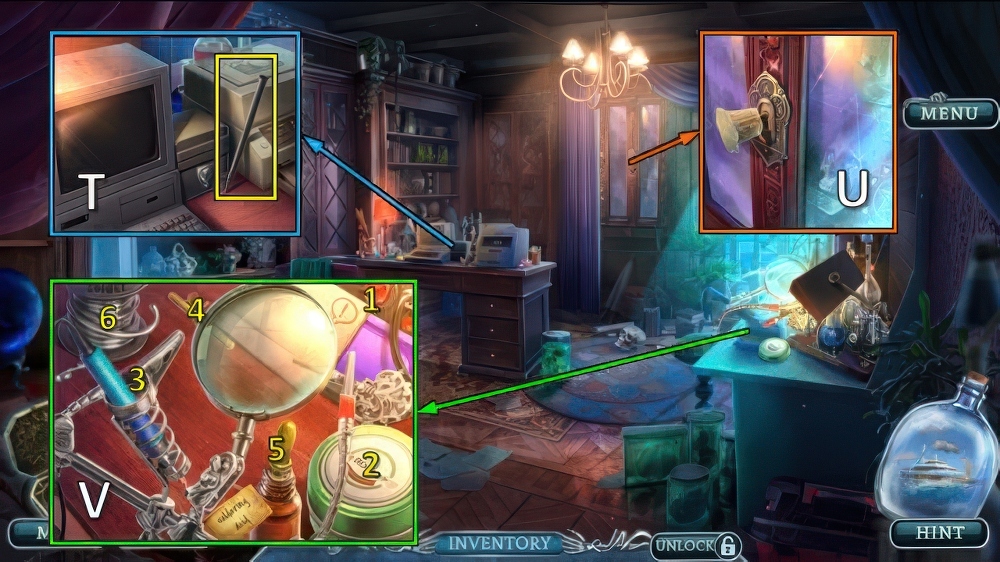
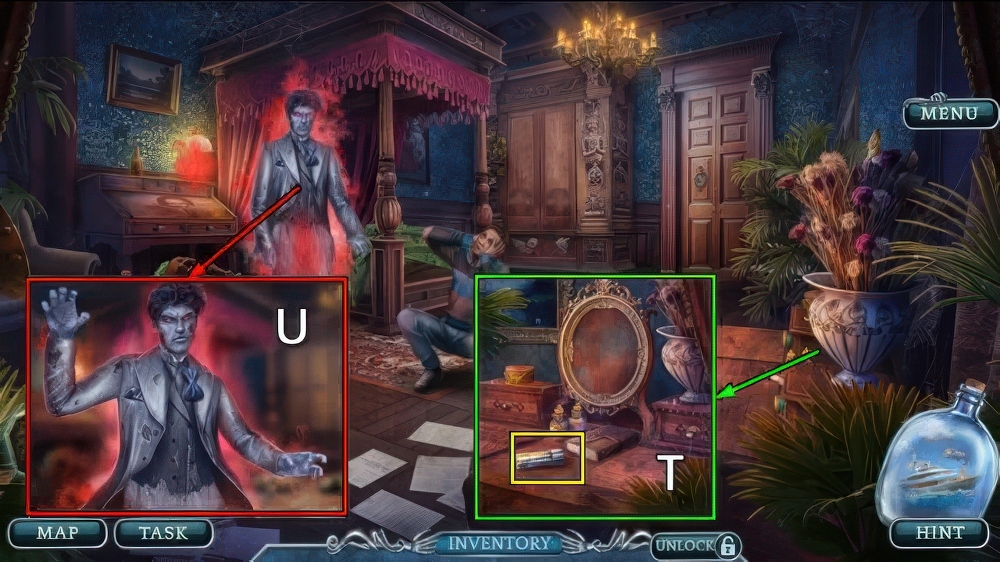
- Take MASTER KEY 3/3 (T).
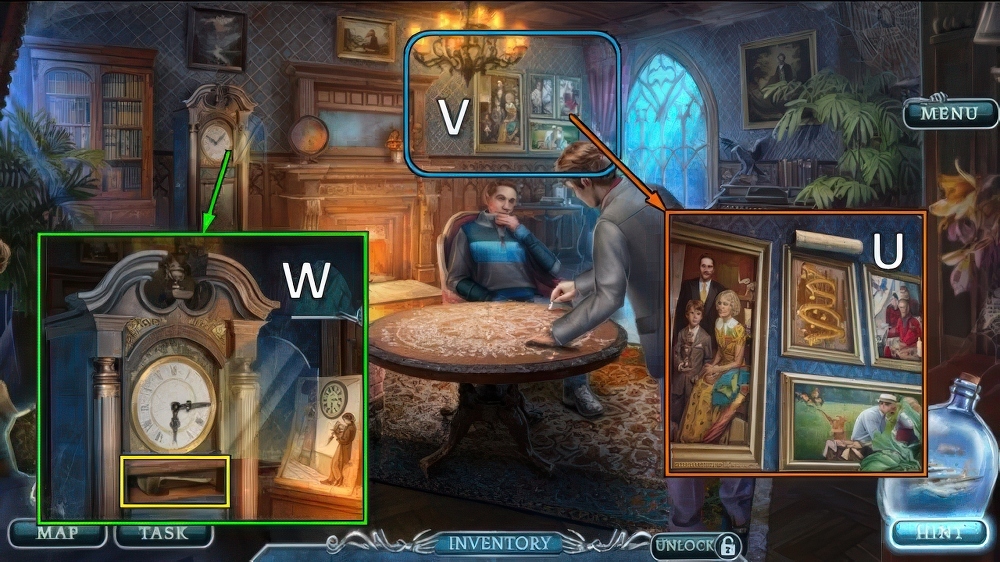
- Place MASTER KEY, try key x3 (U).
- Play puzzle (V), receive SADNESS MASK.
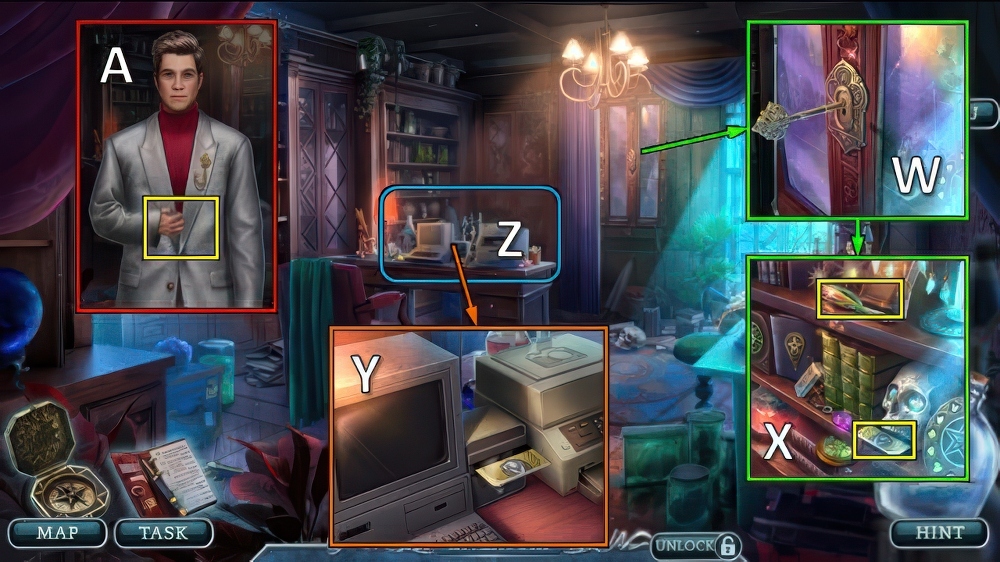
- Use STUN GUN (W).
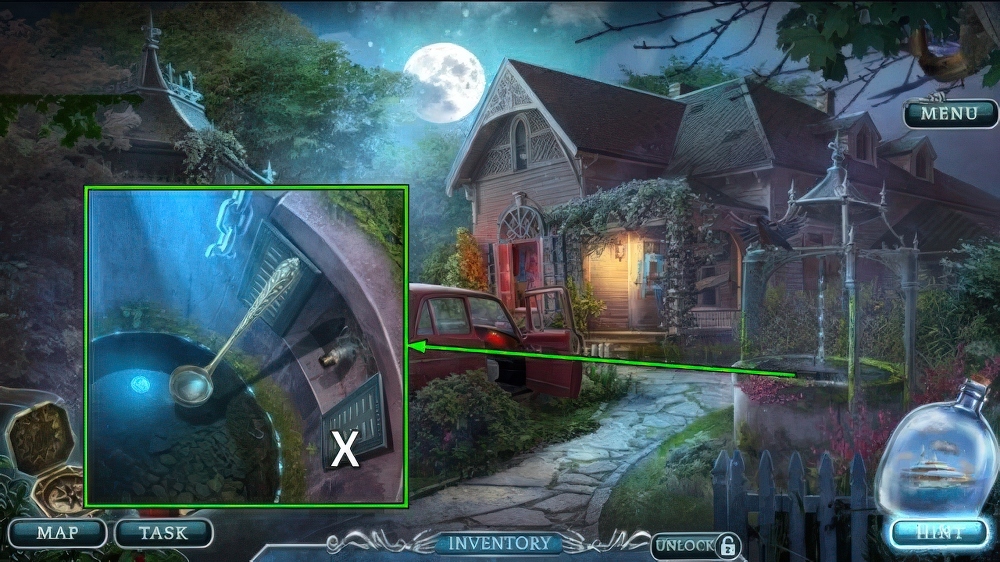
- Take GOLDEN P (X).
- Walk down.
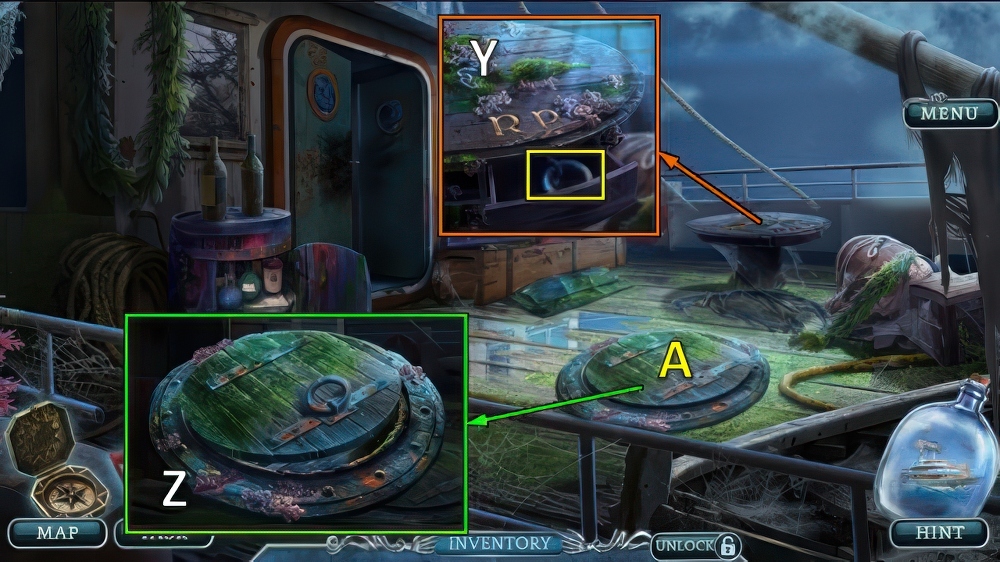
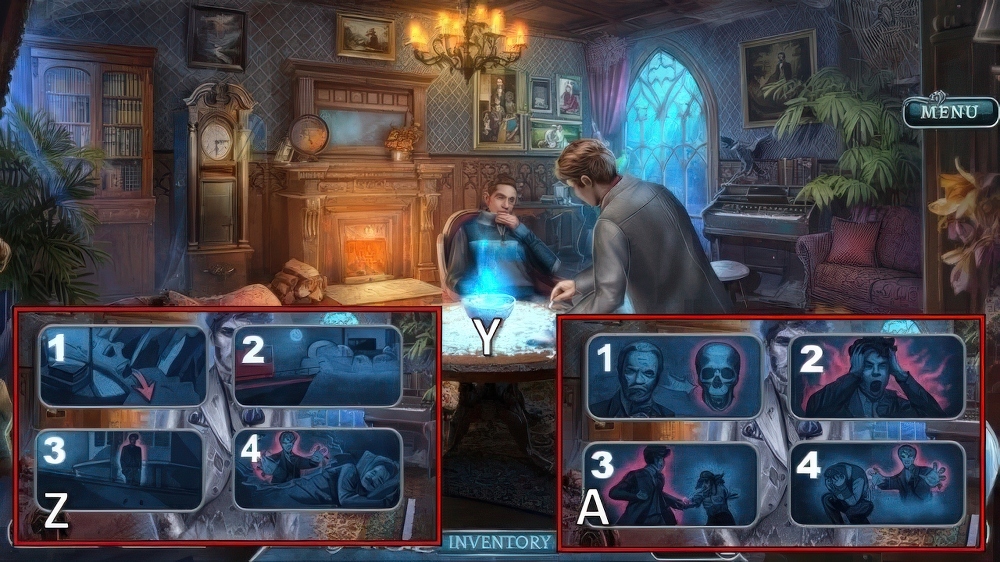
- Place GOLDEN R and GOLDEN P, take HATCH RING (Y).
- Place HATCH RING (Z).
- Go (A).
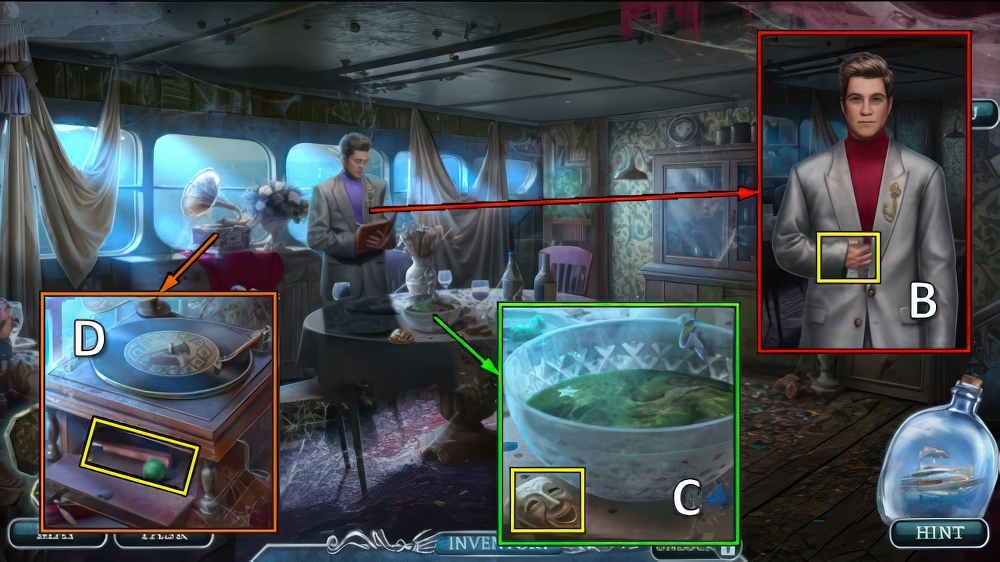
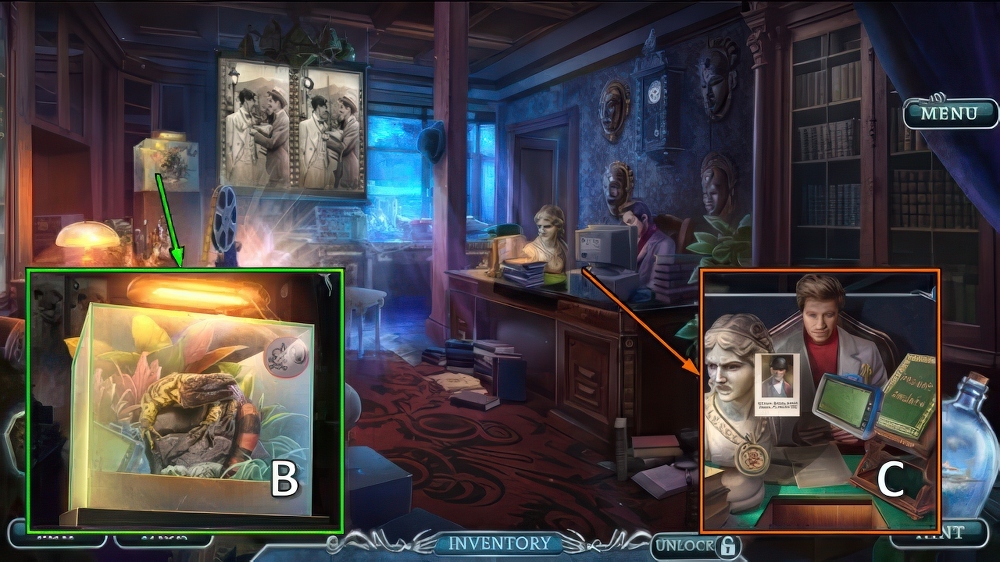
- Talk, take PENDANT BASE (B).
- Take JOY MASK (C).
- SADNESS MASK and JOY MASK on LEATHER FOLDER for mini-puzzle, receive OLD RECORD.
- Place OLD RECORD, take MARBLE BALL and SEAM RIPPER (D).
- Go to Deck House.
- Use SEAM RIPPER, take RUBY STAR and WRENCH (E).
- Use WRENCH and MARBLE BALL (F).
- Turn x3, take SPONGE (G).
- Go to Dining Room.
- Use SPONGE, take DIAMOND RING (H).
- Use DIAMOND RING, take FILM (I).
- Use STUN GUN (J).
- Defeat the ghost (K).
- Receive CHAIN WITH SNAP and CANDLE END.
- Take OLD BOOK (L).
- Take ECTOPLASM DESTROYER (M).
- RUBY STAR and CHAIN WITH SNAP on PENDANT BASE, take SINISTER AMULET.
- Place SINISTER AMULET and OLD BOOK, take ALLIGATOR CLIP WIRES and HEATING MANTLE (N).
- Select amulet x3, receive SINISTER AMULET (O).
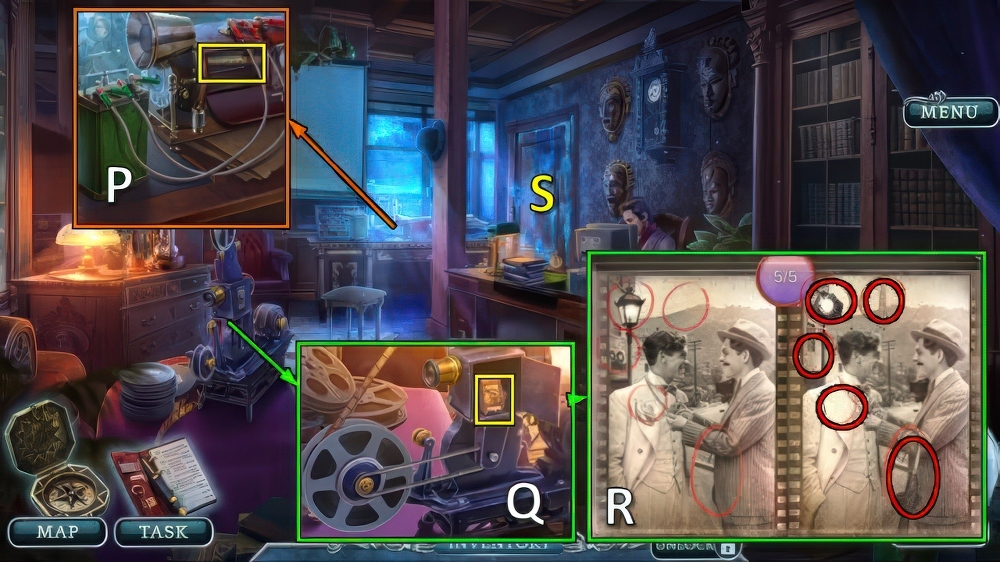
- Place ALLIGATOR CLIP WIRES, take FISHING ROD BASE and PROJECTOR CHAIN (P).
- Place PROJECTOR CHAIN and FILM (Q).
- Find differences (R).
- Take ROBERT’S PHOTO and SILVER POWDER (Q).
- SILVER POWDER and HEATING MANTLE on ECTOPLASM DESTROYER, take ECTOPLASM SOLVENT.
- Use ECTOPLASM SOLVENT, go (S).
- Take SLIDING FISHING ROD (T).
- Use CANDLE END (U), receive KEY FRAGMENT.
- Place KEY FRAGMENT (V).
- Solution: 1, 2, 3 on 4, 5 on 4, 6 on 4, 3 on 2 on 4.
- Receive CABINET KEY.
- Use CABINET KEY (W), take FISHING SPOON and MAGNETIC CARD (X).
- Use ROBERT’S PHOTO and MAGNETIC CARD (Y).
- Play puzzle (Z), receive ROBERT’S ADDRESS.
- Take UNUSUAL DEVICE and SKEIN OF FISHING LINE (A).
- Walk down.
- SLIDING FISHING ROD, FISHING SPOON and SKEIN OF FISHING LINE on FISHING ROD BASE, take FOLDING FISHING ROD.
- Use FOLDING FISHING ROD (B), receive OIL BOTTLE and NAVIGATOR.
- Offer ROBERT’S ADDRESS and NAVIGATOR (C).
- Take LANDING NET (D).
- Take GILDED MUSE 1/3, use LANDING NET (E).
- Take SMOKING PIPE and PLUNGER HANDLE (F).
- Take MAGNET (G).

- Take GILDED MUSE 2/3 (H).
- Use OIL BOTTLE and SMOKING PIPE for mini-puzzle (I), receive SUCTION CUP.
- Use SUCTION CUP and PLUNGER HANDLE, take SATYR HEAD and GILDED MUSE 3/3 (J).
- Place GILDED MUSE (K).
- Solution: Lx2-Mx2-Nx2-Ox2-Px2.
- Take VINTAGE PENDANT and PLIERS (R).
- Use PLIERS (S).
- Take FUSE (T).
- MAGNET, FUSE and VINTAGE PENDANT on UNUSUAL DEVICE, take SUPERWAVE EMITTER.
- Use SUPERWAVE EMITTER for mini-puzzle (U), receive ROBERT’S AWARD.
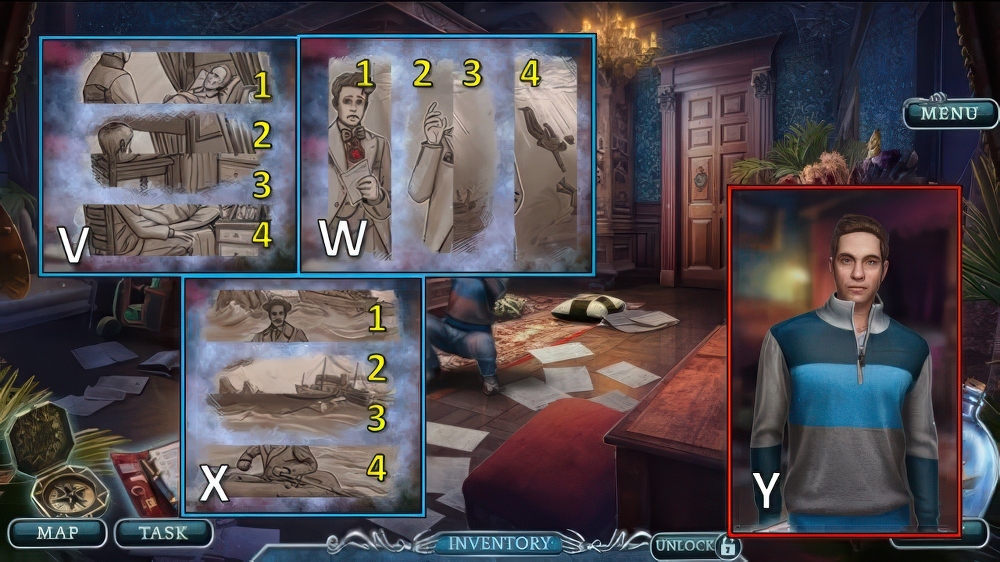
- Solution (V): (1-2)-(3-4).
- Solution (W): (1-2)-(3-4).
- Solution (X): (1-2)-(3-4).
- Take KEY BASE (Y).
- Move cushions, take WOODEN WING and SILVER GEAR (Z).
- Take ANGEL HEAD (A).
- Place SATYR HEAD, ANGEL HEAD and WOODEN WING, take ORGAN KEY and MIRROR (B).
- Place MIRROR and ROBERT’S AWARD, take CARVED BOX and CORKSCREW (C).
- Take CORK with CORKSCREW (D).
- Use CORKSCREW (E).
- Play puzzle (F), receive GOLDEN GEAR.
- SILVER GEAR and GOLDEN GEAR on KEY BASE, take MECHANISM KEY.
- Place MECHANISM KEY (G).
- Go (H).
- Take FIREPOKER (I).
- Use FIREPOKER, take ORGAN LEVER (J).
- Place ORGAN KEY and ORGAN LEVER, take MERMAID TOKEN and METAL EAGLE (K).
- Take GHOST RING (L).
- MERMAID TOKEN and GHOST RING on CARVED BOX (M).
- Solution: (1-2)-(1-6)-(3-4)-(4-7).
- Take LAUREL WREATH and CAMEO.
- Walk down.
- Place LAUREL WREATH (N), take SILVER BOWL and SCREW (O).
- Place CAMEO (P), take DRIED HERBS and BRONZE PAPERWEIGHT (Q).
- Walk down.
- Use BRONZE PAPERWEIGHT, take GLUE BOTTLE and ROBERT’S COAT OF ARMS (R).
- Place ROBERT’S COAT OF ARMS and METAL EAGLE (S).
- Take CLOCK HANDS and ROLLED CANVAS (T).
- Go to Living Room.
- Use GLUE BOTTLE and ROLLED CANVAS (U).
- Play puzzle (V), receive POSTCARD.
- Place CLOCK HANDS, SCREW and POSTCARD, take GOLDEN LADLE (W).
- Walk down twice.
- Use GOLDEN LADLE, receive LADLE WITH WATER (X).
- Go to Living Room.
- SINISTER AMULET, DRIED HERBS and LADLE WITH WATER on SILVER BOWL, take RITUAL BOWL.
- Place RITUAL BOWL (Y).
- Solution (Z): (1-2)-(3-4).
- Solution (A): (1-3)-(2-4).
Congratulations! You have completed the game A Haunting Novel 2: Surfaced Secrets.


