
Book Travelers 1: A Victorian Story – The game walkthrough begins when young Megan Webster accidentally realises that she is able to literally immerse herself in books. Travelling from the world of reality, as we call it, to the world of books has always been as desirable as it is impossible. She thought so until one day there was a pop and a flash of light in her bedroom. Boys and girls of any age, with certain abilities, can walk the thin line of fiction. And they are charged with the difficult mission of guarding these fragile worlds and not letting anyone change them. After all, the lives of the book’s inhabitants can easily be destroyed. Her encounter with the missing Wanderer was food for thought. While the temptation to bring the book characters into reality is great, it is incredibly dangerous, both for them and for her. Everything is set up there so that you can easily immerse yourself in the vast world of books. What books were created for. Only to brighten our lives and allow us to experience what in reality seems unbelievable. You must help the head librarian to save the book world. If you can not pass any of the puzzles or do not know where the items are, on our site you can watch the walkthrough of the game Book Travelers 1: A Victorian Story, and restore the narrative chain of the book.
Book Travelers 1: A Victorian Story – Walkthrough
Here you can see the full walkthrough of Book Travelers 1: A Victorian Story, namely for all chapters, including bonus chapter, in pictures.

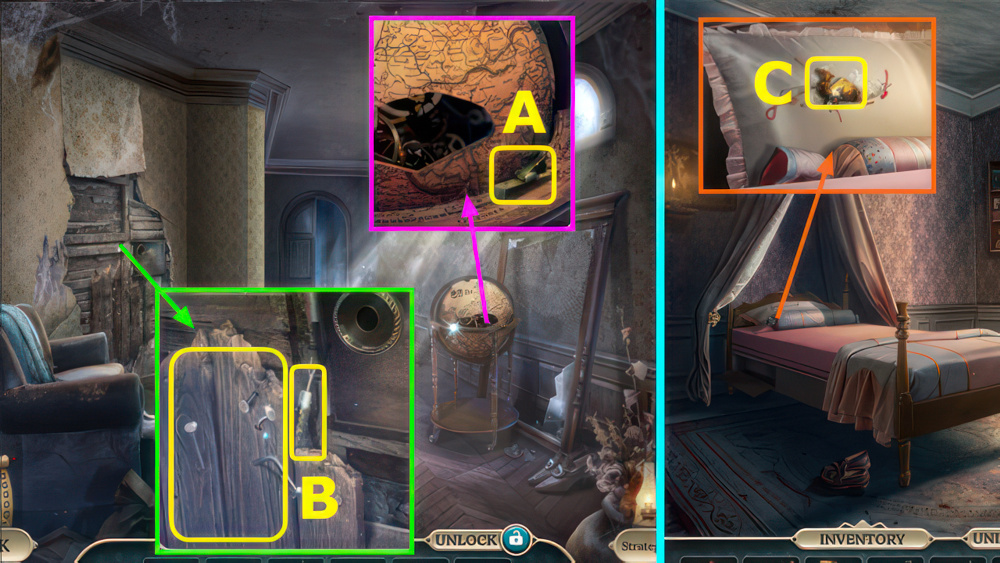
- Read badge, take FLOWER KEY (A).
- Use FLOWER KEY.
- Take 1/3 REFERENCE BOOKS, ANTIQUE COIN, and ROUND BASE (B).
- Place ANTIQUE COIN.
- Take FLAG, 2/3 REFERENCE BOOKS, and LATCH PIN (C).

- Place FLAG, take BOOK TOKEN and LATCH RING (D).
- Use LATCH RING and LATCH PIN (E).
- Play puzzle, earn RARE PRINT (F).
- Place RARE PRINT, take CATALOG CARD and WOODEN SHELF (G).
- Use WOODEN SHELF (H).

- Place BOOK TOKEN, take GLUE and 3/3 REFERENCE BOOKS (I).
- Place CATALOG CARD and REFERENCE BOOKS (J).
- Arrange the books according to the clue.
- Each book’s image is associated with an image on the card.
- Select two books to swap them.
- Walkthrough (K).
- Take CODE (L).
- Place CODE, select 1-4, take LETTER B (M).
- GLUE and LETTER B on ROUND BASE, take MONOGRAM AMULET.

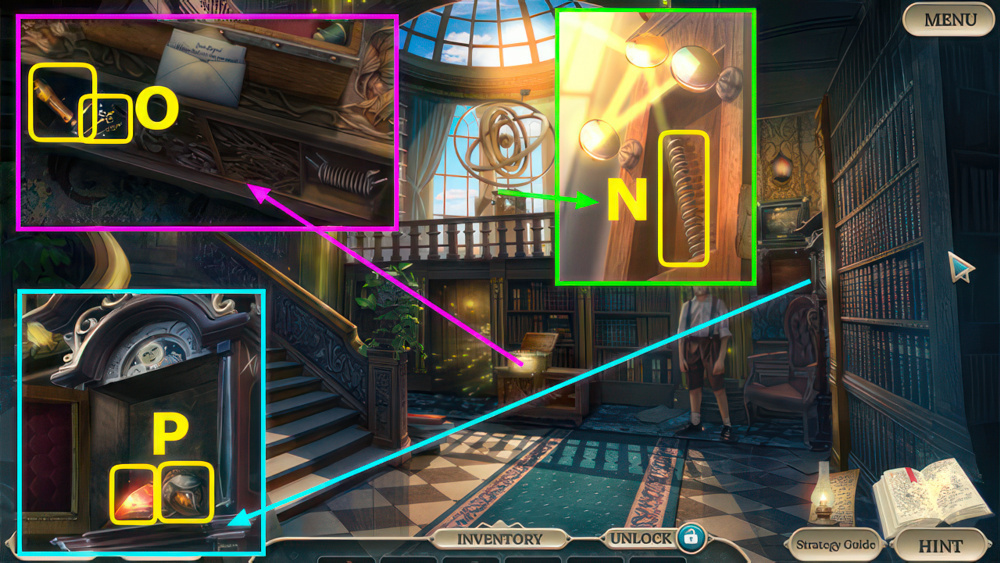
- Place MONOGRAM AMULET, take GEAR and KNOB (N).
- Use KNOB, take GOLDEN QUILL (O).
- Place GOLDEN QUILL (P), earn MANUSCRIPTS.

- Take SNAKE AMULET (A).
- Talk, earn BIRD AMULET (B).
- Take ANTIQUE FRAME.
- Place BIRD AMULET and SNAKE AMULET (C).

- Create a route on the map with the help of the magnifier.
- Place route lines by selecting your current point and then selecting the point next to the location that matches the image in the magnifier.
- Select and drag the slider to move around the map.
- Walkthrough 1-13 (D-E-F).

- Take MECHANISM KEY, read note, take 1st PICTURE PART (G).
- Place GEAR and MECHANISM KEY, select ×3 (H).
- Go forward.

- Take ORNATE HANDLE (I).
- Place ORNATE HANDLE, take TIGER’S EYE and SCREW NUT (J).
- Go down.

- Place TIGER’S EYE (K), play puzzle, earn BECKY’S RIBBON.
- Give BECKY’S RIBBON, earn 2nd PICTURE PART (L).
- 2 PICTURE PARTS on ANTIQUE FRAME, take FRAMED PICTURE.
- Place FRAMED PICTURE, take GLASS LENS and BROKEN BARREL ORGAN (M).
- Place GLASS LENS, take SPRING (N).
- Replace SPRING, take CRANK HANDLE and CLOCK HANDS (O).
- Place CLOCK HANDS and SCREW NUT, select ×3, take 1/3 BIRD TOKENS and HEART HALF (P).
- Go forward.

- Place HEART HALF (Q).
- Play puzzle, earn FISHING ROD (R).
- Use FISHING ROD, take 2/3 BIRD TOKENS and MUSIC NOTE (S).
- MUSIC NOTE and CRANK HANDLE on BROKEN BARREL ORGAN, take 3/3 BIRD TOKENS and MATCHES.
- Place BIRD TOKENS, take YELLOW LIGHT and TORN PAGE (T).

- Place TORN PAGE (A).
- Restore the image on the left to match the page on the right.
- Select a tile to move it to an empty adjacent slot.
- Walkthrough J-G-D-C-F-I-L-K-H-E-F-G-D-C-F-I-L-K-H-E-B-C-F-I-L.
- K-H-E-B-C-F-I-L-M-J-G-F-I-L-K-H-E-F-I-J-M-L-K-H-I-L-M.
- Take RED LIGHT (N).
- Place RED LIGHT and YELLOW LIGHT, take MAGIC PAINT (O).
- Go down.

- Give MAGIC PAINT, earn WANDERER’S AMULET (P).
- Go forward.
- Place WANDERER’S AMULET (Q).

- Give MANUSCRIPTS, earn CAMEOS and INCOMPLETE OUTFIT (A).
- Take 1st PORCELAIN FIGURINE, place CAMEOS (B).
- Arrange the tiles to create the silhouettes of the three cameos.
- Select two tiles to swap them.
- Walkthrough (C).
- Take APRON and SCISSORS.

- Use SCISSORS, take 1/2 CODE PARTS and SHOES (D).
- APRON and SHOES on INCOMPLETE OUTFIT, earn 2nd PORCELAIN FIGURINE.
- Place 2 PORCELAIN FIGURINES (E), play puzzle, earn HAIRPIN.
- Use HAIRPIN (F).
- Go forward.

- Take DOLL’S GLOVES (G).
- Place DOLL’S GLOVES, take 1/4 CARVED PIECES, CANDLE, and LOCK BUTTON (H).
- Use CANDLE and MATCHES, take DOLL’S ARM and CHISEL (I).
- Use CHISEL, take 2/4 CARVED PIECES and FEATHER DUSTER (J).
- Go down.

- Use FEATHER DUSTER (K).
- Play puzzle, earn 2/2 CODE PARTS (L).
- Place LOCK BUTTON and CODE PARTS, select 1-3.
- Take DOLL’S LEG and WOOD PANEL (M).
- Go forward.

- Place WOOD PANEL, take 3/4 CARVED PIECES and NET (N).
- Use NET, take DOLL’S HAT (O).
- Place DOLL’S HAT, DOLL’S LEG, and DOLL’S ARM, take 4/4 CARVED PIECES and BAG (P).
- Place CARVED PIECES (Q).
- Go left.
- Take LATCH (A).
- LATCH on BAG, take GLOBE FRAGMENT and CROWBAR.
- Use CROWBAR, take PLANKS and SEAM RIPPER (B).
- Go down.
- Use SEAM RIPPER, take CAMEL SLIDER (C).
- Go left.

- Place GLOBE FRAGMENT and CAMEL SLIDER, drag inlay right, take BLUEPRINT and SAFE BUTTON (D).
- Use SAFE BUTTON (E).
- Arrange the gold bars so that none of the lock tokens overlap when you overlay the two plates.
- Select and drag bars to swap them.
- Select the red button to overlay the plates and test your solution.
- Walkthrough, select (F), take HAMMER.
- Use PLANKS and HAMMER (G).

- Go forward.
- Earn FLOWER KEY.
- Take DIARY, place FLOWER KEY, take 1/4 WOODEN PETALS and VELVET ROPE (H).
- Use VELVET ROPE, take KNIFE HANDLE, SIGNET RING, and 2/4 WOODEN PETALS (I).
- Use SIGNET RING, take CODE and EARRINGS (J).

- Use CODE, take NECKLACE (K).
- Place EARRINGS and NECKLACE (L).
- Play puzzle, earn CROCODILE AMULET (M).
- CROCODILE AMULET on DIARY, take 3/4 WOODEN PETALS and ORNATE KEY.
- Use ORNATE KEY (N).
- Go forward.

- Use KNIFE HANDLE, earn KNIFE, take PENCIL (O).
- Use KNIFE, take 1st FRAME PIECE, GLUE, and LOCKED CHEST (P).
- GLUE and BLUEPRINT on DIARY, select, take RULER.
- Go down.

- Use RULER, take 1/3 MOSAIC TILES and GOLDEN ANGEL (Q).
- Place GOLDEN ANGEL (R).
- Move the angel tiles to the corners of matching color.
- Select a gold button to rotate the surrounding tiles.
- Walkthrough: U-S-U-T×2-U-S-V×2-U-T-V-W×2-U-W-U×2-S-W×2-U×2.
- Take 4/4 WOODEN PETALS.
- Go forward.

- Place WOODEN PETALS (A).
- Go left.
- Take 2nd FRAME PIECE, use PENCIL, take COMBINATION (B).
- Place 2 FRAME PIECES, take MAGNET (C).
- Go down.

- Use MAGNET (D), play puzzle, earn LOCK DIAL.
- LOCK DIAL and COMBINATION on LOCKED CHEST, solution (E).
- Take HOOK and 1/2 KEY AND ENVELOPE.
- Select, use HOOK, take SILVER HANDLE (F).
- Use SILVER HANDLE, take 2/3 MOSAIC TILES and BUTTER (G).
- Go left.

- Use BUTTER, take 3/3 MOSAIC TILES (H).
- Place MOSAIC TILES (I).
- Play puzzle, earn 2/2 KEY AND ENVELOPE (J).
- Go down ×2.

- Give KEY AND ENVELOPE (K).
- Open envelope, take ADELE’S PHOTO and ESTATE DOCUMENTS (L).
- Go forward, left.

- Place ADELE’S PHOTO, take BAT INLAY (M).
- Use BAT INLAY, take DOOR HANDLE and BUTTON (N).
- Use DOOR HANDLE (O).
- Go right.

- Take NEEDLE AND THREAD (P).
- Take MINT, use BUTTON and NEEDLE AND THREAD (Q), play puzzle, earn SOLVENT.
- Go down.

- Use SOLVENT, take MAP FRAGMENT and POT HOLDER (R).
- Use POT HOLDER, earn SERVANT’S BELL and BOILING WATER (S).
- Go down.
- Place SERVANT’S BELL, take CHISEL and TEA LEAVES (T).
- Place MINT, BOILING WATER, and TEA LEAVES (U).
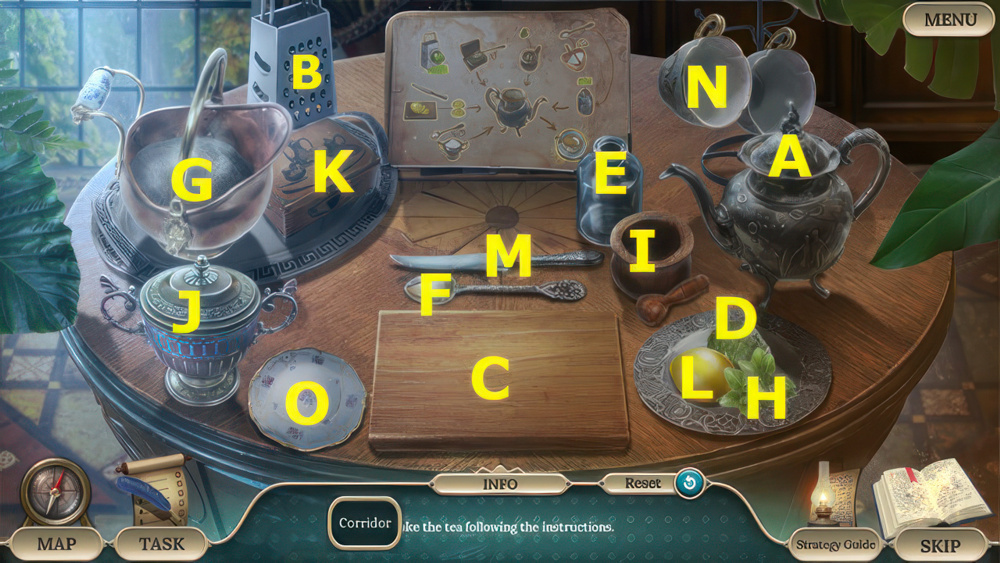
- Follow the instructions to make the tea.
- Select (A).
- Move (D-C)-(B-C)-(C-E).
- Use (F-G), select (E), move (E-A).
- Move (H-I)-(I-A).
- Move (F-J×3).
- Select (K), use (F-K).
- Move (L-C)-(M-C)-(C-A×2).
- Select (N-G).
- Take MINT TEA (O).
- Go left, right.

- Give MINT TEA and ESTATE DOCUMENTS (P), earn PENDULUM.
- Place PENDULUM, take BLACK BUTTON and MAP HALF (Q).
- Use BLACK BUTTON, take ADHESIVE TAPE and STAMP AMULET (R).
- MAP HALF and ADHESIVE TAPE on MAP FRAGMENT, take MAP.

- Place STAMP AMULET, take 1/3 PEARLS and WINDUP KEY (S).
- Use WINDUP KEY, take LATCH PULL (T).
- Go down ×2.
- Use LATCH PULL and MAP (U).
- Play puzzle (V).

- Take COIN (A).
- Use COIN, take METAL BRACE, PLIERS, and CANDLE (B).
- Use PLIERS, take CRANK, BROKEN RAKE, and BRICK (C).

- Use CRANK, take RAKE HEAD and 2/3 PEARLS (D).
- RAKE HEAD and METAL BRACE on BROKEN RAKE, take RAKE.
- Use RAKE, take PLANKS and KEROSENE (E).
- Place PLANKS (F).
- Take MIRRORS, use CHISEL, take FLINT AND STEEL (G).

- Use CANDLE and FLINT AND STEEL (H).
- Arrange the tools to fill every available space on the board.
- Walkthrough, take WRENCH (I).
- Use WRENCH, take ROPE (J).
- Use ROPE (K).

- You earn 3/3 PEARLS.
- Take HANDKERCHIEF, place PEARLS (L).
- Swap the places of the white and blue pearls.
- Select a pearl and then select an available space to move it.
- Walkthrough (M).
- Take TRIANGLE AMULET (N).

- Use HANDKERCHIEF, take WET HANDKERCHIEF (O).
- Use WET HANDKERCHIEF and MIRRORS, take GOLD FLEUR-DE-LIS (P).
- Place BRICK (Q).
- Take ROUND AMULET (R).

- Place ROUND AMULET and TRIANGLE AMULET (S).
- Move the tiles to the correct places according to the requirements in the images.
- Each image represents the types of tiles that belong in their row or column.
- Select two tiles to swap them.
- Walkthrough (T).
- Take CHEESE and EMPTY RING (U).

- Use CHEESE, take FUSE (V).
- Use KEROSENE, FUSE, and FLINT AND STEEL (W).

- Take MARBLE KEY (A).
- Take 1/3 CHAINS, use MARBLE KEY, take SAPPHIRE and SILVER FLEUR-DE-LIS (B).
- Take 2/3 CHAINS, place GOLD FLEUR-DE-LIS and SILVER FLEUR-DE-LIS, take PRECIOUS DUST (C).

- Place MANUSCRIPTS (D).
- Select the symbols on the panel that match the symbols circling the sphere.
- If you select a symbol that does not appear around the sphere, the game will restart.
- Walkthrough (E), take 3/3 CHAINS.
- Use CHAINS, take BURNING CANDLE and STICK (F).
- Use STICK (G), earn SPELL INSTRUCTIONS.
- Go left.

- Take WEIGHT (I).
- Balance the weight of the chains.
- Select two weights to swap them.
- Weights will carry any other weights under them.
- Place WEIGHT, solution (J).
- Take WILD HERBS (K).
- BURNING CANDLE, PRECIOUS DUST and WILD HERBS on SPELL INSTRUCTIONS, take GRAVITATION SPELL.
- Go down.

- Use GRAVITATION SPELL, earn INITIAL (L).
- Give INITIAL (M).
- Take BOWL (N).

- Use BOWL, move side to side, take BOWL OF WATER (O).
- Use BOWL OF WATER (P), earn RUBY.
- SAPPHIRE and RUBY on EMPTY RING, take GEMSTONE RING.
- Use GEMSTONE RING (Q).
- Play puzzle, earn MARBLE FACE (R).
- Go down.

- Place MARBLE FACE, take SCREWDRIVER and HOOK (A).
- Use SCREWDRIVER, take KNIFE (B).
- Go left.
- Use KNIFE, take 1st GLOWING CRYSTAL and ROPE (C).
- Use ROPE and HOOK (D).
- Go left.

- Use STICK (E), play puzzle, earn FEATHER DUSTER.
- Use FEATHER DUSTER, take HAMMER and 1/4 GEARS (F).
- Use HAMMER, take PALETTE and MOSAIC PIECE (G).

- Place MOSAIC PIECE, take 2nd GLOWING CRYSTAL and 2/4 GEARS (H).
- Place 2 GLOWING CRYSTALS (I).
- Arrange the lenses so the ray of light passes through the crystals.
- Select and drag a lens to place it.
- Walkthrough (J).

- Take MATCHES (A).
- Use MATCHES, take 3/4 GEARS and CUCKOO BIRD (B).
- Place CUCKOO BIRD, take VALVE, SUITCASE KEY, and MAGNIFYING GLASS (C).

- Use SUITCASE KEY, take OIL and PIN (D).
- Use PIN, take 4/4 GEARS (E).
- Use OIL, place GEARS (F).
- Restore the image by moving the gears.
- Select a gear twice or more to rotate it or select two gears to swap them.
- Each gear will lock when placed correctly.
- Walkthrough (G).
- Go left.

- Take CATALOG CARD (H).
- Place CATALOG CARD, take PAPERCLIP, PAINTS, and BROKEN DEVICE (I).
- Take 1/3 AMULET PARTS (J).
- Go down.

- Use PAPERCLIP, take PAINTBRUSH (K).
- PAINTS and PAINTBRUSH on PALETTE, take PALETTE WITH PAINTS.
- Use PALETTE WITH PAINTS (L).
- Play puzzle, earn CADUCEUS (M).
- Go left.

- Place CADUCEUS, take STAR MEDALLION and TUBE CASE (N).
- Go down.
- Place STAR MEDALLION, take HANDKERCHIEF and FAUCET (O).
- Use HANDKERCHIEF, take EMPTY BOTTLE (P).
- Go left.

- Use FAUCET, VALVE and EMPTY BOTTLE, earn MAGIC INK (A).
- Use MAGIC INK, take CYPHER (B).
- Place CYPHER, take FLAT CRYSTAL (C).
- Use FLAT CRYSTAL, take 1st GOLDEN WING and MAGIC FILTER (D).
- MAGNIFYING GLASS and MAGIC FILTER on BROKEN DEVICE, take MAGIC MAGNIFIER.

- Use MAGIC MAGNIFIER (E).
- Play puzzle, earn LIBRARIAN’S SIGNATURE (F).
- Use LIBRARIAN’S SIGNATURE (G).
- Go forward.

- Take STONE CHUNK (H).
- Place STONE CHUNK, take MAGIC ACORN and 2/3 AMULET PARTS (I).
- Give MAGIC ACORN (J), play puzzle, earn 2nd GOLDEN WING.
- 2 GOLDEN WINGS on TUBE CASE, take BRONZE SYMBOL.

- Place BRONZE SYMBOL, take IODINE (K).
- Use IODINE, take 3/3 AMULET PARTS and CRYSTAL NET (L).

- Place AMULET PARTS, take MECHANISM CONTROL (M).
- Place MECHANISM CONTROL and CRYSTAL NET, take MAGIC ORB (N).
- Use MAGIC ORB (O).

- Defeat the Librarian.
- Shoot your orbs at his orbs.
- Match at least three orbs of the same color to destroy them and reduce the Librarian’s health each time.
- This mini-game is randomly generated.
- Fire balls (P) at the chain to make sets of three or more (Q).
- Clear 18 balls for stage 1, 20 balls for stage 2, and 27 balls for stage 3.
- Walkthrough Bonus Chapter, at the link below.


