
Bridge to Another World 1: Burnt Dreams – Twenty years have passed since the day a thick fog rose over the river and carried away your little brother, leaving you to watch helplessly from the bridge. All this time you’ve been searching for a way to solve his mystery, and now at last the fog has returned, along with your chance to fix the past. You travel to an island where dreams come to life and danger lurks in every corner. An evil countess rules here, who uses the power of art to bring the creatures she creates to life and then mercilessly burns them into reality. It’s up to you to resist her power, find answers, and save your brother before the fog consumes the world. If you can not pass any of the puzzles or do not know where the items are, on our site you can watch the walkthrough of the game Bridge to Another World 1 Remastered: Burnt Dreams, and reveal the secrets hidden behind the thick veil of fog.
Bridge to Another World 1: Burnt Dreams – Walkthrough
Here you can see the full walkthrough of Bridge to Another World 1 Remastered: Burnt Dreams, including all chapters, including bonus chapter, in pictures.

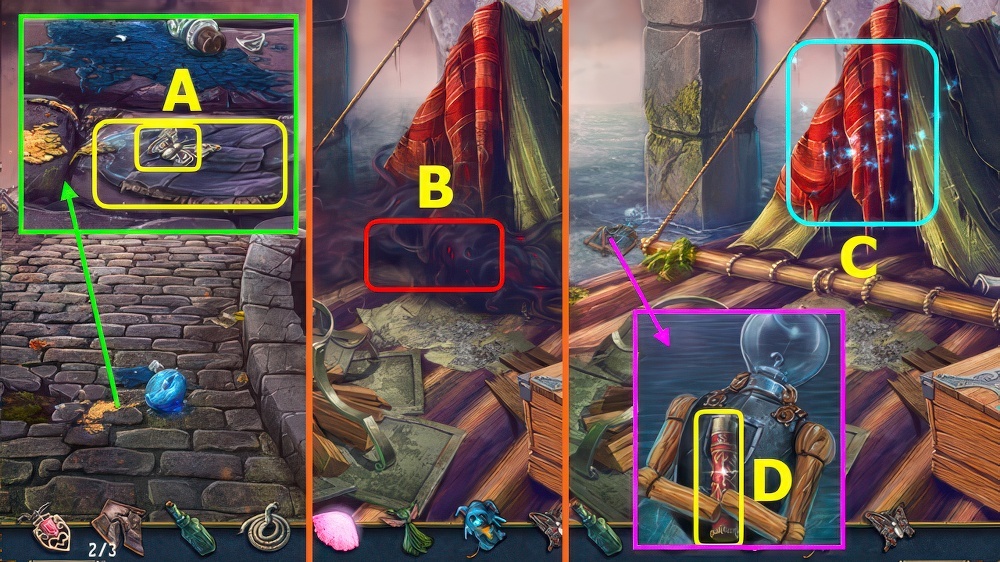
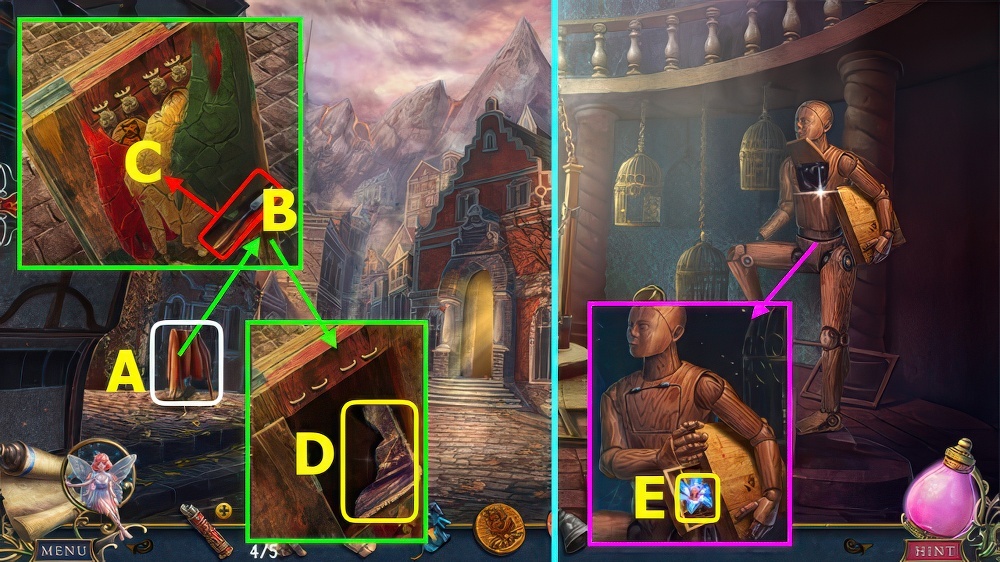
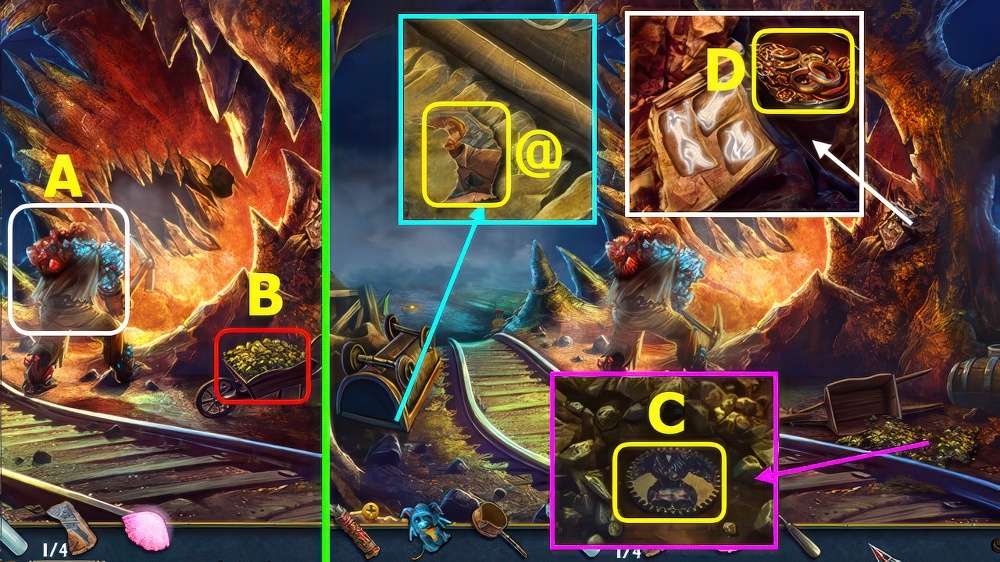
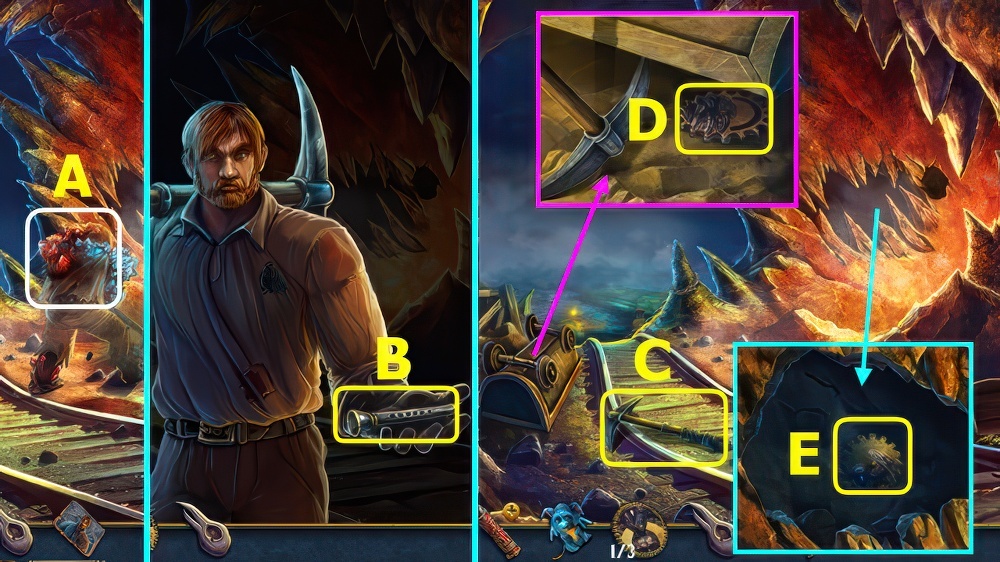
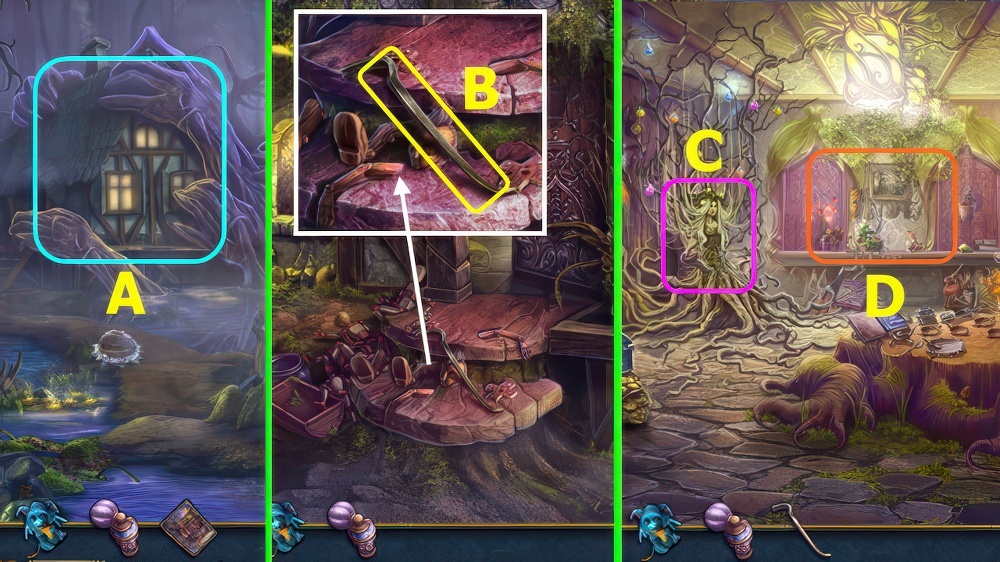
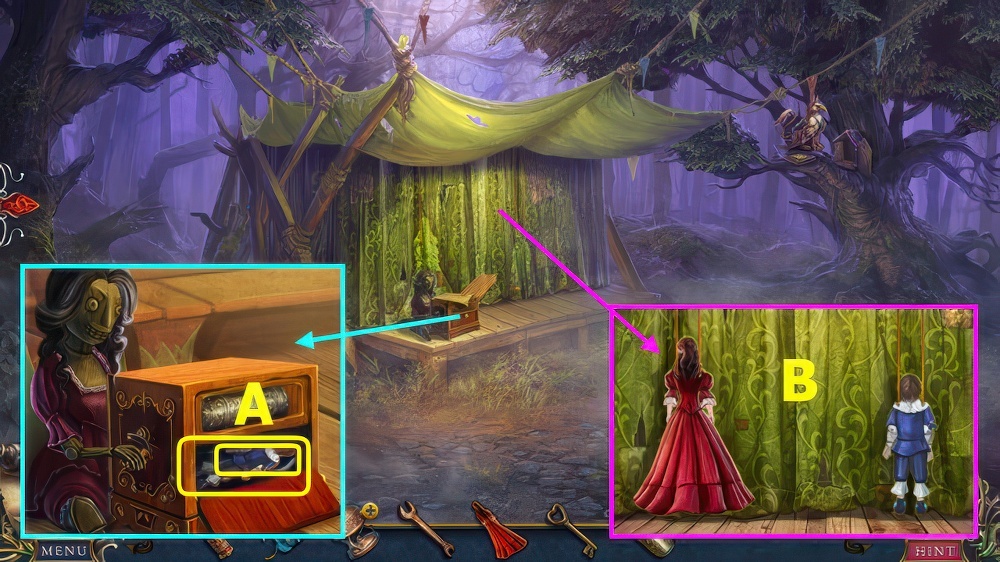
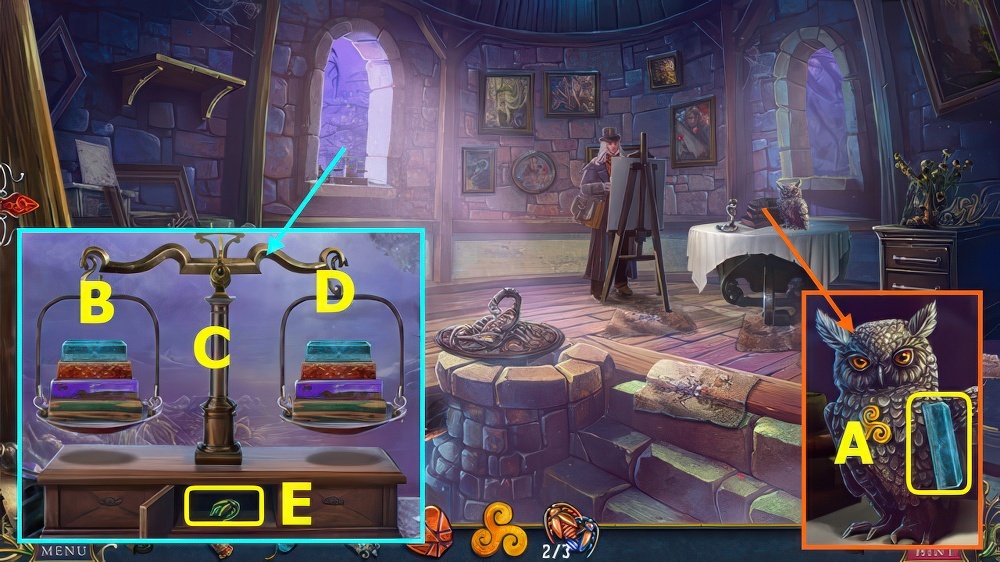
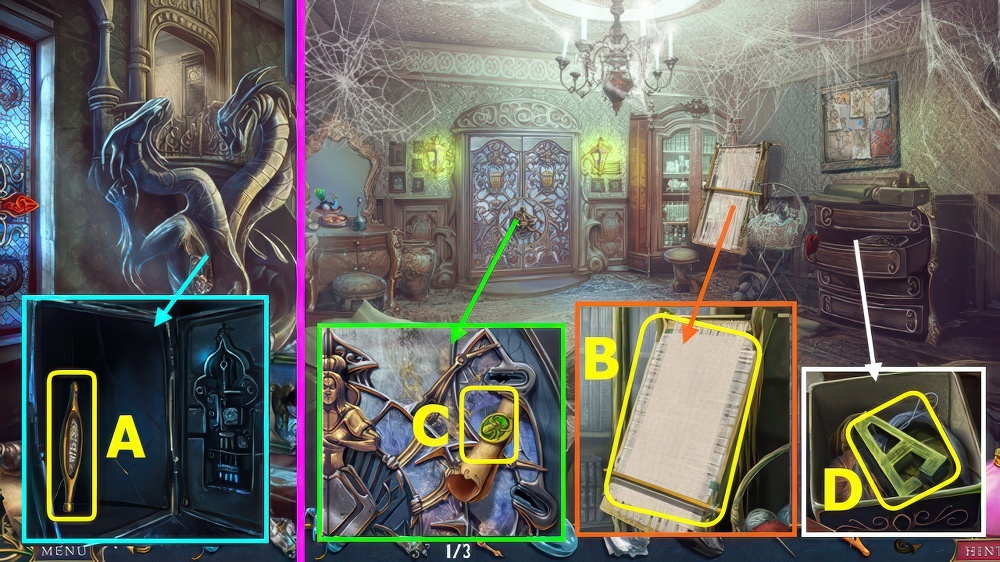
- Take SYMBOL (A).
- Place SYMBOL, read newspaper, take FLINT (B).
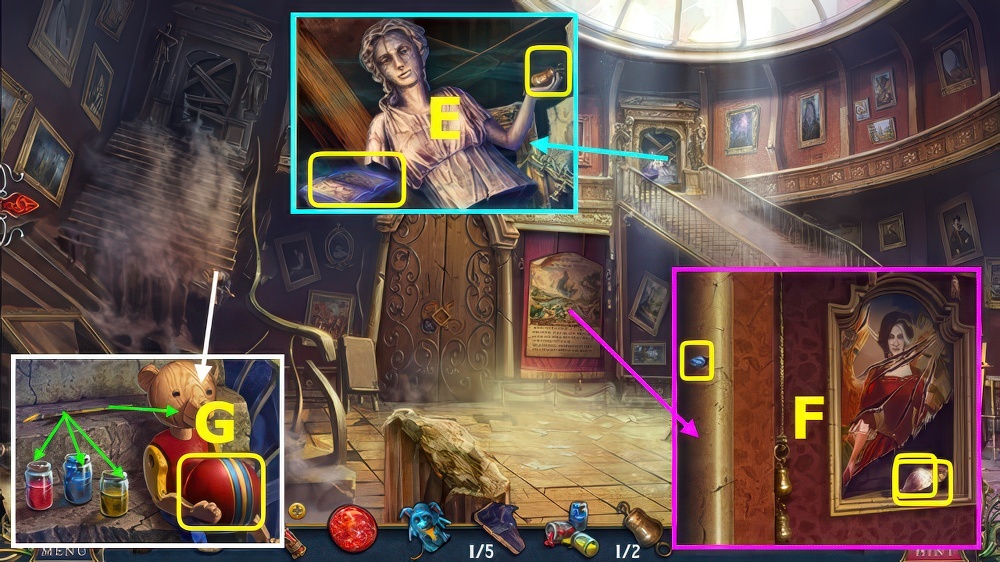
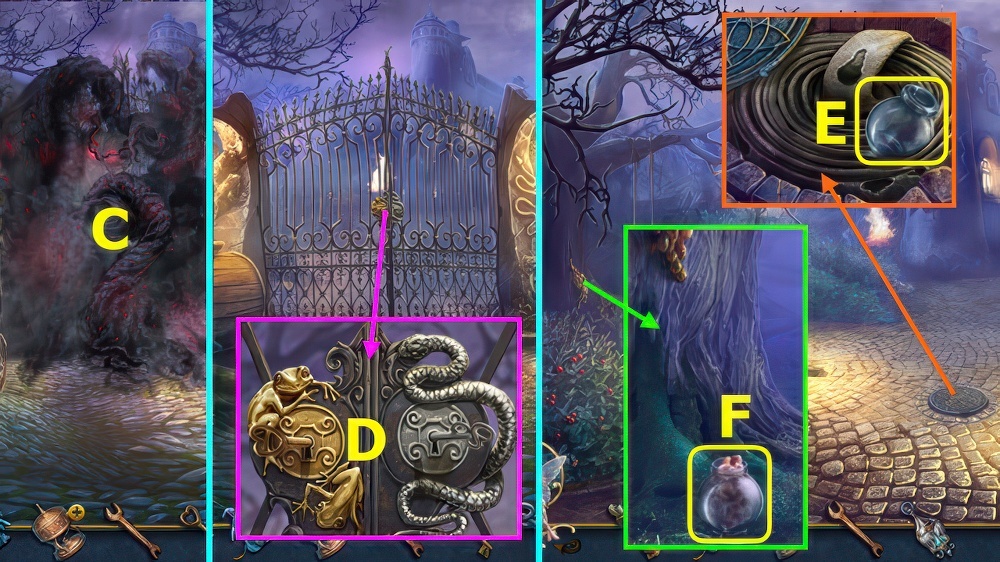
- Take BOWSTRING (C).
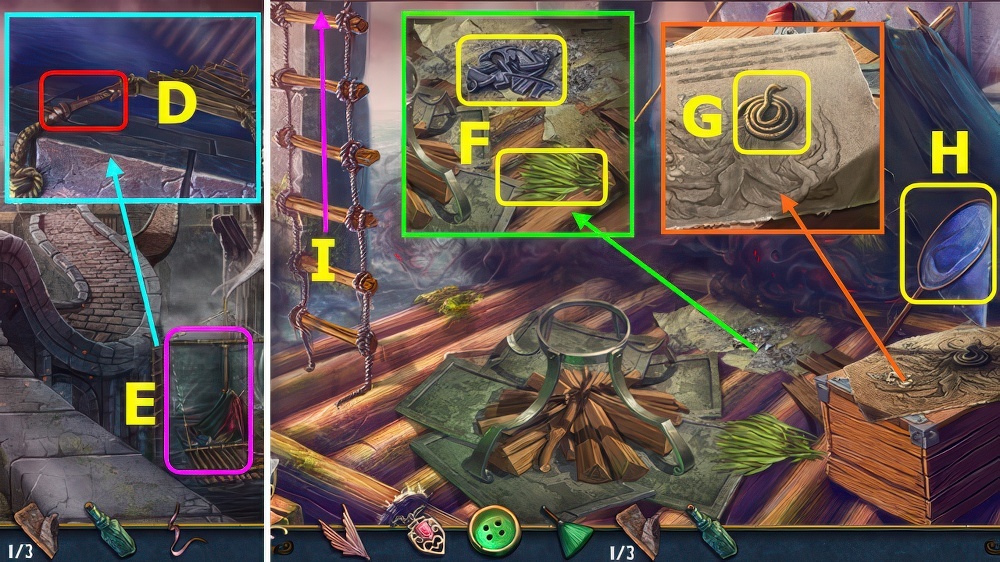
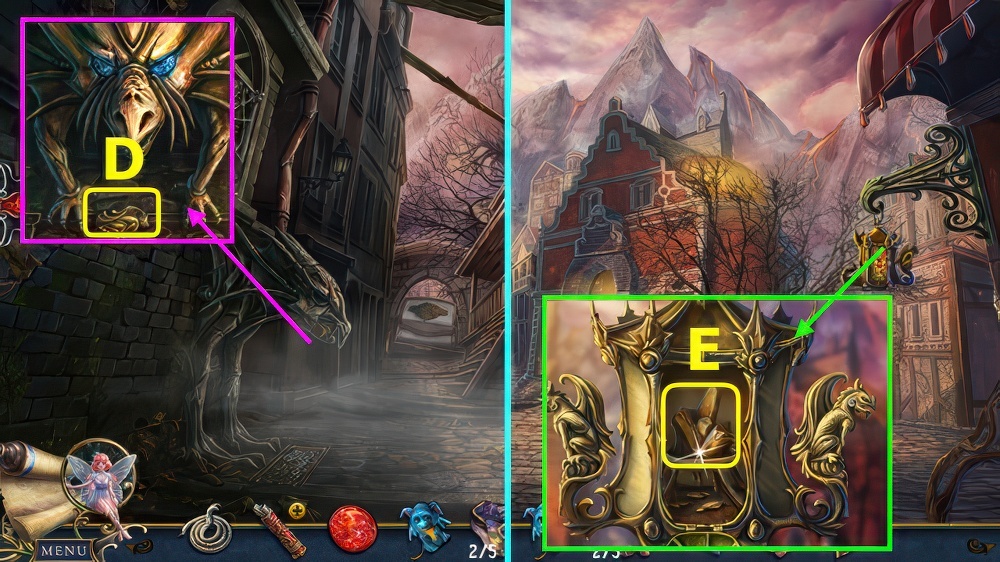
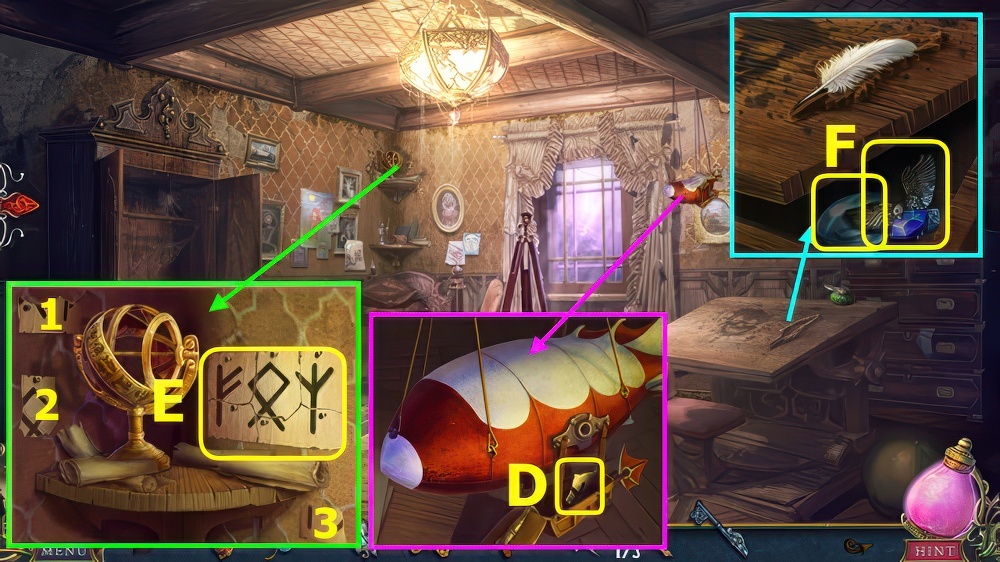
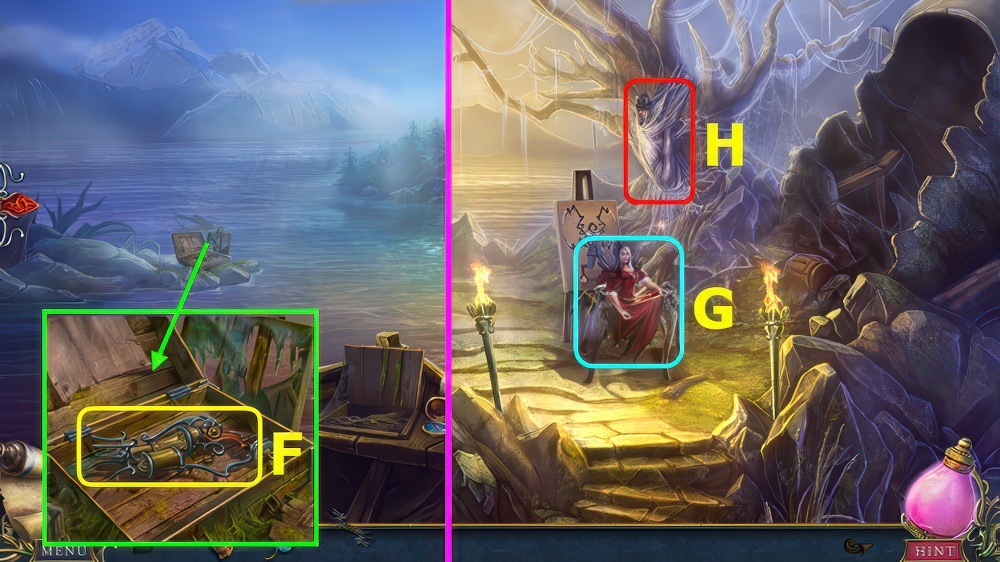
- Take PICTURE PART, move crossbow arms, take UNLOADED CROSSBOW and BLUE EMBLEM (D).
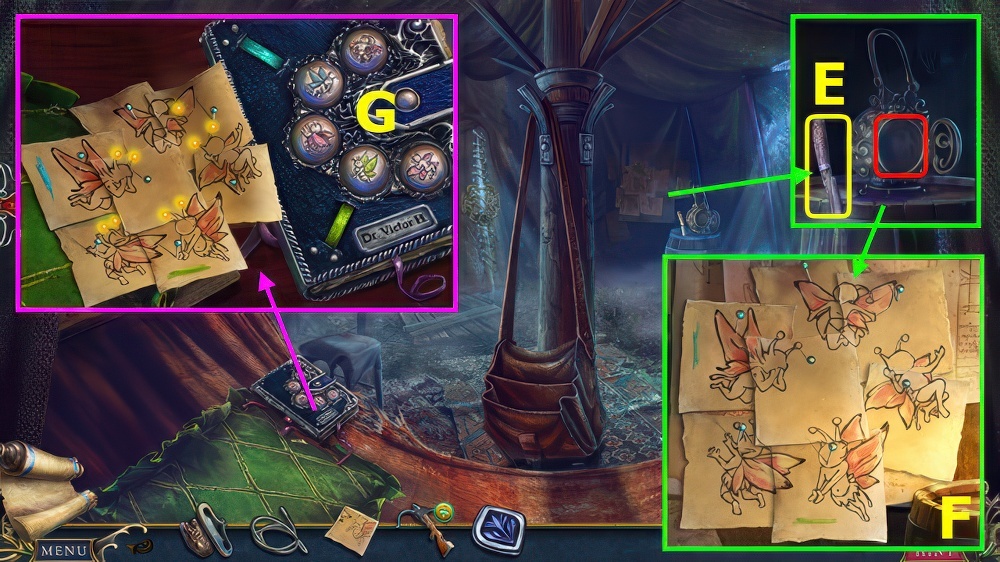
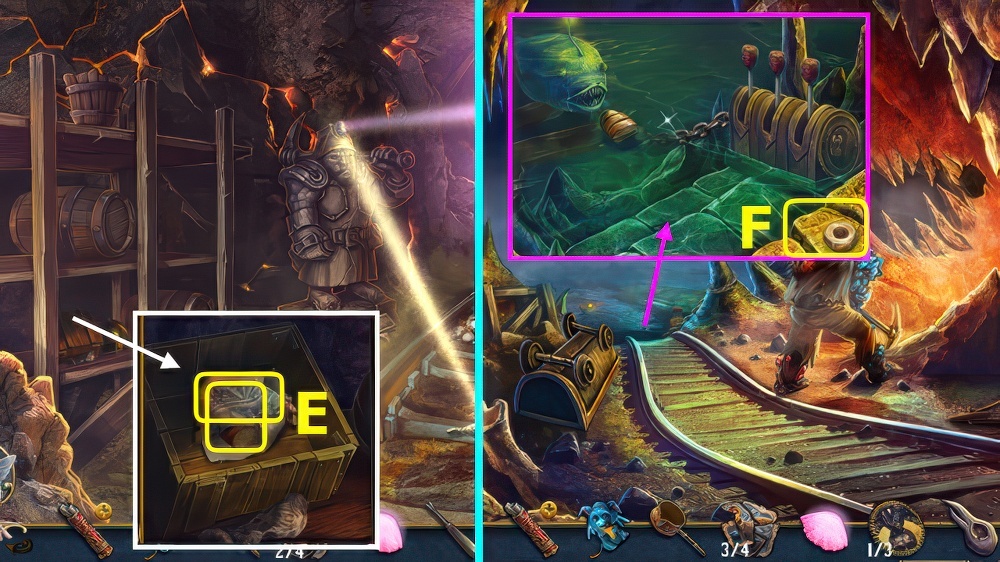
- Take KNIFE, use FLINT (E).
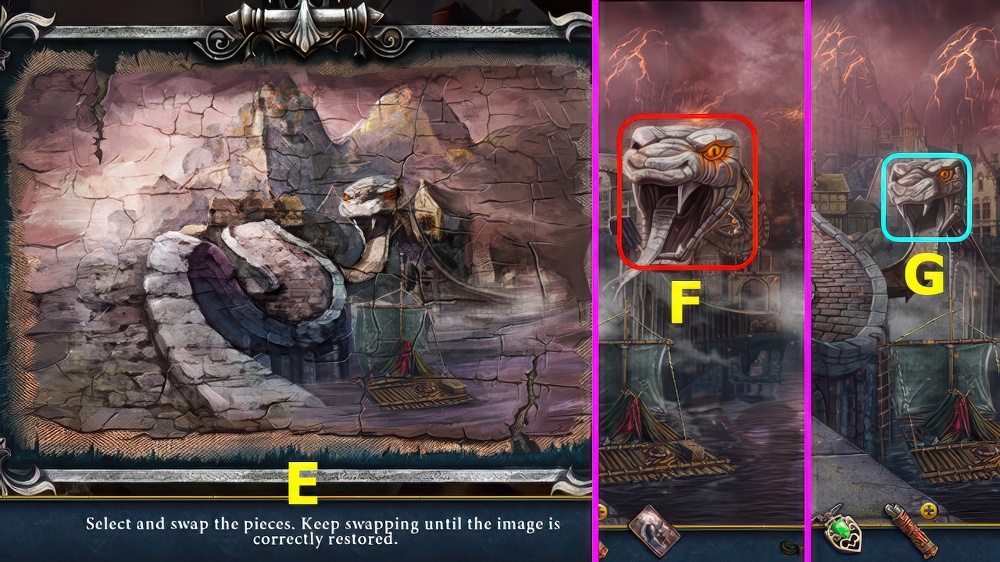
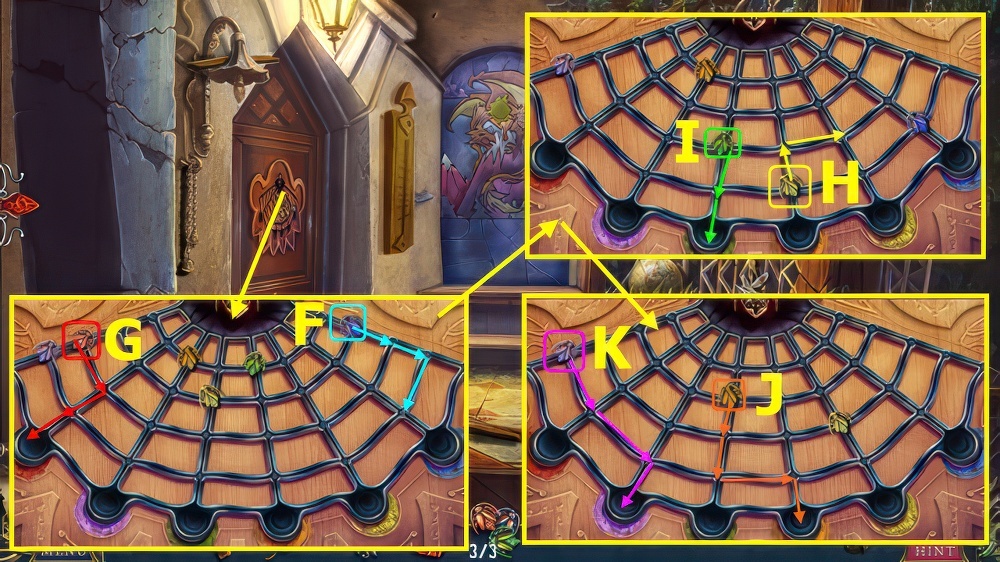
- Place PICTURE PART, solution (F), take FAIRY PICTURES.
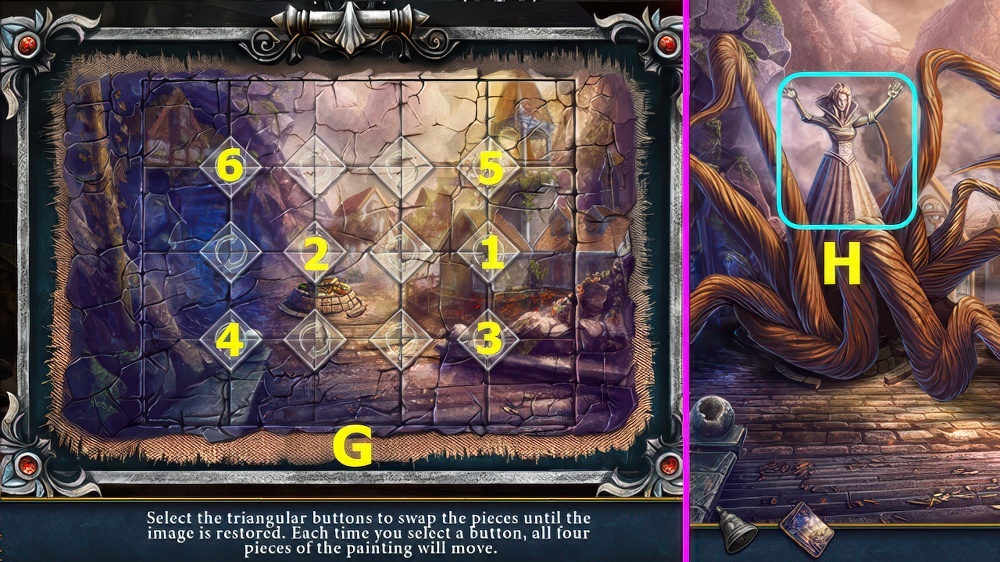
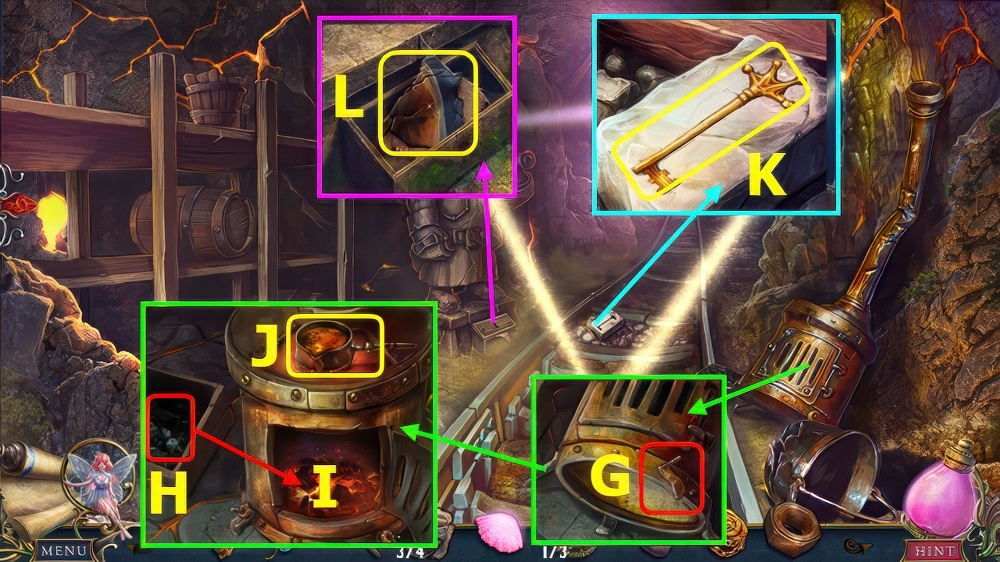
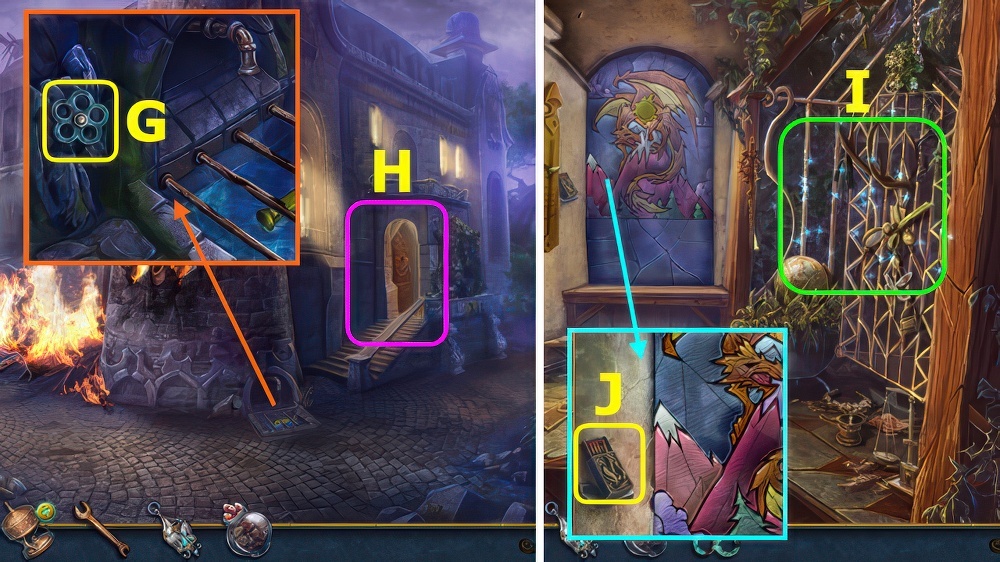
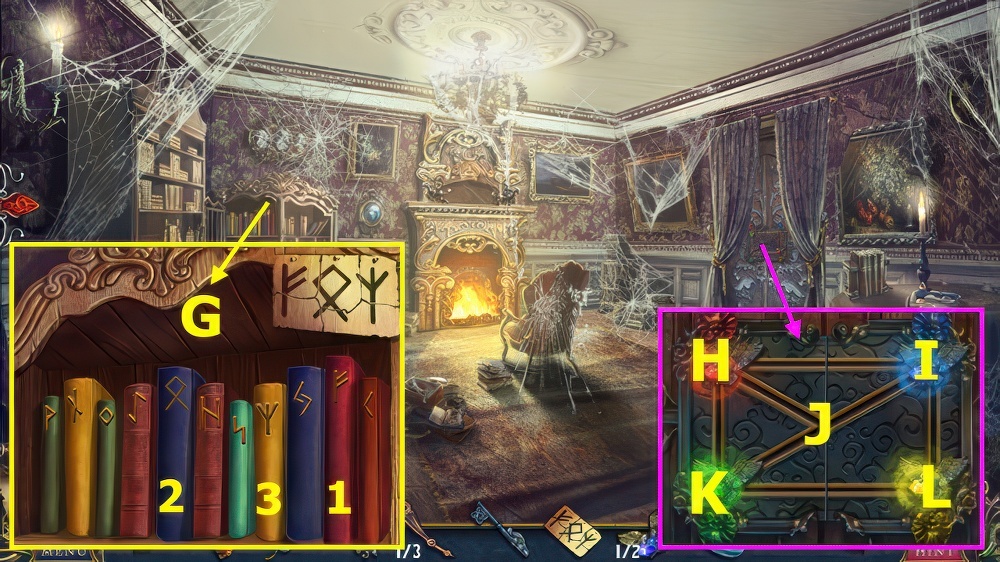
- Use FAIRY PICTURES, solution (G), read journal, take FAIRY WINGS and RED EMBLEM.
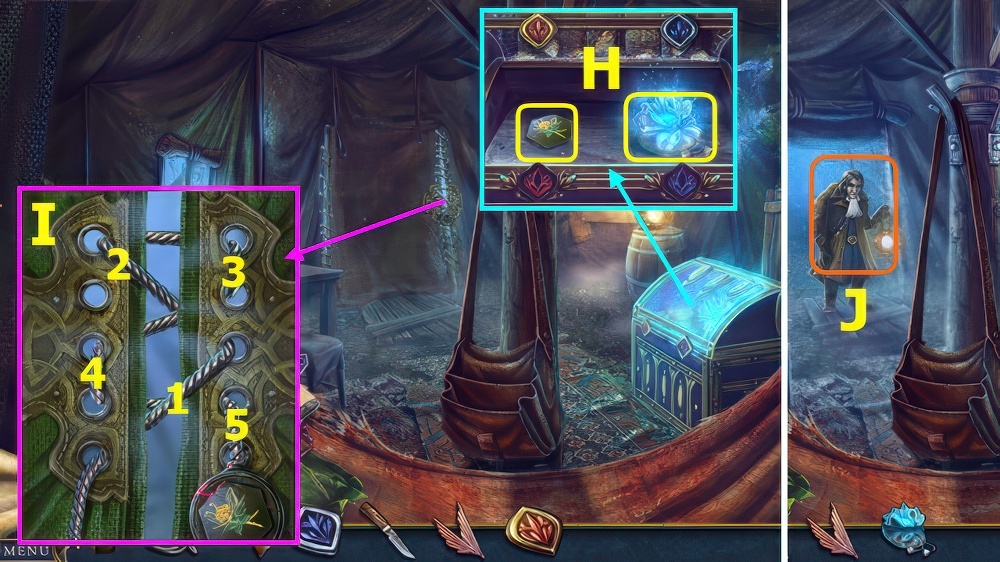
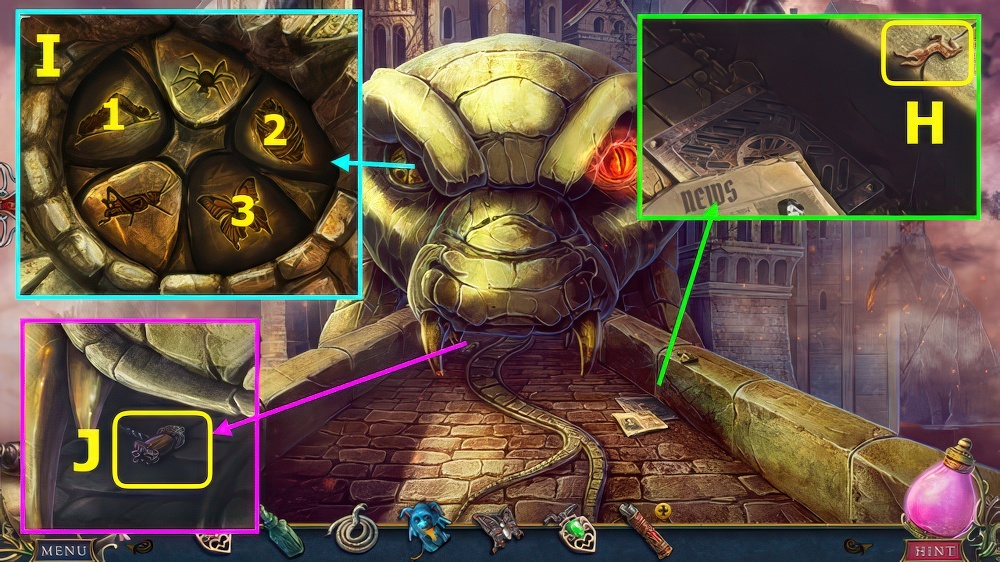
- Place RED EMBLEM and BLUE EMBLEM, read note, take TENT KEY and FAIRY BAIT (H).
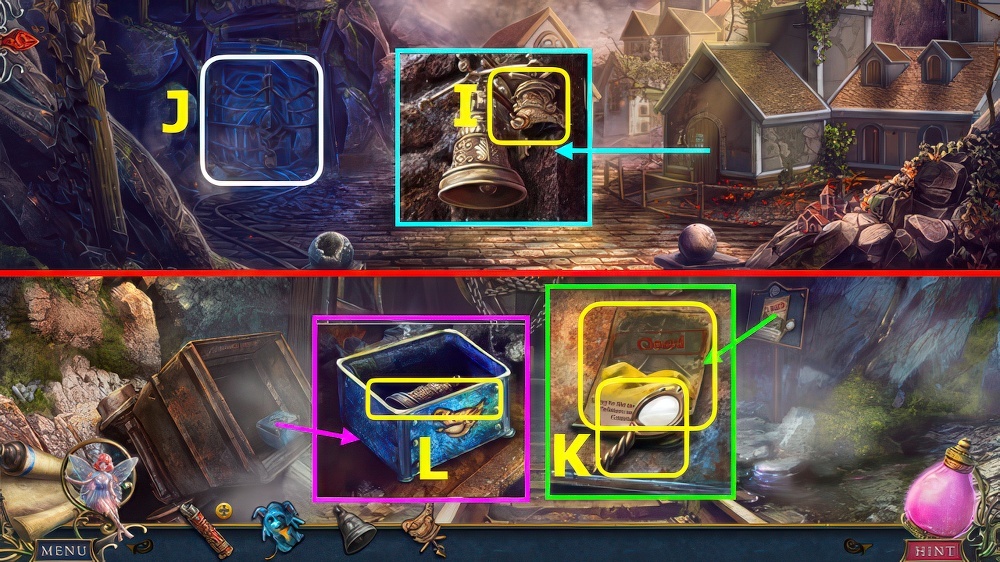
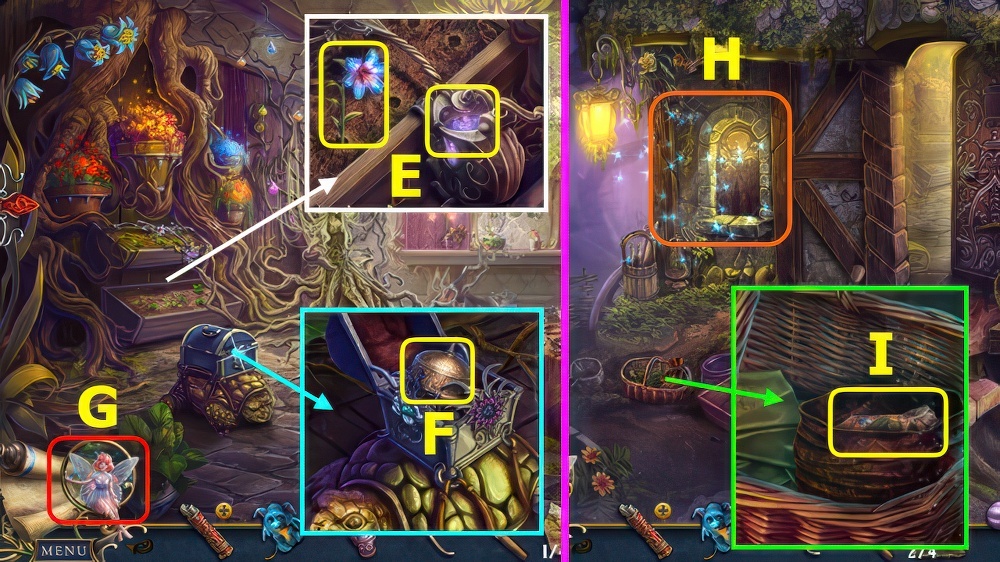
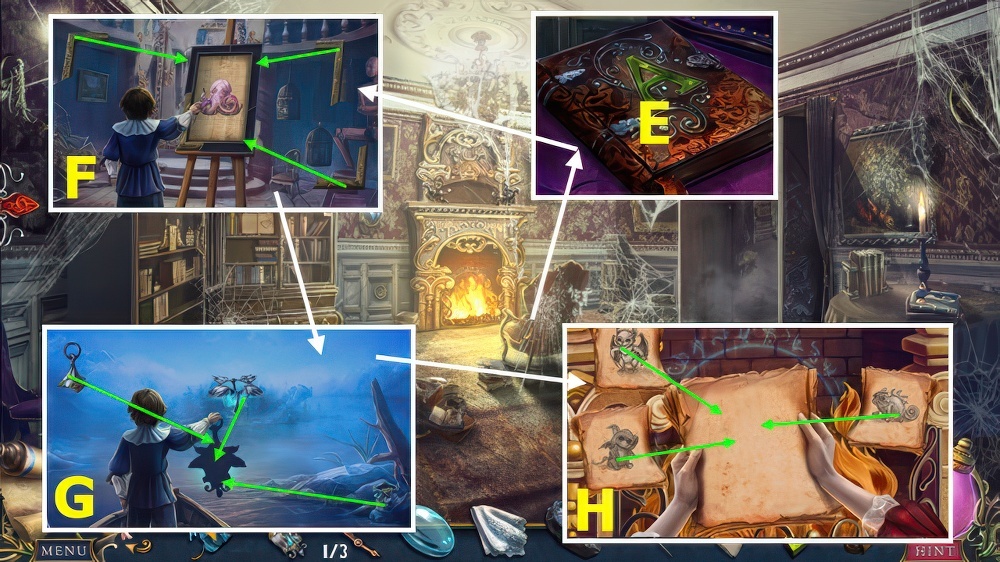
- Place TENT KEY, select 1-5 (I).
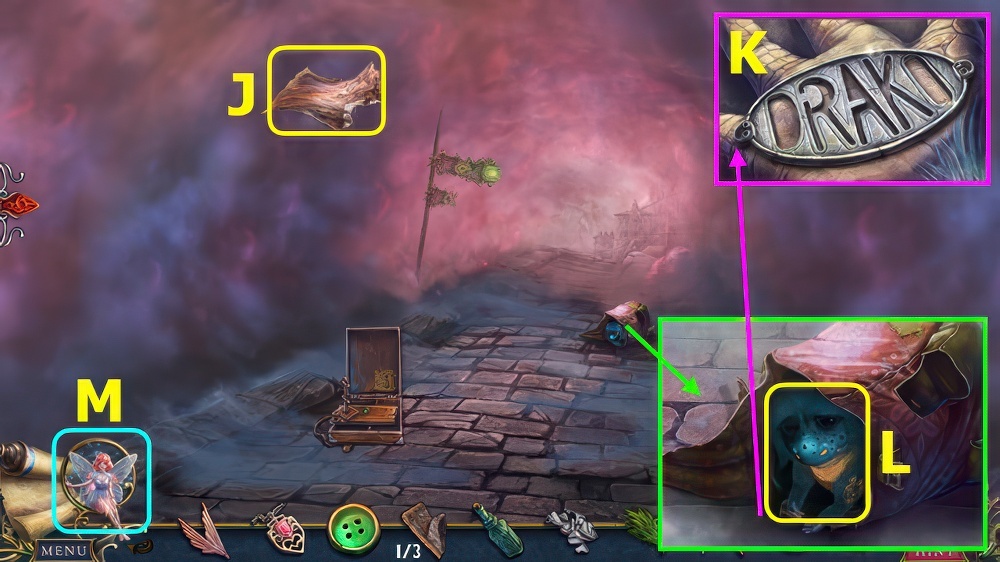
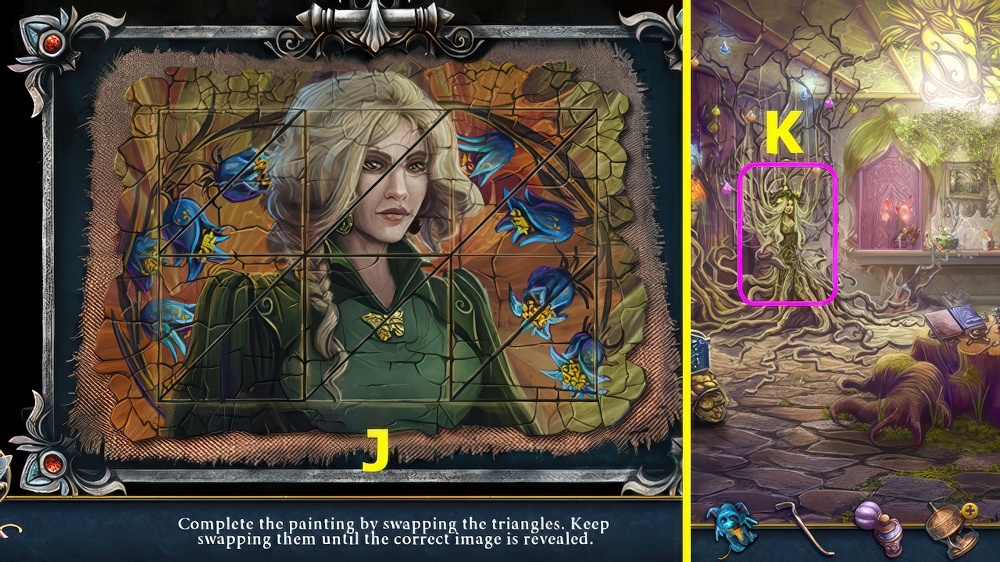
- Talk (J).
- Go forward.
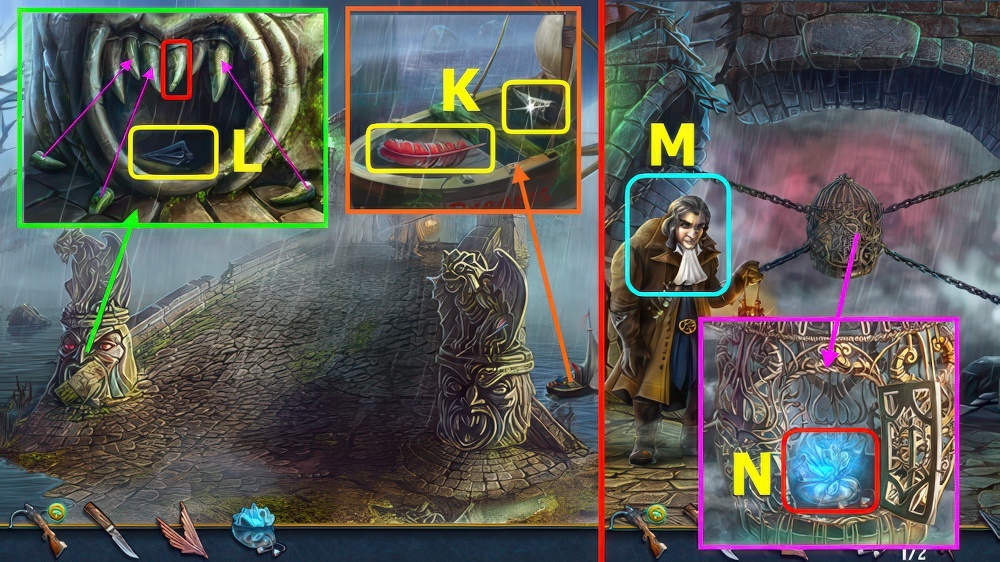
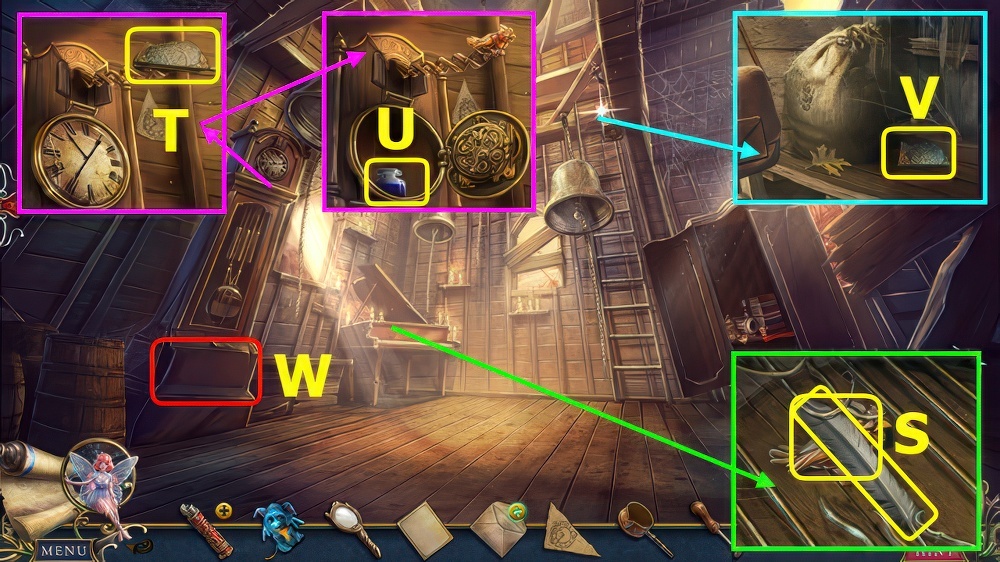
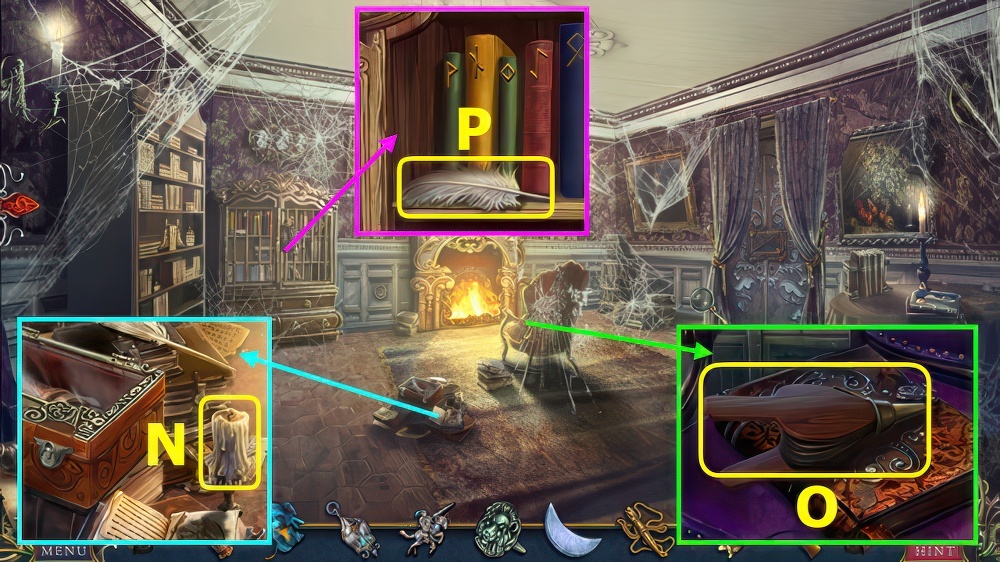
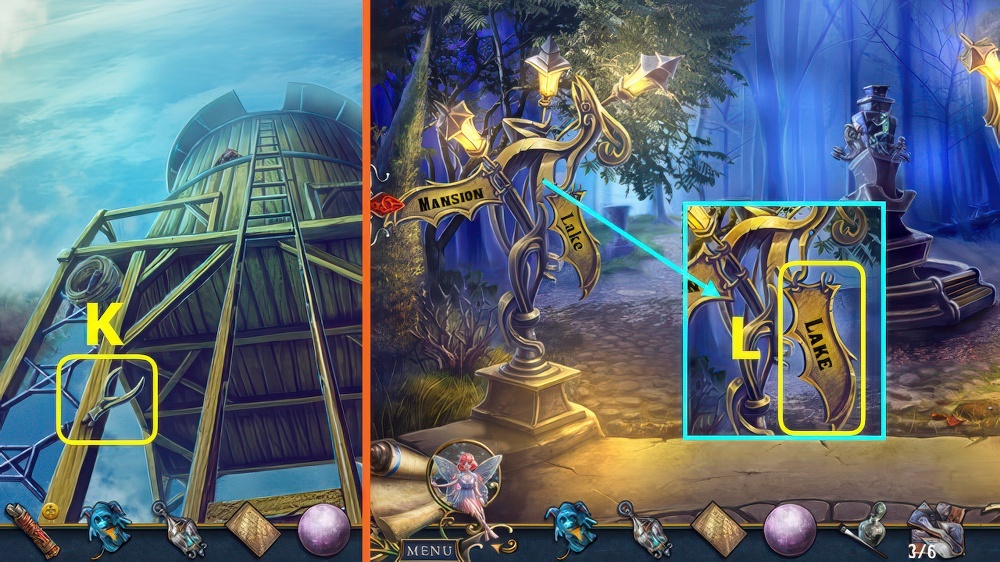
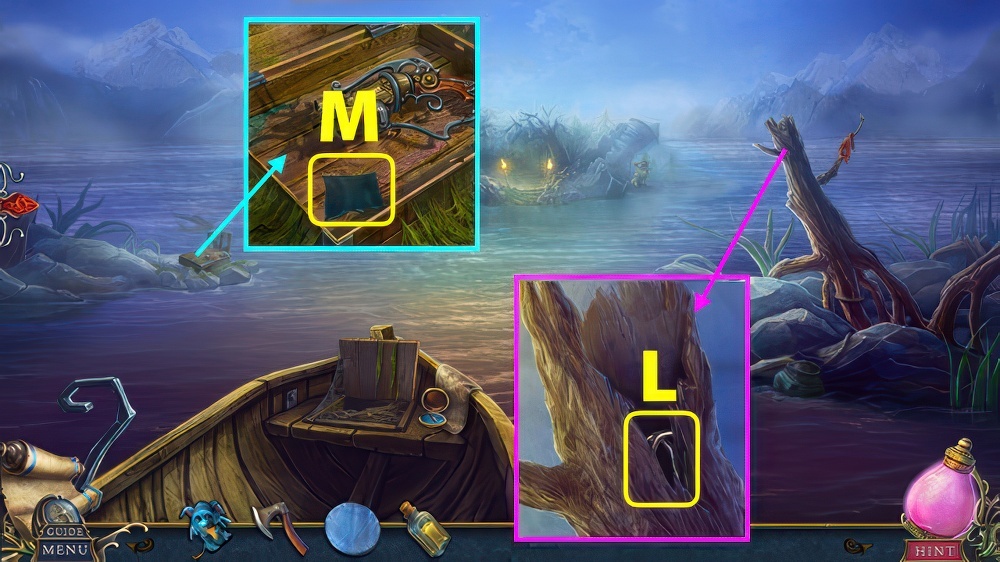
- Take 1/2 FEATHER and FANG (K).
- Read note, remove debris, restore fangs, place FANG, take ARROWHEAD (L).
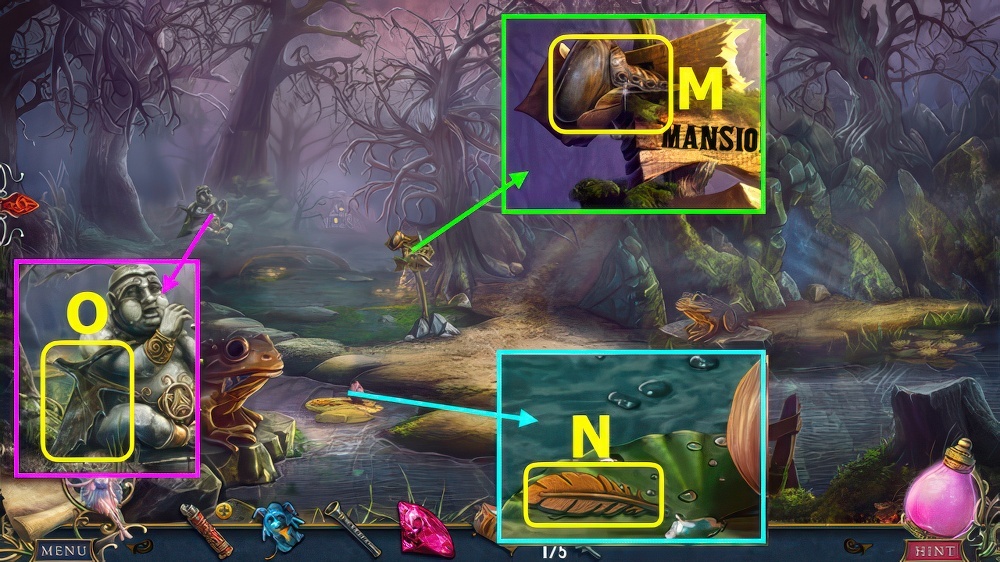
- Go forward.
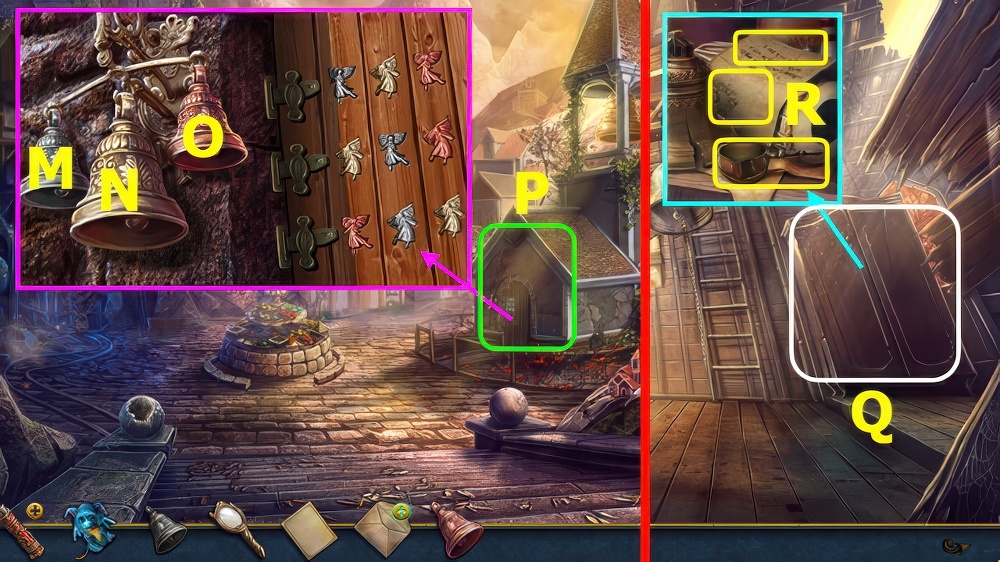
- Talk (M).
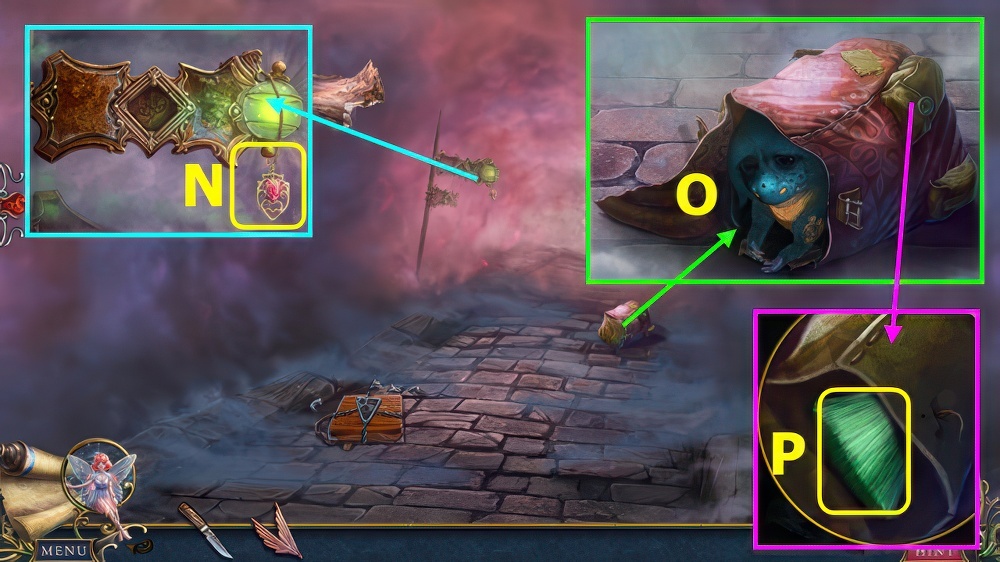
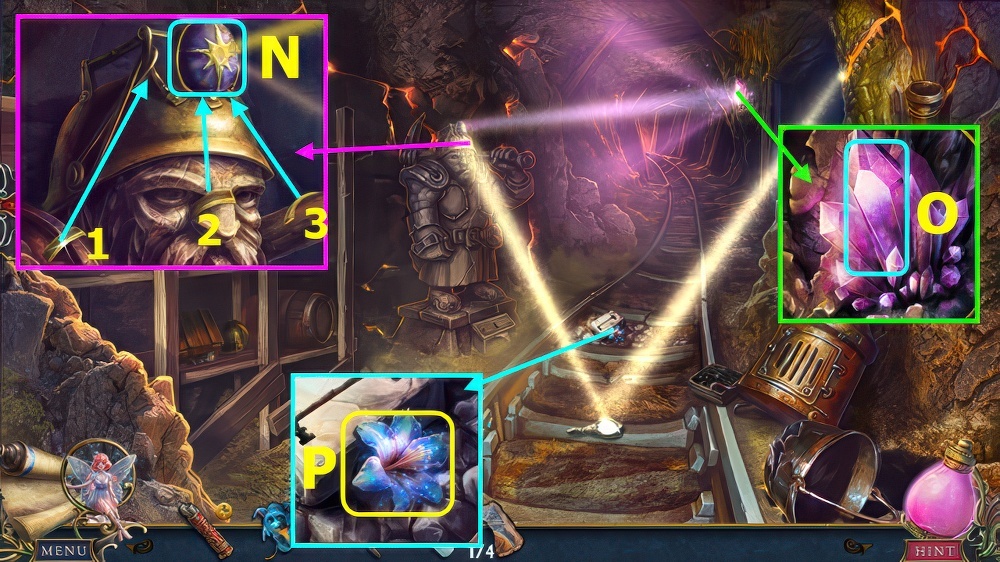
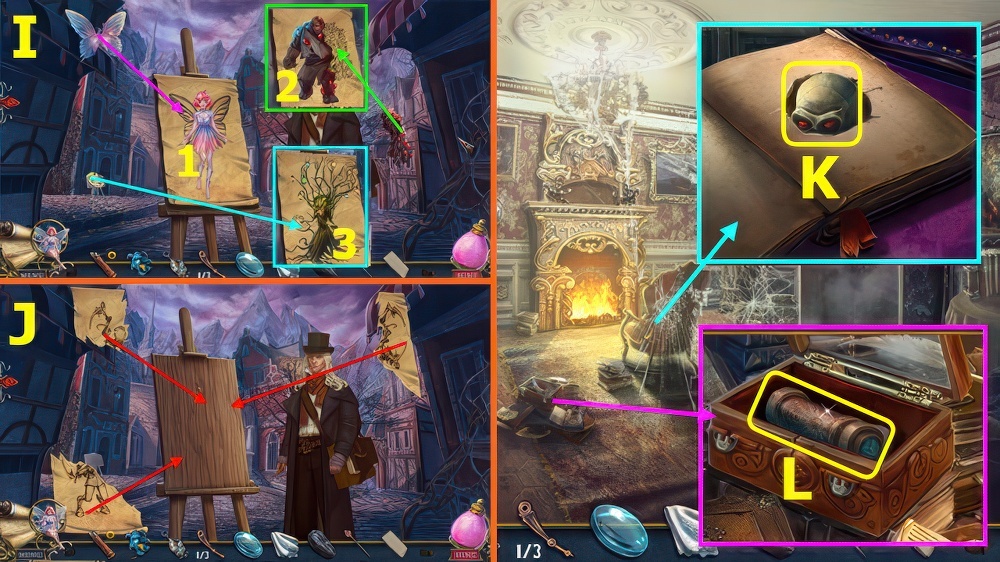
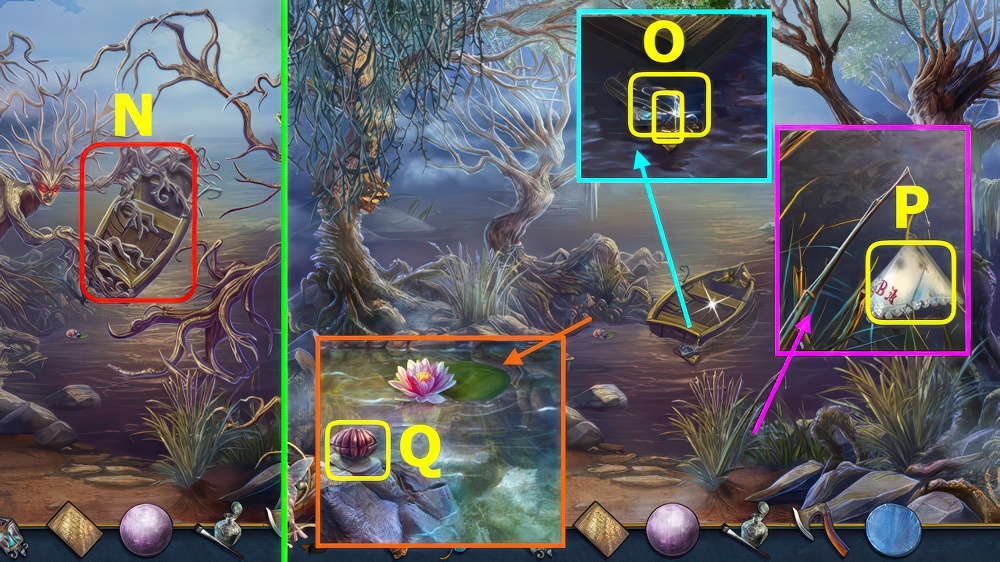
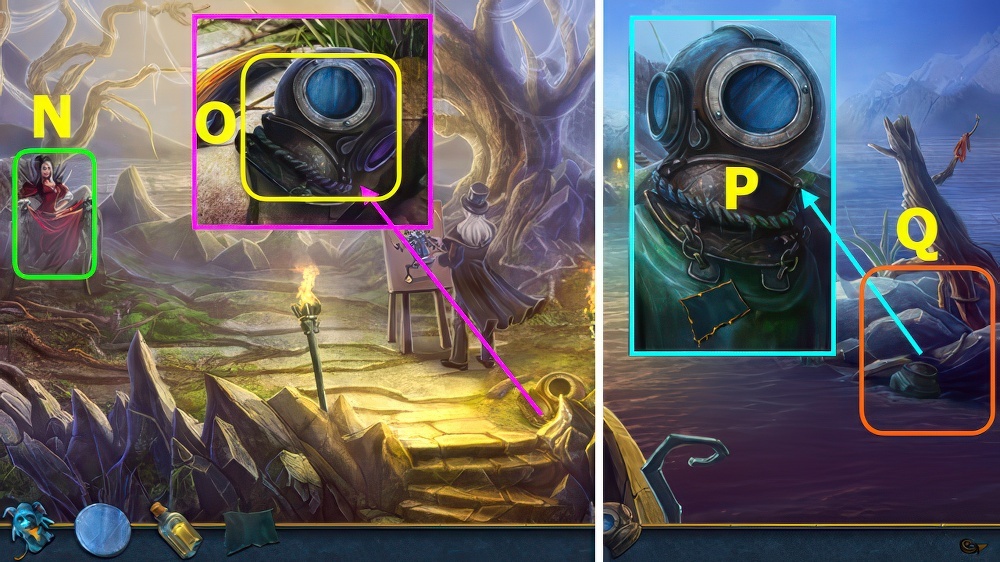
- Open cage, use FAIRY BAIT (N).

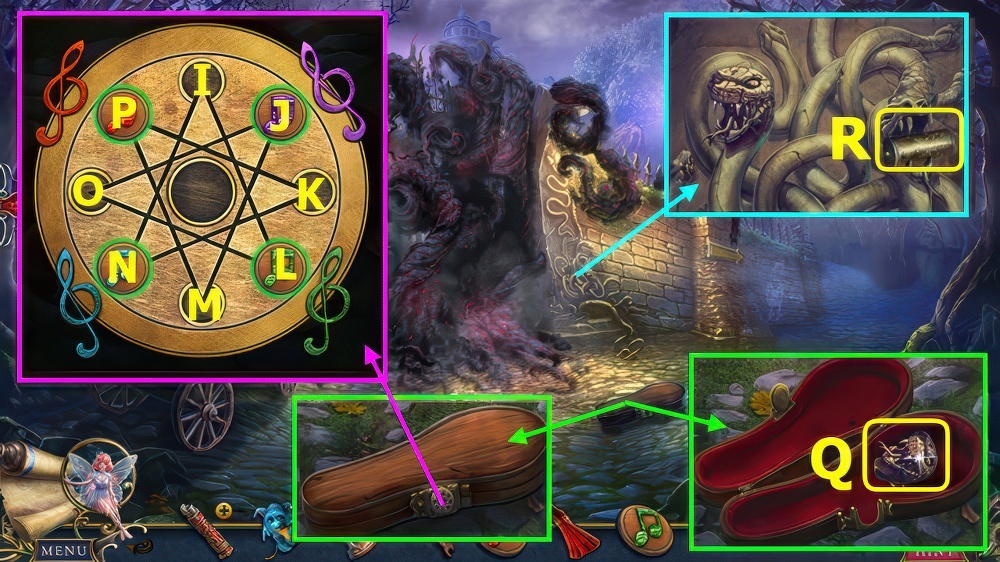
- Take CHAIN (O).
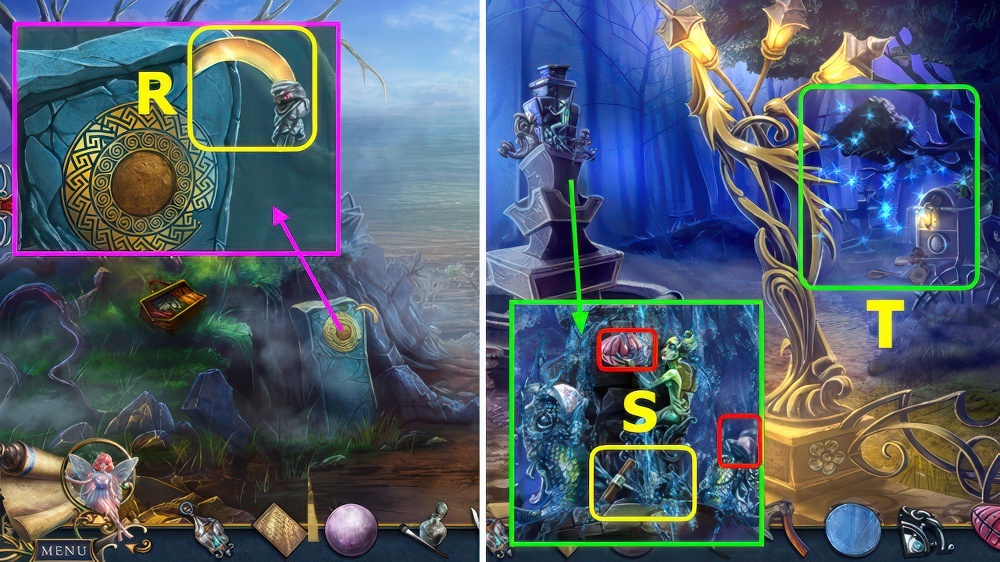
- Use CHAIN (P).
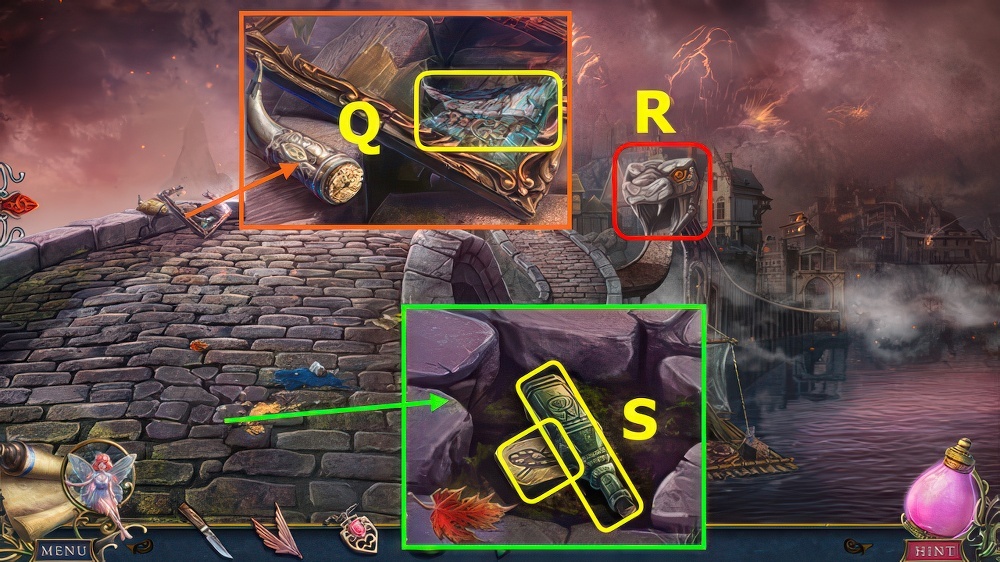
- Move Q-R, take HAMMER and BOARDS.
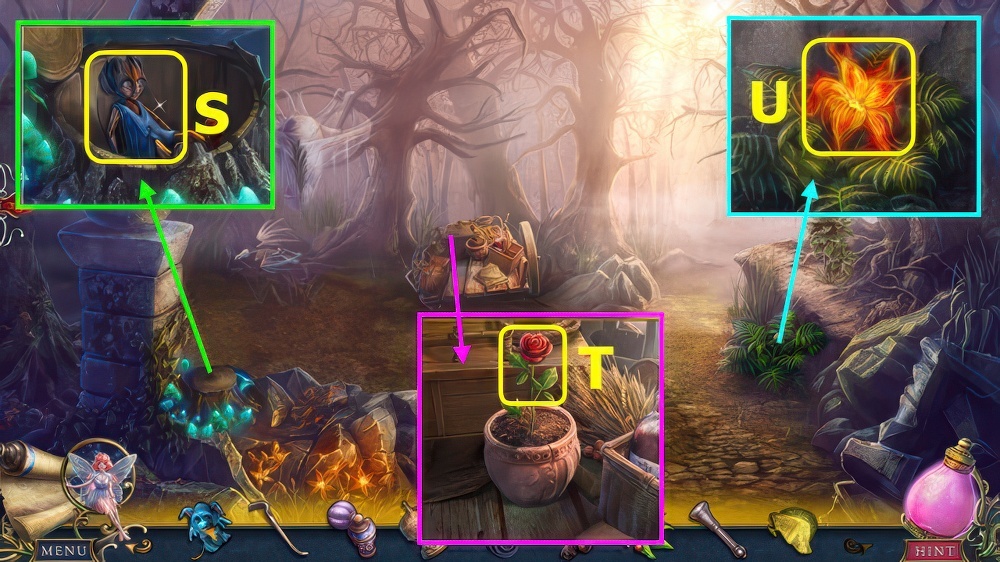
- Use HAMMER (S).
- Walk down.
- Place BOARDS (T).
- Walk left.

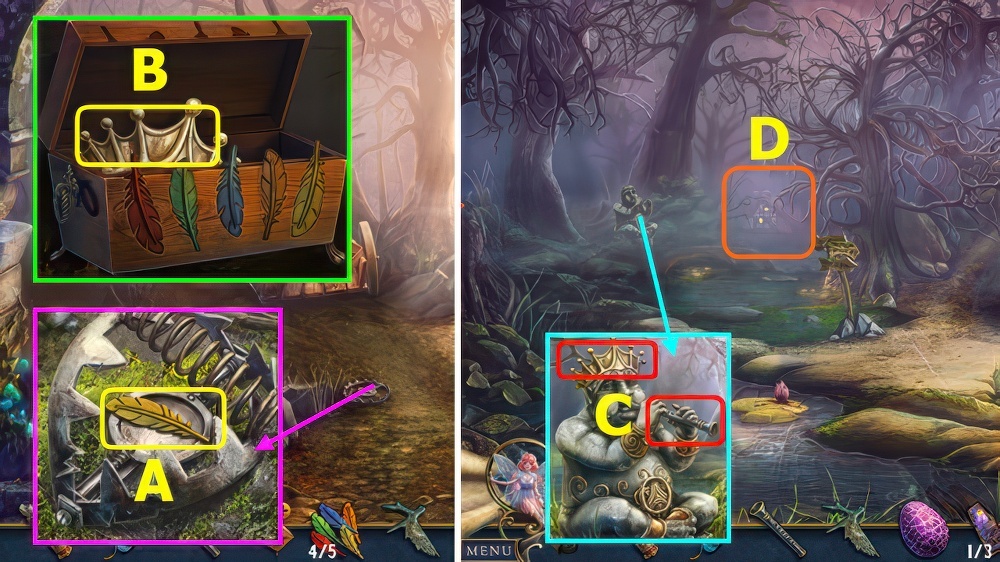
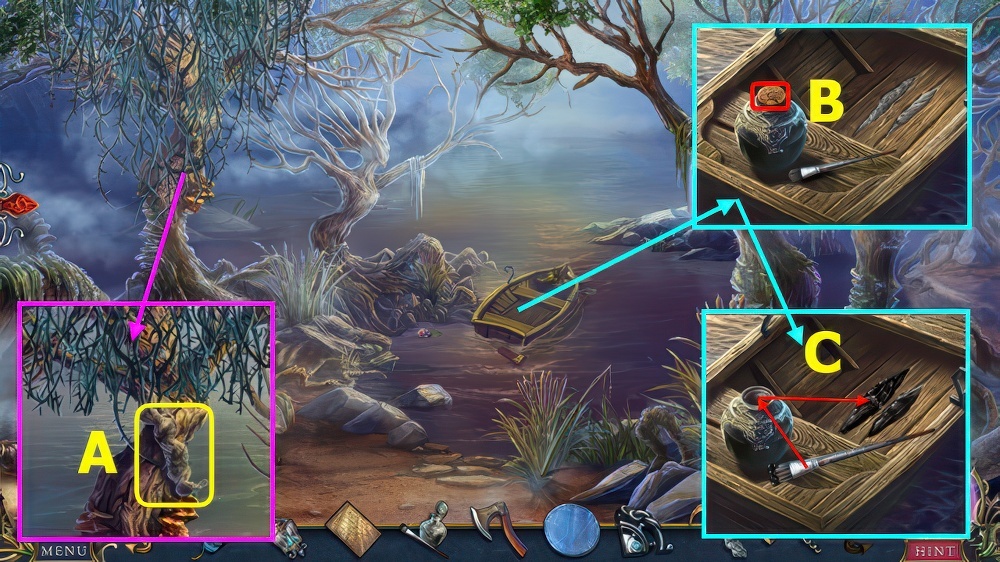
- Select frog, take 2/2 FEATHERS (A).
- Use KNIFE 2x, read note, take COIL (B).
- Walk down.
- Place ARROWHEAD, select, then place FEATHERS, take ARROW (C).
- BOWSTRING, COIL, and ARROW on UNLOADED CROSSBOW, move items to crossbow, take CROSSBOW.
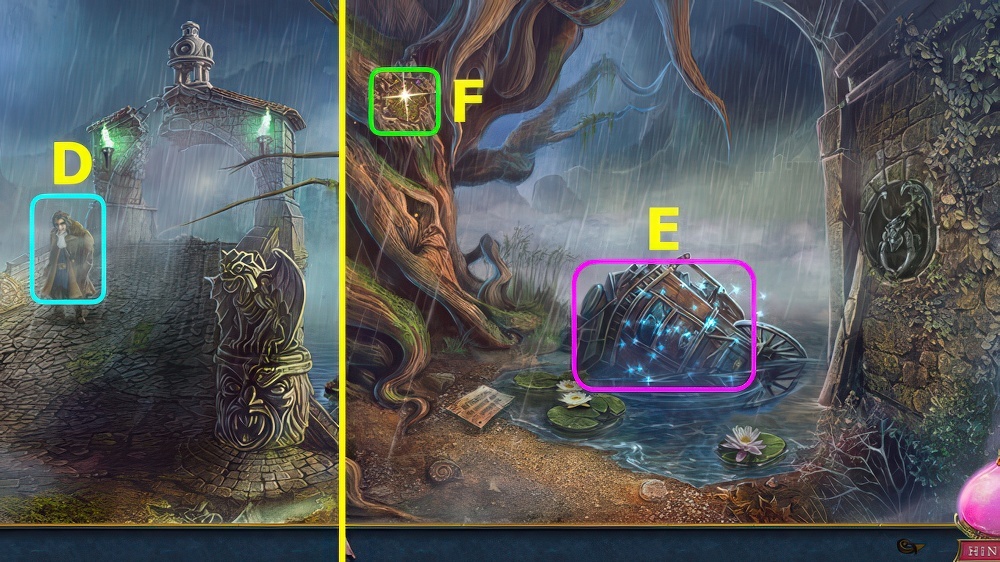
- Talk (D).
- Go left.
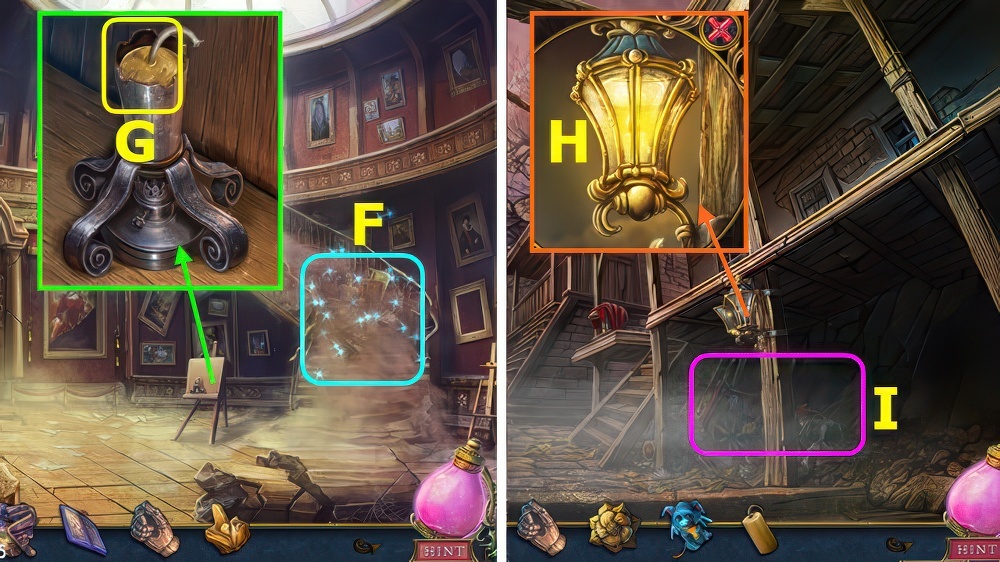
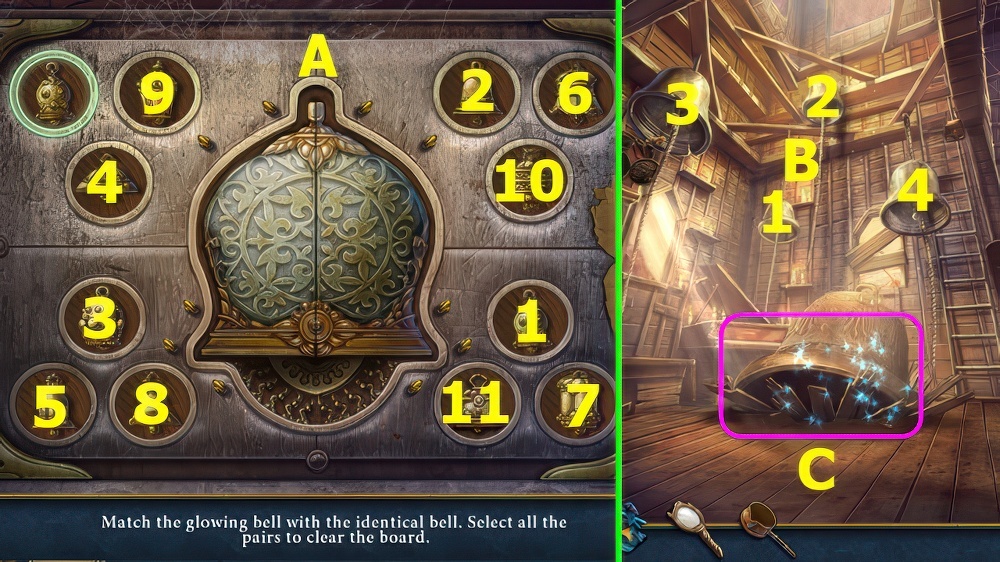
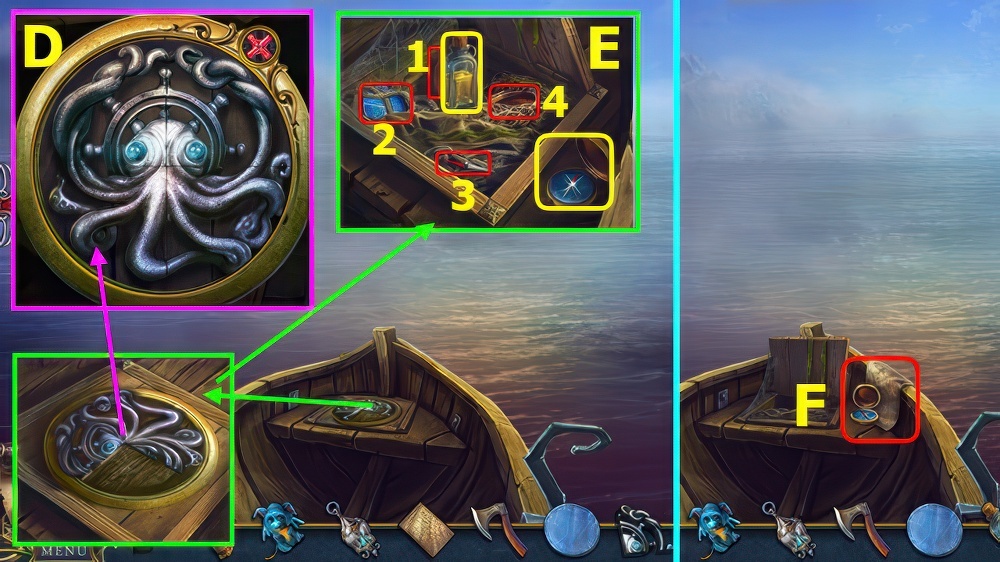
- Use CROSSBOW, play puzzle, earn FIREFLY (E).
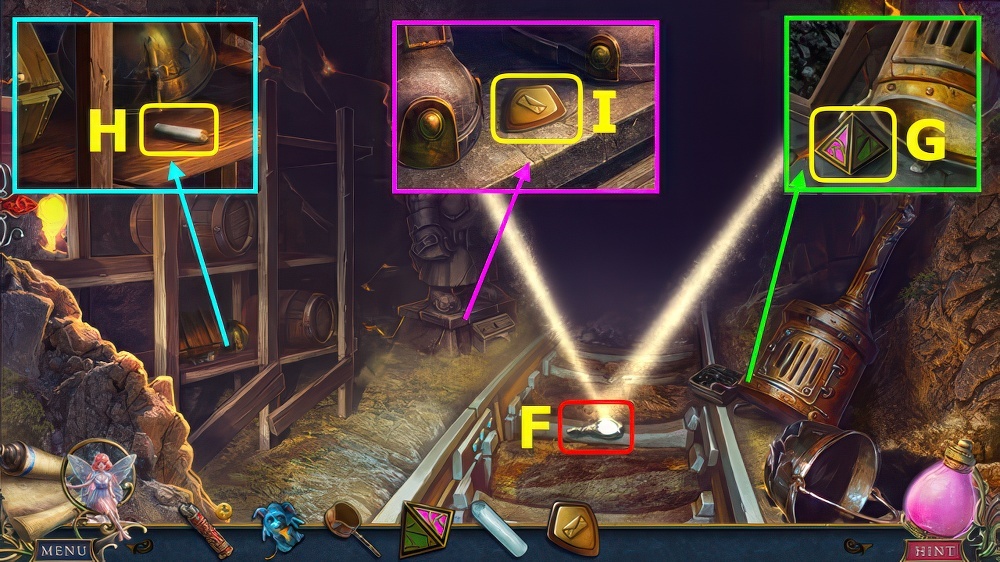
- Select (F).

- Place FIREFLY (G).
- Solution (H), take JAR.
- Walk down, forward.

- Use JAR (I), earn JAR WITH MIST.
- Walk down.
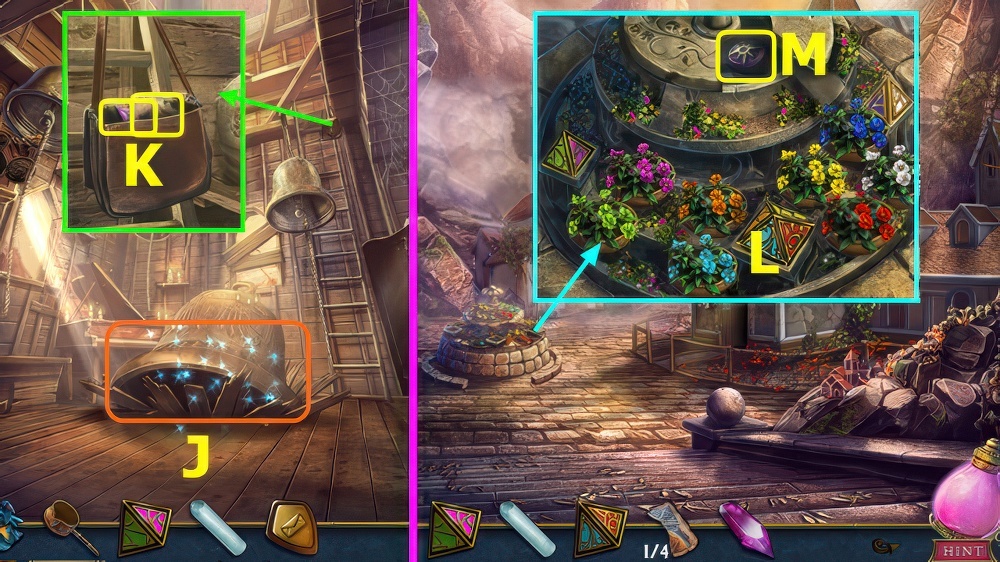
- Open cage and use JAR WITH MIST (J).
- Take DREAM STUFF (K).
- PIXIE is now on the menu bar (L).
- Go forward.
- Use DREAM STUFF (M).
- Go forward.
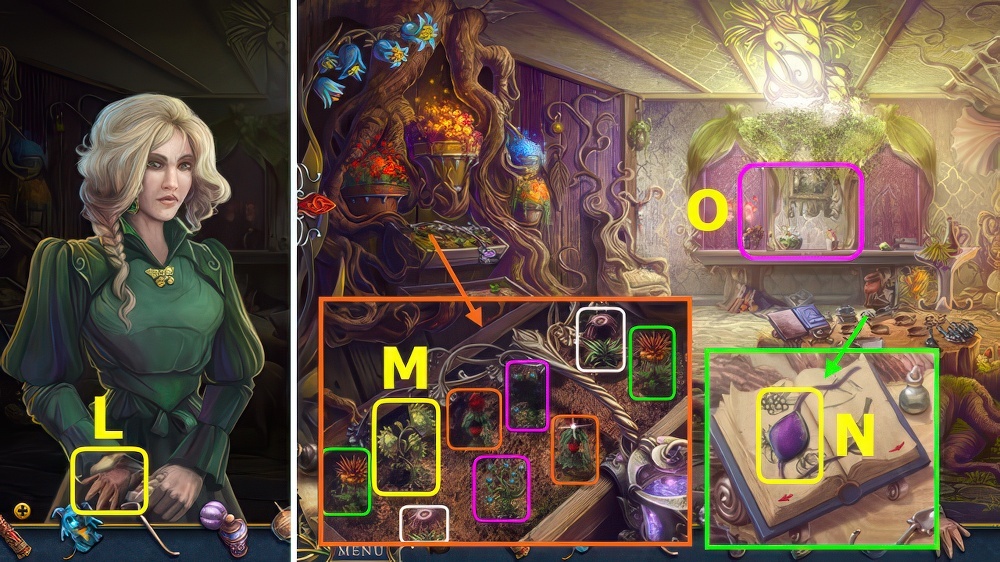
- Take RED MEDALLION (N).
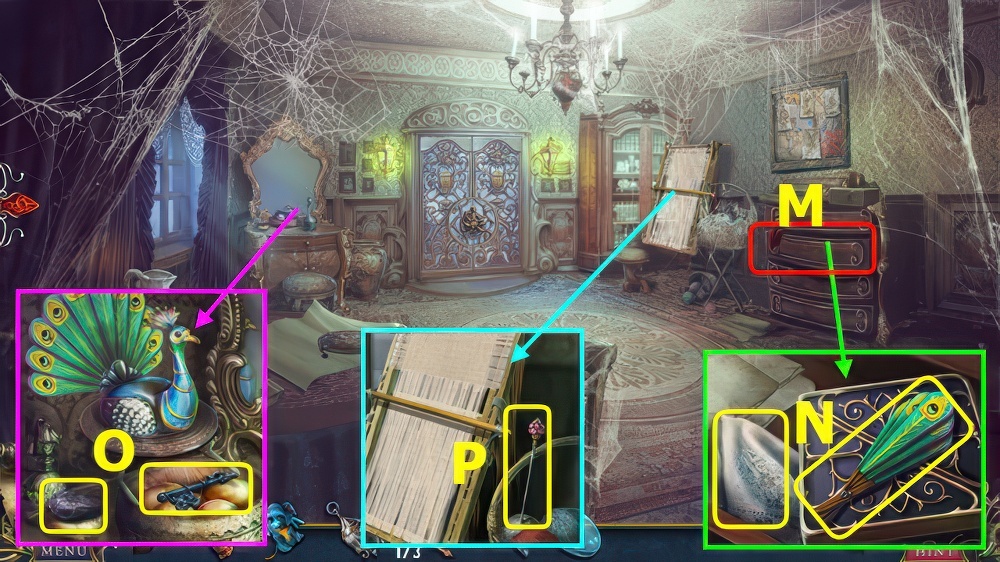
- Open bag (O).
- Take BUTTON, open pocket, take BRUSH (P).
- Go forward.
- Read note, use KNIFE, earn 1/3 PIECE OF PICTURE (Q).
- Select (R).
- Move bricks, take SOLVENT and LOCK ELEMENT (S).
- Walk down.

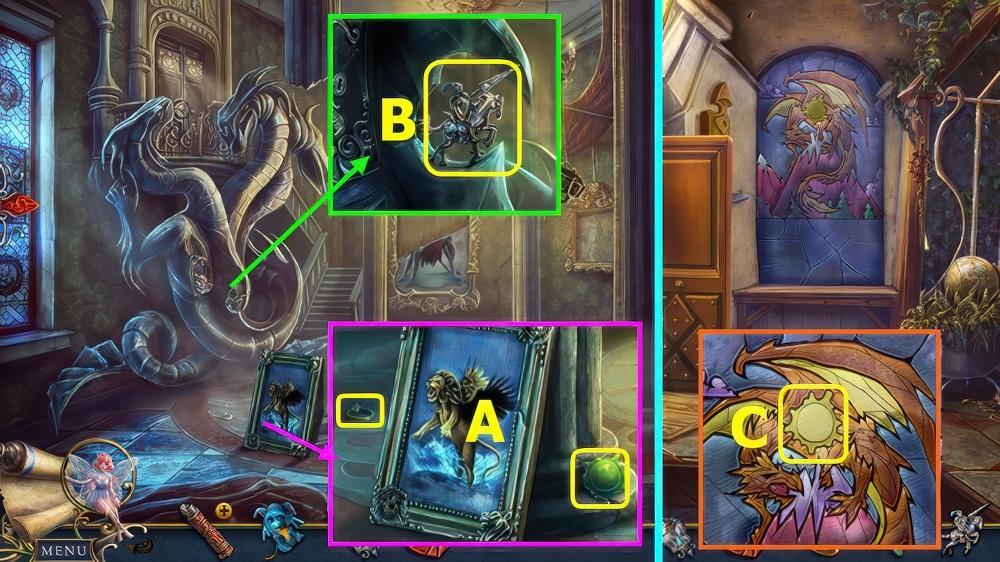
- Place LOCK ELEMENT, take MASK PART (A).
- Restore pieces, add MASK PART (B).
- Take STRAP (C).
- Go forward.
- Use STRAP (D).
- Go right (E).
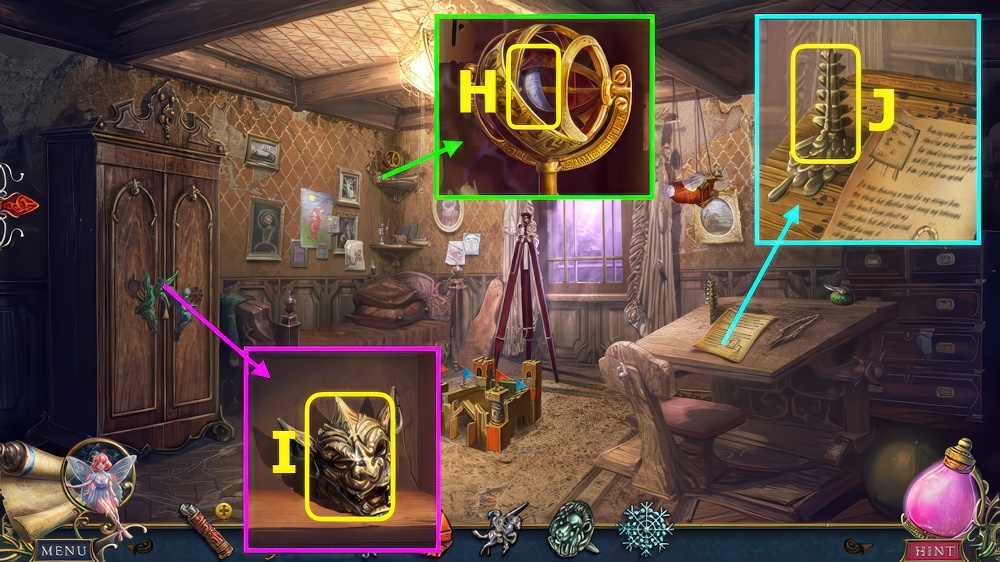
- Use BRUSH, take KEYCHAIN PIECES and GRASS (F).
- Take LANTERN WICK (G), read note.
- Take NET (H).
- Go left (I).
- Walk down.
- Use NET, earn 2/3 PIECES OF PICTURE (J).
- Place KEYCHAIN PIECES, solution (K).
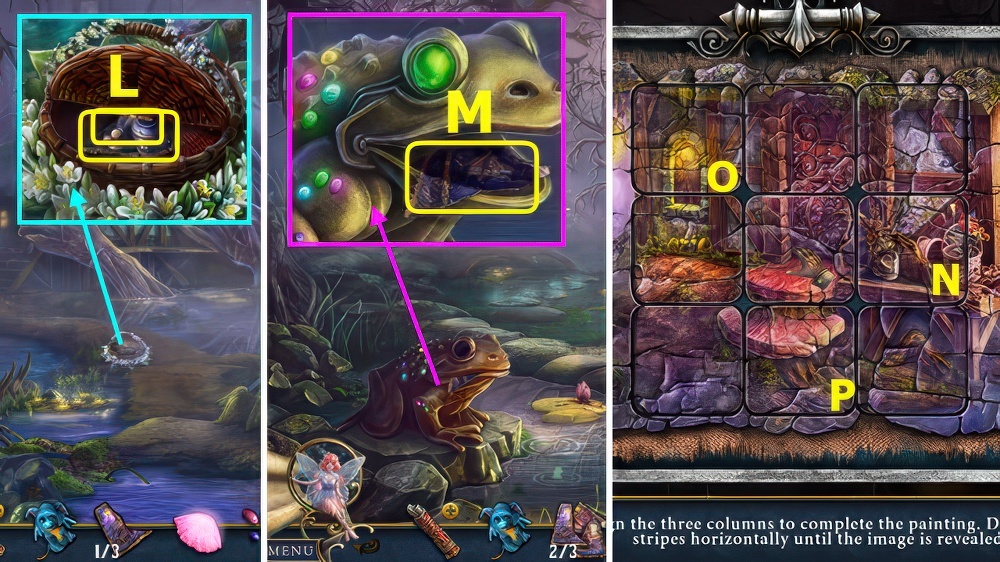
- Take DRAKO and MEMORY FLOWER (L).
- Select PIXIE (M), give MEMORY FLOWER, play puzzle, take MEMORY FLOWER POLLEN.

- Place BUTTON, GRASS, and FAIRY WINGS, move (N-O).
- Select (Px2-Q).
- Move (R-S)-(T-S)-(U-S), take FAIRY FIGURE.
- Go forward.
- Use DRAKO, take BUTTERFLY and 3/3 PIECES OF PICTURE (A).
- Go right.
- Use FAIRY FIGURE (B).
- Play puzzle, earn GREEN MEDALLION (C).
- Take TUBE (D).
- Select TUBE, place PIECES OF PICTURE, solution (E).
- Use MEMORY FLOWER POLLEN, take SNAKE BRIDGE PICTURE.
- Go left.
- Use SNAKE BRIDGE PICTURE (F).
- Go forward (G).
- Read newspaper, take HORSE (H).
- Select 1-3 (I).
- Use DRAKO, take CORKSCREW (J).
- Walk down.

- Use CORKSCREW, take SULFUR (K).
- Go right.
- Place HORSE, select 2x, take BLUE MEDALLION and FLASK (L).
- Read note, place GREEN MEDALLION, RED MEDALLION, and BLUE MEDALLION, take RED GEM and 2nd BUTTERFLY (M).
- Place FLASK, SULFUR, and SOLVENT, use DRAKO, take ACID (N).
- Go left, forward.
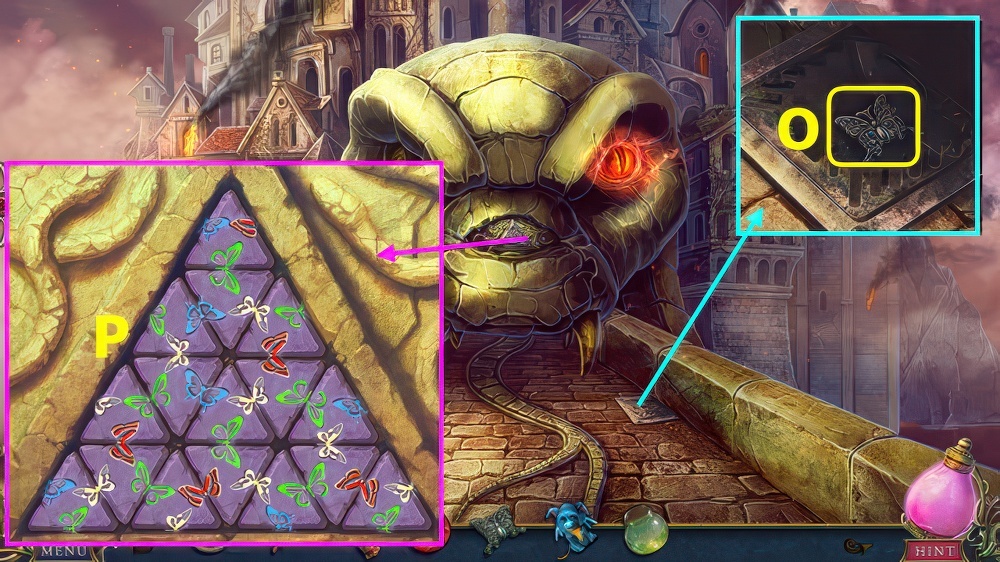
- Use ACID, take 3rd BUTTERFLY (O).
- Place 3 BUTTERFLIES, solution (P).
- Go forward.

- Talk (A).
- Read notes, take 1/5 PIECE OF PICTURE (B).
- Go forward.
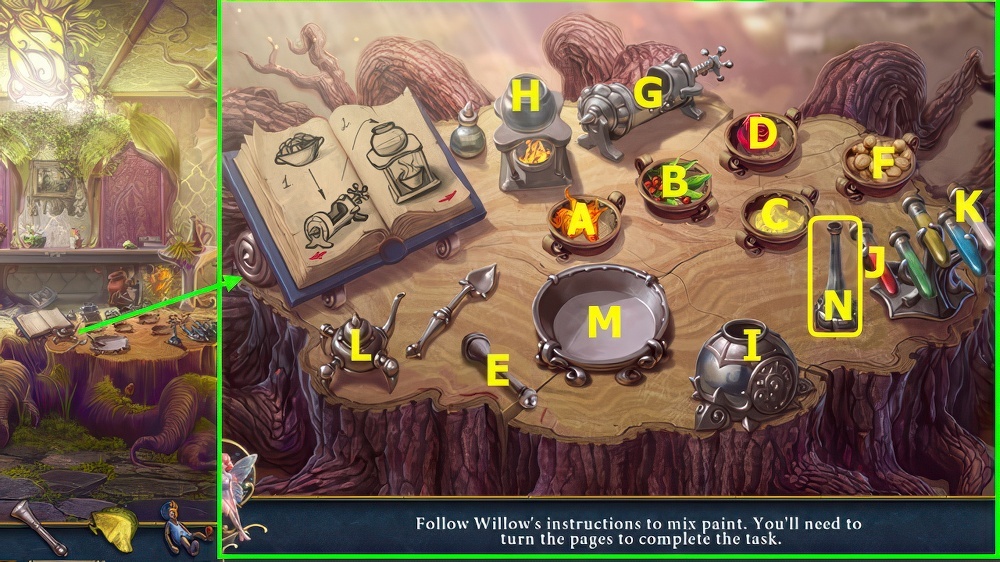
- Play puzzle, earn PAINTS (C).
- Take 1/2 WEIGHT (D).
- Take 2/2 WEIGHTS and SKETCH BOOK (E).
- Place WEIGHTS, select painting, read note, take 2/5 PIECES OF PICTURE, BEAR HEAD, and 1/2 CHIMERA EYE (F).
- Place BEAR HEAD and PAINTS, use paint brush on each paint and bear, take BALL (G).
- Walk down.

- Select, give BALL, take MINER FIGURE (H).
- Read note, place MINER FIGURE.
- Solution J-N-M-K-L-I-I-O.
- Go right (P).

- Take 2/2 CHIMERA EYES (A).
- Take STATUE ARM (B).
- Walk down.
- Go left (C).
- Place CHIMERA EYES, take GARGOYLE (D).
- Walk down.
- Place GARGOYLE, take WAX (E).
- Go forward.
- Play puzzle, earn FLOWER BROOCH (F).
- Use LANTERN WICK, WAX, and DRAKO, take CANDLE (G).
- Walk down, left.
- Place CANDLE (H).
- Play puzzle, earn LOCK PART (I).
- Walk down, forward.

- Place LOCK PART, solution (J).
- Go forward.
- Take SAW (K).
- Place FLOWER BROOCH, take HEART MOLD (L).
- Select, use SKETCH BOOK (M), play puzzle, take 3/5 PIECES OF PICTURE.
- Walk down 2x.

- Use SAW, earn BRANCH (N).
- Go left.
- Play puzzle, earn MOUSE TOKEN (O).
- Remove cloth, use HEART MOLD and RED GEM, take HEART (P).
- Use BRANCH, select (Q).
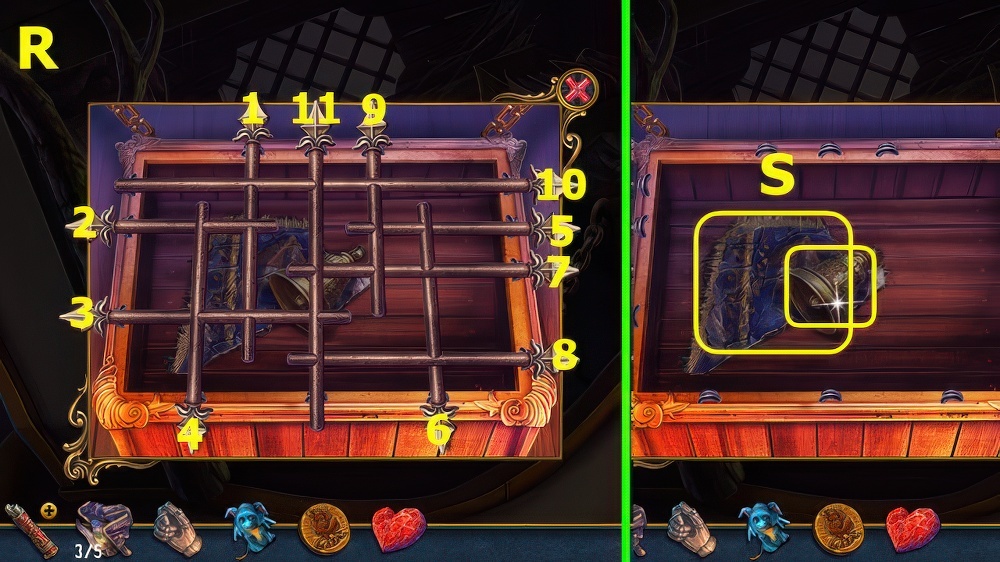
- Select 1-11 (R).
- Take SILVER BELL and 4/5 PIECES OF PICTURE (S).
- Walk down.
- Select (A).
- Use (B-C) 3x.
- Place MOUSE TOKEN, take 5/5 PIECES OF PAINTING (D).
- Go forward 2x.
- Open cover, place STATUE HAND and HEART, read note, take MEMORY FLOWER (E).
- Give MEMORY FLOWER to PIXIE, play puzzle, take MEMORY FLOWER POLLEN.
- Select TUBE, place PIECES OF PICTURE, select 1-6 (G), use MEMORY FLOWER POLLEN, take STATUE SQUARE PICTURE.
- Walk down 2x, go right.
- Use STATUE SQUARE PICTURE (H).
- Take BIRD FIGURINE (I).
- Go left (J).
- Take MIRROR and PAPER (K).
- Place BIRD FIGURINE, read note, take ENVELOPE and BRONZE BELL (L).
- Walk down.
- Place SILVER BELL and BRONZE BELL, select M-N-O-N-M-O-O-M-N.
- Go right (P).
- Select (Q).
- Take COFFEE POT, TIME CODE, and PIANO TUNER (R).
- Use PIANO TUNER, take FEATHER and CUCKOO (S).
- Place TIME CODE, select clock face, take PART OF BELL (T).
- Place CUCKOO, take INK (U).
- PAPER, FEATHER, and INK on ENVELOPE, move feather to ink, select and take LETTER FOR DORIAN.
- Place LETTER FOR DORIAN, take 2nd PART OF BELL (V).
- Select 2x (W).
- Place 2 BELL PARTS, select 1-11 (A).
- Select 1-4 (B).
- Play puzzle, earn CHURCH FIGURINE (C).
- Walk down.

- Place CHURCH FIGURINE, take KEY (D).
- Go left.
- Use KEY (E).
- Go forward.
- Place MIRROR (F).
- Take PYRAMID (G).
- Take CHALK (H).
- Take POSTMAN’S BADGE (I).
- Walk down 2x, go right.
- Play puzzle, earn 2nd PYRAMID (J).
- Place POSTMAN’S BADGE, take 1/4 PIECE OF PICTURE and CRYSTAL (K).
- Walk down.
- Place 2 PYRAMIDS, solution (L), take REFLECTOR (M).
- Go left, forward.
- Restore ring 1-3, add REFLECTOR (N).
- Place CRYSTAL (O).
- Take MEMORY FLOWER (P).
- Give MEMORY FLOWER to PIXIE, play puzzle, take MEMORY FLOWER POLLEN.
- Go forward.
- Talk (A), take NAIL PULLER.
- Select (B).
- Use DRAKO, take 1/3 GEAR (C).
- Take BIRD SKULL, use CHALK, take JEWELRY (D).
- Take 2/4 PIECES OF PICTURE (@).
- Walk down.
- Use NAIL PULLER, take 3/4 PIECES OF PICTURE, move cloth and take BREAD (E).
- Go forward.
- Place BREAD, take NUT (F).
- Walk down.
- Use NUT (G).
- Open stove, move coal (H) to stove (I) 3x.
- Use DRAKO on stove.
- Place COFFEE POT and JEWELRY, take MOLTEN GOLD (J).
- Use MOLTEN GOLD, take GOLDEN KEY (K).
- Use GOLDEN KEY, take 4/4 PIECES OF PICTURE (L).

- Select TUBE, add PIECES OF PICTURE, select S-Xx2-Nx2-R-O-W-U-Px2-V-Wx2-Vx2-Px2-W-Px2-Wx2-Q-R-Q.
- Add MEMORY FLOWER POLLEN, take MINER PICTURE.
- Go forward.
- Use MINER PICTURE (A).
- Take FLUTE (B).
- Take PICKAXE (C).
- Use PICKAXE, take 2/3 GEARS (D).
- Use PICKAXE, take 3/3 GEAR (E).

- Place GEARS, solution (G).
- Select 3x (H).
- Go forward.

- Take RUBY EYE (I).
- Place BIRD SKULL (J).
- Take CHEST (K).
- Read poster, take 1/5 FEATHER (L).
- Go forward.
- Take OLD BOOT (M).
- Remove lace from OLD BOOT, read note.
- Take 2/5 FEATHERS and BOOT.
- Take 3/5 FEATHERS (N).
- Take ANTLER (O).
- Walk down.

- Use BOOT, take EGG, select pairs (P).
- Take LOTUS FIGURINE and 4/5 FEATHERS (Q).
- Go forward.
- Place LOTUS FIGURINE, take BUTTERFLY (R).
- Place RUBY EYE and BUTTERFLY, take SPRING and 1/3 PIECE OF PICTURE (S).
- Walk down.
- Use SPRING, take 5/5 FEATHERS (A).
- FEATHERS on CHEST, solution (B), take CROWN.
- Go forward.
- Place FLUTE and CROWN (C).
- Go left (D).

- Take MEMORY FLOWER (E).
- Give MEMORY FLOWER to PIXIE (F), play puzzle, take MEMORY FLOWER POLLEN.
- Use ANTLER, take PART OF SYMBOL (G).
- Place EGG, take GEMS (H).
- Go forward.

- Play puzzle, earn HERBICIDE (I).
- Use HERBICIDE, take FROG FIGURINE and 2nd PART OF SYMBOL (J).
- Place 2 PARTS OF SYMBOL (K).
- Go forward.
- Remove cloth, place FROG FIGURINE, take EMPTY ATOMIZER and 2/3 PIECES OF PICTURE (L).
- Walk down.
- Place GEMS, take 3/3 PIECES OF PICTURE (M).
- Place PIECES OF PICTURE on TUBE, drag N down-N right-O down-P left-P up, use MEMORY FLOWER POLLEN, take HUT PAINTING..
- Go left.
- Use HUT PAINTING (A).
- Take CROWBAR (B).
- Go forward.
- Talk (C), take KNIFE.
- Play puzzle, earn 1/4 PIECE OF PICTURE (D).
- Take MEMORY FLOWER, use EMPTY ATOMIZER, earn FERTILIZER (E).
- Give MEMORY FLOWER to PIXIE (F), play puzzle, take MEMORY FLOWER POLLEN.
- Open LID, take CHAFING DISH (G).
- Open CHAFING DISH, read instructions, take 2/4 PIECES OF PICTURE.
- Walk down.
- Play puzzle, earn 3/4 PIECES OF PICTURE (H).
- Use KNIFE, earn FISHING LINE, take 4/4 PIECES OF PICTURE (I).
- PIECES OF PICTURE on TUBE, solution (J).
- Add MEMORY FLOWER POLLEN, take WILLOW PICTURE.
- Go forward.
- Use WILLOW PICTURE (K).
- Talk, take GLOVE (L).
- Select, remove pairs, use GLOVE, earn VENUS FLYTRAP (M).
- Open book, take EYE PATCH (N).
- Play puzzle, earn PUPPET’S BODY (O).
- Walk down 2x.

- Place VENUS FLYTRAP, take WOLFBERRIES (P).
- Place EYE PATCH, take PESTLE (Q).
- Walk down.
- Use FERTILIZER, take POLLEN (R).
- Walk down.
- Use CROWBAR, take PUPPET (S).
- Use FERTILIZER, take ROSE (T).
- Use FERTILIZER, take FERN FLOWER (U).
- Go forward, left, and forward 2x.
- Place FERN FLOWER (A), WOLFBERRIES (B), POLLEN (C), ROSE (D), and PESTLE (E).
- Move (F-G)-(G-H)-(C-I)-(J-I)-(K-I)-(L-I).
- Move (B-M)-(A-M)-(D-M)-(E-M).
- Move (M-N)-(H-N)-(I-N), take PAINTS (N).
- Walk down.

- Place PUPPET’S BODY, restore puppet (@), add FISHING LINE and PAINTS.
- Select each paint and use on body (N), take 2nd PUPPET.
- Walk down 2x.
- Place both PUPPETS (O).
- Go forward (P).
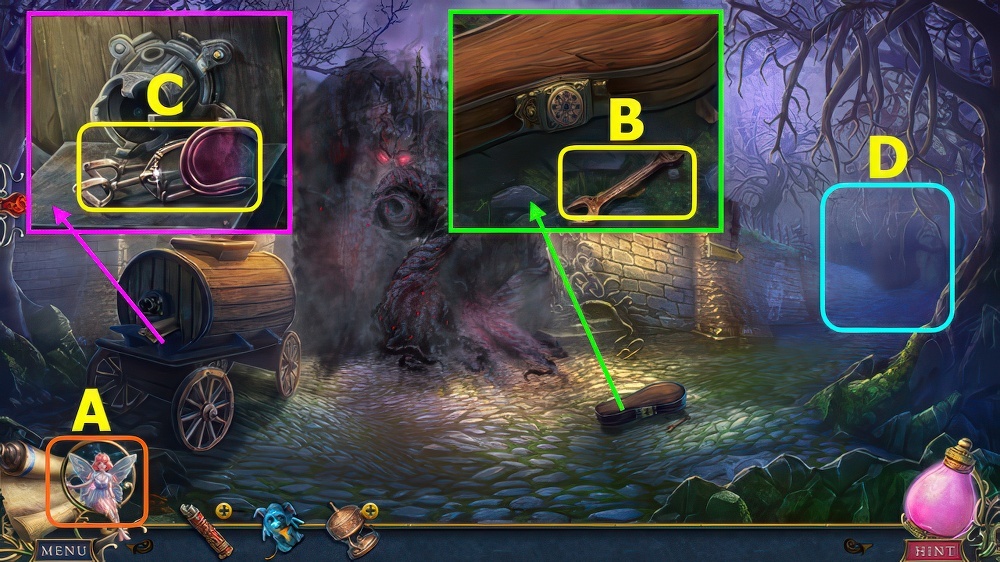
- Talk (A).
- Take WRENCH (B).
- Read note, take SADDLE (C).
- Go right (D).
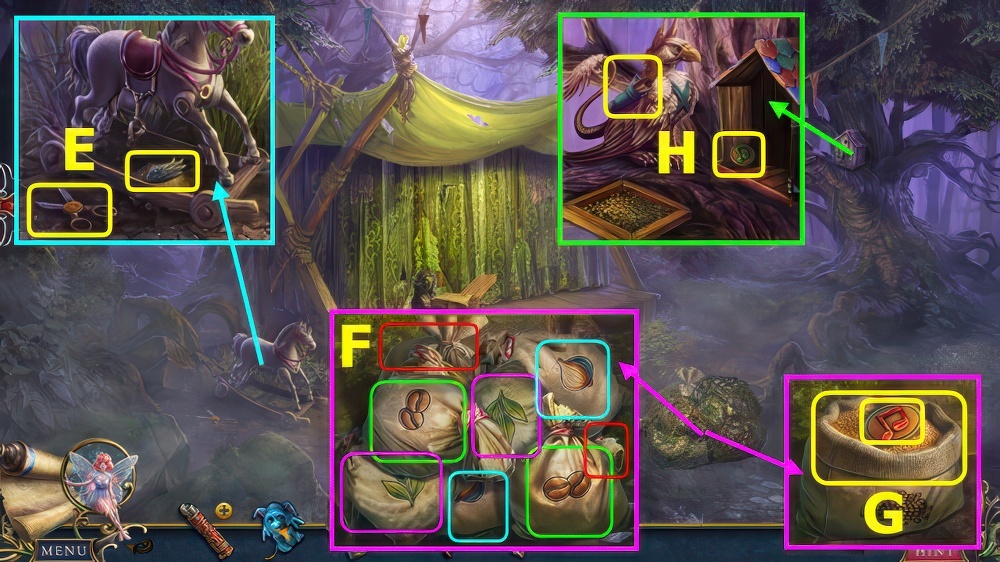
- Take SCISSORS, place SADDLE, take WING INLAY (E).
- Use SCISSORS, remove pairs (F).
- Open bag, take TOKEN and MILLET (G).
- Place MILLET and WING INLAY, read note, take COUNTESS FIGURINE and TOKEN (H).
- Walk down.
- Place 2 TOKENS, move (K-N)-(I-L)-(O-J)-(L-O)-(N-I)-(I-L)-(M-P)-(P-K)-(K-N)-(J-M)-(M-P)-(O-J).
- Take SNAKE HEAD and GOLDEN KEY (Q).
- Place SNAKE HEAD, take CYLINDER (R).
- Walk right.
- Read note, place CYLINDER, take BRYAN FIGURINE and SILVER KEY (A).
- Place COUNTESS FIGURINE and BRYAN FIGURINE (B), play puzzle, take BRYAN’S LANTERN.
- Walk down.
- Use BRYAN’S LANTERN (C).
- Use GOLDEN KEY and SILVER KEY (D).
- Go forward.
- Remove cover, take EMPTY JAR (E).
- Use EMPTY JAR and DRAKO, take RESIN (F).
- Go forward.
- Select, use WRENCH, earn VALVE KNOB (G).
- Go right (H).
- Play puzzle, earn BRASS BOWL (I).
- Take MATCHES (J).
- RESIN, BRASS BOWL, and MATCHES on CHAFING DISH.
- Move resin into dish and light with match, take RESIN.
- Walk down 2x.

- Use RESIN, take FIRE HOSE (K).
- Walk down.
- Place FIRE HOSE and VALVE KNOB (L).
- Select (M).
- Go forward.

- Select (N).
- Go forward.
- Select (O).
- Read note, take EMPTY BAG (P).
- Walk down.

- Place EMPTY BAG, select trowel 3x, take DIRT (A).
- Go forward.
- Use DIRT, remove debris, take GARDEN SHEARS (B).
- Use GARDEN SHEARS, take HOOK (C).
- Walk down.

- Place HOOK, take ROPE WITH HOOK (D).
- Go forward.
- Use ROPE WITH HOOK (E).
- Go forward.
- (F).

- Talk (G).
- Play puzzle, earn SCORPION KEY (H).
- Take PLIERS (I).
- Use SCORPION KEY, open cover, select 1-3, take APPLE INLAY and STONE TOOTH (J).
- Remove paintings, take BOW (K).
- Walk down, go right.

- Play puzzle, earn METAL FILE (L).
- Use PLIERS, earn 2nd STONE TOOTH (M).
- Walk down.
- Use METAL FILE, take METAL TUBE (N).
- Walk down.

- Use BOW, take SYMBOL (O).
- Select, place both STONE TEETH and METAL TUBE, take 1/3 FIREFLY (P).
- Go forward 2x.
- Play puzzle, earn 2/3 FIREFLIES (Q).
- Place SYMBOL, take BOOK (A).
- Place BOOK, solution-(C-D)-(C-D)-(C-B)-(C-B)-(D-B)-(D-B)-(C-D)-(C-D)-(B-C)-(B-C).
- (B-D)-(B-D)-(C-D)-(C-D)-(C-B)-(D-B)-(D-B)-(D-C)-(D-C)-(B-C)-(B-C)-(D-B)-(D-B)-(C-D).
- (C-D)-(C-B)-(C-B)-(D-B)-(D-B)-(C-D)-(B-D)-(B-D)-(B-C)-(B-C)-(D-C)-(D-C)-(B-D)-(C-D).
- (C-D)-(C-B)-(D-B)-(D-B)-(C-D)-(B-D).
- Take 3/3 FIREFLIES (E).
- Walk down, go right.
- Place FIREFLIES, move along indicated paths in order (F-G-H-I-J-K).
- Go left.
- Take DIAMOND RING and GREEN (A).
- Take KNIGHT (B).
- Walk down.
- Use DIAMOND RING, earn YELLOW (C).
- Go left.

- Place GREEN and YELLOW, select 1-7 (D).
- Go left.
- Select (E-F).
- Take LION PIN, Select 1-6, take SNOWFLAKE INLAY (G).
- Take MOON SYMBOL (H).
- Place APPLE INLAY and SNOWFLAKE INLAY, read note, take GARGOYLE HEAD and BRYAN’S KEY (I).
- Read note, take CANDLE (J).
- Walk down.

- Place GARGOYLE HEAD (K).
- Go right.
- Use DRAKO (L).
- Take 2nd CANDLE (M).
- Take 3rd CANDLE (N).
- Take BELLOWS (O).
- Place MOON SYMBOL, take FEATHER (P).
- Walk down.

- Use DRAKO and 3 CANDLES, take 1/3 SPIDER KEY (A).
- Place LION PIN, take 2nd KNIGHT (B).
- Go right.
- Place 2 KNIGHTS, take DRAGON KEY (C).
- Walk down, go left.
- Use BELLOWS and BRYAN’S KEY, take RUNIC CODE PIECE (D).
- Select 1-3, add RUNIC CODE PIECE, take CODE (E).
- Place FEATHER, take 1/2 DOOR TOKEN and LENS (F).
- Walk down, right.
- Place CODE, select 1-3 (G), select book and play puzzle, take 2/2 DOOR TOKENS.
- Place DOOR TOKENS, solution J-K-L-I-J-H-K-J.
- Go right.
- Select (M).
- Take FAN and HANDKERCHIEF (N).
- Place FAN, take CHARCOAL and 2nd DRAGON KEY (O).
- Take PIN (P).
- Walk down 2x.
- Use 2 DRAGON KEYS, take SHUTTLE (A).
- Go right 2x
- Use SHUTTLE, take CANVAS (B).
- Read note, earn SIGNET (C).
- Use SIGNET, take LETTER A (D).
- Walk down.
- Place LETTER A, select (E).
- Restore frame (F).
- Restore lamp (G).
- Move pages to center (H).
- Restore paintings 1-3 (I).
- Restore drawing (J).
- Read book, take SKULL (K).
- Place SKULL, take BROKEN SPYGLASS (L).
- Select BROKEN SPYGLASS 2x, use HANDKERCHIEF, remove lens 3x, take MAP PIECE.
- Add LENS, take SPYGLASS.
- Walk down, left.

- Use CANVAS and CHARCOAL, take UNFINISHED MAP (M).
- Place and select SPYGLASS (N), use UNFINISHED MAP, play puzzle, take 2/3 SPIDER LEGS and 2nd MAP PIECE.
- Walk down, go right 2x.
- Select, place 2 MAP PIECES, take MAP and 3/3 SPIDER KEYS (O).
- Place SPIDER KEYS (P).
- Go forward.

- Play puzzle, earn MARBLE BALL (A).
- Take 1/6 PIECE OF PICTURE (B).
- Go left (C).

- Select paintings (1-9) (D).
- Select, take BONE and 2/6 PIECES OF PICTURE (E).

- Use PIN, earn LOCK PART (F).
- Place LOCK PART, select G-H-G-G.
- Take OIL and 3/6 PIECES OF PICTURE (I).
- Go right (J).
- Take PLIERS (K).
- Walk down 2x.
- Use PLIERS, earn SIGN BOARD (L).
- Go left, forward.

- Take BRANCH (M).
- Walk down, go right.
- Place BONE, BRANCH and SIGN BOARD (N).
- Take SCOOP and AXE (O).
- Take 4/6 PIECES OF PICTURE, use AXE (P).
- Walk down.

- Use SCOOP, take HORN and 5/6 PIECES OF PICTURE (Q).
- Go left.
- Select 1-6 (R), open box and read note, take GLASS and 6/6 PIECES OF PICTURE (S).

- Use OIL and HORN, select, take MEMORY FLOWER (A).
- Give MEMORY FLOWER (B), play puzzle, take MEMORY FLOWER POLLEN.
- PIECES OF PICTURE on TUBE, select Dx2-Cx3-Gx2-Ex5-Hx4-Jx3-Fx5-Ix4-Kx4-Mx5-Lx1.
- Use MEMORY FLOWER POLLEN, take LAKE SHORE PAINTING.
- Go forward.
- Use LAKE SHORE PAINTING (N).
- Take FISHHOOK and LOCK PART (O).
- Place FISHHOOK, take HANDKERCHIEF (P).
- Use DRAKO, take SHELL (Q).
- Walk down.
- Use HANDKERCHIEF, take SICKLE (R).
- Walk down.
- Place MARBLE BALL and SHELL, take CORKSCREW (S).
- Play puzzle, earn RESIN (T).
- Go left, forward.
- Use SICKLE, take OAKUM (A).
- Place OAKUM and RESIN, use CORKSCREW (B).
- Use brush on resin, select oakum 8x (C).
- Go forward.
- Place LOCK PART, solution (D).
- Take FISH GLUE, select 4 compass parts, take COMPASS (E).
- Place MAP and COMPASS, select (F).

- Select H-I-H-H-I-H-G-H-G-H.
- The side panel will appear as so (J).
- Use BRYAN’S LANTERN (K).
- Use AXE, take WIRE (L).
- Select WIRE 3x, take LOCKPICK.
- Remove paintings, use LOCKPICK, take RUBBER PATCH (M).
- Go forward.
- Talk (N).
- Place GLASS, take DIVING HELMET (O).
- Walk down.
- Use RUBBER PATCH, FISH GLUE, and DIVING HELMET (P).
- Play puzzle, earn BRYAN’S PORTRAIT (Q).
- Go forward.

- Give BRYAN’S PORTRAIT (A).
- Select Bx3-Cx2-Dx1.
- Take NET (E).
- Walk down.
- Place NET, take LOADED GUN (F).
- Go forward.
- Use LOADED GUN (G).
- Use DRAKO (H).
- Walkthrough Bonus Chapter, at the link below.


