
Bridge to Another World 11: A Trail of Breadcrumbs – Set in a mysterious world full of evil witches, brave hunters, and ancient magic, adult Gretel faces challenging tests that call into question everything she knew about herself and her reality. She must help the people of the kingdom fight off attacks from witches bent on plunging the world into chaos. But something about this land seems strange and out of place. An amulet that has been with Gretel since childhood reveals its secret: it is linked to her past and present. When the spirit of the amulet awakens, it tells her of her true home and magical origins. Now Gretel must remember her past, team up with the witch hunters led by Hansel, and confront the forces of evil. On the way to unraveling the mysteries of the world, she will have to solve complex puzzles, look for clues to the hiding places and find ways to save the kingdom from destruction. If you can not pass any of the puzzles or do not know where the items are, on our site you can watch the walkthrough of the game Bridge to Another World 11: A Trail of Breadcrumbs, and save the world.
Bridge to Another World 11: A Trail of Breadcrumbs – Walkthrough
Here you can see the full walkthrough of Bridge to Another World 11: A Trail of Breadcrumbs, namely for all chapters, including bonus chapter, in pictures.
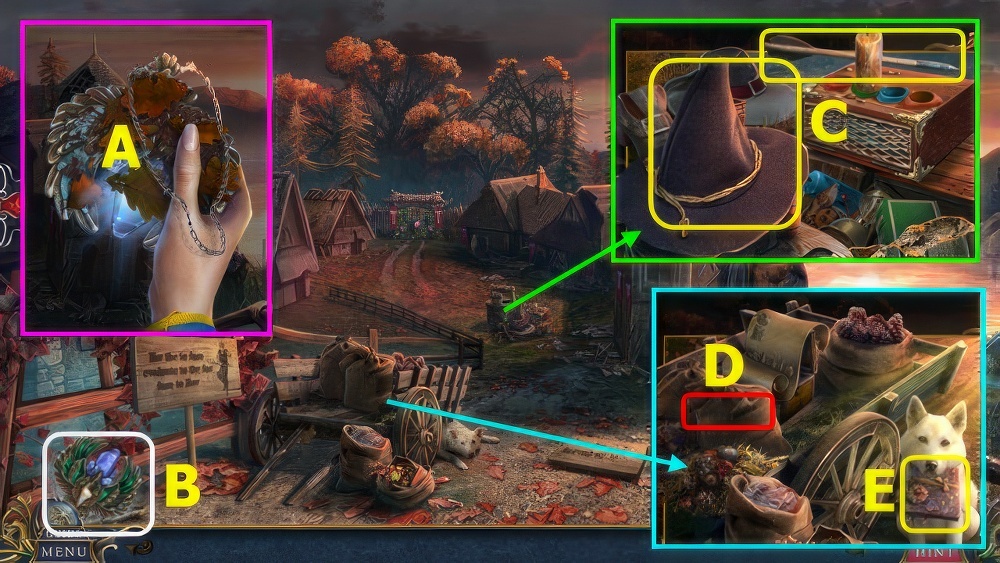
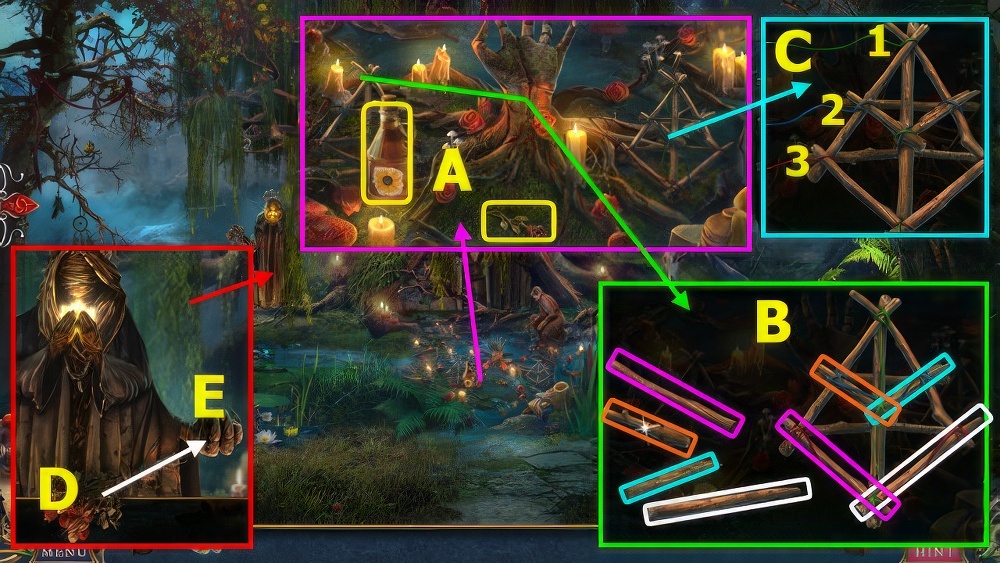
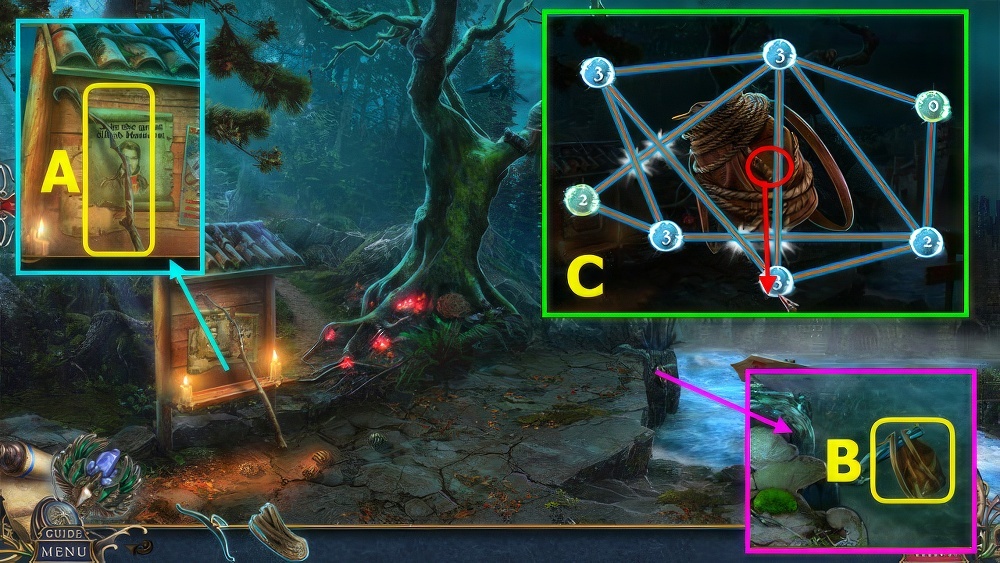
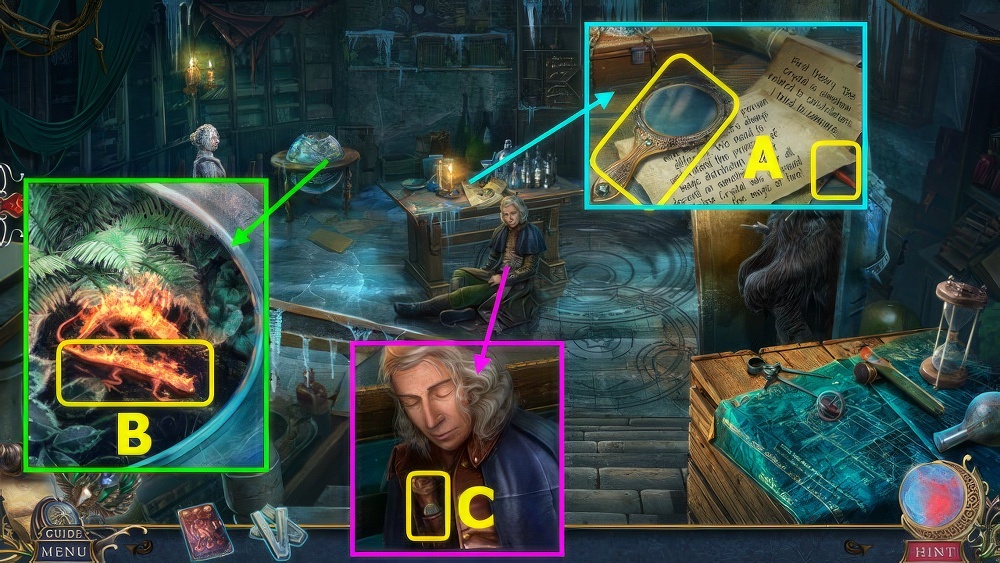
- Select AMULET (A).
- Remove leaves from AMULET, take GLASS SHARD.
- The AMULET is now on your menu bar (B).
- Take HAT and ARROW (C).
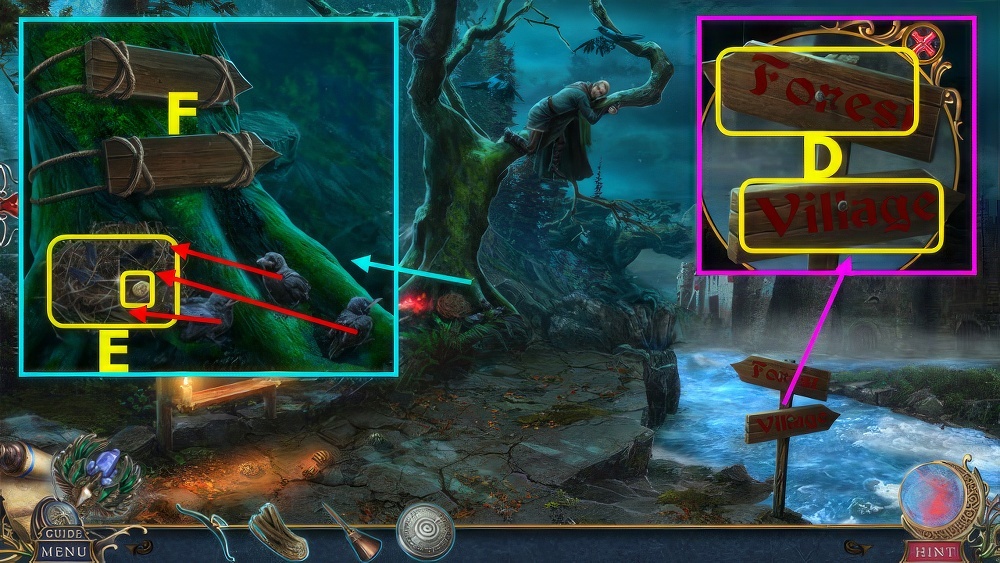
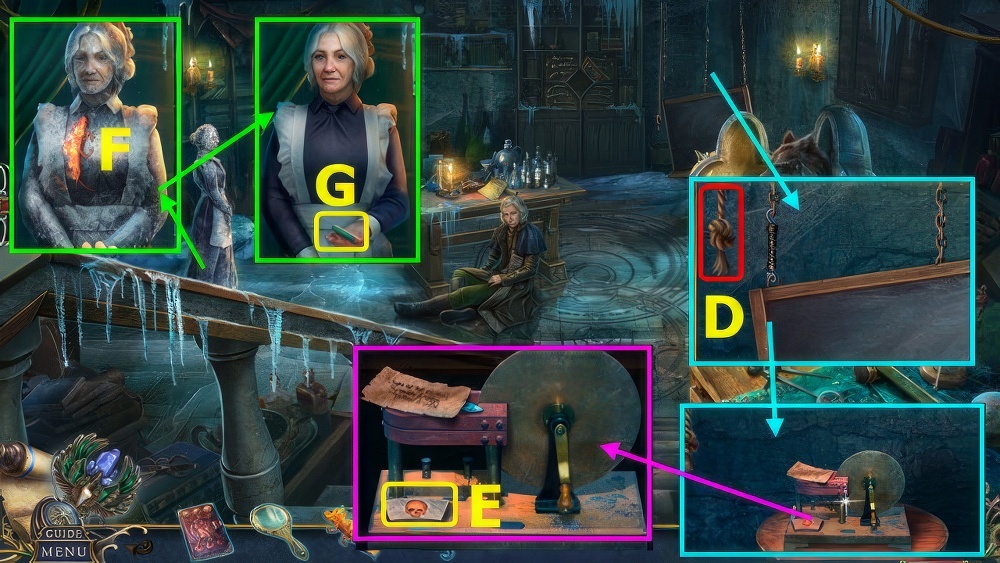
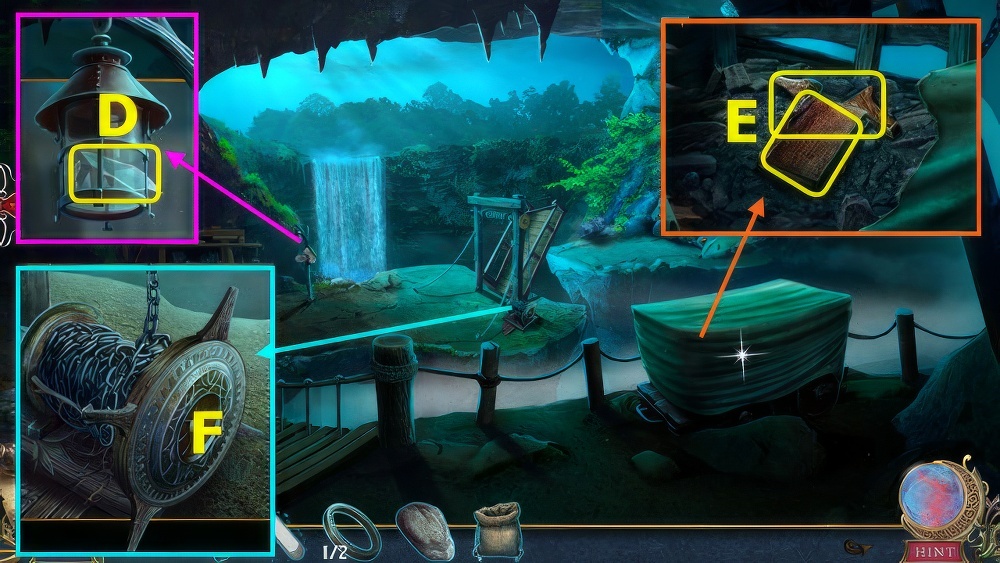
- Read note, use GLASS SHARD (D).
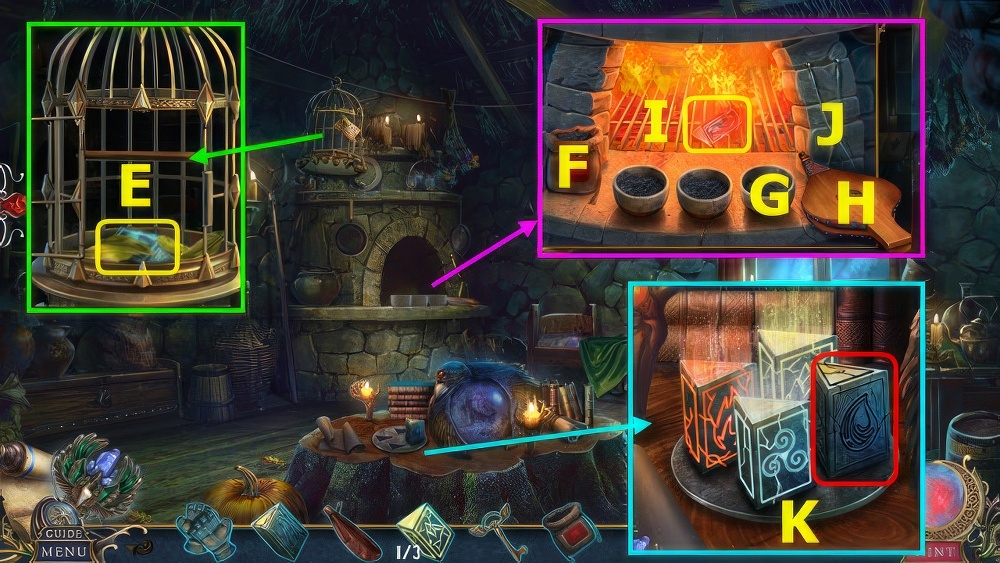
- Read book (E), take BUTTONS.
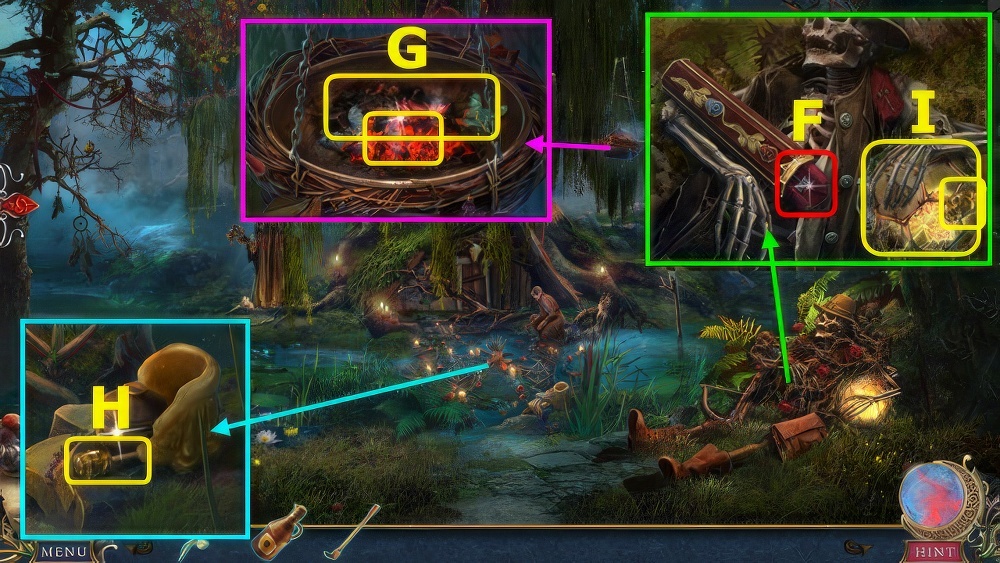
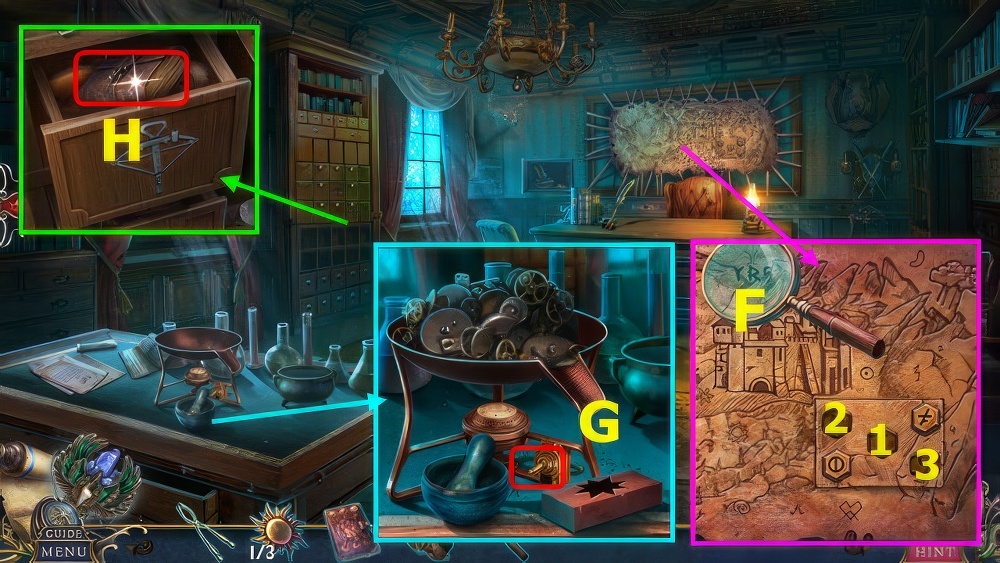
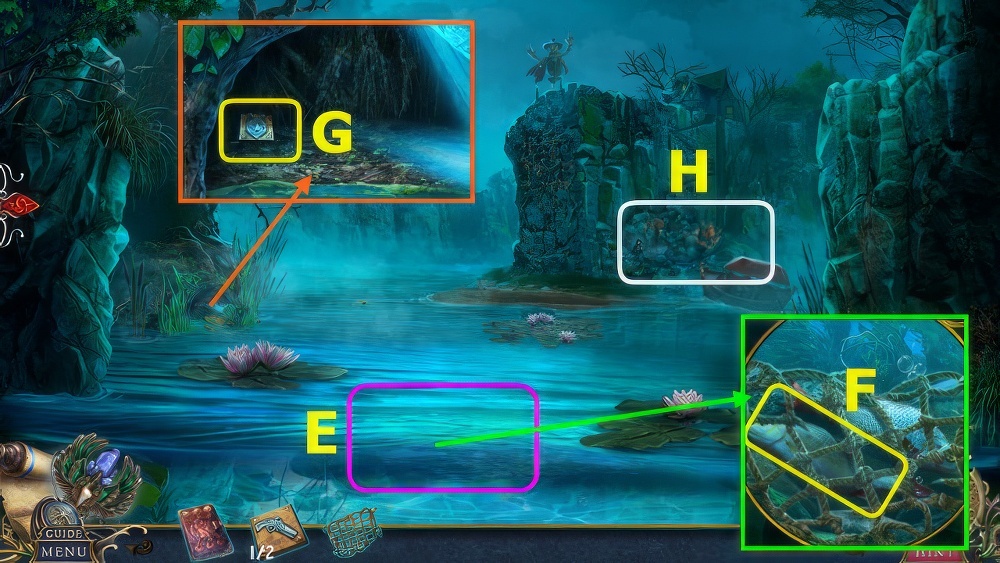
- Play puzzle (F).
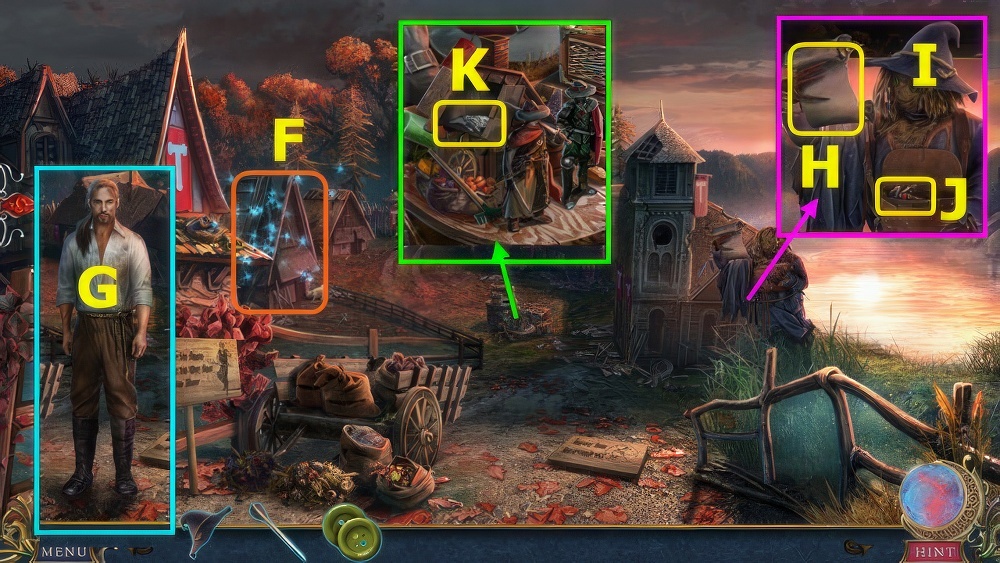
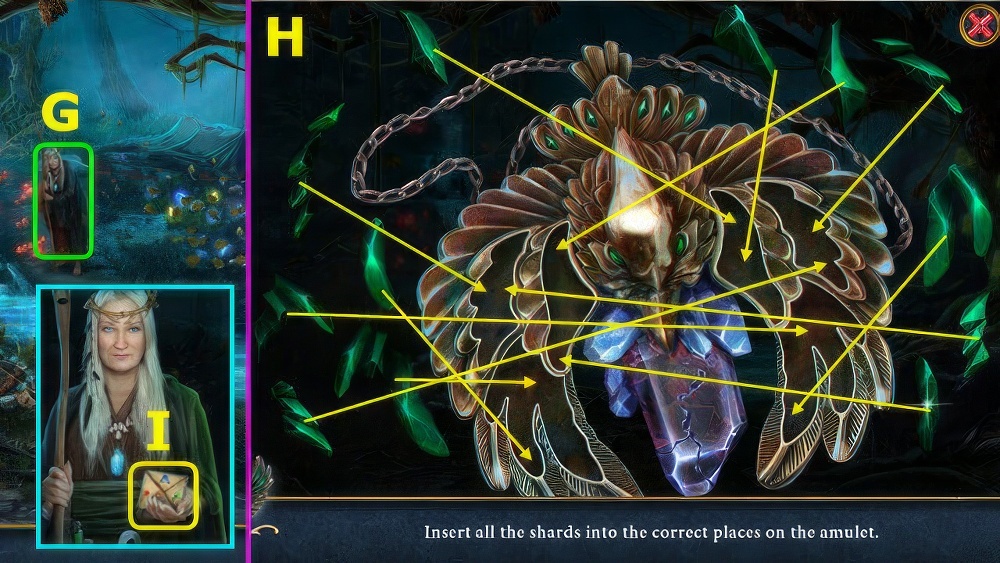
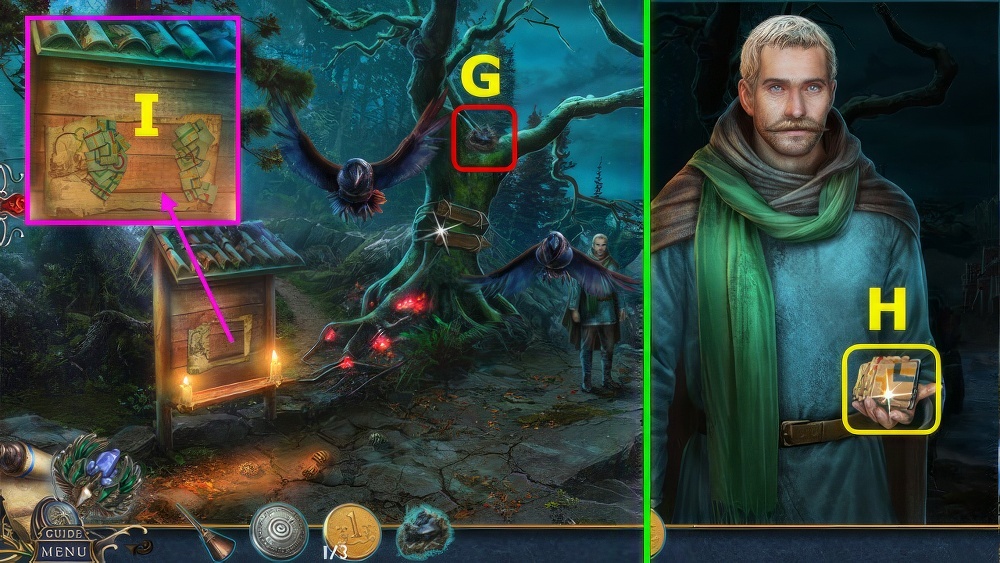
- Talk (G), take 1/2 FIGURINE.
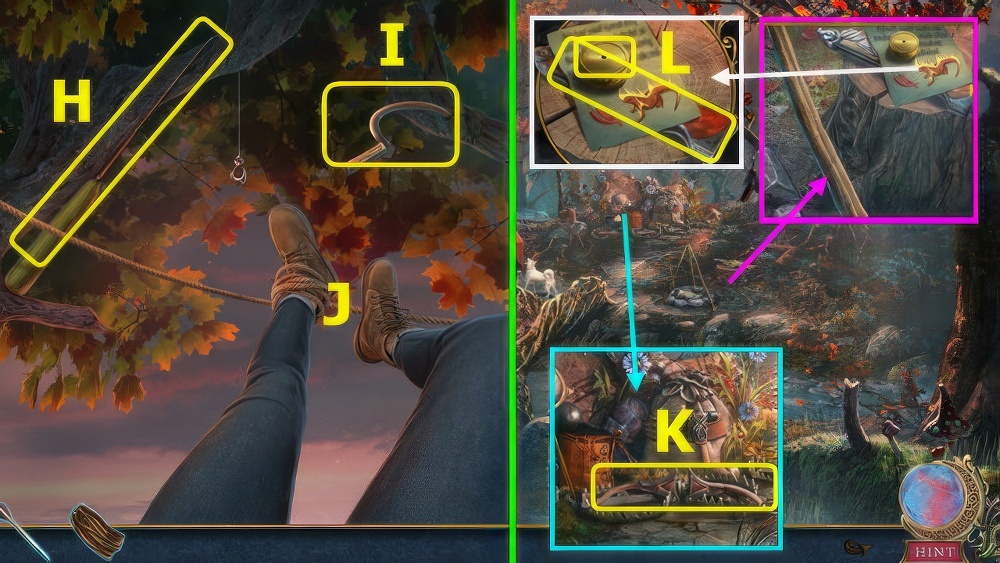
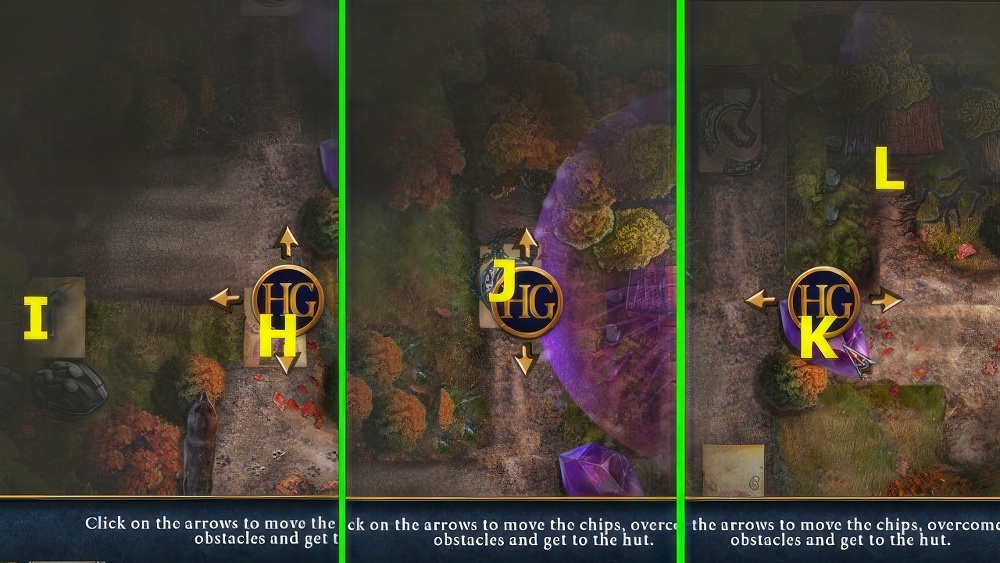
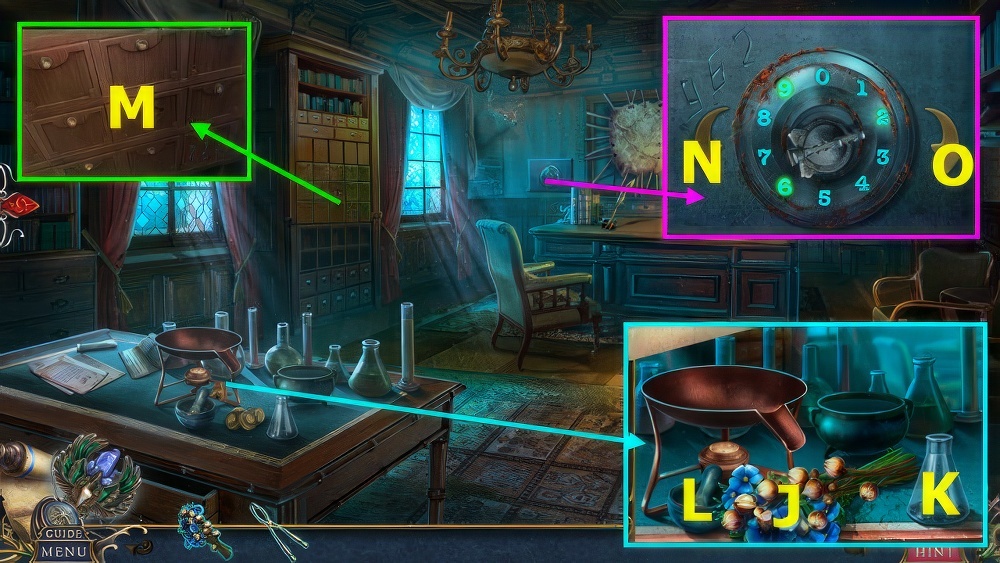
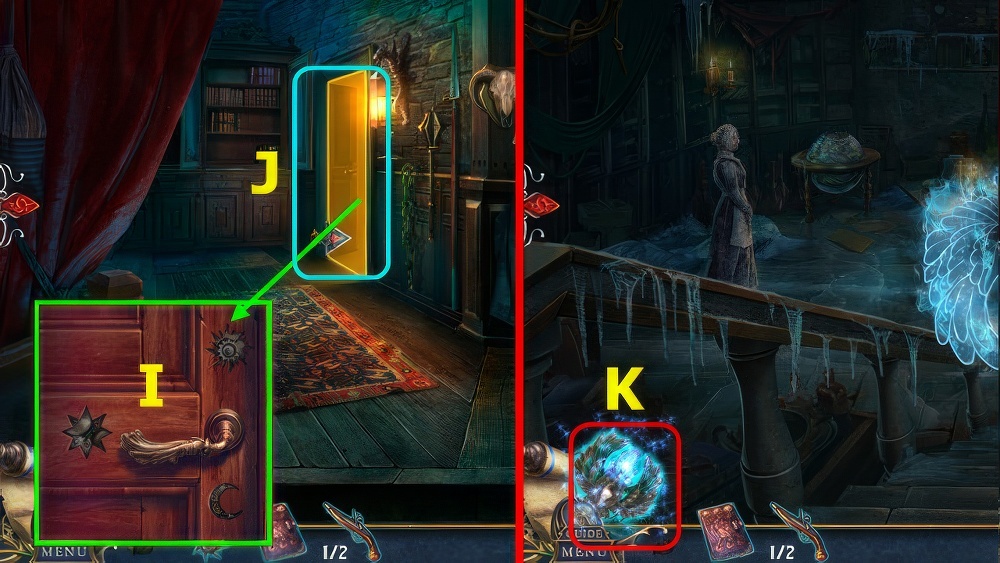
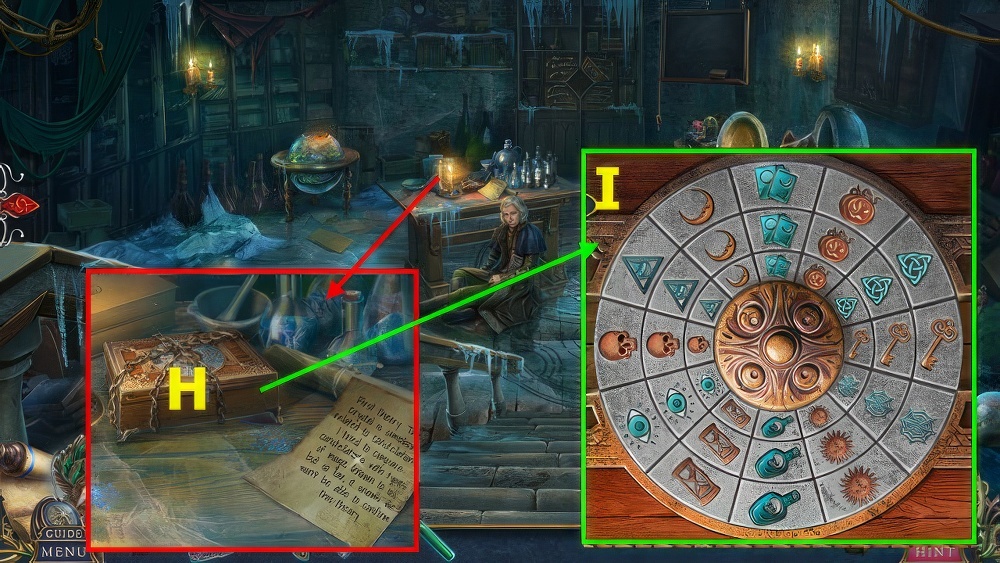
- Take SLINGSHOT and map (H).
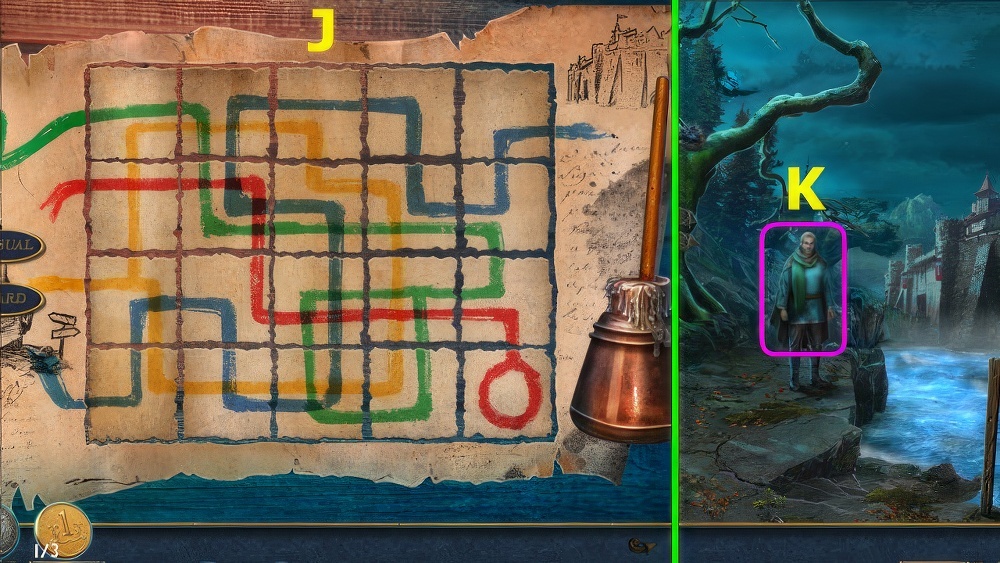
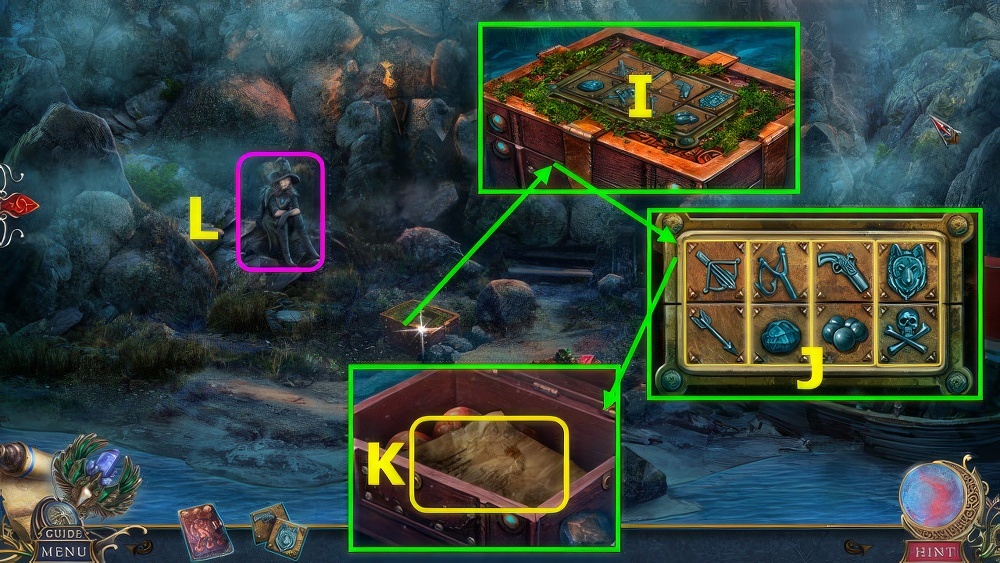
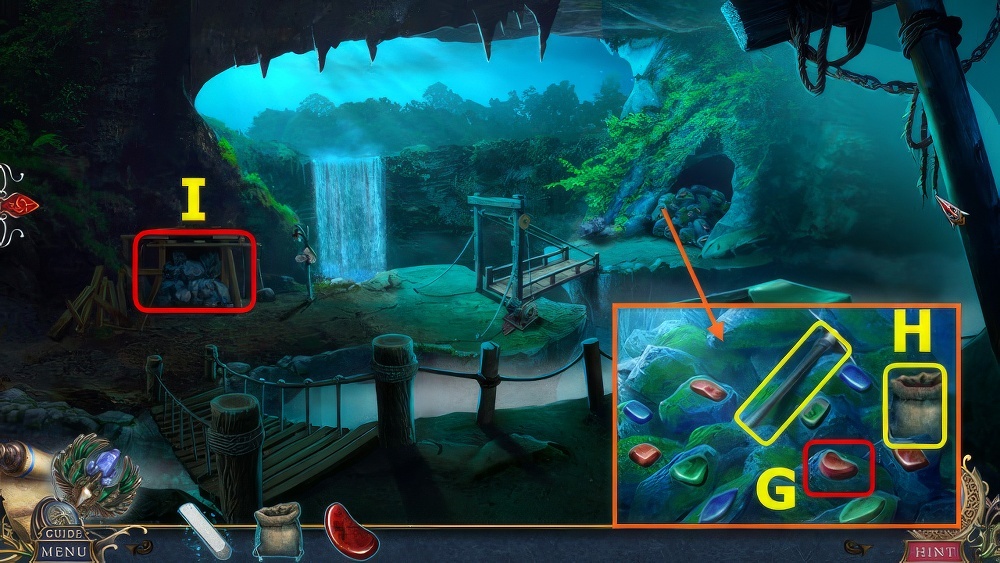
- Place HAT and BUTTONS (I), read notes and take 2/2 FIGURINES (J).
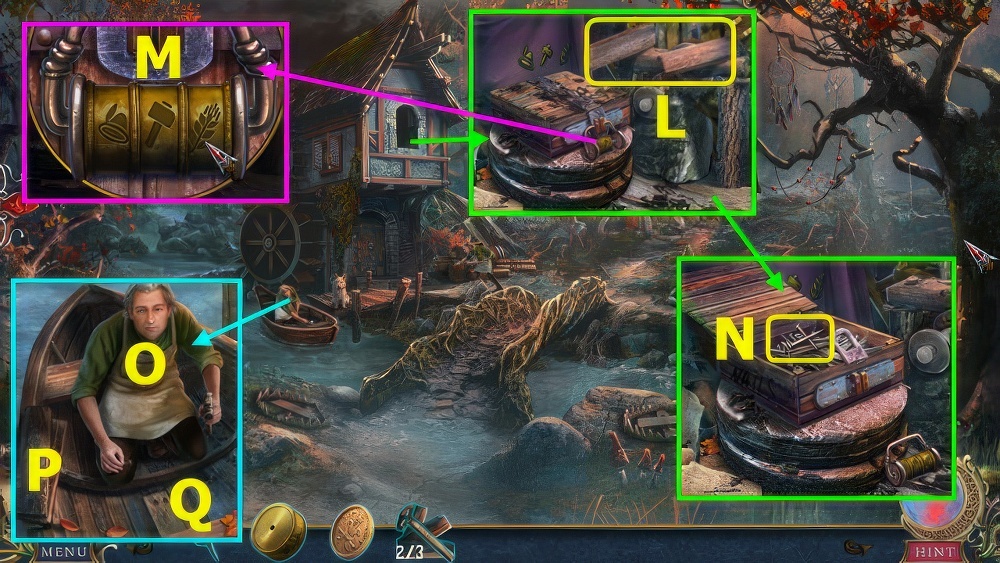
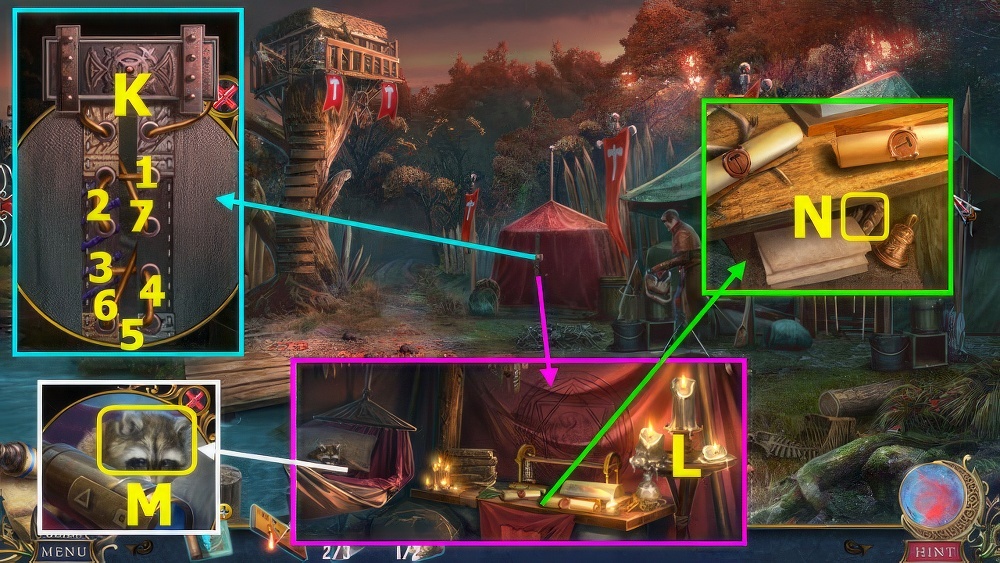
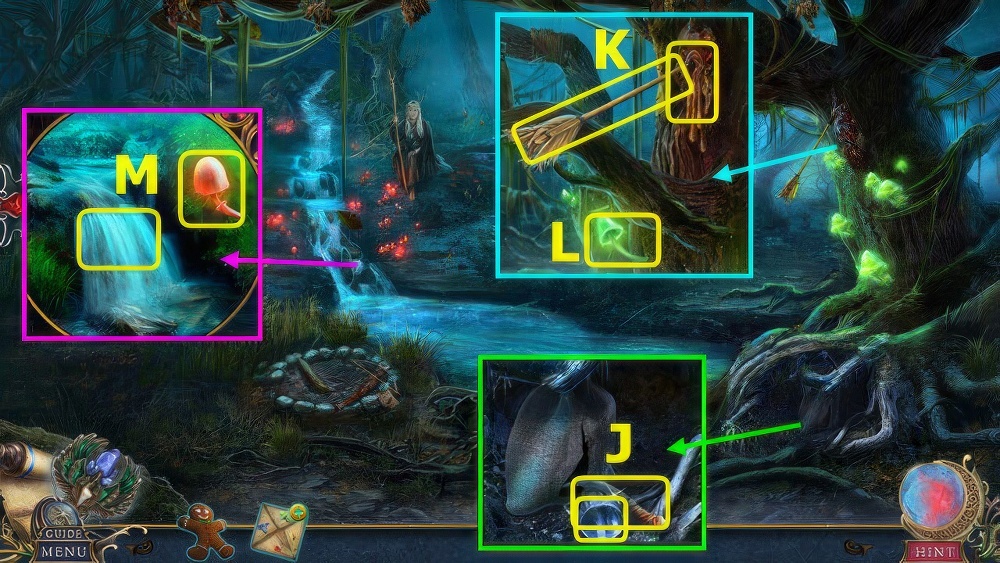
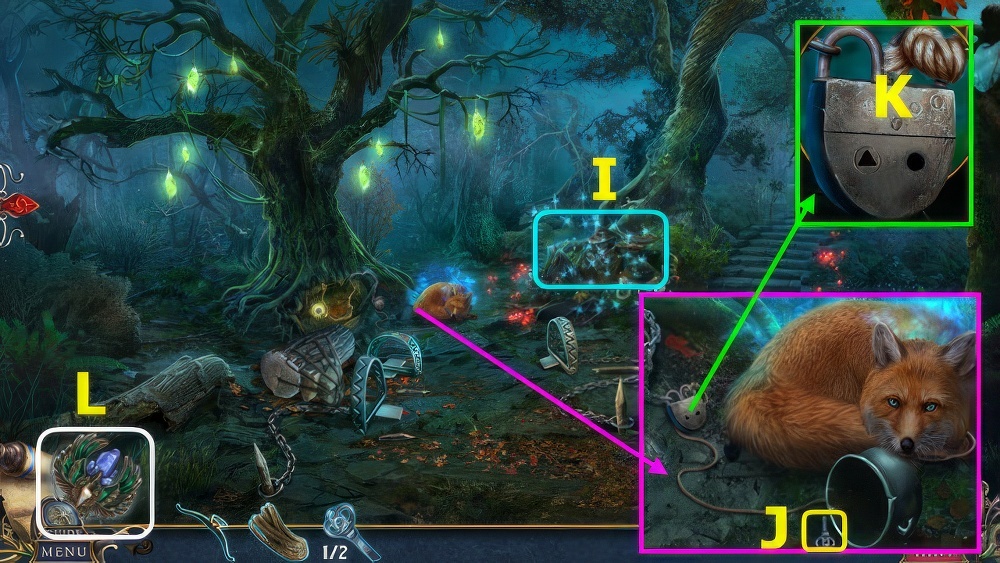
- Place FIGURINES, take RAVEN TOKEN (K).

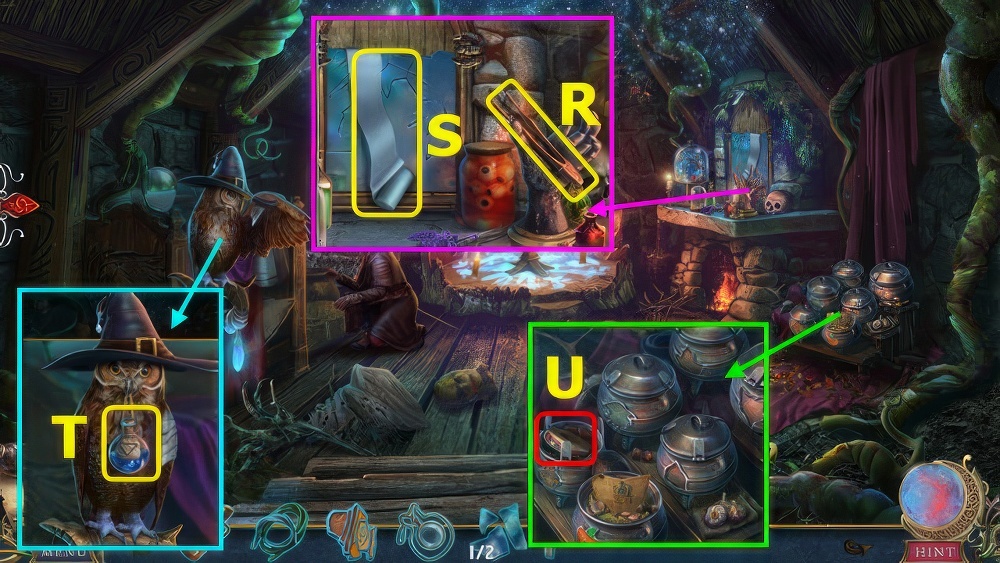
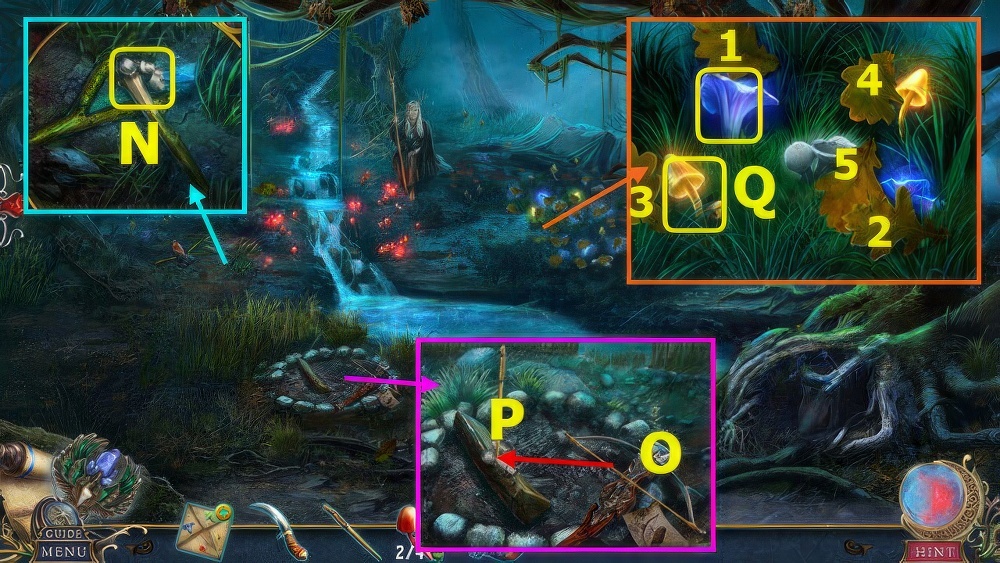
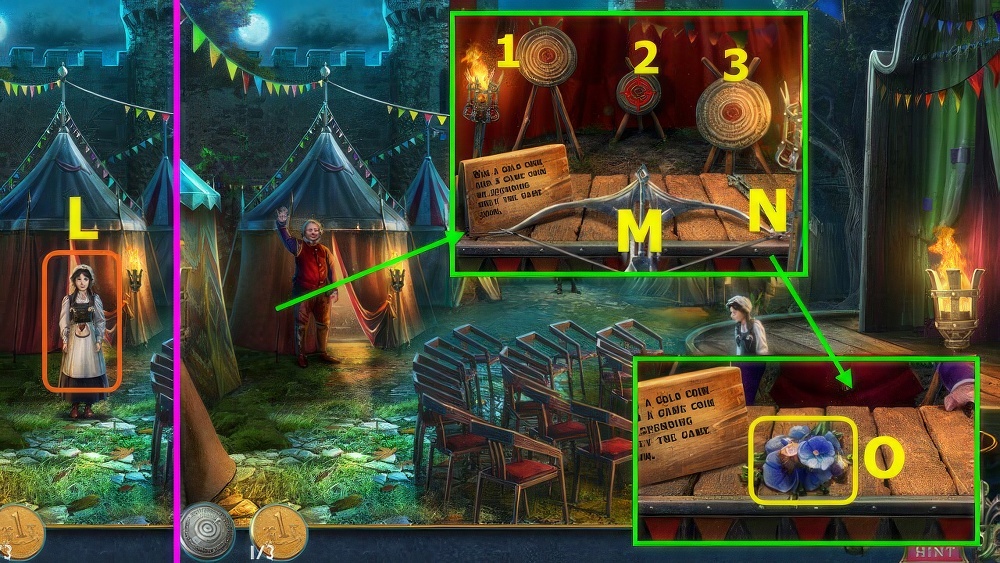
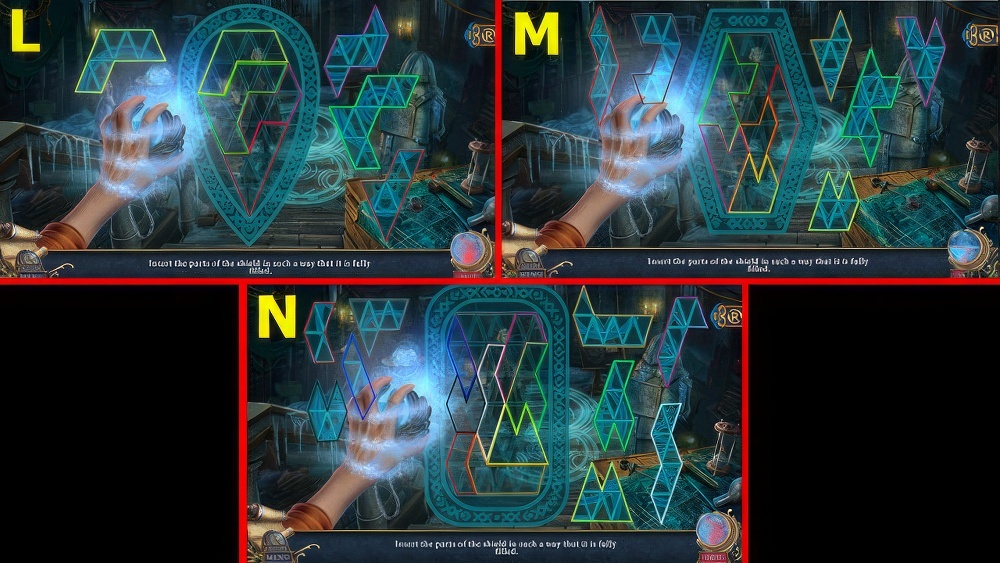
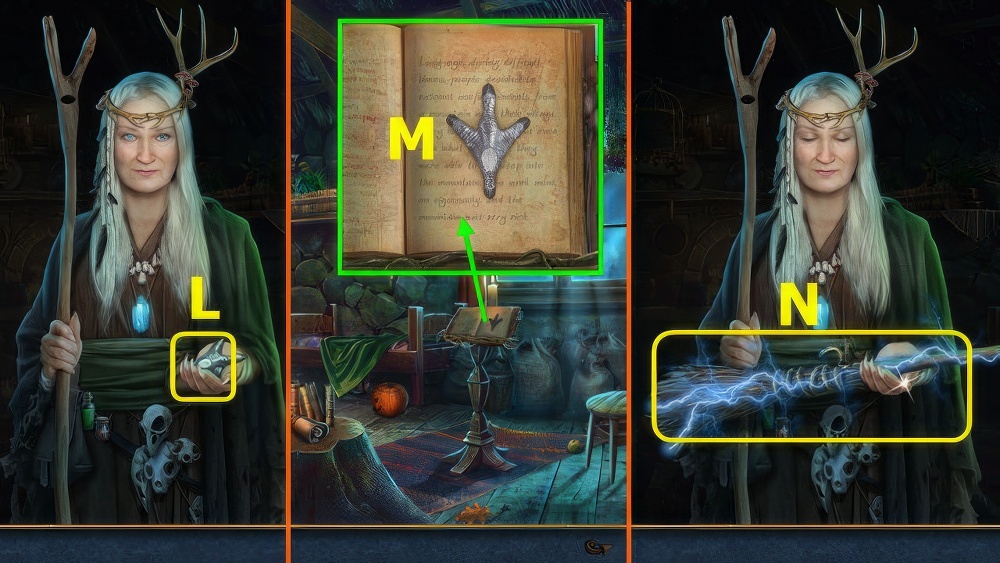
- Use SLINGSHOT, take CANDLE and CHARMS (L).
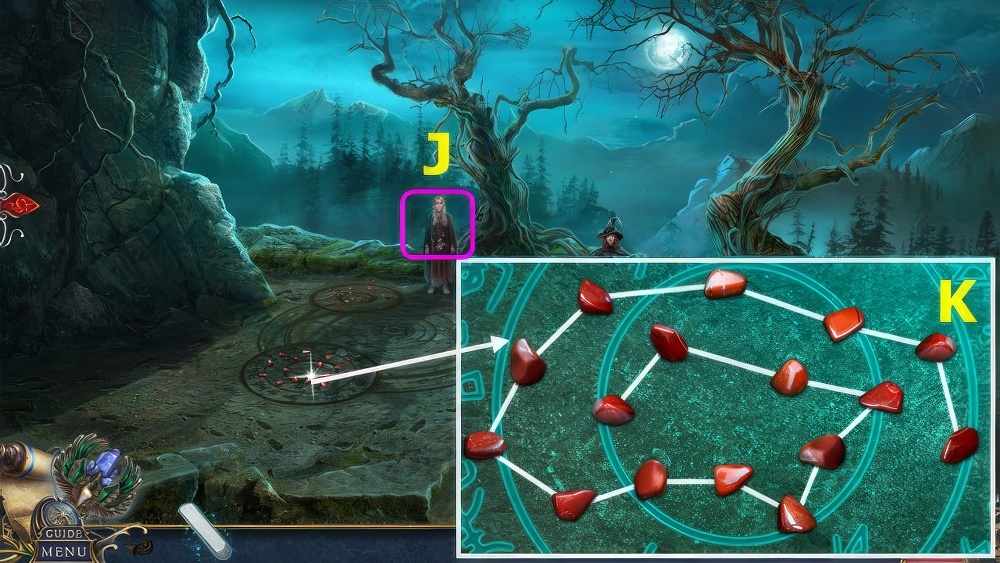
- Select 1-2-3, place CANDLE, solution, take DIARY (M).
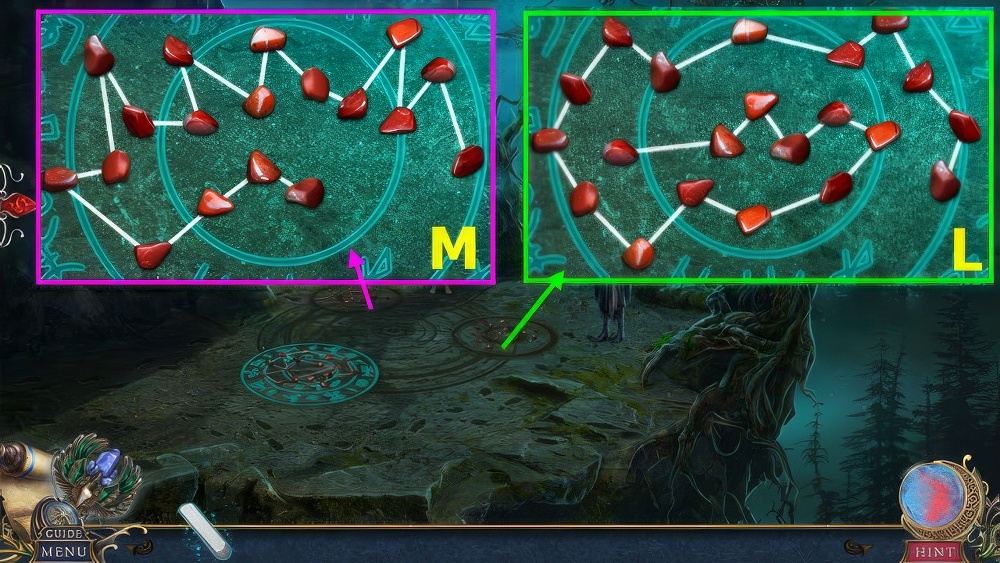
- Select note, place CHARMS on DIARY, solution (N).
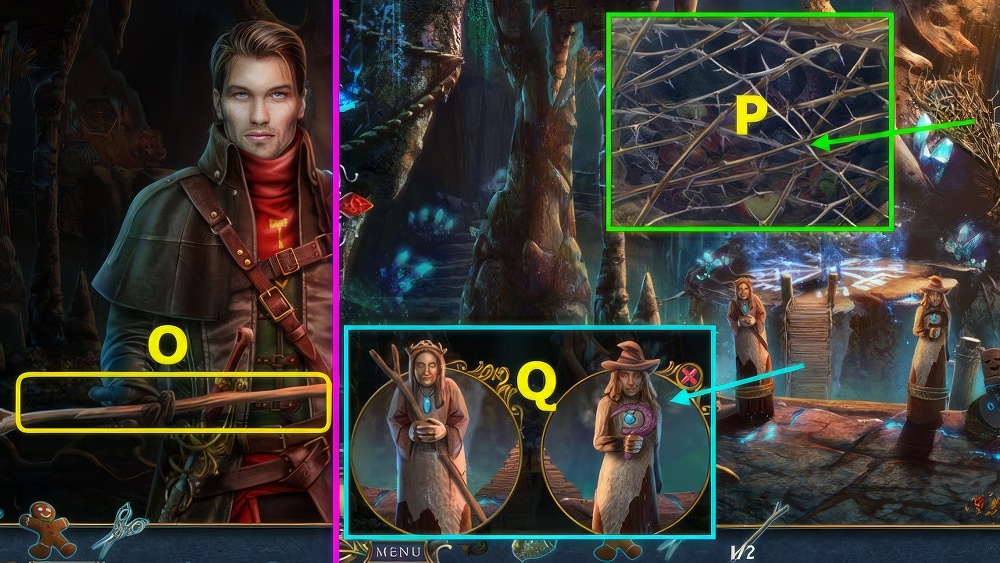
- Read DIARY, take TWINE, open flap, take LABELS.
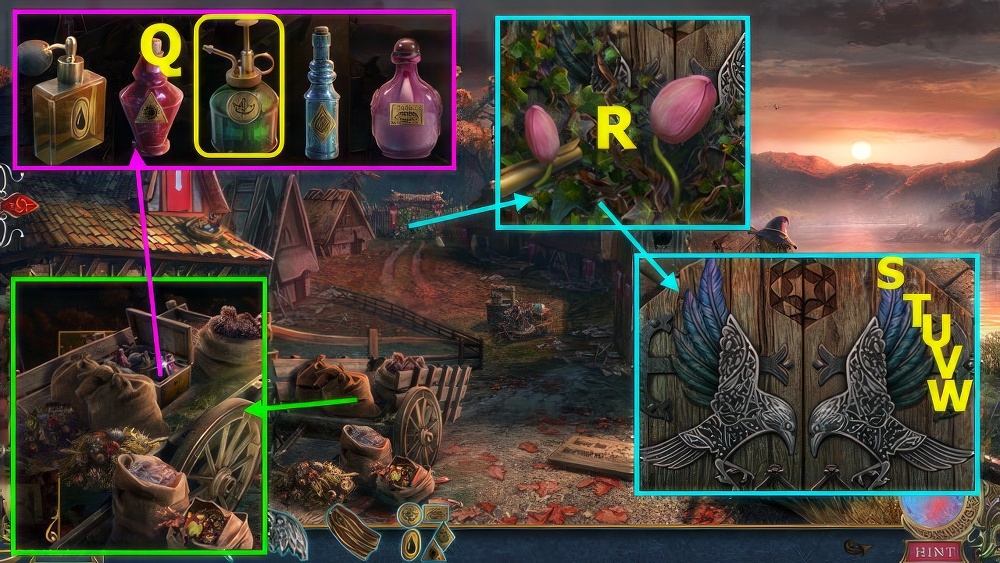
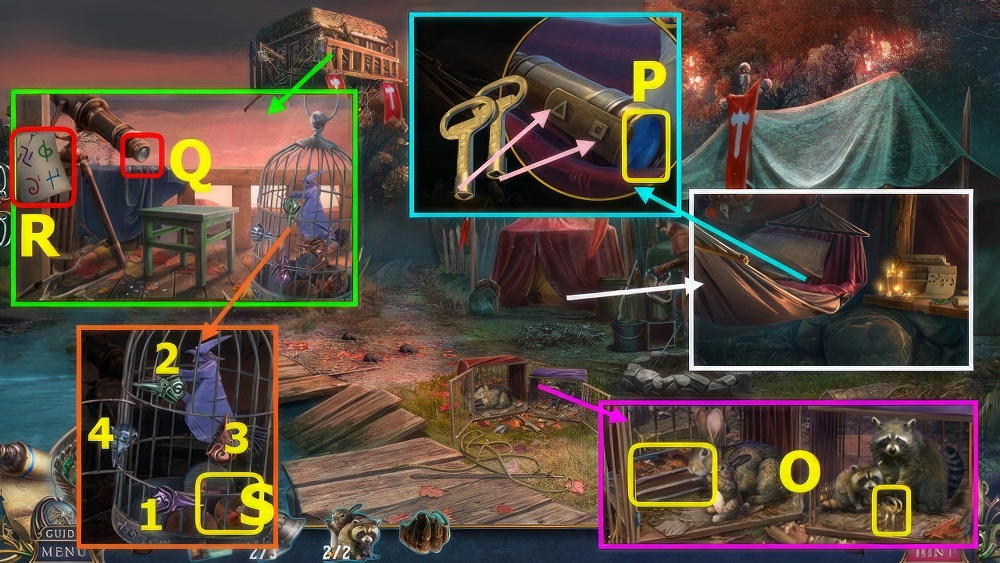
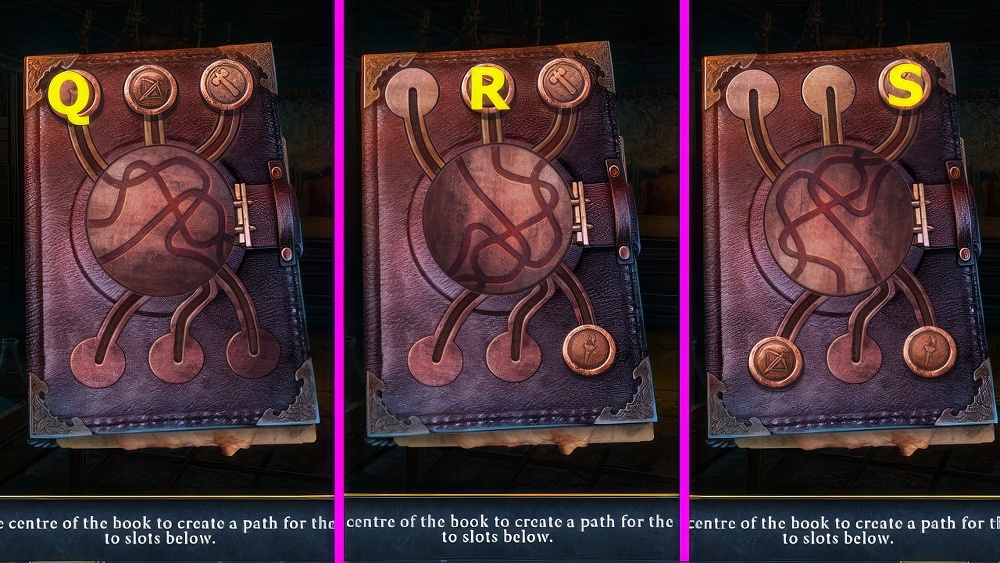
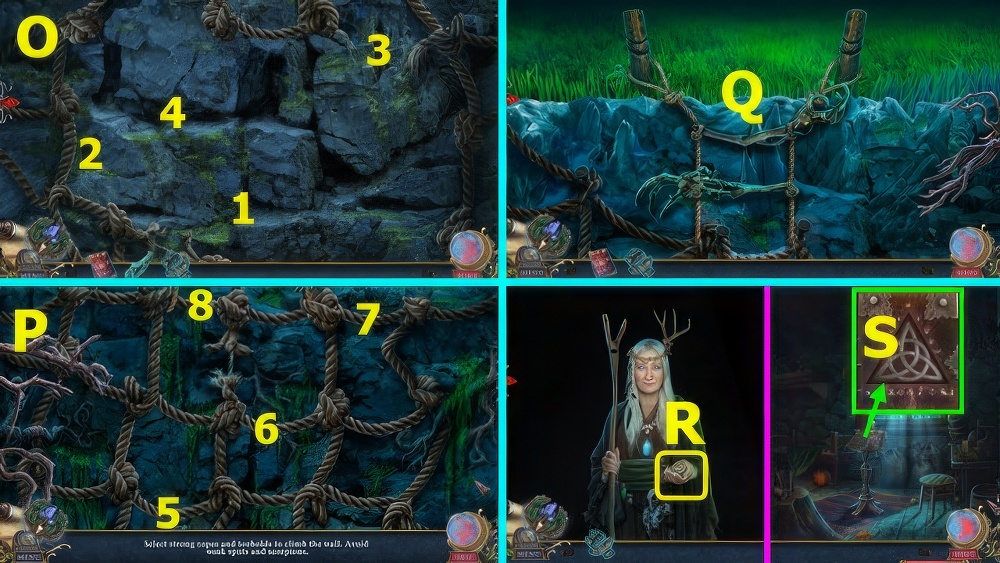
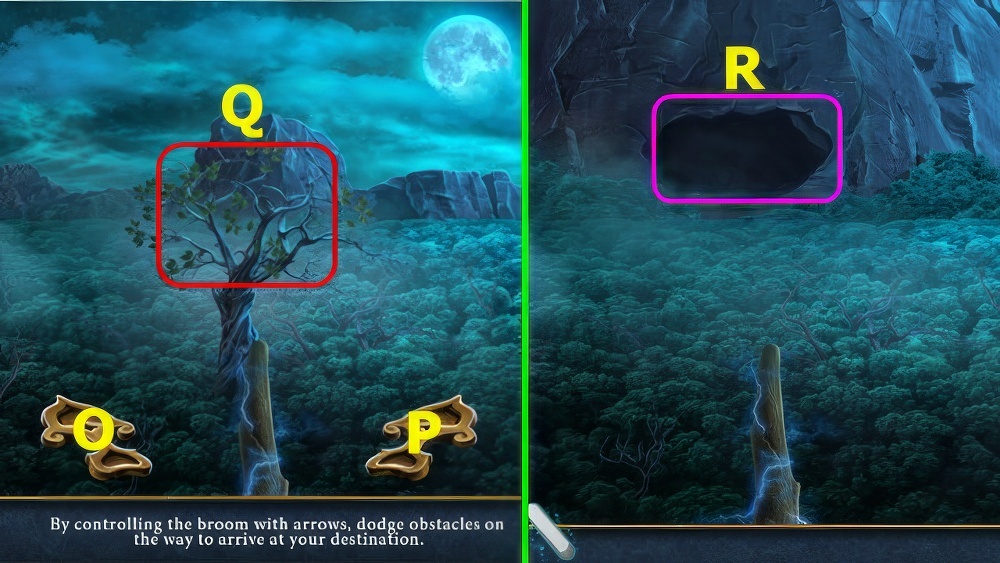
- Place LABELS, solution, take SPRAY REPELLENT (Q).
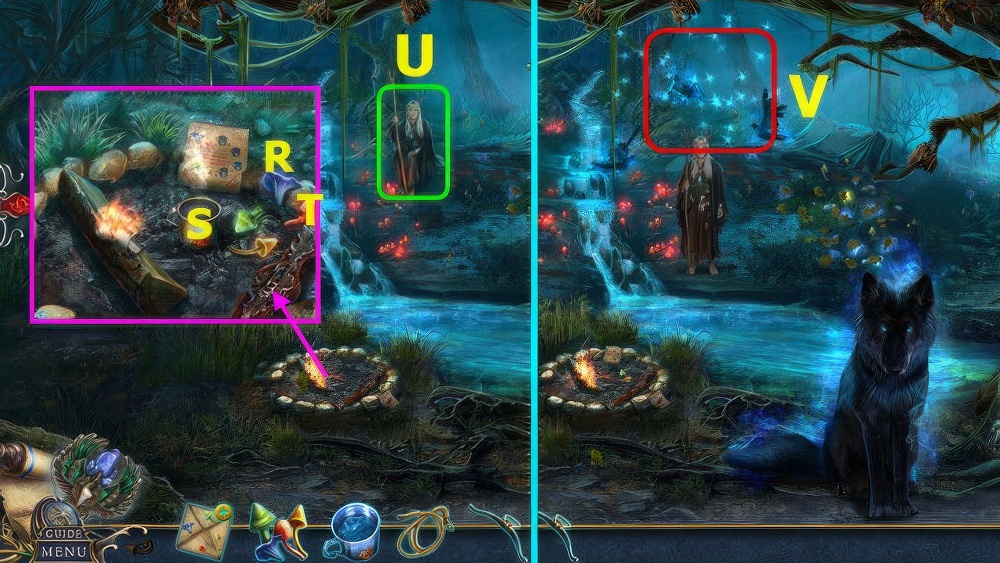
- Read note, use SPRAY REPELLENT (R).
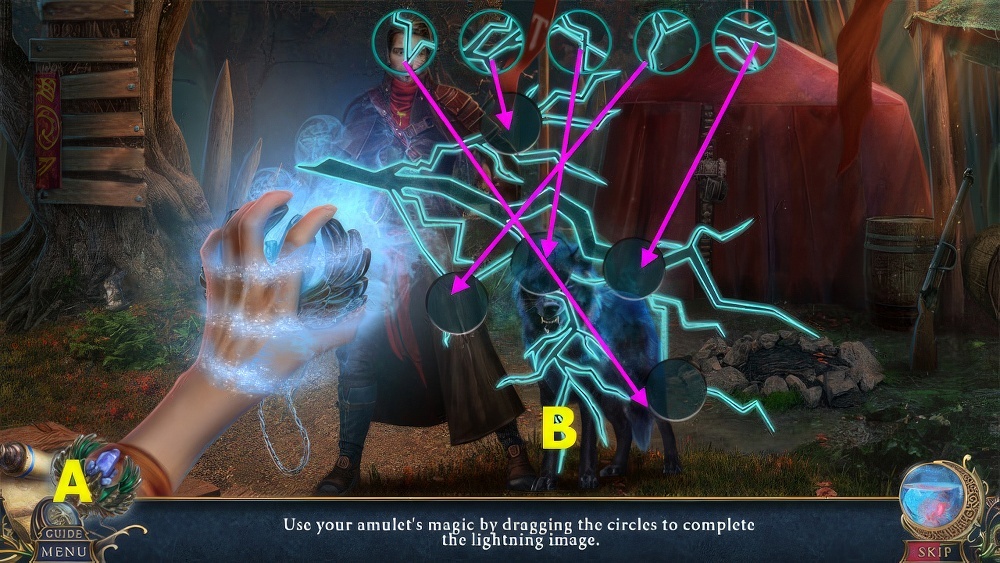
- Place RAVEN TOKEN, select S-T-U-V-T-U-S-T-S.
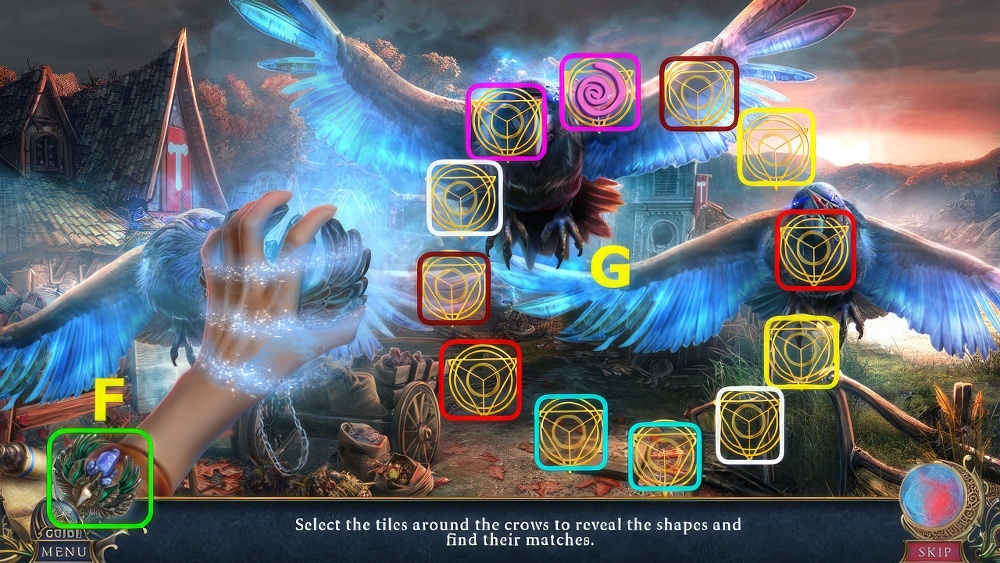
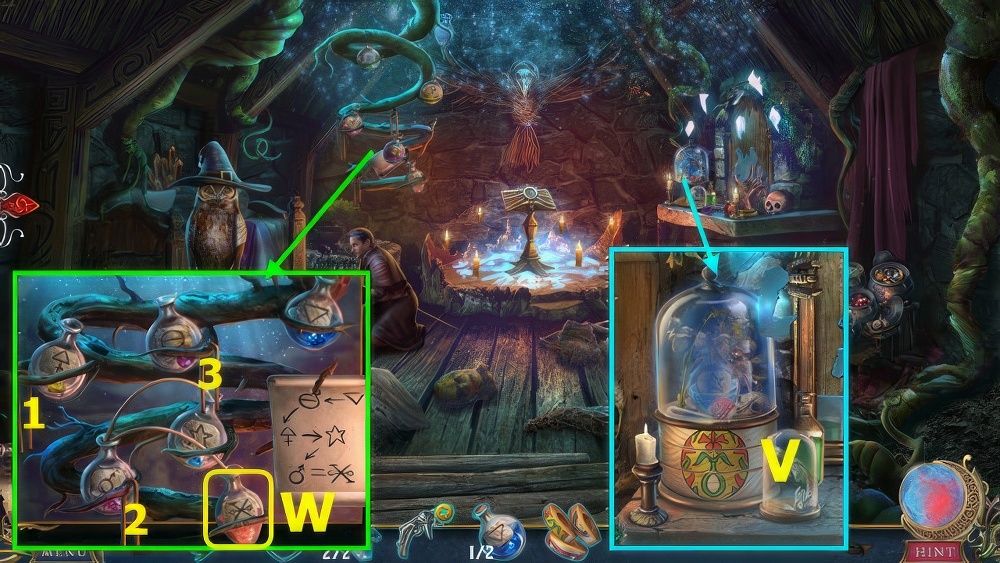
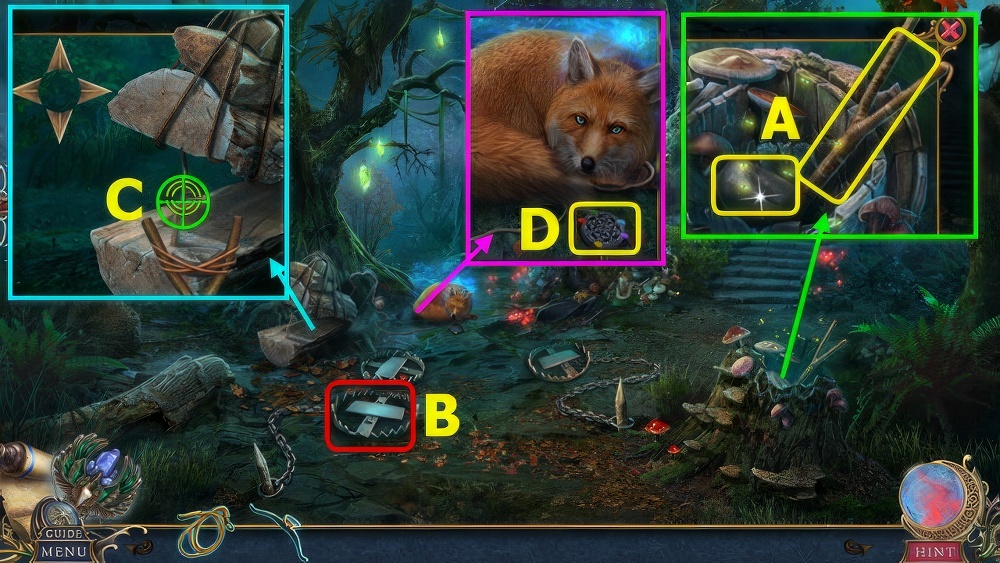
- Select AMULET (F).
- Select pairs (G), this mini-game is randomly generated, your solution may vary.
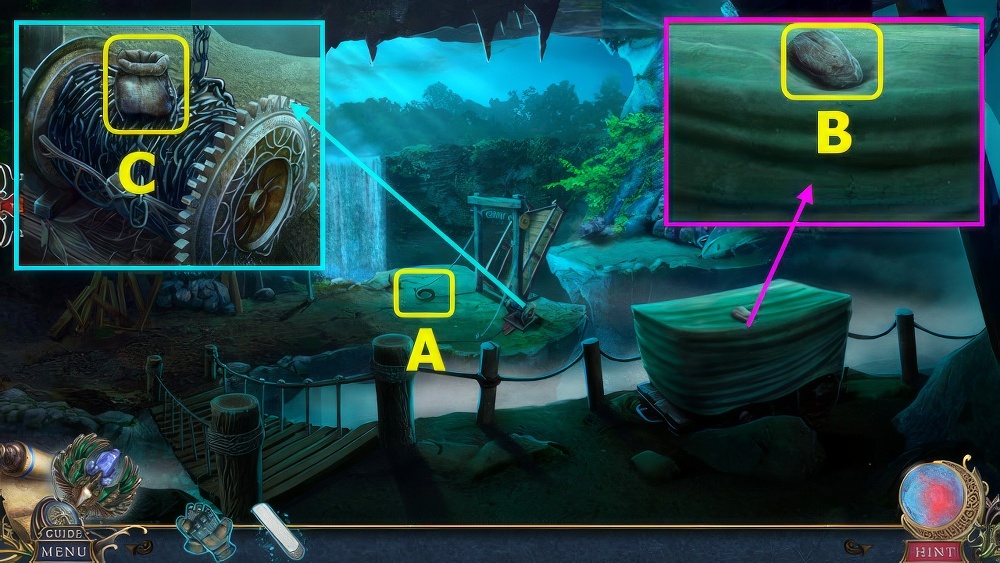
- Go forward.
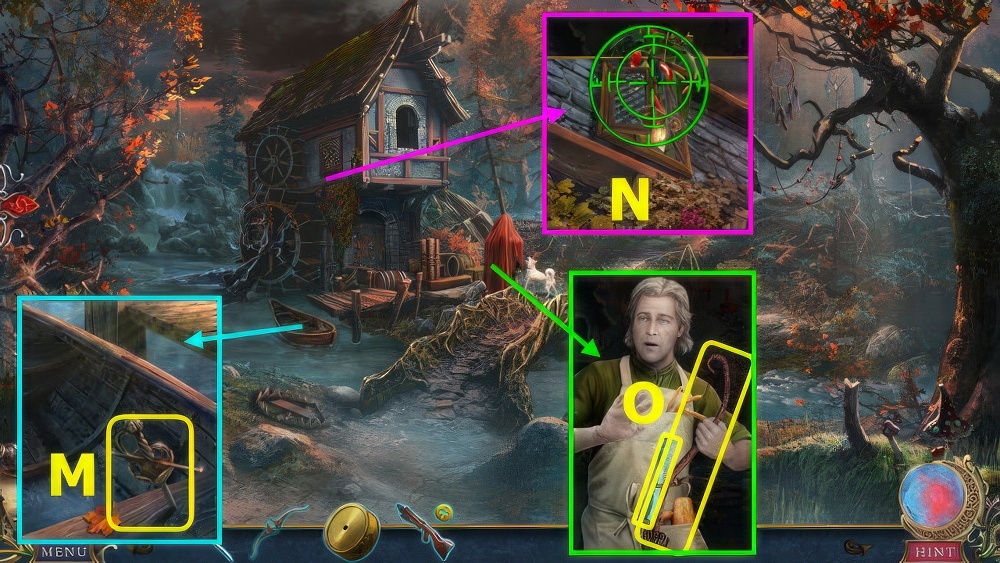
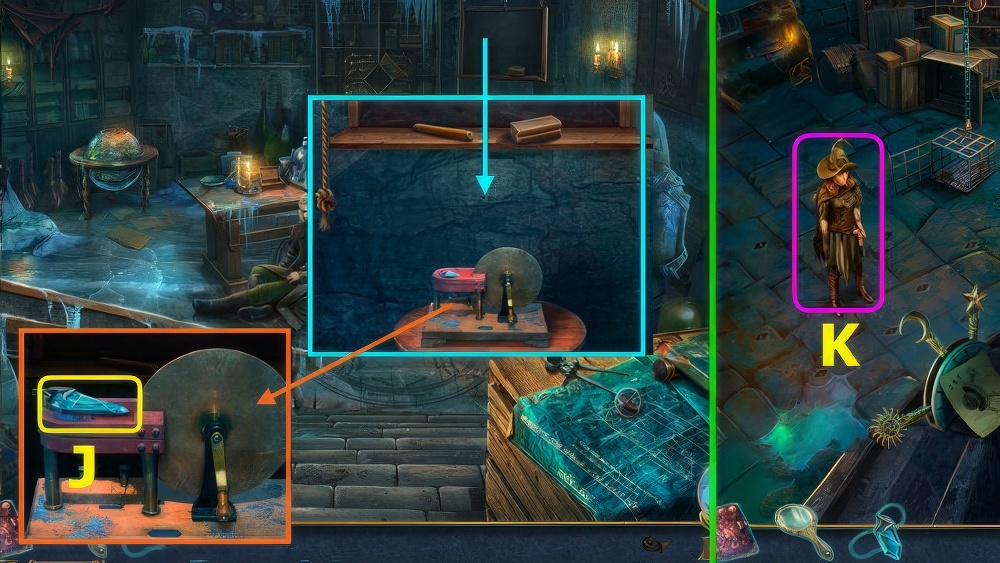
- Take FISHING ROD (H).
- Select FISHING ROD, add TWINE.
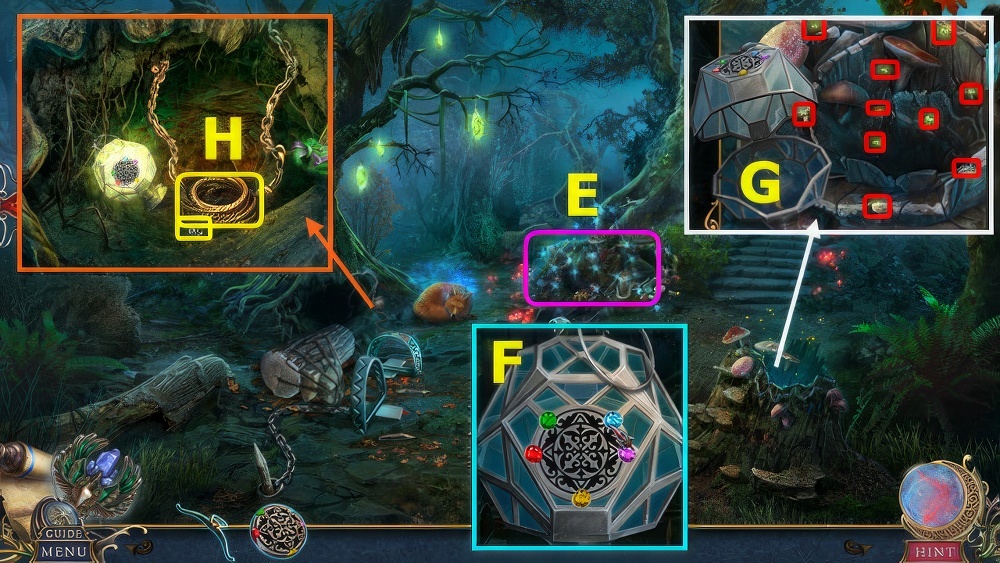
- Use FISHING ROD (I), earn SICKLE.
- Use SICKLE (J).
- Take CROSSBOW PARTS (K).
- Take PADLOCK TUMBLER, read note, take CROSSBOW STOCK (L).
- CROSSBOW PARTS and ARROW on CROSSBOW STOCK, take CROSSBOW.
- Take HILT (M).
- Use CROSSBOW, select when both circles are green (N), earn PEPPERS.
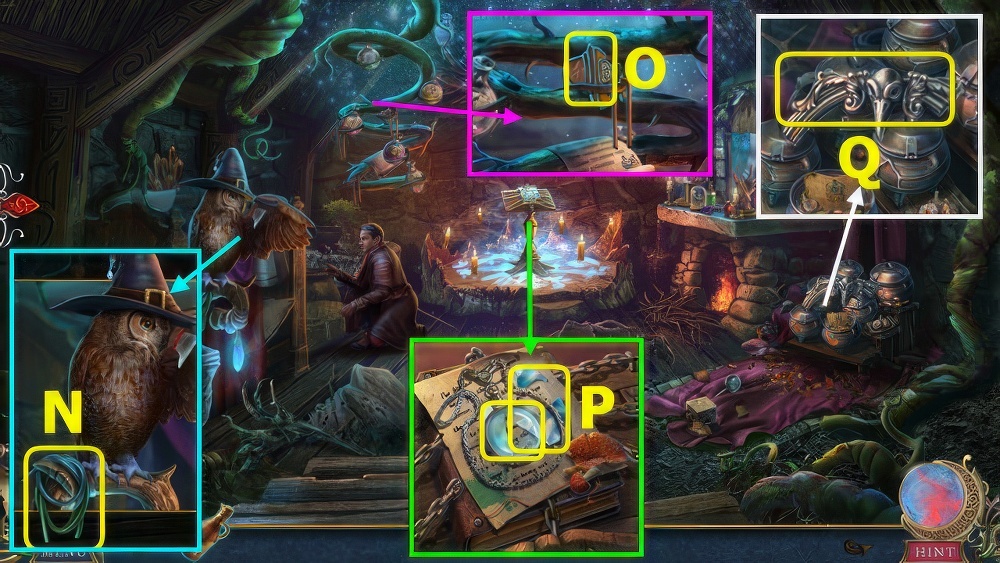
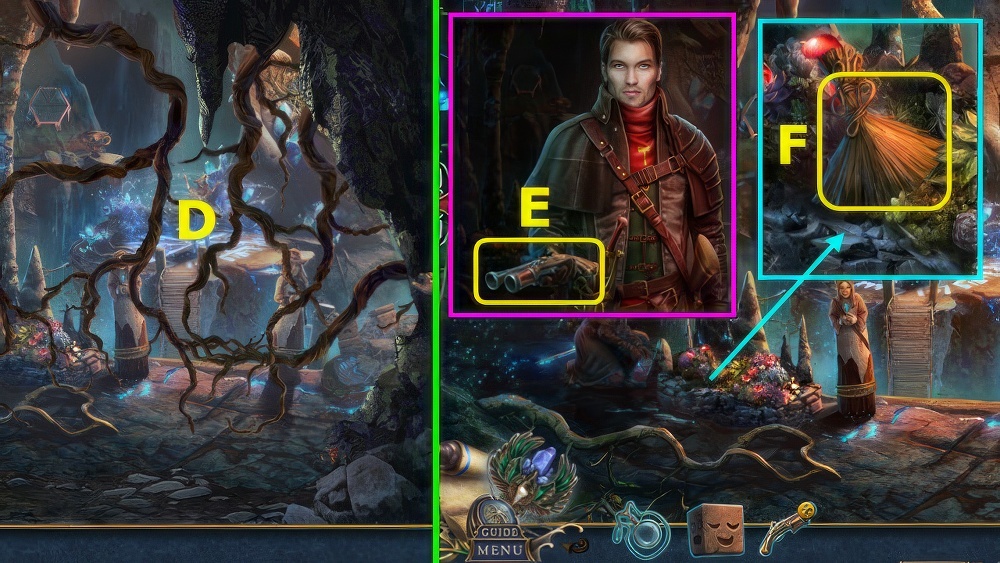
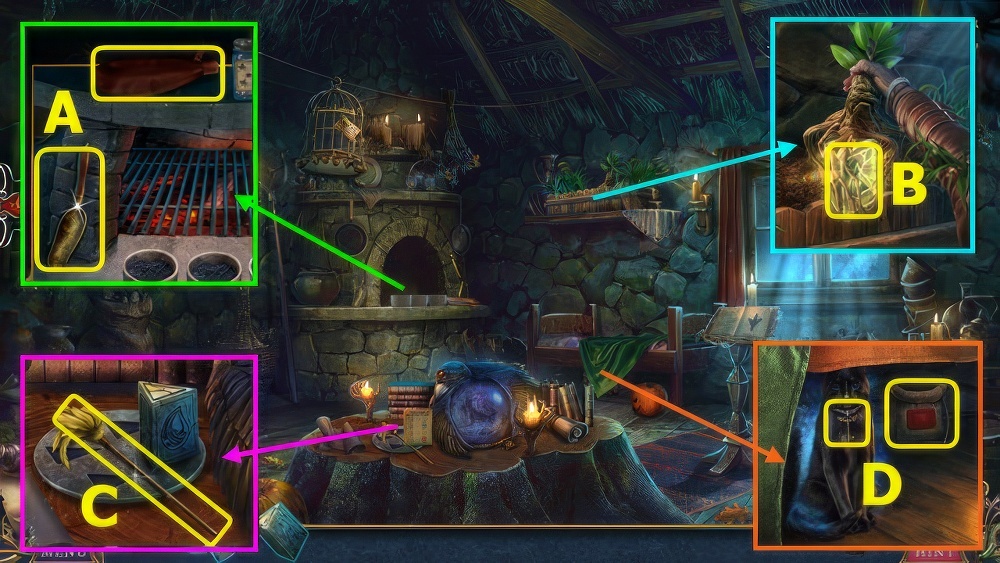
- Remove cape, take and select scroll 4x, earn MAGIC NOTE, take BROOM (O).
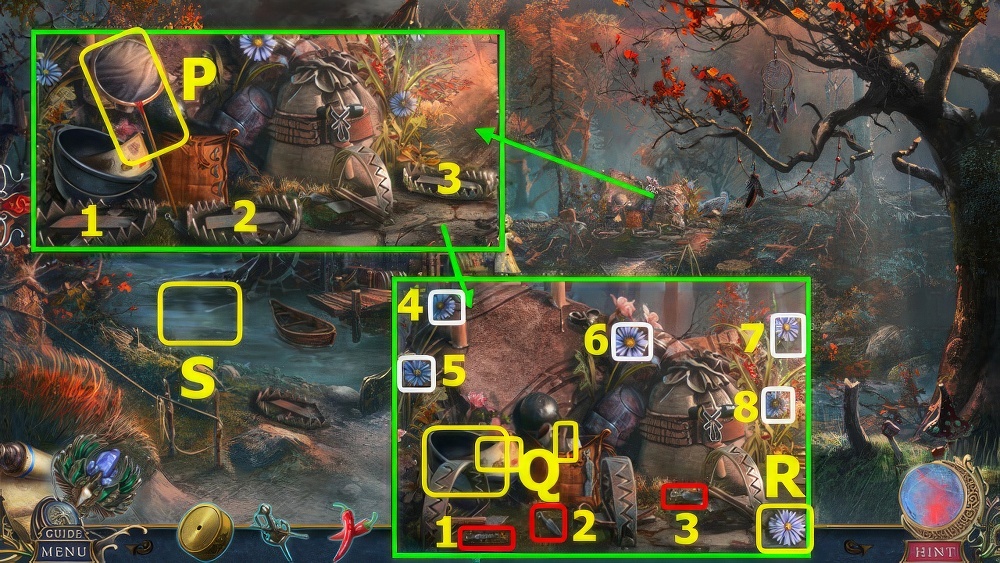
- Use BROOM, select 1-2-3, take NET (P).
- Select 1-2-3, read note, take 1/3 INGREDIENT, ANTIDOTE RECIPE, and CAULDRON (Q).
- Select 4-5-6-7-8, take 2/3 INGREDIENTS (R).
- Use CAULDRON, earn CAULDRON WITH WATER (S).

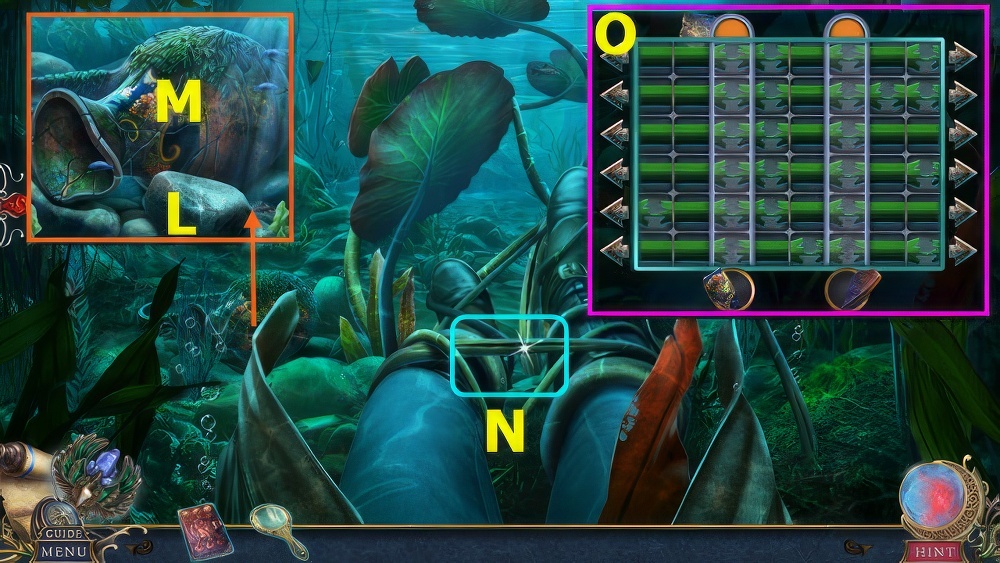
- Use NET, play puzzle, earn 3/3 INGREDIENTS (A).
- INGREDIENTS on ANTIDOTE RECIPE, earn ANTIDOTE INGREDIENTS.
- Read note, use PEPPERS, place CAULDRON WITH WATER and ANTIDOTE INGREDIENTS, move (B-C)-(D-C)-(E-C)-(F-C), earn ANTIDOTE.
- Use ANTIDOTE (G), take MILL TOKEN.
- Use MILL TOKEN, take COIN and 1/3 TOOLS (H).
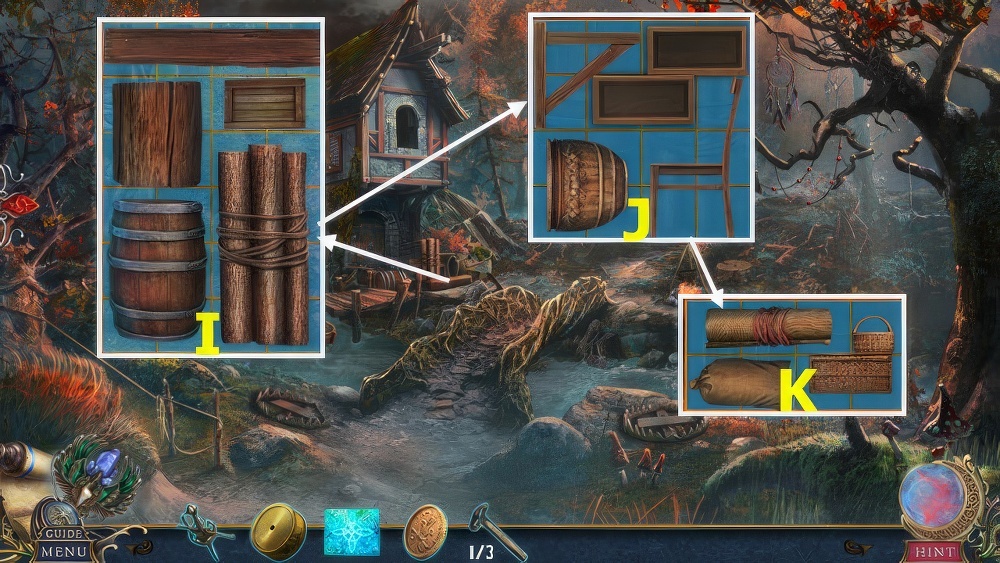
- Solution I-J-K.
- Read note, use MAGIC NOTE, take 2/3 TOOLS (L).
- Place PADLOCK TUMBLER, solution (M).
- Take 3/3 TOOLS (N).
- Use TOOLS (O), move (P-Q)x3.
- Go left, play puzzle.
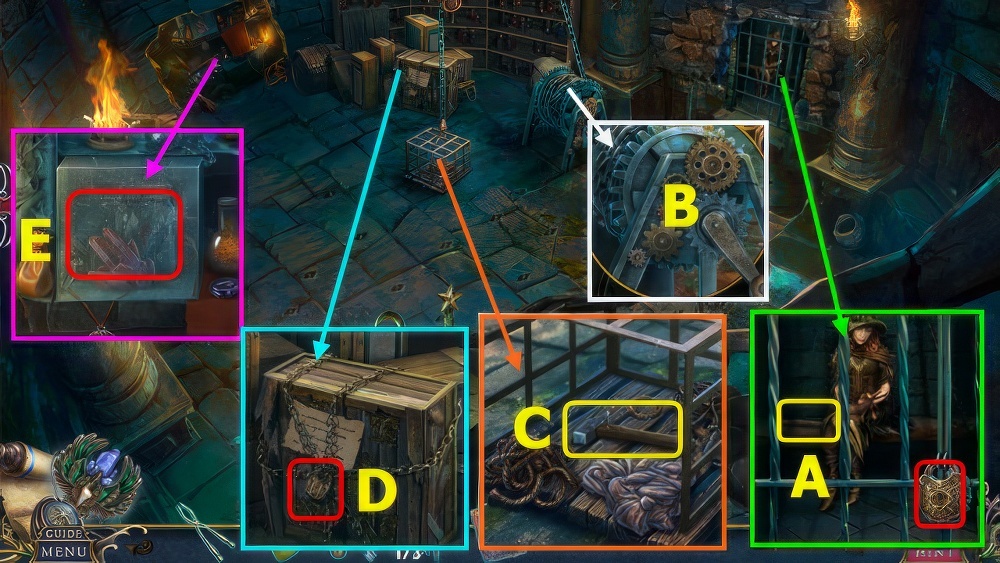
- Select (A).
- Solution (B).
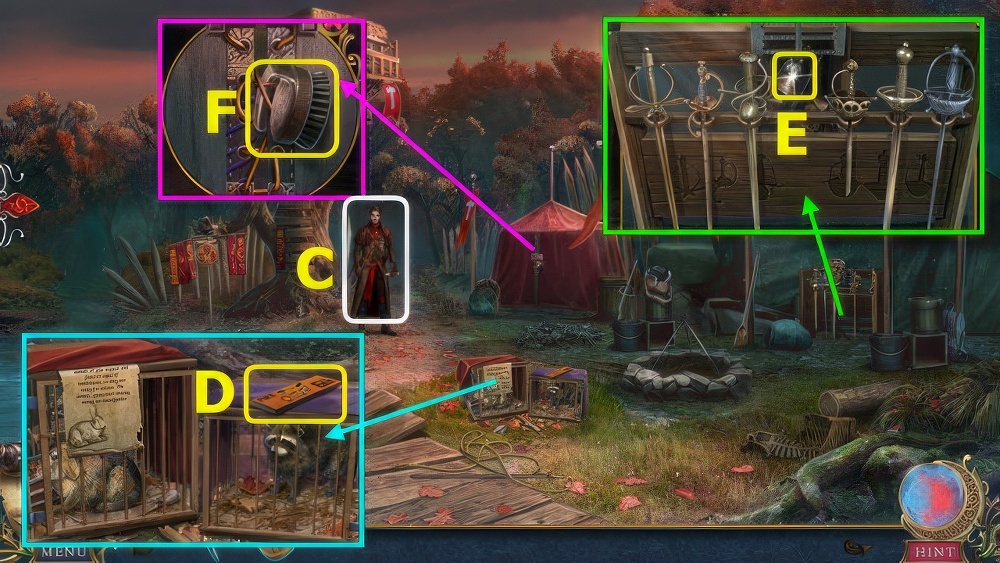
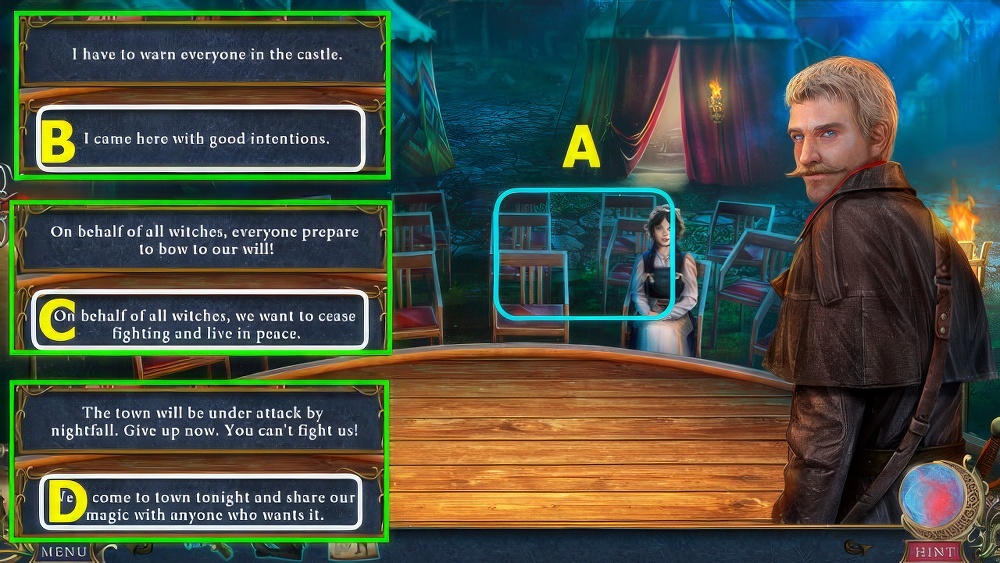
- Talk (C), take WITCHES’ MAP.
- Take MATCHES, read note, open cages (D).
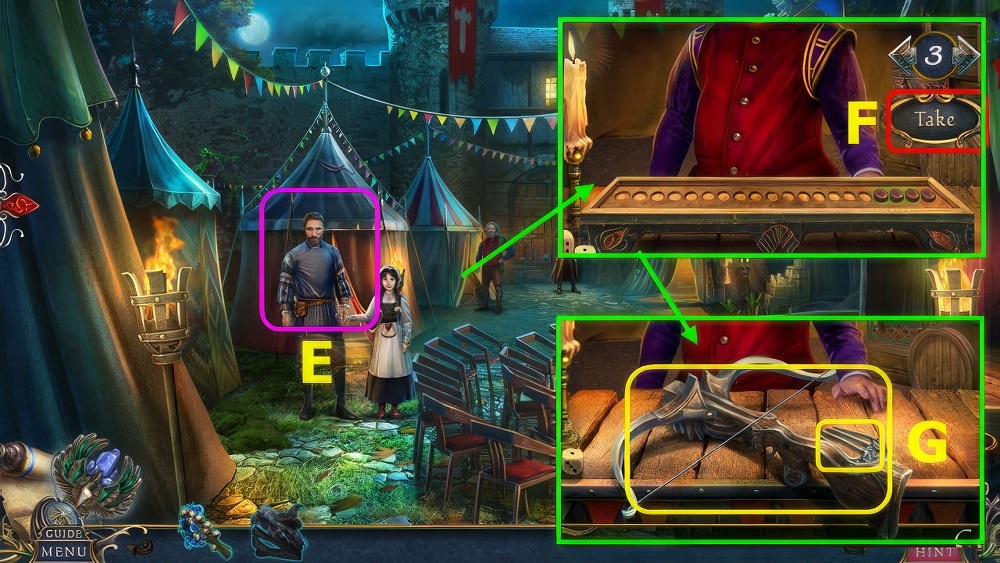
- Take COPPER SKULL, place HILT, solution, take 1/3 BELL (E).
- Take BRUSH (F).
- Take FLAG and 1/2 RABBIT (F).
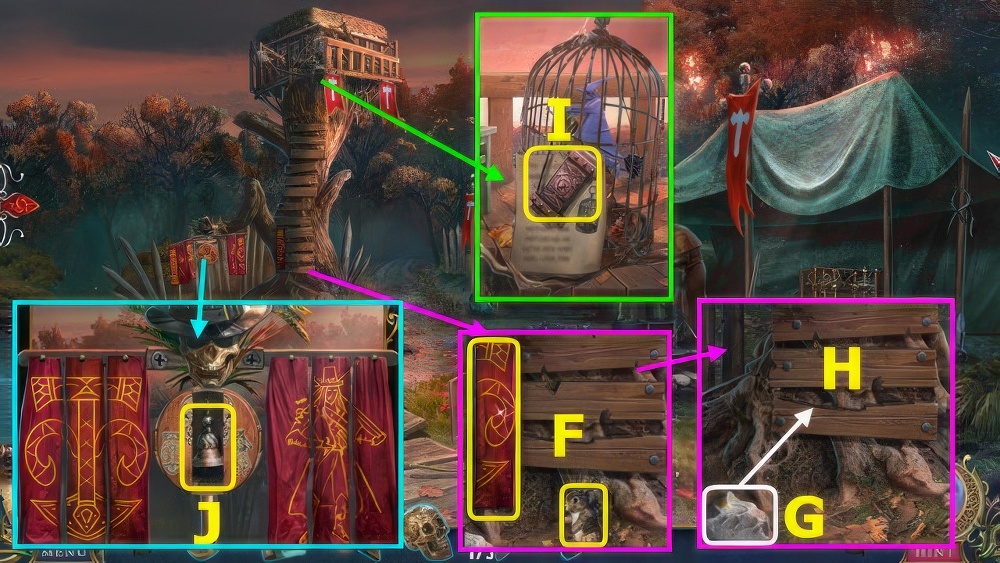
- Select and restore boards, use (G-H), pan up.
- Take HAMMER TOKEN, read note, use BRUSH (I).
- Read note, place COPPER SKULL, use COIN and FLAG, solution, take 2/3 BELLS (J).
- Place HAMMER TOKEN, select 1-7 (K).
- Use MATCHES (L).
- Take 2/2 ANIMALS (M).
- Remove cloth, select note, take PAW, select bell (N).
- Place ANIMALS, take WOODEN BOX and BIZARRE KEYS (O).
- Use BIZARRE KEYS, take LENS (P).
- Place LENS (Q), play puzzle.
- Read note (R).
- Select 1-4, read note, take BOX TOKENS (S).
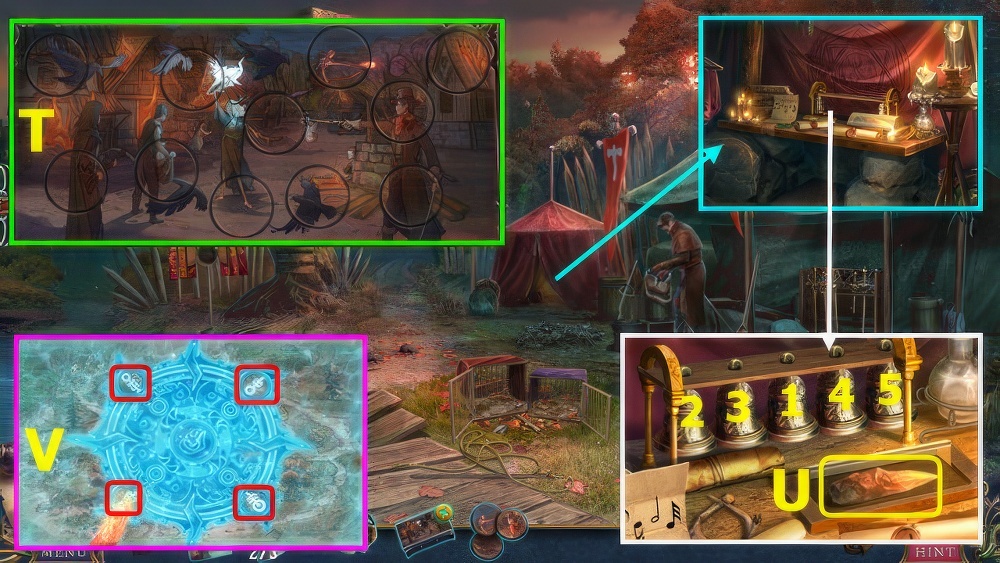
- BOX TOKENS on WOODEN BOX, solution (T), take 3/3 BELLS.
- Place BELLS, select 1-5, take MAGIC CHISEL (U).
- Use MAGIC CHISEL on WITCHES’ MAP 4x (V).
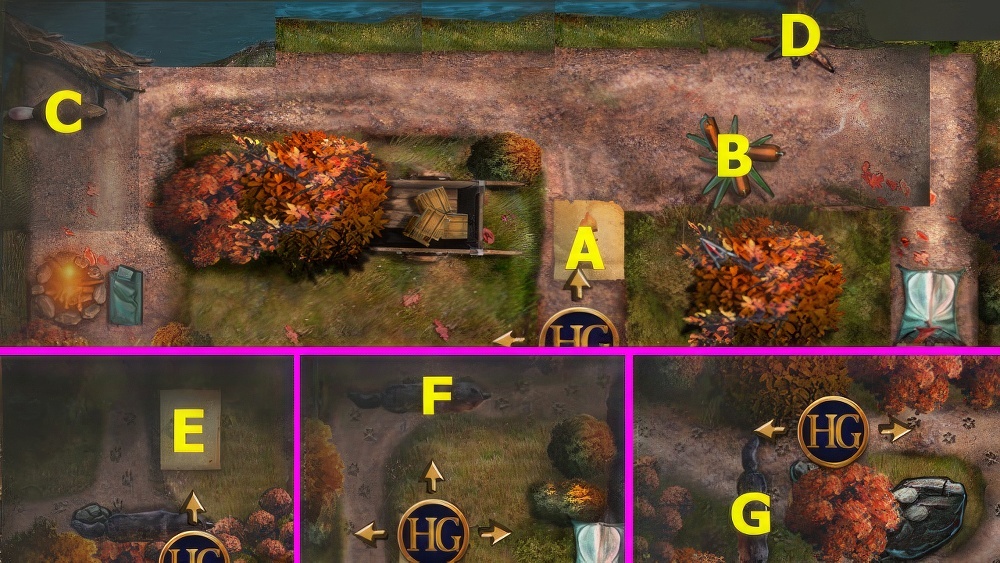
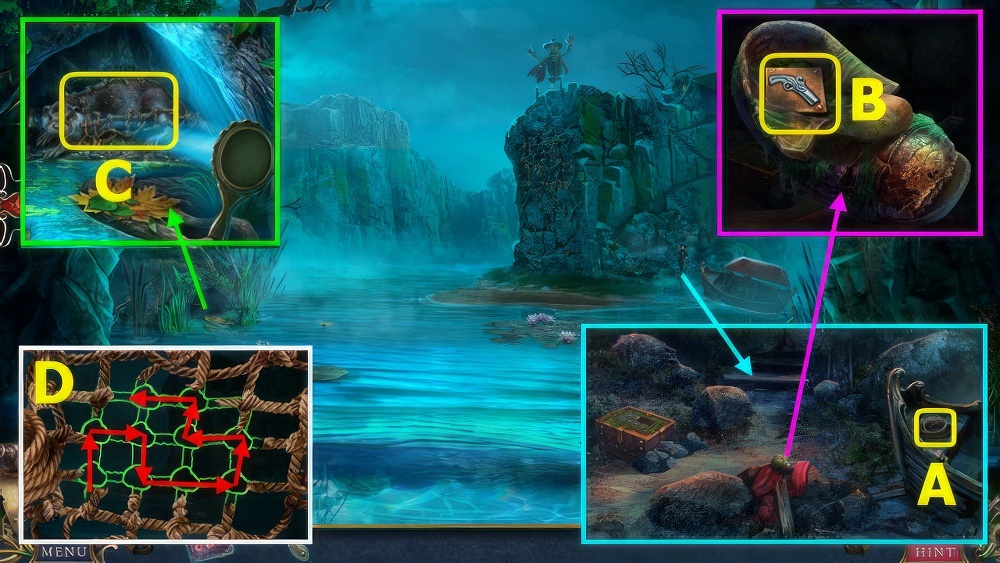
- Go forward, read note (A).
- Go forward, go right 2x, take cattails (B).
- Go up, left 7x, use cattails (C).
- Go right 8x, go forward, use beaver (D).
- Go forward 4x, read note (E).
- When wolf (F) heads right, go forward 5x and left 2x.
- When wolf (G) heads down, go left 3x and up 2x.
- Read note (H).
- Go left 3x, take hammer, read note (I).
- Go right 3x, go forward 4x, use hammer and read note (J).
- Go down 2x, go right, select crystal (K).
- Go right, go forward 2x (L).
- Take ROSE INLAY and LOTION (A).
- Restore sticks (B).
- Restore threads, select 1-2-3 (C).
- Take POKER, place PAW, move (D-E).
- Remove items, place ROSE INLAY, play puzzle (F), earn 1/3 ENCHANTED LEAF and OWL FIGURINE.
- Place OWL FIGURINE, use POKER 2x, earn COALS and BAT TOKENS (G).
- Place COALS, take HONEY (H).
- Use HONEY, earn ANTS, take CAGE (I).
- BAT TOKENS on CAGE, take 2/3 ENCHANTED LEAVES.

- Use ANTS, take WREATH PART, play puzzle, take WITCH SYMBOL (J).
- Place WREATH PART (K), play puzzle, take 3/3 ENCHANTED LEAVES (L).
- Place WITCH SYMBOL and ENCHANTED LEAVES (M).
- Go forward, play puzzle.
- Take HOSE (N).
- Take CAULDRON TOKEN (O).
- Take MONOCLE and 1/2 MIRROR PART (P).
- Take SILVER FRAME, read note (Q).
- Select, use LOTION, take TWEEZERS (R).
- Take BANDAGE (S).
- Use TWEEZERS and BANDAGE, earn 2/2 MIRROR PARTS, take 1/2 HYDROGEN (T).
- Place CAULDRON TOKEN (U), play puzzle, earn BELL JAR DISKS.
- Place BELL JAR DISKS, solution (V), earn 2/2 ALCHEMICAL INGREDIENTS.
- Read note, place ALCHEMICAL INGREDIENTS, solution, add HOSE, select 1-2-3, take COPPER POTION (W).
- COPPER POTION on SILVER FRAME, take COPPER FRAME.

- Place MIRROR PARTS, solution, add COPPER FRAME, take BOOK TOKEN (A).
- Place BOOK TOKEN, solution (B), remove chains, take BOOK OF SHADOWS.
- Open BOOK OF SHADOWS, play puzzle, take HATCH KEY.
- Take STONE HEAD, move items, use HATCH KEY (C).
- Go right.
- Select vines 2x (D).
- Take NET GUN (E).
- Take DUSTER (F).

- Use DUSTER, take BASKET, read note (G).
- Place STONE HEAD, select Hx3-Ix3, take NET and SHOVEL.
- NET on NET GUN.
- Use SHOVEL, take GINGERBREAD MAN and TRIANGULAR TILE (J).
- Use BASKET, play puzzle, take LANTERN (K).
- Place LANTERN (L) and TRIANGULAR TILE, use MONOCLE, select 1-2-3.
- Solution (M), read note, take SCISSORS and SMOKE BOMBS.
- Give SMOKE BOMBS, take 1/2 WOODEN STAFF (O).
- Use SCISSORS (P), play puzzle, earn 2/2 WOODEN TOOLS.
- Place WOODEN TOOLS (Q).
- Use NET GUN, solution, select (A).

- Select (C).
- Solution (D-E-F).
- Talk (G), take AMULET and GLASSES.
- GLASSES on AMULET, solution (H).
- Take RECIPE (I).
- Use GINGERBREAD MAN, take KNIFE and BROKEN CUP (J).
- Take ARROW SHAFT, use BROKEN CUP, earn LEAKPROOF CUP (K).
- Use KNIFE, earn 1/4 MUSHROOM (L).
- Use LEAKPROOF CUP, earn CUP WITH WATER, Use KNIFE, earn 2/4 MUSHROOMS (M).
- Use KNIFE, take WOOD SHAVINGS (N).
- Use WOOD SHAVINGS and ARROW SHAFT, move (O-P), earn CROSSBOW PART.
- Select CROSSBOW PART, take STRING and BOW.
- Select 1-5, use KNIFE, earn 3/4 and 4/4 MUSHROOMS (Q).
- CUP WITH WATER and MUSHROOMS on RECIPE, take COMPLETE RECIPE.
- Use COMPLETE RECIPE, move (R-S)-(T-S), take RECOVERY POTION.
- Give RECOVERY POTION (U).
- Select (V).

- Solution (W).
- Go right (X).
- Take STICK and STONE (A).
- Use STICK, earn SLINGSHOT (B).
- STRING and STONE on SLINGSHOT, earn ARMED SLINGSHOT.
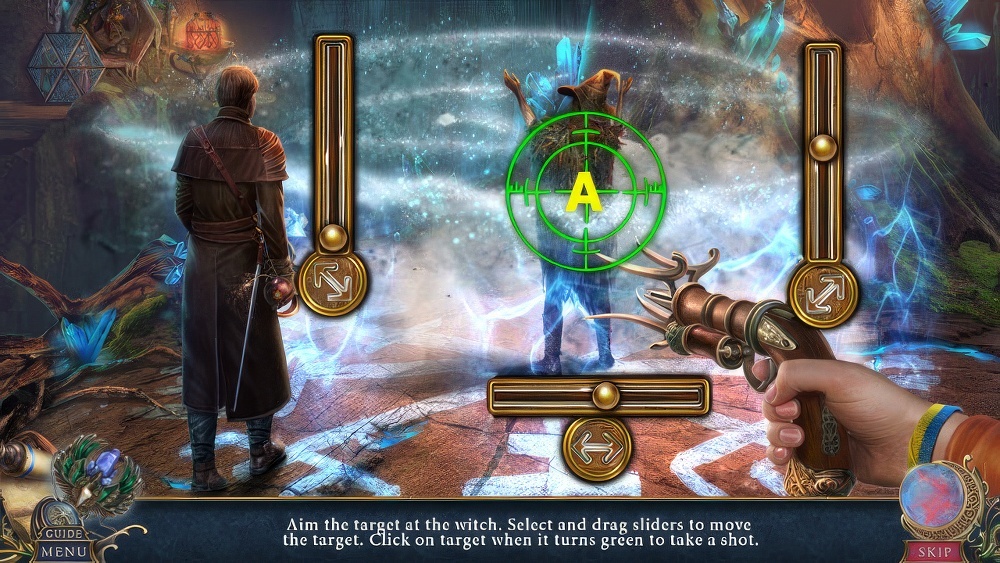
- Use ARMED SLINGSHOT, position target as shown, select (C).
- Take MEDALLION (D), pan left.
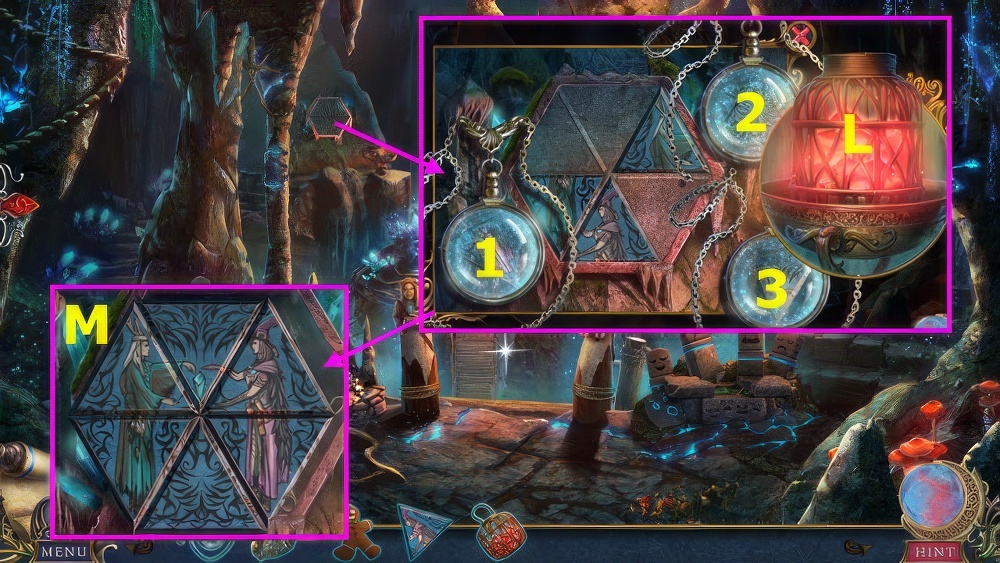
- Play puzzle, earn LAMP (E).
- MEDALLION on LAMP, solution (F), take LAMP.
- Use LAMP, select each firefly (red), take FIREFLIES (G).
- Use FIREFLIES, take ROPES and 1/2 KEY (H).
- Play puzzle, earn KETTLE WITH WATER (I).
- Place KETTLE WITH WATER, take 2/2 KEYS (J).
- Use KEYS (K).
- Select (L).

- Solution M-N-O.
- Go right.
- Take BRANCH, read posters (A).
- Use BRANCH, earn BAG (B).
- Select BAG, solution (C), read notes, take GLUE and GAME COIN.
- Use BOW, earn PLANKS (D).
- Select nest, take 1/3 GOLD COIN, move 3 birds to nest, take NEST WITH CHICKS (E).
- Use PLANKS and ROPES (F).
- Place NEST WITH CHICKS (G).
- Take MAP PARTS (H).
- Place MAP PARTS and GLUE (I).
- Solution (J), take MAP.
- Give MAP (K).
- Go left.
- Talk (L).
- Use GAME COIN, select crossbow (M).
- Select arrow (N), then target 1-2-3.
- Take FLAX, 2/3 COINS, and GAME COIN (O).

- Use GAME COIN, select the ball in cup 3x (P-Q-P).
- Take 3/3 COINS (R).
- Give COINS (S), take MASKS.
- Use MASKS (T), play puzzle, take WITCH COSTUME.
- Take SCRIPT (U).
- Select (V).
- Use SCRIPT (A).
- Select B-C-D.
- Talk (E), take SCHEME.
- This mini-game is randomly generated, your solution may vary.
- Select 3-3-3-3 (F).
- Take 1/2 CROSSBOW and HAIR ORNAMENT (G).

- Place WITCH COSTUME and SCHEME, play puzzle, select (H).
- Select (I).
- Solution (J), earn FULL HUNTER COSTUME.
- Use FULL HUNTER COSTUME (K).
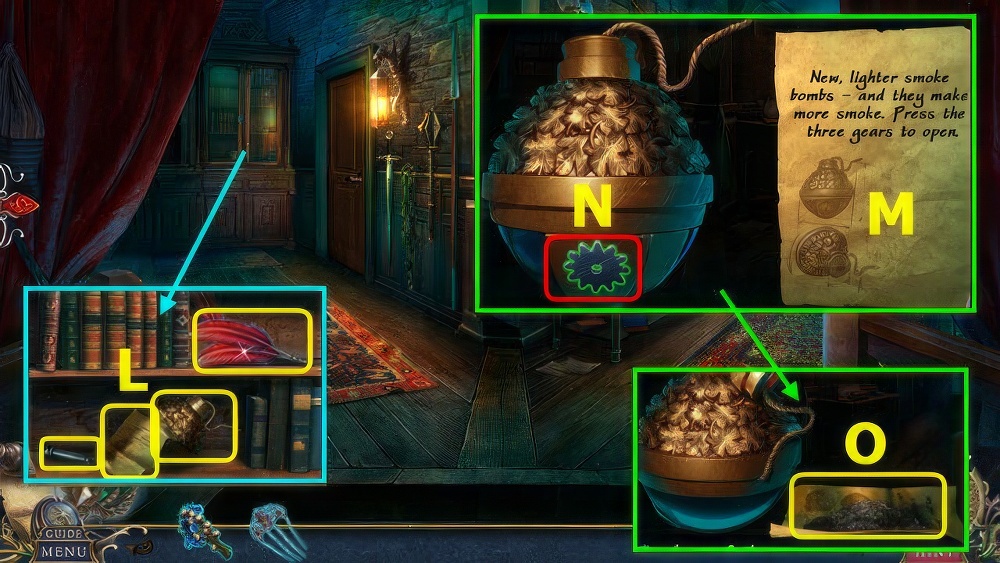
- Use HAIR ORNAMENT, take BOMB HINT, HANDLE, SMOKE BOMB, and FEATHERS (L).
- BOMB HINT on SMOKE BOMB, read hint (M), select bomb to turn, pressing 3 gears (N).
- Select hint and bomb, take POWDER (O).
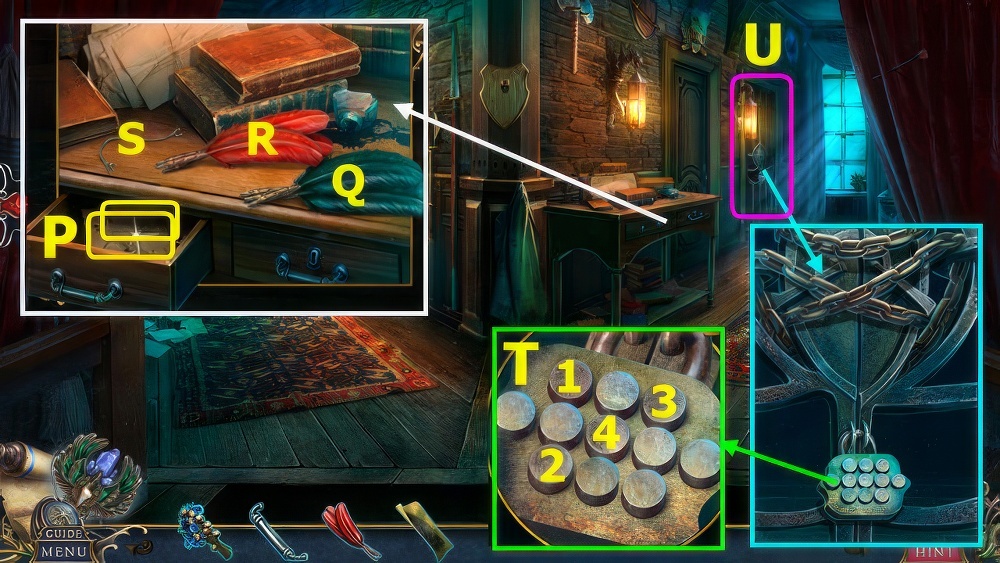
- Use HANDLE, select items, take CODE and LEVER HANDLE (P).
- Place FEATHERS, move (Q-R)-(S-R), take FEATHER DUSTER.
- Use POWDER and FEATHER DUSTER, select 1-4 (T).
- Go right to Prison (U).
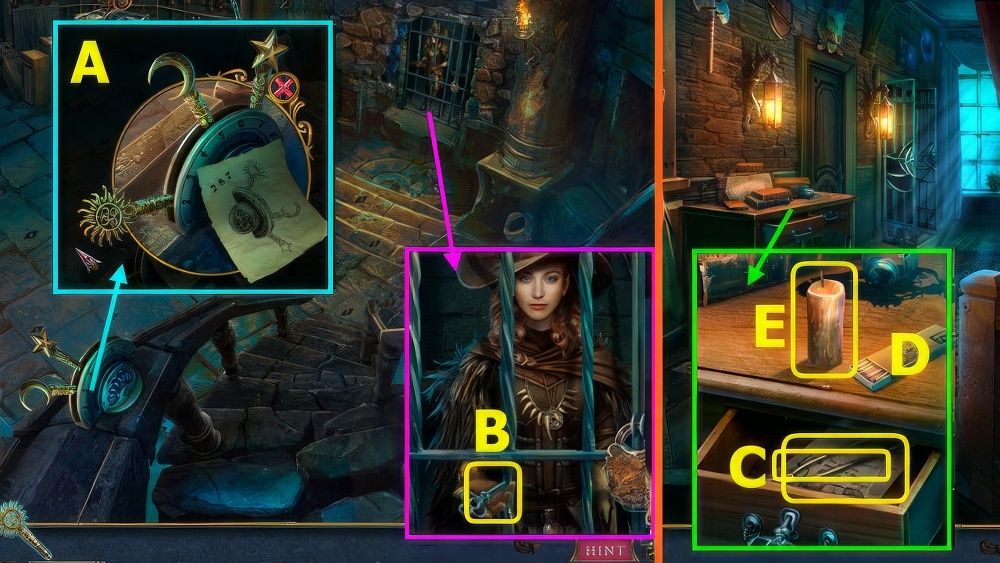
- Use LEVER HANDLE and CODE, solution (A).
- Take TABLE KEY (B).
- Walk down.
- Use TABLE KEY, select items, take TONGS and HINT (C).
- Select (D), take CANDLE (E).
- Go right to Prison.
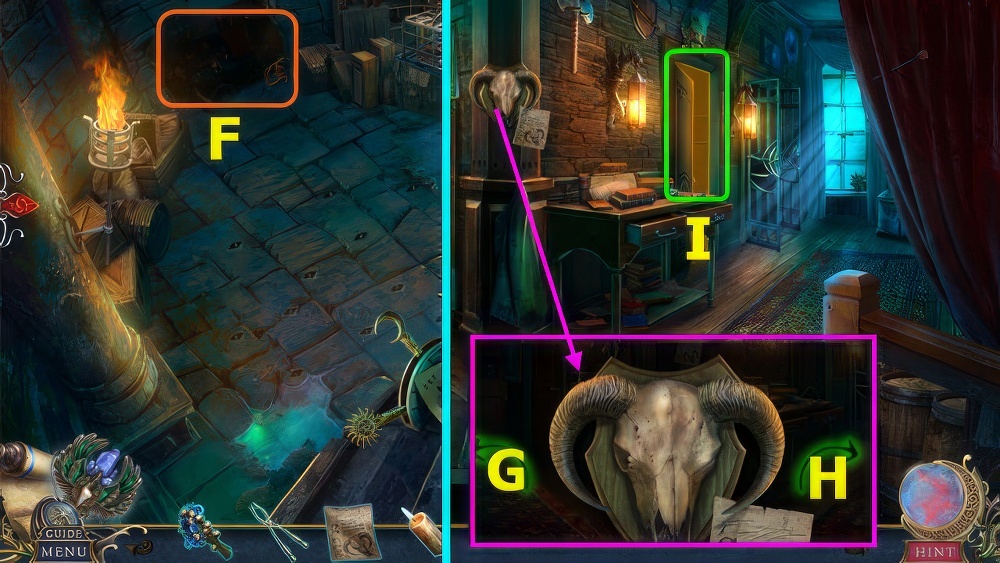
- Use CANDLE (F), play puzzle, earn SKULL.
- Walk down.
- Place SKULL and HINT, select Hx2-G-Hx3.
- Go right to Hansel’s Office (I).
- Take KNOBS, place FLAX (J), select J-K-L, take FLAX OIL.
- Use KNOBS (M), play puzzle, earn SAFE PART.
- Place SAFE PART, select N-Ox7-Nx4, take HANSEL’S DIARY and JAIL KEY.
- Select HANSEL’S DIARY, rotate disc as shown, select (Q-R-S).
- Read notes, take 1/3 LABORATORY TOKEN and HANSEL’S DIARY.
- Go to Prison.
- Use FLAX OIL and JAIL KEY (A), take HAMMER HANDLE.
- Select (B).
- Open cage, move items, place HAMMER HANDLE, take HAMMER (C).
- Read note, use HAMMER (D), open, take BRONZE.
- Use HAMMER (E), play puzzle, earn MAGNIFYING GLASS.
- Go to Hansel’s Office.
- Use MAGNIFYING GLASS, select (F).
- Press 1-2-3, read note, take CROSSBOW INSERT, 1/2 GUN, and MOLD.
- Place MOLD and BRONZE, select switch, use TONGS (G), take 2/3 LABORATORY TOKEN.
- Place CROSSBOW INSERT (H), read journal, play puzzle, earn 3/3 LABORATORY TOKEN.
- Walk down.
- Place LABORATORY TOKEN (I).
- Go left (J).
- Select (K).
- Solution L-M-N.

- Select O-P, take SYMBOLS (Q).
- Place SYMBOLS, select 1-3 (R), take 2/2 GUNS and 1/2 V.
- Place GUN, solution, take TWO VS (S).
- Read note, take MIRROR, read note, take SALAMANDER FOOD (A).
- Use SALAMANDER FOOD, take FIRE SALAMANDER (B).
- Use MIRROR, select, take BUNDLE (C).
- TWO VS on BUNDLE, read note, take FASTENER.
- Place FASTENER, select rope (D).
- Read note, take CASKET PART (E).
- Use FIRE SALAMANDER (F), select.
- Take ACID (G).
- Read note, use ACID, select (H).
- Place CASKET PART, solution (I).
- Read note, take HALF CRYSTAL.
- This mini-game is randomly generated.
- Place HALF CRYSTAL, select lever, take SELINA’S CRYSTAL (J).
- Return to Prison.
- Give SELENA’S CRYSTAL (K).
- Use (L-M), take SHARD.
- Use SHARD (N).
- Solution (O).
- Take ROPE (A).
- Remove leaf, take 1/2 CHEST TOKEN (B).
- Use MIRROR, take BROKEN NET (C).
- ROPE on BROKEN NET, solution (D), take NET.
- Use NET (E).
- Select, take FISH (F).
- Use FISH, take 2/2 CHEST TOKENS (G).
- Select (H).
- Place CHEST TOKENS (I).
- Solution (J).
- Read note, take SCARECROW PICTURE (K).
- Give SCARECROW PICTURE (L).

- Remove items, take STICKS and GLOVES (M).
- Select (N).
- Use GLOVES, select 1-4 (O).
- Select 5-8 (P).
- Use STICKS (Q).
- Give HANSEL’S DIARY, take TRIANGLE (R).
- Place TRIANGLE (S), play puzzle, earn FIRE ELEMENT.
- You earn UNCHARGED FIRE ELEMENT.
- Read note, take WATER and TROWEL (A).
- Read note, use TROWEL and GLOVES, take 1/3 ELEMENT (B).
- Read note, take CAT TOY (C).
- Use CAT TOY, take BIRDCAGE KEY and RED POWDER (D).
- Read note, use BIRDCAGE KEY, take 2/3 ELEMENTS (E).
- Place RED POWDER, select F-G-H.
- Place UNCHARGED FIRE ELEMENT (I), select (J), earn 3/3 ELEMENTS.
- Place ELEMENTS, use WATER (K).
- Take DRAGON CLAW (L).
- Place DRAGON CLAW (M), play puzzle, earn CHALK.
- Take BROOM (N).
- Avoid the trees (Q), solution P-P-O-O-O-O-P-O-P-P-O.
- Go forward (R).
- Take 1/2 WHEEL PART (A).
- Take STONE (B).
- Take BAG (C).
- Use STONE and GLOVES, earn GLASS (D).
- Use GLASS, remove stones, read book, take RED STONE, take 2/2 WHEEL PART (E).
- Place and select WHEEL (F).
- Place RED STONE (G) and BAG (H), play puzzle.
- Take RED STONES (H), earn PICK.
- Use PICK (I).
- Go left.
- Give RED STONES (J).
- Use CHALK, solution (K).
- Use CHALK, solution (L).
- Use CHALK, solution (M).
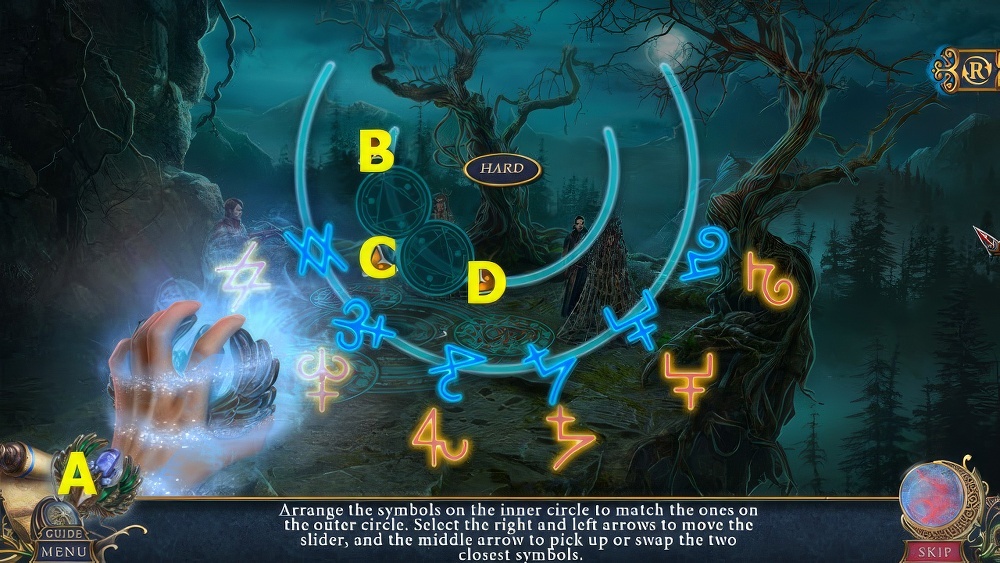
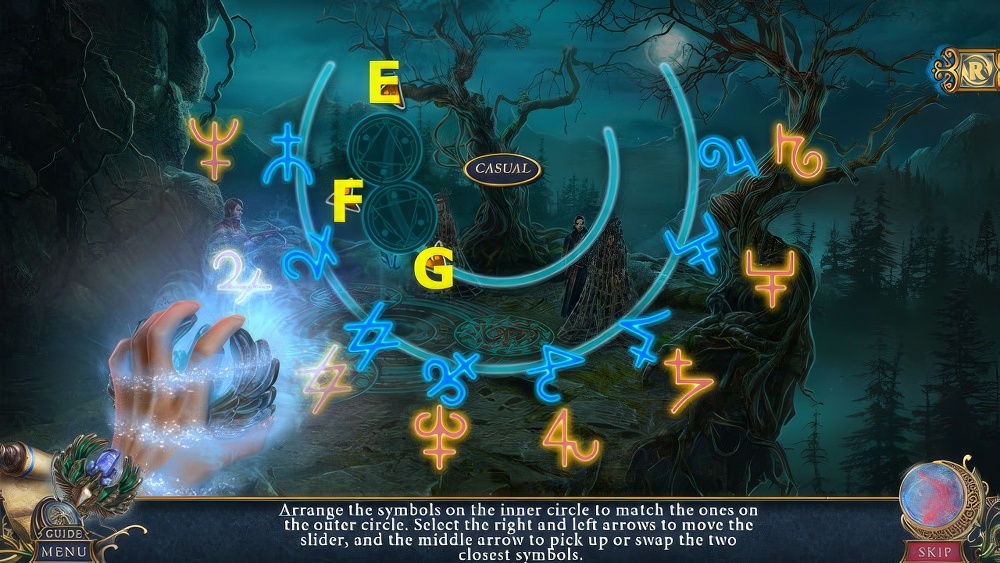
- Select (A).
- Casual solution Bx2-C-Dx4-C-Bx2-C-D-C-Bx2-C-B-C-D-C.
- Hard solution Ex2-F-Gx5-F-Ex5-F-Gx2-F-Gx2-F-Ex5-F-Gx3-F-Ex3-F-Gx2-F-Ex2-F.
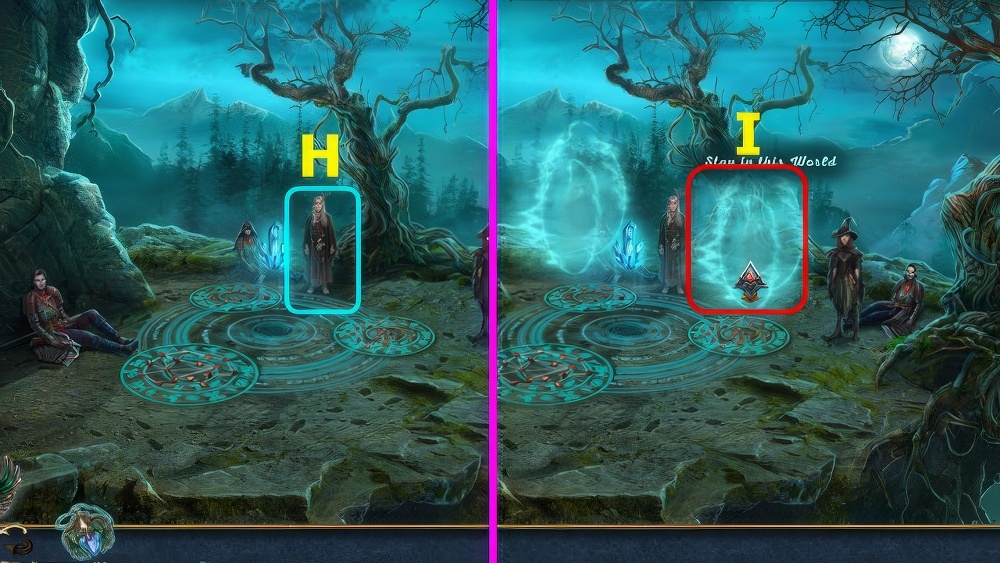
- Give AMULET (H).
- Select (I).
- Walkthrough Bonus Chapter, at the link below.


