
Bridge to Another World 5: Through the Looking Glass – The game’s walkthrough begins with the protagonist’s cat playing with fireclay figures, and suddenly the figure passes through a mirror. The Red King and the White Queen have been fighting for centuries. When you enter the looking glass, you find yourself in the centre of the action. You play as Alice who was prophesied to become the red Queen, and end the eternal battle. If you are stuck and do not know how to pass any of the locations, on our site you can watch a walkthrough of Bridge to Another World 5: Through the Looking Glass, and complete the eternal struggle.
Bridge to Another World 5: Through the Looking Glass – Walkthrough
Below you can see the full walkthrough of Bridge to Another World 5: Through the Looking Glass, namely the main story and the bonus chapter.

- Move (A), look.
- Talk to the Red King (B), eat a piece of pretzel (C).

- Take MIRROR SHARD (D).
- Take CANDLEHOLDER (E).
- Look (F).
- MIRROR SHARD on CANDLEHOLDER, take CLOCK KEY.
- Clear (G), inspect.
- Move (H-I), open, find CANDLE 1/3 and BELLOWS.
- Use BELLOWS (J), collect MATCHES.
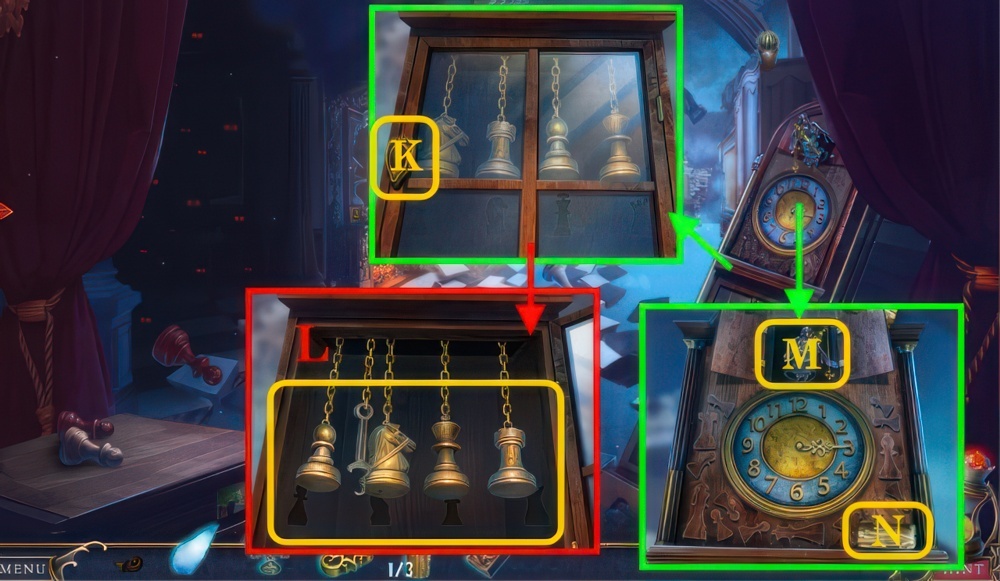
- Use CLOCK KEY (K), open.
- Walkthrough (L).
- Take WRENCH.
- Look (M), take CANDLES 2/3 (N).

- Look (O), take CANDLES 3/3.
- CANDLES and MATCHES on CANDLEHOLDER, take LIT CANDLES.
- Use LIT CANDLES (P), play puzzle, receive SCROLL.
- Inspect SCROLL, find ‘A’ SIGNET RING and ROOM PICTURE.

- Align ROOM PICTURE (Q).
- Use WRENCH (R), slide.
- Move (S), find DIARY.
- ‘A’ SIGNET RING on DIARY, open.
- Take map (T), use MIRROR SHARD.
- Play puzzle, take CLOCK CODE.

- Place CLOCK CODE (U).
- Walkthrough (V): 12-5-6-3-7-4.
- Take DOOR KEY.

- Use DOOR KEY (W).
- Select the chess piece that matches the glowing one.
- Walkthrough (X): 1-12.
- Go forward.

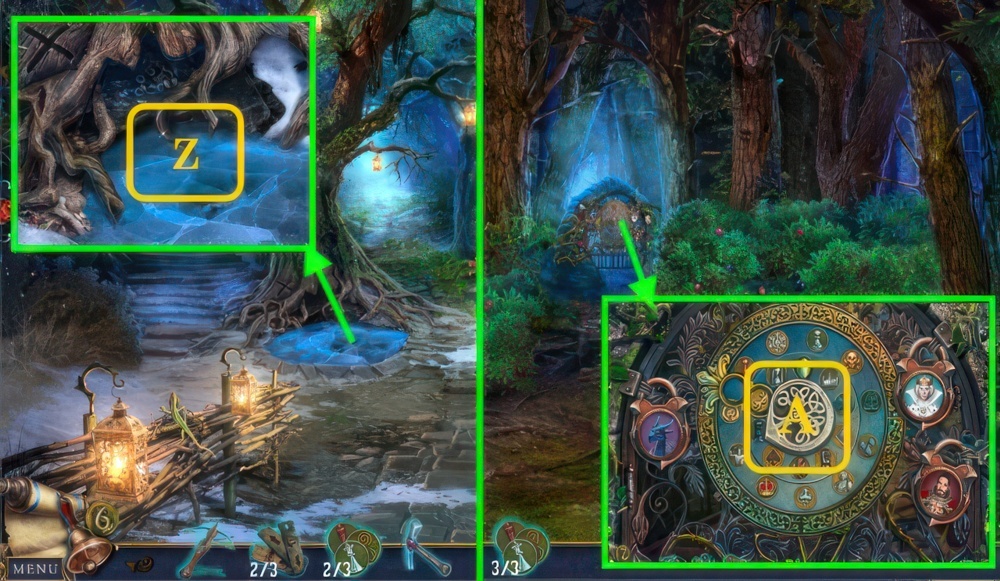
- Look (Y).
- Take ROAD SIGN 1/3 (Z).
- Look right.

- Inspect (A), find SICKLE HANDLE.
- Place SICKLE HANDLE (B), take SICKLE.
- Read (C).
- Move (D).
- Use SICKLE (E), speak.
- Play puzzle, receive HUMPTY-DUMPTY’S POUCH.

- Collect (F), take BROKEN KEY and coin (G).
- Open HUMPTY-DUMPTY’S POUCH, find coin and SHOP CODE.
- MATCHES on HUMPTY-DUMPTY’S POUCH, take SMOKING PIPE.

- Place SHOP CODE (H), ring 1-2-3.
- Spend (I-J), receive NAIL PULLER.
- Speak (K), receive bell.
- Use NAIL PULLER (L), take BOARDS 2/3, 3/3 and coin.
- Look left.

- Use SMOKING PIPE (M), find coin.
- Place BOARDS (N), take CLAY (O).
- Pull (P), climb.
- Look (Q), take coin.
- Look right.

- Spend (R-S), receive MELTING MOLD.
- Open MELTING MOLD, inspect, find CHEESE.
- Give CHEESE (T), play puzzle, receive SILVER PIECES.
- Inspect MELTING MOLD, place CLAY and BROKEN KEY (U), press.
- Use MATCHES (V).
- Place SILVER PIECES (W), take SILVER KEY.
- Look right.

- Use SILVER KEY (X).
- Speak (Y), receive bracelet and compass.
- Go forward.

- Use (@).
- Examine (Z-A-B-C).
- Use MATCHES (D), take MAP and PAWN’S SPEAR.

- Use the map to check your position and your possible paths.
- Visit dead ends to find tools and use them to overcome obstacles.
- Use MAP (E), go right.
- Take BROOM (F), go down, go left.
- Use BROOM (G), go forward.
- Take AXE (H), go down, go right.

- Use AXE (I), go forward, go right.
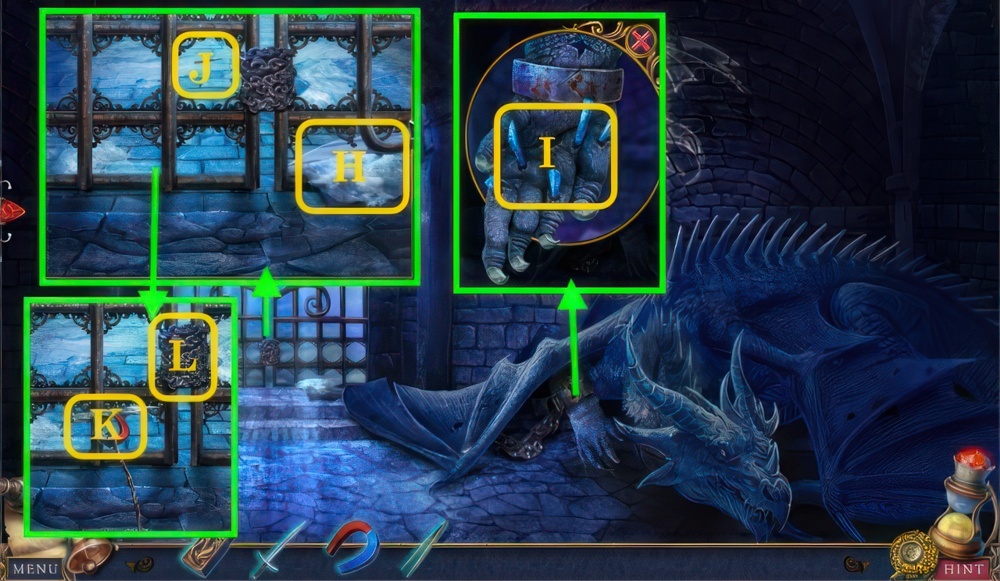
- Take LADDER (J), go down twice, go left.
- Place LADDER (K), go forward twice.
- Take WATER (L), go down.

- Use WATER (M), go right.
- Take coin (N), collect 1-5, turn (O).

- Grab (P).
- Take coin, PAPER and PAWN’S SPEAR (Q).
- Use PAWN’S SPEAR (R), receive TORCH.
- PAPER and MATCHES on TORCH, take LIT TORCH.
- Use LIT TORCH (S).

- Use PAWN’S SPEAR (T).
- Take coin (U).
- Take POT and PAINT 1/2 (V), clear (W).
- Move (X-Y), take COLUMN DECORATION.

- Move (Z), find KNIGHT FIGURINE, take coin (A).
- Place KNIGHT FIGURINE (B), take coin and PAINTS 2/2.
- Inspect (C).
- Speak (D), take SKETCHBOOK.
- Inspect SKETCHBOOK, take COAT-OF-ARMS CLUE.

- Place PAINTS and COAT-OF-ARMS CLUE (E).
- First, select a section to paint and then choose the bottle next to it to paint the area.
- The area you paint must be adjacent to the bottle.
- Replicate the image shown on the solution.
- Walkthrough (F).
- Walkthrough (G).

- Walkthrough (H).
- Walkthrough (I).
- Go left.

- Take FEATHER DUSTER (J).
- Place POT (K).
- Turn (L), take coin and WATER.
- Pour WATER (M), take coin and COAL.
- Place COLUMN DECORATION (N).
- Walkthrough (O): D×2-A-D-A-C-D-A-C.
- COAL on SKETCH-BOOK, take GARDEN PICTURE.
- Align GARDEN PICTURE (P).

- Use FEATHER DUSTER (Q).
- Read (R), find coin and ANTIDOTE FORMULA.
- Take ANTIDOTE INGREDIENTS 1/4 (S).
- Take ANTIDOTE INGREDIENTS 2/4 (T), go down.

- Ring (U), spend (V-W), receive SNAKE-CHARMER KIT.
- Play SNAKE-CHARMER KIT (X), receive ANTIDOTE INGREDIENTS 3/4.
- Take ANTIDOTE INGREDIENTS 4/4 (Y).
- ANTIDOTE INGREDIENTS on ANTIDOTE FORMULA, receive FORMULA WITH INGREDIENTS.
- Go left.

- Place FORMULA WITH INGREDIENTS (Z), play puzzle, receive ROSE ANTIDOTE.
- Go down.

- Spray ROSE ANTIDOTE (A).
- Swing PAWN’S SPEAR (B).
- Get a higher score to win and defeat the White Knight.
- Capture knight pieces by touching or jumping over one.
- Move a red pawn to an adjacent red space to add more pieces to the field.
- Walkthrough (C): A-B, B-C.

- Take DIAMOND RING (D).
- Select random bubbles (E).
- Use (F-G), swim up.

- Speak (H), receive BIRD HEAD.
- Go down.
- Use DIAMOND RING (I), take GLASS 1/2 and coin.
- Place BIRD HEAD (J), open, take TAR.
- Collect (K), receive REED PIPES.
- Assemble REED PIPES, add TAR, receive DIVING HELMET PARTS 2/2.
- Go left.
- Place DIVING HELMET PARTS (L), inspect.
- Go down.

- Find the objects shown on the compass to reveal a hidden item.
- Move the compass until the indicated image is visible, and then select it.
- Walkthrough (M): Select (@), find A-B-C-D.
- Take KNIGHT’S SWORD.

- Use KNIGHT’S SWORD (N), take coin and SHOVEL.
- Use KNIGHT’S SWORD (O), find METAL FISH 1/2.
- Use SHOVEL (P), find coin, clear.

- Take FLY and OLD BOOT (Q).
- FLY on OLD BOOT, take coin and CHESS FIGURINE.
- Adjust the joint segments to move the tentacle segments so they fit the slots underneath.
- Place CHESS FIGURINE (R): A-B-C×3-D-E×3-F-G×2, open.
- Play puzzle, receive HAND MIRROR, take FABRIC.
- Place FABRIC (S), use SHOVEL, inspect.
- Take coin and HUNTING HORN (T), swim up.

- Use HUNTING HORN (U), find WOODEN JELLYFISH 1/2 and STEERING WHEEL 1/2.
- Go down.

- Read note (V), take RUBBER GLOVE.
- Use HAND MIRROR and RUBBER GLOVE (W), take METAL FISHES 2/2.
- Place METAL FISHES (X).
- Walkthrough (Y).
- Take WOODEN FIGURINES 2/2, swim up.

- Place WOODEN FIGURINES (Z), take BOAT PARTS 2/2.
- Give BOAT PARTS (A).

- Take coin and ROPE (B).
- Walkthrough (C): 1-11.
- Use MATCHES (D), take SHISH KEBAB.
- Look (E), read note, take ROYAL CLASP.

- Take coin (F).
- Place ROYAL CLASP (G).
- Select the wires in the correct order to open the tent.
- Walkthrough (H): 1-7.

- Play puzzle (I), receive SCROLL.
- Inspect SCROLL, find coin and PERMISSION.
- Show PERMISSION (J).
- Speak (K), take coin.
- Ring (L), spend (M-N), receive SLEEPING POTION.
- SLEEPING POTION on SHISH KEBAB, take SOPORIFIC SHISH KEBAB.
- Give SOPORIFIC SHISH KEBAB (K), inspect.

- Assemble (O), inspect, find FIRE SYMBOL.
- Place FIRE SYMBOL (P), take GONDOLA KEY.
- Walkthrough (Q): B-A×3-B.

- Clear (R), use ROPE.
- Take MAGNET (S), repair.
- Use GONDOLA KEY (T), enter (U).

- Using all the gears, create a path for the gondola to reach the castle.
- Then select the lever to try a combination.
- Arrows indicate the direction.
- Watch out for traps.
- Walkthrough (V), pull (A).

- Investigate (W).
- Use MATCHES (X), take BRIDGE PICTURE.
- Align BRIDGE PICTURE (Y).
- Take coin (Z), use KNIGHT’S SWORD, find BELL.
- Hang BELL (A), ring, show PERMISSION.
- Go forward.

- Speak (B), take BONE.
- Give BONE (C), take PICKET (D).
- Slide (E), use PICKET (F).
- Use (G-F), find coin and TWEEZERS.
- Take FLAG (H).
- Use TWEEZERS and FLAG (I), take WIRE.
- Inspect WIRE, add MAGNET, receive HOOKING DEVICE.
- Use HOOKING DEVICE (J).
- Use (K-L), go forward.

- Take BROKEN LADDER (M) and ICE CROWN 1/3 (N).
- Investigate BROKEN LADDER, find MAGNIFIER.
- Look (O).
- Take FROZEN BELONGINGS 2/3 (P).
- Use MAGNIFIER (Q), take YARD PICTURE.
- Take HAMMER (R), look right.

- Align YARD PICTURE (S), take FROZEN BELONGINGS 3/3 (T).
- Clear (U), find coin.

- Place FROZEN BELONGINGS (V), take coin and VALVE.
- Use VALVE (W), play puzzle, receive NAILS.
- NAILS and HAMMER on BROKEN LADDER, take LADDER.
- Look left.

- Place LADDER (X), climb.
- Play puzzle (Y), receive CROWN FIGURINE.

- Take ICE FIGURINE (Z).
- Walkthrough (A), take LIT CANDLE and coin.
- Use LIT CANDLE (B), find coin and CORKSCREW.
- Place CROWN FIGURINE (C), take coin and LOTUS FIGURINE.
- Go down.

- Use CORKSCREW (D), take coin and FRENCH HORN.
- Place LOTUS FIGURINE (E), inspect.
- Play FRENCH HORN (F), find coin.
- Play puzzle, receive APPLE PENDANT.
- Look right.

- Place APPLE PENDANT (G), find ICE FIGURINE.
- Move to White Hall.
- Play puzzle (H), receive CHESS CODE.

- Use CHESS CODE (I), inspect (J), take WHITE QUEEN’S DIARY.
- Clear (K), inspect (L).
- Place ICE FIGURINES ×2 (K), take DIARY KEY.
- DIARY KEY on WHITE QUEEN’S DIARY, open, find coin.

- Ring (M), spend (N-O), receive INVISIBLE INK SOLVENT.
- INVISIBLE INK SOLVENT on WHITE QUEEN’S DIARY, read, find CROWN MEDALLION.
- Walkthrough (P): Select (@), find 1-2-3-4.
- Place CROWN MEDALLION (Q).

- Move each chess piece to its crown.
- Note that they can only move to pawns of the same color, and then the color of the pawn changes.
- Walkthrough (R): A-B-C-D.

- Walkthrough (S).
- Investigate (T).

- Take STALE BREAD (U).
- Inspect STALE BREAD, take NAPKIN.
- Use NAPKIN (V), take SHARD.
- SHARD on STALE BREAD, find coin and NIPPERS.
- Use NIPPERS (W), take PORTRAIT PIECE.
- Play puzzle (X), receive JAIL PICTURE.
- Align JAIL PICTURE (Y).

- Collect 1-4, place PORTRAIT PIECE (Z).
- Walkthrough (A), find SKULL MEDALLION.
- Clear (B), place SKULL MEDALLION (C), find coin and CARABINER.
- Take STICK (D).

- Place CARABINER (E).
- Take HEAVY STATUETTE (F).
- Inspect HEAVY STATUETTE, find coin.
- STICK on HEAVY STATUETTE, take HAMMER.
- Use HAMMER (G), take coin and HORSESHOE.
- Use HAMMER (H), take CHAIN PIECE 1/3.
- Go right.

- Look (I), take LONG CHAIN 2/3, find coin (J).
- Look (K), speak (L), receive UNFINISHED BOMB.

- Take NOTE and coin (M).
- Read NOTE, find coin.
- Fold NOTE, receive SNOWMAN CODE.
- Move (N), take SHIELD.
- Flip (N), take TONGS (O).
- Take coin, place HORSESHOE (P).
- Select (Q×6), take TOKEN 1/4 (R).
- Go down.

- Place SNOWMAN CODE (S).
- Walkthrough (T): 1-6, take coin and FUSE.
- FUSE on UNFINISHED BOMB, assemble, take BOMB WITH FUSE.
- Go right.

- Throw BOMB WITH FUSE (U), use TONGS (V).
- Search (W), find TOKENS 2/4.
- Sort (W), unlock (X), go forward.

- Use SHIELD (Y).
- Get a higher score to defeat the White Bishop.
- Capture bishop pieces by touching or jumping over one.
- Move a red knight to an adjacent red space to add more pieces to the field.
- Walkthrough (Z): A-B, C-D, C-E, E-F, B-G, G-A, G-H, H-I, I-J.

- Take CROSSBOW (A).
- Shoot CROSSBOW (B).
- Take coin (C).
- Take HOOK (D).
- Find coin and PAWN STATUETTE 1/2 (E).
- Take coin (F).
- Clear (G), assemble 1-8, find coin and TOKENS 3/4.

- Ring (H), spend (I-J), receive SAUSAGES.
- Give SAUSAGES (K), play puzzle, receive DRAGON MEDALLION.
- Place DRAGON MEDALLION (L), take METAL SNOWFLAKE.
- Use METAL SNOWFLAKE (M), take SNAIL HEAD.
- Go down.

- Place SNAIL HEAD (N), take PAWN STATUETTES 2/2 and ACID.
- Go down.

- Play puzzle (O), receive SKULL KEY.
- Use ACID (P), receive LONG CHAIN 3/3.
- Use LONG CHAIN and HOOK (Q), pull, receive TOKENS 4/4.
- Go right.

- Place TOKENS (P).
- Move the tokens to the slots of the corresponding color.
- Tokens can only be moved to a connected empty slot.
- Walkthrough (Q): 6-2-1-3-4-5-1.
- Walkthrough (R): 4-3-5-6-1-4-5-6-2-1.
- Use SKULL KEY (S), find TOP HAT and HORSE FIGURINE.

- Place TOP HAT (T), inspect (U).
- Use (V-W), open.
- Place (X-Y), take DRAGON KEY and HATTER’S PORTRAIT.
- Speak (Z).
- Go forward.

- Place PAWN STATUETTES (A), read note, take KNIGHT DECORATION.
- Place KNIGHT DECORATION (B).
- Place HORSE FIGURINE (C).
- Go right, then left.

- Use DRAGON KEY (D), open, inspect.
- Use the arrows to guide Jabberwocky and avoid the obstacles and lightning.
- Walkthrough (E): solution is random.

- Take FORCEPS PART (F), inspect, find coin.
- Place FORCEPS PART (G), take FORCEPS.
- Take HAZELNUT (H), use FORCEPS, take BOARDS 1/3, coin and TREE EMBLEM.
- Take TORN PICTURE (I), use FORCEPS, take BOARDS 2/3.
- Use (J-K), take TAR.

- Inspect TORN PICTURE.
- To restore the picture, select and drag each scrap into the correct position.
- Use the arrow button to rotate the pieces.
- Walkthrough (L).
- Use TAR, take FOREST PICTURE.
- Align FOREST PICTURE (M).
- Give HAZELNUT (N), take BRIDGE EMBLEM.
- Place TREE EMBLEM and BRIDGE EMBLEM (O), find coin, read note.
- Go right.

- Look (P).
- Speak (Q), give HATTER’S PORTRAIT, take TOKEN 1/3.
- Take PICKAXE (R) and clear.

- Search (S), find coin.
- Move (T-U) and (V-T).
- Take coin (W), move (X-W), take STONE EYE.
- Take coin (Y), place STONE EYE, take TOKENS 2/3.
- Go down.
- Use PICKAXE (Z), take coin and TOKENS 3/3.
- Go forward.
- Take STONE MEDALLION (A), place TOKENS.

- Rotate each circle to set the three pictures in the discs so that they correspond to the character on the lock.
- Walkthrough (B): 1-2-3.
- Enter (C).

- Clear (D), move to Silent Wood.
- Place STONE MEDALLION (E), find BOARDS 3/3.
- Move to Pelican Swamp.
- Use BOARDS (F), take coin and METAL ARROW.

- Shoot CROSSBOW (G).
- Play puzzle (H), receive RACCOON.
- Take THREAD (I).
- Inspect (J), send RACCOON, take RACCOON.
- Inspect RACCOON, find ROPE and BELL RINGER.
- Look (K), move to Silent Wood.
- CROSSBOW and METAL ARROW on ROPE, assemble, take CROSSBOW WITH ROPE.

- Shoot CROSSBOW WITH ROPE (L), receive CROSSBOW, take FISHNET.
- Place FISHNET and THREAD (M), assemble, receive BUTTERFLY NET.
- Move to Pelican Swamp.

- Use BUTTERFLY NET (N), inspect (O), find DOOR CODE.
- Place DOOR CODE (P) and BELL RINGER (Q).
- Walkthrough (R): A-B-A.
- Inspect (S), find coin and JAR.
- Go down.

- Place JAR (T), collect 1-10, take FIREFLY LANTERN.
- Go forward.
- Hang FIREFLY LANTERN (U), enter (V).

- Search (W), find COMB.
- Clear (X), take DOLL.
- COMB on RACCOON, take coin.
- Take DRAWER HANDLE (Y), look right.

- Use DRAWER HANDLE (Z).
- Move (A), take coin and CORKSCREW.
- Shoot CROSSBOW (B), search (C), take coin and MESSAGE IN A BOTTLE.
- CORKSCREW on MESSAGE IN A BOTTLE, inspect.
- Play puzzle, receive BEADS.
- Look left.

- Place BEADS (D), open, find DOLL’S STUFF.
- DOLL’S STUFF on DOLL.
- Choose the crown, the dress decoration, and the weapon that best suits the red chess piece on the right.
- Walkthrough (E): 1-15.
- Take HUT PICTURE.
- Look right.

- Align HUT PICTURE (F), inspect (G).
- Speak (H), give RACCOON.

- Speak (I), receive AMBUSH PLAN PART.
- Inspect MESSAGE IN A BOTTLE, play puzzle, receive AMBUSH PLAN PART.
- AMBUSH PLAN PART on AMBUSH PLAN PART, take AMBUSH PLAN.
- Look left, move the boxes (J).
- Look right, take SCISSORS (K).

- Look left, use SCISSORS (L), take coin and GRINDSTONE.
- Go down.

- Use GRINDSTONE (M), take SHARPENED AXE.
- Play puzzle (N), receive RUNIC CODE.
- Use SHARPENED AXE (O), find coin and WEIGHT 1/2.
- Go forward.

- Collect (P).
- Place RUNIC CODE (Q).
- Walkthrough (R), take HATCH WEIGHTS 2/2.
- Look right.

- Place HATCH WEIGHTS (S).
- Each weight shows a number of moves and a direction of movement.
- Select them so the ship lands on the empty slot at the end.
- Avoid the black pearls.
- Walkthrough (T): 1-6.
- Enter (U).

- View AMBUSH PLAN (V): 1-10.
- Take AMBUSH KIT.
- Move to Silent Wood.

- Give AMBUSH KIT (W).
- Walkthrough (X): select (@), find 1-4.

- Look (Y).
- Get a higher score to win and defeat the White Rook.
- Capture rook pieces by touching or jumping over one.
- Move a red bishop to an adjacent red space to add more pieces to the field.
- Walkthrough (Z): A-B, C-D, E-F, G-D, H-I, J-K, D-L, M-N, N-K, N-O, I-P, I-Q, Q-R.
- D-S, T-U, V-W, V-X, H-B, Y-Z, Z-1, 2-3, 1-Z, 2-4.

- Look (A), take MACE.
- Take coin (B), speak.

- Ring (C), spend (D-E), receive MAP.
- Use MAP (F), view (G).

- Use the arrows to navigate to the Red Castle.
- When you hit an obstacle, choose the right tool to defeat it.
- If you lack the required tool, try a different path.
- Walkthrough (H): recommended path shown, use items A-J.

- Read (I), take BAR.
- Take CANDLE (J), use BAR (K), find ROPE.
- Take TILE 1/4 (L), speak.
- Look (M), use MACE and CANDLE, take coin and TILES 2/4.
- Search (M1), find TILES 3/4.

- Throw ROPE (N).
- Take SHIELD (O).
- Inspect SHIELD, play puzzle, receive coin and SPYGLASS.
- Inspect (P), place SPYGLASS, move (Q).
- Look (P), select 1-3, take TILES 4/4 and WATER.

- Give WATER (R), speak, take GATE KEY.
- Place TILES (S).
- Place each tile in the correct position according to the pictures.
- Tiles can only move to empty slots.
- Walkthrough (T): A-D, I-A, J-B, K-C, D-K, E-J, C-E, J-D, B-J, A-I, D-A, I-B.
- J-C, H-D, G-J, F-I, C-F, D-G, I-C, J-H, C-J, E-I.
- Use GATE KEY (S), go forward.

- Take CRYSTAL (U).
- Use MACE (V), take SHEARS, place CRYSTAL.
- Inspect (W), find METAL LETTER.

- Take PAPER 1/2 (X), move (Y), go forward.
- Use SHEARS (Z), find METAL LETTER, go forward.
- Take APPLE FIGURINE (A).
- Take coin (B), place APPLE FIGURINE, take SIGNET RING and QUILL AND PAPER 2/2.
- Go down.

- Give QUILL AND PAPER (C), speak, take METAL DECORATION 1/2 and THRONE ROOM PICTURE.
- Place METAL LETTER ×2 (D), take coin and STONE CROWN.
- Go forward.

- Place STONE CROWN (E), take WINDOW DECORATIONS 2/2.
- Use WINDOW DECORATIONS (F), enter.
- Place SIGNET RING (G).

- Push (H).
- Take CANDLE 1/2 (I), move (I-J), take coin.
- Take CANDLES 2/2 (K).
- Take CHESS PIECE (L), place CANDLES (M), find CRESCENT HANDLE.
- Use CRESCENT HANDLE (N), push.

- Play puzzle (O), receive CASKET.
- Inspect CASKET, find coin.
- Ring (P), spend (Q-R), receive OILER.
- Use OILER (S), open (T), enter.
- Align THRONE ROOM PICTURE (T).

- Place CHESS PIECE (U), take coin.
- Take STONE TILE (V), move (W), find STATUE CODE.
- Look (X), take coin and ROSE SCREW (Y).
- Move (Z), move (A), place STONE TILE (Y).

- Place STATUE CODE (B).
- Walkthrough (C).
- Use MACE (D), find PICTURE KEY.
- Use PICTURE KEY (E), look (F).

- Move the bars to place each head on the correct statuette.
- If any one head falls through the bottom, then the puzzle will reset.
- Walkthrough (G): A-G-E-F-G-C×2-G-B×2.
- Take CAMEO, inspect.

- Use (H-I), open.
- Take LION HEAD (J), collect 1-8.
- Inspect (K), find coin and CHESS PENDANT.
- Go down.

- Place CAMEO (L).
- Take coin and CASKET KEY (M).
- CASKET KEY on CASKET, play puzzle, receive KING’S SYMBOL.
- Move to Red Castle.
- Use KING’S SYMBOL (N), find EAGLE HEAD and coin.
- Place LION HEAD and EAGLE HEAD (O).
- Walkthrough (P).
- Take coin, enter.

- Play puzzle (Q), receive CLOCKWORK RABBIT.
- Inspect CLOCKWORK RABBIT, find coin.
- Take coin (R).
- Use ROSE SCREW (S), open.
- Look (T), play puzzle, receive DRAGON FIGURINE.

- Ring (U), spend (V-W), receive WINDING KEY.
- WINDING KEY on CLOCKWORK RABBIT, find RED HORSE.
- Take coin (X).
- Search (Y), find SHIP FIGURINE.
- Move to Red Hall.

- Place SHIP FIGURINE and DRAGON FIGURINE (Z), select 1-8, take coin and SKULL KEY.
- Go down.
- Play puzzle (A), receive COMET LEVER.
- Place COMET LEVER (B), push.
- Use SKULL KEY (C), take coin and BROKEN MECHANICAL BIRD.
- Inspect BROKEN MECHANICAL BIRD, find WHITE HORSE.
- Look (D), go right.

- Take coin (E), place RED HORSE and WHITE HORSE, press.
- Take RED KING’S PORTRAIT 1/3.
- Take coin (F).
- Move (G), spin (H), find WHEEL.

- Take coin and WING (I).
- WING on BROKEN MECHANICAL BIRD, take MECHANICAL BIRD.
- Send MECHANICAL BIRD (J), receive PENCIL.
- Use PENCIL (K), receive HIDING PICTURE.

- Align HIDING PICTURE (L).
- Take RAZOR (M).
- Move (N-O), move (P-Q).
- Move (R-S), move (T-U), find coin.
- Move to Winter Garden.

- Play puzzle (V), receive DIRTY MEDALLION.
- Use RAZOR (W), take ROPE.
- Tie ROPE (X), take RAKE.
- Use RAKE (Y), take coin and PIPE.
- Place PIPE (Z).
- Wash DIRTY MEDALLION (A), find GARDEN PICTURE and PORTRAITS 2/3.

- Align GARDEN PICTURE (B).
- Take coin (C), replace WHEEL, find CONTINENT.
- Move to Hall of Looking Glasses.
- Place CONTINENT (D), take coin and PORTRAITS 3/3.
- Hang PORTRAITS (E).

- Rearrange portraits on the family tree according to the symbols on the leaves.
- Note that only three neighboring ones can be swapped.
- Walkthrough (F).
- Take CHESS PENDANT.

- Place CHESS PENDANT ×2 (G).
- Select anywhere.
- Ring (H), spend (I-J).
- Receive DAGGER.
- Look (K), use DAGGER (L).

- Get a higher score to win and defeat the White Queen.
- Capture queen pieces by touching or jumping over one.
- Move a red rook to an adjacent red space to add more pieces to the field.
- Walkthrough (M): A-B, C-D, C-E, B-F, G-H, I-J, K-L, B-M, M-N, O-P, N-O, F-Q.
- F-R, R-S, J-I, D-G, T-U, N-V, U-W, O-M.

- Take CROWNS (N), give CROWNS (O).
- Use (@), select P-Q-R-S, speak.

- Restore the looking glass so the chess symbols on the tiles are aligned.
- Walkthrough (T): 7-J, 11-O, 14-K, 8-G, 2-E, 12-D, 4-C, 15-B, 1-A, 3-F, 5-H, 6-I, 9-L, 13-M, 10-N.
- Walkthrough Bonus Chapter, at the link below.


