
Bridge to Another World 7: Secrets of the Nutcracker – The game’s walkthrough begins with the fact that when Marie was little she visited her godfather, Drosselmeyer, every Christmas. During these visits she became friends with his apprentice, Fritz. Together they mended toys and assembled them in a toy castle called Spielland. At times they imagined that they too lived with the dolls in their world. It’s been many Christmases since then, but this year she was finally able to visit her godfather again. But the godfather tells you that Fritz has been missing for two weeks. He saw him that night, working late in the workshop. The next morning he was gone, with his tools scattered about. Something bad must have happened to him, and it must have something to do with the castle. If you can not pass any of the puzzles or do not know where the items are, on our site you can watch the walkthrough of Bridge to Another World 7: Secrets of the Nutcracker, and help Marie go through a fantastic world of evil mice and living toys.
Bridge to Another World 7: Secrets of the Nutcracker – Walkthrough
Here you can see the full walkthrough of Bridge to Another World 7: Secrets of the Nutcracker, namely for all chapters, including the bonus chapter, in pictures.

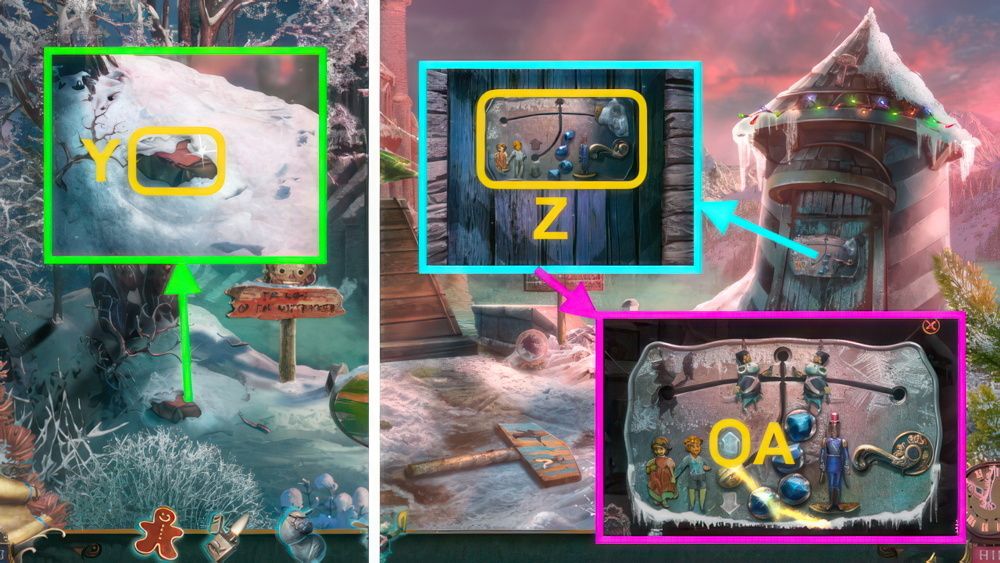
- Take Watch (A), examine photo.
- Take MOUSE FIGURE (1/2) and letter.
- Examine scene.
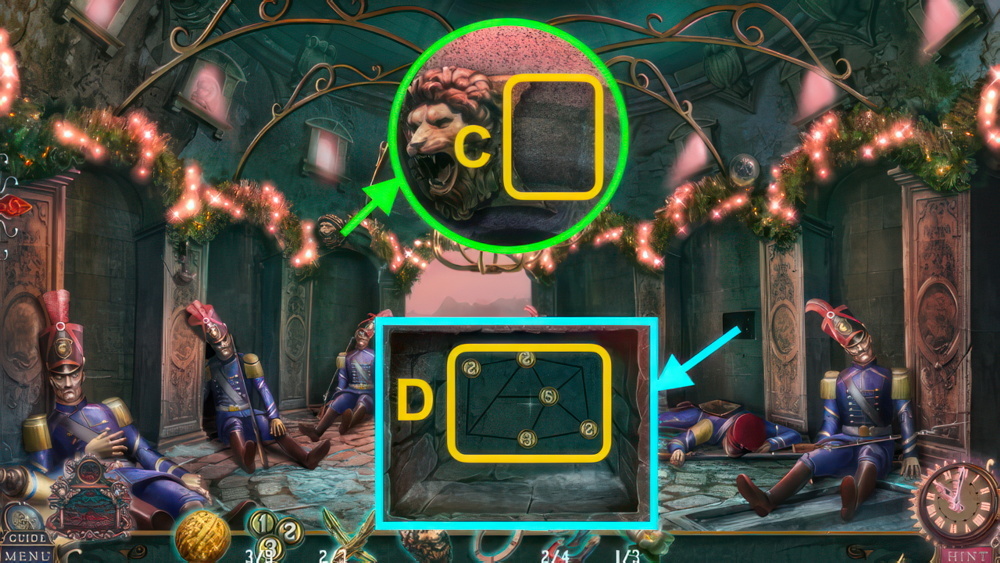
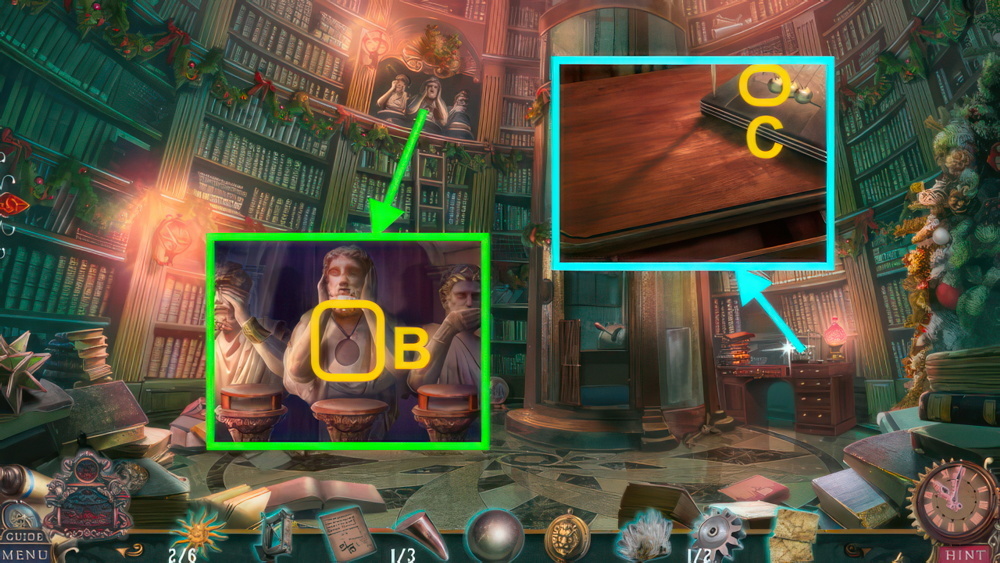
- Talk, take BROKEN CASTLE (B).

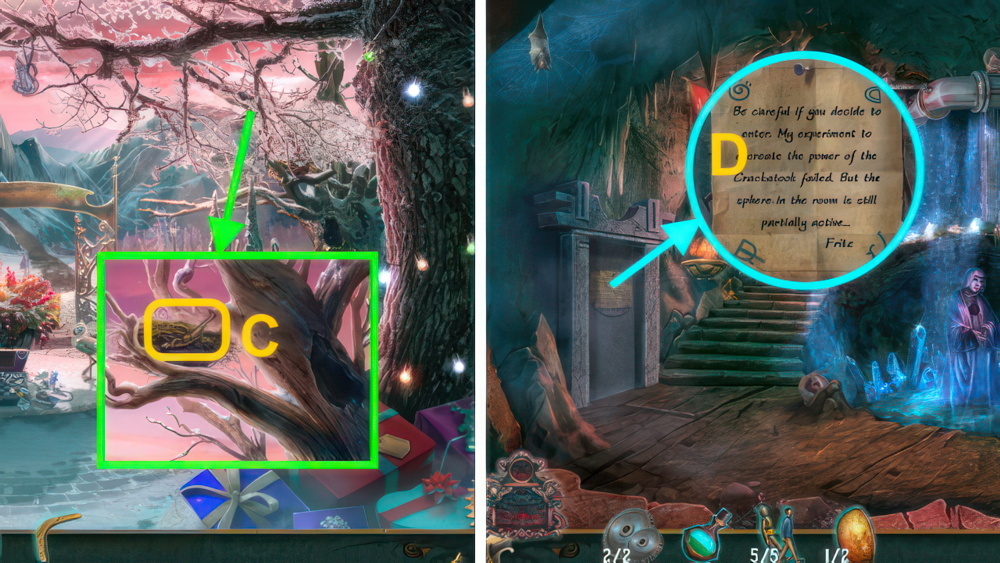
- Examine BROKEN CASTLE, assemble pieces (C).
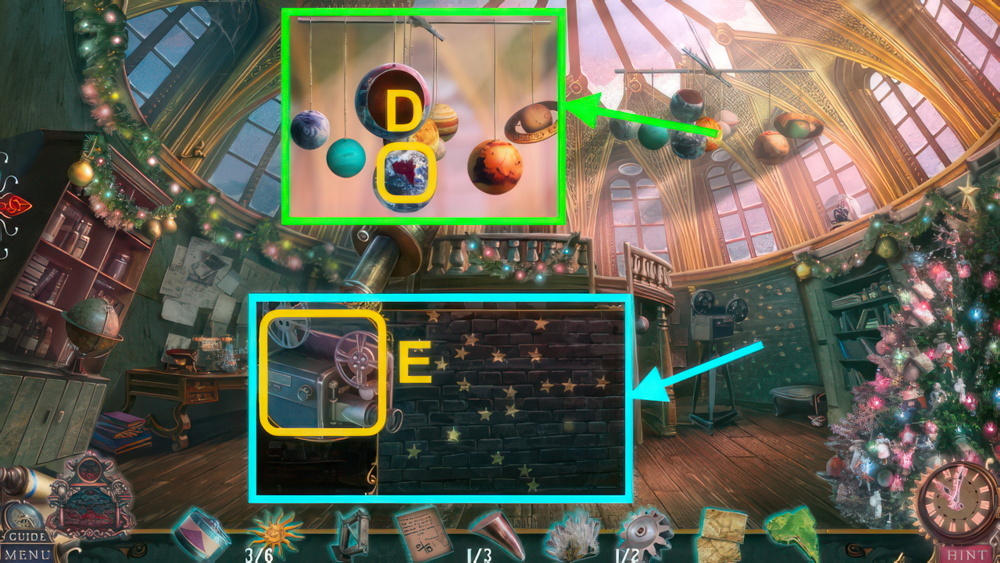
- Take MUSIC CYLINDER.

- Place MUSIC CYLINDER (D).
- Play puzzle, take GINGERBREAD and MOUSE FIGURES (2/2).
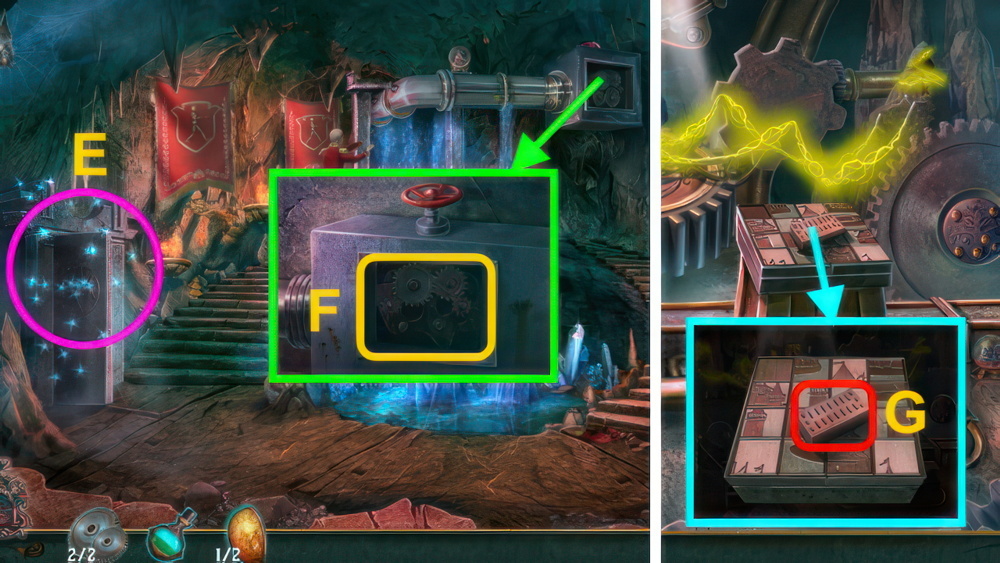
- Place winding key (E) in mouse (F), place MOUSE FIGURES (2/2).

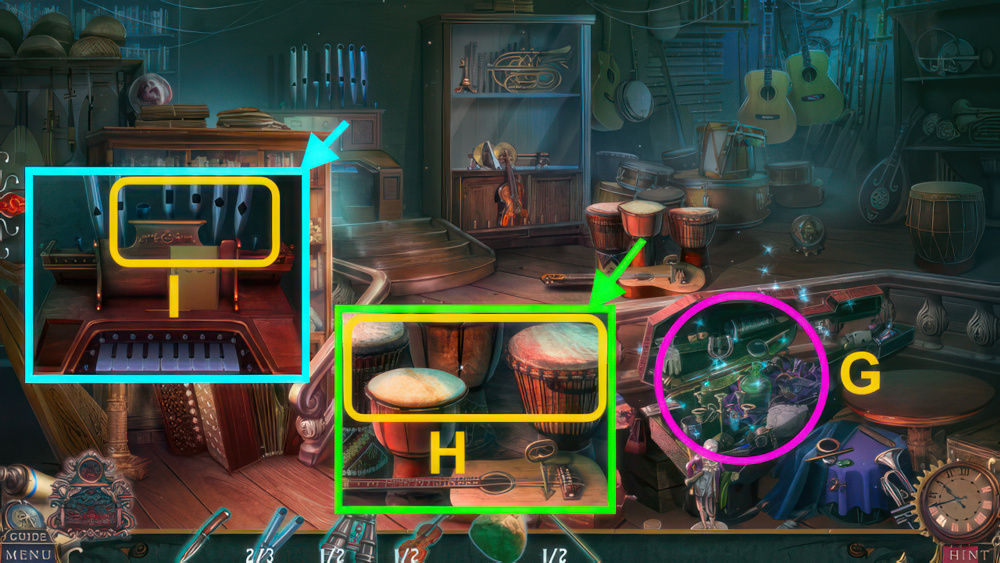
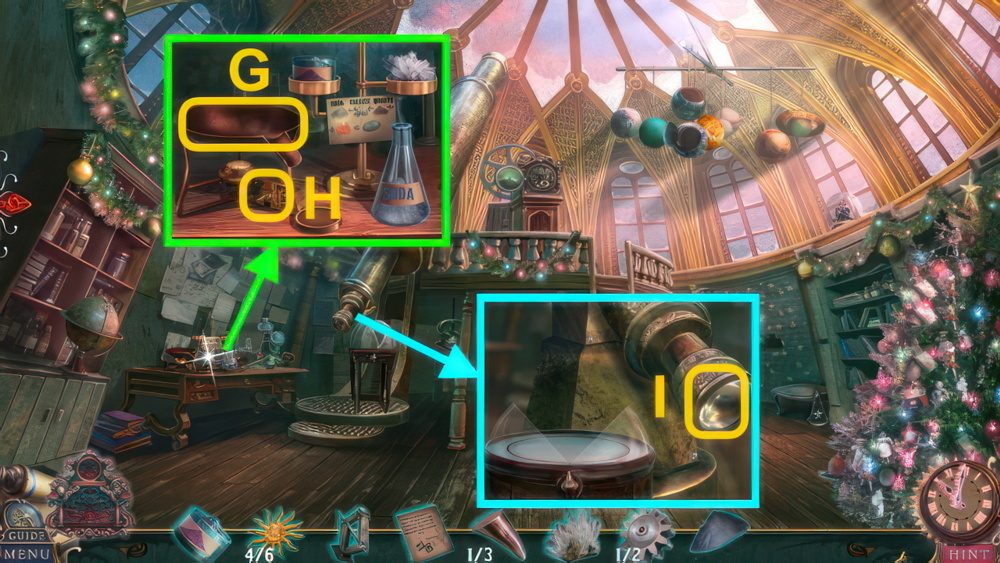
- Walkthrough (G).

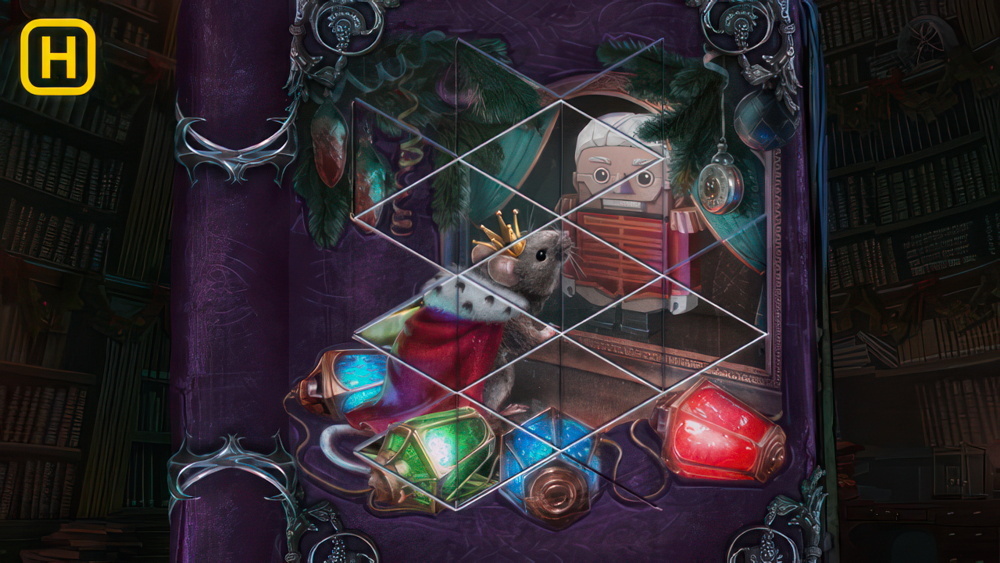
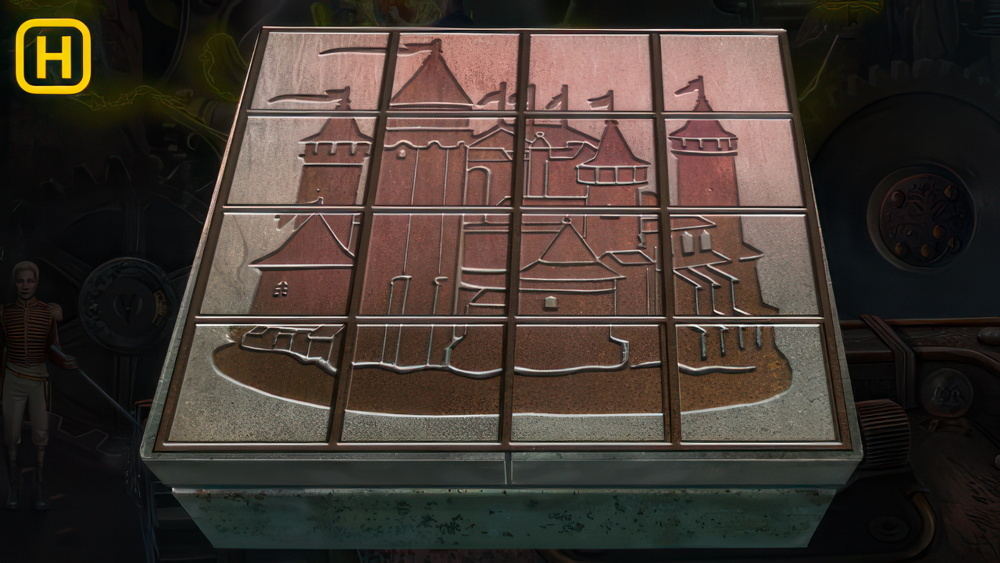
- Walkthrough (H).
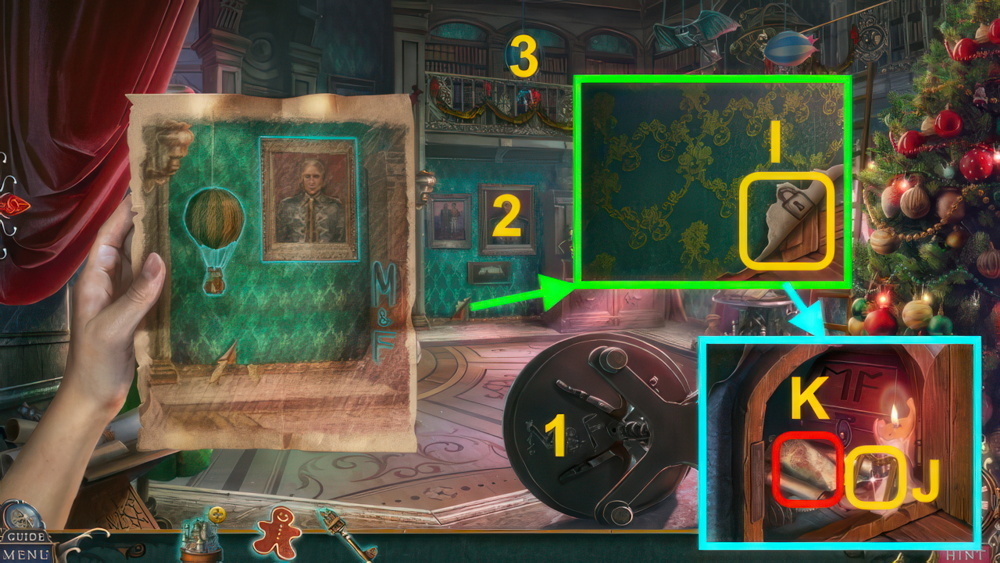
- Turn page.
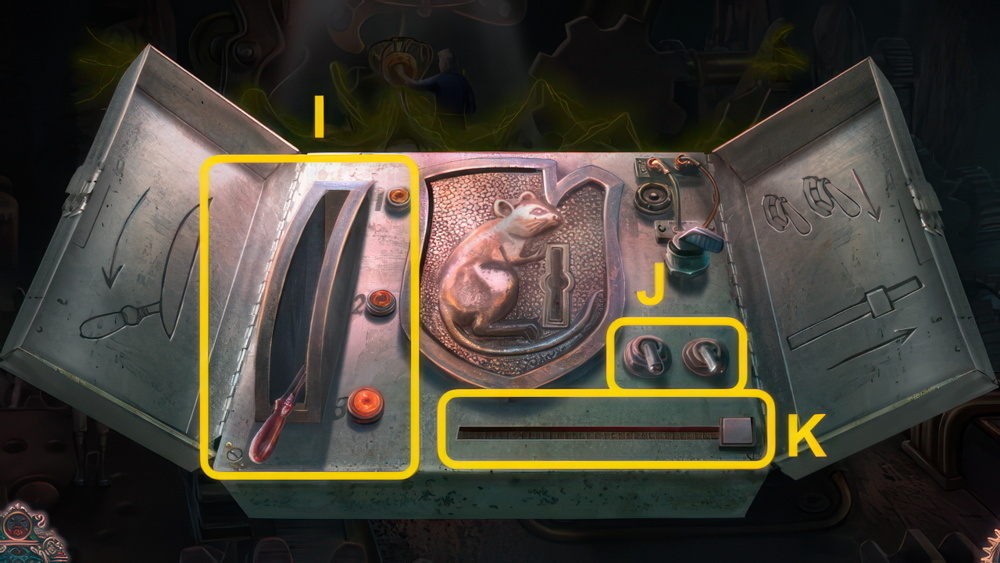
- Examine paper, take TINY KEY.
- Select (1-3).
- Examine (I), use TINY KEY.
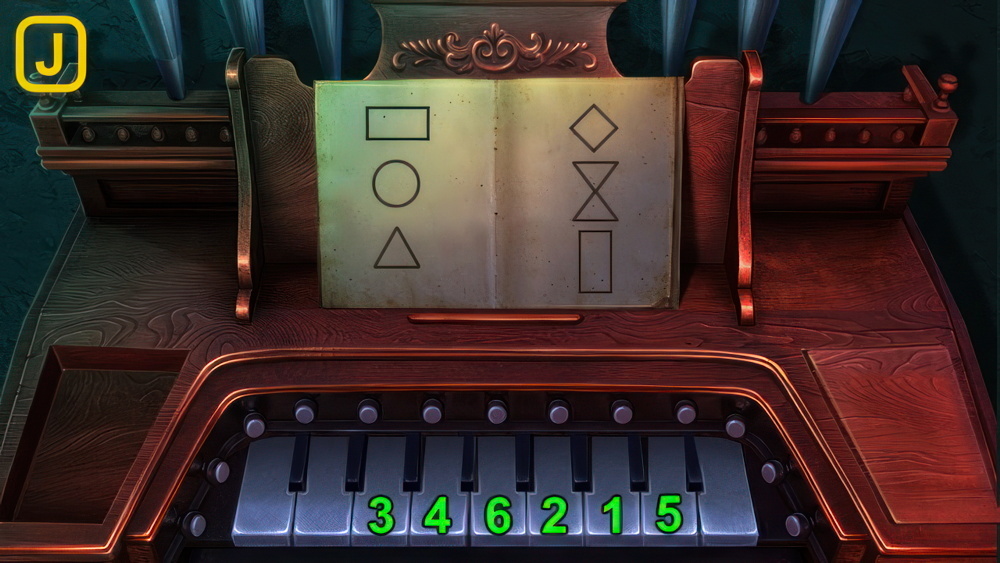
- Use match on candle, examine M (J).
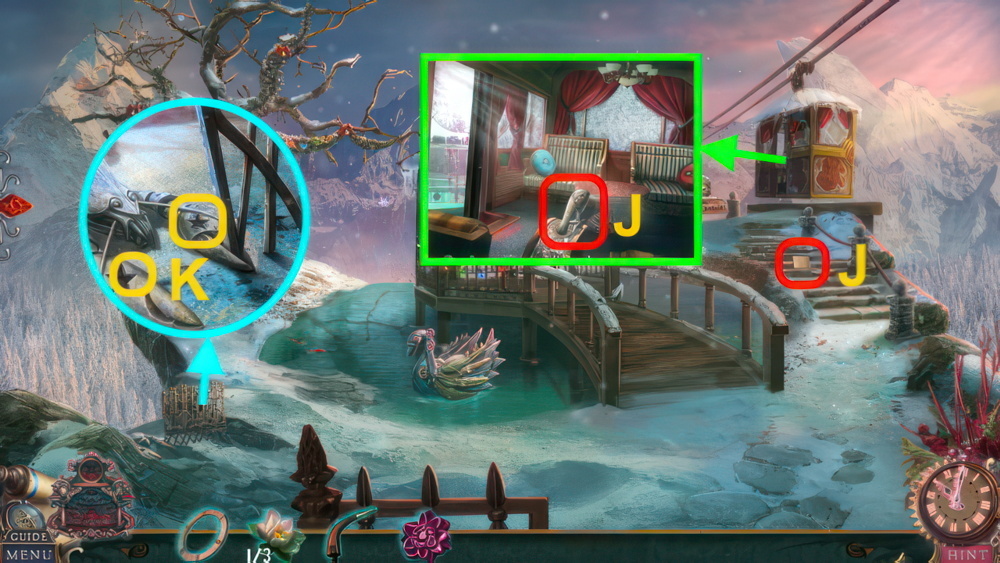
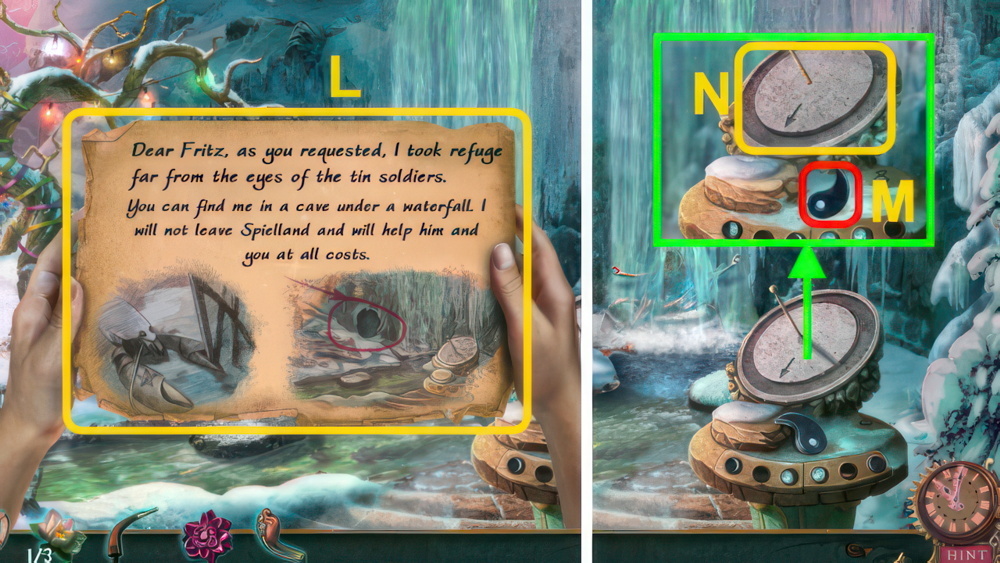
- Take Map (K), examine doll and F.
- Take MARIE TOY (1/2) and INSTRUCTIONS.
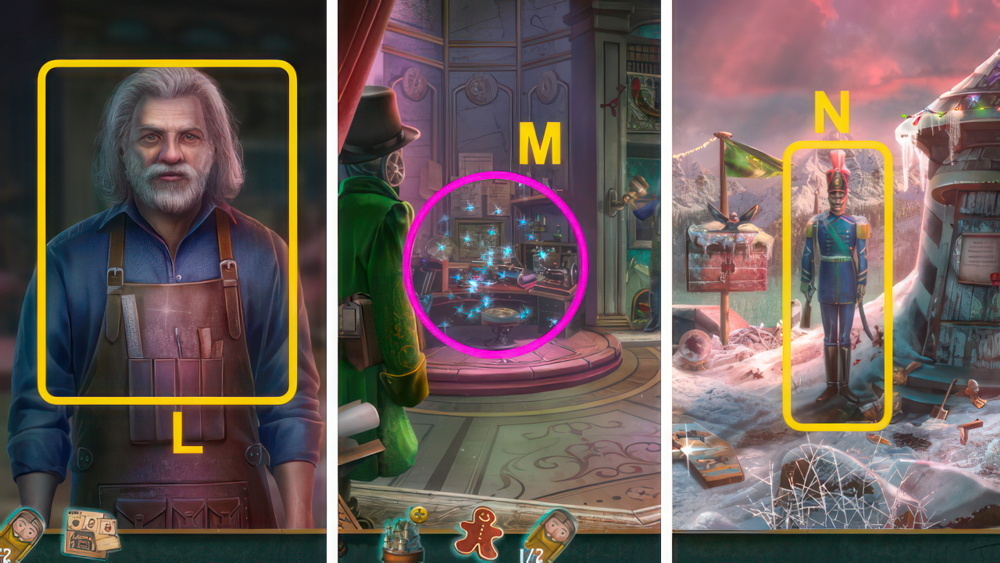
- Give INSTRUCTIONS (L).
- Play puzzle, receive CASTLE TOYS (2/2) (M).
- CASTLE TOYS (2/2) on BROKEN CASTLE.
- Talk (N).
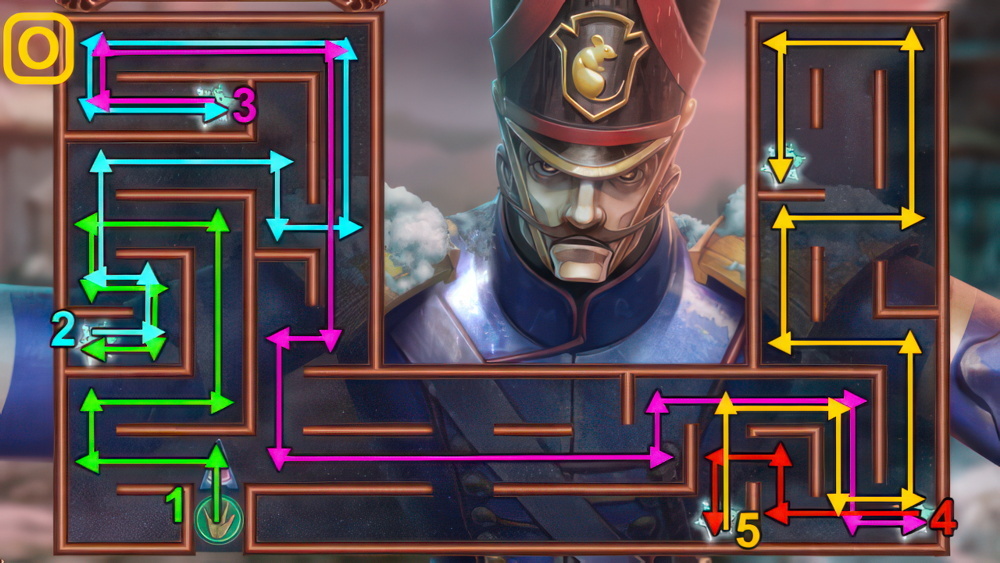
- Collect all the snowflakes.
- Select an arrow to move the chip in that direction.
- The chip will continue moving until it hits a wall.
- Walkthrough (O).
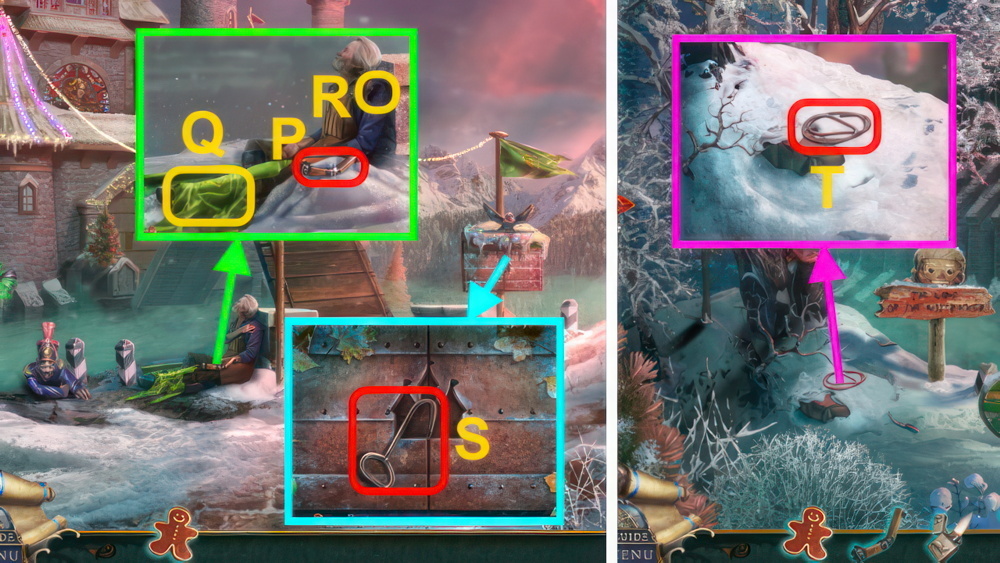
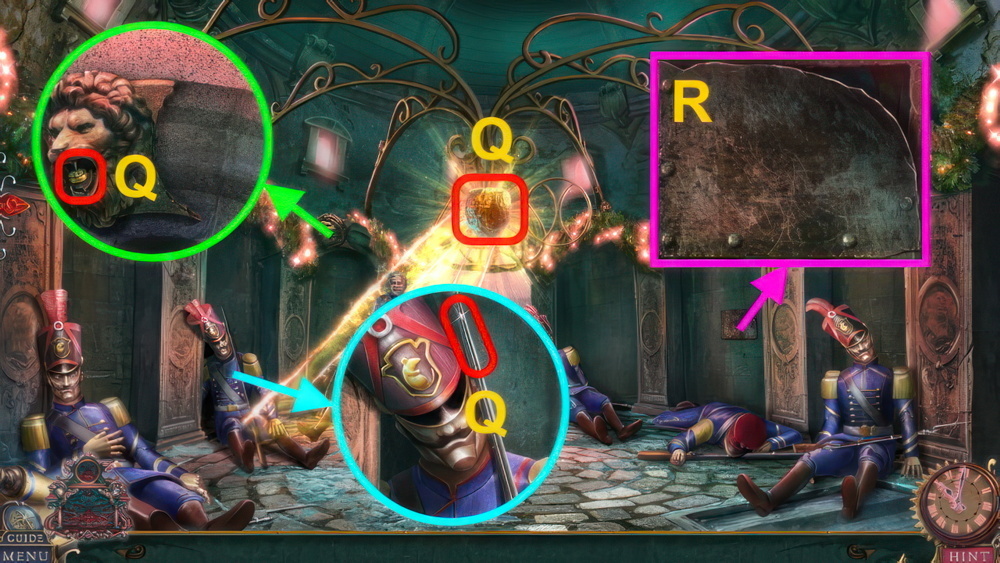
- Take TOY PART (P).
- Examine, use flag (Q) on wound (R).
- Use snow on face, take LIGHTER.
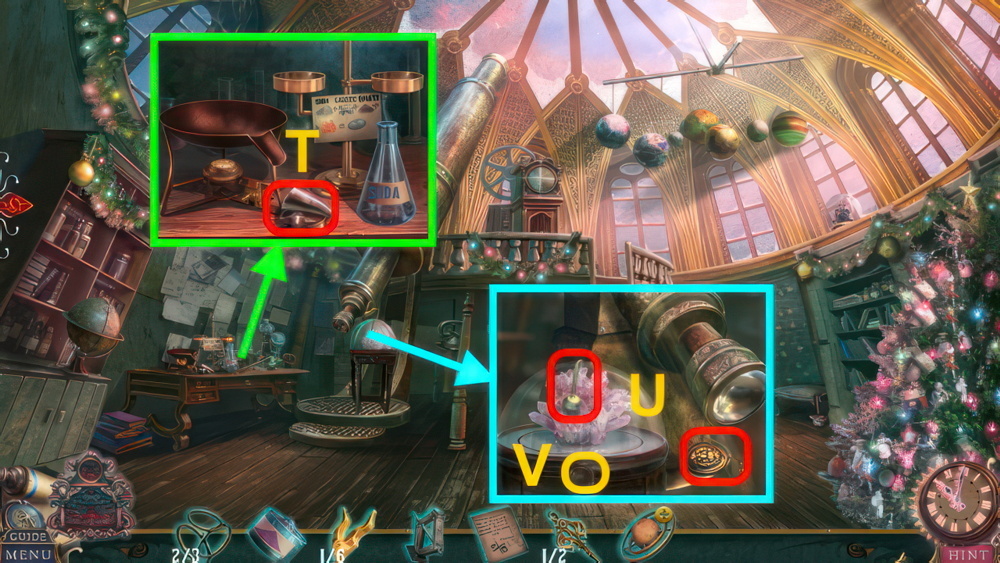
- Take HOOK (S).
- Scroll left.
- Take ROPE (T).
- ROPE on HOOK.

- Talk (U), use HOOK.
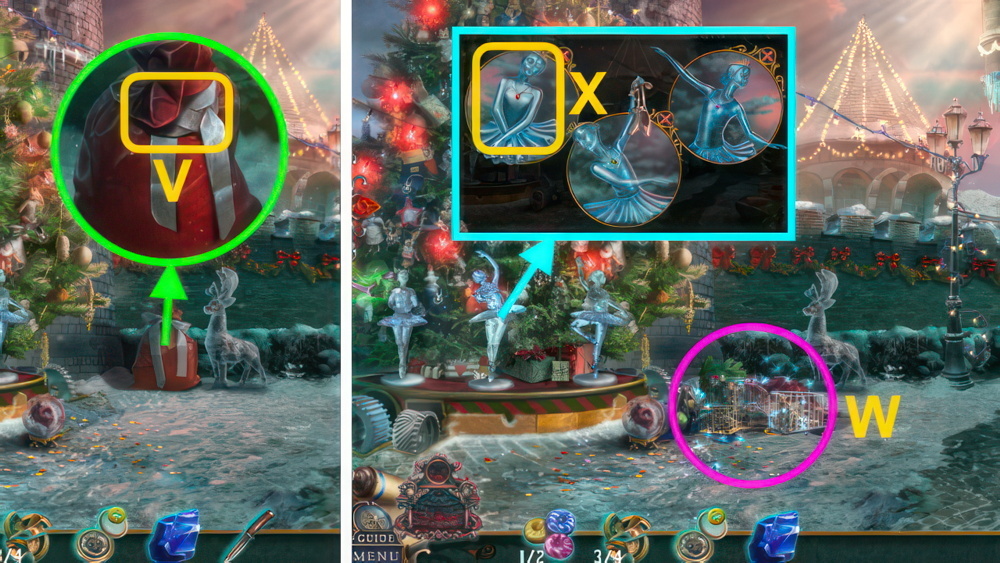
- Examine pouch, open.
- Read note, take ACORNS and WINDING KEY.
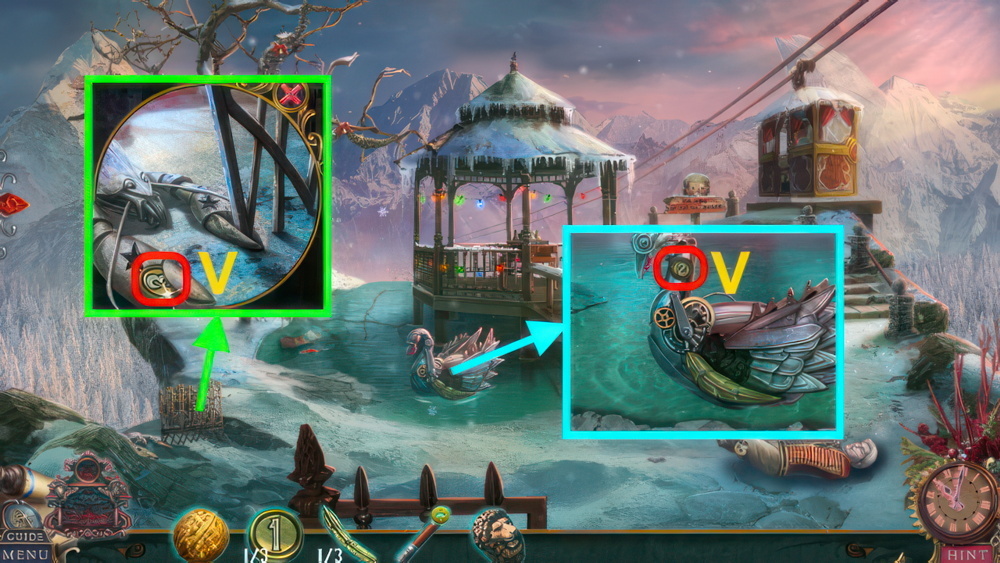
- Scroll right.
- Read note (V).
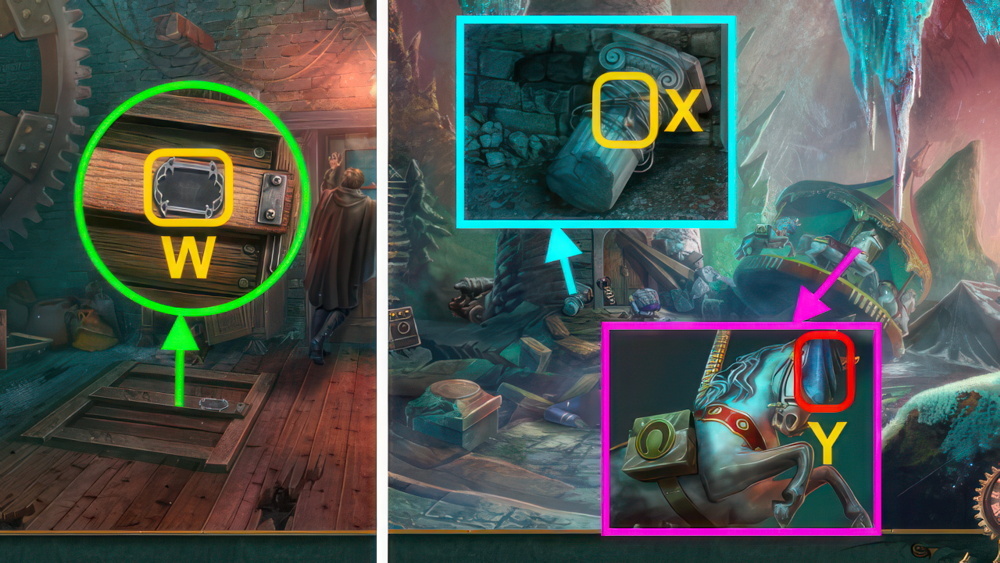
- Collect each piece (W), take TOY RABBIT.

- Examine TOY RABBIT.
- Assemble the toy rabbit.
- Select a part and place it on the rotate button to turn it.
- Place the parts into their correct positions.
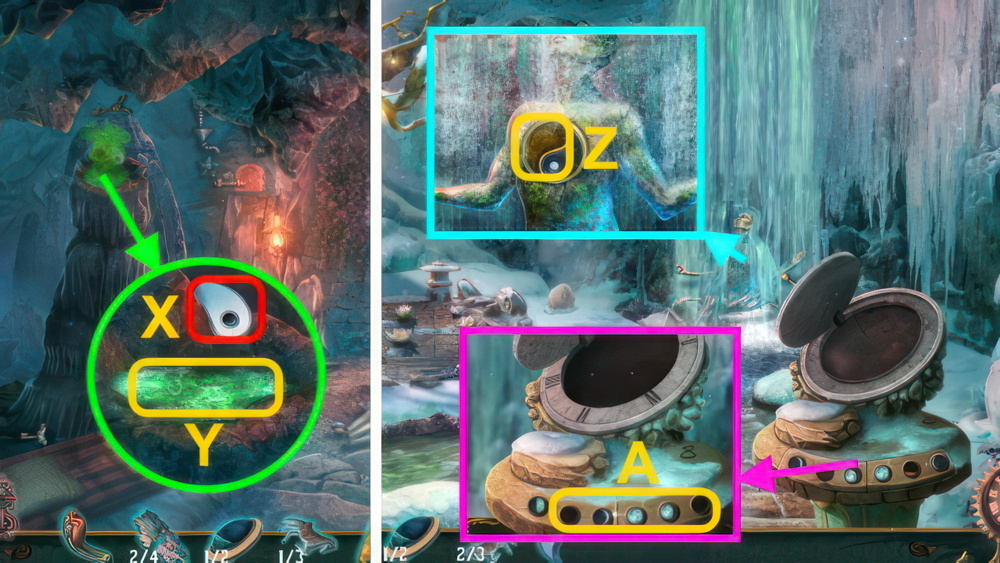
- Walkthrough (X): (B-A×3-G)-(C-A×2-H)-(D-A×5-I)-(E-A×2-J)-(F-A-K).
- Use TOY PART and WINDING KEY, take TOY.
- Scroll left.
- Use TOY (Y), remove cloth.
- Open box, take TOY THEATER.
- Examine TOY THEATER, talk.
- Give GINGERBREAD, play puzzle.
- Take MOUSE FIGURE.
- Scroll right.
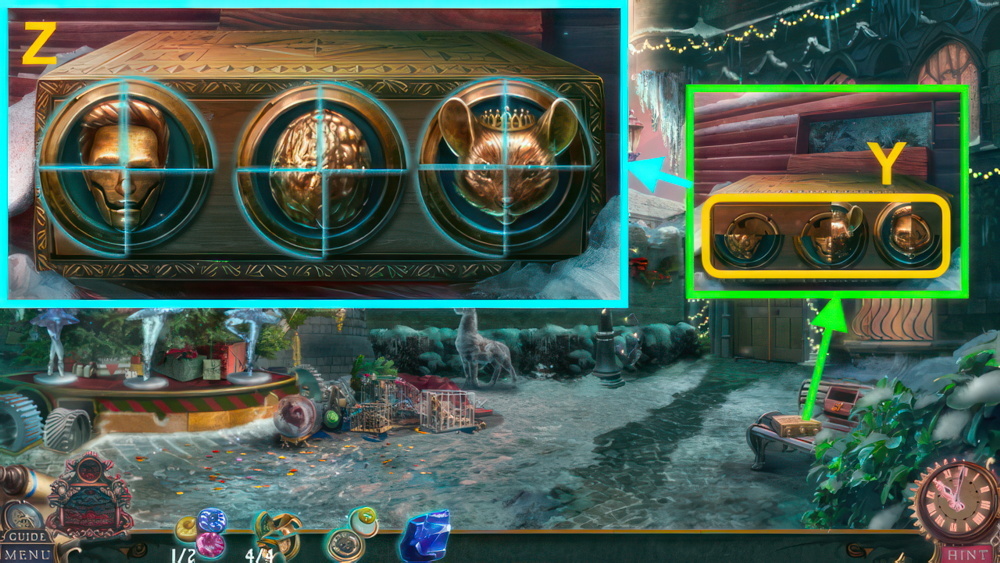
- Examine (Z).
- Place MOUSE FIGURE, use LIGHTER.
- Select ×3 (A), take CASTLE SIGN.

- Place CASTLE SIGN (B).
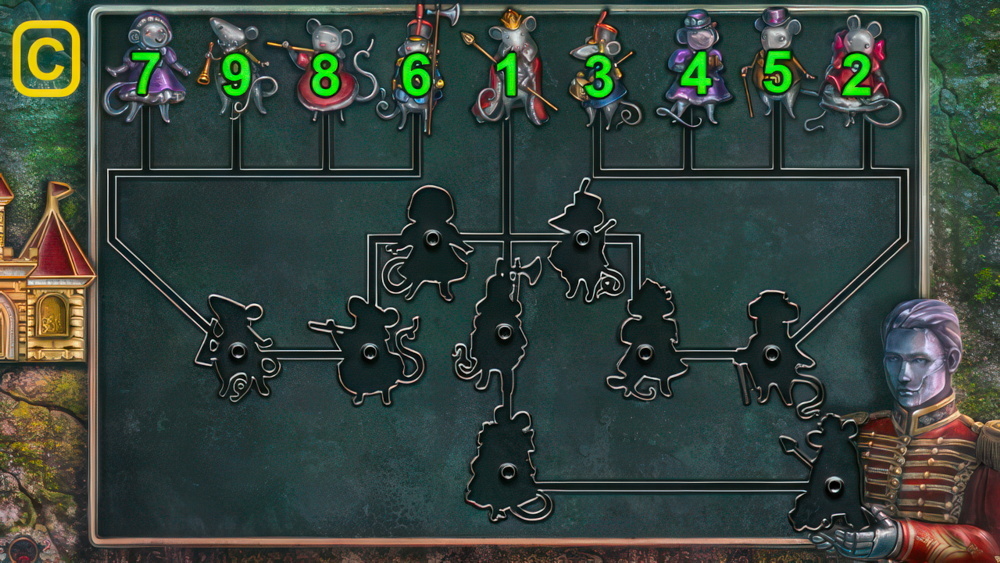
- Move the mouse figures to the correct slots.
- Select a mouse to move it.
- Mice can push other mice along the lines but can’t jump over each other.
- Correctly placed mice are highlighted green.
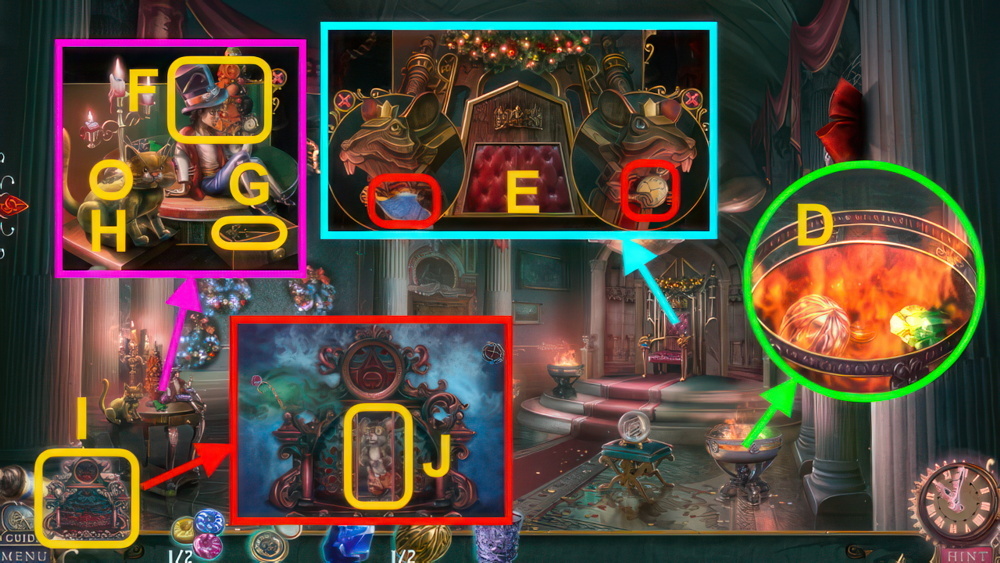
- Walkthrough (C).
- Go forward.

- Examine (D).
- Take note (E), place gem (F) in socket (G).
- Take COIN (1/3).
- Examine (H).
- Walk right.

- Take RUBBER and COINS (2/3) (I), take MOUSE SHAPE (1/2).
- Take SLINGSHOT (J).
- RUBBER and ACORNS on SLINGSHOT.
- Use SLINGSHOT (K).

- Hit the mechanical crows.
- Move the crosshairs to aim.
- To fire, select when the circles overlap.
- Walkthrough (L): stop circles when they overlap.
- Talk (M), read note.
- Take MOUSE SHAPES (2/2) and INSTRUCTIONS.

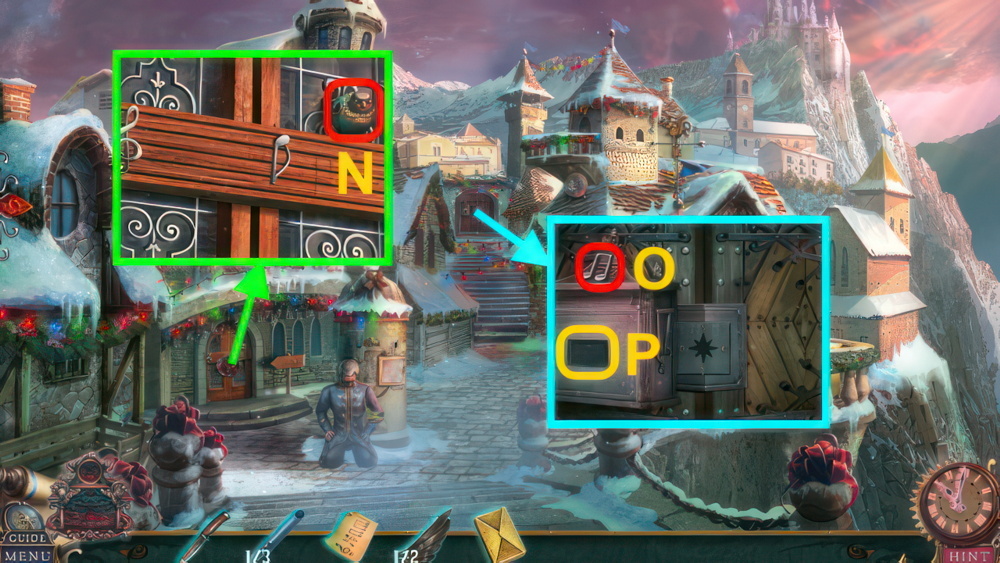
- Take PRUNING SHEARS (N).
- Open (O), take LANTERN HANDLE.
- Examine ×2 (P).
- Place MOUSE SHAPES (2/2) (Q).
- Place pieces, take OIL.
- Use LANTERN HANDLE (R).
- Take FLEUR-DE-LIS (S).
- Examine (T).

- Find pairs of matching candies.
- Select two roses to see the candies inside them.
- Walkthrough (U).

- Take CANDIES (1/2), use PRUNING SHEARS.
- Examine note ×2 (V), use OIL.
- Take HEDGEHOG TOY.
- Place HEDGEHOG TOY (W).
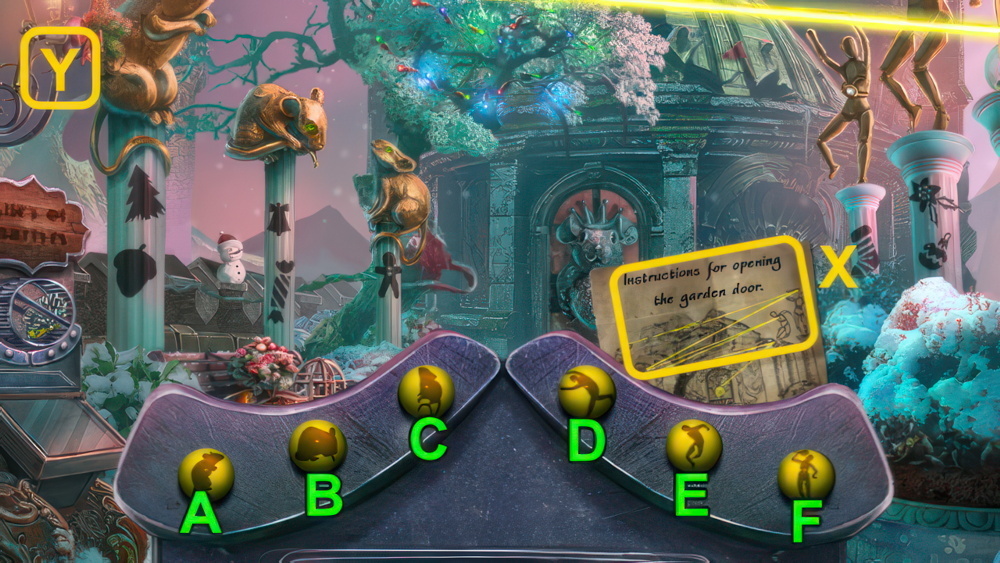
- Use INSTRUCTIONS (X).
- Use the buttons to set the statues so that their mirrors reflect the beam toward the garden door.
- Walkthrough (Y): A×2-B×2-C×2-D×2-E×2-F×2.

- Play puzzle, receive NUTCRACKER (Z).
- Correctly install the wires by matching the colors of the wires at each end.
- Select a wire to move it, and place a wire on the button to rotate it.
- Puzzle walkthrough (A-B).
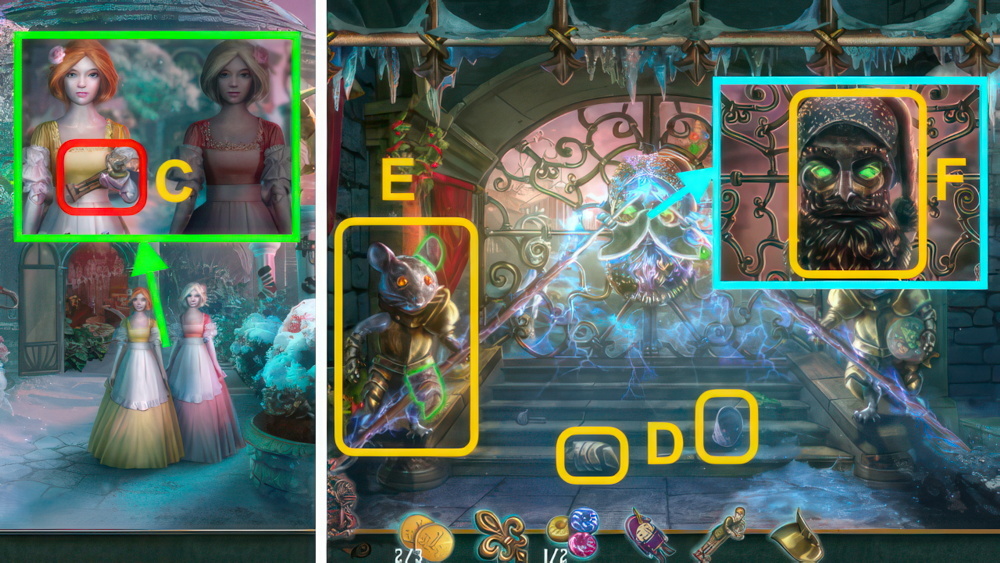
- Talk, take FRITZ FIGURINE (C) and MOUSE ARMOR.
- Walk down.
- Place pieces (D) and MOUSE ARMOR on mouse (E).
- Talk (F), select Nutcracker, Crackatook Nut, and Fritz.
- Take COINS (3/3).

- Take LOCK PART (1/4) (G), place FLEUR-DE-LIS.
- Use COINS (3/3), take CRACKATOOK CARD.
- Place NUTCRACKER, FRITZ FIGURINE, and CRACKATOOK CARD (H).
- Walk forward.
- Take BROKEN PROTECTIVE AMULET (Q).
- Examine (I).

- Read notes (J-L), take METAL BUTTONS (1/3)-(3/3).
- Take PIN (M), place METAL BUTTONS (3/3).
- Move the buttons into the correct positions.
- Select a button, then select an adjacent empty space to move it.
- Walkthrough (N).

- Move snow and bars, take BALLET SHOES (O).
- Use PIN, take LOCK PARTS (2/4).
- Give BALLET SHOES (P), take LETTER N.
- Scroll right.

- Take BLUE CRYSTAL (R).
- Place LETTER N (S), take TIARA.
- Examine, take LOCK PARTS (3/4) (T).
- Place TIARA (U), take KNIFE.
- Use KNIFE (V).
- Play puzzle, receive WINGS (W).
- Place WINGS (X), take LOCK PARTS (4/4).
- Place LOCK PARTS (4/4) (Y).
- Walkthrough (Z).
- Take ACID.

- Pour ACID (A).
- Go forward.
- Talk, take GOLDEN NUT (1/2) (B).
- Take CUP OF WATER (C).
- Pour CUP OF WATER (D), take NUTS (2/2) and GREEN CRYSTAL.
- Take WATCH and PART OF THE CANVAS (1/2) (E), give NUTS (2/2).
- Take TURQUOISE CRYSTAL.
- Examine BROKEN PROTECTIVE AMULET, read note.
- Examine crystals, place BLUE CRYSTAL, GREEN CRYSTAL, and TURQUOISE CRYSTAL.
- Take BROKEN PROTECTIVE AMULET.
- Give WATCH, take CANDIES (2/2) (F).
- Use winding key (G) on cat (H), take CAT.
- Examine Theater (I), give CANDIES (2/2) (J).
- Play puzzle, take PARTS OF THE CANVAS (2/2).

- Place PARTS OF THE CANVAS (2/2) (K).
- Walkthrough (L).

- Use CAT (M).
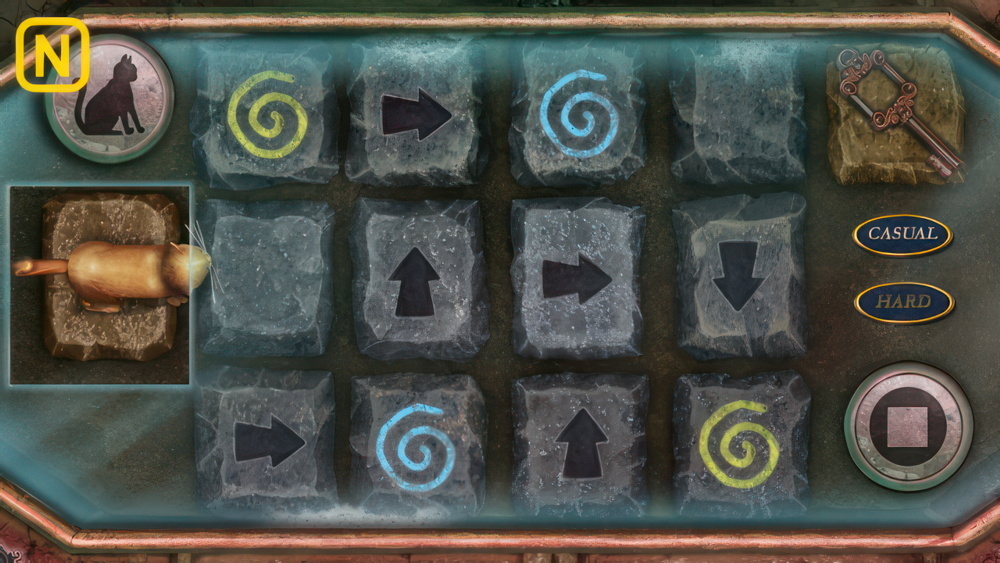
- Set the arrows so that the cat passes through every space when you press the button.
- The cat will keep its current direction through portals and on blank spaces.
- Casual and hard walkthrough (N).
- Receive KEY.

- Use KEY (O).
- Go forward.

- Use PROTECTIVE AMULET on scene.
- Rotate each segment to complete a shape that matches the glowing symbol in the background.
- Segments will turn green when they’re in the correct position.
- Walkthrough (P).
- Take CRACKATOOK, BUTTON (1/3), and BAYONET (Q).
- Use BAYONET (R), take ROPE LADDER and note.

- Read note, take FEATHER (1/3) (S).
- Use ROPE LADDER.
- Go forward.
- Examine scene.
- Take STICK (T).
- Examine STICK ×3.
- Play puzzle, receive LION’S HEAD (U).
- Take BUTTONS (2/3)-(3/3) (V).

- Take ROD and BOX (W).
- Read note (X), examine chess pieces.
- Move the chess pieces so that they do not intersect either vertically or horizontally or diagonally.
- Walkthrough (Y).
- Take FEATHERS (2/3).

- Swap items to create the image.
- Examine BOX, walkthrough (Z).
- Take RING.
- Use ROD (A), receive RIGHT HAND (1/4) and LOTUS (1/3).
- Use STICK (B), receive NUTCRACKER PARTS (2/4).
- Walk down.
- Place LION’S HEAD (C), receive PIPE PART.
- Place BUTTONS (3/3) (D).

- Draw lines from each button in accordance with the number on the button.
- Click on two buttons to create a line.
- Click on one line to delete it.
- Walkthrough (E).
- Take FEATHERS (3/3) and GEAR.
- Walk forward.

- Play puzzle, receive NUTCRACKER PARTS (3/4) (F).
- Place GEAR (G), receive FLOWER.
- Place FEATHERS (3/3) (H), take NUTCRACKER PARTS (4/4).
- Use NUTCRACKER PARTS (I), give CRACKATOOK.
- Take FRITZ’S NOTE, STAR (1/2), and BROKEN LEVER (J).
- Read FRITZ’S NOTE, take STAR (2/2).
- Place STARS (2/2) (K).
- Walk left.
- Examine paper (L).
- Take YIN (M).
- Place RING (N), examine ×5.
- Take GLASS PIECES (1/4).

- Place YIN (O), take MOON BUTTONS (1/2) and LOTUSES (2/3).

- Place FLOWER (P), take LOTUSES (3/3) and CUPCAKE.
- CUPCAKE on Theater, play puzzle.
- Receive MATCHES.
- Read note (Q), take HORSE (1/3).
- Use LOTUSES (3/3).
- Place the lotuses on the field according to the number indicated on the edges.
- Walkthrough (R).
- Take HALF A PIPE.

- PIPE PART and MATCHES on HALF A PIPE, take PIPE.
- Use PIPE (S).
- Walk forward.
- Examine photo (T).

- Find 3 differences.
- Walkthrough (U).
- Take GLASS PIECES (2/4).
- Take CUP (V).
- Examine (W), receive HORSE IN STONE.
- Take YANG (X).
- Use HORSE IN STONE (Y), receive HORSE (2/3).
- Walk down.
- Use YANG (Z), take MOON BUTTONS (2/2).
- Use CUP.
- Place MOON BUTTONS (2/2) (A).

- Arrange the elements according to the phases of the moon.
- Walkthrough (B).
- Take KNIFE.

- Use KNIFE (C), receive HORSE (3/3).
- Walk forward.
- Place HORSE (3/3) (D), take GLASS PIECES (3/4).

- Use CUP (E).
- Examine book, take GLASS PIECES (4/4).
- Take ORGAN PIPES (1/3).
- Use GLASS PIECES (4/4) (F).

- Rotate and place the stained glass pieces to complete the image.
- Walkthrough (G).
- Read note, take TOOLS.

- Use TOOLS (H).
- Use screwdriver (I).
- Place BROKEN LEVER, use wrench (J).
- Use hammer, take LEVER.
- Walk down twice.
- Place LEVER (K).
- Walk left.
- Read notes (L), take MUSICAL PASSWORD.
- Take BIRD WING (1/2) and ENVELOPE SHAPE (M).
- Take BIRD BODY (N).
- Take NOTES (1/3) (O).
- Place ENVELOPE SHAPE (P), take CAT EMBLEM and TWEEZERS.

- Take NOTES (2/3) (Q), place CAT EMBLEM.
- Take ORGAN PIPES (2/3).
- Use TWEEZERS (R), receive TOKEN.
- Examine snow (S), take BIRD WINGS (2/2).
- Examine note, use TOKEN.
- Play puzzle, receive HINT.
- BIRD WINGS (2/2) on BIRD BODY, take BIRD.
- Place HINT (T).
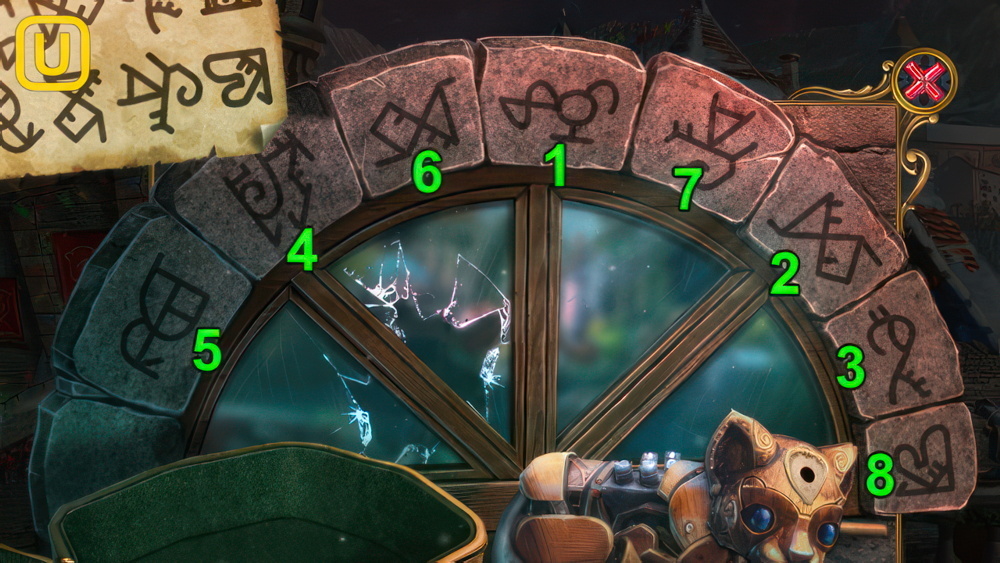
- Click on the characters in the correct sequence.
- Walkthrough (U).
- Receive HANDLE.

- Place HANDLE (V), take SILVER BINOCULARS (1/2).
- Use BIRD (W), receive NOTES (3/3).
- Place NOTES (3/3) and MUSICAL PASSWORD (X).

- Walkthrough (Y).
- Walk left.

- Open (Z), play puzzle.
- Receive VIOLIN.
- Examine VIOLIN, take ORGAN KEYS (1/3).
- Take MECHANICAL MOUSE (A), use KNIFE (B).
- Take ORGAN KEYS (2/3).
- Take ORGAN KEYS (3/3) (C).
- Place ORGAN KEYS (3/3) (D), take GUITAR KEY.

- Use GUITAR KEY (E), receive STRINGS.
- STRINGS on VIOLIN, take VIOLIN (1/2).
- Walk down.
- Use MECHANICAL MOUSE (F), take GREEN CLAY and DRUMSTICK (1/2).
- Walk left.
- Play puzzle, receive DRUMSTICKS (2/2) (G).
- Use DRUMSTICKS (2/2) (H), take ORGAN PIPES (3/3).
- Place ORGAN PIPES (3/3) (I).
- Play the notes in the correct order, guided by the organ pipes.
- Walkthrough (J).
- Take BINOCULARS (2/2).
- Walk down.

- Place BINOCULARS (2/2) (K), take VIOLINS (2/2).
- Walk left.
- Place VIOLINS (2/2) (L), take CYMBALS.
- Walk down.
- Use CYMBALS (M), take MAP.

- Open MAP, take WIND ROSE and MAP.
- Place WIND ROSE (N), use MAP.
- Get to the center of the city, undetected by soldiers.
- Walkthrough (O): move across board when green icons appear.

- Talk, take KEY (P).
- Take DOORKNOB (Q).
- Use GREEN CLAY (R), take GREEN POWDER.
- Use DOORKNOB (S), take OIL and CAKE.
- CAKE on Theater, play puzzle.
- Take CINNABAR.
- Use CINNABAR (R), take RED POWDER.

- Use KNIFE (T), take WIRE CUTTERS.
- Take JARS (U).
- RED POWDER, GREEN POWDER, and OIL on JARS, take PAINTS.
- Use PAINTS (U).

- Select adjacent cells and color the image with the proper colors.
- Walkthrough (V).
- Take PLAQUE.
- Place PLAQUE (W), use KEY.
- Go forward.
- Use WIRE CUTTERS (X), receive HANDLE.
- Take RAG (Y).

- Take BUTTON (1/2) (Z).
- Use RAG (A), enter 13905 (B).
- Take SATURN RING (1/3).
- Examine note, take QUARTZ.
- Use HANDLE on register, take BADGE.
- Place BADGE (C), take HORSESHOE.

- Place HORSESHOE (D), take SUN PART (1/6).
- Go forward.
- Take JACK and WREATH (E).

- Take KEY (F).
- Play puzzle, receive BOOK (G).
- Examine BOOK.
- Swap elements to complete the image.
- Walkthrough (H).
- Play puzzle, receive COORDINATES.

- Take STETHOSCOPE (I).
- Place WREATH (J), take MOUSE (1/3).
- Read note (K), take MICE (2/3) and HOUR HAND (1/2).
- Use KEY (L), take SATURN and UNICORN HORN.
- Walk down.

- Place UNICORN HORN (M), take BUTTONS (2/2).
- Use STETHOSCOPE (N).

- Rotate the arrow in the correct combination as shown by the lights.
- Walkthrough (O).
- Take SATURN RINGS (2/3).

- Place BUTTONS (2/2) (P), take MICE (3/3).
- Use JACK, read note.
- Take SUN PARTS (2/6).
- Walk forward.
- Place MICE (3/3) (Q), take BRACELET.
- Place BRACELET (R), take LEVER HANDLE.
- Place LEVER HANDLE (S).
- Go forward.
- Take FANG (1/3) and SWITCH (T).
- Take SPHERE and MEDALLION (U).
- Place SWITCH (V), turn.
- Take CALCITE.

- Take SATURN RINGS (3/3) (W).
- Insert the numbers into the dial in the correct order.
- Walkthrough (X).
- SATURN RINGS (3/3) on SATURN.

- Place SATURN (Y), take CLOCK HANDS (2/2).
- Place CLOCK HANDS (2/2) (Z), take SUN PARTS (3/6) and GEAR (1/2).
- Examine (@).
- Walk down.
- Play puzzle, receive MAP OF CONSTELLATIONS (A).
- Place MEDALLION (B), take CONTINENT.
- Place SPHERE (C), take SUN PARTS (4/6).
- Walk forward.
- Place CONTINENT (D), take SUN PARTS (5/6).
- Use MAP OF CONSTELLATIONS (E).

- Illuminate the stars and collect the constellation as shown on the image.
- Walkthrough (F).
- Take SODA.
- Place QUARTZ, CALCITE, and SODA, add each item to bowl (G).
- Flip switch (H), take LENS.
- Replace LENS (I), use COORDINATES.

- Draw the indicated number of connected sectors.
- Walkthrough (J).

- Walkthrough (K).
- Take SUN PARTS (6/6).
- Walk down twice.

- Place SUN PARTS (6/6) (L), examine.

- Connect the elements by rotating them.
- Casual and hard walkthrough (M).
- Walk left.

- Take PLANE, FANGS (2/3), and COTTON CANDY (N).
- Use COTTON CANDY (O), take TERMITES.

- Talk (P), take LETTER.
- Take METAL TUSK (Q).
- Use TERMITES (R), take ELIXIR FOR FRITZ.
- Go forward.
- Take VALVE HANDLE (S).
- Take ELEPHANT FIGURE (T), use VALVE HANDLE.
- Take TOY TURTLE HEAD.
- Walk down.

- Play puzzle, receive FANGS (3/3) (U).
- Puzzle walkthrough (V).

- Play puzzle, receive GEARS (2/2) (W).
- Place TOY TURTLE HEAD (X), take FIGURE (1/5).
- Place LETTER (Y), take CRACKATOOK PENDANT (1/2).
- Use FANGS (3/3) (Z), take CHOCOLATE SANTA.
- CHOCOLATE SANTA on Theater, play puzzle.
- Take FIGURES (2/5).
- Place ELEPHANT FIGURE (A), take FIGURES (3/5) and WOOD.
- Place METAL TUSK (B), take FIGURES (4/5).
- PLANE on WOOD, take BOOMERANG.
- Use BOOMERANG (C), receive FIGURES (5/5).
- Walk forward.
- Read note (D), use FIGURES (5/5).
- Play puzzle, receive CONTROL PANEL PART (E).
- Place GEARS (2/2) (F).
- Walk forward.
- Receive EPIC KEY.
- Take BRICK (G), place CONTROL PANEL PART.
- Swap elements to assemble the image.
- Walkthrough (H).
- Take CRACKATOOK PENDANT (2/2) and EPIC KEY PIECE (1/3).
- Arrange parts as shown (I-K).
- Walk down.

- Play puzzle, receive CROWN PART (1/2) (L).
- Use BRICK (M), take CROWN (2/2).
- Place CRACKATOOK PENDANT (2/2) (N), take RING.
- Place CROWN (2/2) (O), take NUT.
- Walk forward.

- Rearrange the acorns so that the lines do not intersect.
- Place NUT, walkthrough (P): (A-B)-(C-D).
- Take EPIC KEY PIECES (2/3).

- Rotate the rings to complete the picture.
- Place RING, walkthrough (Q).
- Take EPIC KEY PIECES (3/3).
- EPIC KEY PIECES (3/3) on EPIC KEY.

- Use EPIC KEY (R).

- Rotate the gears so that the characters in brackets on the adjacent gears match.
- Walkthrough (S).

- Give ELIXIR FOR FRITZ (T).
- Walkthrough Bonus Chapter, at the link below.


