
Bridge to Another World 9: Christmas Flight – Invites you on a magical Christmas adventure full of mystery, magic and family secrets. A quiet holiday evening suddenly turns into a journey when you find yourself kidnapped and transported to Christmasland, a world filled with wonder but plagued by a dark curse. This curse freezes the hearts of the inhabitants and threatens the very existence of holiday magic. Your journey begins with an unexpected meeting with your nephew Junior, whom you didn’t even know existed. He tells you of the tragic fate of his parents, Peter and Wendy, and his hope that only you can save Christmasland. Guided by a letter from his mother, you set out to help in this magical world. You will have to solve many mysteries, meet new friends and unite with them for the common cause of restoring the magic of Christmas. If you can not pass any of the puzzles or do not know where the items are, on our site you can watch the walkthrough of Bridge to Another World 9: Christmas Flight, and save the holiday.
Bridge to Another World 9: Christmas Flight – Walkthrough
Here you can see the full walkthrough of Bridge to Another World 9: Christmas Flight, namely for all chapters, including bonus chapter, in pictures.
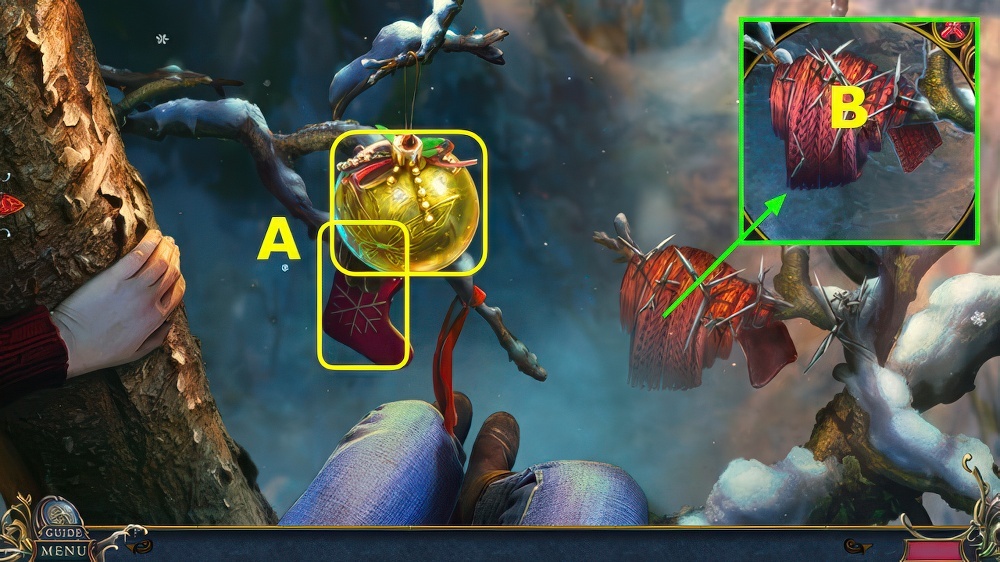
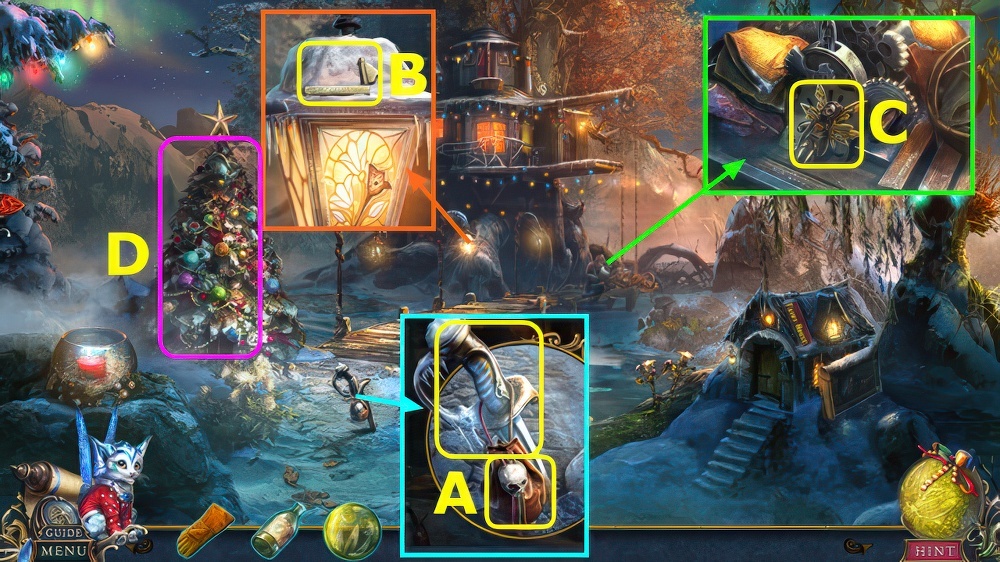
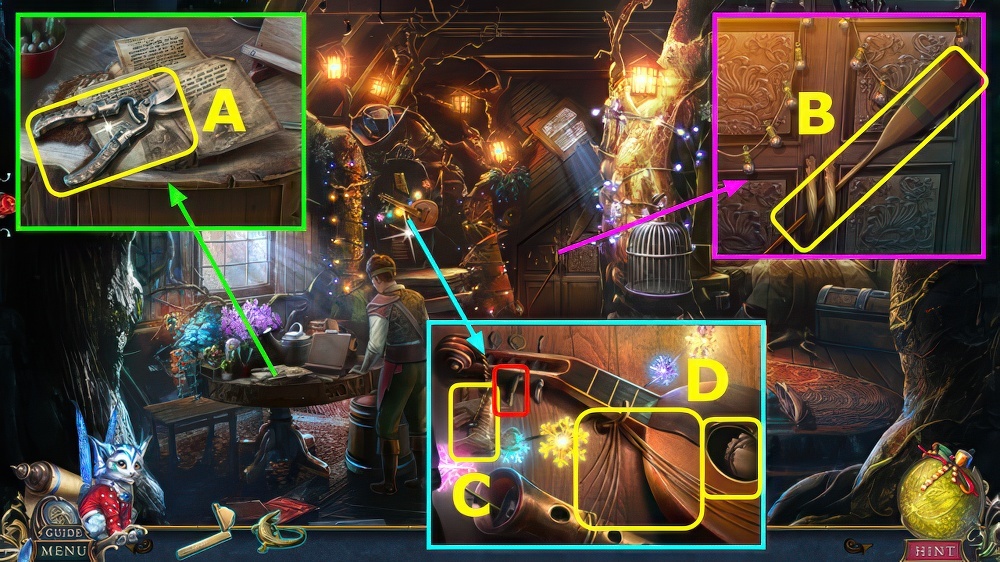
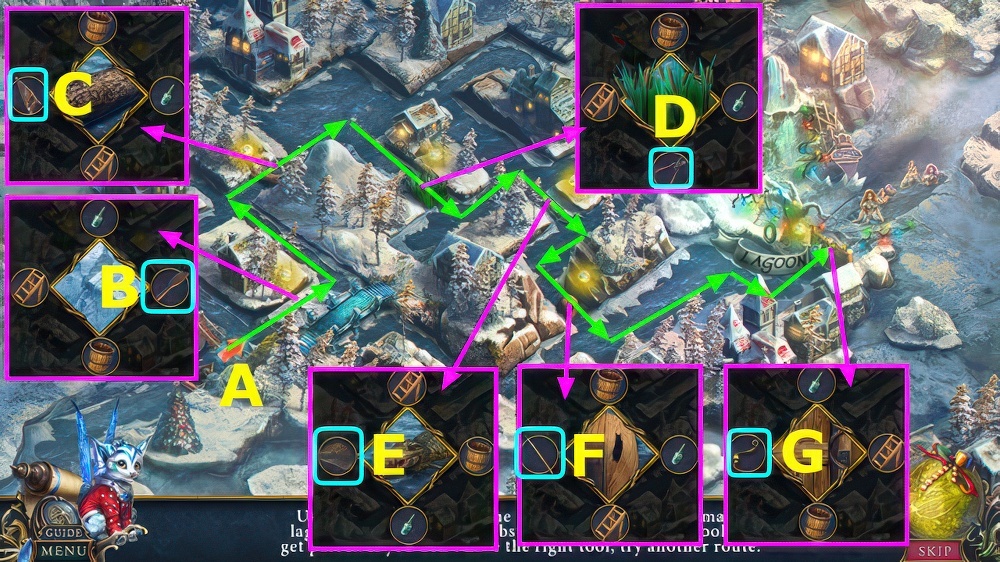
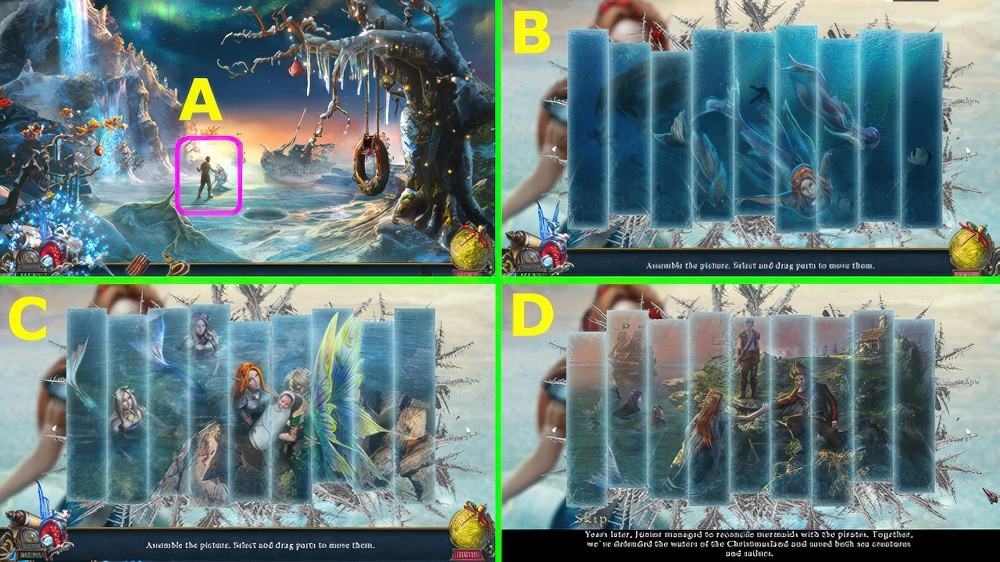
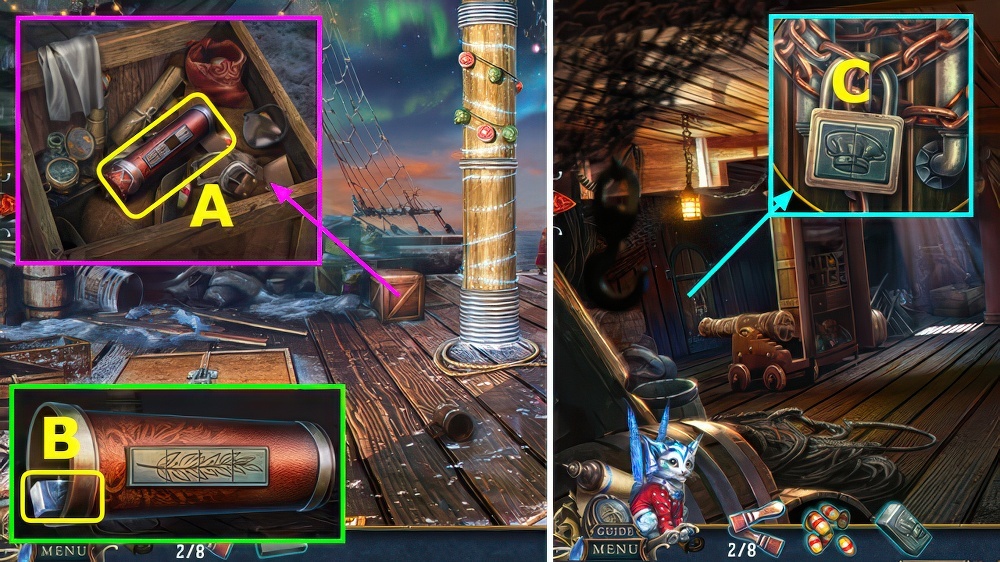
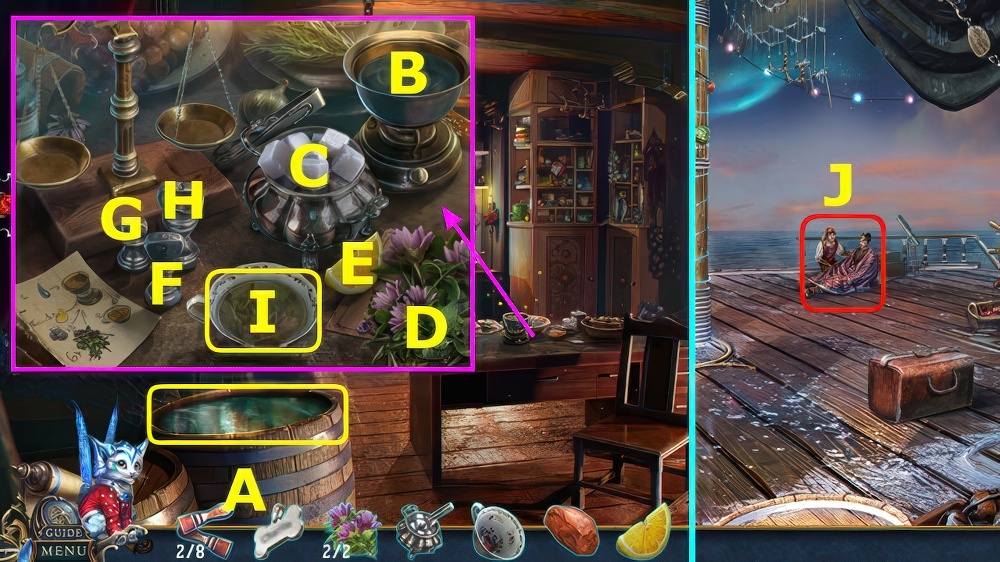
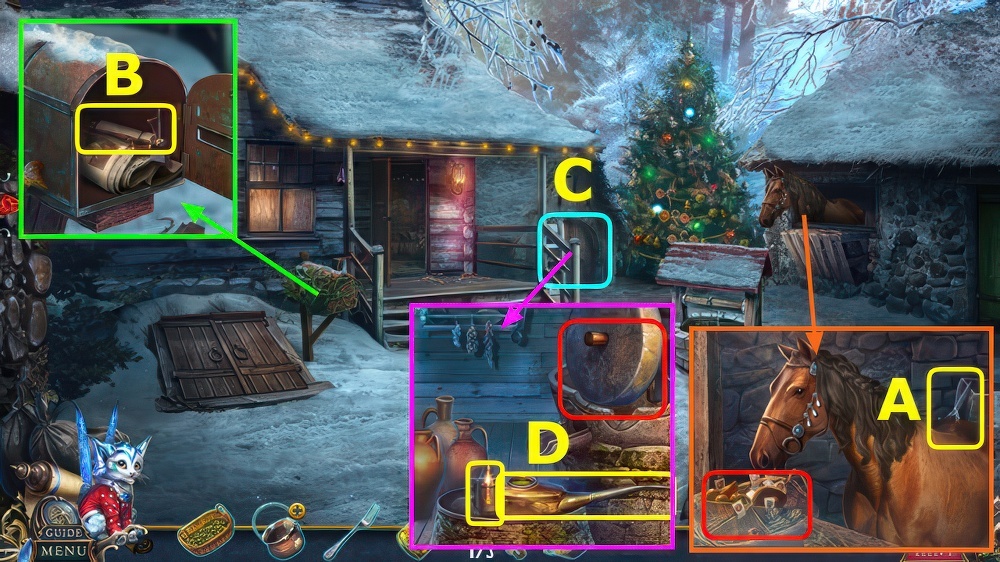
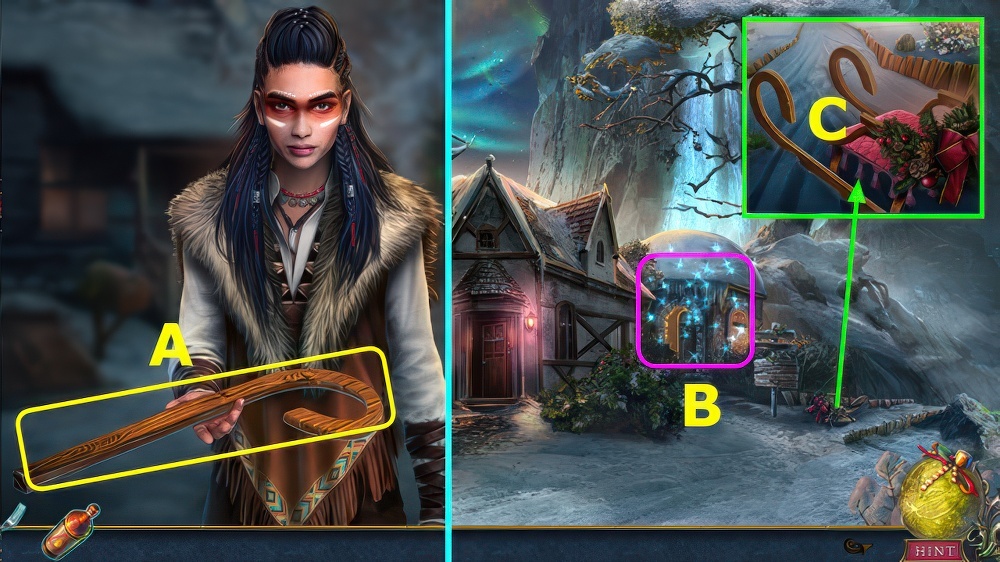
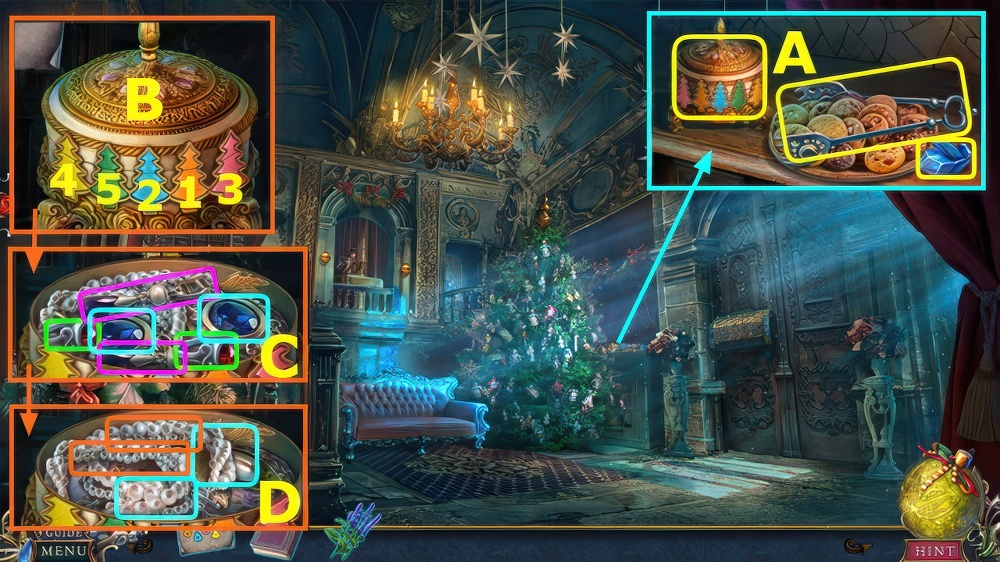
- Select hint ball, take CHRISTMAS STOCKING (A).
- Take GLOVE, read note, take COOKIES from CHRISTMAS STOCKING.
- Use GLOVE, select scarf (B).
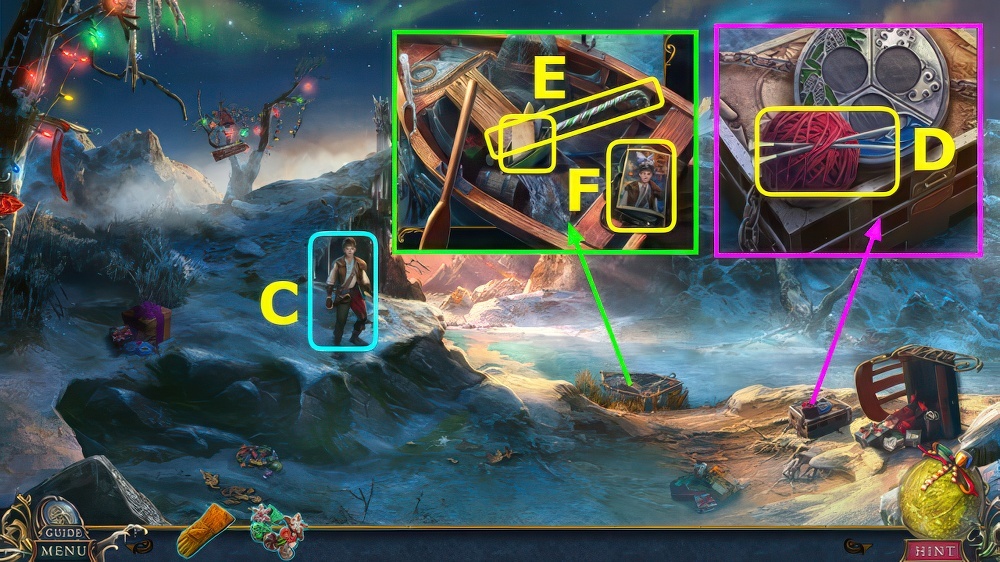
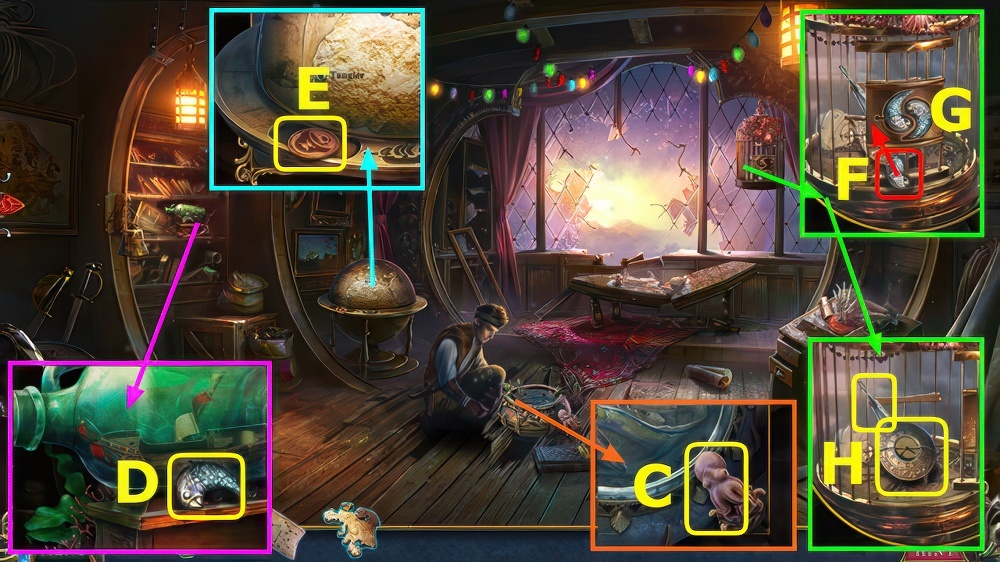
- Talk, read note and take BAG TOKEN (C).
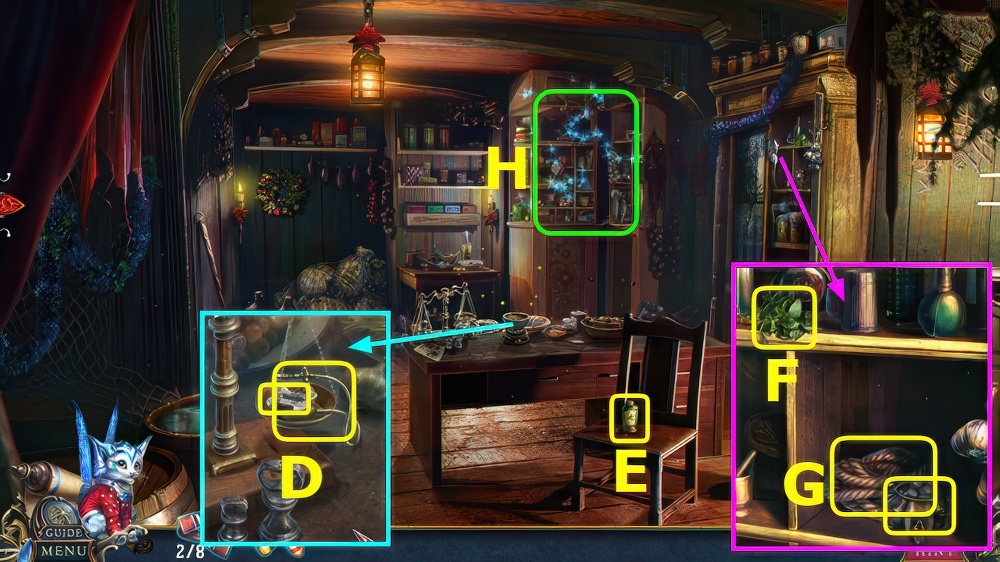
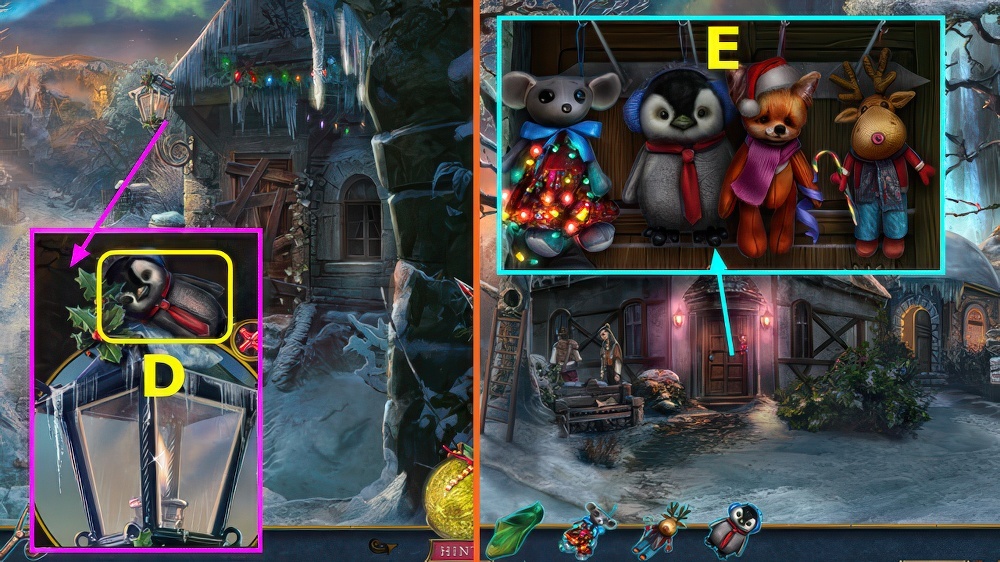
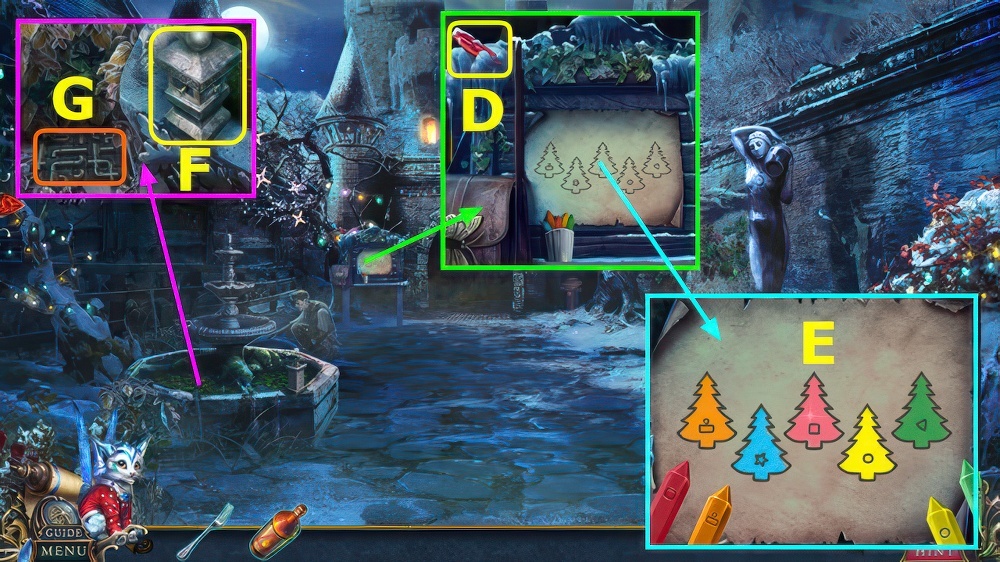
- Take KNITTING NEEDLE AND YARN (D).
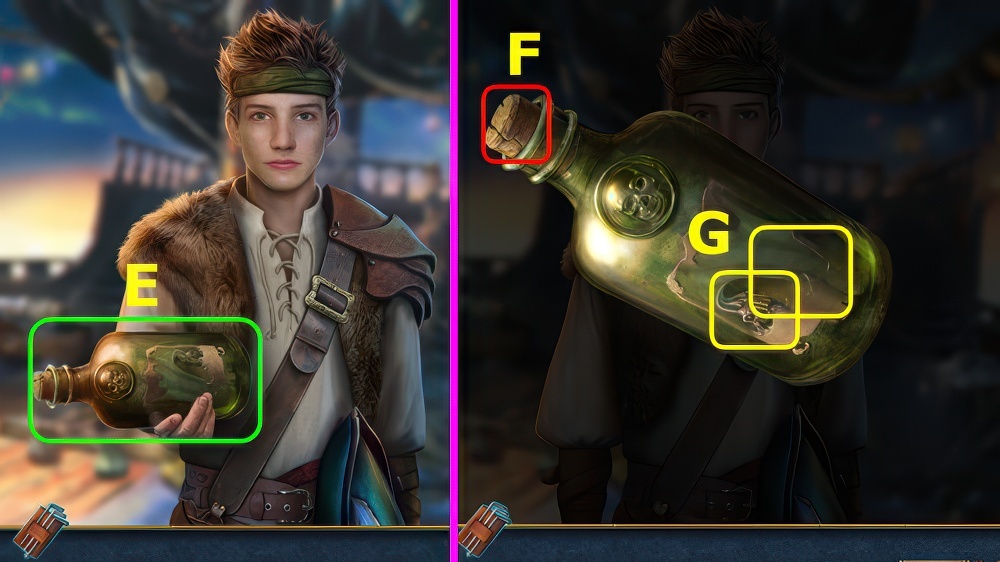
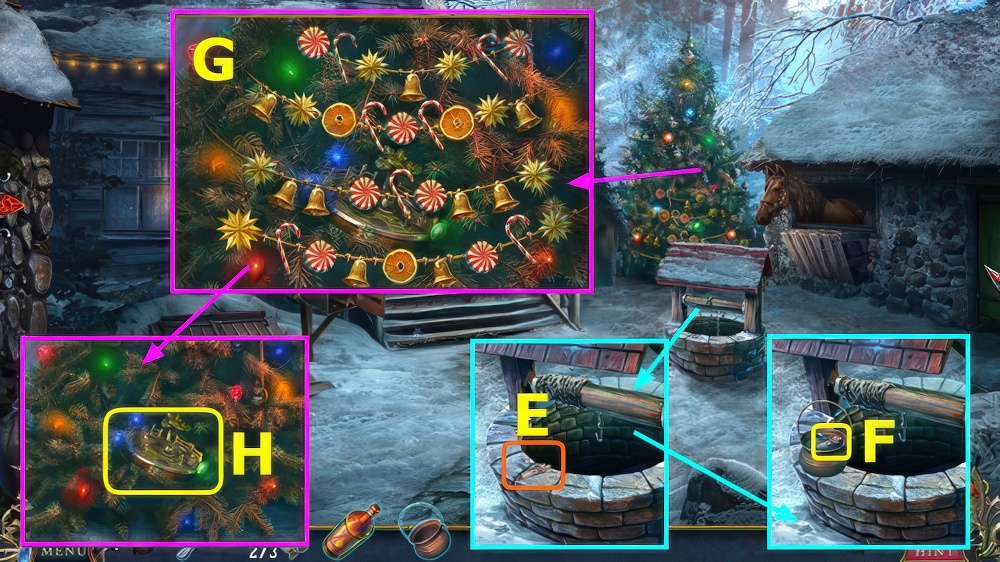
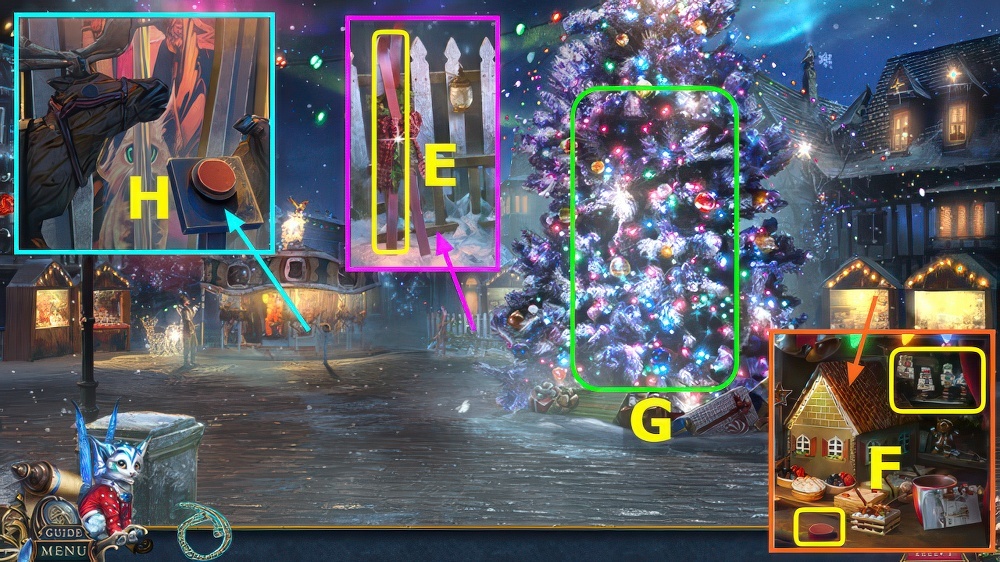
- Read note, take JUNIOR’S HAT and CANE (E).
- Read note, take JUNIOR’S BAG (F).
- Take OIL from JUNIOR’S BAG, place BAG TOKEN, play puzzle, earn PIXIE.

- Use CANE, earn TORN SWEATER and 1/2 BOARD (G).
- KNITTING NEEDLE AND YARN on TORN SWEATER, take SWEATER.
- SWEATER and COOKIES on PIXIE.
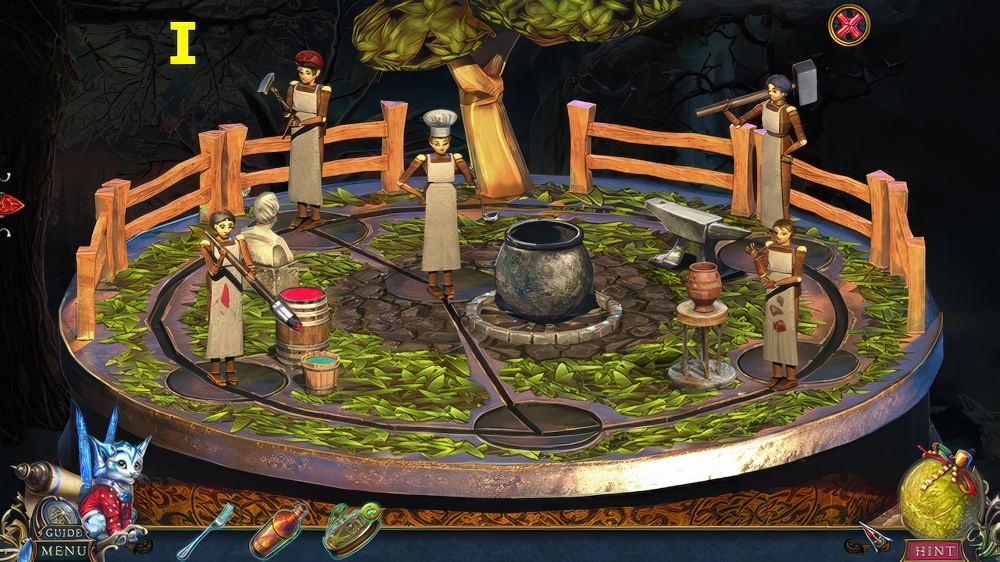
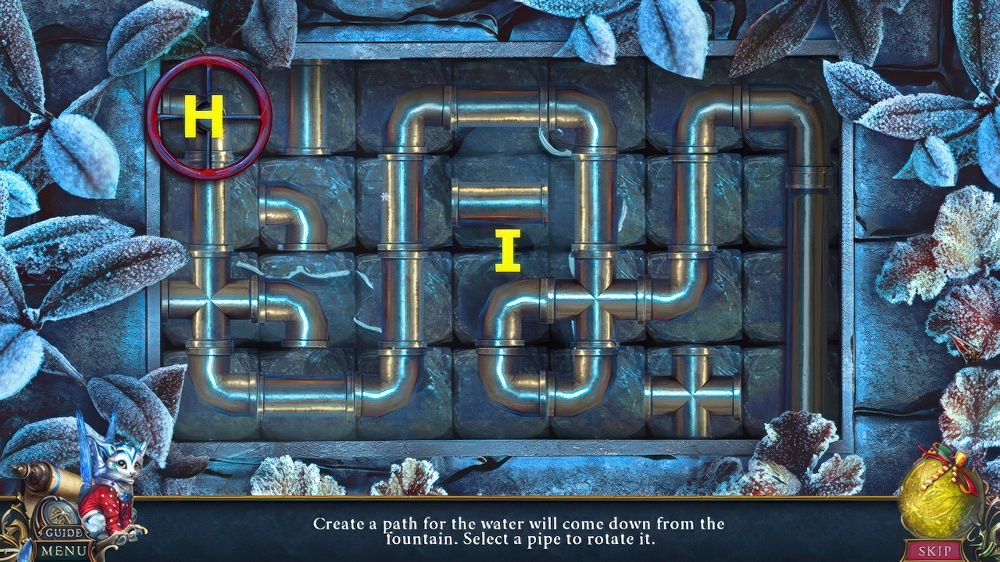
- Give PIXIE (H).
- PIXIE now sits on menu bar (I).
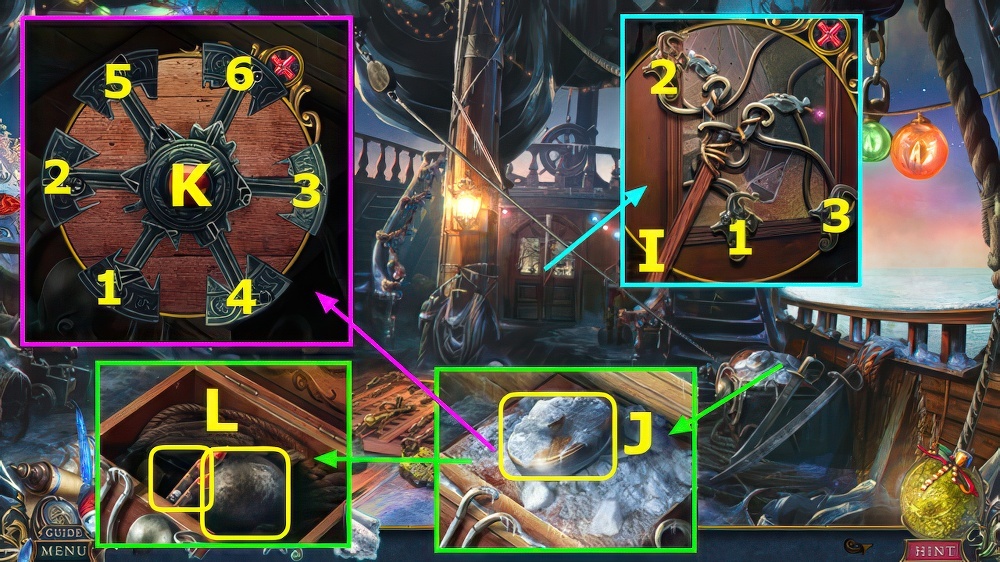
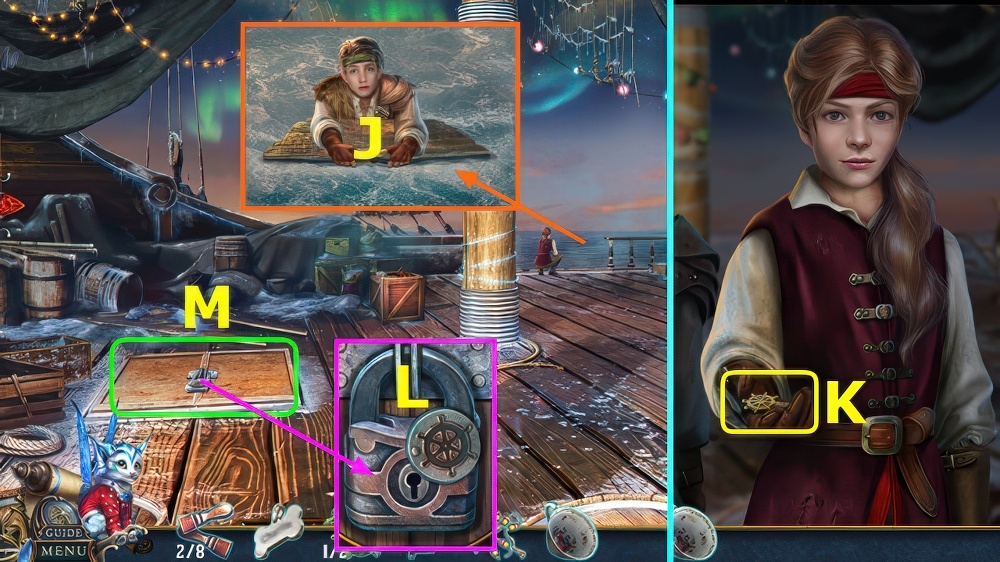
- Select Pixie, give JUNIOR’S HAT, take JUNIOR’S MAGIC HAT.
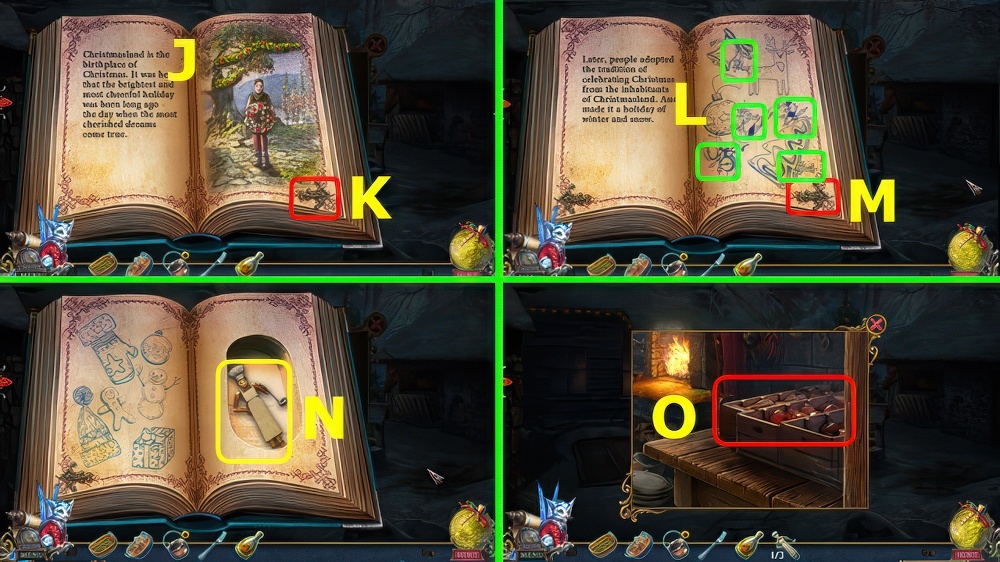
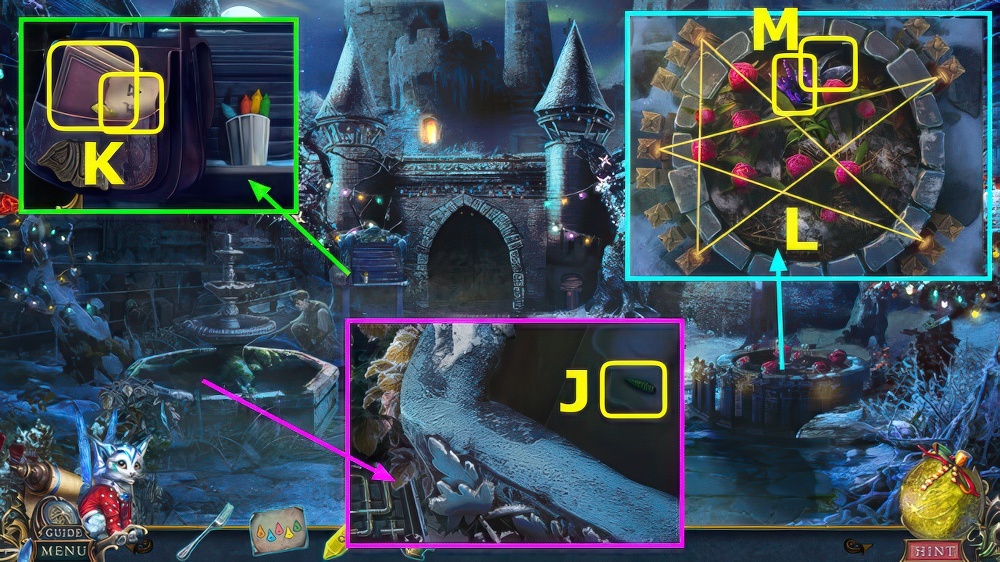
- Give JUNIOR’S MAGIC HAT (J).
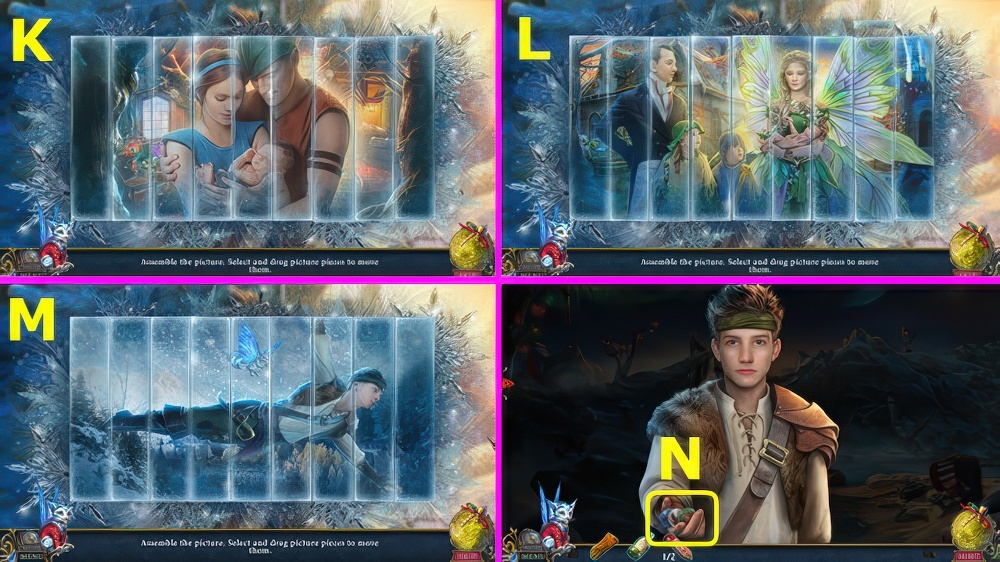
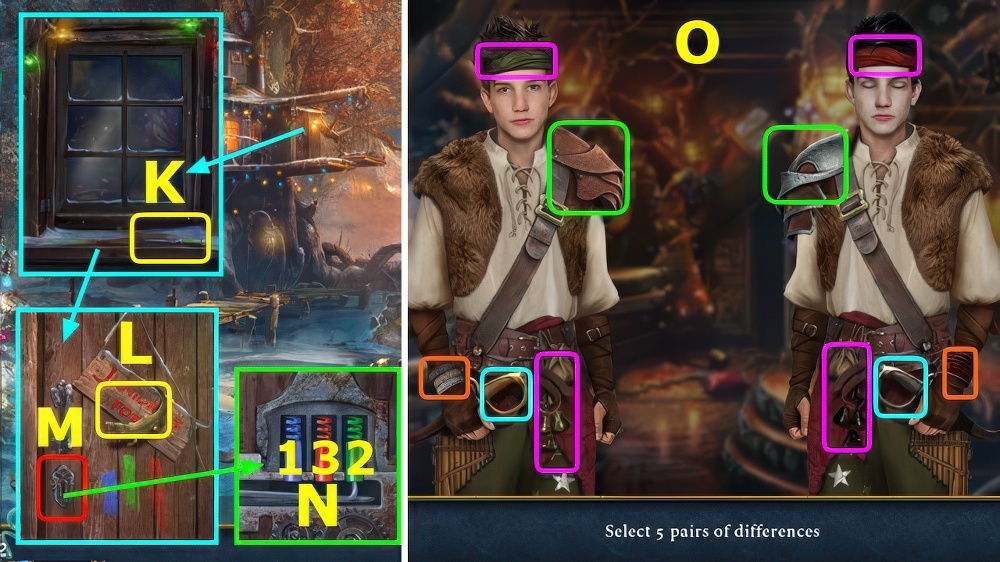
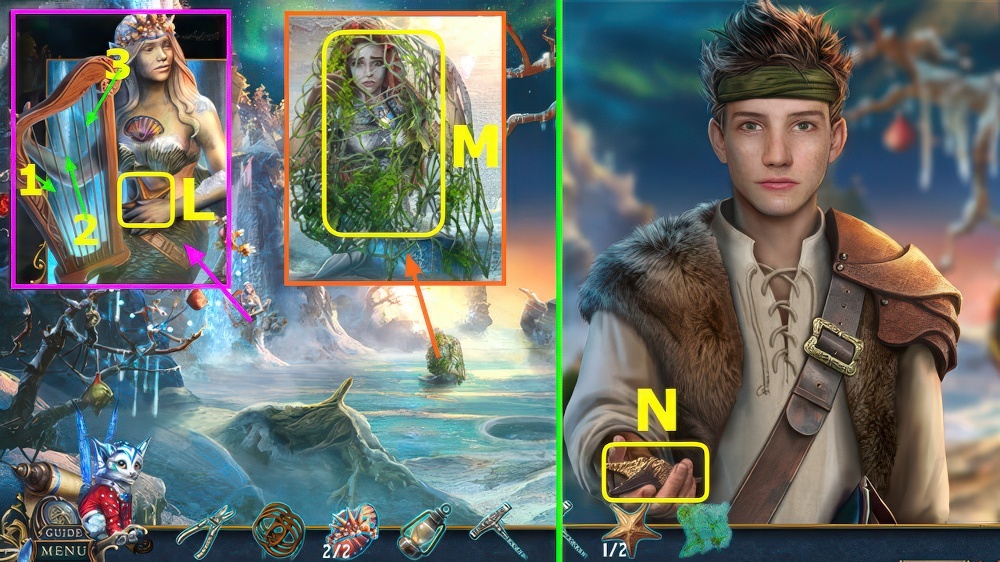
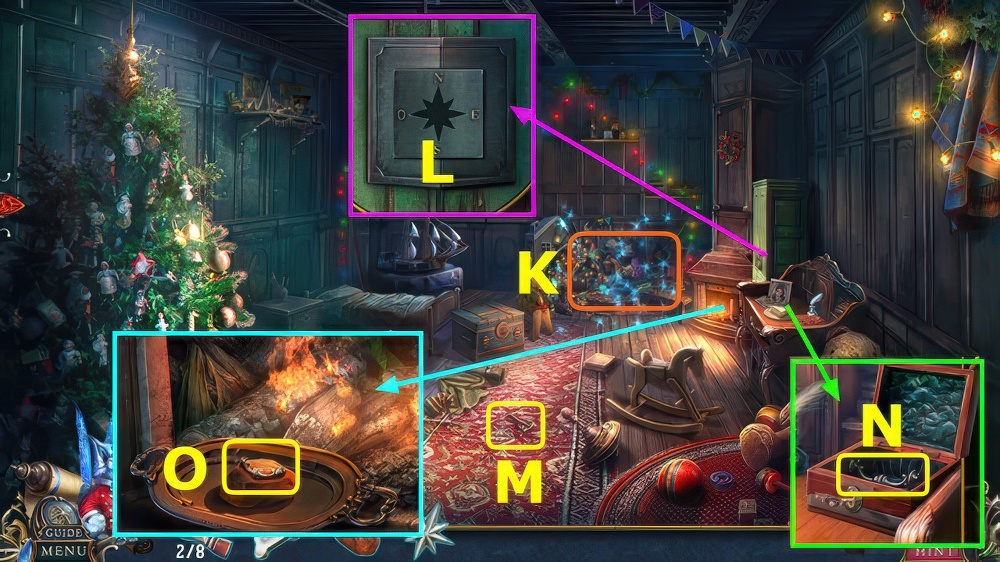
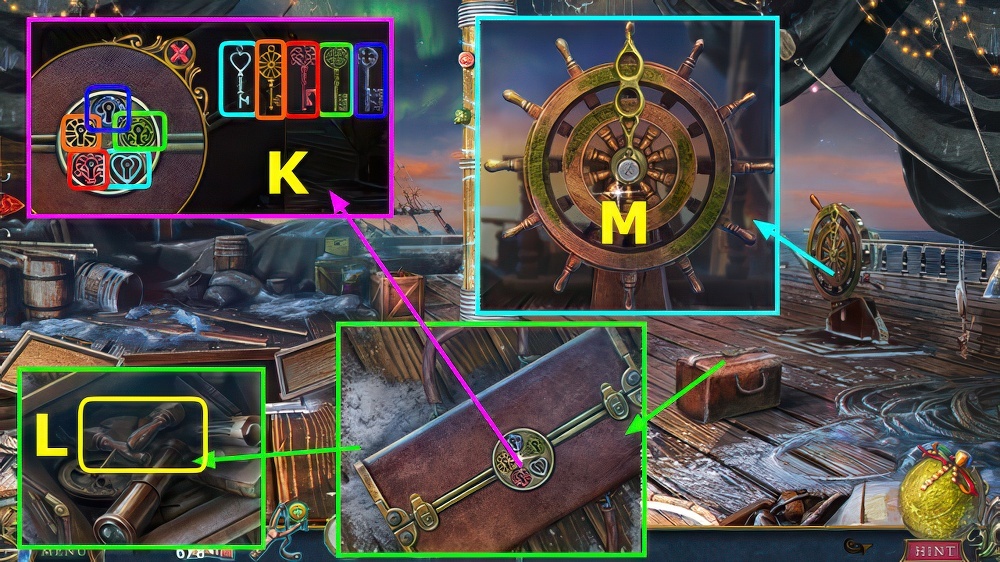
- Solution (K-L-M).
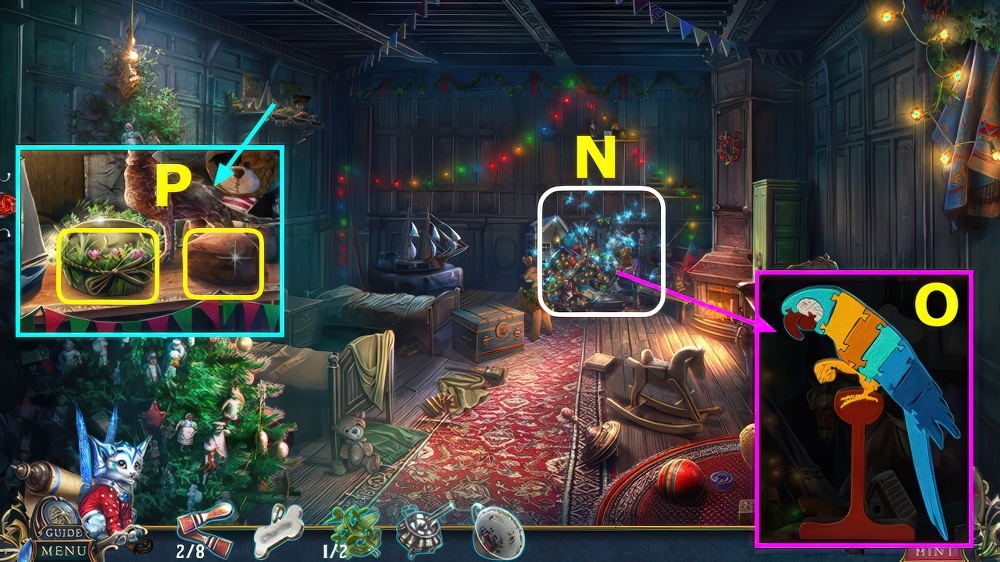
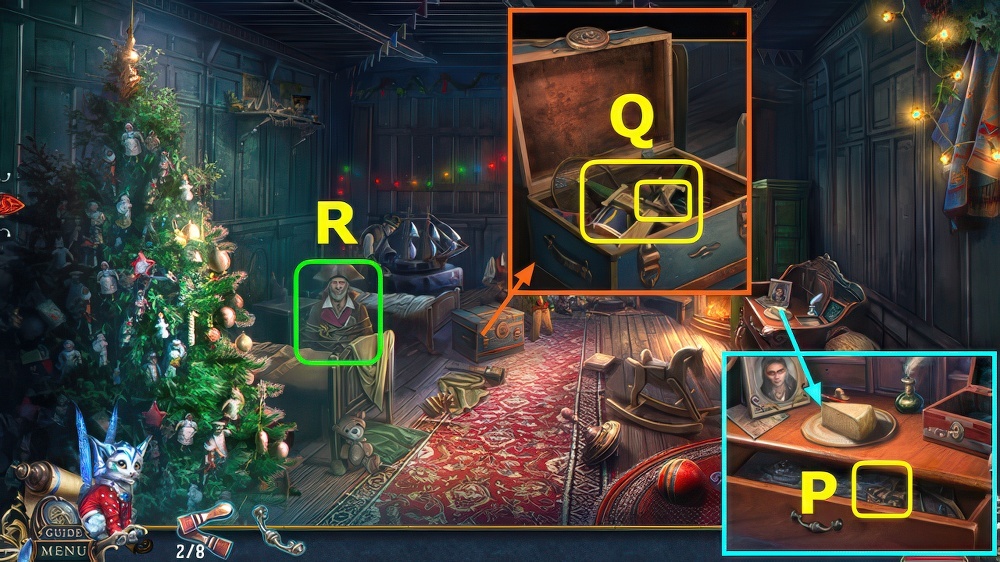
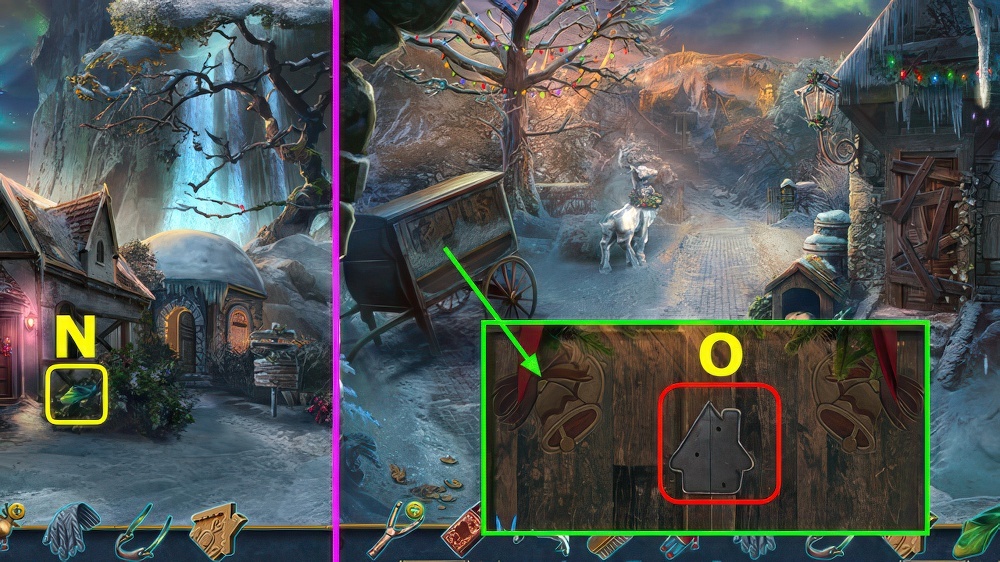
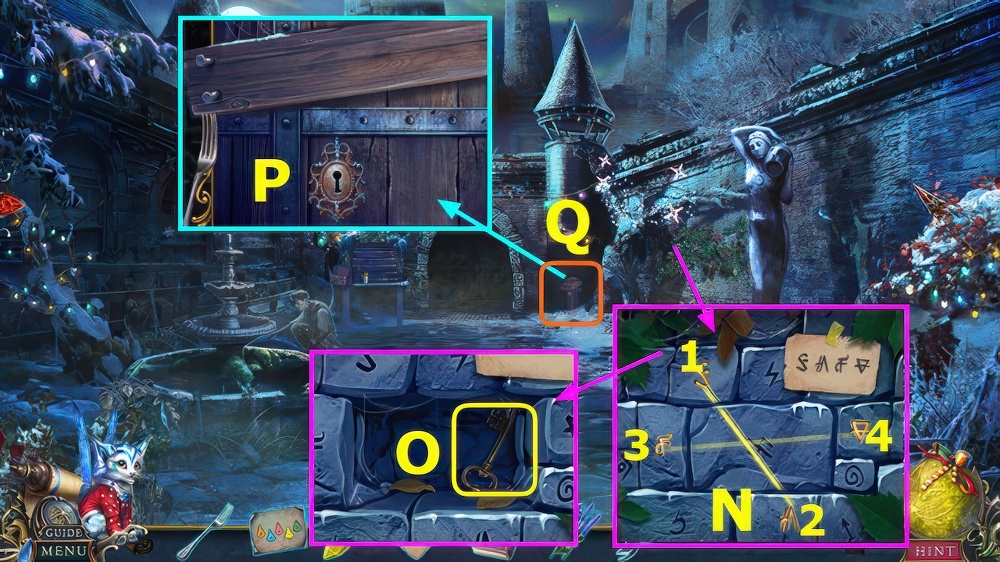
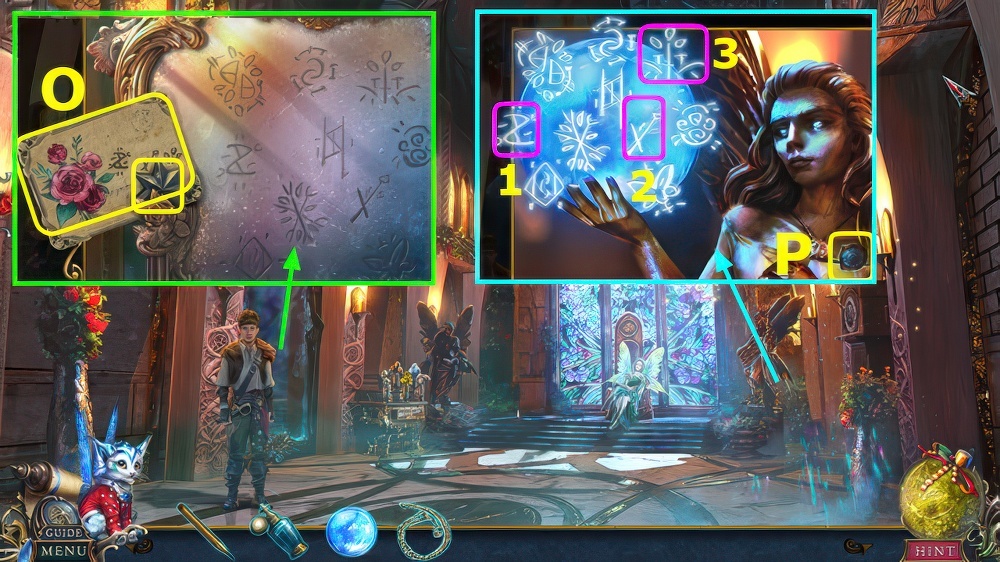
- Take CHEST TOKENS (N).

- Place CHEST TOKENS, solution (O).
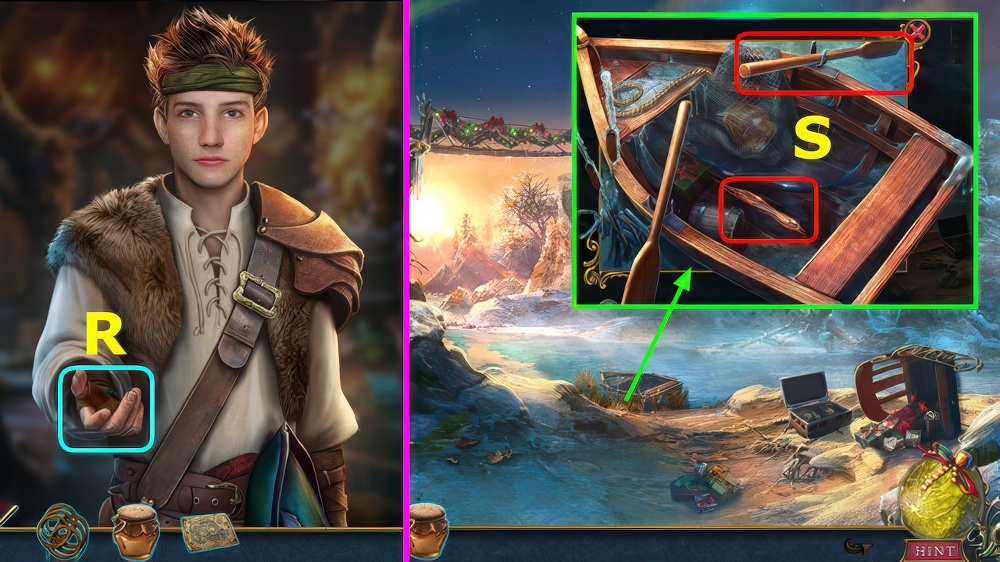
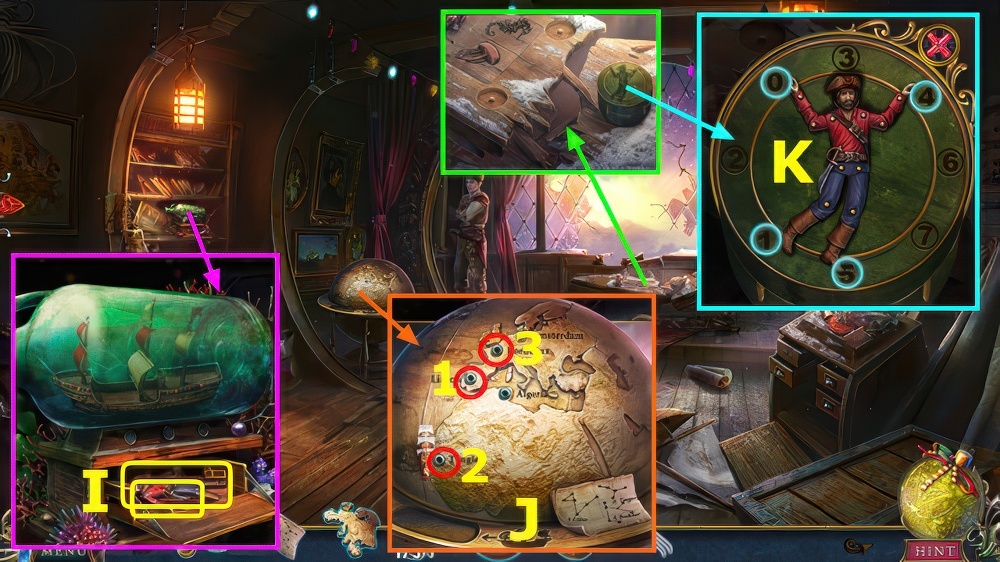
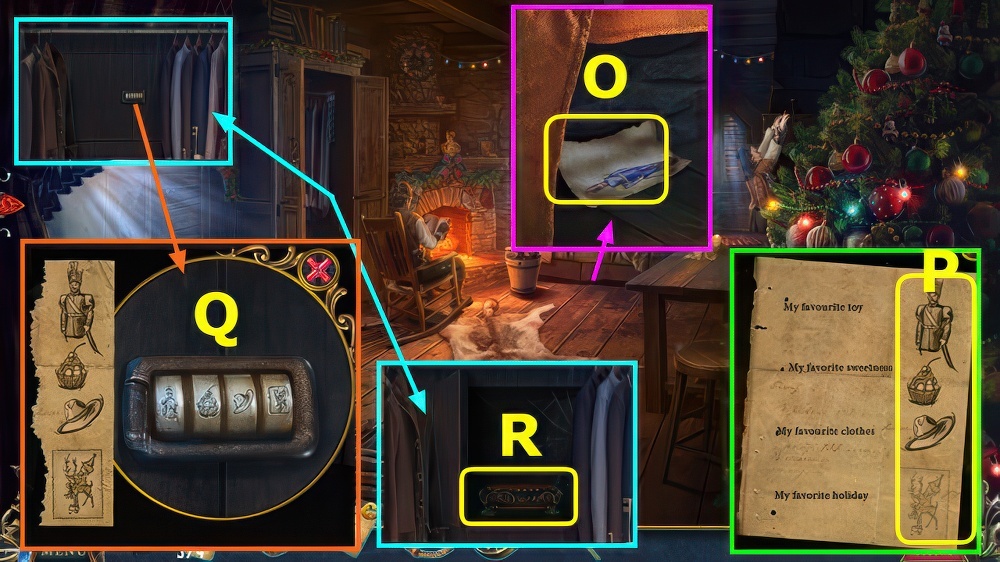
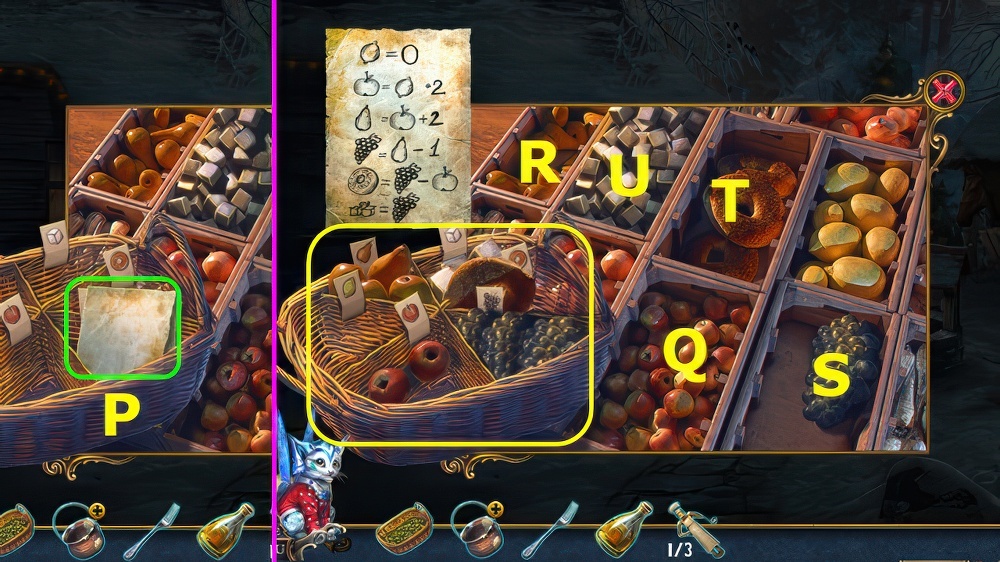
- Restore map, use glue on map, take map (P), take LIGHTER.
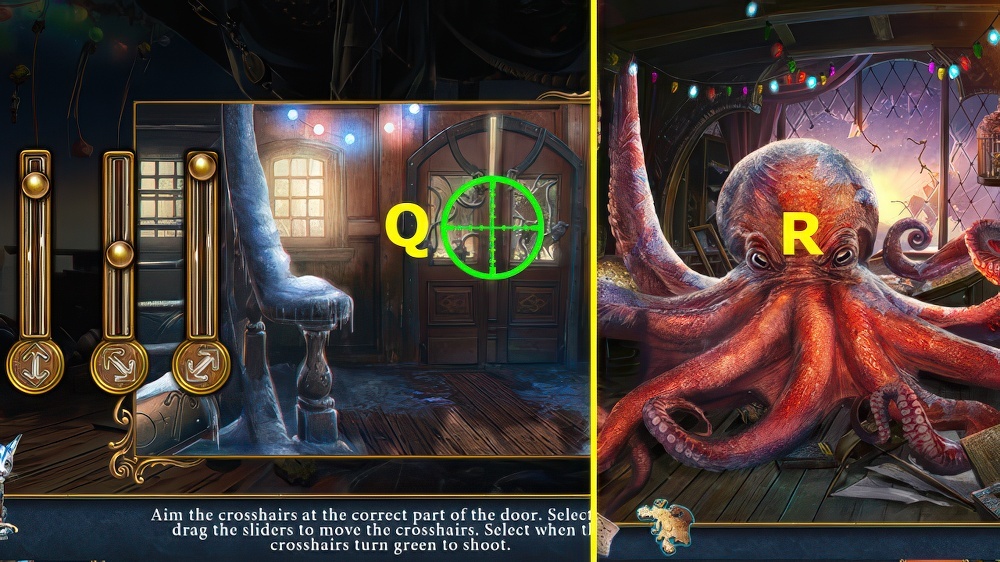
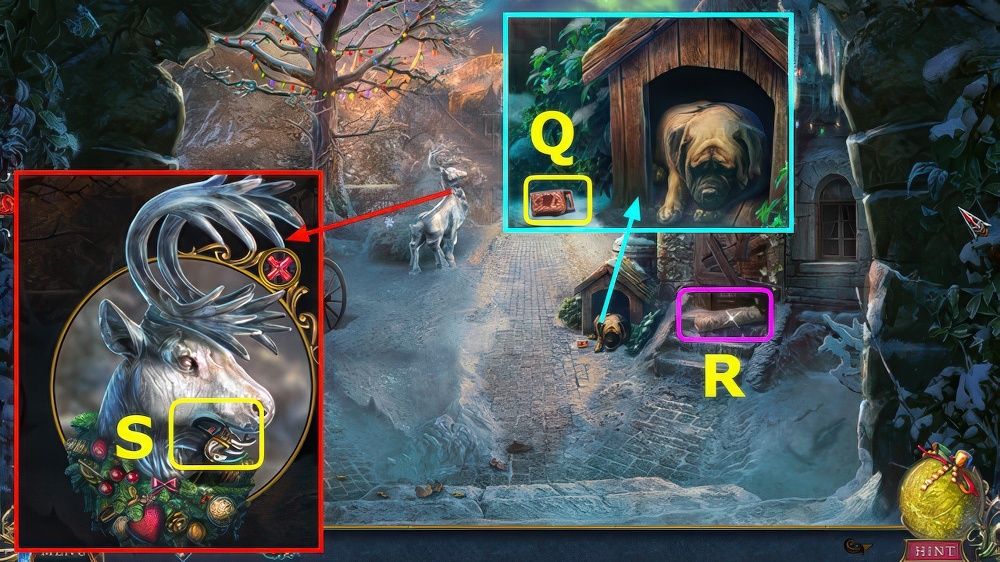
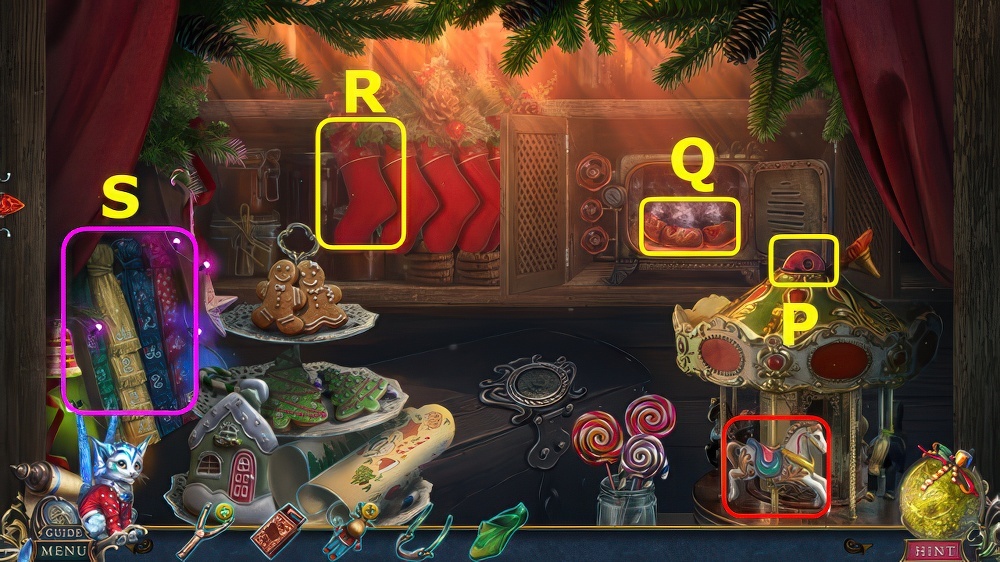
- Use LIGHTER, take 2/2 BOARDS (Q).
- Use LIGHTER, take CHRISTMAS ORNAMENT, select (R).
- Use BOARDS (S).
- Go forward.
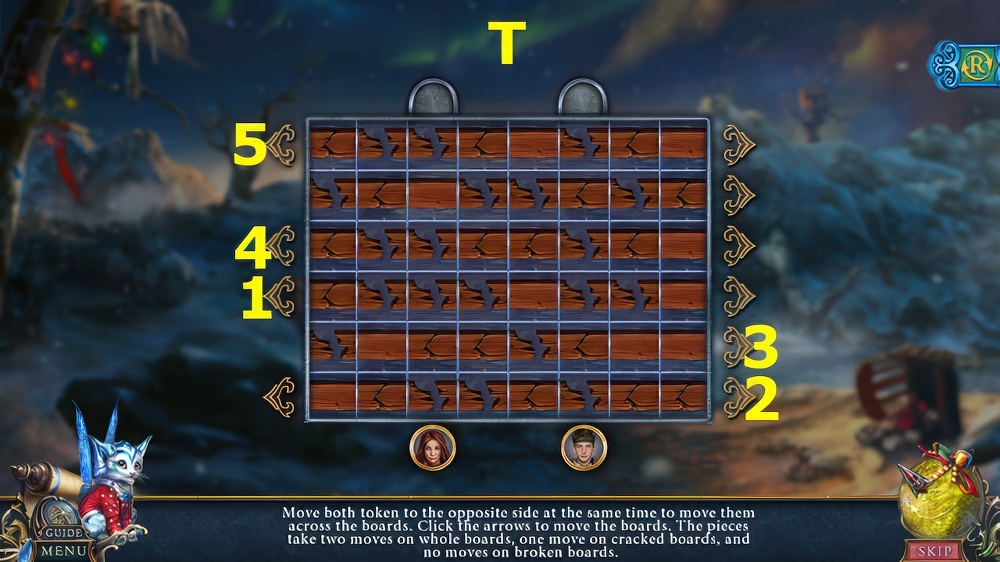
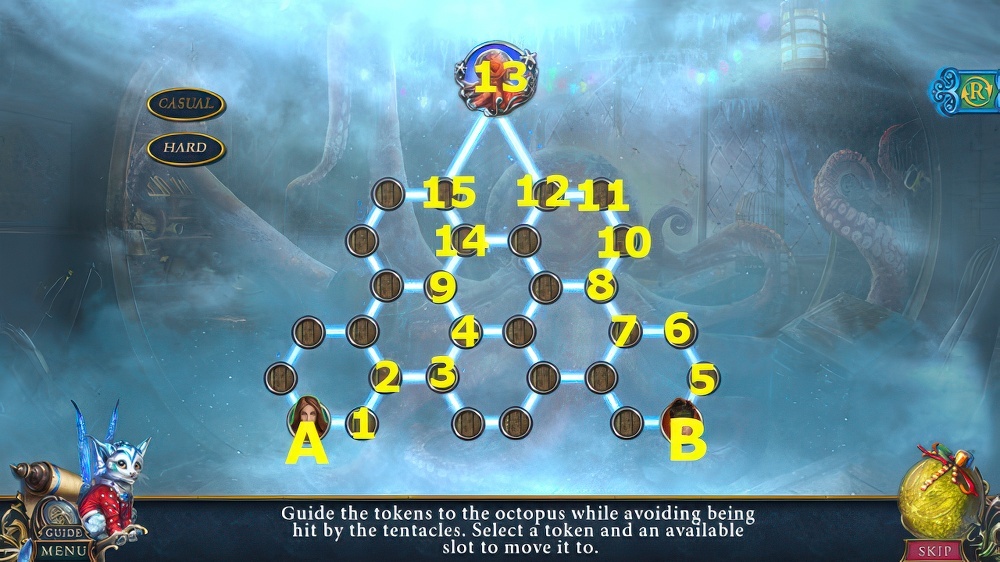
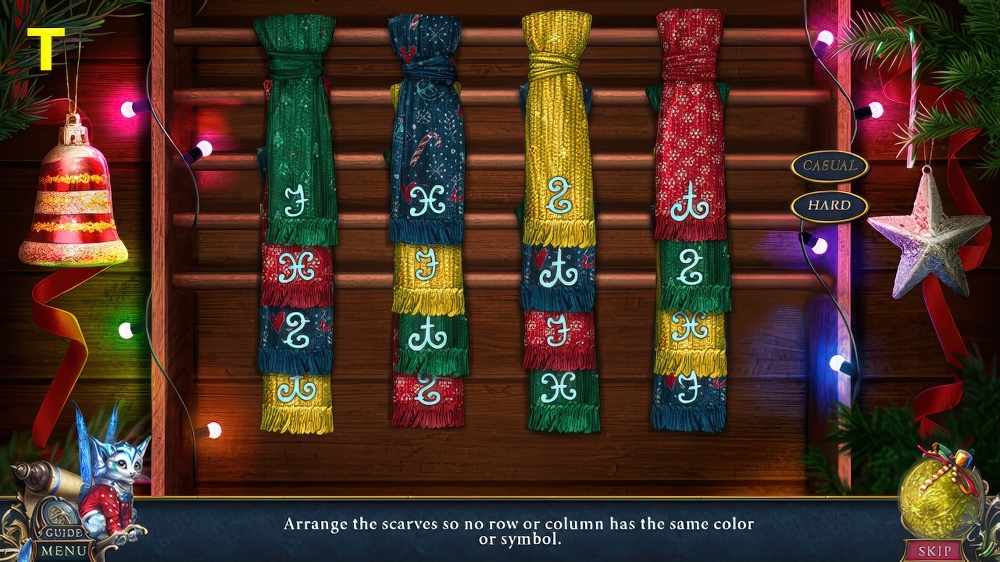
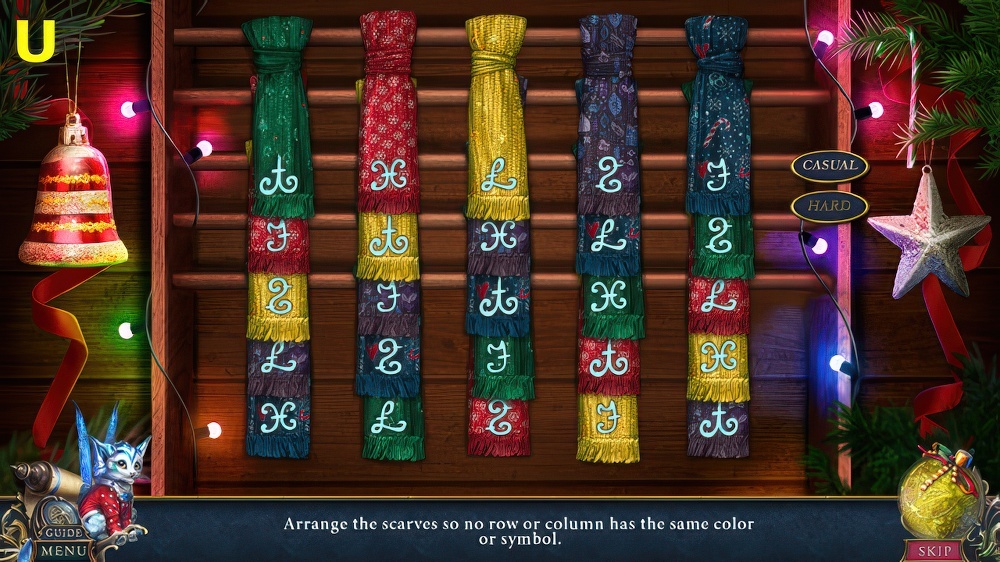
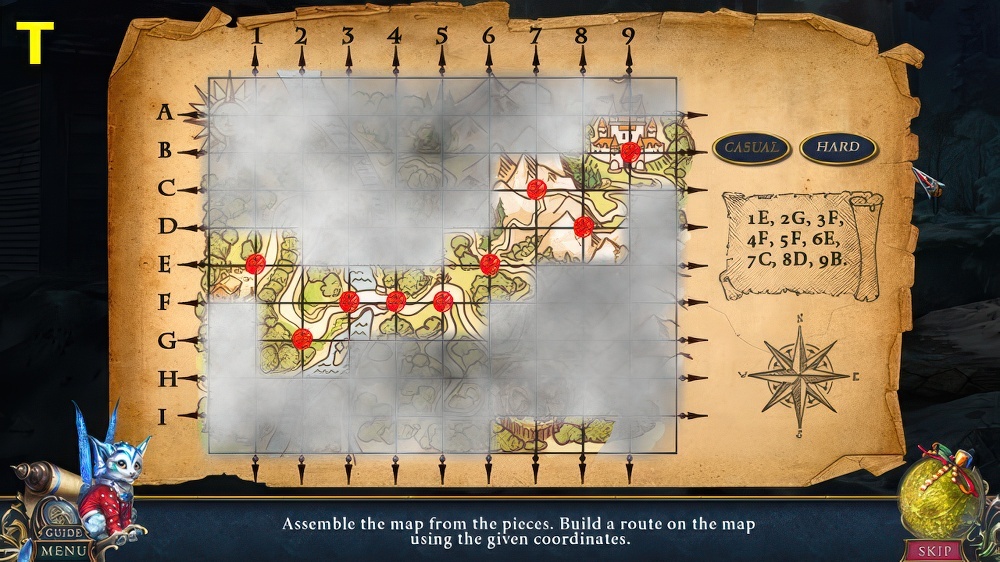
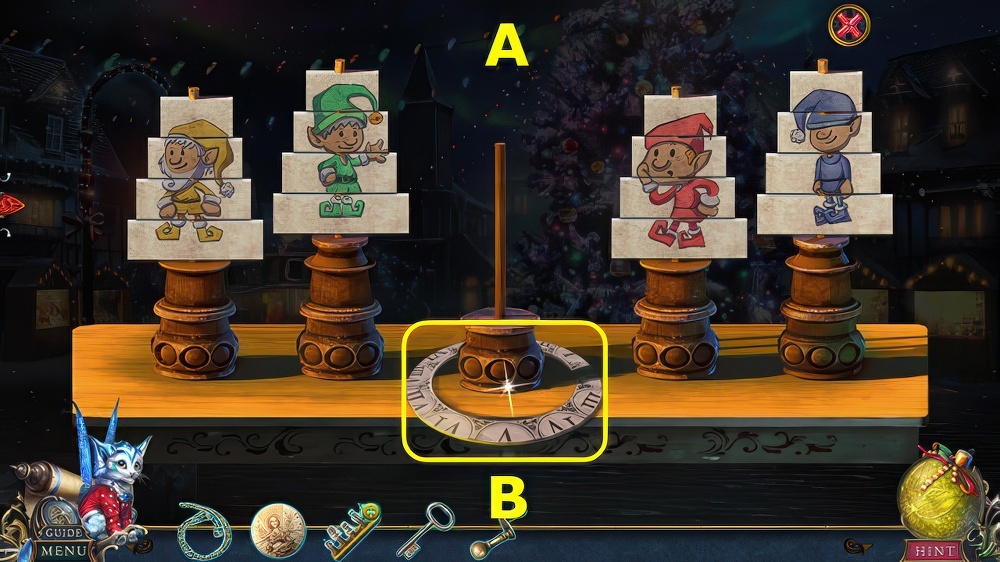
- Select 1-5 (T).
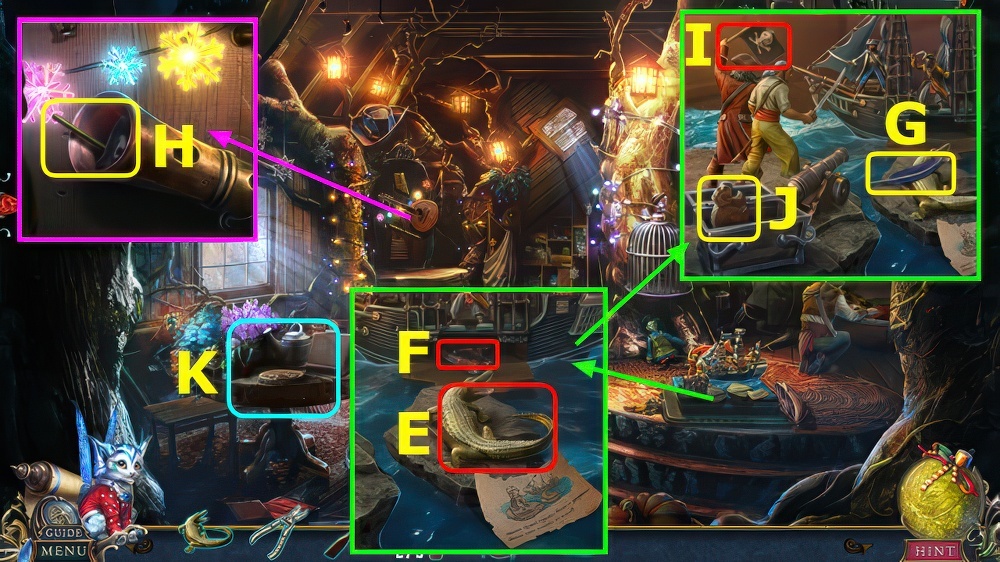
- Take PURSE, use OIL, earn SABER (A).
- Take GUITAR KEY (B).
- Use SABER, take FAIRY FIGURINE, read note (C).
- Select (D).
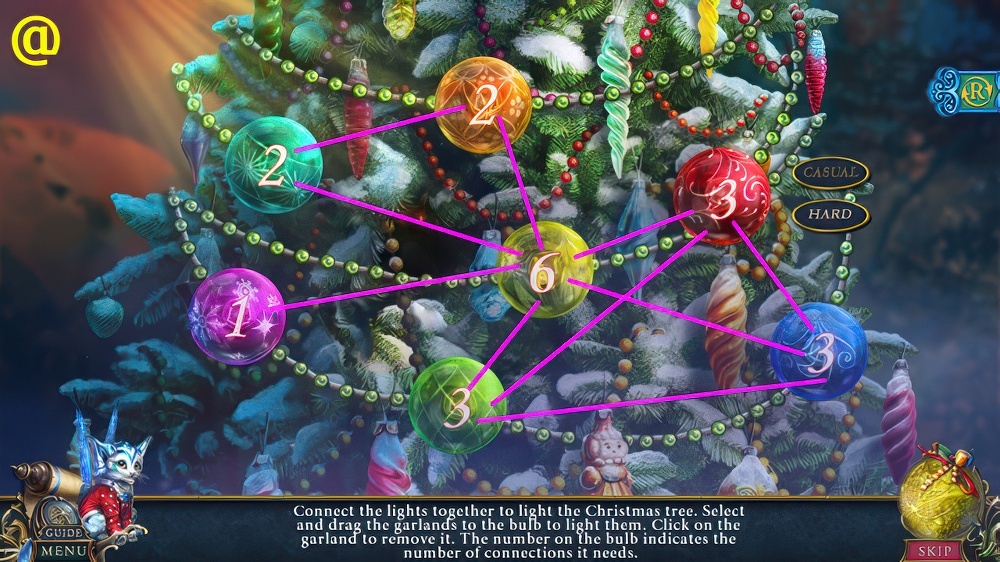
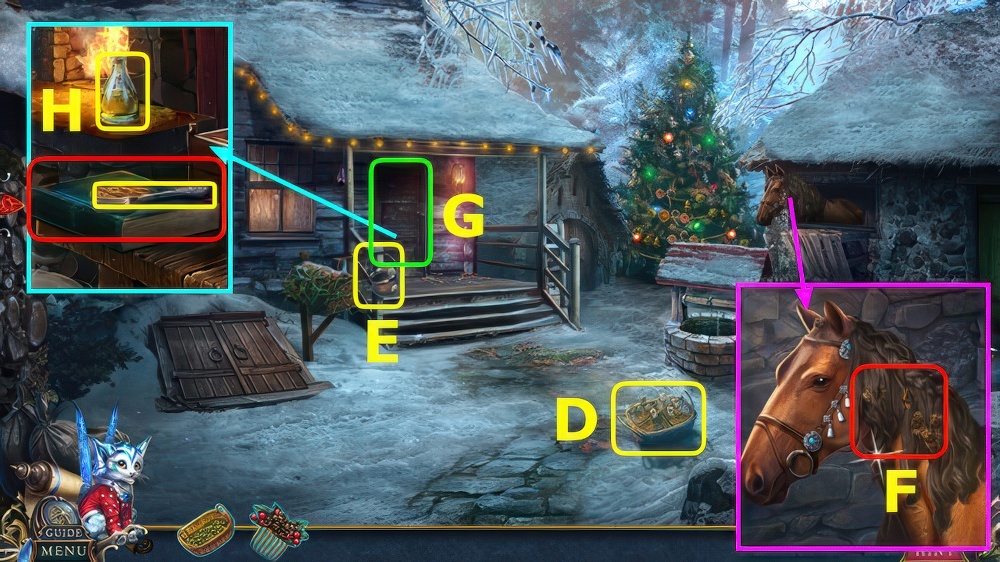
- Place CHRISTMAS ORNAMENT, casual solution (@), take LENS.
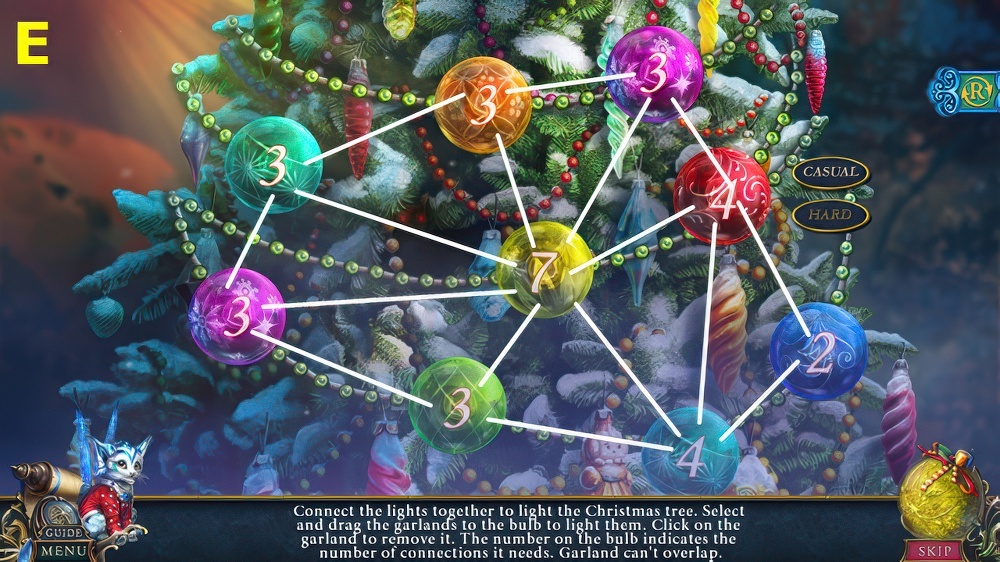
- Hard solution (E).
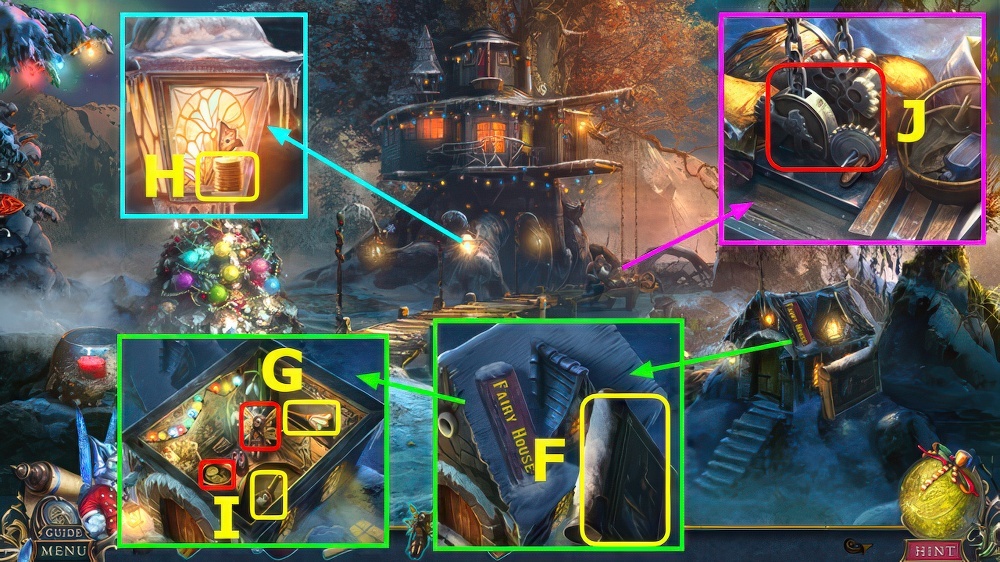
- Take OLD BOOK, remove roof (F).
- Open OLD BOOK, use LENS, play puzzle, read note, take 1/2 WIRE.
- Place FAIRY FIGURINE, take LANTERN PART (G).
- Place LANTERN PART, use GLOVE, earn COINS (H).
- Place COINS, take PURSE KEY (I).
- Use PURSE KEY on PURSE, read note, take GEARS.
- Remove old gears, place GEARS (J).
- Take 2/2 LOCKPICK SET (K).
- Take CROCODILE FIGURINE (L).
- Use LOCKPICK SET (M).
- Select 1-2-3 (N).
- Go forward.
- Select pairs (O).
- Take CUTTER, read 3 notes (A).
- Take PADDLE (B), play puzzle, earn 1/3 WOODEN FIGURINE.
- Take 2/3 WOODEN FIGURINES, use GUITAR KEY (C).
- Take STRINGS and CARVING INSTRUCTIONS (D).
- Read note, place CROCODILE FIGURINE (E).
- Select (F).
- Take FEATHER (G).
- Use FEATHER, earn PIRATE’S FLAG (H).
- Place PIRATE’S FLAG (I).
- Take 3/3 WOODEN FIGURINES (J).
- Select (K).
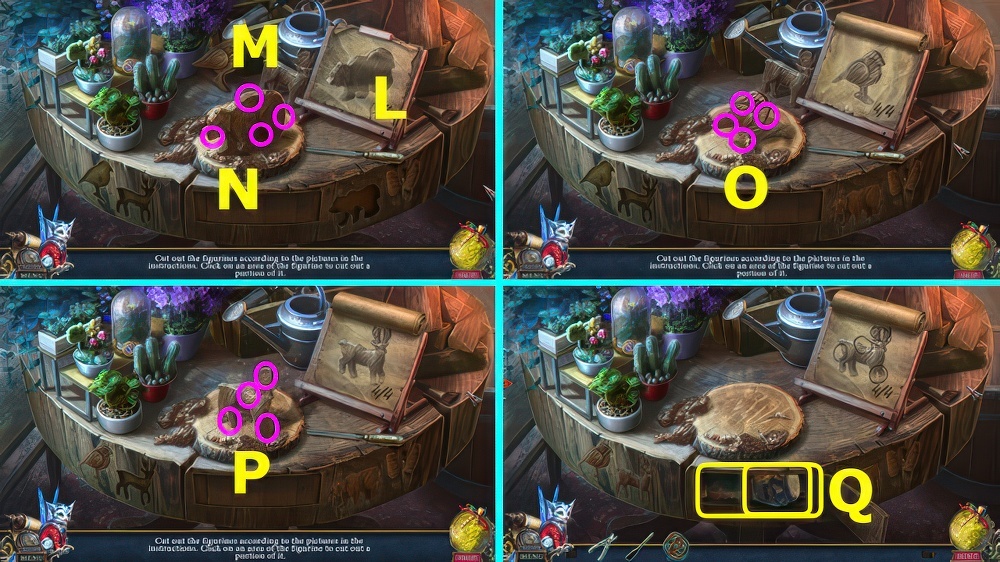
- Place CARVING INSTRUCTIONS (L) and WOODEN FIGURINES (M).
- Select the 4 spots (N).
- Select the 4 spots (O).
- Select the 4 spots (P).
- Take RESIN and NAUTICAL MAP (Q).
- Give NAUTICAL MAP (R).
- Walk down 2x.
- Use RESIN and PADDLE (S).
- Move along marked path (A).
- Use tools (B-C-D-E-F-G).
- Select when circles are green (H).
- Take 1/2 STATUE’S TIARA (I).

- Take OIL LAMP and BERRIES (J).
- Take CORKSCREW, use BERRIES, take 2/2 STATUE DECORATIONS (K).
- Place STRINGS and STATUE’S ADORNMENTS, select 1-3, take 1/2 STARFISH (L).
- Use CUTTER (M), earn NET.
- Take 2/2 STAR (N).
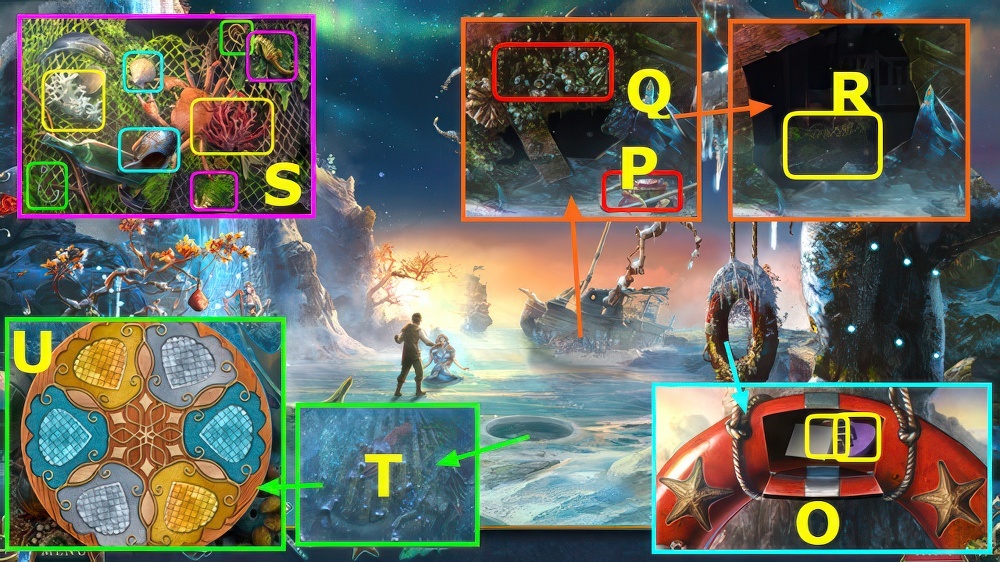
- Use OIL LAMP and STAR, read note, take PISTOL TOOLS and PUMICE (O).
- Select (P), use PUMICE (Q).
- Select wood 2x, use NET, take NET (R).
- Select NET, select pairs (S), take SNORKEL.
- Use SNORKEL (T), play puzzle, earn MERMAID FIGURINE.
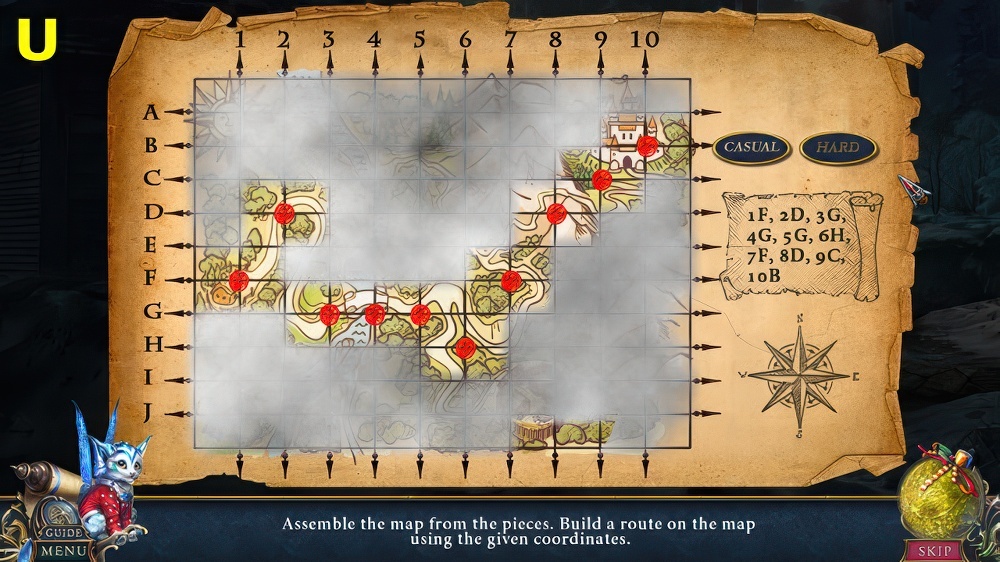
- Puzzle solution (U).
- Select Pixie, use MERMAID FIGURINE, take ENCHANTED MERMAID FIGURINE.
- Use ENCHANTED MERMAID FIGURINE (A).
- Solution (B-C-D).
- Select (E).
- Use CORKSCREW (F), read note.
- Take FISH TOKEN and NAPKIN (G).
- Take MECHANISM PART, place FISH TOKEN, select 1-3, earn CANNON FLINT (I).
- Take CANNON WHEEL, remove sand, place MECHANISM PART (J).
- Select 1-2-K-3-Kx2-4-5-Kx2-6.
- Read note, take EXPLOSIVES and CANNONBALL (L).

- Take WHISTLE (M).
- Take SPYGLASS and PISTOL (N).
- NAPKIN on SPYGLASS, remove lens, take COORDINATES.
- PISTOL TOOLS on PISTOL, take GUNPOWDER.
- Take CONTINENT, place CANNON WHEEL (O).
- Use GUNPOWDER, CANNONBALL, and CANNON FLINT (P).
- Move sliders as shown, select crosshairs when green (Q).
- Go forward.
- Use EXPLOSIVES (R).
- Solution (A-1-2-3-4)-(B-5-6-7-8)-(A-9)-(B-10-11-12-13)-(A-14-15-13).
- Take 1/3 SEA FIGURINE (C).
- Take PARROT TOKEN (D).
- Take CHIP (E).
- Select (F), place PARROT TOKEN, rotate into position (G).
- Take LOCK TOKEN and TWEEZERS (H).
- Use TWEEZERS, move sails as shown, read note, take PIRATE FIGURINE and SMALL SHIP (I).
- Place CONTINENT, COORDINATES, and SMALL SHIP, select 1-3 (J), take 2/3 FIGURINES.
- Place PIRATE FIGURINE, solution (K), take RING.

- Place RING (L).
- Win at rock-paper-scissors 3x, take 3/3 FIGURINES (M).
- This mini-game is randomly generated.
- Select jellyfish, place FIGURINES, select 1-3, take CAPTAIN’S LOG (N).
- Select CAPTAIN’S LOG, place CHIP (O).
- Rotate center disc to (P-Q-R), take EEL FOOD.

- Use EEL FOOD, take HATCH KEY (A).
- Walk down.
- Use HATCH KEY, match keys to lock (B).
- Use WHISTLE (C).

- Talk, take BAG TOKEN (D).
- Take BROKEN LADDER and FLAGPOLE (E).
- Place BAG TOKEN, take 1/8 and 2/8 HELM SPINDLES, PIRATE EMBLEM, and 1/3 LONG ITEM (F).
- Use FLAGPOLE, take TENTACLE (G).
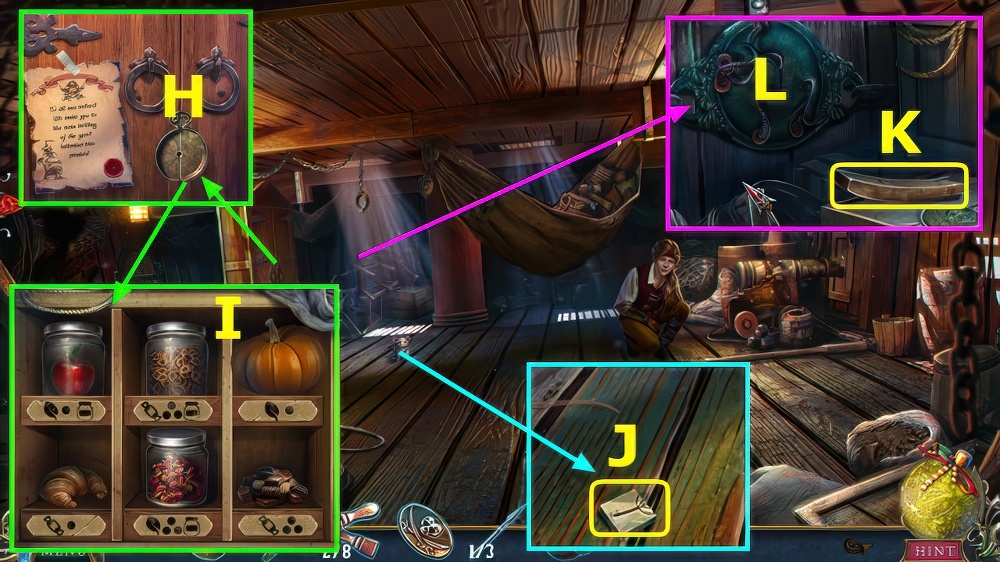
- Read note, place LOCK TOKEN (H), select.
- Solution (I), earn DRIED BERRIES.
- Use DRIED BERRIES, take TUBE FRAGMENT (J).
- Remove chairs, take 2/3 LONG ITEMS (K), place TENTACLE (L).

- Solution (M).
- Read note, take NECKLACE (N).
- Take RIBBON from NECKLACE.
- Place PIRATE EMBLEM, take 3/3 LONG ITEMS (O).
- LONG ITEMS and RIBBON on BROKEN LADDER, take STAIRS.
- Place STAIRS (P).
- Go right (Q).
- Use EEL FOOD, take HATCH KEY (A).
- Walk down.
- Use HATCH KEY, match keys to lock (B).
- Open crate, take STORAGE TUBE (A), play puzzle, earn CORK FLOATS.
- TUBE FRAGMENT on STORAGE TUBE, solution (B), take LOCK FRAGMENT.
- Walk down.
- Place LOCK FRAGMENT (C).
- Take PET TAG and ATOMIZER (D).
- Take MINT OIL (E).
- ATOMIZER on MINT OIL, earn PEST REPELLANT.
- Take 1/2 HERBS (F), use PEST REPELLANT, take SUGAR and ROPE (G).
- CORK FLOATS on ROPE, take LIFELINE.
- Select (H).

- Select pairs (I), earn CUP.
- Walk down, go right.
- Use LIFELINE (J).
- Take CABIN KEY (K).
- Select, use CABIN KEY (L).
- Go left (M).
- Play puzzle, earn TOY DEER ANTLER (N).
- Puzzle solution (O).
- Read note, take 2/2 HERBS and CLAY (P).

- Remove napkin, take LEMON (Q).
- Place TOY DEER ANTLER, take TOY MAST (R).
- Place TOY MAST, take WEIGHT (S).
- Walk down 2x, go left.
- Use CUP, earn CUP WITH WATER (A).
- Use CUP WITH WATER (B).
- Place SUGAR (C), HERBS (D), LEMON (E), and WEIGHT (F).
- Select E-Cx3-Dx3-G-H-B.
- Take TEA (I).
- Walk down, right.
- Use TEA (J), take WARDROBE KEY.
- Go left.
- Play puzzle, earn TRAY (K).
- Use WARDROBE KEY (L).
- Take CHEST KEY (M).
- Use CHEST KEY, take BROKEN HANDLE (N).
- CLAY, BROKEN HANDLE, and PET TAG on TRAY.
- Place TRAY, take HANDLE (O).
- Use HANDLE, take CHEST TOKEN (P).
- Place CHEST TOKEN, take SLINGSHOT and WOODEN SWORDS (Q).
- Select Pixie, use WOODEN SWORDS, take MAGIC WOODEN SWORDS.
- Use MAGIC WOODEN SWORDS (R).
- Solution (A-B-C).
- Take CHRONOMETER (D).
- Walk down.

- Take WREATH DECORATIONS (E).
- Walk down, go left.
- Place WREATH DECORATIONS, restore wreath (F), earn CHRISTMAS WREATH and 3/8 and 4/8 HELM SPINDLES.

- Play puzzle, earn SMALL SCISSORS (G).
- Use SMALL SCISSORS, select pairs (H-I), take BUNCH OF KEYS and 5/8 and 6/8 HELM DETAILS (J).
- Walk down, right.
- Use BUNCH OF KEYS, place keys in matching lock (K).
- Read note, take 7/8 and 8/8 HELM SPINDLES (L).
- Place HELM SPINDLES and CHRONOMETER (M).

- Rotate rings to combine pairs in the arrow (N).
- Go (O).
- Take MATCHES (Q).
- Read newspaper (R).
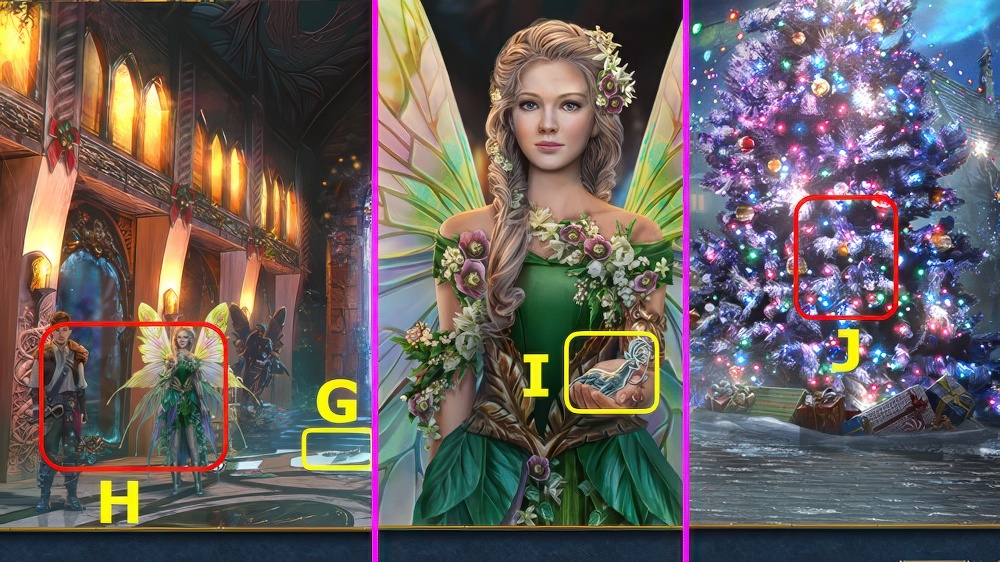
- Place CHRISTMAS WREATH, take CAROUSEL HORSE (S).
- Go forward.
- Talk (T).
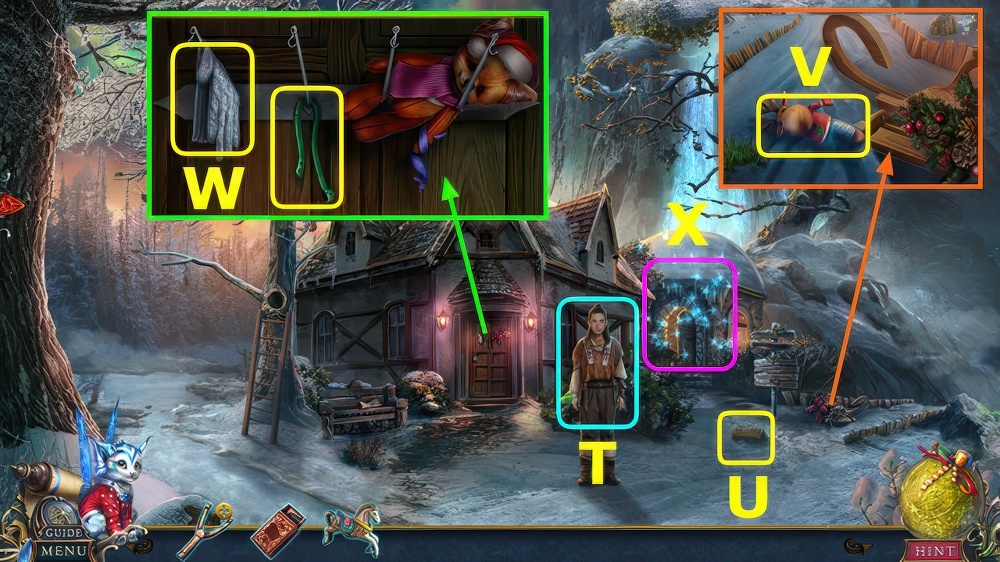
- Take BRUSH (U).
- Take TOY FAWN (V).
- Take GLOVE and SLINGSHOT ELASTIC (W), select and hang toy.
- Select (X).
- Select (A-B)-(B-C)-(D-E)-(E-C)-(F-G)-(G-H-I)-(I-J)-(J-K)-(L-M)-(K-M)-(N-M).
- Take LOCK TOKEN (M).
- Take RAG (N).
- Walk down.
- Use BRUSH and LOCK TOKEN (O).
- Place CAROUSEL HORSE, take FAWN’S NOSE (P).
- Take poster, open doors, use GLOVE, take SAUSAGE (Q).
- Take CHRISTMAS SOCK (R).
- Select (S).
- Casual solution (T), earn TINY SCARF.
- Hard solution (U).
- Exit cart.

- Use SAUSAGE, take TOY MOUSE (A).
- Go forward.
- Place CHRISTMAS SOCK (B), play puzzle, earn APPLES.
- Take NEEDLE AND THREAD (C).
- TINY SCARF, FAWN NOSE, and NEEDLE AND THREAD on TOY FAWN.
- Remove old elastic from SLINGSHOT, add SLINGSHOT ELASTIC and APPLES.
- Walk down.
- Use SLINGSHOT, earn TOY PENGUIN (D).
- Go forward.
- Place TOY MOUSE, TOY FAWN, and TOY PENGUIN, solution (E).
- Go forward.

- Use MATCHES, select 1-5 (F).
- Take 1/4 PAGE (G).
- Take OLIVES (H).
- Use RAG, take 2/4 PAGES (I).
- Take BROOM (J).

- Open book, take DIARY PAGE (K).
- Take BUCKET HANDLE (L).
- Select 6x, earn RIBBON (M).
- Take CHEST TOKEN from BROOM, use RIBBON.
- Take 3/4 PAGES (N), move coats to left and right.
- Use BROOM, take 4/4 PAGES (O).
- PAGES on DIARY PAGE, solution, take CODE (P).
- Place CODE, solution (Q).
- Take BOX WITH PAGES (R).
- Open BOX WITH PAGES, take ADDRESSES.
- Walk down 2x.

- Place CHEST TOKEN, take COMB and ROPE (A).
- BUCKET HANDLE on ROPE, take BUNGEE.
- Go forward.
- Place BUNGEE (B).
- Use ADDRESSES (C).
- Take BASKET (D).
- Take POT (E).
- Use COMB (F).
- Open door (G).
- Take FORK and VINEGAR (H), open book.
- Solution (J), select (K).
- Select 5 snowflakes (L), select (M).
- Take 1/3 BOY FIGURINE (N).
- Use BASKET (O).
- Read instruction (P).
- Select Qx2-Rx4-Sx3-T-Ux3.
- Take HORSE TREAT.
- Give HORSE TREAT, take PRUNERS (A).
- Use PRUNERS and VINEGAR, read note, take 2/3 BOY FIGURINE (B).
- Select (C).
- Take FUEL, use OLIVES, take OIL (D).
- OIL on POT.
- Select (E), place POT, take 3/3 BOY FIGURINE (F).
- Solution (G).
- Take MUSIC BOX (H).
- BOY FIGURINES on MUSIC BOX, final solution shown, take MUSIC BOX (I).
- This mini-game is randomly generated.
- Select Pixie, use MUSIC BOX, take MAGIC MUSIC BOX.

- Select (O).
- Use MAGIC MUSIC BOX (P).
- Solution (Q-R-S).
- Restore map, casual solution (T).
- Hard solution (U).
- Take SLEIGH RUNNER (A).
- Walk down.
- Play puzzle, earn SLEIGH CUSHION (B).
- Place SLEIGH RUNNER and SLEIGH CUSHION (C).
- Go right.
- Take FAUCET HANDLE (D).
- Solution (E), take ENCRYPTION and CHALK.
- Take HISTORIC LANTERN (F).
- FUEL on HISTORIC LANTERN, take GARDEN LANTERN.
- Select (G).
- Place FAUCET HANDLE (H).
- Solution (I).
- Take BUTTERFLY FRAGMENT (J).
- Place BUTTERFLY FRAGMENT, take CODE and BOOK (K).
- Place GARDEN LANTERN, solution (L).
- Take SLEEP-INDUCING FLOWERS and NIPPERS (M).
- Use NIPPERS, CODE, and CHALK, select 1-4 (N).
- Read note, take KEY (O).
- Use FORK and KEY (P).
- Go (Q).
- Take MOONSTONE, TWEEZERS, and JEWELRY BOX (A).
- ENCRYPTION on JEWELRY BOX, select 1-5 (B).
- Select pairs (C-D), take RING.

- Place BOOK, select, play puzzle, earn BELLE’S LETTERS (E).
- RING on BELLE’S LETTERS, remove papers, take PENCIL and LETTER OPENER.
- Use TWEEZERS, earn CHEST TOKEN (F).
- Read note, take BOUQUET and EMPTY BOTTLE (G).
- Place MOONSTONE and CHEST TOKEN, take MOONSTONE DUST and HYPNOTIC (H).
- Read note in EMPTY BOTTLE, add SLEEP-INDUCING FLOWERS, MOONSTONE DUST, and HYPNOTIC, take SLEEPING POWDER.
- Use LETTER OPENER (I).
- Go forward.

- Use SLEEPING POWDER (J).
- Place BOUQUET, solution, read note, take SPRAY (K).
- Take CRYSTAL BALL (L).
- Take HAIR PIN (M).
- HAIR PIN on JEWELRY BOX, earn MEDALLION CHAIN.
- Take 1/2 DOOR TOKEN, use SPRAY and PENCIL, take CODE (O).
- Place CRYSTAL BALL and CODE, select 1-3, take 2/2 DOOR TOKENS (P).
- Walk down.

- Place DOOR TOKENS (A).
- Solution (B-C-D).
- Go right.
- Take SKI, select (E).
- Take CAROUSEL BUTTON, use SKI, earn TOY (F).
- Play puzzle, earn PHOTO (G).
- Place CAROUSEL BUTTON, earn CLOCK KEY and BURNER SCREW (H).
- Select TOY, final solution shown (A).
- This mini-game is randomly generated.
- Take CLOCKFACE FRAME (B).

- Read note, use BURNER SCREW (G).
- Take BOILING WATER (H).
- Use BOILING WATER, take LADDER (I).
- Place LADDER (J), pan up.
- Take MEDALLION (K).
- Walk down.

- Play puzzle, earn 1/2 GEM (L).
- Go forward.
- Use CLOCKFACE FRAME, rotate inner ring to restore clockface.
- Use CLOCK KEY, take 2/2 GEMS (M).
- Open MEDALLION, place PHOTO.
- Remove old chain, place MEDALLION CHAIN and GEMS.
- Select Pixie, use MEDALLION, take MAGIC MEDALLION.
- Use MAGIC MEDALLION (N).

- Solution (A-B-C).

- Solution (D-E-F).
- Take MAGIC WAND (G).
- Use MAGIC WAND (H).
- Take CHRISTMAS TREE DECORATION (I).
- Walk down, right.
- Place CHRISTMAS TREE DECORATION (J) select, play puzzle.
- Walkthrough Bonus Chapter, at the link below.


