Chimeras 13: What Wishes May Come (Bonus Chapter) – Supernatural researcher Sarah Parker finds herself at the center of events when her husband Robert, a keen hunter of the paranormal, faces the consequences of an ill-considered wish. Searching for evidence of the supernatural in an old cemetery, Robert finds an ancient ritual that he thinks is only a joke. But a wish spoken aloud sets off a chain of events that changes him in the most unpredictable ways. Now Sarah must find a way not only to understand the nature of the ritual, but also to save Robert from the consequences of his rash actions. Help Sarah get her husband back to normal. Find out how far you’re willing to go for love and how to protect loved ones from their own mistakes.
Bonus Chapter Walkthrough

- Select scene.
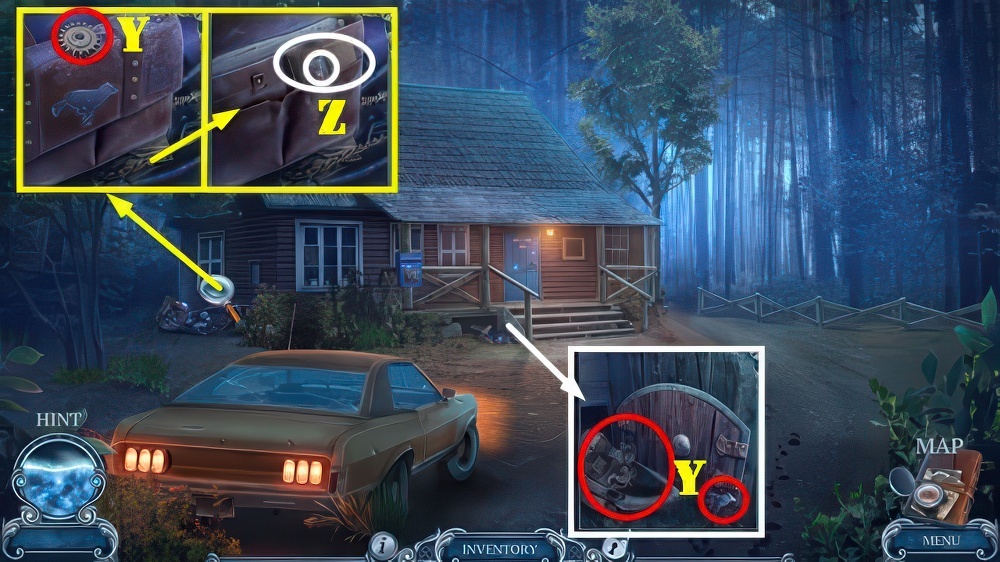
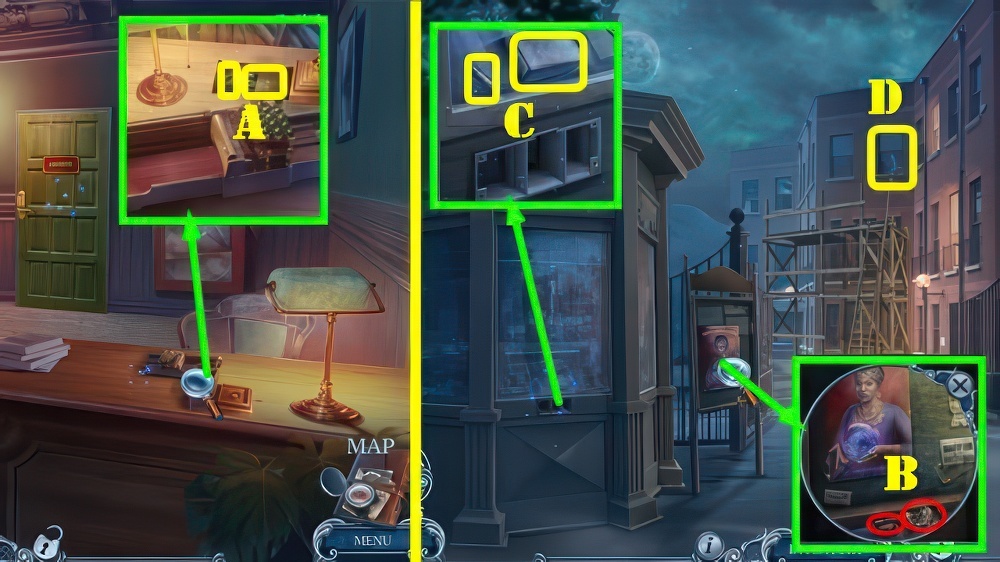
- Take BROKEN STATUETTE, ROBERT’S SCARF, ROBERT’S BAG, LION FIGURINE, and EMF RECEIVER (A).
- Use ROBERT’S SCARF (B), receive SHARP GLASS.
- Use SHARP GLASS, take SNAKE FIGURINE and CLAMP (C).
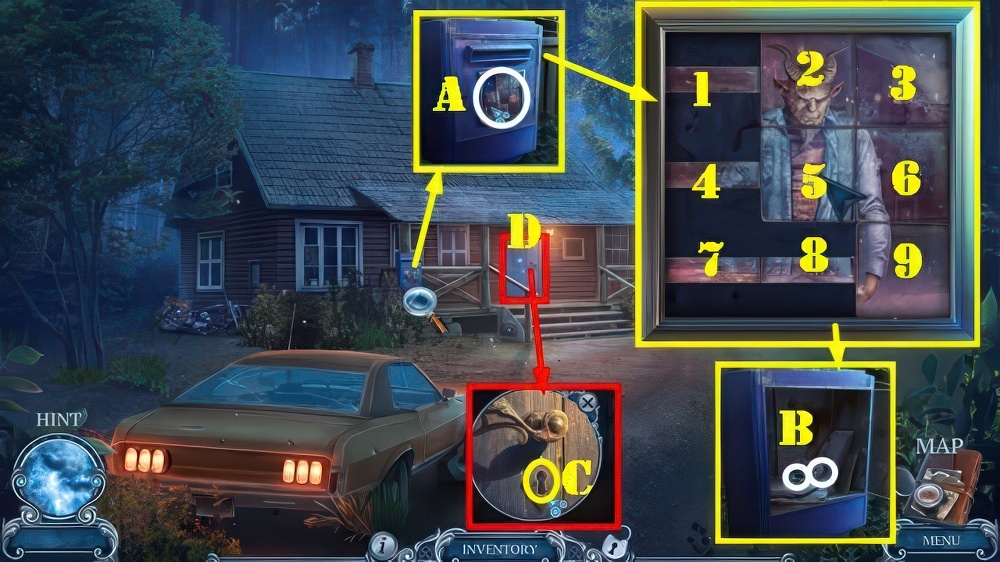
- Place SNAKE FIGURINE and LION FIGURINE (D).
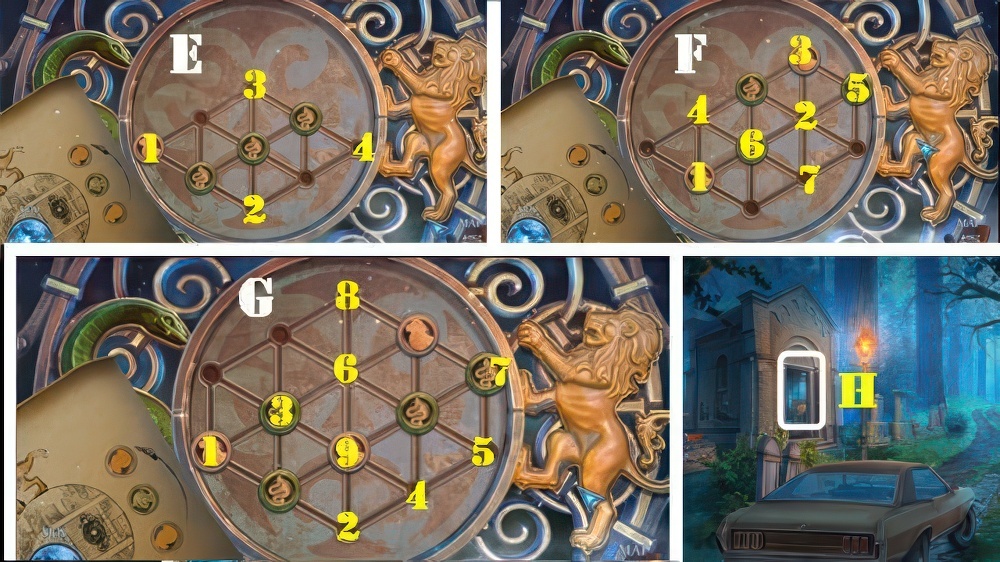
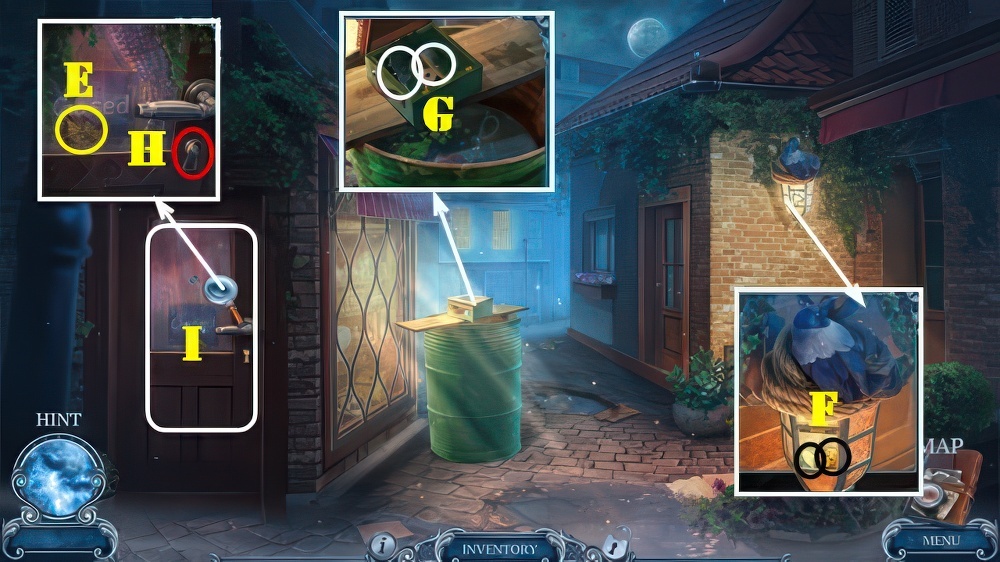
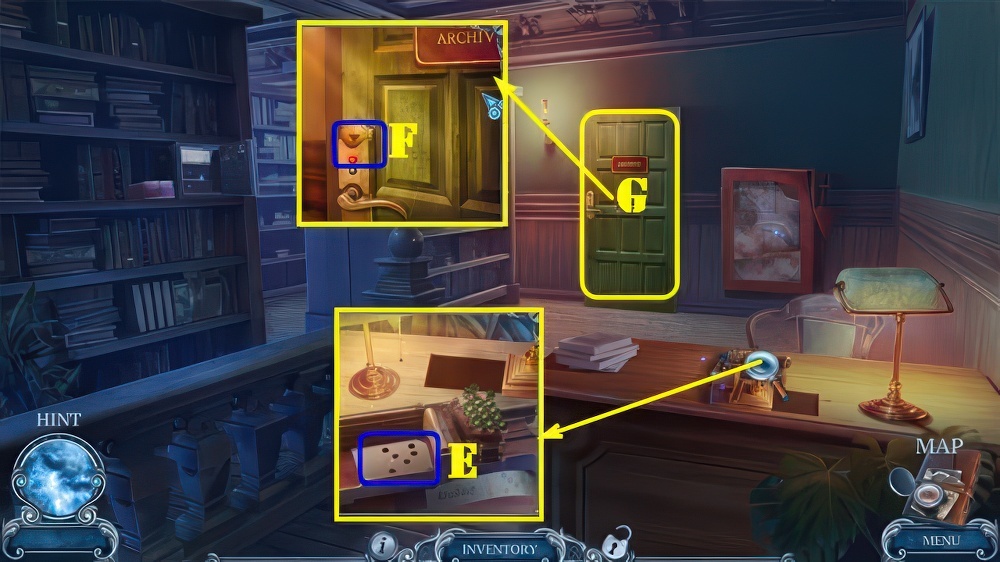
- Solution one (E): (1-2)-(2-3)-(3-4).
- Solution two (F): (1-2)-(3-4)-(5-6)-(4-7).
- Solution three (G): (1-2)-(3-4)-(2-5)-(5-6)-(7-8)-(8-9).
- Go (H).

- Select scene.
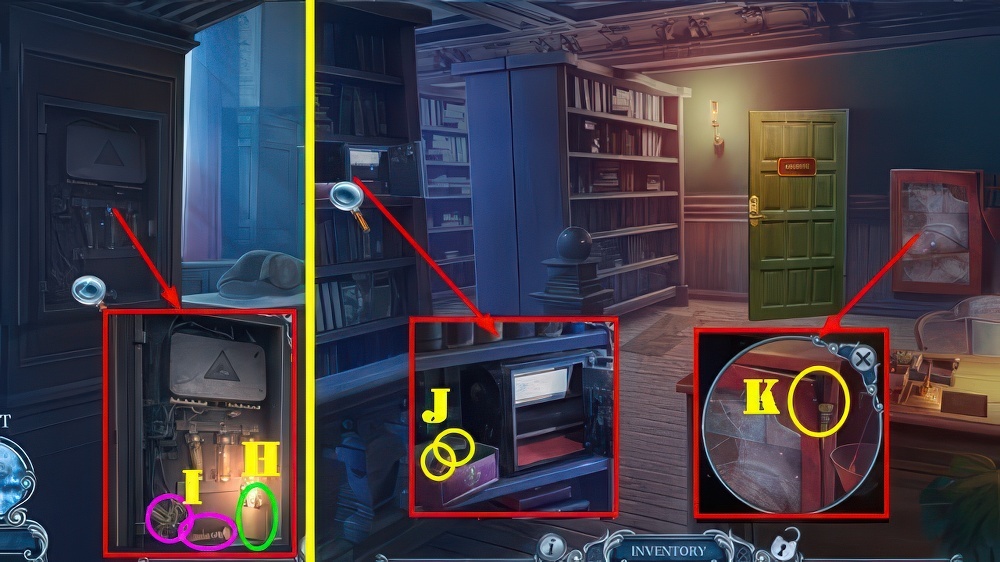
- Talk (I), receive PEN.
- Use EMF RECEIVER on scene.
- Take CAR LOGO, MOSAIC PART, BAG LATCH 1/4, and STATUETTE WING (J).
- Place MOSAIC PART, take BAG LATCH 2/4 and HANDLE (K).
- Walk down.
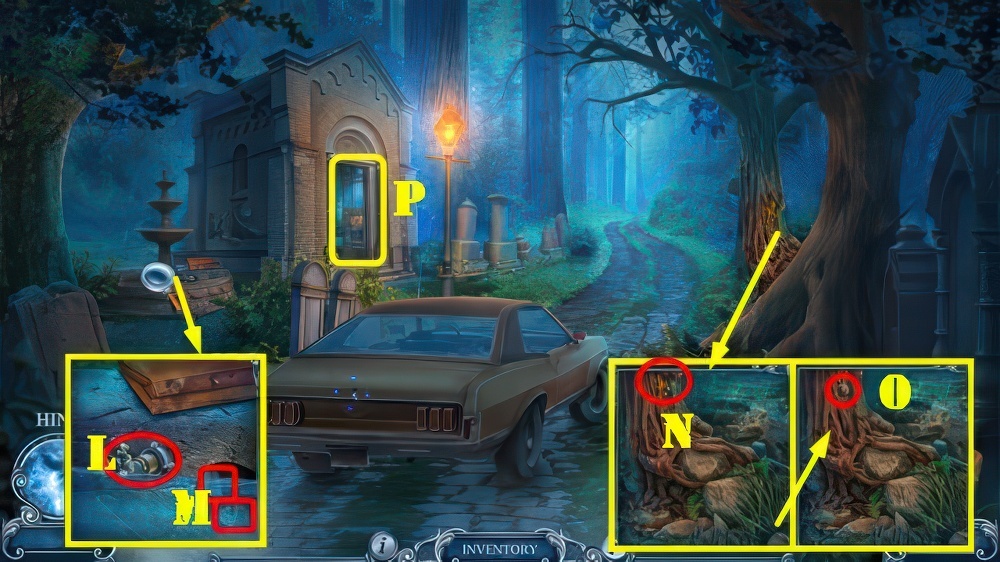
- Place CLAMP and HANDLE (L).
- Take STATUETTE HEAD and SPATULA (M).
- Use SPATULA (N), receive SPATULA WITH RESIN.
- Take BAG LATCH 3/4 (O).
- Go (P).
- SPATULA WITH RESIN, STATUETTE HEAD, and STATUETTE WING on BROKEN STATUETTE, take MANTICORE STATUETTE.
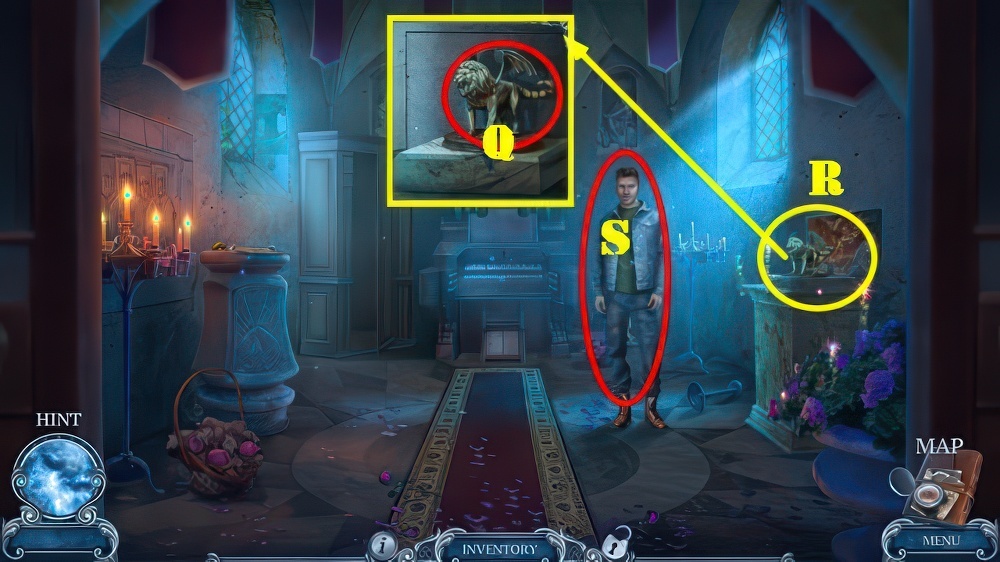
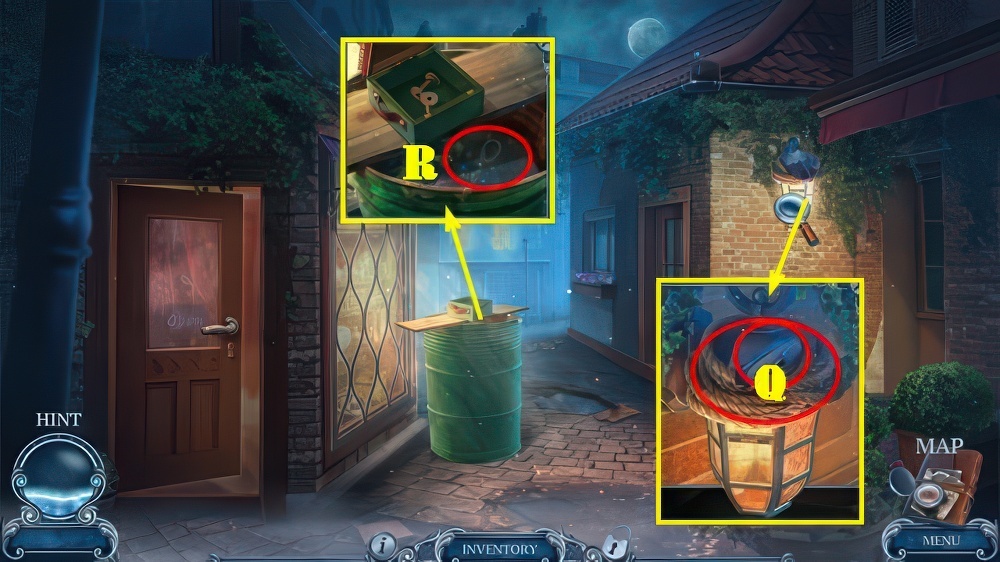
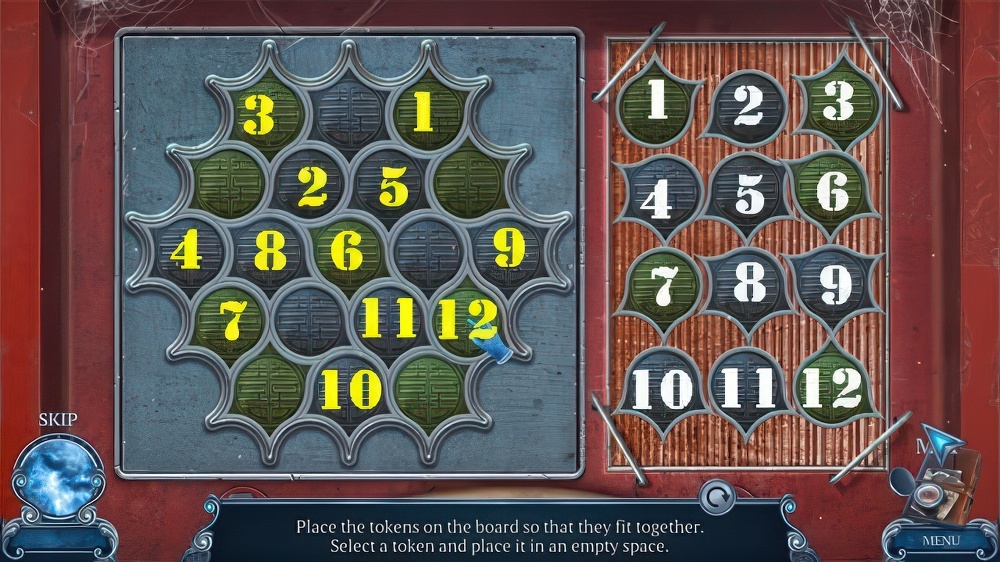
- Place MANTICORE STATUETTE (Q).
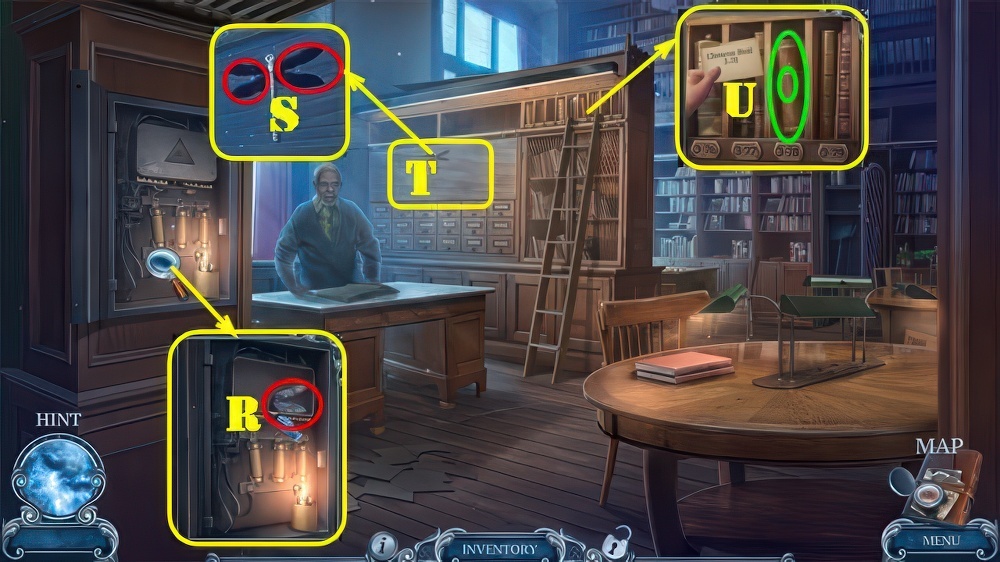
- Play puzzle (R), receive RITUAL PAGE.
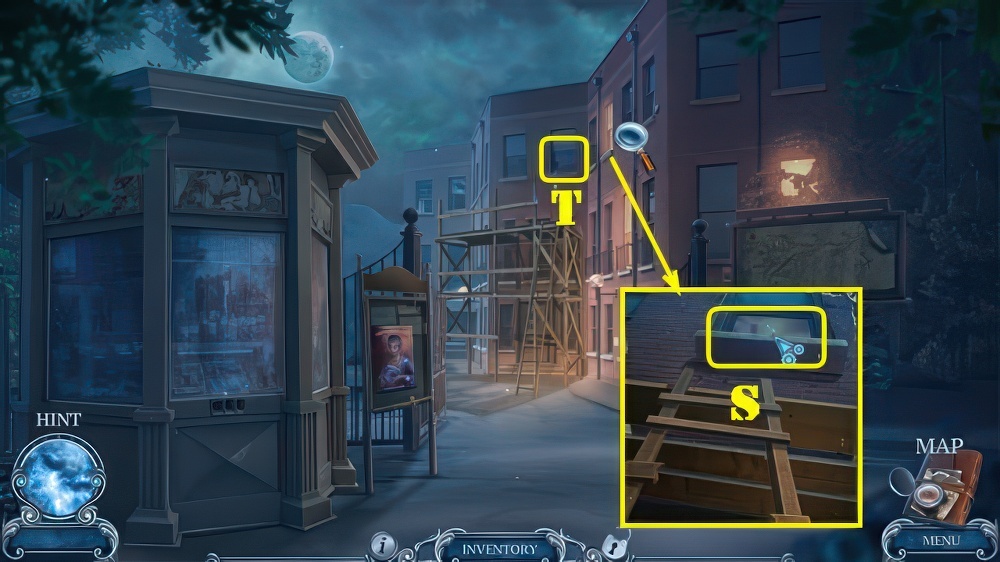
- Give RITUAL PAGE (S).

- Take BAG LATCH 4/4 (T).
- BAG LATCHES on ROBERT’S BAG, select book and read note, take TRUNK HANDLE.
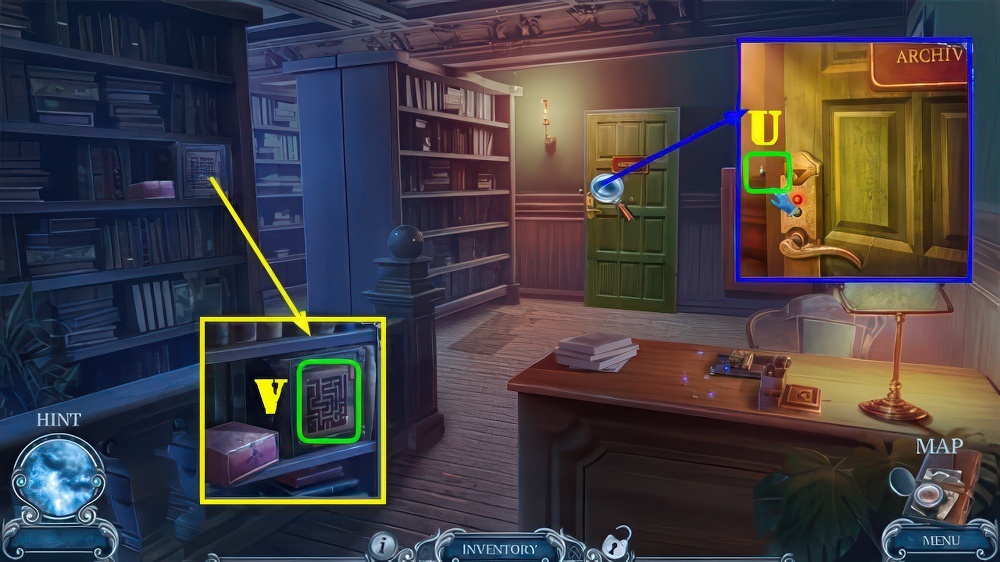
- Place CAR LOGO and TRUNK HANDLE (U), select handle.
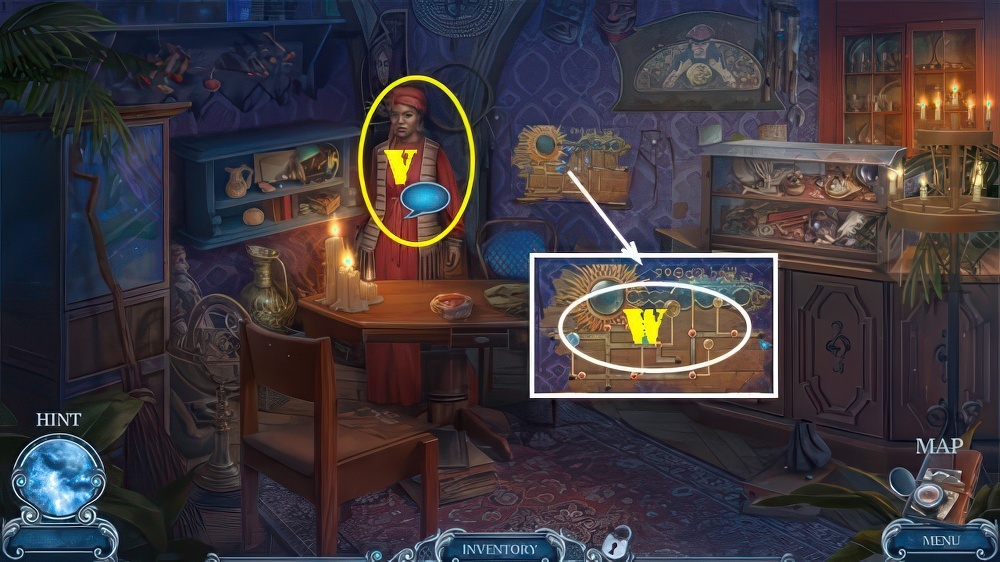
- Select photo twice (V).
- Take TIRE PUMP and CASSETTE (W).
- Use TIRE PUMP (X).
- Take WOLF BADGE, OLD CHAINSAW, and GEAR 1/3 (Y).
- Place WOLF BADGE, take PUZZLE PIECE and VOICE RECORDER (Z).
- Place PUZZLE PIECE (A).
- Solution: (5)-(6)-(7×2)-(5)-(9×2)-(5)-(1×2)-(5)-(2×2)-(5)-(4×2)-(5)-(3×2)-(5).
- Take GEAR 2/3 and SPARE KEY (B).
- Use SPARE KEY (C).
- Enter (D).

- Select scene.
- Take COIN (E).
- Use COIN and place PEN (F).
- Take OLD HANDLE and SARAH’S PHOTO (G).
- Look at note (H).
- Place SARAH’S PHOTO, take GEAR 3/3 and CHAIN LINK (I).
- Look at note (J).

- Place VOICE RECORDER and insert CASSETTE (K).
- Place GEARS (L).
- Play puzzle (M), receive CHIMERA AMULET.
- Place CHIMERA AMULET, take PLIERS (N).
- Look at newspaper and take LIBRARY ADDRESS (O).

- Use PLIERS, take BROKEN CHAIN and OILY RAG (P).
- Use OILY RAG (Q) and place OLD HANDLE (R), take TAPE and FUEL (S).
- BROKEN CHAIN, CHAIN LINK and FUEL on OLD CHAINSAW, take CHAINSAW.
- Use CHAINSAW (T).
- Use LIBRARY ADDRESS (U).
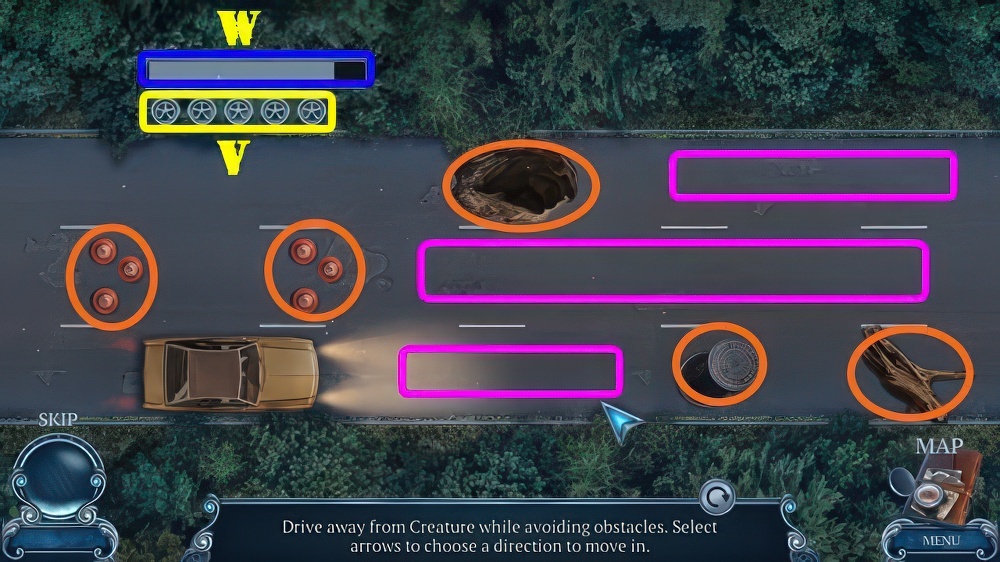
- Avoid obstacles (orange) until you get to the end of the road.
- Select one of the three (purple) sides of the road to change lanes.
- You have five lives to use (V).
- If you use up all your lives before the bar (W) fills up, you will have to restart.
- Solution is random.
- Select scene.
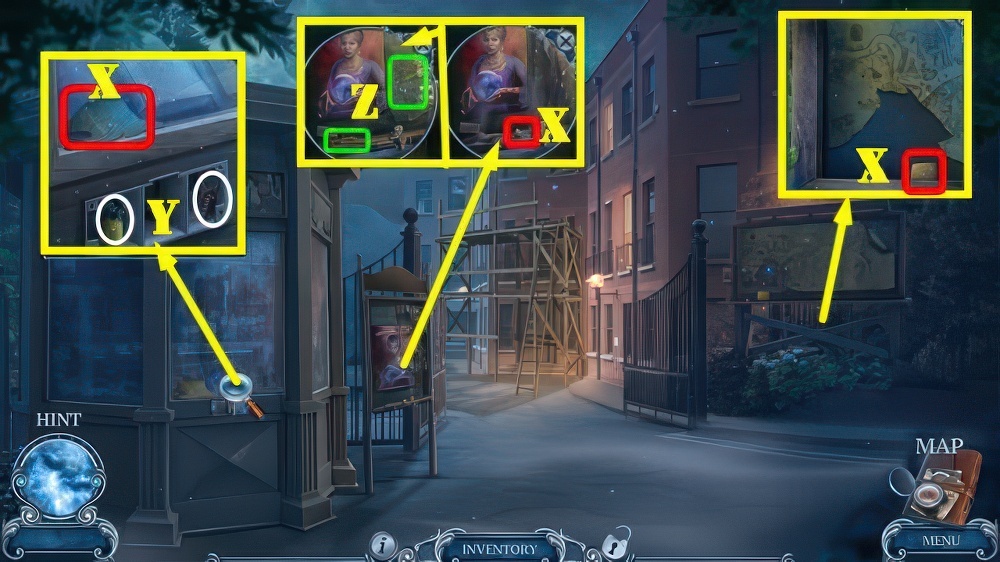
- Take MAP PART 1/3, SMALL STONE, and SPONGE (X).
- Use COIN, take BROKEN SLINGSHOT and WATER (Y).
- Use WATER and SPONGE, take MAP PART 2/3 and ELASTIC (Z).

- ELASTIC, TAPE, and SMALL STONE on BROKEN SLINGSHOT, take SLINGSHOT.
- Use SLINGSHOT (A), receive MAP PART 3/3 and AMETHYST.
- Place MAP PARTS (B).
- Play puzzle (C).
- Go (D).
- Select scene.
- Take GLASS DRAGON (E).
- Place GLASS DRAGON, take DOLL HEAD and EMERALD (F).
- Place AMETHYST and EMERALD, take DOLL ARM and MYSTIC KEY (G).
- Use MYSTIC KEY (H).
- Enter (I).

- Talk and then give RITUAL PAGE (J), talk again and receive EYE AMULET.
- Take TORN NET and HAIRPIN (K).
- Use HAIRPIN, take NEEDLE AND THREAD (L).
- Place DOLL HEAD and DOLL ARM, use NEEDLE AND THREAD (M).
- Take STAR AMULET and BLACK VEIL (N).
- Place EYE AMULET and STAR AMULET (O).
- Play puzzle (P), receive PARTY POPPER.
- Walk down.
- Use PARTY POPPER, take STAPLER and ROPE (Q).
- Remove net from TORN NET, place BLACK VEIL and use STAPLER, take NET.
- Use NET (R), receive HOOK and MAGNET.
- Walk down.
- Select ROPE and place HOOK, take GRAPPLING HOOK.
- Use GRAPPLING HOOK (S).
- Enter (T).
- Take METAL BALL (U).
- Place METAL BALL and MAGNET (V).
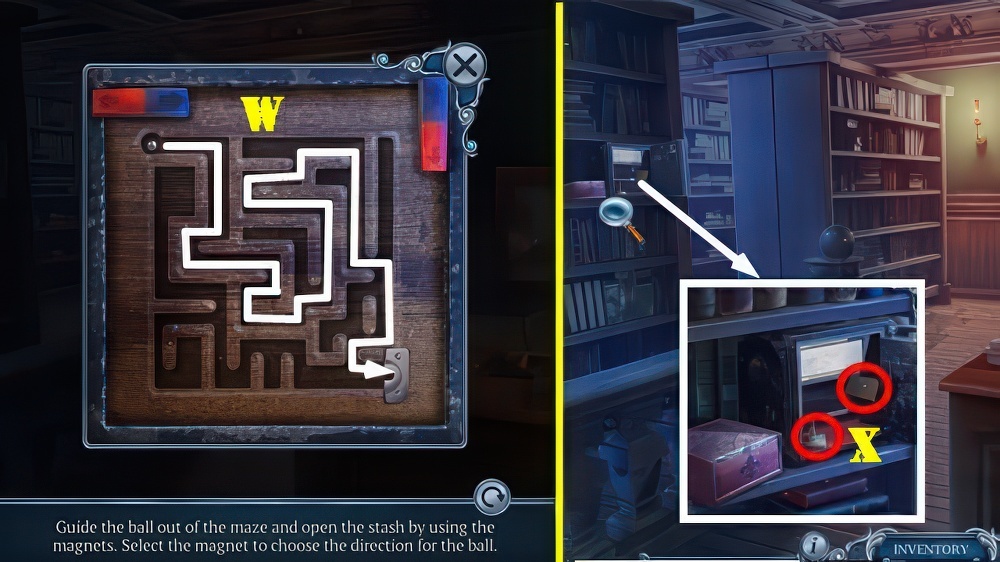
- Solution (W).
- Take BLANK PUNCH CARD and STAMP (X).
- Use STAMP, take LIGHTER and LION DECORATION (A).
- Walk down.
- Place LION DECORATION, take FUSE 1/3 and GLASS CUTTER (B).
- Use GLASS CUTTER, take FUSE 2/3 and select book to receive PUNCH CARD COMBINATION (C).
- Go (D).
- Place BLANK PUNCH CARD and PUNCH CARD COMBINATION, take ARCHIVE PUNCH CARD (E).
- Insert ARCHIVE PUNCH CARD (F).
- Enter (G).
- Select scene.
- Use LIGHTER (H).
- Take FLEUR-DE-LIS and WEDGE (I).
- Walk down.
- Place FLEUR-DE-LIS, take HAMMER and MIRROR (J).
- Place WEDGE and use HAMMER (K).
- Solution (1-12).
- Take FUSE 3/3 and DRAGONFLY WINGS.
- Go to Archives.

- Remove faulty fuses, place FUSES (L).
- Talk (M), receive DUSTER.
- Take LOCKPICK (N).
- Use MIRROR and LOCKPICK (O), take NAILS (O1).
- Place NAILS and use HAMMER (P).
- Use DUSTER, take WARNING SIGN (Q).
- Place WARNING SIGN, take DRAGONFLY WINGS (R).
- Place 2 DRAGONFLY WINGS (S).
- Play puzzle (T), receive ARCHIVE INDEX.
- Place ARCHIVE INDEX, take CHIMERAS BOOK and MARS (U).
- Give CHIMERAS BOOK and then talk (V), receive JUPITER.
- Place JUPITER and MARS (W).
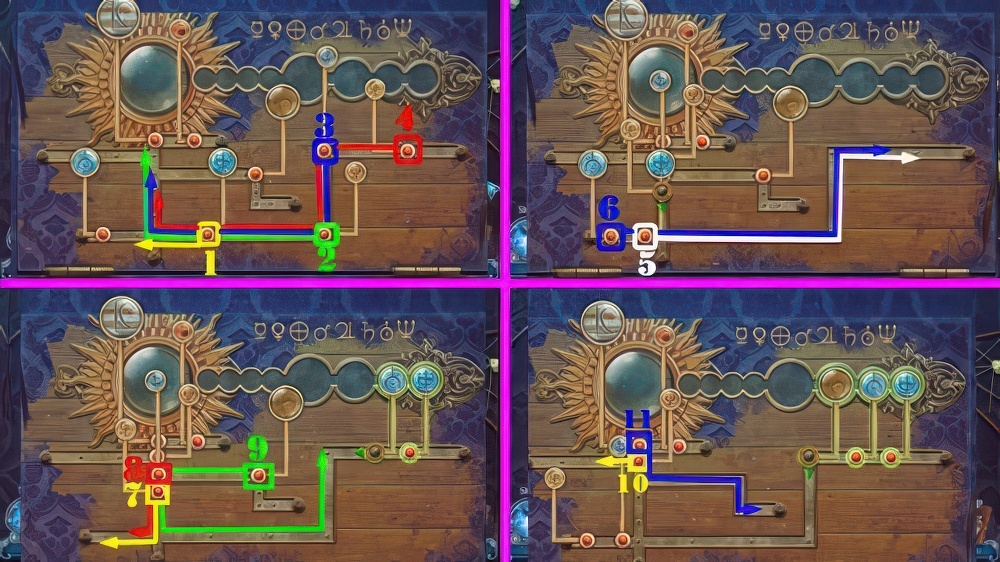
- Solution: (1-5)-(6 and rotate)-(7-10)-(11 and rotate).

- (12 and rotate)-(13-14)-(15 and rotate).
- It is very easy to rotate a piece by mistake, if a piece is in the right spot, but it is not aligning, just rotate it.
- Solved Image (X).
- Take NAGA STATUETTE and BONE WHISTLE.
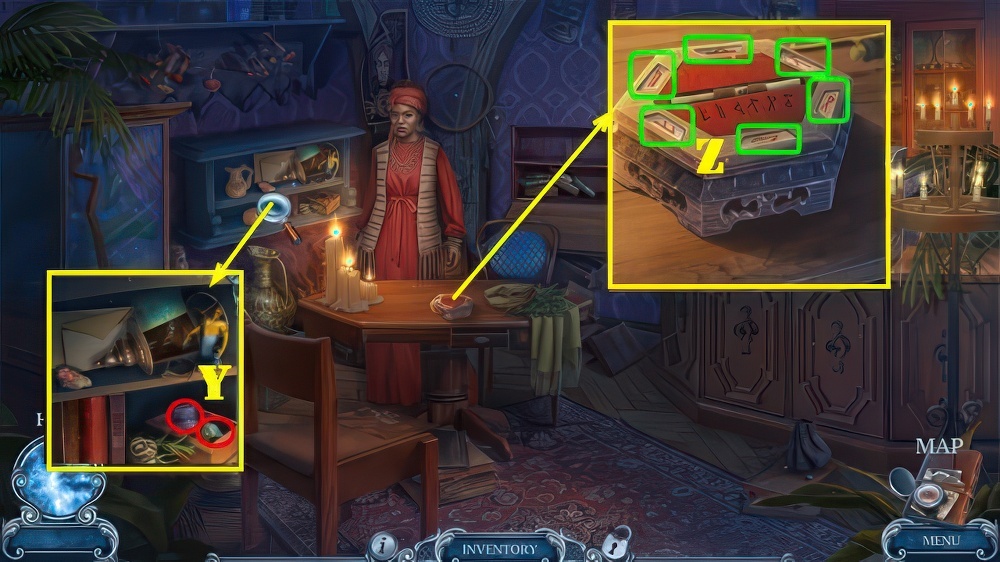
- Place NAGA STATUETTE, take RUNES and SNAKESKIN (Y).
- Place BONE WHISTLE and RUNES on box.
- Select each symbol (Z), receive MAGIC WHISTLE.
- Select scene.
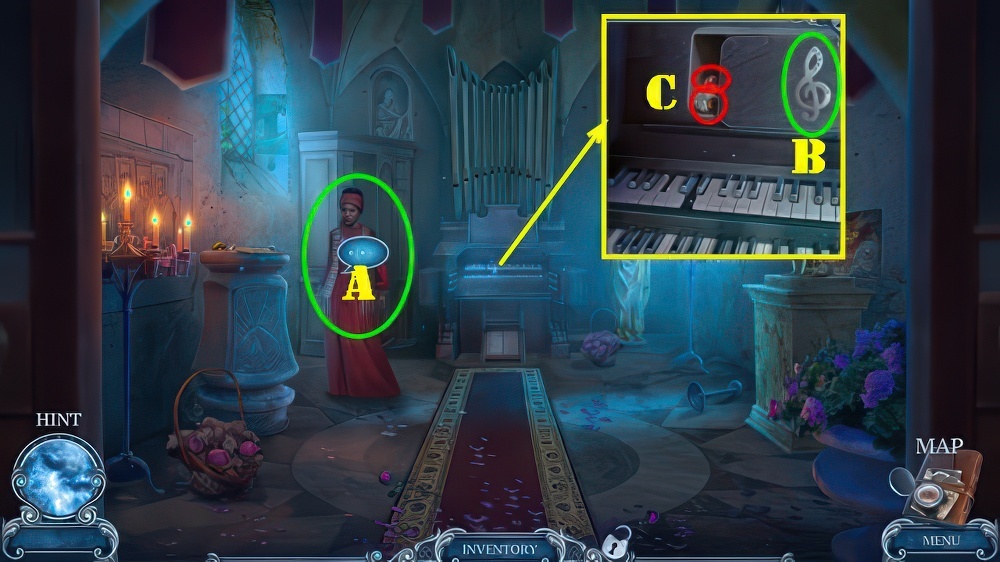
- Talk (A), receive LIST and TREBLE CLEF.
- Place TREBLE CLEF (B).
- Take LION EYE and TOOLBOX HANDLE (C).
- Walk down.

- Place TOOLBOX HANDLE, take PICKAXE and BLACK KEY (D).
- Use PICKAXE, take ROBERT’S CLAW and WHITE KEY (E).
- Go (F).

- Place BLACK KEY and WHITE KEY, take MORTAR (G).
- LION EYE, MORTAR, SNAKESKIN, and ROBERT’S CLAW on LIST, select mortar twice and receive RITUAL INGREDIENTS.
- Place MAGIC WHISTLE and RITUAL INGREDIENTS (H).
- Play puzzle (I).
Congratulations! You have completed the game Chimeras 13: What Wishes May Come.


