Christmas Fables 1: Holiday Guardians – A puzzle game in which you have to get Santa to the children, no matter what, using your wits. The game starts with the fact that the evil wizard wants to realise his plan, to get rid of Santa, and if he is gone, there will be no Christmas, no presents and joyful children. No one will ever have to work in his toy factory again. The villain at first thought he wasn’t strong enough to get rid of Santa once and for all, but now he’s beginning to believe that victory will be ours. While his loyal monsters are wreaking havoc in the city and destroying the Christmas spirit for everyone, Santa’s magical abilities are disappearing right before your eyes, and you need to save the holiday as soon as possible. If you can not pass any of the puzzles or do not know where the items are, on our site you can watch the walkthrough of the game Christmas Fables 1: Guardians of Christmas, and do not let the bad guys spoil the holiday.
Christmas Fables 1: Holiday Guardians – Walkthrough
Here you can see the full walkthrough of Christmas Fables 1: Holiday Guardians game, namely for all chapters, including bonus chapter, in pictures.

- Talk (A).
- Take SANTA’S BUNDLE (B).

- Take BROKEN RUNNER (C) and BROKEN PENCIL.
- Open SANTA’S BUNDLE, take CARPENTER’S TOOLKIT and PENCIL SHARPENER.
- Open (D).

- Take DUCT TAPE (E).
- Open, read, add BROKEN PENCIL and PENCIL SHARPENER.
- Take GIFT LIST.
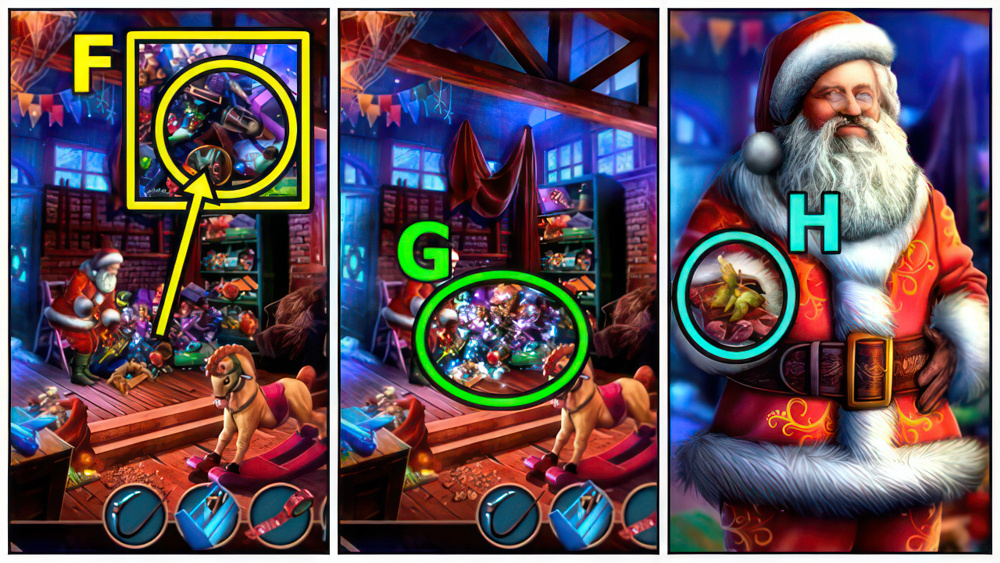
- Add GIFT LIST (F).
- Play puzzle (G).
- Take WINGS (H).

- Read Note (I), take Task Book and SCREWDRIVER.
- Move items, add WINGS.
- Take CLIPPERS and SELF-TAPPING SCREWS.

- Add CARPENTER’S TOOLKIT (J), BROKEN RUNNER, SELF-TAPPING SCREWS and SCREWDRIVER.
- Take RUNNER.
- Add RUNNER (K).

- Take FROSTY’S BROKEN STAFF (L).
- Take STAFF HANDLE (M).
- Examine (N), read.
- Take Map and STAFF FASTENER.
- Take HAIR CLIP (O).
- Use CLIPPERS, take STAFF TIP.
- STAFF FASTENER, STAFF TIP and STAFF HANDLE on FROSTY’S BROKEN STAFF.

- Arrange the wooden parts of the staff to complete the carving.
- Move sequentially from right to left, selecting each part to rotate it.
- Select the blue button to see if all the parts fit together.
- Walkthrough: (P) Easy: A×2-C×2-D×2-E-F-G.
- Walkthrough: (Q) Hard: C-D×3-E-F-A×2-B×3-D×2-G.
- Receive FROSTY’S STAFF.

- Use FROSTY’S STAFF (R).
- Enter Toy Factory.
- Select (S).

- Enter Toy Workshop.
- Receive TOY CHIMNEY.
- Add TOY CHIMNEY (T), take WINDING KEY.
- Read (U).
- Take RAILS 1/4, INSTANT PRINTING CAMERA and MAGNET.
- Insert WINDING KEY (V), read, take RAILS 2/4 and NAIL FILE.
- Move down.

- Use HAIR CLIP (W), move item, take BOX CUTTER and BUTTON.
- Read (X), take WIRES.
- Take SNOWFLAKES 1/3 (Y).
- Add DUCT TAPE, WIRES and BUTTON.

- Help the gingerbread man find the way out of the maze using the red triangles to move around.
- Walkthrough: (Z) Easy: A×2-B×4-D-C-B-C×2-B-C-B-A-B.
- Walkthrough: (Z) Hard: B×3-D×2-C×2-B×2-D-A-B-A×2-D-A-B-D-C-B-C×2-B-C-B-A-B.

- Take TOY HORSE (A) and SNOWLAKES 2/3.
- Use SCREWDRIVER.

- Walkthrough: (B).
- Use BOX CUTTER (C), read, take CANDY CANE.
- Use NAIL FILE, take FILM and RAILS 3/4.
- Move down.

- Use CANDY CANE (D).
- Take STUD EARRINGS, SNOWFLAKES 3/3 and BASKET.
- Add SNOWFLAKES (E), take SUITCASE KEY.
- Move down.

- Remove snow (F), use SUITCASE KEY.
- Take YARN and SNOWMAN AMULET.

- Insert SNOWMAN AMULET (G).
- Play puzzle (H), take HONEY.

- Offer HONEY (I).
- Take KEY RING.
- Use MAGNET, take RAILS 4/4.
- Return to Toy Workshop.

- Add RAILS (J).
- Connect both parts of the railroad track using all the elements on your left.
- Walkthrough: (K) Easy and Hard.

- Read (L), take COMB BARRETTE.
- Return to Rats’ Hideout.

- Read (M).
- Add KEY RING, receive FLUFFY KEY FOB.
- Use FLUFFY KEY FOB (N), take INSTRUCTION.
- Return to By the Toy Factory.

- Add INSTRUCTION (O).
- Connect the wires attached to the yellow knobs with those near them.
- Select a knob to rotate it.
- Be aware that some knobs can move simultaneously.
- Walkthrough: (P) Easy A×2-B-C×2.
- Walkthrough: (Q) Hard C-B×4-C×4.

- Take BLOW DRYER (R).
- Use COMB BARRETTE, take STORAGE BATTERY.
- Use BLOW DRYER (S), take TOY PLANE.
- Enter Toy Factory.

- Add TOY HORSE (T) and TOY PLANE.
- Take TOY TRACTOR, SPARKLERS PACK and GOLDEN CONE AMULET.
- Insert GOLDEN CONE AMULET (U), take LIGHTS.
- Enter Toy Workshop.

- FILM and STORAGE BATTERY on INSTANT PRINTING CAMERA, receive PHOTO.
- Add PHOTO (V).
- Play puzzle (W), read.
- Return to Rats’ Hideout.

- Use LIGHTS (X).
- Fight off the rats by clicking on them in the same order as they show up.
- Walkthrough: (Y) Easy and Hard.

- Walkthrough: (Z) Easy.

- Walkthrough: (A) Hard.

- Select questions (B).
- Take GOLD KEY (C).
- Insert GOLD KEY (D).
- Exit Toy Factory.

- Take SIGNAGE PLATES 1/3 (E) and CARROT.

- Add CARROT (F), take SIGNAGE PLATES 2/3, examine.
- Add STUD EARRINGS, take MAGIC BOOK OF RIDDLES.

- Add MAGIC BOOK OF RIDDLES (G).
- Find the solutions to the riddles you’ve just read among these symbols and click on them to confirm your choice.
- Walkthrough: (H) Easy: A-B-C-D.
- Walkthrough: (H) Hard: A-B-C-D-E.
- Enter Winter Garden.
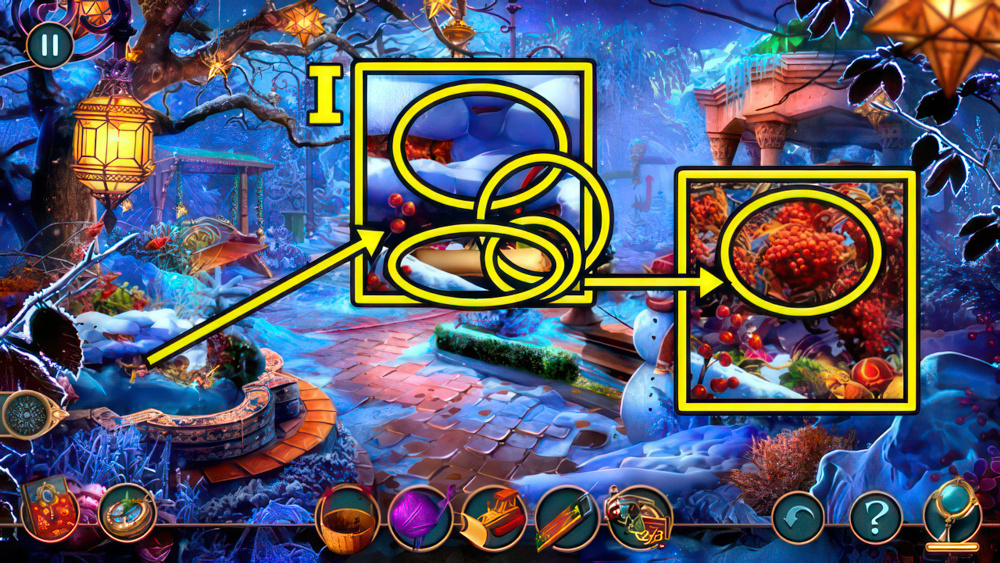
- Read (I), take ELVEN AMULETS 1/2 and STETHOSCOPE.
- Add TOY TRACTOR, then BASKET.

- Play puzzle (J), take SILVER BRACELET.
- Add SILVER BRACELET (K), take TINSEL LASSO and SIGNAGE PLATES 3/3.
- Add SIGNAGE PLATES (L).
- Go to Northern Lights Tower.

- Add TINSEL LASSO (M).
- Take DAMAGED ORB and ICE CROWN.
- Take TOY HAMMER (N) and CHRISTMAS WREATH.
- Add ICE CROWN, take MAGIC DUST and FIRECRACKER.
- Return to Toy Factory Backyard.

- Add SPARKLERS PACK (O) and FIRECRACKER.
- Take KNITTING NEEDLES.
- Add YARN (P) and KNITTING NEEDLES.

- Knit a new scarf for the snowman.
- To do that, assemble the symbols by putting the cubes with their parts together.
- Walkthrough: (Q) B-F-E. B-D-F.

- Walkthrough: (R) B-C-F.
- Take ICE MOON (S) and ELVEN AMULETS 2/2.
- Move forward.

- Add ELVEN AMULETS (T).
- Read, take SNOWBALL LAUNCHER.
- Add SNOWBALL LAUNCHER (U).

- Use the buttons to control the snowball launcher.
- Direct the rays of light at the elves and hit them with snowballs.
- The snowballs will fire once both laser sights are aligned.
- Walkthrough: (V) F×10-B×4-C×5.
- Walkthrough: (W) E×11-A×10-D×8-C.
- Walkthrough: (X) D×24-B×9-C×5.
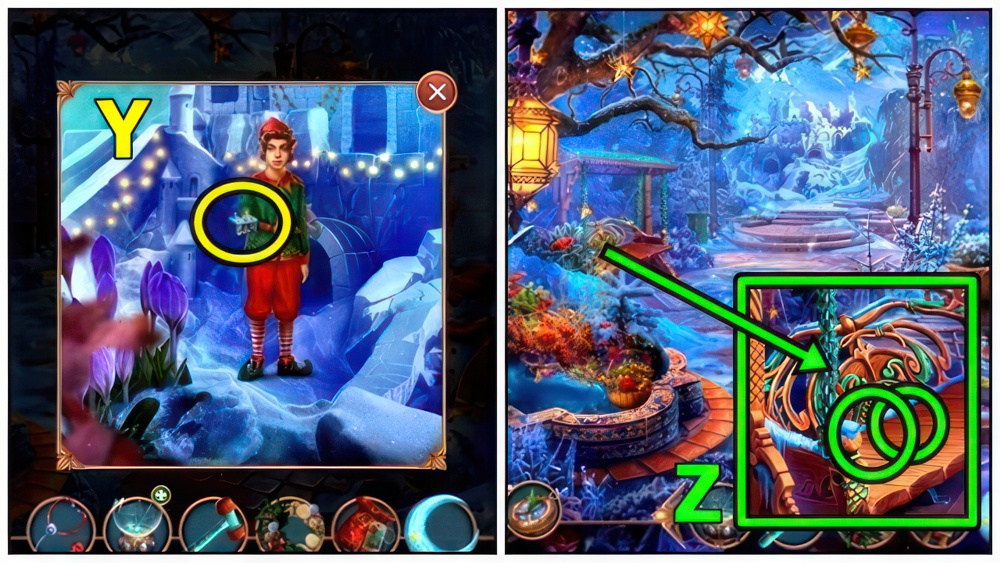
- Take TOY NAILS SET (Y).
- Add TOY HAMMER (Z) and TOY NAILS SET.
- Take FLEXIBLE BRACE and GLASS MOLD.
- Go to Northern Lights Tower.

- Remove glass from DAMAGED ORB, add MAGIC DUST and GLASS MOLD.
- Receive NORTHERN LIGHTS ORB.
- Add NORTHERN LIGHTS ORB (A), read, press buttons: A-B-C.

- Take BELLS (B).
- Hang CHRISTMAS WREATH (C) and BELLS.
- Take BENT ICE SKATES, WIRE SAW and FLASHLIGHT.
- Return to Toy Factory Backyard.

- Add FLASHLIGHT (D).
- Play puzzle (E), take ICE DRILL.

- Brush snow (F).
- Use ICE DRILL, then STETHOSCOPE.
- Take HOOK, SHOELACES and WATER.
- Move forward.

- Add WATER (G), take ICE SUN.
- Go to Northern Lights Tower.
- Add ICE MOON (H) and ICE SUN.
- Take TREE-CLIMBING CRAMPONS 1/2 and PLIERS.
- PLIERS and SHOELACES on BENT ICE SKATES.

- Select the blue buttons to arrange the golden elements in the proper way.
- Walkthrough: (I) A×2-B-D-C×2-E×2-F.
- Receive ICE SKATES.

- Add ICE SKATES (J).

- Skate across the river to get to the cave.
- Use the two red arrows to maneuver and avoid running into obstacles.
- Mind the hearts on your right: once you have none left, you lose.
- Walkthrough: (K) Easy and Hard: Solution is random.

- Take WEDGE (L) and RAIL.
- FLEXIBLE BRACE and RAIL on HOOK, receive HOOK ON A STICK.
- Use HOOK ON A STICK (M).
- Open, take SPATULA, read.

- Use SPATULA (N), read, take GLYCERIN.
- Use GLYCERIN (O).
- Go to Snow-clad Forest.

- Take FLARE (P) and STONE.
- Use WIRE SAW, take ROPE.
- Add ROPE (Q).
- Go to Snowy Plateau.

- Take HANDLE (R), read, take STICK.
- Insert WEDGE (S), then STICK.
- Take RIBBON and SCISSORS.
- Use SCISSORS (T), take TREE-CLIMBING CRAMPONS 2/2.
- Move down.
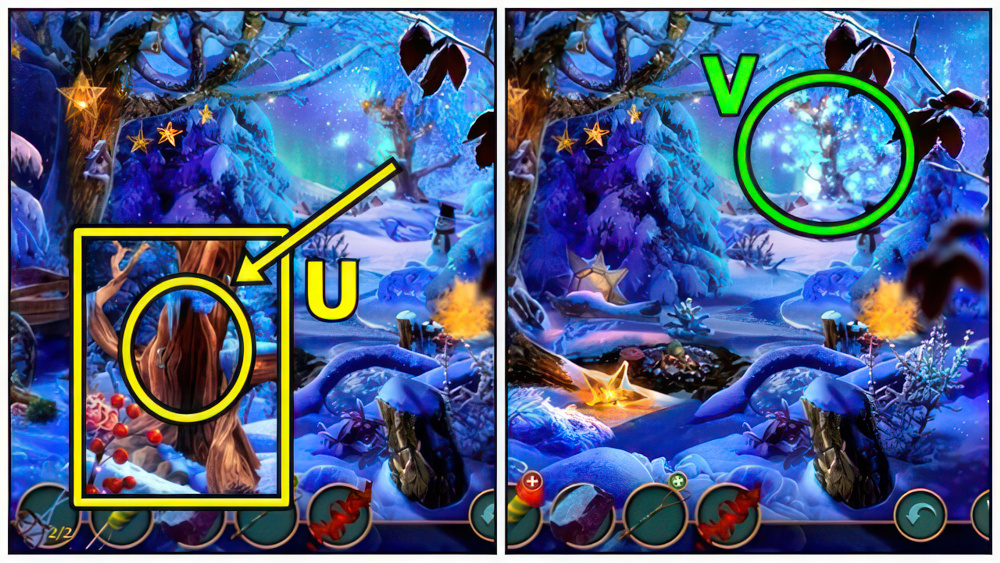
- Use TREE-CLIMBING CRAMPONS (U).
- Play puzzle (V), take ANTI-CUT GLOVE.

- Use ANTI-CUT GLOVE (W), take BLUNT AXE, METAL ROD and HAND FAN.
- Use HAND FAN (X), take MATCHES.
- MATCHES on FLARE, receive BURNING FLARE.

- Select (Y).
- Move down.

- Add METAL ROD (Z) and STONE.
- Take WOODEN TONGS and NET.
- RIBBON and NET on HANDLE, receive BUTTERFLY NET.
- Use NET (A).

- Click on the arrows to maneuver the butterfly net between obstacles until you collect all the objects sticking out of the water.
- Walkthrough: (B) Easy C-B-A-B-A-D.
- C-B-A-B-A-D-C.
- C-B-C-B-A-B-A-B.

- Walkthrough: (C) Hard B-C-D-A-B-C-B.
- C-B-A-B-A-D-C.
- C-B-C-A-B-C-B-D-A-B.

- Take PICKAXE (D).
- Enter Elven Village.

- Take ROPE (E) and WINDMILL BLADE.
- Add WINDMILL BLADE (F).

- Assemble the picture of the mill shown on your right.
- Select an element to move it to or from the center of the rotating part that is driven by the arrows on your left.
- Walkthrough: (G) Easy: A-Q-M-A×2-L-A-P-A-N-A-O-R-K-A-×2-H-F-C-A-I-D-B×2-E-B×2-J-B×3-G.

- Walkthrough: (H) Hard: B-L-R-B×3-N-Q-I-A×4-P-O-G-A-K-M-A×3-D-A-E-A-H-A-E-C-J.

- Take BAG OF FLOUR (I).
- Add ROPE (J), then BAG OF FLOUR, take TIN CAN LID.
- Return to Snowy Plateau.

- Use PICKAXE (K), take STAPLE REMOVER and SMALL HAND FORK.
- Use SMALL HAND FORK (L), take WHETSTONE.
- Add TIN CAN LID, receive MUG.
- Return to Elven Village.

- Pull Garlic (M), add MUG.
- Take GARLIC.
- Add GARLIC (N).
- Take DROP-SHAPED TOKEN.
- Return to Snow-clad Forest.

- WHETSTONE on BLUNT AXE.
- Match the parts of the axe blade with the appropriate pieces of the puzzle to fill in all the cracks and irregularities in its surface.
- Select the whetstone to test your combination.
- Walkthrough: (O) Hard.
- Walkthrough: (P) Easy and Hard.
- Receive AXE.

- Use AXE (Q), receive CHIP OF WOOD.
- Use CHIP OF WOOD (R), receive GHEE.
- Add DROP-SHAPED TOKEN, take GLUE.
- Move down.

- Use GHEE (S), take SYMBOL and DRAWING TOOL.
- Add SYMBOL (T), take MOLD and HOUSE FIGURINE.
- Enter Elven Village.

- Use GLUE (U), take BELL.
- Add BELL (V), take NAMEPLATE.
- Add NAMEPLATE (W).

- Play puzzle (X).
- Return to Snowy Plateau.
- Add HOUSE FIGURINE (Y).
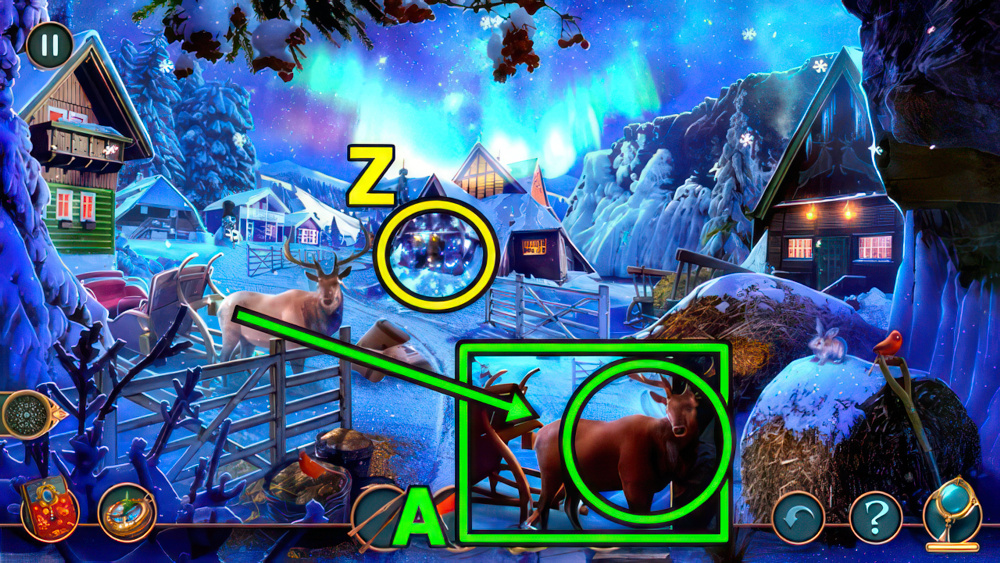
- Play puzzle (Z), take REINDEER HARNESS.
- Add REINDEER HARNESS (A).

- Take VINEGAR (B).
- Use WOODEN TONGS, receive STAR TOKEN.
- Take METAL STICK (C).
- Add STAR TOKEN, take SLEDGEHAMMER.

- Use STAPLE REMOVER (D), take HANDLES 1/2.
- Examine, use SLEDGEHAMMER, take KEY.

- Insert KEY (E).

- Choose an appropriate key for each of the three locks.
- Press “play” to check the indicators.
- Walkthrough: (F) Easy: B-G-A×2-H×2.
- D×2-C-F×2-E.
- Walkthrough: (G) Hard: A×2-B-C×2-D-K-L×2.
- A-H-C-J-E-L.

- Take PADLOCK (H).
- Add PADLOCK (I), pull lever.
- Enter Frozen Lane.

- Take CATAPULT BASE (J), PINCERS and HANDLES 2/2.
- Add HANDLES (K), read, take POTION OF GROWTH and SUGAR PASTE.
- DRAWING TUBE and SUGAR PASTE on MOLD, receive CUPCAKE FIGURINE.
- Add CUPCAKE FIGURINE (L).
- Enter Candy Store.

- Take STAMP (M), HOT PUNCH and CORKSCREW.
- Add CORKSCREW (N), take BLOWTORCH.
- PINCERS and BLOW TORCH on METAL STICK.

- Move the sliders to capture and assemble the image of a spark on the curves of the cane to straighten them.
- Walkthrough: (O) Easy.
- Walkthrough: (P) Hard.
- Receive CANE.
- Use CANE (Q).
- Go to Candy’s Store Roof.

- Take WRENCH (R) and PIECE OF CLOTH.
- Add VINEGAR (S) and PIECE OF CLOTH, take STICK and SHARD.
- Use SHARD (T), receive MAGNET.
- Return to Frozen Lane.

- Use MAGNET (U).
- Play puzzle (V), take ICE CREAM SCOOP.
- POTION OF GROWTH, HOT PUNCH and ICE CREAM SCOOP on CATAPULT BASE, receive CATAPULT.
- Use CATAPULT (W).
- Receive ICE CRYSTAL.
- Move down.

- Use ICE CRYSTAL (X), take CHISEL.
- Use WRENCH, receive BOWL.
- Use STAMP (Y) and CHISEL, take SAPPHIRES 1/2, BLANK PAPER and SUCTION CUP.
- Return to Candy Store.

- Use SUCTION CUP (Z), take PRINCESS LOLLIPOP, PIECE OF GLASS 1/2, examine, take MUFFIN MOLD.
- Add MUFFIN MOLD (A), receive SUGAR.
- Add STICK (B), BOWL and SUGAR.

- Measure the amount of sugar needed for making cotton candy.
- To do that, balance the scale pans with the help of the weights.
- Walkthrough: (C) Easy.
- Walkthrough: (D) Hard.

- Take COTTON CANDY (E).
- Go to Candy Store’s Roof.
- Use COTTON CANDY (F), receive GEAR.
- Add GEAR (G), take SAPPHIRES 2/2.
- Return to Outside the City Gates.

- Add SAPPHIRES (H), take GOLDEN FEATHER.
- Enter Frozen Lane.
- Play puzzle (I), take MELTED ICE CREAM.

- Offer MELTED ICE CREAM (J), take MITTENS 1/2, PUMP and INK.
- Add BLANK PAPER (K), GOLDEN FEATHER and INK, receive CODE.
- Enter Candy Store.

- Add CODE (L).
- Position the sliders according to the hint.
- Walkthrough: (M).

- Take FUSE (N) and PRINCE LOLLIPOP.
- Add PRINCESS LOLLIPOP (O) and PRINCE LOLLIPOP.
- Take FLINT AND FIRE STRIKER and PIECE OF GLASS 2/2.
- Go to Candy Store’s Roof.

- Add PIECE OF GLASS (P).
- Play puzzle.
- Take GIFT (Q).

- Add GIFT (R).
- Examine, open, take BELT.
- Add BELT (S).
- Go to Christmas Fair.

- Take PLUNGER (T) and SMALL MALLET 1/2.
- PLUNGER on PUMP, receive HAND PUMP.
- Examine (U), use HAND PUMP.

- Correctly position the pistons to assemble the image of Santa.
- Click on the pistons to inflate different parts of the figure.
- Walkthrough: (V) Easy.
- Walkthrough: (W) Hard.
- Take GUNPOWDER (X), WEIGHT and BEANIE.
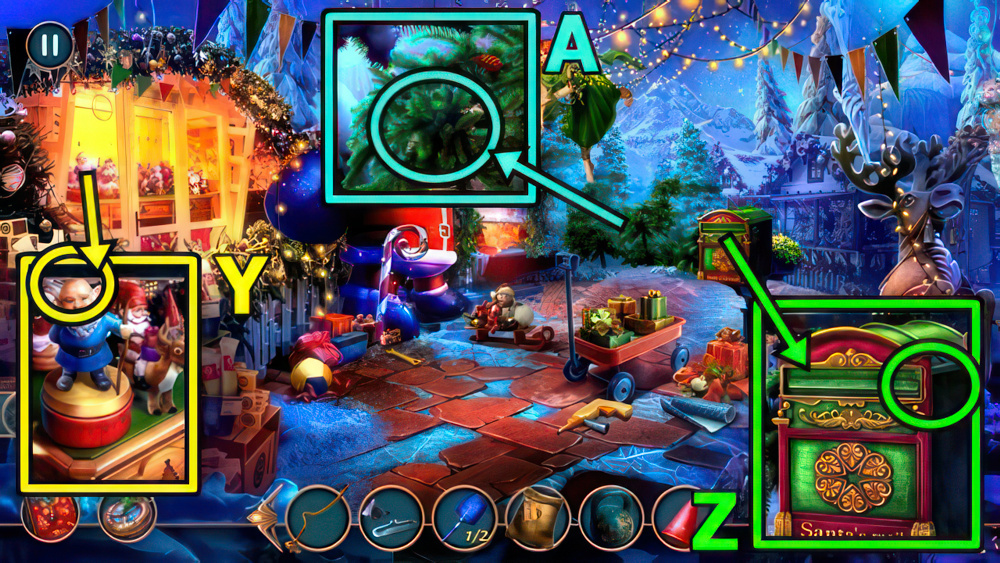
- Add BEANIE (Y), take FLAG.
- Add FLAG (Z), take MITTENS 2/2, read.
- Use MITTENS (A).
- Move forward.

- Take CHOPSTICKS (B) and BOOT, examine.
- Add FUSE, FLINT AND FIRE STRIKER and GUNPOWDER.
- Take SMALL MALLET 2/2.

- Add SMALL MALLET (C).

- Look at the picture of a hare in the central circle, and find its copy in one of the smaller ones.
- The picture changes every time you open the right circle.
- Walkthrough: (D) Easy and Hard: A-G-F-H-C-M-J-P-I-L-O-N-K-B-D-E.

- Read (E), take WEDGE and CORD WITH A BELL.
- Add CORD WITH A BELL (F).
- Enter Storyteller’s Marquee.

- Select (G).
- Enter Blizzard Castle.

- Take POSTCARD (H), CLOCK WEIGHTS 1/2 and CORK.
- Use CORK (I), take METAL BOOKMARK.
- Use METAL BOOKMARK (J), take CLOCK WEIGHTS 2/2.
- Add CLOCK WEIGHTS (K).

- Rotate the clock face and hands until they display the correct number of symbols shown on the weights.
- Walkthrough: (L) Easy.
- Walkthrough: (M) Hard.

- Take WIRE CUTTERS (N).
- Move down.
- Take BILLS 1/2 (O) and CHAIN.

- Add WEIGHT (P) and CHAIN, remove, take PLANKS and VANE.

- Use VANE (Q).
- Read, take WIRE.
- Add WIRE (R).
- Use CHOPSTICKS, receive BILLS 2/2.
- Return to Christmas Fair.
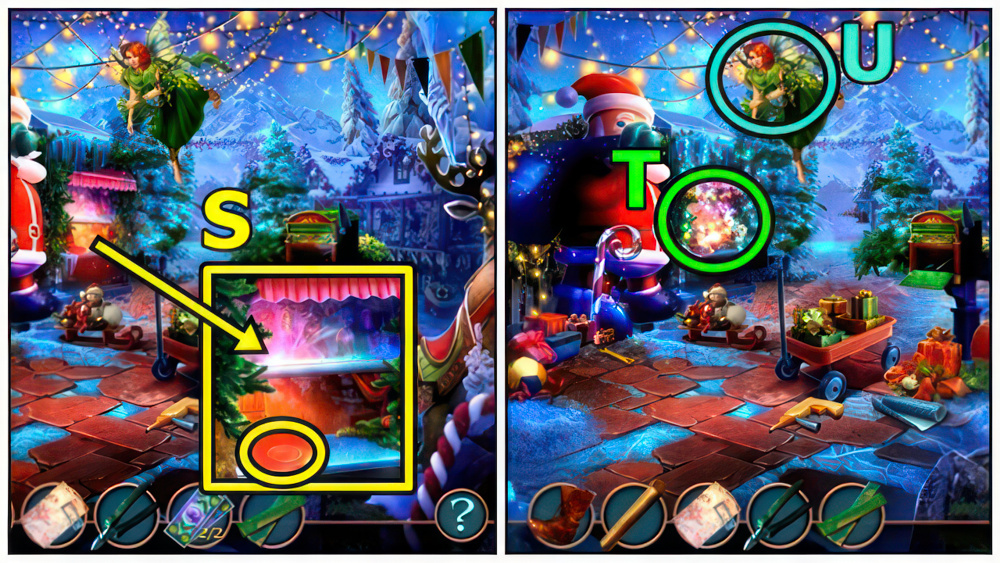
- Add BILLS (S).
- Play puzzle (T), take WINGS.
- Give WINGS (U).
- Receive SUNFLOWER SEEDS.
- Return to Storyteller’s Marquee.

- Open (V), offer SUNFLOWER SEEDS.
- Take NAILS.
- Add BOOT (W), PLANKS and NAILS.
- Take BROKEN FEATHER DUSTER, LIGHTER and HORSE BLANKET.
- Use WIRE CUTTERS, receive KEG.
- Enter Blizzard Castle.

- Add KEG (X).
- Take PENCIL.
- Add POSTCARD (Y) and PENCIL, receive PASSWORD.
- Return to Amusement Park.

- Add HORSE BLANKET (Z), take PLATE.
- Use PLATE (A), take WHEEL.
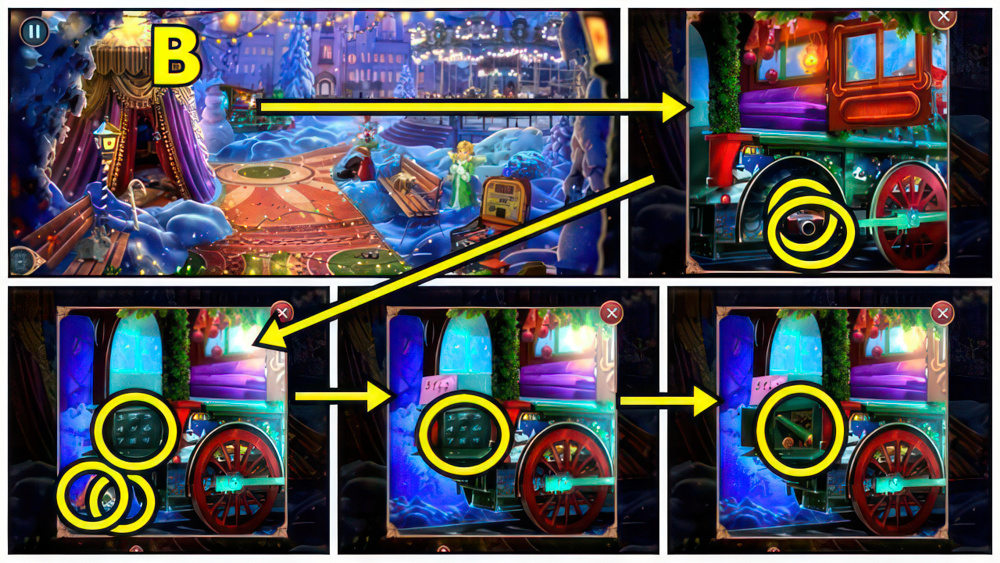
- Add WEDGE (B) and WHEEL.
- Take FEATHERS 1/3 and POCKET WATCH.
- Add PASSWORD, press 3-1-4-7.
- Take EXTENDABLE ROD.
- Return to Blizzard Castle.

- Use EXTENDABLE ROD (C), receive METAL BIRD.
- Add METAL BIRD (D).
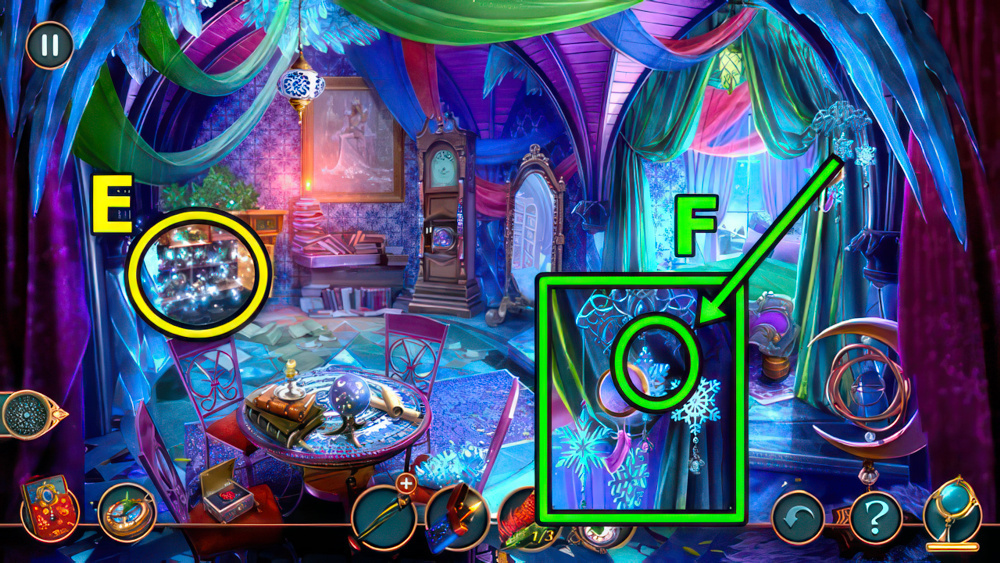
- Play puzzle (E), receive SNOWFLAKE.
- Add SNOWFLAKE (F).
- Move down.

- Add POCKET WATCH (G).

- Place the round tokens the way they match the shapes of the metal pins.
- Select a token and drag it into position chosen.
- Walkthrough: (H) Easy.

- Walkthrough: (I) Hard.

- Take COTTON (L) and SIGNET RING.
- Return to Christmas Fair.
- Insert SIGNET RING (M), take TRAFFIC SIGN.
- Move forward.

- Add TRAFFIC SIGN (N), take FEATHERS 2/3 and SWITCH.
- Add SWITCH (O).

- Take SNOWMEN AMULETS 1/2 (P).
- Use LIGHTER, take FORK.
- Insert FORK (Q), take FEATHERS 3/3.
- FEATHERS on BROKEN FEATHER DUSTER, receive FEATHER DUSTER.
- Take AWL (R).
- Use FEATHER DUSTER, read, take SCREWDRIVER.

- Use SCREWDRIVER (S), take PIE STATUETTE, read, take SNOWMEN AMULETS 2/2.
- Add SNOWMEN AMULETS (T), take BOOKS 1/3, SCOOP and NEEDLE AND THREAD.
- Add COTTON (U) and NEEDLE AND THREAD.

- Play puzzle (V), take CHRISTMAS TREE TOP.
- Add CHRISTMAS TREE TOP (W).
- Go to Patio.

- Use SCOOP (X), receive SAND.
- Take SIEVE (Y) and BOOK COVER PART.
- Add SAND (Z) and SIEVE.
- Go to Alleyway.

- Take BROKEN MUSIC BOX (A) and SKI POLE.
- Add SKI POLE (B) and PIE STATUETTE.
- Take BOOKS 2/3 and CAN OPENER.
- Use CAN OPENER (C).

- Pull all the knots back to make sure the laces in between them don’t overlap.
- Walkthrough: (D) Easy.
- Walkthrough: (E) Hard.
- Take SCARF (F).
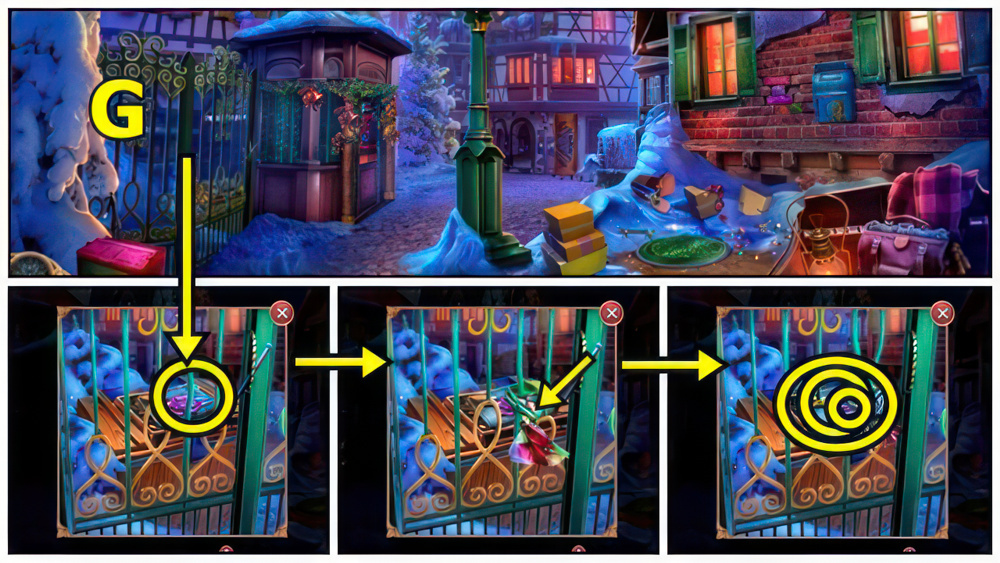
- Add SCARF (G), use Dowel.
- Take STONE ROSE, SPATULA and NEWSPAPER.

- Add NEWSPAPER (H) and AWL, use Key.
- Enter Bookstore.

- Use SPATULA (I), take GARLAND, CARABINER HOOK and DUCT TAPE.
- Read (J), add BOOK COVER PART and DUCT TAPE.
- Take BOOKS 3/3.
- Add BOOKS (K).

- Play puzzle (L), take SOLDERING IRON.
- Move down.
- Use SOLDERING IRON (M), take GEARS 1/2, TOURNIQUET and BRICK.
- Add BRICK (N), take CYLINDER WITH PINS.
- Move down.
- CYLINDER WITH PINS on BROKEN MUSIC BOX, receive MUSIC BOX.

- Add MUSIC BOX (O) and GARLAND.
- Receive FALSE BEARD.

- Add FALSE BEARD (P) and TOURNIQUET.
- Remove, turn faucet, take STONE LILY.

- Add STONE ROSE (Q) and STONE LILY.
- Take PIPETTE and HANDLE.
- Add HANDLE (R).

- Clear the snow from the patio.
- Note that the machine will keep moving until it runs into the first obstacle.
- You can’t reenter the areas you’ve already cleared of snow.
- Walkthrough: (S) Easy.

- Walkthrough: (T) Hard.
- Take CHAIN.
- Return to Bookstore.

- Add CARABINER HOOK (U) and CHAIN.
- Take THIN WIRE NETTING and TWEEZERS.
- Use TWEEZERS (V), receive GEARS 2/2.
- Move down.
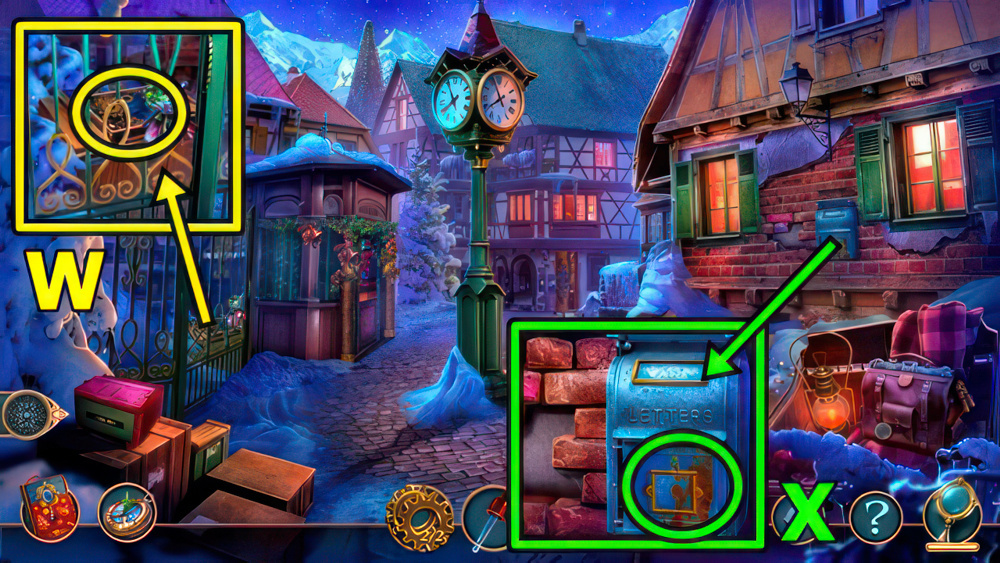
- Add GEARS (W), take BRUSH and FILE.
- Use FILE (X), take FISH FIGURINE.
- Move down.

- Add FISH FIGURINE (Y), take VALVE PART and BATTERIES.
- Return to Bookstore.
- Play puzzle (Z), take HAMMER.

- Use HAMMER (A), take TILE and CITY MAP.
- Add BATTERIES (B) and CITY MAP.

- Take FIR BRANCHES 1/3 (C).
- Add TILE.
- Click on the tiles until you get a complete pattern.
- Note that all the tiles are interrelated.
- Walkthrough: (D) Easy: M-P-F-G-B-C.

- Walkthrough: (E) Hard: U-Q-M-I-E-B-C-G-H-N-O-S-T.
- Walkthrough: (E) Hard: P-U-V-Q-M-I-E-B-C-G-H-N-O-S-T.
- Take MONKEY WRENCH (F).

- Take FIR BRANCHES 2/3 (G).
- Use MONKEY WRENCH, take OIL.
- Add PIPETTE (H) and OIL.

- Play puzzle (I), take CARVED KEY.
- Use CARVED KEY (J), take VALVE PART, RAG and FIR BRANCHES 3/3.
- FIR BRANCHES on THIN WIRE NETTING, receive COVER OF FIR BRANCHES.
- Add COVER OF FIR BRANCHES (K).
- Go to City Square.

- Take DEER ANTLERS 1/2 (L) and SOLVENT.
- Add BRUSH (M) and SOLVENT, take GIGLI SAW.
- Use GIGLI SAW (N), receive WOODEN PLANK.
- Add WOODEN PLANK (O).
- Enter Cafe.

- Take LAMP HOLDER (P) and SOFT CARAMEL.
- VALVE PART and SOFT CARAMELT on VALVE PART, receive VALVE.
- Add VALVE (Q).

- Place the round plate the way the tokens with Christmas symbols fit into the appropriate slots.
- Select a token for it to move into a slot.
- Walkthrough: (R) Easy.

- Place the tokens with symbols in the appropriate slots in the order shown.
- Turn the valve with the arrows.
- The valve skips three positions when rotated clockwise, and four when moving counterclockwise.
- Walkthrough: (S) Hard B-E-B-A×2-B-D-B-C-B×2-G-B×2-F-A×2-H.
- Take GOLD HAIR CLIP.

- Use GOLD HAIR CLIP (T), take UNLOADED SLINGSHOT and DEER ANTLERS 2/2.
- Read (U), add DEER ANTLERS.
- Take BROOCH.
- Return to Beside the City Square.
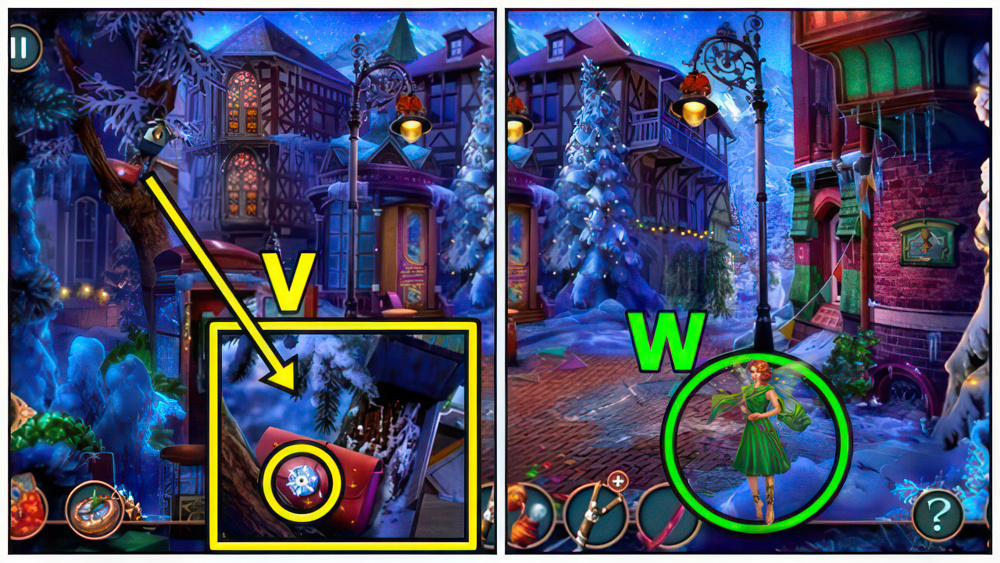
- Insert BROOCH (V), take BENT ICE-CREAM STICK.
- Talk (W), receive MAGIC WAND.
- Move forward.

- Use MAGIC WAND (X).
- Take COMPACT MIRROR (Y).
- Enter Cafe.

- Use COMPACT MIRROR (Z), then BENT ICE-CREAM STICK.
- Play puzzle (A), take UMBRELLA.

- Use UMBRELLA (B).
- Use RAG, take PENDANT and BASKET.
- Move down.
- Use PENDANT (C), take RUBBER BAND and PRUNING SHEARS.
- Move down.

- Add PRUNING SHEARS (D) and BASKET, receive NUTS.
- Offer NUTS (E), take LAMPSHADE.
- Return to Cafe.

- Add LAMP HOLDER (F) and LAMPSHADE.
- Complete the pattern on the lampshade based on the fragments that are already positioned correctly.
- Walkthrough: (G) Easy.
- Walkthrough: (H) Hard.
- Take ENCHANTED STONE (I).
- Move down.
- RUBBER BAND and ENCHANTED STONE on UNLOADED SLINGSHOT, receive SLINGSHOT.

- Use SLINGSHOT (J).
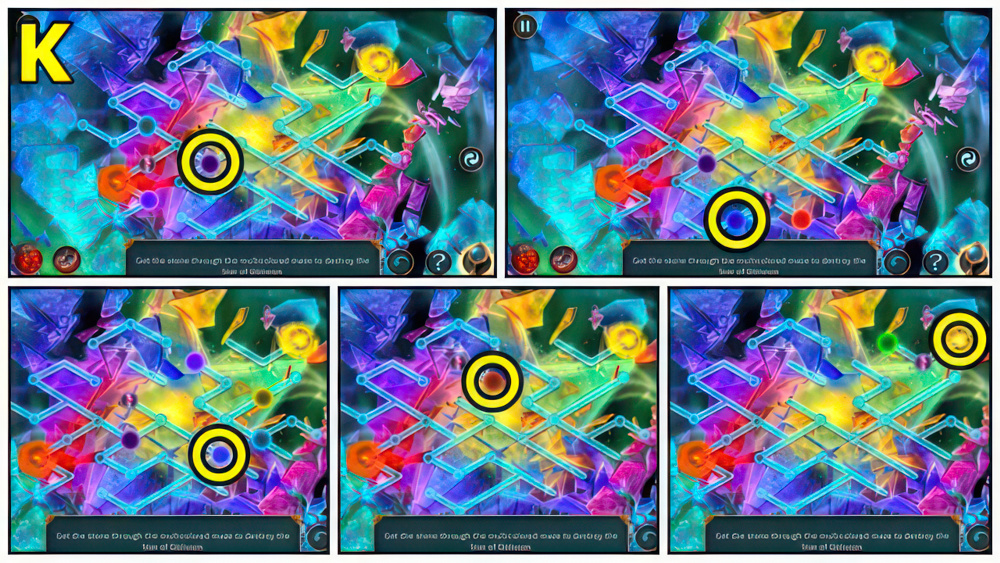
- Get the stone through the multicolored maze to destroy the Star of Oblivion.
- Walkthrough: (K).
- Walkthrough Bonus Chapter, at the link below.

