
City Legends 2: Trapped in Mirror – The walkthrough of the game begins with the fact that you, as a famous writer, have attracted the attention of a major publishing house with your novel about the order of evil witches. But they want a draft of your next horror novel before they pay you. So, you’re going to Pennsylvania to write about Bloody Mary. Lucky for you, the local museum has a unique exhibit with Mary’s mirror. Going there, you could not even imagine what you would encounter. If you can’t complete any of the puzzles or don’t know where the items are, you can watch the walkthrough of City Legends 2: Trapped in Mirror, on our website to stop Mary.
City Legends 2: Trapped in Mirror – Walkthrough
Here you can watch the full walkthrough of the game City Legends 2: Trapped in Mirror, all the chapters, including the bonus one, in pictures.

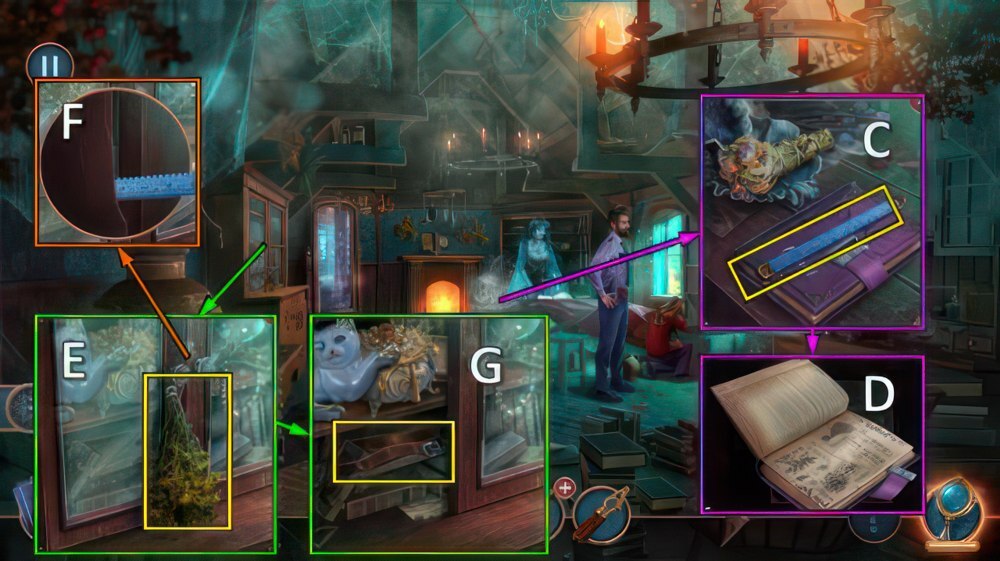
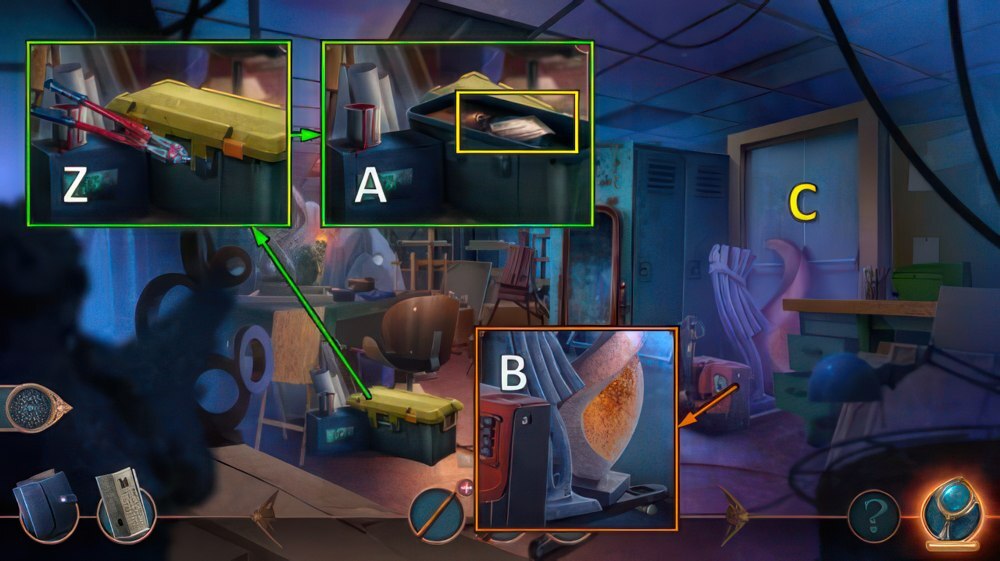
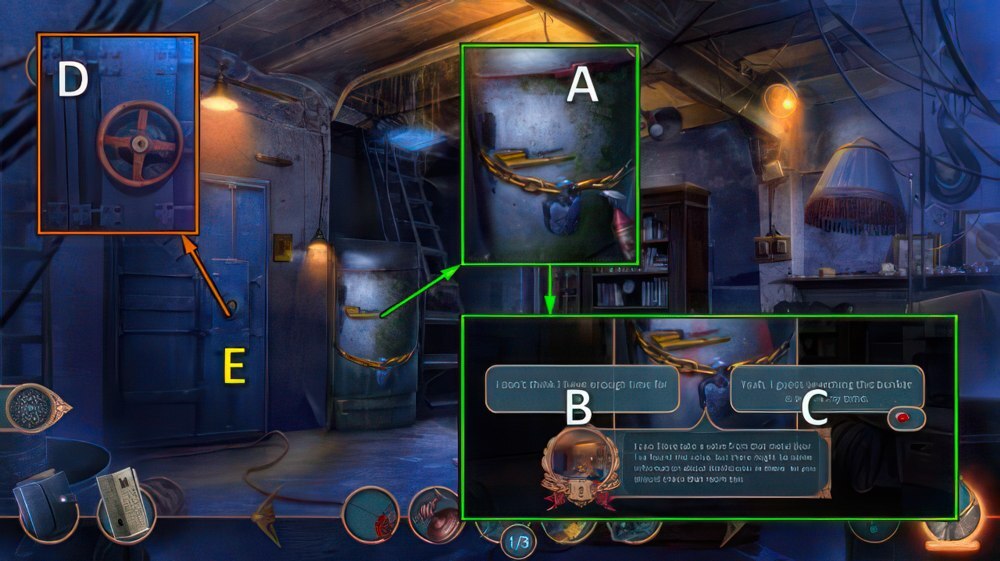
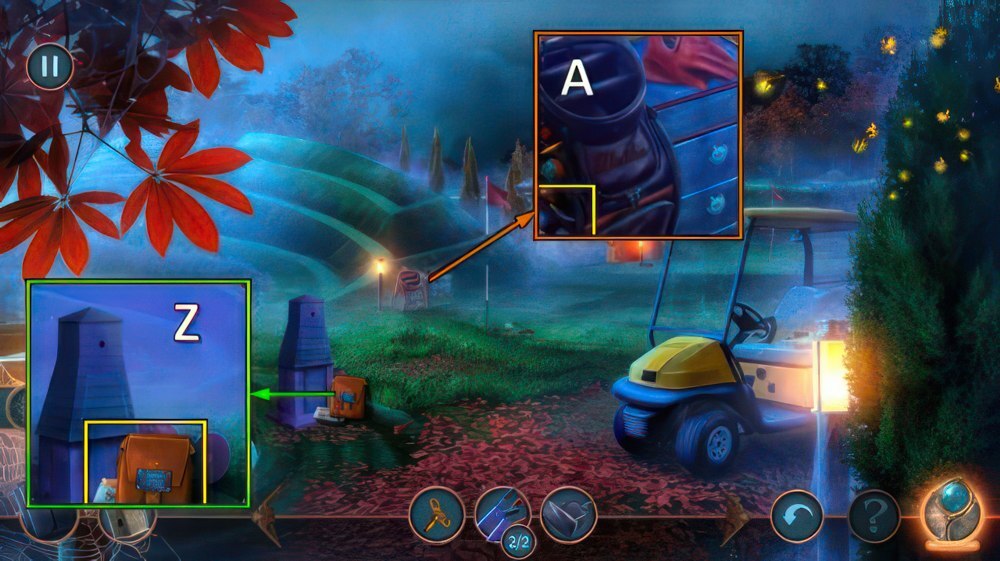
- Talk (A), receive HANDKERCHIEF.
- Take newspaper.
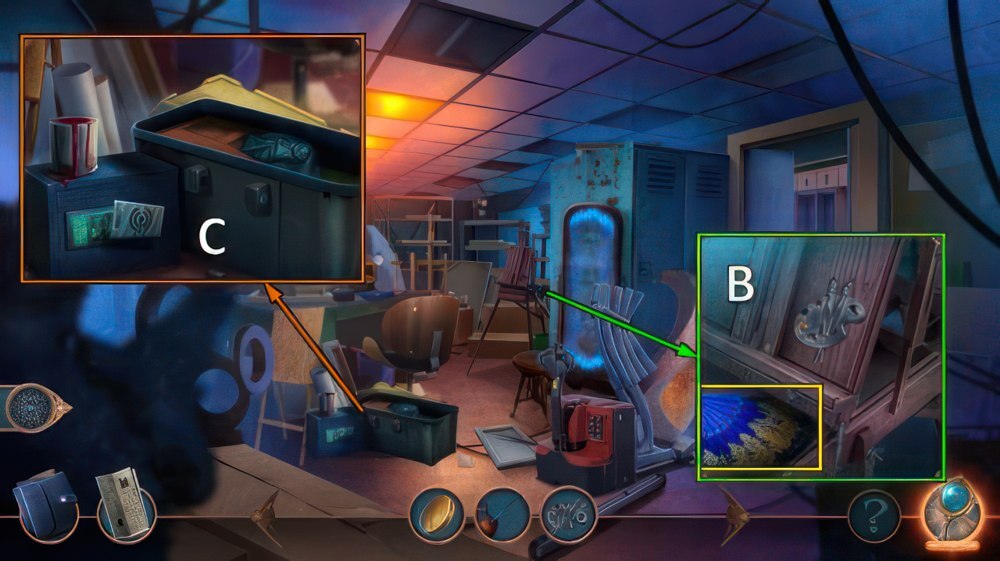
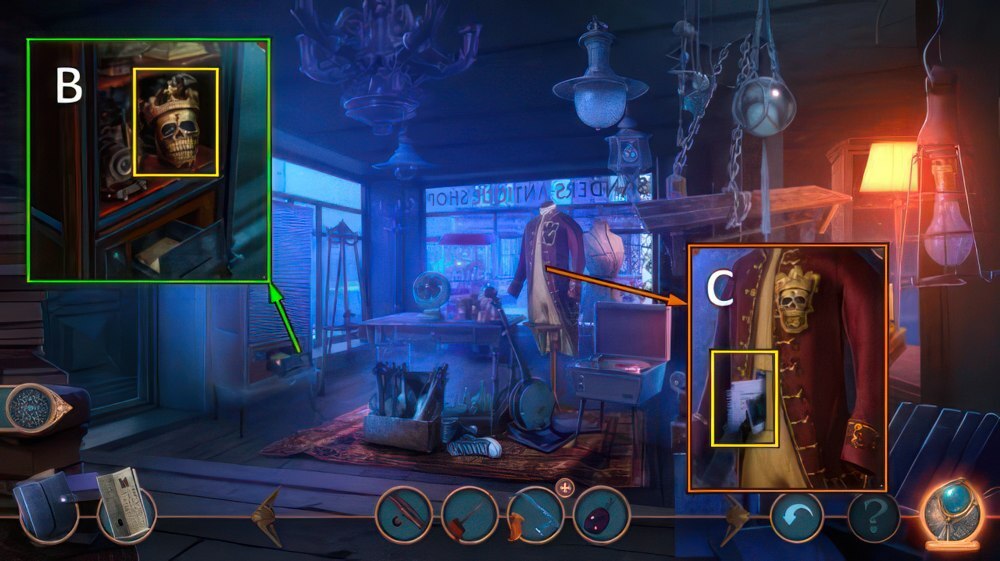
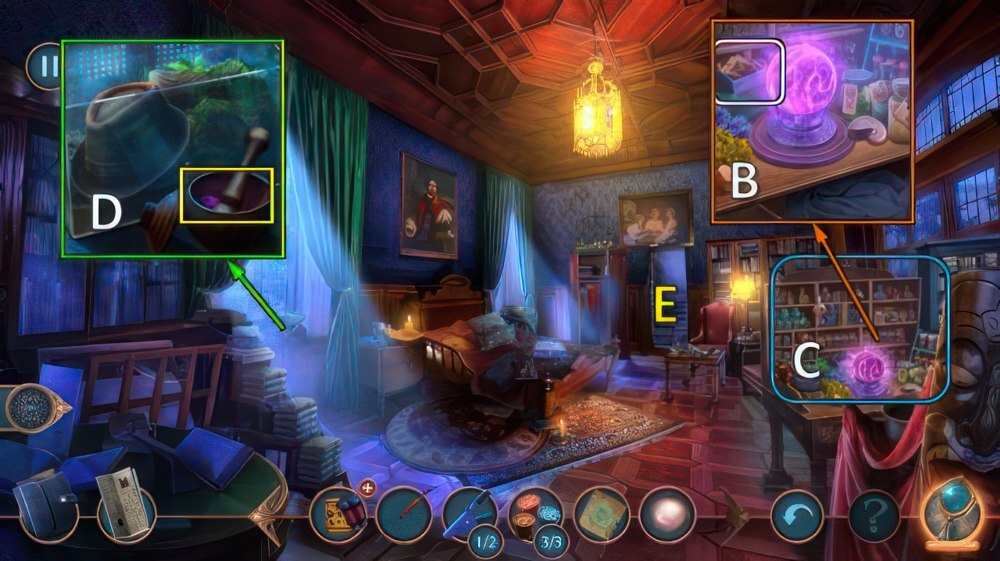
- Use HANDKERCHIEF, open (B).
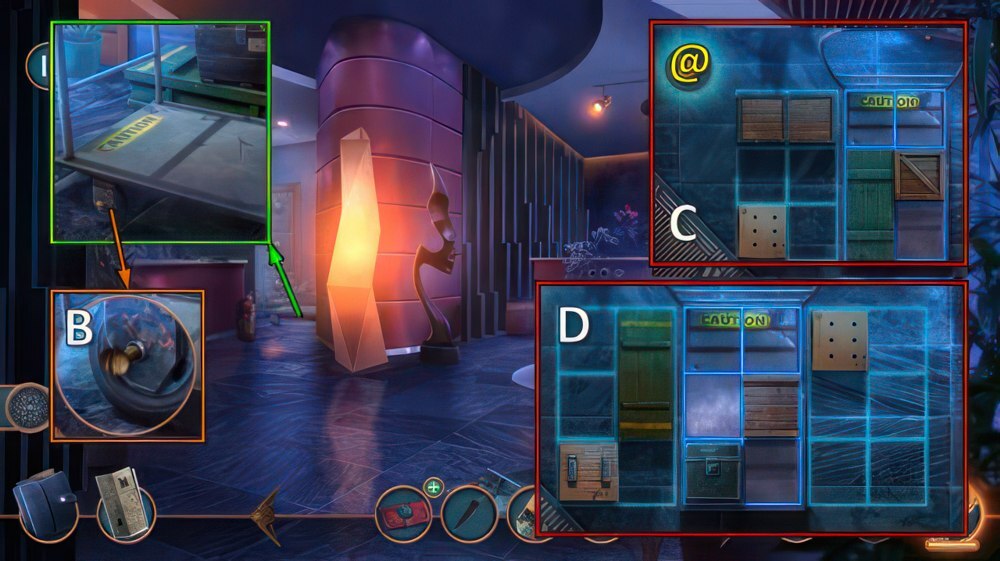
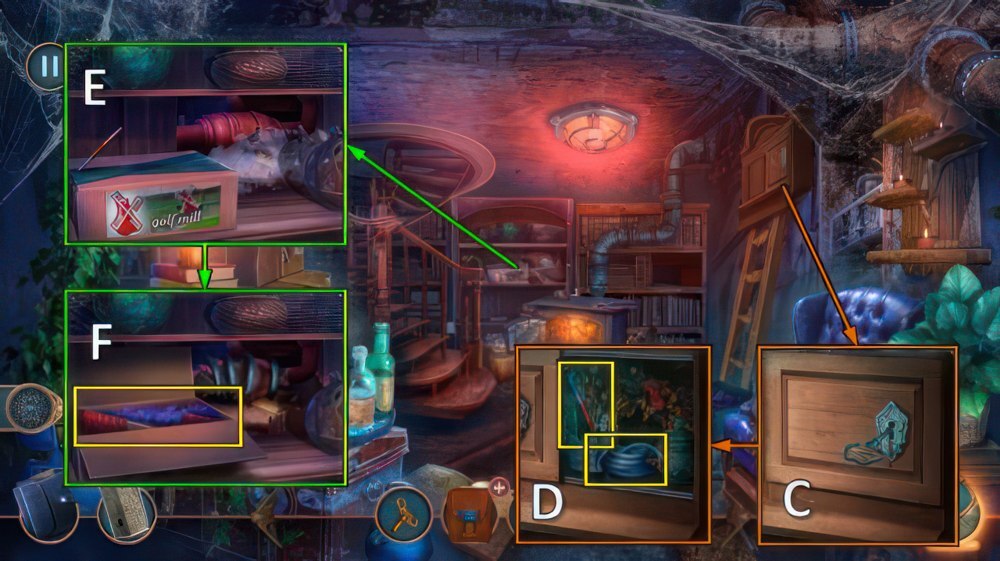
- Take journal, DUCT TAPE and PIPE (C).
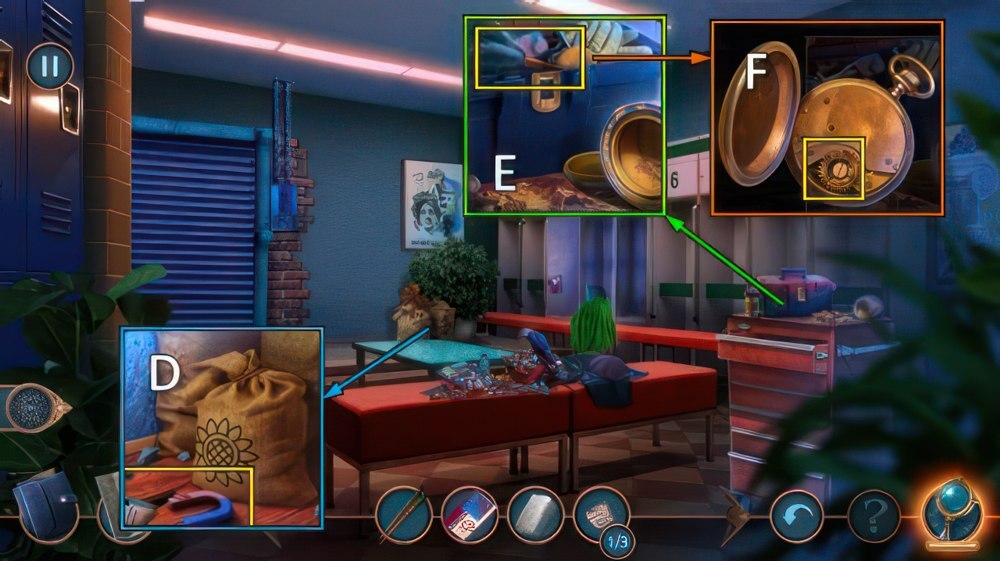
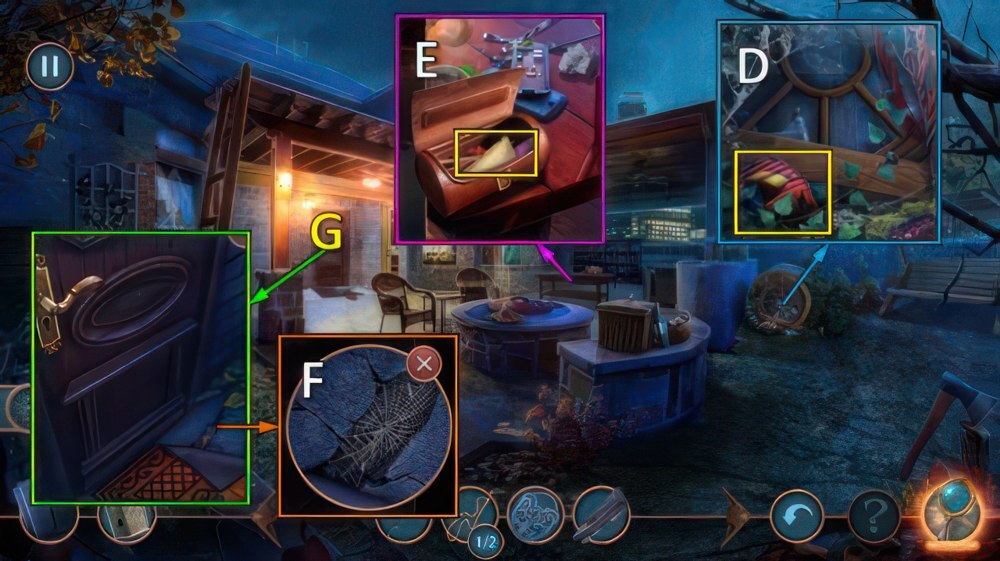
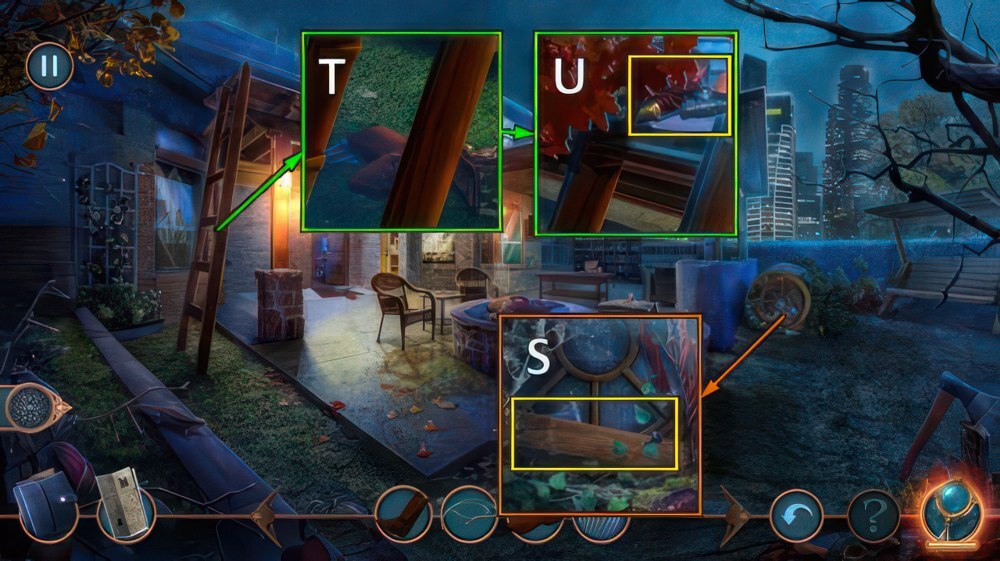
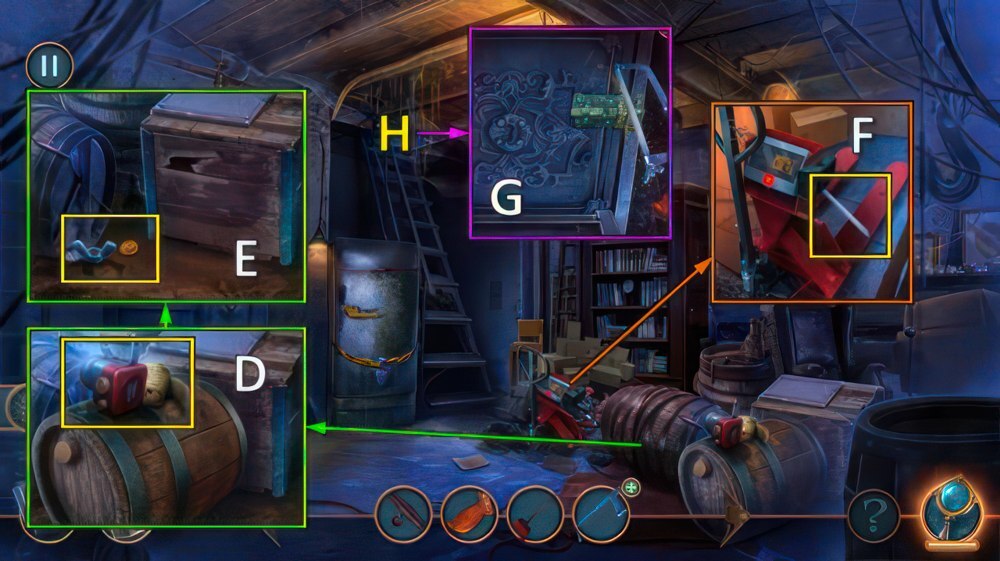
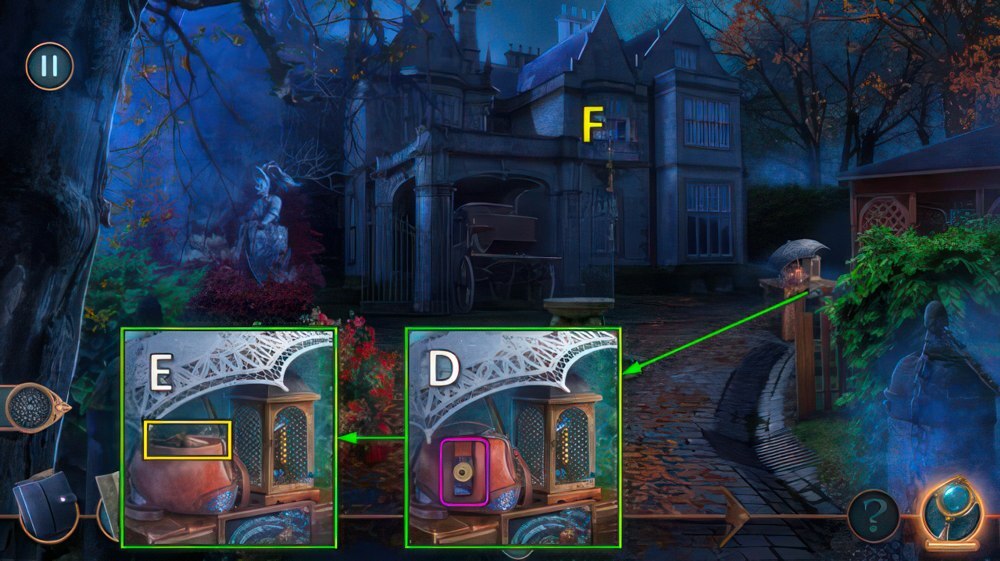
- Use PIPE, take SIGNET RING (D).
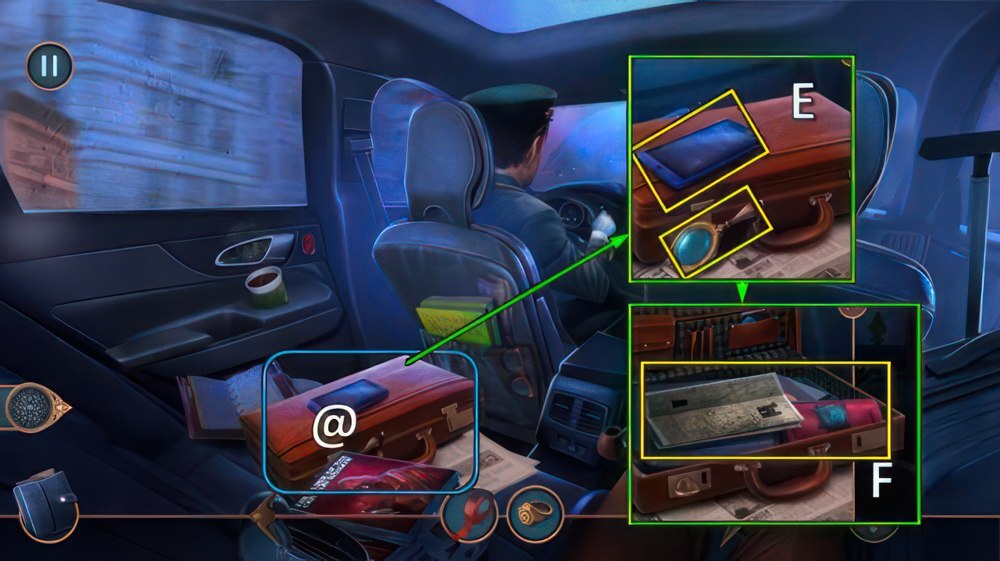
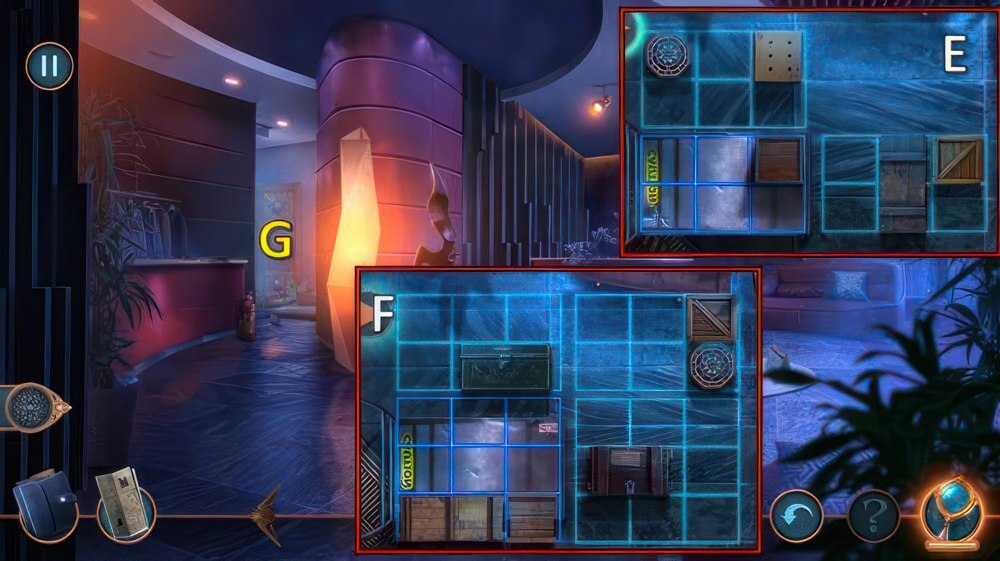
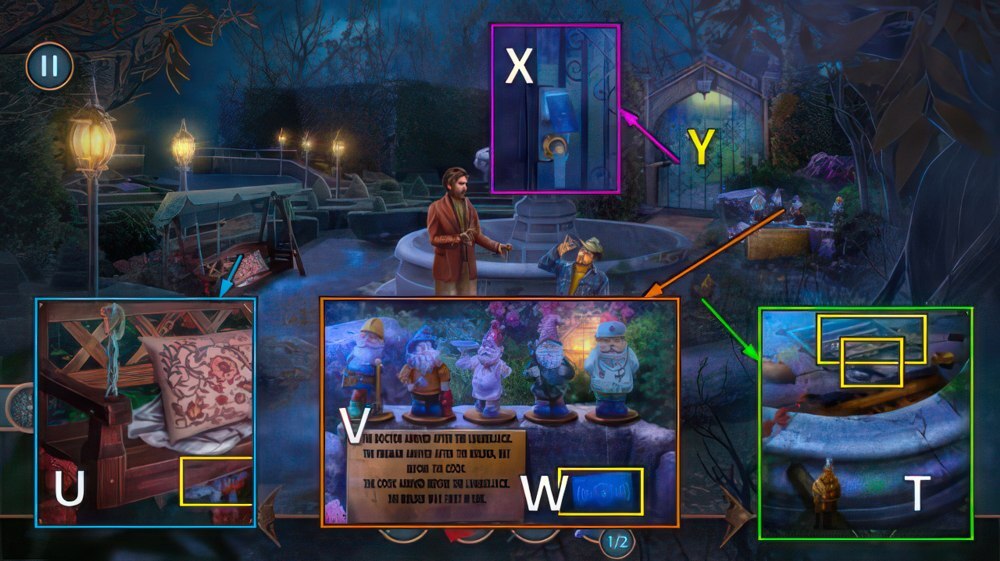
- Take hint glass and CELLPHONE (E).
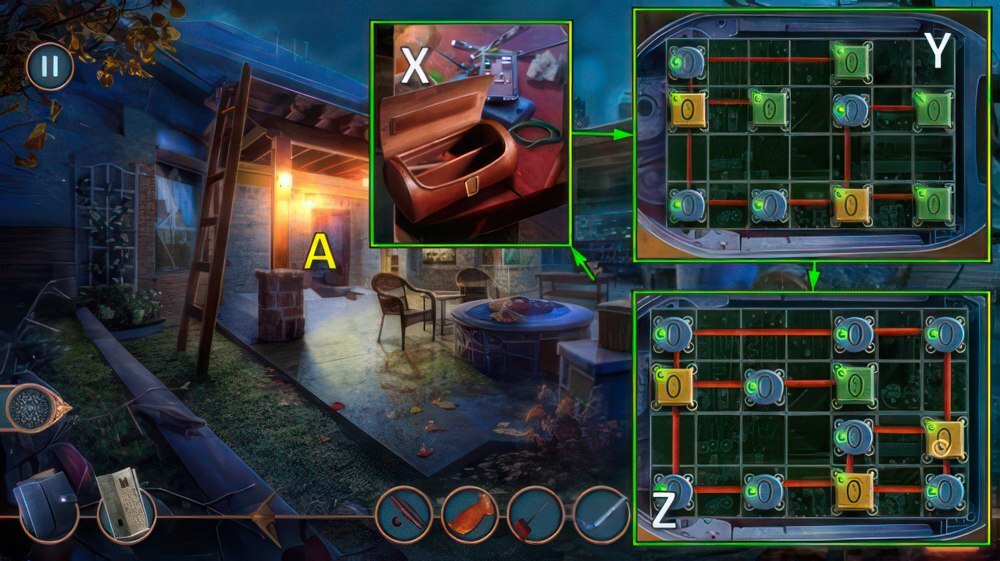
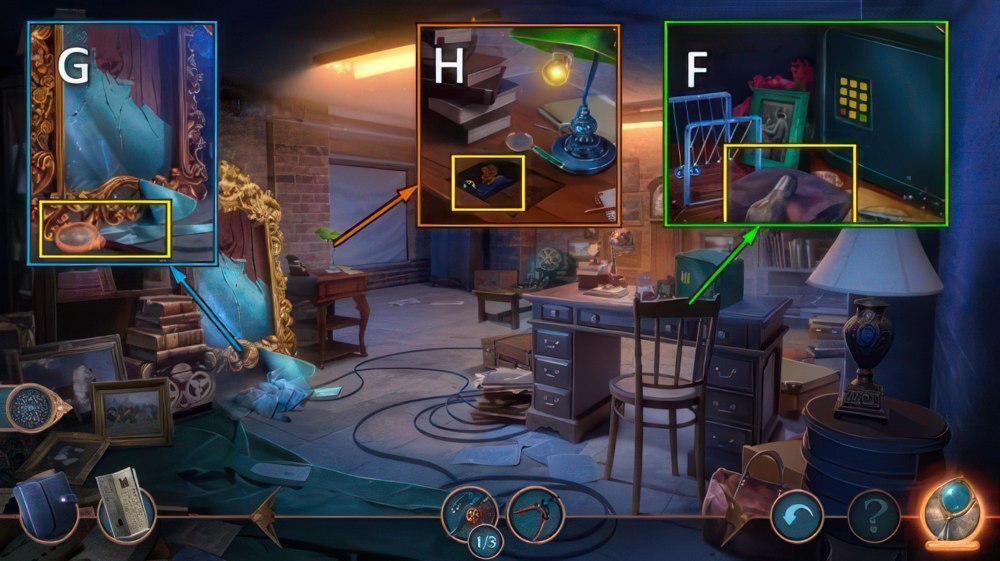
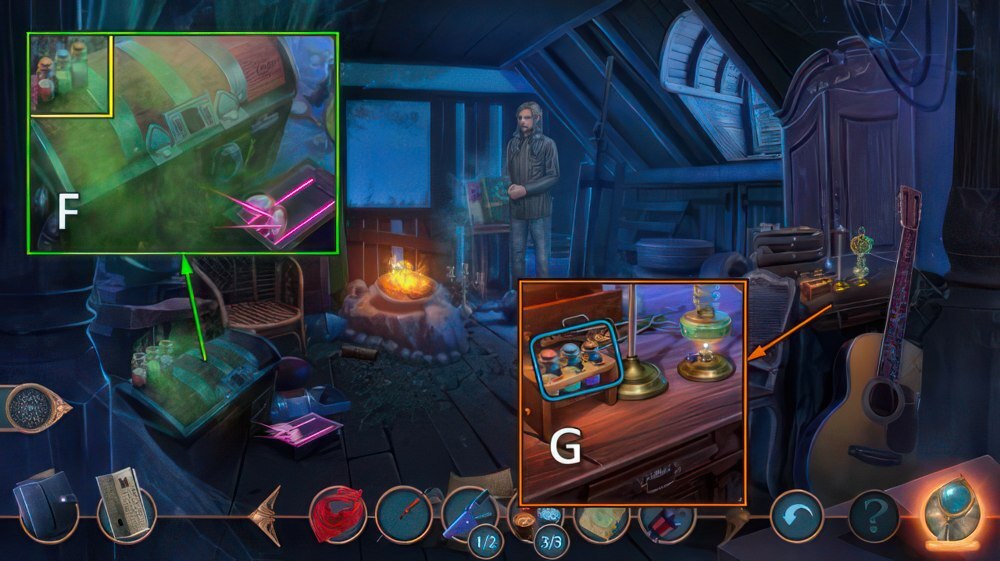
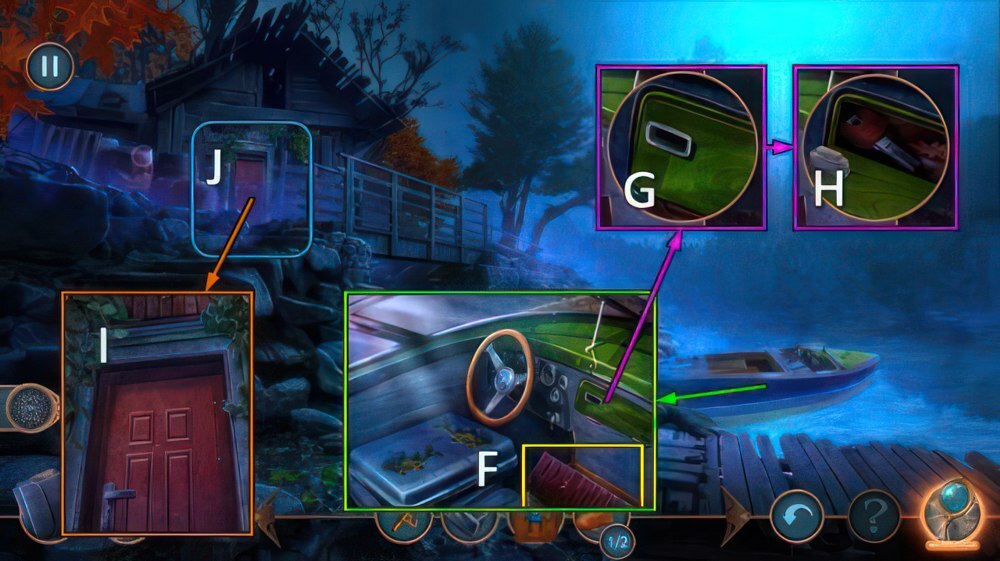
- Use SIGNET RING, take map, WALLET and SHOEHORN (F).
- Select laptop.
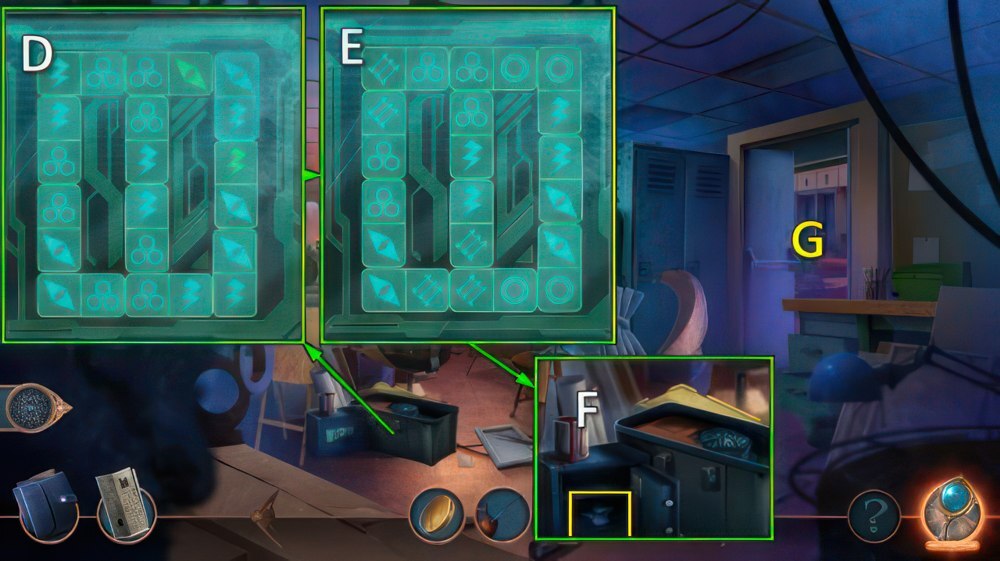
- Play puzzle (@).
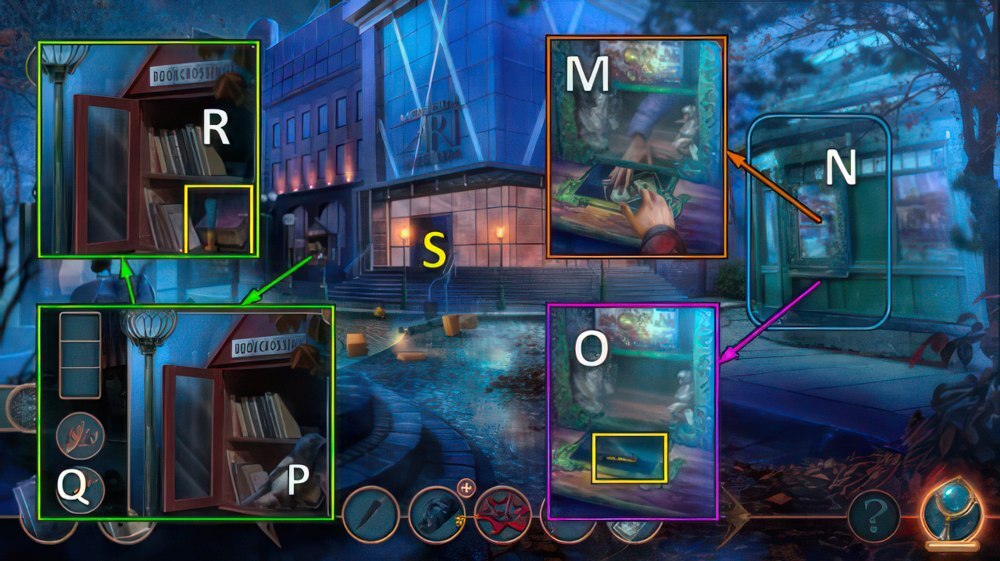
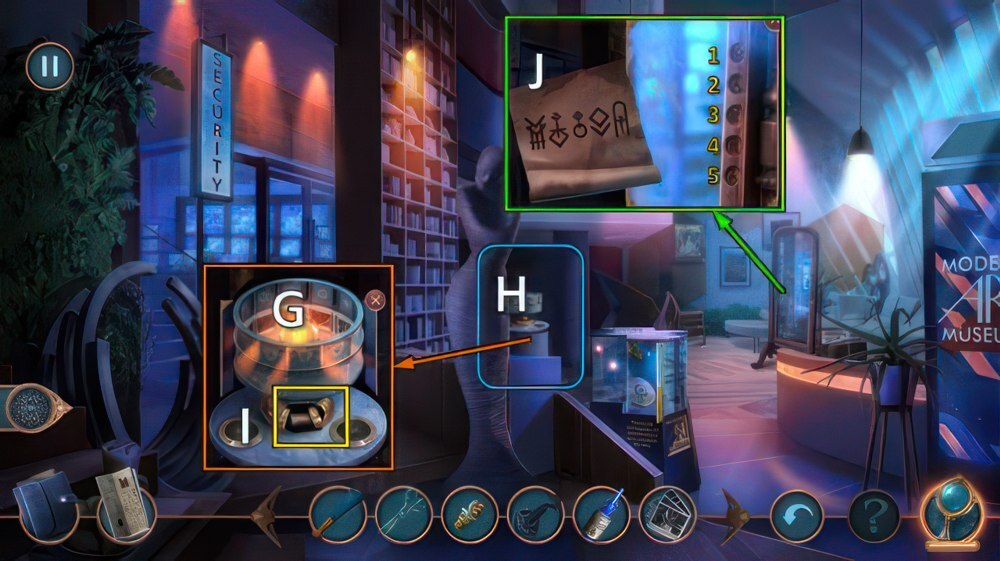
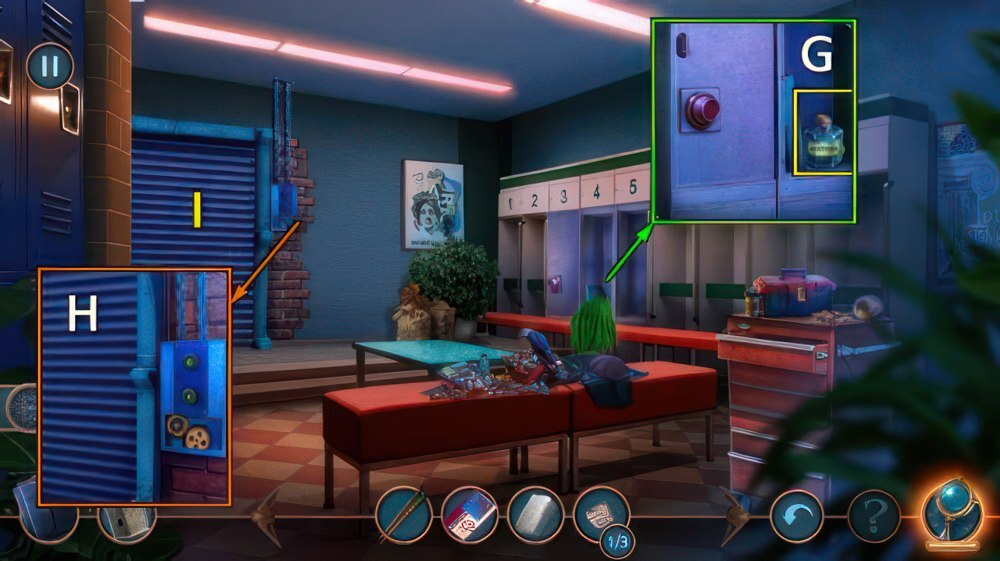
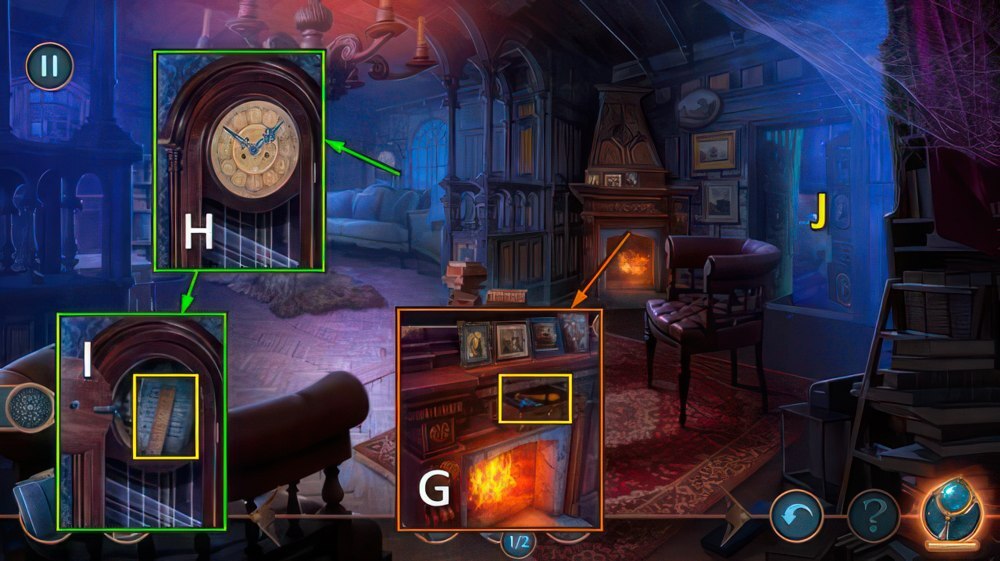
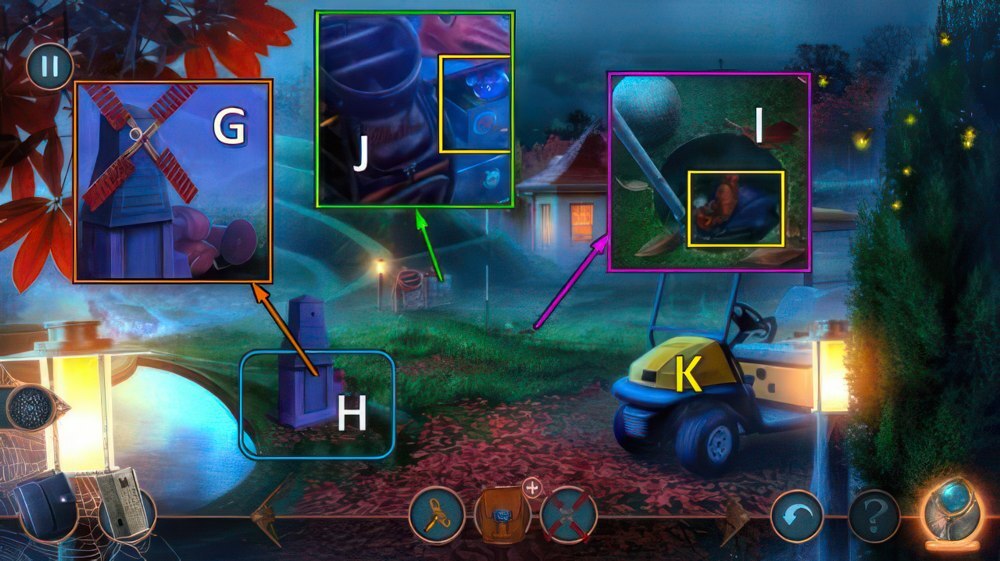
- Take GLOVE and UMBRELLA (G).
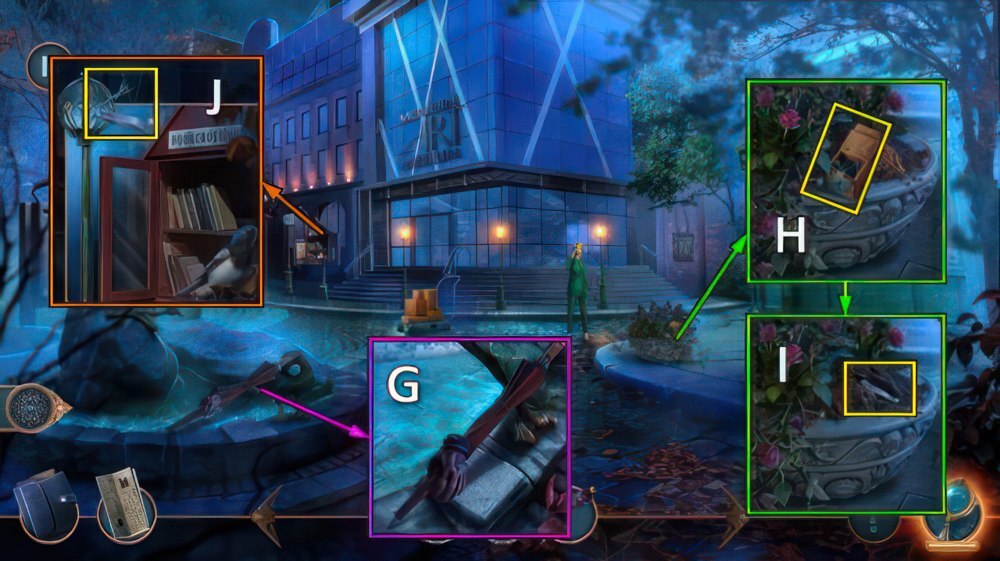
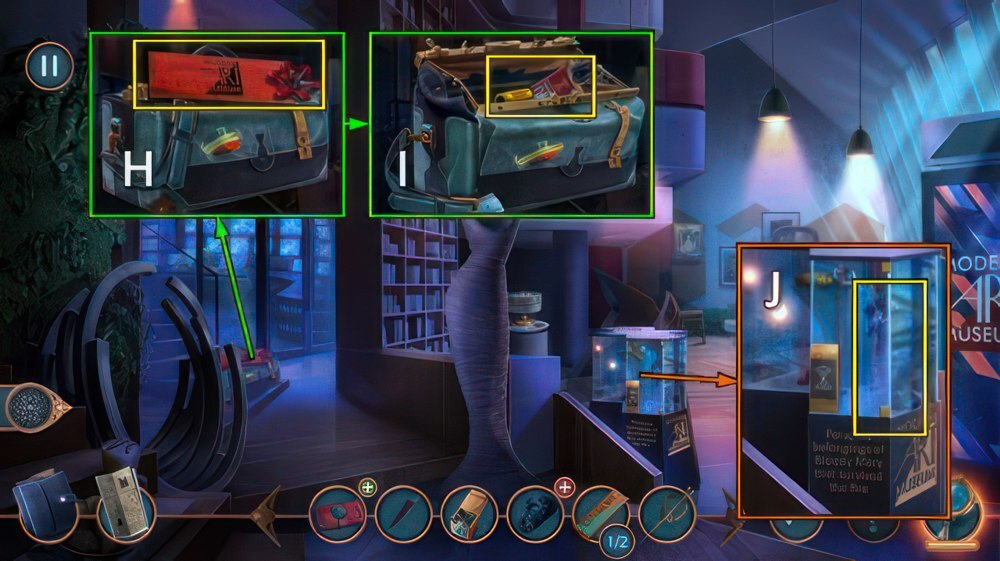
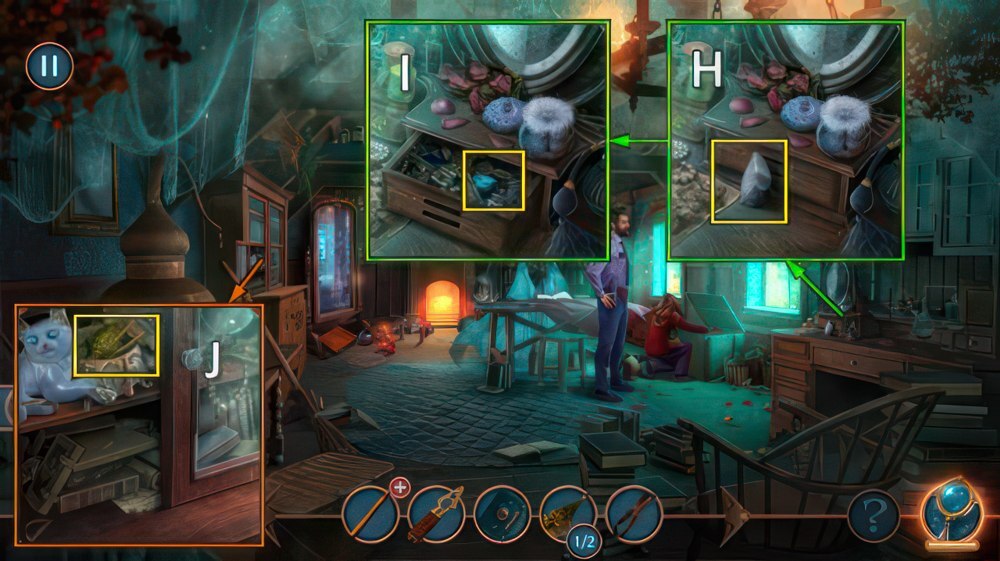
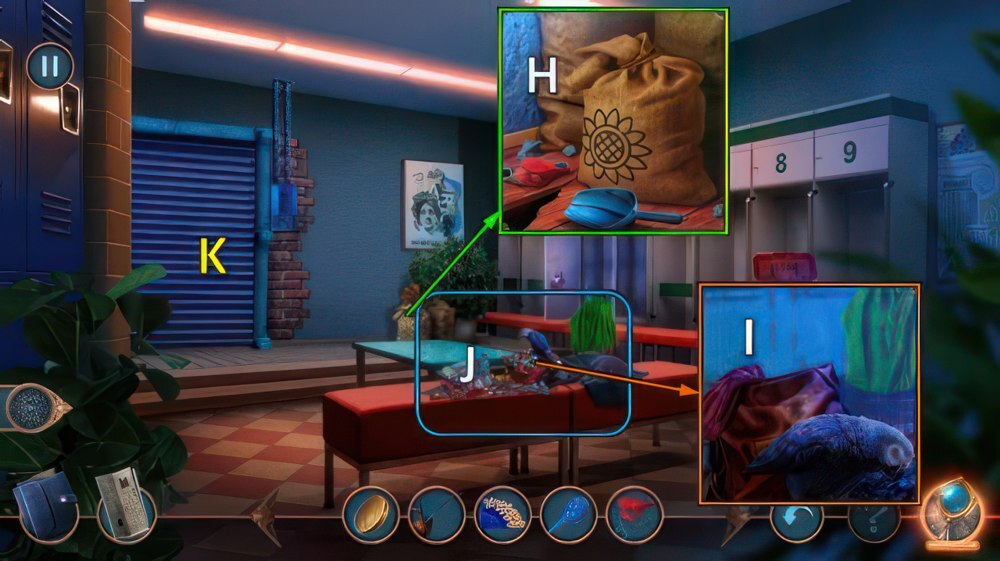
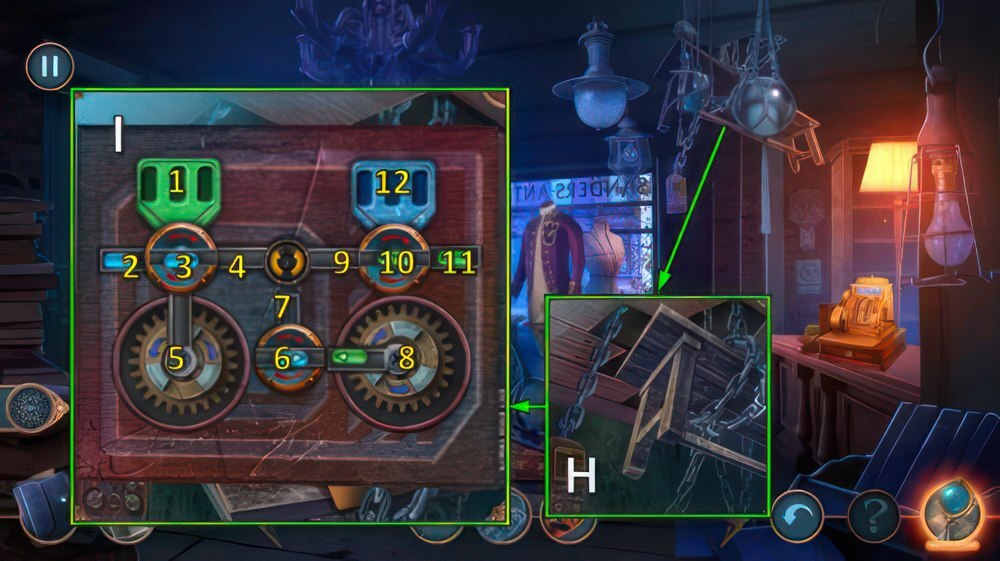
- Use GLOVE, take NAILS (H).
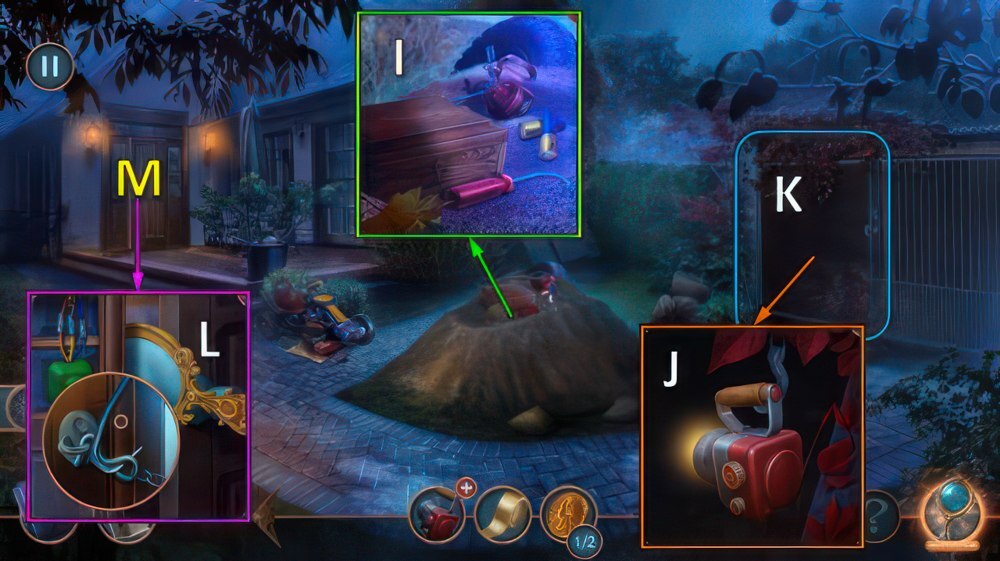
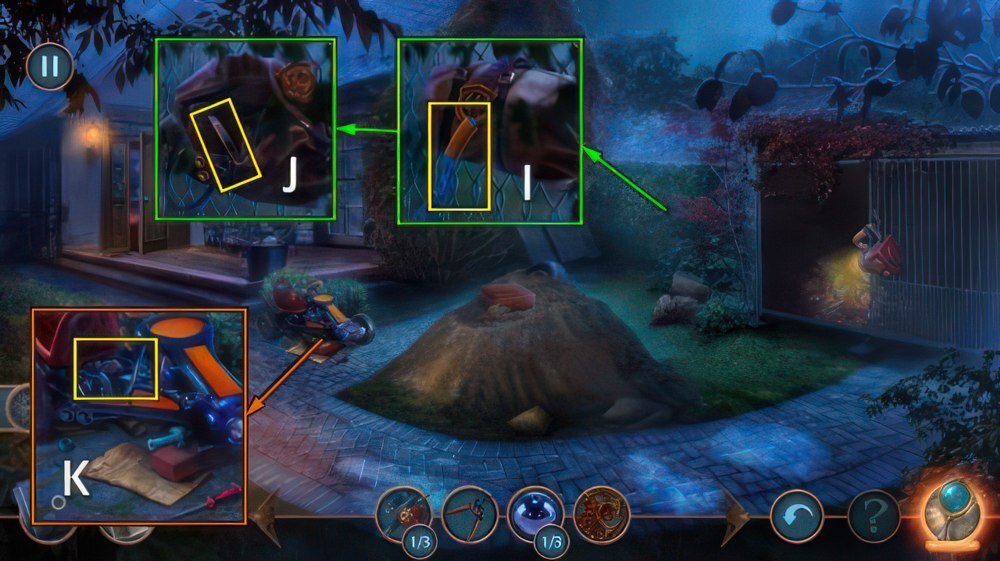
- Use SHOEHORN, take NAIL CLIPPERS (I).
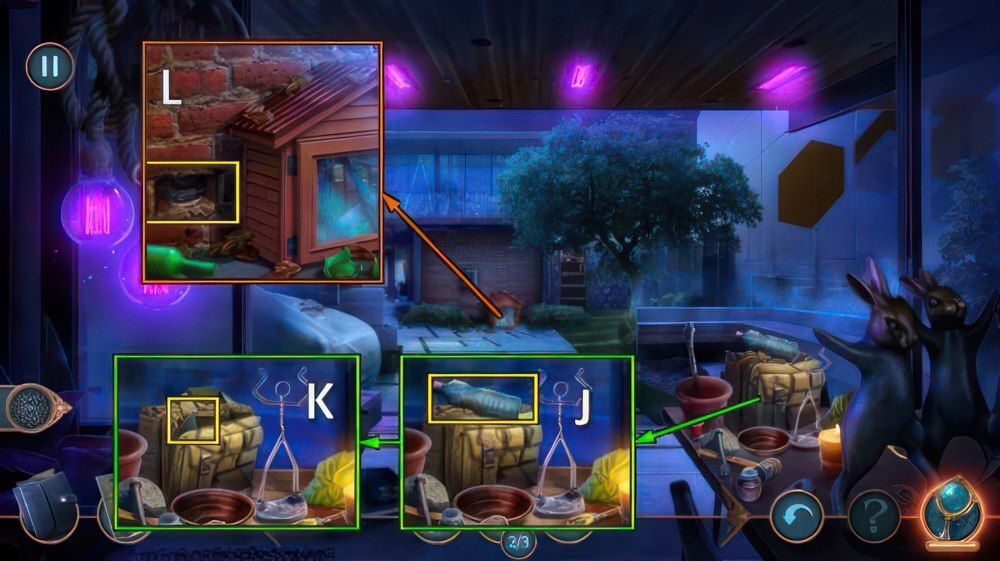
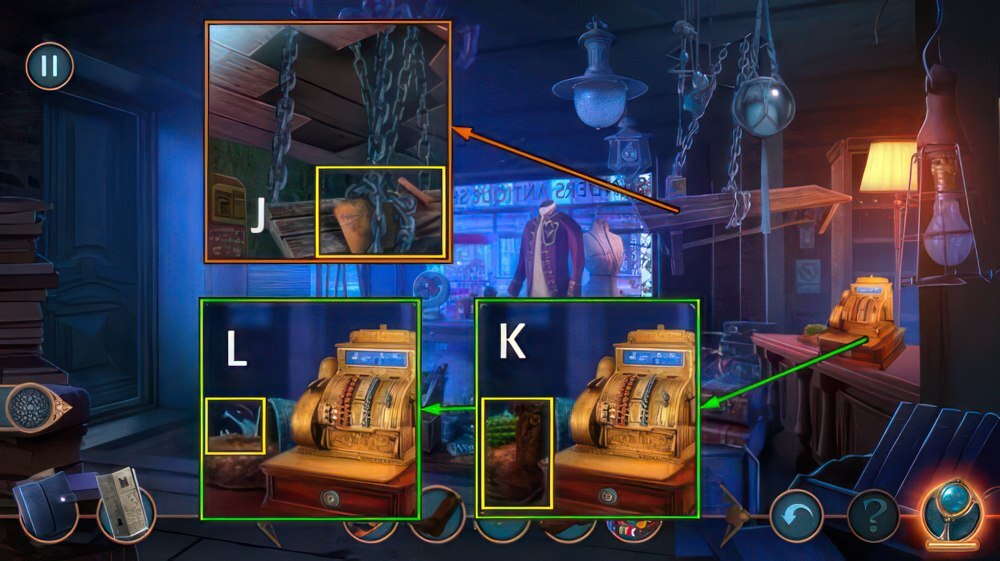
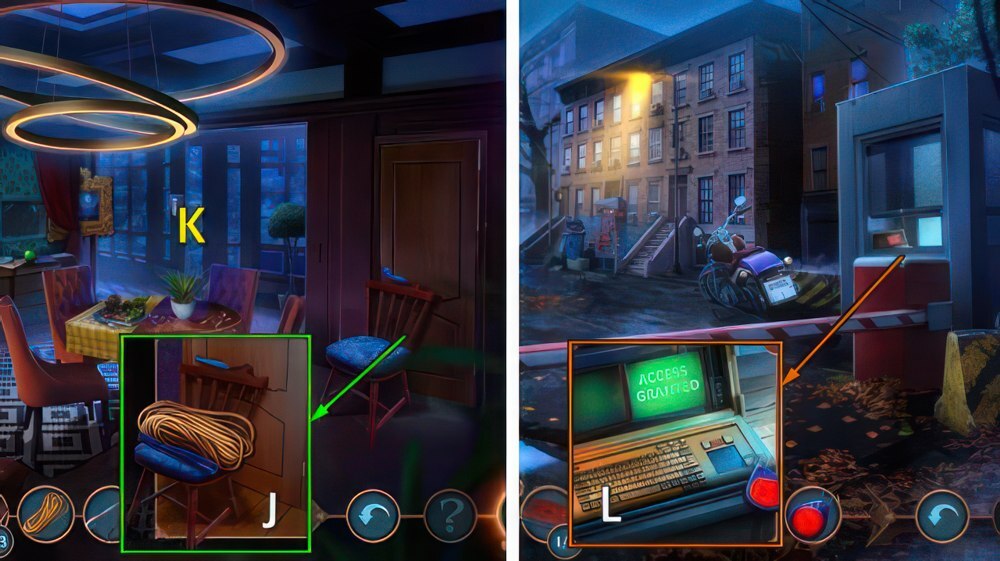
- Take note, take CABLE with NAIL CLIPPERS (J).
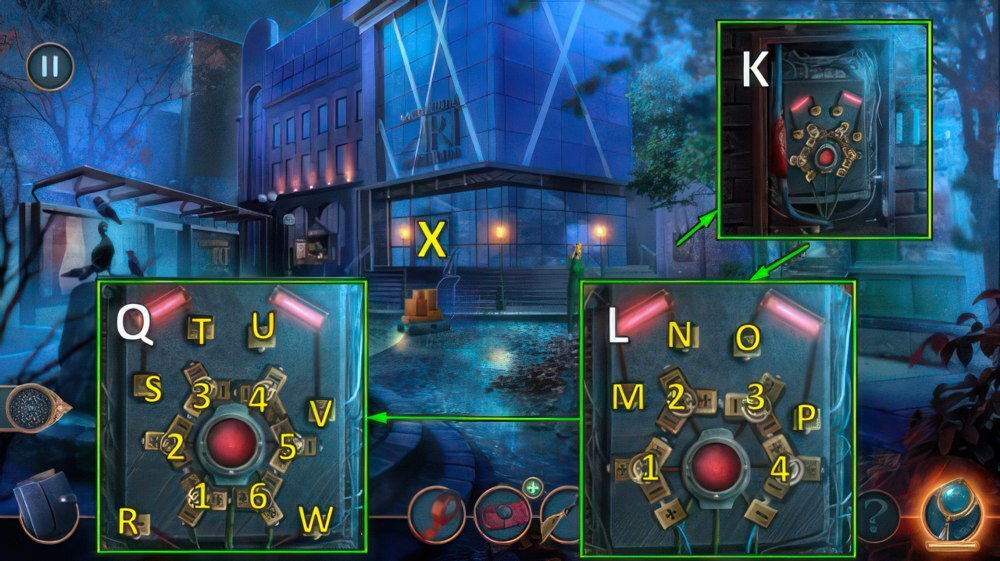
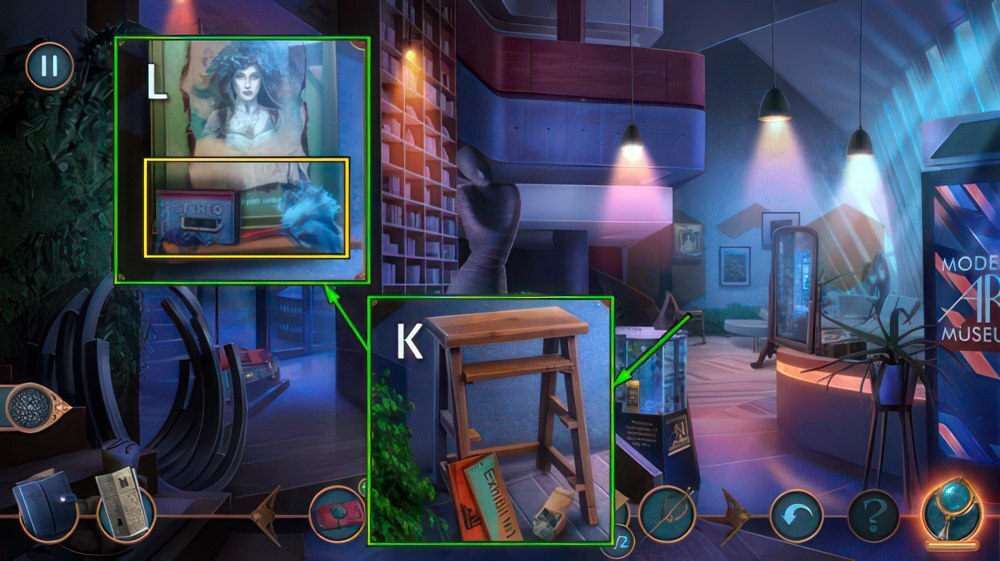
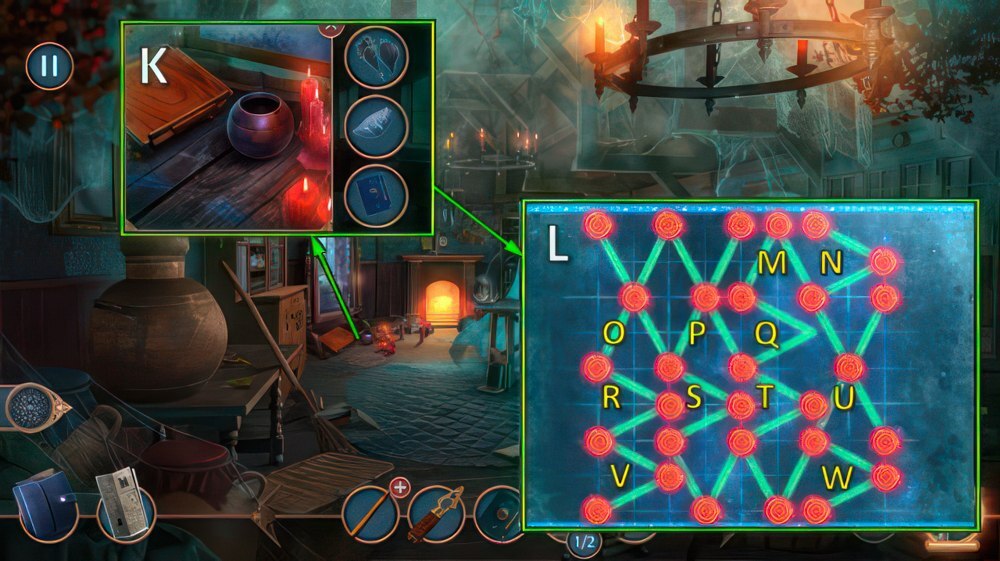
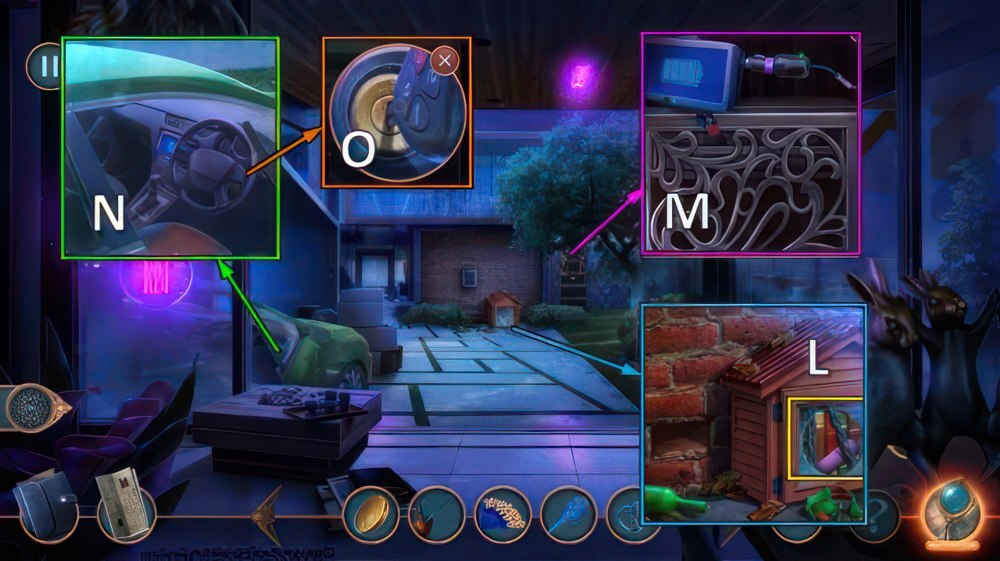
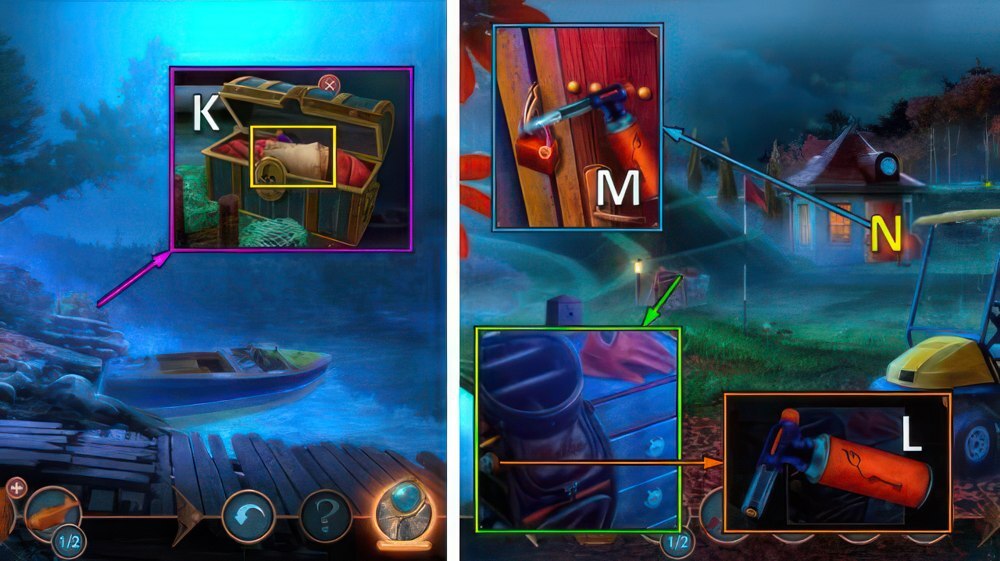
- Use CABLE and DUCT TAPE (K).
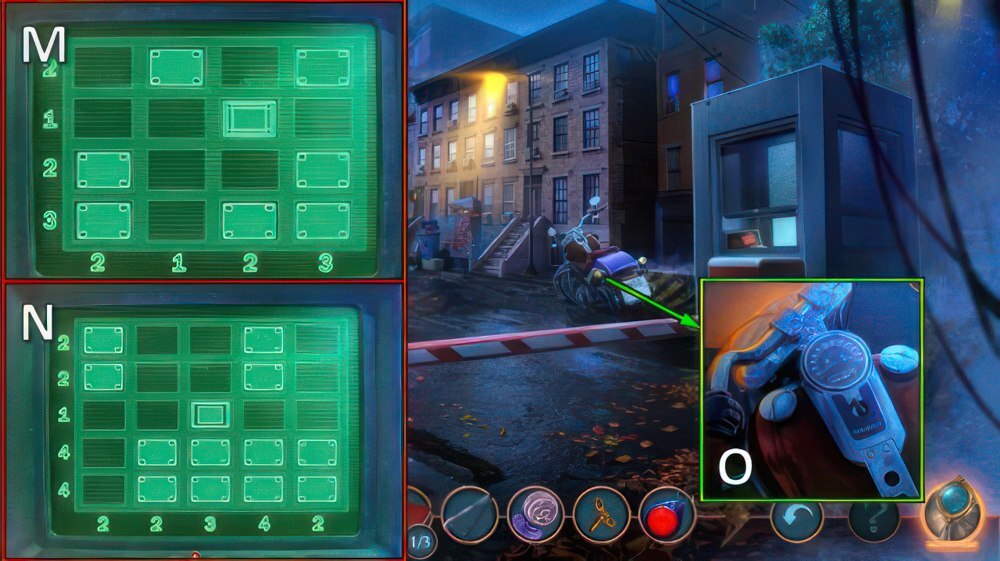
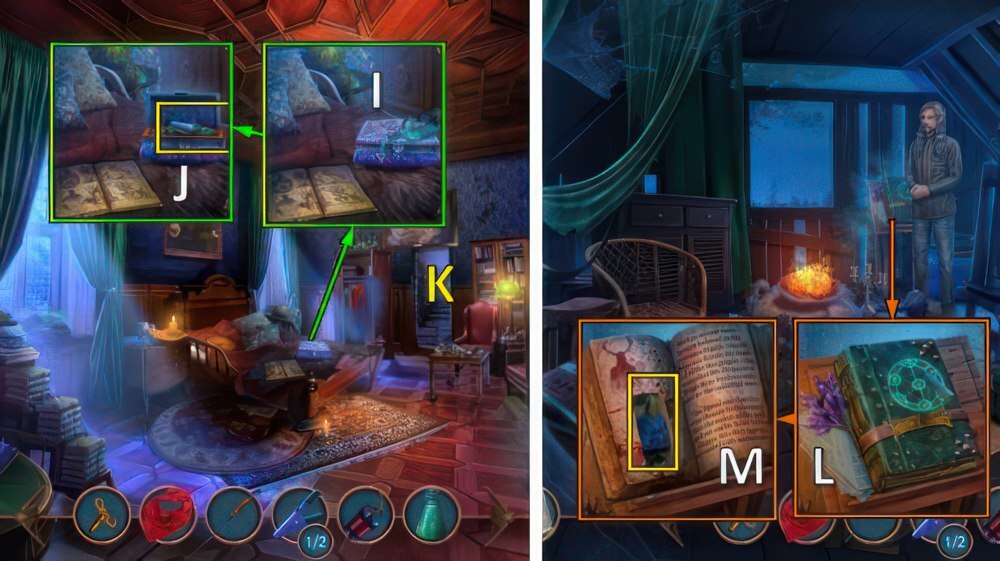
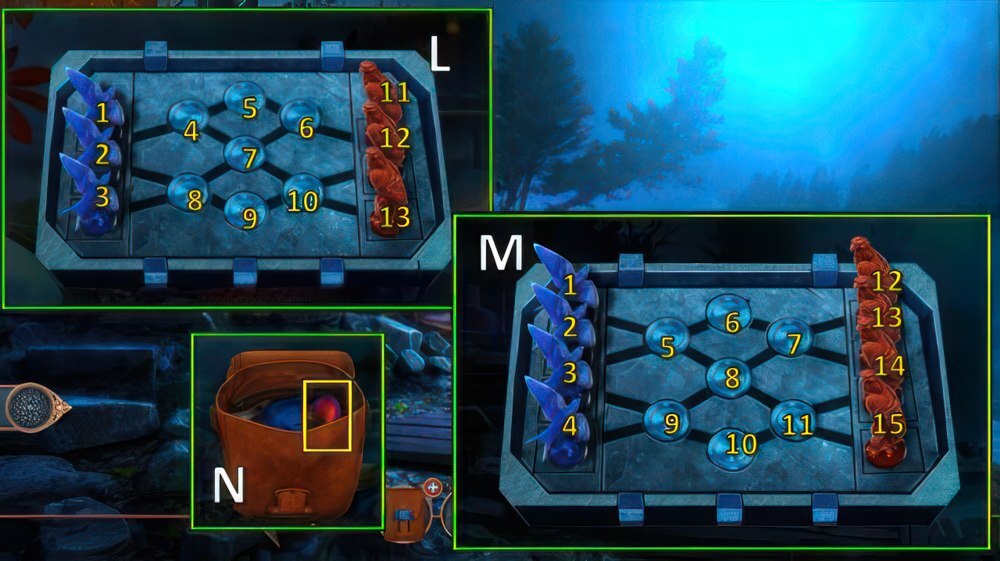
- Easy solution (L): 1-2-2-4-4-(M-1)-(N-2)-(O-3)-(P-4).
- Hard solution (Q): 1-1-2-3-3-5-5-(R-1)-(S-2)-(T-3)-(U-4)-(V-5)-(W-6).
- Receive MUSEUM MAGNET.
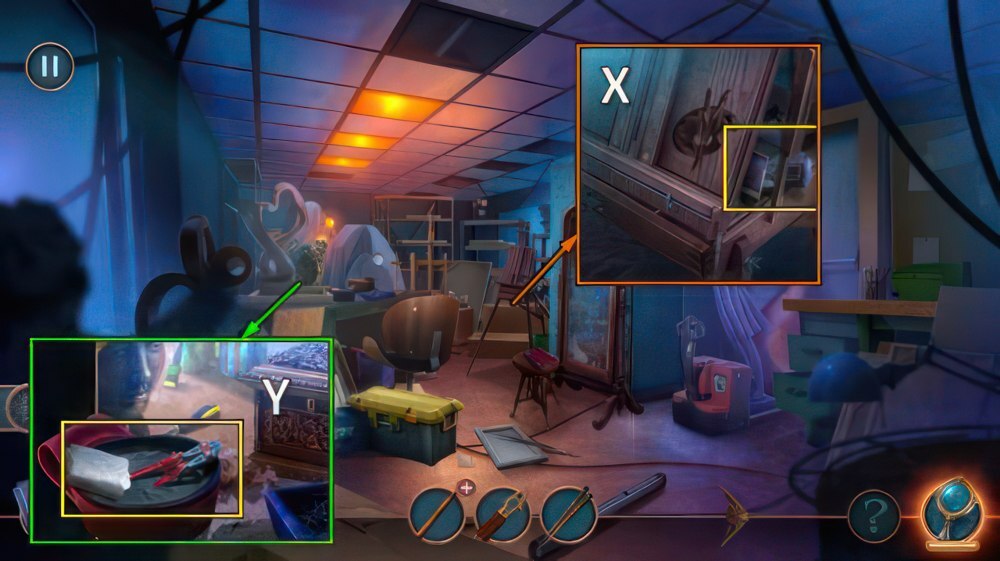
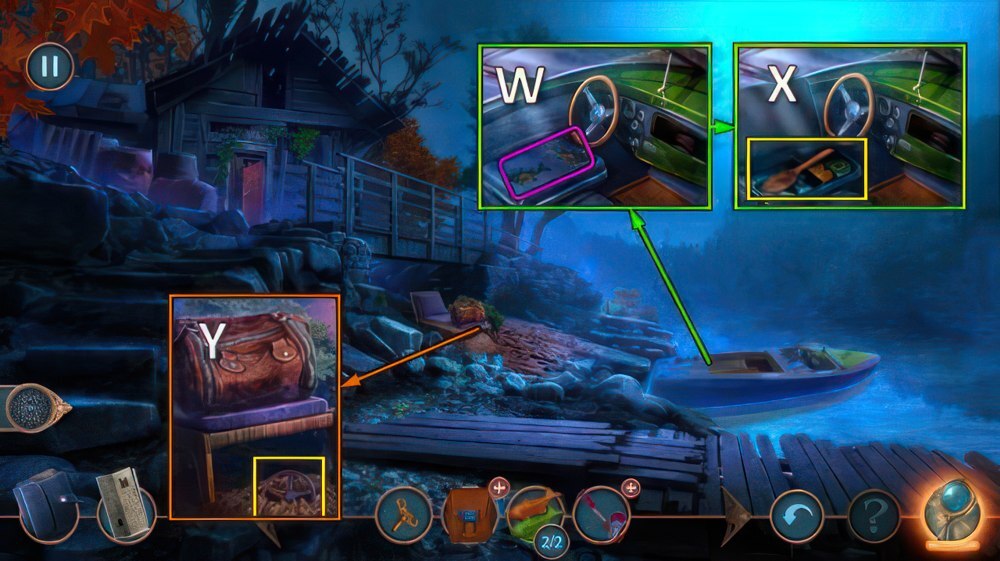
- Go (X).
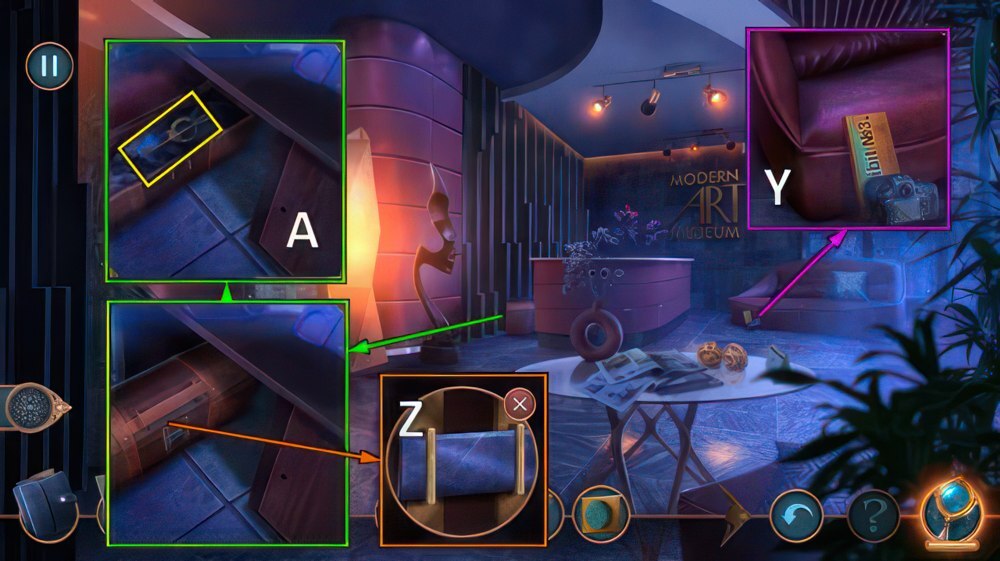
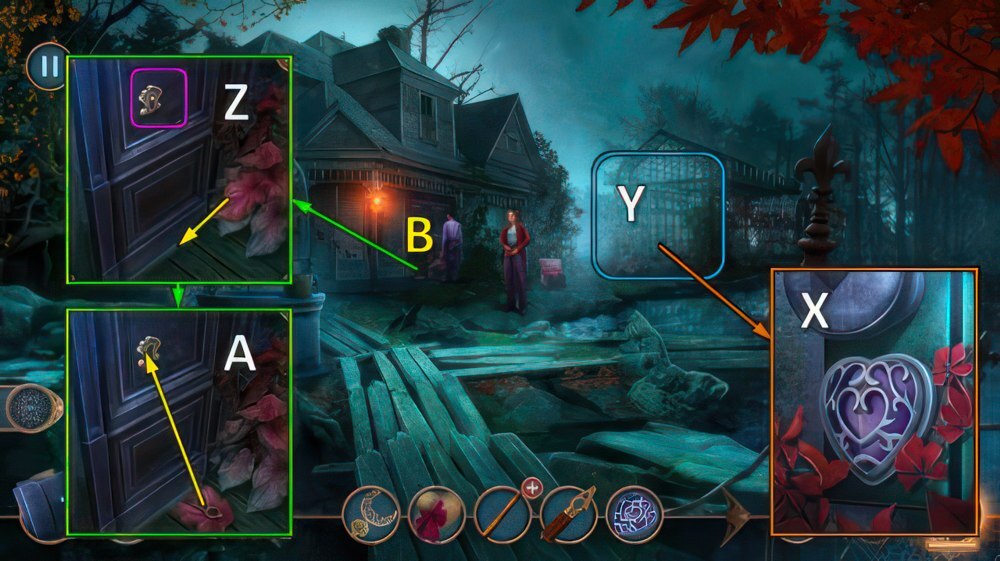
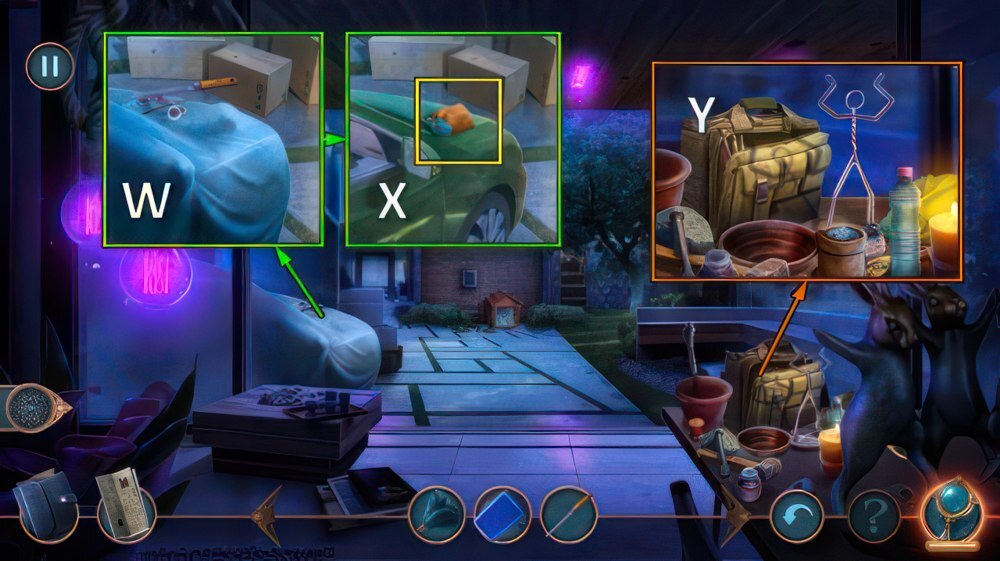
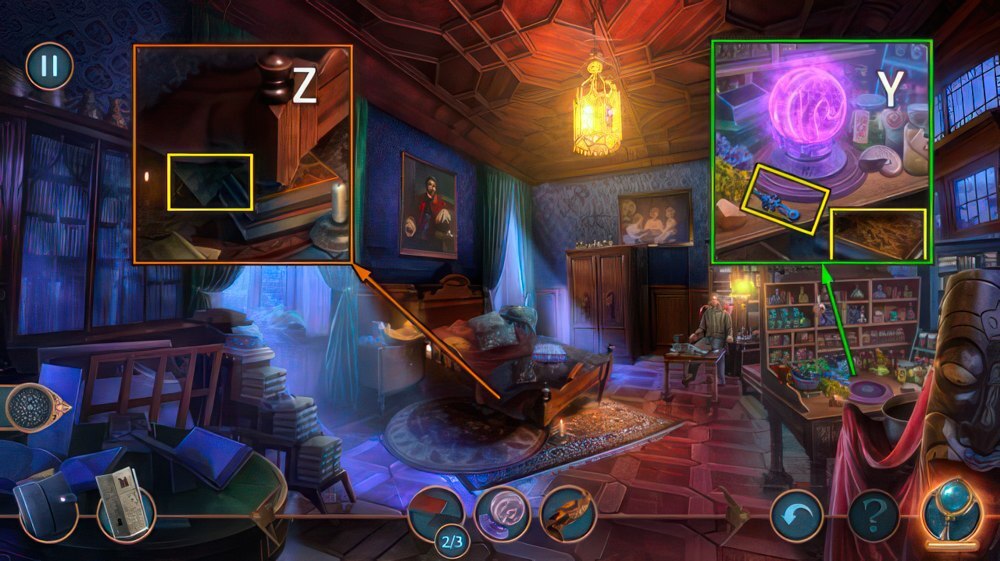
- Take CAMERA and SIGNBOADS 1/2 (Y).
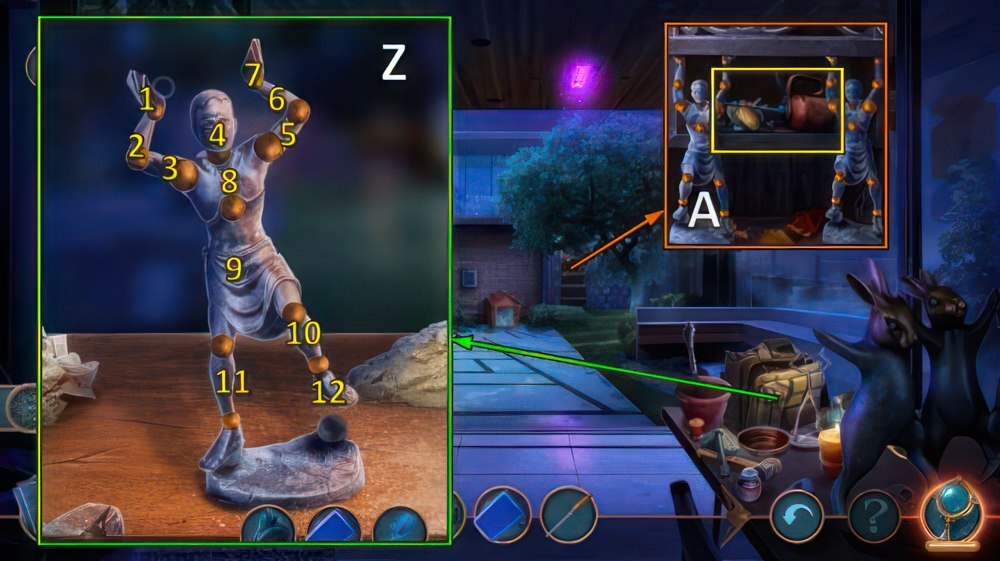
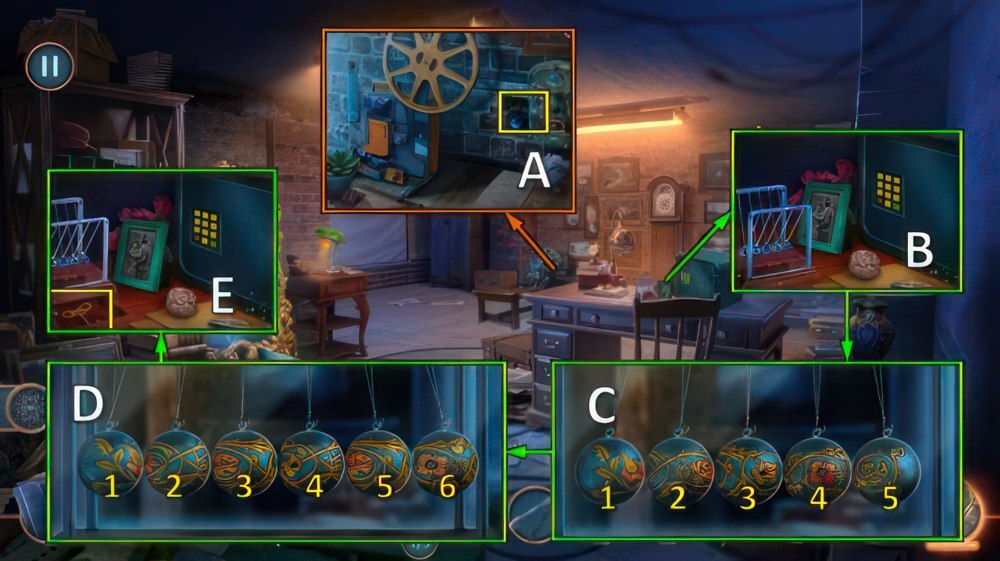
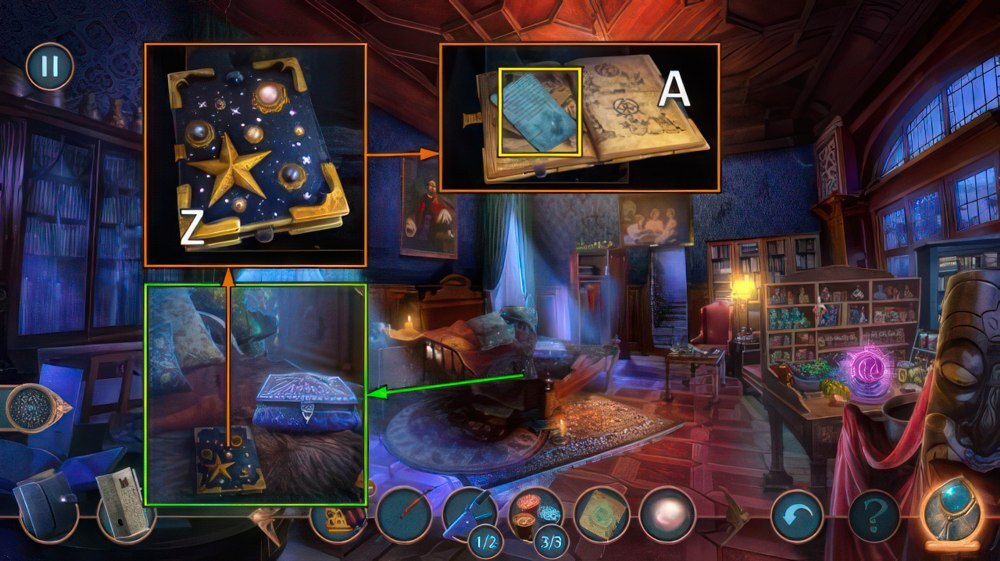
- Use MUSEUM MAGNET (Z), take PIN and FLAT TOKEN (A).
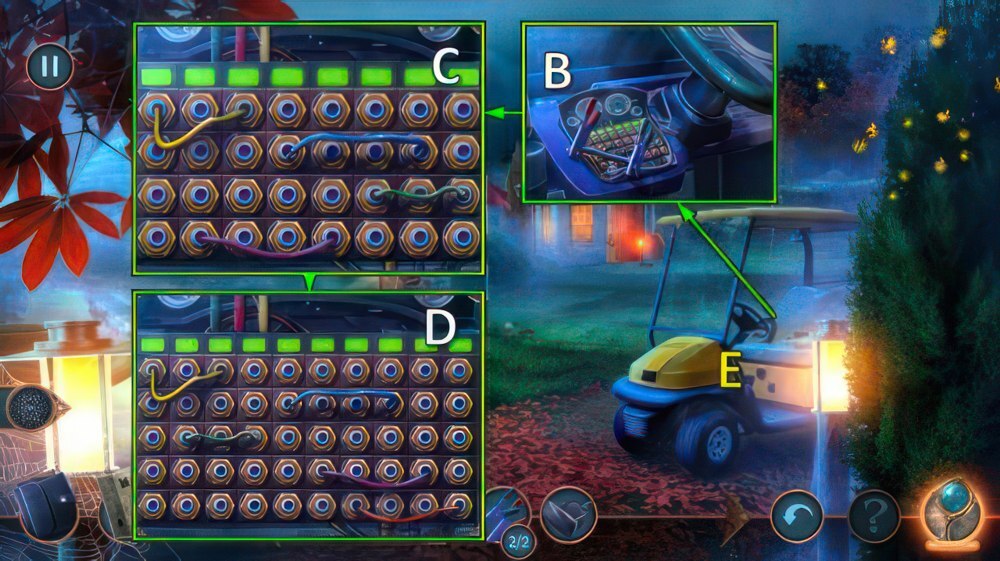
- Use FLAT TOKEN (B).
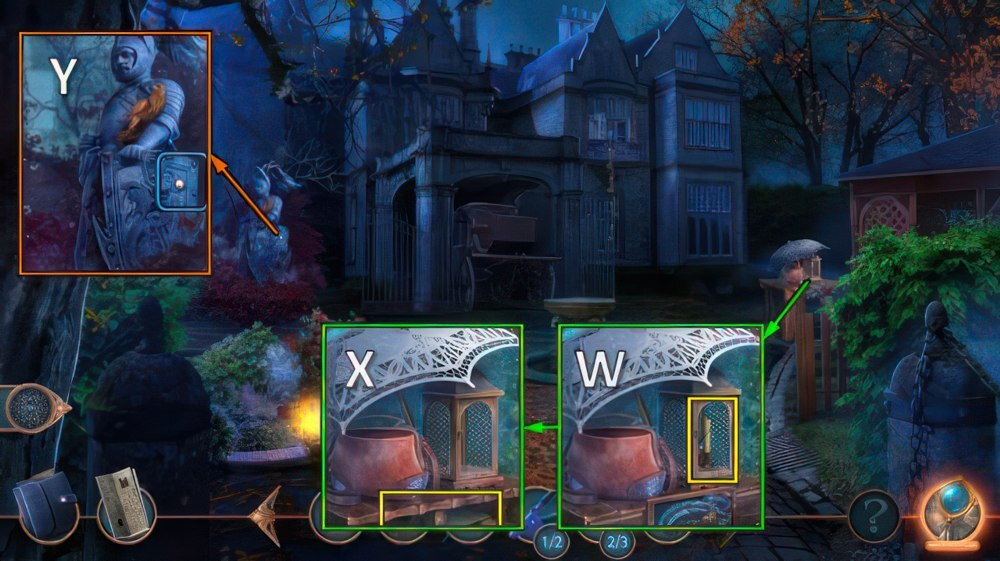
- Place boxes as shown, then select @.
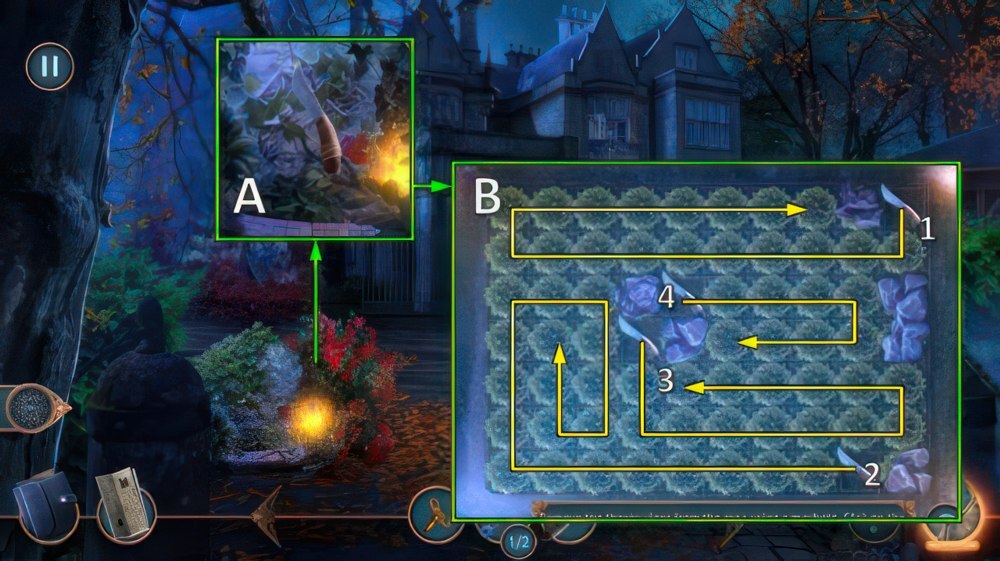
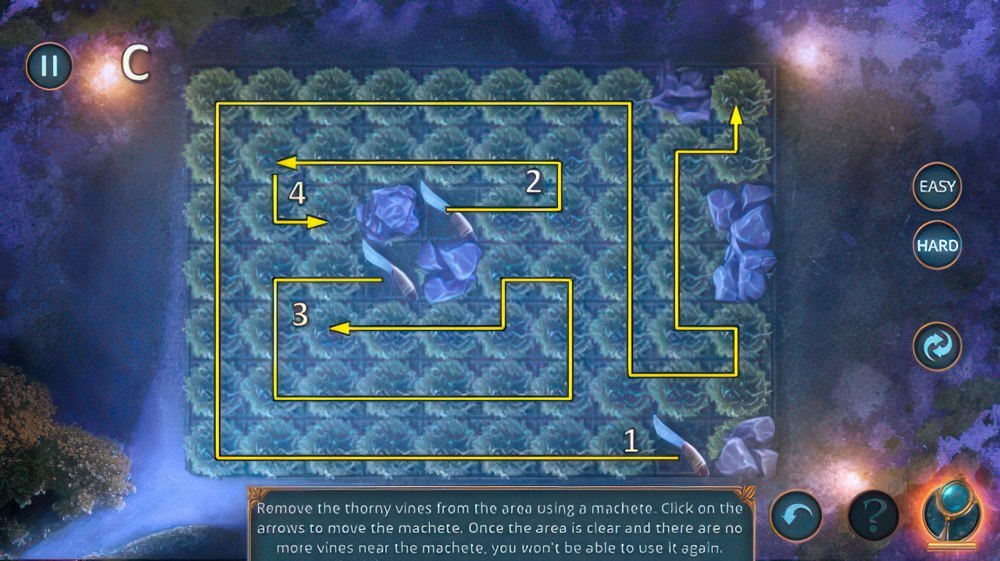
- Easy solution (C-D-E).
- Hard solution (C-D-E-F).
- Go (G).
- Take VALVE and SIGNBOARDS 2/2, use PIN (H).
- Take BATTERIES 1/2 and SECURITY GUARD BADGE (I).
- Use SECURITY GUARD BADGE, take HEAVY STATUETTE (J).
- Place SIGNBOARDS, NAILS and HEAVY STATUETTE (K).
- Take BATTERIES 2/2, FEATHER DUSTER and SMALL BIDENT (L).
- Walk down twice.
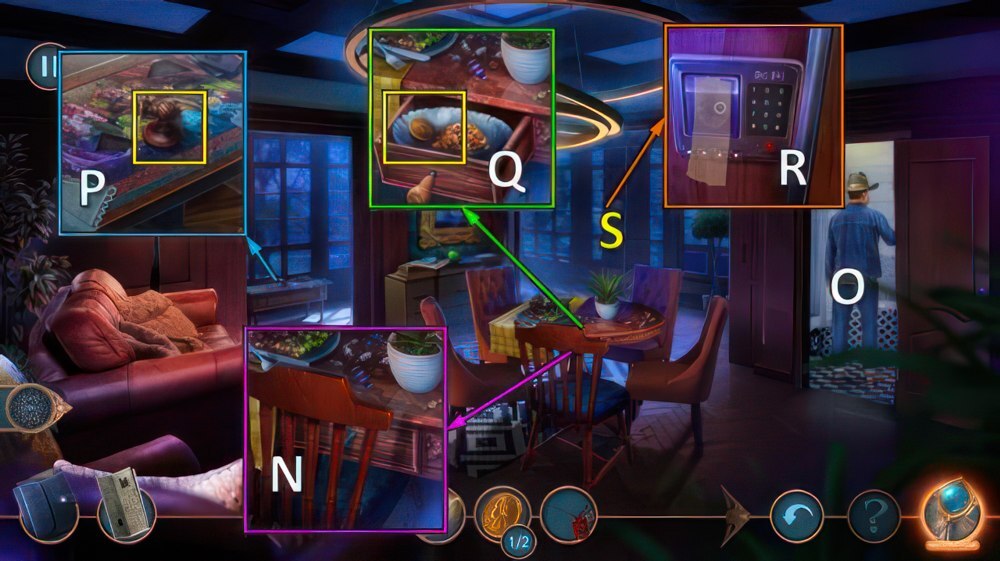
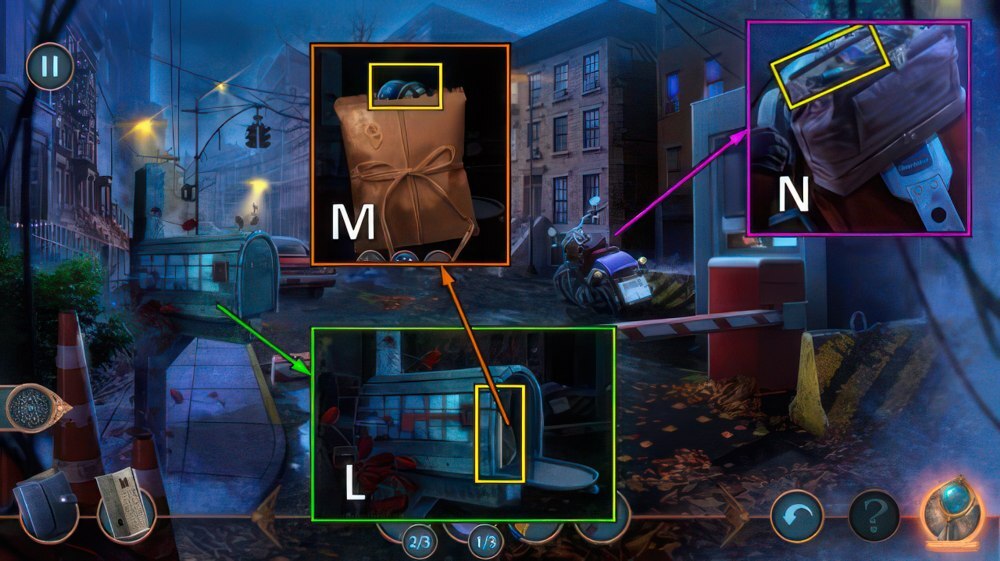
- SMALL BIDENT on WALLET, take MONEY.
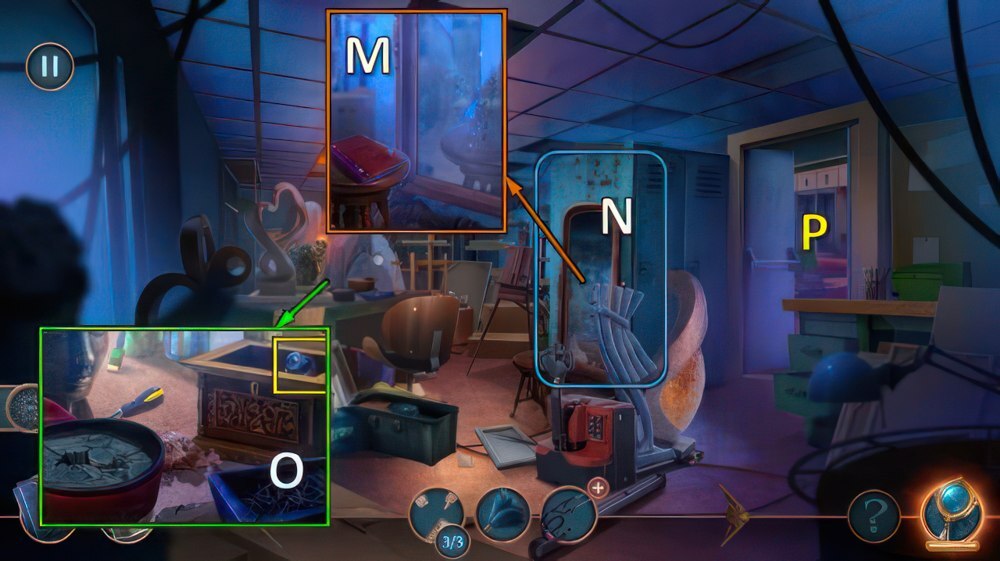
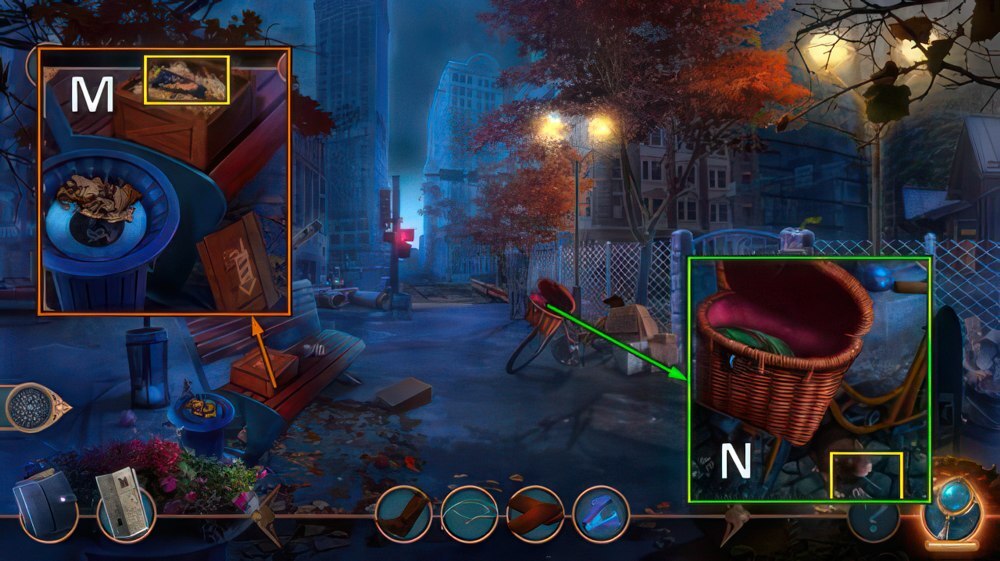
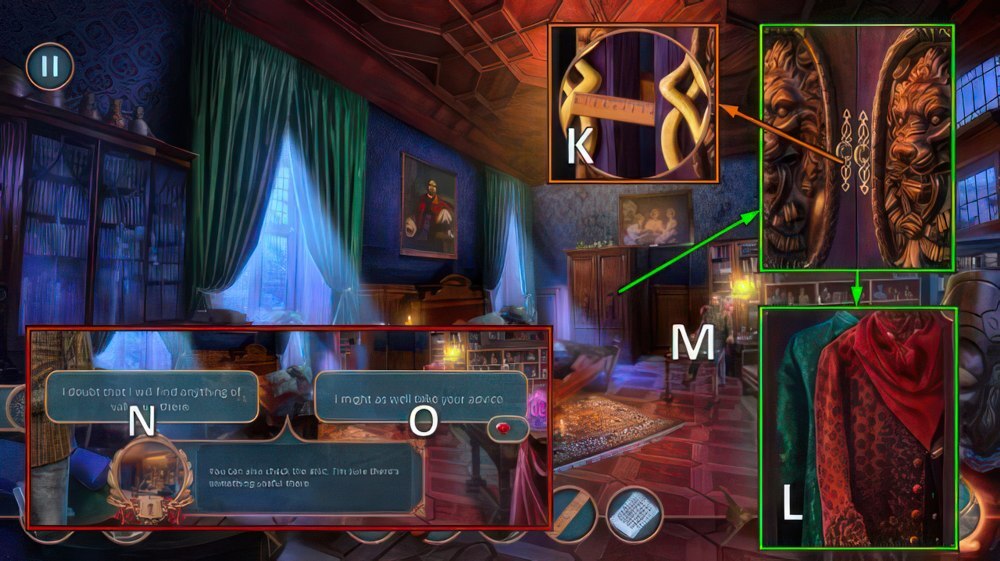
- Offer MONEY (M).
- Play puzzle (N).
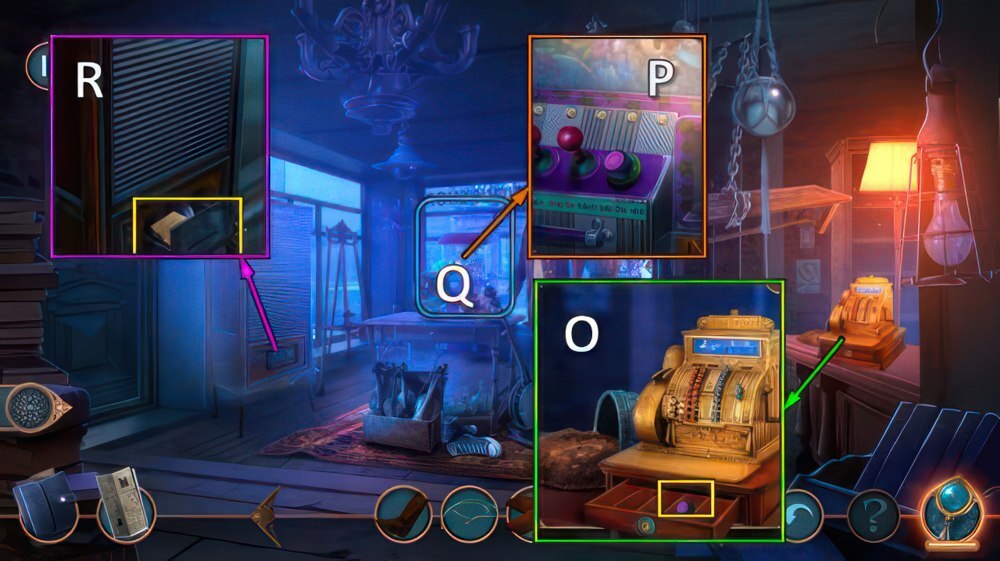
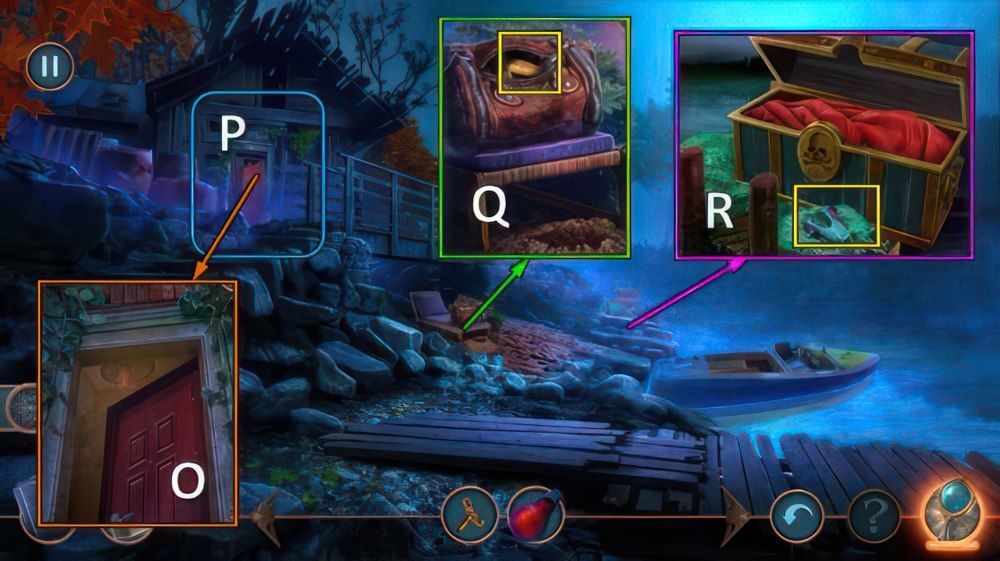
- Take PENNY WHISTLE (O).
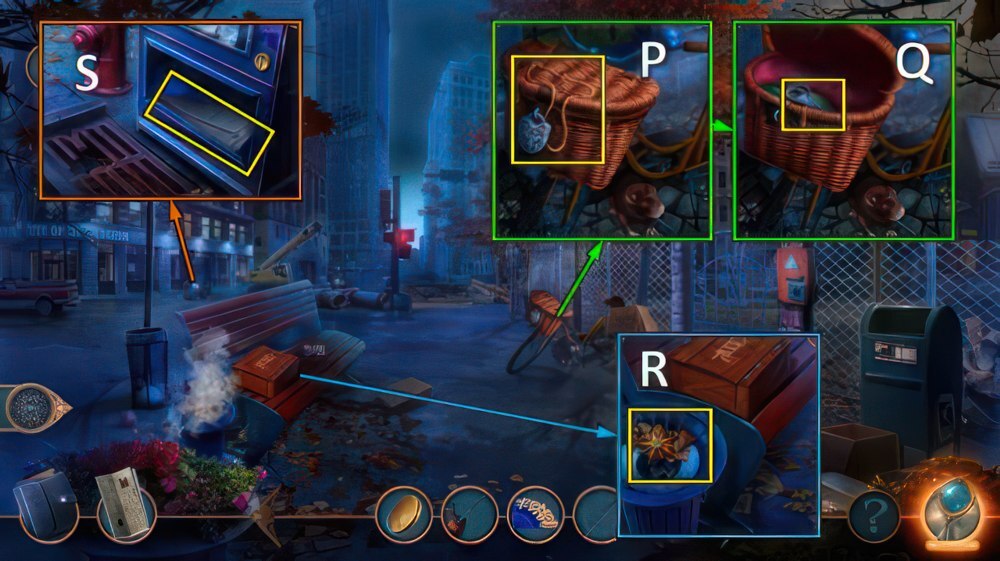
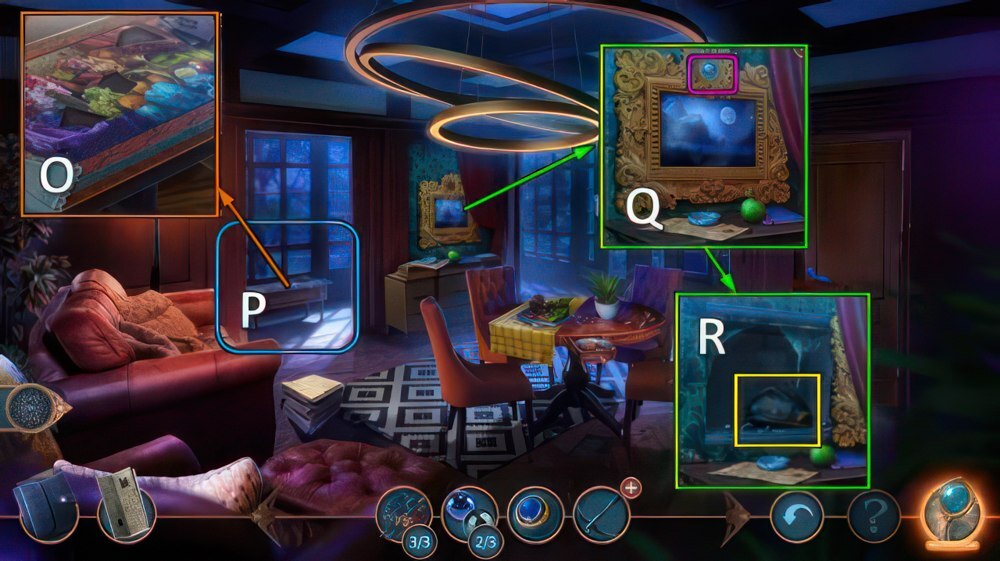
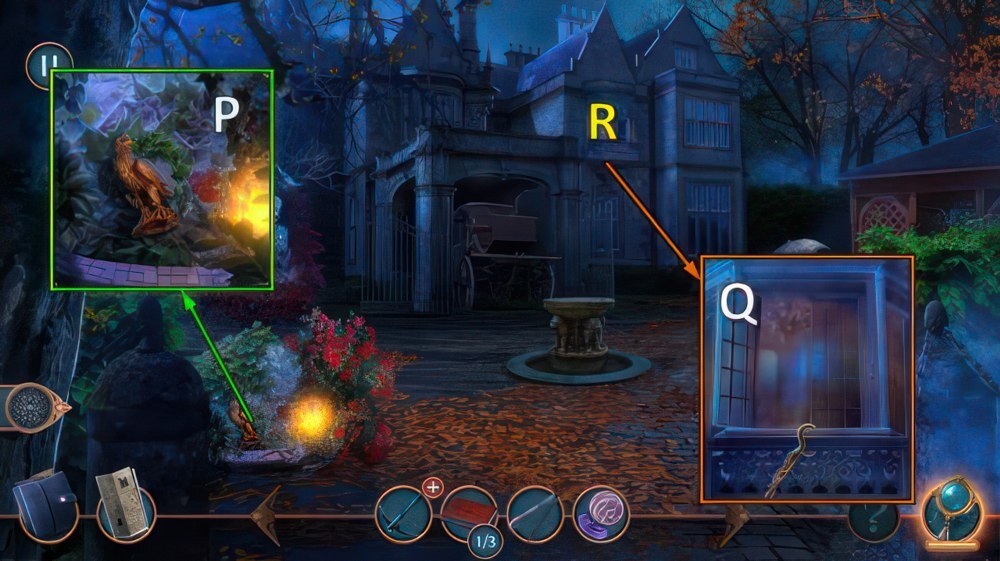
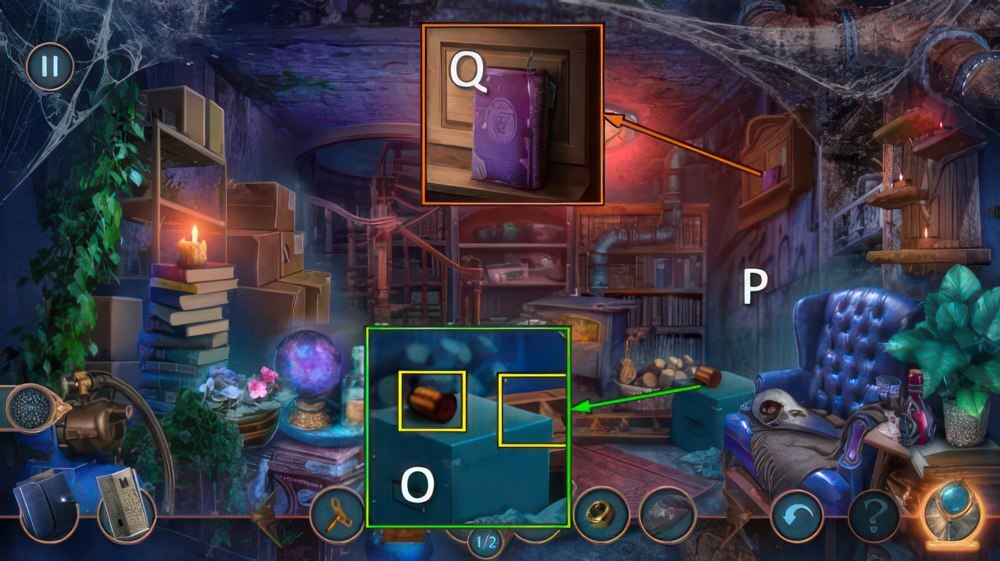
- Place (P) and use (Q) PENNY WHISTLE, take SEAL and THICK BOOK (R).
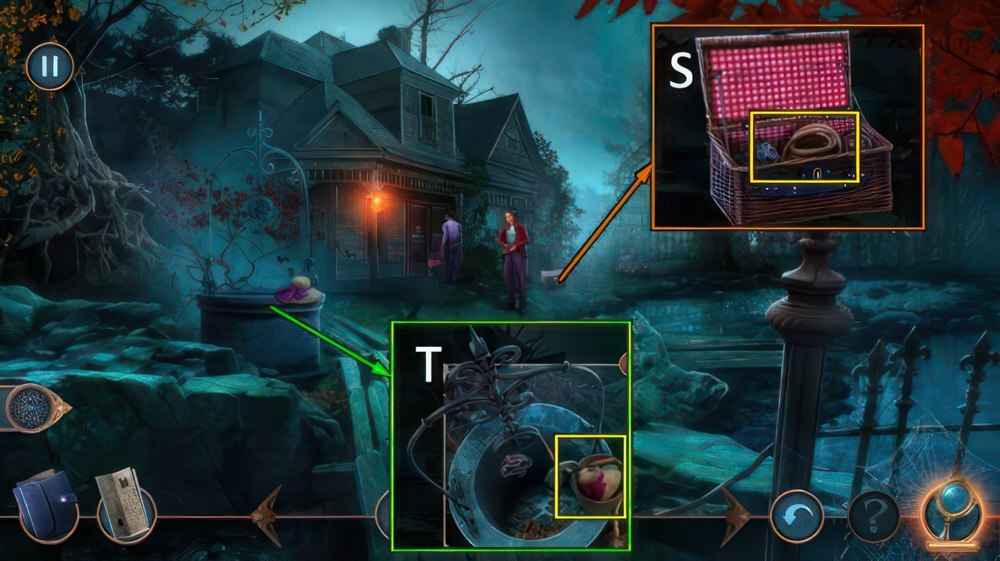
- Go (S).

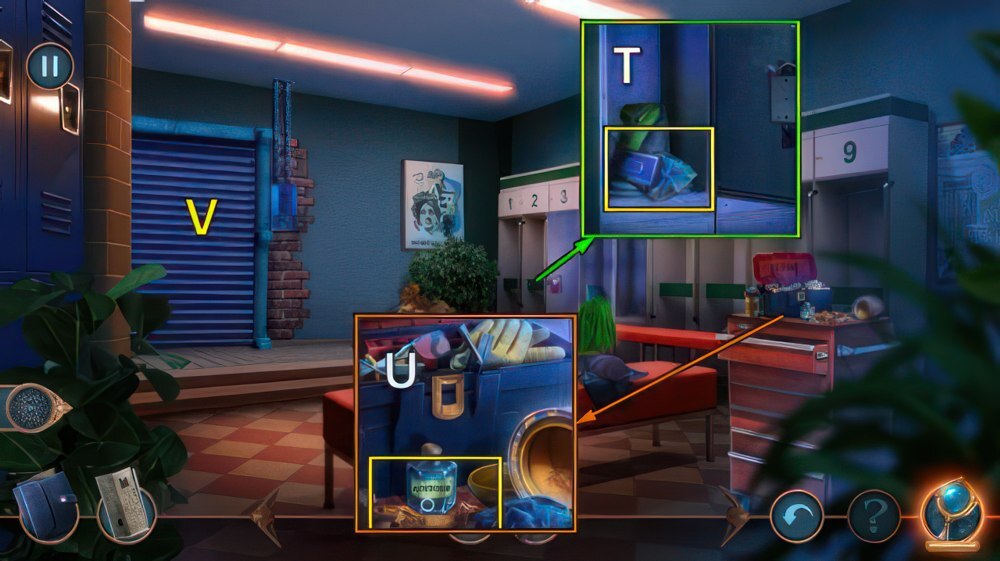
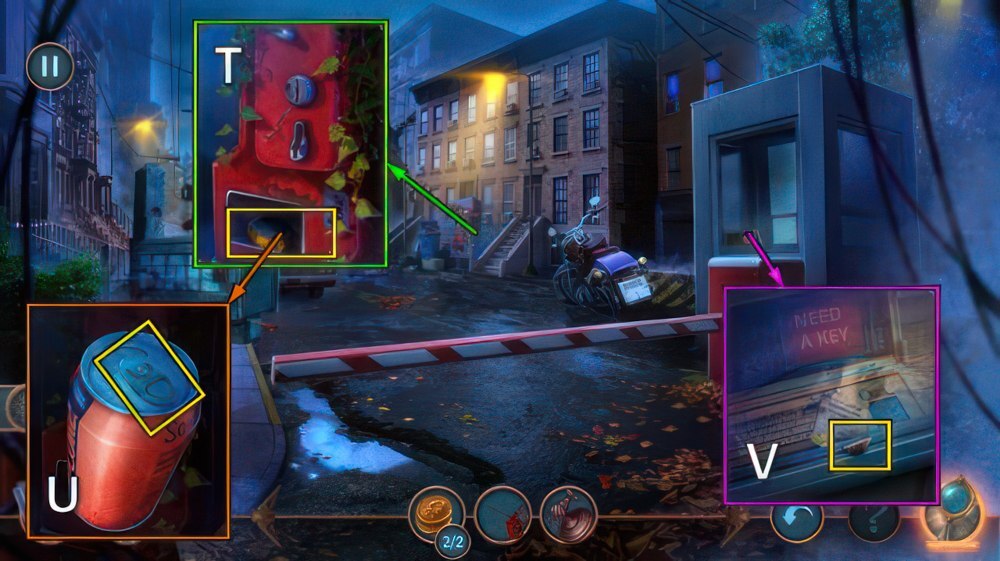
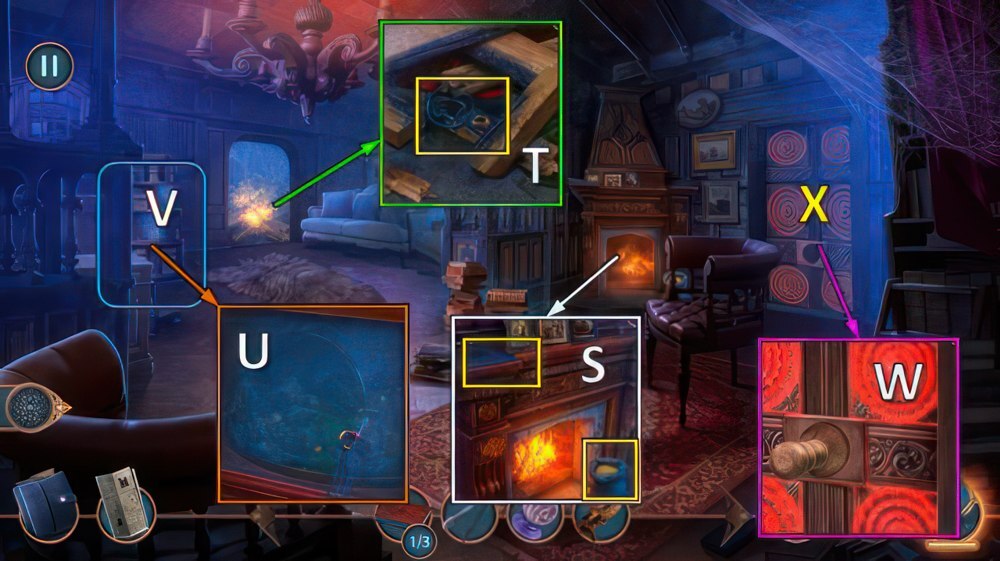
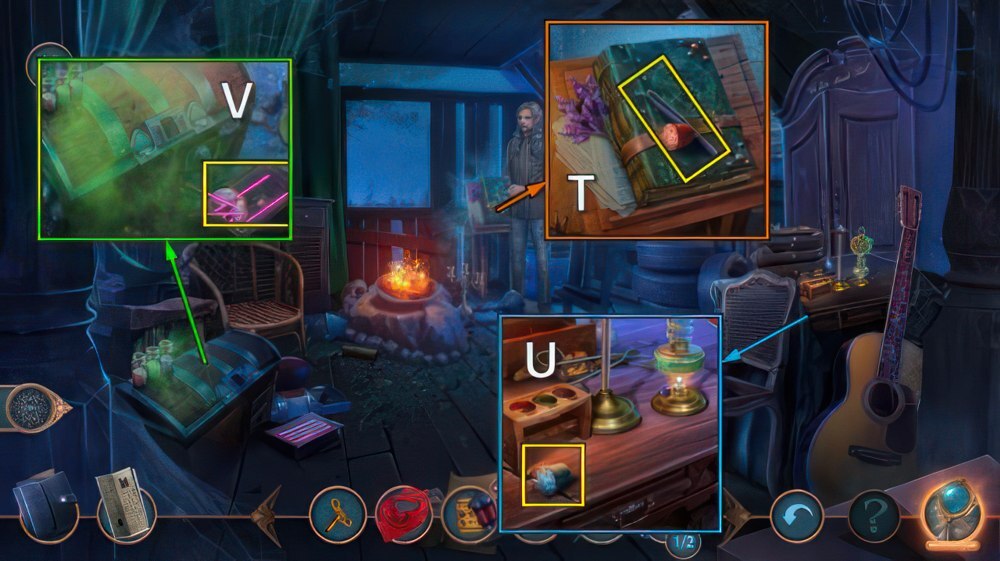
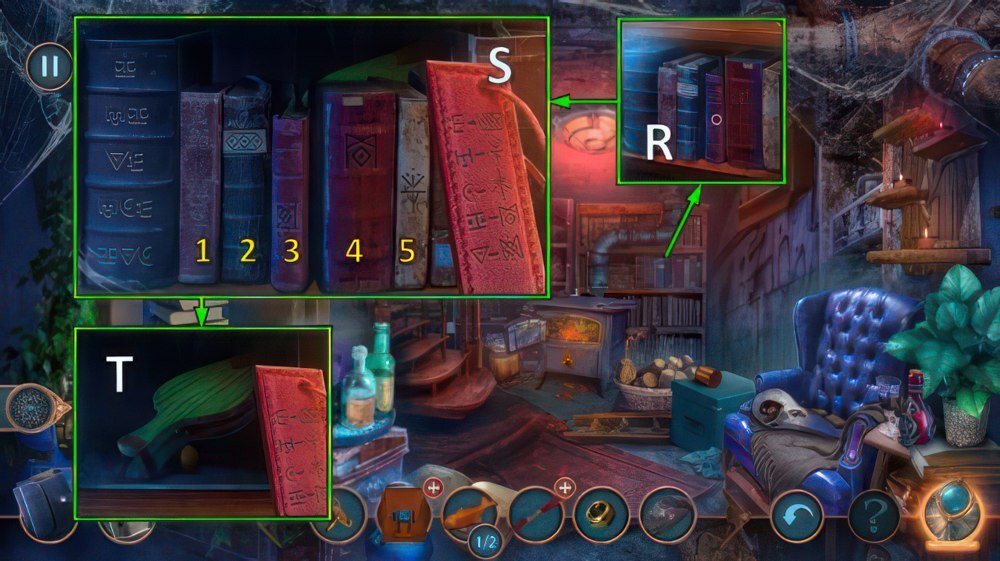
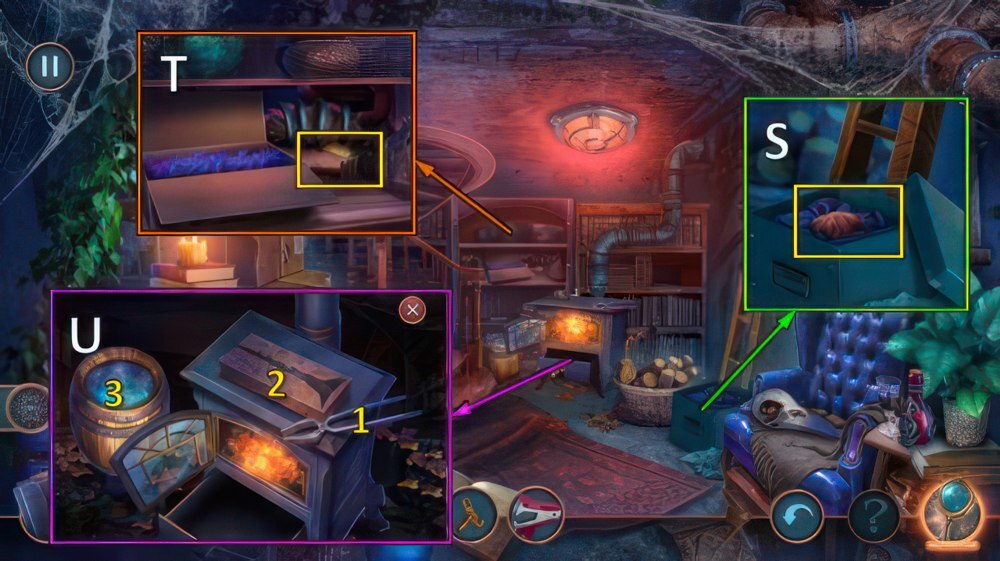
- Place THICK BOOK, take SCISSORS (T).
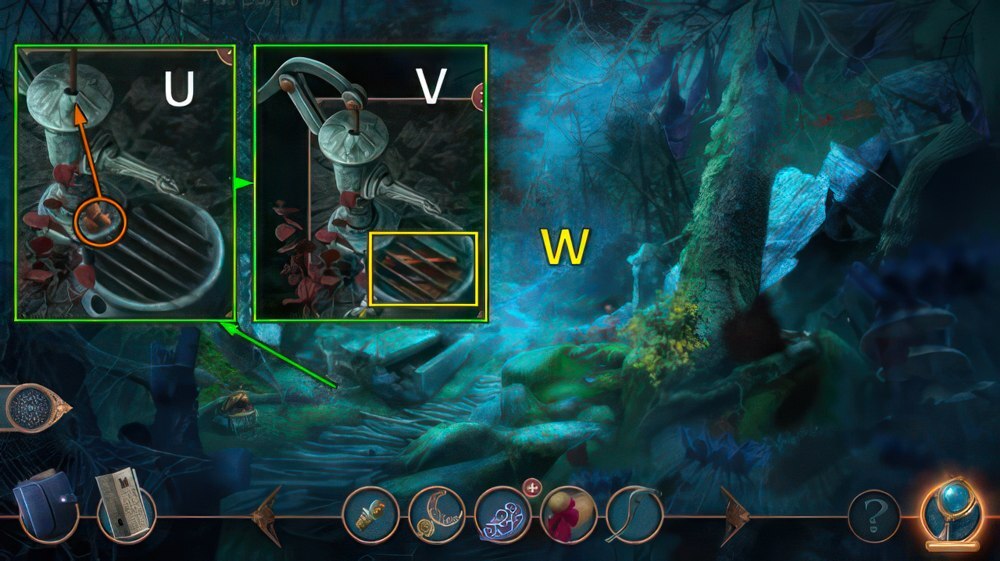
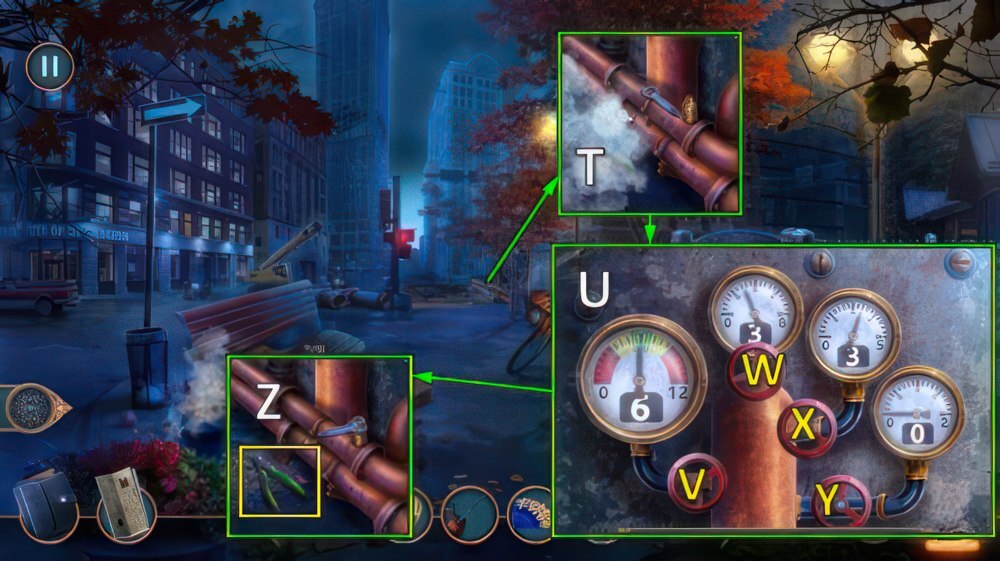
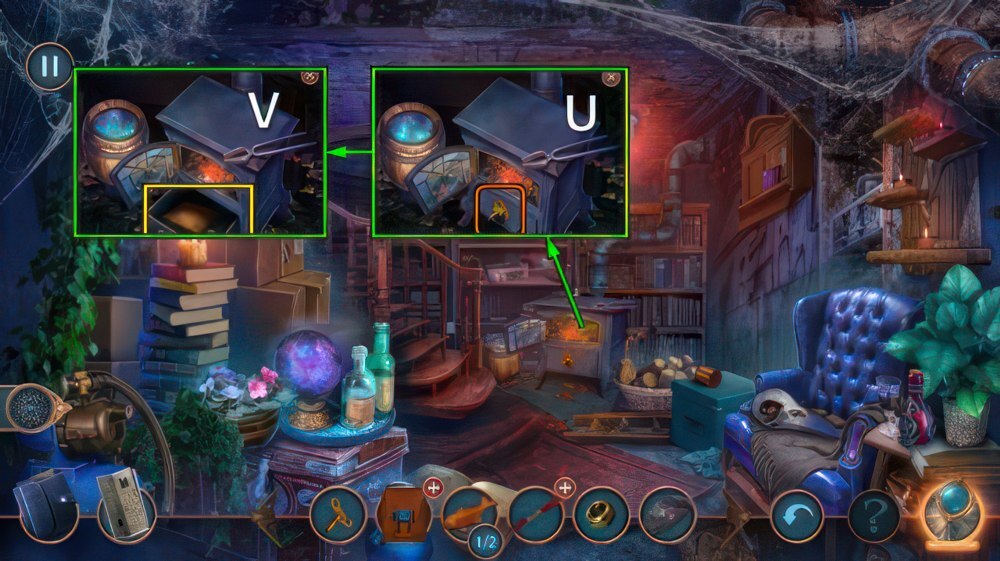
- Use UMBRELLA (U).
- Open, take LENS (V).
- BATTERIES and LENS on CAMERA.
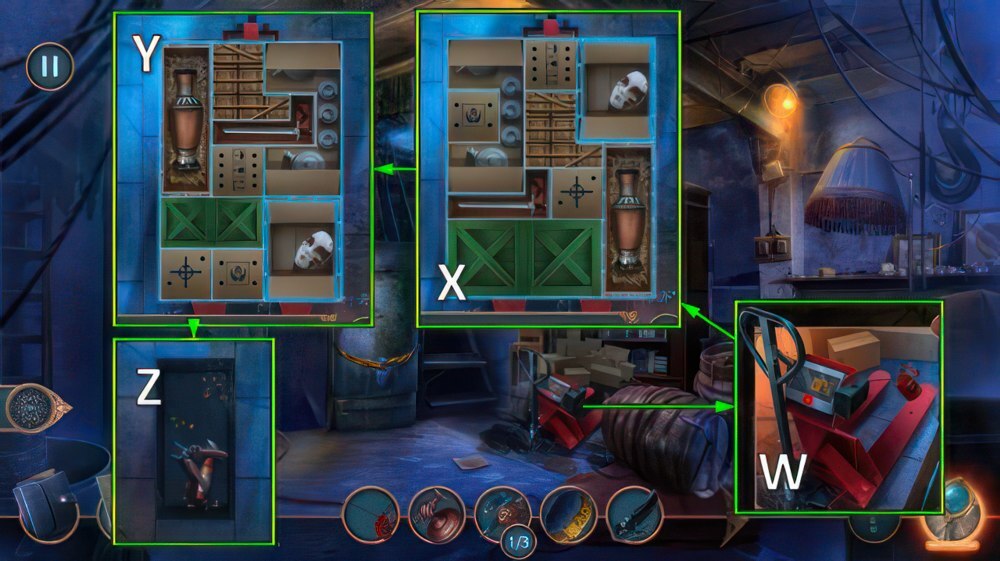
- Use CAMERA (W), receive ENCRYPTED PASSWORD.
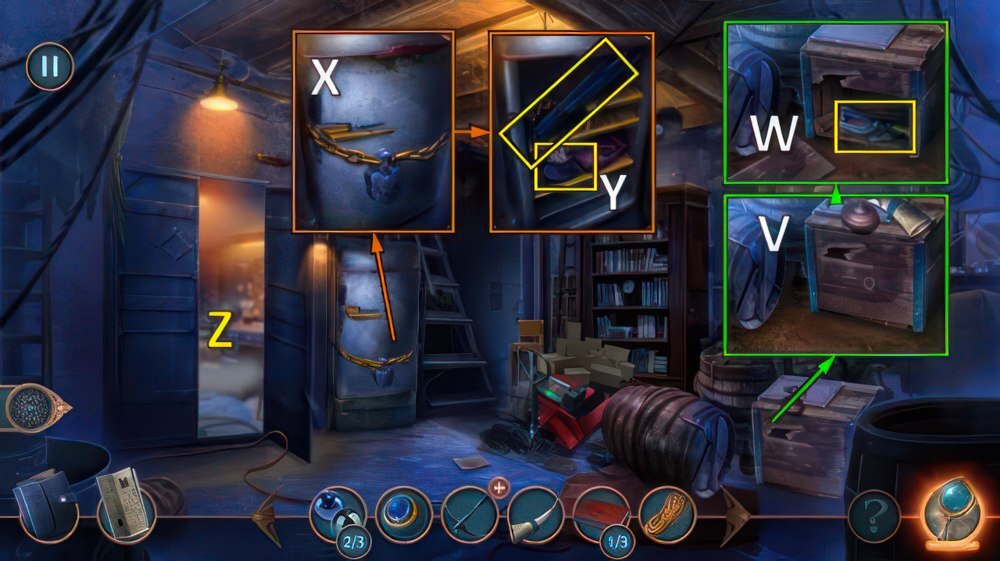
- Go (X).
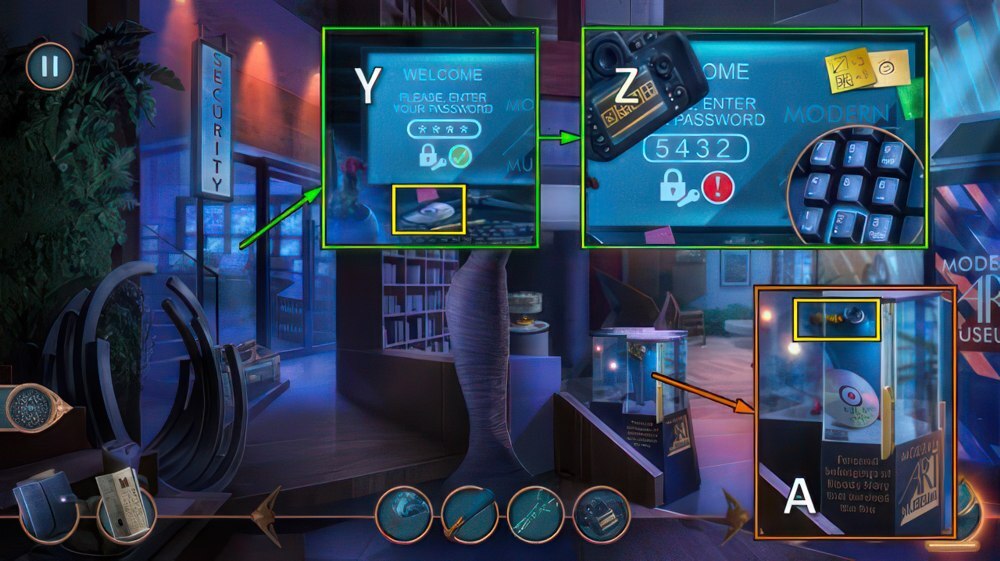
- Place ENCRYPTED PASSWORD (Y).
- Enter 5-4-3-2 (Z).
- Take CD (Y).
- Place CD, take CORK and HEXAGONAL RING (A).
- Walk down twice.

- Move stone, place VALVE and HEXAGONAL RING.
- Take HOOK and CORKSCREW (B).
- Go (C).
- Use CORKSCREW (D).
- Take GLUE.
- Use FEATHER DUSTER, take ZOETROPE PICTURES (E).
- Go (F).
- Place ZOETROPE PICTURES (G).
- Play puzzle (H).
- Take RUNES (I).
- Place RUNES (J), select 3-5-2-1-4.
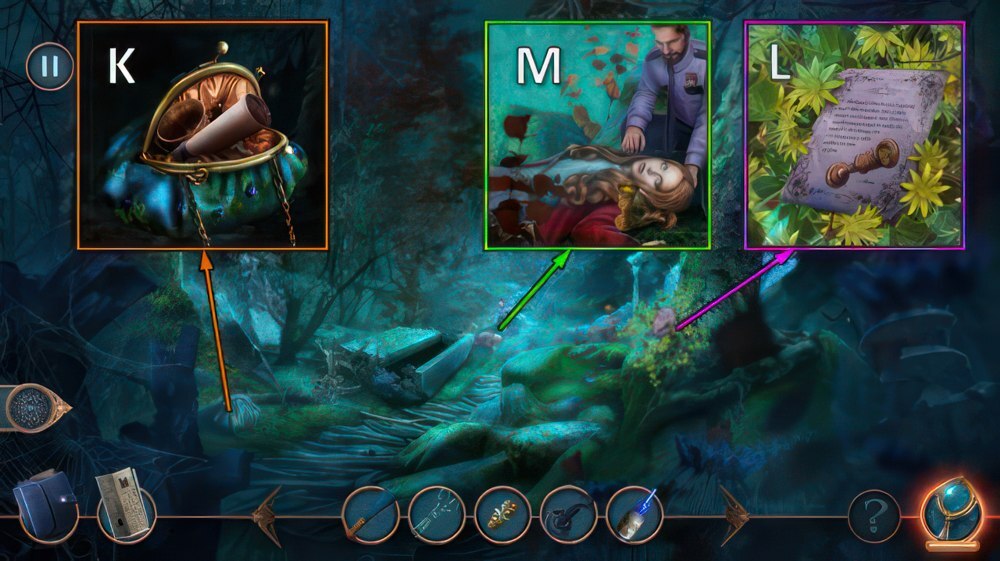
- Open, take note, EARRING and CHALICE (K).
- Take note, take AICHRYSON FLOWERS with SCISSORS (L).
- SEAL and AICHRYSON FLOWERS on CHALICE, receive SMELLY MIXTURE.
- Offer SMELLY MIXTURE (M).
- Receive FLASHLIGHT.

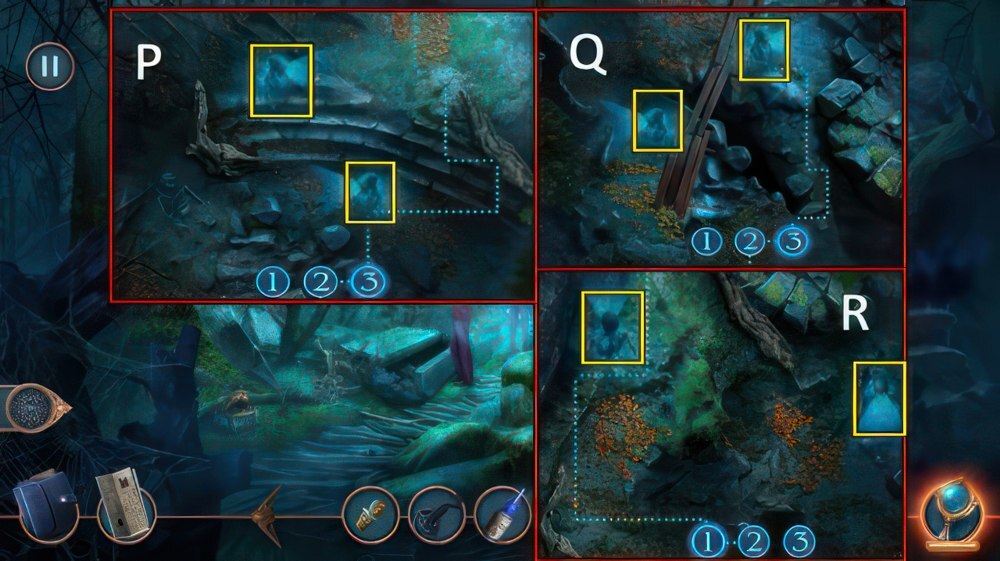
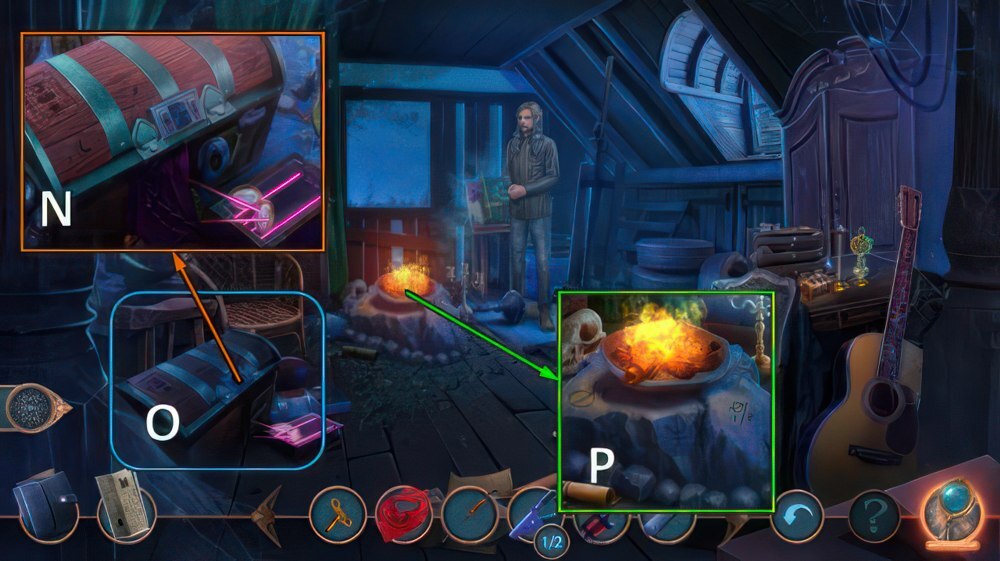
- Use FLASHLIGHT (N).
- Select indicated path when skeletons are as shown.
- Easy solution (O-P-Q).
- Hard solution (O-P-Q-R).
- Walkthrough of the puzzle.
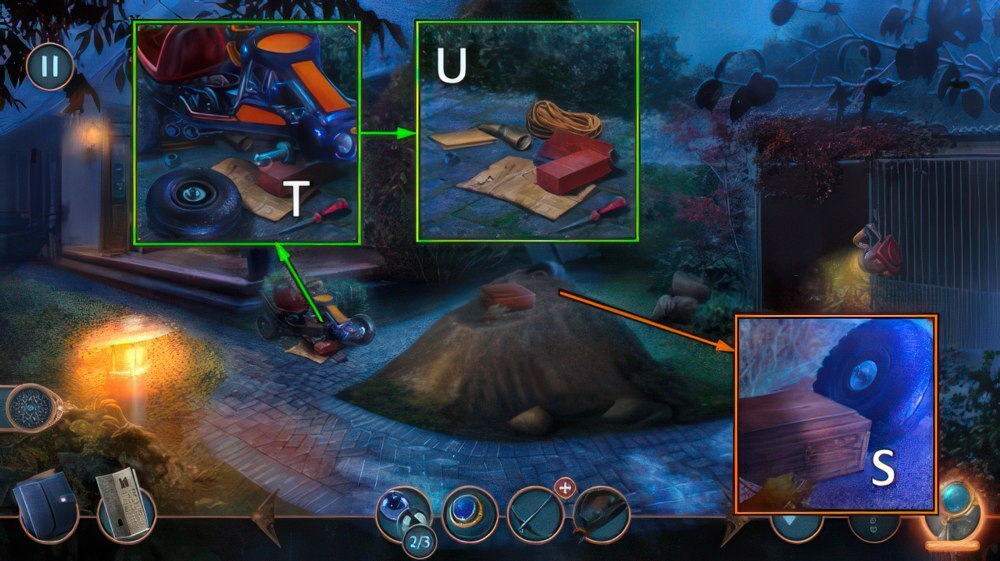
- Take note, open. Take ROPE and BROKEN AMULET (S).
- Use ROPE and HOOK, take HAT and WATER PUMP LEVER (T).
- Walk down.
- Place WATER PUMP LEVER, bolts and CORK (U).
- Take MALLET, NUTCRACKER and AMULET PART (V).
- Go (W).
- GLUE and AMULET PART on BROKEN AMULET, receive HEART AMULET.
- Place HEART AMULET (X).
- Play puzzle (Y), receive ROSE.
- Move leaf, use ROSE (Z). Move and use key (A).
- Go (B).
- Use HAT, take RULER (C).
- Use EARRING, take note and MARY’S DIARY (D).
- Take HERBS 1/2 (E), use RULER (F).
- Take SMALL BELT (G).
- Take CHALK, use SMALL BELT (H). Take RUBY (I).
- Place RUBY, take CHOPSTICKS and HERBS 2/2 (J).
- Place HERBS, CHALK and MARY’S DIARY (K).
- Easy solution (L): Mx2-Nx3-Ox2-Px2-Qx3-Rx3-Sx3-Tx3-Ux2-Vx3-Wx3.
- Hard solution: place figures as shown (L).
- Take CAROLINA’S CARD and CHISEL (X).
- CHISEL on MALLET.
- Take PARAFFIN, use MALLET.
- Take BOLT CUTTER (Y).
- Use BOLT CUTTER (Z).
- Take SPELL FRAGMENTS 1/3 and PALLET JACK WHEEL (A).
- Place PALLET JACK WHEEL and NUTCRACKER (B).
- Go (C).
- Take MAGNET, take SPELL FRAGMENTS 2/3 with CHOPSTICKS (D).
- Use MAGNET, take DUSTER (E).
- Take GEARS 1/2 with CAROLINA’S CARD (F).
- Take ACETONE and GEARS 2/2 (G).
- Place GEARS (H).
- Go (I).
- Take WATER (J).
- Use PARAFFIN, take SPATULA (K).
- Use SPATULA, take SPELL FRAGMENTS 3/3 and BROKEN STETHOSCOPE (L).
- Walk down twice.
- Take notebook, place SPELL FRAGMENTS (M).
- Play puzzle (N), receive KEY.
- Use KEY, take STETHOSCOPE PART (O).
- Go (P).
- STETHOSCOPE PART on BROKEN STETHOSCOPE, receive STETHOSCOPE.
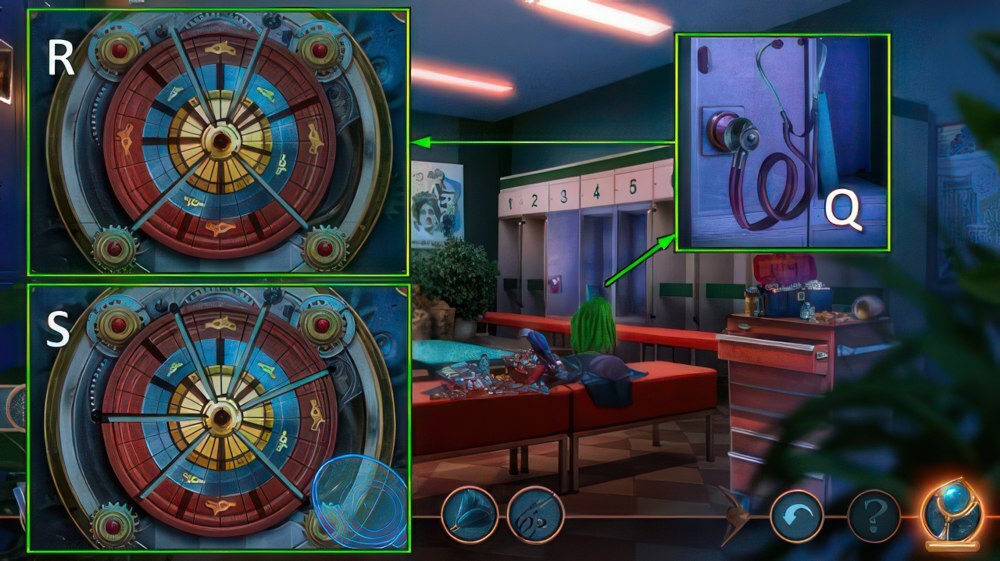
- Use STETHOSCOPE (Q).
- Easy solution (R).
- Hard solution (S).
- Take DEAD NAVIGATION DEVICE and CLOTH (T).
- Use ACETONE and CLOTH, take FILE (U).
- Go (V).
- Use FILE (W), take SCOOP and GYPSUM (X).
- Place WATER and GYPSUM (Y).
- Solution (Z): 1-1-1-2-3-4-5-5-6-6-6-6-6-7-8-9-10-11-12.
- Receive ATLAS.
- Place ATLAS, take COIN and OIL CAN.
- Use DUSTER, take PALETTE INLAY (A).
- Walk down twice.
- Place PALETTE INLAY, take FAN and KEY CARD (B).
- Use KEY CARD (C).
- Easy solution (D).
- Hard solution (E).
- Take CAR KEYS and NAIL CLIPPER (F).
- Go (G).
- Use SCOOP and NAIL CLIPPER (H), receive SEEDS.
- Offer SEEDS (I).
- Play puzzle (J), receive DIAMOND RING.
- Go (K).
- Use DIAMOND RING, take NECKLACE and PATCH (L).
- Place DEAD NAVIGATION DEVICE and PATCH, take NAVIGATION DEVICE (M).
- Open. Place NAVIGATION DEVICE (N) and CAR KEYS (O).
- Take BOOK AMULET PART 1/2, use OIL CAN (P).
- Receive SMALL LOCK.
- Take BOTTLE OPENER (Q).
- Use FAN, take STAR (R).
- Use COIN, take NEWSPAPER and NUT (S).
- Place NUT and BOTTLE OPENER (T).
- Easy solution (U): V-Wx2-Xx2-Yx2-V.
- Hard solution (U): V-W-V-X-W-Xx2-V.
- Take RUBBERIZED WIRE CUTTERS (Z).

- Place STAR (A), use RUBBERIZED WIRE CUTTERS (B).
- Go (C).
- Take BOOK AMULET PART 2/2 and TORN BASEBALL GLOVE (D).
- Place BOOK AMULET PART, take note and TWEEZERS (E).
- Move mat: use NEWSPAPER and TWEEZERS (F).
- Go (G).
- Place NECKLACE and SMALL LOCK (H).
- Easy solution (I): 3-(move chip 3-5)-5-5-(5-8)-8-8-(10-9)-10(8-12)10-(9-10)-10.
- (10-8)-8-(8-5)-5-(5-1)-3-(2-3)-3-(3-5)-5-5-(5-8)-8-8-(8-12)-10-(11-10)-10-(10-8).
- 8-(8-5)-5-(5-1).
- Hard solution (I): 6-(6-7)-6-(3-4)-5-5-(8-5)-5-3-(5-1)-(10-9)-3-(2-3)-3-(3-5)-5-5.
- (5-8)-8-8-10-(8-12)-10-(9-10)-10-(10-8)-8-(8-5)-5-(5-1)-3-(4-3)-3-(3-5)-5-5-(5-8).
- 8-8-(8-12)-10-(11-10)-10-(10-8)-8-(8-5)-5-(5-1)-6-(7-6)-6-(6-8)-8-8-(8-12).
- Take note, BOARDS and SEWING KIT (J).
- SEWING KIT on TORN BASEBALL GLOVE, receive GLOVE.
- Take SHOE, WIRES and note (K). Use GLOVE, take STAPLE REMOVER (L).
- Walk down twice.
- Use STAPLE REMOVER, take FIRECRACKER (M).
- Use FIRECRACKER, take HAIRPIN (N).
- Go to Sanders’s Antique Shop.
- Use HAIRPIN, take SLOT MACHINE BUTTON (O).
- Place SLOT MACHINE BUTTON (P).
- Play puzzle (Q), receive TOY WOLF.
- Use TOY WOLF, take note and COMB (R).
- Walk down.
- Take NAILS with COMB (S).
- Place BOARDS, NAILS and SHOE (T), take CORKSCREW, SAW HANDLE and HOSE (U).
- Walk down.

- Remove cap, place HOSE. Take BROOM, note and ALLEN WRENCH (V).
- Go forward.
- Use ALLEN WRENCH, take FILE and MOTHERBOARD (W).
- Place WIRES and MOTHERBOARD (X).
- Easy solution (Y).
- Hard solution (Z).
- Receive BLINDS REMOTE CONTROL.
- Go (A).
- Use BLINDS REMOTE CONTROL, take SKULL INLAY (B).
- Place SKULL INLAY, take notes (C).
- Take FLASHLIGHT, note and DUCT TAPE, use CORKSCREW (D).
- Take COINS 1/2 and WING NUT (E).
- Use BROOM, take SAW BLADE (F).
- SAW HANDLE, WING NUT and SAW BLADE on FILE.
- Use FILE (G).
- Go (H).
- Take HOOK, BATTERIES and FUEL (I).
- BATTERIES on FLASHLIGHT.
- Place FLASHLIGHT (J).
- Play puzzle (K), receive MIRROR.
- Use MIRROR and HOOK (L).
- Go (M).
- Take CHAIR (N).
- Use CHAIR (O).
- Take DESK LAMP BASE and CORK (P).
- Use CORK, take COINS 2/2.
- Take FINGERPRINT with DUCT TAPE (Q).
- Use FINGERPRINT (R).
- Go (S).
- Take SPONGE, use COINS (T).
- Take CAN RING (U).
- Take MOSAIC 1/3, use CAN RING.
- Take note and HANDLE (V).
- Walk down three times.
- Place HANDLE and FUEL (W).
- Easy solution (X).
- Hard solution (Y).
- Take PRUNING SHEARS and SOLVENT (Z).
- Use SOLVENT and SPONGE (A).
- Select B or C.
- If you selected B, skip steps indicated with.
- Receive METAL VALVE.
- Place METAL VALVE (D).
- Go (E).
- Take LIGHT BULB and WOOL CAP (F).
- Use WOOL CAP, take MAGNIFIER (G).
- Place LIGHT BULB and MAGNIFIER, take NEWTON’S CRADLE BALLS 1/3 and CLOVER AMULET (H).
- Go to Steve’s Courtyard.
- Use PRUNING SHEARS, take HANDLE (I).
- Place CLOVER AMULET, take FOLDING KNIFE (J).
- Place HANDLE, take FLAG and MOSAIC 2/3 (K).
- Go to Road.
- Place FLAG, take note and PAPER CLIP (L).
- Use FOLDING KNIFE, take NEWTON’S CRADLE BALLS 2/3 and THIRD EYE (M).
- Use PAPER CLIP, take GRAVITY HOOK and MOSAIC 3/3 (N).
- Walk down.
- Place MOSAIC (O).
- Play puzzle (P), receive MOON AMULET.
- Place MOON AMULET (Q), take HELMET (R).
- Walk down.
- Use HELMET, take WHEEL (S).
- Place WHEEL (T), take note, HORN, BOOKS 1/3 and ROPE (U).
- Walk down.
- Place HORN and DESK LAMP BASE (V), take TONGS and METAL CUTTING SAW (W).
- Use METAL CUTTING SAW, open (X).
- Take CRYSTAL BALL and BAT (Y).
- Go (Z).
- Place THIRD EYE, take NEWTON’S CRADLE BALLS 3/3 (A).
- Place NEWTON’S CRADLE BALLS (B).
- Easy solution (C): (2-1)-(4-2)-(5-3).
- Hard solution (D): (2-1)-(4-2)-(5-3)-(5-6).
- Take WINDING KEY (E).
- Go to Steve’s Courtyard.

- Use WINDING KEY, take REEL (F).
- Go to Bunker.
- Place REEL (G).
- Play puzzle (H), receive CODE.
- Place CODE, read book (I).
- Go to Steve’s House.
- Place BAT and ROPE (J).
- Receive TOUCH MEMORY.
- Go (K).
- Use TOUCH MEMORY (L).
- Easy solution (M).
- Hard solution (N).
- Receive BIKE KEY.
- Use BIKE KEY (O).
- Take OLD STATUETTE and VINE (P).
- VINE on GRAVITY HOOK, receive GRAVITY HOOK AND VINE.
- Use GRAVITY HOOK AND VINE (Q).
- Go (R).
- Take BOOKS 2/3 and SAND (S).
- Use SAND, take DIAMOND PENDANT with TONGS (T).
- Use DIAMOND PENDANT (U).
- Play puzzle (V), receive WACHOWSKI’S SEAL.
- Use WACHOSKI’S SEAL (W).
- Go (X).
- Place CRYSTAL BALL, take CLOCK HANDS 1/2 and BOOKS 3/3 (Y).
- Place BOOKS, take note and MACHETE (Z).
- Walk down twice.
- Use MACHETE (A).
- Easy solution (B).
- Hard solution (C).
- Receive STUD EARRING.
- Use STUD EARRING (D), take PHOTO and note (E).
- Go (F).
- Place PHOTO, take CLOCK HANDS 2/2, PESTLE and BLACK PEARL (G).
- Place CLOCK HANDS (H), take RULER and RECORDS (I).
- Go (J).
- Use RULER (K), take NECKERCHIEF, EXPLOSIVES BASE and HAT (L).
- Offer RECORDS (M).
- Select N or O.
- Receive CHESS KNIGHT.
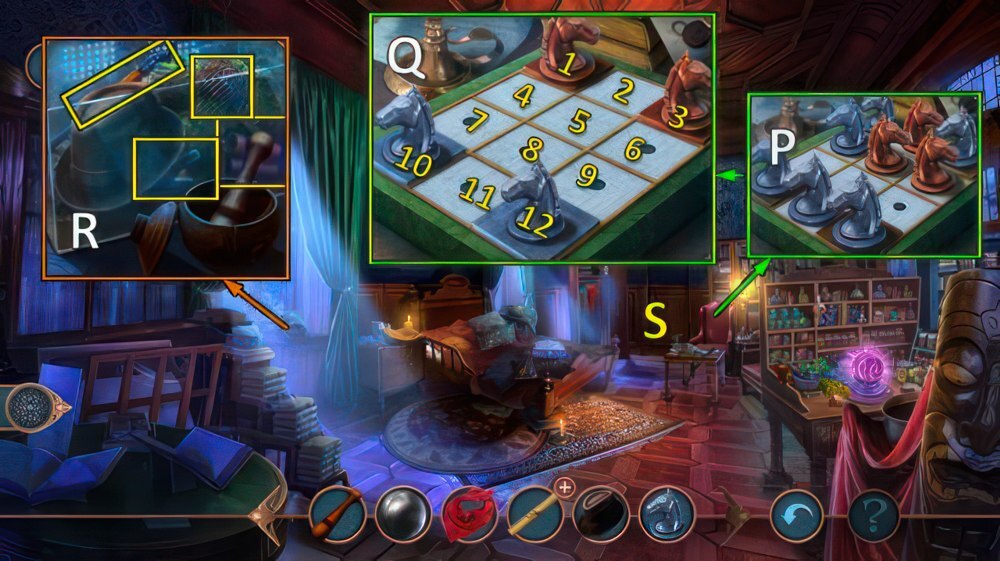
- Place CHESS KNIGHT (P).
- Solution (Q): (11-6)-(6-7)-(7-12)-(8-1)-(1-6)-(6-11).
- (11-4)-(4-9)-(10-5)-(9-10)-(2-9)-(9-4)-(4-3)-(12-7).
- (7-6)-(5-12)-(12-7)-(7-2)-(6-7)-(7-12)-(2-7)-(7-6)-(6-1).
- Place PESTLE and HAT, take COMB, FIRECRACKER BASE, CLAMPS 1/2 and MONKEY WRENCH (R).
- Go (S).
- Take CORKS 1/3 and TWEEZERS (T).
- Take CORKS 2/3, take MIRROR with TWEEZERS (U).
- Place MIRROR, take MOSAIC PART (V).
- Go to Outside the Manor.
- Use COMB, take AWL, CANDLE, and WICK (W).
- Place MOSAIC PART, take CORK 3/3 and FOLIO INLAY (X).
- Use AWL and OLD STATUETTE (Y), receive WHITE PEARL.
- Go to Warlock’s Chamber.
- Place BLACK PEARL and WHITE PEARL (Z), take note and LABELS (A).
- Place LABELS (B).
- Play puzzle (C), receive OBSIDIAN.
- Place OBSIDIAN, take OBSIDIAN POWDER (D).
- Go (E).
- Use CORKS, take CHEMICALS (F).
- Place CHEMICALS (G).
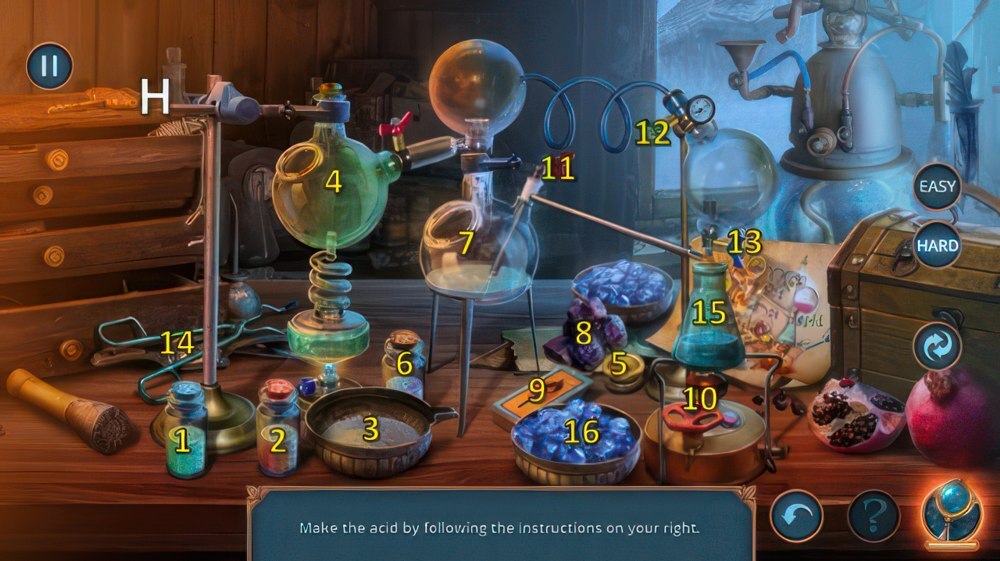
- Easy solution (H): (1-3)-(2-3)-(3-4)-(5-4)-(6-7)-(8-7)-9-(9-10)-11-12-13.
- Hard solution (H): (1-3)-(2-3)-(3-4)-(5-4)-(6-7)-(8-7)-9-(9-10)-11-12-13-(14-15-16).
- Take ACID.
- Walk down.
- Use ACID (I), take WHITE CHALK (J).
- Go (K).
- Place FOLIO INLAY and WHITE CHALK (L), take RUNE (M).
- Place RUNE (N).
- Play puzzle (O), receive MAGIC CONTRACT.
- Place MAGIC CONTRACT (P).
- Go to Main Hall.
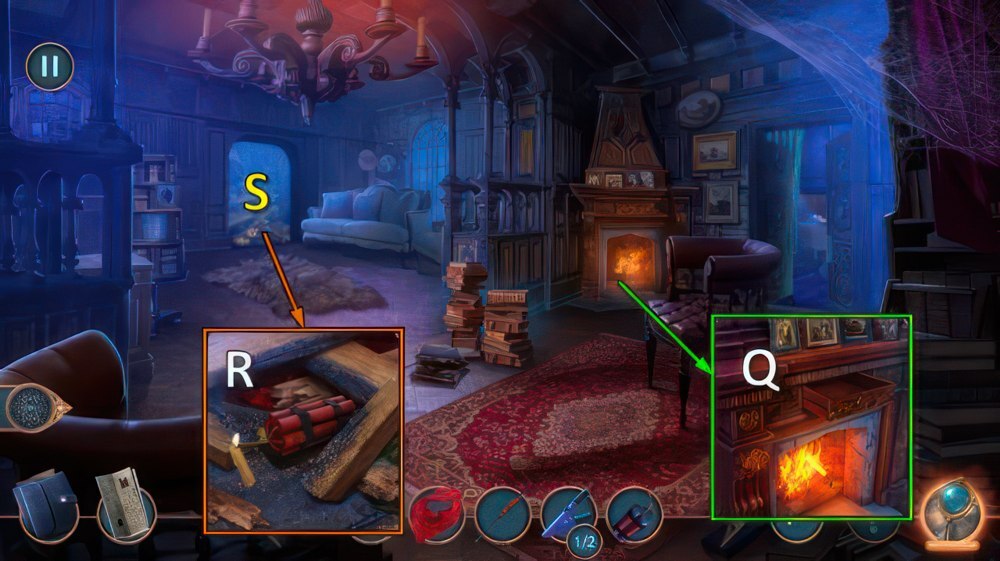
- Use CANDLE (Q), receive LIT CANDLE.
- FIRECRACKER BASE, OBSIDIAN POWDER and WICK on EXPLOSIVES BASE, receive EXPLOSIVE DEVICE.
- Place LIT CANDLE and EXPLOSIVE DEVICE (R).
- Go (S).
- Take CLAMPS 2/2 and GLOVE BOX BUTTON.
- Place NECKERCHIEF and MONKEY WRENCH, take note and CARABINER (T).
- Place CARABINER, take GARDEN GNOME (U).
- Place GARDEN GNOME (V). Solution: (1-3)-(2-4)-(4-5).
- Take PASS CARD (W).
- Use PASS CARD (X).
- Go (Y).
- Take BACKPACK and SOAP (Z).
- Use SOAP, take CABLE and FISH AMULETS 1/2 (A).
- Place CABLE and CLAMPS (B).
- Easy solution (C).
- Hard solution (D).
- Go (E).
- Take WINDMILL’S SAILS and NUT (F).
- Place GLOVEBOX BUTTON (G), take CARETAKER’S KEY (H).
- Use CARETAKER’S KEY (I).
- Play puzzle (J), receive JOLLY ROGER AMULET.
- Place JOLLY ROGER AMULET, take notes, METEORITE INGOT and GAS BURNER (K).
- Walk down.
- Place GAS BURNER (L), receive CUTTING TORCH.
- Use CUTTING TORCH (M).
- Go (N).
- Take COIL OF WIRE and LADDER (O).
- Place LADDER (P).
- Take FAKE BOOK (Q).
- Place FAKE BOOK (R).
- Easy solution (S): 4-5-4-3-2-5-1-2.
- Hard solution (S): 4-5-4-3-2-5-1-2-4-3-1.
- Take BELLOW and CORK (T).
- Place CORK (U), take note, FISH AMULETS 2/2 and SCREW (V).
- Go to Lake.
- Place FISH AMULETS (W), take WOODEN SPOON (X).
- Use WOODEN SPOON, take VALVE (Y).
- Walk down twice.
- Place VALVE and NUT (Z).

- Easy solution (A): 2-9.
- Hard solution (A): 1-10.
- Take KEY (B).
- Go to Pantry.
- Use KEY (C), take TOURNIQUET and FOUNTAIN PEN (D).
- Use FOUNTAIN PEN (E), take SAIL (F).
- Walk down.
- SAIL and SCREW on WINDMILL’S SAILS.
- Place WINDMILL’S SAILS (G).
- Play puzzle (H), receive GOLF CLUB.
- Use GOLF CLUB, take EAGLE and SUCTION CUPS (I).
- Place COIL OF WIRE and SUCTION CUPS, take SWALLOW (J).
- Go (K).
- EAGLE and SWALLOW on BACKPACK.
- Easy solution (L): (1-4-7-8-9)-(11-6-5-4-1)-(2-8-7-6-11)-(9-8-7-6-5).
- (3-8-7-6)-(12-10-9-8-2)-(13-10-9-8-3)-(6-7-10-12)-(5-6-7-10-13).
- Hard solution (M): (1-5-8-9-10)-(2-5-8-9)-(12-7-6-5-1)-(13-7-6-5-2)-(9-8-7-12).
- (10-9-8-7-13)-(3-9-8-7-6)-(4-9-8-7)-(14-11-10-9-3).
- (15-11-10-9-4)-(7-8-11-4)-(6-7-8-11-15).
- Take LIGHT BULB (N).
- Replace LIGHT BULB (O).
- Play puzzle (P), receive GOLD BROOCH.
- Use GOLD BROOCH, take FISHING KNIFE (Q).
- Use FISHING KNIFE, take STAPLE REMOVER (R).
- Go to Pantry.
- Use STAPLE REMOVER, take LEATHER PATCH (S).
- Place LEATHER PATCH and TOURNIQUET, take note and DAGGER MOLD (T).
- Place METEORITE INGOT, DAGGER MOLD and BELLOW, 1 on 2 on 3 (U).
- Receive MAGIC DAGGER.
- Walk down twice.

- Use MAGIC DAGGER (V).
- Defeat your opponent (W).
- Walkthrough Bonus Chapter, at the link below.


