
City Legends Season 1 Episode 2: Whispering in Red – The walkthrough begins with you finding yourself with your hands tied during the harvest, the kidnapper wanted to let you go but you stuck your nose in his business. Molly has been working for him for a long time and now the villain wants to kill you both. It’s up to you to find out what’s behind the red eyes of the angry locals. And whether they are really so serious about preparing for the harvest festival. If you can not pass any of the puzzles or do not know where the items are, on our site you can watch the walkthrough of City Legends Season 1 Episode 2: Whispering in Red, so that you do not become the next on the list of missing people in this unfriendly place.
City Legends Season 1 Episode 2: Whispering in Red – Walkthrough
Here you can see the full walkthrough of City Legends Season 1 Episode 2: Whispering in Red, especially the main story.
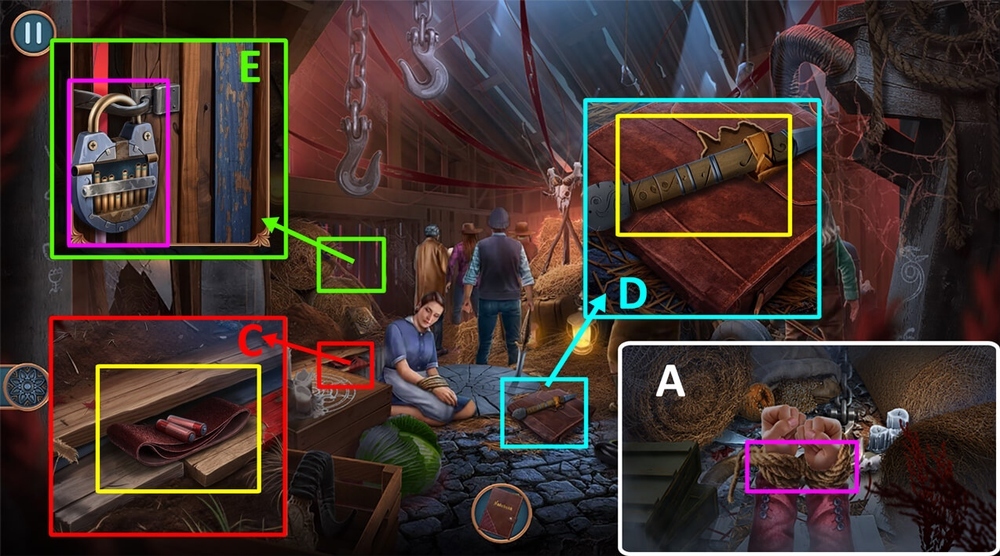
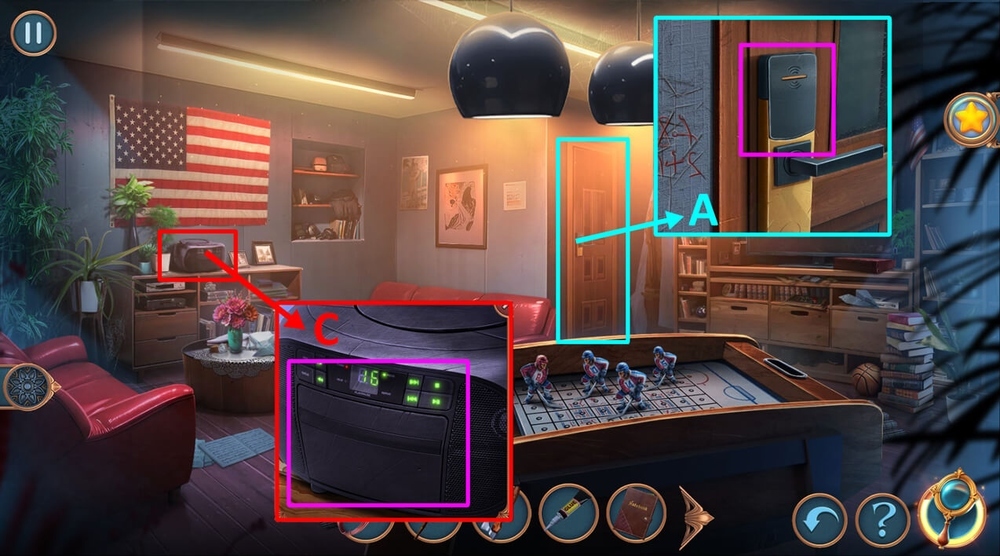
- Take glass shard and cut the rope (A).
- Play puzzle.
- Take BATTERIES and SANDPAPER (C).
- Take RITUAL KNIFE (D).
- Use RITUAL KNIFE on the board, take SCARECROW AMULET (C).
- Insert SCARECROW AMULET into the bag, read the note, take MIRROR and LOCK PICKS (D).
- Use LOCK PICKS on the lock (E).

- Easy solution: 1-6-5 (F).
- Hard solution: 5 (G).
- Select this option (H).
- Read your entry.

- Remove the boxes (I).
- Use SANDPAPER on the branch (K).
- Take LINE, GEAR 1/2, RIPPER, and AXE, click on the keyhole cover (L).
- Use RIPPER on the bag, read the note, take GEAR 2/2.
- Use AXE on the branch, take LEVER (K).
- Use GEAR 2/2 and LEVER on the mechanism (I).
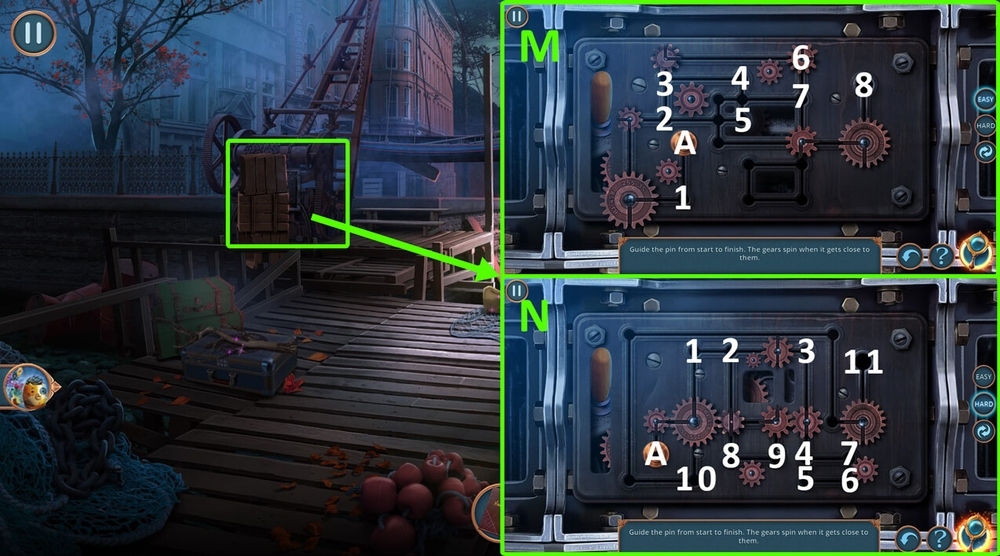
- Easy solution: A-1-2-3-4-5-2-3-4-5-2-3-4-5-2-3-6-7-5-2-3-4-7-8 (M).
- Hard solution: A-1-2-3-4-5-6-7-4-5-6-7-4-5-6-7-4-5-6-7-4-3-2-8-9-10-11 (N).
- Click on the lever.
- Go forward.
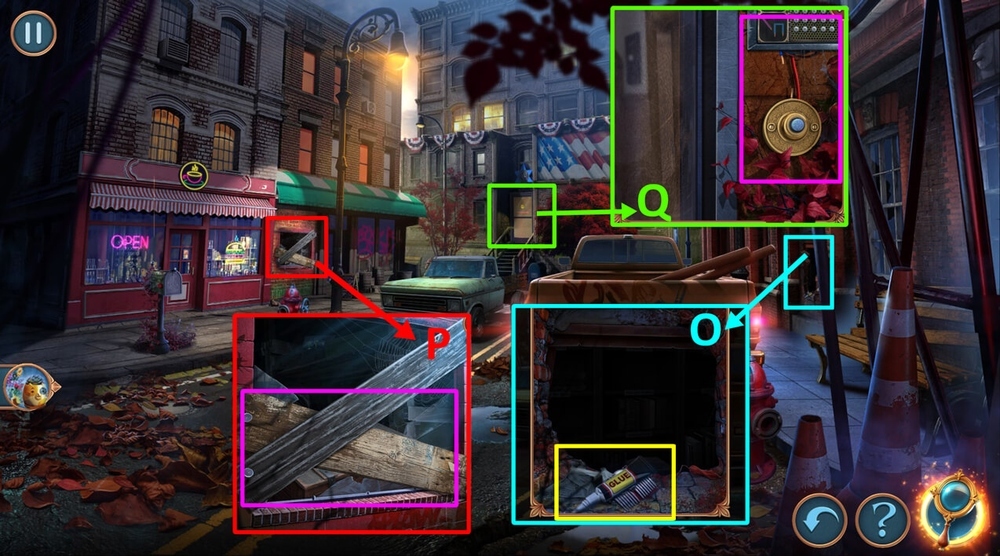
- Take GLUE and COMB (O).
- Use COMB on the boards, read the note, take TWEEZERS and WIRE (P).
- Use WIRE on the mechanism (Q).
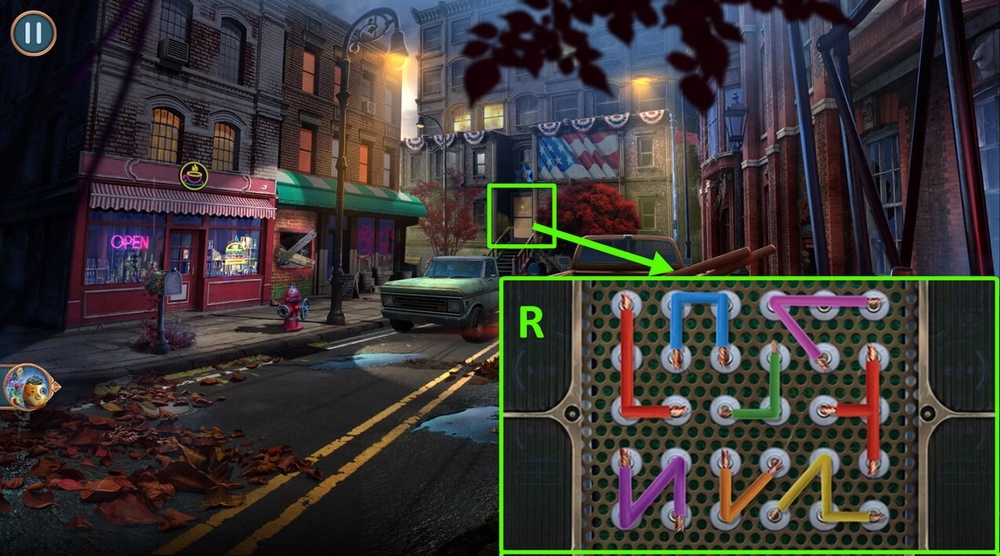
- Easy and Hard solution: arrange the items as in the picture (R).
- Press the doorbell.
- Go forward.
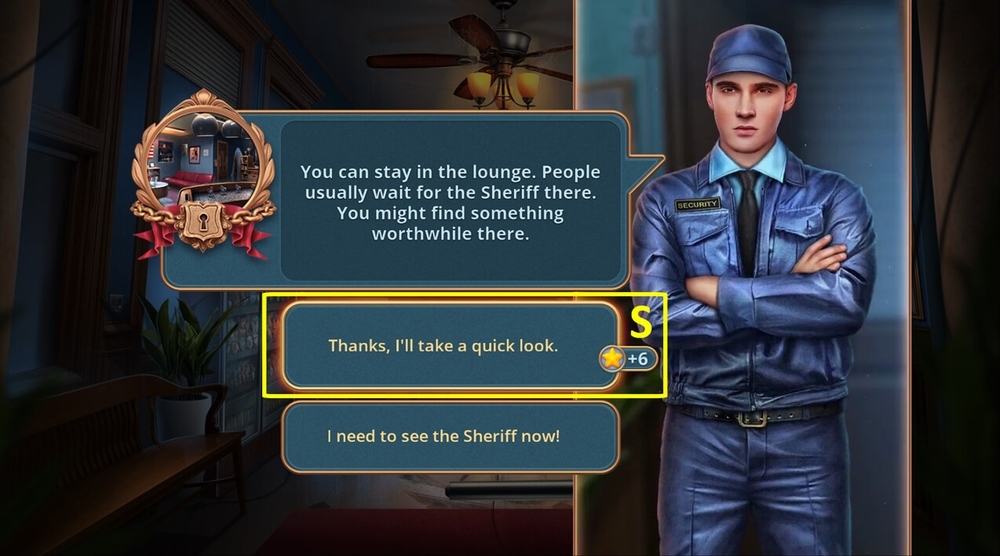
- Select this option (S).
- Read your entry.
- Go forward.
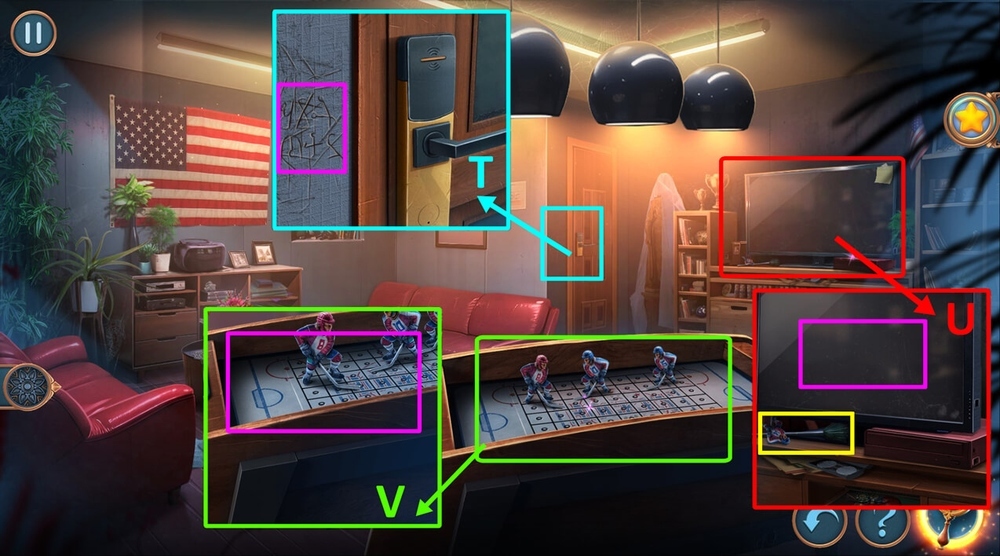
- Use NOVEL DRAFT on the wall (T).
- Take HOCKEY PLAYER and BRUSH, click on the TV screen (U).
- Use BRUSH on the wall (T).
- Place HOCKEY PLAYER on the field (V).
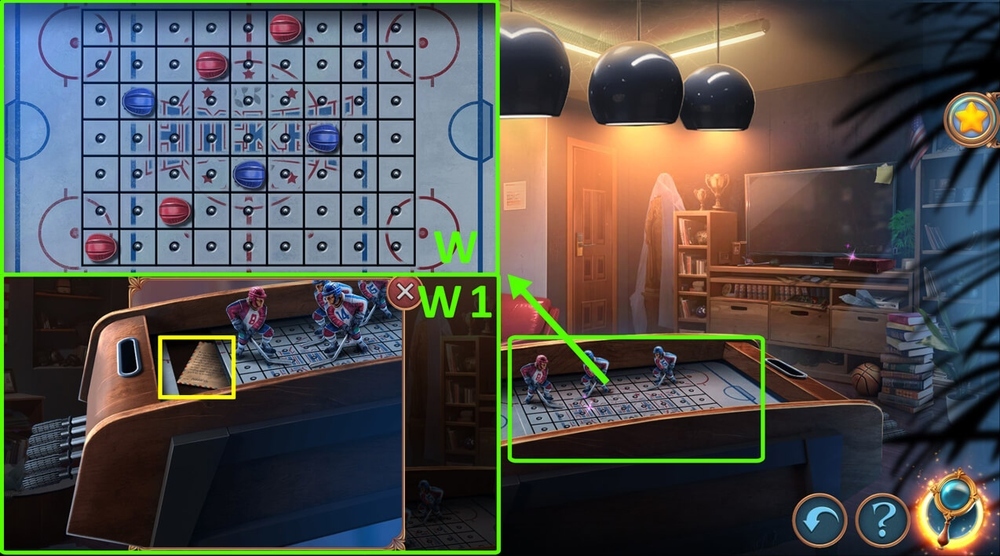
- Easy and hard solution: arrange the items as in the picture (W).
- Read the note, take CHALK (W1).
- Use RED CHALK on the wall, get CODE.
- Go back.

- Use TWEEZERS on the banknote (X).
- Read the note.
- Go to Port.
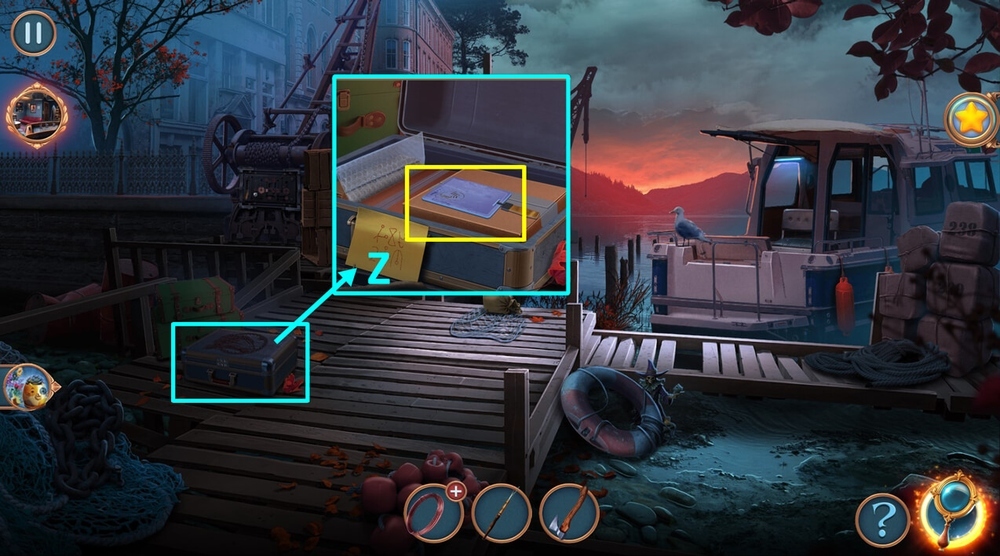
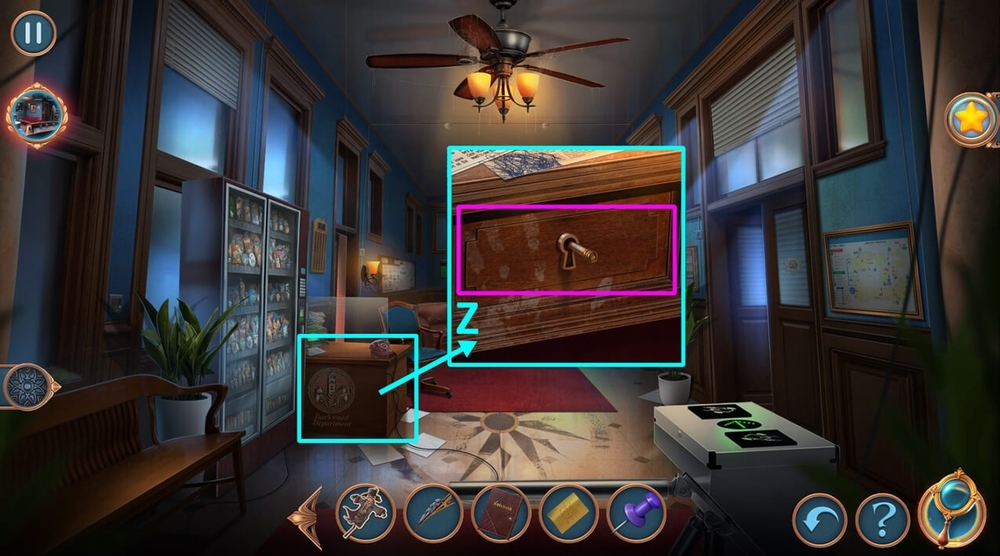
- Click on the code panel, use CODE, enter the combination from the note, take KEY CARD (Z).
- Go to Lounge.
- Use KEY CARD on the door.
- Play puzzle, earn REMOTE (A).
- Use REMOTE on the radio recorder, take PUSHPIN (C).
- Go back.

- Tale SCULPTING CLAY and PAPERWEIGHT, remove the broken lamp (D).
- Use PAPERWEIGHT on the banknote, take CURRENCY (E).
- Insert CURRENCY in the machine (F).
- Play puzzle, earn WET WIPES.
- Use WET WIPES on the spilled coffee, take SCARECROW MAGNET (H).
- Use SCARECROW MAGNET on LINE, get MAGNET AND LINE (I).
- Go to Port.

- Use MAGNET AND LINE on the water (J).
- Easy solution: A-1-2, B-2-3, A-3-4, B-4-5 (K).
- Hard solution: 1-2, B-2-3, C-3-4, A-4-5, B-4-5 (L).
- Get CAPTAIN’S KEY.
- Use CAPTAIN’S KEY on the keyhole, take CARTER’S CAMERA (M).
- Click on CARTER’S CAMERA, get PHOTOGRAPHED RITUAL.
- Go to Department Lobby.

- Give PHOTOGRAPHED RITUAL to the person (O).
- Go forward.
- Give PHOTOGRAPHED RITUAL to the person (P).
- Select this option (Q).
- Solution: get a coherent picture by rotating the tiles (R).
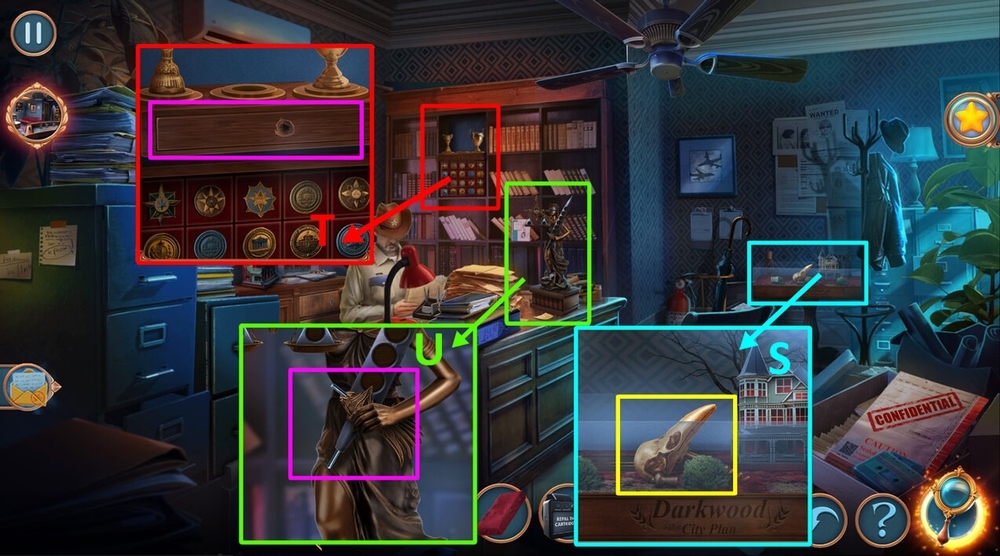
- Take STATUETTE’S ELEMENTS 1/2 and CORKSCREW (S).
- Use CORKSCREW on the drawer, take STATUETTE’S ELEMENTS 2/2 (T).
- Use GLUE and STATUETTE’S ELEMENTS 2/2 on the figurine (U).

- Easy solution: arrange the pieces as shown in the picture (V).
- Hard solution: arrange the pieces as shown in the picture (W).
- Take MOLDING STICKS.
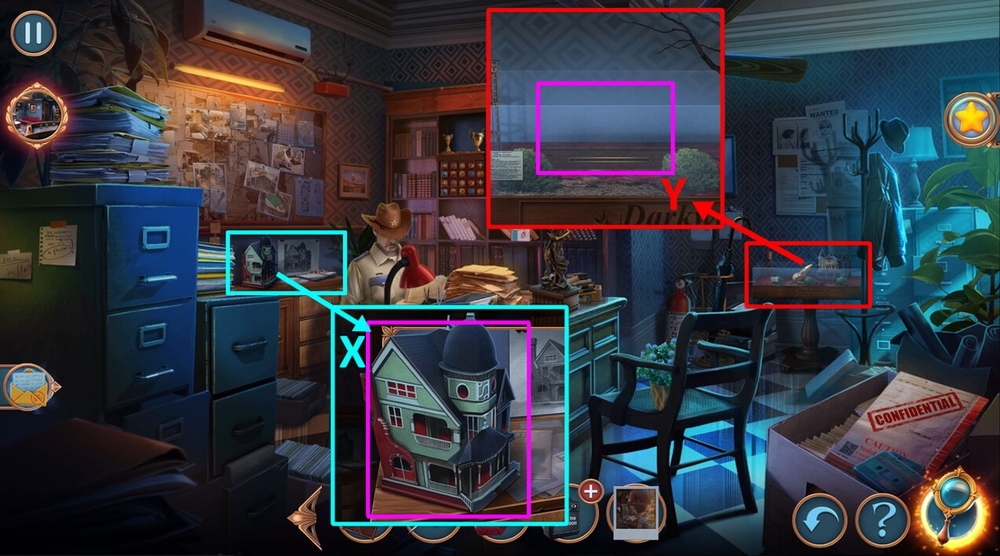
- Use SCULPTING CLAY and MOLDING STICKS on the model, take HOTEL BUILDING (X).
- Place HOTEL BUILDING on the city plan, take HAIRPIN (Y).
- Go back.
- Turn the key, use HAIRPIN on the key stub, use PUSHIP on the small box, take CD DISK and DUCT TAPE, click on the flashlight and use BATTERIES, get LANTERN (Z).
- Go to Lounge.

- Play puzzle, earn CABLE (A).
- Use CD DISK on the player, use CABLE on the TV screen, click on the screen x3 (B).
- Go to Adjacent Department Area.
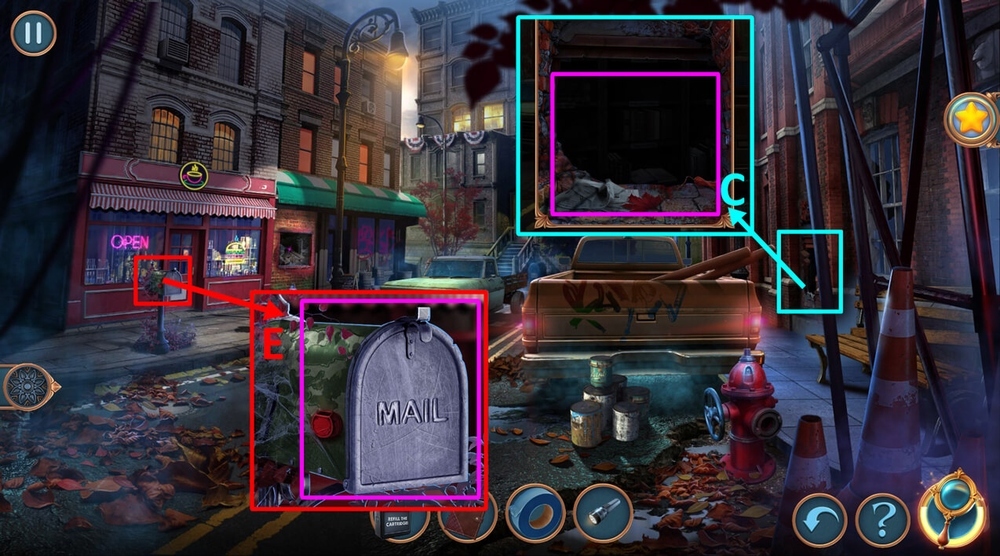
- Use LANTERN on the dark area (C).
- Play puzzle, earn FLAG (C).
- Use FLAG on the mailbox, read the note, take SHERIFF’S KEY (E).
- Go to Sheriff’s Office.
- Use SHERIFF’S KEY on the drawer, click on the notes.
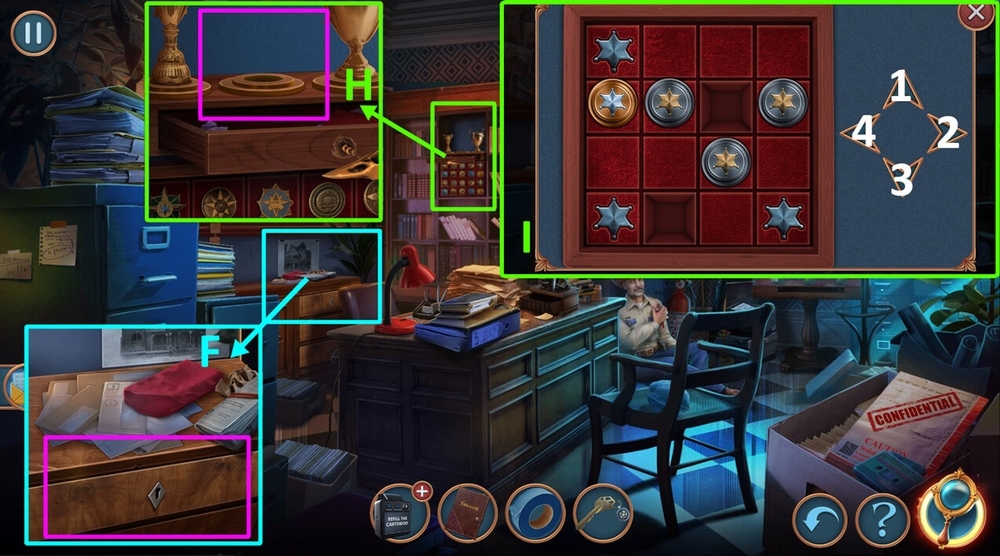
- Play puzzle.
- Take TROPHY CUP (F).
- Place TROPHY CUP among others (H).
- Easy and hard solution: 1-2-2-2-3-3-4-4-1-4-3-2-2-2-1-1-4-4 (I).
- Take SOPORIFIC GAS and FIRST AID KIT (H).
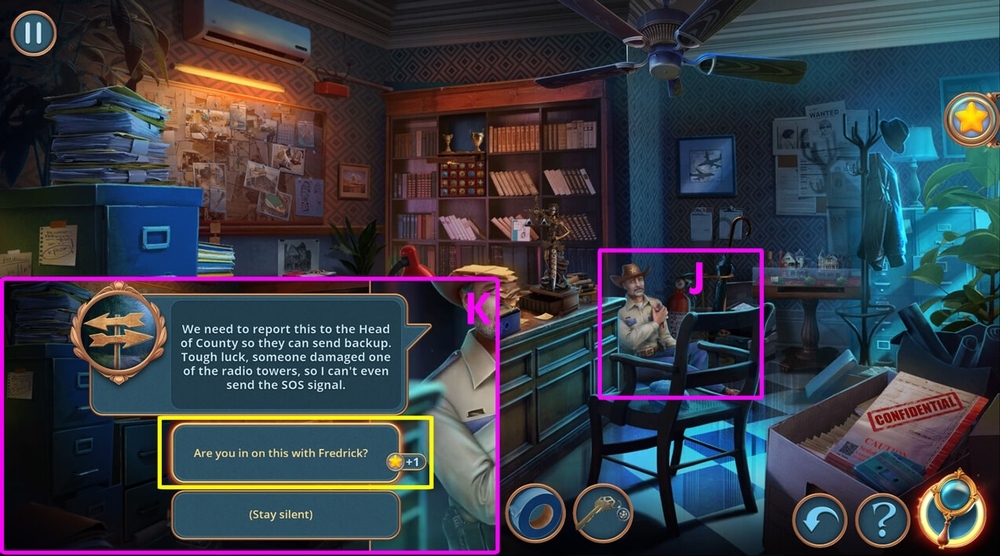
- Use FIRST AID KIT on the person (J).
- Select this option (K).
- Read your entry.
- Go to Adjacent Department Area.
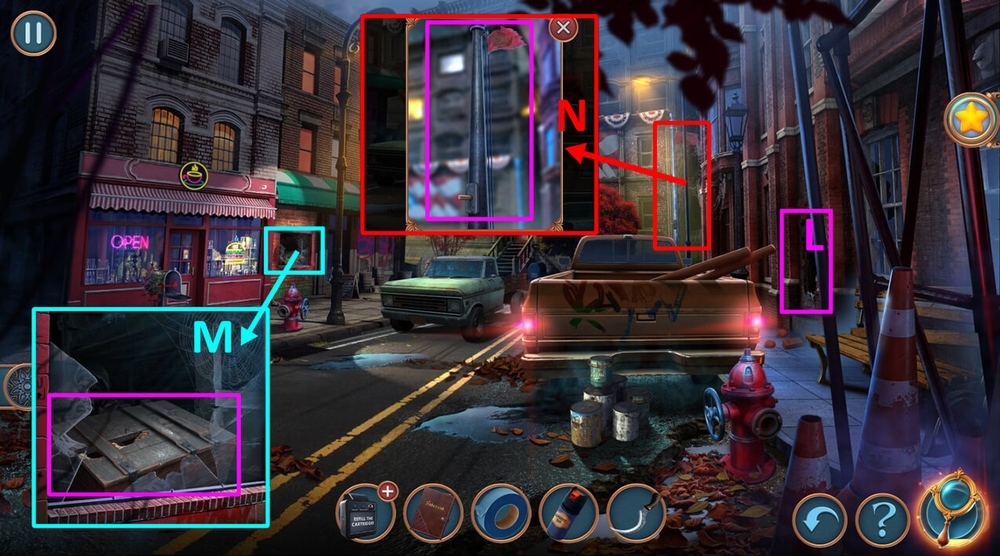
- Play puzzle, earn SICKLE (L).
- Use SICKLE on the box, take SPONGE and FLAGPOLE HANDLE (M).
- Use FLAGPOLE HANDLE on the flagpole, take OLD FLAG (N).
- Go back.

- Use OLD FLAG on the lamp, get LIGHT BULB (O).
- Go to Department Lobby.
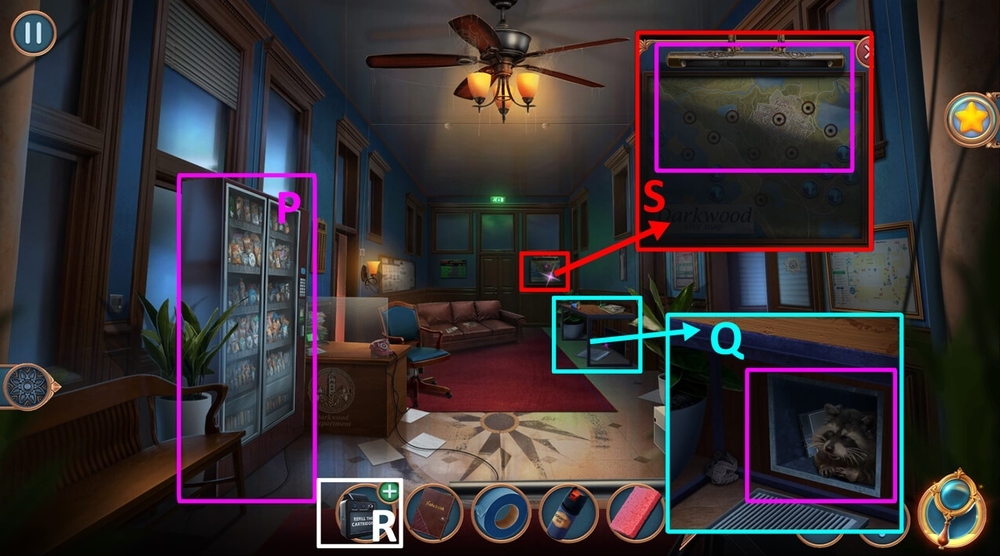
- Play puzzle, earn SANDWICH (P).
- Give SANDWICH to the raccoon, take CARTRIDGE (Q).
- Use CARTRIDGE on CARTER’S CAMERA, get CARTER’S CAMERA (R).
- Use LIGHT BULB on the lamp base, use CARTER’S CAMERA on the board (S).

- Easy and hard solution: arrange the towers so that they all connect to each other (T).
- Take TERMINALS and HANDLE (U).
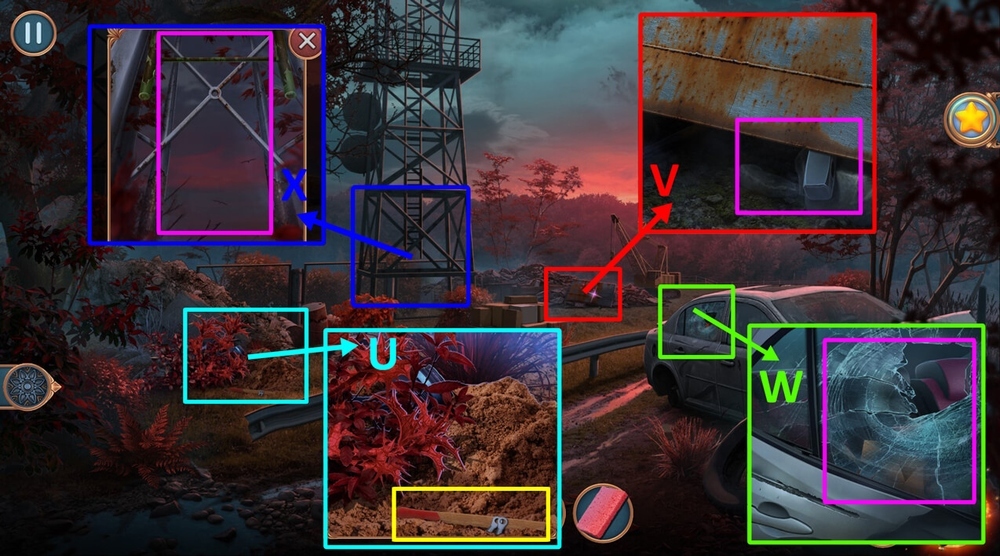
- Use DUCT TAPE and HANDLE on the metal piece, take SLEDGEHAMMER (V).
- Use SLEDGEHAMMER on the window (W).

- Solution: D1 on F1, E2 on E1, F2 on E2, F1 on F2, E1 on F1, C1 on D1, B1 on C2, A1 on C1, A2 on A1, C2 on A2, B3 on C2, A3 on B2, C3 on A3, C2 on D3, C1 on C3 (X).
- Take LONG CROWBAR (W) (previous picture).
- Use LONG CROWBAR on the ladder (X) (previous picture).
- Go forward.

- Use SPONGE on the stain (Y).
- Use MIRROR on the metal bars (Z).
- Use TERMINALS and DUCT TAPE on the cables, take PROPANE TORCH and PLIERS (A).
- Use PLIERS on the radio, get ANTENNA (Z).
- Use ANTENNA on the solvent, get SOLVENT (C).
- Use SOLVENT on the stain, take VALVE (Y).

- Use VALVE on PROPANE TORCH, get PROPANE TORCH (E).
- Go back.
- Use PROPANE TORCH on the metal panel (F).
- Play puzzle, earn SECATEURS (F).
- Use SECATEURS on the bush, take RESPIRATOR (H).
- Go forward.
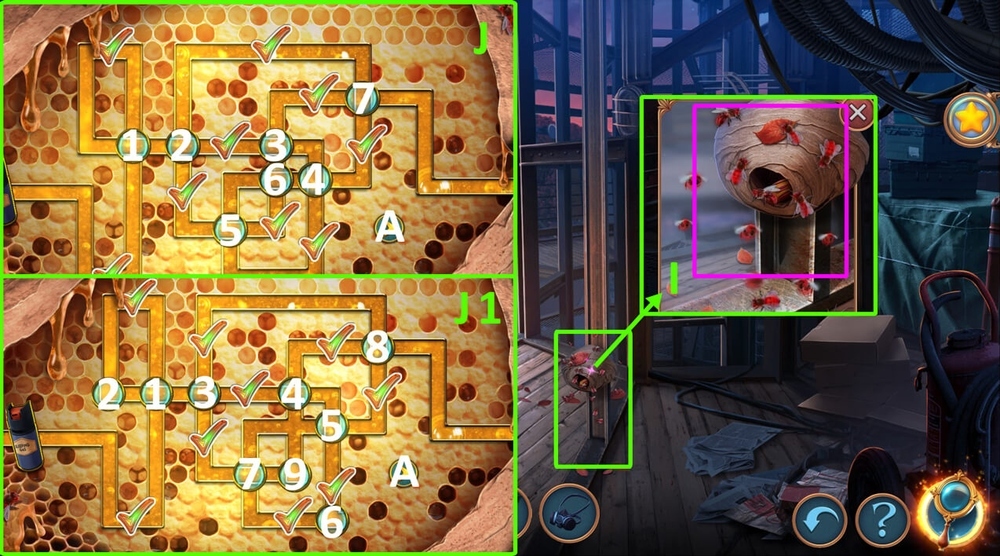
- Use RESPIRATOR and SOPORIFIC GAS on the hive (I).
- Easy solution: 1-A-1-5-4-2-5-6-3-7 (J).
- Hard solution: 1-A-1-6-7-5-3-7-9-4-8 (J1).
- Take SCREWDRIVER (I).

- Click on the mirror, use SCREWDRIVER, get LONG RAIL 1/2 (K).
- Go back.
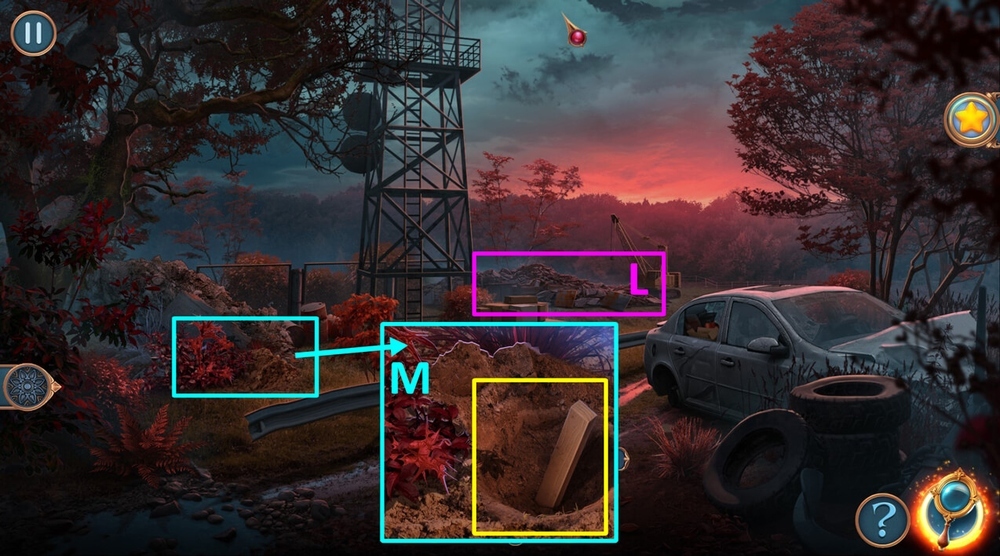
- Play puzzle, earn METAL CORNER (L).
- Use METAL CORNER on the sand, take LONG RAIL 2/2 (M).
- Go forward.
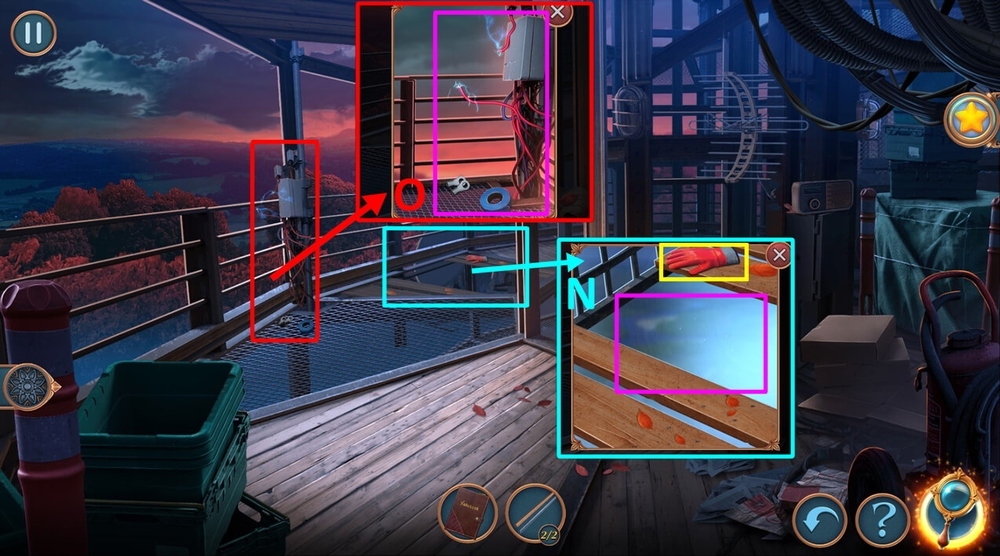
- Use LONG RAIL 2/2 on the gap, take RUBBER GLOVE (N).
- Use RUBBER GLOVE on the cables (O).

- Easy solution: use corners to direct the current to the batteries of appropriate color (P).
- Hard solution: use corners to direct the current to the batteries of appropriate color (P1).
Congratulations! You have completed the game City Legends Season 1 Episode 2: Whispering in Red.


