
Connected Hearts 1: The Full Moon Curse (Bonus Chapter, Extra) – Fast forward a few years. Settled into marital bliss, Mark and Riviera give birth to their daughter, Canissa, who is preparing to marry Prince Wulfus. However, on the wedding day, Canissa is kidnapped by a wolf. As Prince Wolfus, you must save your bride.
Bonus Chapter, Extra Walkthrough

- Take 2 Notes (A).
- Take TORN GLOVES, BROKEN CANE, FLINT, and CORKSCREW (B).
- Use CORKSCREW, take HINGE and HAIR STICKS (C).
- Use HAIR STICKS (D), receive NEEDLE AND THREAD and COAL.

- NEEDLE AND THREAD on TORN GLOVES, receive GLOVES.
- Use GLOVES (E).
- Play puzzle, receive SEDATIVE.
- Use SEDATIVE (F), receive SHELL.
- Go (G).

- Take GEARS 1/3 and NAILS (H).
- Use SHELL, take STEEL (I).
- Use FLINT and STEEL, take CUTTERS (J).
- Walk down.

- Use CUTTERS, take BROKEN HACKSAW and CANE HEAD (K).
- HINGE and CANE HEAD on BROKEN CANE, receive CANE.
- Use CANE (L).

- Easy Solution (M): Pull the colored rings, in the following order, until their matching button lights up.
- Purple (1)-Red (2)-Green (3)-Blue (4)-Orange (5).

- Hard Solution (N): Pull the colored rings, in the following order, until their matching button lights up.
- (Light Blue (9)-Purple (6)-Yellow (10)-Orange (12)-Red (7)-Blue (11)-Green (8)-Yellow (10).
- Take NET.
- Go to Magical Forest.

- Use NET (O).
- Open chest, take WING NUT, BOLT, and PAPYRUS (P).
- Use COAL and PAPYRUS (Q).
- Pull lever (R), receive CODE.
- Place CODE (S).

- Easy Solution (@1).
- Each symbol on the arch has two spots that need to be filled.
- Move (1-A)-(2-B)-(3-C)-(4-D)-(5-E)-(6-F)-(7-G).

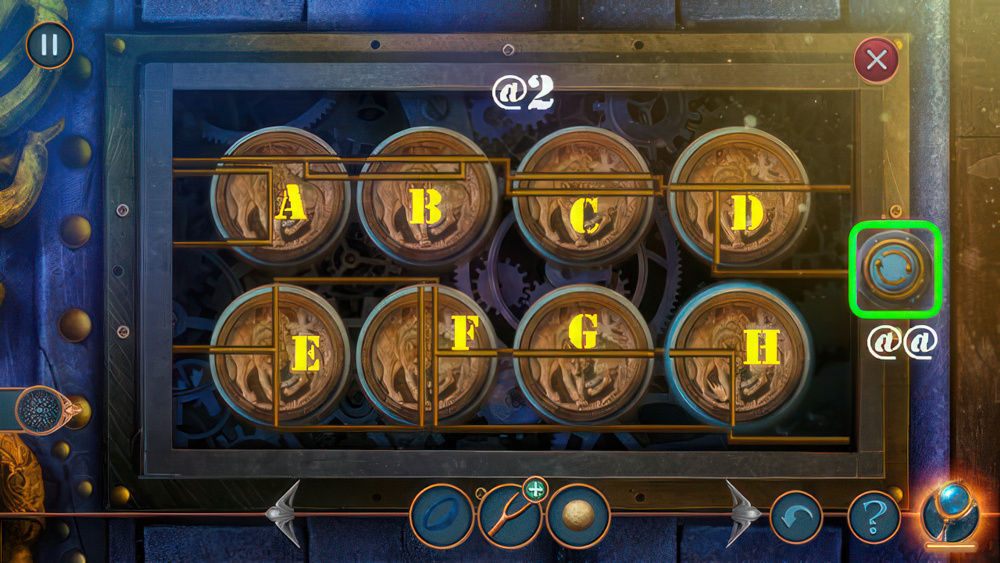
- Hard Solution (@2).
- Each symbol on the arch has three spots that need to be filled.
- Move (1-A)-(2-B)-(3-C)-(4-D)-(5-E)-(6-F)-(7-G).
- Go to Cursed Valley (H).

- Talk (I), receive FANG.
- Look at Note (J).
- Take Note and GEARS 2/3 (K).
- Take LEVER (L).
- Use FANG, take HAMMER (M).
- Use NAILS and HAMMER (N), take TWO-PRONGED FORK and GEARS 3/3 (O).
- Walk down twice.

- Place GEARS 3/3, take MAGNET and BLADE (P).
- WING NUT and BLADE on BROKEN HACKSAW, receive HACKSAW.
- Use HACKSAW, take SPHERES 1/3 and FLASK (Q).
- Go (R).

- Use FLASK (S), receive RESIN.
- Use LEVER and RESIN (T).
- Take MILL KEY (U).
- Go (V).

- Use MILL KEY (W).
- Play puzzle, receive WHEEL.
- Use BOLT and WHEEL (X).
- Go (Y).

- Take HAND BROOM (A).
- Take Note and SPHERES 2/3 (B).
- Use TWO-PRONGED FORK, take STATUETTE (C).

- Use STATUETTE, take MIRROR (D).
- Use MIRROR and MAGNET (E).
- Take BROOCH (F).
- Walk down.
- Use BROOCH (G).

- Easy Solution: 1-2-H-3-4-5-6-7-I-8.

- Hard Solution:1-2-J-3-4-5-6-7-K-8-Lx3-9-Mx3-10.
- Take NOISEMAKER.

- Use NOISEMAKER, take TORN POSTER, RAG, and SPHERES 3/3 (N).
- Place SPHERES 3/3 (O).

- Take SIEVE and CORK (P).
- Use HAND BROOM, take JAR (Q).
- Use JAR (R).

- Easy Solution (S): (1-14).

- Hard Solution (T): (1-17).
- Take TERMITES.

- Use TERMITES, take IRON TUBE (U).
- Use IRON TUBE and RAG (V).
- Go (W).

- Take Note and COAT (X).
- Take RUST REMOVER RECIPE (Y).
- Use CORK, take RULER (Z).
- Use RULER, take PLIERS (Z1).
- Go to Tree House.

- Use COAT, take BERRIES and GLUE (A).
- Use SIEVE (B), take TOBACCO PIPE (C).
- Use TOBACCO PIPE (D), take POSTER PART (E).
- POSTER PART and GLUE on TORN POSTER, receive GAME POSTER.
- Place GAME POSTER (F).
- Play puzzle, receive AMMONIA.
- Go to Silver Wolf’s House.

- Use AMMONIA (G), receive GOBLET.
- Go (H).
- Use GOBLET (I), receive WATER.
- Use WATER, take BEETLE FIGURINE (J).
- Use PLIERS (K),
- receive DUSTPAN.
- Walk down.

- Use DUSTPAN, take BONE and POLLEN (L).
- BERRIES and POLLEN on RUST REMOVER RECIPE,
- receive RUST REMOVER.
- Use RUST REMOVER, take TONGS (M).
- Return to Tree House.

- Use TONGS (N), receive ACID.
- Use ACID, take MORTAR and SEPTUM RING (O).
- Use SEPTUM RING, take AMULET (P).
- Return to Cellar.

- Place AMULET, take LEATHER and PAINT (Q).
- Place PAINT (R).

- Solution (1-4).

- Take Note and SOLVENT (S).
- Take BROKEN LADDER (T).
- Use BEETLE FIGURINE, take PLANK (U).
- Use PLANK (V), take SHOVEL (W).
- Use SHOVEL (X) and BONE (Y).
- Go (Z).

- Take SWORDS 1/3 and CHISEL (A).
- Use MORTAR and CHISEL, take STONE BRICK and BROOM (B).
- Use BROOM, take HOSE (C).
- Use LEATHER and HOSE (D), take Note, BRUSH, and BOARDS WITH NAILS (E).
- Walk down.

- BOARDS WITH NAILS and STONE BRICK on BROKEN LADDER, receive LADDER.
- Place LADDER (F).
- Play puzzle, receive SLEEP SPELL.
- Use SLEEP SPELL (G).
- Go (H).

- Take SWORDS 2/3, FISH WIRE, and INCOMPLETE SLINGSHOT (I).
- Use SOLVENT and BRUSH, take MEAT MALLET (J).
- Use MEAT MALLET, take PENCIL and SCARF (K).
- Return to Cellar.

- Use SCARF, take PEBBLE and SWORDS 3/3 (L).
- Place SWORDS 3/3, take LOCKPICK (M).
- Return to Mortigrew’s Castle.
- Use LOCKPICK (N).

- Easy Solution (@1): (A-C)-(B-F)-(B-D)-(D-G)-(E-H).
- Hard Solution (@2): Rotate (A-Cx3-D-Ex2-Fx2-Gx2-Hx3).
- To rotate pieces, select the piece you want to rotate and select the arrows (@@).
- Select the piece again to cease rotating it.
- Swap (A-C)-(B-F)-(B-D)-(D-G)-(E-H).
- Take CAULDRON TOKEN.

- Place CAULDRON TOKEN, take TELESCOPIC CANE (O).
- Walk down.
- Use TELESCOPIC CANE (P), take BUCKET (P1).
- Use FISH WIRE and BUCKET, take FAN and STAFF (Q).
- Go (R).

- Use STAFF, take BROKEN STAFF, BURNER, and RUBBER SLING (S).
- PEBBLE and RUBBER SLING on INCOMPLETE SLINGSHOT, receive SLINGSHOT.
- Use SLINGSHOT (T).
- Play puzzle, receive DAGGER.
- Use DAGGER (U), receive PICTURE.
- Return to Mortigrew’s Castle.

- Use PENCIL and PICTURE (V).
- Take key (V) and insert it (W).
- Go (X).

- Take OILER and PIPE (Y).
- Look at Note (Z1).
- Use BURNER, take GREEN ENERGY BALL (Z2).

- Use PIPE and open gate, take BLUE ENERGY BALL (A).
- OILER on FAN, receive FAN.
- Use FAN, take RED ENERGY BALL (B).

- GREEN ENERGY BALL, BLUE ENERGY BALL, and RED ENERGY BALL on BROKEN STAFF, receive DRAINED STAFF.
- Place DRAINED STAFF, take CHARGED MAGIC STAFF (C).
- Use CHARGED MAGIC STAFF (D).

- Easy and Hard Solutions are random.
- Fill your side of the meter by dragging across three or more of the matching stones on the right (E).
- Examples of successful matches (F).
Congratulations! You have completed the game Connected Hearts 1: The Full Moon Curse.


Thank you so much,made hard parts easier
Thank you for your walkthrough. I couldn’t finish the games without them.