Connected Hearts 2: Fortune Play – The walkthrough of the game begins with the fact that Dreyer Crowley has a hard time in childhood, he loses his parents and ends up in an orphanage. However, Dreyer does not want to put up with a string of bad luck and wants him and his family to be proud of him. But there is one problem he is not lucky. Desperate, he decides to make a deal with fortune. Infinite luck in exchange for loving hearts. Beatrice and Franz new price for luck. If you are stuck and do not know how to get through any of the locations, on our website you can watch the walkthrough of the game Connected Hearts 2: Fortune Play, and save the lovers.
Connected Hearts 2: Fortune Play – Walkthrough
Here you can watch the complete walkthrough of the game Connected Hearts 2: Fortune Play, namely the main story and the bonus chapter.

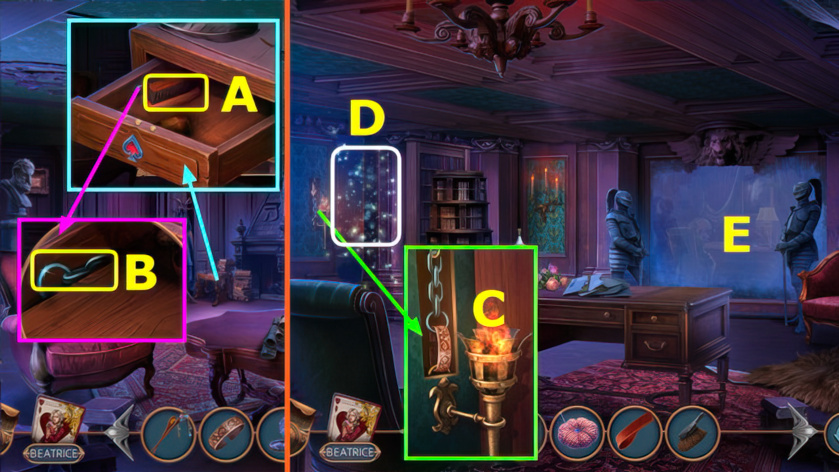
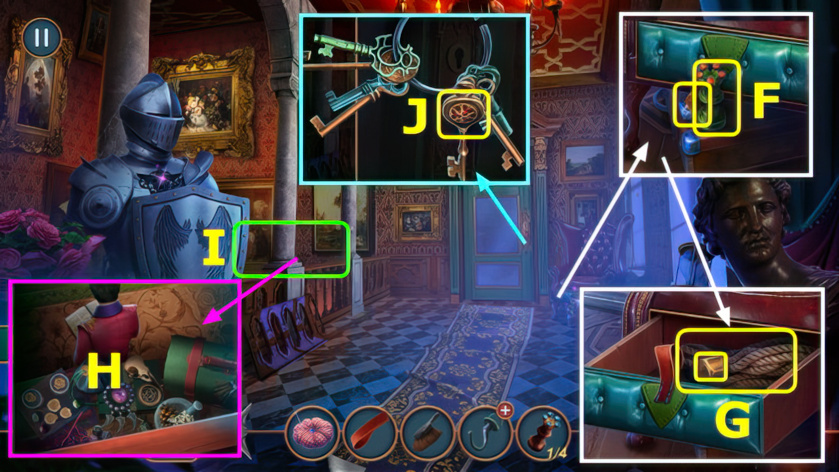
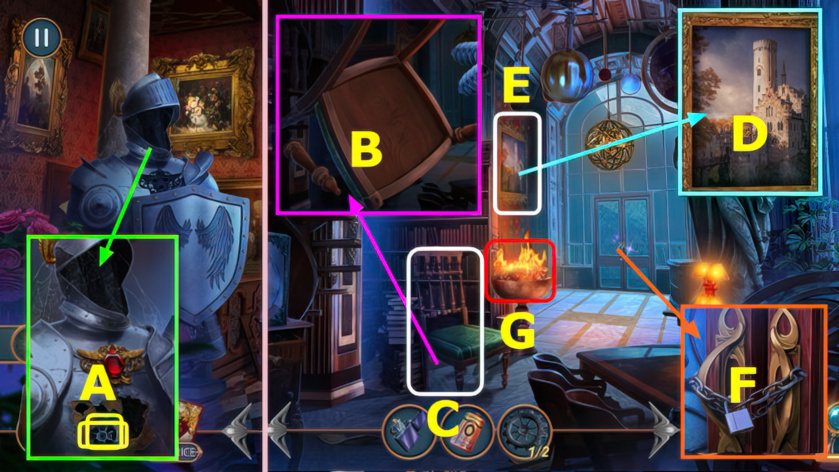
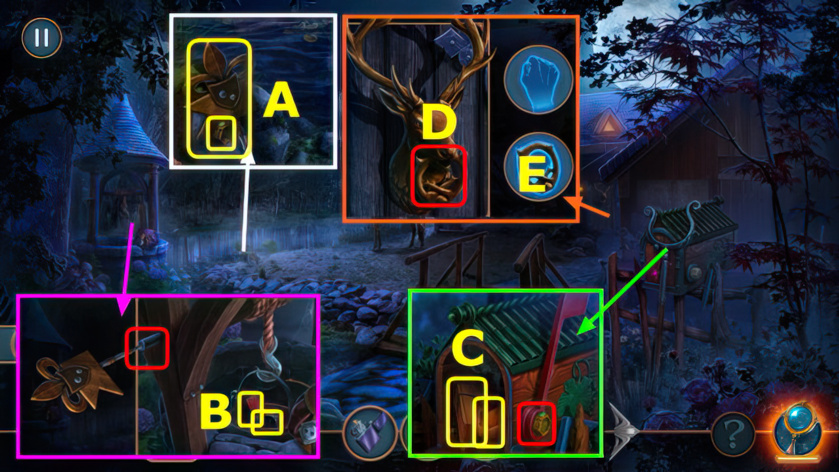
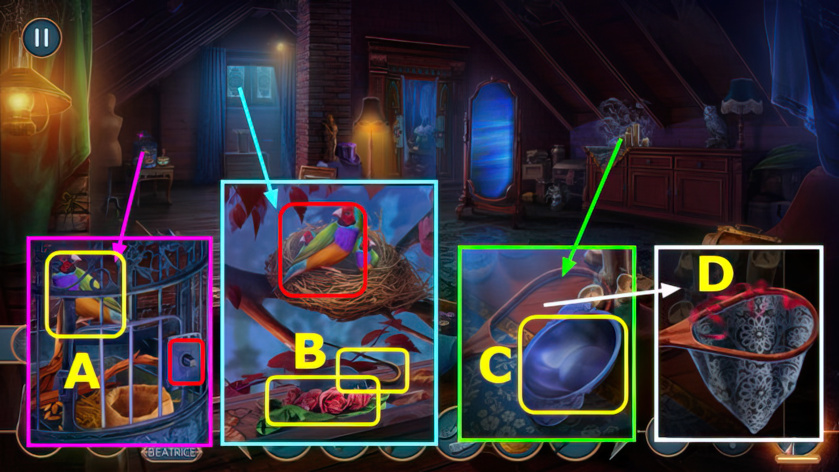
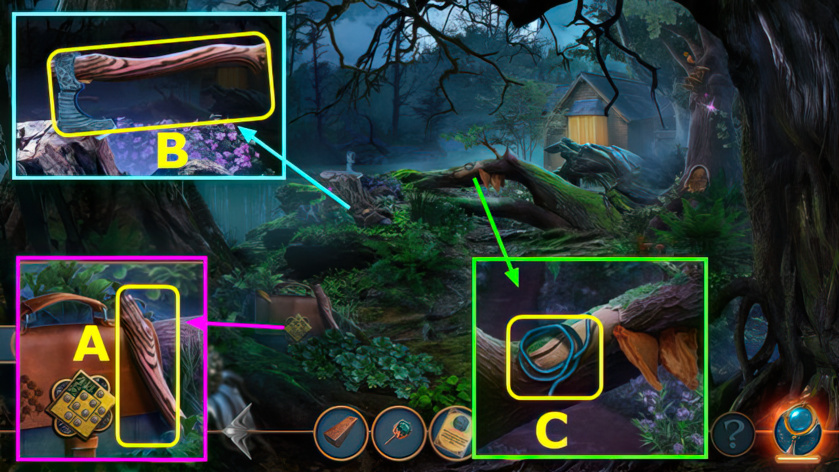
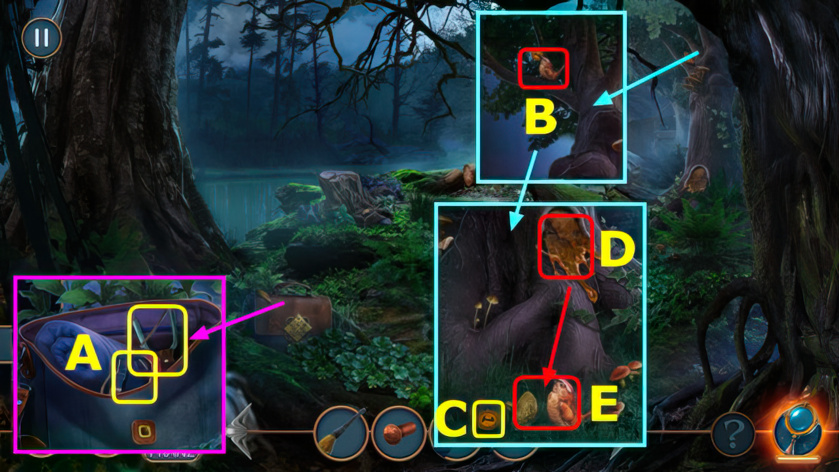
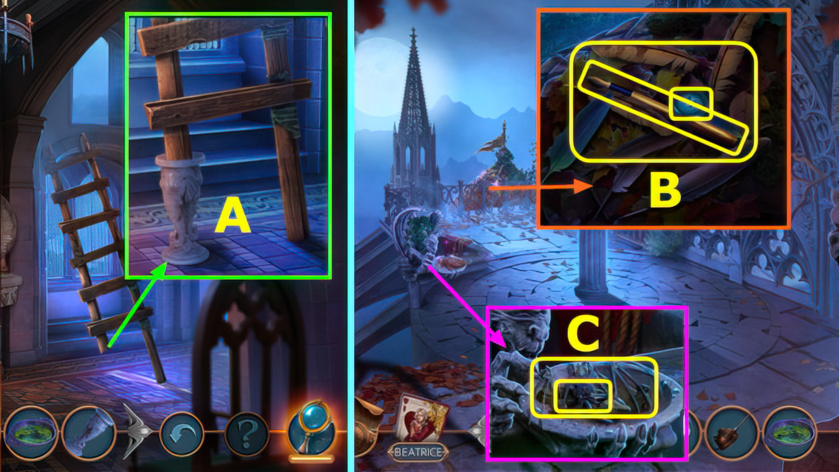
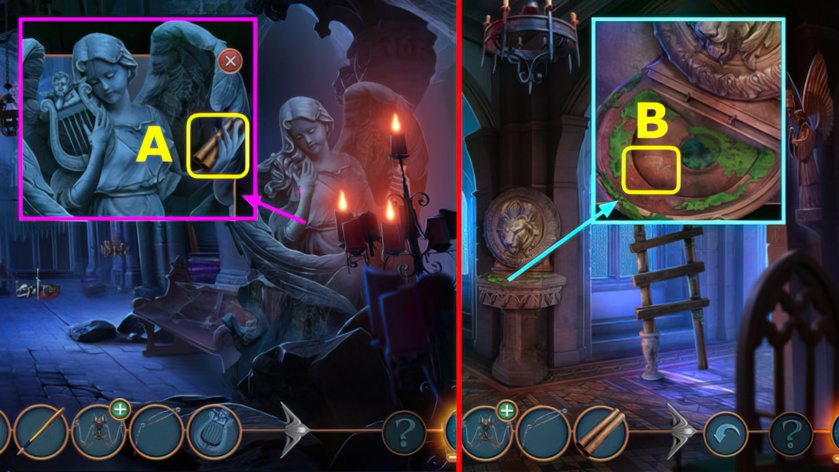
- Read newspaper, take Beatrice card, hint magnifying glass, 1/2 MASK, and NAIL FILE (A).
- Use NAIL FILE (B).
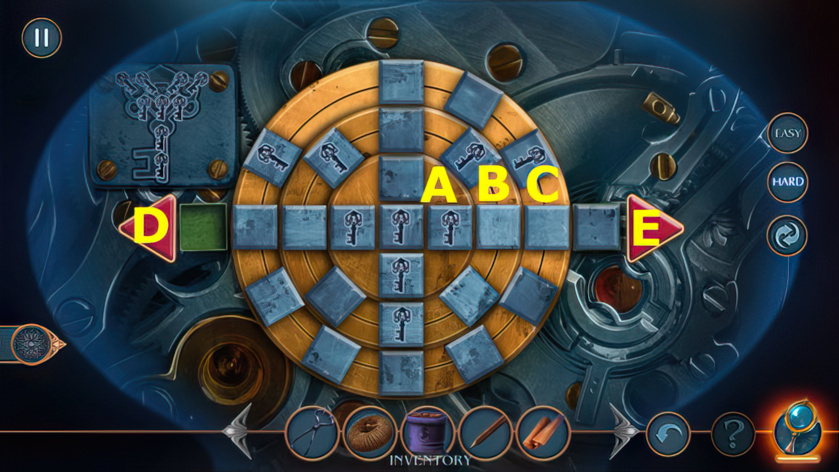
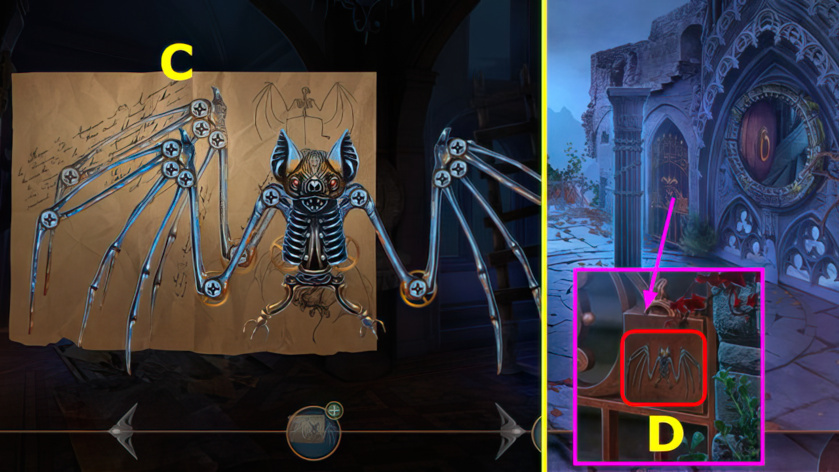
- Play puzzle, earn KEY (C).
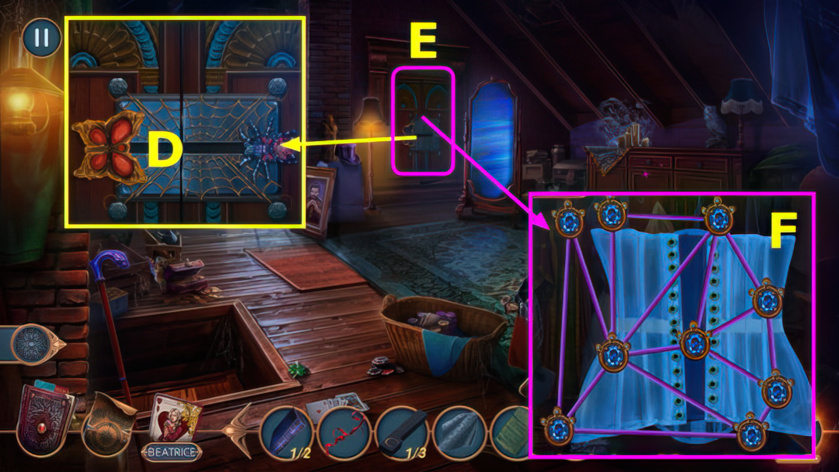
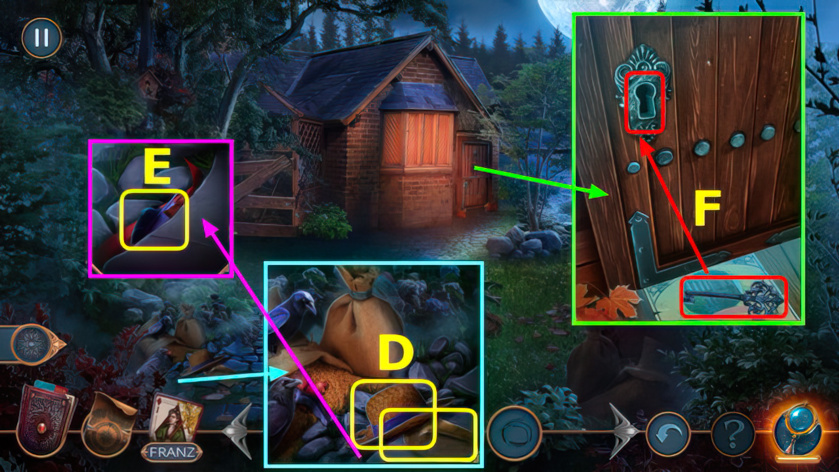
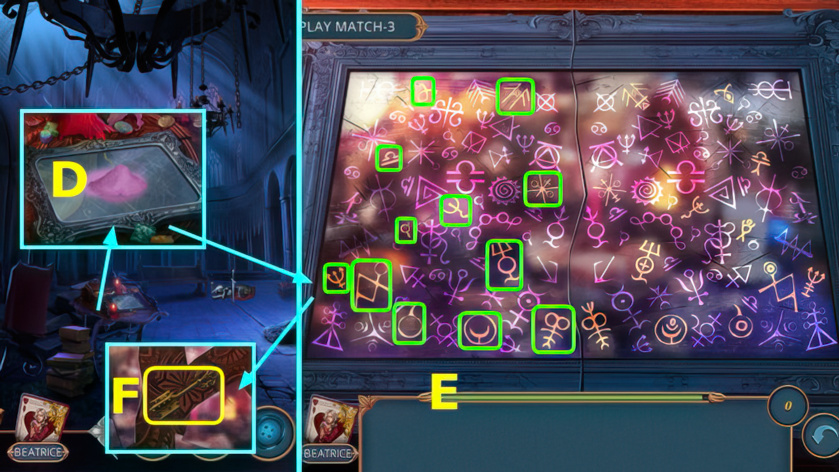
- Take task book (D).
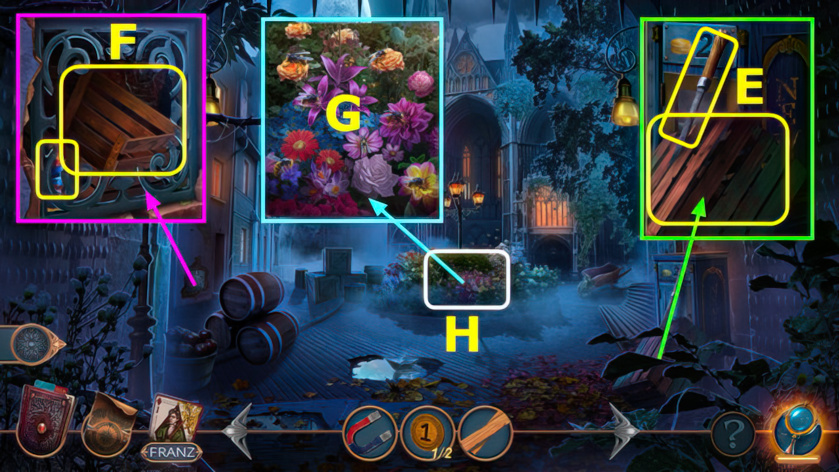
- Use KEY (E), earn GIFT BOX.

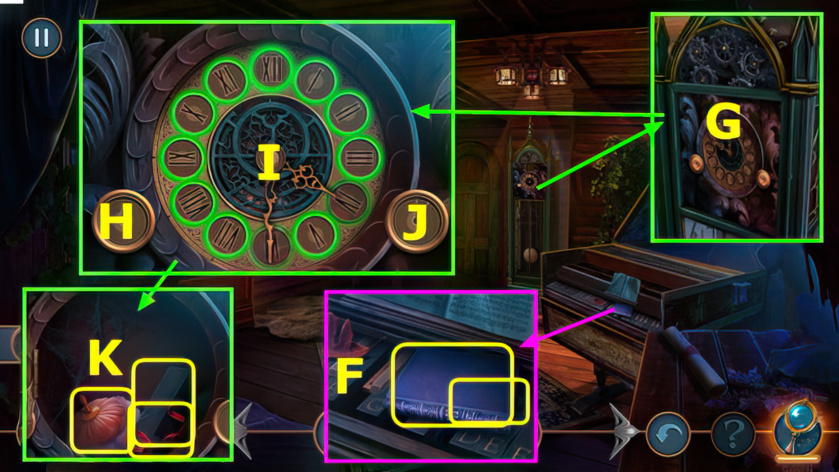
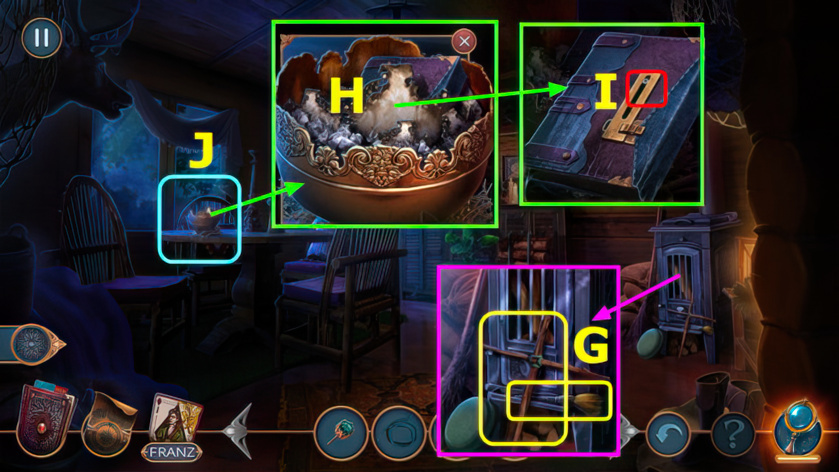
- Open GIFT BOX, take BRACELET, PIN, HAIRPIN, and PHOTO.
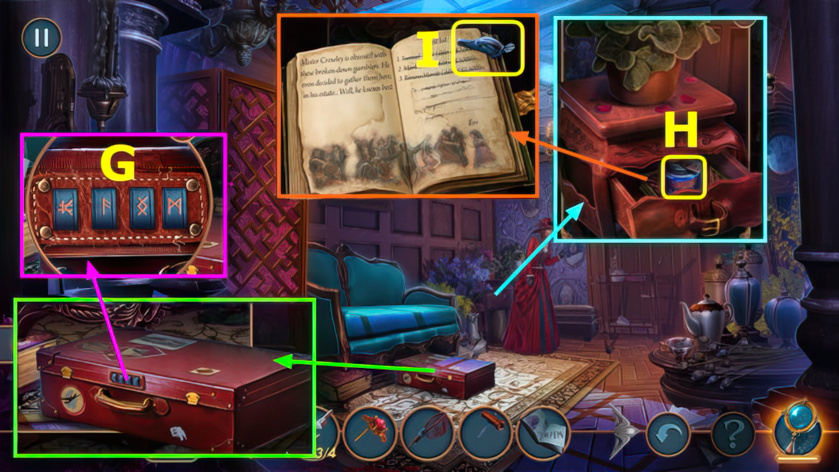
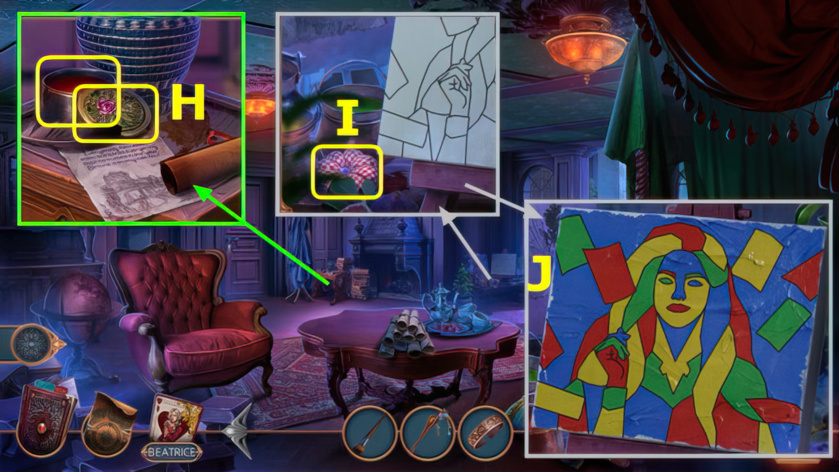
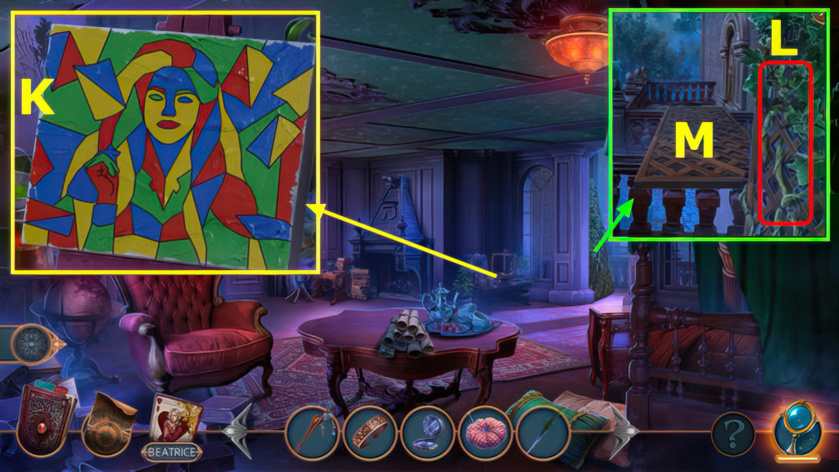
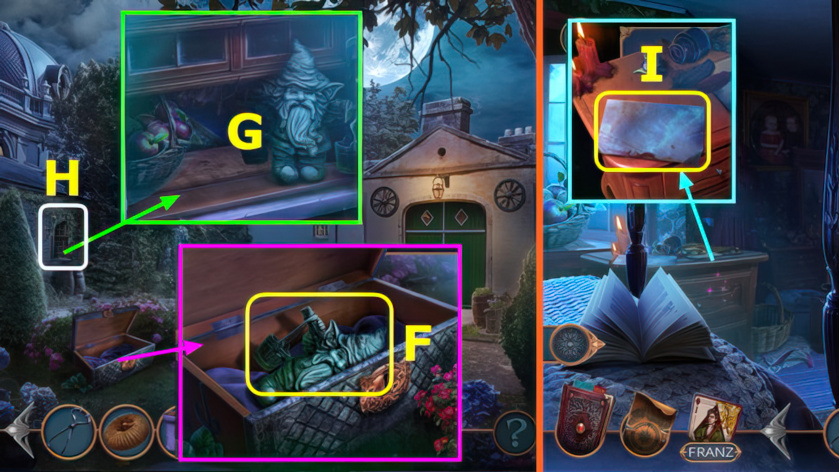
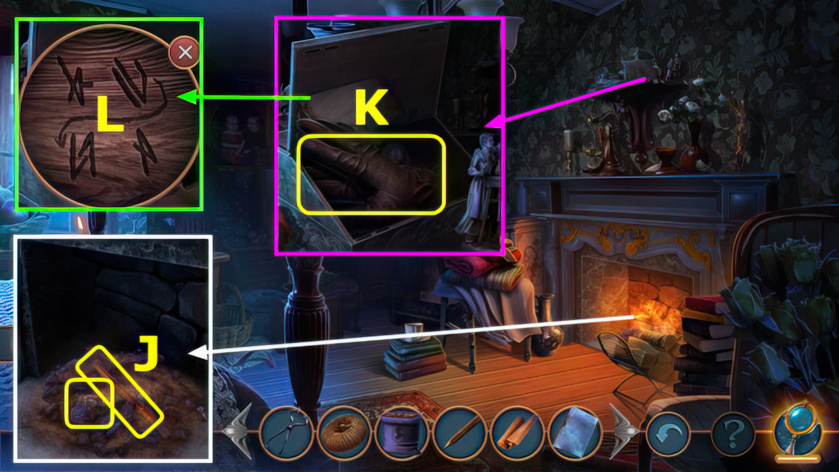
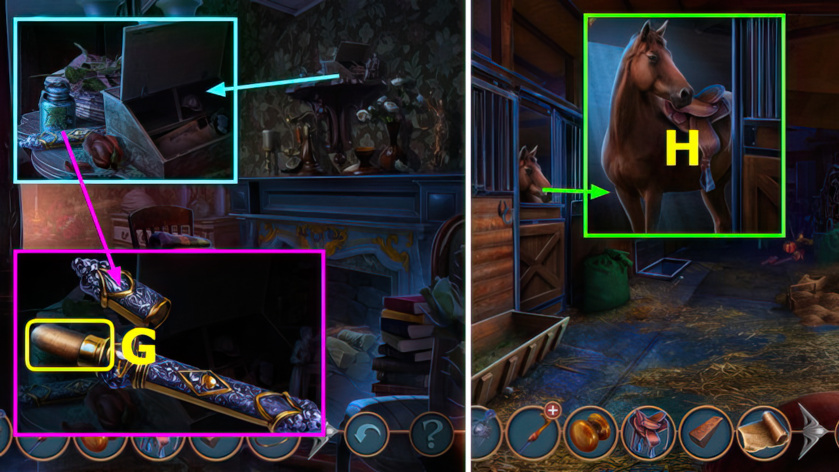
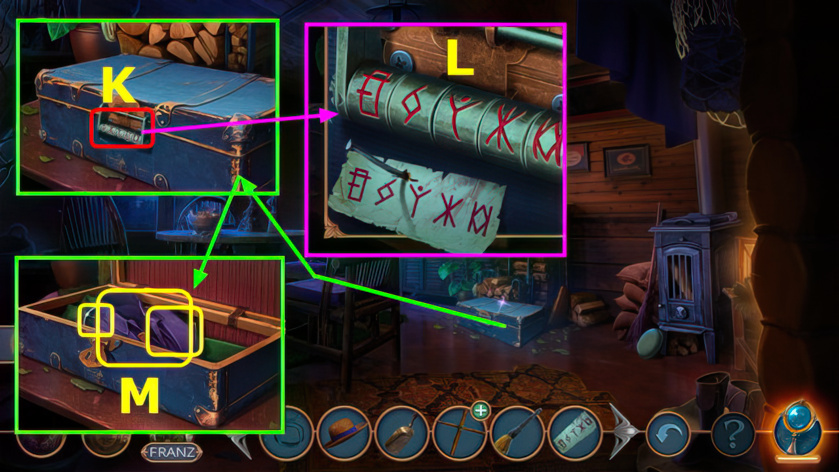
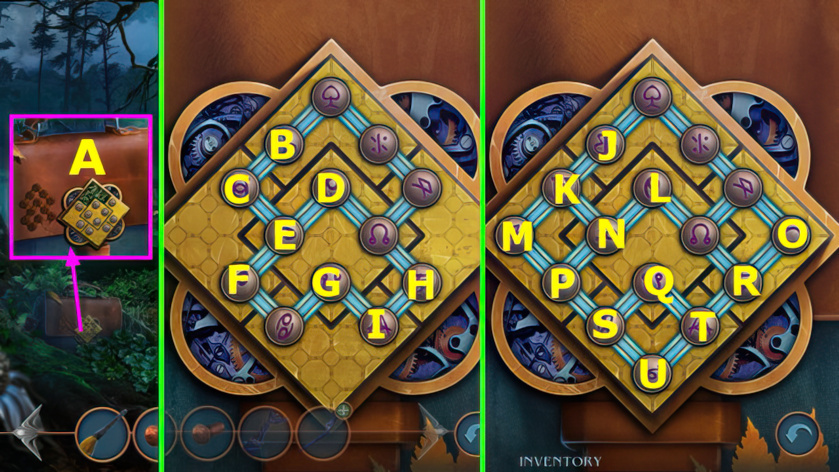
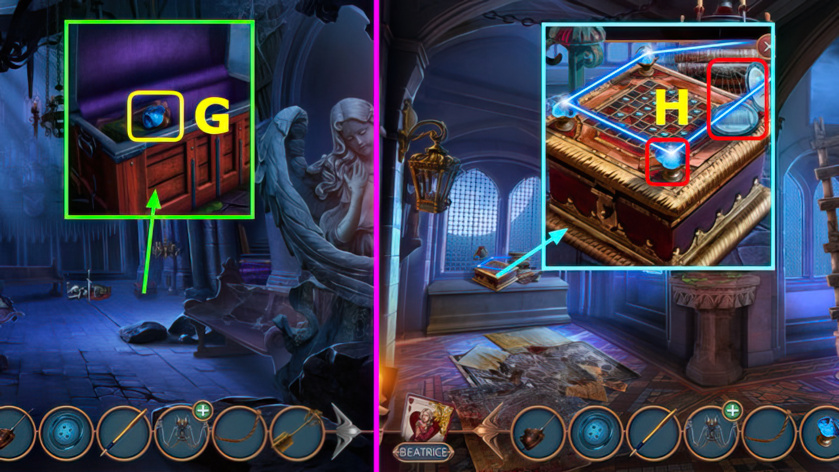
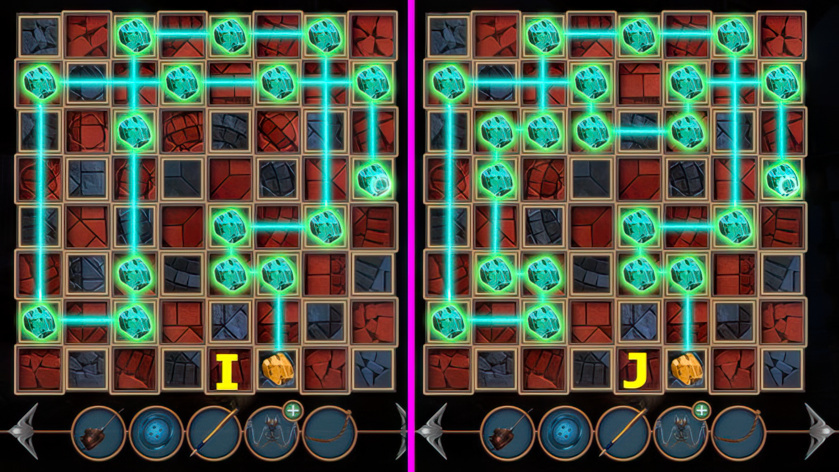
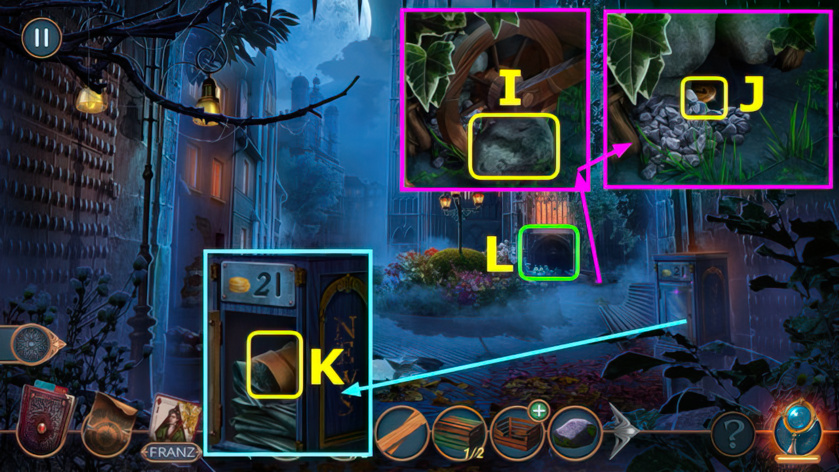
- Use PHOTO, easy solution (Gx3)-(Kx3)-(Lx2)-(Hx2)-(Ix2)-(Jx1).
- Hard solution (Gx3)-(Kx3)-(LX2)-(Mx3)-(Hx2)-(Ix2)-(Jx2).
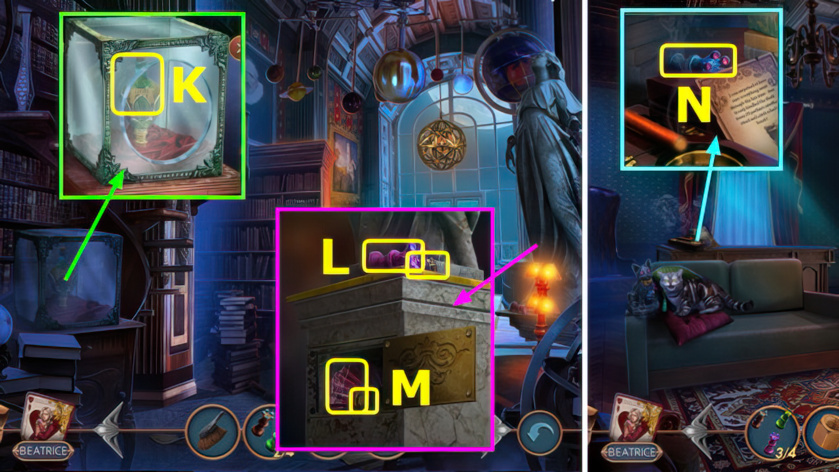
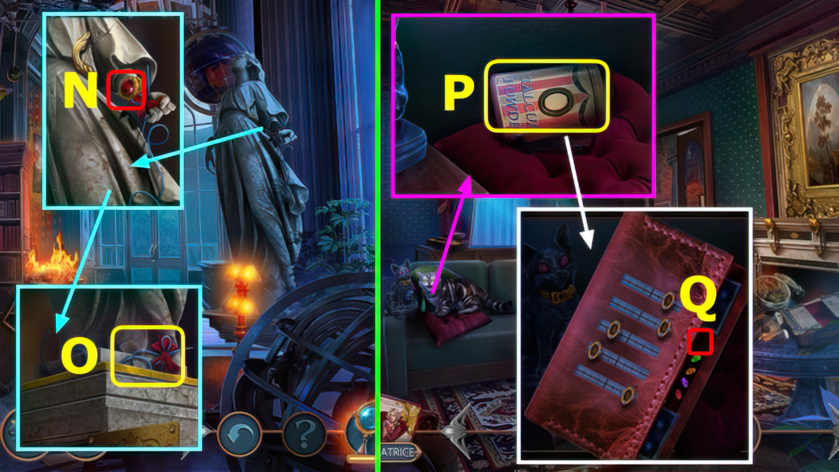
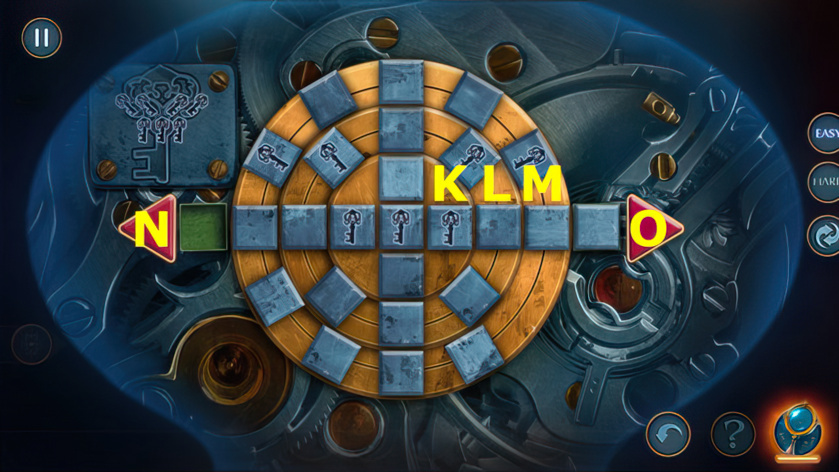
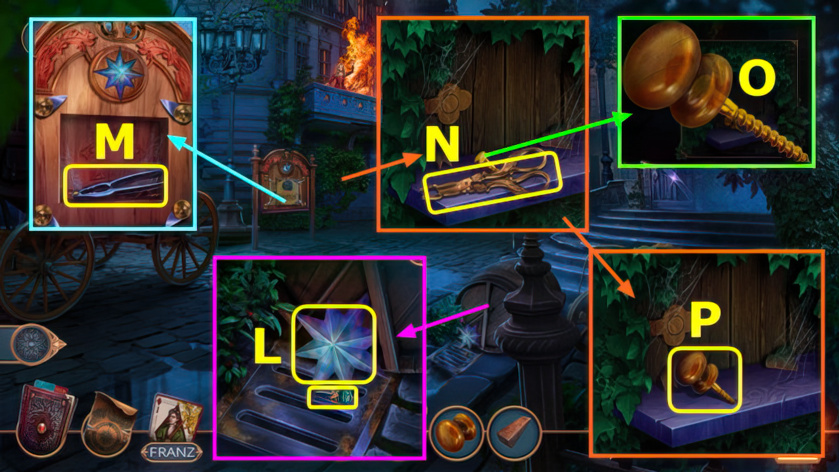
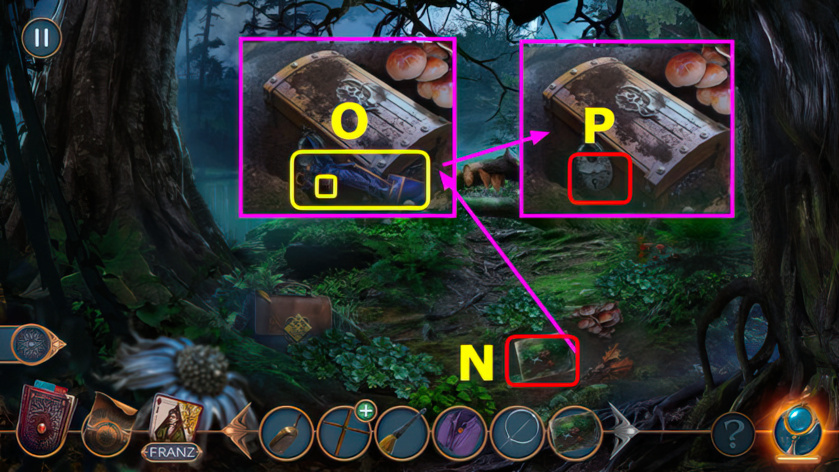
- Take MAKEUP BRUSH, 2/2 MASK, and QUILL (N).

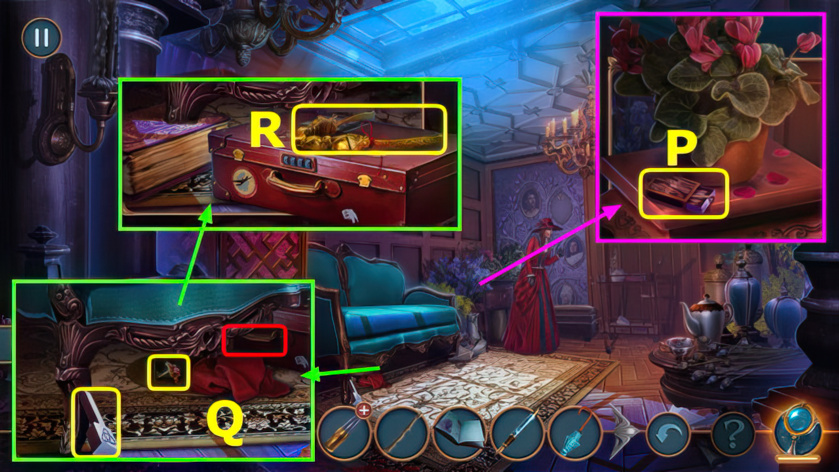
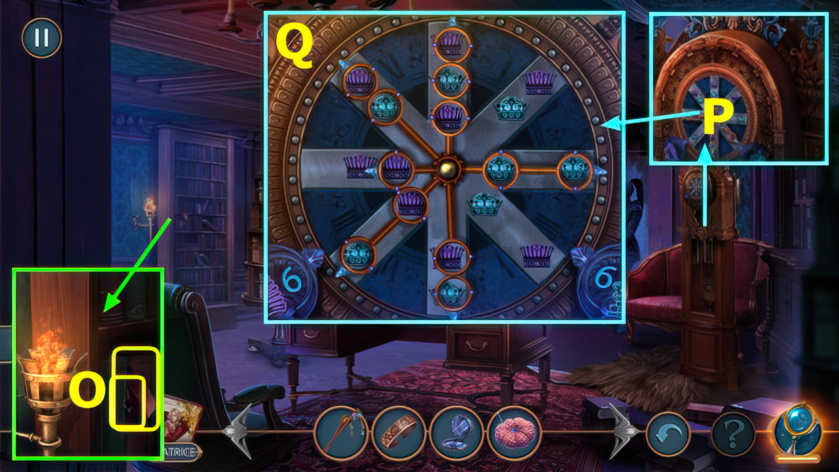
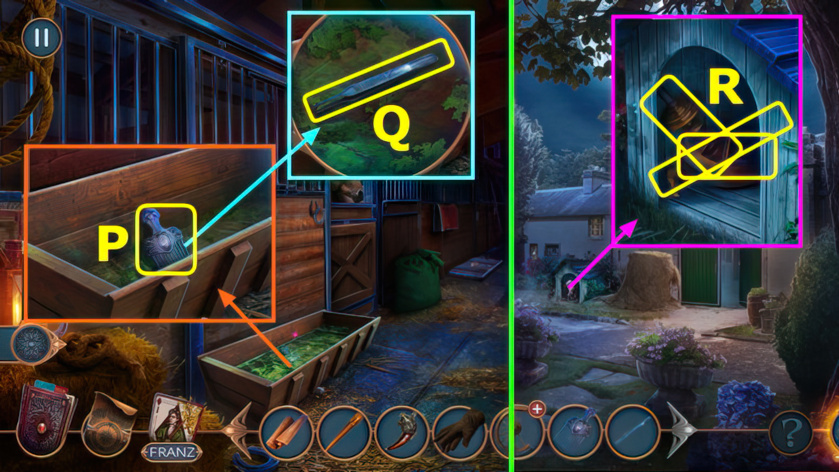
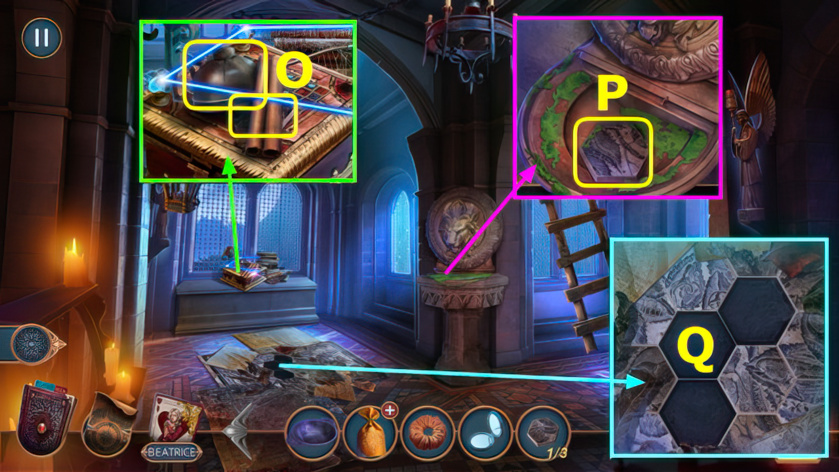
- Place MASK, take map and NOTEPAD (P).
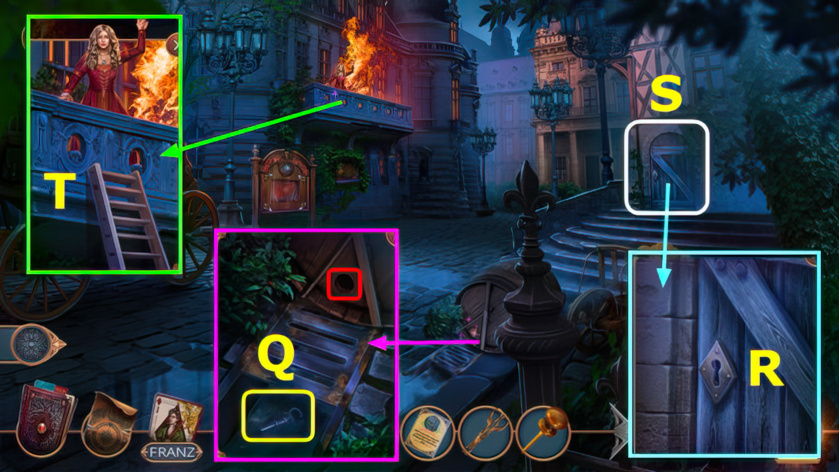
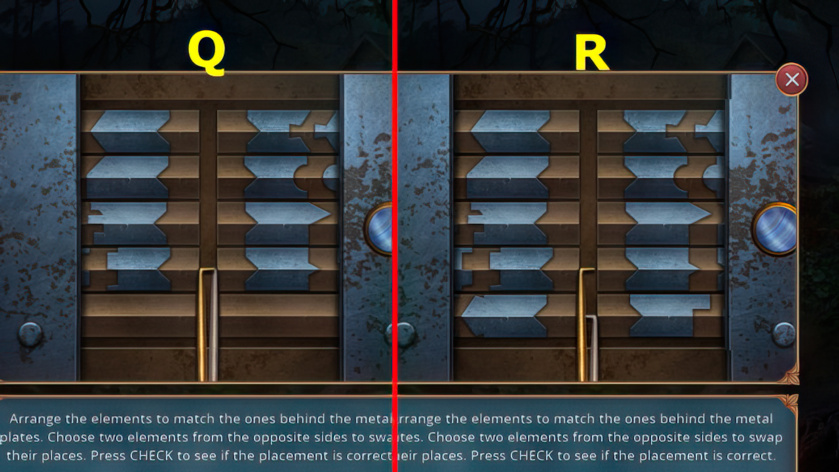
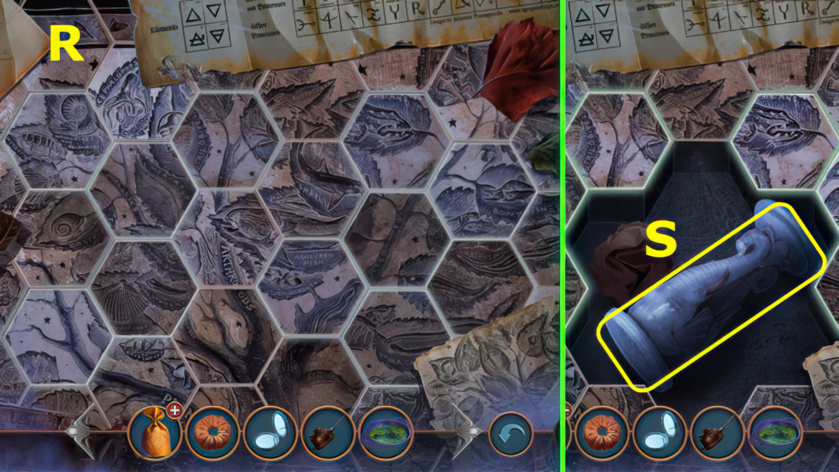
- Use NOTEPAD and QUILL (Q), select note components R-V.

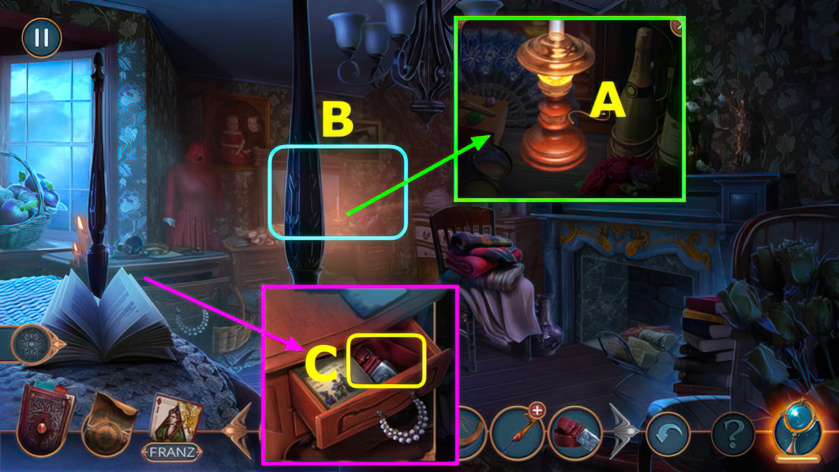
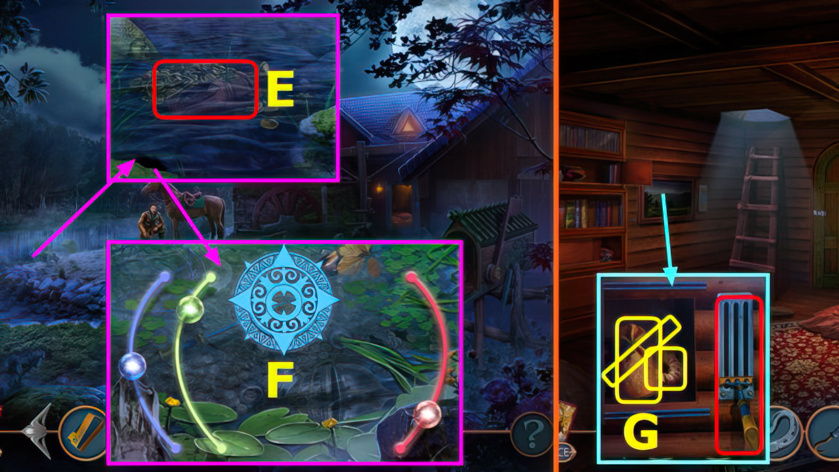
- Take ALCOHOL and examine locket, take BOOK and COG (A).
- Place COG (B).
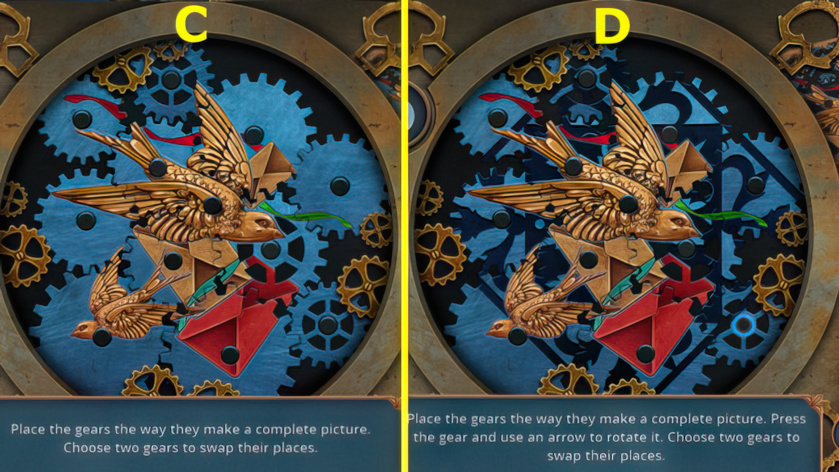
- Easy solution (C).
- Hard solution (D).

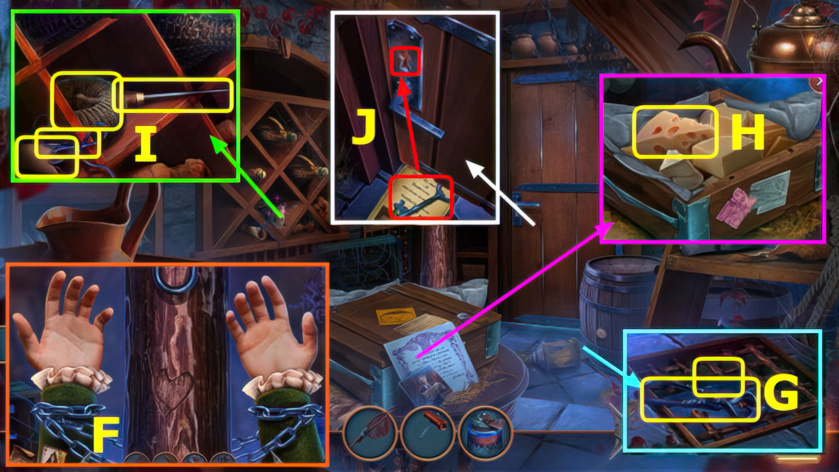
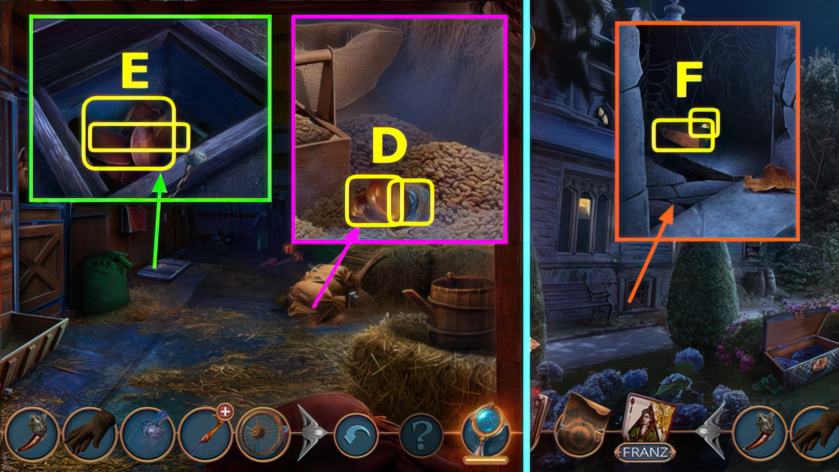
- Open package and read note, take BULLET and GLOVES (E).
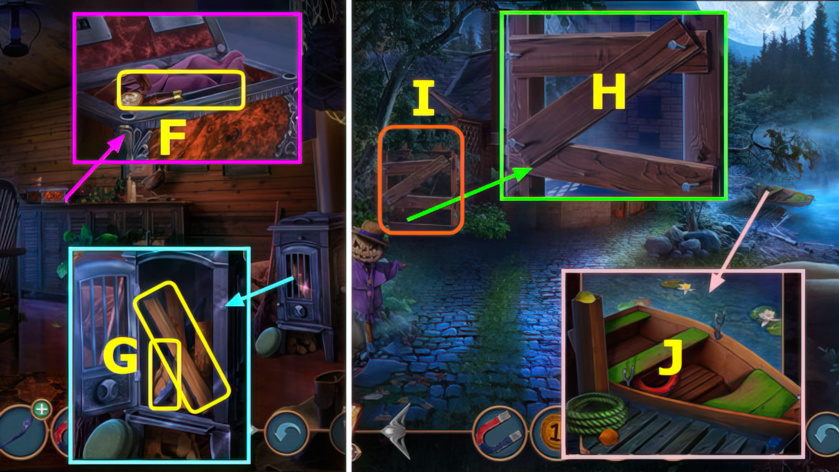
- Use GLOVES, take HANDKERCHIEF and DOOR KNOCKER (F).
- Place DOOR KNOCKER (G), select (H).
- Go forward.

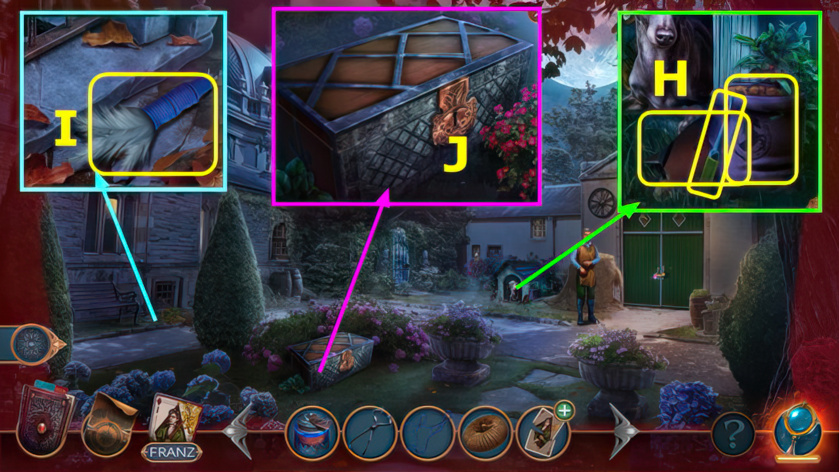
- Talk (I).
- Read note, take FUSE and MUSIC BOOK (J).
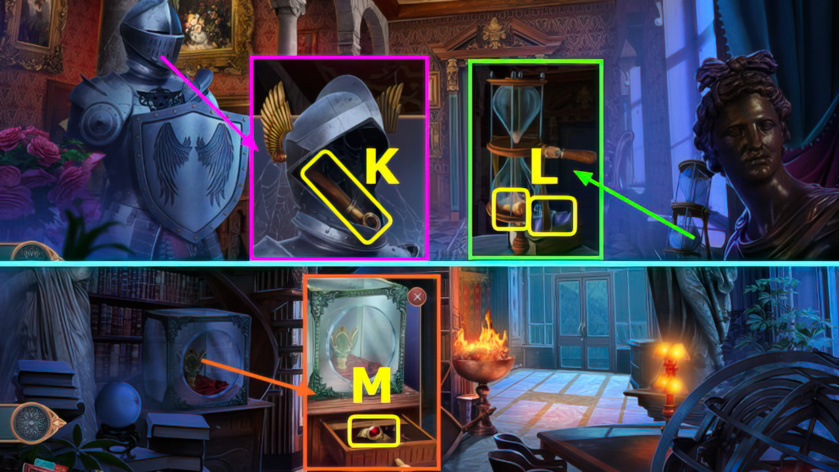
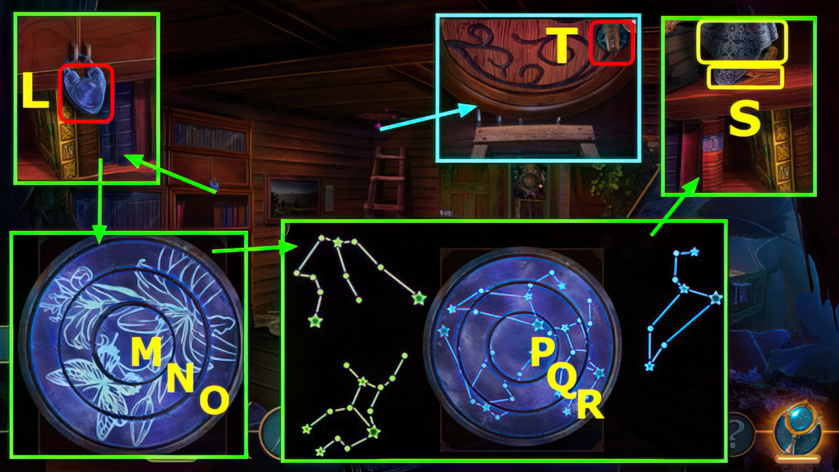
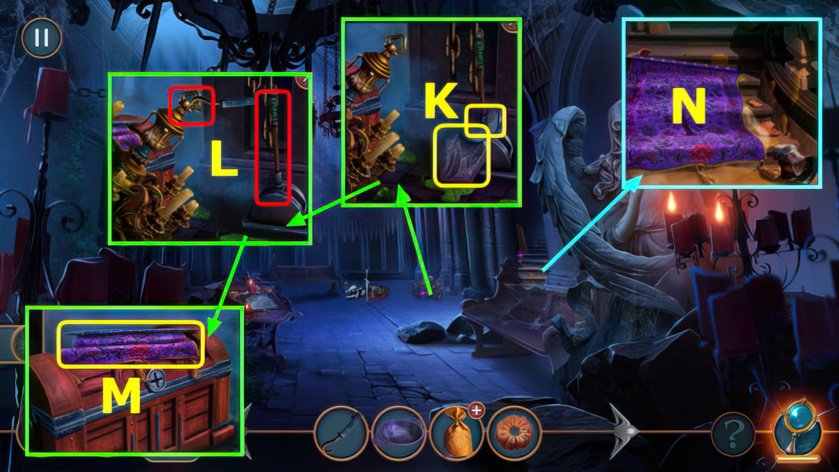
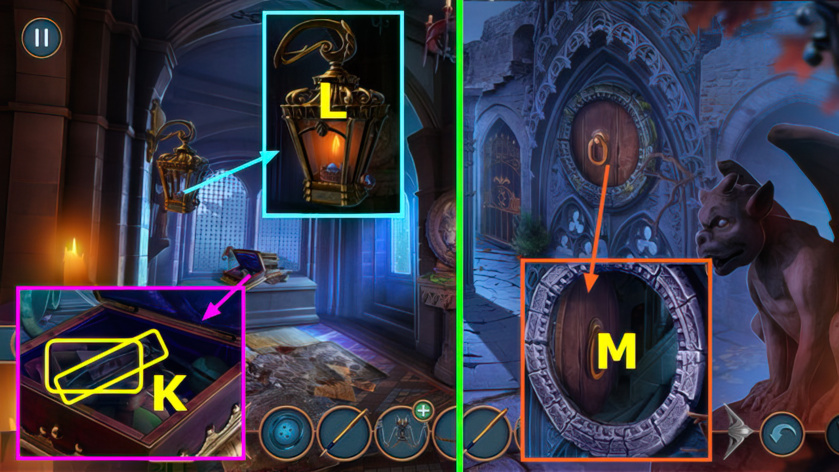
- Use ALCOHOL and HANDKERCHIEF, take FOUNTAIN PEN and LENS (K).

- Open lantern, place LENS (L).
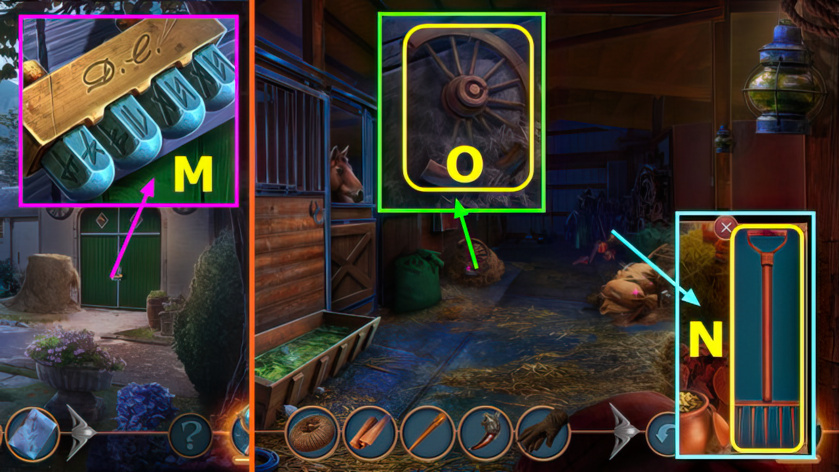
- Play puzzle, earn SHOES (M).
- Puzzle mini-game solution (N).
- Give SHOES (O).
- Go forward.
- Take MATCHES (P).
- Take 1/4 ORGAN KEYS, place BOOK, take STUD EARRING, move cloth, and use UMBRELLA (Q).
- Take NUTCRACKER (R).
- NUTCRACKER on BULLET, earn GUNPOWDER.
- Walk down 2x.
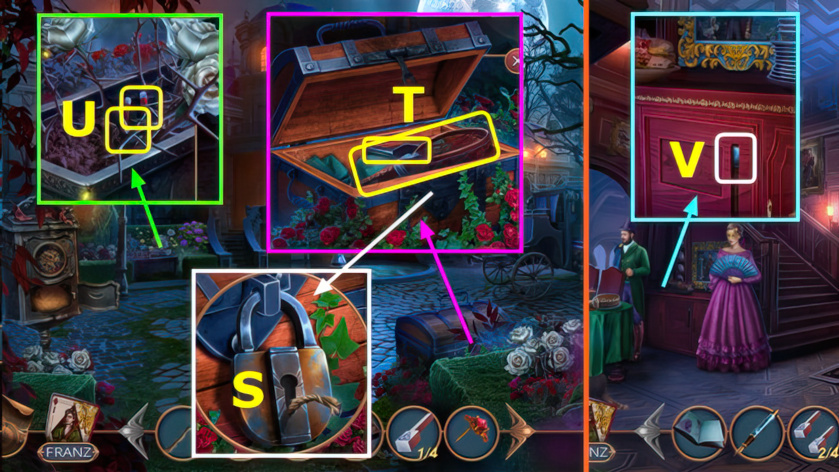
- Use GUNPOWDER, FUSE, and MATCHES (S).
- Open chest, take SCOOP NET and TROWEL (T).
- Use TROWEL, take 2/4 ORGAN KEYS and MAGNET (U).
- Go forward.
- Use MAGNET (V).

- Easy solution (A).
- Hard solution- slide in order 1-5 to positions (B).

- Take MILK (C).
- Move tablecloth, use MILK, take CORKSCREW and 3/4 ORGAN KEYS (D).
- Use MUSIC BOOK and FOUNTAIN PEN, earn CODE (E).
- Go forward.
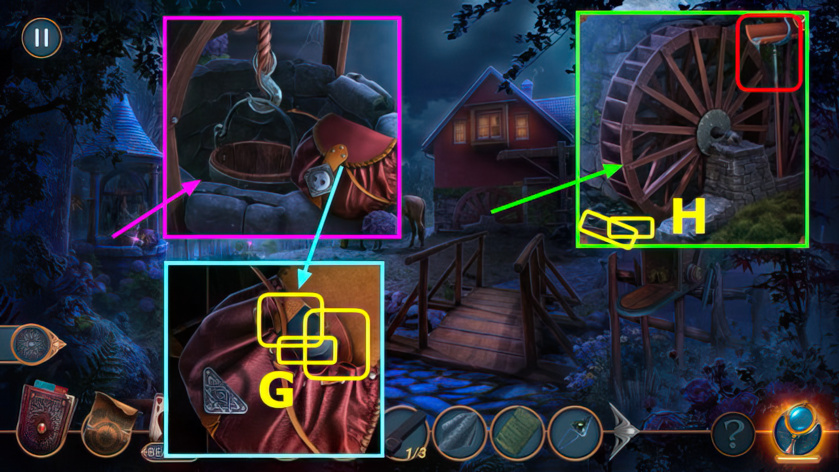
- Place CODE, solution (G), take BELT.
- Use BELT, take GLUE (H).
- Use STUD EARRING, take BOOKMARK (I).
- Walk down 2x.
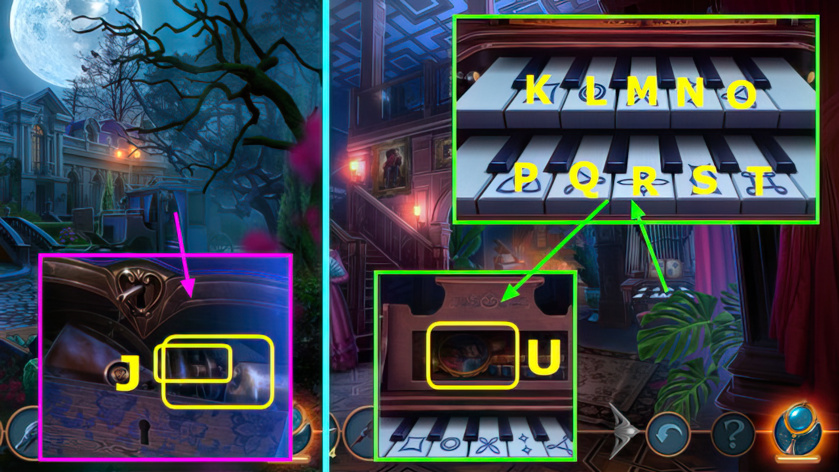
- Select key, use BOOKMARK, take BLOW TORCH and 4/4 ORGAN KEYS (J).
- Go forward.
- Place ORGAN KEYS, easy solution (L-M-P)-(L-R-T)-(K-M-N)-(R-S-T)-(K-N-O).
- Hard solution (L-M-P)-(R-S-T)-(K-M-N)-(L-R-T)-(N-Q-T)-(L-M-S)-(K-L-R)-(K-N-O).
- Take PORTRAIT (U).
- Go forward.
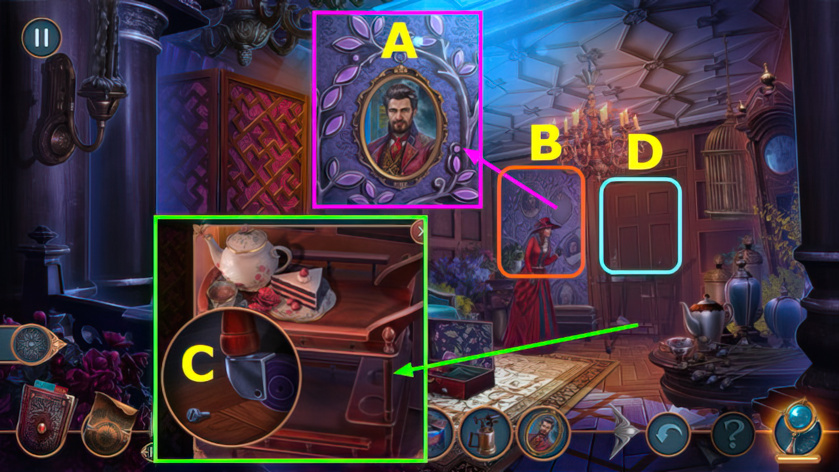
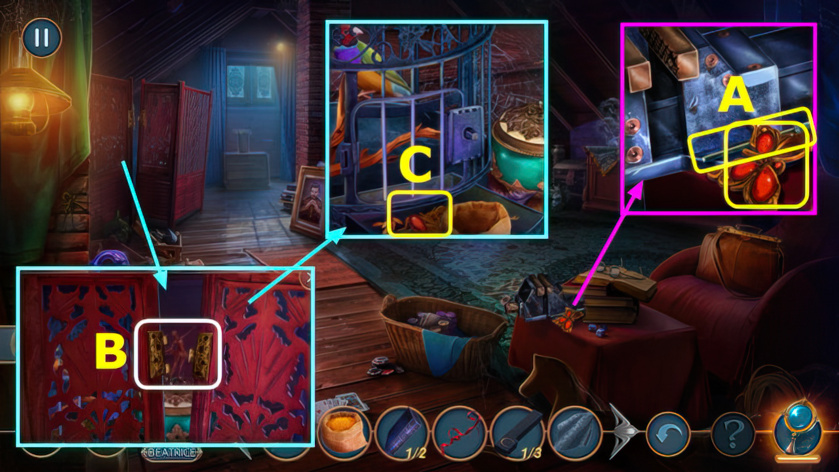
- Place PORTRAIT (A).
- Play puzzle, earn FAMILY MEDAL (B).
- Select cart, use FAMILY MEDAL (C), select cart.
- Select door (D).
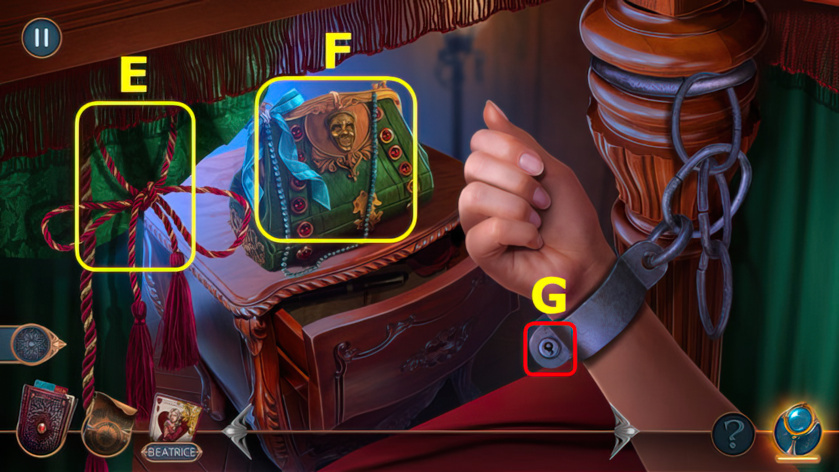
- Take ROPE (E).
- Use ROPE, earn BAG (F).
- Open BAG, take MAKEUP BRUSH, HAIRPIN, BRACELET, and PIN.
- Use PIN (G).
- Take MIRROR and RED PAINT, read note (H).
- Take PIN CUSHION, place RED PAINT and MAKEUP BRUSH (I).
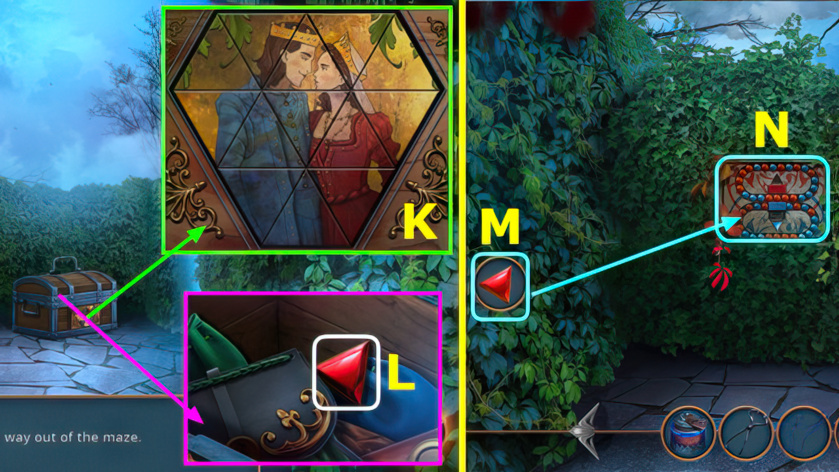
- Easy solution (J), take RITUAL DAGGER.
- Hard solution (K).
- Use RITUAL DAGGER, select trellis (L).
- Place trellis (M).
- Go right.
- Take PIECE OF LEATHER and CLOCK HANDS (O).
- Place CLOCK HANDS (P).
- Easy solution (Q).

- Hard solution (R).
- Take WINDING KEY (S).
- Use WINDING KEY, take SPADES AMULET (T).
- Walk down.
- Place SPADES AMULET, read journal, take BRUSH (A).
- Use HAIRPIN, earn CHAIN (B).
- Go right.
- Select wall, use BRACELET and CHAIN, select torch (C).
- Play puzzle, earn HEAVY FIGURINE (D).
- Use HEAVY FIGURINE (E).
- Use BLOW TORCH (F).
- Use CORKSCREW, take BLACKSMITH TONGS.
- Use SCOOP NET, take BOTTLE OPENER (G).
- Read note, use BOTTLE OPENER, take CHEESE (H).
- Take LACE and WINE LIST, use CHEESE, take METAL SPONGE and AWL (I).
- Use WINE LIST and AWL, select wine list, use key on lock (J).
- Solution (K).
- Select (L).
- Go left.
- Use (M-N).
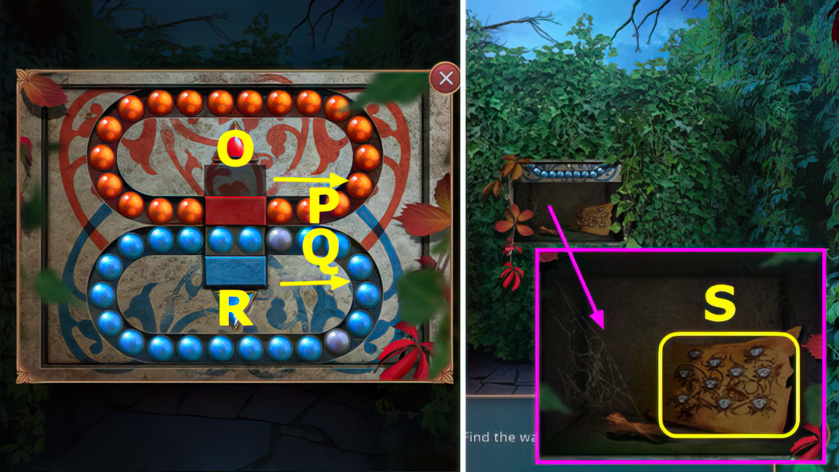
- Solution-(drag P 2x right, select R)-(Qx2-O)-(Px3-R)-(Q-O)-(Px3-R)-(Qx3-O)-(P-R)-(Q-O).
- (P-R)-(Qx2-O)-(Px3-R)-(Q-O)-(Px2-R)-(Qx4-O)-(P-R)-(Q-O)-(Px2-R)-(Qx2-O)-(P-R).
- Select (S).
- Walk down, right.
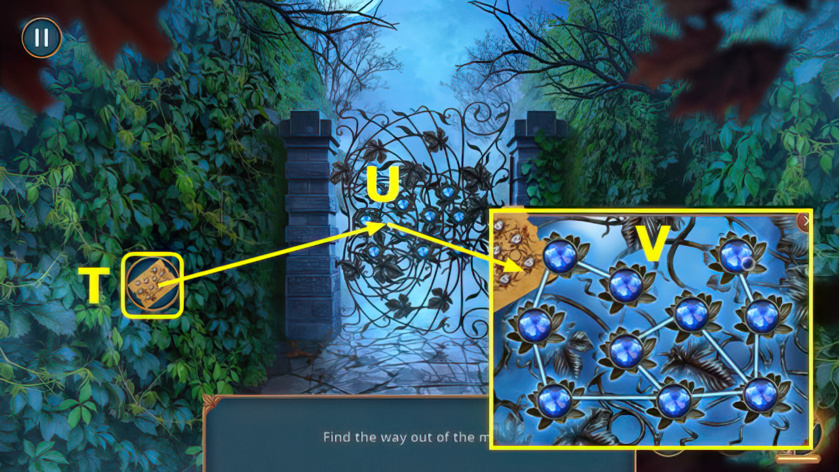
- Use (T-U).
- Solution (V).

- Read note, take EMERALD EYE (A).
- Take HOOK and 1/4 CHESSMEN (B).
- Place EMERALD EYE, take PENDANT (C).
- Select glass, use MIRROR (D).
- Use PENDANT (E).
- Go forward.
- Take 2/4 CHESSMEN and DIAMOND RING (F).
- Use PIN CUSHION and PIECE OF LEATHER, take NUT and ROPE (G).
- ROPE on HOOK, earn ROPE AND HOOK.
- Use ROPE AND HOOK (H).
- Play puzzle, earn BUNCH OF KEYS (I).
- Use BUNCH OF KEYS, select keys 5x (J).
- Go forward.
- Use DIAMOND RING, take SCENTED OIL (K).
- Take 3/4 CHESSMEN and CUFFLINK (L).
- Use BRUSH and SCENTED OIL, take BUTTON and FAN (M).
- Walk down 2x.
- Use FAN, read note, take 4/4 CHESSMEN (N).
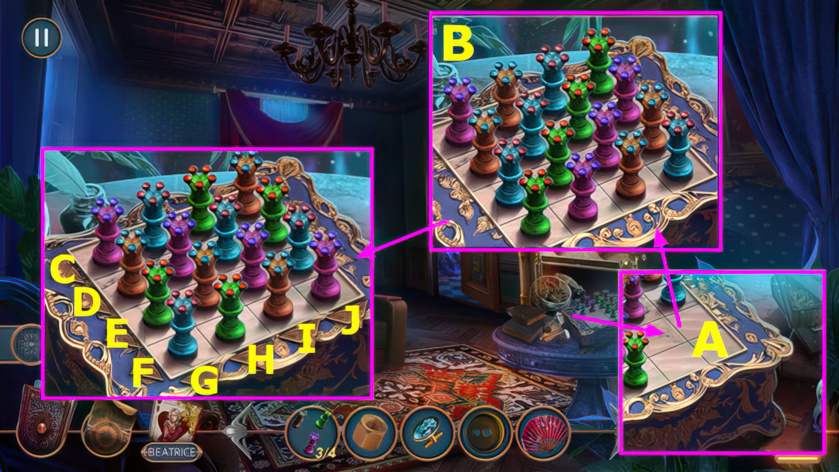
- Place CHESSMEN (A).
- Easy solution (B), take HELMET PART.
- Hard solution-Fx2-J-C-F-Jx3-Fx2-J-H-Ix2.
- Go forward.
- Place HELMET PART, take LEVER (K).
- Use LEVER and NUT, take LIGHTER and CORK (L).
- Go forward.
- Use CORK, take BRACELET (M).
- Place BRACELET (N).
- Take RIBBON (O).
- Walk down 2x.
- Use RIBBON, remove pillows, take TALCUM POWDER (P).
- Place CUFFLINK (Q).
- Easy solution (R).
- Hard solution (S).
- Take MEDAL.
- Go forward.
- Place MEDAL, take 1/2 GEARS and SCREWS (A).
- Go forward.
- Use BUTTON and SCREWS (B).
- Select (C).
- Select (D).
- Play puzzle, earn ACID (E).
- Use ACID (F).
- Select (G).
- Earn TORN CARD.
- Take 1/2 LOCKPICK, SAND, and BELLOWS (H).
- Use BELLOWS, take PENCIL, use LACE, take BRUSH (I).
- GLUE and BRUSH on TORN CARD, earn BAG.
- OPEN BAG, take BANDAGE and 2/2 LOCKPICK.
- Use LOCKPICK (J).
- Easy solution Mx5-O-L-K-Nx2-Lx2-Kx3-O-Lx2-Mx7-N-M-O-Lx4.
- Hard solution Cx5-Ax2-E-Ax2-Bx2-D-A-E-Bx4-Dx2-C-E-Cx7-A.
- Take GARDEN GNOME (F).
- Use GARDEN GNOME (G).
- Go left (H).
- Take PARCHMENT (I).
- Use SAND and BLACKSMITH TONGS, earn PEG and QUEEN FIGURINE (J).
- Take FANG PENDANT, place QUEEN FIGURINE, take GLOVES and read note (K).
- Use PARCHMENT and PENCIL, earn CODE (L).
- Walk down.
- Use CODE, solution (M).
- Go right.
- Play puzzle, take PITCHFORK (N).
- Take 1st WHEEL PART, use PITCHFORK, take BUCKET (O).
- Use BUCKET, take COMB (P).
- Use METAL SPONGE, take TWEEZERS (Q).
- Walk down.
- Use TWEEZERS and BANDAGE, take 2nd WHEEL PART, RUSTY CANE, and OIL LAMP (R).
- Go left.
- Place OIL LAMP (A).
- Play puzzle, earn NECKLACE (B).
- Use NECKLACE, read note, take BELT (C).
- 2nd WHEEL PART and BELT on 1st WHEEL PART, earn WHEEL.
- Walk down, right.
- Use WHEEL and PEG, take HANDLE and ROUND TOKEN (D).
- Use ROUND TOKEN, take SADDLE. Use GLOVES, take MALLET (E).
- Walk down.
- Use FANG PENDANT and MALLET, take CHIP and SIGNET RING (F).
- Go left.
- Use SIGNET RING, take MAP (G).
- Walk down, right.
- Open stall, use SADDLE and MAP (H).
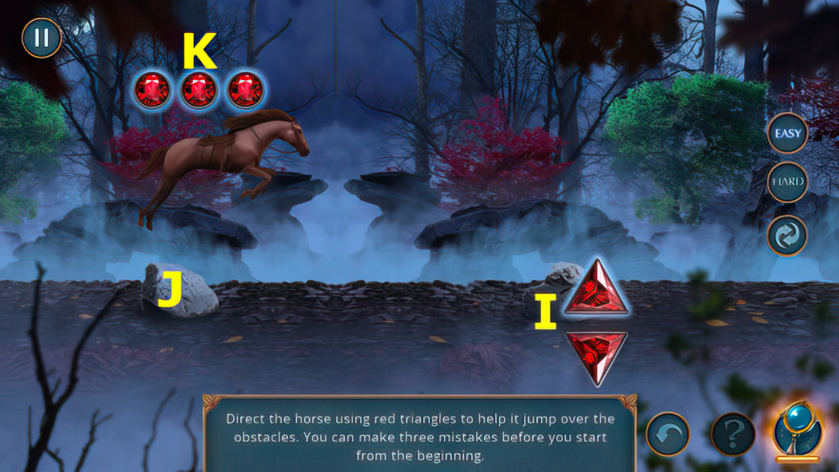
- Use the arrow buttons (I) to avoid obstacles (J).
- Three errors (K) and you begin again for easy solution, hard solution allows no errors.
- Take EARRING and STAR AMULET (L).
- Place STAR AMULET, take LEAFLET, and remove posters. Use COMB, take NUTCRACKER (M).
- NUTCRACKER on RUSTY CANE, earn SWORDSTICK.
- Use SWORD STICK, take TWEEZERS (N).
- Place HANDLE (O).
- Take CORKSCREW (P).
- Use CORKSCREW, take KEY (Q).
- Use KEY (R).
- Play puzzle, earn LADDER (S).
- Place LADDER (T).
- Take HEX RING and WEATHERVANE (A).
- Use WEATHERVANE, take 2/2 GEARS and FLAG (B).
- Take OVEN FORK, use HEX RING and FLAG, take MILLET and PACKAGE (C).
- LIGHTER on PACKAGE, read note, take KNOCKER.
- Place KNOCKER (D), select (E).
- Go forward.
- Take 1/2 BOOKS and CLOCK HANDS (F).
- Place CLOCK HANDS and GEARS (G).
- Solution (H-I)-(Hx3-Jx3-I)-(H-J-I)-(H-J-I)-(H-J-I).
- Take RIBBON, 1/3 KEYS, and POWDER PUFF (K).
- Use POWDER PUFF and TALCUM POWDER (L).
- Easy solution (O-Mx4-Nx3).
- Hard solution (R-Px2-Qx4)-(Px3-Q-Rx11)-(R).
- Read note, take SHAWL and CLOTHESPIN (S).
- Select, use CLOTHESPIN (T).
- Go forward.
- Take AMULET PART and METAL PIN (A).
- Use METAL PIN (B).
- Take SHEET MUSIC, open tray, use MILLET. Open tray, take PRECIOUS STONE (C).
- PRECIOUS STONE on AMULET PART, earn BUTTERFLY AMULET.
- Place BUTTERFLY AMULET (D).
- Play puzzle, earn HAIRPIN (E).
- Puzzle mini-game solution (F).
- Walk down 2x.
- Use HAIRPIN, take 2/3 KEYS, NAILS, and GUTTER (G).
- Use OVEN FORK and GUTTER, take HAMMER and 3/3 KEYS (H).
- Go forward.
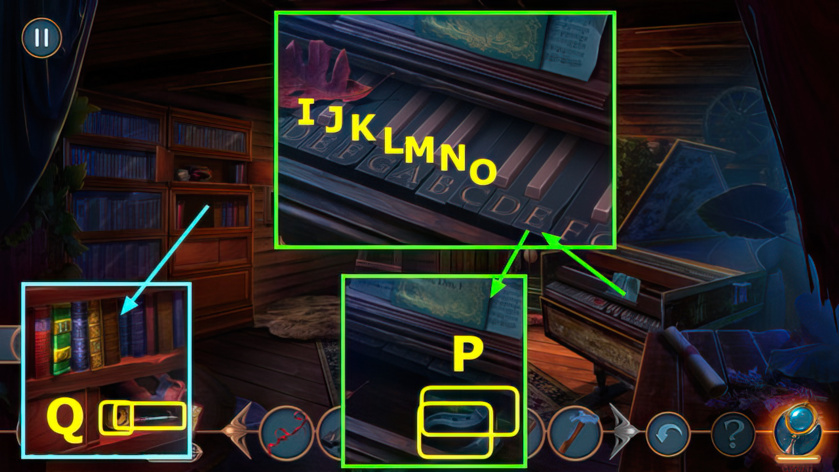
- Place SHEET MUSIC and KEYS, easy solution (M-J-O)-(I-K-M)-(K-M-O).
- Hard solution (M-J-O)-(O-J-L)-(I-K-M)-(K-M-O).
- Take BENT HORSESHOE and 2/2 BOOKS (P).
- Place BOOKS, take COIN and FOUNTAIN PEN (Q).
- Go forward.
- Use COIN, earn BIRD (A).
- Use FOUNTAIN PEN, place BIRD, take HAT and CARABINER (B).
- Use HAT, take SAUCER (C).
- Use RIBBON and SHAWL, earn BUTTERFLY NET (D).
- Walk down 2x.
- Use BUTTERFLY NET (E).
- Solution (F), earn TRIDENT.
- Go forward.
- Use TRIDENT, take POUCH, HAIR ELASTIC, and HANDLE (G).
- Go forward.
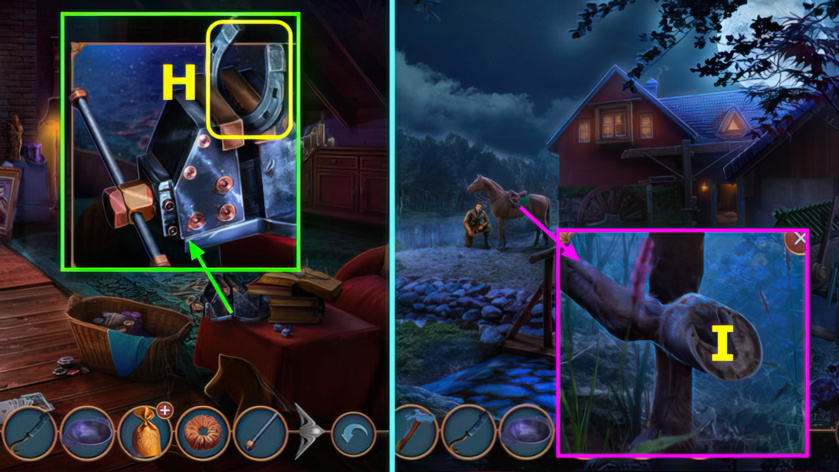
- Use BENT HORSESHOE and HANDLE, take HORSESHOE (H).
- Walk down 2x.
- Use NAILS, HAMMER, and HORSESHOE (I).
- Take HANDLE (A).
- Use HANDLE and CHIP, take AXE (B).
- Take WIRE, use AXE (C).
- Go forward.
- Take STRAW HAT and DUSTPAN (D).
- Use TWEEZERS, earn FEATHER (E).
- Use LEAFLET and FEATHER, select leaflet, use key on lock (F).
- Go forward.
- Take CROSS PIECE and BRUSH (G).
- Select 2x. (H).
- Use EARRING (I).
- Play puzzle, earn CODE (J).
- Place CODE (K).
- Solution (L).
- Take SHIRT, PIN, and TREASURE MAP (M).
- Walk down 2x.
- Use TREASURE MAP (N).
- Use DUSTPAN, take BOLT and HEAVY STATUETTE (O).
- Use PIN (P).
- Easy solution (Q).
- Hard solution (R).
- Read note, take BLUNT KNIFE.
- Go forward 2x.

- Use BLUNT KNIFE, earn SHARP KNIFE (S).
- Use SHARP KNIFE, take JACK-O-LANTERN (T).
- STRAW HAT, WIRE, SHIRT, and JACK-O-LANTERN on CROSS PIECE, earn SCARECROW.
- Walk down.
- Place SCARECROW, take OLD PLIERS and LEAF AMULET (U).
- Place LEAF AMULET, take LOCK PART (V).
- Walk down.
- Place LOCK PART (A).
- Easy solution Bx3-D-Ex2-Cx3-I-C-E-Cx3-F-Ix2-G-Hx2-Ix2.
- Hard solution Kx3-M-P-Mx3-P-L-Jx2-L-Ux3-Tx2-Rx3-O-Rx3-N-Lx3-Q-Sx2-Qx3-Sx2.
- Take MAGNET and SLINGSHOT (A).
- Use SLINGSHOT (B).
- Take 1/2 COINS (C), use BRUSH (D-E), earn BIRD STATUETTE.
- Go forward 2x.
- Place BIRD STATUETTE, read note, take AWL (F).
- Use HEAVY STATUETTE and AWL, take PLANK and PLIERS PART (G).
- BOLT and PLIERS PART on OLD PLIERS, earn PLIERS.
- Walk down.
- Use PLIERS (H).
- Play puzzle, earn PADDLES (I).
- Use PADDLES (J).
- Take MIRROR and 1/3 MOSAIC FRAGMENT (K).
- Use CARABINER, select lever (L).
- Take TAPESTRY (M).
- Place TAPESTRY (N).
- Go right.
- Read note, take OIL and 2/3 MOSAIC FRAGMENT (O).
- Use SAUCER, earn WATER, take 3/3 MOSAIC FRAGMENT (P).
- Place MOSAIC FRAGMENT (Q).
- Solution (R).
- Take STATUETTE (S).
- Use STATUETTE (A).
- Go right.
- Take BUTTON and QUILL PEN, use HAIR ELASTIC, take FEATHERS (B).
- Use WATER, take BAT AMULET SHARD and PLIERS (C).
- PLIERS on POUCH, take FUSE and LOOSE POWDER.
- Walk down 2x.
- Use LOOSE POWDER and FEATHERS (D).
- Select differences (E).
- Take CROSS-SHAPED KEY (F).
- Use CROSS-SHAPED KEY, take CRYSTAL (G).
- Go right.
- Place MIRROR and CRYSTAL (H).
- Easy solution (I).
- Hard solution (J).
- Take WING PART and MATCH (K).
- Use OIL, FUSE, and MATCH, earn FLASHLIGHT (L).
- Go right.
- Open door, use FLASHLIGHT (M).
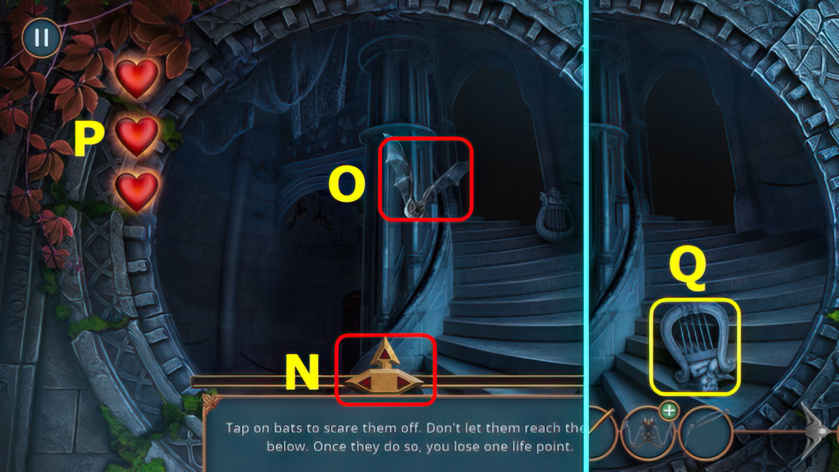
- Use weapon (N) to fire on bats (O) before they reach you.
- Three mistakes and you begin again (P).
- Take HARP (Q).
- Walk down 2x.
- Place HARP, take SCROLL (A).
- Go right.
- Use QUILL PEN and SCROLL, earn INSTRUCTION (B).
- BUTTON, WING PART, and INSTRUCTION on BAT AMULET SHARD, solution (C), earn BAT AMULET.
- Go right.
- Place BAT AMULET (D).
- Take FILE and 1/2 BOXES (E).
- Use FILE, take COLOGNE and BROKEN BOX (F).
- Use COLOGNE (G).
- Play puzzle, earn GARDENING RAKE (H).
- Use GARDENING RAKE, take STONE (I).
- Use MAGNET, earn 2/2 COINS (J).
- Use COINS, take NAILS (K).
- PLANK, NAILS, and STONE on BROKEN BOX, earn 2/2 BOXES.
- Use BOXES (L).
- Go forward.

- Card game 1, this game is randomly generated.
- Collect more cards by playing either a higher number or a trump card (M).
- If you don’t have a card higher than your opponent (N), play a trump card (O).
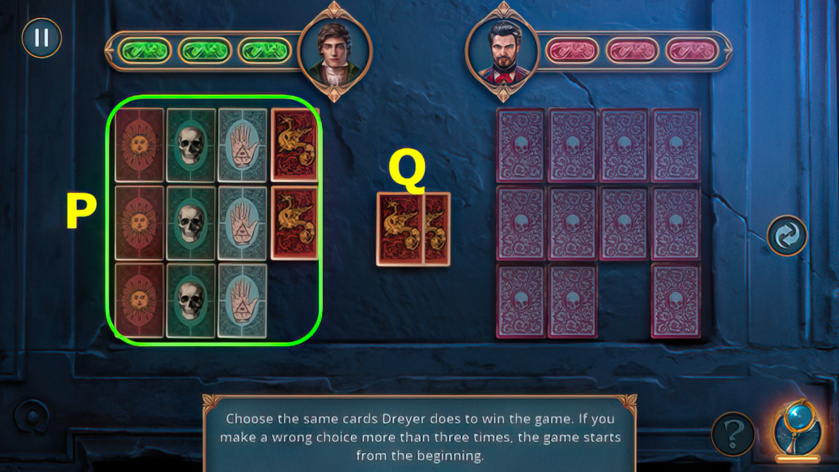
- Card game 2, this game is randomly generated.
- Choose a card (P) to match opponent’s card (Q) 3 times.
- The cards shuffle between rounds.
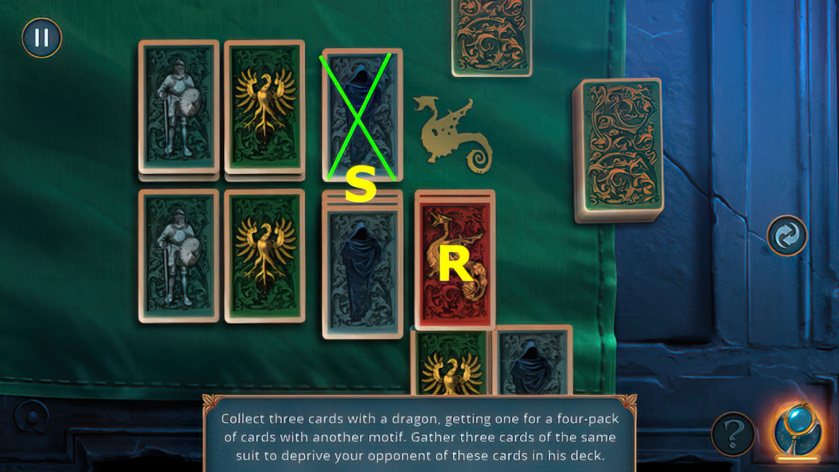
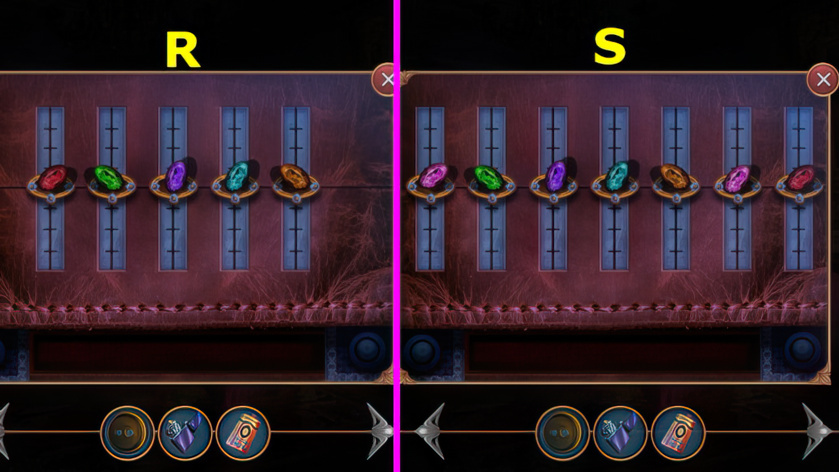
- Card game 3, this game is randomly generated.
- Collect 3 dragon cards (R) by playing 4 cards of the same suit.
- Playing a third card will remove the opponents cards of that type (S).
- Walkthrough Bonus Chapter, at the link below.


