
Connected Hearts 4: Cost of Beauty – Immerse yourself in a magical world where love stories come to life. Follow Cindy and Albert as they try to overcome all odds for the sake of love. Cindy is a young orphan living with her stepmother and stepsister. She discovers that her father, whom she thought was dead, is alive and being held by her stepmother. Cindy decides to save her father and goes to the ball to obtain an important letter. Meanwhile, Albert, the mayor’s son, is disappointed by his father’s absence at the ball. Their fates intertwine when they meet at the party. Help this couple to overcome all the obstacles on the way to happiness. If you can not pass any of the puzzles or do not know where the items are, on our site you can watch the walkthrough of Connected Hearts 4: Cost of Beauty, and learn how love can conquer everything.
Connected Hearts 4: Cost of Beauty – Walkthrough
Here you can see the full walkthrough of Connected Hearts 4: Cost of Beauty, namely for all chapters, including bonus chapter, in pictures.

- Take LIP BALM (A), SMALL BOX, and Map.
- Take BRUSH (B) and Notebook.
- Use SMALL BOX (C).
- Take PINCUSHION.
- Select.
- Read (D).
- Use PINCUSHION (E).
- Receive METAL FAIRY.
- Take DUCT TAPE (F).
- Select.
- Read (G).
- Use METAL FAIRY (H).

- Find all the keys (I).
- Select (1-4).
- Select (5-9) (J).
- Select (10-12) (K).
- Select (L).
- Take LOCK PICKS (M).
- Use LOCK PICKS (N).
- Go to Stepmother’s Bedroom.

- Play puzzle (O).
- Select (1-4).
- Use LIP BALM (P).
- Take PILLOW (Q).
- Use PILLOW (R).
- Select (S), read.
- Take BACK SCRATCHER and TOWELS.
- Take SEWING KIT (T) and OLD SHEET.
- Use OLD SHEET (U).
- Add TOWELS.
- Receive ROPE.
- Use ROPE (V).

- Place the knots on the silhouettes so that they are all tied together.
- Easy walkthrough (W): 1E-2A-3C-4H-5D-6G-7F-8B.
- Hard walkthrough (W): 1F-2A-3H-4B-5C-6G-7I-8K-9E-10D.
- Go to Backyard Garden.

- Talk (X).
- Take SET OF KEYS (Y).
- Select (Z).
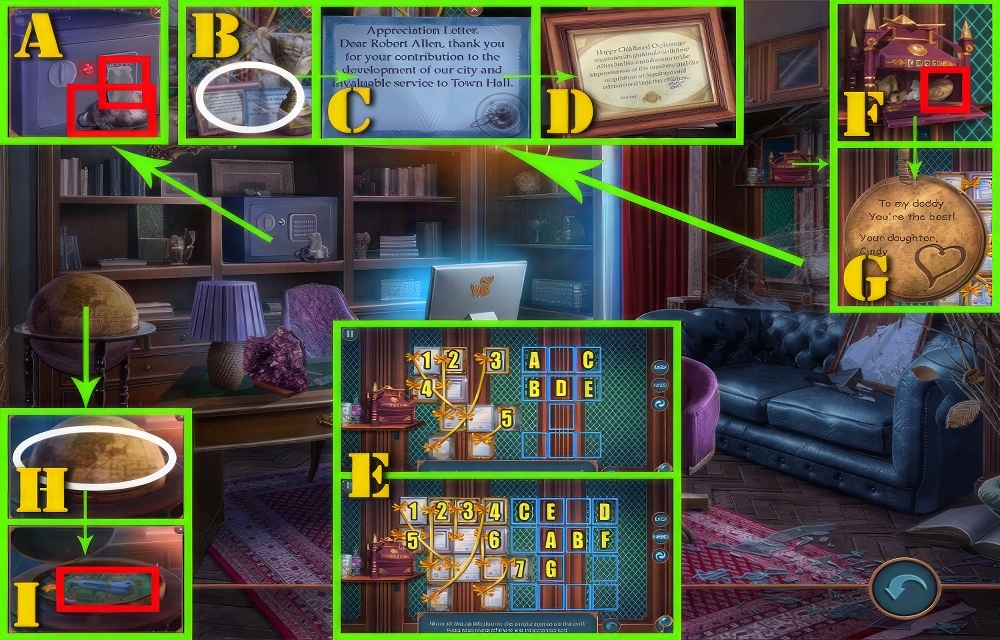
- Take PIECE OF PAPER (A) and FLUFFY KEYCHAIN.
- Use FLUFFY KEYCHAIN (B).
- Read (C).
- Read (D).
- Move all the certificates to the empty spaces on the wall.
- Note that some of them are interconnected.
- Easy walkthrough (E): 1B-2D-3C-4A-5E.
- Hard walkthrough (E): 1A-2B-3C-4D-5E-6F-7G.
- Take MEDAL (F).
- Read (G).
- Use MEDAL (H).
- Take PAPER KNIFE (I).
- Go to Backyard Garden.
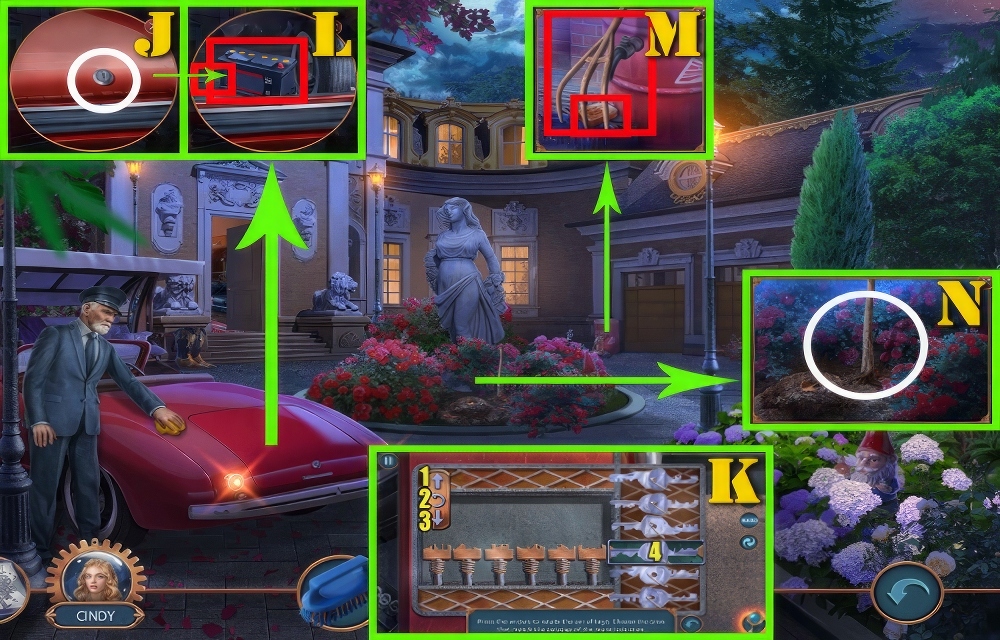
- Use SET OF KEYS (J).
- Press the arrows to rotate the set of keys.
- Choose the ones that match the carvings of the trunk lock ones.
- Easy walkthrough (K): 1-4-3-2-4-1-1-2-4-3-3-3-4-3-3-3-2-4.
- Hard walkthrough (K): 3-3-4-3-3-3-4-3-2-4-1-1-2-4-3-3-3-4-3-3-3-2-4.
- Take BACKUP GENERATOR (L) and SAW.
- Take RAKE and SOAP (M).
- Use SAW (N).
- Receive STICK.
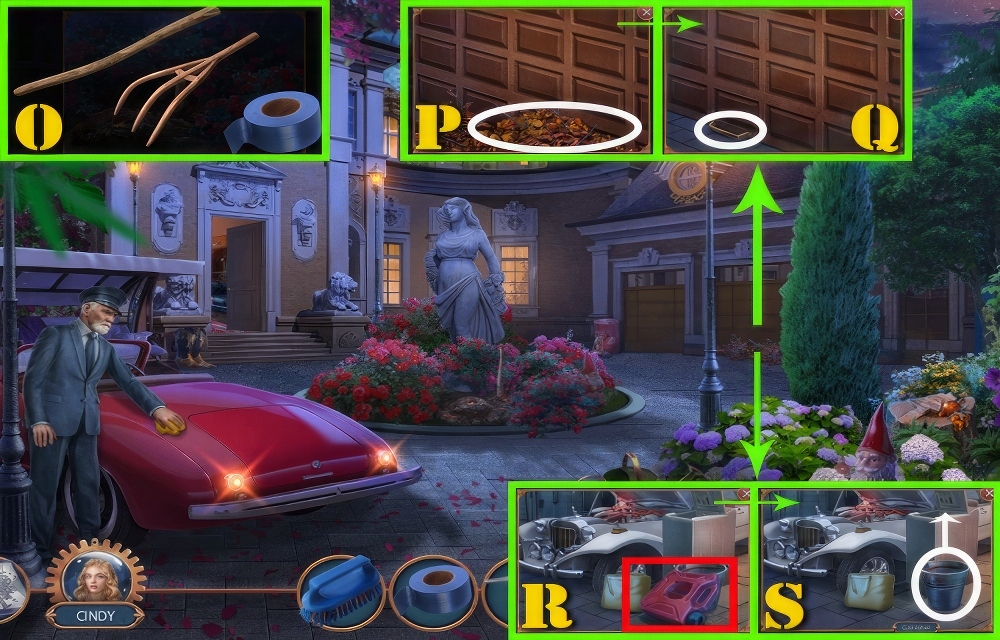
- Use RAKE (O).
- Add DUCT TAPE and STICK.
- Receive PITCHFORK.
- Use PITCHFORK (P).
- Select (Q).
- Take CANISTER (R).
- Select (S).
- Receive WATER BUCKET.
- Go to Parlor.
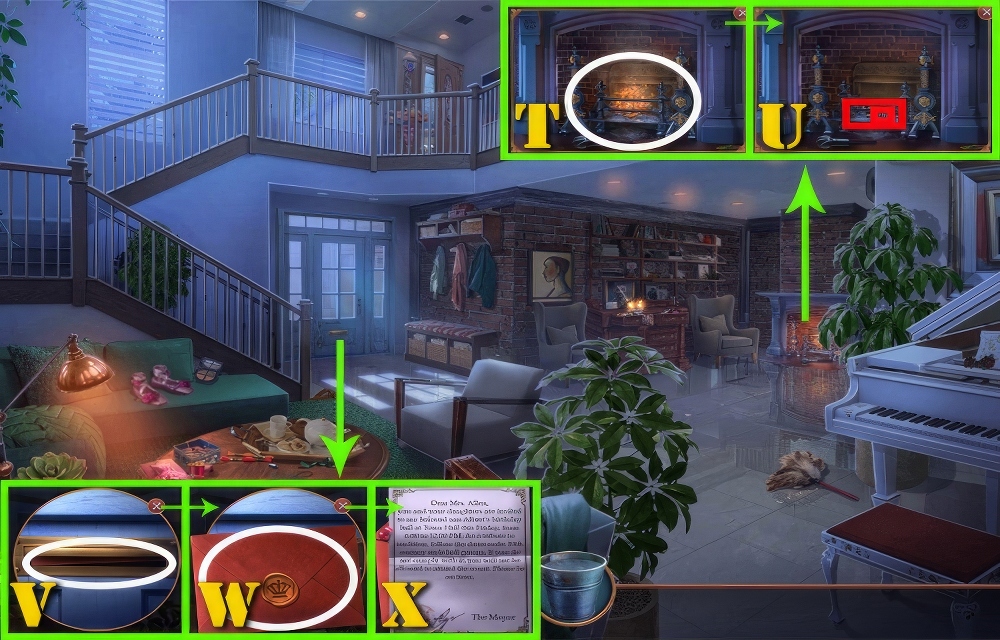
- Use WATER BUCKET (T) and BACK SCRATCHER.
- Take THIMBLE (U) and TWEEZERS.
- Use TWEEZERS (V).
- Select (W).
- Read (X).
- Receive PUSH-PIN.
- Go to Step-Mother’s Bedroom.

- Select (Y).
- Use PUSH-PIN (Z).
- Take PUSH-UP BARS (A).
- Use PUSH-UP BARS (B).
- Play puzzle (C).
- Select (1-12).
- Select (D).
- Take SHOE BOX (E).

- Use SHOE BOX (F).
- Select.
- Select (G).
- Read (H).
- Take COMB (I) and DIRTY DRESS.
- Use COMB (J).
- Select (K).
- Read (L).
- Take SHOES (M) and SCOOP.
- Go to Backyard Garden.

- Use SCOOP (N).
- Take SOLVENT (O).
- Use PAPER KNIFE (P).
- Receive CRAYON.
- Go to Father’s Study.

- Use PIECE OF PAPER (Q) and CRAYON.
- Receive CODE.
- Use CODE (R).
- Select (5-7-2-8) (S).
- Play puzzle (T).
- Select (1-12).
- Select (U).
- Take SOUVENIR HAMMER (V).

- Use SOUVENIR HAMMER (W).
- Take GEM (X).
- Use GEM (Y).
- Guide all the gems to the appropriate holes.
- Press the arrow to rotate the central part of the labyrinth.
- Easy walkthrough (Z): A1-(↓)-A5-(↓)-(↓)-A3-(↑)-(↑)-A4-(↓)-A2-(↑)-(↑)-A7-B1-(↑)-B6.
- Hard walkthrough (Z): (↑)-C3-A3-(↓)-C6-A6-(↓)-A2-(↑)-(↑)-A5-(↓)-A1-(↑)-(↑)-A10-(↑)
- C2-(↑)-(↑)-C5-(↓)-C1-(↑)-C9-B3-(↑)-(↑)-B7-(↑)-B4-(↓)-B8.
- Take GAS BURNER (A).
- Go to Backyard Garden.
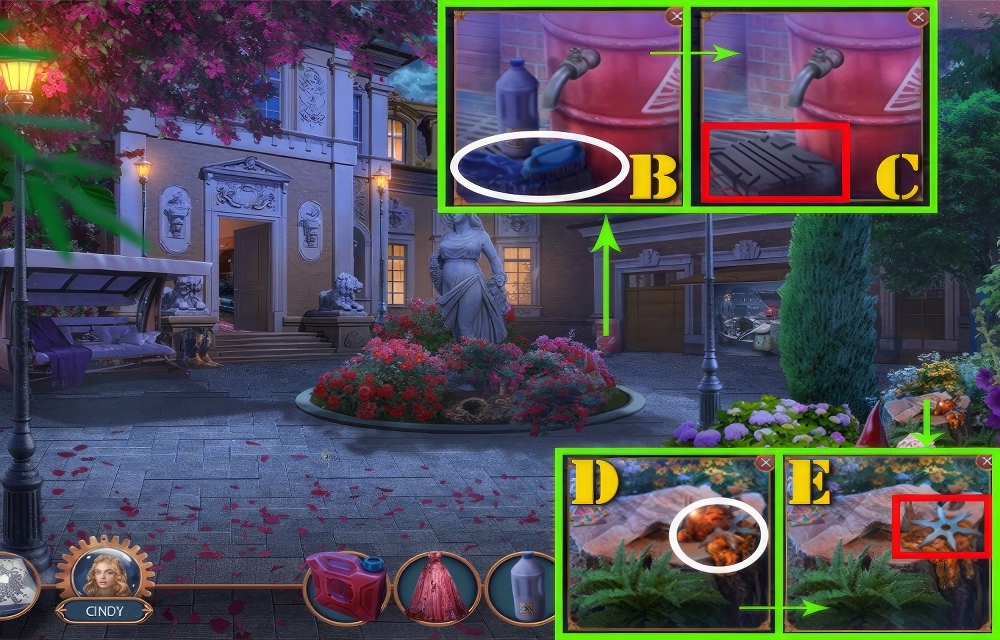
- Use BRUSH (B) and SOLVENT.
- Take TOOL SET (C).
- Use GAS BURNER (D).
- Take SHURIKEN (E).
- Go to Father’s Study.
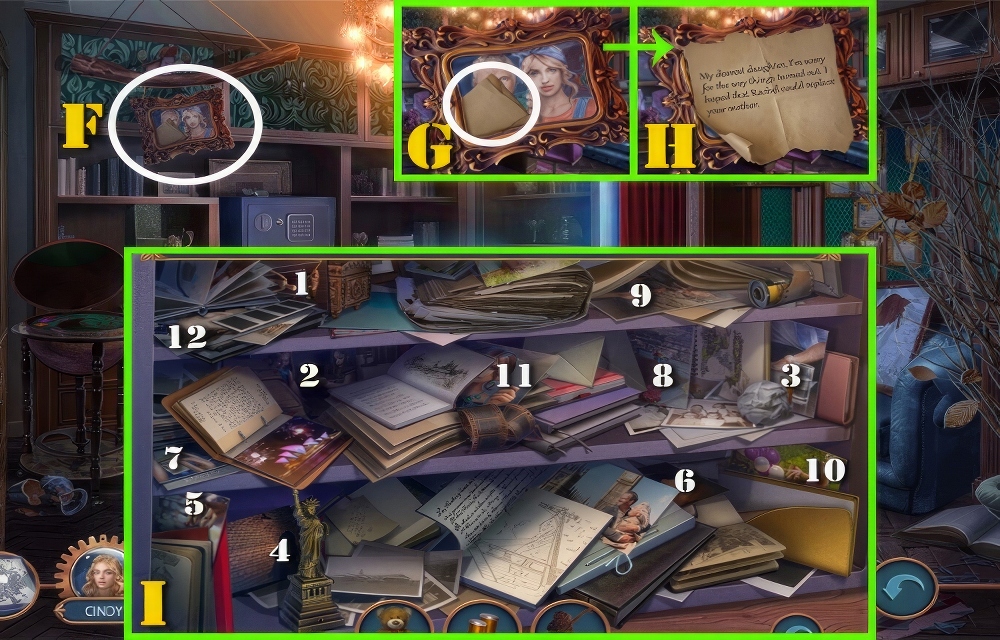
- Use SHURIKEN (F).
- Select (G).
- Read (H).
- Play puzzle (I).
- Select (1-12).
- Go to Backyard Garden.

- Use SOAP (J) and DIRTY DRESS.
- Receive MOM’S DRESS.
- Go to Parlor.

- Play puzzle (K).
- Find all paired objects.
- Select (1-12).
- Select (L).
- Take DRESS DECORATION (M).
- Use SEWING KIT (N), THIMBLE, DRESS DECORATION, and MOM’S DRESS.
- Take BALL GOWN (O).
- Go to Stepmother’s Bedroom.

- Use SHOES (P) and BALL GOWN.
- Play puzzle (Q).
- Select (1-6).
- Select (R).
- Take FURNITURE LIFTER (S).
- Use FURNITURE LIFTER (T).
- Take VALVE.
- Go to Backyard Garden.
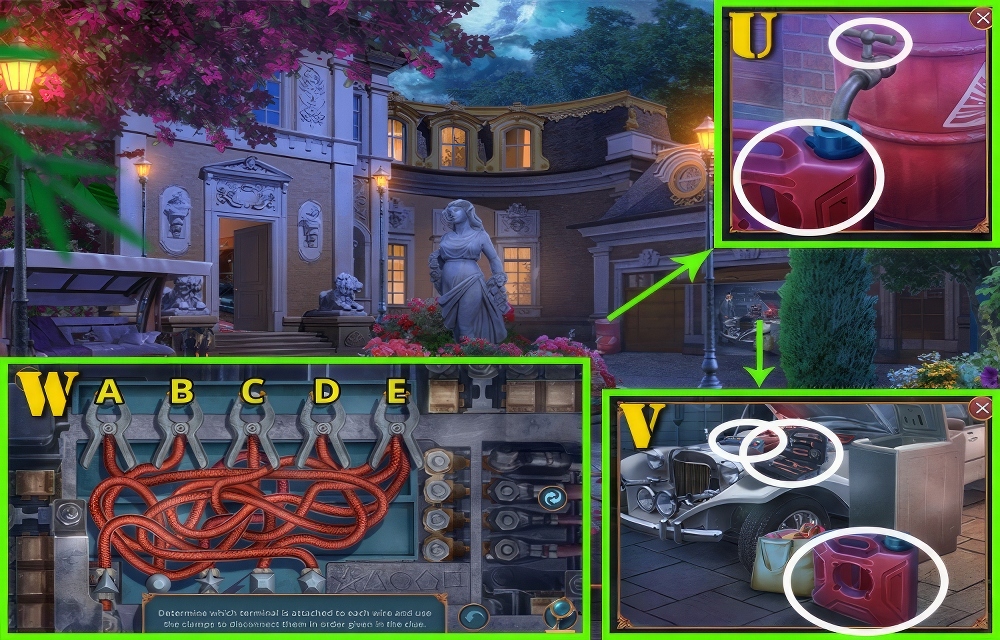
- Use VALVE (U) and CANISTER.
- Receive GASOLINE.
- Use BACKUP GENERATOR (V), TOOL SET, and GASOLINE.
- Play puzzle (W).
- Determine which terminal is attached to each wire and use the clamps to disconnect them in order given in the clue.
- Walkthrough (B-D-C-A-E).
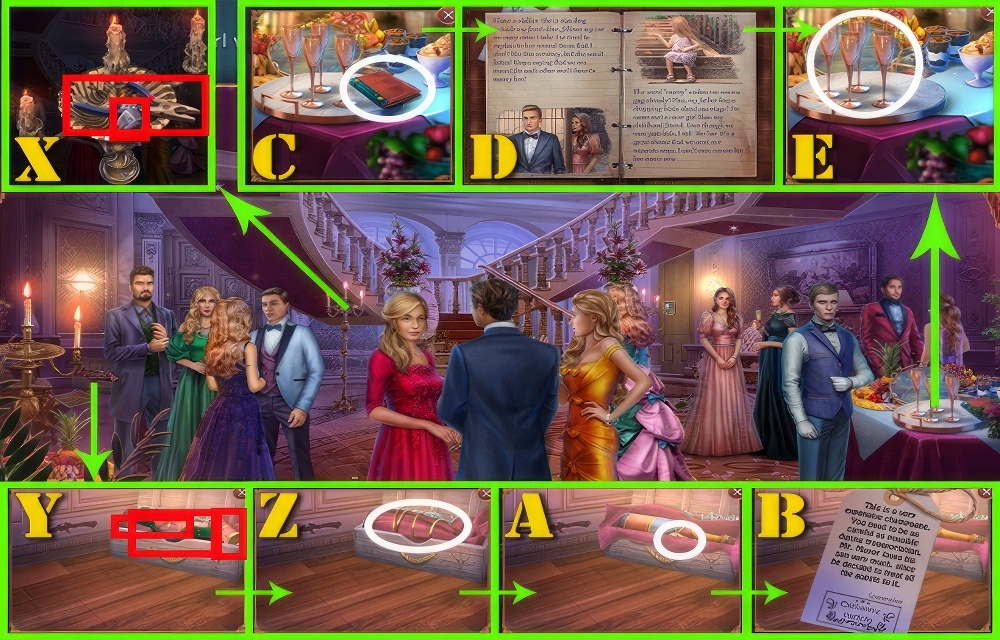
- Take CANDLE (X) and PLIERS.
- Take STRAP (Y), STENCIL, and MONOCULAR.
- Use PLIERS (Z).
- Select (A).
- Read (B).
- Take CHAMPAGNE.
- Select (C).
- Read (D).
- Use CHAMPAGNE (E).

- Take CHAMPAGNE TRAY (F).
- Use CHAMPAGNE TRAY (G).
- Talk.
- Take KEY CARD (H).
- Use KEY CARD (I).
- Find the chip with the image from the clue on the screen three times.
- You have six tries.
- Walkthrough (J): Random.
- Go to Service Corridor.

- Take ROPE (K), PIPE, and MAGNET AND ROPE.
- Use MAGNET AND ROPE (L).
- Guide the magnet through the vent so as to pass through each cell the required number of times and reach the finish.
- Easy walkthrough (M): 4-2-2-2-2-4-4-3-4-1-1-3-3-3-3-3-3-3-1-1-4-4.
- 2-2-1-1-1-1-4-4-1-3-2-4-1-3-2-4-4-4-4-4-2-2-4-3-1-2-2.
- Hard walkthrough (M): 4-2-2-2-2-4-4-3-4-1-1-3-3-3-3-3-4-3-3-3-1-1.
- 4-4-2-2-1-1-1-1-4-4-1-3-2-4-1-3-2-4-4-4-3-4-4-4-3-4-2-2-4-3-1-1-2-2-2.
- Take KEY (N).
- Use KEY (O).
- Take SCREWDRIVER (P).
- Select (Q).
- Use SCREWDRIVER (R) and PLIERS.
- Go to Balcony.

- Take BRUSH (S) and GEAR.
- Use GEAR (T).
- Take METAL DISK (U).
- Use METAL DISK (V).
- Take SIEVE (W).
- Use SIEVE (X).
- Receive GLASS CUTTER.
- Go to Ballroom.

- Use STENCIL (Y) and GLASS CUTTER.
- Receive MAGNIFYING GLASS.
- Use MONOCULAR (Z).
- Add MAGNIFYING GLASS.
- Receive MONOCULAR.
- Use MONOCULAR (A).
- Play puzzle (B).
- Select: (1-12).
- Talk (C).
- Go to Mayor’s Office.

- Select (D).
- Take WIG (E) and STAPLER.
- Use SCREWDRIVER (F) and PIPE.
- Take SCISSORS (G).
- Select.
- Read (H).
- Use SCISSORS (I).
- Receive RESPIRATOR.
- Take BOOKS (J).
- Go to Service Corridor.

- Use RESPIRATOR (K).
- Take OIL (L).
- Use ROPE (M).
- Add OIL.
- Receive OILED WICK.
- Go to Balcony.
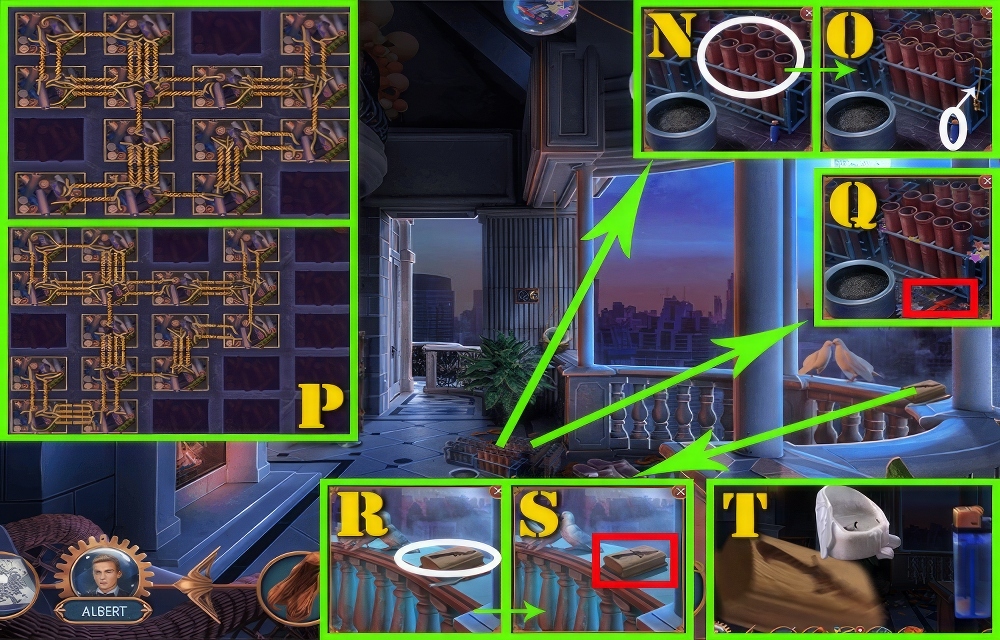
- Use OILED WICK (N).
- Select (O).
- Receive LIGHTER.
- Place the boxes on the field so that the fuses connect.
- Easy and Hard walkthrough (P).
- Take DAGGER FOIL (Q).
- Use DAGGER FOIL (R).
- Take DAGGER CUTOUT (S).
- Use CANDLE (T).
- Add LIGHTER and DAGGER CUTOUT.
- Receive DAGGER.
- Go to Ballroom.

- Use DAGGER (U).
- Place the gems in the same pattern as in the clue, moving four gems at a time.
- Walkthrough (V): 1-1-6-7-7-9-4-4-3-3-7-3-3-2-3-3-2-2-3-10-10-5-5-5-8-8-8-4.
- 4-4-13-13-14-17-18-18-17-18-19-19-18-18-19-20-20-19-19-20-16-11-11-17.
- 17-18-18-18-13-13-18.
- Select (W).
- Read (X).
- Use SCISSORS (Y).
- Take SHAWL.
- Take STAPLES (Z).
- Use STAPLER (A).
- Add STAPLES.
- Receive STAPLER.
- Use WIG (B) and SHAWL.
- Talk (C).
- Go to Mayor’s Office.
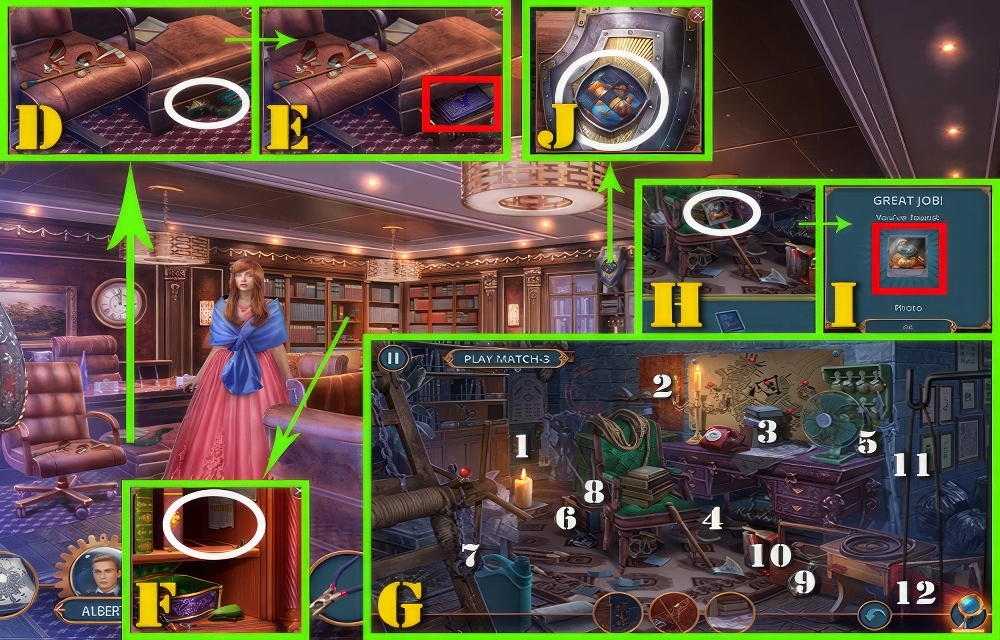
- Use STRAP (D) and STAPLER.
- Take BOOKS 2/2 (E).
- Use BOOKS (F).
- Play puzzle (G).
- Select: (1-12).
- Select (H).
- Take PHOTO (I).
- Use PHOTO (J).

- Swap the tiles around to get an image of a bird.
- Walkthrough (K): 6-3, 3-1, 7-5, 5-2, 9-8, 8-5, 3-6, 6-8, 4-7, 7-9, 9-8, 8-6, 6-3, 8-9, 8-6, 9-7
- Select (L).
- Read (M).
- Play puzzle.
- Select: (1-3).
- Take UNICORN FIGURINE (N).
- Go to Service Corridor.

- Use UNICORN FIGURINE (O) and SCREWDRIVER.
- Take PIN (P).
- Use PIN (Q).
- Add PLIERS.
- Receive HOOK.
- Go to Balcony.

- Use HOOK (R).
- Take CORKSCREW (S).
- Use CORKSCREW (T).
- Select (U).
- Read (V).
- Take GLUE (W).
- Go to Mayor’s Office.

- Use BRUSH (X) and GLUE.
- Receive WITCH.
- Play puzzle (Y).
- Select (1-12).
- Select (Z).

- Take INQUISITOR (A).
- Use INQUISITOR (B) and WITCH.
- Do not let the witch escape by blocking escape routes.
- Easy walkthrough (E): 1-2-3-4-5-6-7-8-9-10-11.
- Hard walkthrough (E): 1-2-3-4-5-6-7-8-9-10-11-12-13-14.
- Take LETTER (D).

- Take PLIERS (E).
- Take JAR (F) and LINE.
- Take IGNITER (G) and SCREWDRIVER.
- Use SCREWDRIVER (H).
- Select (I).
- Read (J).
- Take METAL DETECTOR (K).
- Use METAL DETECTOR (L).

- Play puzzle (M). Find all the key pairs.
- Select (1-7).
- Select (N).
- Take KEY (O).
- Use KEY (P).
- Go to Cindy’s Room.
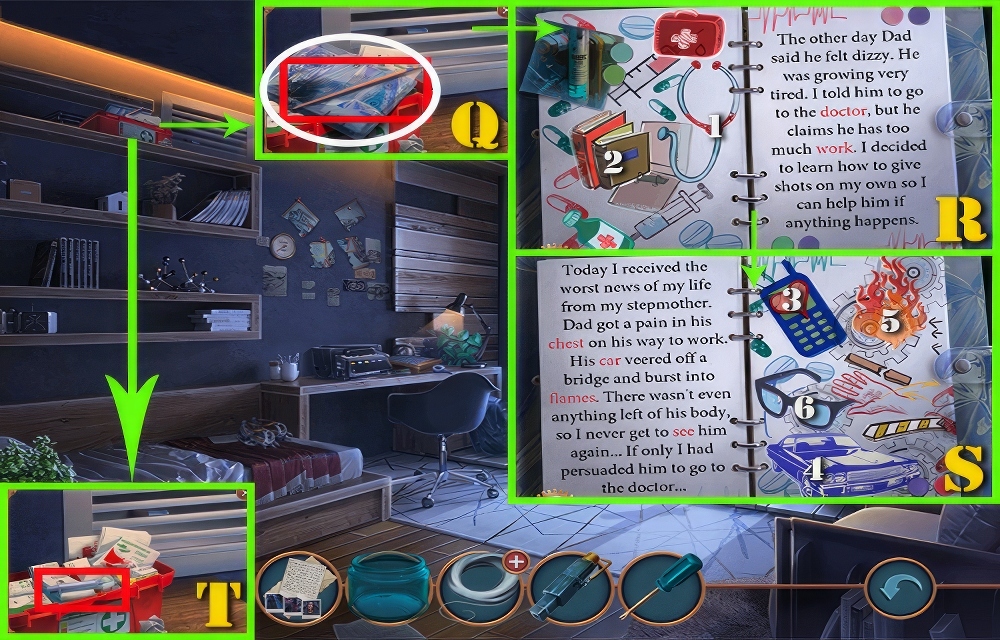
- Take CHOPSTICKS (Q).
- Select.
- Play puzzle (R).
- Select (1-2)
- Select (3-6) (S).
- Take SYRINGE (T).
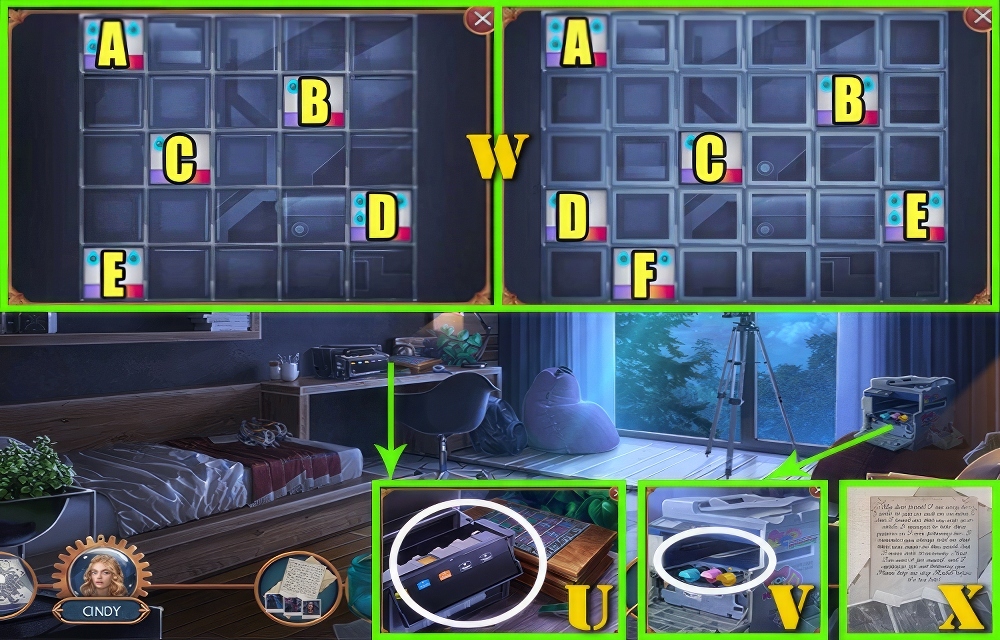
- Use LETTER (U) and SYRINGE.
- Receive INK.
- Use INK (V).
- Fill the entire field with ink.
- Click on a cartridge to choose the direction and amount of ink.
- Easy walkthrough (W): A-4 →, 1 ↓, B-2 ←, 1 ↓, C-1 ←, 1 ↓, 1 →, D-2 ←, 2 ↑, 1 ↓, E-1 ↑, 3 →.
- Hard walkthrough (W): A-4 →, 1 ↓, B-3 ←, 1 ↓, C-2 ←, 1 →, D-3 →, E-1 ←, 3 ↑, 1 ↓, F-1 ←, 3 →.
- Read (X).
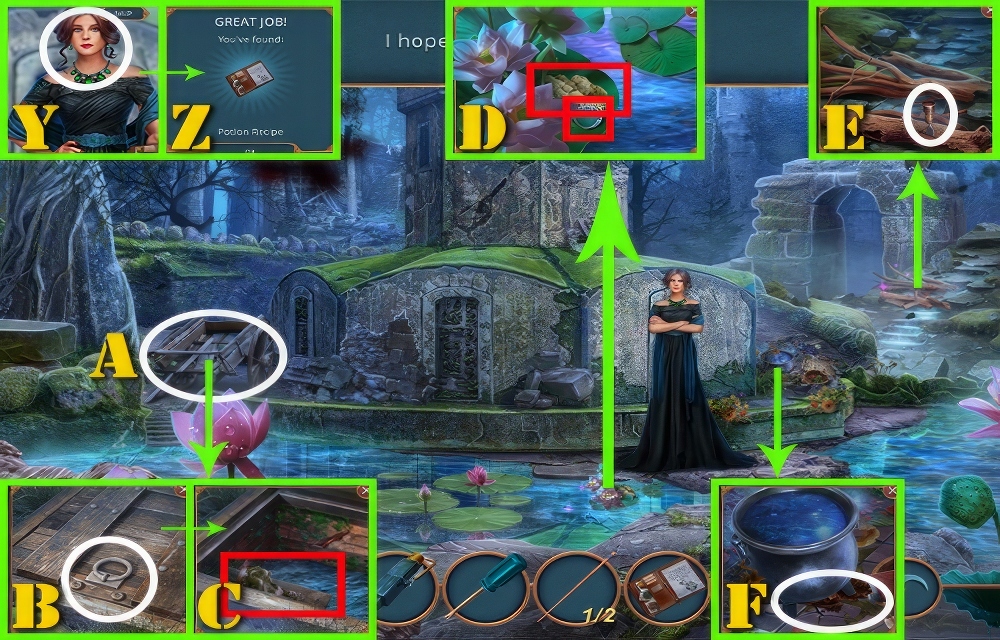
- Talk (Y).
- Take POTION RECIPE (Z).
- Select (A).
- Use SCREWDRIVER (B).
- Take HEAVY STATUE (C).
- Take CHIP (D) and DRY MOSS.
- Use HEAVY STATUE (E).
- Receive FIREWOOD.
- Use FIREWOOD (F), DRY MOSS and IGNITOR.

- Put the twigs in the fire until they connect all the embers.
- Remember that none of them should touch each other.
- Easy walkthrough (G): 1E-2B-3D-4C-5A.
- Hard walkthrough (G): 1F-2C-3B-4D-5E-6A.
- Select (H).
- Receive BOILING WATER.
- Use POTION RECIPE (I).
- Go to Yard.
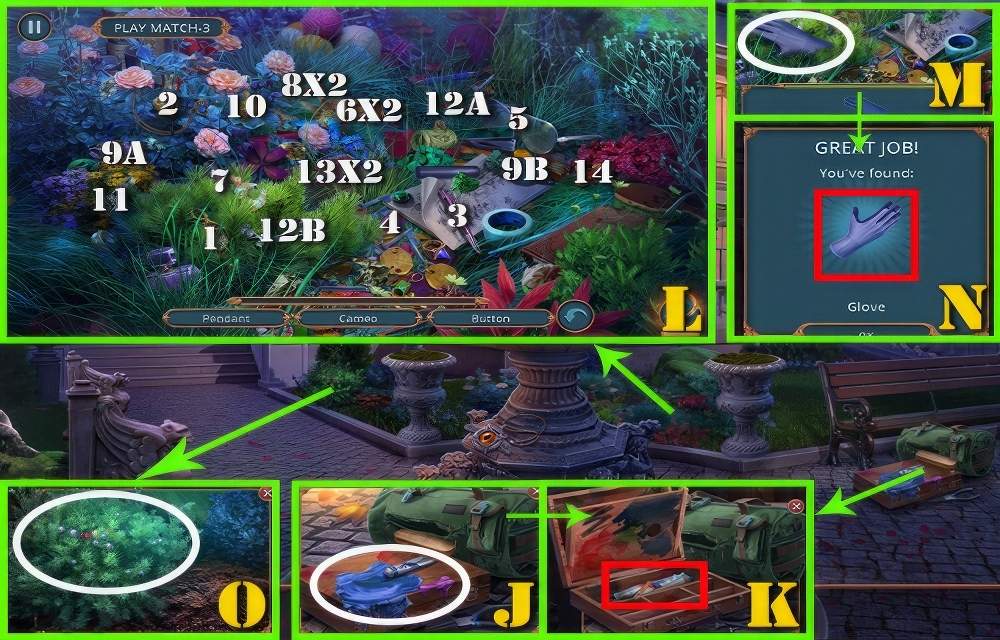
- Use PLIERS (J) and BOILING WATER.
- Take POSTER PIECES (K).
- Play puzzle (L).
- Select (1-14).
- Select (M).
- Take GLOVE (N).
- Use GLOVE (O).
- Receive GLUE and JUNIPER BERRIES.
- Go to Cindy’s Room.
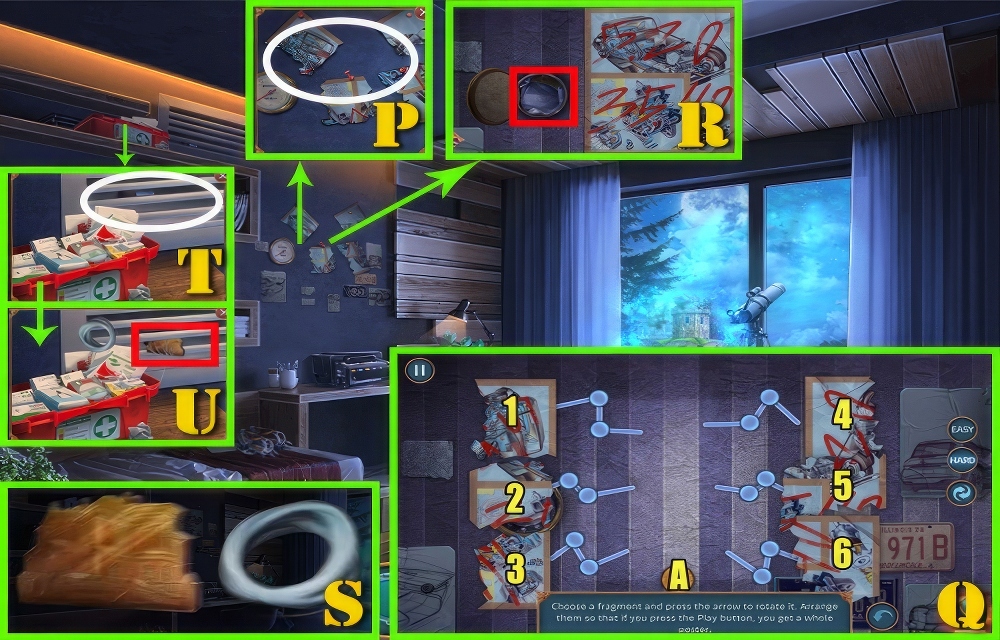
- Use POSTER PIECES (P) and GLUE.
- Choose a fragment and press the arrow to rotate it.
- Arrange them so that if you press the Play button, you get a whole poster.
- Easy walkthrough (Q): 1-2-2-2-3-4-5-5-5-6-A.
- Hard walkthrough (Q): 1-2-2-3-3-3-4-4-4-5-5-6-6-6-A.
- Take JEWELRY BAG (R) and DECORATIVE MAGNET.
- Use LINE (S).
- Add DECORATIVE MAGNET.
- Receive MAGNET.
- Use MAGNET (T).
- Take BRUSH (U).
- Go to Old Ruins.

- Use JAR (V) and BRUSH.
- Receive LOTUS POLLEN and CHOPSTICKS 2/2.
- Use CHOPSTICKS (W).
- Receive CLAY SHARD.
- Go to Yard.

- Use CLAY SHARD (X).
- Take CHIP 2/2 (Y).
- Go to Cindy’s Room.

- Use CHIP (Z).
- Use the arrows to move your chip and push the other chips into the appropriate places.
- Easy walkthrough (A): 4-1-3-4-4-3-2-2-4-1-1-3-3-2-3-2-4-4.
- Hard walkthrough (A): 3-1-1-4-4-2-3-4-4-3-3-2-2-4-4-3-3-1-1-4-4-2-3-2-3-3-2-4-1-4-1-1-3-2-4-2-3.
- Take BLADE (B).
- Go to Old Ruins.

- Use JEWELRY BAG (C) and BLADE.
- Take ALDER BARK (D).
- Use JUNIPER BERRIES (E), LOTUS POLLEN, and ALDER BARK.
- Play puzzle (F).
- Select: (1-12).
- Select (G).
- Take RECOVERY POTION (H).
- Use RECOVERY POTION (I).
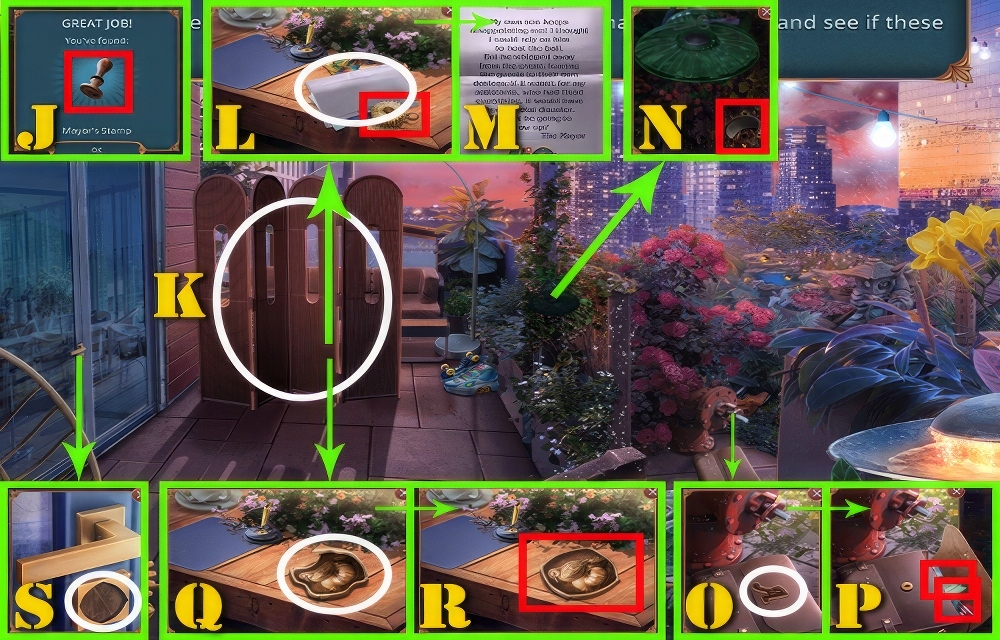
- Take MAYOR’S STAMP (J).
- Select (K).
- Take GEAR PENDANT (L).
- Select.
- Read (M).
- Take DUCT TAPE (N) and LETTER A.
- Use LETTER A (O).
- Take BLANK CHECK (P) and HAMMER.
- Use HAMMER (Q).
- Take CITY EMBLEM (R).
- Use CITY EMBLEM (S).
- Go to Front Desk.

- Take NUT (T) and RAG.
- Use RAG (U).
- Receive COCOA.
- Use DUCT TAPE (V) and COCOA.
- Receive FINGERPRINT.
- Use FINGERPRINT (W).
- Lay out a route between destination points by changing the scale or rotating the paths.
- Walkthrough (X).
- Talk (Y).
- Go to Annie’s Room.
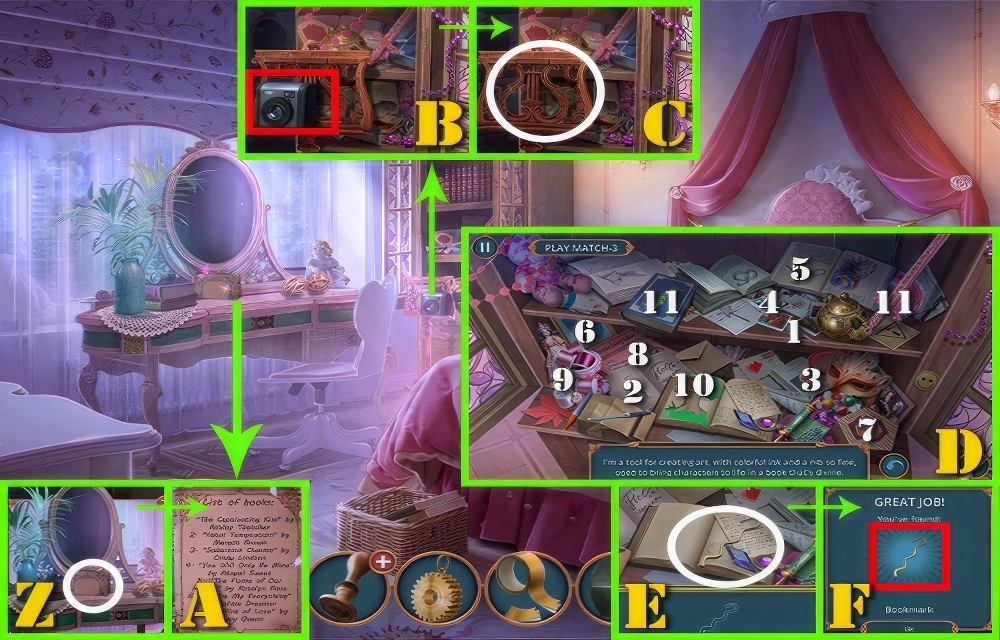
- Select (Z).
- Read (A).
- Receive BOOK LIST.
- Take CAMERA (B).
- Use BOOKLIST (C).
- Play puzzle (D).
- Select: (1-12).
- Select (E).
- Take BOOKMARK (F).

- Use BOOKMARK (G).
- Take CRAYON (H).
- Use CRAYON (I).
- Put the dreamcatcher together by stringing beads from top to bottom from the largest to the smallest.
- Walkthrough (J).
- Draw continuous lines to overlap all the points on the board using the hint.
- Take CODE (K).
- Go to Allen’s Living Room.

- Take METRONOME (L), SHAWL, and SIEVE.
- Take STICK (M).
- Select (N).
- Read (O).
- Use SHAWL (P).
- Take WATCH ARROWS (Q) and PLIERS.
- Use PLIERS (R).
- Receive WIRE.
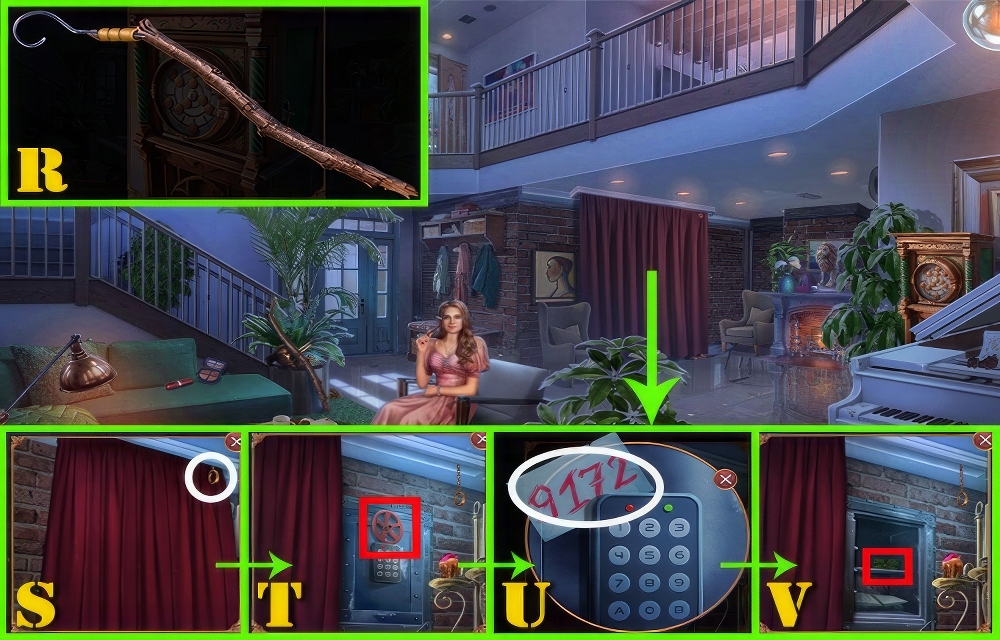
- Use STICK (R).
- Add DUCT TAPE and WIRE.
- Receive HOOK STICK.
- Use HOOK STICK (S).
- Take VALVE (T).
- Use CODE (U).
- Select (9-1-7-2).
- Take FEATURE (V).
- Go to Annie’s Room.
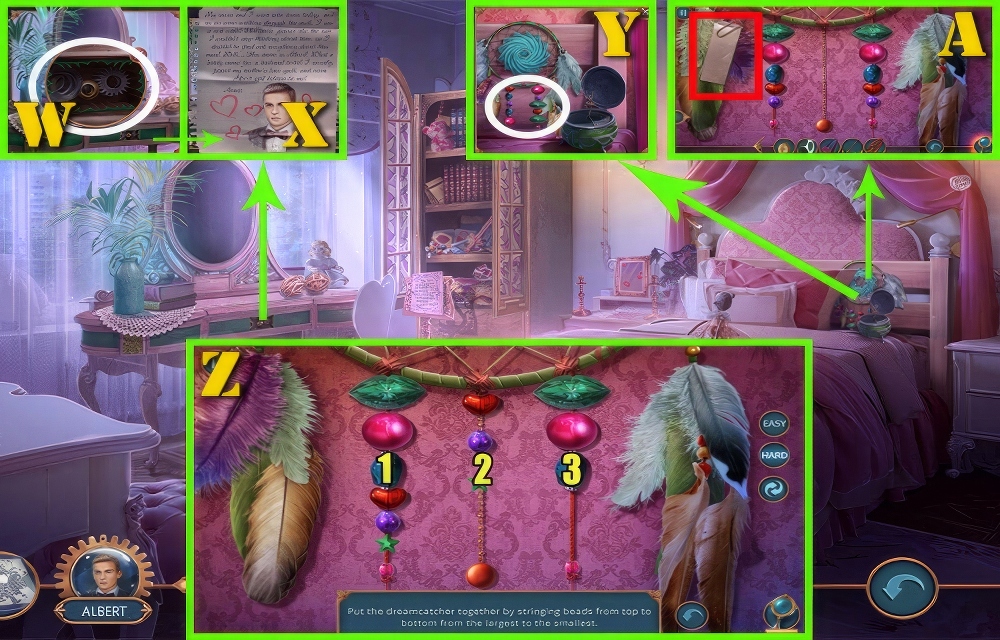
- Use FEATURE (W).
- Read (X).
- Receive DIAMOND EARRING.
- Use DIAMOND EARRING (Y).
- Put the dreamcatcher together by stringing beads from top to bottom from the largest to the smallest.
- Easy walkthrough (Z): 1-3, 2-3, 2-1, 3-2, 3-2, 1-3, 2-1, 2-3.
- Hard walkthrough (Z): 1-3, 2-3, 2-1, 2-3, 1-2, 1-2, 3-1, 3-2, 3-2, 1-3, 2-1.
- 2-1, 2-3, 2-3, 1-2, 1-2, 3-1, 2-1, 2-3.
- Take MANUAL (A).
- Go to Town Hall Roof.

- Use VALVE (B) and NUT.
- Play puzzle (C).
- Select: (1-12).
- Select (D).
- Take LIGHT BULB (E).
- Use LIGHT BULB (F).
- Take KEY (G).
- Go to Front Desk.

- Use KEY (H).
- Select (I).
- Read (J).
- Take CHAIN (K) and CORKSCREW.
- Use CORKSCREW (L).
- Take LIGHTER (M).
- Use MANUAL.
- Easy and Hard walkthrough (N).
- Arrange the components based on the hint from the green indicator to the red one.
- You can swap their places by clicking on them.
- Take UV Lamp (O).
- Go to Annie’s Bedroom.

- Use CAMERA (P) and UV LAMP.
- Receive PHOTO.
- Select (Q).
- Play puzzle (R).
- Select: (1-12).
- Select (S).
- Take CANDLES (T).
- Use CANDLES (U) and PHOTO.
- Select (V).
- Read (W).
- Go to Allen’s Living Room.
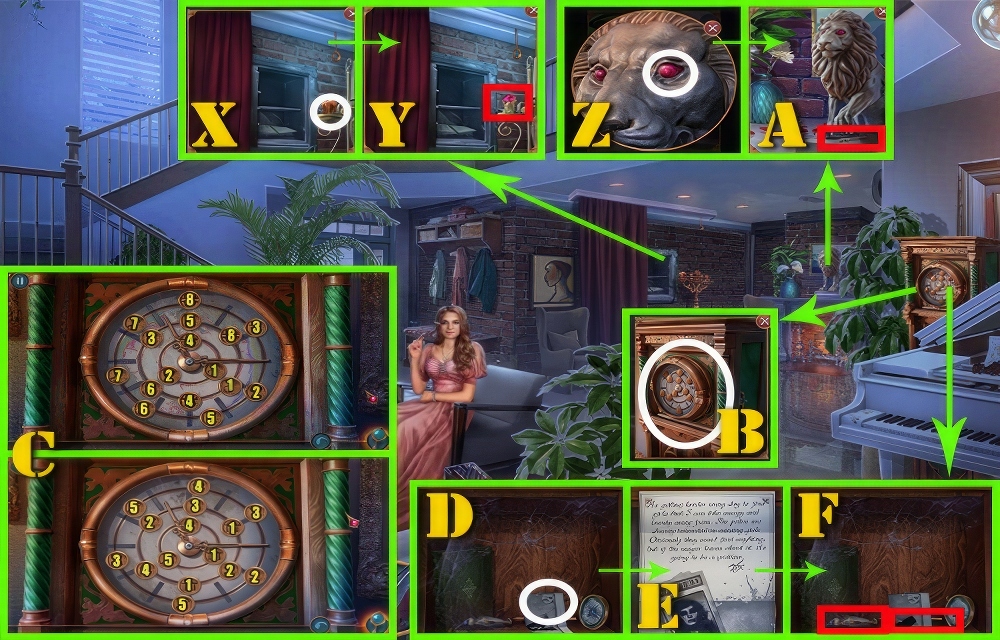
- Use LIGHTER (X).
- Take LION’S EYE (Y).
- Use LION’S EYE (Z).
- Take WATCH ARROWS 2/2 (A).
- Use WATCH ARROWS (B).
- Find all pairs of the same symbols by clicking on the chips.
- Easy walkthrough (C): 1-1, 2-2, 3-3, 4-4, 5-5, 6-6, 7-7, 8-8.
- Hard walkthrough (C): 1-1-1, 2-2-2, 3-3-3, 4-4-4, 5-5-5.
- Select (D).
- Read (E).
- Take CHALK (F) and PEN.
- Go to Town Hall Roof.

- Use BLANK CHECK (G) and PEN.
- Take CASHIER’S CHECK (H).
- Play puzzle (I).
- Select (1-12).
- Select (J).
- Take LONG-HANDLED SCISSORS (K).
- Use LONG-HANDLED SCISSORS (L).
- Receive BLACKBERRY.
- Use MAYOR’S STAMP (M).
- Add SIEVE and BLACKBERRY.
- Receive MAYOR’S STAMP.
- Go to Front Desk.

- Use MAYOR’S STAMP (N) and CASHIER’S CHECK.
- Take NECKLACE (O).
- Go to Allen’s Living Room.
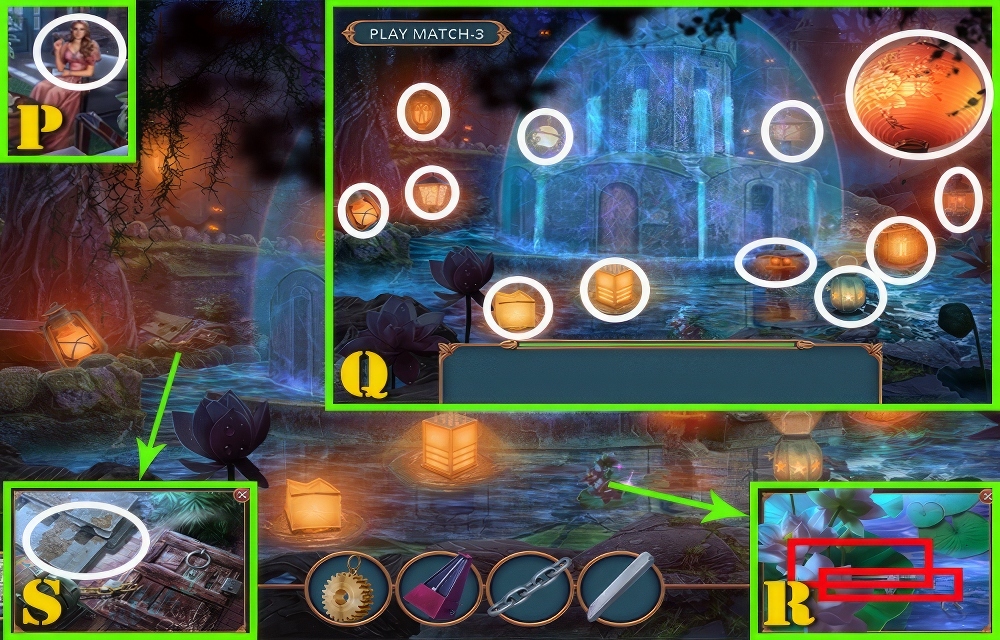
- Use NECKLACE (P).
- Play puzzle (Q).
- Select.
- Take DAGGERS (R) and METAL ROD.
- Use METRONOME (S) and METAL ROD.
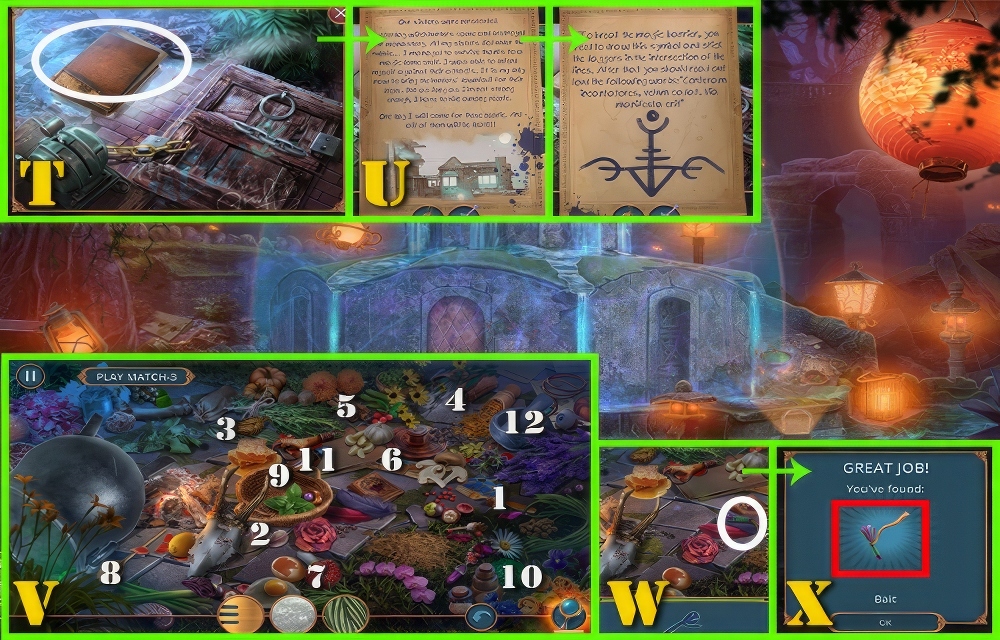
- Select (T).
- Read (U).
- Receive SPELL.
- Play puzzle (V).
- Select.
- Select (W).
- Take BAIT (X).

- Use BAIT (Y).
- Receive CARABINER.
- Use CHAIN (Z) and CARABINER.
- Receive DAGGER 2/2.
- Use CHALK (A), SPELL and DAGGERS.
- Use GEAR PENDANT (B).
- Place the gears in the right position.
- The numbers indicate by how many cells it will be moved.
- Easy walkthrough (C): 1-2-3-4-5-6-7-8-9.
- Hard walkthrough (C): 1-2-3-4-5-6-3-2-7-8-9-2-7-10-8-11-12.
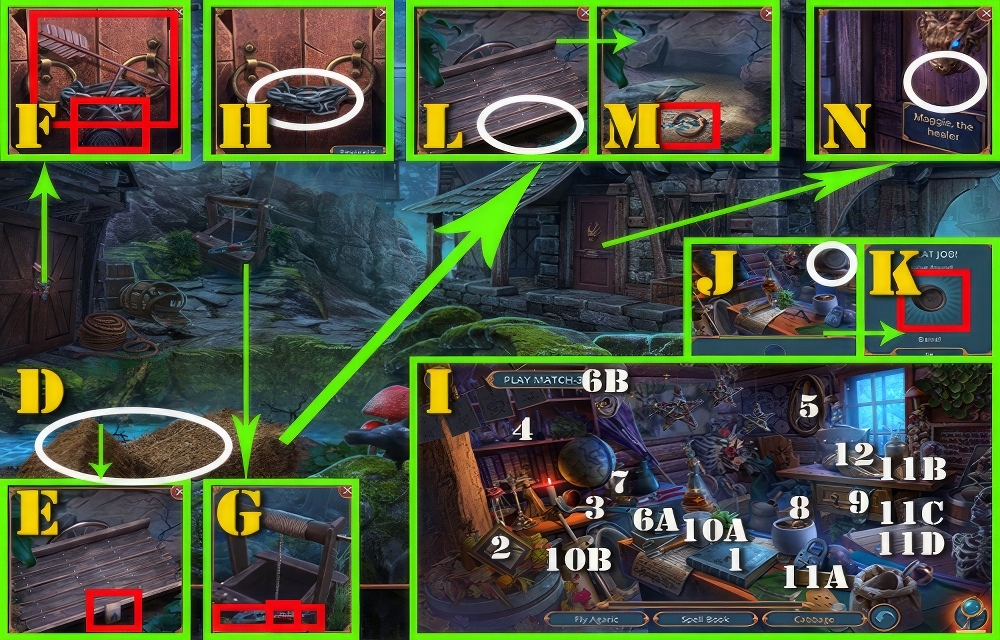
- Select (D).
- Take LIGHTER (E).
- Take CANDLE (F) and BOLT CUTTER.
- Take WEATHER VANE (G) and RESPIRATOR.
- Use BOLT CUTTER (H).
- Play puzzle (I).
- Select (1-12).
- Select (J).
- Take BARREL (K).
- Use BARREL (L).
- Take SEPTUM RING (M).
- Use SEPTUM RING (N).
- Go to Healer’s House.
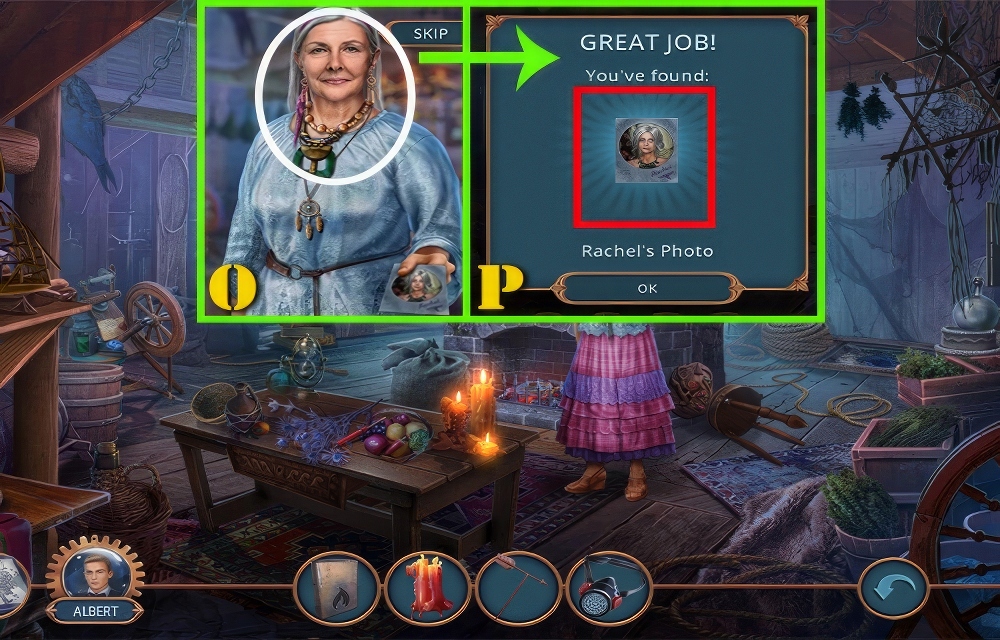
- Talk (O).
- Take RACHEL’S PHOTO (P).
- Go to Rachel’s Room.
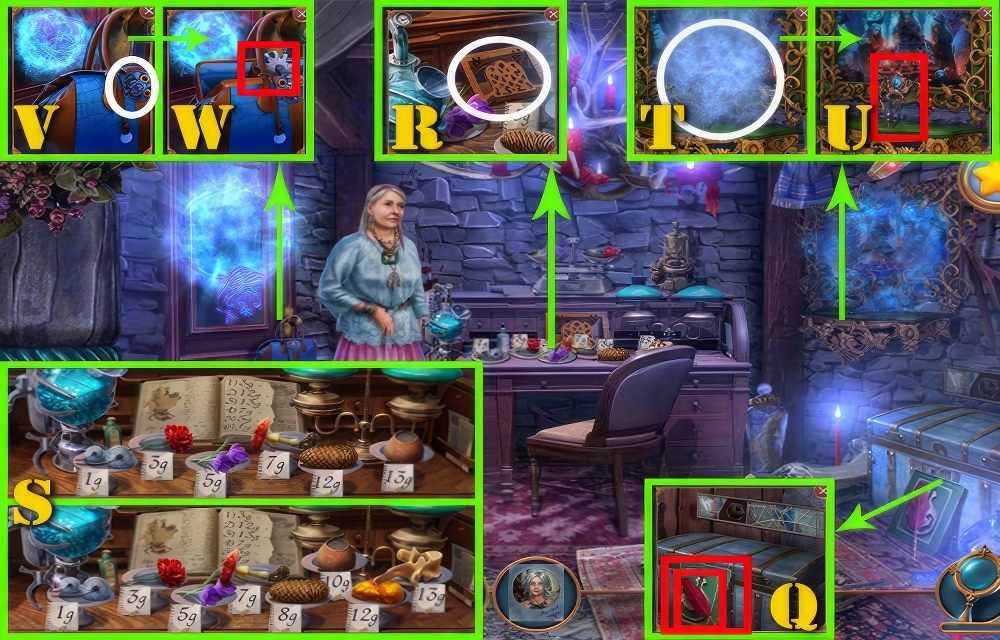
- Take HARPY FEATHER (Q) and HEALER’S HANDBOOK.
- Use HEALER’S HANDBOOK (R).
- Easy and Hard walkthrough (S).
- Weigh all the potion ingredients and arrange them according to weight.
- Receive MANIFESTATION POTION.
- Use MANIFESTATION POTION (T).
- Take HAIRPIN (U).
- Use HAIRPIN (V).
- Take GEAR (W).
- Go to Healer’s House.

- Select (X).
- Read (Y).
- Take WASHING SODA (Z) and SLOTTED SCREWDRIVER.
- Use SLOTTED SCREWDRIVER (A).
- Receive SPINDLE.
- Use SPINDLE (B).
- Take YARN (C).
- Use YARN (D).
- Easy and Hard walkthrough (E).
- Connect the same chips with a continuous line.
- The lines can’t cross with each other.
- Go to Old Shrine.

- Select (F).
- Take LADYBUGS (G) and CORK.
- Use SLOTTED SCREWDRIVER (H).
- Receive MOSS.
- Use GEAR (I).
- Select (J).
- Read (K).
- Go to Rachel’s Room.

- Use HARPY FEATHER (L) and MAGIC INK.
- Play puzzle (M).
- Select (1-12).
- Take PUZZLE (N).
- Use PUZZLE (O).
- Select (P).
- Read (Q).
- Receive MAGIC NEEDLE.

- Use MAGIC NEEDLE (R).
- Easy and Hard walkthrough (S).
- Place all the tapestry fragments in their proper places until no empty cells are left.
- Take SIEVE (T).
- Go to Witches’ Village.
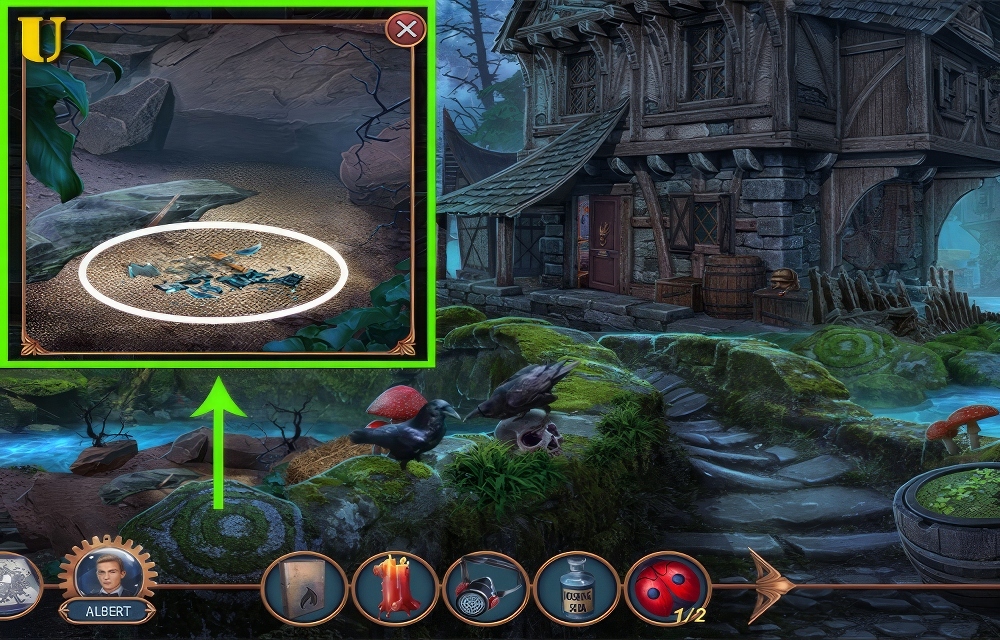
- Use SIEVE (U).
- Receive KEY.
- Go to Rachel’s Room.

- Use KEY (V).
- Take GRIMOIRE (W).
- Play puzzle (X).
- Select (1-12).
- Select (Y).
- Take RACHEL’S STAMP (Z).

- Use GRIMOIRE (A).
- Add RACHEL’S STAMP.
- Read (B).
- Receive GRIMOIRE.
- Use GRIMOIRE (C).
- Talk (D).
- Take TRANSLATION (E).
- Use TRANSLATION (F).
- Read (G).
- Go to Old Shrine.

- Use MOSS (H).
- Select (I).
- Read (J).
- Take AXE (K).
- Use AXE (L).
- Take WEDGE (M).
- Go to Witches’ Village.

- Use WEATHER VANE (N) and WEDGE.
- Select (O).
- Read (P).
- Receive INSTRUCTION.
- Take RITUAL STONES 1/3 (Q).
- Play puzzle (R).
- Select (1-12).
- Select (S).
- Take PICKAXE (T).
- Use PICKAXE (U).
- Take TWEEZERS (V).
- Go to Healer’s House.

- Use TWEEZERS (W).
- Receive GLOVES.
- Use CORK (X) and GLOVES.
- Receive PHOSPHORIC ACID.
- Go to Old Shrine.
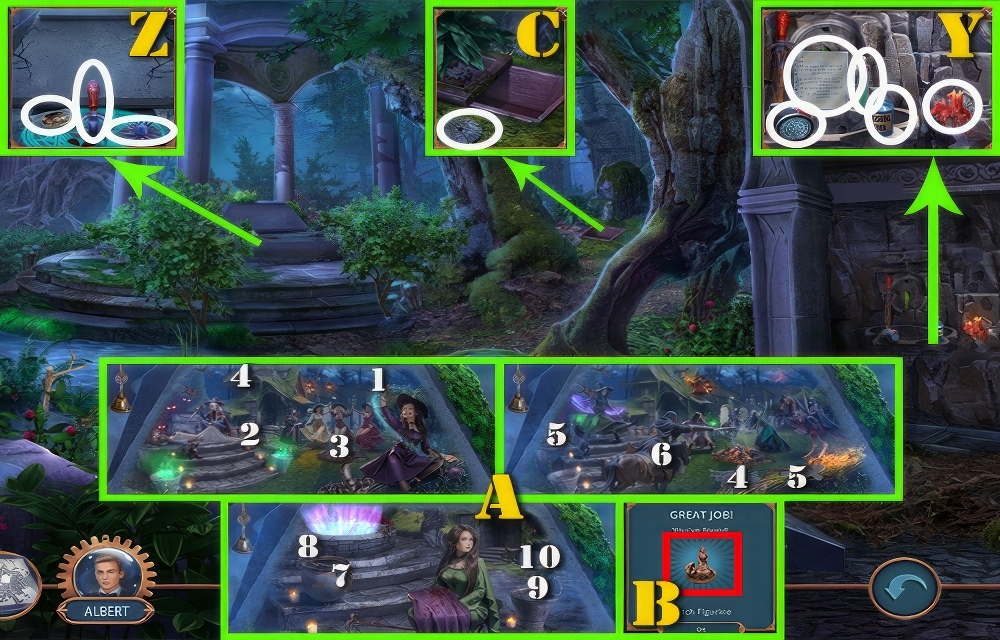
- Use CANDLE (Y), LIGHTER, RESPIRATOR, WASHING SODA, PHOSPHORIC ACID and INSTRUCTION.
- Receive RITUAL KNIFE.
- Use RACHEL’S PHOTO (Z), THISTLE, and RITUAL KNIFE.
- Play puzzle (A).
- Select (1-10).
- Take WITCH FIGURE (B).
- Use WITCH FIGURE (C).
- Receive TRIDENT FORK.
- Go to Witches’ Village.

- Use TRIDENT FORK (D).
- Take LADYBUG 2/2 (E).
- Go to Healer’s House.
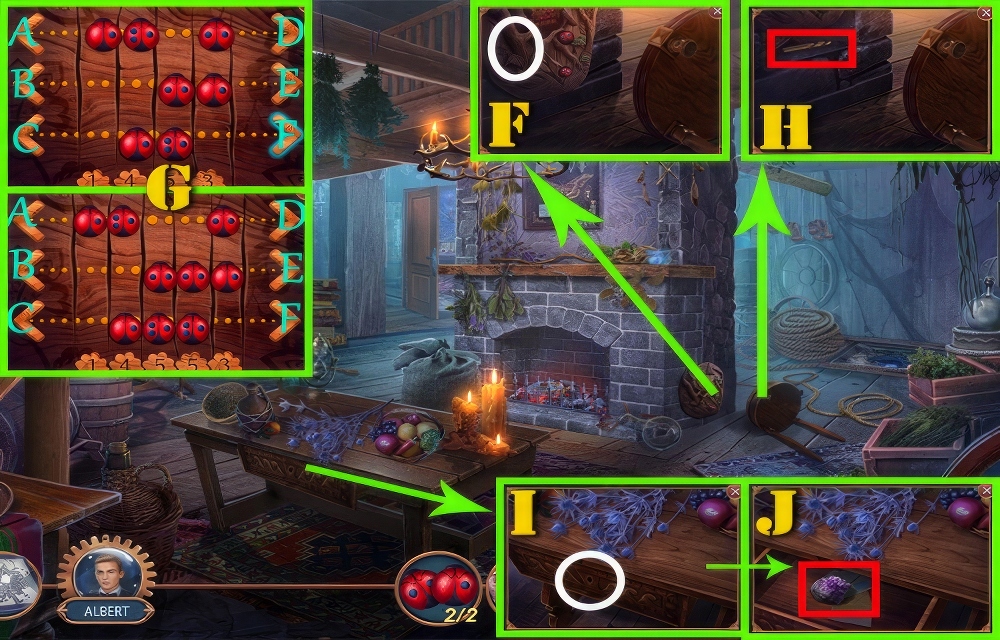
- Use LADYBUGS (F).
- Place the bugs in such a way that the number of specks on their backs will be equal to the number below.
- Easy walkthrough (G): B-D-F-F.
- Hard walkthrough (G): C-D-E-E-E.
- Take DIAMOND DRILL (H).
- Use DIAMOND DRILL (I).
- Take RITUAL STONES 2/3 (J).
- Go to Old Shrine.
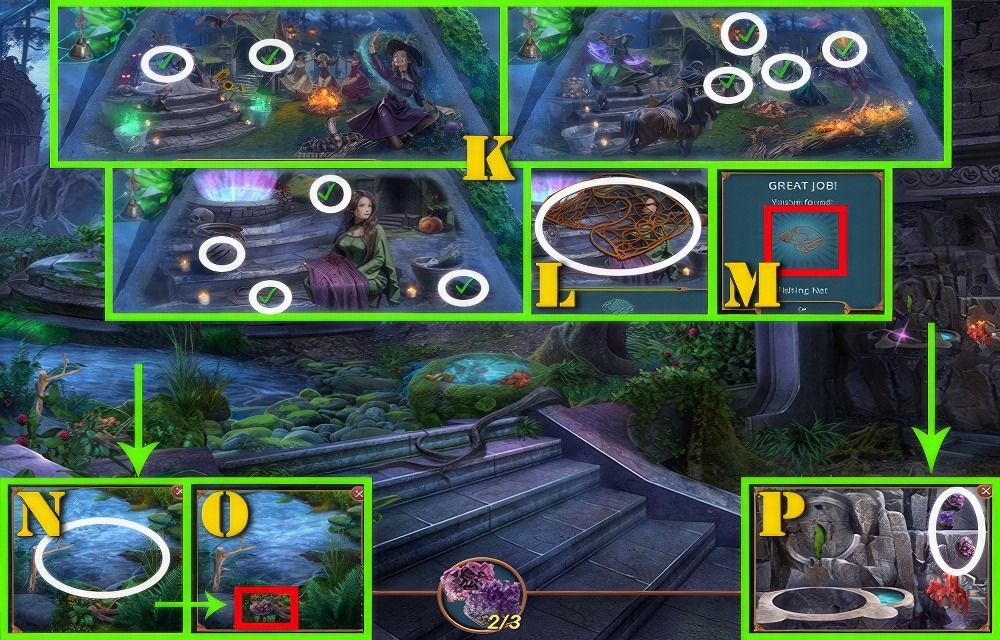
- Play puzzle (K).
- Select.
- Select (L).
- Take FISHING NET (M).
- Use FISHING NET (N).
- Take RITUAL STONES 3/3 (O).
- Use RITUAL STONES (P).
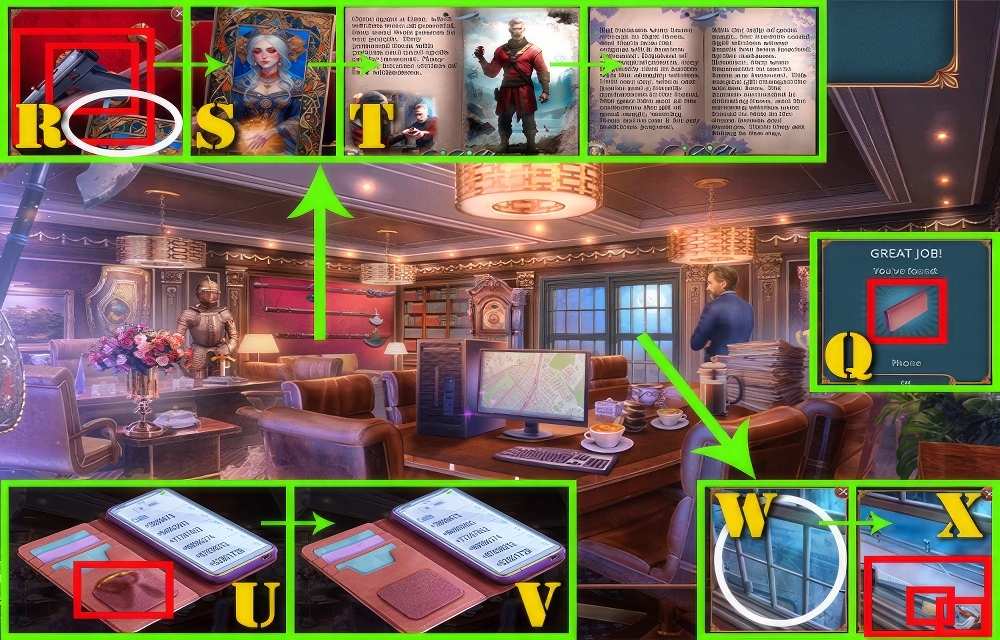
- Take PHONE (Q).
- Take NON-LETHAL GUN (R) and MAGNET.
- Select.
- Select (S).
- Read (T).
- Use PHONE (U).
- Take ALBERT’S RING.
- Receive PHONE (V).
- Use MAGNET (W).
- Take PLIERS (X), PAPER and DAGGER BADGE.

- Use DAGGER BADGE (Y).
- Select (Z).
- Read (A).
- Take WIRE (B).
- Use WIRE (C) and PHONE.
- Choose a path that will prevent your location tracker from hitting the moving chips.
- Walkthrough (D): Find moment when moving along shown trajectories will not lead to collision with opponents.

- Select (E).
- Use ALBERT’S RING (F).
- Take GOLDEN NUGGET (G).
- Select.
- Select (H).
- Read (I).
- Take CLAY SHARD (J).
- Use CLAY SHARD (K).
- Receive WATER OF LIFE.
- Use WATER OF LIFE (L).
- Talk (M).
- Take FANCY KEY (N).
- Use FANCY KEY (O).
- Go to Secret Tunnel.
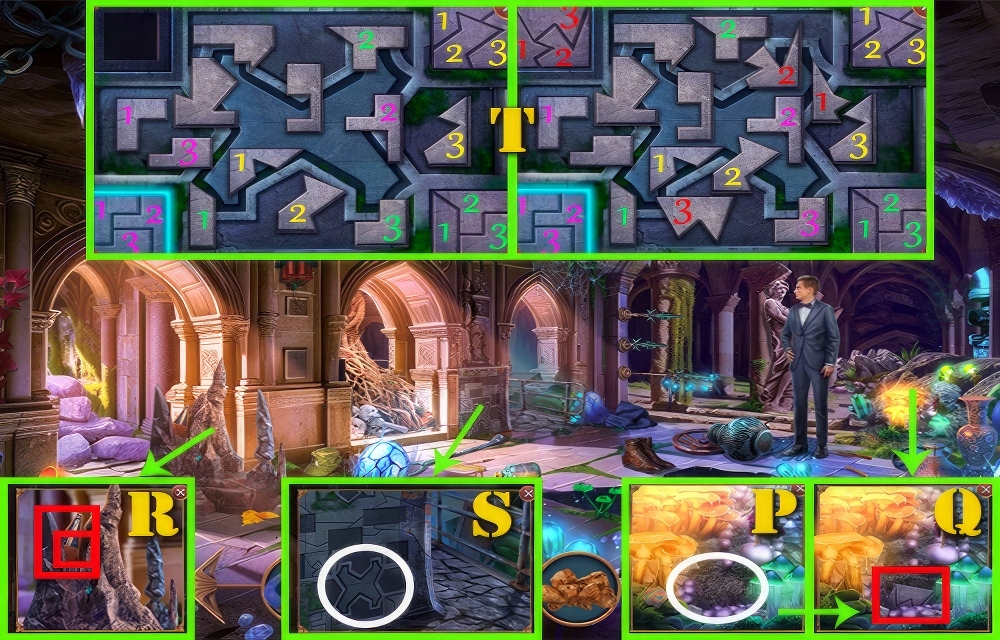
- Use CLAY SHARD (P).
- Take HINT (Q).
- Take METRONOME (R) and RUBBER BULLETS.
- Use HINT (S).
- Put together the square panel on the wall by clicking on each piece of it.
- Choose shapes that are identical to shapes in the selected square.
- Easy walkthrough (T): 1-2-3, 1-2-3, 1-2-3.
- Hard walkthrough (T): 1-2-3, 1-2-3, 1-2-3, 1-2-3.

- Take TRIGGER (U).
- Use NON-LETHAL GUN (V).
- Add TRIGGER and RUBBER BULLETS.
- Receive NON-LETHAL GUN.
- Use NON-LETHAL GUN (W).
- Climb up in three steps, switching levers up and down the footbridges and ladders.
- Easy walkthrough (X): 1-2-3-4, 1-2-3-4, 1-2-3-4.
- Hard walkthrough (X): 1-2-3-2-4, 1-2-3-4-3, 1-2-3-4.
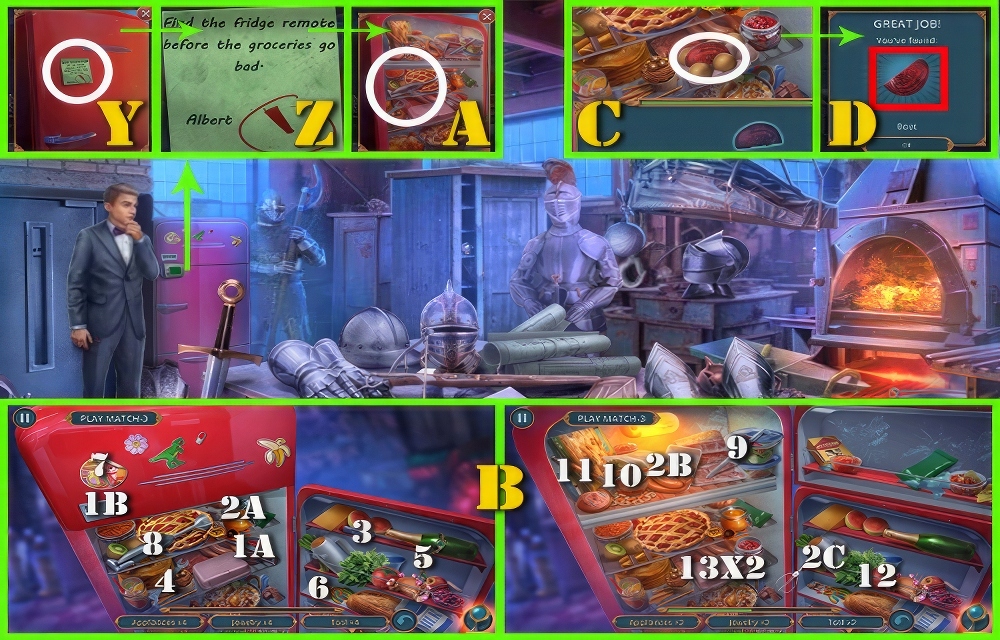
- Select (Y).
- Read (Z).
- Use MAGNET (A).
- Play puzzle (B).
- Select (1-14).
- Select (C).
- Take BEET (D).

- Take BOLT (E) and MOONSTONE.
- Use PAPER (F) and BEET.
- Receive STAMPED CODE.
- Use STAMPED CODE (G).
- Select (H).
- Read (I).
- Take PLIERS (J).
- Go to Mayor’s Office.

- Use PLIERS (K).
- Take ORNAMENTAL HALBERD (L).
- Select (M).
- Use ORNAMENTAL HALBERD (N).
- Receive TONGS.
- Go to Secret Tunnel.

- Use TONGS (O).
- Receive EMERALD.
- Use EMERALD (P).
- Receive FAIRY.
- Go to Cave Hall.

- Use FAIRY (Q).
- Select (R).
- Take AWAKENING SPELL (S).
- Use AWAKENING SPELL (T).
- Tap on the drops in such an order that they get into the vial at the same time.
- Press with slight delay.
- Easy walkthrough (U): 1-2-3-4-5.
- Hard walkthrough (U): 1-2-3-4-5.
- Take MEMORY VIAL (V).
- Go to Albert’s Studio.
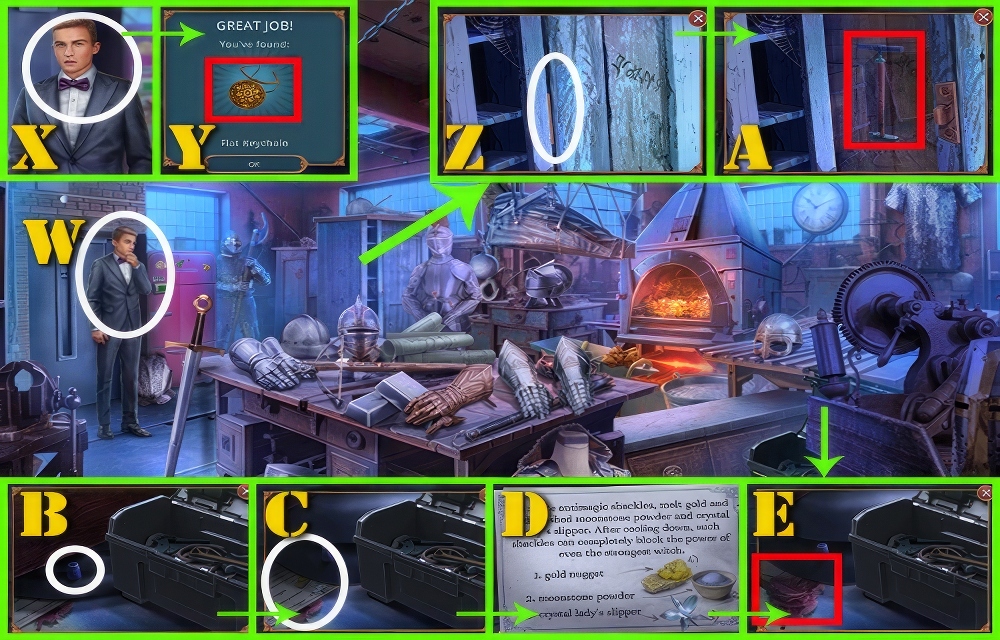
- Use MEMORY VIAL (W).
- Talk (X).
- Take FLAT KEYCHAIN (Y).
- Use FLAT KEYCHAIN (Z).
- Take PUMP (A).
- Use PUMP (B).
- Select (C).
- Read (D).
- Receive CHAIN DRAWING.
- Take BROOM (E).
- Go to Mayor’s Office.
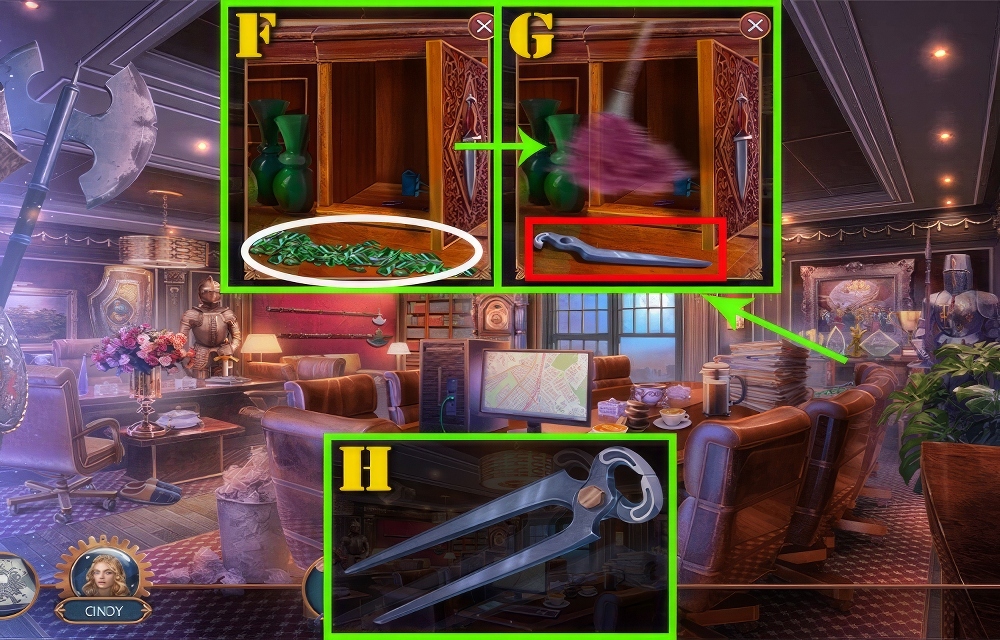
- Use BROOM (F).
- Take PLIERS (G)
- Use PLIERS (H).
- Add PLIERS and BOLT.
- Receive PINCERS.
- Go to Secret Tunnel.
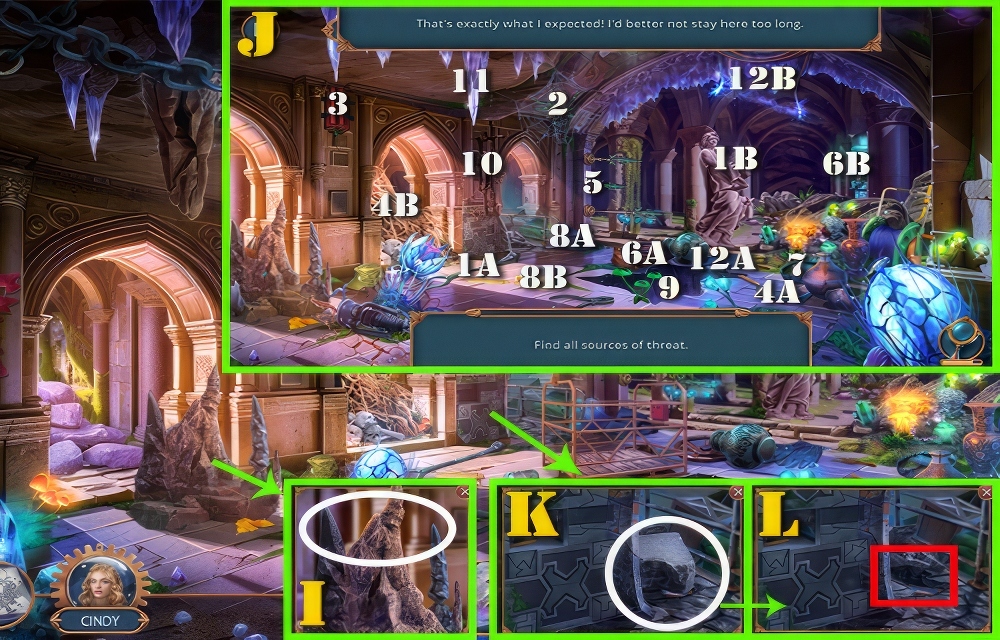
- Use PINCERS (I).
- Receive STALAGMITE.
- Play puzzle (J).
- Select (1-12).
- Use METRONOME (K) and STALAGMITE.
- Take LAMP (L).
- Go to Cave Hall.
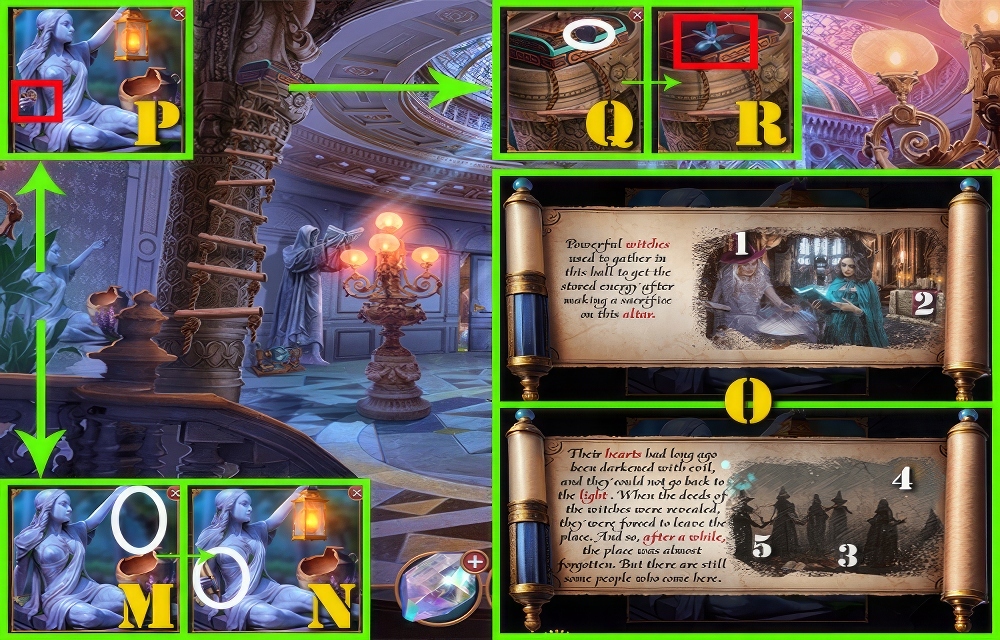
- Use LAMP (M).
- Select (N).
- Play puzzle (O).
- Select (1-2).
- Select (3-5).
- Take HEART BROOCH (P).
- Use HEART BROOCH (Q).
- Take CRYSTAL FLOWER (R).
- Go to Albert’s Studio.

- Play puzzle (S).
- Select (1-6).
- Select (T).
- Take MORTAR AND PESTLE (U).
- Use MOONSTONE (V).
- Add MORTAR AND PESTLE.
- Receive MOONSTONE POWDER.

- Use MOONSTONE POWDER (X), CRYSTAL FLOWER, CHAIN DRAWING, and GOLDEN NUGGET.
- Set the hammers in such a position that they point to the green indicator when checked.
- Click on the button at the right to test for correctness.
- Walkthrough shown (Y): A-C-C-E-E-E-F-play.
- Use MAGIC CHAINS (Z).
- Walkthrough Bonus Chapter, at the link below.


