Connected Hearts 5: Hour of the Witch (Bonus Chapter) – The thrilling story of love, magic, and betrayal continues. After Adrian breaks the curse with the sacrifice of Princess Aurora, their happiness is threatened. The witch Selene, obsessed with lust for power and revenge, decides to cast the spell on Adrian again. She intends to make him hers forever by imprisoning him in the Cathedral of Love, hidden from Aurora’s eyes. Aurora must go through a difficult ordeal to find Adrian and rescue him again. Meanwhile, Adrian encounters the Cathedral’s prisoner, Scrugg, a former soldier cursed for his undivided love for the princess. Now he is forced to obey Selena, finding and turning the souls of lovers into servants subject to her dark will. Selena gathers the magical power of her coven, creating a flame capable of destroying everything around her. This time the heroes will face the witch’s most powerful spells.
Bonus Chapter Walkthrough
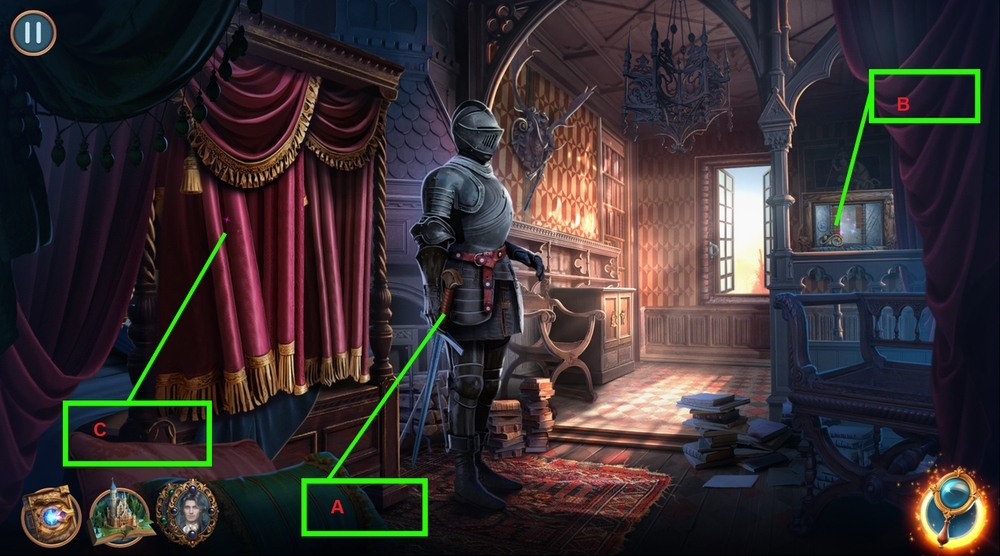
- Take KNIGHT’S SWORD (A).
- Take ROPE, PITCHER, and WIRE HANGER (B).
- Use WIRE HANGER on the hook, take BED SHEET, LEMON, and WIZARD FIGURINE (C).
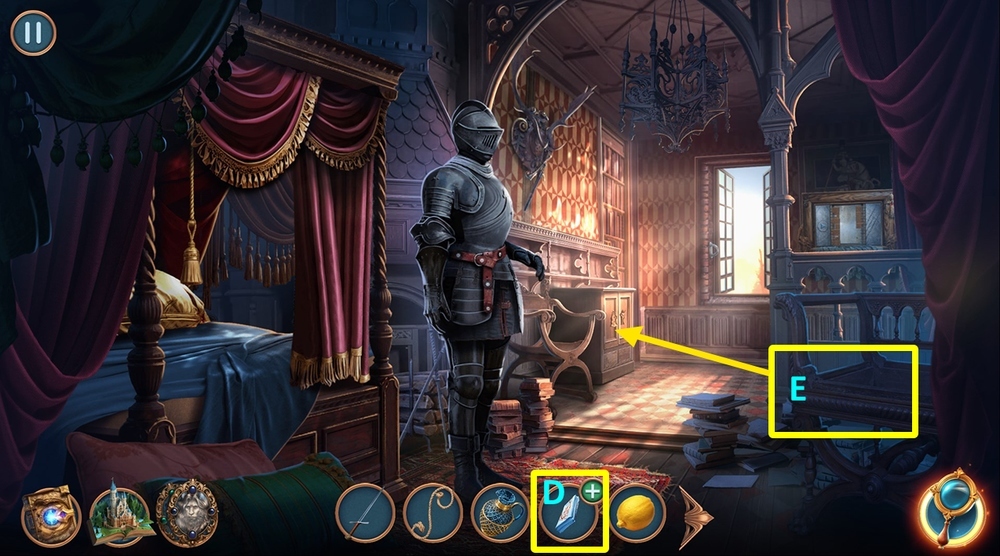
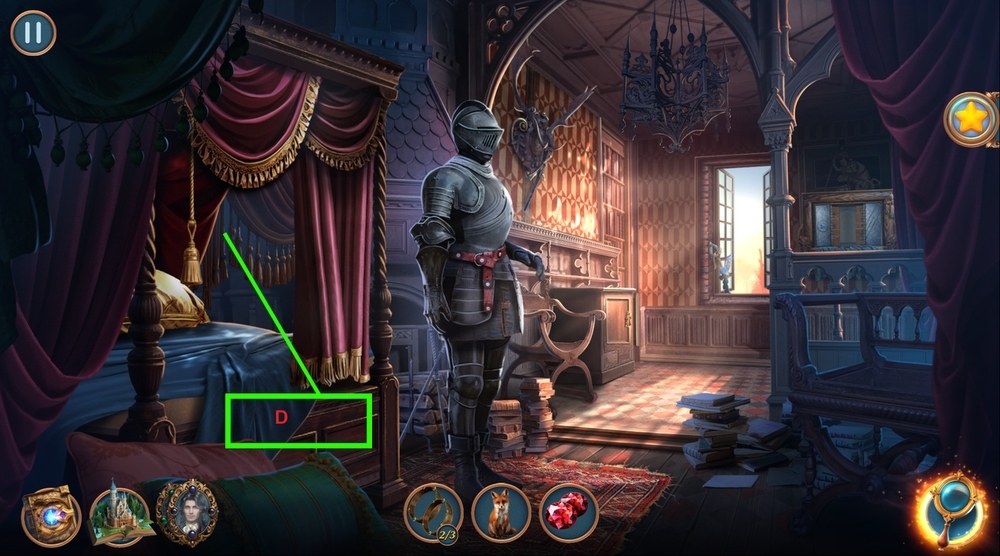
- Use ROPE on BED SHEET (D).
- Use WIZARD FIGURINE on the slot, take FRAME PARTS 1/3, GUNPOWDER, BRUSH, and SILK SCARF (E).
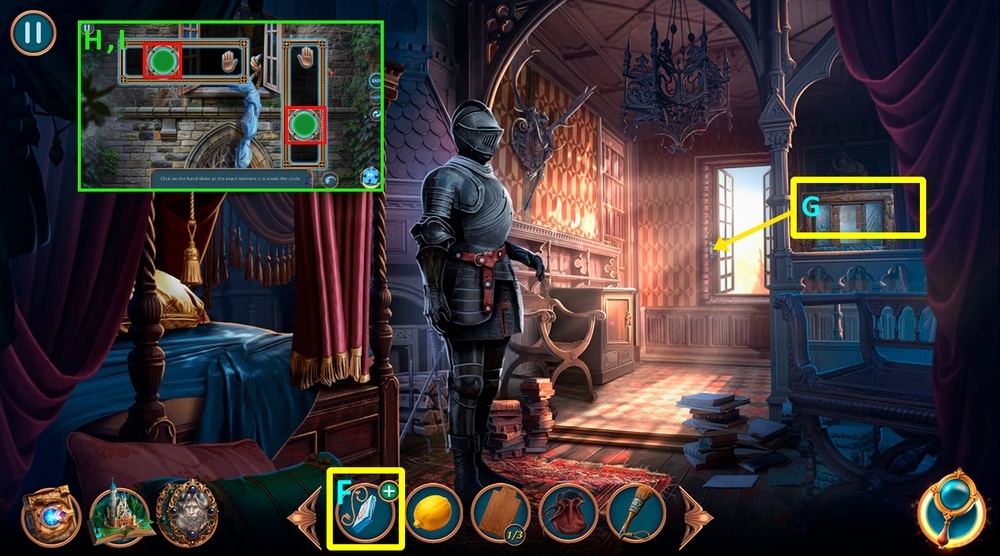
- Use SILK SCARF on BED SHEET, earn MAKESHIFT ROPE (F).
- Use MAKESHIFT ROPE on the grab bar near the window (G).
- Easy solution: Click on the palm when it’s within the borders of the red square (H).
- Hard solution: Click on the palm when it’s within the borders of the red square (I).
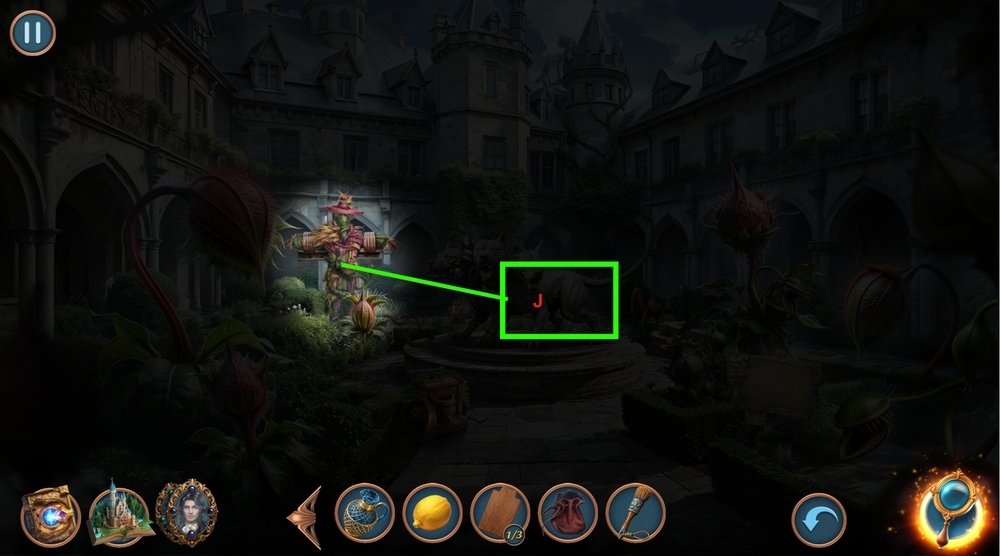
- Click on the scarecrow (J).
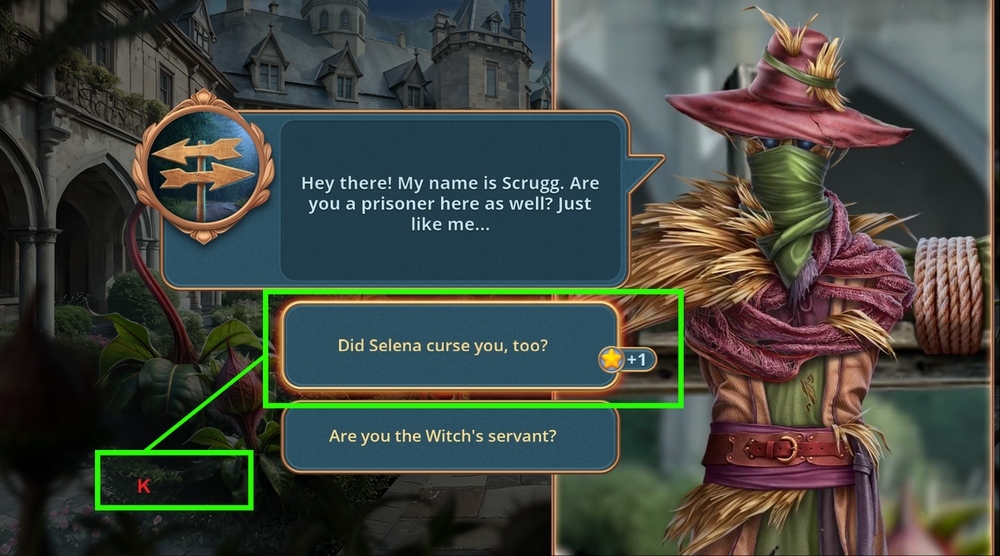
- Select this option (K).
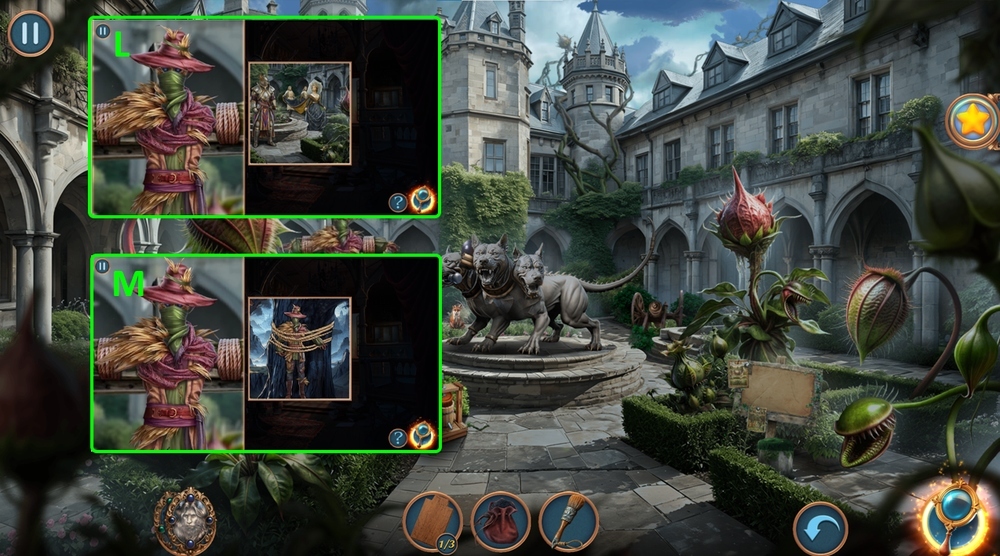
- Solution: place the puzzle in the correct position (L).
- Solution: place the puzzle in the correct position (M).
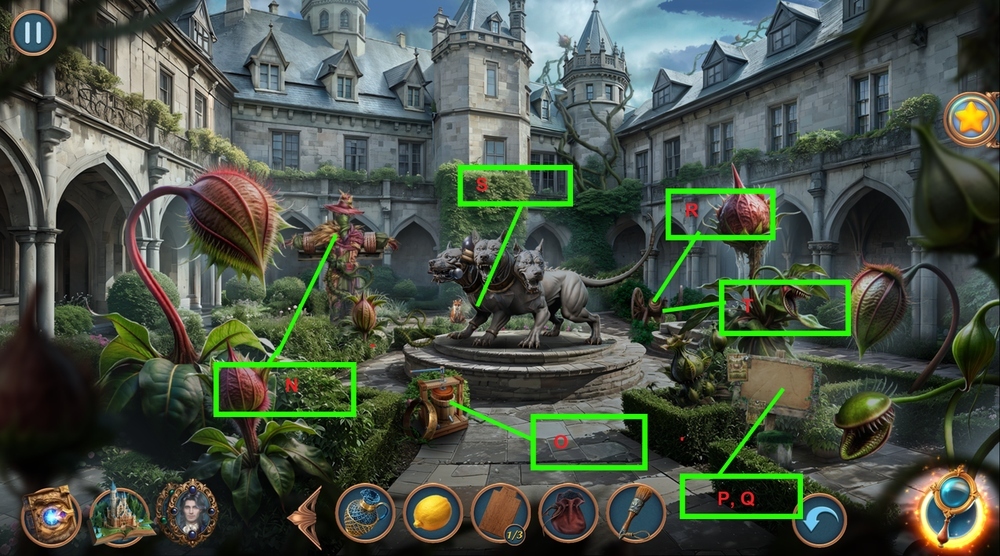
- Use KNIGHT’S SWORD on the scarecrow (N).
- Use PITCHER and LEMON on the juice squeezer, take LEMON JUICE, COLLARS 1/3, BERRIES, and CLOTH LOOP (O).
- Use BRUSH and LEMON JUICE on the paper (P).
- Play puzzle, earn MAGIC FLAME (Q).
- Use GUNPOWDER on the cannon (R).
- Use BERRIES on the fox, earn FOX, take FRAME PARTS 2/3, take and read the note, take CANNONBALL (S).
- Use CANNONBALL and MAGIC FLAME on the cannon (T).
- Go back.
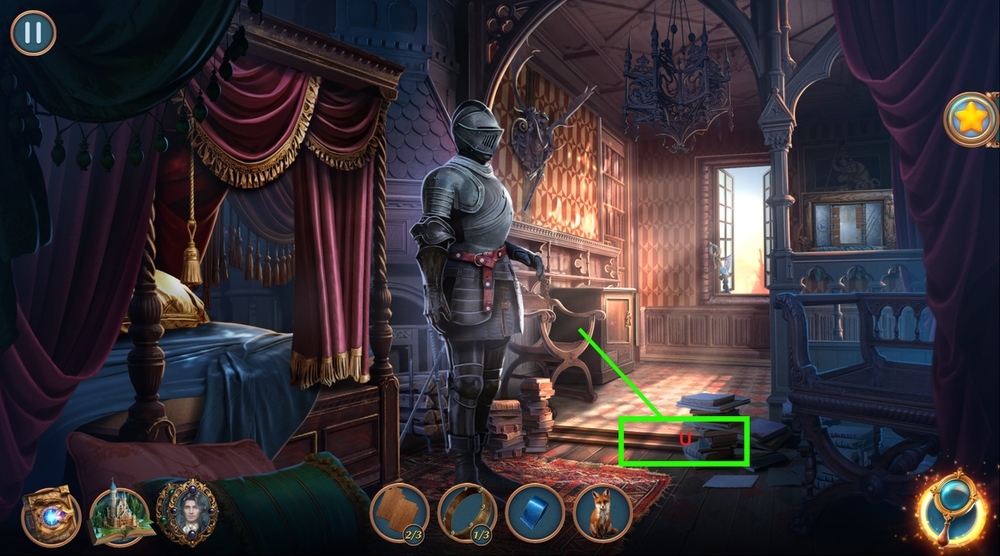
- Use CLOTH LOOP on the box (U).
- Go to the Courtyard.
- Go forward.
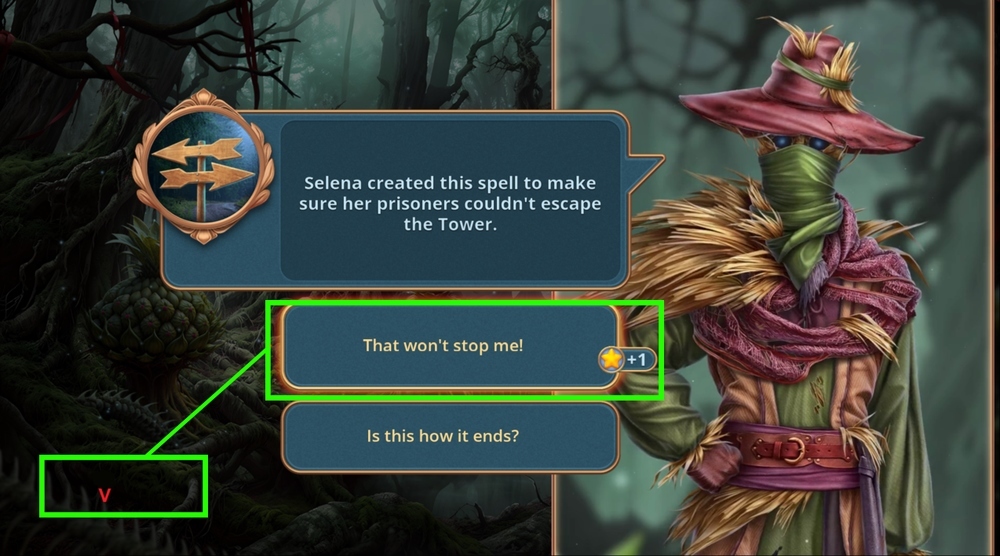
- Select this option (V).
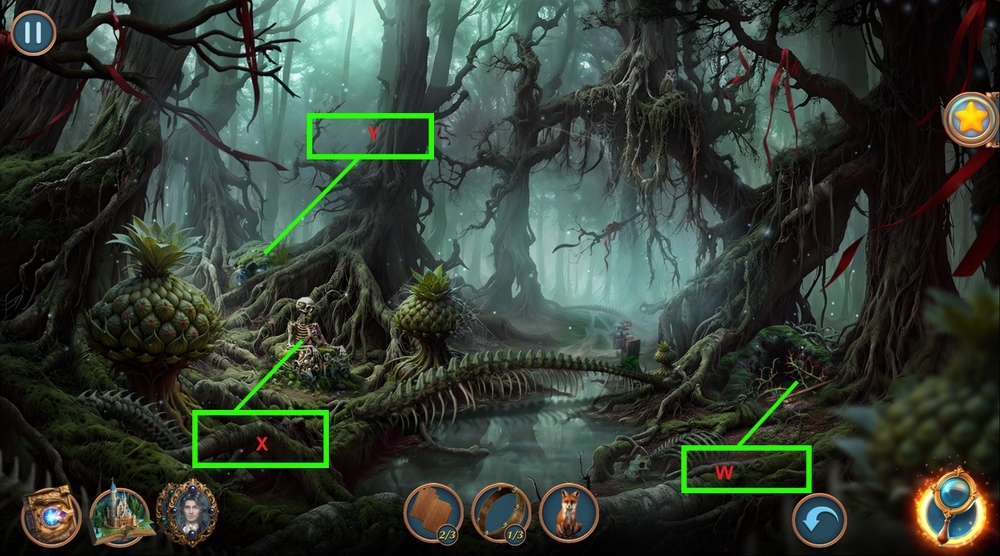
- Take PITCHFORK (W).
- Use PITCHFORK on the pile of bones, take COLLARS 2/3 and SCRAPER (X).
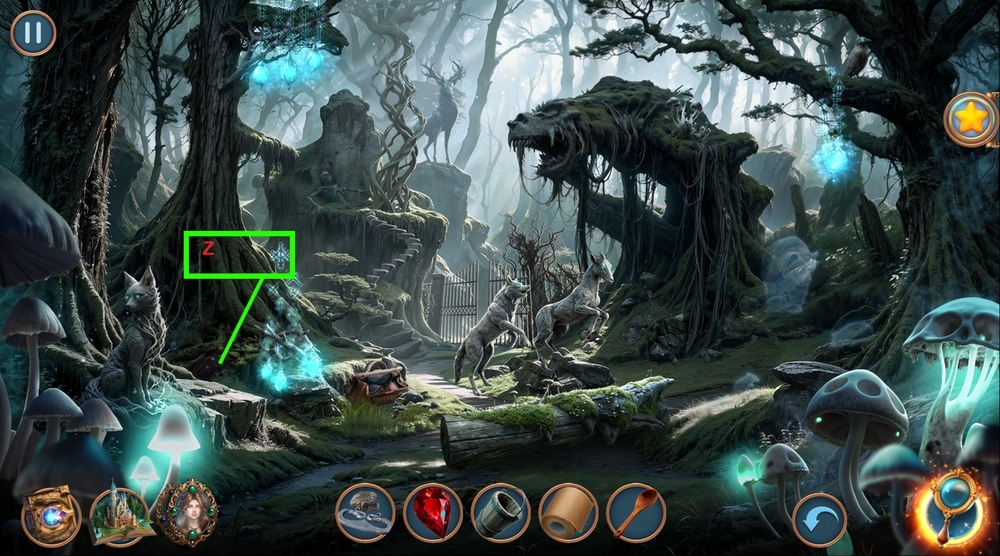
- Use SCRAPER on the moss, take and read the scroll, click on the items that match the highlighted words: heart-shaped bush, wedding rings, and Cerberus statue, take FRAME PARTS 3/3 (Y).
- Go to the High Tower.
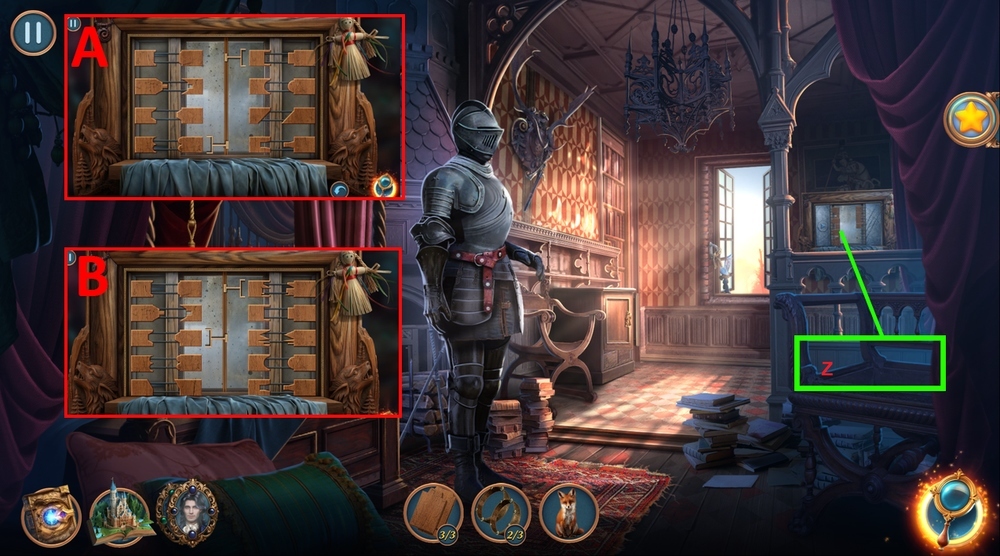
- Use FRAME PARTS on the frame (Z).
- Easy solution: See the picture for correct positioning (A).
- Hard solution: See the picture for correct positioning (B).
- Take RUBY EYES.
- Take a closer look at the dragon, use RUBY EYES on the dragon, take SPRING (D).
- Go forward.
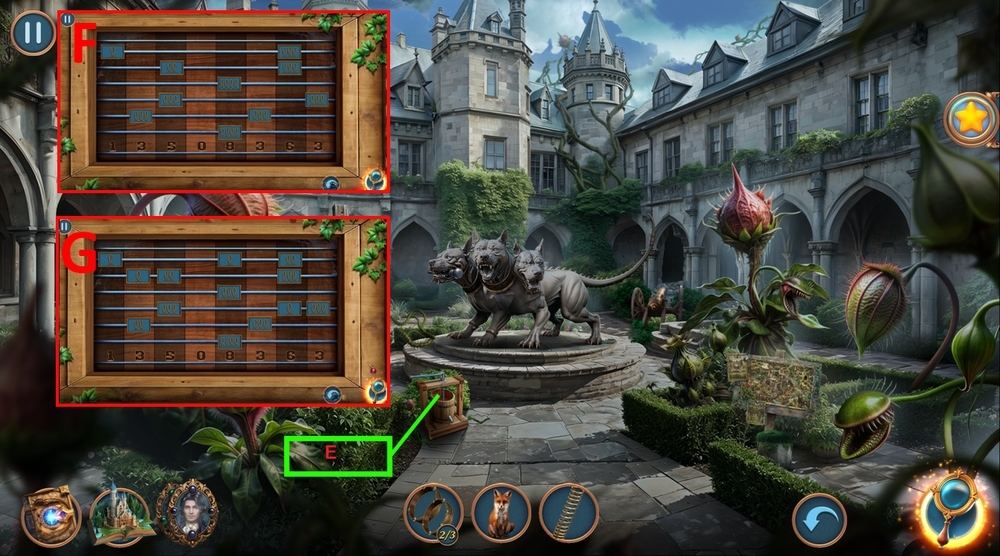
- Use SPRING on the juice squeezer, click on the bottom part of the squeezer (E).
- Easy solution: See the picture for correct positioning (F).
- Hard solution: See the picture for correct positioning (G).
- Take CLEW.
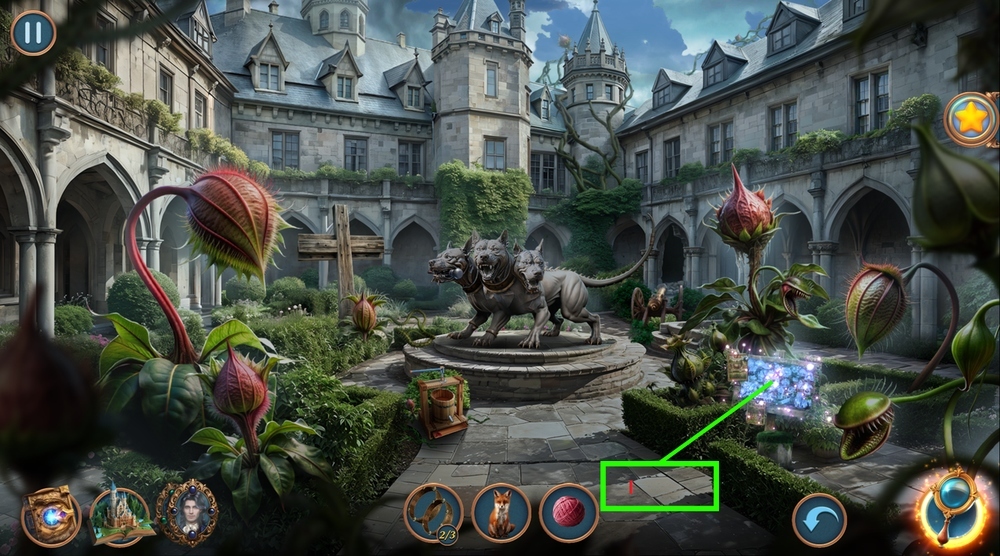
- Play puzzle, earn PENDANT BASE (I).
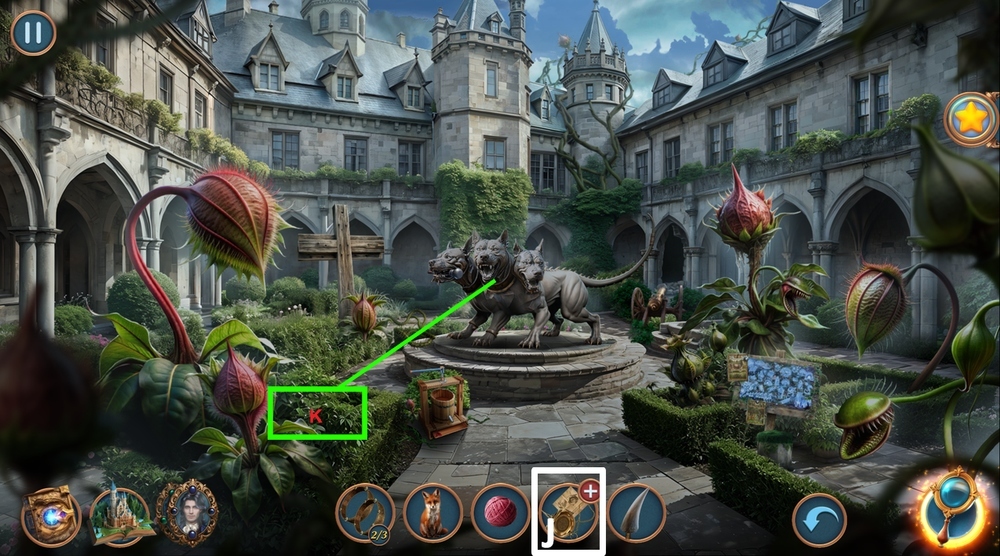
- Click on the PENDANT BASE, take FANG, open the pendant (J).
- Use FANG on the left dog’s head, take OLD CANE (K).
- Go back.
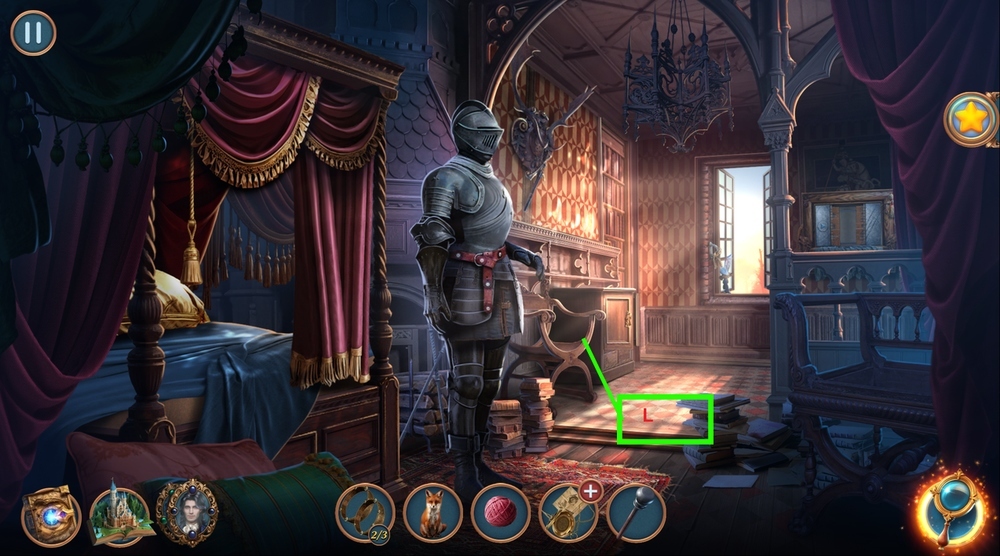
- Use CLEW on the box (L).
- Go to the Forest of Nightmares.
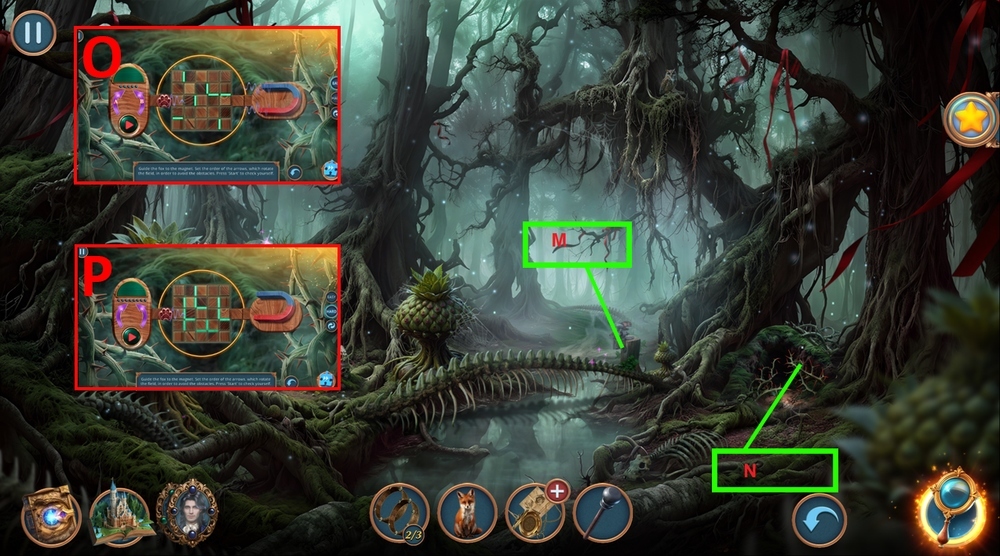
- Use OLD CANE on the clamp, take LEATHER GLOVE (M).
- Use LEATHER GLOVE on thorns, use FOX on the hole (N).
- Easy solution: B-A-A-B-A (O).
- Hard solution: A-B-B-A-A-B-B-A (P).
- Take MAGNET.
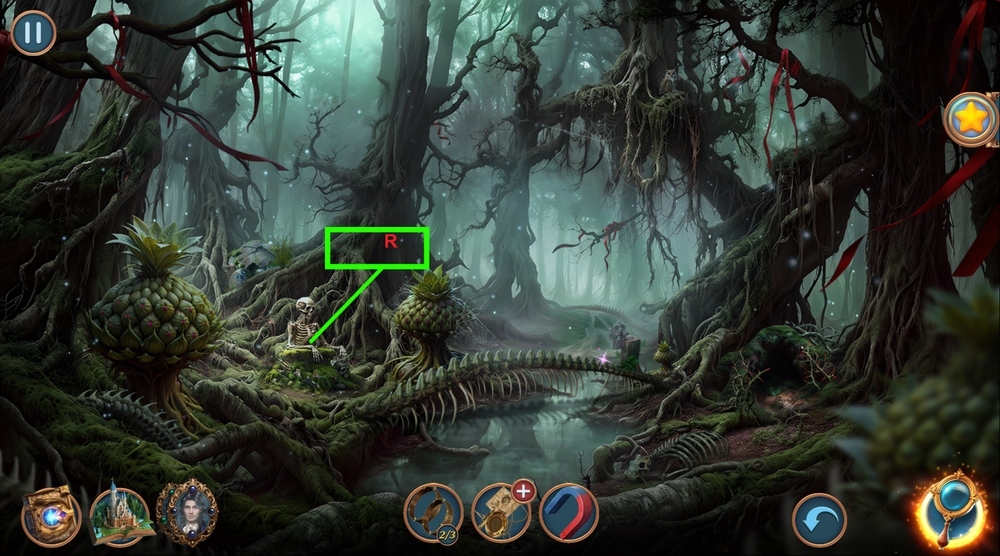
- Use MAGNET on the skeleton ribs, earn NEEDLE (R).
- Go to the High Tower.
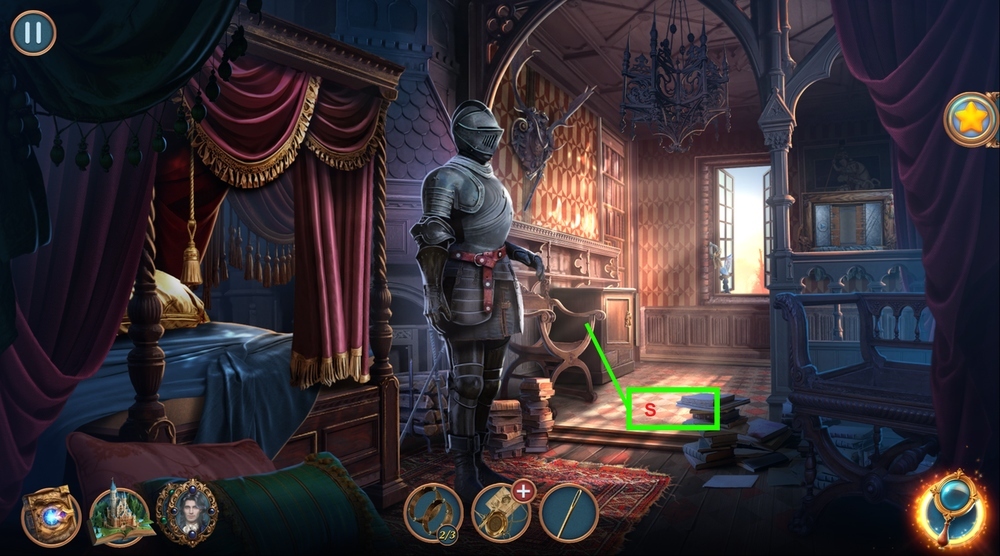
- Use NEEDLE on the box, take COLLARS 3/3 (S).
- Go forward.
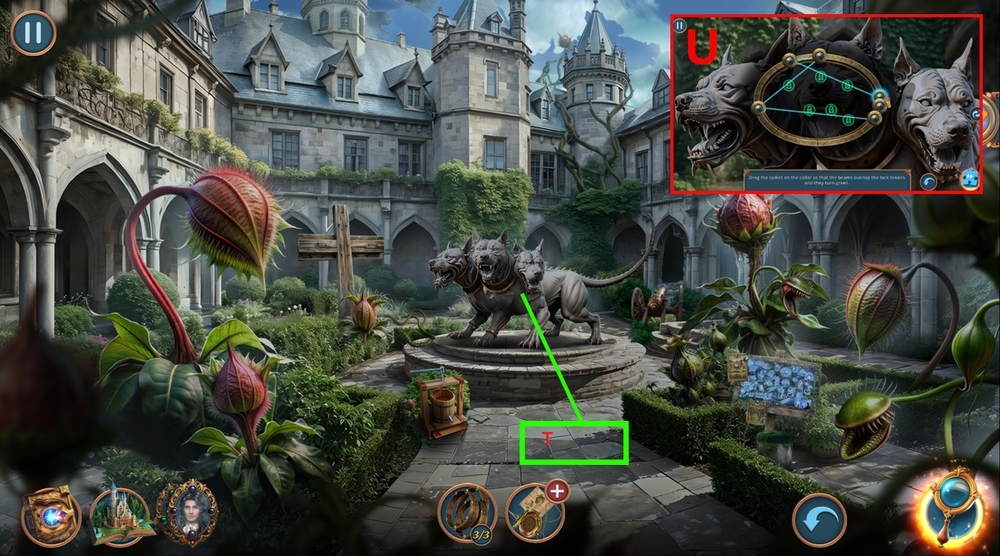
- Use COLLARS on the Cerberus statue (T).
- Solution: Can be solved in different ways.
- See the picture for one of them (U).
- Take RUNE SCROLL.
- Go forward.
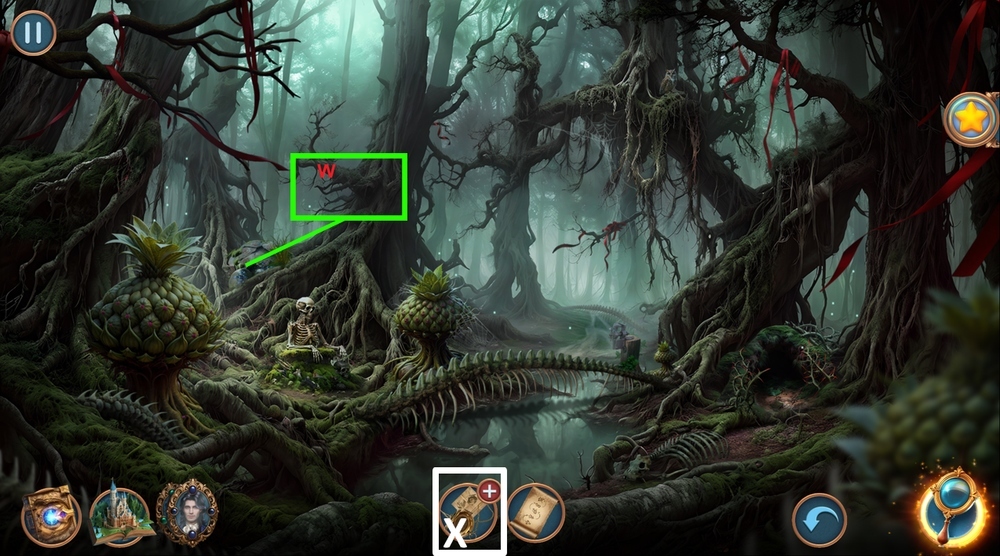
- Use RUNE SCROLL on the stone, click on the runes in the order from the clue: upper right, lower left, lower right, top one, upper left, take GUIDING STONE (W).
- Use GUIDING STONE on PENDANT BASE, earn COMPASS PENDANT (X).
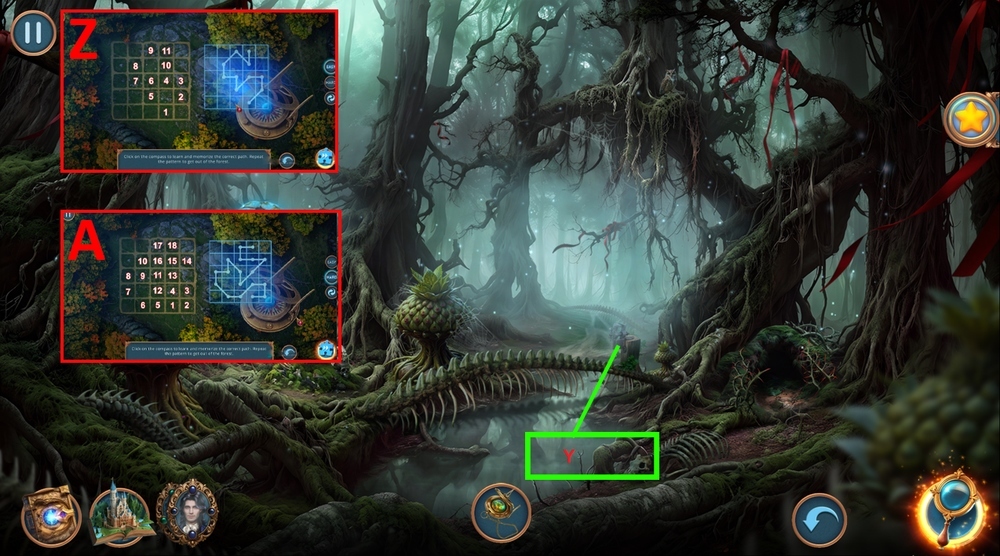
- Use COMPASS PENDANT on the path (Y).
- Easy solution: Follow the instructions (Z).
- Hard solution: Follow the instructions (A).
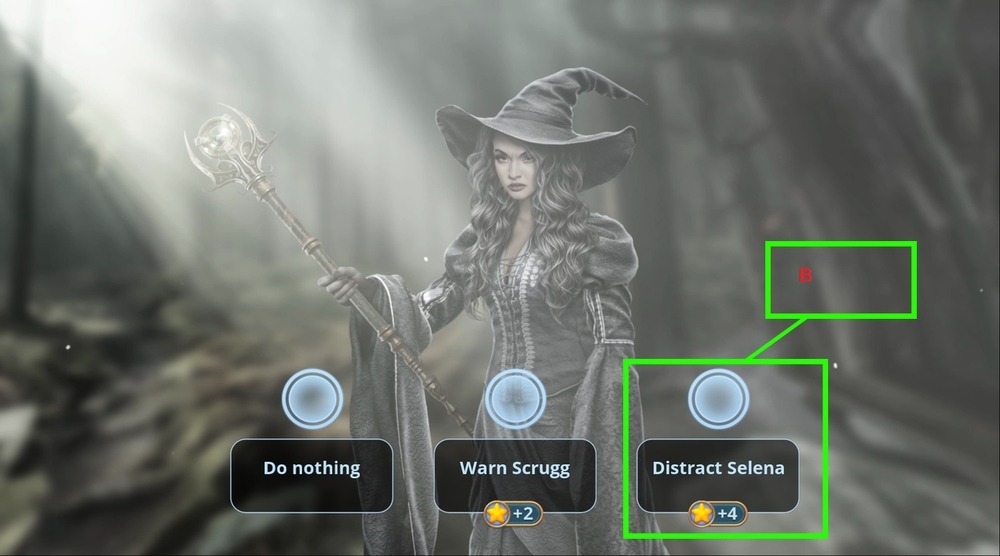
- Select this option (B).
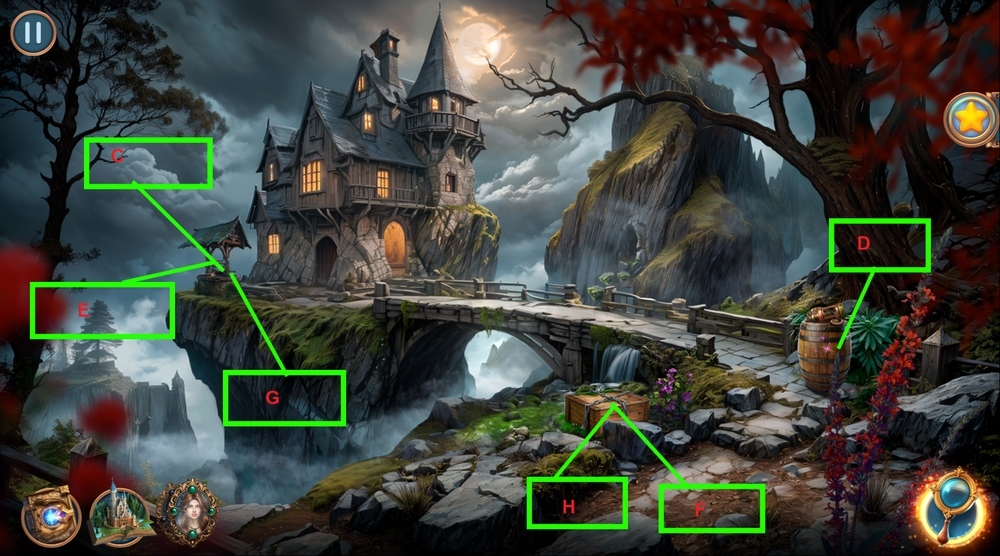
- Take SCOOP NET FRAME, PATTERN, and OIL CAN, click on the well lid (C).
- Take MAGIC LANTERN and ROPE (D).
- Use ROPE on the well (E).
- Take FLINT AND STEEL and HOOK (F).
- Use HOOK on the well, take LEAKY BUCKET (G).
- Use LEAKY BUCKET on the water, take MAGIC GLASS (H).
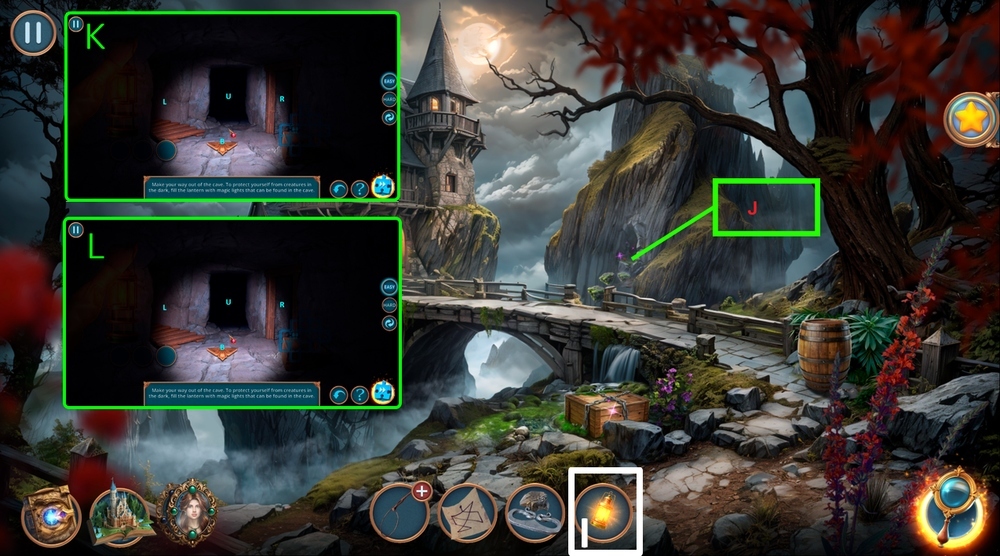
- Use OIL CAN and MAGIC GLASS on MAGIC LANTERN, earn MAGIC LANTERN (I).
- Use MAGIC LANTERN on the dark cave (J).
- Easy solution: L, R, take light, B, B, R, U.
- L, U, take light, B, B, U, L, take light, B, R, U.
- R, R, take light, B, B, L, L, U, take light, B, B, U, L, take light, B, B, R, R, L, U (K).
- Hard solution: L, R, take light, B, L, L, take light, B, B, B, R, U.
- R, R, take light, B, B, L, U, take light, B, B, U, L, take light, B, R, U.
- R, R, take light, B, U, L, take light, B, B, B, L, U, L, take light, B, B, L, U, take light, B, B, R, R, L, U (L).
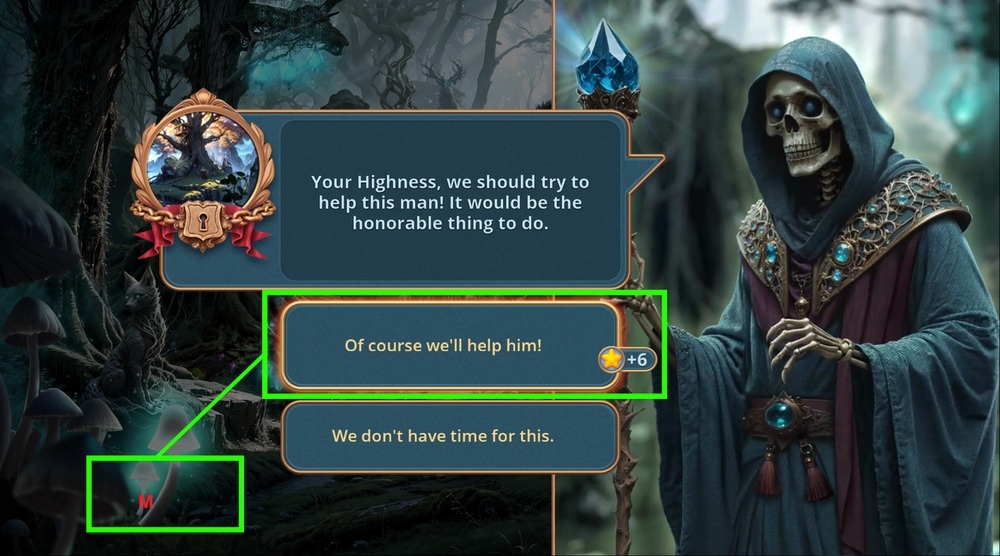
- Select this option (M).
- Go forward.
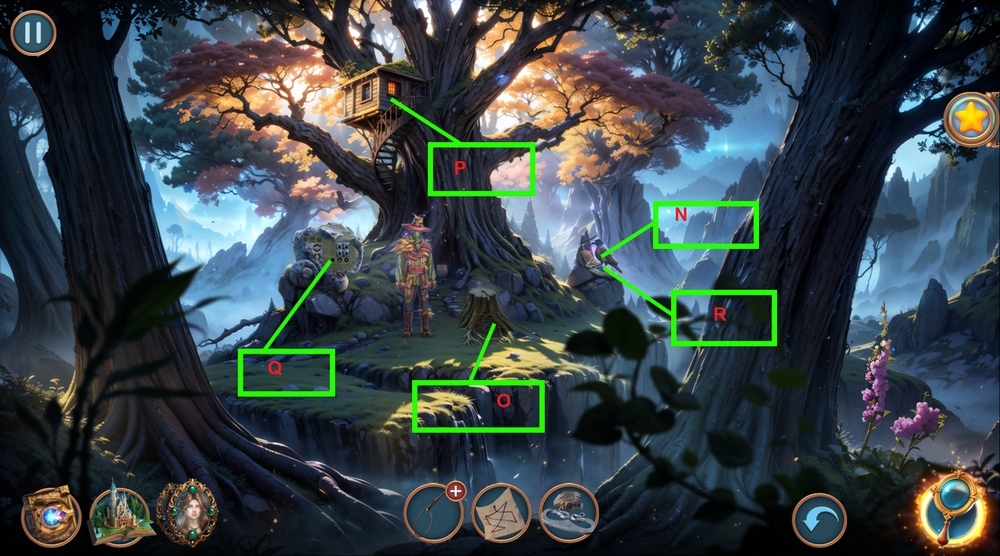
- Take SCISSORS (N).
- Use SCISSORS to cut the rope, take SMALL FLAG (O).
- Use SMALL FLAG on the castle, take KNITTING NEEDLE (P).
- Take Carving Knife (Q).
- Use Carving Knife on the wooden raven (R).
- Go back.
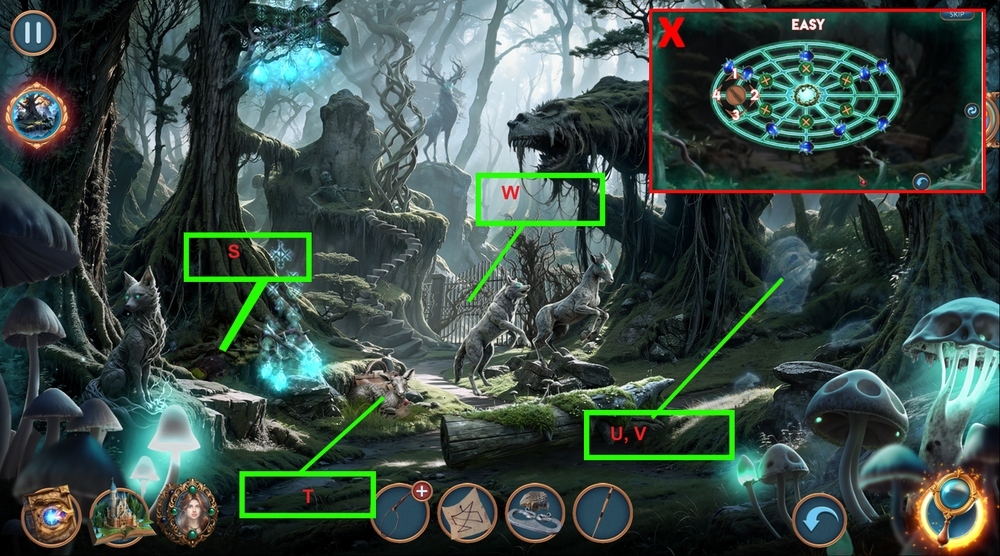
- Take BOWL OF HENNA (S).
- Take and read the note, take MAGIC AMULET (T).
- Use MAGIC AMULET on the clearing of phantom animals (U).
- Play puzzle, earn SAWFISH NOSE (V).
- Use SAWFISH NOSE on the vines (W).
- Solution: Click 1-2-3-3-3-3-3-3-3-4 (X).
- Go to the Old Cathedral.
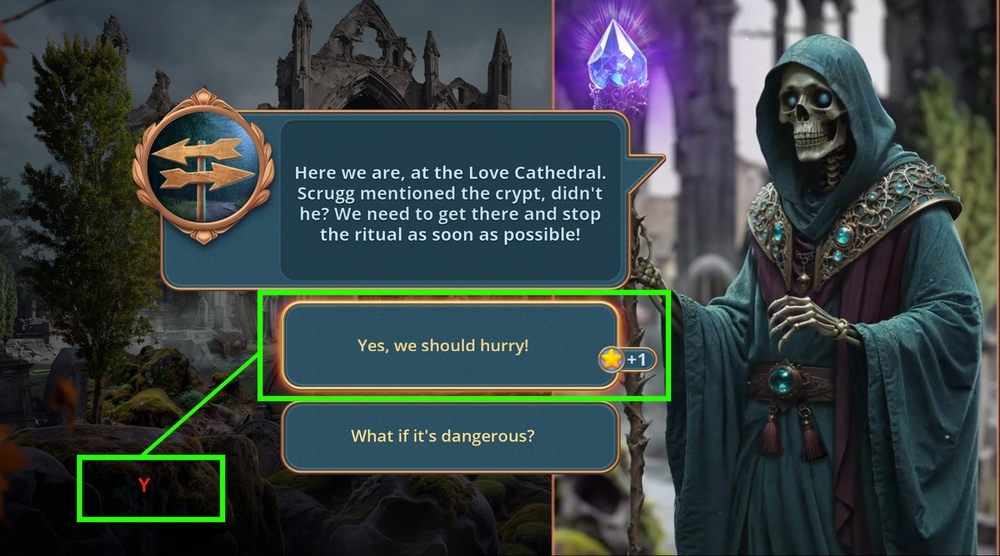
- Select this option (Y).
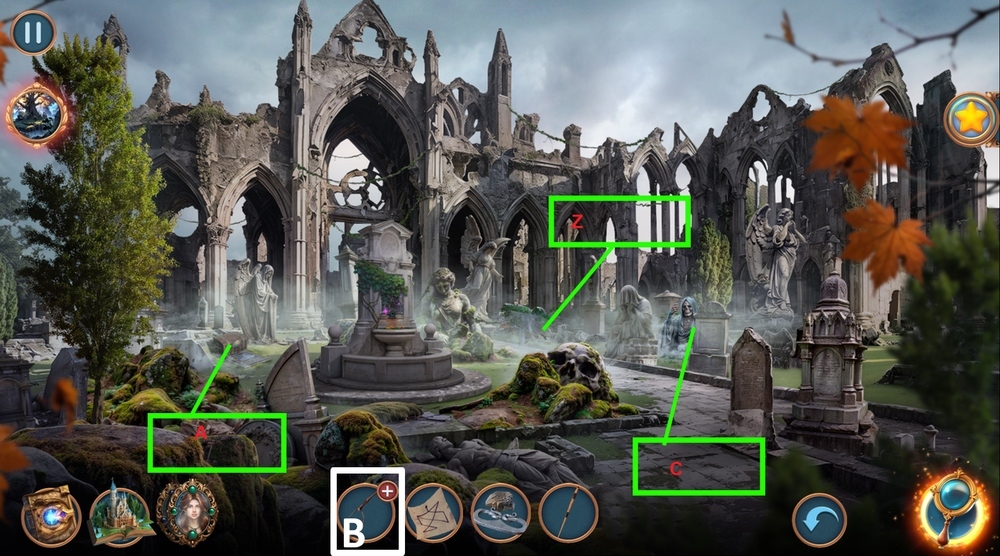
- Use FLINT AND STEEL on the web, take LACE (Z).
- Use PATTERN on the chest (A).
- Use LACE on SCOOP NET FRAME, earn SCOOP NET (B).
- Take STONE ANIMALS 1/3 and OIL (C).
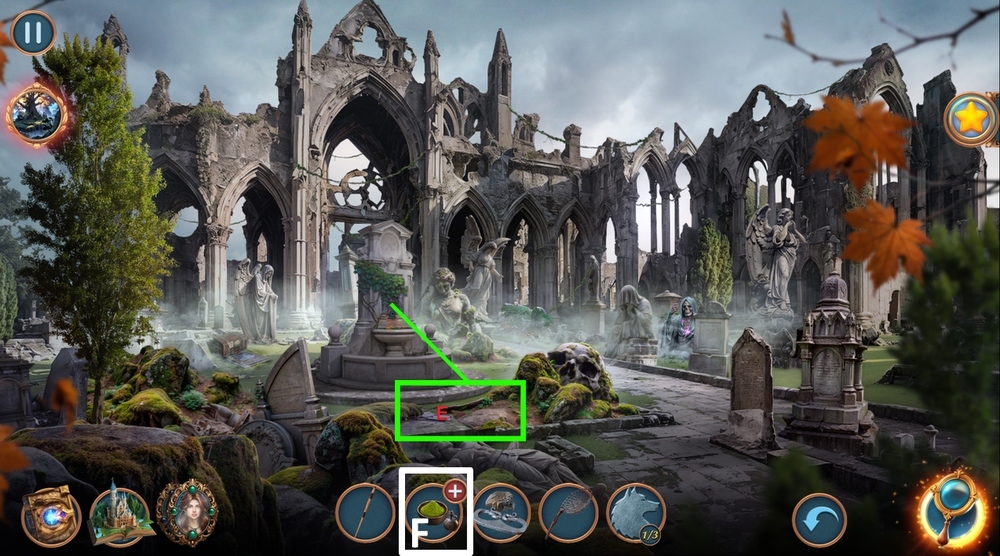
- Use SCOOP NET on the water, earn FEATHER (E).
- Use OIL and FEATHER on BOWL OF HENNA, earn BOWL OF PAINT (F).
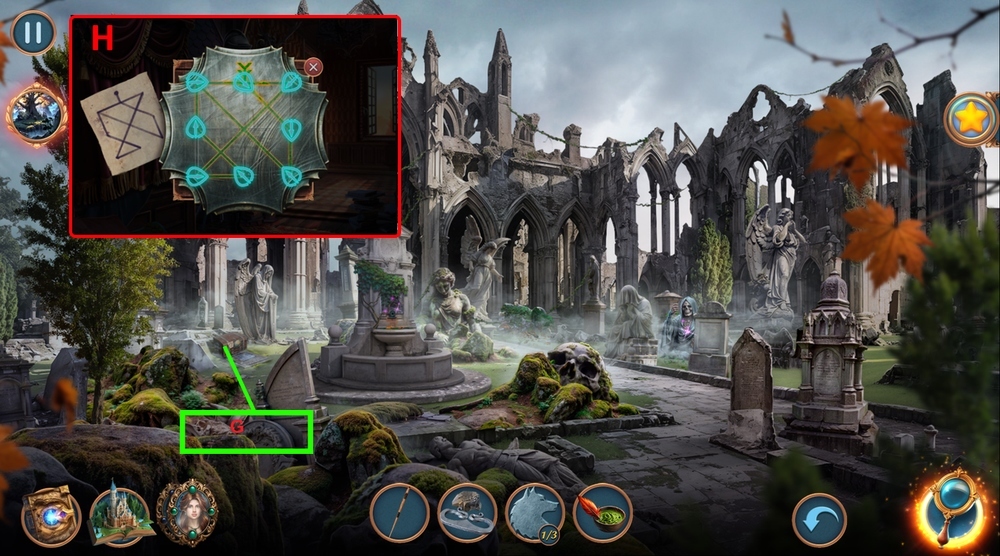
- Use BOWL OF PAINT on the chest (G).
- Solution: See the picture for correct positioning (H).
- Take CORKSCREW, use KNITTING NEEDLE on the double bottom, take CHISEL (G).
- Go to the Soaring Oak.
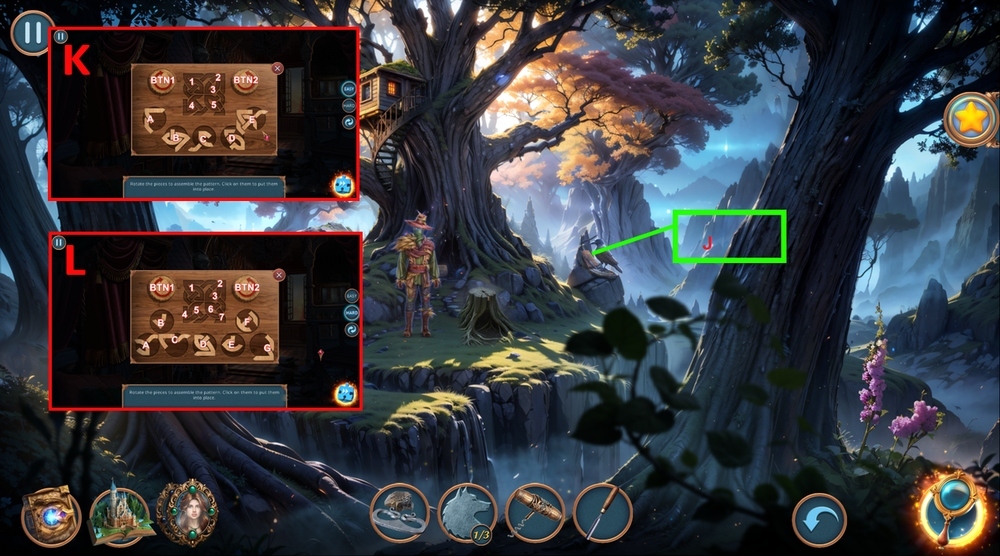
- Use CHISEL on the wooden raven (J).
- Easy solution: BTN2 (2 clicks) E-4, BTN2 (1 click) B-1, BTN1 (1 click) C-3, BTN2 (2 clicks) D-5, BTN2 (2 clicks) A-2 (K).
- Hard solution: BTN1 (2 clicks) A-3, BTN2 (3 clicks) B-7, BTN2 (1 click) C-4, BTN2 (2 clicks) D-1, BTN2 (3 clicks) E-6, BTN1 (1 click) F-5, BTN2 (4 clicks) G-2 (L).
- Take and read the note, take FLOWER TILES 1/3 and WOODEN CLAW.
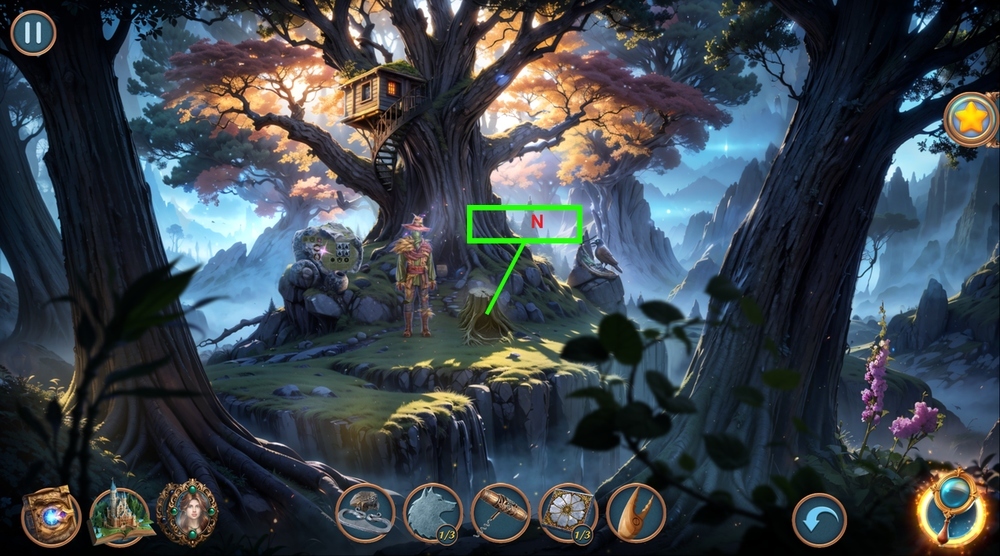
- Use WOODEN CLAW on the stuck objects, earn FLOWER TILES 2/3 and SKULL RING (N).
- Go to the Moonlight Cliff.
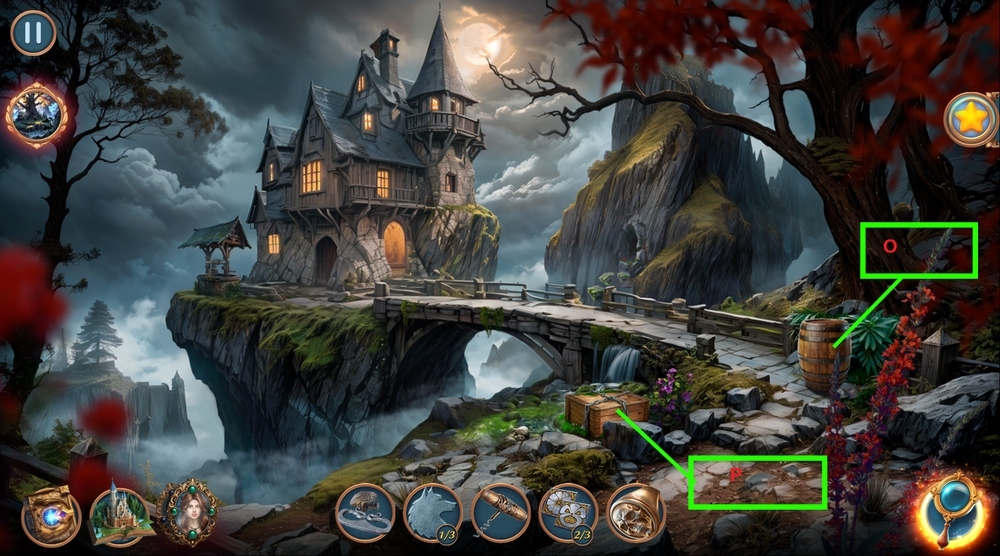
- Use CORKSCREW on the barrel, take GEM and TRAP (O).
- Use TRAP on the box, take BONE, STONE ANIMALS 2/3, and BUCKET (P).
- Go forward.
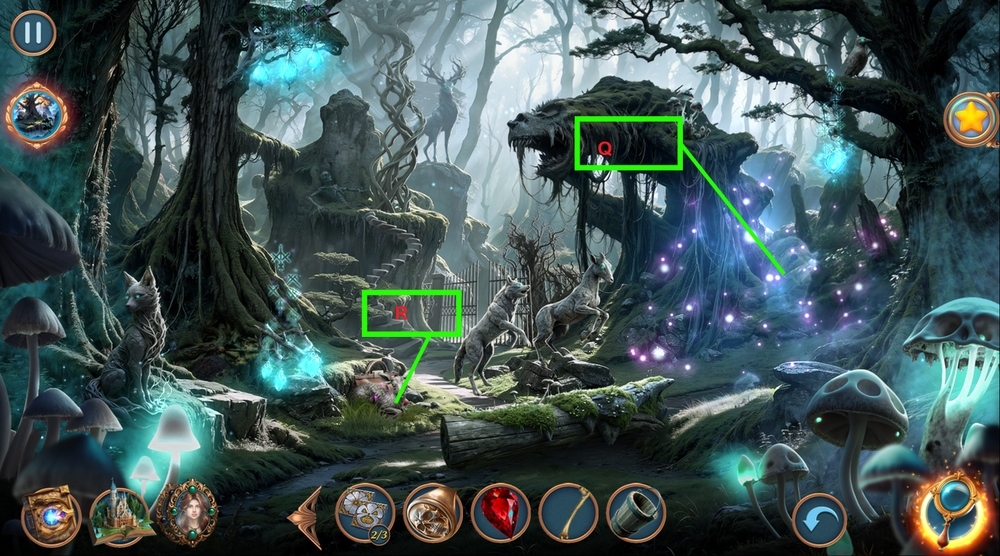
- Play puzzle, earn BASILISK OIL (Q).
- Use BASILISK OIL on the fawn, use SKULL RING on the bag, take FOSSIL, FLOWER TILES 3/3, and GLOWING MUSHROOM (R).
- Go to the Soaring Oak.
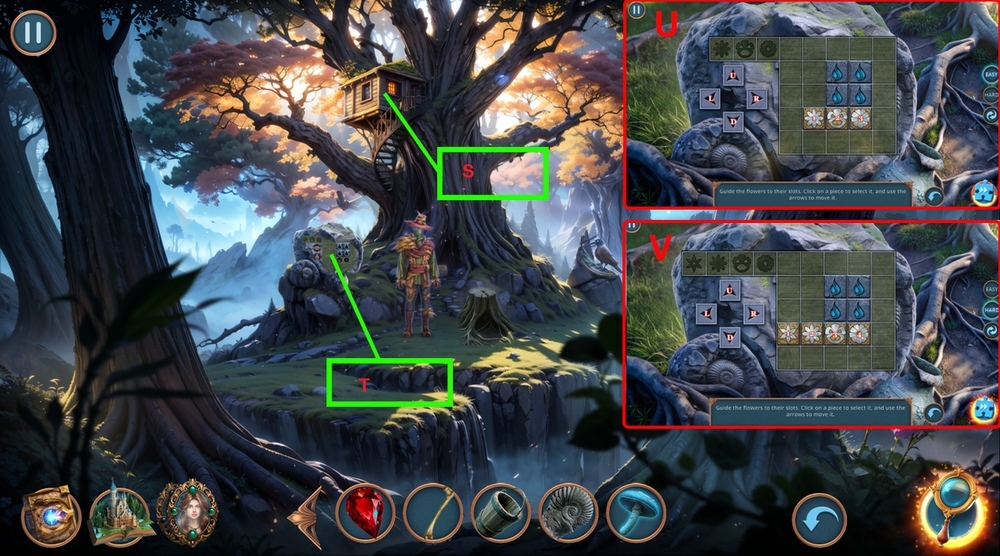
- Take a closer look at the symbols, use GLOWING MUSHROOM on them, click on the symbols from 1 to 7, take SPRING WATER (S).
- Use FLOWER TILES and SPRING WATER on the stone (T).
- Easy solution: 1-U, U, U, L, L, L, L.
- 2-L, U, U, U, L, L, L.
- 3-L, L, U, U, U, L (U).
- Hard solution: 1-U, U, U, L, L, L, L.
- 2-U, U, U, L, L, L, L.
- 3-L, U, U, U, L, L, L/4-L, L, U, U, U, L (V).
- Go to the Old Cathedral.
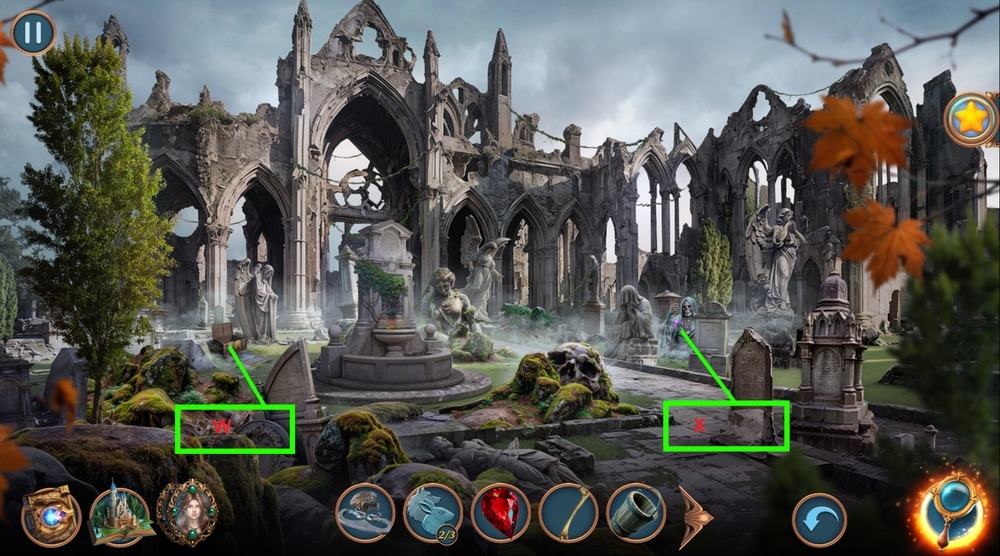
- Use BONE and FOSSIL on the hatch, take BANDAGE and SCYTHE (W).
- Use SCYTHE on the statue’s hand, take STONE ANIMALS 3/3 (X).
- Go to the Moonlight Cliff.
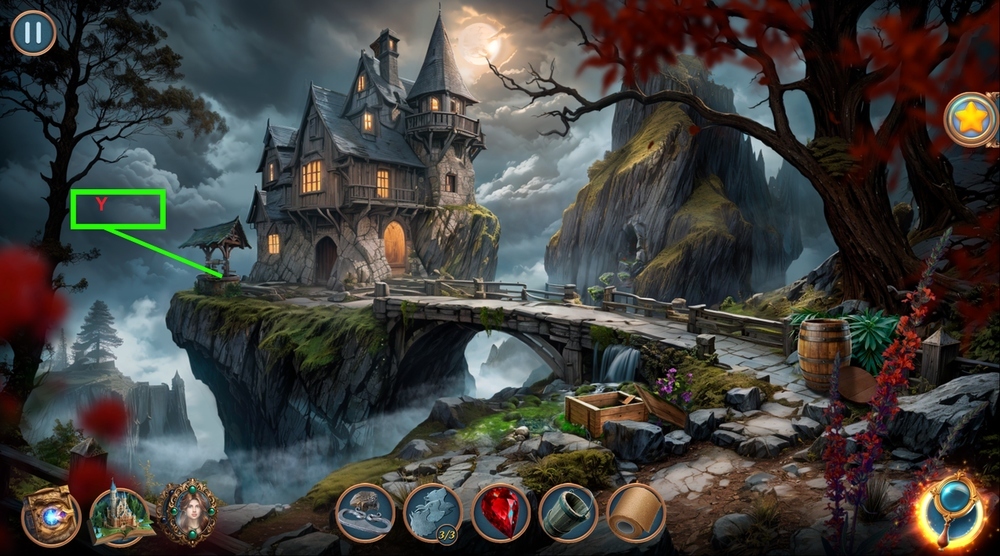
- Use STONE ANIMALS on the well, take SPOON (Y).
- Go forward.
- Use SPOON on the pile of dirt, take STONE TILE (Z).
- Go to the Old Cathedral.
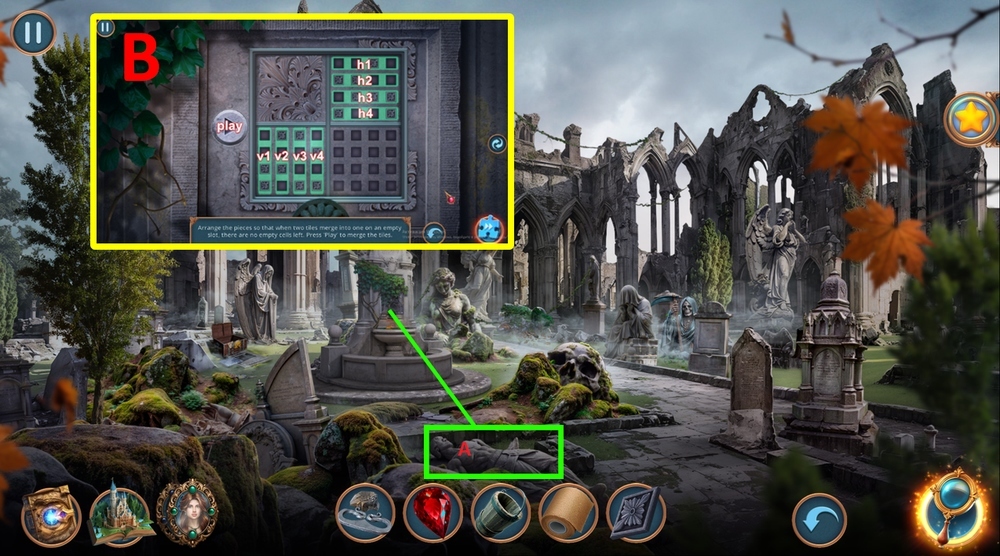
- Use STONE TILE on the mosaic above the fountain (A).
- Solution: v1-v4, v2-v3.
- h1-h4-h2-h3 (B).
- Go to the Crypt.
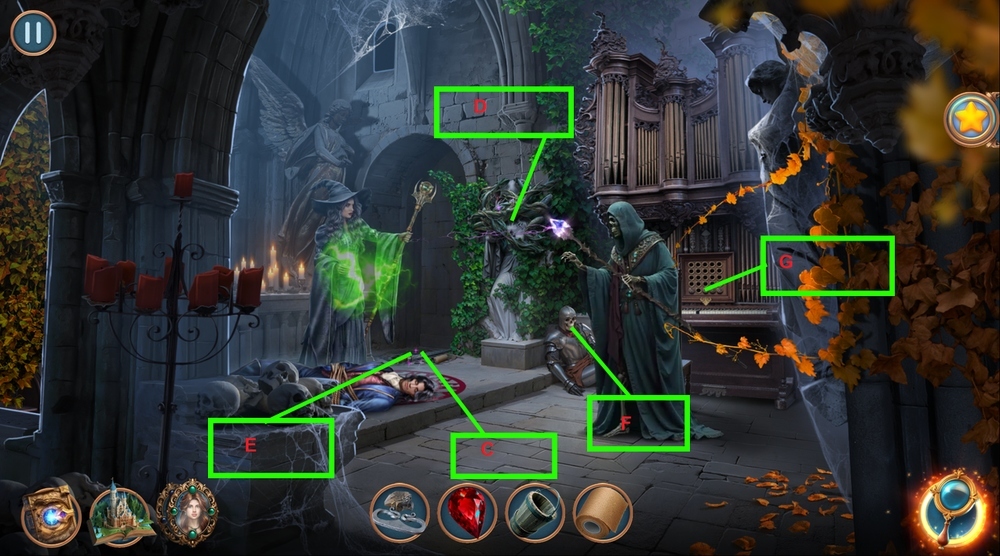
- Take DAMAGED DAGGER and CANDLE (C).
- Use GEM on the statue, use BUCKET on the blood, earn BUCKET OF BLOOD (D).
- Use BUCKET OF BLOOD on the grate, take KEY (E).
- Use FLINT AND STONE and CANDLE on the skull (F).
- Use KEY on the keyboard (G).
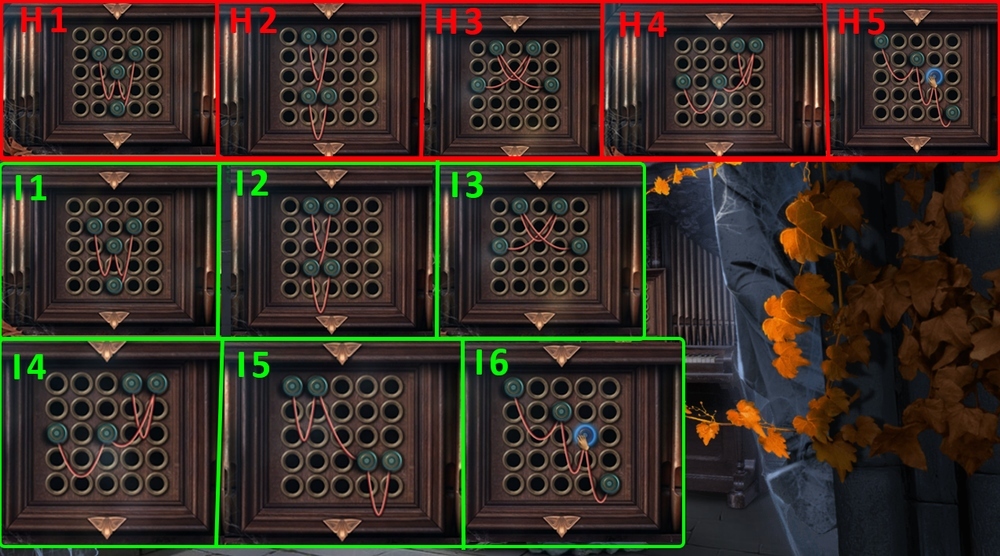
- Easy solution: Follow the instructions (H1-H5).
- Hard solution: Follow the instructions (I1-I6).
- Take INQUISITOR’S EMBLEM.
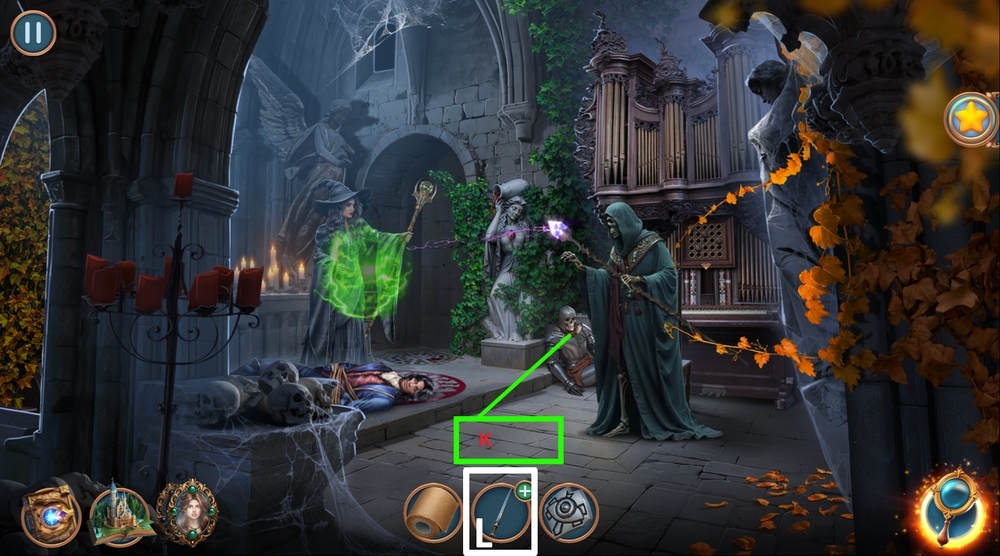
- Use INQUISITOR’S EMBLEM on the skull, take MAGIC RUBY (K).
- Use BANDAGE and MAGIC RUBY on DAMAGED DAGGER, earn MAGIC DAGGER (L).
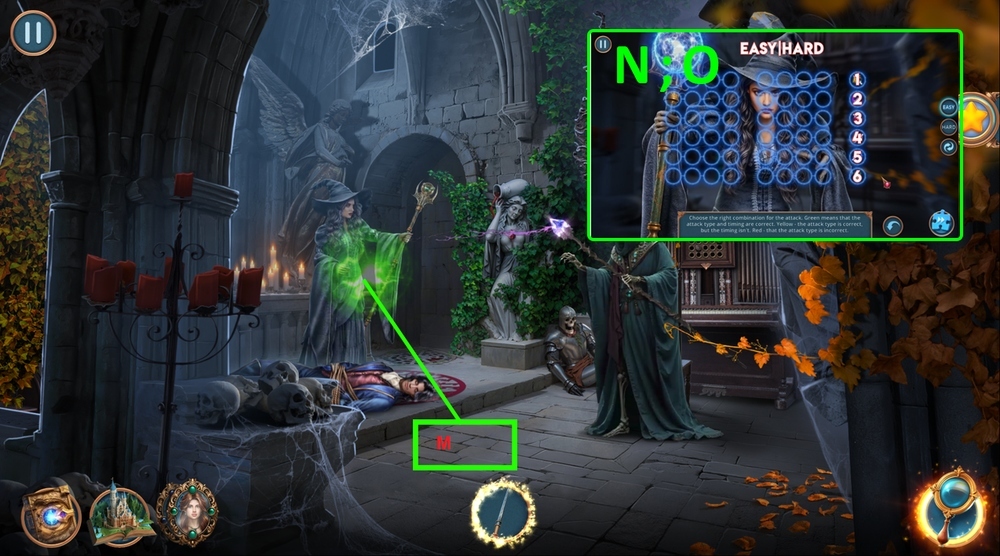
- Use MAGIC DAGGER on Selena (M).
- Easy solution: Click 3-5-2-1 (N).
- Hard solution: Click 3-5-2-1 (O).
Congratulations! You have completed the game Connected Hearts 5: Hour of the Witch.


