
Connected Hearts Season 1 Episode 1: Love and Witches – The walkthrough begins with Cindy talking about her father, who was the deputy mayor. Her mother passed away when she was very young, but her father was always there for her. And when she wanted to follow in her mother’s footsteps and go into mechanics, he supported her. After a while her father remarried, to a gorgeous woman who already had a daughter Annie. Cindy’s stepmother cared for her as if she were her own daughter. However, as soon as her father died, everything changed at the snap of a finger. The stepmother sends the girl to the attic to get fabric for a new dress, where the girl finds a notebook where the father tells her that he was surprised and horrified to discover that his second wife turned out to be an evil sorceress. With the help of charms she forced him to marry her. He also learnt that she sucked the strength out of young girls to keep her young and beautiful. When he learnt of her wrongdoings, he decided to stop her. The police would hardly believe him, so he decided to tell everything to his old friend, the mayor, who had been fighting evil magic for years. The girl grabs the only clue that leads her to the mayor’s son’s birthday ball. It’s up to you to save your father before the evil stepmother disposes of him for good. If you can not pass any of the puzzles or do not know where the items are, on our site you can watch the walkthrough of Connected Hearts Season 1 Episode 1: Love and Witches, and save your father.
Connected Hearts Season 1 Episode 1: Love and Witches – Walkthrough
Here you can see the full walkthrough of Connected Hearts Season 1 Episode 1: Love and Witches, especially the main story.

- Take LIP BALM (A), SMALL BOX, and Map.
- Take BRUSH (B) and Notebook.
- Use SMALL BOX (C).
- Take PINCUSHION. Select.
- Read (D).
- Use PINCUSHION (E).
- Receive METAL FAIRY.
- Take DUCT TAPE (F). Select.
- Read (G).
- Use METAL FAIRY (H).

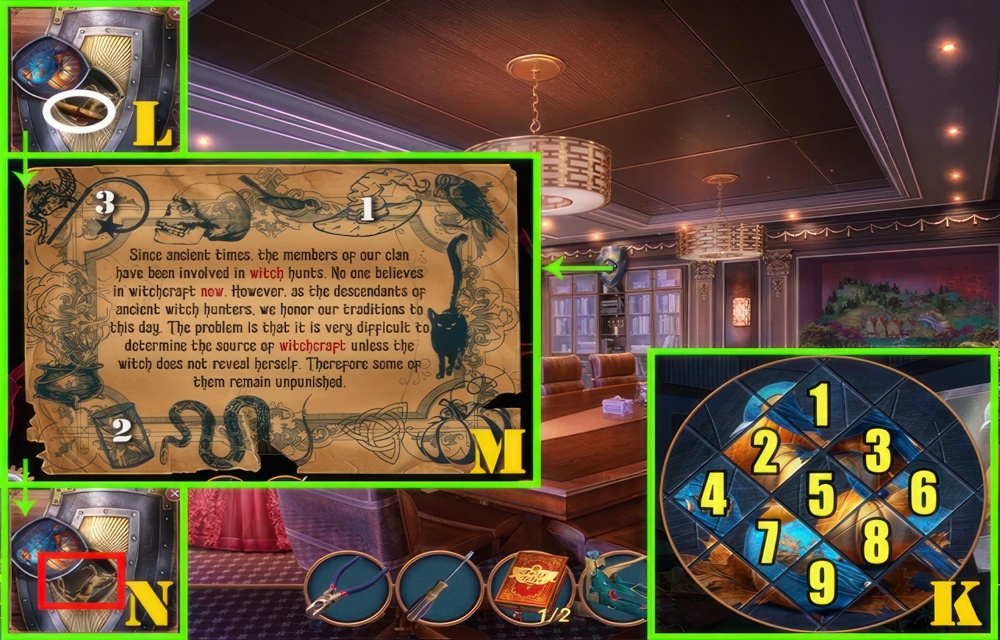
- Play puzzle (I).
- Select (1-4).
- Select (5-9) (J).
- Select (10-12) (K).
- Select (L).
- Take LOCK PICKS (M).
- Use LOCK PICKS (N).
- Go to Stepmother’s Bedroom.
- Play puzzle (O).
- Select (1-4).
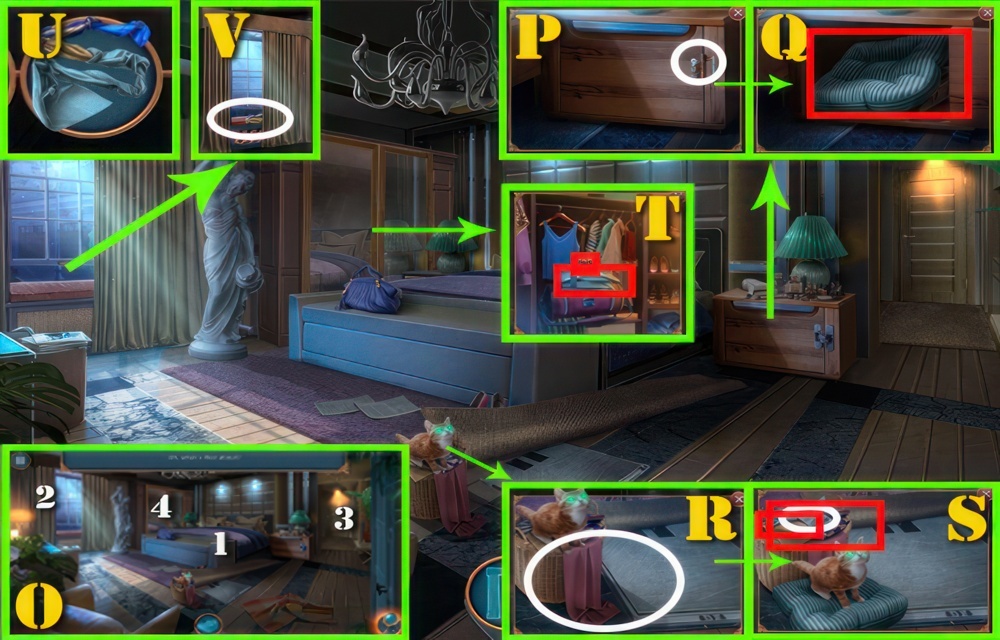
- Use LIP BALM (P).
- Take PILLOW (Q).
- Use PILLOW (R).
- Select (S).
- Read.
- Take BACK SCRATCHER and TOWELS.
- Take SEWING KIT (T) and OLD SHEET.
- Use OLD SHEET (U).
- Add TOWELS.
- Receive ROPE.
- Use ROPE (V).

- Play puzzle (W).
- Easy Solution: 1E-2A-3C-4H-5D-6G-7F-8B.
- Hard Solution: 1F-2A-3H-4B-5C-6G-7I-8K-9E-10D.
- Go to Backyard Garden.

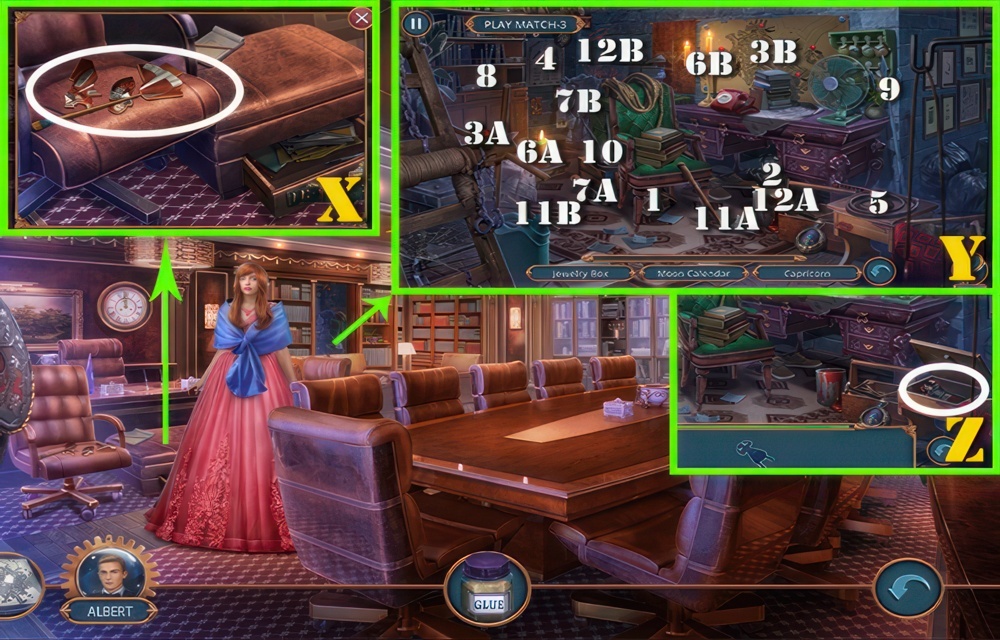
- Talk (X).
- Take SET OF KEYS (Y).
- Select (Z).

- Take PIECE OF PAPER (A) and FLUFFY KEYCHAIN.
- Use FLUFFY KEYCHAIN (B).
- Read (C).
- Read (D).
- Play puzzle (E).
- Easy Solution: 1B-2D-3C-4A-5E.
- Hard Solution: 1A-2B-3C-4D-5E-6F-7G.
- Take MEDAL (F).
- Read (G).
- Use MEDAL (H).
- Take PAPER KNIFE (I).
- Go to Backyard Garden.
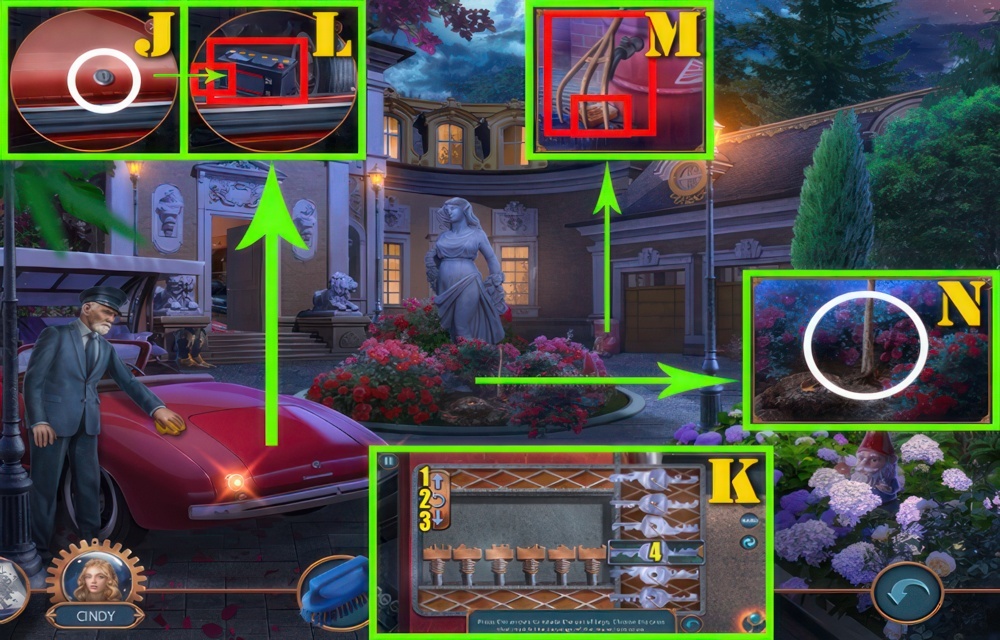
- Use SET OF KEYS (J).
- Play puzzle (K).
- Easy Solution: 1-4-3-2-4-1-1-2-4-3-3-3-4-3-3-3-2-4.
- Hard Solution: 3-3-4-3-3-3-4-3-2-4-1-1-2-4-3-3-3-4-3-3-3-2-4.
- Take BACKUP GENERATOR (L) and SAW.
- Take RAKE and SOAP (M).
- Use SAW (N).
- Receive STICK.

- Use RAKE (O).
- Add DUCT TAPE and STICK.
- Receive PITCHFORK.
- Use PITCHFORK (P).
- Select (Q).
- Take CANISTER (R).
- Select (S).
- Receive WATER BUCKET.
- Go to Parlor.

- Use WATER BUCKET (T) and BACK SCRATCHER.
- Take THIMBLE (U) and TWEEZERS.
- Use TWEEZERS (V).
- Select (W).
- Read (X).
- Receive PUSH-PIN.
- Go to Step-Mother’s Bedroom.

- Select (Y).
- Use PUSH-PIN (Z).
- Take PUSH-UP BARS (A).
- Use PUSH-UP BARS (B).
- Play puzzle (C).
- Select (1-12).
- Select (D).
- Take SHOE BOX (E).
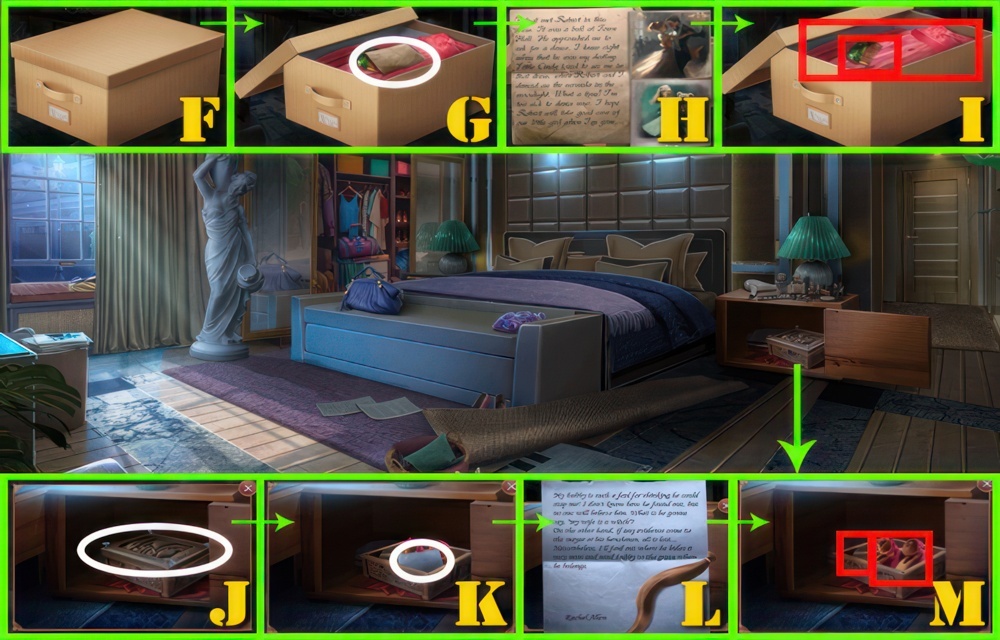
- Use SHOE BOX (F). Select.
- Select (G).
- Read (H).
- Take COMB (I) and DIRTY DRESS.
- Use COMB (J).
- Select (K).
- Read (L).
- Take SHOES (M) and SCOOP.
- Go to Backyard Garden.

- Use SCOOP (N).
- Take SOLVENT (O).
- Use PAPER KNIFE (P).
- Receive CRAYON.
- Go to Father’s Study.
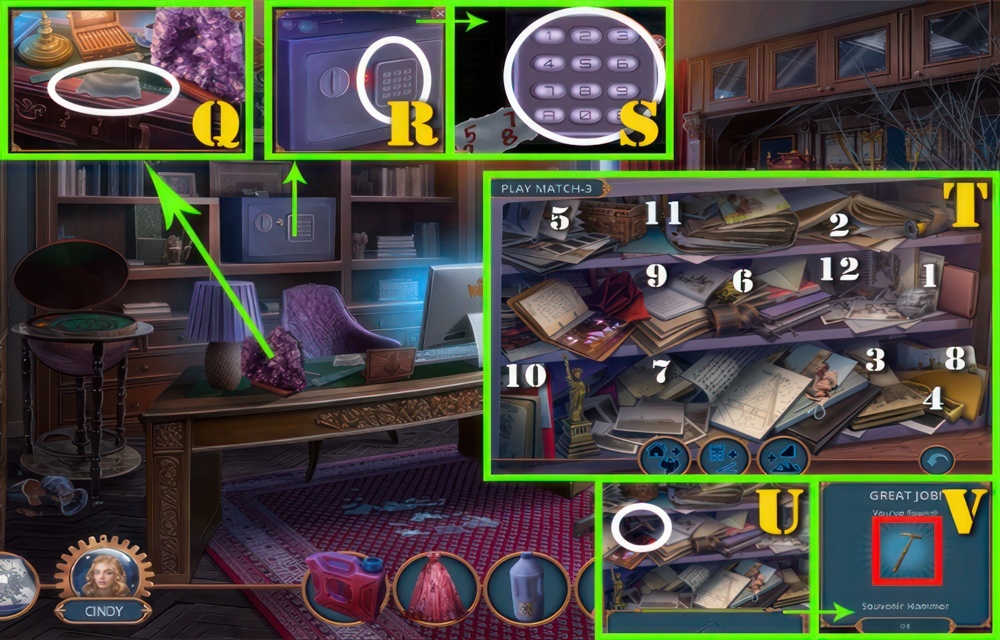
- Use PIECE OF PAPER (Q) and CRAYON.
- Receive CODE.
- Use CODE (R).
- Select (5-7-2-8) (S).
- Play puzzle (T).
- Select (1-12).
- Select (U).
- Take SOUVENIR HAMMER (V).

- Use SOUVENIR HAMMER (W).
- Take GEM (X).
- Use GEM (Y).
- Play puzzle (Z).
- Easy Solution: A1-Down-A5-Down-Down-A3-Up-Up-A4-Down-A2-Up-Up-A7-B1-Up-B6.
- Hard Solution: Up-C3-A3-Down-C6-A6-Down-A2-Up-Up-A5-Down-A1-Up-Up-A10-
- Up-C2-Up-Up-C5-Down-C1-Up-C9-B3-Up-Up-B7-Up-B4-Down-B8.
- Take GAS BURNER (A).
- Go to Backyard Garden.

- Use BRUSH (B) and SOLVENT.
- Take TOOL SET (C).
- Use GAS BURNER (D).
- Take SHURIKEN (E).
- Go to Father’s Study.

- Use SHURIKEN (F).
- Select (G).
- Read (H).
- Play puzzle (I).
- Select (1-12).
- Go to Backyard Garden.

- Use SOAP (J) and DIRTY DRESS.
- Receive MOM’S DRESS.
- Go to Parlor.

- Play puzzle (K).
- Select (1-12).
- Select (L).
- Take DRESS DECORATION (M).
- Use SEWING KIT (N), THIMBLE, DRESS DECORATION, and MOM’S DRESS.
- Take BALL GOWN (O).
- Go to Stepmother’s Bedroom.

- Use SHOES (P) and BALL GOWN.
- Play puzzle (Q).
- Select (1-6).
- Select (R).
- Take FURNITURE LIFTER (S).
- Use FURNITURE LIFTER (T).
- Take VALVE.
- Go to Backyard Garden.

- Use VALVE (U) and CANISTER.
- Receive GASOLINE.
- Use BACKUP GENERATOR (V), TOOL SET, and GASOLINE.
- Play puzzle (W).
- Solution (B-D-C-A-E).

- Take CANDLE (X) and PLIERS.
- Take STRAP (Y), STENCIL, and MONOCULAR.
- Use PLIERS (Z).
- Select (A).
- Read (B).
- Take CHAMPAGNE.
- Select (C).
- Read (D).
- Use CHAMPAGNE (E).

- Take CHAMPAGNE TRAY (F).
- Use CHAMPAGNE TRAY (G).
- Talk.
- Take KEY CARD (H).
- Use KEY CARD (I).
- Play puzzle (J).
- Solution: Random.
- Go to Service Corridor.

- Take ROPE (K), PIPE, and MAGNET AND ROPE.
- Use MAGNET AND ROPE (L).
- Play puzzle (M).
- Easy Solution: 4-2-2-2-2-4-4-3-4-1-1-3-3-3-3-3-3-3-1-1-4-4-2-2-1-1-1-1-4-4-1-3-2-4-1-3-2-4-4-4-4-4-2-2-4-3-1-2-2.
- Hard Solution: 4-2-2-2-2-4-4-3-4-1-1-3-3-3-3-3-4-3-3-3-1-1-4-4-2-2-1-1-1-1-4-4-1-3-2-4-1-3-2-4-4-4-3-4-4-4-3-4-2-2-4-3-1-1-2-2-2.
- Take KEY (N).
- Use KEY (O).
- Take SCREWDRIVER (P).
- Select (Q).
- Use SCREWDRIVER (R) and PLIERS.
- Go to Balcony.

- Take BRUSH (S) and GEAR.
- Use GEAR (T).
- Take METAL DISK (U).
- Use METAL DISK (V).
- Take SIEVE (W).
- Use SIEVE (X).
- Receive GLASS CUTTER.
- Go to Ballroom.

- Use STENCIL (Y) and GLASS CUTTER.
- Receive MAGNIFYING GLASS.
- Use MONOCULAR (Z).
- Add MAGNIFYING GLASS.
- Receive MONOCULAR.
- Use MONOCULAR (A).
- Play puzzle (B).
- Select: (1-12).
- Talk (C).
- Go to Mayor’s Office.

- Select (D).
- Take WIG (E) and STAPLER.
- Use SCREWDRIVER (F) and PIPE.
- Take SCISSORS (G). Select.
- Read (H).
- Use SCISSORS (I).
- Receive RESPIRATOR.
- Take BOOKS (J).
- Go to Service Corridor.

- Use RESPIRATOR (K).
- Take OIL (L).
- Use ROPE (M).
- Add OIL.
- Receive OILED WICK.
- Go to Balcony.

- Use OILED WICK (N).
- Select (O).
- Receive LIGHTER.
- Play puzzle (P).
- Easy Solution.
- Hard Solution.
- Take DAGGER FOIL (Q).
- Use DAGGER FOIL (R).
- Take DAGGER CUTOUT (S).
- Use CANDLE (T).
- Add LIGHTER and DAGGER CUTOUT.
- Receive DAGGER.
- Go to Ballroom.

- Use DAGGER (U).
- Play puzzle (V).
- Solution: 1-1-6-7-7-9-4-4-3-3-7-3-3-2-3-3-2-2-3.
- 10-10-5-5-5-8-8-8-4-4-4-13-13-14-17-18-18-17.
- 18-19-19-18-18-19-20-20-19-19-20-16-11-11-17-17-18-18-18-13-13-18.
- Select (W).
- Read (X).
- Use SCISSORS (Y).
- Take SHAWL.
- Take STAPLES (Z).
- Use STAPLER (A).
- Add STAPLES.
- Receive STAPLER.
- Use WIG (B) and SHAWL.
- Talk (C).
- Go to Mayor’s Office.

- Use STRAP (D) and STAPLER.
- Take BOOKS 2/2 (E).
- Use BOOKS (F).
- Play puzzle (G).
- Select: (1-12).
- Select (H).
- Take PHOTO (I).
- Use PHOTO (J).
- Play puzzle (K).
- Solution: 6-3, 3-1, 7-5, 5-2, 9-8, 8-5, 3-6, 6-8, 4-7, 7-9, 9-8, 8-6, 6-3, 8-9, 8-6, 9-7
- Select (L).
- Read (M).
- Play puzzle.
- Select: (1-3).
- Take UNICORN FIGURINE (N).
- Go to Service Corridor.

- Use UNICORN FIGURINE (O) and SCREWDRIVER.
- Take PIN (P).
- Use PIN (Q).
- Add PLIERS.
- Receive HOOK.
- Go to Balcony.

- Use HOOK (R).
- Take CORKSCREW (S).
- Use CORKSCREW (T).
- Select (U).
- Read (V).
- Take GLUE (W).
- Go to Mayor’s Office.
- Use BRUSH (X) and GLUE.
- Receive WITCH.
- Play puzzle (Y).
- Select (1-12).
- Select (Z).

- Take INQUISITOR (A).
- Use INQUISITOR (B) and WITCH.
- Play puzzle (E).
- Easy Solution: 1-2-3-4-5-6-7-8-9-10-11.
- Hard Solution: 1-2-3-4-5-6-7-8-9-10-11-12-13-14.
- Take LETTER (D).
Congratulations! You have completed the game Connected Hearts Season 1 Episode 1: Love and Witches.


