
Connected Hearts Season 1 Episode 2: Search for Destiny – The walkthrough starts with you reading a letter with pictures written by your father, which he sent to his friend. The letter reads: My dear friend. I hate to write to you on this occasion, but I found out that my wife is a witch. I managed to get these pictures when I was following her. You always told me that there was magic in this world, but I never took it seriously. Now that I’ve seen it with my own eyes, I must ask your forgiveness for my ignorance. Please help me stop Rachel before it’s too late. If you can not pass any of the puzzles or do not know where the items are, on our site you can watch the walkthrough of Connected Hearts Season 1 Episode 2: Search for Destiny, and influence the plot of the episode.
Connected Hearts Season 1 Episode 2: Search for Destiny – Walkthrough
Here you can see the full walkthrough of Connected Hearts Season 1 Episode 2: Search for Destiny, especially the main plot.

- Take PLIERS (E).
- Take JAR (F) and LINE.
- Take IGNITER (G) and SCREWDRIVER.
- Use SCREWDRIVER (H).
- Select (I).
- Read (J).
- Take METAL DETECTOR (K).
- Use METAL DETECTOR (L).

- Play puzzle (M).
- Select (1-7).
- Select (N).
- Take KEY (O).
- Use KEY (P).
- Go to Cindy’s Room.

- Take CHOPSTICKS (Q). Select.
- Play puzzle (R).
- Select (1-2)
- Select (3-6) (S).
- Take SYRINGE (T).

- Use LETTER (U) and SYRINGE.
- Receive INK.
- Use INK (V).
- Play puzzle (W).
- Easy Solution: A-4 right, 1 down, B-2 left, 1 down, C-1 left, 1 down, 1 right, D-2 left, 2 up, 1 down, E-1 up, 3 right.
- Hard Solution: A-4 right, 1 down, B-3 left, 1 down, C-2 left, 1 right, D-3 right, E-1 left, 3 up, 1 down, F-1 left, 3 right.
- Read (X).

- Talk (Y).
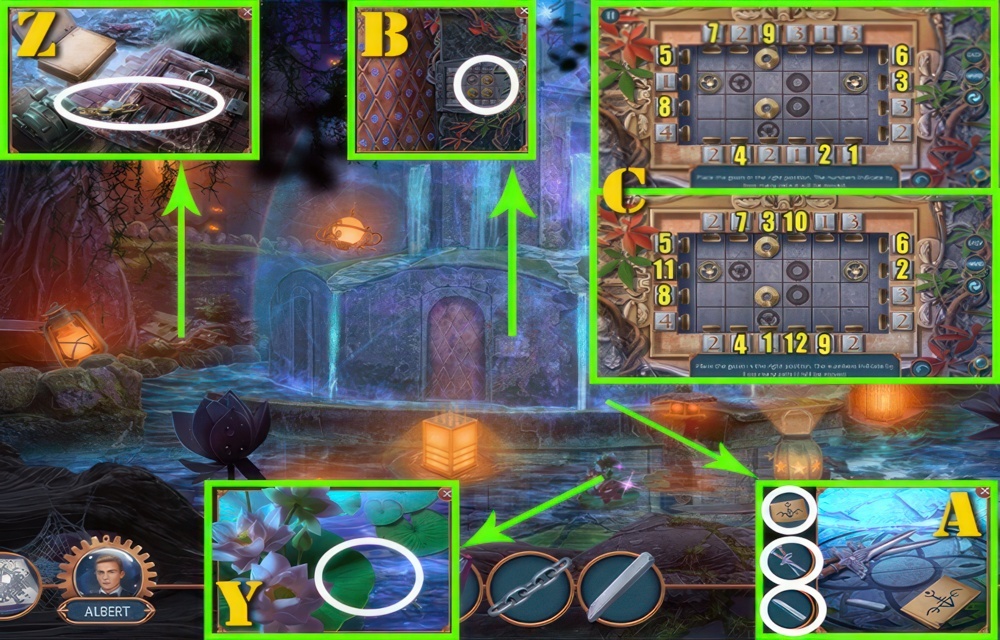
- Take POTION RECIPE (Z).
- Select (A).
- Use SCREWDRIVER (B).
- Take HEAVY STATUE (C).
- Take CHIP (D) and DRY MOSS.
- Use HEAVY STATUE (E).
- Receive FIREWOOD.
- Use FIREWOOD (F), DRY MOSS and IGNITOR.
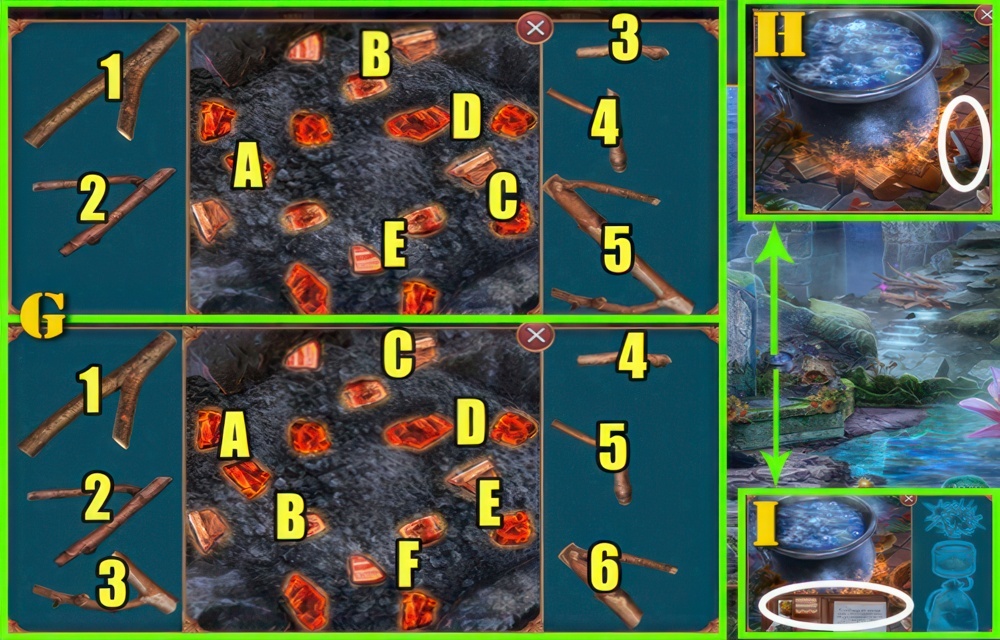
- Play puzzle (G).
- Easy Solution: 1E-2B-3D-4C-5A.
- Hard Solution: 1F-2C-3B-4D-5E-6A.
- Select (H).
- Receive BOILING WATER.
- Use POTION RECIPE (I).
- Go to Yard.

- Use PLIERS (J) and BOILING WATER.
- Take POSTER PIECES (K).
- Play puzzle (L).
- Select (1-14).
- Select (M).
- Take GLOVE (N).
- Use GLOVE (O).
- Receive GLUE and JUNIPER BERRIES.
- Go to Cindy’s Room.

- Use POSTER PIECES (P) and GLUE.
- Play puzzle (Q).
- Easy Solution: 1-2-2-2-3-4-5-5-5-6-A.
- Hard Solution: 1-2-2-3-3-3-4-4-4-5-5-6-6-6-A.
- Take JEWELRY BAG (R) and DECORATIVE MAGNET.
- Use LINE (S).
- Add DECORATIVE MAGNET.
- Receive MAGNET.
- Use MAGNET (T).
- Take BRUSH (U).
- Go to Old Ruins.

- Use JAR (V) and BRUSH.
- Receive LOTUS POLLEN and CHOPSTICKS 2/2.
- Use CHOPSTICKS (W).
- Receive CLAY SHARD.
- Go to Yard.

- Use CLAY SHARD (X).
- Take CHIP 2/2 (Y).
- Go to Cindy’s Room.

- Use CHIP (Z).
- Play puzzle (A).
- Easy Solution: 4-1-3-4-4-3-2-2-4-1-1-3-3-2-3-2-4-4.
- Hard Solution: 3-1-1-4-4-2-3-4-4-3-3-2-2-4-4-3-3-1-1-4-4-2-3-2-3-3-2-4-1-4-1-1-3-2-4-2-3.
- Take BLADE (B).
- Go to Old Ruins.

- Use JEWELRY BAG (C) and BLADE.
- Take ALDER BARK (D).
- Use JUNIPER BERRIES (E), LOTUS POLLEN, and ALDER BARK.
- Play puzzle (F).
- Select: (1-12).
- Select (G).
- Take RECOVERY POTION (H).
- Use RECOVERY POTION (I).

- Take MAYOR’S STAMP (J).
- Select (K).
- Take GEAR PENDANT (L). Select.
- Read (M).
- Take DUCT TAPE (N) and LETTER A.
- Use LETTER A (O).
- Take BLANK CHECK (P) and HAMMER.
- Use HAMMER (Q).
- Take CITY EMBLEM (R).
- Use CITY EMBLEM (S).
- Go to Front Desk.

- Take NUT (T) and RAG.
- Use RAG (U).
- Receive COCOA.
- Use DUCT TAPE (V) and COCOA.
- Receive FINGERPRINT.
- Use FINGERPRINT (W).
- Play puzzle (X).
- Solution shown.
- Talk (Y).
- Go to Annie’s Room.
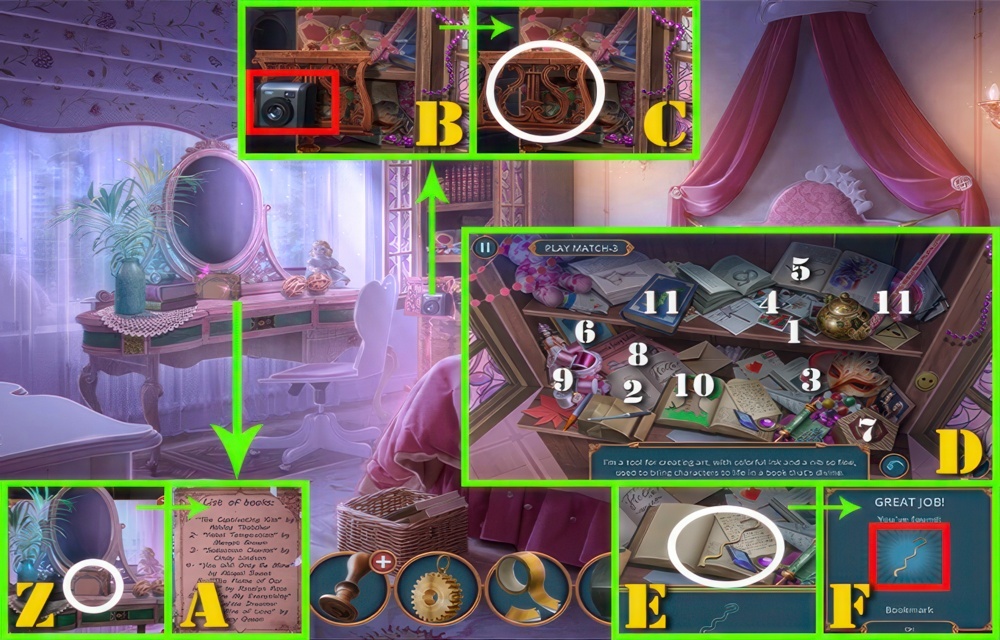
- Select (Z).
- Read (A).
- Receive BOOK LIST.
- Take CAMERA (B).
- Use BOOKLIST (C).
- Play puzzle (D).
- Select: (1-12).
- Select (E).
- Take BOOKMARK (F).

- Use BOOKMARK (G).
- Take CRAYON (H).
- Use CRAYON (I).
- Play puzzle (J).
- Solution shown.
- Take CODE (K).
- Go to Allen’s Living Room.
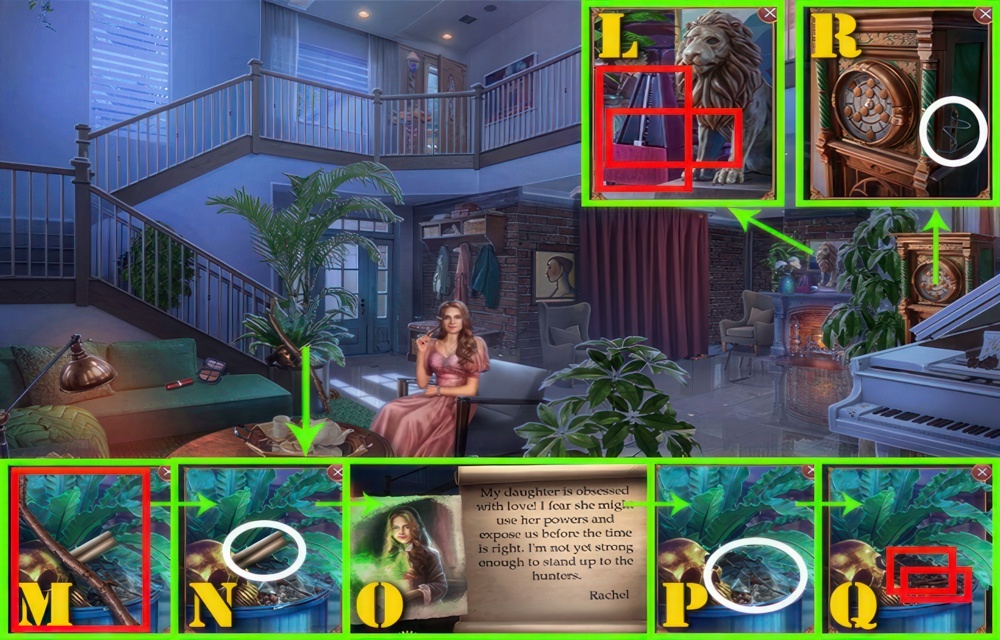
- Take METRONOME (L), SHAWL, and SIEVE.
- Take STICK (M).
- Select (N).
- Read (O).
- Use SHAWL (P).
- Take WATCH ARROWS (Q) and PLIERS.
- Use PLIERS (R).
- Receive WIRE.

- Use STICK (R).
- Add DUCT TAPE and WIRE.
- Receive HOOK STICK.
- Use HOOK STICK (S).
- Take VALVE (T).
- Use CODE (U).
- Select (9-1-7-2).
- Take FEATURE (V).
- Go to Annie’s Room.

- Use FEATURE (W).
- Read (X).
- Receive DIAMOND EARRING.
- Use DIAMOND EARRING (Y).
- Play puzzle (Z).
- Easy Solution: 1-3, 2-3, 2-1, 3-2, 3-2, 1-3, 2-1, 2-3.
- Hard Solution: 1-3, 2-3, 2-1, 2-3, 1-2, 1-2, 3-1, 3-2, 3-2, 1-3, 2-1, 2-1, 2-3, 2-3, 1-2, 1-2, 3-1, 2-1, 2-3.
- Take MANUAL (A).
- Go to Town Hall Roof.

- Use VALVE (B) and NUT.
- Play puzzle (C).
- Select: (1-12).
- Select (D).
- Take LIGHT BULB (E).
- Use LIGHT BULB (F).
- Take KEY (G).
- Go to Front Desk.

- Use KEY (H).
- Select (I).
- Read (J).
- Take CHAIN (K) and CORKSCREW.
- Use CORKSCREW (L).
- Take LIGHTER (M).
- Use MANUAL.
- Play puzzle (N).
- Easy Solution shown.
- Hard Solution shown.
- Take UV Lamp (O).
- Go to Annie’s Bedroom.

- Use CAMERA (P) and UV LAMP.
- Receive PHOTO.
- Select (Q).
- Play puzzle (R).
- Select: (1-12).
- Select (S).
- Take CANDLES (T).
- Use CANDLES (U) and PHOTO.
- Select (V).
- Read (W).
- Go to Allen’s Living Room.

- Use LIGHTER (X).
- Take LION’S EYE (Y).
- Use LION’S EYE (Z).
- Take WATCH ARROWS 2/2 (A).
- Use WATCH ARROWS (B).
- Play puzzle (C).
- Easy Solution: 1-1, 2-2, 3-3, 4-4, 5-5, 6-6, 7-7, 8-8.
- Hard Solution: 1-1-1, 2-2-2, 3-3-3, 4-4-4, 5-5-5.
- Select (D).
- Read (E).
- Take CHALK (F) and PEN.
- Go to Town Hall Roof.

- Use BLANK CHECK (G) and PEN.
- Take CASHIER’S CHECK (H).
- Play puzzle (I).
- Select (1-12).
- Select (J).
- Take LONG-HANDLED SCISSORS (K).
- Use LONG-HANDLED SCISSORS (L).
- Receive BLACKBERRY.
- Use MAYOR’S STAMP (M).
- Add SIEVE and BLACKBERRY.
- Receive MAYOR’S STAMP.
- Go to Front Desk.
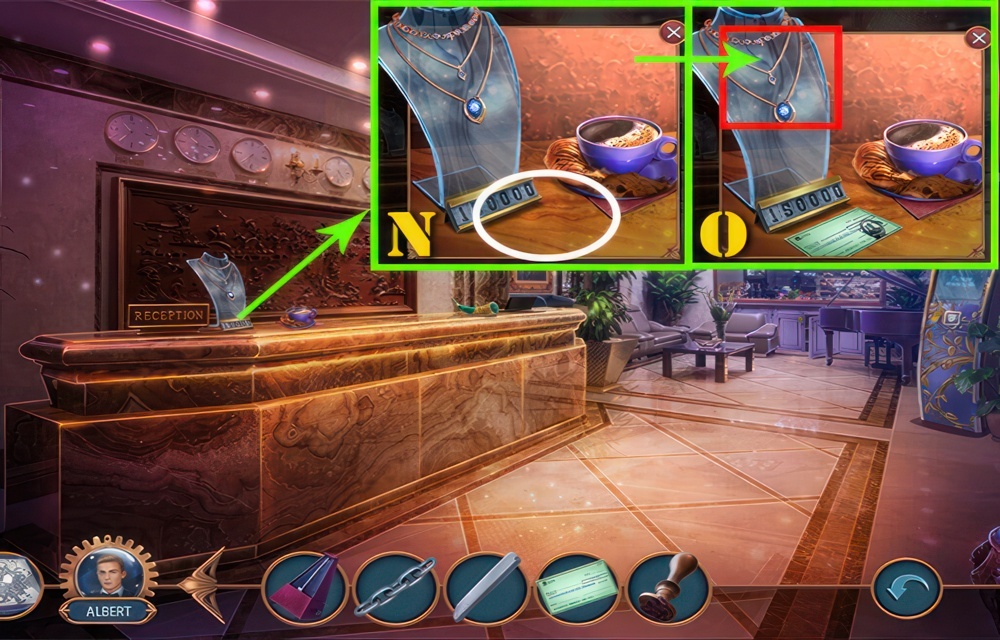
- Use MAYOR’S STAMP (N) and CASHIER’S CHECK.
- Take NECKLACE (O).
- Go to Allen’s Living Room.

- Use NECKLACE (P).
- Play puzzle (Q). Select.
- Take DAGGERS (R) and METAL ROD.
- Use METRONOME (S) and METAL ROD.

- Select (T).
- Read (U).
- Receive SPELL.
- Play puzzle (V). Select.
- Select (W).
- Take BAIT (X).
- Use BAIT (Y).
- Receive CARABINER.
- Use CHAIN (Z) and CARABINER.
- Receive DAGGER 2/2.
- Use CHALK (A), SPELL and DAGGERS.
- Use GEAR PENDANT (B).
- Play puzzle (C).
- Easy Solution: 1-2-3-4-5-6-7-8-9.
- Hard Solution: 1-2-3-4-5-6-3-2-7-8-9-2-7-10-8-11-12.
Congratulations! You have completed the game Connected Hearts Season 1 Episode 2: Search for Destiny.


