Connected Hearts Season 1 Episode 3: Cost of Beauty – The game walkthrough begins with you Alberta being thanked by Robert for saving lives, and happy to have Cindy by your side, such a worthy man. But the witch, will not let you live in peace. We’re all a threat to her, especially family. You must stop her, if you visit the small village near the town where Robert first met Rachel, you can find a way to do so. You must hide Cindy’s father in a safe place. He witnessed Rachel’s crimes, and we can’t let her get to him again. If you can not pass any of the puzzles or do not know where the items are, on our site you can watch Connected Hearts Season 1 Episode 3: Cost of Beauty walkthrough and solve the mystery.
Connected Hearts Season 1 Episode 3: Cost of Beauty – Walkthrough
Here you can see the full walkthrough of Connected Hearts Season 1 Episode 3: Cost of Beauty, especially the main story.
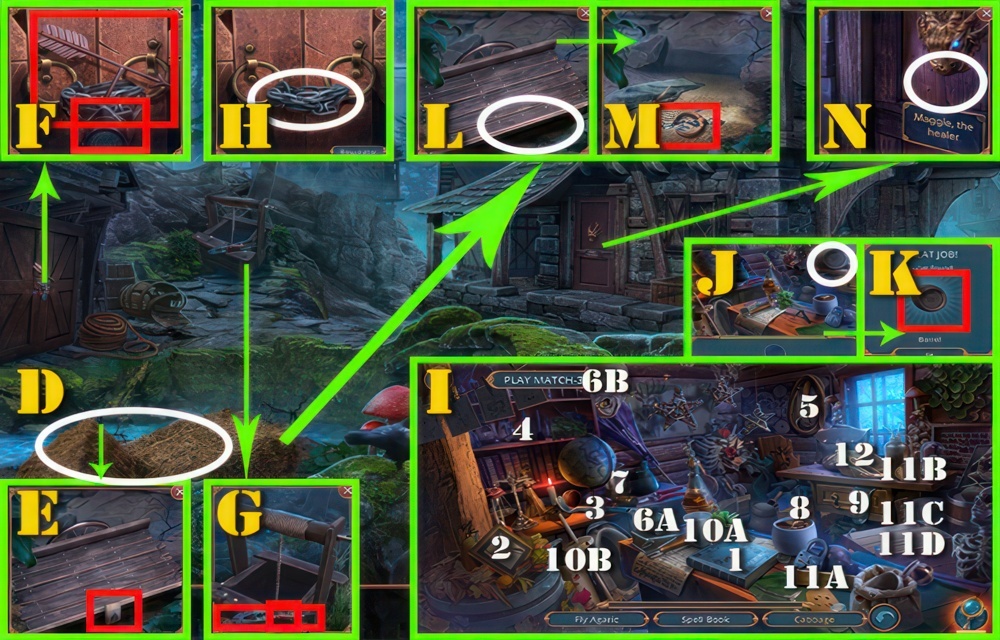
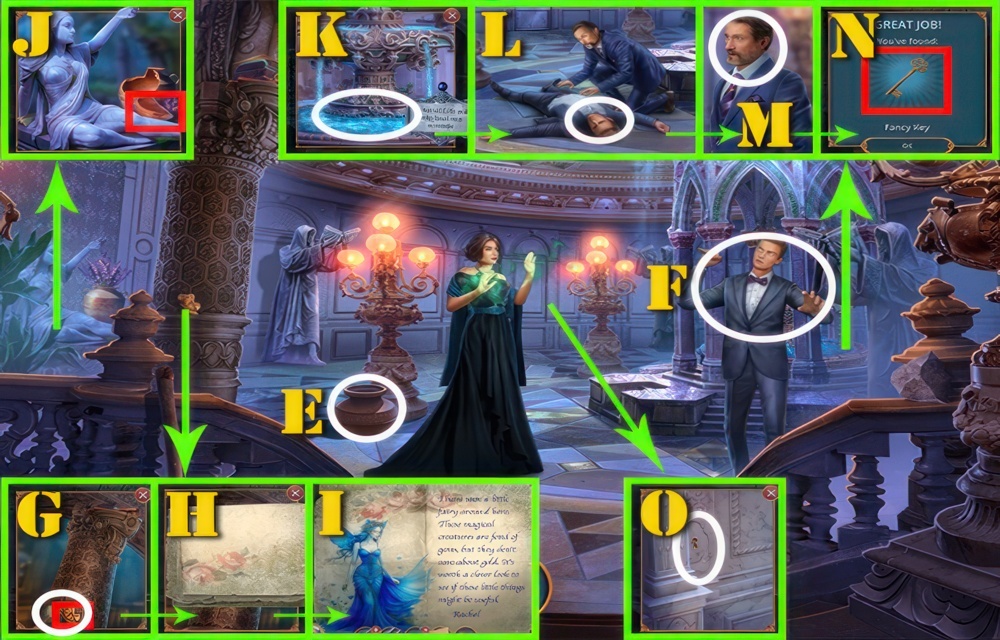
- Select (D).
- Take LIGHTER (E).
- Take CANDLE (F) and BOLT CUTTER.
- Take WEATHER VANE (G) and RESPIRATOR.
- Use BOLT CUTTER (H).
- Play puzzle (I).
- Select (1-12).
- Select (J).
- Take BARREL (K).
- Use BARREL (L).
- Take SEPTUM RING (M).
- Use SEPTUM RING (N).
- Go to Healer’s House.
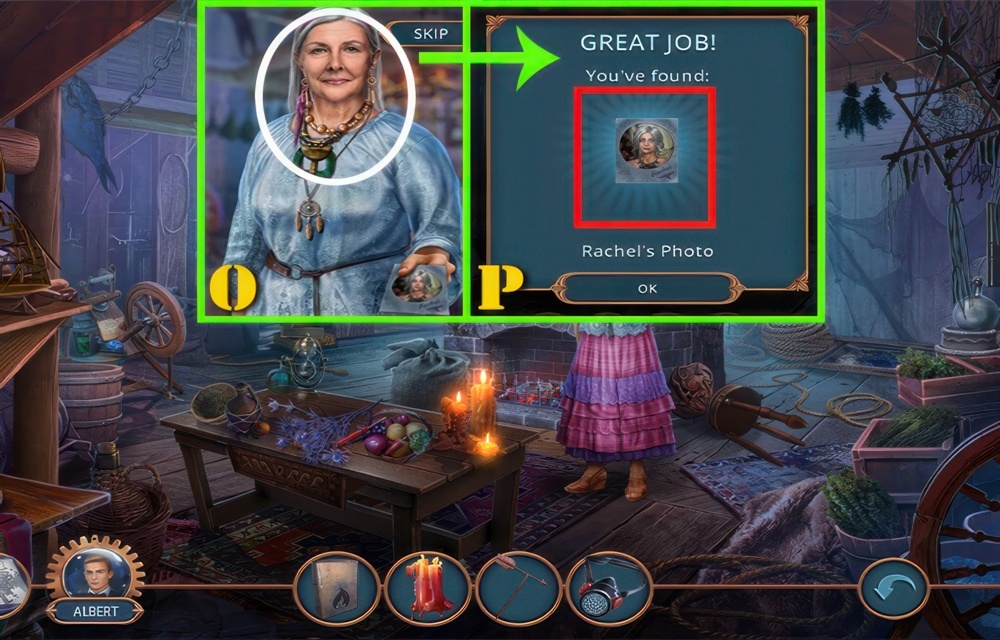
- Talk (O).
- Take RACHEL’S PHOTO (P).
- Go to Rachel’s Room.
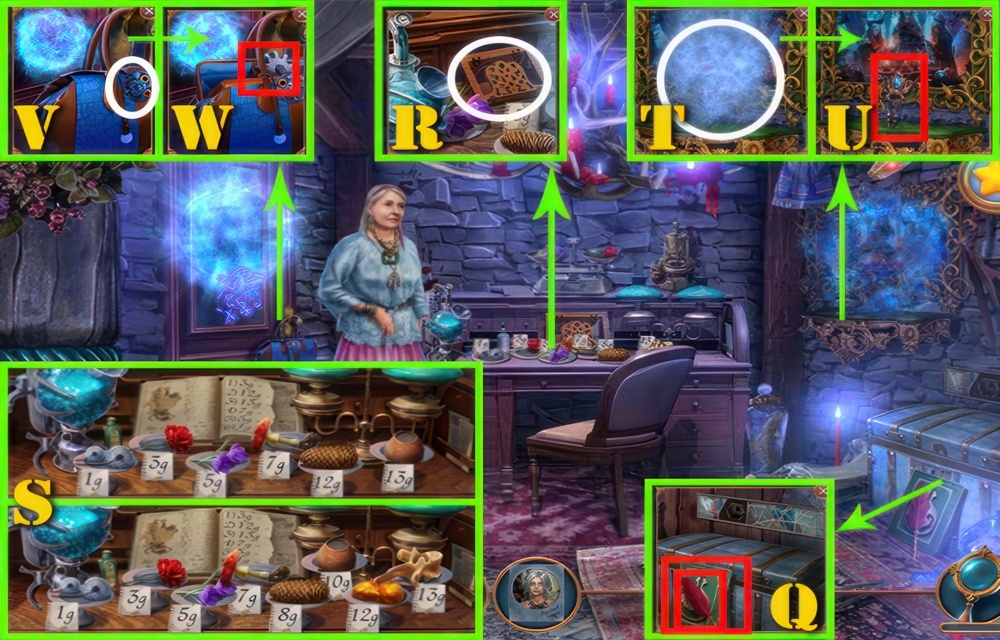
- Take HARPY FEATHER (Q) and HEALER’S HANDBOOK.
- Use HEALER’S HANDBOOK (R).
- Play puzzle (S).
- Easy Solution shown.
- Hard Solution shown.
- Receive MANIFESTATION POTION.
- Use MANIFESTATION POTION (T).
- Take HAIRPIN (U).
- Use HAIRPIN (V).
- Take GEAR (W).
- Go to Healer’s House.
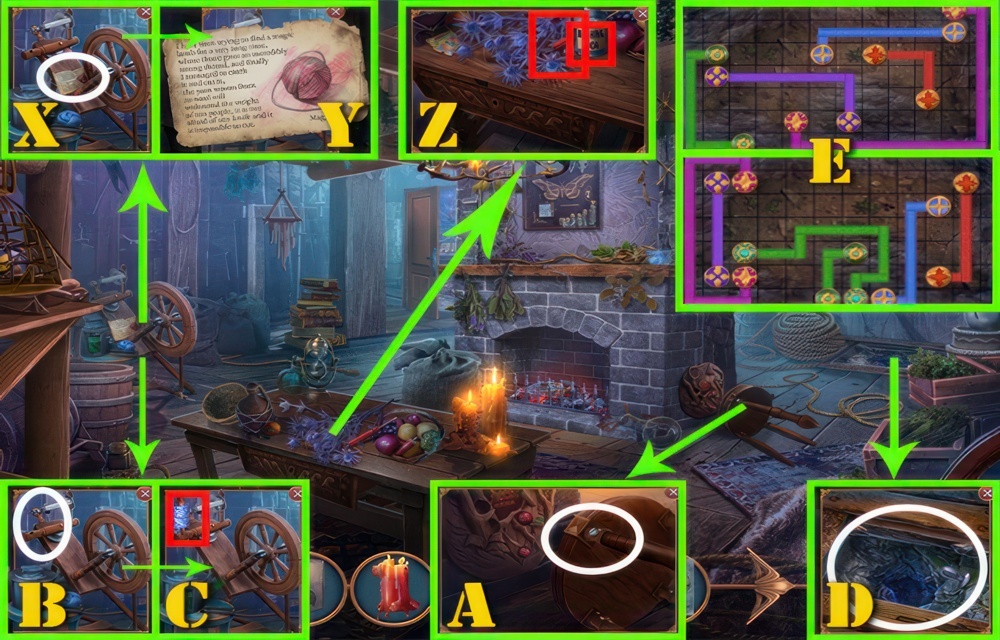
- Select (X).
- Read (Y).
- Take WASHING SODA (Z) and SLOTTED SCREWDRIVER.
- Use SLOTTED SCREWDRIVER (A).
- Receive SPINDLE.
- Use SPINDLE (B).
- Take YARN (C).
- Use YARN (D).
- Play puzzle (E).
- Easy Solution shown.
- Hard Solution shown.
- Go to Old Shrine.
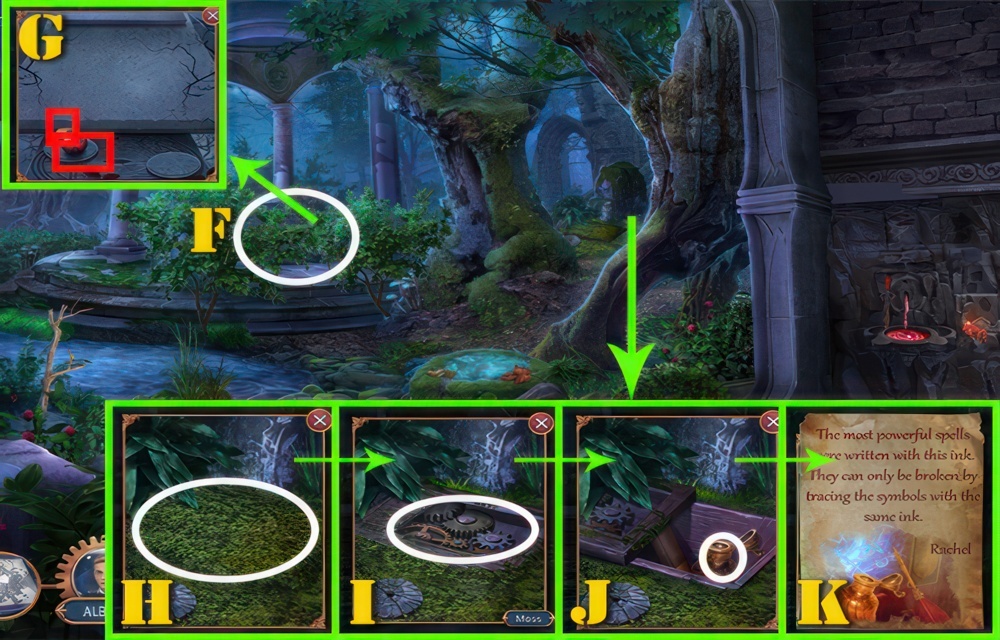
- Select (F).
- Take LADYBUGS (G) and CORK.
- Use SLOTTED SCREWDRIVER (H).
- Receive MOSS.
- Use GEAR (I).
- Select (J).
- Read (K).
- Go to Rachel’s Room.
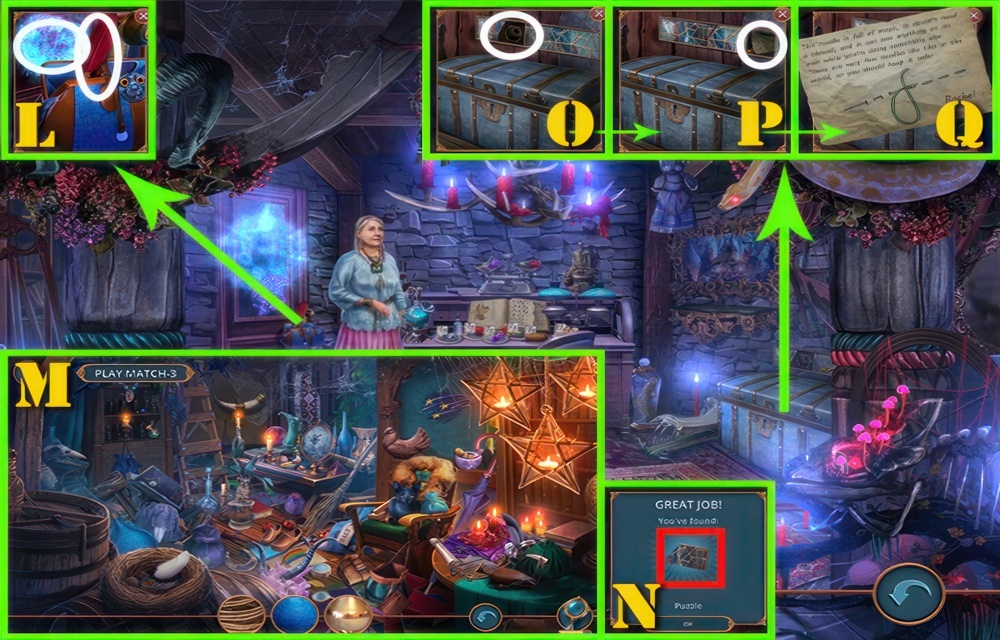
- Use HARPY FEATHER (L) and MAGIC INK.
- Play puzzle (M).
- Select (1-12).
- Take PUZZLE (N).
- Use PUZZLE (O).
- Select (P).
- Read (Q).
- Receive MAGIC NEEDLE.
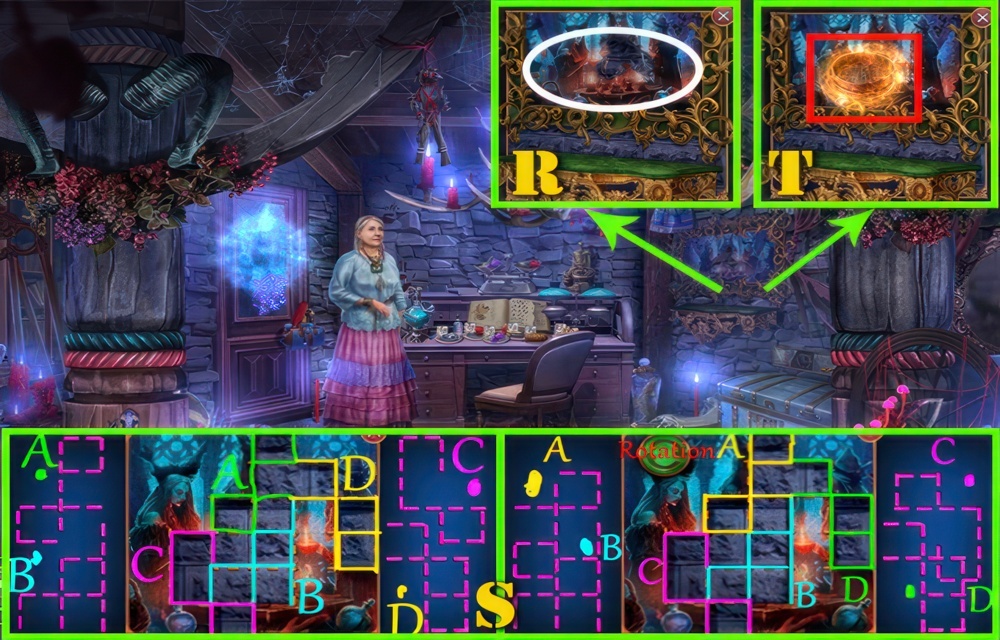
- Use MAGIC NEEDLE (R).
- Play puzzle (S).
- Easy Solution shown.
- Hard Solution shown.
- Take SIEVE (T).
- Go to Witches’ Village.
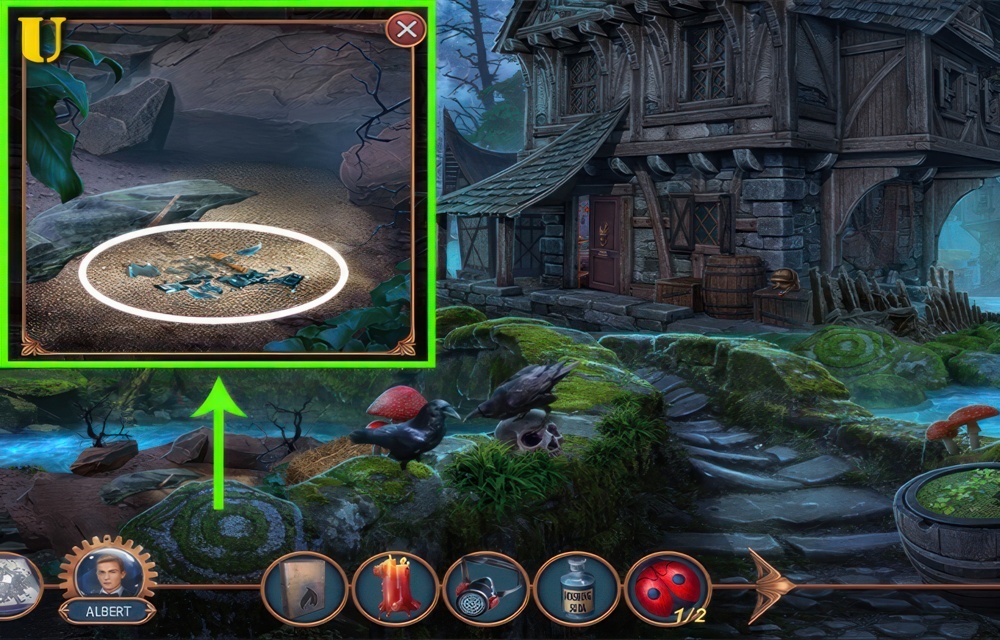
- Use SIEVE (U).
- Receive KEY.
- Go to Rachel’s Room.
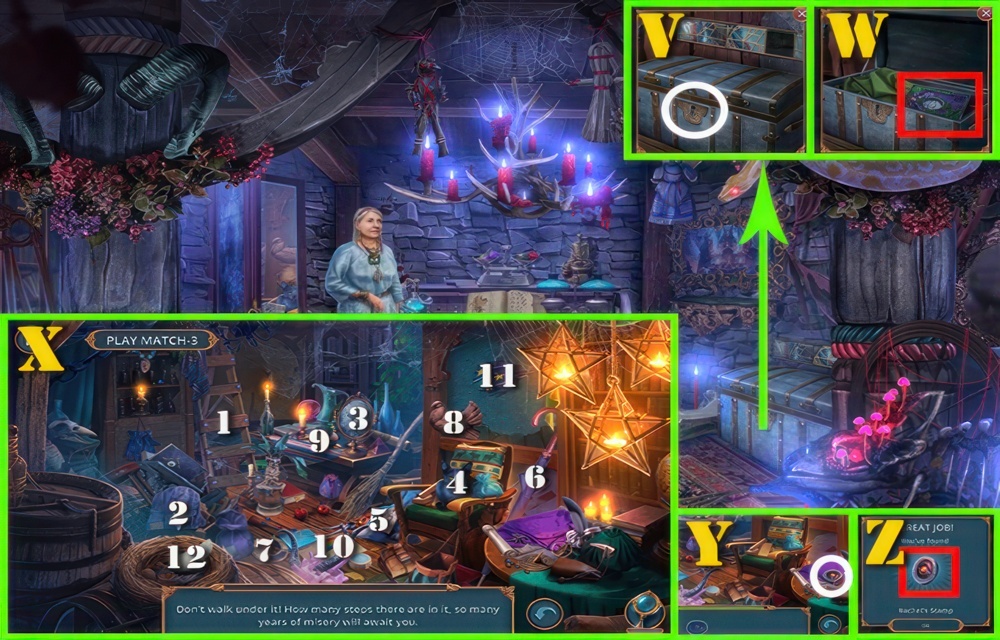
- Use KEY (V).
- Take GRIMOIRE (W).
- Play puzzle (X).
- Select (1-12).
- Select (Y).
- Take RACHEL’S STAMP (Z).
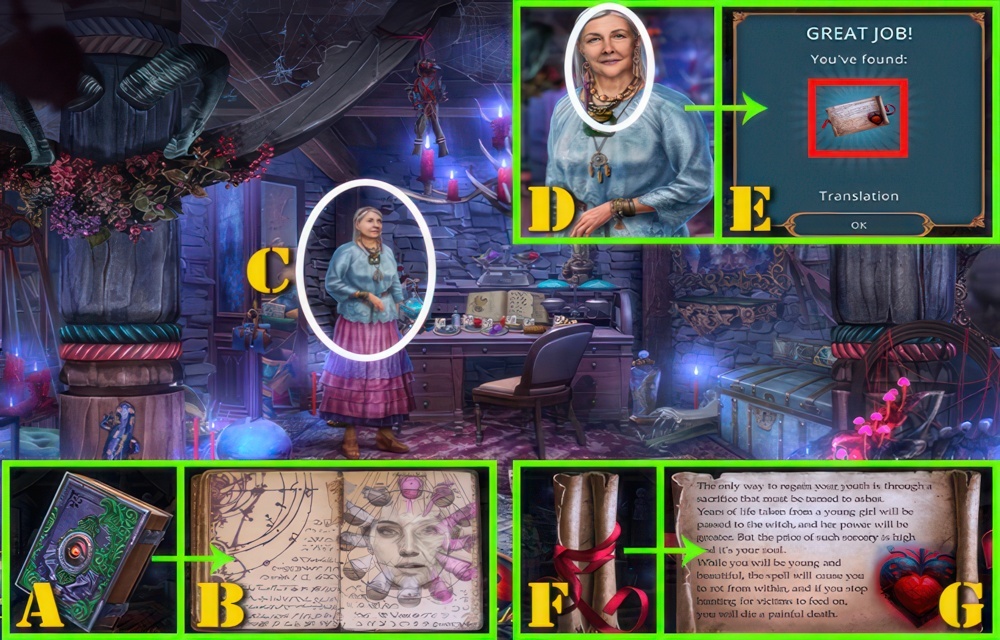
- Use GRIMOIRE (A).
- Add RACHEL’S STAMP.
- Read (B).
- Receive GRIMOIRE.
- Use GRIMOIRE (C).
- Talk (D).
- Take TRANSLATION (E).
- Use TRANSLATION (F).
- Read (G).
- Go to Old Shrine.
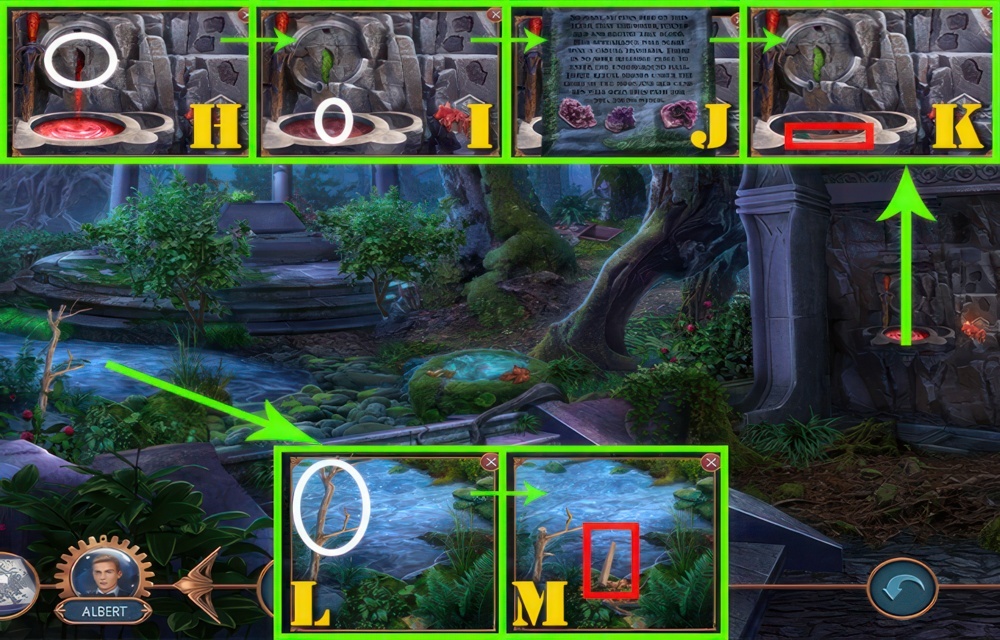
- Use MOSS (H).
- Select (I).
- Read (J).
- Take AXE (K).
- Use AXE (L).
- Take WEDGE (M).
- Go to Witches’ Village.
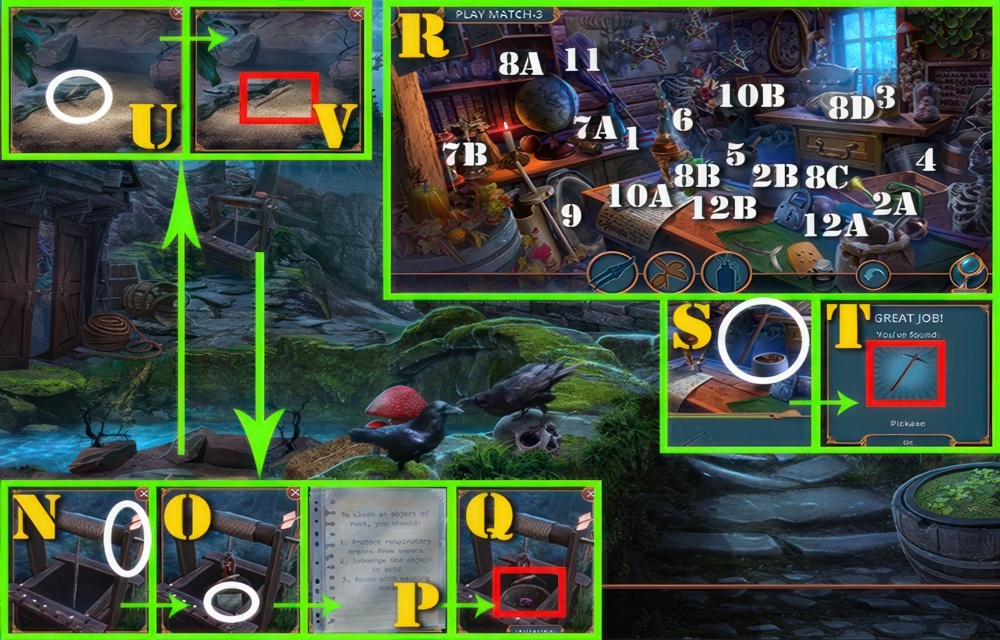
- Use WEATHER VANE (N) and WEDGE.
- Select (O).
- Read (P).
- Receive INSTRUCTION.
- Take RITUAL STONES 1/3 (Q).
- Play puzzle (R).
- Select (1-12).
- Select (S).
- Take PICKAXE (T).
- Use PICKAXE (U).
- Take TWEEZERS (V).
- Go to Healer’s House.
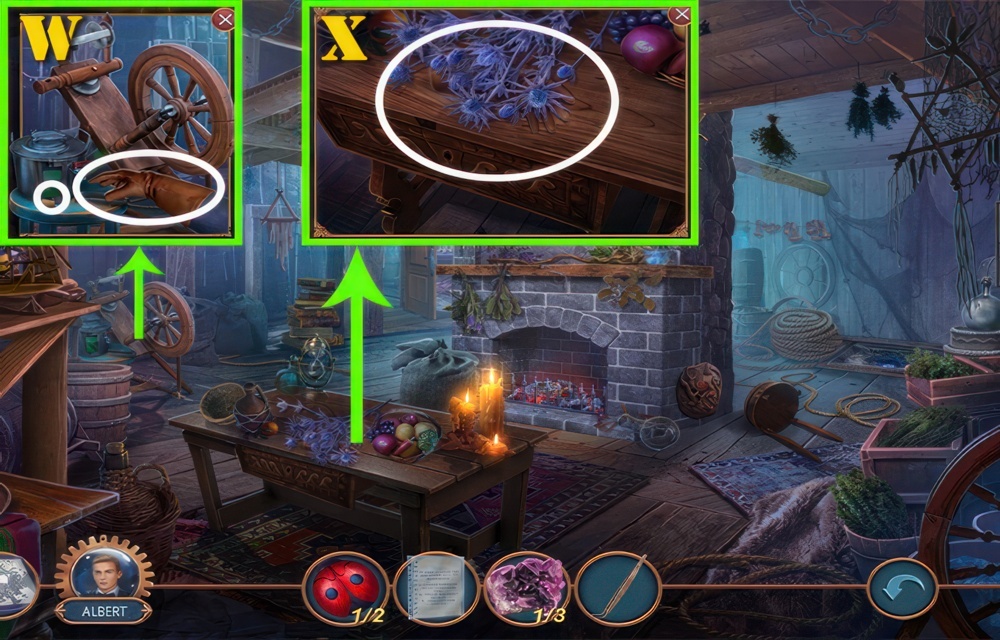
- Use TWEEZERS (W).
- Receive GLOVES.
- Use CORK (X) and GLOVES.
- Receive PHOSPHORIC ACID.
- Go to Old Shrine.
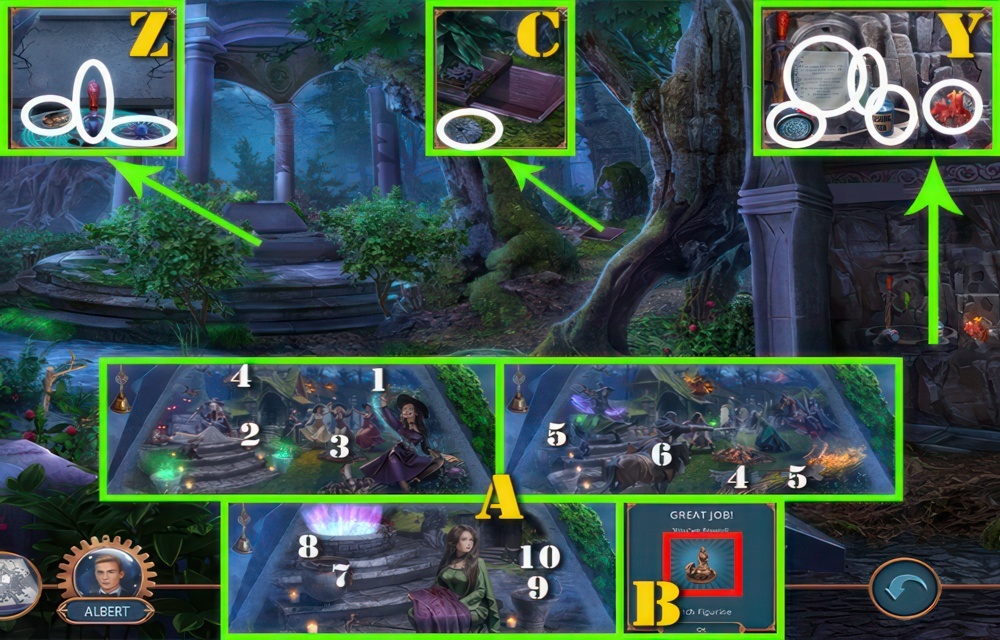
- Use CANDLE (Y), LIGHTER, RESPIRATOR, WASHING SODA, PHOSPHORIC ACID and INSTRUCTION.
- Receive RITUAL KNIFE.
- Use RACHEL’S PHOTO (Z), THISTLE, and RITUAL KNIFE.
- Play puzzle (A).
- Select (1-10).
- Take WITCH FIGURE (B).
- Use WITCH FIGURE (C).
- Receive TRIDENT FORK.
- Go to Witches’ Village.
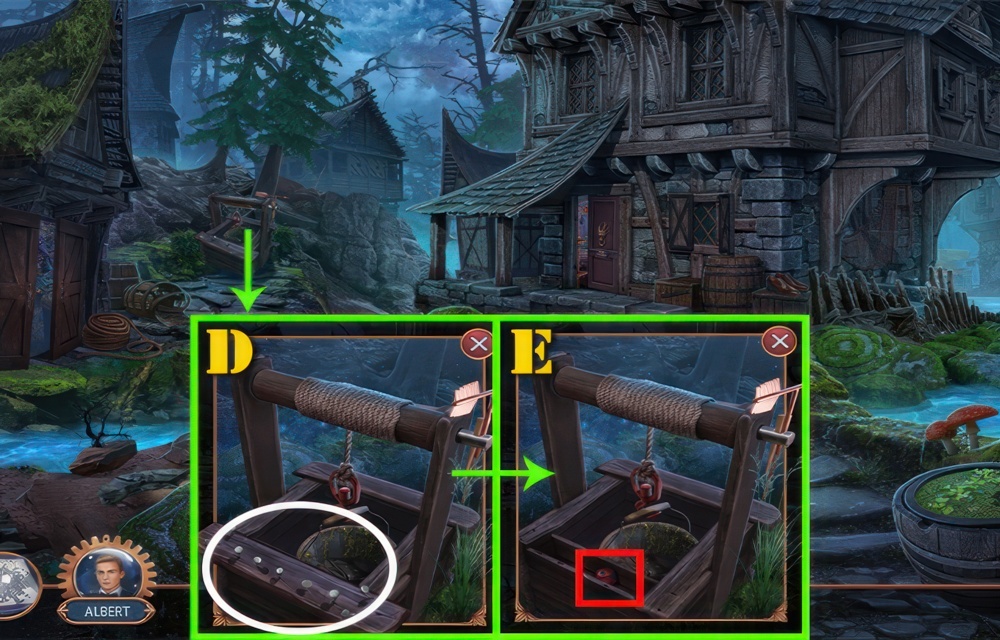
- Use TRIDENT FORK (D).
- Take LADYBUG 2/2 (E).
- Go to Healer’s House.
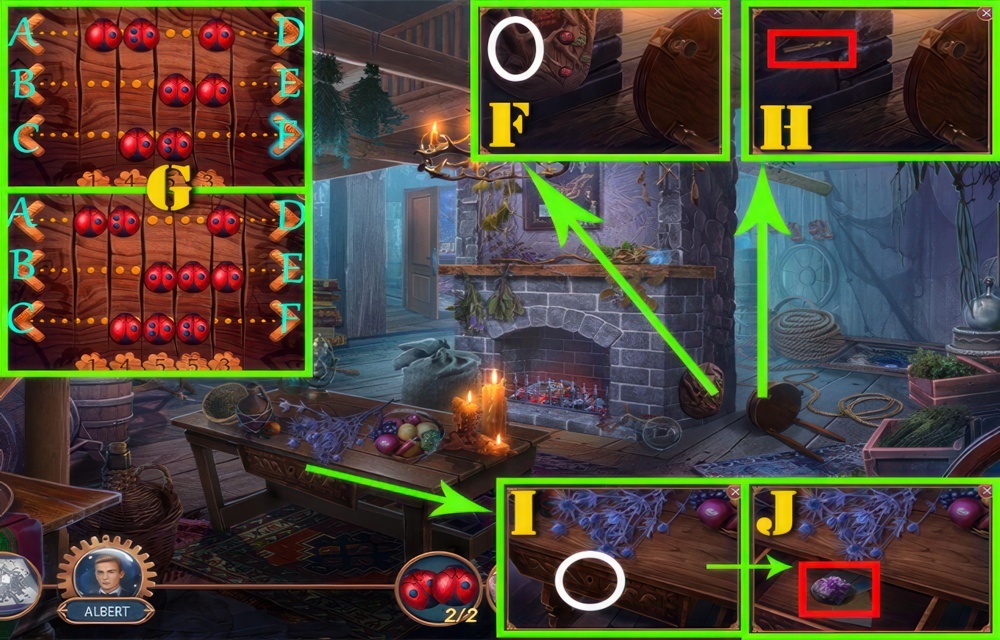
- Use LADYBUGS (F).
- Play puzzle (G).
- Easy Solution: B-D-F-F.
- Hard Solution: C-D-E-E-E.
- Take DIAMOND DRILL (H).
- Use DIAMOND DRILL (I).
- Take RITUAL STONES 2/3 (J).
- Go to Old Shrine.
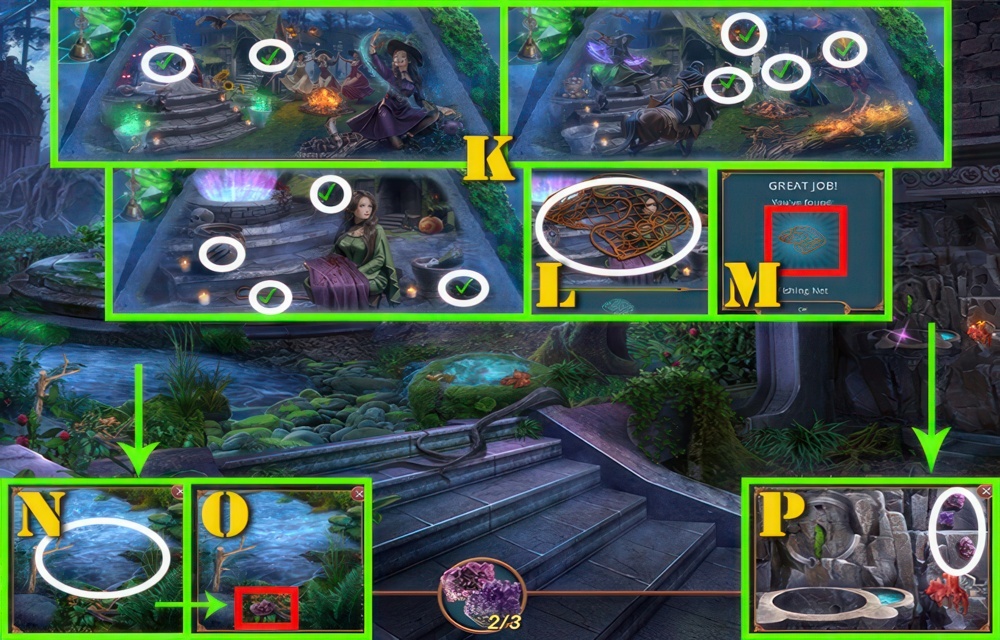
- Play puzzle (K). Select.
- Select (L).
- Take FISHING NET (M).
- Use FISHING NET (N).
- Take RITUAL STONES 3/3 (O).
- Use RITUAL STONES (P).
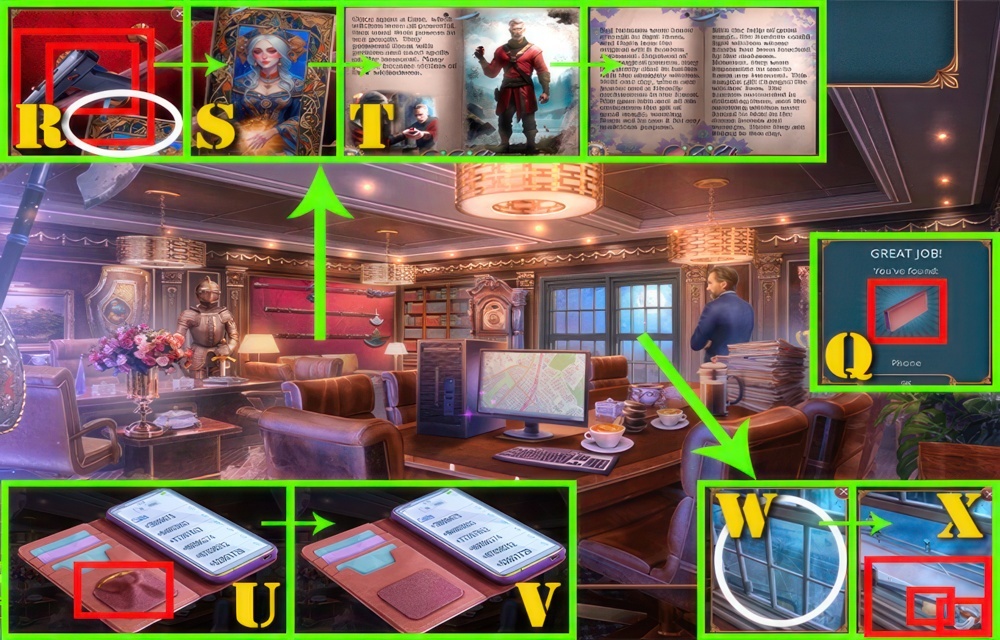
- Take PHONE (Q).
- Take NON-LETHAL GUN (R) and MAGNET. Select.
- Select (S).
- Read (T).
- Use PHONE (U).
- Take ALBERT’S RING.
- Receive PHONE (V).
- Use MAGNET (W).
- Take PLIERS (X), PAPER and DAGGER BADGE.
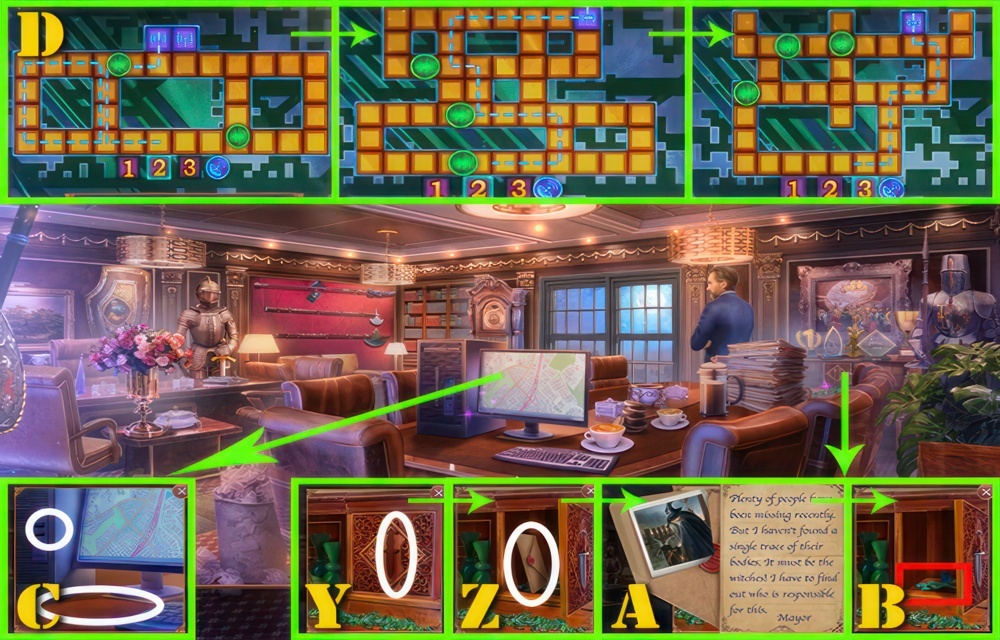
- Use DAGGER BADGE (Y).
- Select (Z).
- Read (A).
- Take WIRE (B).
- Use WIRE (C) and PHONE.
- Play puzzle (D).
- Solution: Find moment when moving along shown trajectories will not lead to collision with opponents.
- Select (E).
- Use ALBERT’S RING (F).
- Take GOLDEN NUGGET (G). Select.
- Select (H).
- Read (I).
- Take CLAY SHARD (J).
- Use CLAY SHARD (K).
- Receive WATER OF LIFE.
- Use WATER OF LIFE (L).
- Talk (M).
- Take FANCY KEY (N).
- Use FANCY KEY (O).
- Go to Secret Tunnel.
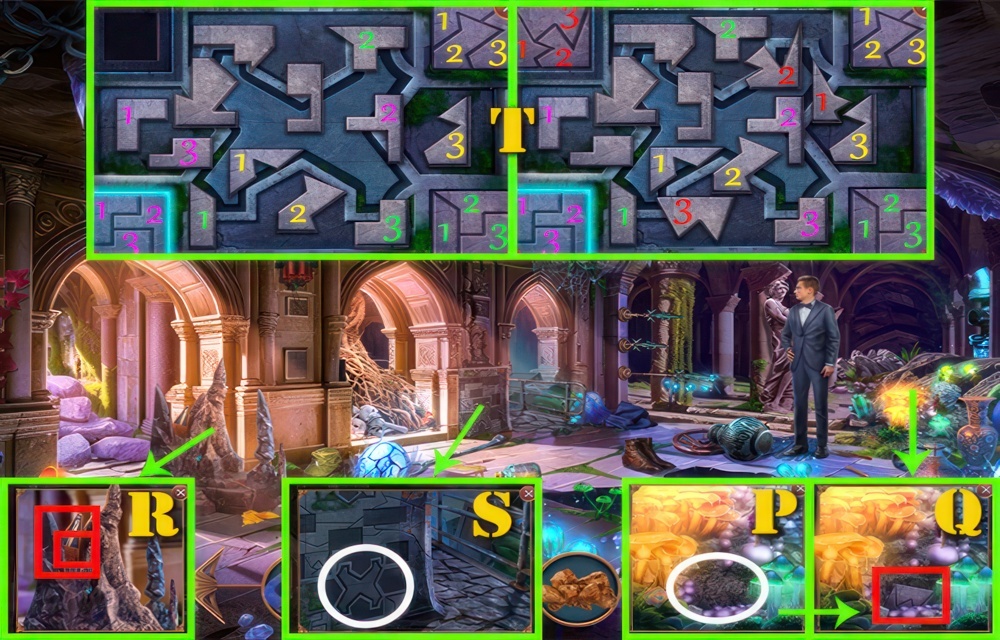
- Use CLAY SHARD (P).
- Take HINT (Q).
- Take METRONOME (R) and RUBBER BULLETS.
- Use HINT (S).
- Play puzzle (T).
- Choose shapes that are identical to shapes in the selected square.
- Easy Solution: 1-2-3, 1-2-3, 1-2-3.
- Hard Solution: 1-2-3, 1-2-3, 1-2-3, 1-2-3.
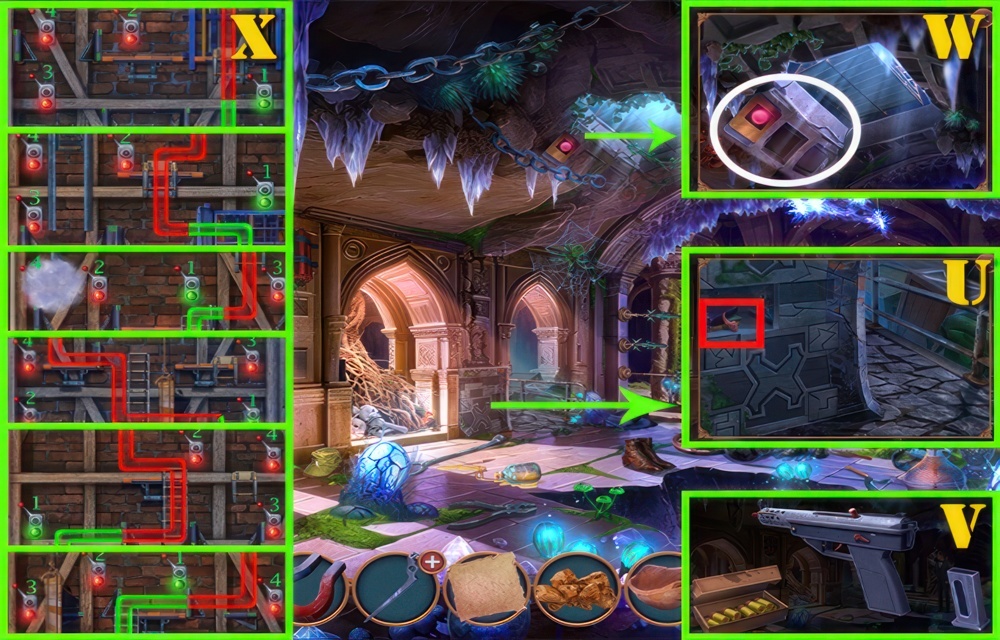
- Take TRIGGER (U).
- Use NON-LETHAL GUN (V).
- Add TRIGGER and RUBBER BULLETS.
- Receive NON-LETHAL GUN.
- Use NON-LETHAL GUN (W).
- Play puzzle (X).
- Easy Solution: 1-2-3-4, 1-2-3-4, 1-2-3-4.
- Hard Solution: 1-2-3-2-4, 1-2-3-4-3, 1-2-3-4.

- Select (Y).
- Read (Z).
- Use MAGNET (A).
- Play puzzle (B).
- Select (1-14).
- Select (C).
- Take BEET (D).
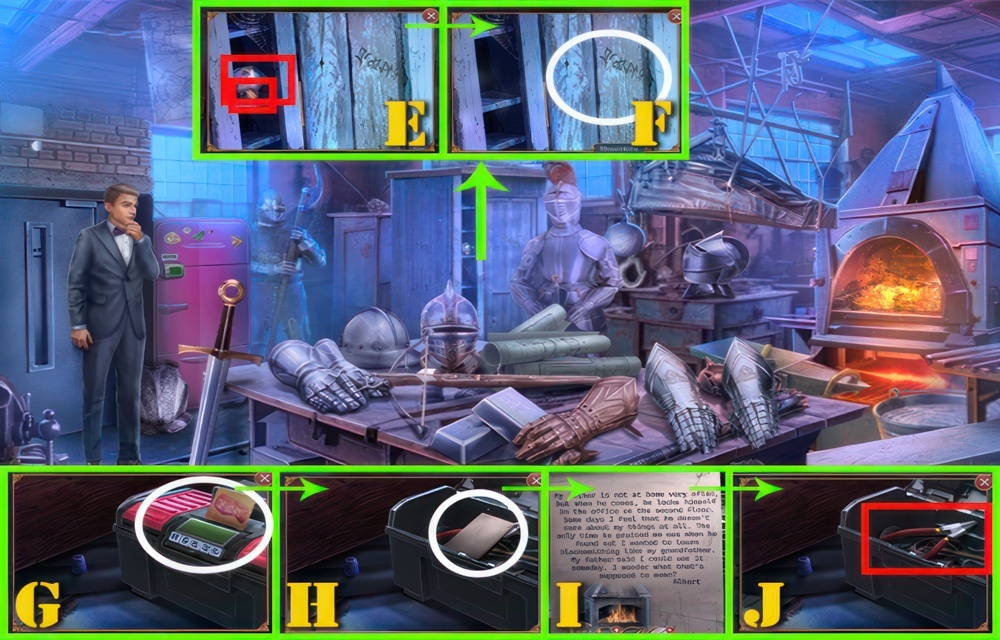
- Take BOLT (E) and MOONSTONE.
- Use PAPER (F) and BEET.
- Receive STAMPED CODE.
- Use STAMPED CODE (G).
- Select (H).
- Read (I).
- Take PLIERS (J).
- Go to Mayor’s Office.
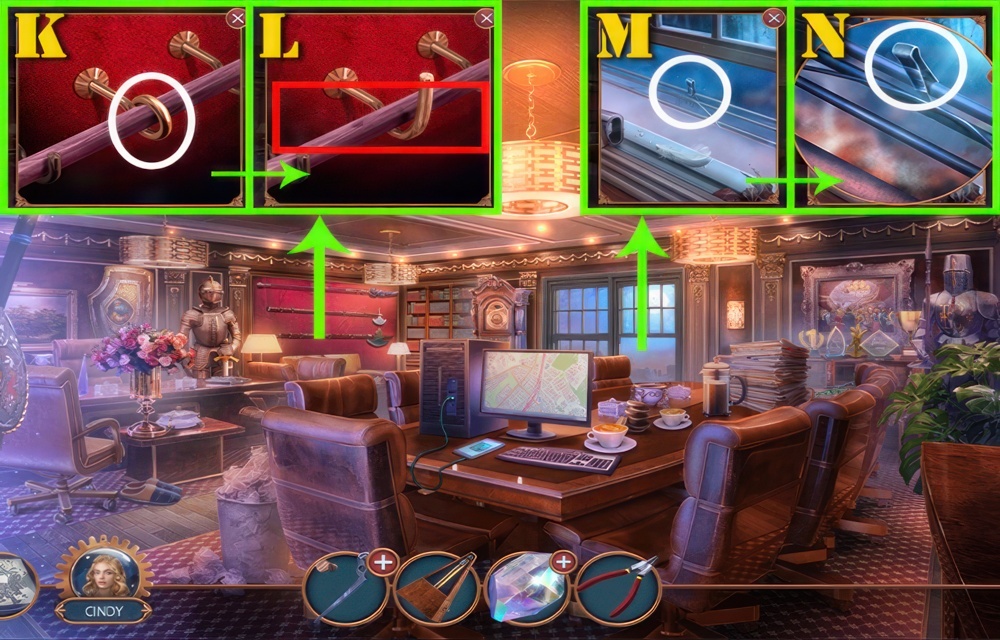
- Use PLIERS (K).
- Take ORNAMENTAL HALBERD (L).
- Select (M).
- Use ORNAMENTAL HALBERD (N).
- Receive TONGS.
- Go to Secret Tunnel.
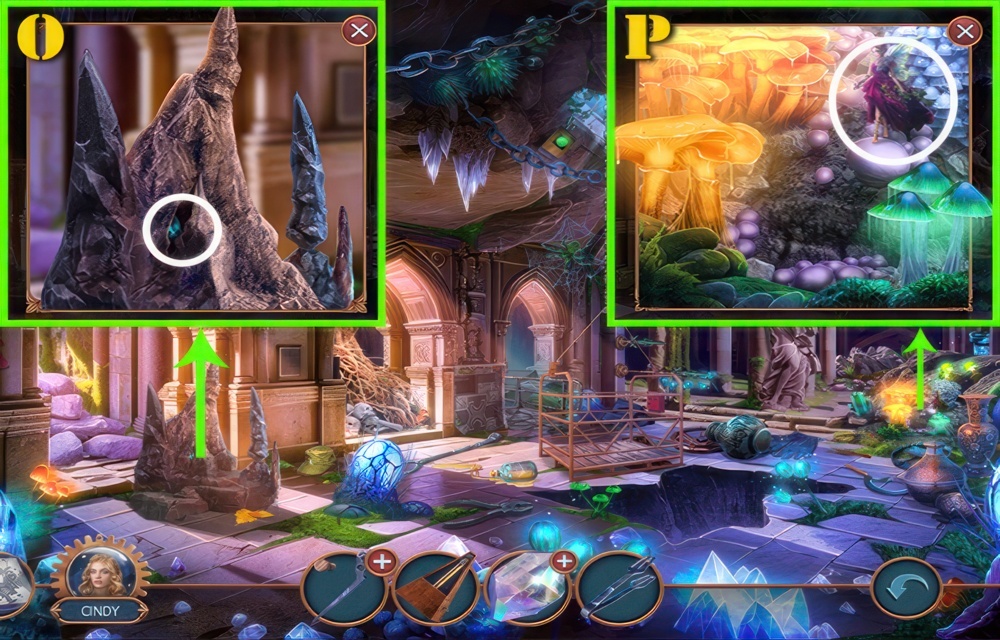
- Use TONGS (O).
- Receive EMERALD.
- Use EMERALD (P).
- Receive FAIRY.
- Go to Cave Hall.
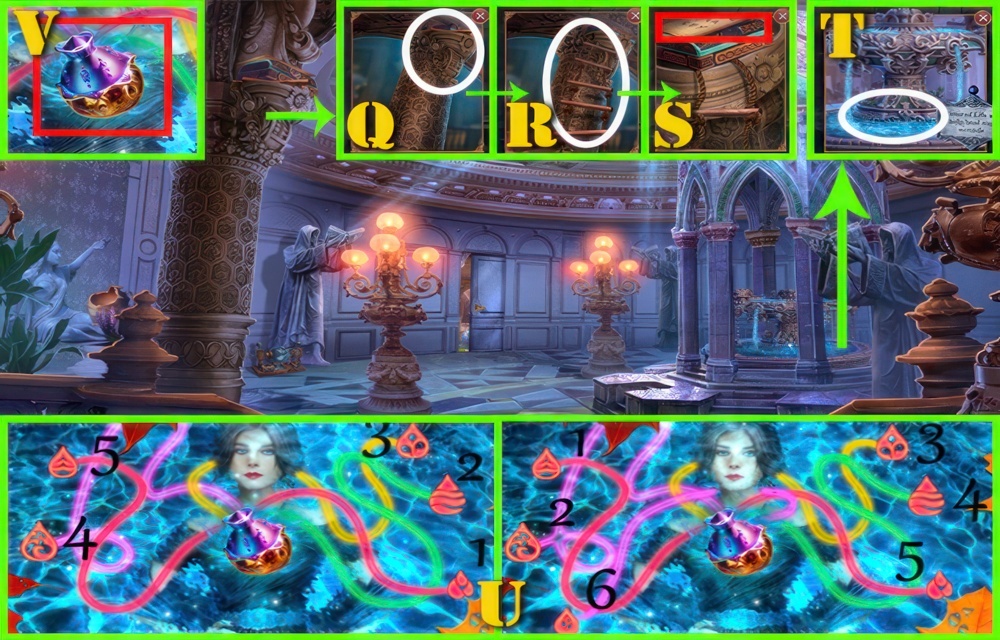
- Use FAIRY (Q).
- Select (R).
- Take AWAKENING SPELL (S).
- Use AWAKENING SPELL (T).
- Play puzzle (U).
- Tap on the drops in such an order that they get into the vial at the same time.
- Press with slight delay.
- Easy Solution: 1-2-3-4-5.
- Hard Solution: 1-2-3-4-5.
- Take MEMORY VIAL (V).
- Go to Albert’s Studio.
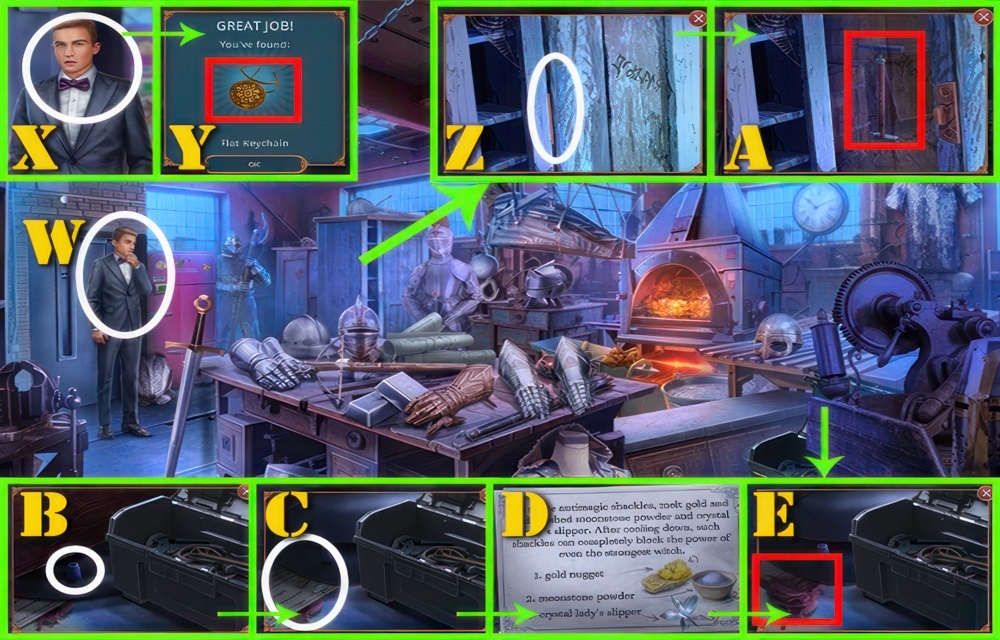
- Use MEMORY VIAL (W).
- Talk (X).
- Take FLAT KEYCHAIN (Y).
- Use FLAT KEYCHAIN (Z).
- Take PUMP (A).
- Use PUMP (B).
- Select (C).
- Read (D).
- Receive CHAIN DRAWING.
- Take BROOM (E).
- Go to Mayor’s Office.
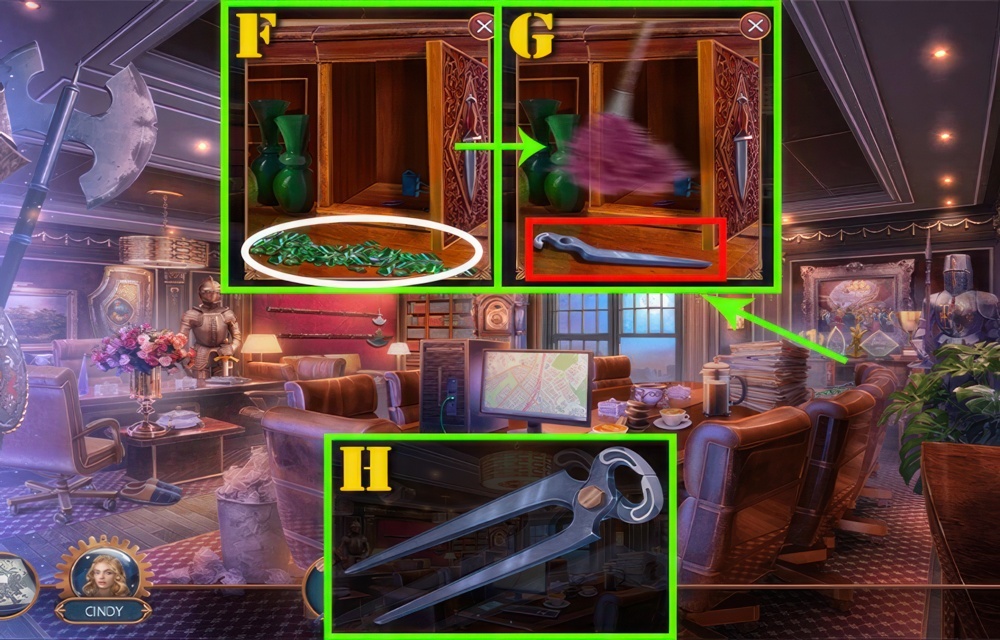
- Use BROOM (F).
- Take PLIERS (G)
- Use PLIERS (H).
- Add PLIERS and BOLT.
- Receive PINCERS.
- Go to Secret Tunnel.
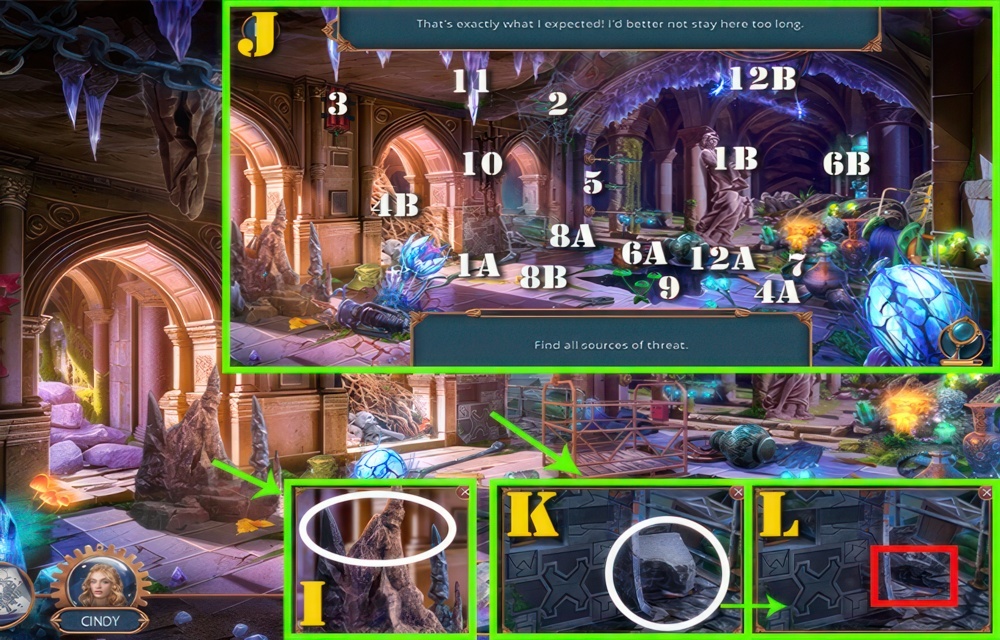
- Use PINCERS (I).
- Receive STALAGMITE.
- Play puzzle (J).
- Select (1-12).
- Use METRONOME (K) and STALAGMITE.
- Take LAMP (L).
- Go to Cave Hall.
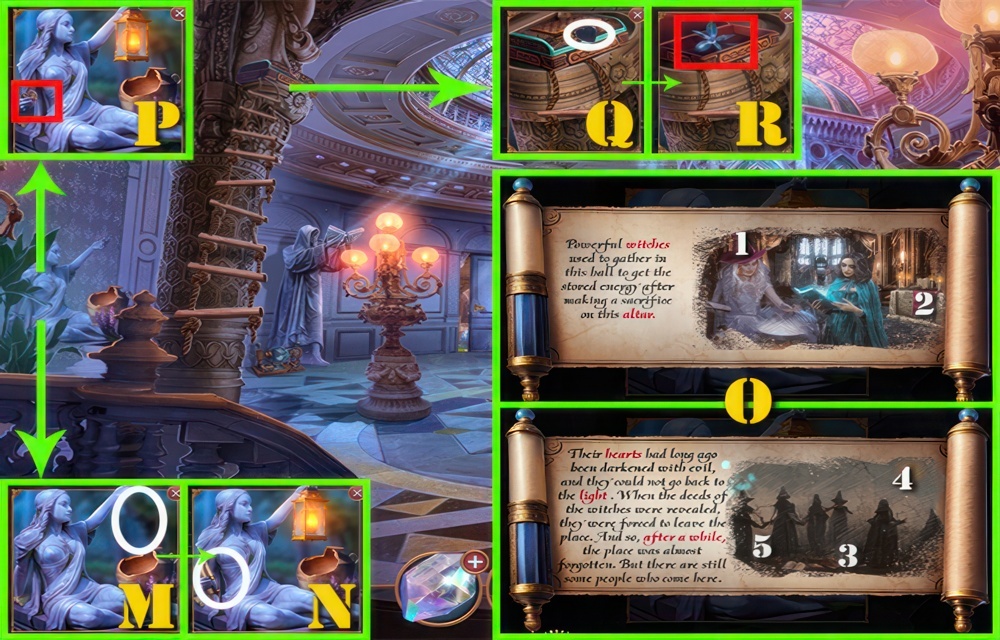
- Use LAMP (M).
- Select (N).
- Play puzzle (O).
- Select (1-2).
- Select (3-5).
- Take HEART BROOCH (P).
- Use HEART BROOCH (Q).
- Take CRYSTAL FLOWER (R).
- Go to Albert’s Studio.
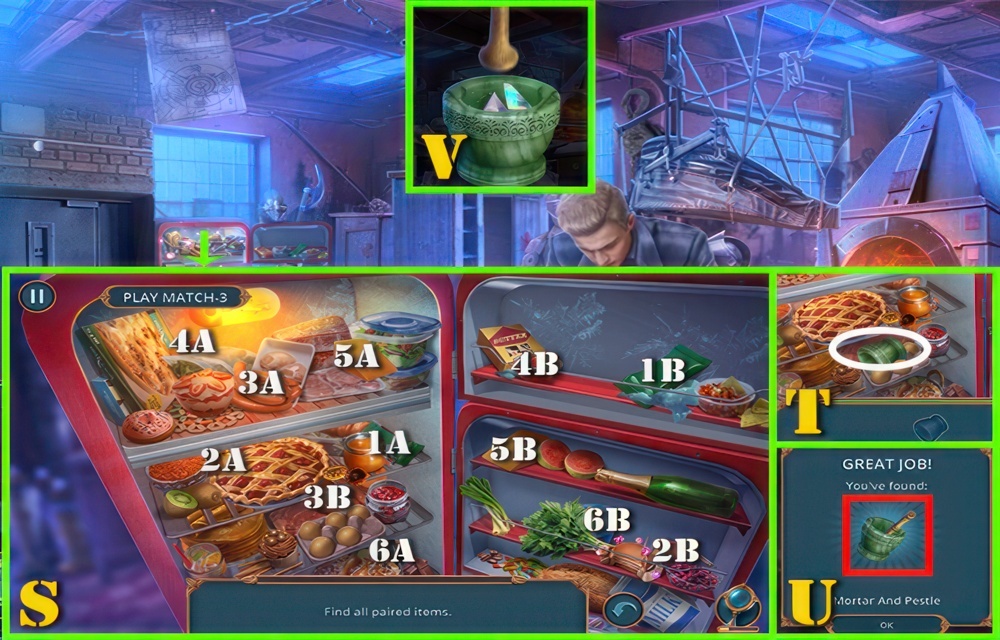
- Play puzzle (S).
- Select (1-6).
- Select (T).
- Take MORTAR AND PESTLE (U).
- Use MOONSTONE (V).
- Add MORTAR AND PESTLE.
- Receive MOONSTONE POWDER.
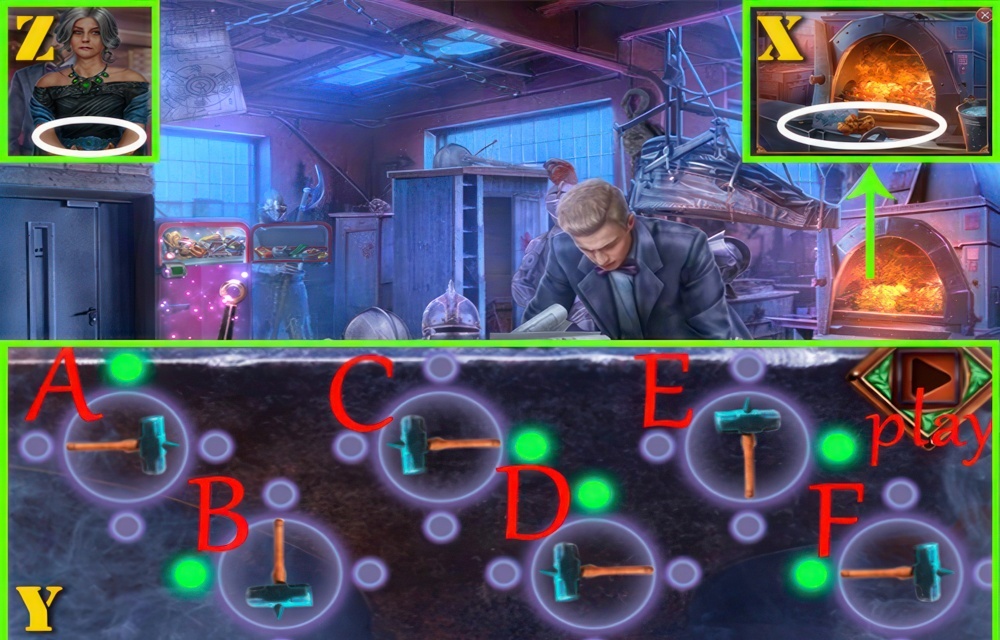
- Use MOONSTONE POWDER (X), CRYSTAL FLOWER, CHAIN DRAWING, and GOLDEN NUGGET.
- Play puzzle (Y).
- Solution shown: A-C-C-E-E-E-F-play.
- Use MAGIC CHAINS (Z).
Congratulations! You have completed the game Connected Hearts Season 1 Episode 3: Cost of Beauty.


I love it