
Connected Hearts Season 1 Episode 4: Trial of Soul – The game’s walkthrough begins with Cindy and Albert finding themselves in the thick of a disaster. Their bond is threatened by accusations of collusion with dark witches by a super-secret clan of witch hunters. Now it’s up to them to find an artefact that will help disprove these accusations and save their relationship. But this challenge could be the true test of their love. Together with the player, Cindy and Albert must fight the last enemy on the way to a happy ending, despite all the difficulties and dangers. If you can not pass any of the puzzles or do not know where the items are, on our site you can watch the walkthrough of Connected Hearts Season 1 Episode 4: Trial of Soul, and deal with the last enemy.
Connected Hearts Season 1 Episode 4: Trial of Soul – Walkthrough
Here you can see the full walkthrough of Connected Hearts Season 1 Episode 4: Trial of Soul, especially the main story.
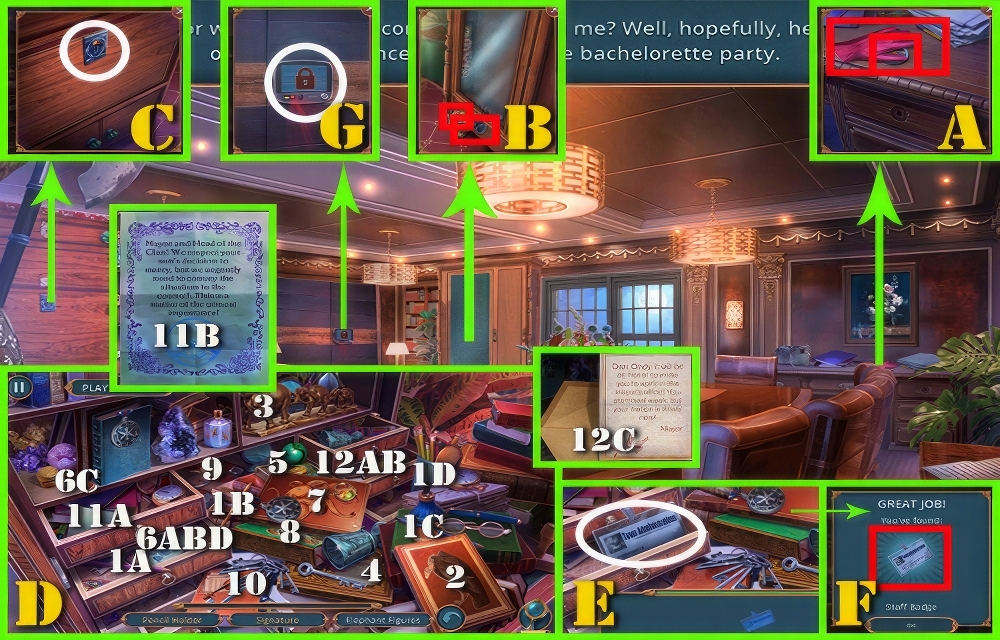
- Take GLOVE (A) and KEY.
- Take LIGHTER (B) and FRAME PART 1/3.
- Use KEY (C).
- Play puzzle (D).
- Select (1-12).
- Select (E).
- Take STAFF BADGE (F).
- Use STAFF BADGE (G).
- Go to Mayor’s Study.

- Talk (H).
- Play puzzle.
- Solution shown.
- Take WICK (I).
- Use GLOVE (J).
- Take TWEEZERS and FRAME PART 2/3.
- Use TWEEZERS (K).
- Take FRAME PART 3/3 (L).
- Use FRAME PARTS (M).
- Play puzzle (N).
- Solutions shown.
- Go to Library.

- Take BRUSH (O), LOCK PICKS, and GASOLINE.
- Use LIGHTER (P).
- Add WICK and GASOLINE.
- Receive LIGHTER.
- Use LIGHTER (Q). Select.
- Play puzzle (R). Select.
- Select (S).
- Take ANCIENT MANUSCRIPT PAGE (T).
- Use ANCIENT MANUSCRIPT PAGE (U).
- Take AMULET (V).
- Go to Mayor’s Office.

- Use AMULET (W).
- Take STURDY SCARF (X) and CHAIN FRAGMENT.
- Use TWEEZERS (Y).
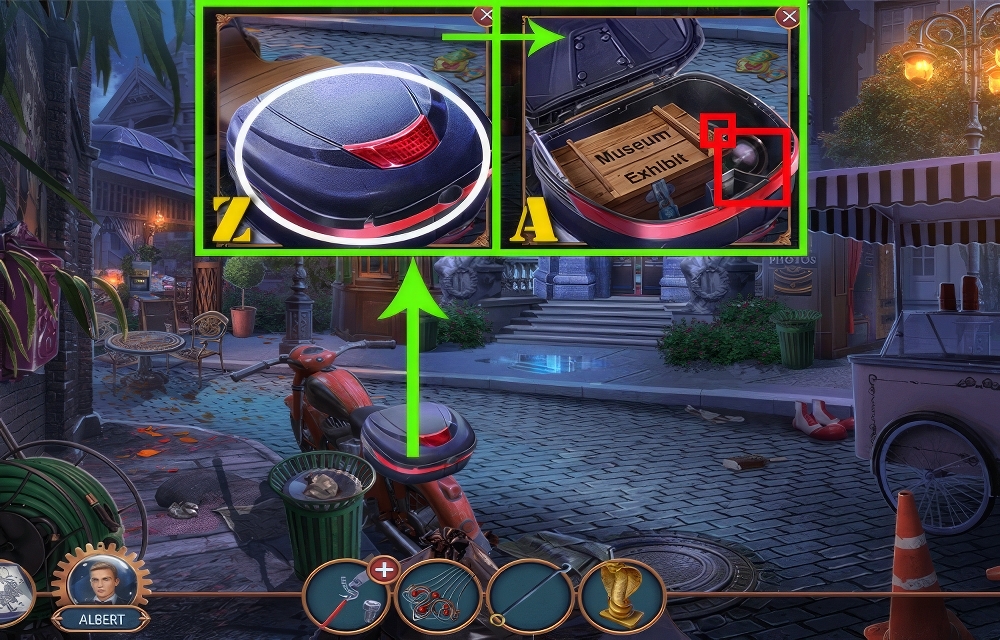
- Take SPRIAL HAIRPIN.
- Use SPIRAL HAIRPIN (Z).
- Select (A).
- Read (B).
- Take MY COMPACT (C).
- Use LIGHTER (D).
- Take SOLVENT (E).
- Go to Mayor’s Study.

- Use BRUSH (F) and SOLVENT.
- Take SHOVEL (G) and GOLD MEDAL.
- Use GOLD MEDAL (H).
- Play puzzle (I).
- Easy Solution: 5-5-5-7-9-2-9-2-4-4-4-1-1-4-4.
- Hard Solution: 3-4-4-4-2-1-2-2-1-1-5-1-1-1-2-2-2-1-1-5-1-1.
- Take CAT FOOD (J).
- Use CAT FOOD (K).
- Take CARABINER (L).
- Go to Library.

- Use CHAIN FRAGMENT (M) and CARABINER.
- Take HAMMER (N).
- Use HAMMER (O).
- Take RAIL (P).
- Use RAIL (Q).
- Take HOOK (R).
- Go to Mayor’s Office.

- Play puzzle (S).
- Select (1-6).
- Select (T).
- Take GEAR (U).
- Use GEAR (V).
- Take ALBERT’S RING (W).
- Use SHOVEL (X).
- Receive MACE.
- Go to Mayor’s Study.

- Use ALBERT’S RING (Y).
- Take IRON LETTERS (Z).
- Use MACE (A).
- Take IRON LETTERS 2/2 (B).
- Go to Library.

- Use IRON LETTERS (C).
- Read (D).
- Play puzzle (E).
- Select (1-12).

- Use LOCK PICKS (F).
- Play puzzle (G).
- Solutions shown.
- Take SPECIAL RING (H). Select.
- Read (I).
- Take CROWBAR (J) and BAG.
- Use SPECIAL RING (K).
- Use MY COMPACT (L) and HOOK.
- Select (M).
- Take KNIFE (N).

- Use CROWBAR (O).
- Use KNIFE (P).
- Take ROPE (Q).
- Use ROPE (R).
- Add STURDY SCARF.
- Receive LASSO.
- Use LASSO (S).
- Select (T).
- Read (U).
- Take FIRST-AID KIT (V).
- Use FIRST-AID KIT (W).
- Play puzzle (X).
- Easy Solution: 1-22, 1-27.
- Hard Solution: 1-34, 1-35.

- Take MY WALLET (Y).
- Take HANDERCHIEF (Z) and EARRING.
- Use EARRING (A).
- Receive CUFFLINK.
- Use MY WALLET (B).
- Add CUFFLINK.
- Receive FIVE DOLLARS.
- Use FIVE DOLLARS (C).
- Play puzzle (D).
- Select (1-12).
- Select (E).
- Take TICKETS (F).
- Use TICKETS (G).
- Go to Witches’ Museum.

- Use HANDKERCHIEF (H).
- Take FIRE EXTINGUISHER (I).
- Use FIRE EXTINGUISHER (J).
- Play puzzle (K).
- Solution shown: A-B.
- Go to Magical Artifacts Exhibition.

- Take BROKEN SECATEURS (L) and STUFFED BAT.
- Use STUFFED BAT (M).
- Play puzzle (N).
- Drag photos to items (1-12).
- Select (O).
- Take BAT’S PAW (P).

- Take SCREW (Q).
- Use BAT’S PAW (R).
- Select (S).
- Read (T).
- Take METAL COMB (U).
- Go to Witches’ Museum.

- Select (V).
- Select (W).
- Read (X).
- Take SCREEN HANDLE.
- Take SNAKE FIGURINE (Y).
- Go to Street by the Museum.
- Select (Z).
- Take PROJECTOR LENSE (A) and TURN ON BUTTON.
- Go to Witches’ Museum.

- Use PROJECTOR LENSE (B), TURN ON BUTTON, and SCREEN HANDLE.
- Take PENCIL (C).
- Use PENCIL (D).
- Take POLAROID (E).
- Go to Street by the Museum.

- Play puzzle (F).
- Select (1-12).
- Select (G).
- Take ROMANTIC CANDLE (H).
- Use ROMANTIC CANDLE (I).
- Select (J).
- Read (K).
- Use METAL COMB (L).
- Take SECATEURS PART (M).
- Use BROKEN SECATEURS (N).
- Add SCREW and SECATUEURS PART.
- Receive SECATEURS.
- Go to Magical Artifacts Exhibition.
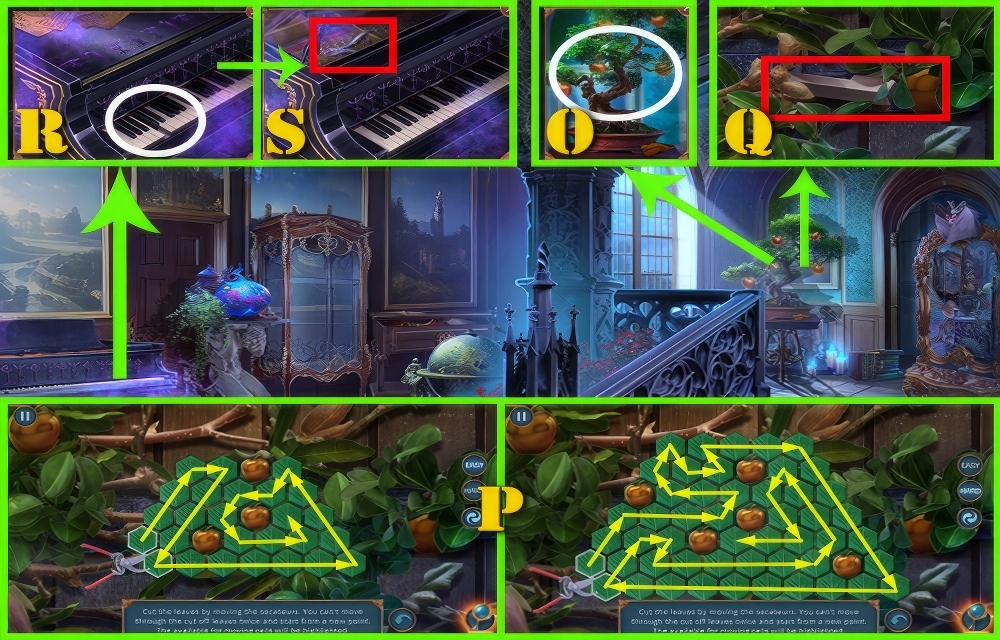
- Use SECATEURS (O).
- Play puzzle (P).
- Solutions shown.
- Take PIANO KEY (Q).
- Use PIANO KEY (R).
- Take CLIPPERS (S).
- Go to Witches’ Museum.

- Select (T).
- Use CLIPPERS (U).
- Take MALACHITE (V).
- Go to Magical Artifacts Exhibition.

- Play puzzle (W).
- Select (1-12).
- Select (X).
- Take AMBER (Y).
- Use MALACHITE (Z) and AMBER.
- Go to Street by Museum.

- Use POLAROID (A).
- Take SYMBOL CODE (B).
- Go to Witches’ Museum.

- Use SYMBOL CODE (C).
- Select until symbols match code (D).
- Take WITCH’S AMULET (E).
- Use WITCH’S AMULET (F).
- Take FLAT EARRING (G).
- Go to Street by Museum.

- Use FLAT EARRING (H).
- Take LIQUID NITROGEN (I).
- Use LIQUID NITROGEN (J) and SNAKE FIGURINE.
- Take LION FIGURINE (K).
- Go to Witches’ Museum.

- Use LION FIGURINE (L) and SNAKE FIGURINE.
- Take ENCHANTED SLIDE (M)
- Use ENCHANGED SLIDE (N).
- Play puzzle (O).
- Easy Solution: Ax9, Ex7, Dx5.
- Ax9, Bx6, Dx6.
- Ax9, Bx12, Cx1.
- Hard Solution: Ax9, Cx1, Ex9.
- Ax9, Cx4, Ex1, Ax9, Dx5, Ex10.

- Play puzzle (P). Select.
- Take AWL (Q).
- Use BAG (R) and SHOVEL.
- Take BLACK SAND (S).
- Select (T).
- Read (U).

- Use BLACK SAND (V).
- Take HANDLE (W).
- Use HANDLE (X).
- Take DAGGER (Y) and MAGIC POWDER.
- Use DAGGER (Z).
- Add MAGIC POWDER, AWL, and SPECIAL RING.
- Receive ENCHANTED DAGGER.
- Use ENCHANTED DAGGER (A).
- Play puzzle (B).
- Easy Solution: S-R2-R2-R1-S-R1-R2-S-R1-R2-S-R2-S-R2-R2-R2-S-R1-R2-R2-S-R1-R1-R1-R2-R2.
- Hard Solution: S1-R1-S1-R1-R1-R1-S1-R1-R1-R1-R3-R3-S1-R2-R2-R2-S1-R1-R1-R1-R2-R2-S2-R3-R2-S2-R3-R3-R3.
Congratulations! You have completed the game Connected Hearts Season 1 Episode 4: Trial of Soul.


