
Criminal Archives 2: Alphabetic Murders (Bonus Chapter, Extra) – Fred Jones from the main chapter has taken over the running of his father’s fashion house. He became famous by dressing famous actress Whitney Winslow. However, this actress is suing him for developing an allergy to the material he used to make the dress. Fred swears that it’s not his fault that the dress caused allergies, because he ordered only the best materials to create it. Looks like someone changed the material the dress is made from. Now you must find out who framed the master.
Bonus Chapter, Extra Walkthrough

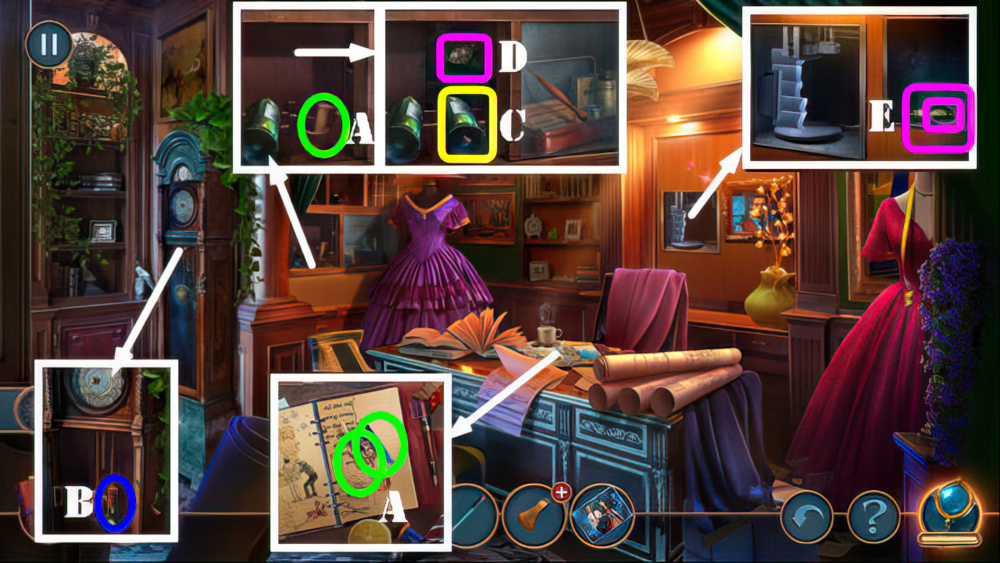
- Take BIRD FEET 1/2, BIRD FEET 2/2, KEROSENE, CARBINE, and OIL LANTERN (A).
- Use CARBINE (B), take PENCIL and WICK (B1).
- Use PENCIL, look at photo, take PURSE and MATCHES (C).

- KEROSENE, WICK, and MATCHES on OIL LANTERN, receive OIL LANTERN.
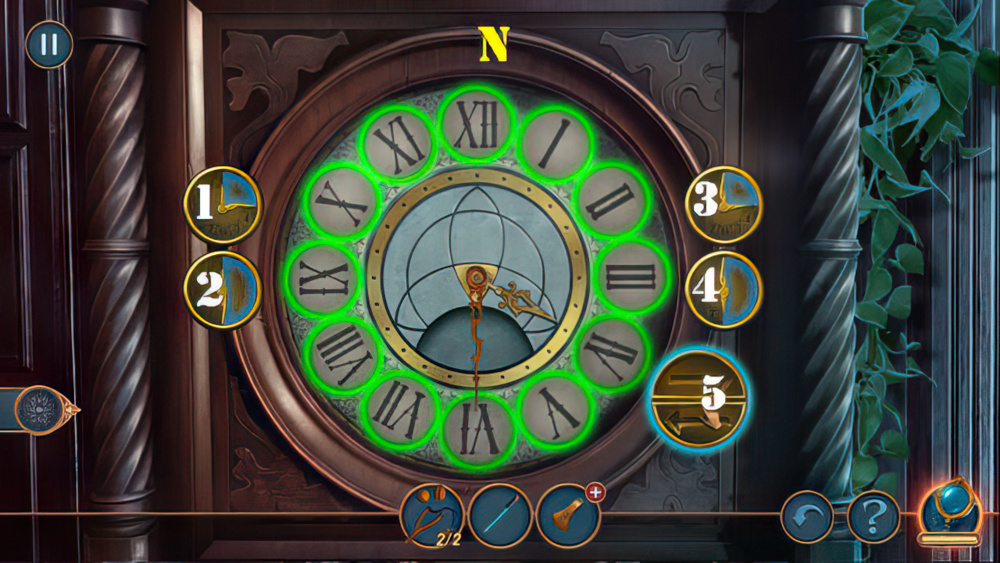
- Use OIL LANTERN, play puzzle, receive DOOR RING (D).
- Use DOOR RING (E).
- Go (F).

- Take STATUETTE 1/3 and NUT (G).
- Use BIRD FEET 2/2, take STATUETTE 2/3 and KNIFE (H).
- Use KNIFE, take EARRING and MORTAR AND PESTLE (I).
- EARRING on PURSE, take ID CARD.
- Give ID CARD and go (J).

- Read note, take CROCHET HOOK (K).
- Take PINEAPPLE AMULET (L).
- Use CROCHET HOOK (M). Read note, take STATUETTE 3/3 (M1).
- Place STATUETTE 3/3 (N).
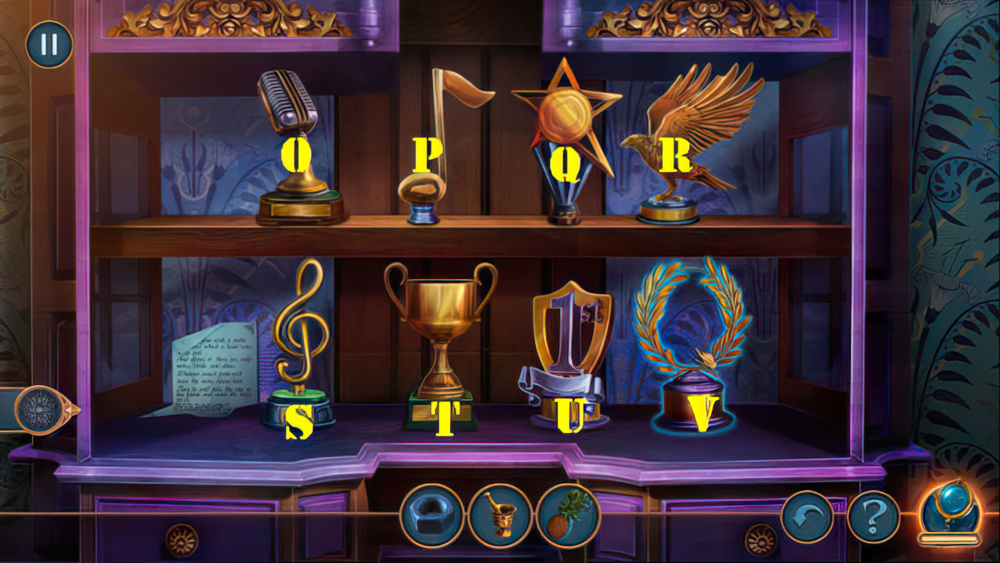
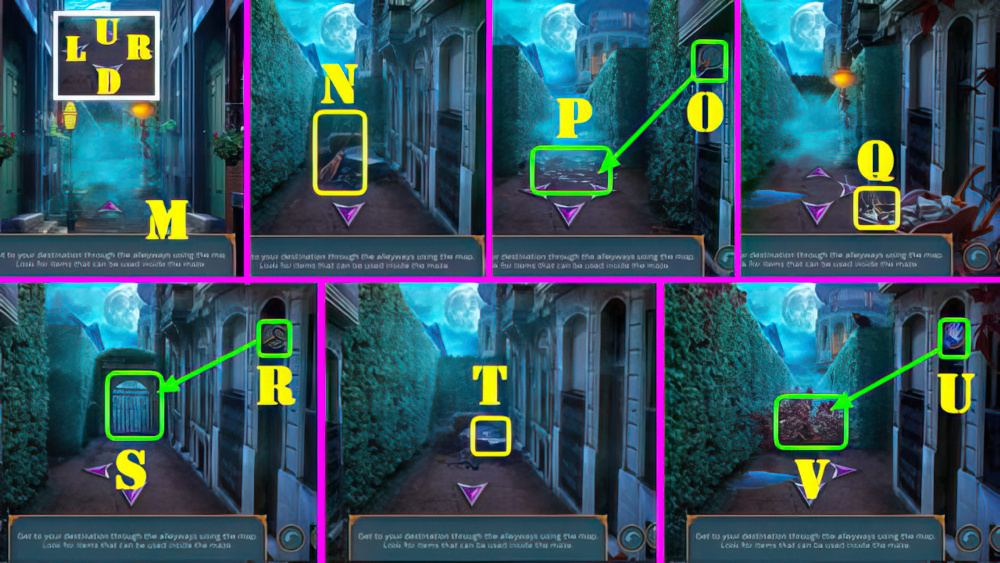
- Solution (O-P)-(S-T)-(S-U)-(R-V).
- Take HORN.
- Go back 2x.

- Use HORN, select, take CHISEL AND VALVE (Z).
- Use VALVE and NUT (A), take VINEGAR and METAL POT (B).
- Go (B1).

- Use VINEGAR (C) and napkin (D) on (C), take FLOWER.
- Use FLOWER, take COINS 1/3, POWDER, and BROCHURE (E).
- Go (E1).
- Use BROCHURE, take BUTTERBUR (F).
- Place MORTAR AND PESTLE and BUTTERBUR (G).

- Easy solution (@1): (J-G-P-Q)-(I-H-P-Q)-(M-K-P-Q)-(J-K-P-Q)-(O-H-L-N-P-Q).
- Hard solution (@1): (H-J-P-Q)-(J-G-P-Q)-(I-H-P-Q)-(M-K-P-Q)-(J-K-P-Q)-(O-H-L-N-P-Q).
- You receive BUTTERBUR SOLUTION.
- Use BUTTERBUR SOLUTION (R), receive BOOK.
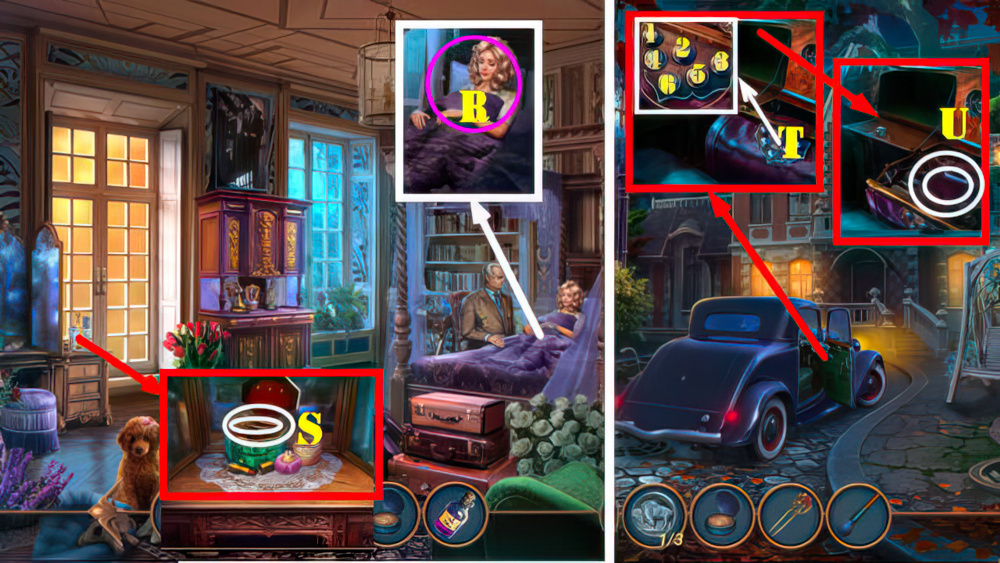
- Use CHISEL and BOOK, take PIN and BRUSH (S).
- Go back 2x.
- Use POWDER and BRUSH (T), select 1-2-3-6, take PHOTOGRAPHIC PLATE and FILE (U).
- Go forward.

- Use FILE and open, take COINS 2/3 (A). Place PINEAPPLE AMULET, take HAIRPIN (B).
- Go forward.
- Use PIN and HAIRPIN (C), play puzzle, receive FINDINGS.
- Give FINDINGS (D).
- Read two notes(E).
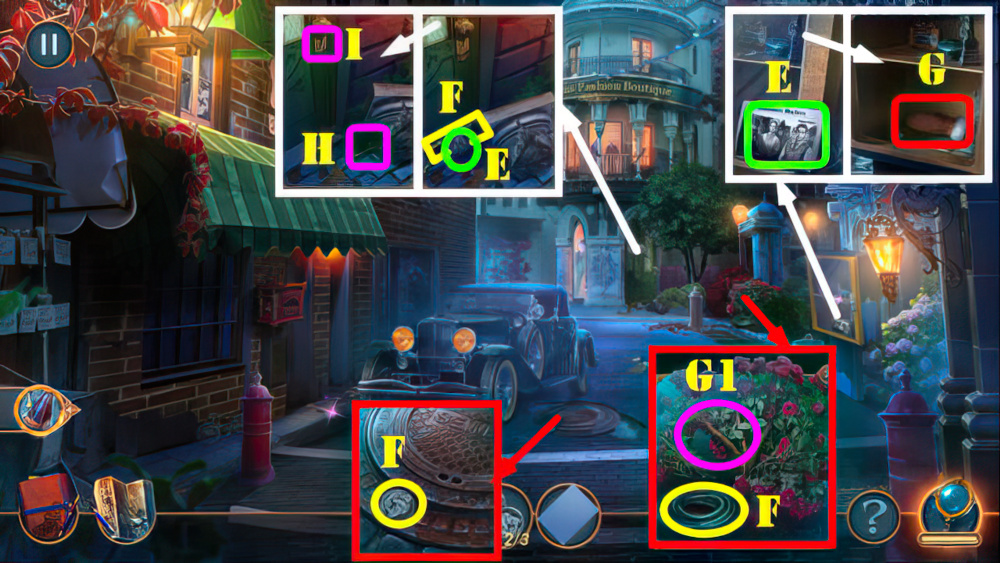
- Take BROKEN PUMP, NEW HOSE, and COINS 3/3 (F).
- Use COINS 3/3, take MITTEN (G).
- Use MITTEN, take TOUGH BRANCH (G1).
- Use METAL POT and TOUGH BRANCH, use (H-I).

- Easy solution: (M-K)-(N-L)-(O-J)-(K-P)-Qx3-(P-K)-(L-P)-Q-(P-L).
- Hard solution (N-L)-(M-K)-(O-N-J)-(L-M-N-O-L)-(K-M-N-O-K).
- Go (R).
- At the end of Marlene’s dialogue (S), you will be given two options. For the purposes of this guide, we chose the first option which mentions checking Fred’s office. If you choose the second answer, some of the steps moving forward may not apply to your game.

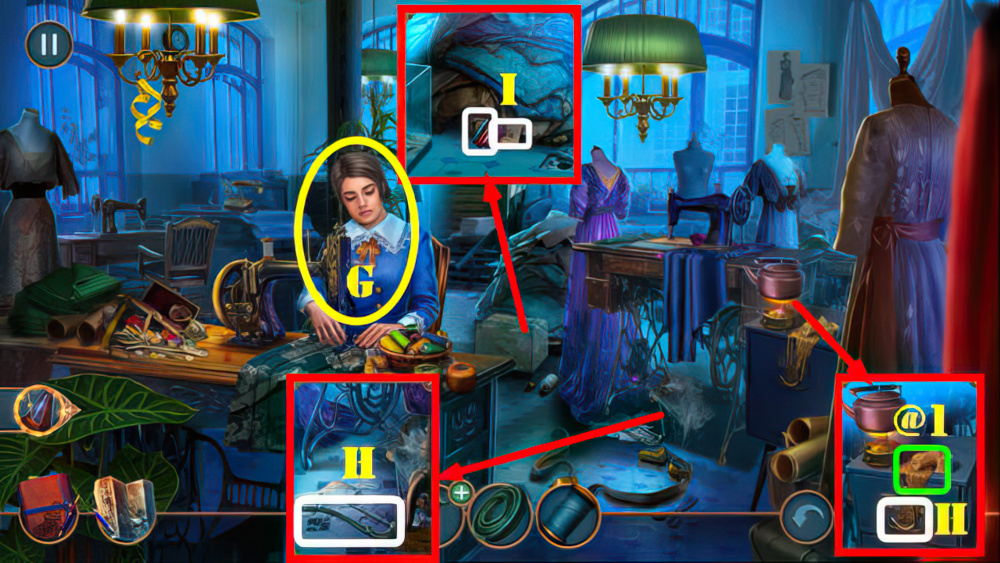
- Take THREAD and WAX CANDLE (A).
- Use WAX CANDLE, take CAMERA (B).
- Place PHOTOGRAPHIC PLATE and CAMERA (C), receive DRESS PHOTO.
- Select drape, place DRESS PHOTO (D), play puzzle, receive GOLDEN GEAR.
- Place GOLDEN GEAR (E), select HANDLE (E1).
- Go (F).
- Talk (G).
- Take KEYHOLDER HOOK and PUMP LEVER (H).
- NEW HOSE and PUMP LEVER on BROKEN PUMP, receive PUMP.
- Use PUMP, select, take FUR PIECES and BUSINESS CARD (I).
- Use BUSINESS CARD (@1).

- Easy solution (@2): (J-Gx5)-(J-F)-(K-D)-(J-Ax2)-(I-Hx6)-(K-Dx6).
- Hard solution (@3): :(W-L)-(U-S-M)-(T-Nx3)-(U-P)-(W-Q)-(V)-(Rx2)-(U-Px2)
- (T-Sx2)-(W-L)-(T-Nx2)-(U-Mx2)-(W-L)-(T)-(Sx3).
- Read note, take WORK LOG.

- Give WORK LOG (A), receive SHEPFIR PIECE.
- Go back.
- Use SHEPFIR PIECE (B). Read note and take TWEEZERS (C).
- Use TWEEZERS (D), take BRACELET (E).
- Go back.

- Use BRACELET, take SLINGSHOT AND NUT 1/2 and CORKSCREW (F).
- Use CORKSCREW, select, take SLINGSHOT AND NUT 2/2 and SOUVENIR MAGNET (G).
- Use SOUVENIR MAGNET, receive NEEDLE (H).
- Return to Sewing Department.
- Use THREAD, FUR PIECES, and NEEDLE (I).

- Easy solution (@4): (M-R)-(P-S)-(N-T)-(O-U)-(Q-V)-(J-W)-(K-X)-(L-Y).

- Hard solution (@5): (A-Qx7-I)-(H-Qx9-J)-(G-K)-(F-Qx9-L)
- (B-Qx9-M)-(E-Qx9-N)-(C-Qx17-O)-(D-Qx18-P).
- Take FLUFFY TAIL.

- Use FLUFFY TAIL, take PENCIL (R), use KEYHOLDER HOOK (S), receive STOPPER.
- Use STOPPER (T), receive KETTLE LID.
- Go back 2x.
- Use KETTLE LID, take AXE BLADE and note (U).
- Go (V).

- Play puzzle, receive WHITNEY’S DRESS SKETCH (V).
- Use WHITNEY’S DRESS SKETCH, select pages 2x and read note (W), take ELISE’S PHOTO (X).
- Go (Y).
- Take WOODEN BLANK, ARROWS 1/2, and NIPPERS (A).
- Use NIPPERS, take WINE BOTTLE (B).
- Place WINE BOTTLE (C), take FRAME PART (D).
- Place FRAME PART, take SCRUNCHY and GLUE (E).
- Return to Sewing Department.

- Give ELISE’S PHOTO (F). You can select yes or no at this point. For the purposes of the guide, we selected no (G). If you decide to select yes, some of the steps moving forward, may not unlock in your game.
- Use GLUE, take ARROW BLUEPRINTS (H).
- Return to Fred’s Office.
- Place WOODEN BLANK and ARROW BLUEPRINTS (I).

- Solution (J): (4-3)-(3-2)-(2-1)-(5-4)-(4-3)-(3-2).
- Take ARROWS 2/2 (K).
- Place ARROWS 2/2 (L).

- Easy Solution (M): (4-4-2-3-7-6-5)-(2-7-1-6-4-4-7-6-4-4)-(1-7-5-4-3-2-1-1)-(7-4-4-1-7).
- Hard Solution (N): (1-2-3-5-3)-(4-1-5-1-4-3)-(5-1-4-3-5).
- Take DIAMOND RING.

- Use DIAMOND RING, take SPOKE (O).
- Go back twice.
- Use SCRUNCHY and SPOKE, take CRUMPLED SHEET PIECE (P).
- Return to Fred’s Office.

- Use CRUMPLED SHEET PIECE (Q). Play puzzle.
- Return to Sewing Department.
- Talk (R).

- Take WHETSTONE and BOARDS 1/2 (A).
- Use SLINGSHOT AND NUT 2/2 (B). Take COMB (C).
- Use COMB, receive BOARDS 2/2 (D).
- Place BOARDS 2/2 (E).

- Solution (F).

- Take PAPER and NET (H).
- Use NET (I), receive RUSTED KEY.
- Use RUSTED KEY (J), play puzzle, receive LADDER.
- Use LADDER (K).
- Go (L).

- Take three notes (@1).
- Take UMBRELLA and ESSENTIAL OIL (M).
- Use ESSENTIAL OIL (N), use toothbrush (O-N), take METAL GLOBE.
- Use METAL GLOBE, read note, take BOOKS 1/3 (P).
- Use PAPER and PENCIL, take PASSWORD (Q).
- Use PASSWORD (R).

- Easy solution. Select 1-14 (S).
- Select 1-17 (T).
- Select 1-13 (U).
- Select 1-10 (V).

- Hard solution, (A-1-2)-(B-3)-(C-4)-(B-5-6)-(A-C-7)-(B-8).
- (D-1)-(E-2)-(F-3-4)-(E-5)-(E-6-7-8-9-10)-(Dx2-F-11).
- (G-1)-(H-2)-(I-3-4)-(G-5)-(H-6)-(I-7).
- (J-1)-(K-2)-(L-3)-(K-4)-(K-5).
- Take PERFUME.
- Go back 2x.

- Use PERFUME, take SOLUTION PREPARATION INSTRUCTIONS and HANDLE (M).
- WHETSTONE and HANDLE on AXE BLADE, receive AXE.
- Use AXE, take BOWL (N).
- Go (M1).

- Give BOWL (O), take BOOKS 2/3 and BOLT CUTTER (O1).
- Use BOLT CUTTER, take JACK and METOL (P).
- Go (P1).

- Use JACK, take SODIUM SULPHATE (Q), use UMBRELLA, receive BOOKS 3/3 (Q1).
- Place BOOKS 3/3 (R), take BENZENE (R1).
- Go back 2x.
- Use SOLUTION PREPARATION INSTRUCTIONS, METOL, BENZENE, and SODIUM SULPHATE (S).

- Solution (W-T-W-T-V-T)-(X-U)-(W-T-W-T-V-T-W-T).
- Receive SOLUTION.
- Return to Marlene’s Apartment.

- Use SOLUTION, take AREA MAP (A).
- Go back.
- Use AREA MAP (B).

- See direction example U-D-L-R (@).
- Easy solution: go U-L-U-R-U-R-Ux2-L (C).
- Take broom (D). Go Dx4.
- Use (E-F), go Ux2-R-U-L.
- Take key (G), go Dx5-R-Ux2.
- Use (H-I), go U.
- Take extinguisher (J), go Dx4-Ux2-R-U-L-U.
- Use (K-L), go Ux4.
- See direction example U-D-L-R (@).
- Hard solution: go U-L-U-R-U-R-Ux2-L (M).
- Take broom (N). Go Dx4.
- Use (O-P), go Ux2-R-U-L.
- Take key (Q), go Dx5-R-Ux2.
- Use (R-S), go U.
- Take glove (T), go Dx4-Ux2-R-U-L-U.
- Use (U-V), go Ux2-R-U-R.

- Hard solution continued. See direction example U-D-L-R (@).
- Take axe (W), go Dx6-R.
- Use (X-Y), go U.
- Take extinguisher (Z), go Dx2-Ux3.
- Use (A-B), go Ux2.
Congratulations! You have completed the game Criminal Archives 2: Alphabetic Murders.


