
Criminal Archives 3: Murder in the Pages – The game’s walkthrough begins with a mysterious series of crimes has been striking San Francisco for the past few weeks. Residents of the city wait in breathless wonder as the horrifying events take place in the quiet alleys of city. Three victims have already perished at the hands of an unknown person. All the deaths appear as if choreographed on a blood-drenched stage. One might think, as though these scenes came off the pages of a horror novel, and they would be right. Isn’t it unnerving that literature connoisseurs have noticed the similarities of the ongoing attacks to the storyline in the popular novels of Damian Crow, the master of crime fiction. Is the celebrated author behind this slaughter. Or is there a roving copycat in the city. That’s something we’ve yet to find out. If you can not pass any of the puzzles or do not know where the items are, on our site you can watch the walkthrough of the game Criminal Archives 3: Murder in the Pages, and stop the villains.
Criminal Archives 3: Murder in the Pages – Walkthrough
Here you can see the full walkthrough of Criminal Archives 3: Murder in the Pages, namely for all chapters, including the bonus chapter, in pictures.

- Take the PLATEN (A).
- Take the MAP, take LETTERS 1/2, take HAIRPINS 1/2, take KEY (B).

- Take JOURNAL, take SCISSORS, take PLATEN KNOB (C).
- Use PLATEN on the printing press (C1).
- Use PLATEN KNOB on the typewriter (D).
- Take SAMPLE TEXT (D1).

- Use SAMPLE TEXT on the printing press (E).
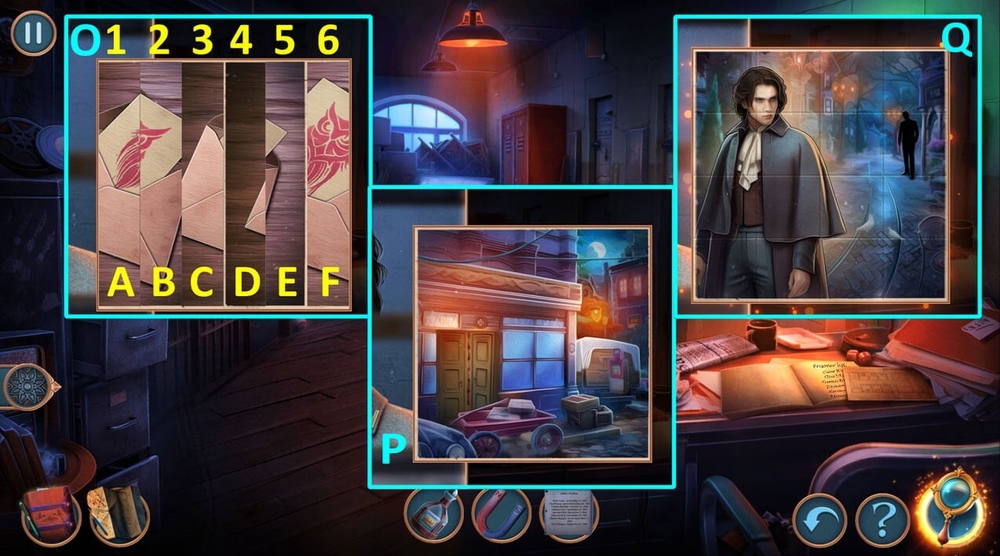
- Use KEY (F).
- Play puzzle, earn CHESS PIECE.
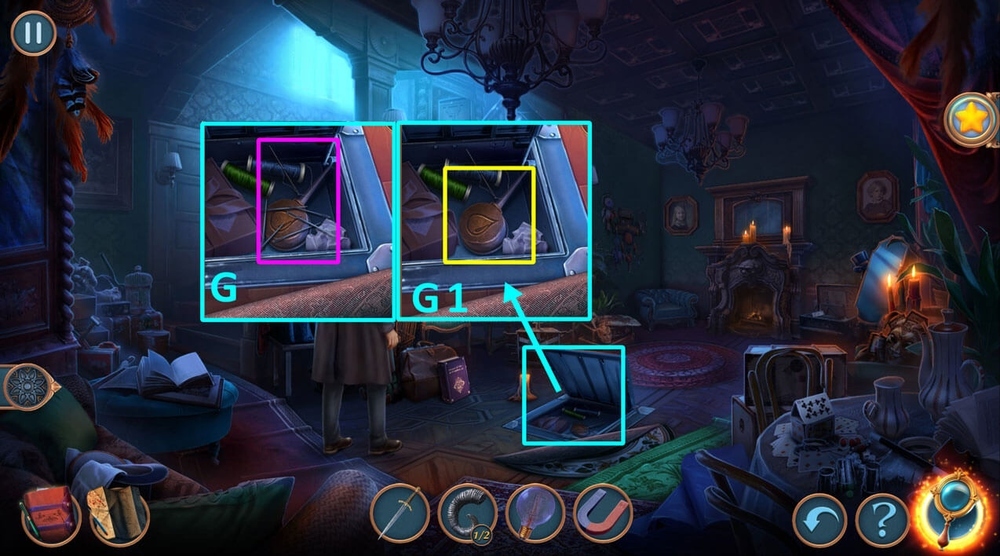
- Use CHESS PIECE on the drawer (G).
- Take SQUIRREL TAIL and LETTERS 2/2 (G1).

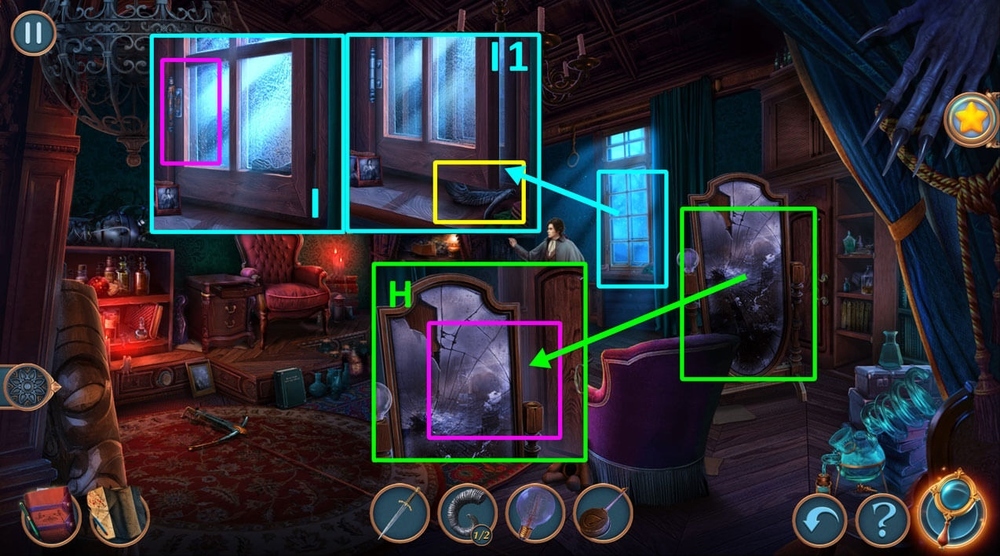
- Use LETTERS on the printing press (H).
- Easy and Hard Solutions: Assemble the title of the article backward: REDRUM NI SEGAP (H1).
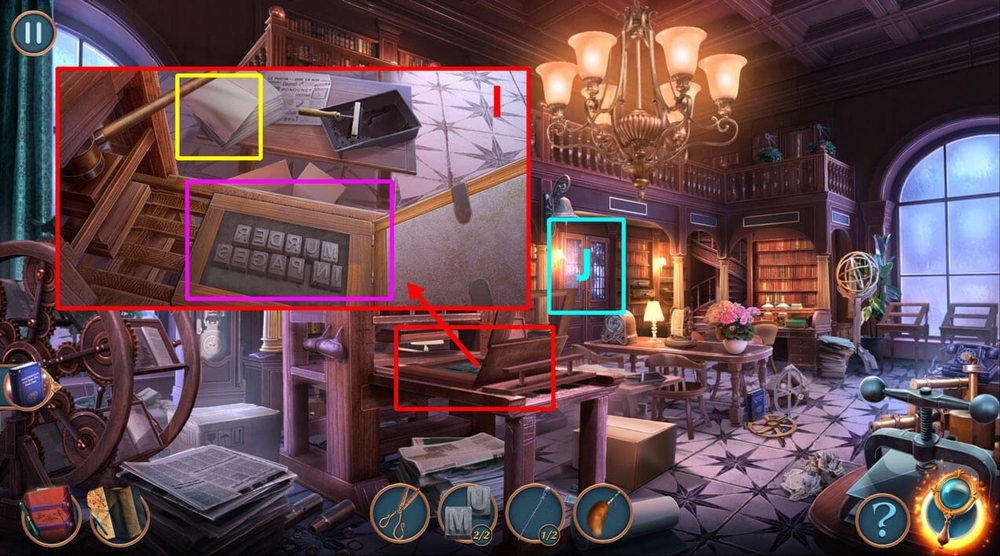
- Take paper and use it on the printing press (I).
- Open the door (J).
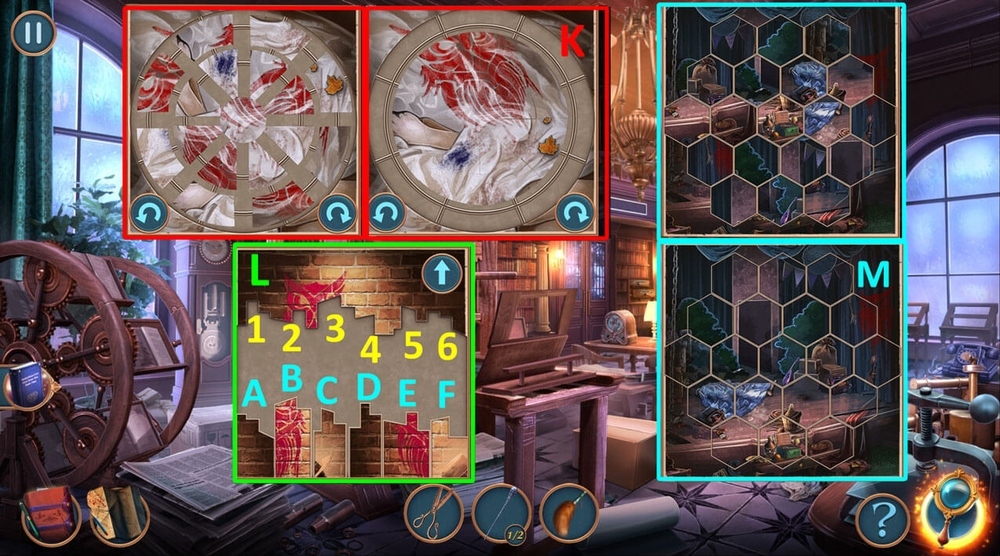
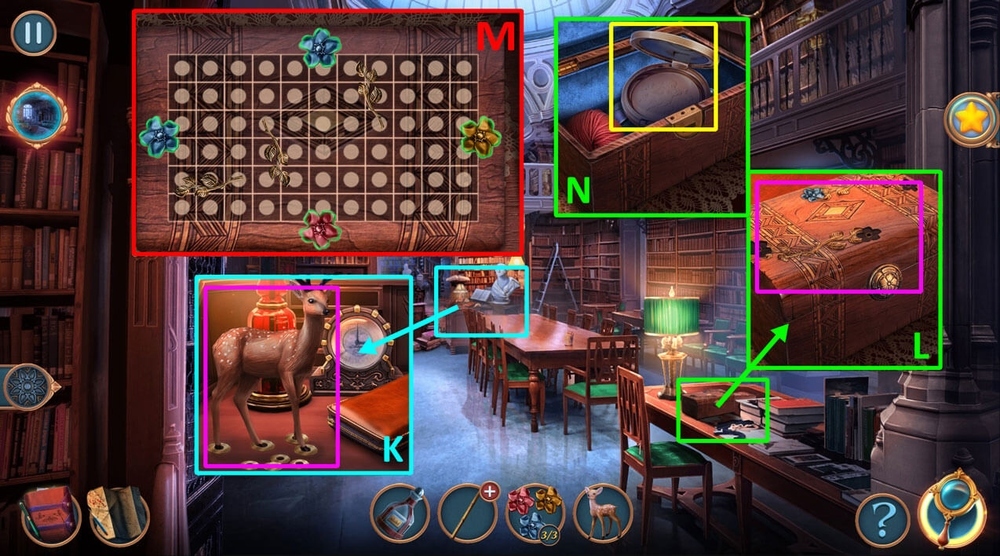
- Assemble the picture as indicated in the picture (K).
- Assemble the picture as indicated in the picture (L): A-6, B-3, C-5, D-1, E-2, F-4.
- Assemble the picture as indicated in the picture (M).

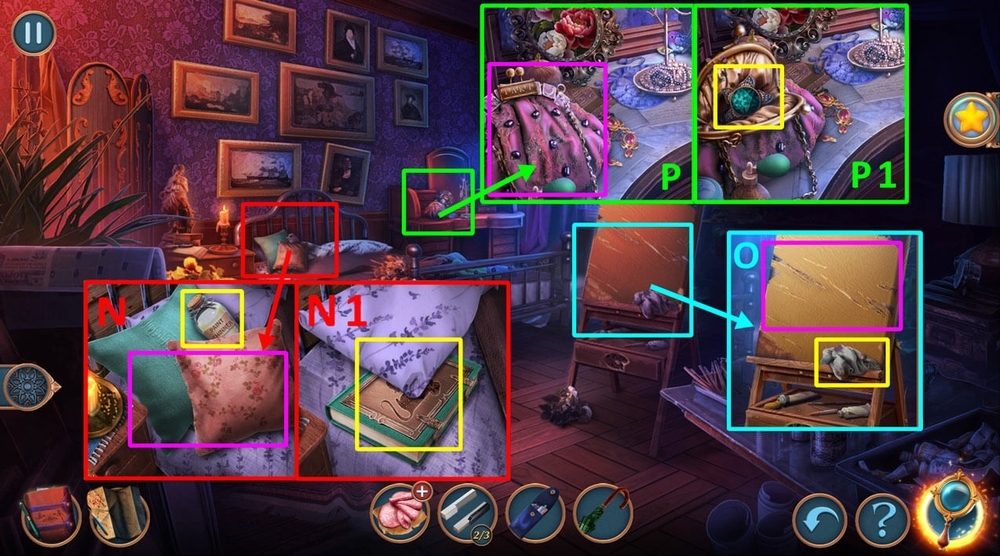
- Select (N), Earn STRANGE LETTER, read LETTER (N1).

- Play puzzle (N2), earn MAGNIFYING GLASS.
- Use MAGNIFYING GLASS on LETTER (N3).

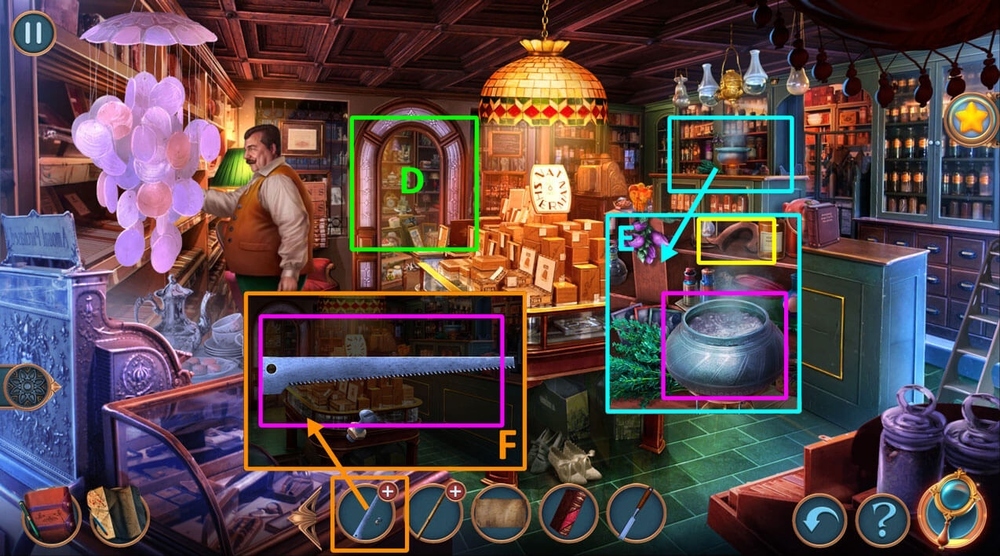
- Take BROKEN FIGURINE, take APOTHECARY KIT (O).
- Use SCISSORS on the bush, take HAIRPINS 2/2 (O1).
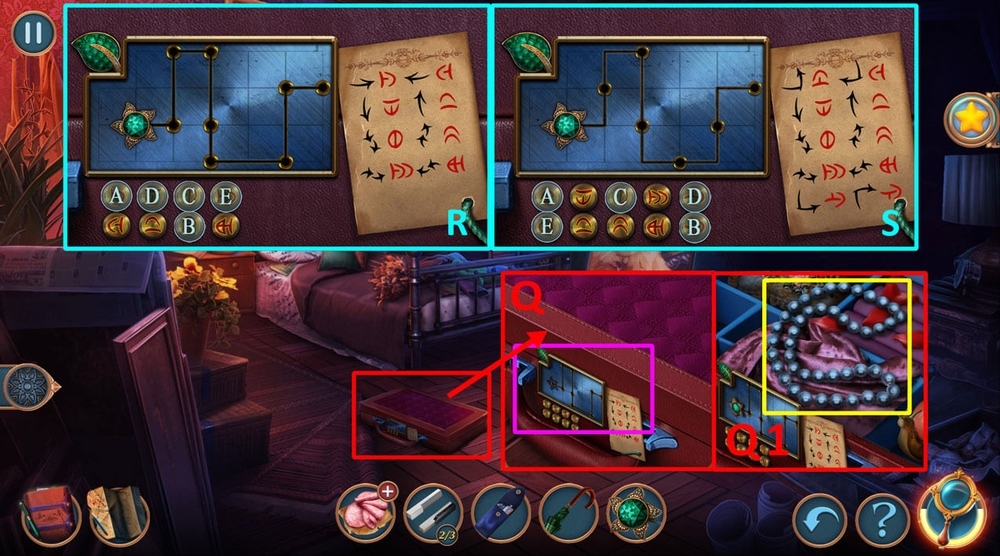
- Use HAIRPINS on the lock (P).

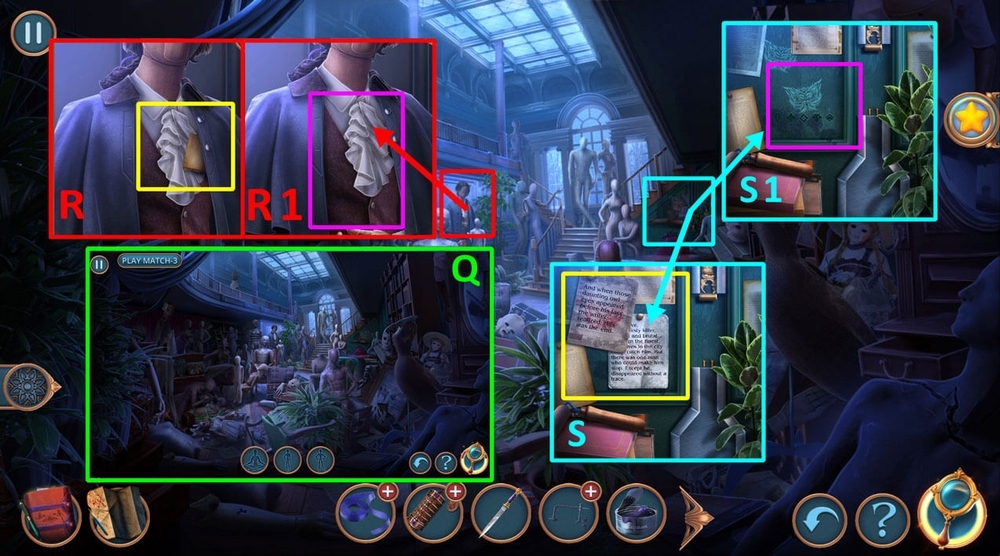
- Easy solution: See the clue for the order of the arrows (Q).
- Hard solution: See the clue for the order of the arrows (R).
- Go to the Bookstore.

- Select 1, 2 or 3 (S).
- Use the pot plants (3) to put out the fire (S1).
- Use APOTHECARY KIT on Clementine (T).

- Take EVIDENCE – Check 1/3 (U).
- Take EVIDENCE – Shoe print 2/3 (V).
- Take SIGNET, read the note, take EVIDENCE 3/3 – Note (W).
- Select 1 or 2 receive UMBRELLA (W1).
- Go to the Detective Section.

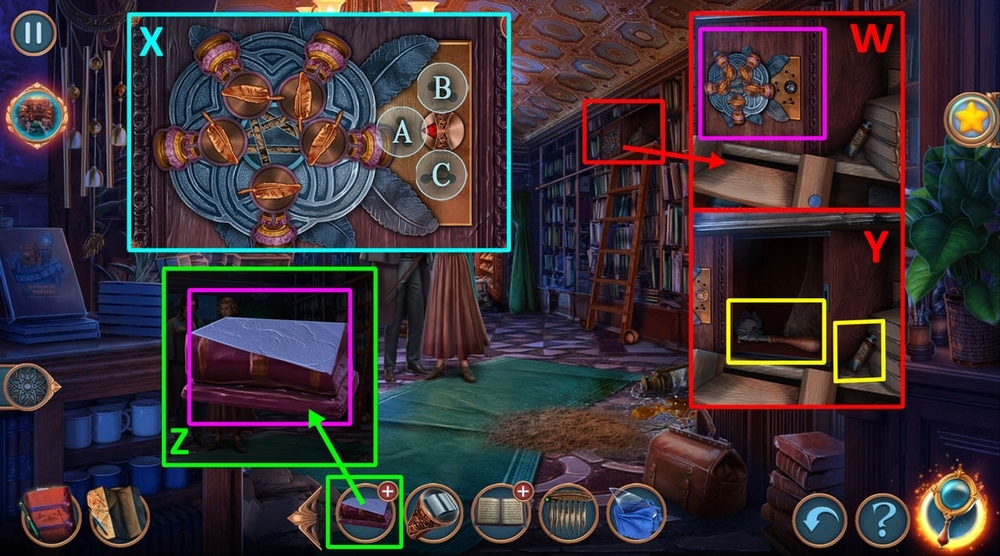
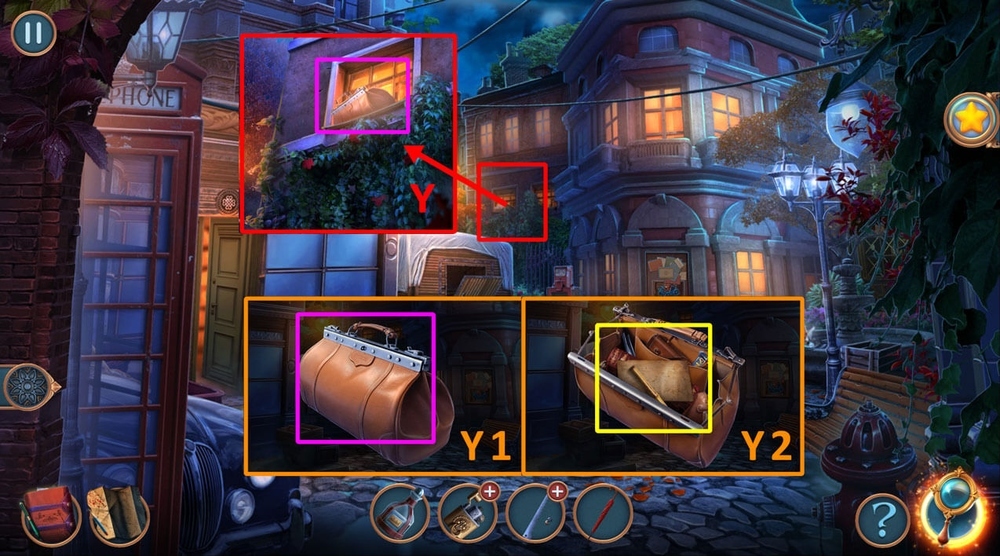
- Take SUN TOKEN, take COMPACT (X).
- Use COMPACT on the frame, earn BOOK NUMBER (Y).
- Use BOOK NUMBER on the book shelf (Z).

- Play puzzle (A), earn ORNATE GEMSTONE.
- Use SUN TOKEN on the plate (B).
- Use ORNATE GEMSTONE on the book cover (C).

- Easy solution: Move the stones until the ones with painted objects on them are next to the appropriate slots.
- Here is one of the solutions (D).
- Hard solution: Move the stones until the ones with painted objects on them are next to the appropriate slots.
- Here is one of the solutions (E).
- Take MESSAGE, take TAURUS CHARM (F).

- Use TAURUS CHARM on the drawer (G).
- Take CLAY WHISTLE (G1).
- Go back 2x.

- Use UMBRELLA on the pipe (H).
- Take CLAPPER (H1).
- Use CLAY WHISTLE on the bird (I).
- Take NAIL FILE (I1).
- Go to the Detective Section.

- Use NAIL FILE on the book (J).
- Take MOON TOKEN (J1).
- Use MOON TOKEN (L).

- Easy solution: Unravel all the chains by moving the tokens.
- Arrange the tokens like in the picture.
- Here is one of the solutions (M).
- Hard solution: Unravel all the chains by moving the tokens.
- Arrange the tokens like in the picture.
- Here is one of the solutions (N).
- Take BALLERINA (O).
- Use BALLERINA on the box (P).
- Take HANDKERCHIEF (P1).
- Go back 2x.

- Use CLAPPER on the demon head (Q).
- Go to the Brasserie.

- Select 1 or 2 (R).
- Take COMB, take WEIGHTY KEY (R1).
- Use WEIGHTY KEY on the door (S).

- Play puzzle (B), earn CHAMPAGNE.
- Use CHAMPAGNE on the shelf, earn CLOCK HANDS (T).
- Go to the Bookstore.

- Use CLOCK HANDS on the lock (U).
- Earn WHIPPING TOP (U1).
- Use HANDKERCHIEF on the glass shard, earn WRAPPED SHARD (U2).
- Use WHIPPING TOP on the ladder (V).
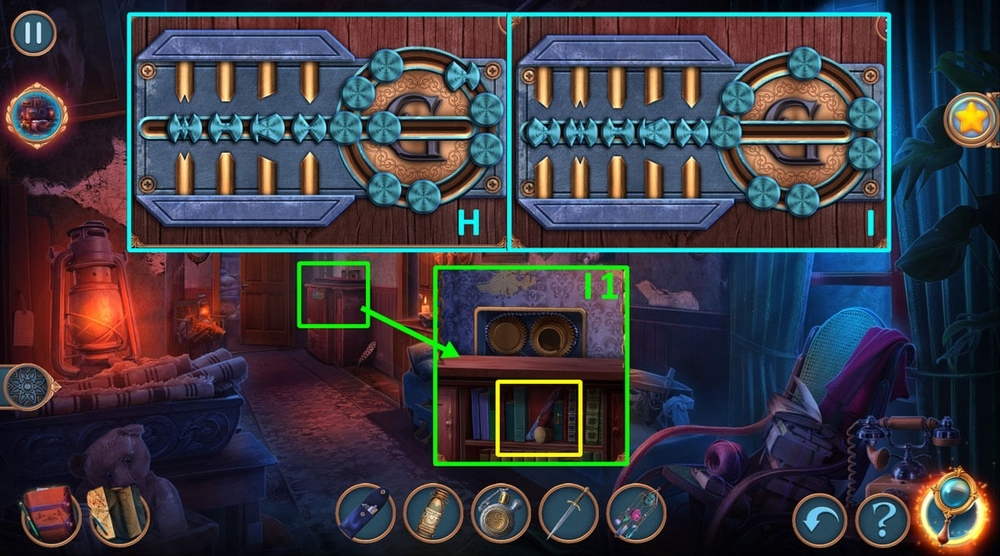
- Use SIGNET on the lock (W).
- Solution: Press the buttons in this order (X): C, A, B, C, A, B.
- Take CAN OPENER, take GLUE (Y).
- Use GLUE on BROKEN FIGURINE (Z).
- Go to the Brasserie.

- Use CAN OPENER on the gap, earn 3 PENCE (A).
- Play puzzle (B), earn GRAPES AMULET.
- Use GRAPES AMULET on the drawer (C).
- Take RIBBON (C1).

- Use SQUIRREL TAIL on the spider web (C2), take FIGURE FRAGMENTS (C3).
- Use FIGURE FRAGMENTS on BROKEN FIGURINE (D), earn FIGURINE.
- Use WRAPPED SHARD on the bag (E), earn PIPETTE (E1).
- Go to the Bookstore.

- Use PIPETTE on the oil, earn OIL (F).
- Go forward.

- Play puzzle (G), earn MECHANICAL HEART.
- Use OIL and MECHANICAL HEART on the robot (H), earn STENCIL (H1).
- Use STENCIL on MESSAGE (I).
- Go back.

- Use FIGURINE on the board (J).
- Easy solution: Step 1 (K), Step 2 (L), Step 3 (M), Step 4 (N).
- Hard solution: Step 1 (O), Step 2 (P), Step 3 (Q), Step 4 (R), Step 5 (S), Step 6 (T), Step 7 (U).

- Earn NUT and CHISEL (V).
- Use CHISEL on the floor (W).
- Earn CRIMINAL’S WATCH (X).
- Select 1 or 2 (X1).
- Go to the Brasserie.

- Use CRIMINAL’S WATCH on the book (Y).
- Find Clive Fitzroy (Y1).
- Earn FITZROY’S ADDRESS (Y2).
- Go back.

- Use FITZROY’S ADDRESS and 3 PENCE on the cab driver (Z).
- Solution: Step 1: We choose the direction indicated by the sign 1937 (A).
- Step 2: Choose the path where parking is only allowed on even numbered days of the month (B).
- Step 3: Turn onto the winding road that leads to the Coit Tower (C).
- Step 4: We take the road that leads to Lombart Street (D).
- Step 5: Head towards the clock tower of the Ferry Building (E).

- Take OWL CRYPTEX, take DAMIAN’S BLADE (F).
- Use DAMIAN’S BLADE on the glove compartment (G), take PIN (G1).
- Use PIN on the lock (H), take PIPE (H1).

- Use PIPE on the hole (I), take IRON CROWBAR (I1).
- Use IRON CROWBAR on the window (J).
- Easy solution: Put the fragments in the order shown in the picture.
- Then click on the fragments in this order: 1, 2, 3 (K).
- Hard solution: Put the fragments in the order shown in the picture.
- Then click on the fragments in this order: 1, 2, 3, 4 (L).

- Play puzzle (M), earn FRESH NEWSPAPER.
- Use FRESH NEWSPAPER on the door, use DAMIAN’S BLADE on the key hole (N).
- Open the door with a key (N1).
- Use COMB on the nail, earn NAILS 1/3, take SAW and SHOE POLISH (O).

- Use NUT on SAW (P).
- Go to Fitzroy Manor.
- Play puzzle (Q).
- Take BLANK SHEET (R), use DAMIAN’S BLADE on the shirt (R1).
- Read note 1 and note 2 (S), use SHOE POLISH and BLANK SHEET on the wall, earn SHOE POLISH and PATTERN IMPRINT (S1).

- Use PATTERN IMPRINT on OWL CRYPTEX, put in the symbols (T), earn WIND-UP KEY (T1).
- Use WIND-UP KEY on the key hole (U), earn MAGNET (U1), use SHOE POLISH on the mechanism (U2).

- Use MAGNET on RIBBON, earn MAGNET AND RIBBON (V).
- Use MAGNET AND RIBBON on the floor, earn COIN (W).
- Use COIN on the screws (X), earn HANDLE and LETTERBOX HORN (X1).

- Use HANDLE on SAW (Y).
- Go back.

- Use LETTERBOX HORN on the mailbox (Z), read the letter, take NAILS 2/3 (Z1).
- Play puzzle, earn MEAT (A).
- Use MEAT on the dog (B), take NAILS 3/3 (B1), use DAMIAN’S BLADE, earn GEAR (B2).
- Go to Fitzroy Manor.

- Use GEAR on the mechanism (C), earn METAL RELAY PART (C1).
- Use METAL RELAY PART on the shoot (D), take METAL STAG BEETLE (D1).
- Use NAILS on the stairs (E).
- Go back.

- Use METAL STAG BEETLE on the lock (F), take THIN BLADE (F1).
- Use THIN BLADE on the SAW, earn SAW (G).
- Use SAW on the boards, earn BOARDS (H), take HINGE (H1).
- Go to Fitzroy Manor.

- Use BOARDS on the stairs (I).
- Use HINGE on the mannequin (J), take OWL STATUETTE (J1).
- Use OWL STATUETTE on the stairs (K).

- Easy solution: Use the picture as a hint (L).
- Hard solution: Use the picture as a hint (M).

- Take CAMERA and OLD PENCIL (A).
- Open CAMERA, take the broken lens out (B).
- Use OLD PENCIL on the cupboard (C).
- Take PIANO KEY 1/3, CAT’S TREAT, and HANDKERCHIEF (C1).
- Use HANDKERCHIEF on the stain (D), take NEW LENS (D1).

- Use NEW LENS on CAMERA (E).
- Use CAMERA on the tripod (F).
- Play puzzle (G).
- Select 1 or 2 (G1), earn MELINDA’S LOCK PICKS.

- Open the lid (H).
- Go to the Second Floor.

- Select 1 or 2 (I).
- Use MELINDA’S LOCK PICKS on the lock (I1).
- Take STURDY CLOTH (J).
- Use STURDY CLOTH on the sofa (K).
- Take PIANO KEY 2/3 and SEWING KIT (L).

- Use SEWING KIT on the sofa (M), earn UMBRELLA (M1).
- Go to Monique’s Room.
- Take SOLVENT, move the pillows (N), look at the book (N1).
- Use SOLVENT on the canvas, take the cloth and remove the paint (O).
- Take a look at the bag, put in the name: “KING” (P), take SUITCASE PIN (P1).
- Use SUITCASE PIN on the lock (Q).
- Easy solution: Press the keypad in this order: A, B, A, C, D, E, B, A (R).
- Hard solution: Press the keypad in this order: A, B, C, D, A, B (S).
- Take BEADS (Q1).
- Go back 2x.

- Use UMBRELLA on the cupboard (T), earn CHISEL (T1).
- Use CHISEL on the floor board (U), earn PIANO KEY 3/3 (U1).
- Use PIANO KEY on the piano (V), earn ODD NOTES (V1).
- Go forward.

- Use ODD NOTES on the box with a code lock (W), take HEART-SHAPED DETAIL (W1).
- Use HEART-SHAPED DETAIL on the frame (X).

- Easy solution: Arrange the pieces as shown in the picture (Y).
- Hard solution: Arrange the pieces as shown in the picture (Z).
- Earn NOTE AMULET (Z1).
- Go back.

- Use NOTE AMULET on the piano (A), earn SLEEPING POWDER (A1).
- Use SLEEPING POWDER on CAT’S TREAT, earn CAT’S SEDATIVE TREAT and EMPTY BOTTLE (B).
- Use CAT’S SEDATIVE TREAT on the cat (C), earn LIGHTER and DAGGER (C1).
- Go forward.

- Use DAGGER on the pillow (D), earn DAGGER and FAMILY RING (D1).
- Use BEADS on the mechanism (E).
- Earn WIND MUSIC WITH MIRROR, use FAMILY RING on the lock with a “G” letter (E1).
- Easy solution: Arrange the amulets in the order shown in the picture (H).
- Hard solution: Arrange the amulets in the order shown in the picture (I).
- Take CORK and PAINTING KNIFE (I1).
- Go to Monique’s Room.

- Use WIND MUSIC WITH MIRROR on a jewelry rack (J).
- Play puzzle, earn PALETTE AMULET (K).
- Use PALETTE AMULET on the easel (L), earn GLUE (L1).
- Go back.

- Use GLUE on the amulet from the box, earn FLAT CAT FIGURE (M).
- Go to Monique’s Room.

- Play puzzle, earn FLAT MOUSE FIGURE (N).
- Use FLAT CAT FIGURE and FLAT MOUSE FIGURE on the book (O).
- Read the note (O1).
- Go back.

- Read Monique’s journal (P).

- Select 1 or 2 (P1).
- Touch the key, take FAKE FLOWER 1/2, take BOOK LIST (Q).
- Use BOOK LIST on the book pile (R).

- Play puzzle, earn LAMP CHAIN (S).
- Use LAMP CHAIN on the lamp (T), take FAKE FLOWER 2/2 (T1).
- Use FAKE FLOWER on the vase (U).
- Solution: Arrange the flowers on the order shown in the picture, take ROLLER (V).

- Use ROLLER on the music box (W), earn COIN (W1).
- Use COIN on the screws (X), take BARRETTE (X1).
- Use BARRETTE on the broken key in the bag’s lock (Y), read the note (Y1).
- Play puzzle (Z).
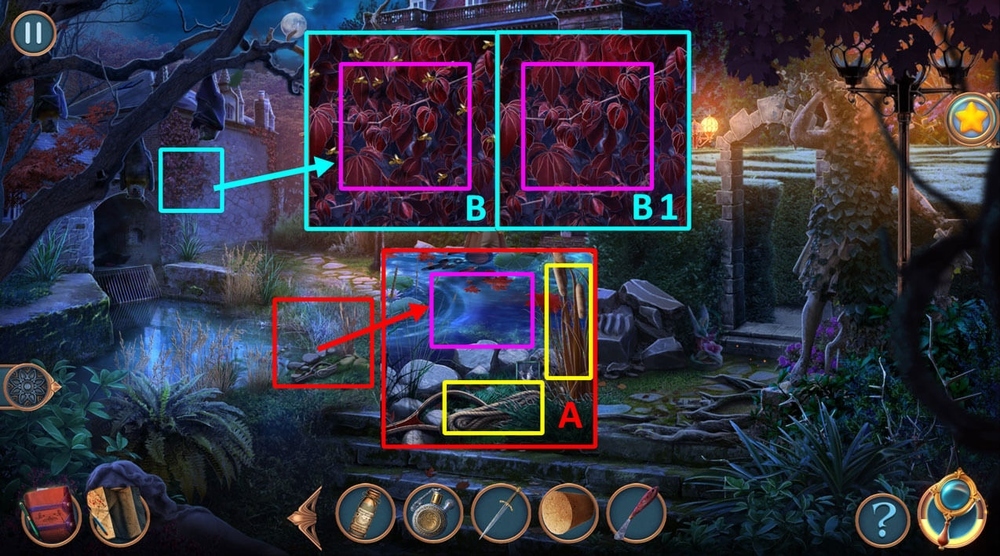
- Use EMPTY BOTTLE on the pond, earn WATER, take ROPE PART, take CATTAIL (A).
- Use CATTAIL and LIGHTER on the bees, earn LIGHTER (B).
- Use DAGGER on the bush (B1).

- Play puzzle, earn STONE PATTERN (C).
- Use STONE PATTERN on the stones (D), earn BIG HEAVY KNOCKER (D1).
- Use BIG HEAVY KNOCKER on the dragon (E).
- Go Forward.

- Solution: Arrange the pieces as shown in the picture (F): 2-K, 4-P, 5-N, 5-K.
- Solution: Arrange the pieces as shown in the picture (G).
- Solution: Arrange the pieces as shown in the picture (H).
- Select 1 or 2 (I).

- Take LONG STICK and TONGS, move the rug (I1).

- Use ROPE PART on LONG STICK (J).
- Use WATER on the fire, use TONGS on the ashes, earn SMALL SLIDER (K).
- Use SMALL SILDER on the hatch (L).

- Easy solution: Arrange sliders as shown in the picture (M).
- Hard solution: Arrange sliders as shown in the picture (N).
- Take TIGER’S EYE (O).

- Use TIGER’S EYE on tiger’s head, use MELINDA’S LOCK PICKS on the key hole (P).
- Go forward.

- Use CORK on the hole, use LIGHTER on the crossbow (Q).
- Take GOLD CHAIN, turn on the lamp, take OIL LAMP (R).
- Use OIL LAMP (S).

- Play puzzle, earn HEAVY FOLIO (T).
- Use PAINTING KNIFE and HEAVY FOLIO on the lock chains (U).
- Take Blackwood’s journal, take HOOK (U1).
- Use HOOK on LONG STICK, earn LONG STICK WITH HOOK (W).
- Use LONG STICK WITH HOOK on the curtain rail (X).
- Take SMALL GEAR (X1).

- Use SMALL GEAR on the padlock, take the book (Y), read the book.
- Earn STONE ANTLERS 1/2 (Y1).
- Go back.

- Use GOLD CHAIN on the hanger (Z).
- Go back.

- Play puzzle, earn LACE NAPKIN (A).
- Use LACE NAPKIN on the racket, earn DECORATION (B).
- Go to the Manor.

- Use DECORATION on the chain (C).
- Easy solution: Arrange the stones as shown in the picture (D).
- Hard solution: Arrange the stones as shown in the picture (E).
- Take REFLECTOR, read the note, take MAGNET (F).
- Use MAGNET on the needles (G), take OILER (G1).
- Go forward.
- Use REFLECTOR on the mirror (H).
- Use OILER on the window (I), earn STONE ANTLERS 2/2 (I1).
- Go back.

- Use STONE ANTLERS on the gargoyle (J).
- Earn STURDY CANE, read the book, earn RITUAL BOOK (J1).
- Go forward.

- Use RITUAL BOOK on the pulpit (K).
- Play puzzle, earn MYSTERIOUS MIRROR PART (L).
- Use MYSTERIOUS MIRROR PART on the mirror (M), earn MAZE PLAN (M1).
- Go to Manor Grounds.

- Use MAZE PLAN on the maze entrance (N).
- Easy solution: Repeat the path from the picture (O).
- Hard solution: Repeat the path from the picture (P).
- Select 1, 2 or 3 (P1).

- Take BARREL (Q).
- Use STURDY CANE and BARREL, earn BROOM (R).
- Use BROOM on the dirt, use DAGGER on the trap, earn DAGGER and TANGLED NET (S).
- Use DAGGER on the prickly bush, earn LONG LASSO (T).

- Use TANGLED NET on LONG LASSO, earn NET ON ROPE (U).
- Use NET ON ROPE on Edmund (V).
- Easy solution: Set the traps as shown in the picture (W).
- Hard solution: Set the traps as shown in the picture (X).

- Take ALCOHOL SOLUTION, read the newspaper, take PENCIL (A).
- Take PUNCH CARD TEMPLATE (B).
- Use PUNCH CARD TEMPLATE on the code plate, enter the code, open the door (C).
- Play puzzle, earn CELL PASS (D).
- Use CELL PASS on the guard (E).
- Go forward.

- Take MAGNET and PAPER SHEET (F).
- Use PENCIL and PAPER SHEET, earn PRISON’S PLAN (G).
- Use PRISON’S PLAN (H).
- Go back.
- Play puzzle, earn MELINDA’S KEY (I).
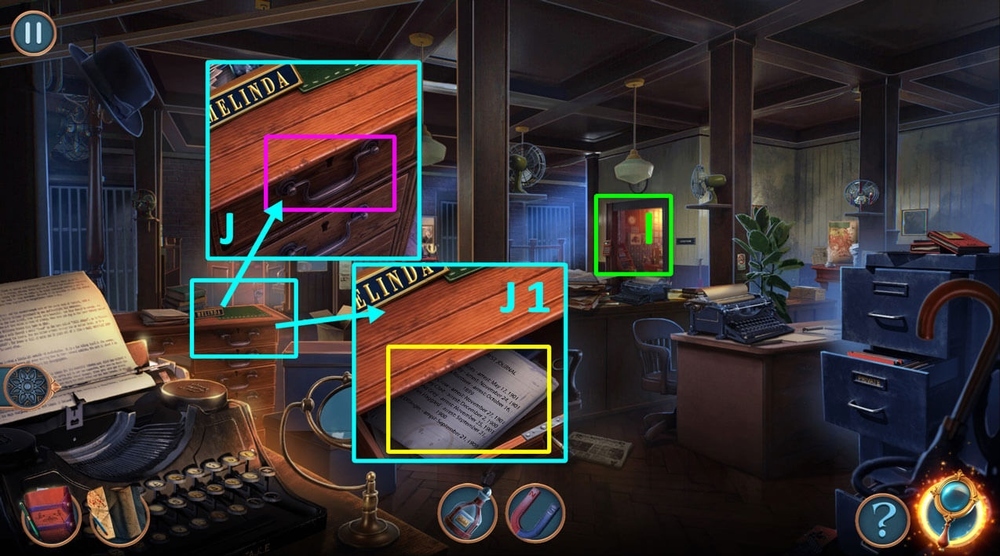
- Use MELINDA’S KEY on the drawer (J), earn ARREST LIST (J1).
- Go forward.
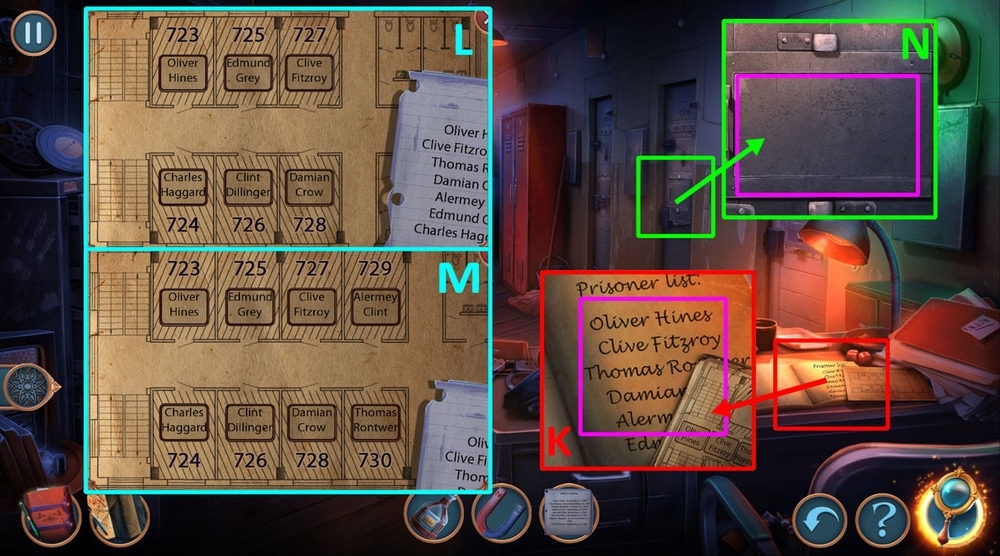
- Use ARREST LIST on Prisoners’ list (K).
- Easy solution: Place the names as on the clue (L).
- Hard solution: Place the names as on the clue (M).
- Talk to Damian (N).
- Solution: You should have a picture like this (O): 5-F, 2-E, 2-D, 1-C, 2-A.
- Solution: You should have a picture like this (P).
- Solution: You should have a picture like this (Q).
- Earn DAMIAN’S BUNDLE.

- Open DAMIAN’S BUNDLE, earn DAMIAN’S ADDRESS and DAMIAN’S RING (R).
- Go back.

- Use DAMIAN’S RING on the staples in the drawer, earn MELINDA’S BROOCH (S).
- Use MELINDA’S BROOCH on her bag (T).

- Easy solution (U).
- Step 1: press button A – 2 times, B – 2 times, then press button C – 2 times, D – 1 time.
- Step 2: press button A – 8 times.
- Step 3: press button A – 3 times, B – 1 time, then press button C – 2 times, D – 1 time.
- Step 4: press button A – 1 time, then press button B – 1 time, C – 2 times, D – 5 times.
- Hard solution (V).
- Step 1: press button A – 2 times, B – 2 times, then press button C – 2 times, D – 1 time.
- Step 2: press button A – 8 times.
- Step 3: press button A – 3 times, B – 1 times, then press button C – 2 times.
- Step 4: press button A – 1 times, then press button B – 1 times, C – 2 times, D – 6 time.

- Earn SANDWICH (W).
- Use DAMIAN’S ADDRESS on the map (C).
- Go forward.

- Use SANDWICH on the mouse (D).
- Take RED THREAD and SCREW (D1).
- Use MAGNET on the needles, earn NEEDLES (D2).
- Go back.

- Use NEEDLES on the map (E).
- Easy solution: Use the picture and plot a route, collecting all the tracks on the map along the way (F).
- Hard solution: Use the picture and plot a route, collecting all the tracks on the map along the way (G).

- Use ALCOHOL SOLUTION on the hinge (H).
- Take SCISSORS (I).
- Use SCISSORS on the bush, take WHEEL (J).
- Use WHEEL on the wheelbarrow (K).
- Go forward.

- Select 1 or 2 (L).
- Take COLOR REAGENT and GOODS LIST (L1).
- Use GOODS LIST (M).
- Play puzzle, earn RING (N).
- Use RING (O).
- Go to the Basement.

- Take LIGHTER, use SCISSORS on the cloth, earn CHINESE COIN (P).
- Use RED THREAD on the grid, use CHINESE COIN on the barrel (Q).
- Move the barrel, take SPATULA and HACKSAW (Q1).

- Use SCREW on HACKSAW (R).
- Use COLOR REAGENT on the vial rack (S).
- Use SPATULA on the posters, earn BRUSH (T).
- Go back 2x.

- Use BRUSH on the hinge (U).
- Easy solution: The markings may be of different sizes and in different locations, but necessarily with the same symbol.
- Please pay attention to the picture (V).
- Hard solution: The markings may be of different sizes and in different locations, but necessarily with the same symbol.
- Please pay attention to the picture (W).
- Earn LONG UMBRELLA (X).
- Use LONG UMBRELLA on the window sill, earn BAG (Y).
- Open BAG (Y1).
- Earn PIPE, DRAFT, DAMIAN’S NOVEL, and TWEEZERS (Y2).

- Use TWEEZERS on the gap in the back of the box, earn HOOK (Z).
- Use HOOK on the grid, earn PIN (A).
- Use PIN on the vials (B).
- Solution: Arrange the bottles as in the picture (C).
- Earn CHISEL.
- Go back up.
- Play puzzle, earn TRAY (D).
- Use TRAY on the boiling pot, take WOODEN HANDLE (E).
- Use WOODEN HANDLE on HACKSAW, earn HACKSAW (F).
- Go back.

- Use HACKSAW on the grid, take SHOVEL (G).
- Use SHOVEL on the dirt, take COTTON (H).
- Use COTTON and ALCOHOL SOLUTION on LIGHTER, earn LIGHTER (I).

- Use LIGHTER on the lollipops, earn HINT (J).
- Go to the Basement.

- Use HINT on the wall, use CHISEL on the brick, take the letter, read the letter (K).
- Open the window (L).
- Easy solution: Use the picture as a hint (M).
- Hard solution: Use the picture as a hint (N).

- Play puzzle, earn BELL RINGER (O).
- Take MOSAIC PART 1/3 (P).
- Take MOSAIC PART 2/3, use BELL RINGER on the bell (Q).
- Select 1 or 2, earn BOOK (Q1).

- Use DAMIAN’S NOVEL and BOOK on the shelves (R).
- Easy solution: Arrange the pieces as shown in the picture (S).
- Hard solution: Arrange the pieces as shown in the picture (T).
- Go to the Old Section.

- Take IODINE (U).
- Use IODINE on the paper, earn DRAWING (V).
- Use DRAWING on the safe (W).

- Easy solution: Use the picture to guide you (X).
- Hard solution: Use the picture to guide you (Y).
- Earn GOLDEN CUCKOO (Z).
- Use GOLDEN CUCKOO on the clock, take JAR OF GLUE (A).
- Go to the Crypt.

- Use LIGHTER on the candles.
- Play puzzle.
- Select 1 or 2 (A1).
- Take CRYPTEX (B).
- Use JAR OF GLUE on the glass shards, earn MONOCLE (C).

- Take LEVER (D).
- Use LEVER on the mechanism, press the lever, take THICK INK (E).
- Use THICK INK and DRAFT on the tombstone, earn CODE (F).
- Use CODE on CRYPTEX, enter the code, read the note, take MOSAIC PARTS 3/3 (G).
- Go to the Old Section.

- Use the MONOCLE on the spyglass (H).
- Play puzzle, earn MOON STONES (I).
- Use MOON STONES, take FAWN FIGURINE (J).
- Use FAWN FIGURINE, take FEATHER AMULET (K).
- Use MOSAIC PARTS on the box (L).
- Solution: Use correct arrangement of colors from the picture (M).
- Earn POWDER (N).

- Use POWDER on the lock, earn BROOM (O).
- Go to the Old Section.

- Play puzzle, earn INKPOT AMULET (P).
- Use INKPOT AMULET and FEATHER AMULET, read Clementine’s journal (Q).
- Go to the Crypt.

- Use BROOM on the shards, take TINY KEY (R).
- Use TINY KEY on the bag, read the note, take the CORKSCREW (S).
- Use CORKSCREW on PIPE, earn FLUTE (T).
- Use FLUTE on the iguana, take GOLDEN WINGS 1/2 (U).
- Go back.

- Play puzzle, earn FIBULA (V).
- Use FIBULA on the wallet, earn GOLDEN WINGS 2/2 and TAP (W).
- Go to the Crypt.

- Use TAP on the nut in the wall, take GOLD OWL SYMBOL (X).
- Use GOLDEN WINGS and GOLD OWL SYMBOL on the grave (Y).

- Easy solution: Move the figure: left 1 time, up 1 time, right 2 times, up 1 time, left 1 time, up 1 time, left 1 time, right 1 time, down 3 times, right 1 time, down 1 time, left 3 times, right 1 time, down 2 times, right 2 times, up 5 times, left 2 times, right 1 time, down 2 times (Z).
- Hard solution: Move the figure: down 2 times, left 1 time, down 1 time, right 2 times, up 2 times, right 1 time, up 3 times, left 1 time, up 1 time, left 2 times, right 1 time, down 3 times, left 1 time, right 1 time, up 2 times, left 3 times, right 2 times, down 3 times, left 1 time, right 2 times, up 1 time (A).
- Read the letter.

- Select 1, 2 or 3 (B).
- Take Clementine’s Robe (B1).
- Use CLEMENTINE’S ROBE and ALCOHOL SOLUTION on Melinda, take REVOLVER (C).
- Use REVLOBER on the door (D).

- Easy solution: You have to get the timing right.
- Press 3, then 3, then 1 (E).
- Hard solution: You have to get the timing right.
- Press 1, then 3, then 3 (F).
- Walkthrough Bonus Chapter, at the link below.


