Criminal Archives 4: Blade of Deceit – Another murder has occurred in the city. This time you are asked to be not only a reporter, but also an official assistant in the case. The experience has shown your wit and ingenuity. The body of a judge is found on the bank of the river. Such a figure has many enemies among villains. Anyone could have killed him. However, after examining the crime scene and the body of the deceased, the circle of suspects is significantly narrowed. Traces of recent shaving were found on the body. Based on the nature of the cuts, it can be concluded that a shaving procedure was performed a few hours before death. A cut was also found in the area of the carotid artery, presumably caused by a knife or other sharp object, but it is not the cause of death. If you can not pass any of the puzzles or do not know where the items are, on our site you can watch the walkthrough of the game Criminal Archives 4: Blade of Deceit, and complete the investigation.
Criminal Archives 4: Blade of Deceit – Walkthrough
Here you can see full walkthrough of Criminal Archives 4: Blade of Deceit game, namely for all chapters, including bonus chapter, in pictures.
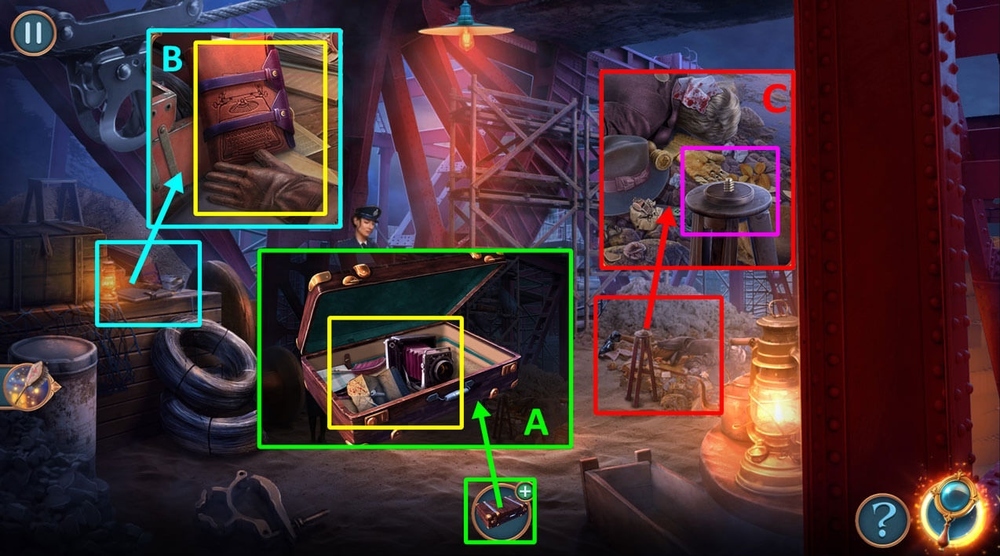
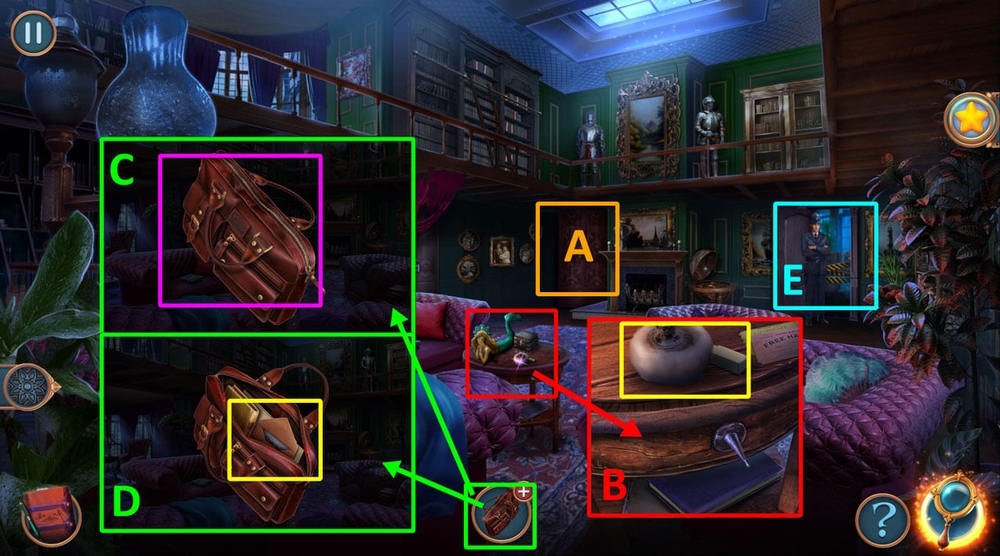
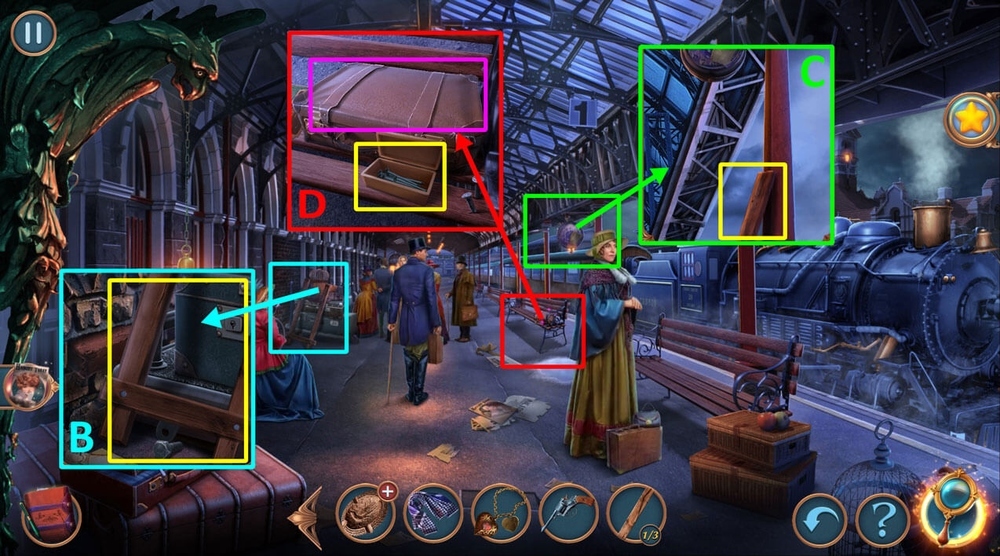
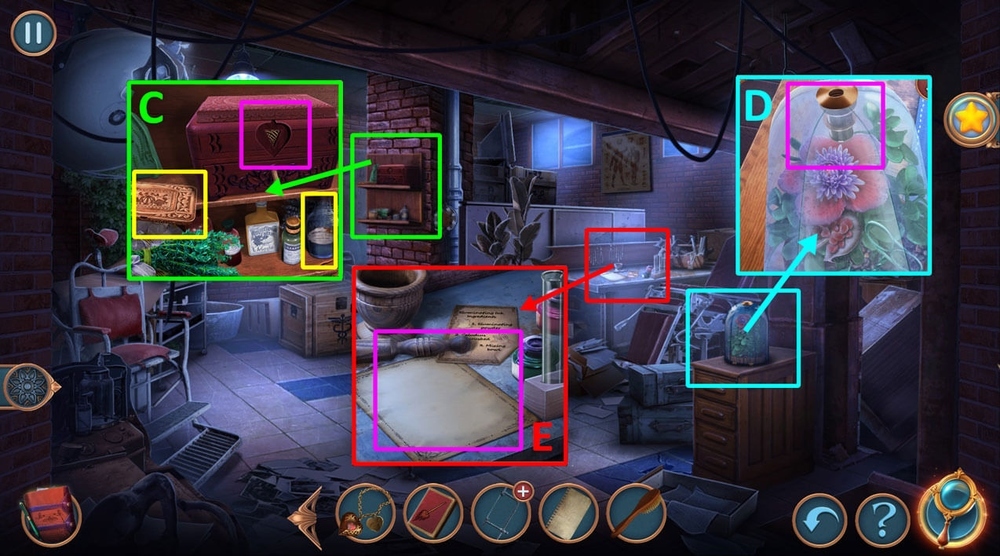
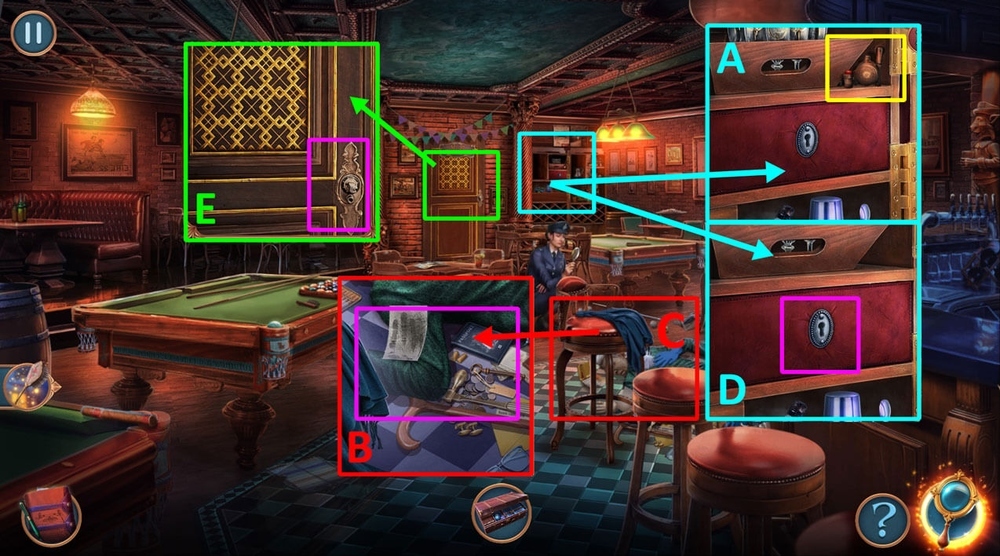
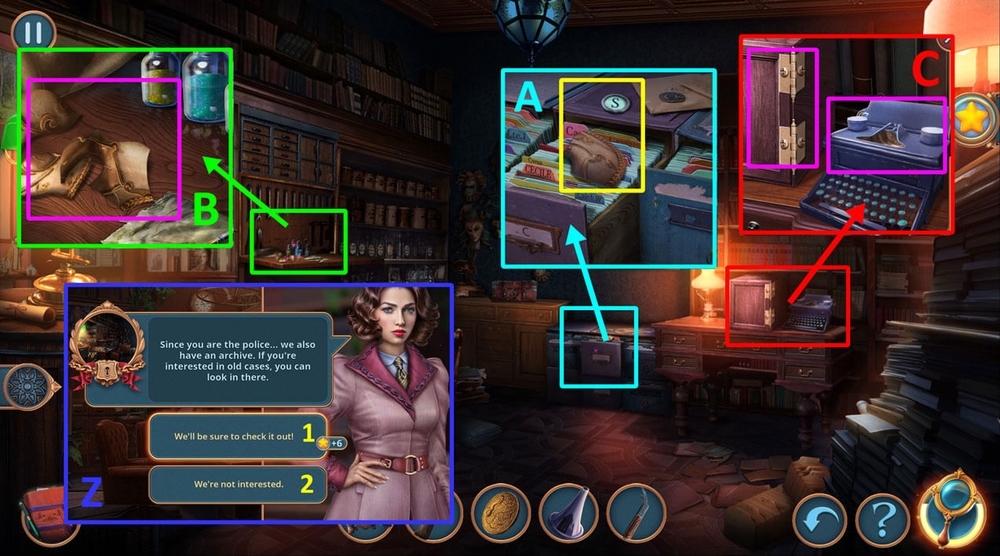
- Open SUITCASE, take SCREW, take the map, take CAMERA (A).
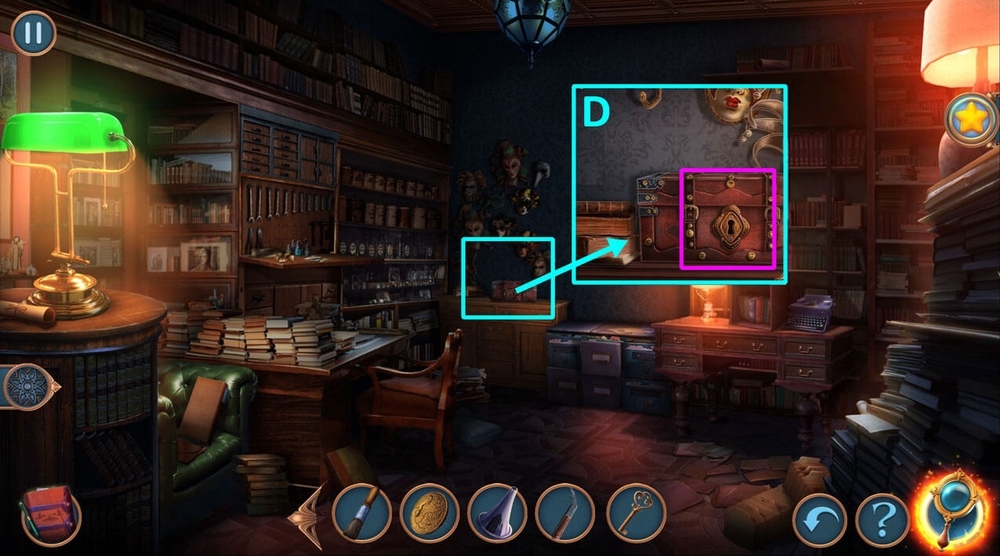
- Take RIPPED GLOVE, take the journal, use SCREW on the box (B).
- Use CAMERA on the tripod (C).
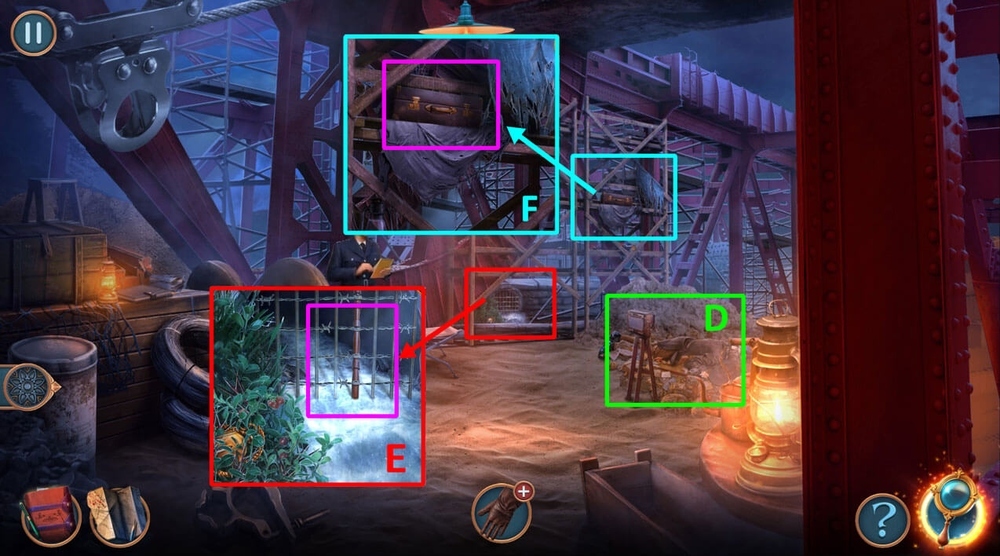
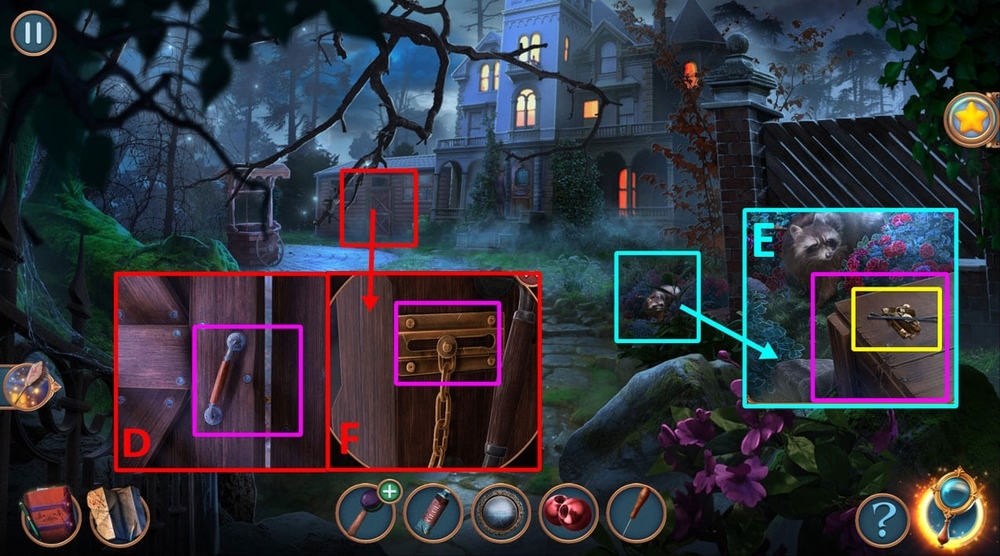
- Play puzzle, earn METAL CUTTERS (D).
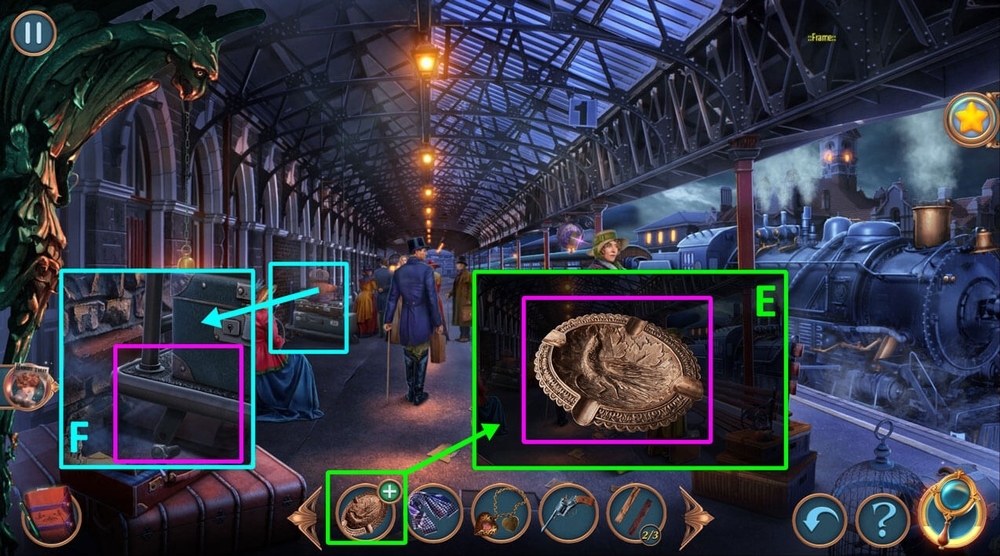
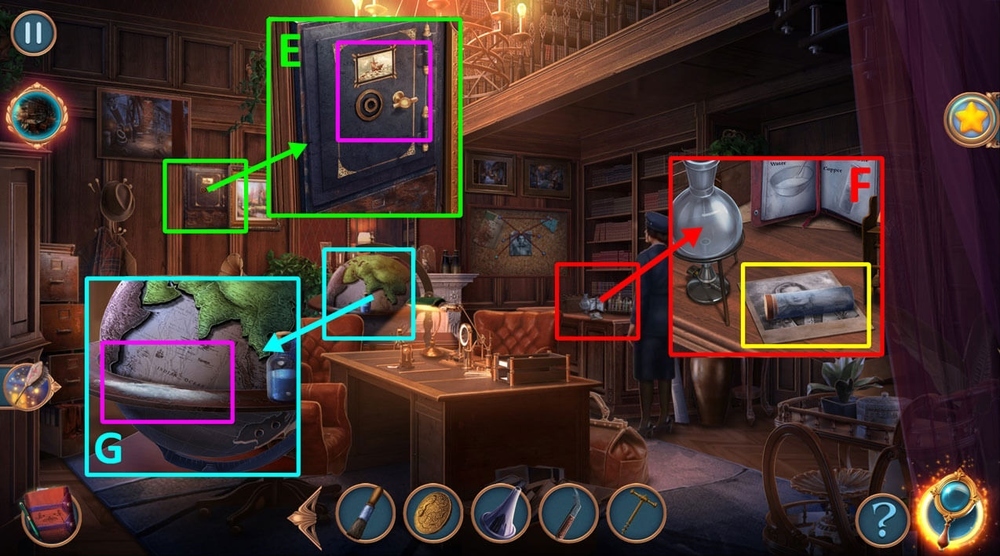
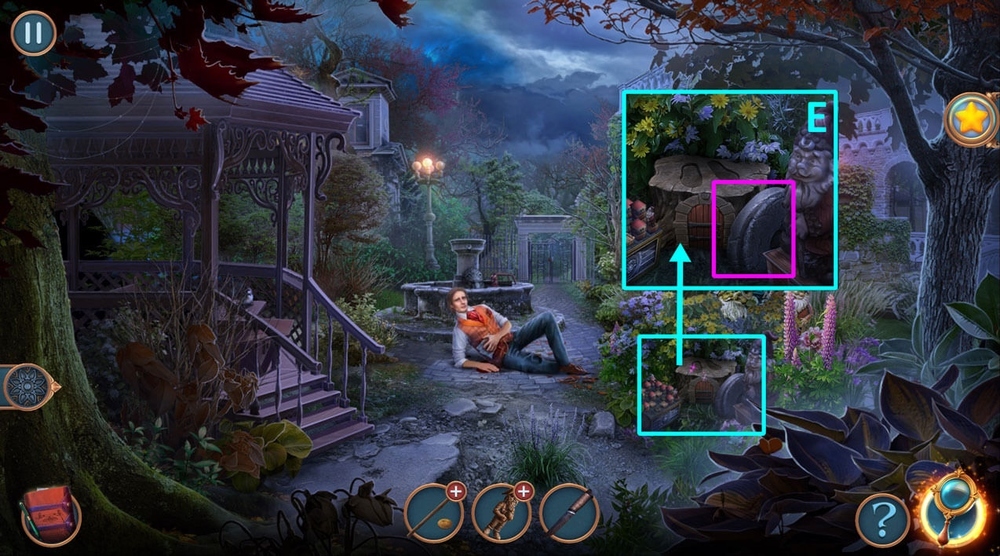
- Use METAL CUTTERS on the barbed wire, get CANE (E).
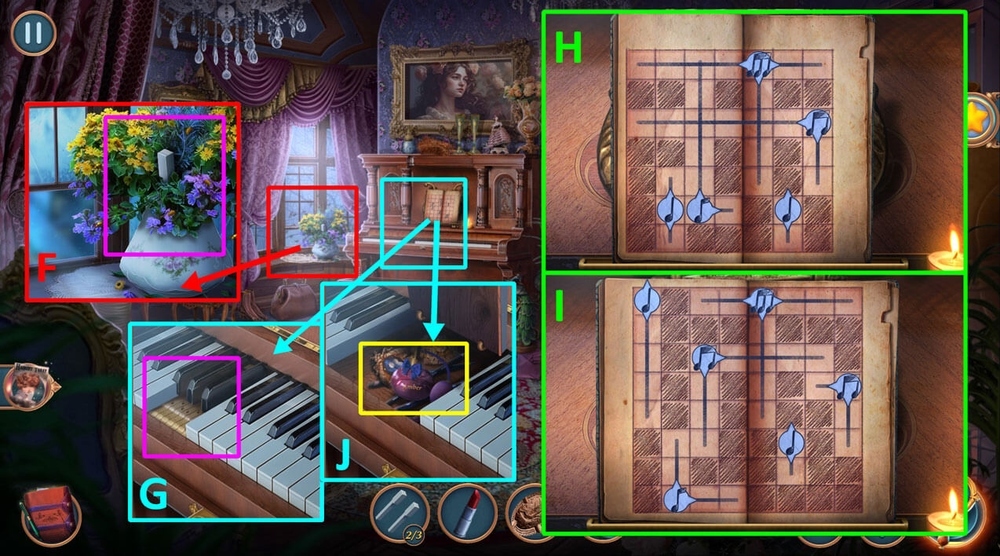
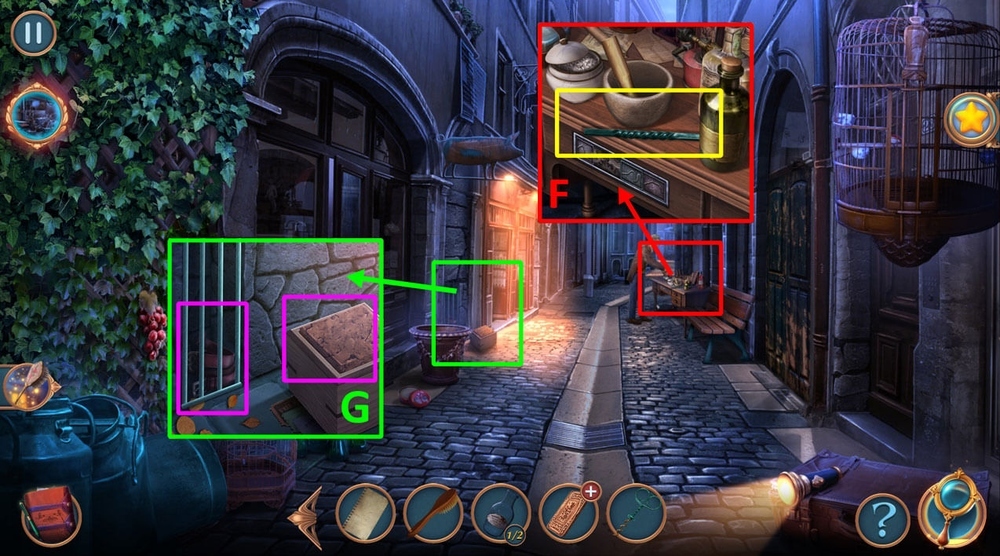
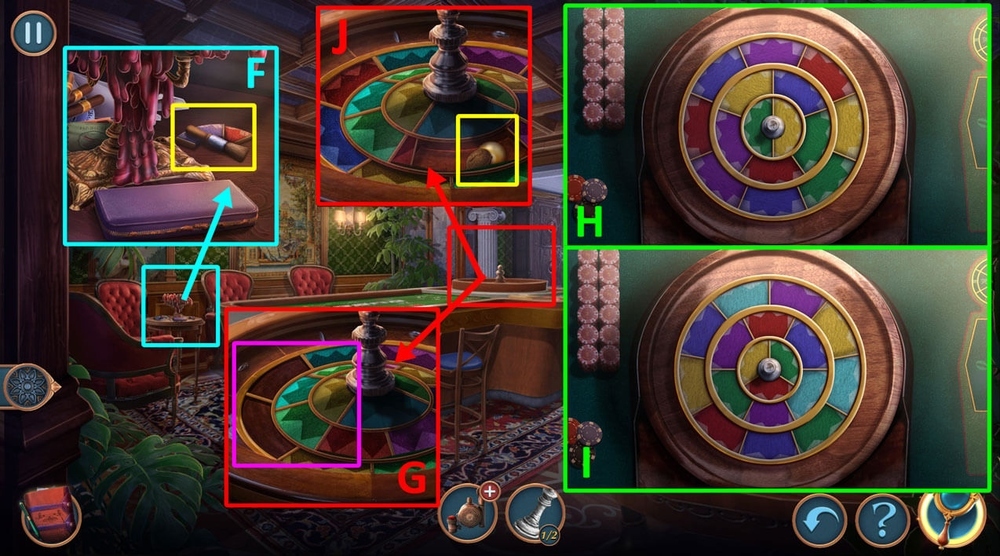
- Use CANE on the suitcase (F).

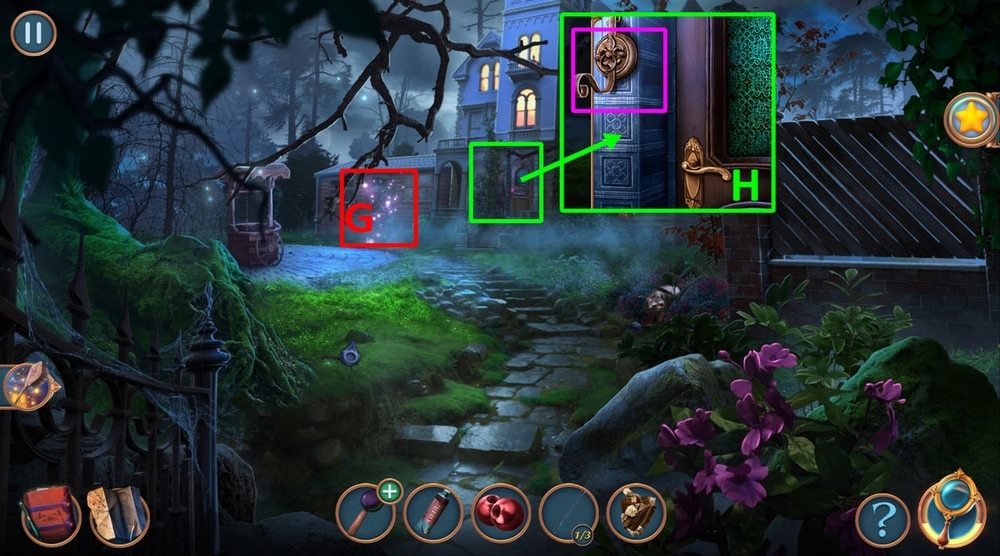
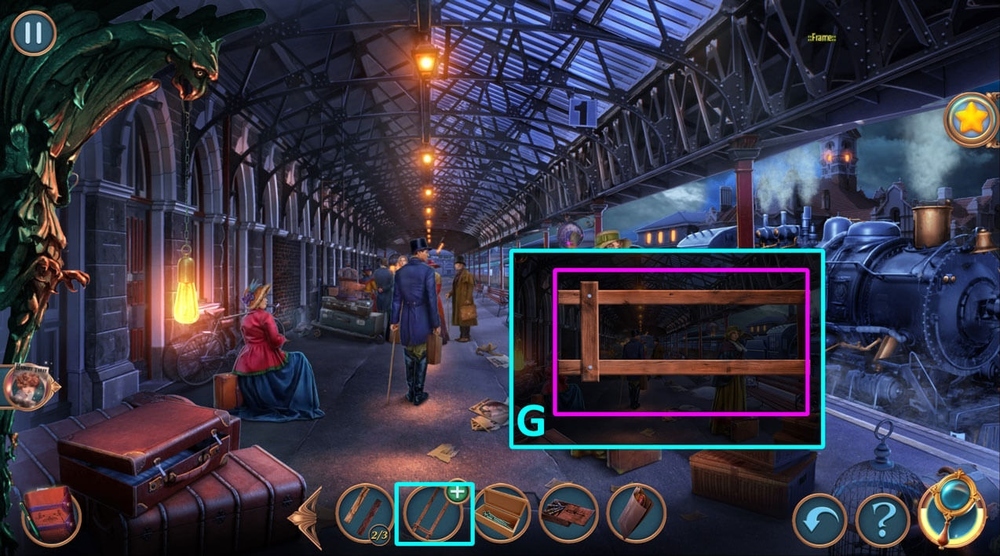
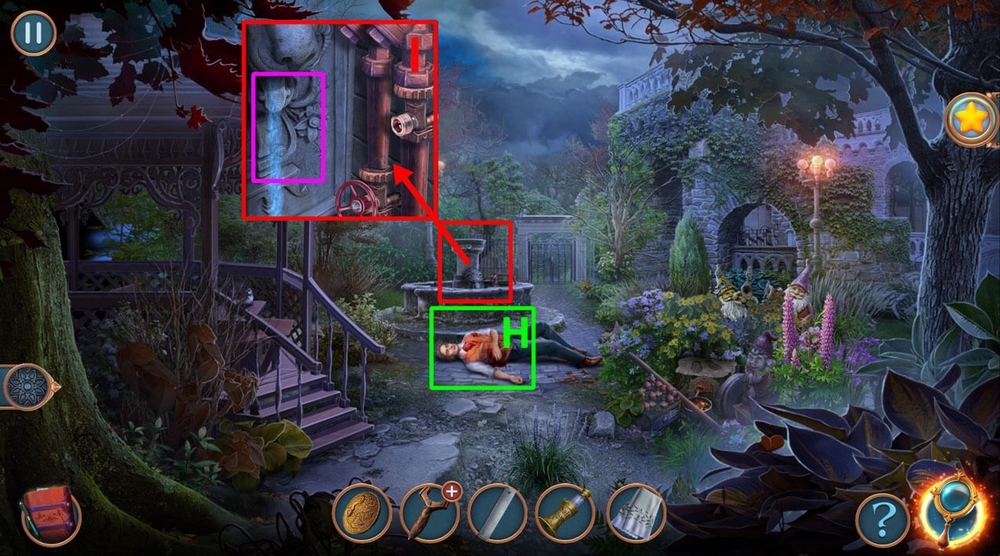
- Easy solution: arrange all the instruments as in the picture (G).
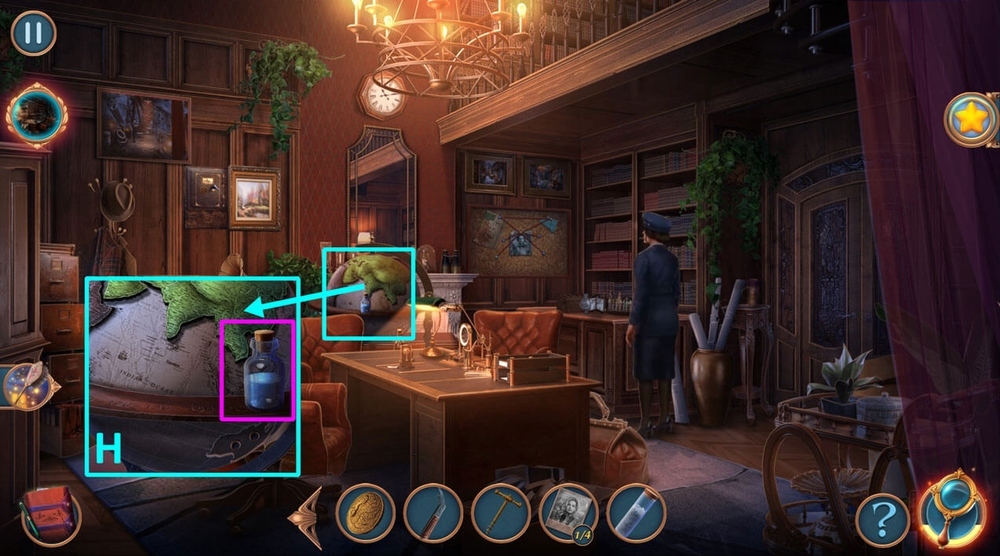
- Hard solution: arrange all the instruments as in the picture (H).
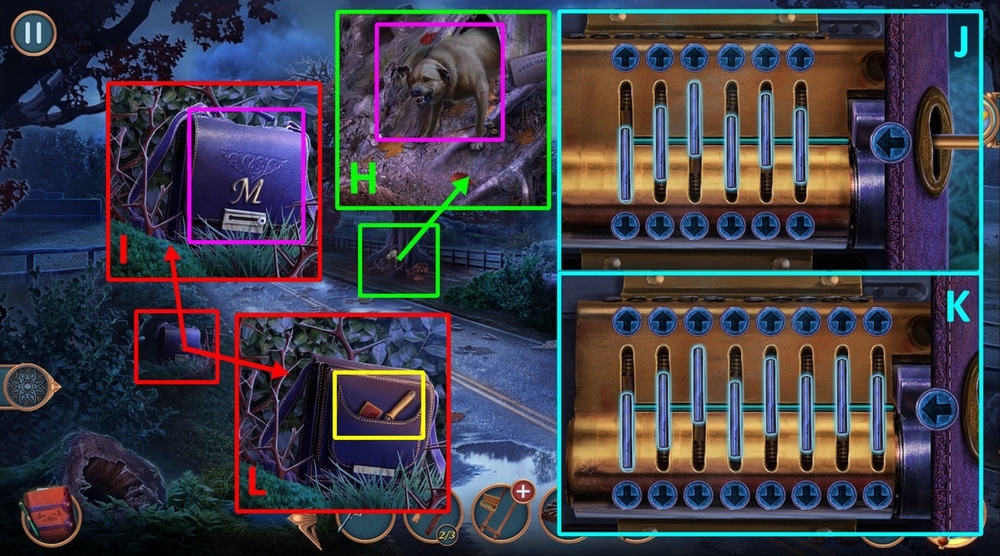
- Read the note, take CONSTRUCTION BAG and SCREWDRIVER.
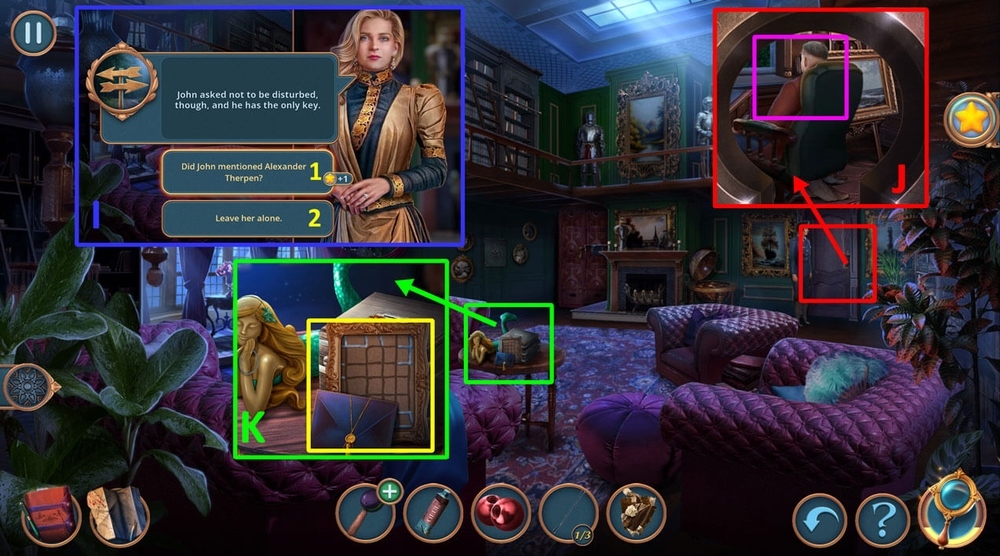
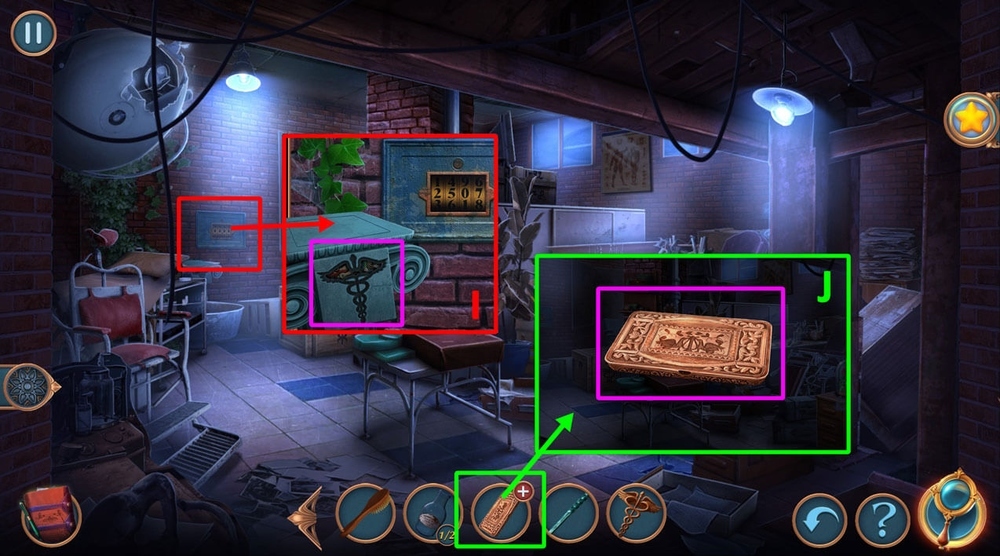
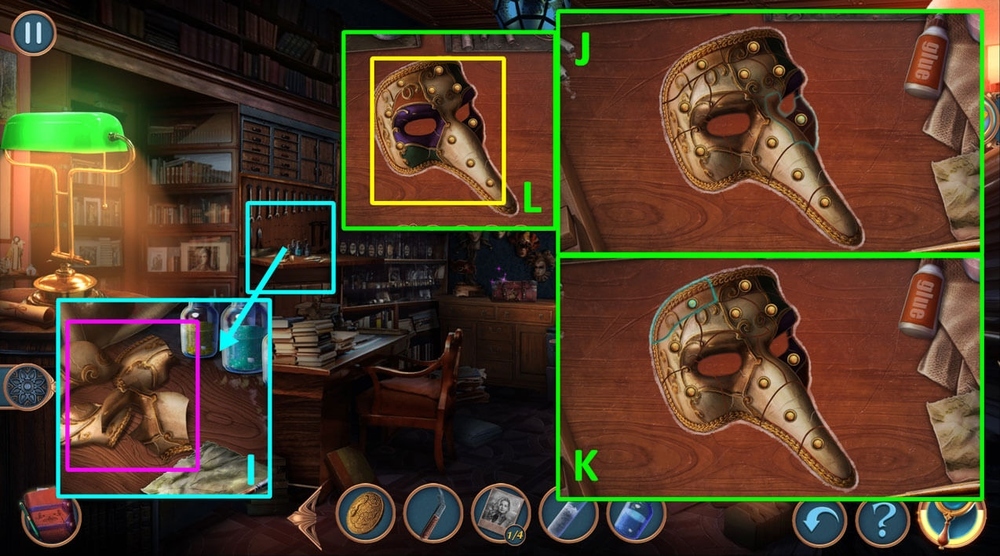
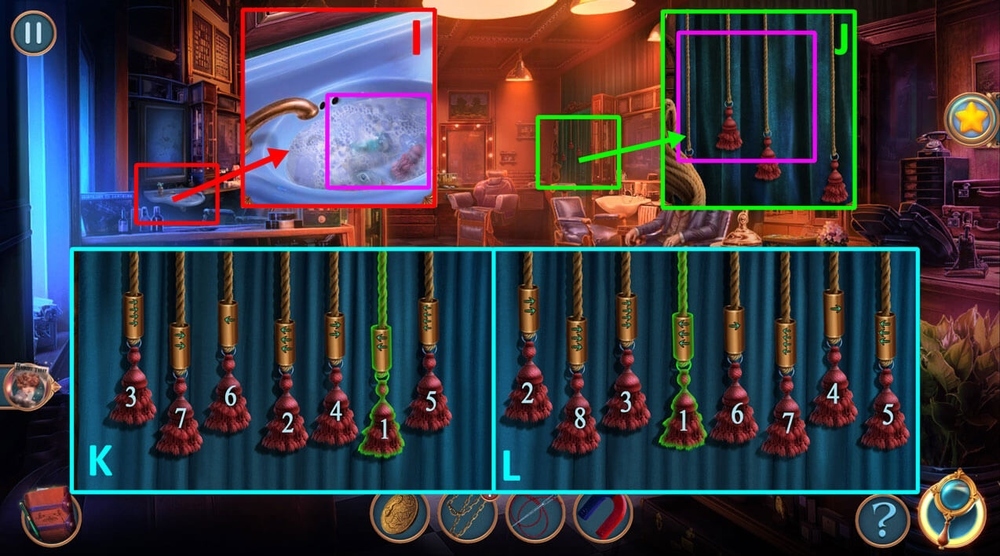
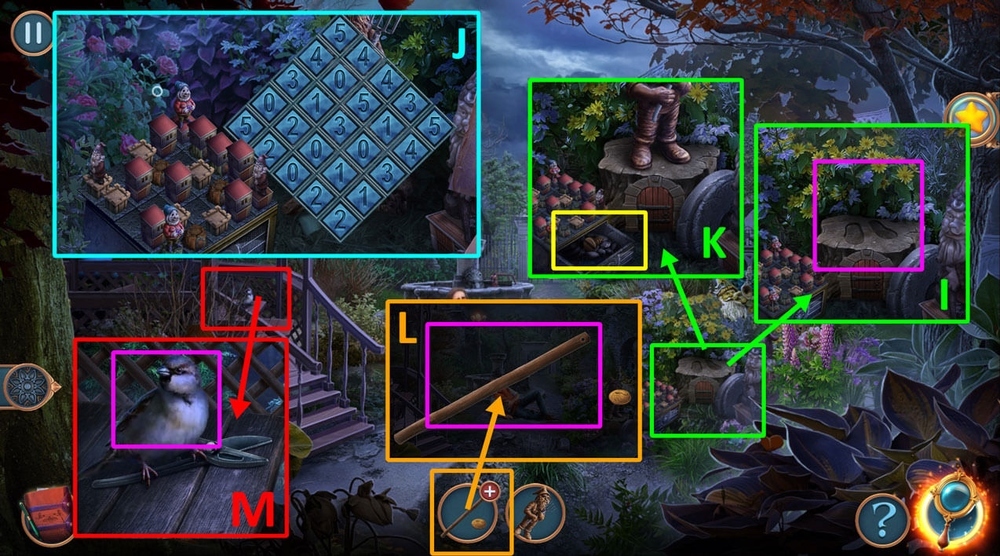
- Use SCREWDRIVER on the box, take SEWING KIT (I).
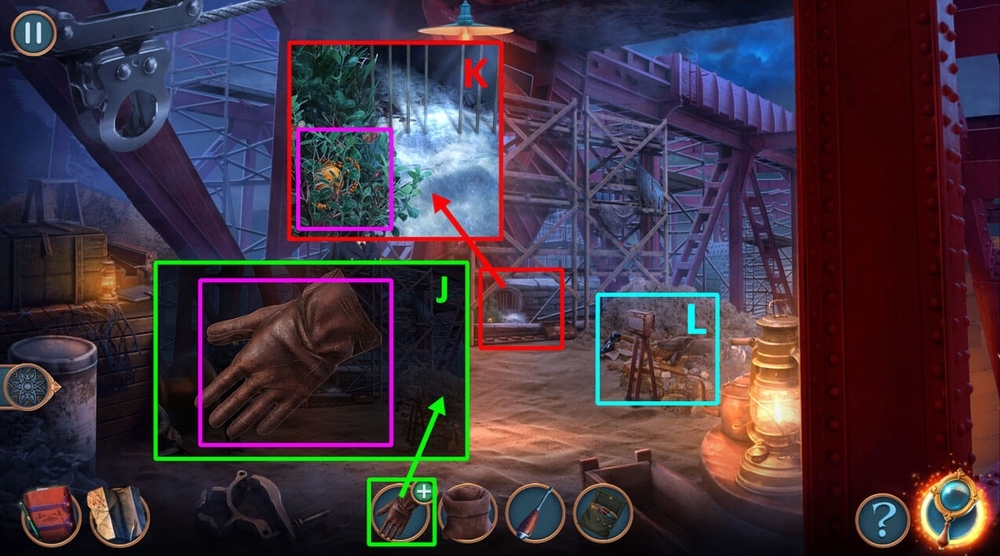
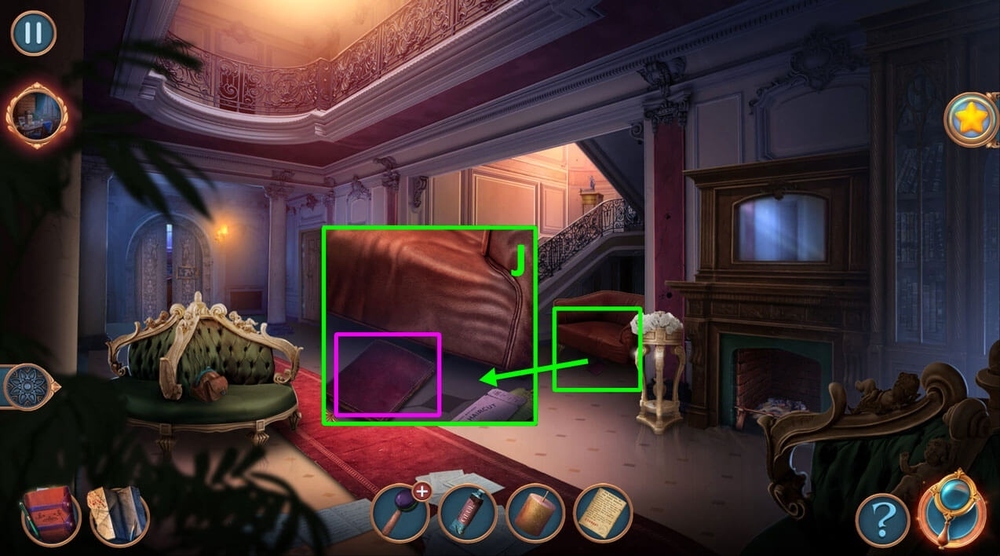
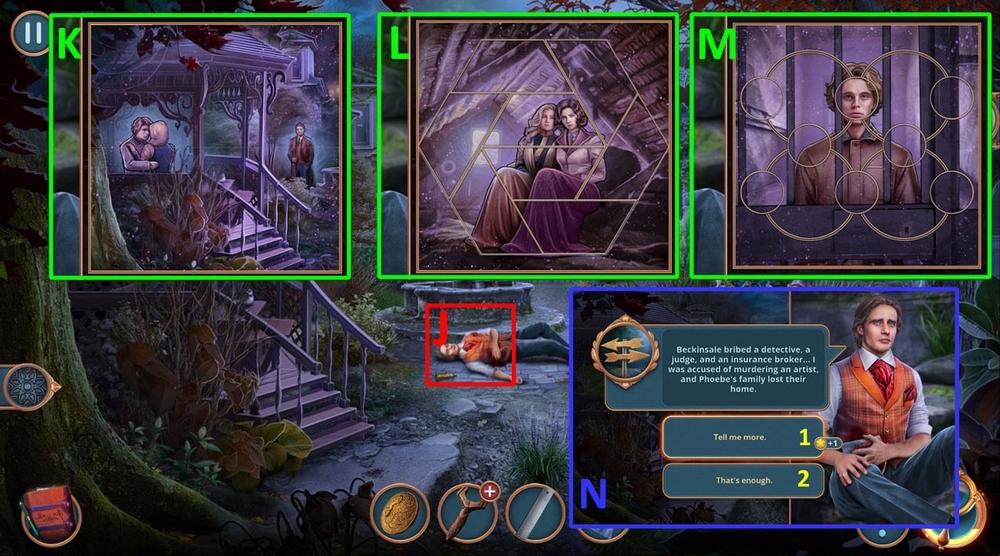
- Use SEWING KIT on RIPPED GLOVE, get GLOVE (J).
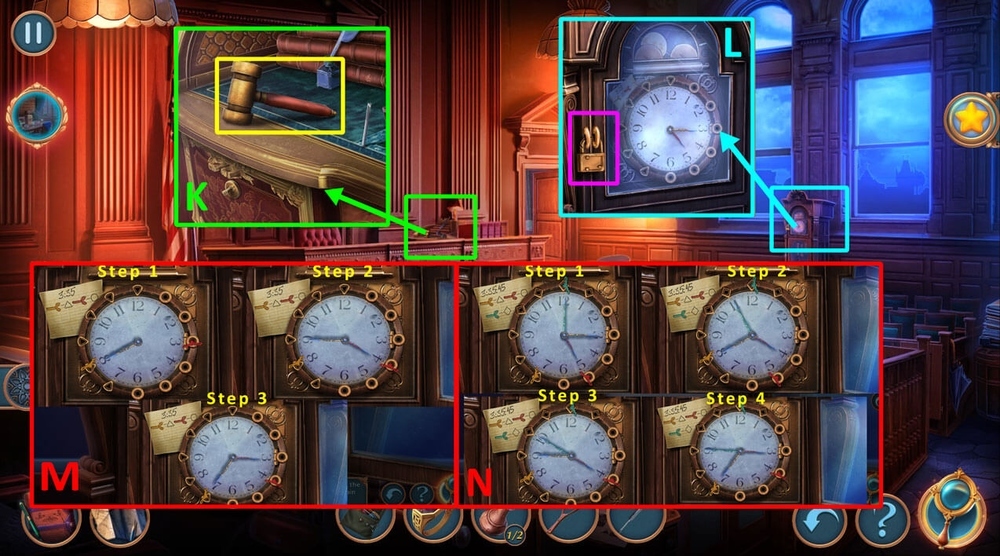
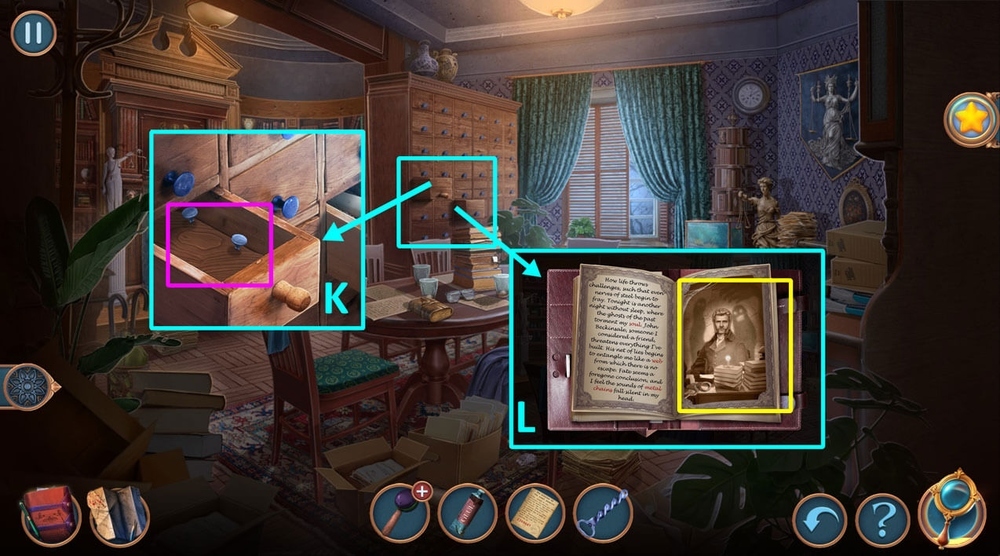
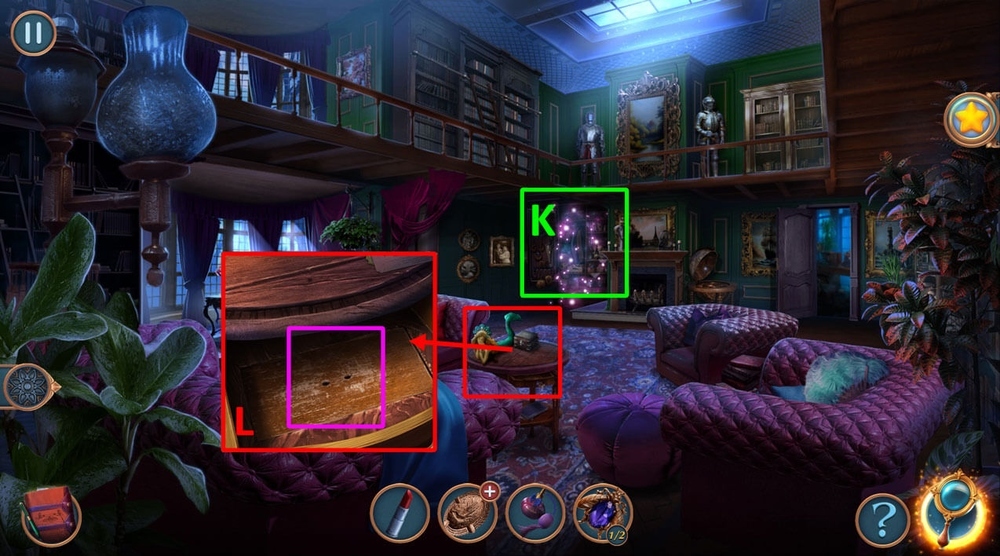
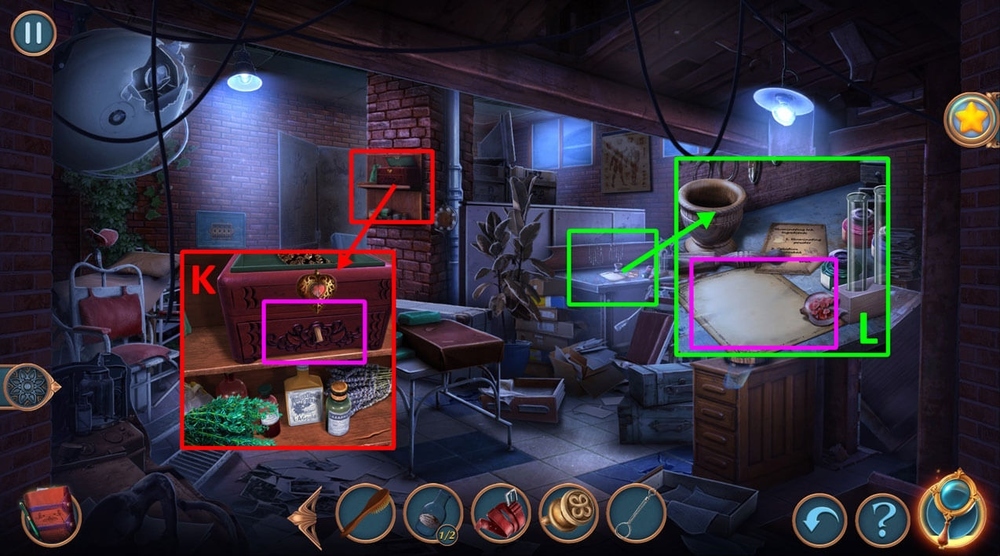
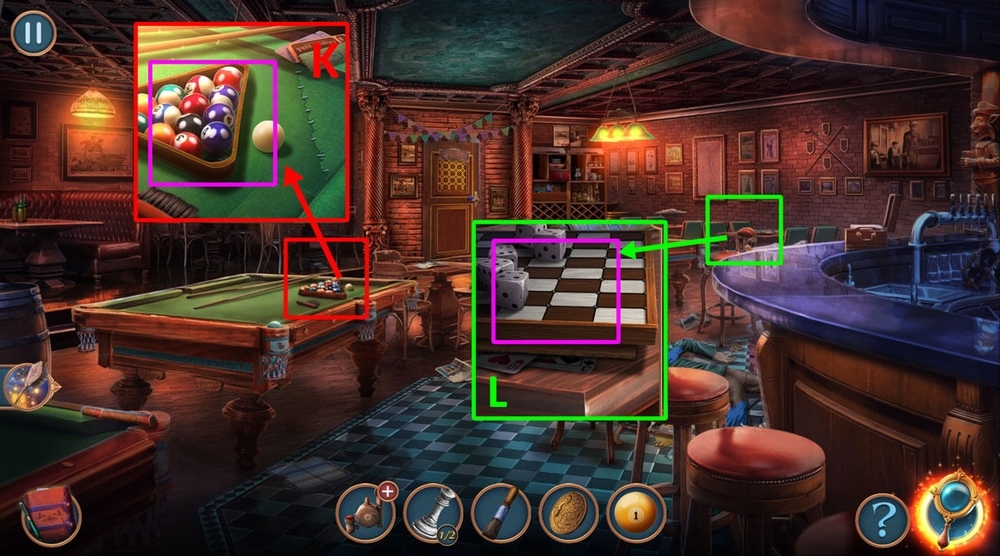
- Use GLOVE on the bush, take POCKET WATCH (K).
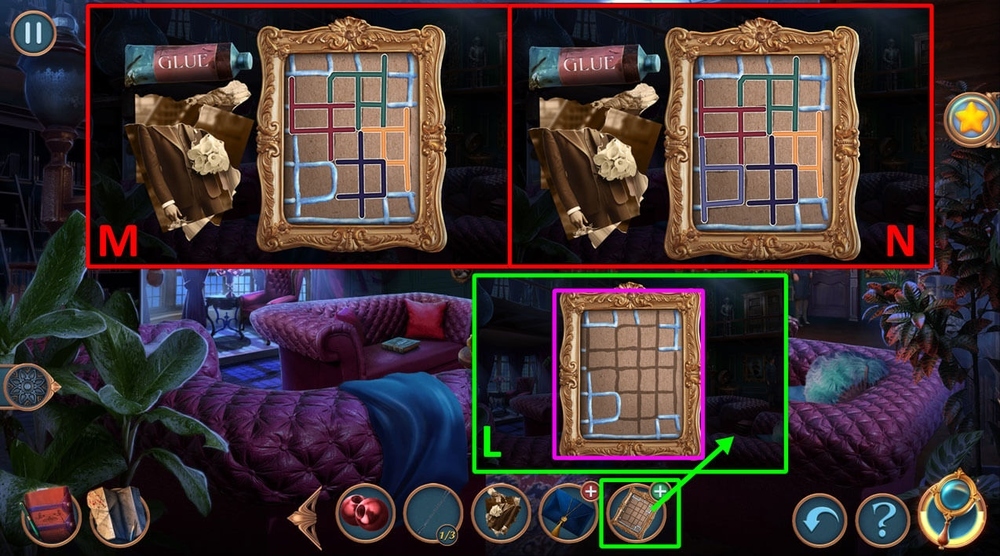
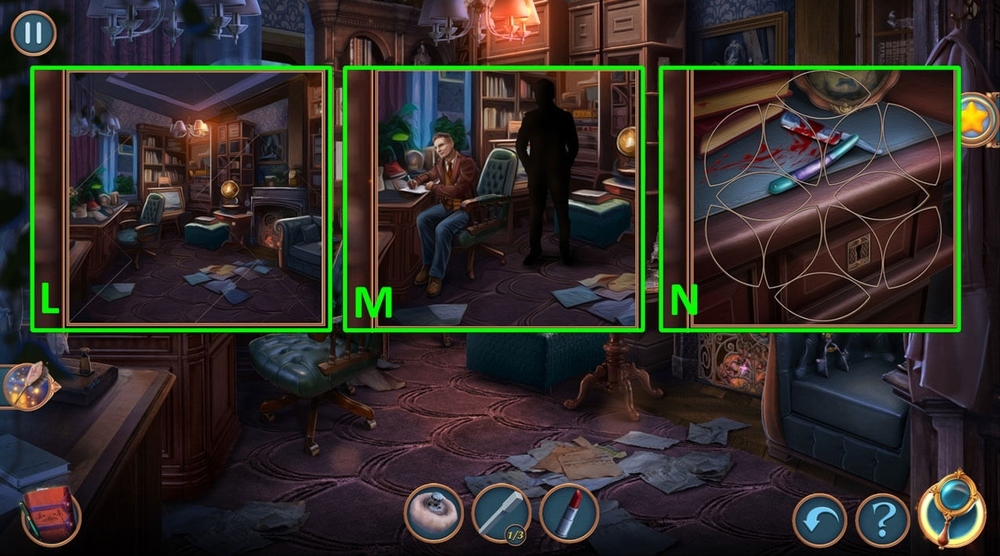
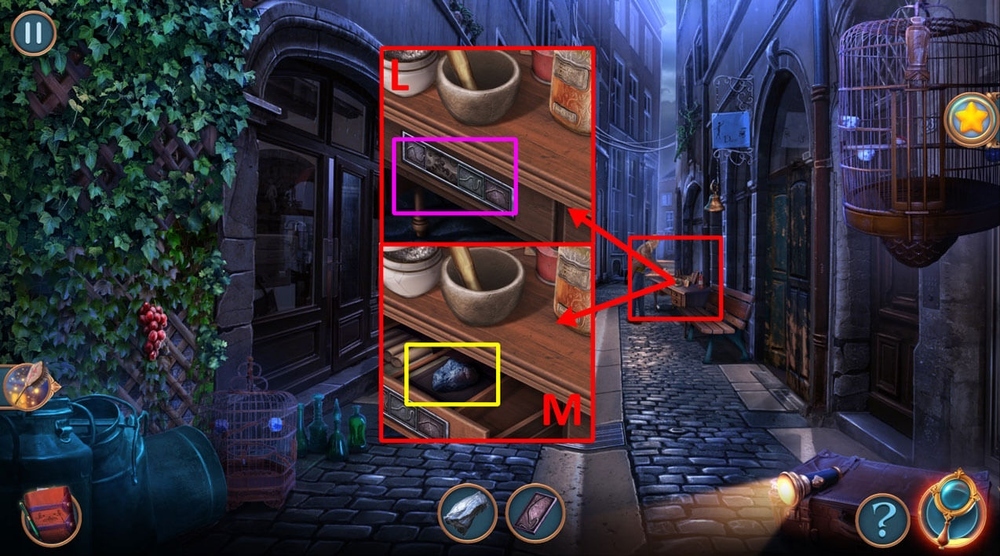
- Play puzzle, earn CASE NOTES (L).
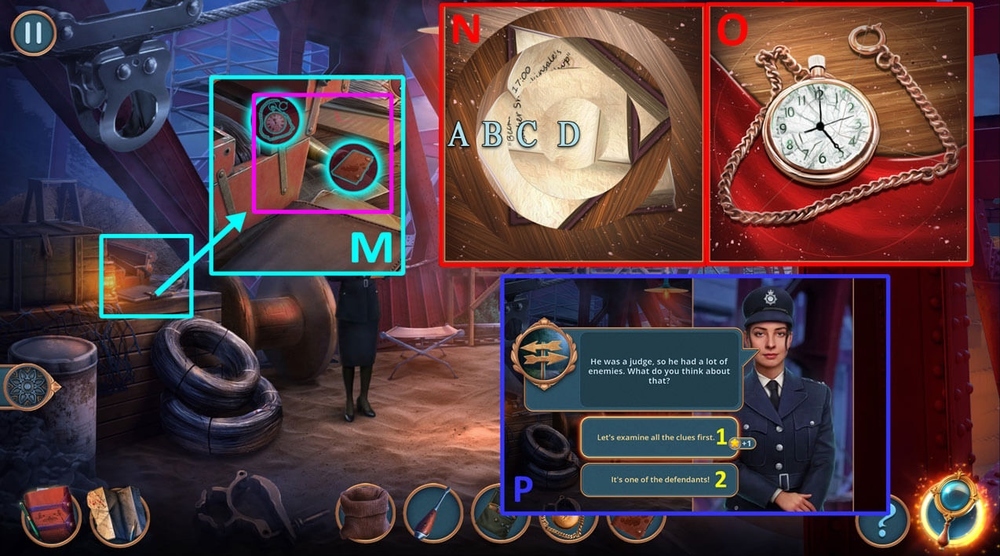
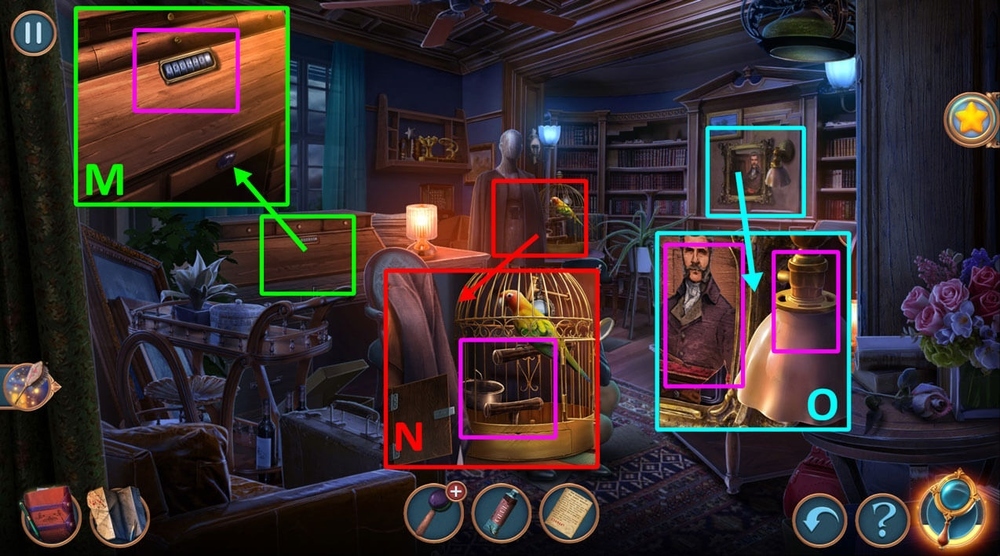
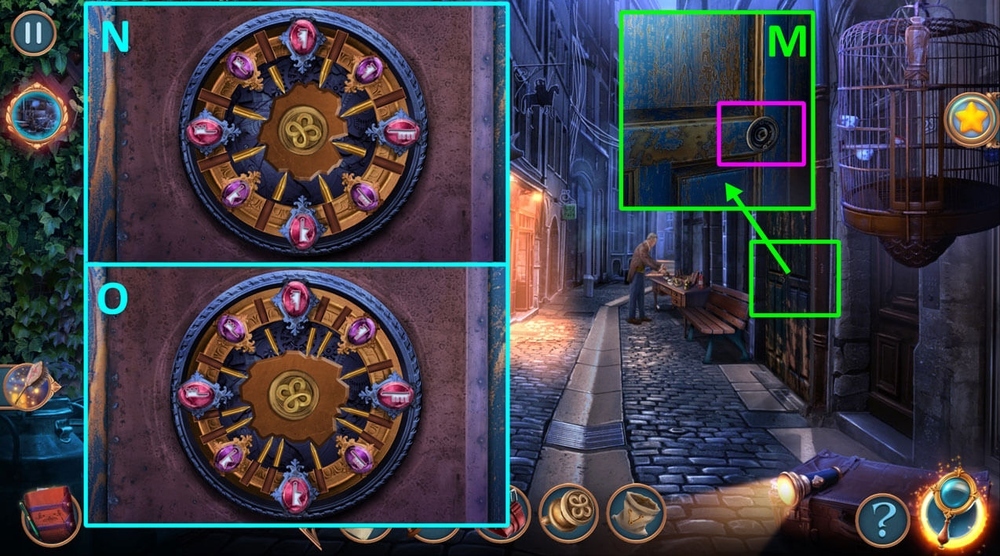
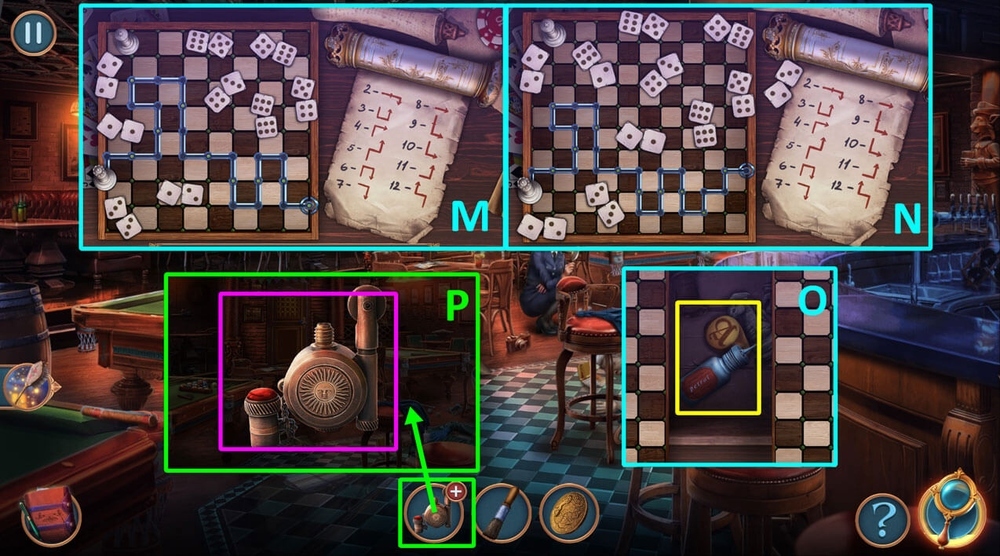
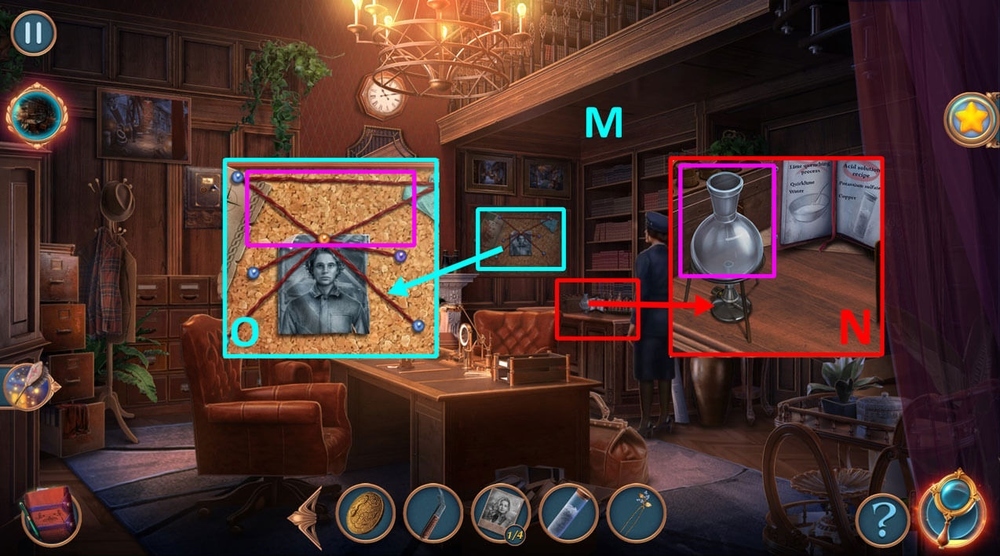
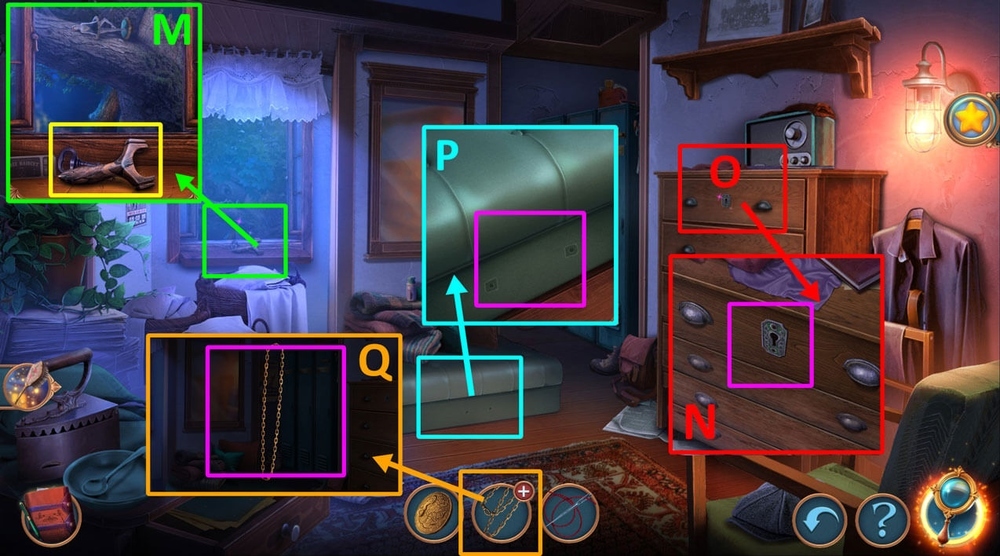
- Use POCKET WATCH and CASE NOTES on the journal, read the note and write notes under each line (M).
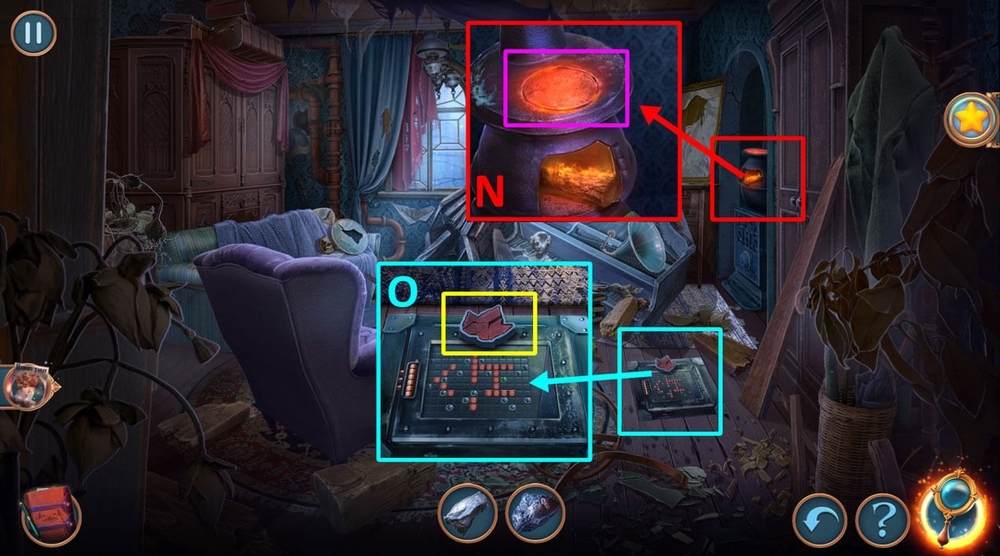
- Solution: press A – 4 times, C – 3 times, D – 1 times, B – 3 times (N).
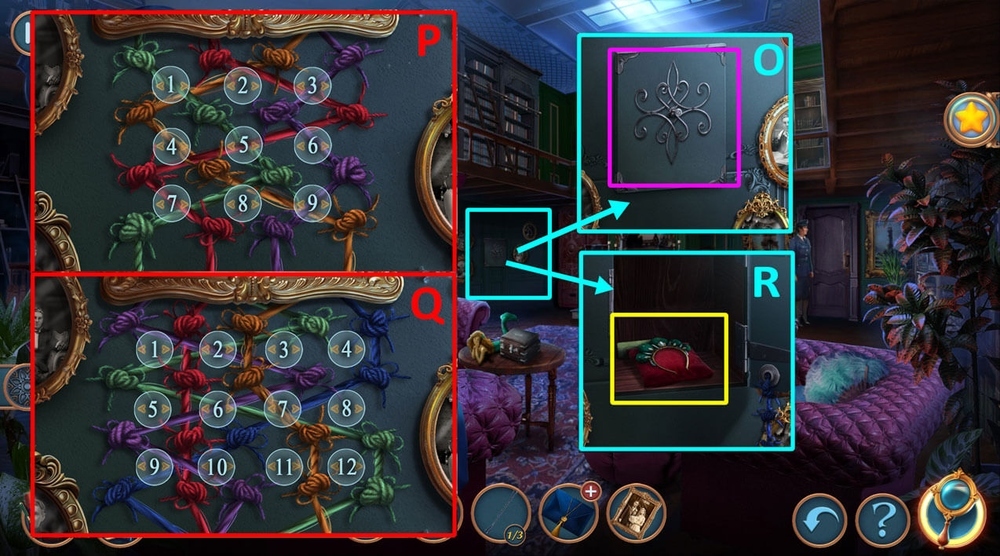
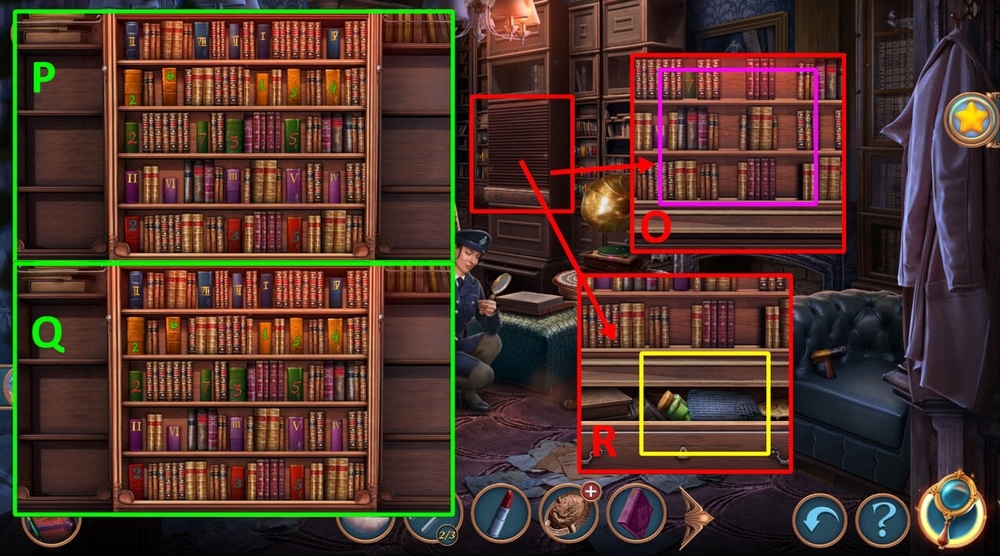
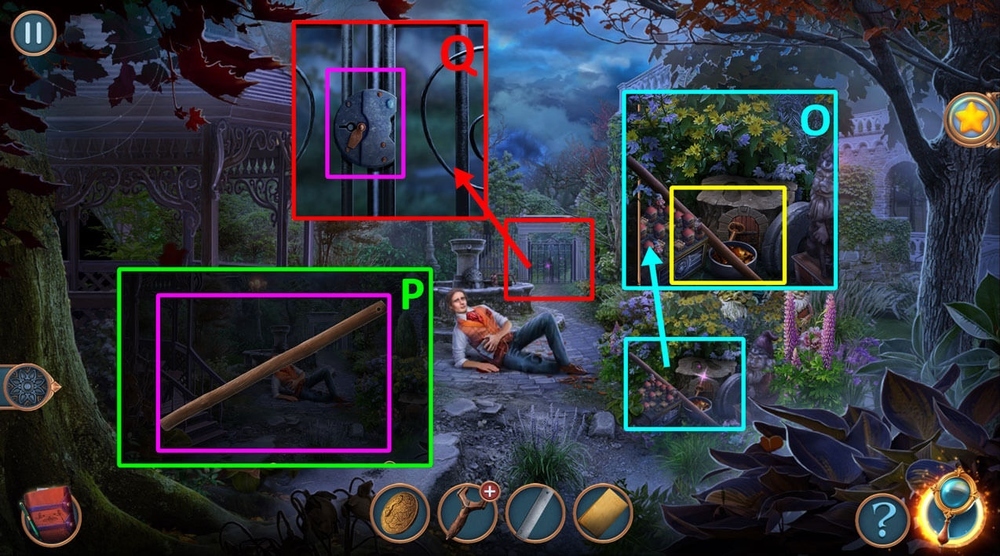
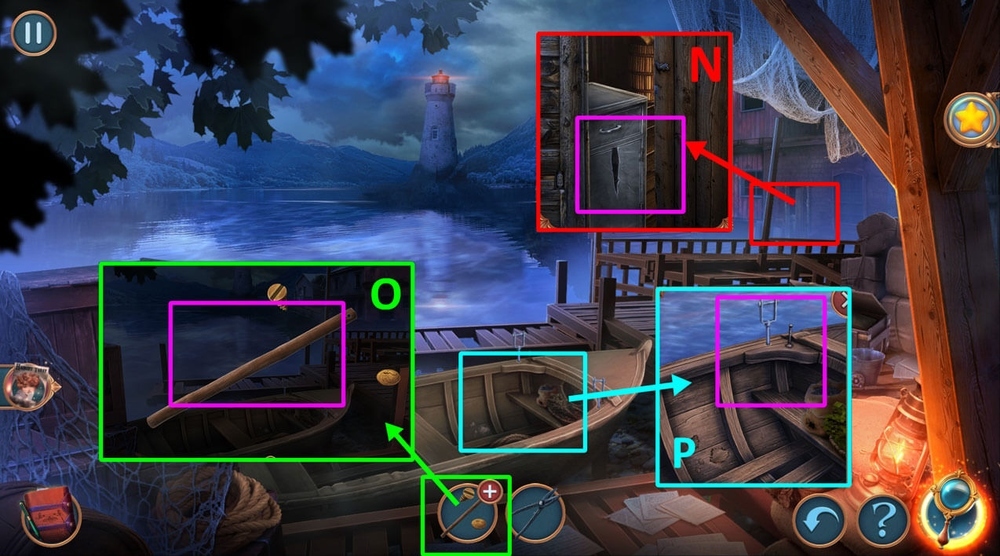
- Solution: swap the tiles to get the result as in the picture (O).
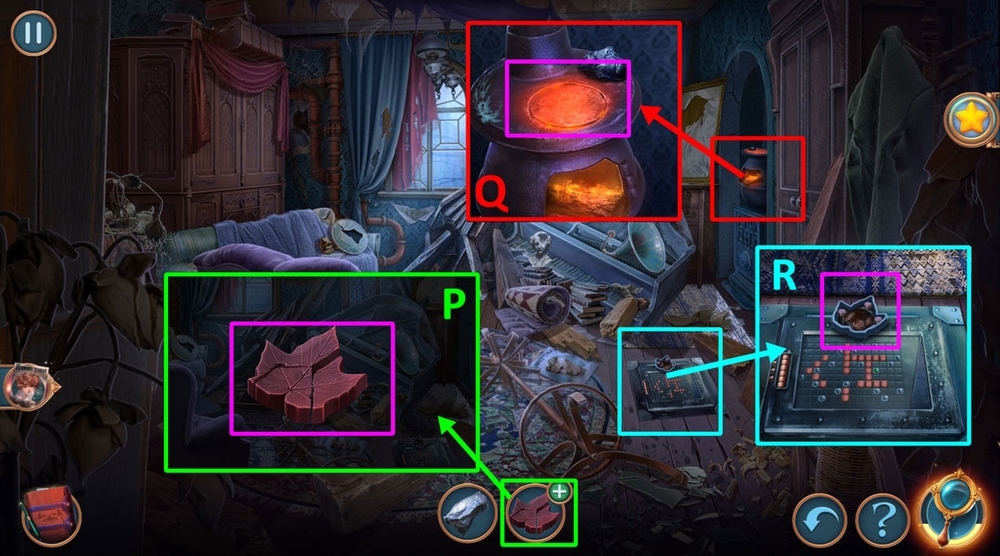
- Select 1 or 2 (P).
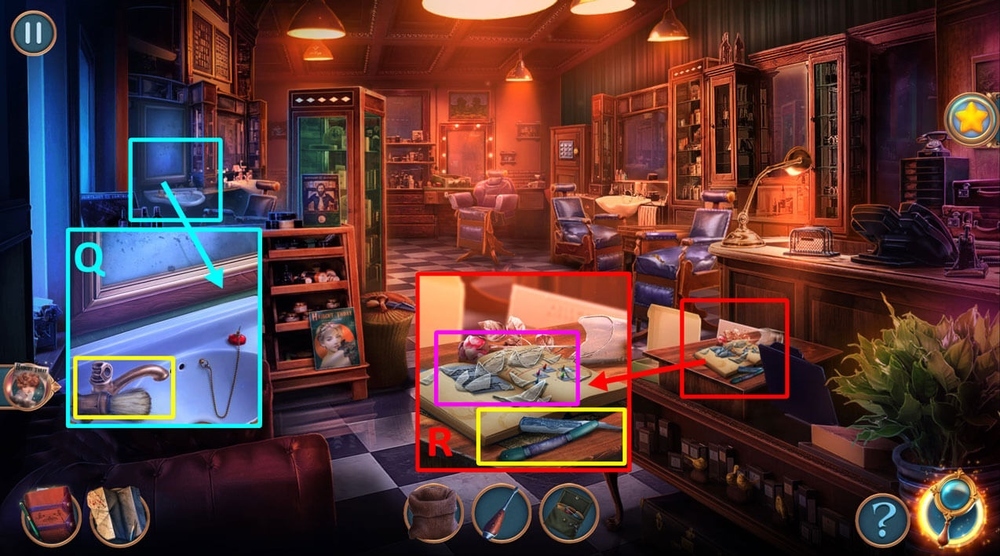
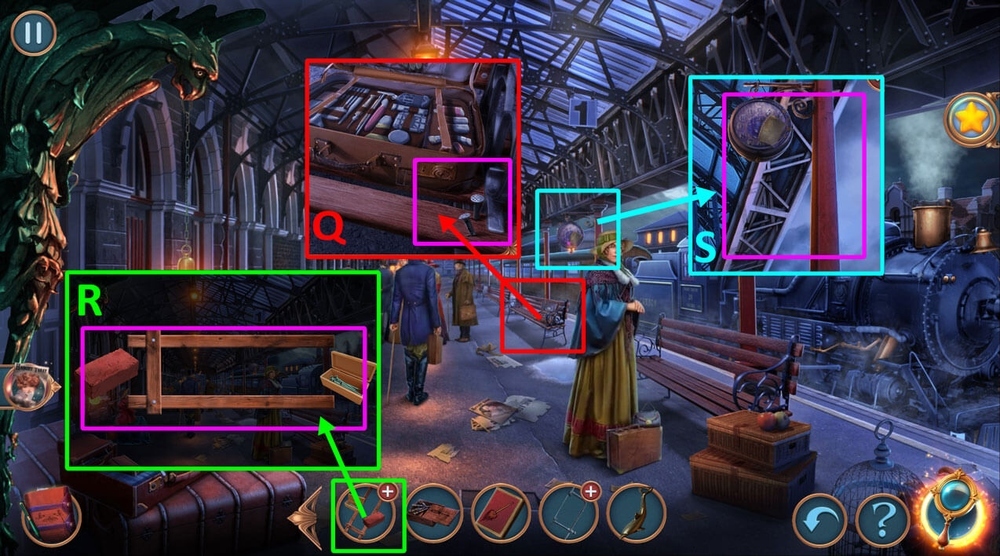
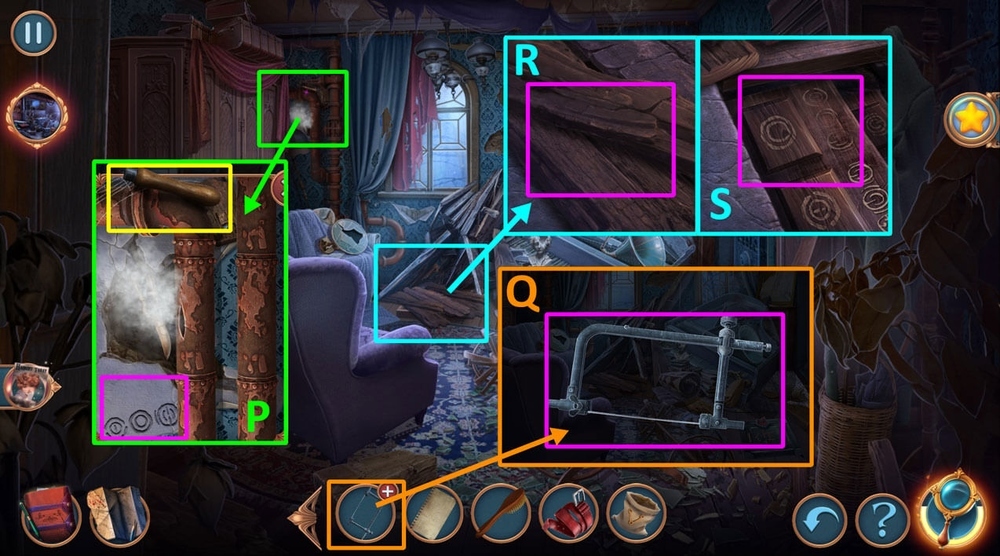
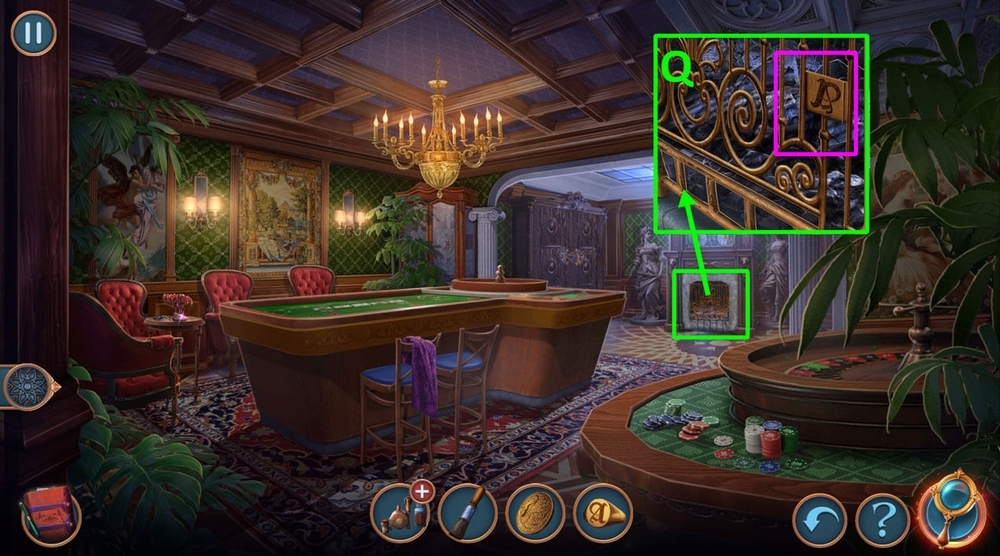
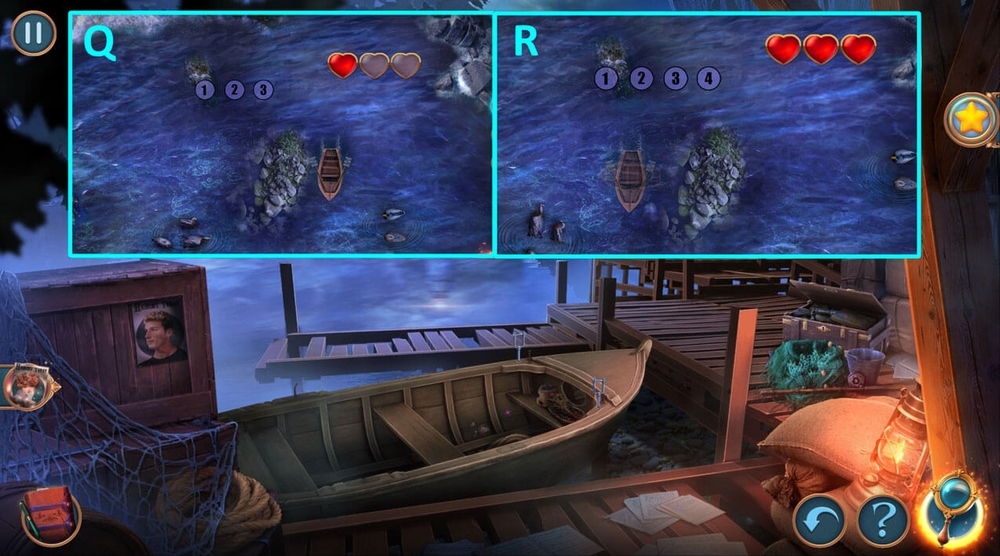
- Take SHAVING BRUSH, use SCREWDRIVER on the faucet (Q).
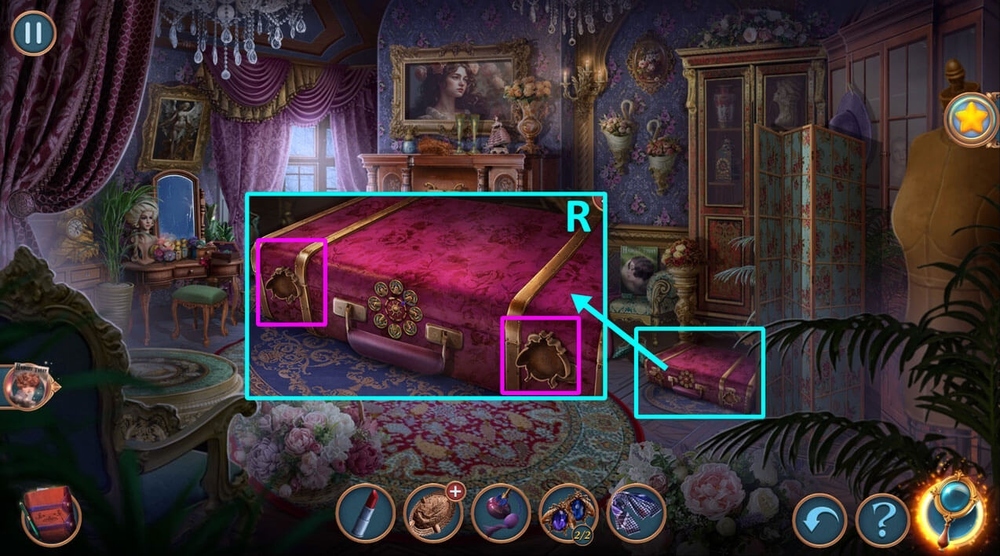
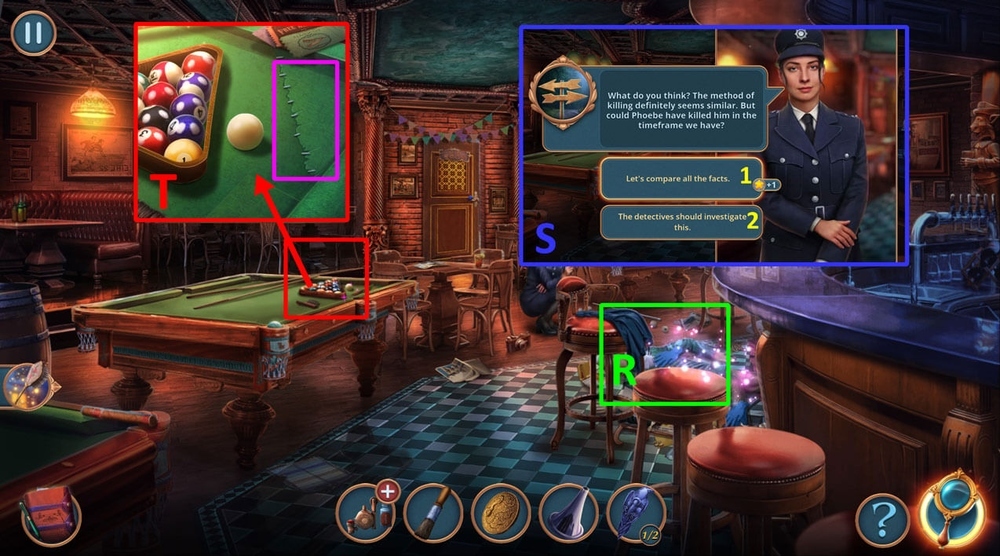
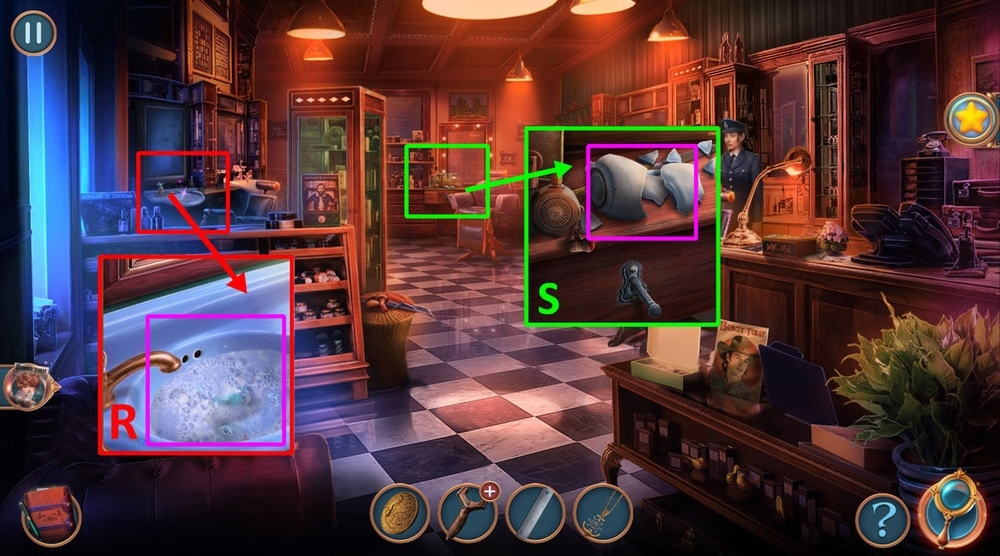
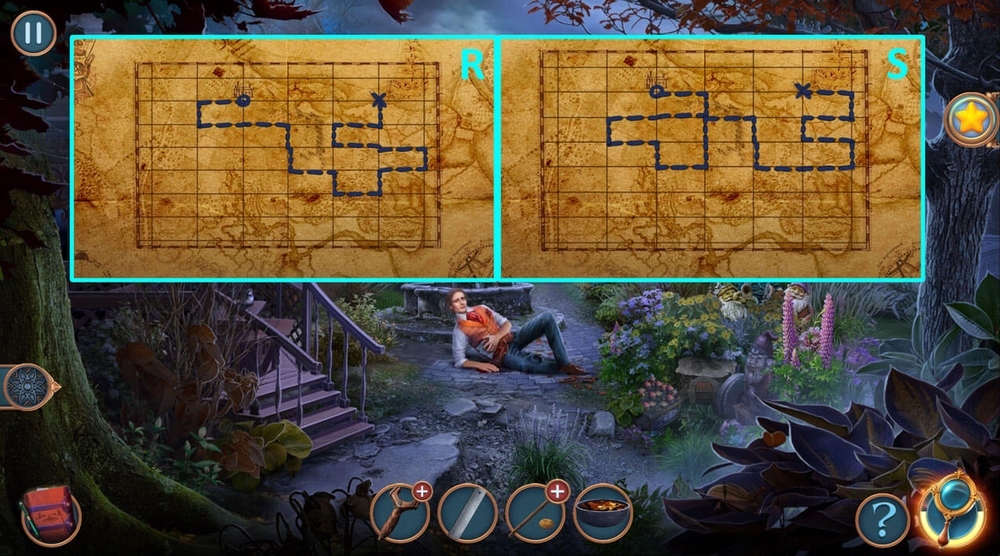
- Take DULL RAZOR, use SHAVING BRUSH on the shards (R).
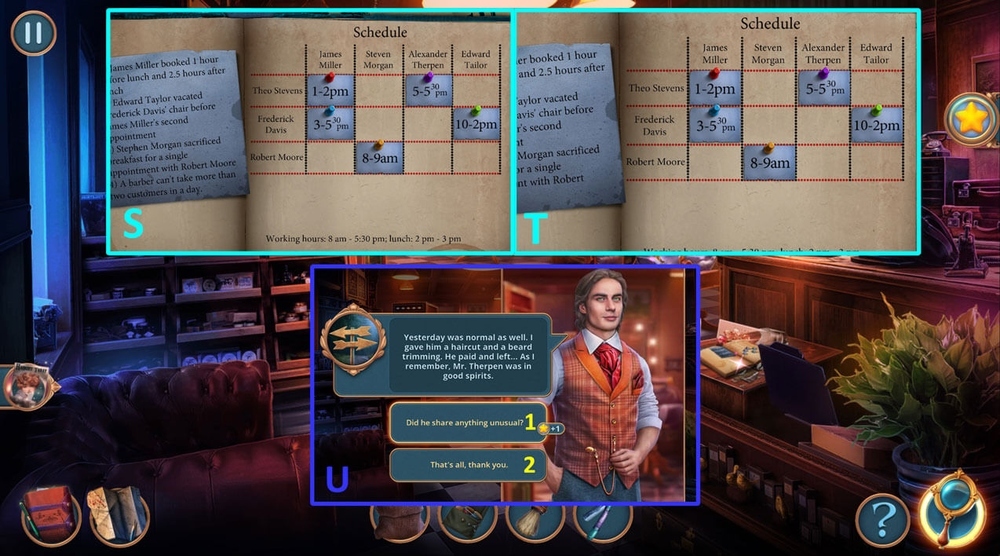
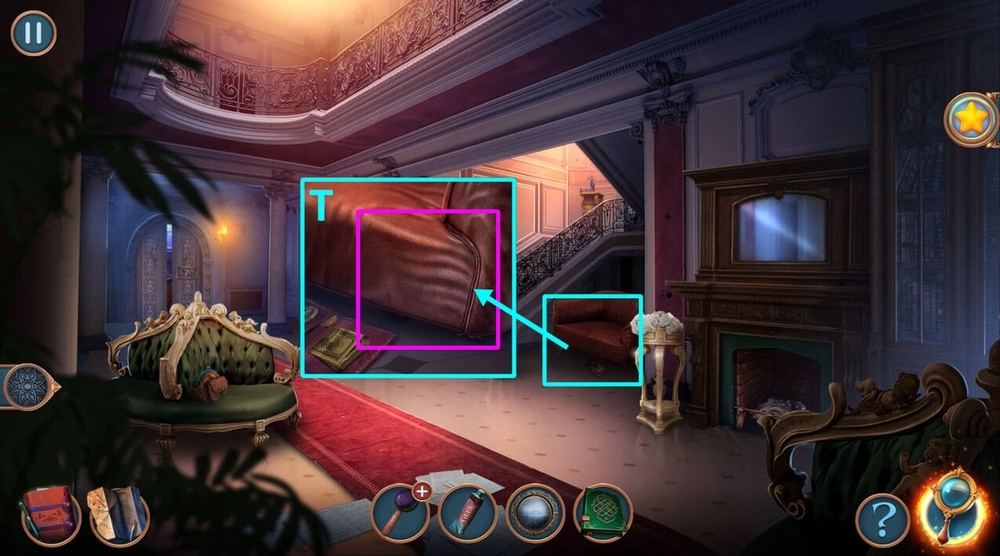
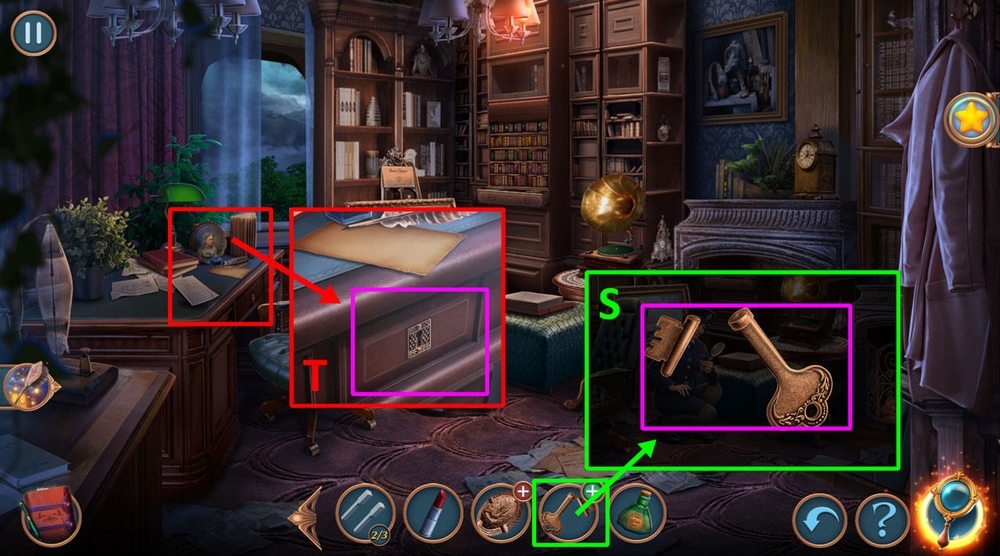
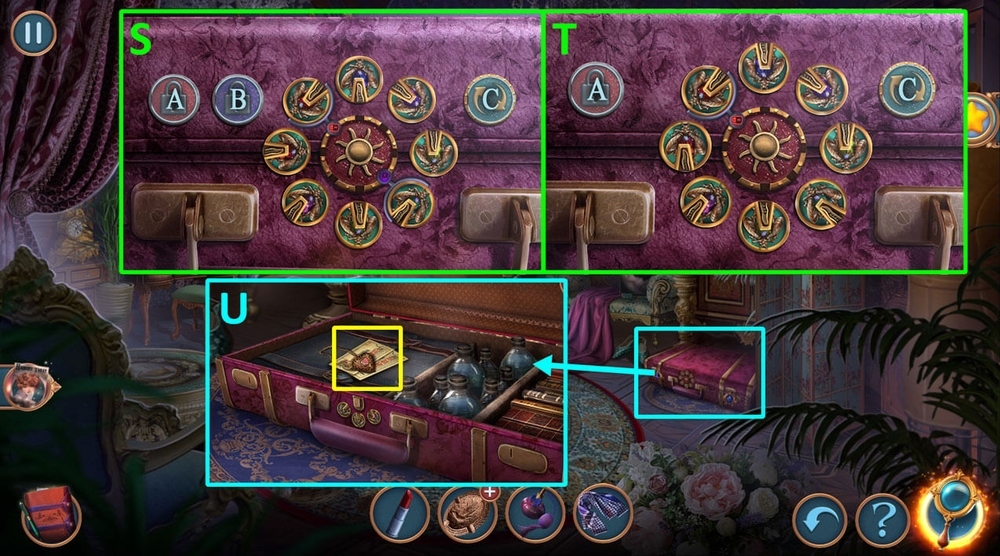
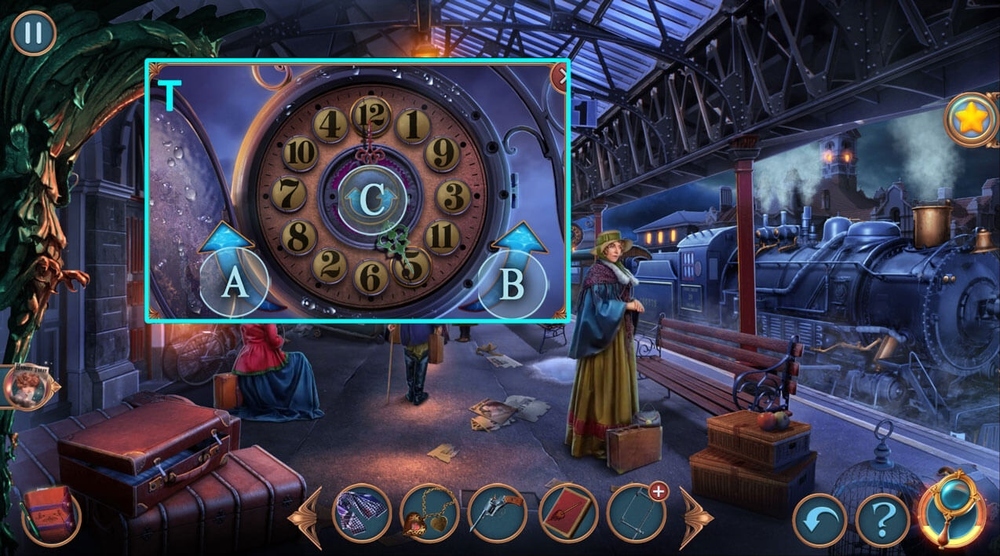
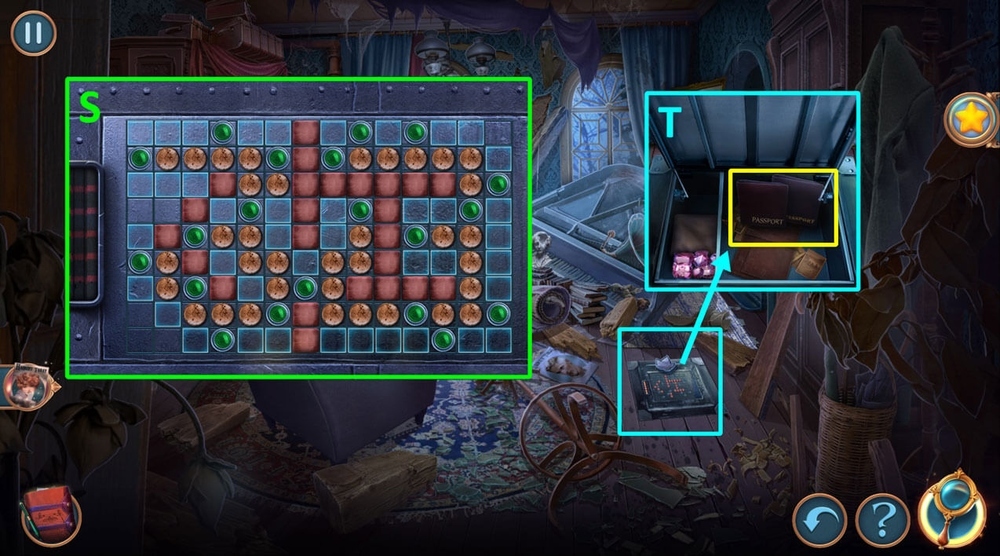
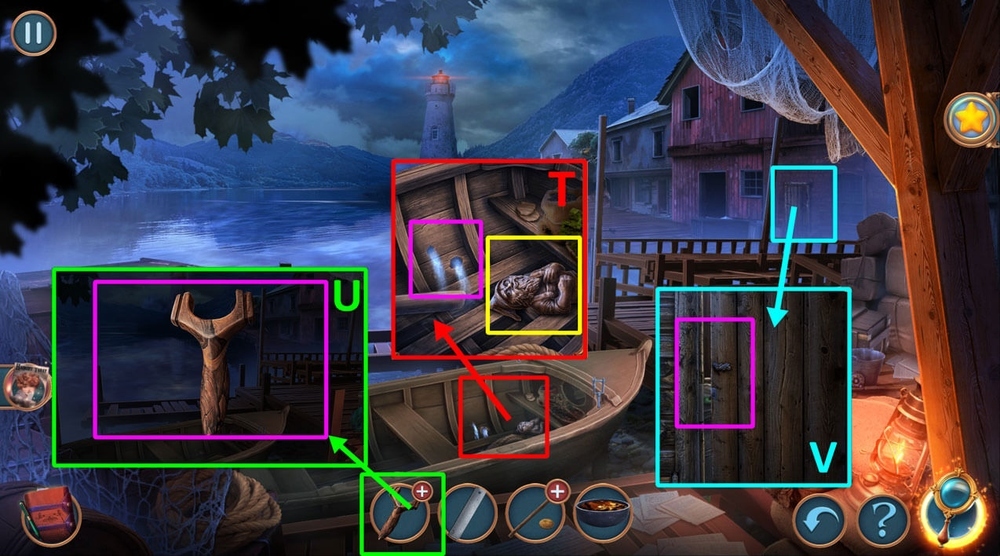
- Easy solution: use the notes as in the picture (S).
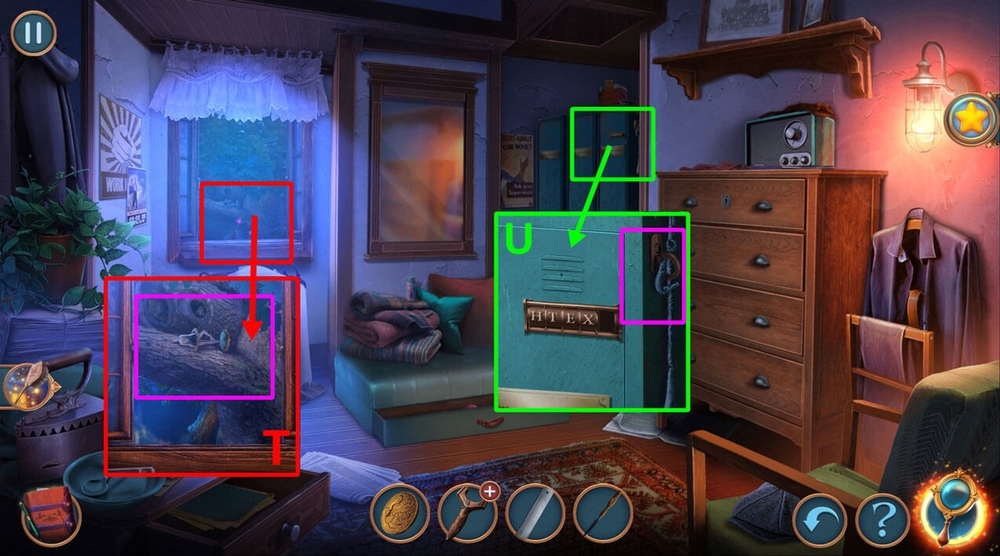
- Hard solution: use the notes as in the picture (T).
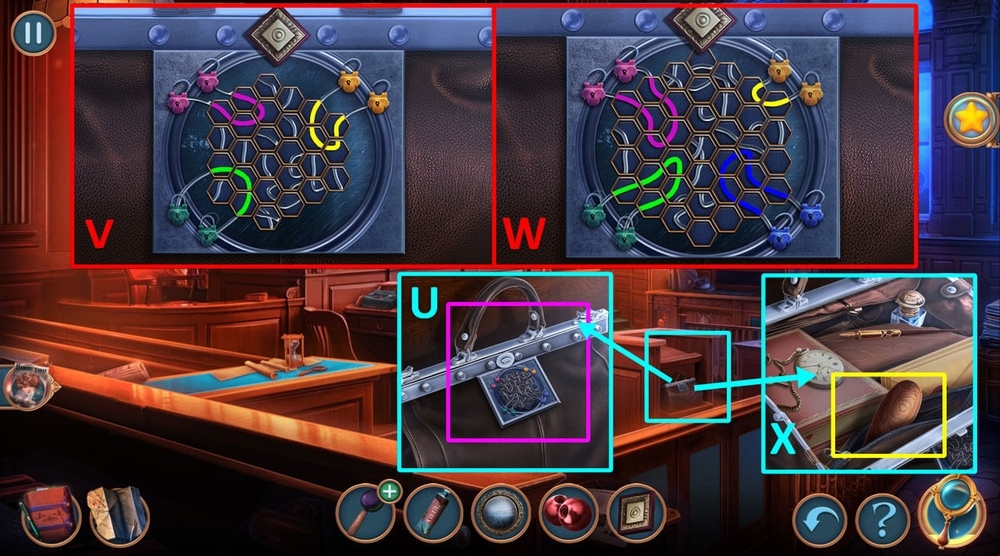
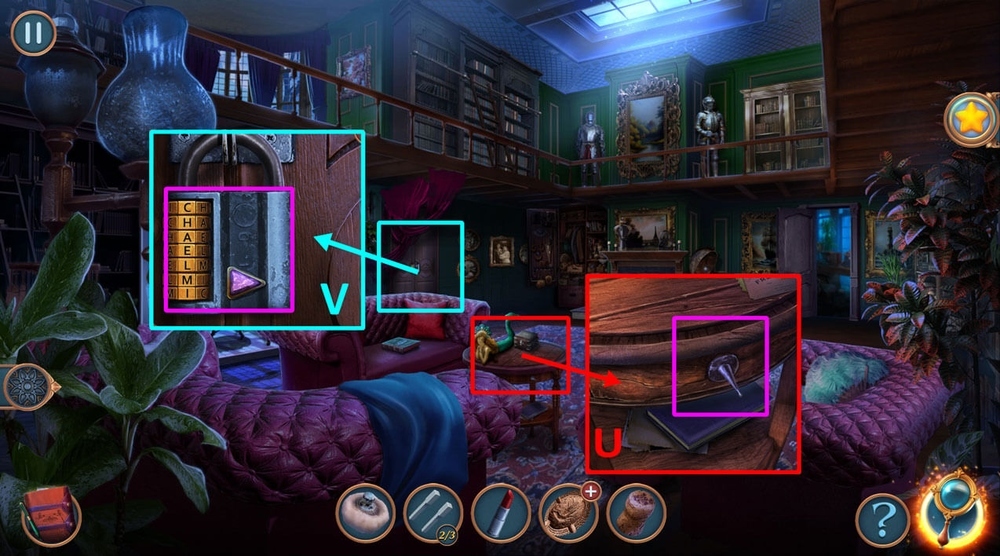
- Select 1 or 2, earn BARBER’S KEY (U).
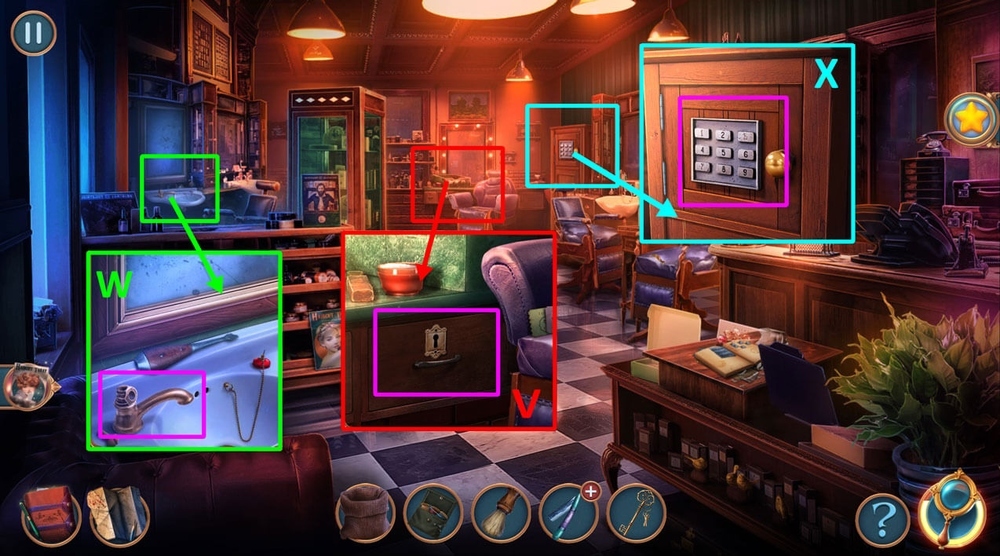
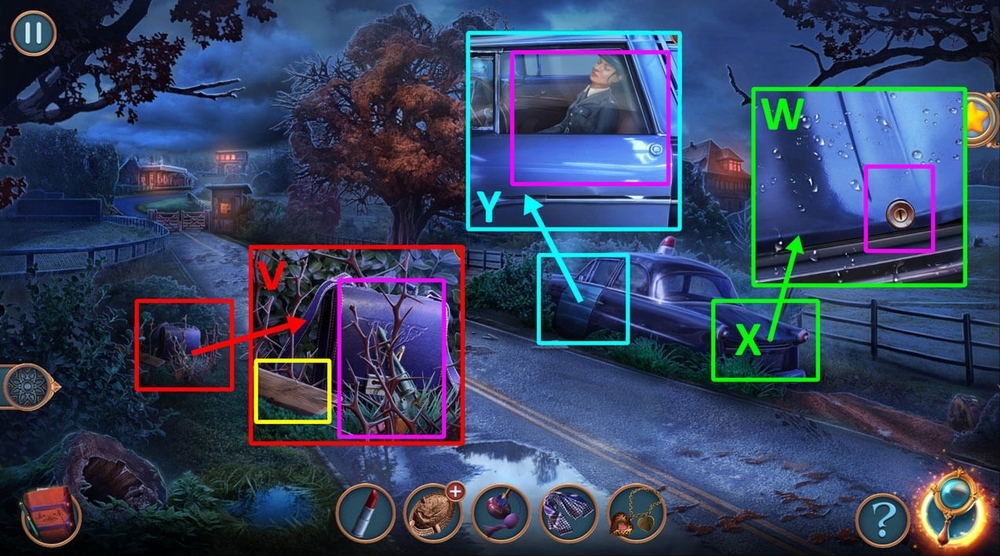
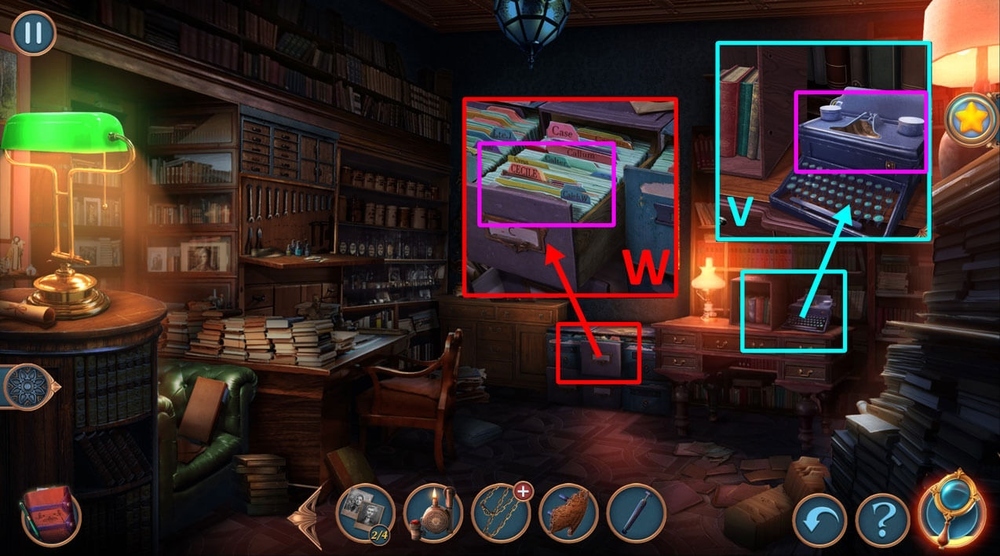
- Use BARBER’S KEY on the keyhole, take LITTLE TOWEL and HOT WATER VALVE (V).
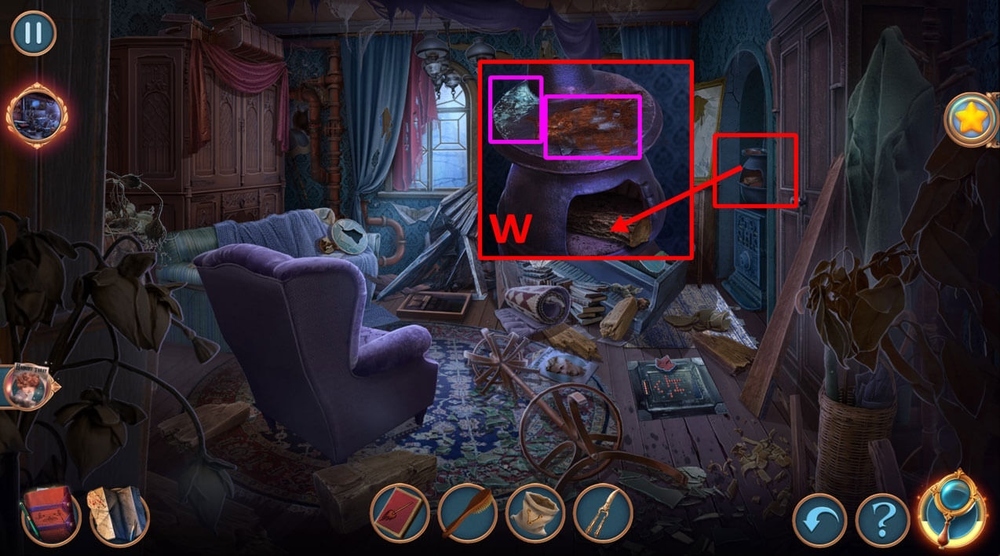
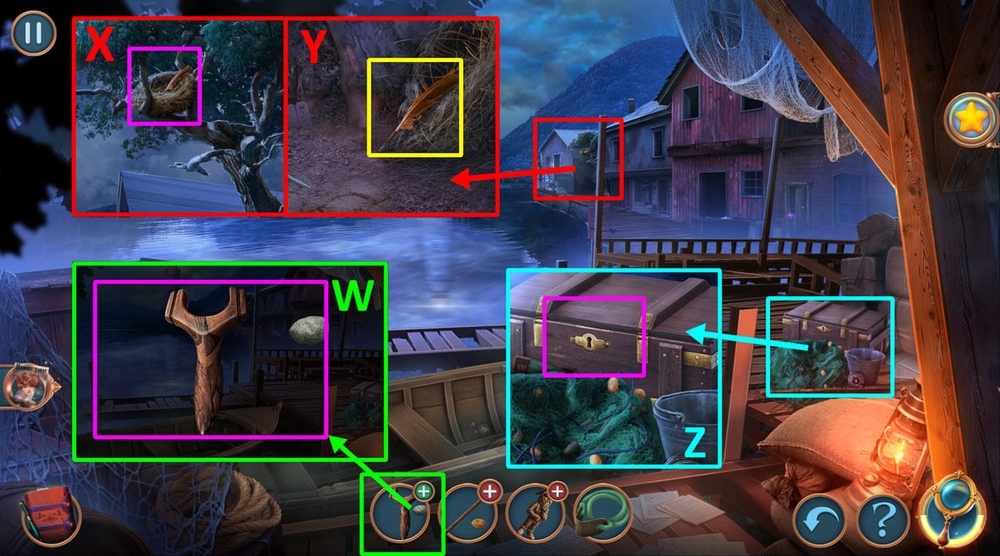
- Use HOT WATER VALVE on the faucet (W).
- Enter 1 – 5 – 6 – 9, take LEATHER BELT (X).
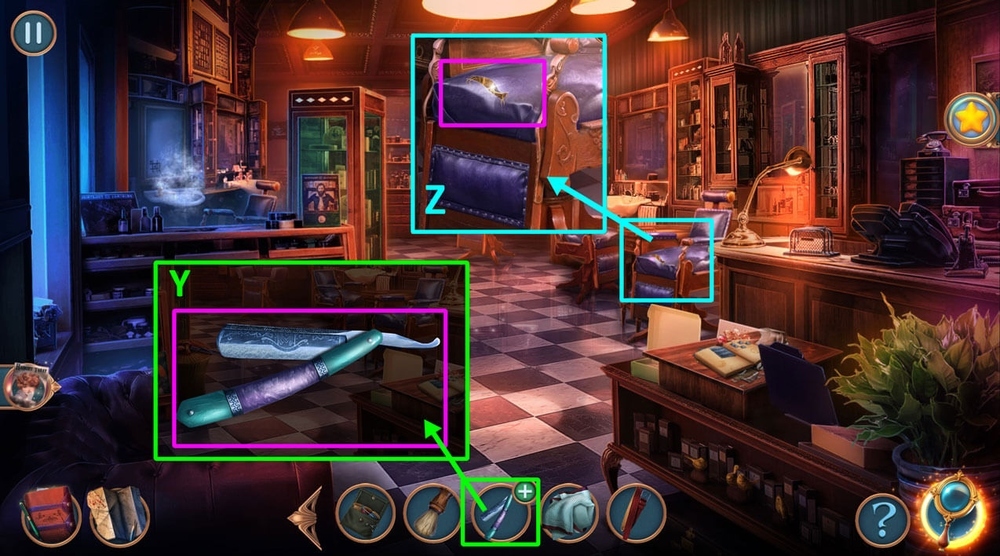
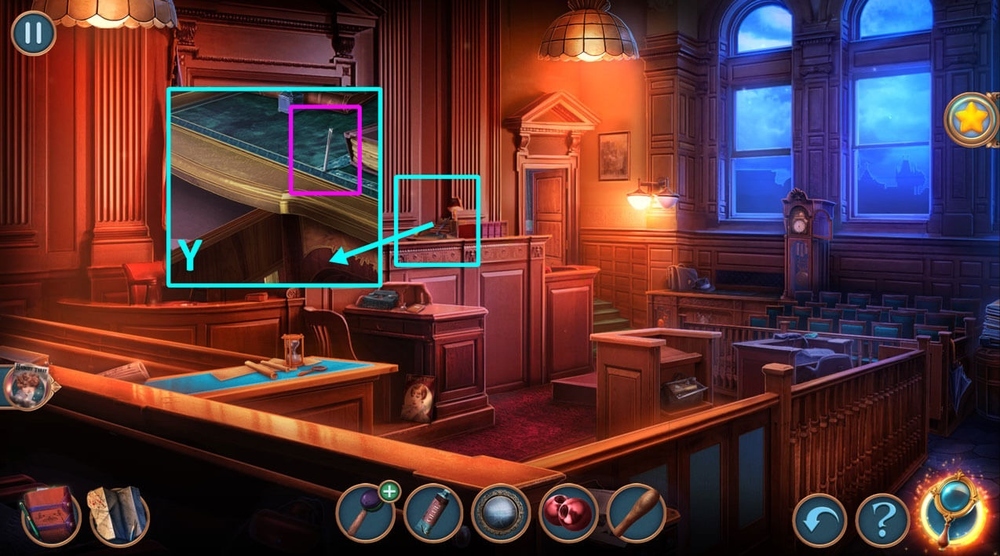
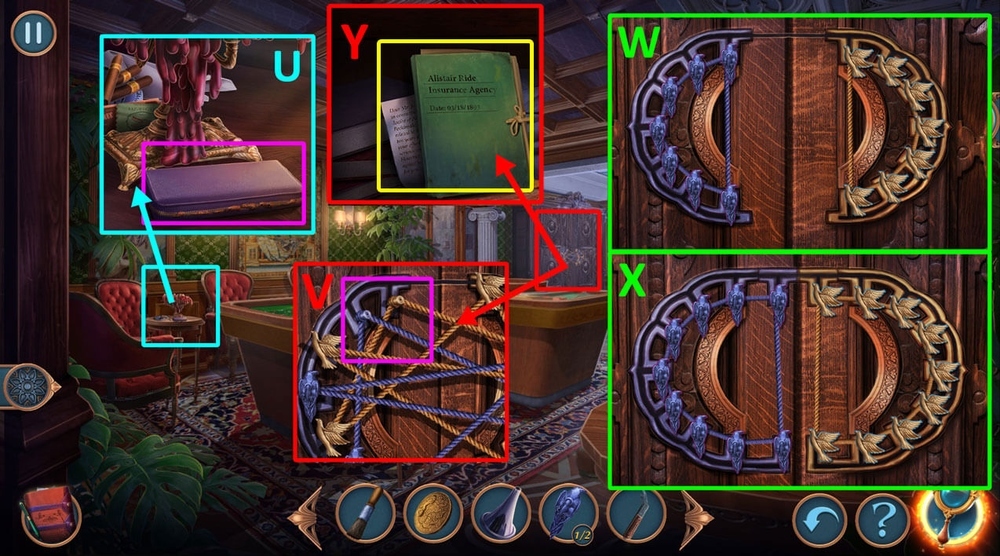
- Use LEATHER BELT on DULL RAZOR, get SHARP BLADE (Y).
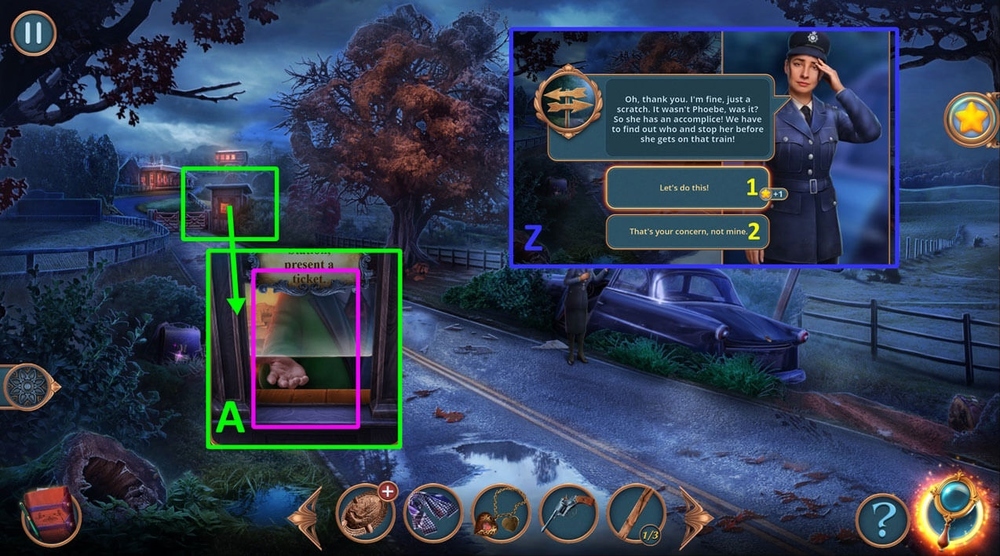
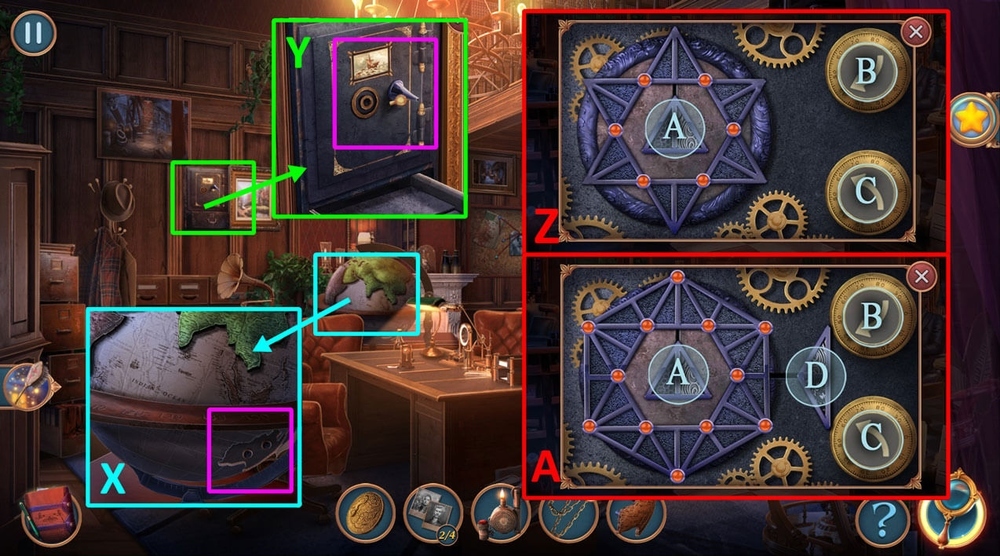
- Use SHARP BLADE on the tear, take THERPEN’S SIGNET RING (Z).
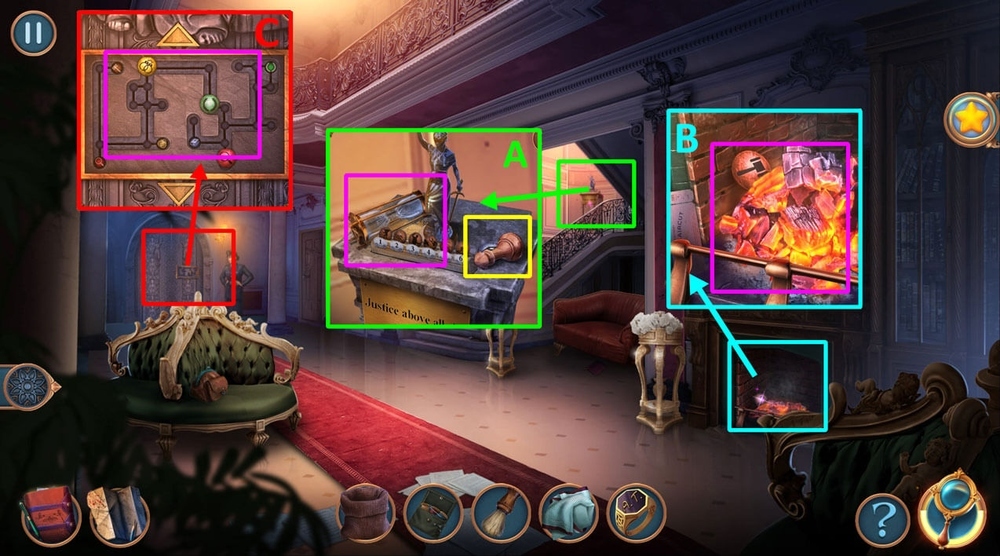
- Use CONSTRUCTION BAG and SHAVING BRUSH on the sand, get HOURGLASS SAND, take CHESS PIECES 1/2 and TOKENS 1/2 (A).
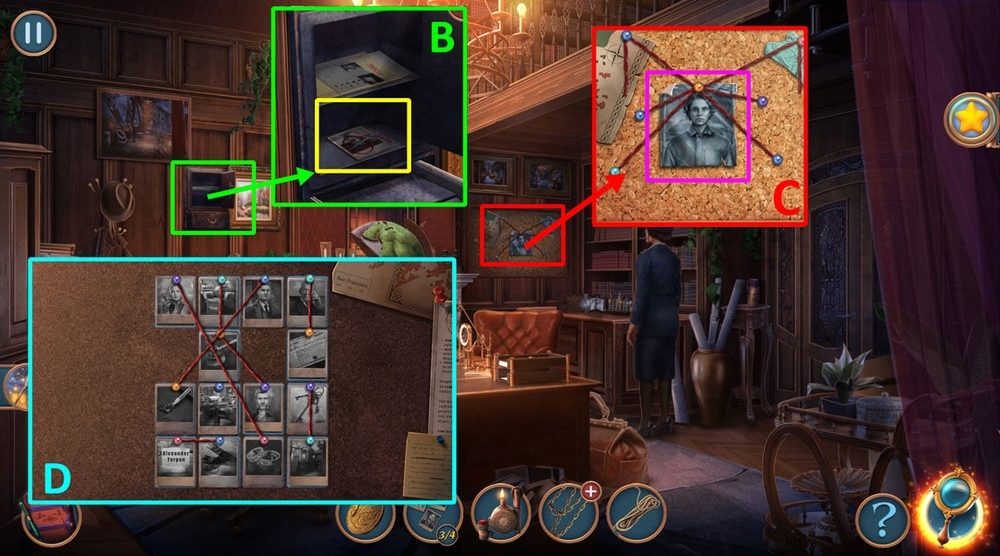
- Use HOURGLASS SAND on the fire, use LITTLE TOWEL on the token, get TOKENS 2/2 (B).
- Use TOKENS on the puzzle (C).
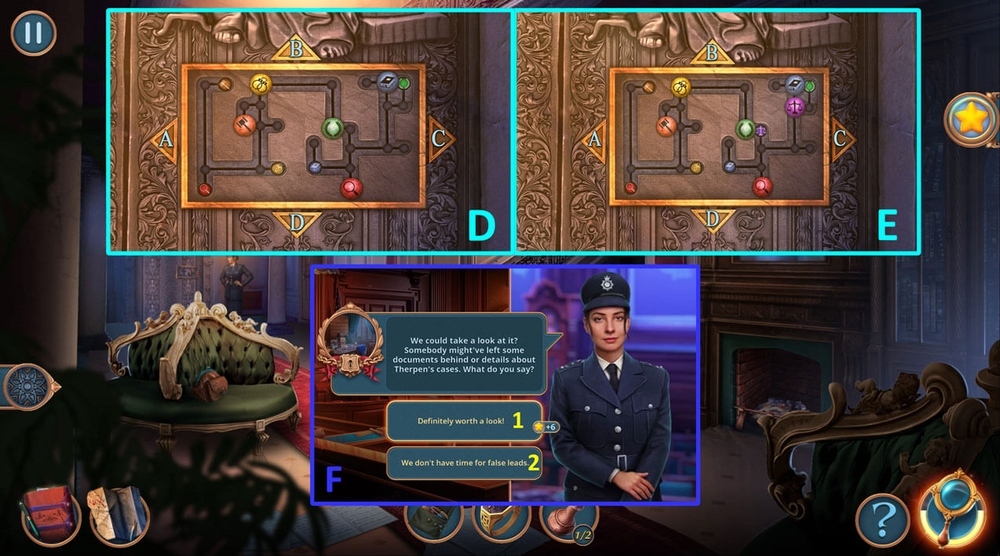
- Easy solution: press C, D, C, D, C, B, C, A, D, C, D, B, A, D, A, D, С, D, С, B, C, B, A, D, C, B, С, В, A, D, C, A, D, A, D, A, B, A, B, D, C, A, В, A, D, A, D, В, C, D, A, B, C (D).
- Hard solution: press C, D, C, D, C, B, C, A, D, C, D, B, A, D, A, D, С, D, С, B, C, B, A, D, C, B, С, В, A, D, C, A, D, A, D, A, B, A, B, D, C, A, В, A, D, A, D, В, C, D, A, B, C (E).
- Go forward.
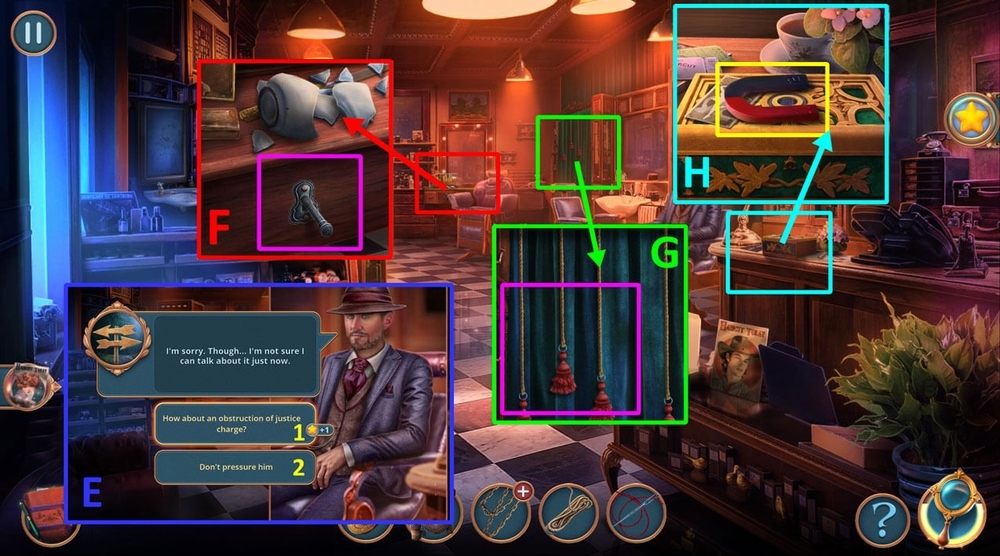
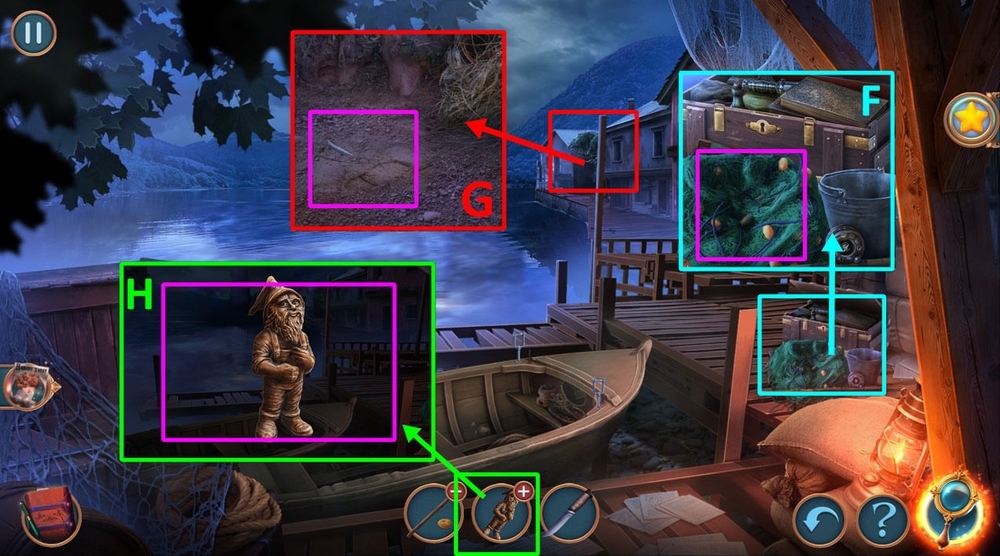
- Select 1 or 2 (F).
- Go to Judges’ Boardroom.
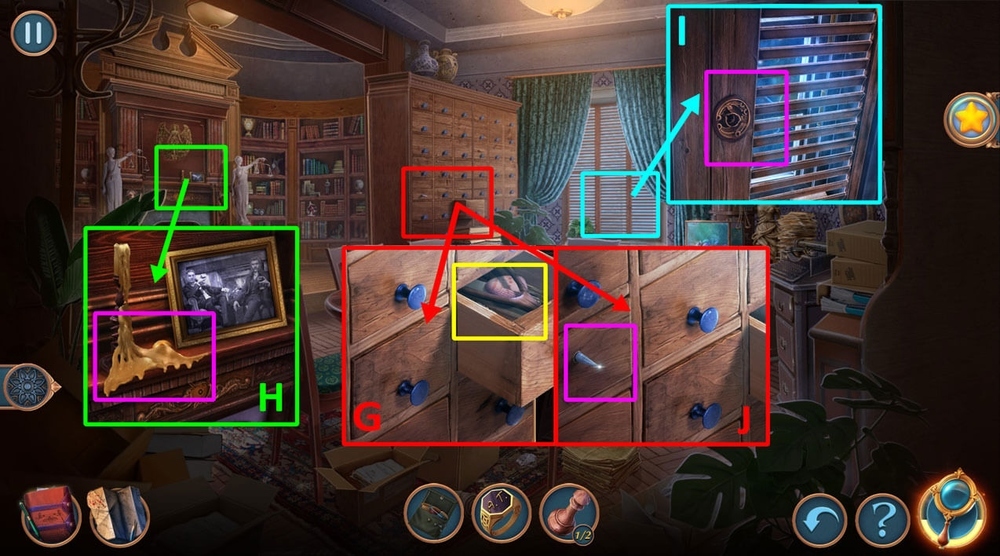
- Take BROKEN NET and SEASHELL BARRETTE (G).
- Use SEASHELL BARRETTE on the wax, take BLINDS HANDLE (H).
- Use BLINDS HANDLE on the hole, take CORK (I).
- Use CORK on the sharp point, take CUTETR, move the papers (J).
- Go back.
- Take JUDGE’S GAVEL (K).
- Use JUDGE’S GAVEL on the lock (L).
- Easy solution: Step 1: rearrange the yellow key to 8, Step 2: rearrange the red key to 4, Step 3: rearrange the yellow key to 7 (M).
- Hard solution: rearrange the red key to 5, rearrange the yellow key to 8, rearrange the red key to 4, rearrange the yellow key to 7 (N).
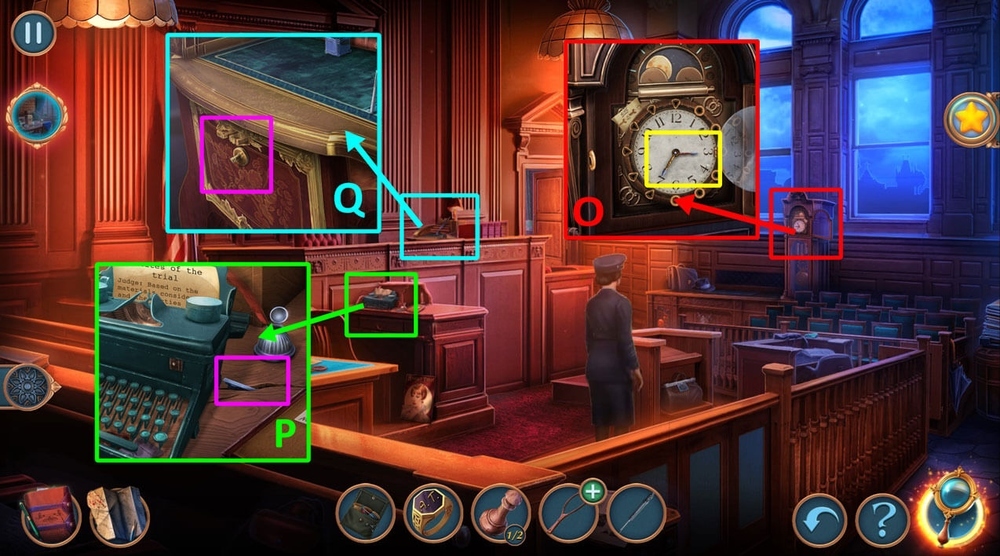
- Take CLOCK HANDS (O).
- Use CLOCK HANDS on the crack, get TIE PIN (P).
- Use TIE PIN on the lock, take BUNCH OF KEYS (Q).
- Go back.
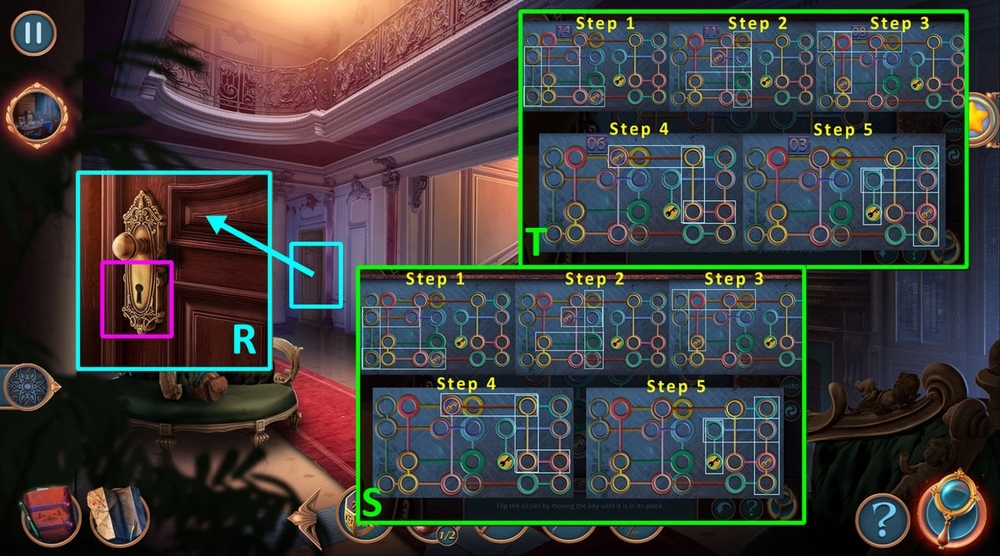
- Use BUNCH OF KEYS on the keyhole (R).
- Easy solution: move the key by clicking on the figures shown in the picture step by step (S).
- Hard solution: move the key by clicking on the figures shown in the picture step by step (T).
- Go to Therpen’s Office.
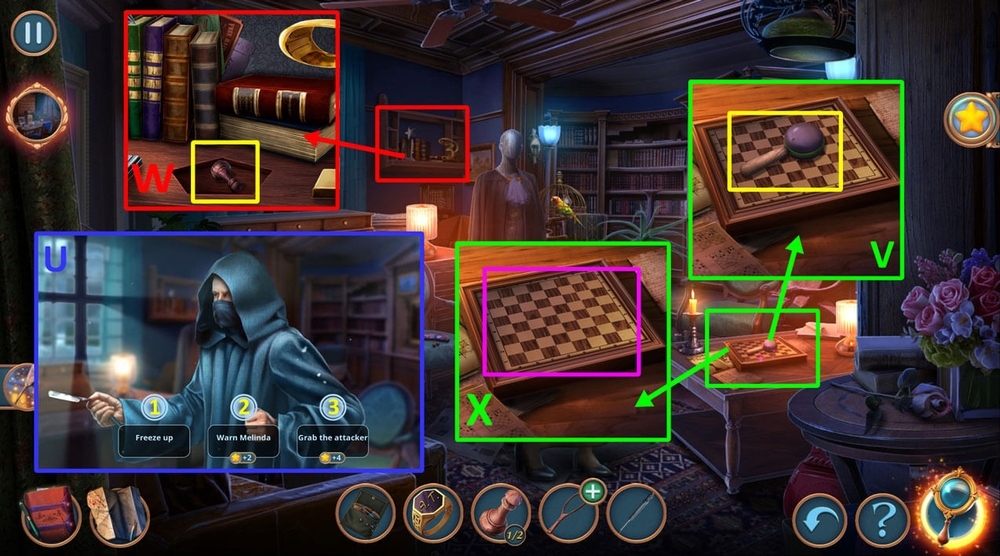
- Select 1, 2 or 3 (U).
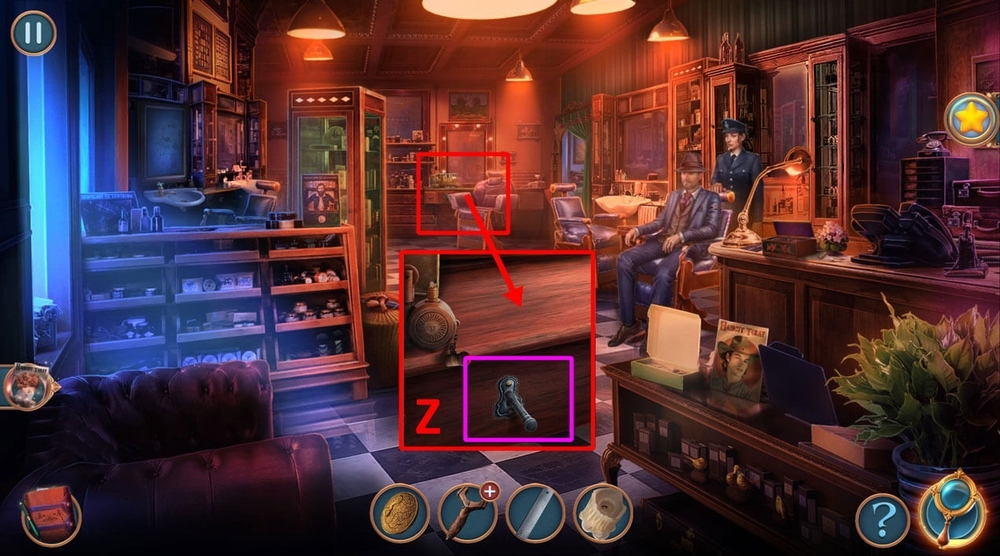
- Take RATCHET (V).
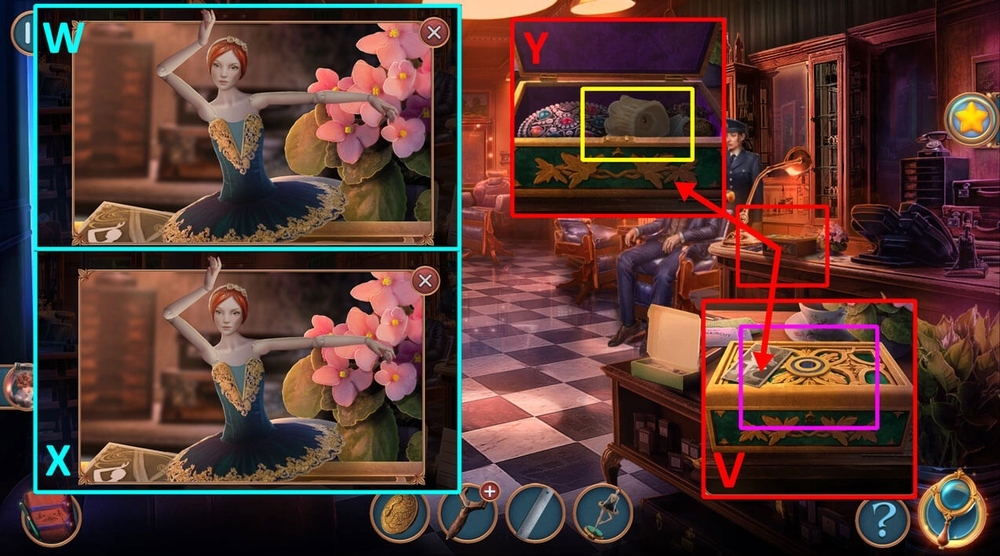
- Take CHESS PIECES 2/2 (W).
- Use CHESS PIECES on the chess board (X).
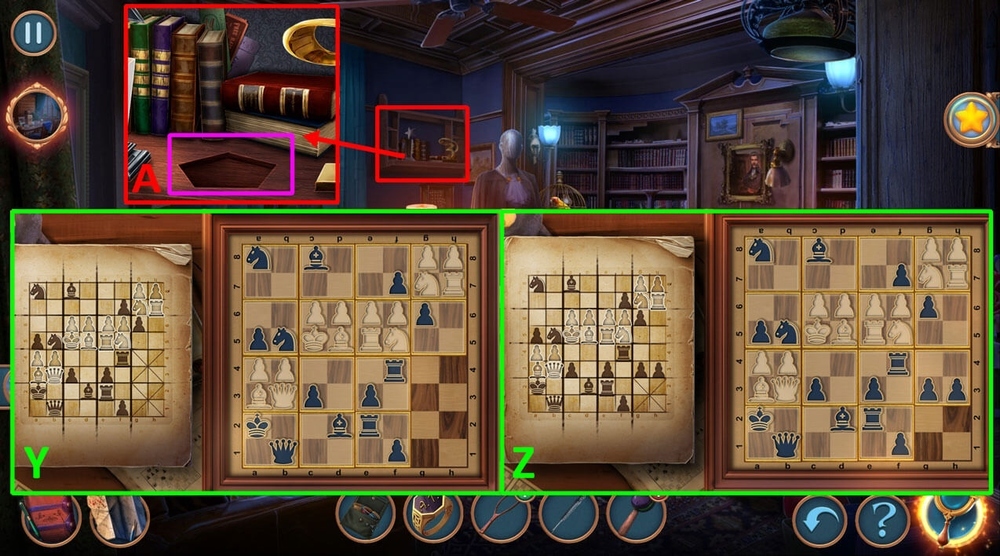
- Easy solution: arrange the pieces as in the picture (Y).
- Hard solution: arrange the pieces as in the picture (Z).
- Take PRIZE.
- Use PRIZE on the shelf, take TABLE AMULET (A).

- Use THERPEN’S SIGNET RING and TABLE AMULET on the recess, take GLUE and TYPEWRITER ROLLER, use CUTTER on the buttons, get JUDGE’S COLLAR (B).
- Use SEWING KIT and JUDGE’S COLLAR on BROKEN NET, get NET (C).
- Go to Judges’ Boardroom.
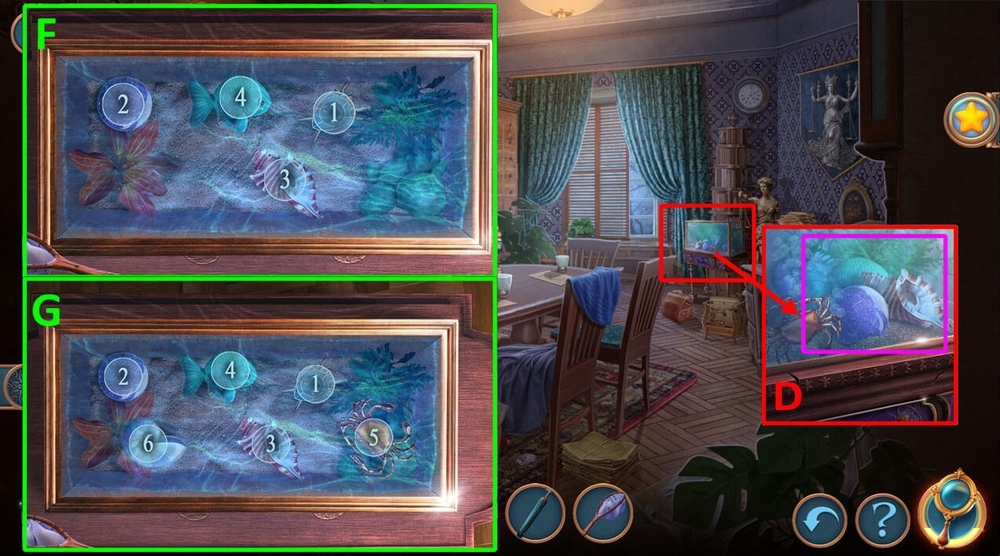
- Use NET on the fish tank (D).
- Easy solution: collect items in this order (F).
- Hard solution: collect items in this order (G).
- Get COAT OF ARMS AMULET.
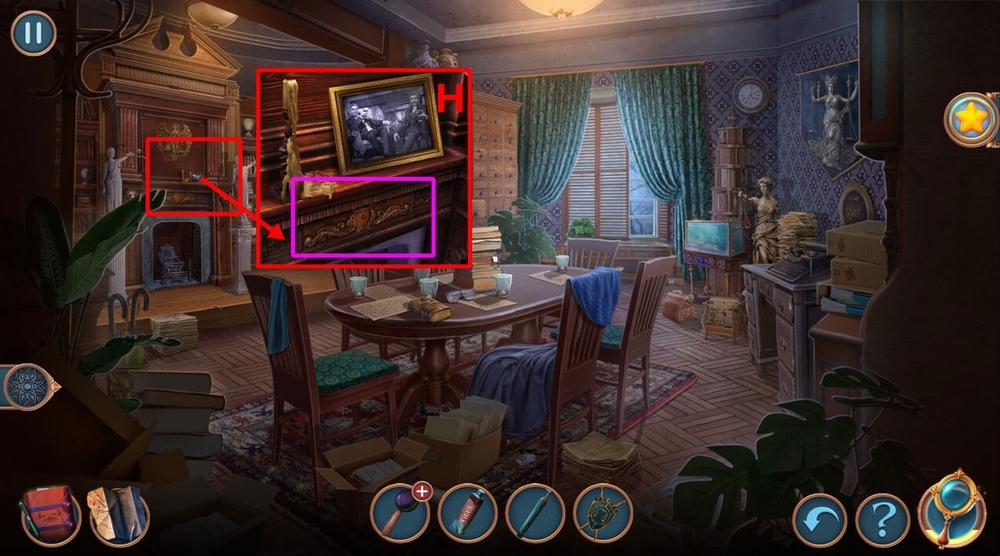
- Use COAT OF ARMS AMULET on the recess, take SMALL CANDLE (H).
- Go back.
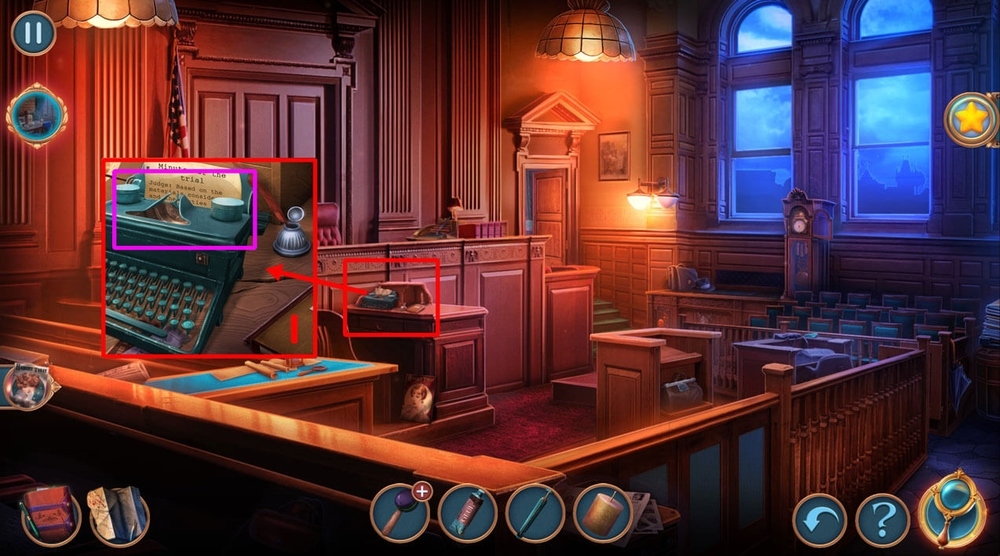
- Use TYPEWRITER ROLLER on the typewriter, read and take REPORT (I).
- Go back.
- Take the wallet, use SMALL CANDLE on the zip, take OPENER (J).
- Go to Judges’ Boardroom.
- Use OPENER on the nails (K).
- Play puzzle (L).
- Go to Therpen’s Office.
- Click on the combination lock, use REPORT on the lock, enter 2 – 3 – 8 – 9 – 4 – 6 – 7, take EAR TUBE and PARROT FOOD (M).
- Click on the feeder, use PARROT FOOD on the feeder, take PARROT’S MIRROR and TUMBLER (N).
- Move the painting, use EAR TUBE on the safe, use TUMBLER on the lamp, click the light on, take FEMIDA’S WEIGHTS (O).
- Go back.
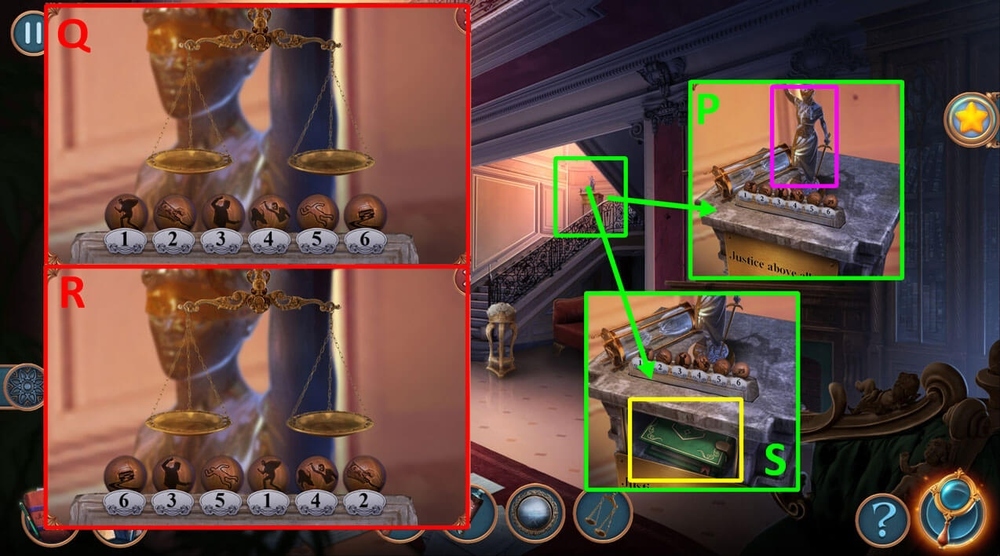
- Use FEMIDA’S WEIGHTS on the figurine (P).
- Easy solution: distribute the balls like this (Q).
- Hard solution: distribute the balls like this (R).
- Take BIG BOOK OF LAWS (S).
- Use BIG BOOK OF LAWS on the sofa, take BEADS and PUZZLE PIECE (T).
- Go to Courtroom.
- Click and use PUZZLE PIECE on the lock (U).
- Easy solution: arrange pieces as in the picture (V).
- Hard solution: arrange pieces as in the picture (W).
- Take WOODEN HANDLE (X).
- Use WOODEN HANDLE on the metal shaft, get AWL (Y).
- Go to Therpen’s Office.

- Use AWL on the drawer, take LOCK CYLINDER (Z).
- Use LOCK CYLINDER on the safe (A).
- Easy solution: rotate the spinner to guide the balls into the appropriate slots (B).
- Read the note (C).
- Use PARROT’S MIRROR on the door (D).
- Take THIN HAIRPINS 1/3 and PORTRAIT PIECES, use AWL on the box, take LITTLE HOOK (E).
- Use LITTLE HOOK on the latch (F).
- Play puzzle, earn DOORBELL (G).
- Use DOORBELL on the doorbell hook, click on the doorbell (H).
- Go forward.
- Select 1 or 2 (I).
- Find the person and click on him (J).
- Take CLOSED ENVELOPE and BROKEN PORTRAIT (K).
- Use GLUE and PORTRAIT PIECES on BROKEN PORTRAIT (L).
- Easy solution: arrange the pieces as in the picture (M).
- Hard solution: arrange the pieces as in the picture (N).
- Get RESTORED PORTRAIT.
- Use RESTORED PORTRAIT on the wall (O).
- Easy solution: press 2, 5, 4, 6, 3, 2, 3, 2 (P).
- Hard solution: press 2, 1, 3, 9, 11, 10, 7, 11, 12, 9, 3, 7, 2, 7, 2, 3, 2, 10, 11, 10, 1, 9, 2, 10, 3, 11, 4, 12 (Q).
- Take DIADEM (R).
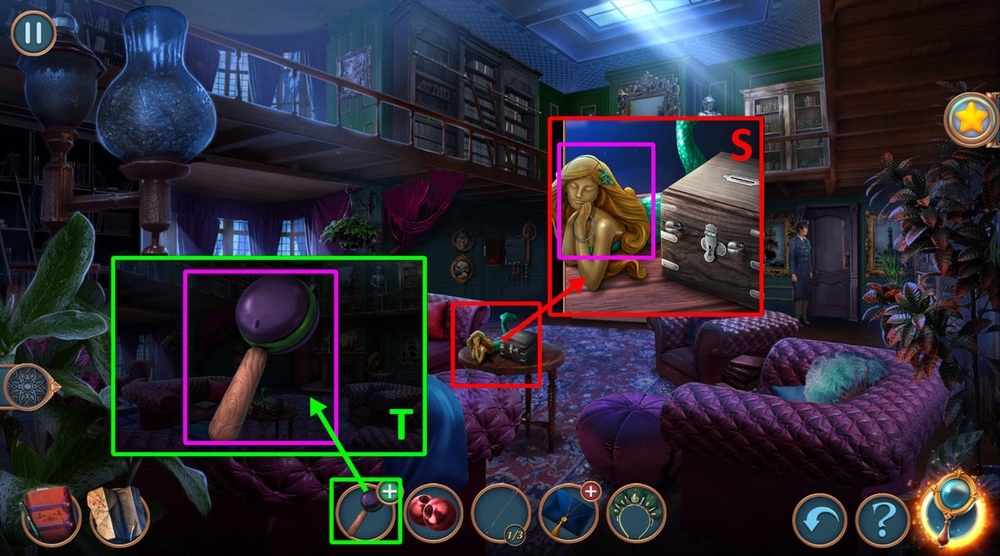
- Use DIADEM on the mermaid, take ELASTIC BAND (S).
- Use BEADS and ELASTIC BAND on RATCHET, get RATCHET (T).
- Go back.
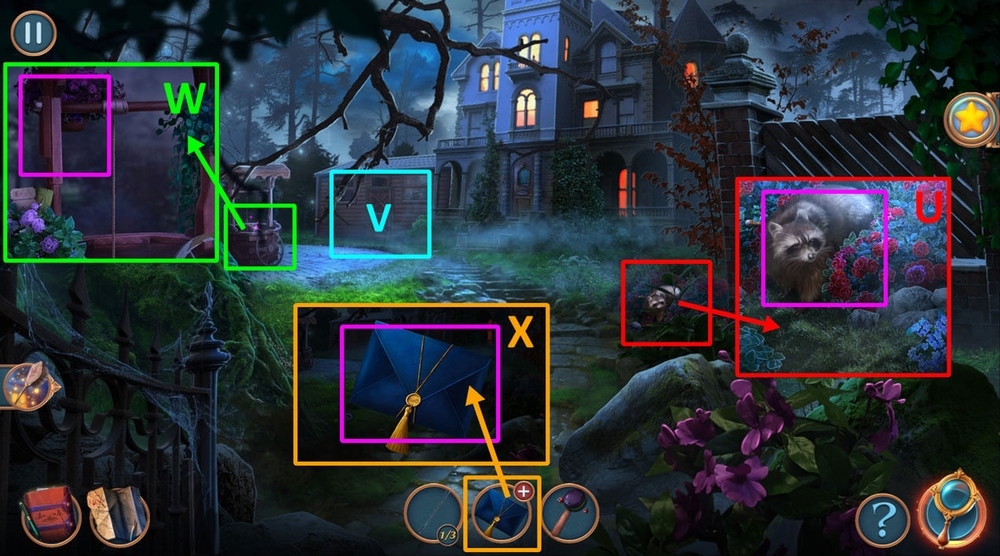
- Use RATCHET on the raccoon, take THIN HAIRPINS 2/3 (U).
- Play puzzle, earn WELL LEVER (V).
- Use WELL LEVER on the rope, take LETTER OPENER (W).
- Use LETTER OPENER on CLOSED ENVELOPE, read the note, take FLAT TOKEN (X).
- Go forward.
- Use FLAT TOKEN on the box, take MASK AMULET (Y).
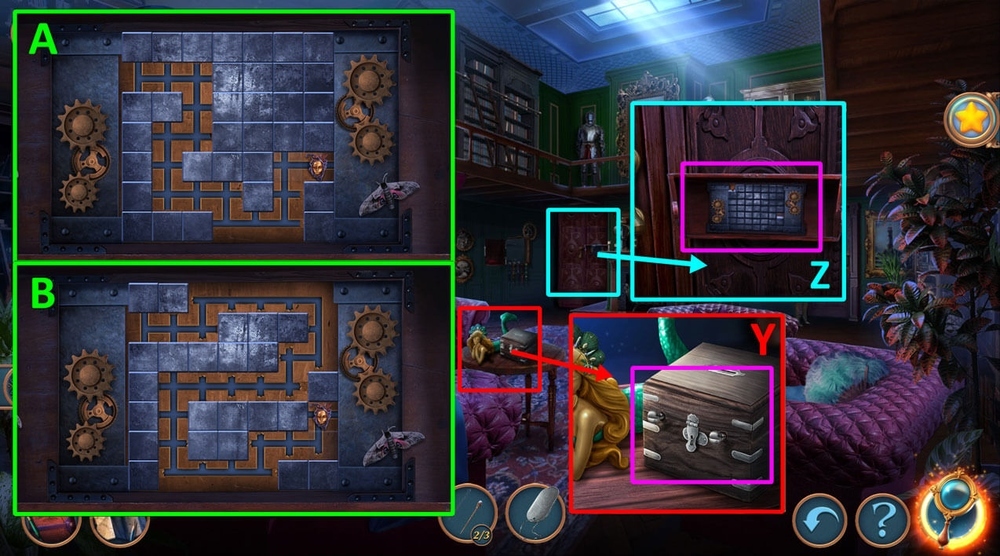
- Use MASK AMULET on the puzzle (Z).
- Easy solution: guide the amulet as in the picture (A).
- Hard solution: guide the amulet as in the picture (B).
- Take THIN HAIRPINS 2/3 (C).
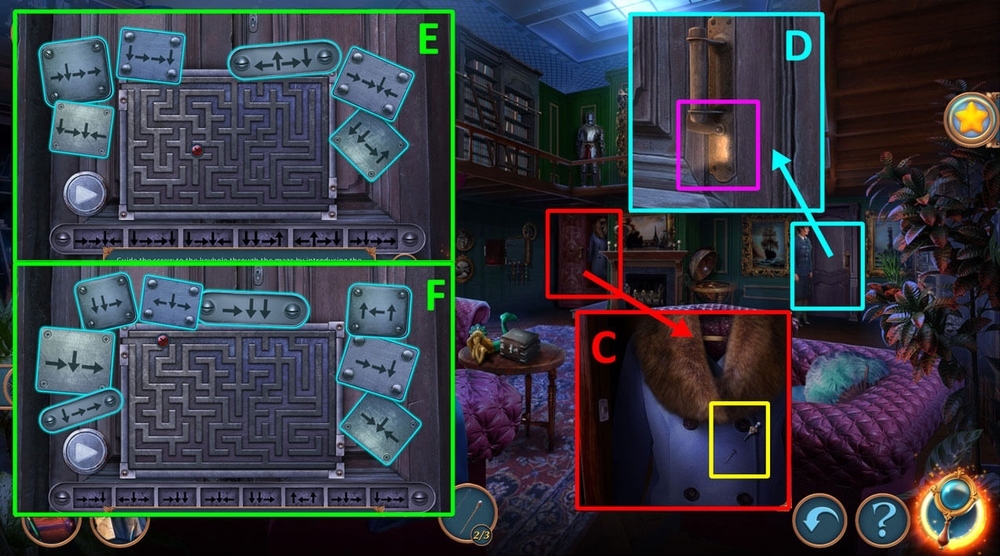
- Use THIN HAIRPINS on the keyhole (D).
- Easy solution: use the sequence as in the picture (E).
- Hard solution: use the sequence as in the picture (F).
- Take MY BAG.
- Open the door, play puzzle, earn LIPSTICK (A).
- Take POWDER PUFF and PIANO KEYS 1/3 (B).
- Use LIPSTICK on MY BAG (C).
- Take POLICE DEPARTMENT PASS (D).
- Give POLICE DEPARTMENT PASS to the policeman (E).
- Go to Beckinsale’s Study.

- Take ASHTRAY, take and read the note (F).
- Take PIANO KEYS 2/3, FAKE BOOK, BROKEN KEY and EVIDENCE (G).
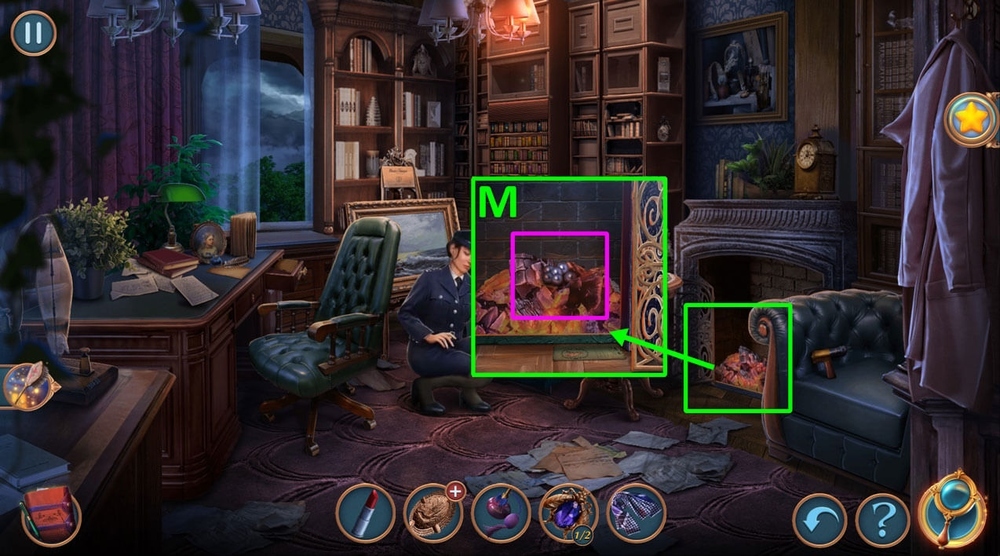
- Examine the fireplace, take EVIDENCE (H).

- Solution 1: Beckinsale let his killer in (I).
- Solution 2: Beckinsale was busy (J).
- Solution 3: Killer walked through the door (K).
- Solution: Arrange the fragments as shown in the picture (L).
- Solution: Arrange the fragments as shown in the picture (M).
- Solution: Arrange the petals as shown in the picture (N).
- Raise the flap, put FAKE BOOK on the shelf (O).
- Easy solution: Arrange the books as shown in the picture (P).
- Hard solution: Arrange the books as in the picture (Q).
- Take and read the note, take GLUE (R).
- Use GLUE on BROKEN KEY, earn FIXED KEY (S).
- Use FIXED KEY on the drawer, take CORK (T).
- Go back.
- Use CORK on the spike, take PHOEBE’S BRACELET (U).
- Use PHOEBE’S BRACELET on the lock.
- Enter the letters from the bracelet (V).
- Go to Phoebe’s Upstairs Room.
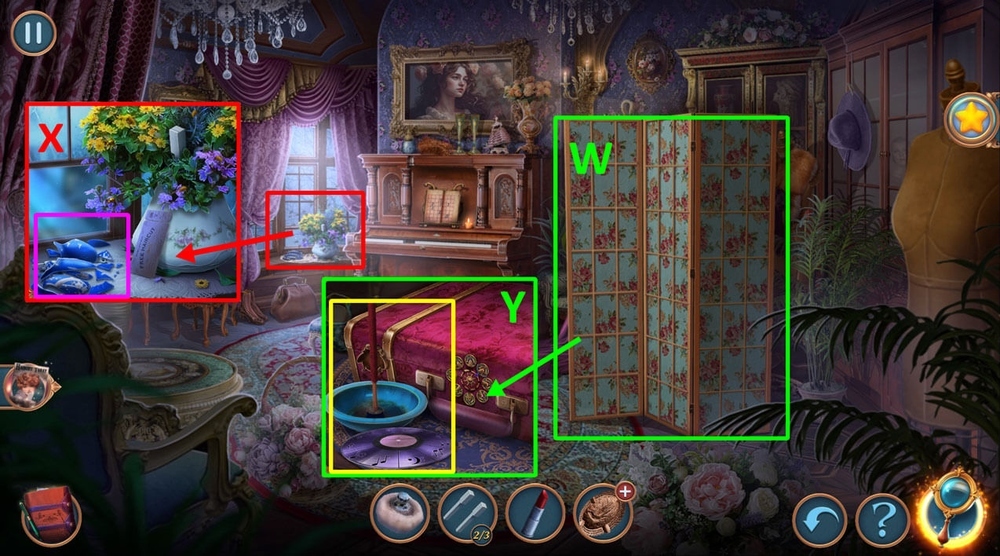
- Move the Interior screen (W).
- Use POWDER PUFF on the shards, take NEEDLE (X).
- Take INCENSE and RECORD (Y).
- Go to Beckinsale’s Study.
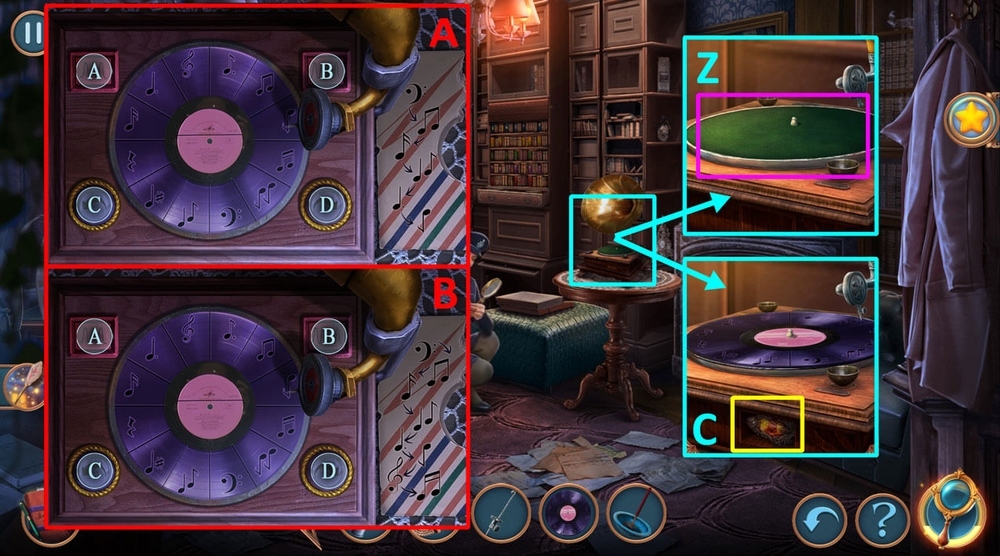
- Use RECORD and NEEDLE on the gramophone (Z).
- Easy solution: Press the buttons in this order: AC, BD, D, AD, BC, C (A).
- Hard solution: Press the buttons in this order: AC, BD, D, AD, BC, C, AD, BC (B).
- Take FIREPLACE AMULET (C).
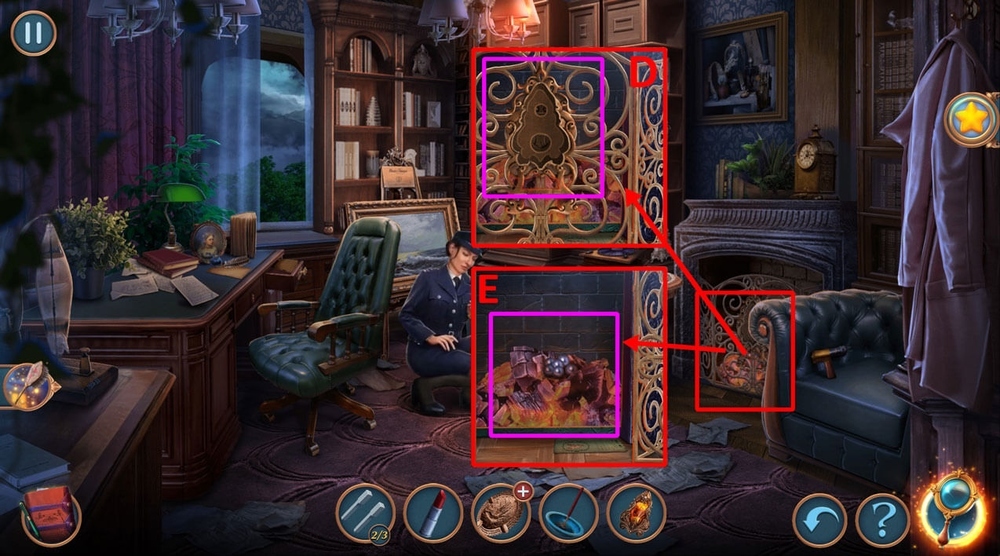
- Use FIREPLACE AMULET on the fireplace (D).
- Use INCENSE on the fireplace, earn LIT INCENSE (E).
- Go to Phoebe’s Upstairs Room.
- Use LIT INCENSE on bees, take PIANO KEYS 3/3 (F).
- Use PIANO KEYS 3/3 on the piano (G).
- Easy solution: Arrange the elements as in the picture (H).
- Hard solution: Arrange the elements as in the picture (I).
- Take PUNGENT PERFUME and SUITCASE AMULETS 1/2 (J).
- Go back.
- Play puzzle, earn SEPTUM RING (K).
- Use SEPTUM RING on the slots, take STURDY SHAWL (L).
- Go to Beckinsale’s Study.
- Use STURDY SHAWL on the beads in the fireplace, take BEADS (M).
- Go to Phoebe’s Upstairs Room.
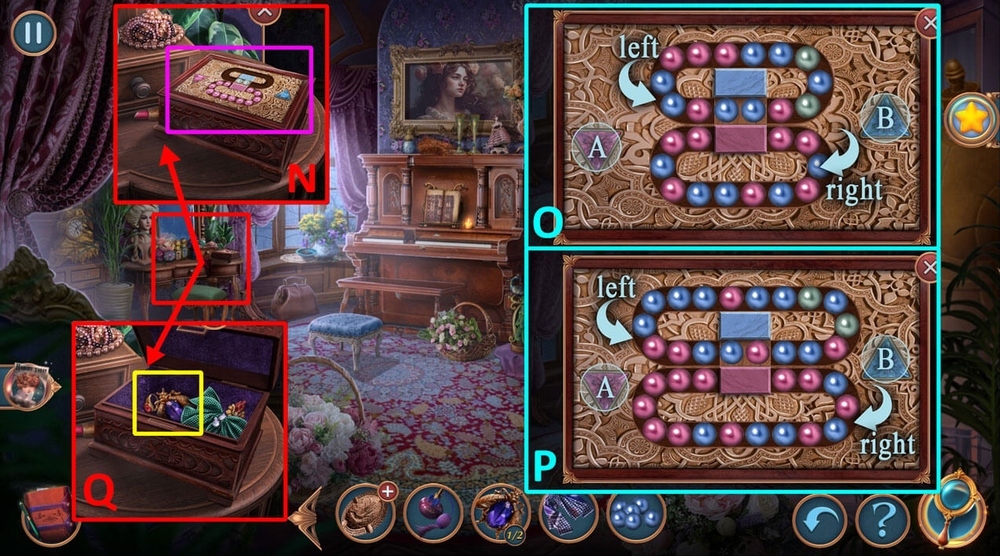
- Use BEADS on the box (N).
- Easy solution: “left” – rotate counterclockwise, “right” – rotate clockwise: right – 2 steps, A, right – 3 steps, B, right – 1 steps, A, right – 1 steps, B, right – 2 steps, A, left – 1 steps, B, right – 2 steps, A, right – 1 steps, B, right – 2 steps, A, right – 2 steps, B, left – 6 steps, A, right – 2 steps, B, left – 4 steps, A, right – 1 steps, B, left – 2 steps, A, right – 1 steps, B, right – 2 steps, A, left – 2 steps, B, right – 5 steps, A, left – 1 steps, B, right – 1 steps, A, left – 1 steps, B, right – 1 steps, A (O).
- Hard solution: “left” – rotate counterclockwise, “right” – rotate clockwise: left – 3 steps, A, left – 4 steps, B, right – 4 steps, A, left – 1 steps, B, right – 3 steps, A, left – 3 steps, B, right – 6 steps, A, left – 4 steps, B, right – 5 steps, A, right – 1 steps, B, left – 5 steps, A, right – 3 steps, B, left – 1 steps, A, right – 1 steps, B, left – 1 steps, A, right – 1 steps, B (P).
- Take SUITCASE AMULETS 2/2 (Q).
- Use SUITCASE AMULETS 2/2 on the suitcase, earn CODE (R).
- Easy solution: Press the buttons in this order: C, A, B, C, C, B, B, A, C, C, C (S).
- Hard solution: Press the buttons in this order: A, C, C, A, C, A, C, A, A, A, A, C, A, A, A, A, A, C, C, A, A, C, C, A, A, C, C, C (T).
- Take and open HEART CHAIN, take and read the note, take TICKETS (U).
- Use STURDY SHAWL on prickly bush, take REVOLVER, BOARDS 1/3 and MELINDA’S TRUNK KEYS (V).
- Use MELINDA’S TRUNK KEYS on the trunk key hole (W).
- Play puzzle, earn CROWBAR (X).
- Use CROWBAR on the car door, use PUNGENT PERFUME on Melinda (Y).
- Select 1 or 2, earn DETECTIVE ID (Z).
- Give the man DETECTIVE ID (A).
- Go to Train Station.
- Take LADDER (B).
- Take BOARDS 2/3 (C).
- Take NAILS, use HEART CHAIN on the suitcase, take SCREWDRIVERS and HAND DRILL, earn HEART CHAIN (D).
- Use HAND DRILL on the ASHTRAY, earn ASHTRAY WITH HOLE (E).
- Use ASHTRAY WITH HOLE on the baggage trolley, take HOT DOG (F).
- Use NAILS on LADDER (G).
- Go back.
- Use HOT DOG on the angry dog, take THIN BROOCH (H).
- Use THIN BROOCH on Melinda’s bag (I).
- Easy solution: Align all pins as shown in the picture (J).
- Hard solution: Align all pins as shown in the picture (K).
- Take MATCHES and CHISEL (L).
- Go to Train Station.

- Use CHISEL on the brick in the wall, earn BRICK (M).
- Use BRICK on LADDER (N).
- Go back.

- Play puzzle, earn SHOVEL (O).
- Use SHOVEL on the pile of dirt, take HANDLESS STRING SAW and OPENER (P).
- Go to Train Station.
- Use OPENER on the nails in the bench, take BOARDS 3/3 (Q).
- Use BOARDS 3/3 on LADDER, earn LADDER (R).
- Use LADDER on clock post, take PIECE OF PAPER, use SCREWDRIVERS on the screws (S).
- Solution: Press the buttons in this order: A, C, A, A, C, A, A, A, A, A, A, A, C, A, A (T).
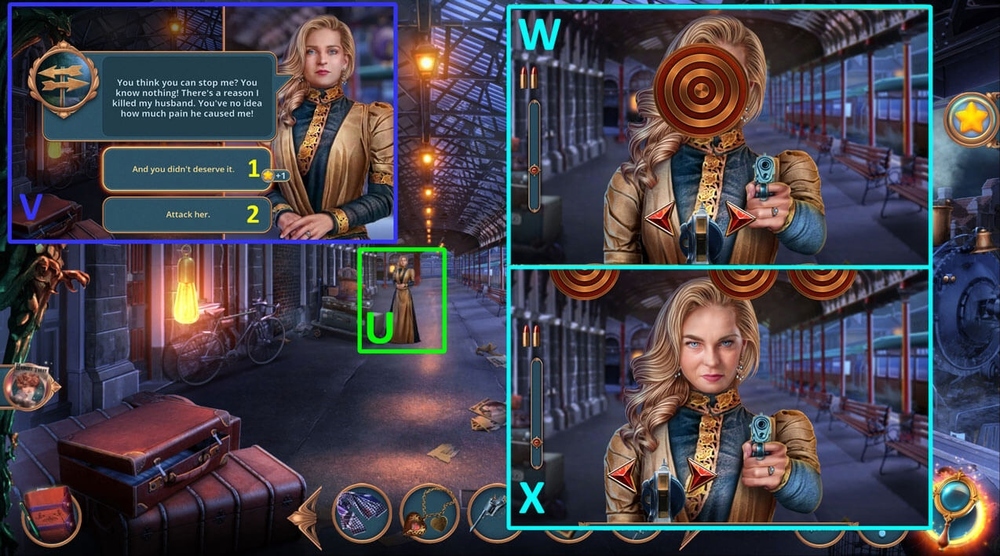
- Use REVOLVER on Phoebe (U).
- Select 1 or 2 (V).
- Easy solution: Use the arrows to move in three positions and avoid colliding with targets.
- If you collide with a target, you will take one shot and lose one bullet (W).
- Hard solution: Use the arrows to move in three positions and avoid colliding with targets.
- If you collide with a target, you will take one shot and lose one bullet (X).
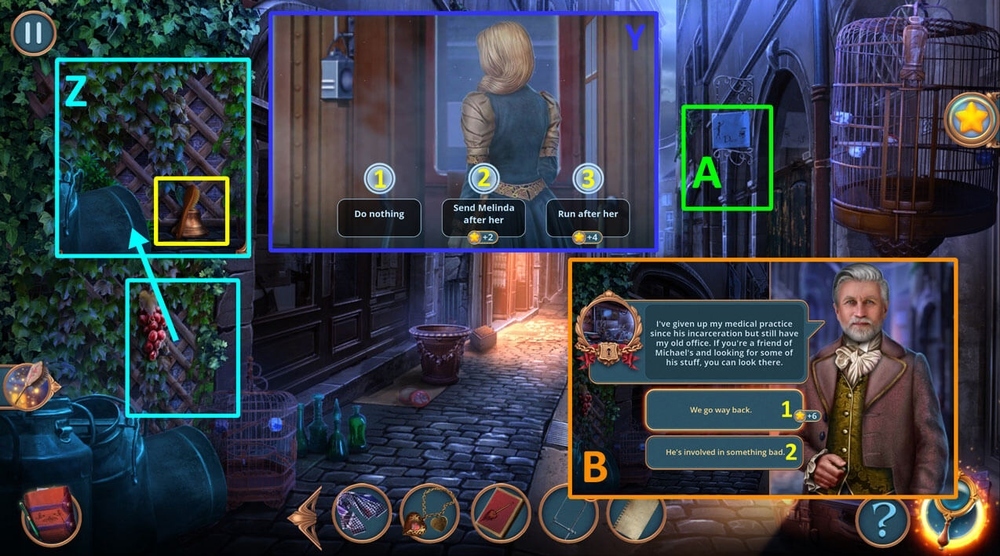
- Select 1, 2 or 3 (Y).
- Take BRUSH and BELL (Z).
- Use BELL on the shop sign (A).
- Select 1 or 2 (B).
- Go to Old Office.
- Use HEART CHAIN on the box, read the note, take VIALS 1/2, CIGAR CASE and DOME HANDLE (C).
- Use DOME HANDLE on the glass dome, take CORKSCREW and STRANGE FLOWER SEEDS (D).
- Use STRANGE FLOWER SEEDS on the table cloth (E).
- Go back.
- Take IRON ROD (F).
- Use STURDY SHAWL on the grid, use CORKSCREW on the box,take METAL CADUCEUS FIGURINE (G).
- Use IRON ROD on the grid, take BELT and ROUND DOOR HANDLE.
- Go to Old Office.
- Use METAL CADUCEUS FIGURINE on the column, take AWL (I).
- Use AWL on CIGAR CASE, take CIGAR CLIP (J).
- Use CIGAR CLIP on the box, take VIALS 2/2 and POUCH (K).
- Use VIALS 2/2 on the table (L).
- Go back to the street.
- Use ROUND DOOR HANDLE on the hole in the door (M).
- Easy solution: Place the handle in the correct position as in the picture.
- Then turn the ring counterclockwise (N).
- Hard solution: Place the handle in the correct position as in the picture.
- Then turn the ring counterclockwise (O).
- Go inside of Old House.
- Use PIECE OF PAPER and LIPSTICK on the symbols, earn IMPRINT, take SAW HANDLE (P).
- Use SAW HANDLE on HANDLESS STRING SAW, earn STRING SAW (Q).
- Use STRING SAW on the boards (R).
- Use IMPRINT on the symbols (S).

- Easy solution: The correct order of elements is shown in the picture, take LEATHER STRIP (T).
- Hard solution: The correct order of elements is shown in the picture, take LEATHER STRIP (U).
- Use LEATHER STRIP and BELT on the pipe, take SECATEURS (V).
- Use BRUSH on the rust stain, use POUCH on the white powder, earn POWDER IN POUCH (W).
- Go to Old Office.
- Use POWDER IN POUCH on the table (X).
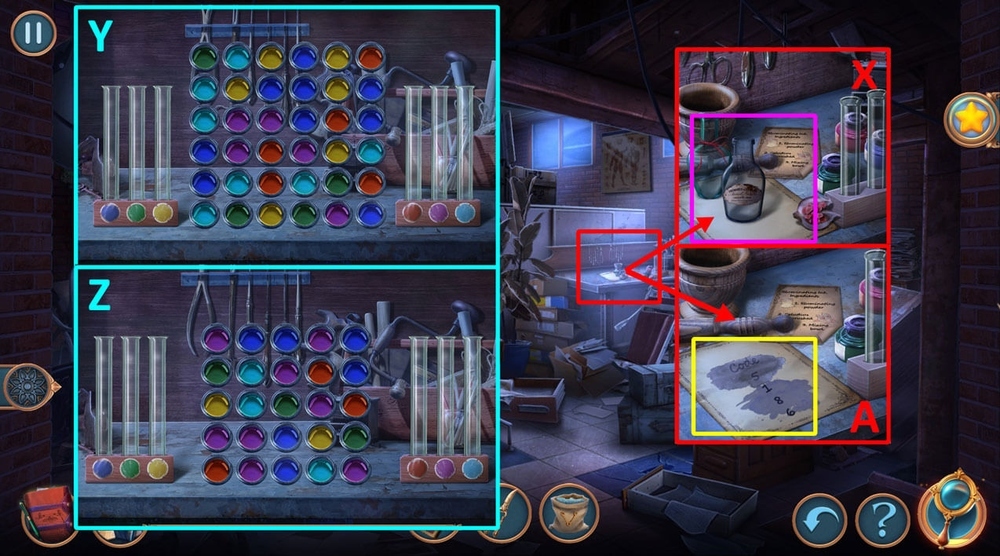
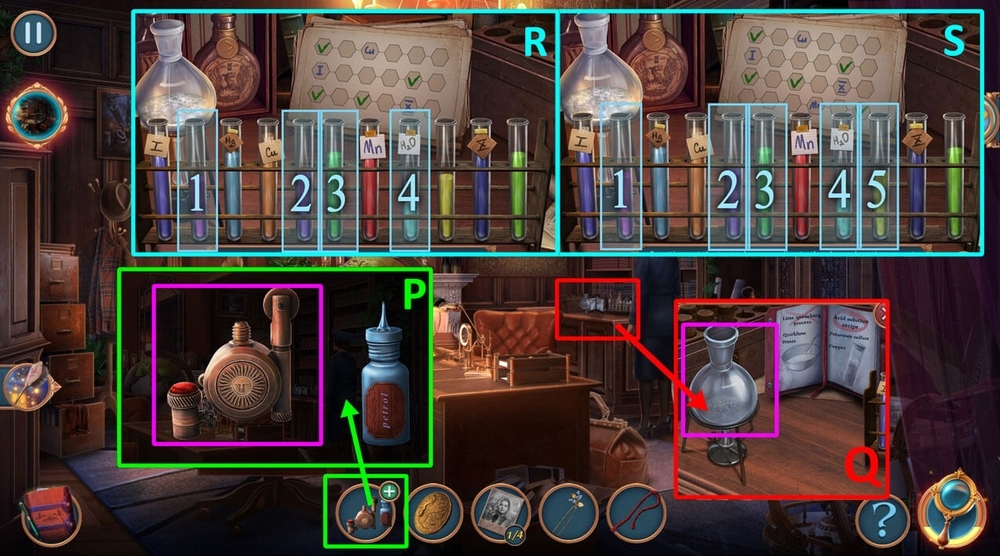
- Easy solution: Combining at least three of each of the same colors of different powders, fill the tubes with ink.
- Get the ink on the left before the waste tubes on the right are filled (Y).
- Hard solution: Combining at least three of each of the same colors of different powders, fill the tubes with ink.
- Get the ink on the left before the waste tubes on the right are filled (Z).
- Earn SAFE CODE (A).
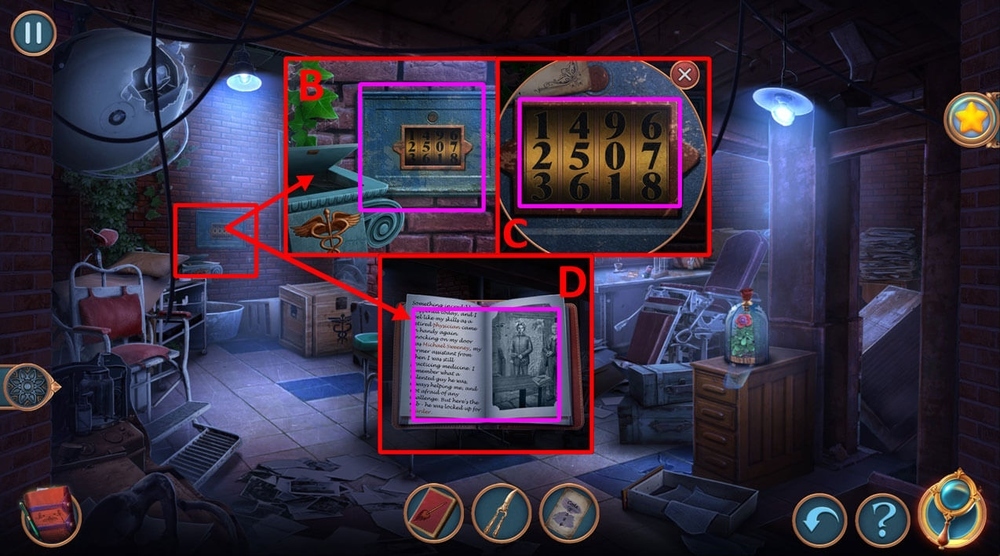
- Use SAFE CODE on the safe (B).
- Enter the code: 5186 (C).
- Play puzzle (D).
- Go back.
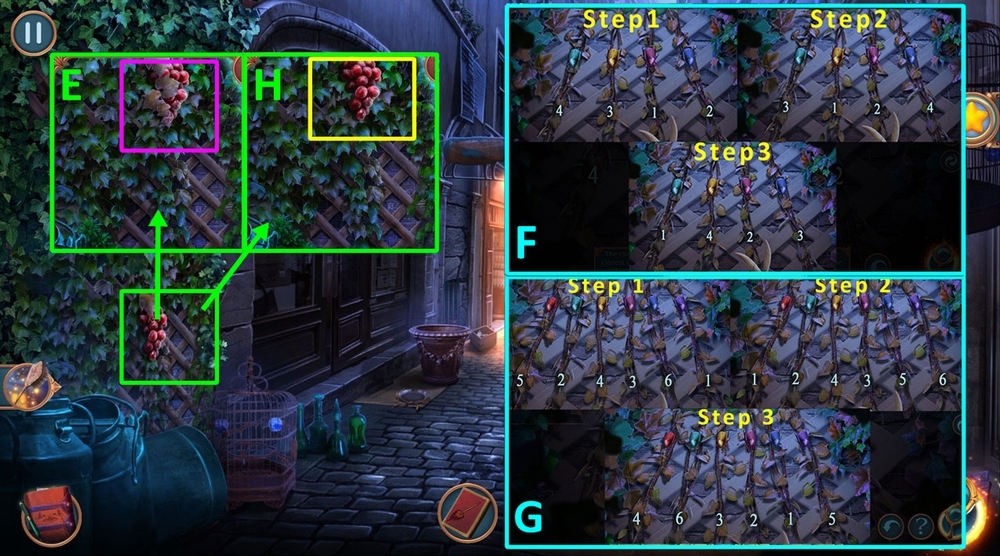
- Use SECATEURS on the grape vines (E).
- Easy solution: Cut the vines in the proper order, step 1, step 2, step 3 (F).
- Hard solution: Cut the vines in the proper order, step 1, step 2, step 3 (G).
- Take GRAPE (H).
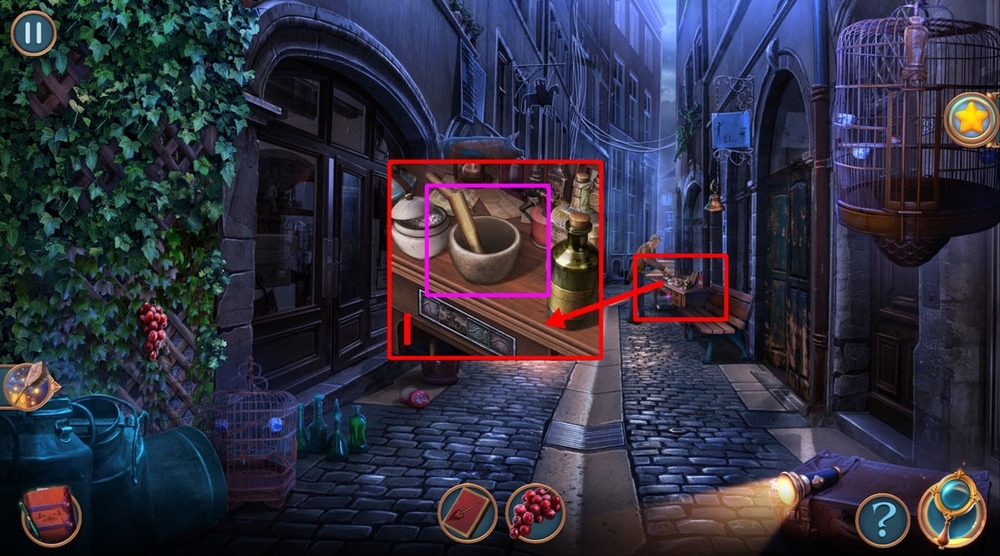
- Use GRAPE on the mortar and pestle, take VINEGAR (I).
- Go inside of Old House.
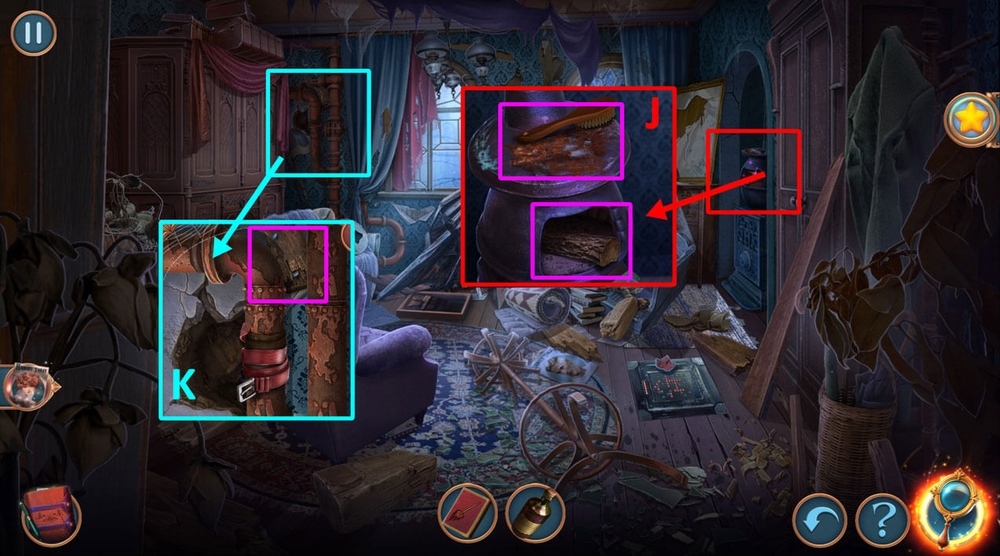
- Use VINEGAR on the rust, take ALUMINUM PLATE and COMB, use MATCHES on firewood in the furnace (J).
- Use COMB on the nails in the old plank, take COMPLEX LOCK PART (K).
- Go back.
- Use COMPLEX LOCK PART on the lock on the drawer (L).
- Solve the puzzle, take TIN (M).
- Go inside of Old House.
- Use TIN on the stove (N).
- Take BROKEN PIECE OF MOSAIC (O).
- Use ALUMINUM PLATE on BROKEN PIECE OF MOSAIC, earn ALUMINUM MOLD (P).
- Use ALUMINUM MOLD on the stove, take PART OF HATCH MOSAIC (Q).
- Use PART OF HATCH MOSAIC on the slot in the hatch (R).
- Solution: Use the picture as a hint (S).
- Take and read passports (T).
- Take FORENSICS KIT.
- Take EMPTY LIGTHER and CHESS PIECES 1/2 (A).
- Use FORENSICS KIT on the crime scene (B).
- Play puzzle, earn MINIBAR KEY (C).
- Use MINIBAR KEY on the lock, take DOOR HANDLE (D).
- Use DOOR HANDLE on the door (E).
- Go to VIP Room.
- Take BRUSH and ROULETTE PARTS (F).
- Use ROULETTE PARTS on roulette (G).
- Easy solution: Follow the hint and select the colors you need (H).
- Hard solution: Follow the hint and select the colors you need (I).
- Take COIN and CUE BALL (J).
- Go back.
- Use CUE BALL on the balls, take CHESS PIECES 2/2 (K).
- Use CHESS PIECES on the game board (L).
- Easy solution: Choose dice with a sum of numbers in this order: 4, 11, 12, 2, 9, 7, 3, 6, 10 (M).
- Hard solution: Choose dice with a sum of numbers in this order: 4, 11, 12, 2, 9, 7, 3, 6, 3, 11, 8 (N).
- Take PETROL and SIGNET RING (O).
- Use PETROL on EMPTY LIGHTER (P).
- Go to VIP Room.
- Use SIGNET RING on the slot in the fireplace grate, take EAR TUBE and BIRD PATTERNS 1/2 (Q).
- Go back.
- Play puzzle (R).
- Select 1 or 2, earn MELINDA’S SWISS KNIFE (S).
- Use MELINDA’S SWISS KNIFE on the staples, take LIPSTICK (T).
- Go to VIP ROOM.
- Use LIPSTICK on the wallet, take BIRD PATTERNS 2/2 (U).
- Use BIRD PATTERNS on the tangled ropes (V).
- Easy solution: Start with the birds that are at the bottom and gradually move to the top.
- It should look like in the picture (W).
- Hard solution: Start with the birds that are at the bottom and gradually move to the top.
- It should look like in the picture (X).
- Take the journal, read the journal, take and read the note (Y).
- Select 1 or 2 (Z).
- Go to Detective’s Archive.
- Take TYPEWRITER BUTTON and MASK PART (A).
- Use MASK PART on the other mask parts on the table (B).
- Use COIN on the screws on the box, take LITTLE KEY,use TYPEWRITER BUTTON on the typewriter (C).
- Use LITTLE KEY on the box, take OPENER (D).
- Go back.
- Use EAR TUBE on the safe (E).
- Take TUBE and OLD CASE EVIDENCE 1/4 (F).
- Use BRUSH and TUBE on the edge of the globe, earn CHEMICAL POWDER (G).
- Click on and use OPENER on the blue bottle, earn PAINT (H).
- Use PAINT on mask parts (I).
- Easy solution: Use the picture as a reference (J).
- Hard solution: Use the picture as a reference (K).
- Take COLORED MASK (L).
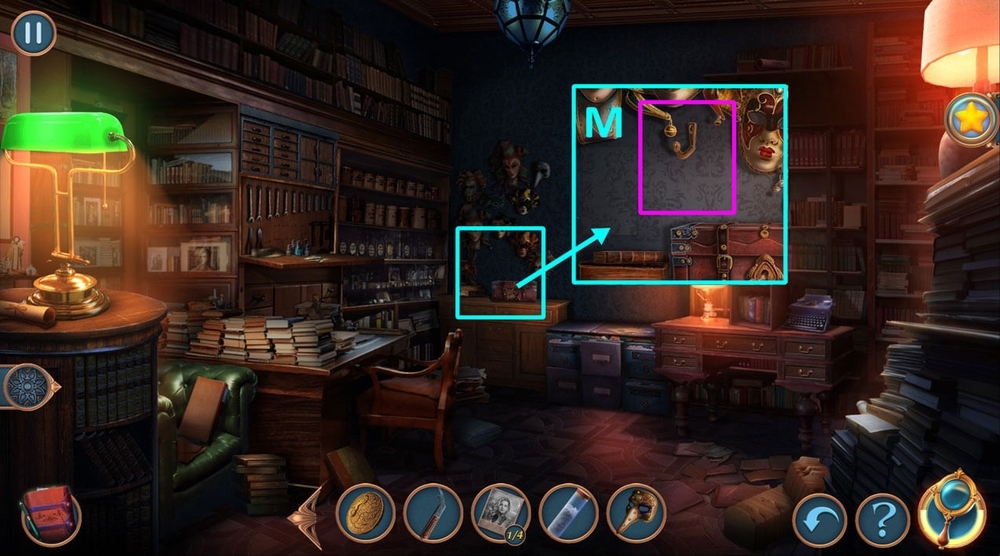
- Use COLORED MASK on the hook, take THIN GOLD BARRETTE (M).
- Go back.
- Use CHEMICAL POWDER on the flask (N).
- Use MELINDA’S SWISS KNIFE on the red threads, earn WICK (O).
- Use WICK on the EMPTY LIGHTER, earn LIGHTER (P).
- Use LIGTHER on the flask, earn LIGHTER (Q).
- Easy solution: Use the picture as a hint (R).
- Hard solution: Use the picture as a hint (S).
- Take ACID SOLUTION.
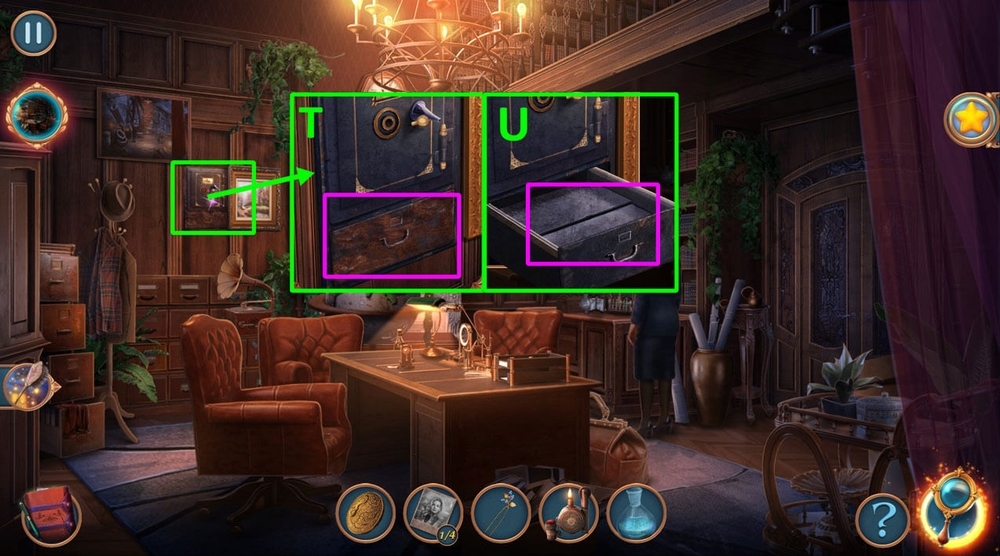
- Use ACID SOLUTION on the rusted drawer, take OLD CASE EVIDENCE 2/4, LONG CHAIN and WOODEN CONTINENT (T).
- Use THIN GOLD BARRETTE on the gap in the drawer, take ROLLER (U).
- Go to Detective’s Archive.
- Use ROLLER on the typewriter, type in: CECILE, take PRINTED CODE (V).
- Use PRINTED CODE on the filing cabinet, read the case report, play puzzle (W).
- Go back.
- Use WOODEN CONTINENT on the globe, press: green, brown, violet continents, take ROPE, OLD CASE EVIDENCE 3/4 and SAFE BUTTON (X).
- Use SAFE BUTTON on the safe (Y).
- Easy solution: Press the buttons in this order: A, C, C, A, B, B, B, A, B, A, C, C, C, A, C, C, A (Z).
- Hard solution: Press the buttons in this order: A, C, C, D, C, A, B, B, D, A, B, B, A, D, B, A, B, D, B, A, B, B, D, B, B, D (A).
- Take NEEDLE AND THREAD and OLD CASE EVIDENCE 4/4 (B).
- Use OLD CASE EVIDENCE on the board (C).
- Solution: Repeat the order as shown in the picture (D).
- Select 1 or 2 (E).
- Use LIGHTER on the key stuck in the drawer’s lock (F).
- Use ROPE on the curtain (G).
- Take MAGNET (H).
- Use MAGNET on the sink, earn CURTAIN WEIGHT (I).
- Use CURTAIN WEIGHT on the curtain (J).
- Easy solution: Repeat the order of pressing the weights as shown in the picture (K).
- Hard solution: Repeat the order of pressing the weights as shown in the picture (L).
- Go to Staff Room.
- Take SLINGSHOT and DRESSER KEY (M).
- Use DRESSER KEY on the dresser’s lock (N).
- Play puzzle, earn LUXURY BELT (O).
- Use NEEDLE AND THREAD and LUXURY BELT on the holes in the drawer, take NARROW RULER and ANCHOR BROOCH (P).
- Use ANCHOR BROOCH on LONG CHAIN, earn ANCHOR PENDANT (Q).
- Go back.
- Use ANCHOR PENDANT on the sink, take BRUSH (R).
- Use BRUSH on the shards, take HACKSAW (S).
- Go to Staff Room.
- Use HACKSAW on the hook with rope, earn SHOEHORN (T).
- Use SHOEHORN on the tree outside, earn BALLERINA FIGURINE (U).
- Go back.
- Use BALLERINA FIGURINE on the music box (V).
- Easy solution: Start moving your limbs from the wrist to the elbow, repeat the pose shown in the picture (W).
- Hard solution: Start moving your limbs from the wrist to the elbow, repeat the pose shown in the picture (X).
- Take CANDLE (Y).
- Use CANDLE on the key stuck in the drawer’s lock, take SMELLING SALTS and LOCK PART (Z).
- Go to Staff Room.
- Play puzzle, earn MICHAEL’S BRACELET (A).
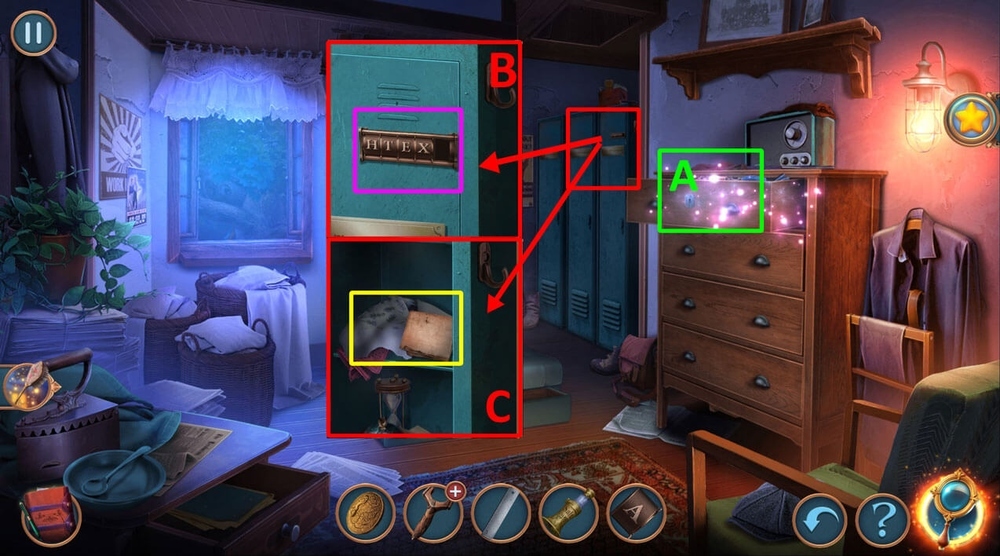
- Use MICHAEL’S BRACELET and LOCK PART on the letter code on the locker (B).
- Take and read the note, take and unwrap MICHAEL’S GUN and TOWEL (C).
- Go back.
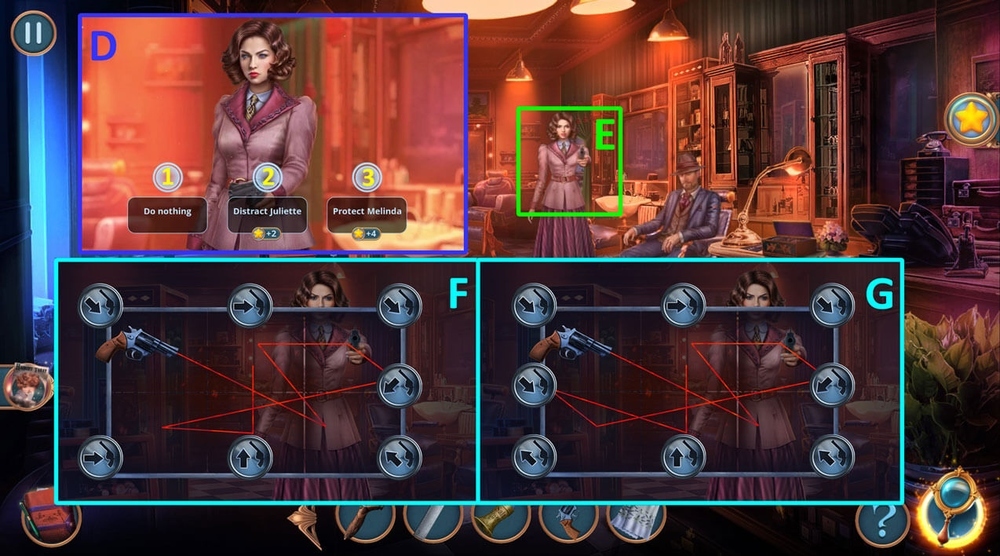
- Select 1, 2 or 3 (D).
- Use MICHAEL’S GUN on Juliet (E).
- Easy solution: Place the arrows as shown in the picture (F).
- Hard solution: Place the arrows as shown in the picture (G).
- Use SMELLING SALTS on Theo (H).
- Use TOWEL on the water, earn WET TOWEL (I).
- Use WET TOWEL on Theo (J).
- Solution: Use the picture as a hint to assemble the picture (K).
- Solution: Use the picture as a hint to assemble the picture (L).
- Solution: Use the picture as a hint to assemble the picture (M).
- Select 1 or 2, take MAZE MAP (N).
- Take SELF-MADE PADDLE, RESIN and MAZE GATE KEY (O).
- Use COIN on SELF-MADE PADDLE (P).
- Use MAZE GATE KEY on the gates’ lock, use MAZE MAP on the open gate (Q).
- Easy solution: Repeat the path from the picture (R).
- Hard solution: Repeat the path from the picture (S).
- Use RESIN on the holes in the boat, take SLACKING GNOME and PEBBLE (T).
- Use PEBBLE on SLINGSHOT (U).
- Use NARROW RULER on the door, take ELASTIC BAND (V).
- Use ELASTIC BAND on the SLINGSHOT, earn SLINGSHOT (W).
- Use SLINGSHOT on the nest in the tree (X).
- Take FEATHER PEN (Y).
- Use FEATHER PEN on the chest’s lock, take VALVE (Z).
- Go back.

- Use VALVE on the pipes (A).
- Easy solution: Position the valves as shown in the picture (B).
- Hard solution: Position the valves as shown in the picture (C).
- Take BLUNT KNIFE (D).
- Use BLUNT KNIFE on the sharpening wheel, earn SHARP KNIFE (E).
- Go to Bay Area.
- Use SHARP KNIFE on the tangled net, take TROWEL (F).
- Use TROWEL on the dirt, take PITCHFORK (G).
- Use PITCHFORK on SLACKING GNOME (H).
- Go back.
- Use SLACKING GNOME on footprints (I).
- Solution: Repeat the numbers shown in the picture (J).
- Take SCREW and SUNFLOWER SEEDS (K).
- Use SCREW on the SELF-MADE PADDLE (L).
- Use SUNFLOWER SEEDS on the bird, take METAL SCISSORS (M).
- Go to Bay Area.
- Use METAL SCISSORS on the metal cabinet, earn METAL PLATE (N).
- Use METAL PLATE on the SELF-MADE PADDLE, earn PADDLE (O).
- Use SELF-MADE PADDLE on the boat’s oarlock (P).
- Easy solution: You need to guess the right time to start moving: 2, 2, 2 (Q).
- Hard solution: You need to guess the right time to start moving: 2, 1, 3 (R).
- Walkthrough Bonus Chapter, at the link below.


