
Crossroads 2: Escaping the Dark – It all starts on a familiar note with a session with a therapist. Your character, Sterling, has been trying to cope with trauma for two years. Another conversation with the doctor promises to be important, because now you have to pass a simple but very personal test. You’ll have to choose the images that cause you anxiety and honestly admit what scares you the most. The therapeutic conversation abruptly ends, leaving you with a feeling of incompleteness. That’s when everything changes. You find yourself in a strange place a bar called The Crossroads. Here you are greeted by Ms. Eve, a confident bartender who seems to know you better than you know yourself. She claims that the bar only attracts those who are lost in their lives and suggests you play a game. This is not just entertainment it is a challenge that is designed to help you deal with your deep hidden fears. Every step in this bar becomes a kind of reflection of your anxiety. You encounter your own fears, explore them and decide whether to give in to them or try to overcome them. Ms. Eve’s approach is simple, she believes that only by facing the darkness can you find the light. From the therapist’s initial questions to the unexpected trials in the bar, the story is engaging and thought-provoking. Your decisions will determine whether you can escape from this strange place or remain a prisoner of the darkness you’ve created yourself. If you can not pass any of the puzzles or do not know where the items are, on our site you can watch the walkthrough of the game Crossroads 2: Escaping the Dark, and take the first step to freedom from the darkness.
Crossroads 2: Escaping the Dark – Walkthrough
Here you can see the full walkthrough of Crossroads 2: Escaping the Dark walkthrough, namely for all chapters, including bonus chapter, in pictures.

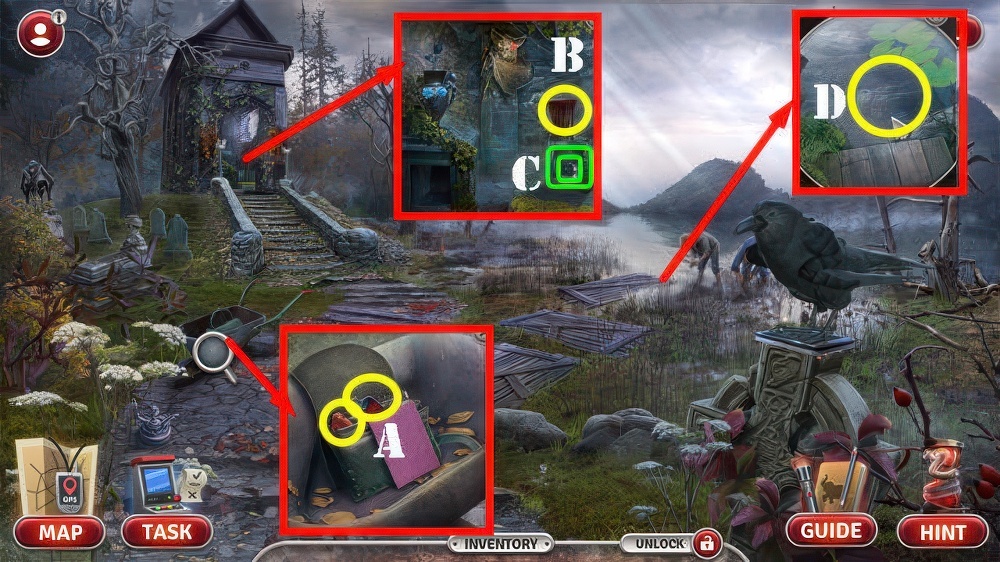
- Talk (A).
- Select either question (A1).
- Look at file (B).
- Talk again (A).
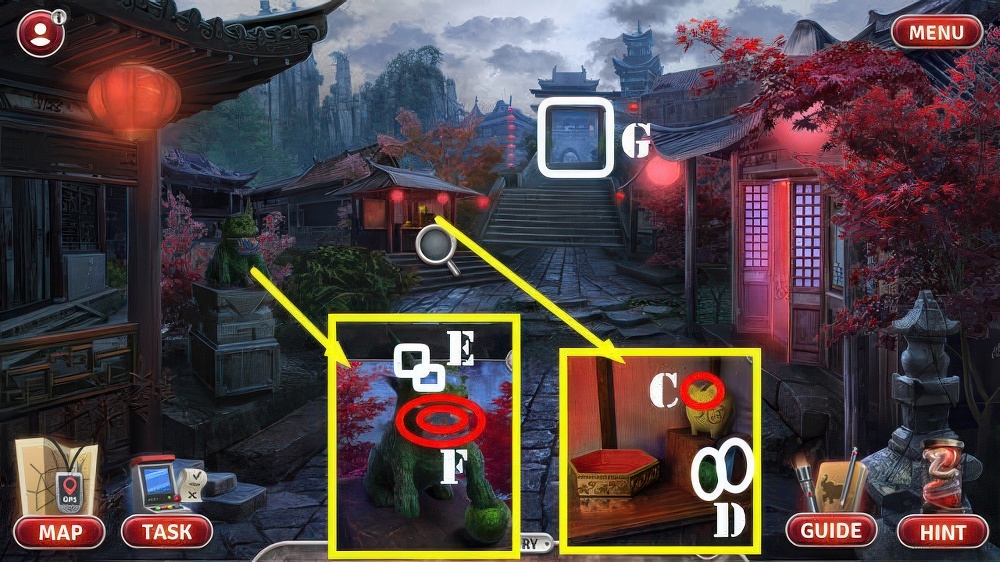
- Look at box (C).
- Select one of the two items until you run out of choices (C1).

- Select either question (D).
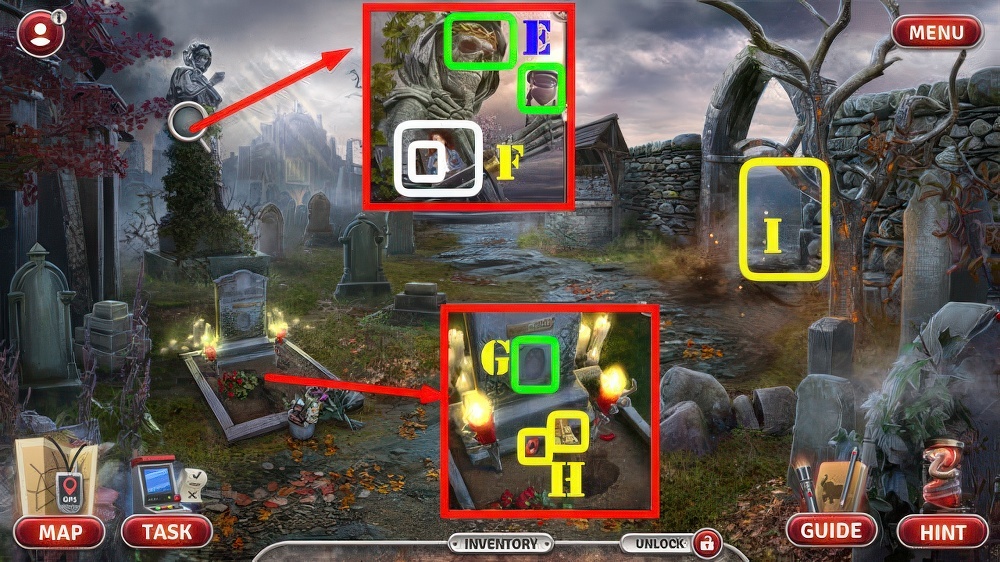
- Select either statement (E).
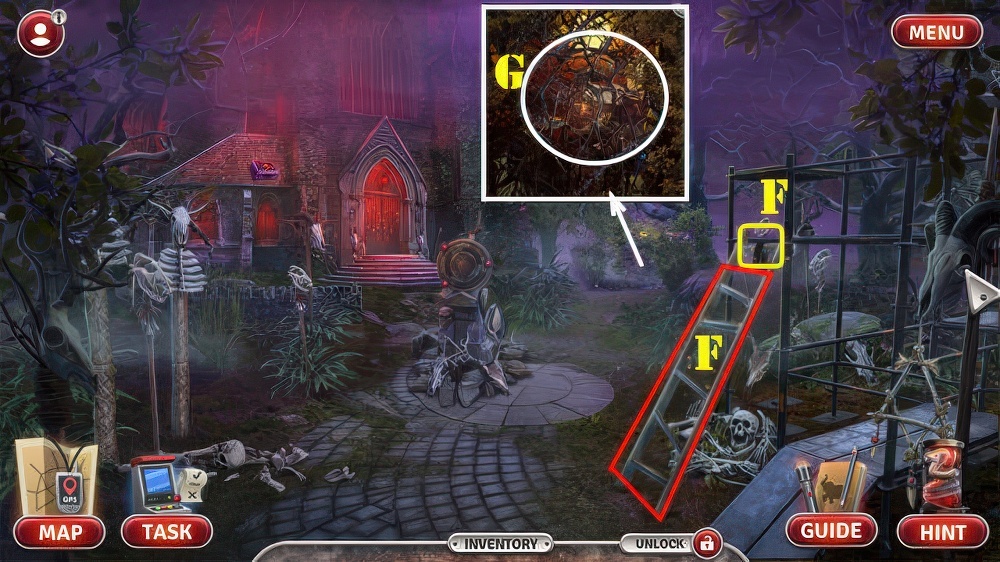
- Select console and Play Game (F).
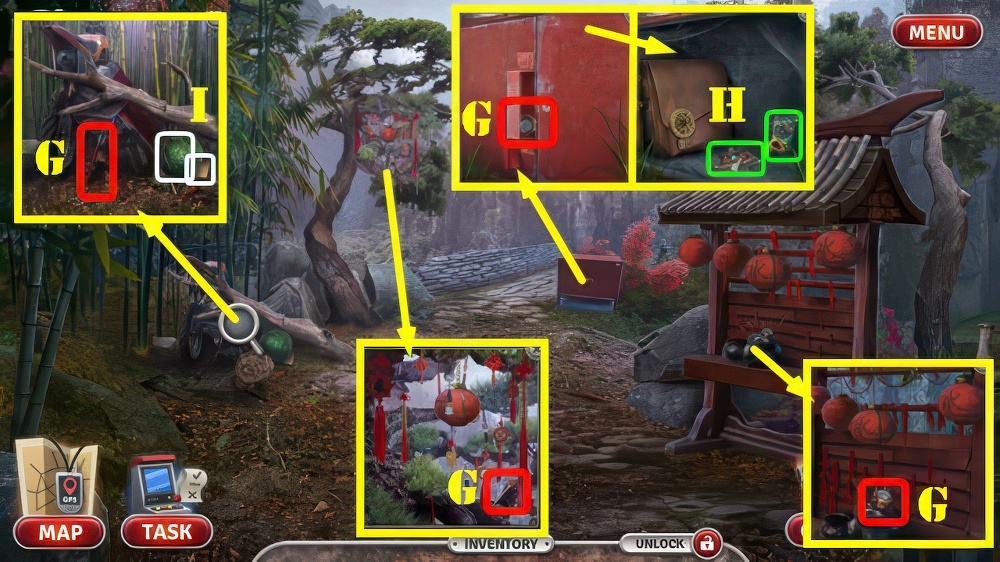
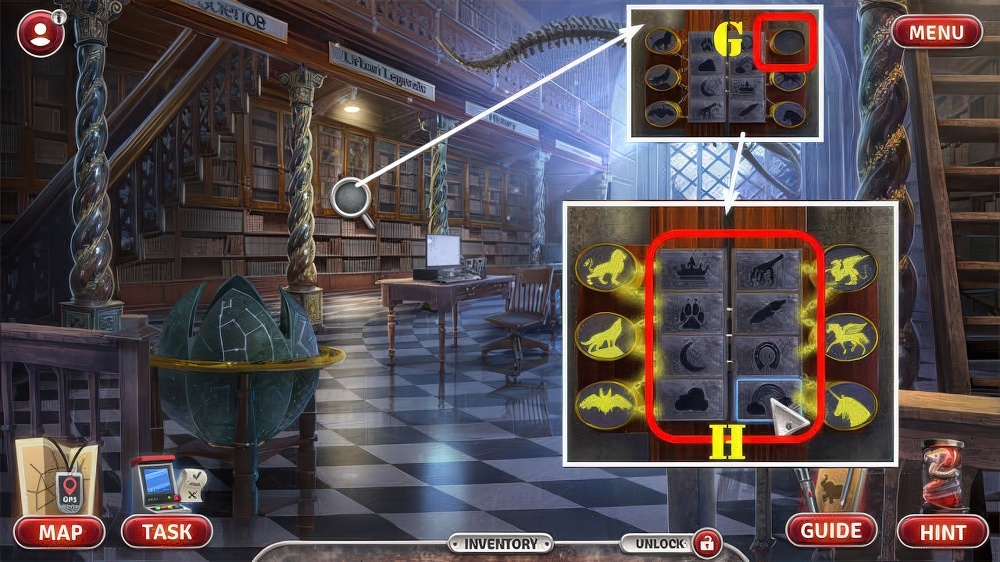
- Take INCENSE 1/2, ANCIENT TALISMAN, COMPASS BASE, and VINTAGE HAIRPIN (G).
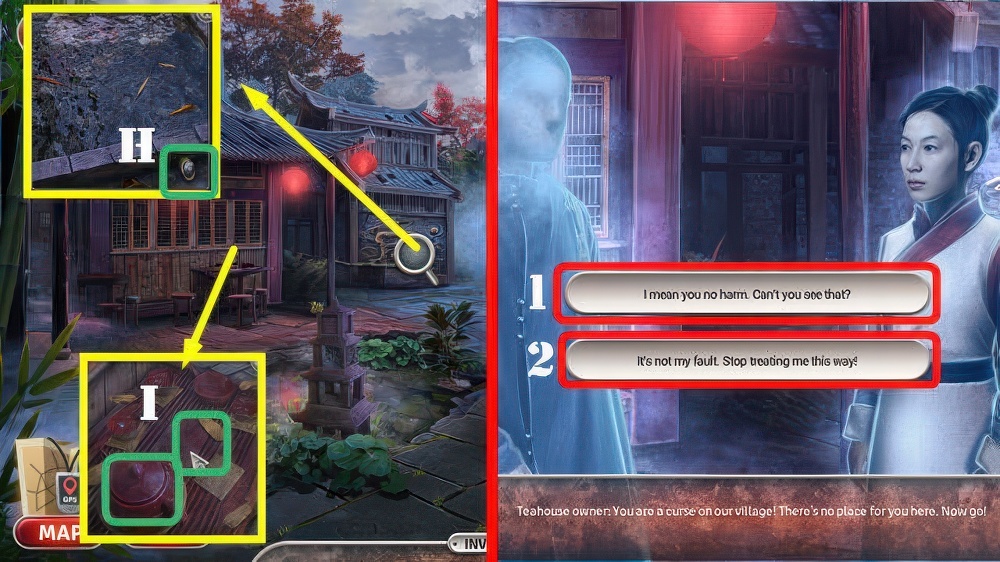
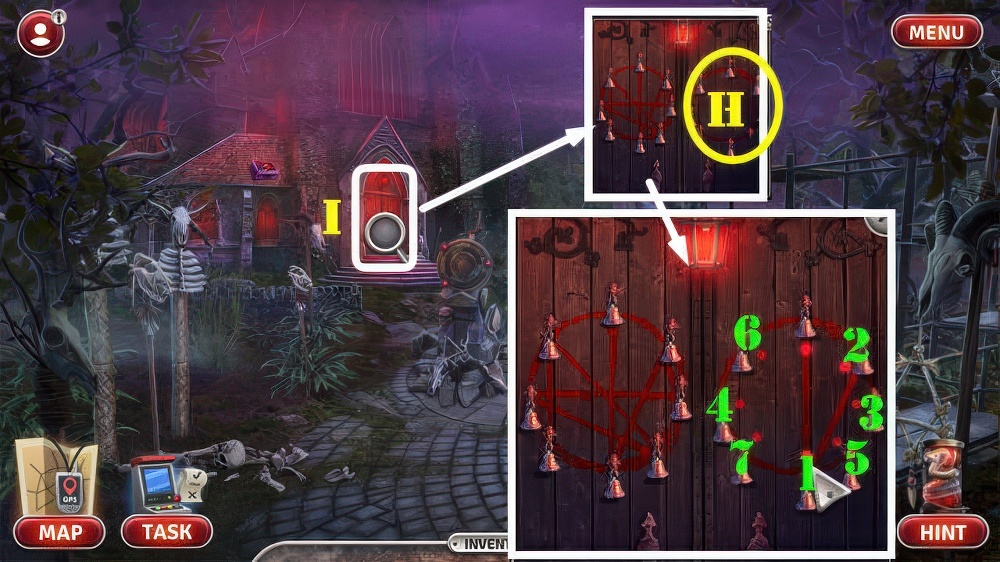
- Use VINTAGE HAIRPIN, take FLINT and SEEDS (H).
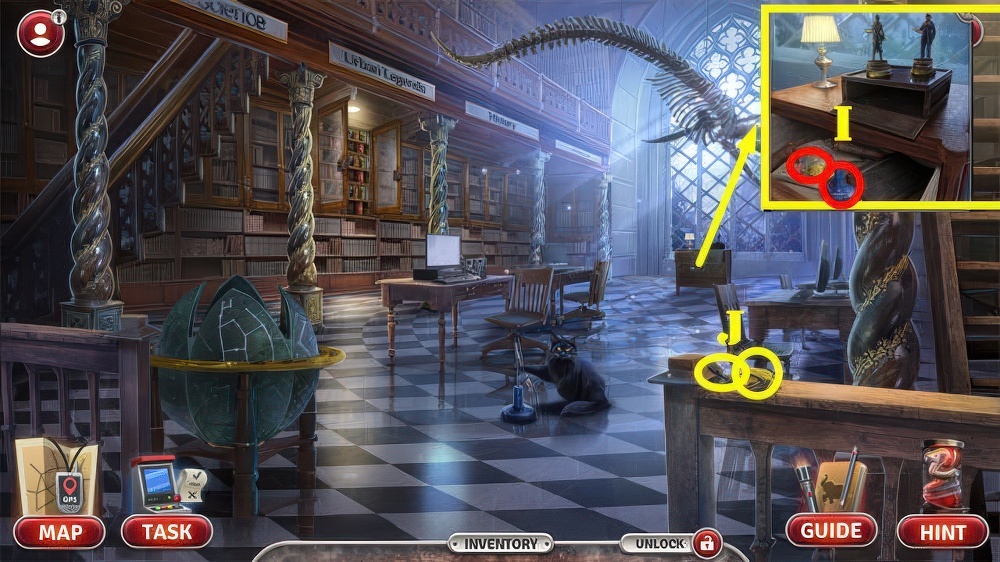
- Use SEEDS, take SHATTERED SPHERE and ANCIENT PLATE (I).

- Place ANCIENT TALISMAN and ANCIENT PLATE.
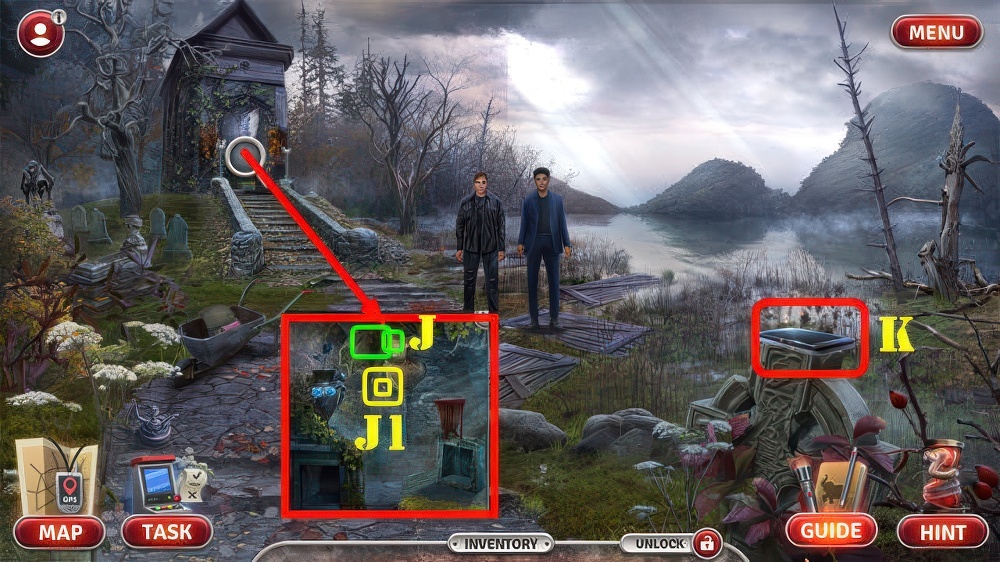
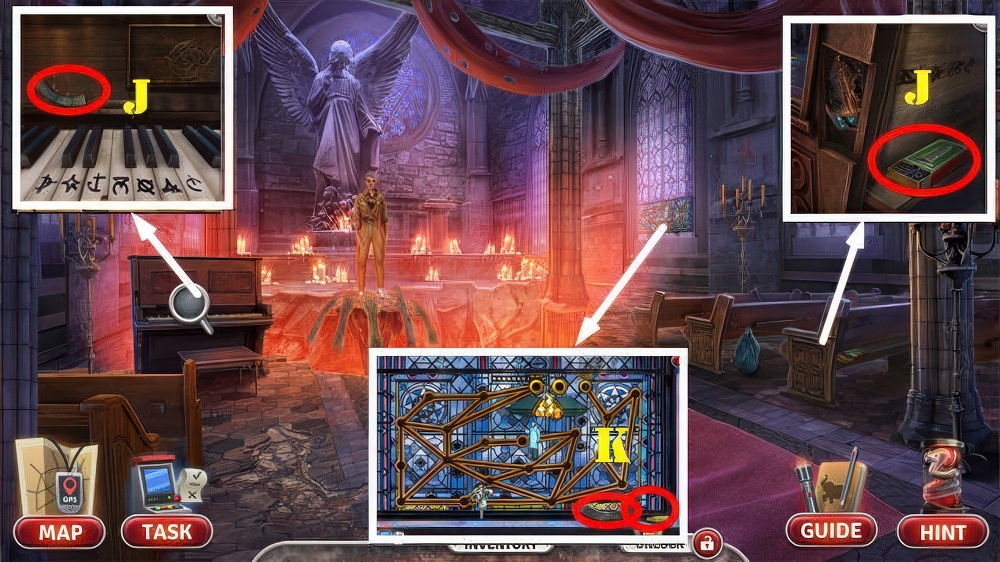
- Play puzzle (J), receive TRAVELER’S AMULET.
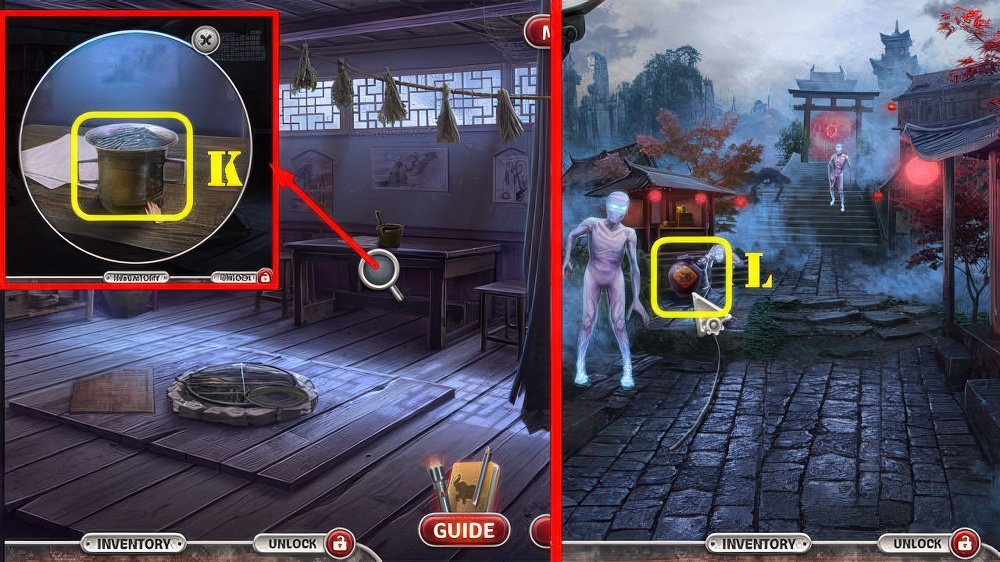
- Use TRAVELER’S AMULET and look at diary, take INCENSE 2/2 and WATER BOTTLE (K).
- Place INCENSE 2/2 and use FLINT (L).
- Take BINOCULARS and AXE (M).
- Use AXE (N), receive TREE BARK.
- Play puzzle, receive METAL FILE.

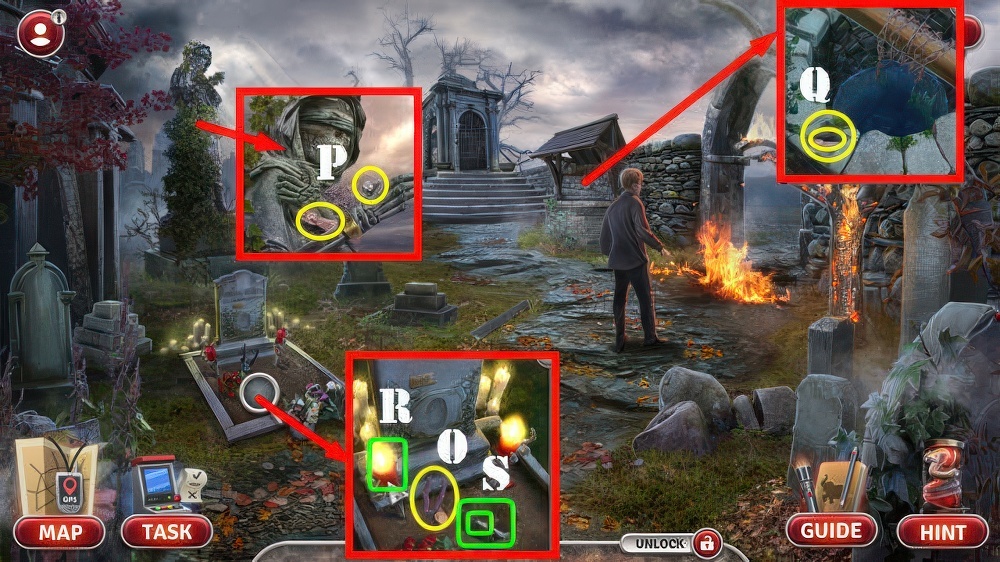
- Use METAL FILE (O), receive RED LANTERN.
- Place RED LANTERN (P).
- Take SPHERE PART 1/3 and COMPASS ARROW (Q).
- Open COMPASS BASE, use WATER BOTTLE, TREE BARK and COMPASS ARROW, take SELF-MADE COMPASS.
- Use SELF-MADE COMPASS and BINOCULARS (R).
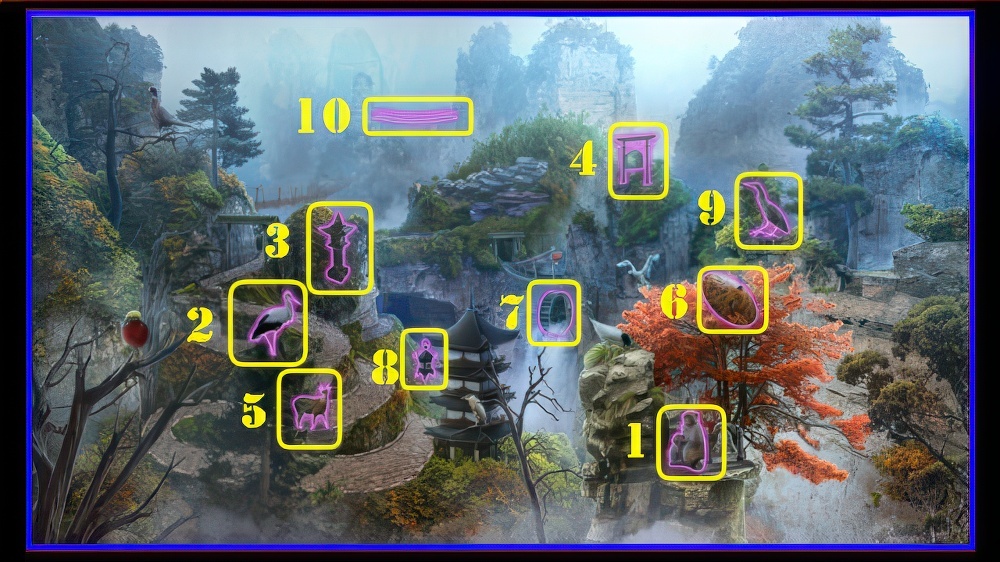
- Solution: (1-10).
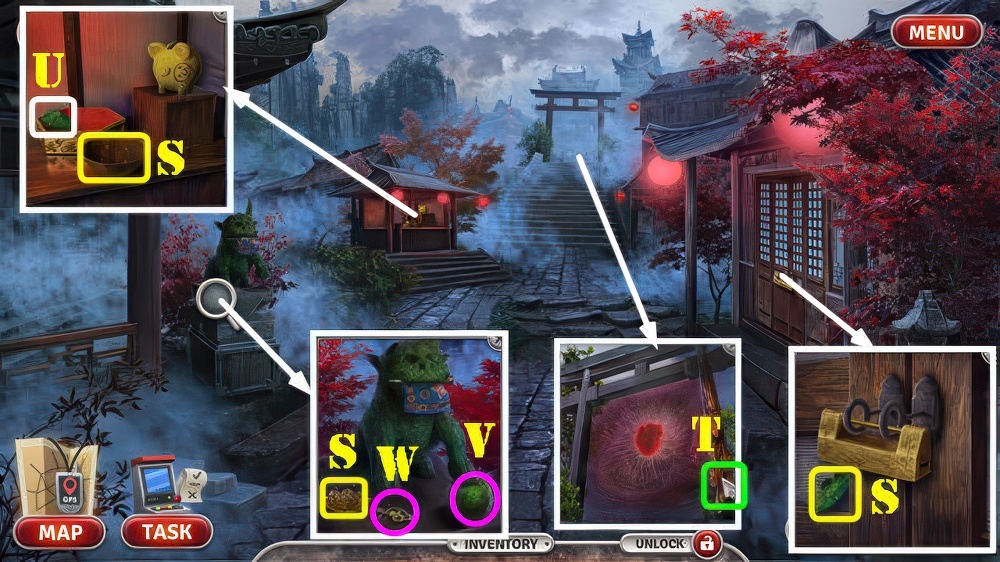
- Take SPHERE PART 2/3, BRONZE LOTUS, and WOODEN BOWL (S).
- Use WOODEN BOWL (T), receive RESIN.
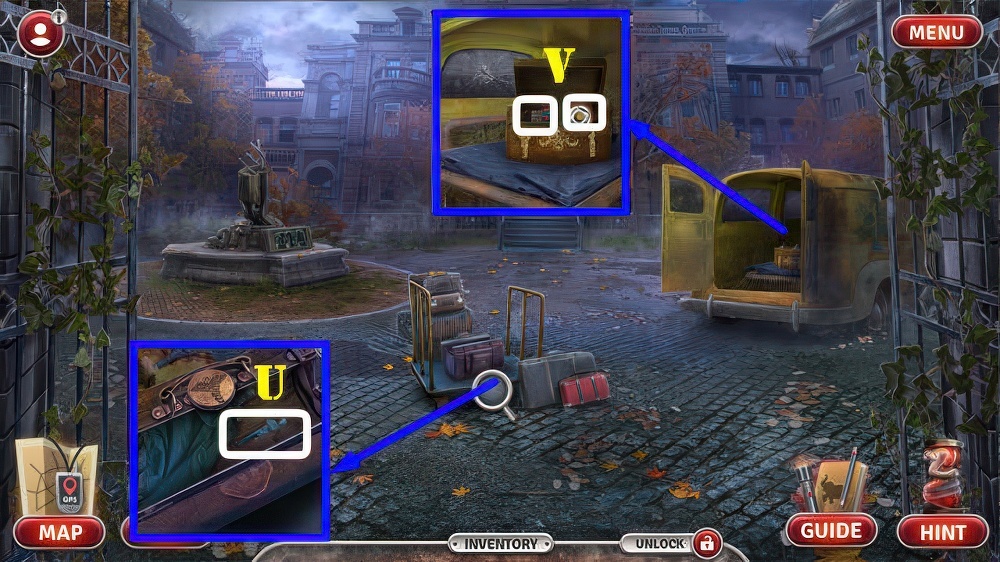
- Place BRONZE LOTUS, receive FIREWORKS RECIPE, take SPHERE PART 3/3 (U).
- SPHERE PART 3/3 and RESIN on SHATTERED SPHERE, take JADE SPHERE.
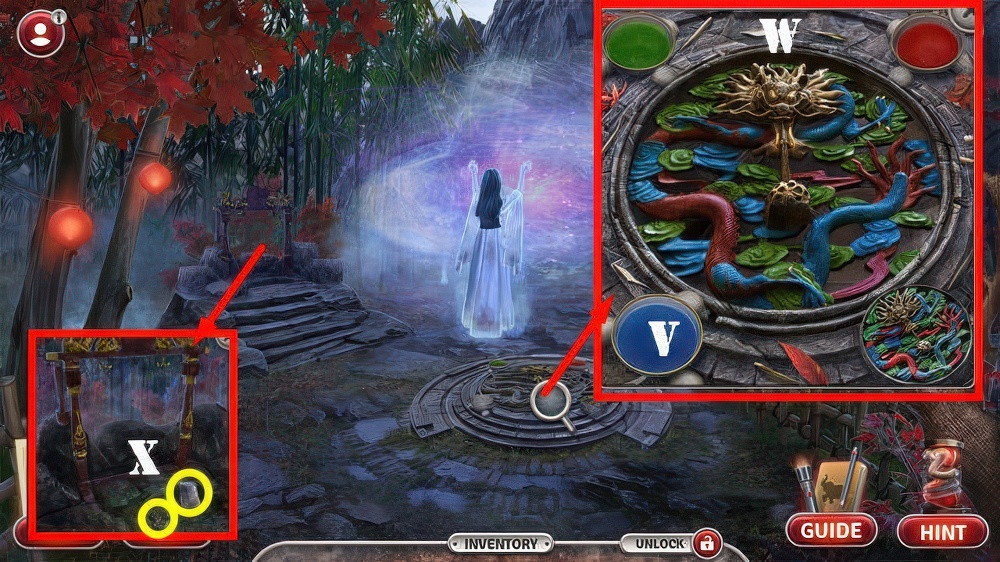
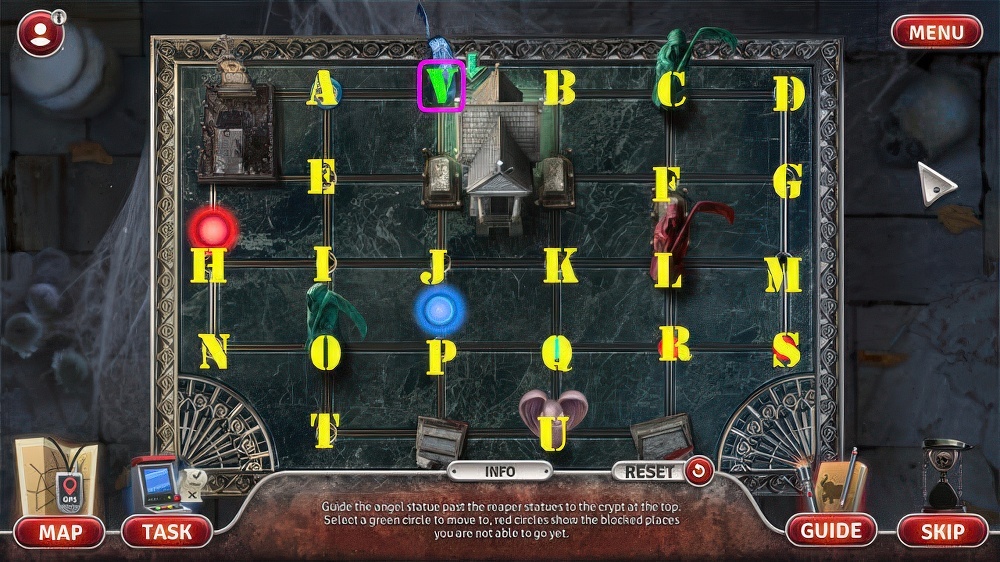
- Place JADE SPHERE (V), take WICK and HOUSE KEY (W).
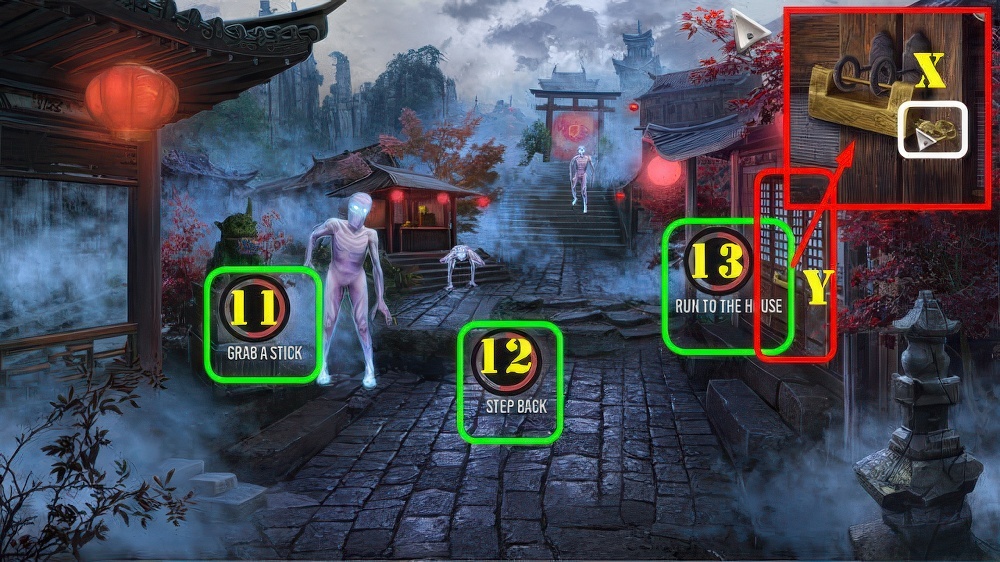
- You are faced with three choices.
- Grab a Stick, Step Back, or Run to the House.
- The choices you make throughout the game, will affect the outcome at the end.
- For the choices that affect each type of ending, please read below.
- Select Grab a Stick (11) for the best ending.
- Select Grab a Stick or Run to the House (11/13) for a normal ending.
- Select Step Back (12) for the worst ending.
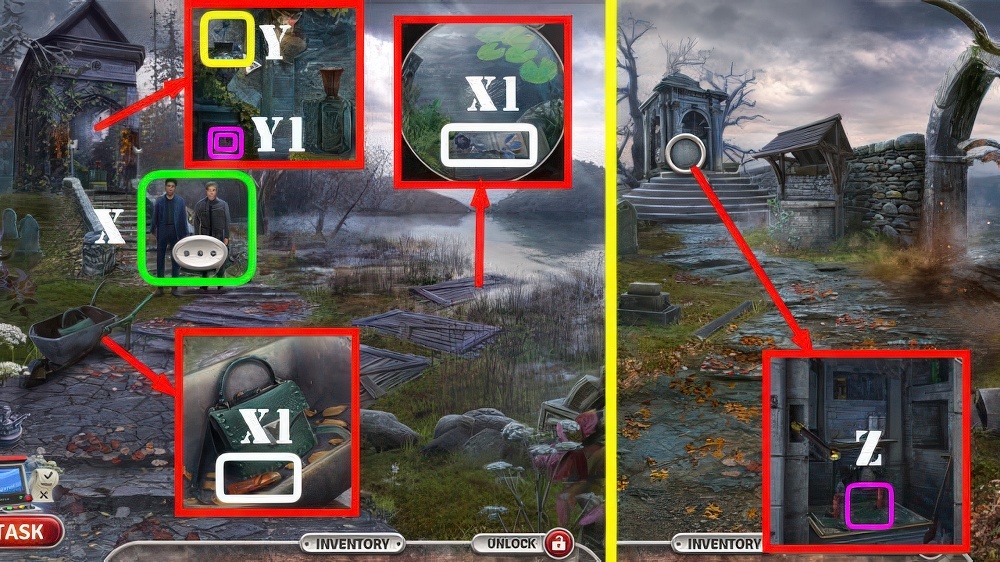
- Use HOUSE KEY (X), receive ANCIENT LOCK.
- Enter (Y).

- Close (Z).
- Play puzzle.
- Solution: (A-B-C-D-C-E-C).

- Take WINE JUG, TONGS, and IDOL FIGURINE 2 (F).
- Use TONGS (G), receive IDOL FIGURINE 1 and CHARCOAL.
- Place IDOL FIGURINE 1 and IDOL FIGURINE 2 (H), take DOOR HANDLE and SULFUR (I).
- Place DOOR HANDLE (J).
- Play puzzle, receive POTASSIUM NITRATE.
- Place SULFUR, CHARCOAL, and POTASSIUM NITRATE, take FIREWORK (K).
- FIREWORK, WINE JUG, and WICK on FIREWORKS RECIPE, take ANCIENT FIREWORK.
- Walk down.
- Place ANCIENT FIREWORK and use FLINT (L).
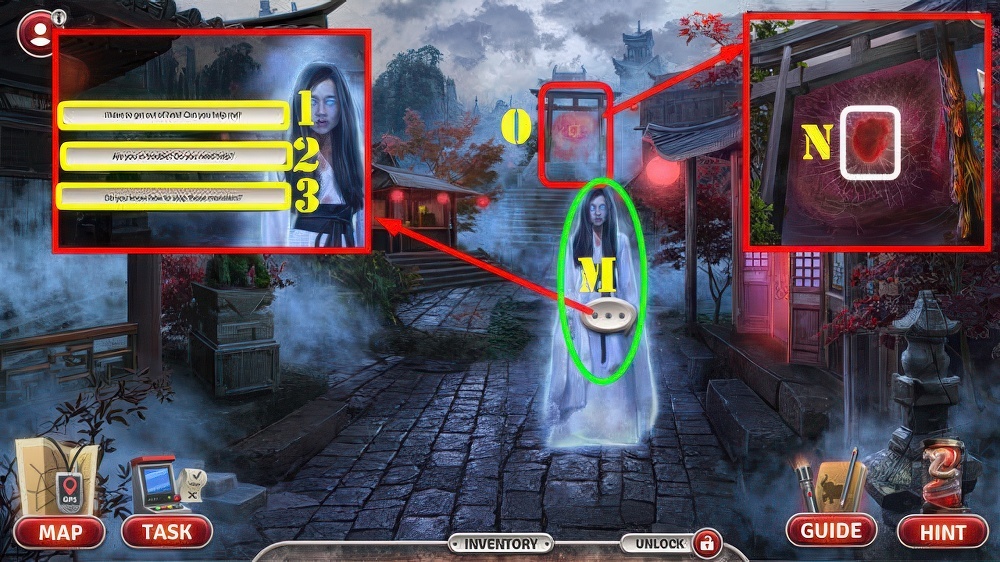
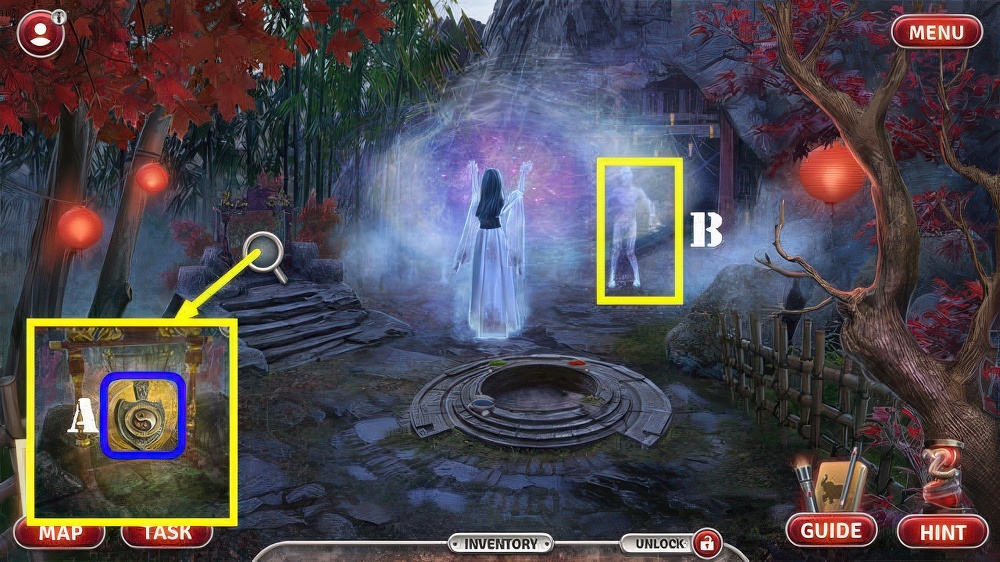
- Talk (M).
- For Best ending, select (2 or 3).
- For Normal ending, select (2 or 3).
- For Worst ending, select (1).
- Receive BEATING HEART.
- Place BEATING HEART (N).
- Go (O).
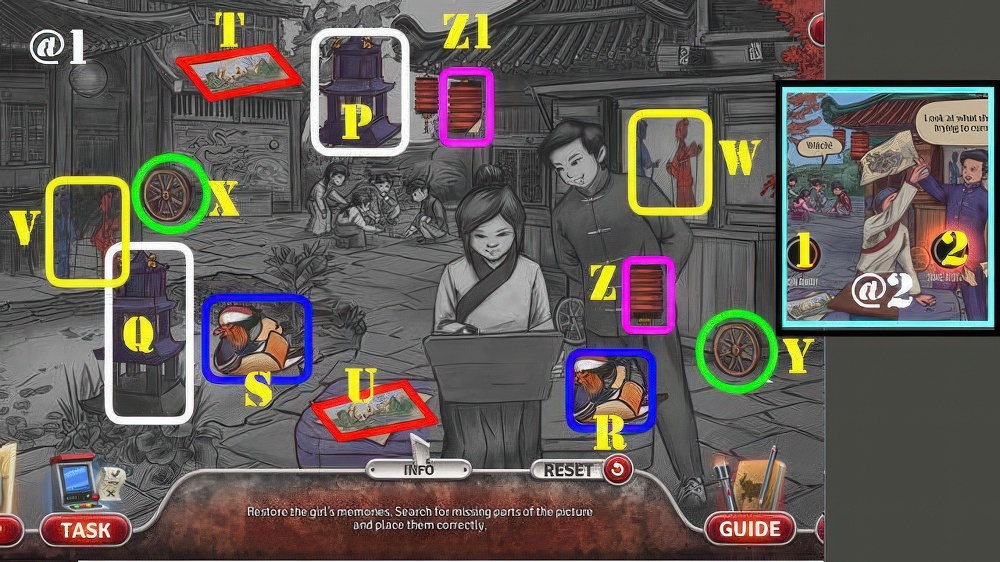
- Select scene twice.
- Solution (@1): (P-Q)-(R-S)-(T-U)-(V-W)-(X-Y)-(Z-Z1).
- Select: Take a Stand (2) for Best ending and Normal ending.
- Select Run Away (1) for Worst Ending (@2).

- Take a Stand Solution (@3): (A-B)-(C-D)-(E-F)-(G-H)-(I-J)-(K-L).
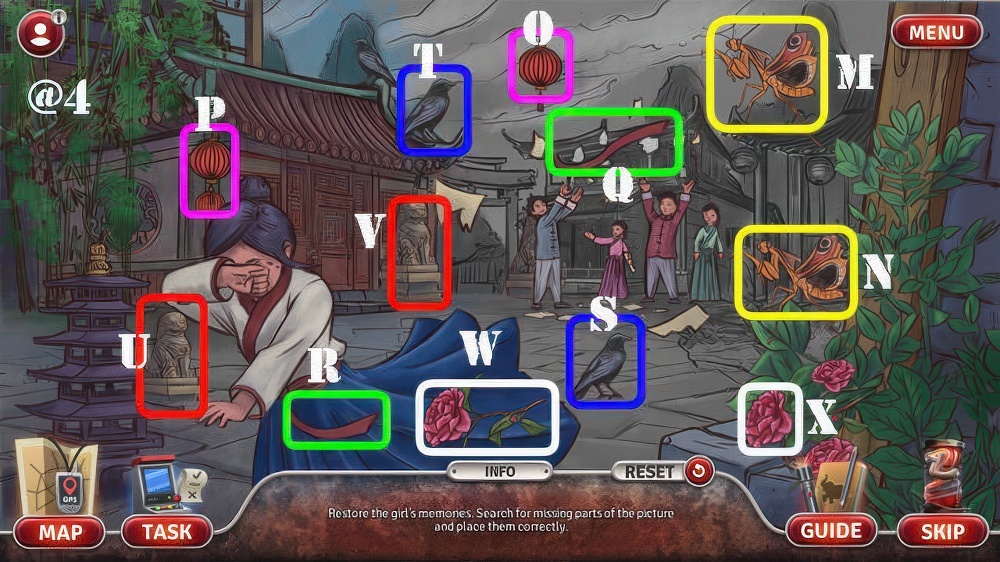
- Run Away Solution (@4): (M-N)-(O-P)-(Q-R)-(S-T)-(U-V)-(W-X).
- Receive BROKEN LANTERN.

- Take ANCIENT COIN, OLD KITE, and BOWL (A).
- Use ANCIENT LOCK, take JADE HORN (B).
- Walk down.
- Use ANCIENT COIN (C), take JADE EYE and COLORED GLASS (D).
- Place JADE EYE and JADE HORN (E), take SILK SCARF and CHISEL (F).
- Go (G).
- Use CHISEL (H).
- Play puzzle, receive KETTLE.
- Place BOWL and KETTLE (I).
- For Best ending, select (1).
- For Normal ending, select (1).
- For Worst ending, select (2).
- Receive TEA BRUSH and PUPPET.

- Use TEA BRUSH, take NEEDLE WITH THREAD and CANDLE (J).
- CANDLE, COLORED GLASS, and FLINT on BROKEN LANTERN, take LIT LANTERN.
- Place PUPPET and LIT LANTERN (K).
- Select puzzle (L).
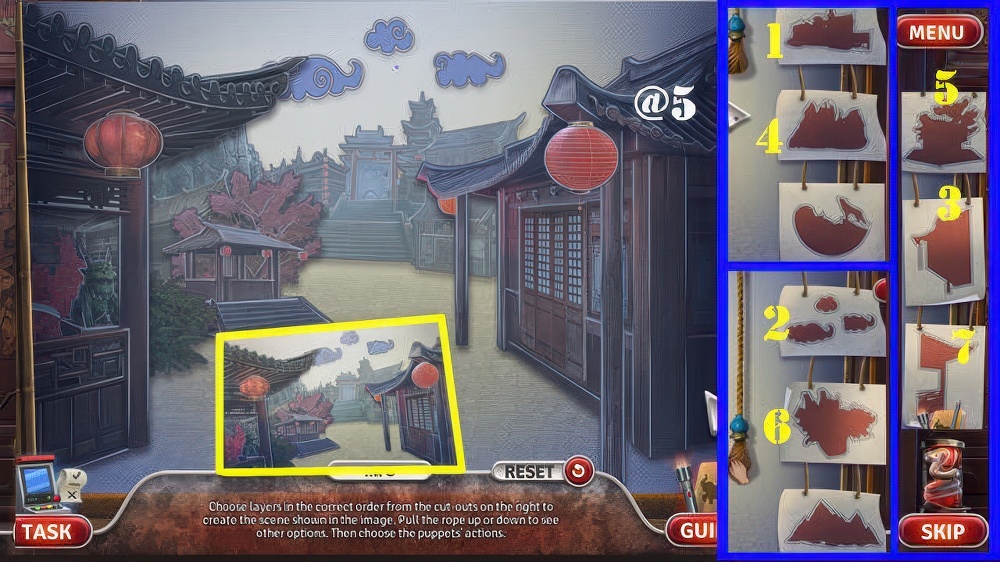
- Solution (@5): (1-7).

- For Best ending, select (8 or 9)-(10)-(12).
- For Normal ending, select (8 or 9)-(10)-(12 or 13).
- For Worst ending, select (8 or 9)-(11)-(14).
- Move to cave (M).
- Go (N).

- Take BELL 1/3, SPOOL OF TWINE, and BRASS DRAGON (O).
- Walk down.
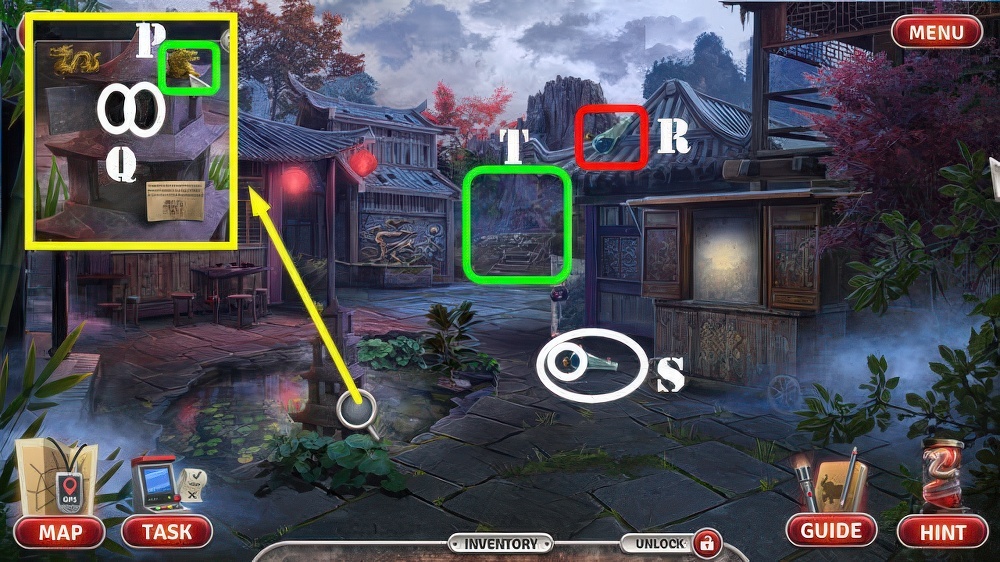
- Place BRASS DRAGON (P) and look at note, take STRANGE SKULL and SCISSORS (Q).
- SILK SCARF, SPOOL OF TWINE, NEEDLE WITH THREAD, and SCISSORS on OLD KITE.
- Take OLD KITE.
- Use OLD KITE (R), take BOTTLE OF PAINT and BELL 2/3 (S).
- Go (T).
- Use BOTTLE OF PAINT (V).
- Solution (W).
- Take PAPER and SHOVEL.
- Use SHOVEL, take LITTLE KEY and SILVER BAR (X).
- Return to Old Kitchen.

- Use LITTLE KEY, take BELL 3/3 and FAN (Y).
- Use PAPER, FLINT, SILVER BAR, and FAN, take GONG (Z).
- Return to Village Outskirts.
- Place GONG, take MYSTERIOUS AMULET (A).
- MYSTERIOUS AMULET and BELL 3/3 on STRANGE SKULL, take AMULET AGAINST MONSTERS.
- Use AMULET AGAINST MONSTERS (B).
- Play puzzle.
- Find symbols quickly in this puzzle and don’t select incorrect symbols for the Best ending.
- For Normal and Worst endings, take your time selecting the correct symbols or do nothing at all, so the girl attacks you in the end.
- Let her attack you twice so your mental state falls to zero.
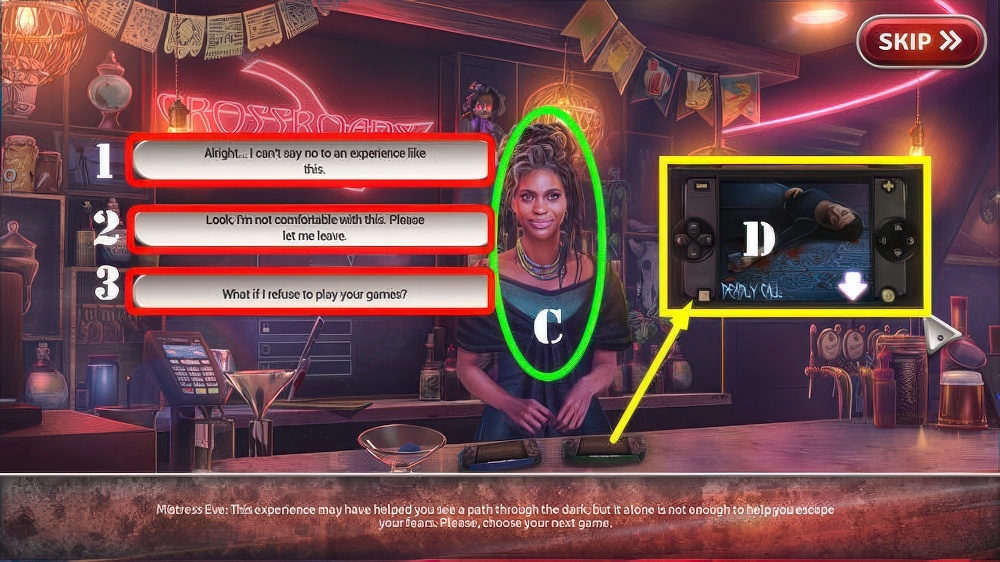
- Talk (C).
- You can select any question or statement (1, 2, or 3).
- Choose the Deadly Call game (D).
- In this chapter, the Best ending rewards you with a red token from Mistress Eve and the ‘Truth Seeker’ achievement.
- The Normal ending rewards you with a blue token from Mistress Eve.
- The Worst ending rewards you with a black token from Mistress Eve.
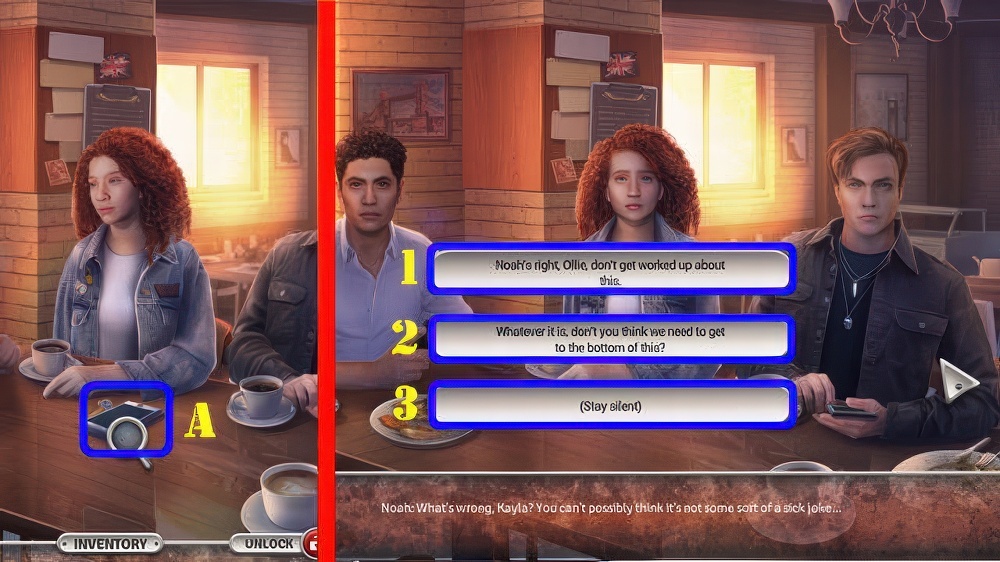
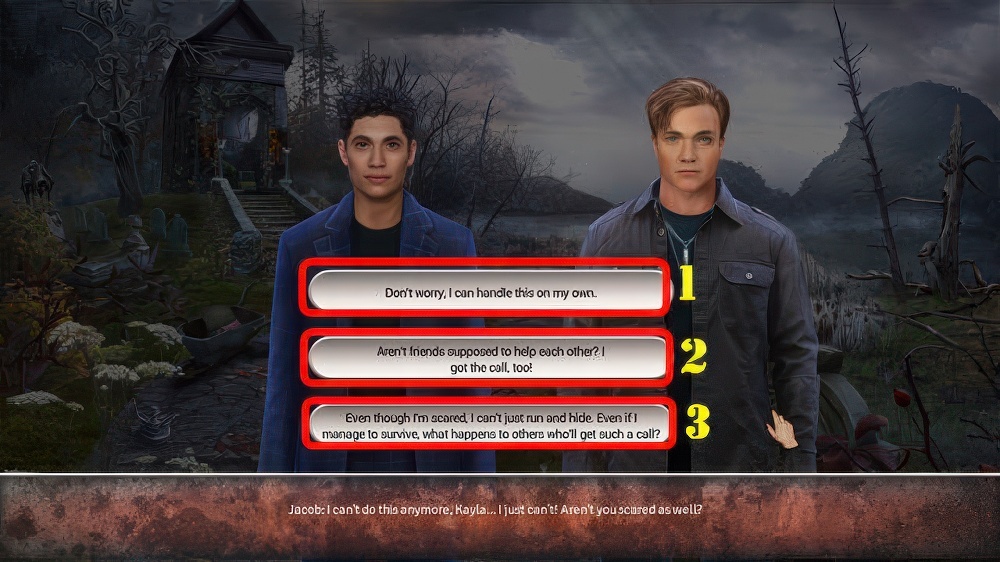
- Select the phone twice (A).
- For Best ending, select (2).
- For Normal ending, select (1).
- For Worst ending, select (3).

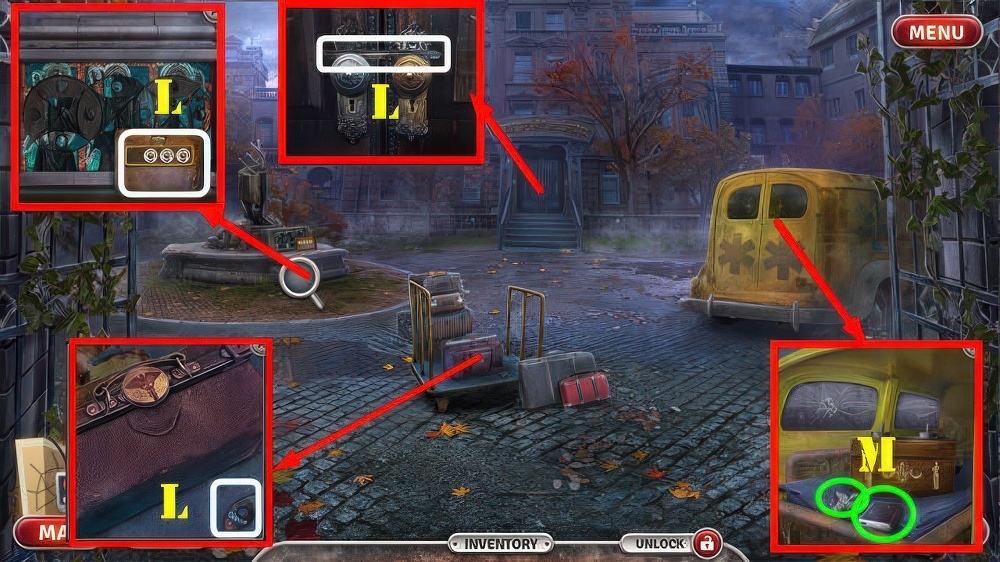
- Look at note, receive SEALED BOX (B).
- Take ORION CONSTELLATION and LIBRARIAN FIGURINE (C).
- Place LIBRARIAN FIGURINE (D).
- Take CHAIN and CASSIOPEIA CONSTELLATION (E).
- Place ORION CONSTELLATION and CASSIOPEIA CONSTELLATION, take FEATHER and GRIFFIN SIGN (F).
- Place GRIFFIN SIGN and CHAIN (G).
- Solution (H).
- Take ASTROLOGICAL SIGN 1/3 and PAPER KNIFE.
- PAPER KNIFE on SEALED BOX, take FILM REEL and DRAWER KEY.
- Use FEATHER and DRAWER KEY, take CAT TOY and ASTROLOGICAL SIGN 2/3 (I).
- Use CAT TOY, take WIRE and ASTROLOGICAL SIGN 3/3 (J).

- Place ASTROLOGICAL SIGN 3/3, take FINGER BONE and LIBRARY CARD (K).
- Use LIBRARY CARD, FILM REEL, and WIRE (L).
- Play puzzle, receive BOOK NUMBER.
- Use BOOK NUMBER (M).
- Play puzzle.

- For Best ending, select (2).
- For Normal ending, select (3).
- For Worst ending, select (1).
- Take CLIPPERS (O).
- Use CLIPPERS, take BROKEN STATUETTE and SKULL RING (P).
- Use SKULL RING, take STATUETTE PART 1/3 and LIGHTER (Q).
- Use LIGHTER and FINGER BONE (R), take LEVER and HOOK (S).

- Place LEVER (T).
- Play puzzle, receive BUCKET and STATUETTE PART 2/3.
- Use BUCKET and HOOK (U), receive CANE and WATER IN BUCKET.
- Use WATER IN BUCKET (V), receive BUCKET.
- Go (W).

- For Best ending, select (1).
- For Normal ending, select (1 or 2).
- For Worst ending, select (2).
- Talk (X).
- Take GLUE and METAL FLOWER (X1).
- Place METAL FLOWER (Y), take STATUETTE PART 3/3 and NET (Y1).
- Walk down.
- GLUE and STATUETTE PART 3/3 on BROKEN STATUETTE, take ANGEL STATUETTE.
- Place ANGEL STATUETTE (Z).
- Solution (@1): (Q-P-J-P-J-I-E-A)-(E-I-H-N-H-I-J-K-L)-(M-S-M-G-F-C-B-V).
- Receive DEATH DATE and CORD.

- Place DEATH DATE (W), take OLIVIA’S MEDALLION (X).
- Go (Y).
- Use OLIVIA’S MEDALLION, look at diary, take BLOOD VIAL and STAPLER (A).
- Use BLOOD VIAL (B), take HOURGLASS and METAL RIM (C).
- METAL RIM, CORD, STAPLER, and NET on CANE, take IMPROVISED SCOOP NET.
- Use IMPROVISED SCOOP NET (D).
- Play puzzle, receive WREATH.

- For Best ending, select (2).
- For Normal ending, select (1, 2, or 3).
- For Worst ending, select (1).
- Walk down.
- Use HOURGLASS and WREATH (E), take OLIVIA’S PHOTO and BATWING (F).
- Place OLIVIA’S PHOTO (G), take MOSAIC PART 1/4 and BAT EYE (H).
- Go (I).
- Place BATWING and BAT EYE (J), take DUCK CALL and BRONZE KEY (J1).
- Use DUCK CALL (K), take KAYLA’S PHONE.
- Select KAYLA’S PHONE.
- Play puzzle.
- For Best ending, select (1 or 3).
- For Normal ending, select (1).
- For Worst ending, select (2).
- Receive DISCHARGED PHONE.
- Take FOLDER, MOSAIC PART 2/4, and GLASS CUTTER (L).
- Use GLASS CUTTER, take CADUCEUS AMULET and DAMAGED POWER BANK (M).

- Use CADUCEUS AMULET, take BANDAGE and SILVER KEY (N).
- DAMAGED POWERBANK and BANDAGE on DISCHARGED PHONE, take FLASHLIGHT.
- Use BRONZE KEY, SILVER KEY, and FLASHLIGHT (O), select door.
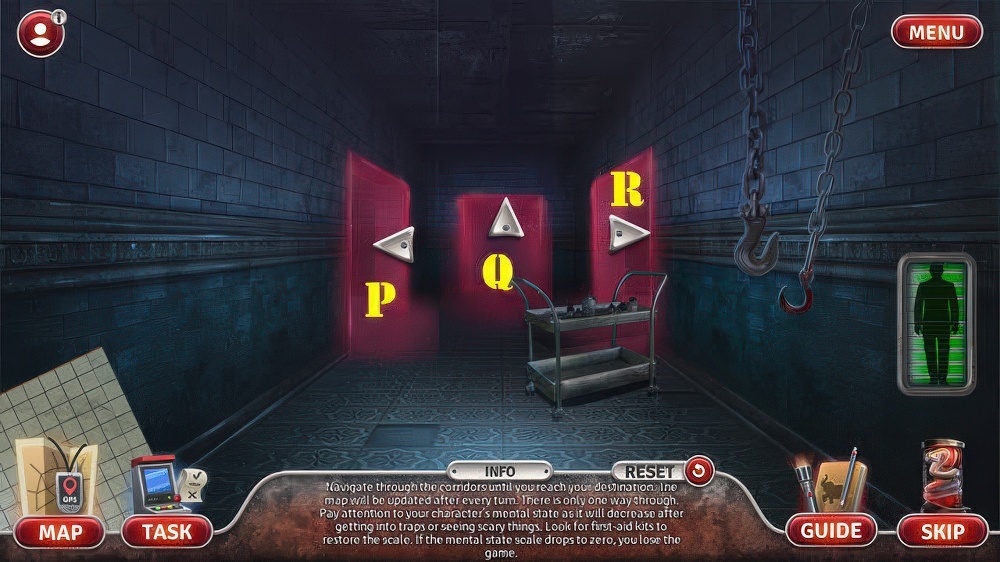
- For (Best and Normal endings), do not let your mental state fall to zero and don’t make any wrong turns or you will lose.
- For the (Worst ending), make wrong turns, let your mental state fall to zero, die a few times, and do not collect first-aid-kits.
- Solution: (P-Rx2-Q-Px2-Rx2-P).
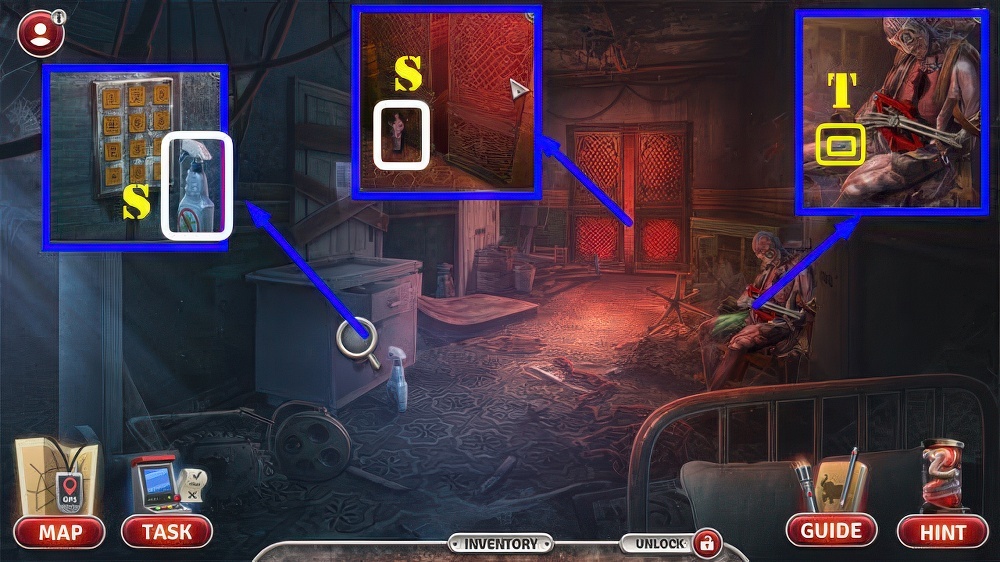
- Take SOLVENT and DOCTOR FIGURINE (S).
- Use SOLVENT, take SCALPEL and MOSAIC PART 3/4 (T).
- Walk down.
- Use SCALPEL, take NURSE FIGURINE (U).
- Place DOCTOR FIGURINE and NURSE FIGURINE, take CODE WHEEL and MOSAIC PART 4/4 (V).

- Place MOSAIC PART 4/4 (W).
- Solution (X).
- Take POWDER and HINT.

- CODE WHEEL and HINT on FOLDER.
- Solution: (Ax3-C-Dx2).
- Look at note and take BRUSH (E).
- Go (E1).

- Use POWDER and BRUSH (F), look at note, take PLASTIC HEART (F).
- Select sheets, take BEDSHEET ROPE (G).
- Place PLASTIC HEART (H), take JACK (I).
- Use JACK and BEDSHEET ROPE (J).
- Play puzzle.
- For (Best ending), complete before time runs out.
- For (Normal and Worst endings) do not finish collecting the items before time runs out.

- Talk (K).
- Select the video game Horrors on Set (L).
- In Chapter 2, the Best ending rewards you with a red token from Mistress Eve and the ‘No More Calls’ achievement.
- The Normal ending rewards you with a blue token from Mistress Eve.
- The Worst ending rewards you with a black token from Mistress Eve.

- For Best ending, select (2).
- For Normal ending, select (1).
- For Worst ending, select (3).

- Take BLUNT BLADE, GRINDSTONE, and FOB (A).
- Use FOB, take VIDEO CAMERA and RED MARKER (B).
- Look at note (C).
- Use VIDEO CAMERA (D).
- Take BROKEN LADDER and STRAP (F).
- GRINDSTONE and STRAP on BLUNT BLADE, take SHARPENED MACHETE.
- Use SHARPENED MACHETE (G).
- Play puzzle, receive BELL.
- Place BELL and use RED MARKER (H).
- Solution (1-7).
- Go (I).

- For Best ending, select (1 or 2).
- For Normal ending, select (2).
- For Worst ending, select (3).
- Take SCREWS and CIRCLE PART 1/3 (J).
- Use VIDEO CAMERA, take SCREWDRIVER and CIRCLE PART 2/3 (K).
- Walk down.

- SCREWS and SCREWDRIVER on BROKEN LADDER, take LADDER.
- Place LADDER (L), take CIRCLE PART 3/3 (M).
- Place CIRCLE PART 3/3 (N).
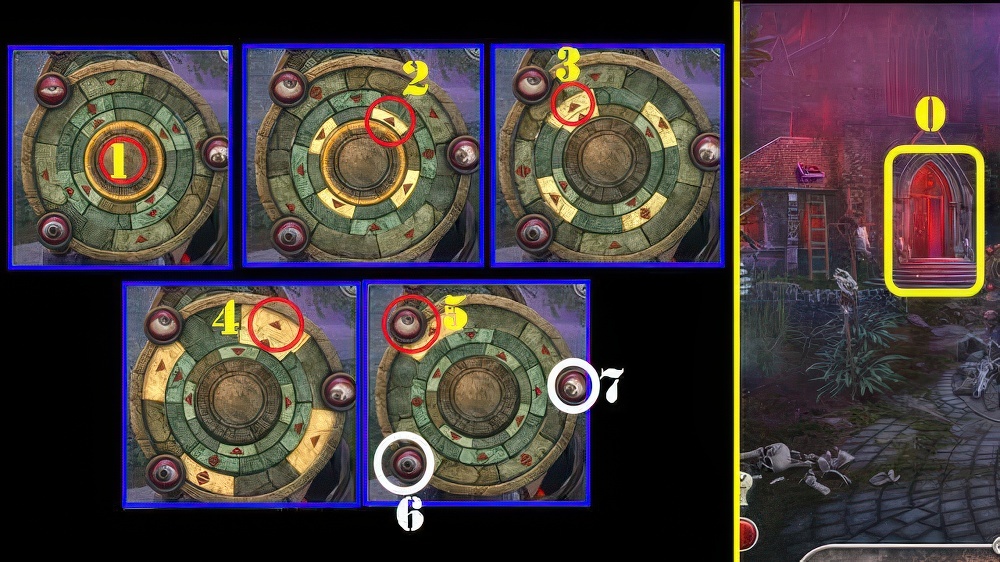
- Solution: (1-5).
- Follow the same steps to close the other two eyes (6-7).
- Take LU’S FIGURINE and SHEET OF PAPER.
- Go (O).

- Use RED MARKER and SHEET OF PAPER, take PIANO CLUE (P).
- Take ALEX’S FIGURINE (Q).
- Use PIANO CLUE.
- Solution: (1-4).
- Take MOVIE SCRIPT and CLAPBOARD AMULET (R).
- Place LU’S FIGURINE, ALEX’S FIGURINE, and MOVIE SCRIPT (S).

- (2-3-4-5-6-9-10)-(9-11-9-11-12)-(11-12-13-12-13)-(14-15-8-7).
- (8-15-13-15-13-15-8)-(15-13-14-16-14-16)(17-16-17-18)-(17-20-19-21).
- Take ELEMENT STONE 1/4.

- Take OMINOUS SKULL (T).
- Walk down.
- Place OMINOUS SKULL (U), take ELEMENT STONE 2/4 and FILM AMULET (V).
- Place FILM AMULET and CLAPBOARD AMULET, take ELEMENT STONE 3/4 and CHISEL (W).
- Go (X).
- Use CHISEL, take EMPTY OILER and ELEMENT STONE 4/4 (X1).
- Place ELEMENT STONE 4/4 (Y).
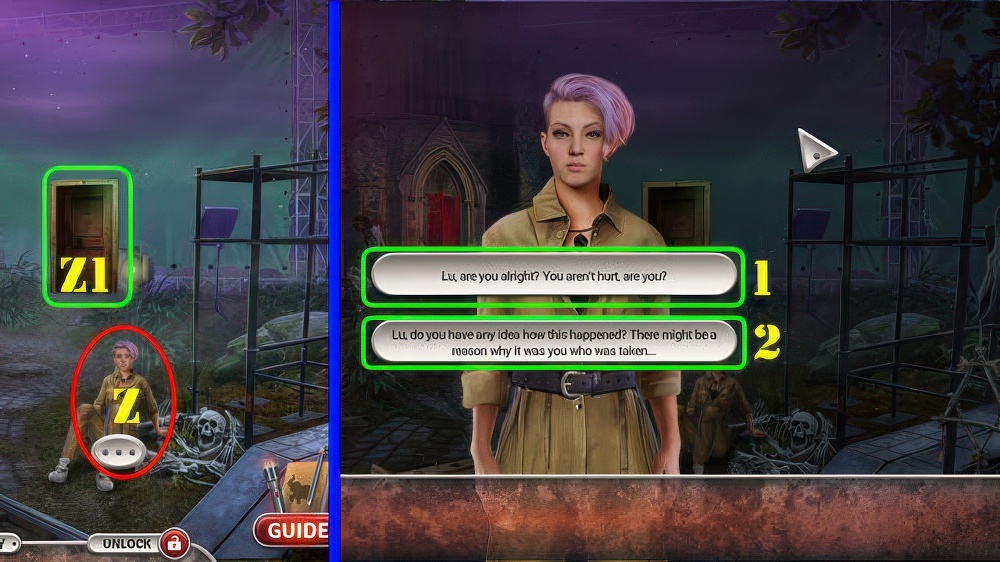
- Talk (Z).
- For Best ending, select (1).
- For Normal ending, select (1).
- For Worst ending, select (2).
- Receive PROTECTIVE TALISMAN.
- Go (Z1).

- Talk (A).
- Use VIDEO CAMERA (B).

- Take TWO-PRONG FORK and HORSESHOE HALF (C).
- Use TWO-PRONG FORK (D), receive HORSESHOE HALF.
- Take CARABINER (E).
- Place two HORSESHOE HALVES, take STORE KEY (F).
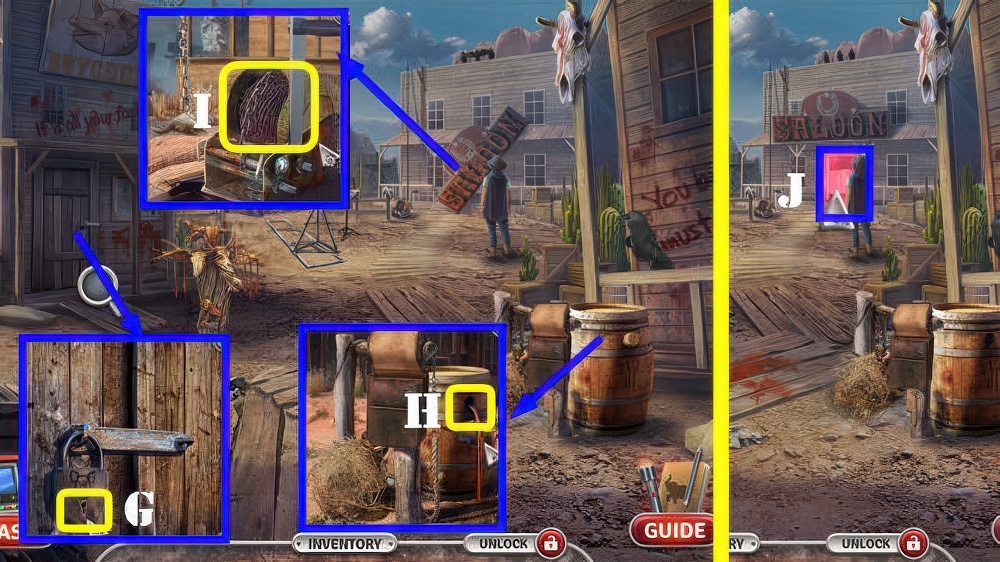
- Use STORE KEY (G).
- Play puzzle, receive MALLET.
- Use MALLET and EMPTY OILER, take OIL (H).
- Use CARABINER and OIL (I).
- Go (J).

- Talk (K).
- For Best ending, select (3).
- For Normal ending, select (1).
- For Worst ending, select (2).

- Take COLORED BONE 1/5, KERCHIEF, STUFFED HYENA, and PURSE (L).
- Use KERCHIEF, take COLORED BONE 2/5 and MIRROR (M).
- Walk down.
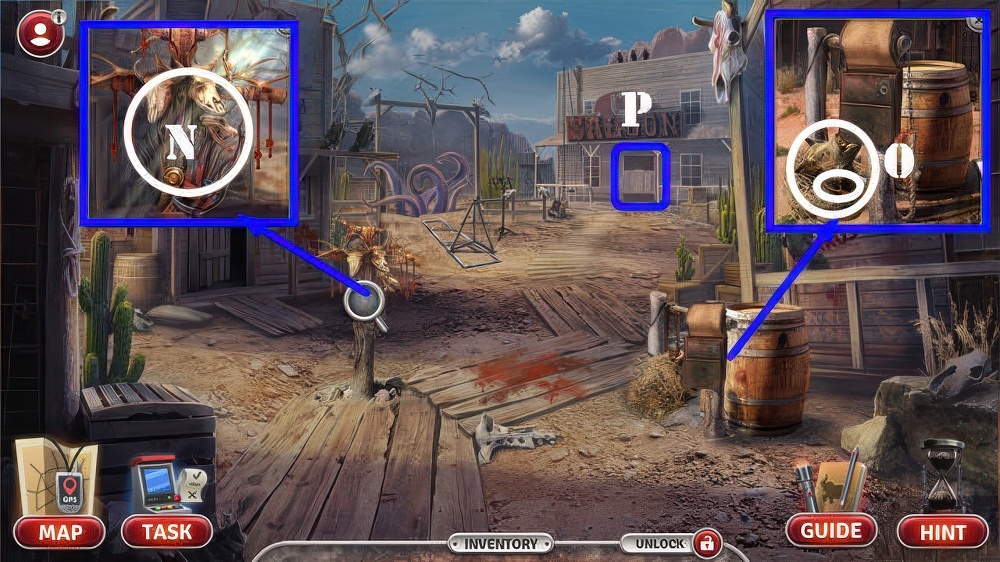
- Use MIRROR (N).
- Play puzzle, receive SICKLE.
- Use SICKLE, take COLORED BONE 3/5 and STUFFED BOAR (O).
- Go (P).

- Place STUFFED HYENA and STUFFED BOAR, take OLD MEDALLION and BROKEN REVOLVER (Q).
- OLD MEDALLION on PURSE, take PERFUME and COLORED BONE 4/5.
- Use PERFUME and KERCHIEF, select red-green-blue buttons (R).
- Take SHERIFF STATUETTE and MOVIE SCRIPT (S).
- Walk down.
- Use MOVIE SCRIPT and VIDEO CAMERA (T).

- Solution (2-4)-(5-2-3)-(2-4-2-1-5).
- Take COLORED BONE 5/5 (U).
- For Best ending, select (7).
- For Normal ending, select (7).
- For Worst ending, select (6).
- Receive DRAINED CAMERA.
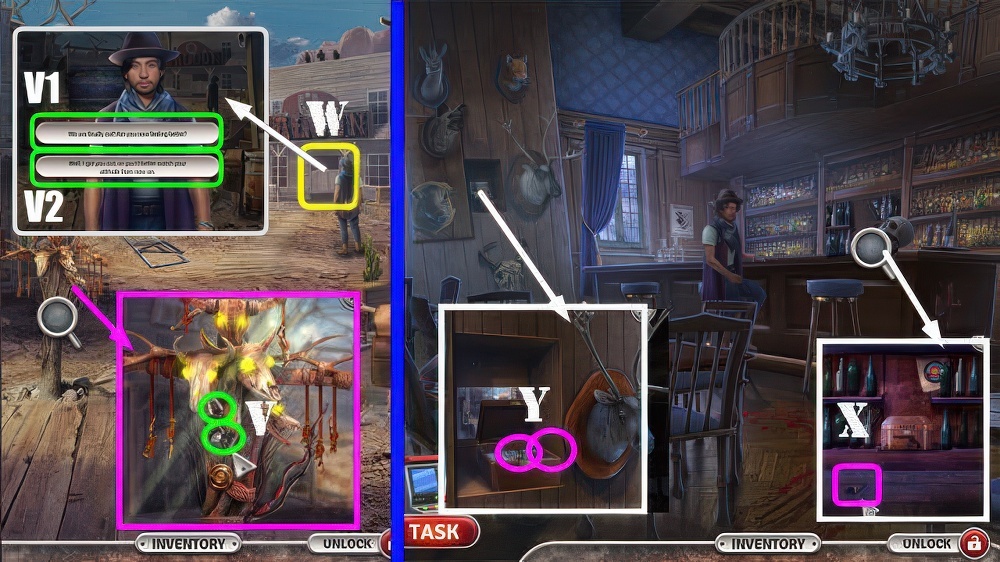
- Place COLORED BONE 5/5, take BONE TONGS and REVOLVER CYLINDER (V).
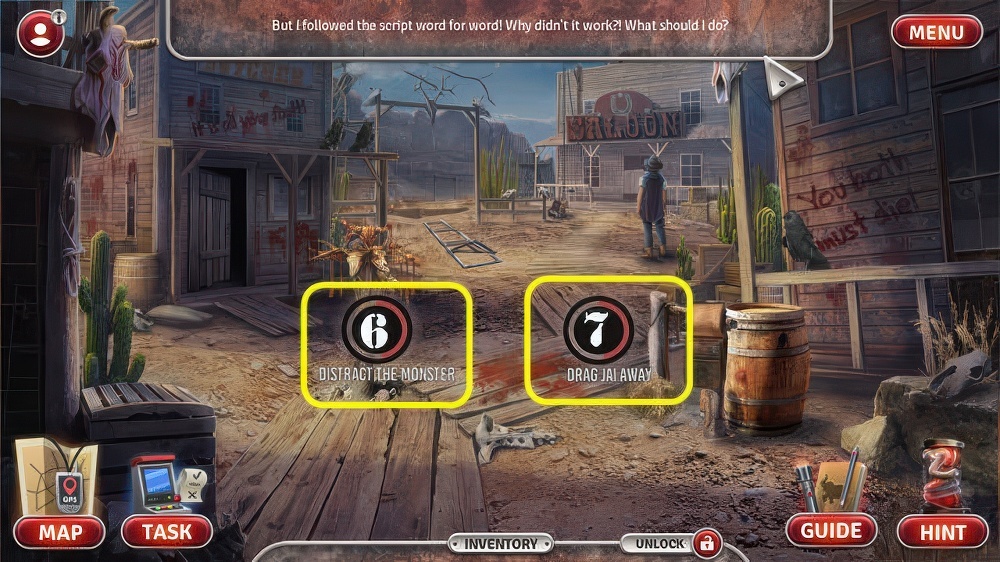
- Talk to Jai.
- For Best and Normal ending, select (V1).
- Take PROTECTIVE TALISMAN.
- For Worst ending, select (V2).
- Take PROTECTIVE TALISMAN.
- Go (W).
- Use BONE TONGS (X), take BANDIT STATUETTE.
- Place SHERIFF STATUETTE and BANDIT STATUETTE, take PRECIOUS RING and REVOLVER HAMMER (Y).

- Place PRECIOUS RING on right hand.
- Find matching pairs (A).
- Take BULLETS (B).
- REVOLVER CYLINDER, REVOLVER HAMMER and BULLETS on BROKEN REVOLVER, take LOADED REVOLVER.
- Use LOADED REVOLVER.
- Aim and shoot at 5 random bottles (C).
- Take VIDEO CAMERA BATTERY and ‘A’ MONOGRAM (D).
- Walk down.
- VIDEO CAMERA BATTERY on DRAINED CAMERA, take VIDEO CAMERA.
- Use VIDEO CAMERA (E).
- Play Hop.

- Take ‘P’ MONOGRAM and BROKEN TRACTOR (F).
- Place ‘P’ MONOGRAM and ‘A’ MONOGRAM, look at note, take PUMPKIN and CAGE KEY (G).
- Use CAGE KEY, take HEAD DRAWING and POKER (H).

- Use POKER, take KNIFE and TRACTOR EXHAUST (I).
- KNIFE and HEAD DRAWING on PUMPKIN, take PUMPKIN HEAD.
- Place PUMPKIN HEAD (J).
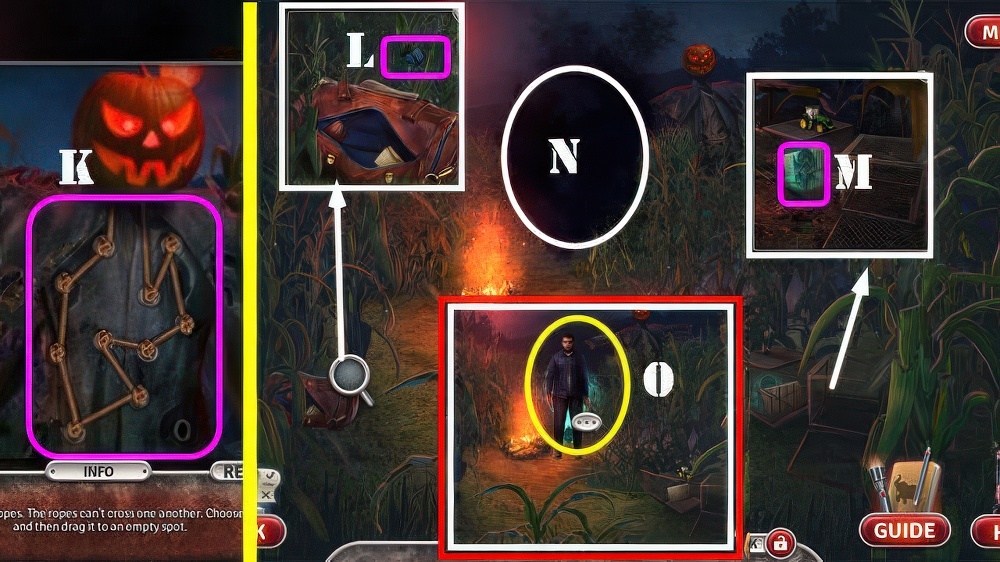
- Solution: (K).
- Take TRACTOR WHEEL and ALEX’S PHOTO.
- Place ALEX’S PHOTO, take TRACTOR CABIN (L).
- TRACTOR WHEEL, TRACTOR CABIN, and TRACTOR EXHAUST on BROKEN TRACTOR, take TOY TRACTOR.
- Use TOY TRACTOR, select book twice, take GUIDING LANTERN (M).
- Use GUIDING LANTERN (N).
- Talk (O).
- Protective Talisman gets used automatically.

- For Best ending, select (2-4-10-11).
- For Normal ending, select (3-5-‘I’ve already come this far and I’m not backing down!’-11).
- For Worst ending, select (1-5-9-12).

- Talk (P).
- Select video game machine (Q-R-S).
- For the Best ending, select the black buttons (T, U and V).
- For the For the Normal ending, select the blue buttons (T, U and V).
- For the Worst ending, select the black buttons (T, U and V).
- In Chapter 3, the Best ending rewards you with a red token from Mistress Eve and the ‘Breaking Free’ achievement.
- The Normal ending rewards you with a blue token from Mistress Eve.
- The Worst ending rewards you with a black token from Mistress Eve.
- Walkthrough Bonus Chapter, at the link below.


