
Cursed Fables 3: A Voice to Die For – Uncover the heartbreaking love story of a siren and save the kingdom. Marianne, known for her good deeds for aquatic creatures, is faced with an unexpected situation. She is visited by Princess Cassandra, who swears that someone has bewitched her fiancé and something is wrong with him. His eyes have started to glow and look creepy. Right before the wedding, he said he decided to go on a sea voyage. The maid the other day, saw him with a strange girl. She jokingly said that a girl with such a marvelous voice can’t be an ordinary person. If you can not pass any of the puzzles or do not know where to find items, on our site you can watch the walkthrough of the game Cursed Fables 3: A Voice to Die For, and find out who wants to spoil the royal wedding.
Cursed Fables 3: A Voice to Die For – Walkthrough
Here you can see the full walkthrough of Cursed Fables 3: A Voice to Die For, namely for all chapters, including bonus chapter, in pictures.

- Read notes, take WHISTLE (A).
- Use WHISTLE, earn FIRE MEDALLION and CASSANDRA’S DIARY (B).
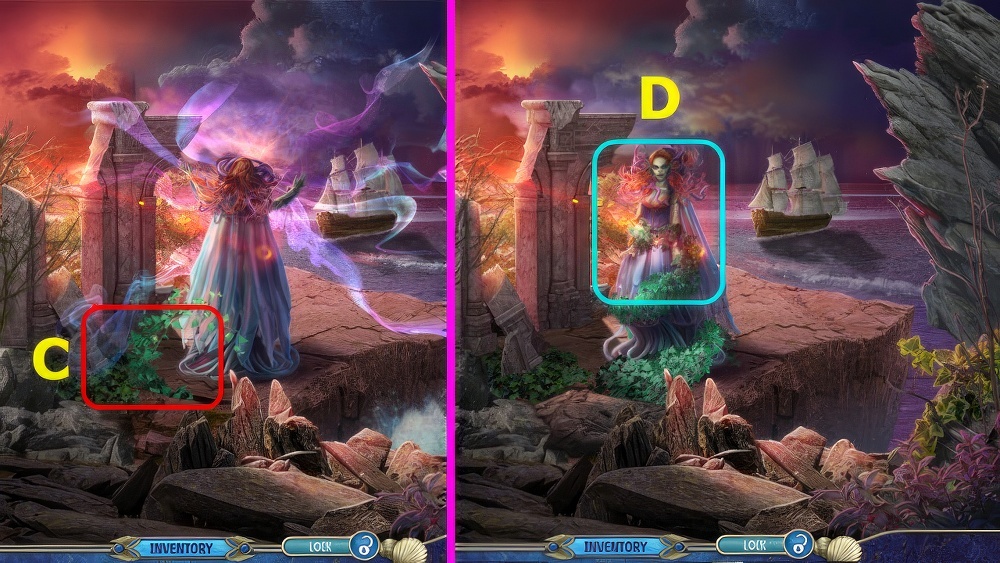
- Use FIRE MEDALLION (C).

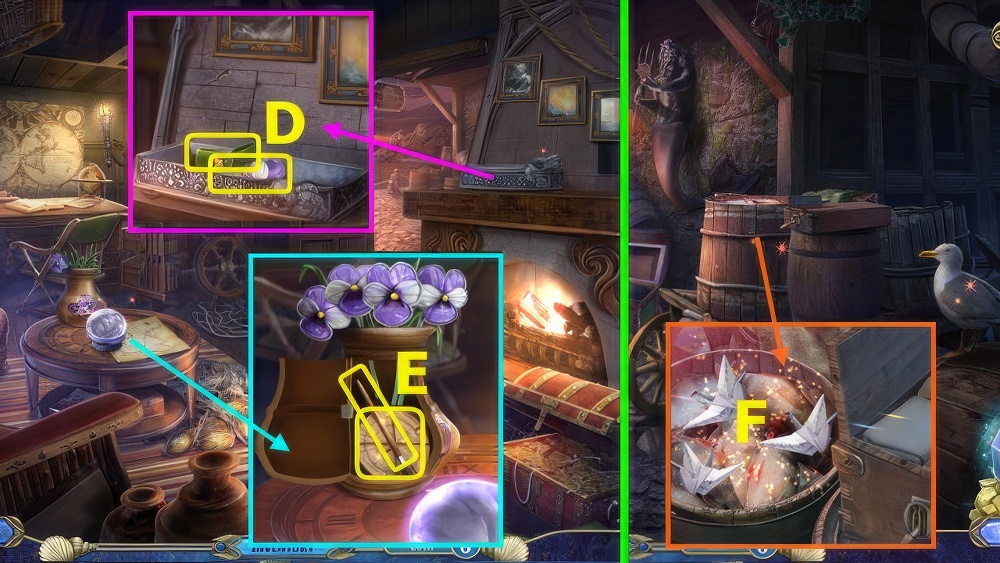
- Take STARFISH (D).
- Use STARFISH, take GLOVES and MARIANNA FIGURINE (E).
- Use GLOVES, earn ENGRAVED STONE and ALISTAIR FIGURINE (F).

- Place MARIANNA FIGURINE and ALISTAIR FIGURINE.
- Take CREATURE CATALOG and LIGHT RUNE (G).
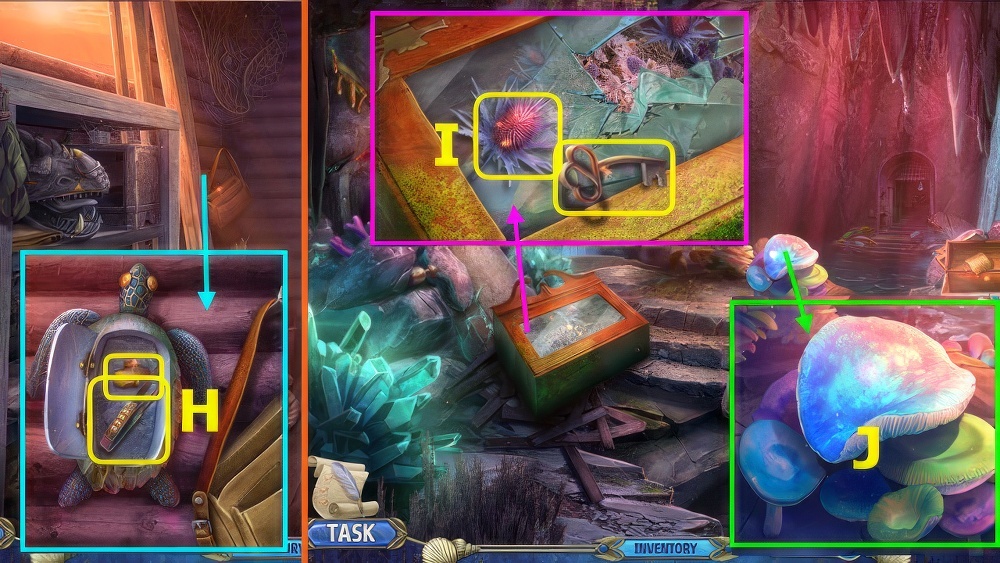
- Use LIGHT RUNE, take SEAWEED and ACID (H).
- Use ACID (I).

- Play puzzle, earn CECILIA’S STORY (J).
- Open CASSANDRA’S DIARY, add CREATURE CATALOG and CECILIA’S STORY, restore lines (K), take PRINCE’S FILE.
- Give PRINCE’S FILE (L), earn CROWN KEY.

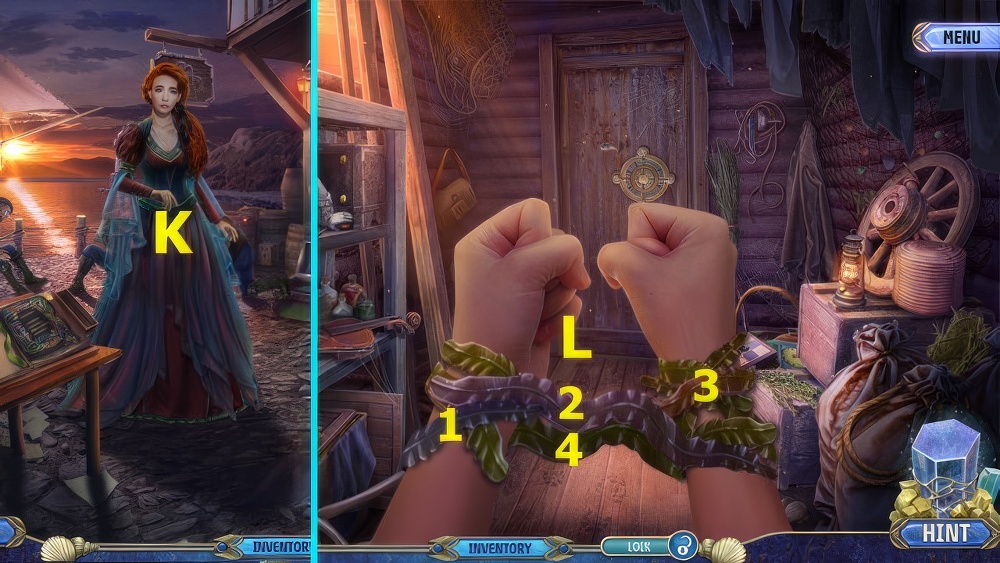
- Talk (M).
- Select 1-2-3 (N).
- Read note, take KNITTING NEEDLE, use SEAWEED (O).

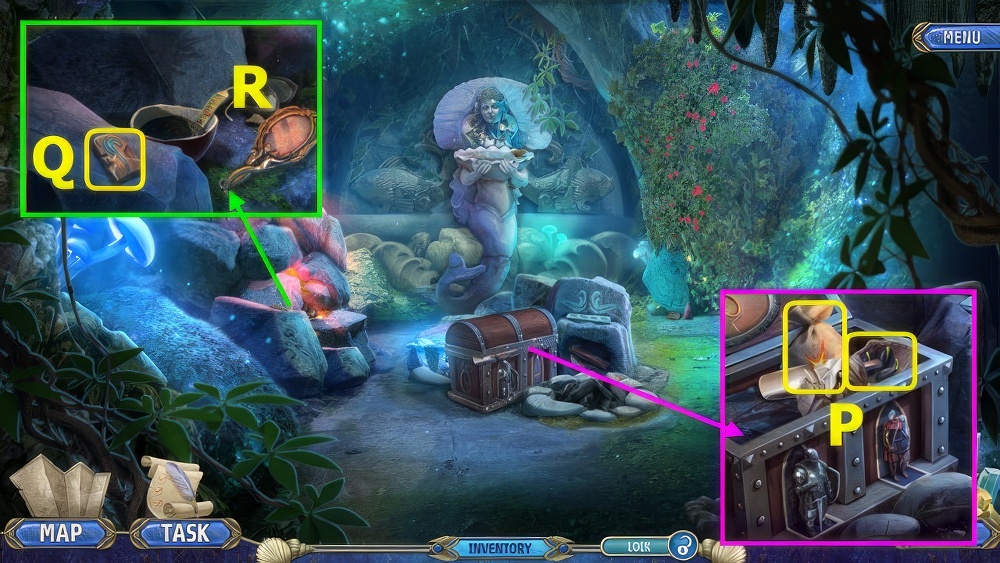
- Take OIL LAMP, use KNITTING NEEDLE, take OAK LEAF and SEAHORSE KEY (P).
- Take SNAKE, use CROWN KEY and SEAHORSE KEY, take CHISEL and OIL (Q).
- Use CHISEL and ENGRAVED STONE, take FLINT and POCKETKNIFE (R).
- Use POCKETKNIFE (S).

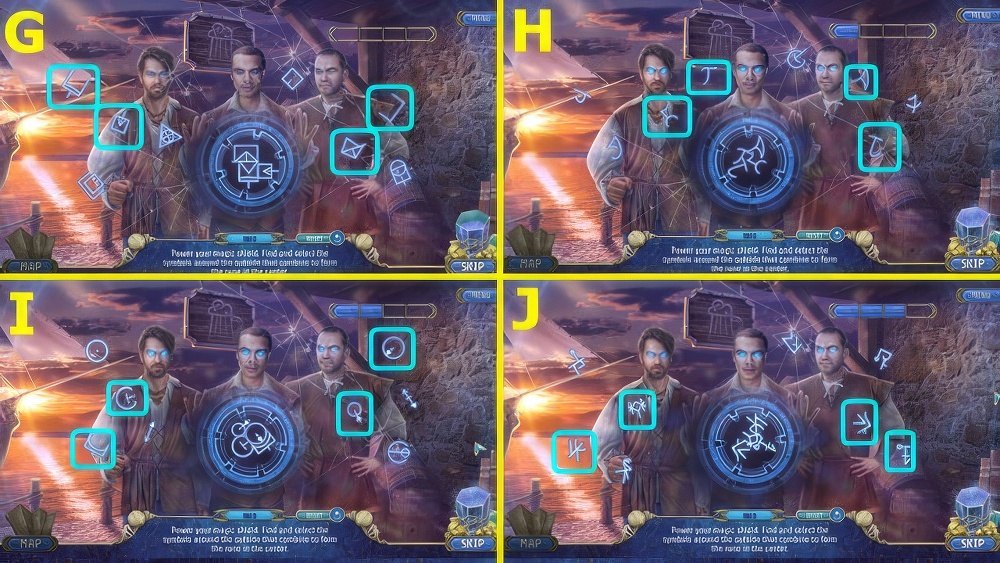
- Solution L-H-D-C-B-A-E-I-J-K-L-H-D-C-B-F-G-H-D-C-B-A-E-I.
- M-N-J-F-E-I-J-N-O-K-G-F-J-I-E-F-G-K-J-N-O-P-L-H-G-K-L-H.
- G-F-E-I-M-N-O-P-L-K-J-N-O-K-J-N-M-I-J-N-O-K-J-I-M-N-O-P.
- Take 1/3 TILE and WICK (P).

- OIL, WICK, and FLINT on OIL LAMP, take LIT LAMP.
- Use LIT LAMP (A).
- Go left.
- Take ADORNMENT (B).
- Place ADORNMENT, take RECIPE, MAPLE LEAF, and 2/3 TILE (C).

- Place MAPLE LEAF and OAK LEAF, solution (D).
- Take CUP and HERBS (E).
- Place CUP and SNAKE, take PESTLE, 3/3 TILES, and CALMING PETALS (F).
- Walk down.

- Place TILES, take PEPPER and POSTAL COIN (G).
- Use POSTAL COIN, take HAIRPIN and MARBLE FISH (H).
- Go left.
- Use HAIRPIN (I).
- Play puzzle, earn MORTAR (J).
- HERBS, PEPPER, MORTAR, and PESTLE on RECIPE, take HERBAL MIX.
- Walk down.

- Use HERBAL MIX (K), earn FIFE.
- Use FIFE (L).
- Go right.

- Take WOODEN BIRD (M).
- Place WOODEN BIRD, take APPLE, CHAIN, and WEIGHT (N).
- Read note, place APPLE and CALMING PETALS (O), play puzzle, earn MARBLE JUG.
- Place MARBLE JUG and MARBLE FISH, take CAPTAIN’S BOX and DRAWER HANDLE (P).
- Walk down and left.

- Use DRAWER HANDLE, take FEMALE MEDALLION and PLATE (Q).
- Use CHAIN, PLATE, and WEIGHT, take PIPE and SILVER WHEEL (R).
- Walk down and right.
- Place PIPE (S).

- Solution (A).

- Take BELL and 1/4 CHIME (B).
- Use BELL and FIFE (C).
- Go left.

- Read note, take MAGIC SPHERE (D).
- Use MAGIC SPHERE, take MALE MEDALLION, 2/4 CHIME, and SHIP (E).
- FEMALE MEDALLION and MALE MEDALLION on CAPTAIN’S BOX, read note, take GOLD WHEEL and SAIL.
- Take 3/4 CHIME (F).
- Place SILVER WHEEL and GOLD WHEEL (G), solution Hx2-Ix2.
- Take CAPTAIN and TONGS (J).
- Walk down.

- Use TONGS, take 4/4 CHIMES and FRAME CORNER (K).
- Place CHIMES, take PORTHOLE and TRIDENT (L).
- SAIL, CAPTAIN, and PORTHOLE on SHIP, take FRIGATE.
- Go left.

- Place FRIGATE (M).
- Play puzzle, earn CALM OCEAN (N).
- Place CALM OCEAN and FRAME CORNER, take DAISY DROPS and 1/3 PANSY (O).
- Go forward.

- Take FEATHER (P).
- Place FEATHER, take 2/3 PANSY, GIANT PEARL, and PAPER CRANE (Q).
- Place TRIDENT and GIANT PEARL, take HORSE BRUSH and LEVER (R).

- Use LEVER, take CLOCK HAND and CHARCOAL (A).
- Use CHARCOAL (B), play puzzle, earn CARE INSTRUCTIONS.
- Use CARE INSTRUCTIONS, HORSE BRUSH, and DAISY DROPS, take MAGIC PAINT and SEA NYMPH (C).
- Walk down.
- Place SEA NYMPH, take HAIR CLIP and 3/3 PANSIES (D).
- Place PANSIES, take WOODEN DISK and PAINTBRUSH (E).
- MAGIC PAINT and PAINTBRUSH on PAPER CRANE, take MAGIC CRANE.
- Go forward.
- Use MAGIC CRANE (F).
- Solution G-H-I-J.
- Select (K).
- Select 1-4 (L).

- Take FANG (M).
- Place FANG, take GLASS, TREE, and LEFT HAND (N).
- Place CLOCK HAND and GLASS, take ANCHOR and SEAGULL (O).
- Place ANCHOR, take 1/4 STRING and ROD (P).

- Place WOODEN DISC and ROD, rotate (B-A)-(C-A)-(D-A).
- Final positions (E).
- Go forward.

- Take SOLVENT (F).
- Use SOLVENT, take SMALL SHOE, 2/4 STRING, and KEEPER’S DIARY (G).
- Place HAIR CLIP and SMALL SHOE, read note, take LETTER R, LIGHTHOUSE LENS, and 3/4 STRING (H).

- Place SEAGULL, LIGHTHOUSE LENS, and TREE (I).
- Play puzzle, earn RIGHT HAND (J).
- Place LEFT HAND and RIGHT HAND, take SPOON and 4/4 STRINGS (K).
- Walk down.

- Place STRINGS, take DIAMOND and CHECKER (L).
- Place CHECKER, take 1/3 SHELL PIECE and LETTER O (M).
- LETTER R and LETTER O on KEEPER’S DIARY, read, take 2/3 SHELL PIECE and HERBARIUM.
- Go forward.

- Place HERBARIUM (N), play puzzle, earn CORROSIVE POWDER.
- Use CORROSIVE POWDER (O).

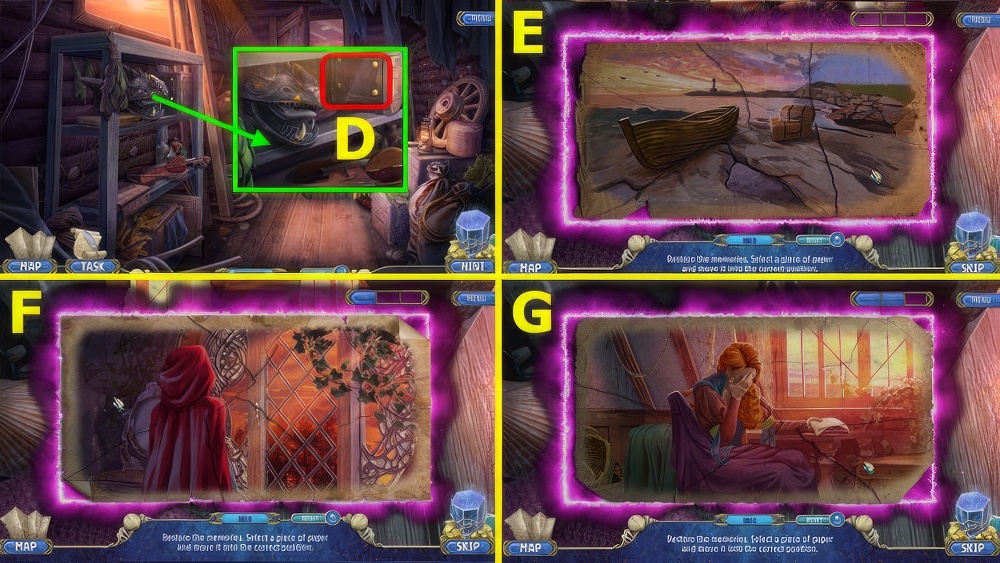
- Take ENGRAVED TILE (A).
- Place ENGRAVED TILE, read note, take WOODEN WHEEL, HEAT RUNE, and BASIC POTION (B).
- Use HEAT RUNE and SPOON, take COIN and RESIN (C).
- Walk down 2x.
- Use COIN (D).
- Solution E-F-G, take 3/3 SHELL PIECES and HORSE.
- Place SHELL PIECES, take TWEEZERS and GINGER (H).
- Go forward 2x.
- Use DIAMOND and TWEEZERS, take BENT KEY and THISTLE (I).
- GINGER, RESIN, and THISTLE on BASIC POTION, take GROWTH POTION.
- Use GROWTH POTION (J).
- Go forward.

- Take CORKSCREW (K).
- Use CORKSCREW, take EMPTY BOWL, EARRING, and DRIVER (L).
- Place HORSE, DRIVER, and WHEEL (M).
- Play puzzle, earn SHARD (N).
- Walk down.

- Use SHARD, take PICKAXE and GOLDEN FRAME (O).
- Use PICKAXE, take PURPLE CORAL and DOOR HANDLE (P).
- Go forward.
- Use BENT KEY and DOOR HANDLE, take STORMY MUG and BLUE FLAME (Q).
- Read note, place GOLDEN FRAME and STORMY MUG on EMPTY BOWL, take DRYING BOWL.
- Use DRYING BOWL (R).
- Go right.

- Take MALLET (A).
- Take 1/5 FAN PART, use MALLET, read note, take ROSE and SHELL NECKLACE (B).
- Place EARRING and SHELL NECKLACE, take STONE PIECES and 2/5 FAN PART (C).

- Place STONE PIECES (D).
- Solution E-F-G.
- Take RED THREAD and GEAR.
- RED THREAD and BLUE FLAME on PURPLE CORAL, take CORAL TORCH.
- Use CORAL TORCH (H).
- Go forward.
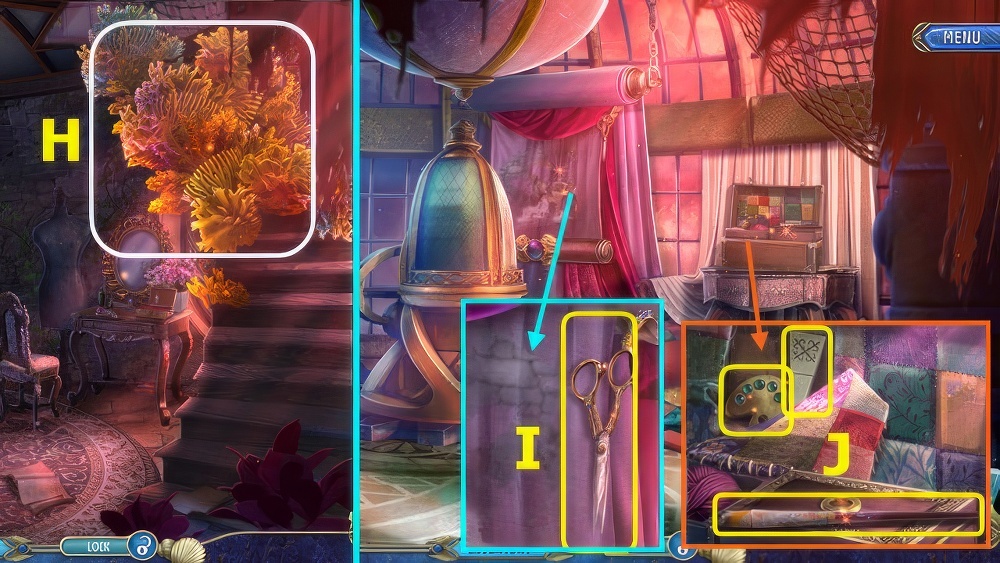
- Take SCISSORS (I).
- Use SCISSORS, take PALETTE, 3/5 FAN PART, and USED PAINTBRUSH (J).

- Take 4/5 FAN PART, place PALETTE (K), play puzzle, earn HEART.
- Place ROSE and HEART, take 5/5 FAN PARTS and UNFINISHED DRESS (L).
- Walk down 2x.
- Place FAN PARTS, take BRONZE LEVER and LACE (M).

- Use GEAR and BRONZE LEVER, take REVEALING POTION and 1/4 ORB (N).
- Go forward 2x.
- Use REVEALING POTION (O).
- Play puzzle, earn MERMAID KEY (P).

- Use MERMAID KEY, take 2/4 ORB and PAINT TUBE (Q).
- Place USED PAINTBRUSH and PAINT TUBE, take BUTTON and JELLYFISH HANDLE (R).
- Use JELLYFISH HANDLE, take NEEDLE and CHAIN HANDLE (S).
- NEEDLE, BUTTON, and LACE on UNFINISHED DRESS, take FESTIVE DRESS.
- Walk down.

- Place FESTIVE DRESS, take 3/4 ORB and SIGNET RING (T).
- Use SIGNET RING, take 4/4 ORBS and GLUE (U).
- Place ORBS (V).
- Solution (B-B-A)-(B-A-B)-(B-B-A)-(B-B-B).

- Take WOODEN TONGS, read note (A).
- Take SILVER HAMMER (B).
- Use WOODEN TONGS, take BROKEN BELL and SCROLL (C).
- BROKEN BELL, SILVER HAMMER, and GLUE on CHAIN HANDLE, take DOORBELL.
- Use DOORBELL (D).
- Go forward.

- Earn 1/3 BLUE RIBBON.
- Take LIZARD (E).
- Take ALISTAIR’S FLINT (F).
- Place LIZARD, take 2/3 BLUE RIBBON and QUILL (G).

- Place SCROLL and QUILL, read note, take EMPTY JAR and BOOK SPINE (H).
- Use NEEDLE and BOOK SPINE (I).
- Play puzzle, earn DRAGON KEY (J).
- Use DRAGON KEY, take TRAP DESCRIPTION and 3/3 BLUE RIBBONS (K).
- Walk down.

- Use ALISTAIR’S FLINT and BLUE RIBBONS, read note, take HERBICIDE and HORN (L).
- Use HERBICIDE (M).
- Go left.

- Take SMOOTH STONE (N).
- Use SMOOTH STONE, take FIREFLIES, FILE, and CRANK (O).
- Take SEASHELL, use FIREFLIES (P), play puzzle, earn AMETHYST.
- Walk down, forward.

- Place EMPTY JAR and AMETHYST, take NYMPH TEARS (A).
- HORN, SEASHELL, FILE, and NYMPH TEARS on TRAP DESCRIPTION, take VOICE TRAP, earn WATER SPIRIT.
- Solution (B), take RUNE CHARGER and EARPLUG.
- Walk down.

- Place WATER SPIRIT, take WAX and CALMING HERBS (E).
- Use CRANK and WAX, take BROOCH and SIEVE (F).
- Go left.
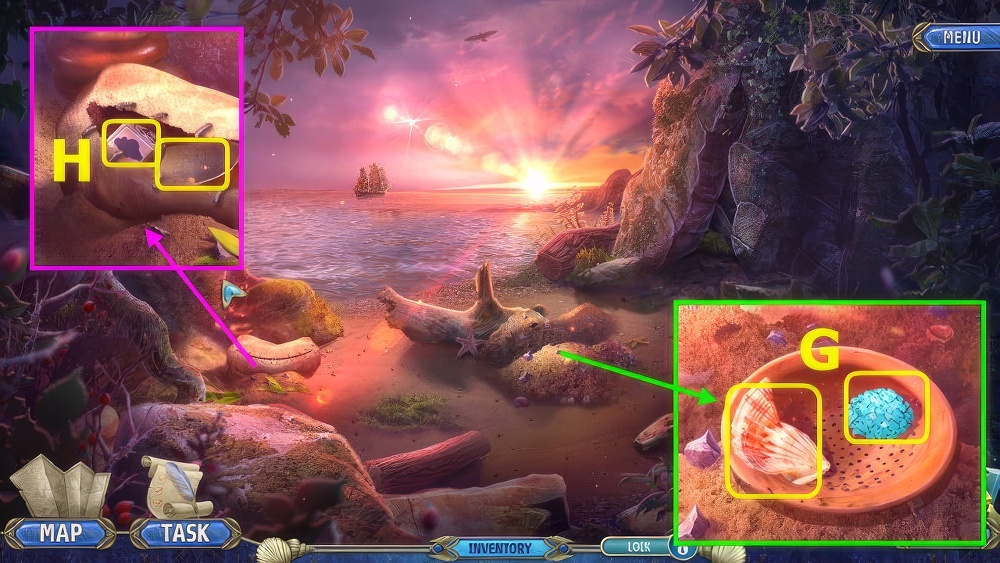
- Use SIEVE, take SHARP SHELL and SALT (G).
- Use SHARP SHELL, take AIR RING and COCONUT SHELL (H).
- Walk down, right.

- Place BROOCH and AIR RING, solution (I).
- Take BOOKMARK and INACTIVE RUNES (J).
- INACTIVE RUNES, SALT, and CALMING HERBS on RUNE CHARGER, take PROTECTION RUNES.
- Place EARPLUGS and PROTECTION RUNES, take IMPENETRABLE EARPLUGS (K).
- Walk down, left.

- Use IMPENETRABLE EARPLUGS (L), play puzzle.
- Take KNIFE (M).
- Take GREEN SHIELD (N).
- Use KNIFE, take SQUIRE, MIRROR (O).
- Place SQUIRE, read note, take GUNPOWDER and FLYTRAP SEEDS (P).
- GUNPOWDER and BOOKMARK on COCONUT SHELL, take BOMB.
- Take 1/4 WOODEN SYMBOL (Q).
- Place MIRROR and BOMB (R).
- Walk left.

- Take KNOB (A).
- Take CASE (B).
- Use KNOB, take POKER, 2/4 WOODEN SYMBOL, and CANDLE (C).
- Use POKER, take STAMP, RED SHIELD, and 3/4 WOODEN SYMBOL (D).

- Place RED SHIELD and GREEN SHIELD (E).
- Solution (F).
- Remove cloth, read note, take LIVING WATER and FERTILIZER (G).

- Use LIVING WATER (H).
- Walk down.
- Place FLYTRAP SEEDS and FERTILIZER, take 4/4 WOODEN SYMBOLS and SPEARHEAD (I).
- Place WOODEN SYMBOLS, take BEAM and TIARA (J).
- Walk left.

- Use BEAM (K), play puzzle, earn MERCHANT KEY.
- Use MERCHANT KEY, take CROSSBOW and SANDPAPER (L).
- SANDPAPER and STAMP on CASE, take ARROW and NECKLACE.
- Walk down.

- Place TIARA, CANDLE, and NECKLACE (M).
- Play puzzle, earn SIREN AMULET (N).
- Place SIREN AMULET, take HAMMER and ROPE (O).
- Walk left.

- Use SPEARHEAD and HAMMER, take HOOK and DISSOLUTION POTION (A).
- ROPE, HOOK, and ARROW on CROSSBOW, take GRAPPLING HOOK.
- Use GRAPPLING HOOK (B).
- Use DISSOLUTION POTION (C).
- Use VOICE TRAP (D).

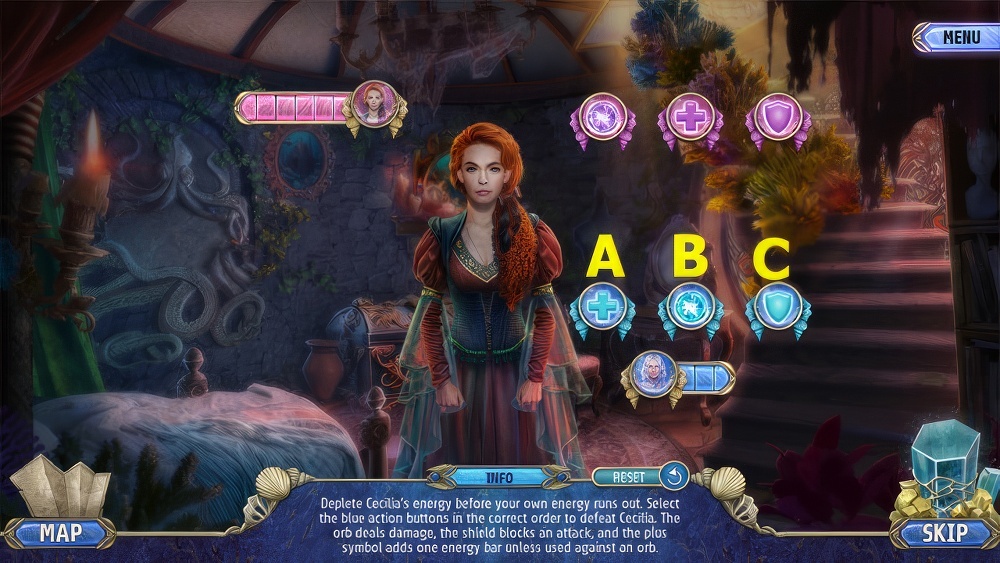
- Solution E-F-G.
- Walkthrough Bonus Chapter, at the link below.


