
Dark City 1: London – The game’s walkthrough begins as London is about to celebrate the opening of the world’s largest clock tower, until a decapitated ghost appears, threatening to destroy the gloomy city and kill hundreds of people at the opening ceremony. Explore dark alleys and collect clues to track down the killer and uncover the terrifying secrets hidden inside the clock tower. If you are stuck and do not know how to pass any of the locations, on our site you can watch the walkthrough of Dark City 1: London, and catch the decapitated clockmaker.
Dark City 1: London – Walkthrough
Here you can see the full walkthrough of Dark City 1: London, namely the main story and the bonus chapter.
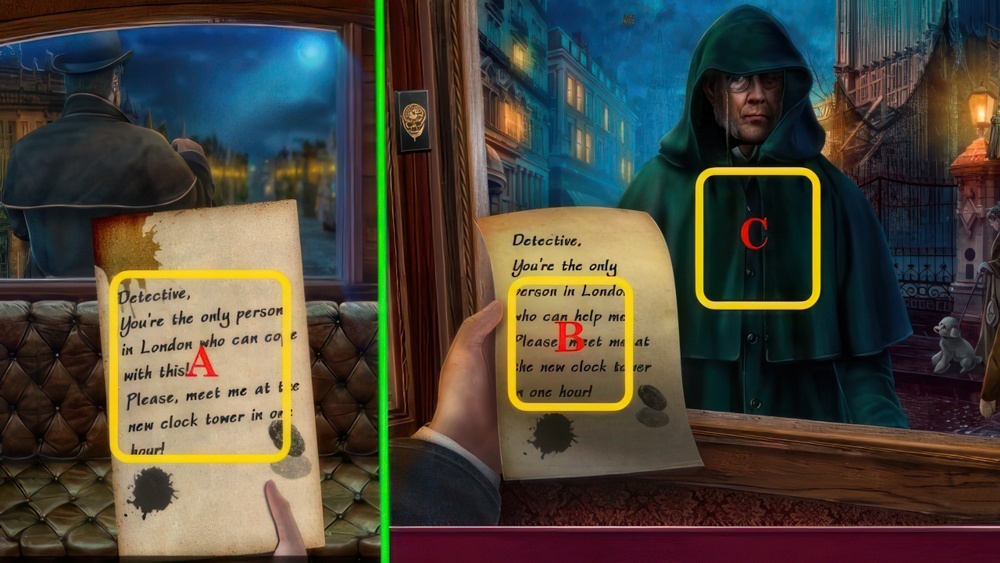
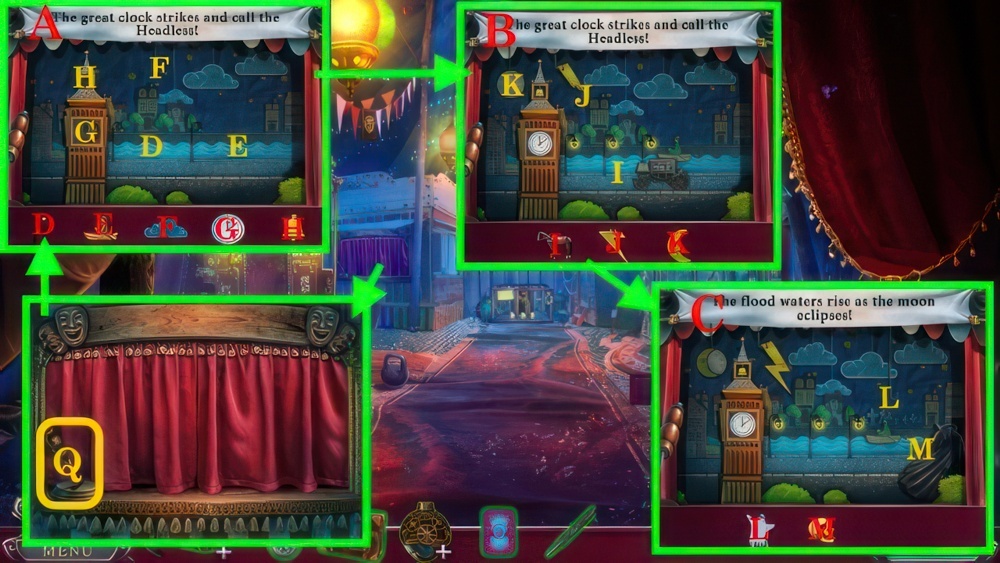
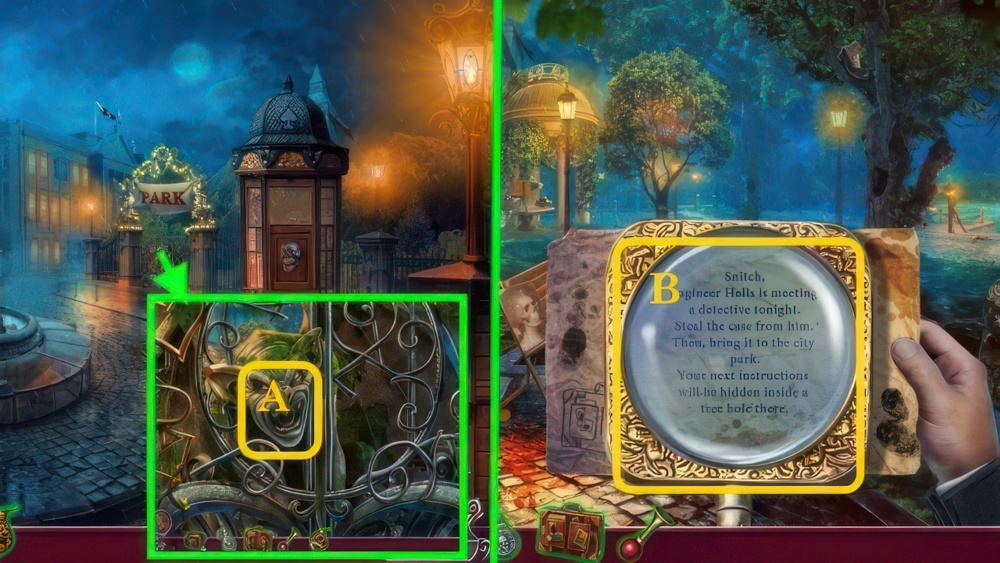
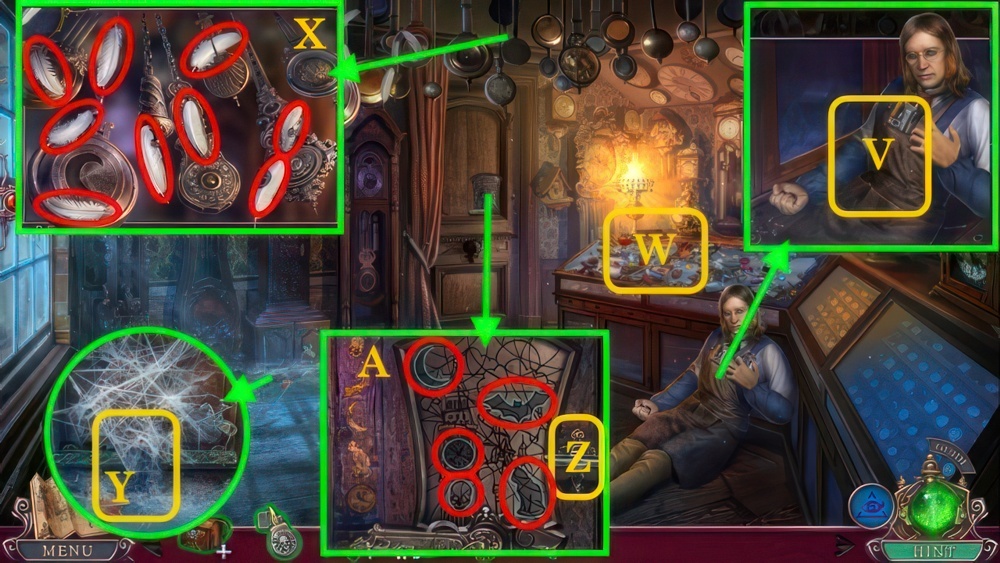
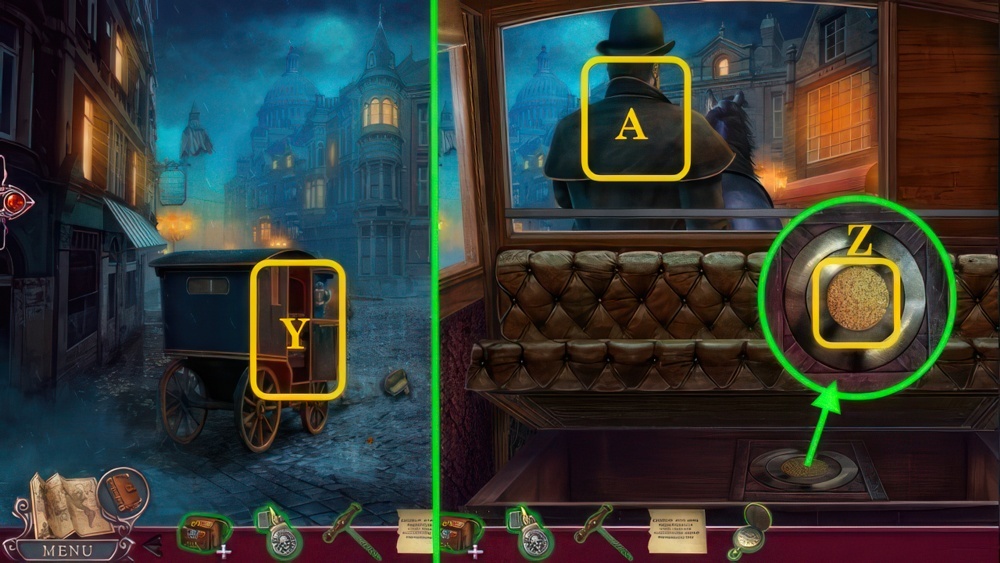
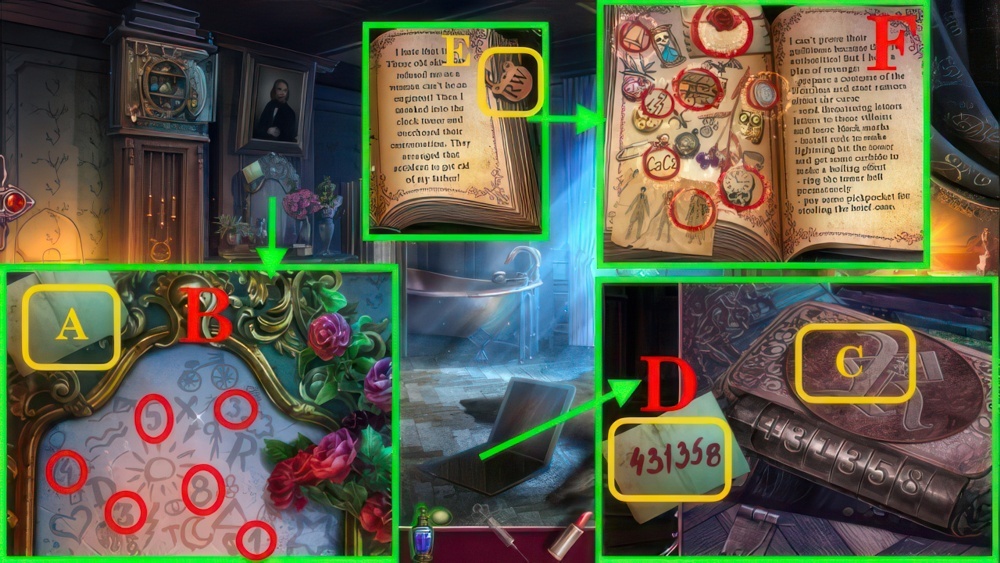
- Read (A).
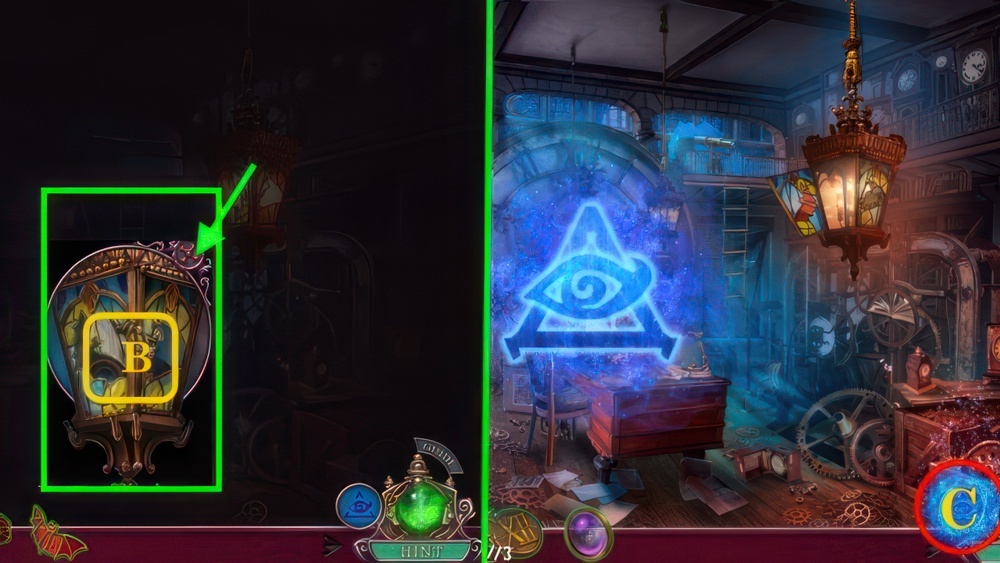
- Take NOTE (B).
- Speak (C), give NOTE.
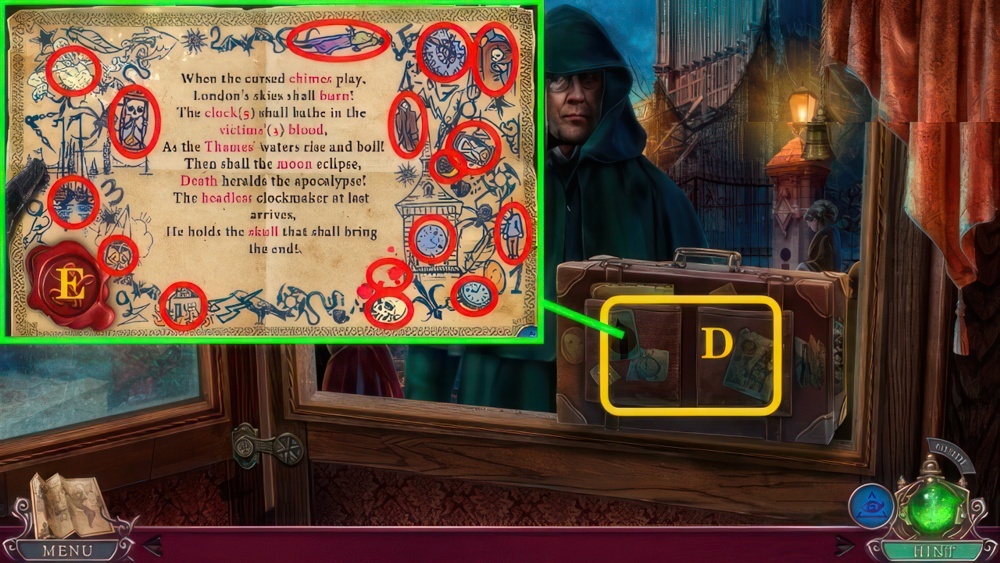
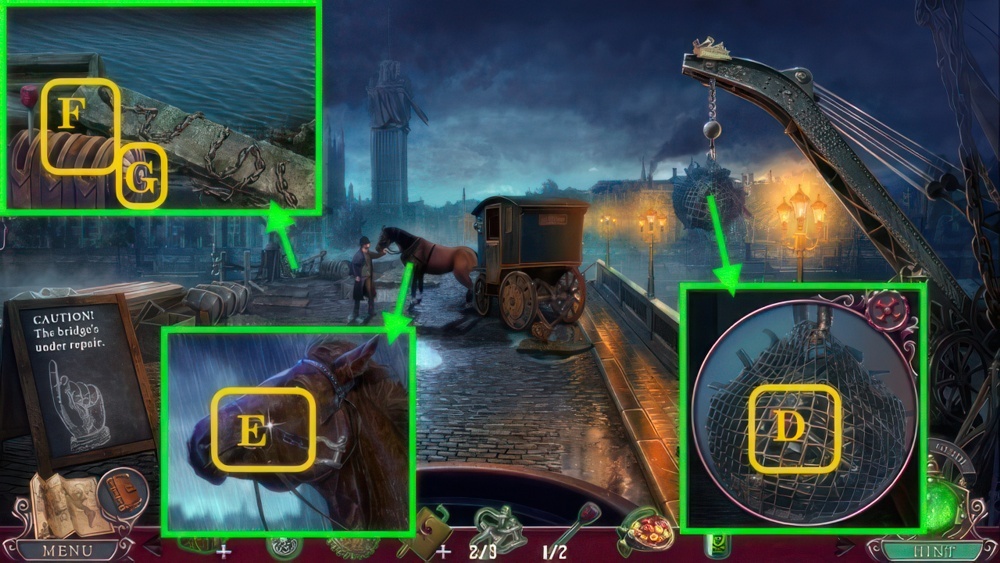
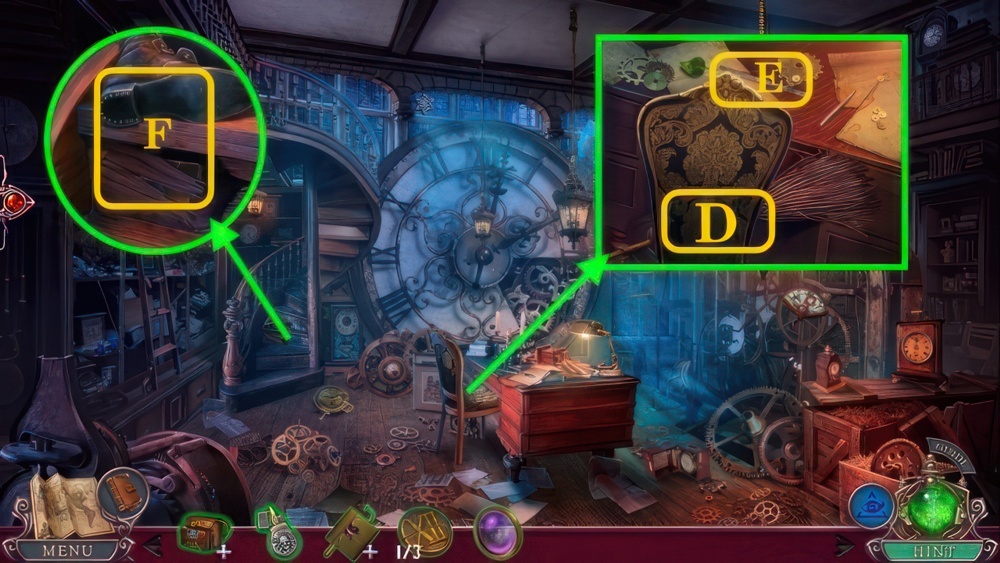
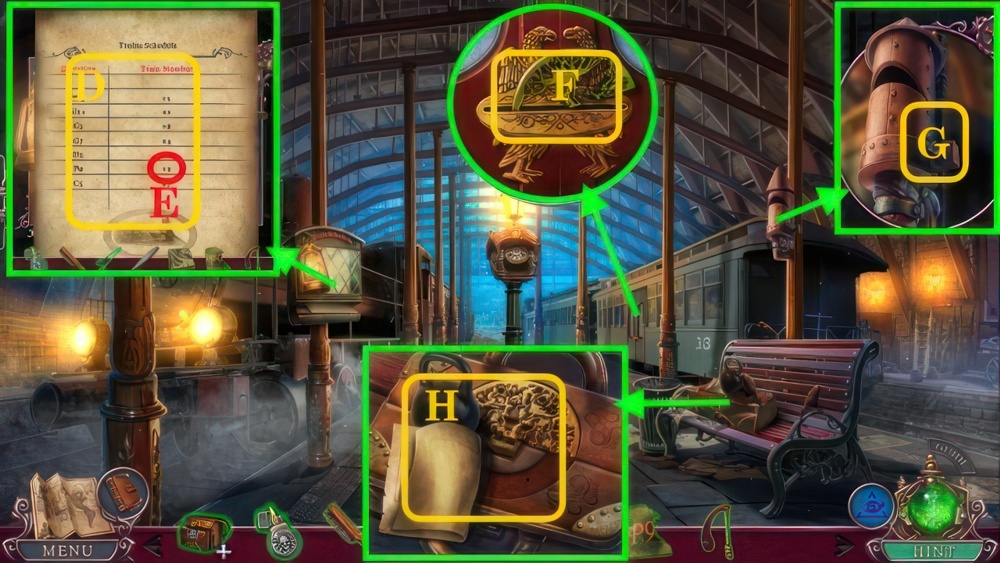
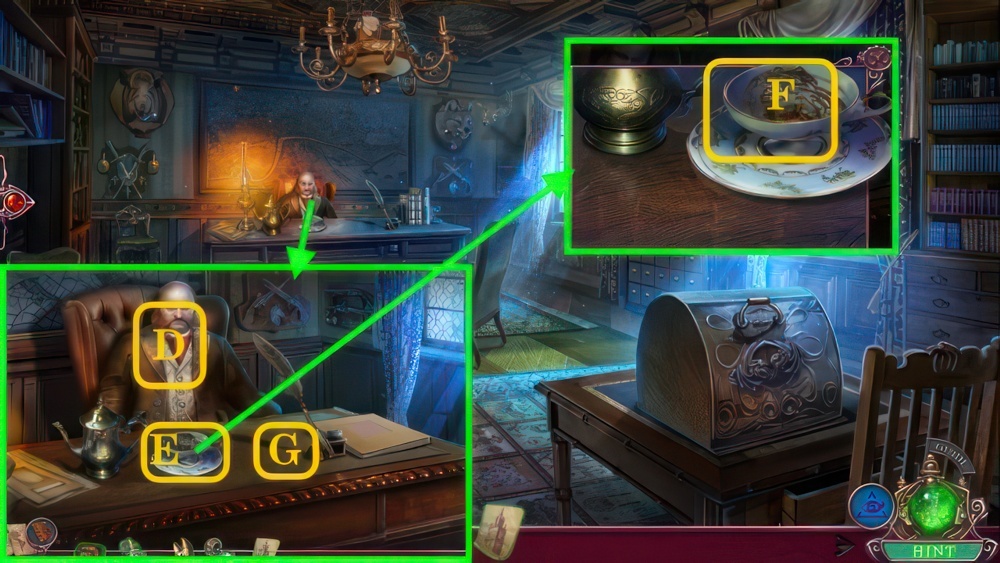
- Take ENGINEER’S BRIEFCASE (D), inspect.
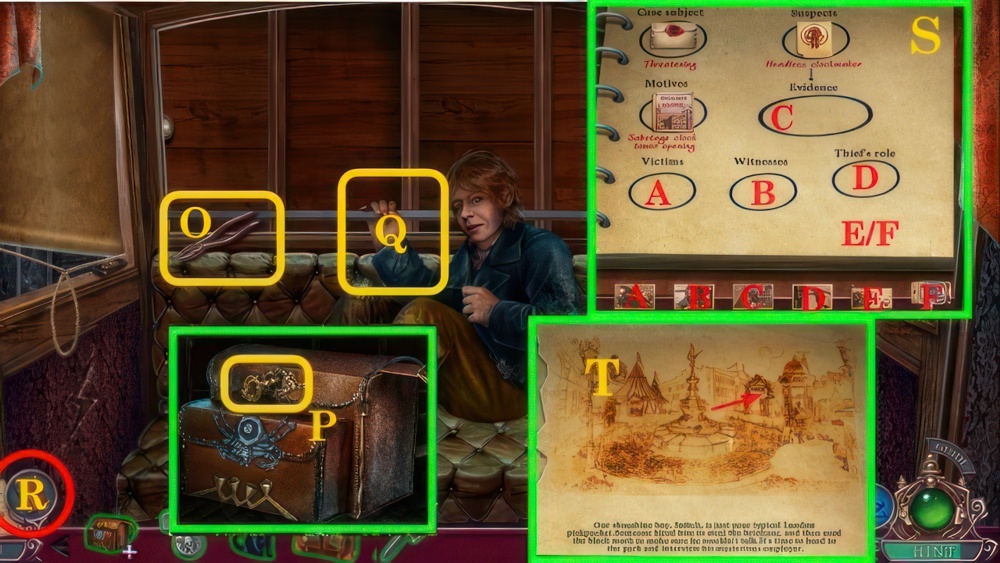
- Take Map, pick up MIRROR, read note.
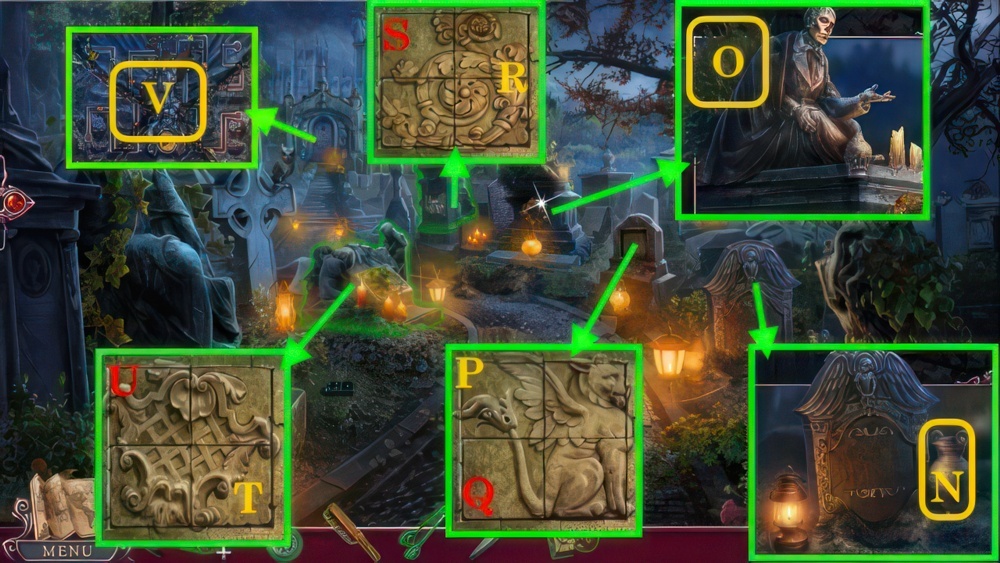
- Find the images related to the highlighted words.
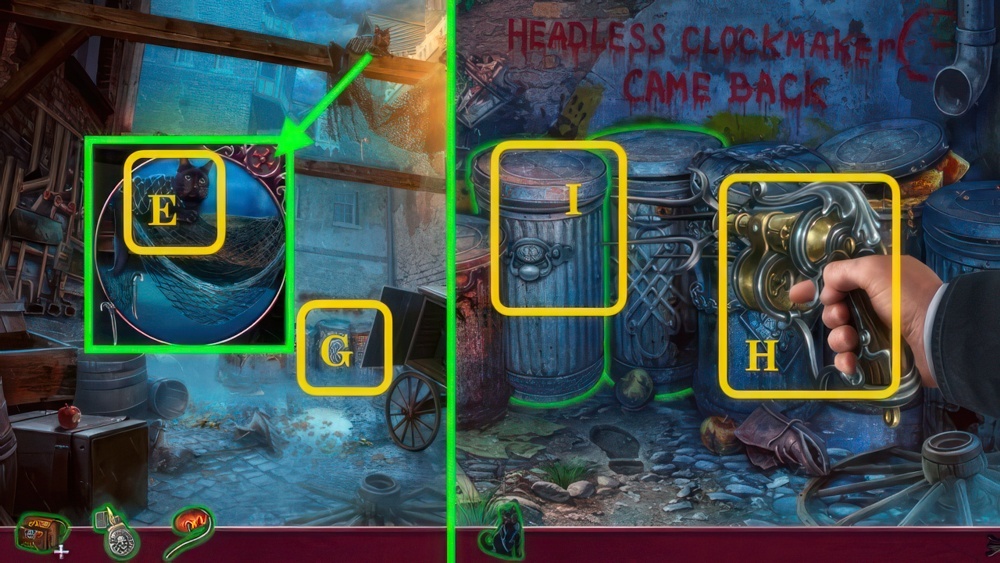
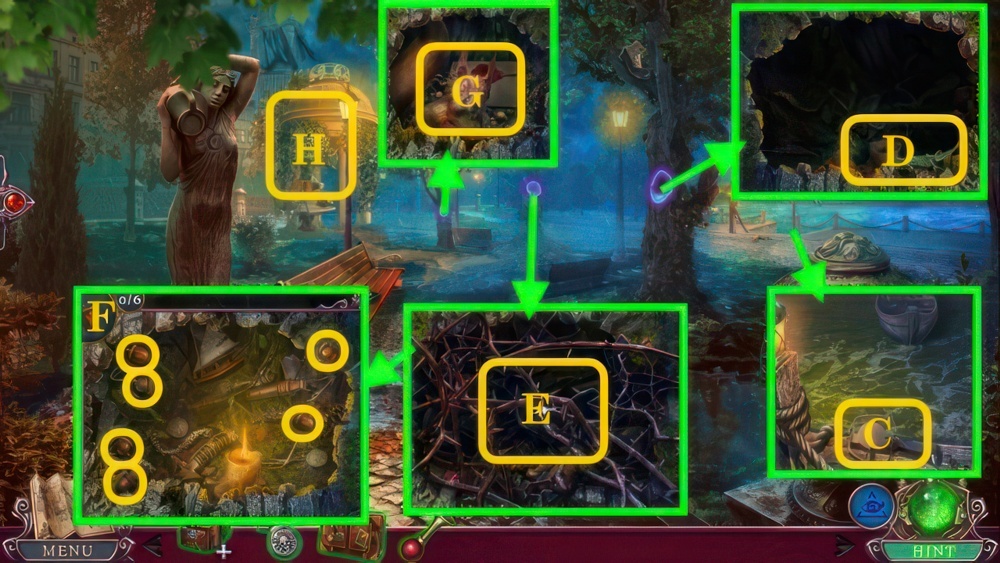
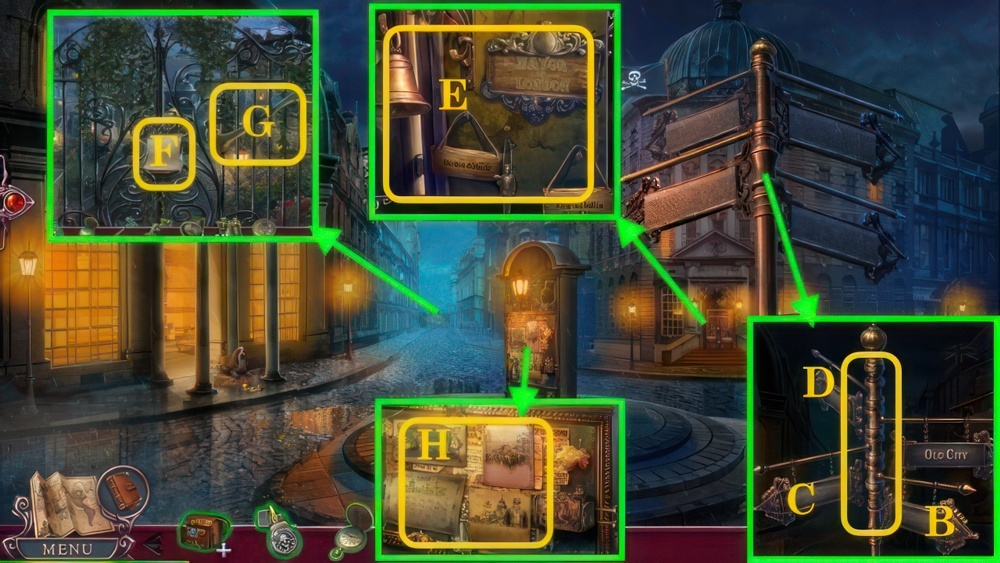
- Walkthrough (E).
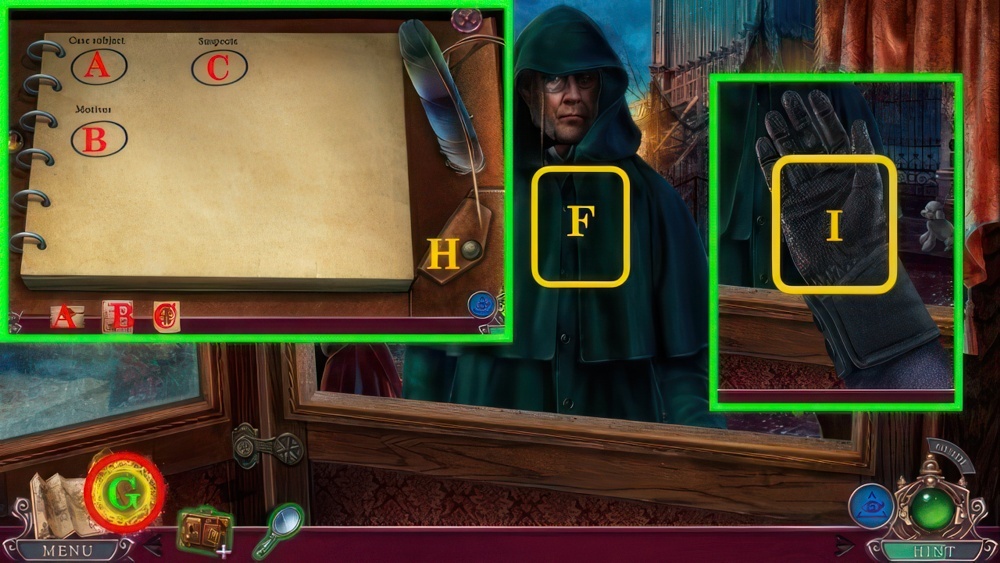
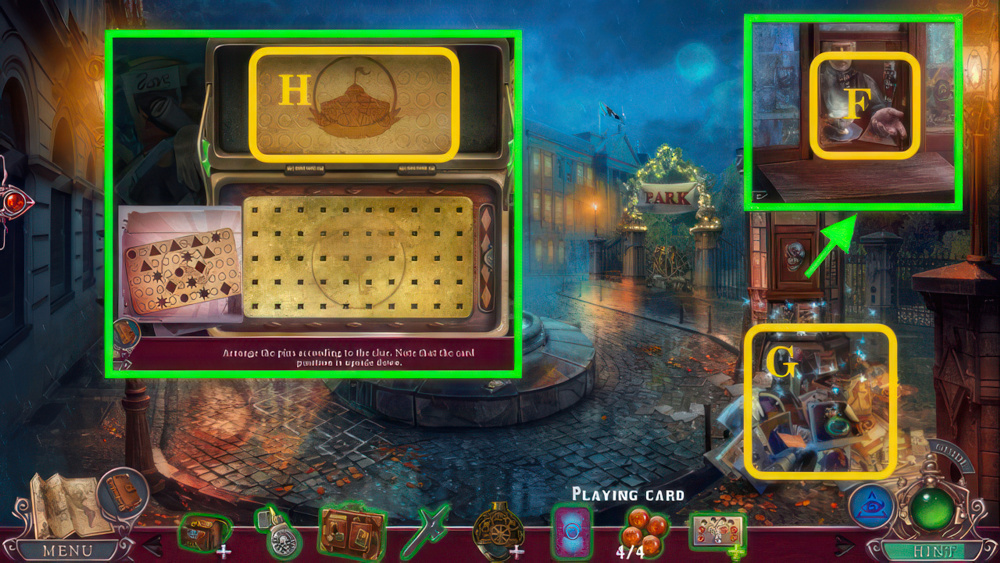
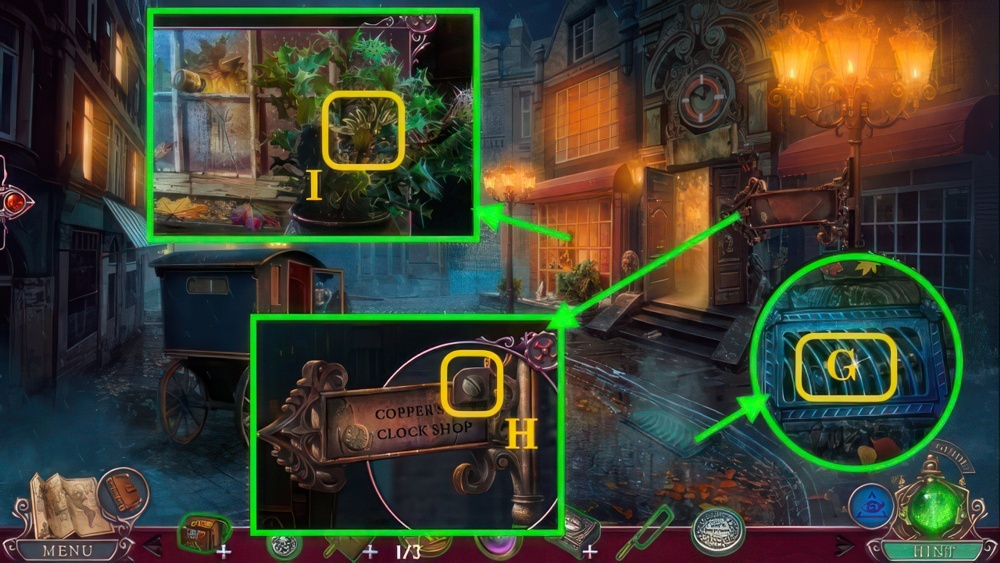
- Talk (F), view (G).
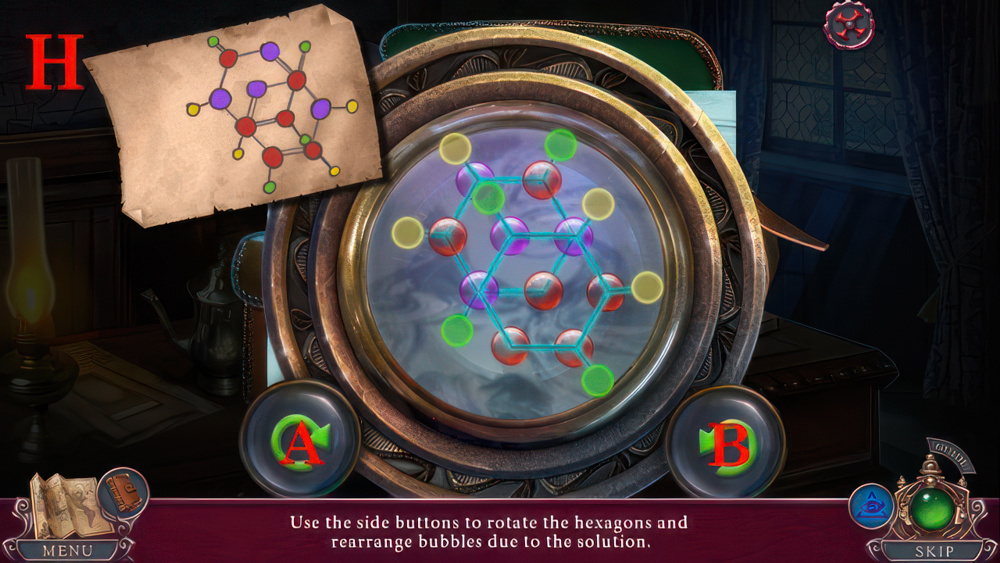
- Walkthrough (H), receive DEDUCTION.
- Give DEDUCTION (F).
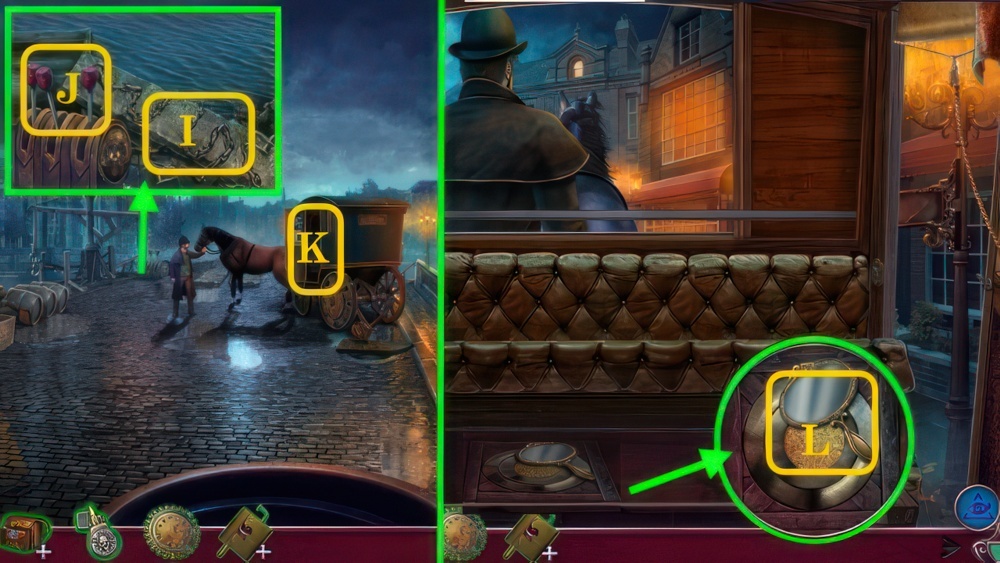
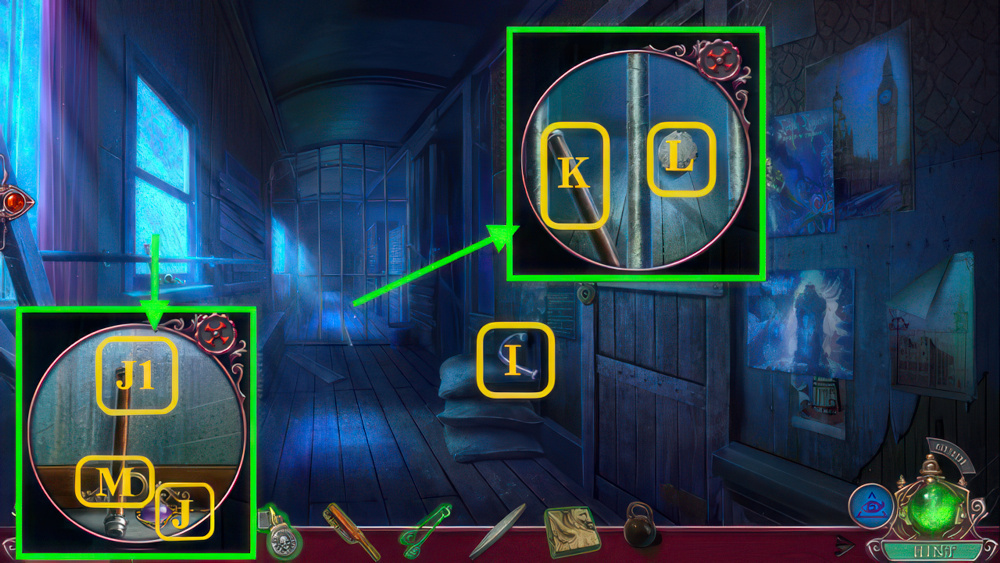
- Remove (I), receive GLOVE.
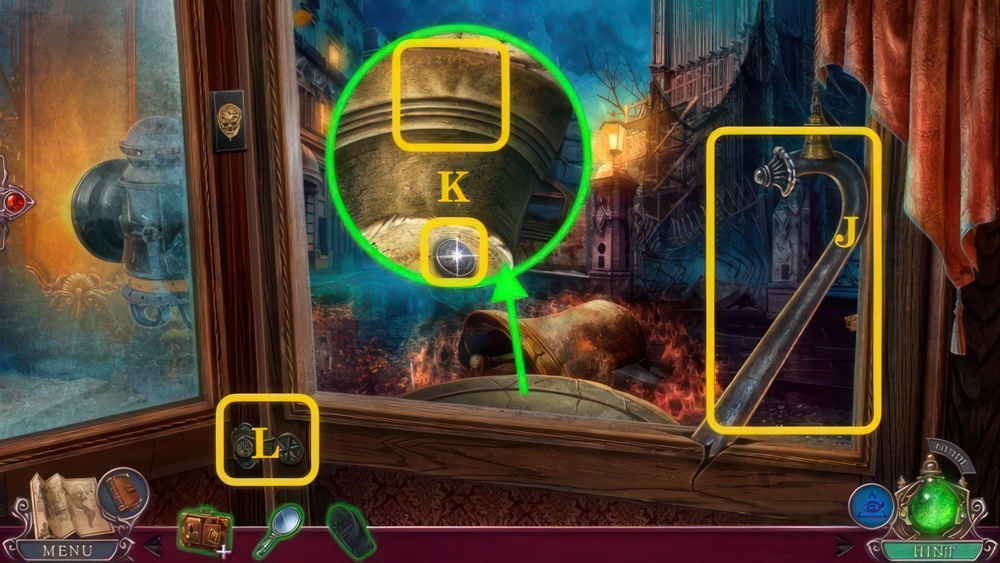
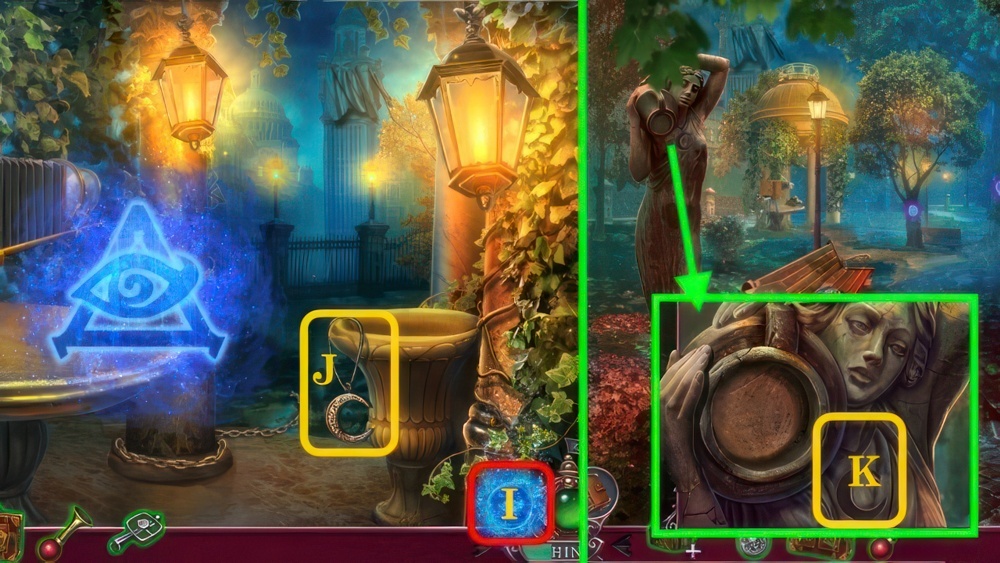
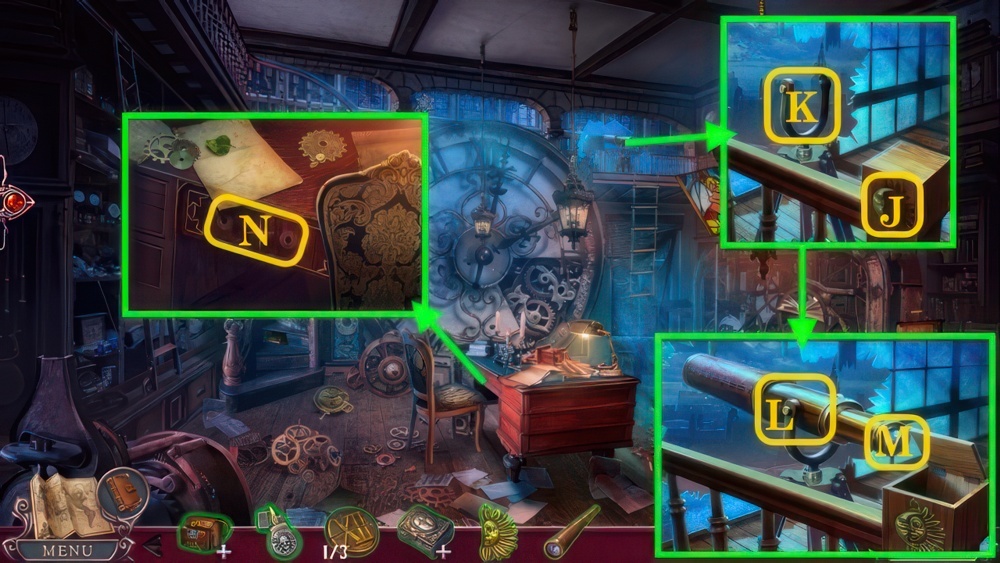
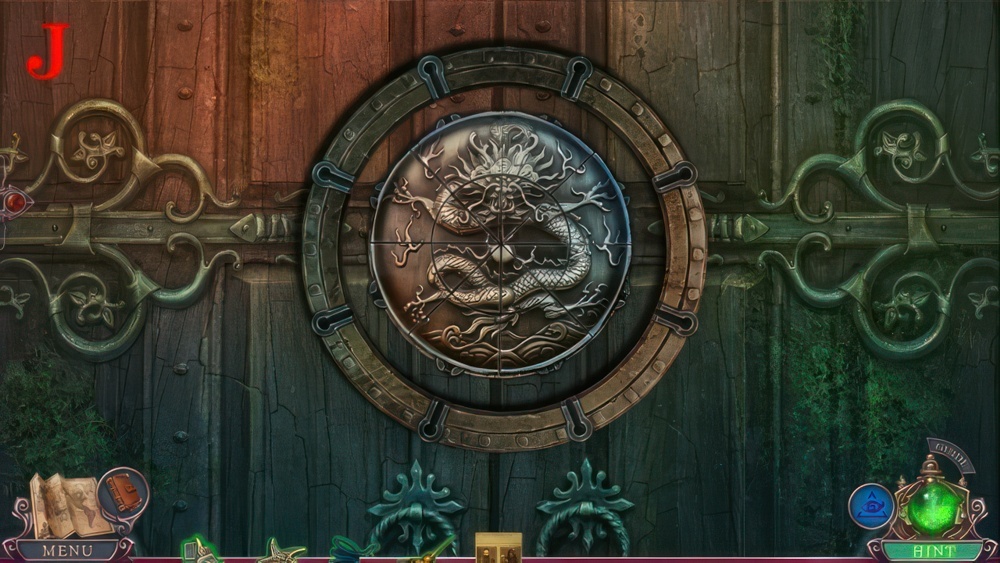
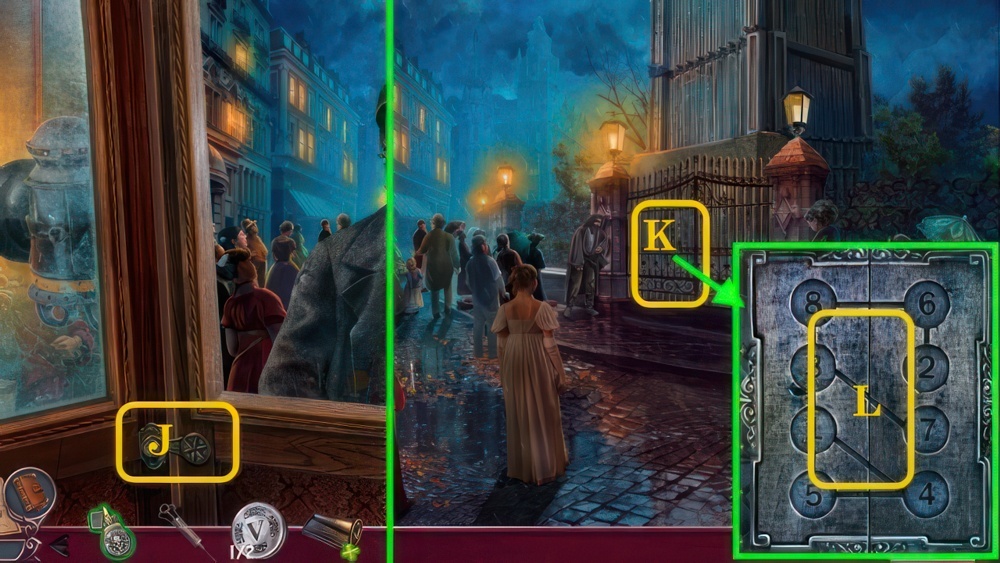
- Take CROWBAR (J).
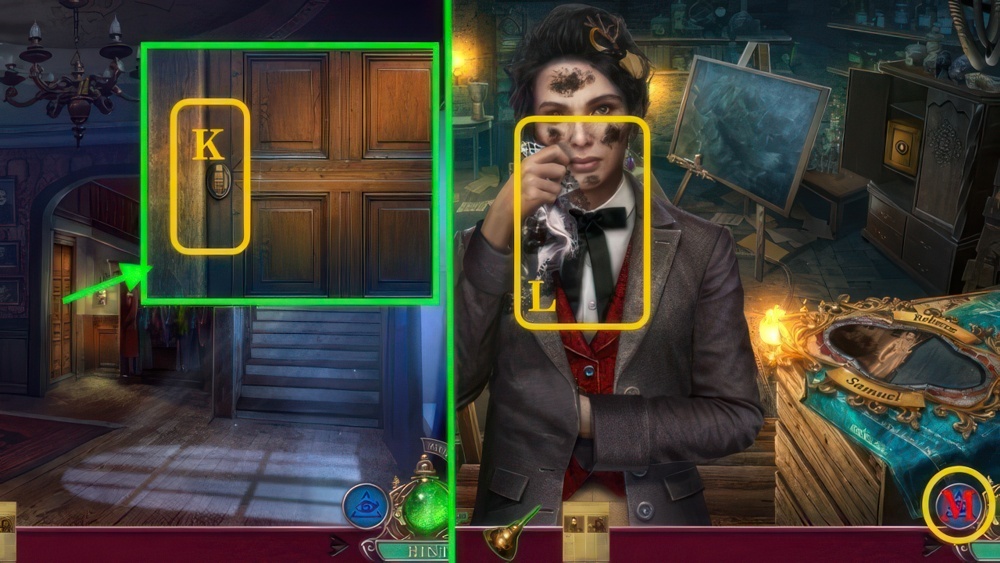
- Take COIN 1/3 (K), use CROWBAR.
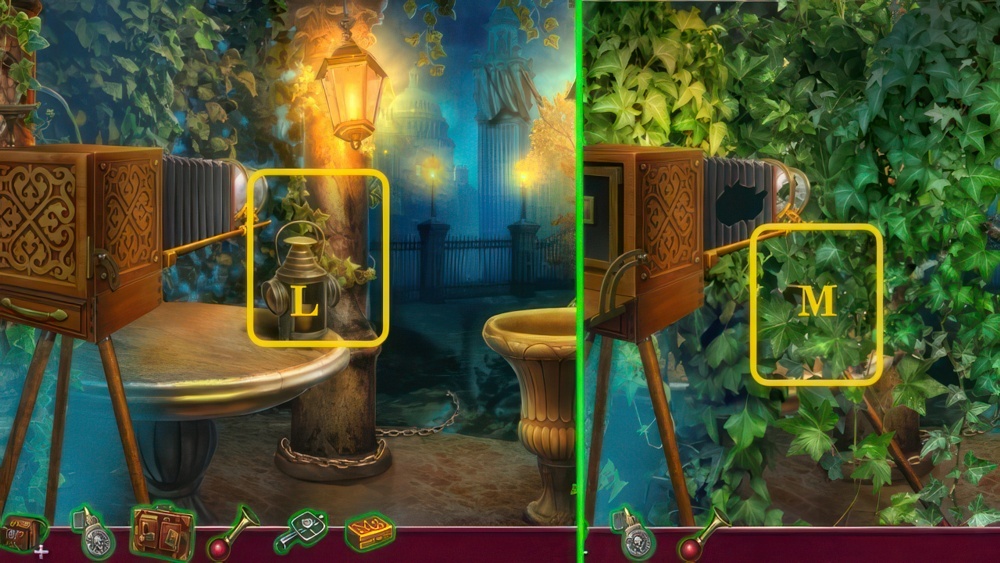
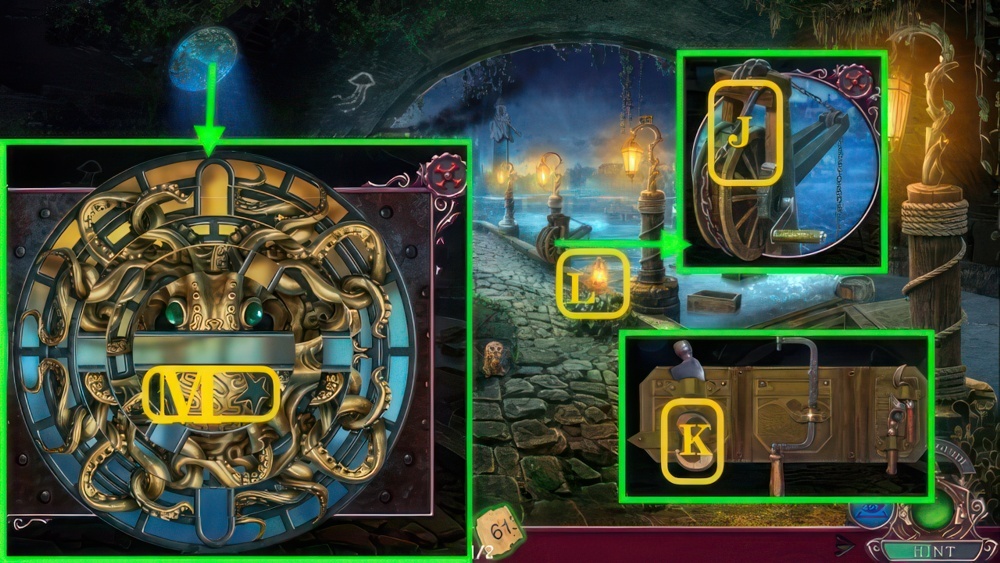
- Open (L), move forward.

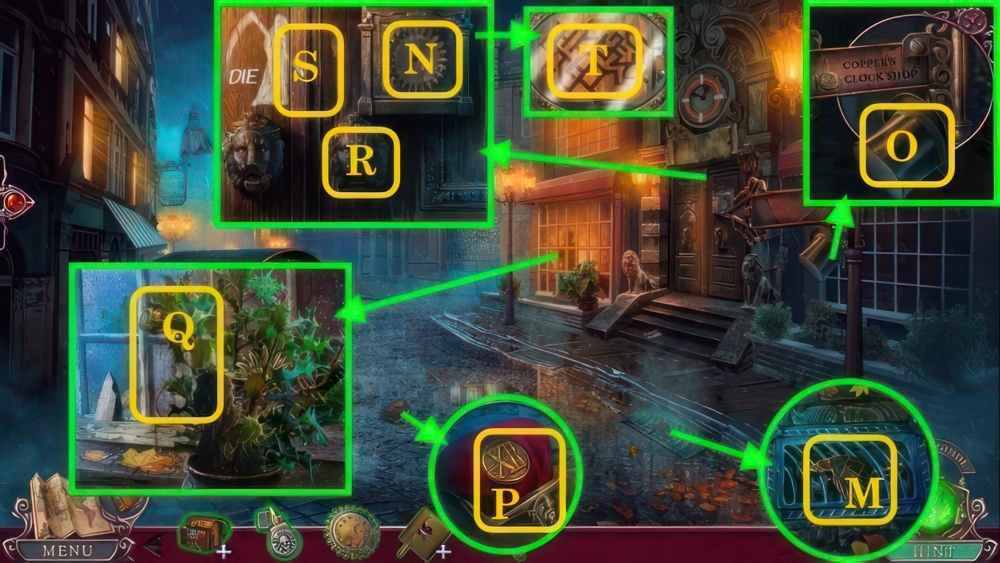
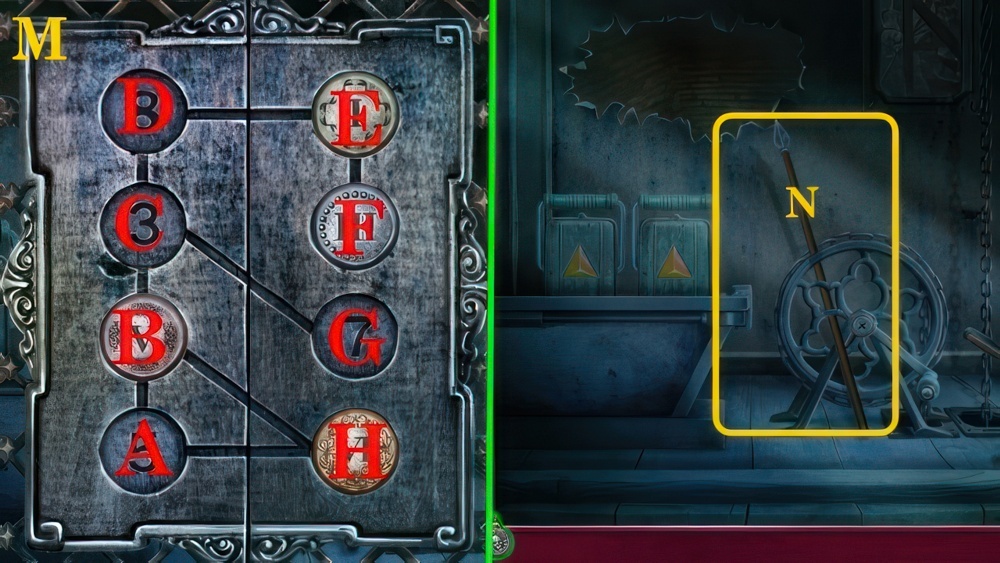
- Use GLOVE (M), receive SHARD.
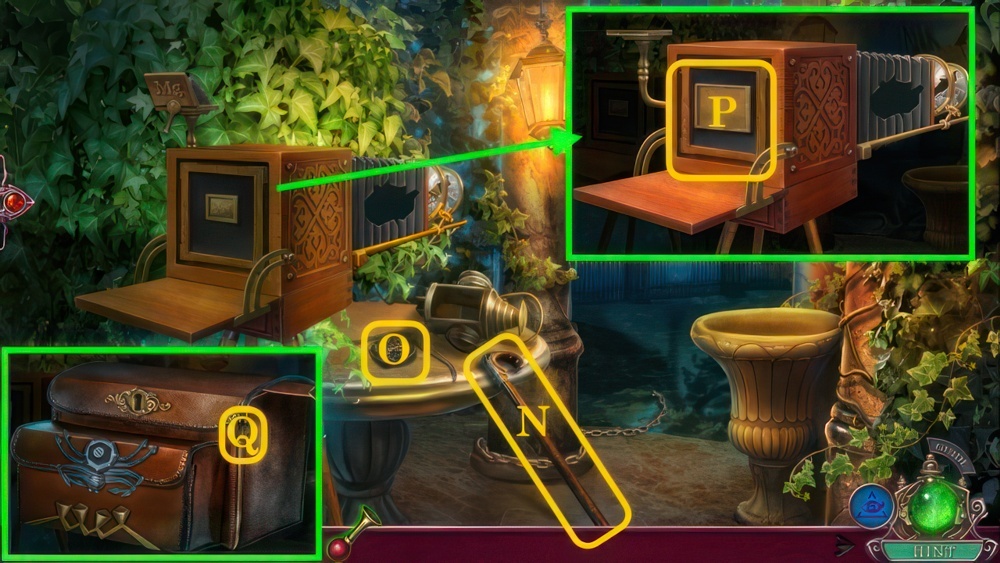
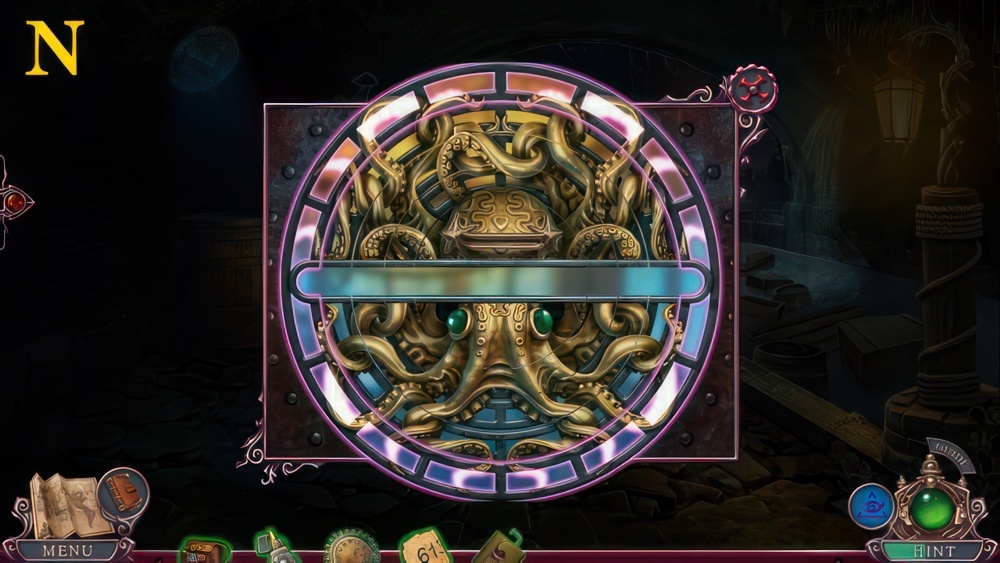
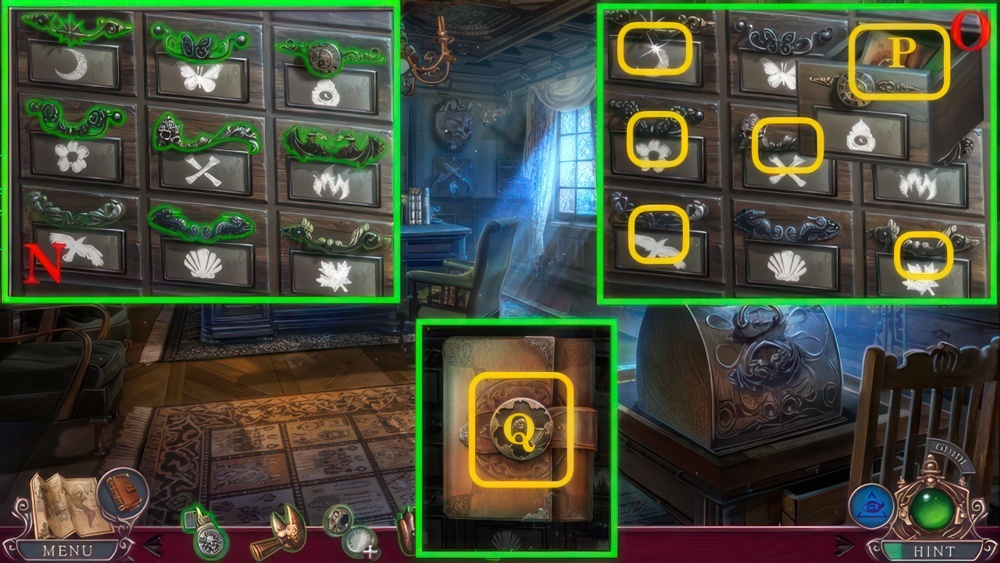
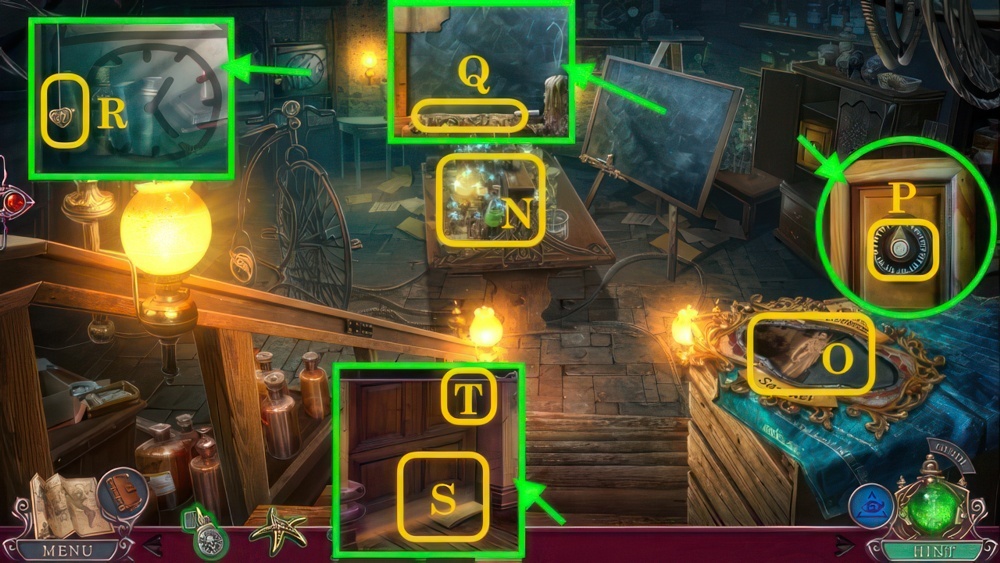
- Turn (N), receive VALVE 1/3.
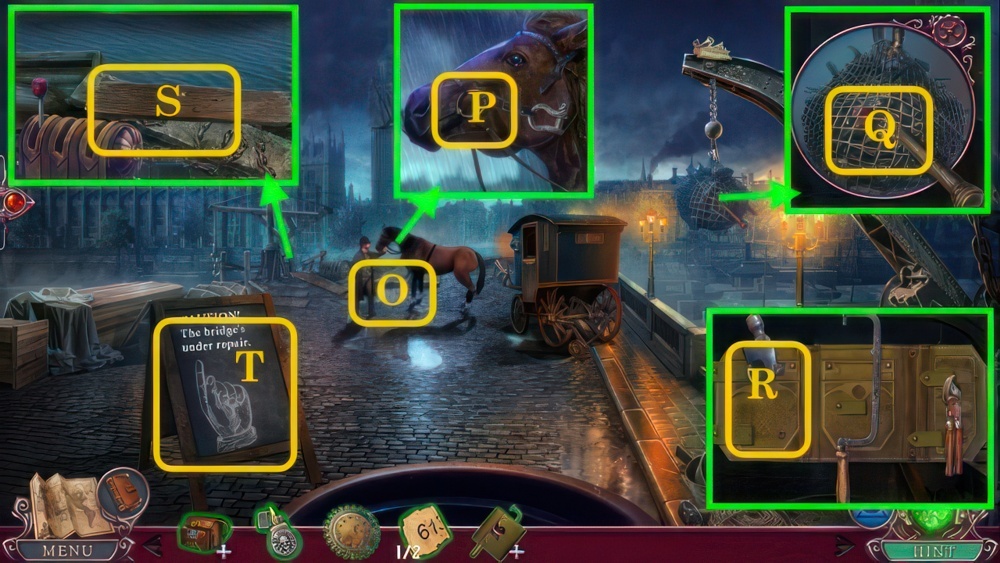
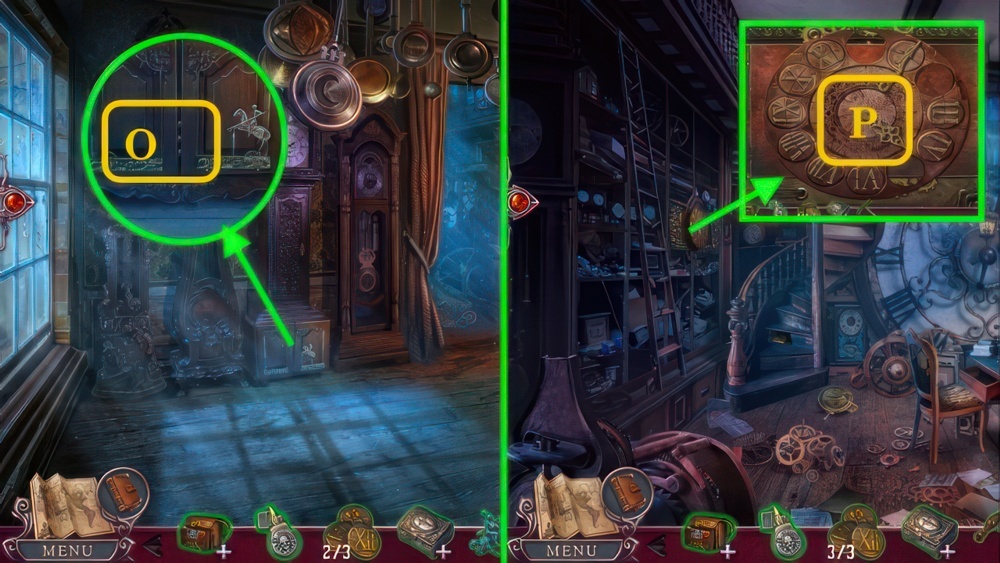
- Inspect (O).
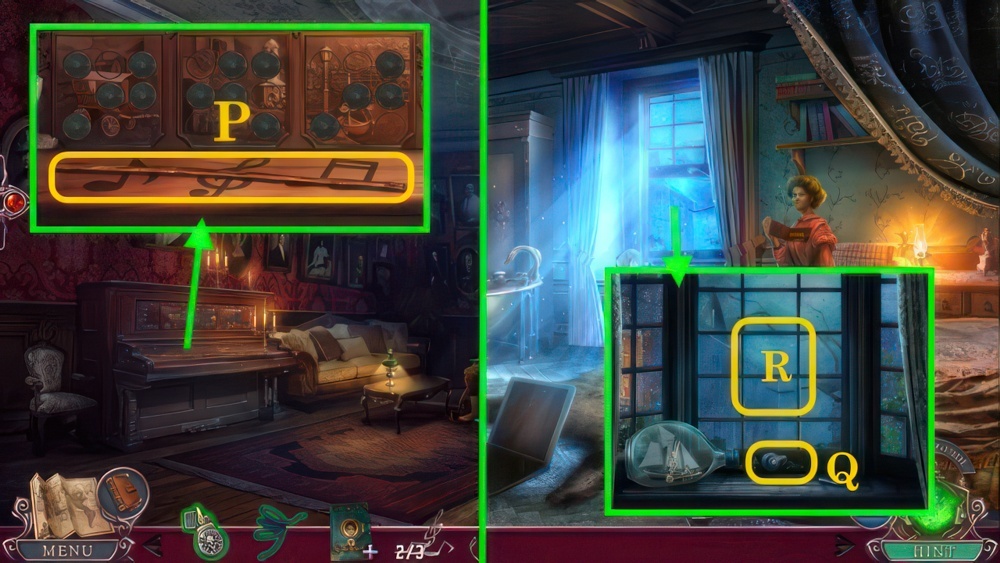
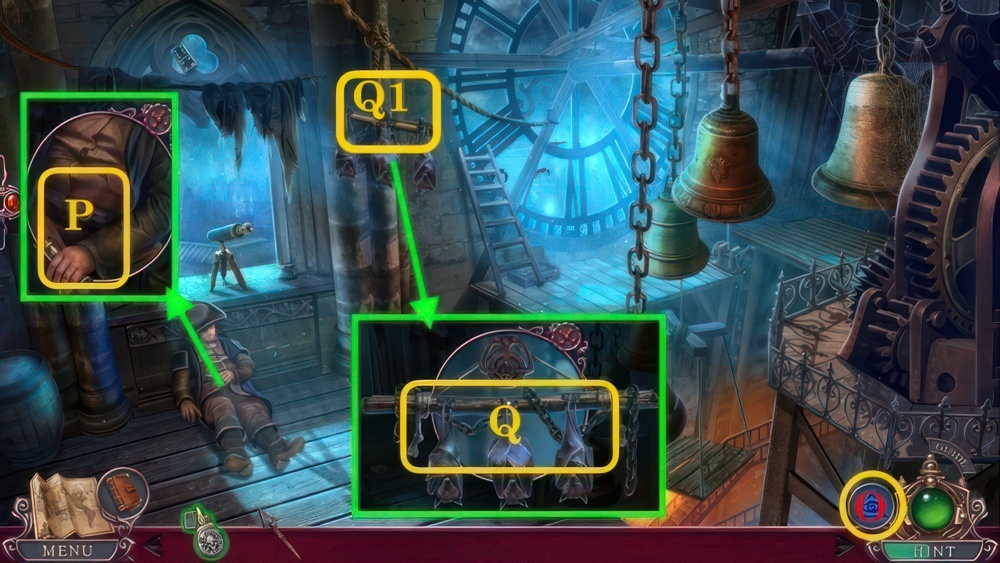
- Take LIGHTER (P).
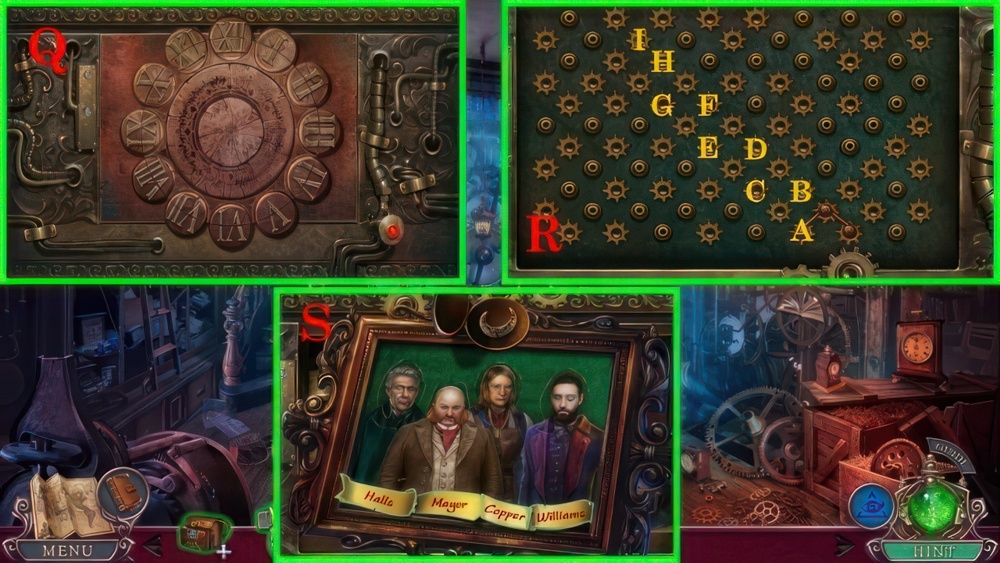
- Use SHARD (Q), open.
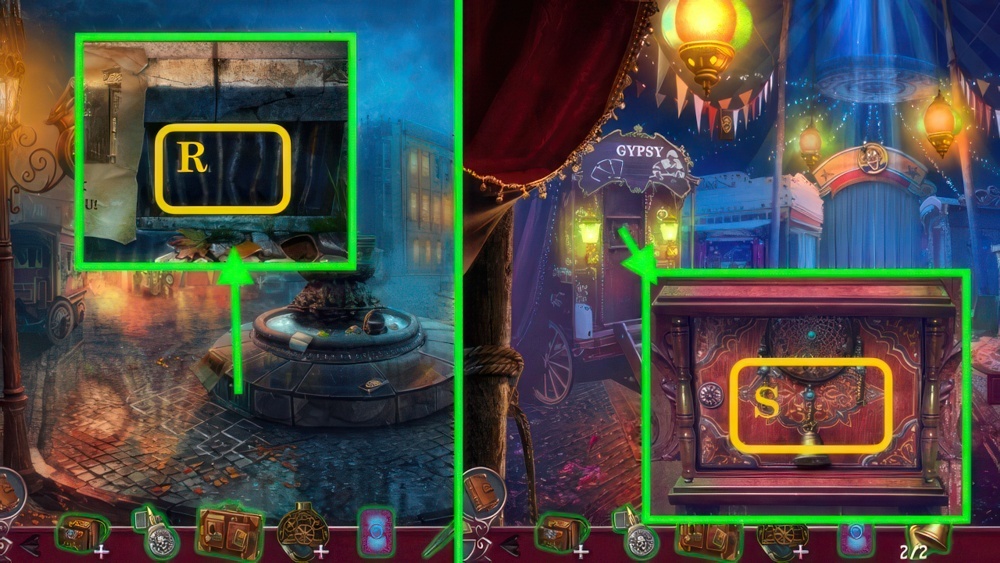
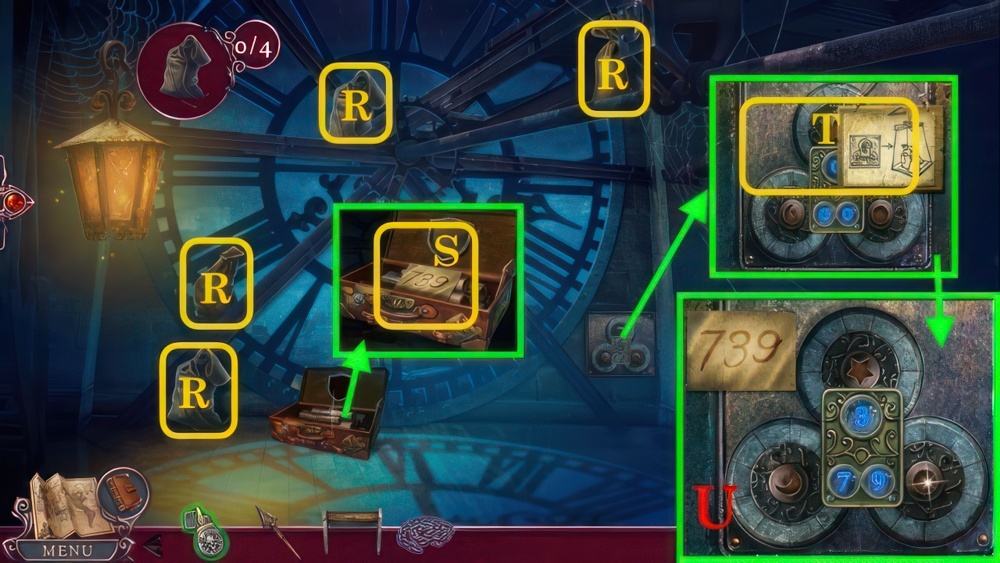
- Take SHILLINGS 2/3 and HOSE (R).
- Use HOSE (N).
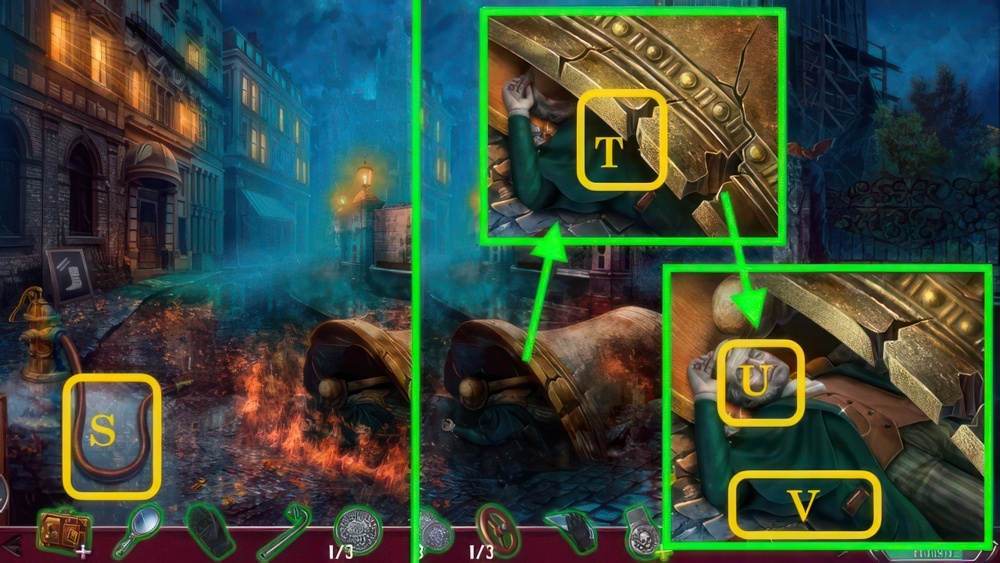
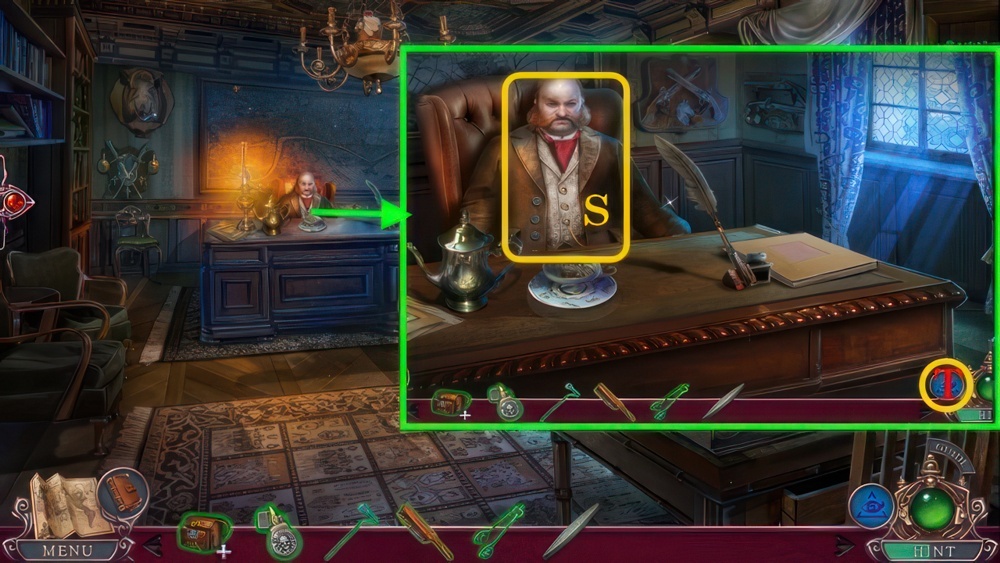
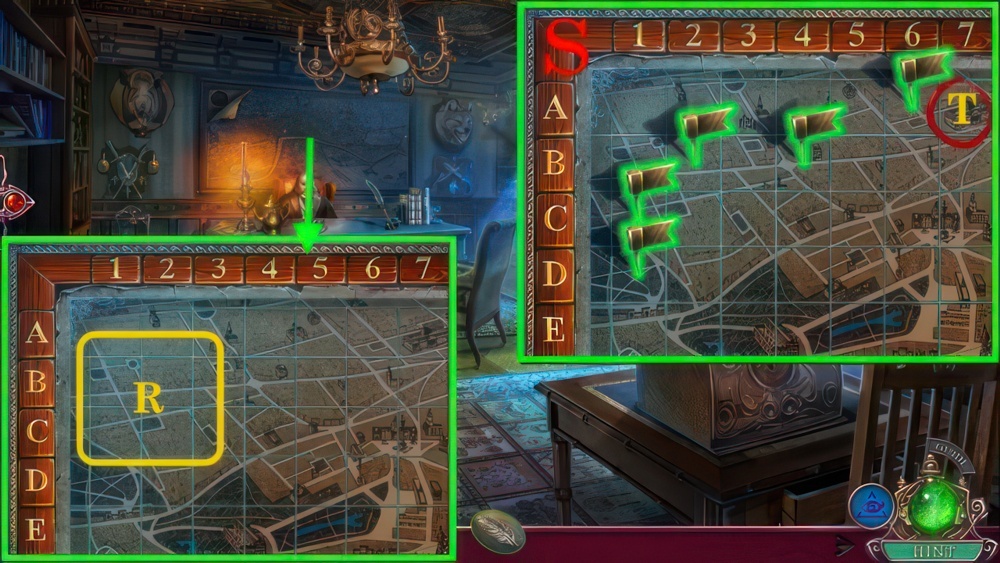
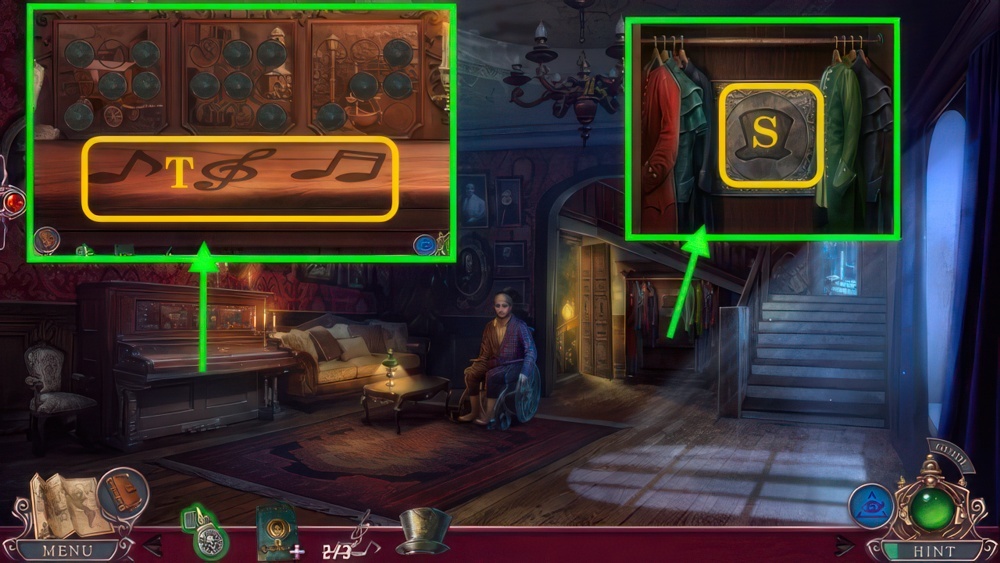
- Use (S).
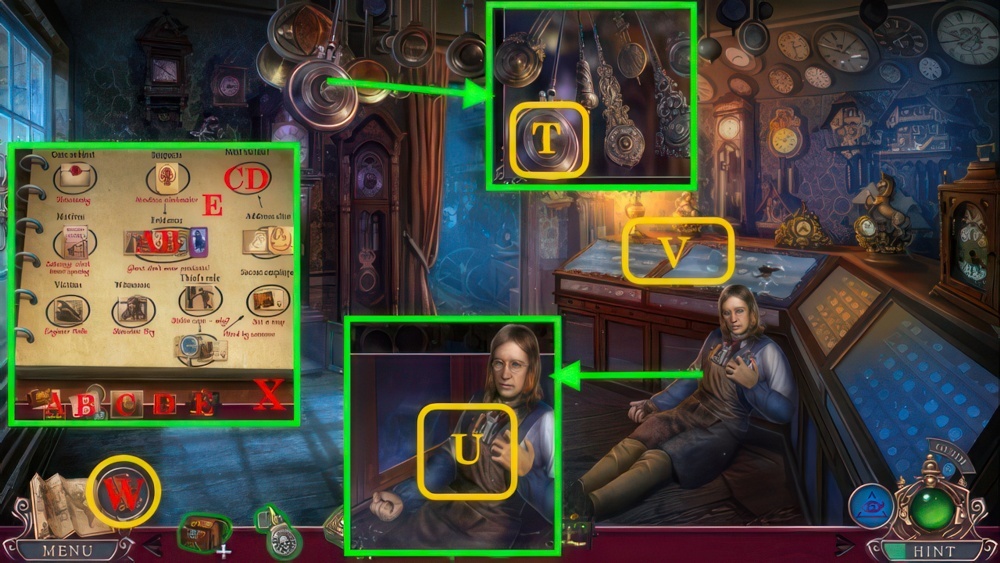
- Use CROWBAR (T).
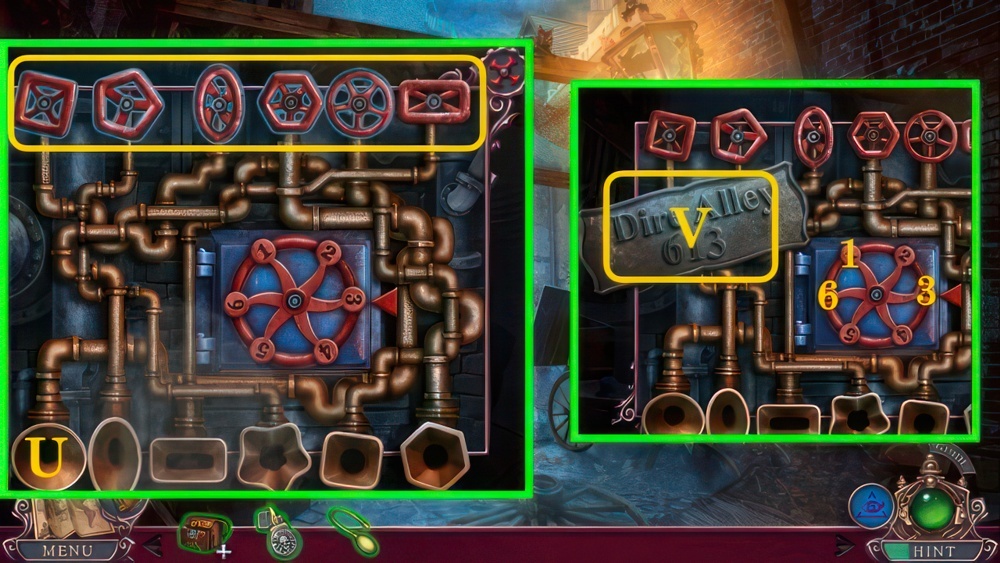
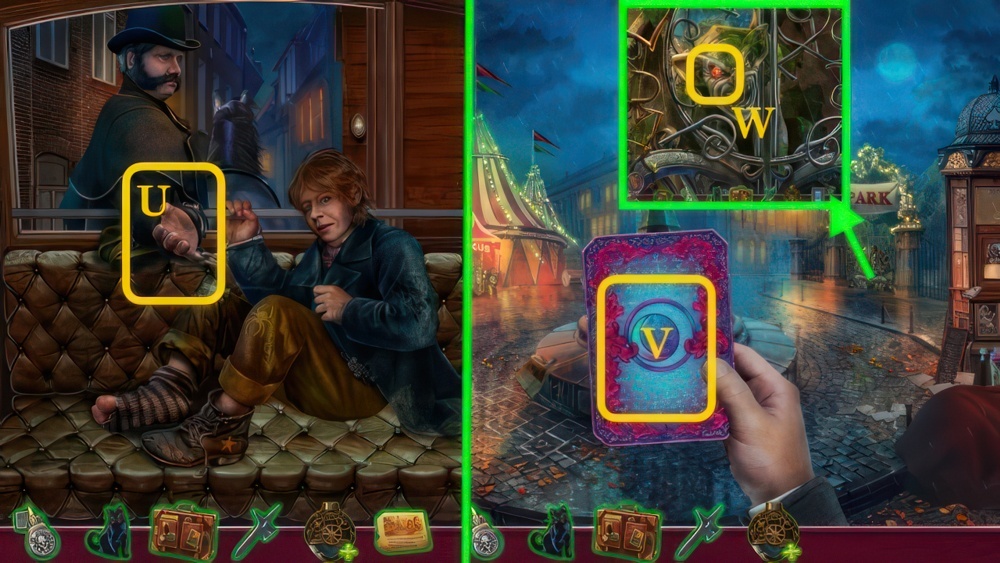
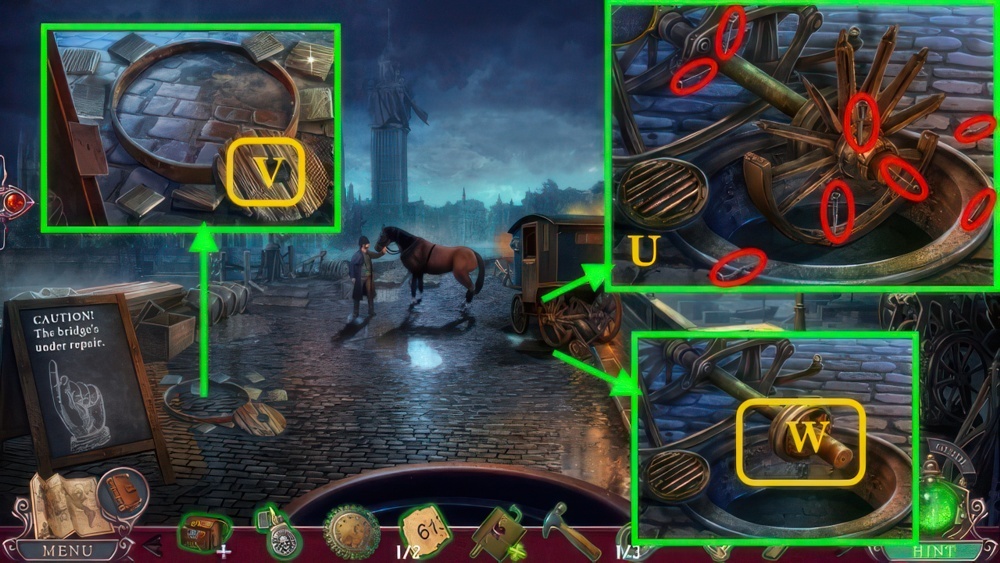
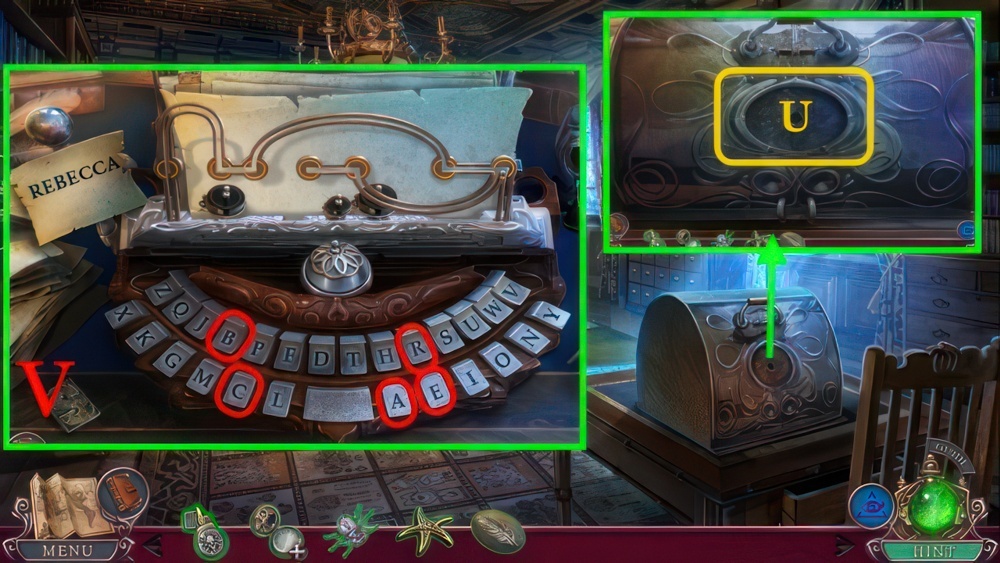
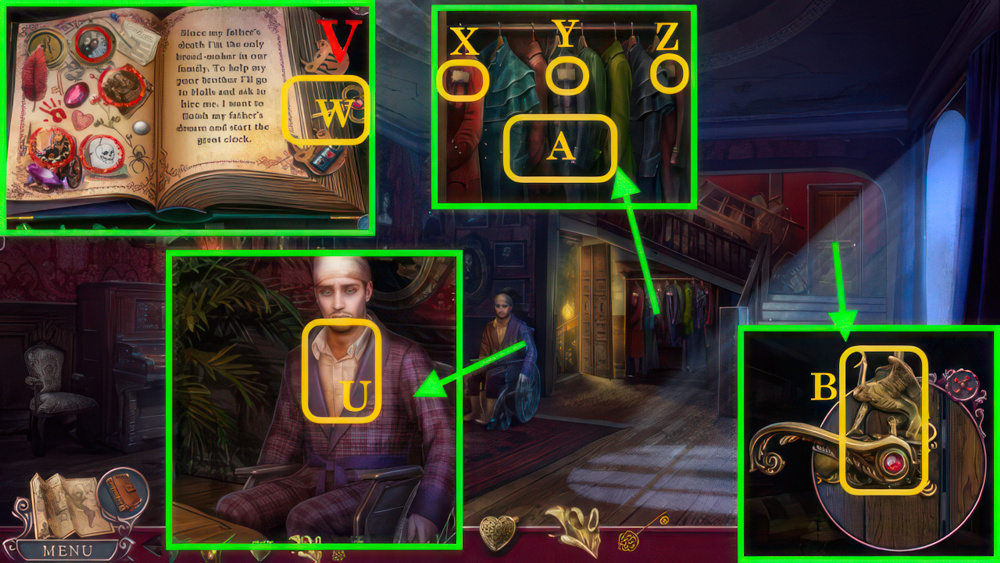
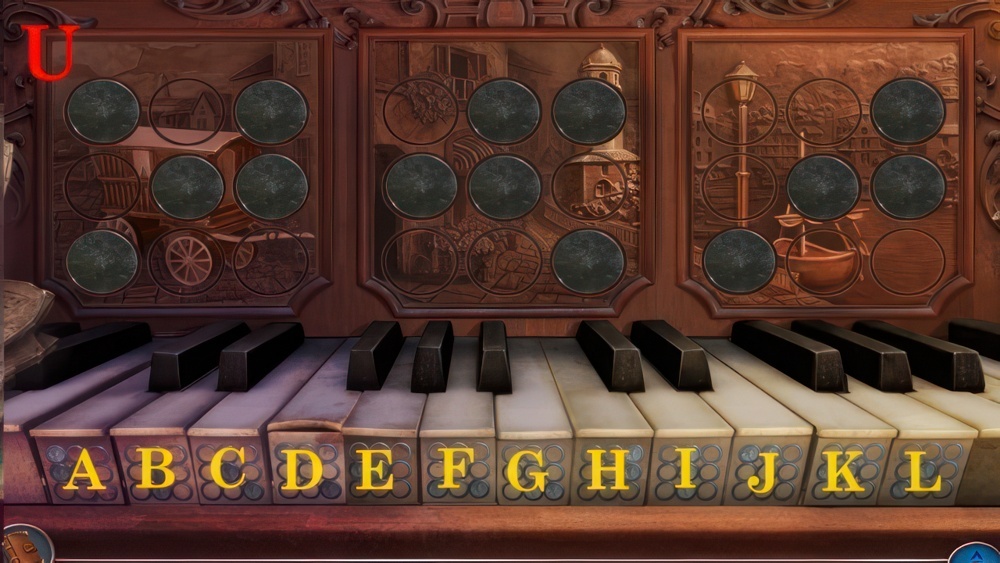
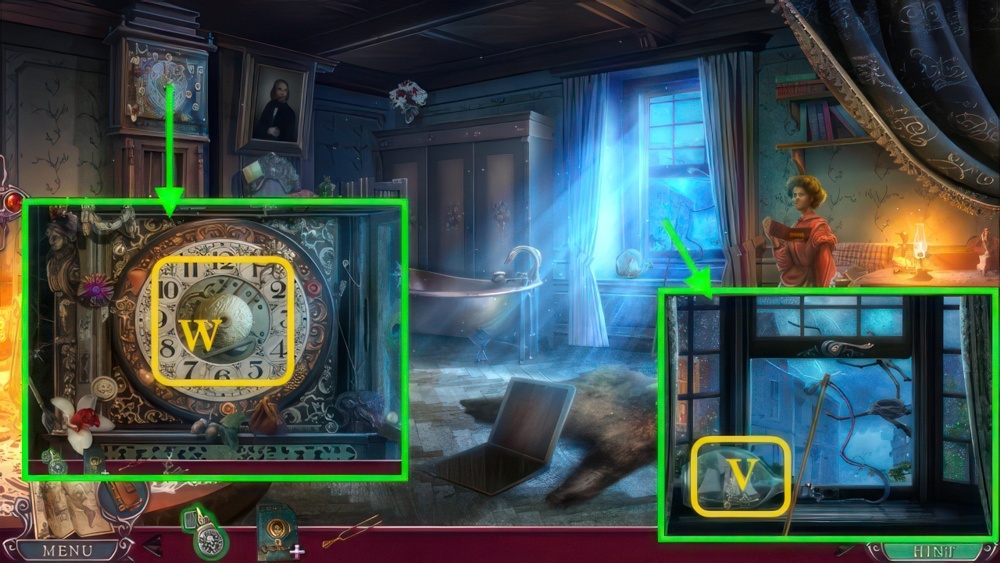
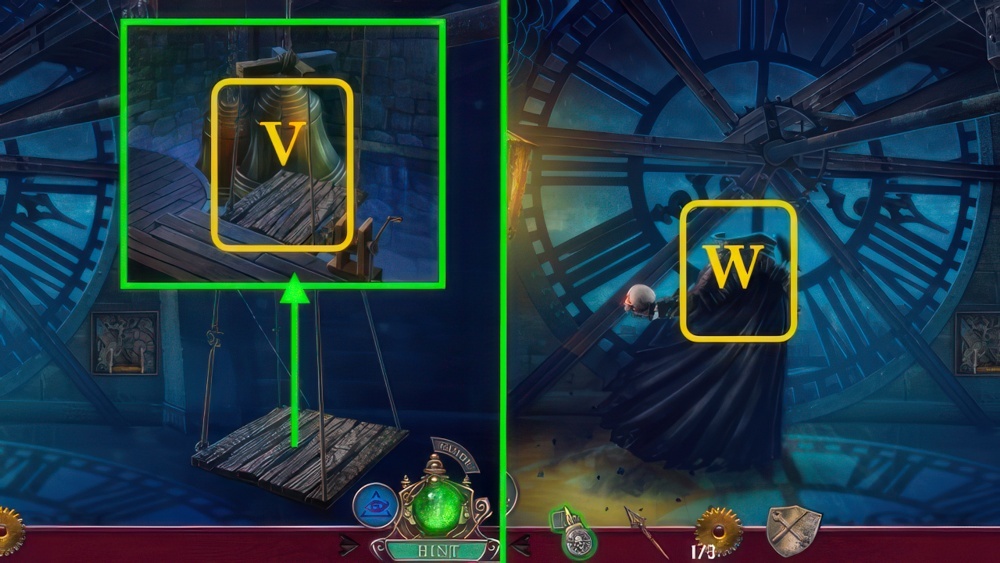
- Use MIRROR (U), inspect (V).
- Play puzzle, receive BRIEFCASE CODE.
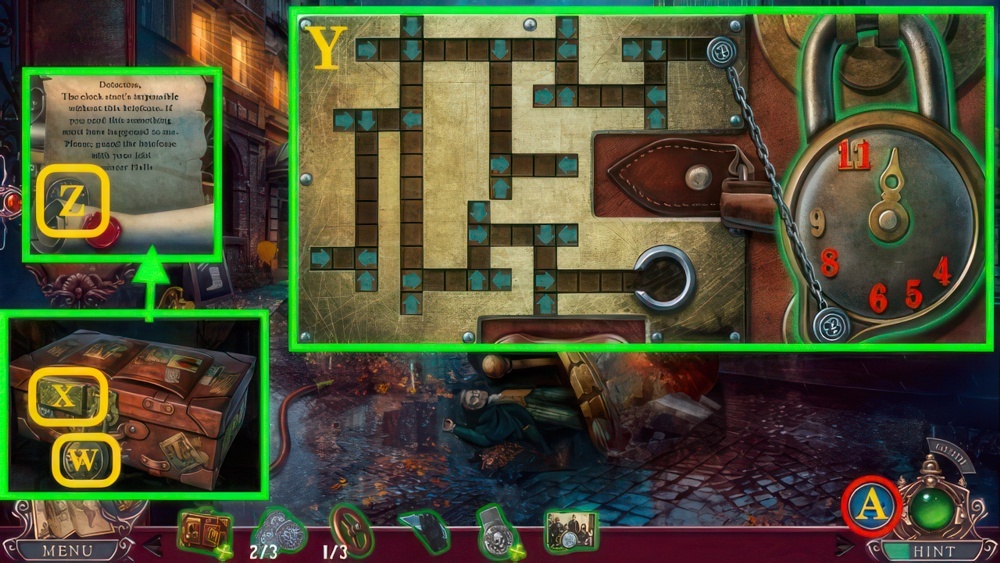
- BRIEFCASE CODE on ENGINEER’S BRIEFCASE.
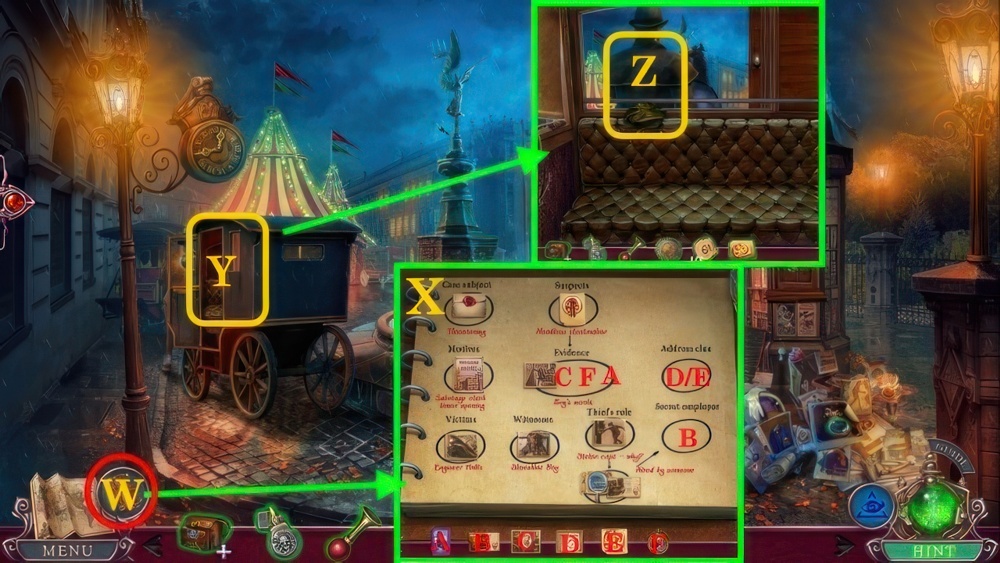
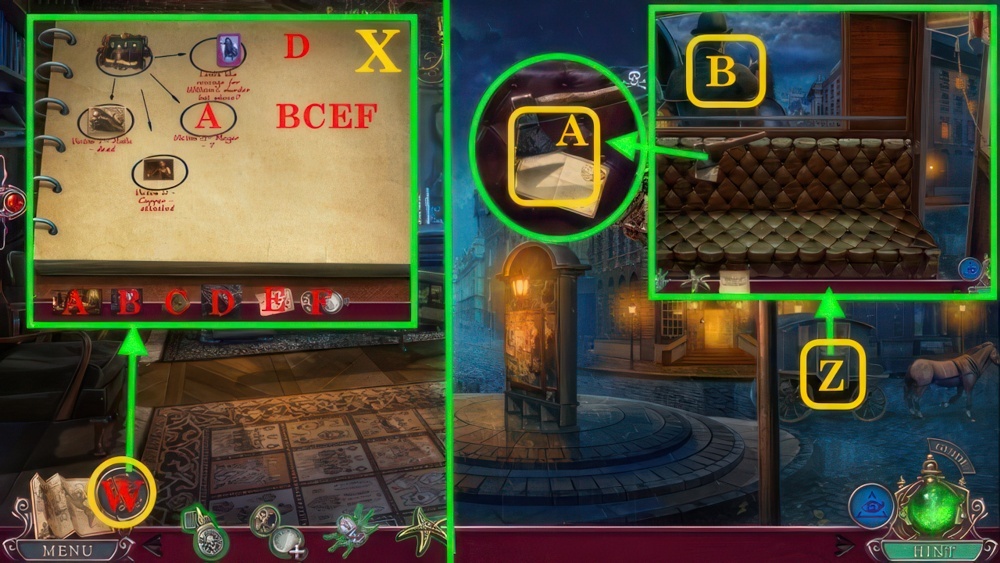
- Spin (W).
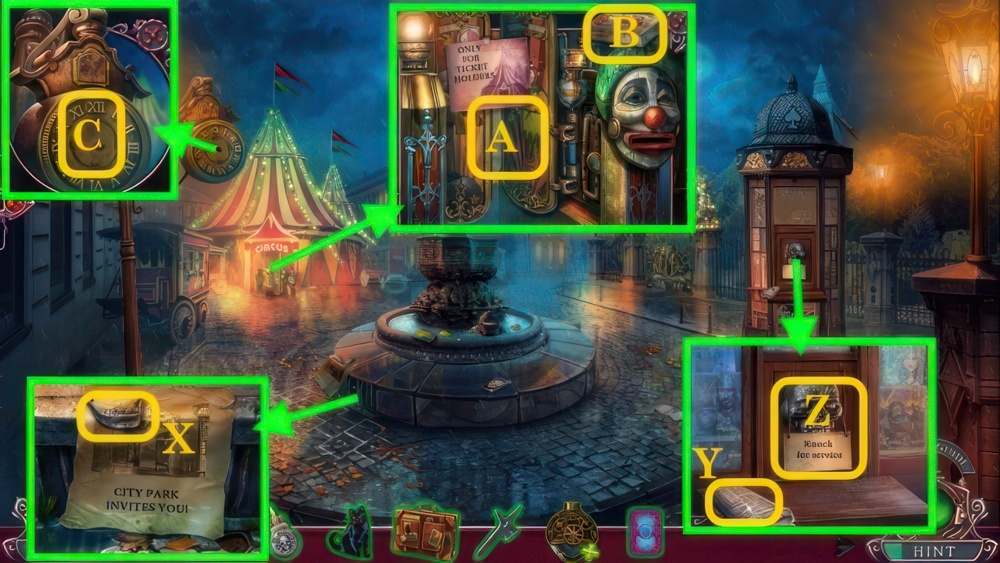
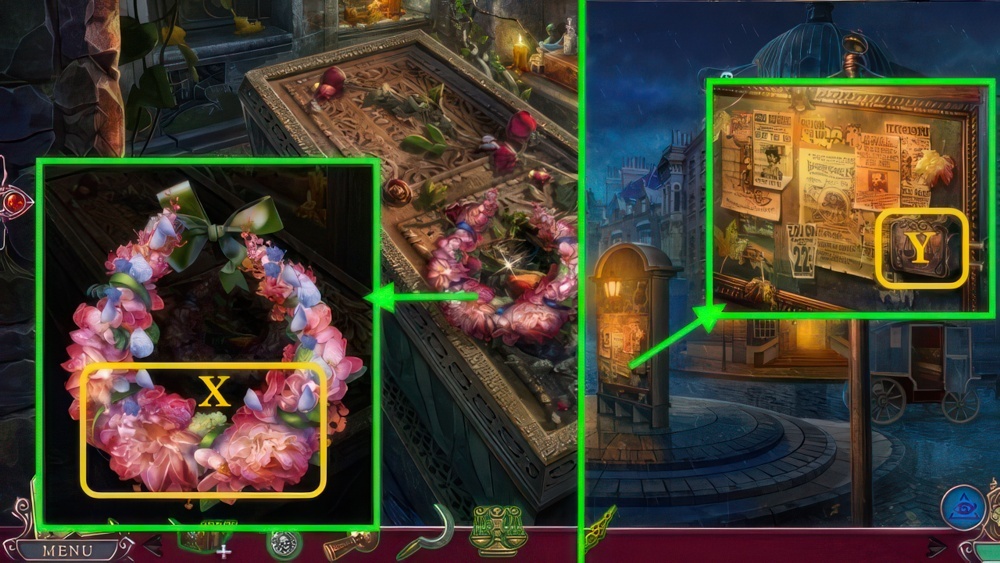
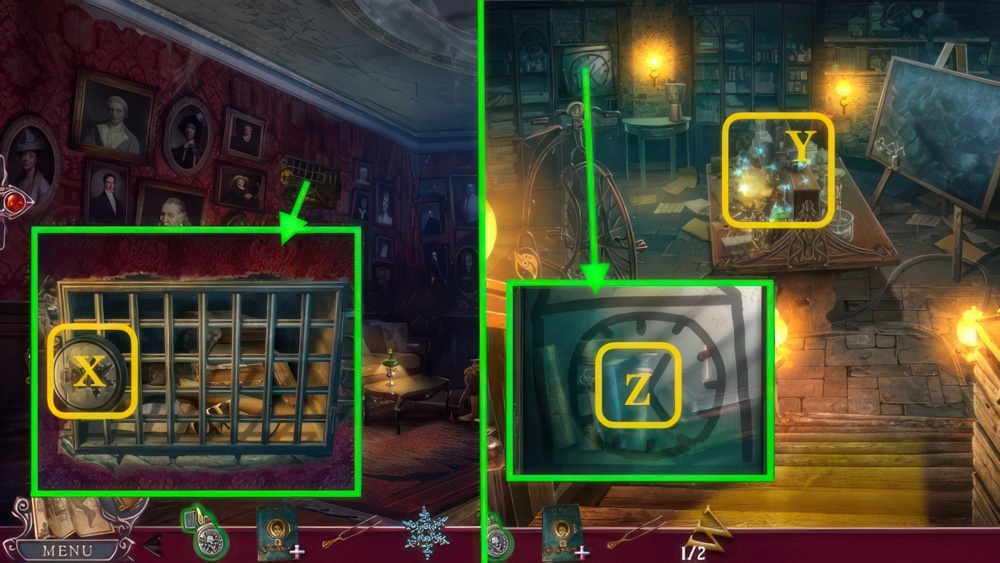
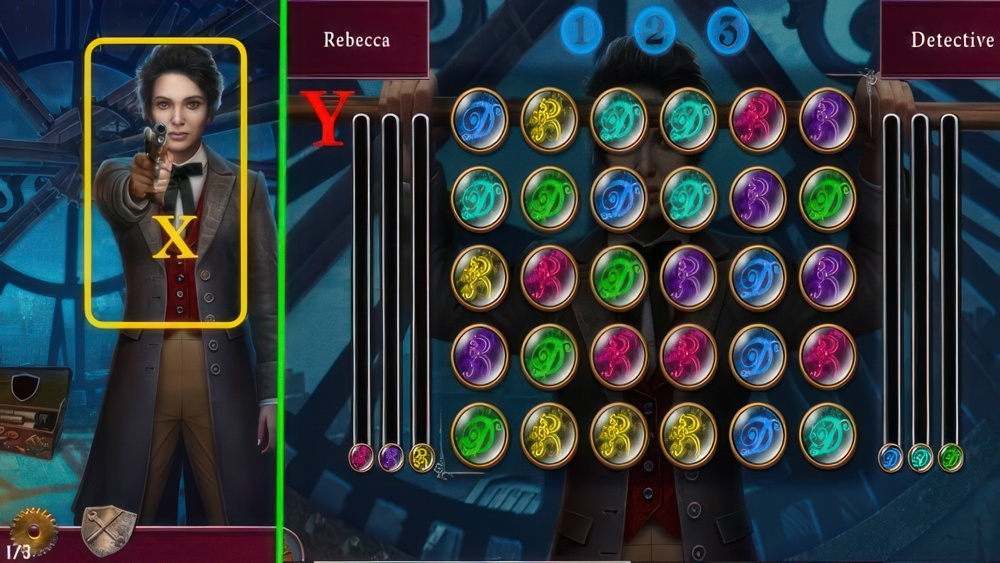
- Inspect (X).
- Move the latch to the round hole to open the lock.
- Choose the numbers on the padlock to move the latch that many moves as directed by the arrows.
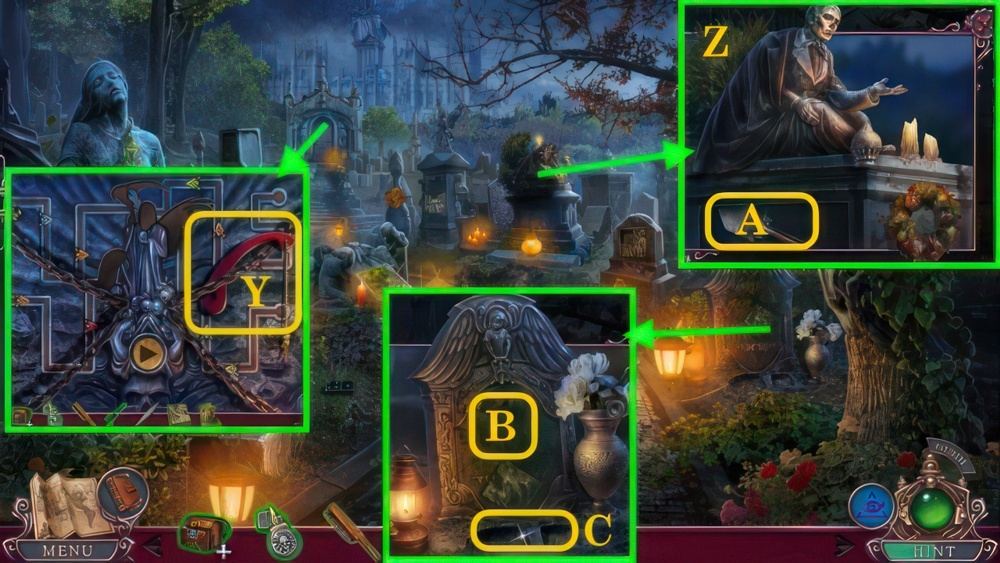
- Walkthrough (Y): 5×2-4-6-4-11-8-4-5-4-5-4×2.
- Open (X).
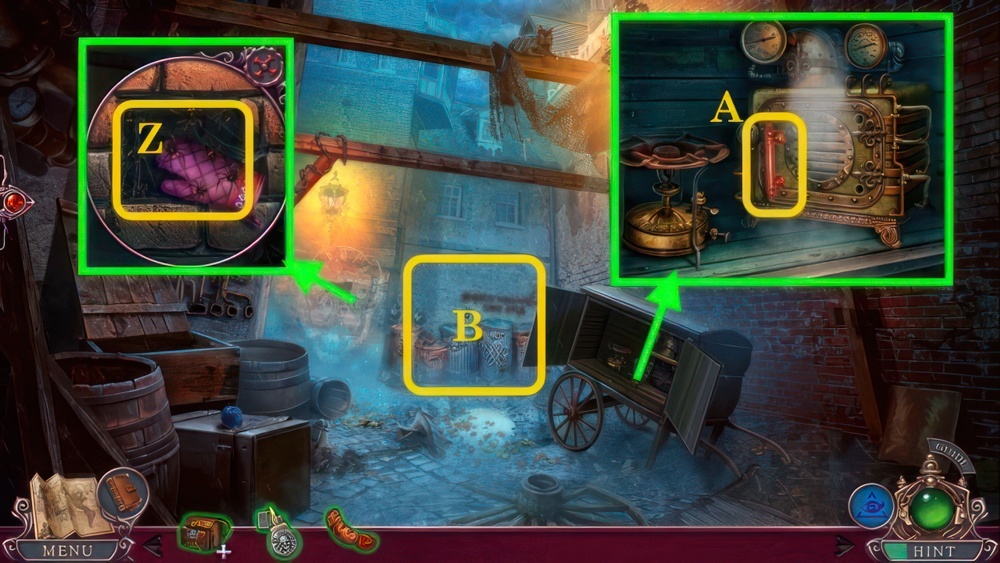
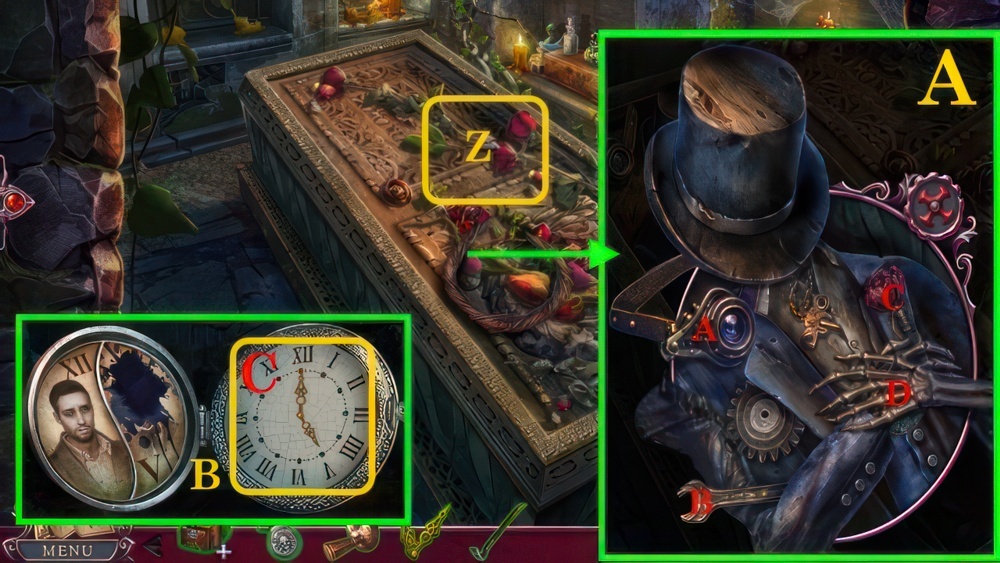
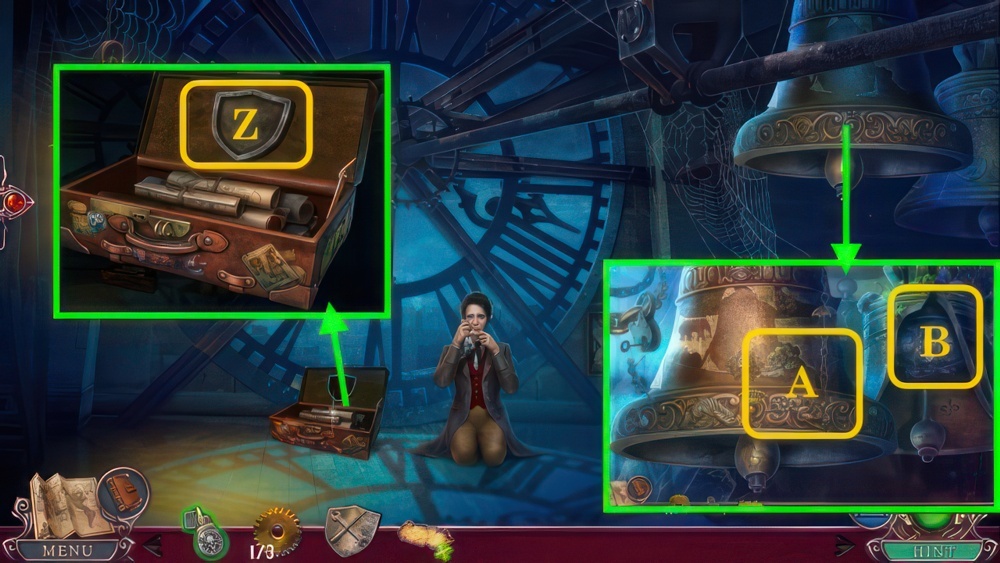
- Read and take SHILLINGS 3/3 (Z).
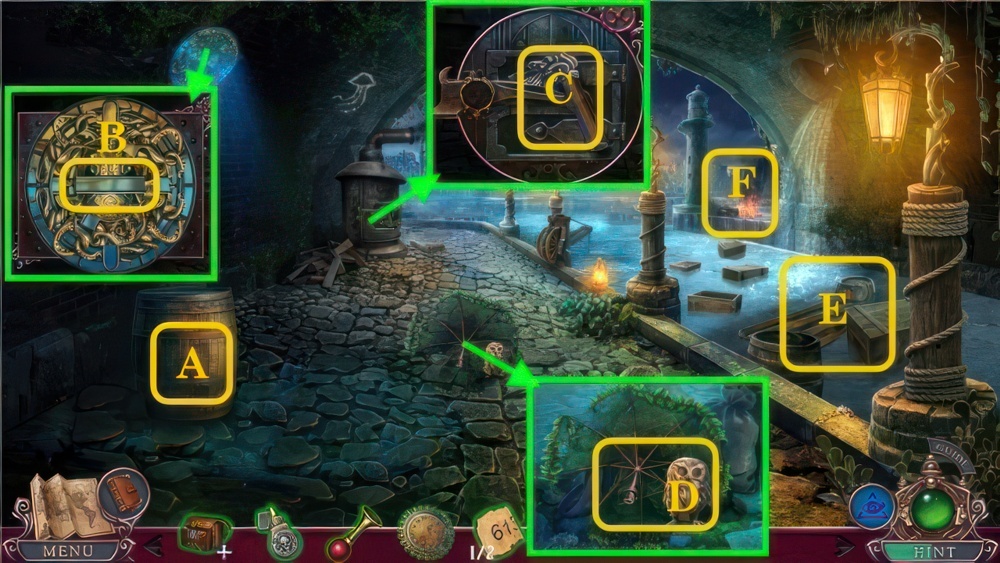
- Use (A), play puzzle.
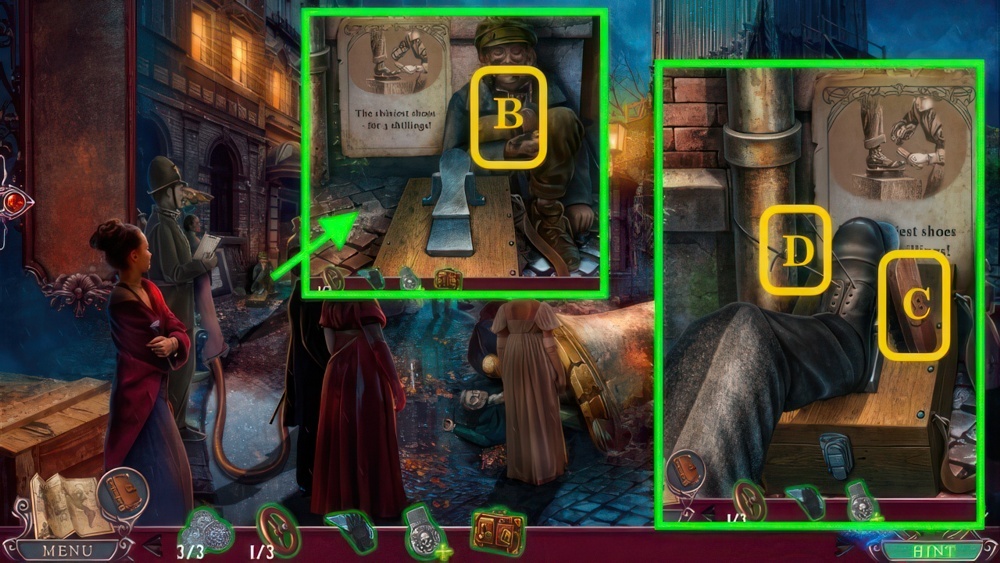
- Talk (B), give SHILLINGS, speak.
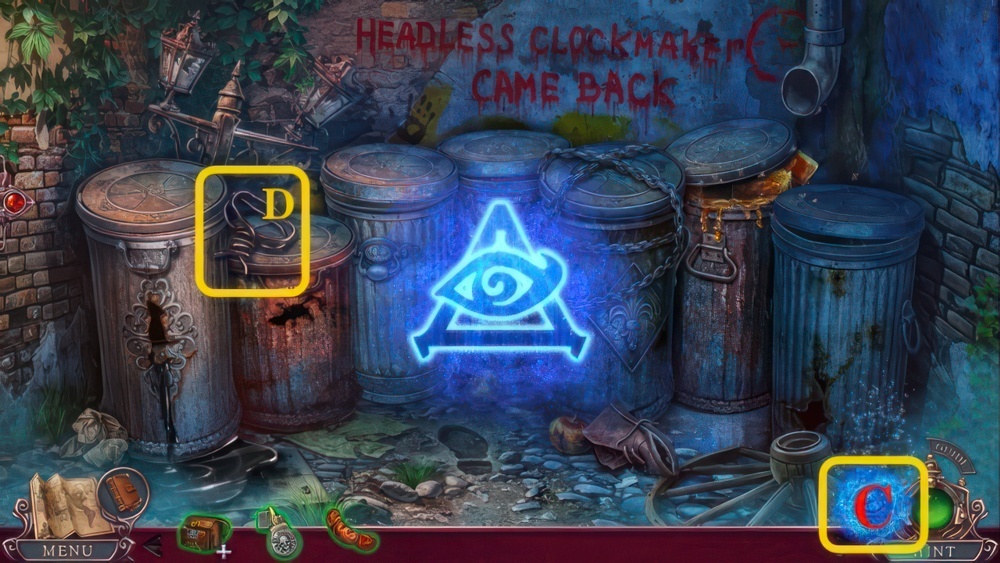
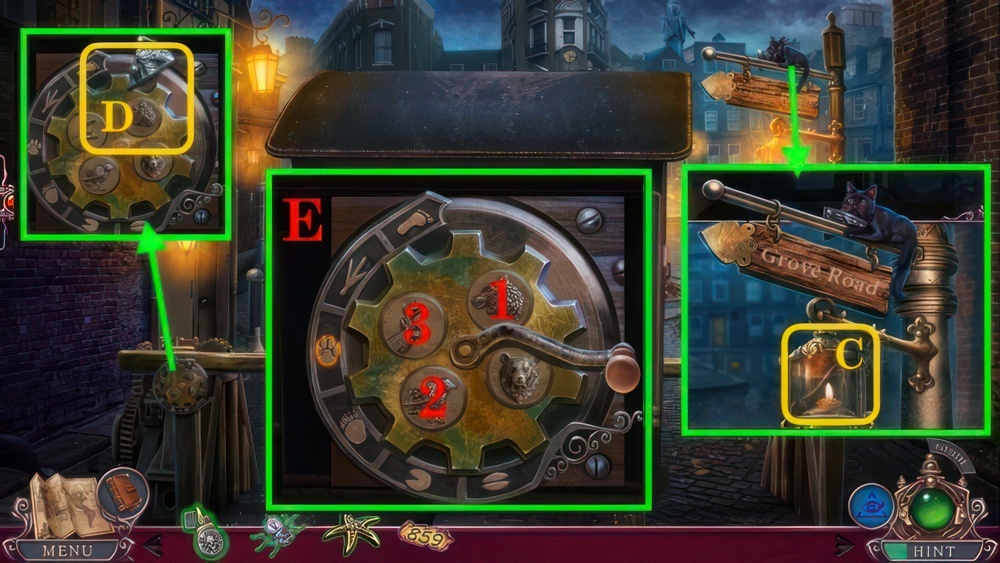
- Take BRUSH (C).
- Use SHARD (D).
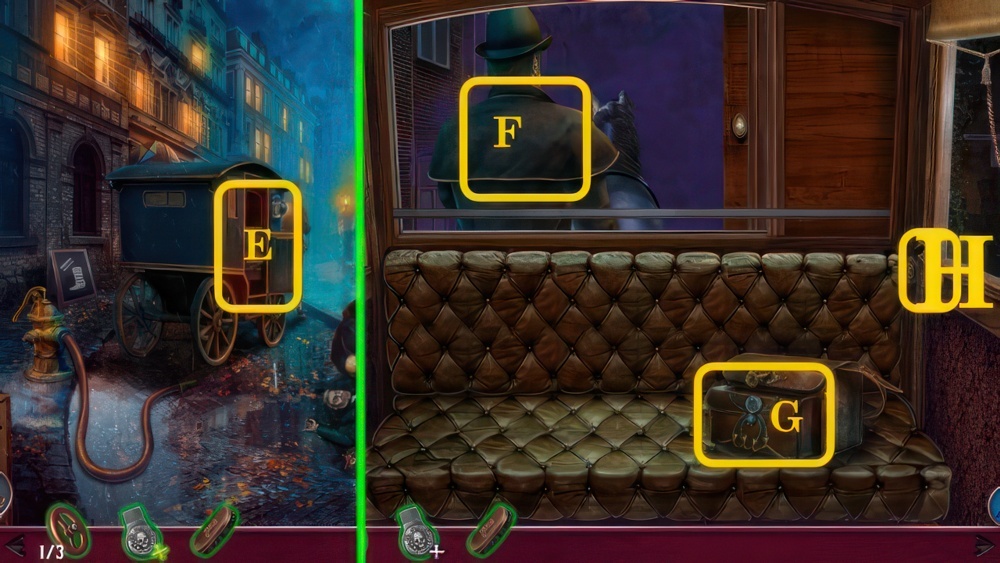
- Enter (E).
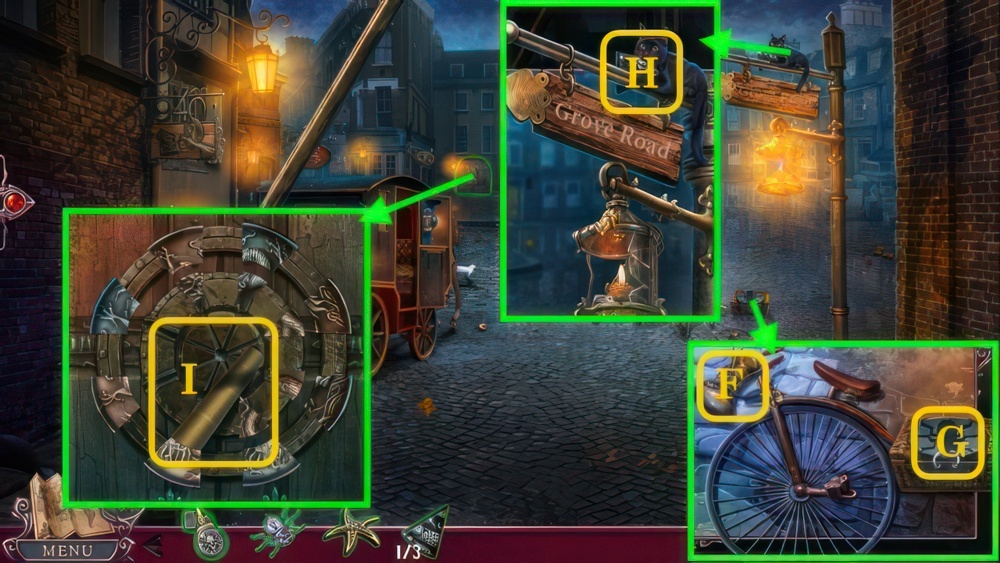
- Talk (F).
- Pick up BAG (G).
- Open (H), move right.
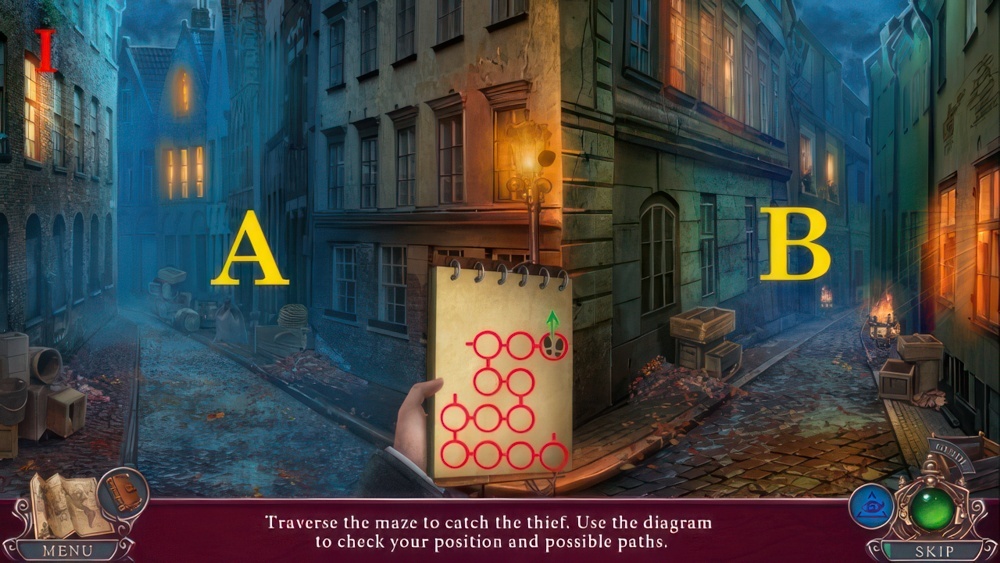
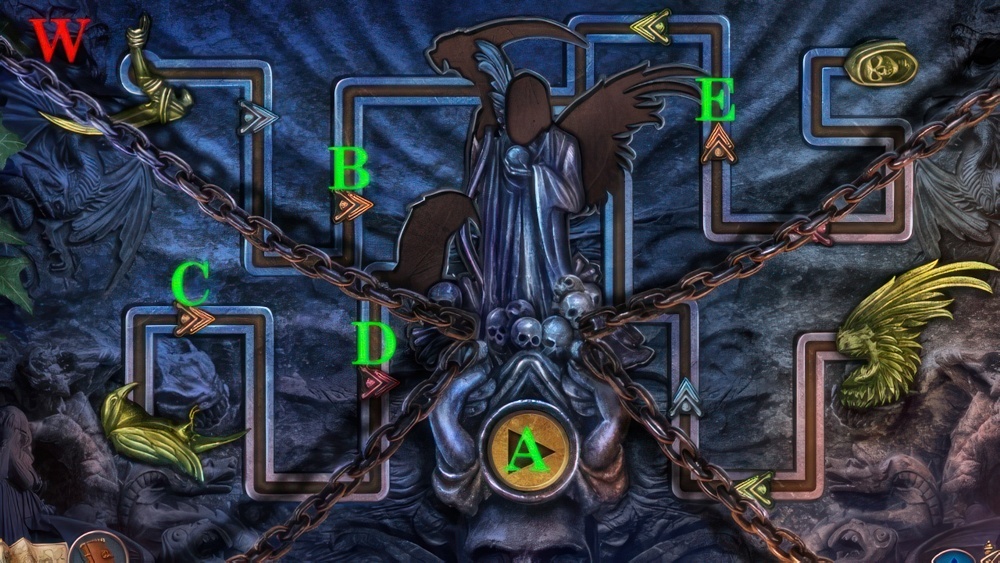
- Walk through the maze to catch the thief.
- Use the diagram to check your position and your possible paths.
- Walkthrough (I): A×4-B×3-A×2-B×3.
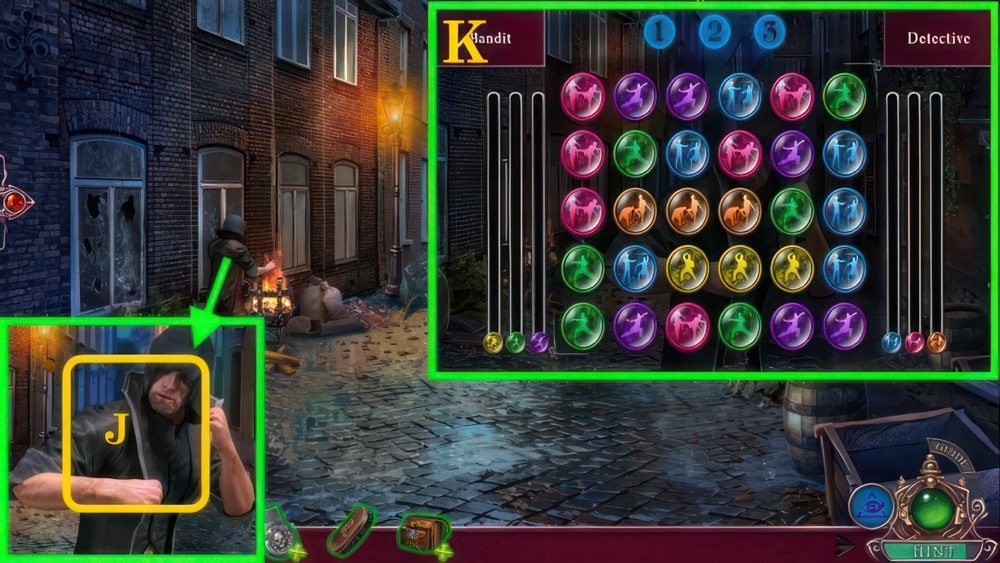
- Talk (J).
- Drag a path between three or more matching symbols of the same color to fill your tubes.
- Avoid matching any symbols on your opponent’s colors or your tubes will be emptied.
- When the tubes are filled, the winner will punch.
- Punch three times to win.
- Walkthrough (K): solution is random.
- Go forward.
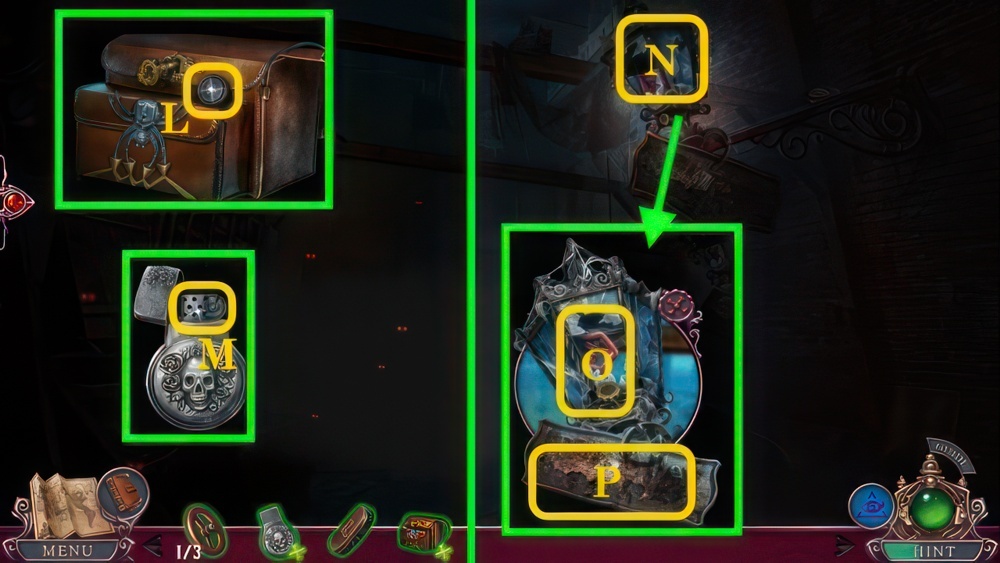
- Inspect BAG, take FLINT WHEEL (L).
- Open LIGHTER, remove broken wheel, place FLINT WHEEL (M).
- Use LIGHTER (N).
- Take VALVES 2/3 (O), turn, use LIGHTER.
- Use BRUSH (P), take CODE.
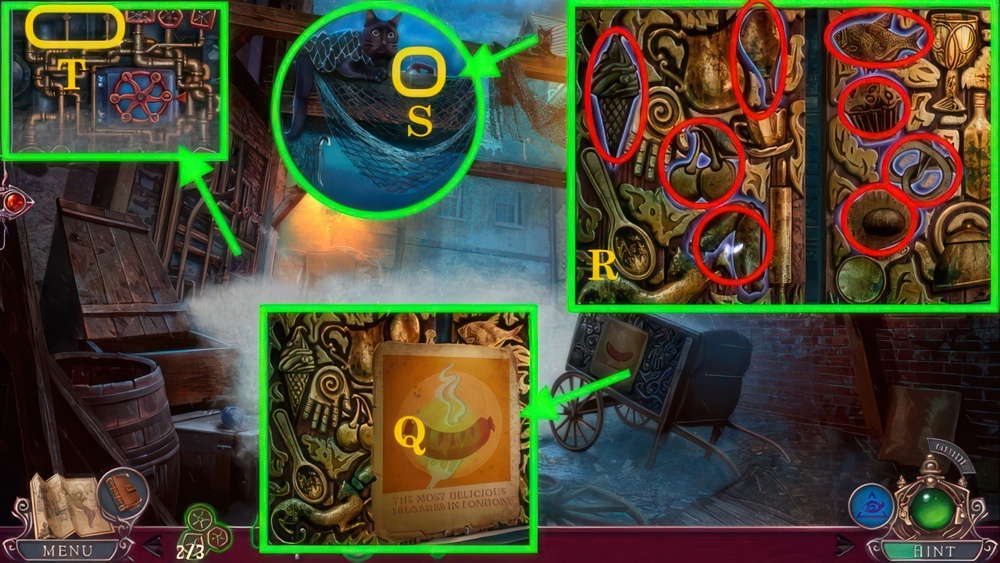
- Inspect (Q).
- Walkthrough (R), open.
- Take VALVES 3/3 (S).
- Place VALVES (T).
- Rearrange the valves so each one matches the pipe hole shape.
- Walkthrough (U).
- Place CODE (V), solution: 6-1-3, take ATOMIZER.
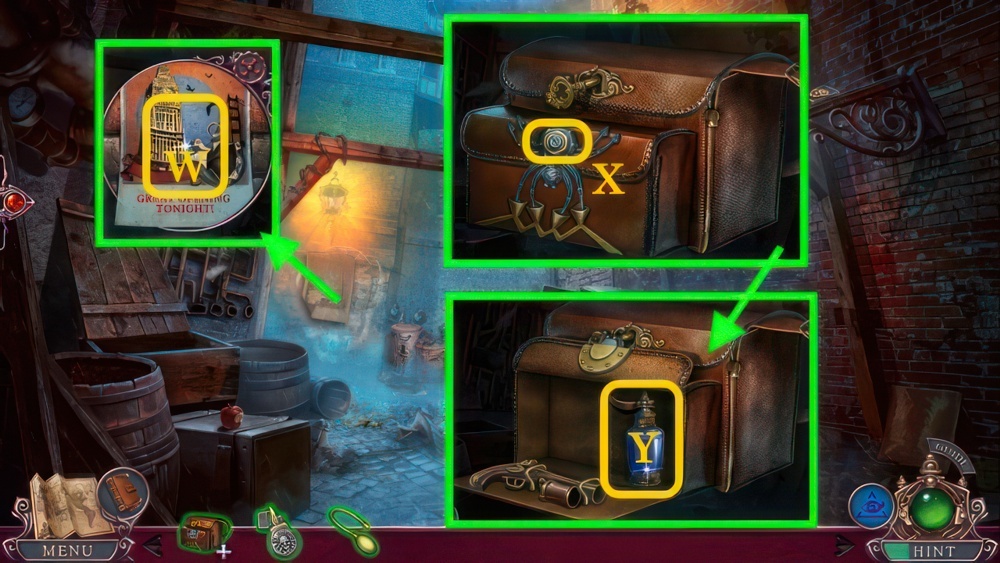
- Inspect (W), take WRENCH, move poster.
- Inspect BAG, use WRENCH (X).
- View potions, add ATOMIZER (Y), take SPIDER REPELLENT.
- Use SPIDER REPELLENT (Z), take OVEN MITT.
- Use OVEN MITT (A), take SAUSAGES.
- Look (B).
- Use (C), play puzzle.
- Take KNOTTED WIRE (D).
- SAUSAGES on KNOTTED WIRE, receive BAIT.
- Go down.
- Use BAIT (E), receive CAT IN NET.
- Untangle CAT IN NET.
- NET on BAG, take NET GUN.
- Inspect (G).
- Equip NET GUN (H), look (I).
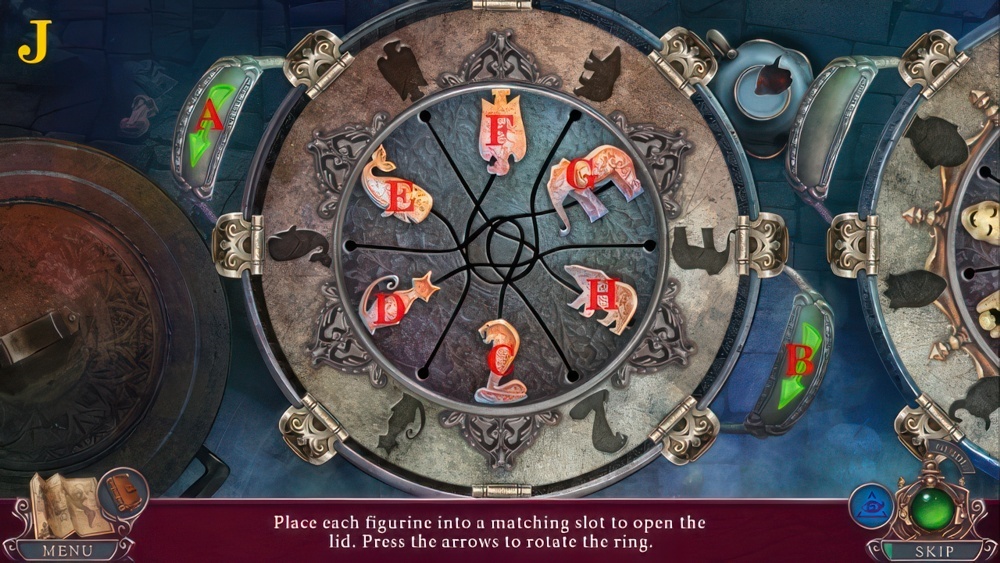
- Place each figurine into a matching slot to open the lid.
- Press the arrows to rotate the ring.
- Walkthrough (J): A×2-D-F-B-H-B×2-G-B-E-C.
- Open, receive ENGINEER’S BRIEFCASE.
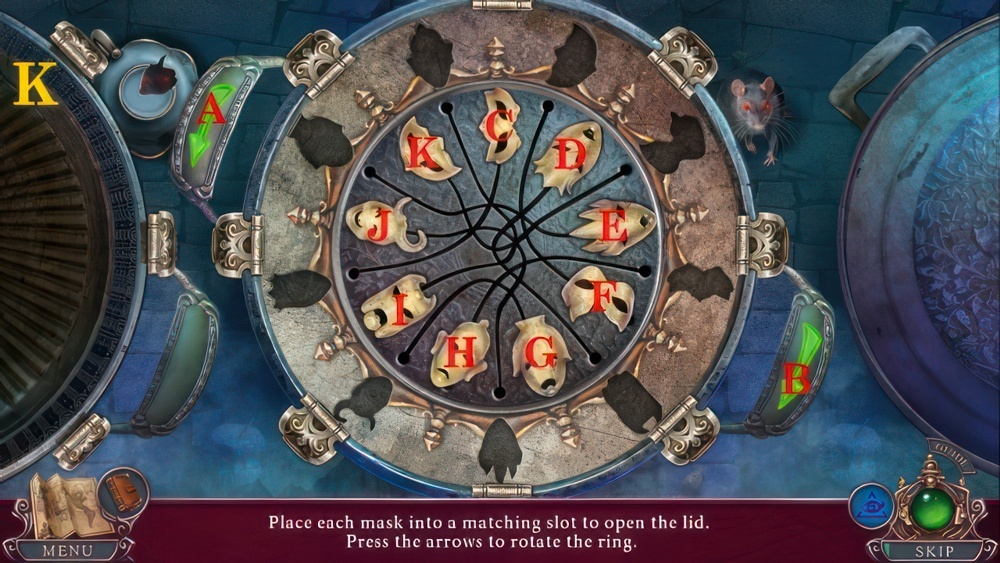
- To open the lid, place each mask into its matching slot.
- Press the arrows to rotate the ring.
- Walkthrough (K): A-F-J-A-G-A-D-A-I-A-C-A-E-H-A×2-K.
- Open, talk.
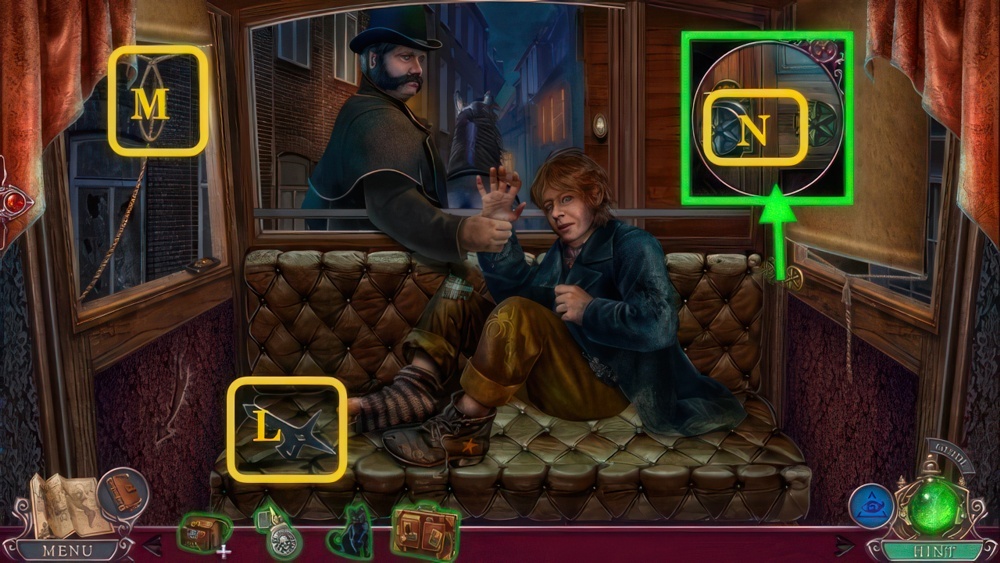
- Take KNIFE (L).
- Pull (M), take HOOK.
- Place HOOK (N), latch.
- Take PLIERS (O).
- Inspect BAG, turn (P), use PLIERS.
- Open, take HANDCUFFS and MAGNIFYING GLASS.
- Use HANDCUFFS (Q), play puzzle, receive BUNDLE.
- Unwrap BUNDLE, take BROKEN BOMB.
- MAGNIFYING GLASS on BUNDLE.
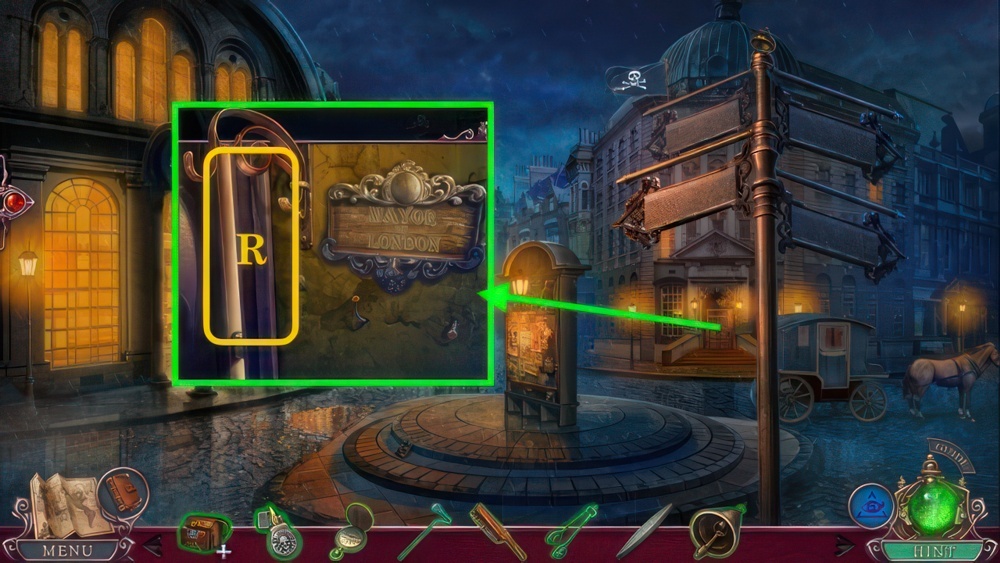
- Use (R).
- Walkthrough (S).
- Take PARK MAP (T).
- Give PARK MAP (U).
- Inspect (V), receive PLAYING CARD.
- Take GEM 1/4 (W).
- Pick up KNOCKER (X), move.
- Open paper (Y), take GEMS 2/4.
- Remove (Z), add KNOCKER, knock.
- Speak, take SIEVE.
- Look (A).
- Take BOX (B), inspect BOX and take CLOCK HANDS.
- Use CLOCK HANDS (C), take GEMS 3/4, open.
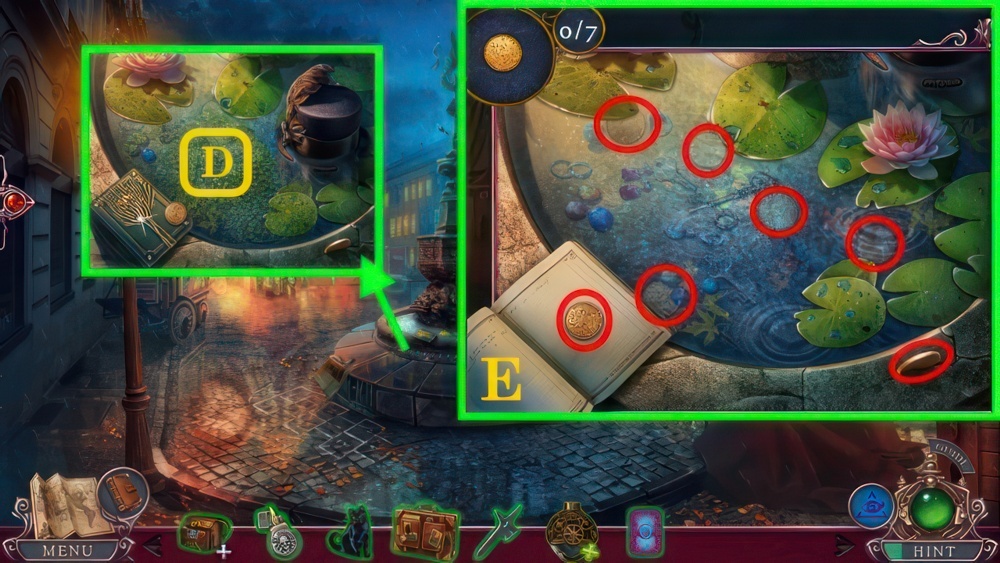
- View (D), use SIEVE, receive GEMS 4/4.
- Place CAT.
- Walkthrough (E), receive COINS.
- Give COINS (F), speak.
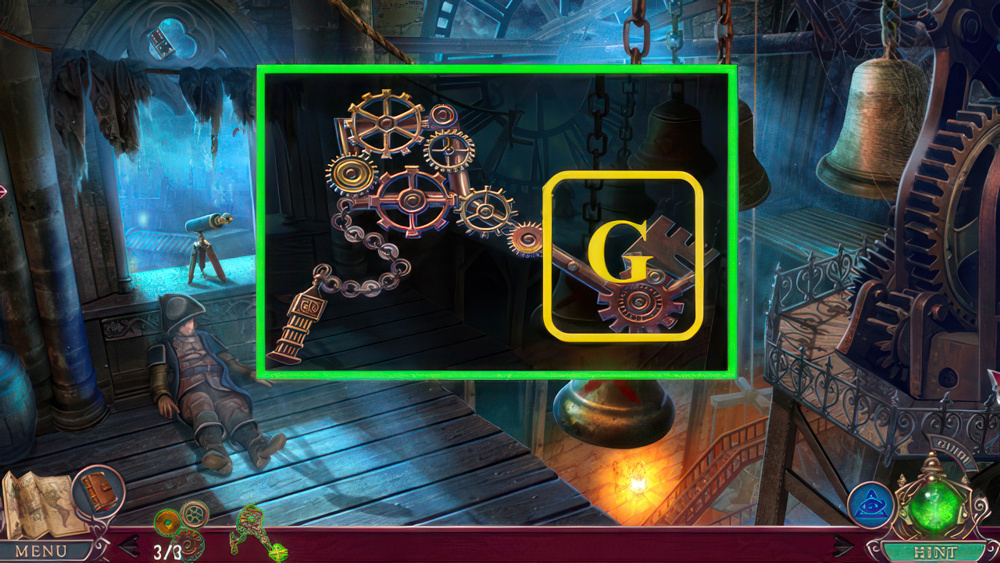
- Play puzzle (G), receive SAMPLE TICKET.
- GEMS on BOX, add SAMPLE TICKET (H).
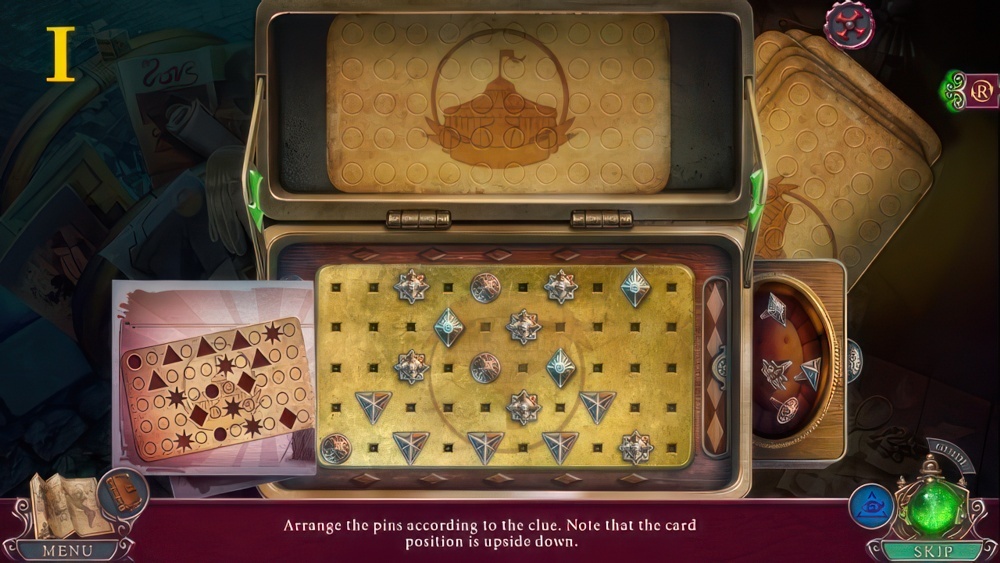
- Arrange the pins according to the clue.
- Note that the card position is upside down.
- Walkthrough (I), receive PUNCHED TICKET.
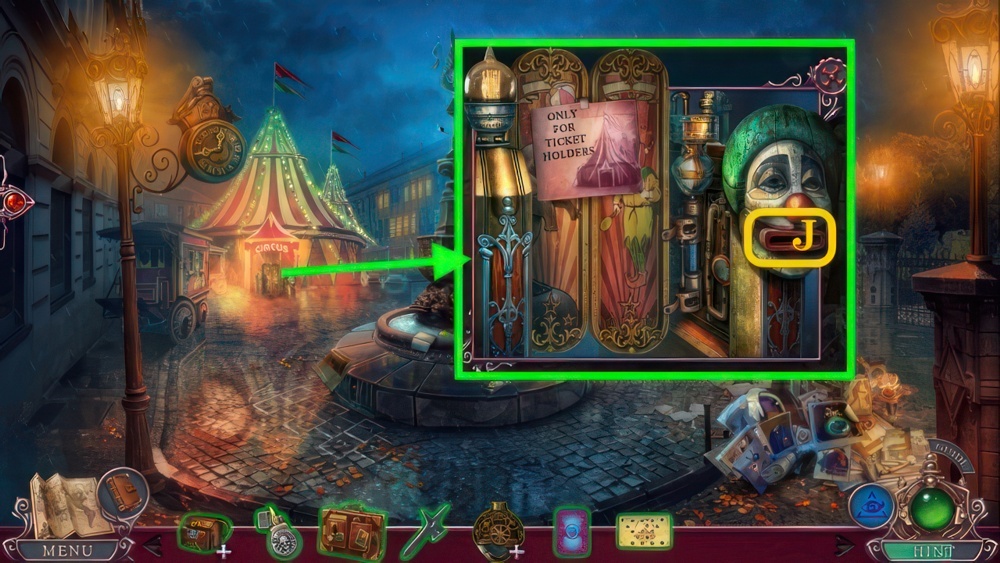
- Use PUNCHED TICKET (J).
- Go forward.
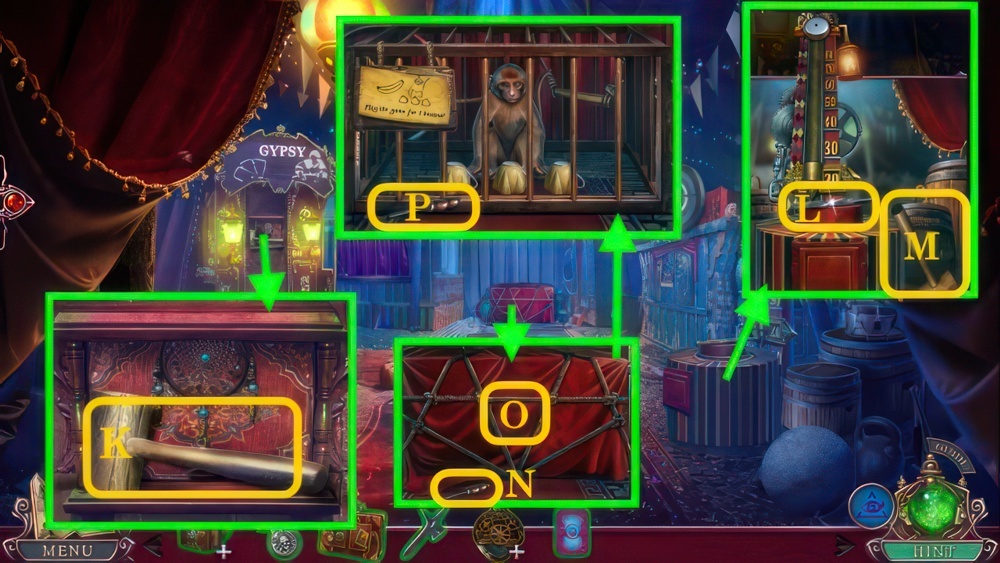
- Take HAMMER (K).
- Take FILE (L).
- Place HAMMER (M), use, receive WICK.
- Take (N).
- Use KNIFE (O), uncover.
- Take LEVER (P).
- Replace LEVER (Q).
- Walkthrough: A-B-C, receive BELL 1/2.
- Go down.
- Use FILE (R), bend.
- Use LIGHTER, take BELLS 2/2.
- Go forward.
- Place BELLS (S), ring, give PLAYING CARD.
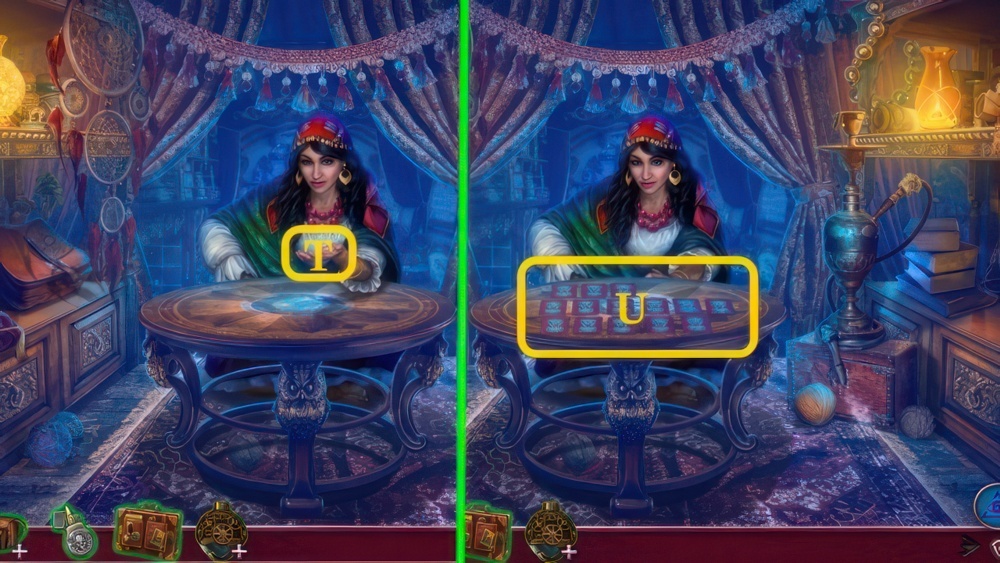
- Speak (T).
- Read (U).
- Take BANANA.
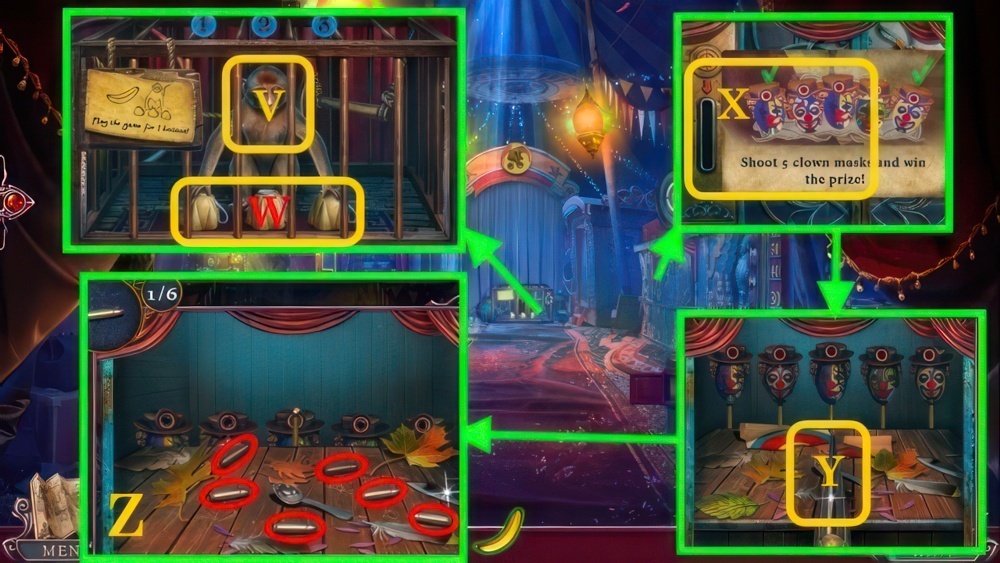
- Give BANANA (V).
- To win, find the token under the cups three times.
- Play (W), solution is random, take TOKEN.
- View (X), use TOKEN.
- To win-a prize, shoot the all the targets on the clowns.
- Play (Y), solution is random, take HORN.
- Walkthrough (Z), receive BULLETS.
- Go down.
- WICK and BULLETS on BROKEN BOMB, assemble.
- Use BOMB and LIGHTER (A), walk forward.
- Read (B).
- Take TRAP (C).
- Inspect (D), use LIGHTER, pick up GARDEN SHEARS.
- Use GARDEN SHEARS and LIGHTER (E).
- Walkthrough (F), receive ACORNS.
- Give ACORNS (G), read letter.
- Look (H).
- Use (I), play puzzle.
- Take PENDANT (J).
- Move down.
- Place PENDANT (K), take MAGNESIUM.
- Look forward.
- Place ENGINEER’S BRIEFCASE, TRAP, and MAGNESIUM (L), use LIGHTER.
- Move (M).
- Pick up CANE (N).
- Take VILLAIN’S MEDALLION (O).
- Open (P), read note and take TWEEZERS.
- TWEEZERS on BAG, open (Q), inspect.
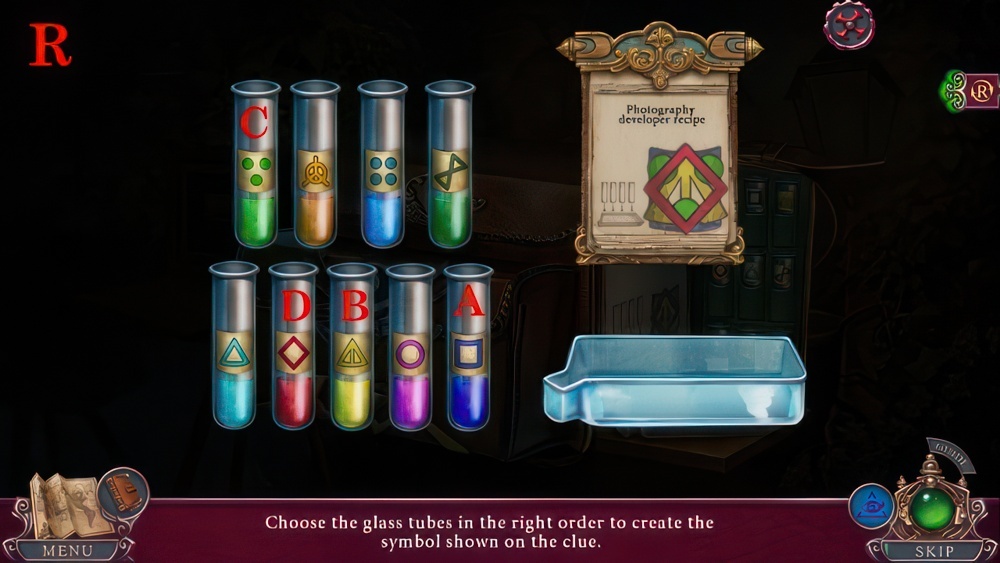
- Choose the glass tubes in the right order to create the symbol shown on the clue.
- Walkthrough (R): A-B-C-D.
- Take DEVELOPING SOLUTION.
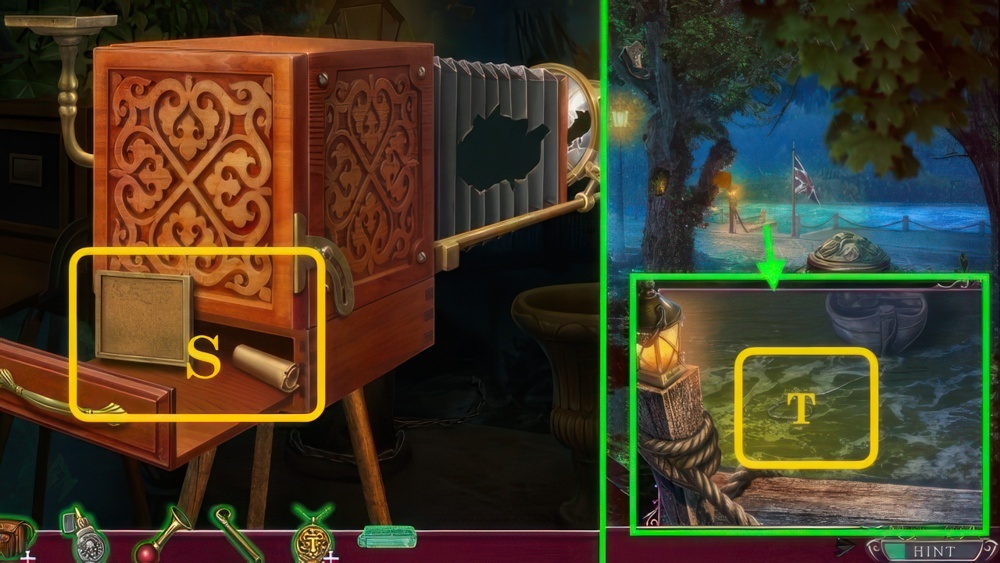
- Place DEVELOPING SOLUTION (S), use, receive NEWSPAPER PHOTO.
- Use CANE (T), take OIL.
- Go down.
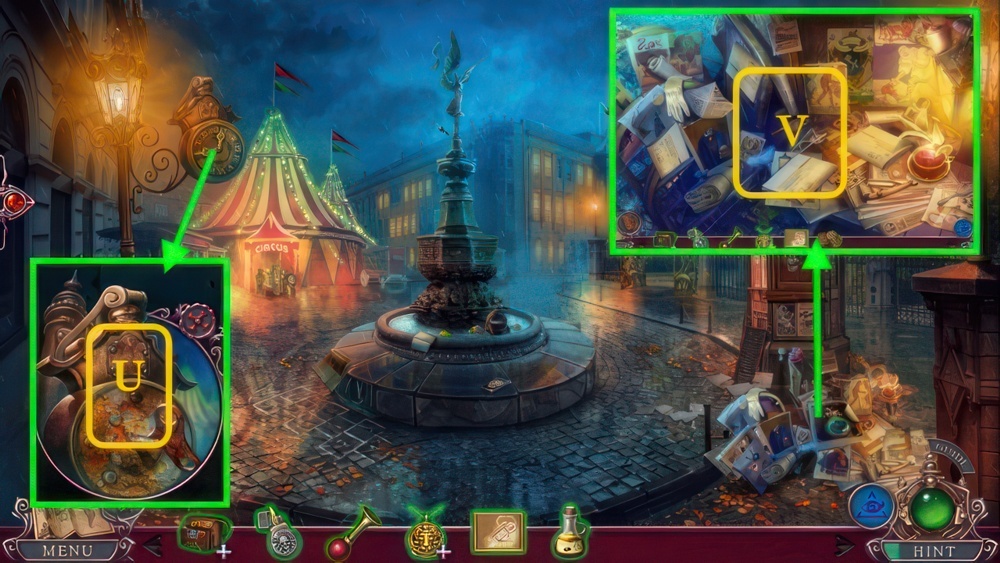
- Use OIL (U), turn, take GEARS.
- Place NEWSPAPER PHOTO (V), play puzzle, receive CLOCK SYMBOL.
- Disassemble VILLAIN’S MEDALLION, place GEARS, open and take CODE PIECE 1/2.
- Use (W).
- Walkthrough (X), receive CLOCK WORKSHOP ADDRESS.
- Enter (Y).
- Give CLOCK WORKSHOP ADDRESS (Z).
- Move (A).
- View (B), take TOOLKIT.
- Take UMBRELLA HANDLE (C).
- Use HORN (D), add UMBRELLA HANDLE, take UMBRELLA.
- Use UMBRELLA (E).
- Inspect (F).

- Use (G).
- Walkthrough (H).
- Walkthrough (I), take SCOOP FIGURINE 1/2.
- Take TOOL FIGURINES 2/2 (J).
- TOOL FIGURINES on TOOLKIT, take HOOK (K).
- Place HOOK (J), turn.
- Play puzzle (L), receive HATCH HANDLE.
- Place HATCH HANDLE (M).
- Select each circle and rotate it to fix the image and open the hatch.
- Walkthrough (N).
- Go up.
- Speak (O).
- Take BAG MEDALLION (P).
- Take HAMMER HANDLE (Q).
- HAMMER HANDLE on TOOLKIT (R), take HAMMER and CARBINER.
- Pick up BOARD (S).
- Move (T).
- Walkthrough (U), receive NAILS.
- Assemble (V), add NAILS and HAMMER, receive WHEEL.
- Remove (W), place WHEEL and BOARD, push.
- Take CARBINERS 2/3.
- Go down.

- Place BAG MEDALLION (X), take CODE PIECES 2/2 and HAIRPIN.
- HAIRPIN on BAG, take CRANE LEVER 1/2.
- Place CODE PIECES (Y).
- Walkthrough (Z), take UNKNOWN POWDER and OVEN TOKEN.
- Place OVEN TOKEN (A), open, take BASKET.
- Place BASKET (B), play puzzle, receive APPLES.
- UNKNOWN POWDER on BAG.
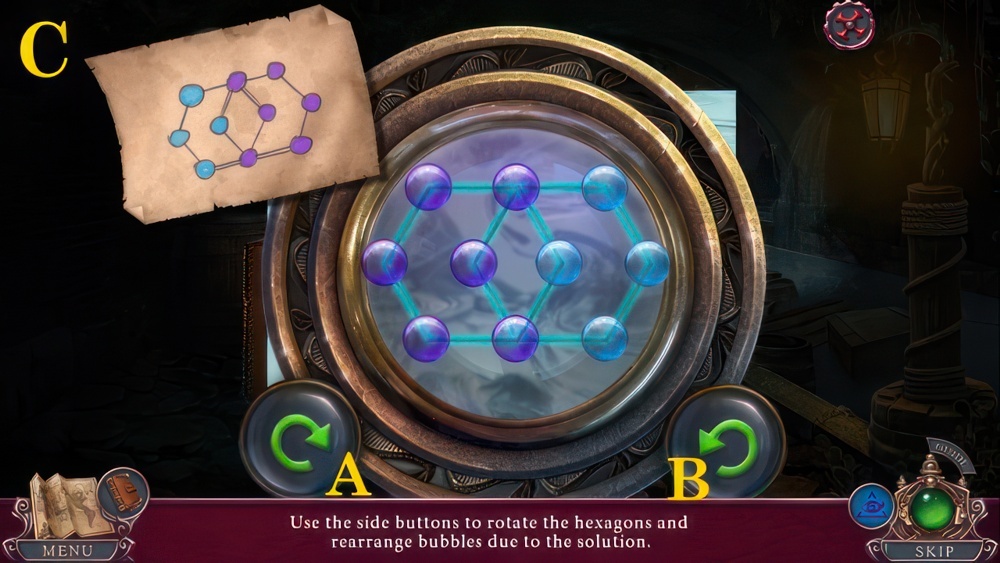
- Use the side buttons to rotate the hexagons and rearrange the bubbles according to the solution.
- Walkthrough (C): B×3-A×3.
- Take ACID.
- Go up.
- Use ACID (D), receive CRANE LEVERS 2/2.
- Give APPLES (E), take CARBINERS 3/3.
- Place CRANE LEVERS (F), pull.
- Inspect (G).
- Restore the image.
- Choose two gears and swap them.
- Select a gear to rotate it.
- Once a gear has been correctly arranged, it can’t be moved.
- Walkthrough (H).
- Place CARBINERS (I), pull (J).
- Enter (K).
- Take HAND MIRROR (L).
- Move right.
- Take GLASS CROW (M).
- Place CLOCK SYMBOL (N), read note, take RAZOR.
- Take TOP HAT (O), inspect, take SQUIRREL.
- RAZOR on TOP HAT, take MAGNET.
- Pick up CLOCK BUTTON 1/3 (P), place SQUIRREL.
- Open and take AMMONIA, move, take DOOR HANDLE 1/2.
- Investigate (Q), move plant.
- Use MAGNET, take DOOR HANDLE 2/2.
- Place DOOR HANDLES (R), open.
- Use HAND MIRROR (S).
- Place MAGNET (T).
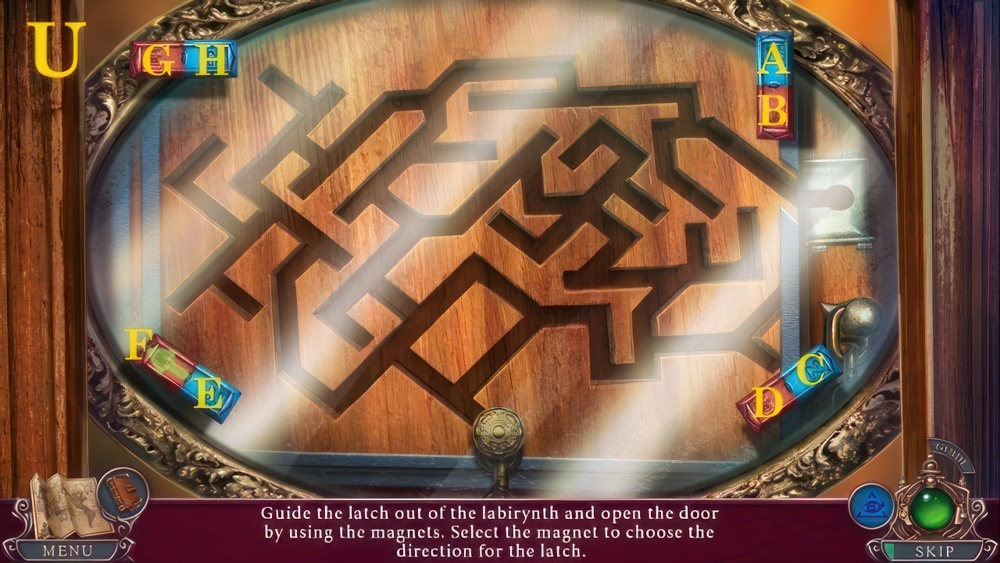
- Guide the latch out of the maze and open the door by using the magnets.
- Select the magnet to choose the direction for the latch.
- Walkthrough (U): F×2-C-F-C-F-C×2-A-C-H-B-H-B-E-H.
- Go right.
- Use AMMONIA (V), take KEY CLUE.
- Play puzzle (W), receive BUNCH OF KEYS.
- KEY CLUE on BUNCH OF KEYS, find BACK DOOR KEY.
- Walkthrough (X), receive DUSTER.
- Use DUSTER (Y), take GLASS BAT.
- Look (Z), use BACKDOOR KEY, turn.
- Walkthrough (A), move forward.
- Place GLASS CROW and GLASS BAT (B), open, take LENS and use LIGHTER.
- Use (C), play puzzle.
- Move (D), speak, take BROOM.
- Speak, take PILLBOX.
- Pick up SAW RAZOR (E).
- Move (F), use BROOM, take COIN.
- Go down ×2.
- SAW RAZOR on TOOLKIT, take SAW.
- Use SAW (G), take BROKEN TELESCOPE.
- Use COIN (H), turn, receive SCREW.
- SCREW on TOOLKIT, take SHEARS.
- Use SHEARS (I), take SUN FIGURINE.
- Go right, then forward.
- LENS on BROKEN TELESCOPE, assemble.
- Place SUN FIGURINE (J), take HANDLE.
- Place TELESCOPE (K), view (L).
- Take CLOCK BUTTONS 2/3 (M).
- Place HANDLE (N), open, take KNIGHT.
- Go down.
- Place KNIGHT (O), open, take CORKSCREW and CLOCK BUTTONS 3/3.
- Go forward.
- Place CLOCK BUTTONS (P).
- Walkthrough (Q).
- Move the connecting tube across the field to make the upper gears rotate.
- Note that the tube attaches to three gears at the same time.
- Walkthrough (R): A-B-C-D-E-F-G-H-I.
- Match each person’s face to their body, then correctly rearrange the nameplates.
- Walkthrough (S), take CRESCENT MOON and PICTURE.
- Go down.
- Place CRESCENT MOON (T), take MEDICAL SYMBOL.
- MEDICAL SYMBOL on PILLBOX, sort the pills due to their colors and the clue on the lid, find HEART PILLS.
- Give HEART PILLS (U).
- Speak, give PICTURE, take SHOWCASE KEY.
- Use SHOWCASE KEY (V), play puzzle, receive MAYOR’S WATCH.
- Use (W), solution (X), receive MAYOR’S OFFICE ADDRESS.
- Go down.
- Enter (Y).
- Use CORKSCREW (Z), take WRENCH.
- Give MAYOR’S OFFICE ADDRESS (A).
- Use WRENCH (B-D), take LOCK PICK.
- Remove BELL (E), move signs, take COOK STATUETTE 1/3.
- LIGHTER on BELL, receive BUTTERFLY BUTTON.
- Read (F), take BONE (G).
- Read (H), find STATUETTES 2/3.

- Take METAL HANDLE (I).
- Give BONE (J).
- Place BUTTERFLY BUTTON (K), open.
- Walkthrough (L), receive BRUSH.
- Close, walk forward.

- Use METAL HANDLE (M), turn, receive STATUETTES 3/3.
- Turn (M), view.
- Pick up SHARPENER (N).
- Take TONGS (O).
- Place STATUETTES (P).
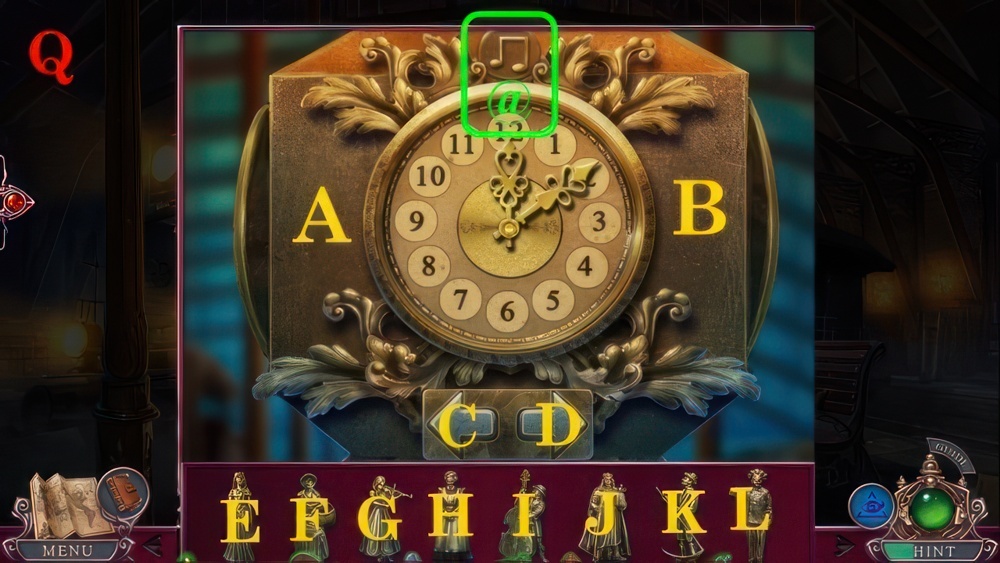
- Walkthrough (Q): solution start place is random.
- Start (@): I-A-G-B-D-J-A-E-B-D-L-A-H-B-D-K-A-F-B.
- Take BELL CLAPPER.
- Go down.
- BELL CLAPPER on BELL.
- Place BELL (R), speak, give MAYOR’S WATCH.
- Go forward.
- Speak (S).
- Use (T), play puzzle.
- Speak, get CEMETERY LOCK EMBLEM.
- Go back ×2.

- View (U).
- Place CEMETERY LOCK EMBLEM (V).
- Use LOCKPICK (W).
- To open the lock, bend the lock pick into the right shape.
- Select the button to try opening it.
- Walkthrough (X).
- Open, move forward.
- Pick up WHISTLE HANDLE (Y).
- Walkthrough (Z).
- Take TROWEL (A).
- Use BRUSH (B), take STONE PLATE.
- Use TROWEL (C), find TORN TICKET.
- Go to Railway Station.
- Place TORN TICKET (D), find (E).
- Take LOCK PART (F).
- Place WHISTLE HANDLE (G), pull.
- Read (H), pick up WEIGHT.
- Place LOCK PART, find TRAIN TICKET.
- Use TRAIN TICKET (F).
- Move forward.
- Pick up CANE HANDLE (I).
- Pick up earring (J).Pick up CANE PIECE (J1).
- Pick up CANE PIECE (K).
- CANE PIECES on CANE HANDLE.
- Use CANE (L), open, take WINDOW HANDLE and CEMETARY MAP.
- Use WINDOW HANDLE (M), open, move left.
- Go to Old Cemetery.
- Use WEIGHT (N), take BLUNT SICKLE.
- SHARPENER on BLUNT SICKLE.
- Use SICKLE (O), receive SCALES FIGURINE.
- Place STONE PLATE (P).
- Walkthrough (Q), take BOAR PAW FIGURINE and BAS-RELIEF PART 1/3.
- Use TONGS (R).
- Walkthrough (S), take BAS-RELIEF PART 2/3.
- Use BRUSH (T).
- Walkthrough (U), take BAS-RELIEF PART 3/3.
- Place BAS-RELIEF PARTS (V).
- Restore the bas-relief by moving its parts onto the center.
- Use the arrows to rotate each one into the correct position.
- Press the central button to check the combination.
- Walkthrough (W): B-C-D-E-A.
- Look forward.
- Use SICKLE (X), find WATCH HANDS.
- Go back ×2.
- Place SCALES FIGURINE (Y), open, take CROWBAR.
- Go forward, look forward.
- Use CROWBAR (Z).
- Walkthrough (A), receive POCKET WATCH.
- Inspect POCKET WATCH, play puzzle.
- Place WATCH HANDS (B).
- Walkthrough (C), open and take CLOCKMAKER’S NOTE.
- Go to Mayor’s Office.
- Give CLOCKMAKER’S NOTE (D), speak.
- View (E).
- Search (F), receive UNKNOWN POWDER.
- Take WOLF PAW FIGURINE (G).
- UNKNOWN POWDER on BAG.
- Use the side buttons to rotate the hexagons and rearrange the bubbles according to the solution.
- Walkthrough (H): B×5-A×5.
- Find GRAPHITE LUMP.

- Pick up BEETLE FIGURINE (I), use WOLF PAW FIGURINE, take DRAWER HANDLE 1/3.
- Place BOAR PAW FIGURINE (J), take DRAWER HANDLE 2/3.
- Pick up STARFISH FIGURINE (K).
- Take DRAWER HANDLES 3/3 (L).
- Place DRAWER HANDLES (M).
- Walkthrough (N).
- Walkthrough (O), receive PETALS.
- Investigate (P).
- Place PETALS (Q), use GRAPHITE LUMP, receive MAP COORDINATES.
- Place MAP COORDINATES (R).
- Walkthrough (S).
- Select (T), pick up FEATHER SYMBOL.
- Place FEATHER SYMBOL (U), open.
- Print the word shown on the clue.
- Select the key to move the corresponding letter stamp.
- The keys should be chosen in the correct order.
- Walkthrough (V): E-C-A-C-B-E-R, take INK REMOVER.
- INK REMOVER on POCKET WATCH.
- Use (W).
- Walkthrough (X), receive REBECCA’S ADDRESS.
- Go down.
- Enter (Z).
- Read (A), take AX.
- Give REBECCA’S ADDRESS (B).
- Use AX (C), take MECHANISM HANDLE.
- Take LOCK PIECE 1/3 (D), place MECHANISM HANDLE.
- Walkthrough (E): 1-2-3.
- Play puzzle.
- Pick up BOOT (F).
- Place BEETLE FIGURINE (G), open, take SAUSAGES.
- Disassemble BOOT, receive LACE, OIL and LOCK PIECES 2/3.
- Give SAUSAGES (H), receive LOCK PIECES 3/3.
- Take NEWSPAPER (I), place LOCK PIECES.
- Rotate the ring to insert the door fragments into the center lock.
- Inner fragments must be inserted first.
- Walkthrough (J).
- Go forward.
- Open (K), speak, move forward.
- Speak (L).
- Use (M), play puzzle.
- Play puzzle (N), receive STETHOSCOPE.
- Take PICTURE (O).
- Place STETHOSCOPE (P), spin, take DIARY KEY and PICTURE PIECE.
- PICTURE PIECE on PICTURE, open, take AWL.
- Use LIGHTER (Q), take GRYPHON HEAD.
- Take HEART HANDLE (R).
- Place NEWSPAPER and AWL (S), retrieve DOOR KEY.
- Use DOOR KEY (T), open, enter.
- Speak (U), take REBECCA’S DIARY.
- DIARY KEY on REBECCA’S DIARY, open.
- Walkthrough (V).
- Take REBECCA’S ROOM KEY (W).
- Read (X-Z), receive WING VALVE.
- Move (A).
- Place GRYPHON HEAD (B), use REBECCA’S ROOM KEY.
- Go right.

- Take COMB (C).
- Use COMB (D), take KNITTING NEEDLE.
- Move, use OIL (E), open and take CLOCK KEY.

- Walkthrough (F), receive METAL BUTTONS.
- Remove (G), place HEART HANDLE.
- Open, take HOOK.
- Use CLOCK KEY (H), open.
- Play puzzle, receive MUSIC SYMBOL 1/3.
- Place WING VALVE (I), turn.
- Place STARFISH FIGURINE (J), inspect, receive WET SPONGE.
- Use KNITTING NEEDLE (K), find WINDOW HANDLE.
- Go to Vault Laboratory.

- Use WET SPONGE (I), inspect, receive DIARY CODE.
- DIARY CODE on REBECCA’S DIARY.
- Walkthrough (M), turn page.
- Find the images related to the highlighted words.
- Walkthrough (N).
- Take MUSIC SYMBOLS 2/3 (O).
- Go down.
- Pick up ROD (P).
- LACE and HOOK on ROD, assemble, receive FISHING ROD.
- Go right.
- Replace WINDOW HANDLE (Q), open.
- Cast FISHING ROD (R), receive HAT FIGURINE.
- Go down.
- Place HAT FIGURINE (S), receive MUSIC SYMBOLS 3/3.
- Use MUSIC SYMBOLS (T).
- Rebuild each of the three bas-reliefs.
- Press the piano keys to swap the pieces.
- Walkthrough (U).
- Walkthrough 1: J-I-H-G-F.
- Walkthrough 2: I-G-H-L.
- Walkthrough 3: L-C-D-A-K-J-D-F.
- Take TUNING FORK.
- Go right.
- Use TUNING FORK (V), take CLOCK HANDS.
- Place CLOCK HANDS (W), play puzzle, receive SNOWFLAKE SYMBOL.
- Go down.
- Move (X), use SNOWFLAKE SYMBOL, pick up LETTER W 1/2.
- Go forward.
- Play puzzle (Y), find GLASS POTION.
- Use TUNING FORK (Z), pick up SYRINGE and LIPSTICK.
- Go to Rebecca’s Room.
- Place GLASS POTION and LIPSTICK (A).
- Walkthrough (B), take CASKET CODE.
- Place METAL BUTTONS and CASKET CODE (C).
- Walkthrough (D), take REBECCA’S INITIALS.
- REBECCA’S INITIALS on REBECCA’S DIARY (E), turn page.
- Find the images related to the highlighted words.
- Walkthrough (F), turn page, take NUMBER TOKEN 1/2 and CLOCK TOWER ADDRESS.
- Go down ×2.

- Give CLOCK TOWER ADDRESS (G).
- Speak (H), take BROKEN HARMONICA.
- Inspect BROKEN HARMONICA, find NUMBER TOKENS 2/2.
- SYRINGE on BROKEN HARMONICA.
- Give HARMONICA (I).
- Open (J), move forward.
- Open (K), enter.
- Place NUMBER TOKENS (L).
- Rearrange the tokens according to the numbers on them and the slot numbers.
- The tokens can only move to an empty connected slot.
- Walkthrough (M): B-A, H-B, B-C, C-G, E-D, D-C, C-B, B-H.
- F-E, E-D, D-C, C-B, G-C, C-D, D-E, B-C, H-B.
- Take SPEAR (N).
- Go forward.
- Use (O), play puzzle.
- Inspect (P), take SWITCH and WHISTLE.
- Use WHISTLE (Q), take CHAIN.
- Slide (Q1).
- Pick up SAND BAGS (R).
- Take LIFT MECHANISM CODE (S).
- Inspect (T), place LIFT MECHANISM CODE.
- Walkthrough (U), take GEAR 1/3, place SWITCH and pull.
- Inspect (V), place CHAIN and SAND BAGS.
- Play puzzle, receive CLOCKMAKER’S EMBLEM.
- Go back.
- Speak (W).
- Speak (X), use SPEAR.
- Drag a path between three or more matching symbols of the same color to fill your tubes.
- Avoid matching any symbols on your opponent’s colors or your tubes will be emptied.
- When the tubes are filled, the winner will punch.
- Punch three times to win.
- Walkthrough (Y): solution is random.
- Place CLOCKMAKER’S EMBLEM (Z), take BIG CLOCK KEY.
- LIGHTER on PAPER, take BOMB CLUE.
- Use BOMB CLUE (A), play puzzle.
- Investigate (B).

- Use the buttons to change the position of the bars and set the code on the display.
- Walkthrough (C): A×5-B×5-C-D×2-E×5-F×2.
- Take GEARS 2/3.

- Use (E), solution (F).
- Turn the page, solution F1 and F2.
- Select Yes or No due to your opinion, receive GEARS 3/3.
- GEARS on BIG CLOCK KEY (G).
- Walkthrough Bonus Chapter, at the link below.


Thank you for helping me finishing this game 👍