Dark City 6: Paris (Bonus Chapter) – You have agreed to help the Minister again, exhibits in the Louvre are disappearing and some of the staff claim that the exhibits have come to life. The Assistant Director has been a witness. He is waiting in one of the halls to give you his testimony. And it seems the legend is true. It is said that the alchemist Flamel created a pendant with special properties while searching for the secret of eternal life. The pendant was delivered to the Louvre a few days ago. It suggests that it’s the reason for all these events.
Bonus Chapter Walkthrough

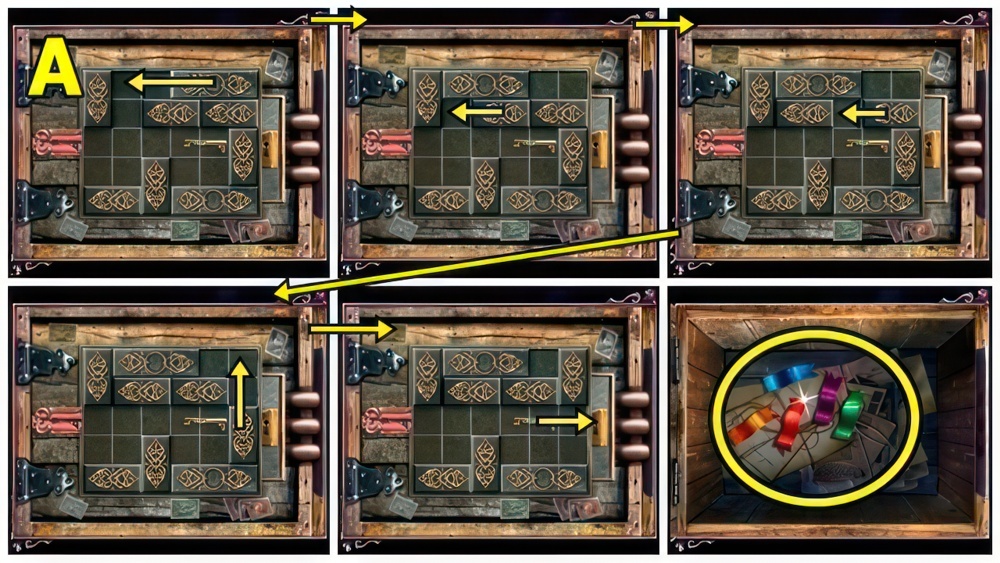
- Talk (A).
- Take CLOCK HAND 1/2 (B).
- Play puzzle (C), receive HARP.

- Take CHAIN (D) and FRAME PART 1/2.
- Add HARP, take FRAME PARTS 2/2.

- Add FRAME PARTS (E).
- Adjust, take CLOCK HANDS 2/2.
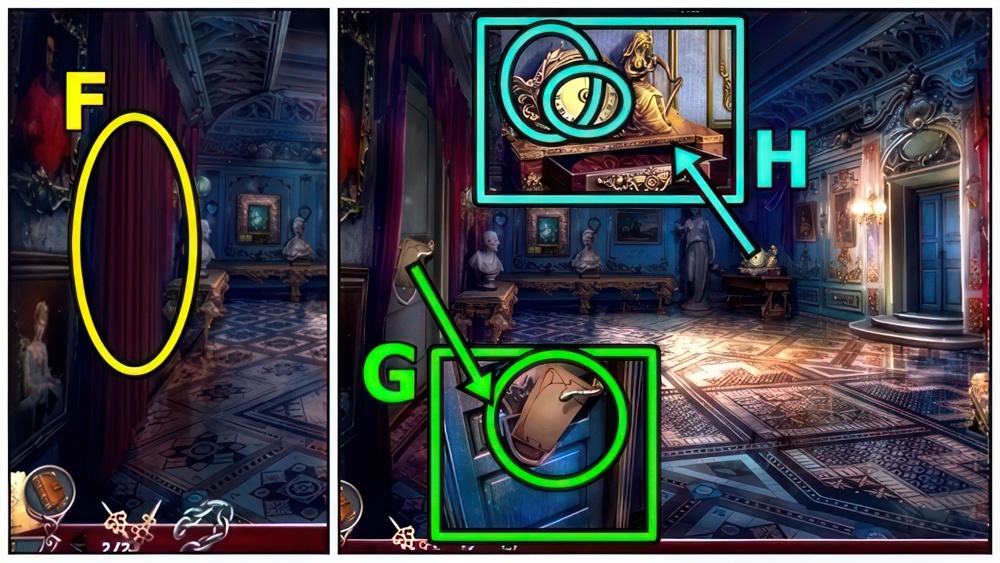
- Open (F).
- Take NOTICE (G).
- Add CLOCK HANDS (H) and NOTICE.
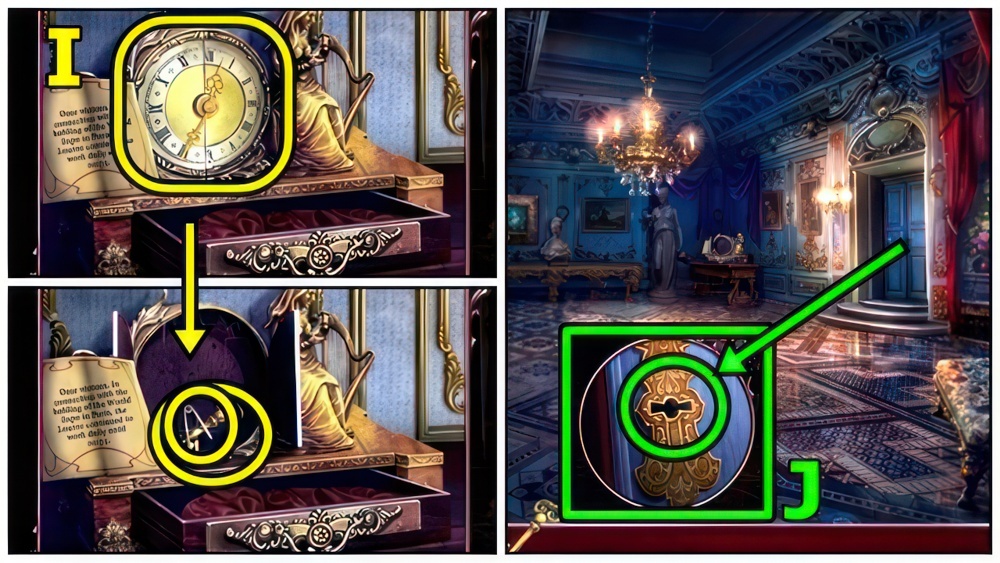
- Walkthrough (I).
- Take PIN and DOOR KEY.
- Insert DOOR KEY (J).
- Move right.
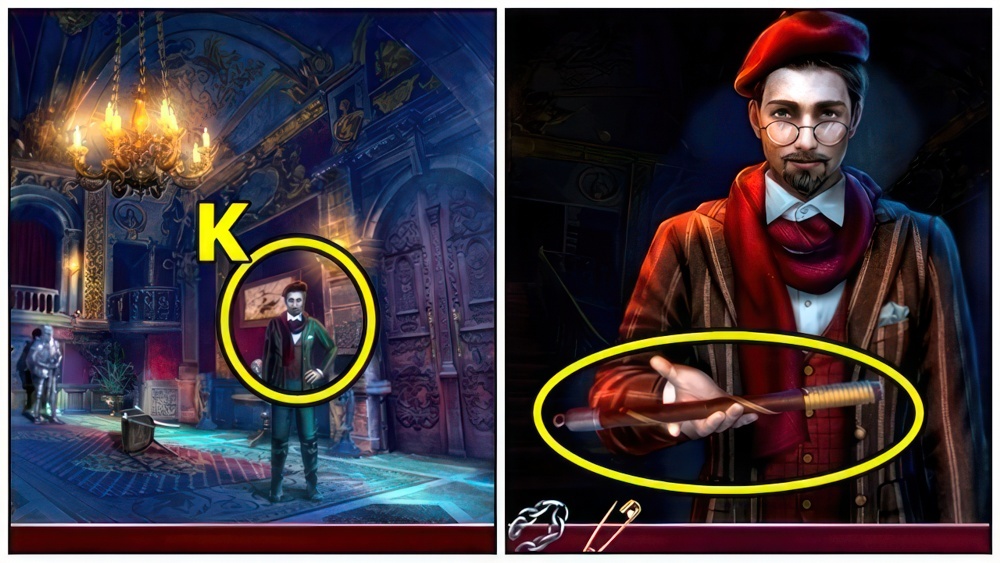
- Talk (K).
- Take BROKEN MACE.

- Insert PIN (L), remove items, take BROKEN LIGHTER, remove item, take COIN.

- Take WICK (M).
- Use COIN, take FEATHER DUSTER.

- Use FEATHER DUSTER (N).
- Use COIN, remove.
- Take ROYAL EMBLEM 1/2 and STATUE PENDANT.

- Insert STATUE PENDANT (O).
- Take MACE HEAD.
- CHAIN and MACE HEAD on BROCKEN MACE, take MACE.
- Talk (P).

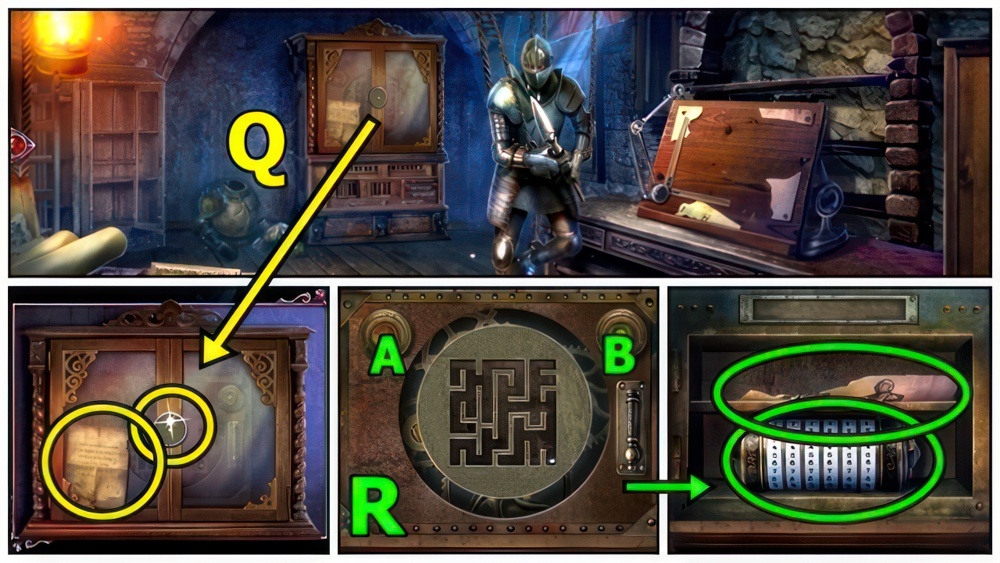
- Use MACE (Q).
- Rearrange the nodes according to the numbers.
- Each number indicates how many times its lines should cross other lines.
- Walkthrough (R).

- Talk (S).
- Take LIGHTBULB.
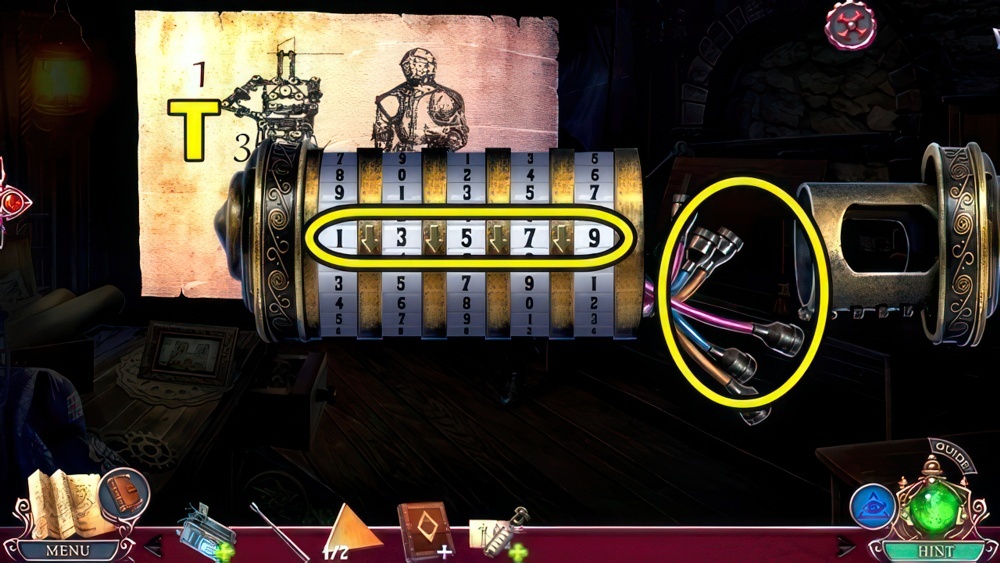
- Play puzzle (T), add LIGHTBULB.
- Take ROYAM EMBLEMS 2/2.

- Insert ROYAL EMBLEMS (U).
- Go left.
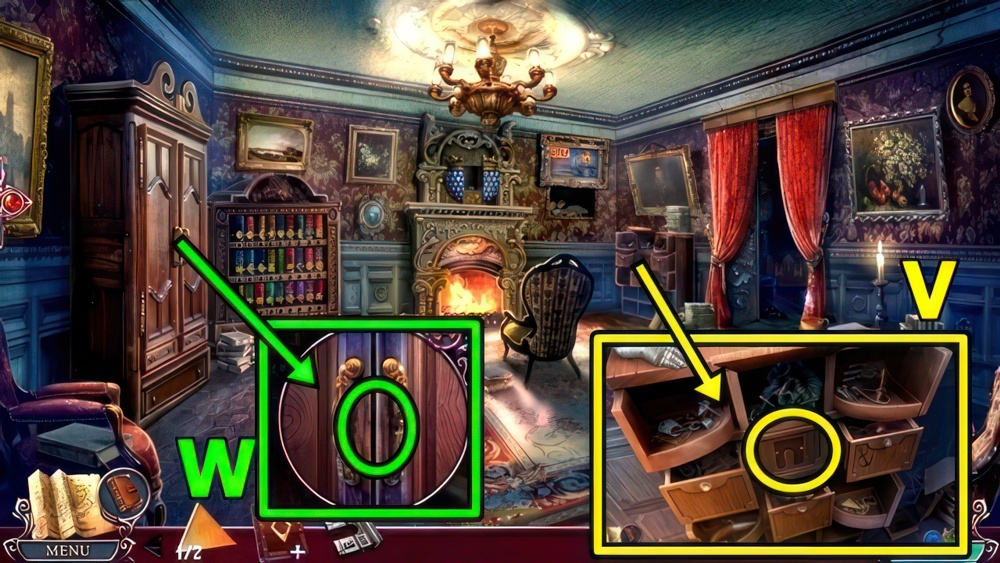
- Talk (V).
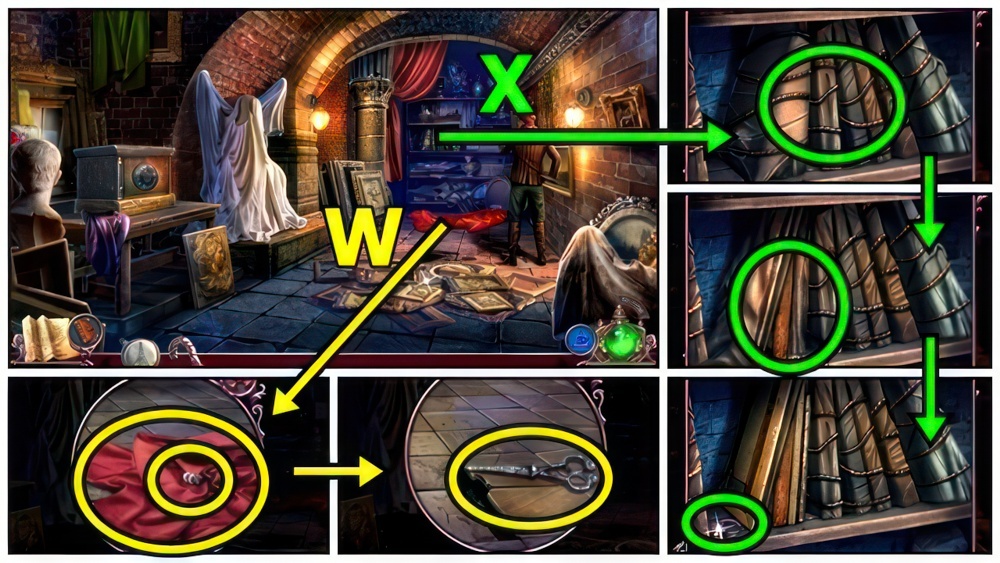
- Take RING 1/3 (W).
- Lift cloth, take SCISSORS.
- Use SCISSORS (X), remove, take RINGS 2/3.

- Find pairs (Y), take RINGS 3/3.
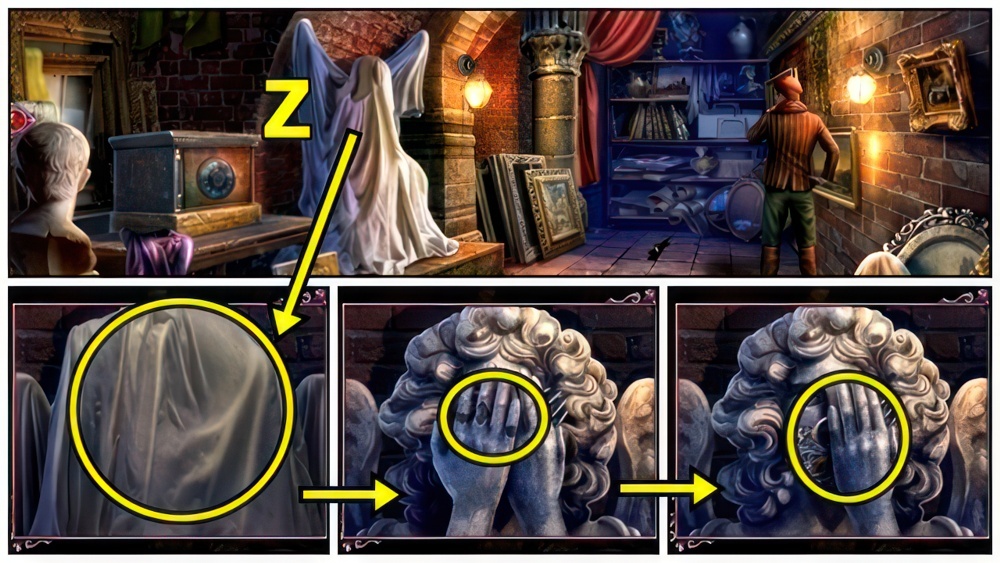
- Move cloth (Z).
- Add RINGS, take COMB.

- Add COMB (A), bend.
- Receive SAFE DIAL.
- Add SAFE DIAL (B).
- Use the arrows to turn the dial and enter the password: MARSEL.
- Walkthrough (C): B×13-A×2.
- Open.

- Examine (D).
- Find clues (E).
- Pull (F).
- Go right.

- Take CHEESE (G) and LIGHTER PART.
- Offer CHEESE (H), take CHEST TOKEN 1/2.
- WICK and LIGHTER PART on BROKEN LIGHTER, take LIGHTER.

- Use LIGHTER (I).
- Open, read, take GLOVES and GARDEN SHOVEL.

- Use GARDEN SHOVEL (J), take CHEST TOKENS 2/2.
- Add CHEST TOKENS (K), take DAGGER.
- Use DAGGER (L), take BROKEN TRANSMITTER and PENDANT.
- Examine PENDANT.

- Take LOCK PART (M).
- Add LOCK PART (N).

- Use the arrows to rotate the lock parts, and then select the start button to try a solution.
- Walkthrough (O): A×2-B×3-C-D-E.

- Talk (P).
- Move forward.
- Talk (Q).
- Play puzzle (R), receive ADDRESS DIRECTORY.
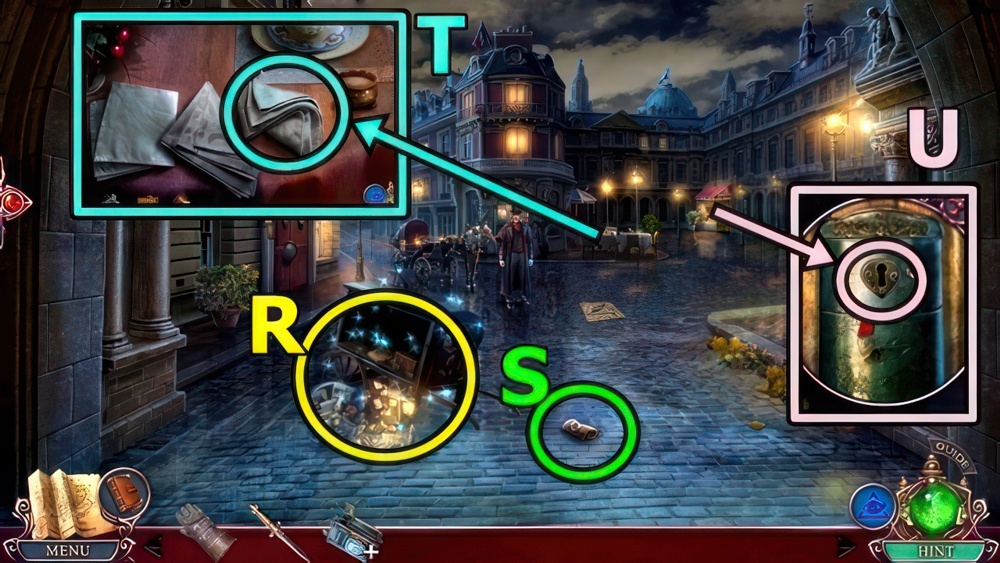
- Take SEALED BUNDLE (S).
- Move napkin (T), take HAIRPIN.
- Use HAIRPIN (U).
- Use DAGGER, receive RIBBON 1/2.
- RIBBONS 2/2 from ADDRESS DIRECTORY.

- Use GLOVES (V), gather sticks, add RIBBONS, receive BROOM.
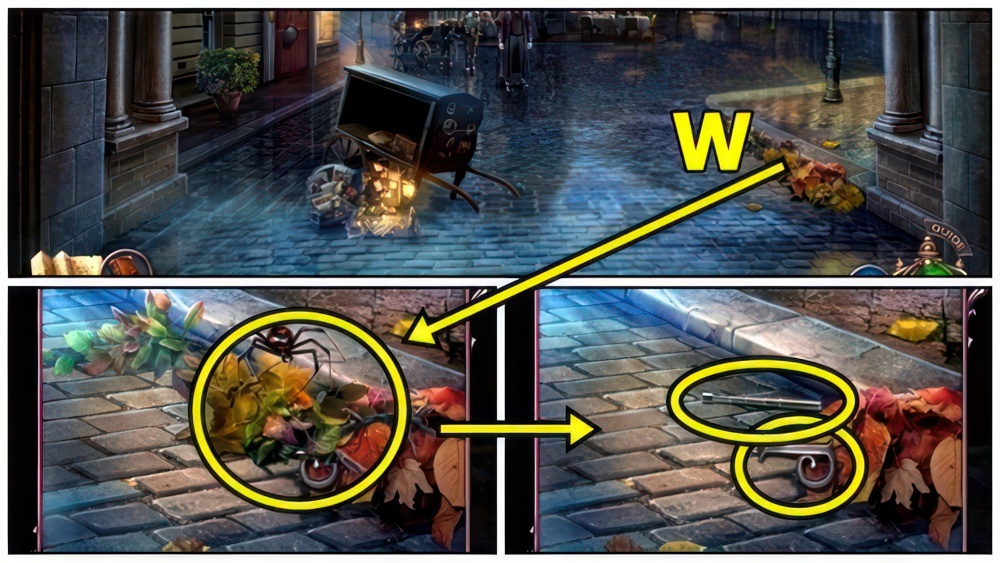
- Use BROOM (W), take ANTENNA and MONOGRAM.
- MONOGRAM on SEALED BUNDLE, read.

- Open clue book (X), deduce.
- Take KEY HEAD.

- Play puzzle (Y), add KEY HEAD.
- Receive BOX TILE.
- Move down.

- Add BOX TILE (Z).
- Move the tiles to form a straight clear path to the lock.
- The key can be moved at any time.
- Walkthrough.
- Walkthrough (A).
- Take FLAGS.
- Move forward.
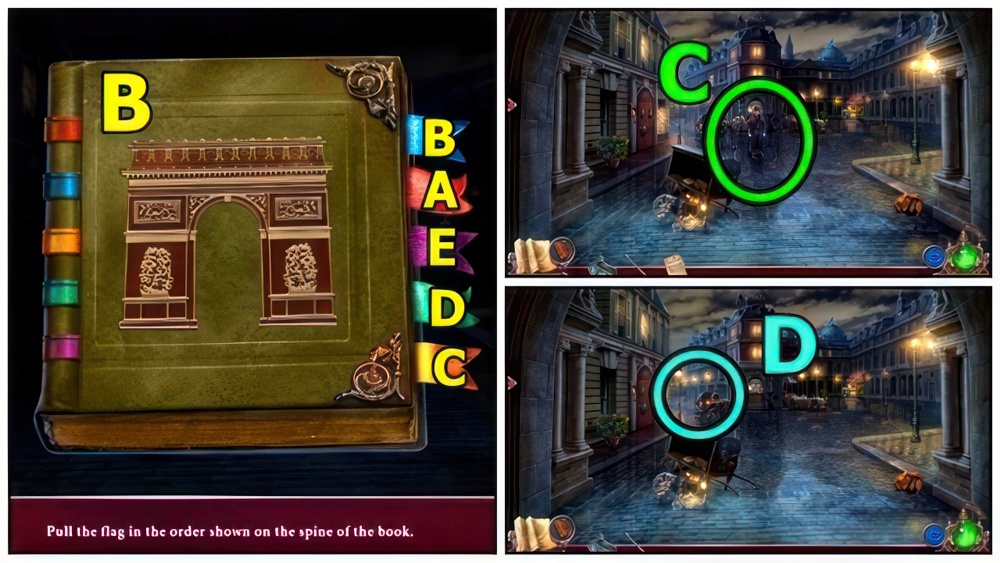
- FLAGS on ADDRESS DIRECTORY.
- Pull the flags in the order shown on the book’s spine.
- Walkthrough (B).
- Take PASCAL’S ADDRESS.
- Give PASCAL’S ADDRESS (C).
- Go (D).
- Take PENCIL (E).

- Take GLUE (F), read, use PENCIL.
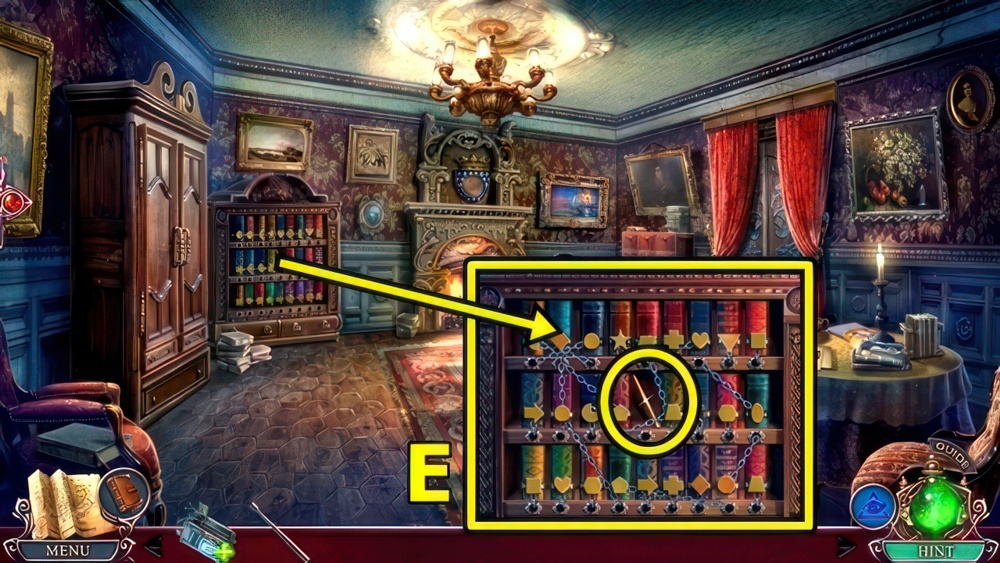
- Take FRAME CODE.

- Add FRAME CODE (G).
- Select the buttons to enter the code.
- Walkthrough (H).
- Read, take DRAWER HANDLES, read, take BOOK.

- Insert BOOK (I).
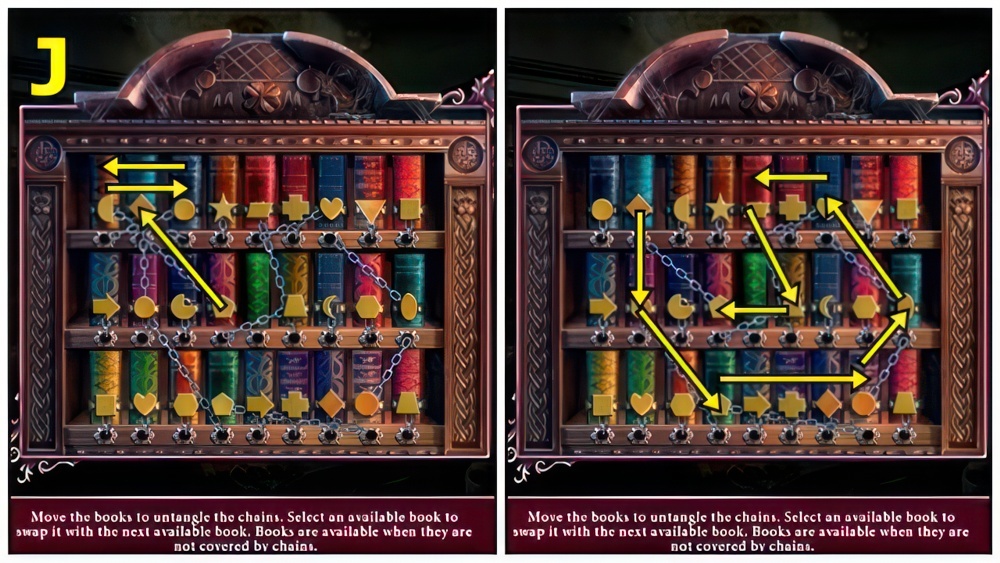
- Move the books to untangle the chains.
- Select an available book to swap it with any highlighted book.
- Books can be moved when they are not covered by chains.
- Walkthrough (J).

- Take DIARY TOKEN 1/2 (K).
- Add DRAWER HANDLES (L).
- Play puzzle, receive SHIELD FRAGMENT.

- Add SHIELD FRAGMENT (M).
- Rotate the part to restore the coat of arms.
- Walkthrough (N).
- Take LOCKED DIARY.
- Move right.

- Take BRUSH (O) and BLUEPRINT PARTS 1/3.
- Take BLUEPRINT PARTS 2/3 (P), remove, take CABINET HANDLE.
- Read (Q), add CABINET HANDLE.
- Use the buttons to rotate the maze and guide the ball to the hole.
- Walkthrough (R): B×7-A×6-B×8.
- Take BLUEPRINT PARTS 3/3 and CRYPTEX.
- BRUSH on GLUE, take GLUE WITH BRUSH.

- Move (S), add BLUEPRINT PARTS and GLUE WITH BRUSH.
- Take CRYPTEX CODE.
- CRYPTEX CODE on CRYPTEX.
- Use the arrows to select the number shown on the clue.
- Walkthrough (T).
- Take WIRES.

- ANTENNA and WIRES on BROKEN TRANSMITTER, take TRANSMITTER.
- Use TRANSMITTER (U), take DRAWER TOKEN.
- Move down.
- Add DRAWER TOKEN (V).
- Play puzzle, receive DIARY TOKEN.
- DIARY TOKENS on LOCKED DIARY.
- Take RULER.
- Use RULER (W).
Congratulations! You have completed the game Dark City 6: Paris.


