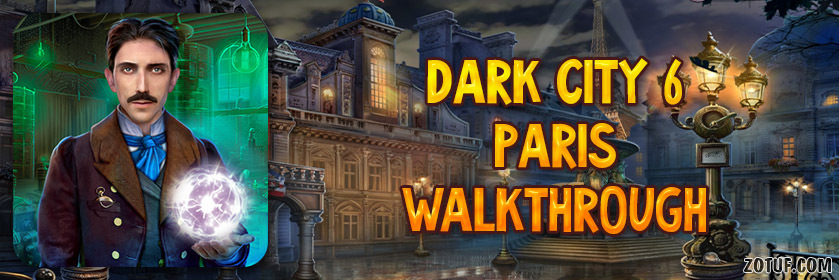
Dark City 6: Paris – The walkthrough begins with a letter from Minister Dubois saying that he has heard about your successful investigations and he needs your help. The World’s Fair in Paris is on the verge of collapse. Witnesses claim to have seen ghosts and citizens are terrified. As Minister, he fears for the safety of both the event and the citizens, so your visit must be kept secret. As absurd as these claims are, if anyone finds out about the investigation, it will only add to the panic. His secretary will meet you at the Ministry. All of France is counting on you. If you can’t complete any of the puzzles or don’t know where the items are, you can watch the Dark City 6: Paris walkthrough on our website and uncover who is behind the dangerous attacks and stop them.
Dark City 6: Paris – Walkthrough
Here you can see full walkthrough of Dark City 6: Paris game, namely for all chapters, including bonus chapter, in pictures.
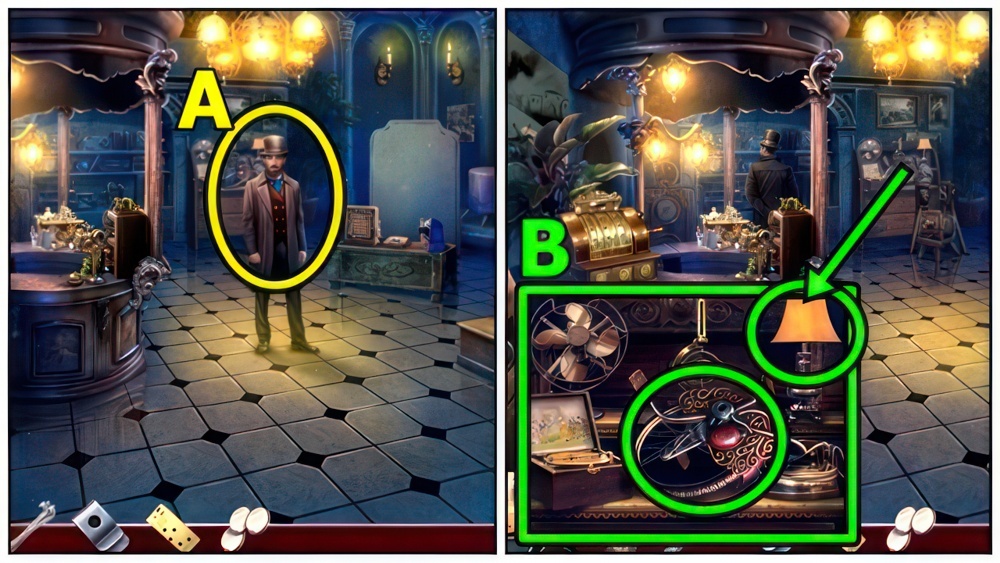
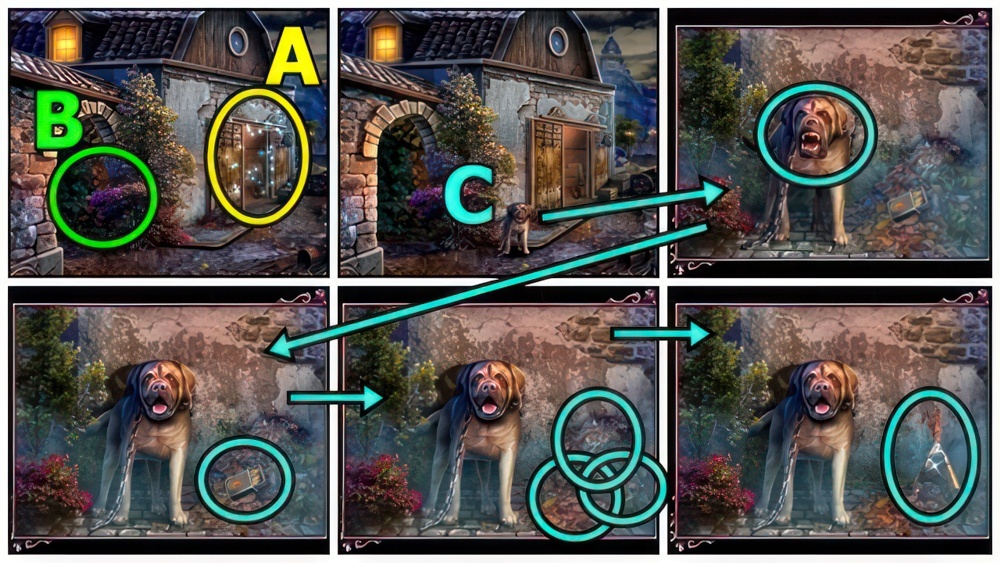
- Read note (A), then Map.
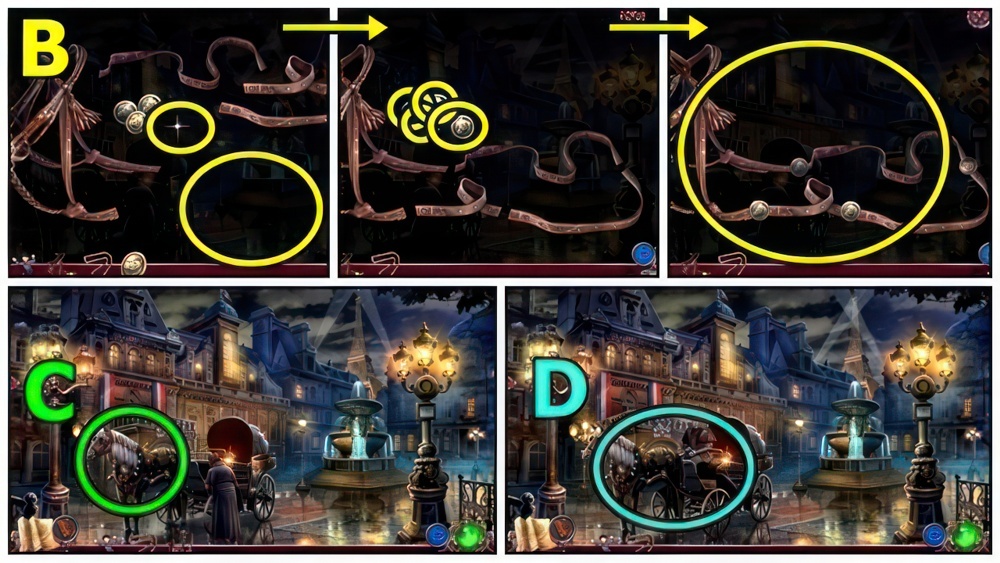
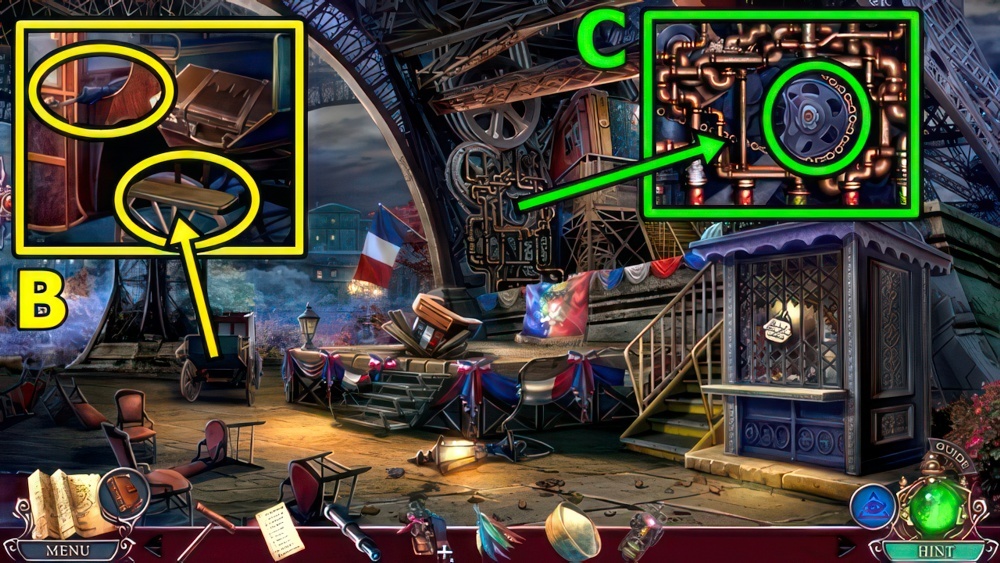
- Take BAG (B).
- Read note on BAG, open, take METAL CIRCLE and METAL FLOWER 1/2.
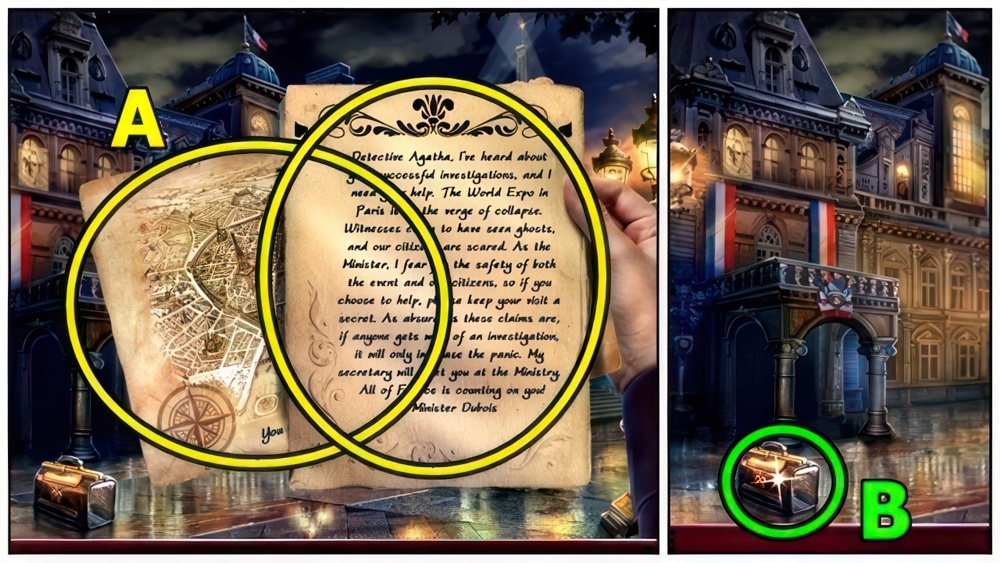
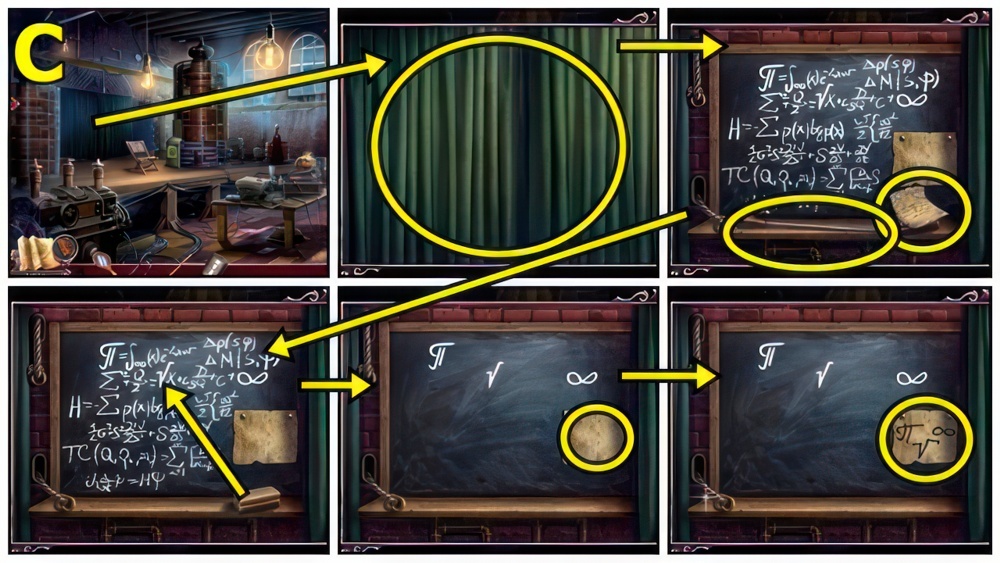
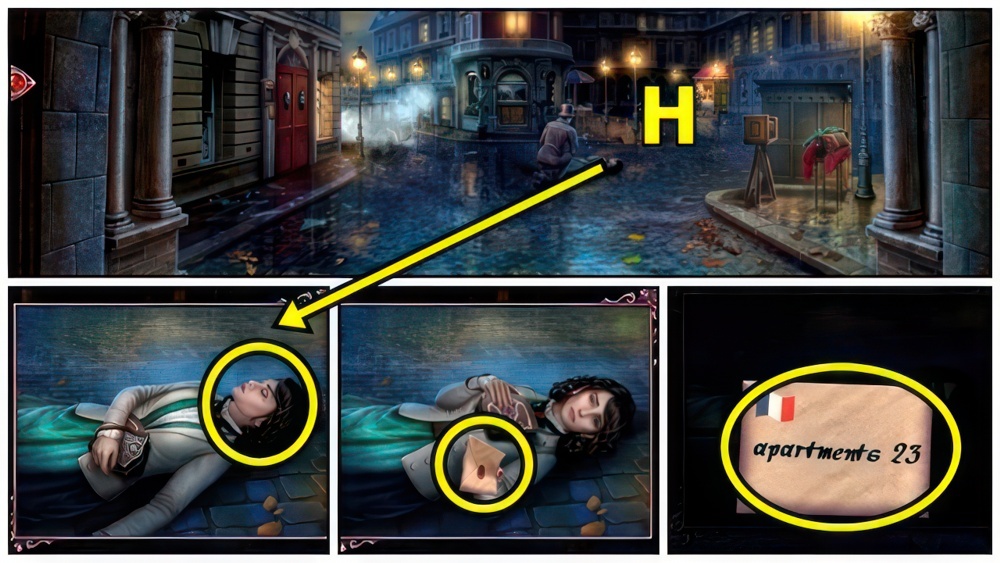
- Read note (C), take CRUMPLED PAPER.
- Examine, select pairs.
- Take LOG and METAL FLOWERS 2/2.
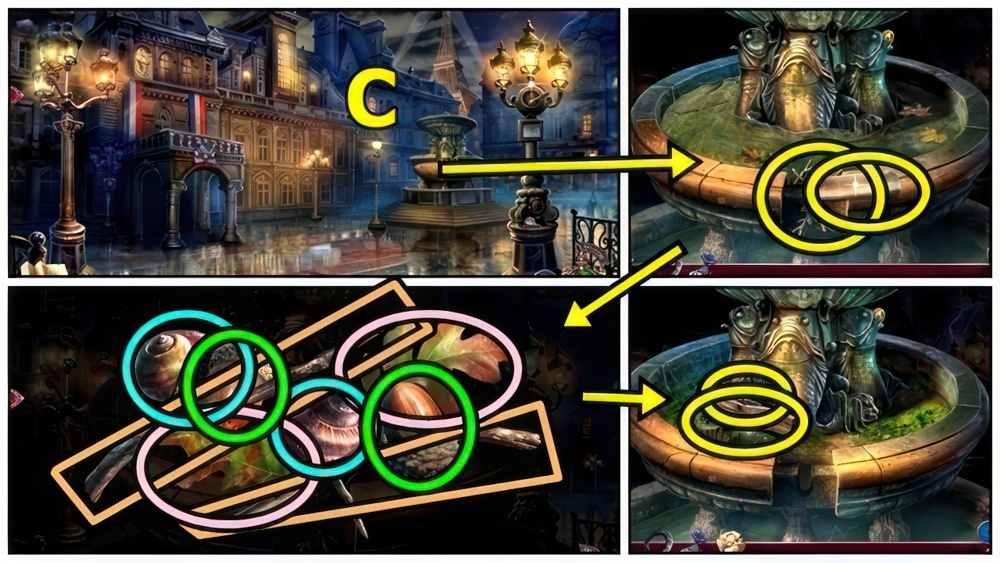
- Turn the disc to complete the pattern.
- Select and drag the disc to rotate it.
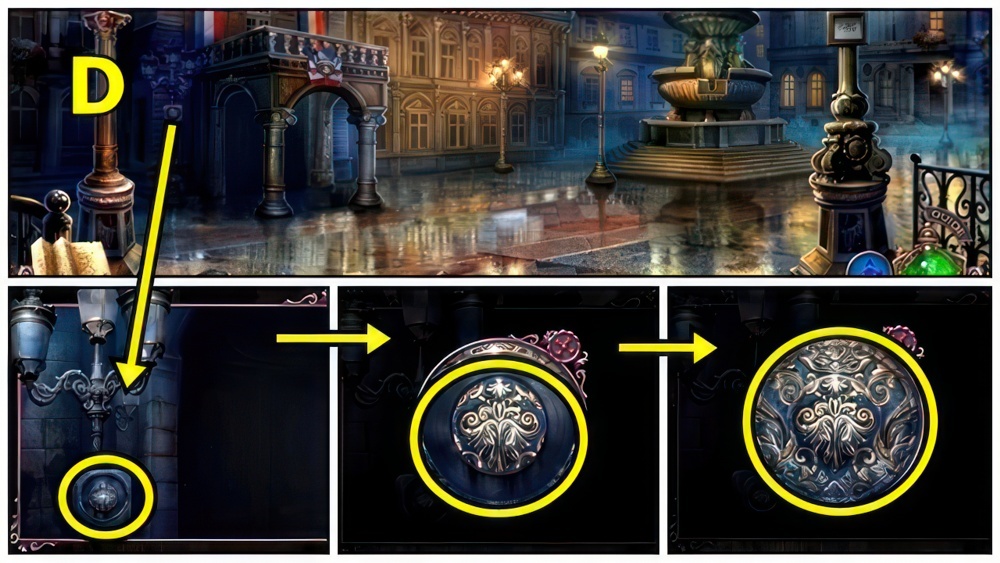
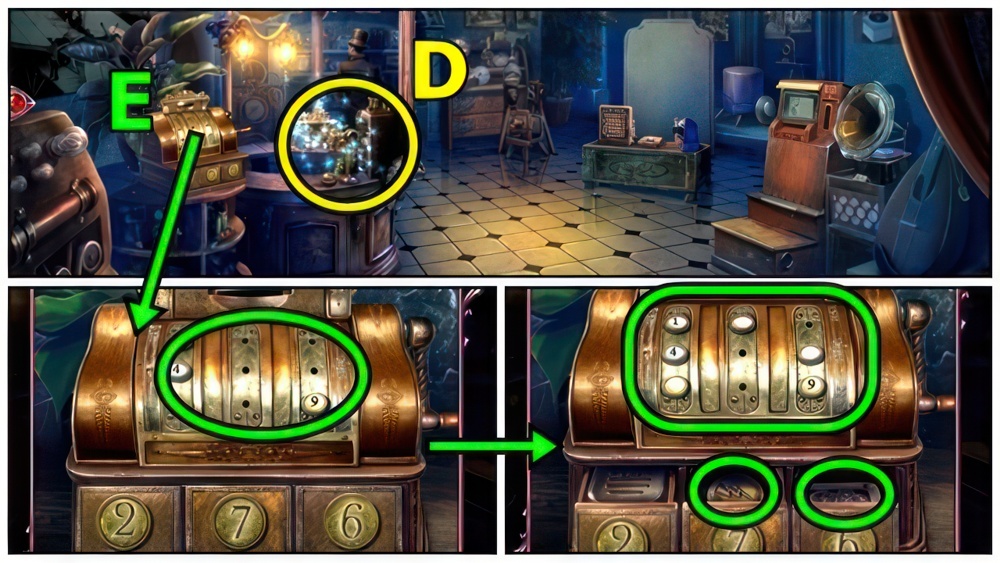
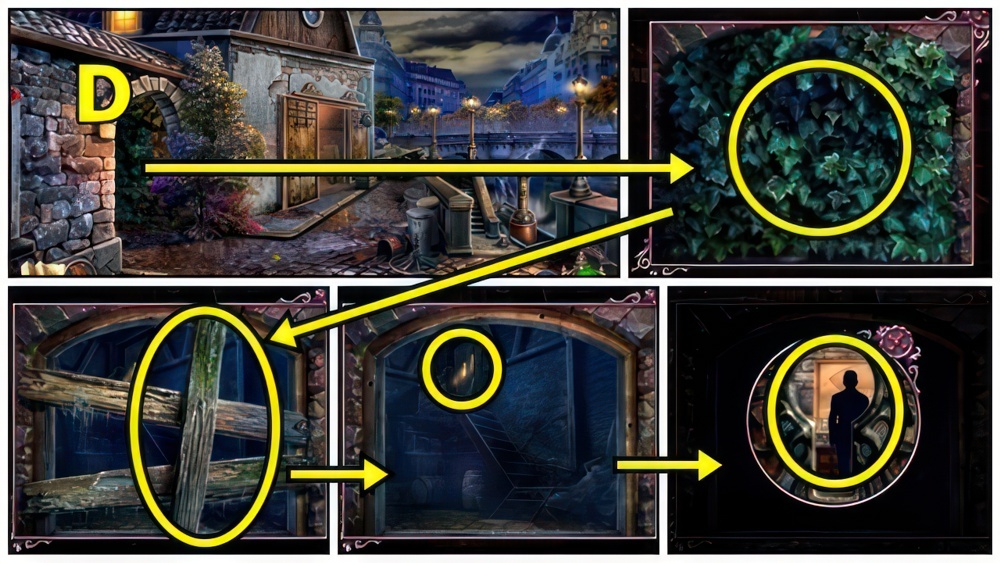
- Examine (D), add METAL CIRCLE, adjust.
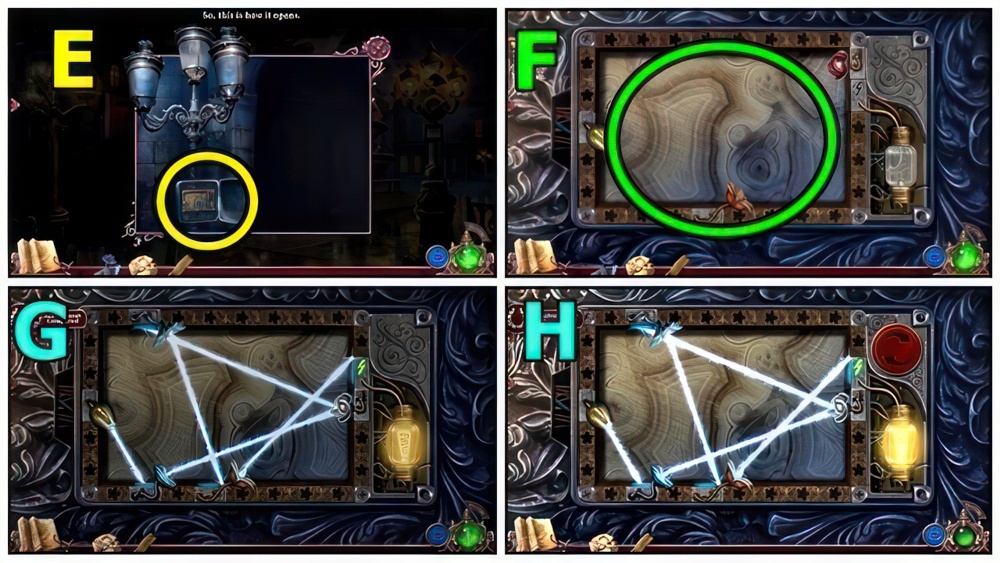
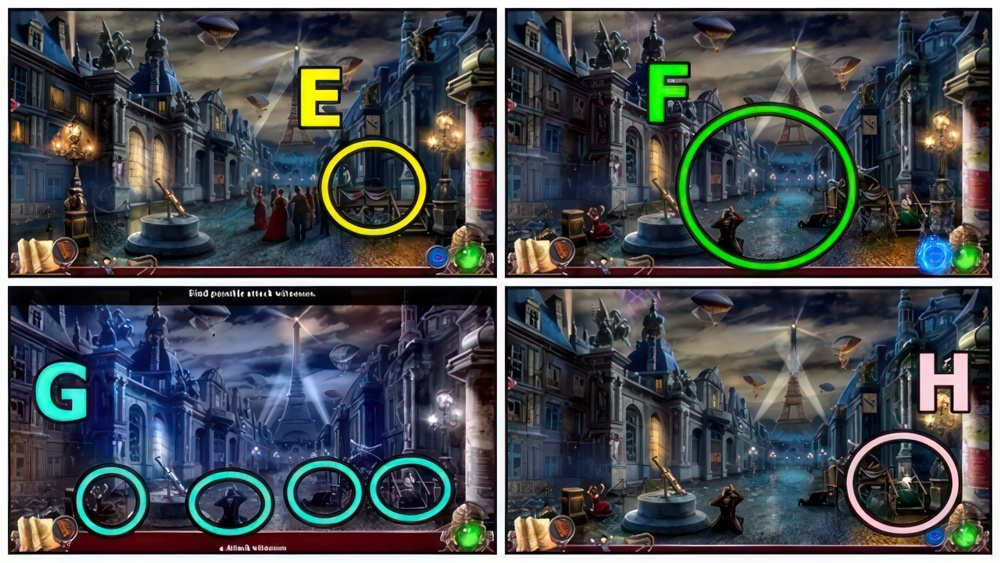
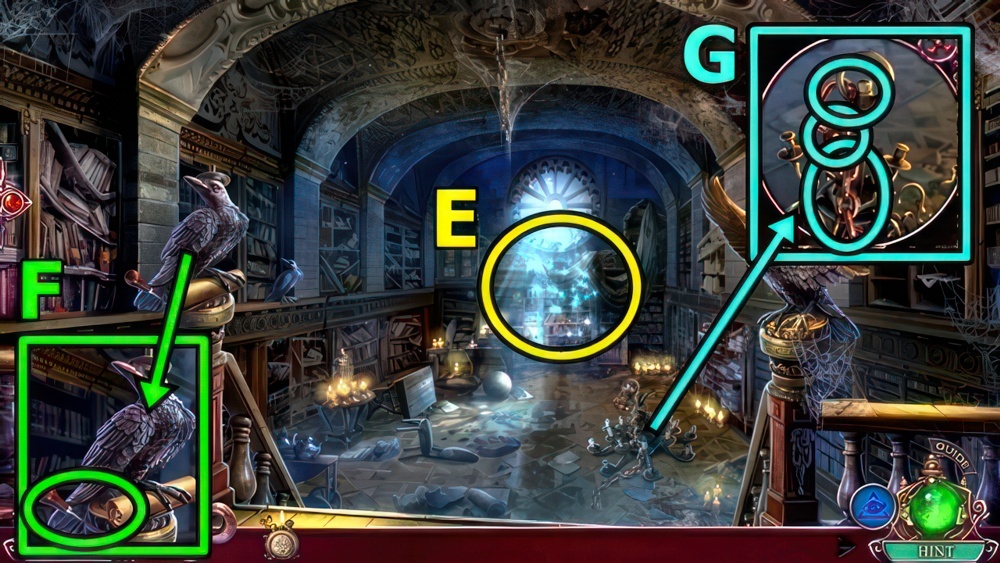
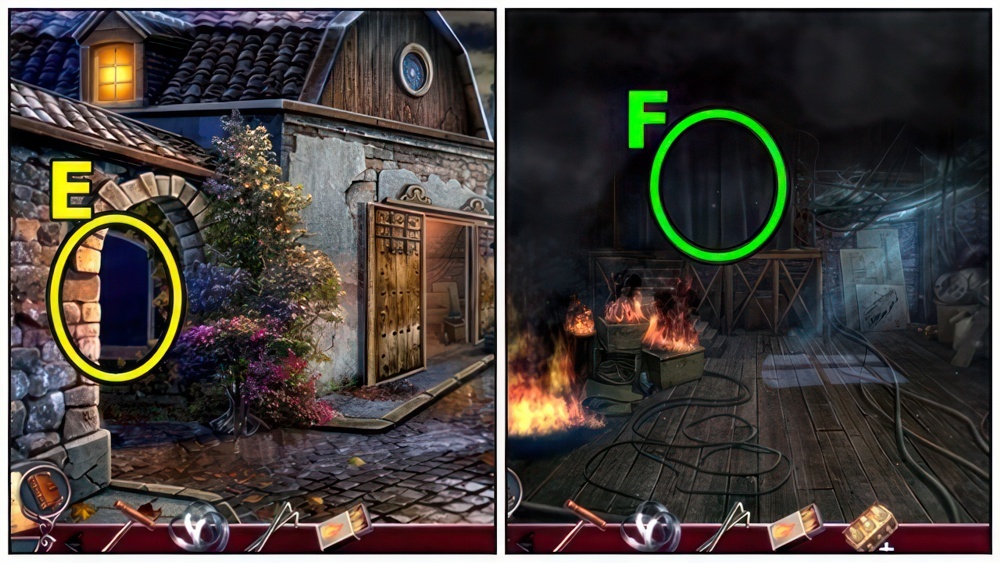
- Examine (E).
- Add METAL FLOWERS (F).
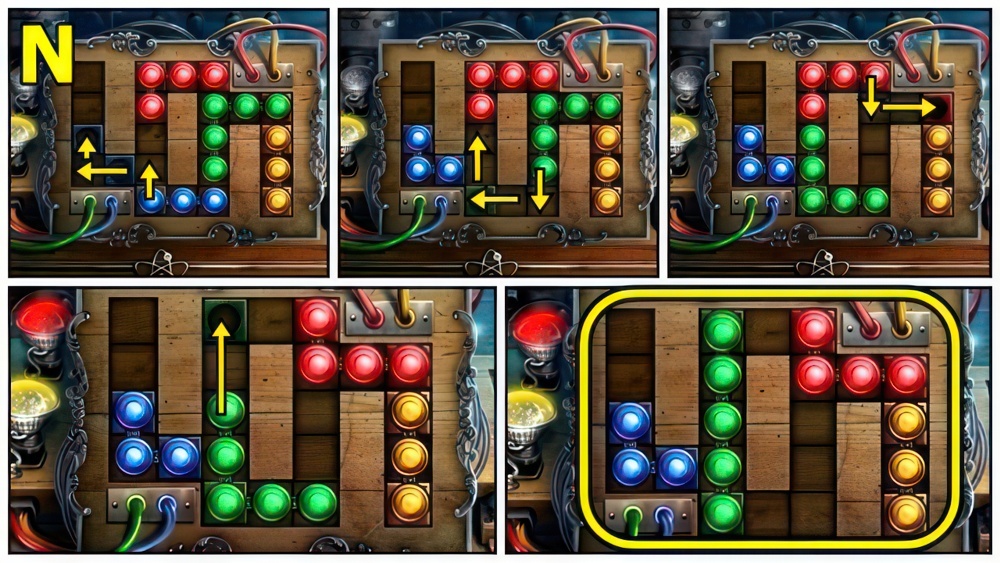
- Direct electricity to the lightning symbol on the right.
- Select a flower to move it to an available space.
- Each flower directs electricity at a specific angle.
- In hard mode, select a flower and then the arrow button to rotate it.
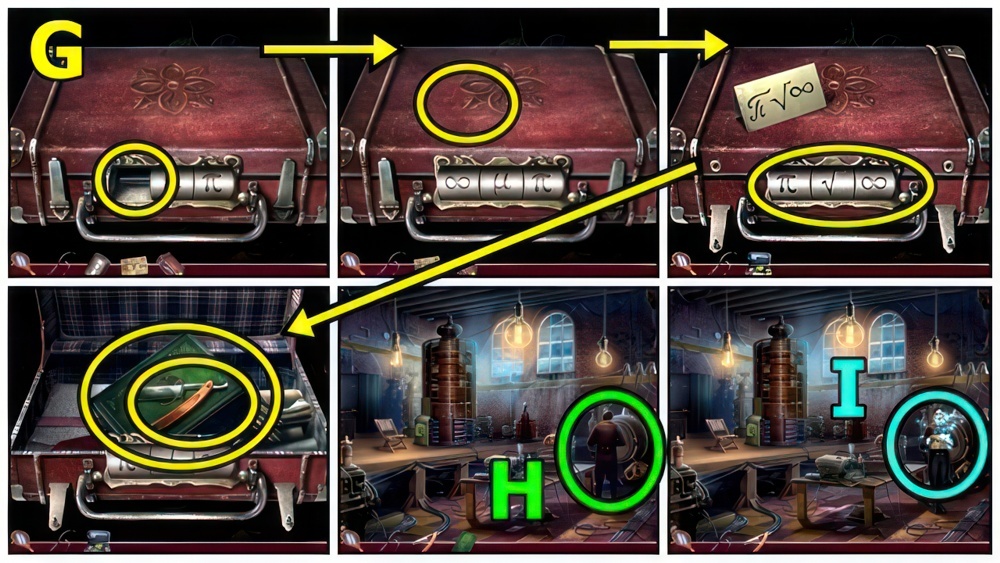
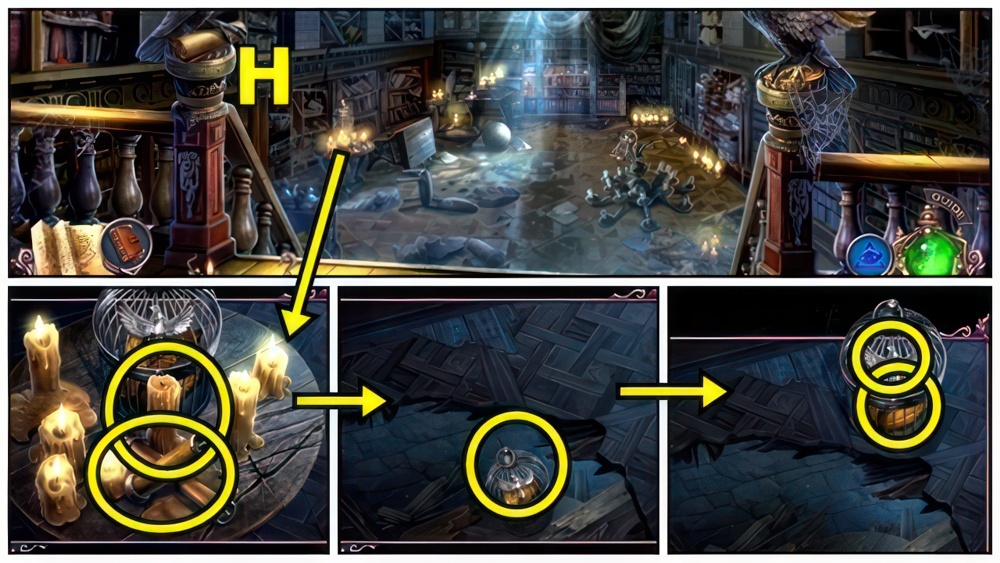
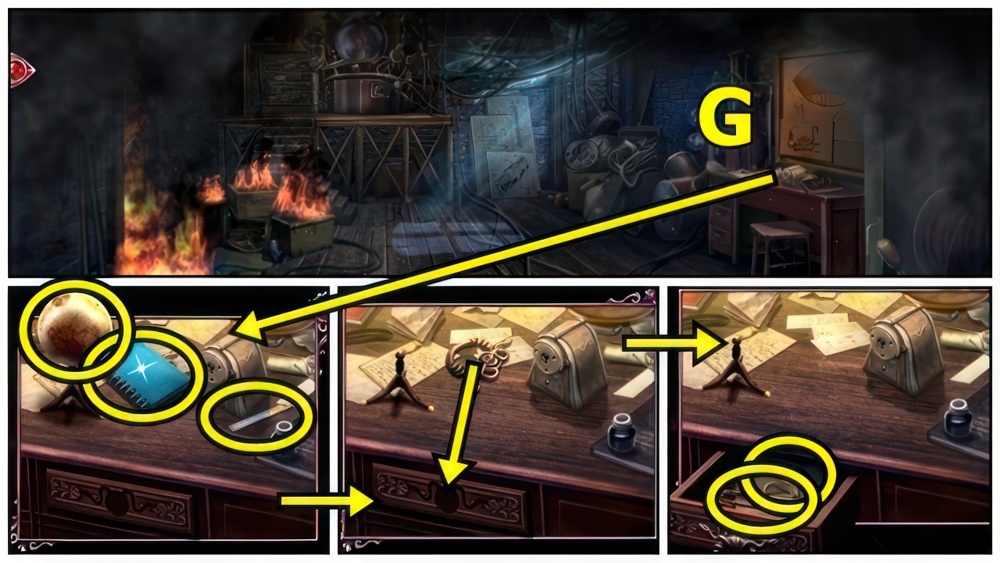
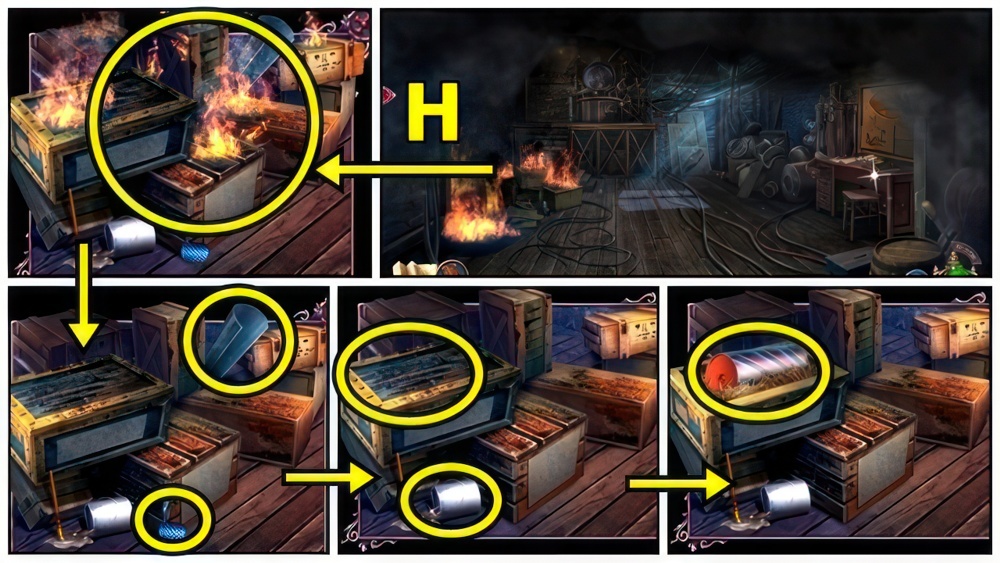
- Walkthrough: Easy (G).
- Walkthrough: Hard (H).
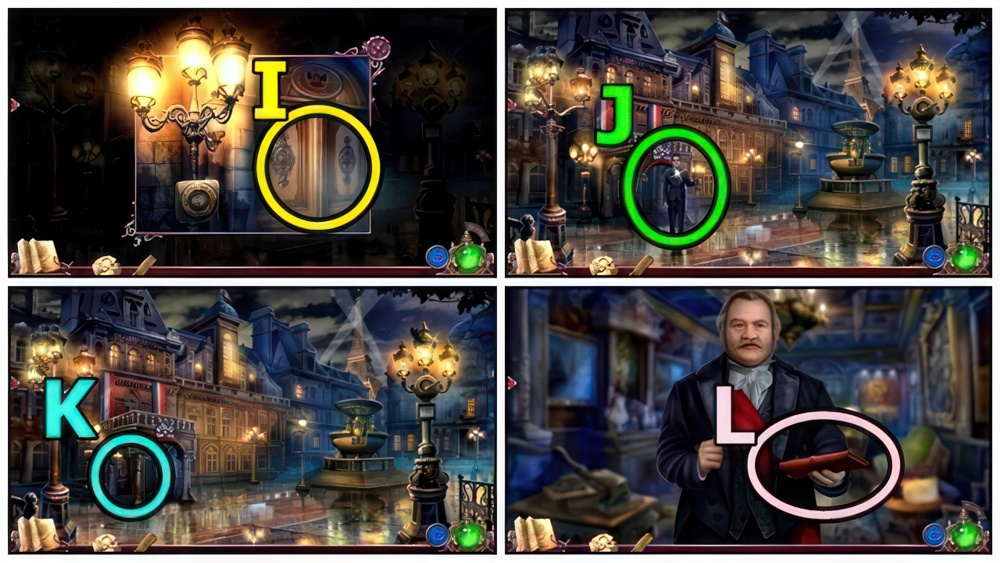
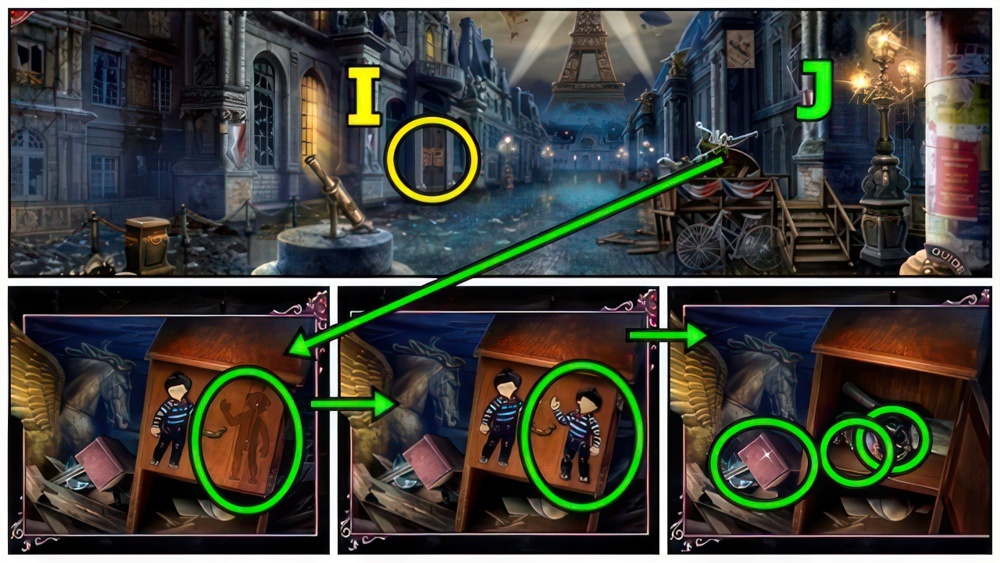
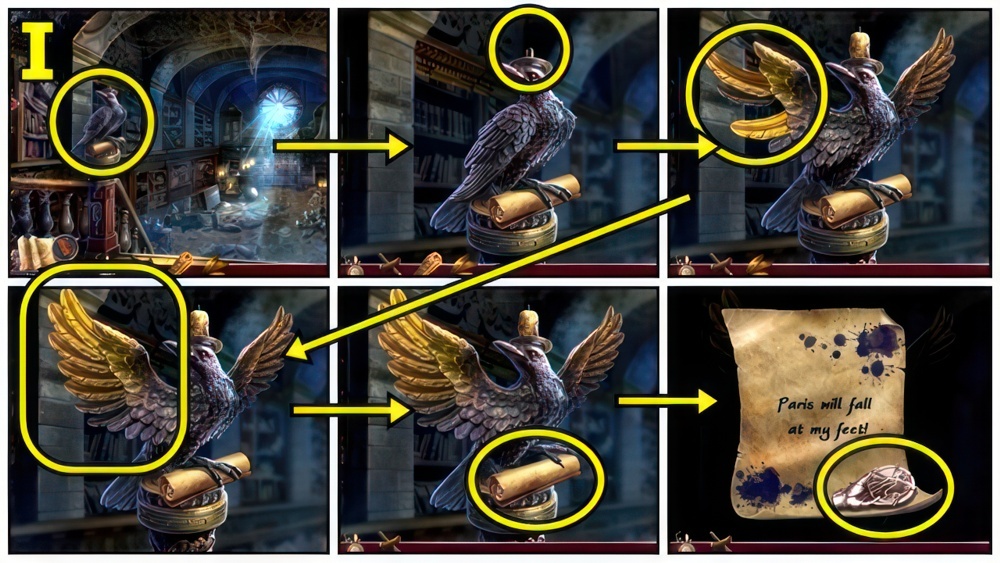
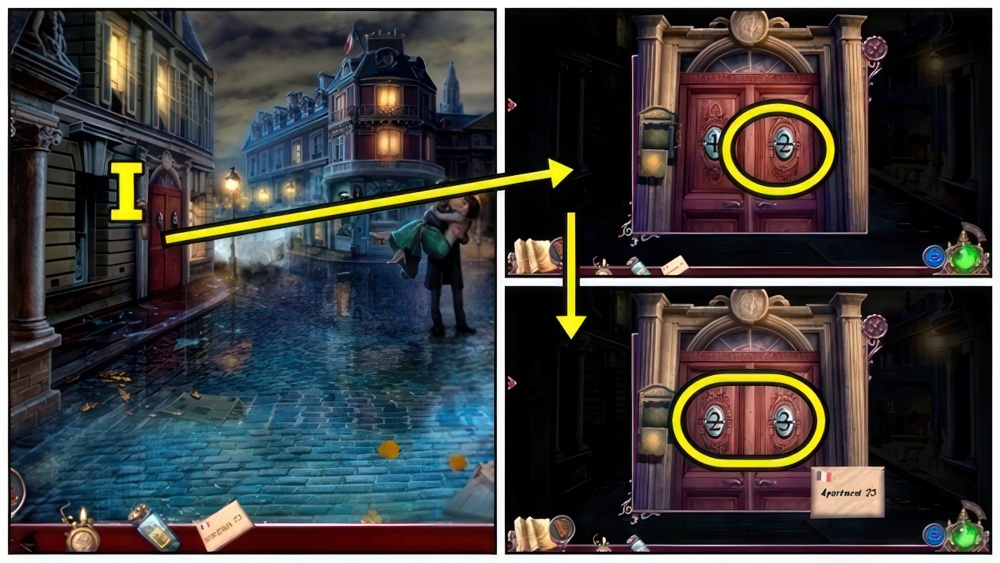
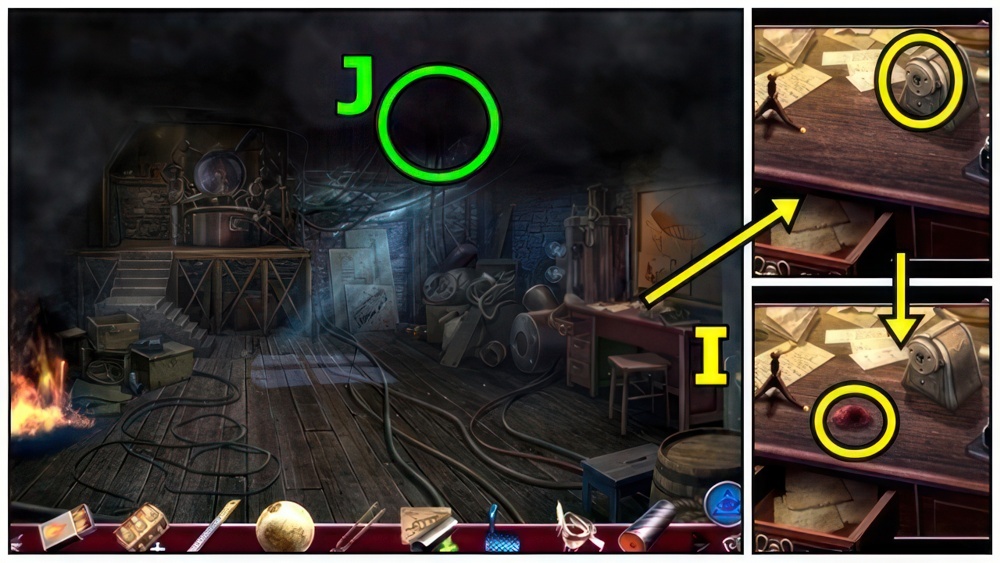
- Open (I).
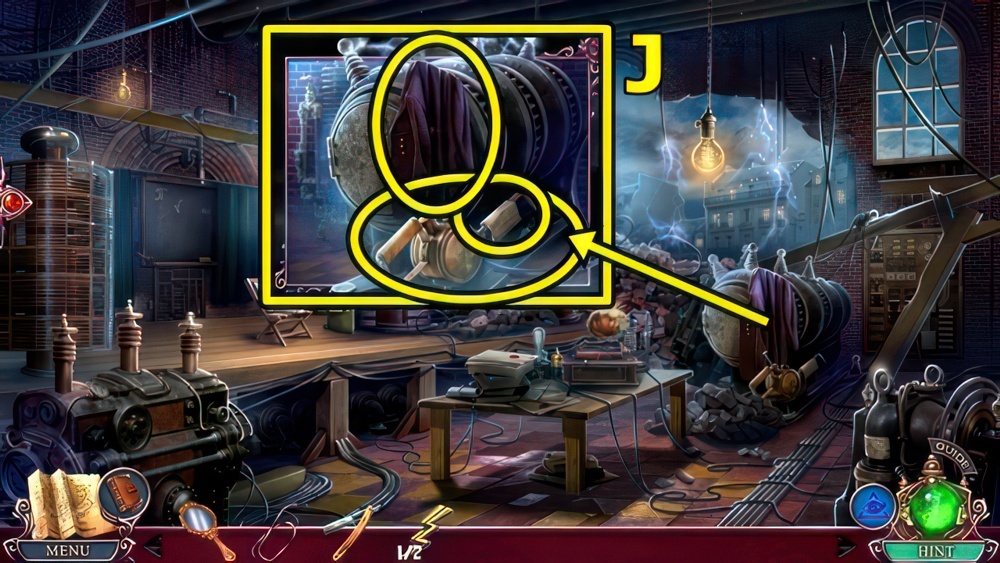
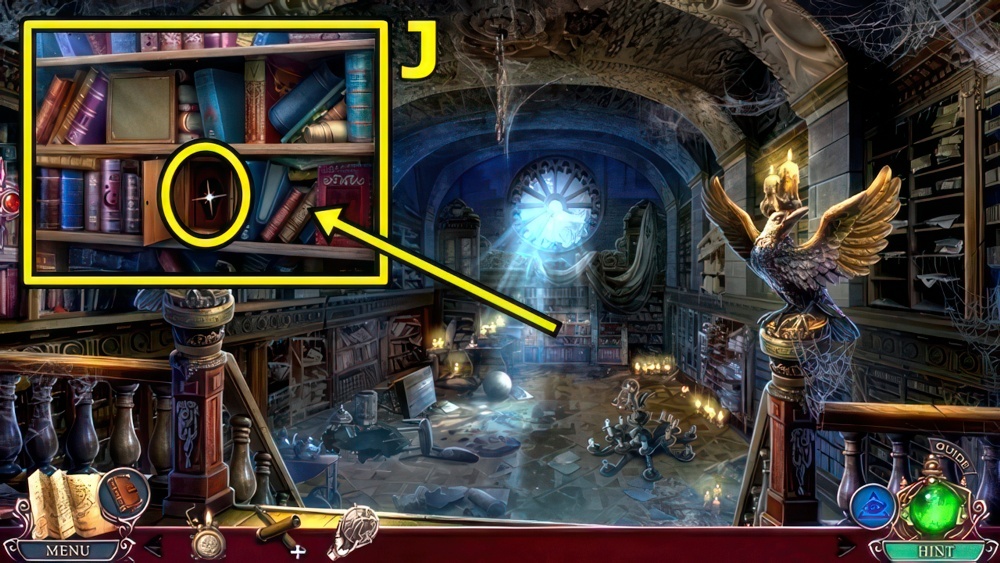
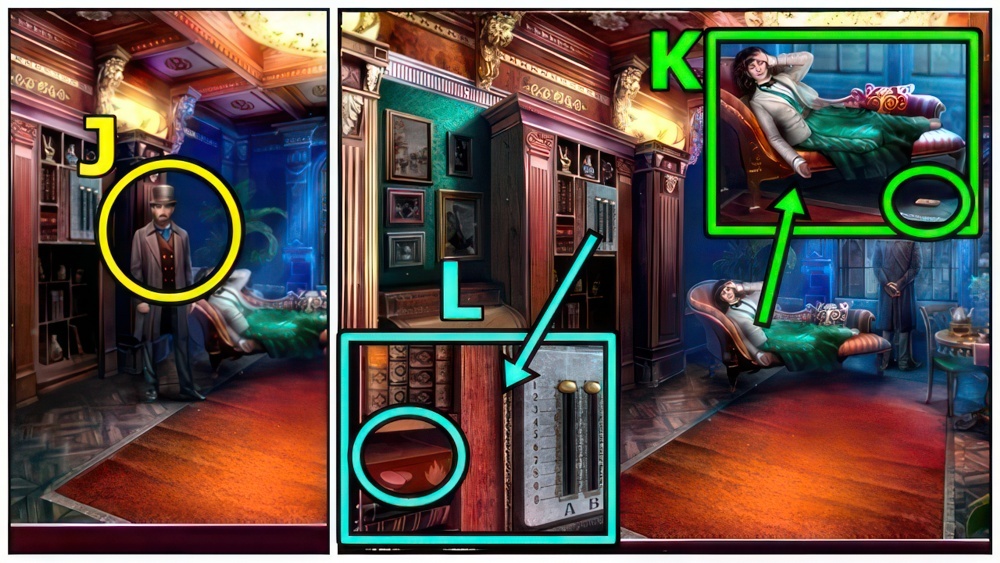
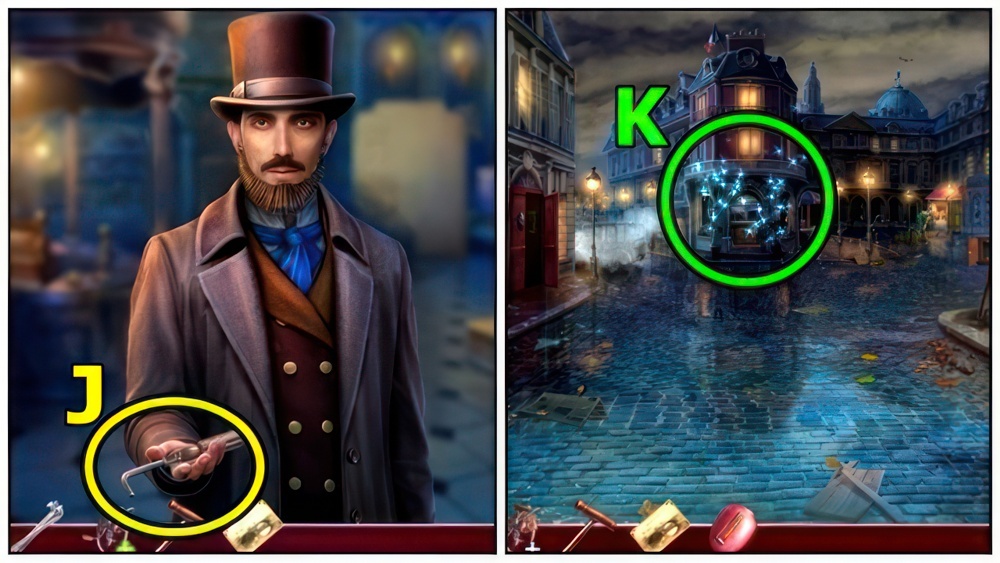
- Talk (J).
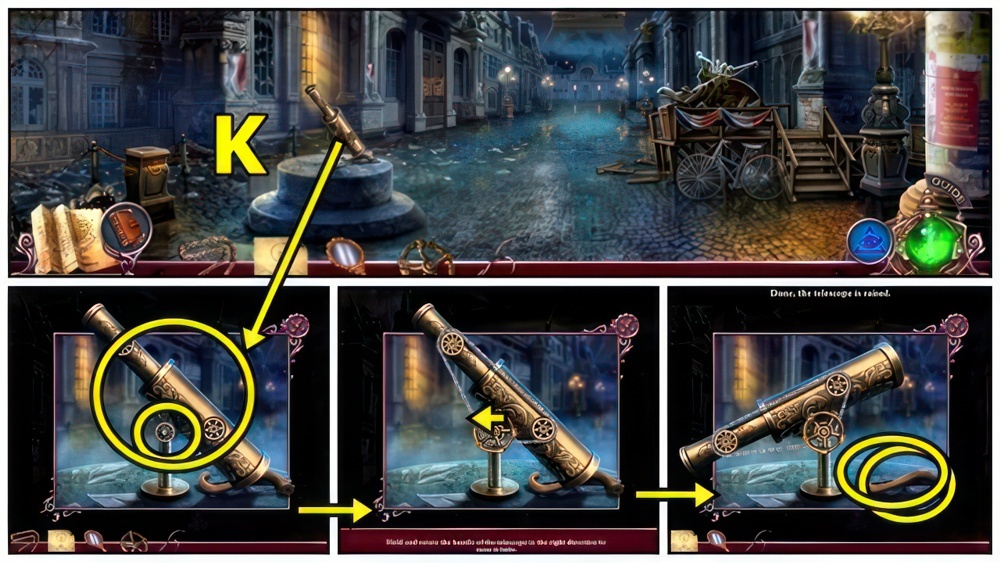
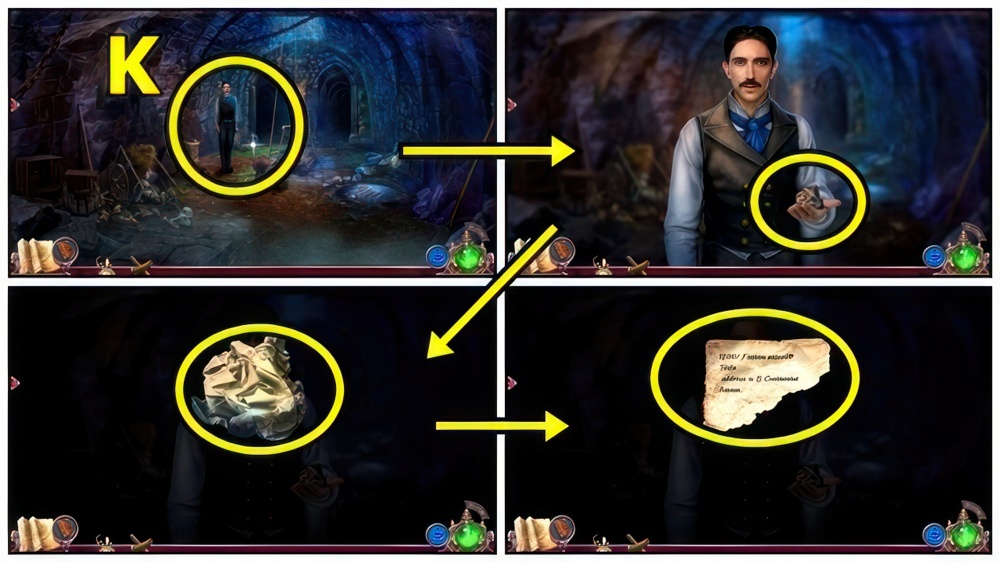
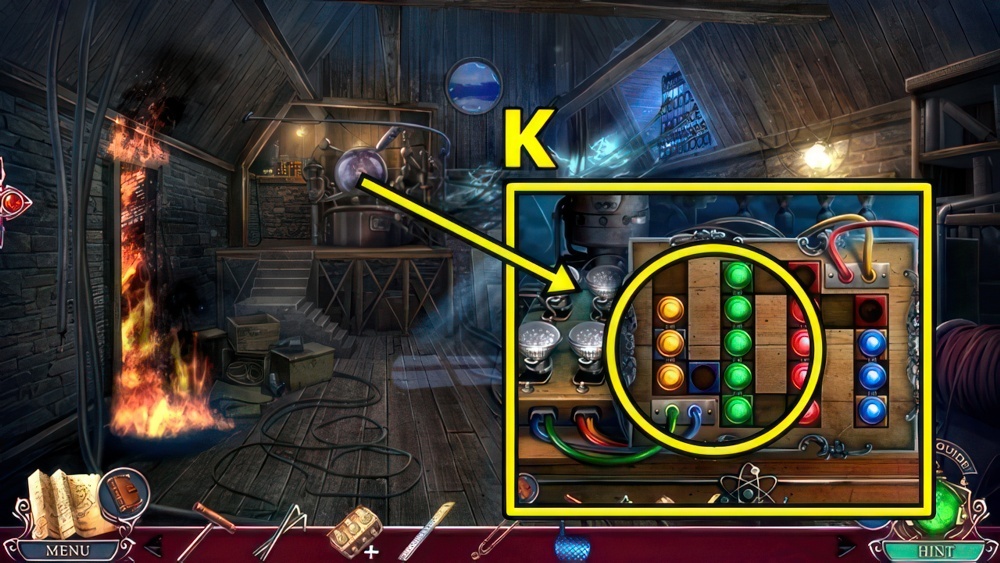
- Enter (K).
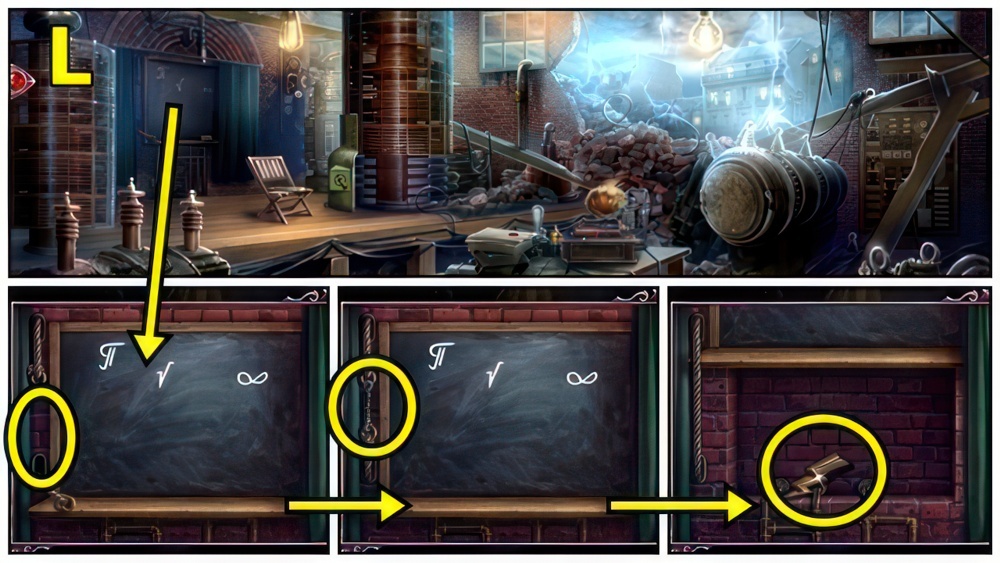
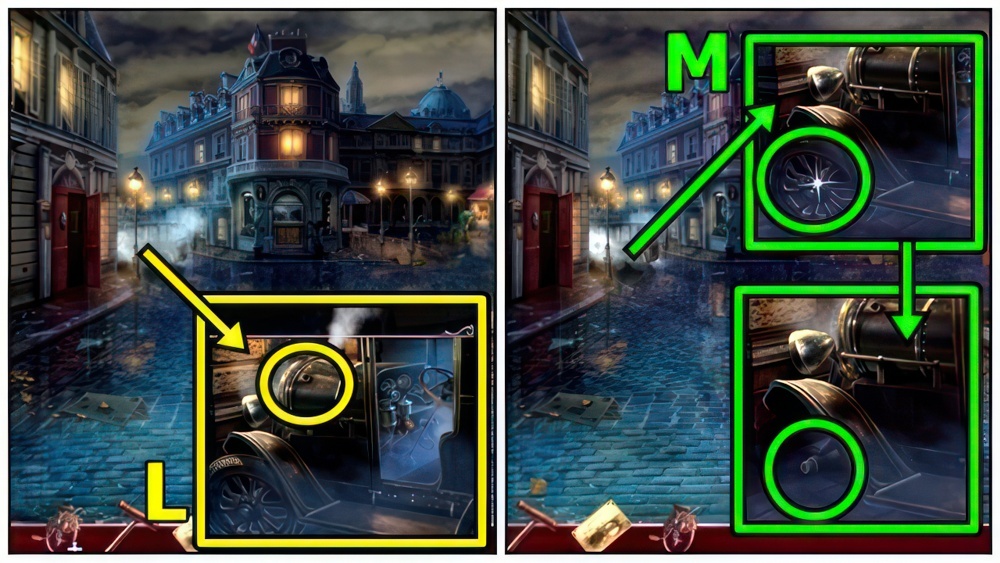
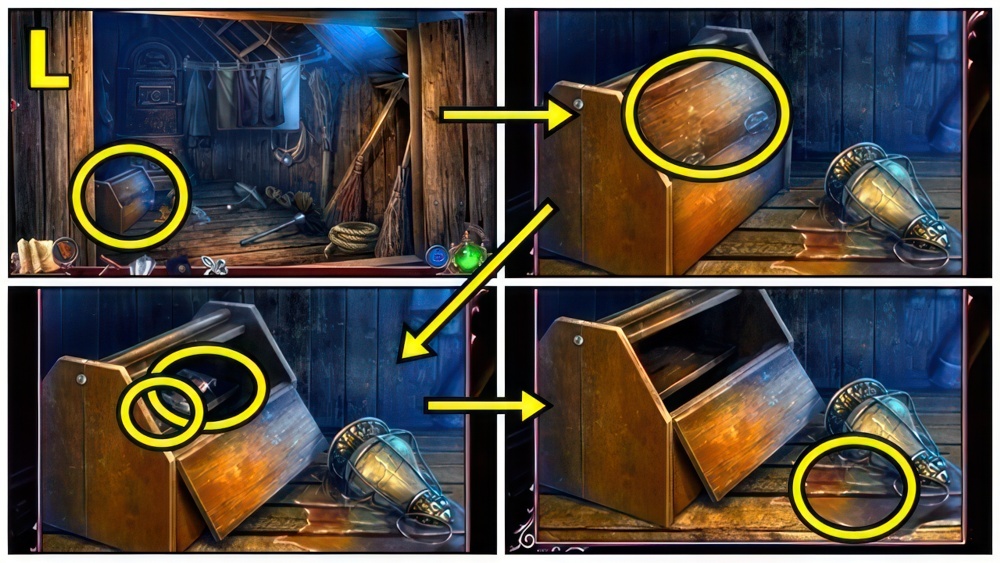
- Take FOLDER (L).

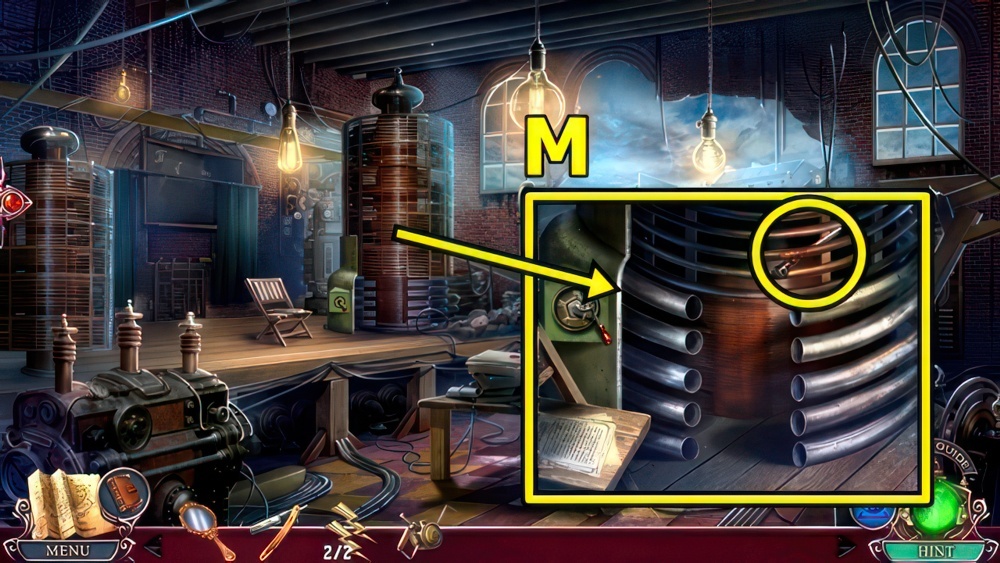
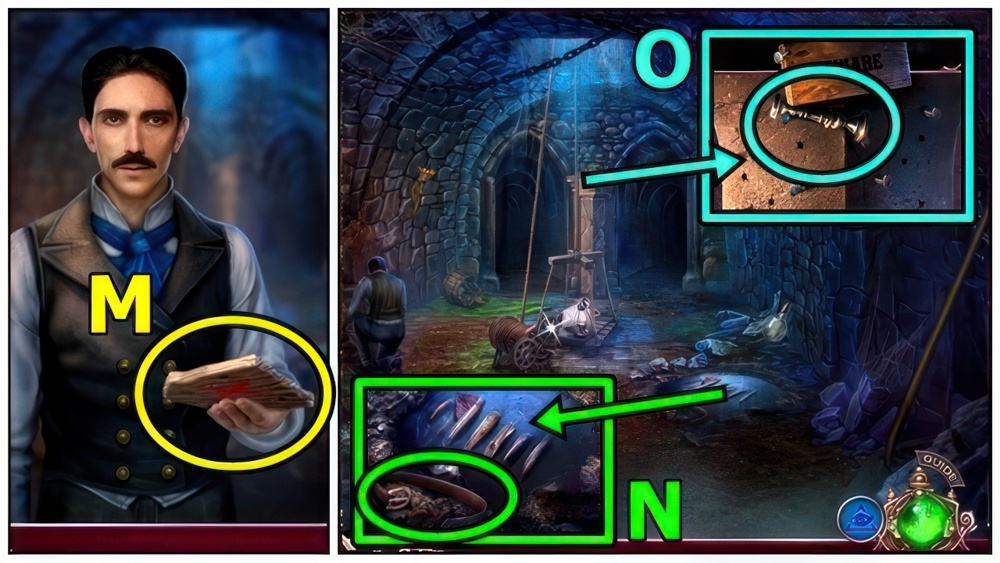
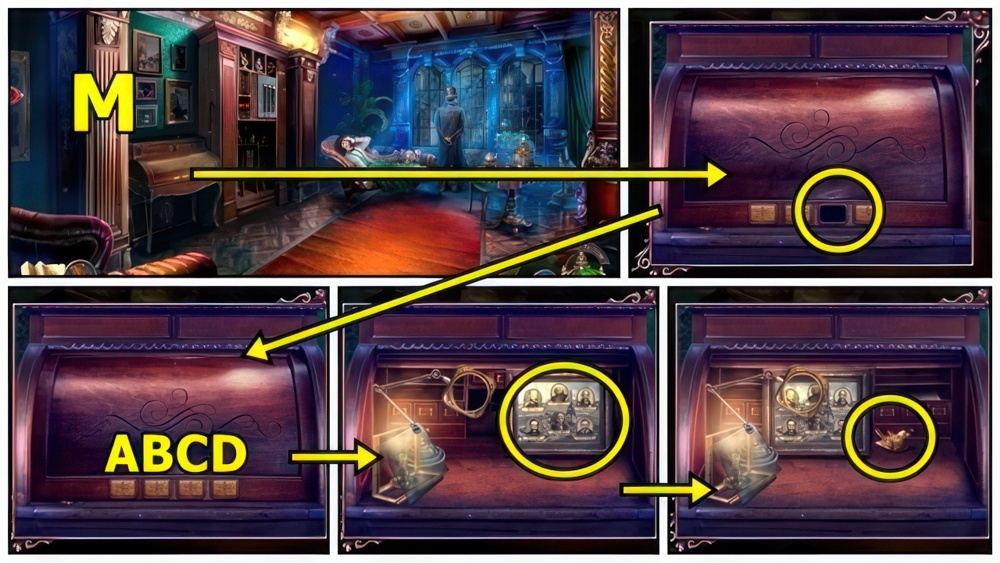
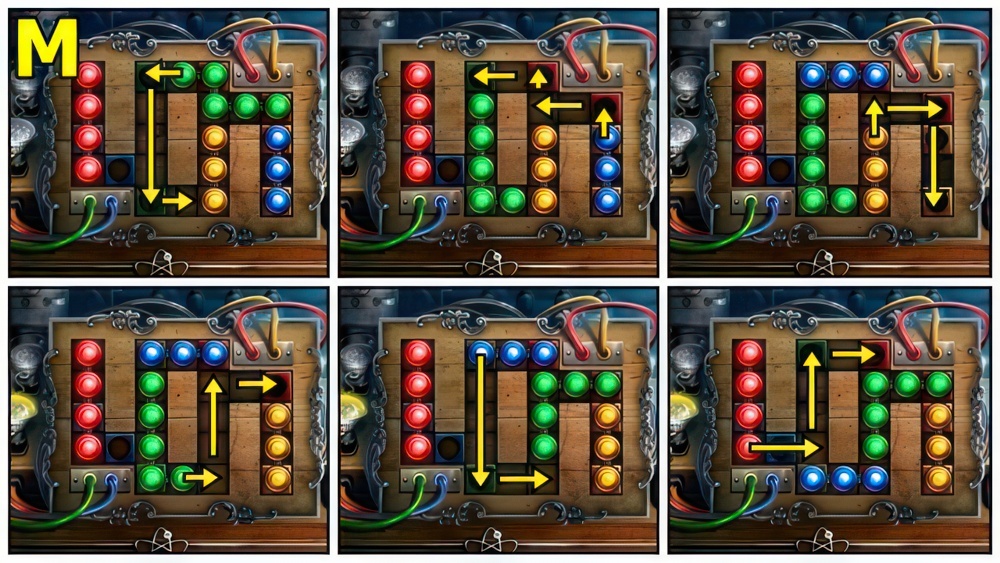
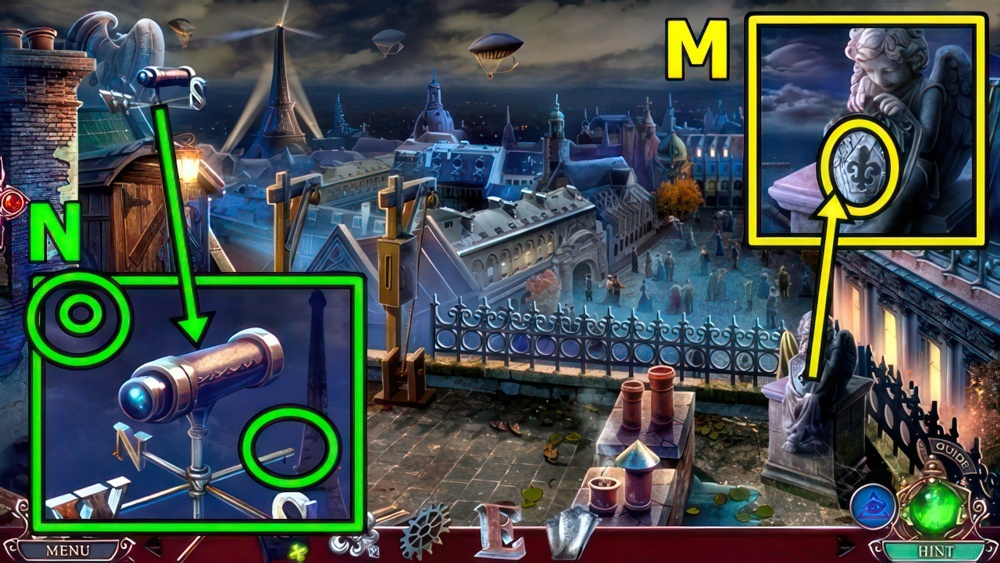
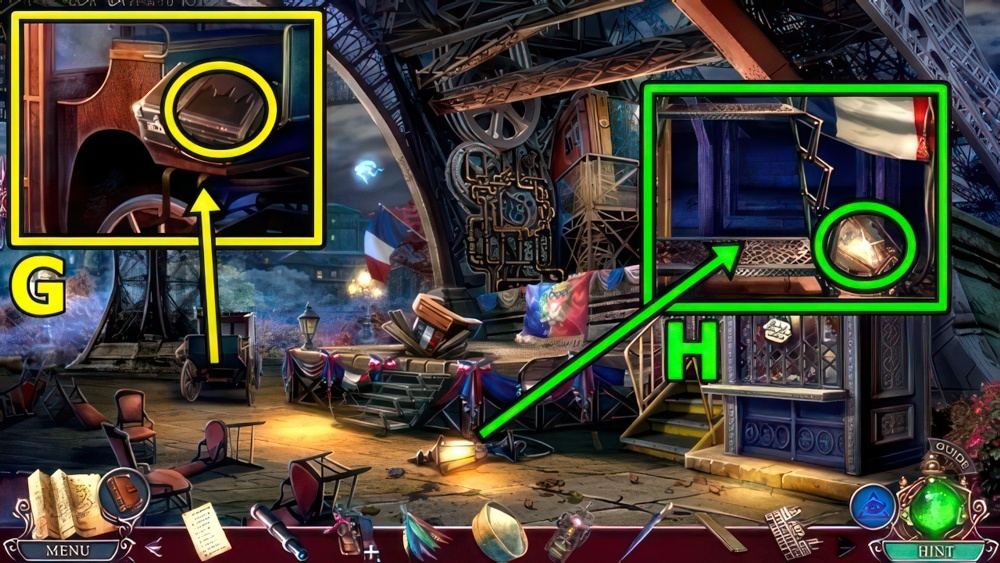
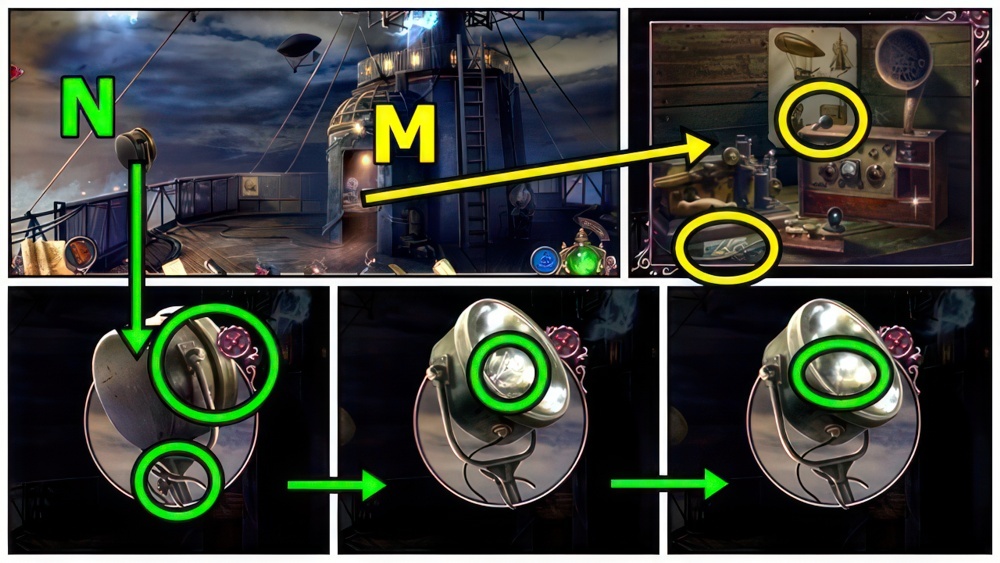
- Open FOLDER, read, find clues (M), receive CONCLUSIONS.
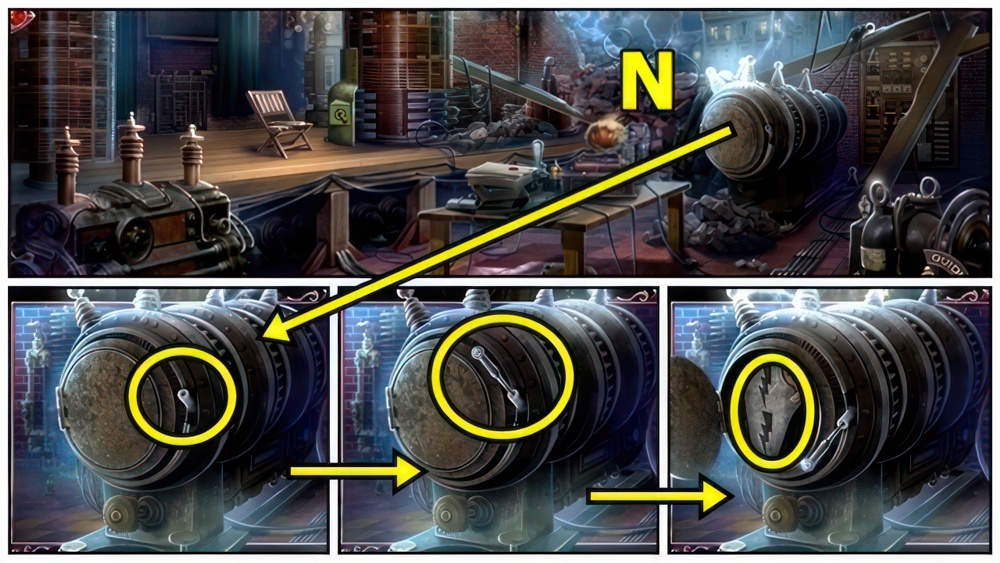
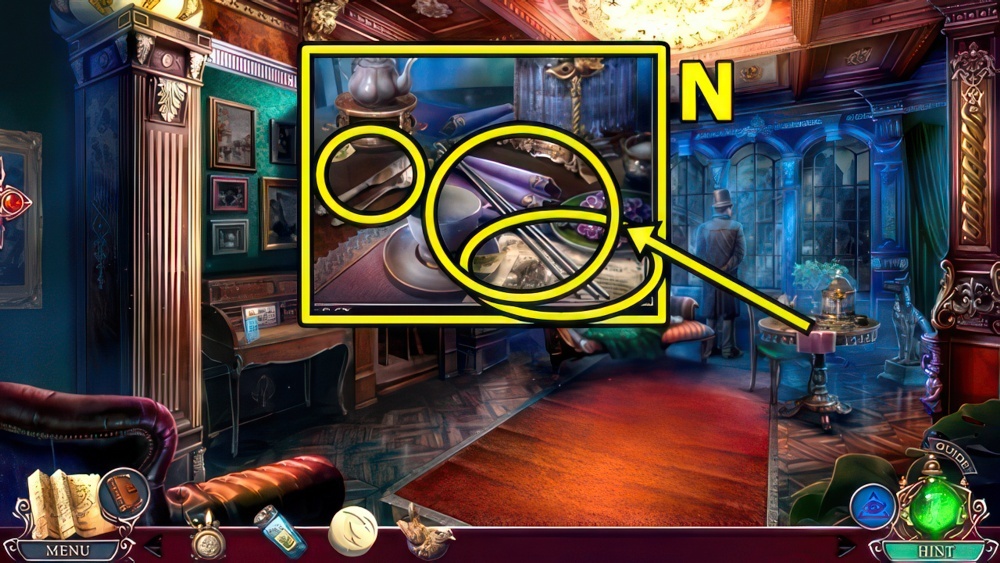
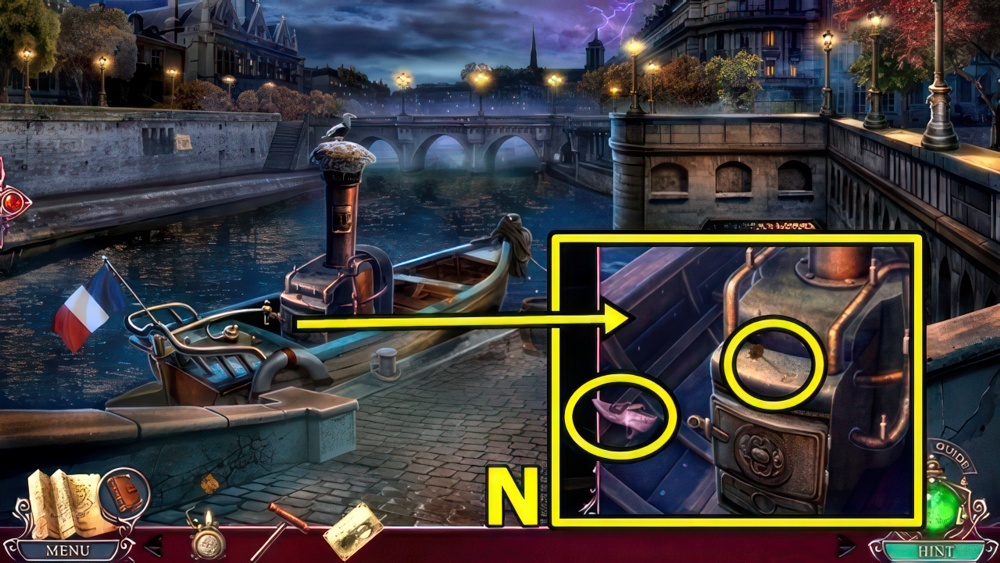
- Offer CONCLUSIONS (N).
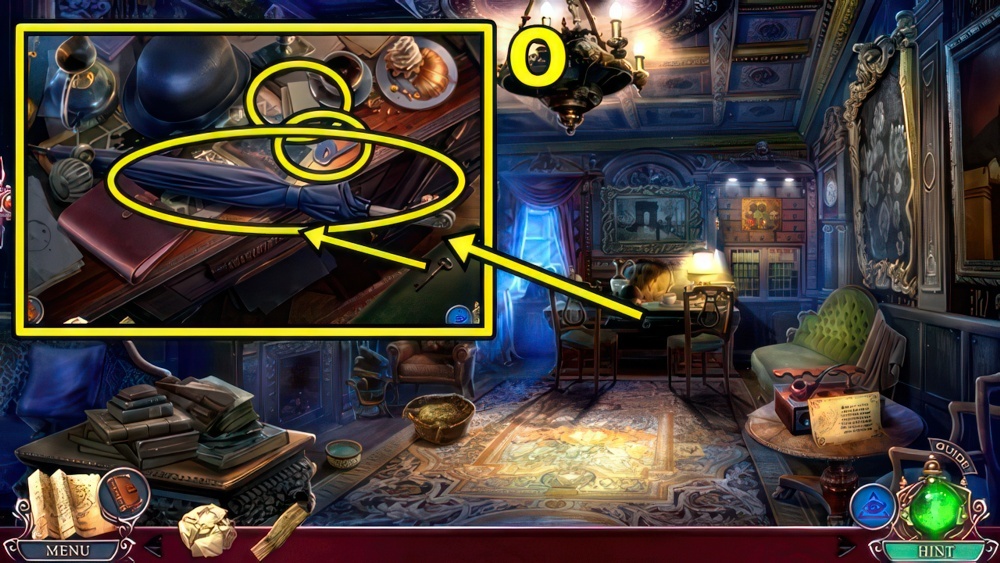
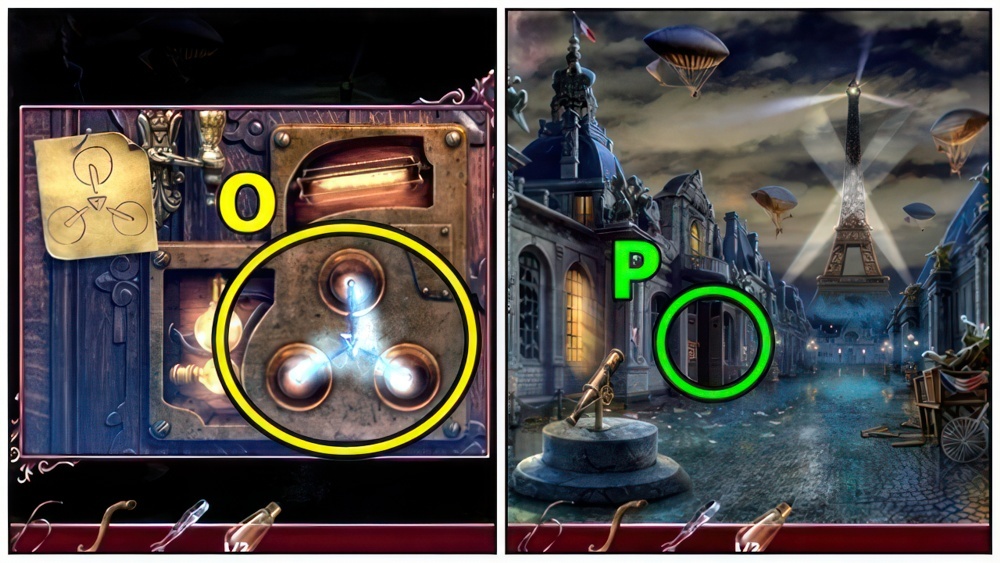
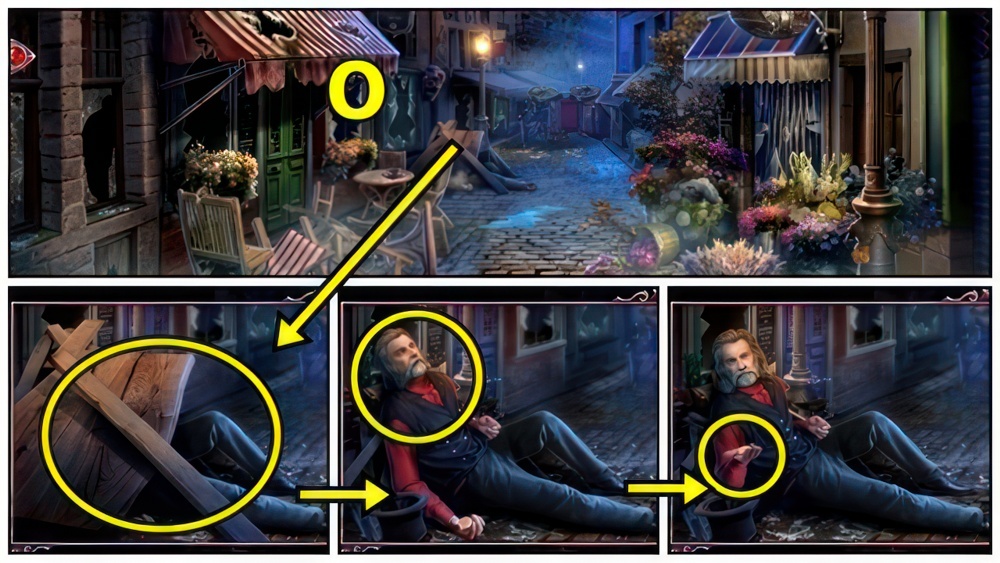
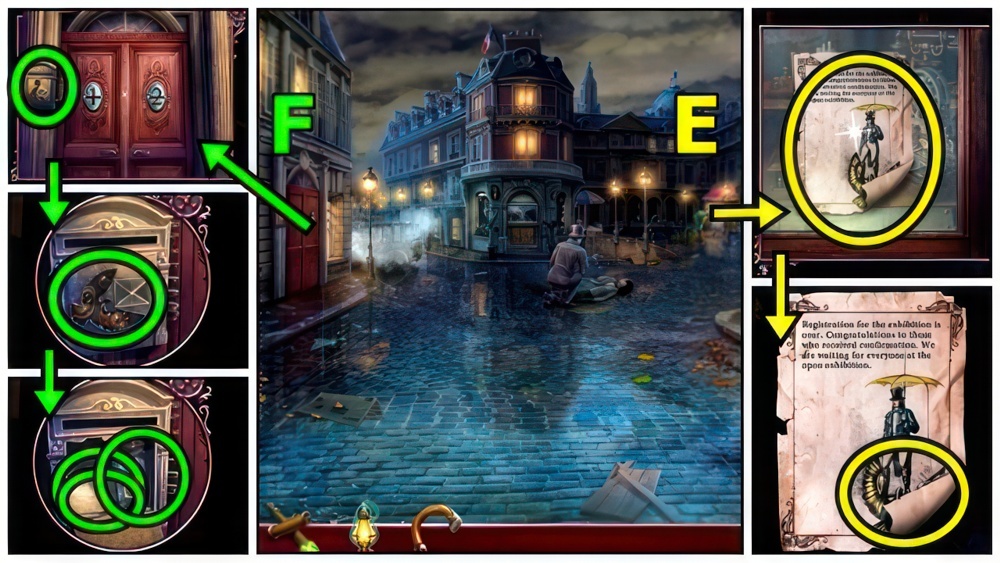
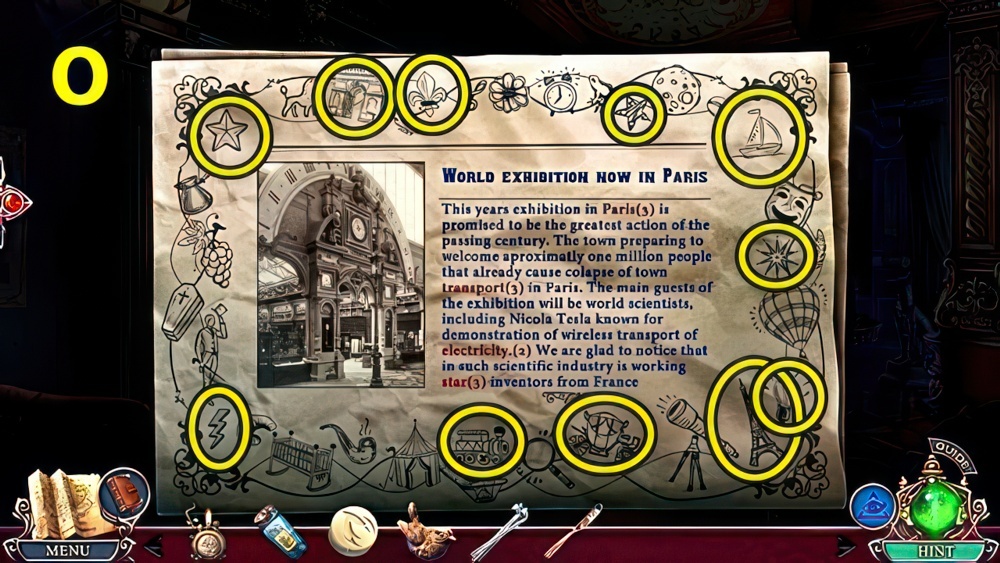
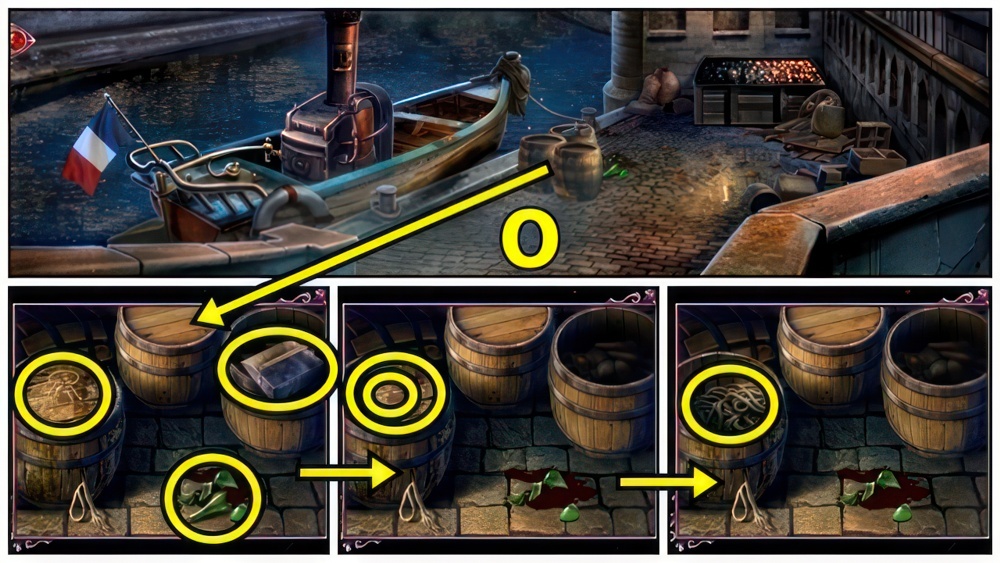
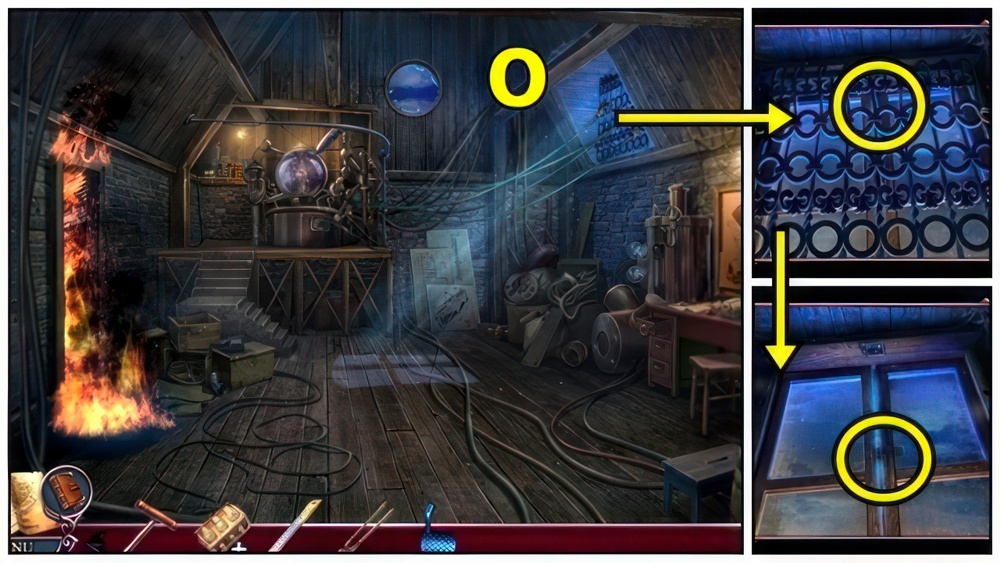
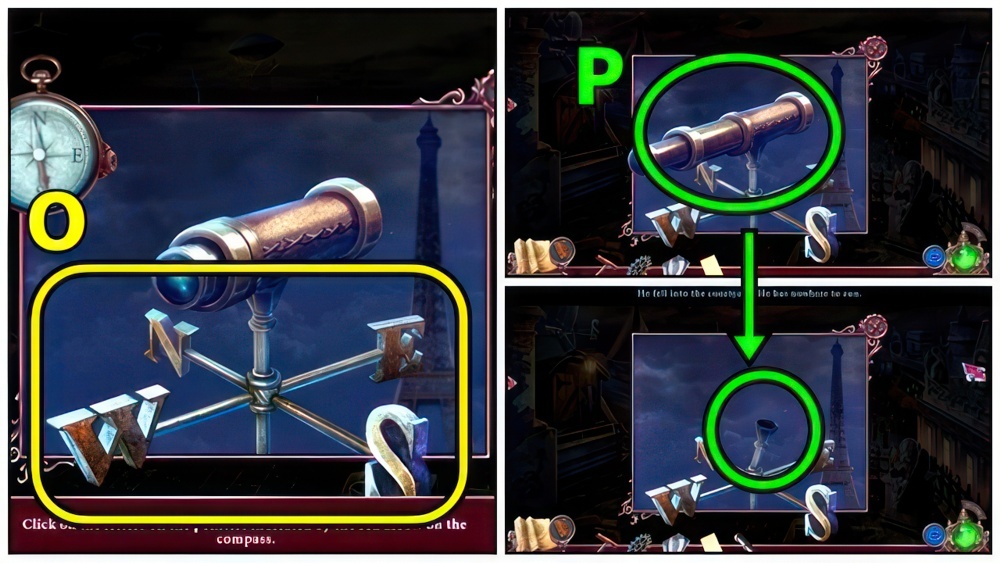
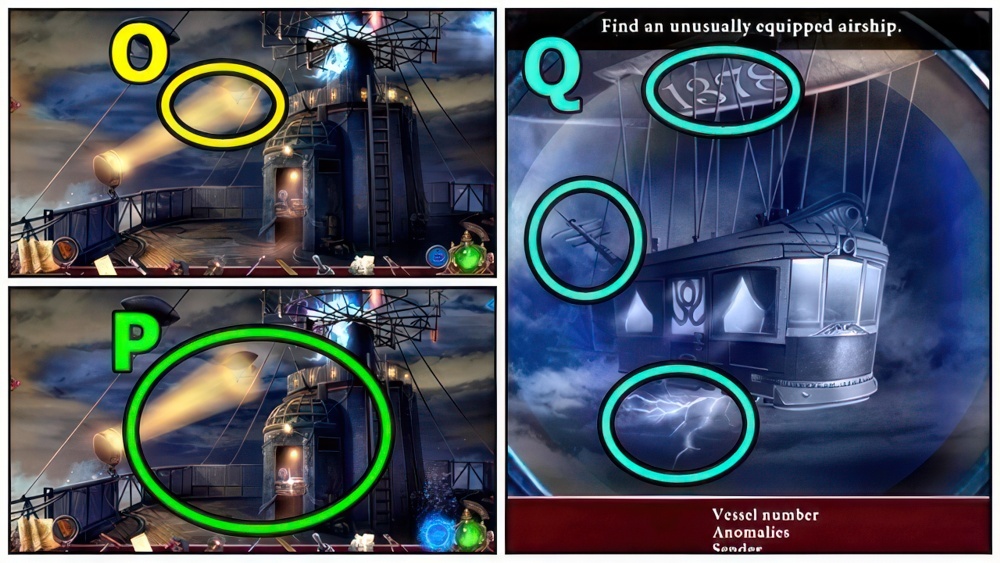
- Take UMBRELLA (O) and PIPE EMBLEM.
- Read, take COAT OF ARMS TOKEN 1/2.
- Use key.
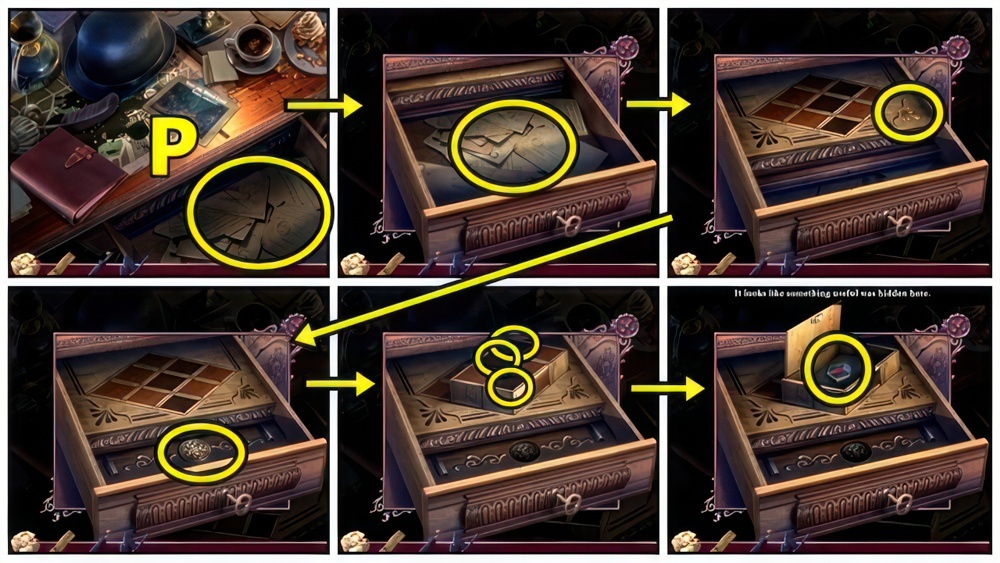
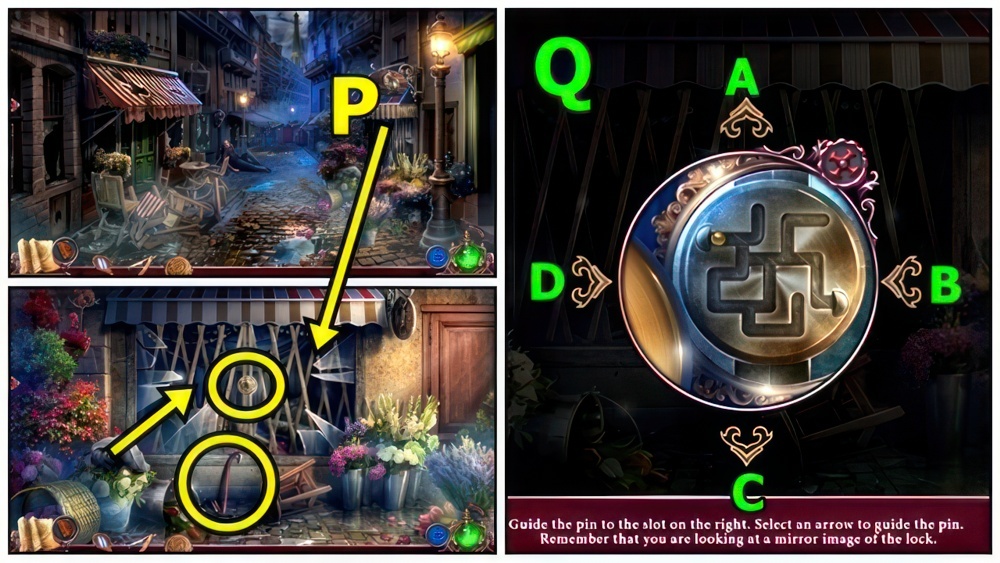
- Examine (P), examine, press emblem, button then blocks.
- Take COAT OF ARMS TOKENS 2/2.
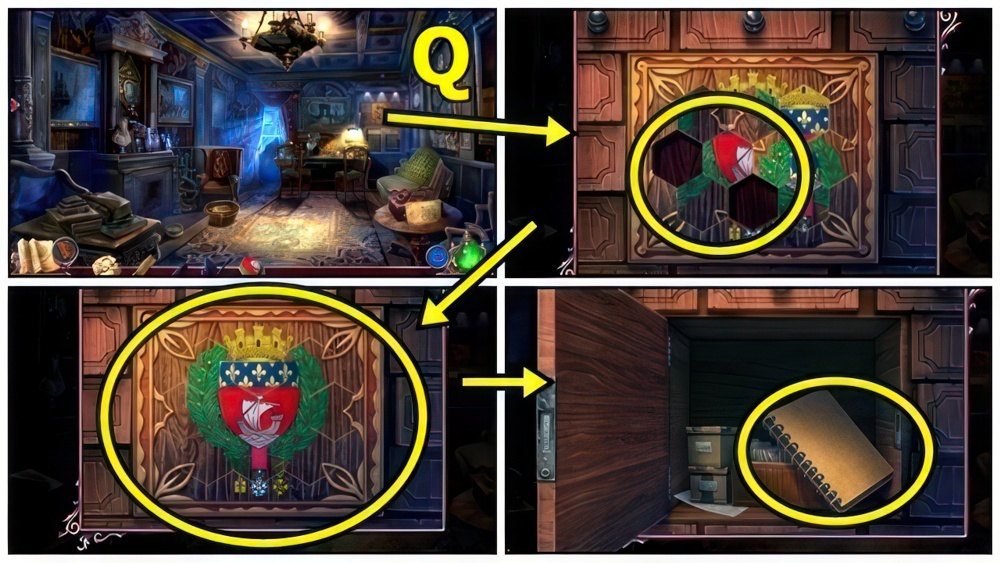
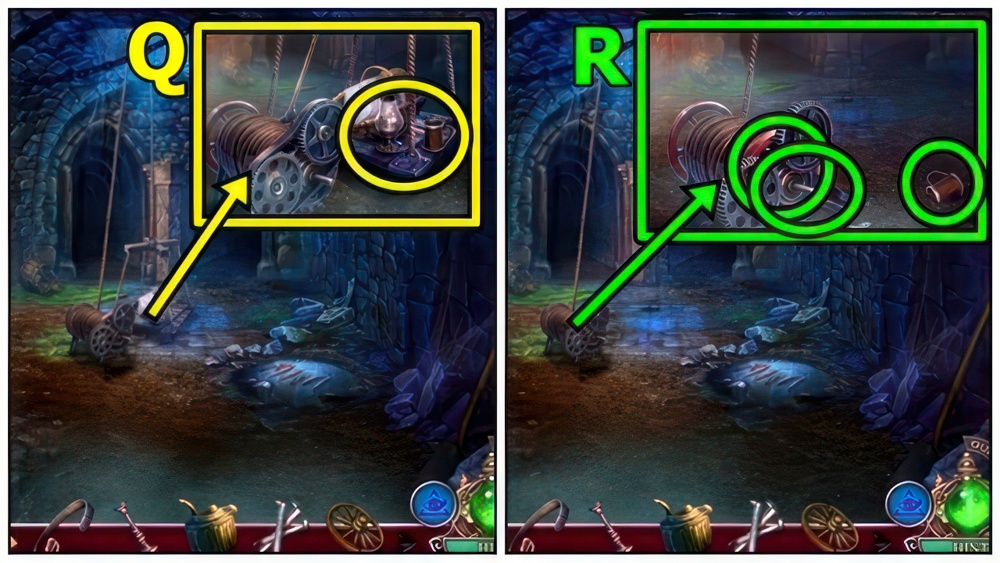
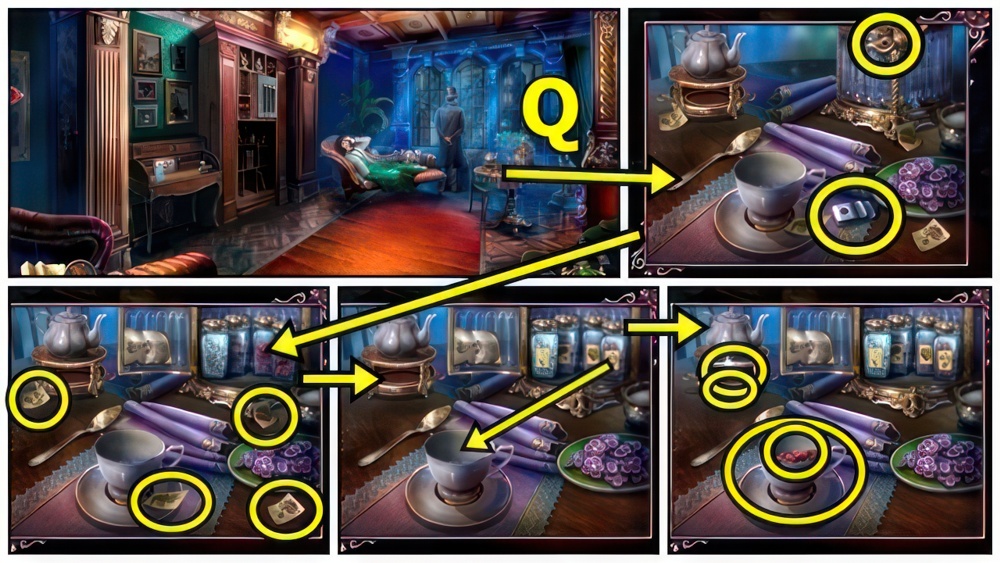
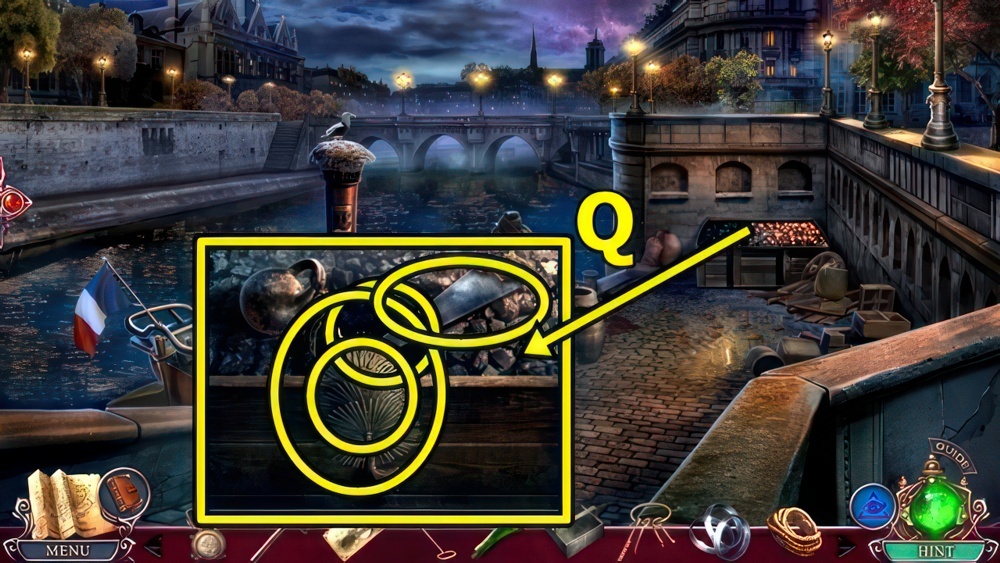
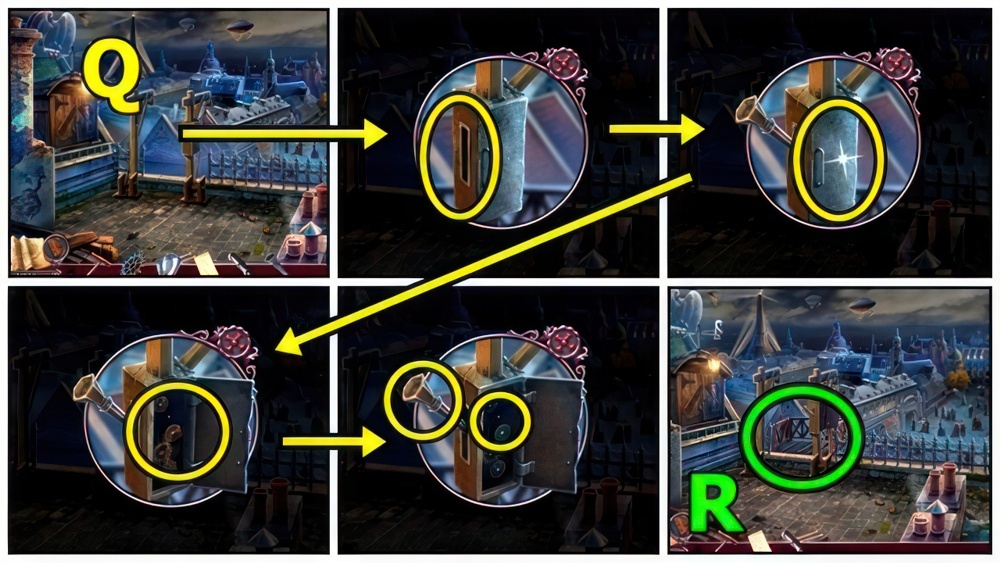
- Add COAT OF ARMS TOKENS (Q).
- Adjust tiles.
- Examine, take CLEANING INSTRUCTIONS.
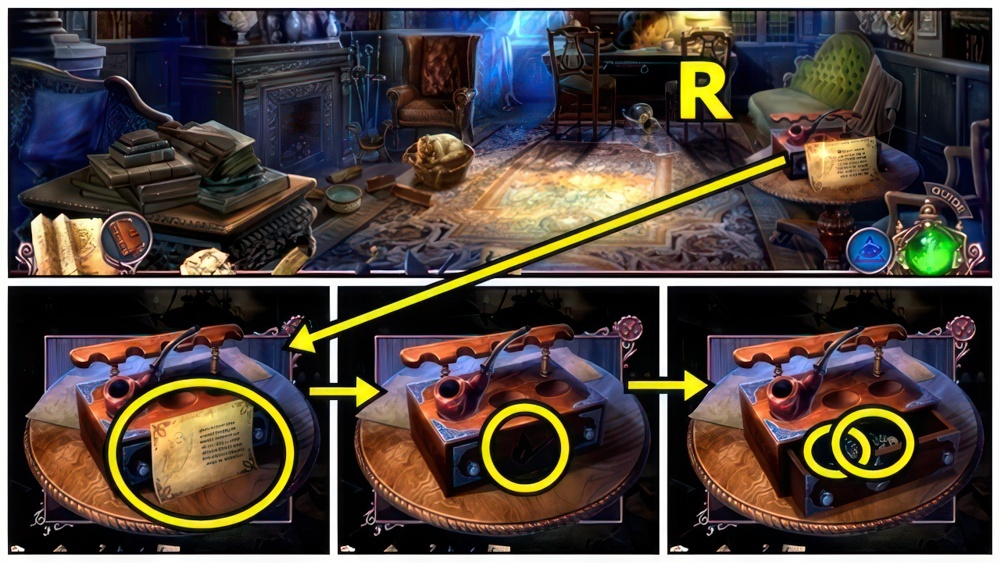
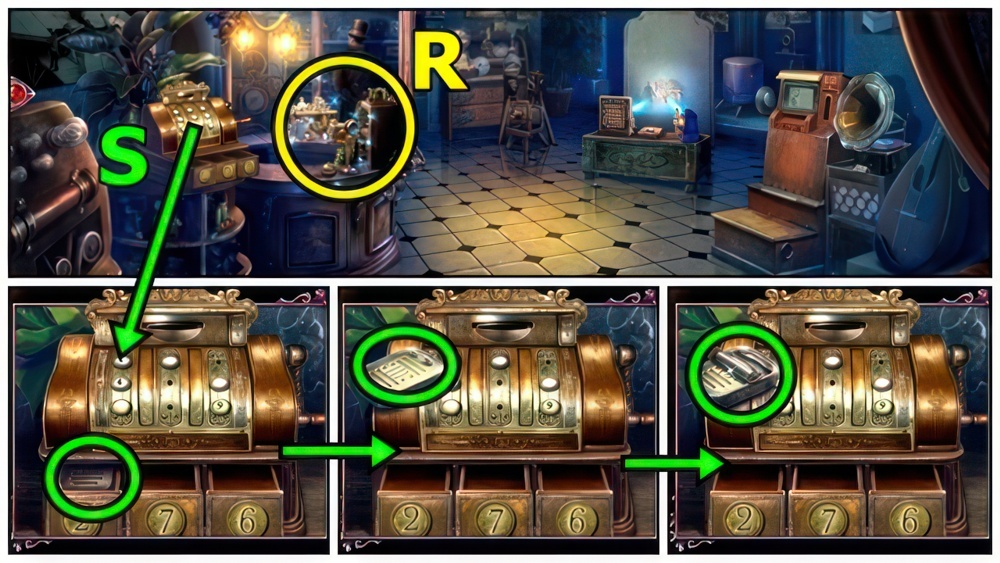
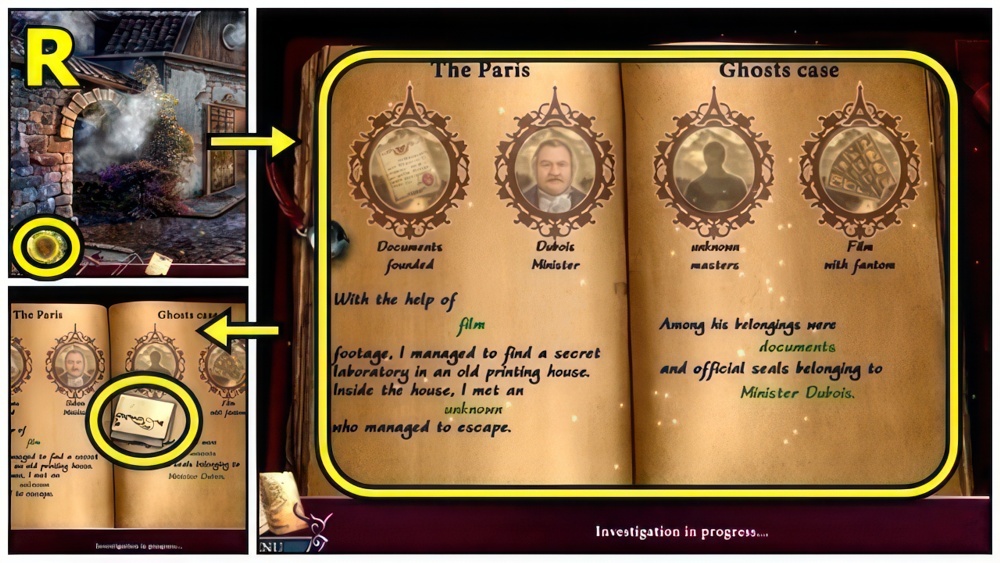
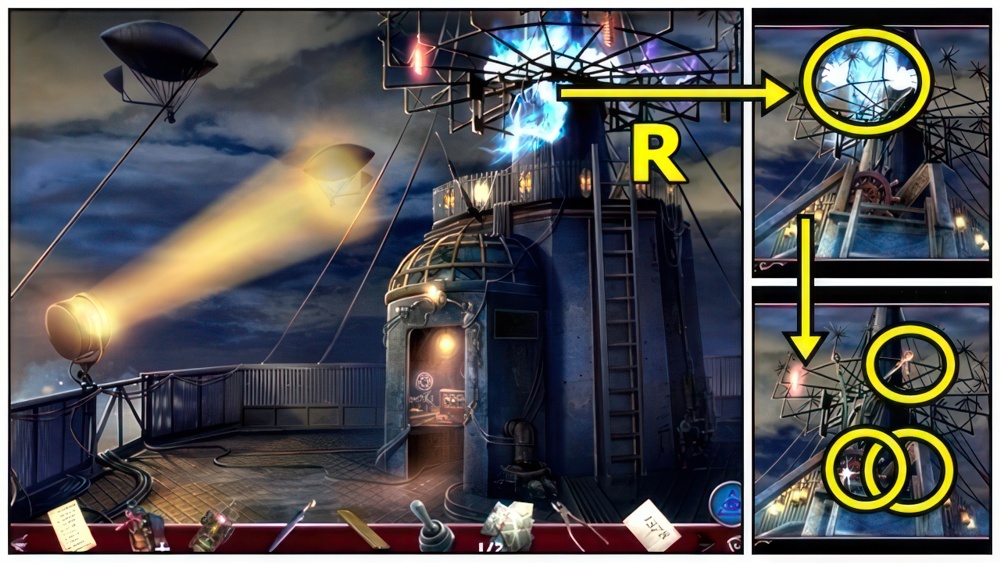
- Read (R).
- Add PIPE EMBLEM, take MIME FIGURINE and MATCHES.
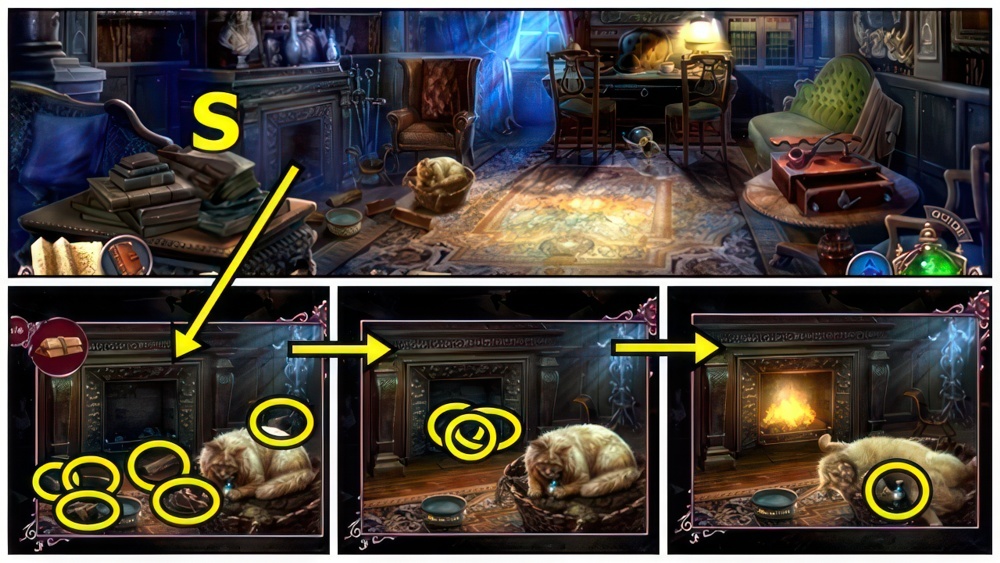
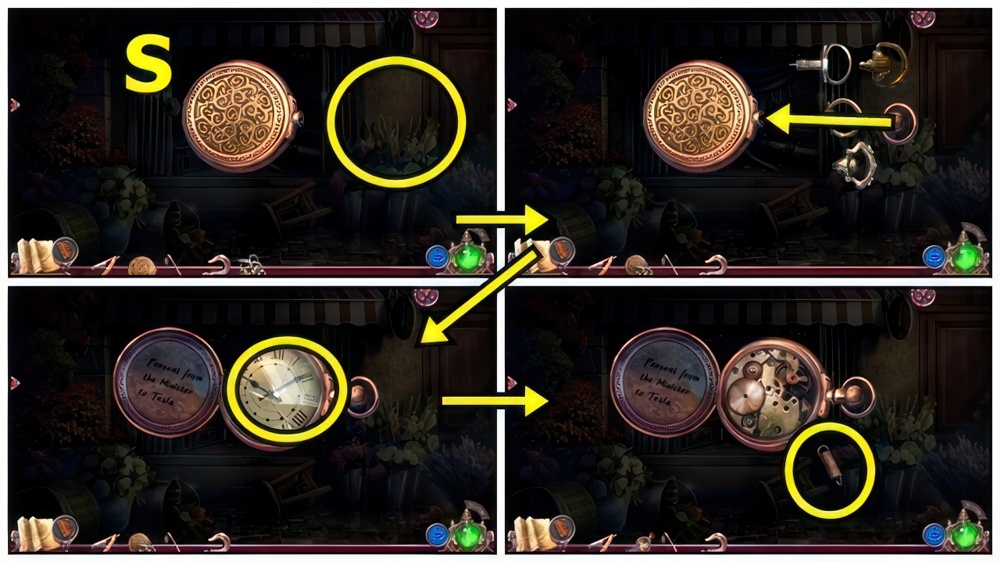
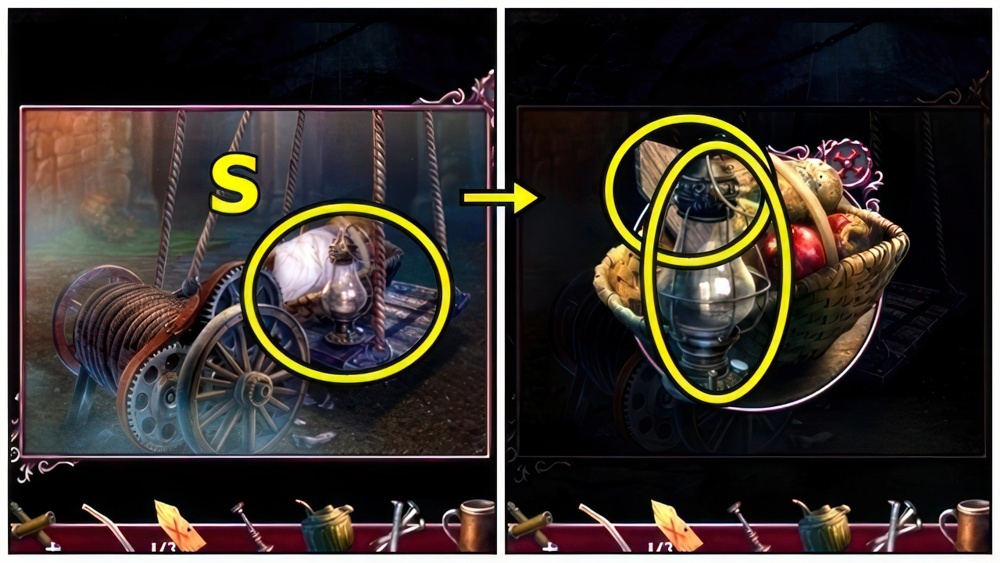
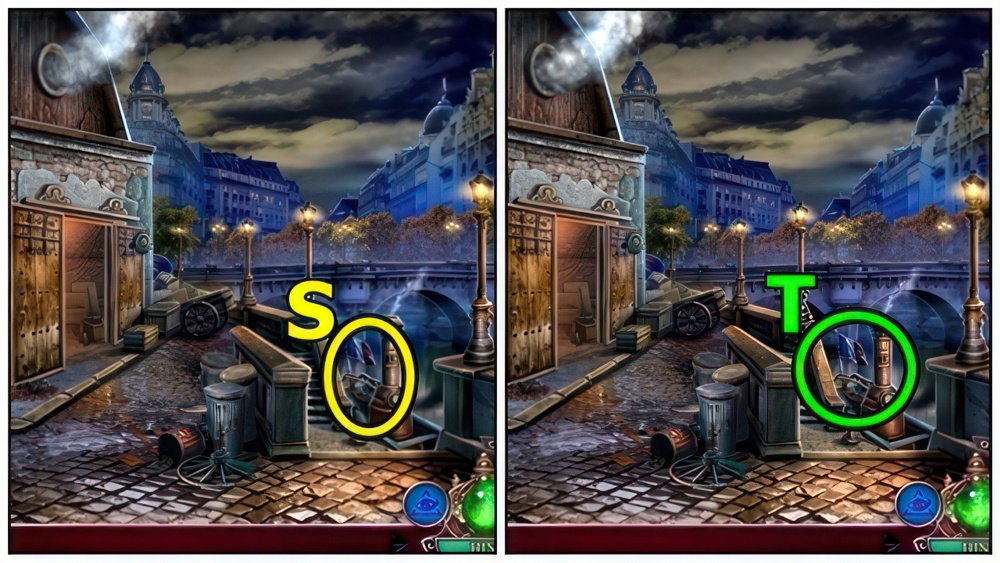
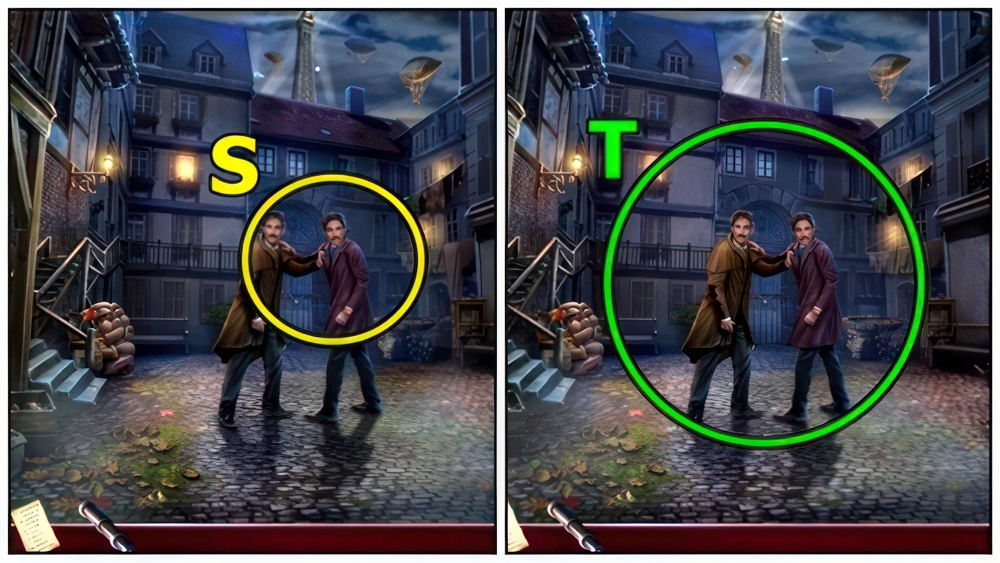
- Add wood (S), LOG and CRUMPLED PAPER, use MATCHES.
- Take REAGENT.
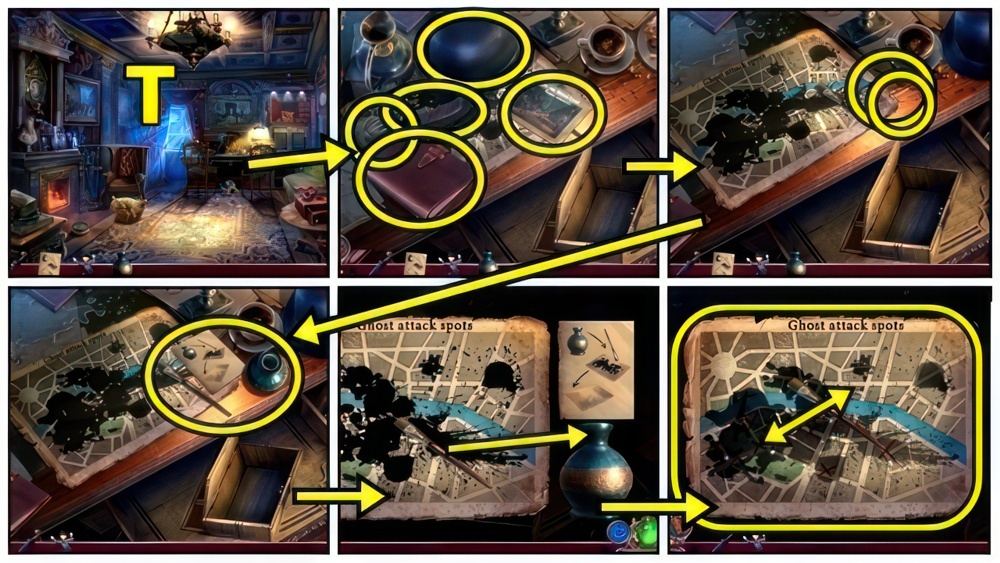
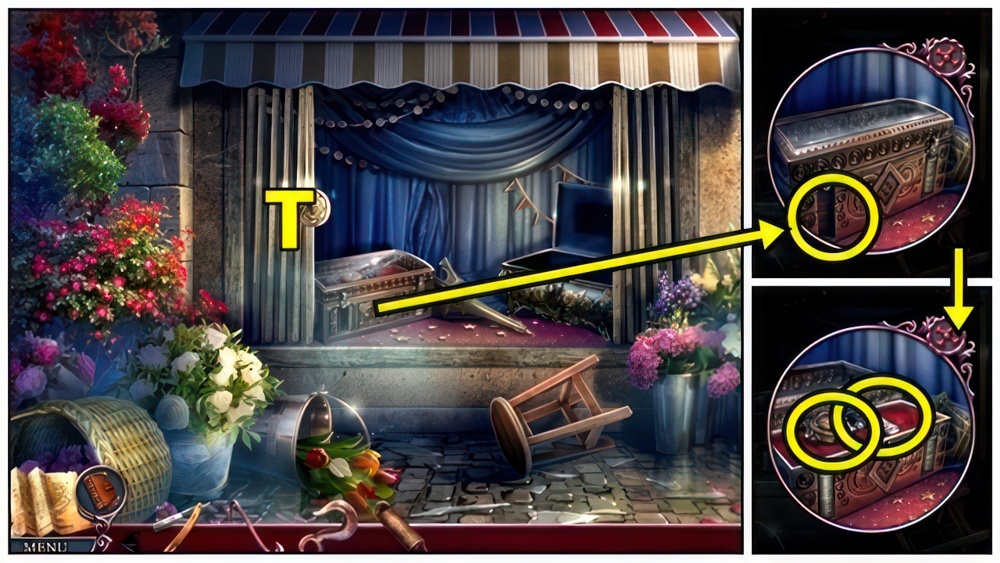
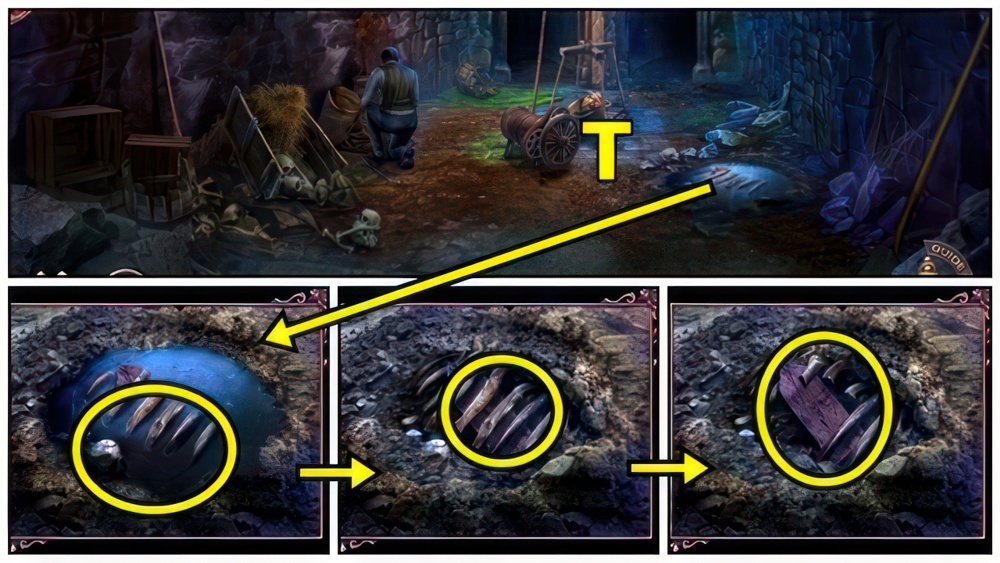
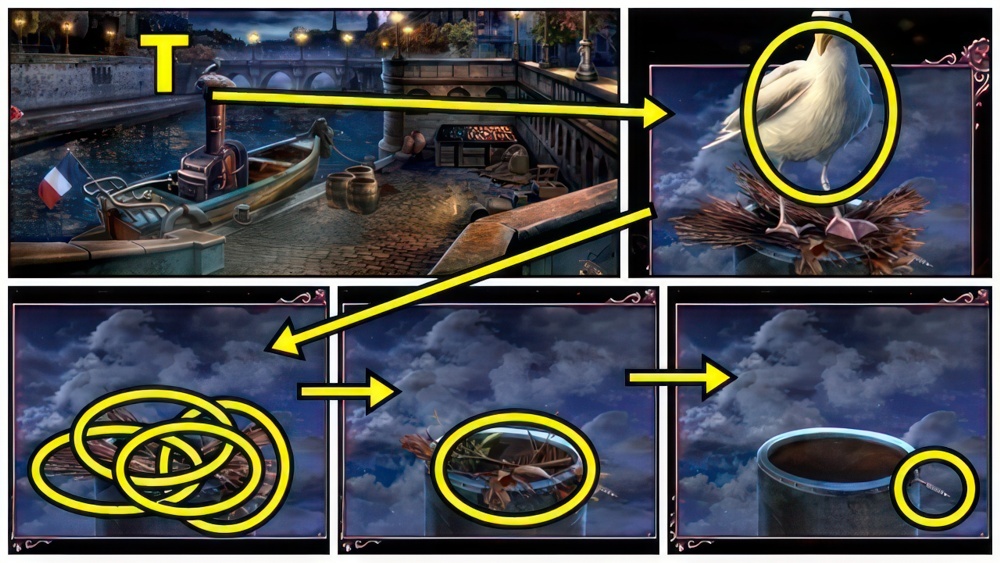
- Move items (T).
- Add CLEANING INSTRUCTIONS and REAGENT.
- Examine.
- Brush in Reagent, paint, take clue.
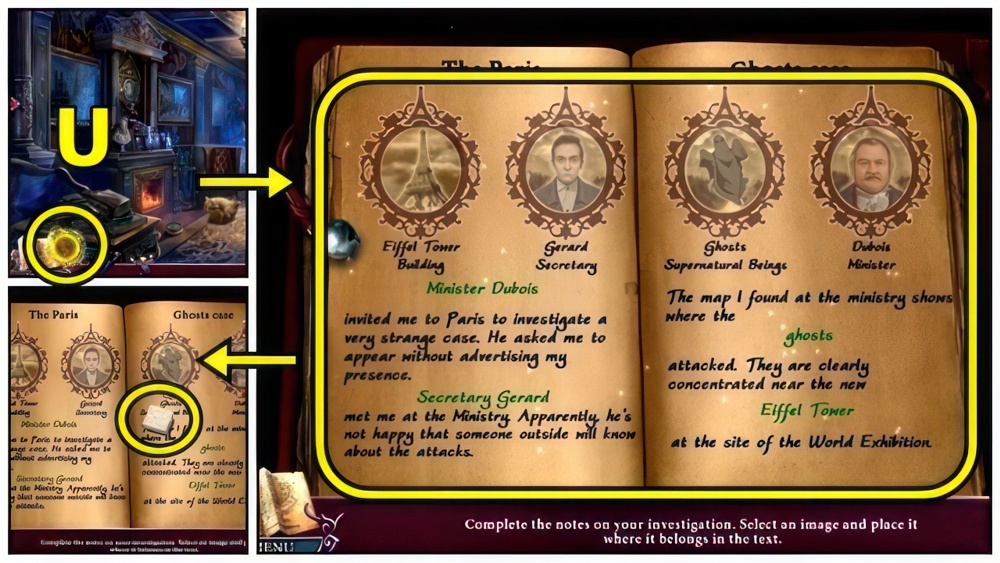
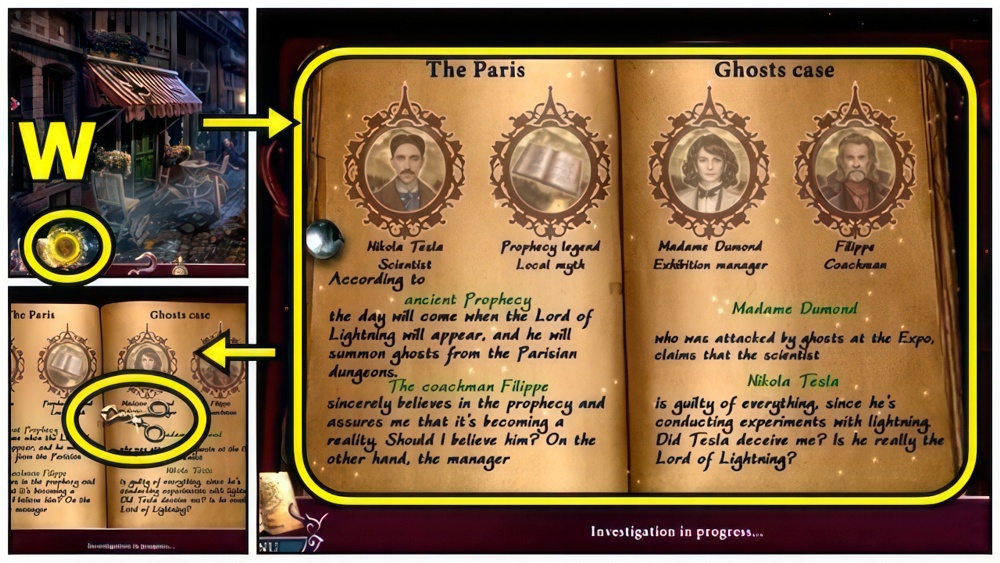
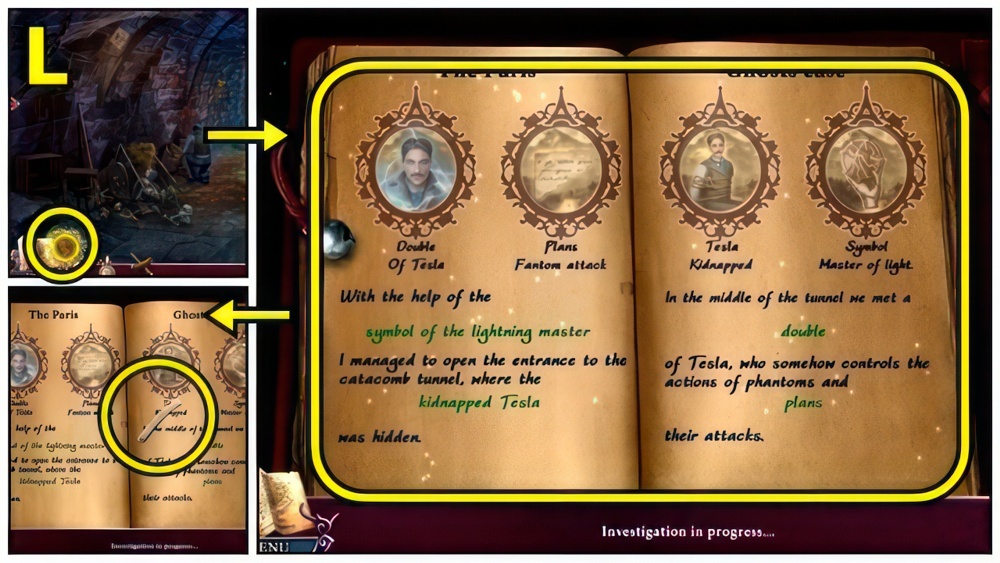
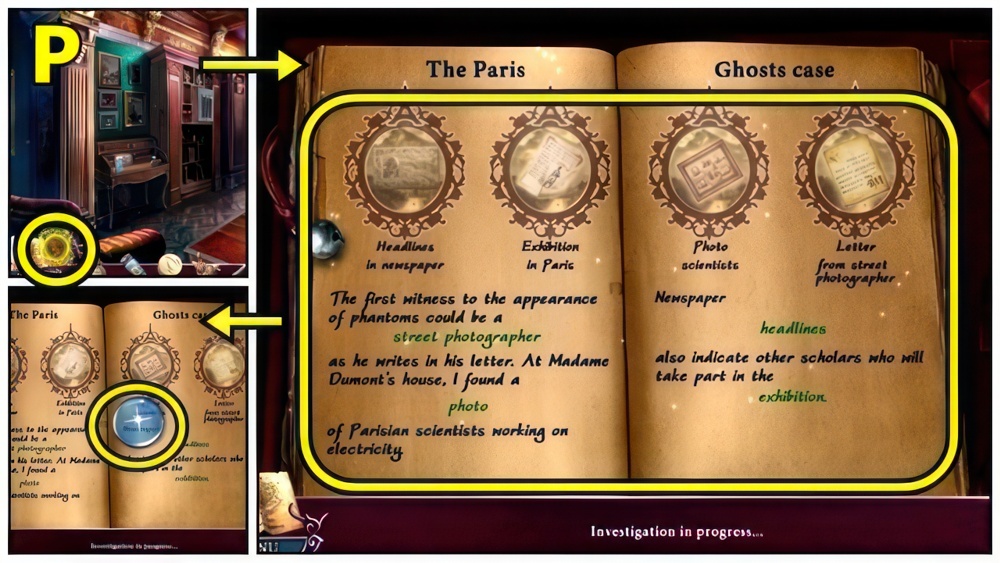
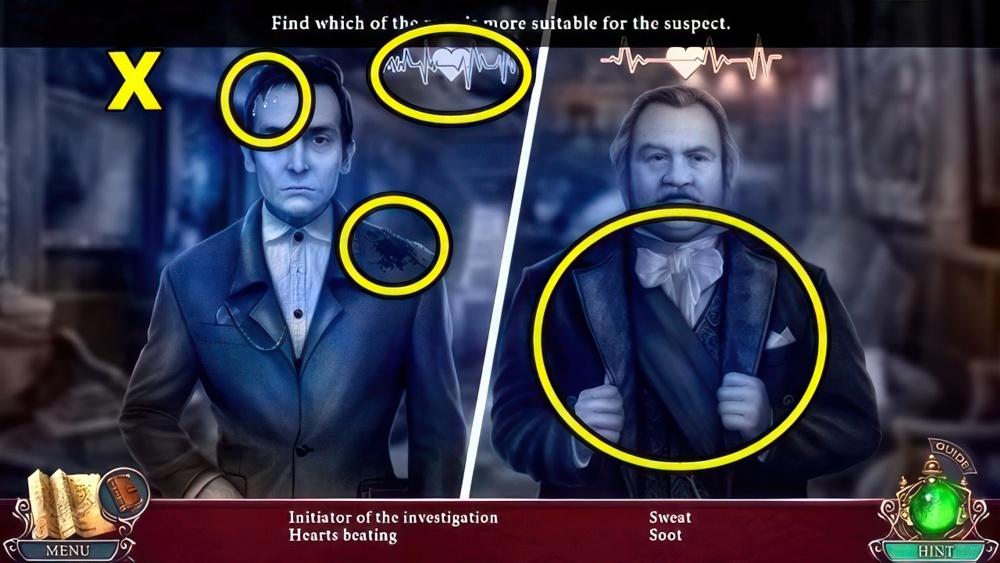
- Complete the notes on your investigation.
- Select an image and place it where it belongs in the text.
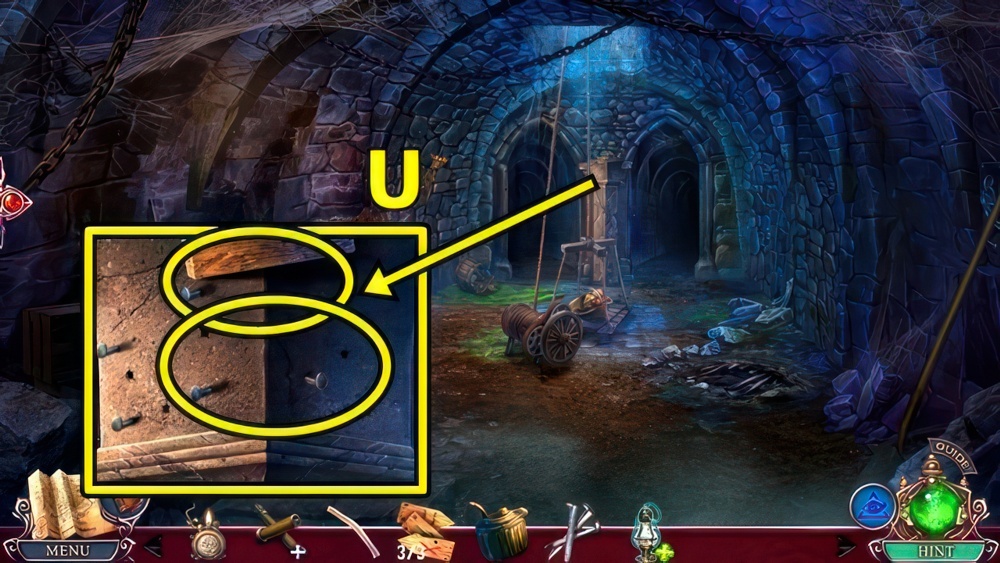
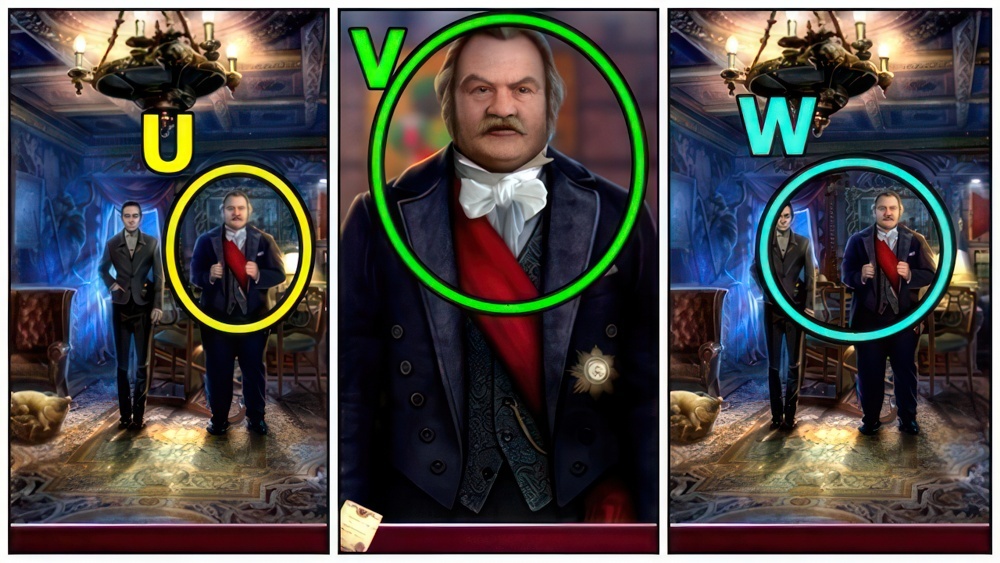
- Open clue book (U), deduce.
- Take SUGAR.
- Move down.
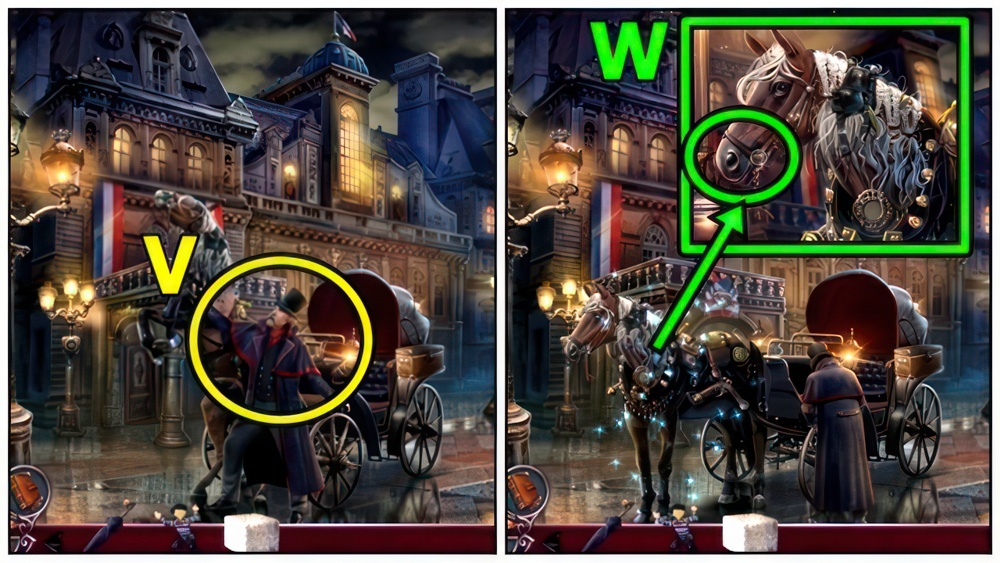
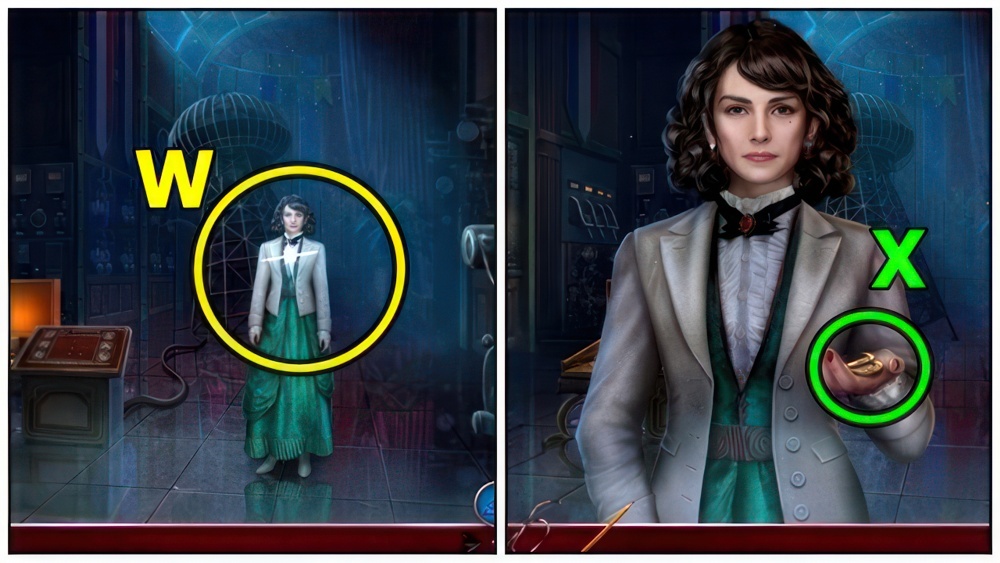
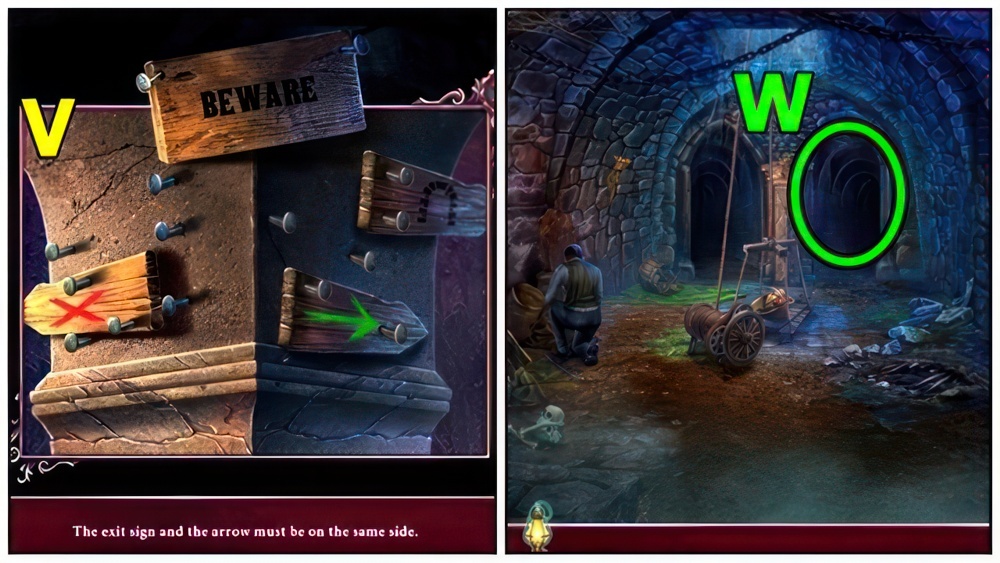
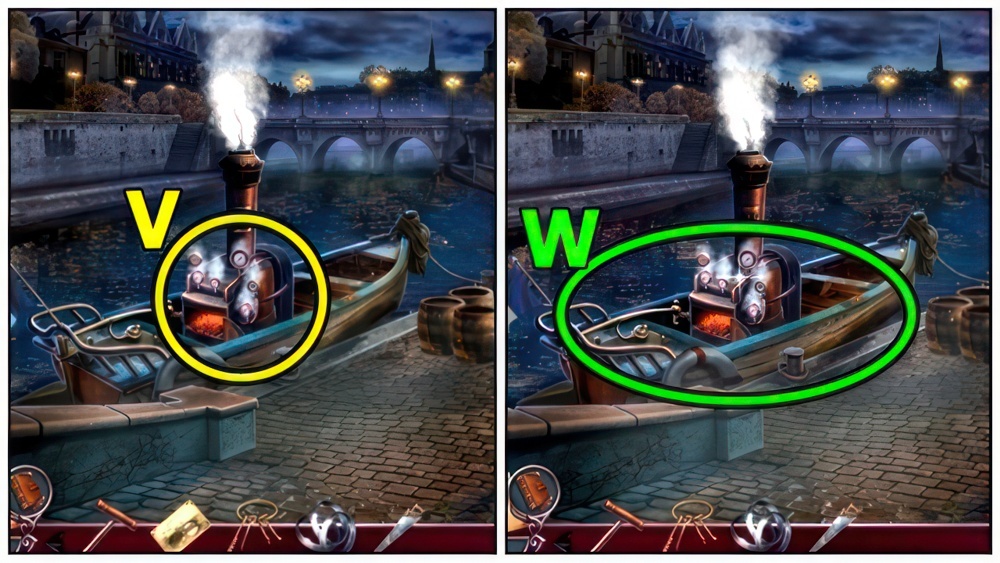
- Talk (V).
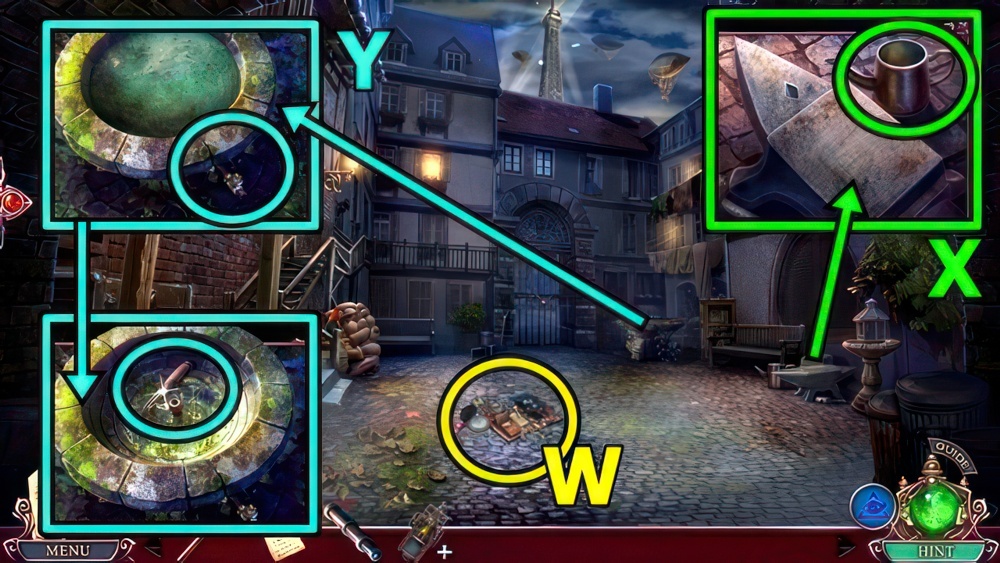
- Offer SUGAR (W).
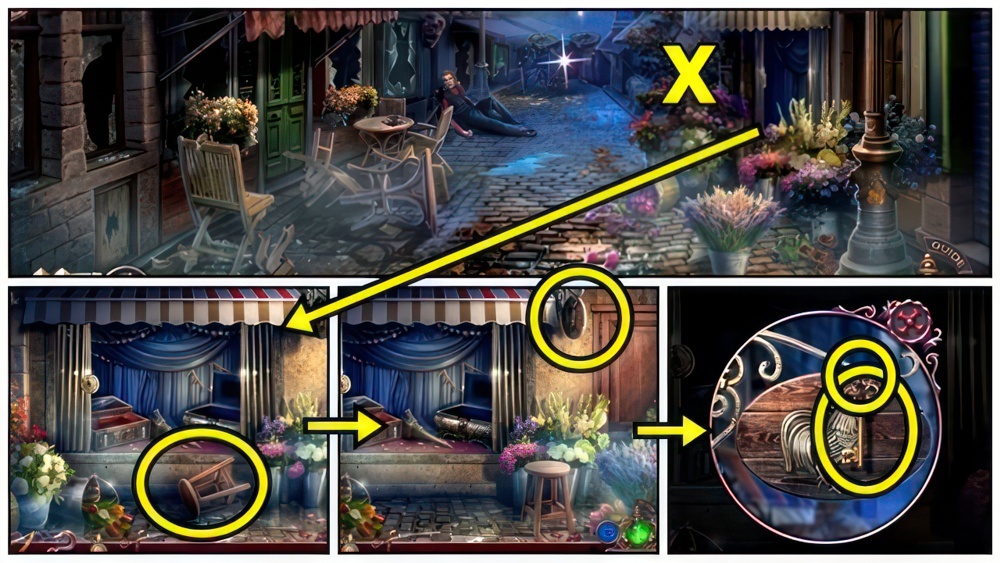
- Play puzzle, receive TORN REINS.
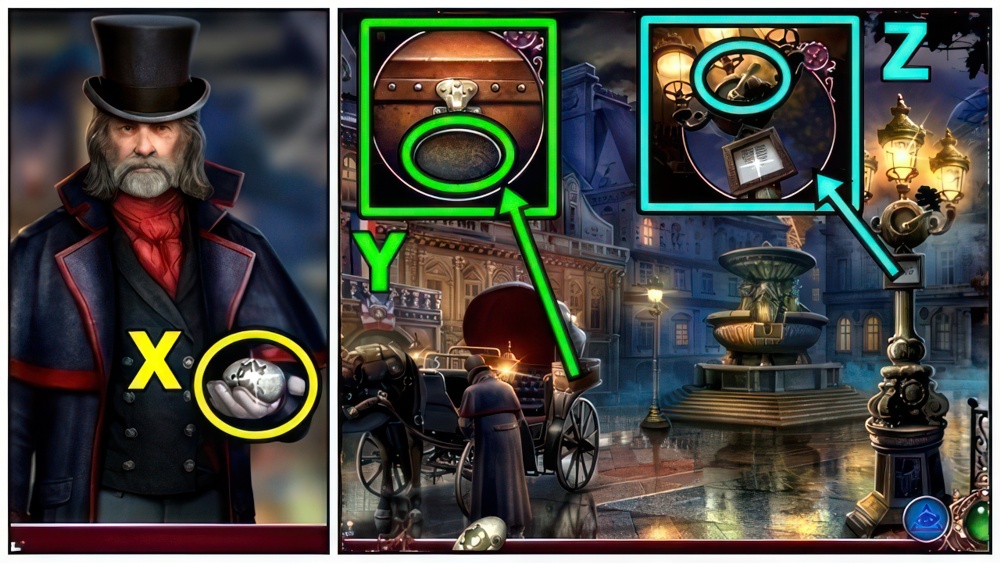
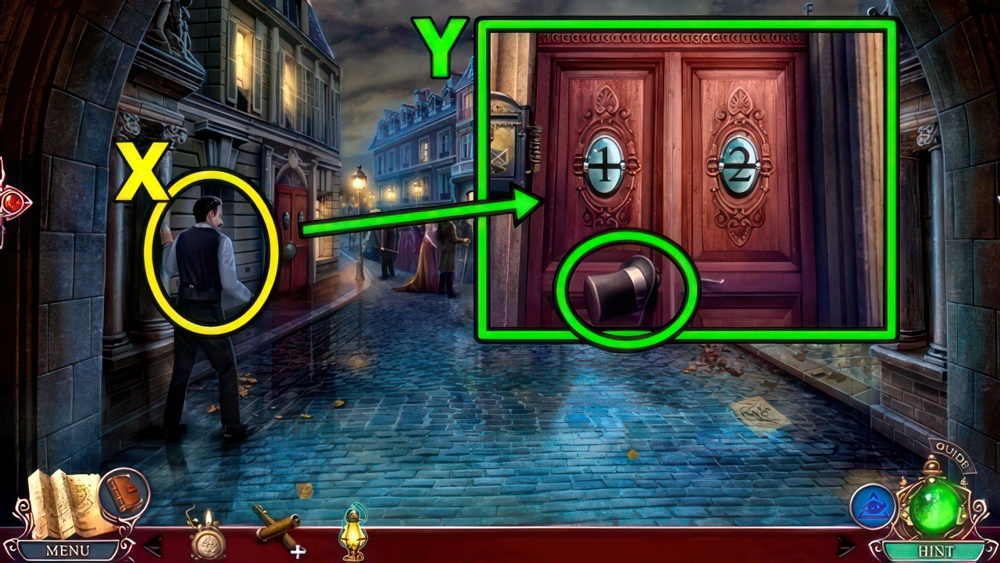
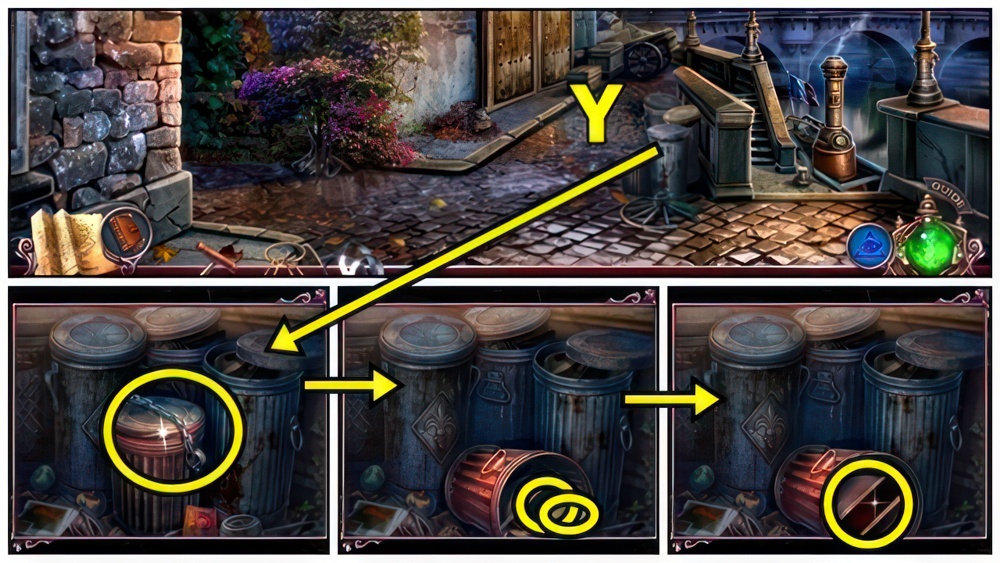
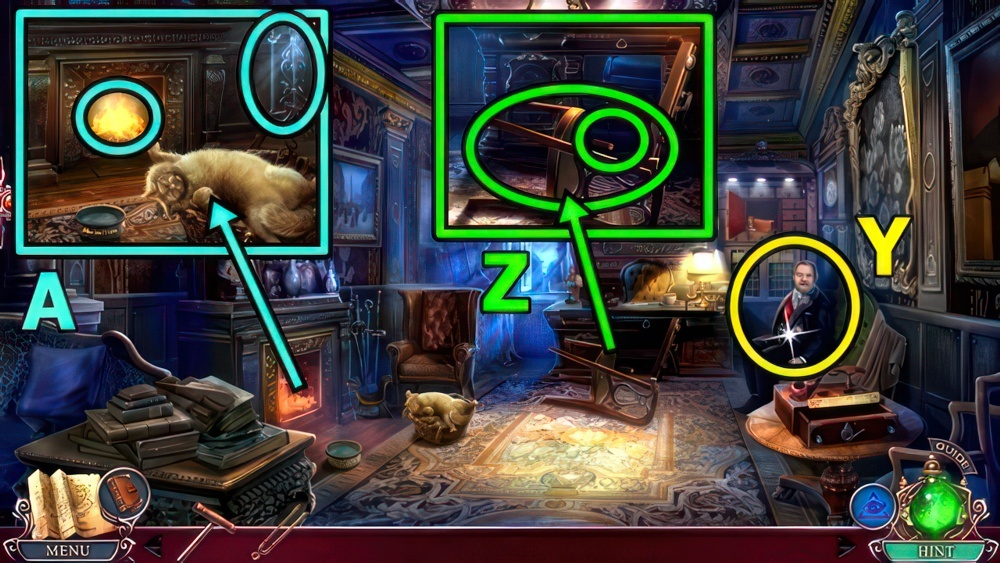
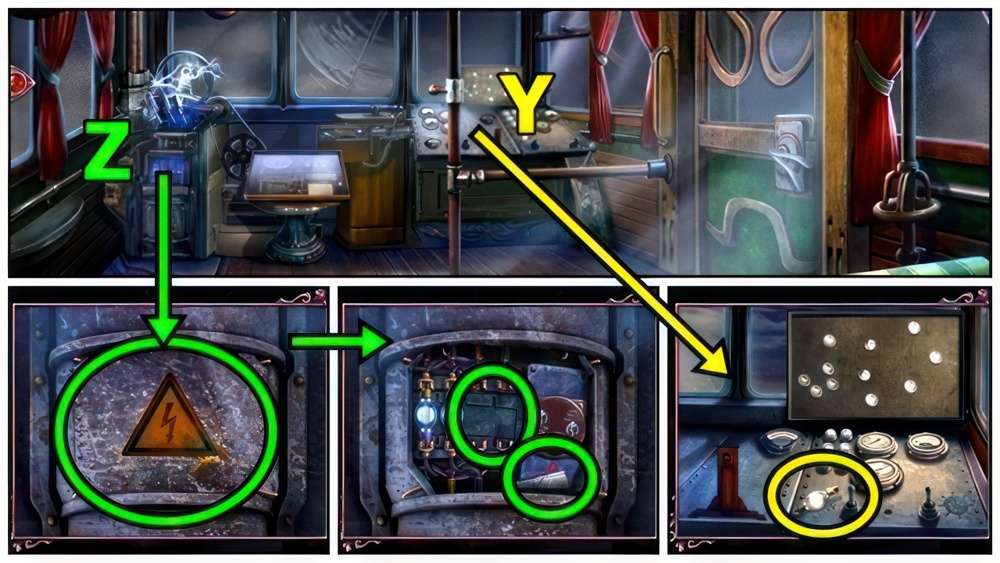
- Take CARRIAGE TOKEN (X).
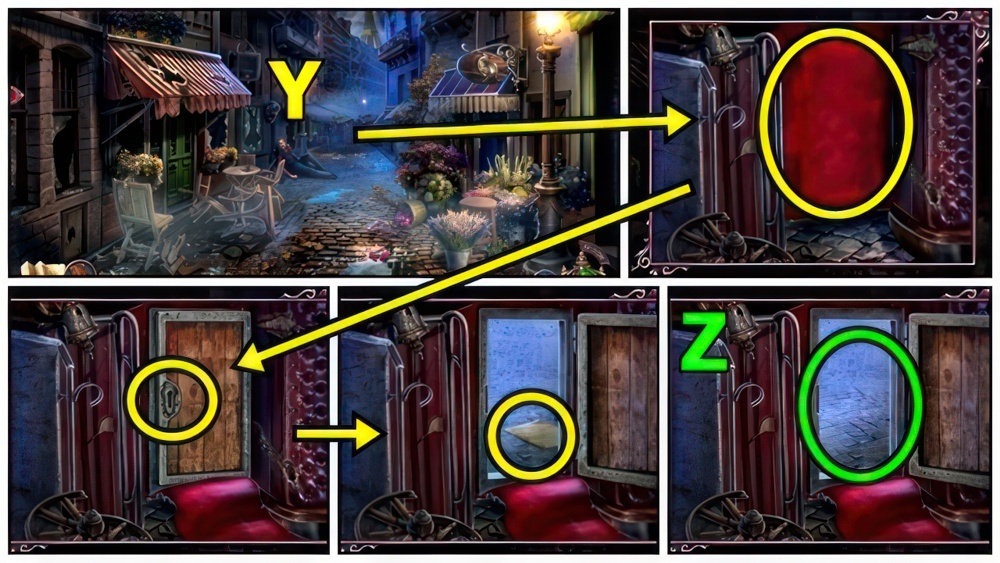
- Add CARRIAGE TOKEN (Y), take CHAIN and BRUSH.
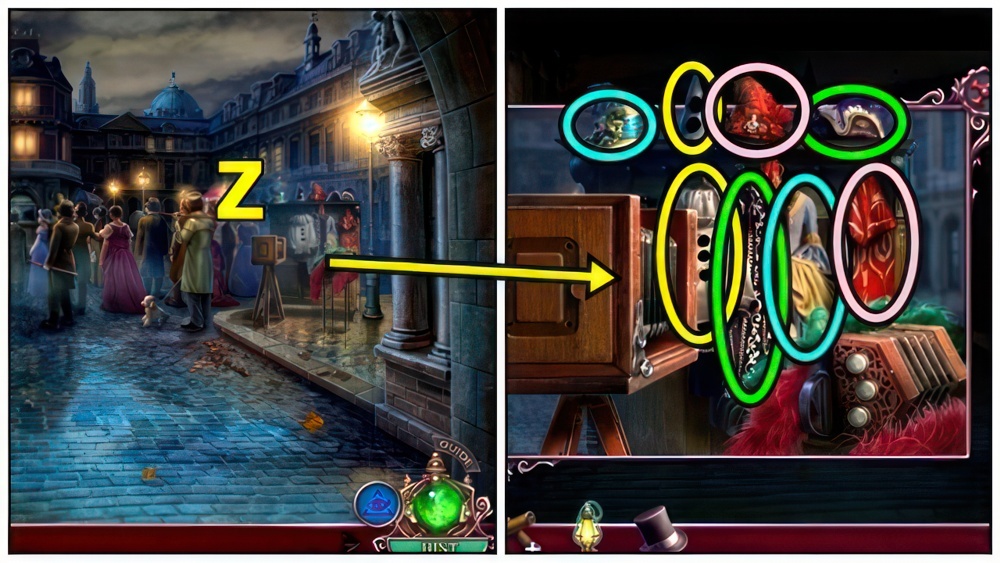
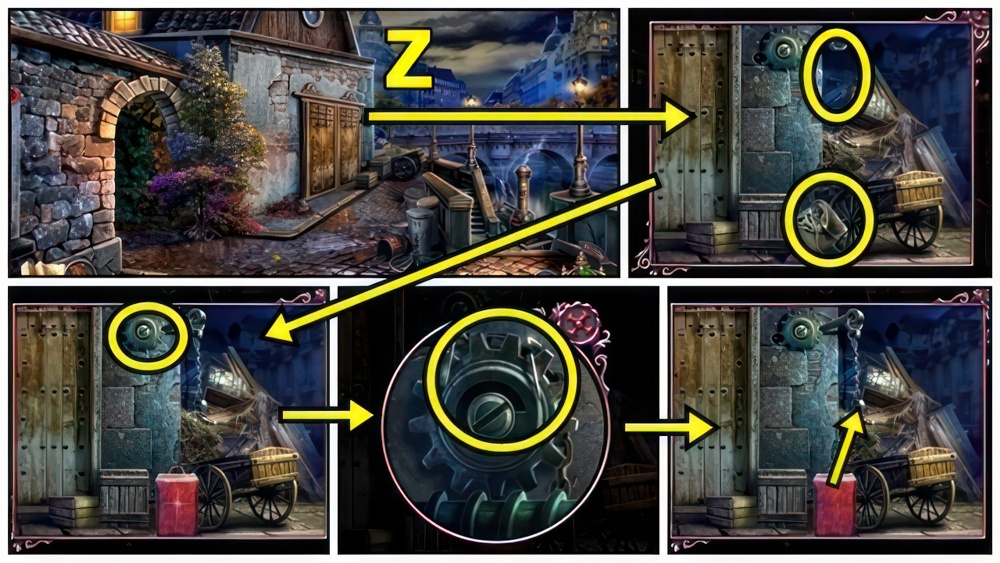
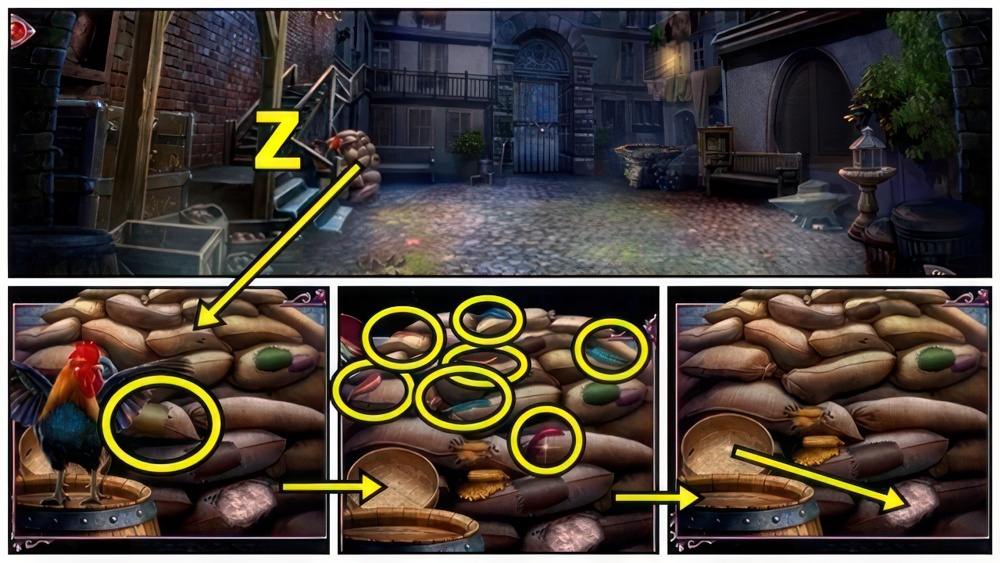
- Use UMBRELLA (Z), receive PIPE HANDLE.
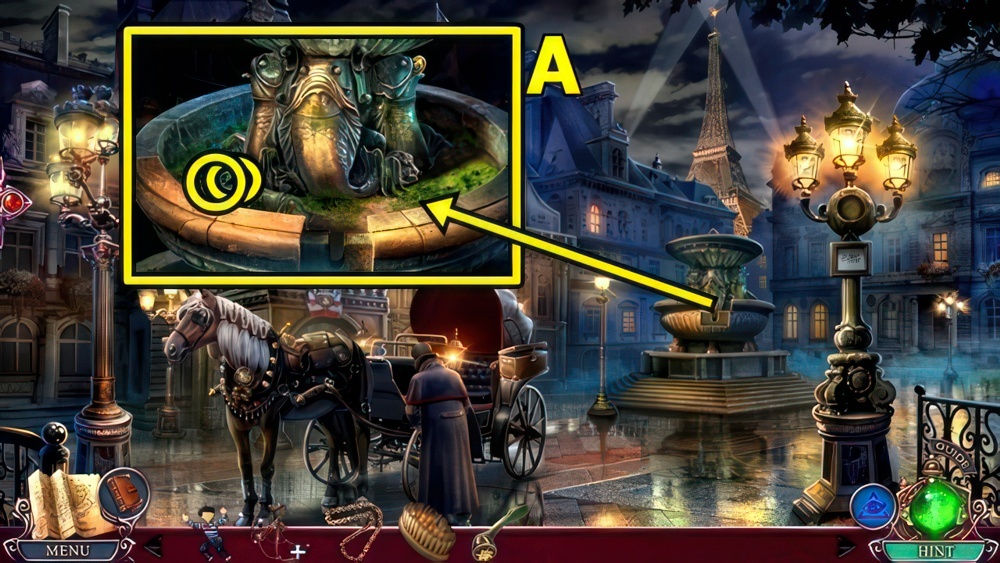
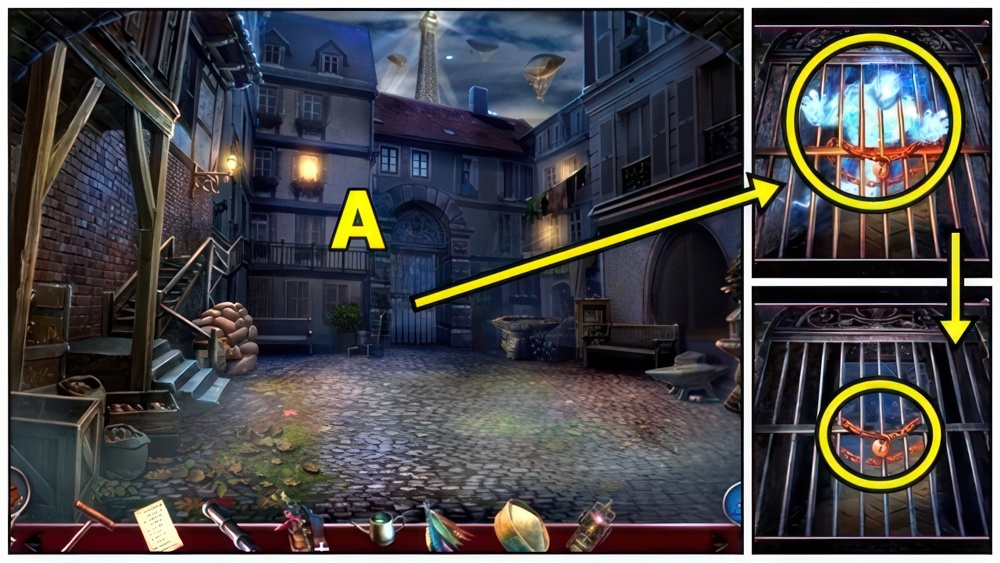
- Use BRUSH (A), add PIPE HANDLE, turn.
- Receive REINS FASTENER.
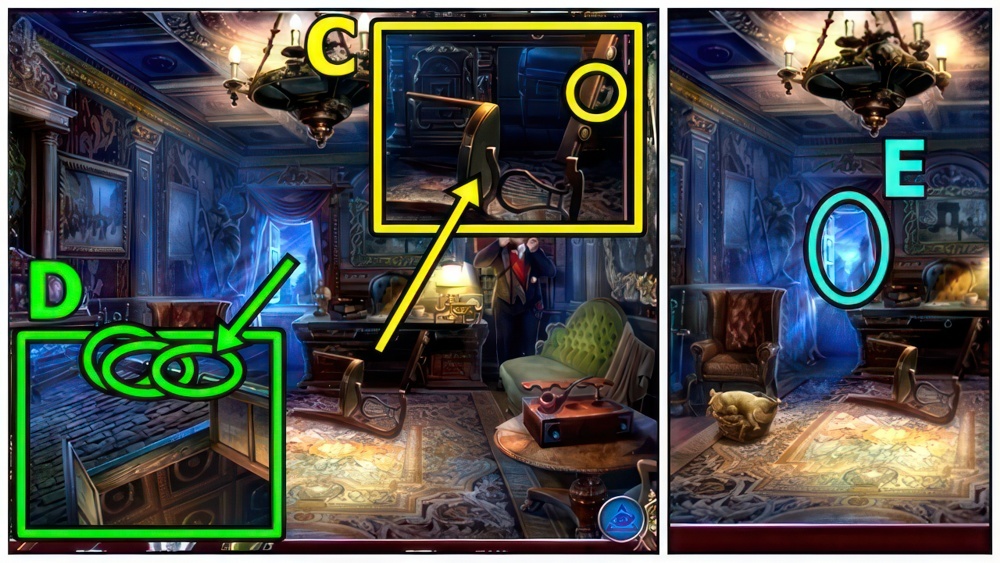
- REINS FASTENER (B) on TORN REINS, reassemble, take REINS.
- Add REINS (C).
- Go (D).
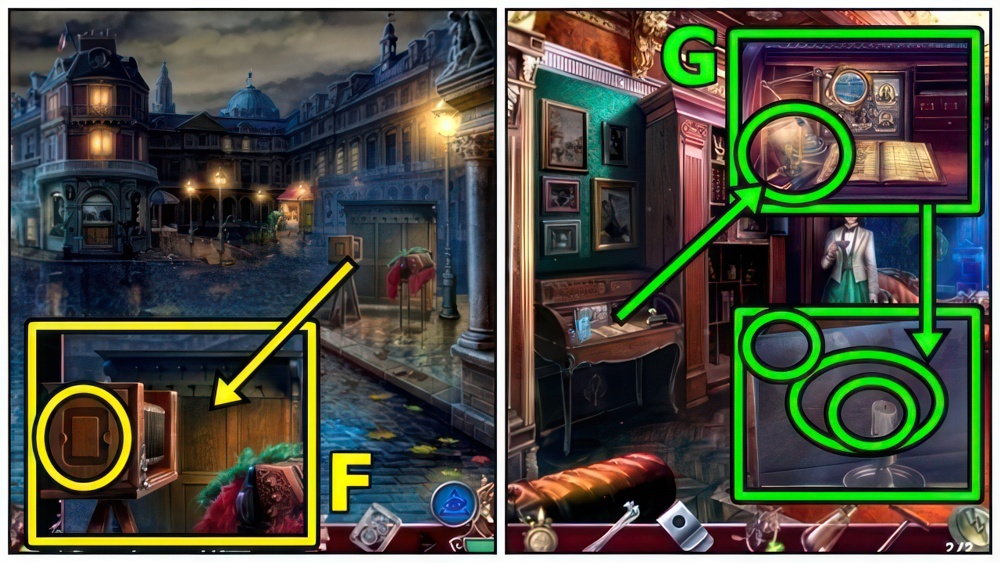
- Examine (E).
- Examine (F).
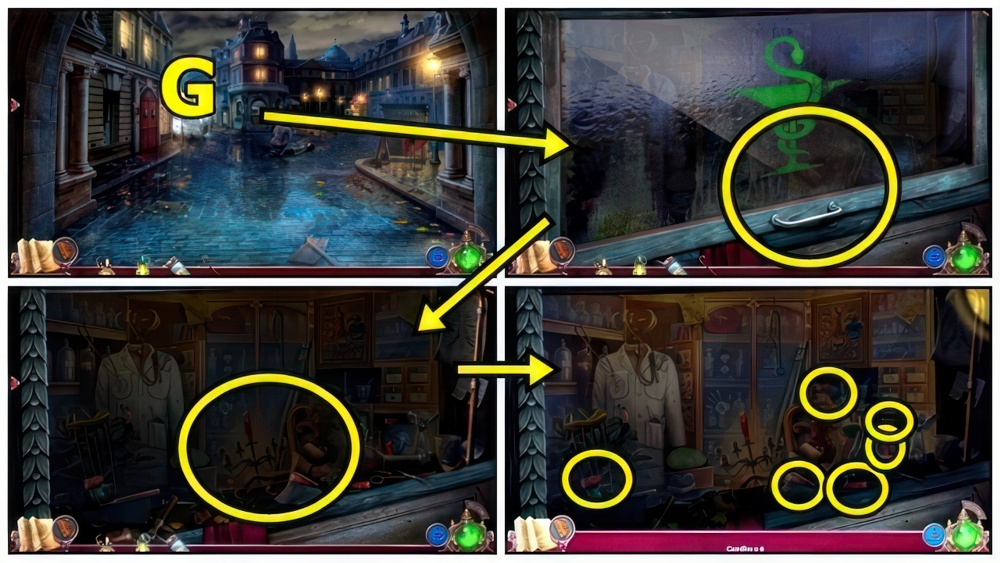
- Find clues (G).
- Talk (H).
- Take LOCK CLUE.
- Examine (I).
- Add MIME FIGURINE (J), adjust pose.
- Take MIRROR and HANDLE.
- Read, take WIRE.
- Add CHAIN (K) and HANDLE.
- Turn handle, take WOODEN BEAM and TONGS.

- Use TONGS (L), receive BROKEN GLASS.
- Read (M), take LIGHTBULB 1/2.
- Use BROKEN GLASS, receive LOCK DEVICE PART.
- Add LOCK DEVICE PART (N) and LOCK CLUE.
- Adjust device parts (O).
- Enter (P).
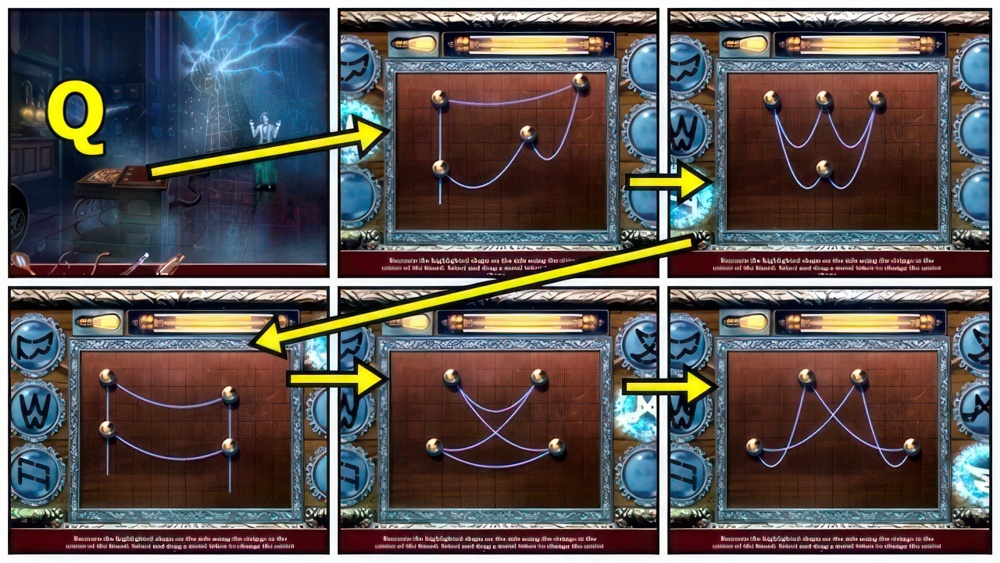
- Recreate the highlighted shapes on the sides using the strings in the center of the board.
- Select and drag a metal token to change the shape.
- Walkthrough (Q).
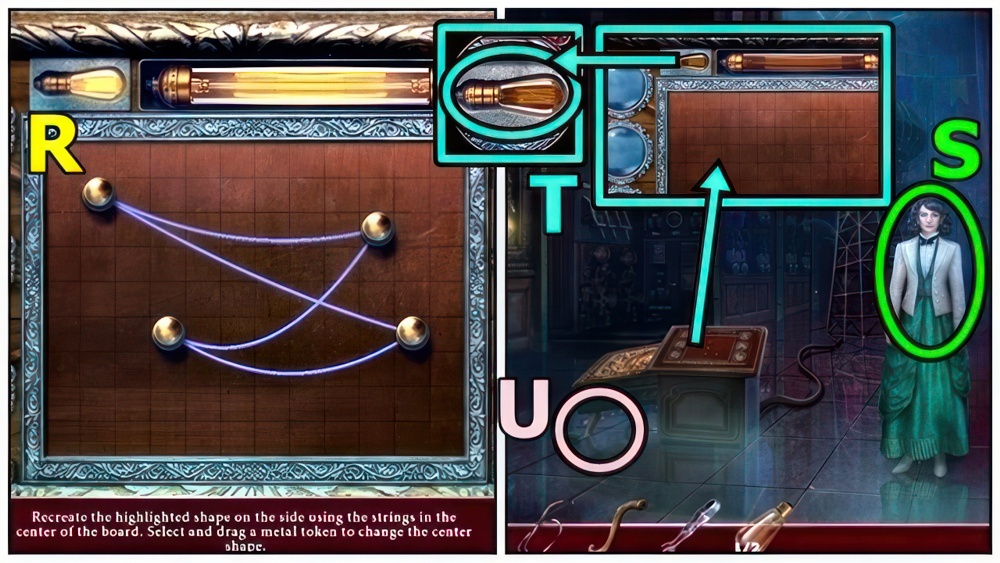
- Walkthrough (R).
- Talk (S).
- Use TONGS (T), receive LIGHTBULBS 2/2.
- Add WOODEN BEAM (U).
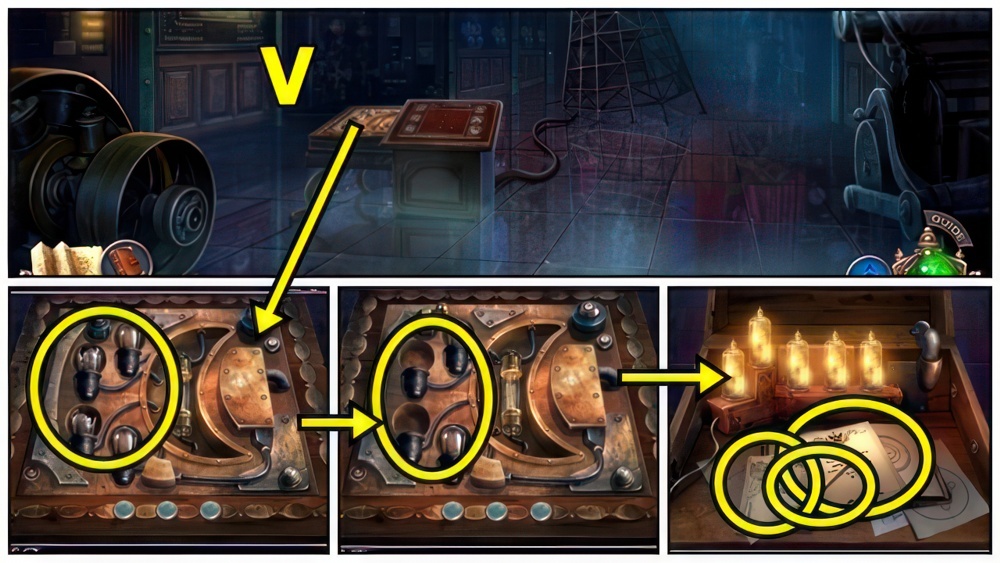
- Remove lightbulbs (V), add LIGHTBULBS.
- Take PENCIL, read notes.
- Talk (W).
- Take DUMOND’S KEY (X).

- Insert DUMOND’S KEY (Y).
- Go (Z).

- Examine (A).
- Take LOCK REEL (B).
- Open (C).
- Take PHONOGRAPH NEEDLE, read.
- Use brush.
- Use PENCIL, take CODE.
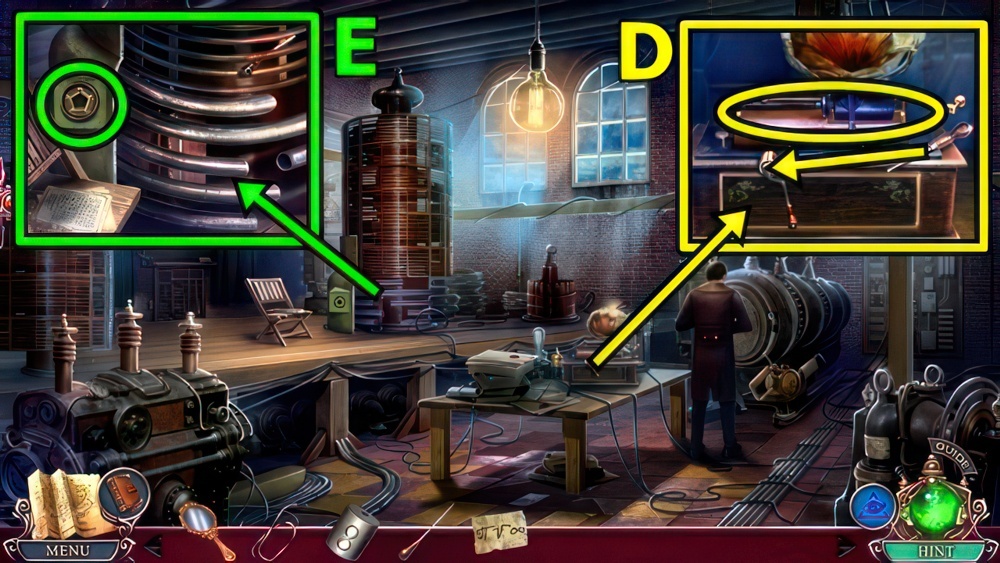
- Add PHONOGRAPH NEEDLE (D).
- Use screwdriver, receive TELESCOPE HANDLE.
- Insert TELESCOPE HANDLE (E).
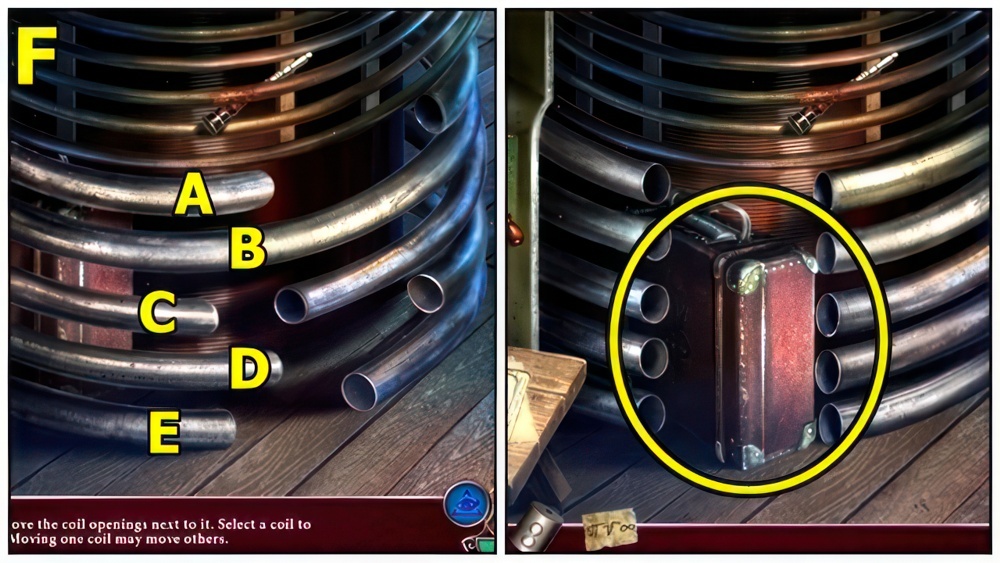
- To get the briefcase, move the coils.
- Select a coil to rotate it.
- Moving one coil may move others.
- Walkthrough (F): A-B-C-D-B-A.
- Take BRIEFCASE.
- LOCK REEL on BRIEFCASE (G), add CODE.
- Adjust reels, take RAZOR and TESLA’S DIARY.
- Give TESLA’S DIARY (H).
- Play puzzle (I), take LIGHTNING EMBLEM 1/2.
- Take TESLA’S JACKET (J).
- Read, take OIL.
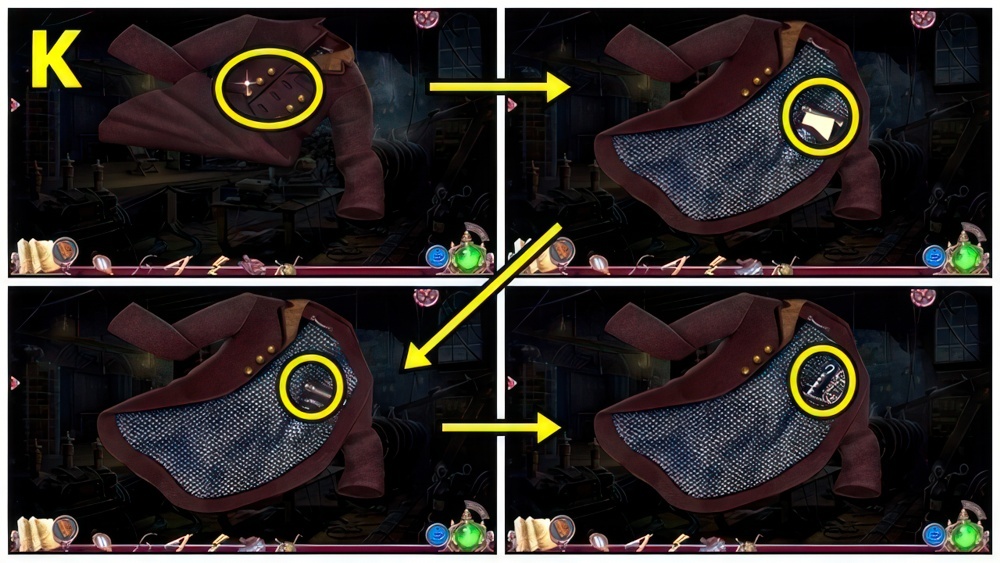
- Open TESLA’S JACKET (K).
- Read note, use WIRE, take HOOK.
- Add HOOK (L), pull.
- Take LIGHTNING EMBLEMS 2/2.
- Use OIL (M), receive LEVER.
- Insert LEVER (N), pull.
- Insert LIGHTNING EMBLEMS.
- Move forward.
- Move boards (O).
- Touch, take BROKEN WATCH.
- Take CROWBAR (P).
- Use cloth, add MIRROR.
- Guide the pin to the slot on the right.
- Select an arrow to move the pin.
- Remember that you are looking at a mirrored image.
- Walkthrough (Q): D-C-D×3-C-D.

- Open (R), take HOOK and WATCH PARTS.
- WATCH PARTS on BROKEN WATCH (S), select top, remove glass, take SPRING.
- Add SPRING (T), take LIGHTER and CORKSCREW.
- Move down.
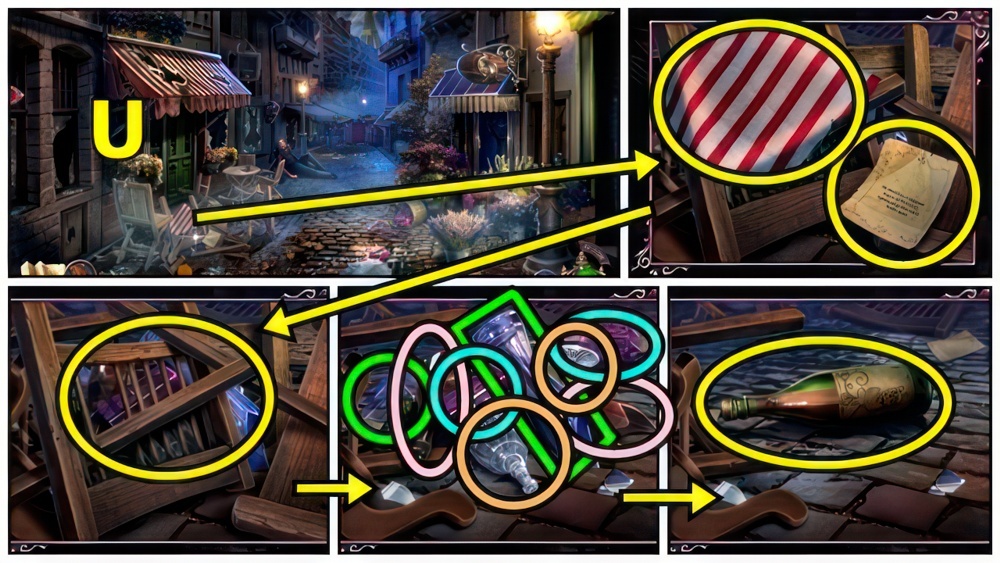
- Read (U), remove cloth, use CROWBAR, match items, take CORKED BOTTLE.
- CORKSCREW on CORKED BOTTLE, take BEVERAGE.
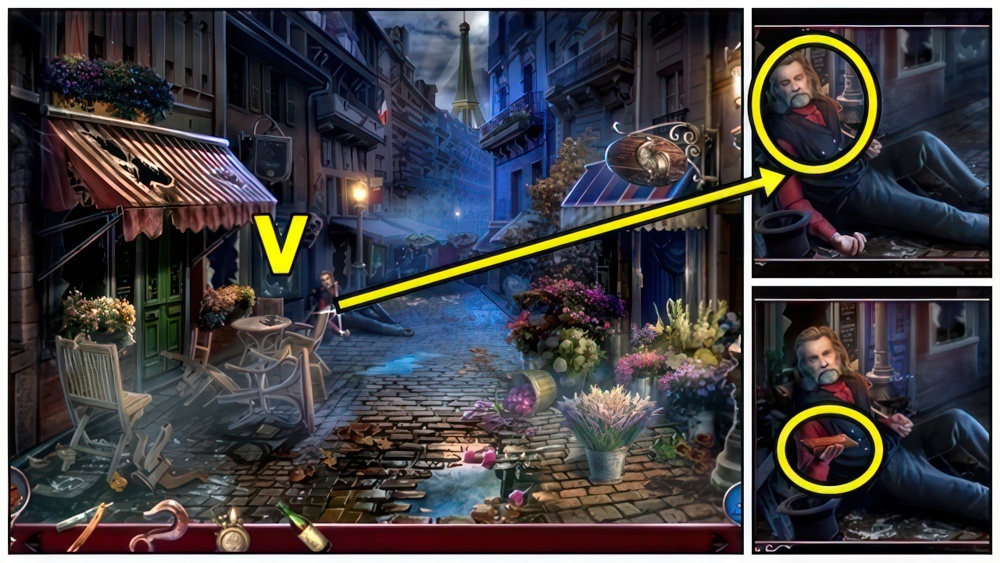
- Offer BEVERAGE (V), take OLD LEGEND.
- Open, read OLD LEGEND.
- Complete the notes on your investigation.
- Select an image and place it where it belongs in the text.
- Open clue book (W), deduce.
- Take CUTTERS.
- Move stool (X), examine, use CUTTERS, take SKELETON KEY.
- Use RAZOR (Y), then SKELETON KEY.
- Read note.
- Go (Z).
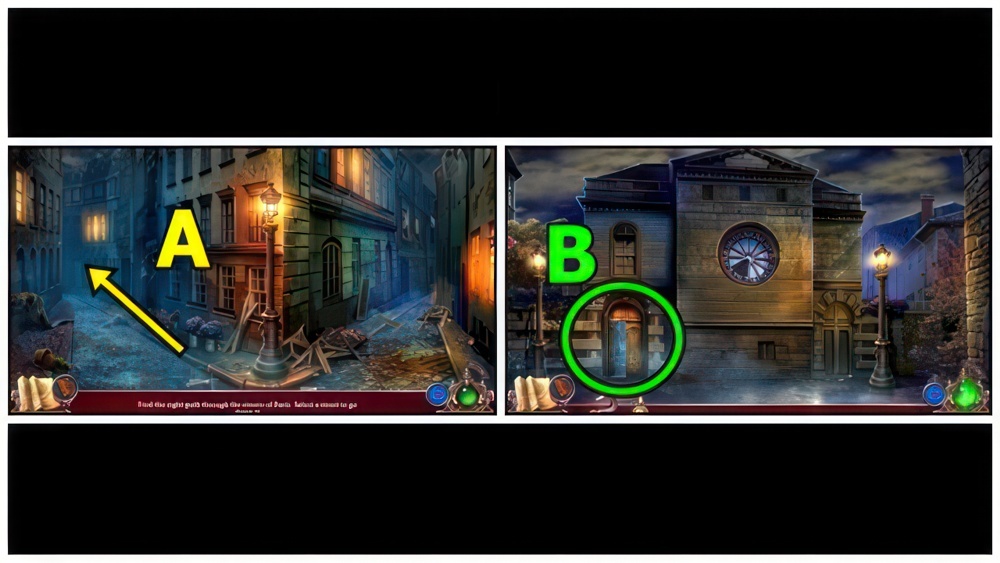
- Find the right path through the streets of Paris.
- Select a street to go down it.
- Move left (A), forward, right, right, forward, right, right, right.
- Enter (B).

- Examine (C).
- Find clues (D).
- Play puzzle (E), take ACID.
- Take AWL (F).
- Use ACID (G), then AWL.
- Take CHAIN.
- HOOK on CHAIN, take CHAIN WITH HOOK.
- Take CANE PARTS (H) and CANDLE.
- Use CHAIN WITH HOOK.
- Open, take FEATHERS.
- Add CANDLE (I), then FEATHERS.
- Arrange the feathers from the brightest on the top to darkest on the bottom.
- Select two feathers to swap them.
- Read scroll, take STRANGE INLAY.
- Insert STRANGE INLAY (J).
- Talk (K).
- Take, open, read.
- Complete the notes on your investigation.
- Select an image and place it where it belongs in the text.
- Open clue book (L), deduce.
- Take LACE.
- Take SIGNS 1/3 (M).
- Take BELT (N).
- Take BRONZE CANDLESTICK (O).

- Take KEROSENE (P).
- Use BRONZE CANDLESTICK, take NAILS and WHEEL.
- Touch (Q).
- Take MUG (R).
- Add WHEEL and BELT.
- Examine (S), take BROKEN LANTERN and SIGNS 2/3.
- Use MUG (T), use BRONZE CANDLESTICK, take SIGNS 3/3.
- Add NAILS (U), then SIGNS.
- Place the signs in the correct positions.
- Walkthrough (V).
- Add LACE, KEROSENE and LIGHTER on BROKEN LANTERN, take LANTERN.
- Use LANTERN (W).
- Talk (X).
- Take HAT (Y).
- Match outfits (Z).

- Take SUIT and BEARD (A).
- Add HAT (B), SUIT and BEARD.

- Take MIRROR (C).
- Use MIRROR (D), take CANE HANDLE.
- Read (E), take HOMING PIGEON.
- Insert HOMING PIGEON (F).
- Take TEA LEAVES, read, take GLUE.
- CANE HANDLE and GLUE on CANE PARTS, receive CANE.
- Use CANE (G), then LANTERN.
- Find candles.
- Play puzzle, take AMMONIA.
- Use AMMONIA (H).
- Take letter, open, receive DUMOND’S ENVELOPE.
- Add DUMOND’S ENVELOPE (I), adjust numbers to 23.
- Enter.
- Talk (J).
- Take WOODEN BUTTON (K).
- Take SOLID FUEL (L).
- Add WOODEN BUTTON (M).
- Press B-C-A-D.
- Examine.
- Take METAL BIRD.
- Take SPOKES (N) and TABLE KNIFE.
- Examine.
- Find items (O).
- Complete the notes on your investigation.
- Select an image and place it where it belongs in the text.
- Open clue book (P), deduce.
- Take LENS.
- Take CLIP (Q).
- Add METAL BIRD, add labels.
- Read instructions, add spice.
- Add TEA LEAVES, SOLID FUEL, then LIGHTER.
- Take SOOTHING DRINK.

- Offer SOOTHING DRINK (R).
- Take SAFE PASSWORD.
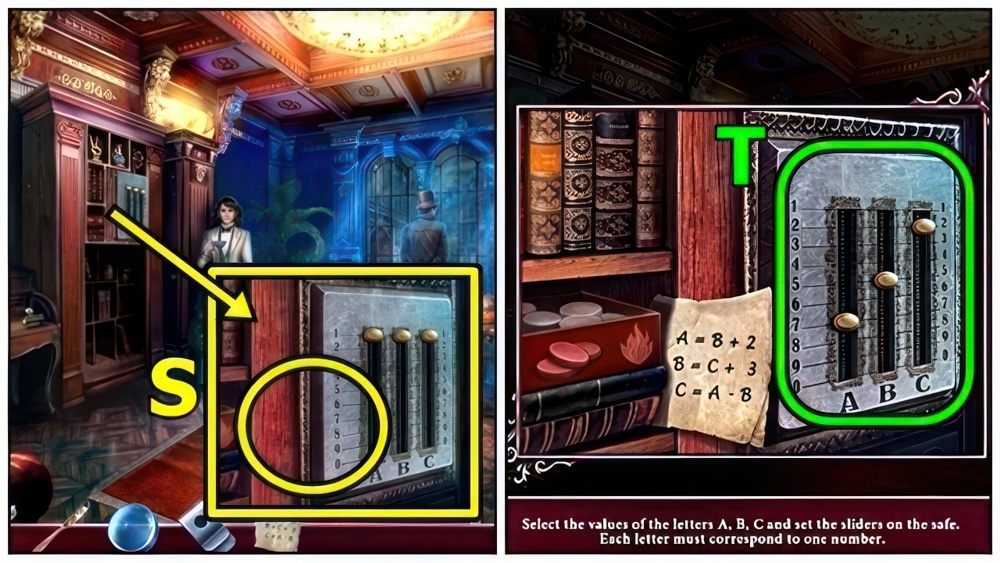
- Add SAFE PASSWORD (S).
- Select the values of the letters A, B, C and set the sliders on the safe.
- Each letter must correspond to a number.
- Walkthrough (T): 7-5-2.
- Take JOURNAL.
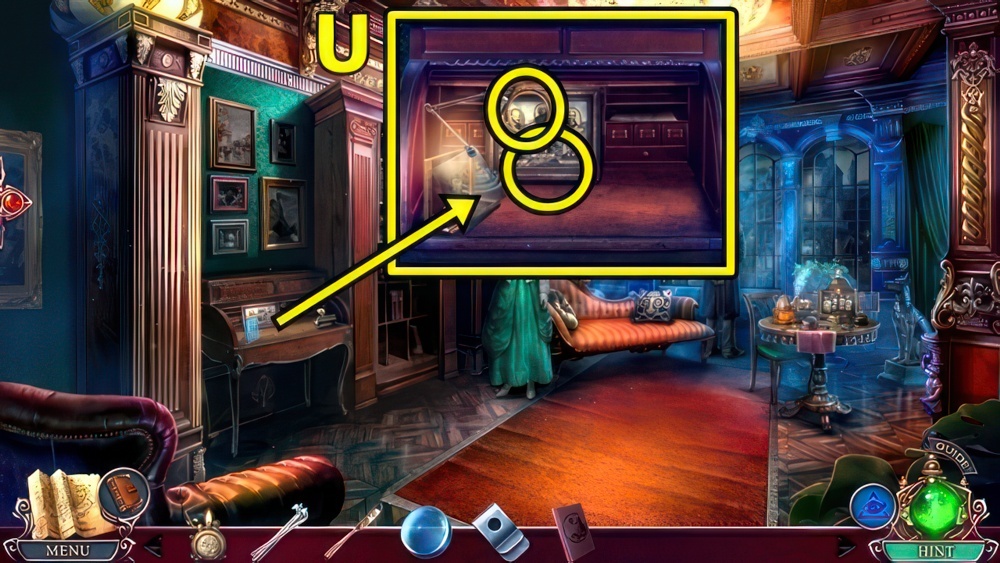
- Add LENS (U) and JOURNAL.
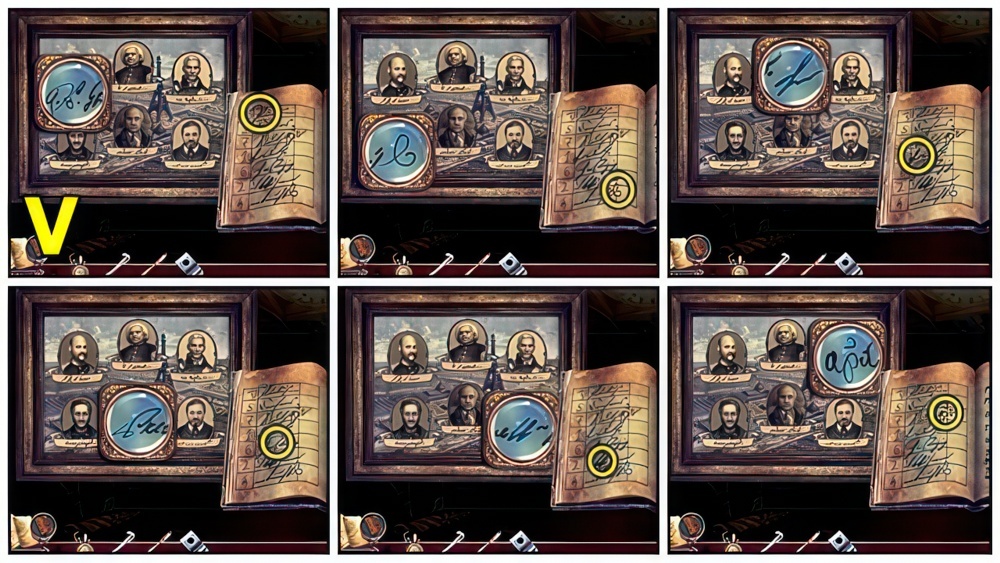
- Find signatures (V).
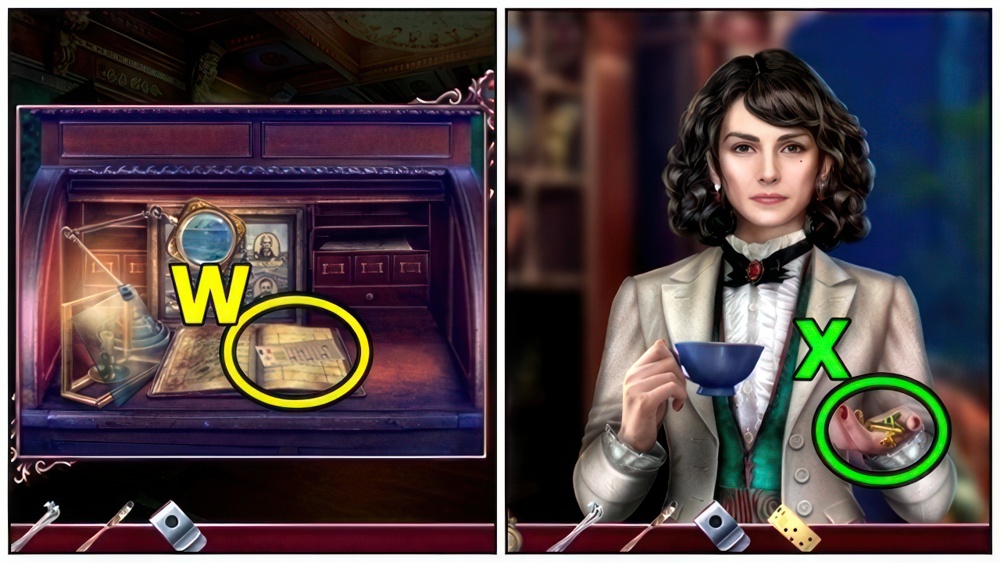
- Take PUNCHCARD (W).
- Take SHOP KEY (X).
- Move down.

- Use TABLE KNIFE (Y), receive REGISTER BUTTONS.
- Insert SHOP KEY (Z).
- Enter.
- Talk (A).
- Take FLAT MONOWHEEL (B).
- Remove shade, take LIGHTBULB.

- Insert PUNCHCARD (C), take LEVER.
- Read, take TOKEN 1/2.
- Examine.
- Play puzzle (D), take NEGATIVES.
- Place the buttons according to the number on the drawers.
- Add REGISTER BUTTONS (E), place buttons.
- Take TOKENS 2/2 and CAMERA FRAME.
- Move down.
- Add CAMERA FRAME (F), take PHOTOS.
- Enter Dumond’s House.
- Examine (G).
- Use LIGHTER, CLIP then NEGATIVES.
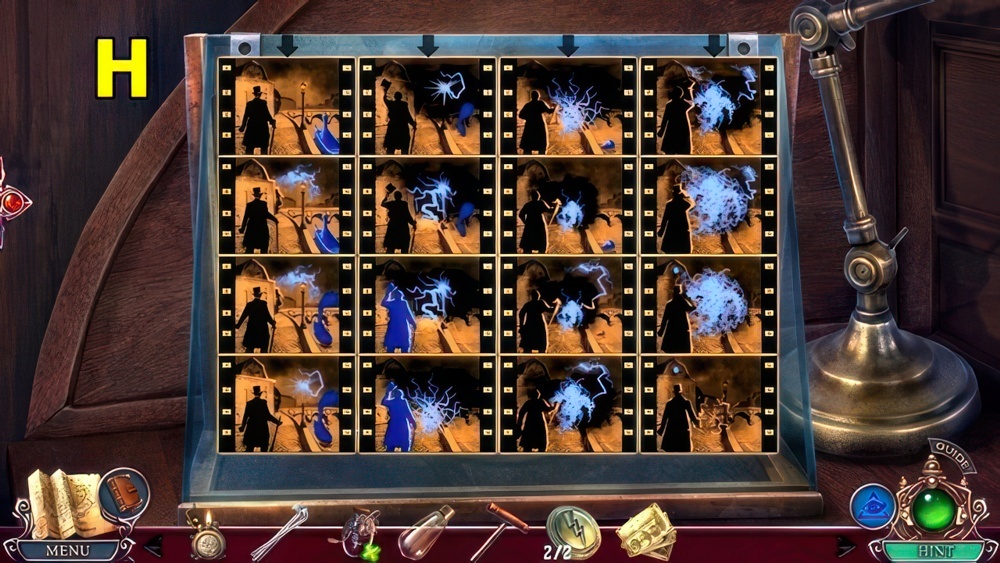
- Find the same elements between the frames and arrange them one by one to view the whole story in sequential order.
- Select two negatives to move them.
- Walkthrough (H).
- Receive KINETOSCOPE FILM.
- Return to Scientist Shop.

- Add TOKENS (I), then KINETOSCOPE FILM and LIGHTBULB.
- Add PHOTOS.
- Examine photos, take ADDRESS.
- Take BALLOON KEY (J).
- Move down.
- SPOKES and BALLOON KEY on FLAT MONOWHEEL, take DEFLATED BALLOON.
- Play puzzle (K), receive HOSE.
- Add HOSE (L) then DEFLATED BALLOON, receive INFLATED BALLOON.
- INFLATED BALLOON on FLAT MONOWHEEL, take MONOWHEEL.
- Remove wheel (M), add MONOWHEEL.
- Move forward.
- Take SHOE (N) and CAN OPENER.
- Take BROKEN BOTTLE (O), SCOOP and MASTER KEYRING.
- Use SHOE, lift, grab.
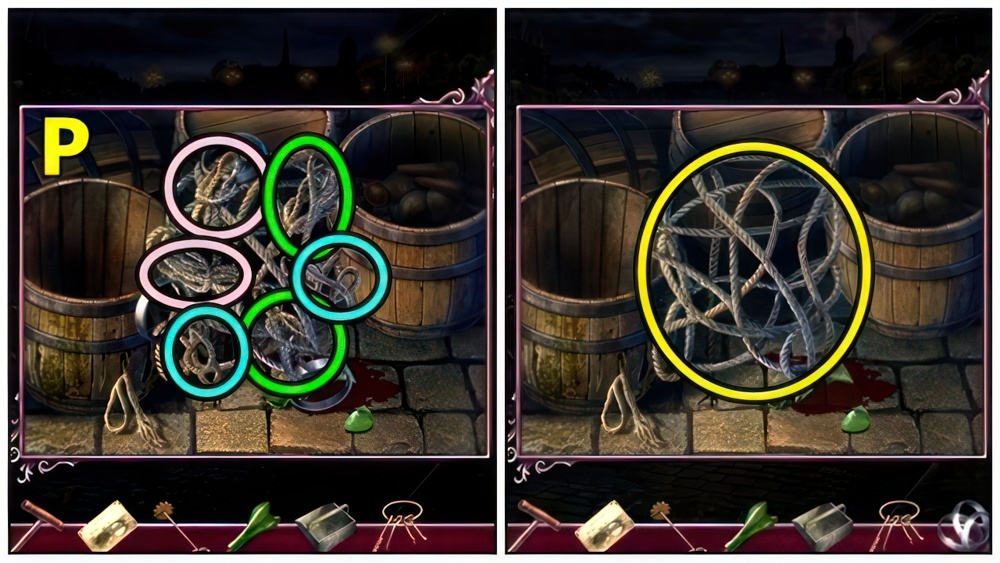
- Find matching knots (P), receive METAL RINGS.
- Take ROPE.
- Take SAW (Q).
- Add ROPE, take CLEANING TOOLS.
- Add SCOOP, take COAL.
- Return to Scientist Shop.
- Play puzzle (R), receive MANOMETERS.
- Examine (S).
- Use CAN OPENER, take CANNED TUNA.
- Return to River.
- Offer CANNED TUNA (T), gather BRUSH.
- Use CLEANING TOOLS.
- Use BROKEN BOTTLE, receive CORK.

- Add MANOMETERS (U) and CORK.
- Open.
- Use BRUSH, add COAL and LIGHTER.
- Add LEVER, pull.
- Add ADDRESS (V).
- Go (W).
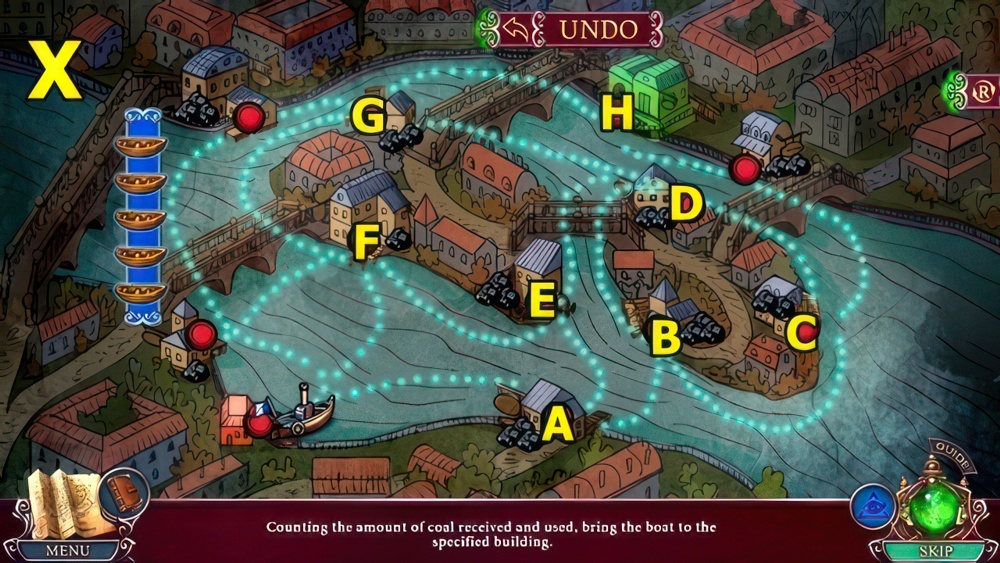
- Monitor the amount of coal used and received between each point in order to get the boat to your destination.
- Walkthrough (X).
- Use MASTER KEYRING (Y), receive HANDCUFFS.
- Read notes, take POSTAL BAG.
- Add HANDCUFFS (Z) and POSTAL BAG.
- Take HOOKS.
- Hang bag.
- Play puzzle (A), receive DOG WHISTLE.
- Examine (B).
- Use DOG WHISTLE (C).
- Take MATCHES.
- Remove leaves, take GARDEN SCISSORS.
- Use GARDEN SCISSORS (D), then SAW.
- Use MASTER KEYRING.
- Enter (E).
- Receive BAG.
- Take CURTAIN (F).
- Take RULER (G) and SPHERE.
- Read, insert handle.
- Take TONGS and TELEGRAM RIBBON.
- Add CURTAIN (H).
- Take EXPLOSIVE INSTRUCTIONS and LEVER.
- Add TELEGRAM RIBBON, receive STICKY RIBBON.
- Open, take FIRECRACKER.
- Insert MATCHES (I), add STICKY RIBBON, receive IMPROVISED WICK.
- FIRECRACKER, METAL RINGS, IMPROVISED WICK and SPHERE on EXPLOSIVE INSTRUCTIONS, take EXPLOSIVE.
- Use EXPLOSIVE (J).
- Add HOOKS (K).

- Arrange the chains so that their ends are placed correctly according to color.
- Select the ends of the colored chains to drag them.
- Walkthrough (L).
- Walkthrough (M).
- Walkthrough (N).
- Add LEVER (O), then RULER.

- Play puzzle (P), receive LOCK SOLUTION.
- LOCK SOLUTION on BAG (Q), adjust locks.
- Read notes, take DOCUMENTS.
- Complete the notes on your investigation.
- Select an image and place it where it belongs in the text.
- Open clue book (R), deduce.
- Take MINISTRY INVITATION.
- Use MINISTRY INVITATION (S).
- Go (T).
- Talk (U).
- Offer DOCUMENTS (V).
- Examine (W).
- Find clues (X).
- Talk (Y).
- Take CHAIR LEG (Z) and CANDLE.
- Take POKER (A).
- Use CANDLE, receive LIT CANDLE.

- Take NAPKIN (B).
- Lift cushion, use LIT CANDLE.
- Use TONGS, receive TOKEN.
- Add TOKEN (C), take BILLIARD CUE.
- Add POKER (D), BILLIARD CUE and CHAIR LEG.
- Go (E).

- Traverse the rooftops and use the items to find out where Gerard fled.
- Walkthrough (F): Move up, left, take board.
- Move down, down, right.
- Add board.
- Move up.
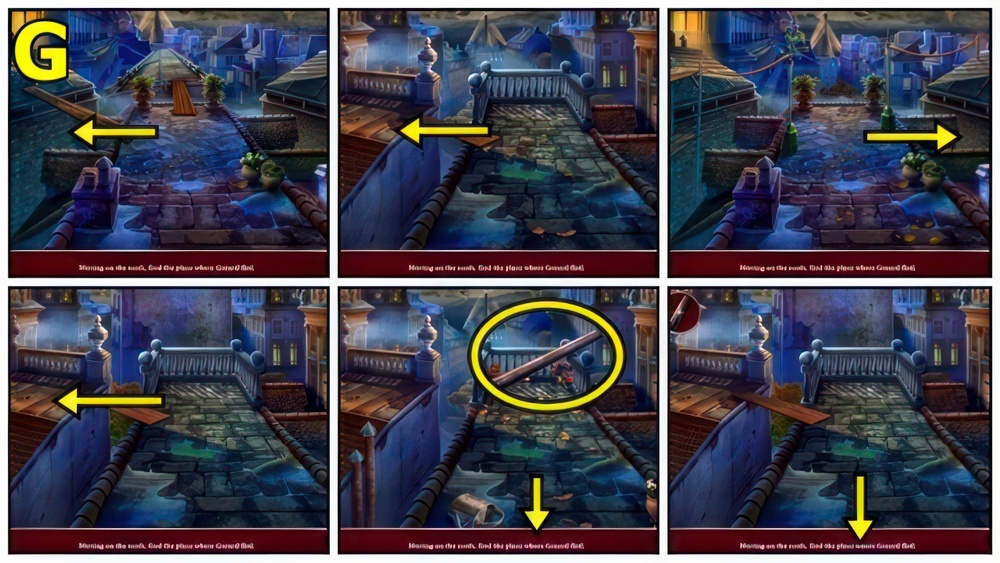
- Walkthrough (G): Move left, left, right, left.
- Take pipe.
- Move down, down.
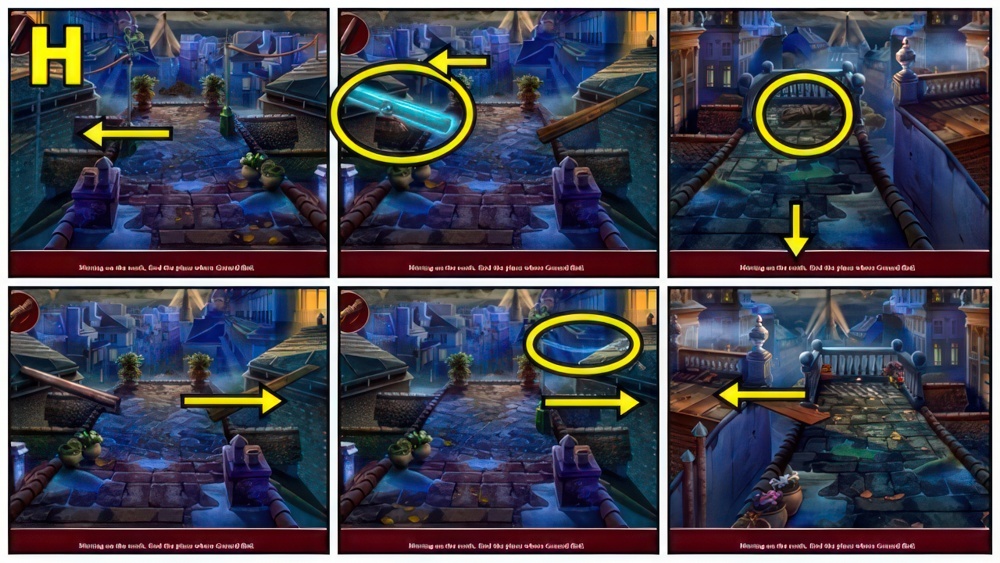
- Walkthrough (H): Move left.
- Add pipe.
- Go left.
- Take rope.
- Move down, right.
- Add rope.
- Move right, left.
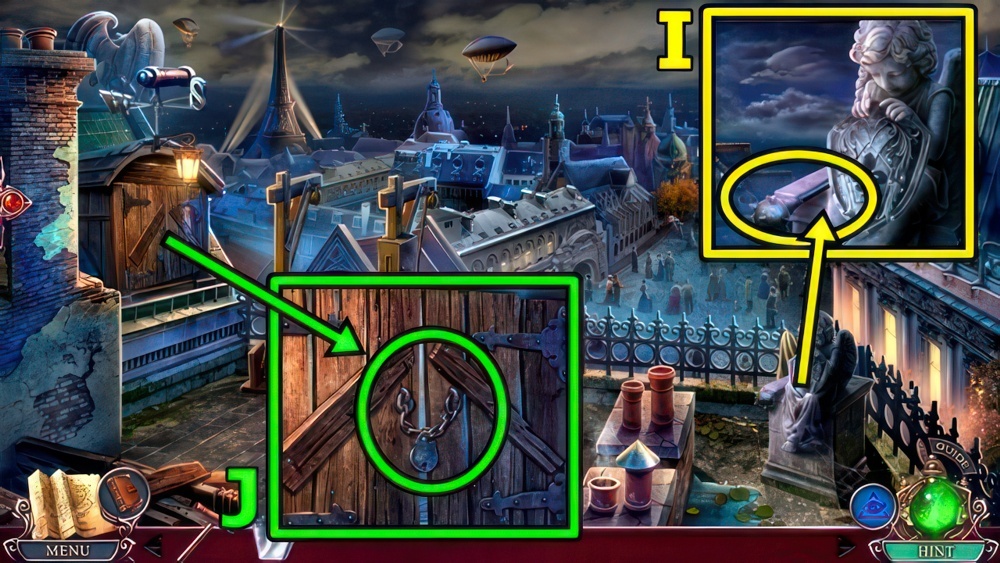
- Take MACE (I).
- Use MACE (J).
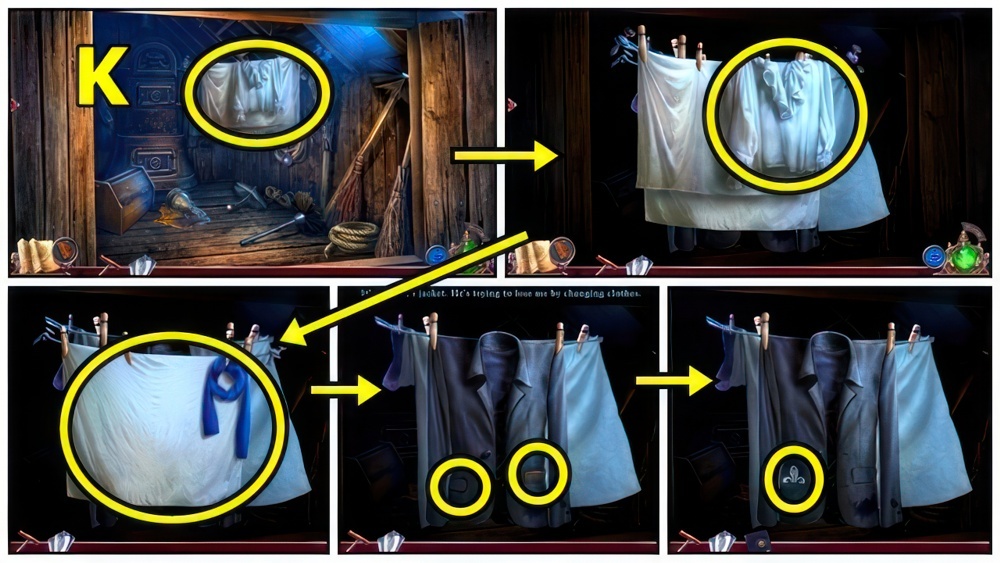
- Examine clothes (K), take NOTEPAD, open, take FLEUR-DE-LIS.
- Open (L), take GEAR and LETTER.
- Use NAPKIN, receive OILED NAPKIN.
- Insert FLEUR-DE-LIS (M), take COMPASS.
- Open NOTEPAD, take MORSE CODE and COMPASS ARROW.
- Add LETTER (N), COMPASS and COMPASS ARROW.
- Select the letters on the compass indicated by the red arrow.
- Walkthrough (O): solution is random, watch arrow and click letters.
- Examine (P).
- Receive SPYGLASS, take LEVER.
- Add LEVER (Q), open, use OILED NAPKIN, add GEAR.
- Pull lever.
- Go (R).
- Talk (S).
- Examine (T).

- Find clues (U).
- Take PHANTOM DESTROYER (V).
- Take TOOL CASE (W).
- Take EMPTY WATERING CAN (X).
- Add EMPTY WATERING CAN (Y), receive WATERING CAN.
- Take KNIFE.
- Use KNIFE (Z).
- Find FEATHERS.
- Use, receive SIEVE WITH FLOUR.
- Examine TOOL CASE.
- Play puzzle, receive BATTERY.
- BATTERY on PHANTOM DESTROYER.
- Use PHANTOM DESTROYER (A), then WATERING CAN.
- Move forward.
- Take UMBRELLA (B) and STEP.
- Take BENT GEAR (C).
- Move down.

- Add BENT GEAR (D), use hammer, take GEAR.
- Move forward.

- Add GEAR (E).

- Close and open the pipes according to the clues on the bottom.
- Select the top of the pipes to move the valve between them.
- Walkthrough (F).
- Take SUITCASE EMBLEM.
- Add SUITCASE EMBLEM (G).
- Take TIME SOLUTION and MITTEN.
- Use MITTEN (H), take LIGHTBULB.

- Add SIEVE WITH FLOUR (I), then FEATHERS.
- Press buttons.

- Play puzzle (J), receive TICKET.
- Add TIME SOLUTION (K), then TICKET.
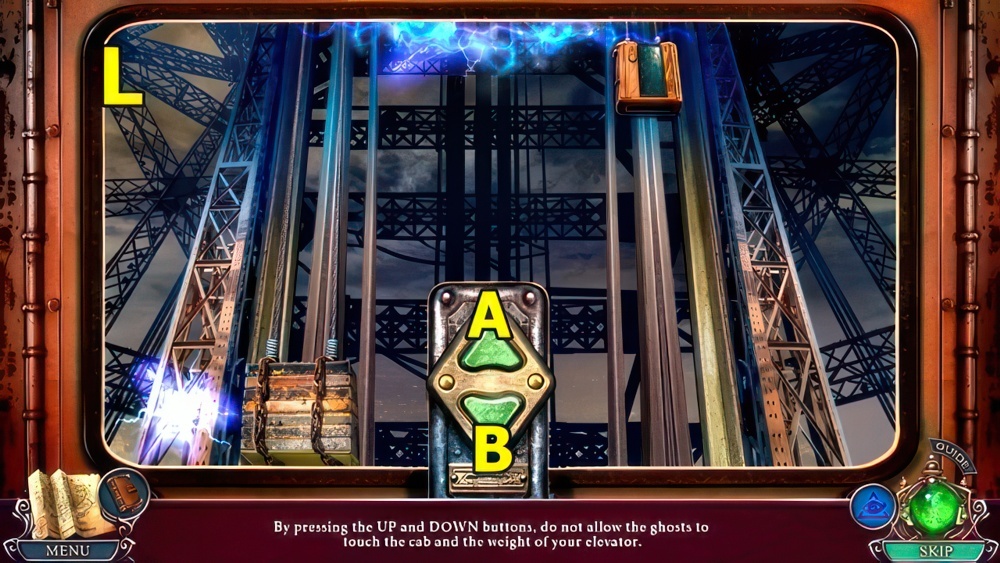
- Select the UP and DOWN buttons to prevent the ghosts from touching the cab or the elevator weight.
- Walkthrough (L): B×2-let ghost pass-B×2-let ghost pass-A.
- A×2-let two sets of ghosts pass-A-let ghost pass-B.
- A-let ghost pass-A-let ghost pass-B×2-let ghost pass-A.
- Take SWITCH (M) and MAP PART 1/2.
- Take PLIERS (N).
- Move, remove, add LIGHTBULB.
- Use SPYGLASS (O).
- Examine (P).
- Fine clues (Q), receive AIRSHIP NUMBER.
- Use PHANTOM DESTROYER (R).
- Add UMBRELLA, take STEERING WHEEL and STEP.
- Move down.

- Play puzzle (S), receive TELEGRAPH REEL.
- Add STEPS (T), take LADDER.
- Move up.
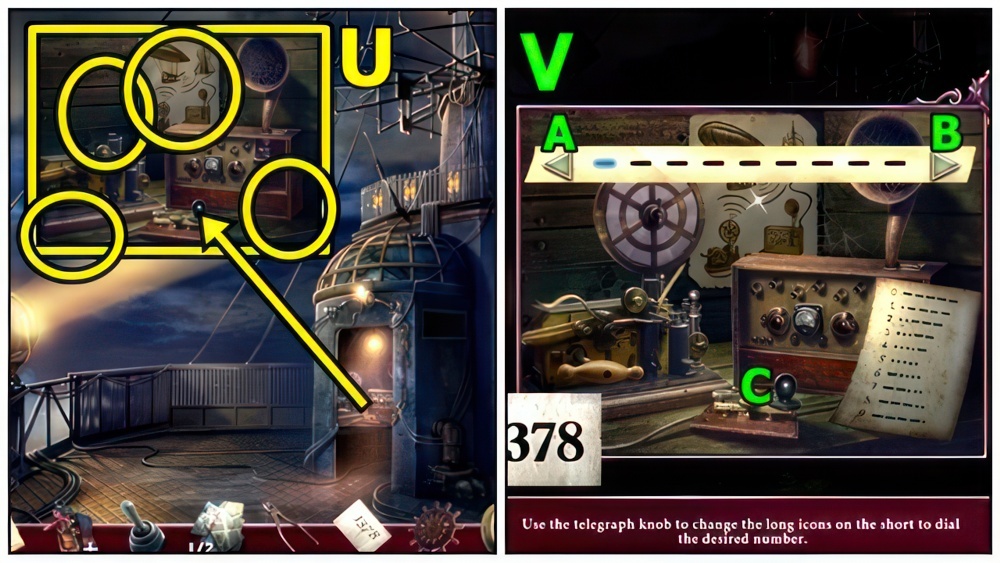
- Examine (U).
- Add MORSE CODE, TELEGRAPH REEL and AIRSHIP NUMBER.
- Use the telegraph knob and the arrows to enter the desired number in Morse code.
- Walkthrough (V): C-B×4-C×3-B×4-C×3-B×3-C×2.
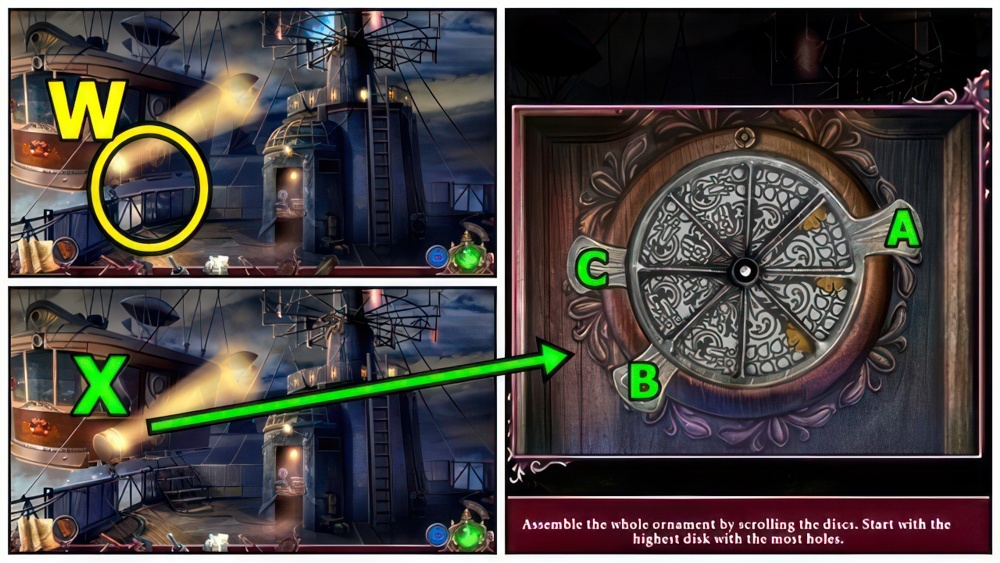
- Add LADDER (W).
- Select the handles to rotate the discs and assemble the ornament.
- Walkthrough (X): A×5-C×7-B×6.
- Enter.
- Take FUSE 1/2 (Y).
- Open TOOL CASE.
- Play puzzle, receive FUSES 2/2.
- Use PLIERS (Z), take MAP PARTS 2/2.
- Add FUSES.

- Add SWITCH (A), STEERING WHEEL and MAP PARTS.
- Add map parts.
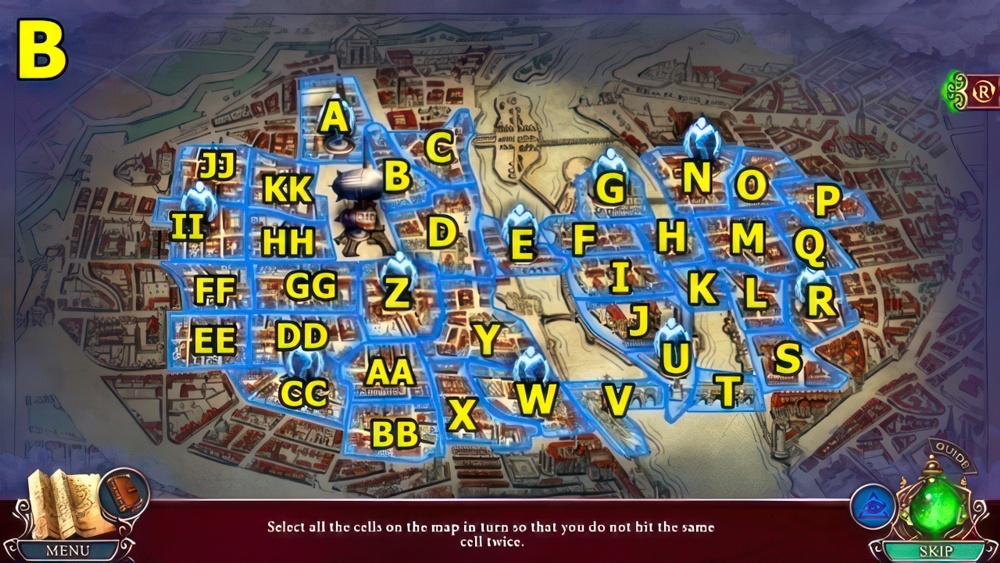
- Cross over all the cells with the airship without crossing over the same one twice.
- Walkthrough (B).
- Walkthrough Bonus Chapter, at the link below.


