Dark City 7: International Intrigue – The game’s walkthrough begins as horrifying and unexplained incidents occur in New York City. Reporters are investigating a series of devastating fires in the city. Something is behind these fires and you are determined to find out what it is. People say it’s a supernatural cause. They believe a mythological creature is burning the city to the ground. Fires happen all the time, so the police and firemen are too busy fighting them. They just don’t have time to find out who or what is behind them. Some people claim to have seen a phoenix during one of the fires, but that can’t be true, can it. It must be some kind of mass hallucination. Whatever caused those fires is now targeting you. If you can’t complete any of the puzzles or don’t know where the items are, on our site you can watch the walkthrough of Dark City 7: International Intrigue and find out what happened.
Dark City 7: International Intrigue – Walkthrough
Here you can see the full walkthrough of Dark City 7: International Intrigue, namely for all chapters, including bonus chapter, in pictures.
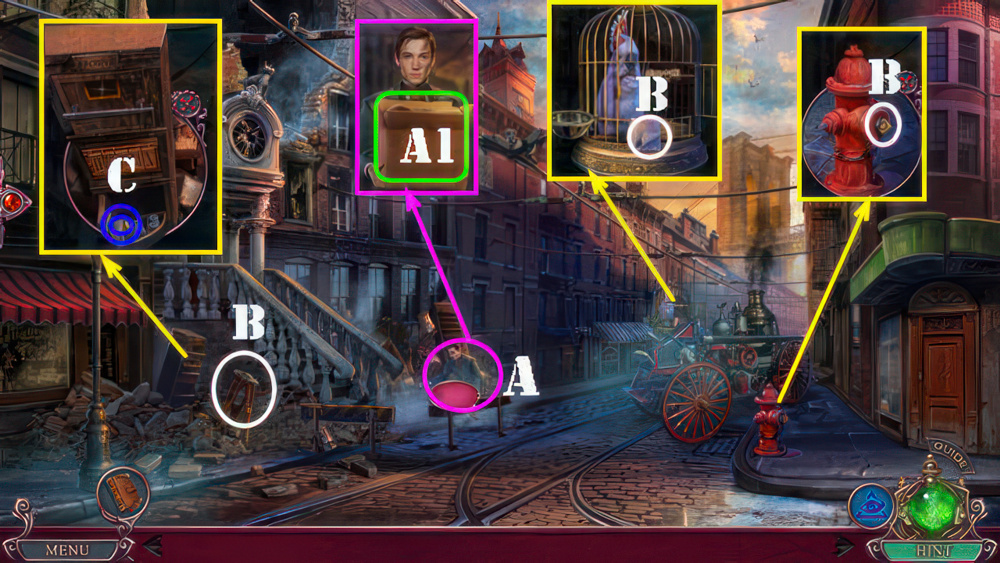
- Select scene ×8.
- Talk (A), take BOX (A1).
- Select BOX and open diary, take Map.
- Look at newspaper and find the three items written in red.
- Take COAT OF ARMS.
- Take STAND, TOWEL, and CUBE (B).
- Open drawer, take FASHION MAGAZINE and NOTEBOOK (C).
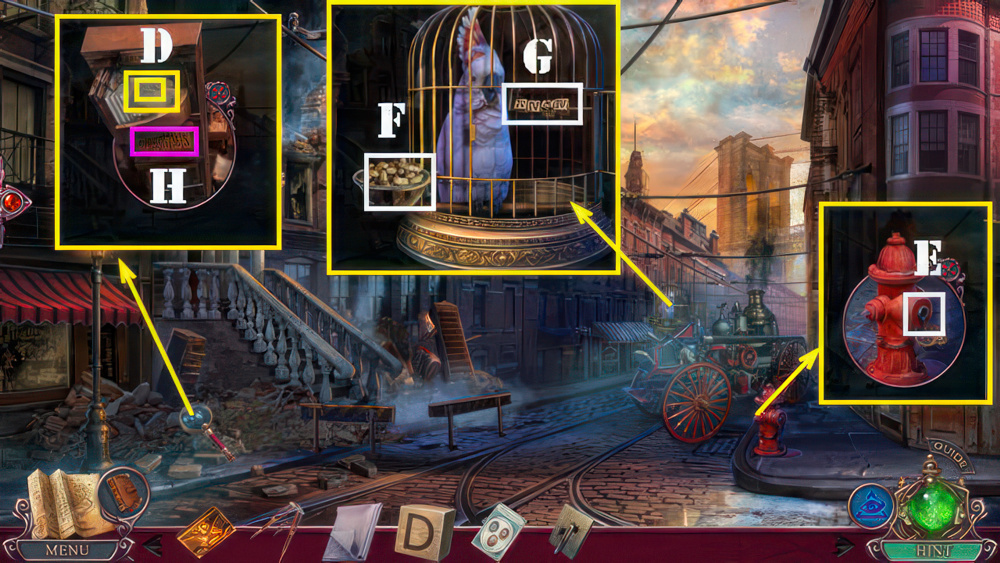
- Place COAT OF ARMS and select, take CAMERA PLATE and NUTS (D).
- Use TOWEL (E), receive WET TOWEL.
- Use NUTS (F).
- Place CUBE and use NOTEBOOK (G), receive CODE.
- Use CODE (H).
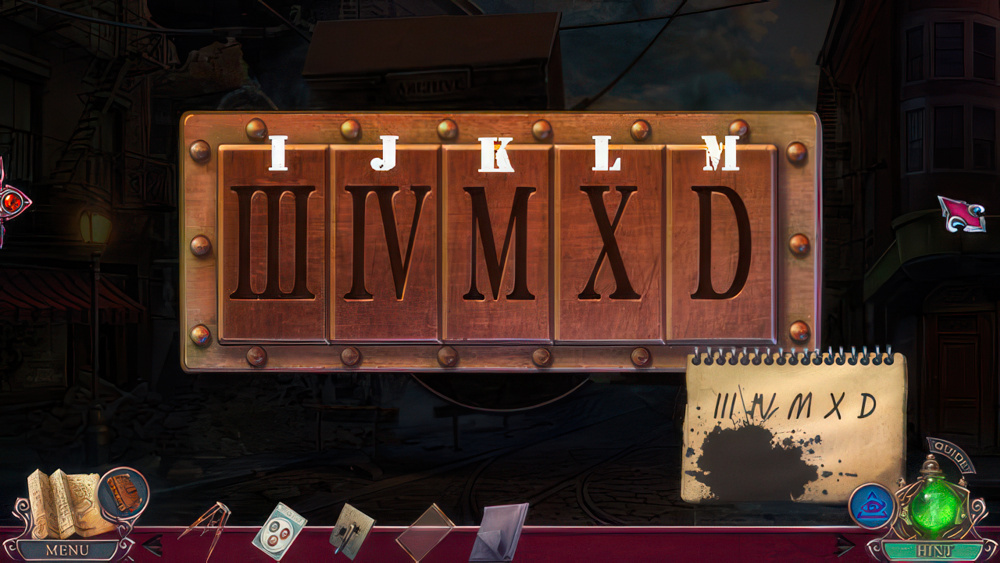
- Walkthrough: (I-J-K×2-L×4-M×2).
- Take NEWSPAPER ARTICLE.
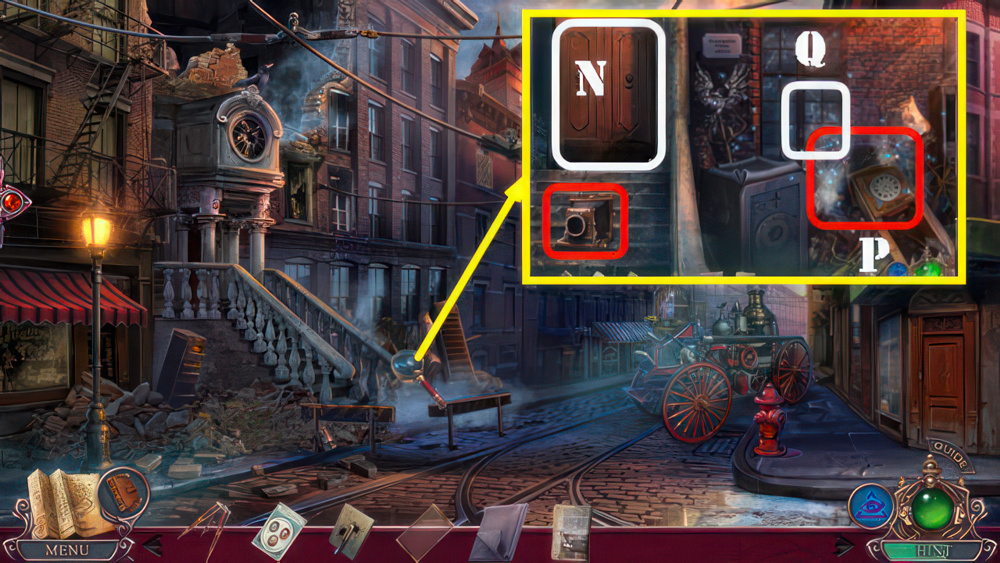
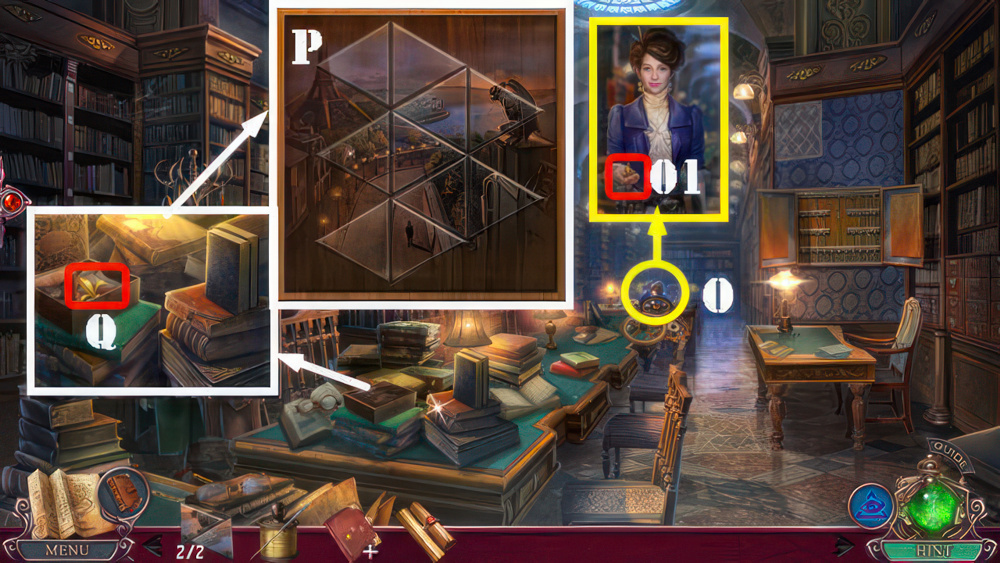
- Select door (N).
- Take CAMERA (O).
- Play puzzle (P), receive CAMERA LENS.
- CAMERA LENS, STAND, CAMERA PLATE, and WET TOWEL on CAMERA, take CAMERA.
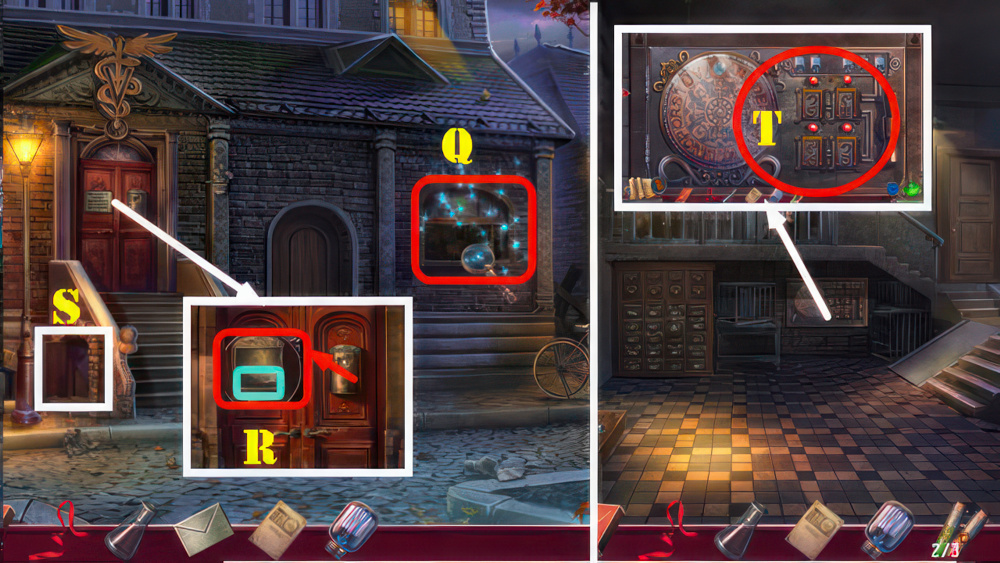
- Use CAMERA (Q), receive PHOTO.
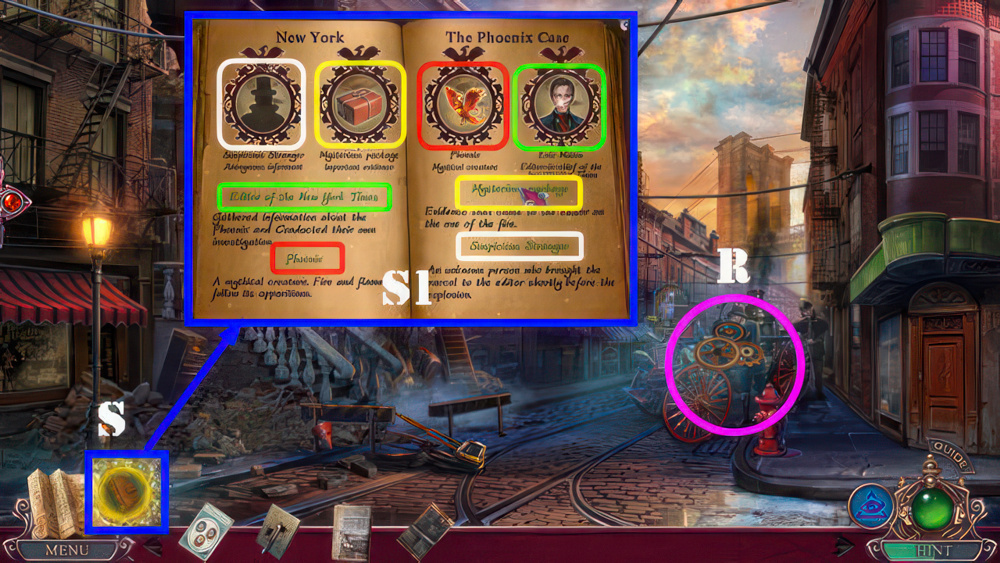
- Use NEWSPAPER ARTICLE (R), receive a Clue.
- Select (S).
- Complete the notes on your investigation.
- Select an image and place it where it belongs in the text.
- Walkthrough (S1).
- Take CLEANER.

- Take ADDRESS (T).
- CLEANER on ADDRESS, take PHOENIX ADDRESS.
- Go (U).
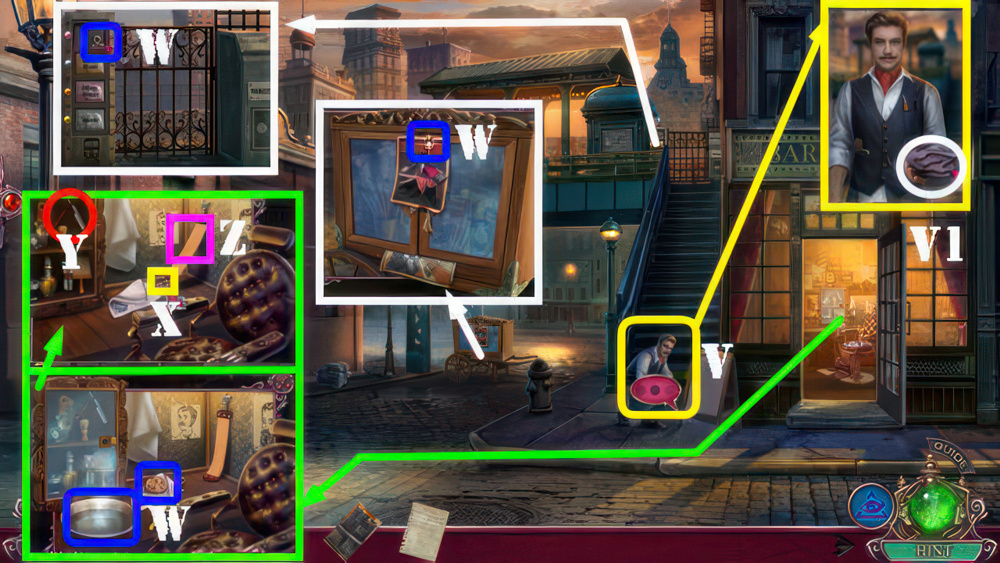
- Talk (V), give PHOENIX ADDRESS, take STENCIL (V1).
- Take PIN, COOKIE, BOILING WATER, and RING (W).
- Attach RING (X).
- Use PIN and select, take razor (Y) and use it (Z).
- receive SHARP RAZOR.
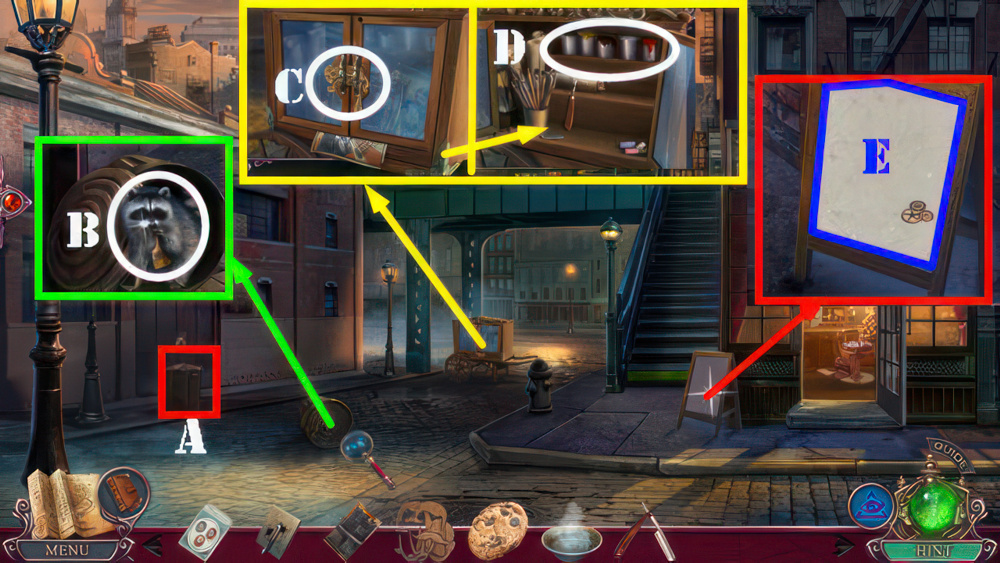
- Select barrel ×3 (A).
- Open it and give COOKIE (B), receive BRUSH.
- Use SHARP RAZOR, take ROPE (C).
- Open door, select two flyers, take PAINTS (D).
- Use PAINTS, BRUSH, FASHION MAGAZINE, and STENCIL (E).
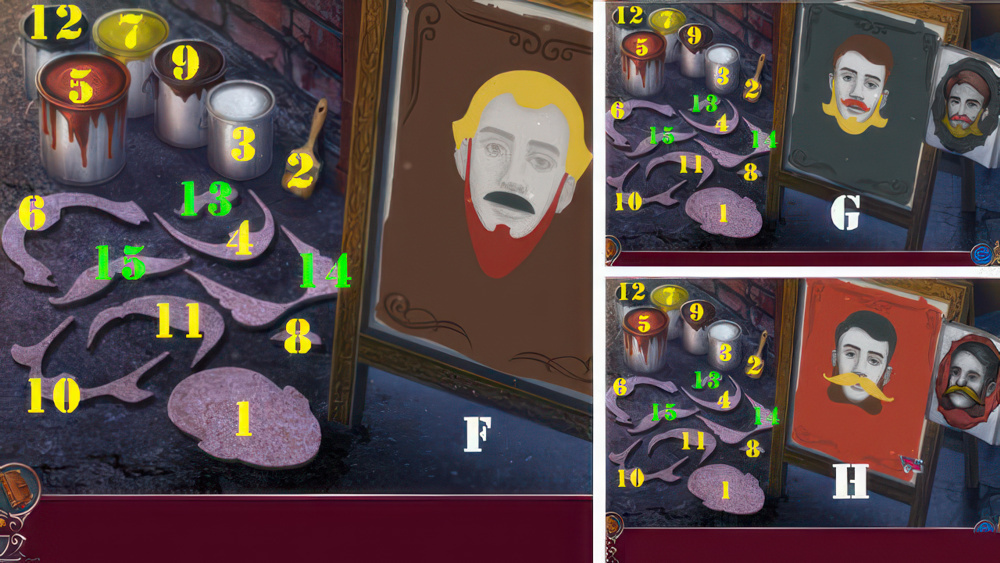
- Using paints and templates, you need to copy the pictures from the magazine to the posters.
- Walkthrough one (F): (2-9) (1-2-3)-(4-2-5)-(6-2-7)-(8-2-12).
- Walkthrough two (G): (2-12) (1-2-3)-(10-2-7)-(11-2-9)-(13-2-5).
- Walkthrough three (H): (2-5) (1-2-3)-(14-2-9)-(11-2-12)-(15-2-7).
- Receive POSTERS.
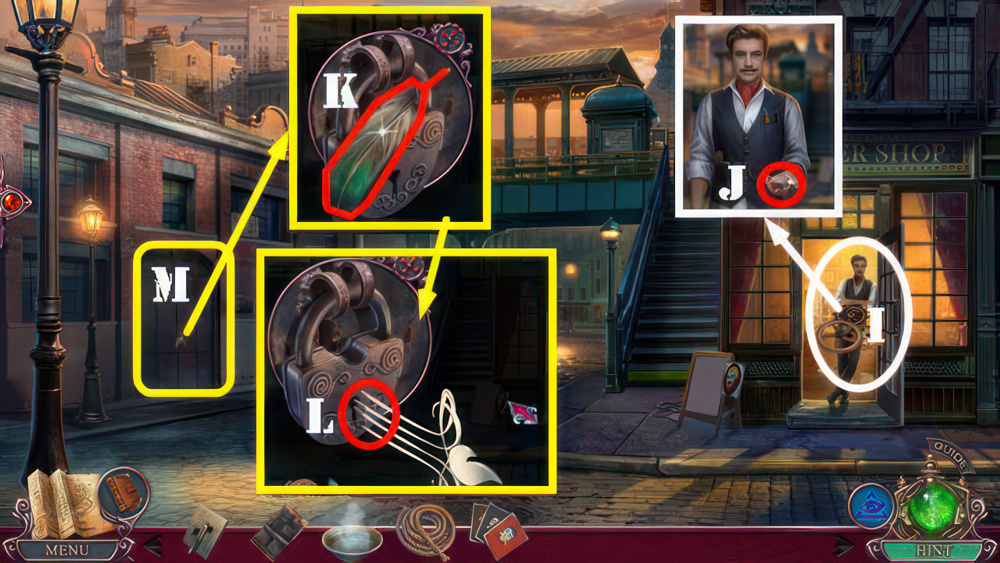
- Give POSTERS (I).
- Take PIN (J).
- Take FEATHER (K).
- Use PIN and select ×3 (L).
- Go (M).
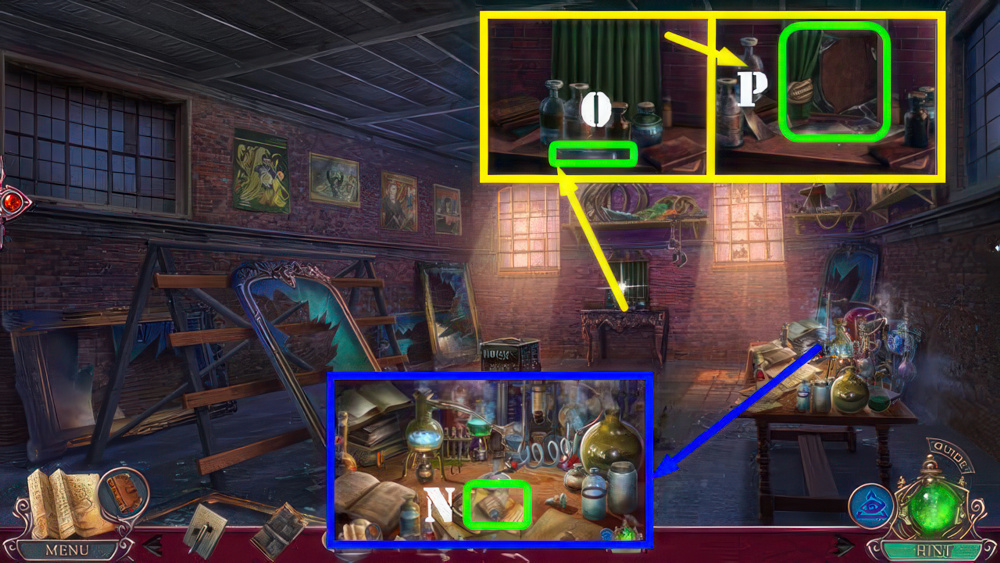
- Select scene.
- Play puzzle.
- Select notes ×4 (N).
- Take TEST TUBE (O).
- Move bottles.
- Use ROPE and zoom in (P).
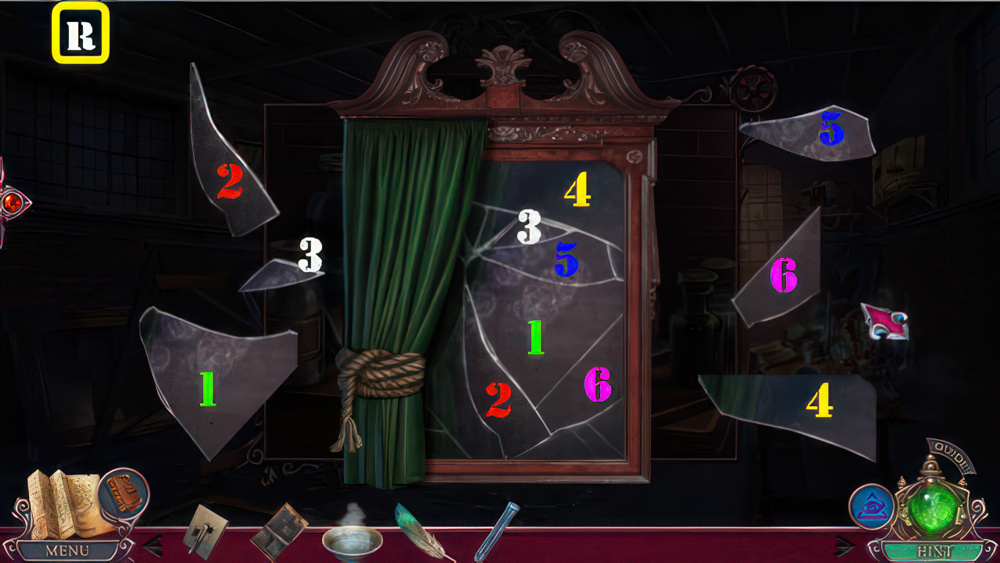
- Walkthrough (R): (1-6).
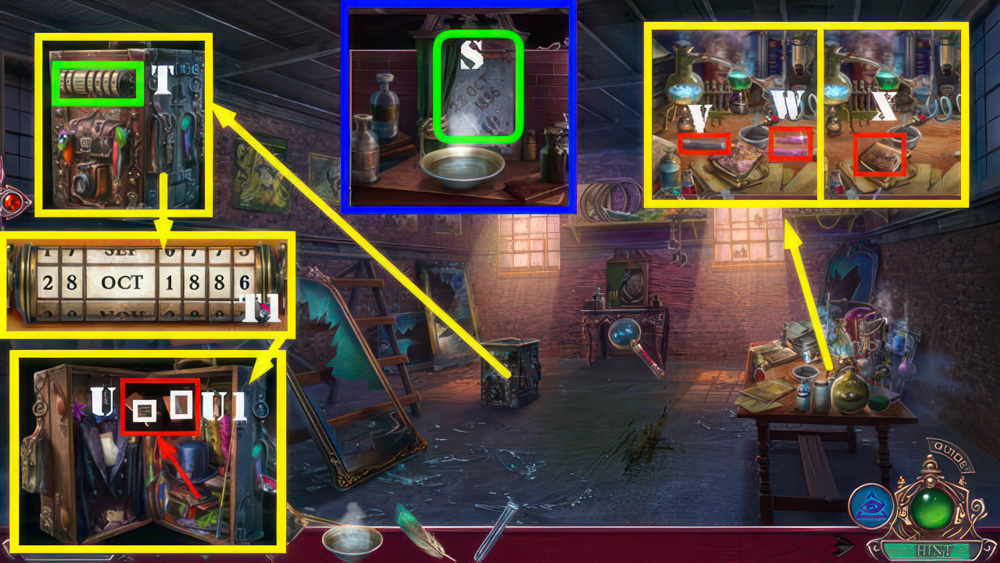
- Use BOILING WATER and NOTEBOOK (S), receive CIPHER.
- Use CIPHER (T).
- Walkthrough (T1).
- Open book and select twice, take BUSINESS CARD (U).
- Open wallet and take TICKET (U1).
- Place TEST TUBE (V) and FEATHER (W), receive FLAMMABLE POWDER.
- Look at notes twice, take PLATE (X).
- Walk down.

- Place PLATE.
- Walkthrough (Y).
- Take PHOENIX PENDANT (Z).
- Insert TICKET (A).
- Use BUSINESS CARD (B).
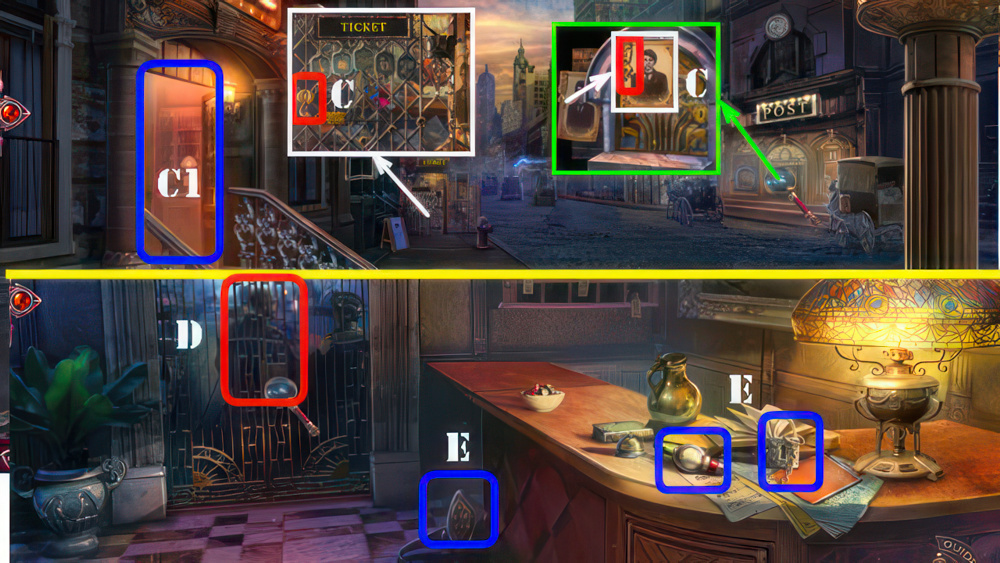
- Take CARRIER PIGEON and ELEPHANT KEYCHAIN 1/3 (C).
- Go (C1).
- Talk (D).
- Take KEYCHAINS 2/3, RED FUSE 1/2, and POSTMAN’S BAG (E).
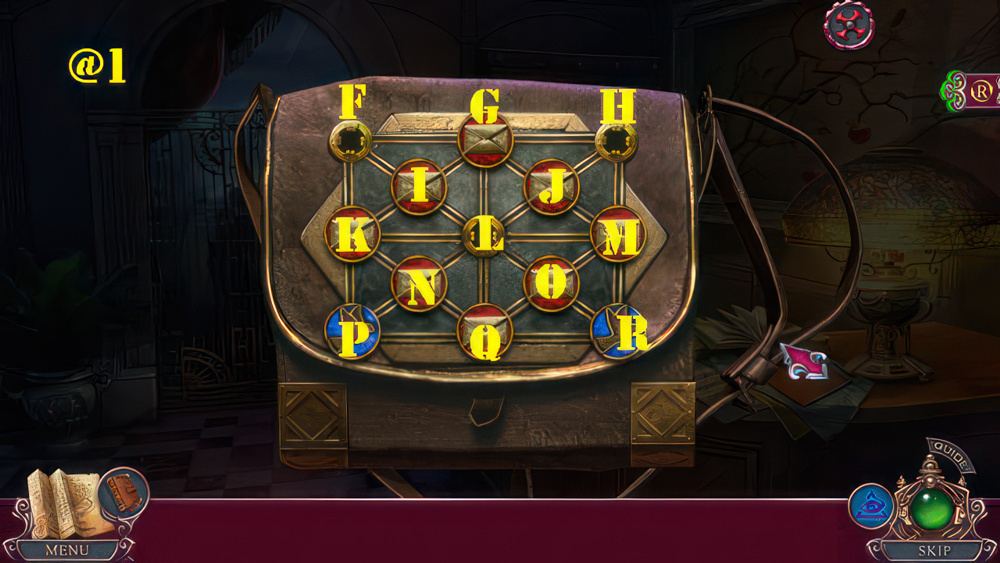
- CARRIER PIGEON on POSTMAN’S BAG.
- Remove the red chips by jumping over them with the blue chips.
- Walkthrough (@1): (P-L)-(L-F)-(R-H)-(F-P)-(P-R)-(R-L)-(H-F)-(L-H).
- Open envelope and look at both letters.
- Take POST OFFICE KEY.
- Walk down.
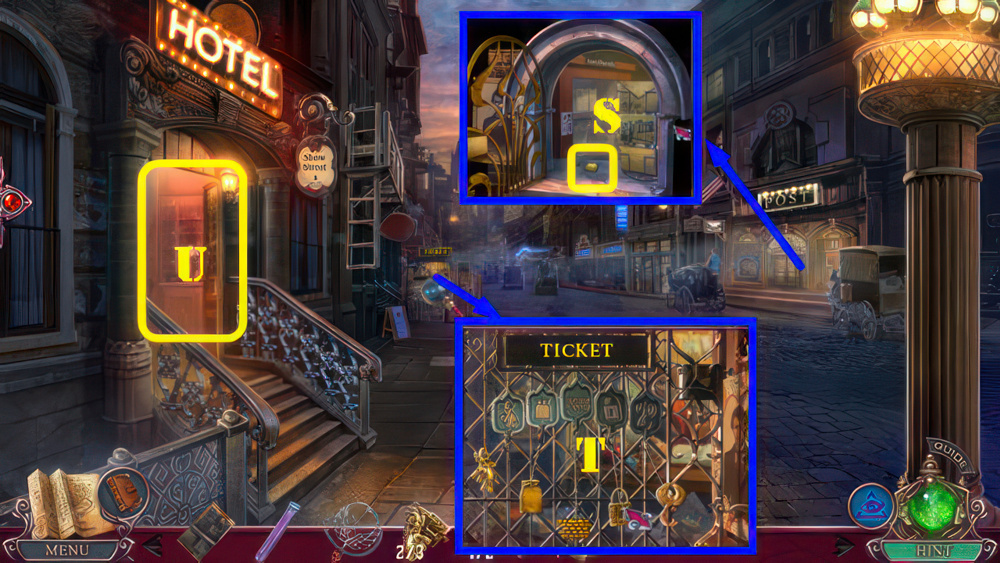
- Use POST OFFICE KEY, take KEYCHAINS 3/3 (S).
- Use KEYCHAINS 3/3.
- Walkthrough (T).
- Play puzzle, receive TICKET.
- Go (U).
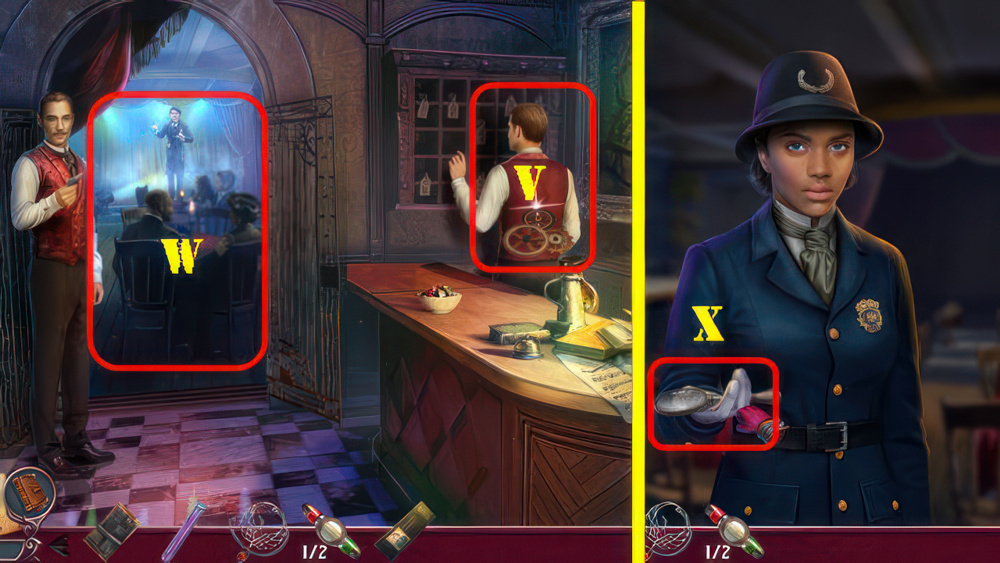
- Give TICKET (V).
- Go (W).
- Take MAGNIFYING GLASS (X).
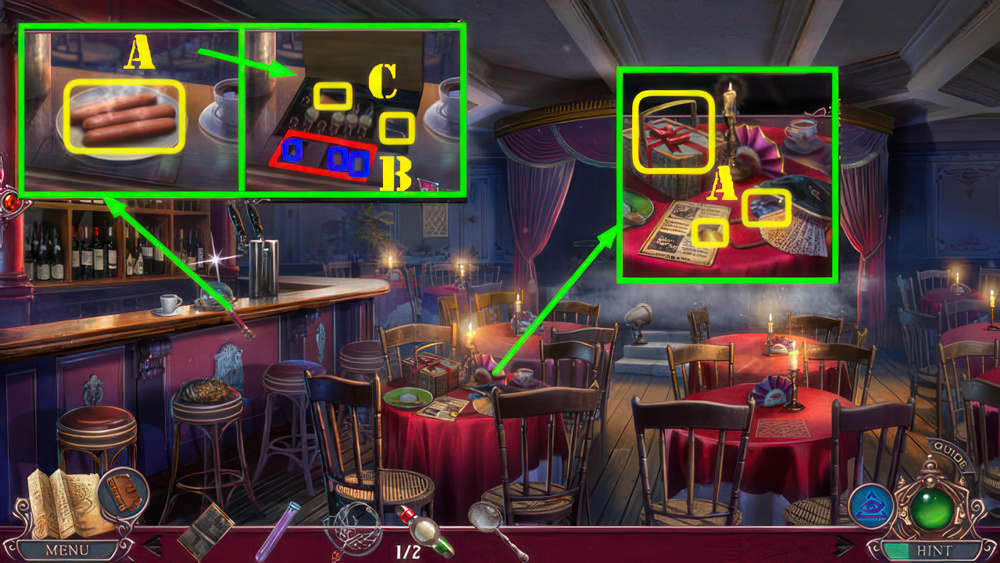
- Take HOT SAUSAGES, COIN 1/5, BAG OF FLOUR, and BASKET OF KITTENS (A).
- Select BASKET OF KITTENS ×4 and give them HOT SAUSAGES, take KITTENS, DUSTER, and FUSES 2/2.
- Use BAG OF FLOUR, DUSTER, and MAGNIFYING GLASS, select (B).
- Take HOOK and CHIP 1/2 (C).
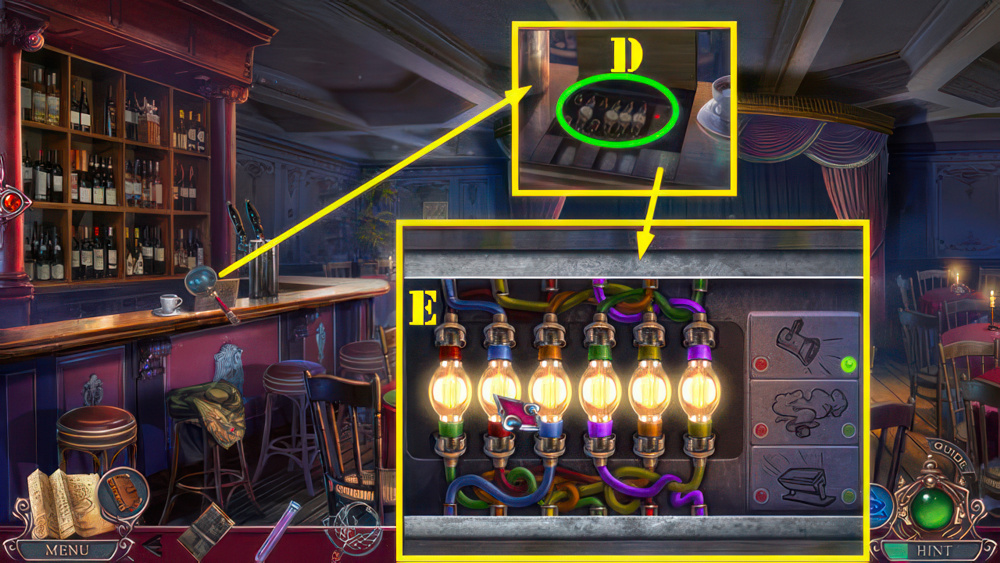
- Place FUSES 2/2 (D).
- Walkthrough (E).
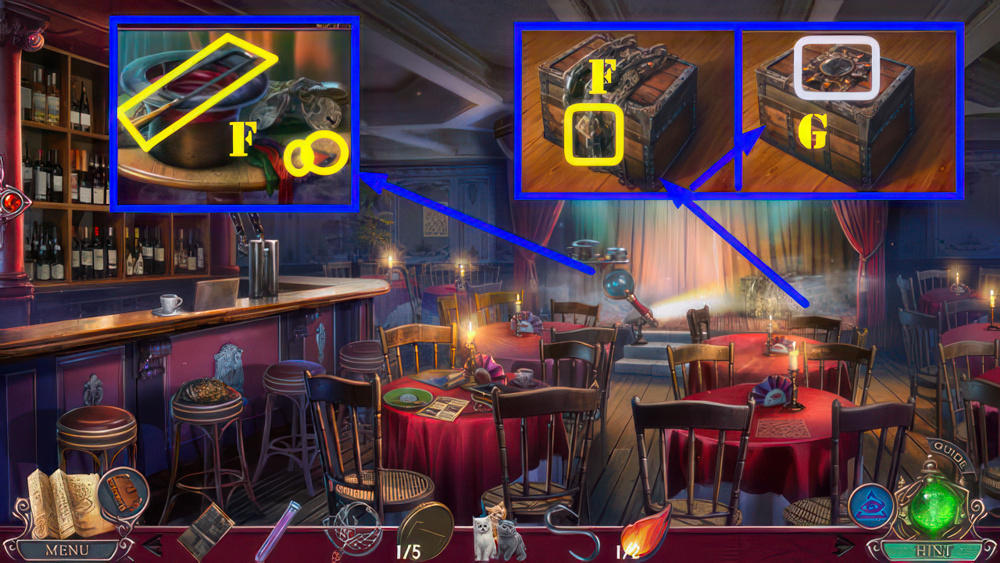
- Take SAW, COINS 2/5, CHIPS 2/2, and KING 1/3 (F).
- Use SAW and CHIPS 2/2 (G).
- Select.
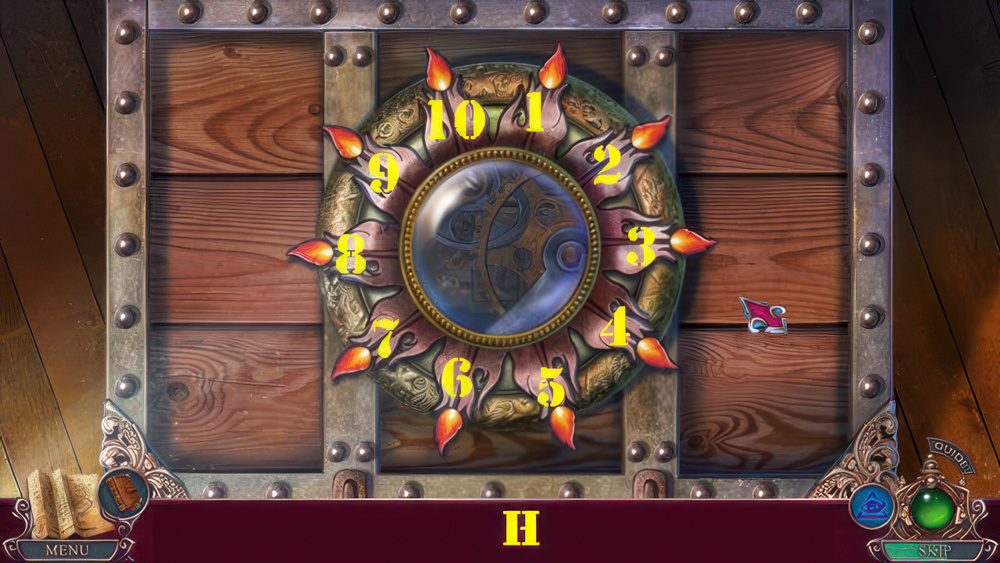
- By moving the chips, find the ones that match each other and assemble the picture from the halves.
- Walkthrough (H): (3-7)-(4-8)-(5-10)-(9-1)-(2-6).
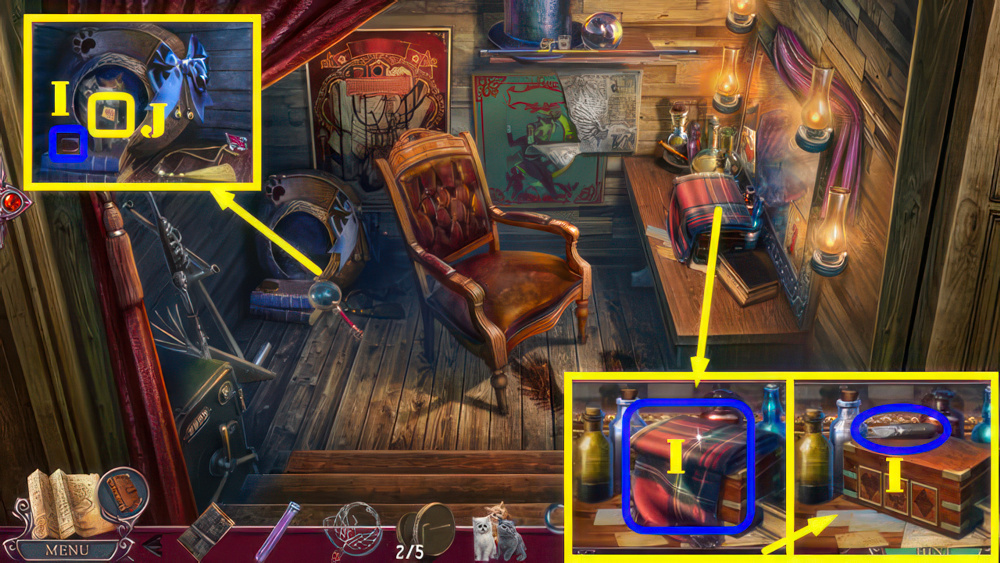
- Select the scene.
- Play puzzle.
- Take COINS 3/5, BLANKET, and UTILITY KNIFE (I).
- Place BLANKET and KITTENS, take KINGS 2/3 (J).
- Walk down.
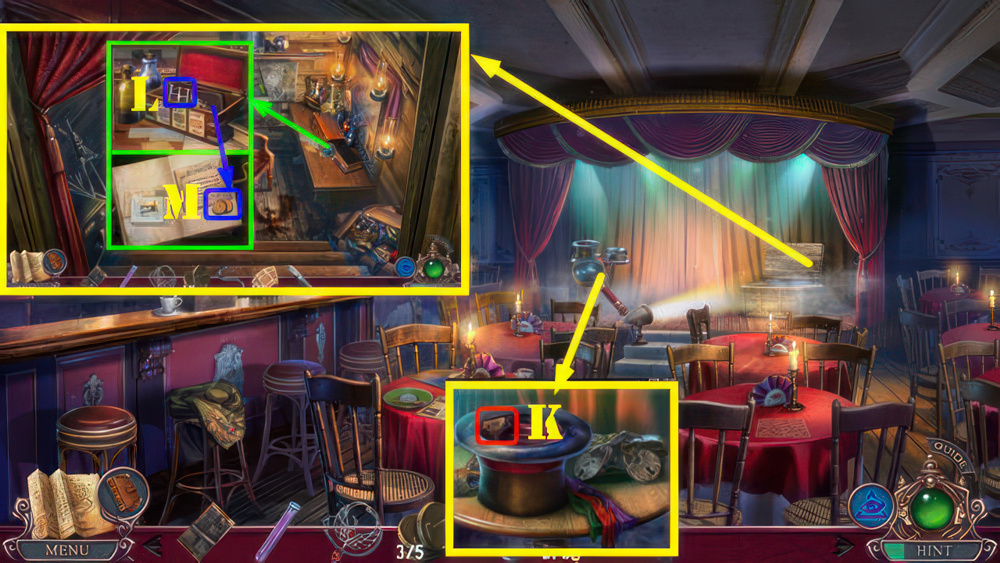
- Use UTILITY KNIFE, take KINGS 3/3 (K).
- Place KINGS 3/3, take INITIALS (L).
- Open book and select, take COINS 4/5, and COINS 5/5 (M).
- Walk down.
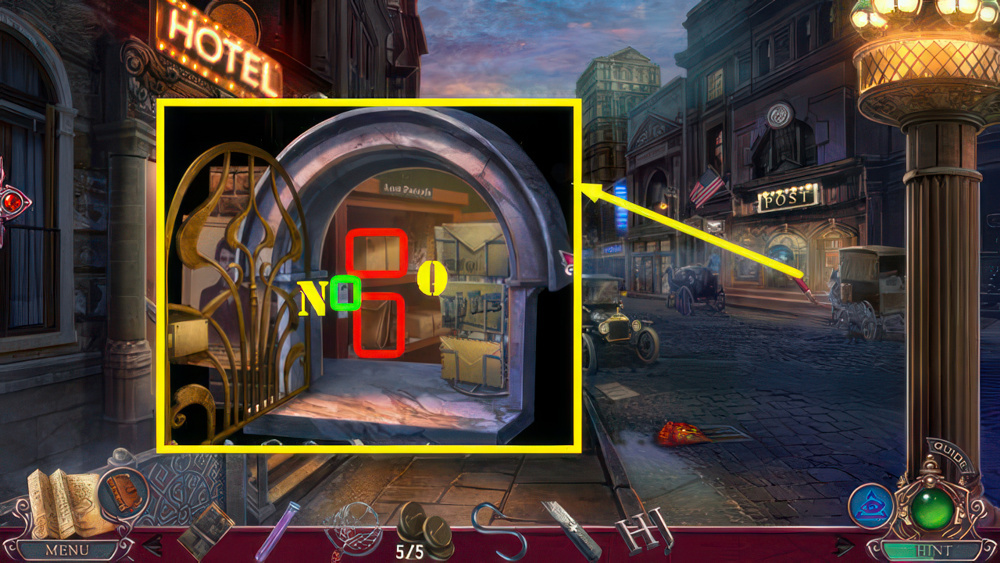
- Use COINS 5/5 (N).
- Take TOOL BAG and LOST PARCEL (O).
- UTILITY KNIFE and PHOENIX PENDANT on LOST PARCEL, look at note and take LACE.
- Place INITIALS, use FLAMMABLE POWDER and PHOTO.
- Take PHOTOS OF CRIME.
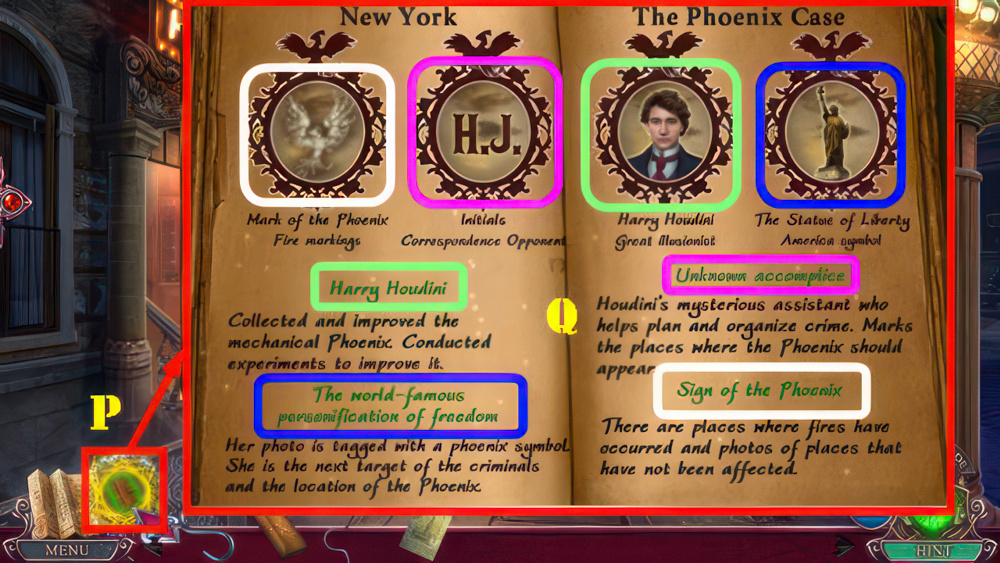
- Select (P).
- Complete the notes on your investigation.
- Select an image and place it where it belongs in the text.
- Walkthrough (Q).
- Take PICK.
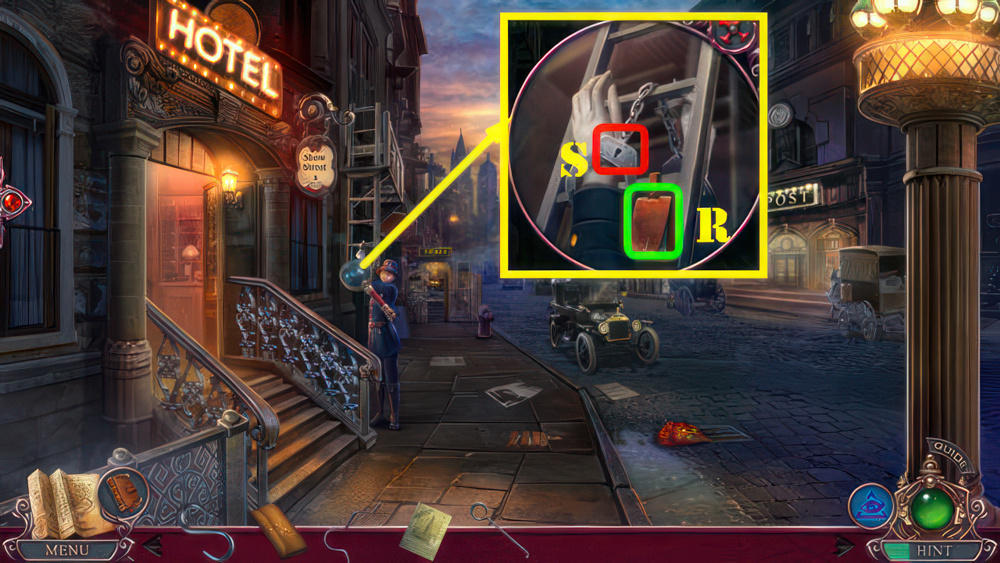
- Take BAGGAGE STAMP (R).
- Use PICK (S).
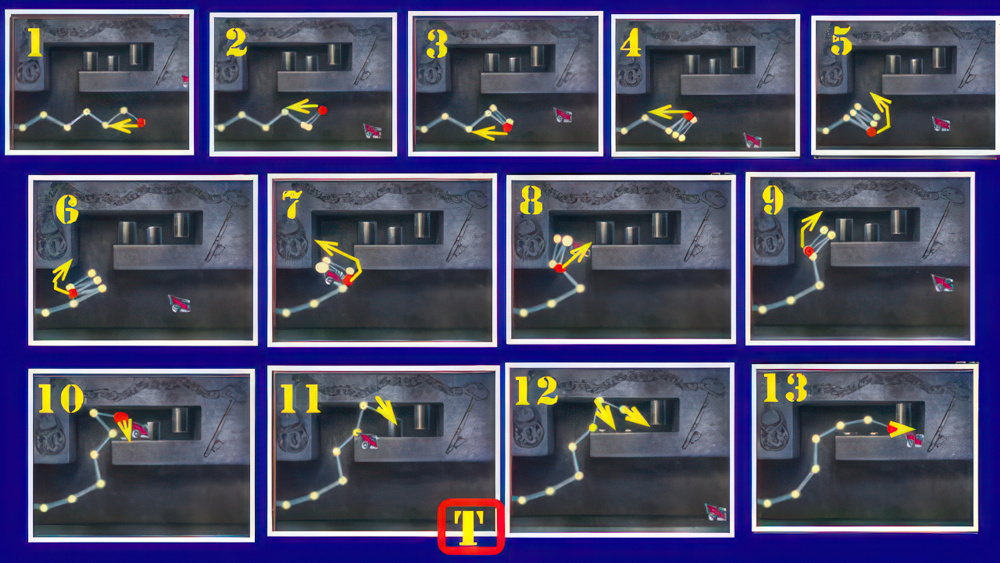
- Lift all of the rods by bending the pick to fit.
- Walkthrough (T): (1-13).
- On step (10), hover the tip of the rod over the first pin.
- On step (11), move the rods as shown and place the tip of the rod over the middle pin.
- On step (12), adjust the two dots closest to the third pin as shown in screenshot (13).
- Once the last dot touches the third pin, the puzzle will solve.
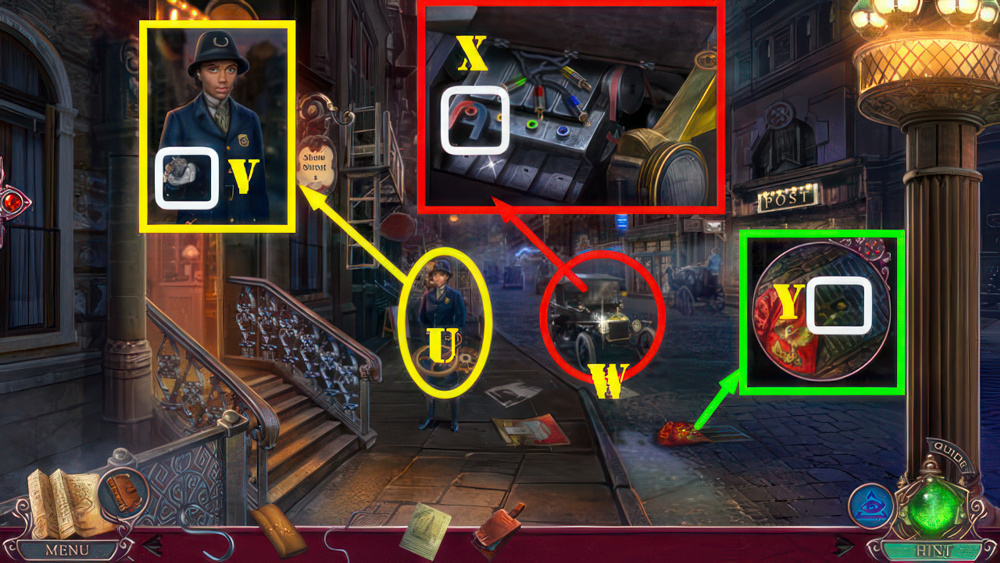
- Give PHOTOS OF CRIME (U).
- Take IGNITION KEY (V).
- Use IGNITION KEY (W).
- Open compartment, take MAGNET (X).
- LACE on MAGNET, take MAGNET WITH LACE.
- Use MAGNET WITH LACE (Y), receive NUTS and POKER CHIP.
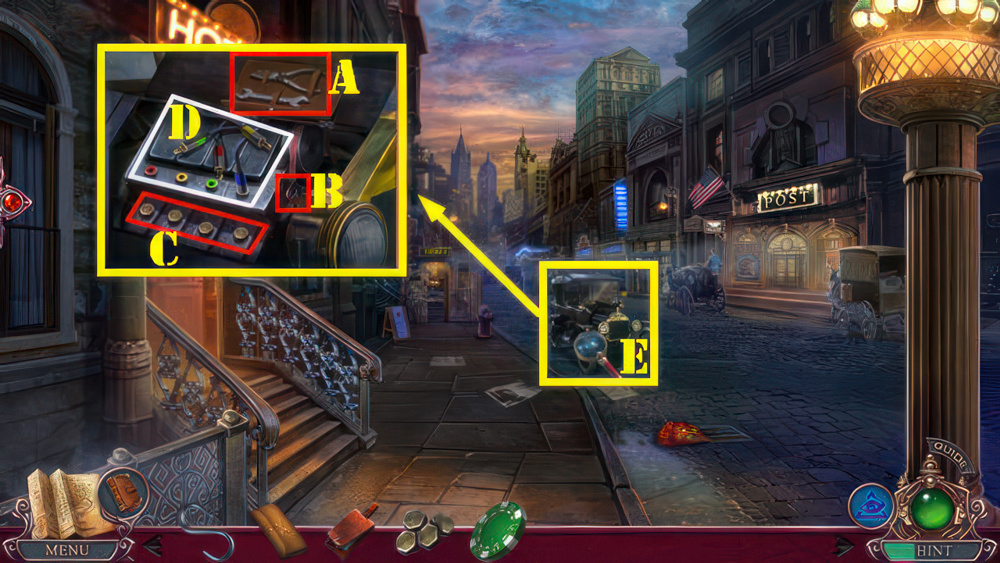
- Place TOOL BAG (A), HOOK (B), and NUTS (C).
- Open tool bag and use wrench on nuts.
- Take pliers from tool box and use it on hook.
- Select each wire (D).
- Select vehicle (E).
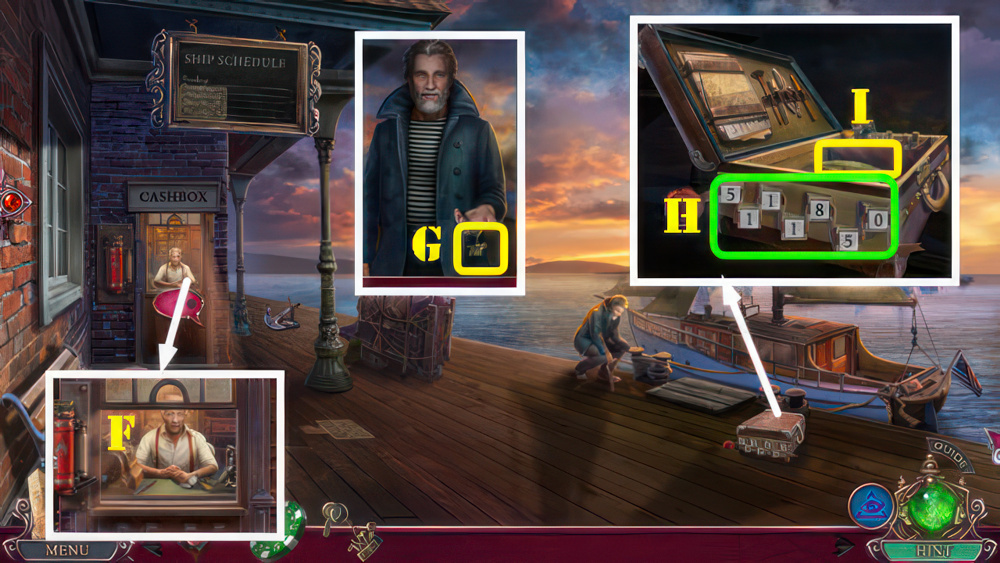
- Talk (F).
- Take KEY (G).
- Use BAGGAGE STAMP.
- Choose the side of the cubes, the signs on which will correspond to the code on the baggage receipt.
- Walkthrough (H).
- Open book and select twice, take PHOENIX FEATHER (I).
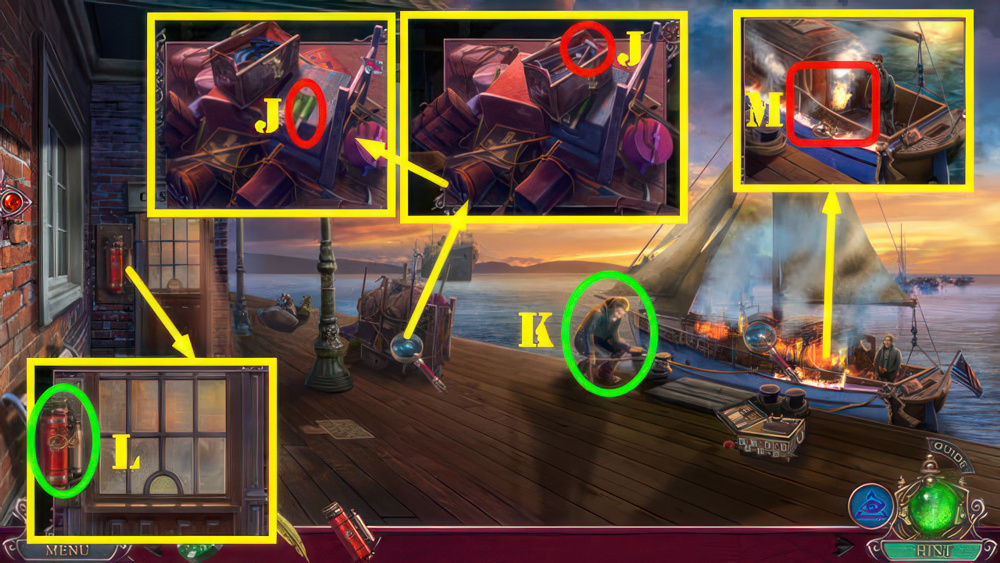
- Use PHOENIX FEATHER and KEY, take REPAIR TOOLS and TOOL (J).
- Give REPAIR TOOLS (K).
- Use TOOL (L), receive FIRE EXTINGUISHER.
- Use FIRE EXTINGUISHER (M).
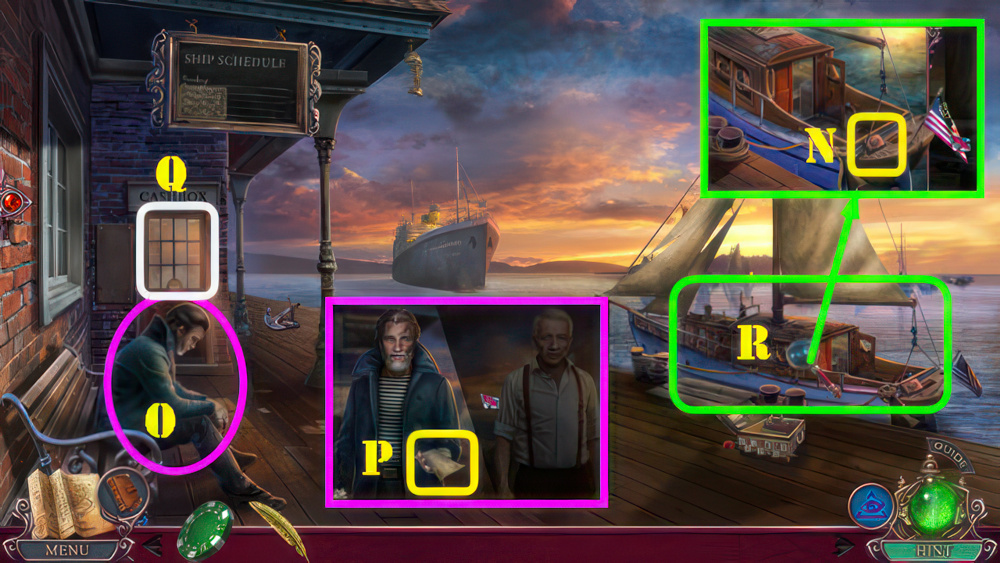
- Take MEDICAL KIT (N).
- Open MEDICAL KIT, select bandages and bottle.
- Use POKER CHIP on bottle.
- Pour bottle on bandage, take MEDICATED BANDAGES.
- Use MEDICATED BANDAGES (O).
- Take CONSIGNMENT NOTE (P).
- Use CONSIGNMENT NOTE (Q).
- Play puzzle, receive PIPES.
- Go (R).
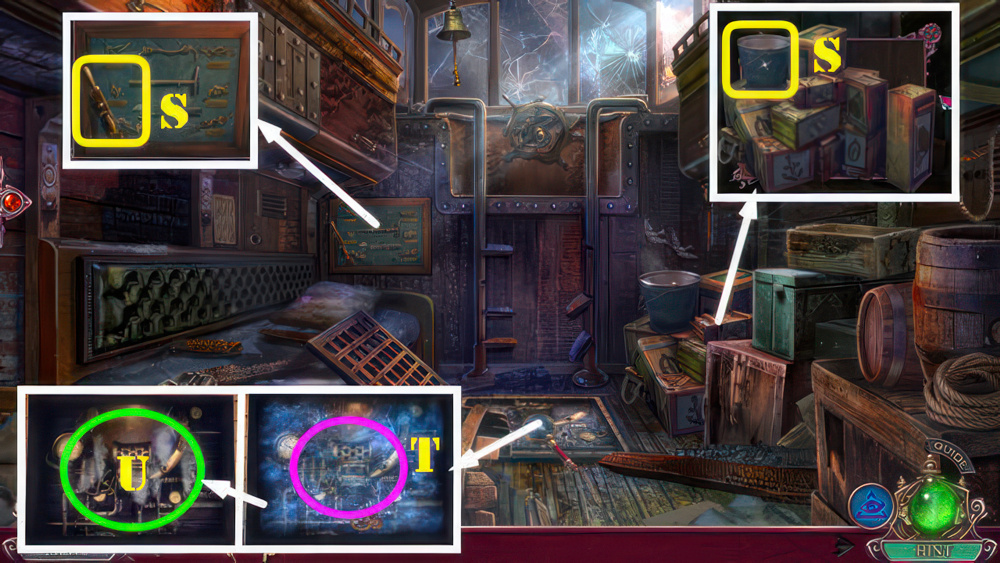
- Take BUCKET and WHEEL PART 1/4 (S).
- Use BUCKET (T), receive BUCKET OF WATER.
- Place PIPES (U).
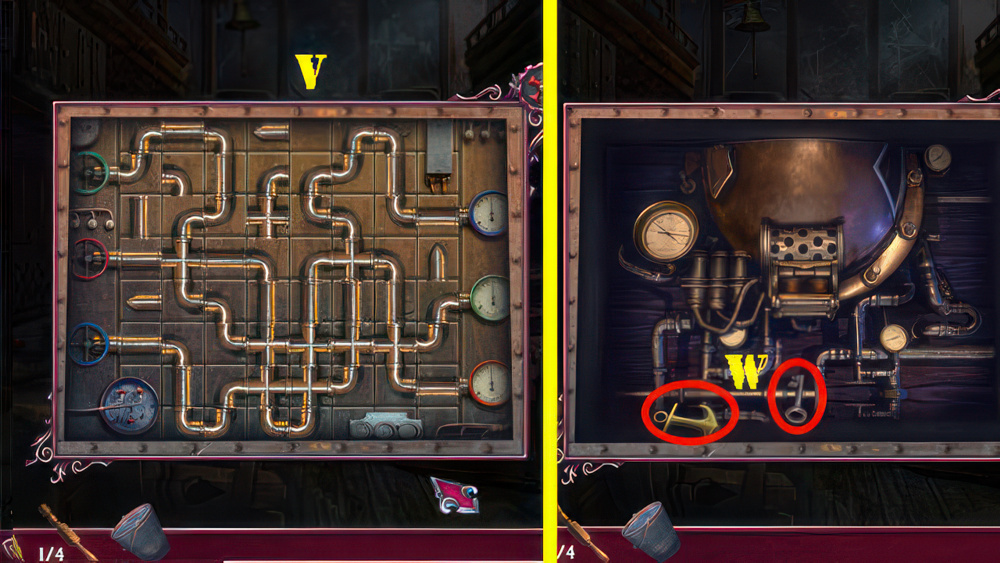
- Make a closed system of pipes leading from the valves to the counters by rotating the parts.
- Walkthrough (V).
- Take GOLDEN ANCHOR and KEY (W).
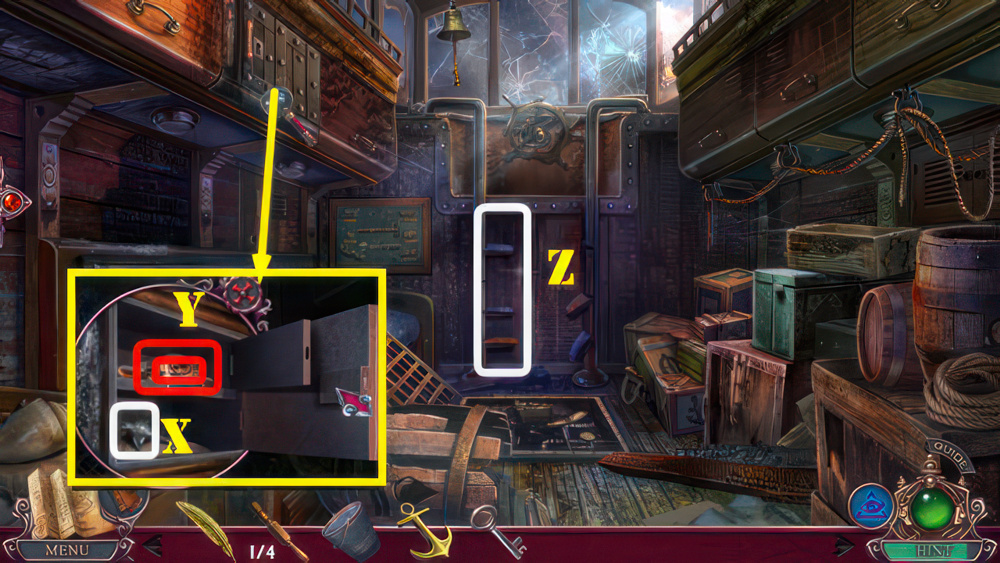
- Use BUCKET OF WATER and KEY, take SILVER MANTA RAY (X).
- Place GOLDEN ANCHOR, take MEASURING TAPE and WHEEL PARTS 2/4 (Y).
- Use MEASURING TAPE (Z), receive YARDSTICK.
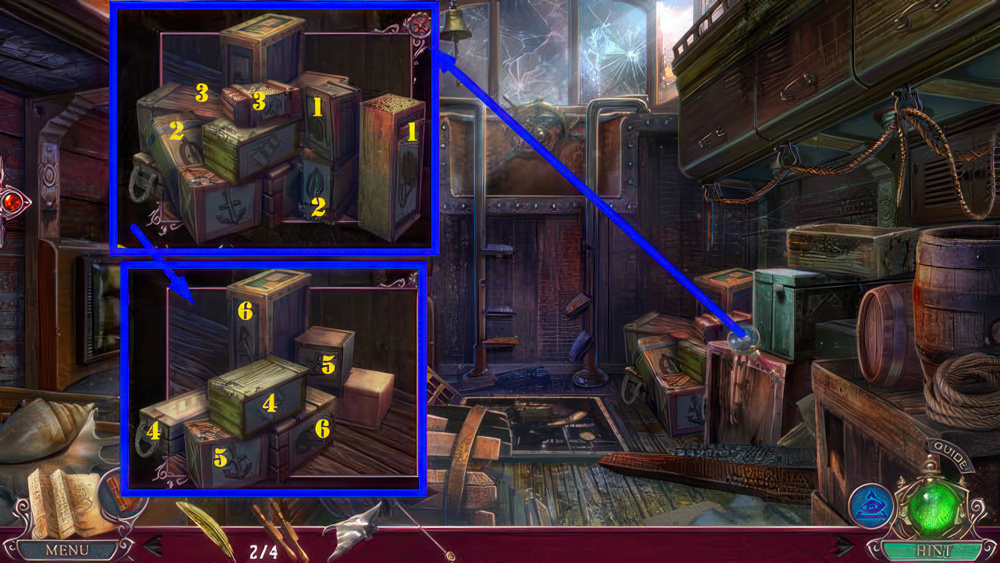
- Select matching crates (1-6).
- Walk down.
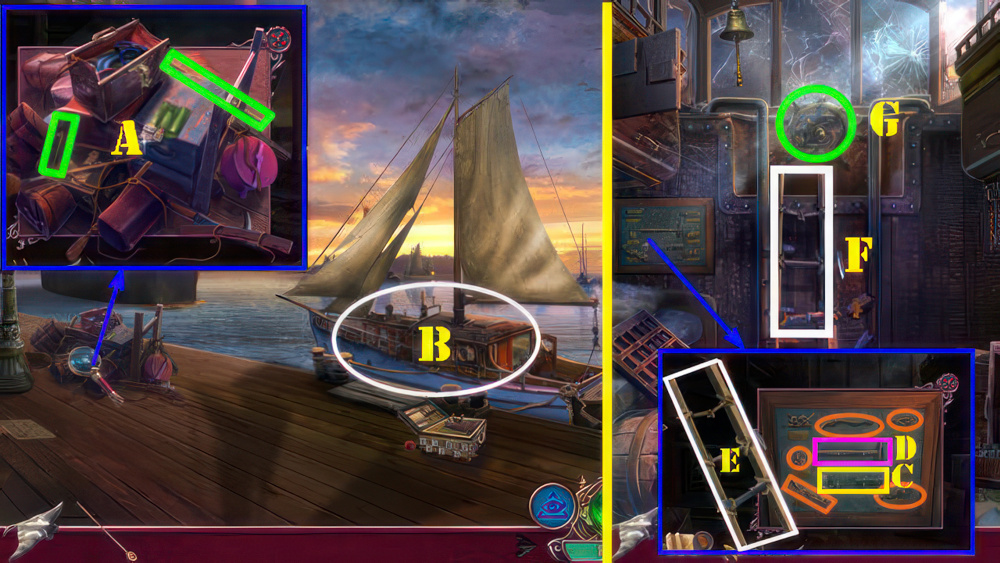
- Use YARDSTICK, select two poles (A), receive LADDER POLES.
- Go (B).
- Place LADDER POLES, select wrench (C), 5 rope pieces (orange), and hammer (D).
- Take LADDER (E).
- Place LADDER (F) and go (G).
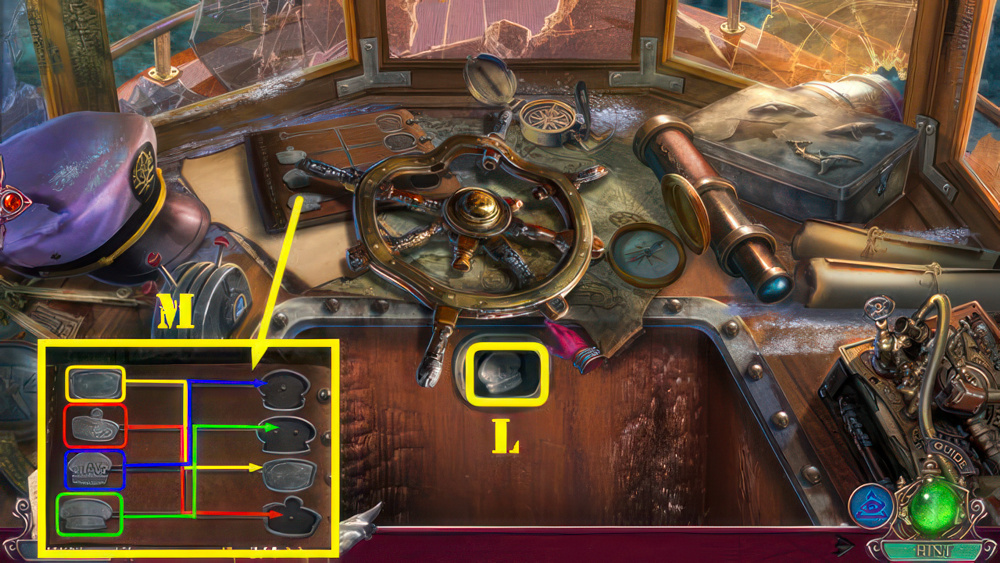
- Select steering wheel, take METAL CAP (L).
- Place METAL CAP.
- Move the chips along the guides and insert them into the corresponding slots to open the logbook.
- Walkthrough (M).
- Take SHIP CONTROL MANUAL.
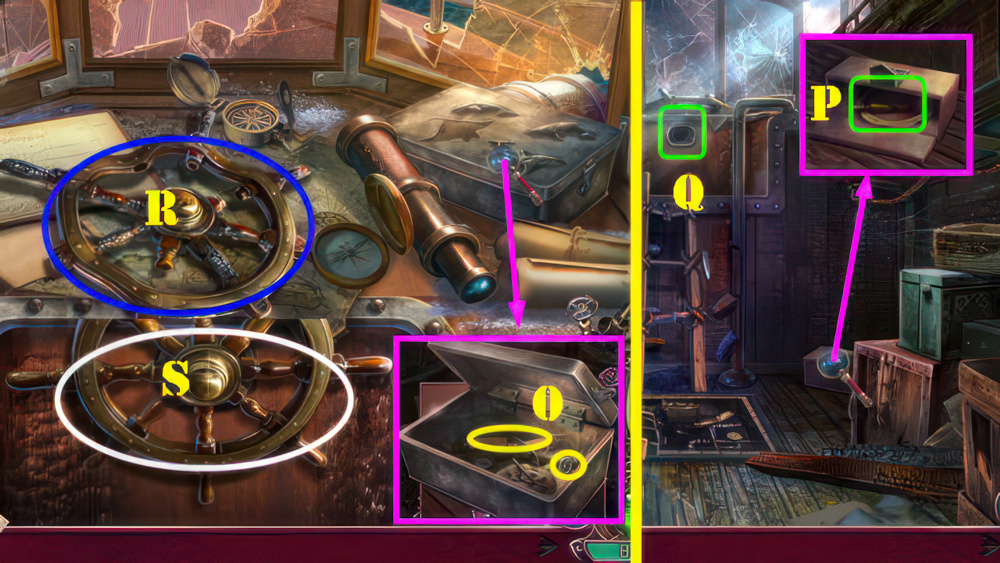
- Place SILVER MANTA RAY, take WHEEL PARTS 3/4 and BRONZE STEERING WHEEL (O).
- Walk down.
- Use BRONZE STEERING WHEEL, take WHEEL PARTS 4/4 (P).
- Go (Q).
- Place WHEEL PARTS 4/4 and select twice (R).
- Use SHIP CONTROL MANUAL (S).
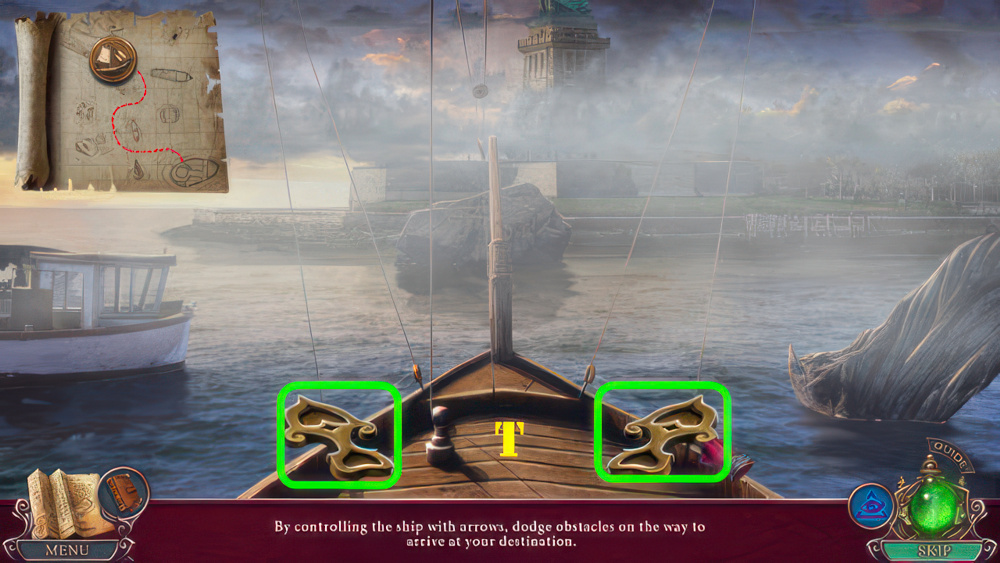
- By controlling the ship with arrows, dodge obstacles on the way to arrive at your destination.
- The solution is random.
- Use the arrows to avoid obstacles in the water (T).
- Go forward.
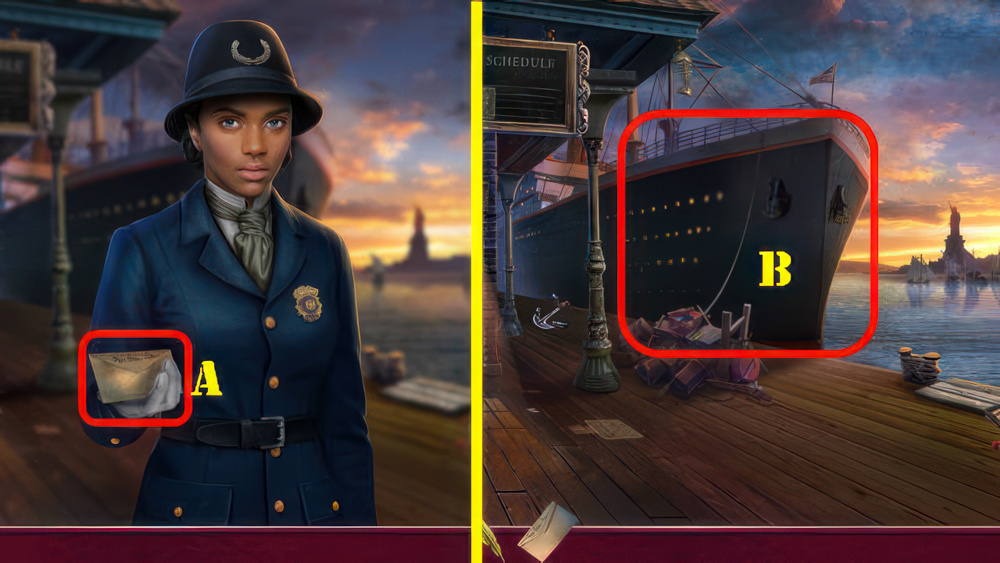
- Take LETTER (A).
- Go (B).
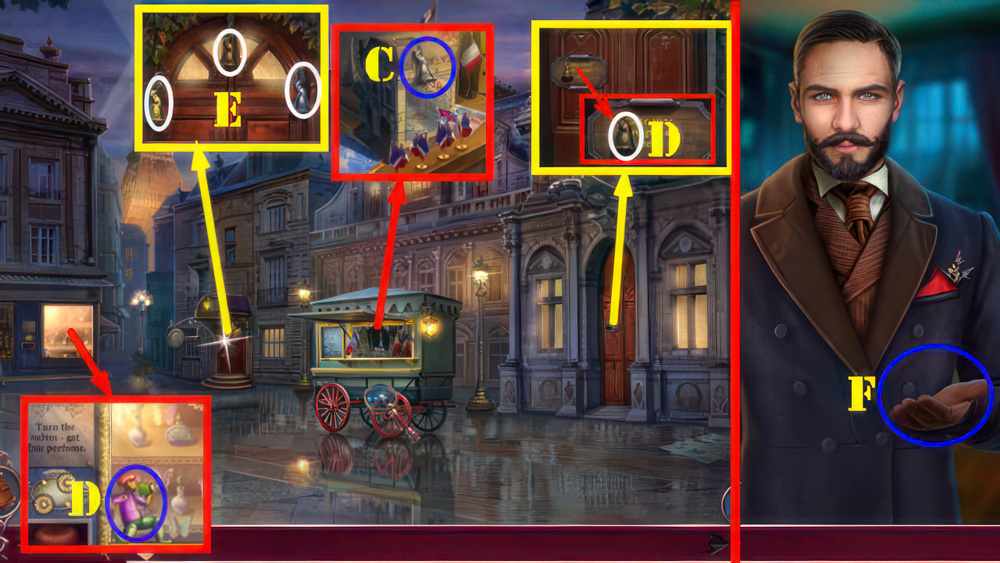
- Look at note, take DOORBELL 1/2 (C).
- Take FIGURINE 1/2 and DOORBELLS 2/2 (D).
- Remove sign and place DOORBELLS 2/2, select all three bells (E).
- Give LETTER (F).
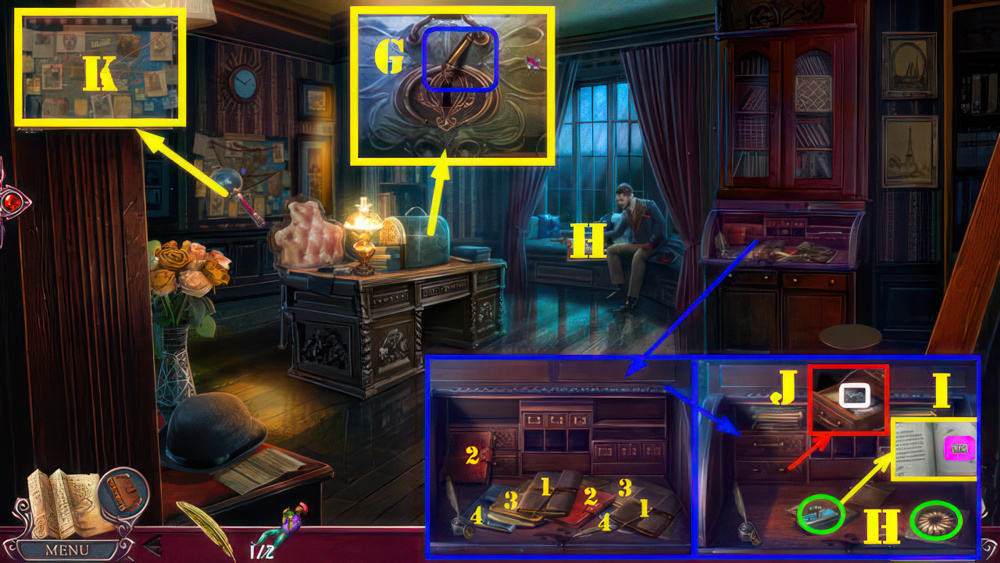
- Take HANDLE (G).
- Select desk and then the matching pairs (1-3), take PRESS and VALVE 1/2 (H).
- Open book and look at note, take INSTRUCTION (I).
- Place HANDLE and select, take LETTERS (J).
- Play puzzle (K).
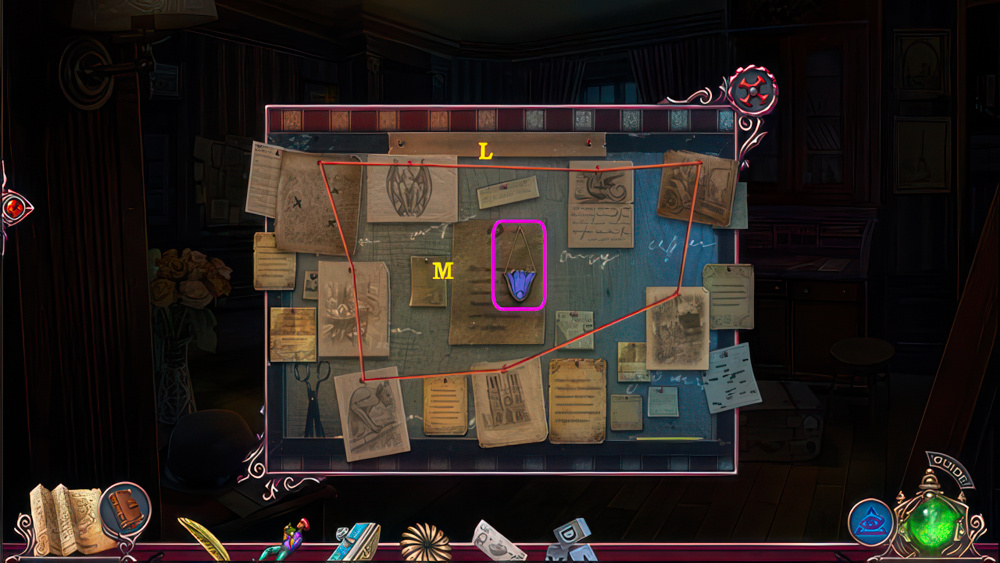
- Choose two pictures to swap their position so no lines intersect.
- Walkthrough (L).
- Take TOKEN (M).
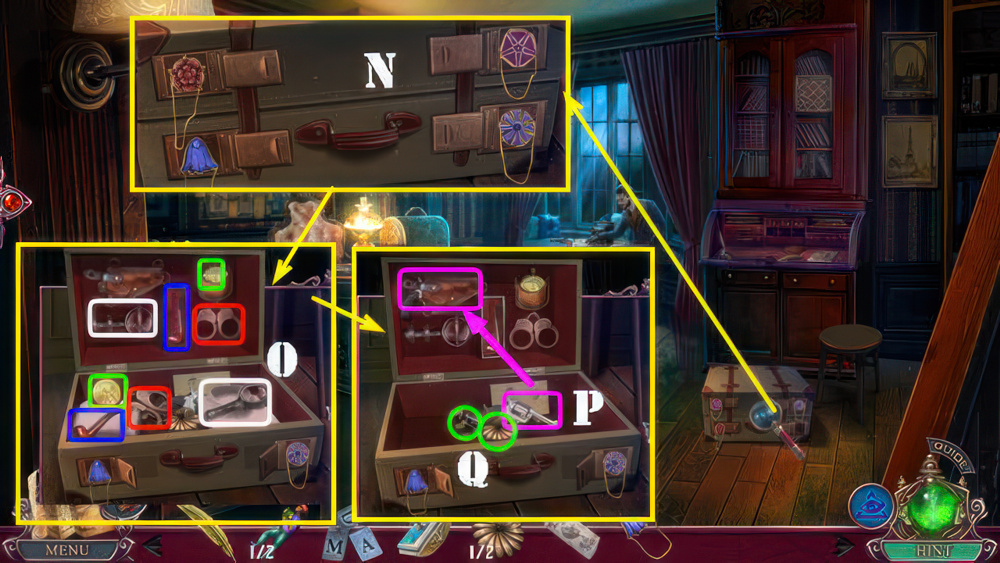
- Place TOKEN and swap as shown (N).
- Move items, place pipe, magnifying glass, handcuffs, and coin as shown (O).
- Move shirt, take gun and place (P).
- Take VALVES 2/2 and COINS (Q).
- Walk down.
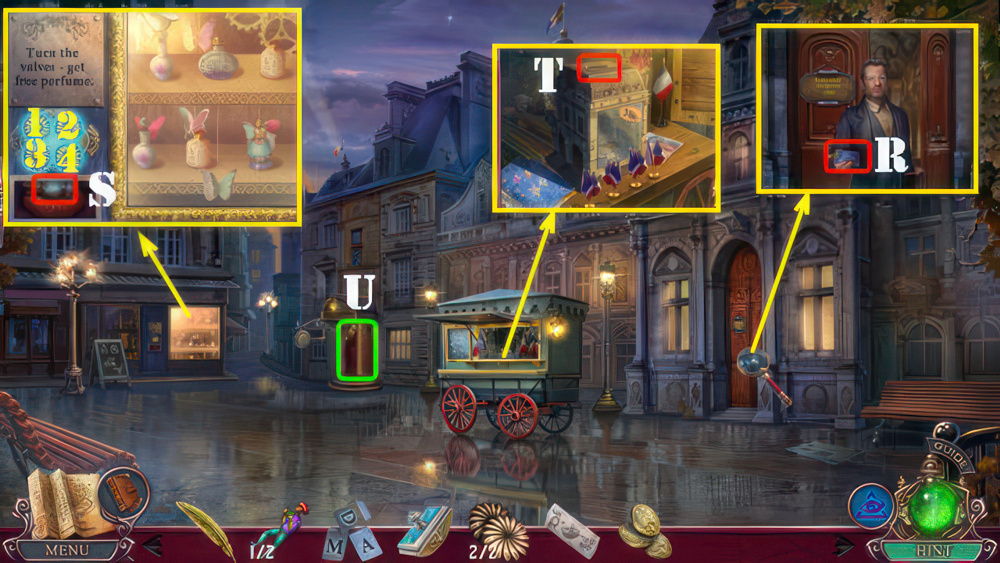
- Take SAMPLE (R).
- Take PIN from SAMPLE.
- Place VALVES 2/2, select 3-2-4-1.
- Take PERFUME (S).
- Use COINS (T).
- Play puzzle, receive BLUE PAPER.
- Go (U).
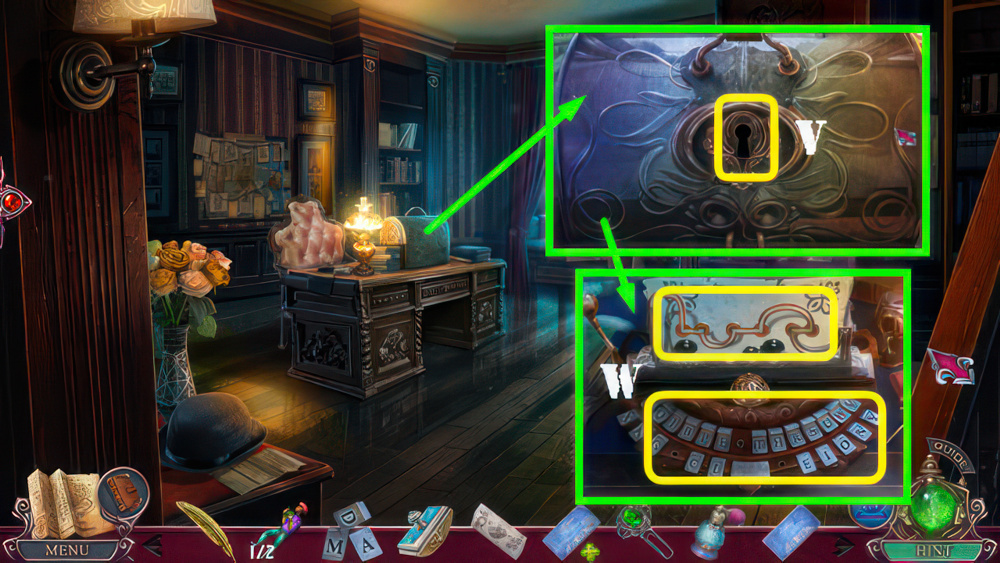
- Use PIN and select (V).
- Place LETTERS and BLUE PAPER (W).
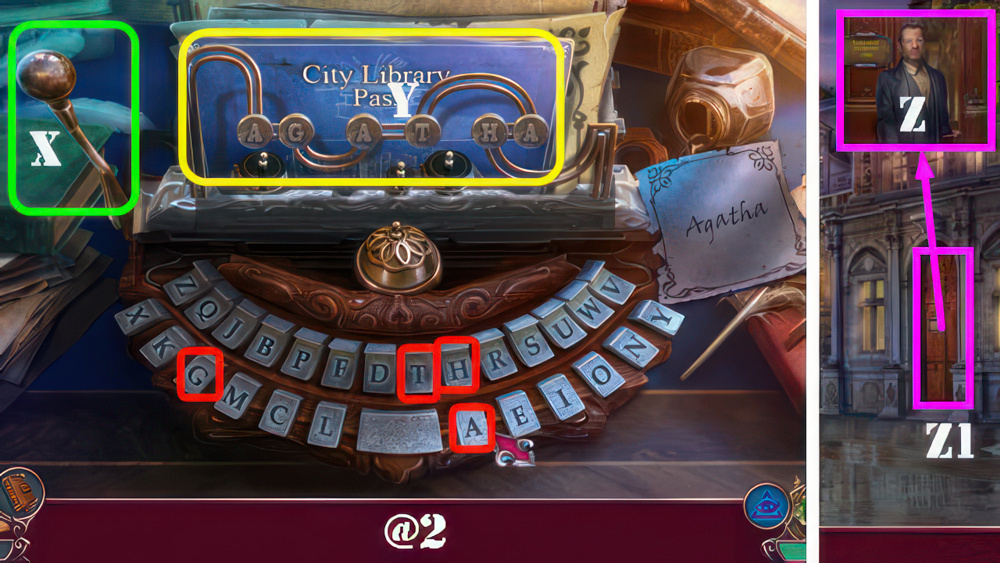
- Print your name to finish the pass.
- Select the key to move the corresponding letter stamp.
- The key should be chosen in the correct order.
- Walkthrough (@2): (H-A-T-A-G-A).
- Select lever (X), take UNFINISHED PASS (Y).
- Walk down.
- Use PRESS, INSTRUCTION, PERFUME, and UNFINISHED PASS on SAMPLE.
- Use perfume on the passes, take PASS.
- Use PASS (Z).
- Enter (Z1).
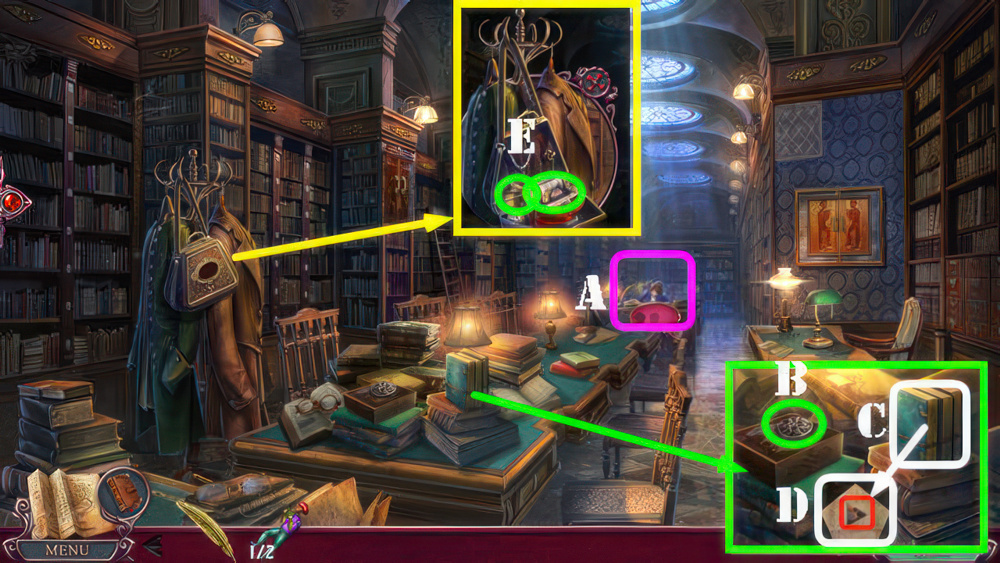
- Talk (A).
- Take FLOWER (B).
- Use PHOENIX FEATHER (C) and open envelope ×3, take TRIANGLE 1/2 (D).
- Place FLOWER, take NEEDLE AND THREAD and COINS (E).
- Walk down.
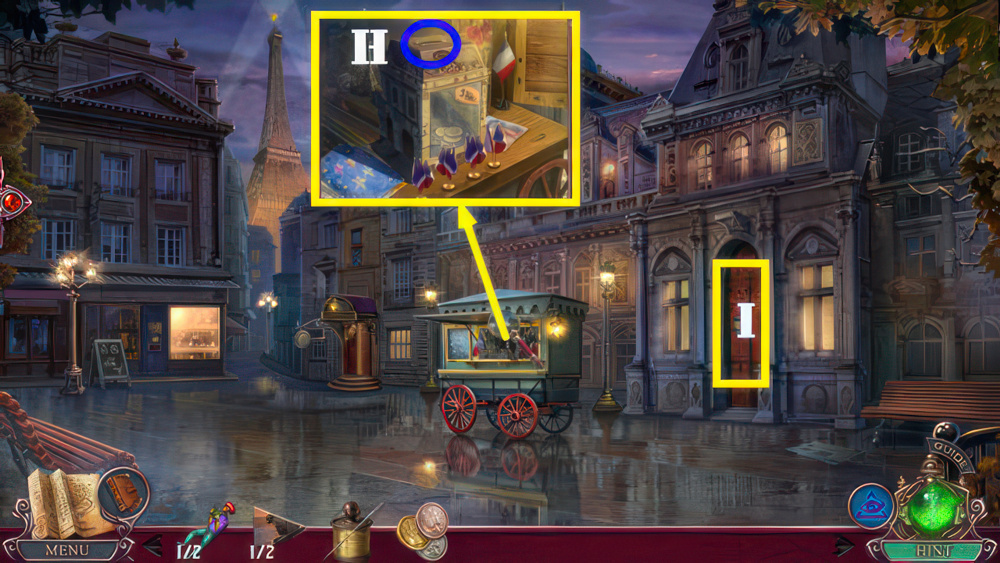
- Use COINS (H).
- Play puzzle, receive FIGURINES 2/2.
- Enter (I).
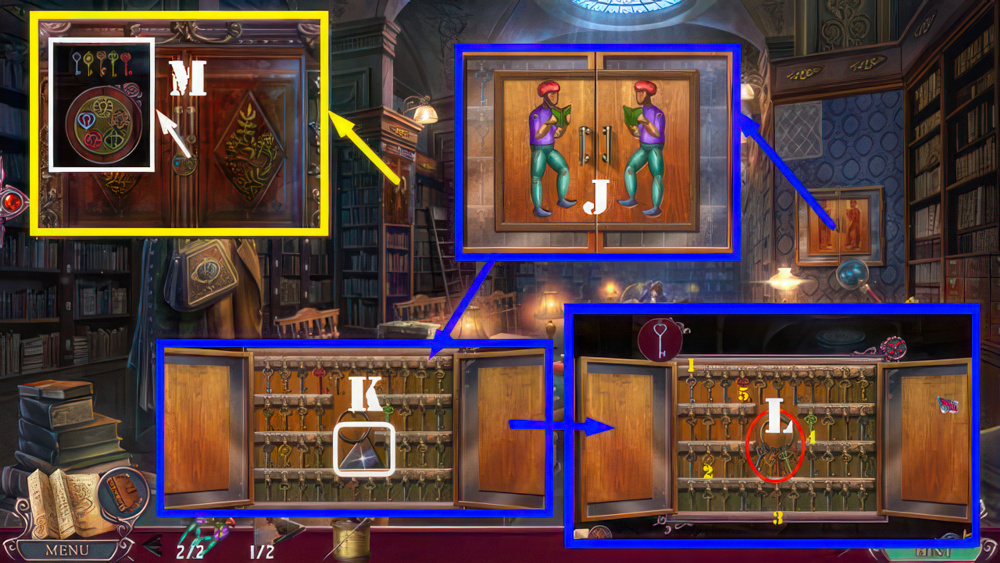
- Place FIGURINES 2/2.
- Walkthrough (J).
- Take TRIANGLES 2/2 (K).
- Select 1-5, take KEY RING (L).
- Use KEY RING, place keys in matching slots and turn all keys (M).
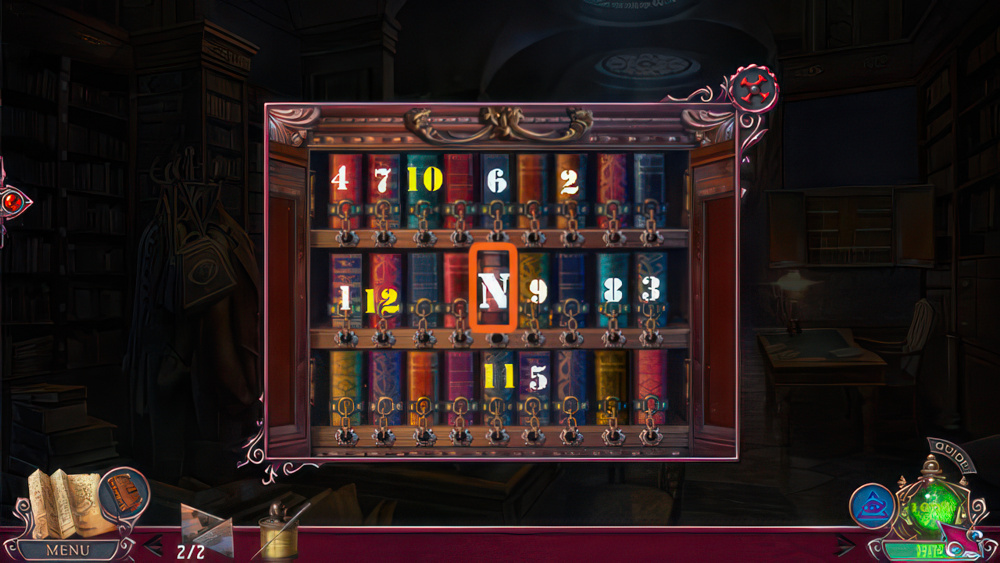
- Move the books to untangle the chains.
- Select the available book to swap it with the next available.
- Books are available when they not covered with chains.
- Walkthrough: 1-2-3-1-4-5-6-3-4-7-3-8-4-9-1-7-10-11-7-12-10.
- Take BOOK and MATERIALS (N).
- Give MATERIALS (O).
- Take FLEUR-DE-LIS 1/2 (O1).
- Place TRIANGLES 2/2.
- Walkthrough (P).
- Take FLEUR-DE-LIS 2/2 (Q).
- FLEUR-DE-LIS 2/2 on BOOK.
- Play puzzle.
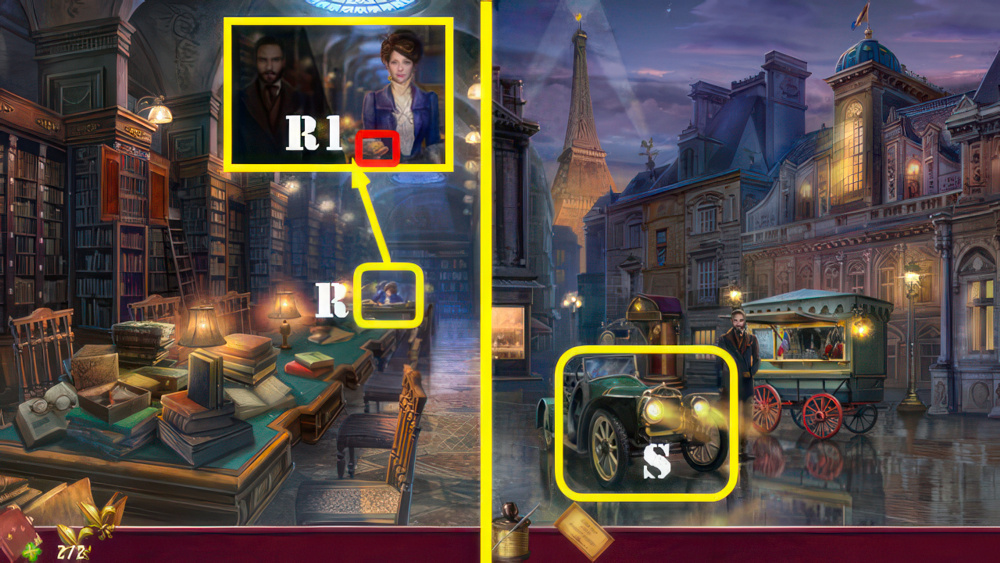
- Talk (R).
- Take ADDRESS CARD (R1).
- Walk down.
- Select the car (S).

- Find the location on the map indicated by the clue.
- Select circle to move to that area and investigate.
- When you find the correct location, you will receive a new clue.
- Walkthrough: (1-8).
- You must pass by all the green dots for the locations to be revealed.
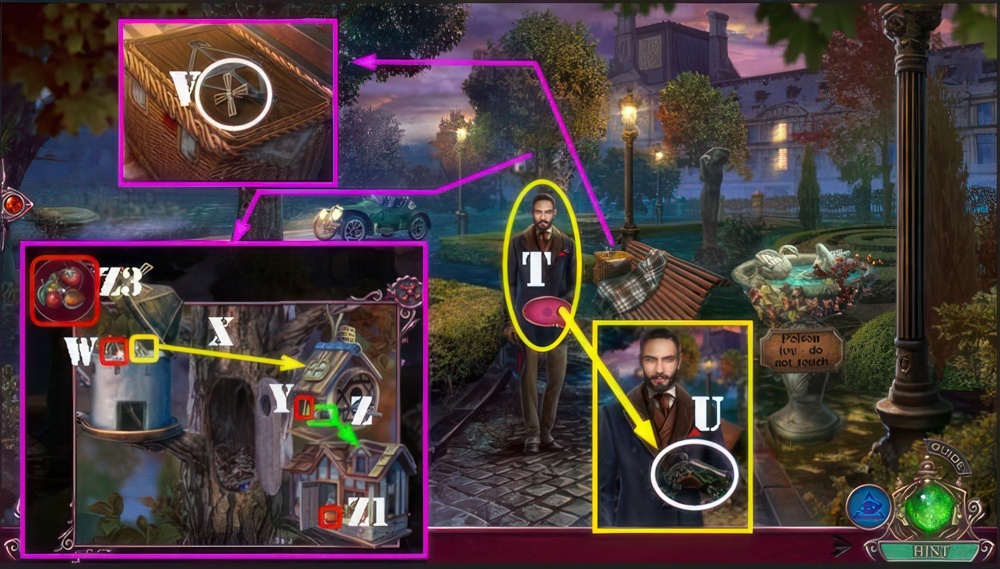
- Talk (T).
- Take BROKEN GUN (U).
- Take DOOR TOKEN (V).
- Use DOOR TOKEN, select cherry (W).
- Place window (X), take pear (Y).
- Place attic (Z), select plum (Z1).
- Place bird, take TOWER and strawberry (Z2).
- Take BASKET TOKEN (Z3).
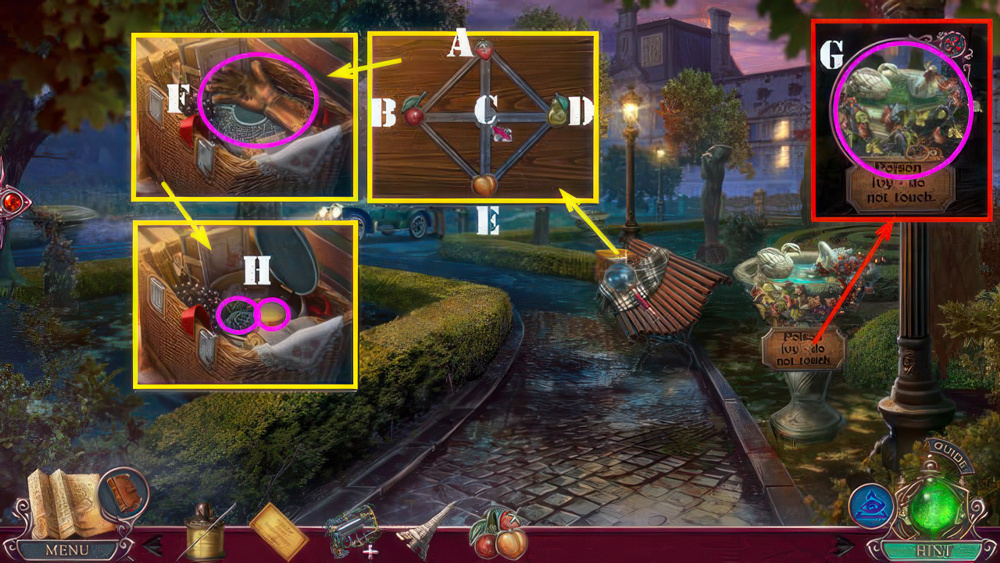
- Place BASKET TOKEN.
- Arrange the tags so they match their corresponding depiction.
- Walkthrough: (D-E-B-A-C-E-B-A-C).
- Take GLOVE (F).
- NEEDLE AND THREAD on GLOVE, take GLOVE.
- Use GLOVE (G), receive WOOL TOKEN and HOOKS.
- Place WOOL TOKEN, take HONEY and WOOL (H).
- HOOKS and WOOL on BROKEN GUN.
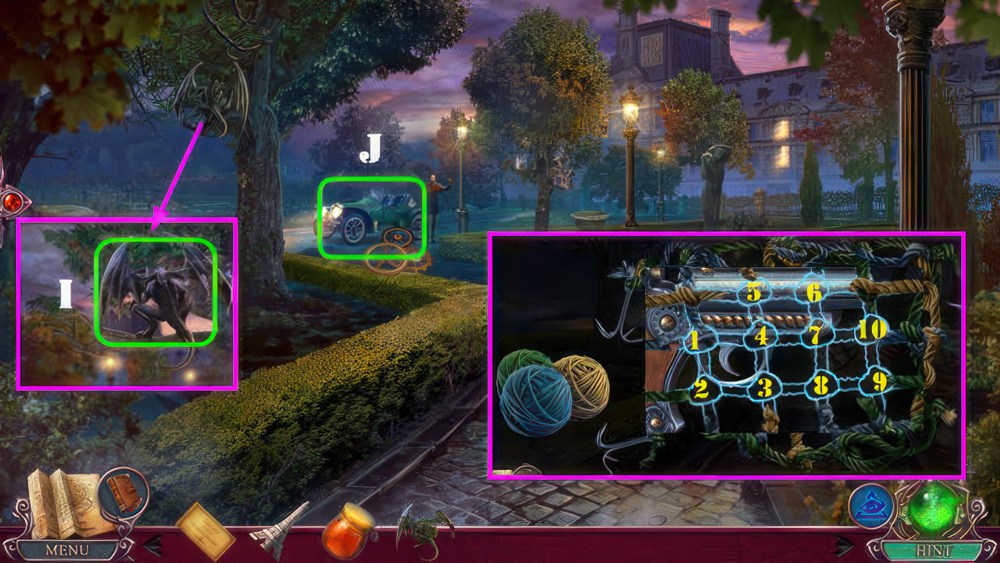
- Weave the net by restoring the knots.
- Notice that you can only go through each knot once.
- Walkthrough: (1-10).
- Take TRAP.
- Use TRAP, take GARGOYLE (I).
- Used ADDRESS CARD and go (J).

- Talk (K).
- Give GARGOYLE, take BROKEN GLASSES (L).
- Take WEIGHT 1/2 and WINDOWSILL TOKEN (M).
- Place TOWER and then place monuments on globe (N).
- Take WEIGHTS 2/2 and LENSES (O).
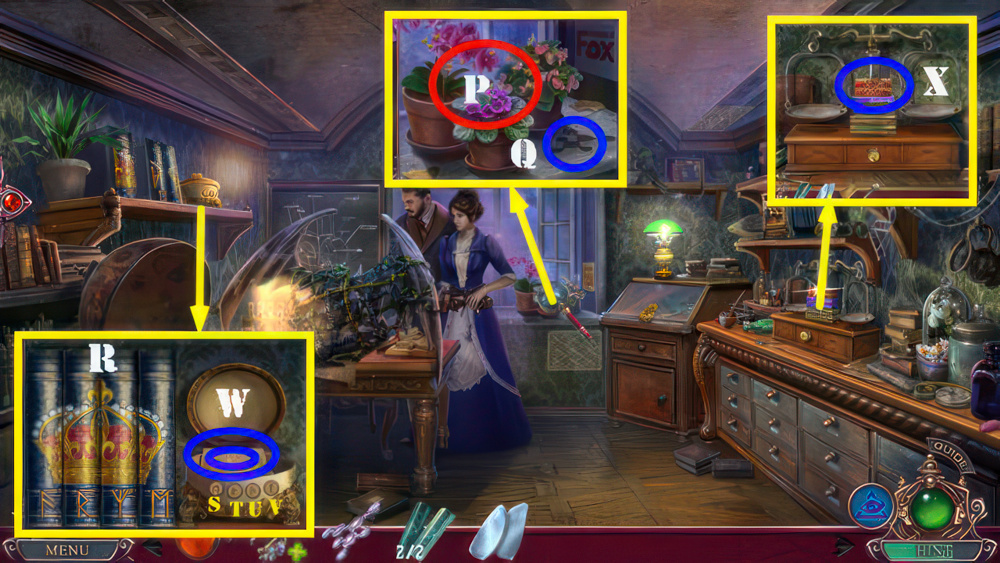
- Use HONEY (P).
- Use WINDOWSILL TOKEN (Q), take BOOK.
- Place BOOK, arrange as shown (R).
- Select 3241 (U-T-V-S).
- Take STAGE PASS and SCREW (W).
- Place WEIGHTS 2/2 (X).
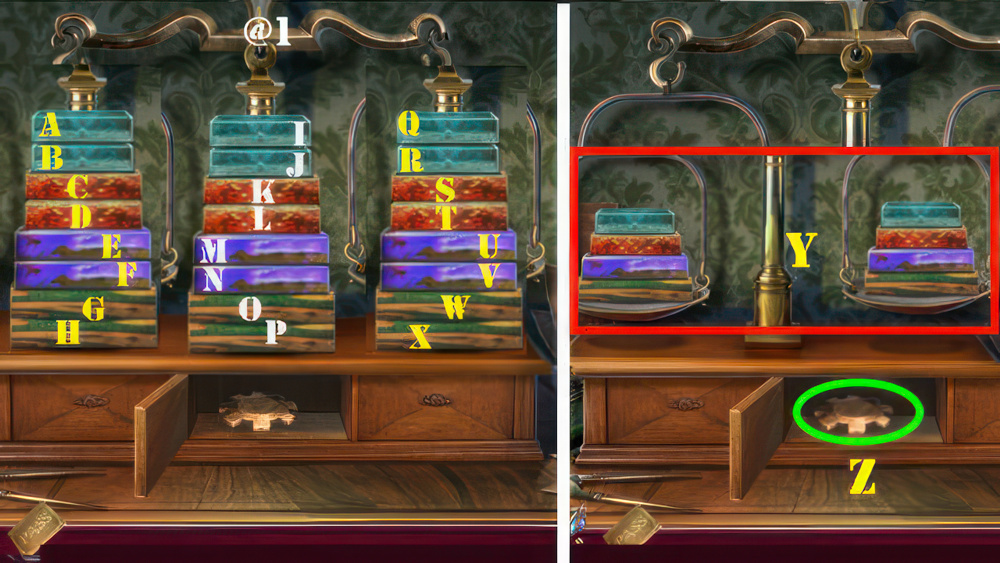
- Place the correct weights in each pan.
- Weights must be stacked from large to small.
- Walkthrough (@1): (I, J-H, G)-(K, L-X-W)-(G, H-V, U)-(M, N-G, H).
- (U, V-N, M)-(W, X-F-E)-(M, N-C, D)-(O-X).
- (C, D-W, V)-(E, F-O, N)-(V, W-M, L)-(G, H-W, V).
- (L, M-H, G)-(N, O-U, T)-(G, H-S, R)-(P-H).
- (R, S-G, F)-(T, U-P, O)-(F, G-N, M)-(V-G).
- (M, N-F, E)-(O-V)-(E, F-U, T)-(P-F)-(T-E).
- Solved image (Y).
- Take TOOLS TOKEN (Z).
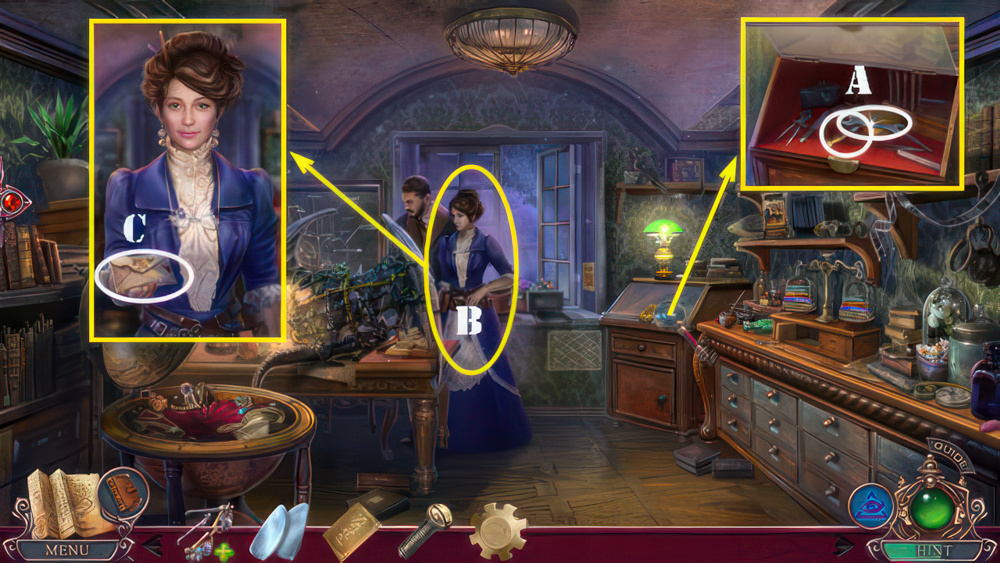
- Use TOOLS TOKEN, take WRENCH 1/3 and SCREWDRIVER (A).
- LENSES, SCREW, and SCREWDRIVER on BROKEN GLASSES, take GLASSES.
- Give GLASSES (B).
- Take letter (C).

- Complete the notes on your investigation.
- Select an image and place it where it belongs in the text.
- Select (D), walkthrough (E).
- Take PIN.
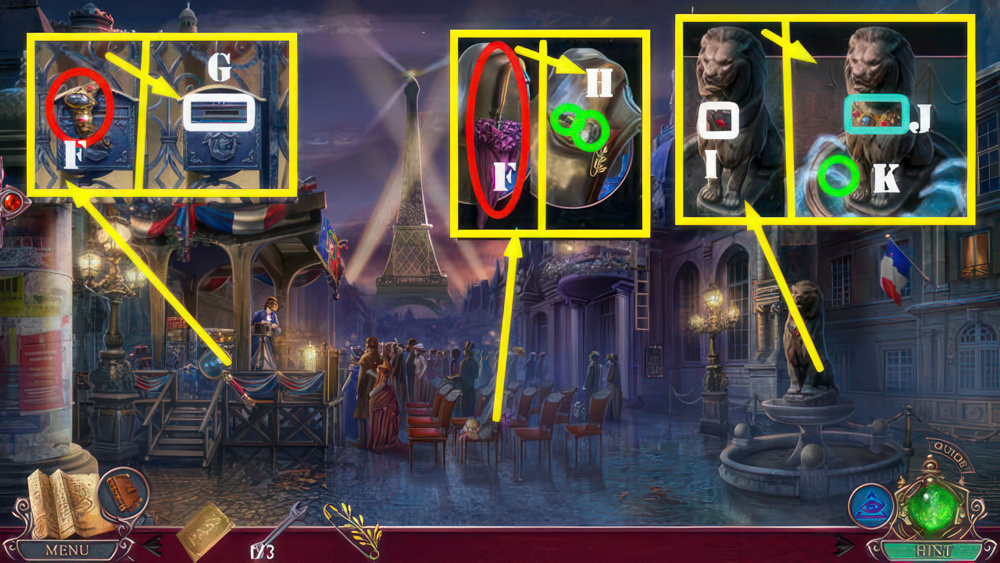
- Take COLLAR and UMBRELLA (F).
- Use STAGE PASS (G).
- Play puzzle, receive GEM 1/2.
- Select jacket and use PIN, take FLASK and KNIFE (H).
- Use KNIFE, take GEMS 2/2 (I).
- Place COLLAR (J).
- Use FLASK (K).
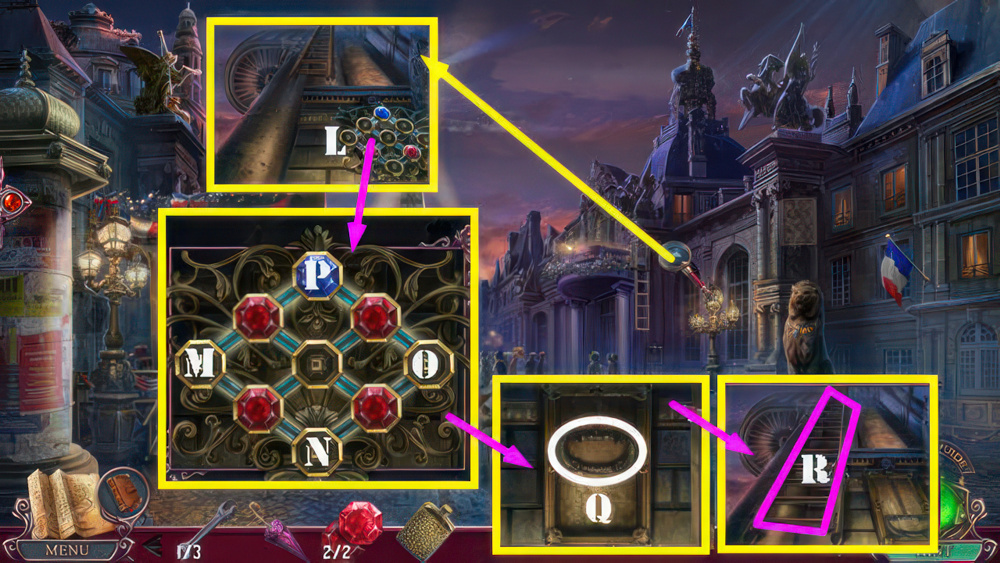
- Place GEMS 2/2 (L).
- Clear the red gems.
- Select a gem and space to move it to.
- Jumping over a gem will remove it.
- Walkthrough (M-N-O-P).
- Pull lever (Q).
- Go (R).
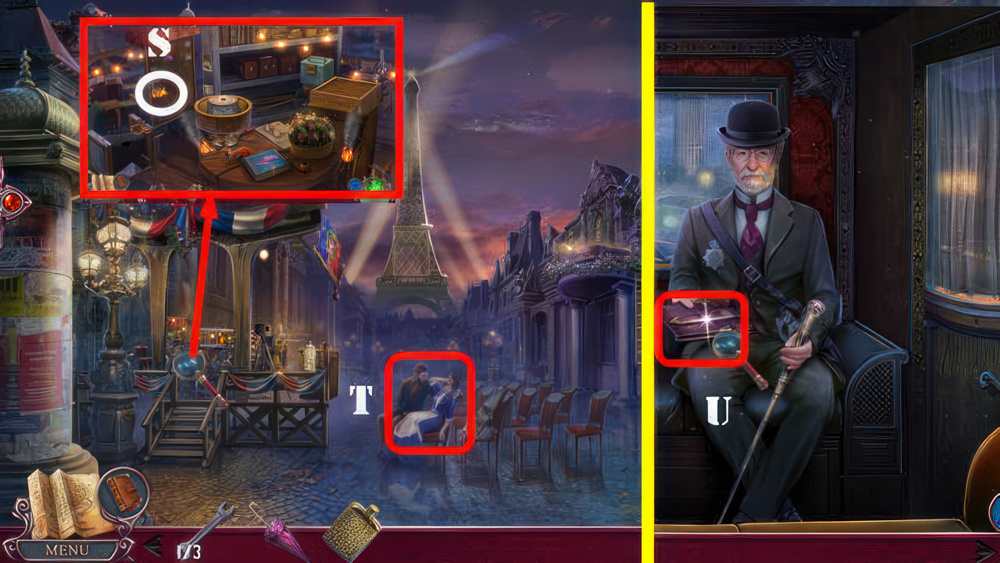
- Select scene.
- Play puzzle.
- Use FLASK (S).
- Play puzzle, receive EVIDENCE.
- Give EVIDENCE (T).
- Take and look at all the notes (U), take TAXI KEY.
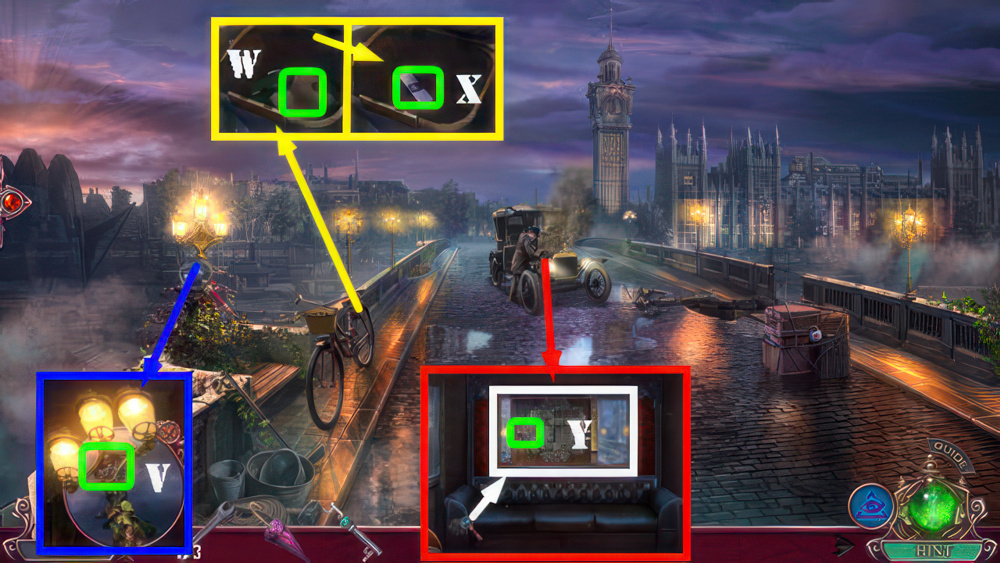
- Use UMBRELLA (V), receive BIKE TOKEN.
- Use BIKE TOKEN, select twice, take PAPER AND PENCIL (W).
- Select again, take IMAGE PART (X).
- Insert TAXI KEY (Y).
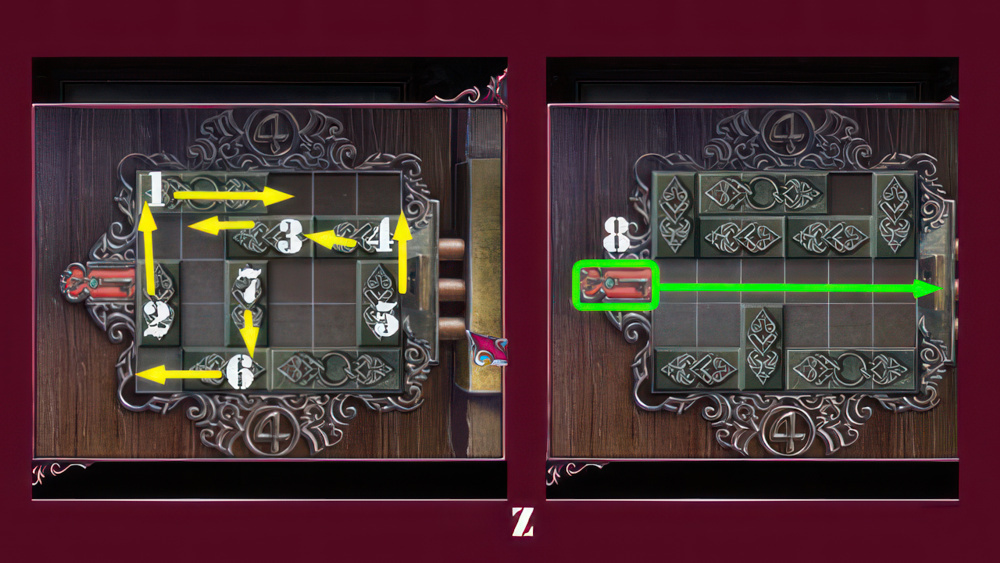
- Move the tiles in order to form a straight pass for key to the lock.
- Walkthrough (Z): (1-8).
- Take CROWBAR and TOOLS 2/3.
- Place IMAGE PART.
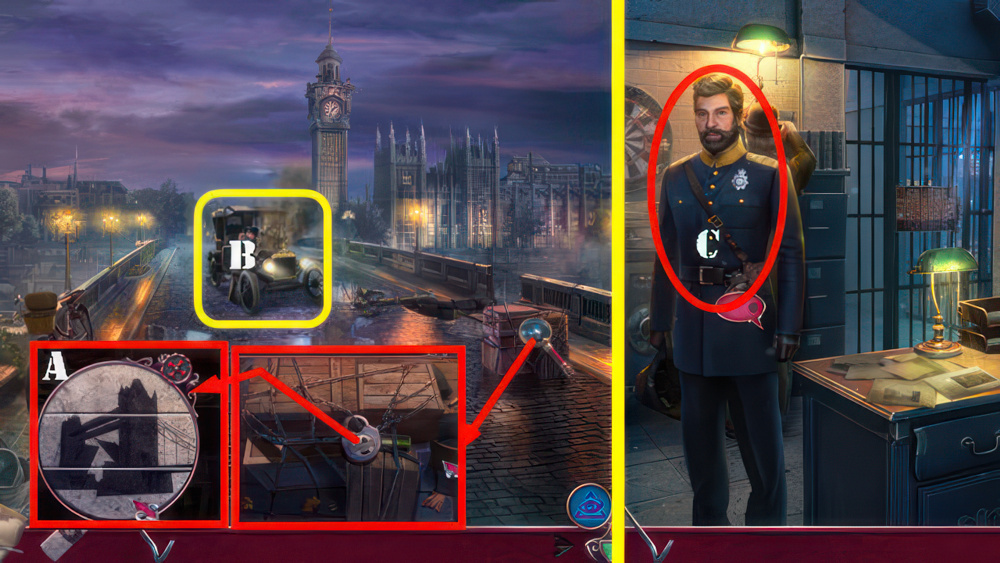
- Walkthrough (A).
- Play puzzle, receive TOOLS 3/3.
- Use TOOLS 3/3 and select (B).
- Talk (C).
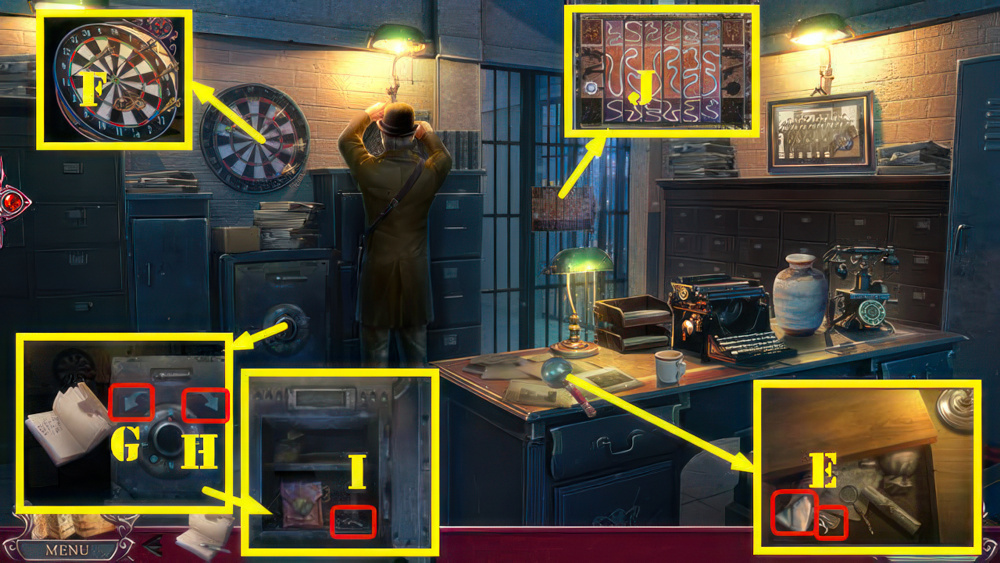
- Select ×3 and use CROWBAR, take HANDKERCHIEF and LION 1/2 (E).
- Use PAPER AND PENCIL, take CODE (F).
- Place CODE, walkthrough: (H-G×8).
- Take CELL TOKENS 2/2 (I).
- Place CELL TOKENS 2/2 (J).
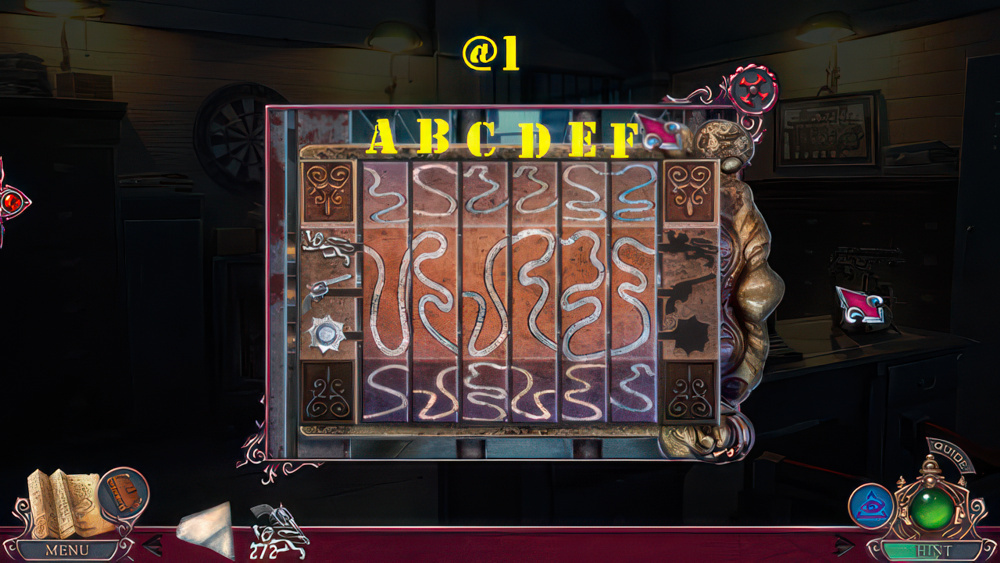
- Create a path for the tokens from the left side to their matching slots.
- Select a cylinder to rotate it.
- Select a token to move it along the path.
- This puzzle has three stages (@1).
- Walkthrough one: (C-E-F×2).
- Walkthrough two: (A×3-E×4-F).
- Walkthrough three: (A-F).
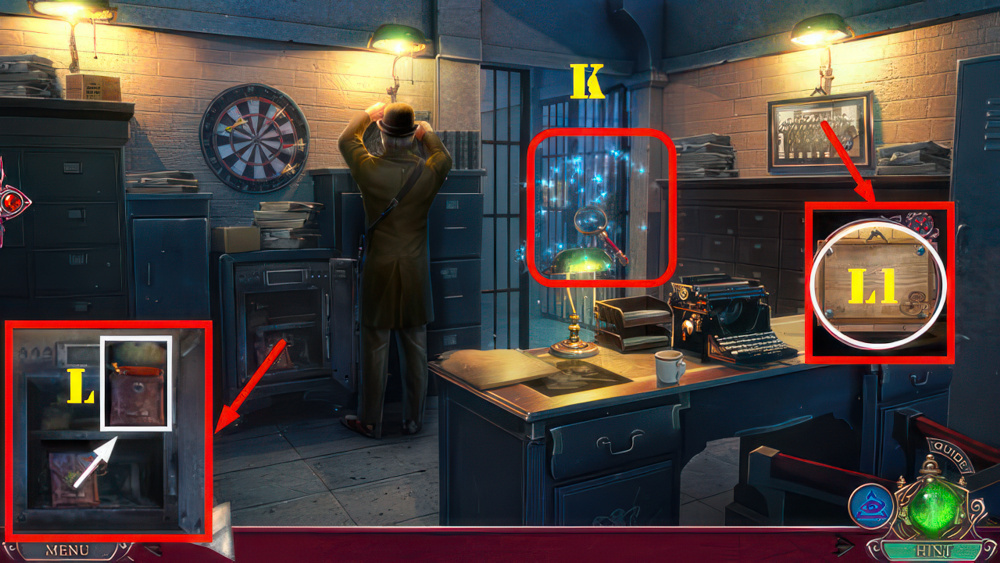
- Play puzzle (K), receive DNA.
- Use DNA, take DIARY and SCREWDRIVER (L).
- Select picture and use SCREWDRIVER (L1), receive DIARY TOKEN.
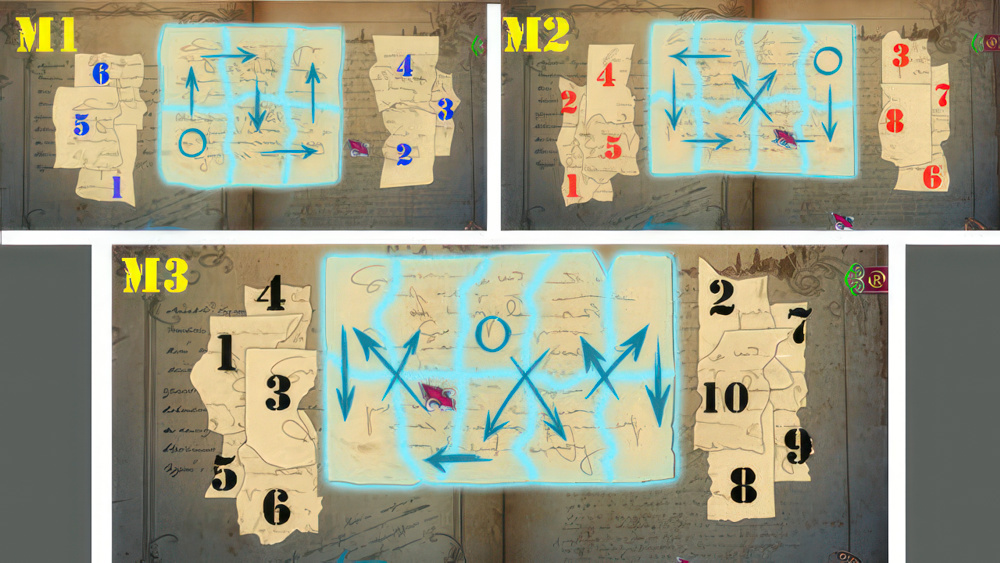
- DIARY TOKEN on DIARY.
- Place pieces into initial slot and allow them to flow into the correct place.
- Pieces move according to the arrows shown, so choose their order carefully.
- Walkthrough one (M1): (1-6).
- Walkthrough two (M2): (1-8).
- Walkthrough three (M3): (1-10).
- Take TOKEN.
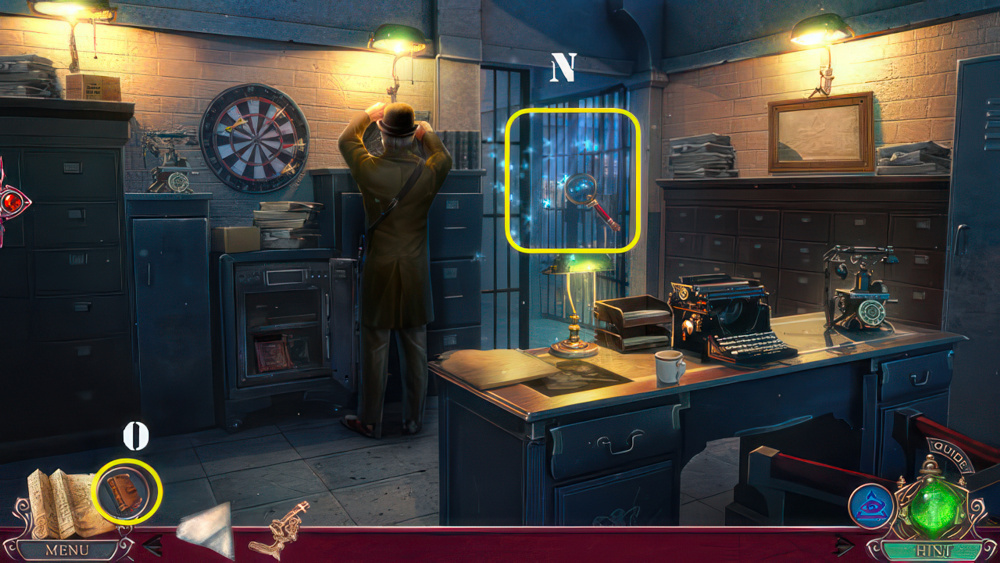
- Play puzzle (N), receive BOX.
- TOKEN on BOX, take clue.
- Select (O).
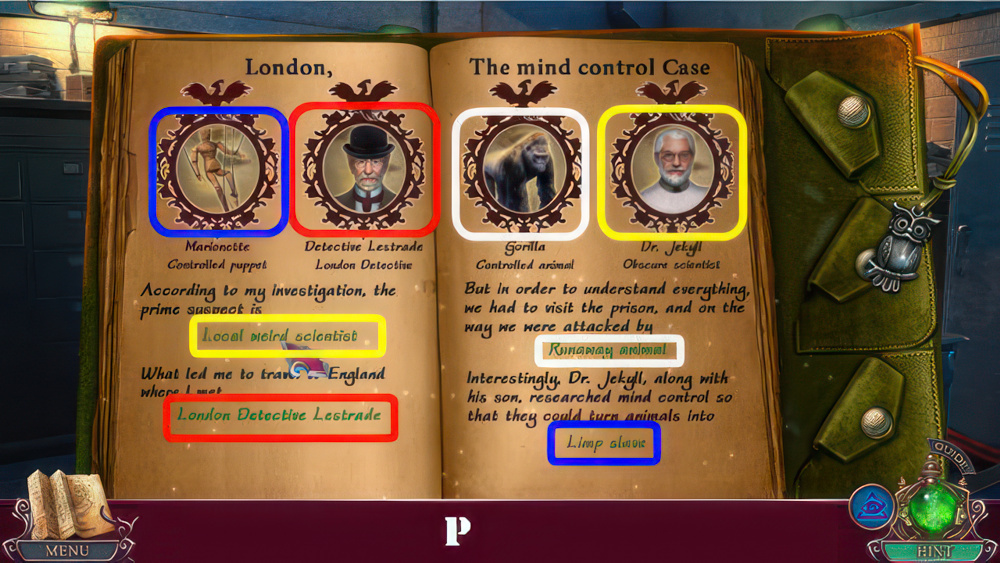
- Complete the notes on your investigation.
- Select an image and place it where it belongs in the text.
- Walkthrough (P).
- Take TICKET 1/3.
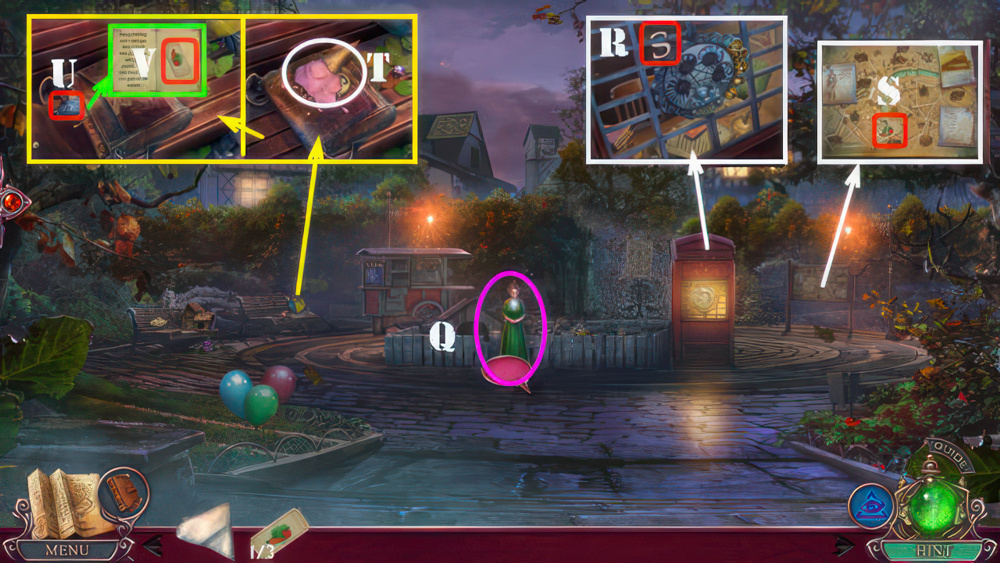
- Talk (Q).
- Take SCHOOLBAG TOKEN (R).
- Select notes ×3, take TICKET 2/3 (S).
- Use HANDKERCHIEF (T), receive ICE CREAM.
- Place SCHOOLBAG TOKEN (U), take MOUSE TOY.
- Open book, take TICKET 3/3 (V).
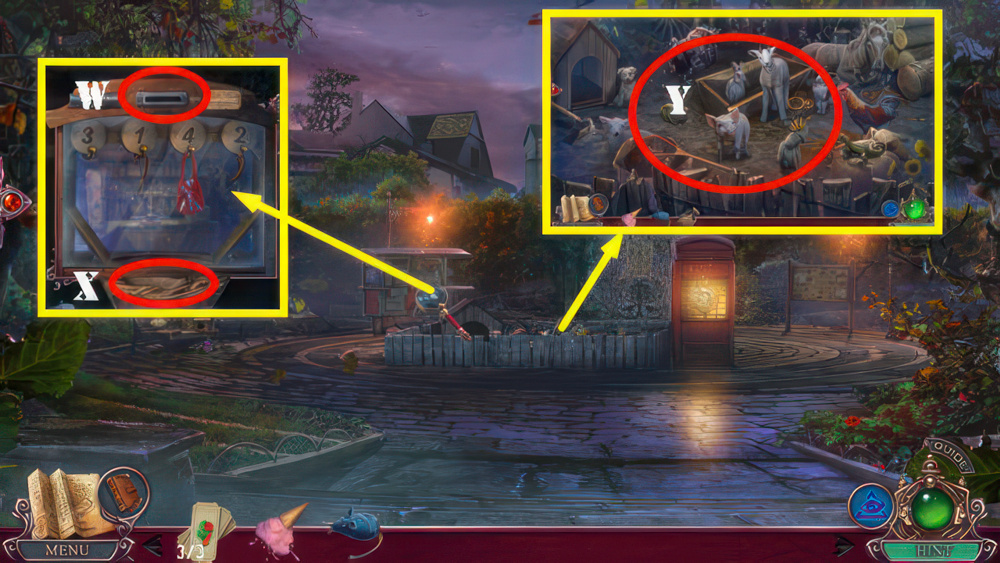
- Use TICKET 3/3 (W).
- Take ANIMAL FOOD (X).
- Use ANIMAL FOOD (Y).
- Play puzzle, SELECT MATCHING PAIRS.
- receive CHIPS.
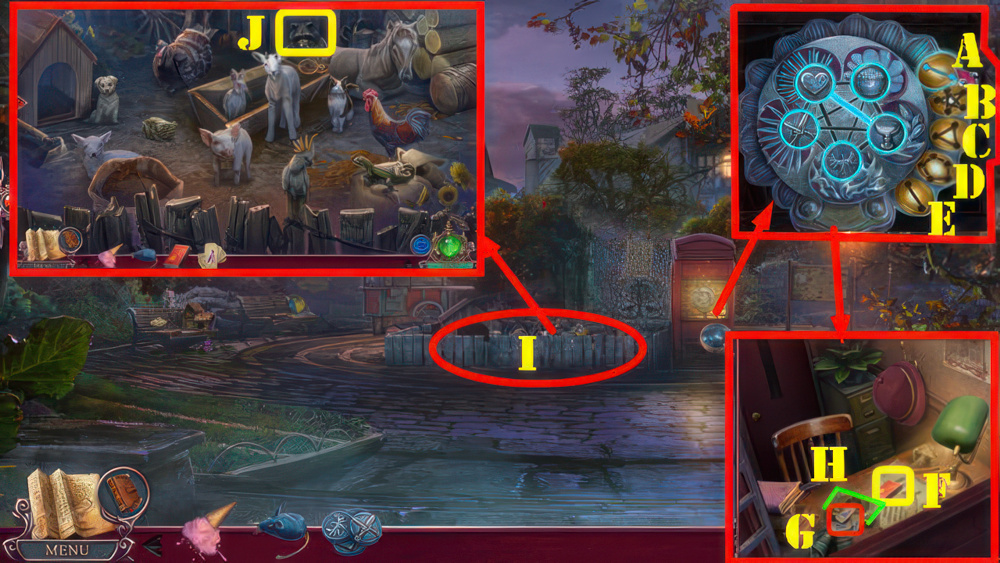
- Place CHIPS.
- Move the tokens along the lines into their corresponding slots.
- Press the buttons on the right to move the tokens along the indicated path.
- Tokens light up when placed correctly.
- Walkthrough: (D×4-C×2-E-A).
- Take MATCHES (F).
- Select papers twice, take CHALK BALLOTS (G).
- Select vet card (H).
- Put the animals in their places and find the raccoon.
- Play puzzle (I).
- Use ICE CREAM on raccoon (J), receive VET CARD.
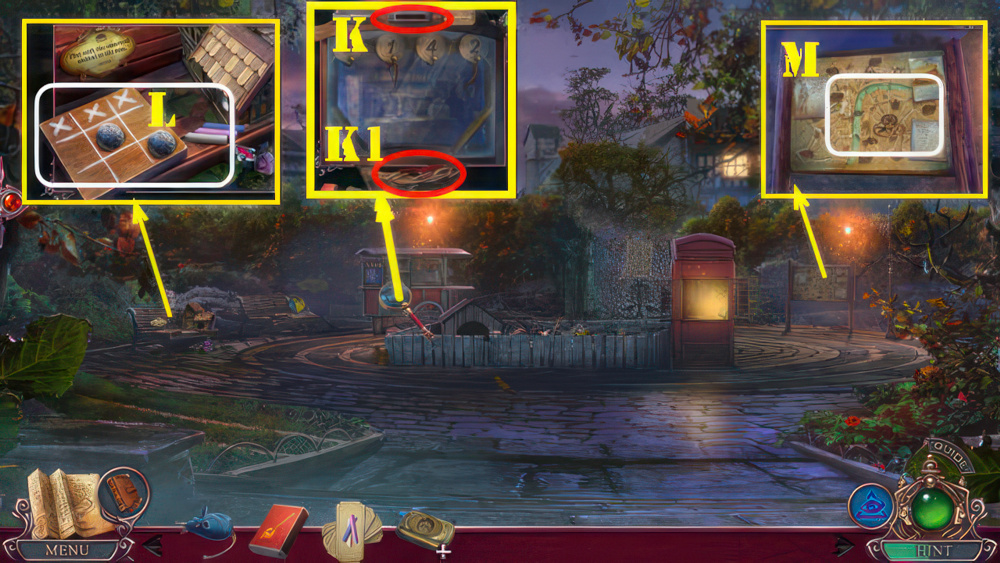
- Insert CHALK BALLOTS (K).
- Take CHALK (K1).
- Place CHALK and mark board as shown.
- Win the game with three X in a row.
- Take CARD TOKEN (L).
- CARD TOKEN on VET CARD, take VET CARD.
- Place VET CARD (M).
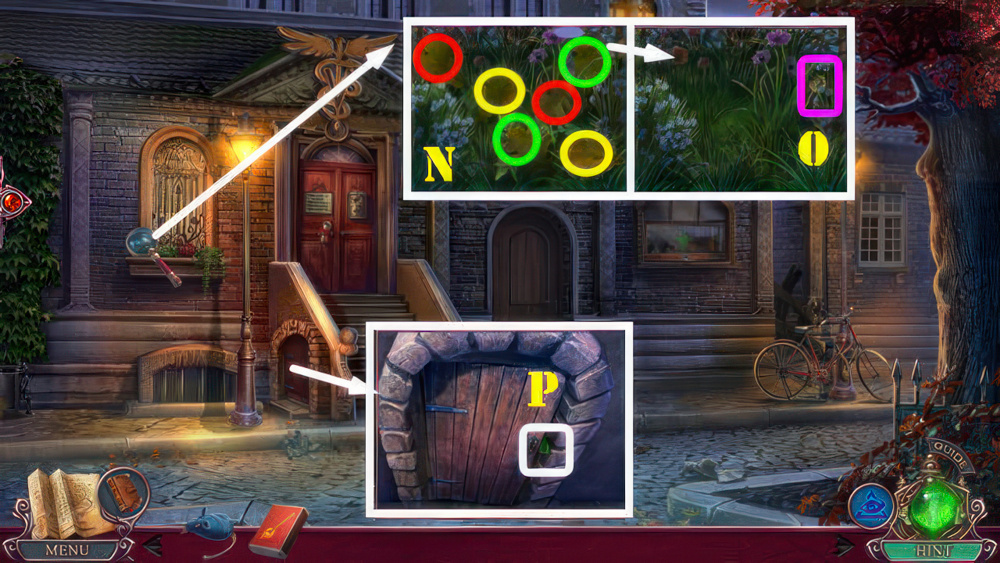
- Select scene.
- Play puzzle.
- Select matching pairs (N).
- Take HAIR PIN (O).
- Take APOTHECARY TOKEN 1/2 (P).

- Take RIBBON (Q), look at paper, take FLASK (R).
- Use MOUSE TOY, take APOTHECARY TOKEN 2/2 (S).
- Place APOTHECARY TOKEN 2/2 (T) and MATCHES (U).
- Play puzzle, receive STETHOSCOPE.
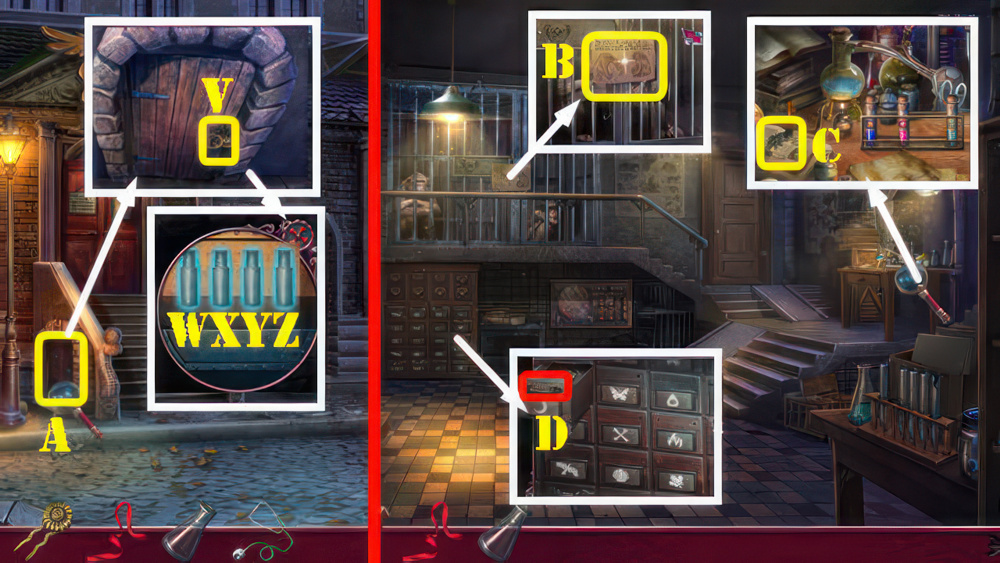
- Use STETHOSCOPE and HAIR PIN (V).
- Walkthrough: (W-Y-X-Z).
- Enter (A).
- Look at note (B).
- Take HANDLE (C).
- Place HANDLE (D).
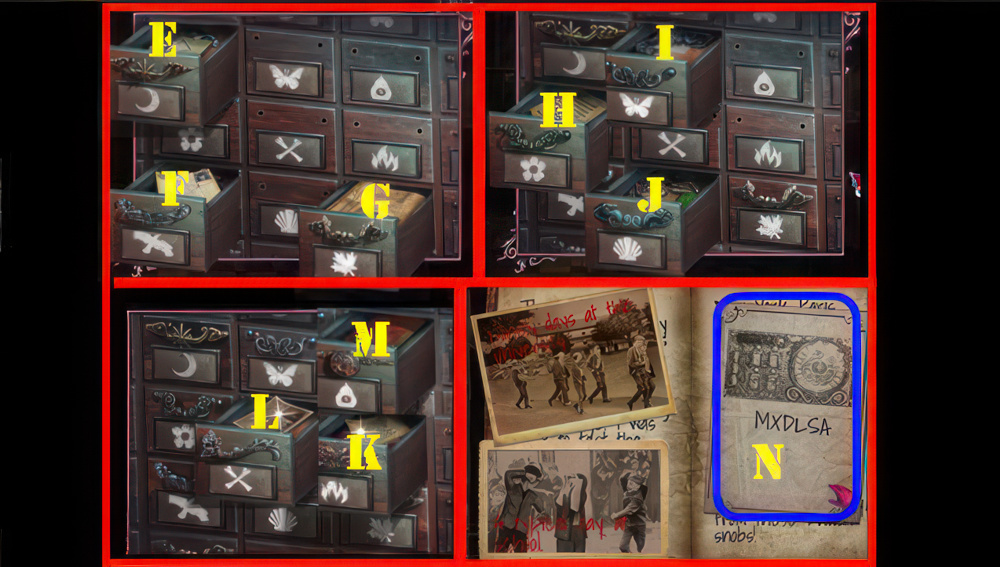
- Take LETTER and next handle (E).
- Place handle, take clue and next handle (F).
- Place handle, take newspaper and next handle (G).
- Place handle, take letter and next handle (H).
- Place handle, take next handle (I).
- Place handle, take next handle (J).
- Place handle, take note and next handle (K).
- Place handle, take postcard and next handle (L).
- Place handle and open book (M).
- Take CODE (N).
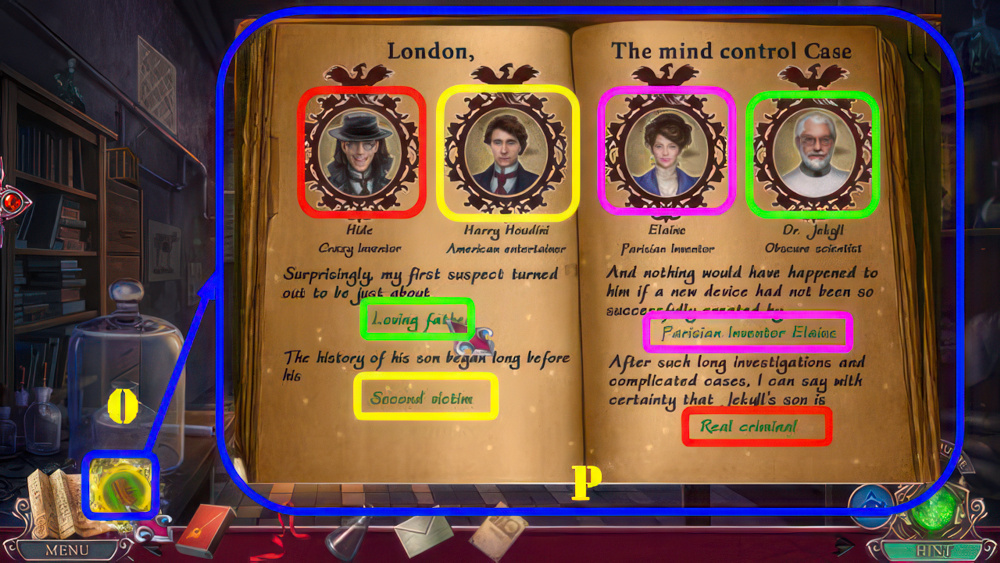
- Select (O).
- Complete the notes on your investigation.
- Select an image and place it where it belongs in the text.
- Walkthrough (P).
- Take BULB.
- Walk down.
- Play puzzle (Q), receive INGREDIENT 1/3.
- Place LETTER and look at note, take INGREDIENTS 2/3 (R).
- Go (S).
- Place BULB and CODE (T).
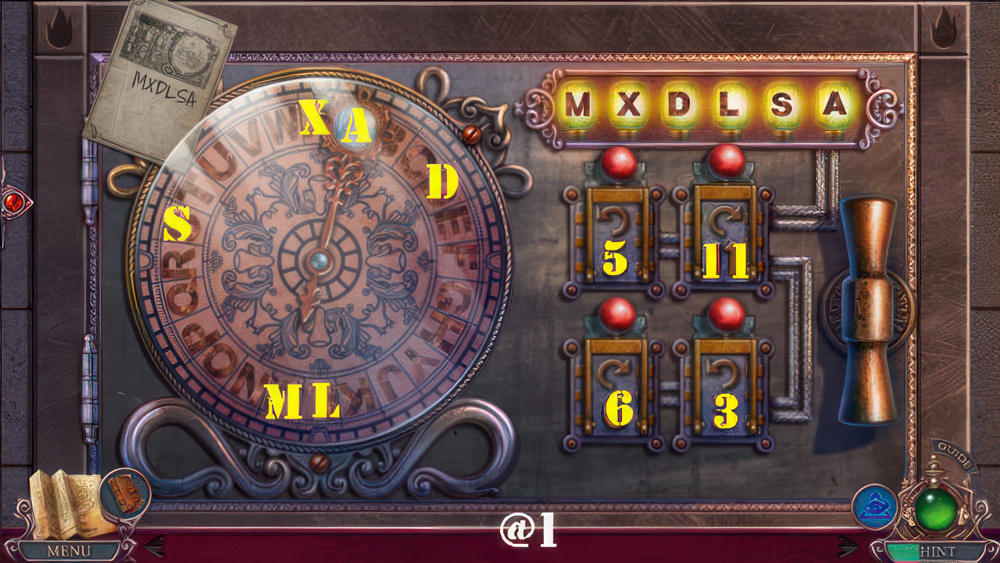
- Choose switches and then select the chosen letter.
- Walkthrough (@1): (5-3-3-M)-(11-X)-(11-11-6-D)-(5-5-3-3-L)-(6-6-5-S)-(6-A).
- Take INGREDIENTS 3/3 and CAGE KEY.
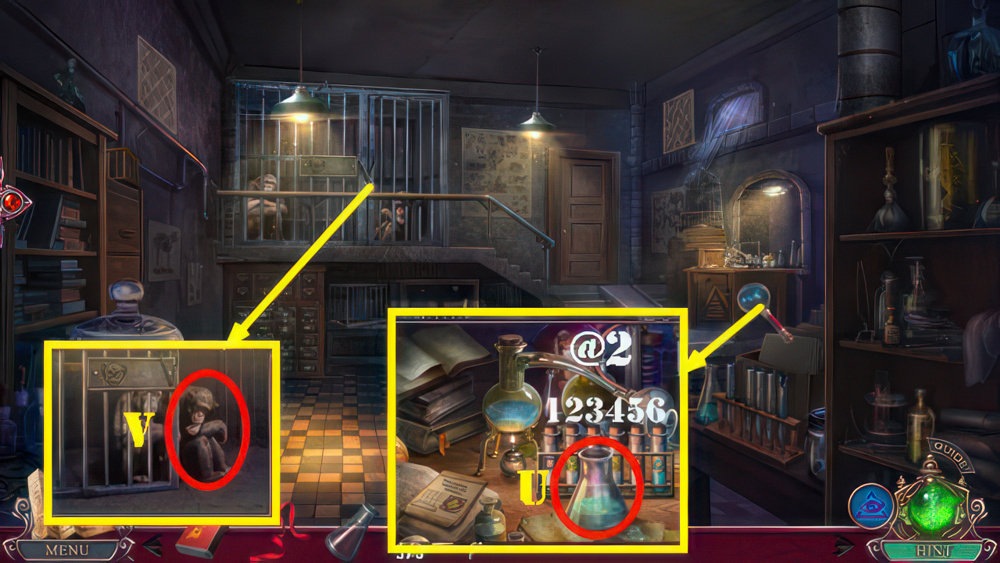
- Use FLASK and INGREDIENTS 3/3.
- Mix the ingredients from the correct flasks in the correct order.
- Focus on the order of the symbols on the piece of paper.
- Walkthrough (@2): (5-2-4-1).
- Take CURE (U).
- Use CAGE KEY and CURE (V).
- Walk down.
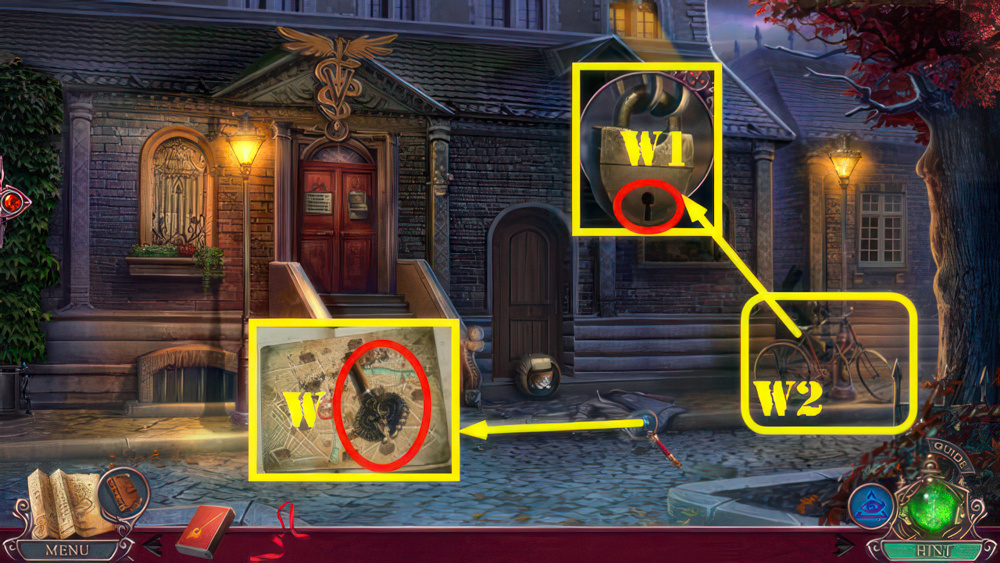
- Open book and take BICYCLE LOCK KEY (W).
- Select book twice, take SLEEPING PILL.
- Use BICYCLE LOCK KEY (W1), select bicycle (W2).
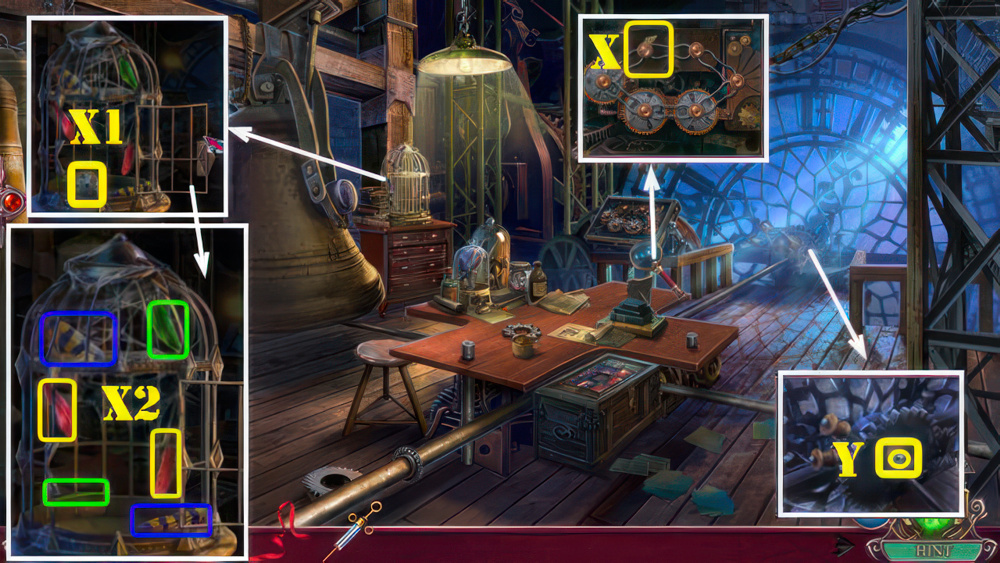
- Select scene.
- Play puzzle.
- Take CAGE TOKEN (X).
- Place CAGE TOKEN, take GEAR 1/3 (X1).
- Select matching feathers (X2), use RIBBON, take FEATHER DUSTER.
- Use MATCHES and FEATHER DUSTER, take GEARS 2/3 and CHEST TOKEN (Y).
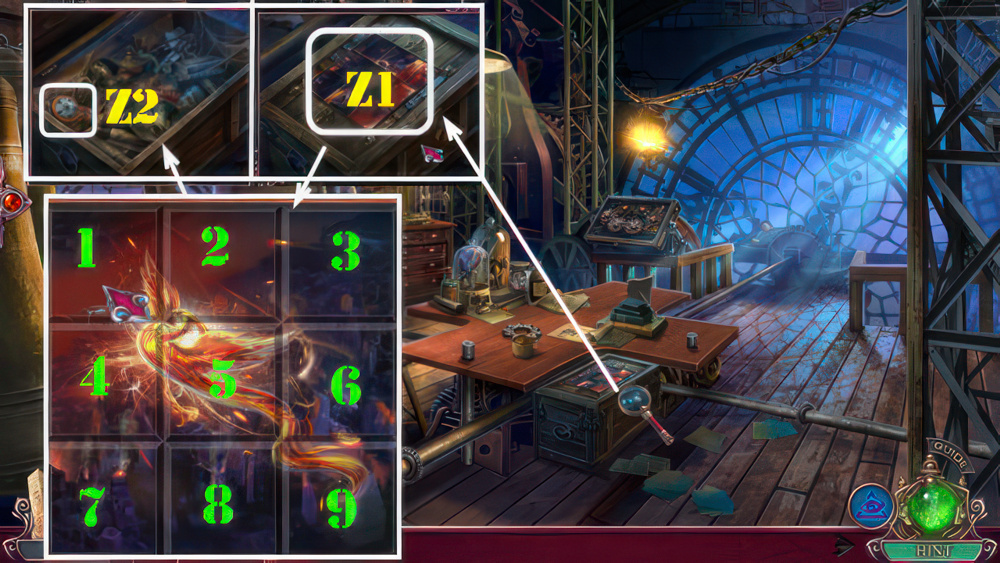
- Place CHEST TOKEN (Z1).
- Place the items in the correct order.
- Walkthrough: (4-7)-(7-8)-(8-9)-(8-7)-(7-4)-(4-1)-(8-7)-(7-4).
- (7-8)-(7-4)-(4-1)-(1-2)-(4-1)-(7-4)-(4-1).
- Take GEARS 3/3 (Z2).
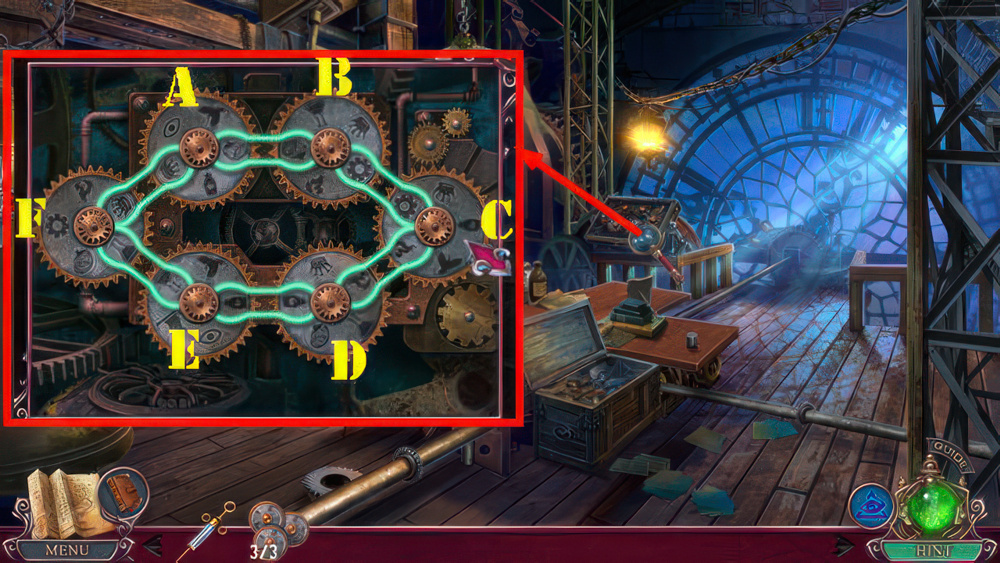
- Place GEARS 3/3.
- Scroll the gears so that the characters in parentheses match.
- Walkthrough: (D×4-E×4-F×2-A×2-B-C×3).
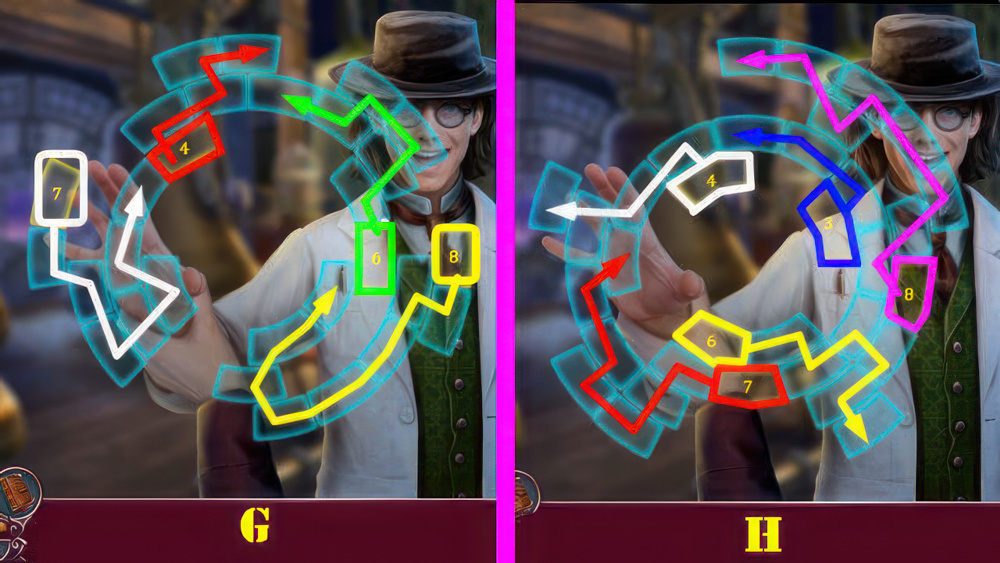
- Select and light up the fuses according to the numbers near them.
- If the number of lighted fuses is correct, the number will also light up.
- Easy walkthrough: (G-H).
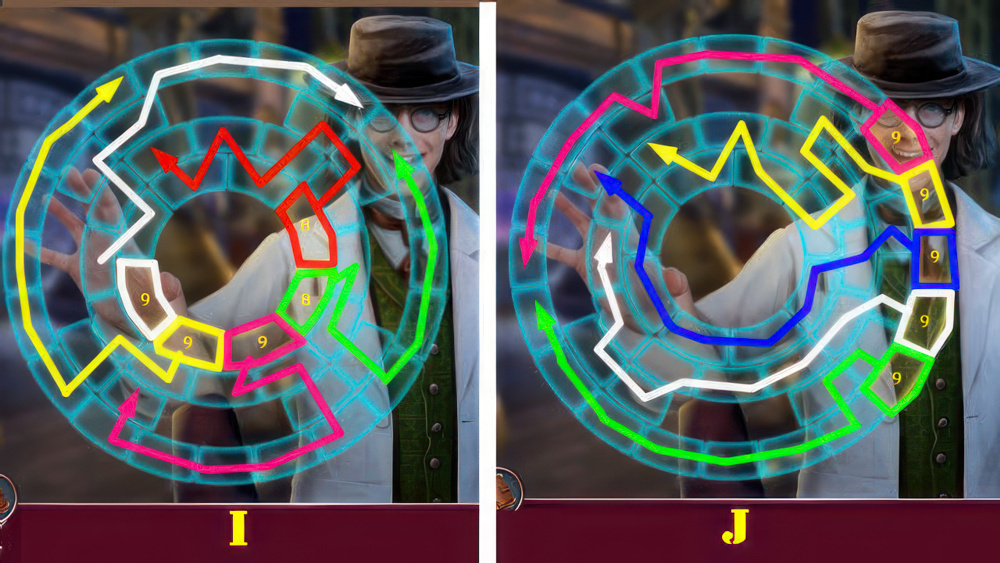
- Hard walkthrough: (I-J).
- Walkthrough Bonus Chapter, at the link below.


Thank you so much for helping me finishing this game 💐
I got stuck in this game when I had reached the point where I have to disentangle the knots around the revolver. Nothing moves anymore!
Any tips?
Danke, danke, danke, du bist toll 💕