
Darkness and Flame 1: Born of Fire (Bonus Chapter) – Alice was the most ordinary girl until she found an egg in a strange chest. With just one touch, a firebird hatches from it, forever changing its life. Now she is forced to leave her home, facing a dangerous adventure full of wonders beyond her imagination.
Bonus Chapter Walkthrough
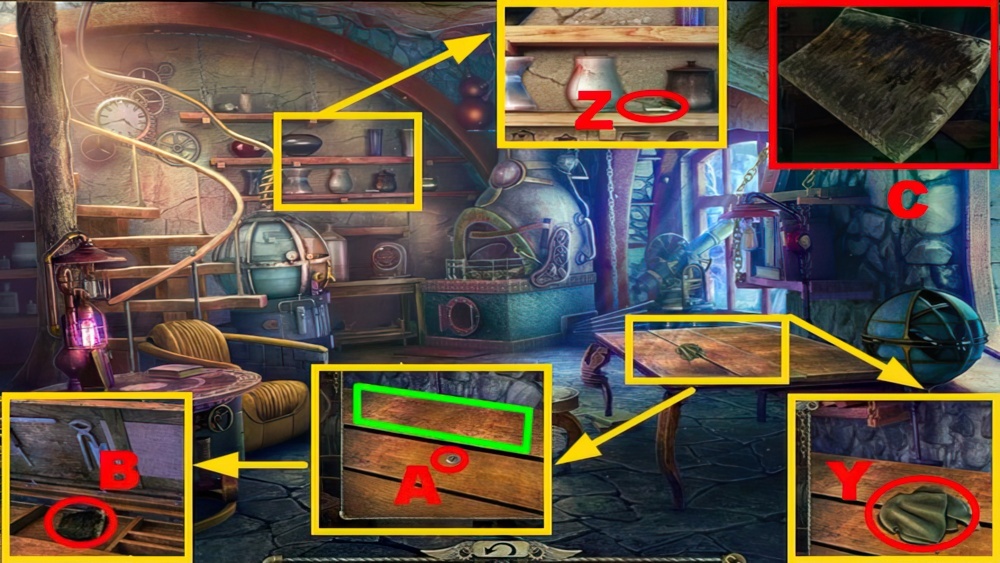
- Turn left twice.
- Take the RAG (Y) and KEY (Z). Insert the KEY (A), open the case (green).
- Take the PART (B). Clean the PART (C) with the RAG to acquire the PART.
- Walk down.
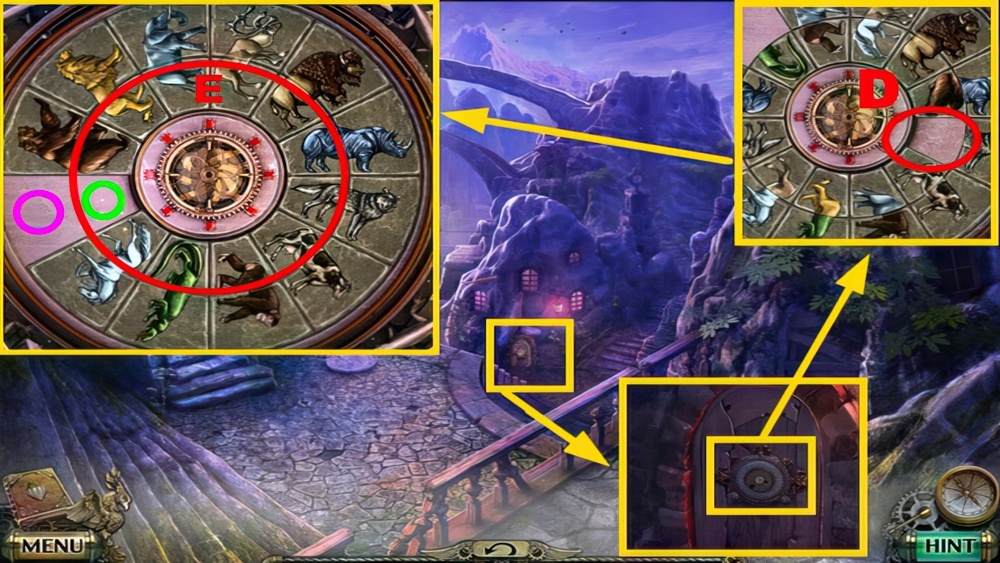
- Place the PART (D).
- Play the mini-game.
- Solution: E-cwx2, green, E-cwx3, purple, E-cwx2, green, E-ccwx5, purple, E-ccwx5, green, E-ccwx2.
- Purple, E-ccwx4, green, E-cwx6, purple, E-cwx4, green, E-cwx2, purple, E-cw, green, E-ccwx3, purple.
- E-ccwx4, green, E-ccwx5, purple, E-ccwx3, green, E-ccwx4, purple, E-cwx2, green, E-cwx2.
- Purple, E-ccwx4, green, E-cwx2, purple, E-ccwx4, green, E-cwx2, purple.
- E-ccwx4, green, E-cwx2, purple, E-cwx2, green, E-ccwx4, purple, E-cwx2, green, E-cwx2, purple, E-cw.
- Green, E-ccwx3, purple, E-ccwx2, green, E-cwx5, purple, E-ccw, green, E-ccwx4, purple, E-cwx2, green, E-cwx2, purple, E-ccwx2.
- Go to the Market.
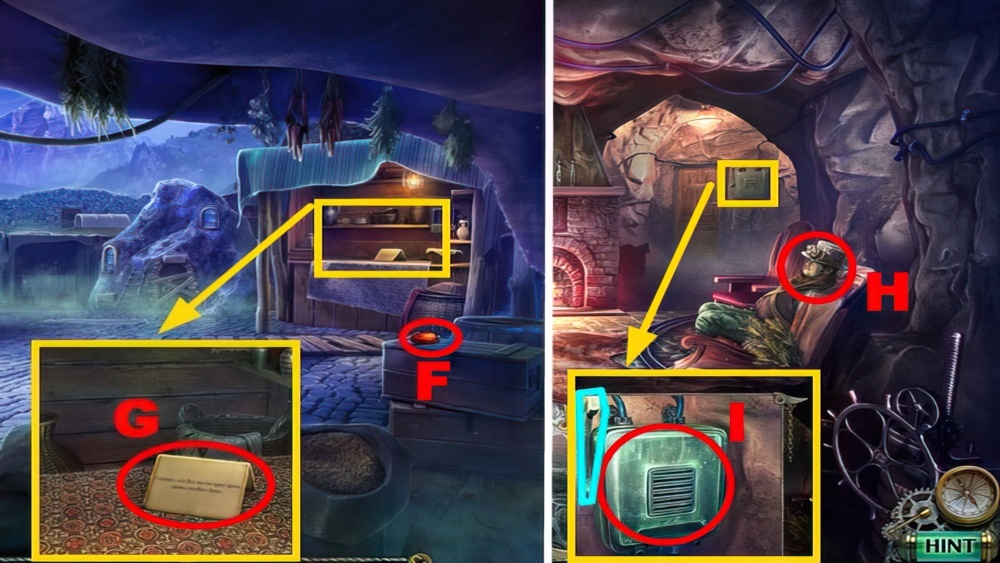
- Take the CRYSTAL (F).
- Read the note (G).
- Go to Frederic’s House.
- Talk to Frederic (H) to acquire the SCORPION FIGURINE.
- Pull the lever (blue), open the cover (I).

- Take the LADDER (J).
- Walk down.
- Place the LADDER (K).
- Take the CRYSTAL (L).
- Go to Frederic’s House.

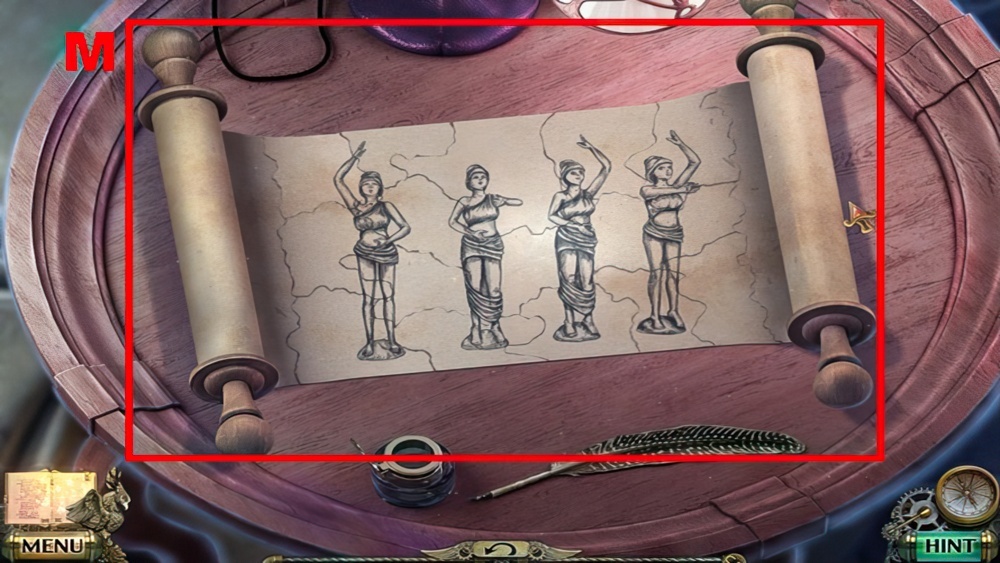
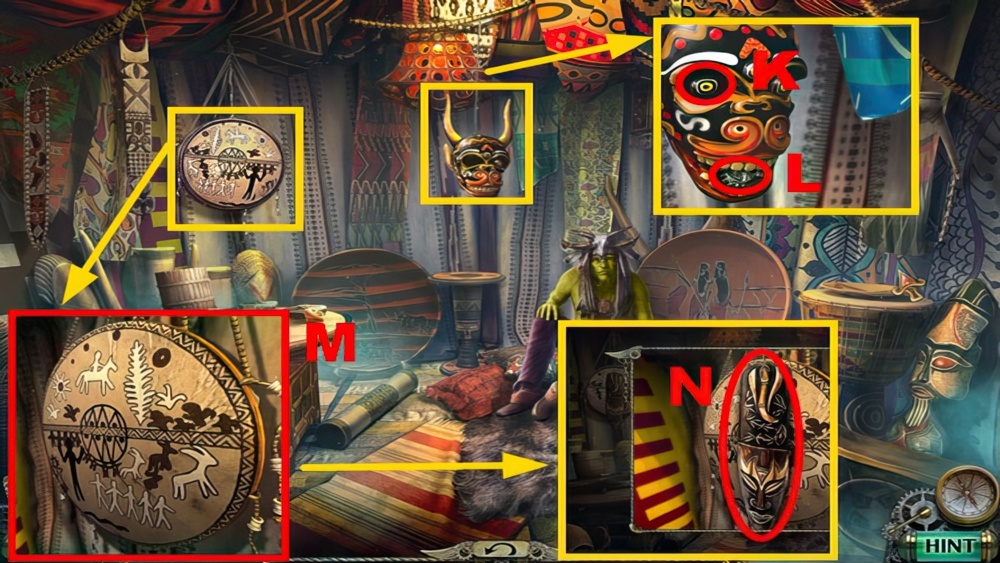
- Place 2 CRYSTALS (green), pull the lever (M).
- Go downstairs.
- Move the apples (blue), take the UNUSUAL KEY (N) and BOWL (O).

- Take the EAGLE FIGURINE (P).
- Go to the Scientist’s House.
- Use the UNUSUAL KEY (Q), open the door (R).

- Play the puzzle (@).
- Solution mini-game: (S).
- You receive the KEY.
- Go to the Skydeck.
- Insert the KEY (T).
- Turn right, move forward.

- Talk to Chloe (U) to receive the FISH OIL.
- Go to the Market.
- Use the FISH OIL (purple), open the lock (V).
- Take the BOTTLE (W) and SIEVE (X).
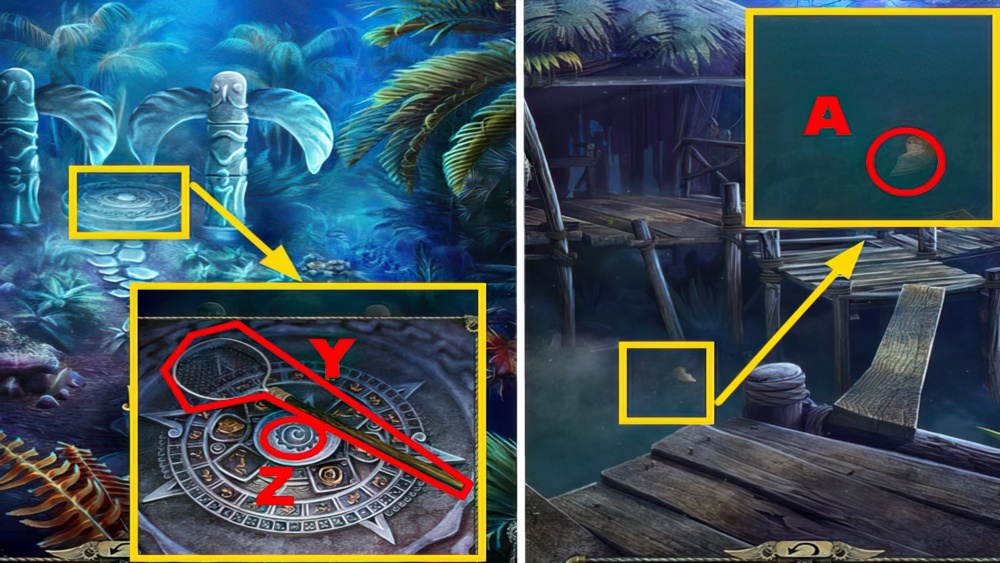
- Go to the Cellar.

- Use the SIEVE (Y), take the HINT (orange).
- Go to the Scientist’s House.
- Place the BOTTLE (Z) and HINT (A).
- Play the mini-game.

- Solution: (B).
- Take the SLIDING BAR (C).
- Go to the Forest Village.

- Place the SLIDING BAR (D).
- Play the mini-game.
- Solution: (E).
- Enter the Elder’s Hut.

- Talk to the elder (F) to acquire the COINS.
- Take the CLIP (G).
- Go to the Market.
- Place the COINS (H), take the OWL FOOD (I).
- Go to Frederic’s House.

- Talk to Frederic (J) to receive the MECHANISM DIAGRAM.
- Place the OWL FOOD (K) to acquire the SCROLL PIECES.
- Place the SCROLL PIECES (L).
- Play the mini-game.
- Solution: (M).

- Play the mini-game.
- Solution: Nx2-Ox2-Px2-Qx2-R-Sx2-T-Ux2.
- Take the OPENER (V), LIZARD FIGURINE (W), and KNIFE (X).
- Go downstairs.

- Use the OPENER (Y), take the MASK EYE (Z).
- Go to the Forest.
- Use the KNIFE to collect a MUSHROOM (A).
- Place the MUSHROOM (B), take the MARTEN FIGURINE (C).
- Move forward.

- Use the KNIFE (D), take the PLANK (purple) and MACHETE (blue).
- Turn right to the River.
- Place the PLANK (E).
- Take the TORCH (F).

- Place the CLIP (G), open the clips and basket (green).
- Take the DRUMSTICK (H) and DIAGRAM PART (I).
- Use the MACHETE to collect the HEALING FRUIT (J).
- Go to the Elder’s Hut.
- Place the MASK EYE (K), take the FIGURINE PART (L).
- Use the DRUMSTICK (M), take the MASK (N).

- Place the DIAGRAM PART (O) and container (P).
- Place the HEALING FRUIT (Q) and BOWL (R).
- Assemble the container: 1-5.
- Rotate the wheel (S), take the HEALING FRUIT JUICE (T).

- Give the HEALING FRUIT JUICE to the elder (U) to receive the KEY.
- Walk down.
- Place the MASK (V).
- Play the puzzle (@).

- Solution mini-game 1: (W).
- Solution mini-game 2: 1-5.
- You receive the FIGURINE PART.
- Place 2 FIGURINE PARTS (X).
- Move forward.
- Take the BUTTERFLY NET (Y), place the KEY (Z).
- Go to the River.
- Use the BUTTERFLY NET to collect the MEDALLION PART (A).
- Go to the Skydeck.

- Place the MEDALLION PART (B), take the MAP (C) and SNAKE FIGURINE (D).
- Go to the Totem in the Forest.
- Place the MAP (E).

- Take the CHIP (F), remove the stones (G).
- Take the GOAT FIGURINE (orange), move the leaves (blue).
- Take the FIGURINE (H), place the CHIP (I).
- Play the mini-game.

- Solution: (J).

- Place the FIGURINE (K).
- Remove the leaves (L), take the PARROT FIGURINE (M).
- Play the mini-game.
- Solution: 1-5.

- Place the PARROT FIGURINE (N).
- Play the mini-game.
- Solution: (O).
- Go downstairs, turn left.

- Take the METAL BRUSH (P).
- Hold down the TORCH (Q) to acquire the TORCH.
- Walk down.
- Use the METAL BRUSH (R).
- Move forward.

- Use the TORCH (S).
- Take the SPEAR (T).
- Turn right.

- Take the PICK-AXE (U), MOSAIC PIECES (V), DEER FIGURINE (W), and WAX (X).
- Place the MECHANISM DIAGRAM (Y).
- Walk down.
- Hold the WAX (Z) to acquire the MELTED WAX.
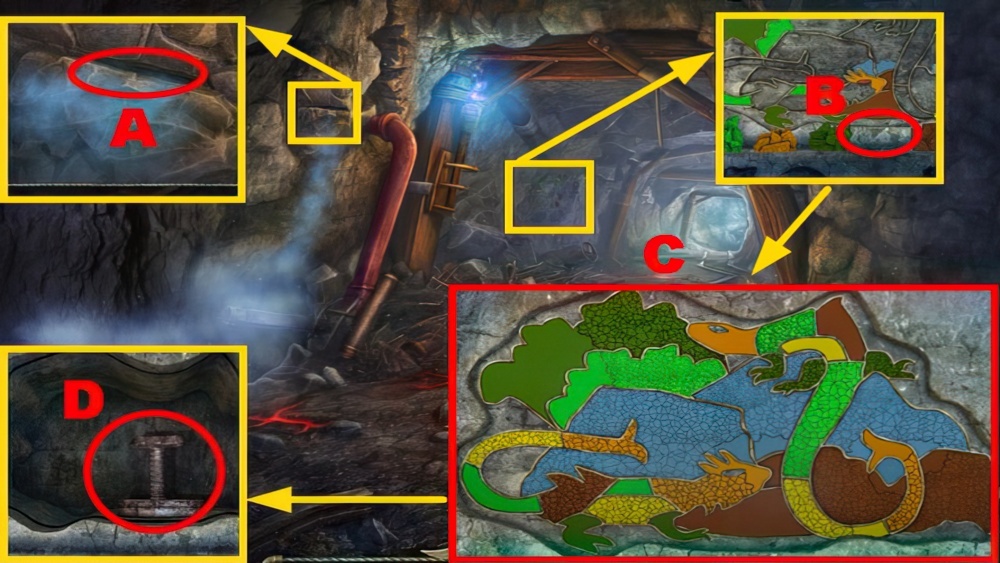
- Place the MELTED WAX (A) and MOSAIC PIECES (B).
- Play the mini-game.
- Solution: (C).
- Take the KEY (D).
- Go to the Geyser.

- Use the SPEAR (E), take the TIGER FIGURINE (F) and NAIL (G).
- Place the NAIL (H), hit it with the stone (I) to acquire the EMERALD.
- Walk down.

- Place the EMERALD (J), take the MOONSTONE (K).
- Place the MOONSTONE (L), take the OWL FIGURINE (M).
- Go to the Cellar.

- Place the SCORPION FIGURINE (N), EAGLE FIGURINE (O), LIZARD FIGURINE (P), MARTEN FIGURINE (Q), SNAKE FIGURINE (R), GOAT FIGURINE (S), DEER FIGURINE (T), TIGER FIGURINE (U), and OWL FIGURINE (V).
- Read the book (W), take the REAGENT (X) and VESSEL OF LIQUID (Y).

- Use the PICK-AXE (Z), take the KEY (A).
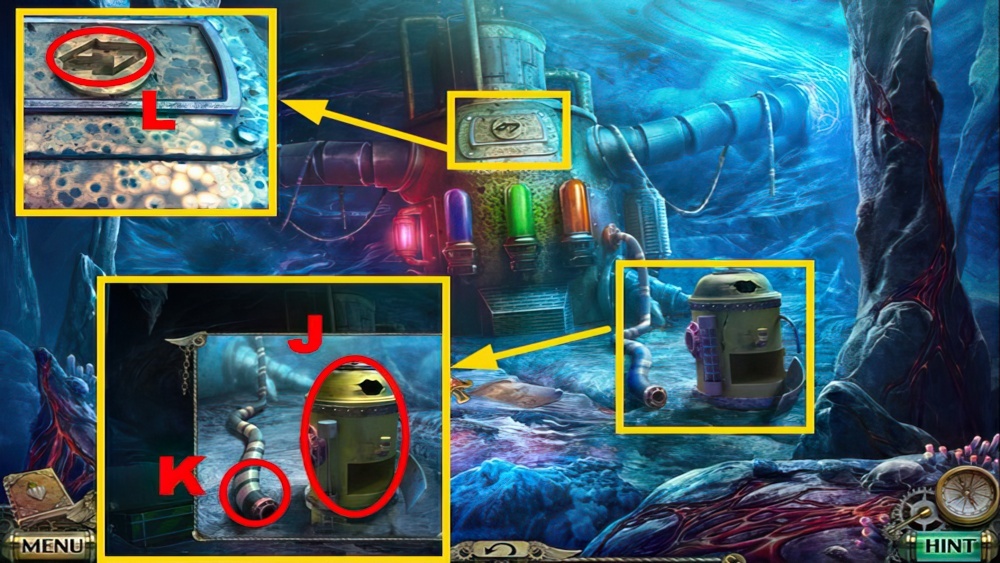
- Go to the Mechanism.
- Insert the KEY (B), open the container (C).
- Take the ROPE LADDER (D).

- Place the VESSEL OF LIQUID (E).
- Walk down.
- Place the ROPE LADDER (F).

- Play the puzzle (@).
- Enter the code ‘153’ (G).
- You acquire the TANK.
- Open the TANK (H), place the REAGENT (purple).
- Close the TANK to acquire the TANK.
- Place the TANK (I) to acquire the TANK.
- Turn right.
- Place the TANK (J), connect the tube (K).
- Insert the KEY (L).
Congratulations! You have completed the game Darkness and Flame 1: Born of Fire.


