
Darkness and Flame 4: Enemy in Reflection – Adventure game with a lot of puzzles, item search and incredible characters. The playthrough will take place in a fictional world for the protagonist Alice. The power of the Flame has been restored, Alice and her friends have escaped from the Dark Army. Looking for a place to rest, they stop in a foreign clearing and allow themselves to relax. However, in this new hostile world, you can not let your guard down for a minute. And payback for carelessness will not be long in coming. Alice finds herself drawn into a battle with an evil that is older than the darkness itself. She will have to solve the questions that many generations of brave men could not solve. This time friends will not come to the rescue they have become victims of a powerful curse. Together with Alice you will explore the pristine beauty of the fertile lands and discover long forgotten secrets. Solve puzzles and collect everything that can help her stop the ancient evil. If you are stuck at some point, and do not know how to pass the puzzle can, watch the full walkthrough of the game Darkness and Flame 4: Enemy in Reflection on our site.
Darkness and Flame 4: Enemy in Reflection – Walkthrough
Here you can see the full walkthrough of Darkness and Flame 4: Enemy in Reflection, namely for all chapters, including bonus chapter, in pictures.
Find out what happened
When I opened my eyes, I found myself in my room. Everything looks as if no altercations with Darkness and Fire, nor adventures with Farador and Ray ever happened. Never before have I had such vivid dreams with so much detail. We have to find someone and try to understand what is happening.
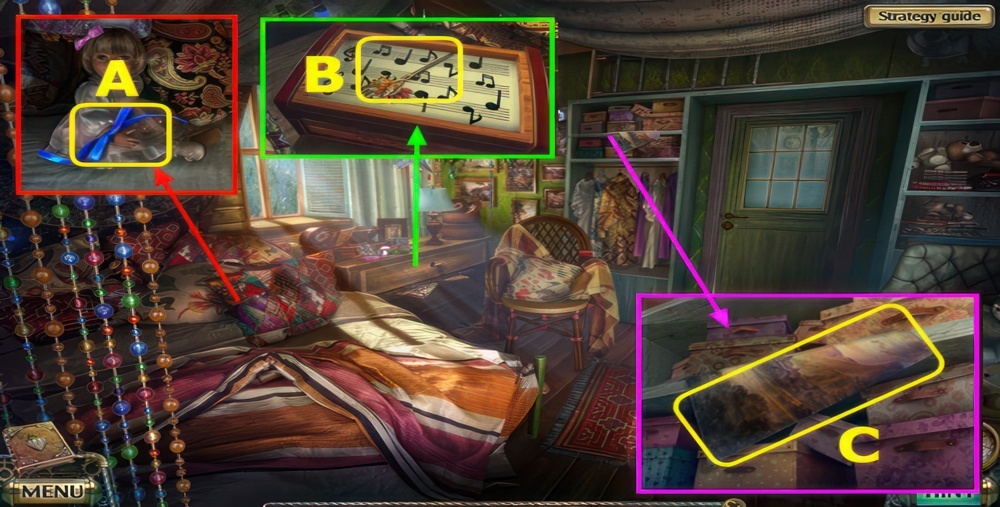
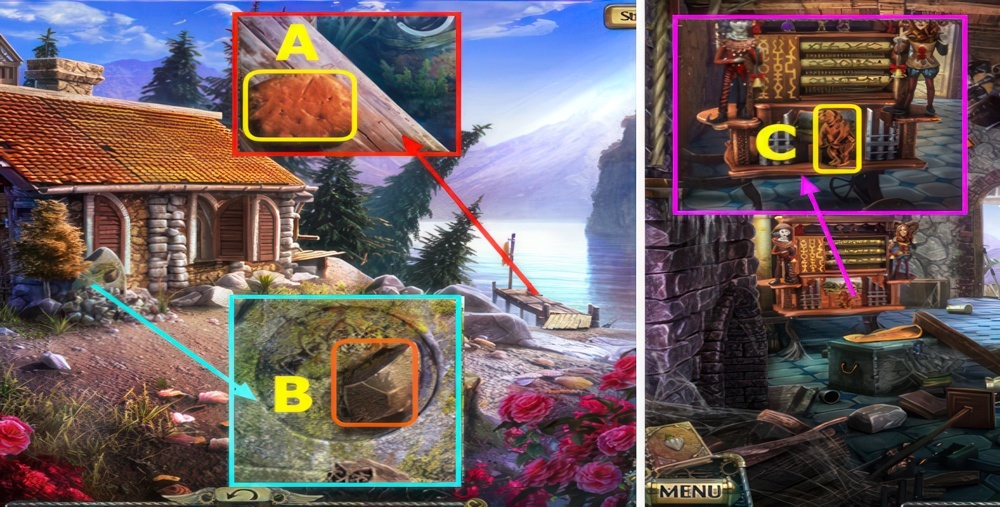
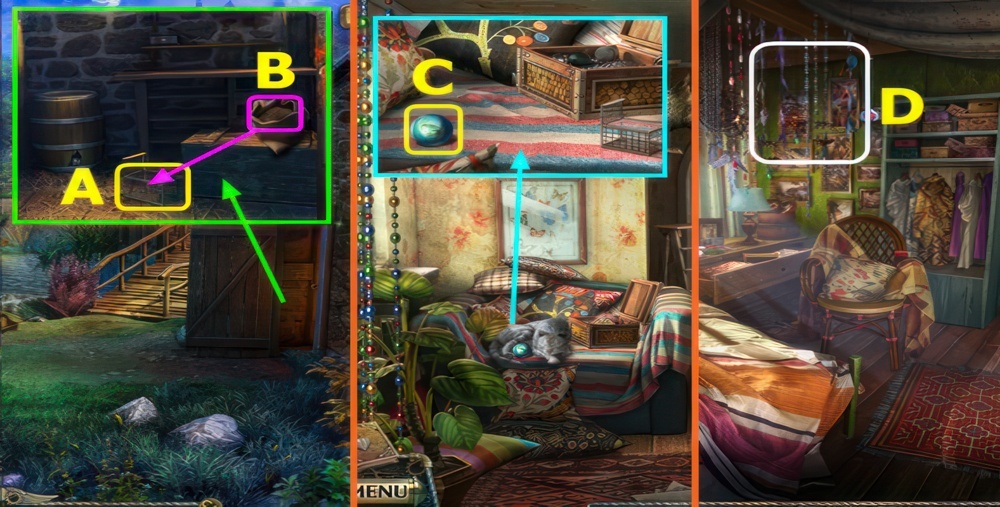
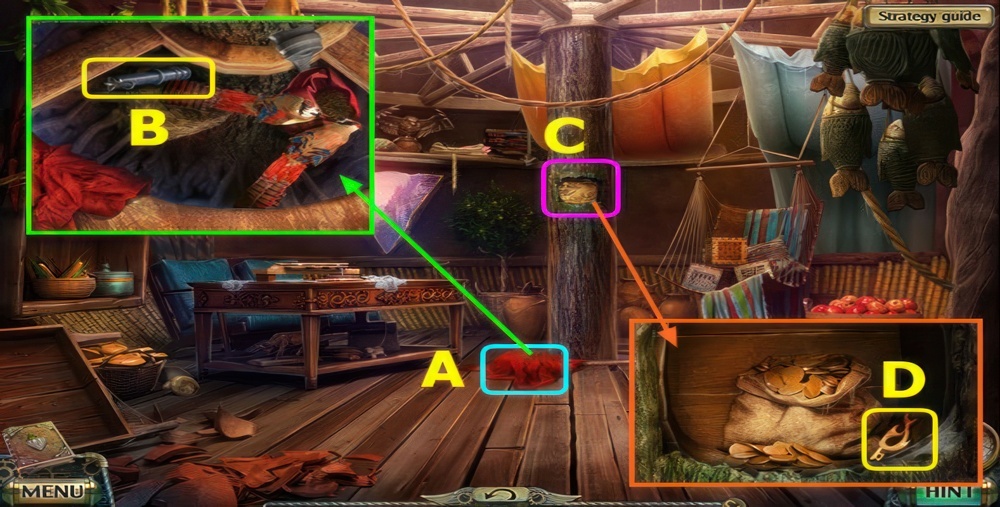
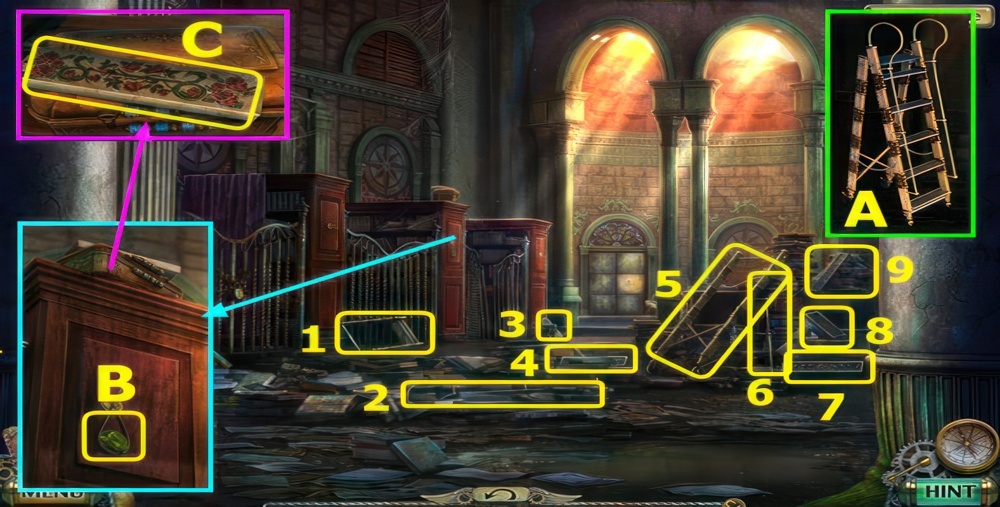
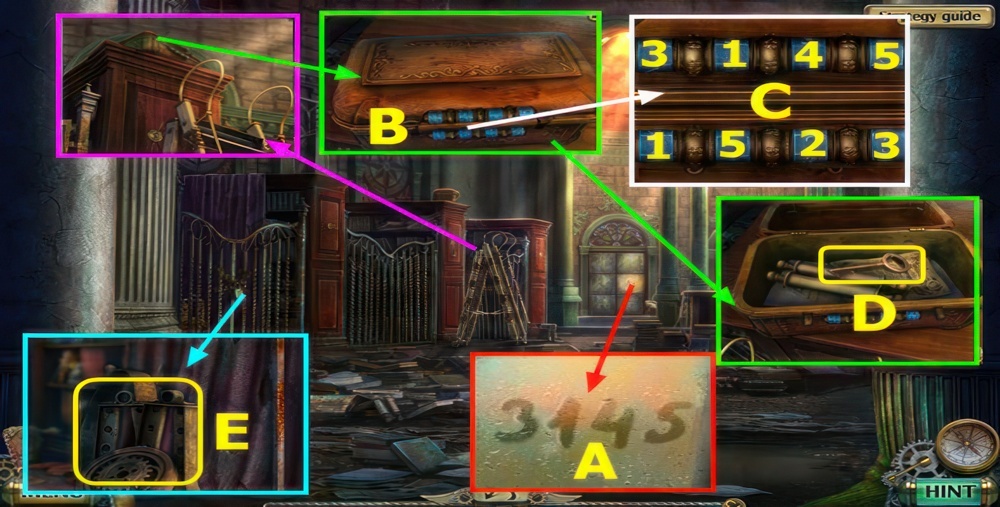
- Move pillows, take RIBBON (A).
- Open drawer, take HAIRPIN (B).
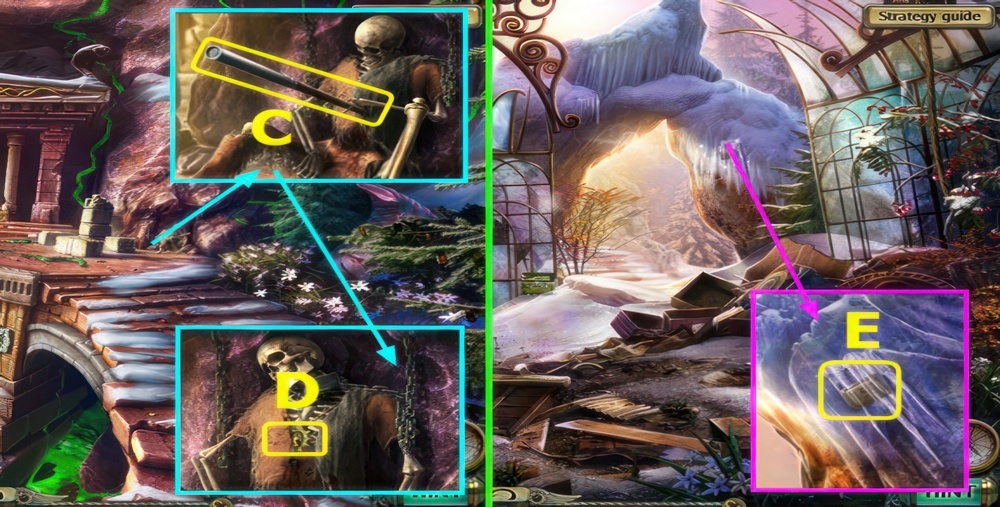
- Take POSTER (C).
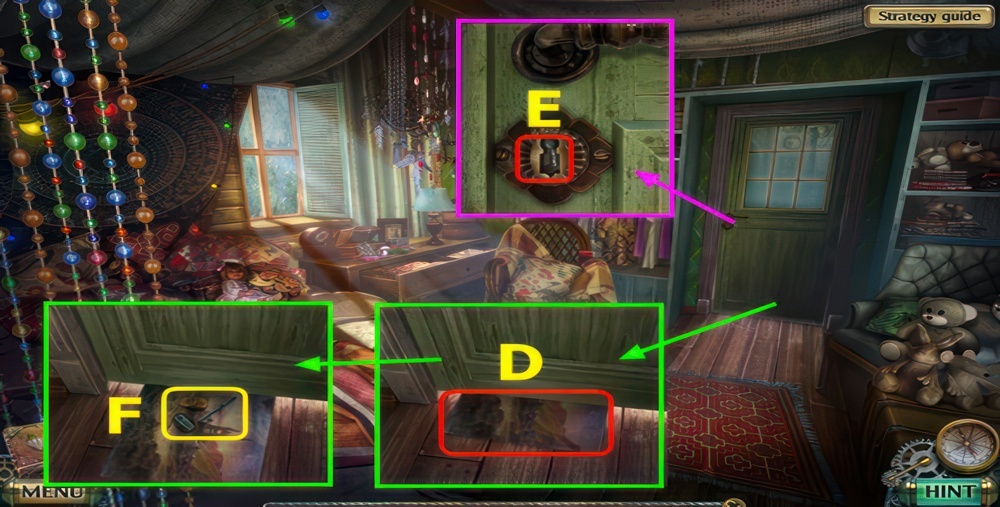
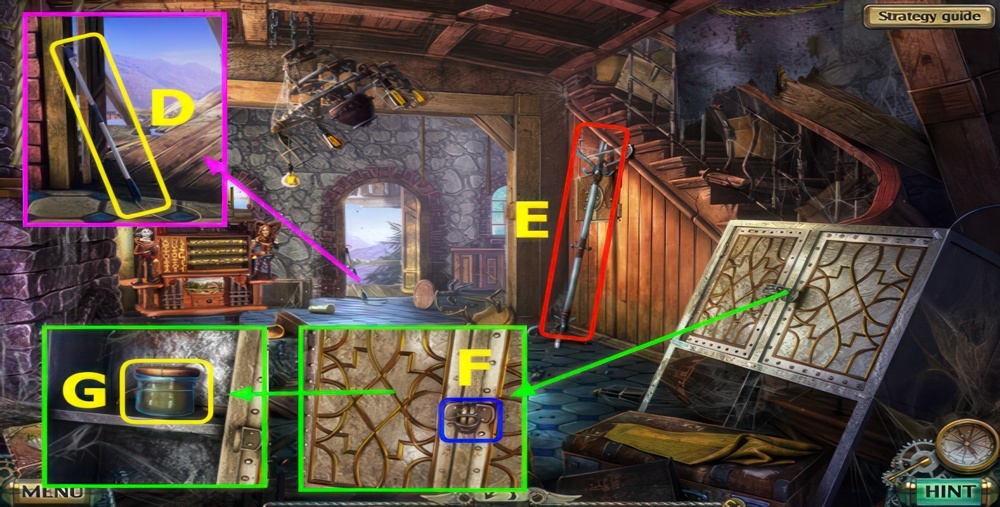
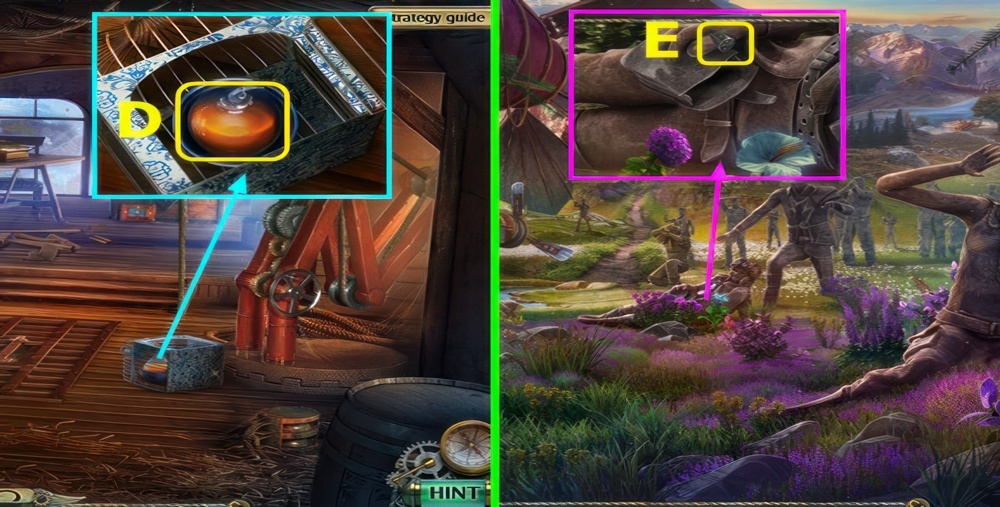
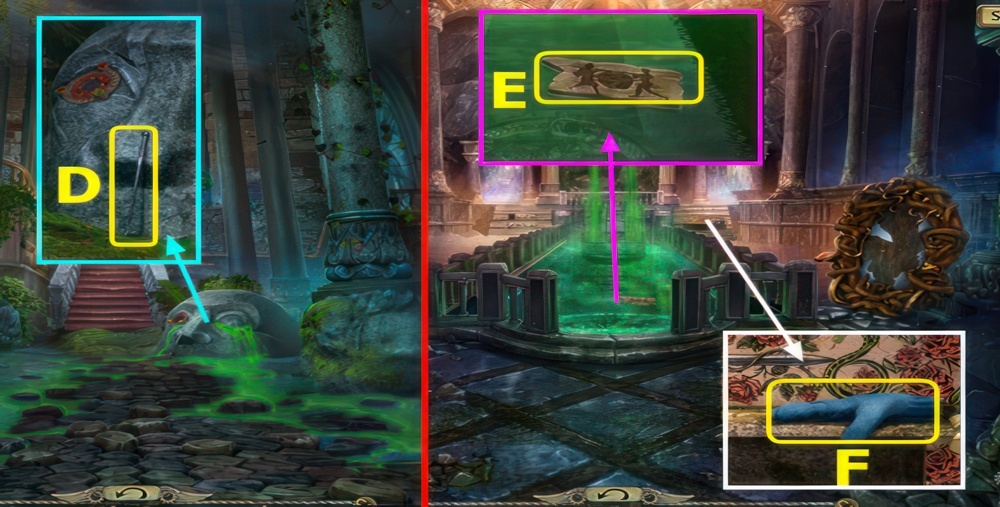
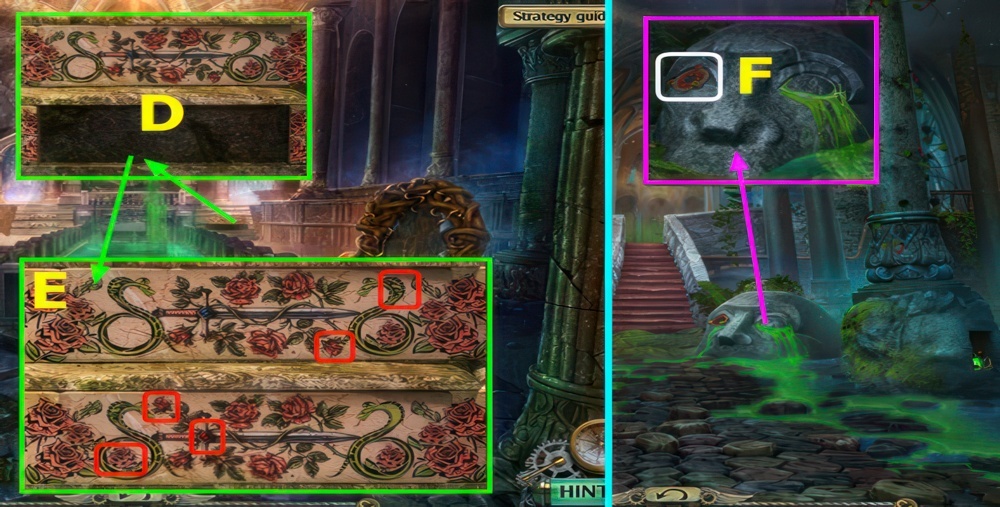
- Place POSTER (D).
- Use HAIRPIN (E).
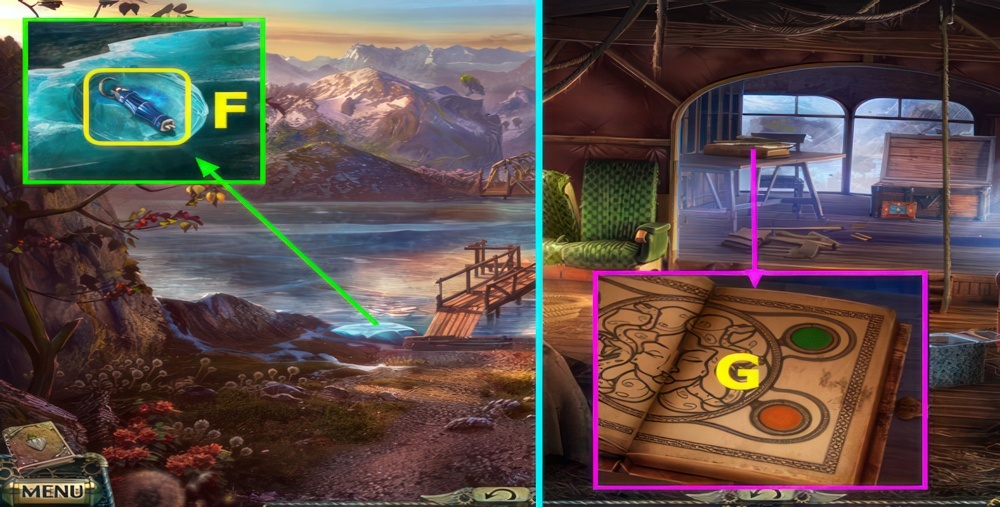
- Select poster, take BROKEN KEY (F).
- Restore BROKEN KEY, add RIBBON, earn KEY.
- Use KEY, turn handle (E).
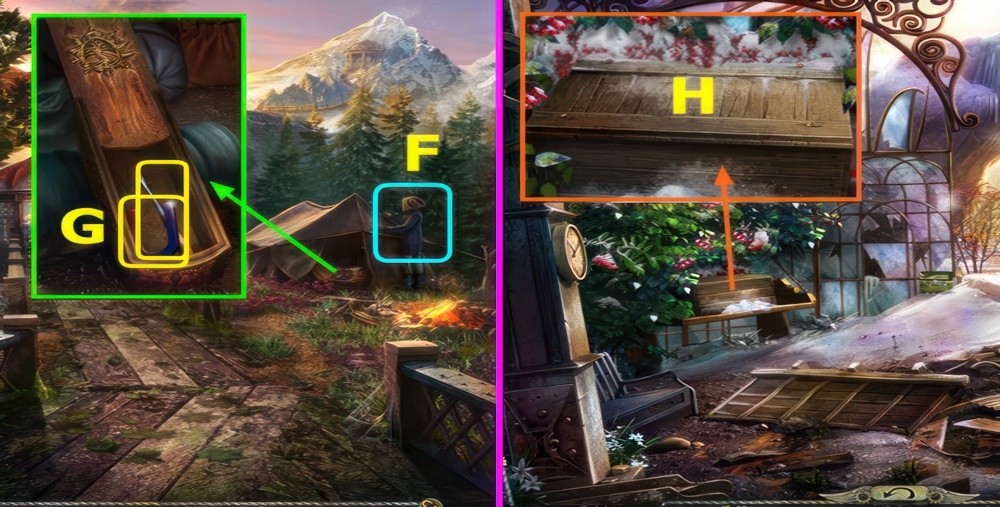
- Go forward.
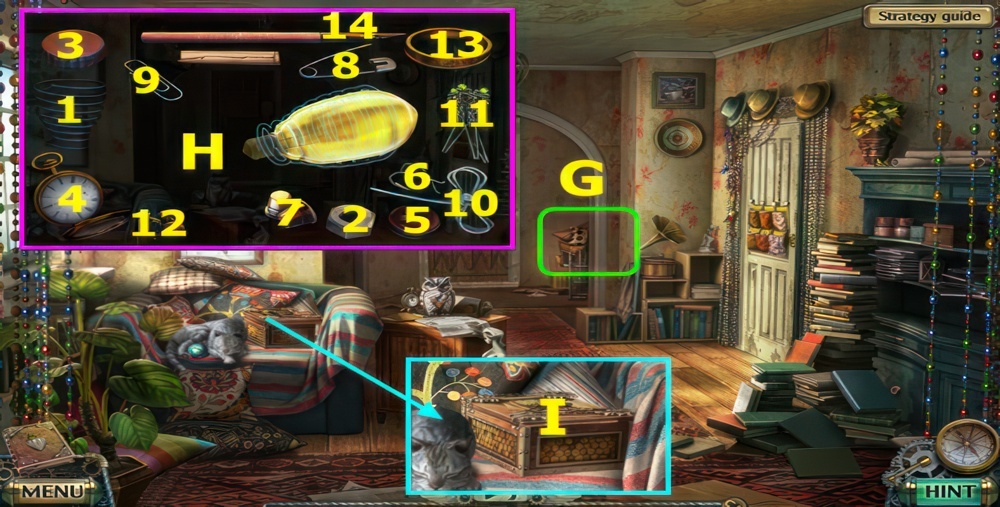
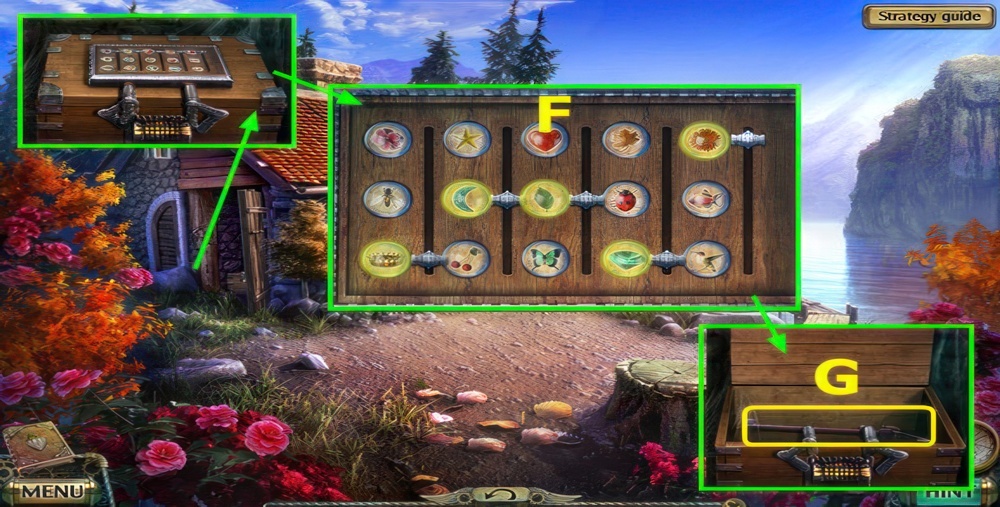
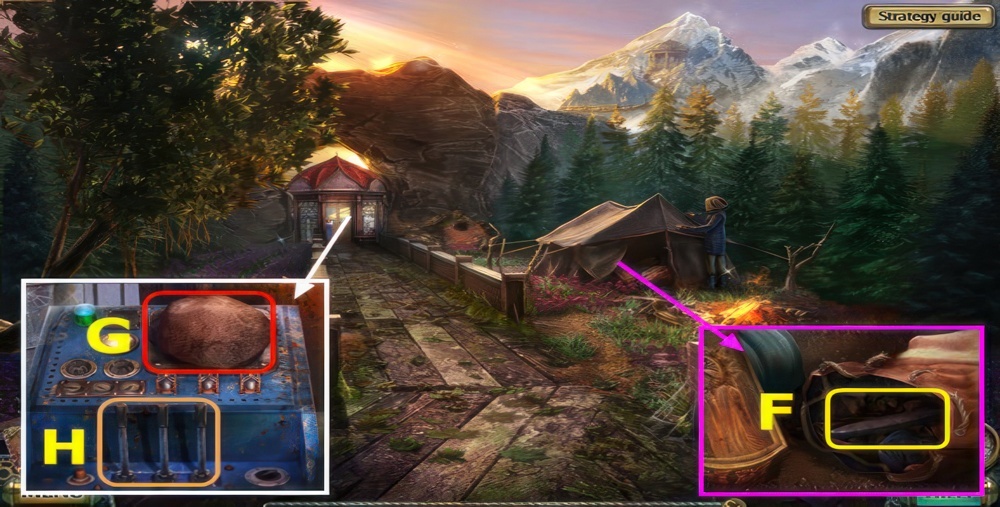
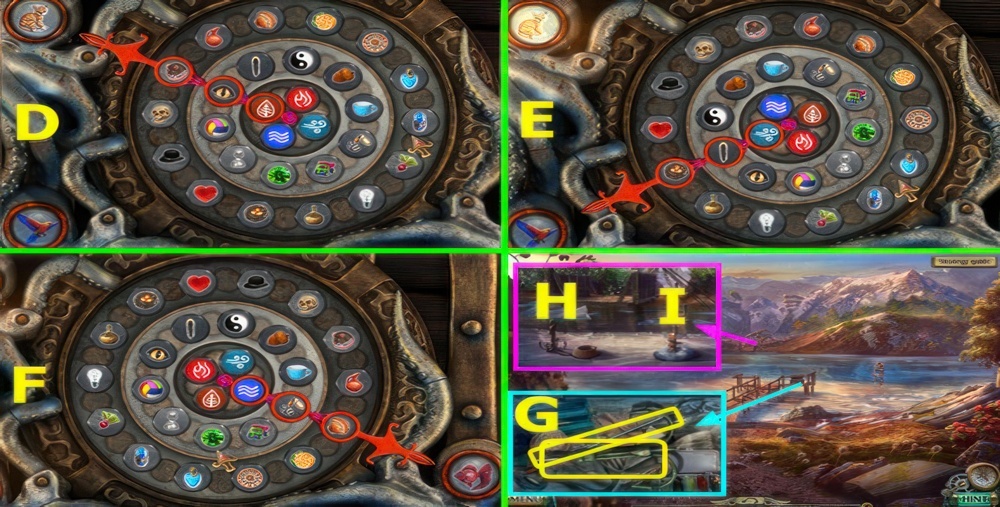
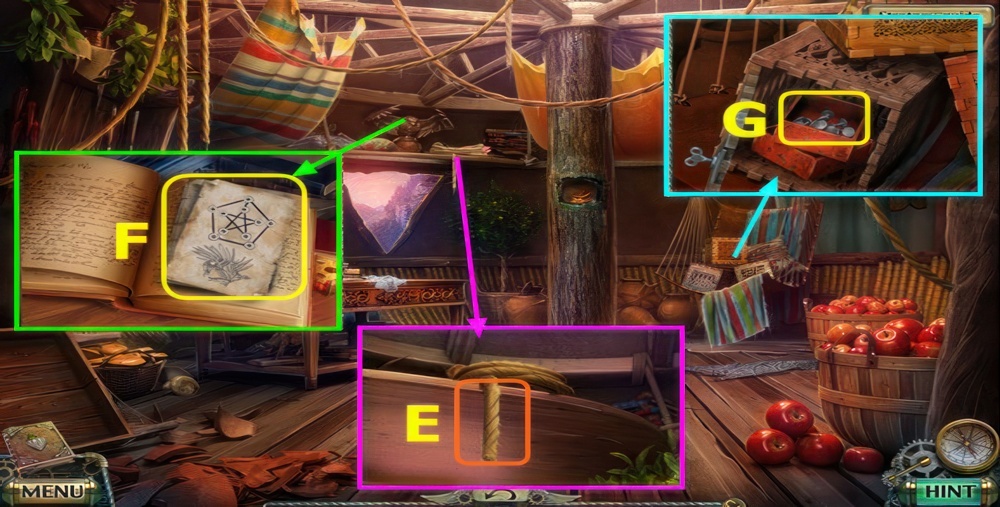
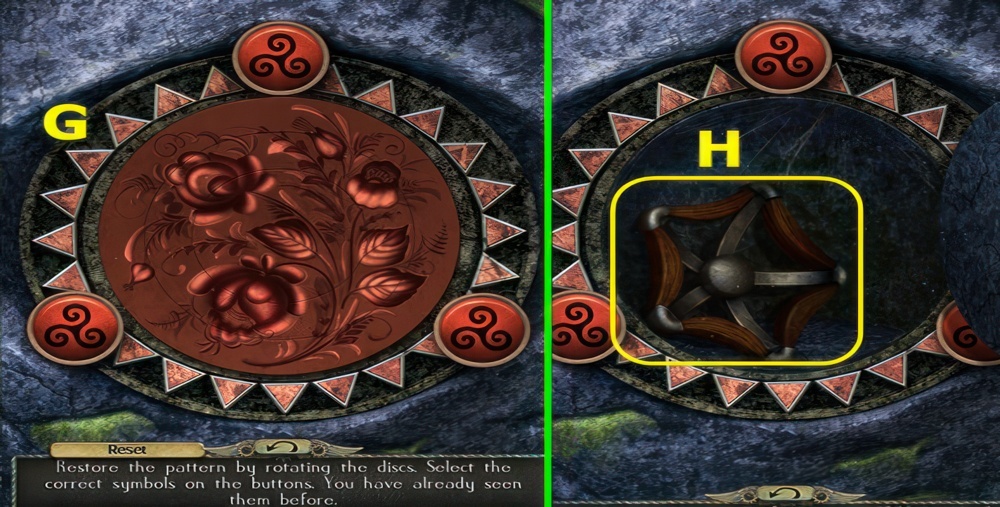
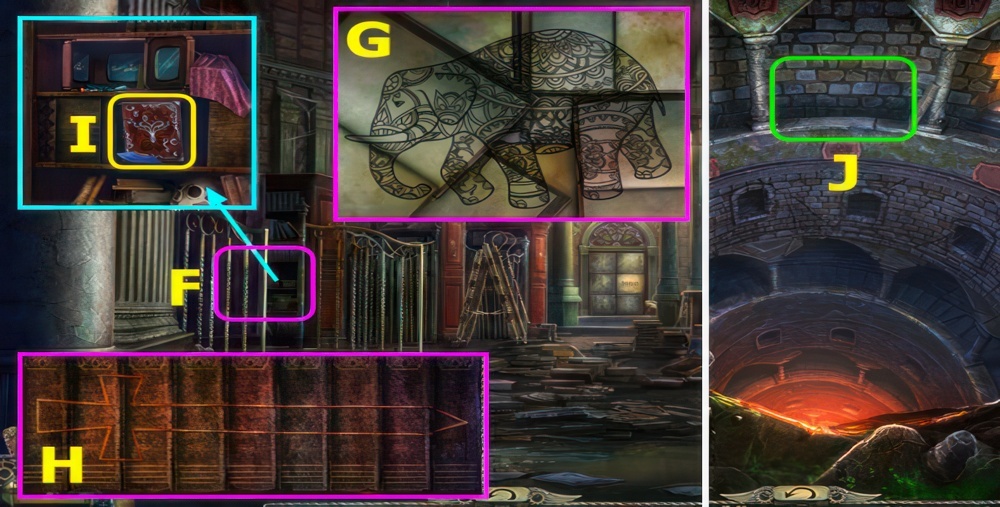
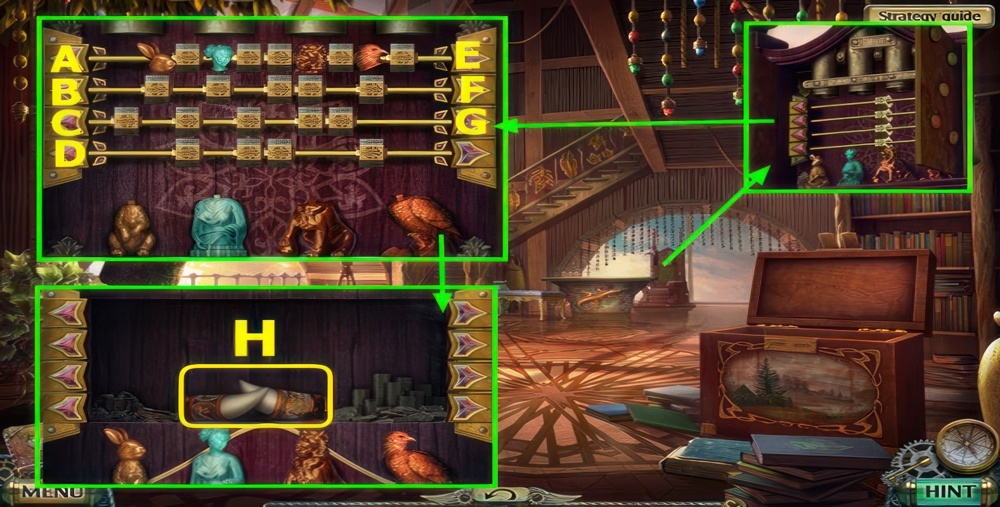
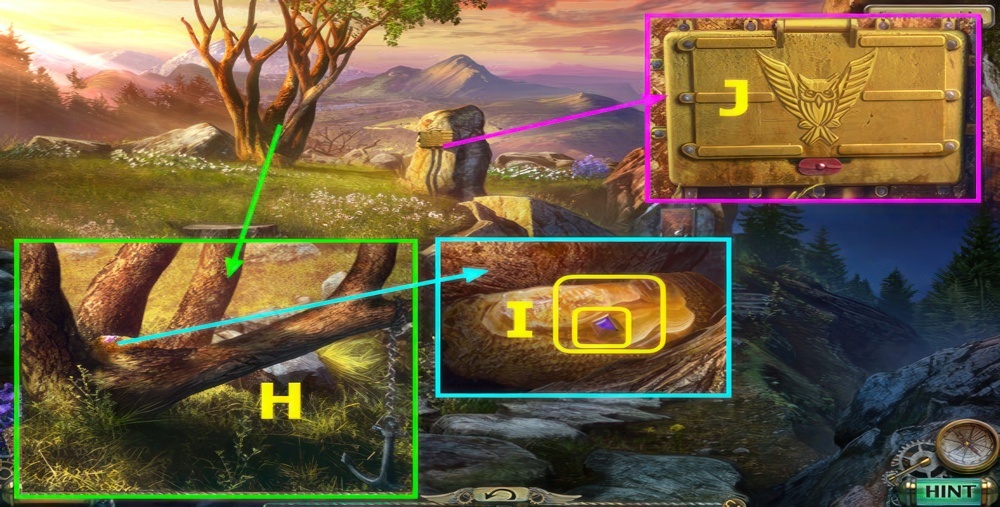
- Play puzzle, earn PARTS KIT (G).
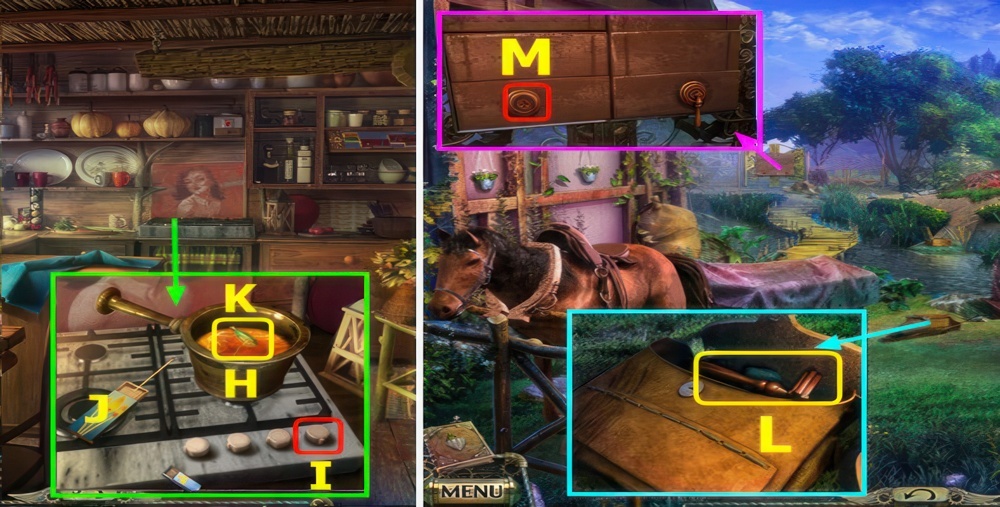
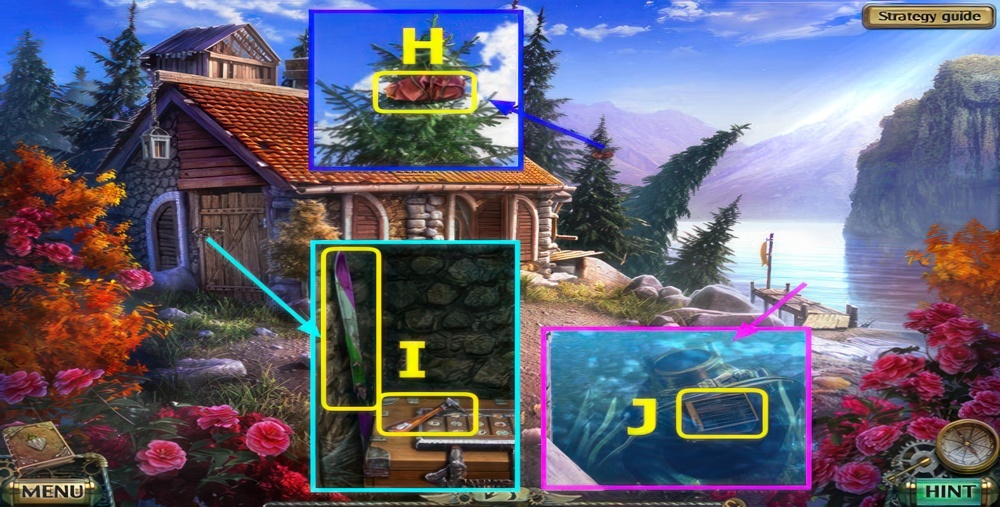
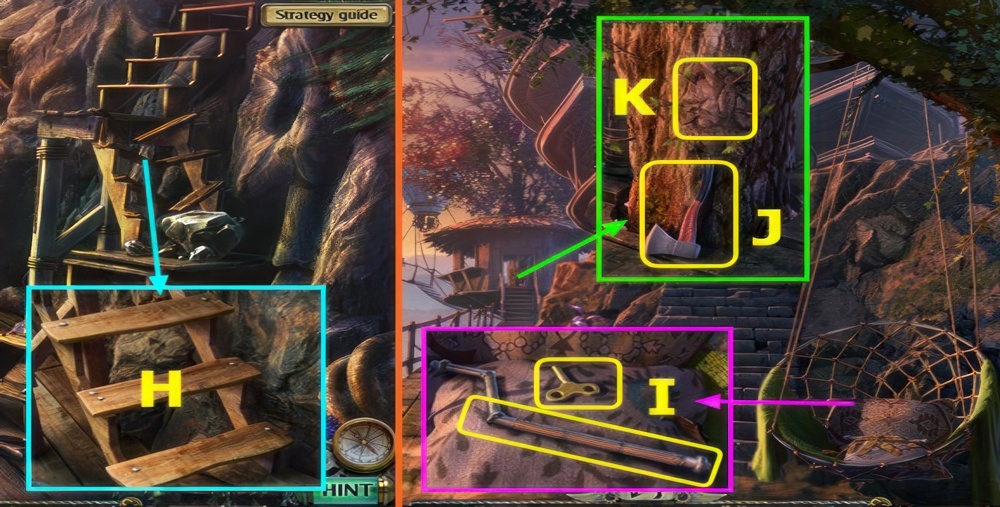
- Select PARTS KIT, select 1-14 (H), earn BEE.
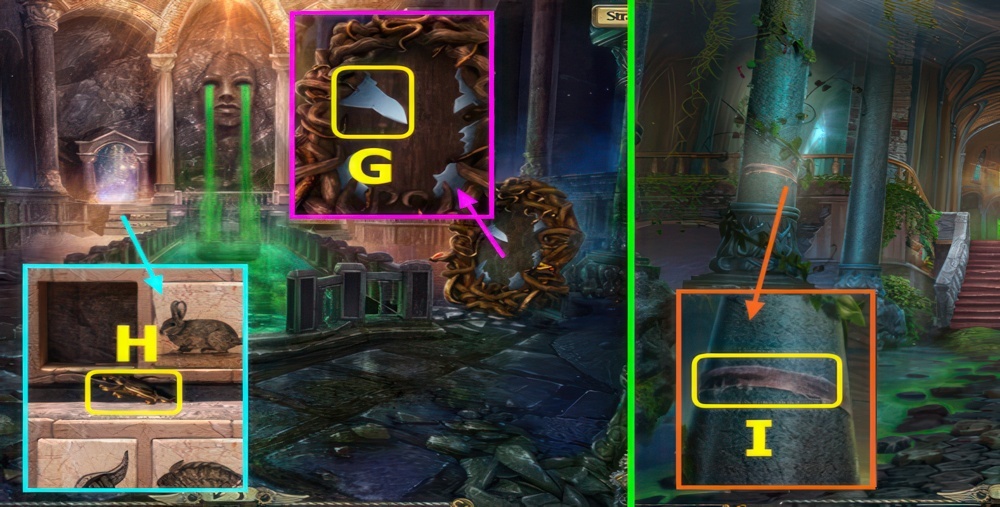
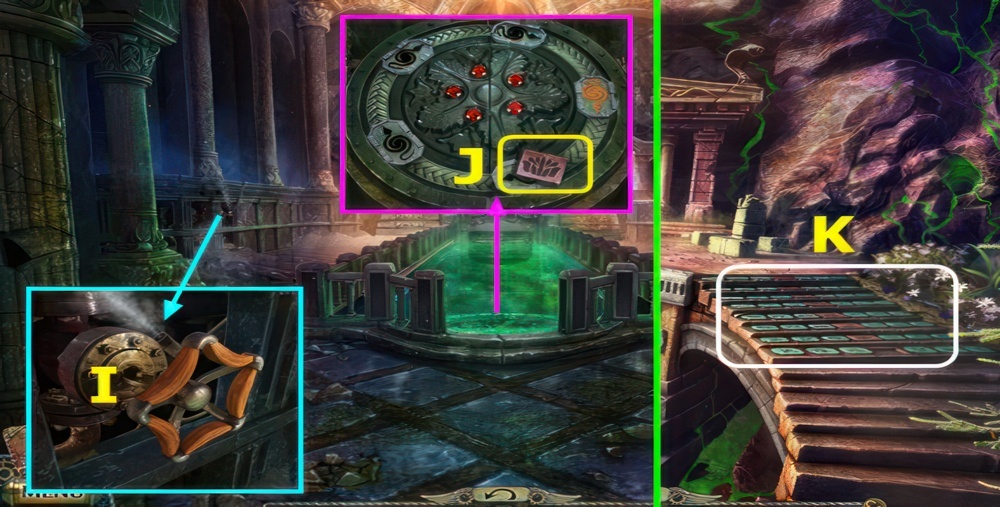
- Select (I).

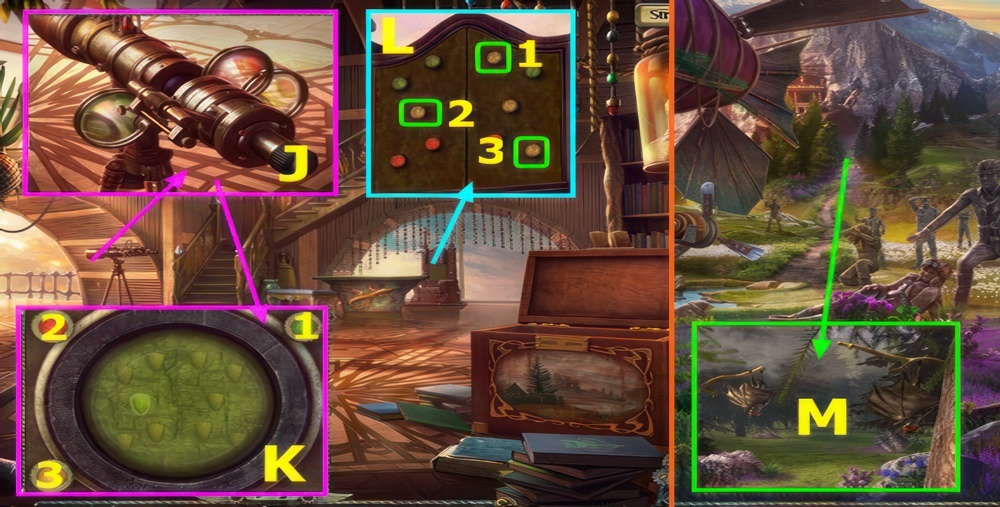
- Place BEE (J).
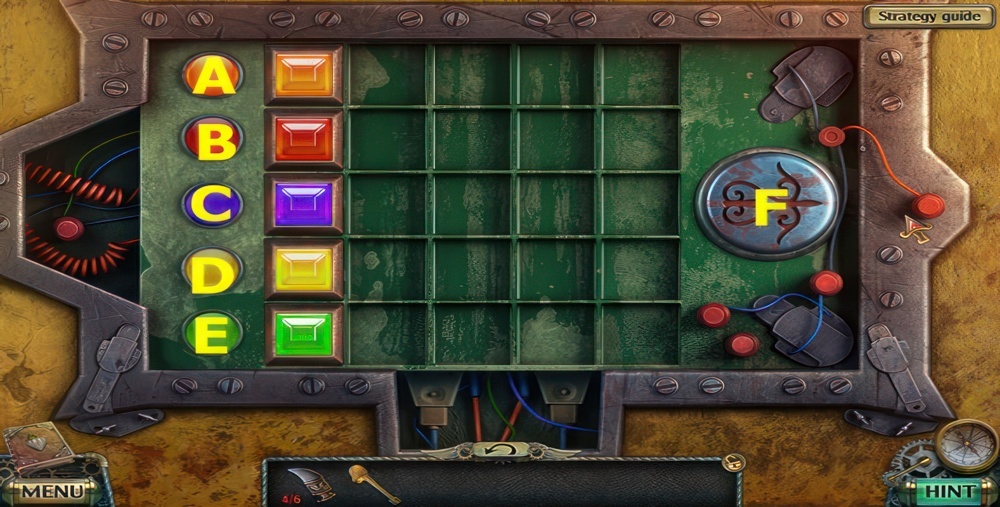
- Press on the chips to place them on the cells with matching symbols.
- The chip will move in the direction of an arrow.
- Move the chip on the cell with a gear to change its direction if needed.
- Walkthrough: K×3-L-K×5-L-K-L-K×7-J×2-K-J-K.
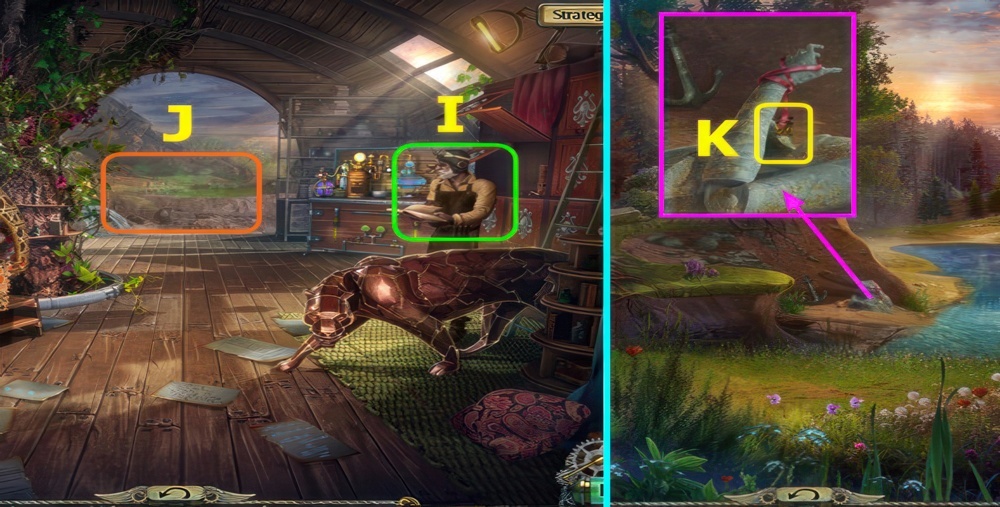
Equip horse
I saw my mother standing by the table in the kitchen. She looked at me with a warm smile. My legs buckled from surprise. After all, Mom disappeared a long time ago, and for a long time we lived together with my dad, and he did his best to take care of me. According to my mom, everything that I remember is just a dream. For two days I lay unconscious, after hitting my head really hard falling off a horse. All of this is difficult to understand and even more difficult to believe. In the meantime, my dream keeps seeming more real to me than what I see around me now. Out into the yard, I discovered the exact same box, that I found in my dream. The box that stored the firestone. It turned out to be empty. My mind keeps playing evil games with me. Mom keeps trying to convince me, that after a while I will come return to my normal self and everything will fall into place.
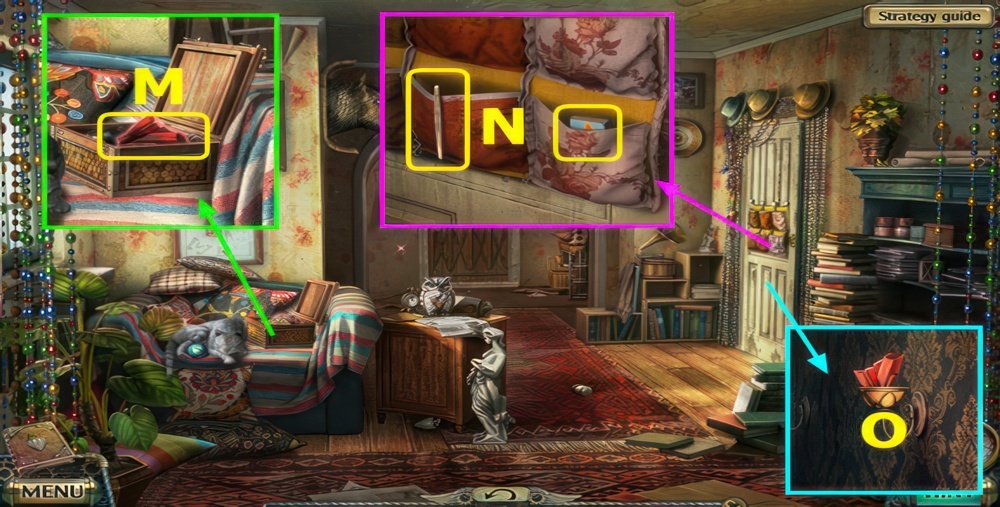
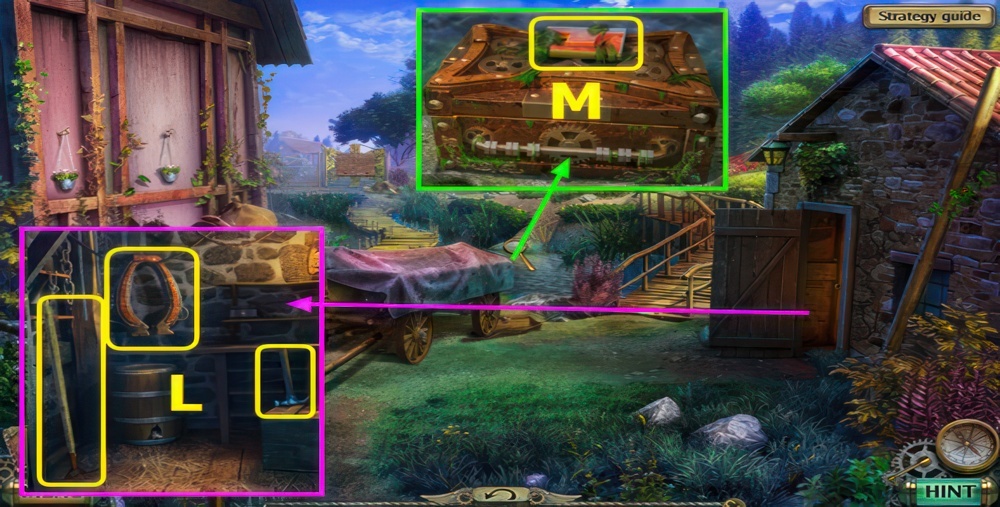
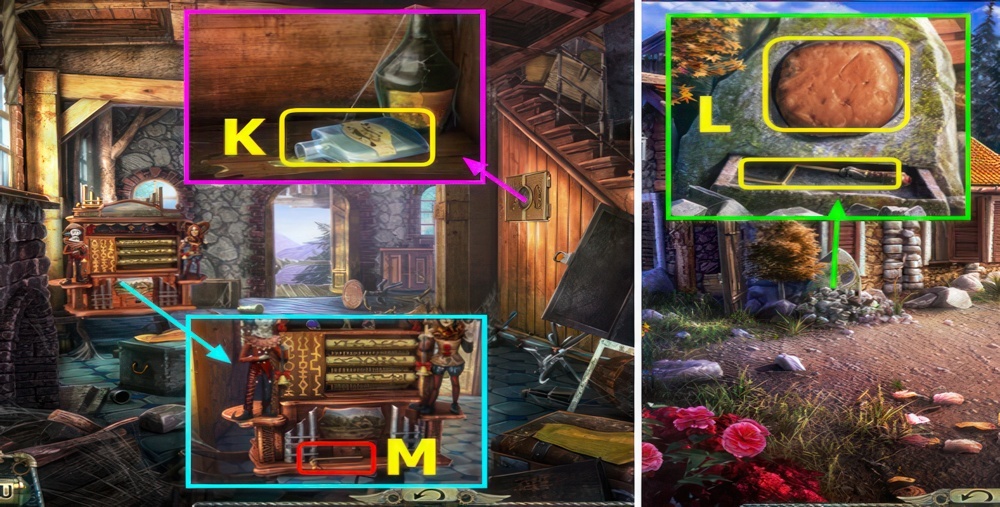
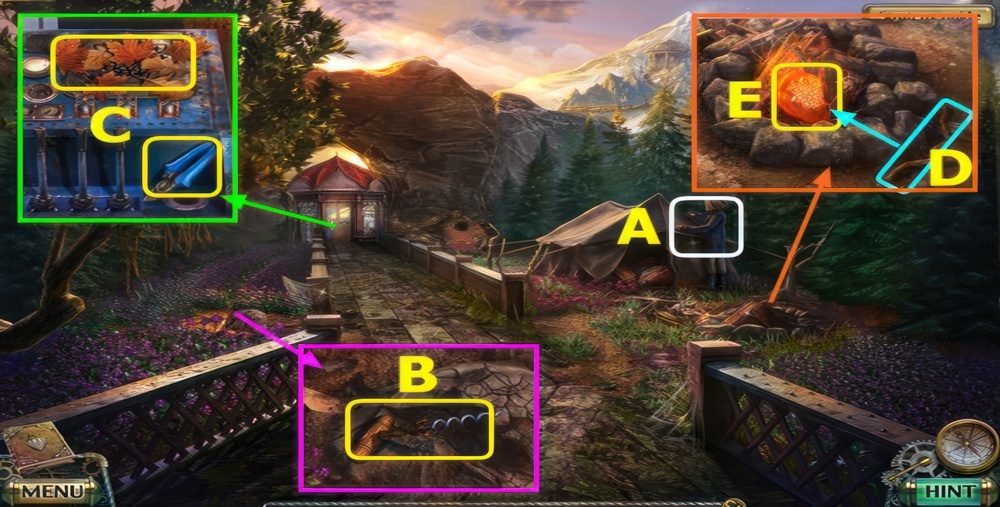
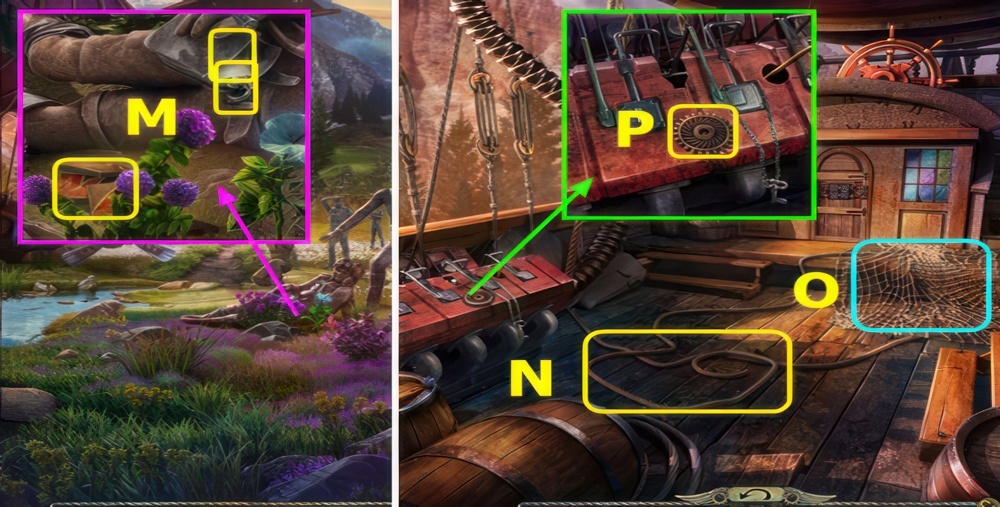
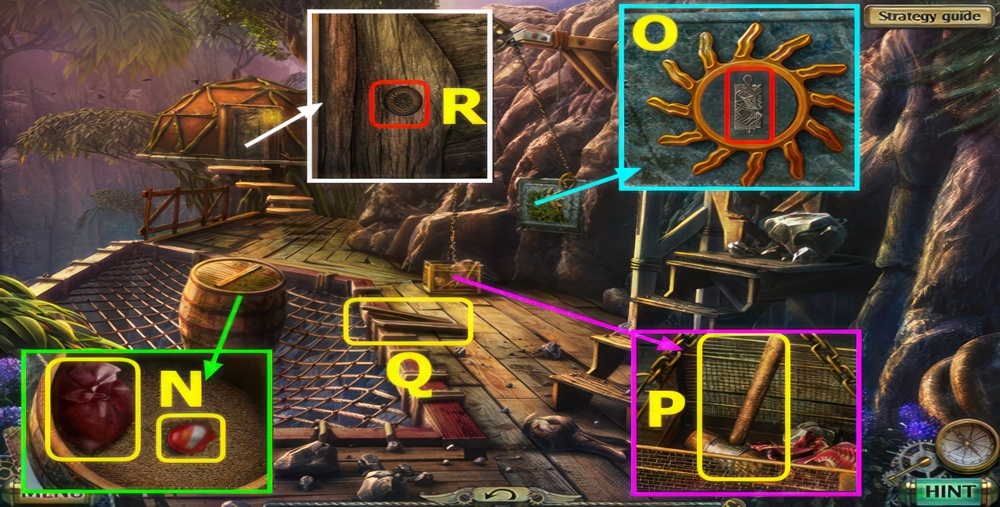
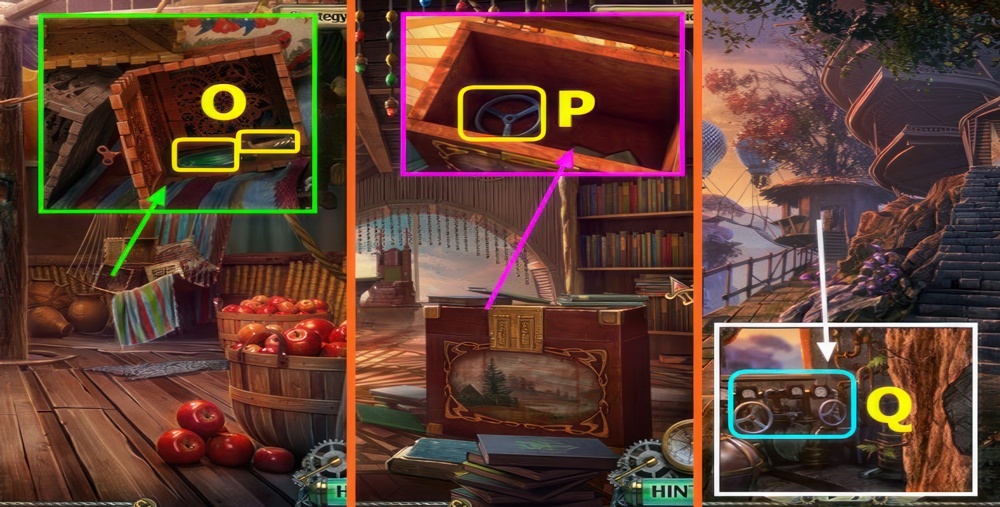
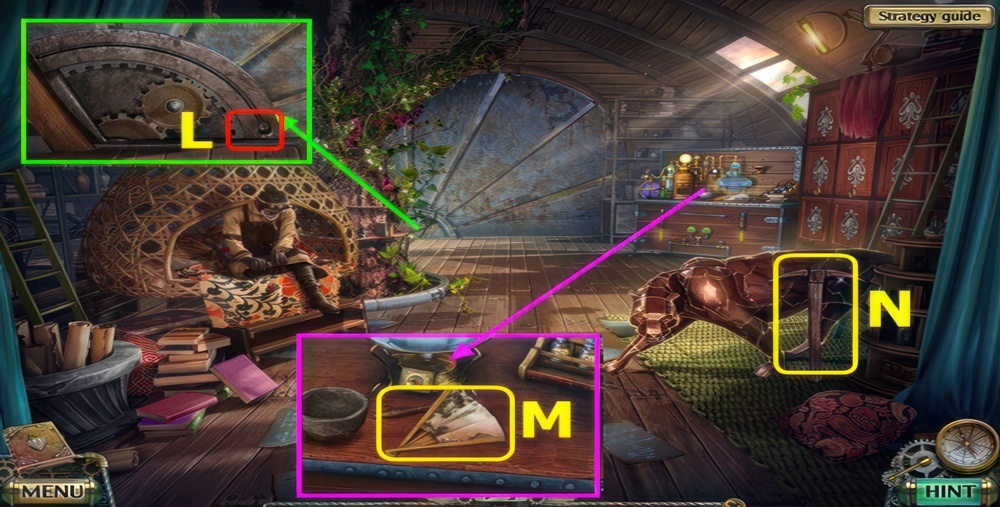
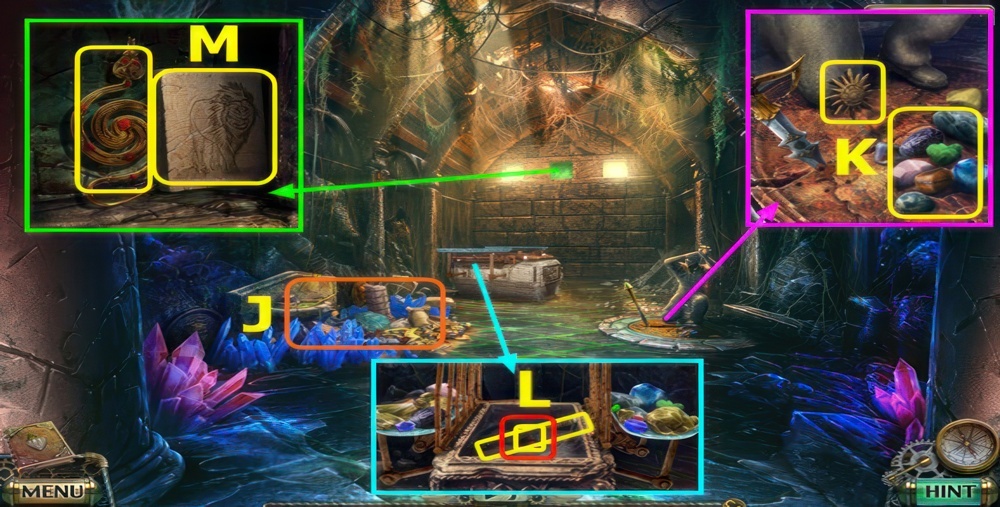
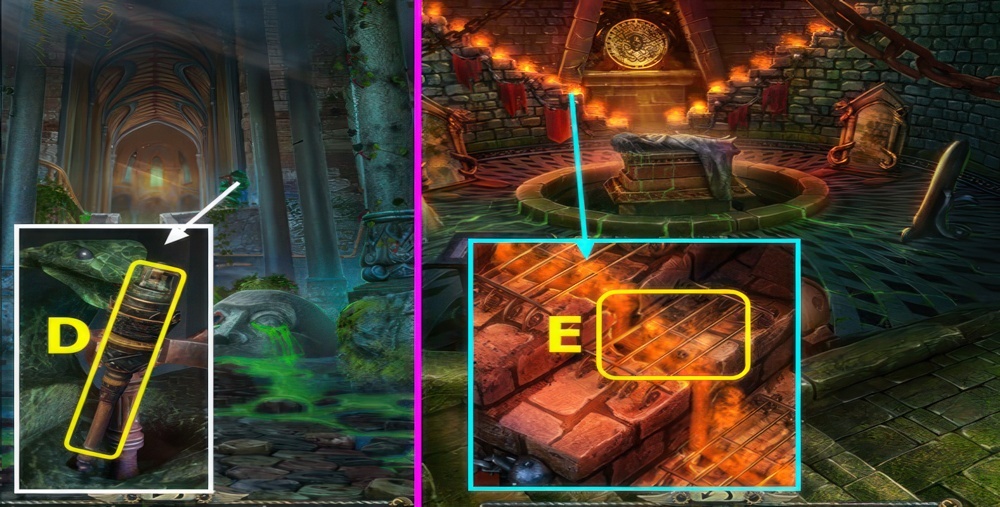
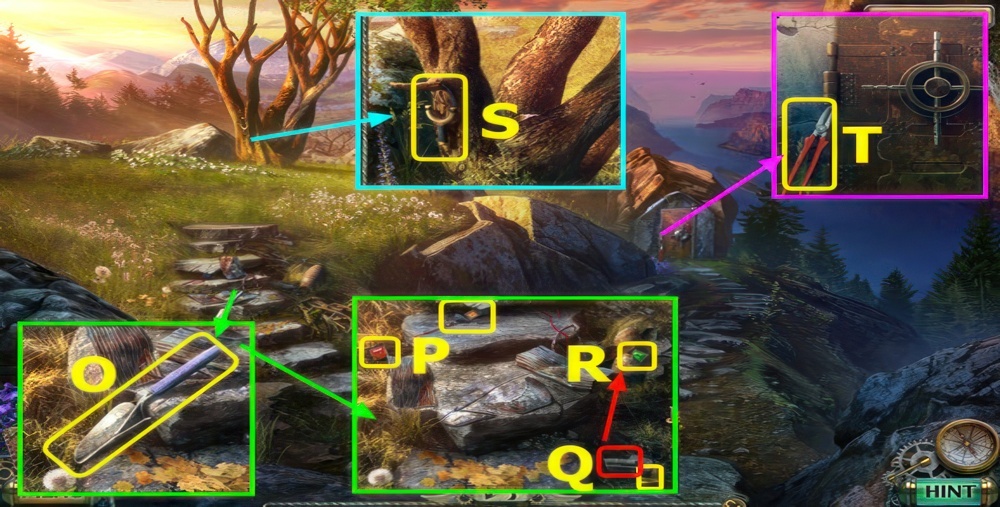
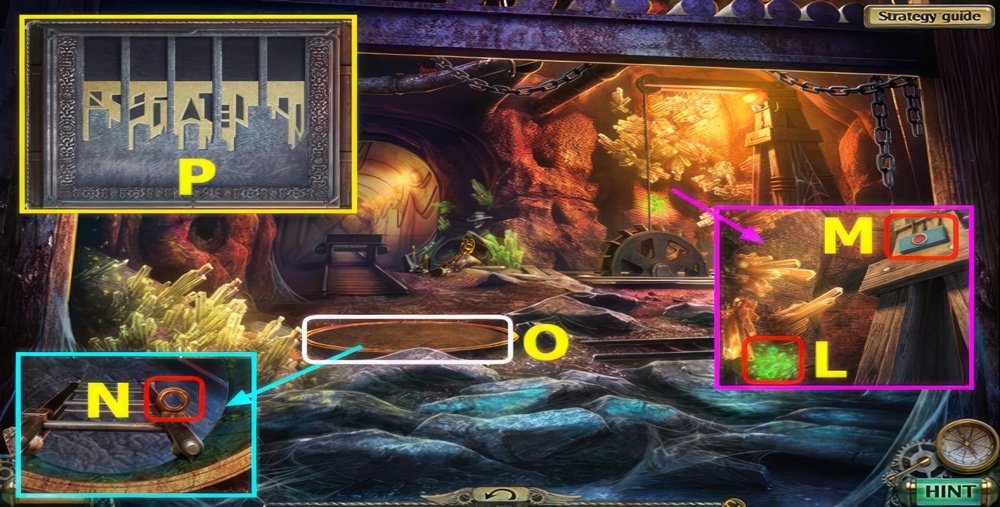
- Take CRYSTAL (M).
- Take MATCHES and TWEEZERS, turn knob (N).
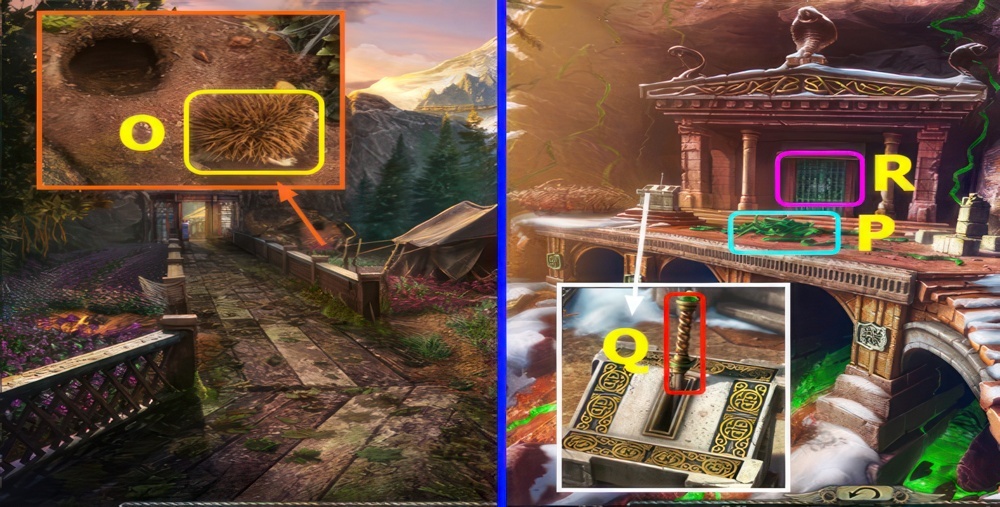
- Replace CRYSTAL (O).
- Go right.
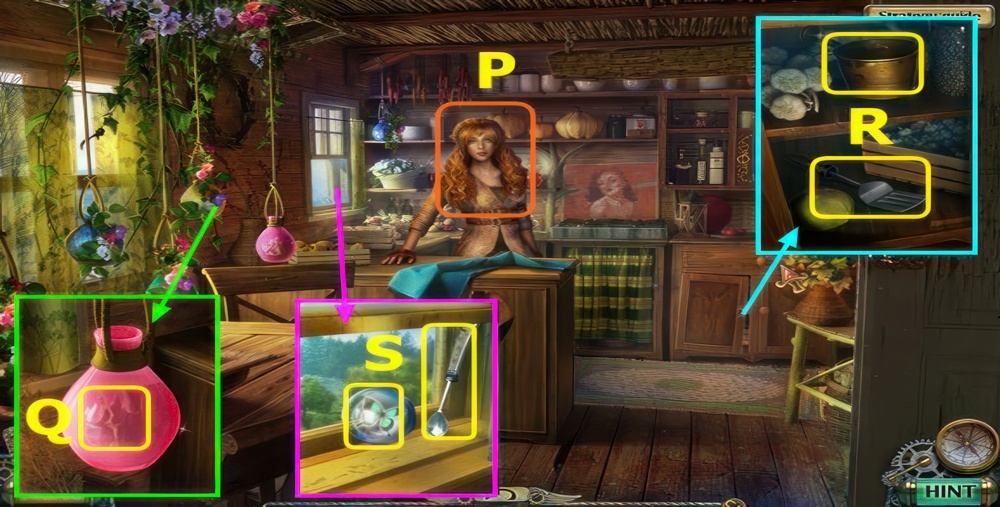
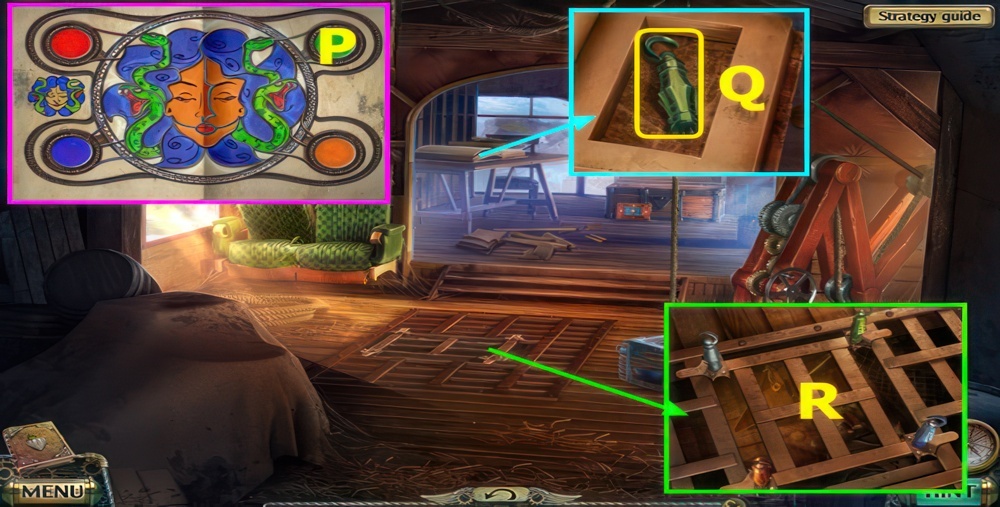
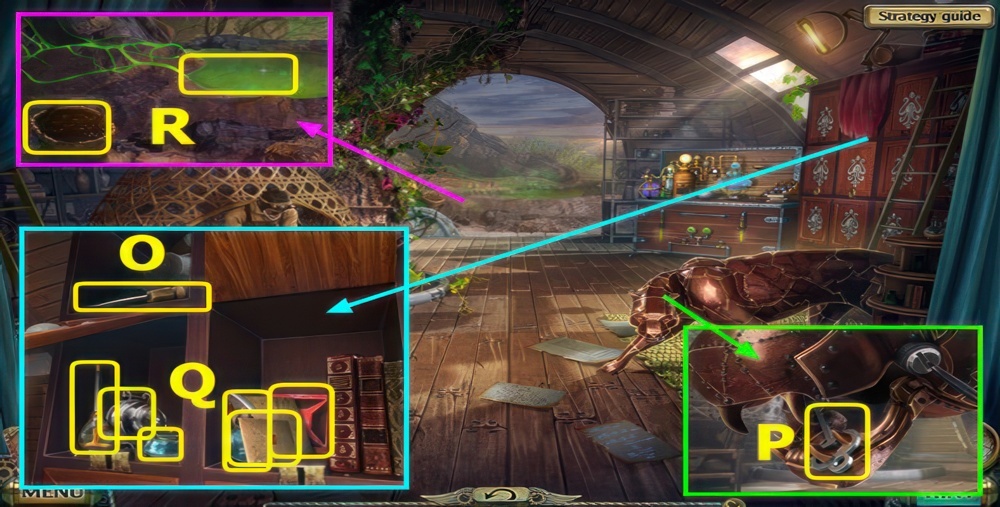
- Talk, earn KEY (P).
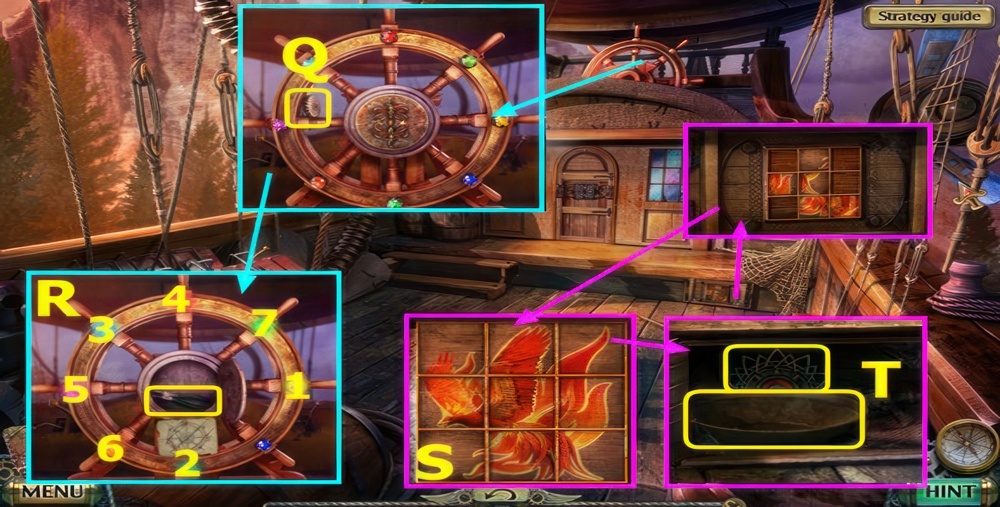
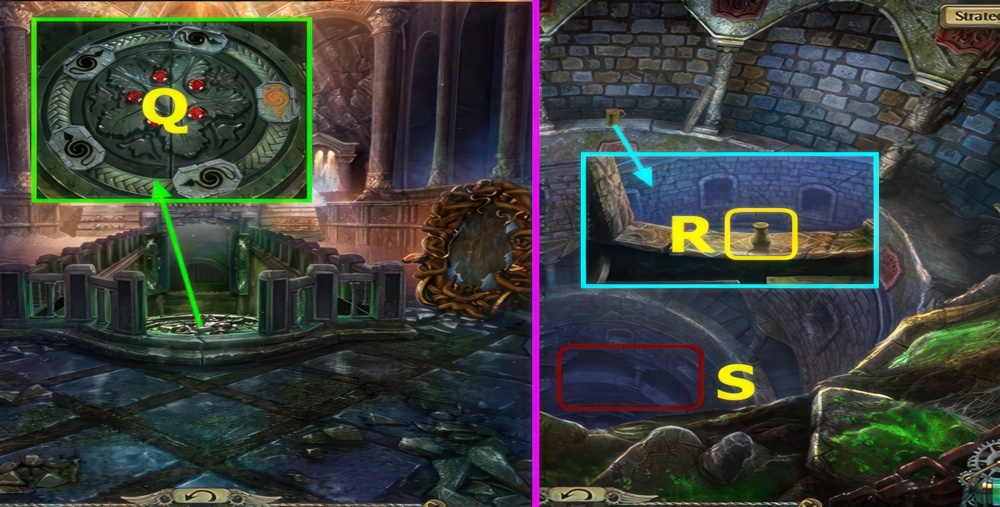
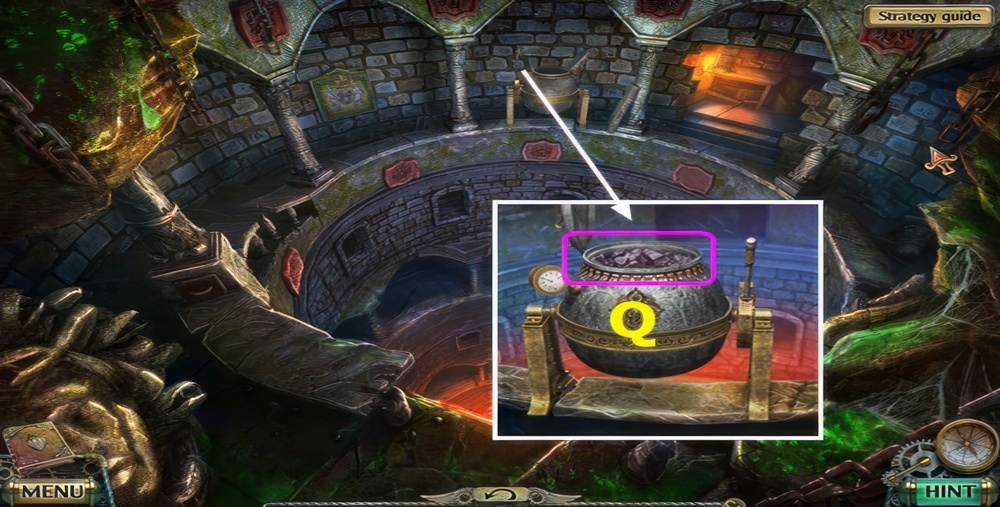
- Use TWEEZERS, earn HINT (Q).
- Use TWEEZERS, take SPATULA and LADLE (R).
- Use SPATULA and open window, take 1/4 GLASS SPHERES and SPOON (S).
- Go down twice.
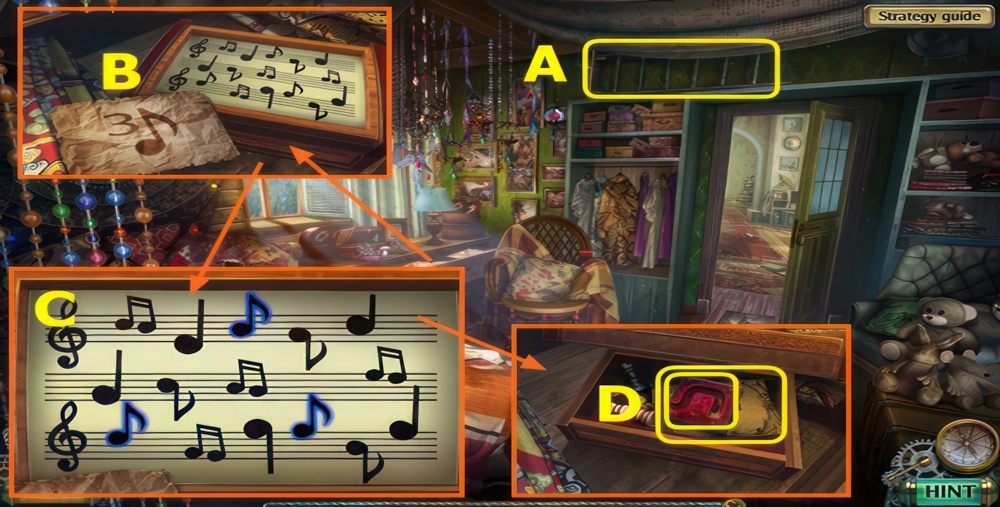
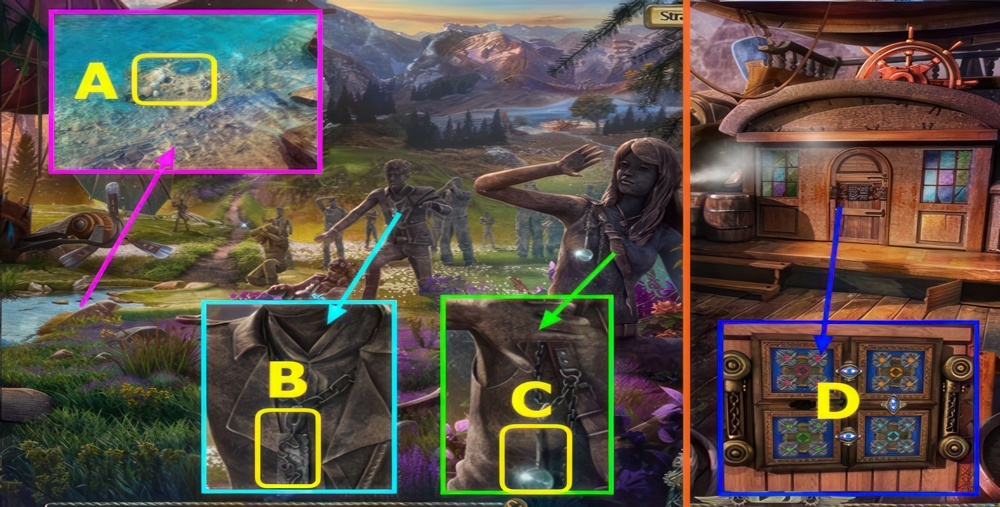
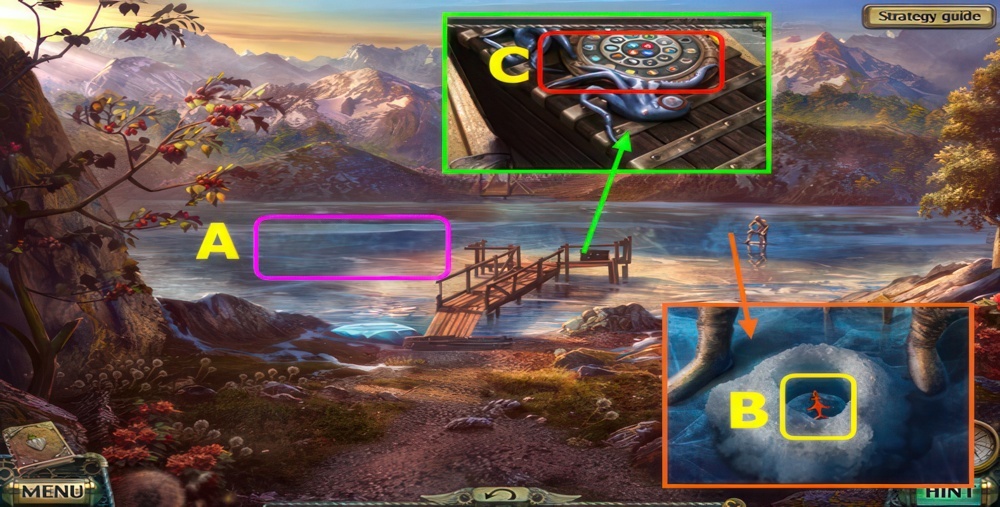
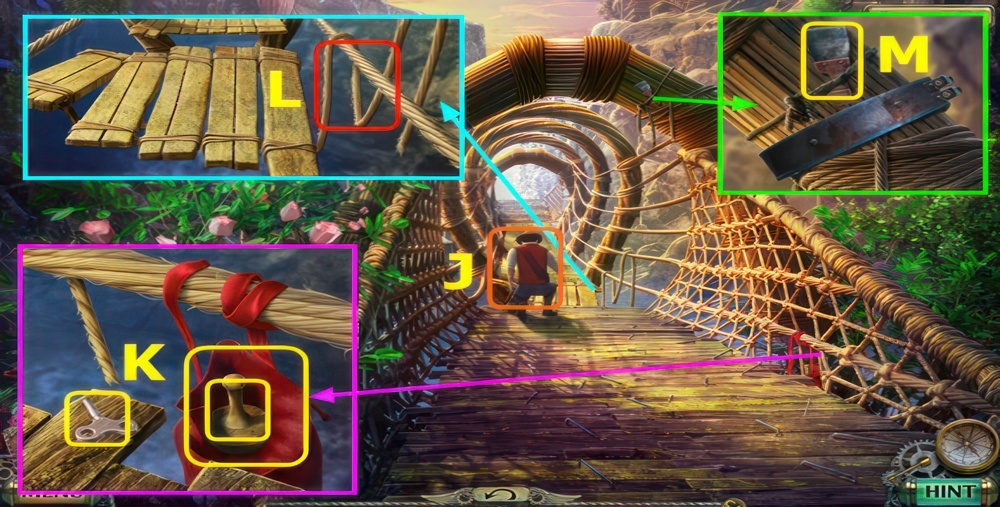
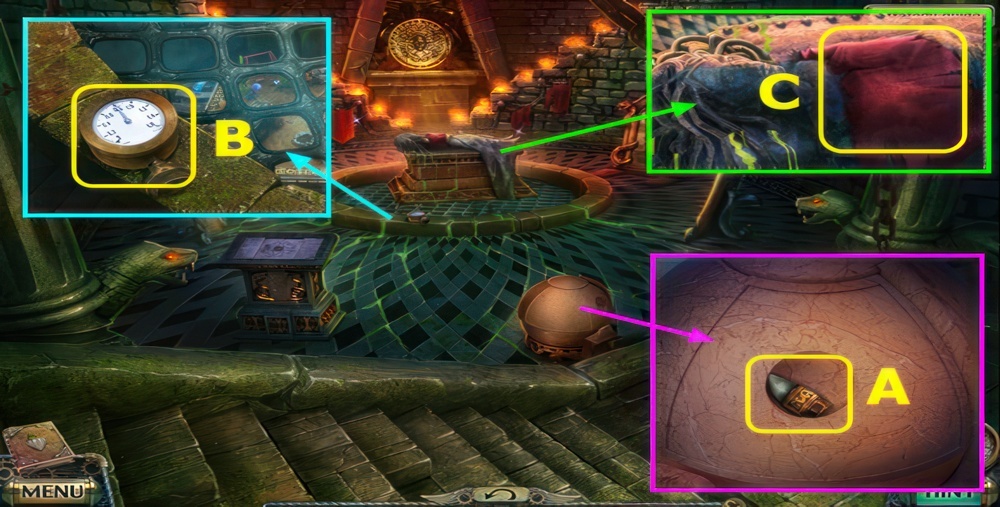
- Take LADDER (A).
- Place HINT, select (B).
- Click on the specific notes using the hint.
- Walkthrough (C).
- Take 1/2 PUZZLE PIECE and HINT (D).
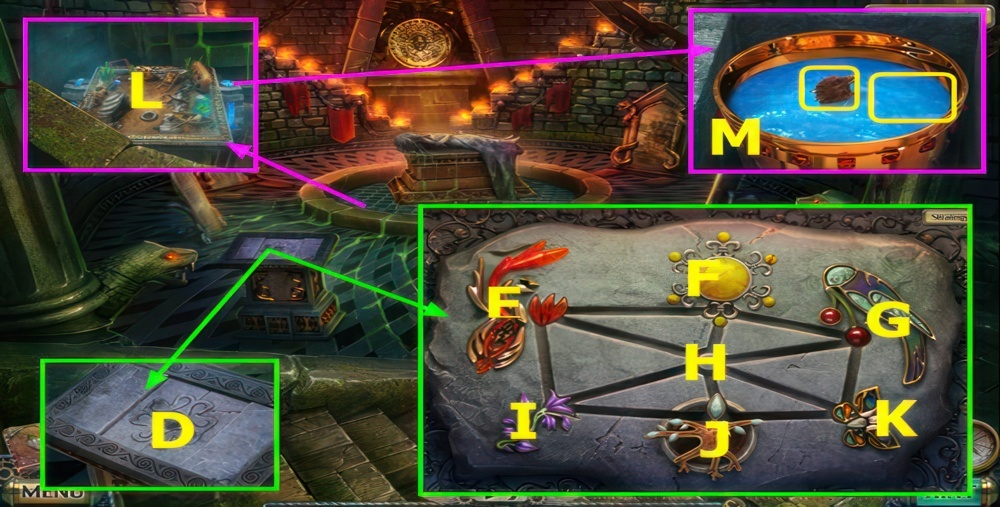
- Go forward.
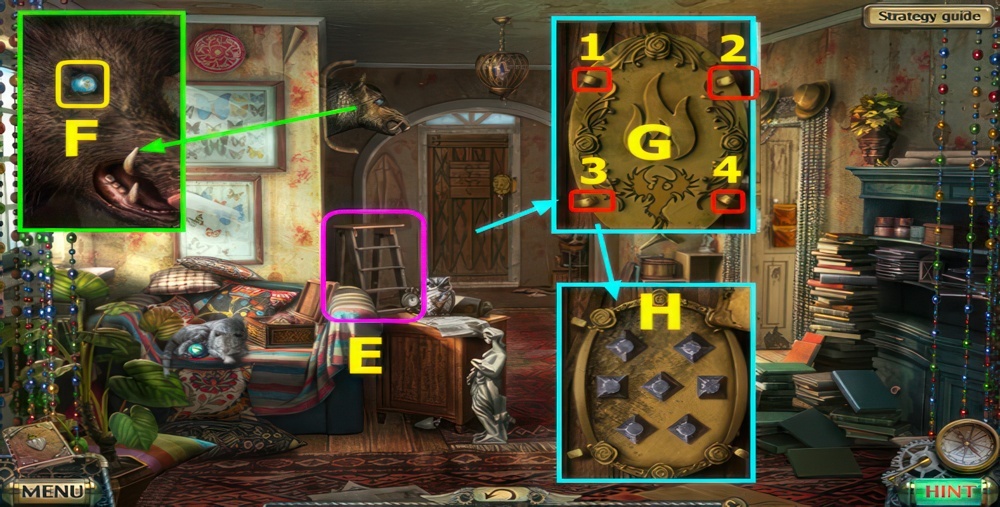
- Place LADDER (E).
- Use SPOON, earn 2/3 GLASS SPHERES (F).
- Place KEY, select 1-4 (G).
- Using the hint, open the lock.
- Walkthrough (H).
- Go forward.
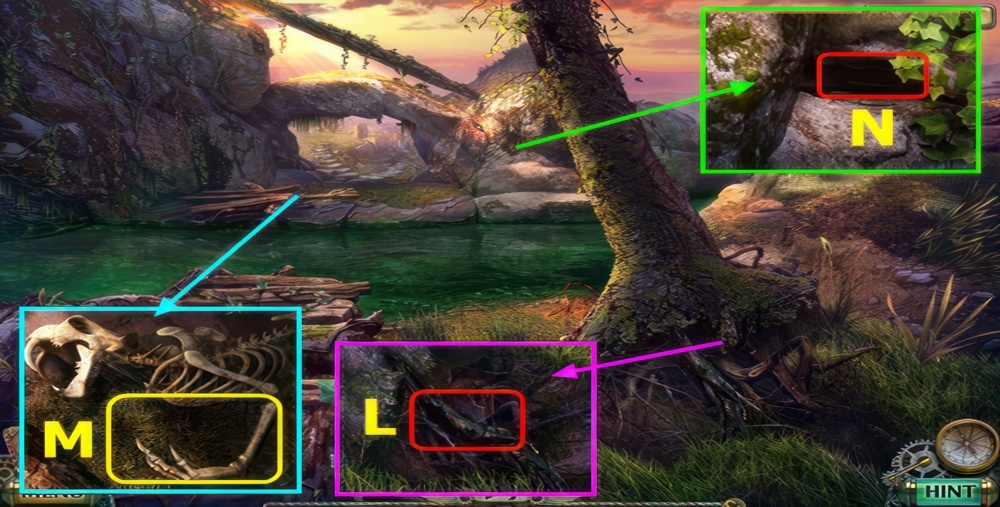
Run to uncle’s house
I decided to make sure that there really was no one at uncle’s house. And yes, apparently his home was abandoned long ago. Yet the house was not quite empty. I ran into a girl about my age. It turned out that uncle Colin is her father, but for several years now she’s been living all alone. It is apparent that Camilla is wary of any stranger and is very careful. But still she should not stay here alone. The dangerous squad of soldiers, that my mother spoke about, may come around here. Perhaps Camilla agrees to go with me and we can go on the run together, the three of us. I wonder what my mother will say when she sees her.
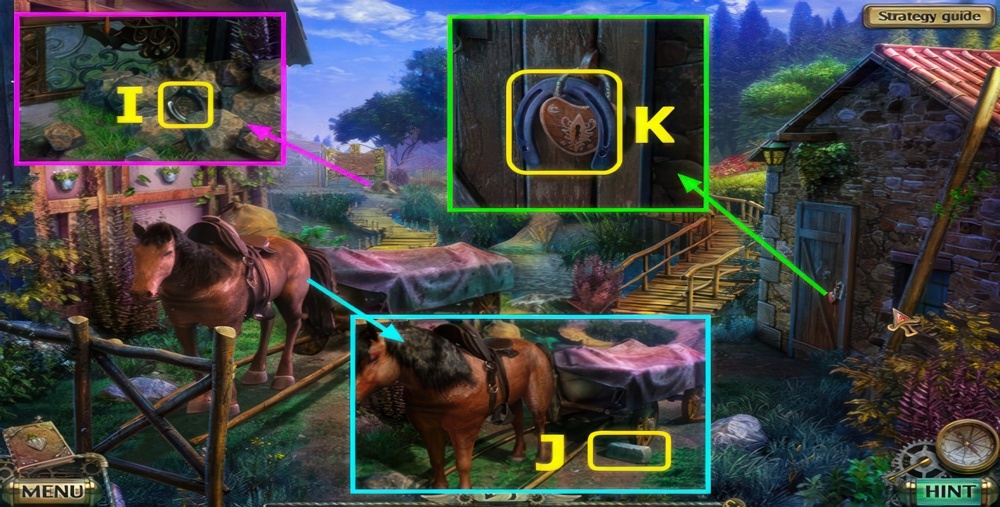
- Move rocks, take 1/2 HORSESHOE (I).
- Take BRICK (J).
- Take 2/2 HORSESHOE, use BRICK (K).
- Take RAKE, HORSE COLLAR, and HAMMER (L).
- Use RAKE, remove moss, take 2/2 PUZZLE PIECE (M).
- Go down, right.
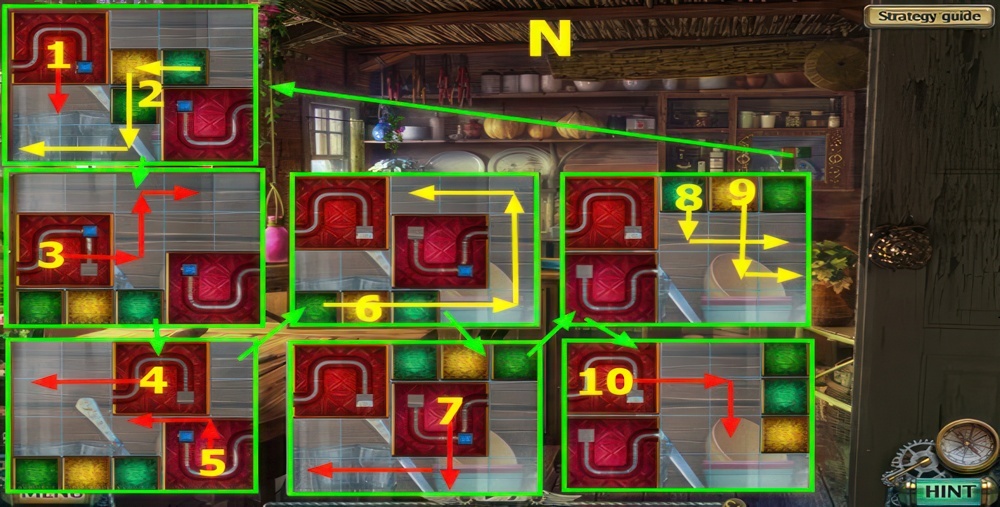
- Place PUZZLE PIECE (N)
- Move the chips on the field to free up the red ones from the blue blocks that hold them.
- Then connect them so that the ends of the line inside them meet.
- Walkthrough: 1-10.
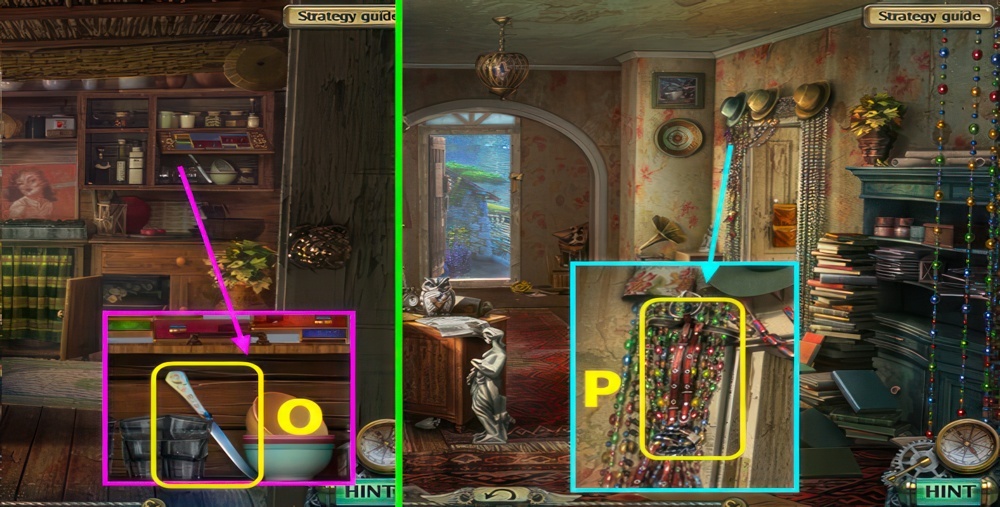
- Take KNIFE (O).
- Go down.
- Use KNIFE, earn BRIDLE (P).
- Go forward.
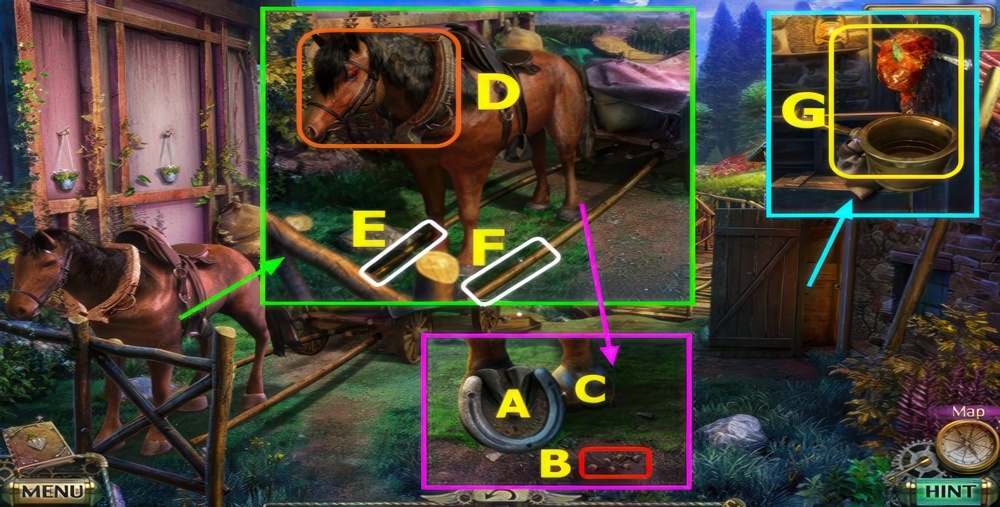
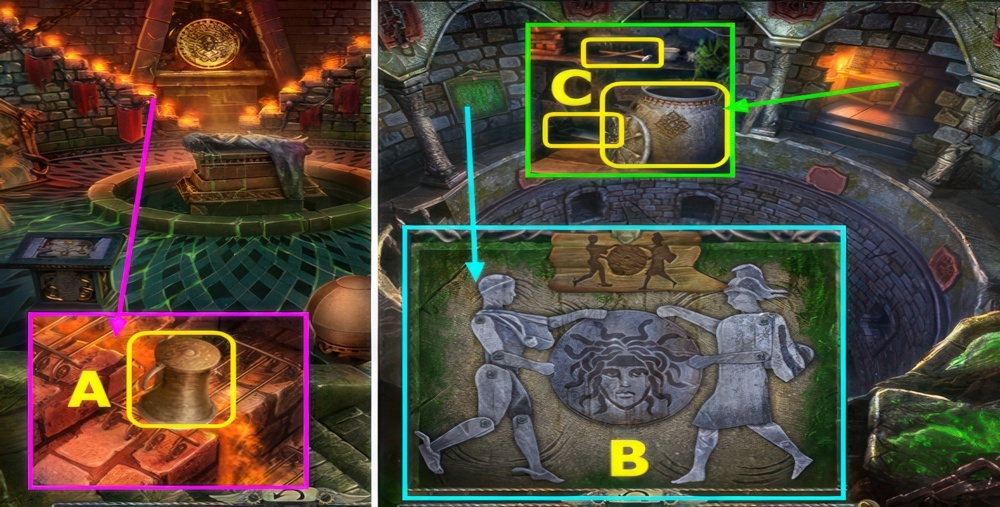
- Select (A), place 1/2 HORSESHOE.
- Select nails (B).
- Use HAMMER (A).
- Select (C), place 2/2 HORSESHOE.
- Select nails (B).
- Use HAMMER (C).
- Place HORSE COLLAR and BRIDLE (D).
- Select (E-F).
- Use LADLE and KNIFE, earn LADLE FULL OF RESIN (G).
- Go Kitchen.
- Place LADLE FULL OF RESIN (H).
- Select knob (I), use MATCHES (J).
- Take MEDALLION (K).
- Go down, forward.
- Use MEDALLION, take diary and GATE HANDLE (L).
- Place GATE HANDLE (M).
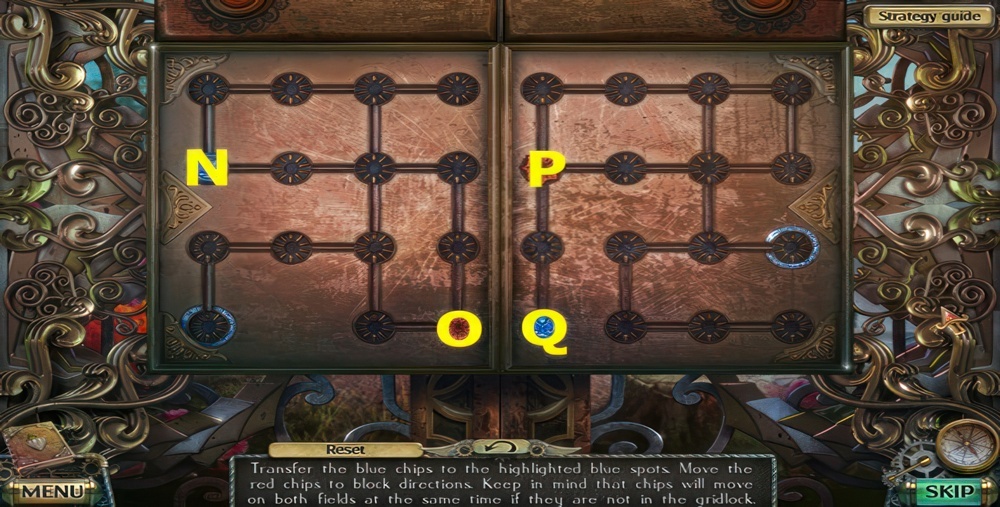
- Transfer the blue chips to the highlighted blue spots.
- Move the red chips to block directions.
- Keep in mind that chips will move on both fields at the same time if they are not in the gridlock.
- Walkthrough: move O up-N right-O down, left-N down, left-P up, right, down-Q up-P left-N down-P right, up-Q right, down, right.
- Go left.
After obtaining the transcript, return home quickly
I need to find uncle’s records, and then hurry home to mom. Camilla shouldn’t stay here either.
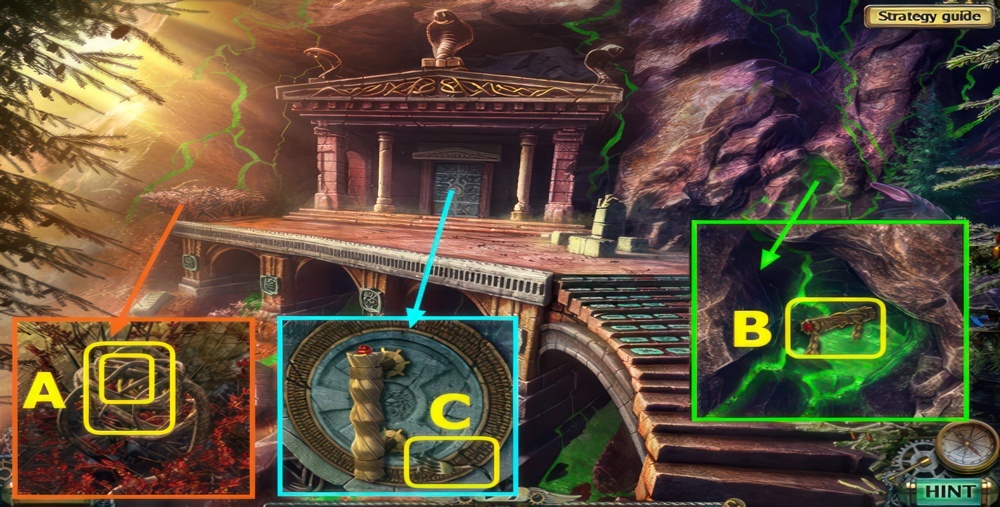
- Take CLAY (A).
- Select (B).
- Go left.
- Take 1/2 BEAR FIGURINE (C).
- Take HOOK (D).
- Select (E).
- Use KNIFE, earn DULL KNIFE (F).
- Open cabinet, take LUBRICANT (G).
- Go down.
- Use HOOK, earn TIED-UP PACKAGE (H).
- Open TIED-UP PACKAGE, take 2/2 BEAR FIGURINE and RAG.
- Use LUBRICANT, open latch, take SKI and HOE (I).
- Use SKI, take MOUSETRAP (J).
- Go left.
- Place 2 BEAR FIGURINE, take STAIN REMOVER (K).
- Go down.
- Use RAG, STAIN REMOVER, and CLAY, take CAST and LEVER (L).
- Go left.
- Place and select LEVER (M).
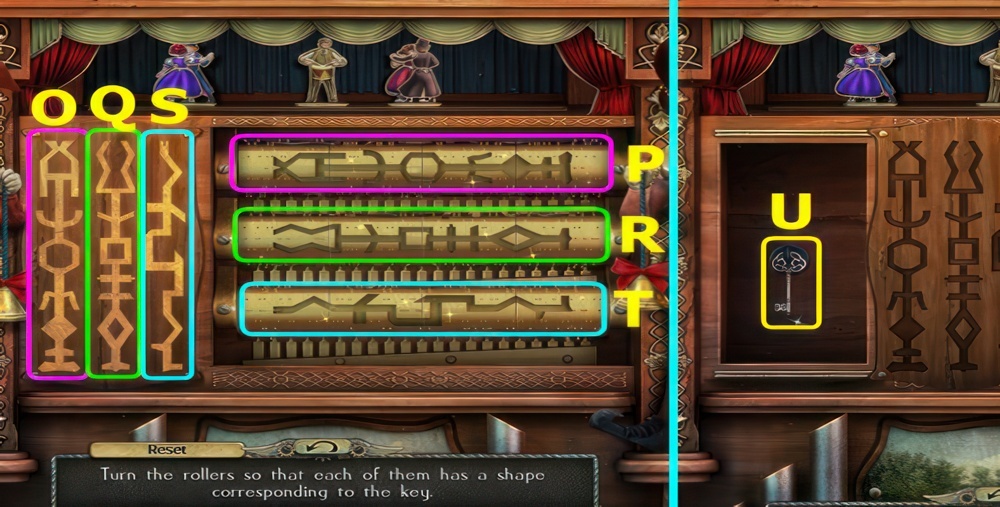
- Turn the rollers so that each of them has a shape corresponding to the key.
- Walkthrough: set rollers as shown, move (O-P)-(Q-R)-(S-T).
- Take papers and KEY (U).
- Go down twice, go right, left.
Find mom
Together with Camilla we ran to my house. We were almost there when we suddenly saw how right before our eyes, two armed men grabbed my mom and rode off in an unknown direction. It must’ve been the soldiers of the squad, which was exactly what she feared. I’ll go after them. Camilla volunteered to help me, and now we, two little girls, must somehow keep up with those riders.
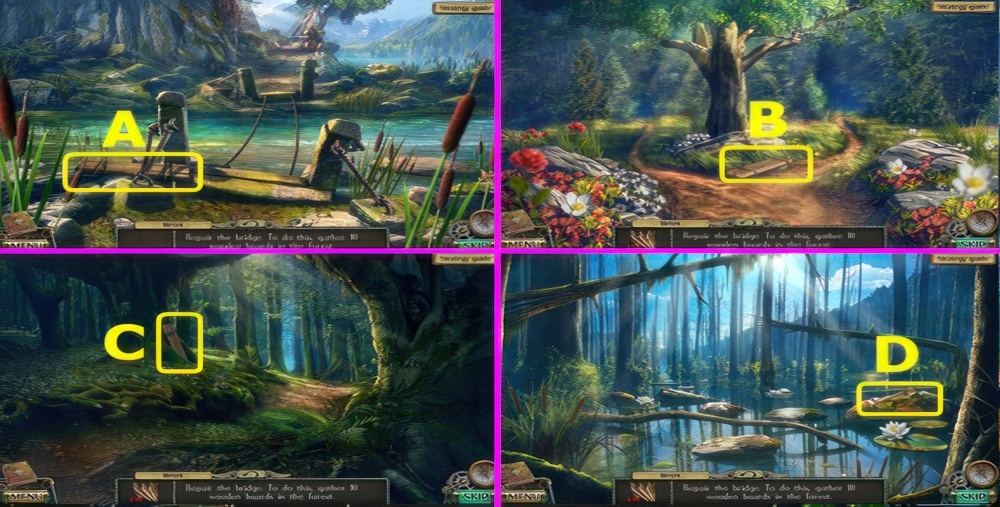
- Repair the bridge.
- To do this, gather 10 wooden boards in the forest.
- Take 1/10 WOOD (A).
- Go down.
- Take 2/10 WOOD (B).
- Go right.
- Take 3/10 wood (C).
- Go right.
- Remove moss, take 4/10 WOOD (D).
- Go right.
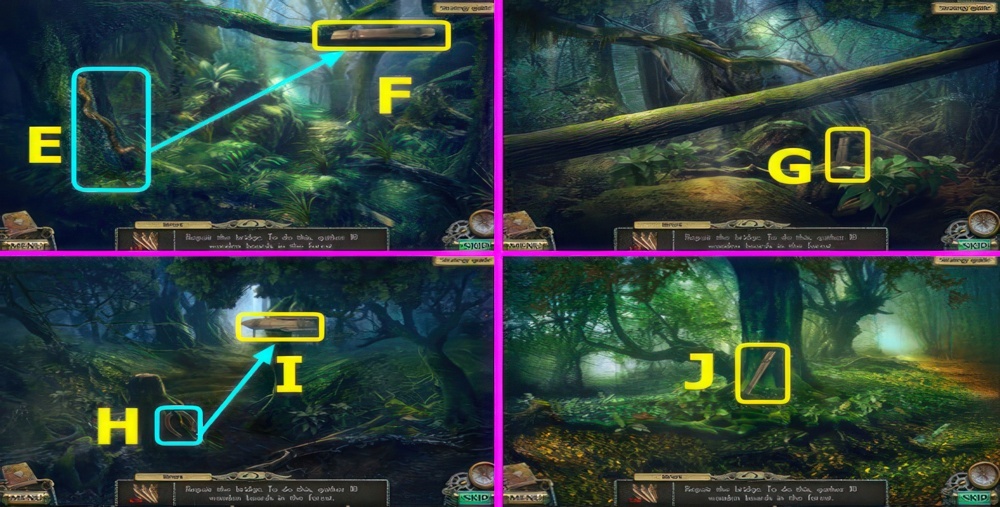
- Use (E-F), earn 5/10 WOOD.
- Go forward.
- Take 6/10 WOOD (G).
- Go down twice, go left.
- Use (H-I), earn 7/10 WOOD.
- Go forward.
- Remove foliage, take 8/10 WOOD (J).
- Go right.
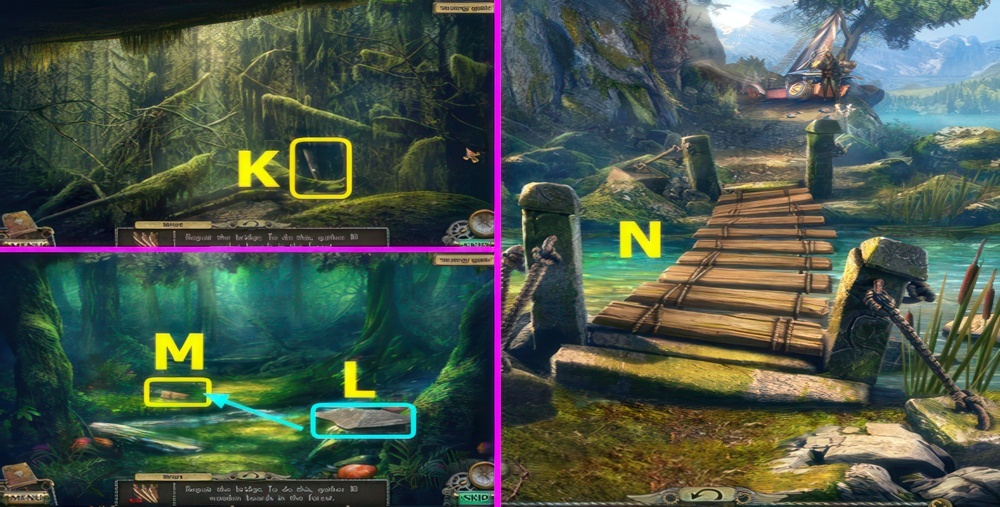
- Take 9/10 WOOD (K).
- Go down, go left.
- Use (L-M), take 10/10 WOOD.
- Go down ×5, go left.
- Place 10 WOOD (N).
- Go forward.
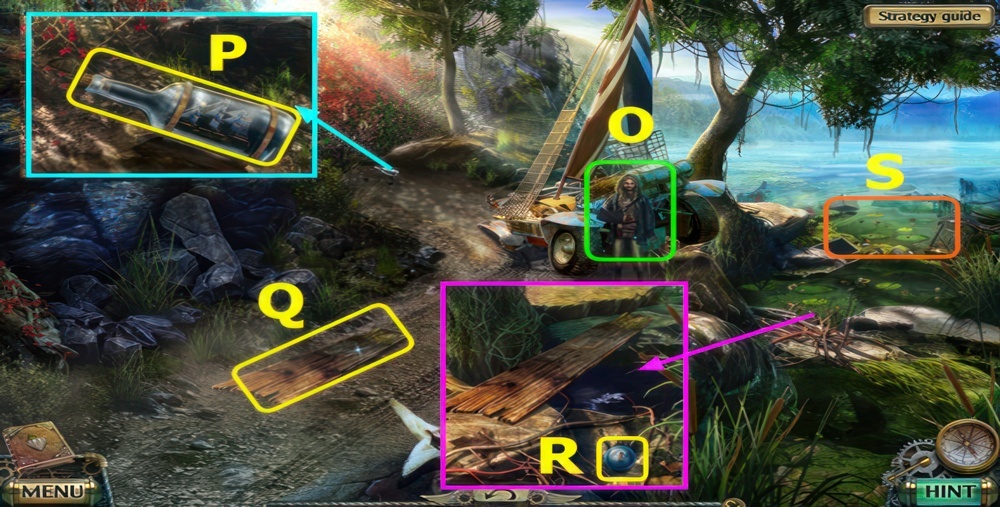
- Talk, earn WRENCH (O).
- Take SHIP IN A BOTTLE (P).
- Take BOARD (Q).
- Remove sticks, take 3/4 GLASS SPHERES, place BOARD (R).
- Play puzzle, earn WHEEL (S).
- Go down.
- Place MOUSETRAP (A).
- Open bag, move (B-A), earn MOUSE.
- Go down.
- Use MOUSE, take 4/4 GLASS SPHERES (C).
- Go down.
- Select (D).
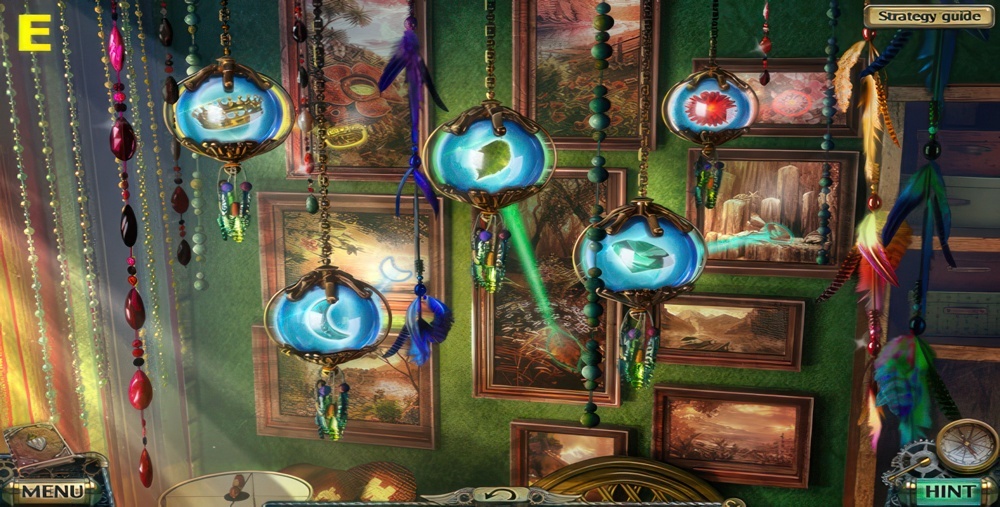
- Direct the rays from the window through the spheres to the pictures.
- The symbol inside the sphere should match the symbol hidden in the opposite picture.
- Click on the spheres to change the symbol inside, and click on the fastening of two spheres to switch them in places.
- Place GLASS SPHERES, walkthrough (E).
- Go Colin’s House Yard.
- Select specific symbols by moving the levers on the right.
- You’ve already seen the right combination in the spheres near the window.
- Walkthrough (F).
- Take JACK (G).
- Go to Road.
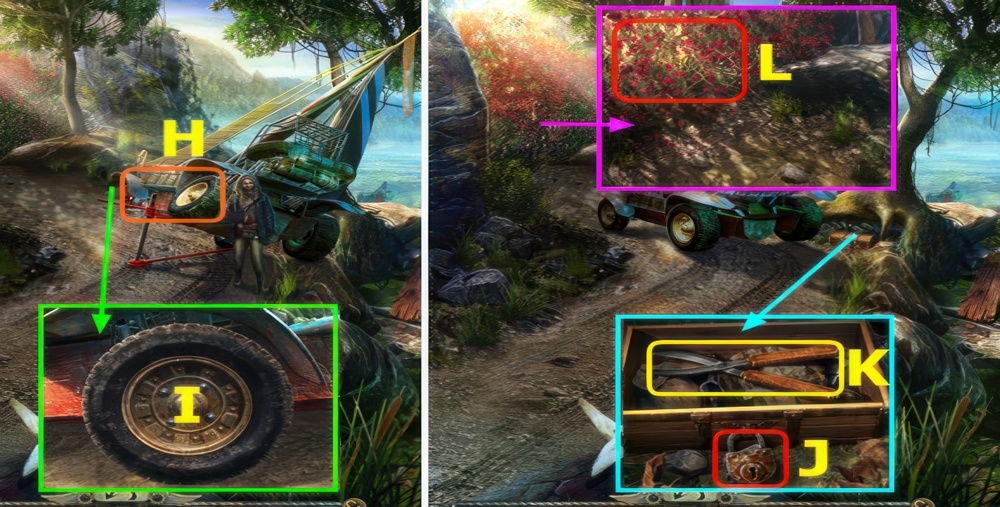
- Use JACK (H).
- Use WHEEL and WRENCH (I).
- Remove leaves, use KEY (J).
- Open chest, take GARDENING SCISSORS (K).
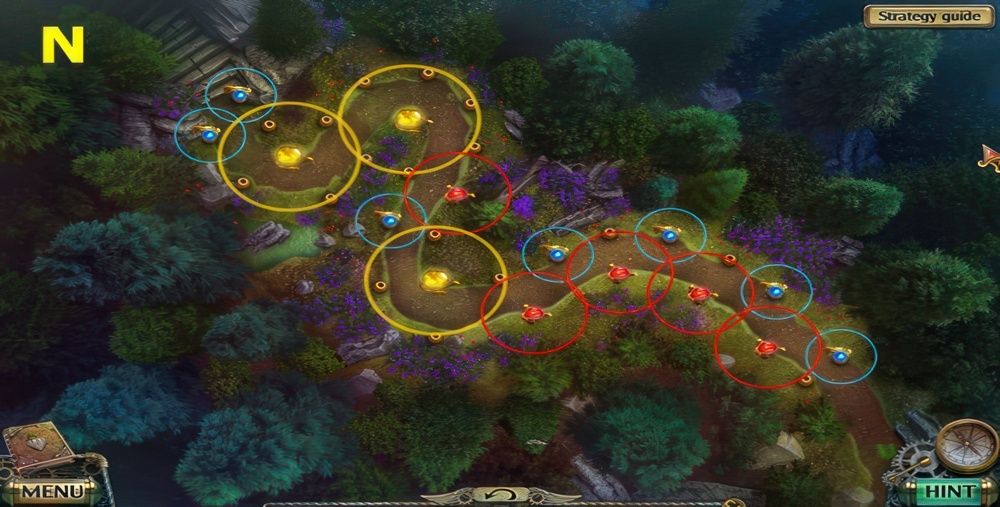
- Use GARDENING SCISSORS (L).
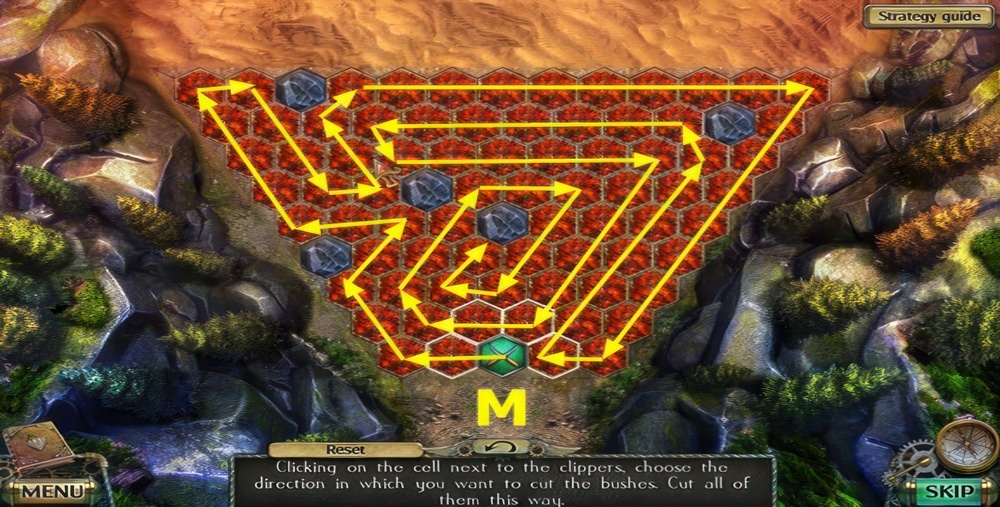
- Clicking on the cell next to the clippers, choose the direction in which you want to cut the bushes. Cut all of them this way.
- Walkthrough (M).
- Talk (A).
- Use HOE, take CORKSCREW (B).
- Take DRY LEAVES and SNIPS (C).
- Select, use DRY LEAVES, MATCHES, and CAST, use (D-E).
- Take HARDENED CAST.
- Open bag, take GRINDSTONE (F).
- DULL KNIFE on GRINDSTONE, earn KNIFE.
- Place HARDENED CAST (G).
- Select (H).
- Go right twice, go forward.

- Climb up the mountain.
- If you run into an obstacle, find something that will help you overcome it.
- Beware of rockfalls.
- Take MACHETE (I).
- Go down thrice, go forward twice.
- Use MACHETE (J).
- Go forward.
- Go left (K).
- Take BOARD (L).
- Go down, forward.
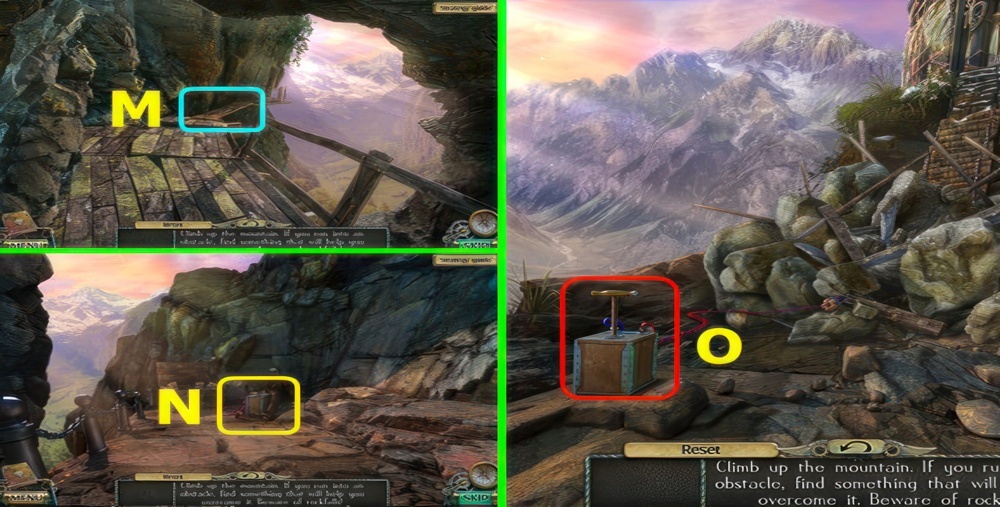
- Place BOARD (M).
- Go forward, go left twice.
- Take DYNAMITE (N).
- Go down ×7, go right, and then forward twice.
- Place and select DYNAMITE (O).
- Go forward.
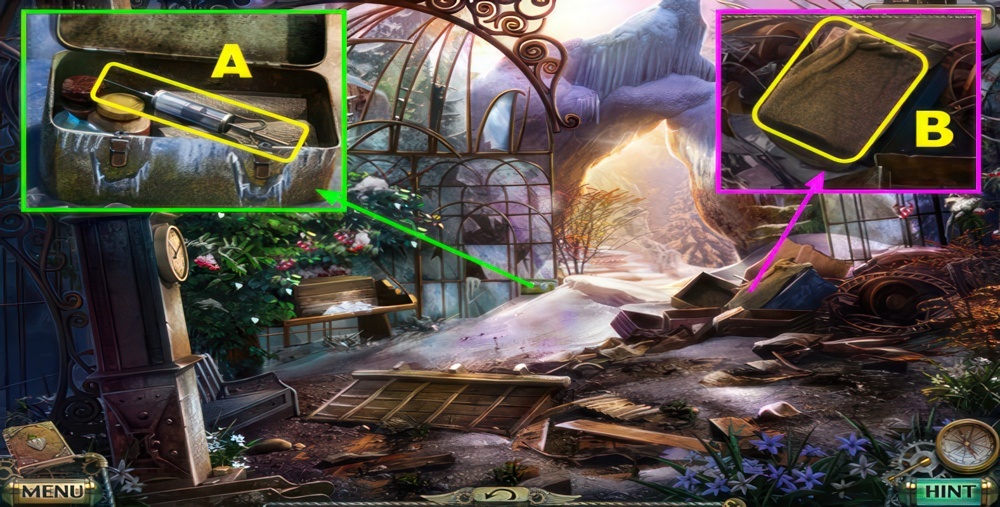
- Use KNIFE, open box, take SYRINGE (A).
- Take SACK (B).
- Go forward.
- Take LONG SPEAR (C).
- Use SNIPS, earn MEDALLION (D).
- Go down.
- Use LONG SPEAR, earn CODE (E).
- Go down.
- Talk, earn APPLES (F).
- Use MEDALLION, take MAGNET and NAIL PULLER (G).
- CORKSCREW and MAGNET on SHIP IN A BOTTLE, earn PART OF MECHANISM.
- Go forward.
- Use NAIL PULLER, open BOX (H), play puzzle, earn BOTTLE OF WINE.
- Use BOTTLE OF WINE and SYRINGE on APPLES, earn APPLE FOR THE HEDGEHOG.
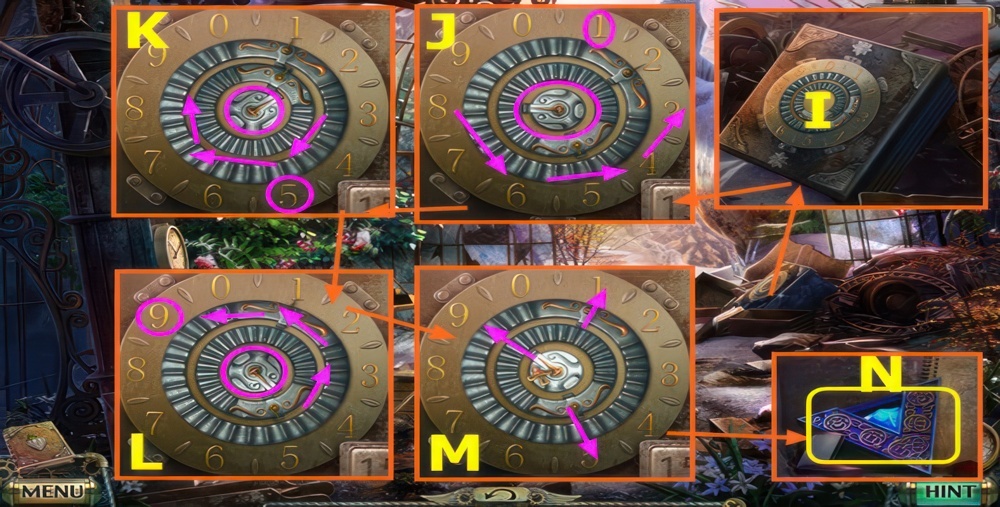
- Rotating the central part of the mechanism, set the arrows on the desired numbers.
- Place CODE and PART OF MECHANISM (I).
- Rotate ↺ to put outer arrow on 1 (J).
- Rotate ↻ to place middle arrow on 5 (K).
- Rotate ↺ to 9 (L).
- Final positions (M).
- Take TRIANGULAR CHIP (N).
- Go down.
- Use APPLE FOR THE HEDGEHOG and SACK, earn HEDGEHOG (O).
- Go forward twice.
- Use HEDGEHOG (P).
- Select (Q).
- Select (R).
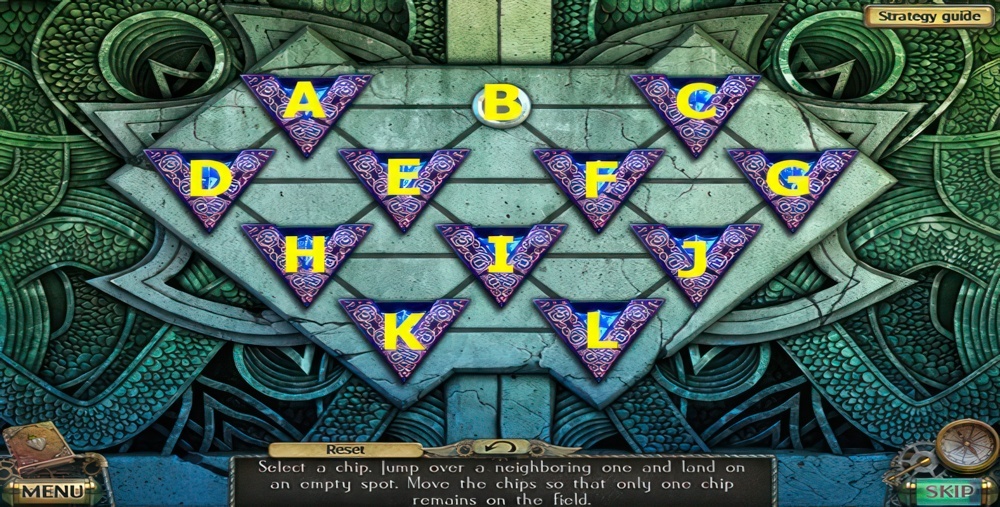
- Select a chip.
- Jump over a neighboring one and land on an empty spot.
- Move the chips so that only one chip remains on the field.
- Walkthrough: (H-B)-(G-E)-(B-H)-(L-E)-(A-I)-(K-F)-(D-K)-(C-I)-(K-F)-(J-B).
- Go forward.
Find local residents
I came back to reality, which never disappeared anywhere. A whole field of petrified people is in front of me. Ray and Farador are amongst them. Now everything is clear, I never fell off a horse. Uncle Colin didn’t move, he has no daughter, and my father didn’t disappear anywhere. House, mother, Camilla everything was just an illusion. Some woman pretended to be my mother and made me to save her. I released the fire bird, everything disappeared, the woman laughed and now I’m here again. Looks like I ruined something that kept her in the mirror. I need to find out who this woman is, and why she was imprisoned in the mirror. And what happened to my friends. I hope I can still help them.
- Take 1/4 GRIPS, HINT, and PUZZLE PIECES (M).
- Go left.
- Take ROPE (N).
- Select (O).
- Take 1/3 GEARS (P).
- Take 2/3 GEARS, place HINT (Q).
- Using the hint, click on the stones in the right order.
- Walkthrough: 1-7, take JAWS (R).
- Put together the puzzle by moving the parts.
- Walkthrough (S).
- Take SIEVE and CLUE (T).
- Go down.
- Use SIEVE, earn DETAIL (A).
- Use PLIERS, take PENDANT (B).
- Use PLIERS, take MAGNIFYING GLASS (C).
- Go left.
- Select (D).
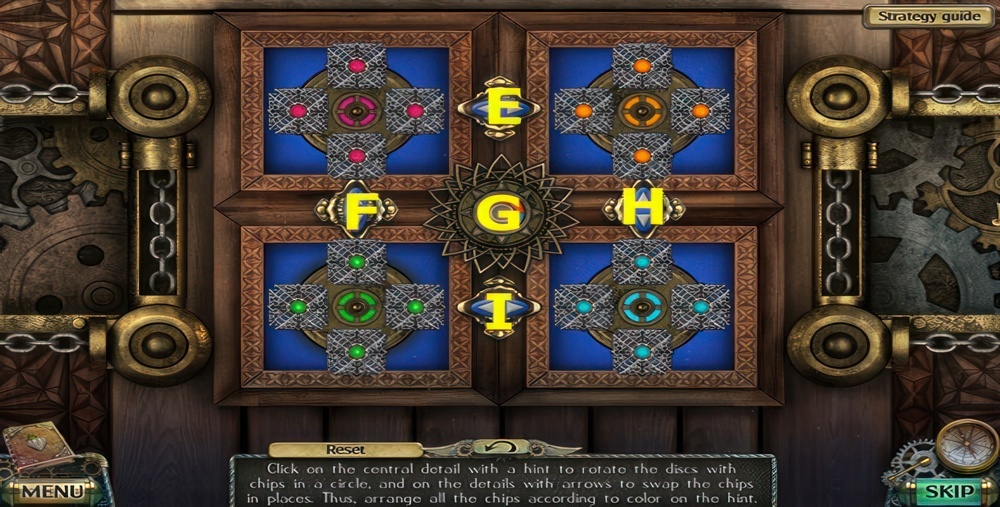
- Click on the central detail with a hint to rotate the discs with chips, and on the details with arrows to swap the chips in places.
- Thus, arrange all the chips according to color on the hint.
- Walkthrough: F-H-G-H-G-E-I-G-E-I-G×2-I-G-H-G×2-H.
- Go forward.
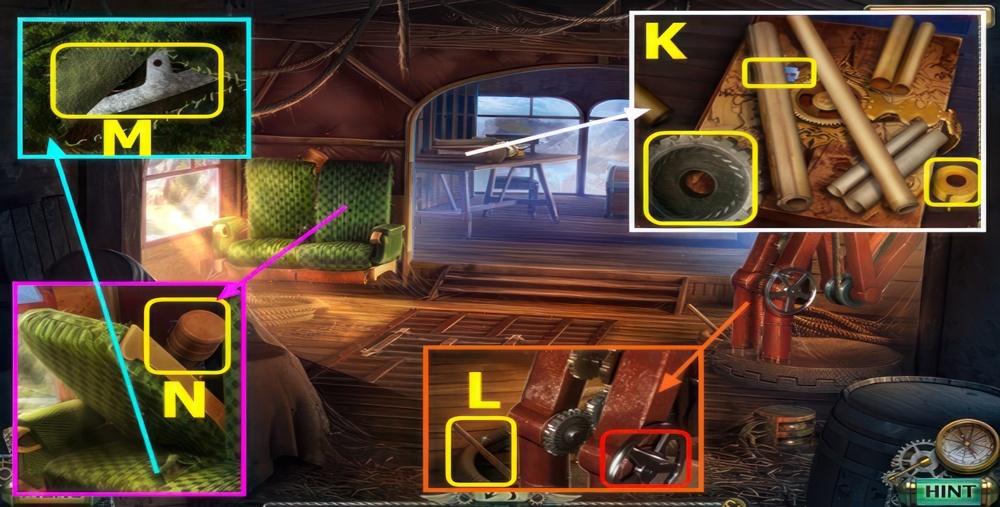
- Remove scrolls, take 3/3 GEARS, RAZOR BLADE and DUCT TAPE (K).
- Take REBAR, place GEARS and select handle (L).
- Use RAZOR BLADE, take 1/2 ICE SKATE BLADE (M).
- Use REBAR, take TUBE (N).
- Open TUBE, unroll map, take 2/4 GRIPS.
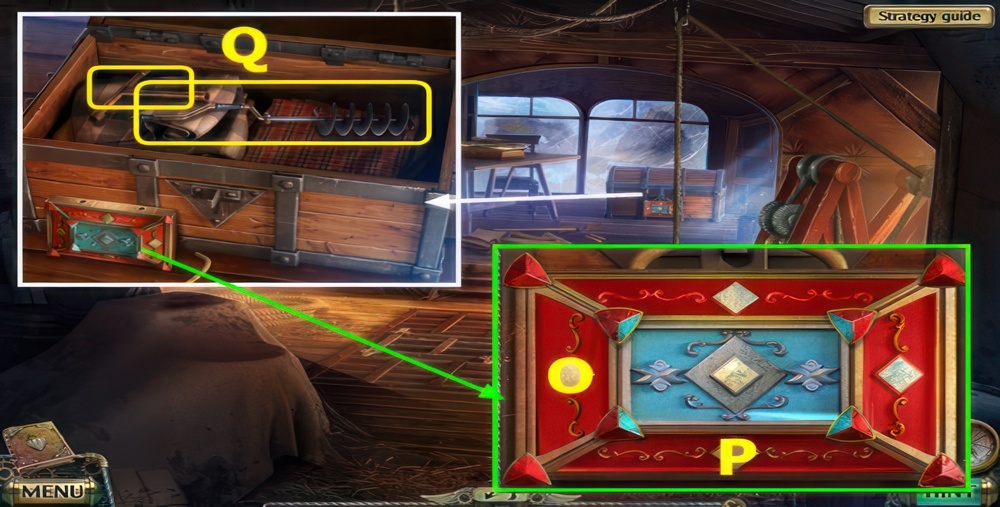
- Click on the buttons to move the chips so that the blue side of them is in the center at the right angle.
- Walkthrough: P-O-P×3.
- Open chest, take WRENCH and AUGER (Q).
- Go down.
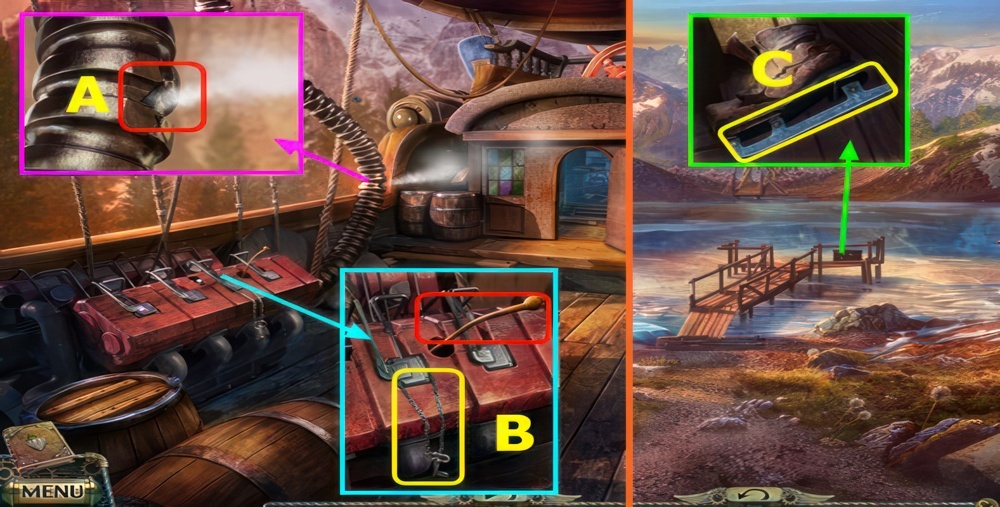
- Use DUCT TAPE (A).
- Select, earn KEY (B).
- Go down, right.
- Use WRENCH, earn 2/2 ICE SKATE BLADE (C).
- Go to Cabin.
- Use KEY, take OIL (D).
- Go down twice.
- Use OIL, take SIGNET RING (E).
- Go right.
- Use OIL and MAGNIFYING GLASS, take 3/4 GRIPS (F).
- Go to Cabin.
- Use SIGNET RING, open book, select page (G).

- Using the hint, color the picture.
- Click on the paint to fill the field with it.
- The paint enters the drawing through those parts of picture that are connected with it and they have to be blank to lead the paint.
- Click on the painted part of the picture to remove the paint from it.
- Select (H), remove all 🔴 except the areas shown (I).
- Select (J), remove all 🔵 except the areas shown (K).
- Select (L), remove all 🟢 except the areas shown (M).
- Select (N), remove all 🟠 except the areas shown (O).
- Select (P).
- Take 4/4 GRIPS (Q).
- Use GRIPS (R), play puzzle, earn ICE SKATE SHOES.
- ICE SKATE BLADE and WRENCH on ICE SKATE SHOES, earn ICE SKATES.
- Go to Frozen Lake.
- Use ICE SKATES (A).
- Use AUGER, take HAND (B).
- Select (C).
- The hand is pointing to an animal.
- Place three symbols that are corresponding to the animal inside it.
- Place HAND, set rings (D-E-F).
- Take GRAPPLE and PICK-UP TOOL (G).
- ROPE on GRAPPLE, earn GRAPPLING HOOK.
- Place GRAPPLING HOOK (H) and AUGER (I).
- Select (H).
- Go forward.
Repair the Bridge
I managed to find a local resident. His name is Roger, and he told me about the powerful earthquake, which took place in the neighborhood. I think it’s my fault most likely it happened because I let the spirit out of the mirror world. But Roger doesn’t know anything particular about any glade with statues, nor the mirror, nor the spirit. We’ll have to go into the city and meet with the chief adviser. Surely, he will be able to clarify the situation and come up with a plan of action. But the bridge leading to the settlement was badly damaged in the earthquake. We need to fix it before moving on.
- Talk, earn CLAMP (J).
- Take SILVER KEY, SCOOP, and EMPTY BAG (K).
- Use PICK-UP TOOL (L).
- Use RAZOR BLADE, take PUTTY KNIFE, use CLAMP and WRENCH (M).
- Go forward.
- Earn ARBOREAL KEY.
- Remove lid, use EMPTY BAG and SCOOP, take 1/3 LENSES and BAG OF GRAIN (N).
- Use PUTTY KNIFE and PENDANT (O).
- Take HAMMER (P).
- Take BOARDS (Q).
- Use ARBOREAL KEY (R).
- Go left.
Repair the Ladder
The advisor is at the town hall, but the stairs to it were destroyed by the collapse during an earthquake. I must fix it in order to climb it.
- Select (A).
- Use BAG OF GRAIN, take CURTAIN WAND (B).
- Play puzzle (C).
- Take CARVED KEY (D).
- Use CURTAIN WAND (E).
- Use CARVED KEY, read diary, take SET OF PATTERNS (F).
- Use SILVER KEY, take NAILS (G).
- Go down.
Open the door to the town hall
During the earthquake, the door to the town hall closed shut. The advisor got locked inside and can’t find the key. If I find all the necessary materials, I can make a suitable key and open the town hall.
- Remove stone and broken boards, use BOARDS, NAILS, and HAMMER (H).
- Go right.
- Remove leaves, take HANDLE and GOLDEN KEY (I).
- Take HATCHET (J).
- Use HATCHET, earn YEW WOOD (K).
- Go down, left.
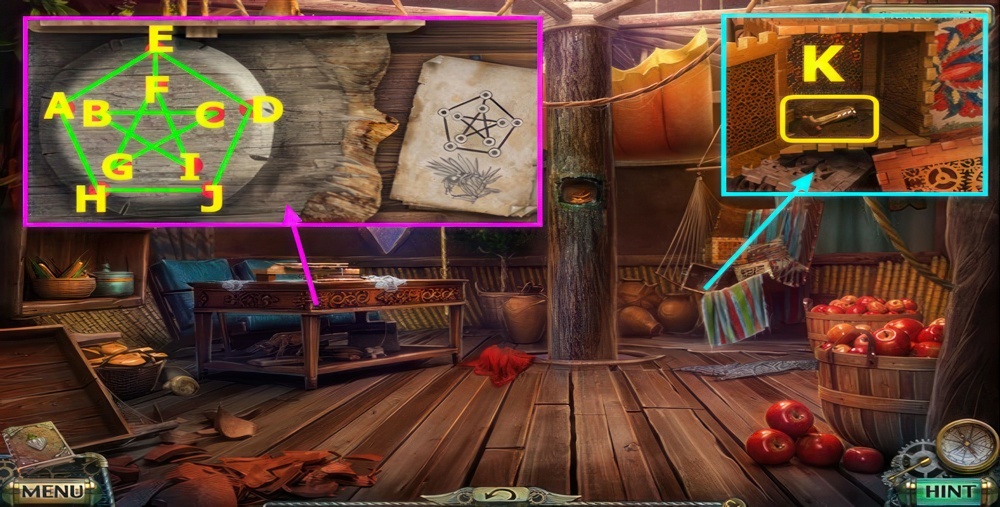
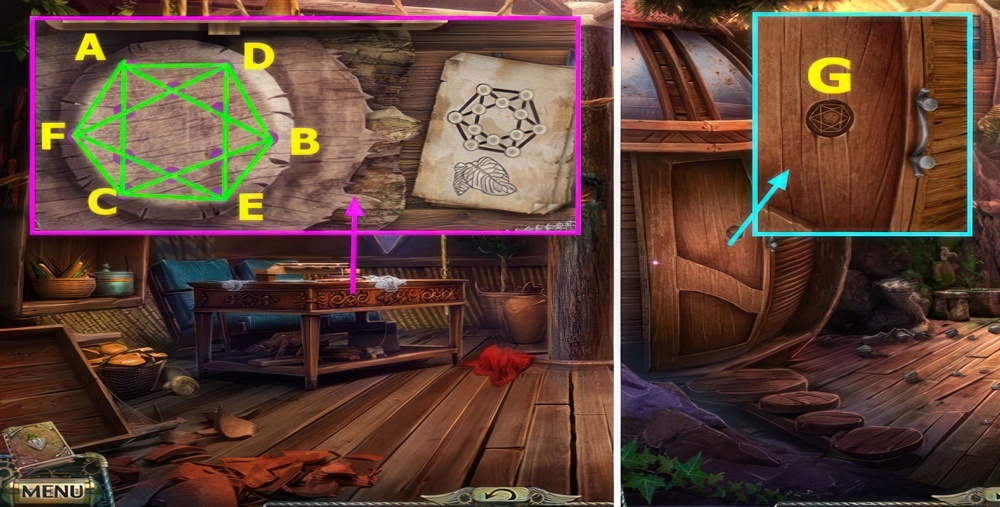
- Using one single continuous line, connect all the points without repetitions into the design drawn on the hint.
- Place SET OF PATTERNS and YEW WOOD.
- Walkthrough: E-D-J-H-A-E-F-I-B-C-G-F, earn KEY TO THE TOWN HALL.
- Use GOLDEN KEY, take 1/2 LEVERS (K).
- Go down, right.
Find the scientist
It turns out, I released the spirit of Gorgon from the mirror world. She is an ancient and very dangerous creature. Locals are stricken with panic. It’s good that the adviser doesn’t believe that it’s my fault, otherwise I probably would have to face a severe punishment. But instead I want to help make it right. The adviser and his assistant consider me a foolish and restless inventor, but it seems to me that if there is anyone who can deal with the Gorgon then that person is me, because the fire bird is watching over me. I do not know how to help my petrified friends, but Roger has agreed to take me to a local scientist. I hope that he knows more than the adviser and will take me seriously.
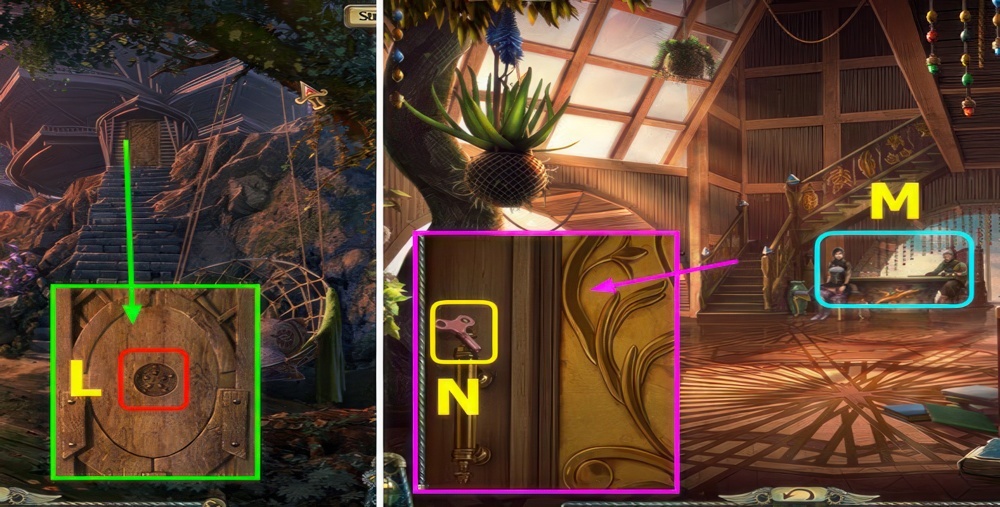
- Use KEY TO THE TOWN HALL (L).
- Go right.
- Talk (M).
- Take BRONZE KEY (N).
- Go down twice, go left.
- Use BRONZE KEY, take 2/3 LENSES and 2/2 LEVERS (O).
- Go to Town Hall.
- Remove books and use LEVERS, remove items and take VALVE (P).
- Go down.
- Select (Q).
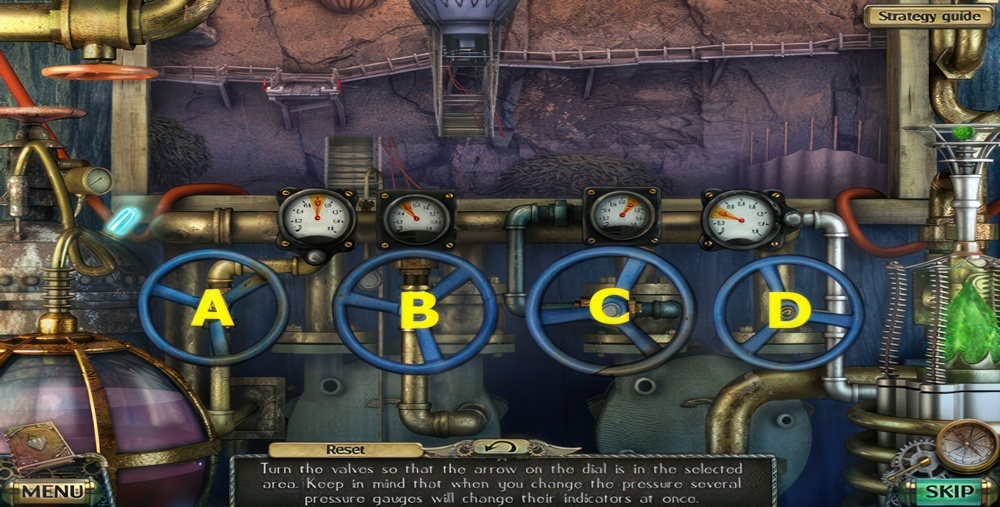
- Place VALVE (C).
- Turn the valves so that the arrow on the dial is in the selected area.
- Keep in mind that several pressure gauges will change their indicators at once.
- Turn arrows to yellow area C-B-D-A-C.
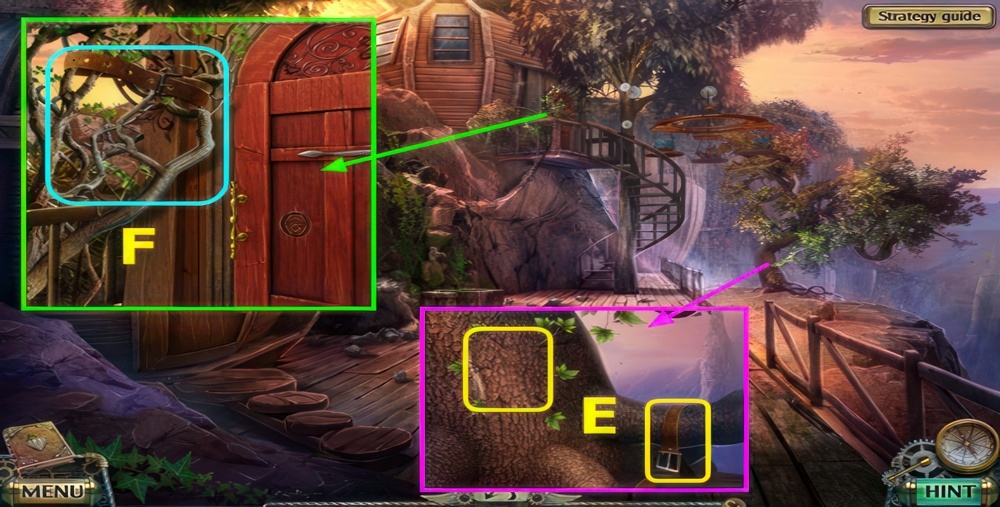
- Take BELT, use HATCHET, earn ASH WOOD (E).
- Use BELT (F).
- Go to Roger’s House.
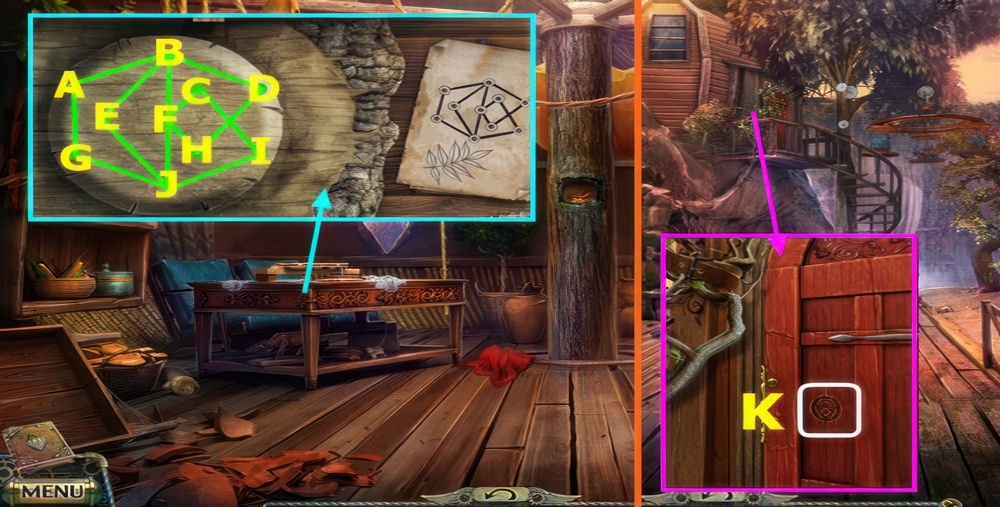
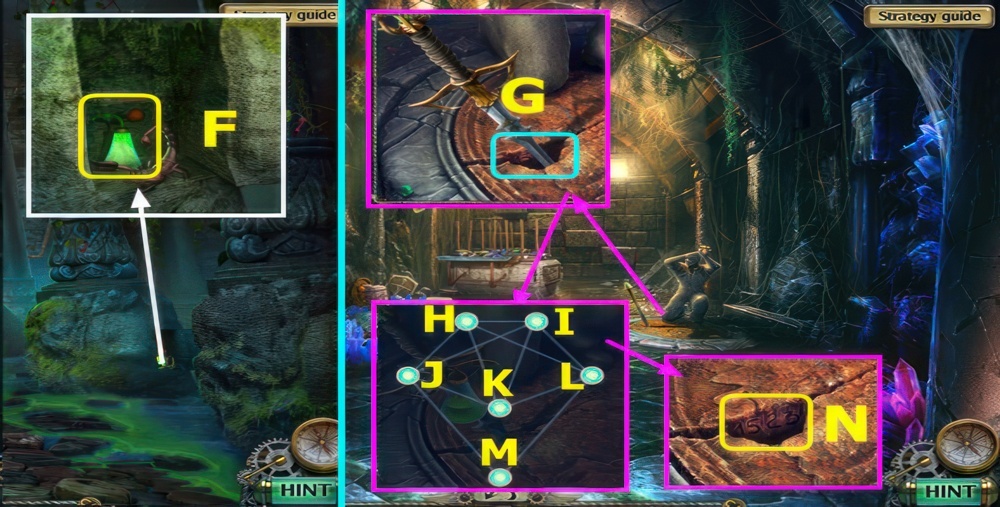
- Using one single continuous line, connect all the points without repetitions into the design drawn on the hint.
- Place ASH WOOD.
- Walkthrough: F-C-I-J-E-B-J-G-A-B-D-H-F, earn ARBOREAL KEY.
- Go down, right, and forward.
- Use ARBOREAL KEY (K).
- Go forward.
Wake Albert
The scientist was in a deep state of trance. Roger said that there must be a special pollen somewhere that will help bring him back to his senses.
- Use HANDLE (L).
- Take FAN (M).
- Take PICKAXE (N).
- Open cabinet, take SCREWDRIVER (O).
- Use SCREWDRIVER, take KEY (P).
- Use KEY, take FLASK, POT, EMPTY JAR, AWAKENING POLLEN RECIPE, EMPTY SPRAY BOTTLE, and SQUARE VALVE (Q).
- Take BASKET, use POT, earn POISON FROM THE RIVER (R).
- Go down.
Make Pollen
There wasn’t any pollen left, but we found a recipe and some lab equipment. We need to collect the rest of the ingredients and make the pollen.

- Place and select SQUARE VALVE (S).
- Play puzzle, take REAPING HOOK (T).
- Go down.
- Use PICKAXE and HATCHET, earn AMARANTH WOOD (U).
- Go right.
- Use FLASK, earn ALOE JUICE (V).
- Go to Roger’s House.
- Using one single continuous line, connect all the points without repetitions into the design drawn on the hint.
- Place AMARANTH WOOD.
- Walkthrough: A-B-C-A-D-E-F-D-B-E-C-F-A, earn ARBOREAL KEY.
- Go down, go right, left.
- Use ARBOREAL KEY (G).
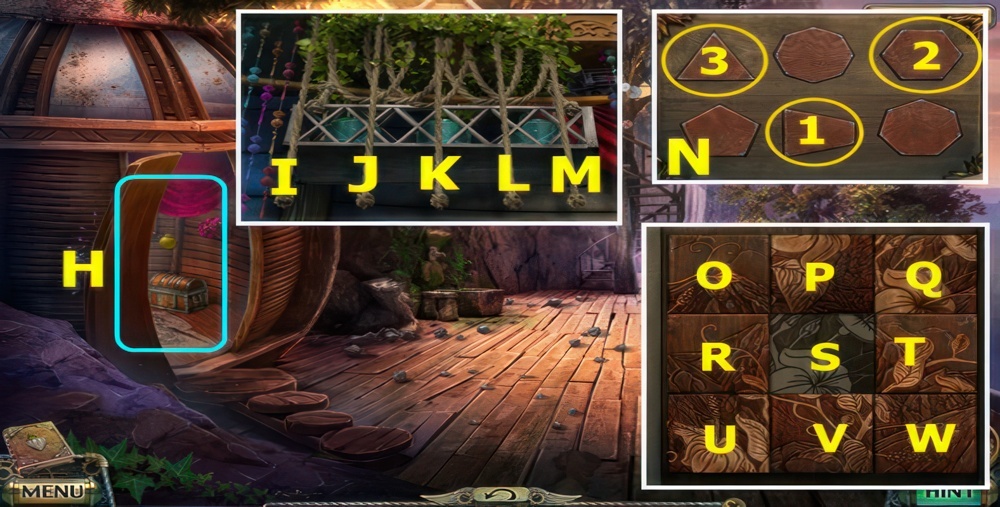
- Play puzzle (H).
- Pull down all the ropes with knots in a particular order.
- If the order is incorrect, all the ropes will go back up.
- Puzzle 1 walkthrough: M-L-M-I-L-M-K-I-L-M-J-K-I-L-M.
- Using the hint, select the geometric figures in the right order.
- Puzzle 2 walkthrough: 1-3 (N).
- Move the details of the puzzle to restore the pattern.
- Puzzle 3 walkthrough: P-O-R-S-T-Q-P-S-R-U-V-S-T-W, take LEVER ARM.
- Place and select LEVER ARM, use EMPTY SPRAY BOTTLE, earn SPRAY BOTTLE (A).
- Go down thrice.
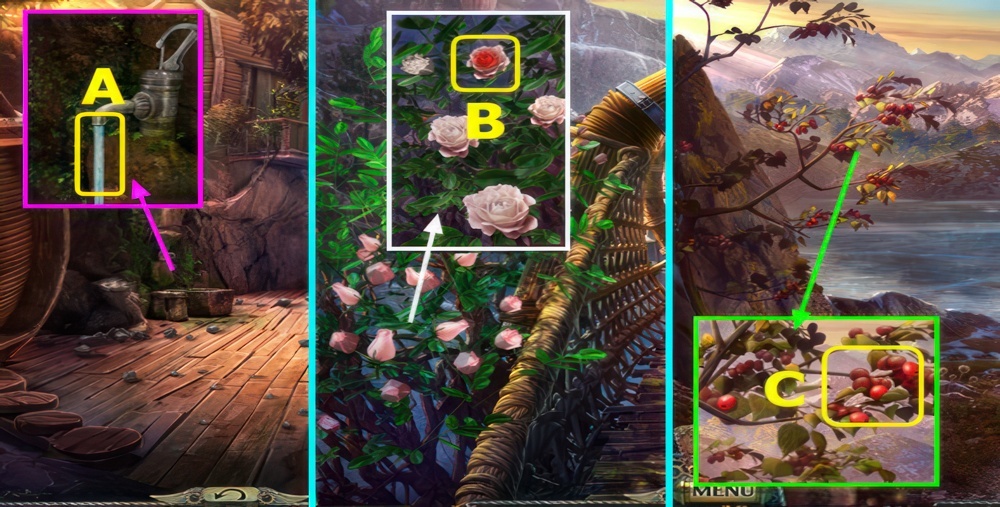
- Use SPRAY BOTTLE and REAPING HOOK, earn RED ROSE (B).
- Go down.
- Use BASKET, earn RED BERRIES (C).
- Go down.
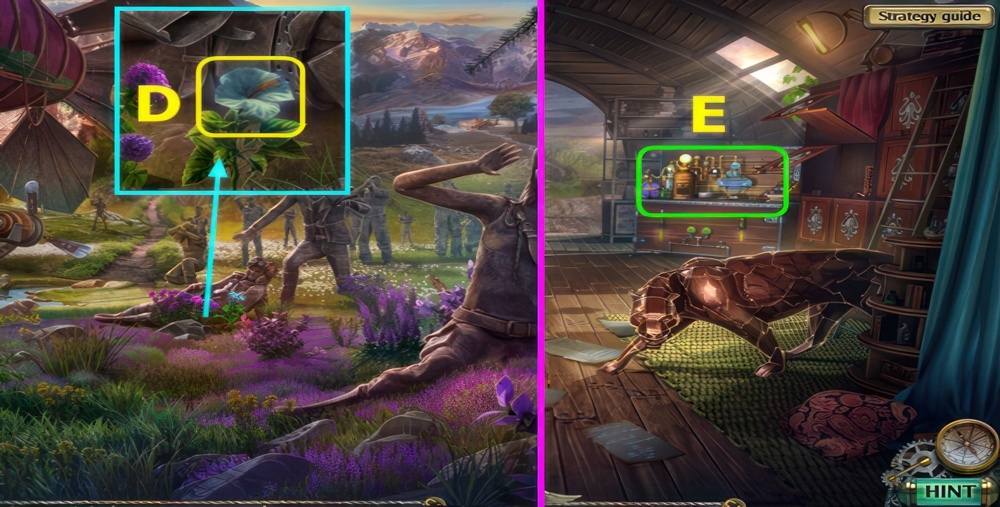
- Use REAPING HOOK, earn SOMNOLENT FLOWER BUD (D).
- EMPTY JAR, POISON FROM THE RIVER, ALOE JUICE, RED BERRIES, SOMNOLENT FLOWER BUD, and RED ROSE on AWAKENING POLLEN RECIPE, earn BASKET WITH INGREDIENTS.
- Go to Albert’s House.
- Select (E).
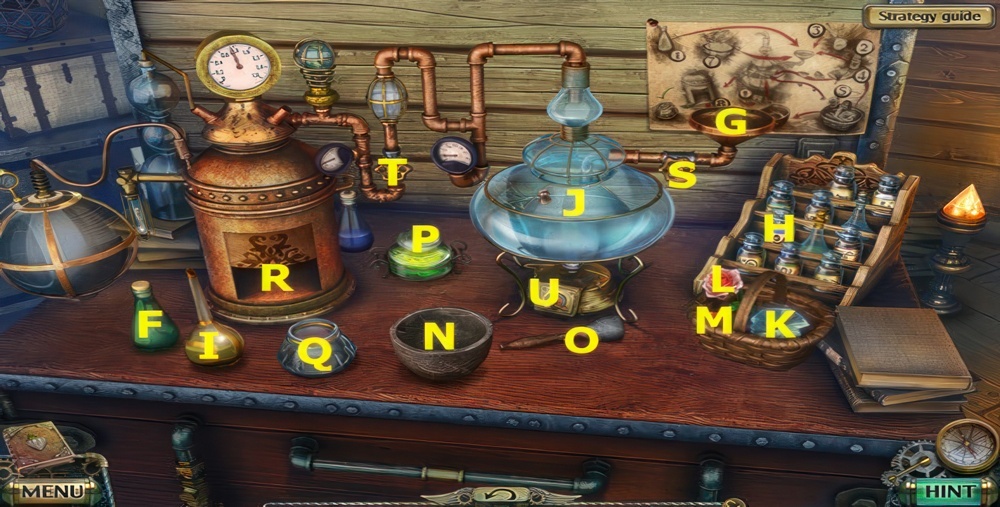
- Place BASKET WITH INGREDIENTS, close instructions.
- Turn (S), use (F-G)-(H-G)-(I-G).
- Select (J), use (K-J)-(L-J)-(M-N)-(O-N)-(N-J)-(P-G)-(Q-R).
- Select (R-S-J-T-U).
- Take JAR WITH WAKE-UP POLLEN (R).
Go to the Gorgon temple
We have found the scientist, his name is Albert. Fortunately, he has ideas on how to stop the Gorgon. She was defeated once with the help of a special shield made from a particular mirror-like material that reflected the harmful gaze of the Gorgon and trapped in itself its spirit. But when the spirit was released the shield got destroyed. Her body is still in the temple, and today, at sunset, she could return into it. We decided to go to the temple to find a way to defeat her once again. I hope we can find some information on how to do it.
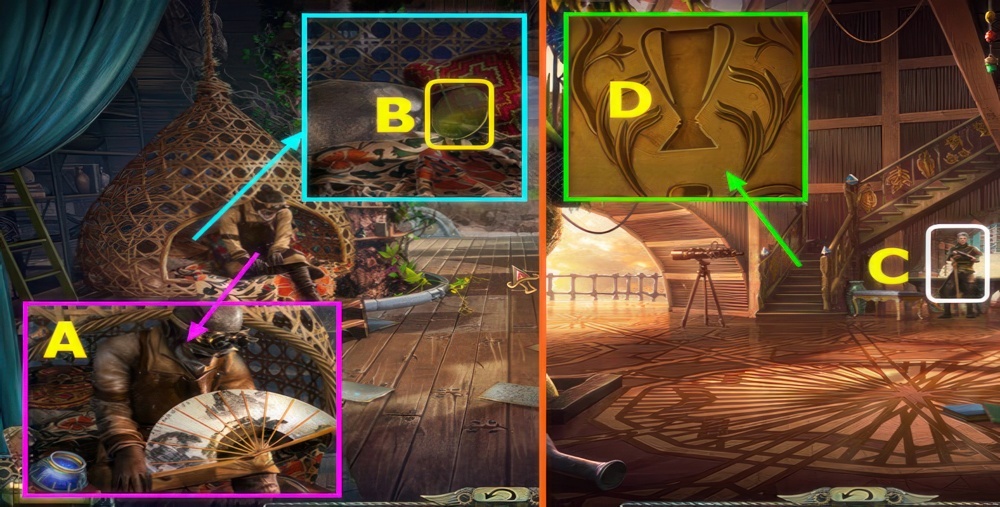
- Use JAR WITH WAKE-UP POLLEN and FAN (A).
- Move items, take 3/3 LENSES (B).
- Go to Town Hall.
- Talk, earn CUP SHAPED KEY (C).
- Place CUP SHAPED KEY (D).

- Play puzzle (E).
- Balance all the weights.
- Puzzle 1 walkthrough: (F).
- Click on the stones in the right order.
- Puzzle 2 walkthrough: (H-G-I-H-G), take CRYSTALS.
- Place LENSES, select (J).
- Walkthrough: 1-3 (K).
- Press certain buttons to open the door.
- Walkthrough: 1-3 (L).
- Go down ×5.
- Use CRYSTALS (M).
- Use the crystals to fully illuminate the path.
- Walkthrough (N).
Get to the library
We need to find a library in the Gorgon temple. There should be records of the ancients who studied her. After all, once she was already defeated.
- Take LIANA and 1/4 SNAKE KEYS (A).
- Use LIANA, earn HANDLE (B).
- Take TWISTED FORK, use HANDLE (C).
- Go forward.
- Take POKER (D).
- Go forward.
- Use POKER, earn TABLET WITH ENGRAVING (E).
- Take GARDEN GLOVE (F).
Enter the closed section
One of the sections in the library is closed. Albert thinks that it was to protect the most important records. We must get in there.
- Take MIRROR FRAGMENT (G).
- Use TWISTED FORK, earn FORGED SYMBOL (H).
- Go down.
- Use MIRROR FRAGMENT, earn STRIP OF FABRIC (I).
- Go forward, left.
- Play puzzle, earn 2/4 SNAKE KEYS (J).
- Take SOLAR CHARM and STONES (K).
- Place STONES, select thrice, take LEVER and METAL BRUSH, push button (L).
- Place SOLAR CHARM, take PUZZLE PIECE and 3/4 SNAKE KEYS (M).
- Go down.
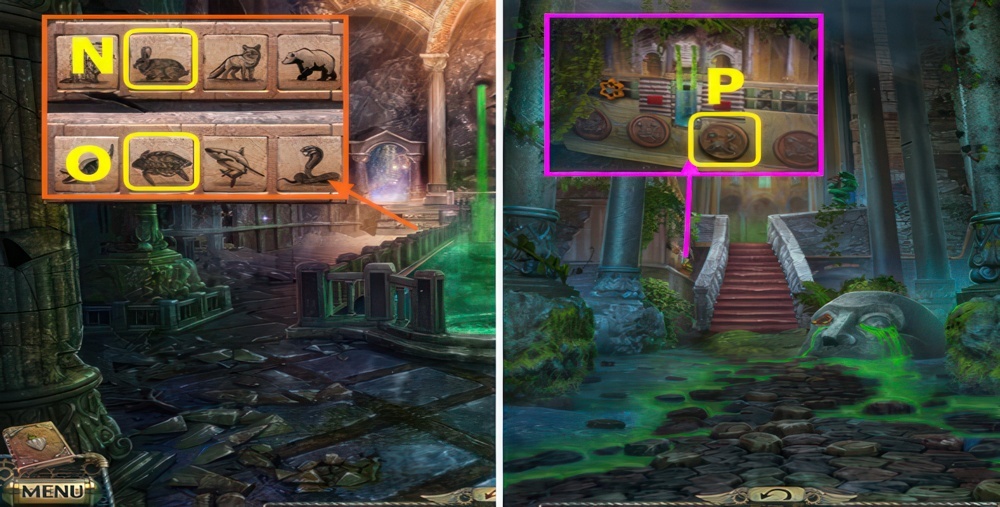
- Find an odd one animal out in each line.
- Place PUZZLE PIECE, select (N-O).
- Go down.
- Use GARDEN GLOVE and METAL BRUSH, take CLAY KEY (P).
- Go forward, right.
- Select 1-9, restore items, earn LADDER (A).
- Take DISK WITH PATTERN, place LADDER (B).
- Take PLATE WITH A DRAWING (C).
- Go down.
- Place PLATE WITH A DRAWING (D).
- Spot 5 differences.
- Walkthrough (E).
- Go down.
- Select (F).
- Restore the pattern by rotating the discs.
- Select the correct symbols on the buttons.
- Place DISK WITH PATTERN.
- Walkthrough (G).
- Take VALVE (H).
- Go forward.
- Use VALVE (I).
- Take COLORED TILE (J).
- Go down twice.
- Select (K).
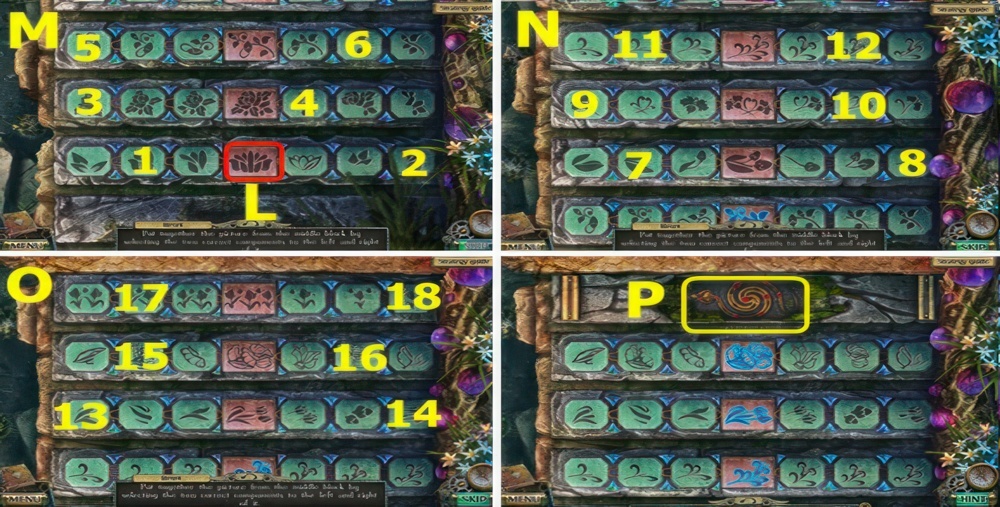
- Create a picture from the middle block by selecting two correct parts of it to the left and right.
- Place COLORED TILE (L).
- Select 1-6 (M).
- Select 7-12 (N).
- Select 13-18 (O).
- Take 4/4 SNAKE KEYS (P).
- Go forward twice.
- Place SNAKE KEYS (Q).
- Go forward.
- Take MUG (R).
- Go forward (S).
- Take 1/6 FANGS, place CLAY KEY (A).
- Take PRESSURE GAUGE (B).
- Take RAG (C).
- Place FORGED SYMBOL (D).
- Move the small parts to restore the bijous.
- Walkthrough: H-F-G-K-J-H-F-G-K-J-H-E-I-J-H.
- Play puzzle (L).
- Take EAGLE HEAD FIGURINE, use MUG, earn MUG WITH WATER (M).
- Use MUG WITH WATER, earn MUG WITH BOILING WATER (A).
- Go down.
- Put the figures in the same position as on the hint.
- Use RAG and TABLET WITH ENGRAVING.
- Walkthrough (B).
- Take HAMMER WITH A CHISEL, TANK, and SAW (C).
- Go down twice.
- Use HAMMER WITH A CHISEL, take OLD TORCH (D).
- STRIP OF FABRIC on OLD TORCH, earn TORCH.
- Go to Gorgon’s Crypt.
- Use TORCH, earn BURNING TORCH (E).
- Go down thrice.
- Use BURNING TORCH, take BOTTLE WITH ACID (F).
- Go to Treasury.
- Use BOTTLE WITH ACID (G).
- Connect all the dots with one continuous line so that it repeats the pattern.
- Walkthrough: K-L-M-J-H-K-I-L-H-I-J-K.
- Remove sword, note code (N).
- Go down, go right.
- Use MUG WITH BOILING WATER, note code (A).
- Select (B).
- Enter two codes.
- You have already seen them in the temple.
- Walkthrough (C).
- Take KEY (D).
- Use KEY, take ANCHORAGE (E).
Assemble the device
In the Gorgon temple, we found a book with records of the ancients, who studied her. We found a detailed recipe for the shield of the brave man who defeated her before. It turns out that this material mirrarrium can trap both the spirit and the body of the Gorgon, and then stop her for good. And there will no longer be any innocent victims. Albert suggested to pour a special alloy on the Gorgon as her spirit connects with the body. To do this, we need to build a metal melting device directly over the spot where the body is located, and also obtain mirrarrium from the mines on the side of Darkness.
- Play puzzle (F).
- Turn the pages of books to collect the picture you need.
- Puzzle 1 walkthrough: (G).
- Swap books to collect a picture on their backs.
- All lines should be neatly connected.
- Puzzle 2 walkthrough: (H).
- Take BOOK ABOUT GORGON (I).
- Go to Spiral Staircase.
- Select (J).
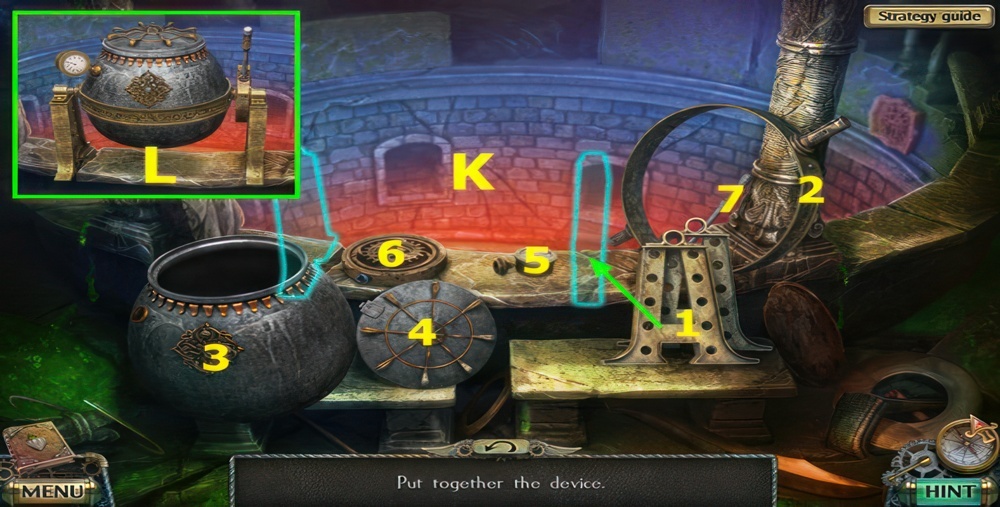
- Assemble the device.
- Place LEVER, ANCHORAGE, PRESSURE GAUGE, and TANK, restore 1-7 (K).
- Final (L).
- Go to Town Hall.
Get Mirrarrium
The device is ready, we just have mirrarrium left to collect. It can be found in the mines nearby, but it belongs to the land of the dark forces. I’ll have to go there alone.
- Move the rows with the chips to the right and left so that the heads from the top row fall on the corresponding figures.
- Place EAGLE HEAD FIGURINE.
- Walkthrough: A-G-E-F-G-C×2-G-B×2.
- Take 2/6 and 3/6 FANGS (H).
- Go to Albert’s House.
- Talk, earn ROPE (I).
- Use ROPE (J).
- Take 4/6 FANGS (K).
- Go right.
- Use SAW (L).
- Move items, take SKELETON PAW (M).
- Use SKELETON PAW, earn HONEY SPOON (N).
- Go forward.
- Take GARDEN SHOVEL (O).
- Move items, take 1-2/5 MULTICOLORED CHIPS (P).
- Use (Q-R), take 3-4/5 MULTICOLORED CHIPS.
- Take SLINGSHOT (S).
- Take CLIPPERS (T).
- Go down twice.

- Use SAW and GARDEN SHOVEL, open bag, take SWIMMING MASK (A).
- Use SLINGSHOT, earn BRUSH (B).
- Use BRUSH (C).
- Select (D).
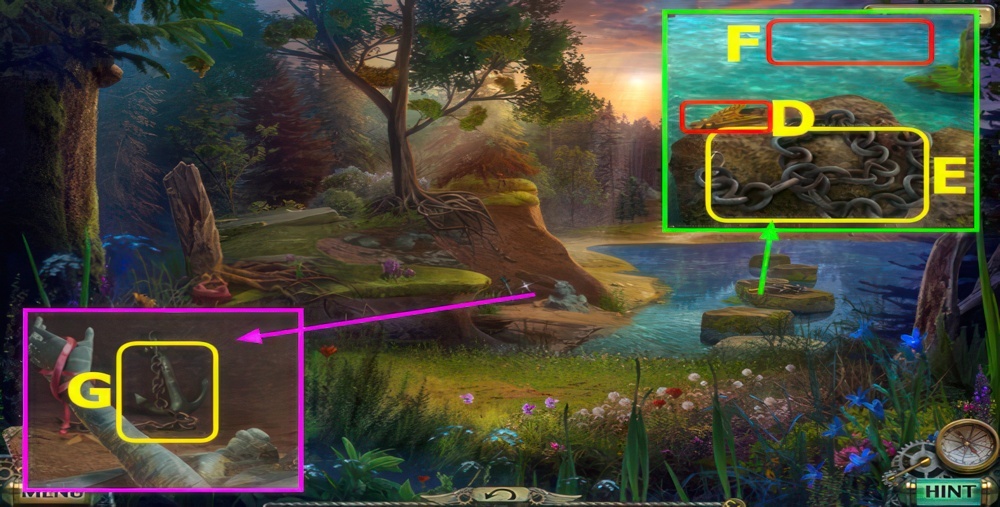
- Use CLIPPERS, take CHAIN (E).
- Use SWIMMING MASK (F).
- Play puzzle, earn OWL FIGURINE.
- Use CHAIN, take ANCHOR WITH CHAIN (G).
- Go forward twice.
- Use ANCHOR WITH CHAIN (H).
- Use HONEY SPOON, earn SPOON WITH HONEY, take 5/5 MULTICOLORED CHIPS (I).
- Place OWL FIGURINE, select panel (J).
- Place MULTICOLORED CHIPS on grid.
- Place each chip near the button of the same color.
- Use this buttons to select a path, and move the chips along it by pressing the button on the right.
- Walkthrough: C-F×2-E-F×7-D-F×4-C-F×7-A-F×8.
- Go forward.

- Use SPOON WITH HONEY, take 5/6 FANGS and DENTAL FORCEPS (G).
- Go down twice.
- Use DENTAL FORCEPS, earn 6/6 FANGS (H).
- Go forward twice.
- Select (I).
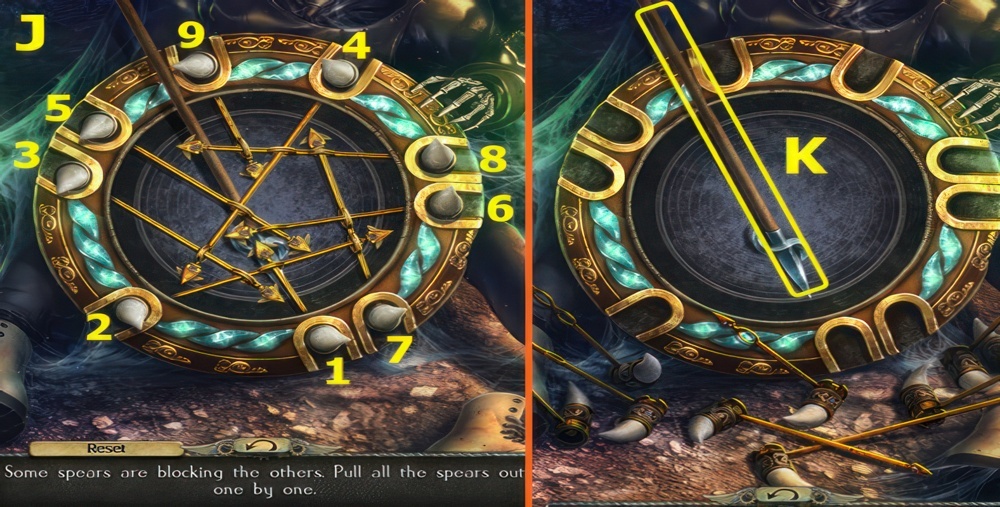
- Place FANGS.
- Some spears are blocking the others.
- Pull all the spears out one by one.
- Walkthrough: 1-9 (J)
- Take SPEAR (K).
- Select (L).
- Use SPEAR (M).
- Select (N).
- Play puzzle (O).
- Swap the parts of the mosaic so the top ones fit the bottom ones.
- Walkthrough (P), earn MIRRARRIUM.
- You earn SPECIAL SWORD.
- Go to Spiral Staircase.
Stop the Gorgon
We have prepared everything we need to enclose the Gorgon in the mirror trap. We don’t have much time. While I was away, Albert found a recording of some wanderer woman. She studied the influence of the poison on the dark forces at the Gorgon temple. While searching for ways to heal people from the darkness influence, she concluded that the poison out of the river, though effective, but isn’t enough poison directly from one of the snake heads of the Gorgon is required. Once the Gorgon returns back to life, I will try to cut off one of the snake heads right before mirrarrium alloy is poured on her. Then I will have a chance to save my uncle. I hope everything works out.
- Place MIRRARRIUM (Q).
- Walkthrough Bonus Chapter, at the link below.


