Detectives United 5: Deadly Debt (Bonus Chapter) – Play as the detectives again to keep a dangerous artifact from falling into the wrong hands. From what Dorian found, someone is trying to recreate the ritual Agatha used.
Bonus Chapter Walkthrough
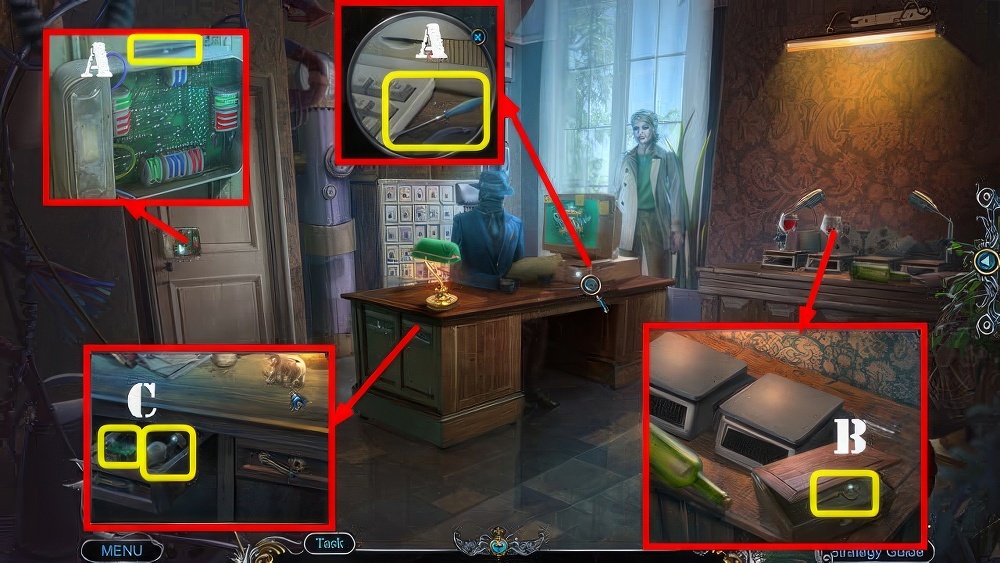
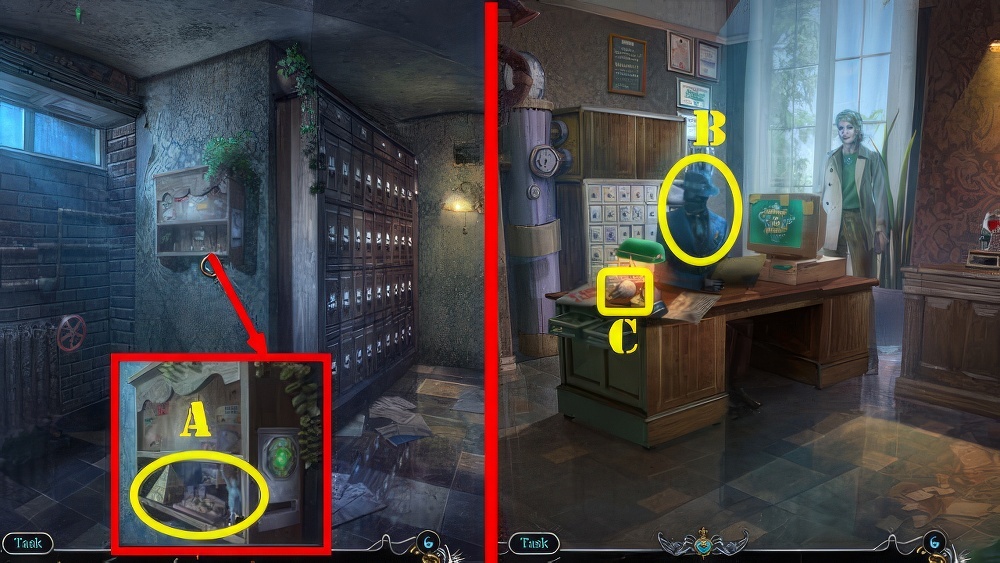
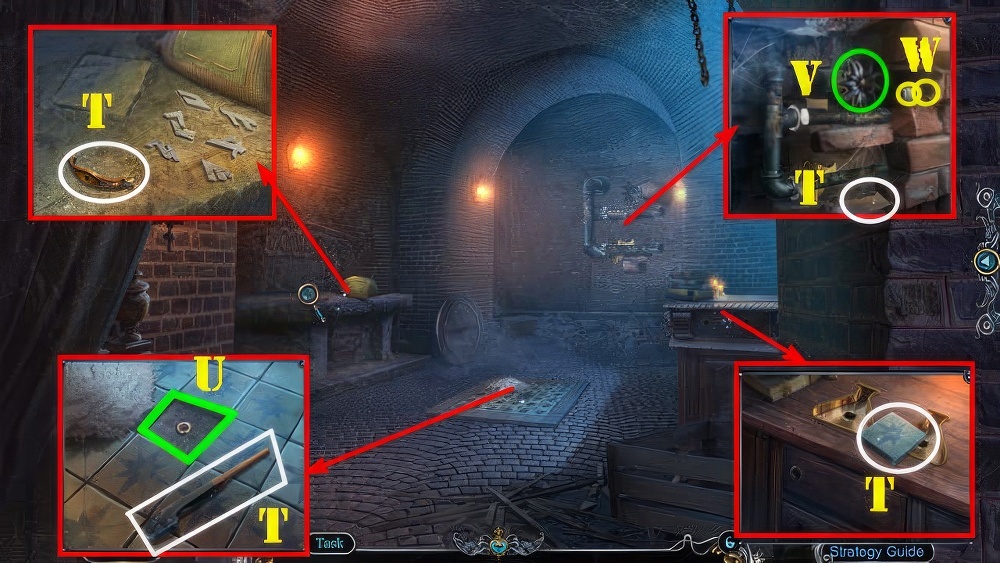
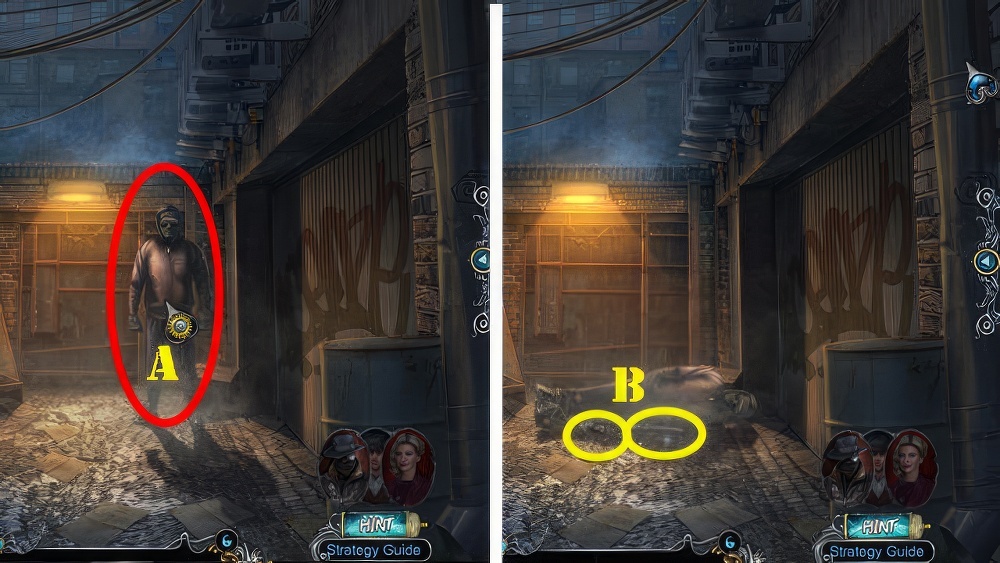
- Take SCREWDRIVER and TWEEZERS (A).
- Use SCREWDRIVER, take SILVER KEY (B).
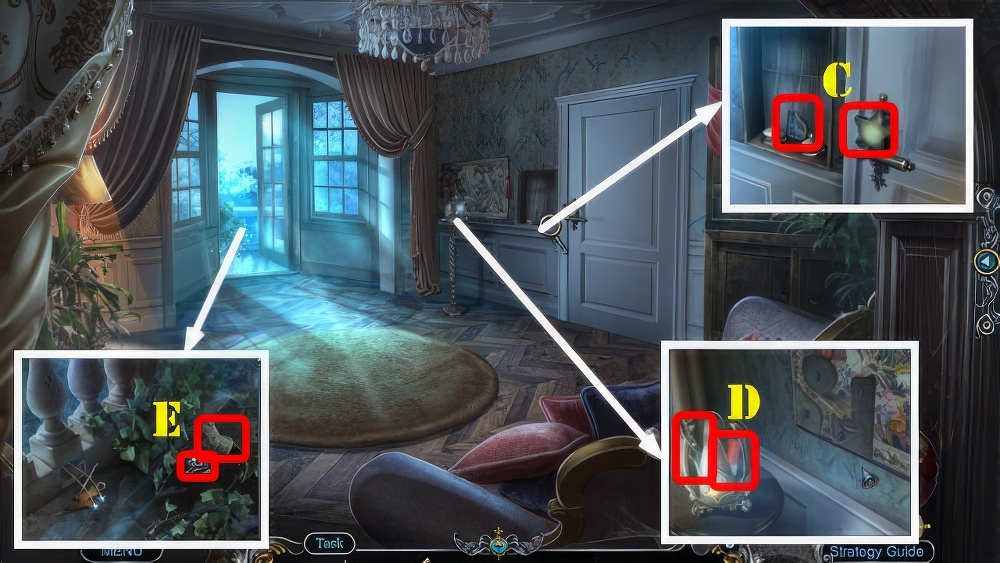
- Use SILVER KEY, take GLASS 1/2 and DISK (C).
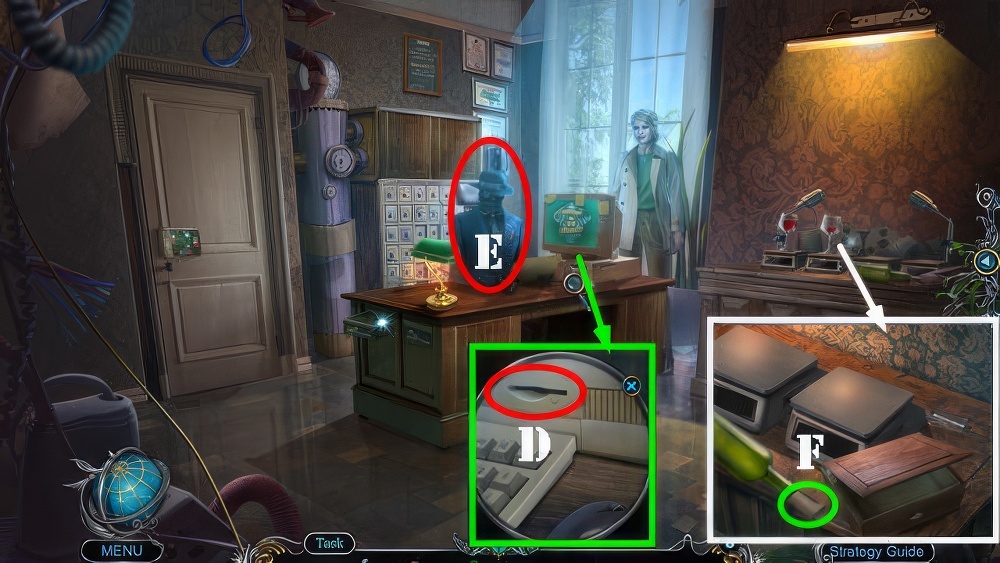
- Use DISK (D).
- Play puzzle, receive PRINTOUT.
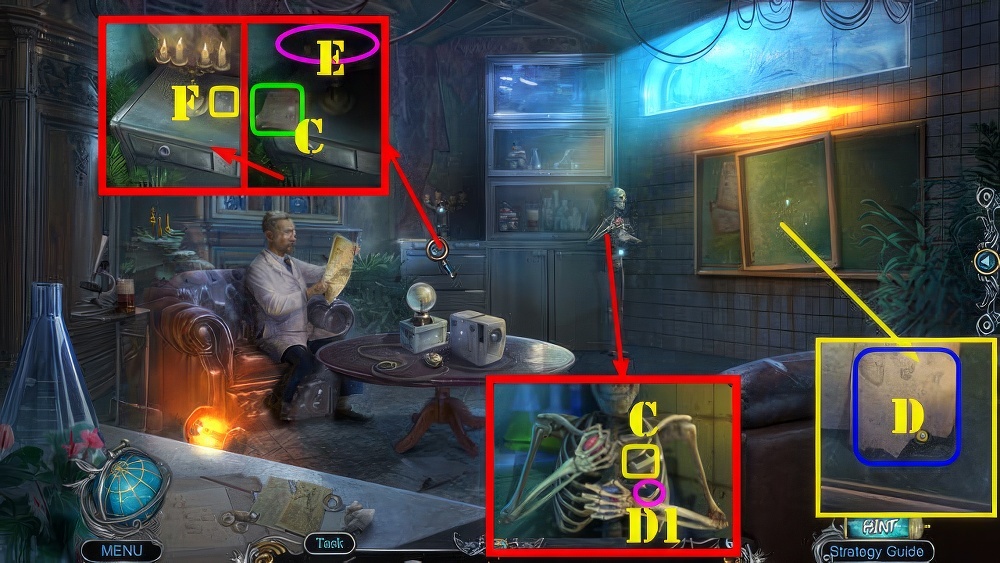
- Give PRINTOUT (E), receive CORKSCREW.
- Use CORKSCREW and TWEEZERS, take LOCK INSTRUCTIONS (F).
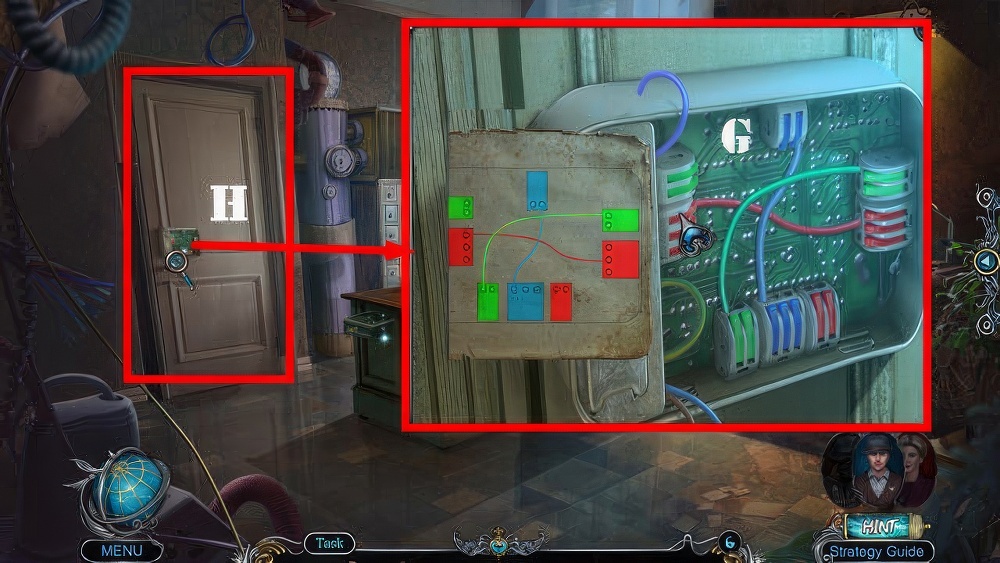
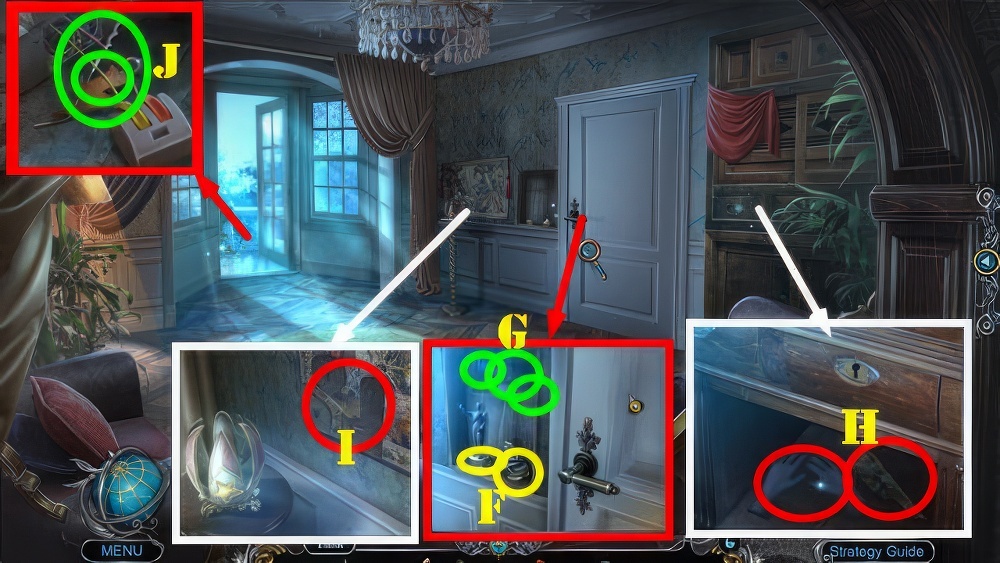
- Place LOCK INSTRUCTIONS, solution (G).
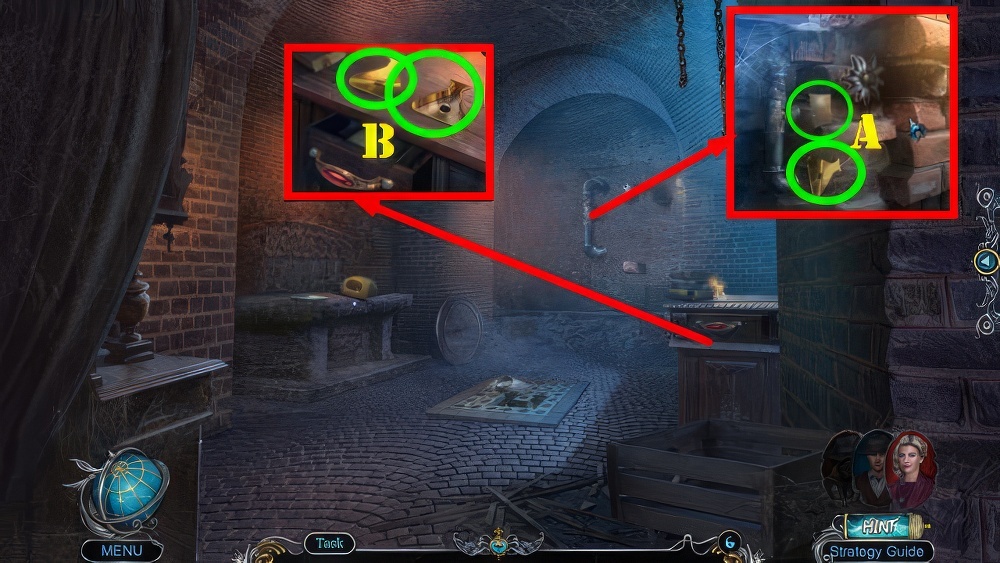
- Go (H).

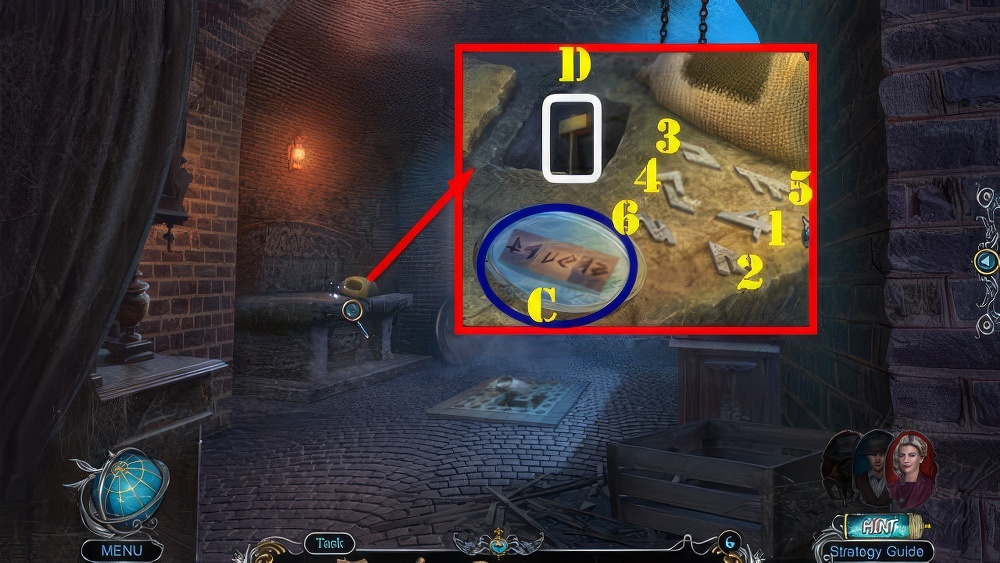
- Take SCREW, PYRAMID FIGURINE, and GLASS 2/2 (I).
- Walk down.
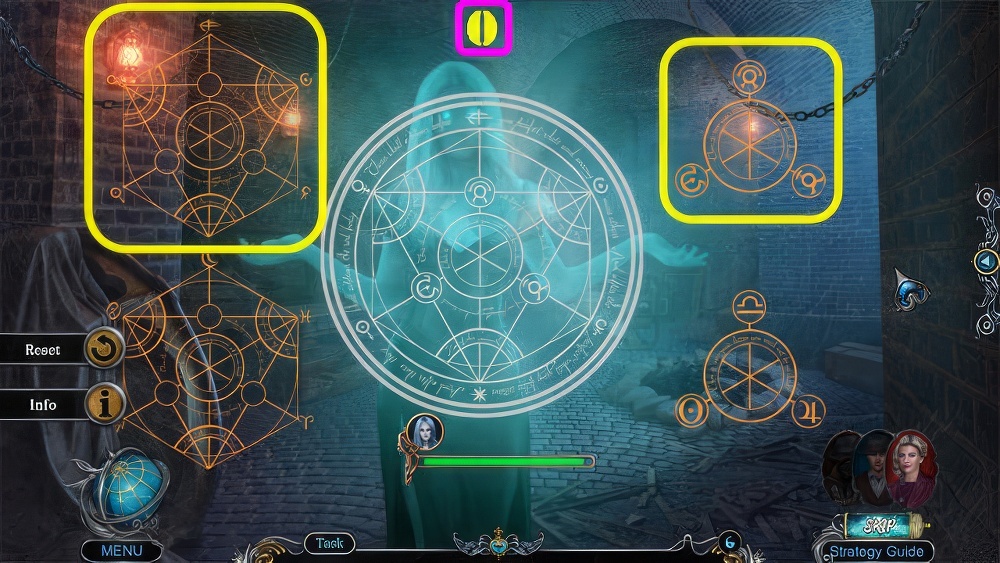
- Use SCREW (J).
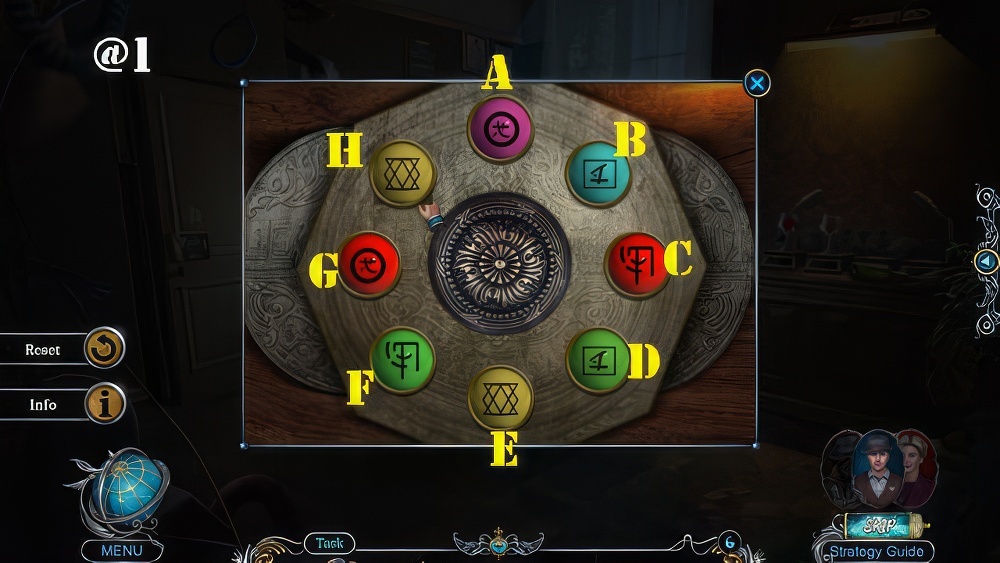
- Solution (@1): (A-G)-(B-D)-(C-F)-(E-H).
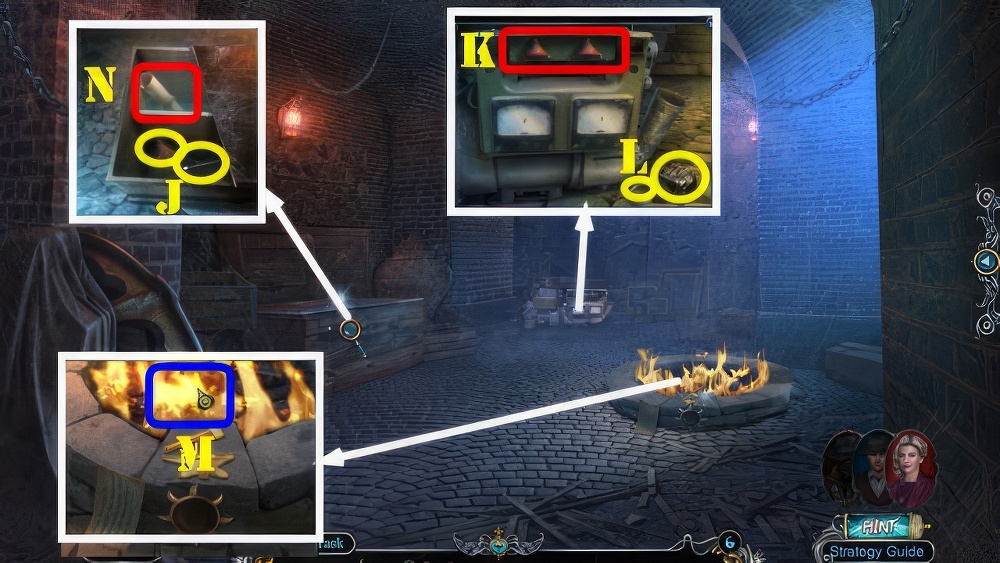
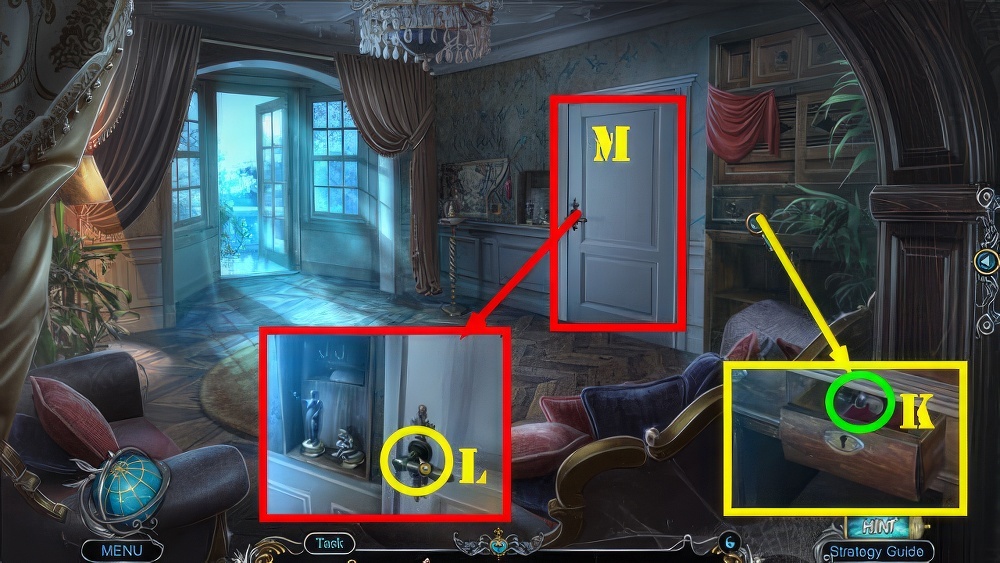
- Take CHOPSTICKS and CHAIN.
- Go to Archives.
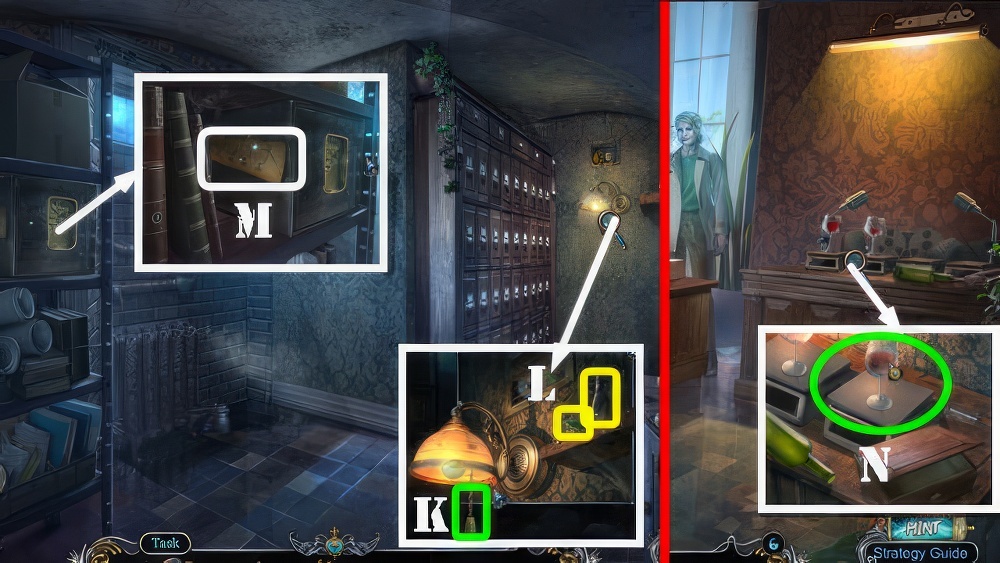
- Remove broken chain and place CHAIN (K).
- Take GREEN CHALK and WINE (L).
- Use GREEN CHALK, take WINE CODE (M).
- Walk down.
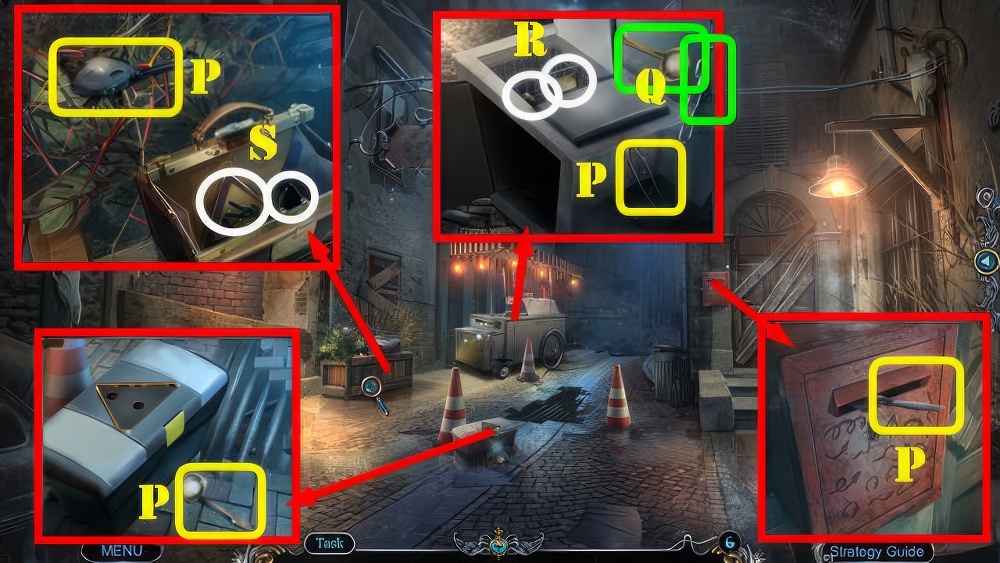
- Place GLASS 2/2, WINE, and WINE CODE (N).
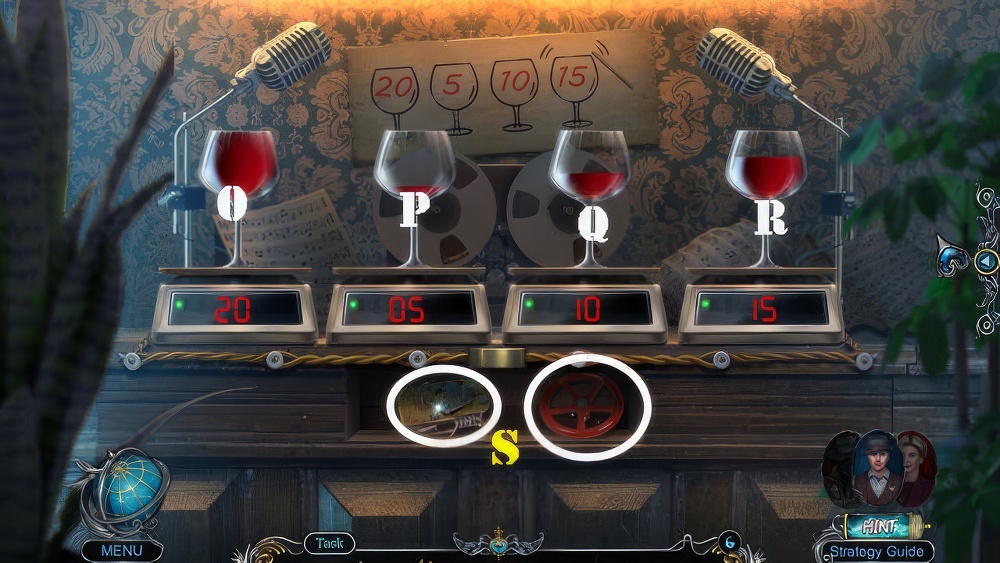
- Solution: (R-Q)-(P-O)-(P-O)-(P-O).
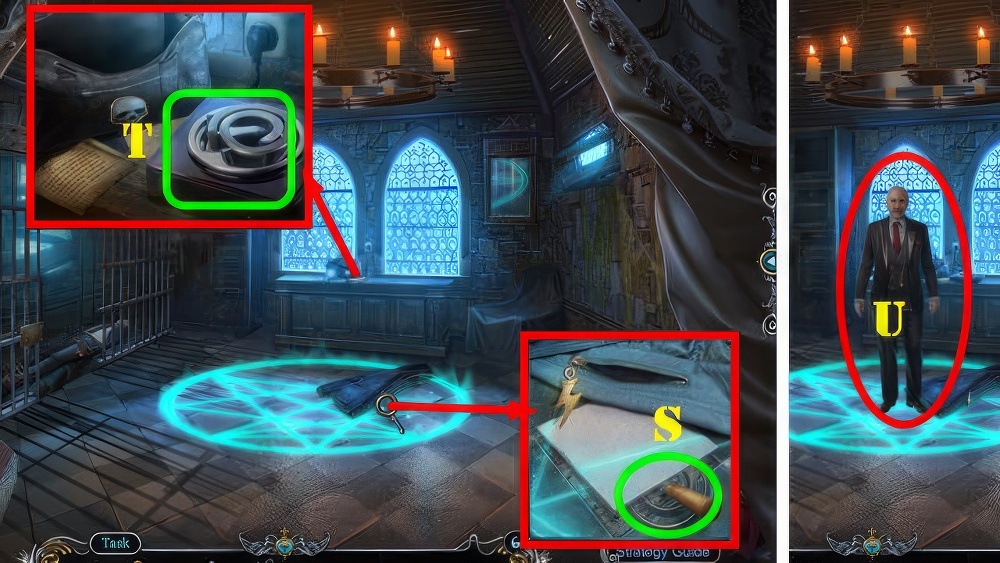
- Take BROKEN MECHANISM and HANDLE (S).
- Go to Archives.
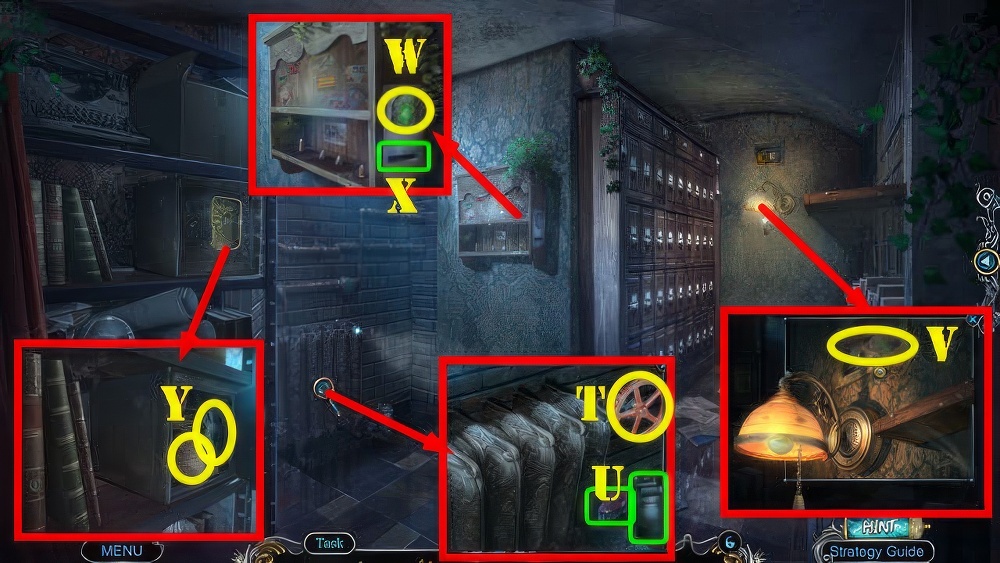
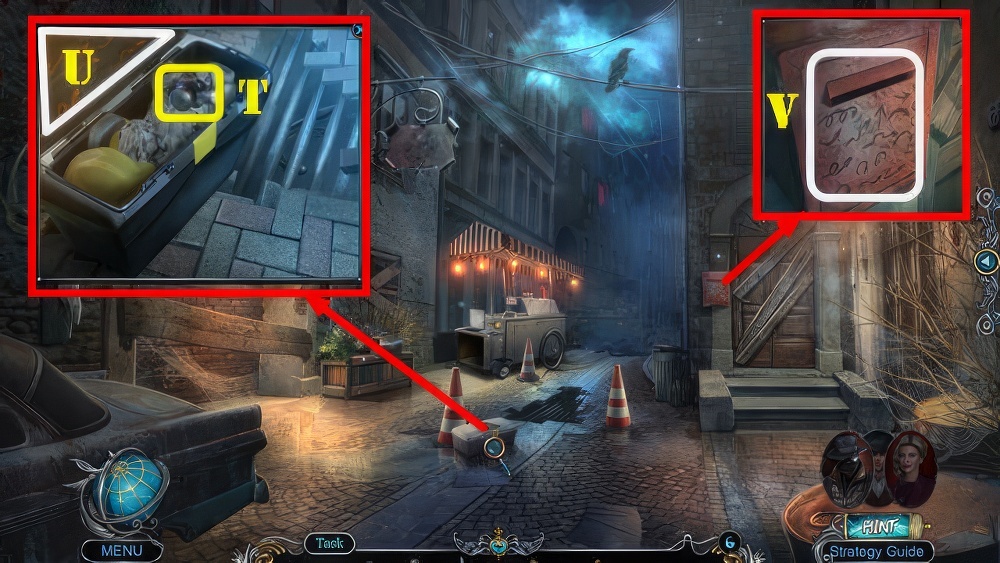
- Place HANDLE (T).
- Take BRUSH and OILCAN (U).
- Use BRUSH and CHOPSTICKS (V), receive GEAR and OCTAGONAL TOKEN.
- Place OCTAGONAL TOKEN (W), take SPRING (X).
- Remove broken spring on BROKEN MECHANISM, place SPRING and GEAR, take LOCK MECHANISM.
- Use LOCK MECHANISM and look at note, take LIBERTY FIGURINE (Y).
- Walk down.
- Receive GREAT WALL FIGURINE.
- Return to Archives.
- Place GREAT WALL FIGURINE, LIBERTY FIGURINE, and PYRAMID FIGURINE (A).
- Play puzzle, receive VIOLIN CASE.
- Walk down.
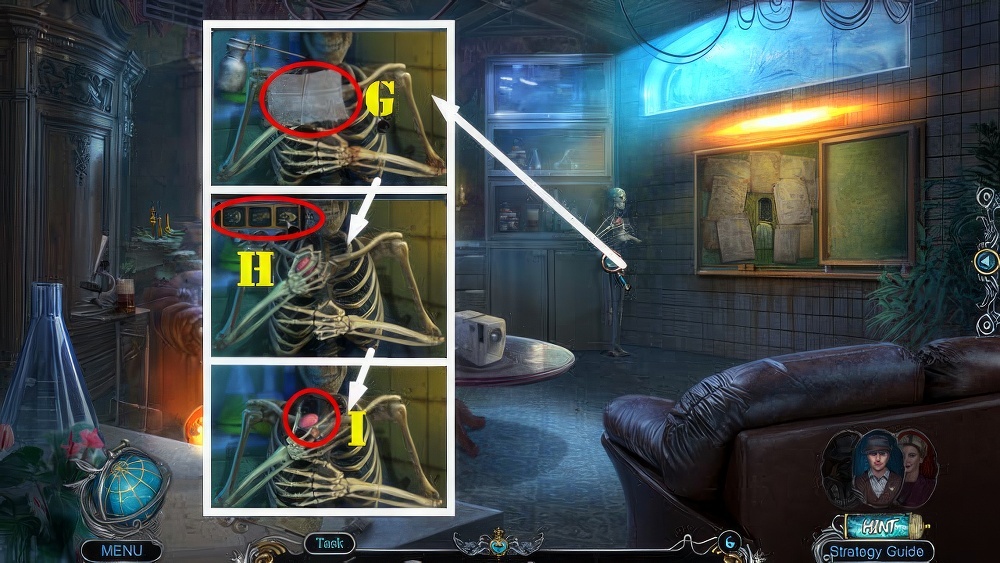
- Give VIOLIN CASE (B), take LIGHTBULB (C).
- Receive SKELETON RIB.
- Take DRAWINGS and PROJECTOR SLIDES (C).
- Place SKELETON RIB (D1), receive WHEEL.
- Use WHEEL and DRAWINGS (D).
- Play puzzle, receive LIGHTER.
- Use LIGHTER (E), take FABRIC (F).
- Use OILCAN and FABRIC (G).
- The solution is random.
- Select rock, paper, or scissors (H) 3x correctly, to win the game.
- Take SWITCH (I).

- Place SWITCH and LIGHTBULB (J).
- Take DRAWER HANDLE and CODED BOX (K).
- Place DRAWER HANDLE, take PROJECTOR LENS (L).
- Place PROJECTOR SLIDES (M) and PROJECTOR LENS (N).
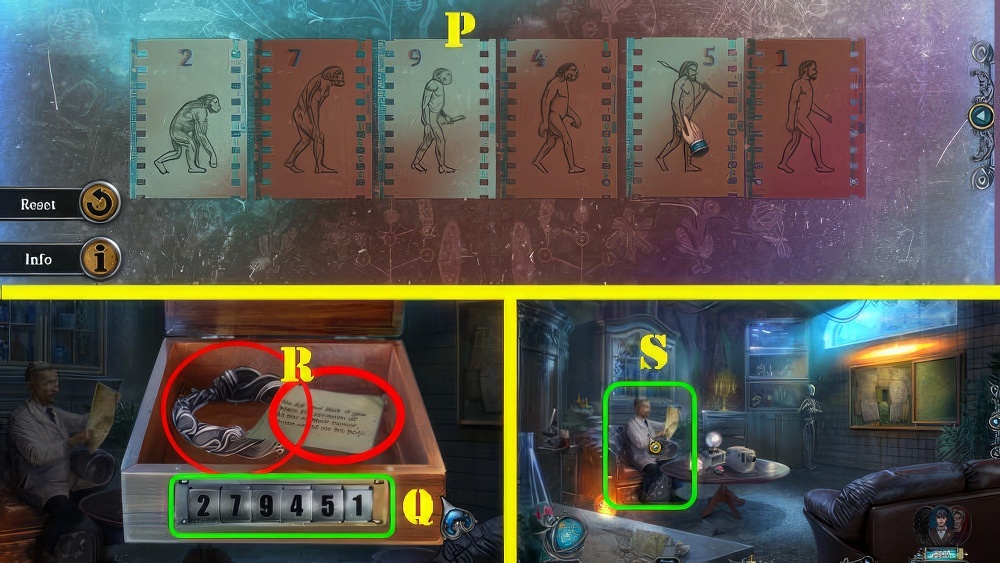
- Solution (P).
- Receive CODE.
- CODE on CODED BOX.
- Solution: 279451 (Q).
- Look at note and take BRACELET (R).
- Give BRACELET (S).
- Take CODE PIECE 1/3, PIPE WRENCH, FLOOR TILE, and HANDLE (T).
- Place FLOOR TILE (U).
- Play puzzle, receive FLOWER TOKEN.
- Place FLOWER TOKEN (V), take NUT and HANDLE BUTTON (W).

- Place HANDLE and HANDLE BUTTON, take SCISSORS and DEVELOPER (X).
- Use SCISSORS, take CODE PIECE 2/3 and SIEVE (Y).
- Use SIEVE, take FLASK TOKEN and WRENCH HANDLE (Z).
- WRENCH HANDLE and NUT on PIPE WRENCH, take PIPE WRENCH.
- Use PIPE WRENCH, take FLASK TOKEN and CODE PIECE 3/3 (A).
- Place 2 FLASK TOKENS (B).
- Play puzzle, receive TRAY.
- Place TRAY, DEVELOPER and CODE PIECE 3/3 (C).
- Select 1-6.
- Take HAMMER SYMBOL (D).

- Take WRENCH and BROKEN TONGS (E).
- Use WRENCH, take ANVIL SYMBOL (F).
- Look at note (G).
- Place HAMMER SYMBOL and ANVIL SYMBOL (H).
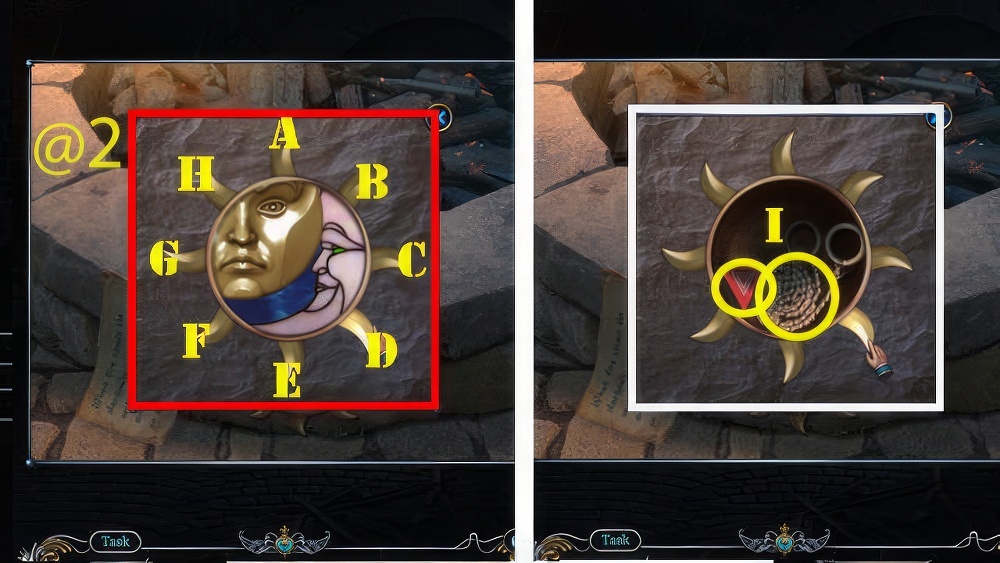
- Solution (@2): (Dx2-E-H-Dx2).
- Take WIRE SAW and TRIANGULAR BUTTON 1/2 (I).
- Use WIRE SAW, take TRIANGULAR BUTTON 2/2 and METAL ROD (J).
- Place TRIANGULAR BUTTON 2/2 (K), take COAL and ROUND SPRING (L).
- METAL ROD and ROUND SPRING on BROKEN TONGS, take TONGS.
- Use TONGS and COAL (M), receive HOT COAL.
- Use HOT COAL (N).
- The solution is random.
- Choose one piece from each side that once combined make up the image in the center.
- Screenshot shows one random solution (O).
- Take DISASSEMBLED DRONE, SPOON TOKEN, PROPELLER 1/3, and WIRE (P).
- Place SPOON TOKEN and pull chain (Q).
- Take PEN AND PAPER and LOCK (R).
- Place LOCK, take ROADWORK INLAY and PROPELLER 2/3 (S).
- Place ROADWORK INLAY, take SMALL CAMERA (T).
- Use PEN AND PAPER (U), receive CODE.
- Place CODE (V).
- Play puzzle, receive FLASHLIGHT.

- Use FLASHLIGHT (W), receive HOOK and CLEAVER.
- Use CLEAVER, take CANE (X).
- CANE and WIRE on HOOK, take LONG HOOK.
- Use LONG HOOK, take BOLAS and PROPELLER 3/3 (Y).
- PROPELLER 3/3 and SMALL CAMERA on DISASSEMBLED DRONE, take DRONE.
- Select scene to automatically use DRONE.
- Use BOLAS (A).
- Take SHOTGUN and STATUETTE (B).
- Take TAPESTRY PIECE 1/4 and STAR TOKEN (C).
- Place STAR TOKEN, take CARTRIDGE and PRUNER (D).
- Use PRUNER, take TAPESTRY PIECE 2/4 and STATUETTE (E).
- Place 2 STATUETTES (F).
- Take TAPESTRY PIECE 3/4 and HERALD, look at note (G).
- Place HERALD, take TAPESTRY PIECE 4/4 and RUBBER GLOVES (H).
- Place TAPESTRY PIECE 4/4 (I).
- Play puzzle, receive ISOLATION DEVICE.
- Use ISOLATION DEVICE and RUBBER GLOVES, take LIGHTNING PULL and LOCKPICK (J).
- Use LOCKPICK, take TRIGGER (K).
- TRIGGER and CARTRIDGE on SHOTGUN, take LOADED SHOTGUN.
- Use LOADED SHOTGUN (L).
- Go (M).

- Take BROKEN STOVE (N).
- Use LIGHTNING PULL, take SKULL TOKEN and COIN (O).
- Place SKULL TOKEN, take METAL BRUSH (P).
- Look at note (P1).
- Use METAL BRUSH and COIN (Q).
- Take WAX FIGURINE and CHISEL (R).
- Use CHISEL, take SPIRAL (S).
- SPIRAL on BROKEN STOVE, take ELECTRIC STOVE.
- Place ELECTRIC STOVE and WAX FIGURINE (T), receive ENCHANTED HARP.
- Use ENCHANTED HARP (U).
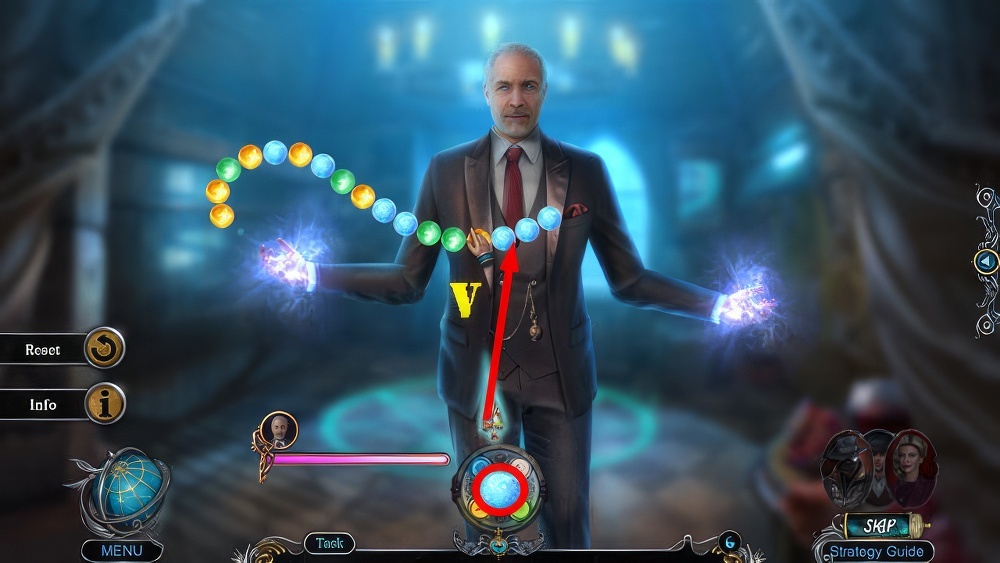
- The solution to this puzzle is random.
- You have to solve 6 rounds.
- In each round, you must eliminate a certain number of balls (V).
- Round one (10 balls).
- Round two (12 balls).
- Round three (19 balls).
- Round four (18 balls).
- Round five (22 balls).
- Round six (27 balls).
Congratulations! You have completed the game Detectives United 5: Deadly Debt.


