
Detectives United 6: Beyond Time – The game starts with the detective team receiving a mysterious package with a powerful spell that splits your team. The agents learn about a mysterious creature that can change time frames. You don’t have much time to stop the chaos created by this creature. You will find the last heir of an ancient family lineage that protected everyone from the time keeper, and set out to save the world from rebooting in this paranormal investigation. If you can not pass any of the puzzles or do not know where the items are, on our site you can watch the walkthrough of Detectives United 6: Beyond Time, and learn why the past is changing and how to stop it.
Detectives United 6: Beyond Time – Walkthrough
Here you can see the full walkthrough of Detectives United 6: Beyond Time, namely for all chapters, including bonus chapter, in pictures.
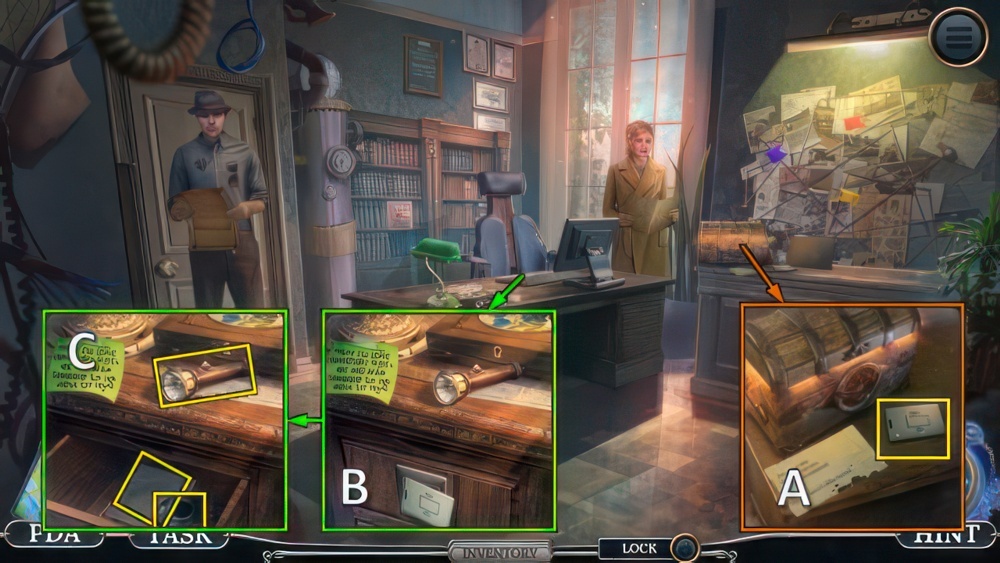
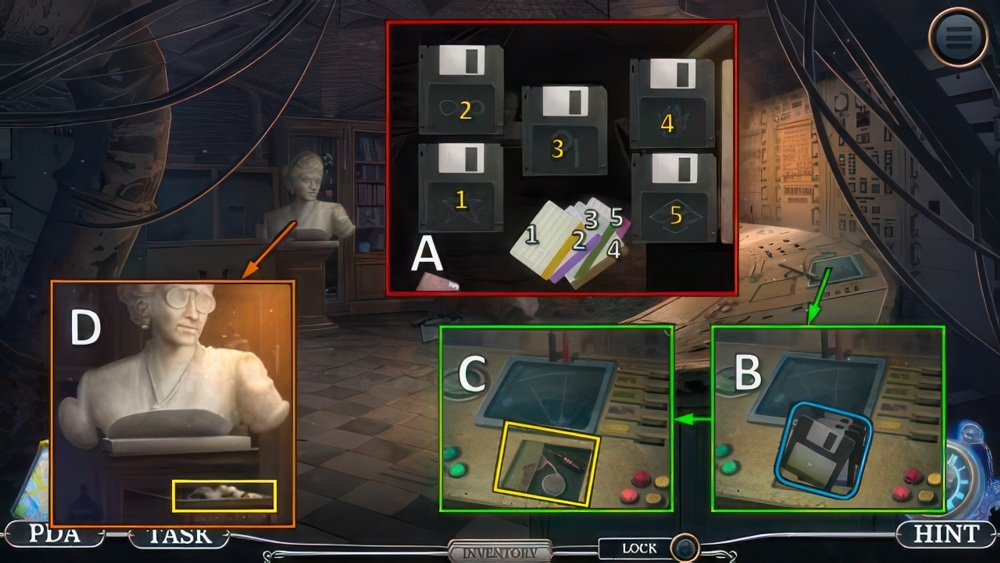
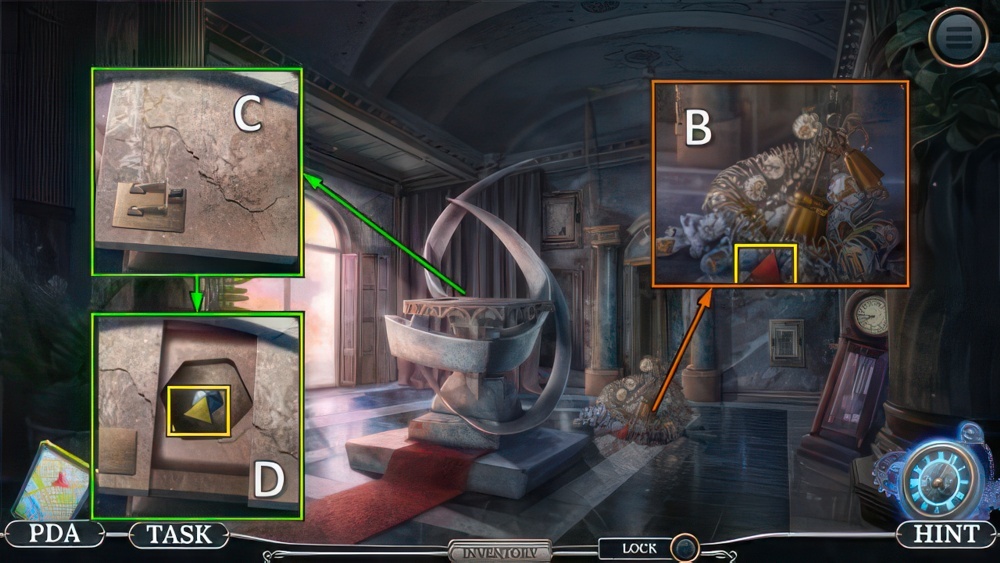
- Take PASS CARD (A).
- Use PASS CARD (B).
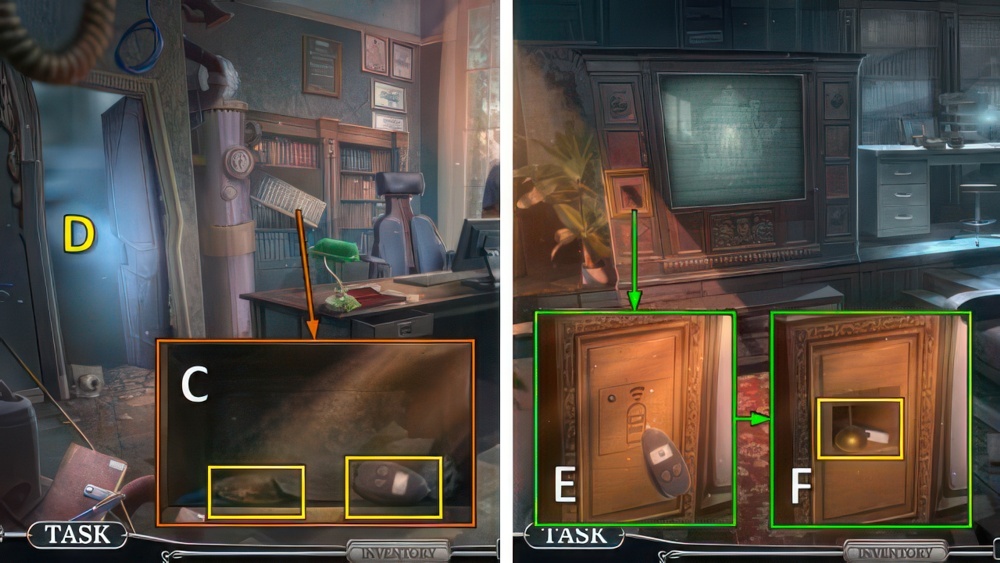
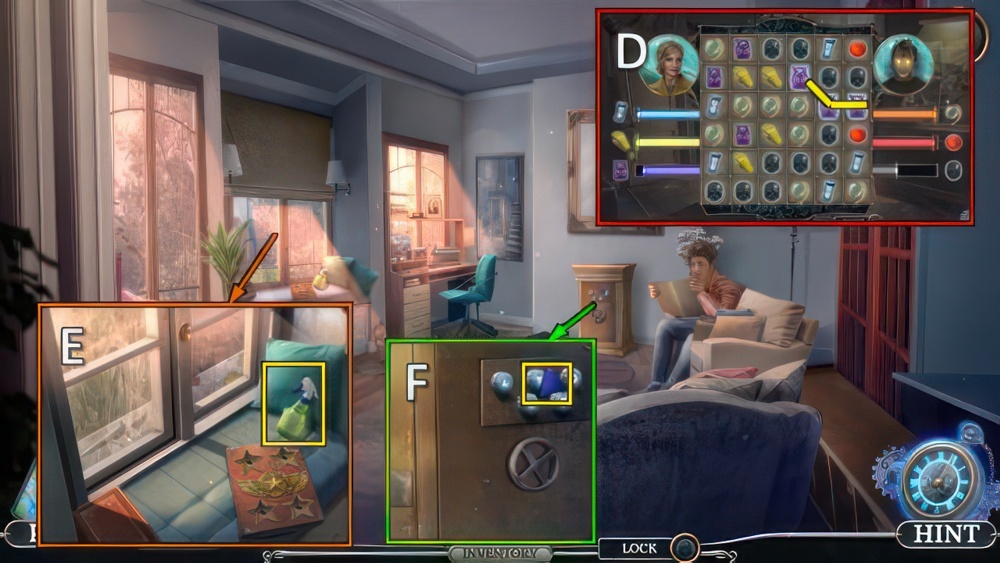
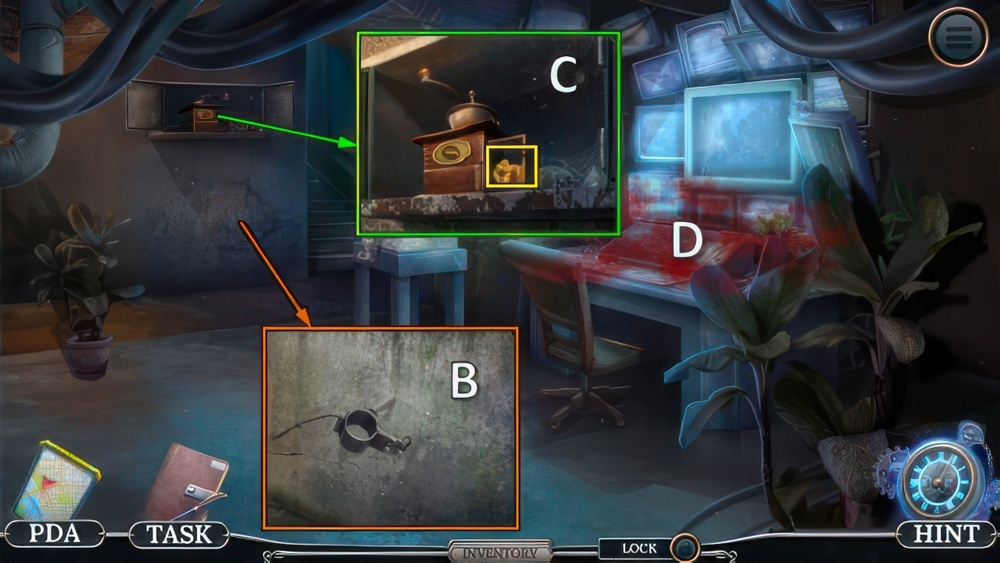
- Take BROKEN FLASHLIGHT, SAFE LOCK and PAST CASE LIST (C).
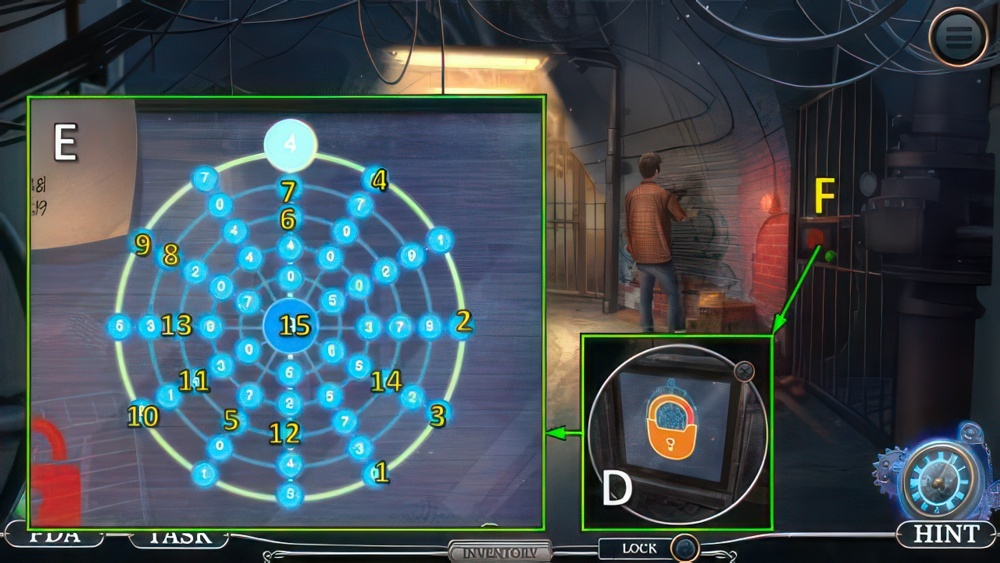
- Place PAST CASE LIST (D).
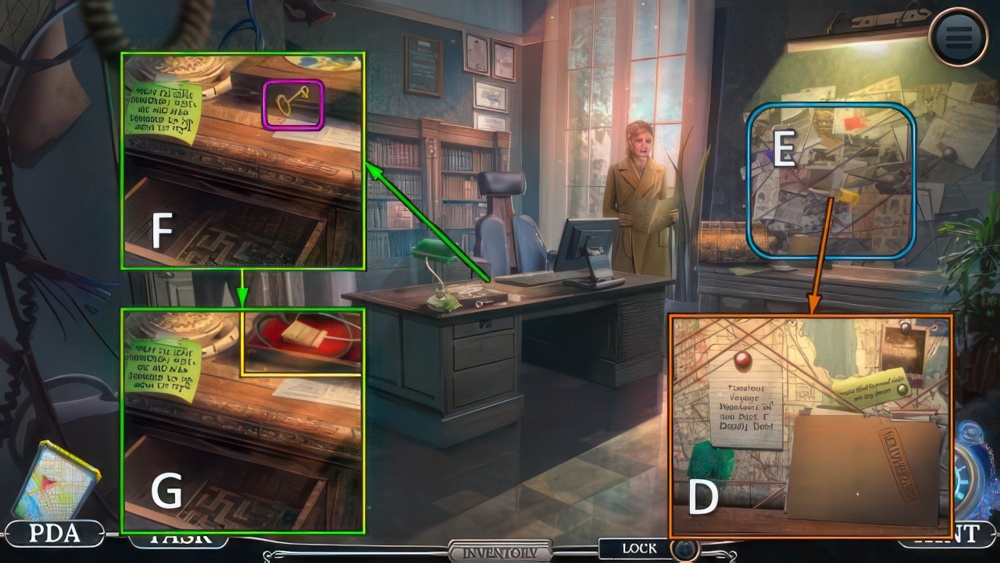
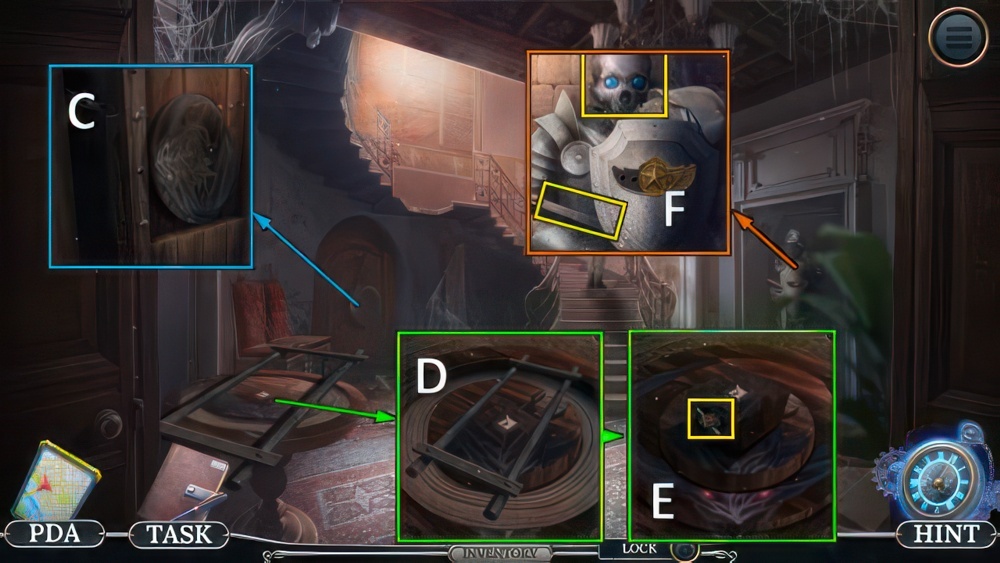
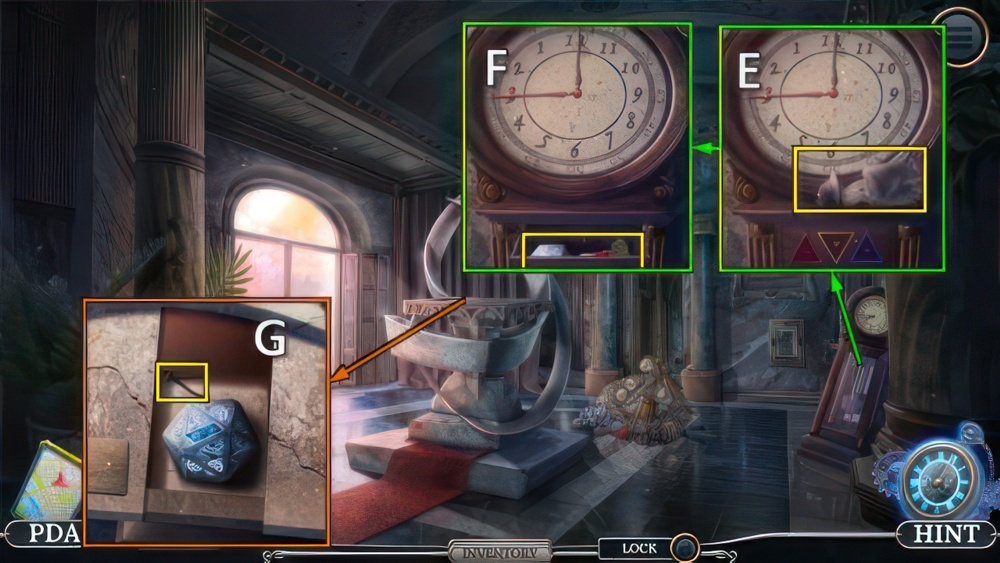
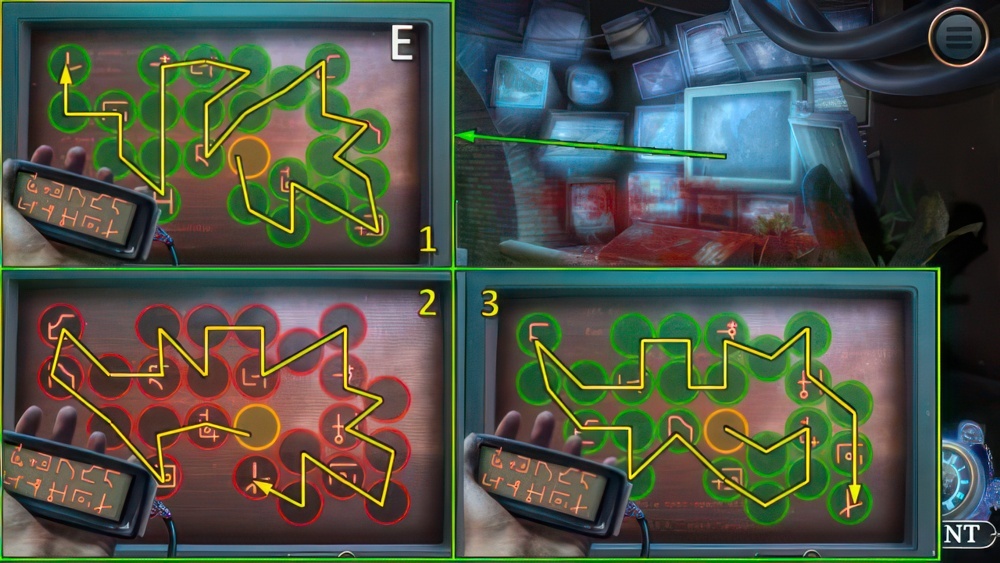
- Play puzzle (E), receive DORIAN’S KEY.
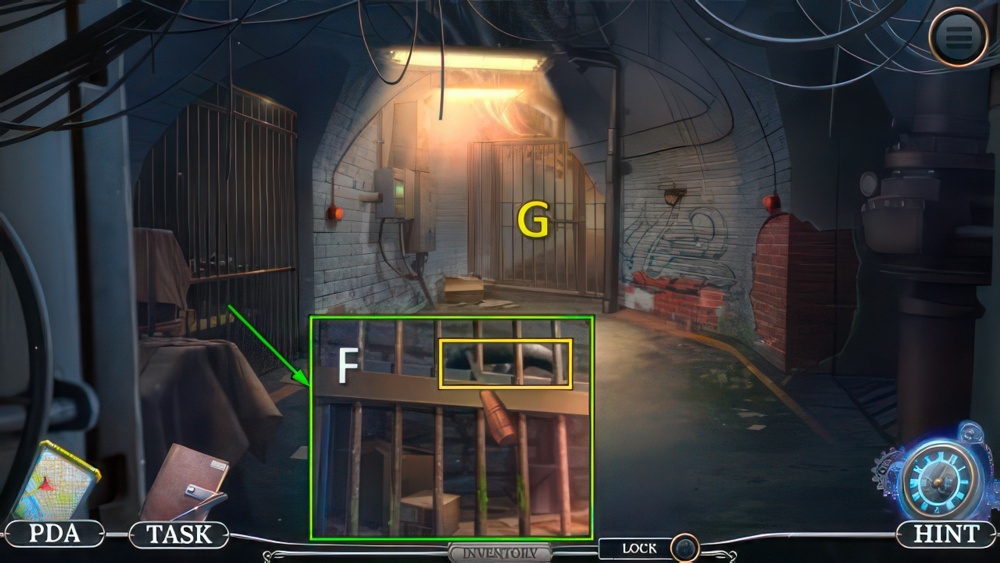
- Use DORIAN’S KEY (F).
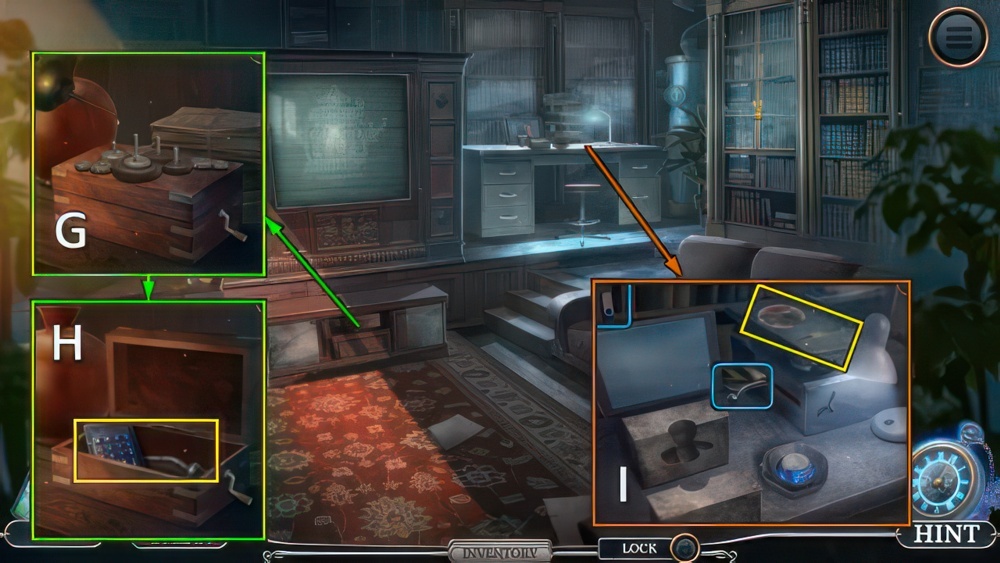
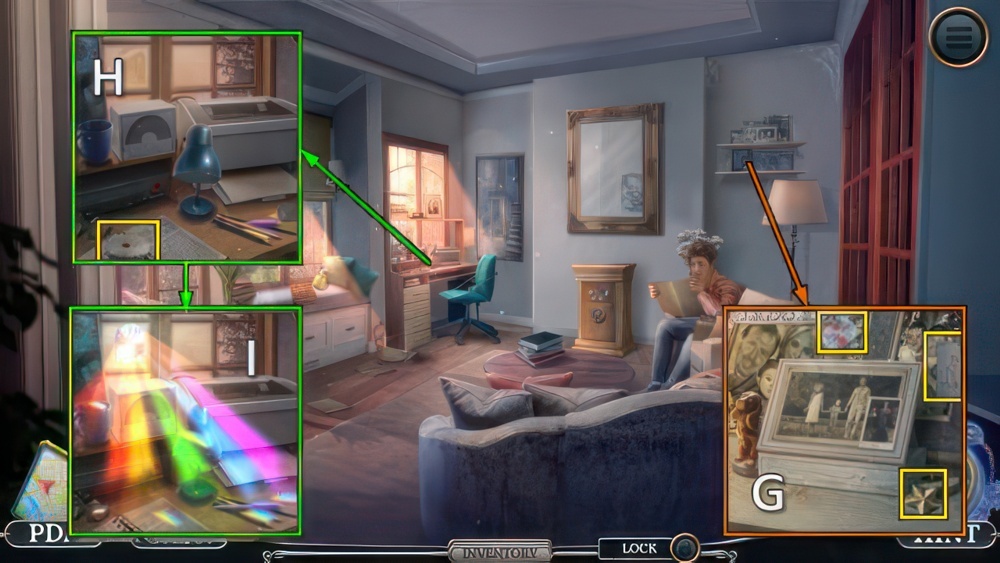
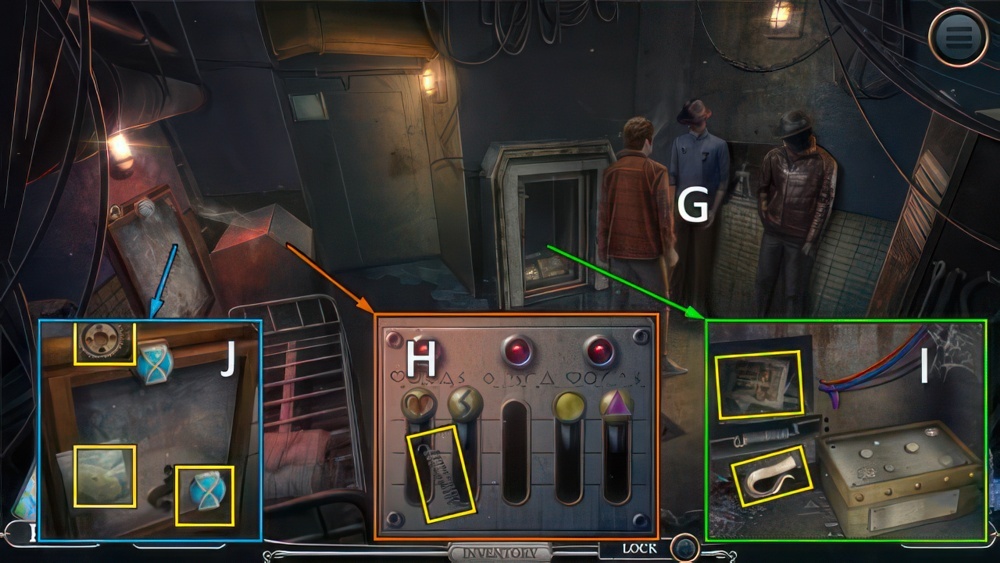
- Take BAKING SODA and STETHOSCOPE (G).

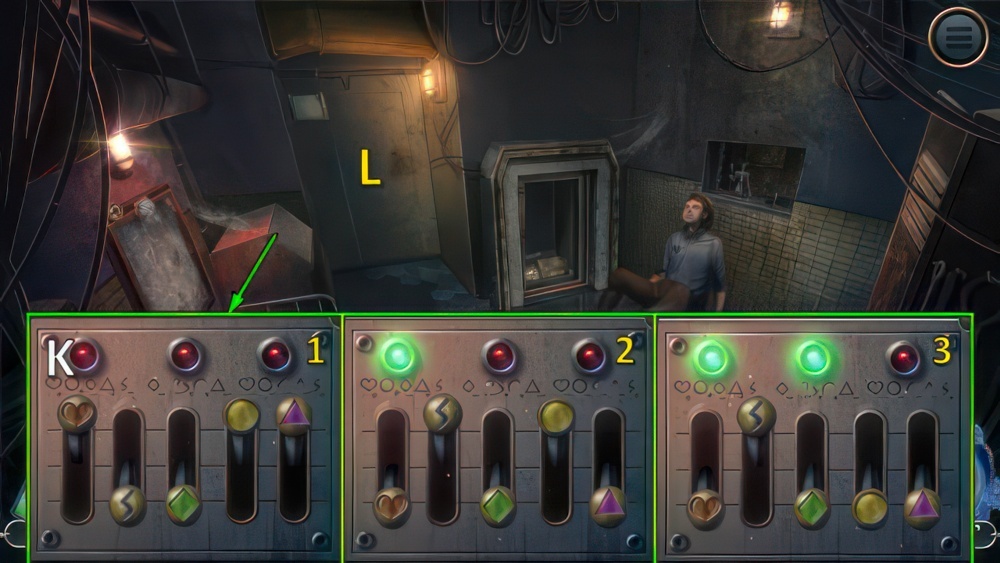
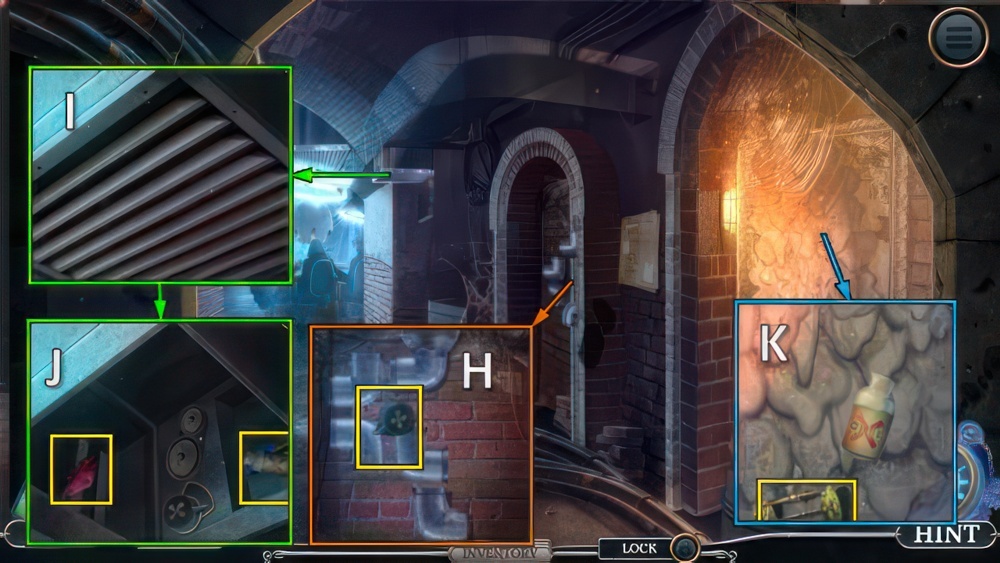
- Place SAFE LOCK and STETHOSCOPE (H).
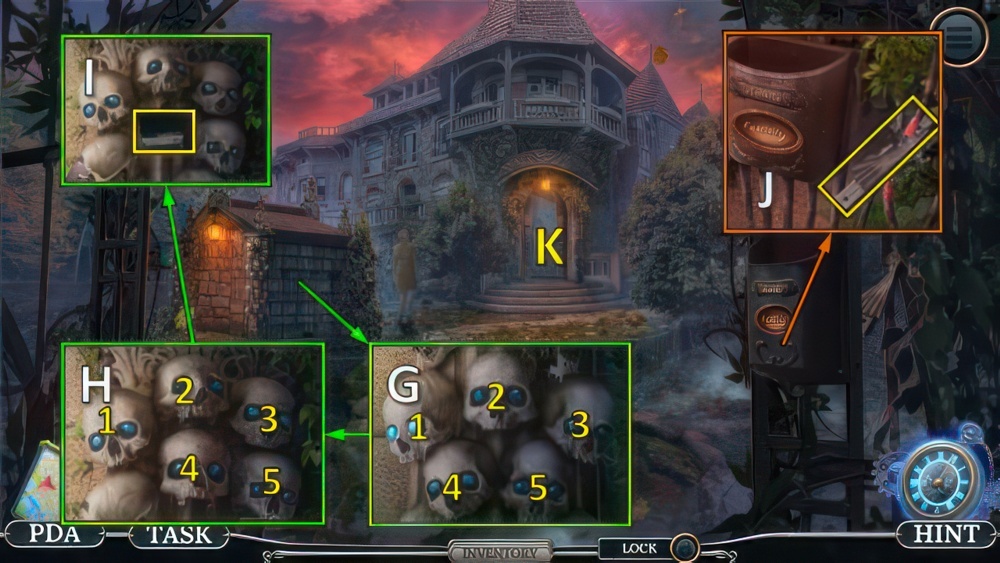
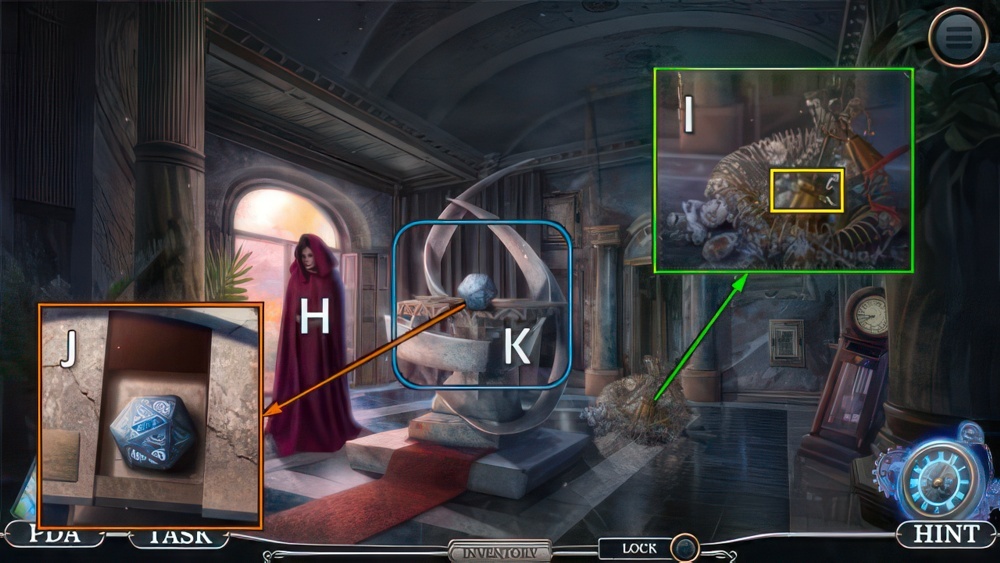
- Take BATTERY and FLORENCE SEAL (I).
- Use FLORENCE SEAL (J).
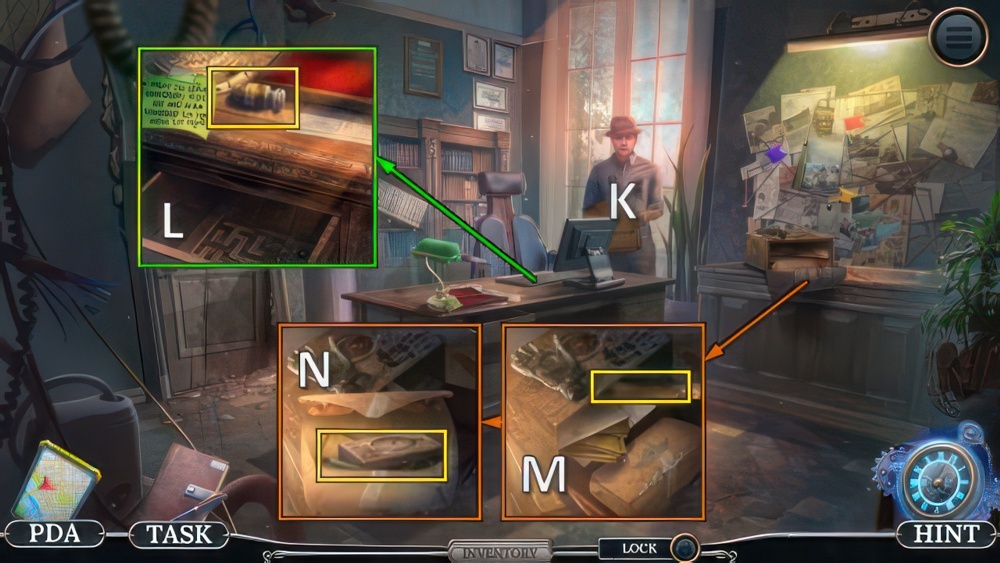
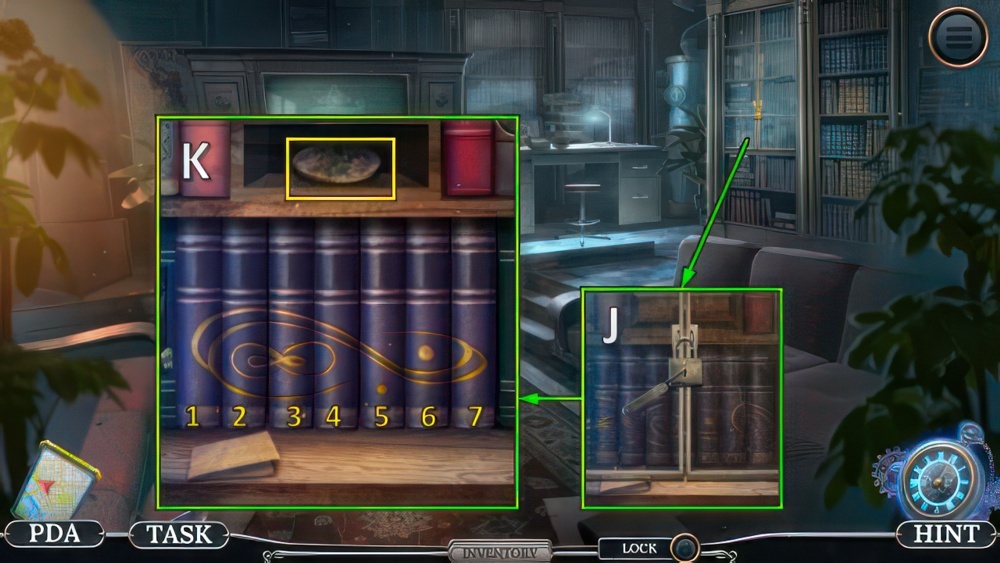
- Talk (K), receive KNIFE.
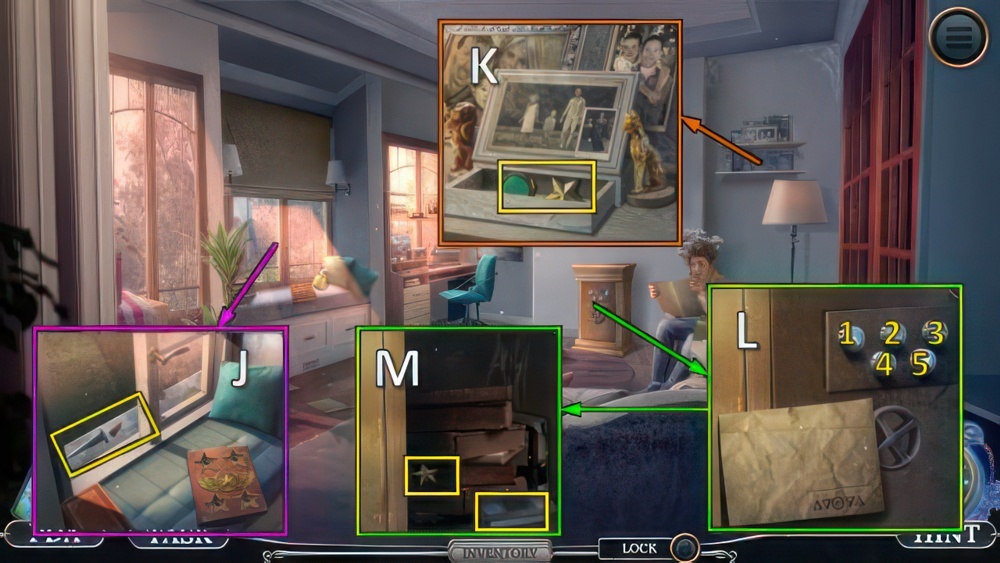
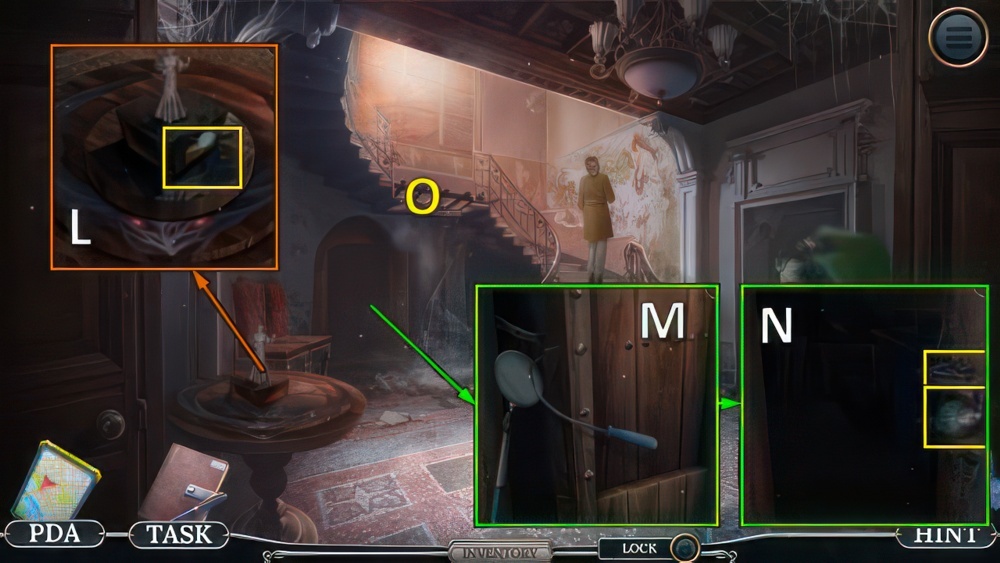
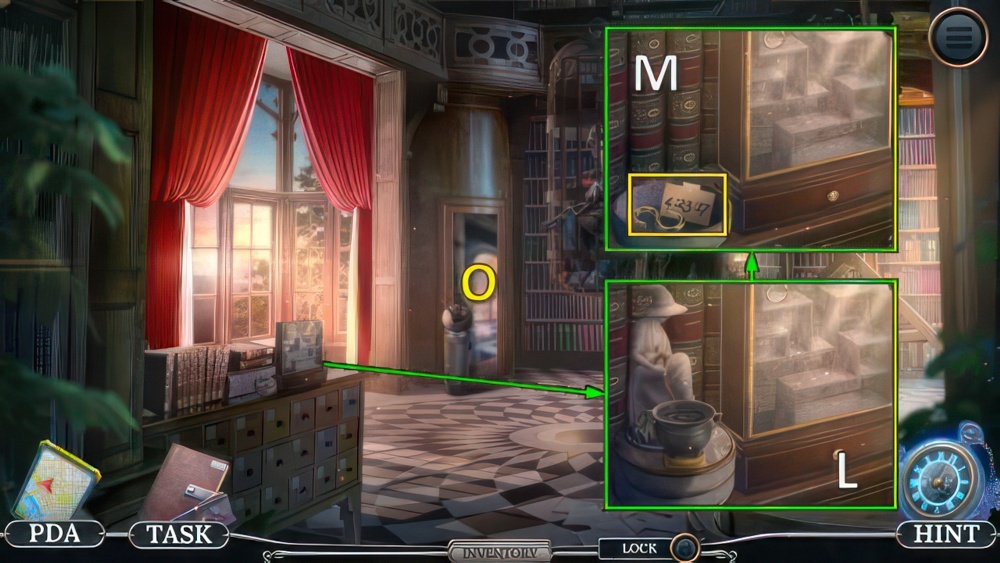
- Take SOLVENT (L).
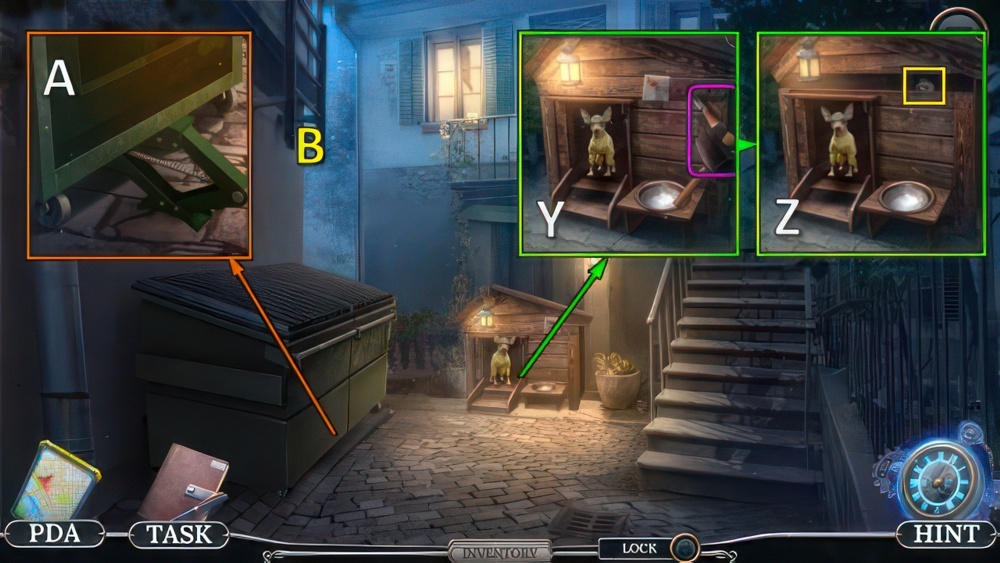
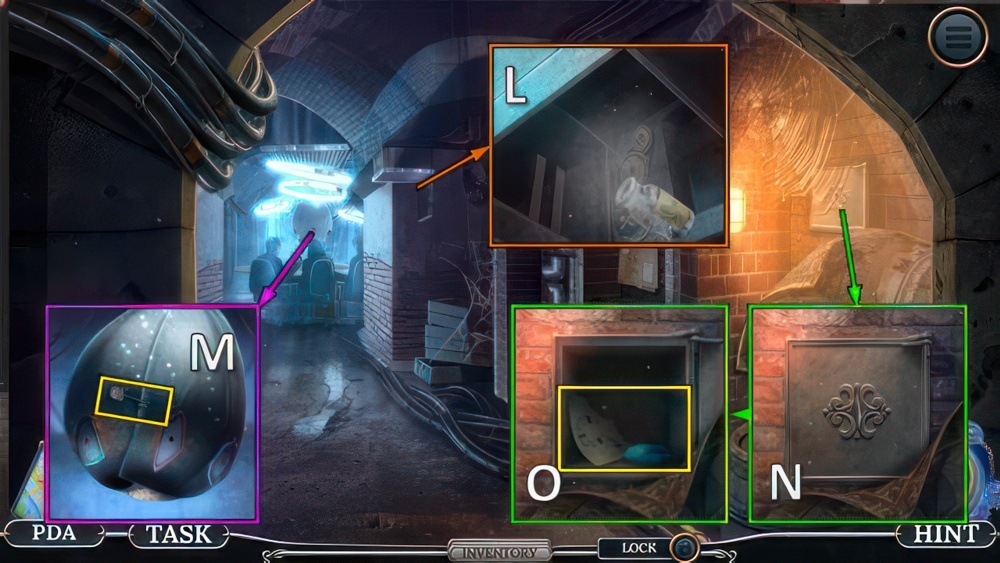
- Take HAMMER BASE (M).
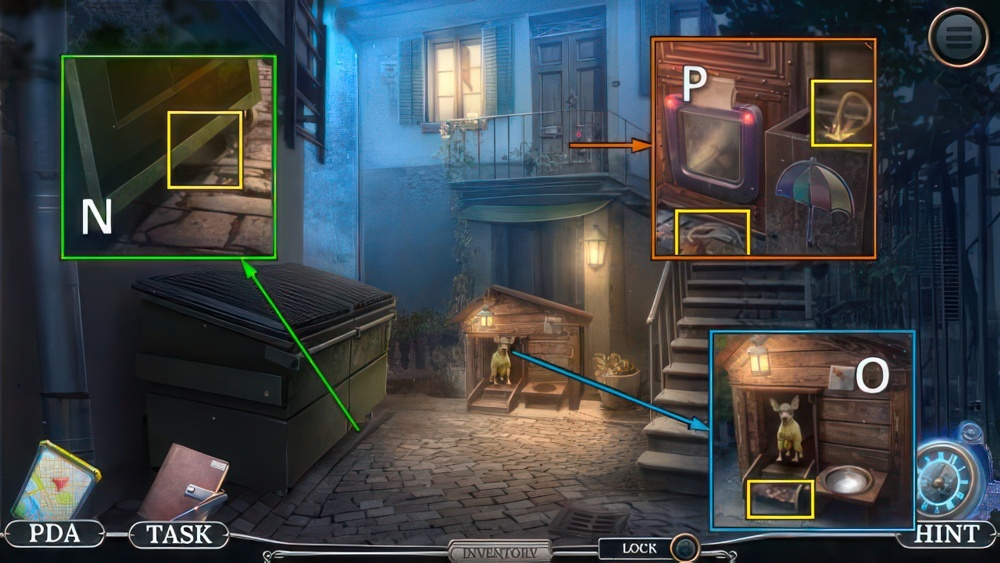
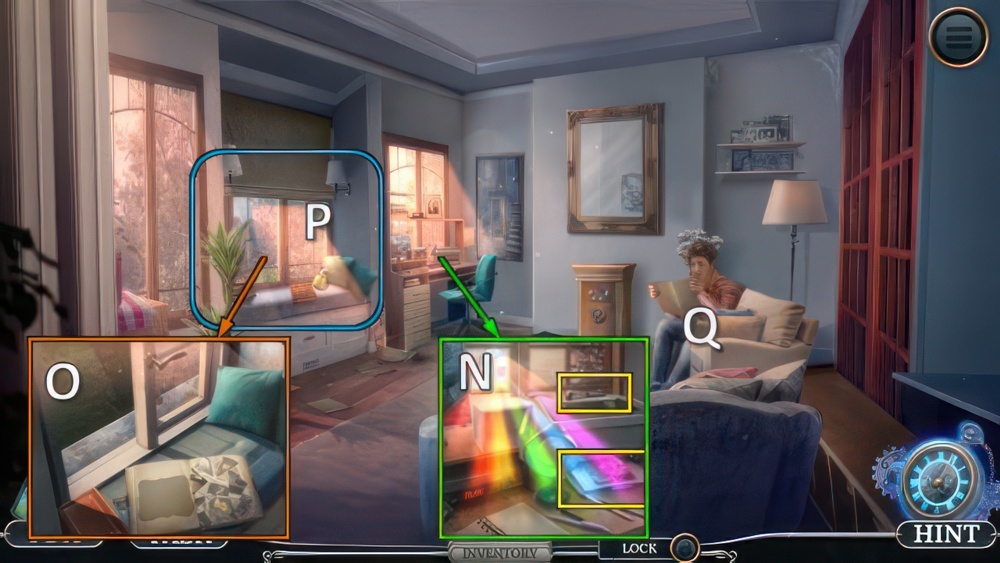
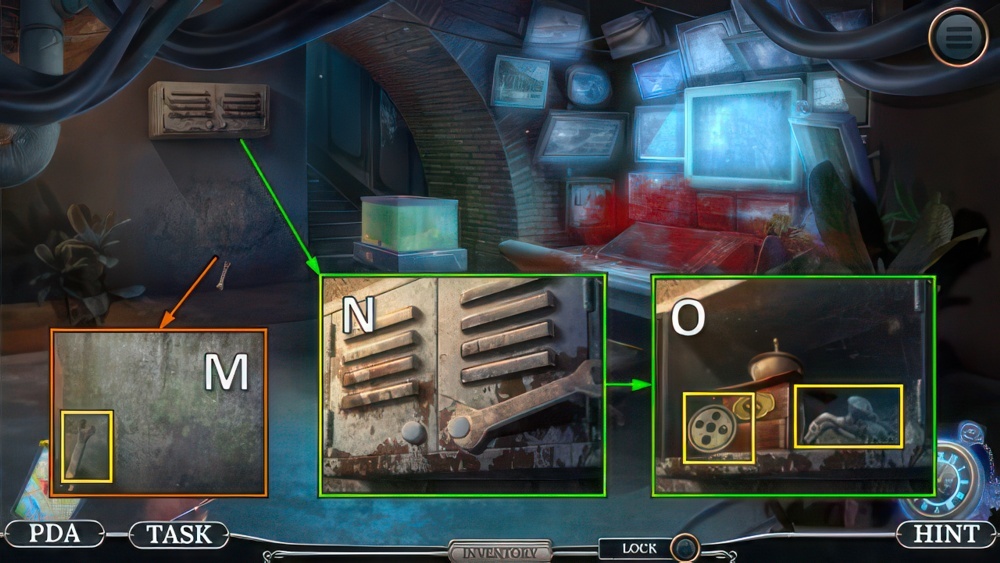
- Use SOLVENT and KNIFE, take PUZZLE, PENCIL and notes (N).
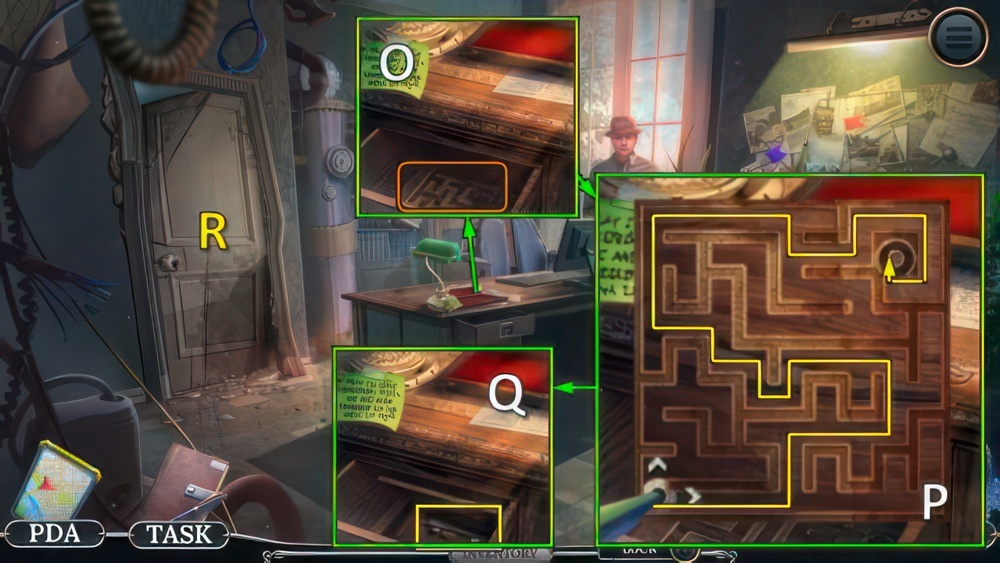
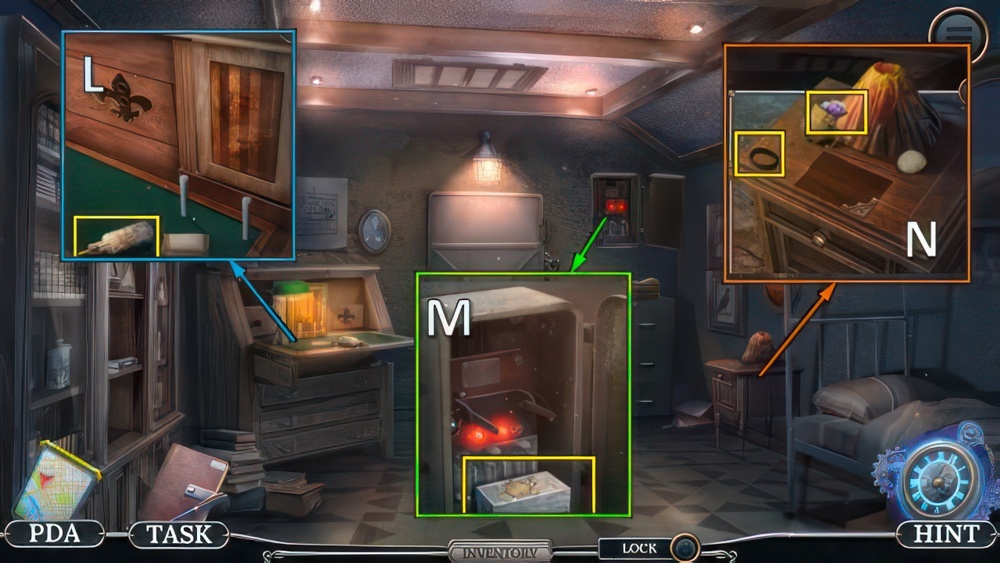
- Use PENCIL (O).
- Guide the disk from the beginning of the maze to the slot in the top right comer.
- Select an arrow to move the disk in the indicated direction.
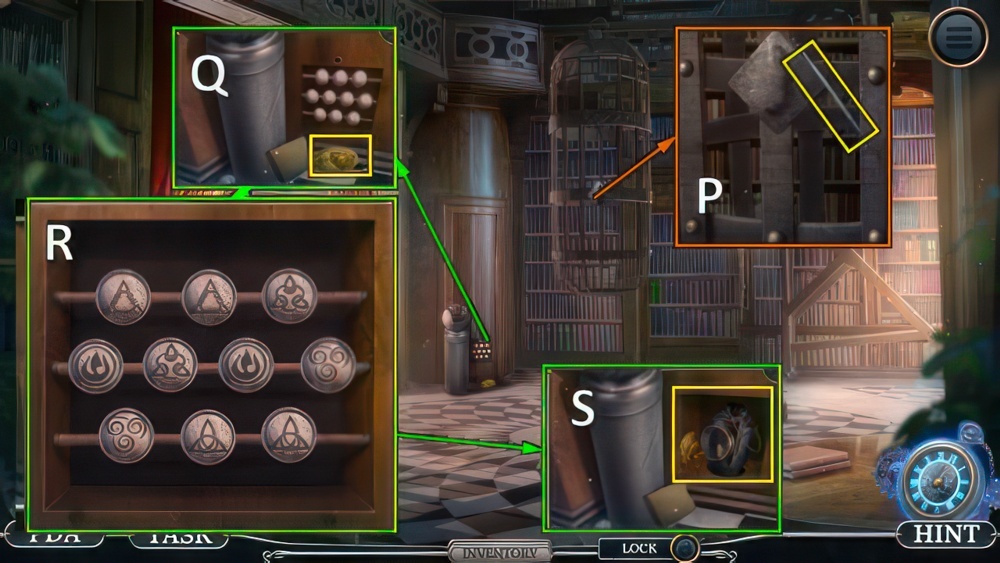
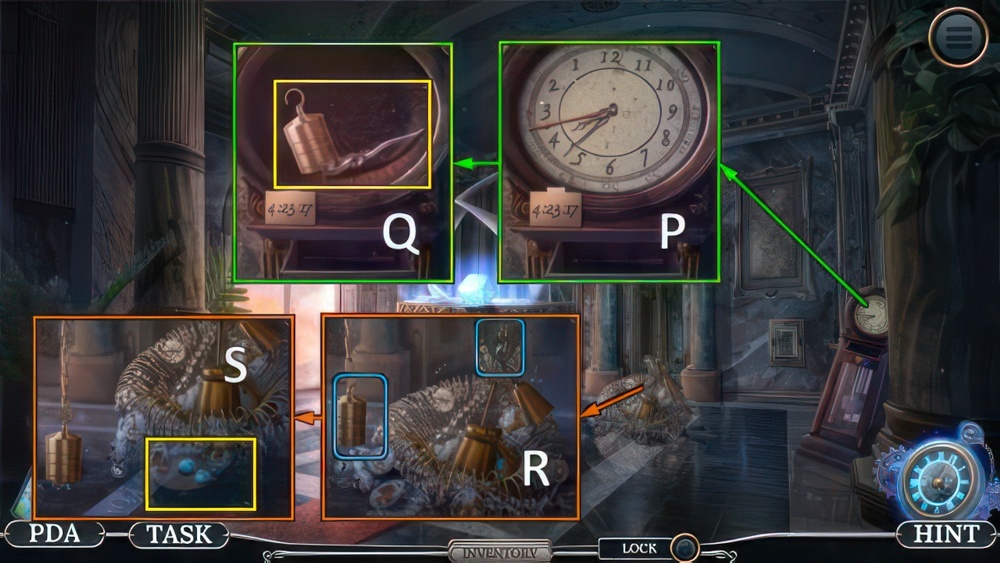
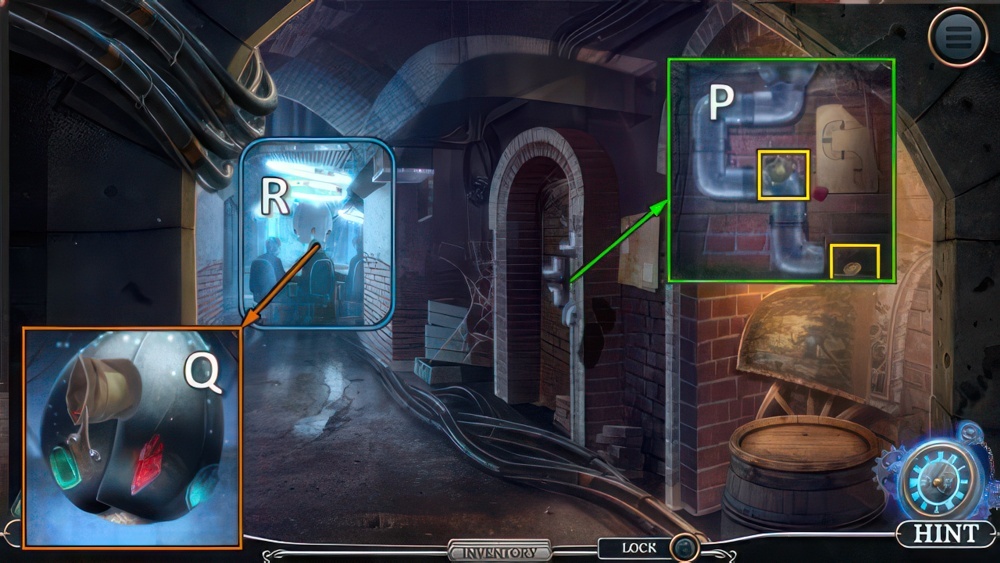
- Walkthrough (P).
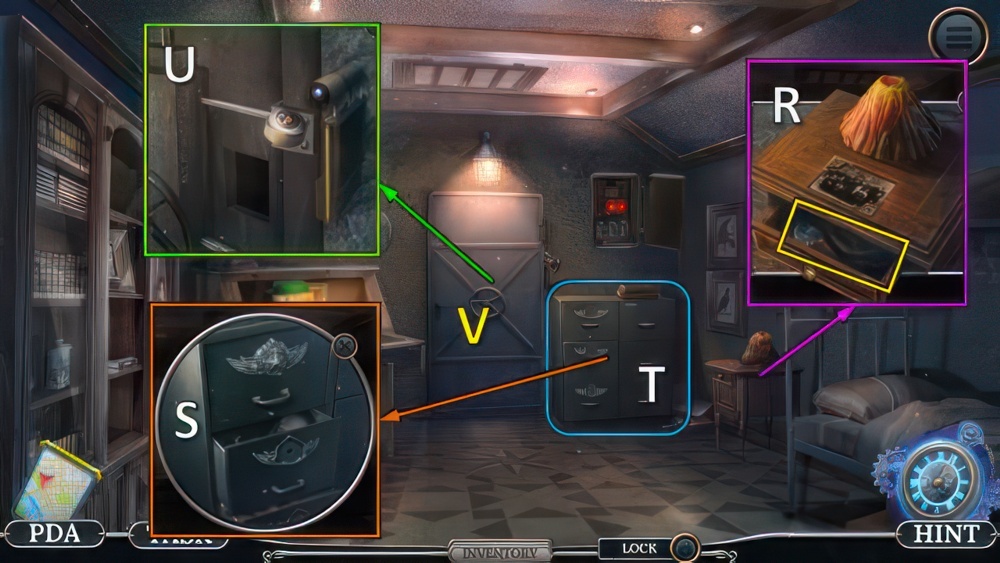
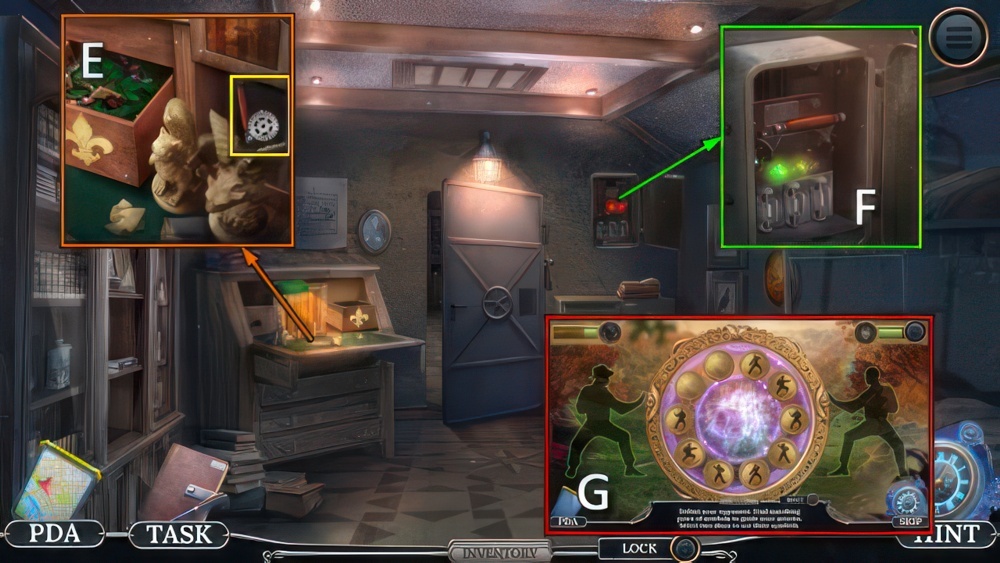
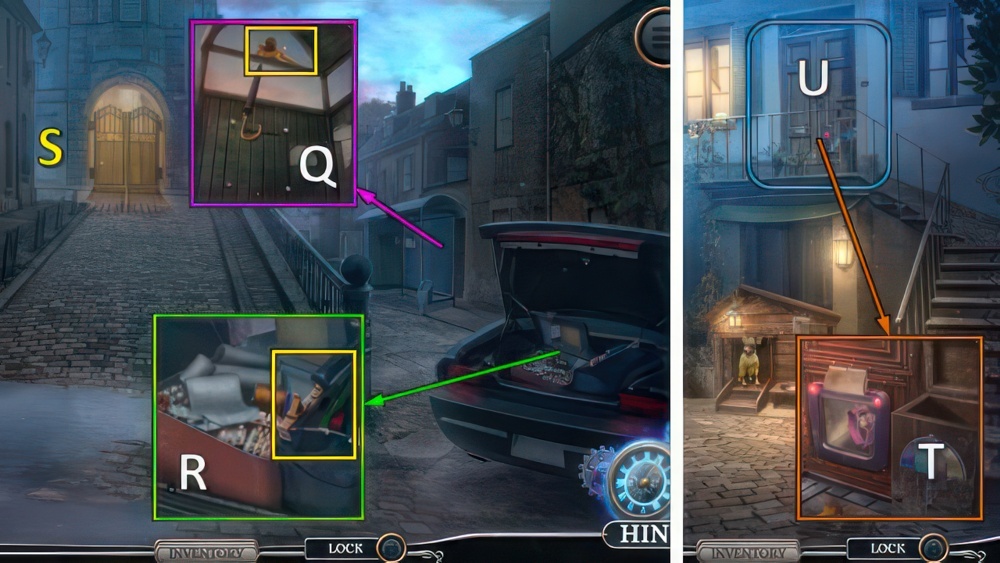
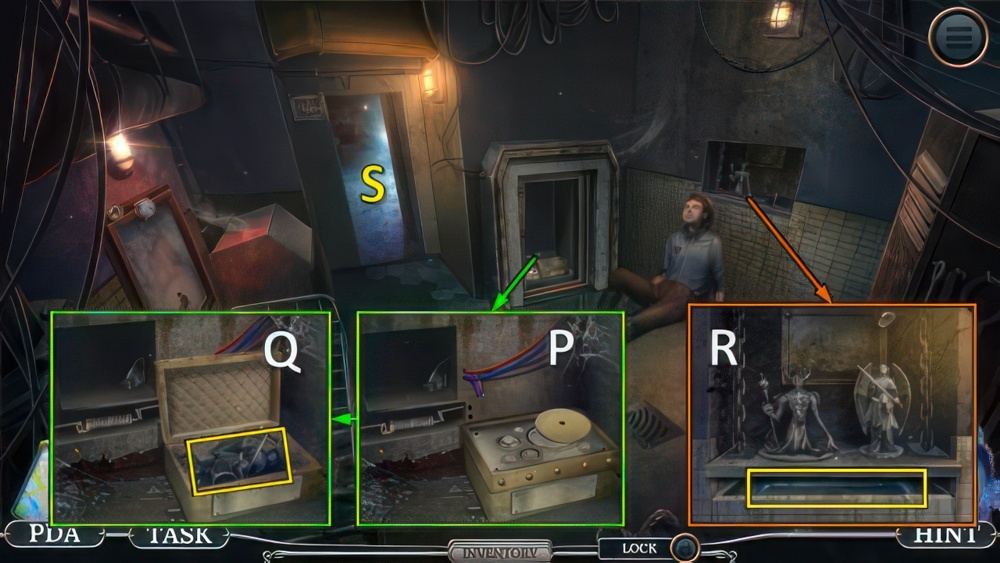
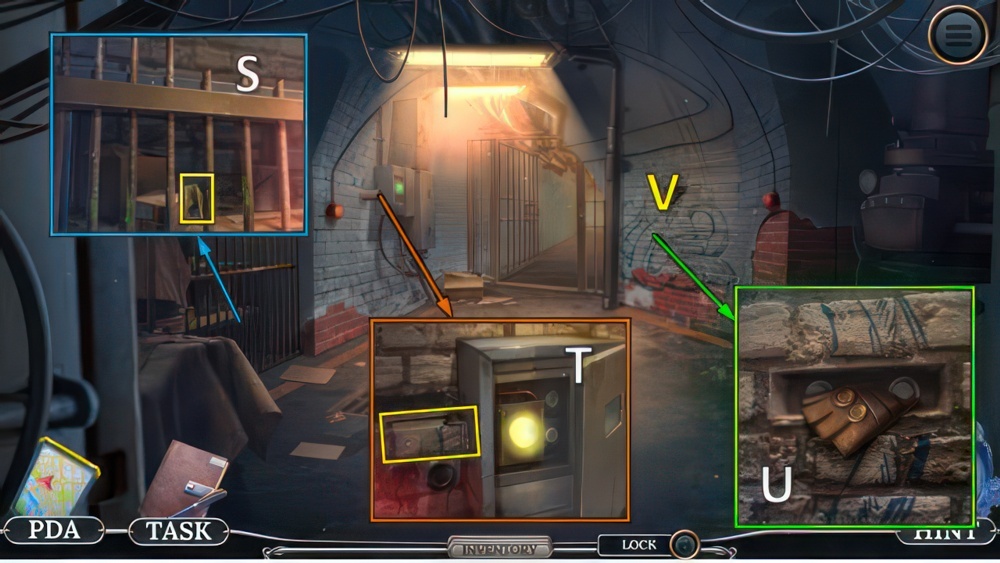
- Take QUESTION MARK TOKEN and HACKSAW (Q).
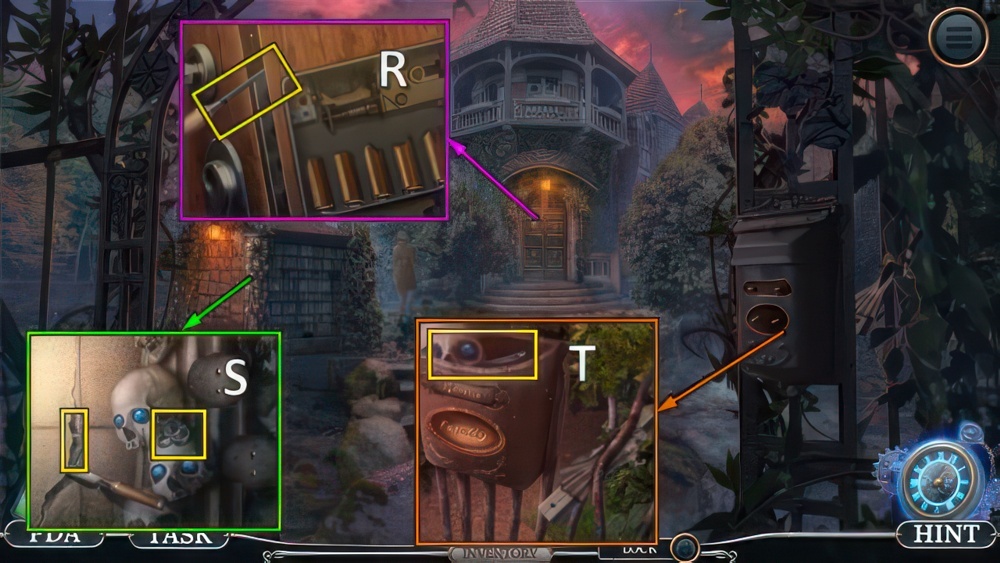
- Use HACKSAW, go (R).
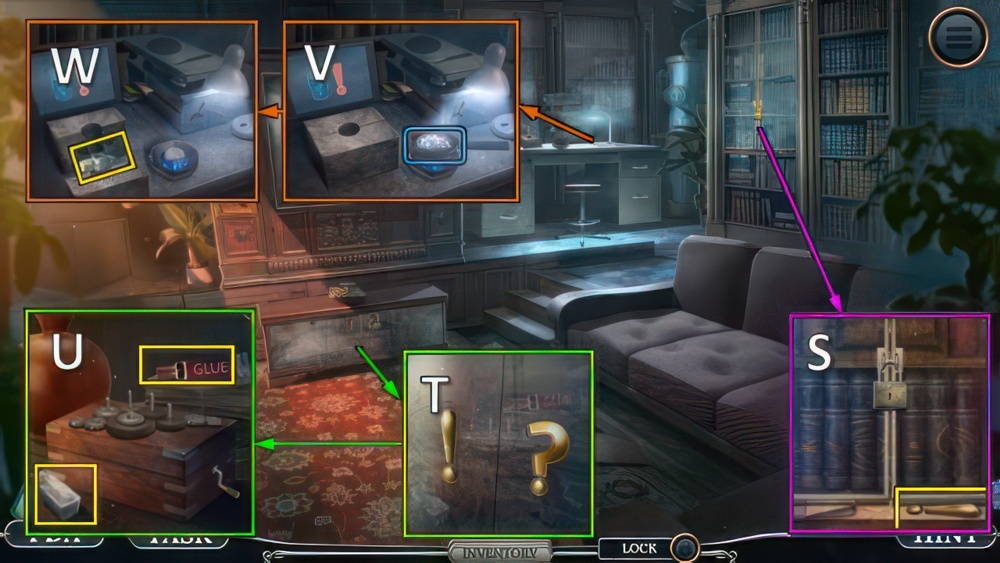
- Take EXCLAMATION TOKEN (S).
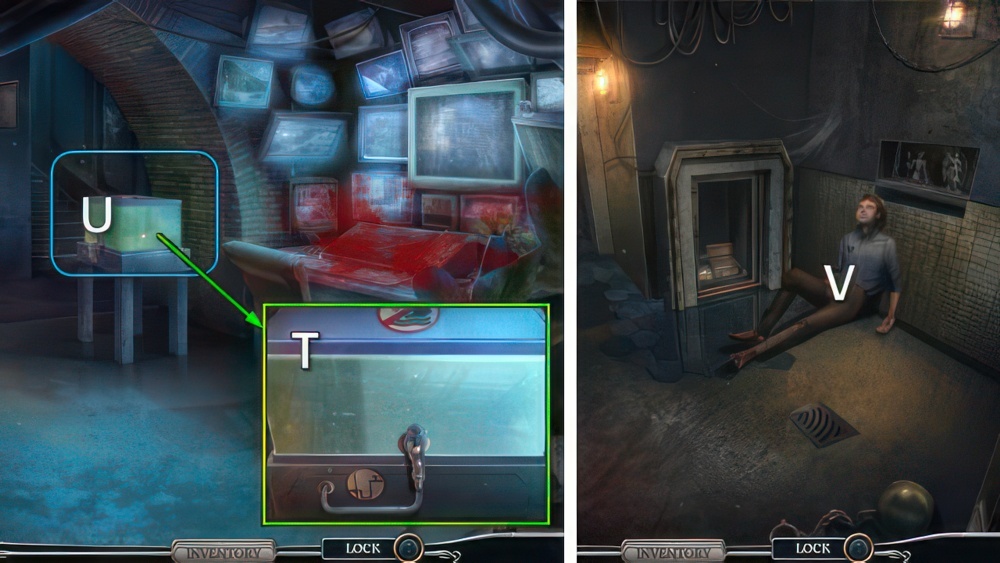
- Place EXCLAMATION TOKEN and QUESTION MARK TOKEN (T).
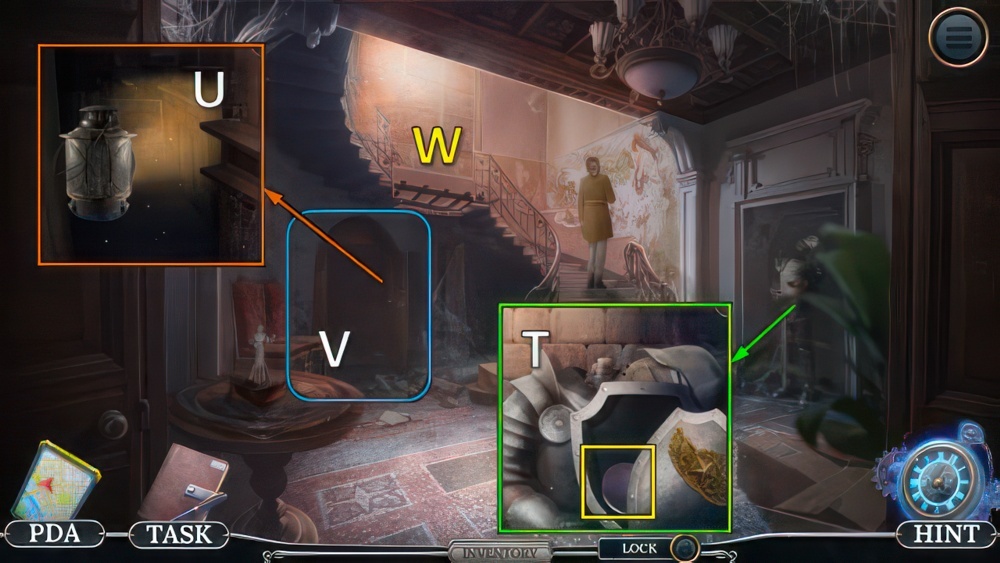
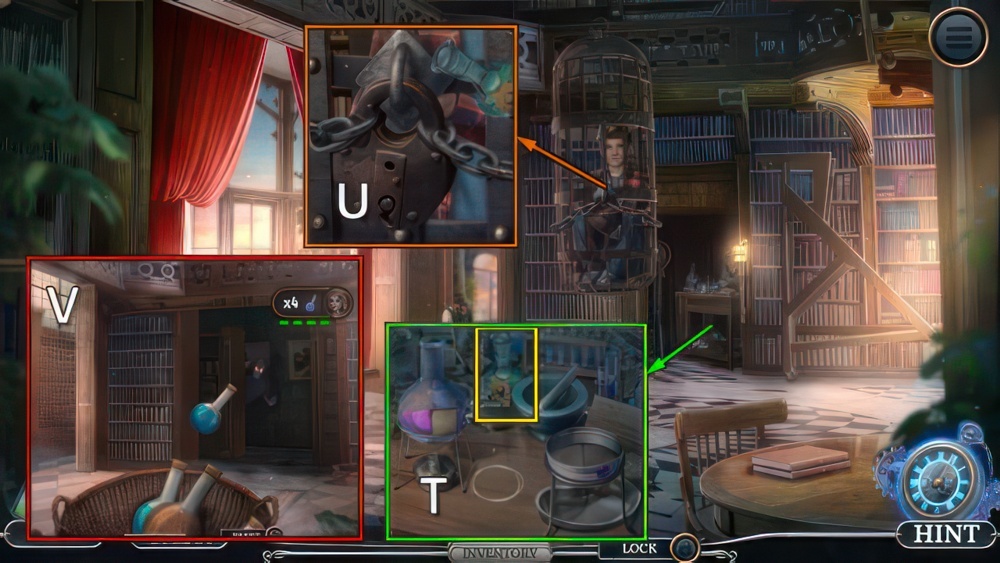
- Take METAL INGOT and GLUE (U).
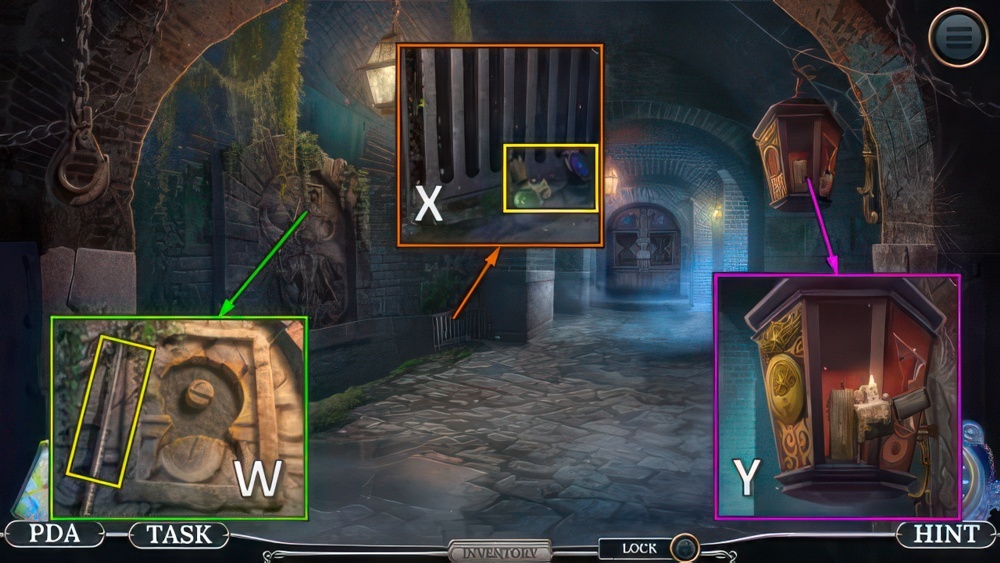
- Place METAL INGOT (V), take HAMMER HEAD (W).
- Walk down.
- HAMMER HEAD and GLUE on HAMMER BASE, take HAMMER.
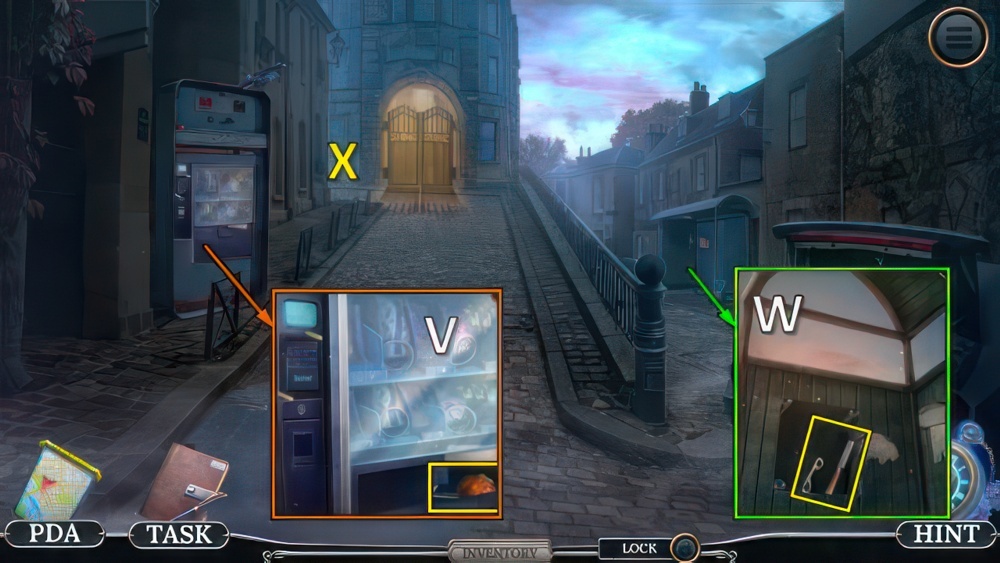
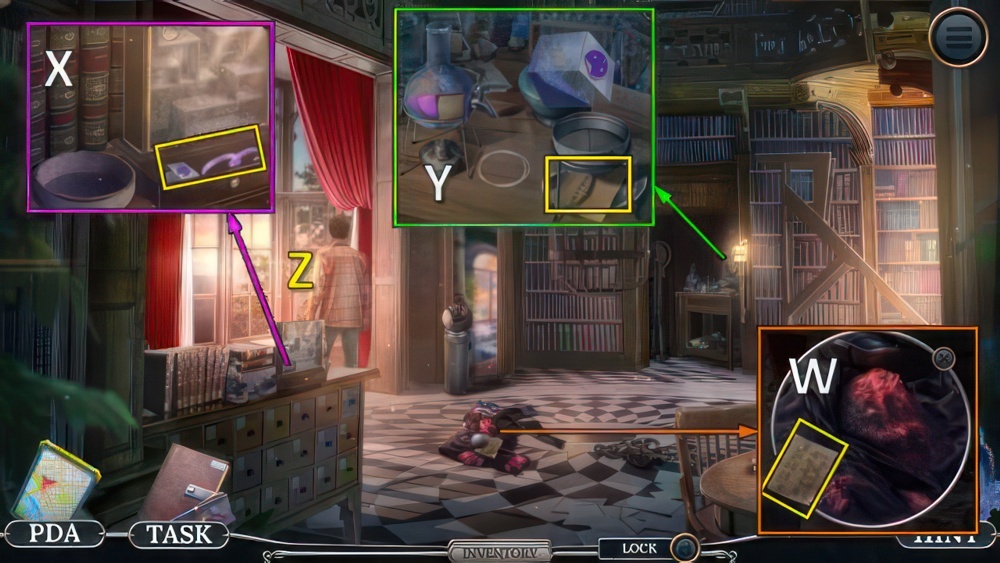
- Use HAMMER (X), take TAPE (Y).
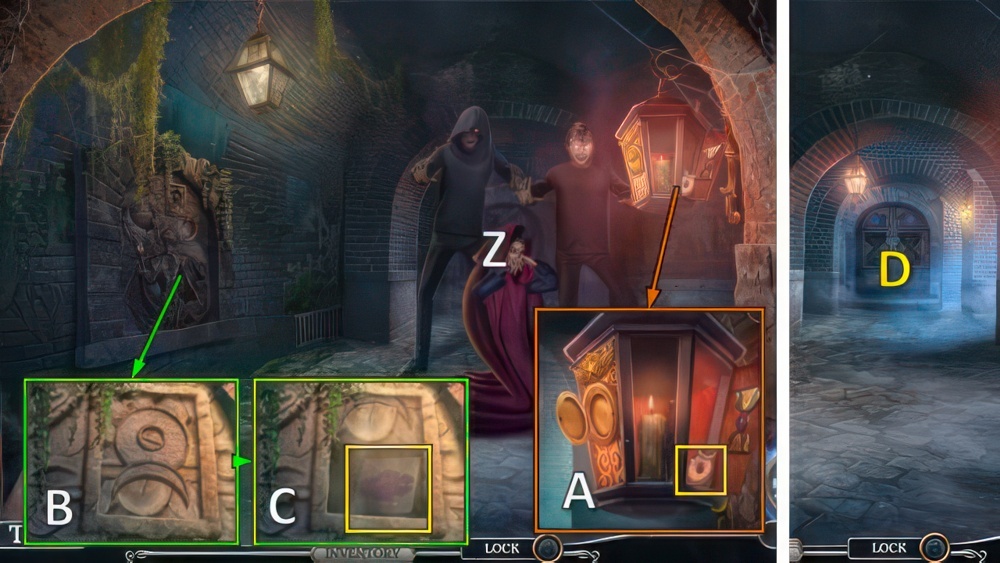
- Take DORIAN’S FINGERPRINT with TAPE (Z).
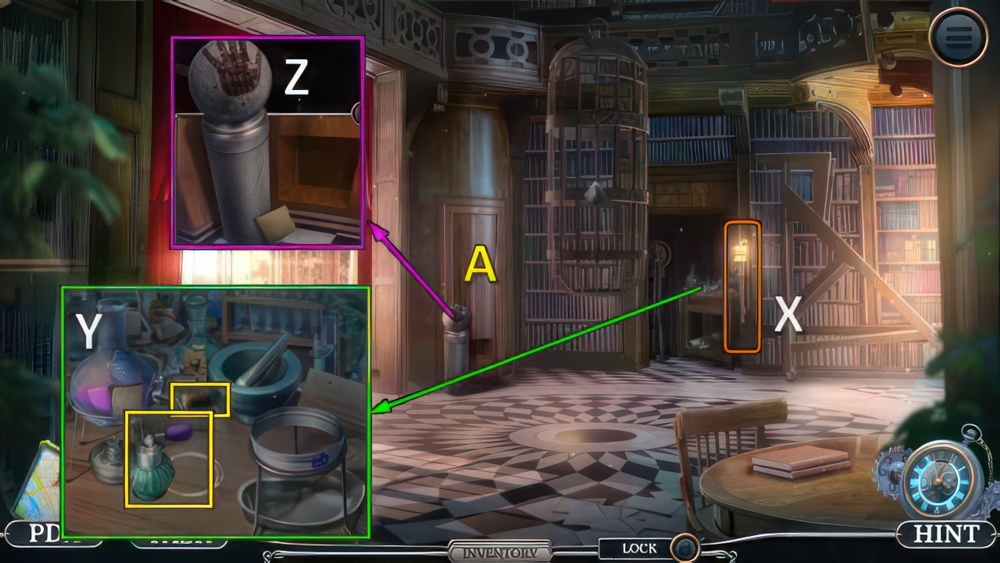
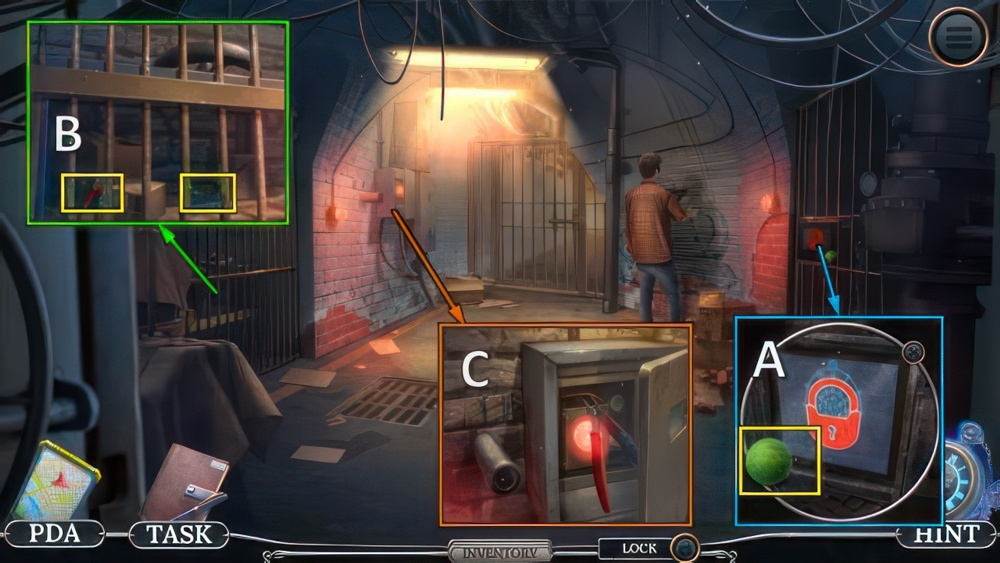
- Use DORIAN’S FINGERPRINT (A).
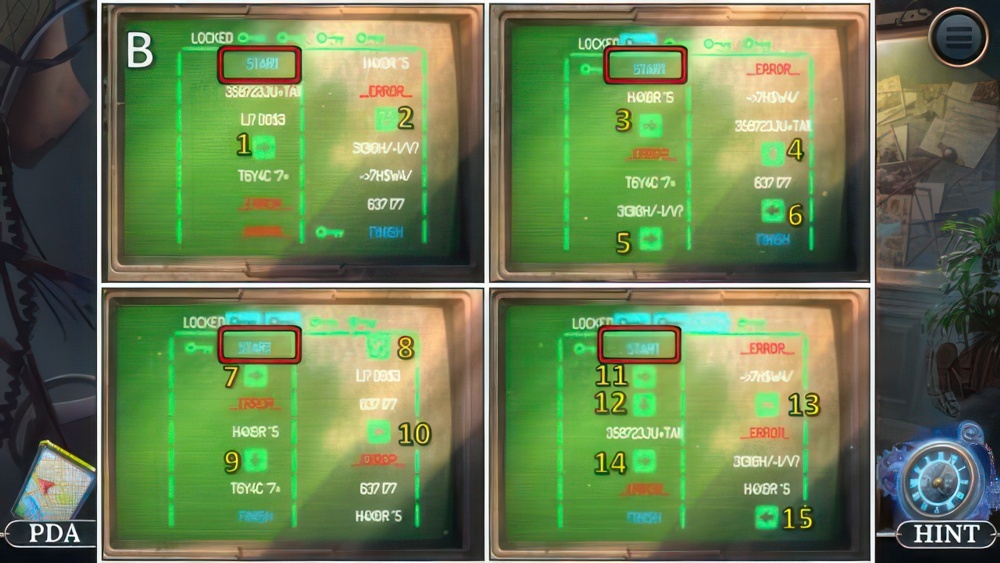
- Create a path across the code for the key to reach the endpoint.
- Select and drag green symbol boxes to move them.
- Arrows move the key in the indicated direction, and X blocks the key.
- Press Start to test your solution.
- Walkthrough (B): (1-2)-start, (3-6)-(4-6)-start, (7-9)-(8-10)-(8-9)-start, (11-13)-(12-13)-(14-15)-start.
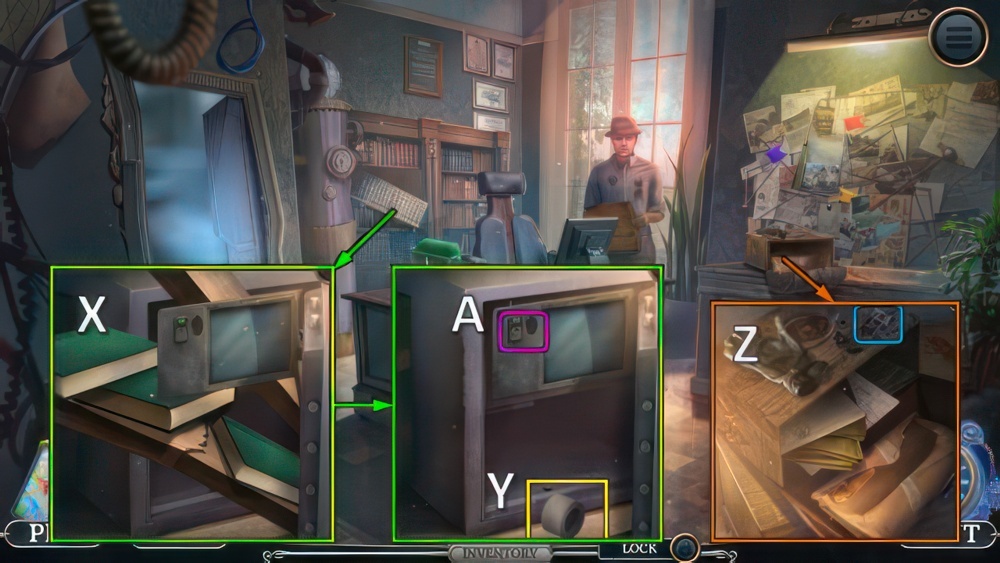
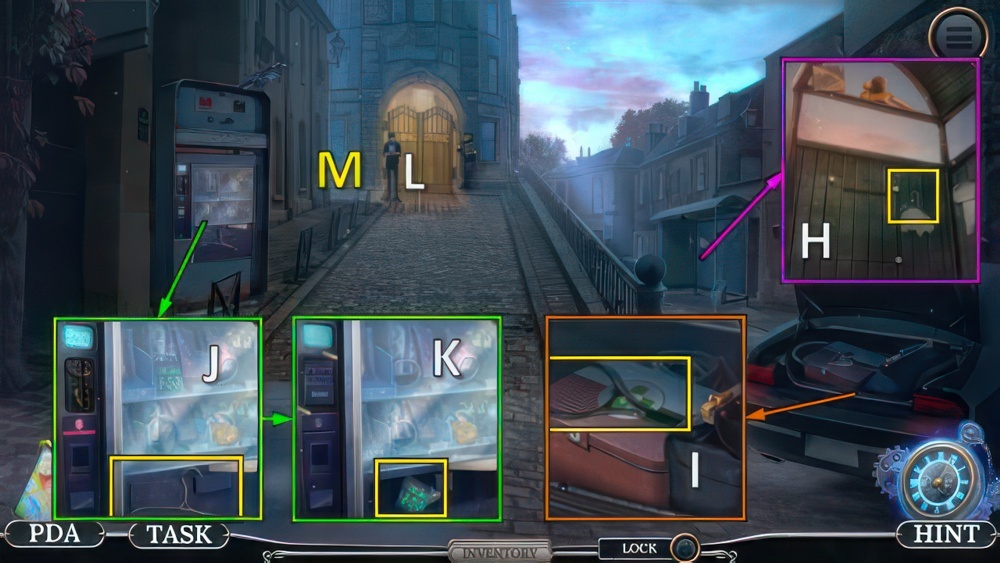
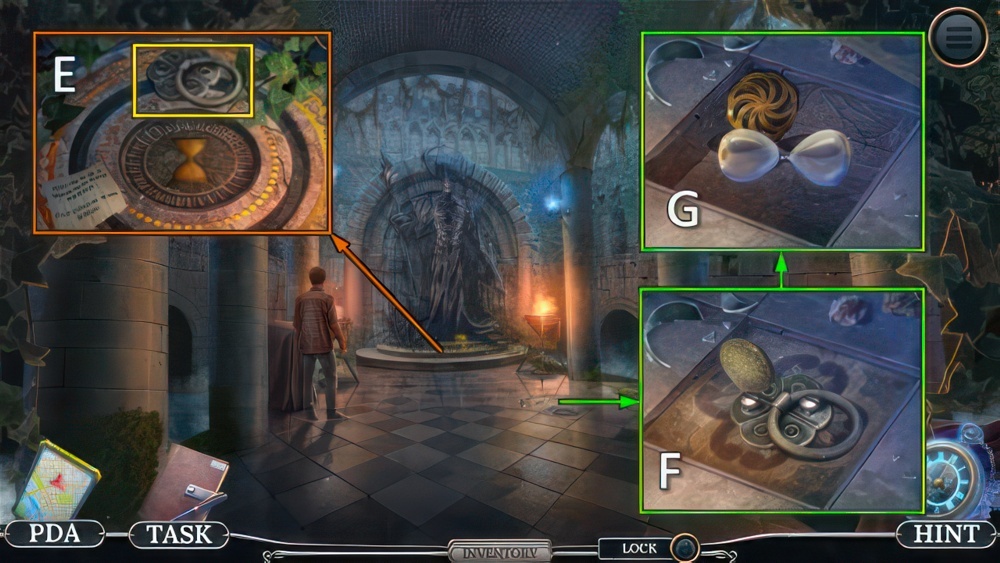
- Take PUZZLE PIECE 1/3 and REMOTE CONTROL (C).
- Go (D).
- Use REMOTE CONTROL (E).
- Take MACHINE OIL and FLASH DRIVE (F).
- Use MACHINE OIL (G).
- Take NUMBER PAD and POWER LEVER (H).
- Place FLASH DRIVE and POWER LEVER, take PUZZLE PIECE 2/3 and PICKLOCK (I).
- Use PICKLOCK (J).
- Move the books to restore the pattern on their spines.
- Select two books to swap them.
- Walkthrough (K): (1-6)-(2-3)-(3-6)-(4-7)-(5-6).
- Take PUZZLE PIECE 3/3.
- PUZZLE PIECE on PUZZLE.
- Open box, take COLLAR CHIP and LETTER FOR EWAN.
- Take VINEGAR (L).
- Take MYSTERY BOX (M).
- Use BAKING SODA and VINEGAR, take RUBBER BAND, BULB and COLORED STICKERS (N).
- BATTERY and BULB on BROKEN FLASHLIGHT, take UV FLASHLIGHT.
- Use UV FLASHLIGHT (O).
- Take TEAM PHOTO, FLEUR DE LIS and FLOPPY DISKS (P).
- Place FLEUR DE LIS, play puzzle (Q).
- Receive FRAME PIECE.
- Place TEAM PHOTO and FRAME PIECE, take FLORENCE FAMILY STAMP and FEATHERS (R).
- Place FLORENCE FAMILY STAMP (S).
- Play puzzle (T), receive FALSE EYE.
- Use FALSE EYE (U).
- Go (V).

- Take RUBBER GLOVE (W).
- Use RUBBER GLOVE, take STICK and WIRE (X).
- STICK and RUBBER BAND on FEATHERS, take FEATHER DUSTER.
- Use FEATHER DUSTER (Y).
- Take FUSES 1/3, GOLDEN CHIMERA and DISK INSTRUCTIONS (Z).
- DISK INSTRUCTIONS and COLORED STICKERS on FLOPPY DISKS.
- Walkthrough (A).
- Place and select FLOPPY DISKS (B).
- Take FUSES 2/3 and GLASSES (C).
- Place GLASSES, take GOLDEN GRIFFON and FUSES 3/3 (D).
- Walk down.
- Place GOLDEN GRIFFON and GOLDEN CHIMERA, take GEAR 1/4 and LEVER (E).
- Place FUSES and LEVER (F).
- Defeat your opponent.
- Find matching pairs of symbols to guide your attacks.
- Select two disks to see their symbols.
- Find pairs (random) (G).
- Take PAPER CLIP (H).
- Take DISTRACTION KIT 1/2, use PAPER CLIP (I).
- Play puzzle, receive TAPE.
- Take HANGER, place NUMBER PAD and TAPE (J).
- Take DISTRACTION KIT 2/2 and WATER BOTTLE (K).
- Use DISTRACTION KIT (L).
- Go (M).
- Take DOG BOWL (N).
- Use DOG BOWL and WATER BOTTLE, take UMBRELLA AMULET and BROKEN COLLAR (O).
- Place UMBRELLA AMULET, take ROPE WITH RING, STAR 1/4 and UMBRELLA (P).
- Walk down.
- Take MALLET and LATCH with UMBRELLA (Q).
- Use LATCH, take TAPE and CAR JACK (R).
- Go (S).
- TAPE and COLLAR CHIP on BROKEN COLLAR, take CAT COLLAR.
- Use CAT COLLAR (T).
- Play puzzle (U), receive MONEY.
- Walk down.
- Use MONEY, take AMBER PIECE and HEX WRENCH (V).
- Use HEX WRENCH, take CHISEL and DOUBLE CARABINER (W).
- Go (X).
- Use CHISEL and MALLET (Y), receive HANDKERCHIEF.
- Take WHEEL (Z).
- Place CAR JACK and WHEEL (A).
- DOUBLE CARABINER and ROPE WITH RING on HANGER, take GRAPPLING HOOK.
- Use GRAPPLING HOOK, go (B).
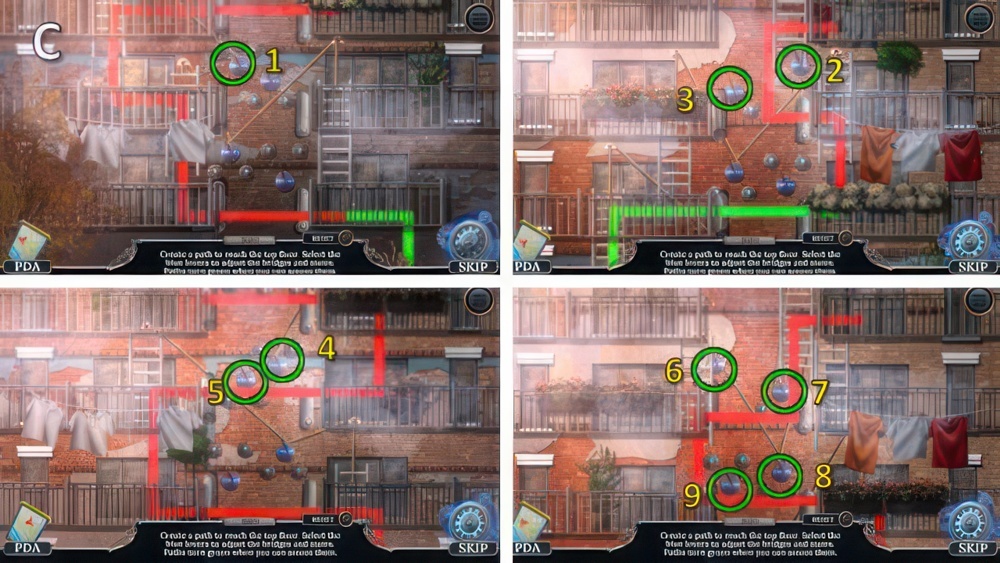
- Create a path to reach the top floor.
- Select the blue levers to adjust the bridges and stairs.
- Paths turn green when you can access them.
- Walkthrough (C).
- Connect the colored elements to fill the bars and defeat the villain.
- Select and connect at least three objects of the same color to remove them from the board.
- Defeat your opponent (D).
- Talk, receive ENCRYPTED LETTER.
- Take GLASS CLEANER (E).
- Take BLUE TRIANGLE (F).
- Use GLASS CLEANER and HANDKERCHIEF, take STAR 2/4, RAINBOW ACTIVATOR and PATTERN DRAWING (G).
- Take FLAP DISK, place RAINBOW ACTIVATOR (H).
- Play puzzle (I), receive WINDOW HANDLE.
- Place WINDOW HANDLE, take CHISEL and PENCIL (J).
- PATTERN DRAWING, CHISEL and FLAP DISK on AMBER PIECE, take AMBER FIGURINE.
- Place AMBER FIGURINE, take STAR 3/4 and UNUSUAL MONOCLE (K).
- PENCIL and UNUSUAL MONOCLE on ENCRYPTED LETTER, find symbols.
- Place ENCRYPTED LETTER: select 4-5-3-2-1 (L).
- Take VIDEOTAPE and STAR 4/4 (M).
- Place VIDEOTAPE.
- Take ESTATE PHOTO and SURGEON’S MALLET (N).
- Place STAR and ESTATE PHOTO (O).
- Play puzzle (P), receive ESTATE ADDRESS.
- Offer ESTATE ADDRESS (Q).
- Talk, receive FAMILY NAMEPLATE.
- Take CHISEL (R).
- Use CHISEL, take KEY HEAD, FLORENCE FAMILY NAMEPLATE and PASTE GLUE (S).
- Place FAMILY NAMEPLATE and FLORENCE FAMILY NAMEPLATE, take THIN PLATE and LAUGHING SKULL (T).

- THIN PLATE and PASTE GLUE on KEY HEAD, take MAIN KEY.
- Use MAIN KEY (U).
- Open the lock by giving the key the required shape.
- Press the key segments to change the shape, then press the button to check.
- Walkthrough: W-X×2-Y×3-Z×4-A.
- Go (B).
- Take ROTATING ELEMENT (C).
- Take BROKEN LADDER, place ROTATING ELEMENT (D).
- Take MATCHES and SCREWDRIVER (E).
- Use SCREWDRIVER, take STEP 1/3, SAD SKULL and FLEXIBLE MAGNET (F).
- Walk down.
- Place SAD SKULL and LAUGHING SKULL (G).
- Select the skulls in the right order so all of their eyes glow-at the same time.
- Walkthrough: 1-4-5 (G), 2-3-4 (H).
- Take STEP 2/3 and BLOWTORCH (I).
- Use BLOWTORCH, take ORELLA STATUE and STEP 3/3 (J).
- Go (K).
- Place ORELLA STATUE, take MIRROR and PAPERWEIGHT (L).
- Use FLEXIBLE MAGNET and MIRROR (M).
- Take EMPTY FLASK and NAIL PACKAGE (N).
- STEP, PAPERWEIGHT and NAIL PACKAGE on BROKEN LADDER, take LADDER.
- Touch ledge, place LADDER.
- Go (O).
- Take THIN KNITTING NEEDLE (P).
- Take OVAL LOCKET, use THIN KNITTING NEEDLE (Q).
- Select the symbol that matches the glowing symbol.
- Find pairs (R).
- Take LANTERN WITHOUT LENS and GOLDEN WING (S).
- Walk down.
- Place GOLDEN WING, take LENS (T).
- LENS and MATCHES on LANTERN WITHOUT LENS, take LAMP.
- Use LAMP (U).
- Play puzzle (V), receive OIL.
- Go (W).
- Use OIL (X).
- Use MATCHES and EMPTY FLASK, take ANTISEPTIC and CORK (Y).
- Use ANTISEPTIC (Z).
- Go (A).
- Take RED TRIANGLE, use SURGEON’S MALLET (B).
- Play puzzle, receive LEVER.
- Place LEVER (C).
- Take YELLOW TRIANGLE (D).
- Take WITCH STATUE, place BLUE TRIANGLE, RED TRIANGLE and YELLOW TRIANGLE (E).
- Take CORNER MECHANISM and RUBY KEY (F).
- Place CORNER MECHANISM, take PLIERS (G).
- Talk (H), receive GLOWING BOX.
- Use PLIERS, take SAPPHIRE KEY and CLOCK HAND (I).
- RUBY KEY and SAPPHIRE KEY on GLOWING BOX, take HALF-OPEN BOX.
- Place HALF-OPEN BOX (J).
- Play puzzle (K).
- Receive CAULDRON STATUE.
- Place WITCH STATUE and CAULDRON STATUE (L).
- Take CHAIN PART and CORRECT TIME CLUE (M).
- Go (O).
- Place CLOCK HAND and CORRECT TIME CLUE, set the time (P).
- Note: clock is in reverse.
- Take DELICATE HAIRPIN and WEIGHT (Q).
- Place CHAIN PART and WEIGHT (R).
- Take SALT CRYSTALS and SIEVE (S).
- Walk down.
- Place SALT CRYSTALS, take ACID (T).
- Use ACID (U).
- Defeat minion (V).
- Take NOTE and METAL BALL (W).
- Use METAL BALL, take GLOWING POWDER and SATIN RIBBON (X).
- Place SIEVE, NOTE and GLOWING POWDER, take COORDINATES (Y).
- Go (Z).
- Take STICKY BALL (A).
- Use STICKY BALL and DELICATE HAIRPIN, take PLIERS and LAB CHEST (B).
- Use PLIERS (C).
- Place COORDINATES (D).
- Press the buttons in the right numerical order.
- Press the buttons on the same radius or curve.
- Walkthrough (E).
- Go (F).
- Talk, receive RASP(G).
- Take SPRING (H).
- Replace SPRING, place WIRE.
- Take GLIMBORG’S TENTACLE, BUNKER MAP and FLUFFY PAINTBRUSH (I).
- Use FLUFFY PAINTBRUSH, take OIL DISK, SIGN OF TIME and GEAR 2/4 (J).
- SIGN OF TIME and GLIMBORG’S TENTACLE on MYSTERY BOX, take SHAPED LEVER and GEAR 3/4.
- Arrange the toggle switches according to the instructions under the bulbs.
- Place SHAPED LEVER, walkthrough (K).
- Place BUNKER MAP, go (L).
- Take WRENCH (M).
- Use WRENCH (N), take GEAR 4/4 and FAUCET (O).
- Walk down.
- Use GEAR and OIL DISK (P).
- Take KEEPER STATUE and METAL FOREARM GUARD (Q).
- Place KEEPER STATUE, take TUBE (R).
- Go (S).
- Place FAUCET and TUBE (T).
- Play puzzle (U), receive ANTIDOTE.
- Walk down.
- Offer ANTIDOTE (V).

- Receive METAL FOREARM GUARD.
- Take MYSTERY AMULET (W).
- Place MYSTERY AMULET (X).
- Take ANCIENT SCROLL and TONGS (Y).
- Use TONGS, take CHARCOAL and SHARP NAIL (Z).
- Go (A).
- Use SHARP NAIL and METAL FOREARM GUARD, play puzzle (B).
- Receive COFFEE MILL HANDLE.
- Place COFFEE MILL HANDLE, take GOLD (C).
- CHARCOAL and GOLD on ANCIENT SCROLL, take MAGIC DEACTIVATOR.
- Use MAGIC DEACTIVATOR (D).
- Create an uninterrupted chain connecting every sphere and symbol.
- Use the hint to guide your path.
- Select the first sphere and move to each adjacent sphere to connect them.
- You have to go through each sphere.
- If you make a wrong connection, you have to start from the beginning.
- Walkthrough (E).
- Use RASP, take WHEEL (F).
- Place WHEEL, go (G).
- Take REGULATOR (H).
- Remove vent (I).
- Place SATIN RIBBON and REGULATOR, take CRYSTAL OF POWER 1/3, SOLVENT and STABILIZER (J).
- Take EMPTY PORTAL, use SOLVENT (K).
- Play puzzle, receive BURNER.
- STABILIZER and BURNER on LAB CHEST, take CRYSTAL OF POWER 2/3 and DRY CHLOROFORM.
- Use DRY CHLOROFORM (L).
- Take ANCIENT KEY (M).
- Use ANCIENT KEY (N).
- Take ORDER INSTRUCTIONS and CRYSTAL OF POWER 3/3 (O).
- Place ORDER INSTRUCTIONS, take COIN and COPPER DUST (P).
- Use CRYSTAL OF POWER and COPPER DUST (Q).
- Play puzzle (R), receive STAFF OF TIME.
- Take FIRECRACKER (S).
- Place FIRECRACKER and CORK, take GLASS 1/3 and UNUSUAL BRICK (T).
- Take STRANGE GLOVE, place UNUSUAL BRICK (U).
- Go (V).
- Take HOOK (W).
- Use HOOK, take GLASS 2/3, RUNE OF POWER and LIGHTER (X).
- Use OVAL LOCKET and LIGHTER (Y), receive RUNE OF PROTECTION and MAGNET.
- RUNE OF POWER and RUNE OF PROTECTION on STRANGE GLOVE, take SAFETY GLOVE.
- Use SAFETY GLOVE (Z).
- Receive GLASS 3/3 and CARVED BOX.
- Place GLASS, take PLATINUM SYMBOL (A).
- Place PLATINUM SYMBOL (B).
- Take PLATINUM PLATE (C).
- PLATINUM PLATE and MAGNET on CARVED BOX for puzzle.
- Take STAR KEY.
- Use STAR KEY, go (D).
- Take RING (E).
- Use RING and COIN (F).
- Take HOURGLASS and SYMBOL OF ETERNITY (G).
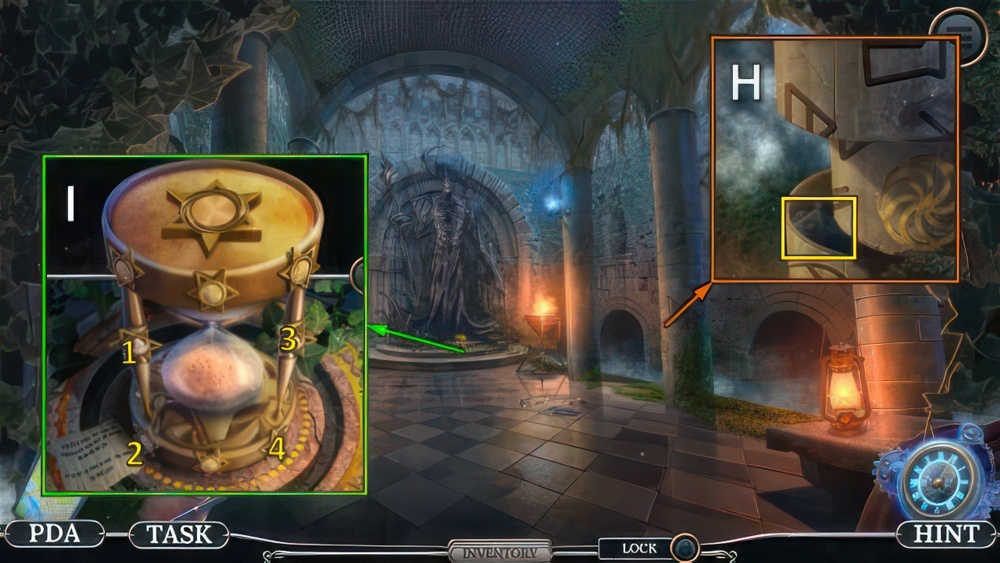
- Place SYMBOL OF ETERNITY, take SANDS OF TIME and SUCTION HOOK (H).
- SANDS OF TIME and HOURGLASS on EMPTY PORTAL, take TIME PORTAL.
- Place TIME PORTAL (I).
- Turn on all the stars on the hourglass.
- Note that when you enable one star, the state of the adjacent stars will change.
- Select 1-2-3-4.

- Take DIAMOND (J).
- Use DIAMOND and SUCTION HOOK (K).
- Take BLACK POWDER and GOLDEN HANDS (L).
- Place GOLDEN HANDS, take MYSTERIOUS WRITINGS (M).
- Place BLACK POWDER and MYSTERIOUS WRITINGS (N).
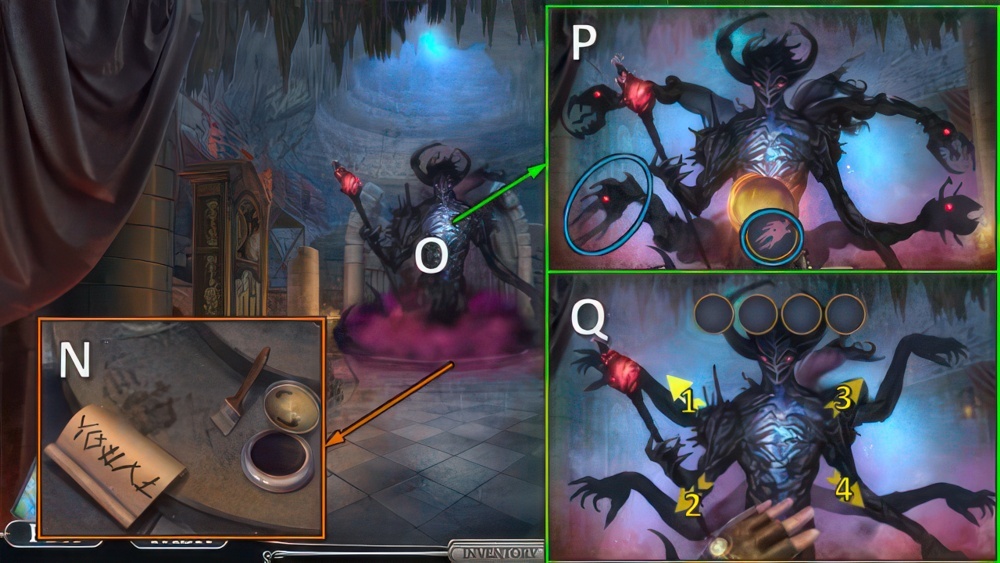
- Use STAFF OF TIME (O).
- Using the staff, neutralize Glimborg by correctly matching the silhouettes that appear on screen.
- Wait for and select matching silhouettes (P).
- Follow Glimborg’s movements to deflect his blow and hit him.
- Walkthrough (Q): 1-3-2-4, 1-4-3-2-4, 3-4-4-1-2-3-1.
- Walkthrough Bonus Chapter, at the link below.


