
Detectives United 8: Vengeance from the Past (Bonus Chapter) – After an intense investigation at the Brown mansion, Anna Gray was hoping for a break. But things turn out differently: her colleagues don’t wake up, and the familiar laws of reality begin to crumble. What if the cause lies in an artifact that went unnoticed, or what if they all fell into time itself? Anna must act without her team and search for answers alongside her father, Richard Gray, an expert on magical anomalies. Immerse yourself in a story where every step is an attempt to break through the illusions and lift the curse. A dangerous journey awaits you, where magic, artifacts, and clocks that do not obey the usual passage of time intersect. Search for clues, examine strange mechanisms and diaries, track paranormal phenomena, and study the nature of darkness that has reared its head once again. Your mind is your main weapon. Only you can uncover who or what is behind this new round of nightmares and stop the approaching darkness in time.
Bonus Chapter Walkthrough
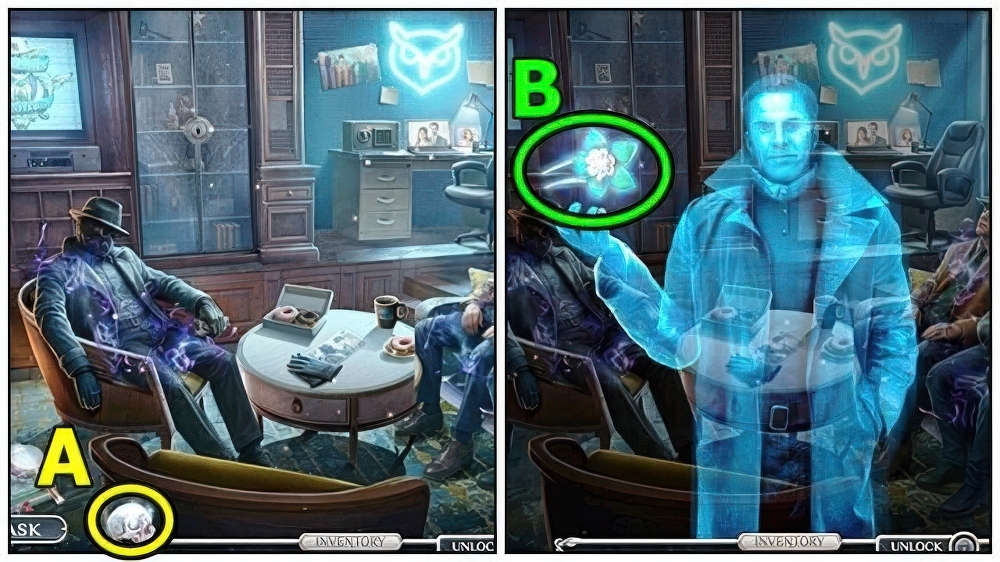
- Talk (A).
- Take ANNA’S PIN (B).
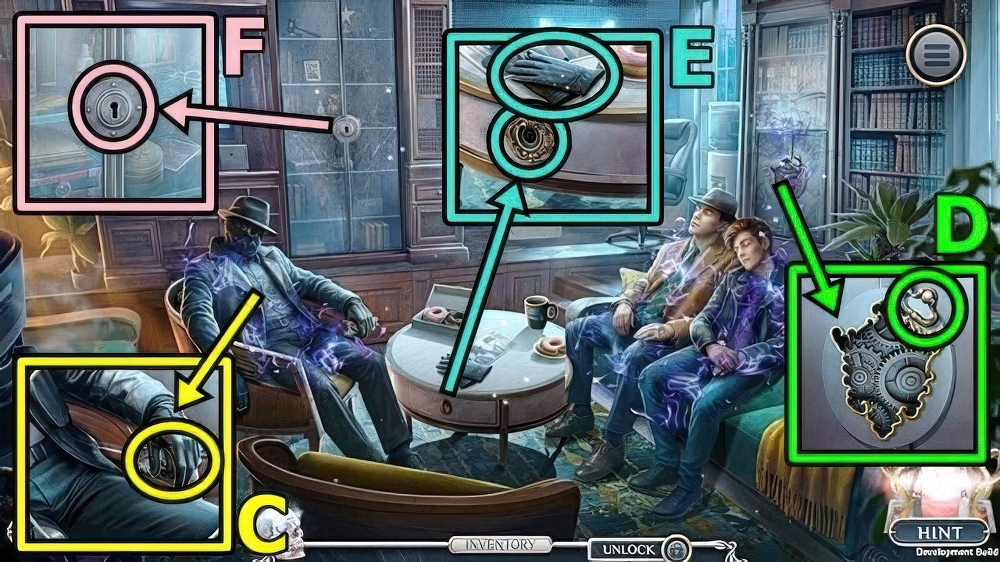
- Take BROKEN SYMBOL (C).
- Take TABLE HANDLE (D).
- Take GLOVES (E).
- Add TABLE HANDLE, take SPRAY LUBE and POWDER PUFF.
- Use ANNA’S PIN (F), take GLUE and POWDER BOX.
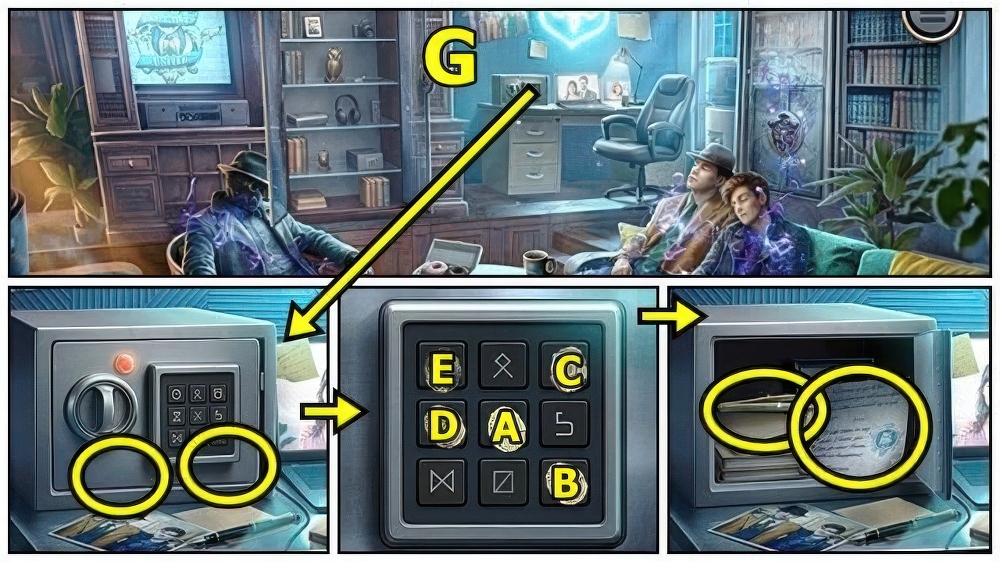
- Add POWDER BOX (G) and POWDER PUFF, press A-B-C-D-E, read, take TWEEZERS and GOLDEN KEY.
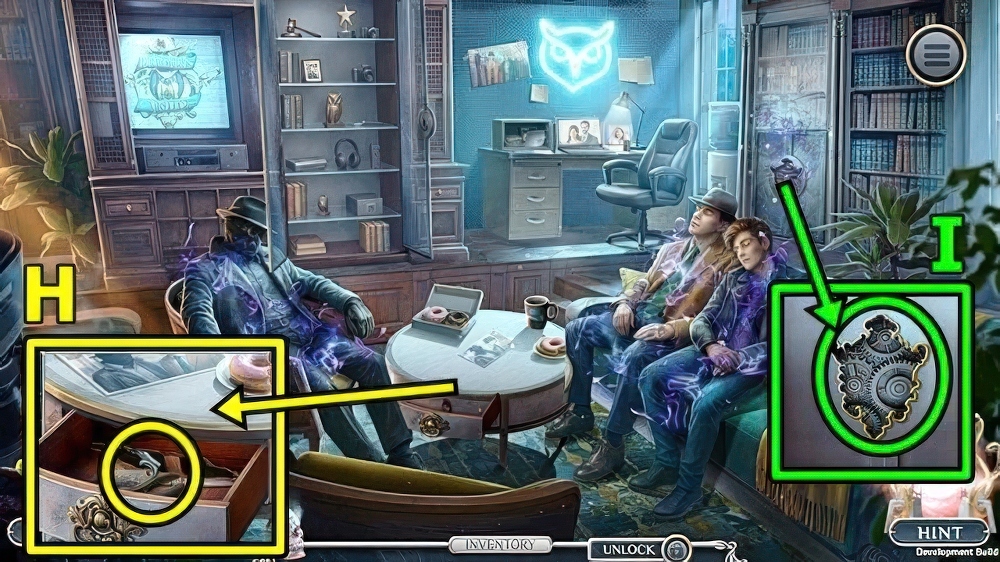
- Use TWEEZERS (H), take SYMBOL BASE and WIDE BELT.
- SYMBOL BASE and GLUE on BROKEN SYMBOL, take DETECTIVES SYMBOL.
- Add DETECTIVES SYMBOL (I).
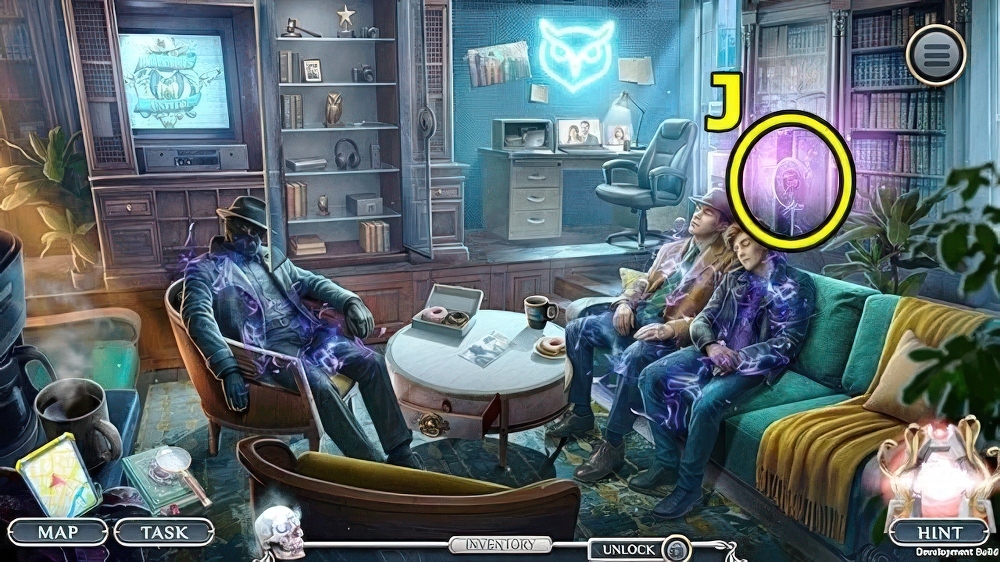
- Play puzzle (J).
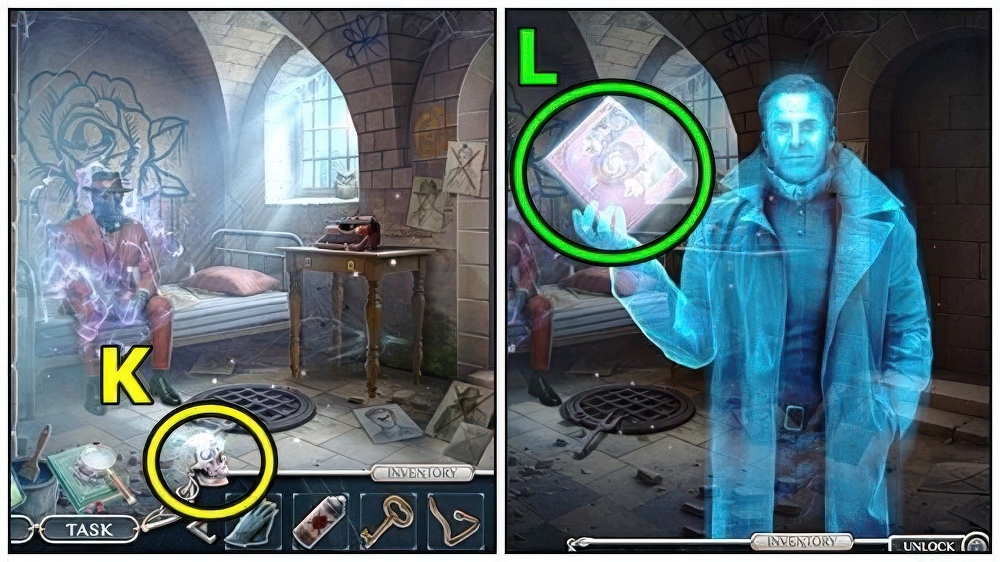
- Talk (K).
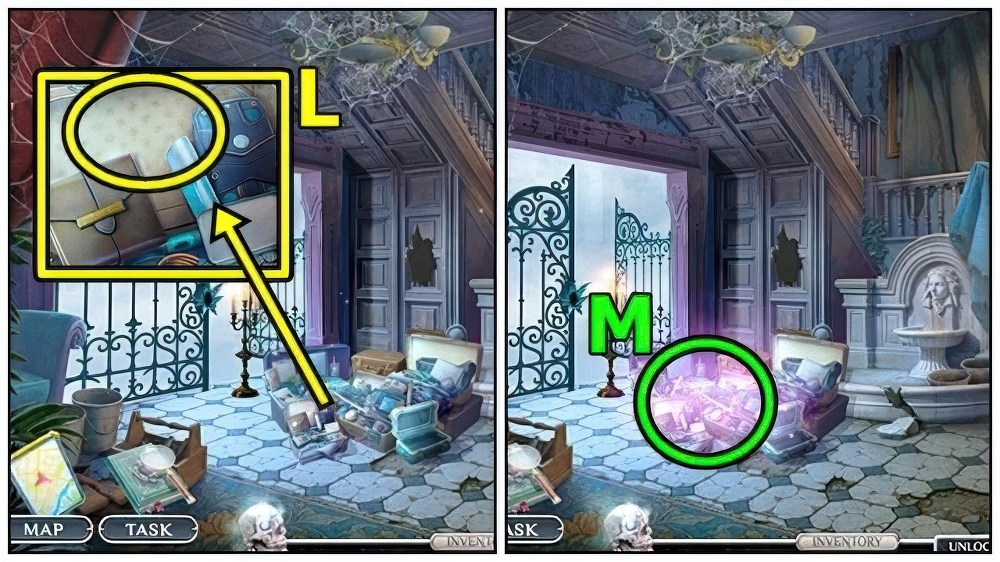
- Take MORTIMER’S DIARY (L).
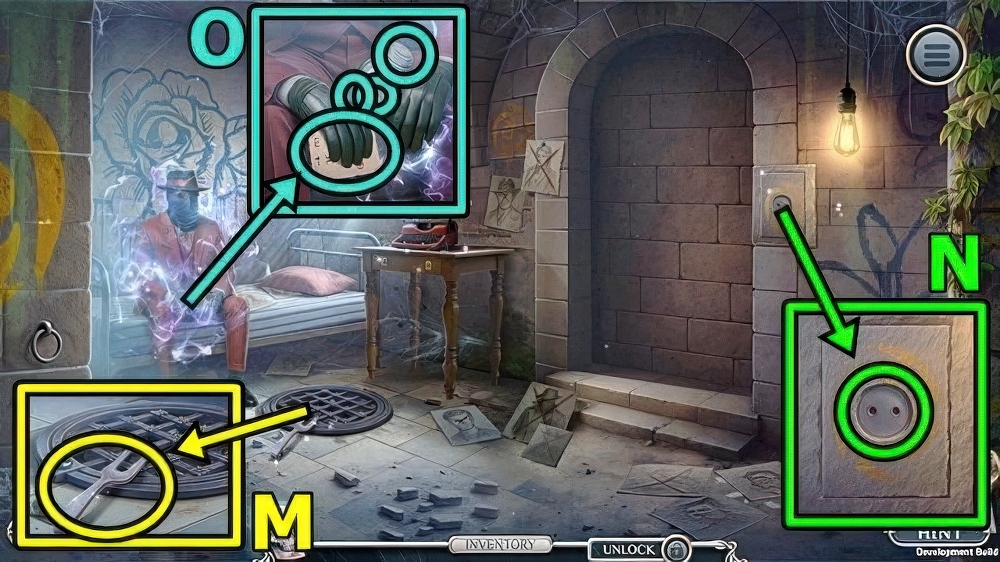
- Take TWO-TOOTHED FORK (M).
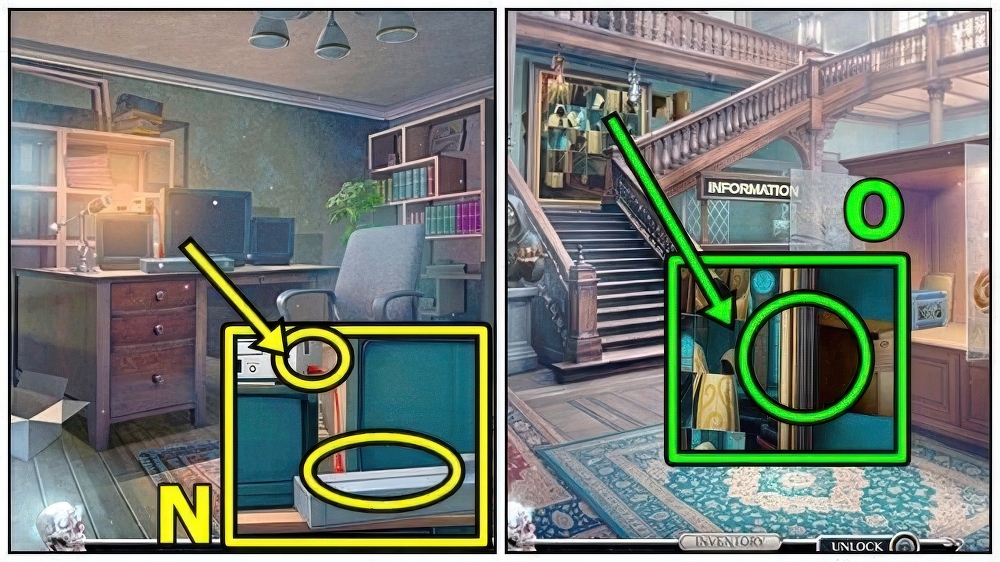
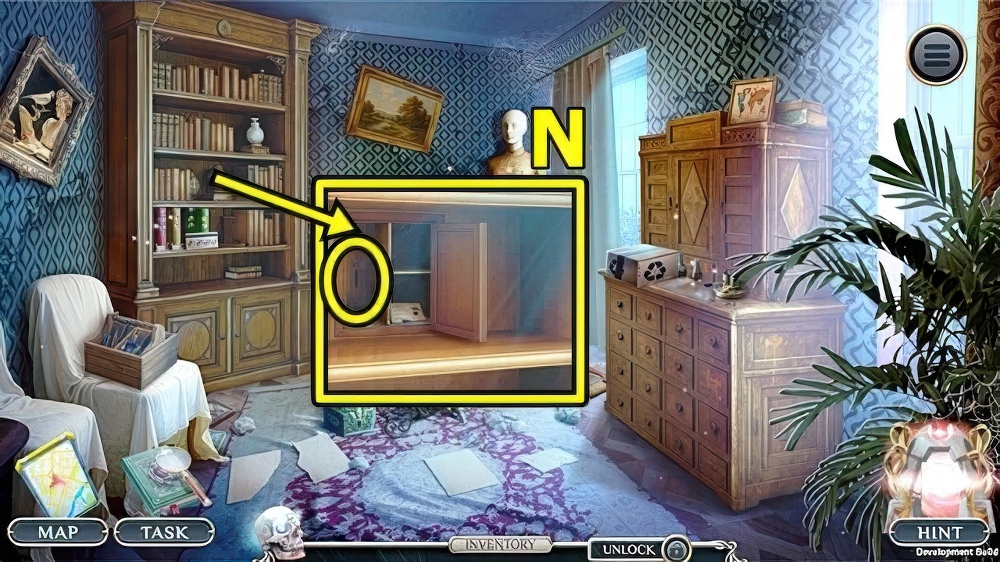
- Use TWO-TOOTHED FORK (N), take VINTAGE CORKSCREW and SILVER KEY.
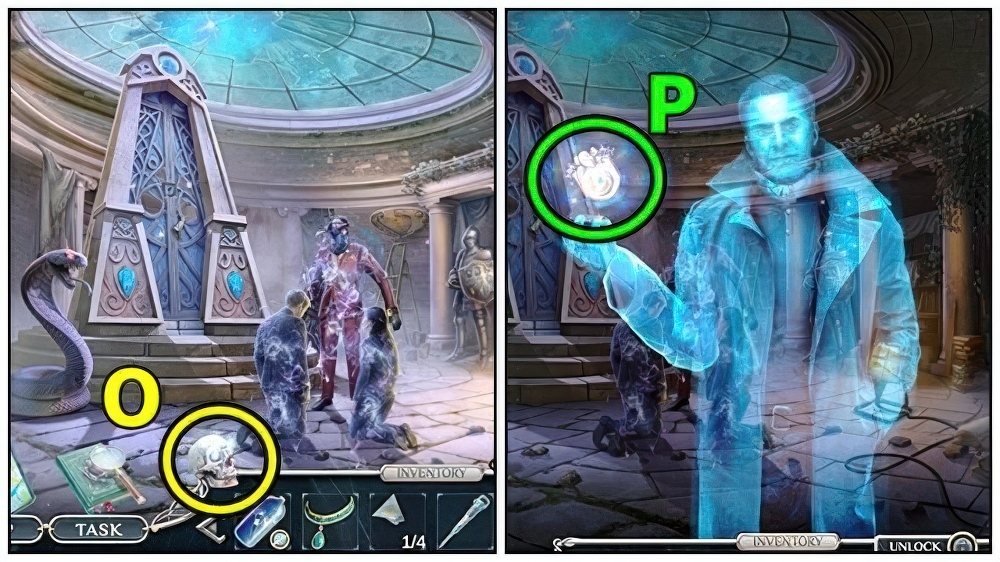
- Take CIPHERED MESSAGE (O).
- Use VINTAGE CORKSCREW, take MORTIMER’S SYMBOL and TAPE.
- Enter Sewer.
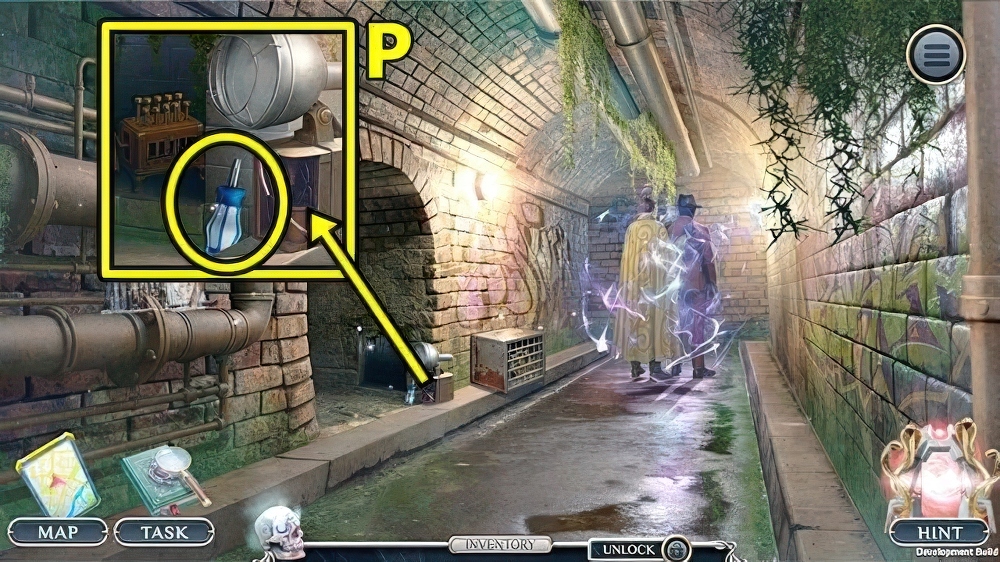
- Take STAR SCREWDRIVER (P).
- Move down.
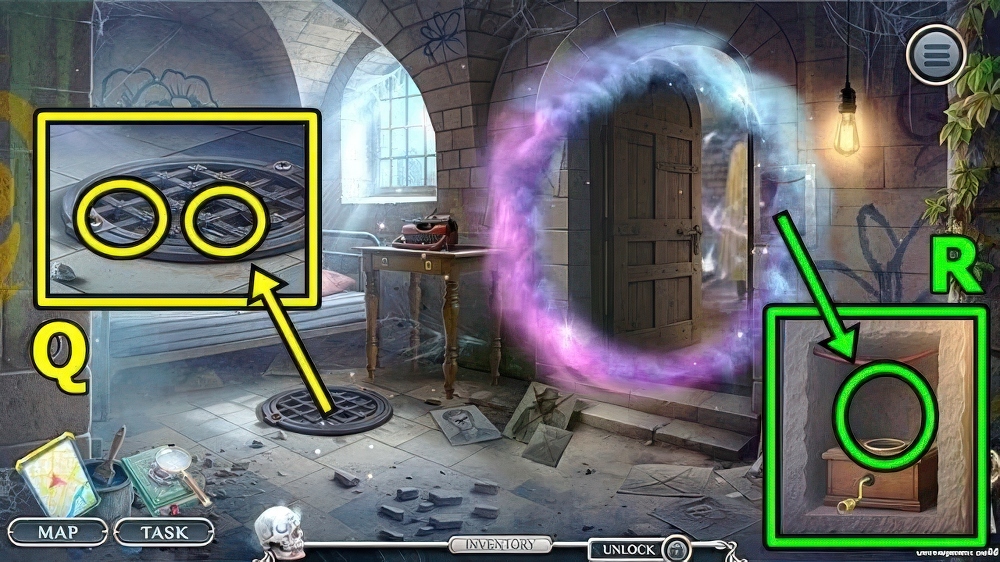
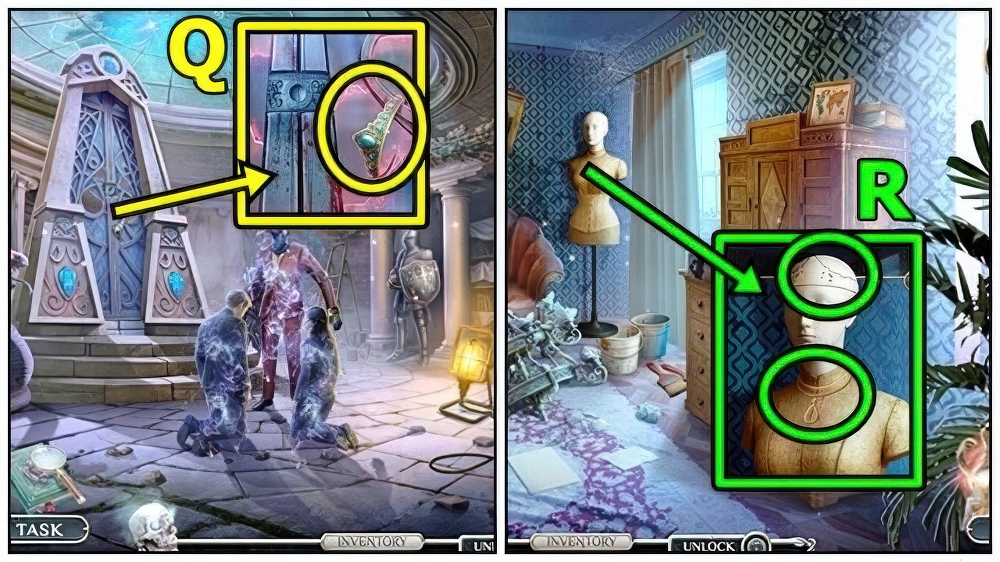
- Use SPRAY LUBE (Q) and STAR SCREWDRIVER, find items, take LEADER FIGURINE.
- Add LEADER FIGURINE (R), take ACID POWDER and WEIGHTS 1/4.
- Enter Sewer.
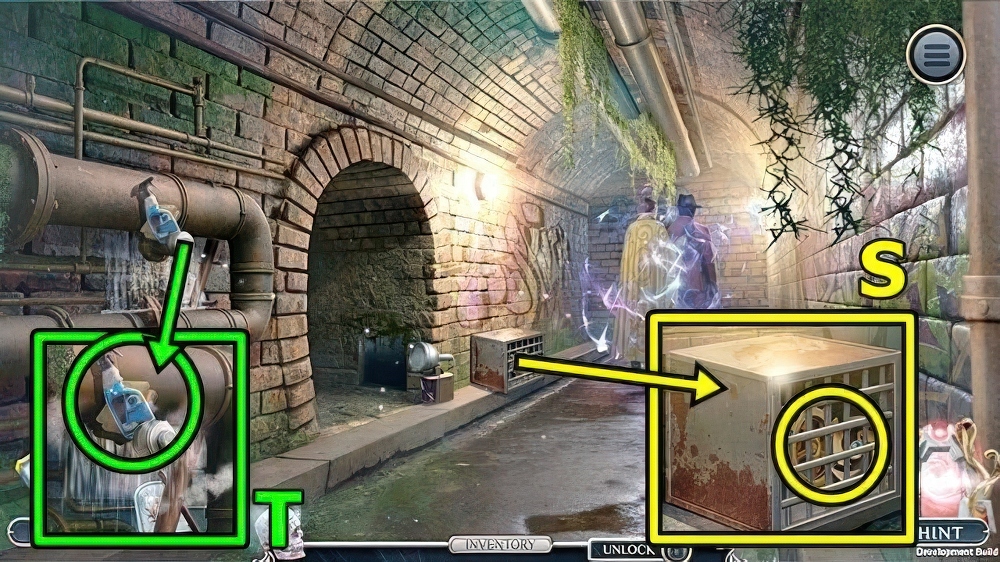
- Use ACID POWDER (S), then GLOVES, take BIG COG and CATACLYSM SYMBOL.
- Take CLEANING SUBSTANCE (T).
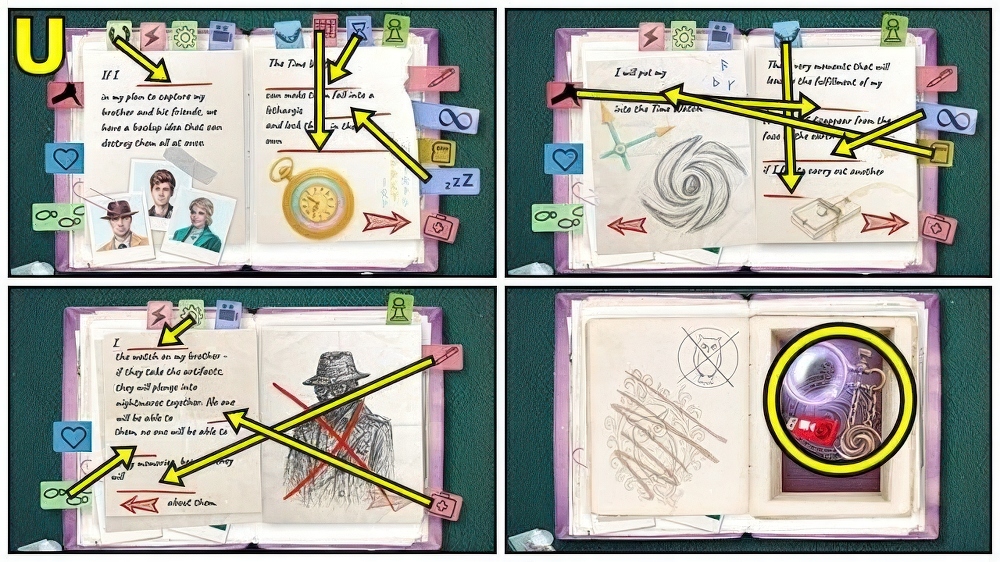
- CLEANING SUBSTANCE on MORTIMER’S DIARY, add CATACLYSM SYMBOL and MORTIMER’S SYMBOL.
- Solution: (U).
- Take THUMB DRIVE and CATACLYSM LENS.
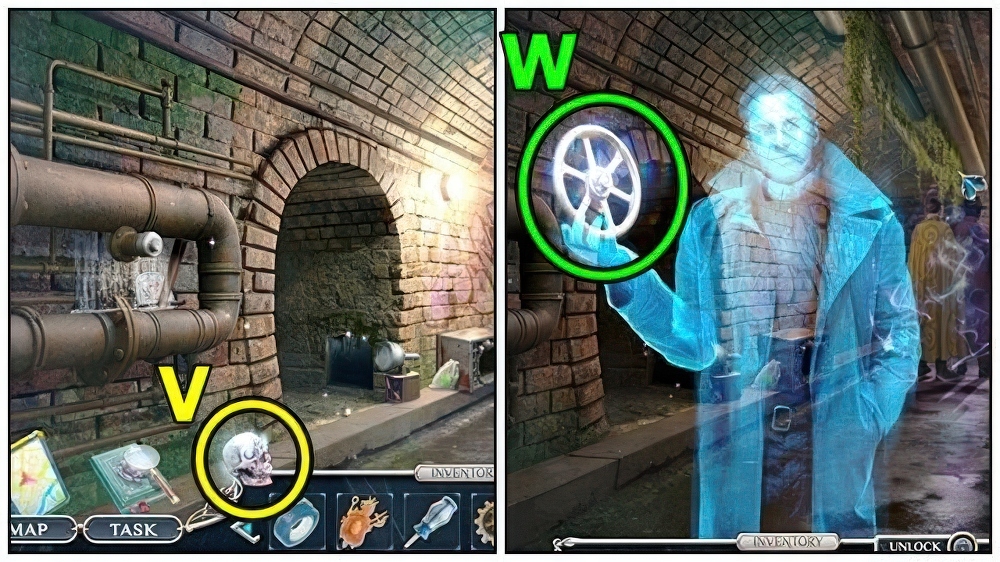
- Talk (V).
- Take VALVE (W).
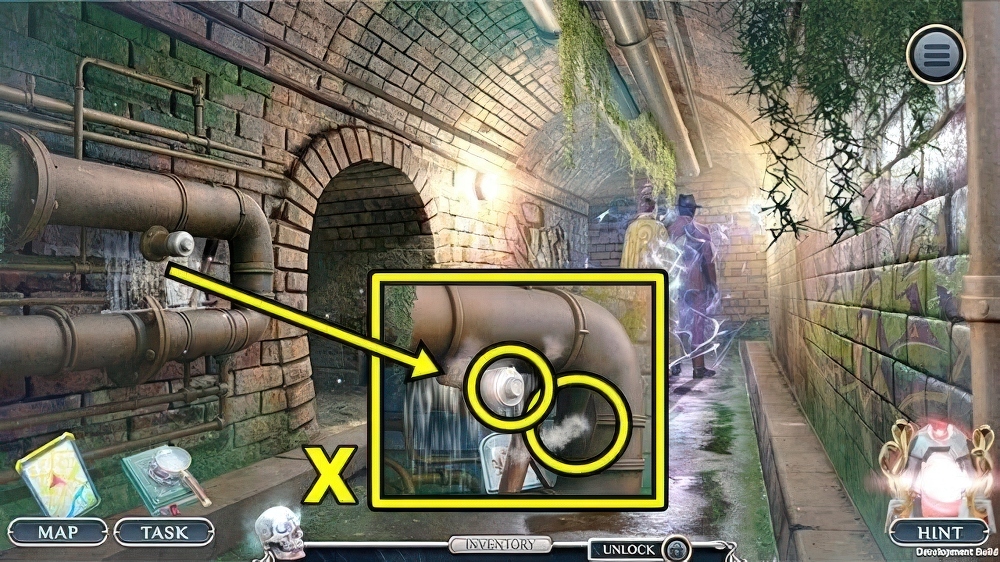
- Use VALVE (X) and WIDE BELT, take PACKAGE and TYPEWRITER PART.
- Move down.
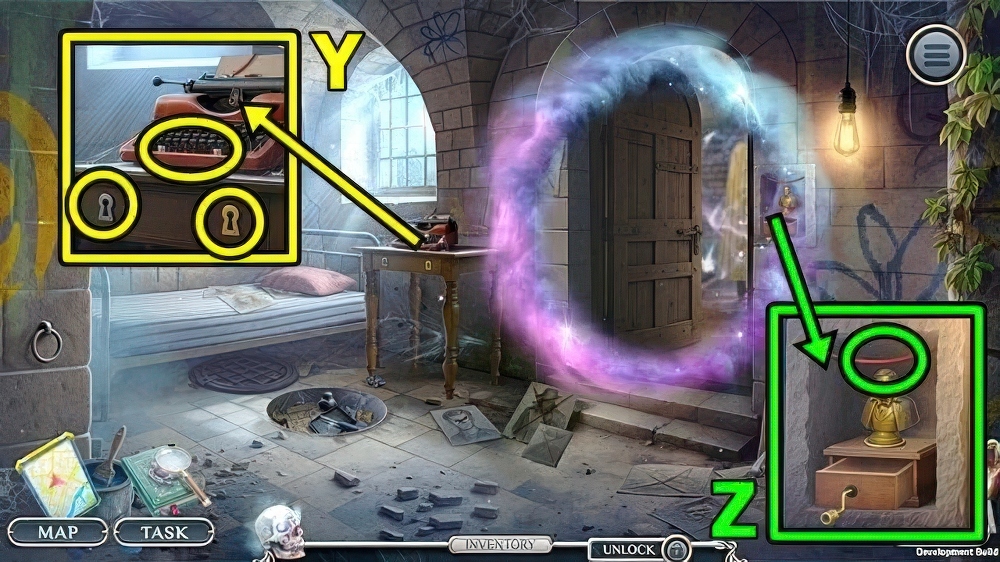
- Use SILVER KEY (Y) and GOLDEN KEY, receive WEIGHTS 2/4 and MT SEAL.
- Add TYPEWRITER PART, take WEIGHTS 3/4 and SMALL SNIPS.
- Use SMALL SNIPS (Z), take RED WIRE.
- Enter Sewer.
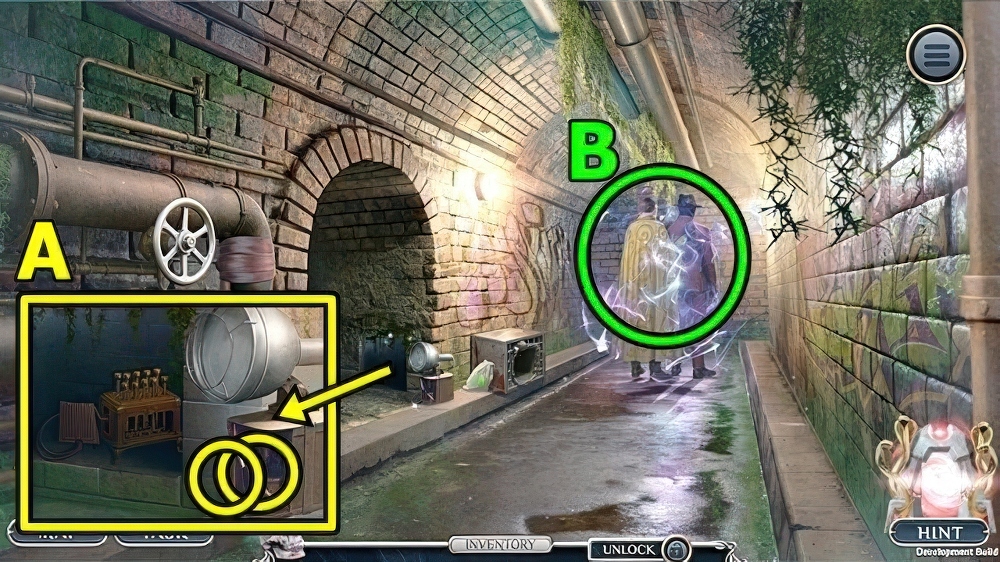
- Use TAPE (A) and RED WIRE, take PUNCHCARD DEVICE and HEATING ELEMENT.
- CATACLYSM LENS and HEATING ELEMENT on CIPHERED MESSAGE, take ESCAPE PLAN.
- Use ESCAPE PLAN (B).
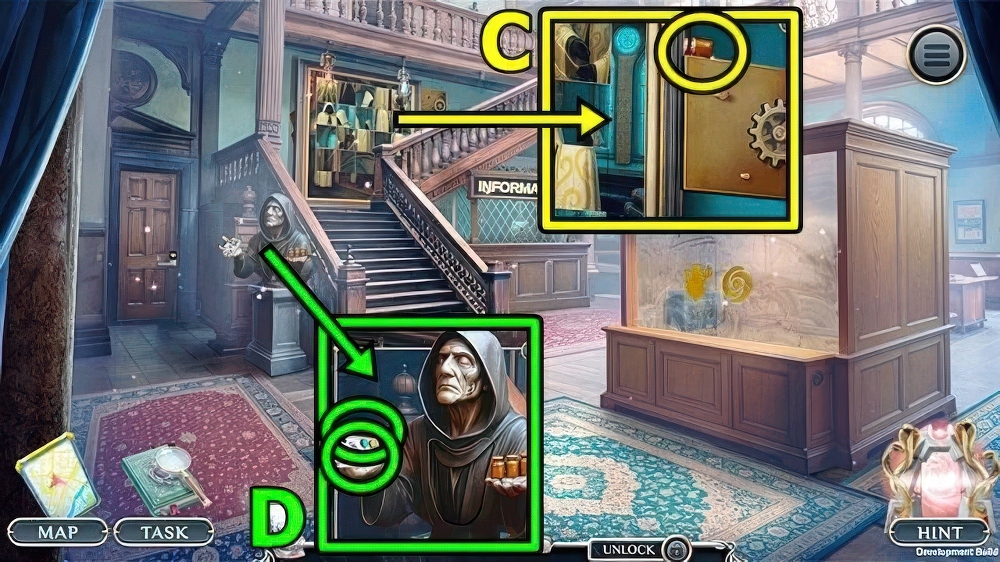
- Take WEIGHTS 4/4 (C).
- Take BROKEN REMOTE (D), add WEIGHTS, take ORDER SEAL and SPONGE.
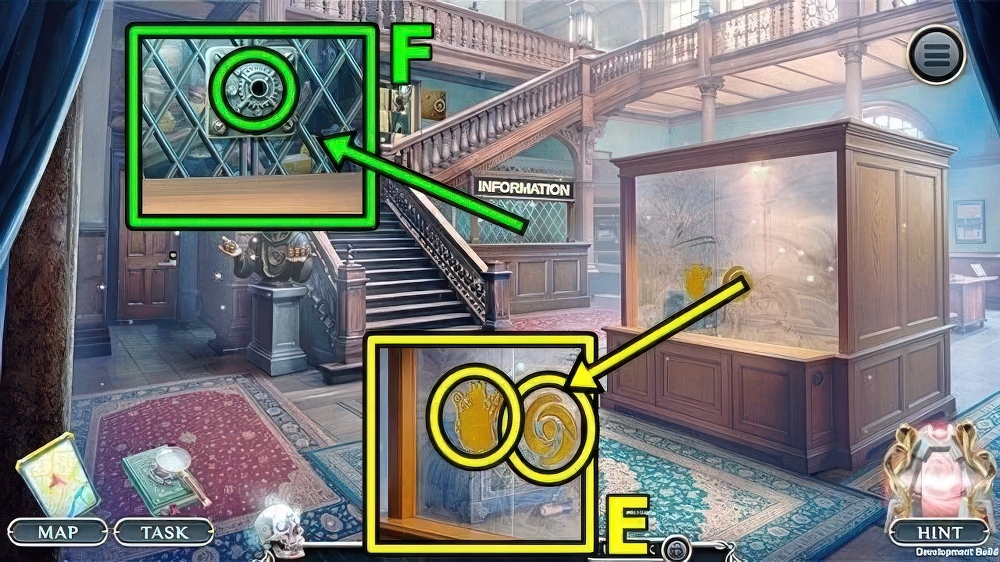
- Add MT SEAL (E) and ORDER SEAL, take ROTATING MECHANISM and BATTERY 1/3.
- Add ROTATING MECHANISM (F).
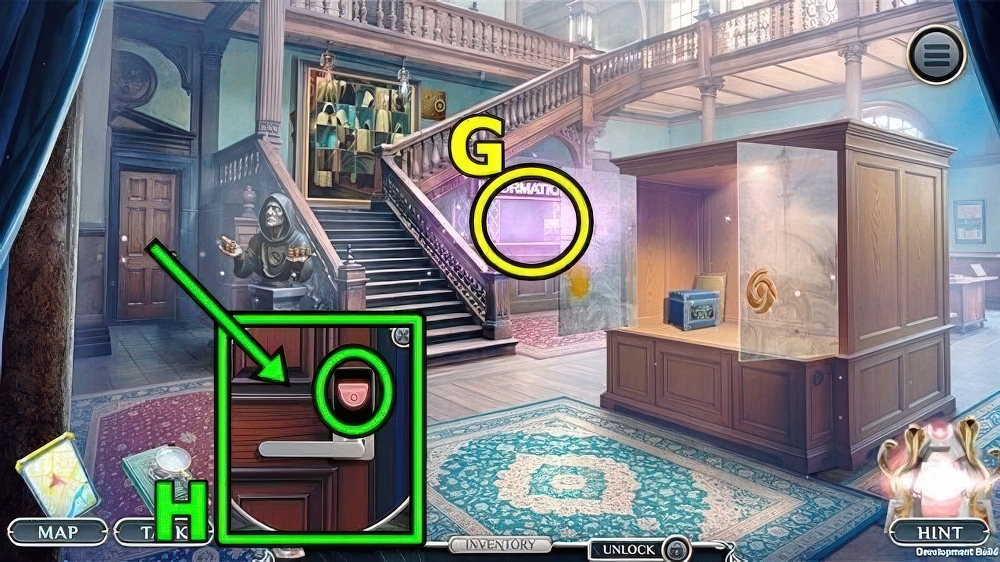
- Play puzzle (G), take KEY CARD.
- Use KEY CARD (H).
- Enter Security Room.
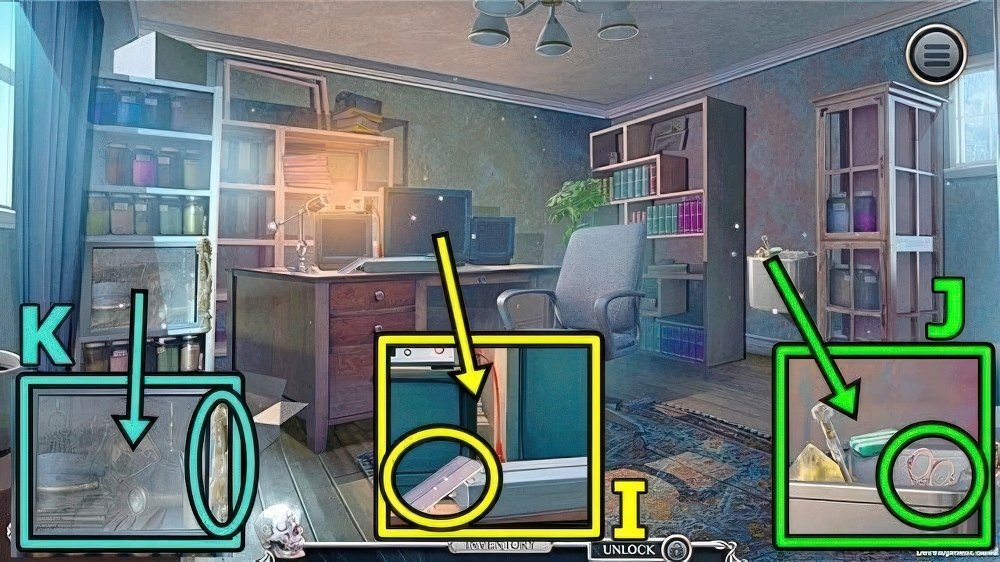
- Take REMOTE COVER (I).
- Take NAIL SCISSORS (J).
- NAIL SCISSORS on PACKAGE, take SMALL COG and LIGHTER.
- Use LIGHTER (K), find items, take WATCH MECHANISM and SAFE BUTTONS.
- Move down.
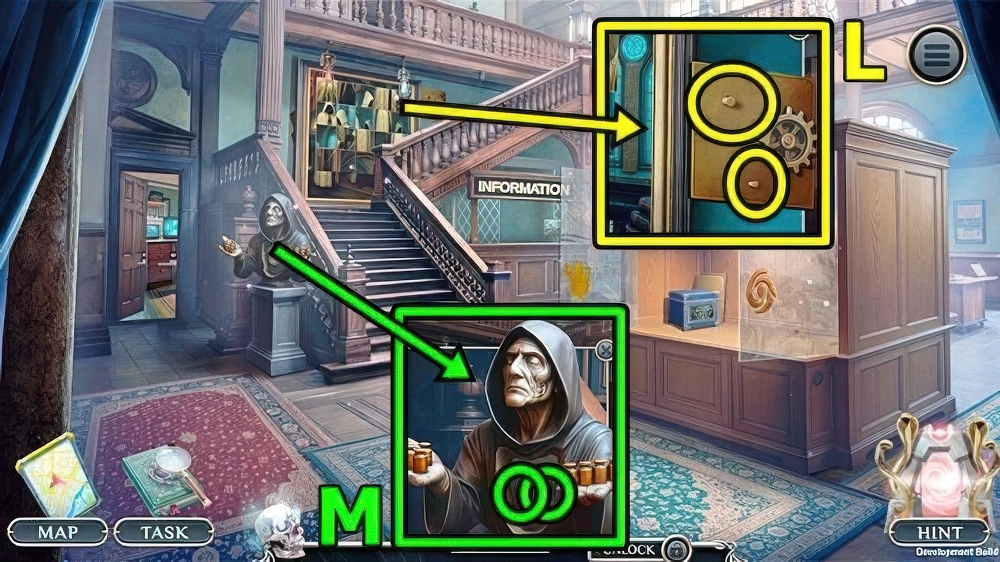
- Add BIG COG (L) and SMALL COG, take BATTERY 2/3 and WATCH HANDS.
- Add WATCH MECHANISM (M) and WATCH HANDS, take BATTERY 3/3 and EMPTY CARD.
- Enter Security Room.
- Remove batteries from BROKEN REMOTE, add BATTERY and REMOTE COVER, take VIDEO MONITORING PANEL.
- Use VIDEO MONITORING PANEL (N) and THUMB DRIVE, find items, take PICTURE PRINTING.
- Move down.
- Add PICTURE PRINTING (O).
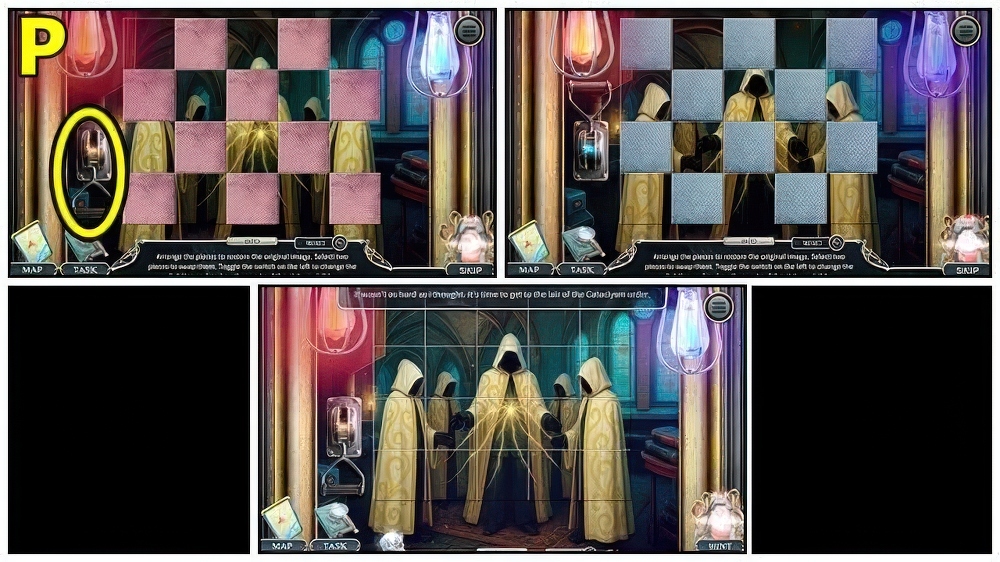
- Solution: (P).
- Enter Order Secret Room.
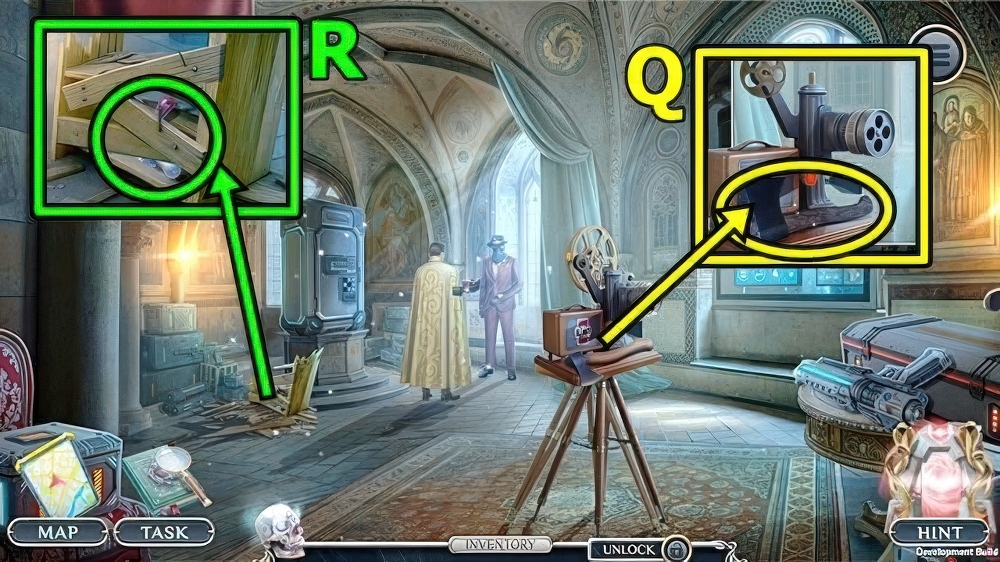
- Take SMALL AXE (Q).
- Use SMALL AXE (R), take DRINKING WATER TAP and DEVICE SWITCH.
- Return to Security Room.
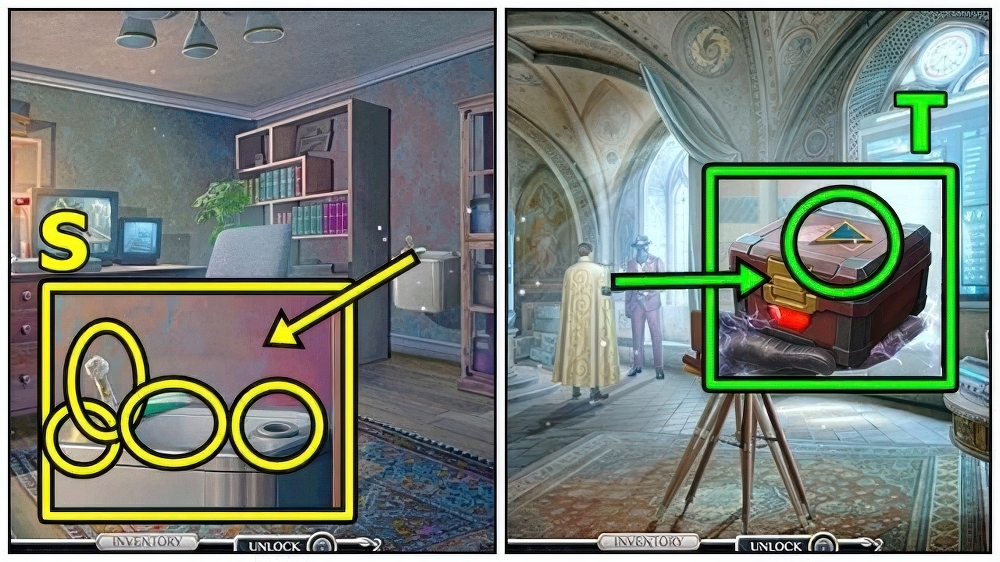
- Add SPONGE (S) and DRINKING WATER TAP, take DEVICE NEEDLE and CODE TABLE.
- Return to Order Secret Room.
- Take PUZZLE PART 1/2 (T).
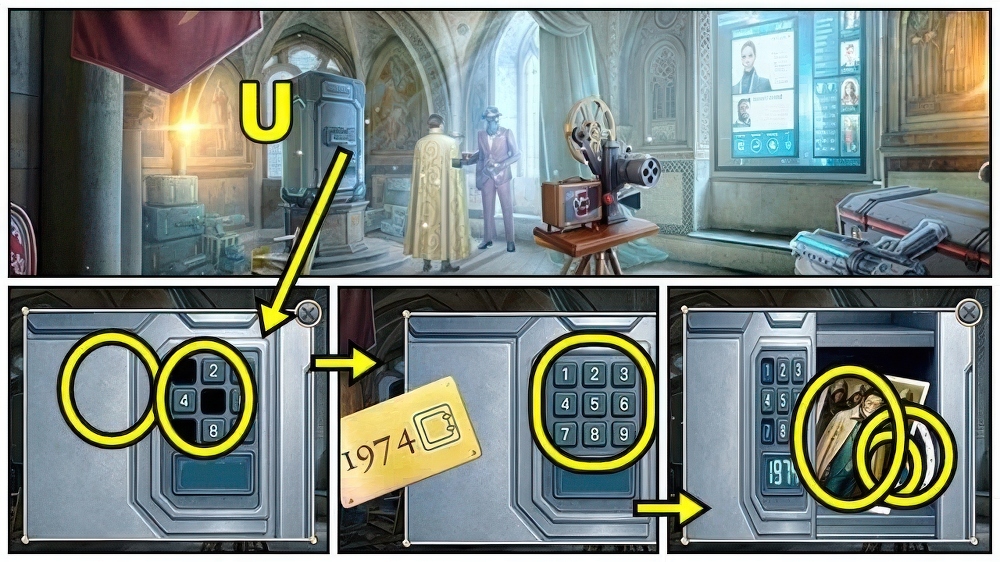
- Add SAFE BUTTONS (U) and CODE TABLE, press 1-9-7-4, examine, take WICK and PUZZLE PART 2/2.
- Move down.
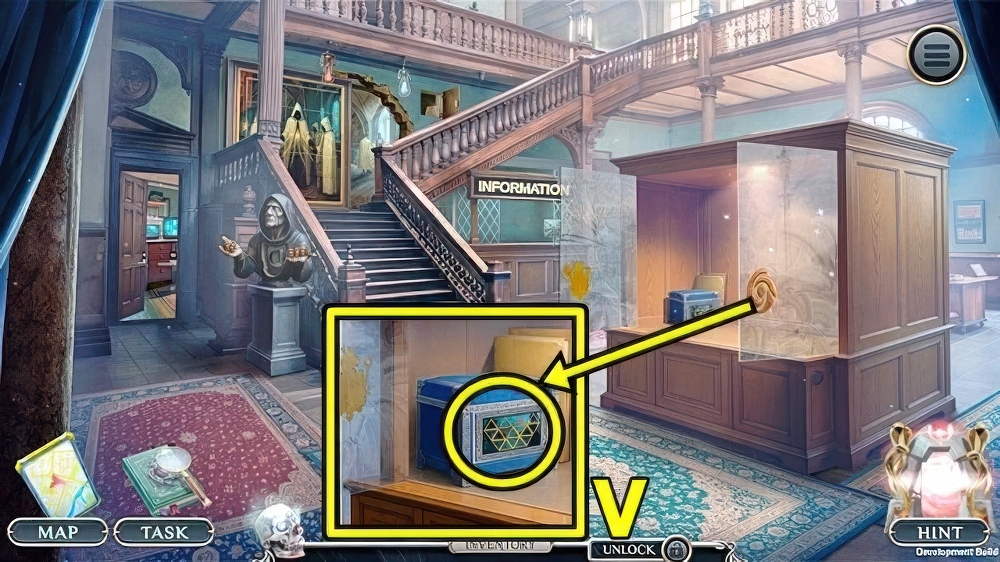
- Add PUZZLE PART (V).
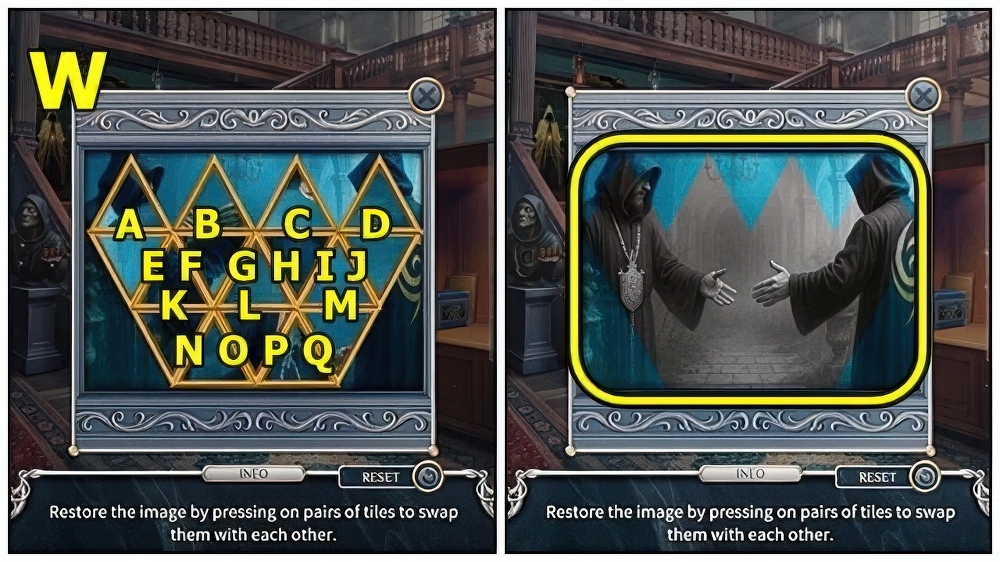
- Solution (W): K-E-A-P-O-N-K-E-F-G-H-I-J-D-Q-M-J-P-Q-F-G-H-I-N-K-H-L-P-G-L-O-N-L-C-H-C-H-G-B-G.
- Take PHOTO FLASH and PUNCHCARD PATTERN.
- Enter Order Secret Room.
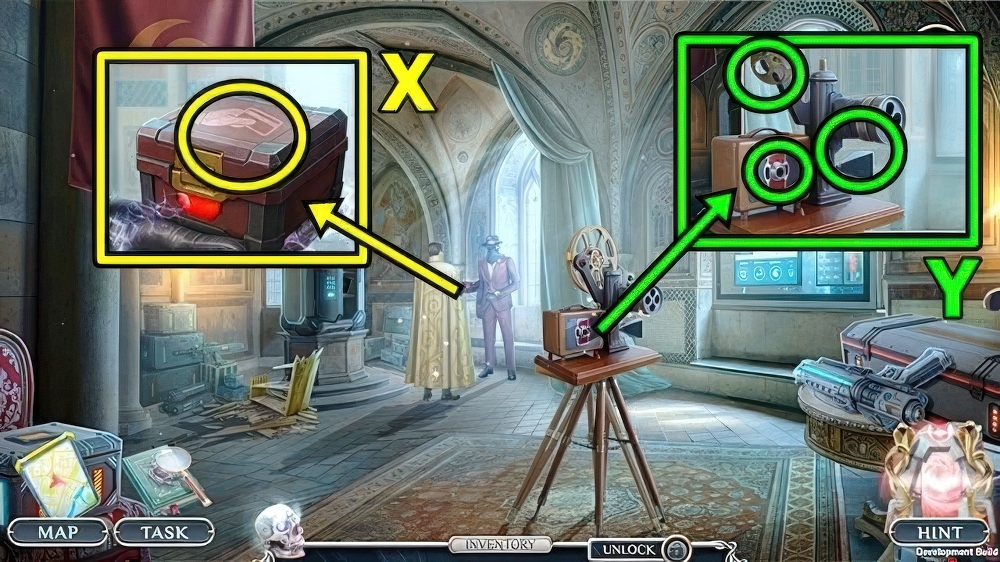
- EMPTY CARD, PUNCHCARD PATTERN and DEVICE NEEDLE on PUNCHCARD DEVICE, press twice, take LEADER PUNCHCARD.
- Use LEADER PUNCHCARD (X), read, take LEADER’S FILM and EMPTY CAN.
- Add LEADER’S FILM (Y), DEVICE SWITCH and PHOTO FLASH.
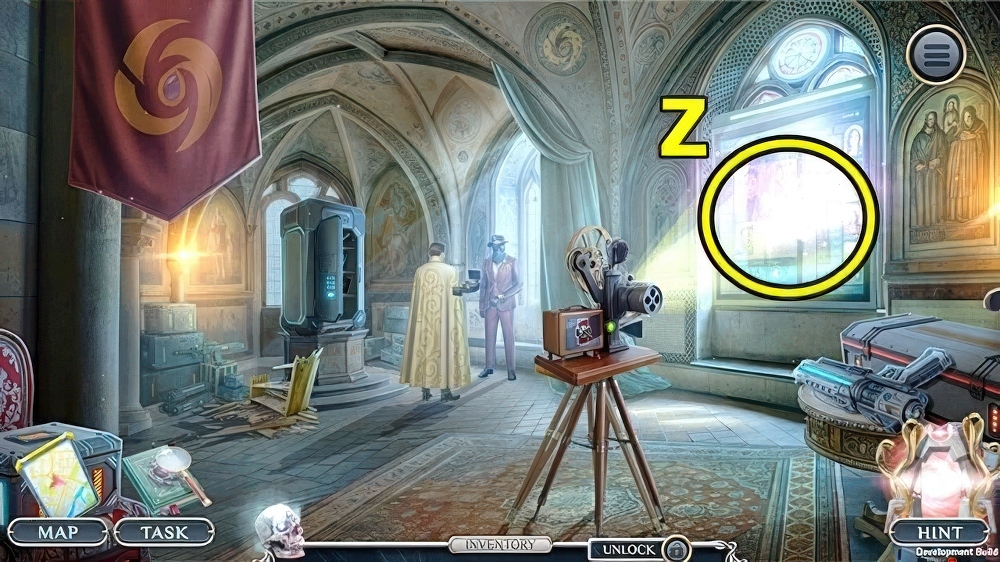
- Play puzzle (Z).
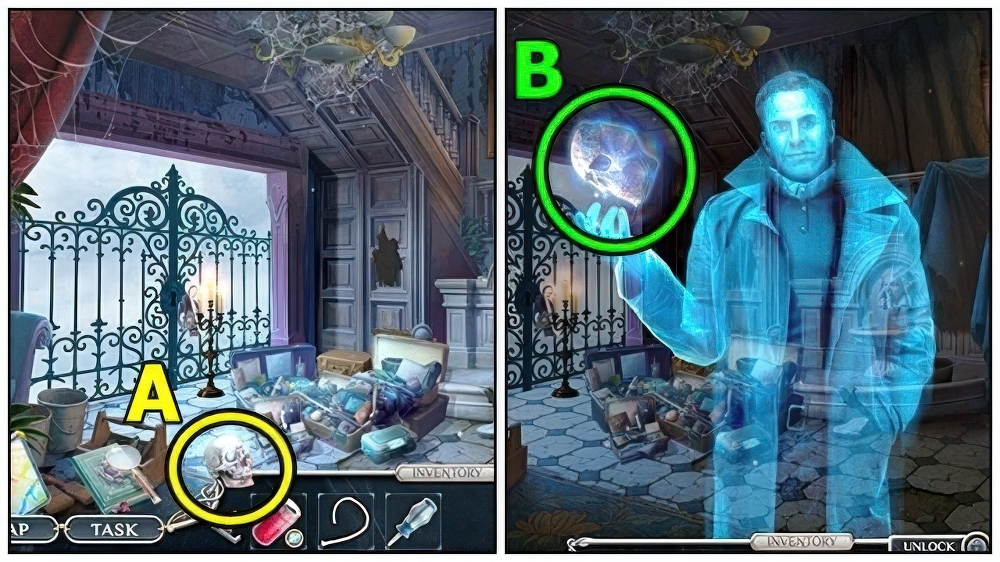
- Talk (A).
- Take STONE SKULL (B).
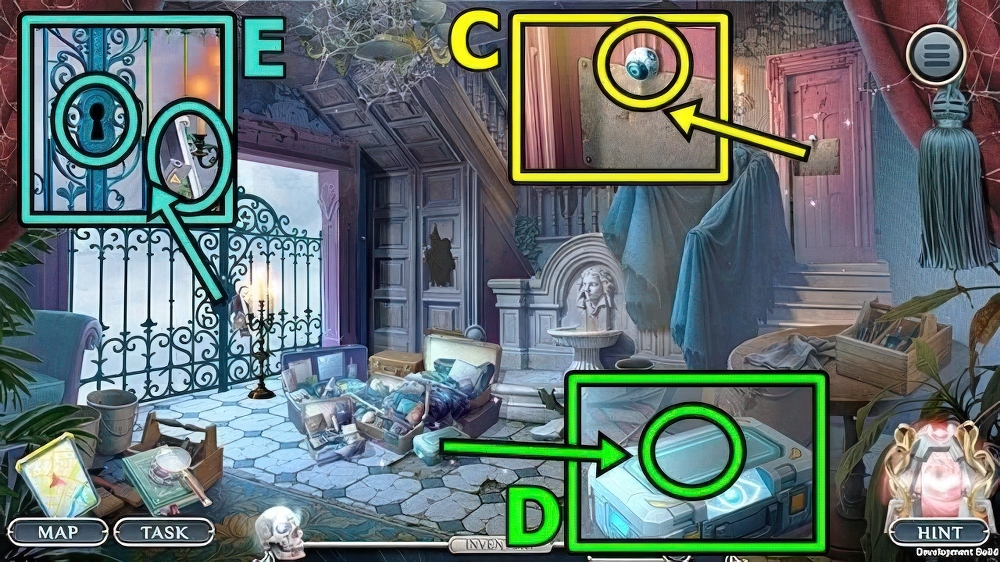
- Take MECHANICAL EYE (C).
- Add MECHANICAL EYE (D), take CIPHERING PLATE and TERMITE MIX.
- WICK and TERMITE MIX on EMPTY CAN, take TERMITE STICK.
- Take BROKEN LAMP (E).
- Add TERMITE STICK.
- Enter Renovated Hall.
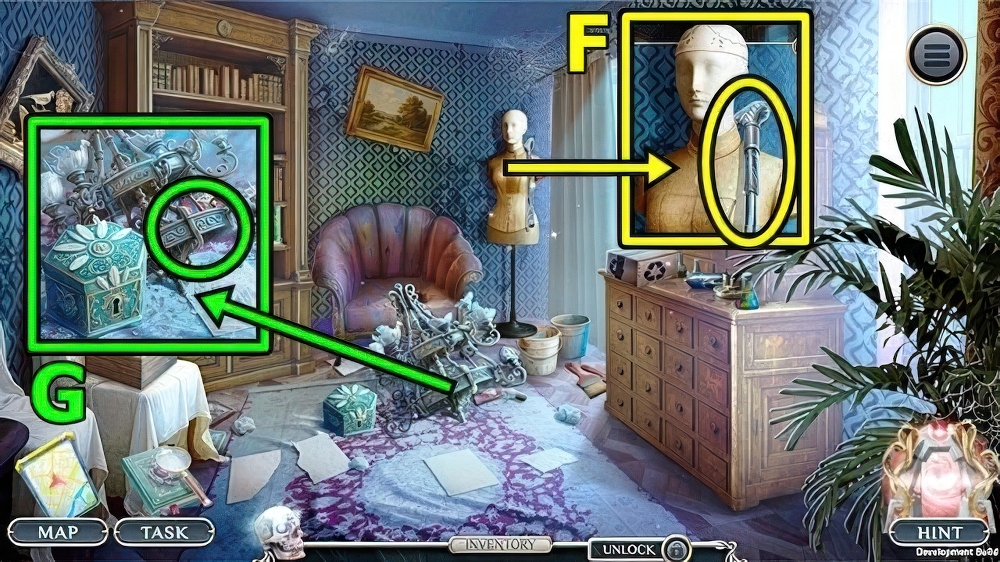
- Take FOLDABLE CANE (F).
- Use FOLDABLE CANE (G), take RECHARGEABLE BATTERY and CHISEL.
- Move down.
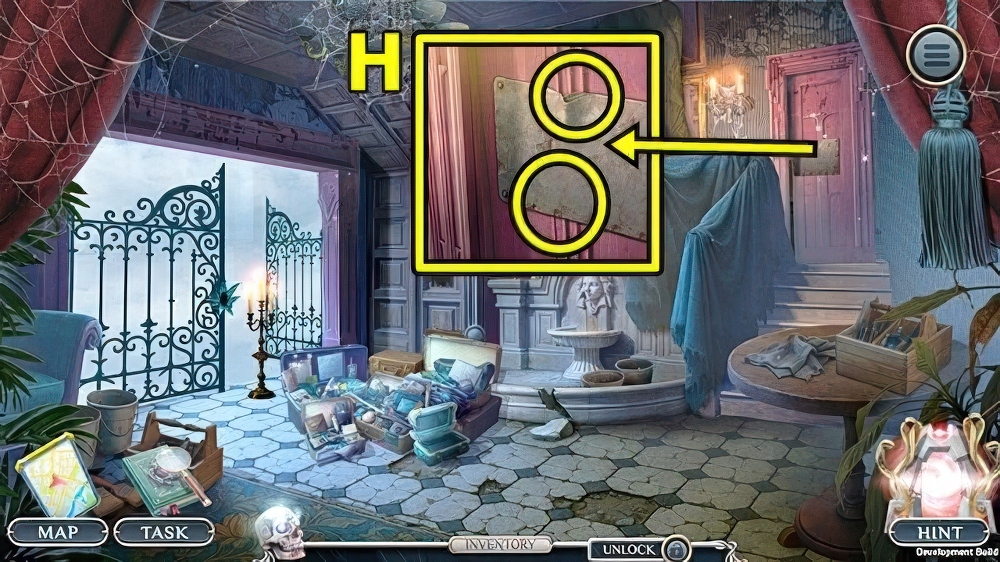
- Use CHISEL (H) and STONE SKULL.
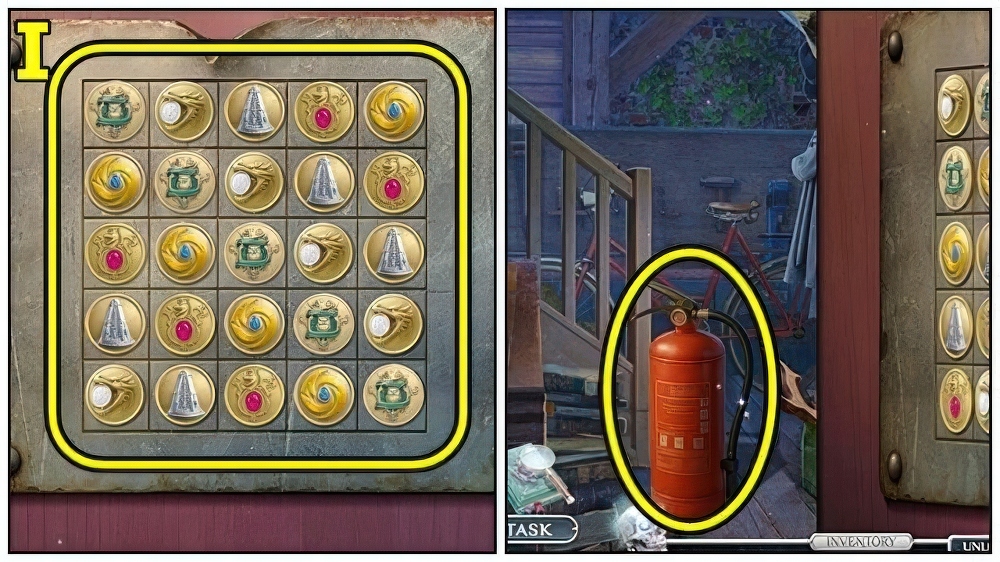
- Solution: (I).
- Take FIRE EXTINGUISHER.
- Enter Renovated Hall.
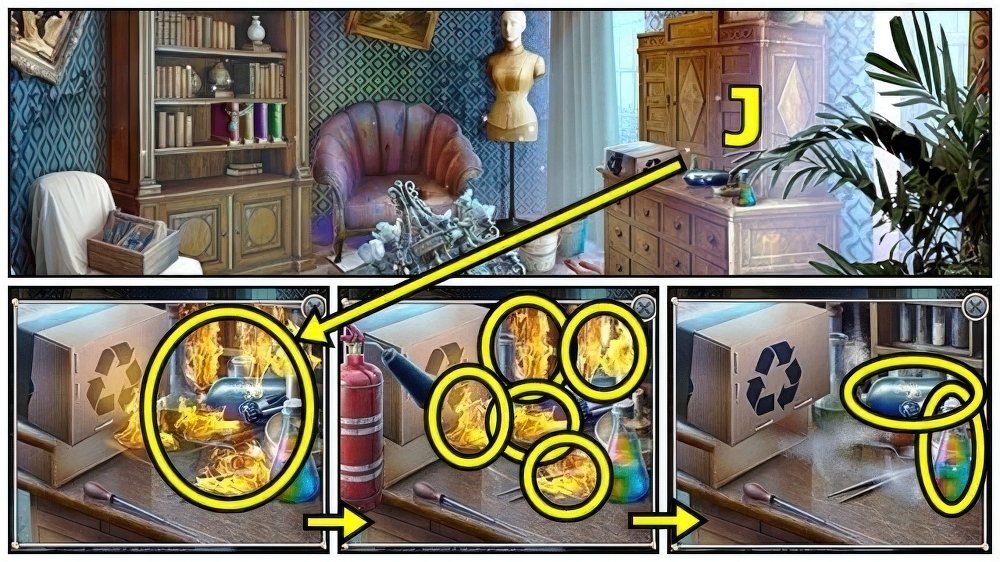
- Use FIRE EXTINGUISHER (J), use, take CYLINDER and DEVELOPING PIGMENT.
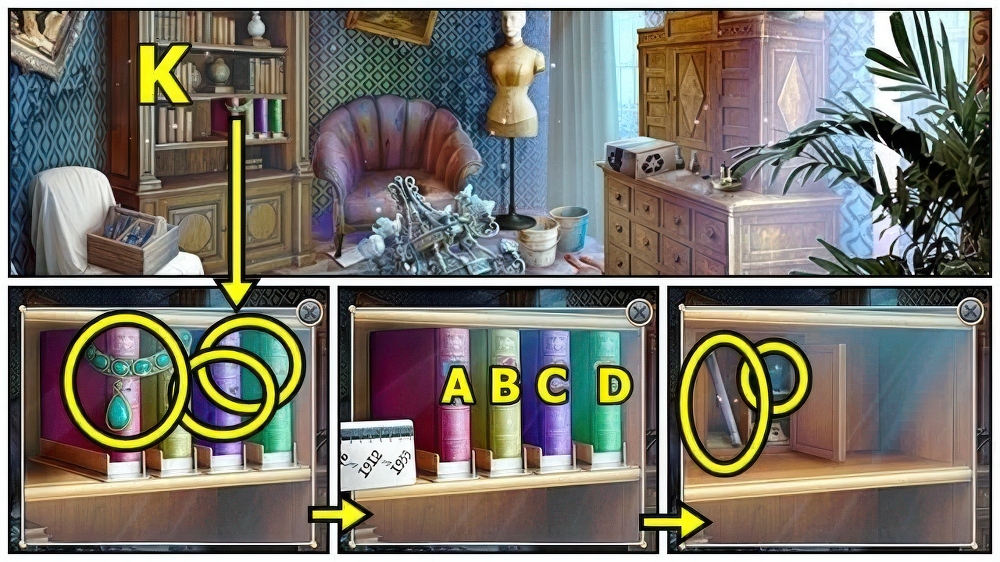
- Take AZURE NECKLACE (K).
- Add DEVELOPING PIGMENT and CIPHERING PLATE, press C-D-B-A, take NEW LAMP and HECATE’S SHARDS 1/4.
- Move down.
- NEW LAMP, RECHARGEABLE BATTERY and STAR SCREWDRIVER on BROKEN LAMP, take UV LAMP.
- Use UV LAMP (L).
- Play puzzle (M), receive CABINET LEVER and AIR HAMMER.
- Enter Renovated Hall.
- Add CABINET LEVER (N).
- Enter Artifact Room.
- Talk (O).
- Take ORDER SIGN (P).
- Take AZURE TIARA (Q).
- Move down.
- Add AZURE NECKLACE (R) and AZURE TIARA, take HECATE’S SHARDS 2/4 and JACK.
- Enter Artifact Room.
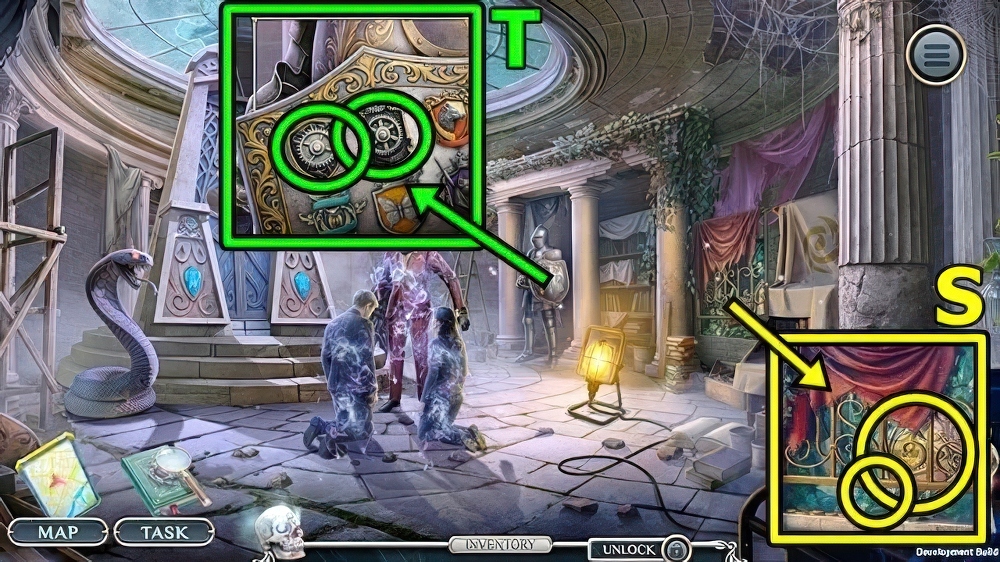
- Use JACK (S), take SIGN OF THE BROWNS.
- Add SIGN OF THE BROWNS (T) and ORDER SIGN.
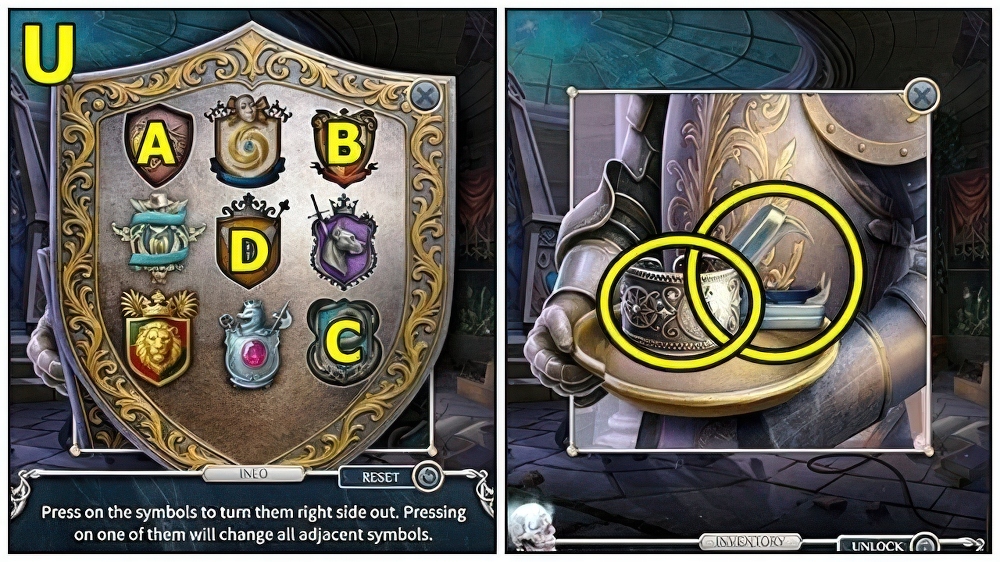
- Solution (U): A-B-C-D.
- Take HECATE’S BRACELET and STAPLE REMOVER.
- Move down.
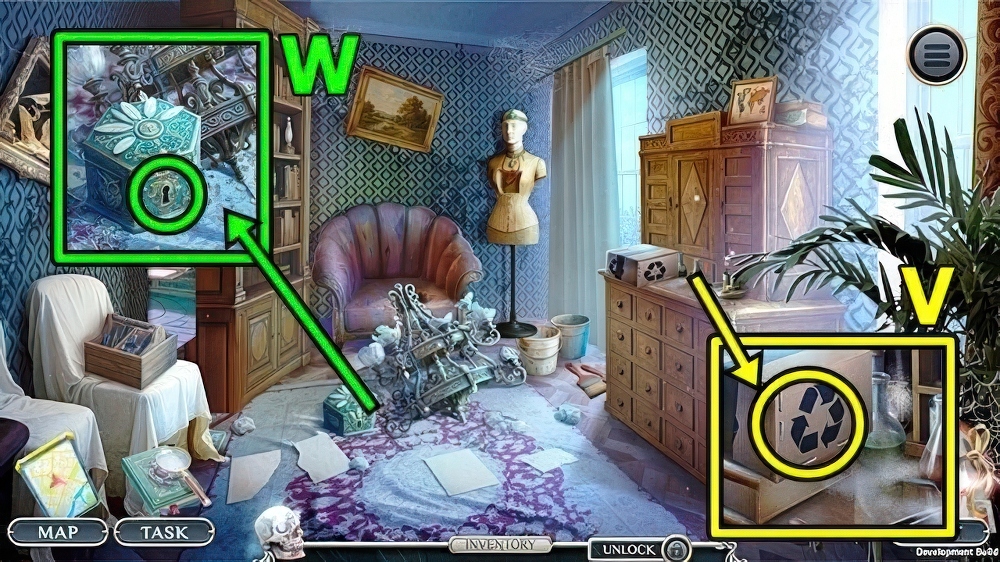
- Use STAPLE REMOVER (V), take STASH KEY and HECATE’S SHARDS 3/4.
- Use STASH KEY (W), take GAS VALVE and HECATE’S SHARDS 4/4.
- Enter Artifact Room.
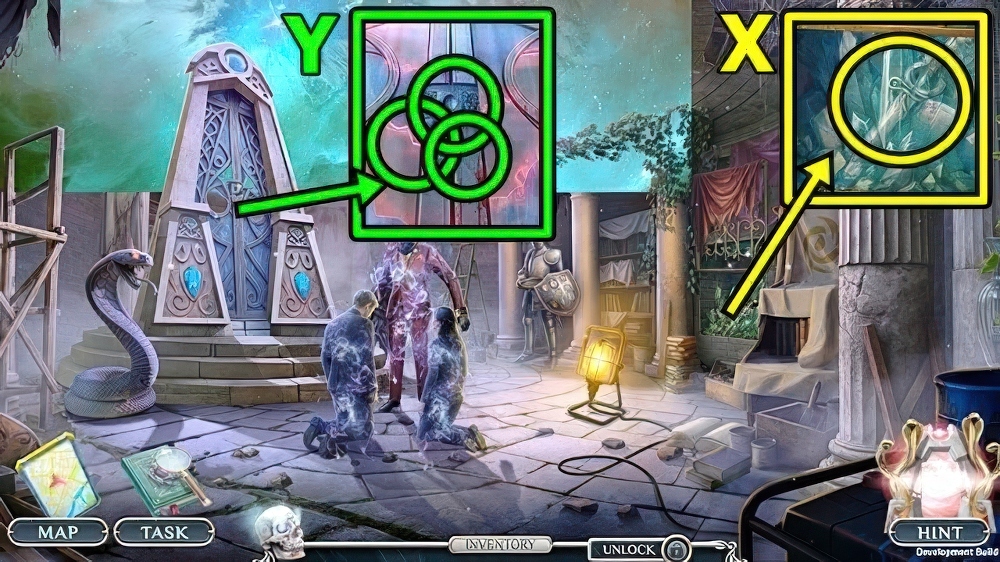
- GAS VALVE and AIR HAMMER on CYLINDER, take JACKHAMMER.
- Use JACKHAMMER (X), take HECATE’S DAGGER.
- Use HECATE’S DAGGER (Y), HECATE’S BRACELET and HECATE’S SHARDS.
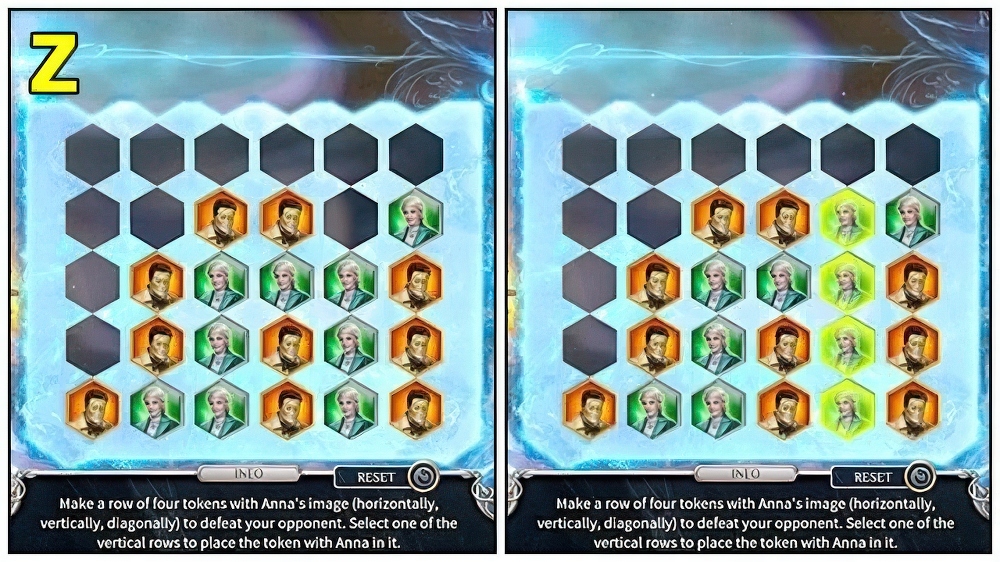
- Solution (Z): Puzzle solution is randomly generated.
Congratulations! You have completed the game Detectives United 8: Vengeance from the Past.


