Edge of Reality 4: Hunter’s Legacy – The game starts with you inheriting an old lighthouse and all the property inside it from your uncle Abe Hanson, and the rest of the property will be divided among the other relatives. You need to understand why Abe decided to leave the lighthouse to you, and find the answers there. But instead of answers, you discover a secret legacy filled with magical creatures and their connections to your family. A journey into a world of magic and adventure will open up amazing locations filled with mysteries and riddles. Solve riddles, search for ancient artefacts and fight against dark forces. If you can not pass any of the puzzles or do not know where the items are, on our site you can watch the walkthrough of Edge of Reality 4: Hunter’s Legacy, and unlock the secrets of the lighthouse.
Edge of Reality 4: Hunter’s Legacy – Walkthrough
Here you can see the full walkthrough of Edge of Reality 4: Hunter’s Legacy game, namely for all chapters, including bonus chapter, in pictures.
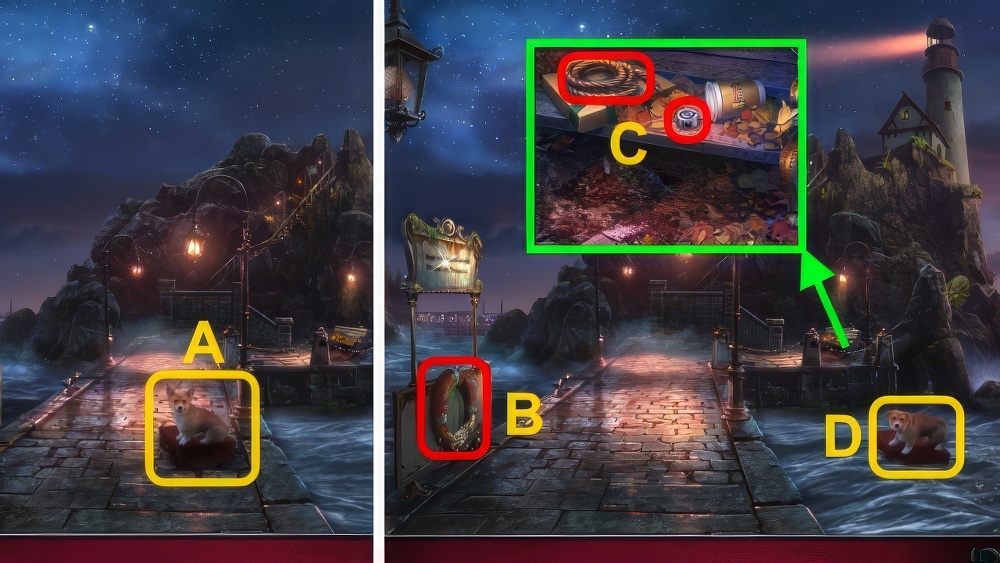
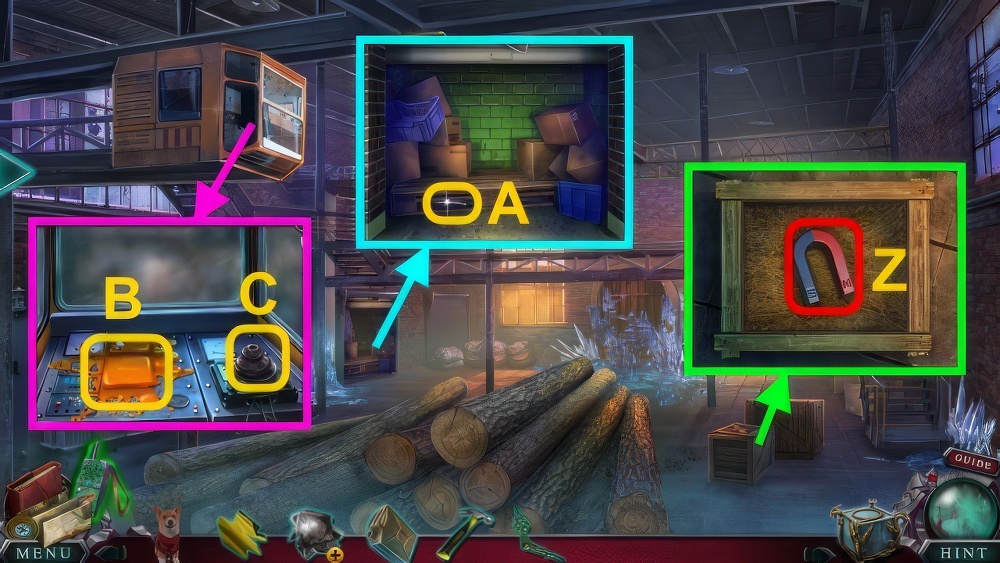
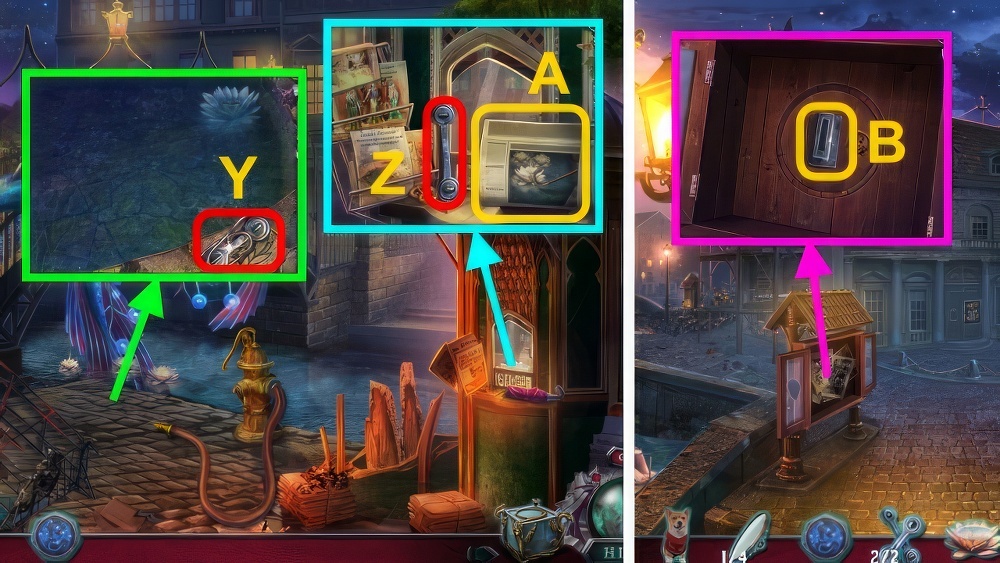
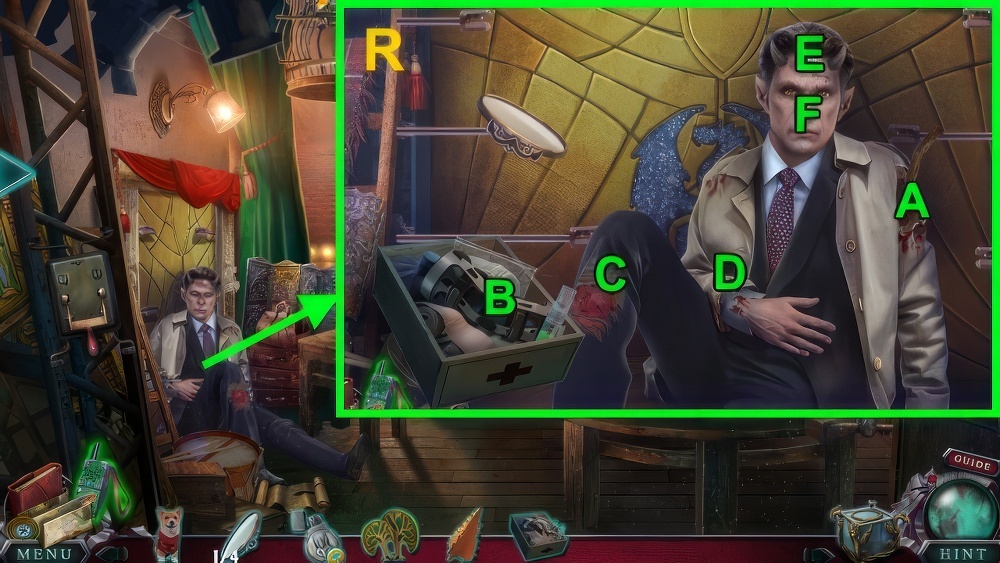
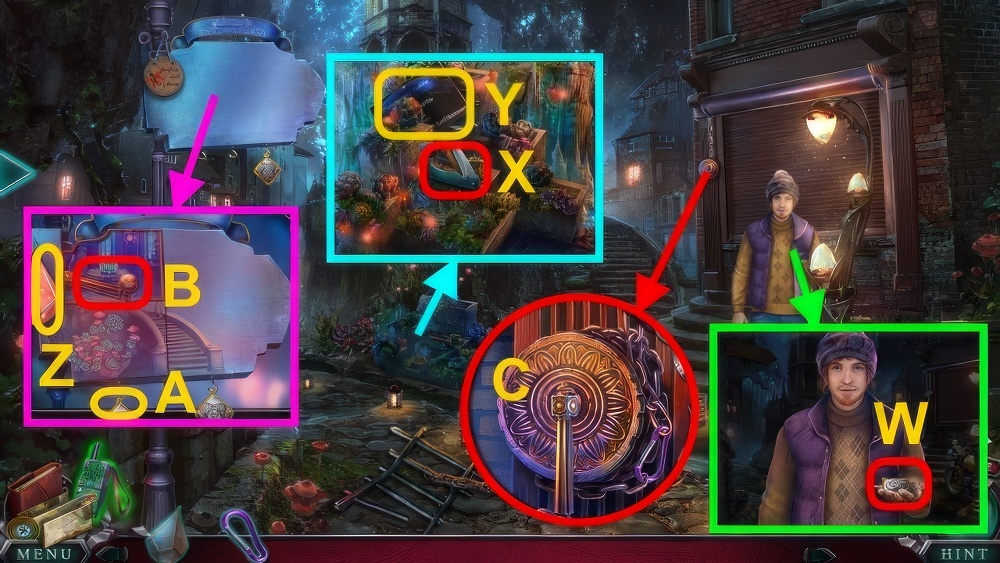
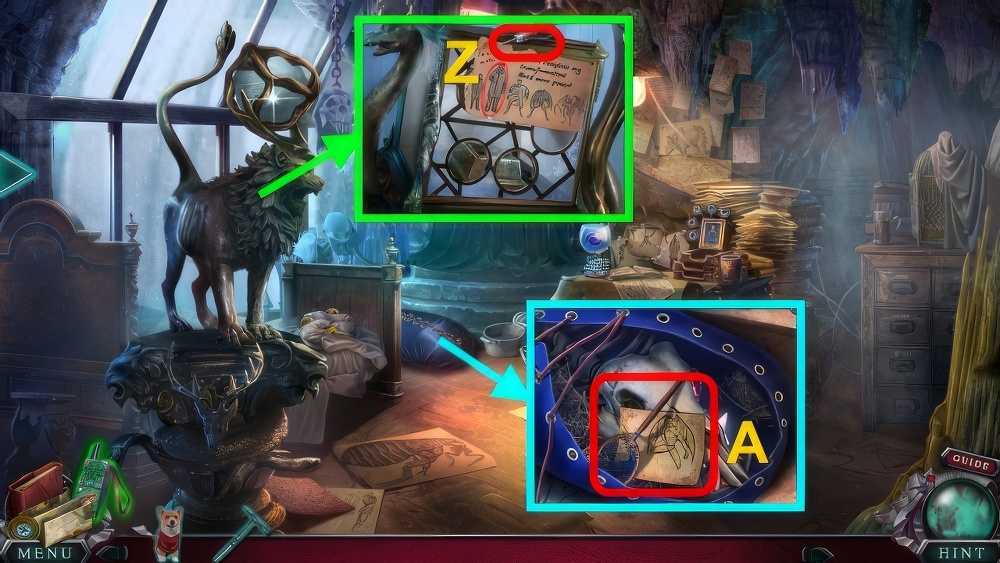
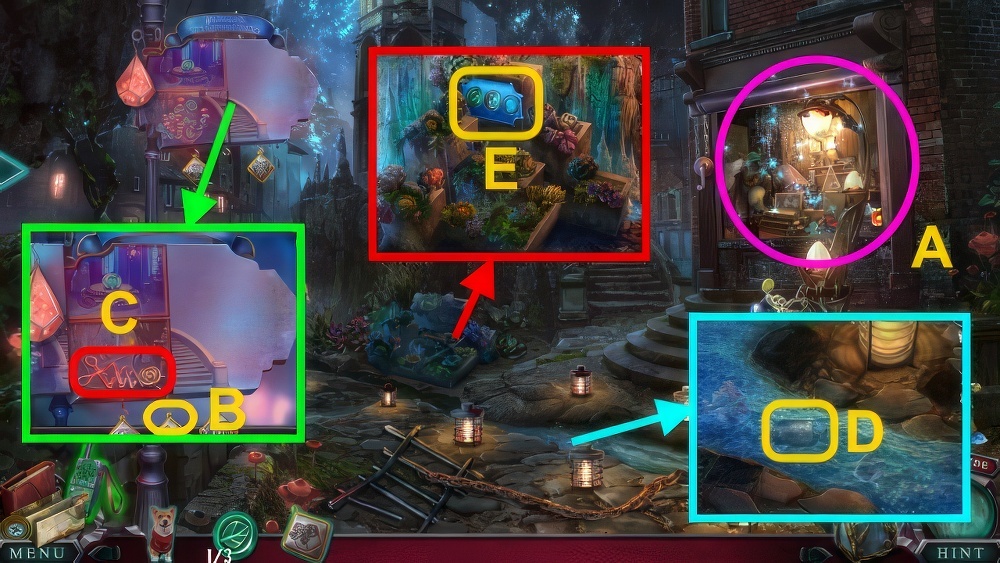
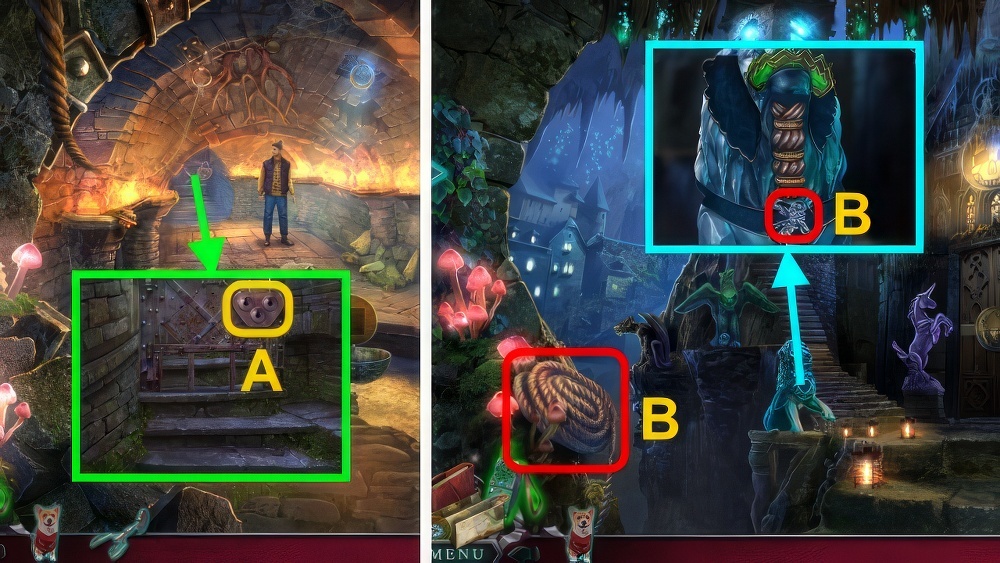
- Examine (A).
- Take LIFE RING (B).
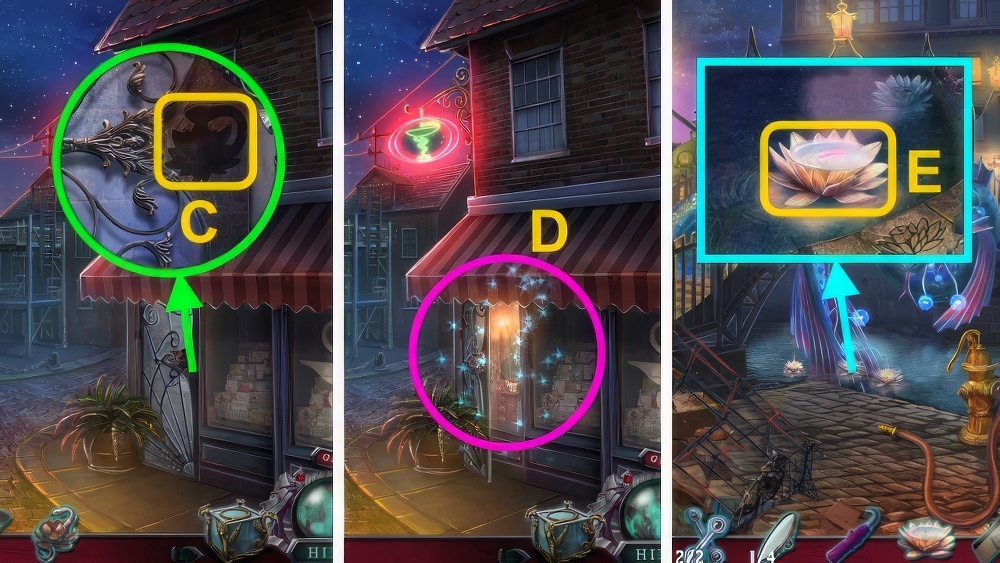
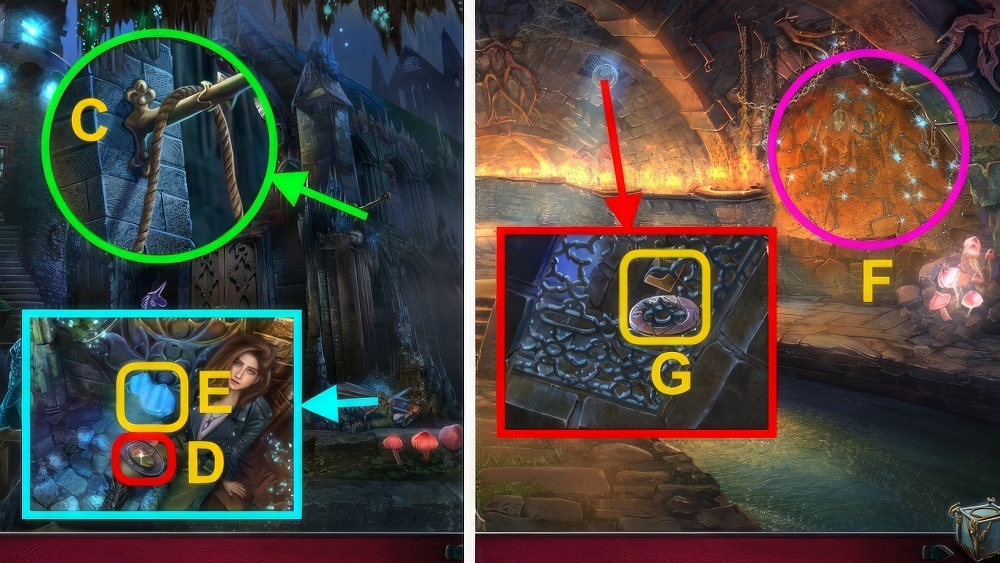
- Examine leaves twice, take CLOVER BUTTON and ROPE (C).
- Examine LIFE RING twice, take HANDKERCHIEF.
- Use ROPE, take LIFE RING WITH ROPE.
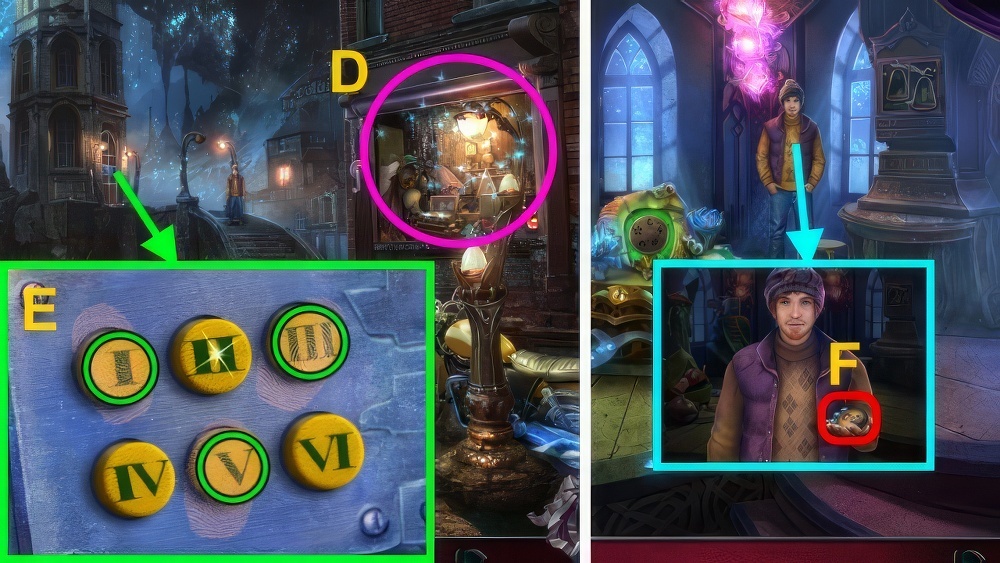
- Use LIFE RING WITH ROPE (D).
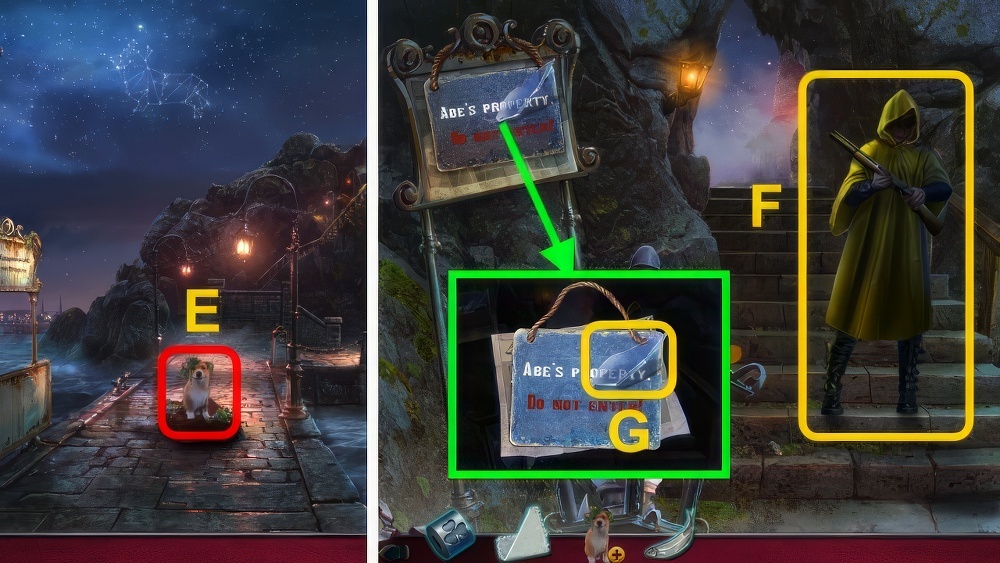
- Take SHIVERING DOG (E).
- Examine SHIVERING DOG twice, take FISH.
- Go forward.
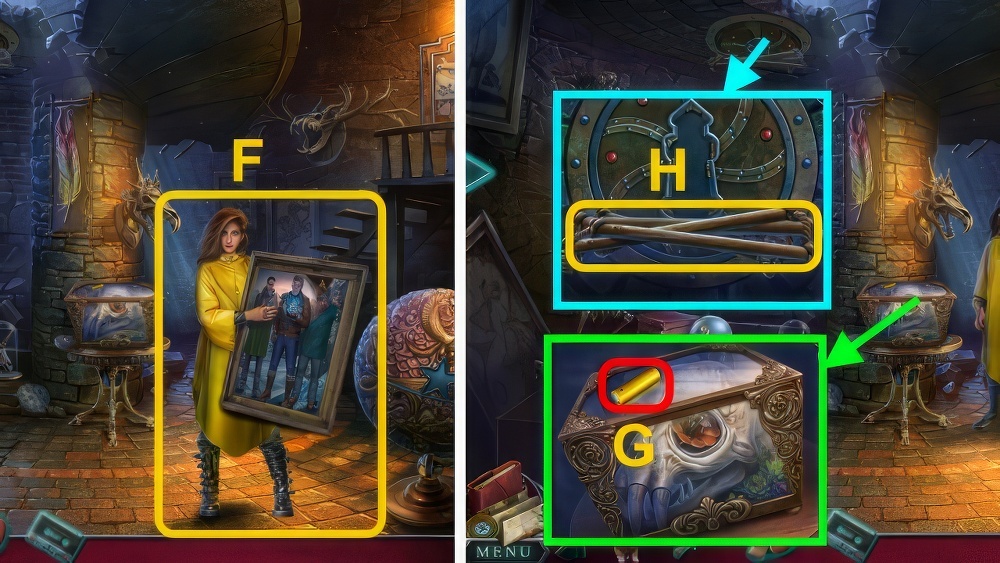
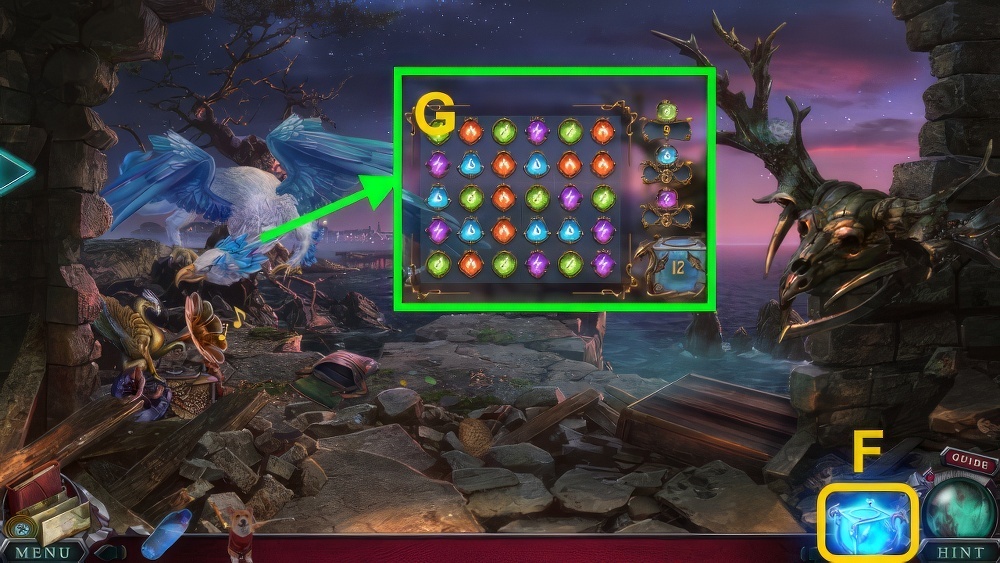
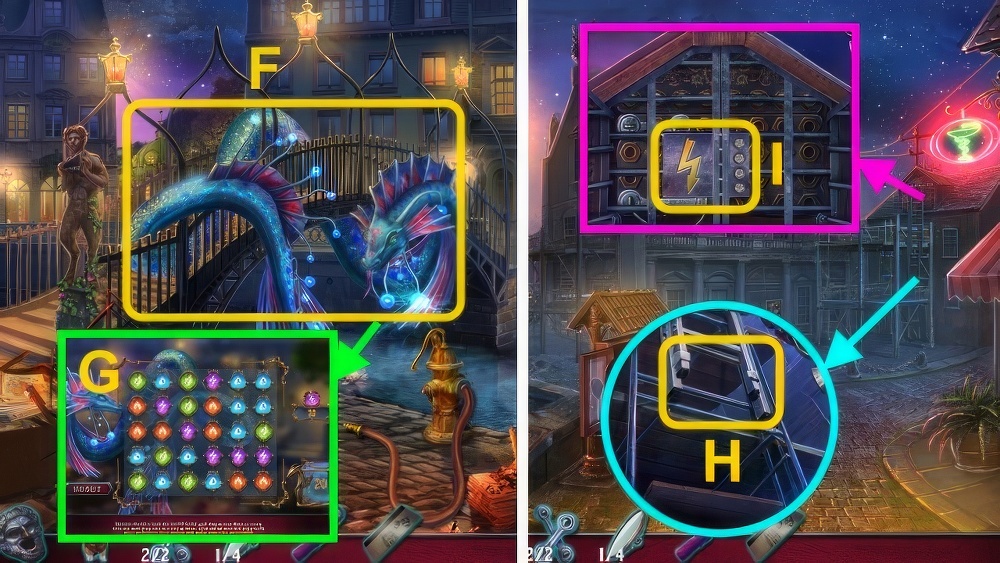
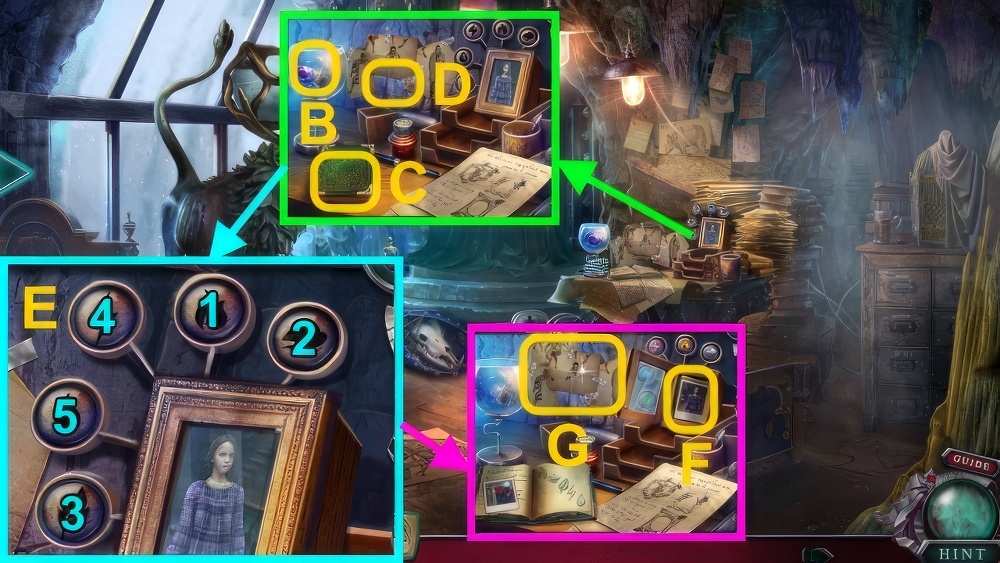
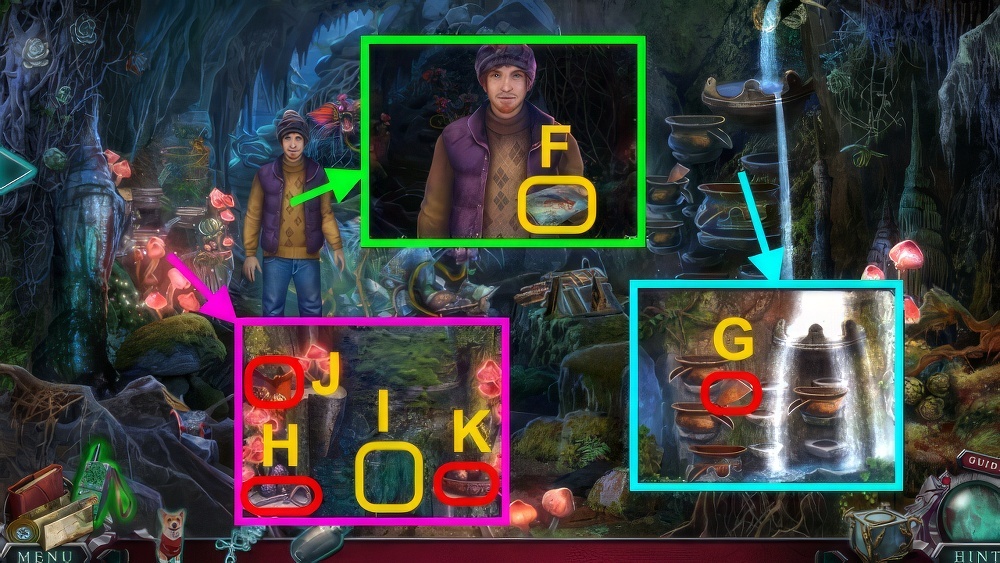
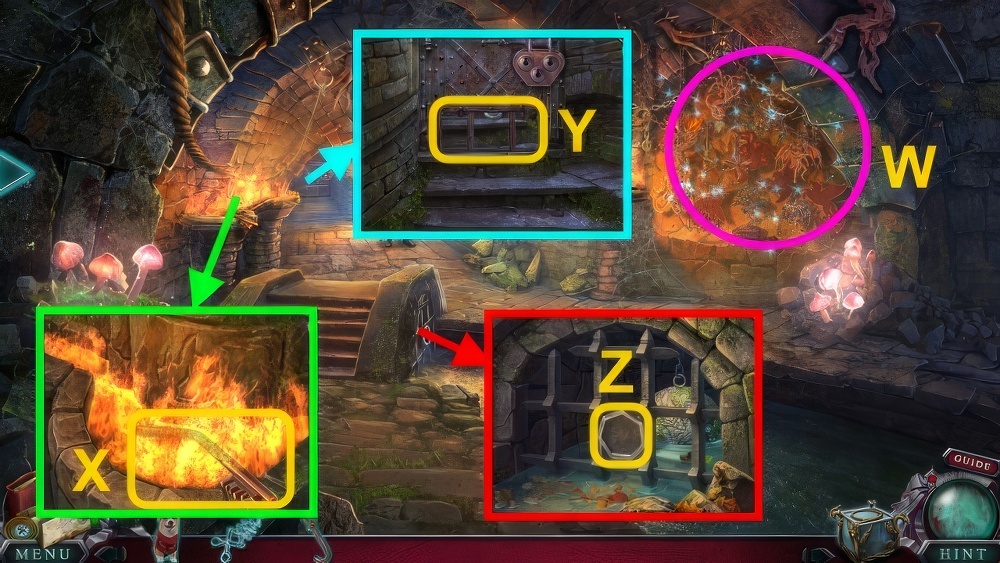
- Talk (F).
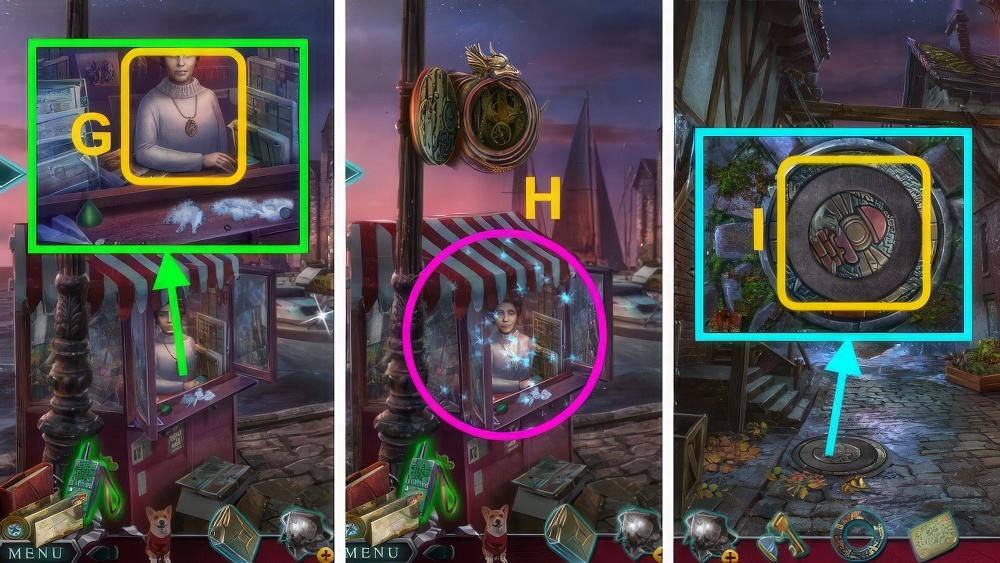
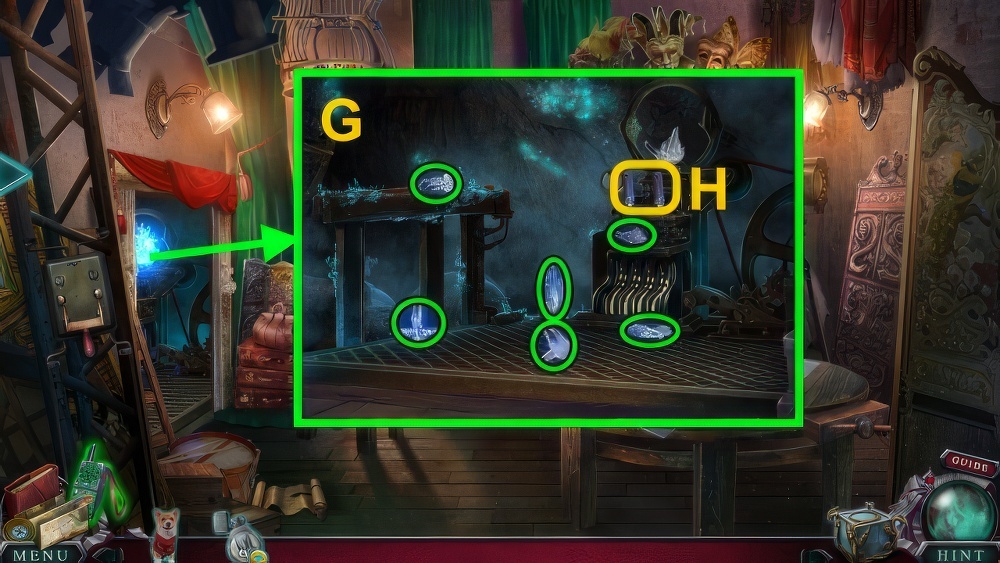
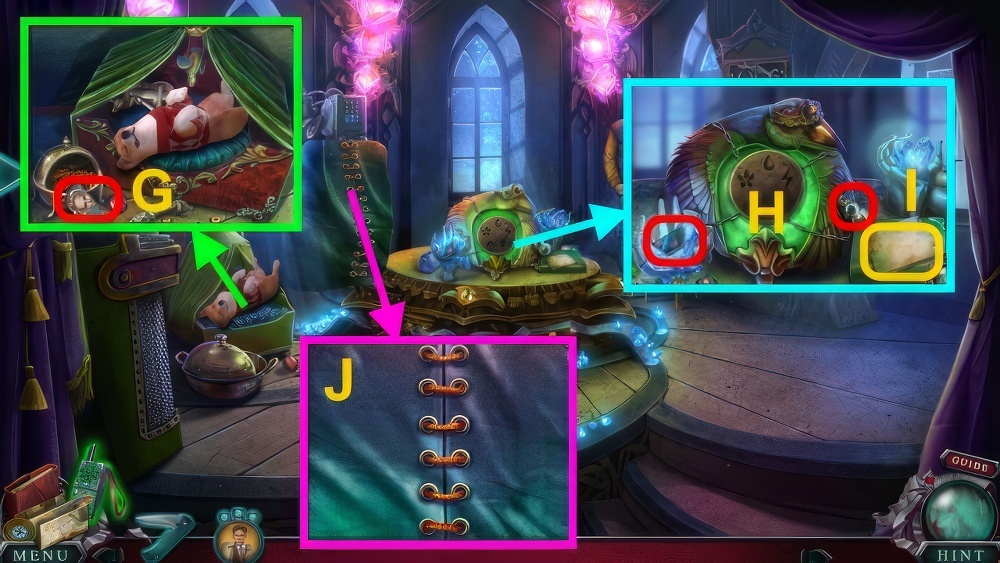
- Use HANDKERCHIEF (G), receive SHARD.
- Move sign, take Map.
- Go down.
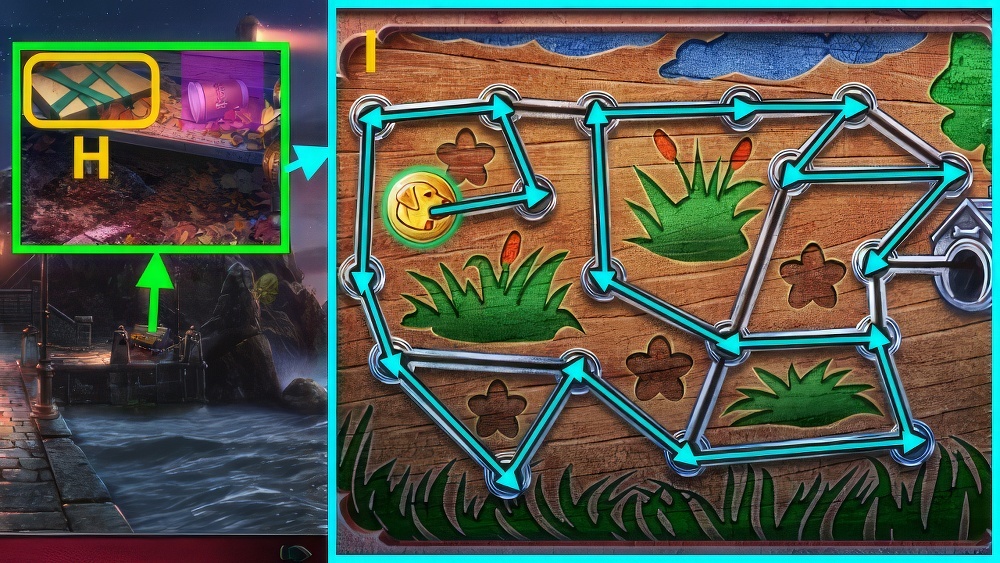
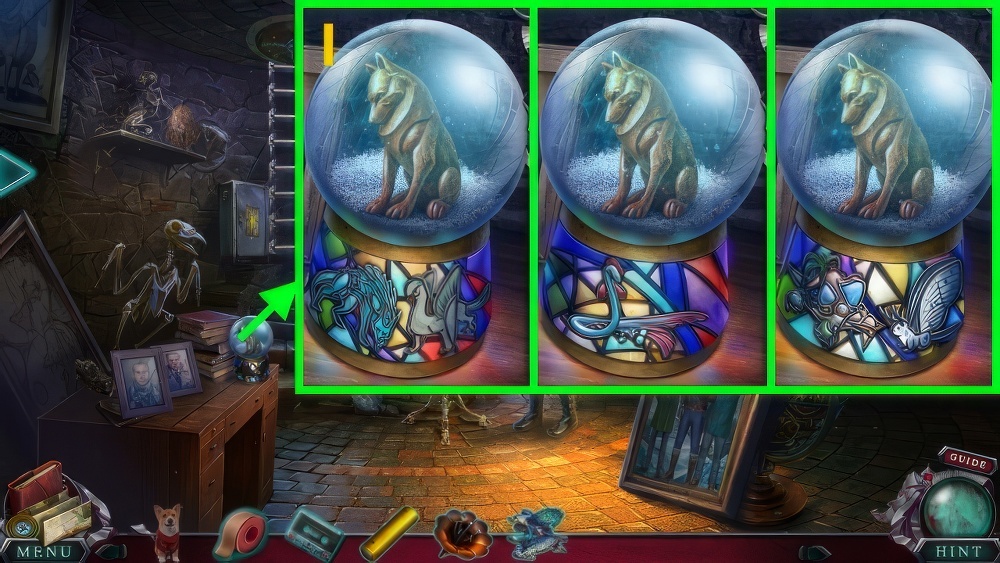
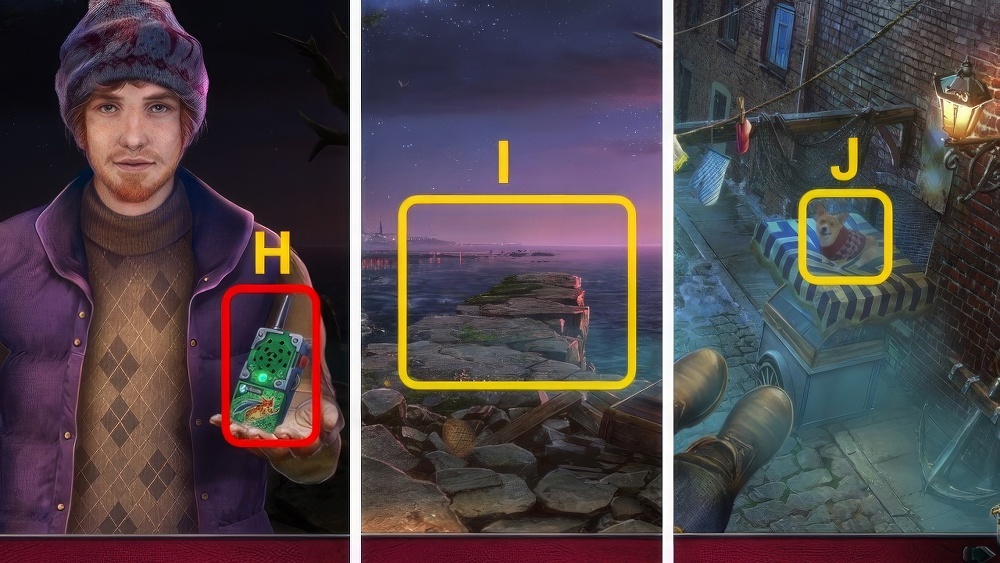
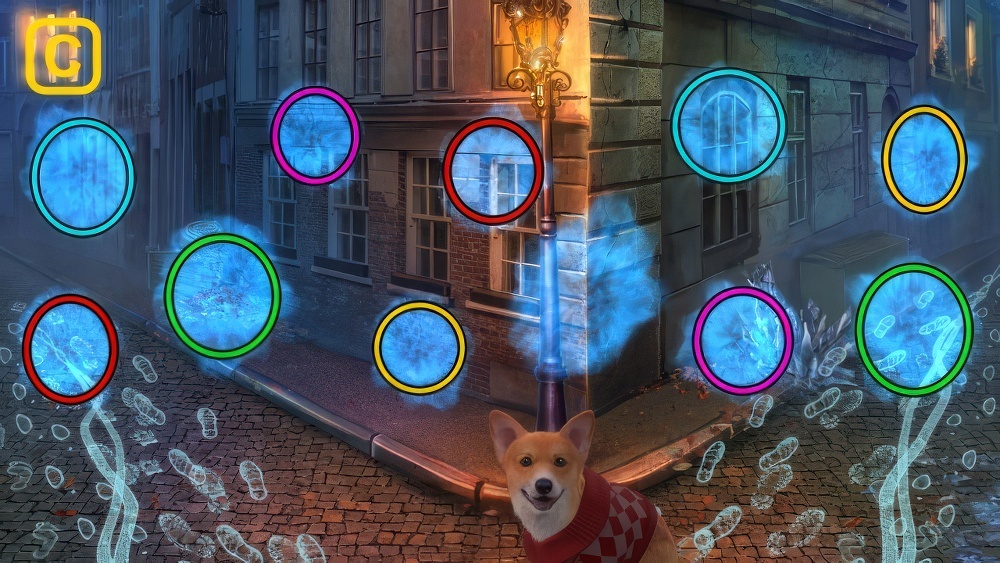
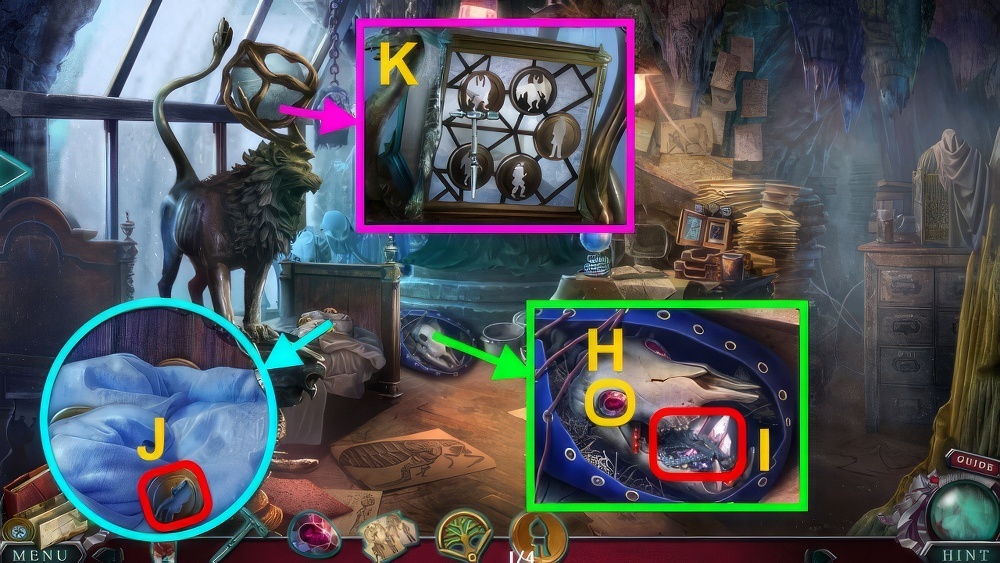
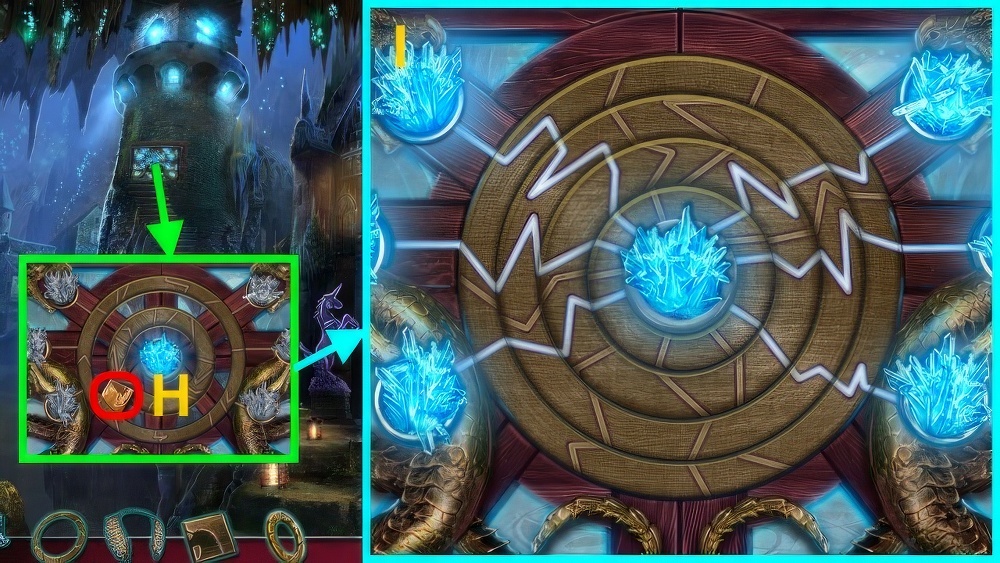
- Use SHARD (H), examine.
- Move the dog along the lines to the doghouse.
- Select a circle to move the dog.
- Each circle on the path must be crossed over.
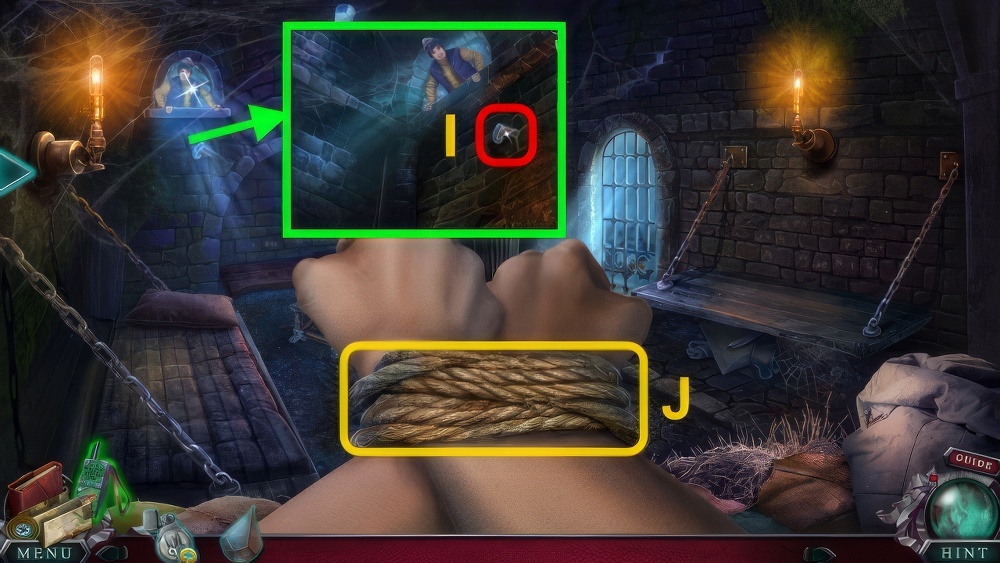
- Walkthrough (I).
- Examine paper, take TOYS (2/2) and DOG SWEATER.
- DOG SWEATER on SHIVERING DOG, take ASH.
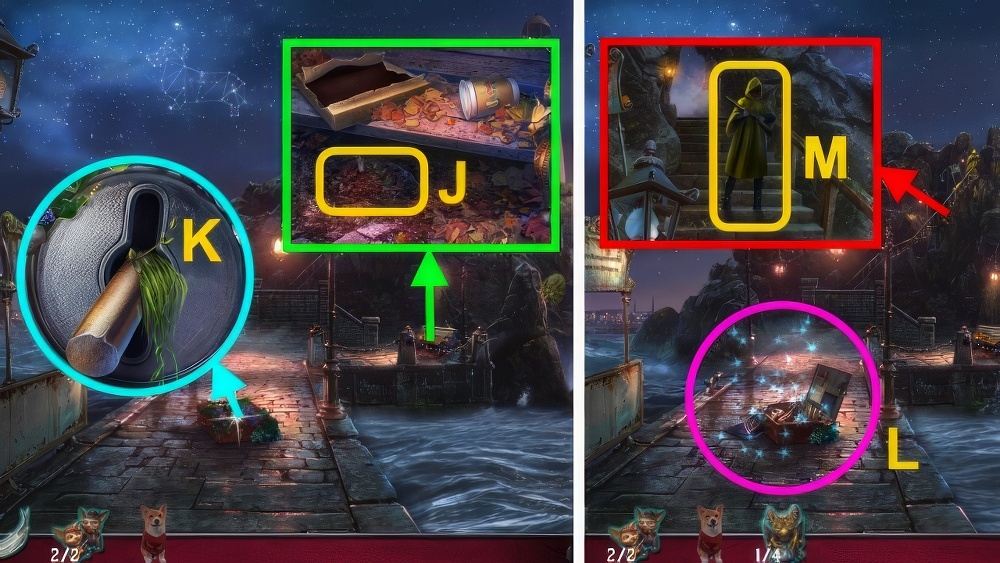
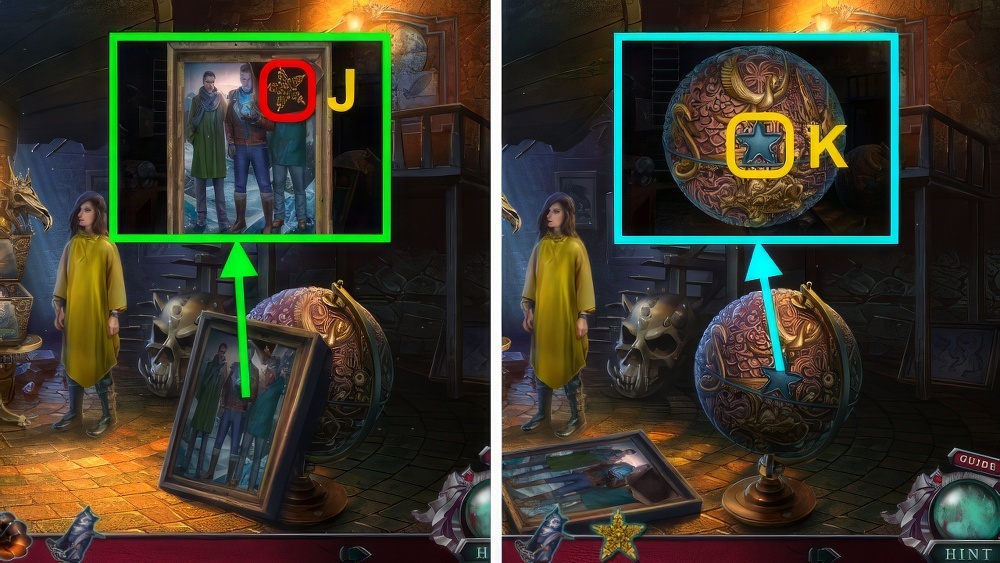
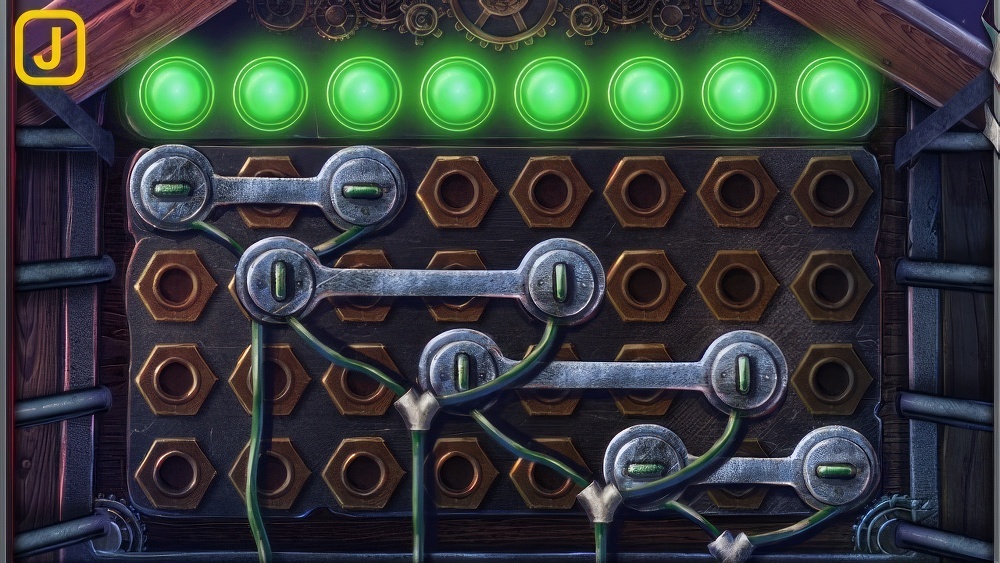
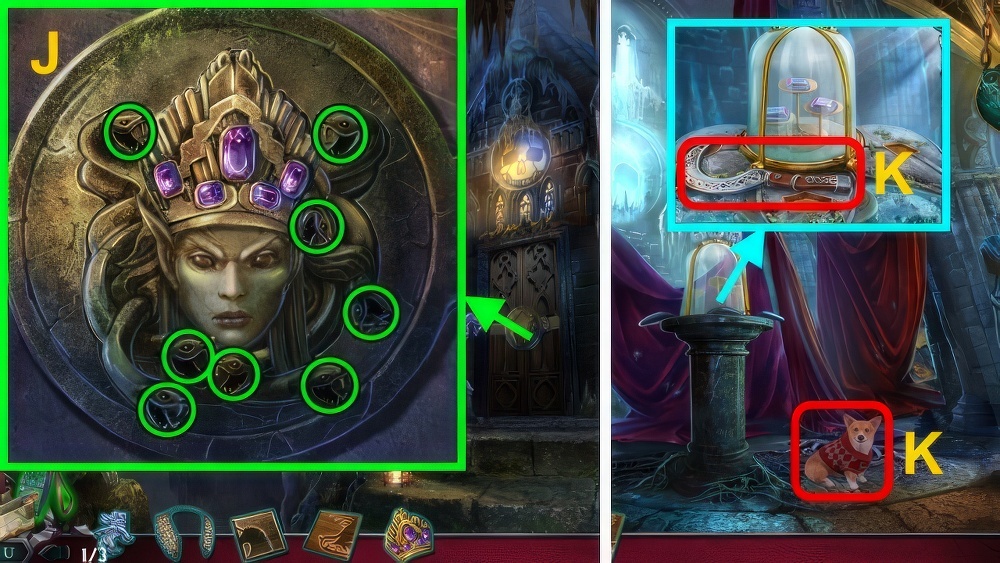
- Use ASH (J), take ASH, GARGOYLE FIGURINE (1/4), and PIN.
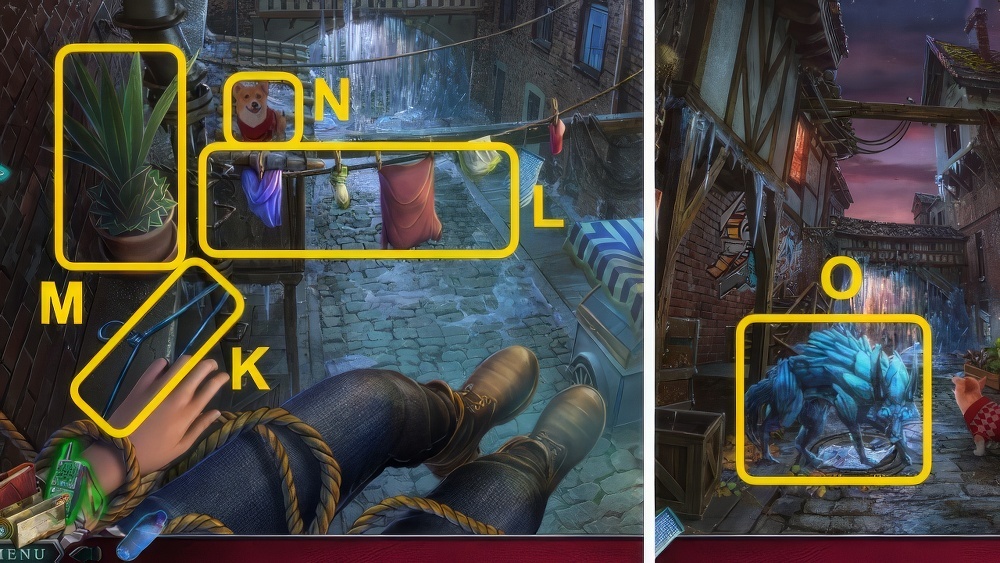
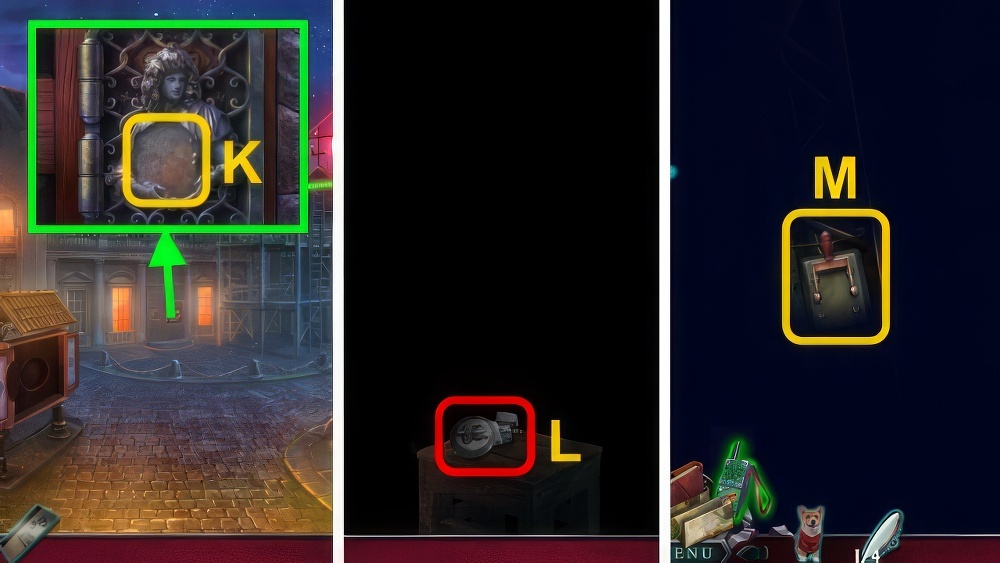
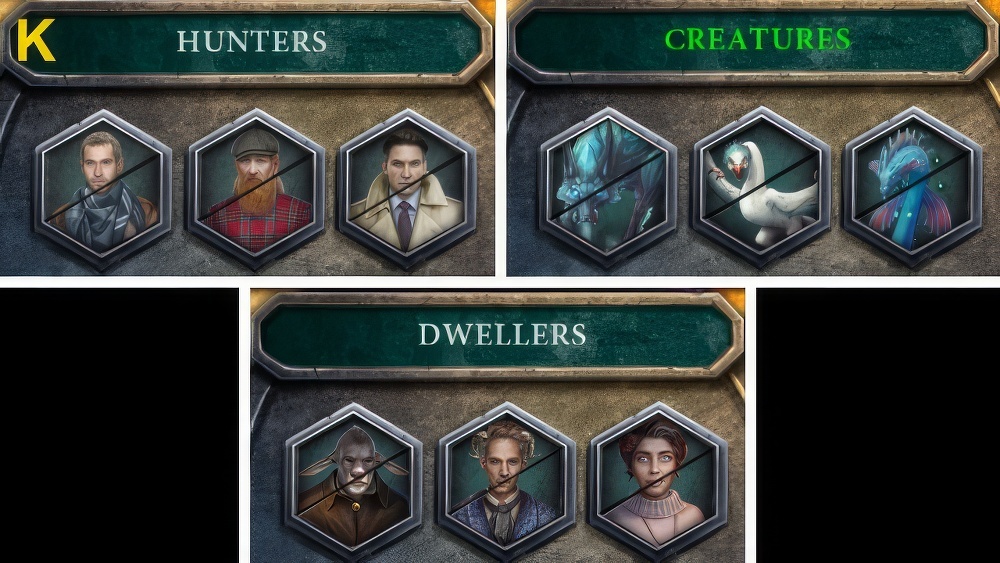
- Examine (K) twice, use PIN.
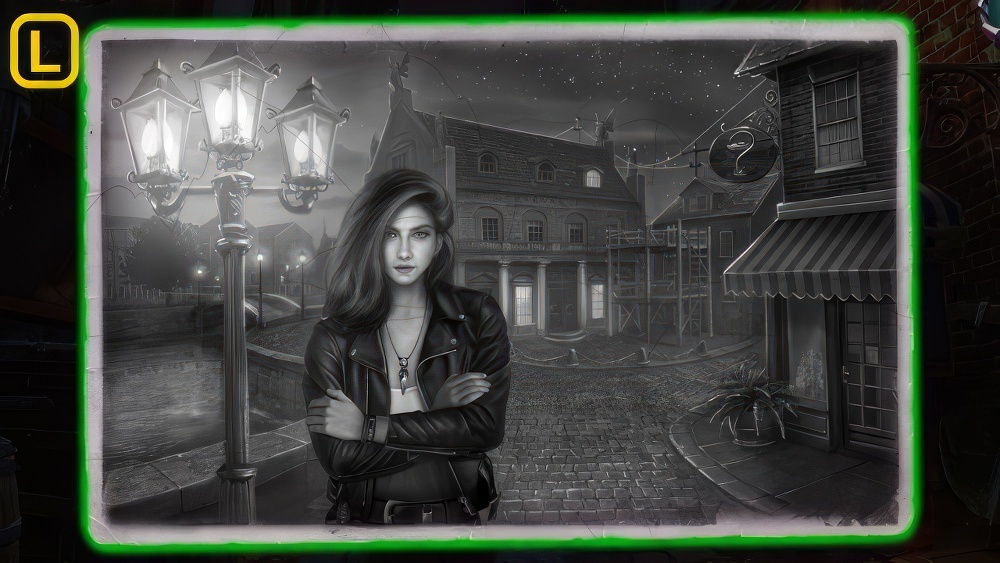
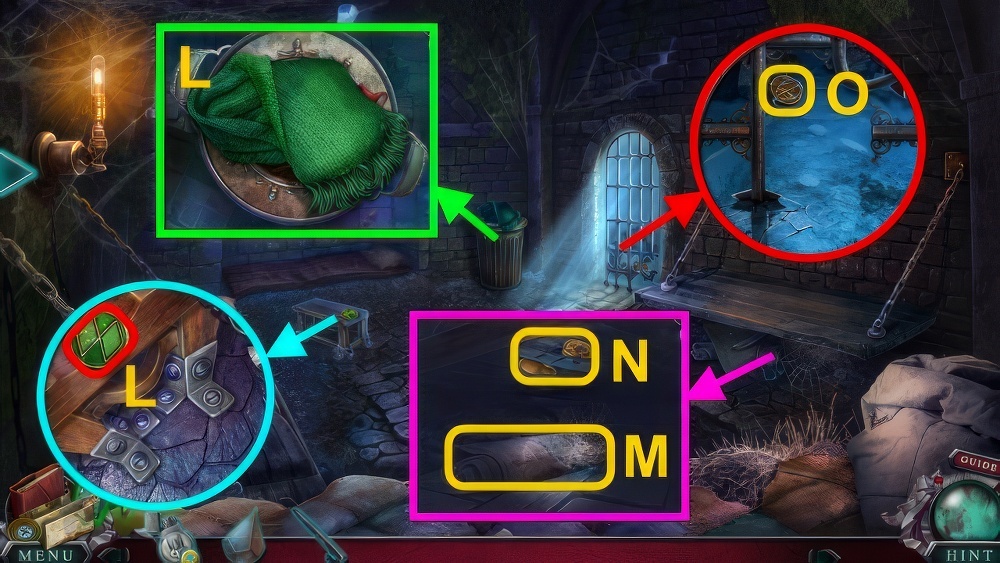
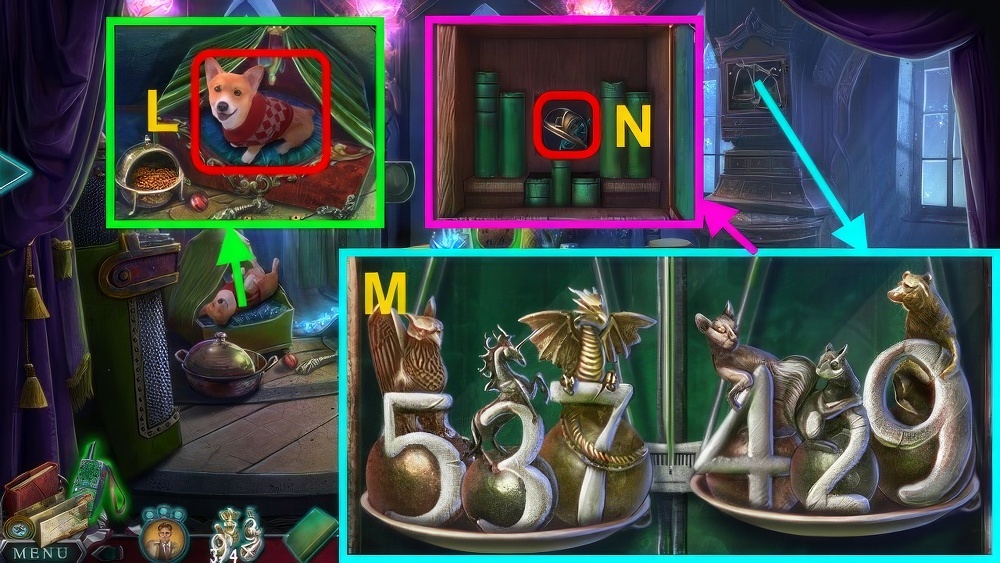
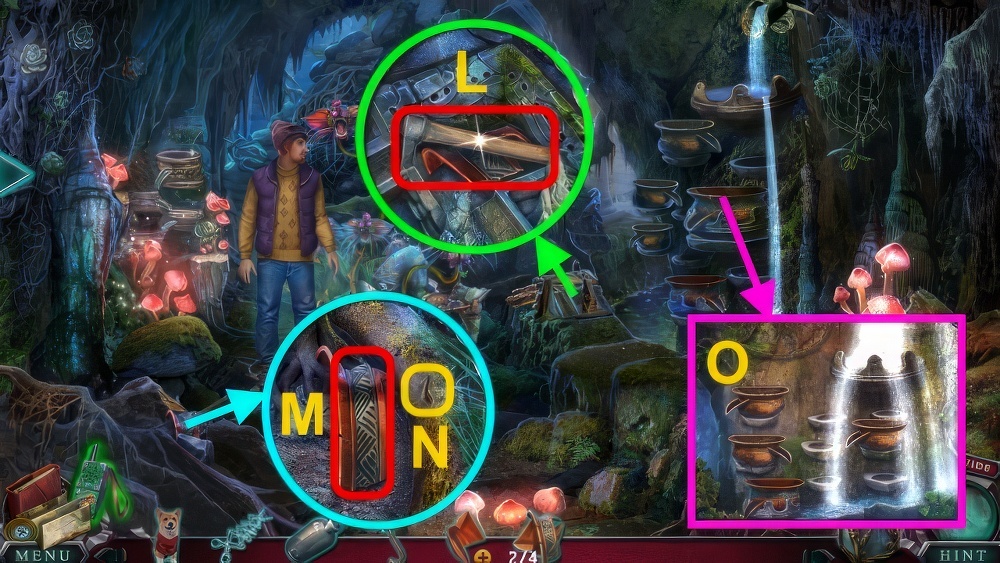
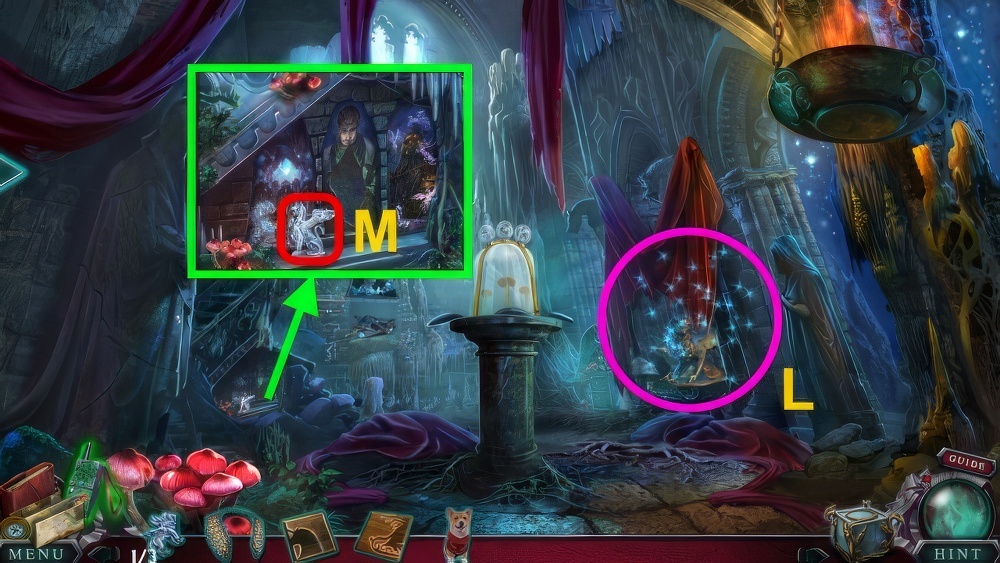
- Play puzzle, receive CLUTCH (L).
- Open CLUTCH, take KEYS.
- Examine picture, read letter.
- Take ABE’S WILL.
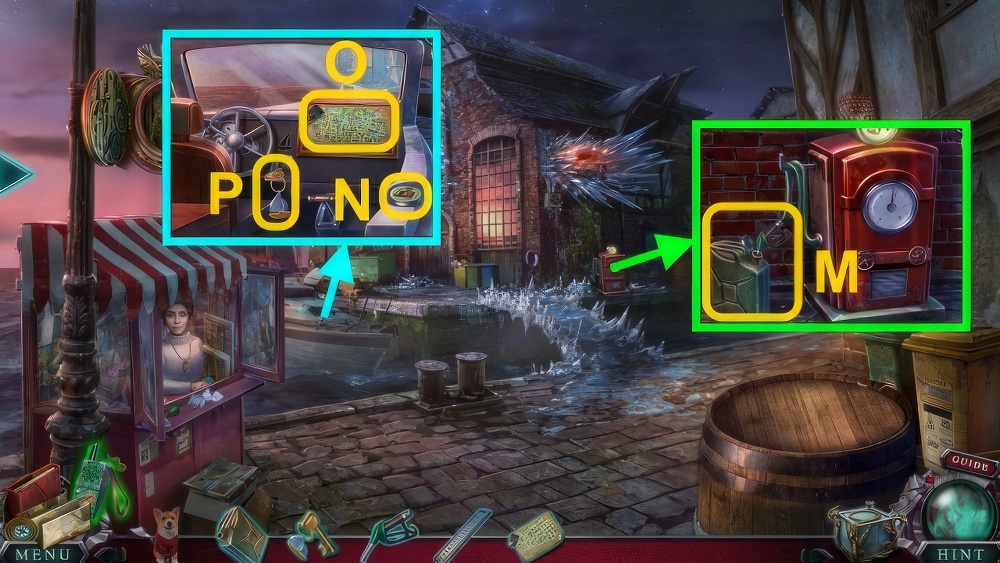
- Give ABE’S WILL (M).
- Go forward.
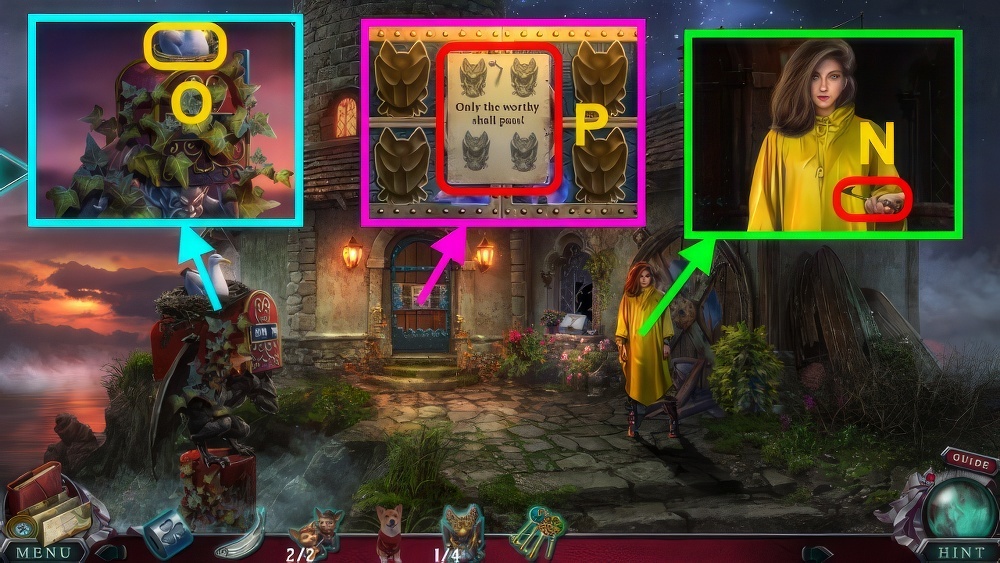
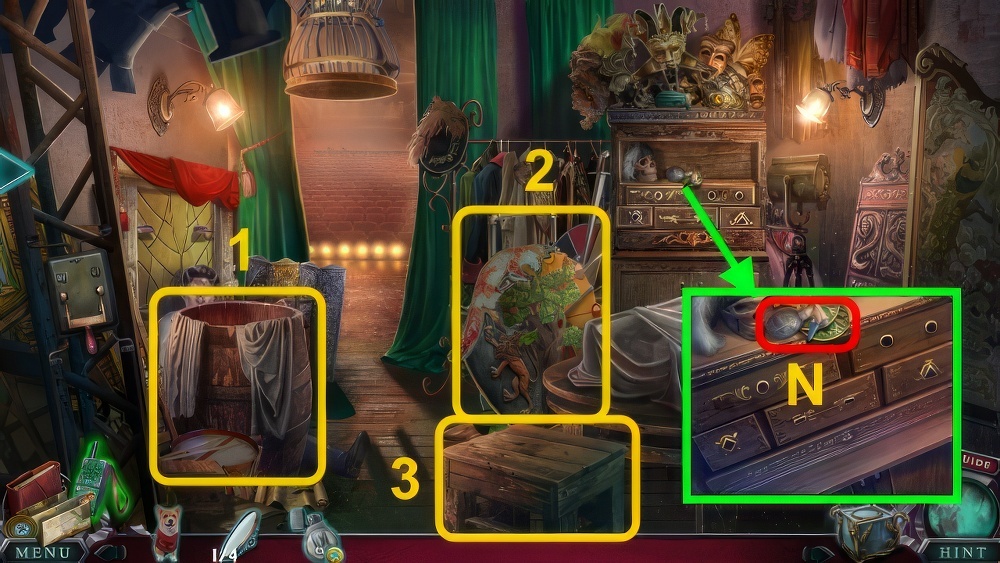
- Talk, take BROKEN HARPOON (N).
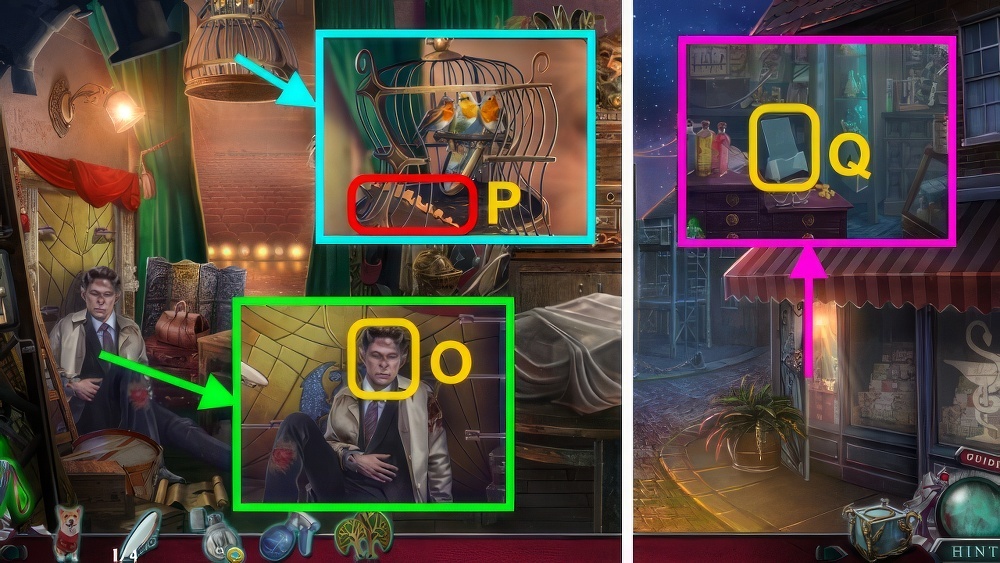
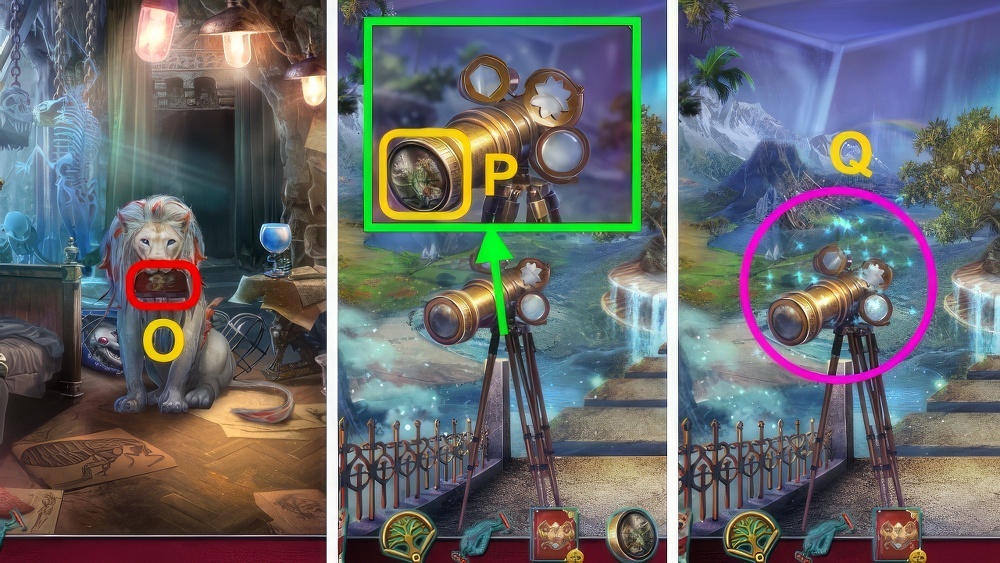
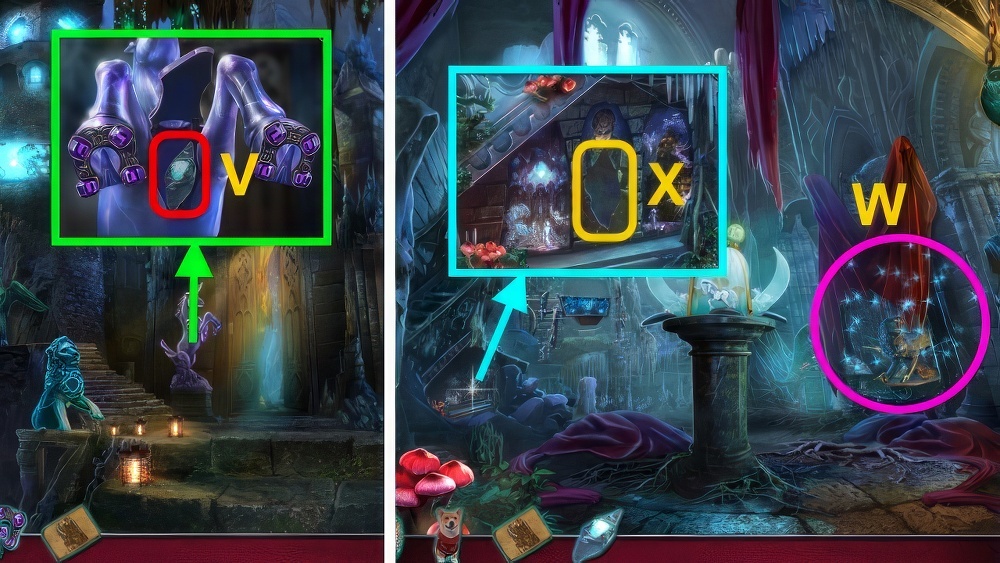
- Give FISH (O), take BROKEN GARGOYLE.
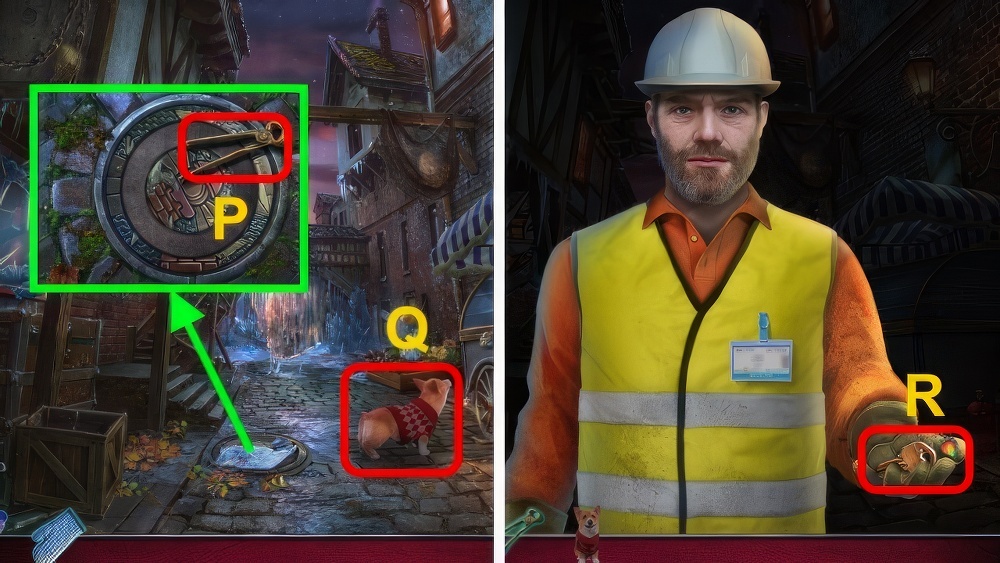
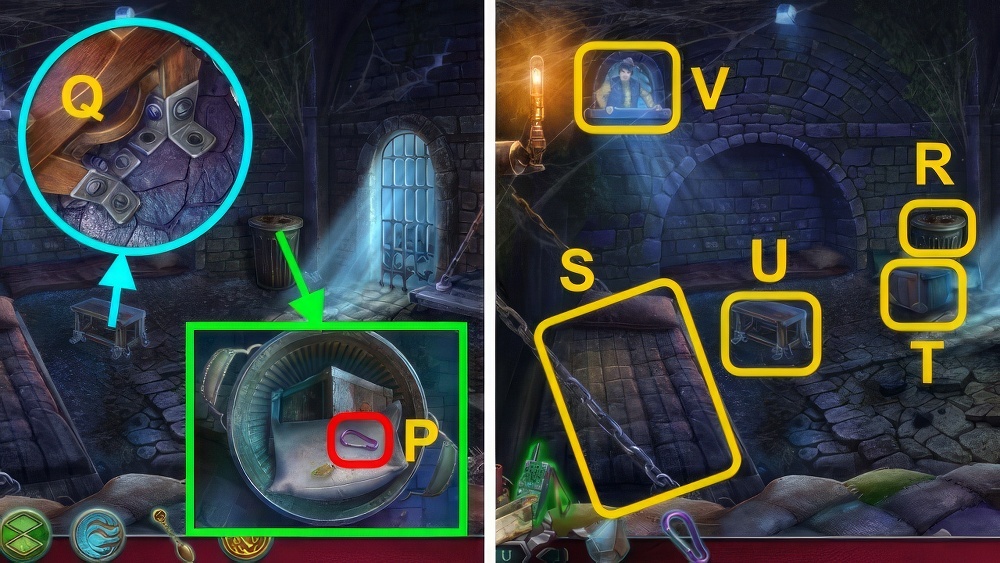
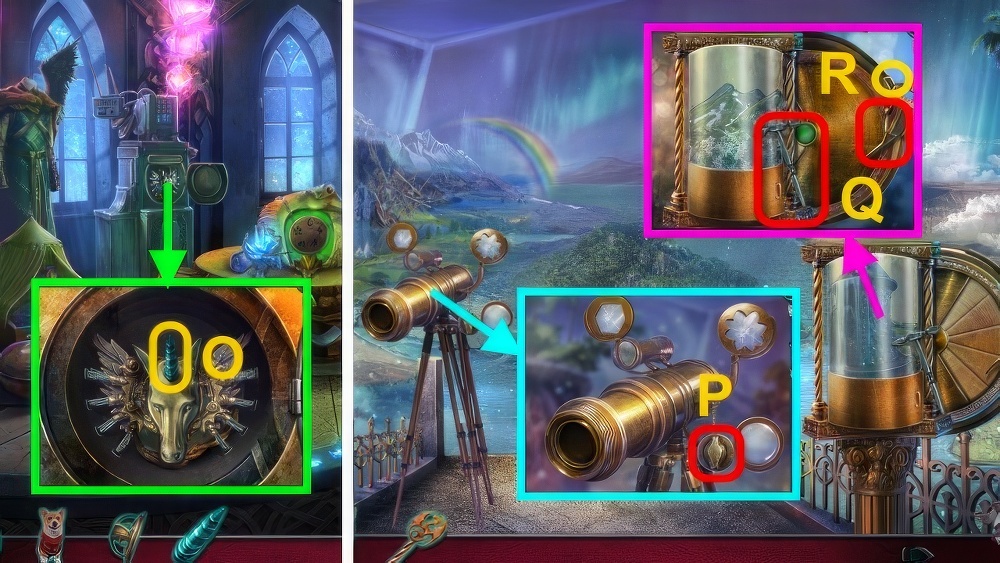
- Take note (P) and GLOVE.
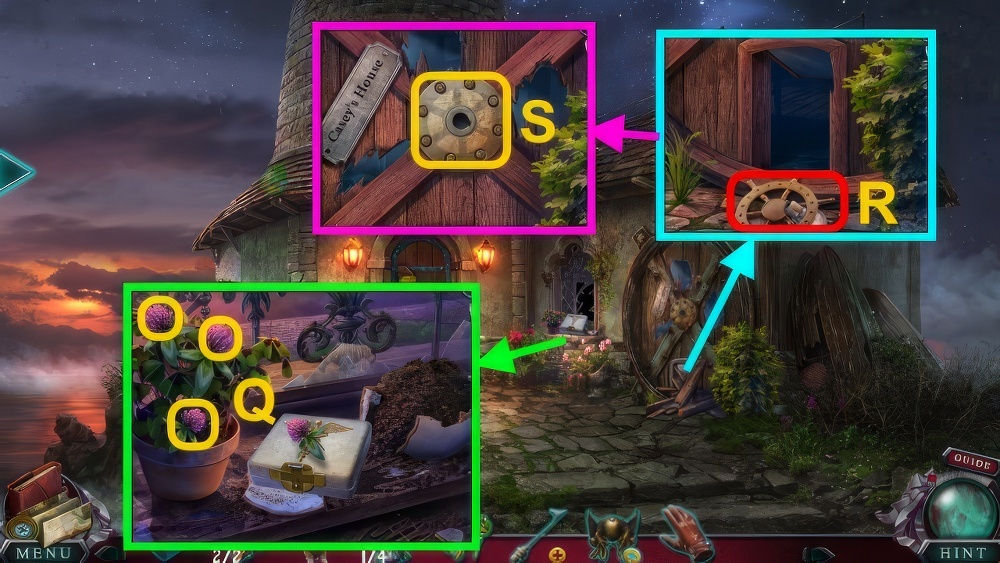
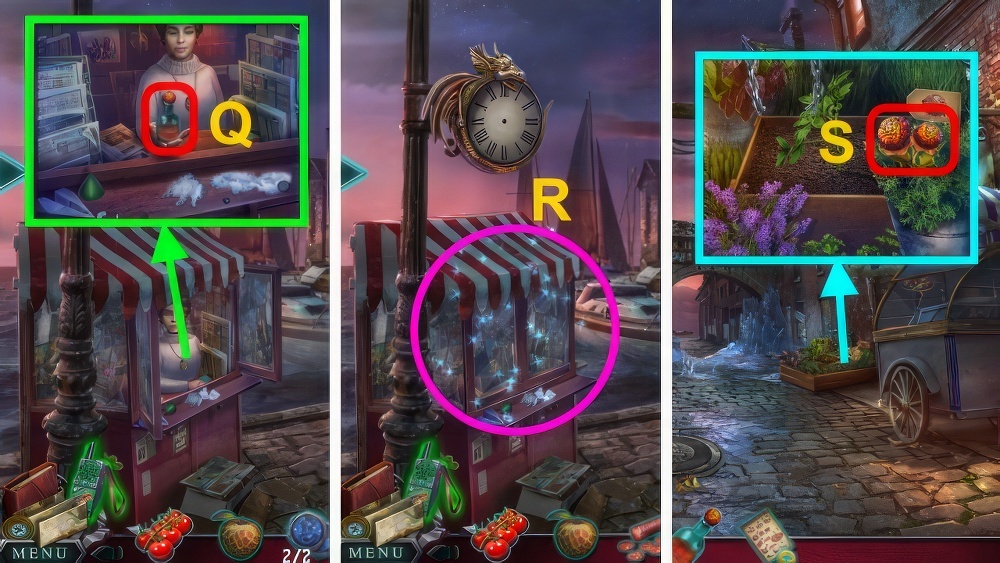
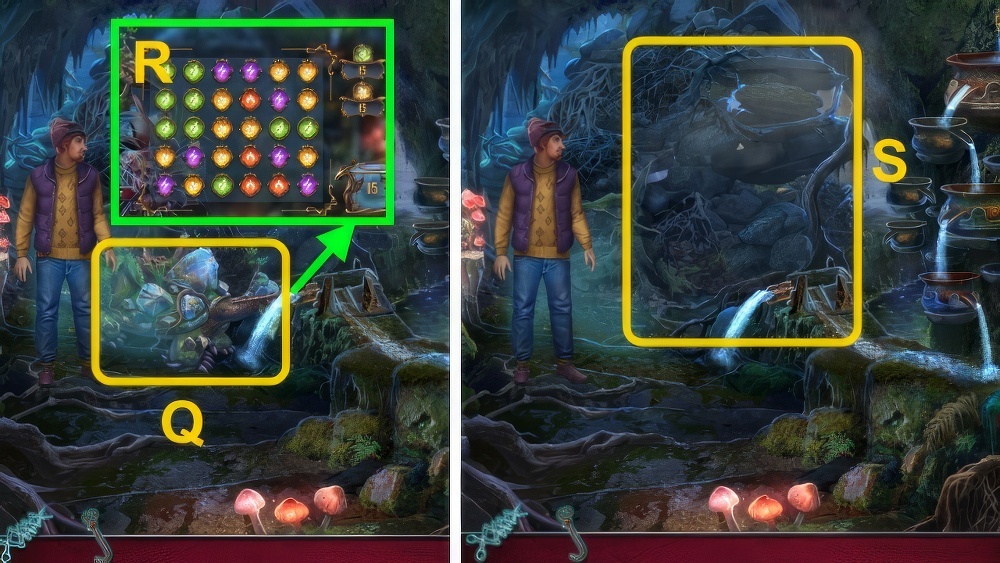
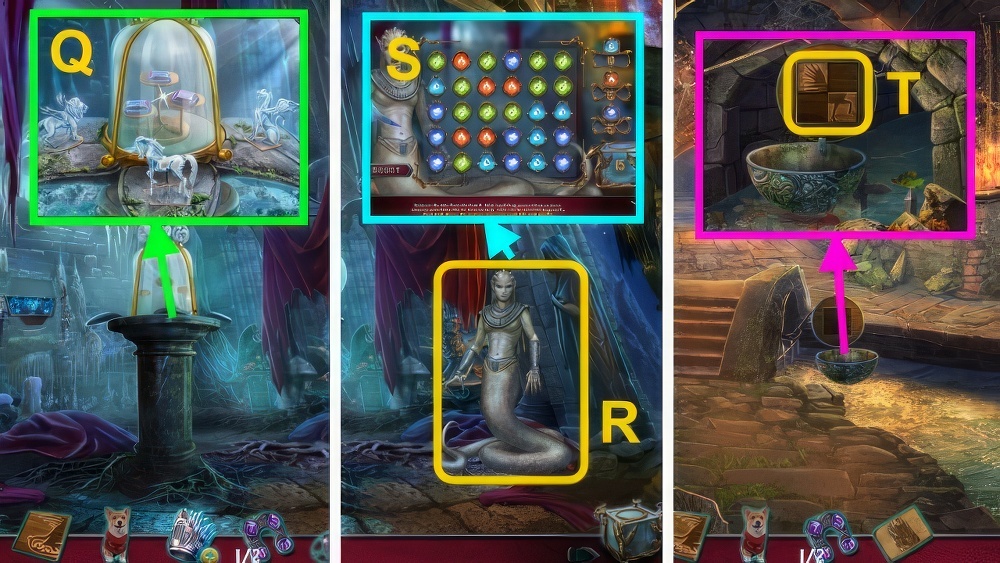
- Collect flowers (Q), take CLOVER FLOWERS.
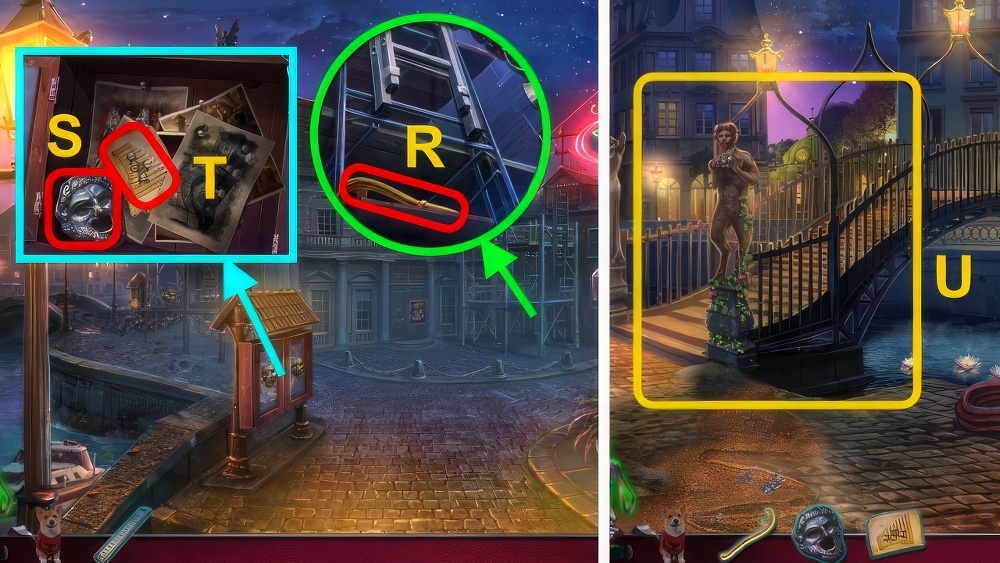
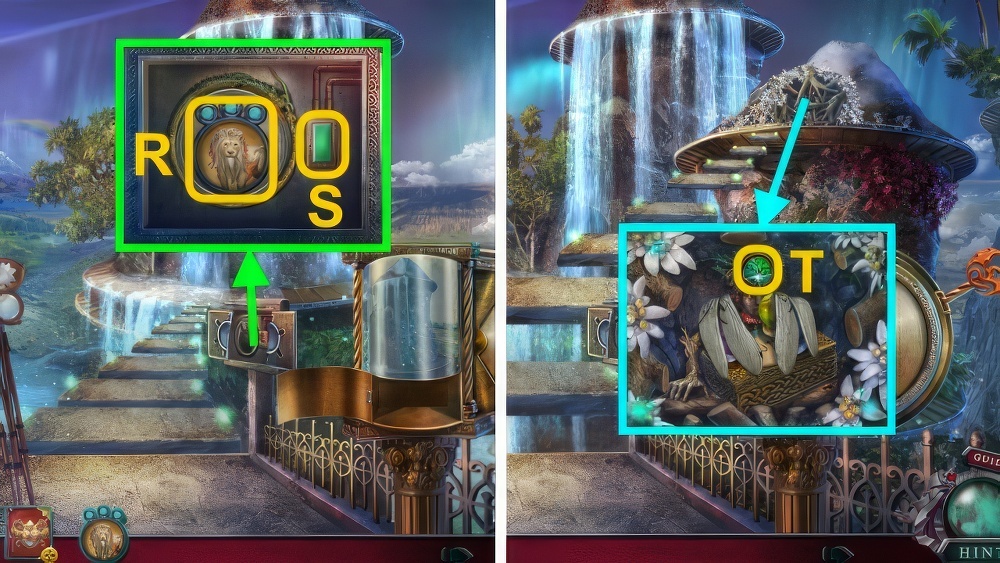
- Use GLOVE thrice, use ASH, take BULB and VALVE (R).
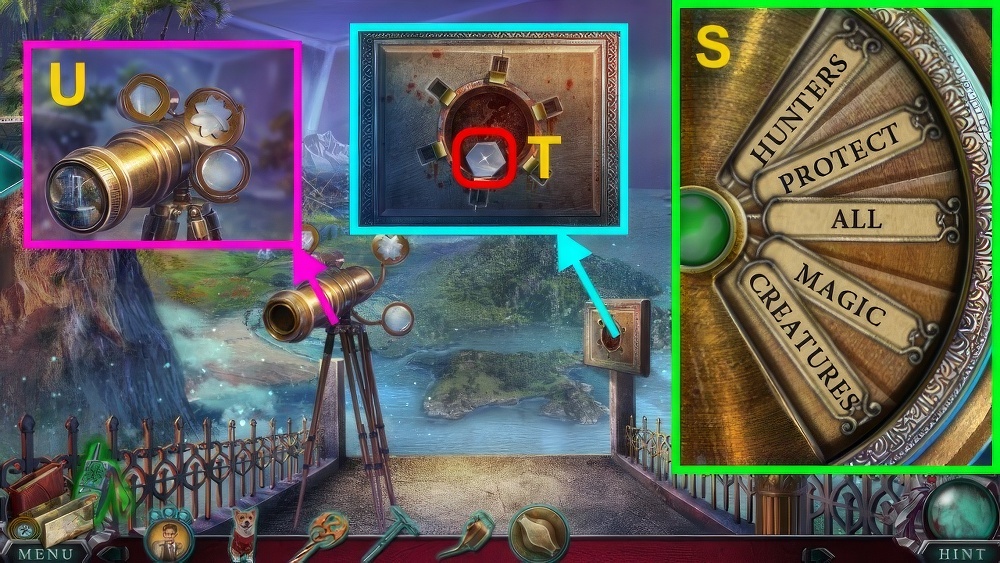
- Place VALVE (S).
- Go right.
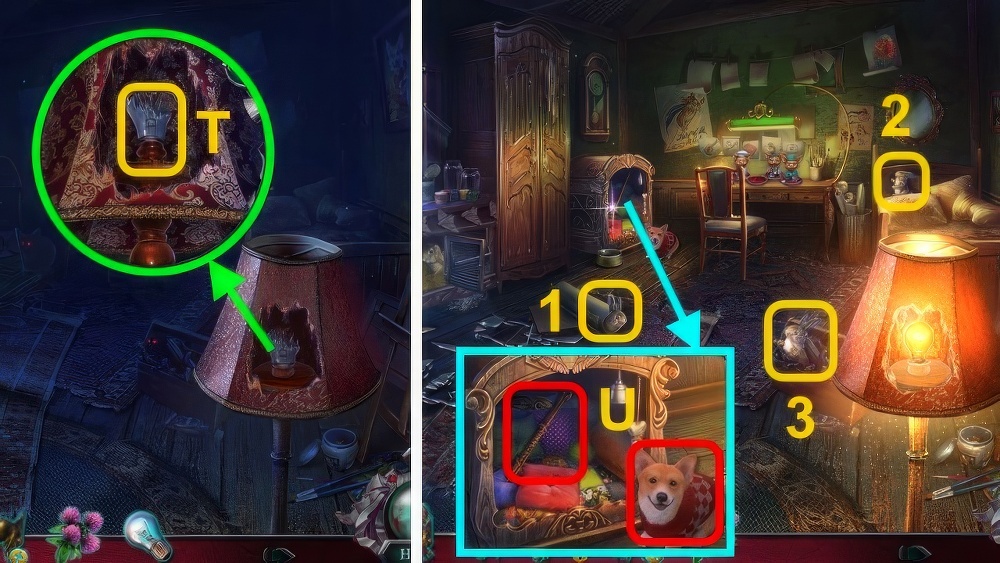
- Replace BULB (T).
- Collect rabbits (1-3).
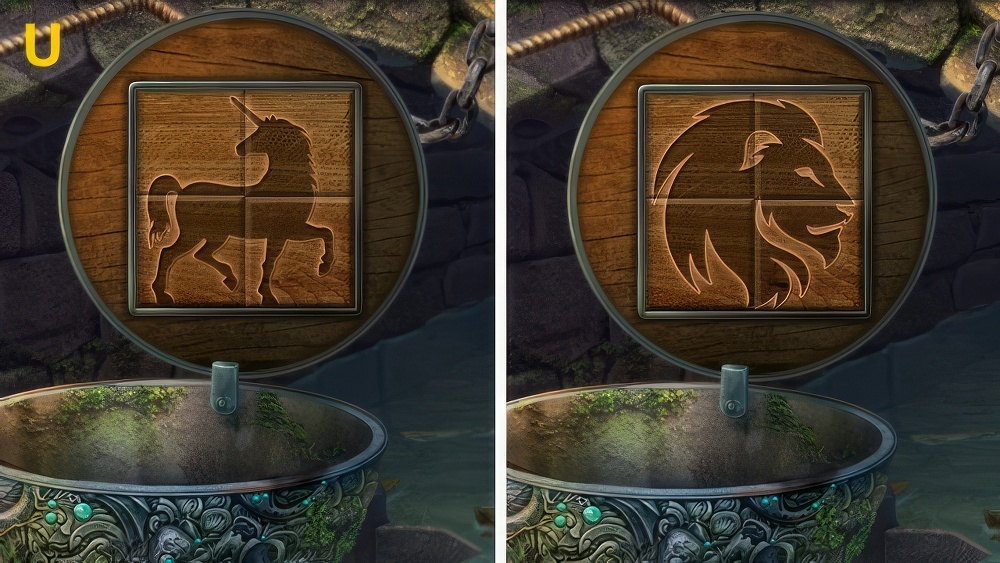
- Take STICK and ASH (U).
- Use CLOVER FLOWERS, take BUNNY.
- STICK on BROKEN HARPOON, take HARPOON.

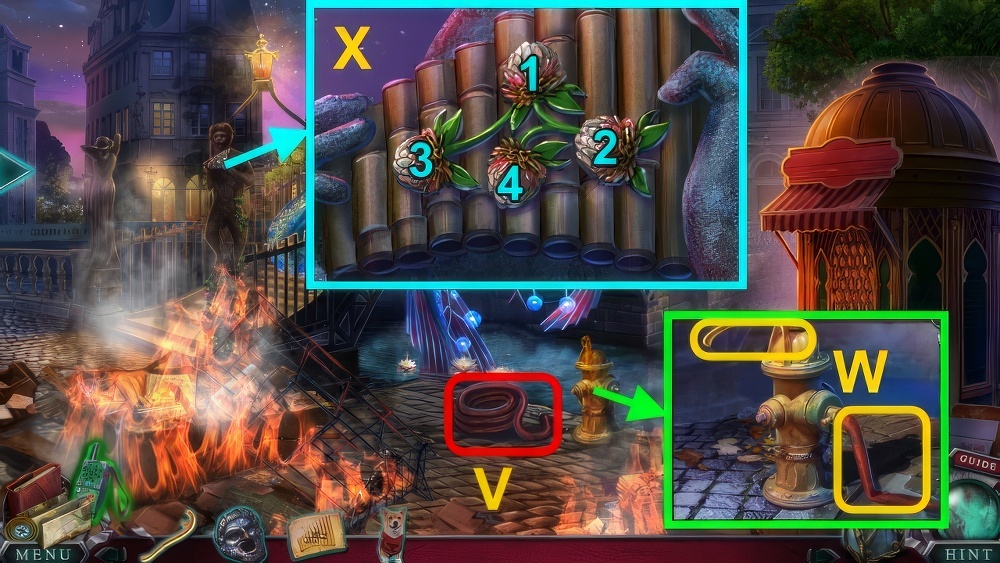
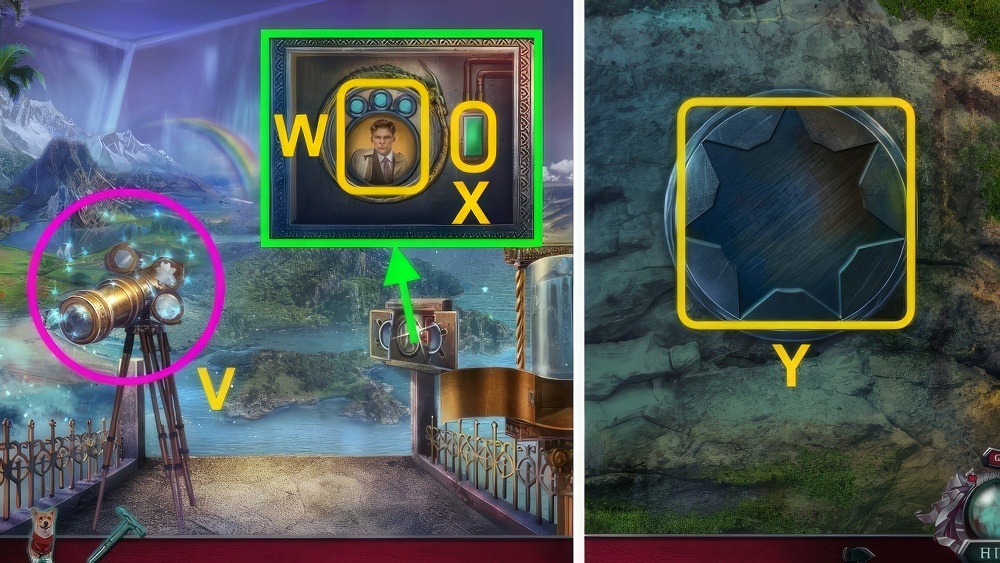
- Place BUNNY, take GARGOYLE LANTERN (V).
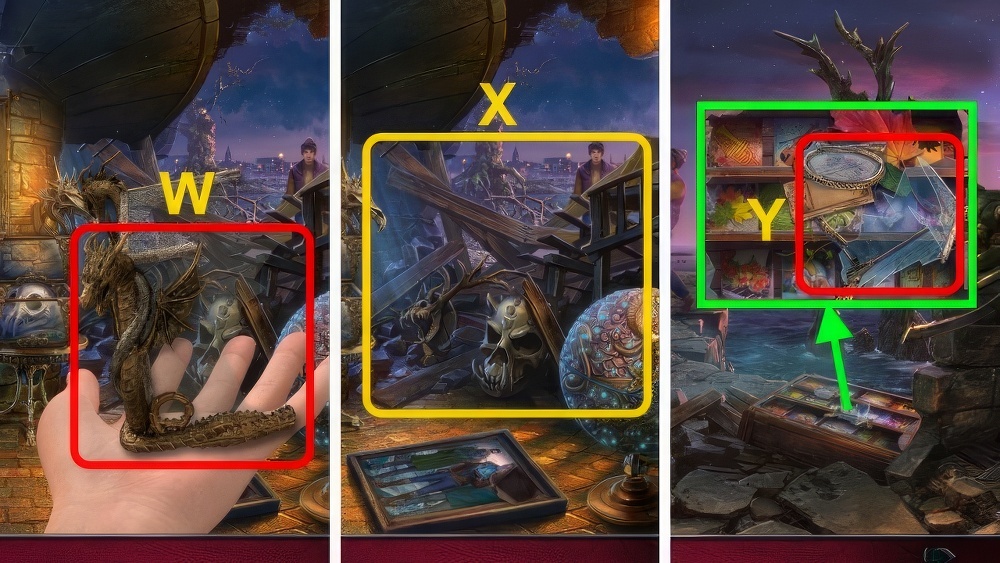
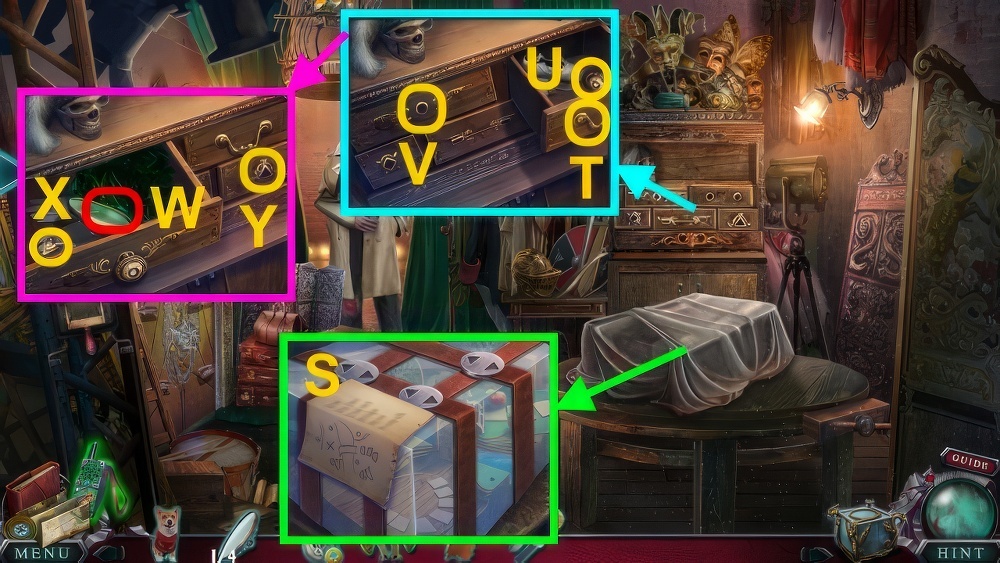
- Examine photos (W), place TOYS (2/2).
- Swap the papers until they form the family motto.
- Select two papers to swap them.
- Complete the figurines according to the pictures above them.
- Select two figurine parts to swap them.
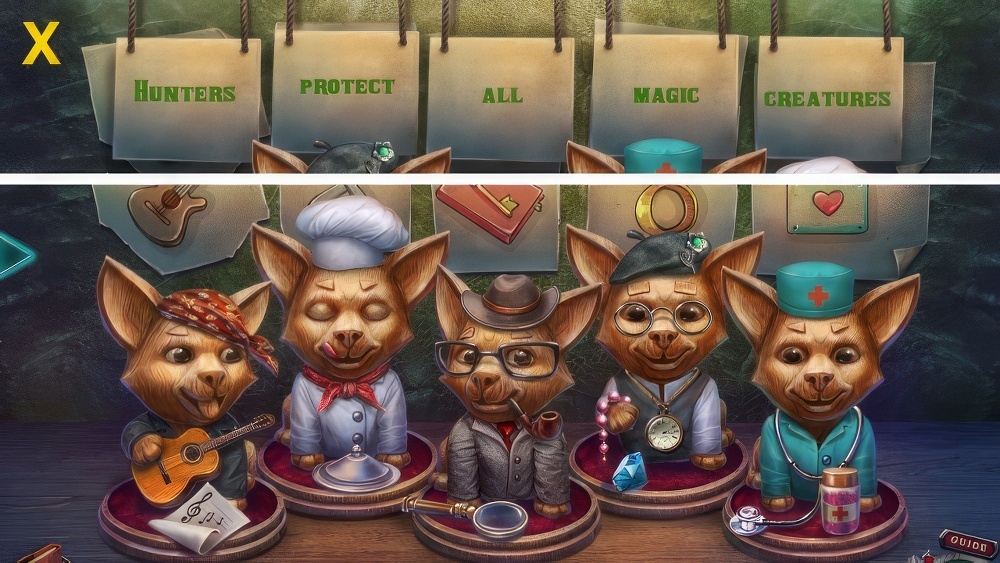
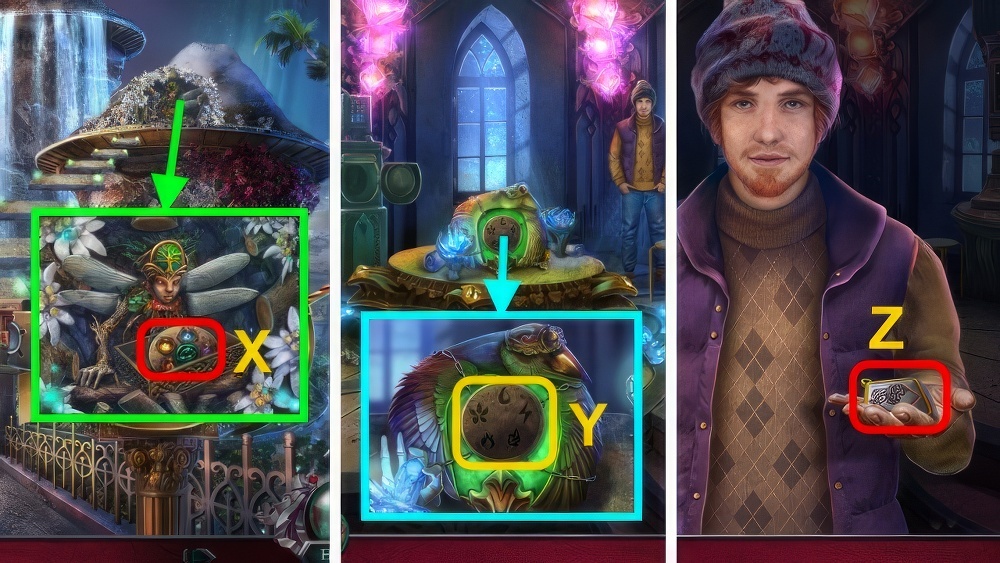
- Walkthrough (X).
- Take MEDICAL SYMBOL and GARGOYLE FIGURINES (2/4).
- Go down.
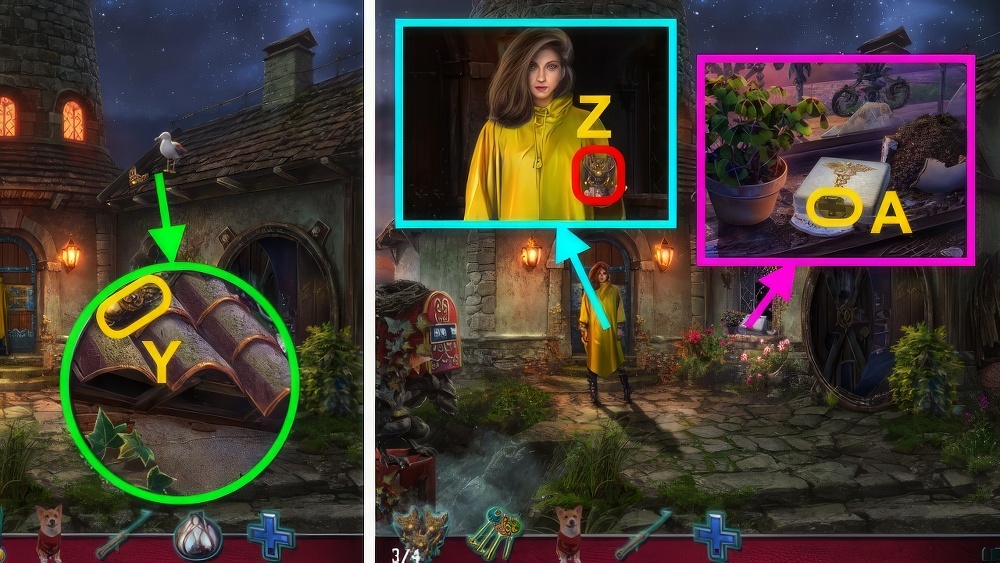
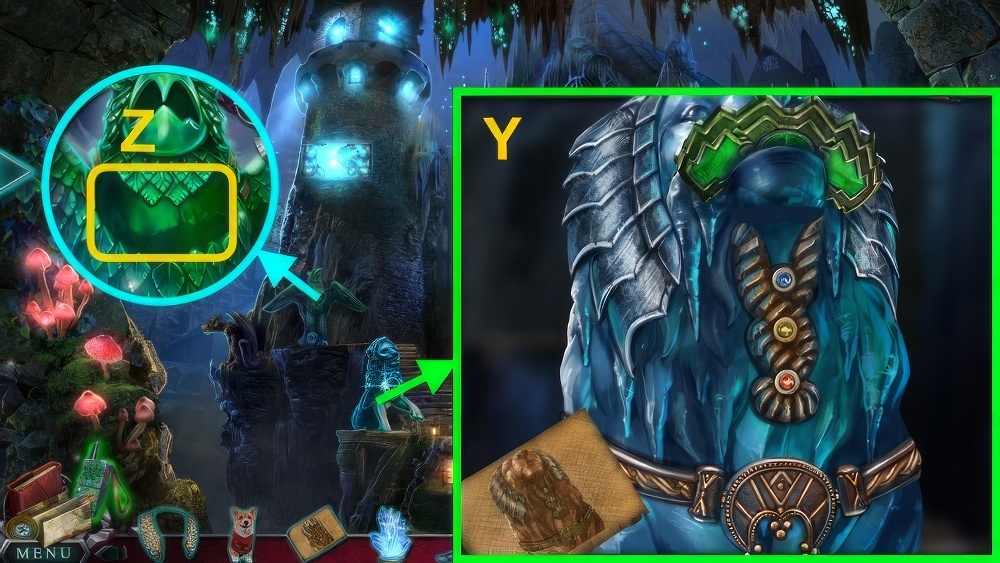
- Use HARPOON (Y), receive GARGOYLE HEAD.
- GARGOYLE LANTERN and GARGOYLE HEAD on BROKEN GARGOYLE, take GARGOYLE FIGURINES (3/4).
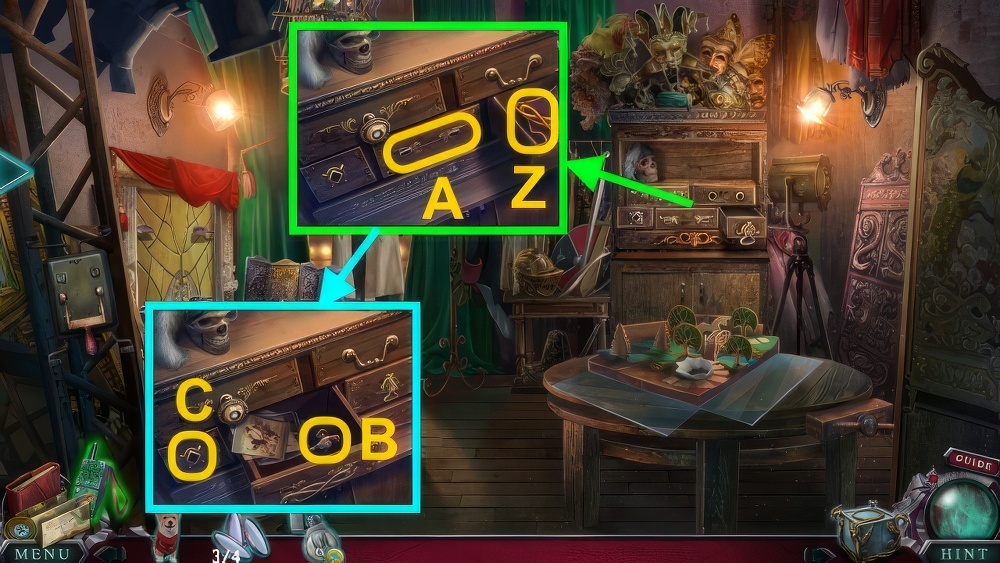
- Talk, take GARGOYLE FIGURINES (4/4) (Z).
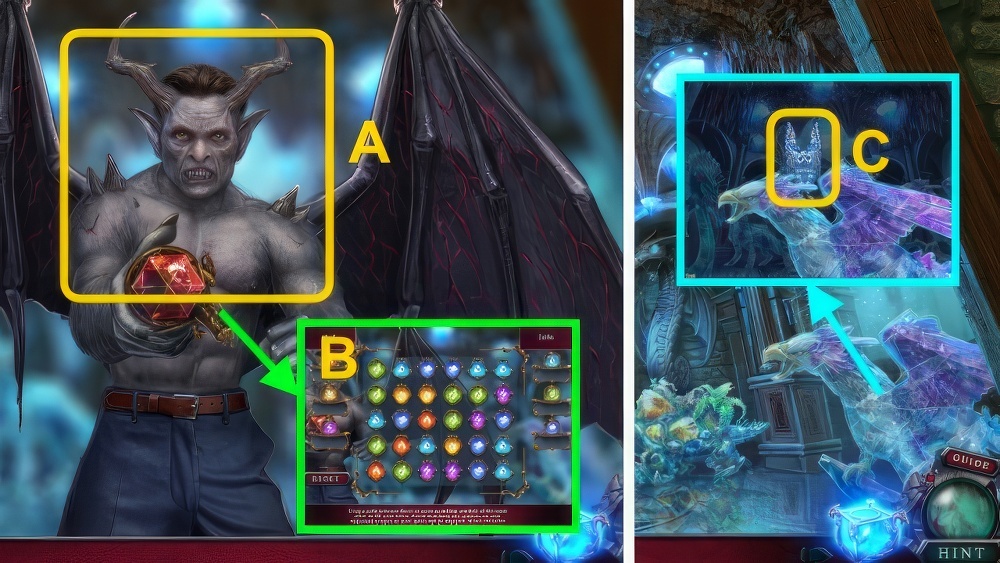
- Examine (A), place MEDICAL SYMBOL.
- Move items, open.
- Take ELECTRICAL TAPE and CODE.
- Move leaves.
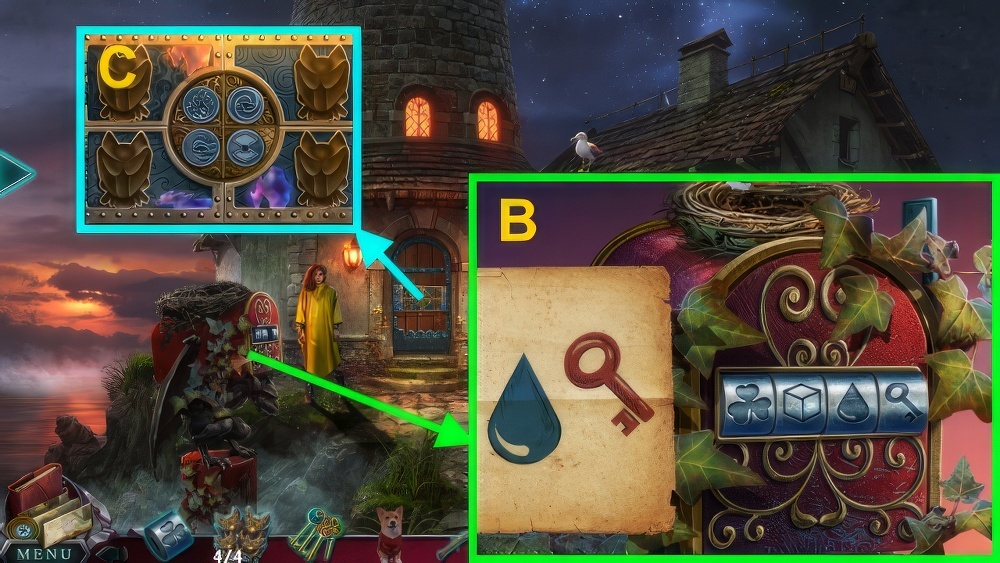
- Place CLOVER BUTTON and CODE, enter code (B).
- Read letters, take TAPE.
- Use KEYS and GARGOYLE FIGURINES (C).
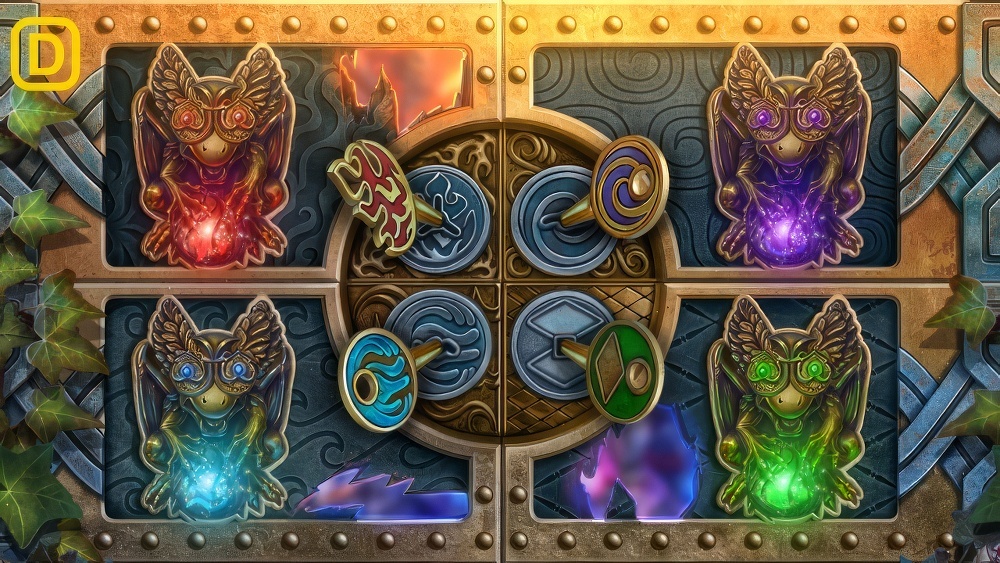
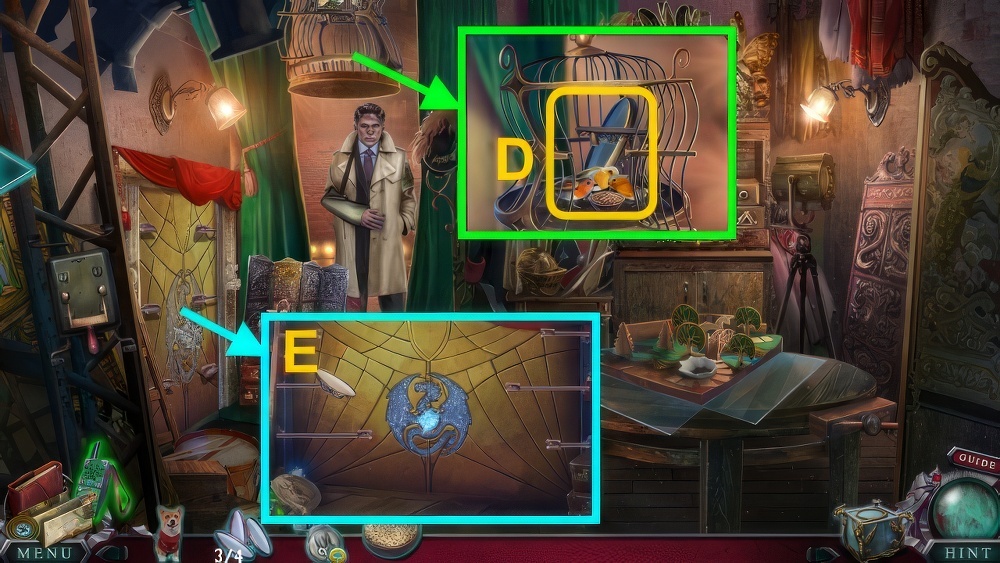
- Arrange gargoyles (D).
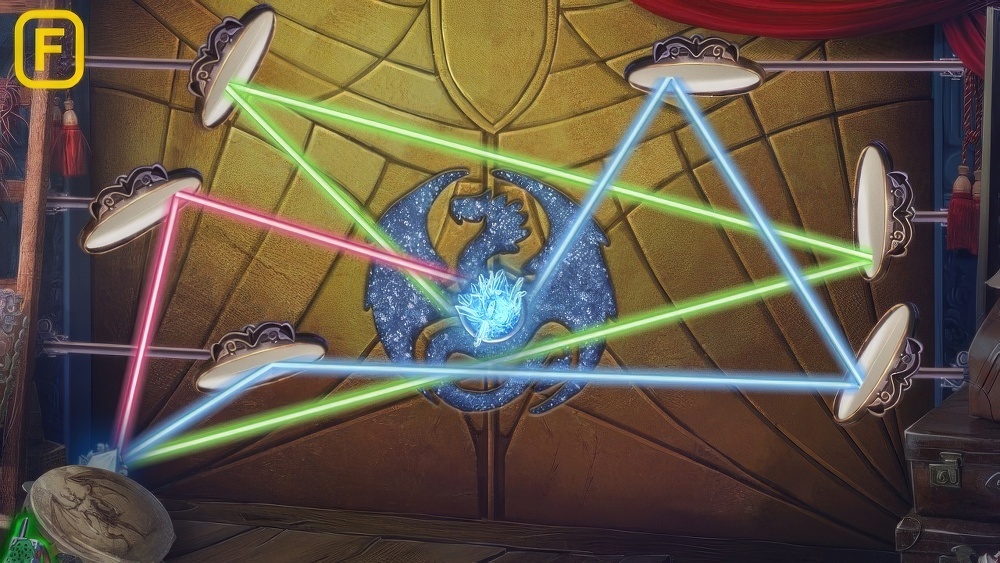
- Restore the image.
- Select two discs of the same size to swap them.
- Press a disc more than once to rotate it.
- Discs won’t move once placed correctly.
- Walkthrough (E).
- Go forward.
- Talk (F).
- Take BATTERY (G).
- Open, take GRAMOPHONE BUTTON.
- Use HARPOON (H), take GLASS MONSTERS.
- Use GLASS MONSTER, place monsters (I).
- Take MECHANICAL WOLF.
- Examine, take STAR (J).
- Place STAR (K).
- Take LIGHT SWITCH, use BATTERY and ELECTRICAL TAPE.

- Take note and LIGHTNING SYMBOL (L).
- Place LIGHTNING SYMBOL (M), take DIARY TOKEN.
- Place LIGHT SWITCH, pull.
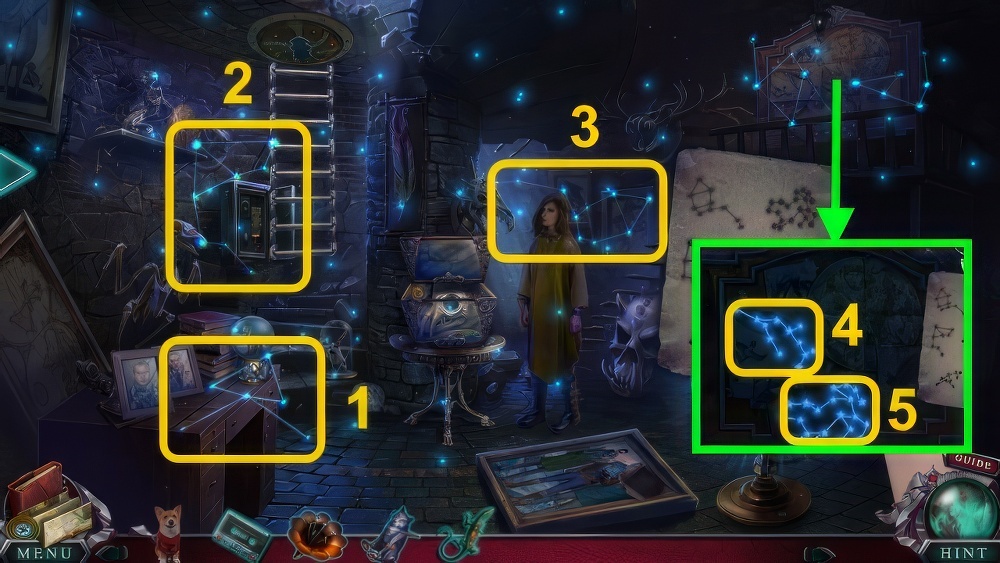
- Collect constellations (1-5).
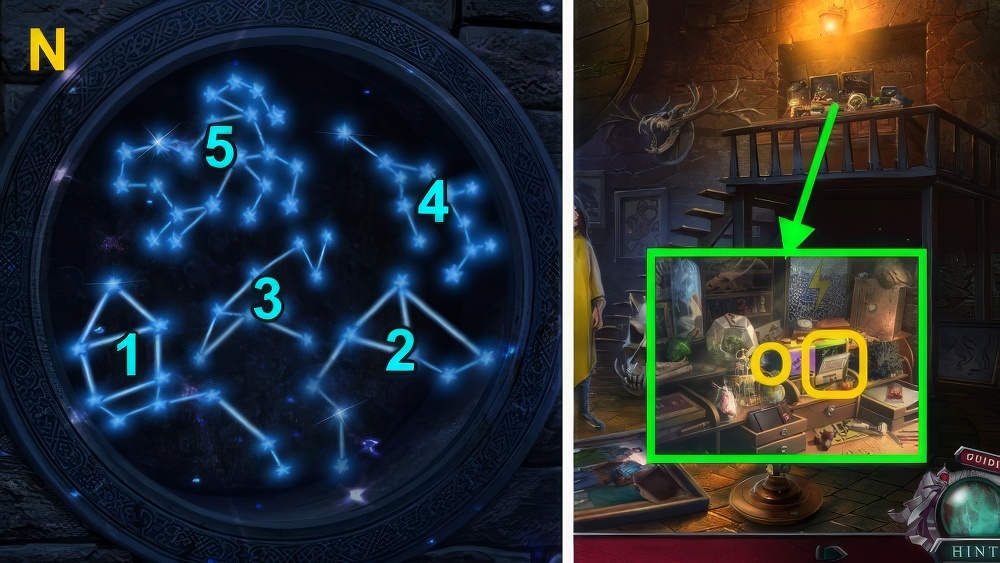
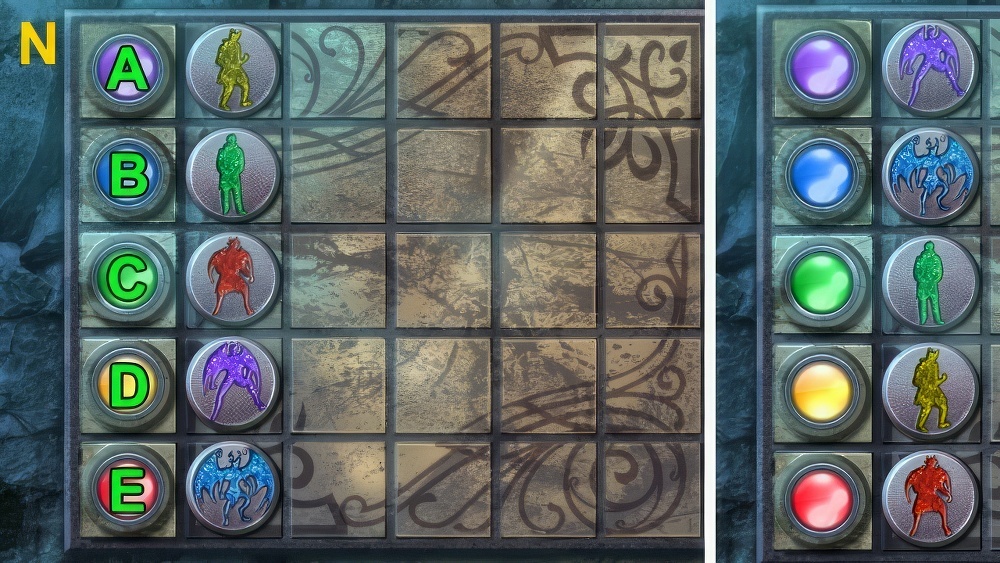
- Walkthrough (N).
- Play TAPE (O).
- Play puzzle, receive ABE’S DIARY.
- DIARY TOKEN on ABE’S DIARY.
- Examine pictures, take COMIC BOOK.
- Turn page, take LIGHTHOUSE EMBLEM.
- Turn page, examine picture.
- Take MECHANICAL BAT.
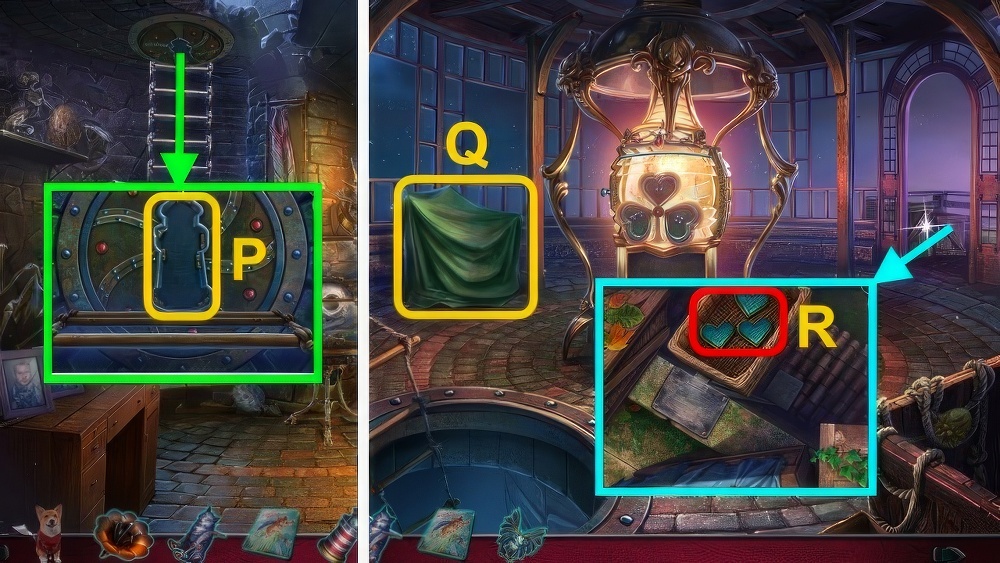
- Place LIGHTHOUSE EMBLEM (P).
- Go up.
- Use ASH on scene.
- Remove cloth (Q), take GRAMOPHONE.
- Examine GRAMOPHONE, take MECHANICAL BUTTERFLY.
- Take CLOVER LEAVES (R).
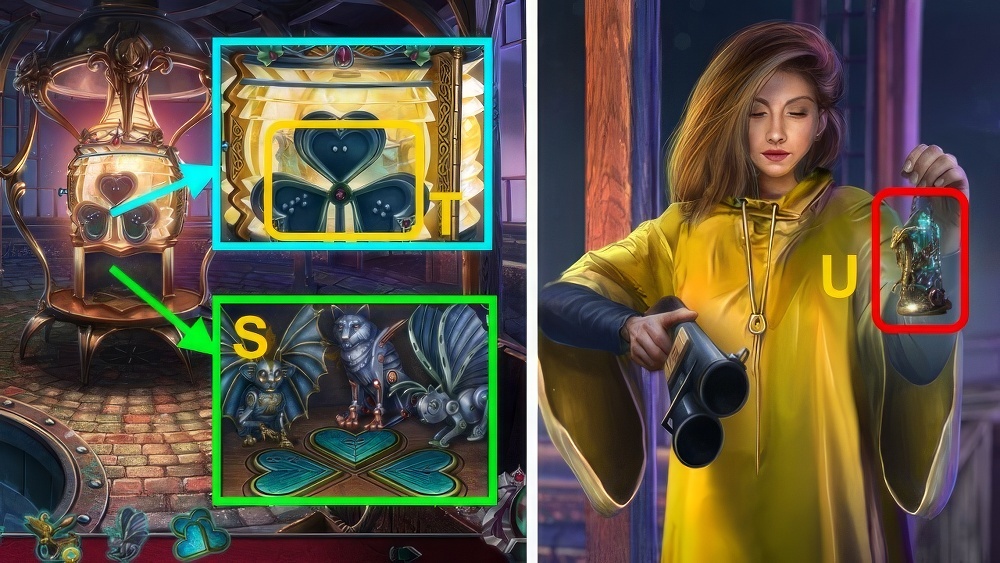
- Place CLOVER LEAVES, MECHANICAL WOLF, MECHANICAL BAT, and MECHANICAL BUTTERFLY (S), take PIERCED LEAVES.
- Place PIERCED LEAVES (T), take Cube.
- Examine crystal (U).
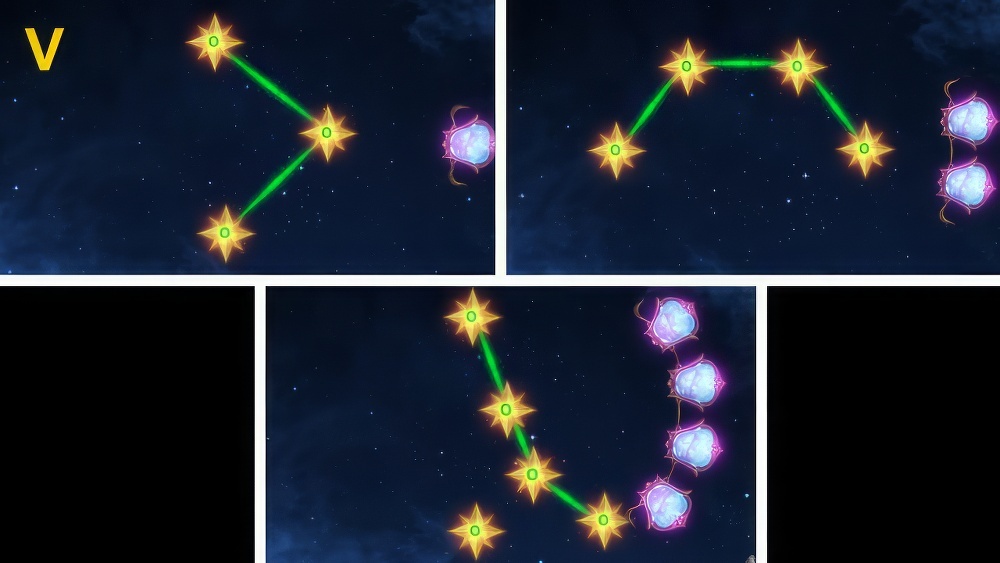
- Make the number of connections between stars equal to the numbers on them.
- Select a star to remove its connections.
- You have a limited number of turns.
- Walkthrough (V).
- Take BROKEN CUBE (W).
- Move boards (X).
- Go right.
- Take CUBE PARTS (2/3) (Y).
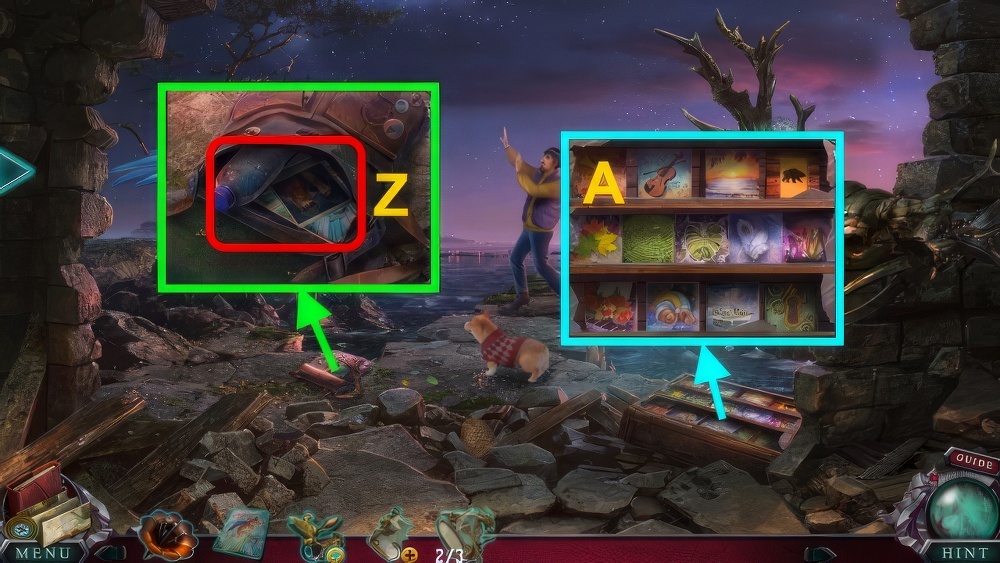
- Open bag, take photo, WATER, and COMIC BOOK PART (Z).
- COMIC BOOK on COMIC BOOK PART, read.
- Take RECORD NAME.
- Move leaves, place RECORD NAME (A).
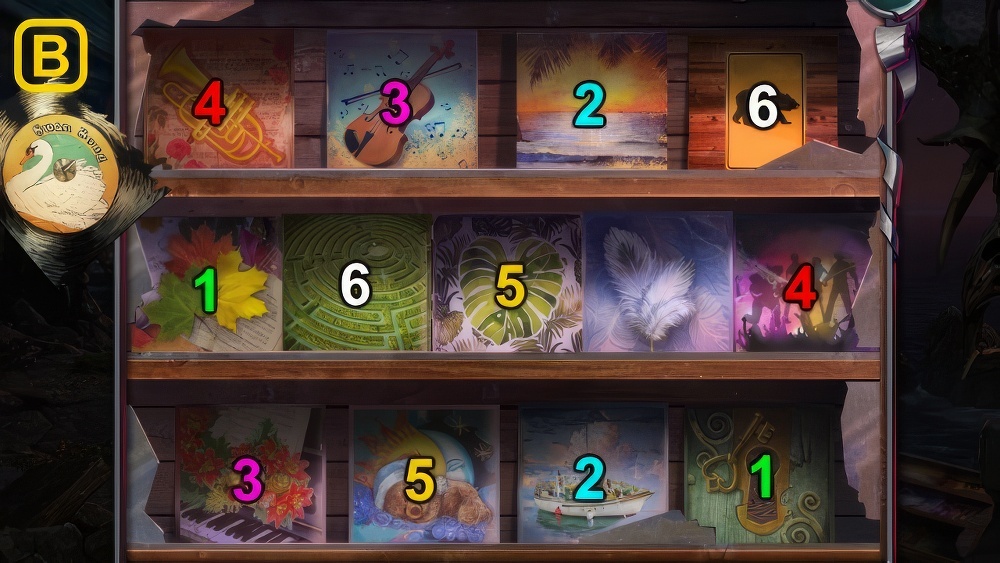
- Find matching pairs of records.
- Select two records to see the images under them.
- Walkthrough (B).
- Take RECORD.
- GRAMOPHONE BUTTON and RECORD on GRAMOPHONE, take GRAMOPHONE WITH RECORD.

- Use GRAMOPHONE WITH RECORD (C).
- Take ASH (D).
- Talk, take CUBE PARTS (3/3) (E).
- CUBE PARTS (3/3) on BROKEN CUBE, take Cube.
- Use CUBE (F) on gryphon.
- Remove the tiles from the board.
- Select and drag across three or more adjacent matching tiles to remove them.
- Tiles can be matched diagonally.
- After each move, the creature will make some tiles unavailable.
- Walkthrough is random (G).
- Take Radio (H).
- Use Cube (I).
- Examine Ash (J).
- Examine hanger thrice (K), receive BENT WIRE.
- Use BENT WIRE (L), receive ROPE and OVEN MITT.
- Use ROPE (M).
- Examine ASH (N).
- Examine (O).
- Move ice, take PLIERS (P).
- Take ASH (Q).
- Take FOOD TRUCK KEY (R).
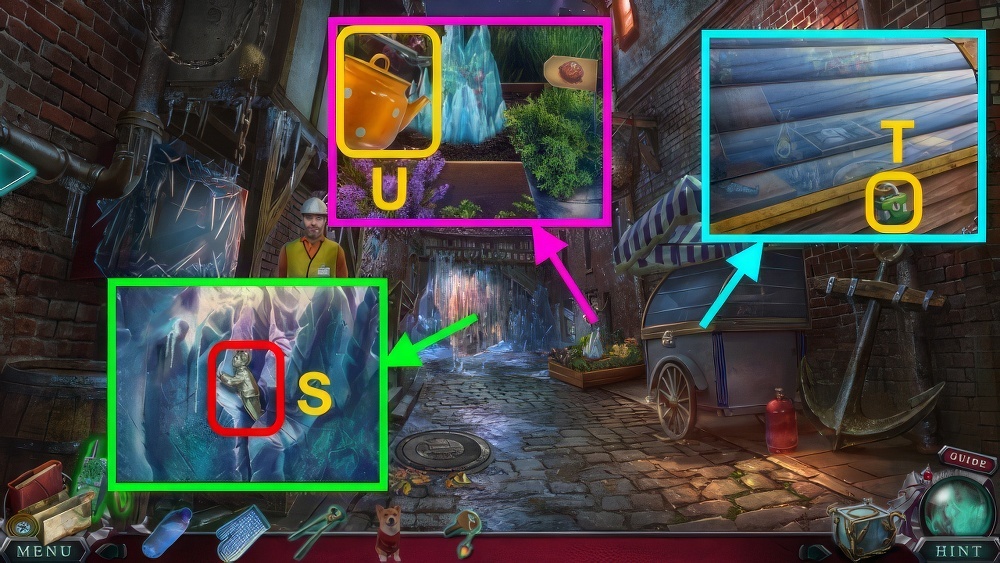
- Take FIGURINE (1/2) (S).
- Use FOOD TRUCK KEY (T), take FIGURINES (2/2).
- Use PLIERS (U), receive TEA POT.
- Turn on stove, place TEA POT and WATER (V).
- Use OVEN MITT, receive POT WITH HOT WATER.
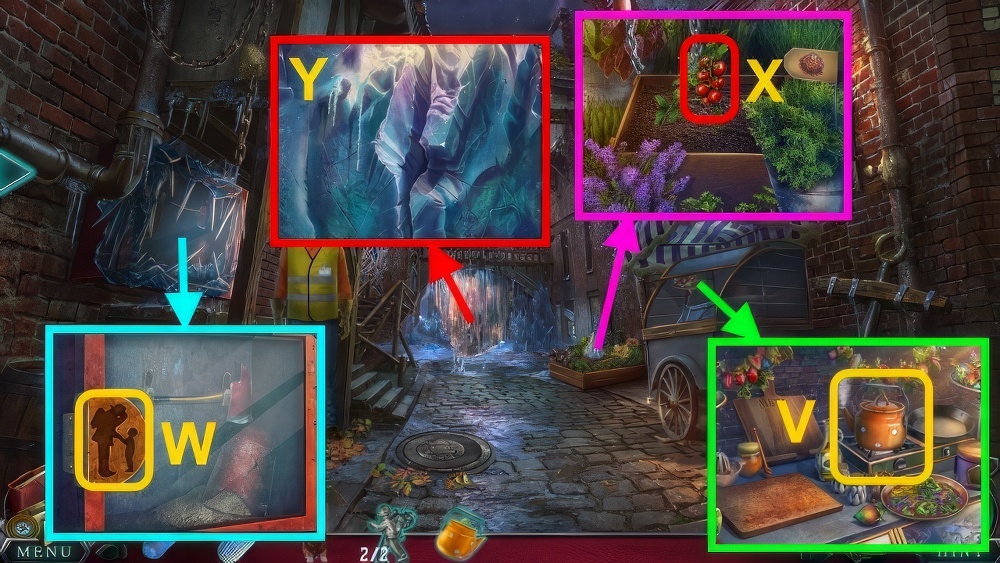
- Pour POT WITH HOT WATER, place FIGURINES (2/2) (W).
- Take AXE.
- Pour POT WITH HOT WATER, take TOMATOES (X).
- Use AXE (Y).
- Go forward.
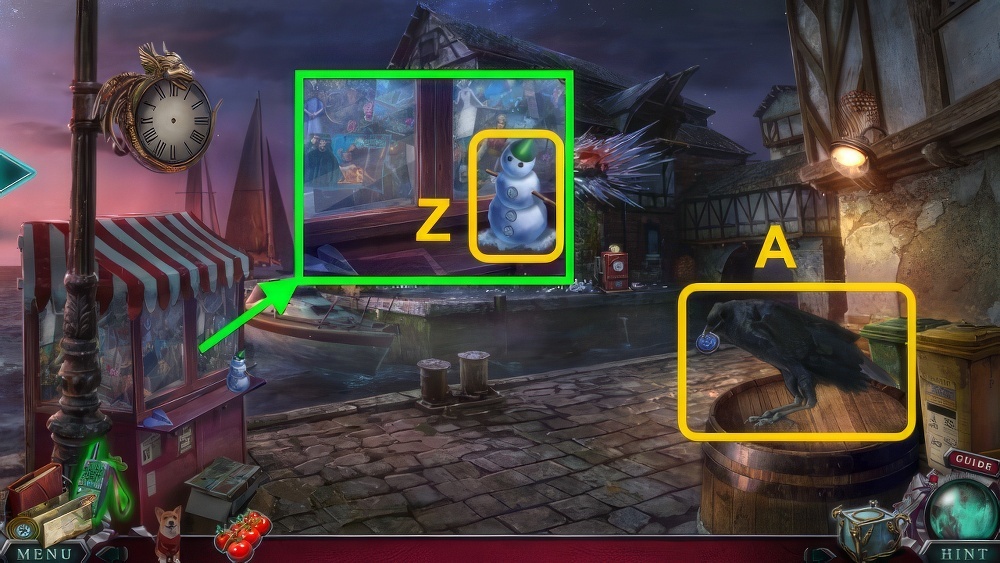
- Examine (Z), take SNOWBALL.
- Use SNOWBALL (A), take APPLE.
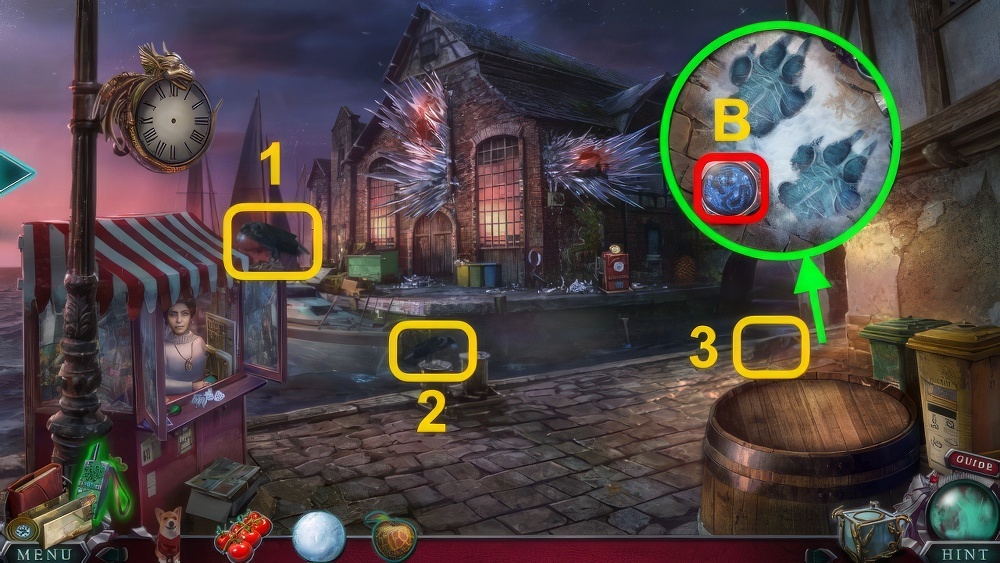
- Use SNOWBALL thrice (1-3).
- Take DRAGON COIN (1/2) (B), use ASH.
- Find matching pairs of tracks beneath the clouds.
- Select two clouds to see the tracks beneath them.
- Then select the path you want to take.
- Walkthrough (C).
- Go right.
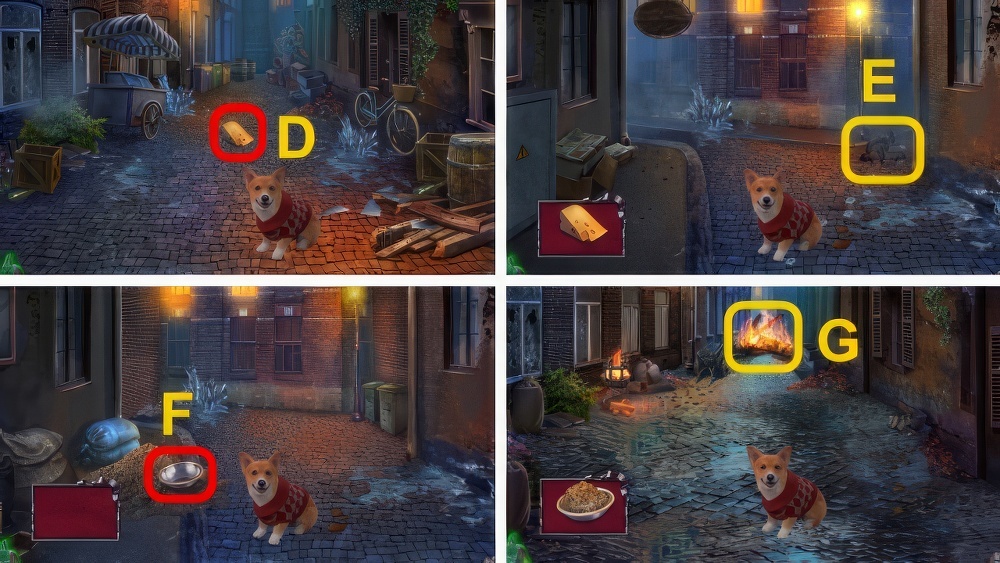
- With help from the dog, find a way through the maze.
- Use items you find along the way to overcome obstacles.
- Take cheese (D).
- Go down, left.
- Give cheese (E).
- Go right, left.
- Take bowl (F).
- Go down, right.
- Use bowl (G).
- Go forward.
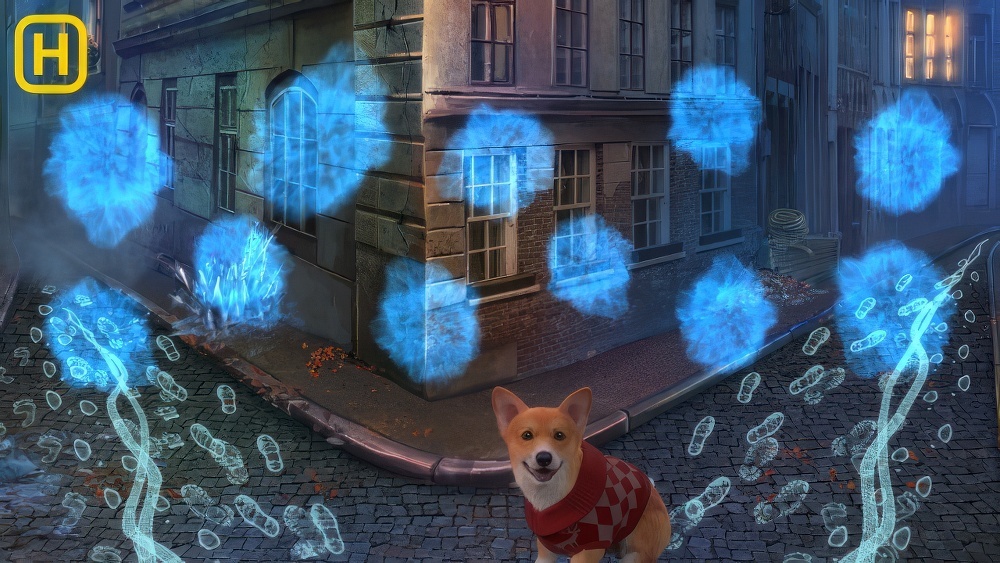
- Examine scene, walkthrough is random (H).
- Go right.
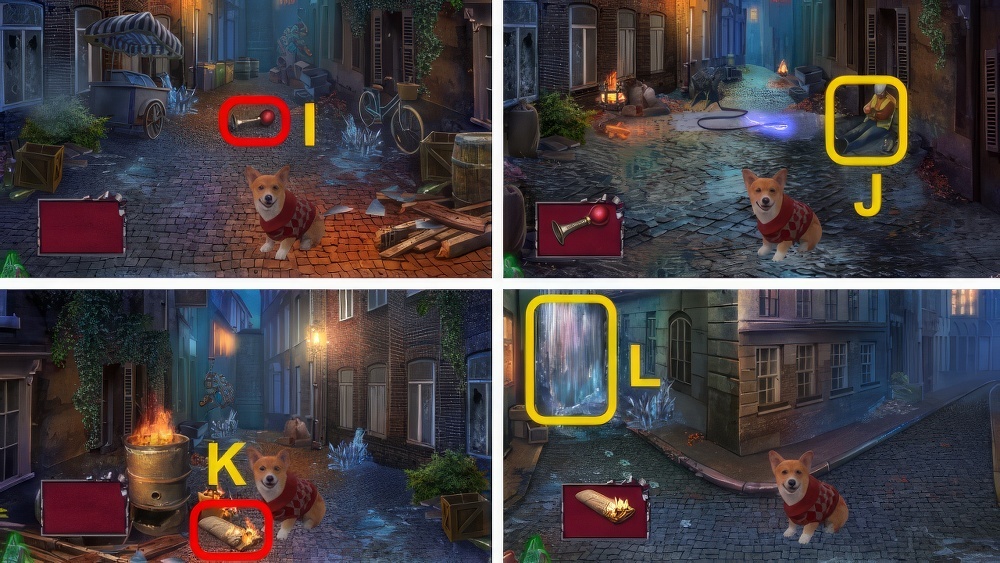
- Take horn (I).
- Go down, left, forward.
- Use horn (J).
- Go forward, right.
- Take newspaper (K).
- Go down.
- Use newspaper (L).
- Go left.

- Use Radio (M).
- Take ASH, SAUSAGE, and DRAGON WING (N).
- Replace DRAGON WING (O).
- Take DRAGON COINS (2/2) (P).
- Select Superhero, give DRAGON COINS (2/2).
- Take GROWTH STIMULANT (Q).
- Play puzzle, receive COMIC BOOK (R).
- Read COMIC BOOK, take RECIPE.
- Go down.
- Use GROWTH STIMULANT, take UNUSUAL FRUIT (S).
- SAUSAGE, TOMATOES, APPLE, and UNUSUAL FRUIT on RECIPE, take FOOD.
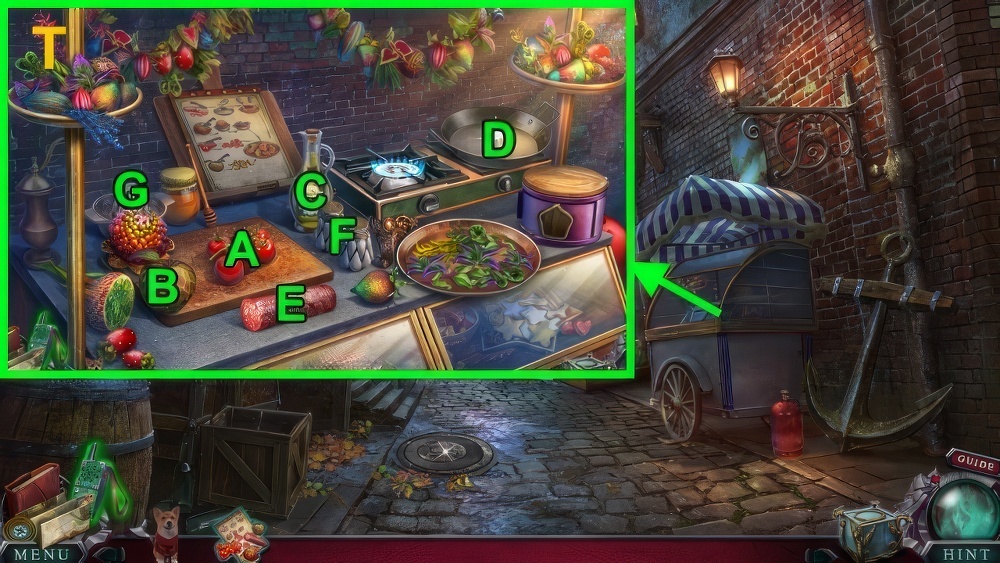
- Place FOOD (T).
- Examine tomatoes (A) ×2.
- Examine apple (B) ×3.
- Pour oil (C) in pan (D), examine sausage (E) ×3.
- Use salt and pepper (F) on sausage (D), examine pan.
- Examine fruit (E) ×3, examine juicer (G).
- Take ICE CREATURE FOOD.
- Go forward.
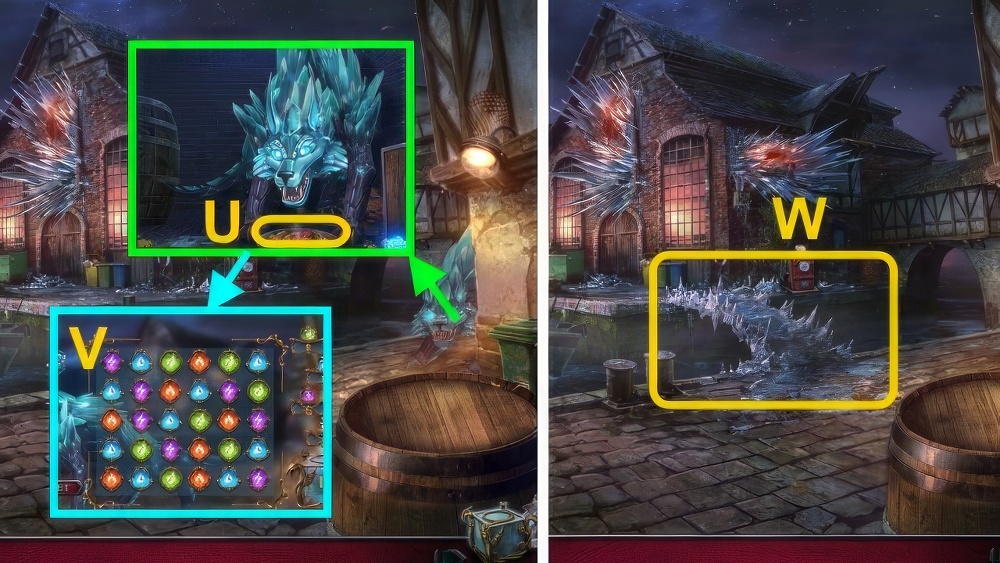
- Give ICE CREATURE FOOD (U), use Cube.
- Remove the tiles from the board.
- Select and drag across three or more adjacent matching tiles to remove them.
- Tiles can be matched diagonally.
- After each move, the creature will make some tiles unavailable.
- Walkthrough is random (V).
- Use Cube (W).
- Go forward.
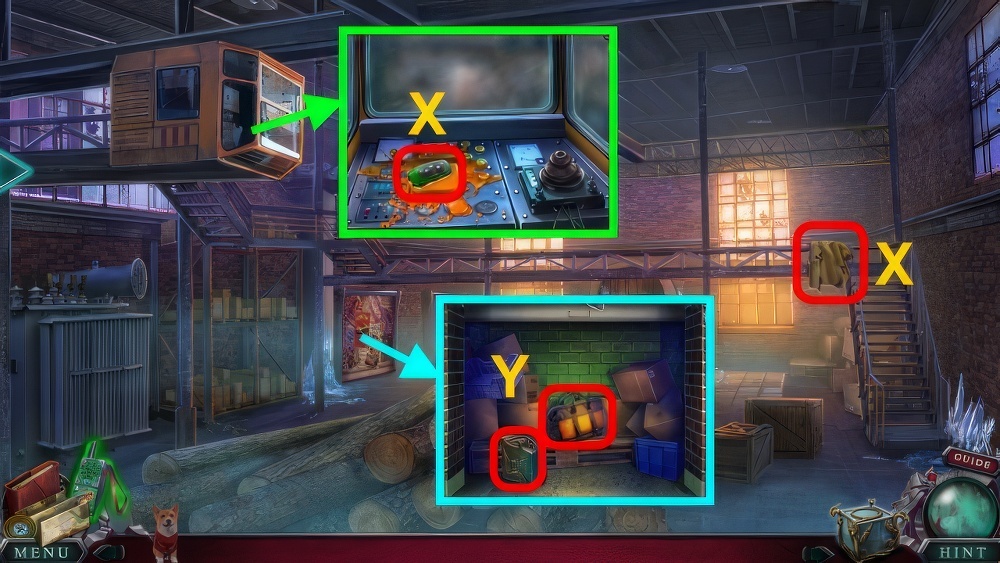
- Take GARAGE OPENER and RAINCOAT (X).
- Examine RAINCOAT, receive COAT PIECE.
- Take PHOTO.
- Examine PHOTO, take PAPER CLIP.
- Use GARAGE OPENER, move boxes.
- Take GAS CANISTER and BAG (Y).
- PAPER CLIP on BAG, take HAMMER and CLOCK HANDS.
- Use HAMMER ×6, open.
- Take MAGNET (Z).
- Use MAGNET (A), take LEVER.
- Use COAT PIECE (B), place LEVER (C).
- Go forward.

- Take BOAT KEY (D).
- Take CIRCLE (E).
- Place CLOCK HANDS.
- Open, take DRAGON COINS (F).
- Give DRAGON COINS (G).
- Play puzzle, receive MAP (H).
- Go down.
- Place CIRCLE (I).
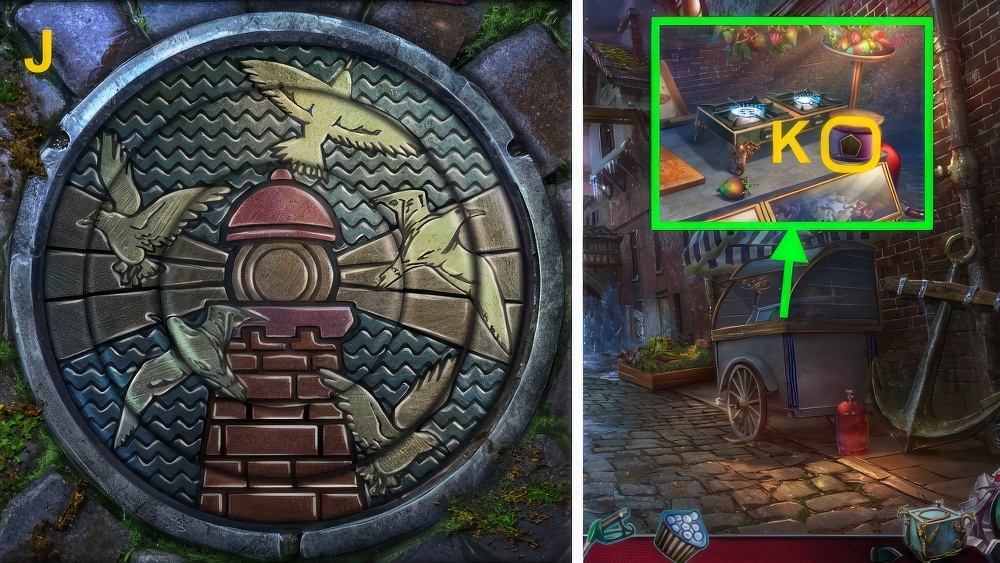
- Walkthrough (J).
- Remove leaves, take FUEL NOZZLE and CUPCAKE EMBLEM.
- Place CUPCAKE EMBLEM (K), take RULER and TAPE.
- TAPE on PHOTO.
- Repair the map of Dublin.
- Select and drag each scrap into the correct position.
- Use the arrow button to rotate the pieces.
- Walkthrough (L).
- Place MAP on PHOTO, take MAP WITH ADDRESS.
- Go forward.
- Place GAS CANISTER and FUEL NOZZLE (M), examine nozzle.
- Take GASOLINE.
- Open, pour GASOLINE (N).
- Place MAP WITH ADDRESS (O).
- Use BOAT KEY (P).
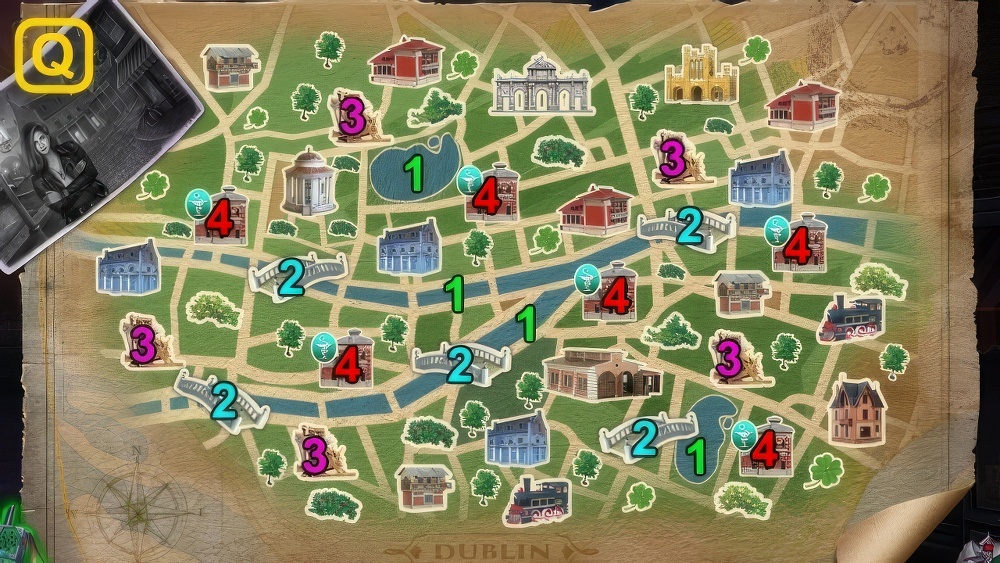
- Fourth clue this place stands near the pharmacy.
- Find all the pharmacies.
- Walkthrough (Q).
- Take LEVER (R).
- Use RULER, take MASK (S).
- Examine picture, take PAN FLUTE HINT (T).
- Go left.
- Use ASH (U).
- Take HOSE (V).
- Place HOSE and LEVER (W).
- Use PAN FLUTE HINT.
- Walkthrough (X).
- Take MIRROR (1/4) and DRAGON COIN.
- Take WIRE and CONNECTOR (1/2) (Y).
- Examine note, take CONNECTORS (2/2) (Z).
- Read newspaper (A), take UMBRELLA.
- Use WIRE on latch, take LILY.
- Go down.
- Move posters.
- Use DRAGON COIN (B), take COMIC BOOK and KEY CARD.
- Examine COMIC BOOK, take SNAKE EMBLEM.
- Place SNAKE EMBLEM (C).
- Play puzzle, receive AROMA OIL (D).
- Go left.
- Place LILY and AROMA OIL (E).
- Use Cube (F).
- Walkthrough is random (G).
- Go down.
- Use UMBRELLA (H).
- Move sign, use Cube (I).
- Place CONNECTORS (2/2).
- Arrange the connectors so that all lights become green.
- Connectors can’t cross each other by the vertical line.
- Walkthrough (J).
- Place MASK (K), use KEY CARD.
- Go forward.
- Take LIGHTER (L).
- Use LIGHTER on scene, flip switch (M).
- Receive LIGHTER.
- Move items (1-3).
- Take SPRAYER and MODEL PART (N).
- Use SPRAYER (O), talk.
- Take LIST.
- Open cage, take MODEL PART (P).
- Go down.
- Place LIST (Q).
- Play puzzle, receive MEDICAL KIT.
- Go forward.
- Use MEDICAL KIT (R).
- Remove stick (A), use spray (B) on wound (A).
- Place brace (B) on leg (C), place cotton and bandage (B) on arm (A).
- Place sling (B) on arm (D).
- Place ice (B) on head (E).
- Place bandages (B) on face (F).
- Take CRATE KEY.
- Remove cloth.
- Read note, use CRATE KEY thrice (S).
- Place 2 MODEL PARTS, take HANDLE and MIRRORS (2/4).
- Place HANDLE (T), open.
- Move shoes, place handle (U) on drawer (V).
- Open, move boa.
- Take MIRRORS (3/4) (W), place handle (X) on drawer (Y).
- Open, flip mask.
- Place handle (Z) on drawer (A), open.
- Move items, place handle (B) on drawer (C).
- Open, take SEEDS.
- Give SEEDS (D), take MIRRORS (4/4).
- Place MIRRORS (4/4) (E).
- Using the mirrors, arrange all rays of light to the center.
- Walkthrough (F).
- Take GLASS CASE, collect crystals (G).
- Examine (H).
- Take NAIL (I).
- Use NAIL (J).

- Guide the tokens to the lower slots.
- Tokens must fall into the slots at the same time.
- Walkthrough (K).
- Take SCARF, FUEL, and ORNAMENT (L).
- Open LIGHTER, use FUEL.
- Use LIGHTER, move cup and paper.
- Read newspaper (M), take ORNAMENT.
- Use NAIL (N), receive SPOON.
- Use SCARF (O), take ORNAMENT.
- Place 3 ORNAMENTS.
- Move pillows, take SPRING HOOK (P).
- Move pillow, examine crate.
- Use SPOON (Q) twice.
- Move garbage can (R).
- Examine bed (S), move crate.
- Move crate (T).
- Move stool (U).
- Examine (V).
- Talk, take FIRST PANEL (W).
- Take KNIFE (X).
- Examine sign (Y).
- Place GLASS CASE, collect fireflies.
- Take LANTERN.
- Place LANTERN (Z) and FIRST PANEL (A).
- Take HANDLE (B).
- Place SPRING HOOK and HANDLE (C), turn.
- Play puzzle, receive MIRROR (D).
- Remove sign, place MIRROR.
- Use powder on buttons, press (E).
- Go forward.
- Talk, take RICK’S PORTRAIT (F).
- Take PORTRAIT (G).
- Take WEIGHT (1/4) and PORTRAIT (H).
- Read note (I), take BOOK.
- Use KNIFE (J), place 2 PORTRAITS.
- Place all the portraits in the correct places.
- Use the arrows to move between panels.
- Walkthrough (K).
- Take DOG TREAT and WEIGHTS (2/4)-(3/4).
- Give DOG TREAT, take ASH and WEIGHTS (4/4) (L).
- Place WEIGHTS (4/4).
- Walkthrough (M).
- Place BOOK, take CUBE KEY and UNICORN HORN (N).
- Place UNICORN HORN (O).
- Take CATALOG KEY, place CUBE KEY.
- Take DIAL (P).
- Take SMALL HAMMER and OILER (Q).
- Examine (R), place CATALOG KEY.
- Walkthrough (S).
- Examine pictures, take WATERFALL CAP.
- Take LENS (1/2) (T).
- Use OILER and DIAL, take LENSES (2/2).
- Place LENSES (2/2) and WATERFALL CAP (U).
- Play puzzle, receive DRAGON RING (V).
- Place DRAGON RING and RICK’S PORTRAIT (W).
- Press button (X), take RICK’S KEY.
- Go forward.
- Place RICK’S KEY (Y).
- Take AWL (Z), read note.
- Use AWL, open.
- Take FISHING NET and PAPER (A).
- Use FISHING NET (B), receive EYE.
- Read book (C).
- Place paper (D).
- Enter code (E).
- Examine photo (F).
- Place paper and PAPER (G).
- Take HINT, TREE TOKEN, and SILHOUETTE (1/4).
- Place EYE (H).
- Take WIRE SAW and CRYSTAL (I).
- Move blanket thrice and take SILHOUETTES (2/4)-(4/4) (J).
- Place SILHOUETTES (4/4), use SMALL HAMMER (K).
- Place CRYSTAL.

- Open curtain (L).
- Rearrange the tokens according to the lit up silhouettes.
- Use HINT, walkthrough (M).
- Move the tokens to their places using the given pathways.
- Walkthrough (N): A×3-C×2-B×4-C×3-E×2-C×3-A-E-C×9-A-C-A×11.
- Take ELIOT’S DIARY (O).
- Examine ELIOT’S DIARY, take EDELWEISS CAP.
- Go down.
- Place EDELWEISS CAP (P).
- Play puzzle, receive LION PORTRAIT (Q).
- Place LION PORTRAIT (R).
- Press button (S).
- Use WIRE SAW, place TREE TOKEN (T).
- Take DIARY KEY.
- DIARY KEY on ELIOT’S DIARY.
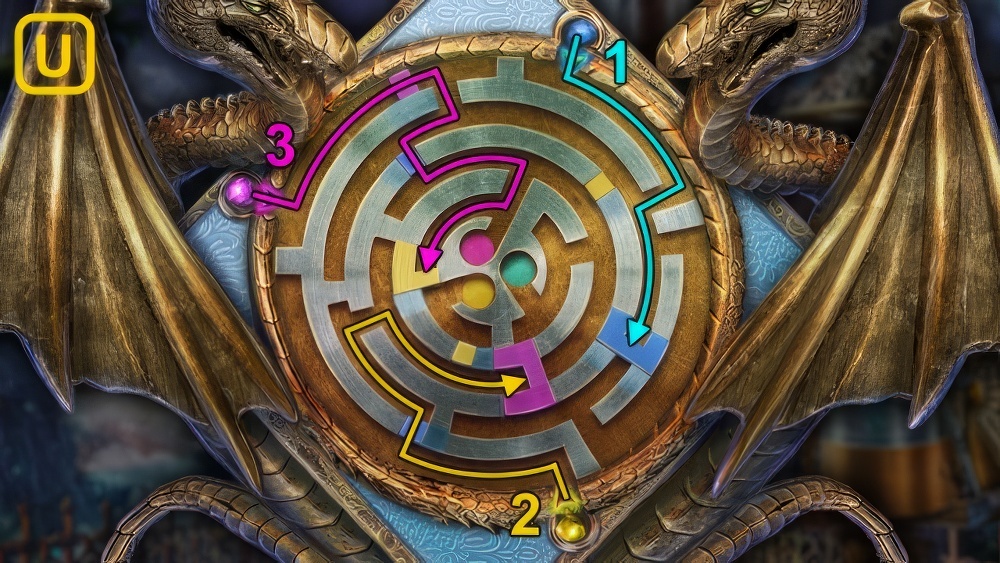
- Using the arrows, move the balls to the center of the maze.
- Walkthrough (V).
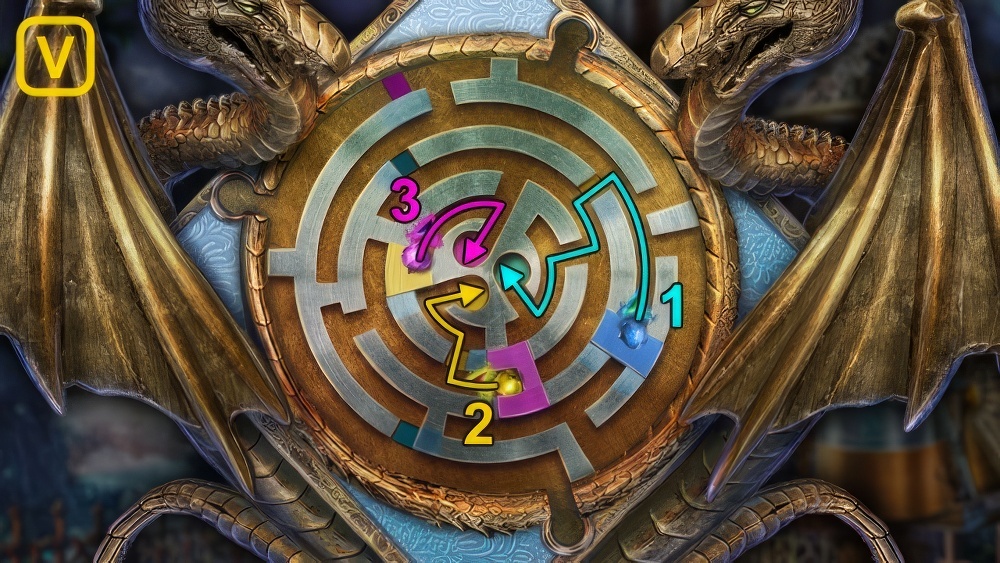
- Walkthrough (V).
- Open book, place picture pieces (W).
- Move paper, take KEY.
- Place KEY, take EARTH EMBLEM (1/3) and COMBINATION PANEL (X).
- Place COMBINATION PANEL (Y).
- Take SECOND PANEL (Z).
- Go down.
- Play puzzle, receive PANEL (A).
- Place SECOND PANEL (B).
- Take EMBLEMS (2/3) and EXPANDABLE TWEEZERS (C).
- Use EXPANDABLE TWEEZERS (D), receive EMBLEMS (3/3) and VIAL.
- Place PANEL and EMBLEMS (3/3) (E).
- Enter Blockage.
- Talk, read comic (F).
- Take SCRAPER (G).
- Take HOOK (H).
- Use SCRAPER (I), take BOWL BASE.
- Take BOWLS (1/4)-(2/4) (J-K).
- Use HOOK, remove grate.
- Take BOWLS (3/4) and AXE (L).
- Move stones, take BOWLS (4/4) (M).
- Use AXE and VIAL (N), receive SAP.
- BOWLS (4/4) and SAP on BOWL BASE, take BOWL.
- Place BOWL (O).
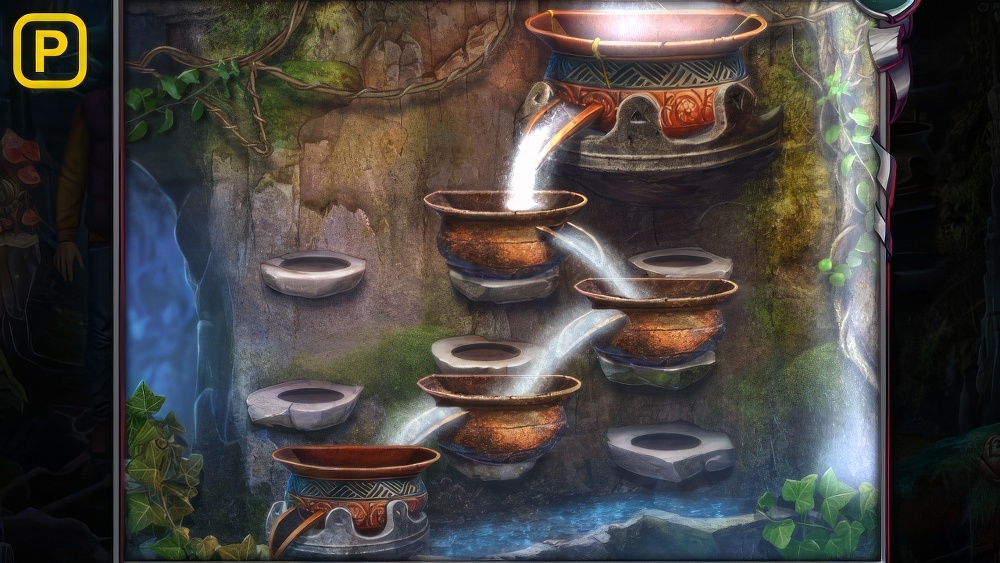
- Rearrange the bowls so that the water can flow from the upper bowl to lower one.
- Walkthrough (P).
- Use Cube (Q).
- Walkthrough is random (R).
- Use Cube (S).
- Go forward.
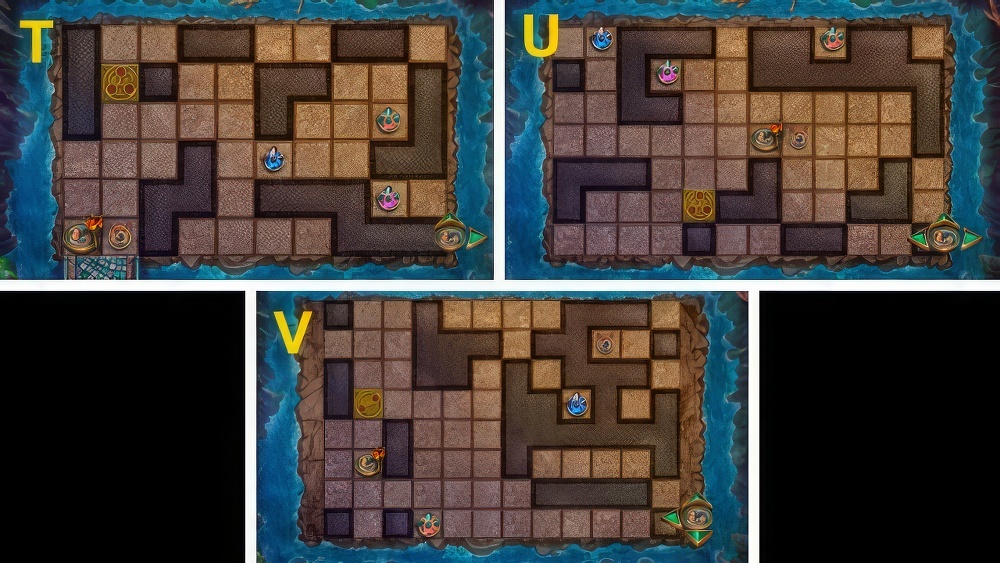
- Guide the characters through the maze using the arrows and collect all the lock parts to open the hatch.
- Ash can dig under the wails.
- Walkthrough (T): (→)-(↑)-(←)-(↑)-(→)-(↓)-(←)-(↑)-(→)-(↑)-(→)-(↓)-(←)-(↑×2).
- Walkthrough (U): (←×2)-(↓)-(→)-(↑)-(→×2)-(↓)-(→)-(↑)-(←×4)-(↓)-(→)-(↑)-(→)-(←)-(↓)-(←)-(↓).
- Walkthrough (V): (←)-(↓)-(→)-(↑)-(←)-(↓)-(→)-(↑)-(↓)-(→×2)-(↓)-(↑)-(←×2)-(↑)-(←)-(↑)-(→)-(↑).
- Examine scene.
- Play puzzle, receive COMPLEX KEY (W).
- Use EXPANDABLE TWEEZERS (X), receive KEY PART (1/3).
- Use ASH (Y), receive GATE LOCK and ASH.
- Place GATE LOCK (Z), use HOOK.
- Open, take KEY PARTS (3/3).
- Examine COMPLEX KEY, use KEY PARTS (3/3).
- Take KEY.
- Use KEY (A).
- Go forward.
- Examine scene.
- Take ROPE and GLASS LION (1/3) (B).
- Use ROPE (C).
- Take BIG CIRCLE (D).
- Use ASH (E), receive BOOMERANG.
- Go down.
- Play puzzle, receive DECORATION (F).
- Use BOOMERANG (G), receive PUZZLE PIECE and SMALL CIRCLE.
- Go forward.
- Take PUZZLE PIECE (H), place BIG CIRCLE and SMALL CIRCLE.
- Rotate the circles and arrange all the paths to make all the crystals shine.
- Walkthrough (I).
- Take COMIC BOOK.
- Read COMIC BOOK, take GORGON CROWN.
- Place GORGON CROWN, walkthrough (J).
- Go forward.
- Take ASH and SICKLE (K).
- Use SICKLE.
- Play puzzle, receive CROWN BASE (L).
- Examine CROWN BASE, take HORSESHOE (1/2).
- Take GLASS CREATURES (2/3) (M).

- Sort weapons and glass pieces (N).
- Take GLASS CREATURES (3/3) (O).
- Open (P), take CHAINS.
- Place GLASS CREATURES (3/3) (Q), take GEMS.
- GEMS and CHAINS on CROWN BASE, take CROWN.
- Give CROWN (R), use Cube.
- Walkthrough is random (S).
- Take LION HINT.
- Go down twice.
- Place 2 PUZZLE PIECES (T).
- Walkthrough (U).
- Take HORSESHOE (2/2).
- Go forward.
- Place HORSESHOE (2/2), take PORTRAIT (V).
- Go forward.
- Play puzzle, receive MEDAL (W).
- Place PORTRAIT (X), take note and CRYSTAL.
- Go down.
- Place LION HINT, DECORATION, and MEDAL, walkthrough (Y).
- Take EAGLE PLATE.
- Place EAGLE PLATE (Z).
- Go left.
- Use CRYSTAL on scene.
- Use Cube (A).
- Drag a path between three or more matching symbols of the same color to fill your tubes.
- Avoid matching any symbols on your opponent’s colors or your tubes will be emptied.
- Walkthrough is random (B).
- Use Cube (C).
- Use Cube on scene.
- Walkthrough Bonus Chapter, at the link below.


