
Edge of Reality 6: Mark of Fate (Bonus Chapter) – This time the Sheriff of Saltshore, Karen Mulheron, finds herself at the center of events. She learns that her fiance is imprisoned on a cursed pirate ship along with other victims. She faces a risky adventure to rescue him and put an end to the ancient curse. The only way to free the captives is to destroy the ship, but it remains invisible and only appears at night at one of the town’s docks. The key is hidden in John’s notes, which tell of the curse and its connection to pirate treasure. After finding the cipher, Karen goes to John’s store where she discovers an important clue, a lens from a spyglass that will allow her to see the ship. But even if it is possible to find her way to the ship, dealing with it will not be easy. The ship is not just an object, it has a will of its own and will try to stop the intruder. The only chance, find the heart of the ship and put there a magical talisman. Karen will have to overcome all the obstacles, destroy the curse and save her lover, so that the pirate ship is not left forever furrowing the waters of Saltshore.
Bonus Chapter Walkthrough

- Take GUN, SHERIFF’S BADGE, LETTER OPENER, RUSTIC HOOK, DRAWER HANDLE, and ENCRYPTED MESSAGE (S).
- Place DRAWER HANDLE (T), take LATCH.

- Use LETTER OPENER (U), take FLASHLIGHT.
- Use LATCH (V), turn handle.
- Walk forward.
- Talk, give ENCRYPTED MESSAGE (W).
- Examine FLASHLIGHT, take SCREWDRIVER.

- Take NOTEPAD (1/2) and MATCHES (X).
- Place SHERIFF’S BADGE (Y), take COMBINATION.
- Use COMBINATION, solution (Z).
- Play puzzle, receive TROWEL (A).
- Use RUSTIC HOOK (B), receive NUT.
- Use TROWEL (C), take SHARPENER HANDLE.
- Walk down.

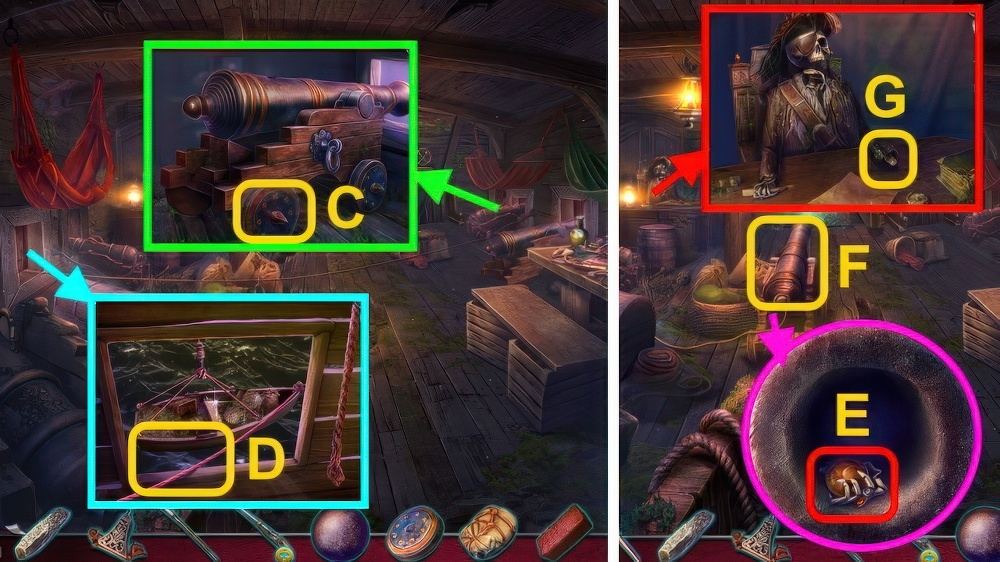
- Open, take BATTERY (1/3) (D).
- Open (E), take DULL PENCIL.
- Place NUT (F), take BATTERIES (2/3).
- Open drawer, take FLASHLIGHT COVER (G).
- Place SHARPENER HANDLE and DULL PENCIL (H), receive PENCIL AND PAD (2/2).
- Walk forward.
- Use PENCIL AND PAD (2/2), take ALLEY ADDRESS (I).
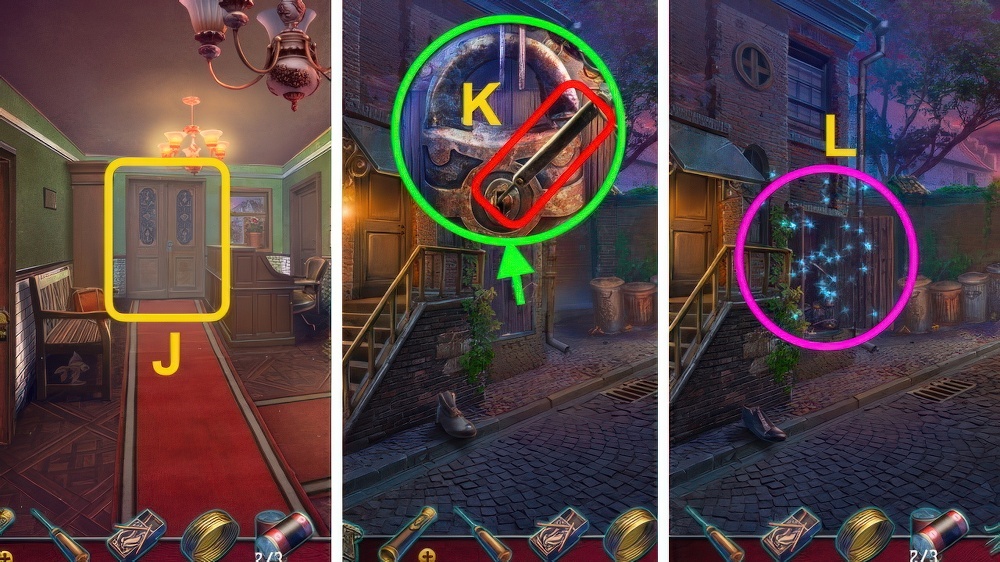
- Use ALLEY ADDRESS (J).
- Walk forward.
- Take PICKLOCKS (K), use GUN.
- Play puzzle, receive MAGNET (1/2) (L).

- Open cans, take BATTERIES (3/3) and MERCHANT’S LOCK EMBLEM (1/2) (M).
- BATTERIES (3/3) and FLASHLIGHT COVER on FLASHLIGHT.
- Walk down.
- Use SCREWDRIVER (N).
- Use PICKLOCKS, open.
- Take MOP and MAGNET AND ROPE (2/2) (O).
- Walk forward.
- Use FLASHLIGHT and MAGNET AND ROPE (2/2) (P), receive MERCHANT’S LOCK EMBLEM (2/2).

- Move crates and cloth (Q).
- Solution (R).

- Place MERCHANT’S LOCK EMBLEM (2/2).
- Walk right.
- Use FLASHLIGHT on scene.
- Use MATCHES (S).
- Take TALISMAN ELEMENTS (1/2) (T), remove papers.
- Arrange papers (U).
- Take INVENTA NOTE, REPAIR NOTES, and SYMBOLS.

- Take LETTERS (1/3)-(2/3) and SPOON (V).
- Use MOP (W), take LETTERS (3/3), CROWBAR and ORE.

- Move cloth (X).
- Place SYMBOLS (Y).
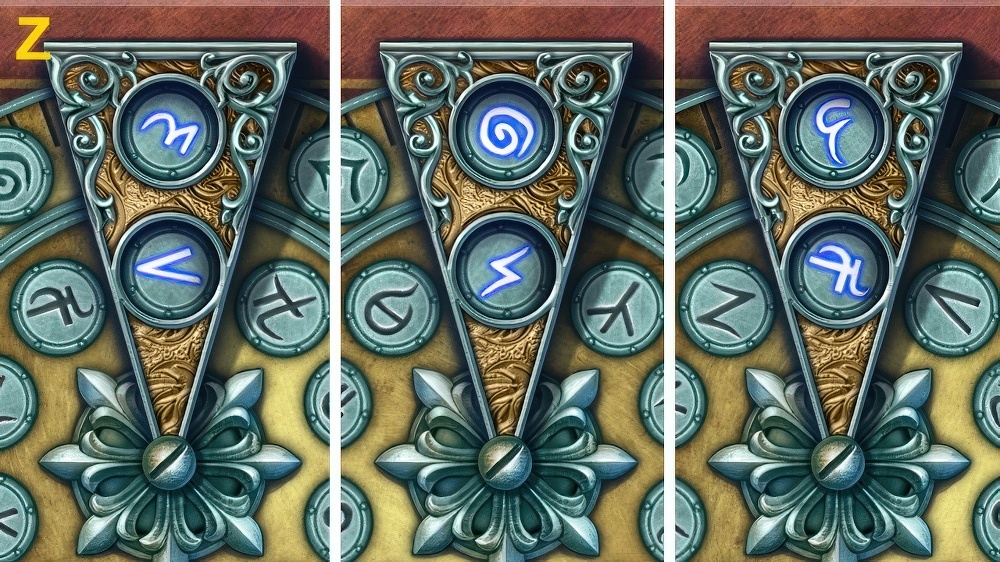
- Solution (Z).
- Take TALISMAN PARTS (2/2) and MERCHANT’S SECRETS (1/2).
- Walk down.

- Play puzzle, receive CANDLE (A).
- Use CROWBAR (B), take PIRATE BOX and OIL CAN.

- LETTERS (3/3) and INVENTA NOTE on PIRATE BOX, solution (C).
- Take TONGS.
- Walk right.

- Use TONGS (D), receive CRYSTAL.
- Use OIL CAN and PICKLOCKS (E).
- Open, use REPAIR NOTES, CANDLE, MATCHES, TALISMAN PARTS (2/2), CRYSTAL, ORE, SPOON, and TONGS.
- Use spoon (F) on crystal (G), take MERCHANT’S SECRETS (2/2).
- Walk down twice.

- Give MERCHANT’S SECRETS (2/2) (H).
- Play puzzle, receive SPYGLASS (I).
- Give SPYGLASS (H), take TALISMAN, LENS, and DOCK ADDRESS.
- Use DOCK ADDRESS (J).
- Walk forward.

- Use LENS on scene.
- Take HOOK (1/2)-(2/2) and HACKSAW (K).
- Use HOOK (L).
- Take BELT and GEAR (M).
- Examine anchor (N), use HACKSAW.
- Receive STEEL CABLE.

- Use HOOK and BELT (O), receive IMPROVISED KNIFE.
- Use IMPROVISED KNIFE (P), open.
- Take CRANE HANDLE.
- Use CRANE HANDLE, GEAR, and STEEL CABLE (Q).
- Walk forward.
- Solution is random (R).

- Take AXE and CLAPPER (1/2) (S).
- Use SABER, take BELL (2/2) and EMPTY BOTTLE (T).
- Remove cork (U).
- Use AXE, take LIT PIPE.
- Use EMPTY BOTTLE, receive RUM.
- Use RUM and LIT PIPE (V), take BOOT.
- Examine BOOT, take FLINT.
- Examine boot, take BELL RINGING PATTERN.
- Replace BELL (2/2) (W), use BELL RINGING PATTERN.
- Ring bell 3x.
- Go forward.

- Play puzzle, receive GUNPOWDER BOX (X).
- Take RAMROD, PISTOL, CANNONBALL, note, WHEEL, WAD and BRICK (Y).

- Take ROPE (Z).
- Open, take OAR (A).
- Use ROPE.
- Examine rope (B).
- Use OAR, BRICK, and WHEEL (C).
- Use SABER (D).
- Take BONE FIST (E), use WAD, RAMROD, and CANNONBALL.
- Use GUNPOWDER BOX and LIT PIPE (F).
- Place BONE FIST (G), take TOPAZ (1/2).
- Walk forward.

- Take KEY (1/5), BULLET, and SHAWL (H).
- FLINT, GUNPOWDER BOX, and BULLET on PISTOL, take LOADED PISTOL.
- Take KEYS (2/5) (I).
- Use SHAWL (J), take TOPAZ (2/2).

- Place TOPAZ (2/2) (K), take JAW BONE.
- Walk down.
- Play puzzle, receive COMPASS (L).
- Use LOADED PISTOL (M), open.
- Take KEYS (3/5).
- Place JAW BONE (N), take KEYS (4/5) (O).
- Walk forward.

- Use COMPASS (P), take COORDINATES.
- Use COORDINATES (Q).
- Solution: 7-9-4-6-7-1-4-3-5×2-9.
- Take KEYS (5/5).
- Place KEYS (5/5) (R).
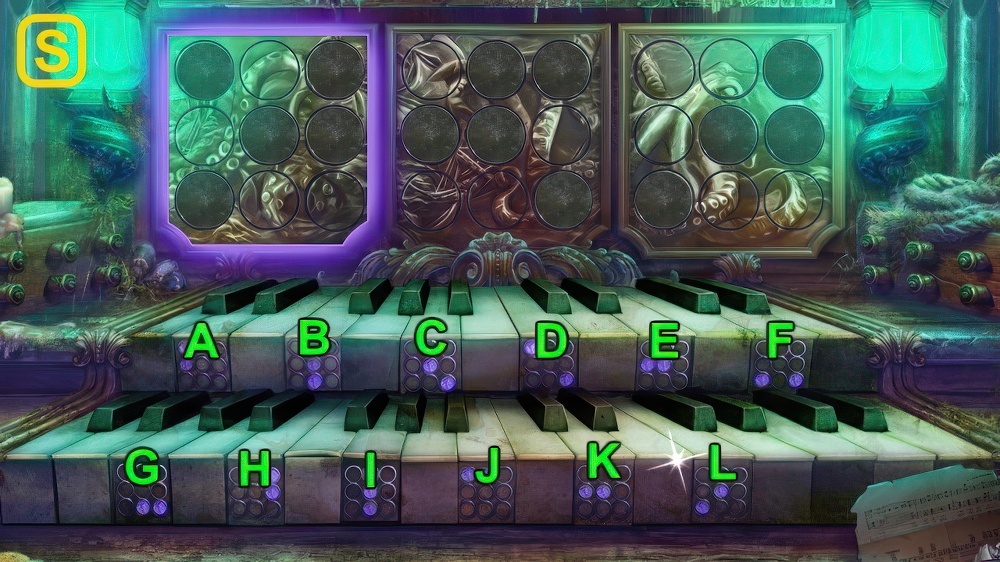
- Solution (S): (J-I-H-G-F)-(I-G-H-L)-(H-F-C).
- Place TALISMAN.
Congratulations! You have completed the game Edge of Reality 6: Mark of Fate.


