Edge of Reality 6: Mark of Fate – You are a detective tasked with investigating a series of attacks in the small island town of Saltshore. When the murder of a lighthouse keeper causes the residents to panic, the town’s mayor, Richard MacDonald, turns to you, one of the best detectives in the world, for help. You go to the island, but on the way you encounter the inexplicable, a pirate ship, suddenly appeared out of the thick fog, goes to ram. You manage to survive, but the captain of the ship is badly wounded, and on the shores of Saltshore are already frightening rumors. People are convinced that the pirate Storm Morey has returned from the other side of the world and is after the townspeople. A ghostly ship patrols the waters, preventing anyone from leaving the island. The mayor of Saltshore meets you at the dock. He asks you to solve the mystery at all costs. It soon becomes clear that the sheriff, who could help with the investigation, has been missing for days. The only clue, an amulet that the captain says has protective powers, but is damaged. By repairing it, you may be able to discover the truth behind the long-standing legend. If you can not pass any of the puzzles or do not know where the items are, on our site you can watch the walkthrough of the game Edge of Reality 6: Mark of Fate, and solve the mystery of the pirate.
Edge of Reality 6: Mark of Fate – Walkthrough
Here you can see the full walkthrough of Edge of Reality 6: Mark of Fate game, namely for all chapters, including bonus chapter, in pictures.
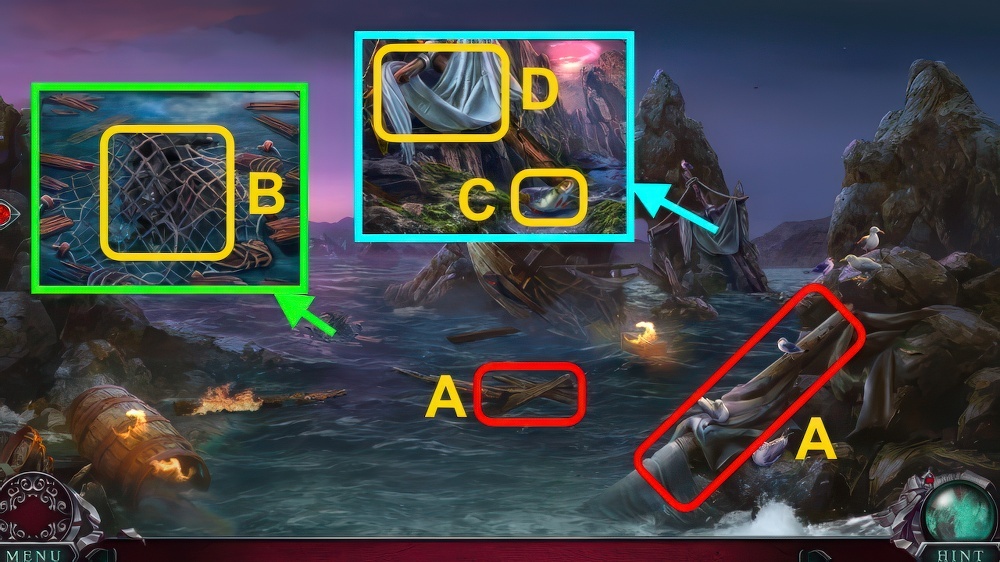
- Take BROKEN MAST and BOARDS (3/6) (A).
- Inspect BROKEN MAST, take PIECE OF GLASS and BROKEN RAFT.
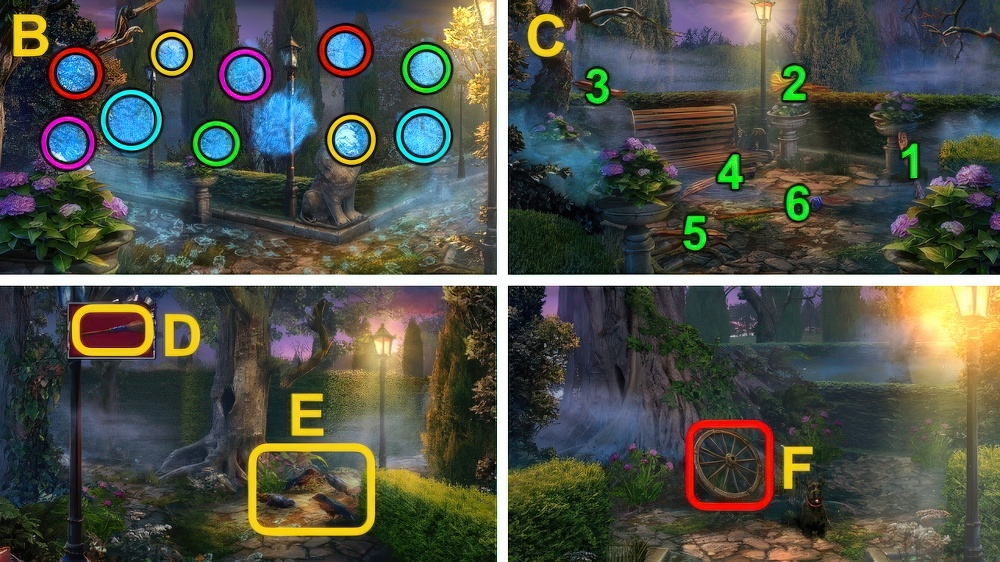
- Use PIECE OF GLASS (B), receive NET.
- Use NET (C), take FISH.
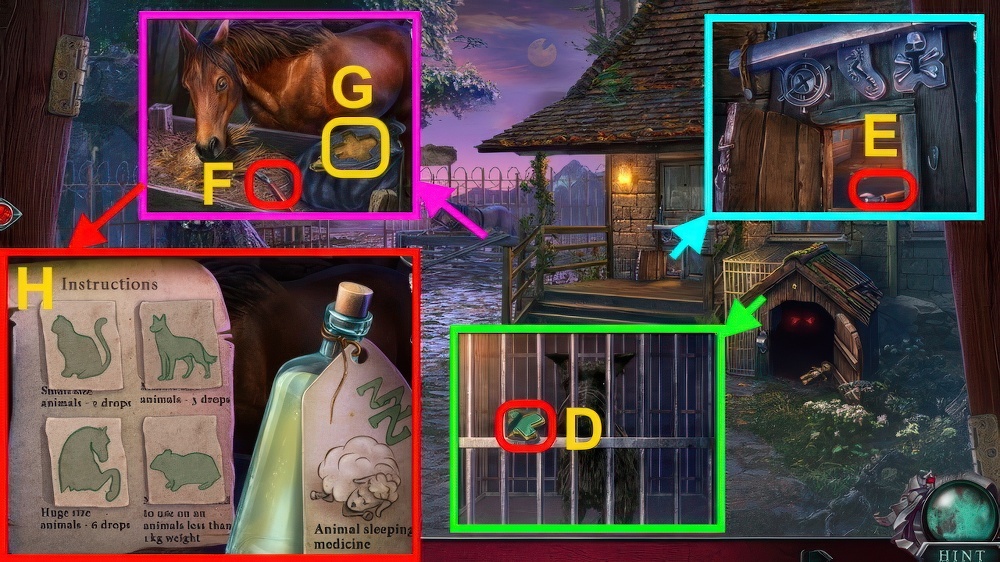
- Inspect (D), take ROPE.
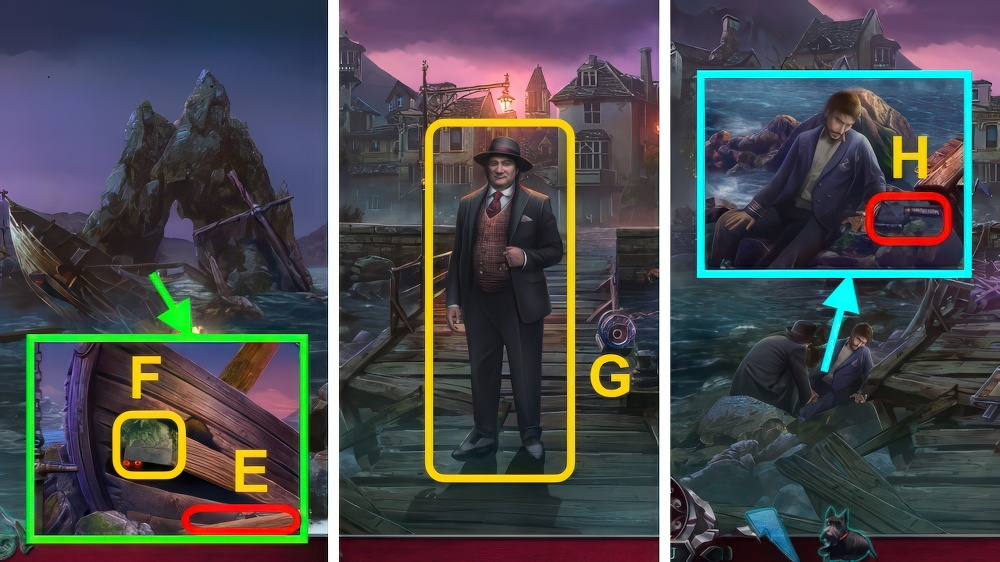
- Take BOARDS (4/6) (E).
- Inspect paper (F).
- Take BOARDS (5/6).
- Give FISH, take BOARDS (6/6).
- BOARDS (6/6) and ROPE on BROKEN RAFT, receive RAFT.
- Use RAFT on scene.
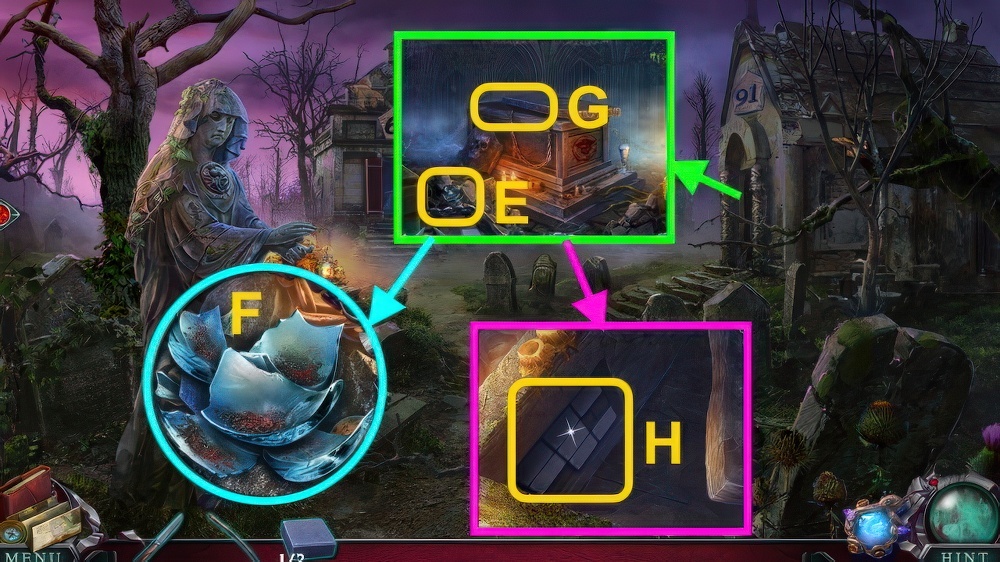
- Talk (G).
- Take HANDLE (H).
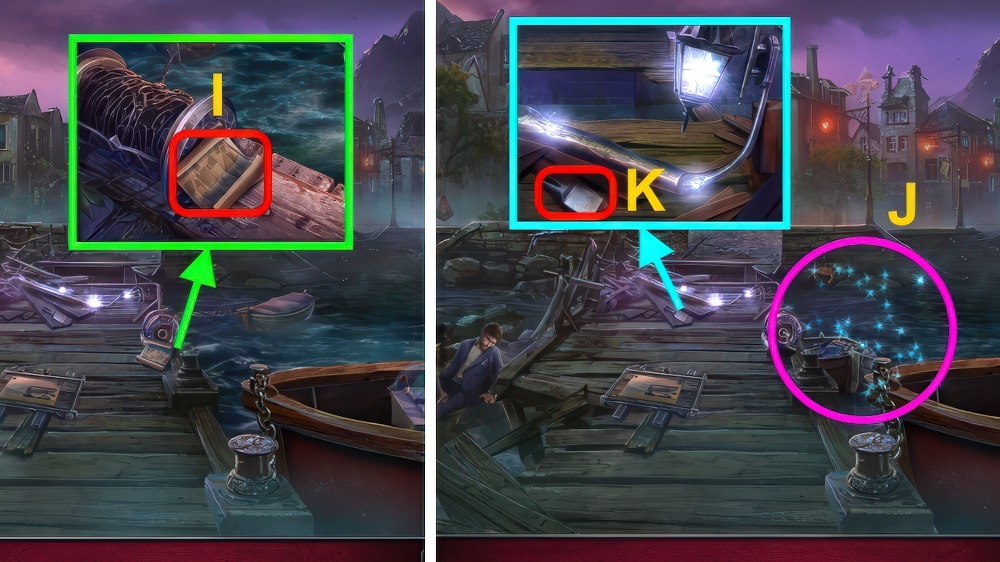
- Take Map (I), place HANDLE.
- Use PIECE OF GLASS on boat, remove cloth.
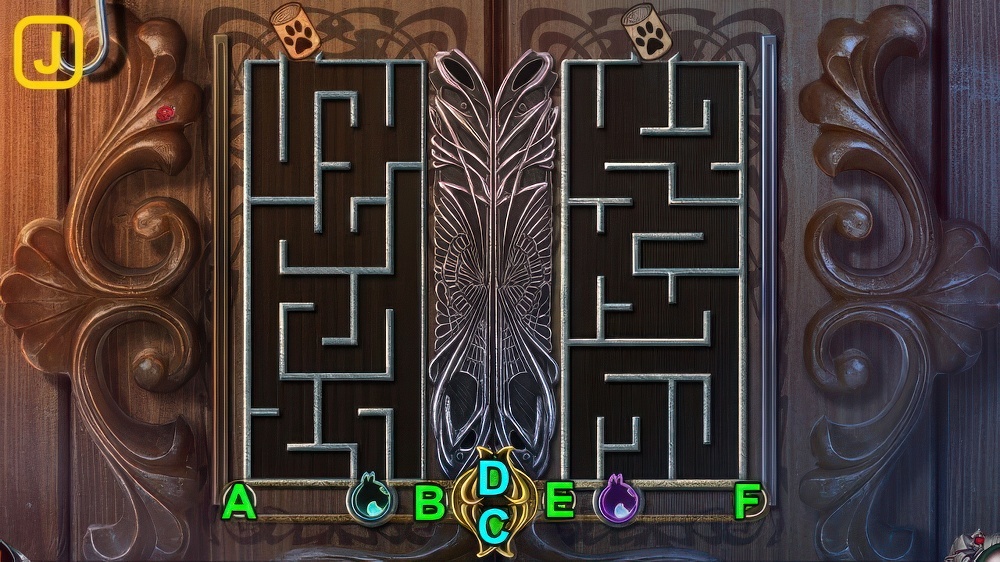
- Play puzzle, receive MEDICINE CHEST (J).
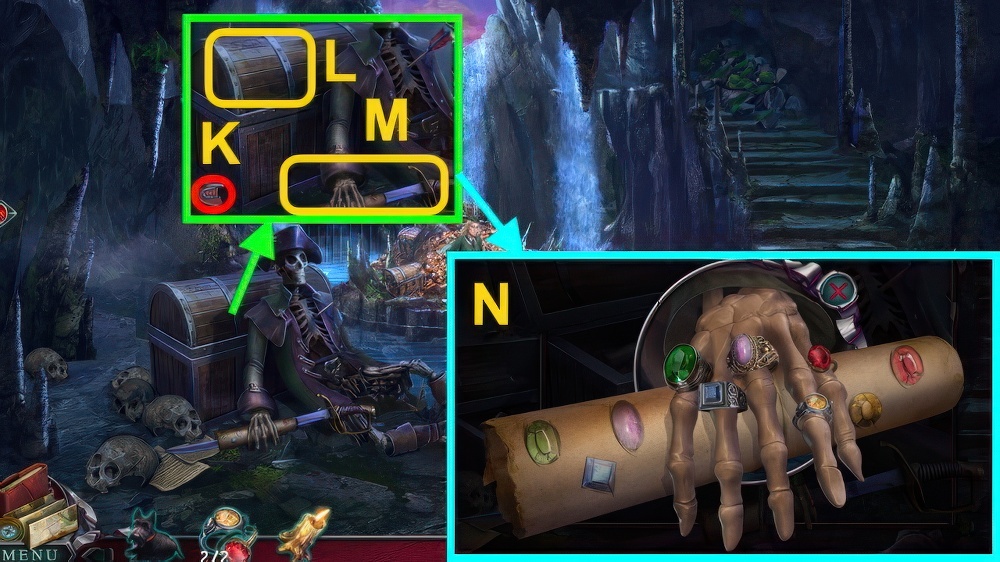
- Take PUTTY KNIFE (K).
- Use PATRICK on scene.

- Inspect paper (L), inspect sign.
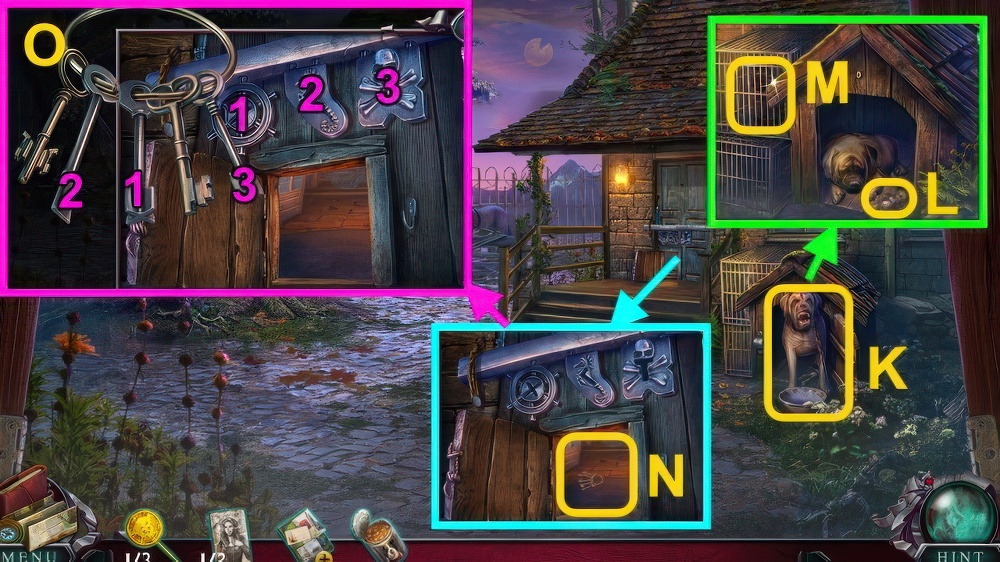
- Inspect (M).
- Use PUTTY KNIFE (N), take MEDICINE CHEST PART.
- MEDICINE CHEST PART on MEDICINE CHEST.
- Move items, take AMMONIA.
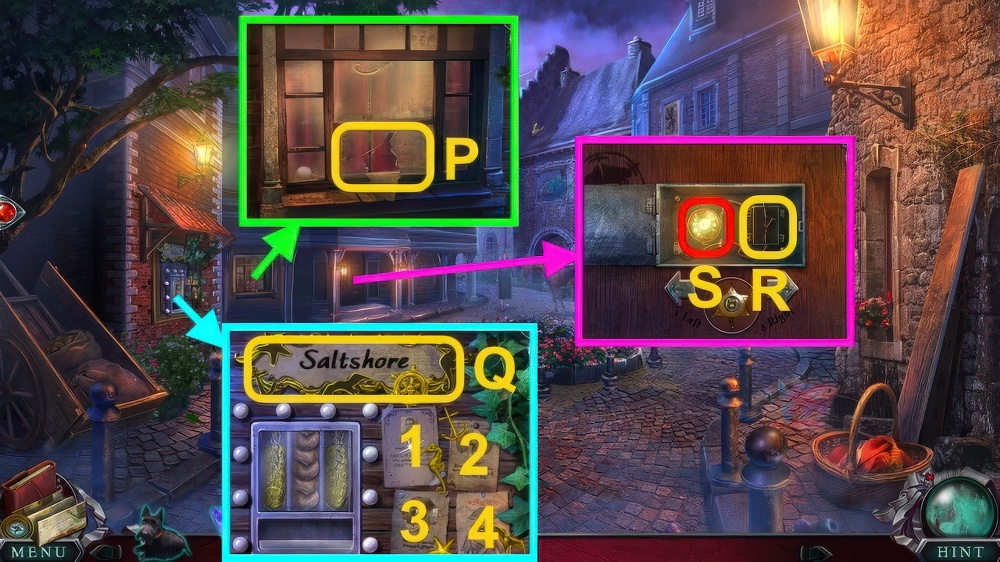
- Use AMMONIA (O), inspect (P).
- Remove seaweed, inspect.
- Take BROKEN AMULET.
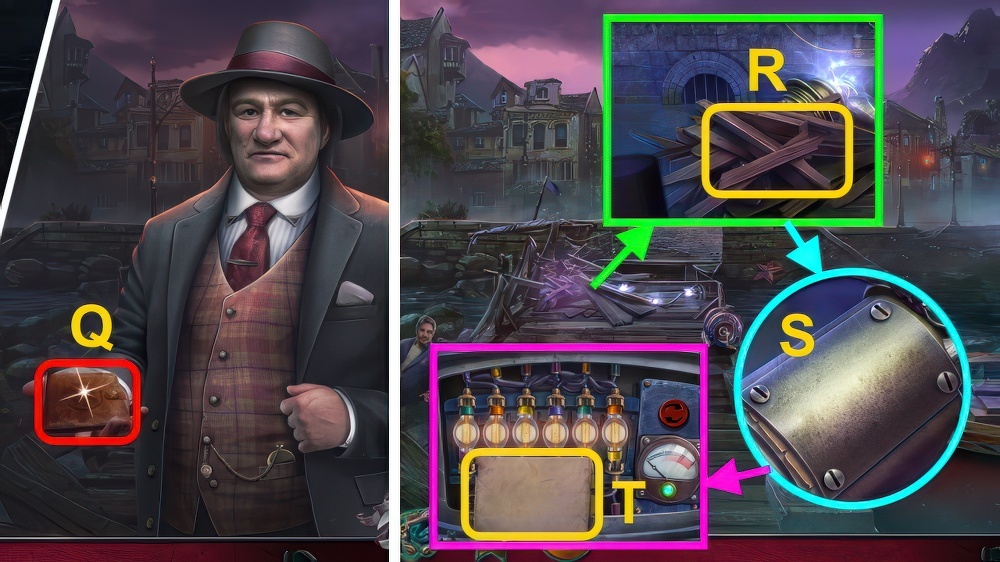
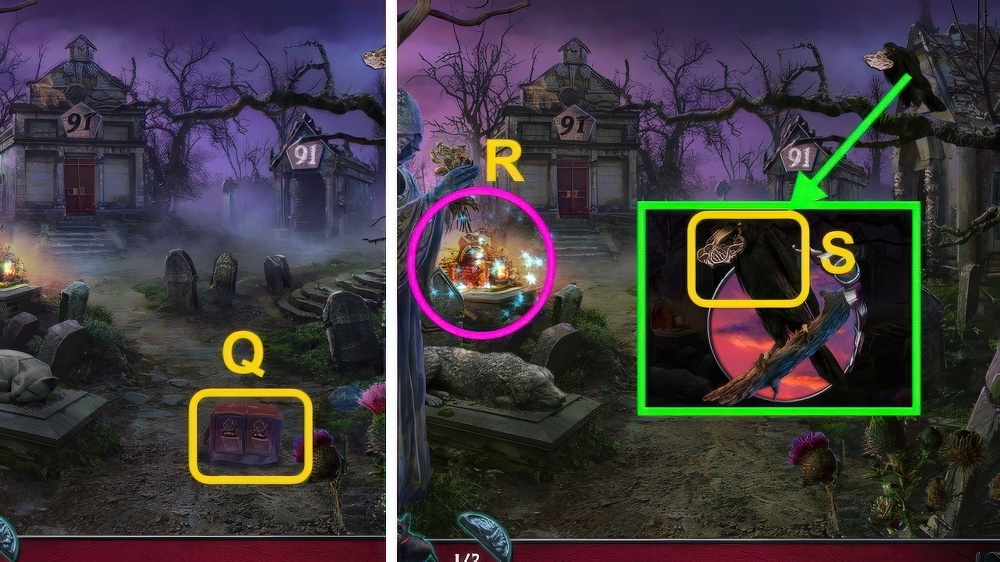
- Take SHERIFF’S DOCUMENTS (Q).
- Open SHERIFF’S DOCUMENTS, take SHERIFF’S BADGE.
- Inspect photos, take COIN.
- Remove boards (R), inspect.
- Use COIN (S), read note (T).

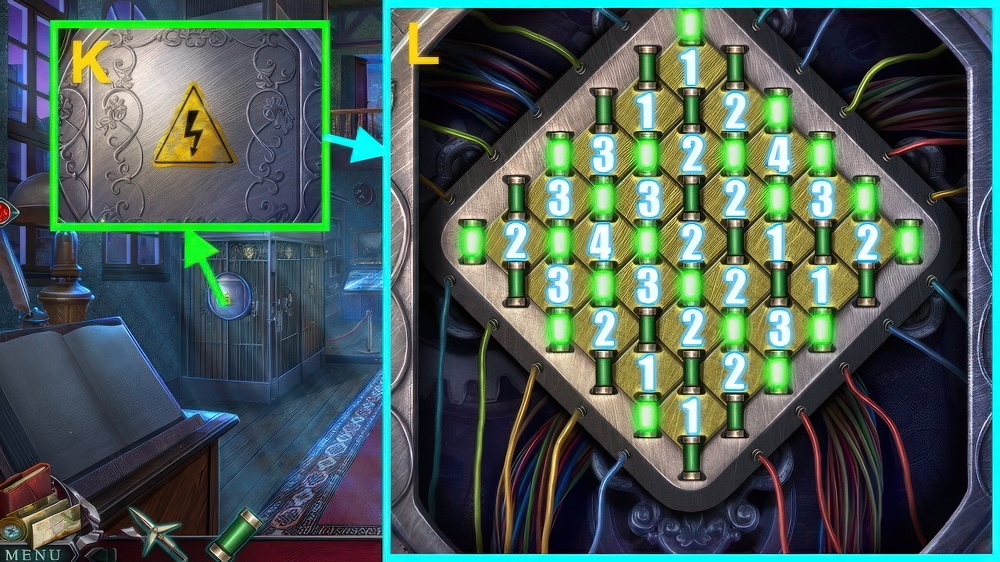
- Set up the fuses correctly by matching the wire colors on each end.
- Select a bulb to move it and place a bulb on the red button to rotate it.
- A correctly placed bulb will light up.
- Walkthrough (U).

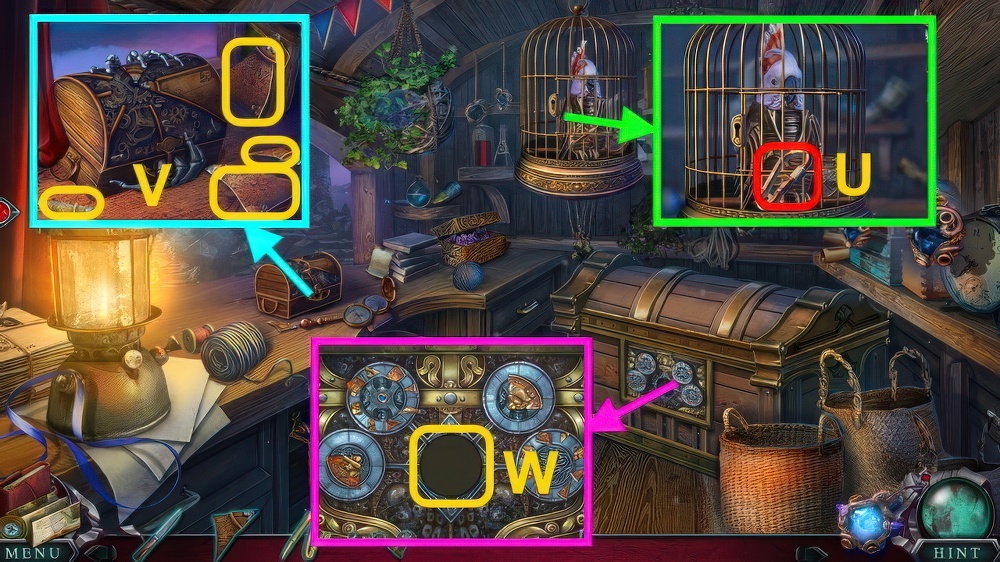
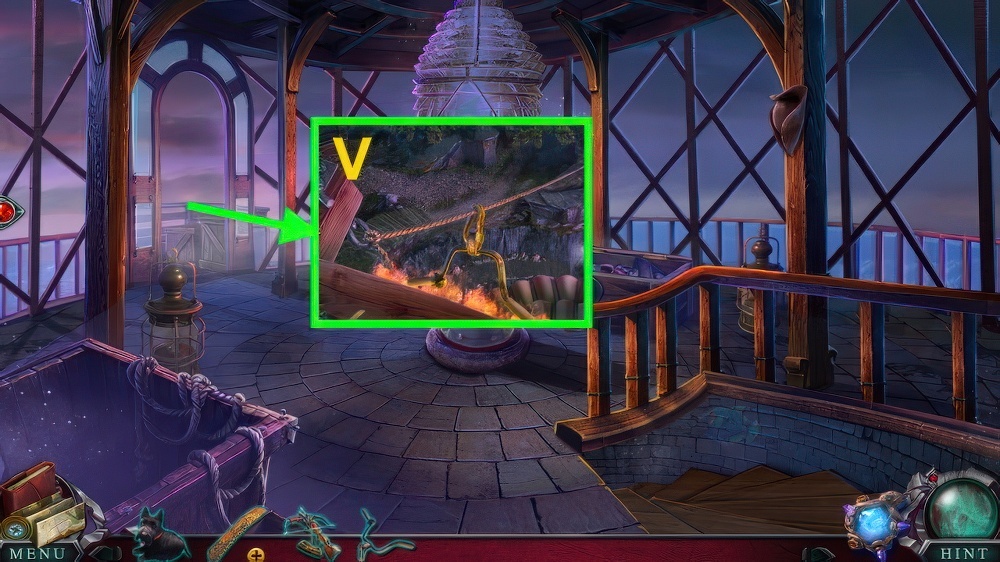
- Move debris, place boards (V).
- Go forward.
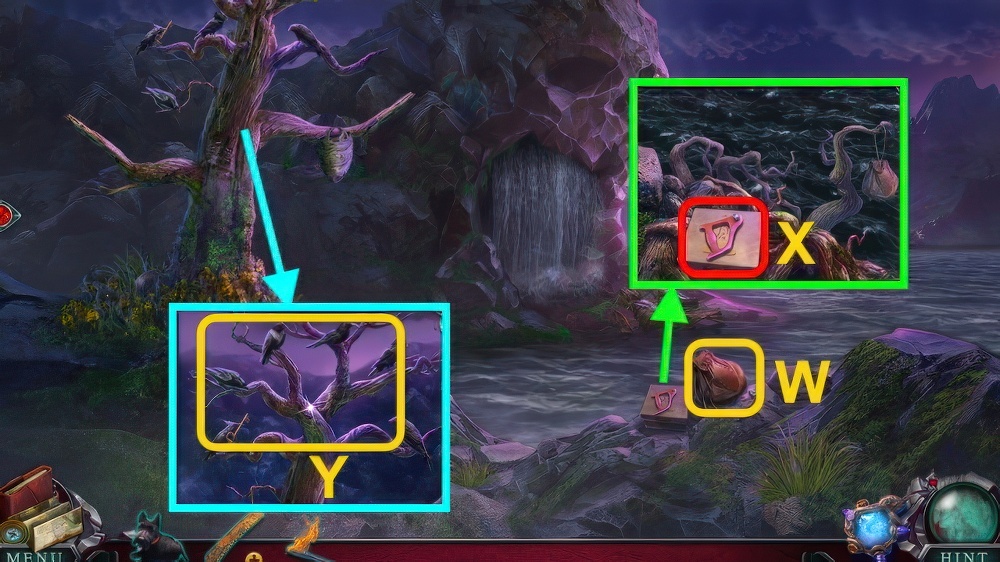
- Take BOTTLE OF MILK (W).
- Inspect (X), take HAIRPIN.
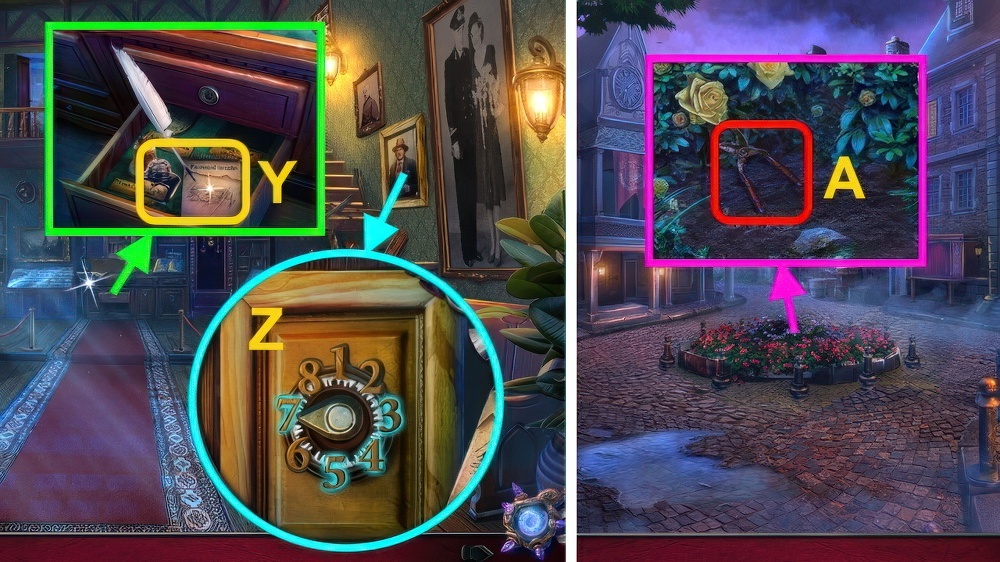
- Open door, inspect handkerchief (Y).
- Take CORKSCREW.
- Inspect HAIRPIN twice, take CRYSTAL (1/2).
- Go left.
- Inspect scene.
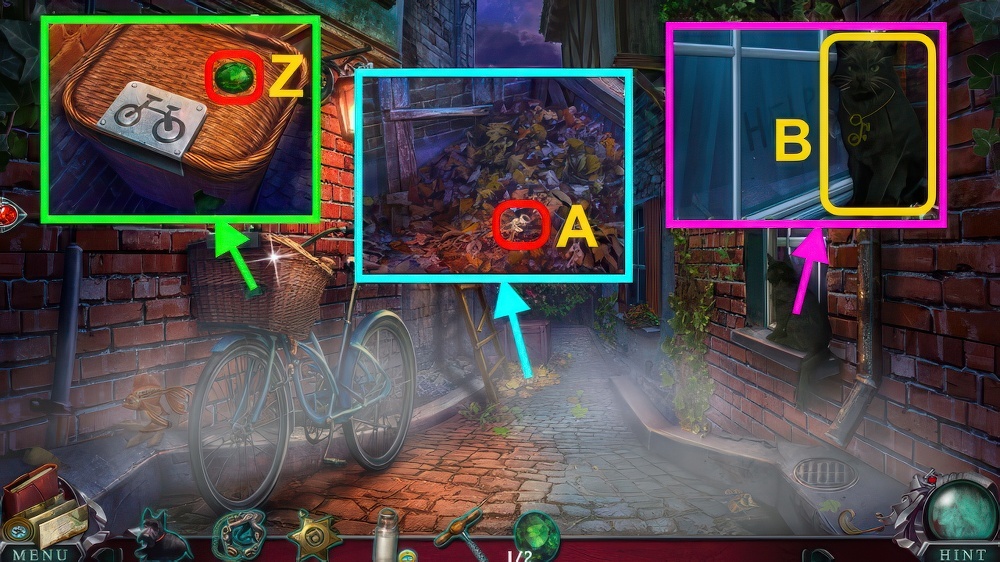
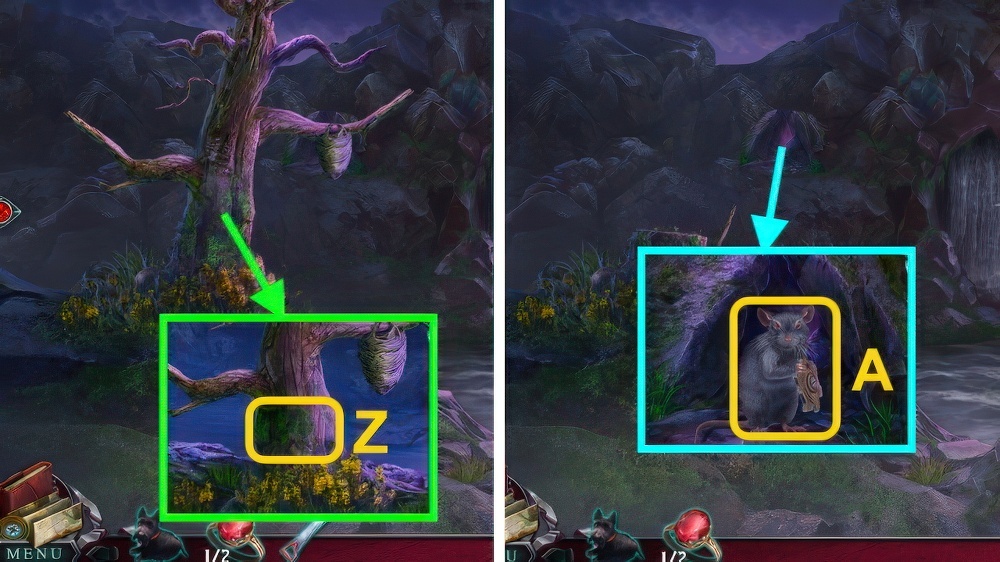
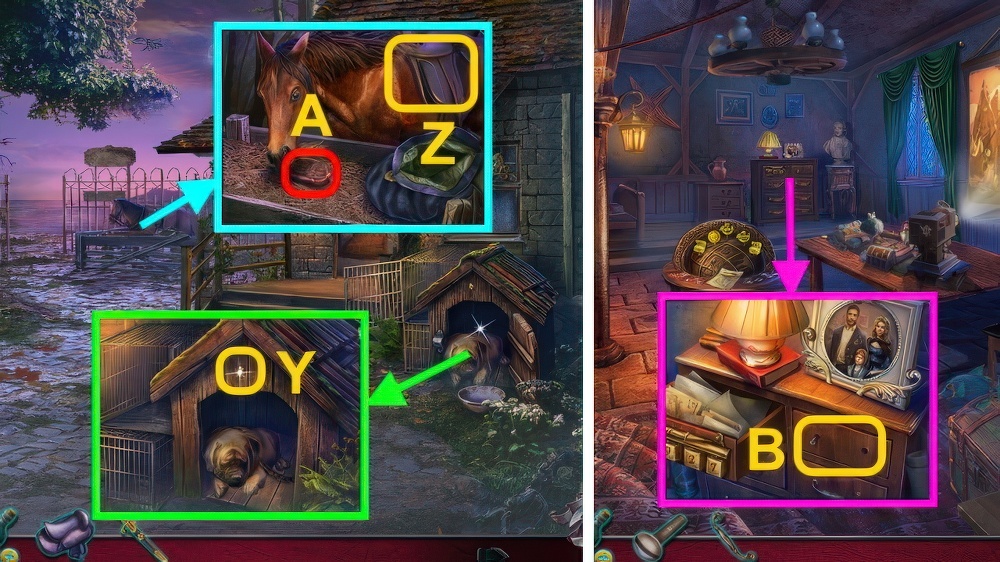
- Take CRYSTALS (2/2) (Z).
- Take DRIED GLUE (A), use PATRICK.
- Take DIRTY BOWL.
- Inspect (B).
- Go down.
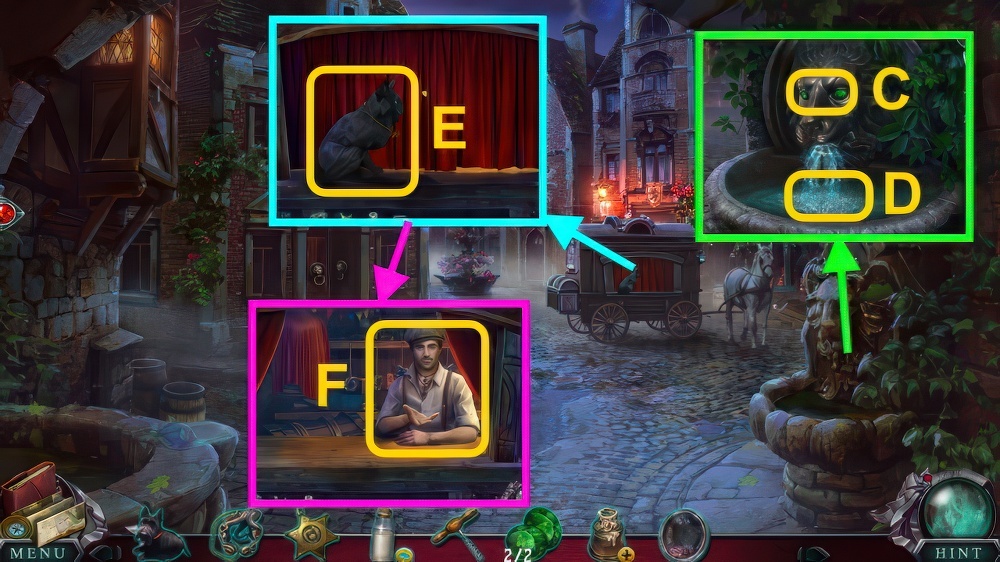
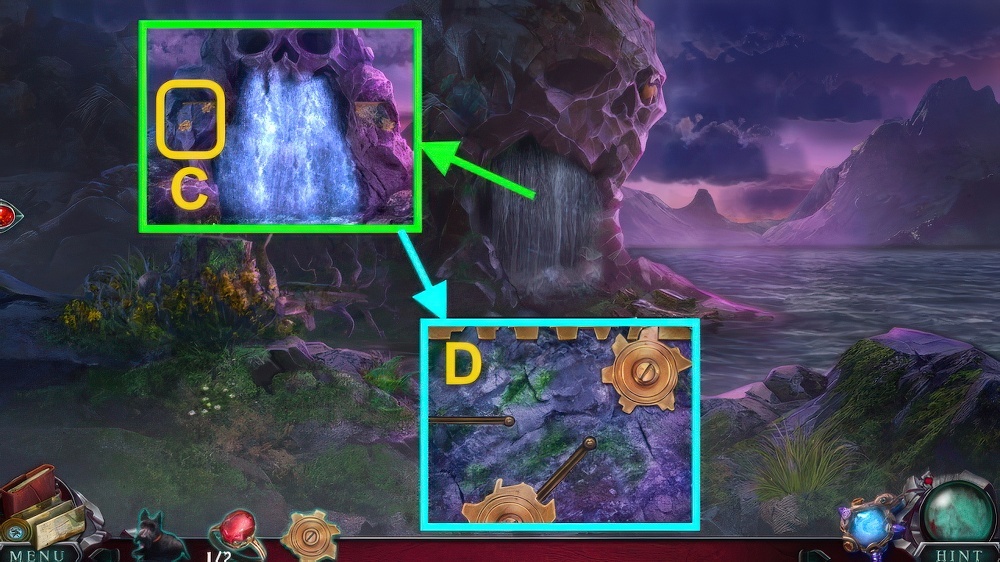
- Place CRYSTALS (2/2) (C).
- Use DIRTY BOWL (D).
- Receive EMPTY BOWL.
- CORKSCREW and EMPTY BOWL on BOTTLE OF MILK, take MILK.
- Give MILK (E), take BIKE EMBLEM.
- Give BROKEN AMULET (F).

- Assemble the amulet by arranging the pieces of glass in their correct places.
- There are two sides to the amulet.
- In Hard Mode, you can rotate the pieces by placing them on the rotate button.
- Easy walkthrough (G).
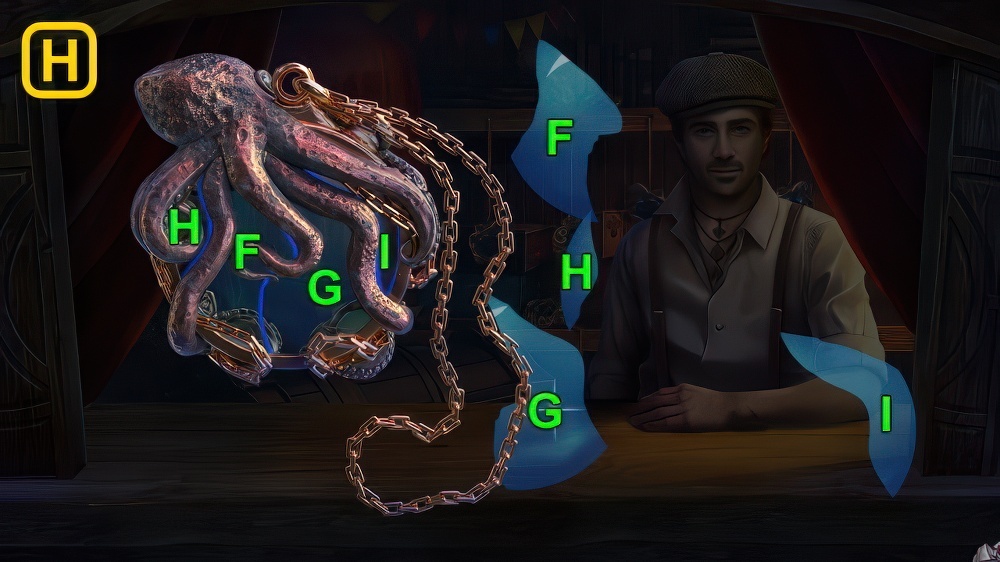
- Hard walkthrough (H).
- Receive Amulet.
- Go left.

- Place BIKE EMBLEM (I), move flowers.
- Read newspaper, take JACK.
- Use JACK (J), take NOTEBOOK (K).
- SHERIFF’S BADGE on NOTEBOOK, turn page.
- Take MARK OF FATE.
- Go down.
- Give MARK OF FATE (L).

- Take SCREWDRIVER and CRYSTAL OF AMULET (M).
- Move items, take FLASHLIGHT (N).
- Take BOLTS (O).
- Inspect Amulet (P), place CRYSTAL OF AMULET.
- Go left.

- Use FLASHLIGHT (Q), inspect.
- Take DART (1/3) (R).
- Move book, take WEIGHT (1/4) (S).
- Inspect glass ×4.
- Use Amulet, play puzzle.
- Take SWITCH.
- Inspect (T).
- Take WEIGHTS (2/4) (U), use SWITCH, BOLTS, and SCREWDRIVER.
- Press switch.

- Take HANDLE (V), inspect each picture (1-5).
- Inspect pieces.
- Complete the puzzle.
- You can rotate puzzle pieces by placing them on the Rotate button.
- Walkthrough (W).
- Press button, take WEIGHTS (3/4).
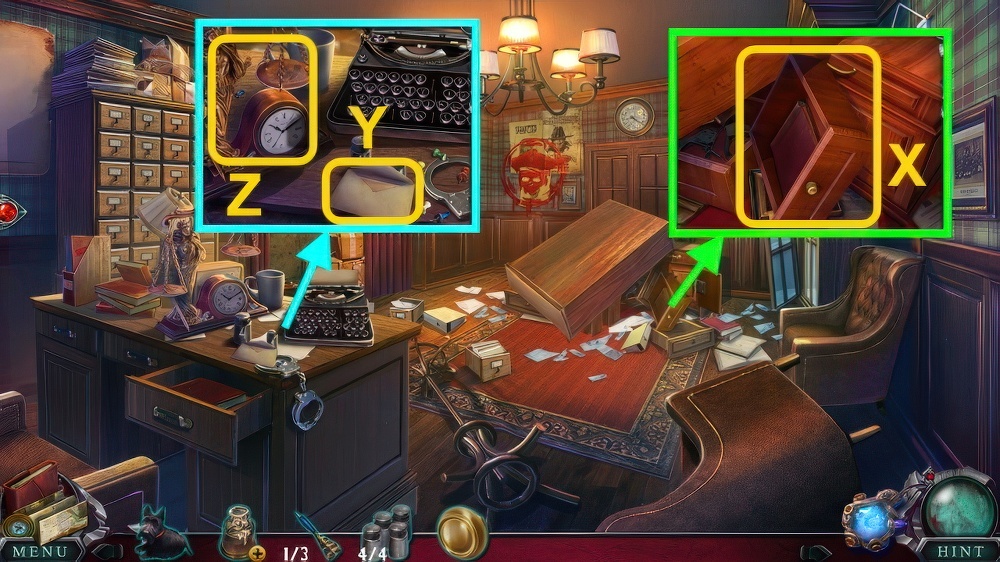
- Inspect drawer (X), take photo and WEIGHTS (4/4).
- Place HANDLE, take TYPEWRITER KEY (1/2).
- Read letter (Y).
- Place WEIGHTS (4/4) (Z).

- Balance the scales using the weights.
- No more than three weights will fit in a bowl.
- Walkthrough (A).
- Take TYPEWRITER KEYS (2/2) (B).
- Place TYPEWRITER KEYS (2/2) (C).
- Place keys (D), take CODE.

- Inspect (E), place CODE.
- Use the arrows to enter the code in the correct order.
- Once a character is selected, you can’t return to it.
- Walkthrough (F): B×7-B×2-B-B×5-A×2.
- Take SHERIFF’S FOLDER.
- Read SHERIFF’S FOLDER, play puzzle.
- Take TAVERN KEY.
- Go down ×2.
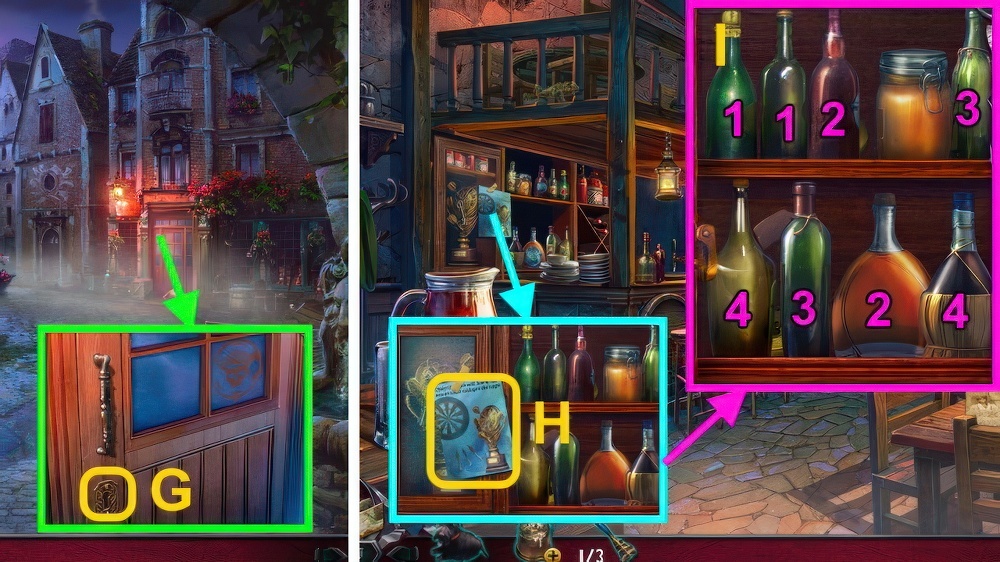
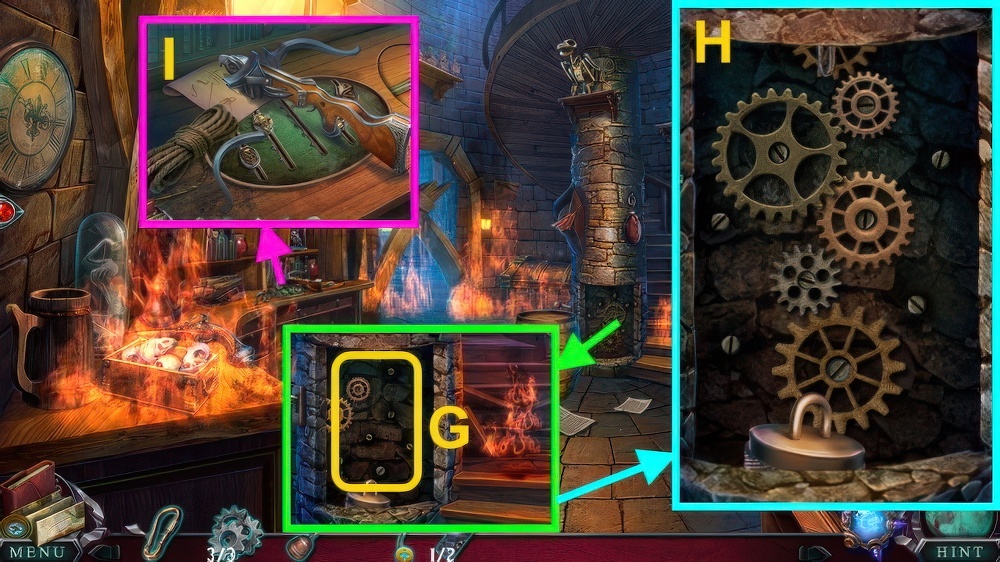
- Use TAVERN KEY (G).
- Inspect paper (H).
- Find matching pairs of labels on the bottles.
- Select two bottles to see their labels.
- Walkthrough (I).
- Take HONEY.

- Inspect paper (J), take DARTS (2/3).
- Open coat, take BRUSH.
- BRUSH in DRIED GLUE, take GLUE.
- Take FLOWER CLASP (K).
- Move paper (L).
- Place FLOWER CLASP (M).
- Inspect dart, use GLUE.
- Inspect, take DARTS (3/3).
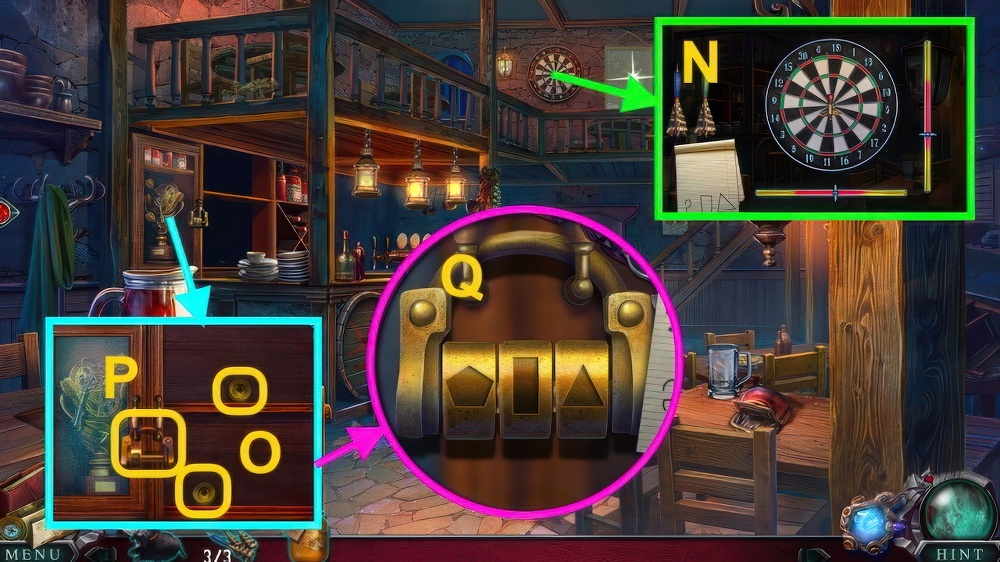
- Use DARTS (3/3) (N).
- Take a dart to start the game.
- To hit the target, throw the dart when both sliders on the panels are in the red zone.
- Walkthrough (N).
- Take CODE.
- Place lock parts (O) on (P), inspect.
- Use CODE.
- Walkthrough (Q).
- Open door, take KEY.
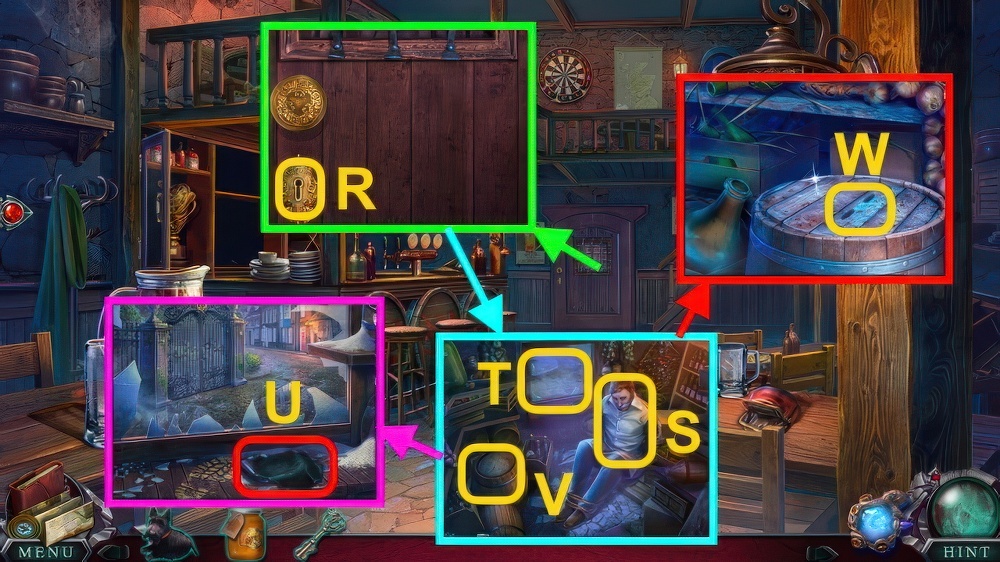
- Use KEY (R).
- Talk (S).
- Inspect window (T).
- Take PIRATE’S CLOTHING SCRAP, CRYSTAL OF AMULET and BARREL HANDLE (U).
- CRYSTAL OF AMULET on Amulet.
- Inspect barrel (V).
- Use HONEY (W), place BARREL HANDLE.
- Move apples, take KNIFE.

- Inspect (X).
- Use KNIFE twice (Y).
- Take WOODEN MALLET.
- Inspect (Z).
- Use WOODEN MALLET (A).
- Go forward.
- Use PATRICK and PIRATE’S CLOTHING SCRAP on scene.
- Find matching pairs of animal tracks beneath the scent clouds.
- Select two clouds to see the tracks behind them.
- Eliminate pairs until you find the right one.
- Find a way through the maze using the path Patrick sniffed out.
- Use items you find along the way to overcome obstacles.
- Walkthrough (B).
- Go left ×2.
- Walkthrough (C).
- Go down.
- Use (D) on (E).
- Go right ×2.
- Take (F).
- Go down.

- Use (G) on (H).
- Go left.
- Walkthrough is random (I).
- Go left.
- Take (J).
- Go down, then right.
- Use (K) on (L).
- Go right, then left.
- Use Amulet.
- Play puzzle.

- Take BROKEN LADDER (M).
- Inspect (N).
- Use PATRICK (O), take MEDALLION PART (1/2) and RIBBON.
- RIBBON on BROKEN LADDER, take LADDER.
- Use LADDER (P).
- Go forward.
- Inspect bag thrice (Q).
- Play puzzle, receive SHERIFF’S BAG (R).
- Inspect SHERIFF’S BAG, inspect paper.
- Take PAPER BALL.
- Use PAPER BALL (S), receive SHERIFF’S BAG PART.
- SHERIFF’S BAG PART on SHERIFF’S BAG, take CRYPT PHOTO.
- Use CRYPT PHOTO on scene.

- Inspect (1-3).
- Take TWEEZERS and MEDALLION PARTS (2/2) (T).

- Place MEDALLION PARTS (2/2) (U).
- Take DRIED FLOWERS (V).
- Use DRIED FLOWERS (W), take BONE HAND.
- Inspect sign (X), place BONE HAND.

- Move the right skeleton into the same position as the left skeleton.
- Press the buttons on its joints to move them.
- Walkthrough (Y): B×2-A-E×2-D-C×2.
- Inspect (Z).
- Take SMOKE GENERATOR HANDLE (A).
- Inspect (B).
- Take STICK (C), place SMOKE GENERATOR HANDLE.
- Turn handle, open.
- Use TWEEZERS (D), receive STONE DETAIL (1/2).
- Inspect (E).
- Move glass (F), take STONE DETAILS (2/2).
- Inspect (G).
- Inspect (H), place STONE DETAILS (2/2).

- Rotate and move the stone chips to assemble the image.
- Walkthrough (I).
- Inspect stairs.

- Using the reference on the left, find all parts of the symbols.
- When you have selected the correct parts, they will be highlighted on the stone board.
- Walkthrough (J).

- Move vines.
- Take ROPE and TORN NET (K).
- ROPE on TORN NET.

- Restore the net by weaving the torn knots.
- Note that you can only go through each knot once.
- Walkthrough (L).
- Take NET.

- Use NET (M).
- Use STICK, move items.
- Take HAIRPIN.
- Take BOX PIECE (N).
- Use HAIRPIN (O).
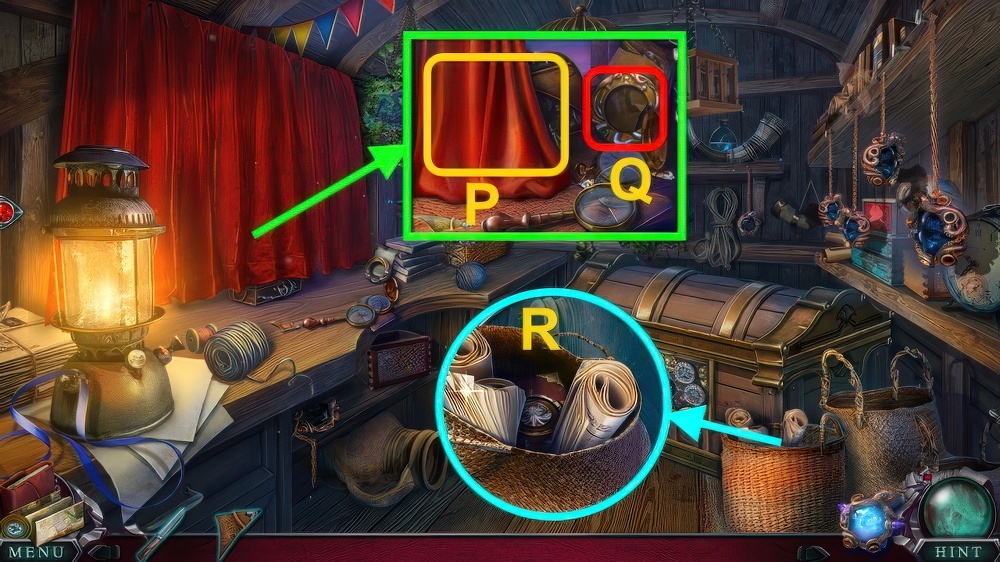
- Move curtain (P), inspect chest.
- Take DIARY LOCK PIECE (Q).
- Read papers (R), take WING BONE and LOCKED DIARY.

- Assemble the image by rotating the two outer circles.
- DIARY LOCK PIECE on LOCKED DIARY, walkthrough (S).
- Open diary, walkthrough (T).
- Open diary, take KEY.
- Take CARABINER (U).
- Use KEY and KNIFE, take COMPASS.
- Move items, place box parts (V).
- Open book, place box part.
- Place BOX PIECE and COMPASS.
- Take CRYSTAL OF AMULET, GEAR (1/3), and CHEST LOCK PIECE.
- CRYSTAL OF AMULET on Amulet.
- Place CHEST LOCK PIECE (W).
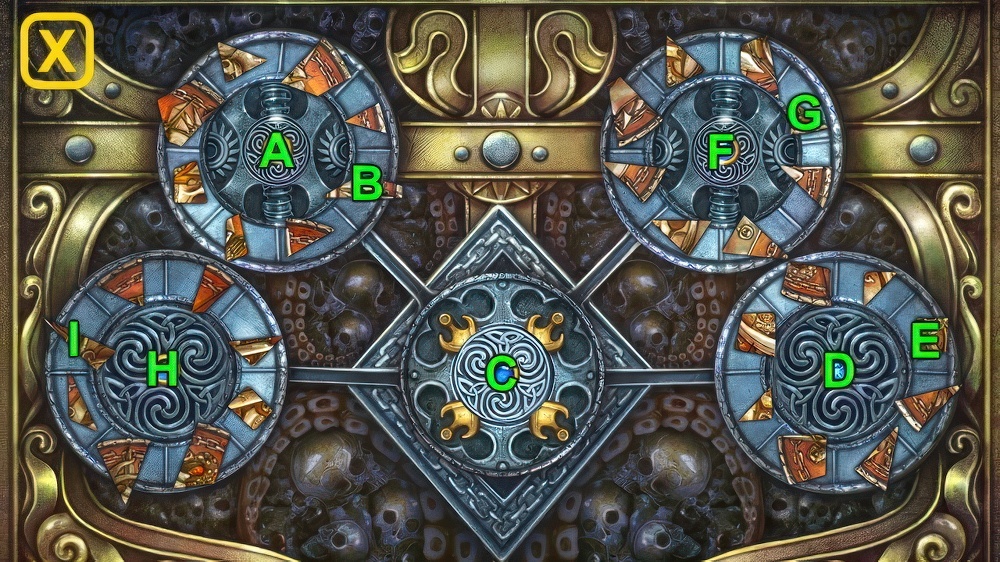
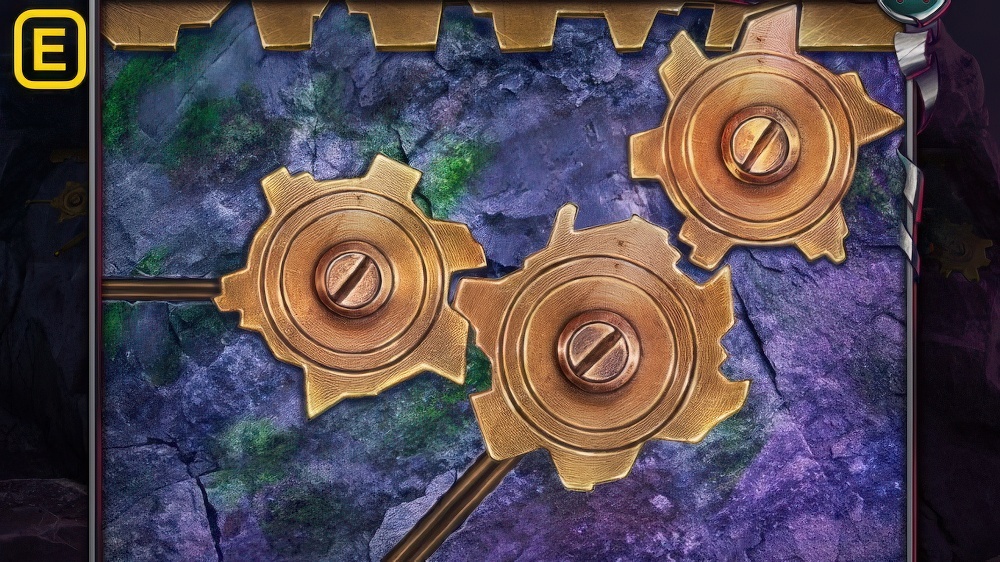
- Arrange the triangles around each disc so they unite in the center.
- Select a ring to rotate the triangles around the disk.
- Select the center of a disk to rotate its parts into triangles.
- Press the button in the center disk to try your solution.
- Easy walkthrough (X): A×3-B×3-D×5-E-C.
- Hard walkthrough (X): A×3-B×3-D×5-E-F×2-G×4-H×7-I×6-C.

- Inspect (Y), receive PATRICK.
- Take CRYSTALS (Z).
- Go down.
- Place CRYSTALS (A).
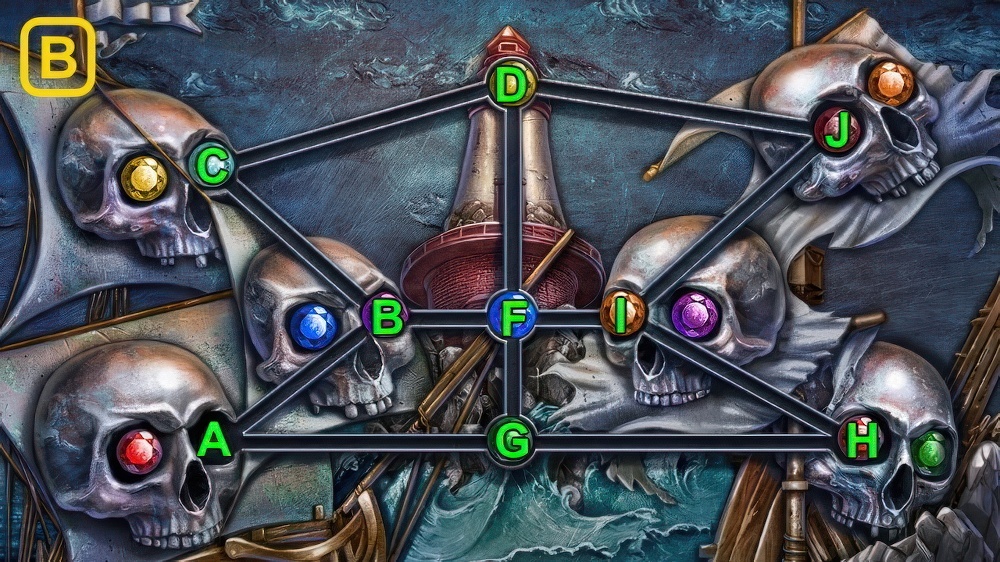
- Move each crystal along the tracks until every skull has a pair of same-colored eyes.
- Use the empty slot as a way station.
- Walkthrough (B): B-C-D-J-I-F-G-H-I-F.
- G-A-B-F-G-H-I-F-G-A-B-F.
- Go forward.
- Use Amulet, play puzzle.

- Move BARREL (C).
- Take HOOK (D), place WING BONE.
- Take GEARS (2/3).
- Take CROWBAR (E).
- Take HANDLEBARS (F), use CROWBAR.
- Take PART OF THE IMAGE (1/2).
- Move items, take GEARS (3/3).
- Use GEARS (3/3) (G).
- Repair the mechanism.
- Align the gears so that they contact each other without overlapping.
- Then select the lever.
- Walkthrough (H).
- Place HOOK, pull handle.
- Take PARROT SKELETON.
- Inspect PARROT SKELETON, take PIRATE KNOB.
- Take CROSSBOW (I), place PIRATE KNOB.

- Move the levers until they line up in the center of the mechanism.
- Walkthrough (J): A-D×3.
- Read note, take BUTTON and NEEDLE (1/2).
- Inspect PARROT SKELETON, inspect lock.
- Place BUTTON.

- Move the bird tiles into their matching slots.
- Select a tile and a direction for it to move.
- Use the bottom arrows to rotate the center disk.
- Note that tiles can’t jump over each other.
- Walkthrough (K).
- Inspect parrot, take NEEDLE WITH THREAD (2/2).

- Use NEEDLE WITH THREAD (L), take BAG WITH SAND.
- Use BAG WITH SAND (M).
- Go upstairs.
- Take PATRICK (N).

- Take RUSTY SAW (O).
- Take RAG (P).
- Read note, open.
- Take WIRE.
- Take PARTS OF THE IMAGE (2/2) (Q).
- Place PARTS OF THE IMAGE (2/2) (O).

- Walkthrough (R).
- Take DIRTY SPYGLASS and ARROW.
- RAG on DIRTY SPYGLASS, inspect.
- Take SPYGLASS.
- Inspect CROSSBOW, place WIRE and ARROW.
- Place pieces, take CROSSBOW.

- Place SPYGLASS (S), inspect.
- Find the objects outlined on the lens.
- Press the arrows to move your field of vision.
- Slide the button to change your focus.
- Walkthrough (T).

- Walkthrough (U).
- Take METAL COLLAR.
- CARABINER and METAL COLLAR on HANDLEBARS, take ZIP LINE HANDLE.
- Use CROSSBOW and ZIP LINE HANDLE (V), inspect handle.
- Play puzzle, receive TORCH.
- Inspect bag (W).
- Take SAW HANDLE and BOX (X).
- Inspect ×4 (Y).
- Use TORCH, take RING (1/2) and KEY.
- KEY on BOX, take ACID.
- SAW HANDLE and ACID on RUSTY SAW, take SAW.
- Use SAW (Z).
- Inspect (A), use PATRICK.

- Using the arrows, help Patrick find the escaped rat.
- Be careful, the maze has traps.
- Walkthrough (B): C-B-D-B-C×2-A-C-B×2-D-B-C-A-C×2-B-C-A-D-A-C.
- Receive GEAR.
- Inspect (C).
- Place GEAR (D).
- Connect all the gears.
- Wait until each gear rotates to the correct position, then select it to connect it with another gear.
- Walkthrough (E).

- Inspect (F).
- Remove all the flies.
- Select a spider and a space to move it.
- Jumping over a fly will remove it.
- Walkthrough (G): (A-B)-(B-C)-(C-D)-(D-B).

- Connect all the gears.
- Wait until each gear rotates to the correct position, then select it to connect it with another gear.
- Walkthrough (H).
- Go forward.

- Take RINGS (2/2) (I).
- Inspect (J), take CANDLE.
- Take MAP PART (K).
- Open (L), move items.
- Inspect rings.
- Inspect (M), place RINGS (2/2).
- Walkthrough (N).
- Take SWORD.

- Move rocks and crates, use SWORD (O).
- Open, take DYNAMITE.
- Place DYNAMITE (P), use CANDLE.
- Pull lever.
- Inspect (Q), place MAP PART.

- Complete the image by selecting and moving the fragments in the correct order.
- Walkthrough (R).
- Move items, read book.
- Take CRYSTAL OF AMULET and LANCE.
- CRYSTAL OF AMULET on Amulet.
- Go down.

- Use LANCE (S), open bag.
- Read note, take BLACK MARK PIN (1/3).
- Inspect scene.
- Use Amulet, play puzzle.
- Talk.
- Inspect twice (T).

- Move the ropes to release the glass shards.
- They must fall into the bottom niches at the same time.
- Walkthrough (U).

- Take BOY FIGURINE and BENT NAIL (V).
- Inspect hat (W), take WOMAN’S PHOTO (1/2).

- Use BENT NAIL (X), open.
- Take EMPTY JAR.
- Take newspaper and PHOTO ALBUM, walkthrough (Y).
- Use EMPTY JAR, receive JAR OF TERMITES.
- Inspect PHOTO ALBUM, place BOY FIGURINE.

- Walkthrough (Z), open.
- Take CLIP.
- Use CLIP, open (A).
- Take MIRROR COMPASS.
- Use JAR OF TERMITES and MIRROR COMPASS (B).

- Use the arrows to move the latch through the labyrinth and to open the door.
- Walkthrough (C): D-B-D-C-A-C-D-C-A-B-A.
- Go forward.
- Take GREEN CROSS (D), inspect.
- Take CAN OPENER (E).
- Take SCRAPER (F).
- Place GREEN CROSS (G), open.
- Inspect papers.
- Walkthrough (H), take LIQUID SEDATIVE.
- Go down.

- Use SCRAPER (1-4), move picture.
- Take DOG TOKEN.
- Place DOG TOKEN (I).
- Move both tokens left and right and guide them to the top of their maze.
- Walkthrough (J): D-F-D-A-D-B×2-E×2-D-F×4-D×2-A-C×2-A×2-D-B-D-E-C-E.
- D-A×2-E-D×2-B-C-B-D-F-D-B-E×2-D-F-D×2-A×2-F-D.
- Take DOG FOOD.
- CAN OPENER and LIQUID SEDATIVE on DOG FOOD, receive SLEEP-INDUCING FOOD.
- Go forward.
- Give SLEEP-INDUCING FOOD (K).
- Inspect (L), take DARTBOARD IMAGE PIECE (1/2).
- To open the door, find a key for every keyhole.
- Open (M), take PATRICK.
- Use PATRICK (N).
- Walkthrough (O).
- Go forward.

- Take FAMILY PHOTOS (2/2) (P).
- FAMILY PHOTOS (2/2) on PHOTO ALBUM, take CODE.
- Place CODE, enter (Q).
- Take SLIDES.

- Place SLIDES (R), play puzzle.
- Receive SAW.
- Use SAW (S), open.
- Take BLACK MARK PINS (2/3).
- Move clothes, take SHIP IN BOTTLE (T).
- Read book (U), take DARTBOARD IMAGE PIECE (2/2).
- Go down.

- Place DARTBOARD IMAGE PIECE (2/2) (V).
- Remove plants, take scroll and SADDLE (W).
- Select a belt to open it.
- It may be connected to other belts.
- Walkthrough (X).
- Take photos and DAGGER.
- Use DAGGER (Y), receive BOLT.
- Place SADDLE (Z).
- Take HANDLE (A).
- Go forward.
- Place HANDLE and BOLT (B), open drawer.
- Inspect paper, take SLIDES.

- Use SLIDES (C).
- Play puzzle, receive FLASHLIGHT.
- Use FLASHLIGHT, take KEY (D).
- Use KEY (E), take TWEEZERS.
- Open SHIP IN BOTTLE, use TWEEZERS.
- Receive CRYSTAL OF AMULET and BLACK MARK PINS (3/3).
- Read note, place BLACK MARK PINS (F).

- To open the globe, swap the tokens so the vertical and horizontal lines match the solution shown.
- Walkthrough (G).
- Take MAP TO SALTSHORE.
- Go down.

- Use MAP TO SALTSHORE (H).
- Play puzzle (I).
- Inspect (J).
- Talk, take SHERIFF’S BADGE (K).

- Inspect, place SHERIFF’S BADGE (L).
- Walkthrough (M): A-B×2.
- Take THEATER TOKEN.

- Use THEATER TOKEN (N), play puzzle.
- Receive GLOVES.
- Walkthrough (O).
- Use GLOVES, remove glass (P).
- Take LIGHT BULB (1/2).
- Inspect each paper (1-4), collect each sign part.
- Inspect sign (Q), take SWITCH.
- Press switch.
- Place SWITCH (R), press.
- Take LIGHT BULBS (2/2) (S).

- Replace LIGHT BULBS (2/2) (T).
- Take WIRE.
- Use WIRE (U), open.
- Go through window.
- To defeat Captain Lowden, select the fist icon when the arrow reaches it.
- Continue until you win three rounds.
- Walkthrough is random (V).
- CRYSTAL OF AMULET on Amulet.

- Take FEATHER and ANCHOR WEIGHTS (1/2)-(2/2) (W).
- Place ANCHOR WEIGHTS (2/2) (X), take INK.
- Place FEATHER and INK (Y), take CODE.
- Remove picture, use CODE.
- Press (5-3-7-4) (Z), take scroll and SECRET STORAGE MAP.
- Go down.
- Use SECRET STORAGE MAP on scene.
- Take PRUNERS (A), use PATRICK.
- Take MACDONALD DIARY.

- Use PRUNERS (B), take THEATER TOKEN.
- Use THEATER TOKEN (C).
- Play puzzle, receive GOBLET.
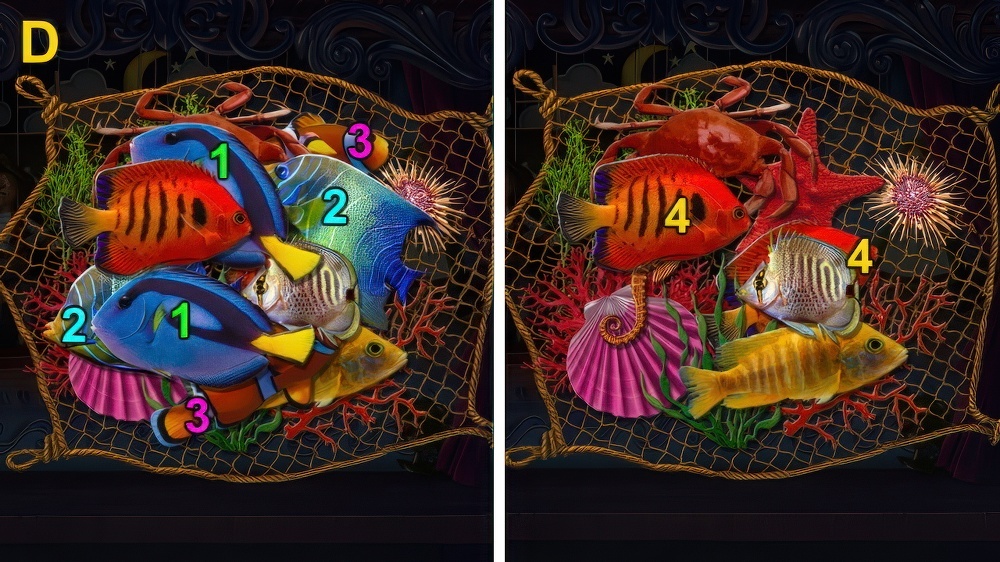
- Find matching pairs of fish to clear the net.
- Walkthrough (D).

- Read MACDONALD DIARY, place GOBLET.
- Walkthrough (E).
- Open, take RING WITH FIRE EMBLEM.
- Go left.
- Use RING WITH FIRE EMBLEM (F), take HARPOON TIP and SPYGLASS.
- Use SPYGLASS (G), take KEY.
- Use KEY (H).
- Untangle the wires so they don’t cross over each other.
- Select and drag the outside pins to swap them.
- Walkthrough (I).
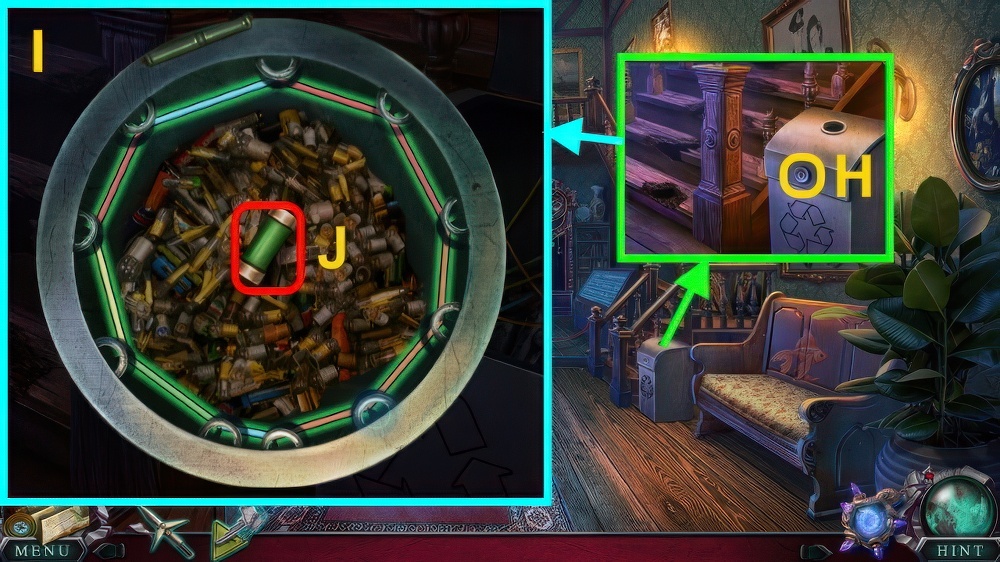
- Take FUSE (J).
- Open (K), replace FUSE.
- Select and light up the fuses according to the numbers near them.
- If the number of lighted fuses is correct, the number will also light up.
- Walkthrough (L).
- Go left.
- Inspect scene.

- Take GLOVES (M).
- Use GLOVES (N), take FIRE.
- Use HARPOON (O), take FIREFIGHTER.
- Use FIRE and FIREFIGHTER (P), take HOSE.
- Use HOSE (O), inspect.
- Use Amulet, play puzzle.

- Select a number and tap cells to fill all the cells on the field to defeat the Storm of the Seas.
- Easy walkthrough (Q).

- Hard walkthrough (R).
- Walkthrough Bonus Chapter, at the link below.


