Edge of Reality 9: The Legend of Greenbush – You eagerly return to Emberton where your old friend Jesse is waiting for you, but the meeting is marred by disturbing events. The lake, once calm, suddenly becomes restless, and the town of Greenbush, thought to be long gone, begins to rise from the depths. An ancient amulet found by Jesse may be the cause, but before the truth can be discovered, a mysterious ghost kidnaps him. Following the clues left behind, you will explore the gloomy streets of the newly emerged Greenbush, collect fragments of the amulet and delve into the mysteries of the past. Find out who is behind the events, and save a friend before the whole town disappears under the waves again. If you can not pass any of the puzzles or do not know where the items are, on our site you can watch the walkthrough of the game Edge of Reality 9: The Legend of Greenbush, and uncover the secrets of Greenbush.
Edge of Reality 9: The Legend of Greenbush – Walkthrough
Here you can see the full walkthrough of Edge of Reality 9: The Legend of Greenbush game, namely for all chapters, including bonus chapter, in pictures.
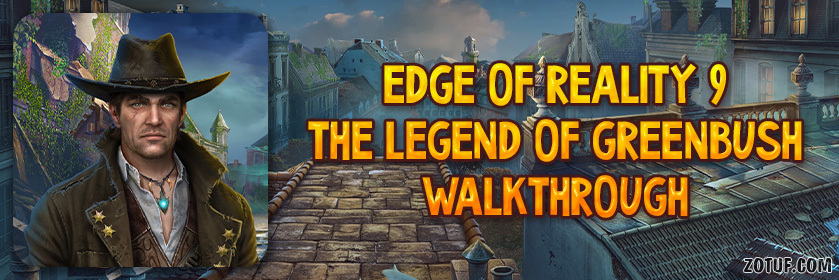
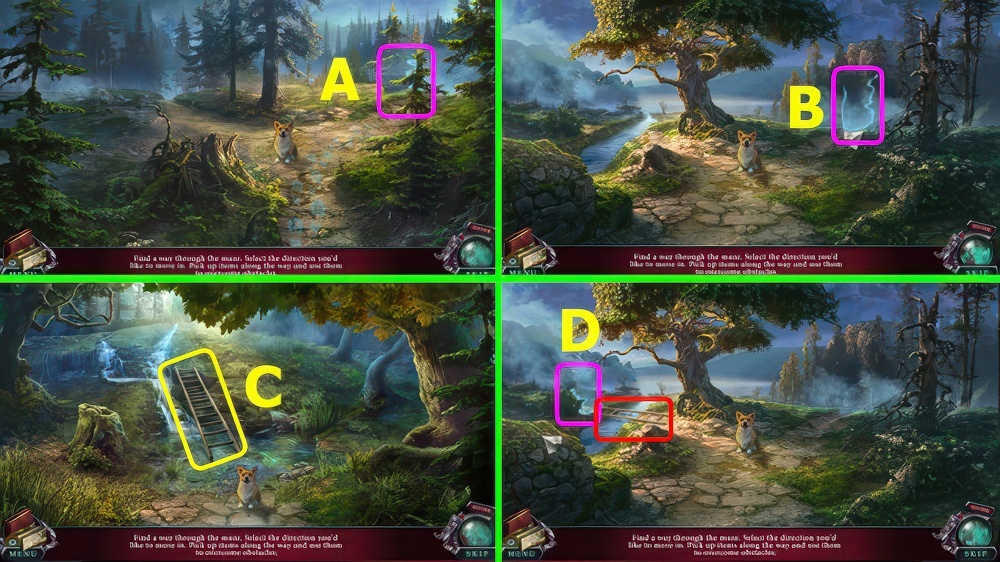
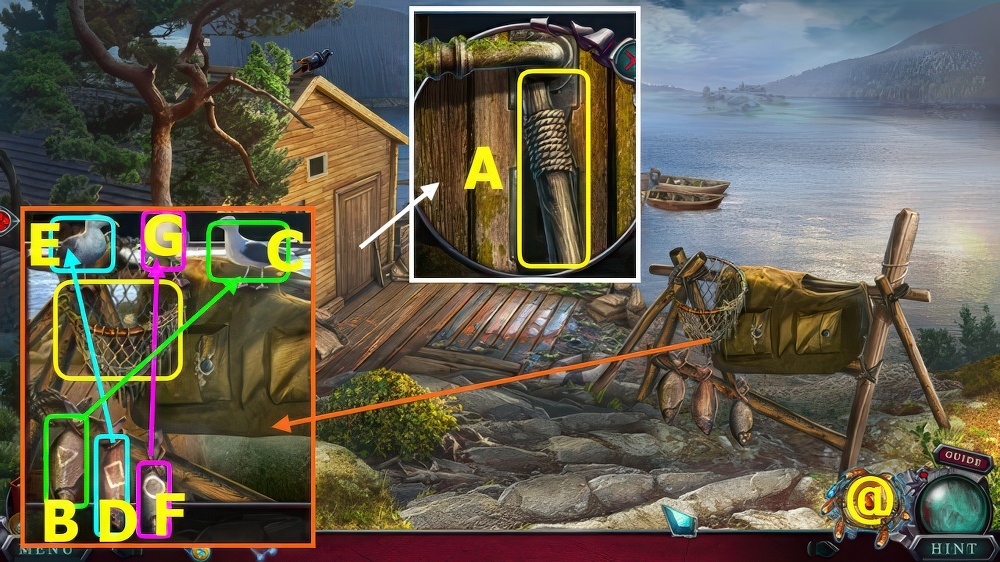
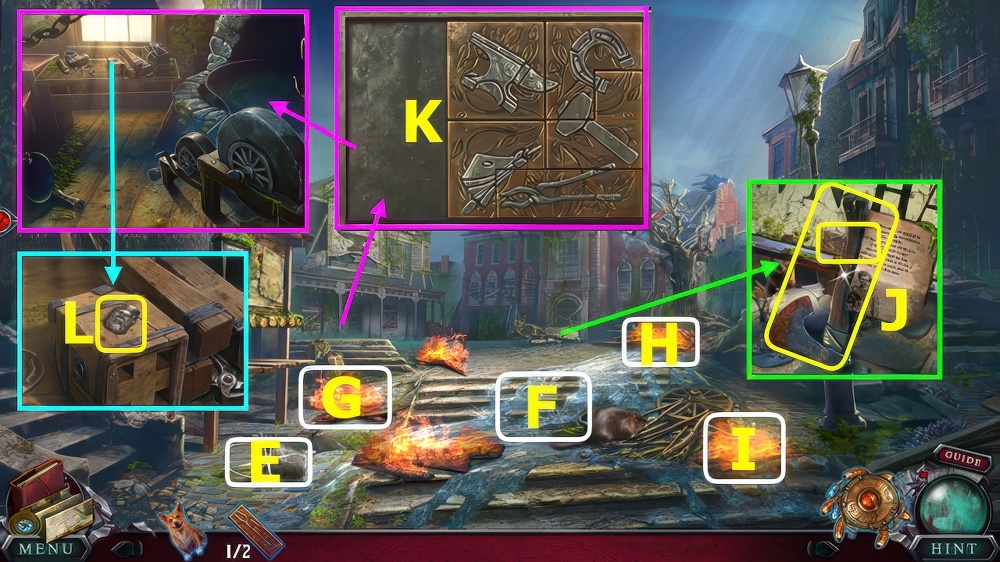
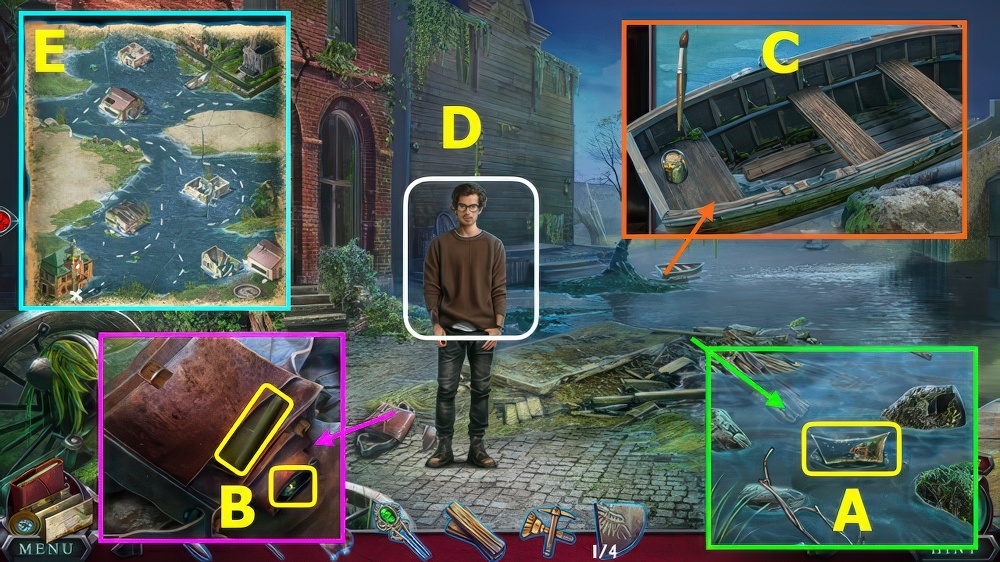
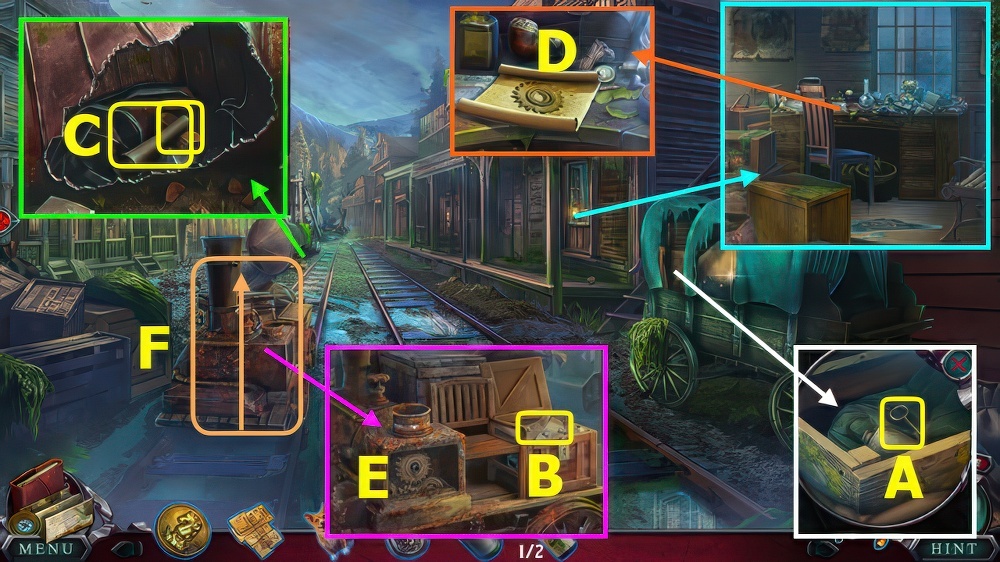
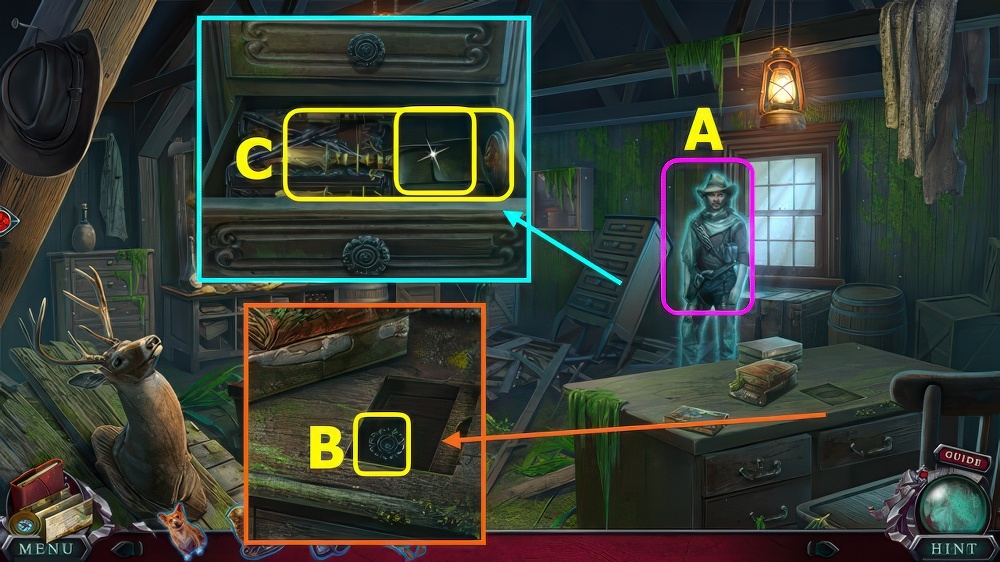
- Take SMARTPHONE (A).
- Select SMARTPHONE, remove case, take GLOVE-BOX KEY.
- Move wires, read license and file, take TOKEN HALF (B).
- Use GLOVE-BOX KEY, select, take PIN and map (C).
- Select, use PIN (D), earn OZZY.
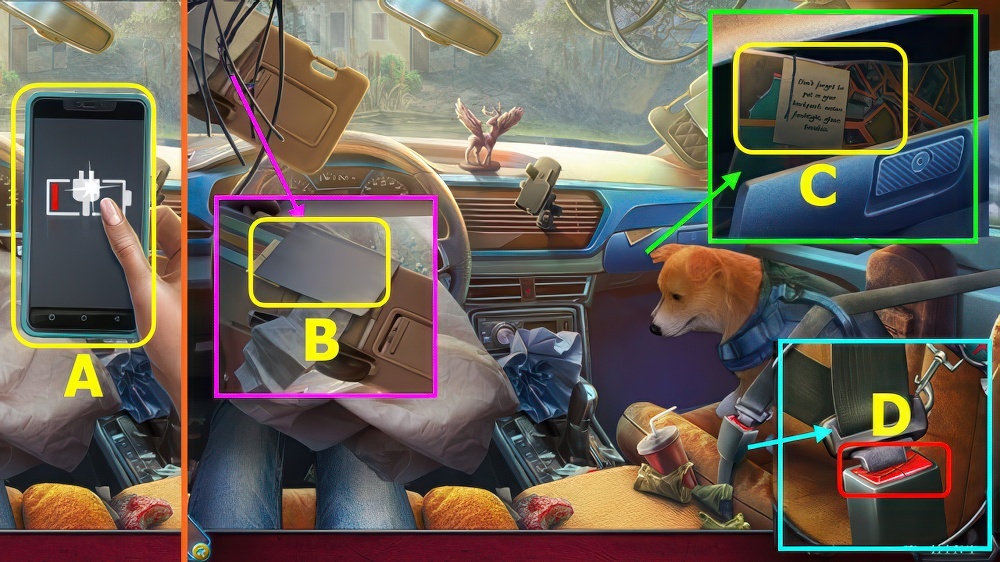
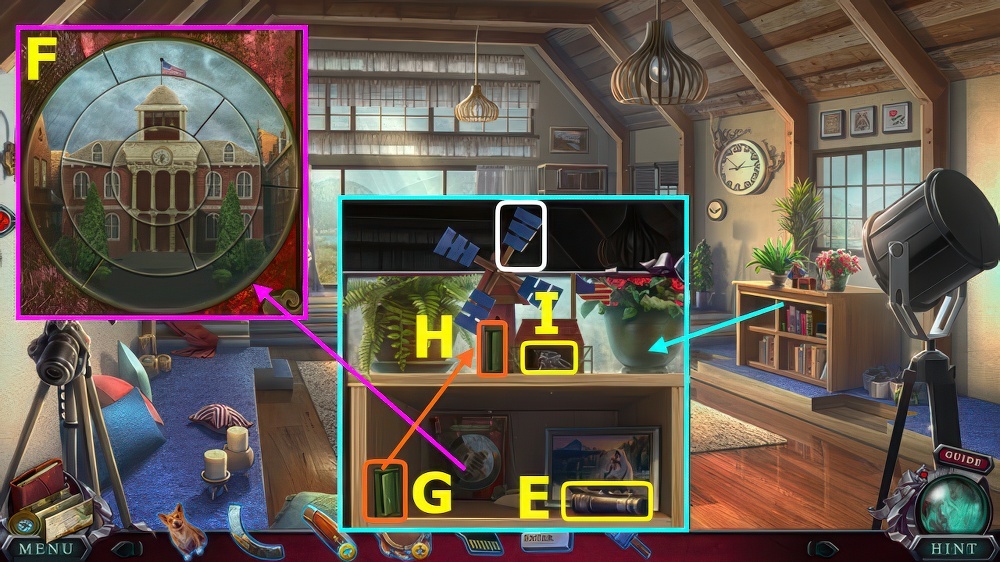
- Remove item, take UMBRELLA HANDLE (E).
- Use UMBRELLA HANDLE, take WALLET (F).
- TOKEN HALF on WALLET, read ID, open zipper, take SCISSORS.
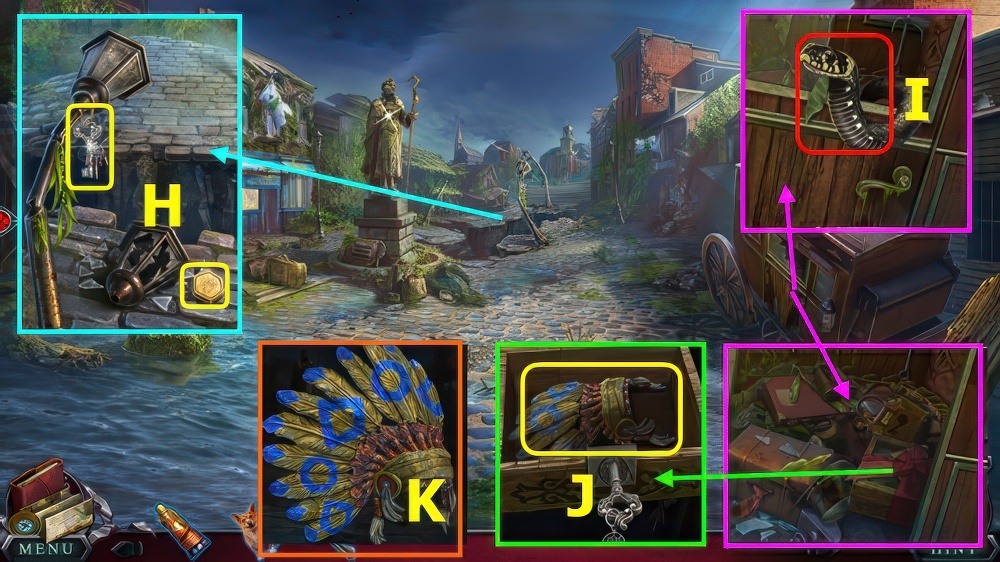
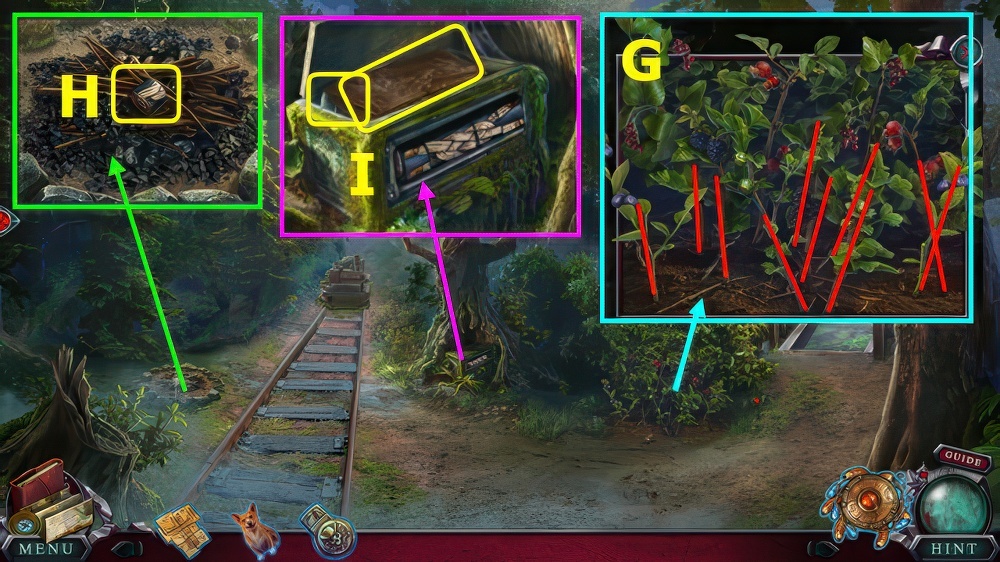
- Select, use SCISSORS, remove items 2x, take GLASS BREAKER (G).
- Use GLASS BREAKER (H).
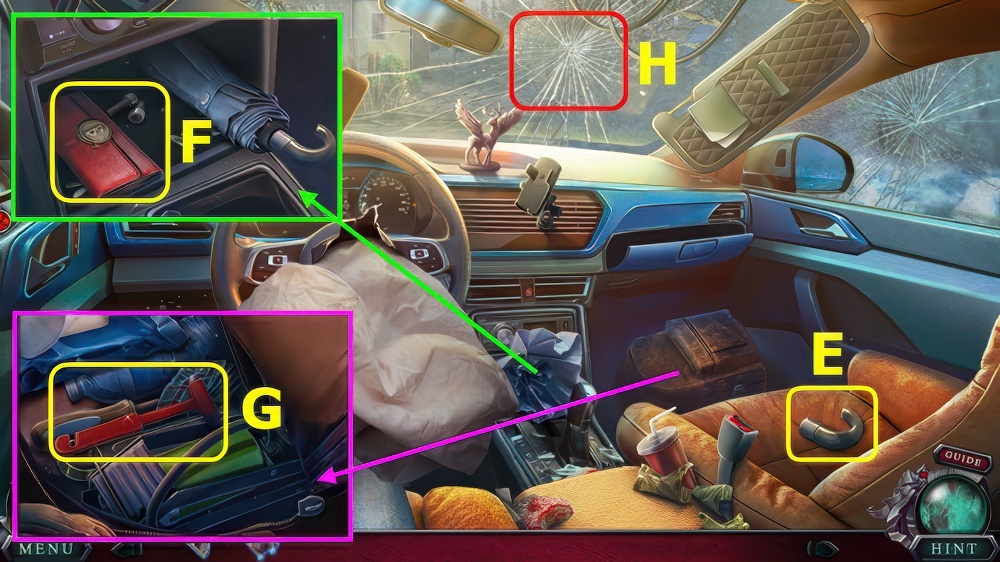
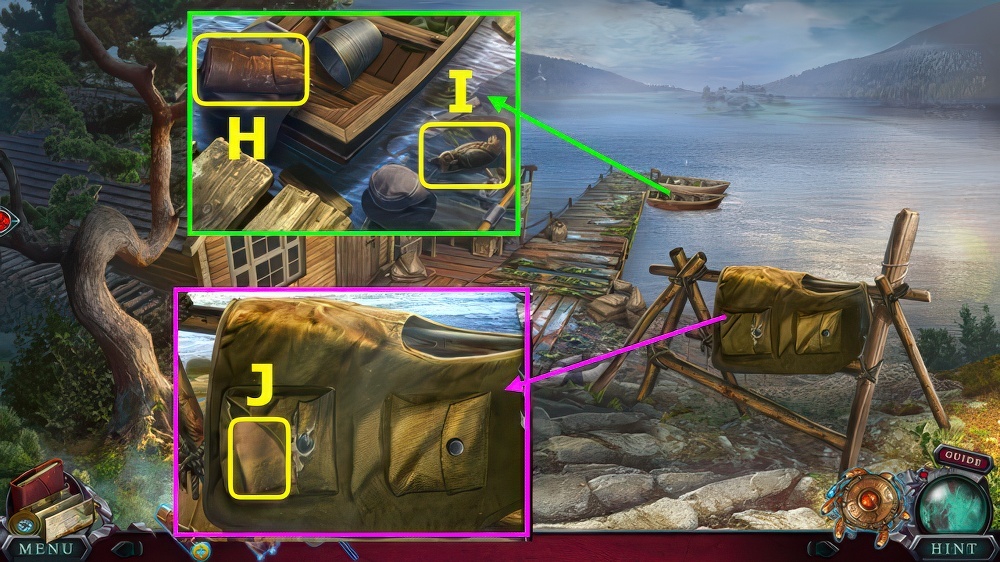
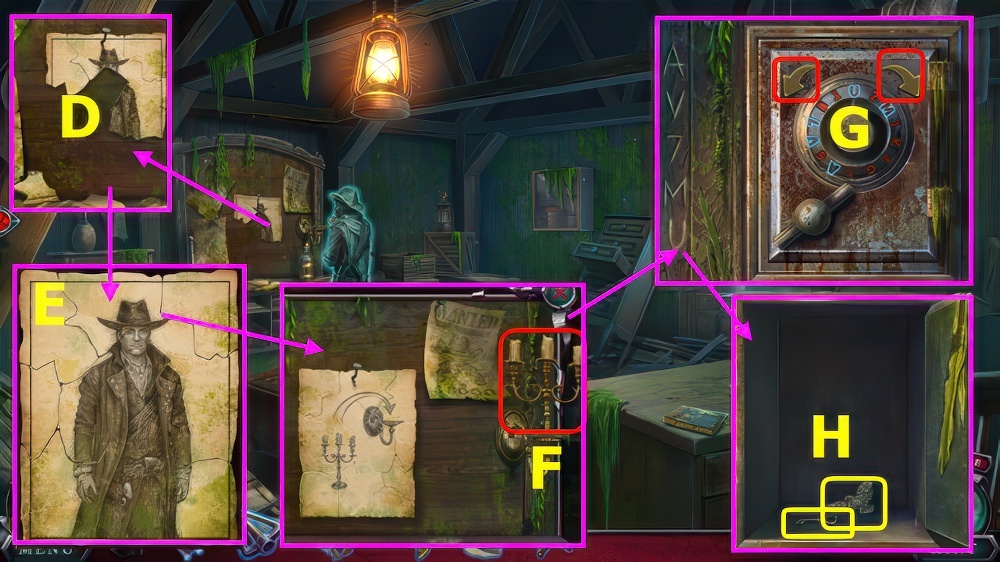
- Go forward.
- Take OZZY (I).
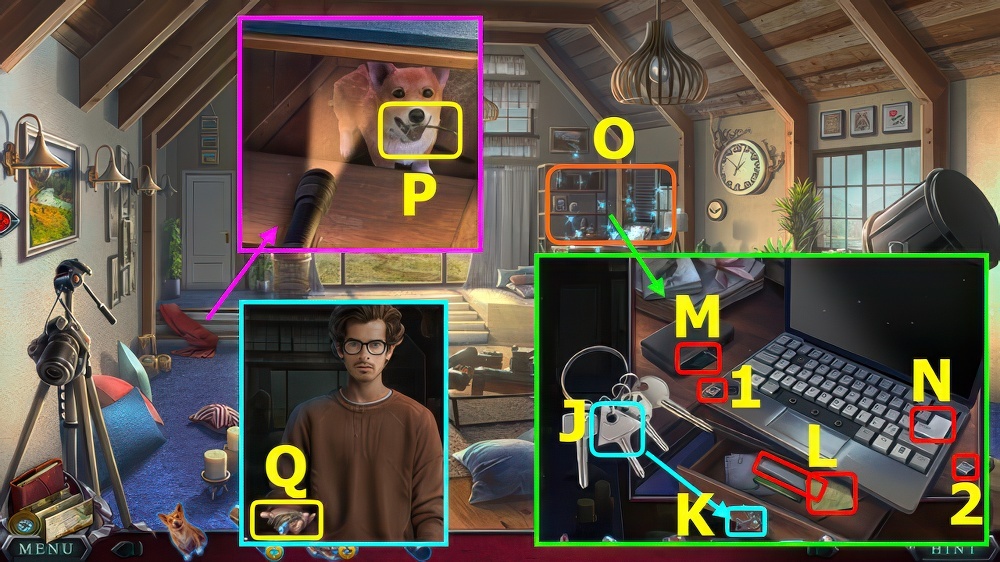
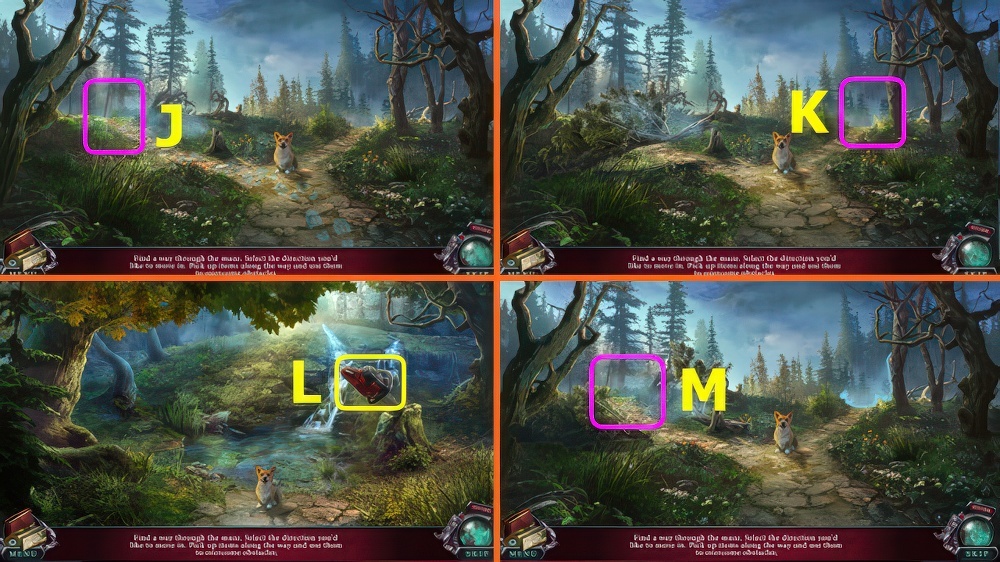
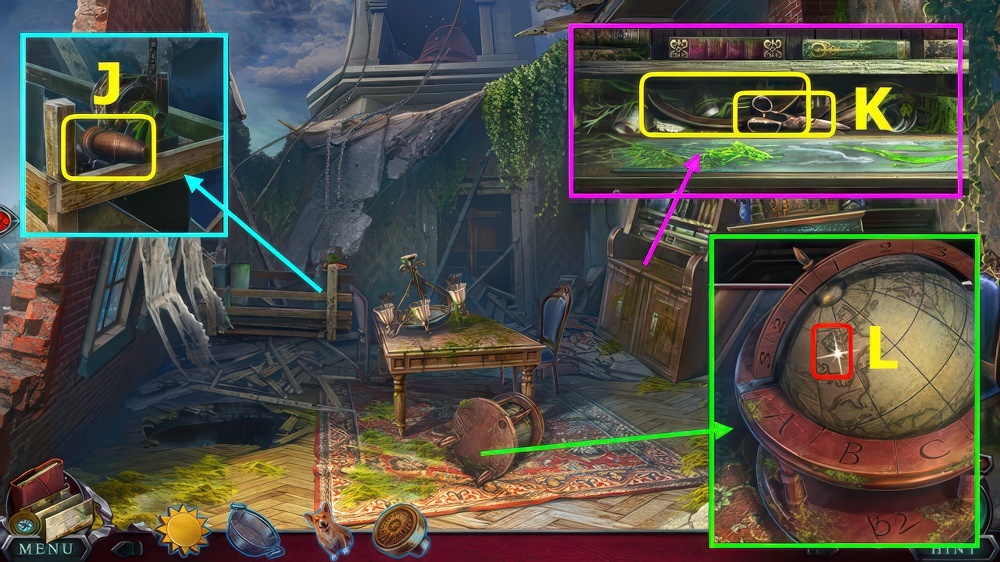
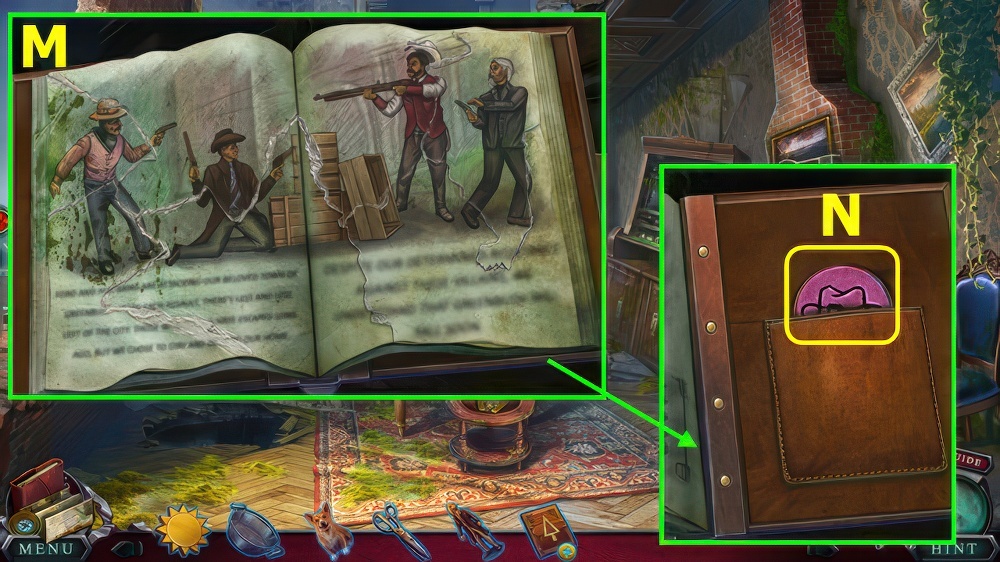
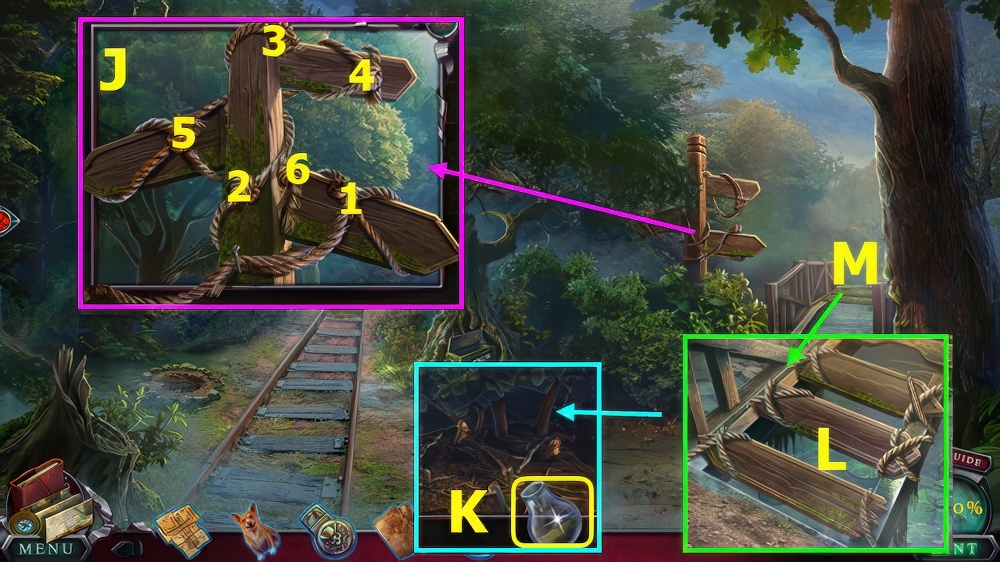
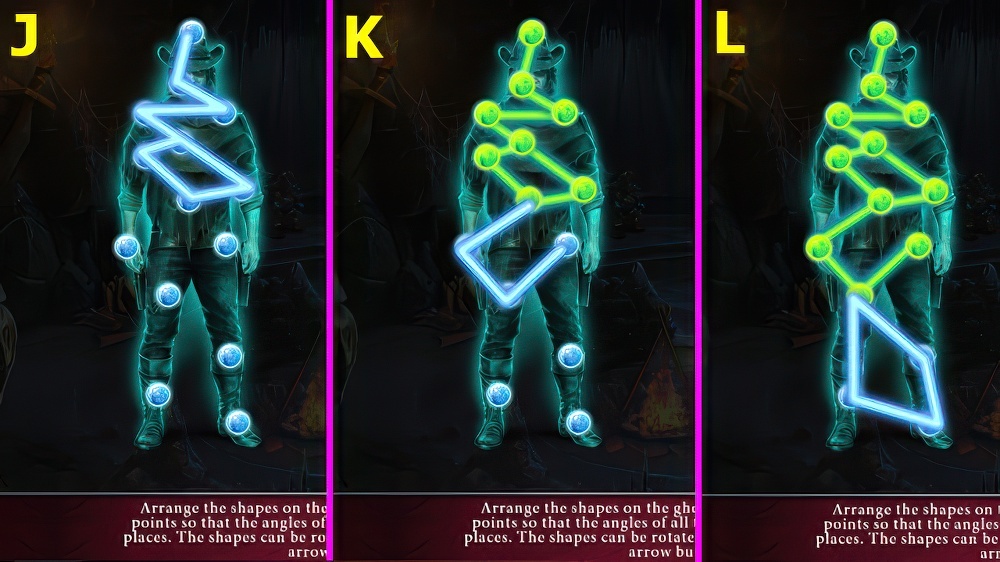
- Take BOOK PART (J), read paper and photos.
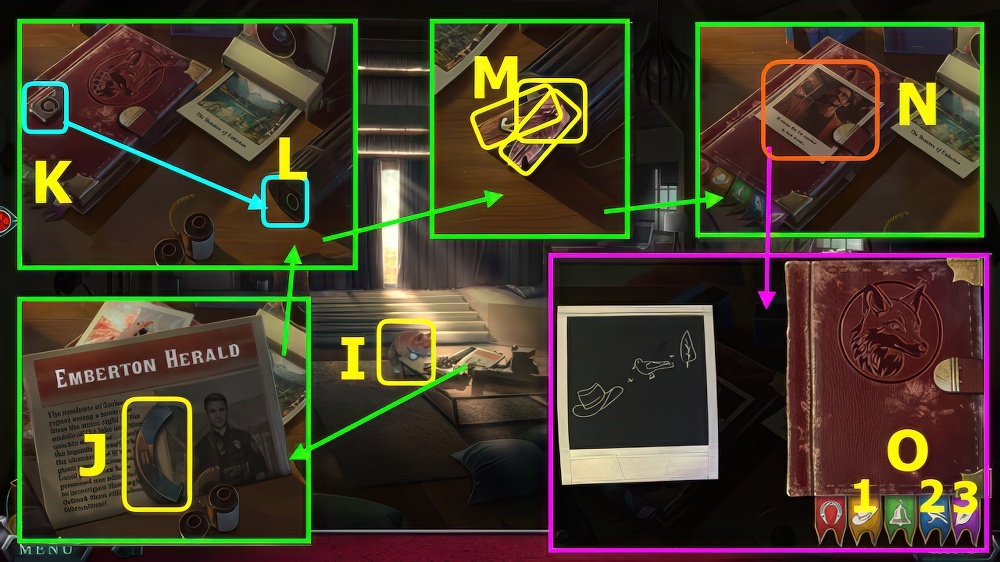
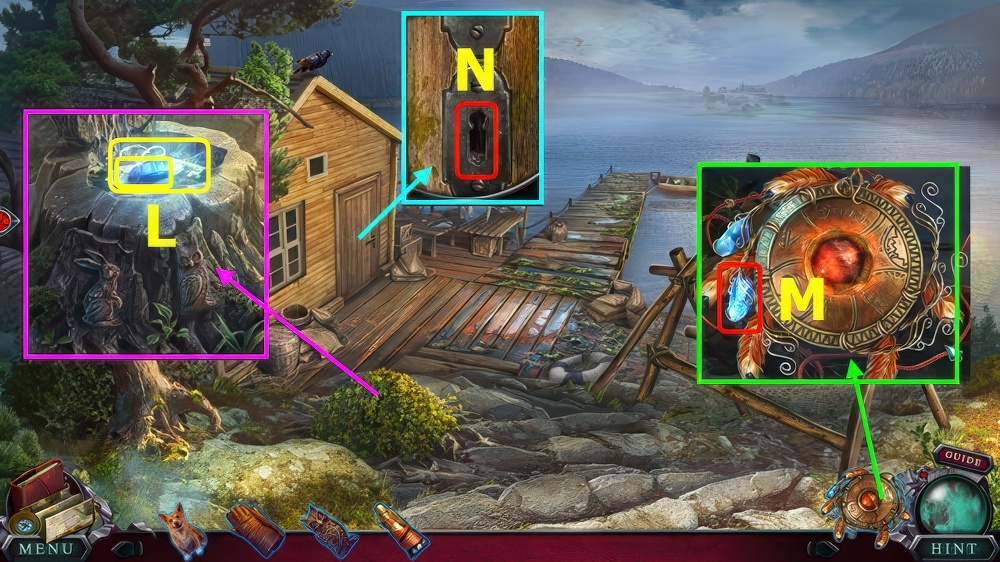
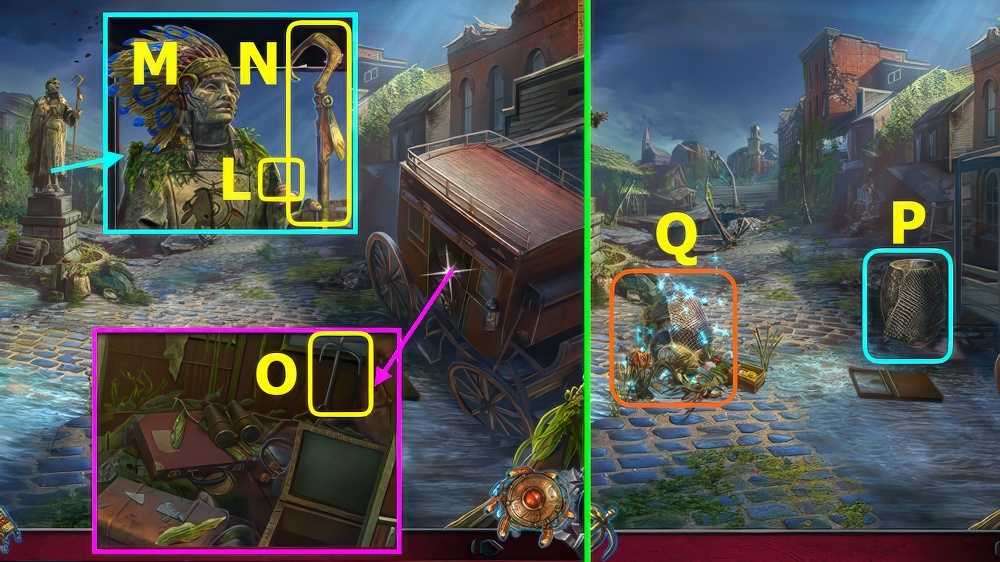
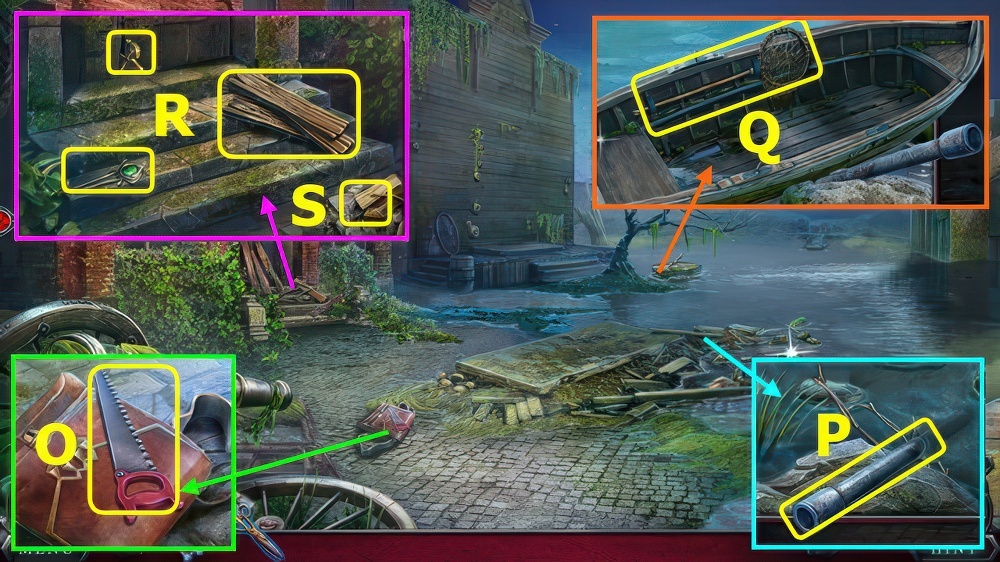
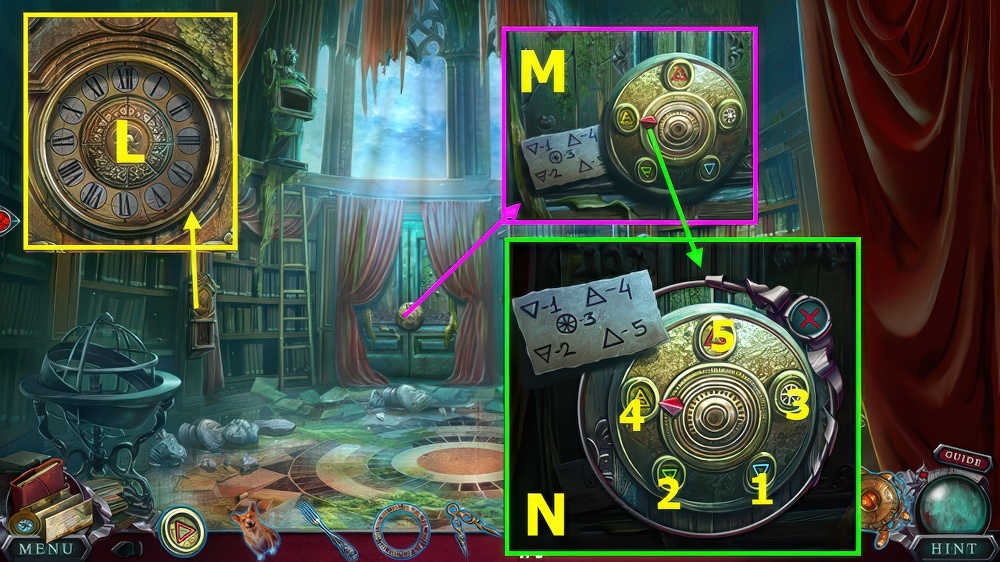
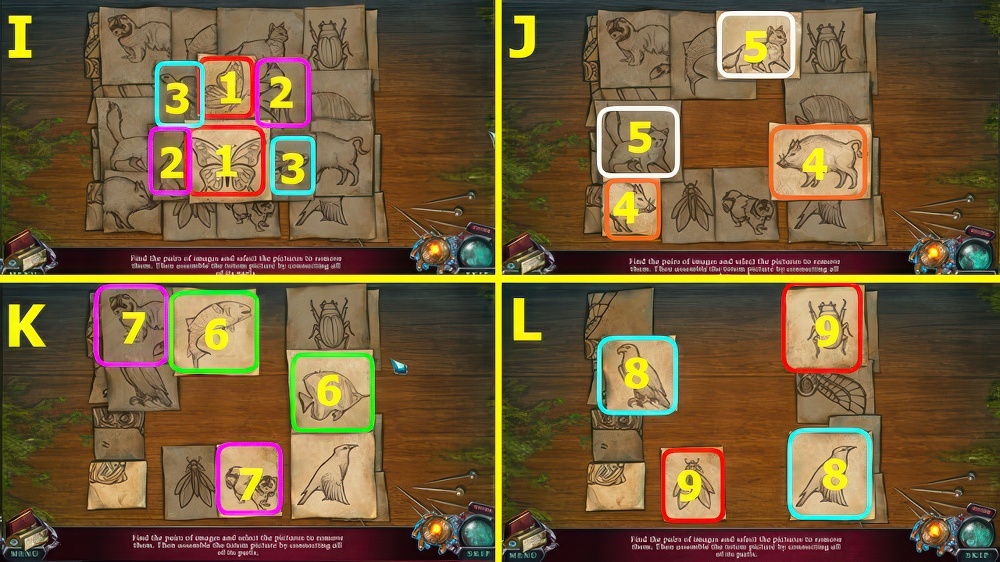
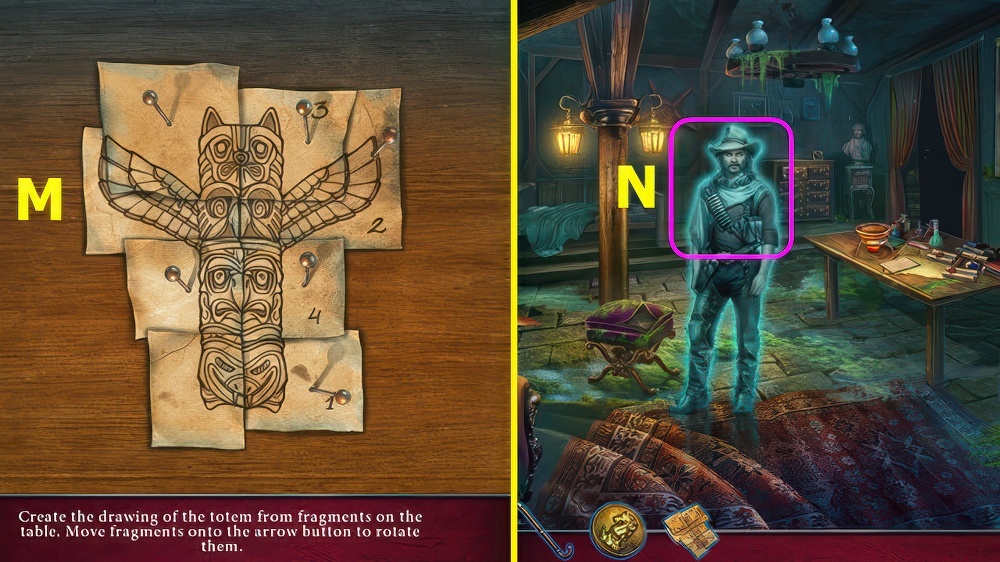
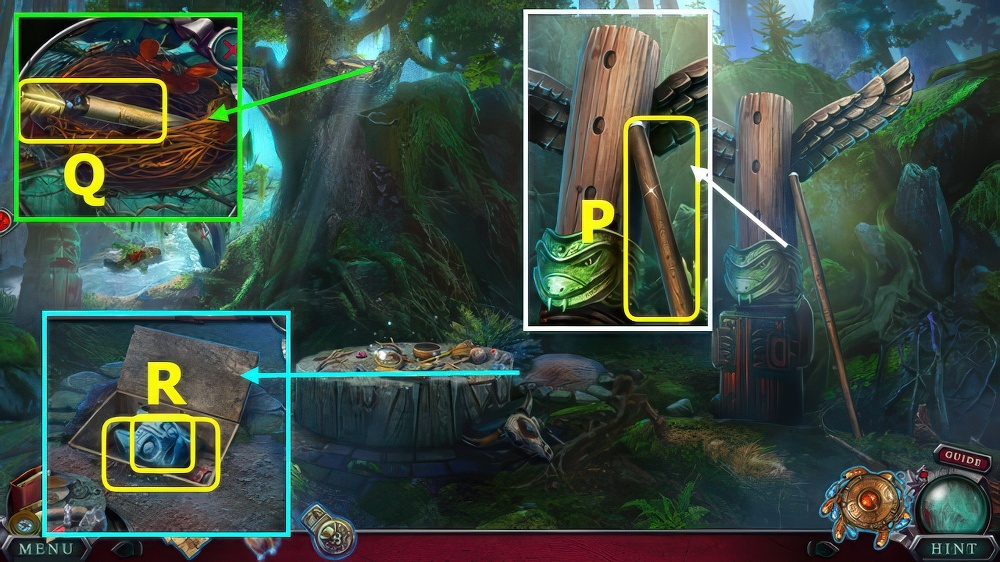
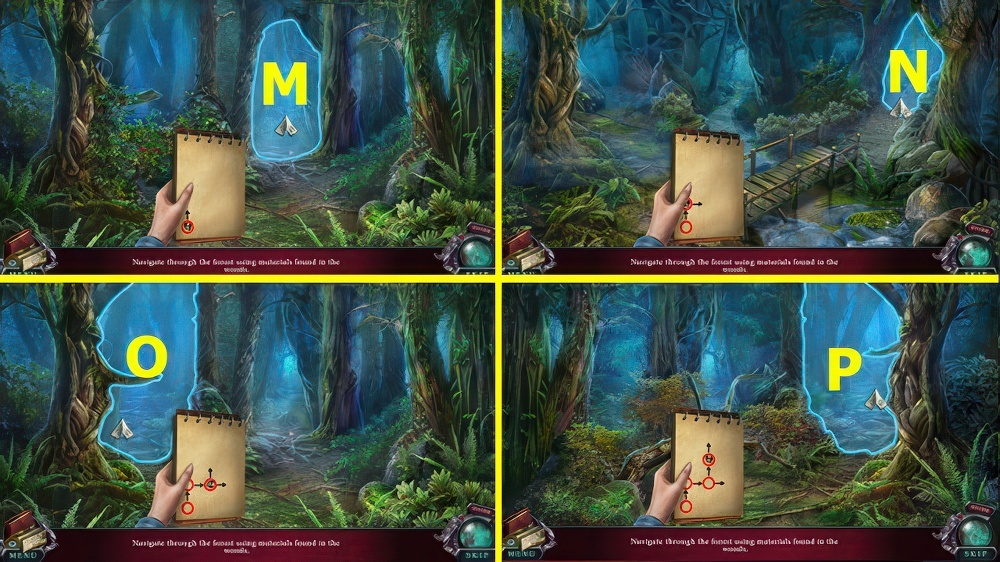
- Move (K-L), take FEATHER and DULL KNIFE, select photo (M).
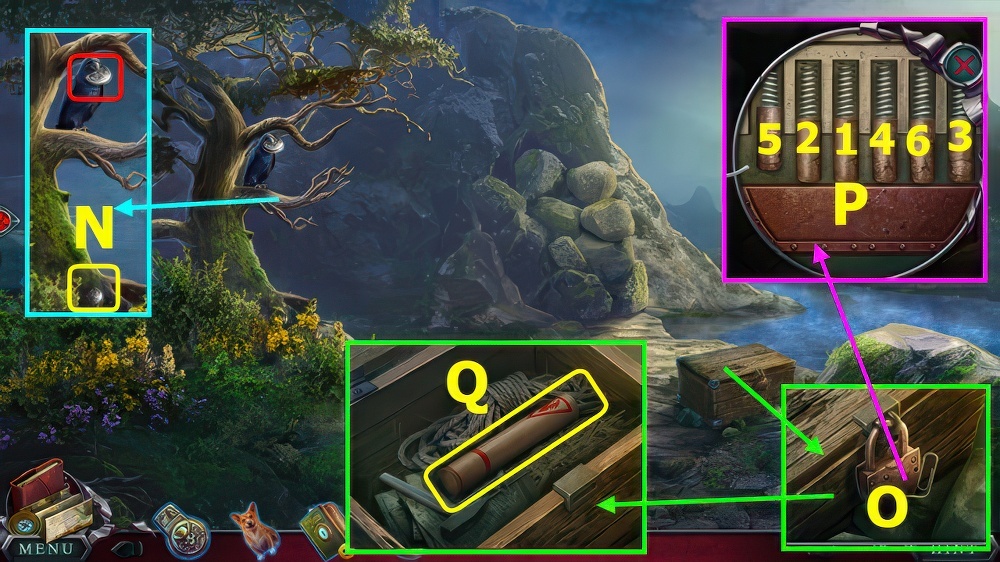
- Select (N).
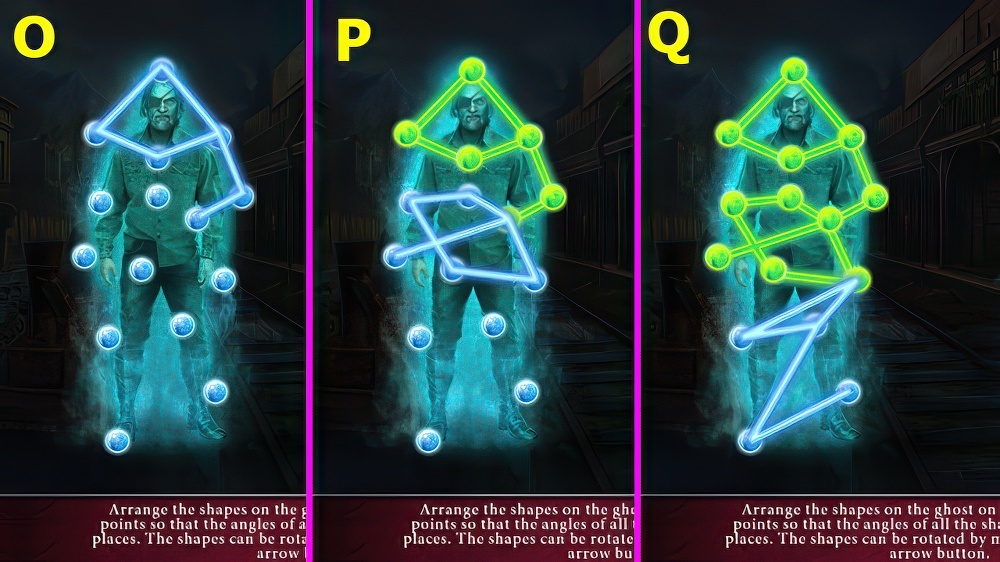
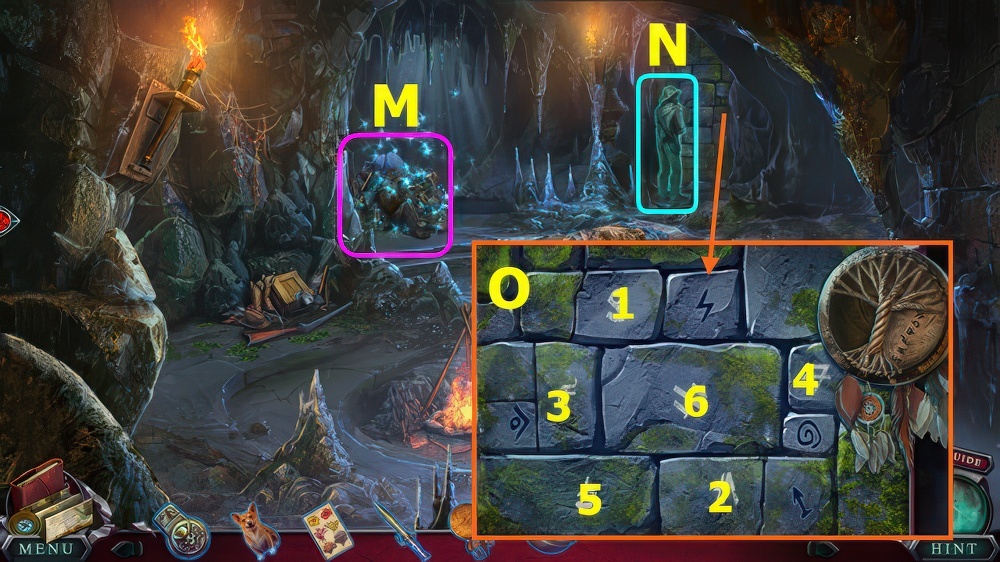
- Select photo, select 1-3 (O), examine photos, turn page, take AMULET.

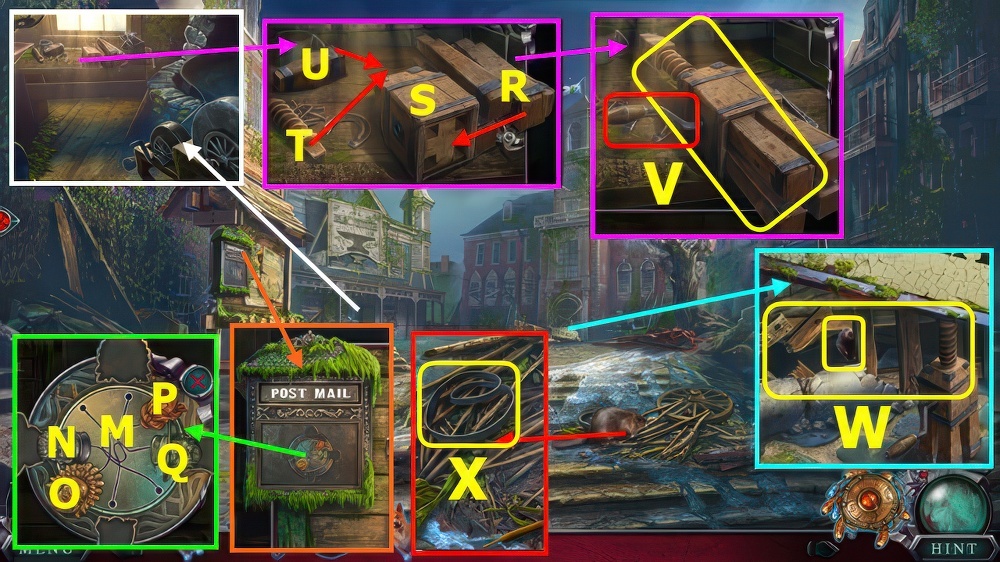
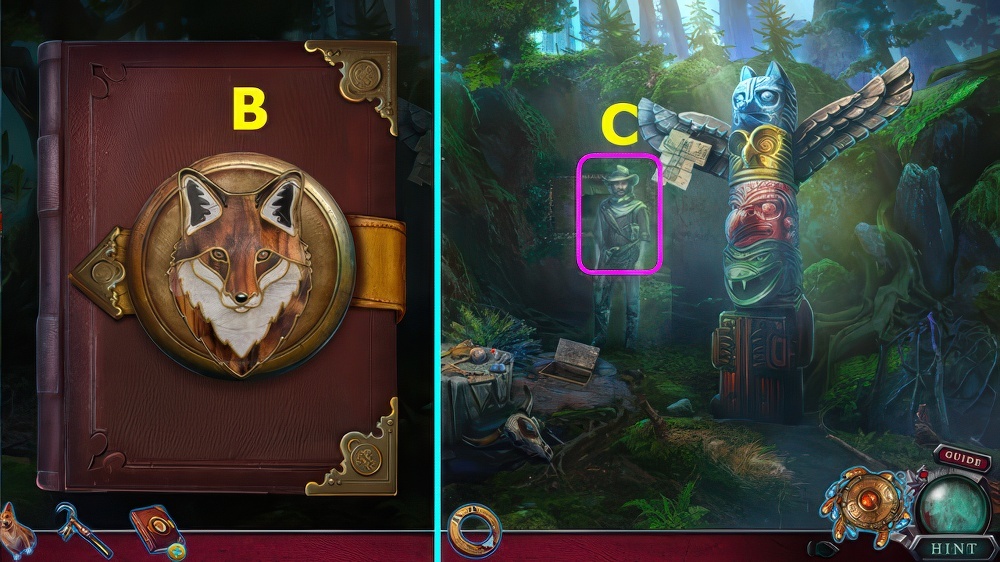
- Talk (A), take MEMORY CARD.
- Remove cover, place FEATHER, take ENTER KEY (B).
- Select 2x, earn PARROT FOOD (C).
- Use PARROT FOOD (D), earn WINDMILL PART.
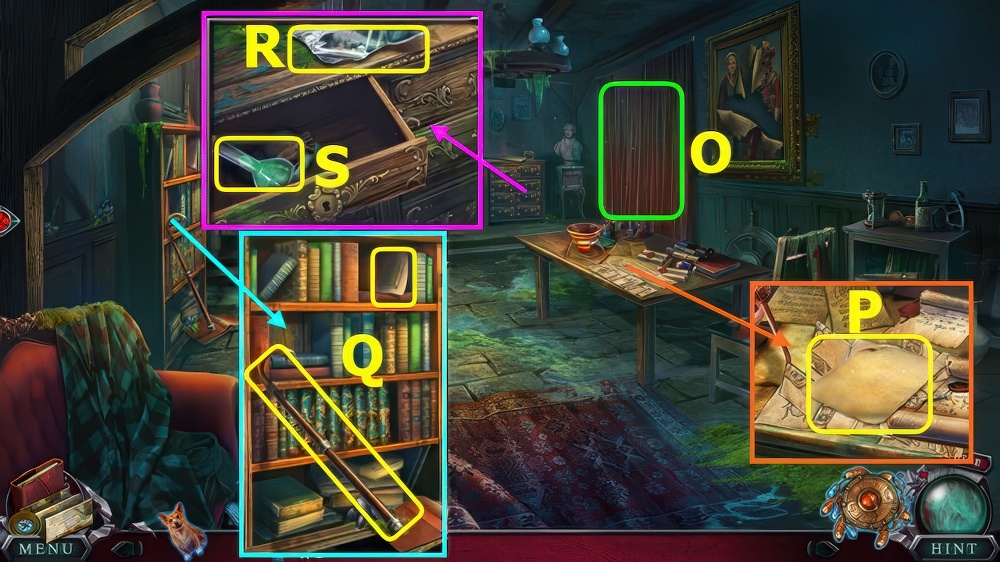
- Remove books 2x, take FLASHLIGHT (E).
- Place BOOK PART, solution (F), read note, select flag.
- Move (G-H), place WINDMILL PART, take KEYS (I).
- Place KEYS, use (J-K), read note, select space bar and sticky note (L).
- Place MEMORY CARD (M) and ENTER KEY (N), select 1-2.
- Play puzzle (O), earn 1/3 AMULET PART.
- Remove board, use FLASHLIGHT and OZZY, take 2/3 AMULET PARTS (P).
- Take 3/3 AMULET PARTS (Q).
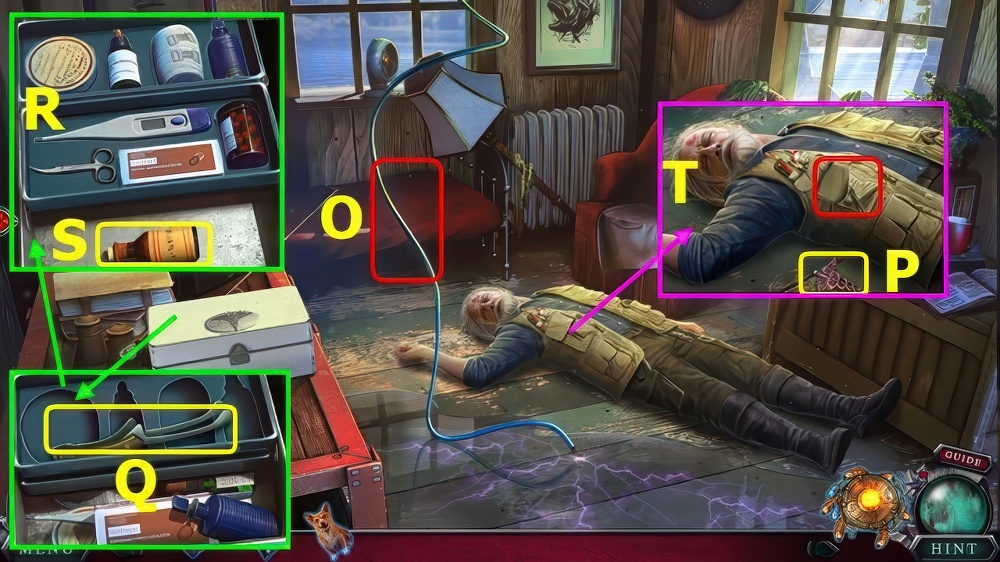
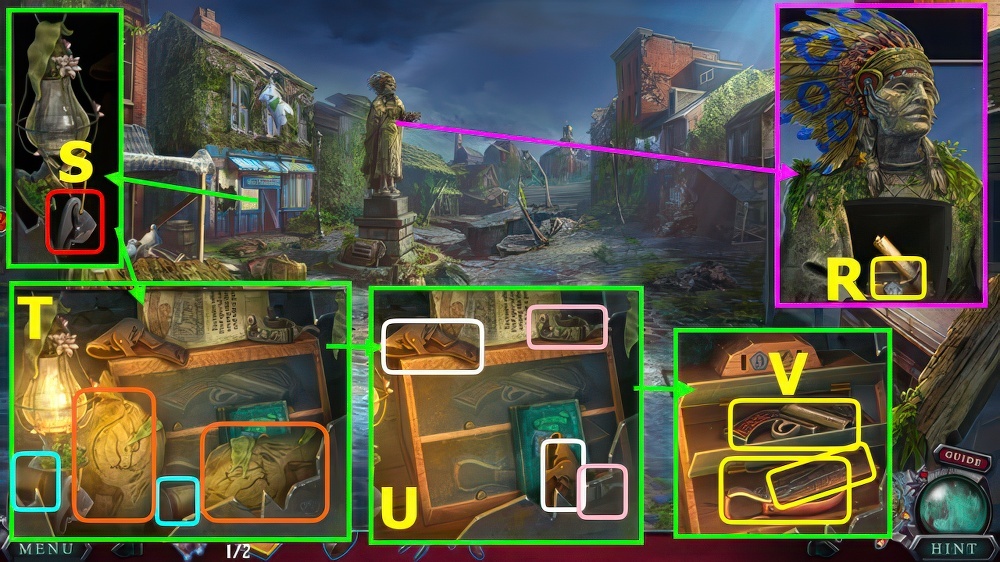
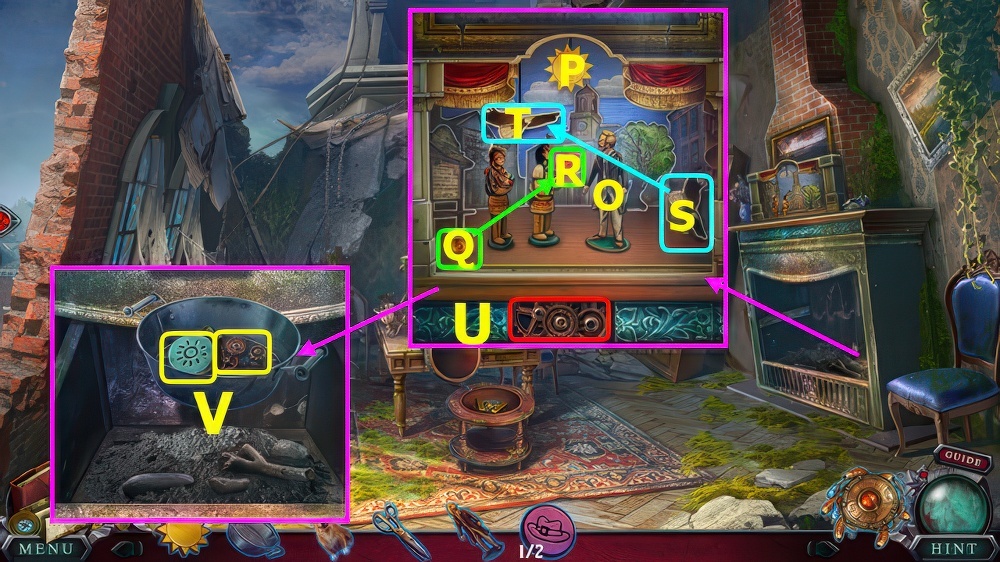
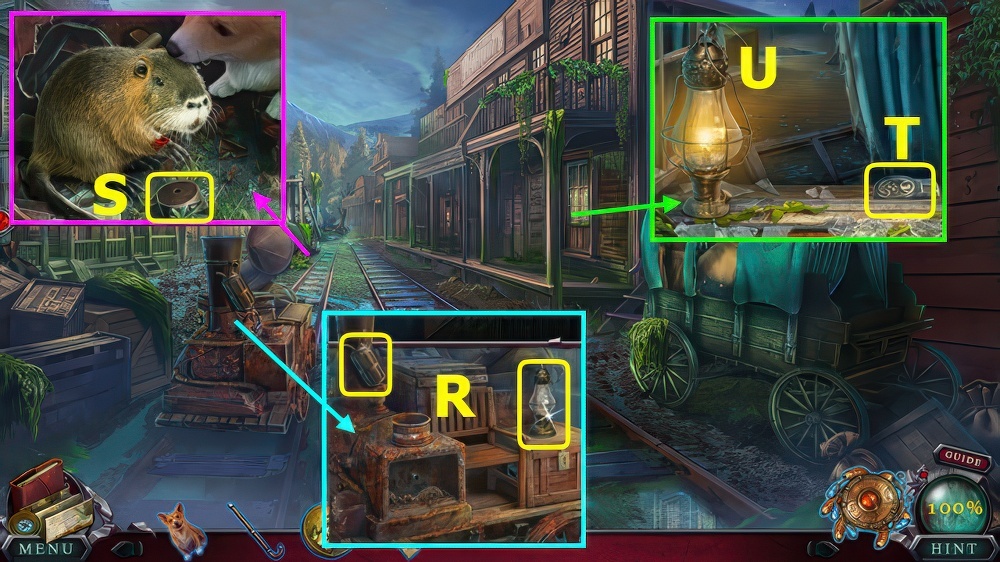
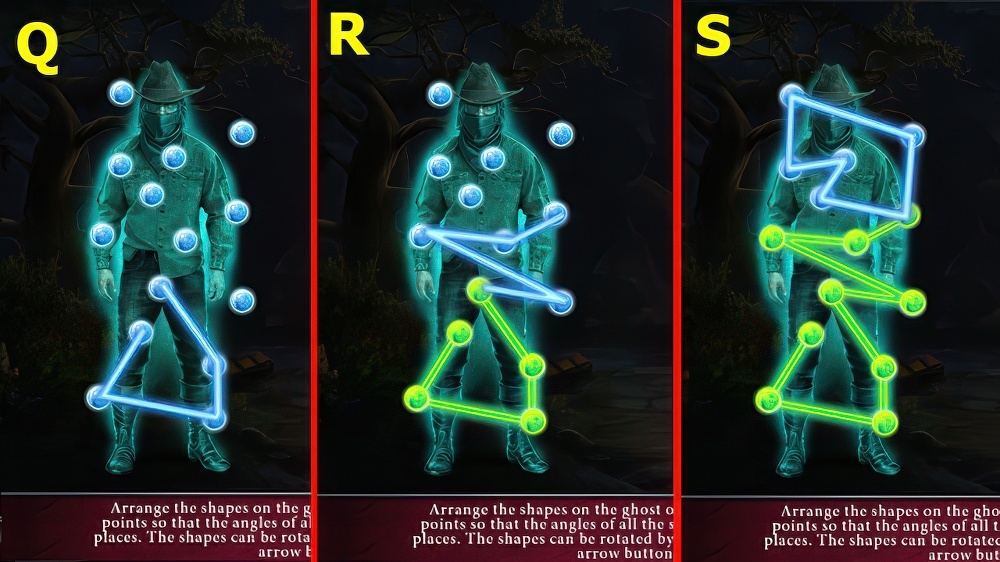
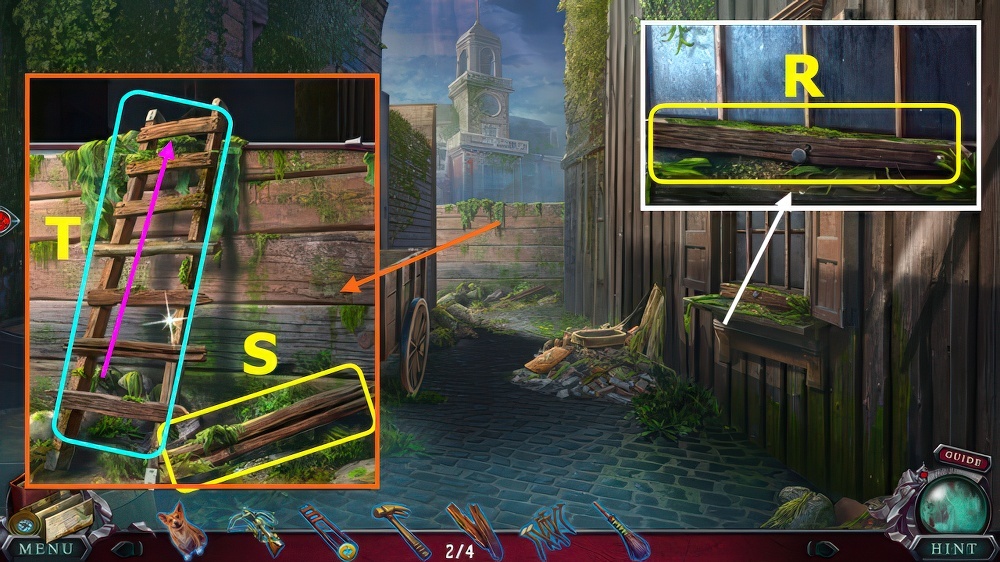
- AMULET PARTS on AMULET.
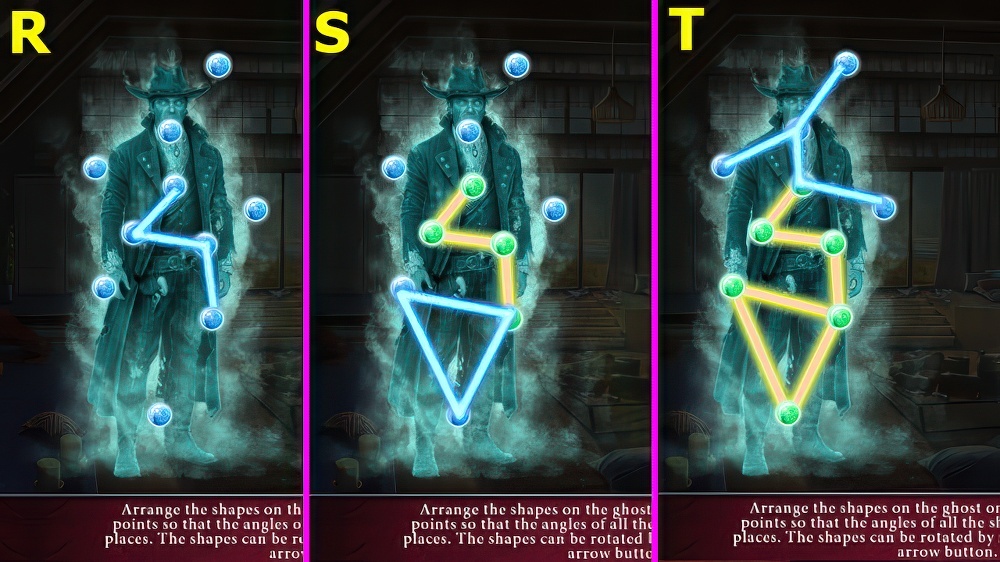
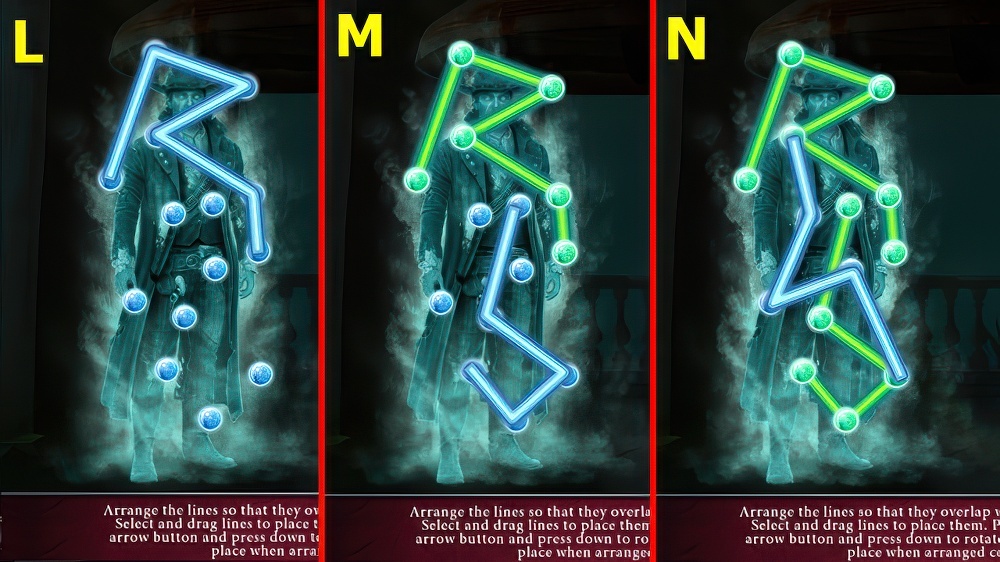
- Solution R-S-T.
- Go forward.
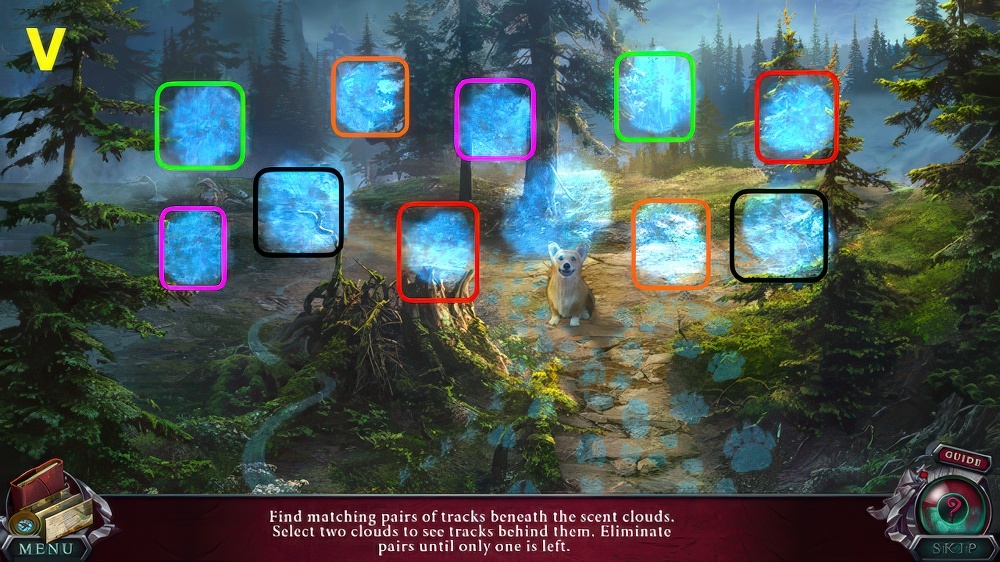
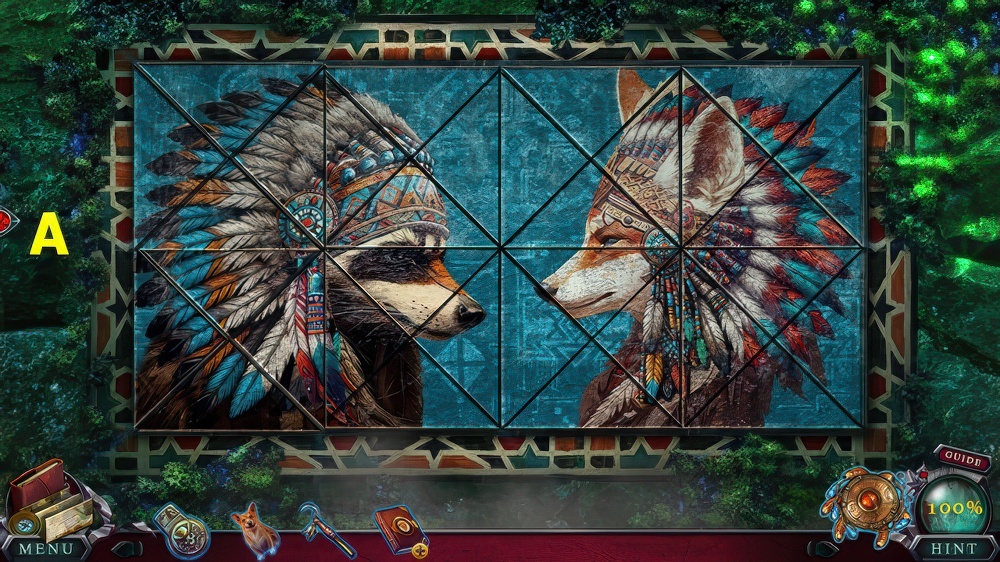
- Use OZZY on scene, select pairs (V).
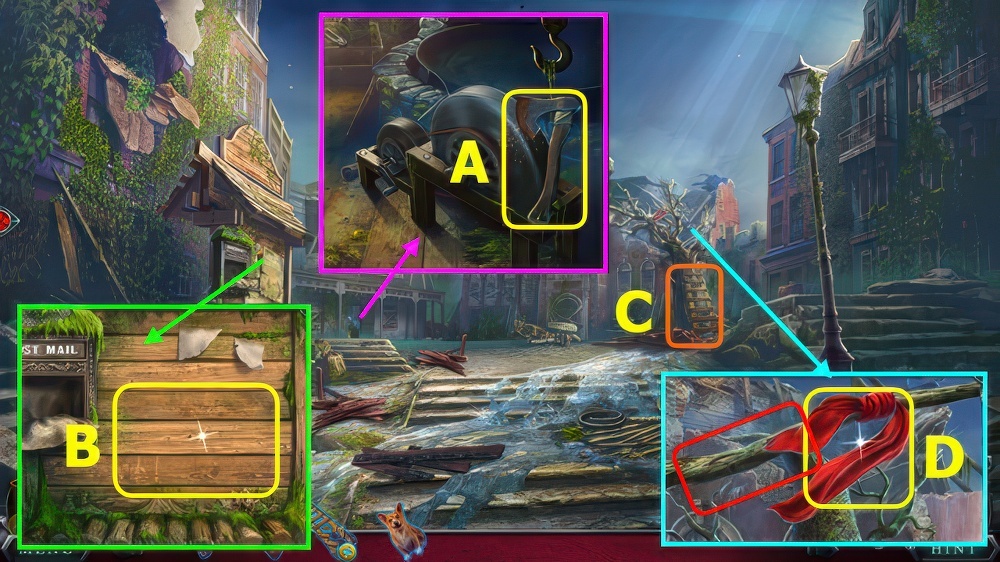
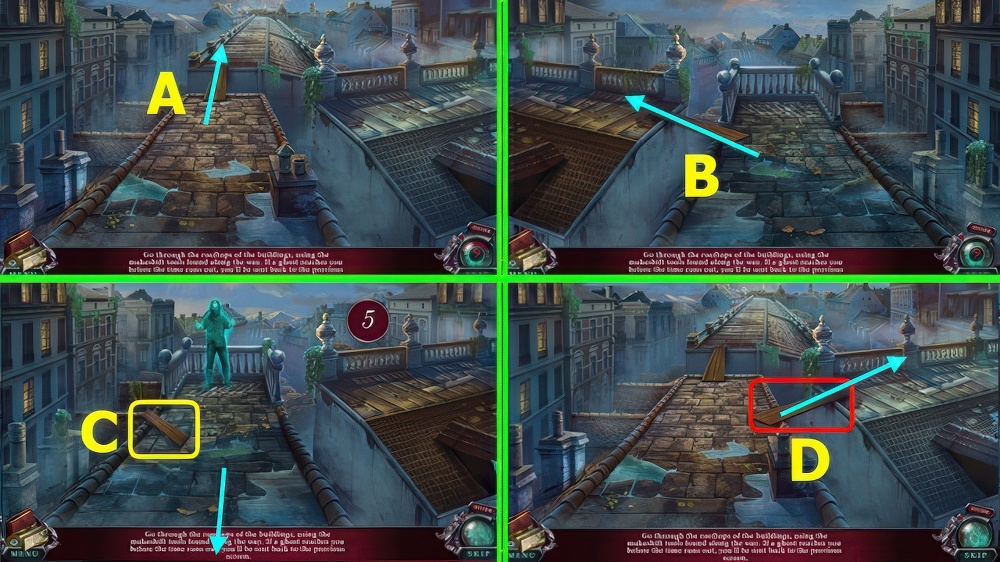
- Go right (A).
- Go right (B).
- Take LADDER (C), walk down.
- Place LADDER (D), go left.
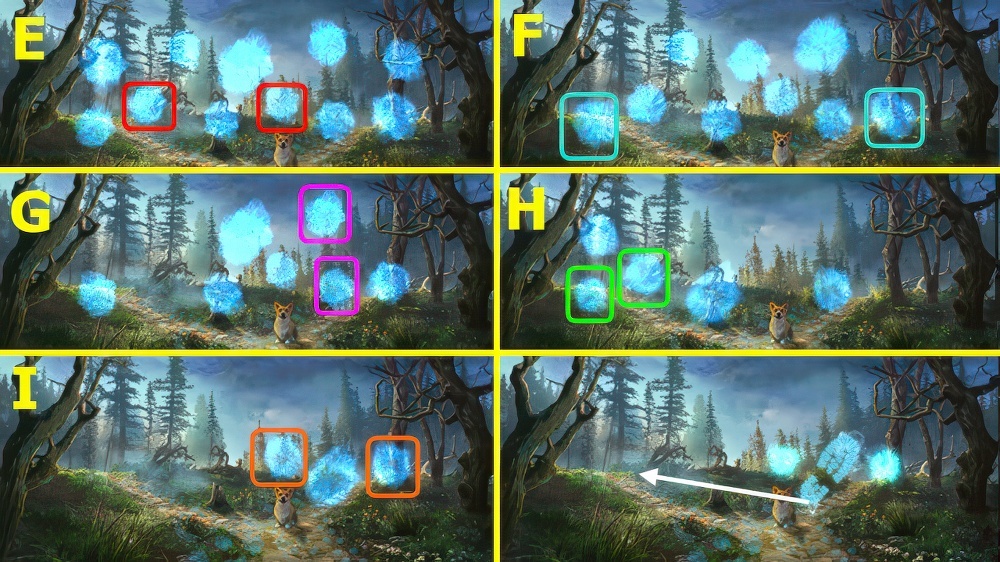
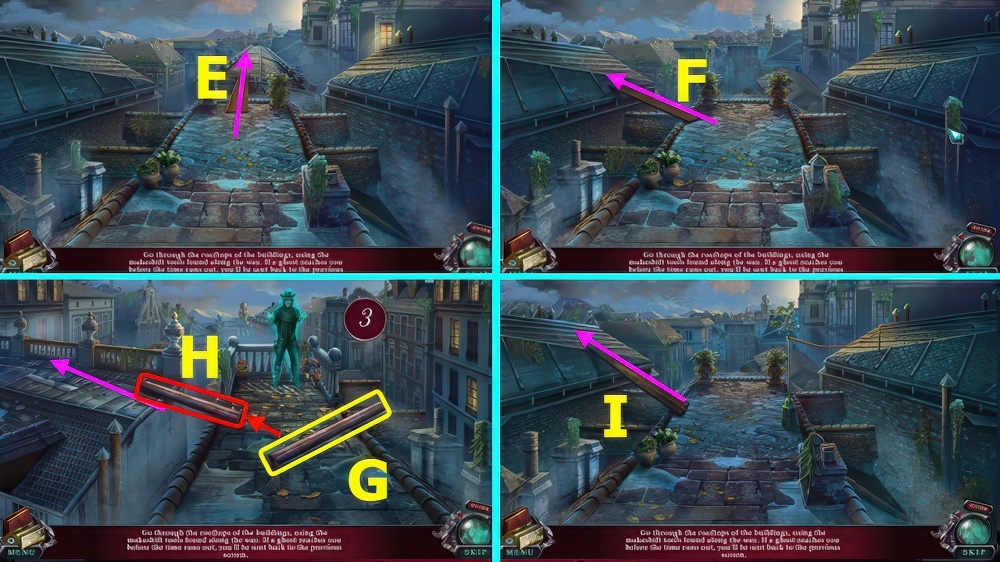
- Select pairs (E-I), note that clouds will shuffle after each match.
- Go left (J).
- Go right (K).
- Take CHAINSAW (L), walk down.
- Use CHAINSAW (M), go left.
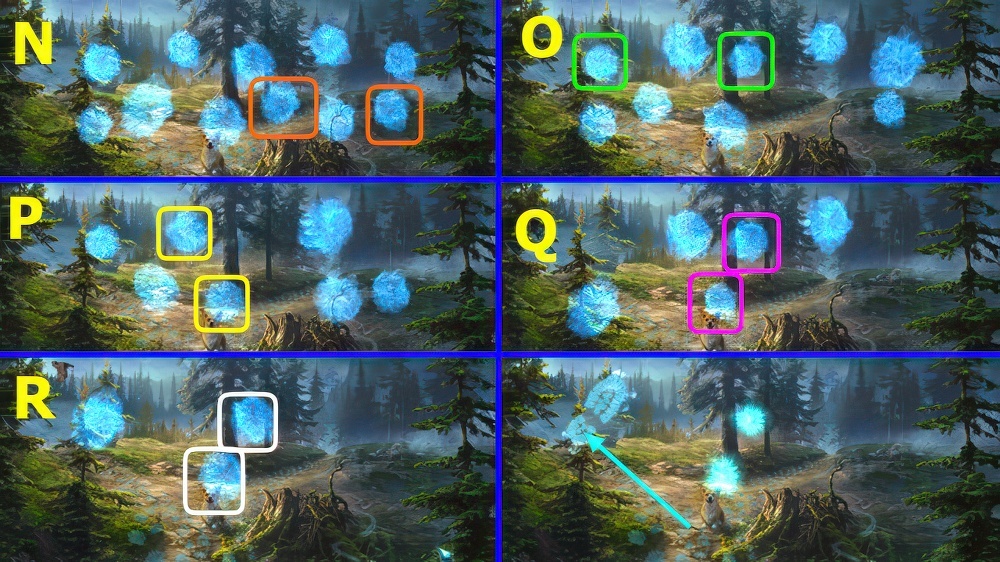
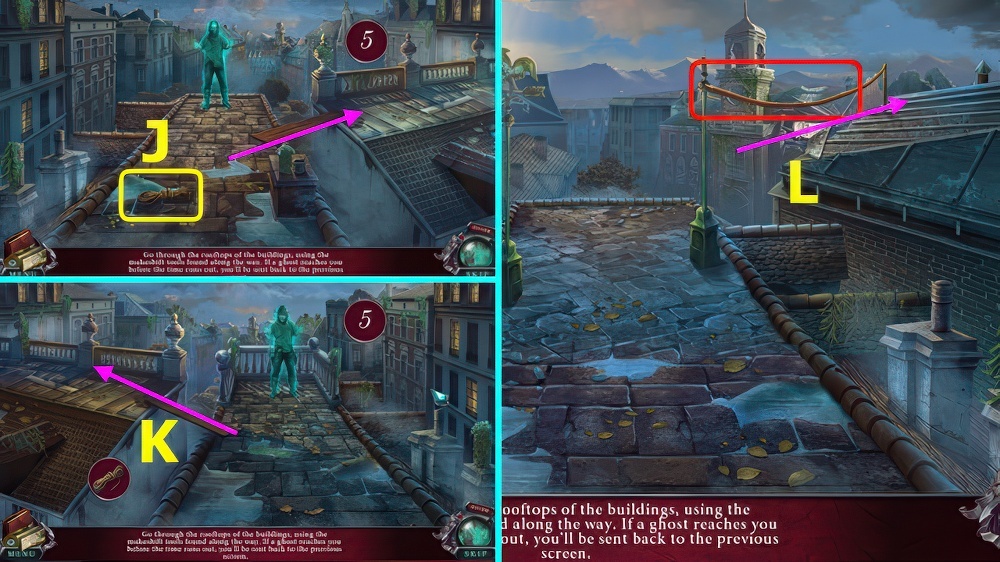
- Select pairs (N-R), note that clouds will shuffle after each match.
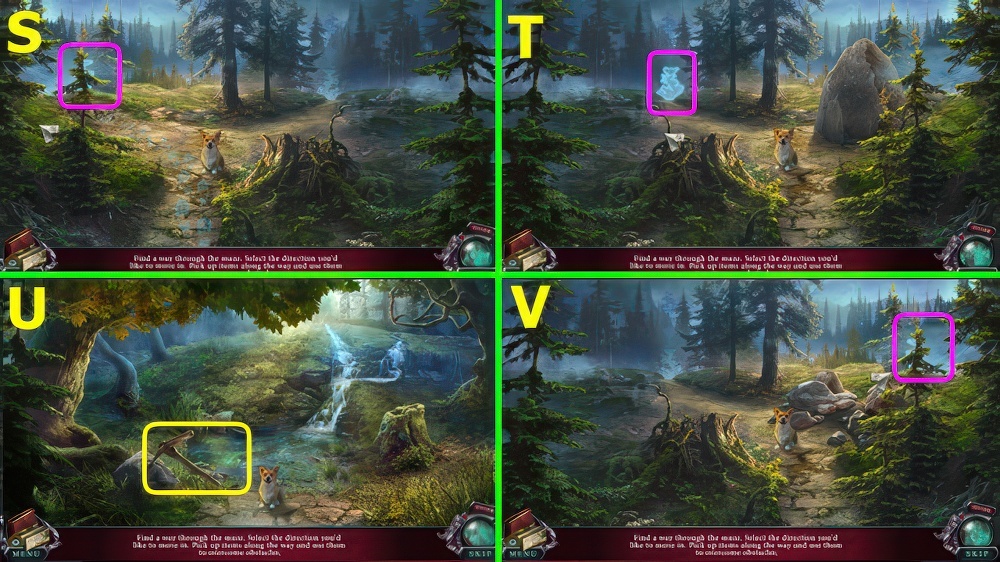
- Go left (S).
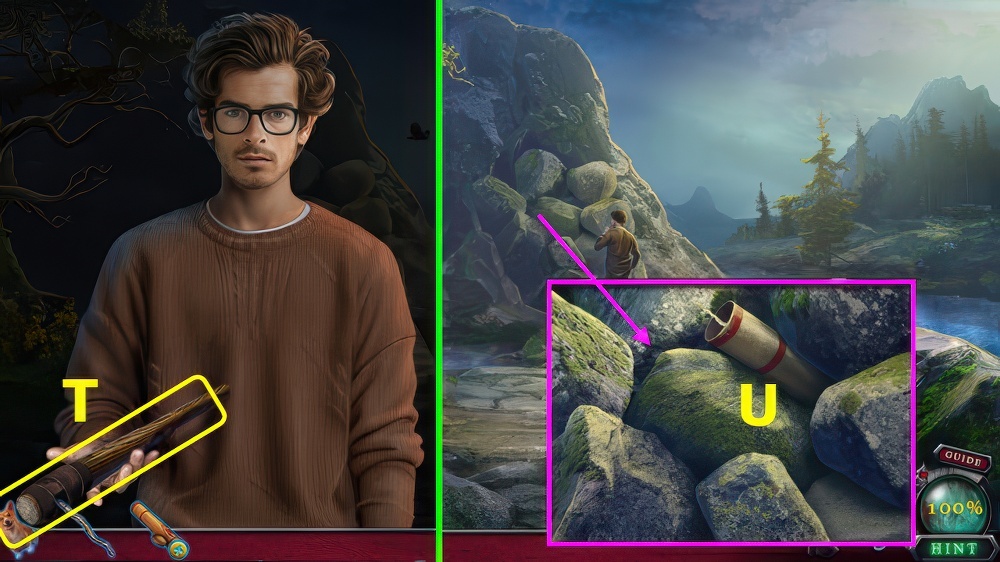
- Go forward (T).
- Take PICK (U), walk down.
- Use PICK (V), go right.
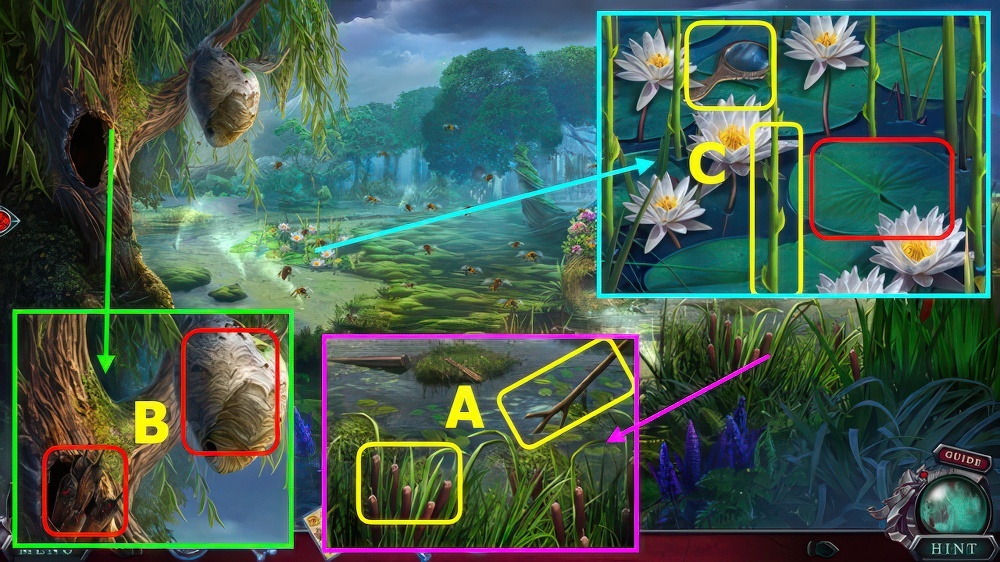
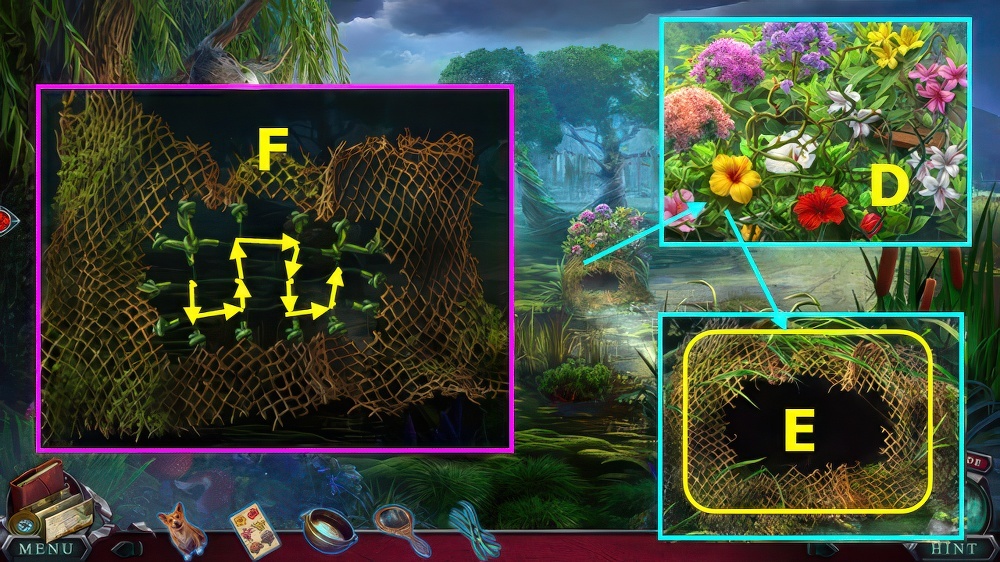
- Take NET HANDLE (A).
- Use (B-C)-(D-E)-(F-G), take NET.
- NET HANDLE on NET, earn SCOOP NET.
- Note the amulet is now on your menu bar (@).
- Take LEATHER GLOVES (H).
- Use SCOOP NET (I).
- Remove items from SCOOP NET, take SHARPENER.
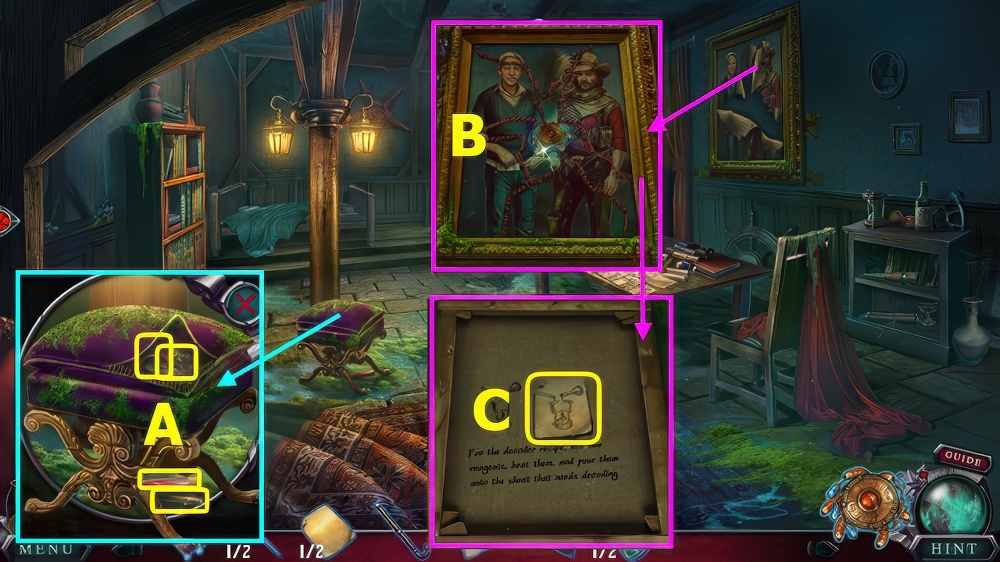
- Use LEATHER GLOVES, take CARVED OWL.
- Open DULL KNIFE, use SHARPENER, take POCKETKNIFE.
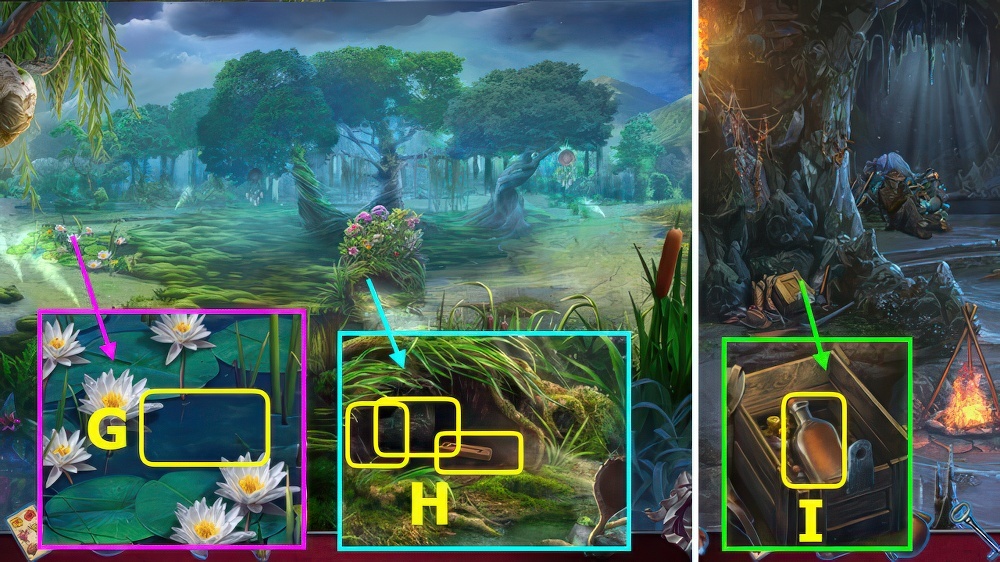
- Use POCKETKNIFE, earn GLUE, read/take CACHE NOTE (J).
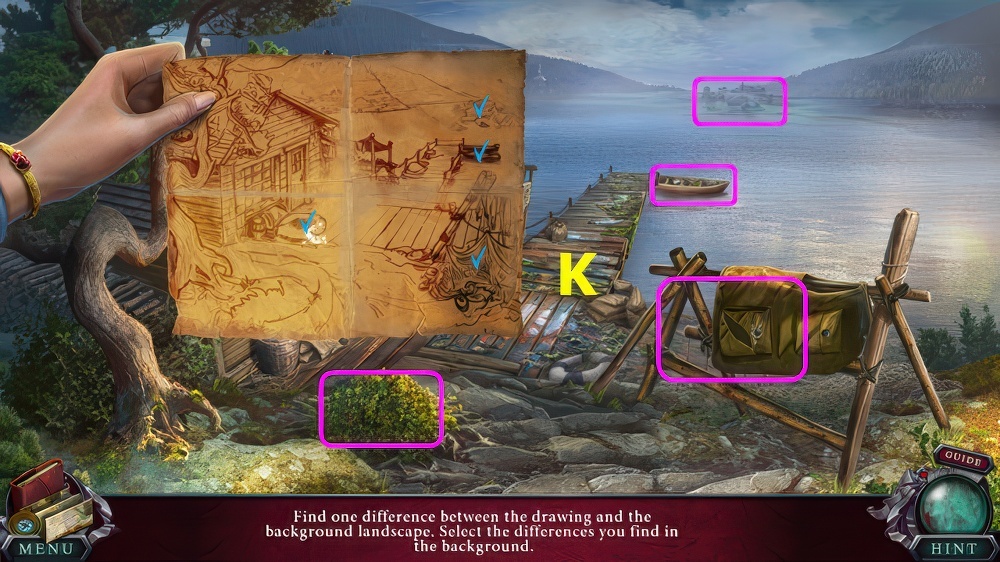
- CACHE NOTE on scene, select differences (K).
- Use OZZY and CARVED OWL, take CRYSTAL and HOUSE KEY (L).
- Add the CRYSTAL to the amulet (M).
- Use HOUSE KEY (N).
- Use LEATHER GLOVES (O).
- Select pocket, take CADUCEUS (P).
- Place CADUCEUS, take FORCEPS (Q).
- Restore items, solution (R), take AMMONIA (S).
- Use AMMONIA (T), take FUEL.
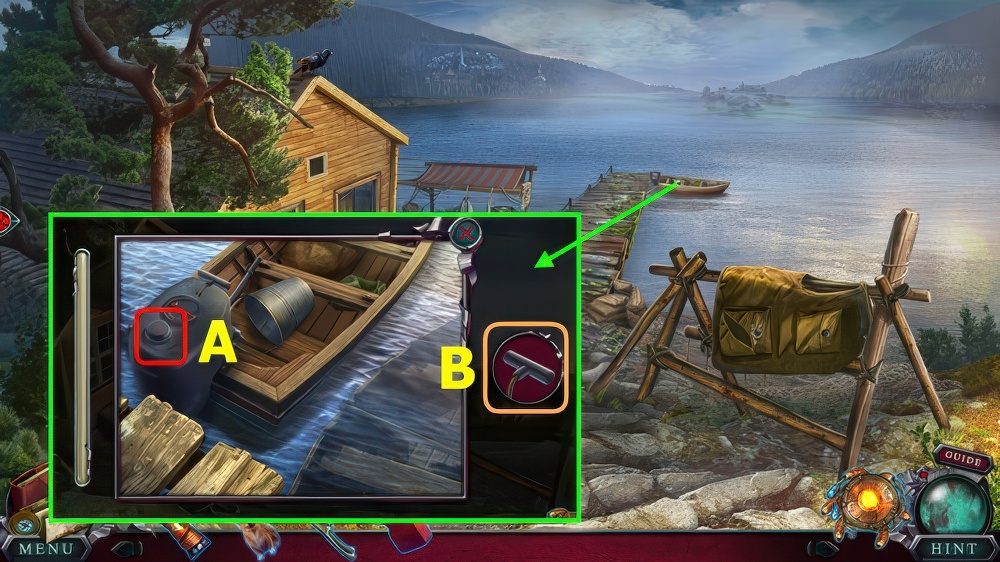
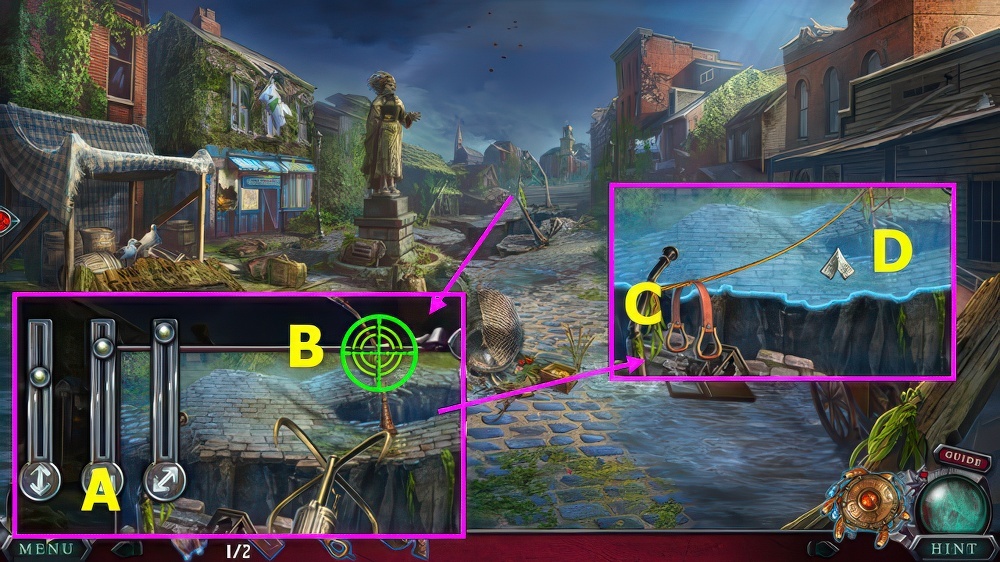
- Use FUEL (A).
- Select 3x (B).
- Enter boat.

- Easy solution (C).
- Hard solution (D).
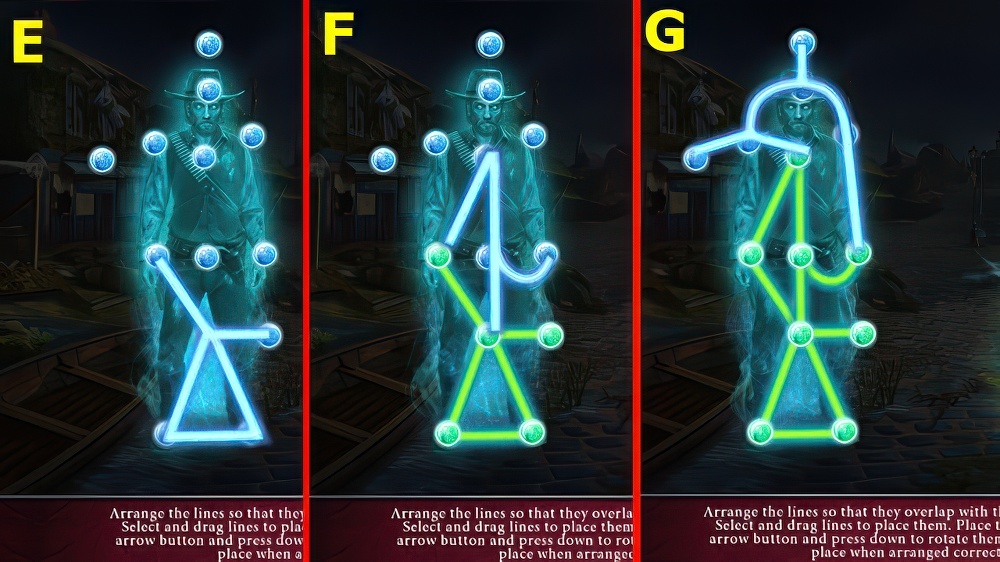
- Solution (E-F-G).
- Go forward.
- Take BOX KEY and 1/2 COIN (H).
- Select handle, use FORCEPS on snake (I), open door.
- Remove bow, read note, use BOX KEY, take BROKEN HEADDRESS (J).
- GLUE on BROKEN HEADDRESS, solution (K), take HEADDRESS.
- Take OIL (L).
- Select frog, place HEADDRESS (M), take STAFF (N).
- Use STAFF, earn HOOK (O).
- Select 2x (P).
- Play puzzle, earn AMULET HALF (Q).
- Place AMULET HALF, read note, take 2/2 COINS (R).
- Use OIL, select (S).
- Select pairs (T-U), read note and book.
- Place COINS, select each coin, take PISTOL, 1/2 BLACKSMITH TILE, and STIRRUPS (V).
- HOOK on PISTOL, take GRAPPLING HOOK.
- Use GRAPPLING HOOK, solution (A), select (B).
- Place STIRRUPS (C).
- Go (D).
- Use (E-F-G-H-I).
- Take BLUNT AXE, read note, take 2/2 BLACKSMITH TILES (J).
- Place BLACKSMITH TILES, solution (K).
- Take MAILMAN TOKEN (L).
- Place MAILMAN TOKEN, select (M-O-P-M-N-Q), remove mail, open package, take HAMMER and JACK LEVER.
- Select, move (R-S)-(T-S)-(U-S).
- Place JACK LEVER, take JACK (V).
- Use JACK, take BROKEN LADDER.
- Use OZZY, take BEAVER (W).
- Select, place BEAVER, take BELT (X).
- Use BELT and BLUNT AXE (A), earn AXE.
- Remove posters, use AXE, earn BOARDS (B).
- Remove broken pieces on BROKEN LADDER, add BOARDS and HAMMER, earn LADDER.
- Place LADDER (C).
- Take FABRIC, select stick (D).
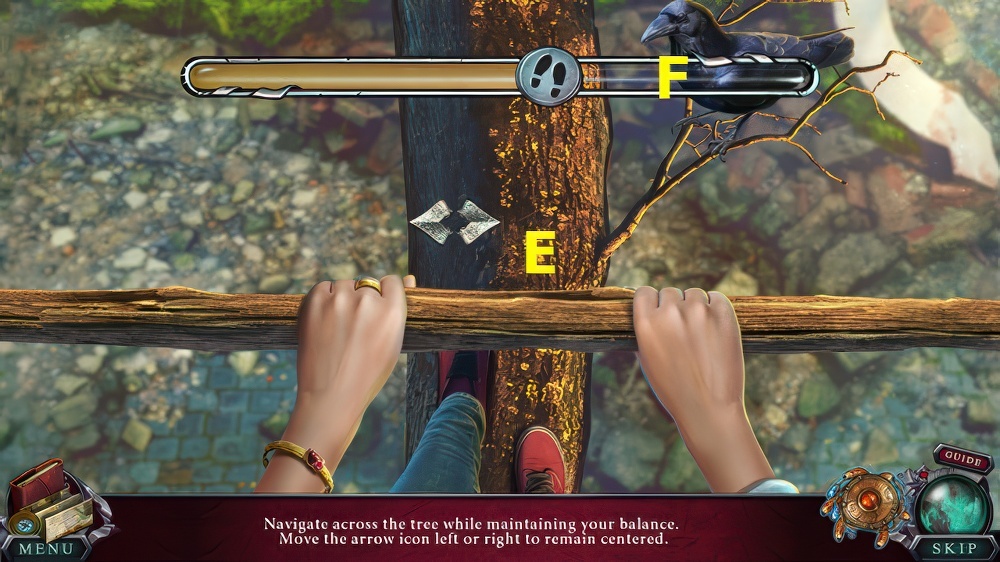
- Drag cursor left and right to stay centered on branch (E).
- You are finished once the meter is full (F).

- Take HAT (G).
- Select HAT, turn over, select 1-5 (H), read note, take SUN FIGURINE.
- Go forward.
- Take SIEVE (I), select 1-7, use FABRIC, earn OZZY.
- Select OZZY, play puzzle, earn HANDLE.
- Take WOODEN LEG (J).
- Place HANDLE, take SCISSORS and GLOBE PART (K).
- Place WOODEN LEG and GLOBE PART, select (L), take MAYOR FIGURINE and MAYOR’S DIARY.
- Open MAYOR’S DIARY, solution (M).
- Turn page, take 1/2 SAFE TOKENS (N).
- Place MAYOR FIGURINE (O).
- Place SUN FIGURINE (P), move (Q-R)-(S-T).
- Select gears (U).
- Use SIEVE, select 2x, take 2/2 SAFE TOKENS and GEARS (V).

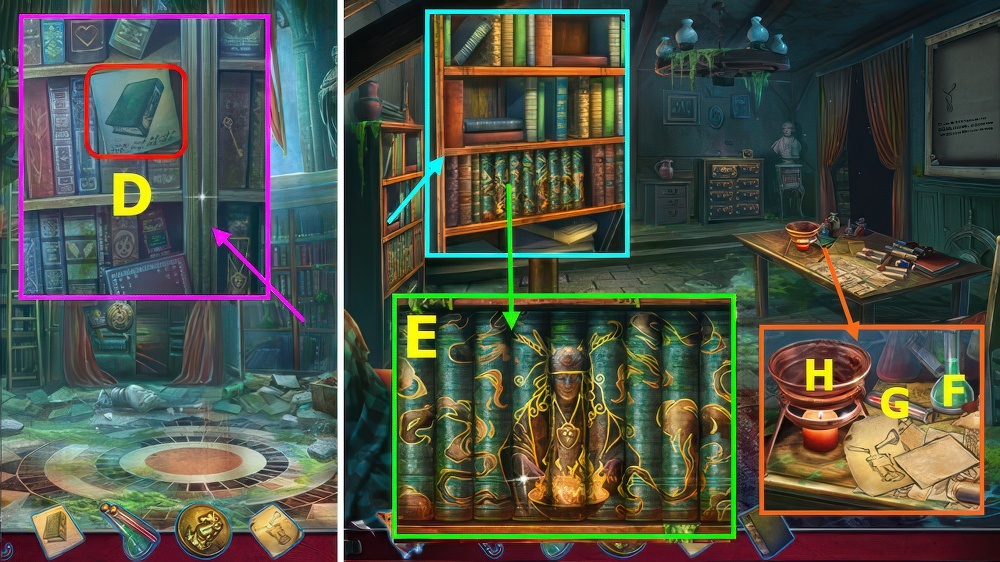
- Restore books as shown (A).
- Place SAFE TOKENS, select Bx3-C-Fx2-D-E-G-Hx3-Ix4, take CRYSTAL and CHAIN.
- Add CRYSTAL to amulet.
- Place GEARS, solution (J).
- Place CHAIN (K).
- Solution (L-M-N).
- Take SAW (O).
- Take LEVER (P).
- Use SAW, LEVER, and SCISSORS, earn SCOOP NET (Q).
- Remove items, take HAIRPIN and PLANKS.
- Use SCISSORS, earn LOCK EMBLEM (R).
- Use OZZY, take 1/4 LOCK PART (S).
- Use SCOOP NET, earn MAP PIECE (A).
- Use HAIRPIN, take TOOLS: remove book, use SCISSORS, take GLUE (B).
- LOCK EMBLEM on TOOLS, take BRUSH.
- Use PLANKS, GLUE, and BRUSH (C).
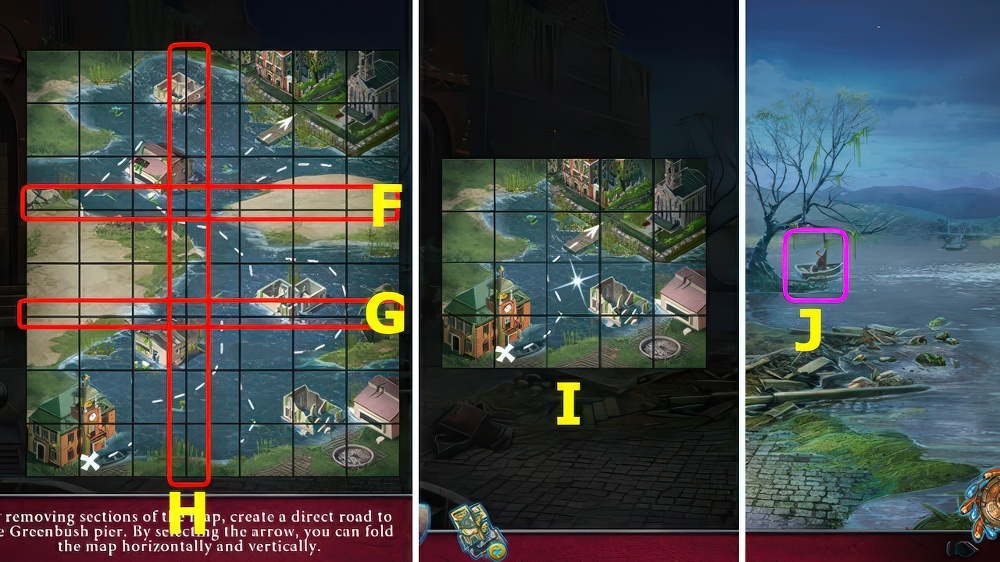
- Talk, take MAP (D).
- MAP PIECE on MAP, solution (E).
- Restore books as shown (A).
- Place SAFE TOKENS, select Bx3-C-Fx2-D-E-G-Hx3-Ix4, take CRYSTAL and CHAIN.
- Add CRYSTAL to amulet.
- Place GEARS, solution (J).
- Place CHAIN (K).
- Solution (L-M-N).
- Select (F-G-H), take MAP (I).
- Use MAP (J).
- Look, select (N).
- Use OZZY, take LOCK CHIP and 2/4 LOCK PARTS (K).
- Use SCISSORS, read notice, take FISH EMBLEM (L).
- Use SCISSORS, earn ROPE, place FISH EMBLEM (M), take SAW.
- Read note, take 3/4 LOCK PARTS.
- Use SAW, earn BOARD (N).
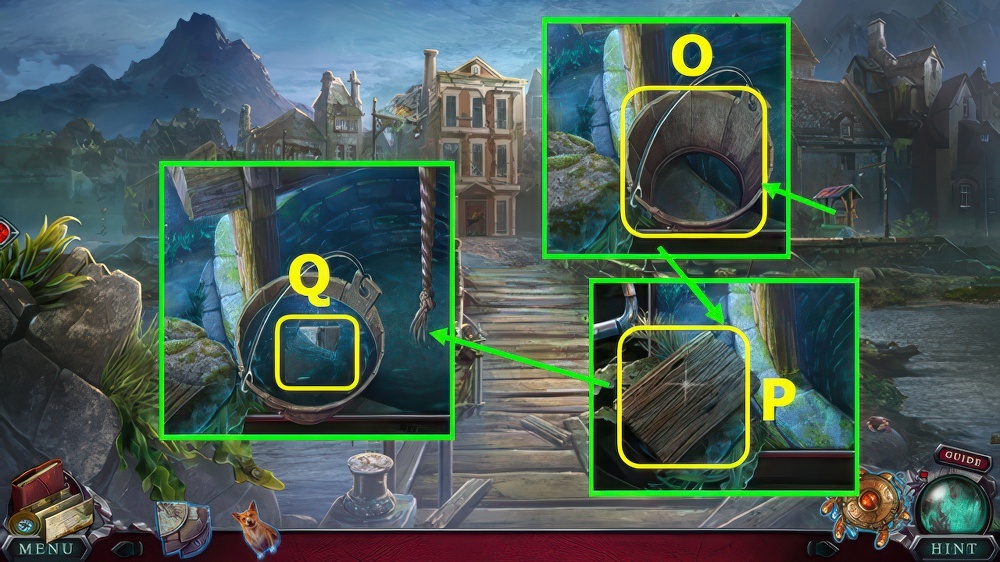
- Take BROKEN BUCKET (O).
- Use BOARD and SAW, earn BUCKET PART (P).
- ROPE and BUCKET PART on BROKEN BUCKET, take BUCKET.
- Use BUCKET, take 4/4 LOCK PARTS (Q).
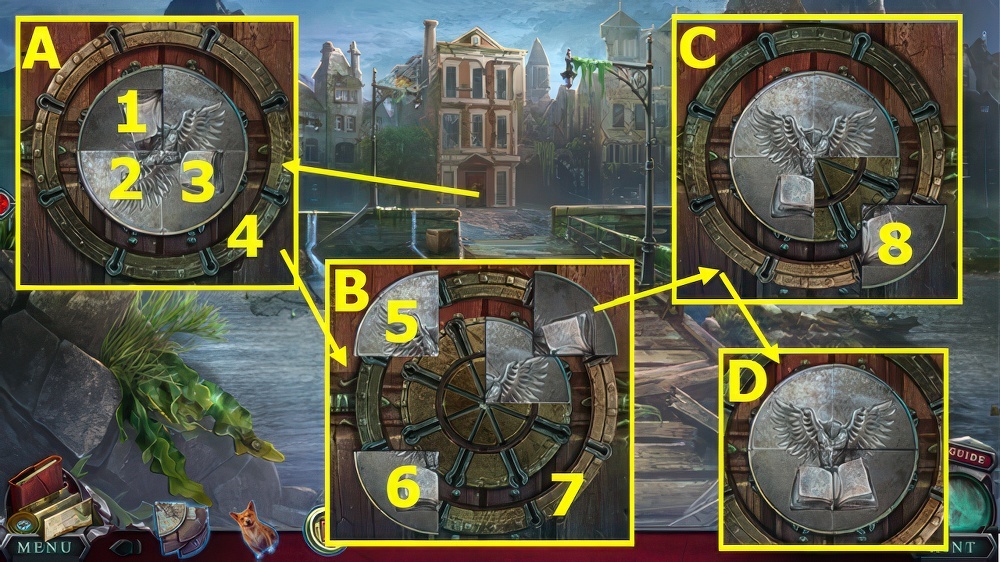
- Use LOCK PARTS, select 1-4 (A), 5-7 (B), 8 (C).
- Final position (D).
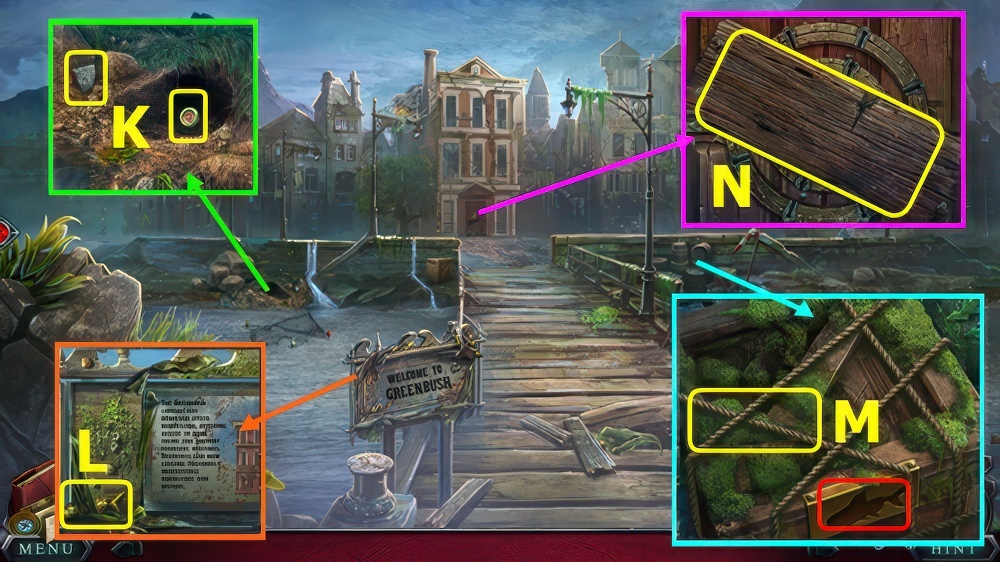
- Go forward.
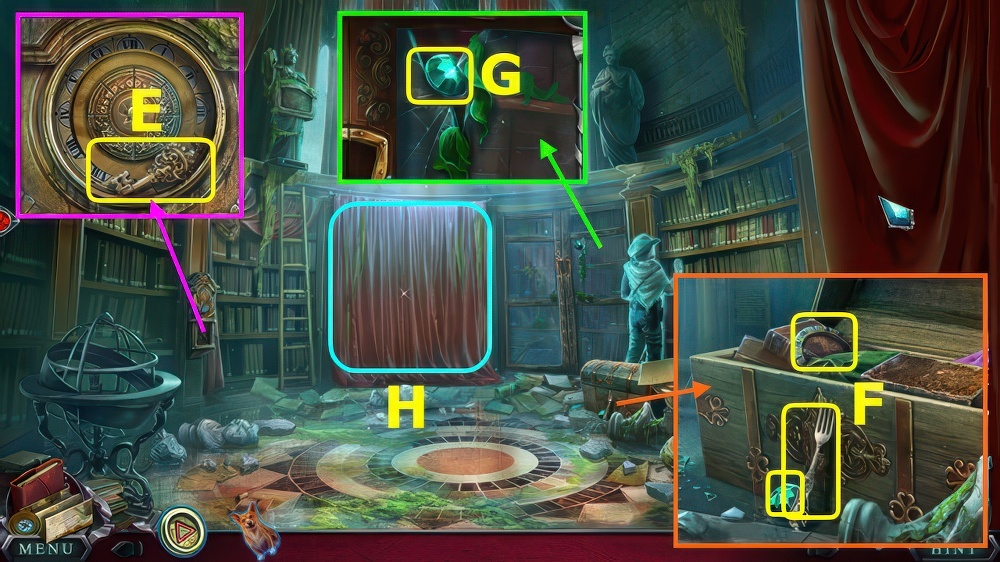
- Remove broken glass, take KEY (E).
- Take 1/2 GEM EYE and FORK, use KEY, read books 2x, take DIAL (F).
- Take 2/2 STATUE EYES (G).
- Select (H).
- Place STATUE EYES, take CHEST and 1/2 CLOCK HAND, use FORK, take 1/2 NEEDLE and EMERALD (I).
- EMERALD on CHEST, take LIBRARY EMBLEM.
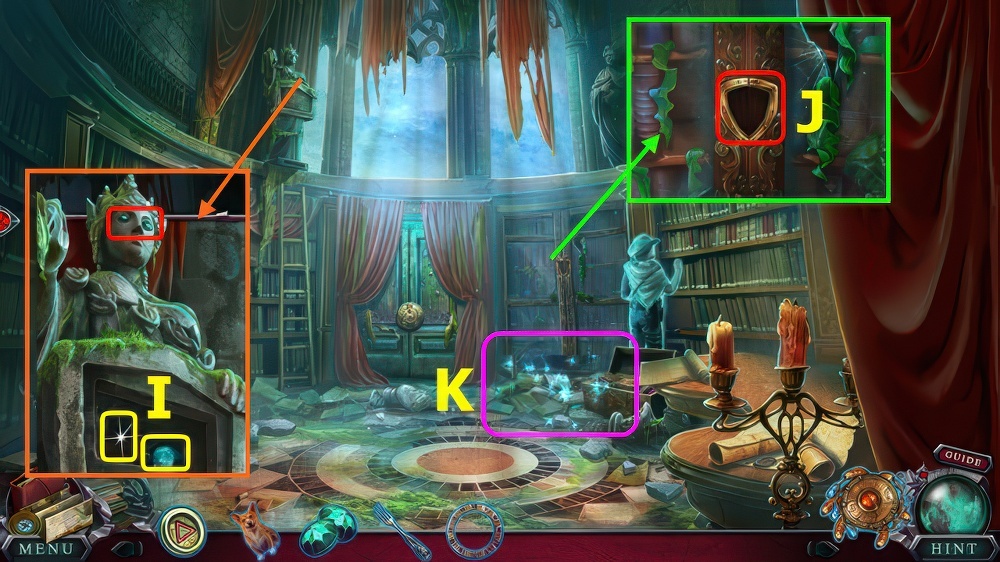
- Place LIBRARY EMBLEM (J).
- Play puzzle, earn 2/2 CLOCK HANDS (K).
- Place DIAL, rotate to restore numerals, add CLOCK HANDS (L), take CIPHER.
- Place LOCK CHIP and CIPHER (M).
- Select 1-5 (N).
- Go forward.
- Select (O).
- Take 1/2 PAPER (P).
- Take CANE and PICTURE (Q).
- Read note, take SHARD (R).
- Use FORK, take 1/2 REAGENTS (S).
- Take 2/2 REAGENT and 2/2 PAPER AND PENCIL, use SHARD, take COIN and 2/2 SEWING KIT (A).
- Use SEWING KIT (B), select painting, use PAPER AND PENCIL, take RECIPE (C).
- Walk down.
- Use PICTURE (D), play puzzle, earn BOOK.
- Go forward.
- Place BOOK, solution (E), take CRYSTAL and SCROLL.
- Place CRYSTAL on amulet.
- Place REAGENTS, RECIPE, and SCROLL, select (F-G-H).
- Select pairs numerically (I-J-K-L).
- Solution (M), take TOTEM SCROLL.
- Talk (N).
- Solution O-P-Q.
- Take OIL CAN and OIL LAMP (R).
- Use OZZY, take LOCK CYLINDER (S).
- Use CANE, take LIGHTER (T).
- OIL CAN and LIGHTER on OIL LAMP, take LIT LAMP.
- Use LIT LAMP (U).

- Place LOCK CYLINDER, enter 4-7-3-9 (V), take SNAKE SYMBOL and ACID (W).
- Remove boards (X).
- Place SNAKE SYMBOL (Y), play puzzle, earn 1/2 ANTISEPTIC.
- Use COIN, take KEY (A).
- Use KEY, take BANDAGE AND ANTISEPTIC (B).
- Use BANDAGE and ANTISEPTIC, take BLUEPRINT and BRUSH (C).
- Use BLUEPRINT (D), play puzzle, earn GEAR.
- Use ACID, BRUSH, and GEAR (E).
- Go (F).
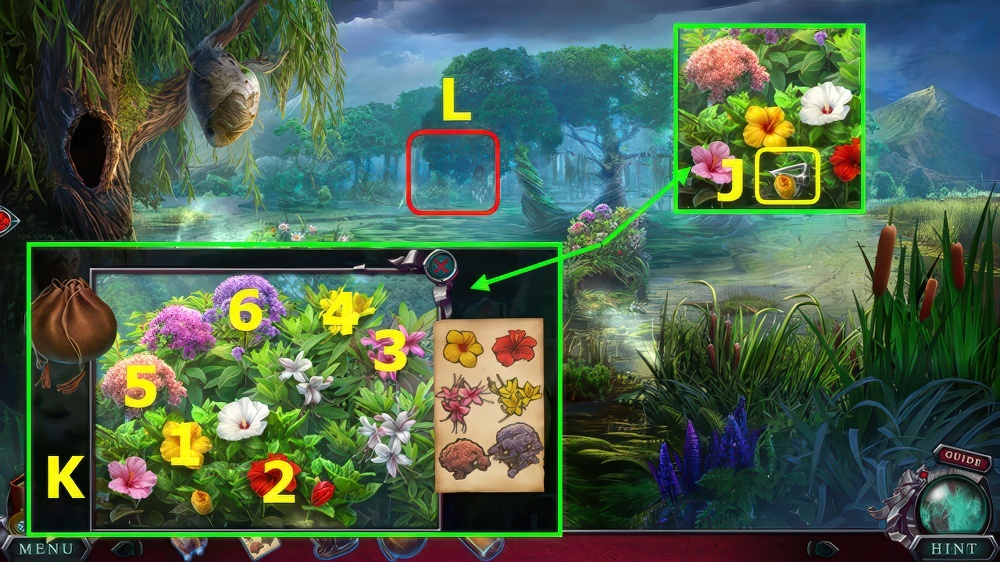
- Select 10 twigs with berries, earn TWIGS (G).
- Use TWIGS, take LOCK PART (H).
- Place LOCK PART, solution (I), take MAP, read note, and take JAR.
- Select 1-6, take ROPE and BOARDS (J).
- Use JAR, earn RESIN (K).
- RESIN on ROPE, take ROPE WITH RESIN.
- Use BOARDS and ROPE WITH RESIN (L).
- Use MAP (M).
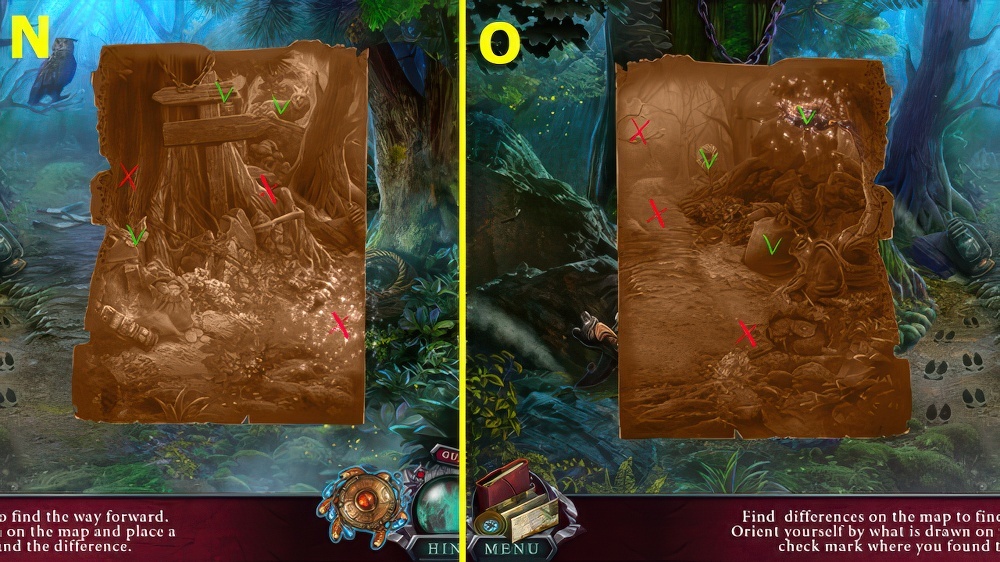
- Select the differences (N-O).
- Take STICK (P).
- Use STICK, read note, earn ARROW (Q).
- Use OZZY, take 1/3 OWL MASK.
- Place ARROW, take 2/3 MASKS and SICKLE (R).

- Take RIBBON (S).
- STICK and RIBBON on SICKLE, earn EXTENDED SICKLE.
- Use EXTENDED SICKLE, take TILE and 3/3 MASKS (T).
- Place MASKS and TOTEM SCROLL, select 1-4, take DIARY (U).
- Select (V).
- Place TILE, solution (A), read note, take LOCK PART.
- LOCK PART on DIARY solution (B), select, take CRYSTAL and MAP.
- Place CRYSTAL on amulet.
- Talk (C).
- Walk down.

- Use EXTENDED SICKLE, select pairs (D).
- Go (E).
- Use MAP (F).

- Take KEYS (G).
- Use KEYS, match colored key to colored lock (H), earn SILVER KEY.
- Take DIARY (I).
- SILVER KEY on DIARY, take PAPER CLIP, turn page.
- Use PAPER CLIP, take COOKIE (J).
- Use COOKIE, take TOKEN HALF (N).
- TOKEN HALF on DIARY, take LITTLE ROPE.
- Use PAPER CLIP (O).
- Select 1-6 (P), take DYNAMITE CASING.
- Solution (Q-R-S).
- Take TORCH (T).
- LITTLE ROPE on DYNAMITE CASING, take DYNAMITE.
- Use DYNAMITE and LIGHTER (U).
- Go forward.

- Use TORCH and LIGHTER (A).
- Use LIGHTER (B).
- Use LIGHTER (C).
- Move pillow, take FLOWER CLUE, 1/3 BUTTONS, and KNIFE (D).
- Use KNIFE, take TAMBOURINE (E).

- Take HANDKERCHIEF, move items 3x, take 2/3 BUTTONS (F).
- Use KNIFE, earn RING (G).
- Turn over TAMBOURINE, use HANDKERCHIEF, take 3/3 BUTTONS and TAMBOURINE WITH SYMBOLS.
- Use BUTTONS, take TIN (H).
- Read note, place RING (I), play puzzle, earn CRYSTAL.
- Place CRYSTAL on amulet.
- Solution (J-K-L).
- Play puzzle, earn CHALK (M).
- Talk (N).
- Place TAMBOURINE WITH SYMBOLS and CHALK, select 1-6 (O).
- Go forward.
- Use KNIFE, earn REED, take STICK (A).
- Use REED and LIGHTER, select (B).
- Use STICK, earn MIRROR.
- Use KNIFE, earn STEMS, remove leaf (C).
- Select (D).
- Take BROKEN NET (E).
- STEMS on BROKEN NET, solution, take NET (F).
- Use NET, earn FISH (G).
- Use MIRROR and FISH, take KEY MOLD, OWL FIGURINE, and POUCH (H).
- TIN on KEY MOLD, take KEY.
- Walk down.
- Use KEY, read note, take POISON (I).
- Go forward.
- Use POISON, take ARROW TIP (J).
- Place FLOWER CLUE and POUCH, select 1-6 (K), take POUCH OF POLLEN.
- Go forward (L).
- Go forward (M).
- Go right (N).
- Go left.
- (O).
- Go right (P).

- Go right (Q).
- Go left.
- (R).
- Talk (A)
- Place OWL FIGURINE, read note, take HANDLE (B).
- Place HANDLE, take FOLDER and CANDLESTICK (C).
- ARROW TIP on FOLDER, take PICTURE PIECE and SHERRIF’S STAR.
- Place PICTURE PIECE (D).
- Solution, select (E).
- Place CANDLESTICK (F).
- Use arrows to move dial to A-V-7-M-U (G).
- Remove gold, take BIRD EMBLEM and KEY (H).

- Use KEY, take BOWSTRING (I).
- Use SHERRIF’S STAR (J), play puzzle, earn BROKEN CROSSBOW.
- Take HAIRPIN from BROKEN CROSSBOW.
- Use HAIRPIN (K), play puzzle, earn PLIERS.
- Use PLIERS, remove lid, take ARROW SHAFT (L).
- BOWSTRING, POUCH OF POLLEN, ARROW TIP, and ARROW SHAFT on BROKEN CROSSBOW, take MAGIC CROSSBOW.
- Go right (M).
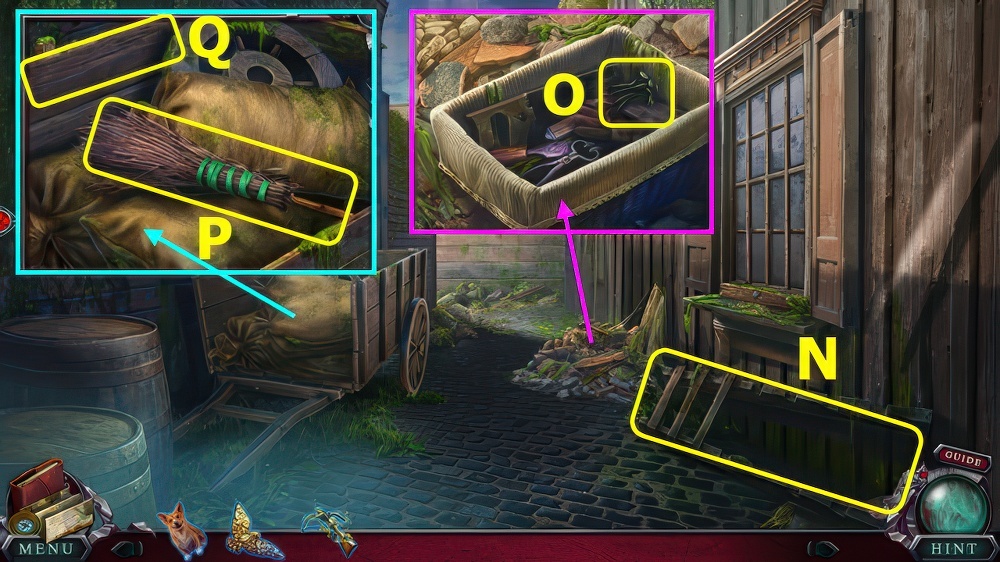
- Take BROKEN LADDER (N).
- Take 1/4 BOARD and HAMMER, remove items, place BIRD EMBLEM, take NAILS (O).
- Remove sack 2x, take BROOM (P).
- Use HAMMER, take 2/4 BOARDS (Q).
- Use HAMMER, take 3/4 BOARDS (R).
- Use BROOM, take 4/4 BOARDS (S).
- BOARDS, NAILS, and HAMMER on BROKEN LADDER, take LADDER.
- Use LADDER, go forward (T).
- Go forward (A).
- Go left (B).
- Take BOARD (C).
- Walk down 2x.
- Place BOARD, go right (D).
- Go forward (E).
- Go left (F).
- Take PIPE (G), place PIPE (H), go left.
- Note-you must do above before the clock runs out.
- Go left (I).
- Take ROPE (J), go right.
- Go left (K).
- Use ROPE (L), go right.
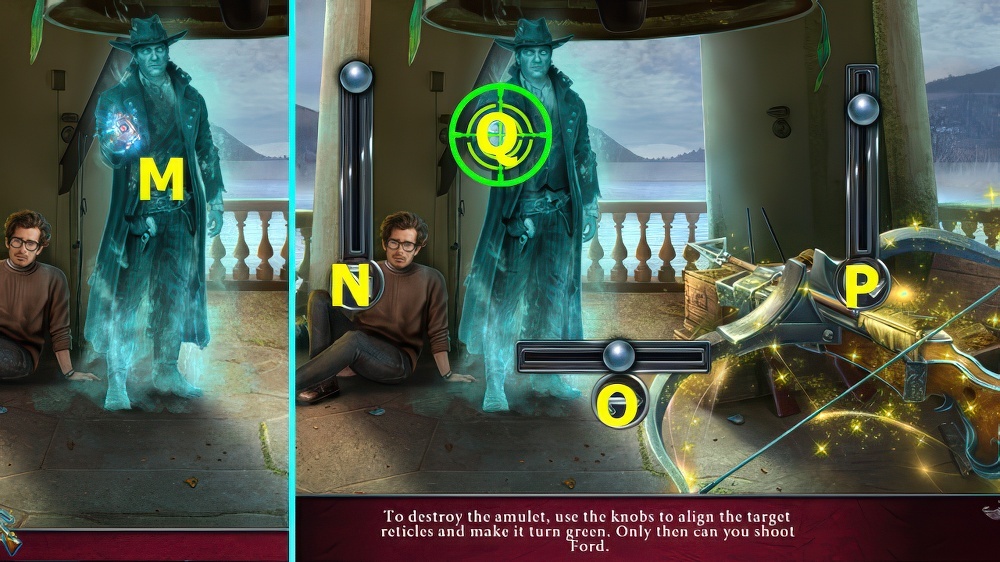
- Use MAGIC CROSSBOW (M).
- Use levers (N-O-P) to move bullseye until green (Q), select.
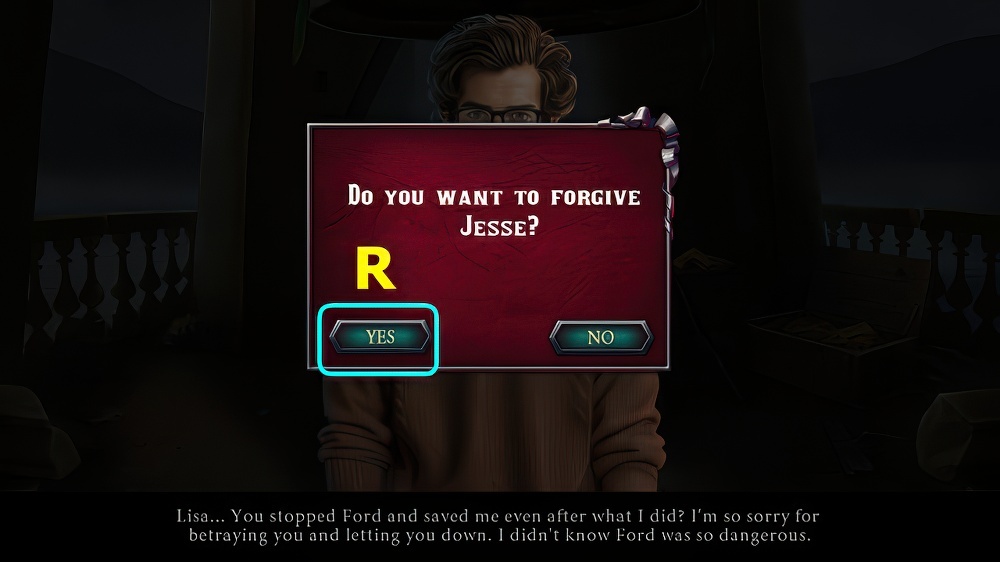
- Select (R).
- Walkthrough Bonus Chapter, at the link below.


