
Escape from P-BOX – Quest from developer TOKI GAMES, in which you find yourself in a phone booth at night and must find a way out. The game is easy to control: click on objects, combine items and use hints or answers if you get stuck. Progress is saved automatically, so you can continue from any point.
Escape from P-BOX – Walkthrough
Here you can watch the full walkthrough of Escape from P-BOX, in pictures.

- 1. Move.
- 2. Remember the position of the pattern.
- 3. Move.
- 4. Align the button with the height of the pattern and press the bottom button.
- 5. The panel will open and you will get the metal parts.
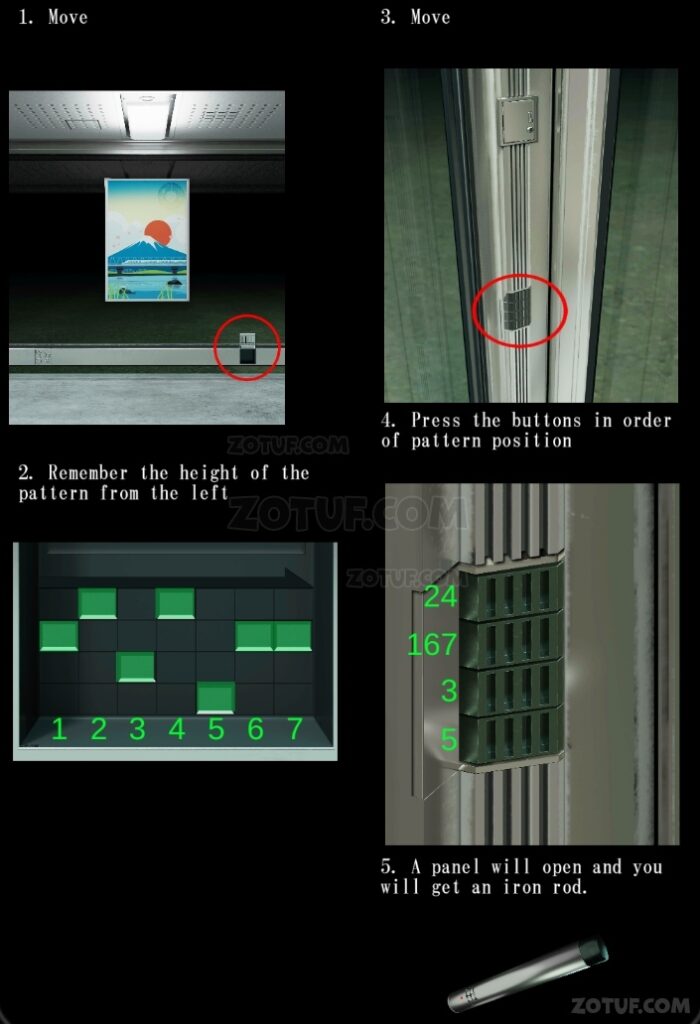
- 1. Move.
- 2. Remember the height of the pattern from the left.
- 3. Move.
- 4. Press the buttons in order of pattern position.
- 5. A panel will open and you will get an iron rod 1-7.
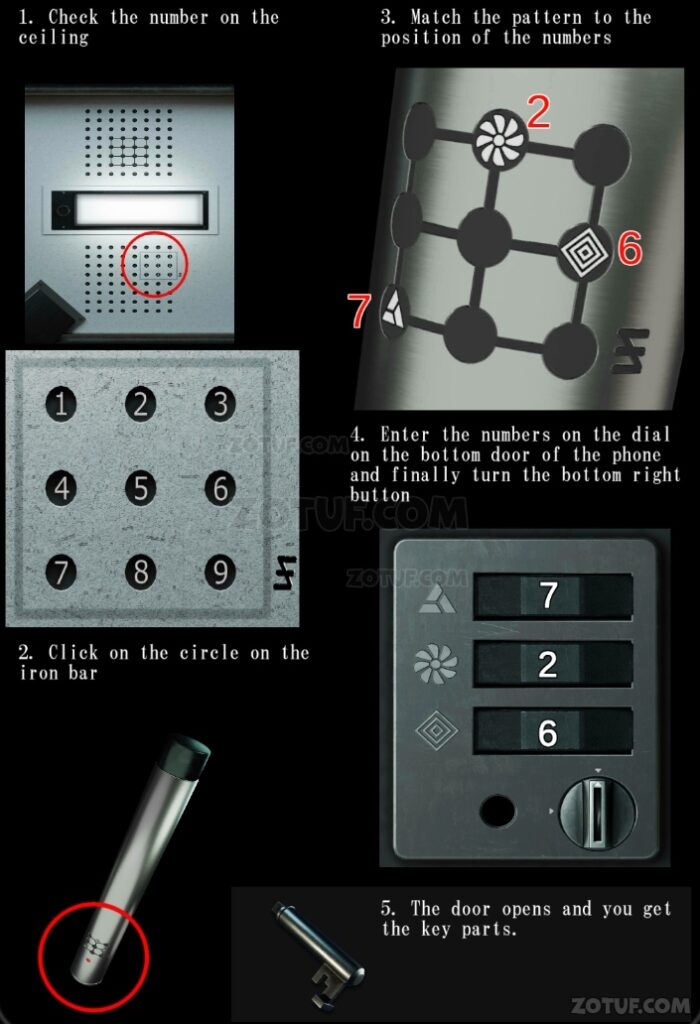
- 1. Check the number on the ceiling.
- 2. Click on the circle on the iron bar.
- 3. Match the pattern to the position of the numbers.
- 4. Enter the numbers on the dial on the bottom door of the phone and finally turn the bottom right button.
- 5. The door opens and you get the key parts.
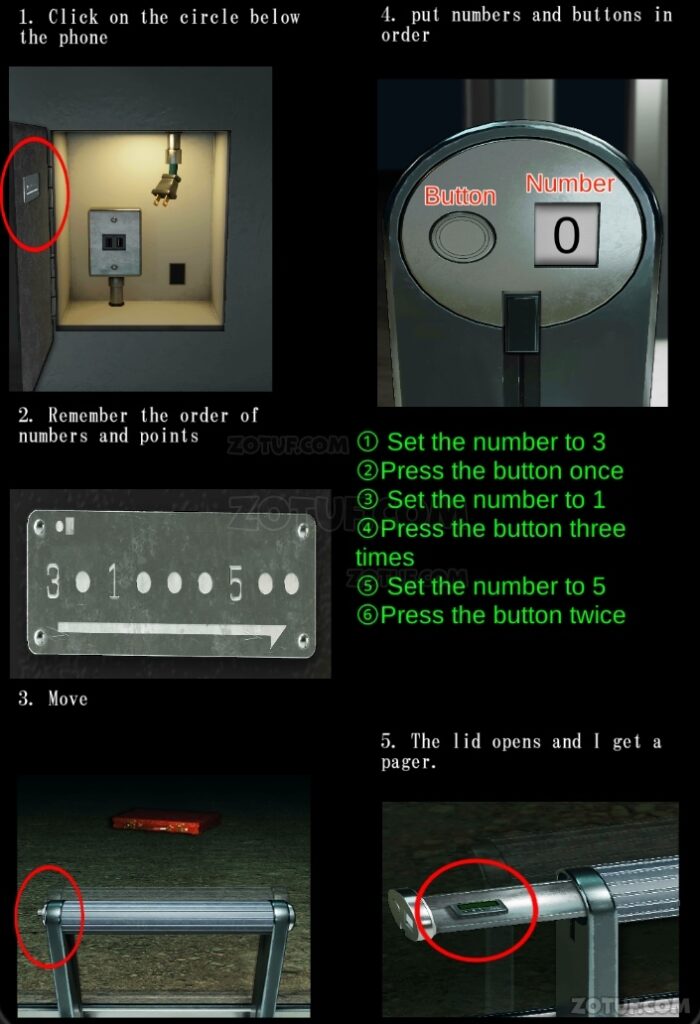
- 1. Click on the circle below the phone.
- 2. Remember the order of numbers and points.
- 3. Move.
- 4. Put numbers and buttons in order.
- ➀ Set the number to 3. ➁ Press the button once. ➂ Set the number to 1. ➃ Press the button three times. ➄ Set the number to 5. ➅ Press the button twice.
- 5. The lid opens and I get a pager.
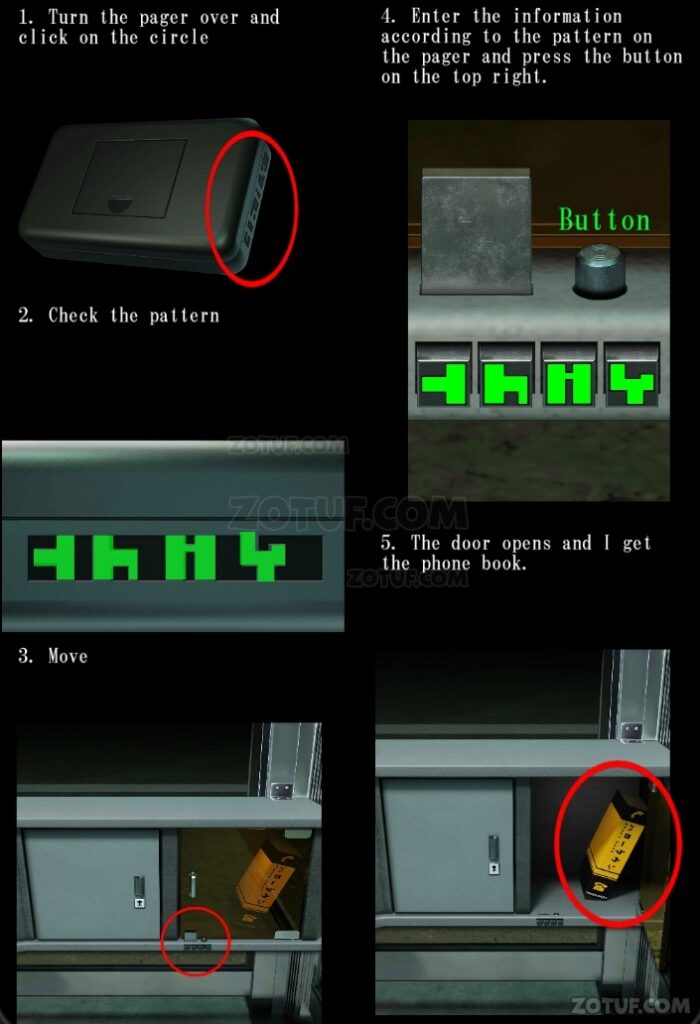
- 1. Turn the pager over and click on the circle.
- 2. Check the pattern.
- 3. Move.
- 4. Enter the information according to the pattern on the pager and press the button on the top right.
- 5. The door opens and I get the phone book.
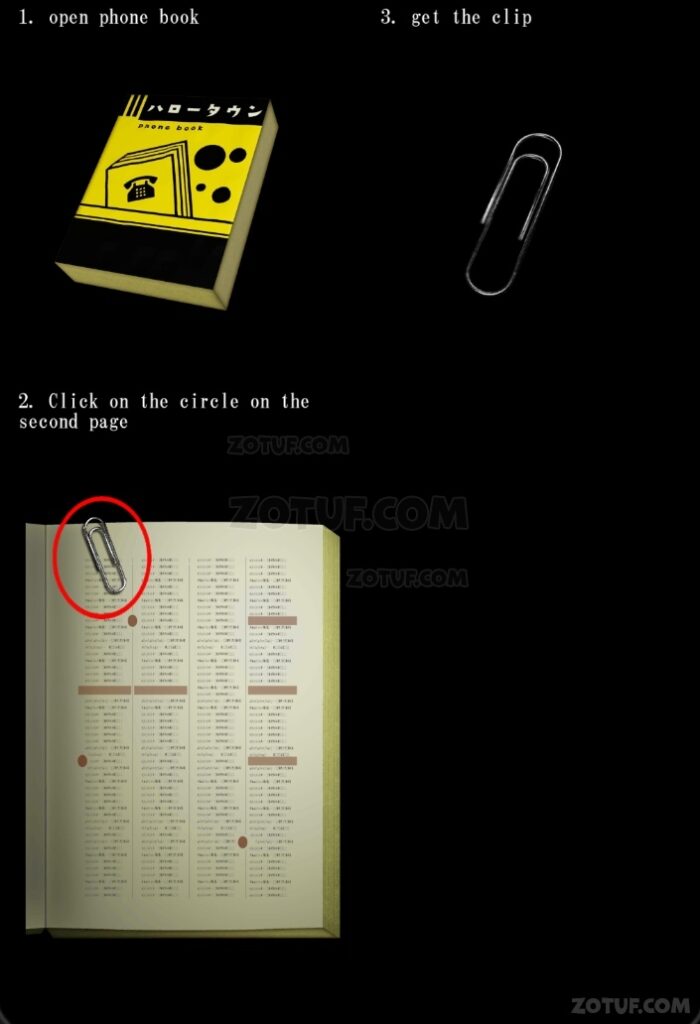
- 1. Open phone book.
- 2. Click on the circle on the second page.
- 3. Get the clip.
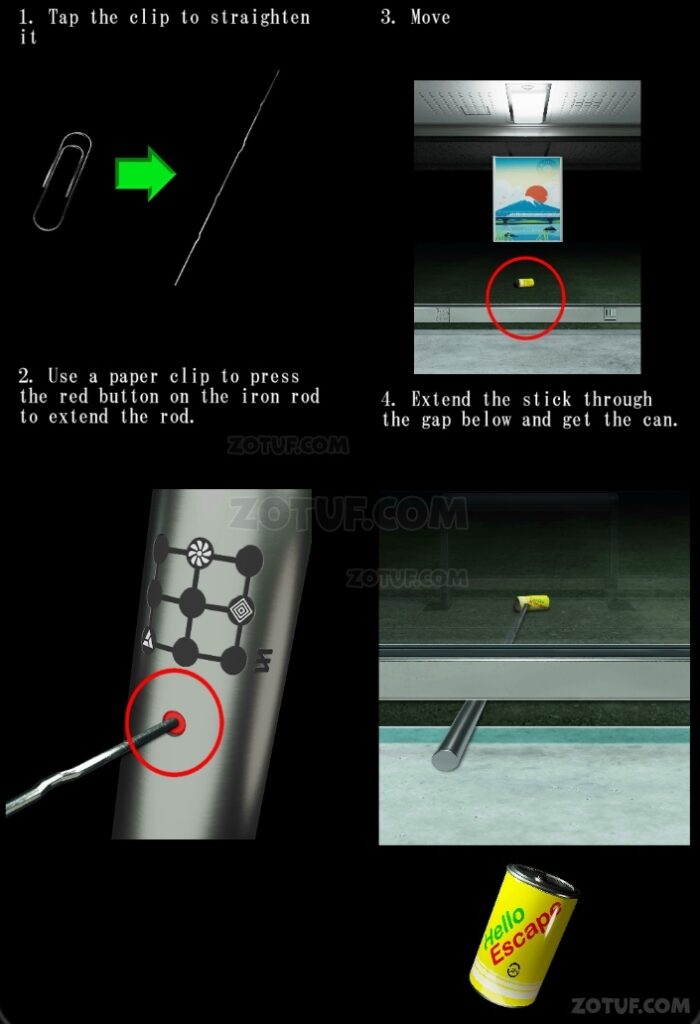
- 1. Tap the clip to straighten it.
- 2. Use a paper clip to press the red button on the iron rod to extend the rod.
- 3. Move.
- 4. Extend the stick through the gap below and get the can.

- 1. Remember the pictures and colors on the board on the phone.
- 2. Attach the metal part to the recess at the top of the can.
- 3. Match the color to the picture on the board and press the black button.
- 4. The lid of the can opens and you get an extension cord.
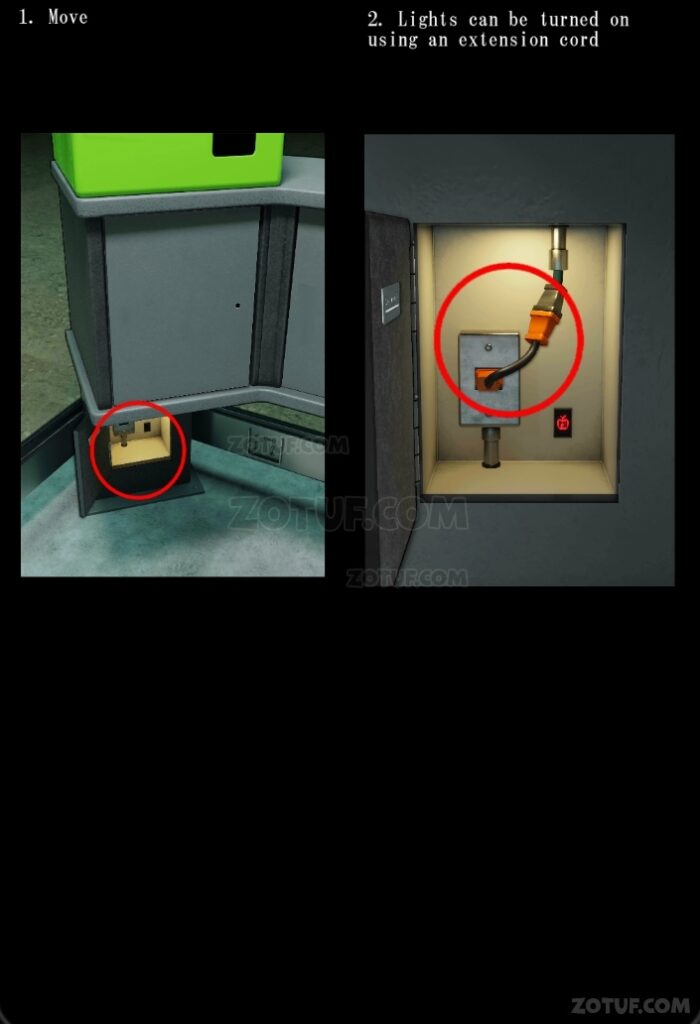
- 1. Move.
- 2. Lights can be turned on using an extension cord.
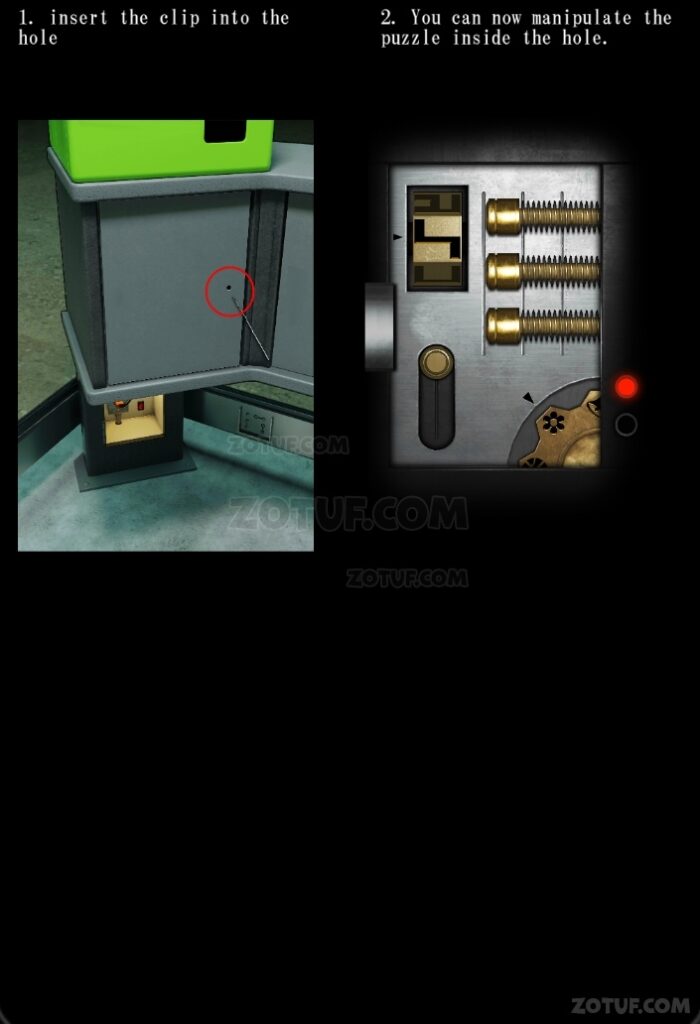
- 1. Insert the clip into the hole.
- 2. You can now manipulate the puzzle inside the hole.
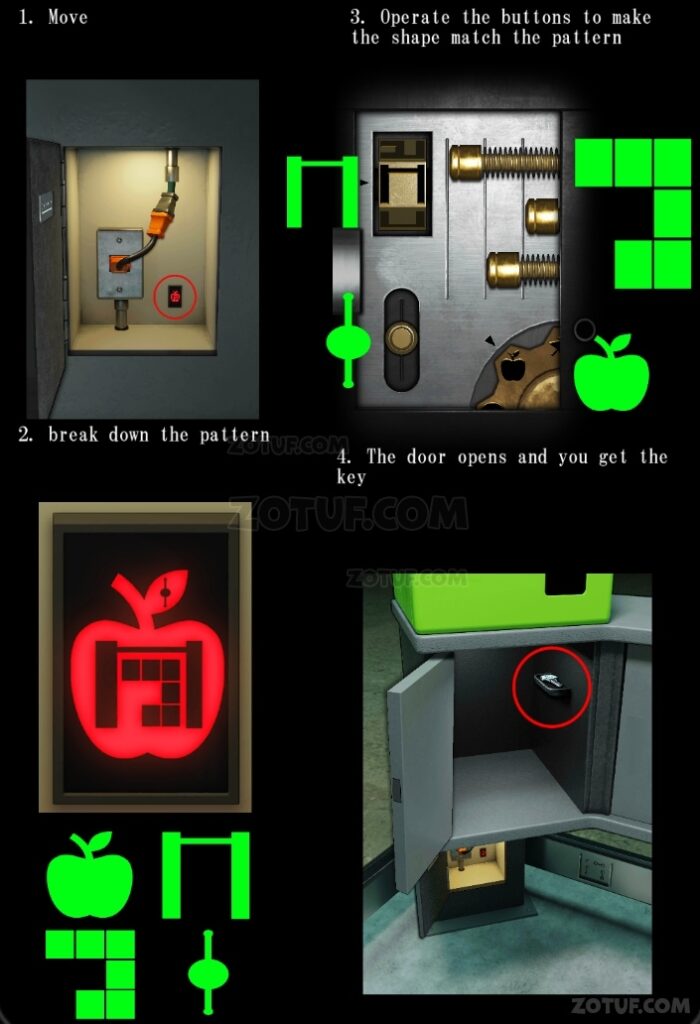
- 1. Move.
- 2. Break down the pattern.
- 3. Operate the buttons to make the shape match the pattern.
- 4. The door opens and you get the key.

- 1. Move to ◯.
- 2. Use key.
- 3. The door will open so press the switch down.
- 4. The electricity in the room will turn off.
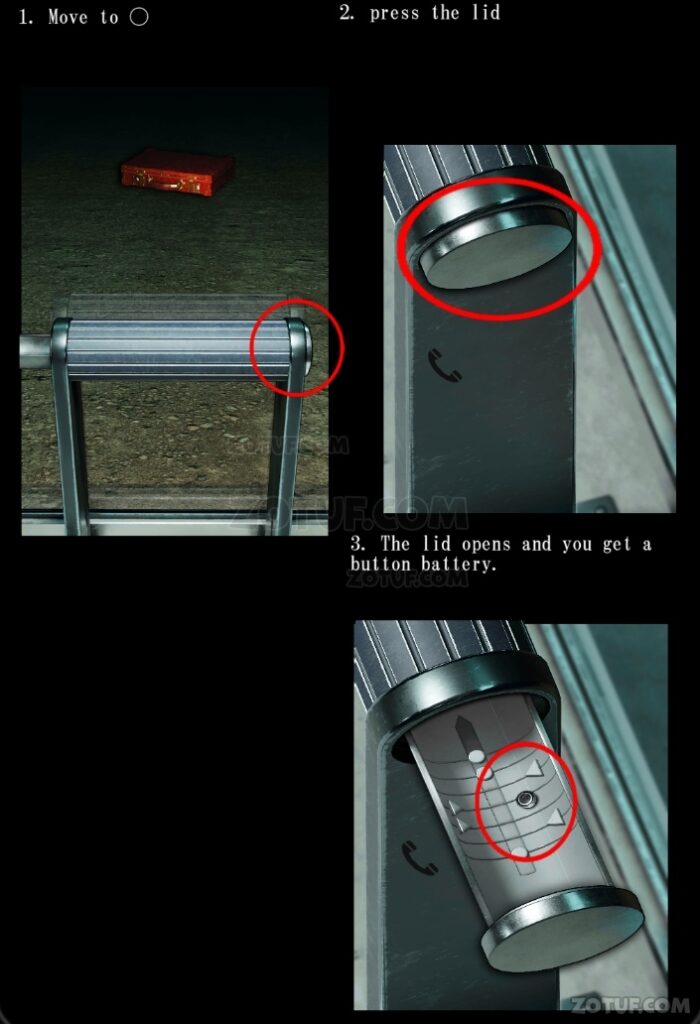
- 1. Move to ◯.
- 2. Press the lid.
- 3. The lid opens and you get a button battery.

- 1. Open the third page of the phone book and check the playing card pattern and numbers written at the bottom.
- 2. Turn off the lights and move to the location marked with.
- 3. Press the button in order of the playing cards in the phone book.
- 4. The panel will open and you will get a button battery.

- 1. Turn over the pager.
- 2. Open the lid and insert two button batteries.
- 3. Pager starts.

- 1. Move.
- 2. Check the number of lines in a shape.
- 4. Press buttons in sequence.
- 5. The drawer opens and you get a coin.
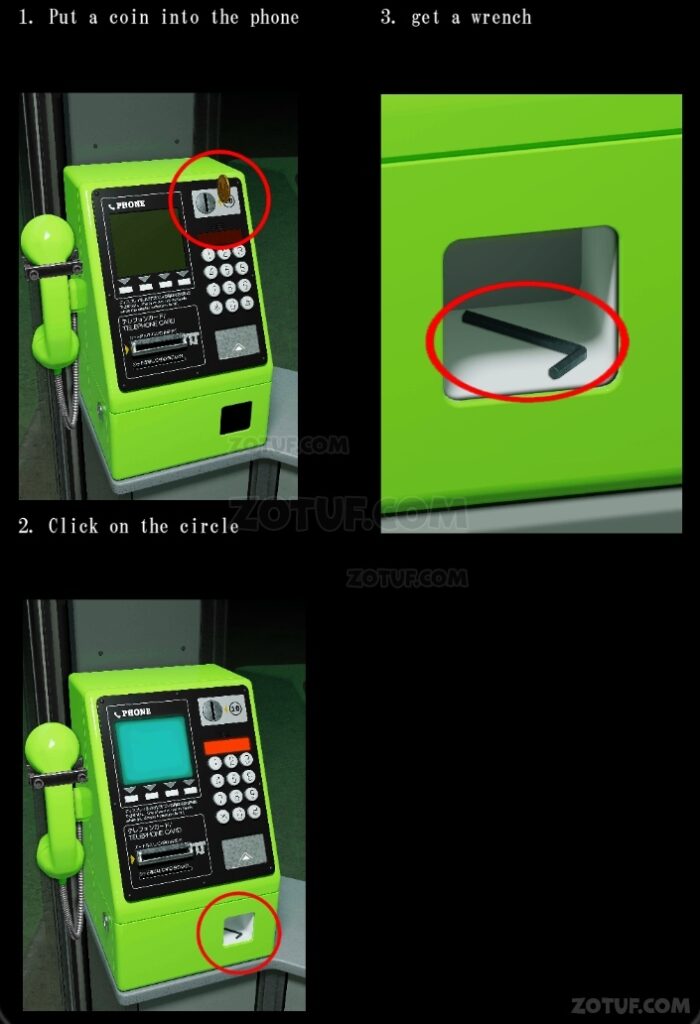
- 1. Put a coin into the phone.
- 2. Click on the circle.
- 3. Get a wrench.
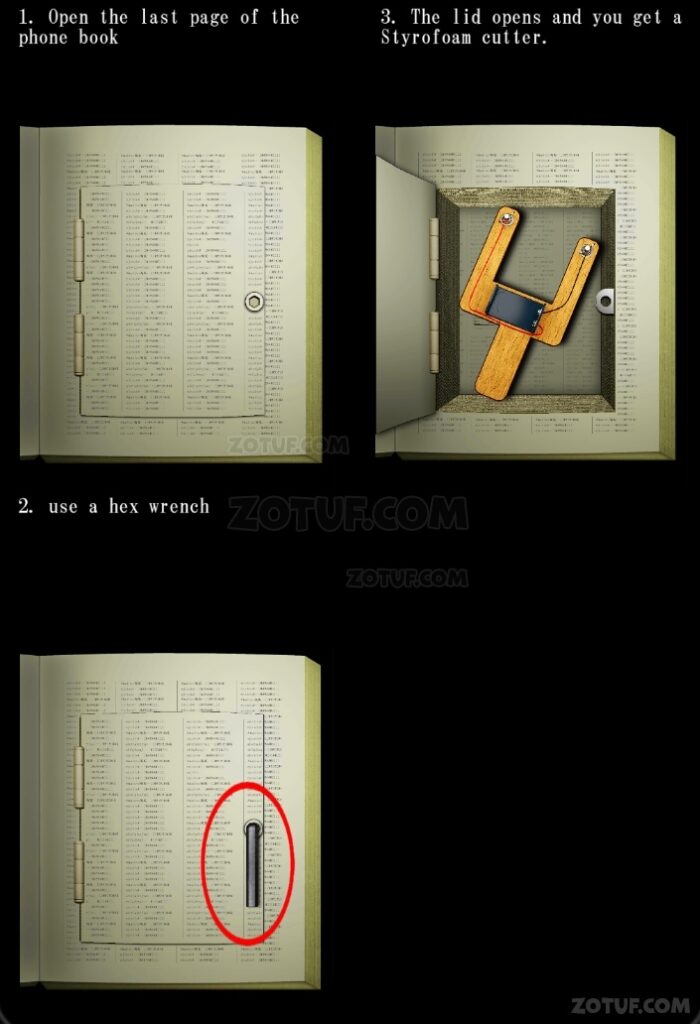
- 1. Open the last page of the phone book.
- 2. Use a hex wrench.
- 3. The lid opens and you get a Styrofoam cutter.
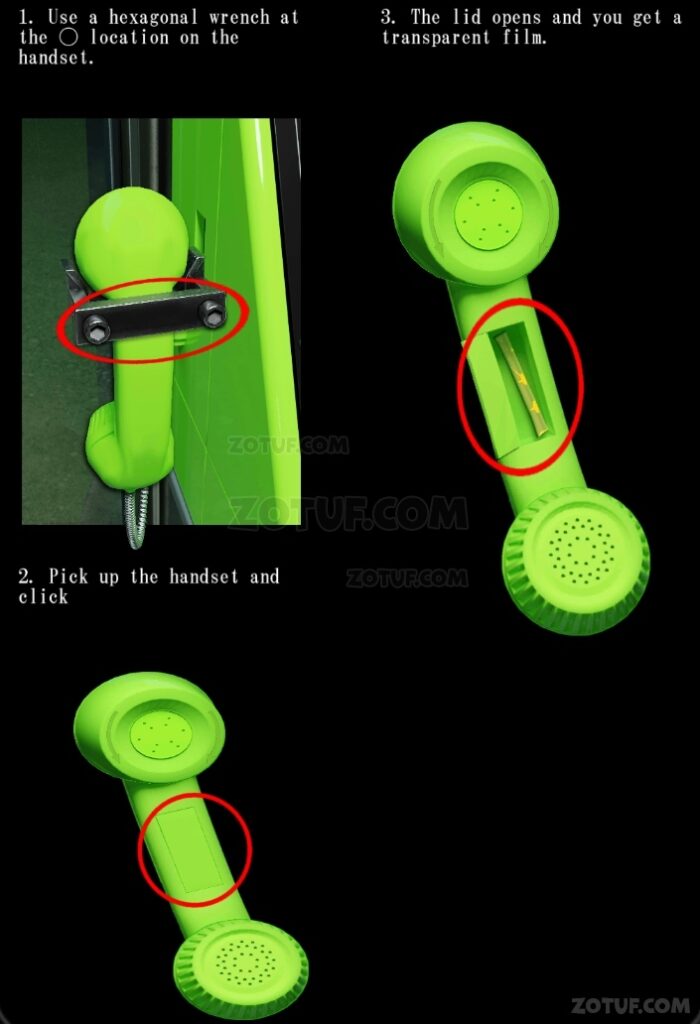
- 1. Use a hexagonal wrench at the ◯ location on the handset.
- 2. Pick up the handset and click.
- 3. The lid opens and you get a transparent film.
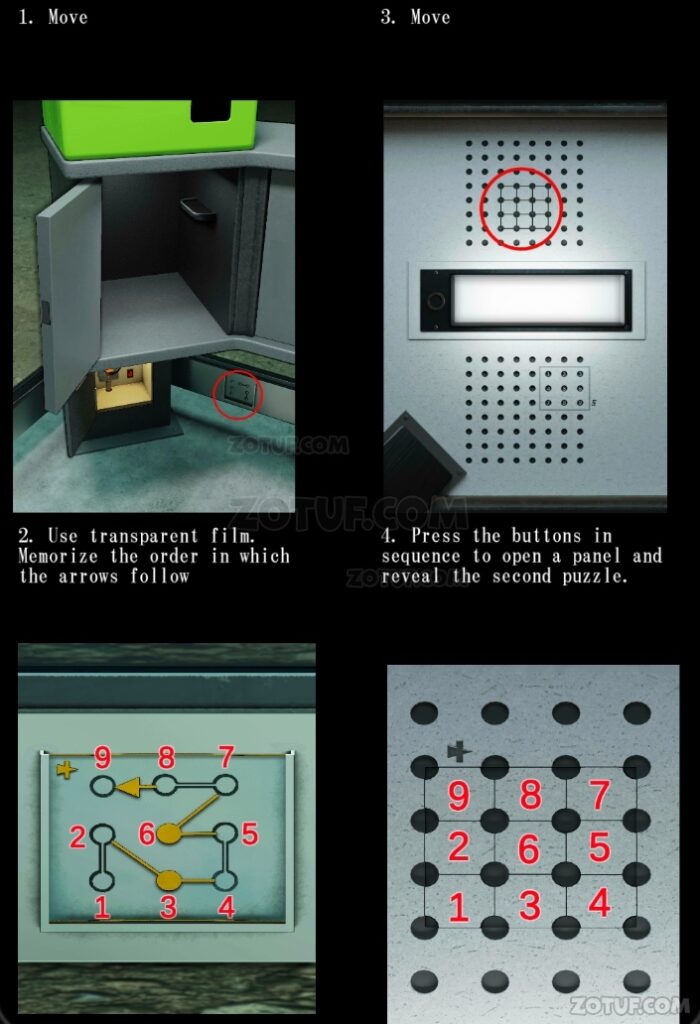
- 1. Move.
- 2. Use transparent film. Memorize the order in which the arrows follow.
- 3. Move.
- 4. Press the buttons in sequence to open a panel and reveal the second puzzle.
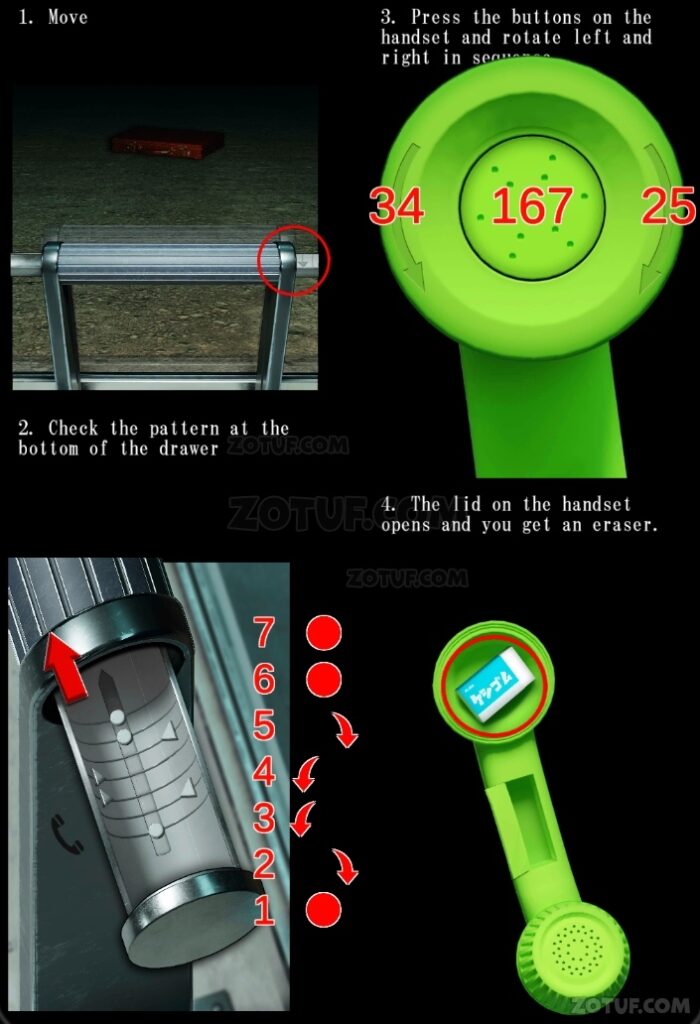
- 1. Move.
- 2. Check the pattern at the bottom of the drawer.
- 3. Press the buttons on the handset and rotate left and right in sequence.
- 4. The lid on the handset opens and you get an eraser.
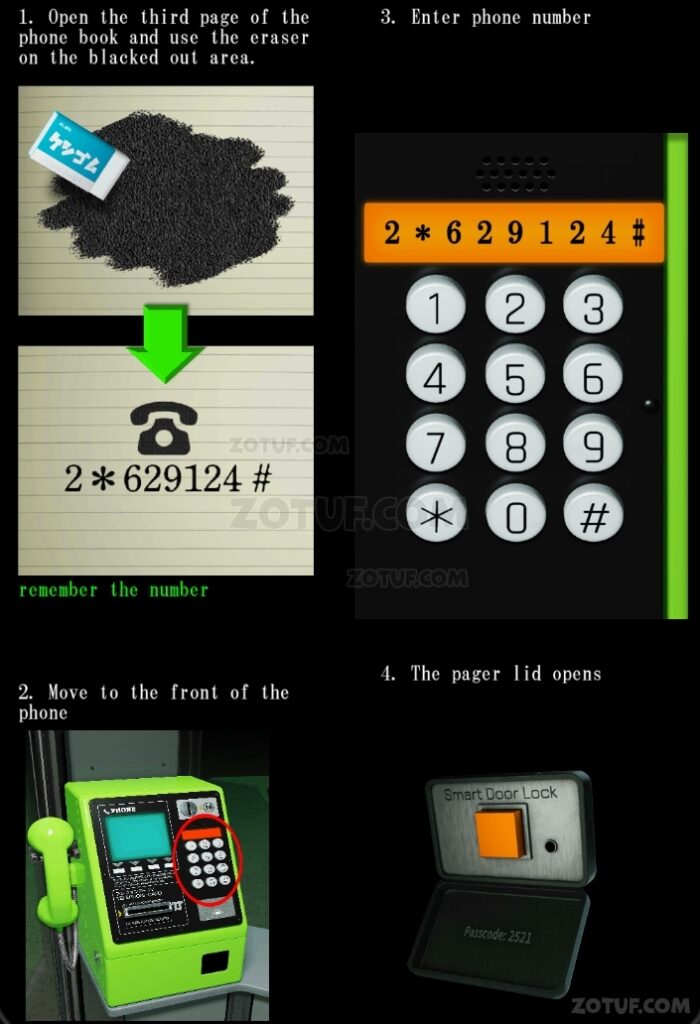
- 1. Open the third page of the phone book and use the eraser on the blacked out area.
- remember the number.
- 2. Move to the front of the phone.
- 3. Enter phone number.
- 4. The pager lid opens.
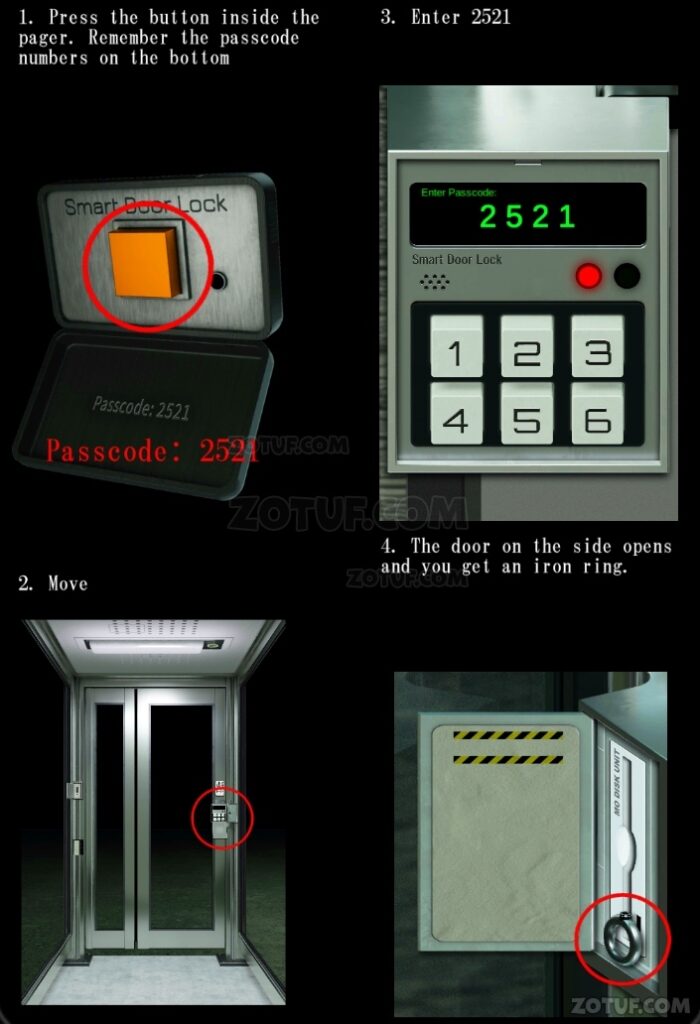
- 1. Press the button inside the pager. Remember the passcode numbers on the bottom.
- 2. Move.
- 3. Enter 2521.
- 4. The door on the side opens and you get an iron ring.

- 1. Combine key parts and rings to create a classic key.
- 2. Move.
- 3. Use key.
- 4. The door opens and you get the Styrofoam.
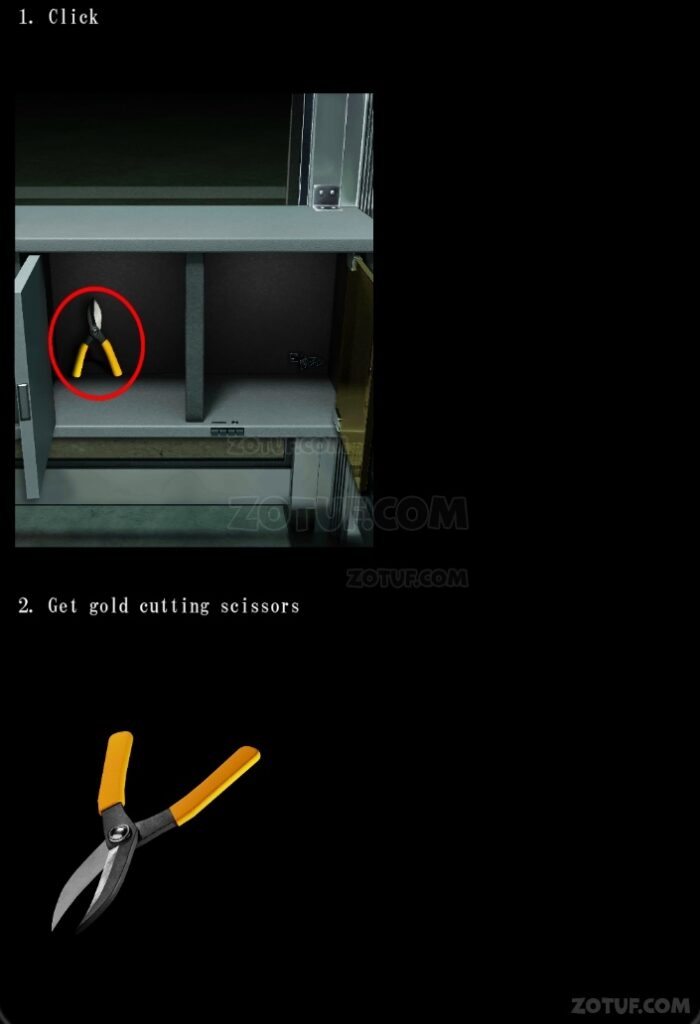
- 1. Click.
- 2. Get gold cutting scissors.

- 1. Make a hook on the can using metal scissors. Then combine the stick and hook to make a hanging stick.
- 3. Move.
- 4. Use the stick on the trunk.
- 5. Get trunk case.

- 1. Turn over pages 1 and 2 of the phone book alternately and check the overlapping patterns.
- 2. Click on the circle on the trunk case.
- 3. Enter the panel as per the phone book.
- 4. The lock on the right side of the trunk case is released.

- 1. Click on the circle on the trunk case.
- 2. Check the number of vertically arranged points.
- 3. Move.
- 4. Match the gauge to the number of dots on the trunk case to open the modular cable slot.

- 1. Move.
- 2. Check the direction of the arrow and the order of the pattern.
- 3. Go to the puzzle on the ceiling.
- 4. press dials and buttons in sequence.
- ➀ Turn the arrow on the dial to the left. ➁ Press the button twice. ➂ Turn the arrow on the dial up. ➃ Press the button. ➄ Turn the dial arrow down. ➅ Press the button. ➆ Press the button.
- 5. The panel will open and you will get the key with the green handle.
- dial.

- 1. Click on the trunk.
- 2. Use the key with the green handle.
- 3. Open trunk and get laptop.
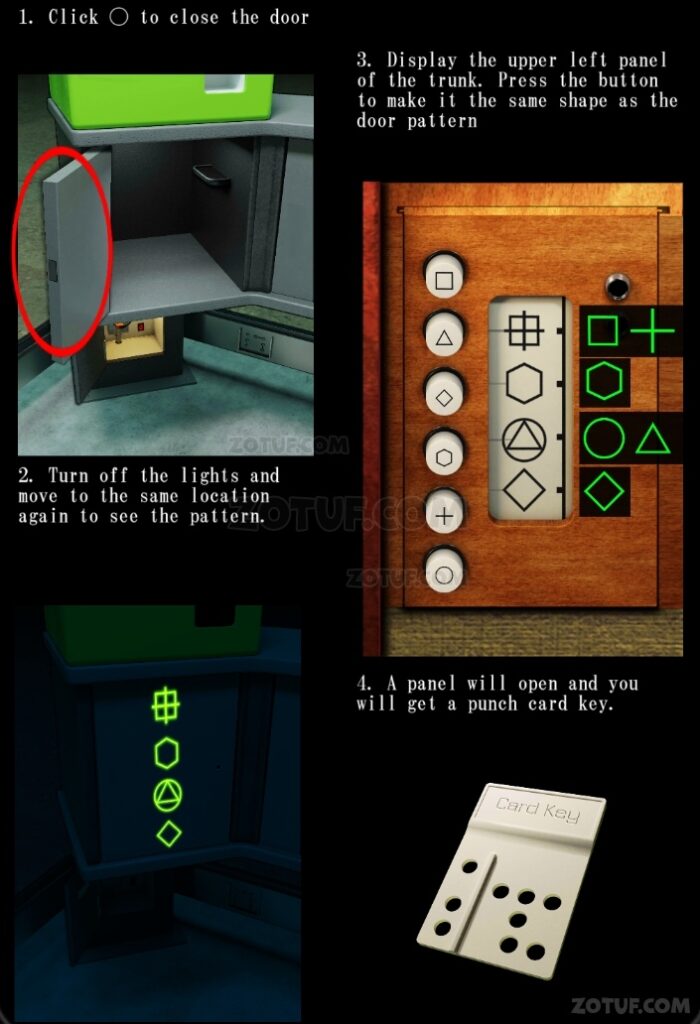
- 1. Click ◯ to close the door.
- 2. Turn off the lights and move to the same location again to see the pattern.
- 3. Display the upper left panel of the trunk. Press the button to make it the same shape as the door pattern.
- 4. A panel will open and you will get a punch card key.
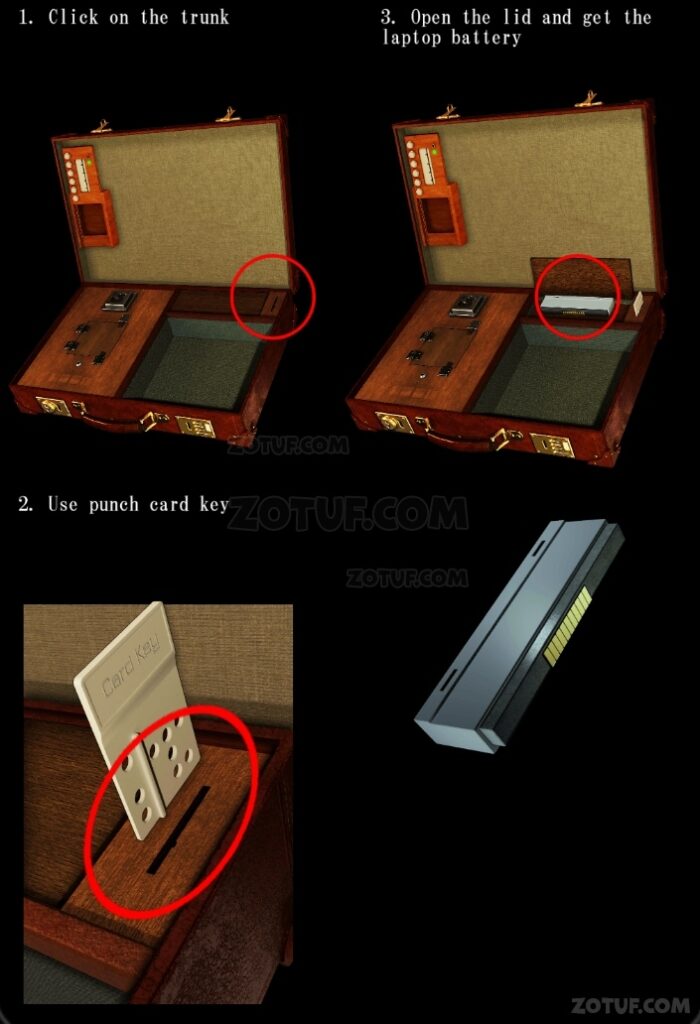
- 1. Click on the trunk.
- 2. Use punch card key.
- 3. Open the lid and get the laptop battery.

- 1. Click on the ◯ spot on your computer.
- 2. Use a laptop battery.
- 3. Place the computer on the shelf and click on the.
- 4. Press the button to start the computer.
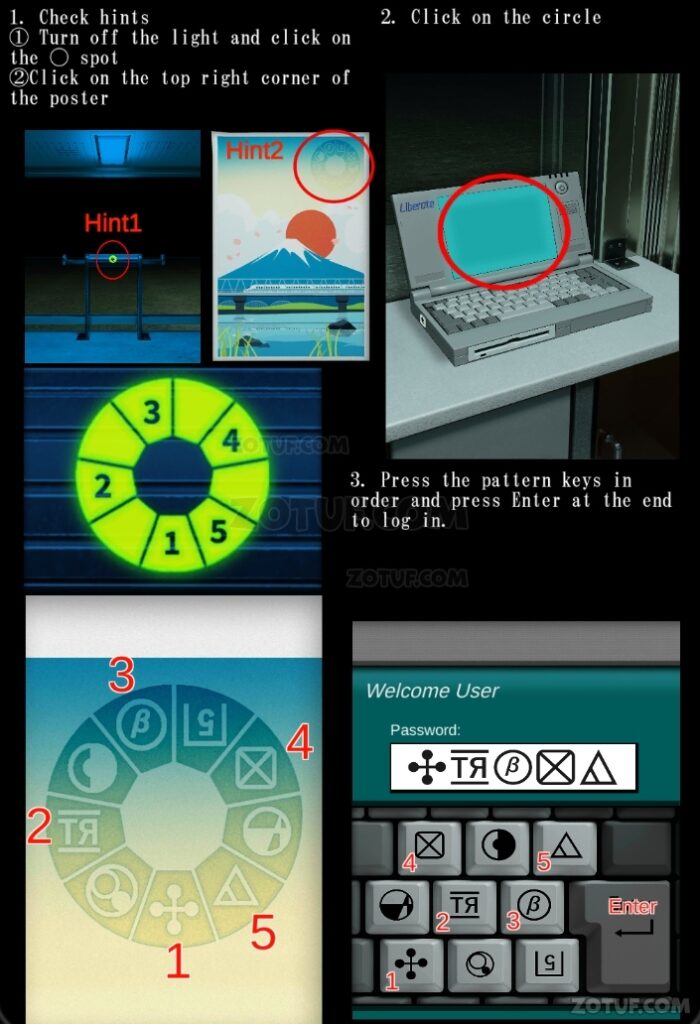
- 1. Check hints. ➀ Turn off the light and click on the ◯ spot. ➁ Click on the top right corner of the poster.
- 2. Click on the circle.
- 3. Press the pattern keys in order and press Enter at the end to log in.
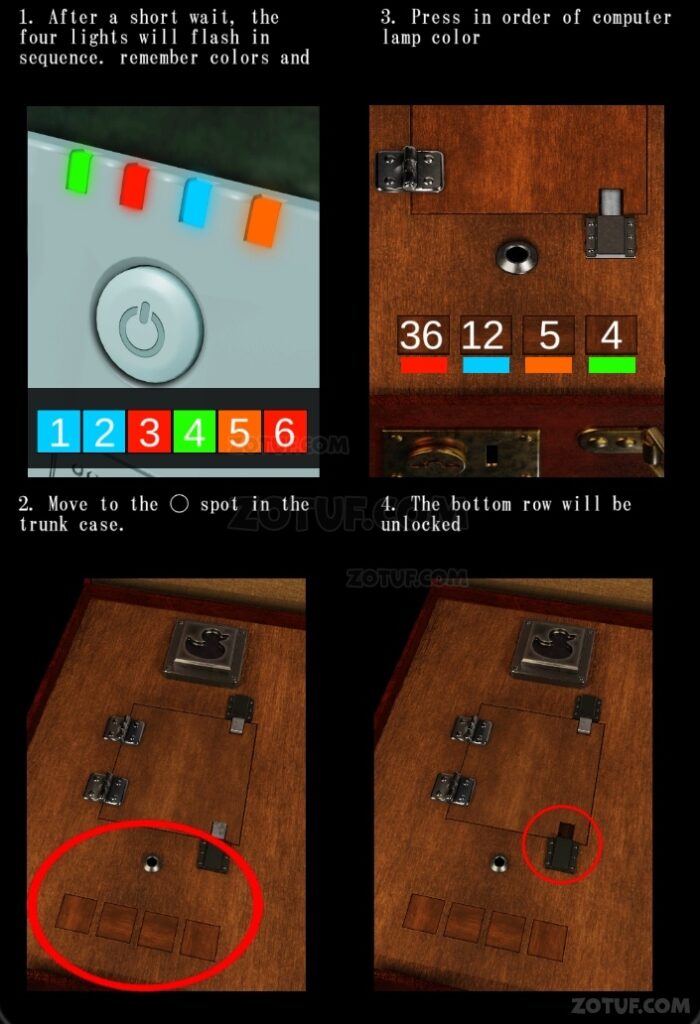
- 1. After a short wait, the four lights will flash in sequence. remember colors and order.
- 2. Move to the ◯ spot in the trunk case.
- 3. Press in order of computer lamp color.
- 4. The bottom row will be unlocked.
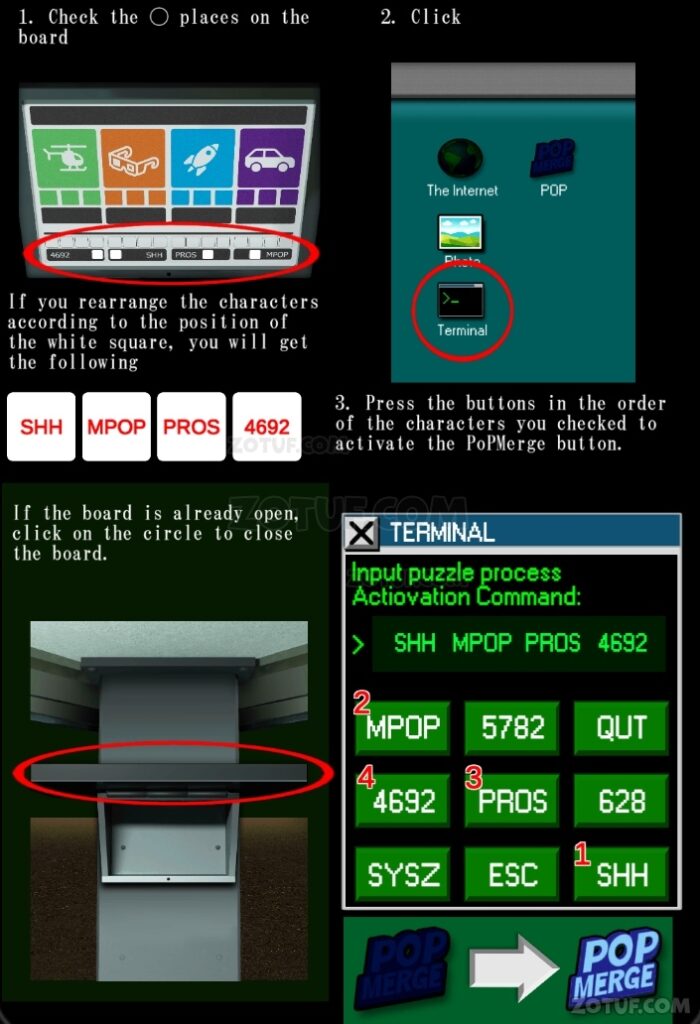
- 1. Check the ◯ places on the board.
- If you rearrange the characters according to the position of the white square, you will get the following.
- If the board is already open, click on the circle to close the board.
- 2. Click.
- 3. Press the buttons in the order of the characters you checked to activate the PoPMerge button.
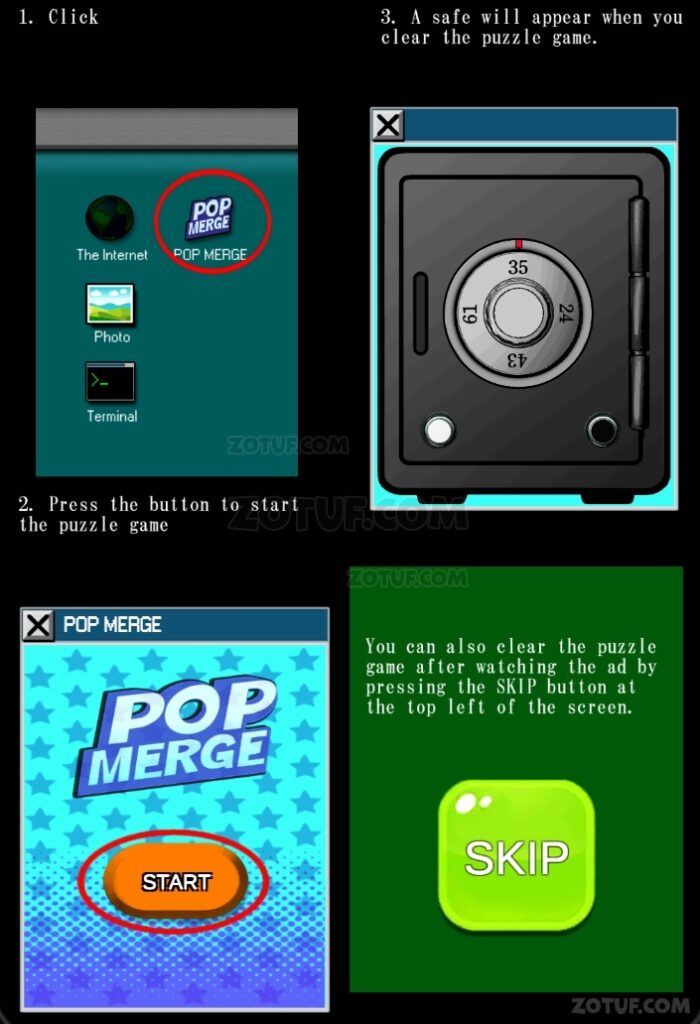
- 1. Click.
- 2. Press the button to start the puzzle game.
- 3. A safe will appear when you clear the puzzle game.
- You can also clear the puzzle game after watching the ad by pressing the SKIP button at the top left of the screen.

- 1. Tap the circle on the last page of the phone book.
- 2. Check the numbers, colors and number of cracks on the wood.
- How to open a safe.
- 3. Operate the buttons and dials according to the information checked in the phone book.
- ➀ Set the dial to 24. ➁ Press the black button at the bottom right. ➂ Set the dial to 43. ➃ Press the white button at the bottom left. ➄ Set the dial to 35. ➅ Press the white button at the bottom left. ➆ Set the dial to 61. ➇ Press the black button at the bottom right.
- 4. When the safe is open, push the lever and the PC drawer will open. Get a 9V battery.
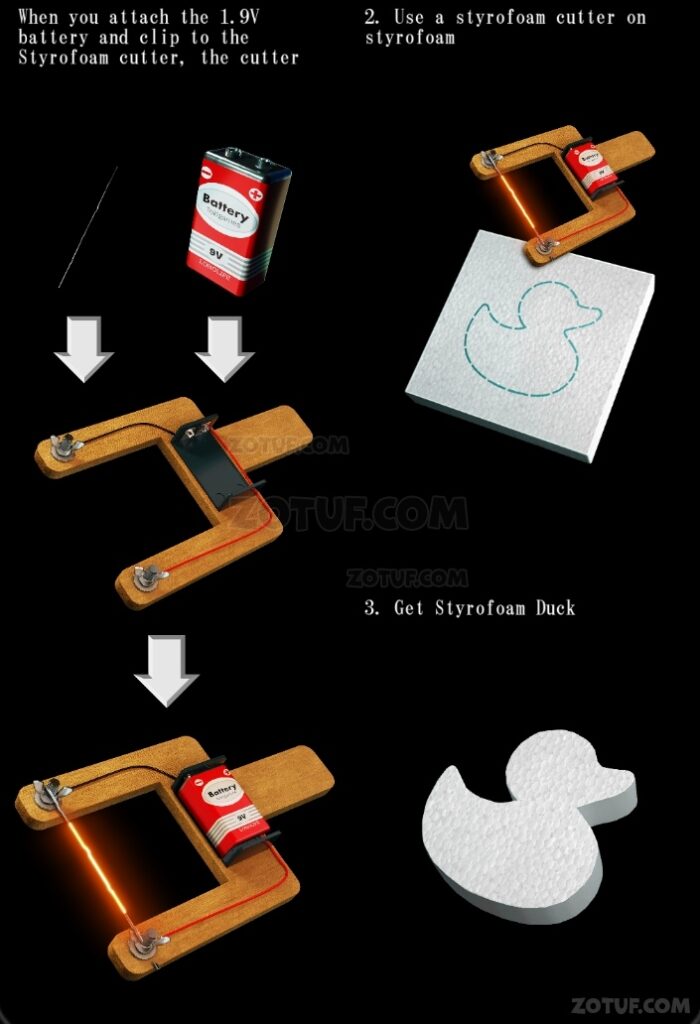
- 1. When you attach the 1.9V battery and clip to the Styrofoam cutter, the cutter becomes heated.
- 2. Use a styrofoam cutter on styrofoam.
- 3. Get Styrofoam Duck.
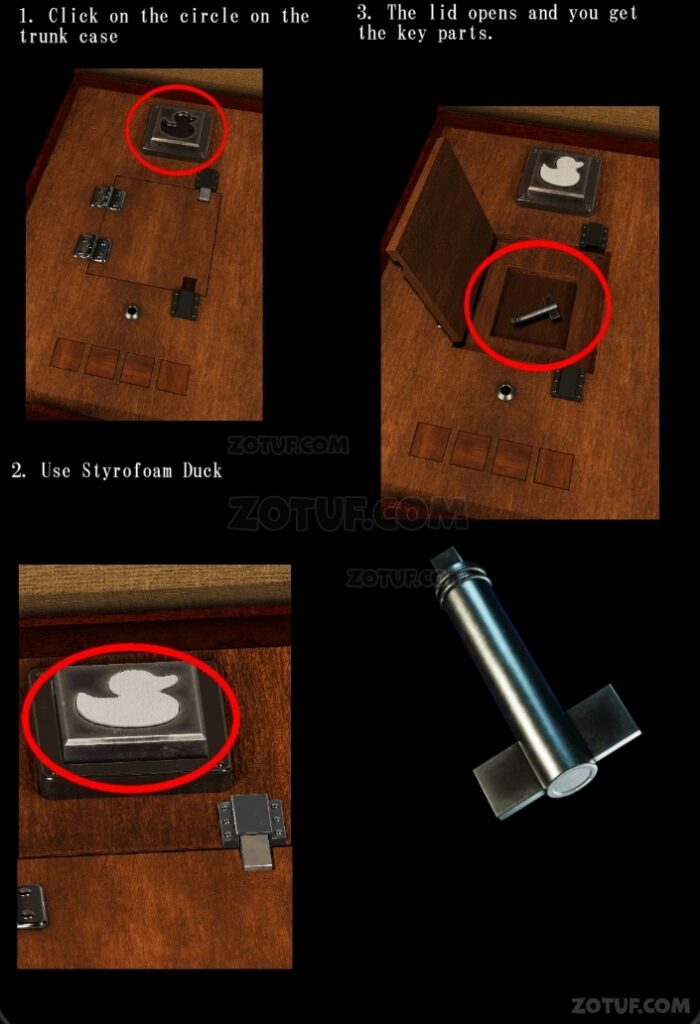
- 1. Click on the circle on the trunk case.
- 2. Use Styrofoam Duck.
- 3. The lid opens and you get the key parts.
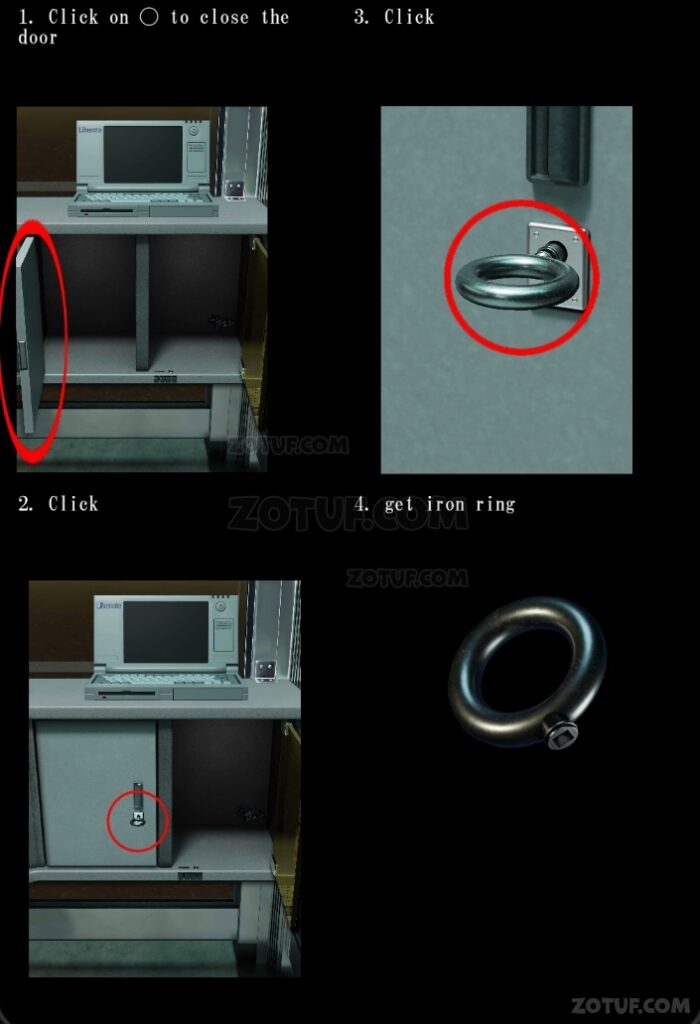
- 1. Click on ◯ to close the door.
- 2. Click.
- 3. Click.
- 4. Get iron ring.

- 1. Combine the iron ring and key parts to create Classic Key 2.
- 2. Move.
- 3. Use classic key 2 in the keyhole.
- 4. The drawer opens and you get the MO disk.
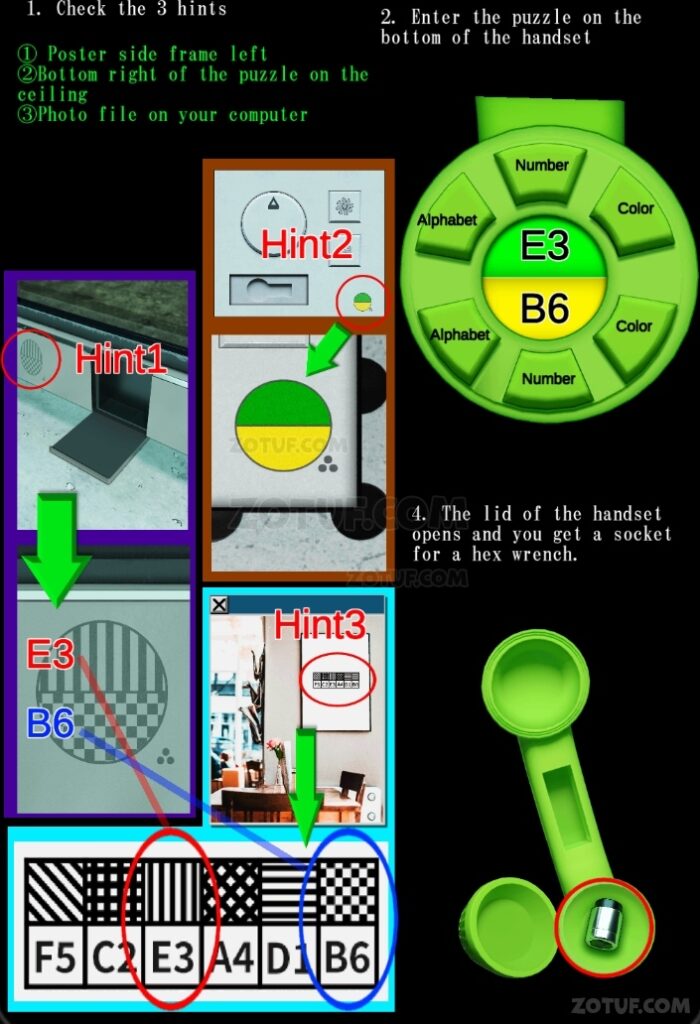
- 1. Check the 3 hints.
- ➀ Poster side frame left. ➁Bottom right of the puzzle on the ceiling. ➂Photo file on your computer.
- 2. Enter the puzzle on the bottom of the handset.
- 4. The lid of the handset opens and you get a socket for a hex wrench.
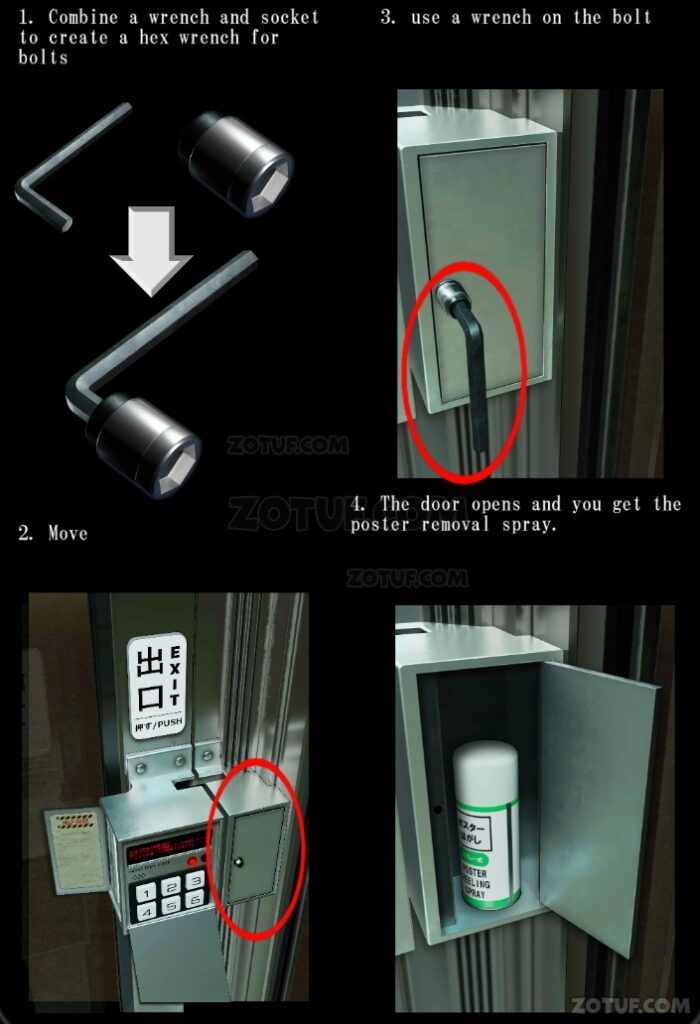
- 1. Combine a wrench and socket to create a hex wrench for bolts.
- 2. Move.
- 3. Use a wrench on the bolt.
- 4. The door opens and you get the poster removal spray.
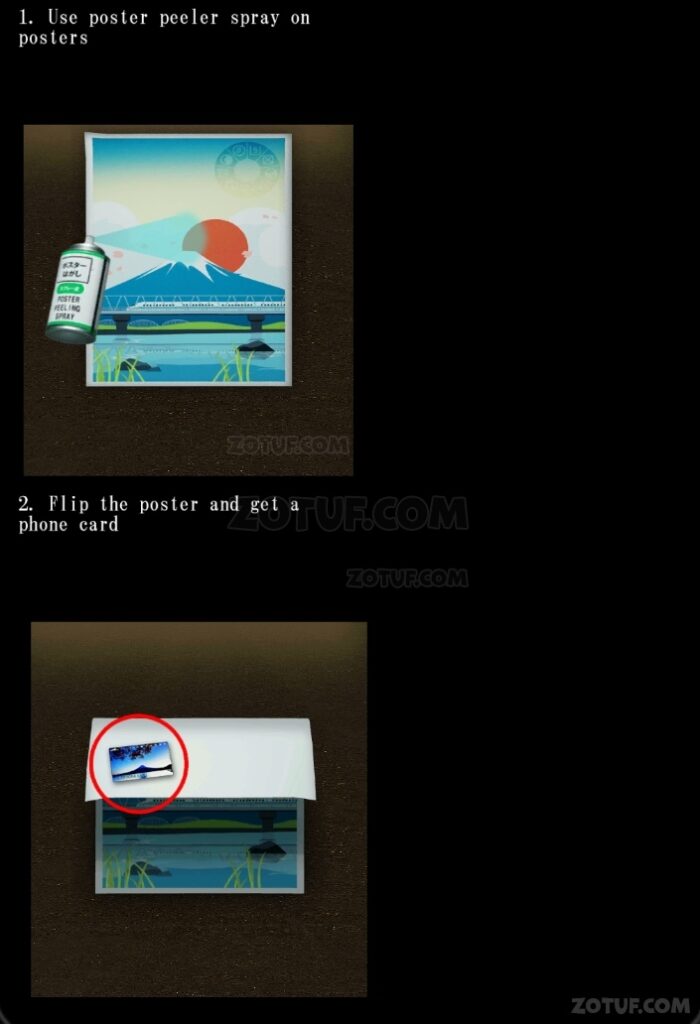
- 1. Use poster peeler spray on posters.
- 2. Flip the poster and get a phone card.
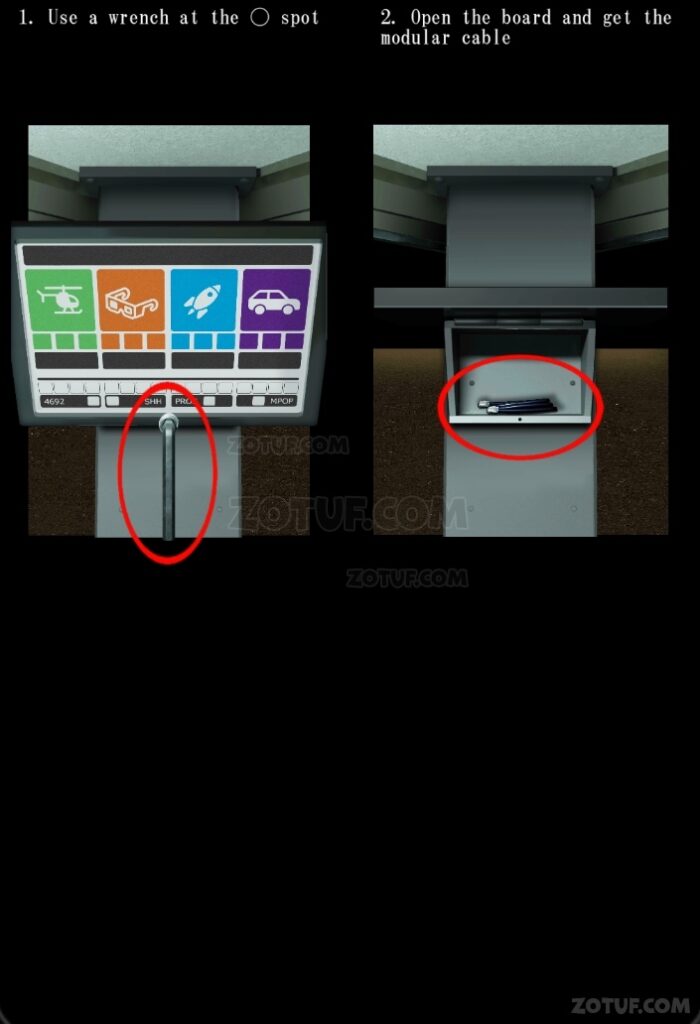
- 1. Use a wrench at the ◯ spot.
- 2. Open the board and get the modular cable.

- 1. Insert your phone card in the box marked with.
- Use modular cables.
- 3. Move to the desktop screen of your computer and press the “YES” button.
- 4. Internet icon becomes active.
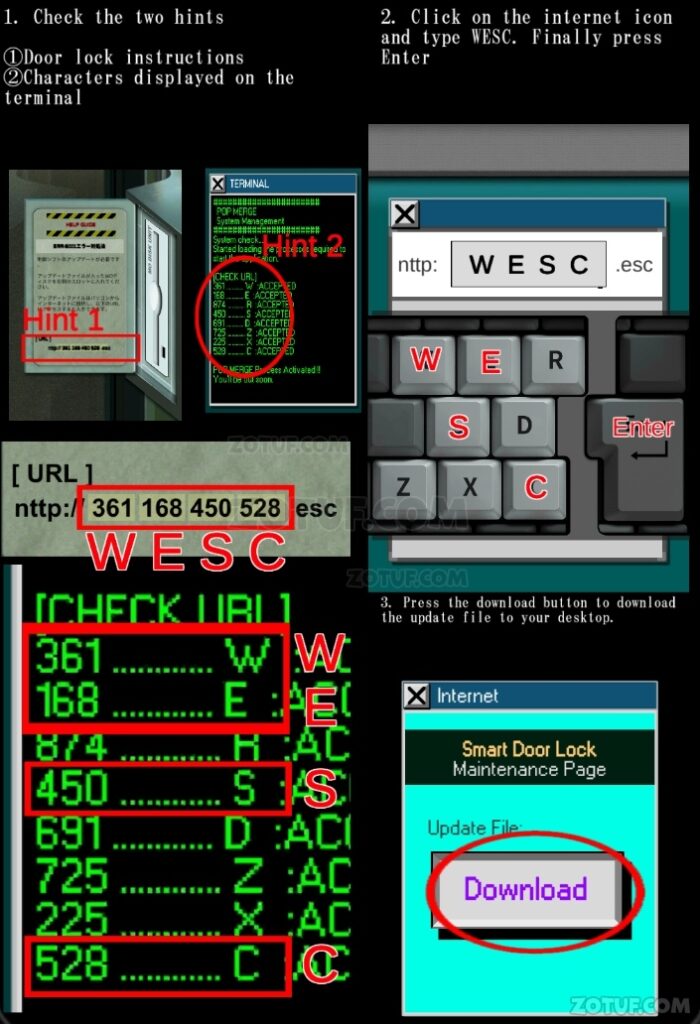
- 1. Check the two hints ➀ Door lock instructions. ➁ Characters displayed on the terminal.
- 2. Click on the internet icon and type WESC. Finally press Enter.
- 3. Press the download button to download the update file to your desktop.
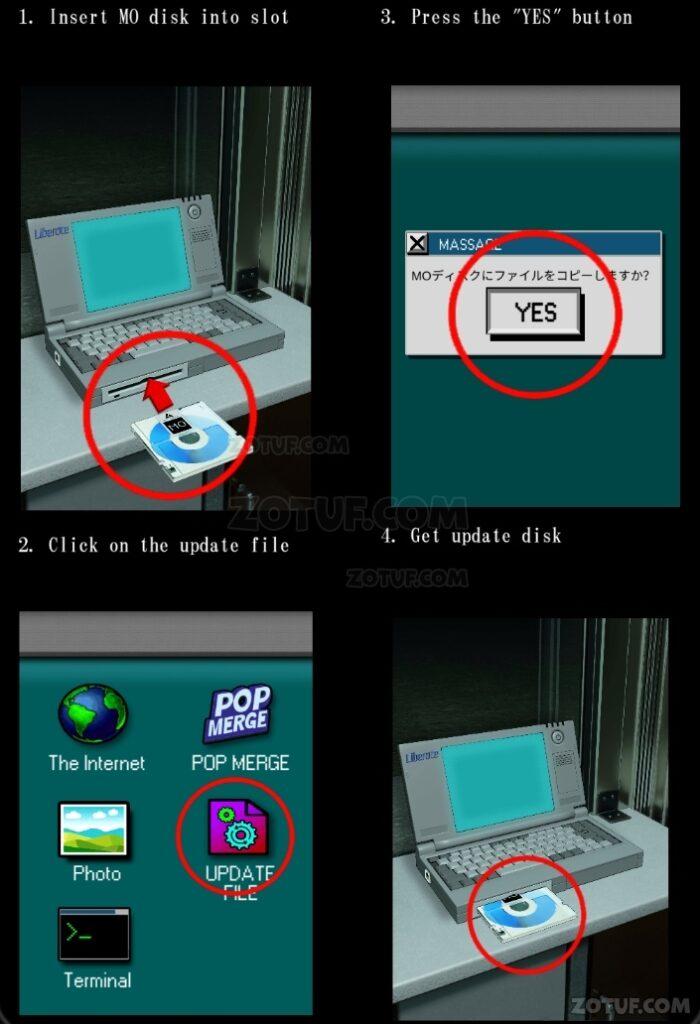
- 1. Insert MO disk into slot.
- 2. Click on the update file.
- 3. Press the “YES” button.
- 4. Get update disk.
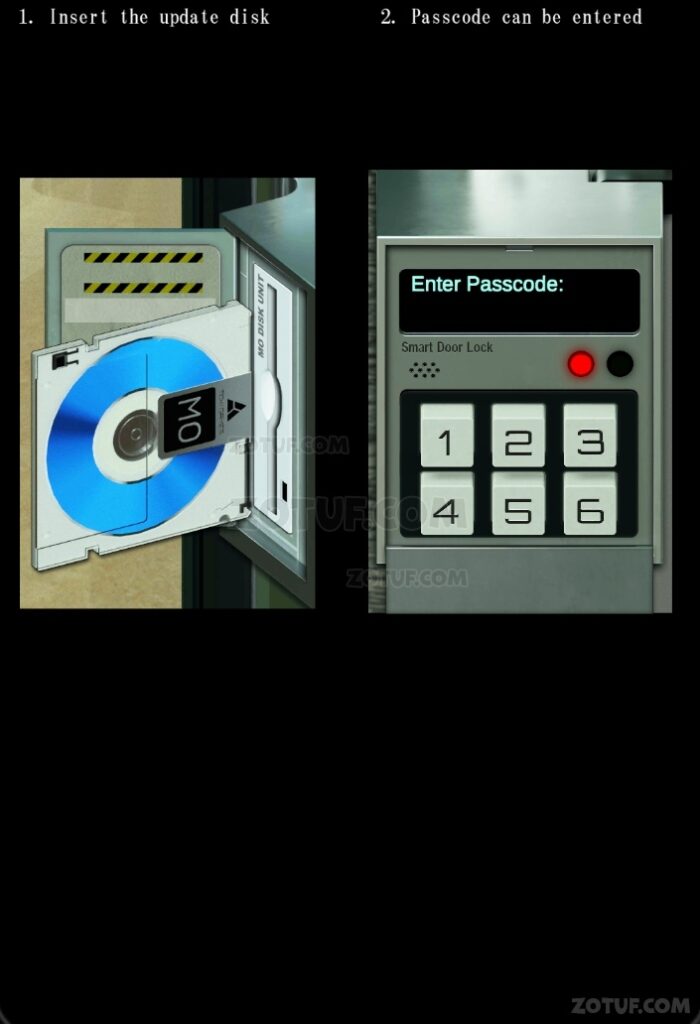
- 1. Insert the update disk.
- 2. Passcode can be entered.
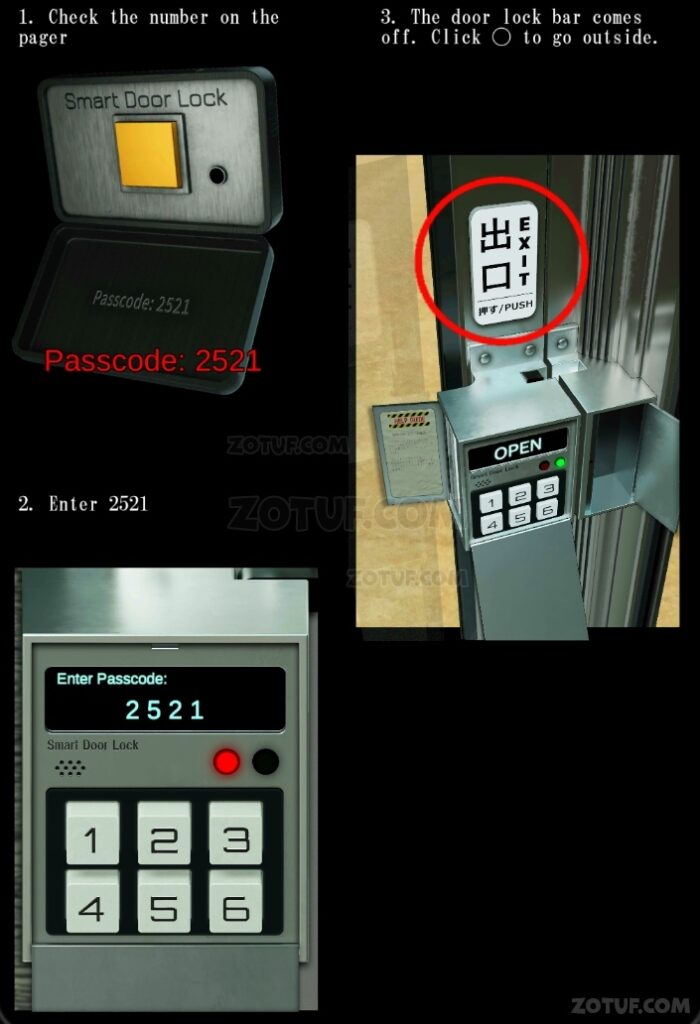
- 1. Check the number on the pager.
- 2. Enter 2521.
- 3. The door lock bar comes off. Click ◯ to go outside.
Congratulations! You have completed the game Escape from P-BOX.


