
Fairy Godmother Stories 1: Cinderella – The game’s walkthrough begins with you heading out to help Cinderella. But unfortunately, everything falls apart when you are arrested and accused of a series of robberies. Someone is definitely trying to frame you, but who and why is unknown. With nothing left at the scene of the crime but strange glass shoes, it’s up to you to solve the case and find out who did it. You will have to find out who is hiding under the mask of the criminal and unravel the tangle of mysteries. If you can not pass any of the puzzles or do not know where the items are, on our site you can watch the walkthrough of the game Fairy Godmother Stories 1: Cinderella, and get your reputation back.
Fairy Godmother Stories 1: Cinderella – Walkthrough
Here you can see the full walkthrough of Fairy Godmother Stories 1: Cinderella, namely for all chapters, including bonus chapter, in pictures.
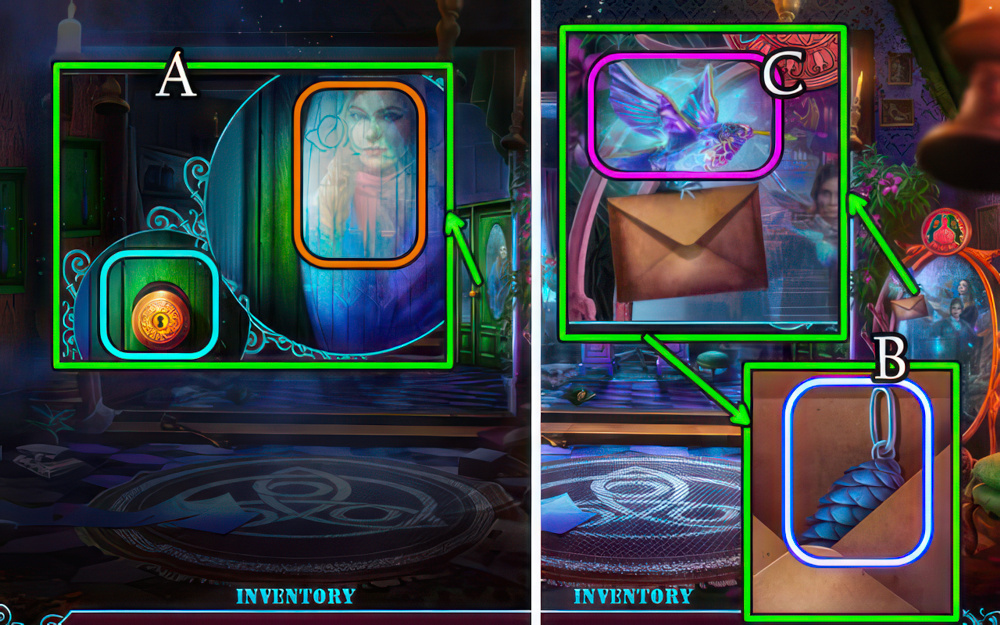
- Speak to character, select door knob (A).
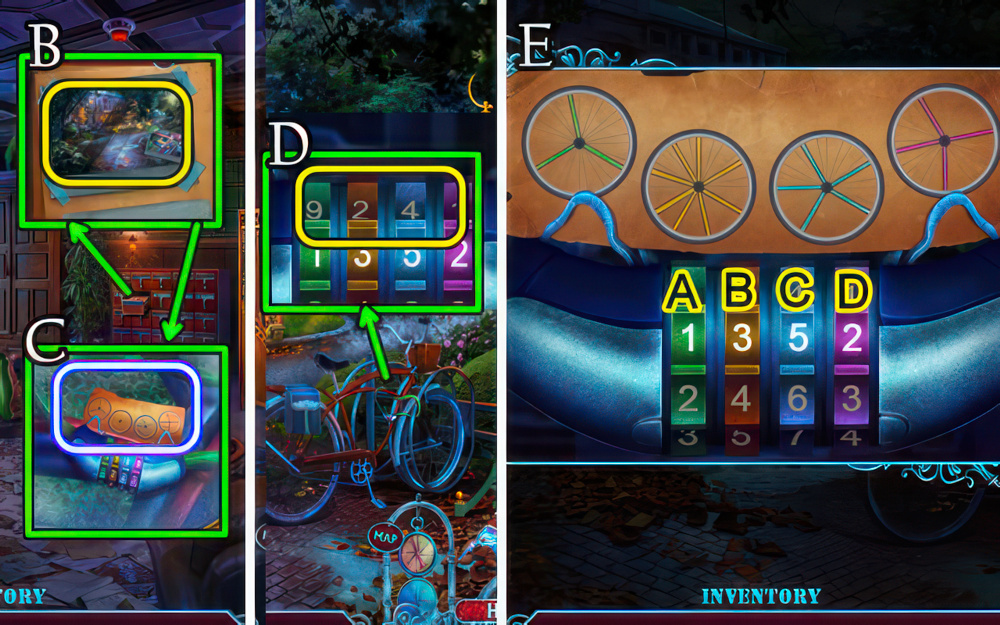
- Open envelope, take note, WEIGHT (B).
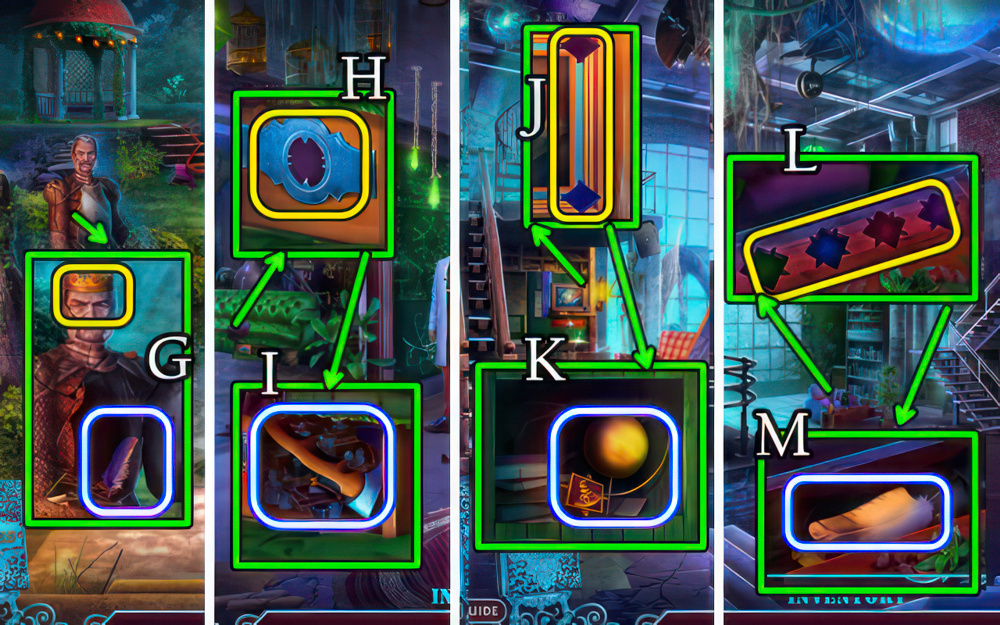
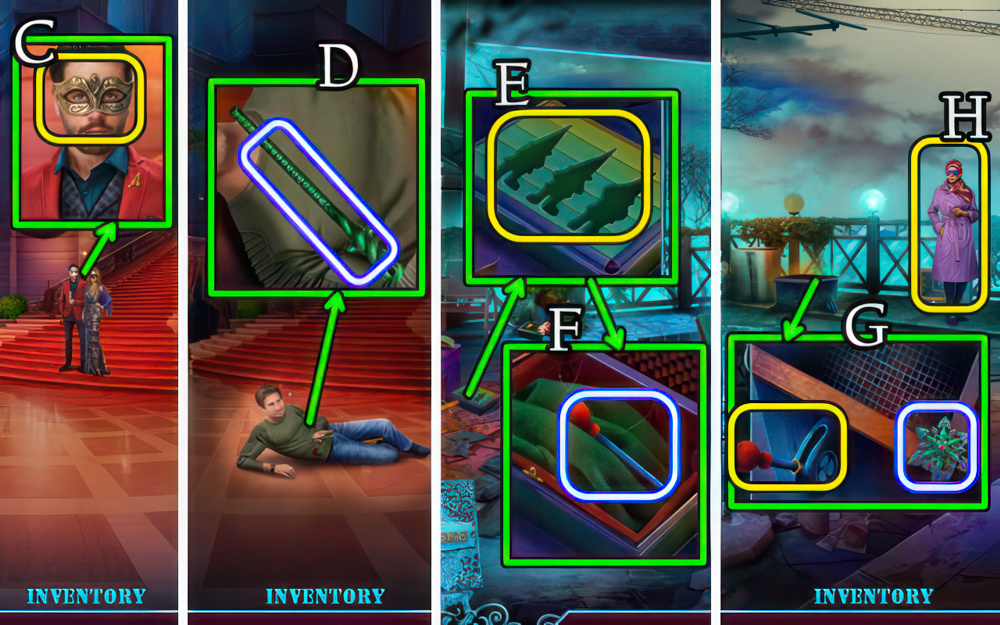
- Take hummingbird Hint (C).

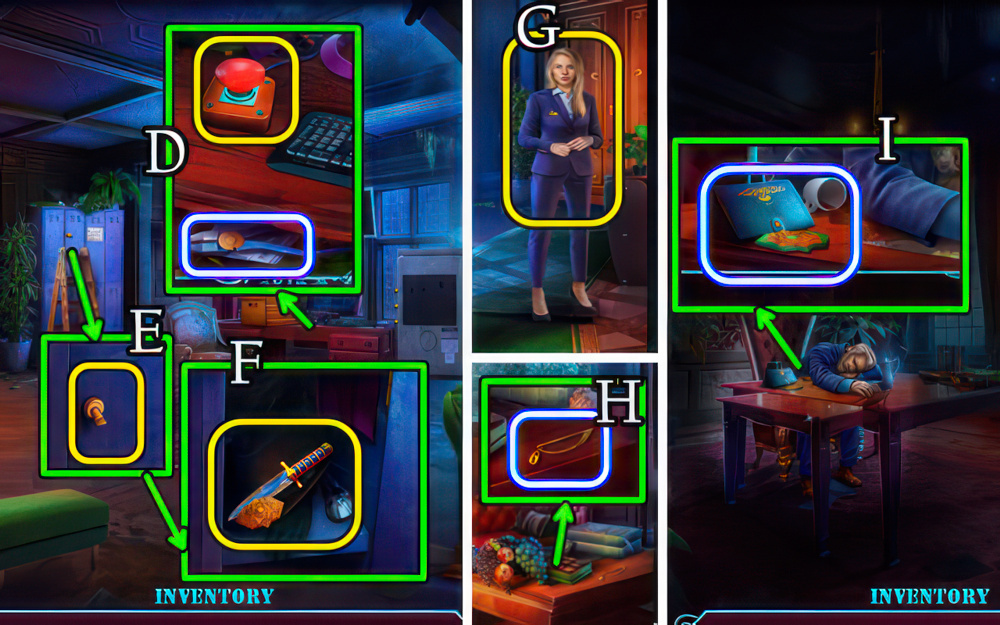
- Take BIRD AMULET, posters, WIRE (D).
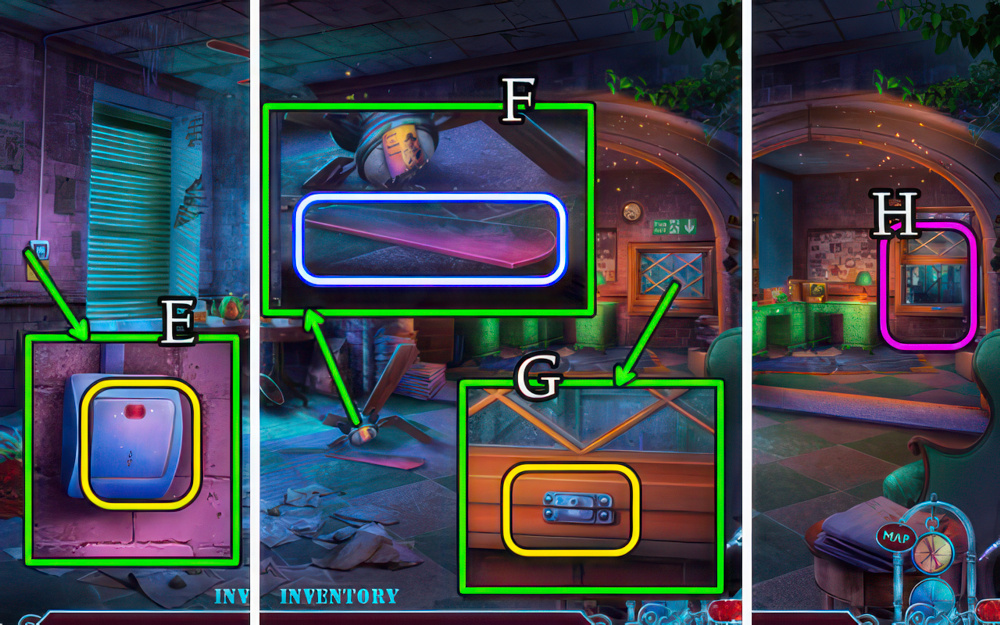
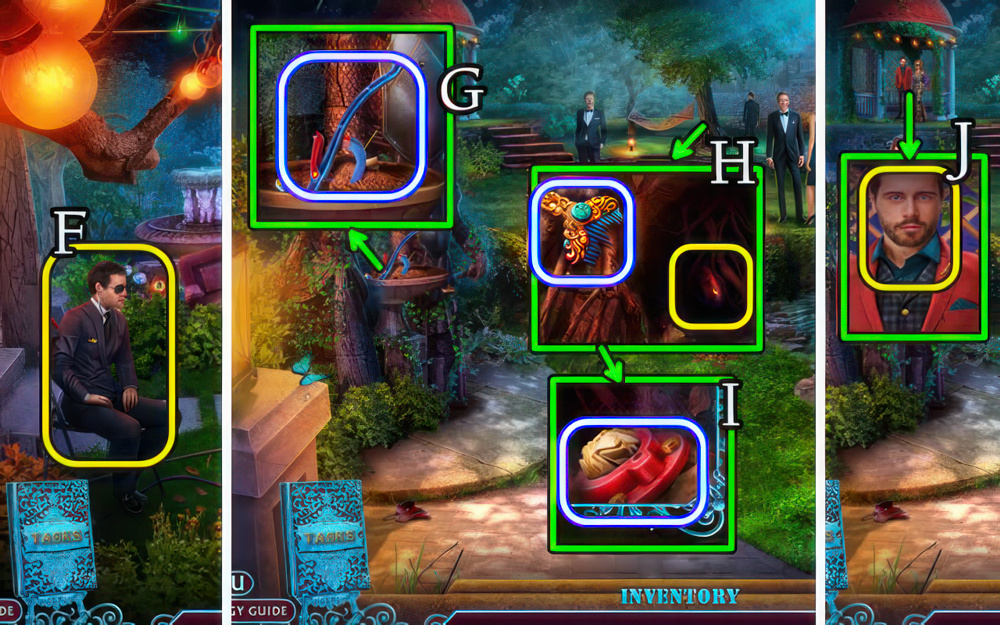
- Place WEIGHT (E) for puzzle (F), receive FAIRY GODMOTHER FIGURINE.
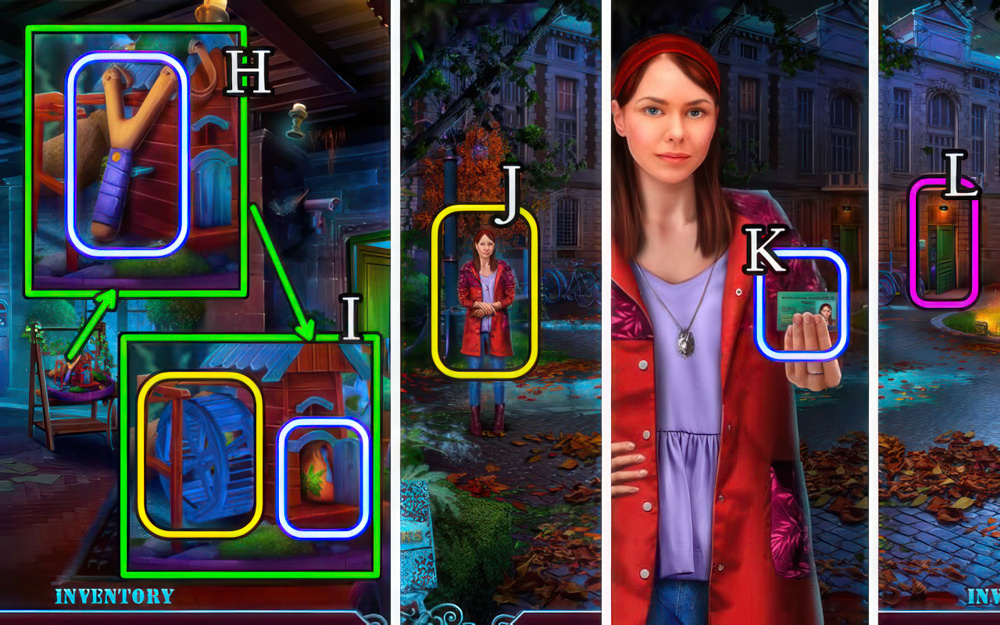
- Take BROOM, article, picture (G), CHOPSTICKS (H).
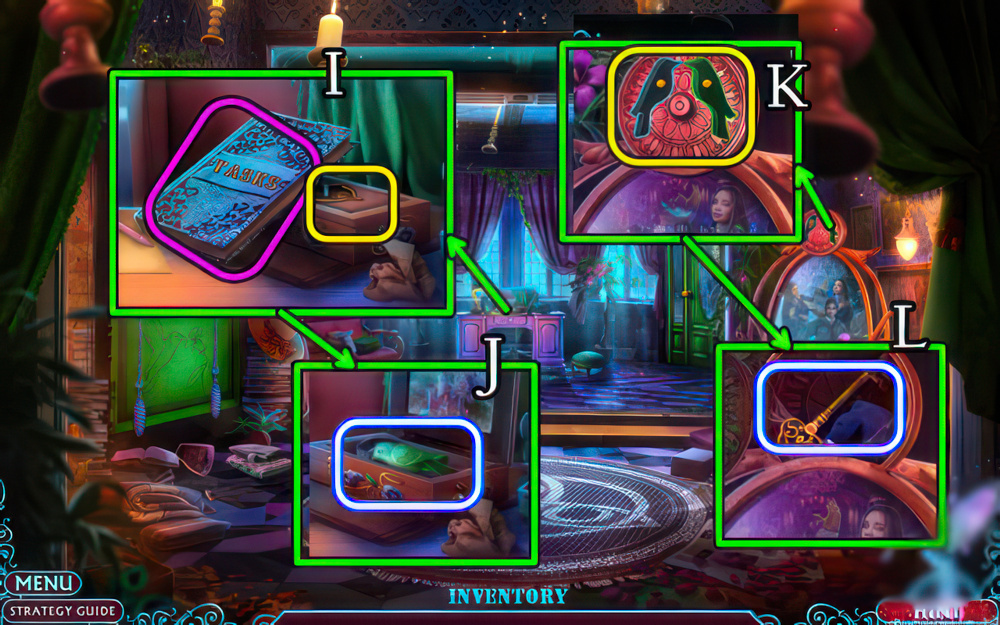
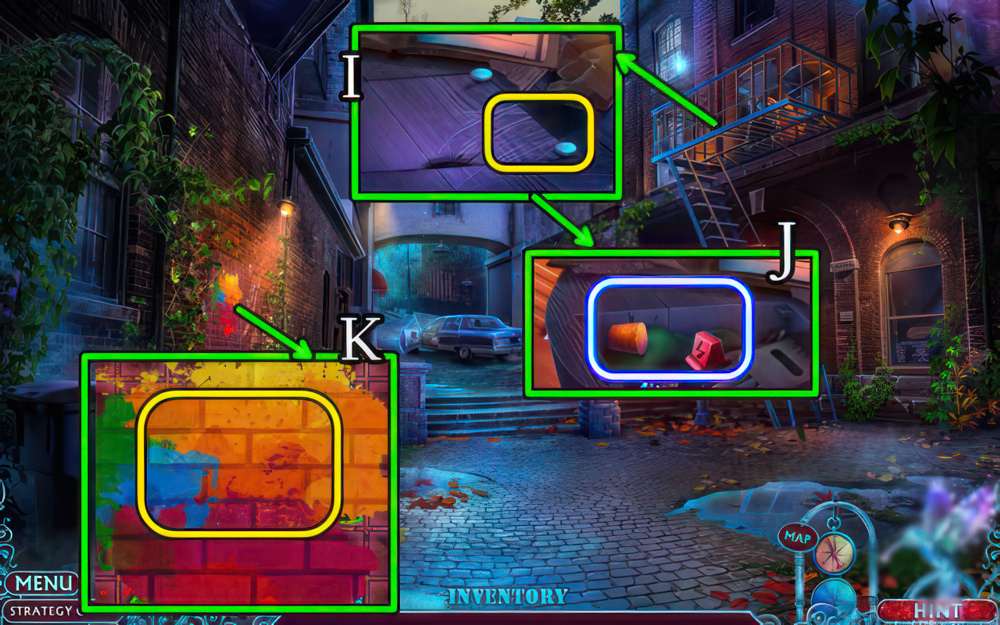
- Take Tasks, place FAIRY GODMOTHER FIGURINE (I)
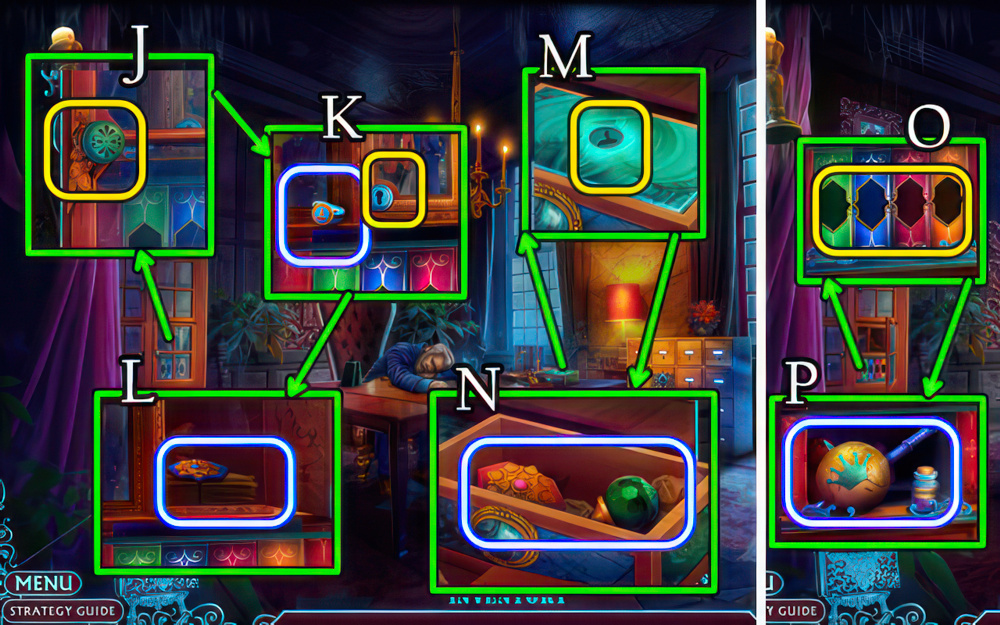
- Take BIRD AMULET (J).
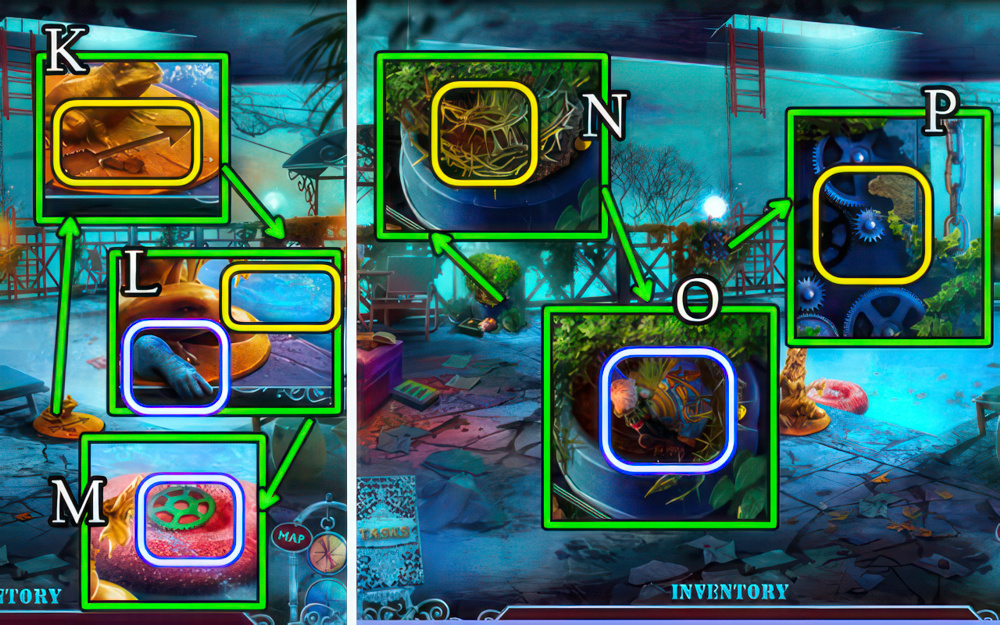
- Place 2 BIRD AMULETS (K).
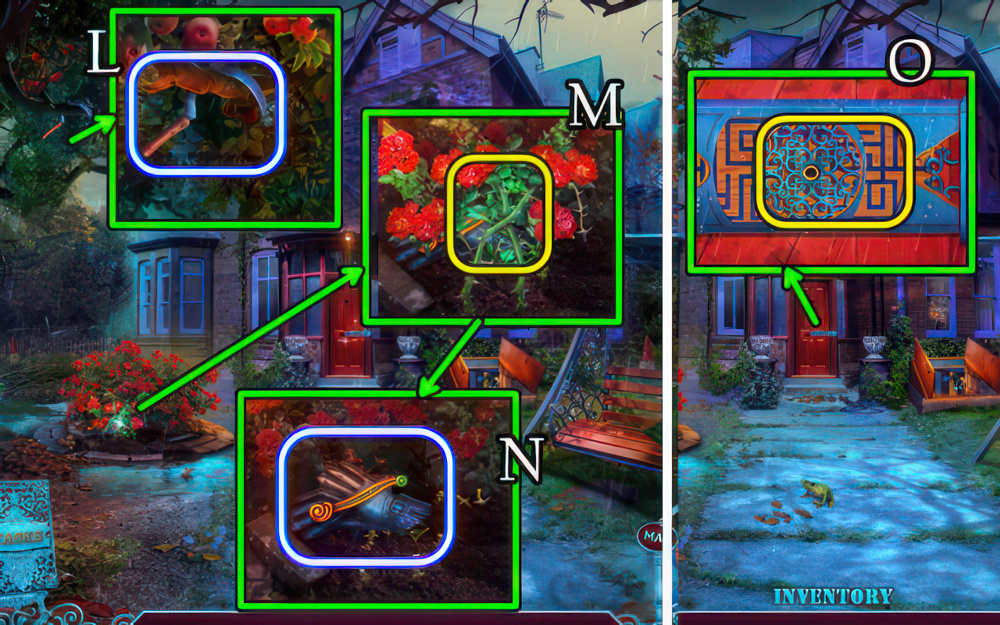
- Take DOOR KEY (L).
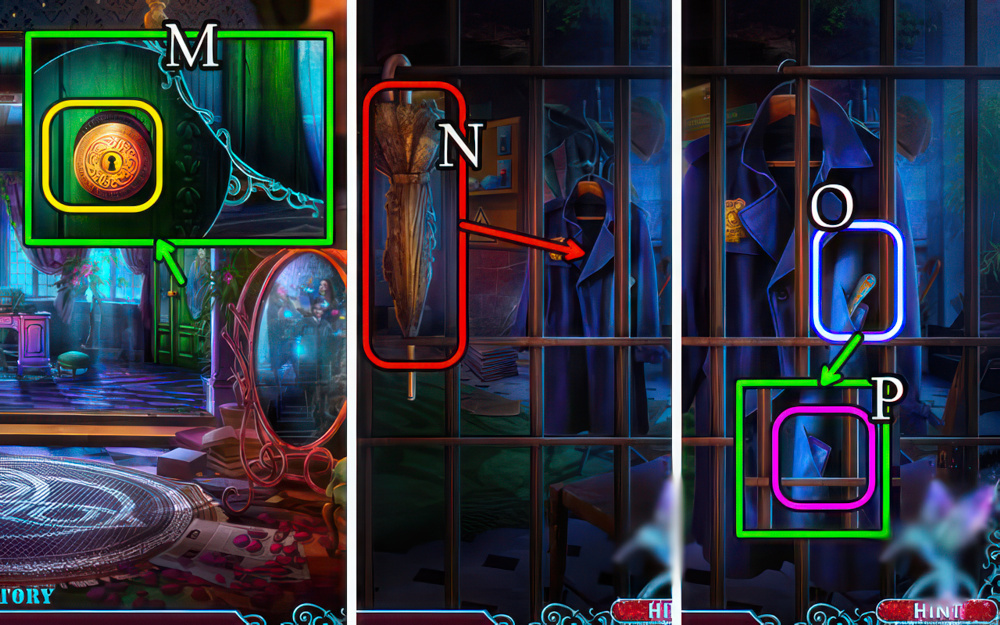
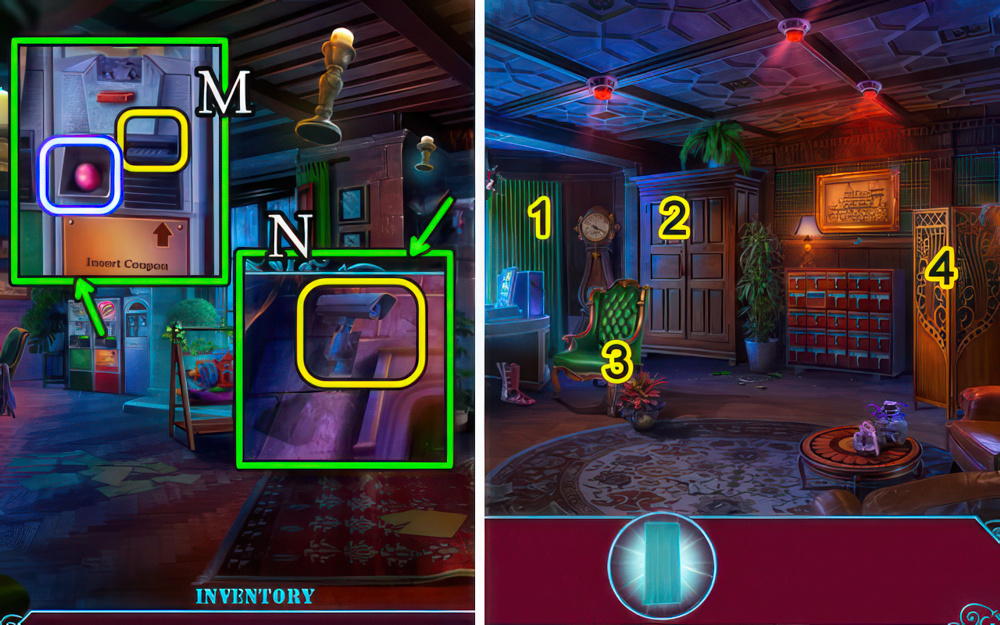
- Use DOOR KEY (M).
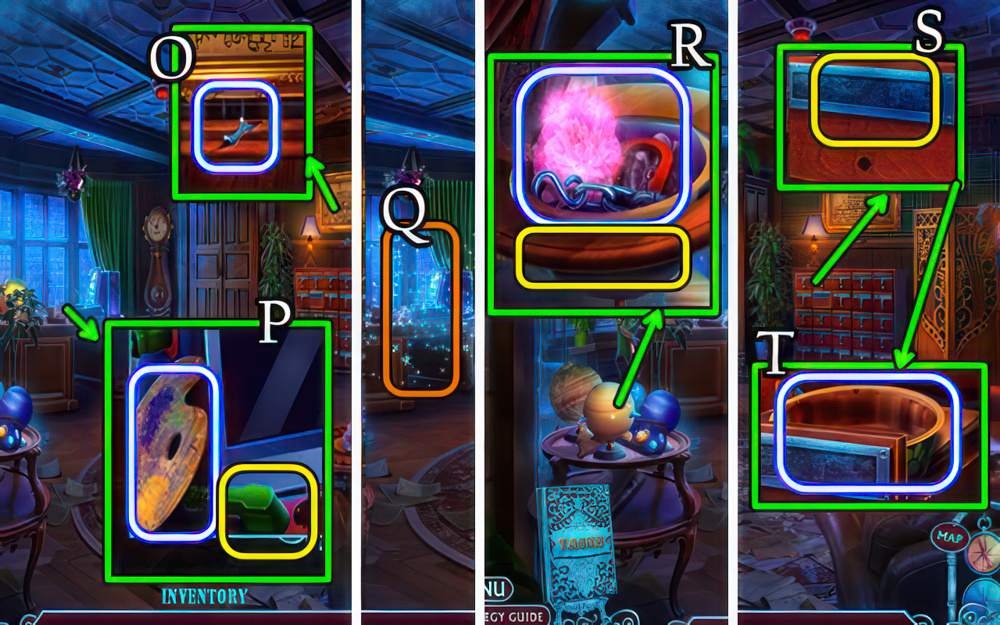
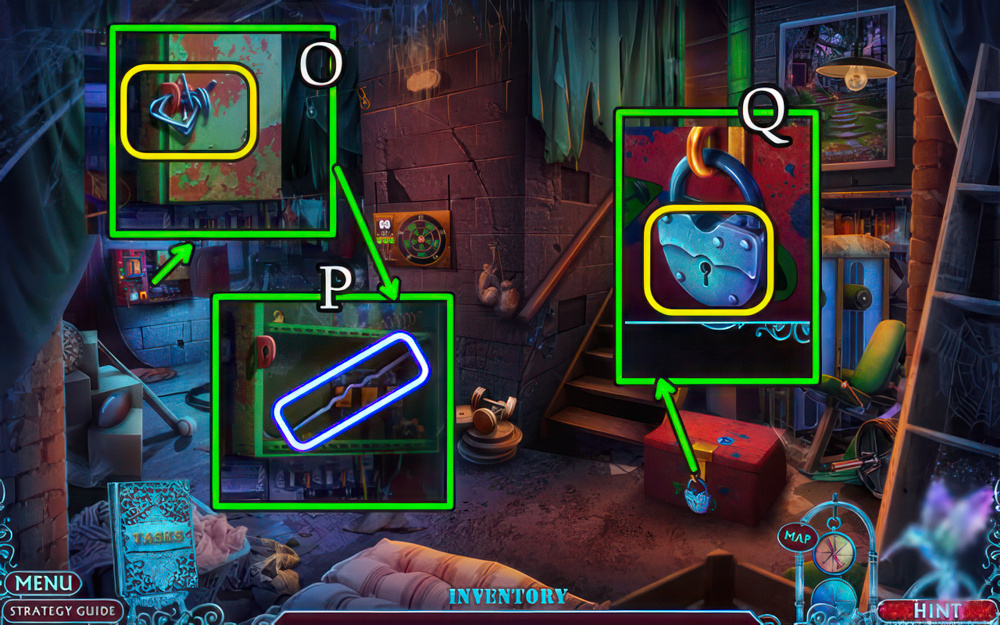
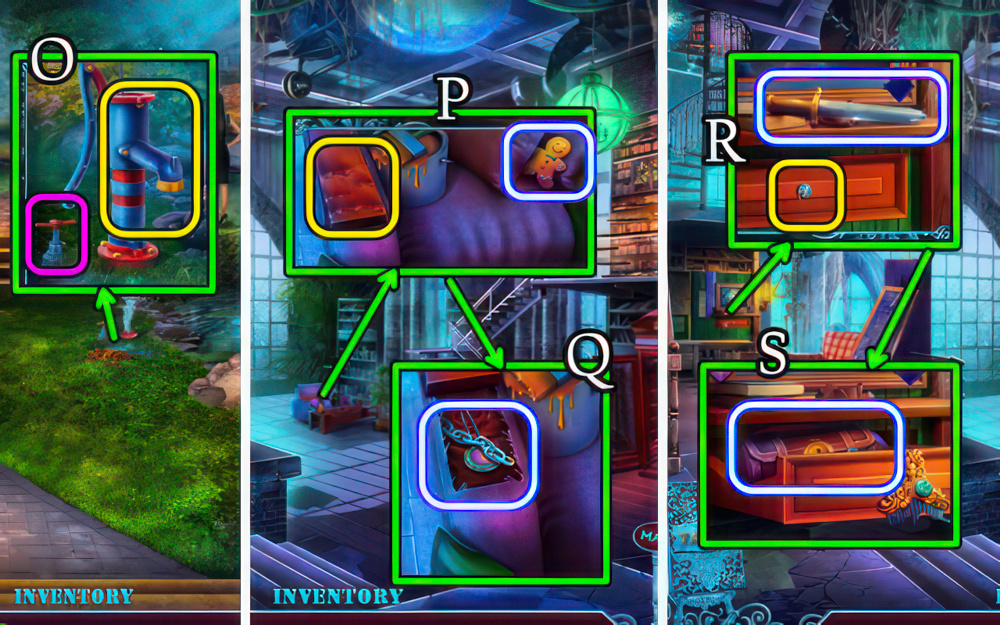
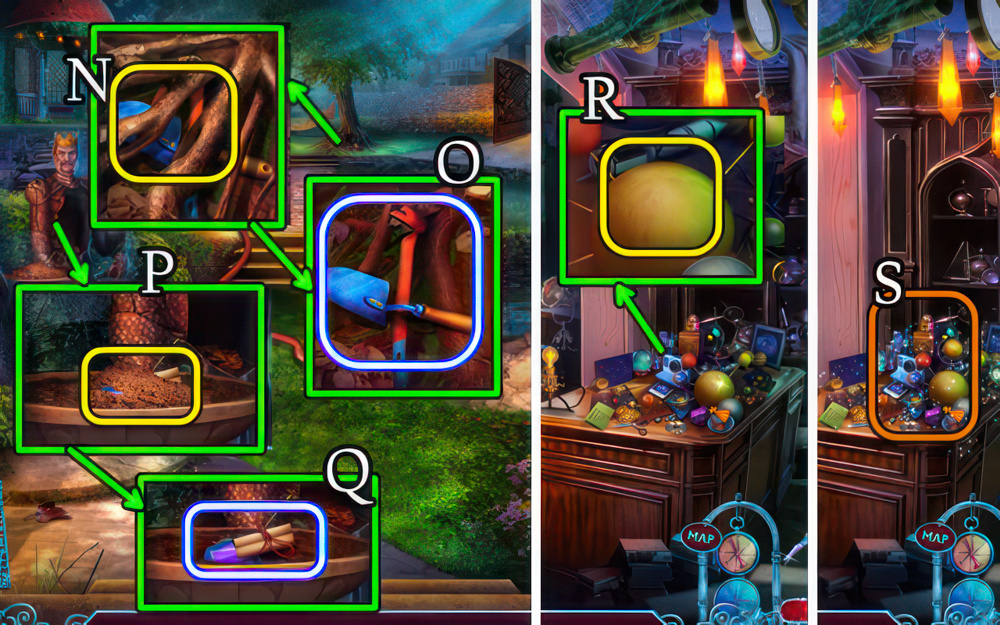
- Take, use umbrella (N) for METAL COMB (O).
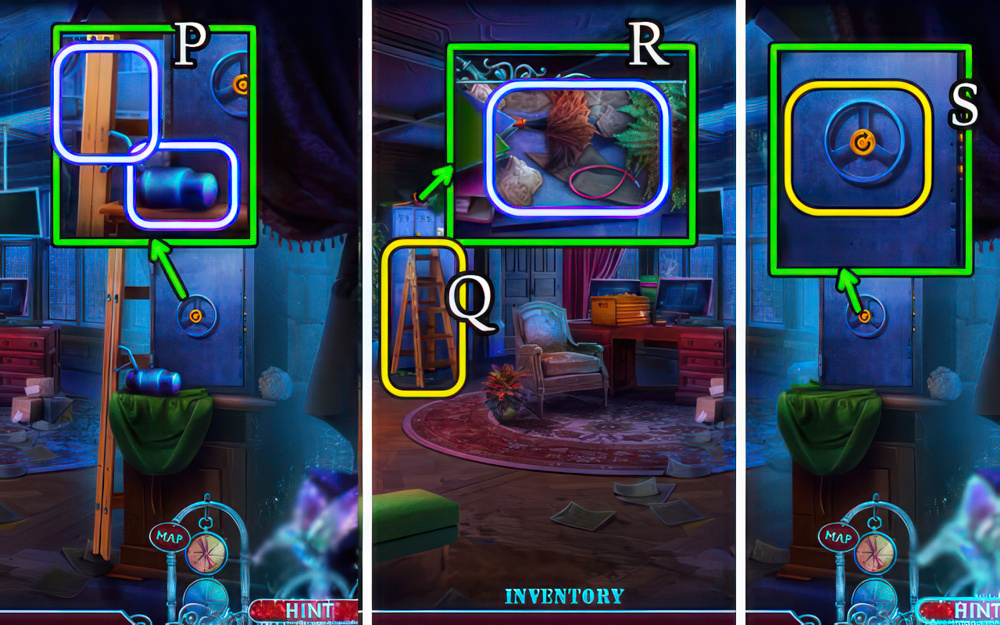
- Take, select phone (P).
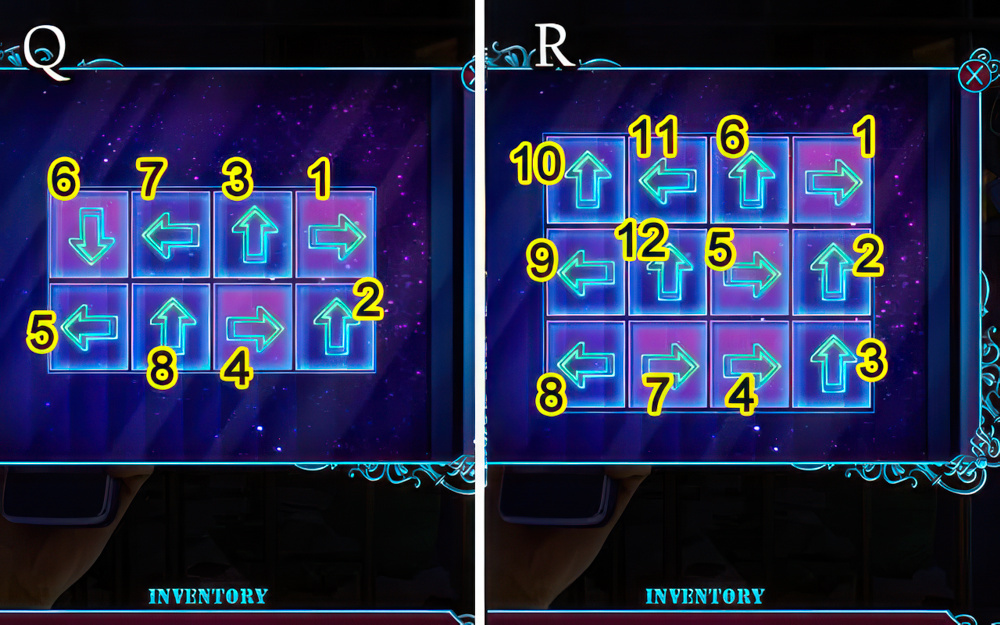
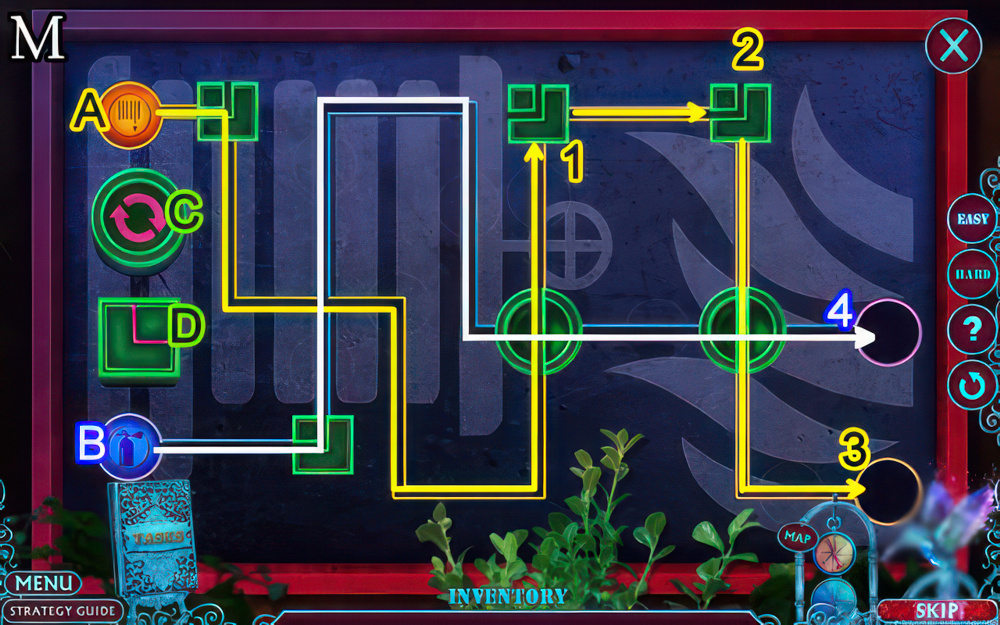
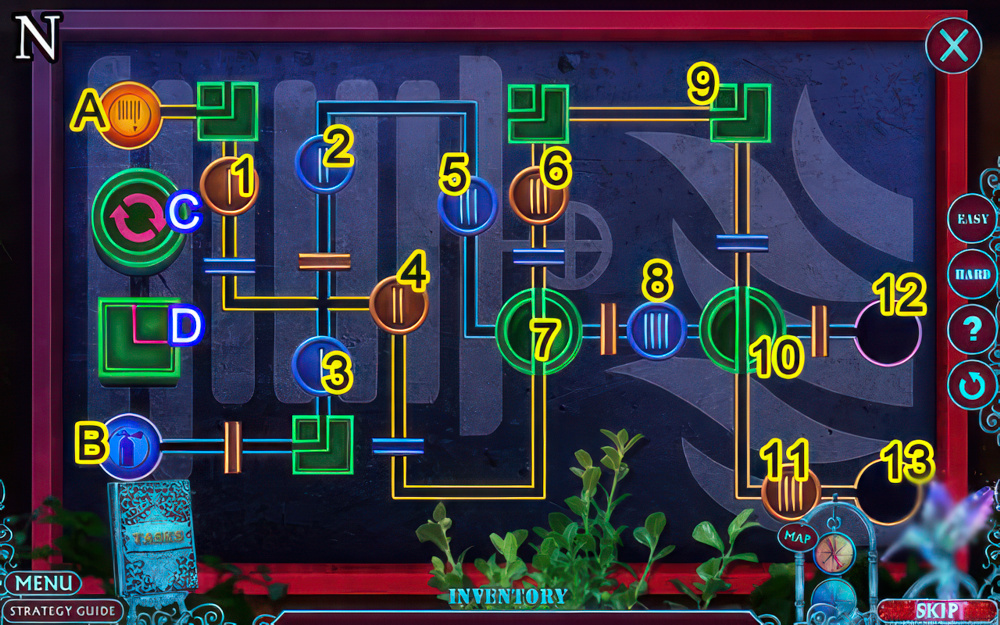
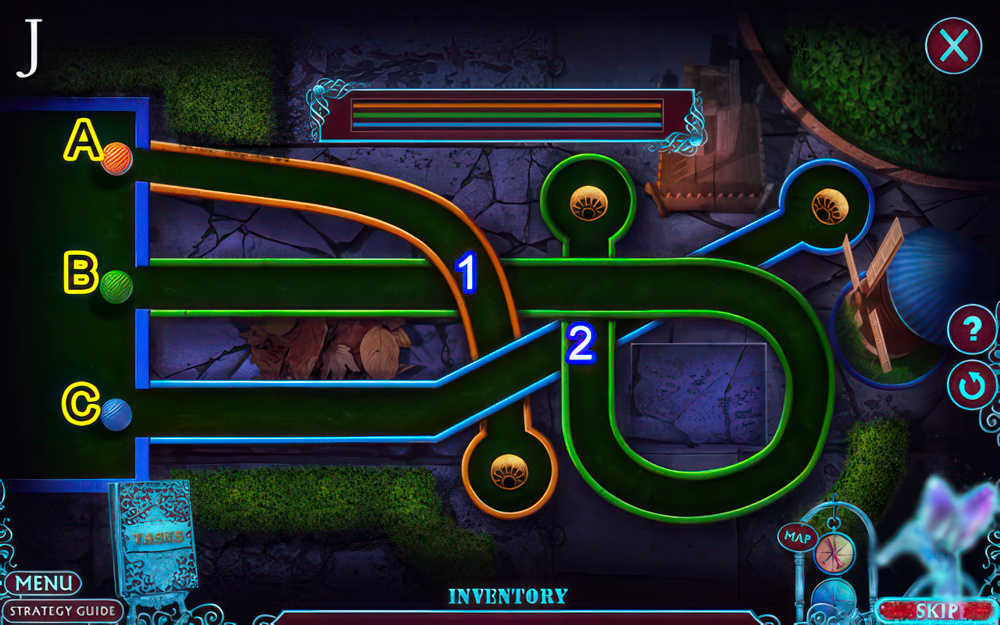
- Clear the board.
- Select an arrow tile to move it in the indicated direction off the board.
- Tiles can’t jump over each other.
- Easy walkthrough (Q): 1-8.
- Hard walkthrough (R): 1-12.
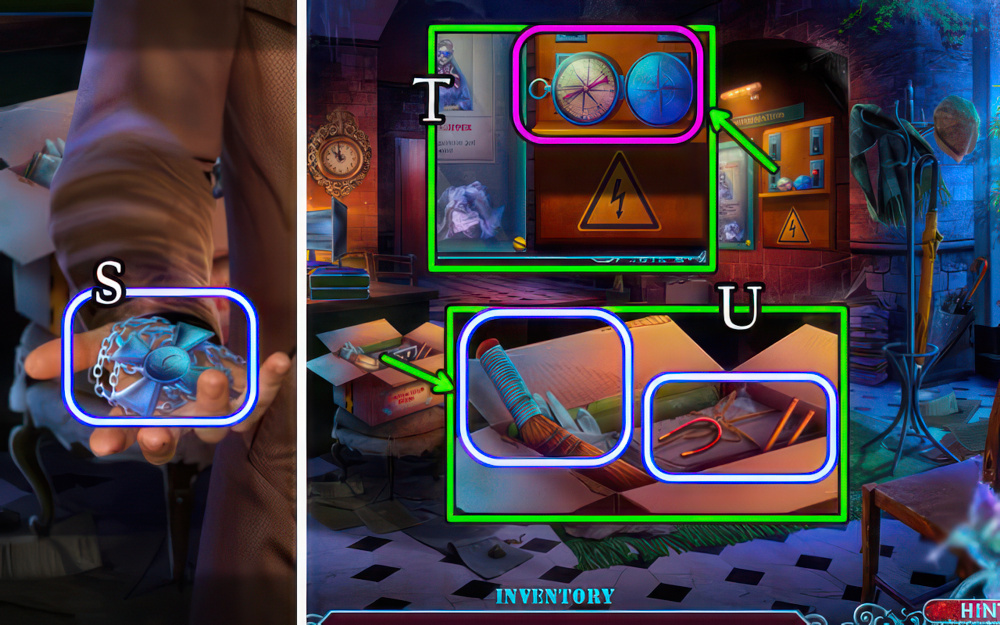
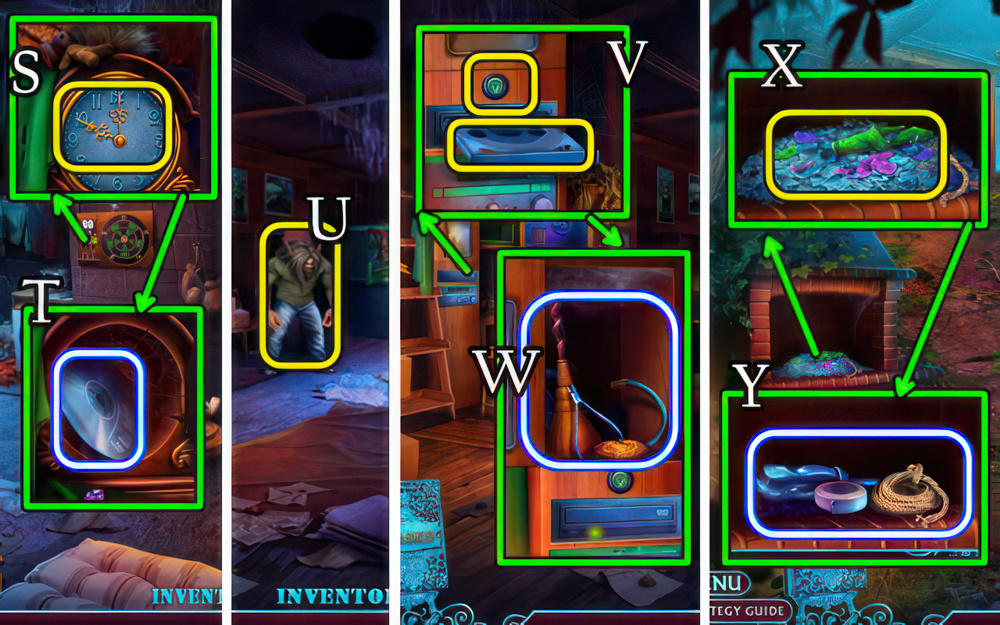
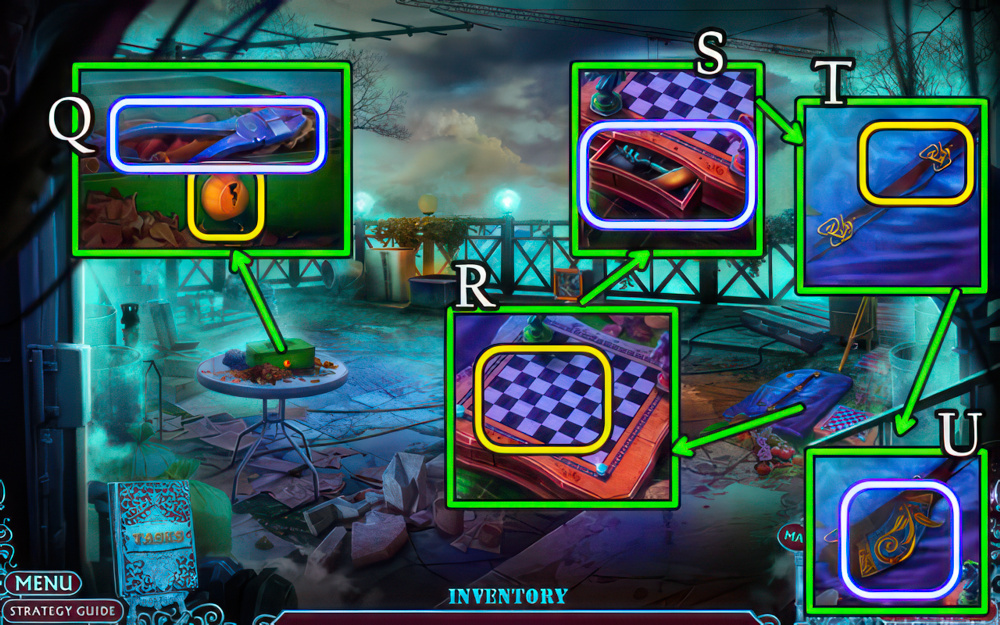
- Take GOODWIN’S MEDAL (S).
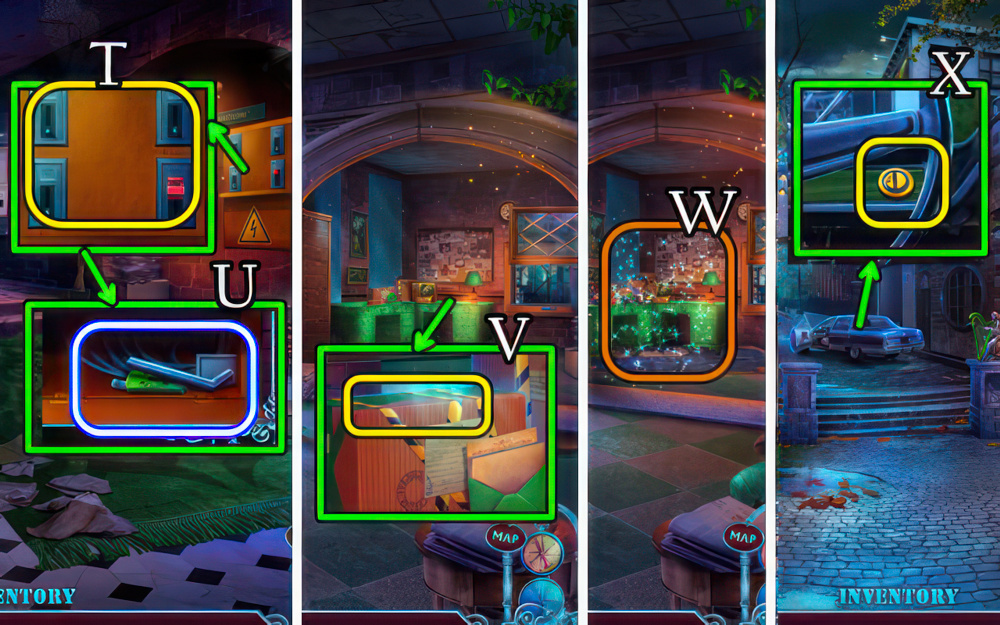
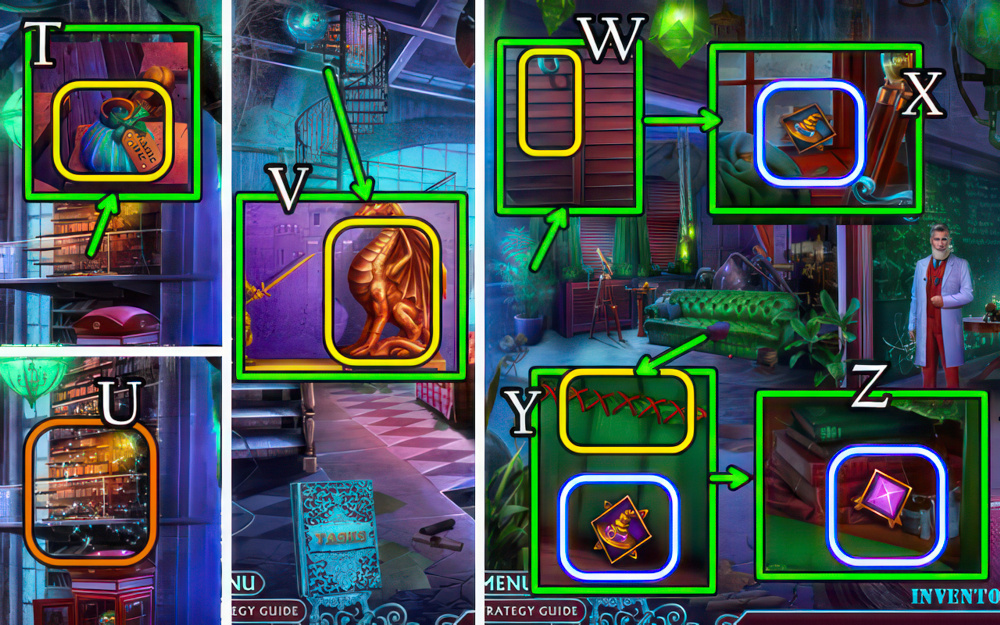
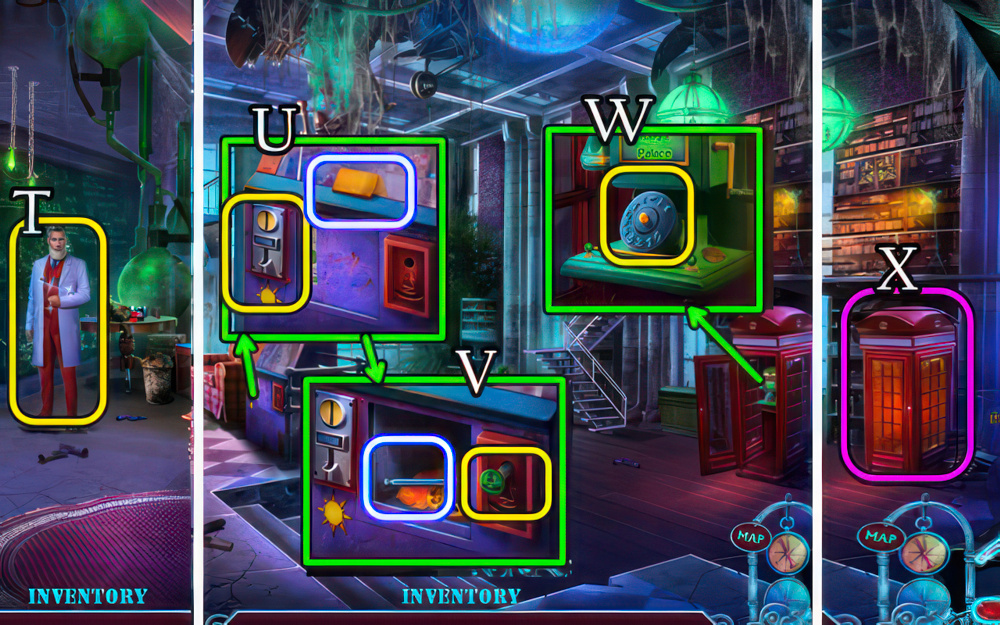
- Take compass Map (T).
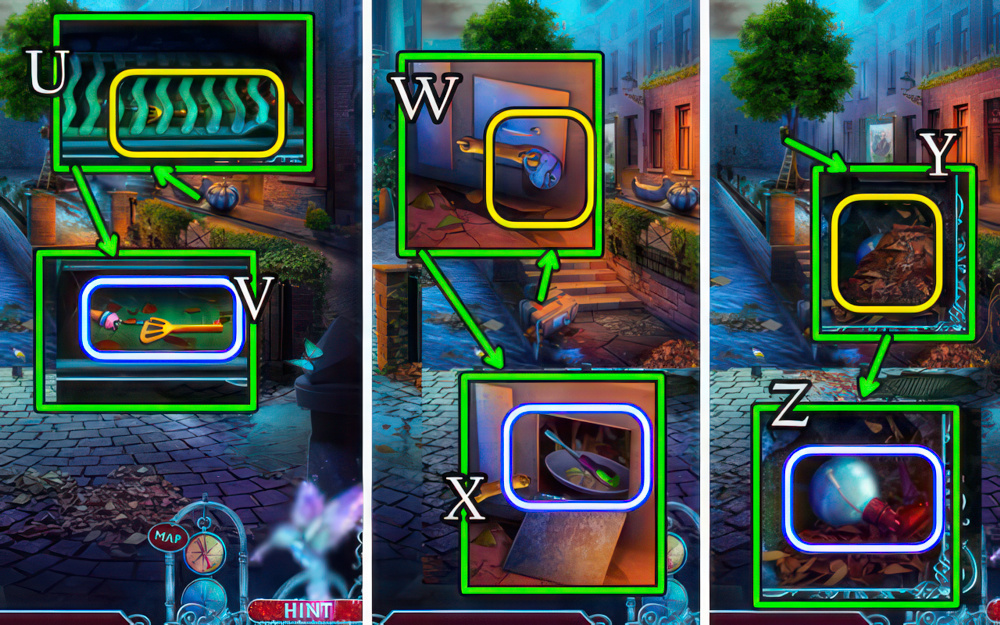
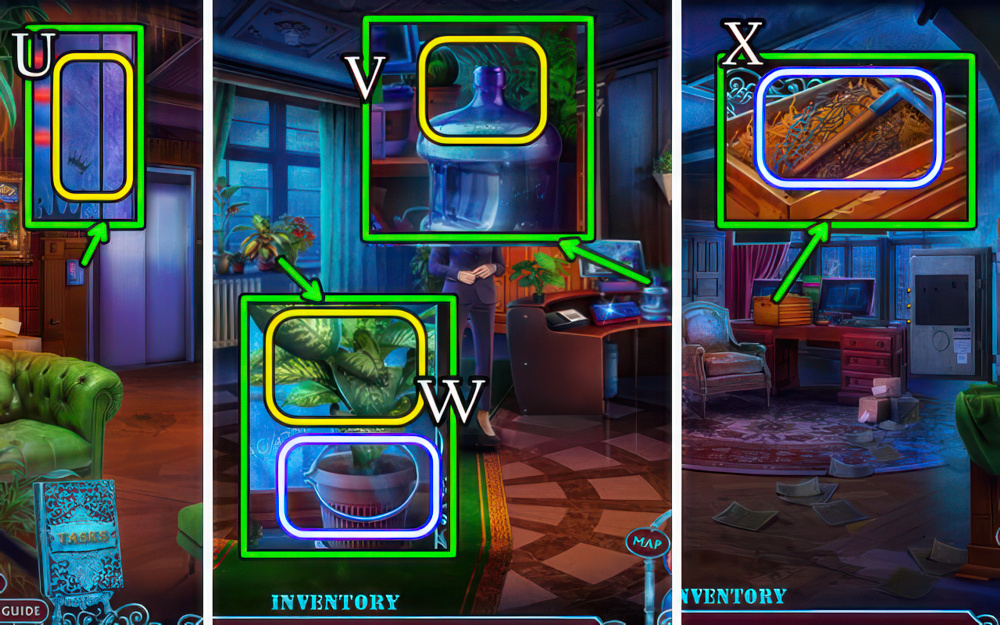
- Take note, photo, BROOM, WIRE, CHOPSTICKS (U).
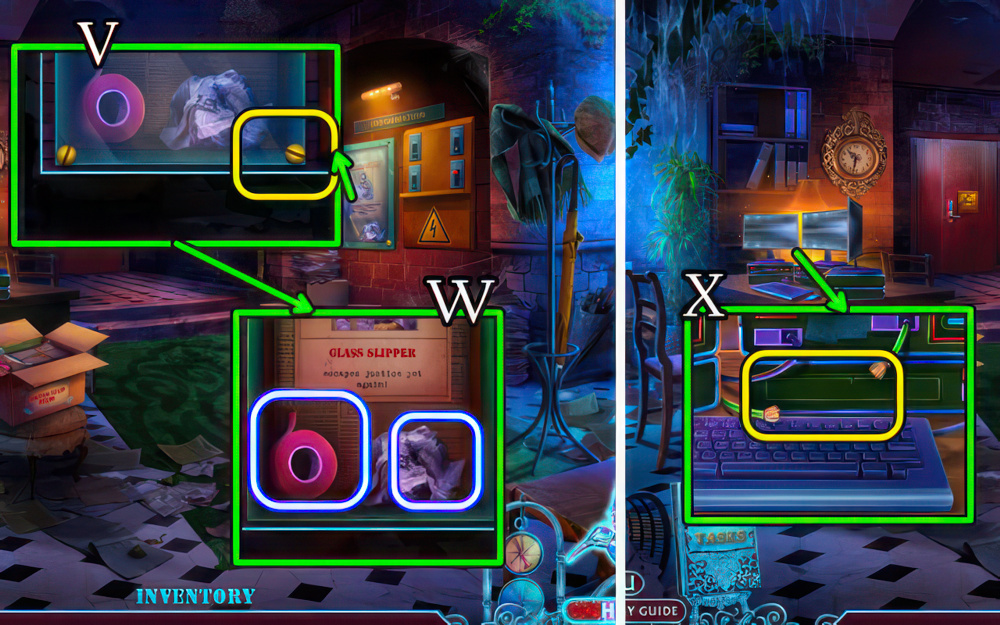
- Use GOODWIN’S MEDAL (V).
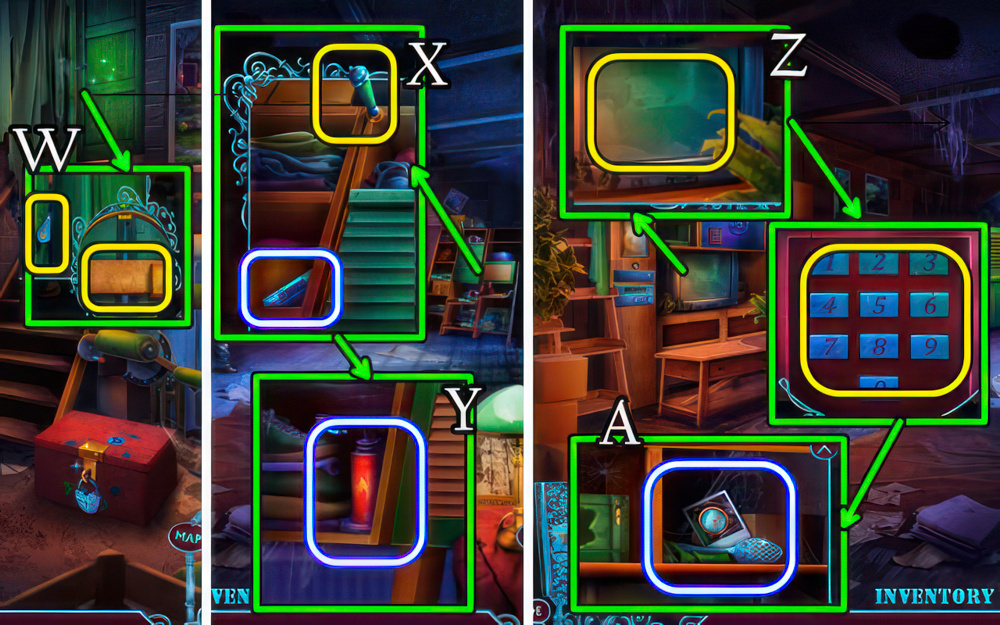
- Take ELECTRICAL TAPE, NEWSPAPER and poster (W).
- Place WIRE, use ELECTRICAL TAPE (X).
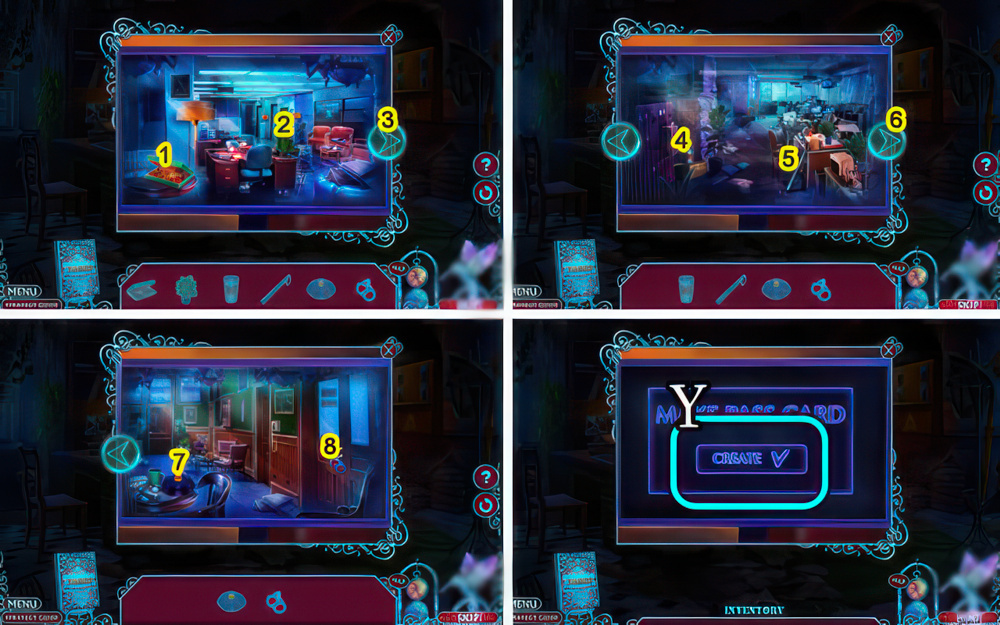
- Find the objects based on their silhouettes.
- Select the arrows to change the screen.
- Walkthrough: 1-8.
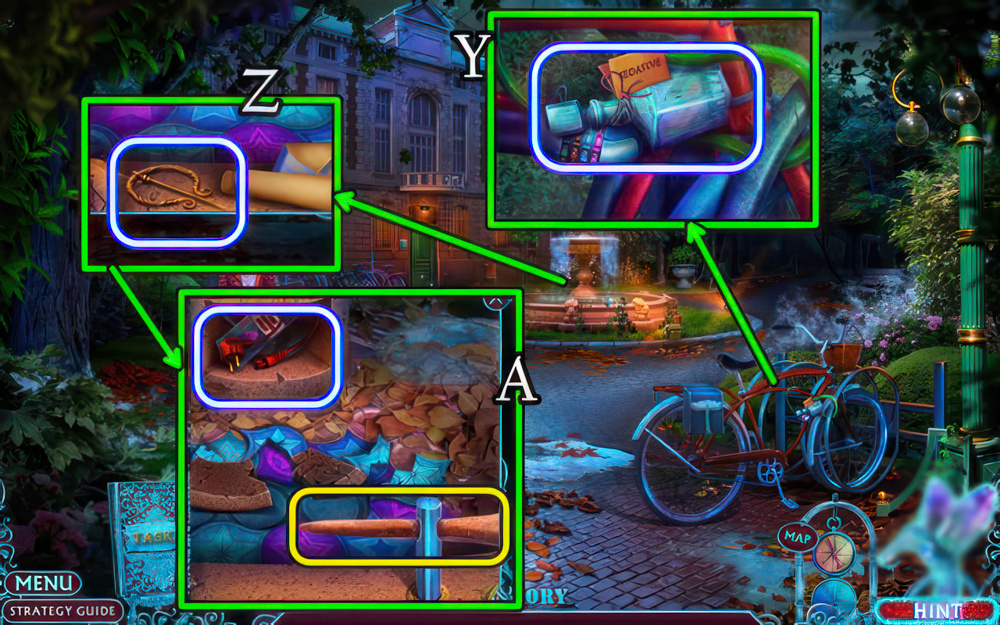
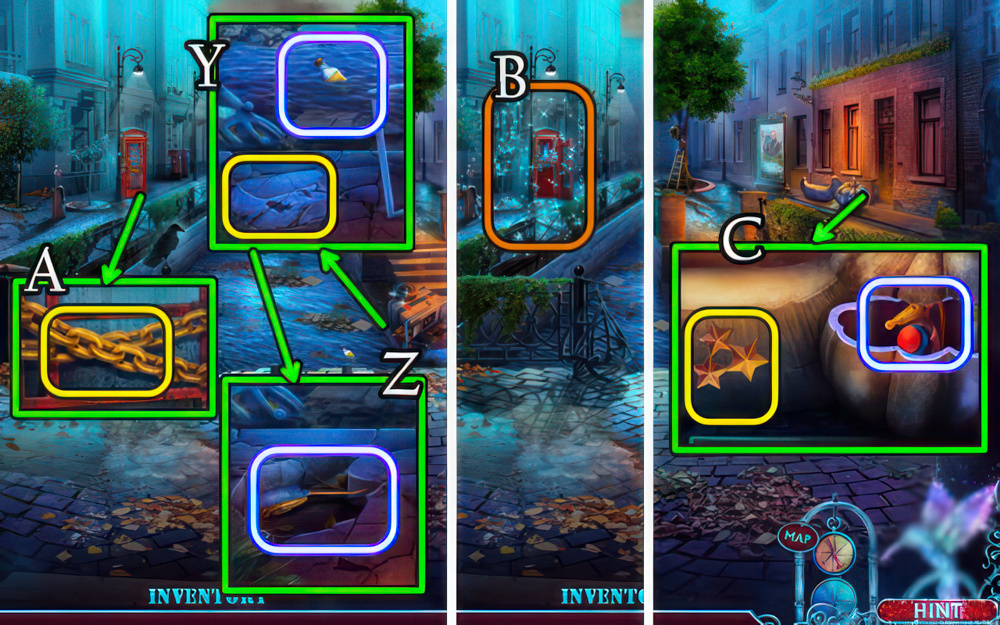
- Select (Y).
- Take ACCESS CARD.

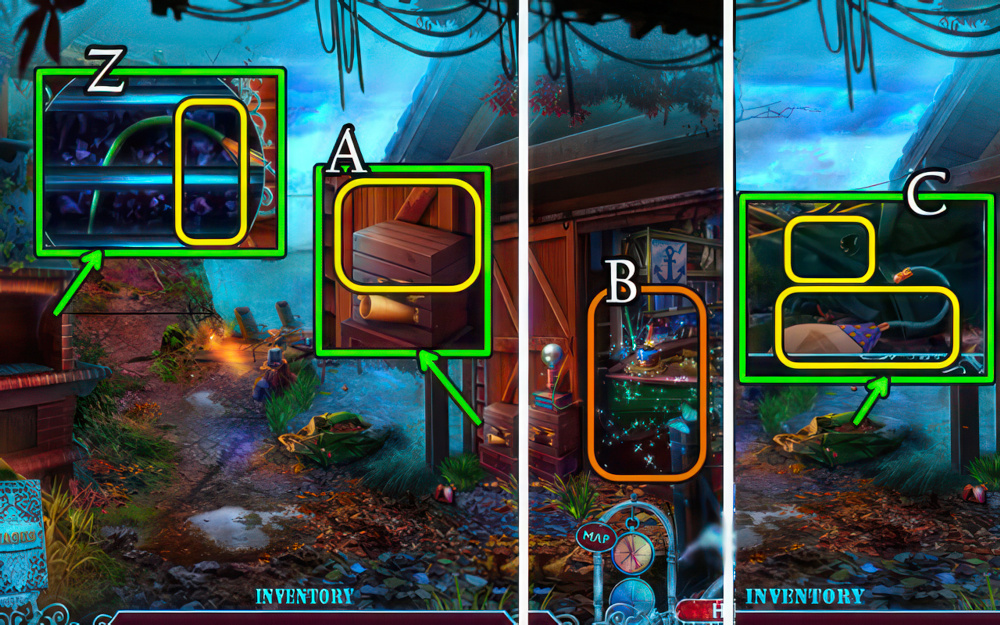
- Use ACCESS CARD (Z).
- Sneak by the guards.
- Select a numbered path to use it.
- Choose the right moment to avoid being caught in the guards’ lights.
- Walkthrough: when guards are in position (A), select 3.
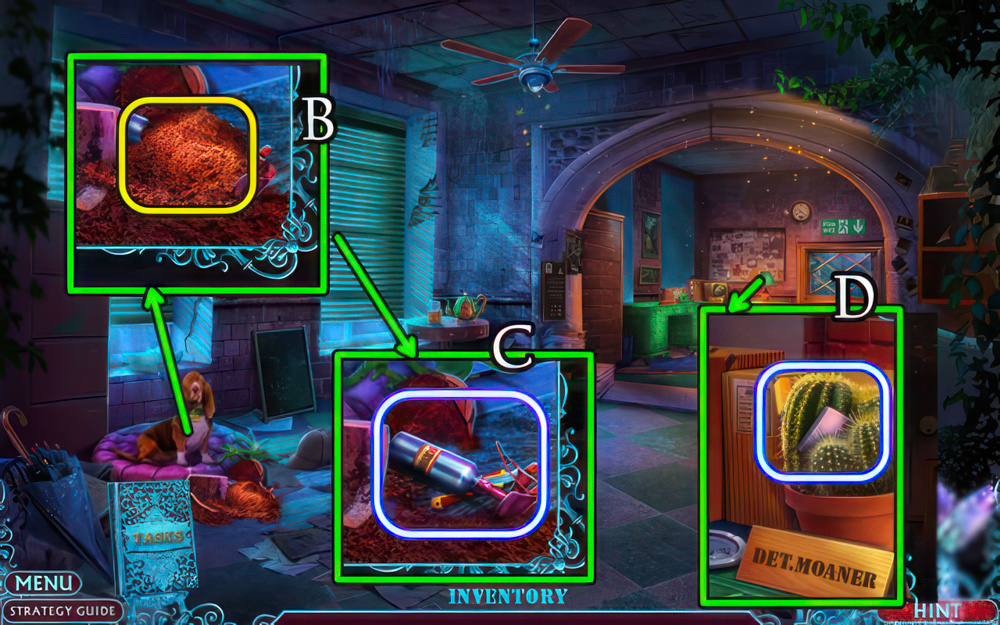
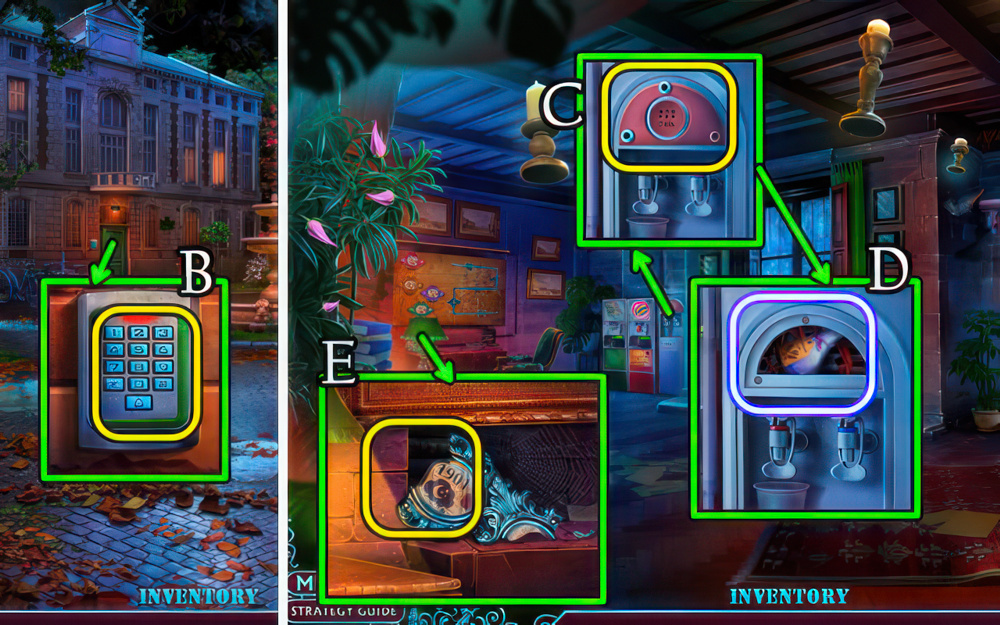
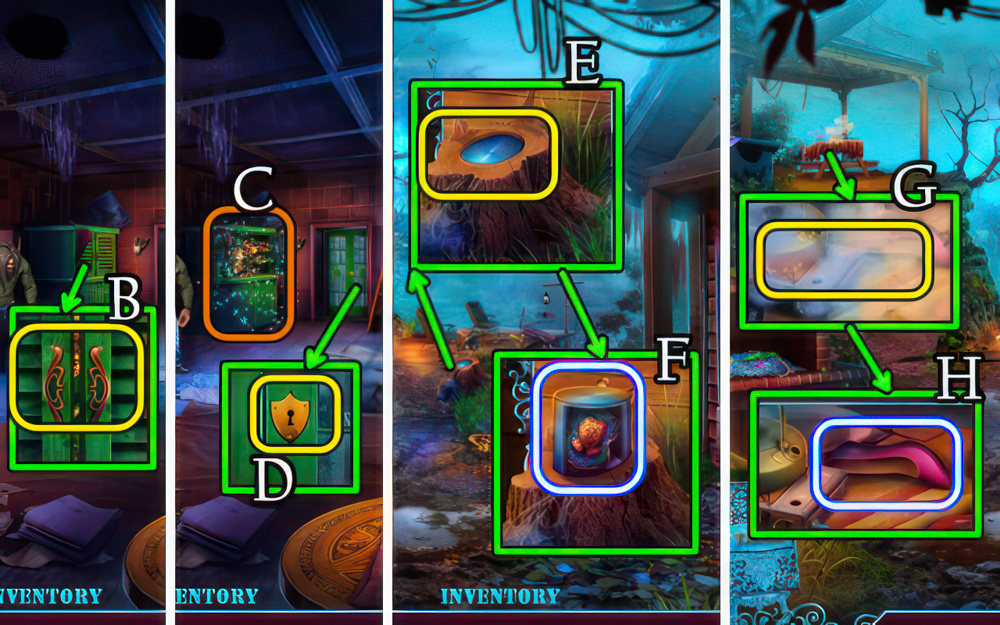
- Use BROOM (B).
- Take SOLVENT, BROKEN KNIFE (C).
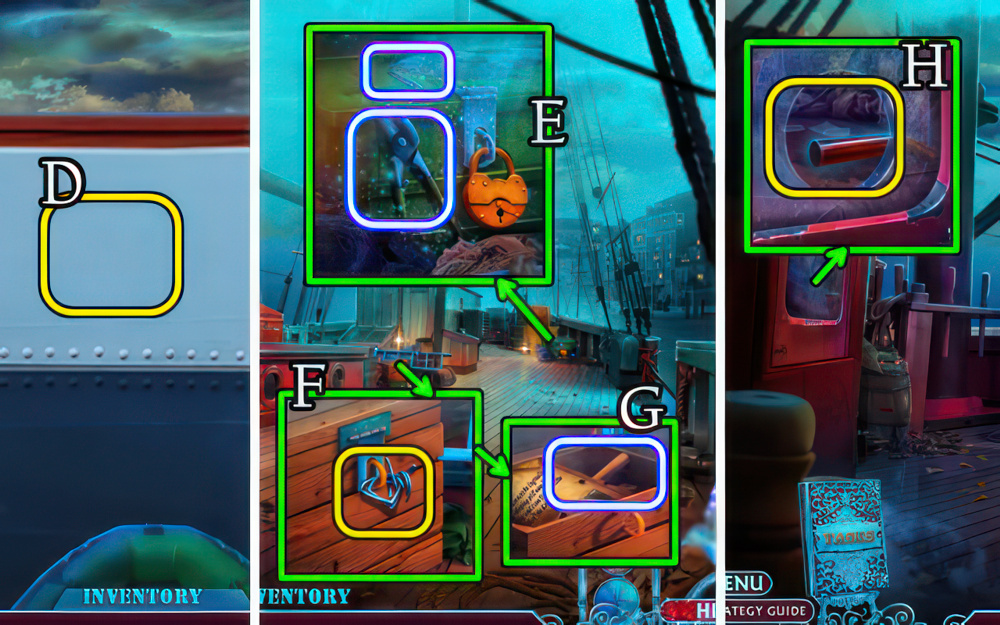
- Use CHOPSTICKS for SWITCH BUTTON (D).
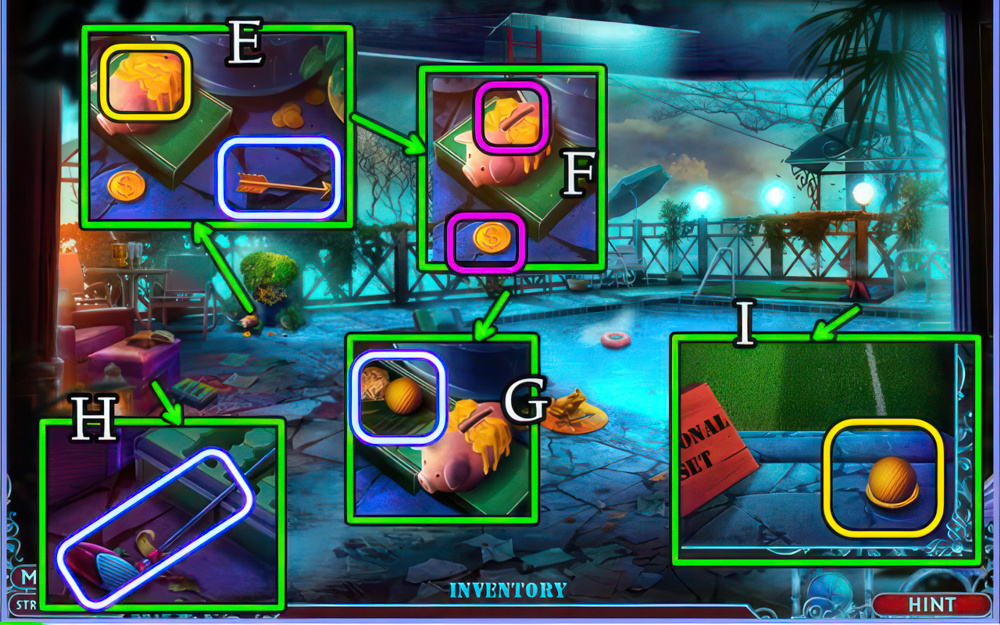
- Take note, place, select SWITCH BUTTON (E).
- Take note, FAN BLADE (F).
- Use FAN BLADE (G).
- Go (H).
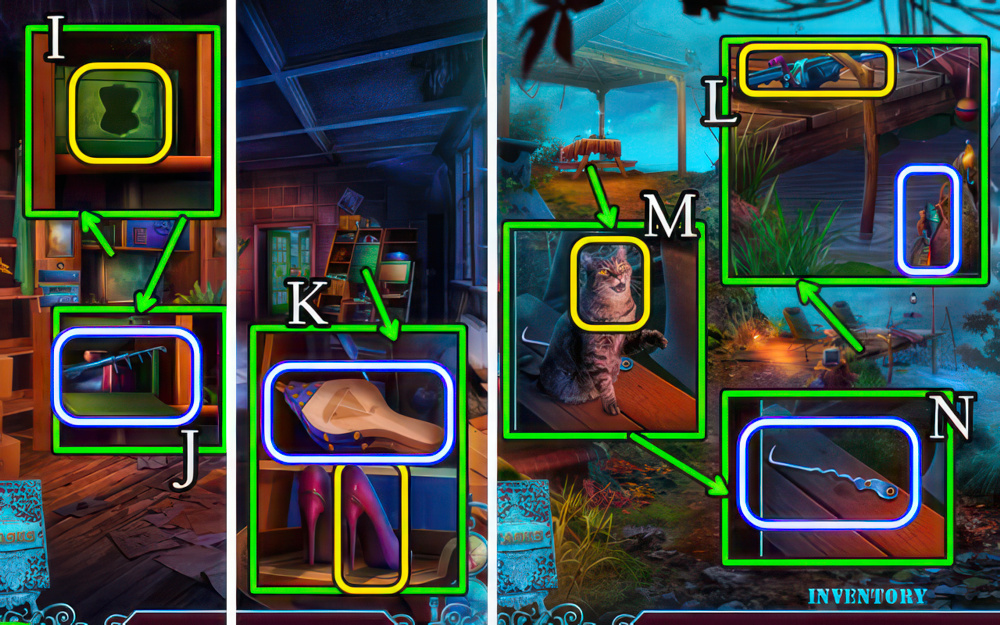
- Take note, use METAL COMB (I).
- Take 1/3 SWITCHES, CORK (J).
- Use SOLVENT and NEWSPAPER (K).
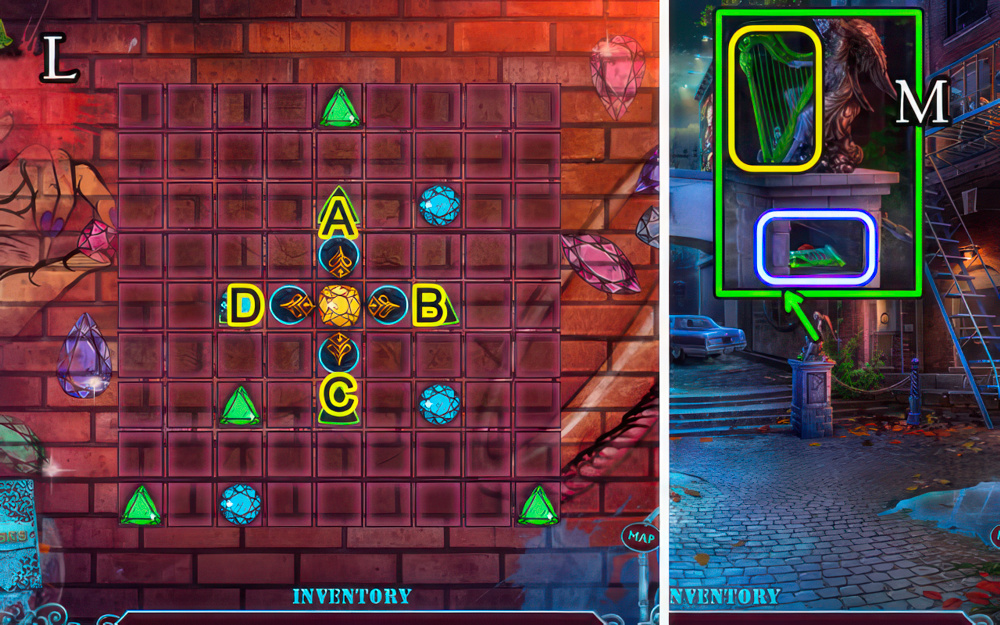
- Move the gems into their matching slots.
- Select the arrows to move the central gem.
- Gems connect when they touch.
- Walkthrough (L): B-C×4-B-D×4-B×4-A×6-D×4-C×2-B×2.
- Take HARP.
- Place HARP, take GLUE, 2/3 SWITCHES (M).
- Go down twice.
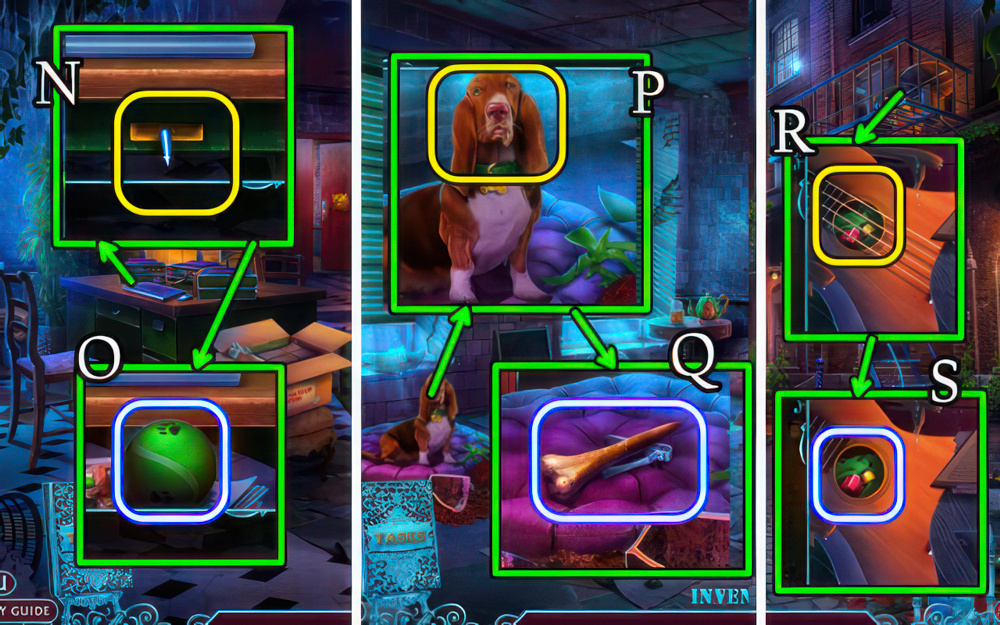
- Use CORK (N).
- Take BALL (O).
- Go forward.
- Give BALL (P).
- Take BONE, NAIL CLIPPERS (Q).
- Go forward.
- Use NAIL CLIPPERS (R).
- Take 3/3 SWITCHES, SCREW (S).
- Go down twice.
- Place 3/3 SWITCHES (T).
- Take HEX KEY, KNIFE PART (U).
- Go forward.
- SCREW and KNIFE PART on BROKEN KNIFE for BOX CUTTER.
- Use BOX CUTTER (V) for puzzle (W), receive CAR KEY.
- Go forward.
- Take note, use CAR KEY (X).
- Take VIAL WITH RECIPE (Y).
- Take note and FIBULA (Z).
- Place BONE, take POWER CABLE, LATENT FINGERPRINT SPRAY (A).
- Use LATENT FINGERPRINT SPRAY (B).
- Go forward.
- Use HEX KEY (C).
- Take LAVENDER OIL (D).
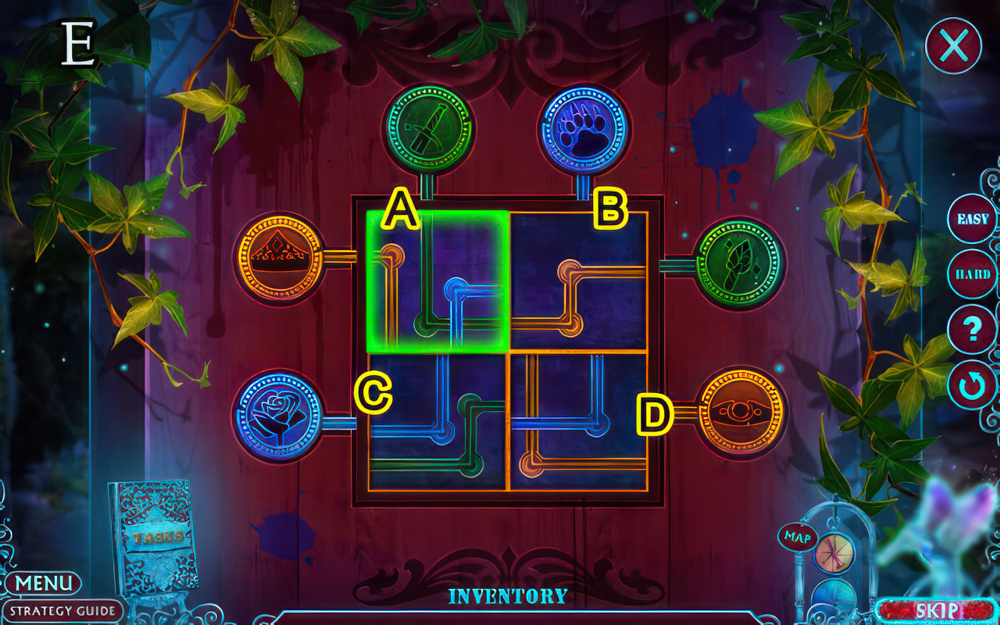
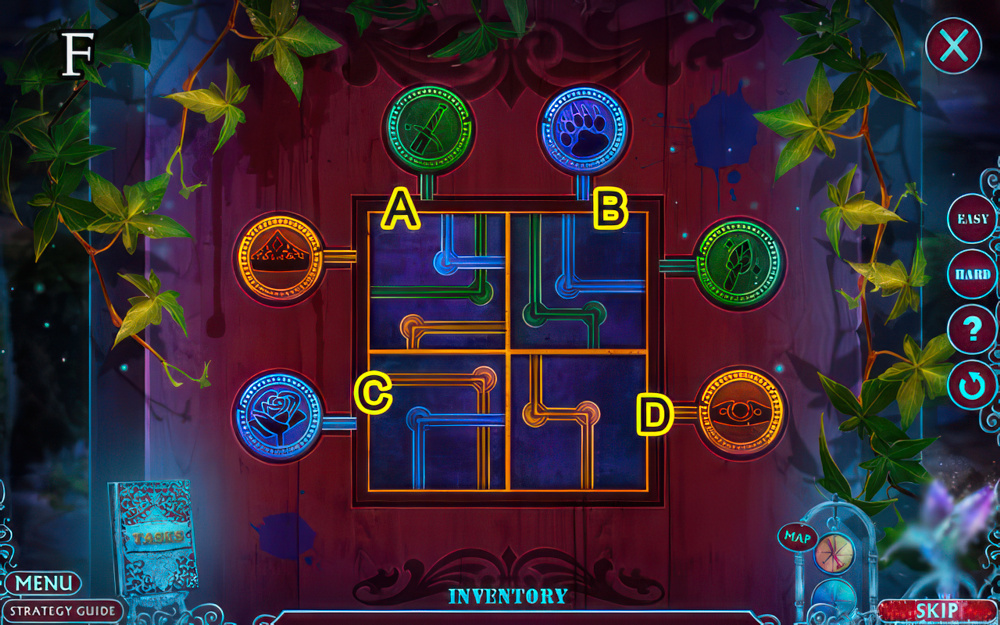
- Use GLUE (E).
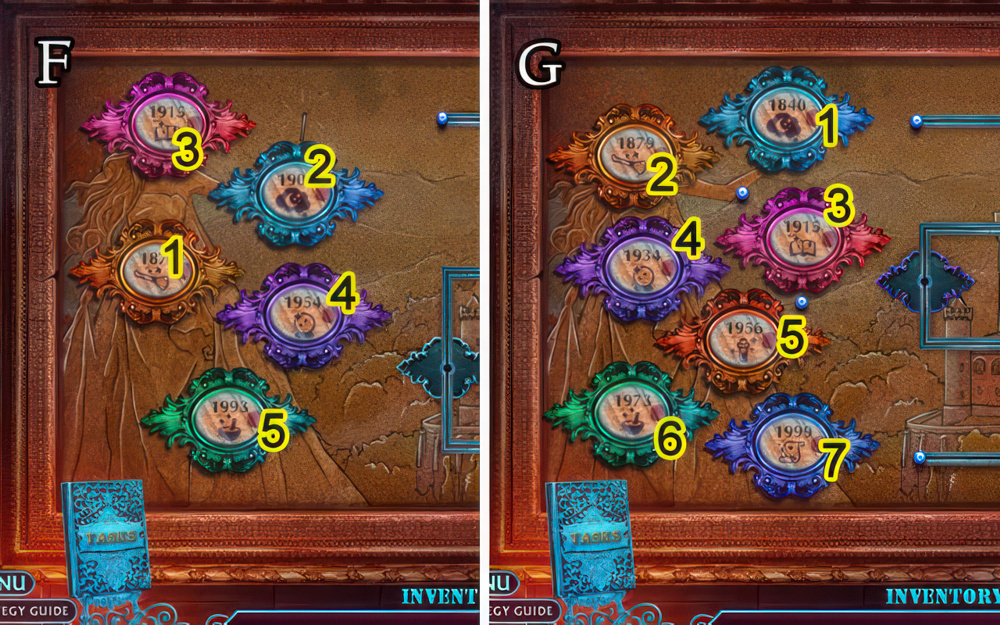
- Complete the picture.
- Select and drag the puzzle tiles into their correct positions.
- Select the arrows to rotate the circle.
- Easy walkthrough (F): 1-5.
- Hard walkthrough (G): 1-7.
- Take MILL WHEEL.
- Take UNLOADED SLINGSHOT (H).
- Place MILL WHEEL, take DRIED MINT, BRUSH (I).
- Go down.
- LAVENDER OIL and DRIED MINT on VIAL WITH RECIPE for SEDATIVE.
- Give SEDATIVE (J), speak to character.
- Take COUPON FOR GUM (K).
- Go (L).
- Use COUPON FOR GUM take GUM (M).
- GUM on UNLOADED SLINGSHOT for SLINGSHOT WITH GUM.
- Use SLINGSHOT WITH GUM (N).
- Go forward.
- Select 1-4.
- Use FIBULA (O) for 1/3 MOSAIC TILES.
- Take note, INCOMPLETE PALETTE, replace POWER CABLE (P) for puzzle (Q), receive SATURN’S RING.
- Place SATURN’S RING, take CHAIN, FLOWER and MAGNET (R).
- Use MAGNET (S).
- Take 2/3 MOSAIC TILES, CAT BOWL (T).
- Go down.

- Give FLOWER (U).
- Take BROKEN HACKSAW, MAGIC PAINTS (V).
- Go (W).
- BRUSH and MAGIC PAINTS on INCOMPLETE PALETTE for MAGIC PALETTE.
- Place MAGIC PALETTE (X).
- Take 3/3 MOSAIC TILES, CARABINER (Y).
- Go down twice.

- Uncover, place 3/3 MOSAIC TILES (Z).
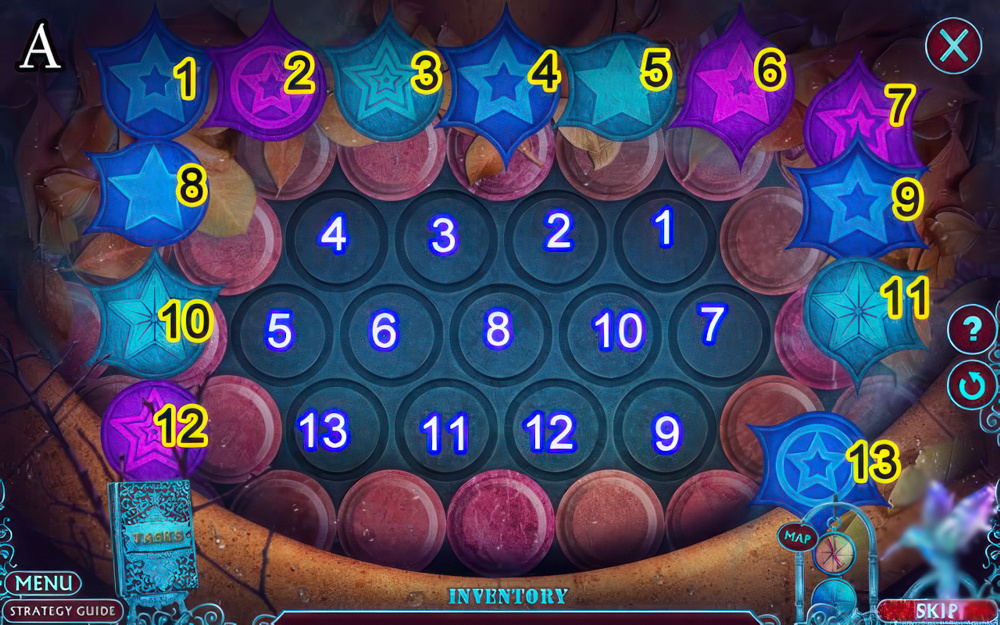
- Arrange the tiles to complete the mosaic.
- Select a tile to move it.
- All tiles should fit into each other without touching a tile of the same color.
- Walkthrough (A): 1-13.
- Take MAGNIFIER.
- Go forward twice.
- Select, open folder, use MAGNIFIER (B).
- Take BICYCLE CODE (C).
- Go down twice.
- Place BICYCLE CODE (D).
- Enter the code according to the top clue.
- Select a lock reel to rotate it.
- Walkthrough (E): A×2-B×5-D×2.

- Use CAT BOWL (F).
- Take ELECTRICAL TAPE, HACKSAW BLADE (G).
- Use CHAIN and CARABINER (H).
- Take PLUG, WINGNUT (I).
- HACKSAW BLADE and WINGNUT on BROKEN HACKSAW for HACKSAW.
- Take HOOK, use HACKSAW (J) for puzzle (K), receive BOOMERANG.
- Use BOOMERANG (L), receive SICKLE.
- Use SICKLE (M).
- Take DOOR HANDLE, RUBBER GLOVE (N).
- Place DOOR HANDLE (O).
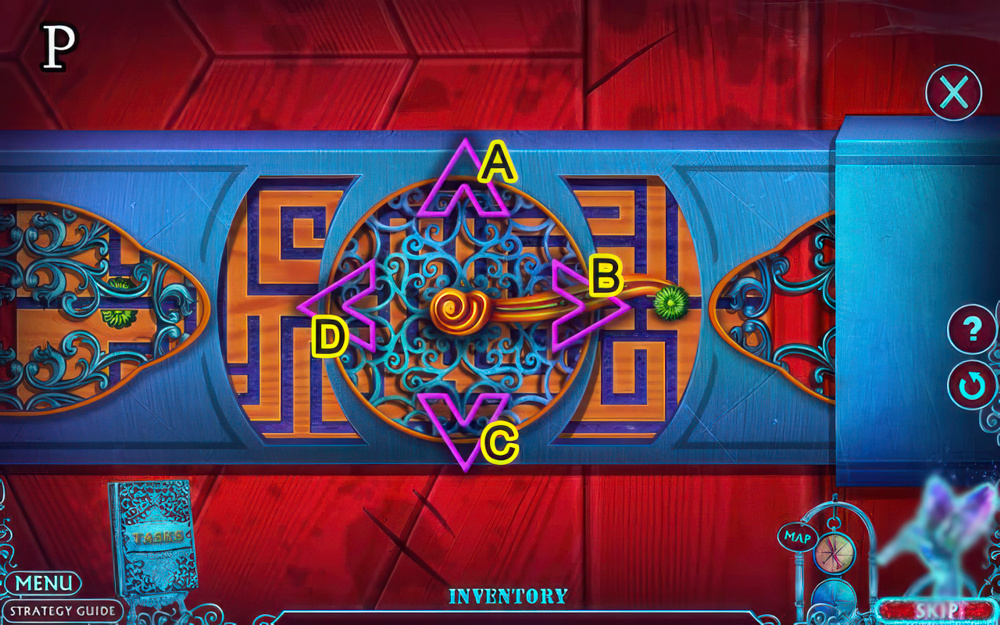
- Guide the right end of the handle through the maze to the green gem.
- Select the arrows to move the handle in the indicated direction.
- Walkthrough (P): D-A×2-D-C×3-D-C-D-A-B-A-D.
- Go forward.
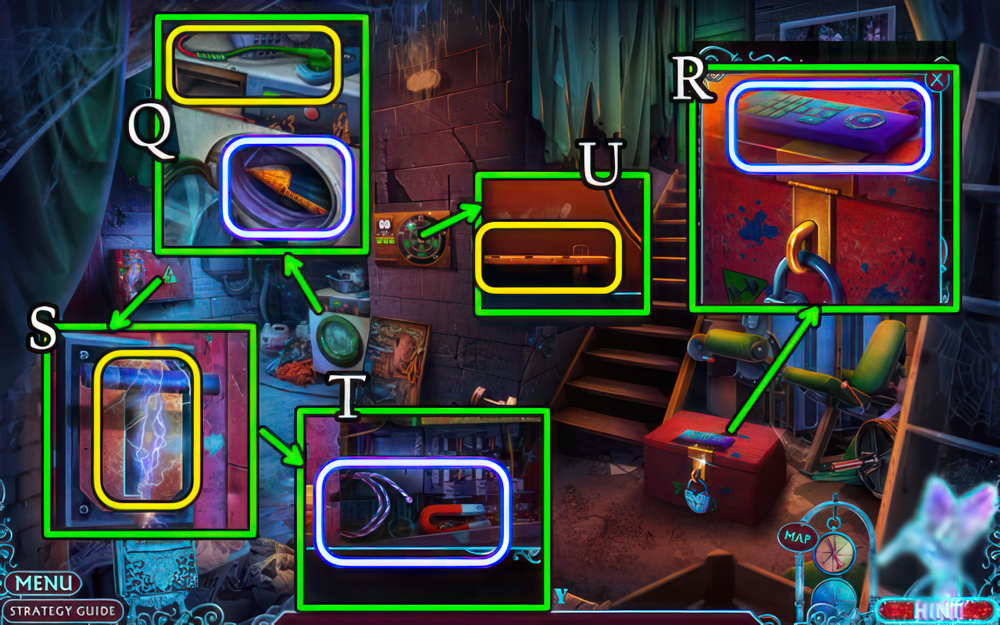
- Use PLUG, ELECTRICAL TAPE, take FAN, MIRROR (Q).
- Take REMOTE CONTROL, DARTS (R).
- Use RUBBER GLOVE (S).
- Take MAGNET, WIRE (T).
- Place DARTS (U).
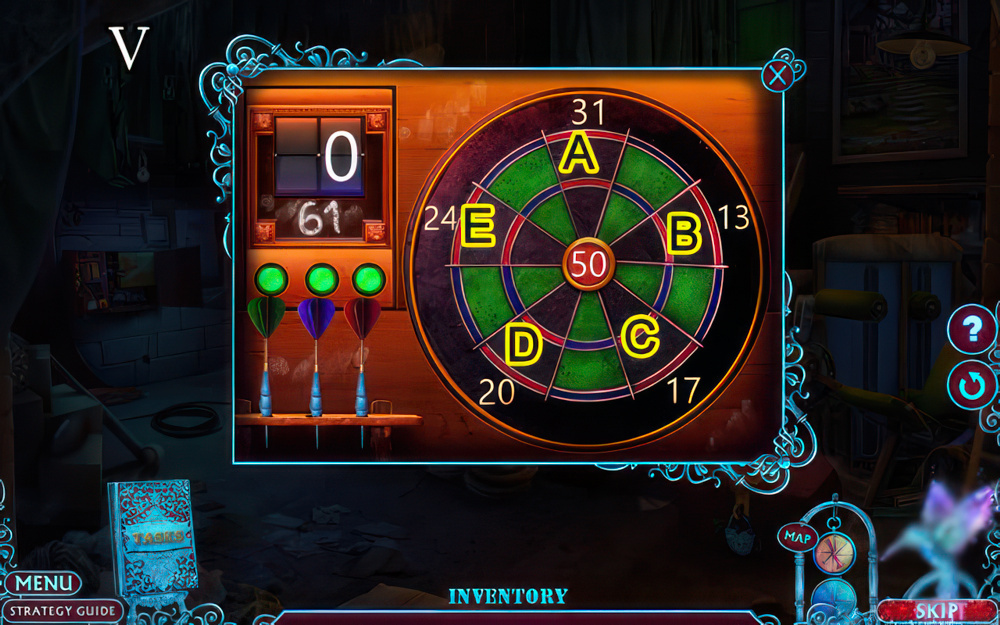
- Throw three darts so they land on the numbers.
- The total sum must be 61.
- Walkthrough (V): A-B-C.
- Take YOYO, 1/2 BATTERIES.
- HOOK on WIRE for HOOK AND WIRE.
- Place MIRROR, use HOOK ON WIRE (W).
- Go forward.
- Take note, 2/2 BATTERIES, use YOYO (X).
- Take BLOWTORCH (Y).
- 2/2 BATTERIES on REMOTE CONTROL.
- Enter the code shown on the TV.
- Select a number to enter it.
- If you don’t remember the code, close the mini-game to see it.
- Use REMOTE CONTROL (Z), select 2-5-8-4-3.
- Take SPATULA, CLOCK PHOTO (A).
- Use SPATULA (B) for puzzle (C), receive DOOR KEY.
- Use DOOR KEY (D).
- Go forward.
- Use MAGNET (E).
- Take BOX AMULET (F).
- Use FAN (G).
- Take PINK SHOE (H).
- Go down.
- Place BOX AMULET (I).
- Take FISHING ROD, UNLIT LAMP (J).
- Place PINK SHOE, take BELLOWS, SHOEHORN (K).
- Go forward.
- Use FISHING ROD, take FISH (L).
- Give FISH (M).
- Take 1/2 LOCKPICKS (N).
- Go down twice.
- Use BLOWTORCH (O).
- Take 2/2 LOCKPICKS (P).
- Use 2/2 LOCKPICKS (Q).

- Move the inner lock pieces so that they fit into the outer ones.
- Select a lock piece from each side to swap them.
- The lock pieces light up when placed correctly.
- Select CHECK button to try your solution.
- Walkthrough (R): (A-2)-(B-2)-(A-2)-(D-2)-(E-2)-(G-6)-(F-6)-(D-4)-(D-6)-(D-2)-(G-2).
- Take ANTIDOTE, BULB.
- Place CLOCK PHOTO (S).
- Take DISK (T).
- Go forward.
- Use ANTIDOTE (U), speak to character, receive DVD BUTTON.
- Place DVD BUTTON, DISK (V).
- Take NAIL CLIPPERS, HOSE, POWDER and BROOM (W).
- Go forward.
- Use BROOM (X).
- Take TAPE, ANCHOR ON ROPE (Y).
- Use SHOEHORN (Z), receive WIRES.
- WIRES and BULB on UNLIT LAMP for LIT LAMP.
- Take note, place LIT LAMP (A) for puzzle (B), receive REPAIR KIT.
- HOSE on BELLOWS for IMPROVISED PUMP.
- Place IMPROVISED PUMP and REPAIR KIT (C).
- Go forward.
- Use ANCHOR ON ROPE (D).
- Take TIN SNIPS, NUT (E).
- Use NAIL CLIPPERS (F).
- Take note, GLASS CUTTER (G).
- Use GLASS CUTTER, select handle (H).
- Go left.
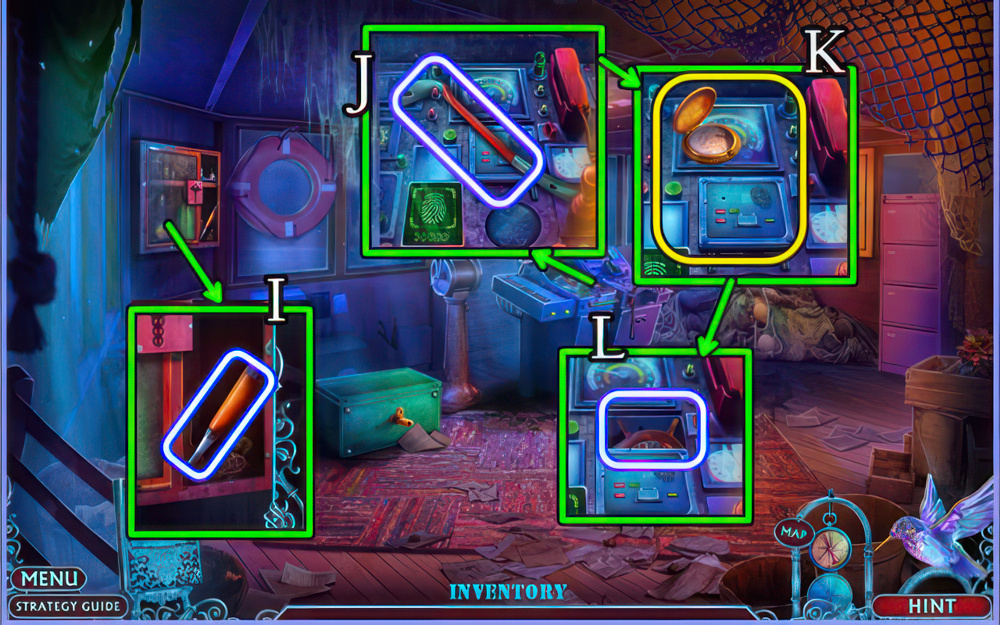
- Take CHISEL (I).
- Take CROWBAR (J).
- Use POWDER, TAPE (K).
- Take SHIP’S WHEEL (L).
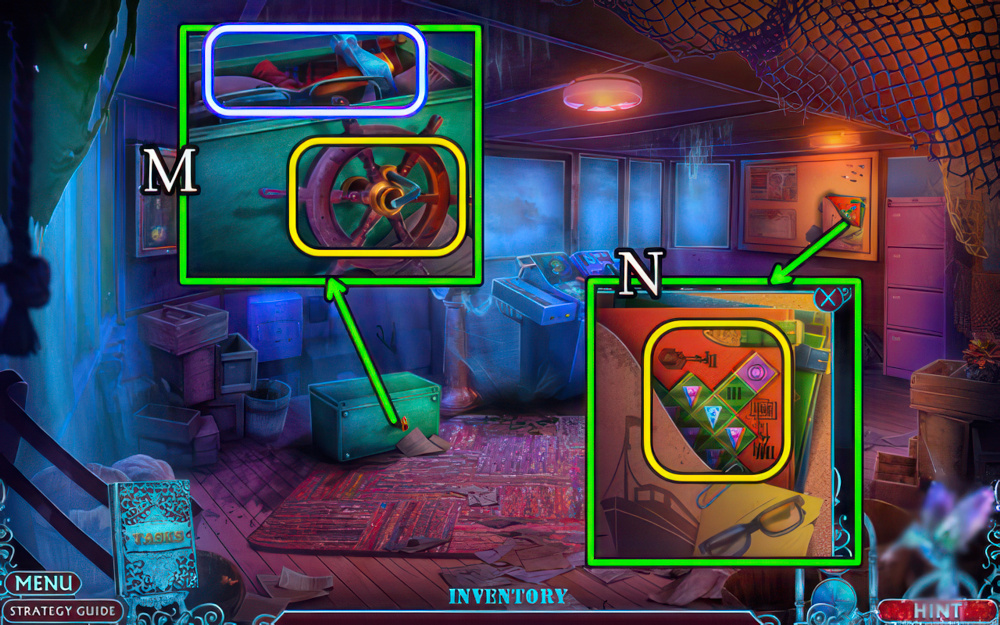
- Use NUT, SHIP’S WHEEL, take 3-D GLASSES, HAMMER (M).
- Use 3-D GLASSES (N).
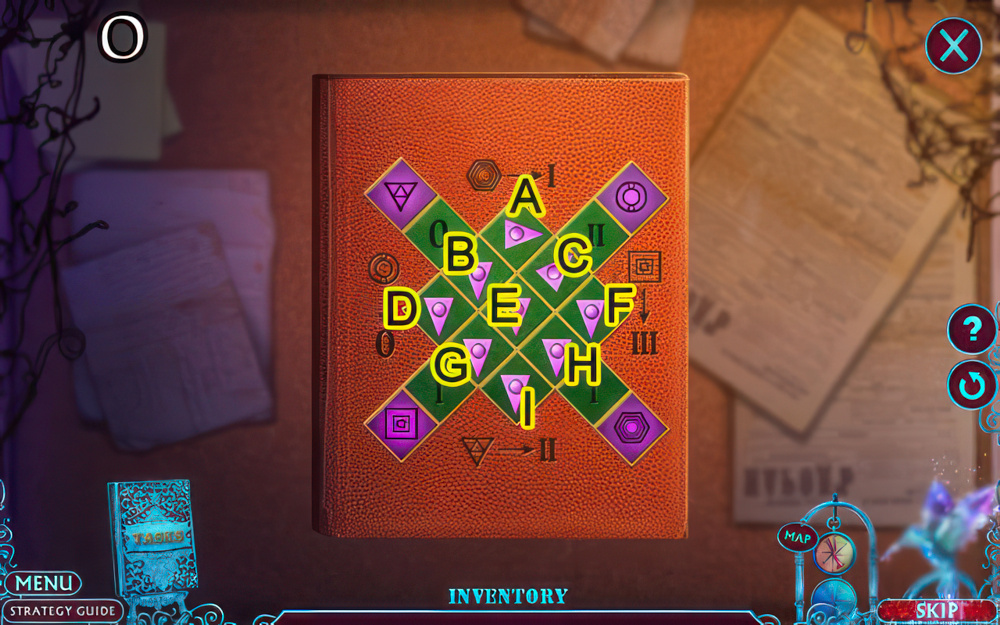
- Rotate the arrows until the number of lines next to each of the symbols corresponds to the ones shown on the clues.
- Each line represents an arrow pointed towards the symbol.
- Walkthrough (O): A×7-B×6-C×5-E×7-F×2-G-H×3-I×2.
- Take photo, receive HANDKERCHIEF.
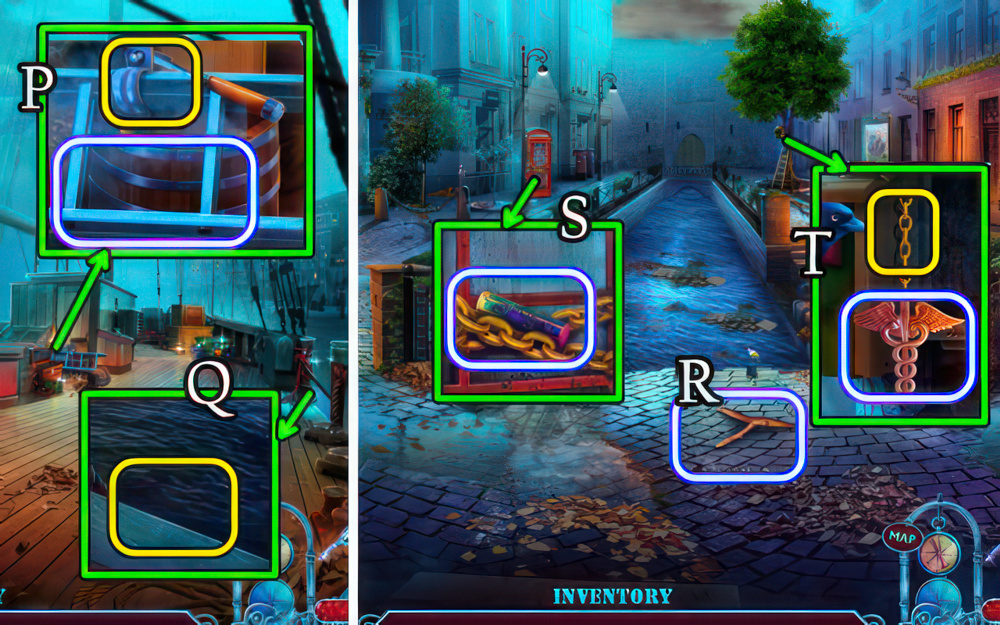
- Use CHISEL, HAMMER, take LADDER (P).
- Place LADDER (Q).
- Go to Pier.
- Take SLINGSHOT FRAME (R).
- Take note, DIRTY CRYPTEX (S).
- Use TIN SNIPS for MEDICAL SYMBOL (T).
- Use CROWBAR (U).
- Take SAFE KEY (V).
- Use SAFE KEY (W).
- Take SCREWDRIVER, BOWL (X).
- Use BOWL (Y).
- Take EMPTY ATOMIZER (Z).
- Go to Wheelhouse.
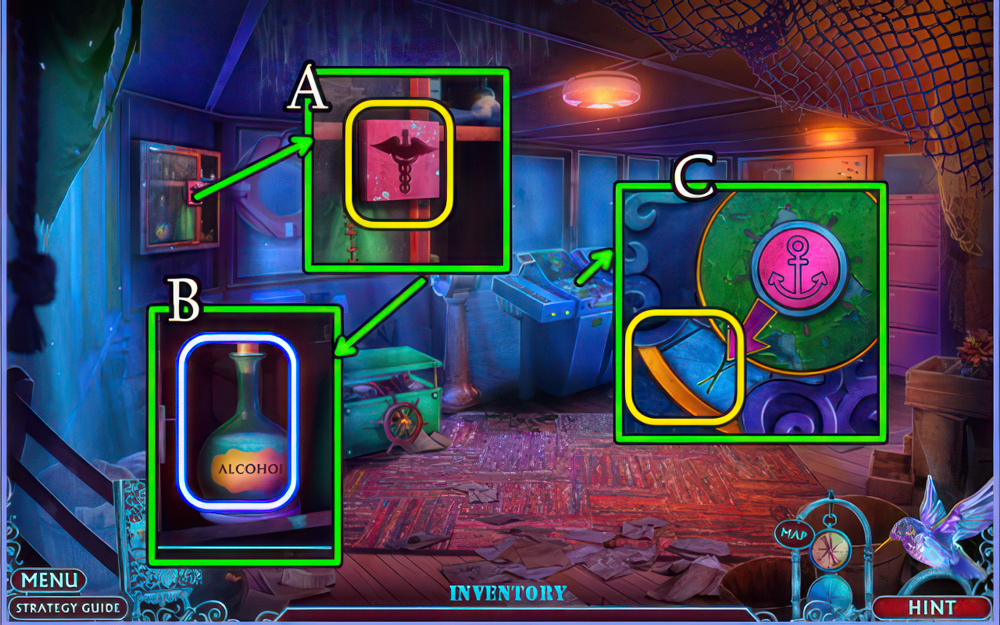
- Place MEDICAL SYMBOL (A).
- Take ALCOHOL, TOURNIQUET (B).
- HANDKERCHIEF and ALCOHOL on DIRTY CRYPTEX for CRYPTEX.
- Use CRYPTEX (C).
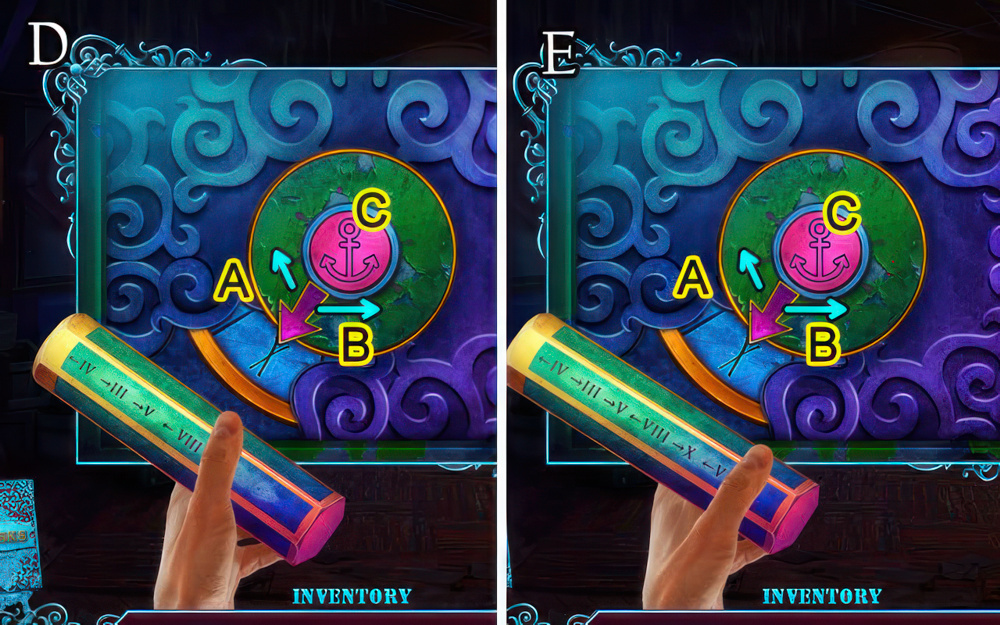
- Set the code using the clue below.
- Select and drag the green circle to move it.
- Press the anchor button to select the number.
- The arrows on the clue show the direction the circle should be moved.
- Easy walkthrough (D): (A to IV)-(C)-(B to III)-(C)-(B to V)-(C)-(A to VIII).
- Hard walkthrough (E): (A to IV)-(C)-(B to III)-(C)-(B to V)-(C)-(A to VIII)-(C)-(B to X)-(C)-(A to V).
- Take MERMAID, NOISEMAKER.
- Go down.
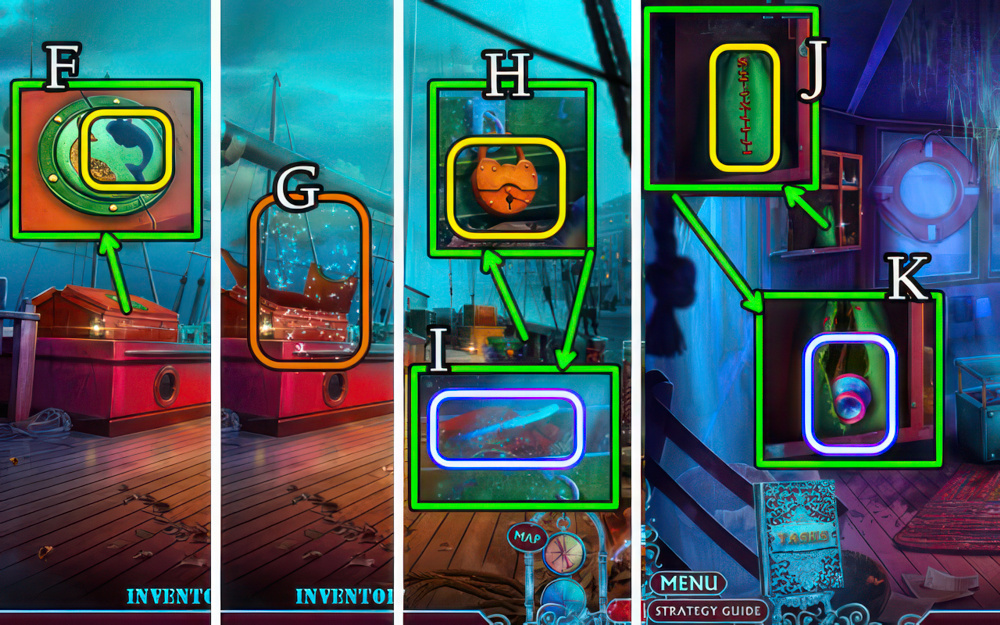
- Place MERMAID (F) for puzzle (G), receive SET OF LOCKPICKS.
- Use SET OF LOCKPICKS (H).
- Take KNIFE (I).
- Go to Wheelhouse.
- Use KNIFE (J).
- Take STETHOSCOPE PART (K).
- Go to Pier.

- Use NOISEMAKER (L).
- Take NUT (M).
- TOURNIQUET and NUT on SLINGSHOT FRAME for SLINGSHOT.
- Use SLINGSHOT (N).
- Go (O).
- Take PUMP, STEPLADDER (P).
- Place STEPLADDER (Q).
- Take DUSTER, BROKEN STETHOSCOPE (R).
- STETHOSCOPE PART on BROKEN STETHOSCOPE for STETHOSCOPE.
- Use STETHOSCOPE (S).

- Open the safe.
- Guide the pointer to the three latches.
- Rotate the pointer with the arrows and press the green arrow to move it.
- Not all paths will work.
- Easy walkthrough (T): C-B-A-B-A-B-C-B×2-A-B×2-C-B-C-B×2-C-B×2-C-B-C-B-A-B.
- Hard Walkthrough (T): C-B-A-B-A-B-C-B-C-B-A-B-A-B-C-B-C-B-A-B-C-B-C-B-C-B.
- A-B×2-C-B-A-B×2-C-B×2-C-B-C-B-A-B.
- Take ACCESS CARD.
- Use ACCESS CARD (U).
- Go forward.
- Place PUMP, EMPTY ATOMIZER (V), receive WATER.
- Use WATER, take METAL RIM (W).
- Go down.
- Use SCREWDRIVER, take PICKAXE, NET (X).
- Go down.
- METAL RIM and NET on DUSTER for SCOOP NET.
- Use SCOOP NET for ACID, use PICKAXE (Y).
- Take OILCAN (Z).
- Use ACID (A) for puzzle (B), receive STARS.
- Place STARS, take RED BUTTON (C).
- Go forward.
- Place RED BUTTON, take PLIERS, BUSINESS CARD (D).
- Use PLIERS (E).
- Take RUSTY DAGGER, 1/4 COVER AMULETS (F).
- Go forward.
- Give BUSINESS CARD (G), speak to character.
- Take SAFETY PIN (H).
- Go forward.
- Take 2/4 COVER AMULETS, NOTEBOOK, invitation (I).
- Use OILCAN (J), take KING’S RING, use SAFETY PIN (K).
- Take 3/4 COVER AMULETS (L).
- Use KING’S RING (M).
- Take 4/4 COVER AMULETS, POISON VIAL LID (N).
- Place 4/4 COVER AMULETS (O).
- Take GLOBE, BATON and SEDATIVE (P).

- Place GLOBE, take PEN (Q).
- Go down.
- Place POISON VIAL LID (R).
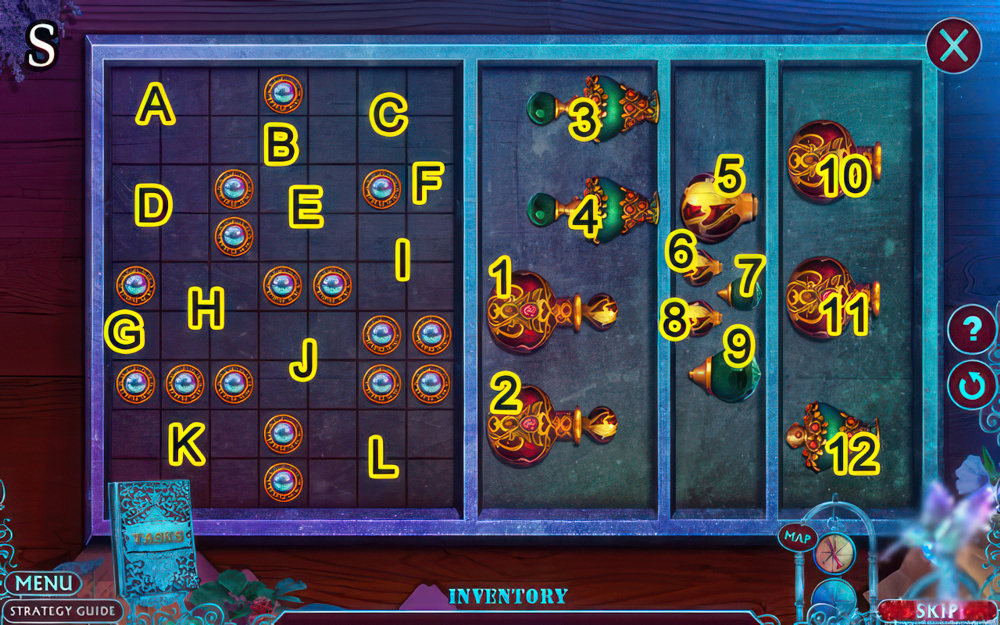
- Arrange all the vials and toppers on the left.
- Select a vial to move it.
- Walkthrough (S): (1-A)-(2-K)-(3-C)-(4-L)-(5-I)-(6-F)-(7-B)-(8-G)-(9-J)-(10-E)-(11-H)-(12-D).
- Take EMPTY VIAL.
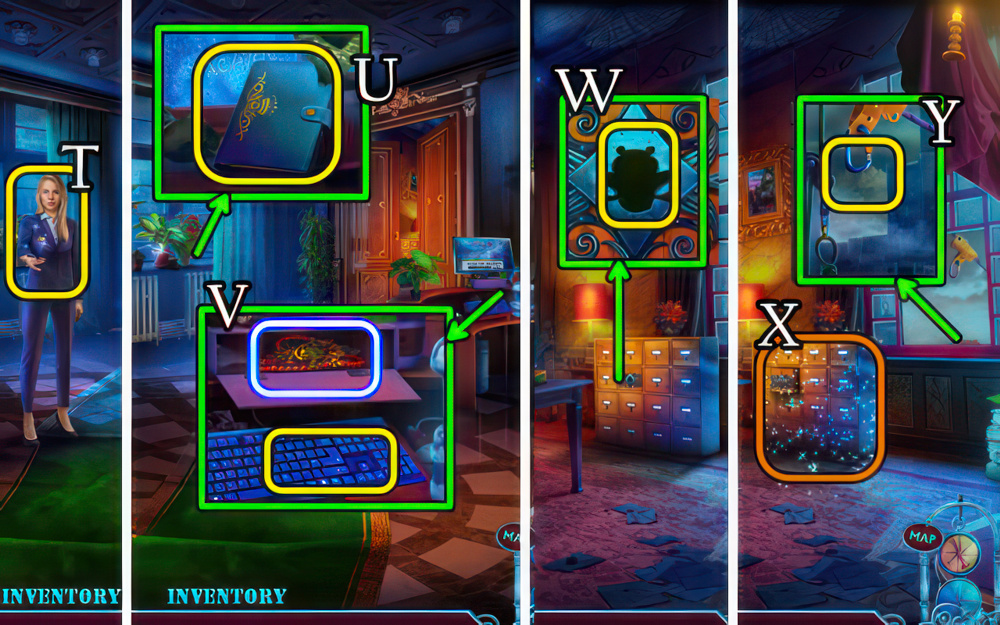
- Give EMPTY VIAL (T), speak to character.
- Place NOTEBOOK, PEN (U), receive PASSWORD.
- Place PASSWORD, take DECORATED FROG, BEADS (V).
- Go forward.
- Place DECORATED FROG (W) for puzzle (X), receive ROPE SWING.
- Place ROPE SWING (Y).
- Go forward.
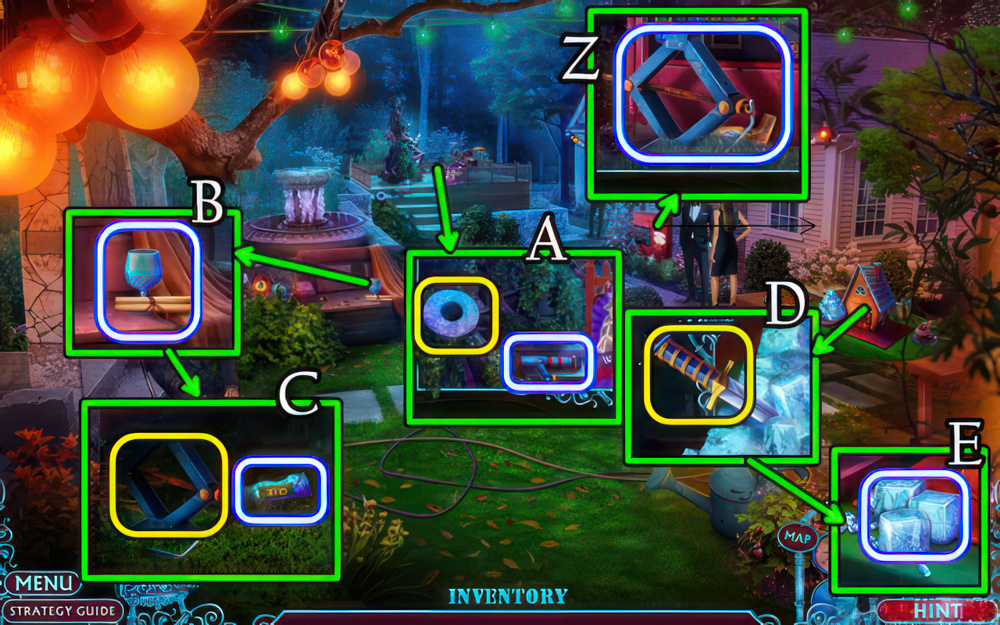
- Take JACKSCREW, BURNER (Z).
- Take poster, BROKEN HYDRANT, place RUSTY DAGGER on grindstone (A) for SHARP DAGGER.
- Take EMPTY GLASS (B), use JACKSCREW, take GLUE (C).
- Use SHARP DAGGER, BATON (D).
- Take ICE CUBES (E).
- SEDATIVE, BURNER and ICE CUBES on EMPTY GLASS for SLEEPING POTION.
- Give SLEEPING POTION (F).
- Go left.
- Speak to character.
- Take HYDRANT LEVER, MAGNET (G).
- MAGNET on BEADS for STRUNG MAGNET.
- Take DECORATED COMB, use STRUNG MAGNET (H).
- Take CINDERELLA’S CRIMINAL PHOTO, HYDRANT BASE (I).
- Give CINDERELLA’S CRIMINAL PHOTO (J).

- Open purse, take THINNER, TOKEN (K).
- Go down.
- Place TOKEN (L).
- Slide the two tokens along the path to the spots on the left.
- Select and drag a token to move it.
- Press the buttons on the left to rotate the green discs or tiles accordingly.
- Easy walkthrough (M): (D×3)-(A-1)-(D×3)-(A-2)-(D)-(A-3)-(D)-(C)-(B-4).
- Slide the two tokens along the path to the spots on the left.
- Select and drag a token to move it.
- Placing a token on a colored spot will unlock the corresponding gate.
- Press the buttons on the left to rotate the bronze discs or separate tiles.
- Hard walkthrough (N): (D×3)-(A-1)-(D)-(B-3)-(A-4)-(B-2)-(A-7)-(B-5).
- (A-6)-(C)-(B-8)-(D×2)-(A-9)-(D)-(C)-(A-11)-(C)-(B-12)-(A-13).
- Take HOSE, CLOTH.
- Go left.
- HYDRANT BASE, HYDRANT LEVER on BROKEN HYDRANT for HYDRANT.
- Select handle, place HYDRANT, HOSE (O).
- Go forward.
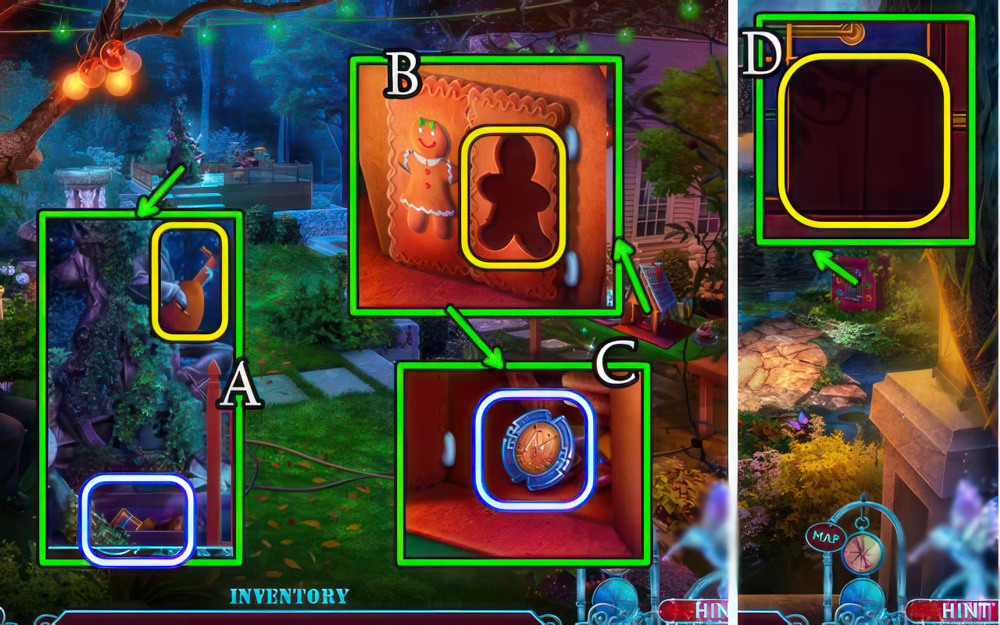
- Take GINGERBREAD MAN, use THINNER, CLOTH (P).
- Take CHAIN, HAIRPIN (Q).
- Take SWORD, use GLUE, DECORATED COMB (R).
- Take CLOSED TUBE, LUTE and MAGIC INKWELL (S).
- HAIRPIN on CLOSED TUBE for BRUSH.
- Take book, place MAGIC INKWELL, BRUSH (T) for puzzle (U), receive GOLD DRAGON.
- Place GOLD DRAGON (V).
- Climb stairs.
- Speak to character.
- Use CHAIN (W).
- Take 1/4 WITCH’S TOKENS (X).
- Take 2/4 WITCH’S TOKENS, use SWORD (Y).
- Take 1/2 COLORFUL DECORATIONS (Z).
- Go to Party.
- Replace LUTE, take BLUE TILE (A).
- Place GINGERBREAD MAN (B).
- Take MONOGRAM (C).
- Go left.
- Place BLUE TILE (D).
- Connect all the tokens by color.
- Select two tiles to swap them.
- A tile turns green when placed correctly.
- Easy walkthrough (E): (C-D)-(B-D).
- Hard walkthrough (F): D×3-C×2-A.
- Take CROWN.
- Place CROWN, take 1/3 COLORED FEATHERS, 3/4 WITCH’S TOKENS (G).
- Go to Observatory.
- Place MONOGRAM (H).
- Take HATCHET, 2/2 COLORFUL DECORATIONS (I).
- Go down.
- Place 2/2 COLORFUL DECORATIONS (J).
- Take 4/4 WITCH’S TOKENS, JUPITER (K).
- Place 4/4 WITCH’S TOKENS (L).
- Take 2/3 COLORED FEATHERS, SPRING (M).
- Go down.
- Use HATCHET (N).
- Take TROWEL, CROWBAR (O).
- Use TROWEL (P).
- Take GLUE, SATURN (Q).
- Go to Observatory.
- Place SATURN, JUPITER (R) for puzzle (S), receive CLAIRVOYANT SPHERE.
- Give CLAIRVOYANT SPHERE (T), speak to character, tale COIN.
- Go down.
- Use COIN, take LIGHTER (U).
- Place SPRING, take ANTENNA, PHONE PART and 3/3 COLORED FEATHERS (V).
- Place PHONE PART (W).
- Enter (X).

- Take BENT KNIFE, PINCE-NEZ (Y).
- 3/3 COLORED FEATHERS and PINCE-NEZ on GLUE.
- Speak to character (Z).
- Take HAND VACUUM, use CROWBAR (A).
- Take MONEY, use ANTENNA to take CHESS PIECES (B).
- Give MONEY (C), receive CROWN INLAY.
- Place CROWN INLAY (D).
- Go forward.
- Take GOLDEN ARROW, use LIGHTER (E), select, place coin (F).
- Take GOLF BALL (G).
- Take GOLF CLUB (H).
- Place GOLF BALL, GOLF CLUB (I).
- Select a golf ball to start the game.
- All three balls must reach the holes at the same time.
- The indicator shows the speed of a ball.
- Walkthrough (J): B, C when B is at 1, A when C is at 2.
- Take WINDUP DUCK.
- Place GOLDEN ARROW (K).
- Take GAUNTLET, place WINDUP DUCK (L).
- Take GEAR (M).
- Use GAUNTLET (N), take 1/3 GNOMES, EMBLEM PART (O).
- Place GEAR (P).
- Climb ladder.
- Use BENT KNIFE, take PLIERS (Q).
- Place CHESS PIECES (R).
- Take CORKSCREW (S).
- Use PLIERS (T).
- Take EMBLEM PART (U).

- Use HAND VACUUM (V).
- Take CHAMPAGNE GLASS (W).
- Go down.
- Use CORKSCREW, take note, 2/3 GNOMES (X).
- Go down.
- Give CHAMPAGNE GLASS (Y) for puzzle (Z), receive CHANGE-OF-HEART POTION.
- Place 2 EMBLEM PARTS (A).
- Take MAGIC PERFUME, 3/3 GNOMES (B).
- Give CHANGE-OF-HEART POTION (C).
- Speak to character, take BROKEN WAND (D).
- Go forward.
- Place 3/3 GNOMES (E).
- Take VENT LEVER (F).
- Go forward.
- Place, select VENT LEVER, take WAND TOP (G).
- MAGIC PERFUME and WAND TOP on BROKEN WAND for WAND.
- Use WAND (H).
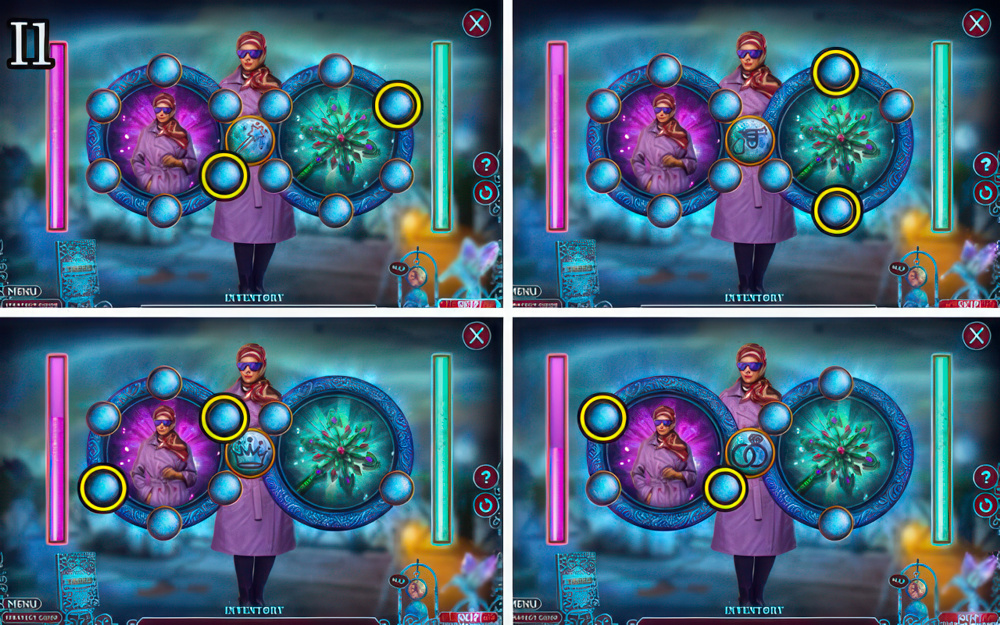
- Fight Cinderella.
- Find two symbols that match the one in the center.
- Select two discs to see the symbols under them.
- Match them before the symbols disappear.
- Walkthrough (I1).
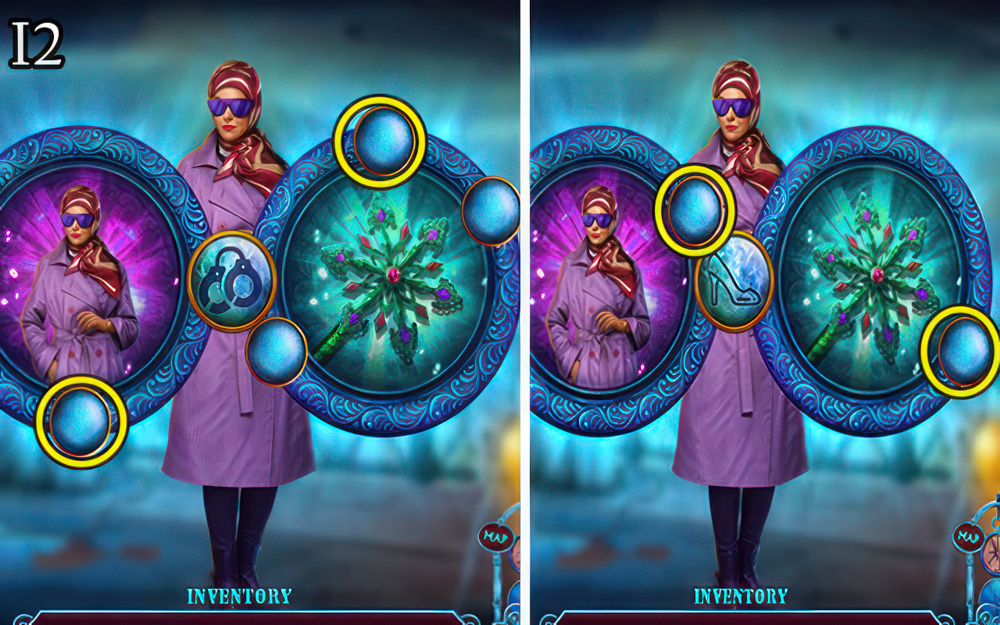
- Walkthrough (I2).
- Walkthrough Bonus Chapter, at the link below.


